

Page 1

3FHJTUFS
OFXEFWJDFPO
.Z#PTDIOPXBOE
HFUGSFFCFOFGJUT
CPTDIIPNFDPN
XFMDPNF
ZPVS
Free standing cooker
HGV1F0U5..
[en] Instruction manual Free standing cooker
Page 2

Page 3

Table of contents
[en]I n st r u ct i on manual Fr ee s t andi ng cooker
8 Intended use . . . . . . . . . . . . . . . . . . . . . . . . . . . . . 4
( Important safety information . . . . . . . . . . . . . . . 5
en
q Appliance door . . . . . . . . . . . . . . . . . . . . . . . . . . 23
Detaching and attaching the oven door . . . . . . . . . . .23
Removing and refitting the door panels . . . . . . . . . . .24
5 Installation and connection. . . . . . . . . . . . . . . . . 7
Measures to be noted during transport . . . . . . . . . . . . 7
Installation . . . . . . . . . . . . . . . . . . . . . . . . . . . . . . . . . . 7
Positioning and levelling. . . . . . . . . . . . . . . . . . . . . . . . 7
Gas connection . . . . . . . . . . . . . . . . . . . . . . . . . . . . . . 8
Appliance categories . . . . . . . . . . . . . . . . . . . . . . . . . . 8
Electrical connection . . . . . . . . . . . . . . . . . . . . . . . . . . 9
] Causes of damage . . . . . . . . . . . . . . . . . . . . . . . 10
Hob . . . . . . . . . . . . . . . . . . . . . . . . . . . . . . . . . . . . . 10
Damage to the oven. . . . . . . . . . . . . . . . . . . . . . . . . . 10
Damage to the plinth drawer . . . . . . . . . . . . . . . . . . . 10
7 Environmental protection . . . . . . . . . . . . . . . . . 11
Saving energy . . . . . . . . . . . . . . . . . . . . . . . . . . . . . . 11
Saving energy with the gas hob. . . . . . . . . . . . . . . . . 11
Environmentally-friendly disposal . . . . . . . . . . . . . . . .11
* Getting to know your appliance . . . . . . . . . . . . 12
Hob . . . . . . . . . . . . . . . . . . . . . . . . . . . . . . . . . . . . . 12
Control panel . . . . . . . . . . . . . . . . . . . . . . . . . . . . . . .13
Timer . . . . . . . . . . . . . . . . . . . . . . . . . . . . . . . . . . . . . 13
Oven . . . . . . . . . . . . . . . . . . . . . . . . . . . . . . . . . . . . . 13
The cooking compartment . . . . . . . . . . . . . . . . . . . . . 14
Storage compartment . . . . . . . . . . . . . . . . . . . . . . . . 14
_ Accessories . . . . . . . . . . . . . . . . . . . . . . . . . . . . 14
Inserting accessories . . . . . . . . . . . . . . . . . . . . . . . . . 15
Optional accessories . . . . . . . . . . . . . . . . . . . . . . . . . 15
p Rails. . . . . . . . . . . . . . . . . . . . . . . . . . . . . . . . . . . 25
Detaching and refitting the rails . . . . . . . . . . . . . . . . .25
3 Trouble shooting . . . . . . . . . . . . . . . . . . . . . . . . 26
Fault table. . . . . . . . . . . . . . . . . . . . . . . . . . . . . . . . . .26
Replacing the bulb in the oven ceiling light . . . . . . . .27
Glass cover . . . . . . . . . . . . . . . . . . . . . . . . . . . . . . . .27
4 Customer service . . . . . . . . . . . . . . . . . . . . . . . . 27
E number and FD number . . . . . . . . . . . . . . . . . . . . .27
J Tested for you in our cooking studio. . . . . . . . 28
Cakes and pastries. . . . . . . . . . . . . . . . . . . . . . . . . . .28
Baking tips . . . . . . . . . . . . . . . . . . . . . . . . . . . . . . . . .30
Meat, poultry, fish, toast . . . . . . . . . . . . . . . . . . . . . . .31
Tips for roasting and grilling . . . . . . . . . . . . . . . . . . . .31
Yoghurt. . . . . . . . . . . . . . . . . . . . . . . . . . . . . . . . . . . .32
Acrylamide in foodstuffs . . . . . . . . . . . . . . . . . . . . . . .32
Defrosting . . . . . . . . . . . . . . . . . . . . . . . . . . . . . . . . . .32
Produktinfo
Additional information on products, accessories,
replacement parts and services can be found at
www.bosch-home.com and in the online shop
www.bosch-eshop.com
K Before using for the first time. . . . . . . . . . . . . . 16
Baking out the oven . . . . . . . . . . . . . . . . . . . . . . . . . . 16
Cleaning the burner caps and cups. . . . . . . . . . . . . . 16
Cleaning the accessories. . . . . . . . . . . . . . . . . . . . . . 16
Å Cooking pans . . . . . . . . . . . . . . . . . . . . . . . . . . . 17
Precautions for use . . . . . . . . . . . . . . . . . . . . . . . . . . 17
1 Operating the appliance . . . . . . . . . . . . . . . . . . 18
Hob . . . . . . . . . . . . . . . . . . . . . . . . . . . . . . . . . . . . . 18
Oven . . . . . . . . . . . . . . . . . . . . . . . . . . . . . . . . . . . . . 19
Rotisserie spit . . . . . . . . . . . . . . . . . . . . . . . . . . . . . . 20
D Cleaning . . . . . . . . . . . . . . . . . . . . . . . . . . . . . . . 21
Cleaning agents . . . . . . . . . . . . . . . . . . . . . . . . . . . . . 21
Keeping the appliance clean . . . . . . . . . . . . . . . . . . . 23
3
Page 4

en Intended use
8Intended use
Intended use
Read these instructions carefully. Only then
will you be able to operate your appliance
safely and correctly. Retain the instruction
manual and installation instructions for future
use or for subsequent owners.
The images shown in these instructions are for
guidance only.
Appliance category: Category 1
Check the appliance for damage after
unpacking it. Do not connect the appliance if it
has been damaged in transport.
Only allow a licensed professional to connect
the appliance and to convert the appliance to
a different type of gas. The appliance must be
installed (electric and gas connections) in
accordance with the instruction and
installation manual. An incorrect connection or
incorrect settings may lead to serious
accidents and damage to the appliance. The
appliance manufacturer accepts no liability for
damage of this kind. The appliance's warranty
becomes void.
This appliance is intended for private domestic
use and the household environment only. The
appliance must only be used for the
preparation of food and beverages. The
cooking process must be supervised. A short
cooking process must be supervised without
interruption. Only use the appliance in
enclosed spaces.
Caution:This appliance is for cooking
purposes only. It must not be used for other
purposes, for example room heating.
This appliance is intended for use up to a
maximum height of 2000 metres above sea
level.
CAUTION: Observe the applicable regulations
and only set up the appliance in well-ventilated
rooms. Read the instructions before setting up
and using the appliance.
Caution:The use of a gas cooking appliance
results in the production of heat, moisture and
products of combustion in the room in which it
is installed. Ensure that the kitchen is well
ventilated especially when the appliance is in
use: keep natural ventilation holes open or
install a mechanical ventilation device
(mechanical extractor hood).
Prolonged intensive use of the appliance may
call for additional ventilation, for example
opening of a window, or more effective
ventilation, for example increasing the level of
mechanical ventilation where present.
:Warning – WHAT TO DO IF YOU SMELL
GAS!
Escaping gas may cause an explosion.
If you smell gas or notice any faults in the
gas installation:
■ Immediately shut off the gas supply or close
the gas cylinder valve.
■ Immediately extinguish all naked flames
and cigarettes.
■ Do not use any light or appliance switches
and do not pull any plugs out of sockets.
Do not use any telephones or mobile
phones within the building.
■ Open windows and ventilate the room.
■ Call the aftersales service or the gas
supplier.
This appliance is not designed for operation
with an external timer or by remote control.
Do not use inappropriate child safety shields
or hob guards. These can cause accidents.
This appliance may be used by children over
the age of 8 years old and by persons with
reduced physical, sensory or mental
capabilities or by persons with a lack of
experience or knowledge if they are
supervised or are instructed by a person
responsible for their safety how to use the
appliance safely and have understood the
associated hazards.
Children must not play with, on, or around the
appliance. Children must not clean the
appliance or carry out general maintenance
unless they are at least 15 years old and are
being supervised.
Keep children below the age of 8 years old at
a safe distance from the appliance and power
cable.
Always slide accessories into the cooking
compartment the right way round.
~ "Accessories" on page 14
4
Page 5

Important safety information en
(Important safety
information
Impor t ant safety informat i on
:Warning – Risk of fire!
■ A draught is created when the appliance
door is opened. Greaseproof paper may
come into contact with the heating element
and catch fire. Do not place greaseproof
paper loosely over accessories during
preheating. Always weight down the
greaseproof paper with a dish or a baking
tin. Only cover the surface required with
greaseproof paper. Greaseproof paper
must not protrude over the accessories.
Risk of fire!
■ Combustible objects that are left in the
cooking compartment may ignite. Never
store combustible items in the cooking
compartment. Never open the appliance
door if there is smoke inside. Switch off the
appliance and unplug the mains plug or
switch off the fuse in the fuse box. Shut off
the gas supply.
Risk of fire!
■ Hot oil and fat can ignite very quickly. Never
leave hot fat or oil unattended. Never use
water to put out burning oil or fat. Switch off
the hotplate. Extinguish flames carefully
using a lid, fire blanket or something similar.
Risk of fire!
■ The hotplates become very hot. Never
place combustible items on the hob. Never
place objects on the hob.
Risk of fire!
■ The appliance becomes very hot, and
flammable materials can easily catch fire.
Do not store or use any flammable objects
(e.g. aerosol cans, cleaning agents) under
or in the vicinity of the oven. Do not store
any flammable objects inside or on top of
the oven.
Risk of fire!
■ When gas hotplates are in operation without
any cookware placed on them, they can
build up a lot of heat. The appliance and the
extractor hood above it may become
damaged or be set on fire. Grease residue
in the filter of the extractor hood may ignite.
Only operate the gas burners with
cookware on them.
Risk of fire!
■ The rear of the appliance becomes very hot.
This may cause damage to the power
cables. Electricity and gas lines must not
come into contact with the rear of the
appliance.
Risk of fire!
■ Never place flammable objects on the
burners or store them in the cooking
compartment. Never open the appliance
door if there is smoke inside. Switch off the
appliance. Pull out the mains plug or switch
off the appliance at the circuit breaker in the
fuse box. Shut off the gas supply.
Risk of fire!
■ The surfaces of the plinth drawer may
become very hot. Only store oven
accessories in the drawer. Flammable and
combustible objects must not be stored in
the plinth drawer.
:Warning – Risk of burns!
■ The appliance becomes very hot. Never
touch the interior surfaces of the cooking
compartment or the heating elements.
Always allow the appliance to cool down.
Keep children at a safe distance.
Risk of serious burns!
■ Accessories and ovenware become very
hot. Always use oven gloves to remove
accessories or ovenware from the cooking
compartment.
Risk of burns!
■ Alcoholic vapours may catch fire in the hot
cooking compartment. Never prepare food
containing large quantities of drinks with a
high alcohol content. Only use small
quantities of drinks with a high alcohol
content. Open the appliance door with care.
Risk of burns!
■ The hotplates and surrounding area
(particularly the hob surround, if fitted)
become very hot. Never touch the hot
surfaces. Keep children at a safe distance.
Risk of burns!
■ During operation, the surfaces of the
appliance become hot. Do not touch the
surfaces when they are hot. Keep children
away from the appliance.
Risk of burns!
■ Empty cookware becomes extremely hot
when set on a gas hotplate that is in
operation. Never heat up empty cookware.
Risk of burns!
■ The appliance becomes hot during
operation. Allow the appliance to cool down
before cleaning.
Risk of burns!
■ Caution: Accessible parts may be hot when
the grill is in use. Young children should be
kept away from the appliance.
Risk of burns!
■ If the liquefied gas bottle is not upright,
liquefied propane/butane can enter the
appliance. Intense darting flames may
therefore escape from the burners.
Components may become damaged and
start to leak over time so that gas escapes
uncontrollably. Both can cause burns.
Always use liquefied gas bottles in an
upright position.
5
Page 6

en Important safety information
:Warning – Risk of scalding!
■ The accessible parts become hot during
operation. Never touch the hot parts. Keep
children at a safe distance.
Risk of scalding!
■ When you open the appliance door, hot
steam can escape. Steam may not be
visible, depending on its temperature. When
opening, do not stand too close to the
appliance. Open the appliance door
carefully. Keep children away.
Risk of scalding!
■ Water in a hot cooking compartment may
create hot steam. Never pour water into the
cooking compartment when the cooking
compartment is hot.
:Warning – Risk of injury!
■ Scratched glass in the appliance door may
develop into a crack. Do not use a glass
scraper, sharp or abrasive cleaning aids or
detergents.
Risk of injury!
■ A scratched glass cover may break and
fragment. Do not use glass scrapers, sharp
or abrasive cleaning aids, or harsh cleaning
products.
Risk of injury!
■ Incorrect repairs are dangerous. Repairs
may only be carried out, and damaged
power and gas lines replaced, by an aftersales engineer trained by us. If the
appliance is faulty, unplug the mains plug or
switch off the fuse in the fuse box. Shut off
the gas supply. Contact the after-sales
service.
Risk of injury!
■ Faults or damage to the appliance are
dangerous. Never switch on a faulty
appliance. Unplug the appliance from the
mains or switch off the circuit breaker in the
fuse box. Shut off the gas supply. Contact
the after-sales service.
Risk of injury!
■ Unsuitable pan sizes, damaged or
incorrectly positioned pans can cause
serious injury. Observe the instructions
which accompany the cookware.
Risk of injury!
■ Caution: Glass lids may shatter when
heated. Turn off all the burners before
shutting the lid. Wait until the oven has
cooled down before closing the glass
cover.
Before opening the top cover, remove any
spills with a cloth.
Risk of injury!
■ If the appliance is placed on a base and is
not secured, it may slide off the base. The
appliance must be fixed to the base.
Risk of injury!
■ The hinges on the appliance door move
when opening and closing the door, and
you may be trapped. Keep your hands away
from the hinges.
Risk of injury!
■ If you leave the appliance door open,
people may bump into it, resulting in injury.
The appliance door must be kept closed
both while the appliance is in operation and
when it has finished.
:Warning – Risk of electric shock!
■ Incorrect repairs are dangerous. Repairs
may only be carried out by one of our
trained after-sales engineers. If the
appliance is faulty, unplug the mains plug or
switch off the fuse in the fuse box. Contact
the after-sales service.
Risk of electric shock and serious injury!
■ The cable insulation on electrical
appliances may melt when touching hot
parts of the appliance. Never bring
electrical appliance cables into contact with
hot parts of the appliance.
Risk of electric shock!
■ Do not use any high-pressure cleaners or
steam cleaners, which can result in an
electric shock.
Risk of electric shock!
■ When replacing the cooking compartment
bulb, the bulb socket contacts are live.
Before replacing the bulb, unplug the
appliance from the mains or switch off the
circuit breaker in the fuse box.
Risk of electric shock!
■ A defective appliance may cause electric
shock. Never switch on a defective
appliance. Unplug the appliance from the
mains or switch off the circuit breaker in the
fuse box. Contact the after-sales service.
6
Page 7
Installation and connection en
5Installation and connection
Instal lation and connect i on
Do not install the appliance behind a decorative door
or the door of a kitchen unit, as this may cause the
appliance to overheat.
Measures to be noted during transport
Secure all mobile parts in and on the appliance using
an adhesive tape that can be removed without leaving
any traces. Push all accessories (e.g. baking tray) into
the corresponding slots with cardboard at the edges, in
order to avoid damaging the appliance. Place
cardboard or similar between the front and rear side to
prevent knocks against the inside of the glass door.
Secure the door and, if available, the top cover to the
appliance sides using adhesive tape.
Keep the original appliance packaging. Only transport
the appliance in the original packaging. Observe the
transport arrows on the packaging.
If the original packaging is no longer available
pack the appliance in protective packaging to
guarantee sufficient protection against any transport
damage.
Transport the appliance in an upright position. Do not
hold the appliance by the door handle or the
connections on the rear, as these could be damaged.
Do not place any heavy objects on the appliance.
Installation
This appliance is supplied with a set of adjustable feet
and a glass cover. The glass cover is prefitted.
Fitting the adjustable feet
1. Remove all parts that are not permanently fixed,
especially the pan supports and burners.
2. Remove any accessories from the oven.
3. Lift one side of the appliance off the floor and tilt it
slightly.
4. Screw the adjustable feet into the mounting holes on
the underside of the appliance.
Positioning and levelling
Positioning the appliance
When installing the appliance, make sure that there is
enough space in the final installation location to pull the
appliance forwards for cleaning and maintenance work.
The ground underneath must be hard and firm. The wall
immediately behind the appliance must be made from
non-flammable material, e.g. tiles.
If you need to move the appliance in order to position it,
make sure that the adjustable feet are fully screwed in.
Aligning the appliance
Turn the adjustable feet to align the appliance.
Note: Do not align the appliance until all other work has
been completed.
With the adjustable feet, you can make the appliance
up to 45 mm higher.
When the appliance has been installed in the intended
location, check that the appliance is aligned correctly.
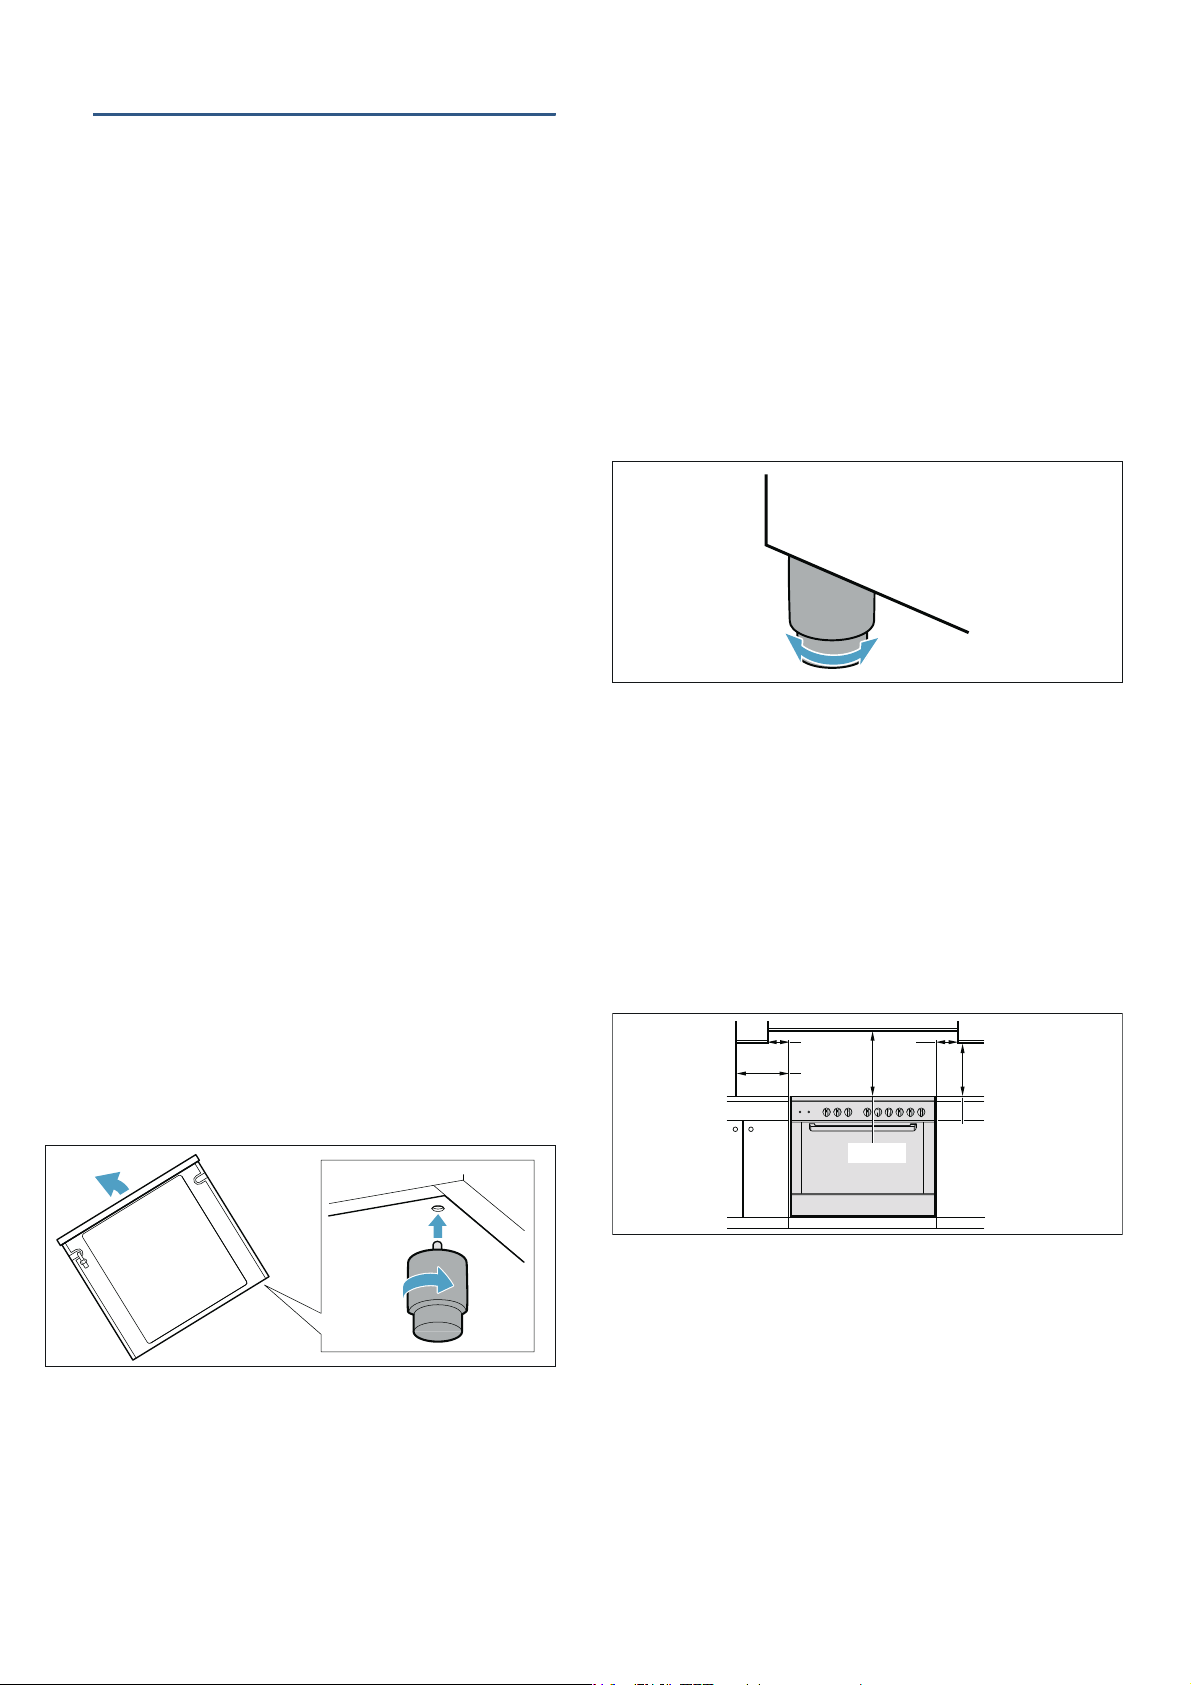
Adjacent units
Any adjacent units must not be made of flammable
materials. The fronts of any adjacent units must be heatresistant up to at least 90 °C. If the appliance is
installed very close to any other units, the minimum
clearances given in the figure must be maintained.
PLQ
PLQ
PLQ
PLQ
PLQ
Note: If the appliance needs to be moved again,
screw the adjustable feet in fully.
5. Only finally level the appliance once the electricity
and gas have been connected and all of the
installation work is complete.
Note: Make sure that the distance between the
appliance and the back wall is at least 10 mm.
7
Page 8

en Installation and connection
Gas connection
Installation must only be performed by an approved
expert or a licensed after-sales service engineer in
accordance with the instructions specified under "Gas
connection and conversion to a different gas type".
For the licensed expert or after-sales service
Caution!
■ The settings for configuring this appliance can be
found on the rating plate.
■ Before setting up the appliance, check the grid
access conditions (gas type and gas pressure) and
ensure that the gas setting of the appliance meets
these conditions. If the appliance settings have to be
changed, follow the instructions in the section "Gas
connection and conversion to a different gas type".
■ This appliance is not connected to a waste gas
main. It must be connected and commissioned in
accordance with the installation conditions. Do not
connect the appliance to a waste gas main. All
ventilation regulations must be observed.
■ The gas connection must be made via a fixed, i.e.
not mobile connection (gas line) or via a safety
hose.
■ If using the safety hose, ensure that the hose is not
trapped or crushed. The hose must not come into
contact with hot surfaces.
■ The connection must have an easily accessible
locking device.
Checking for leaks
After connecting the gas line, check the connections for
leaks using soapy water.
Initial use
Switch the appliance on as described in the instructions
for use. Light all the burners and check that the flames
remain stable at both the high and low settings.
Faults in the gas installation/smell of gas
If you notice a smell of gas or faults in the gas
installation, you must
■ immediately shut off the gas supply and/or close the
gas cylinder valve
■ immediately extinguish all naked flames and
cigarettes
■ switch off electrical appliances and lights
■ open windows and ventilate the room
■ call the aftersales service or the gas supplier
Moving the appliance by the gas line or door handle
Do not move the appliance while holding the gas line;
the gas pipe could be damaged. There is a risk of a gas
leak! Do not move the appliance while holding it by the
door handle. The door hinges and door handle could
be damaged.
Appliance categories
Flexible hoses
For flexible hoses, observe the following points:
■ Do not pinch or squeeze hoses.
■ Do not subject the hoses to twisting or pulling
forces.
■ Keep the hoses away from sharp edges.
■ Do not let the hoses come into contact with parts
that may reach a temperature higher than 70 °C
above room temperature.
■ Make sure that the full length of the hoses is
accessible for inspection.
Country Category P (mbar)
RU, BY, KZ, AM, KG II 2H3B/P 2000 тта–3000 тта
UA II 2H3B/P 20 - 28 - 30
MA I 3+ 28 - 30/3728 - 30/37
AE, LB, JO II 2H3B/P 20 - 28 - 30
EG II 2H3+ 20 - 28 - 30/37
8
Page 9
Installation and connection en
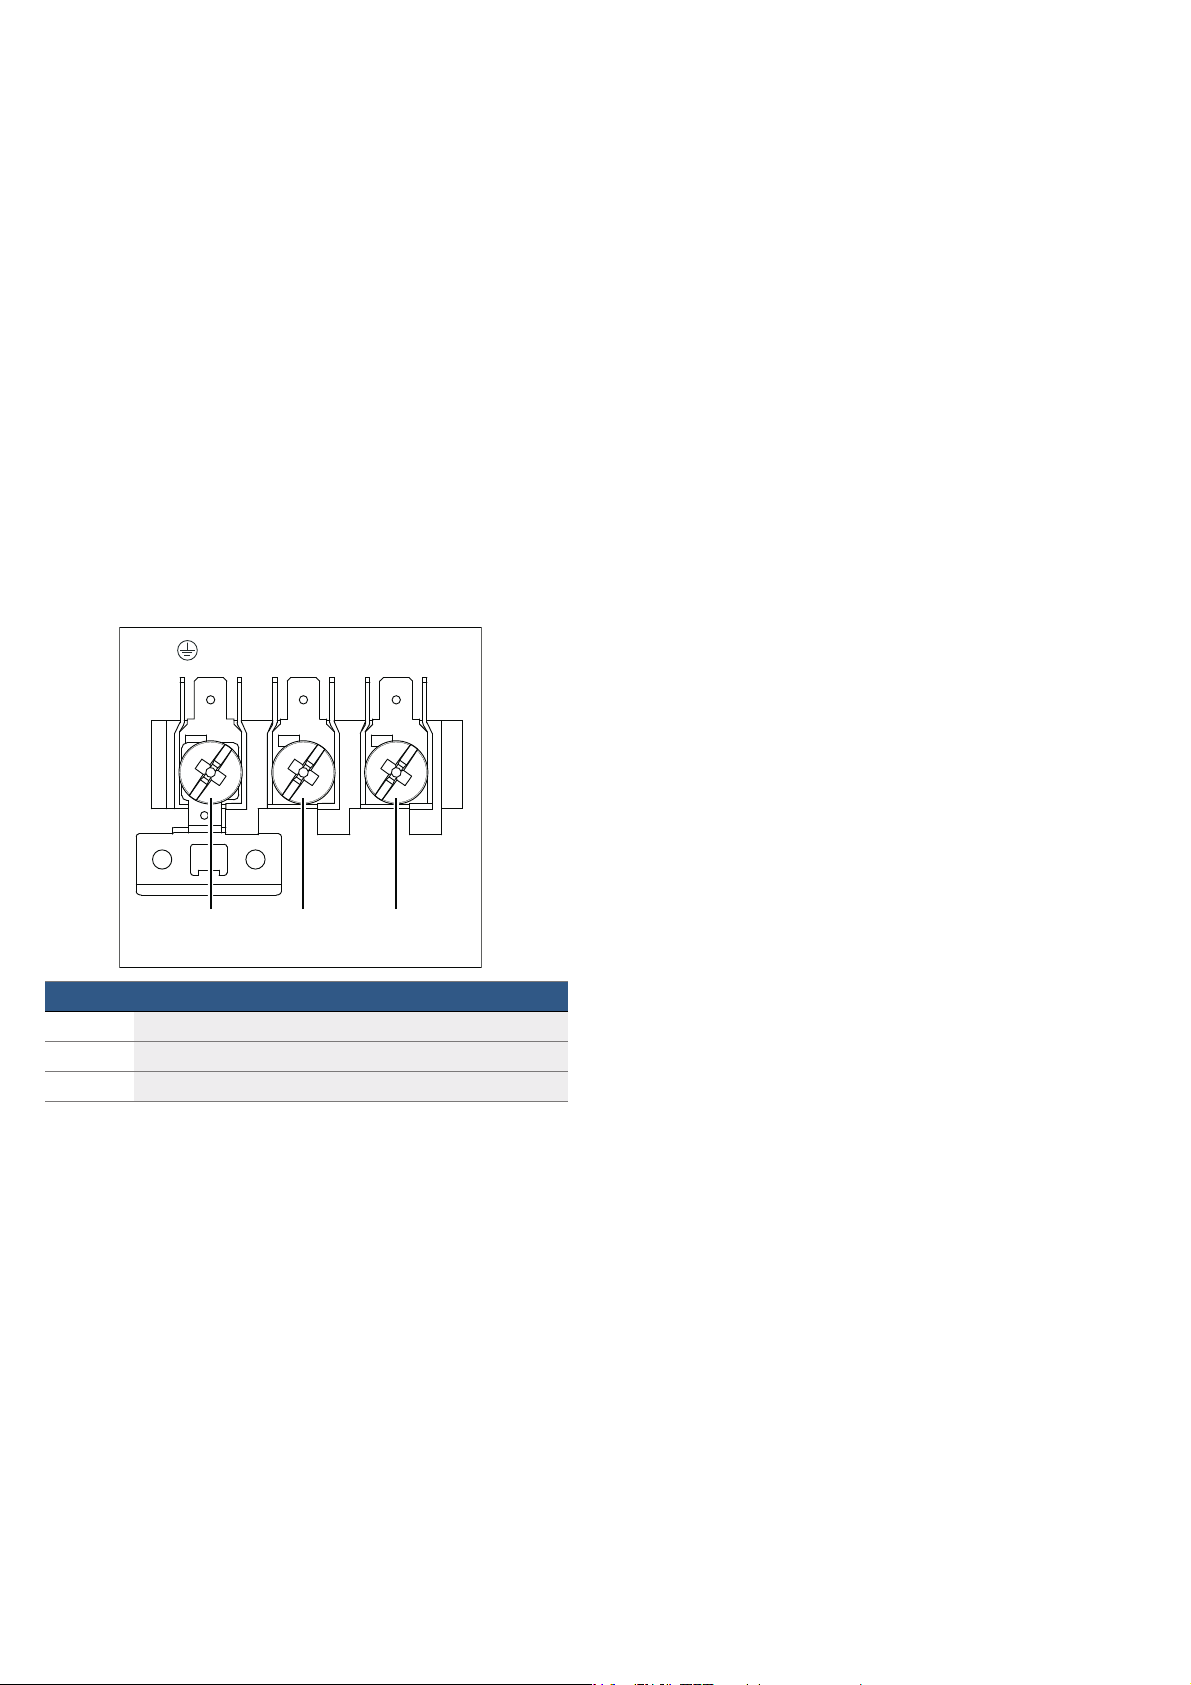
Electrical connection
Only licensed specialists may connect the appliance.It
is important that you comply with the requirements of
your electricity supplier.
The appliance is designed to operate at 220-240 V. A
16 A fuse is required for connection.
Any damage arising from the appliance being
connected incorrectly will invalidate the warranty.
Caution!
If the supply cord is damaged, it must be replaced by
the manufacturer, its service agent or similarly qualified
persons in order to avoid a hazard.
■ The appliance must be disconnected from the power
supply whenever installation work is being carried
out.
■ The appliance fulfils the requirements of protection
class I and may only be connected to an earthed
socket.
■ The mains power cable must be at least type
H05 V V-F 3G 1 mm².
W
>
E
Notes
■ The mains plug fits the socket.
■ The cable cross section is adequate.
■ The earthing system is properly installed.
■ The mains cable is only replaced by a qualified
electrician (if this is necessary).Spare mains cables
can be ordered from our after-sales service.
■ No power strips/multi-way connectors or extension
cables are used.
■ If using a residual current device, only use one that
bears the mark z.
The presence of this mark is the only way to be sure
that it fulfils all the applicable regulations.
■ The mains plug can be accessed at all times.
■ The mains cable is not kinked, crushed, modified or
severed.
■ The mains cable does not come into contact with
heat sources.
Notes
1 Yellow and green
2 Brown
3 Blue
:Warning – Danger of death!
There is a risk of electric shock if you touch live
components.
■ Always make sure your hands are dry when you
touch or hold the mains plug.
■ Only pull out the mains cable by taking hold of the
plug and removing the plug; never pull it out by the
mains cable itself, as this could damage it.
■ Never unplug the mains plug when the appliance is
in operation.
Please note the following information and ensure that:
9
Page 10

en Causes of damage
]Causes of damage
Cau s e s of damage
Hob
Caution!
■ Only use the burners when cookware has been
placed on top. Do not heat up empty pots or pans.
The saucepan base will be damaged.
■ Only use pots and pans with an even base.
■ Place the pot or pan centrally over the burner. This
will optimise transfer of the heat from the burner
flame to the pot or ban base. The handle does not
become damaged, and greater energy savings are
guaranteed.
■ Observe the manufacturer's instructions when using
special ovenware.Aluminium foil and plastic
containers can melt and stick on hot burners.
■ Ensure that the gas burners are clean and dry. The
burner cup and burner cap must be positioned
exactly.
■ Clear up spills immediately. Use deep pots for
dishes with a lot of liquid. This will prevent the food
from boiling over.
■ Cooking on gas burners releases extra heat and
moisture. Adjacent units may become damaged over
time. For long cooking times, switch on the cooker
hood or ventilate the room.
■ Ensure that the top cover is not closed when the
oven is started up.
■ The area around the appliance must be clean and
dry.
Always keep the appliance and the area around it
clean and dry after cleaning.
Make sure that there are no cleaning materials,
cleaning products or water marks on any of the
appliance's surfaces.
■ Cooling with the appliance door open: Following
operation at high temperatures, only allow the
cooking compartment to cool down with the door
closed. Do not trap anything in the appliance door.
Even if the door is only left open a crack, the front of
nearby furniture may become damaged over time.
Only leave the cooking compartment to dry with the
door open if a lot of moisture was produced whilst
the oven was operating.
■ Fruit juice: when baking particularly juicy fruit pies,
do not pack the baking tray too generously. Fruit
juice dripping from the baking tray leaves stains that
cannot be removed. If possible, use the deeper
universal pan.
■ Extremely dirty seal: If the seal is very dirty, the
appliance door will no longer close properly during
operation. The fronts of adjacent units could be
damaged. Always keep the seal clean. Never
operate the appliance if the seal is damaged or
missing. ~ "Cleaning" on page 21
■ Appliance door as a seat, shelf or worktop: Do not
sit on the appliance door, or place or hang anything
on it. Do not place any cookware or accessories on
the appliance door.
■ Inserting accessories: depending on the appliance
model, accessories can scratch the door panel
when closing the appliance door. Always insert the
accessories into the cooking compartment as far as
they will go.
■ Carrying the appliance: do not carry or hold the
appliance by the door handle. The door handle
cannot support the weight of the appliance and
could break.
■ Grilling: do not insert the baking tray or universal pan
higher than level 3 when grilling. The high heat
distorts it and the enamel may be damaged when it
is removed. At level 4 and 5, only grill directly on the
wire rack.
Damage to the oven
Caution!
■ Accessories, foil, greaseproof paper or ovenware on
the cooking compartment floor: do not place
accessories on the cooking compartment floor. Do
not cover the cooking compartment floor with any
sort of foil or greaseproof paper. Do not place
ovenware on the cooking compartment floor if a
temperature of over 50 ºC has been set. This will
cause heat to accumulate. The baking and roasting
times will no longer be correct and the enamel will
be damaged.
■ Aluminium foil: Aluminium foil in the cooking
compartment must not come into contact with the
door glass. This could cause permanent
discolouration of the door glass.
■ Water in a hot cooking compartment: do not pour
water into the cooking compartment when it is hot.
This will cause steam. The temperature change can
cause damage to the enamel.
■ Moisture in the cooking compartment: Over an
extended period of time, moisture in the cooking
compartment may lead to corrosion. Allow the
cooking compartment to dry after use. Do not keep
moist food in the closed cooking compartment for
extended periods of time. Do not store food in the
cooking compartment.
Damage to the plinth drawer
Caution!
Do not place hot objects in the plinth drawer. It could be
damaged.
10
Page 11
Environmental protection en
7Environmental protection
Env i r on ment al pr ot ect i on
Your new appliance is particularly energy-efficient.
Here you can find tips on how to save even more
energy when using the appliance, and how to dispose
of your appliance properly.
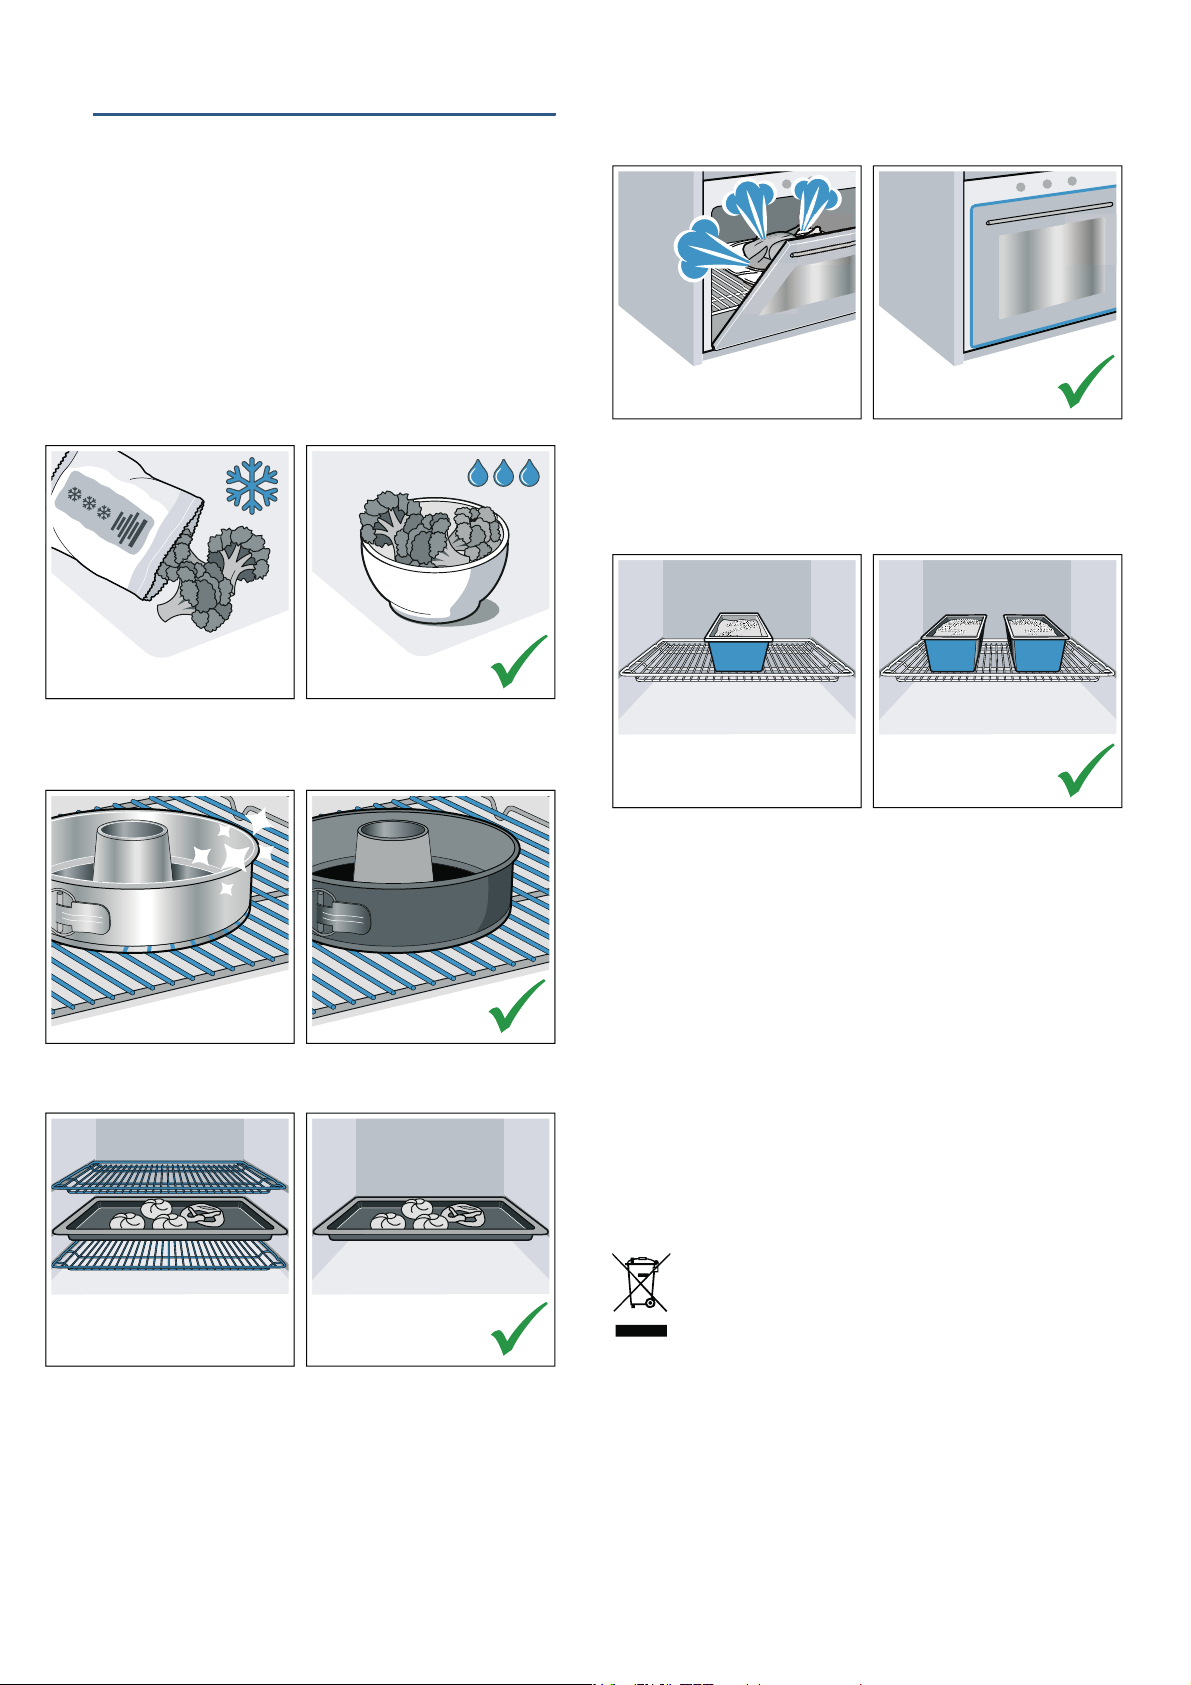
Saving energy
■ Only preheat the appliance if this is specified in the
recipe or in the tables in the operating instructions.
■ Leave frozen food to defrost before placing it in the
cooking compartment.
■ Open the appliance door as infrequently as possible
when the appliance is in use.
■ It is best to bake several cakes one after the other.
The cooking compartment stays warm. This reduces
the baking time for the second cake. You can place
two cake tins next to each other in the cooking
compartment.
■ Use baking tins that are dark-coloured, painted black
or have an enamel coating. These absorb the heat
particularly well.
■ Remove any unnecessary accessories from the
cooking compartment.
■ For longer cooking times, you can switch the
appliance off 10 minutes before the end of the
cooking time and use the residual heat to finish
cooking.
Saving energy with the gas hob
■ Always use a saucepan which is the correct size for
your food. A larger, less full saucepan requires a lot
of energy.
■ Always place a suitable lid on the saucepan.
■ The gas flame must always be in contact with the
base of the saucepan.
Environmentally-friendly disposal
Dispose of packaging in an environmentally-friendly
manner.
This appliance is labelled in accordance with
European Directive 2012/19/EU concerning
used electrical and electronic appliances
(waste electrical and electronic equipment WEEE). The guideline determines the
framework for the return and recycling of used
appliances as applicable throughout the EU.
11
Page 12

en Getting to know your appliance
*Getting to know your
appliance
Gett i ng to know your appl i ance
In this section, we will explain the indicators and
controls. You will also find out about the various
functions of your appliance.
Note: Depending on the appliance model, individual
details and colours may differ.
Depending on the appliance model, individual details
may differ.
Hob
Here you can see an overview of the hob. Details may
vary depending on the appliance model.
Explanation
1 High-output burner
2 Wok burner
3 Standard-output burner
4 Steam outlet
Caution!
When the oven is in operation, hot steam escapes here.
5 Economy burner
Control knob for hotplates
This control knob is used to adjust the heat setting of
the gas burner hotplates.
The symbols above the control knob show you the gas
burner to which the control knob belongs.
Explanation
1 Hob cover
2 Hob
3 Control panel
4 Oven
5 Storage compartment
Position Meaning
Û
8
—
˜
Off
Igniting
Large flame, highest setting
Small flame, lowest setting
12
Page 13

Control panel
You can set your appliance's various functions on the
control panel. Below, you will see an overview of the
control panel and the layout of the controls.
Getting to know your appliance en
Description
1 Selector for the gas burners
2 Selector for the oven
3 Function selector switch
4 Short-term timer selector
Timer
You can set a time of up to 60 minutes on the oven
timer. The timer has no effect on how the oven works. It
can only be used as a kitchen timer.
Position Meaning
Û
5 – 60 Cooking time in mins
Setting procedure
Set the timer for the desired cooking time.
Countdown
Once the duration has elapsed, an audible signal
sounds. The switch automatically switches to the Off Û
position.
Off
Oven
Here you can see an overview of the oven. Details may
vary depending on the appliance model.
Explanation
1 Gas grill (3.1 kW)
2 Oven gas burner (4.2* kW)
* Depending on the gas type. You can find further information in the
technical data of the gas table.
Control knob for oven
Turn this function selector anti-clockwise for the oven
temperature or clockwise for the grill function.
Position Meaning
Û
140–255
(max)
(
Off. The oven is not heating.
Oven gas burner on, temperature range in °C
Position of the grill burner for grilling food at max.
temperature.
There is a limit stop between the "Max" and Û positions.
Do not turn the selector beyond this point.
13
Page 14
en Accessories
Function selector switch
Switch the fan, oven light and the rotary spit on and off
using this selector.
Button Meaning
4
5
Fan position
Fan-assisted cooking enables heat to be distributed
evenly throughout the oven. To switch the fan on, press
the button on the control panel.
You can also use this position for defrosting.
Caution!
For safety reasons, the fan cannot be switched on when
the grill is in use.
Oven light and rotary spit
Fan position
The cooking compartment
The oven light is located in the cooking compartment.
Steam outlet
The hot air from the cooking compartment escapes at
the rear of the hob. Caution: do not cover the ventilation
slots. Otherwise the oven will overheat.
Cooling fan
The hot air escapes via the ventilation opening. This
cooling fan switches on and off as required. Caution!
Do not cover the ventilation slots. Otherwise the oven
will overheat.
_Accessories
Acc e s s o r i e s
Your appliance is accompanied by a range of
accessories. Here, you can find an overview of the
accessories included and information on how to use
them correctly.
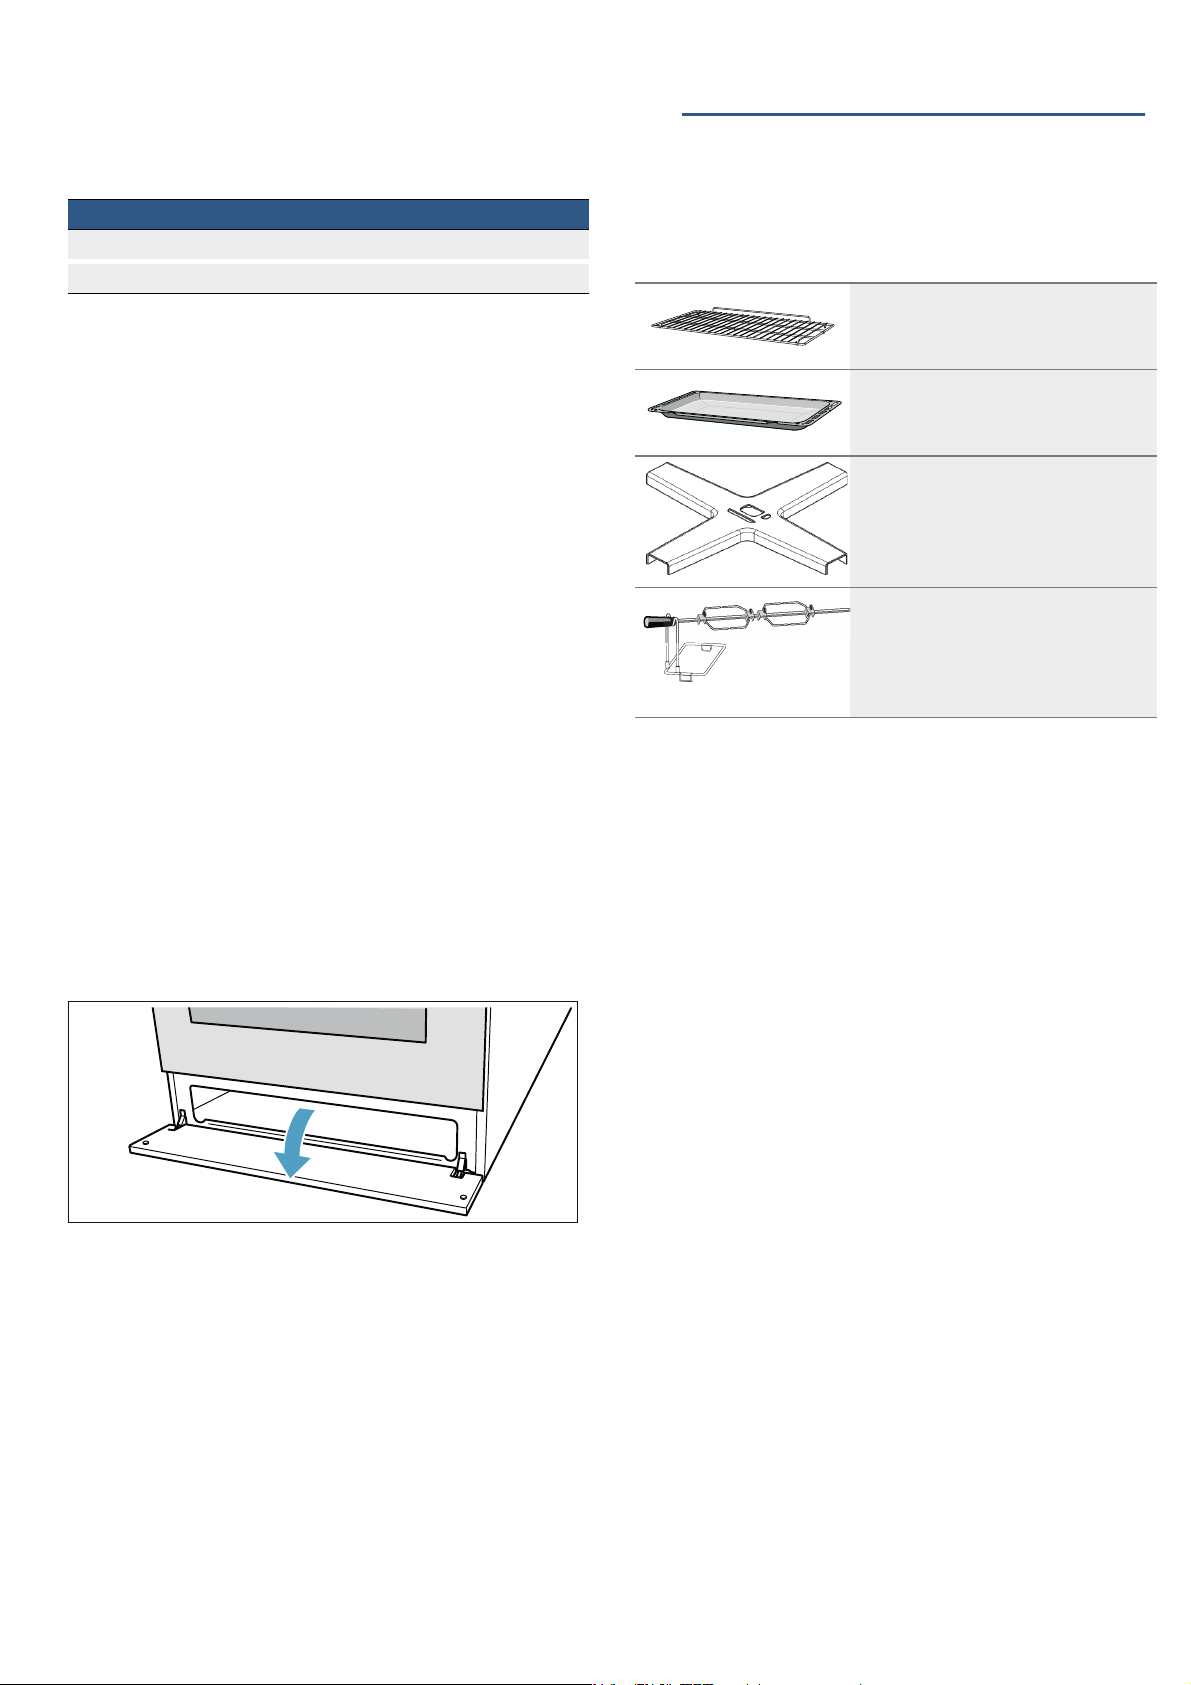
Baking and roasting shelf
For ovenware, cake tins, roasts, grilled
items and frozen meals.
Baking tray
For tray bakes and small baked items.
Coffee maker trivet
Coffee maker trivet for placing on the
economy burner.
Rotary spit
With spit adaptor and metal frame
For roasting joints of meat and large
poultry.
:Warning – Risk of fire!
Under no circumstances should a roasting tin, baking
tray, frying pan or any other form of cookware be
placed directly on the oven floor. This causes the floor
of the appliance to overheat and can seriously damage
the appliance.
Storage compartment
Open the storage compartment by folding down the
panel.
This compartment can be used to store hob or oven
accessories.
:Warning – Fire hazard!
Never leave combustible items in the storage
compartment.
14
Page 15

Accessories en
Inserting accessories
The cooking compartment has five shelf positions. The
shelf positions are counted from the bottom up.
In some appliances, the highest shelf position is
marked on the cooking compartment by the grill
symbol.
Always insert accessories between the two guide rods
for the shelf position.
Accessories can be pulled out approximately halfway
without tipping.
When sliding accessories into the cooking
compartment, ensure that the kink in the side rail is at
the back. Only then will they lock in place.
Notes
■ Hold the baking tray securely at the sides with both
hands and slide it into the shelf supports, keeping it
parallel. Do not move the baking tray from side to
side as you slide it in, otherwise it will not go in easily
and the enamelled surfaces may be damaged.
■ Make sure that you always insert the accessories
into the cooking compartment the right way round.
■ Always insert the accessories fully into the cooking
compartment so that they do not touch the appliance
door.
■ Take any accessories that you will not be using out
of the cooking compartment.
Optional accessories
You can buy optional accessories from our after-sales
service, from specialist retailers or online. You will find a
comprehensive range of products for your appliance in
our brochures and online.
Their availability and whether it is possible to order
them online varies from country to country. See your
sales brochures for more details.
Note: Not all optional accessories are suitable for every
appliance. When purchasing, always quote the exact
product number (E no.) of your appliance.
~ "Customer service" on page 27
Optional accessories
Baking and roasting shelf
For ovenware, cake tins, roasts, grilled items and frozen meals.
Baking tray
For tray bakes and small baked items.
Universal pan
For moist cakes, baked items, frozen food and large roasts.
It can be used to catch dripping fat when you are grilling directly on
the wire rack.
Round enamel baking tray
For moist cakes, pastries, frozen meals and large meat dishes.
Always use with the wire rack.
To ensure that the food cooks evenly throughout, place the baking
tray in the centre of the wire rack.
Rotary spit
With spit adaptor and metal frame
For roasting joints of meat and large poultry.
Pull-out system, one level
Fitting pull-out rails at position 3 will allow you to pull accessories out
further without them tipping.
--------
15
Page 16

en Before using for the first time
KBefore using for the first
time
Bef or e usi ng for the first ti me
In this section, you can find out what you must do
before using your oven or hob to prepare food for the
first time. Read the following section beforehand.
~ "Important safety information" on page 5
Remove the appliance packaging and dispose of it
appropriately.
Baking out the oven
Precleaning the oven
1. Remove accessories and hook-in racks from the
cooking compartment.
2. Fully remove any remaining packaging, such as
small pieces of polystyrene, from the cooking
compartment.
3. Some parts are covered with a protective film.
Remove the protective film.
4. Clean the outside of the appliance with a soft, damp
cloth.
5. Clean the cooking compartment with hot soapy
water.
Cleaning the burner caps and cups
$
%
&
1. Clean the burner caps (A) and cups (B) with water
and washing-up liquid.
2. Dry the parts well.
3. Place the burner cup (B) onto the burner (C).
4. Position the burner cap (A) exactly on the burner
cup (B).
Cleaning the accessories
Before using the accessories, clean them thoroughly
using a cloth and warm soapy water.
Heating up the oven
To remove the new cooker smell, heat up the oven
when it is empty and closed.
1. Turn the temperature selector to the maximum
temperature.
2. Switch off the oven after 45 minutes.
16
Page 17

ÅCooking pans
Cooki ng pans
Burner Power
[kW]
High output
burner
Wok burner 4 kW 24 cm 28 cm
Standard
output burner
Economy
burner
3 kW 24 cm 28 cm
1.75 kW 18 cm 24 cm
1 kW 12 cm 18 cm
Minimum
cookware
diameter
Maximum
cookware
diameter
Cooking pans en
Precautions for use
The following advice is intended to help you save
energy and prevent pan damage:
Use pans which are the
right size for each burner.
Do not use small pans on
large burners. The flame
must not touch the sides of
the pan.
Do not use damaged pans,
which do not sit evenly on
the hob. Pans may tip over.
Only use pans with a thick,
flat base.
Do not cook without using
a lid and make sure the lid
is properly fitted. This
wastes energy.
Always centre the pan over
the burner, not to one side.
Otherwise it could tip over.
Do not place large pans on
the burners near the
control knobs. These may
be damaged by the very
high temperatures.
Place the pans on the pan
supports, never directly on
the burner.
Make sure that the pan
supports and burner caps
are correctly positioned
before using the appliance.
Pans should be placed on
the hob carefully.
Do not strike the hob and
do not place excessive
weight on it.
Never use two burners or
heat sources to heat one
single pan.
Do not use grill pans,
earthenware casserole
dishes, etc. for a long
period of time on
maximum power.
17
Page 18

en Operating the appliance
1Operating the appliance
Operat i ng the appl i ance
You have already learnt about the controls and how
they work. Now we will explain how to set your
appliance. You will learn about what happens when you
switch the appliance on and off, and how to select the
operating mode.
Hob
This chapter explains how to set a hotplate. The table
shows heat settings and cooking times for various
meals.
Switching on the gas burner
Always position the burner lid precisely on the burner
cup. Keep the openings in the burner cup free from
obstructions. All parts must be dry.
1. Open the top hob cover. The top cover must remain
open for as long as the hob is in operation.
2. Turn the selector for the required burner anti-
clockwise to the ignition position
process starts.
3. Press and hold the hob selector for 1–3 seconds.
Gas begins to flow out and the gas burner ignites.
The safety pilot is activated. If the gas flame goes
out, the gas supply is automatically shut off by the
safety pilot.
4. Set the desired flame size. Between the Off Û
position and the — position, the flame is not stable.
You must therefore always choose a position
between the — large flame and ˜ small flame.
Position Meaning
Û
˜
—
5. Check whether the flame is lit. If it is not, repeat the
process from step 2.
Do not press the ignitor for longer than 15 seconds. If
the burner does not ignite within 15 seconds, wait at
least one minute before repeating the procedure.
If the burner's flame accidentally goes out, switch off the
burner's selector and wait at least one minute before
igniting the burner again.
Off
Small flame, lowest setting
Large flame, highest setting
8. The ignition
If the flame goes out
Switch off the selector. Wait for one minute and switch
on again.
:Warning – Fire hazard!
If the flame goes out, gas will escape. Never leave the
gas burner (hob) unattended while it is in use. Ensure
that there are no draughts.
If the gas burner does not ignite
In the event of a power failure or damp ignition plugs,
light the gas burner with a gas lighter or a match.
Switching off the gas burner
Turn the selector for the hob clockwise to the Off Û
position.
:Warning – Caution!
If, after switching the appliance off, you turn the selector
while the oven is still hot, gas will escape. If you do not
turn the selector to the ignition position 8 within 60
seconds, the gas supply is shut off.
Warnings
It is normal to hear a soft whistling noise while the
burner is operating.
When first used, it is normal for the burner to give off
odours. This does not pose any risk and does not
indicate a malfunction. They will disappear in time.
An orange-coloured flame is normal. This is caused by
the presence of dust in the atmosphere, spilt liquids,
etc.
In the event of the burner flames being accidentally
extinguished, turn off the burner control and do not
attempt to re-ignite the burner for at least one minute.
A few seconds after the burner is switched off, a sound
(thud) will be produced. This is not a fault - this means
that the safety device is no longer operating.
Keep the burner as clean as possible. If the ignition
sparkers are dirty they will not light properly. Clean
them periodically using a small non-wire brush. Bear in
mind that the ignition sparkers must not suffer any
serious impacts.
18
Page 19

Operating the appliance en
Table – Cooking
Select the right pot size for each burner. The diameter
of the pot or pan base should be the same size as the
hotplate.
Cooking times may vary depending on the type of food,
its weight and quality. Deviations are therefore possible.
You yourself can best judge the optimum cooking time.
Example Food Cooking zone Cooking mode
Melting Chocolate, butter, margarine Economy burner Small flame
Warming Stock, tinned vegetables Standard-output burner Small flame
Heating and keeping warm Soups Economy burner Small flame
Steaming* Fish Standard-output burner Between large and small flame
Braising* Potatoes and miscellaneous vegetables, meat Standard-output burner Between large and small flame
Boiling* Rice, vegetables, meat dishes (with sauces) Standard-output burner Large flame
Roasting Pancakes, potatoes, schnitzel, fish fingers High-output burner
* If you are using a saucepan with a lid, turn the flame down as soon as the food starts to boil.
Oven
Operating the oven
:Warning – Risk of overheating!
The cooling fan will not work without power. The
appliance could overheat. Never operate the oven
without power.
Note: Do not use the appliance if the cooling fan is
faulty and call the after-sales service.
Oven lighting
Switching on the oven light
Use the function selector 4 to switch the oven light on
or off.
Operating modes
The following operating modes are available.
Operating mode Use
Oven gas burner
$
140–255
(max) °C
Gas grill For steaks, sausages, fish
(
Fan position For defrosting. For
5
For cakes and pastries,
bakes, poultry, lean joints of
meat, e.g. beef, veal and
game.
and toasted sandwiches.
defrosting meat, poultry,
bread and cakes. The fan
circulates the hot air around
the food.
When the oven gas burner
is switched on, the fan
circulates the hot air around
the food.
Vitamins and minerals in the food can easily be lost.
You should therefore use as little water as possible
when cooking, so that the food retains its vitamins and
minerals. Select short cooking times so that the
vegetables remain firm and full of nutrients.
Between large and small flame
Wok burner
Operating the oven
Switching on the oven gas burner
1. Open the top cover of the appliance.
2. Open the oven door.
3. Press the control knob for the oven and turn it to the
required temperature.
The gas burner ignites.
4. Press and hold the selector for a few seconds until
the flame stabilises.
5. Close the oven door carefully.
Do not press the ignitor for longer than 15 seconds. If
the burner does not ignite within 15 seconds, wait at
least one minute before repeating the procedure.
In the event of the burner flames being accidentally
extinguished, turn off the burner control and do not
attempt to re-ignite the burner for at least one minute.
If the flame goes out
Switch off the control knob. Wait one minute and switch
the burner on again.
:Warning – Risk of fire!
If the flame goes out, gas will escape. Never leave the
gas burner unattended during operation. Ensure that
there are no draughts.
Switching off the oven gas burner
Turn the selector to the Û position.
19
Page 20

en Operating the appliance
Operating the grill
Note: Keep the appliance door closed while you are
using the grill function.
1. Open the top cover of the appliance.
2. Open the oven door.
3. Press and hold the selector for the oven and turn to
the grill setting ( .
The gas burner ignites.
4. Press and hold the selector for a few seconds until
the flame stabilises.
5. Close the oven door carefully.
Do not press the ignitor for longer than 15 seconds. If
the burner does not ignite within 15 seconds, wait at
least one minute before repeating the procedure.
In the event of the burner flames being accidentally
extinguished, turn off the burner control and do not
attempt to re-ignite the burner for at least one minute.
If the flame goes out
Switch off the control knob. Wait one minute and switch
the burner on again.
:Warning – Risk of fire!
If the flame goes out, gas will escape. Never leave the
gas burner unattended during operation. Ensure that
there are no draughts.
Switching off the grill
Turn the control knob to the Û position.
Rotisserie spit
Rot i s s e r i e spi t
The rotary spit is particularly good for cooking large
roasts, such as rolled roasting joints or poultry. The
meat becomes crispy and brown.
Preparing roasts
To ensure that the roast is well-browned and cooked
evenly, observe the following points:
Skewering and securing the meat to the spit
Place the joint as close as possible to the centre of the
rotary spit.
Use the clamps to secure the joint at both ends. In
doing so, the joint must be at least 10 cm away from
the end of the spit.
You can also truss the joint with string. With poultry,
bind the ends of the wings underneath the back and the
thighs against the body. This prevents them from
overbrowning. Pierce the skin on the underside of the
wings to allow the fat to escape.
Inserting the rotary spit
:Warning – Risk of burns!
Never touch the hot surfaces of the cooking
compartment or the heating elements. Keep children at
a safe distance. Open the appliance door carefully. Hot
steam may escape from the appliance.
:Warning – Caution!
Do not insert the rotary spit without meat.
1. Place the rotary spit support on the baking tray. (Fig.
A)
$
2. Slide the handle onto the rotary spit and screw it on.
3. Slide the baking tray in at shelf position 1.
4. Insert the rotary spit onto the support. There is an
opening in the back oven wall. Insert the rotary spit
here. (Fig. B) Ensure that the rotary spit is inserted
correctly.
20
Page 21

Cleaning en
5. Remove the handle and close the oven door. (Fig.
C)
%
&
Switching on the rotary spit
1. Press and hold the selector for the oven and turn to
the grill setting ( .
2. Press the function selector switch 4.
Note: Pour some water into the universal pan to catch
any fat that drips out.
Removing the rotary spit
:Warning – Risk of scalding!
Never touch the hot surfaces of the cooking
compartment or the heating elements. Keep children
away from the appliance at all times. Open the
appliance door carefully. Hot steam may escape from
the appliance.
DCleaning
Cleani ng
With good care and cleaning, your appliance will retain
its appearance and remain fully functioning for a long
time to come. We will explain here how you should
correctly care for and clean your appliance.
Cleaning agents
Damage to the various different surfaces caused by
using the wrong cleaning agent can be avoided by
observing the following instructions.
When cleaning the hob do not use
■ undiluted washing-up liquid or dishwasher detergent,
■ scouring pads,
■ abrasive cleaning agents such as oven cleaner or
stain remover,
■ high-pressure cleaners or steam jets.
■ Do not clean individual parts in the dishwasher.
When cleaning the oven do not use
■ sharp or abrasive cleaning agents,
■ cleaning agent with a high alcohol content,
■ scouring pads,
■ high-pressure cleaners or steam jets.
■ Do not clean individual parts in the dishwasher.
Wash new sponges thoroughly before first use.
:Warning – Risk of scalding!
Never touch the rotary spit or other accessories directly
when they are hot. Always use a pot holder or wear
oven gloves to handle accessories when they are hot.
1. When the dish has finished cooking, switch off the
selector for the oven ( and the function selector
switch 4.
2. Open the appliance door carefully.
3. Slide the handle onto the rotary spit and screw it on.
4. Pull out the rotary spit carefully from the installation
location.
5. Remove the baking tray.
:Warning – Risk of burns!
The appliance becomes very hot. Never touch the
interior surfaces of the cooking compartment or the
heating elements. Always allow the appliance to cool
down. Keep children at a safe distance.
Zone Cleaning agent
Stainless steel surfaces*
(depending on
appliance model)
Enamel, painted,
plastic and screenprinted surfaces*
(depending on
appliance model)
Control panel Hot soapy water:
* Optional (available for some appliances, depending on the appli-
ance model)
Hot soapy water:
Clean with a dish cloth and dry with a soft cloth.
On stainless steel surfaces, always wipe parallel
to the natural grain. Otherwise, you may scratch
the surface. Remove patches and splashes of
limescale, grease, starch and albumin (e.g. egg
white) immediately. Corrosion can form under
such patches and splashes.
Special care products suitable for hot stainless
steel surfaces are available from our after-sales
service and from specialist retailers. Apply a thin
layer of care product with a soft cloth.
Hot soapy water:
Clean with a dish cloth and dry with a soft cloth.
Do not use glass cleaner or glass scrapers for
cleaning.
Clean with a dish cloth and dry with a soft cloth.
Do not use glass cleaner or glass scrapers for
cleaning.
21
Page 22

en Cleaning
Zone Cleaning agent
Upper glass cover*
(depending on
appliance model)
Rotary knobs
Do not remove.
Hob surround Hot soapy water:
Gas hob and pan
supports*
(depending on
appliance model)
Gas burners*
(depending on
appliance model)
Electric hotplate*
(depending on
appliance model)
Hotplate ring*
(depending on
appliance model)
Ceramic hob*
(depending on
appliance model)
Glass cleaner:
Clean with a soft cloth.
You can remove the upper glass cover for cleaning. To find out how to do this, please refer to
the section Upper glass cover.
Hot soapy water:
Clean with a dish cloth and dry with a soft cloth.
Do not clean with a glass scraper, lemon juice or
vinegar.
Hot soapy water.
Use very little water. Water must not be allowed
to enter the appliance through the base of the
burners.
Clean off boiled-over liquids and spilt food immediately.
You can remove the pan supports.
Cast iron pan supports*:
Do not clean in the dishwasher.
Remove the burner head and cap and clean with
hot soapy water.
Do not clean in the dishwasher.
The gas outlet openings must remain unobstructed at all times.
Ignition plugs: Small, soft brush.
The gas burners only work properly when the
ignition plugs are dry. Dry all parts thoroughly.
Ensure that they are refitted correctly.
The burner caps are coated in black enamel.
The colour may change over time. This does not
impair their performance.
Abrasive materials or sponges:
Briefly heat up the hotplate afterwards, so that it
dries. Hotplates can rust over time if they remain
wet. Apply care product to finish.
Clean off boiled-over liquids and spilt food immediately.
Remove yellow to blue iridescent discolouration
from the hotplate ring with a steel care product.
Do not use any abrasive materials that may
scratch surfaces.
Care: Protective/care products for ceramics
Cleaning: Cleaning agents suitable for ceramics.
Follow the cleaning instructions on the packaging.
:Glass scraper for stubborn dirt:
Remove the protective cover and clean using
the blade only. Caution: The blade is very sharp.
Risk of injury.
Cover the blade again after cleaning. Replace
damaged blades immediately.
* Optional (available for some appliances, depending on the appli-
ance model)
Zone Cleaning agent
Glass hob*
(depending on
appliance model)
Care: Protective/care products for glass
Cleaning: Cleaning agents for glass.
Follow the cleaning instructions on the packaging.
:Glass scraper for stubborn dirt:
Remove the protective cover and clean using
the blade only. Caution: The blade is very sharp.
Risk of injury.
Cover the blade again after cleaning. Replace
damaged blades immediately.
Glass panel Glass cleaner:
Clean with a soft cloth.
Do not use the glass scraper.
The door can be removed to facilitate cleaning.
To find out how to do this, please refer to the
section Removing and refitting the oven
door.
Childproof lock*
(depending on
appliance model)
Seal
Do not remove.
Cooking zone Hot soapy water or a vinegar solution:
Hot soapy water:
Clean with a dish cloth.
If a childproof lock has been fitted to the oven
door, it must be removed before cleaning.
If it is very dirty, the childproof lock will not work
properly.
Hot soapy water:
Clean with a dish cloth. Do not scour.
Clean with a dish cloth.
For stubborn dirt, use a stainless steel scouring
pad or oven cleaner.
Only use when the cooking compartment is
cold.
:Please use the self-cleaning function to
clean self-cleaning surfaces. To find out how to
do this, please refer to the section Self-clean-
ing.
Caution! Never use oven cleaner on self-cleaning surfaces.
Glass cover for the
oven light
Shelf Hot soapy water:
* Optional (available for some appliances, depending on the appli-
ance model)
Hot soapy water:
Clean with a dish cloth.
Clean with a dish cloth or a brush.
You can remove the shelves for cleaning. To find
out how to do this, please refer to the section
Removing and refitting shelves.
Telescoping extension rails*
(depending on appliance model)
Hot soapy water:
Clean with a dish cloth or a brush.
Do not remove the lubricant from the extension
rails. It is best to clean them when they are
pushed in. Do not soak, clean in the dishwasher,
or clean in the oven as part of the self-cleaning
programme. This may damage the shelves and
they may no longer work properly as a result.
22
Page 23

Appliance door en
Zone Cleaning agent
Accessories Hot soapy water:
Soak and then clean with a dish cloth or a brush.
Enamelled accessories are dishwasher-suitable.
Aluminium baking tray*:
(depending on appliance model)
Dry with a soft cloth.
Do not clean in the dishwasher.
Never use oven cleaner.
To prevent scratches, never touch the metal surfaces with a knife or a similar sharp object.
Harsh cleaning products, scratchy sponges and
rough cleaning cloths are not suitable. Otherwise, you may scratch the surface.
Rotary spit*
(depending on appliance model)
Hot soapy water:
Clean with a dish cloth or a brush. Do not clean
in the dishwasher.
Meat thermometer*
(depending on appliance model)
Hot soapy water:
Clean with a dish cloth or a brush. Do not clean
in the dishwasher.
Plinth drawer*
(depending on
Hot soapy water:
Clean with a dish cloth.
appliance model)
* Optional (available for some appliances, depending on the appli-
ance model)
Notes
■ Slight differences in colour on the front of the
appliance are caused by the use of different
materials, such as glass, plastic and metal.
■ Shadows on the door panels, which look like
streaks, are caused by reflections made by the
interior lighting.
■ Enamel is baked on at very high temperatures.This
can cause some slight colour variation. This is
normal and does not affect operation.
The edges of thin trays cannot be completely
enamelled. As a result, these edges can be rough.
This does not impair the anti-corrosion protection.
qAppliance door
App l i an c e door
With good care and cleaning, your appliance will retain
its appearance and remain fully functional for a long
time to come. This will tell you how to remove the
appliance door and clean it.
Detaching and attaching the oven door
For cleaning purposes and to remove the door panels,
you can detach the oven door.
The oven door hinges each have a locking lever. When
the locking levers are closed (figure A), the oven door
is secured in place. It cannot be detached. When the
locking levers are open in order to detach the oven
door (figure B), the hinges are locked. They cannot
snap shut.
%$
:Warning – Risk of injury!
Whenever the hinges are not locked, they snap shut
with great force. Ensure that the locking levers are
always fully closed or, when detaching the oven door,
fully open.
Detaching the door
1. Open the oven door fully.
2. Fold up the two locking levers on the left and right
(Fig. A).
3. Close the oven door as far as the limit stop. Grip the
left and right hand sides of the door with both hands.
Close the door a little further and pull it out (Fig. B).
$
%
Keeping the appliance clean
Always keep the appliance clean and remove dirt
immediately so that stubborn deposits of dirt do not
build up.
:Warning – Fire hazard!
Loose food remnants, fat and meat juices may catch
fire. Before using the appliance, remove the worst of the
food residues and remnants from the cooking
compartment, heating elements and accessories.
Tips
■ Always clean the cooking compartment after use.
This ensures that dirt cannot be baked on.
■ Remove limescale, grease, starch and albumin (e.g.
egg white) stains immediately.
■ Use suitable ovenware for roasting, e.g. a roasting
dish.
23
Page 24

en Appliance door
Attaching the door
Reattach the oven door by following the same steps in
reverse order.
1. When attaching the oven door, ensure that both
hinges are inserted straight into the opening (Fig. A).
2. The notch on the hinge must engage on both sides
(Fig. B).
$
3. Fold back both locking
levers (Fig. C). Close the oven door.
%
&
Removing and refitting the door panels
The glass panels can be removed from the oven door
to allow more thorough cleaning.
Removing
1. Detach the oven door. To do this, read the section
entitled "Detaching the door". Position it on a cloth with
its handle pointing downwards (Fig. A).
2. Turn the two screws at bottom followed by the two
screws at the top in an anti-clockwise direction (Fig.
b).
$
3. Remove the complete door base (Fig. C).
%
&
:Warning – Risk of injury!
Risk of injury! Do not touch the hinges; the door might
accidentally fall or a hinge might suddenly snap shut.
Call the after-sales service.
Do not wash the removed parts. Only clean the glass
surfaces with a damp, soft cloth and a small amount of
glass cleaner.
:Warning – Risk of injury!
Scratched glass in the appliance door may develop into
a crack. Do not use a glass scraper, sharp or abrasive
cleaning aids or detergents.
Installation
1. Insert the complete door base (Fig. D).
2. First tighten the two screws at the bottom and then
the two screws at the top (Fig. B).
$
%
24
3. Attach the oven door. To do this, see the section
entitled Attaching the door.
Only use the oven once the glass panels have been
correctly fitted.
Page 25

Rails en
pRails
Rails
With good care and cleaning, your appliance will retain
its appearance and remain fully functional for a long
time to come. This will tell you how to remove the
shelves and clean them.
Detaching and refitting the rails
The rails can be removed for cleaning. The oven must
have cooled down.
Unhooking the rails
1. Hold the shelf frames from underneath and pull
slightly forward. Pull the extension pins at the bottom
of the rails out of the mounting holes (Fig. A).
2. Then fold the rails upwards and carefully remove
them (Fig. B).
$
%
Installing the frames
1. Insert the two hooks carefully into the upper holes.
(Figure A-B)
$
%
:Warning
Incorrect assembly!
Never move the frame before the two hooks are fully
anchored in the upper holes. The enamel could be
damaged and may break (figure C).
&
Clean the rails with washing-up liquid and a sponge. For
stubborn deposits of dirt, use a brush.
2. the two hooks must be inserted fully into the upper
holes. Now move the frame slowly and carefully
downwards and insert in the lower holes (figure D).
3. Insert both frames into the side walls of the oven
(figure E).
If the rails are fitted correctly, the distance between the
two upper shelf positions is greater.
'
(
25
Page 26

en Trouble shooting
3Trouble shooting
Troubl e s hoot i ng
If a fault occurs, there is often a simple explanation.
Before calling the after-sales service, please refer to the
fault table and attempt to correct the fault yourself.
Fault table
If a dish does not turn out as well as you had hoped,
refer to the section entitled Tested for you in our cooking
studio
. It contains useful tips and information on
cooking, baking, roasting and frying.
Fault Possible cause Remedy/information
The appliance does not start. The fuse is faulty Check the fuse in the fuse box.
Power failure Check whether the kitchen light or other kitchen
Disruption of gas supply Make sure that the gas supply valves are open.
The oven light has failed. The oven light is faulty Replace the oven light. (see section entitled "Replac-
The gas burner does not ignite. Power cut or damp ignition plugs Light the gas burner with a gas lighter or a match.
The flame (oven) does not burn through all
outlet openings.
All dishes prepared in the oven burn within a
short period of time.
The door panel steams up when the oven
heats up.
Fan position not working. The grill selector is switched on. Make sure that the grill selector is switched off.
The oven switches off. The gas pressure is too high or too low Check whether the correct pressure regulator is
The cooling fan is not working. The cooling fan is faulty. Call the after-sales service.
Normal build-up of dirt The burner must be professionally cleaned.
The thermostat is faulty. Call the after-sales service.
This is a normal occurrence caused due to the
temperature difference
Fan position is not selected Make sure that the fan position is switched on.
Fan fault Call the after-sales service.
Power failure Check the oven's power supply.
Incorrect installation Make sure that the appliance was installed accord-
:Warning – Risk of electric shock!
Incorrect repairs are dangerous. Repairs may only be
carried out by one of our trained after-sales technicians.
appliances are working.
ing the oven light")
Do not operate the oven without power.
No intervention needed; this has no effect on performance.
being used.
ing to installation instructions.
26
Page 27

Customer service en
Replacing the bulb in the oven ceiling light
If the bulb in the oven light fails, it must be replaced.
Heat-resistant, 25 watt spare bulbs can be obtained
from our after-sales service or a specialist retailer. Only
use these bulbs.
:Warning – Risk of electric shock!
Switch off the circuit breaker in the fuse box.
1. Place a tea towel in the cold oven to prevent
damage.
2. Unscrew the glass cover by turning it anti-clockwise.
3. Replace the bulb with one of the same type.
4. Screw the glass cover back in.
5. Remove the tea towel and switch on the circuit
breaker.
Glass cover
You must replace a damaged glass cover. Suitable
glass covers may be obtained from the after-sales
service. Please specify the E number and FD number of
your appliance.
4Customer service
Cus t o mer servi ce
Our after-sales service is there for you if your appliance
needs to be repaired. We will always find an
appropriate solution, also in order to avoid after-sales
personnel having to make unnecessary visits.
E number and FD number
When calling us, please give the product number (E
no.) and the production number (FD no.) so that we can
provide you with the correct advice. The rating plate
containing these numbers can be found on the righthand side of the oven door. You can make a note of the
numbers of your appliance and the telephone number
of the after-sales service in the space below to save
time should it be required.
E no.
After-sales service O
Please note that there will be a fee for a visit by a
service technician in the event of a malfunction, even
during the warranty period.
After-sales contact details for all countries can be found
in the attached after-sales service directory.
FD no.
27
Page 28

en Tested for you in our cooking studio
JTested for you in our
cooking studio
Test ed for you in our cooki ng st udi o
Here, you can find a selection of dishes and the ideal
settings for them. We will show you which type of
heating and temperature are best suited to your dish.
You will get information on suitable cooking
accessories and the height at which they should be
placed in the oven. You will also get tips about
cookware and preparation methods.
Notes
■ The values in the table always apply to dishes
placed into the cooking compartment when it is cold
and empty.
Only preheat the appliance if the table specifies that
you should do so. Line the accessories with
greaseproof paper before preheating the appliance.
■ The times specified in the tables are intended as a
guide only. These values depend on the quality and
composition of the food.
■ Use the accessories provided. You can purchase
other accessories from after-sales service or
specialist retailers.
Remove any unnecessary accessories and
ovenware from the cooking compartment.
■ Always use oven gloves when taking hot
accessories or ovenware out of the cooking
compartment.
■ Your oven can be used to bake on one level.
Caution!
The appliance was manufactured in accordance with
the reference gases specified in the standards. If a gas
is used which does not comply with the specified gas
mixture and pressure, cooking performance and heat
output may not produce the desired result.
Cakes and pastries
Cake tins
When you are baking in the cake tin, insert the wire rack
at the level indicated and place the cake tin on the wire
rack.
Dark-coloured cake tins are the most suitable.
If you use light-coloured baking tins or glass, the baking
time increases and the cake is not browned evenly.
Only use heat-resistant glass dishes. Do not place a hot
glass dish on a cold or wet surface. The glass could
break.
If you want to use silicone moulds, follow the guidelines
in the manufacturer's instruction manual. Silicone
moulds turn out slightly smaller than normal cake tins.
For this reason, the quantities may be slightly different
to those indicated in your recipe.
Baking tables for the lower burner in the gas oven
In the tables, you will find the optimum types of heating
for a selection of cakes and gateaux. The temperature
and cooking times depend on the quantity and
consistency of the dough.
The values in the table apply to dishes placed into the
cooking compartment when it is cold and empty.
The heat is distributed in the oven as soon as the gas
escaping from the lower gas burner is ignited. For this
reason, the underside of food is usually more browned
than the top.
Gas designation Gas mixture (%)
G20 CH4=100
G25 CH4=86, N2=14
G30 n-C4H10=50, i-C4H10=50
Note: A lot of steam can build up in the cooking
compartment when cooking food.
Your appliance is very energy-efficient and radiates very
little heat to its surroundings during operation. Due to
the high difference in temperature between the
appliance interior and the external parts of the
appliance, condensation may build up on the door,
control panel or adjacent kitchen cabinet panels. This is
a normal physical phenomenon. Condensation can be
reduced by preheating the oven or opening the door
carefully.
28
Page 29

Tested for you in our cooking studio en
Cakes in tins Accessories/cookware Shelf posi-
tion
Sponge cake Round Bundt pan, deep 3
Sponge cake Round Bundt pan, deep 2
6-egg fatless sponge cake Springform cake tin (dia. 28 cm) 2
Apple pie Springform cake tin (dia. 20 cm) 3
Apple pie Springform cake tin (dia. 20 cm) 3
Revani (hot water sponge cake) Glass ovenproof dish, rectangular** 3
Revani (hot water sponge cake) Glass ovenproof dish, rectangular** 2
Crème caramel Dish for crème caramel 2
* Preheat for 10 minutes.
** Use heat-resistant glass ovenware only. Never set hot glass ovenware down on a cold or wet surface after taking it out of the oven. This may cause
the glass ovenware to crack.
Baked items on a baking tray Accessories/cookware Shelf posi-
tion
Biscuits Baking tray 3
Sesame pretzels Baking tray 3
Baked items made from puff pastry Baking tray 3
Pies and tarts made from yufka dough Baking tray 3
Rosenkuchen (Bavarian yeast-leavened cake) Baking tray 3
Pastries made from yeast dough Baking tray 4
Pastries made from yeast dough Baking tray 3
Pizza Baking tray 4
Pizza Baking tray 3
Pizza, frozen, thin base Baking tray 3
Mini pizzas, frozen Baking tray 3
Bread rolls Baking tray 3
Preheating bread (1500 g)* Baking tray 3
* Preheat for 10 minutes.
Type of heating
$
$ and 5
$ and 5
$
$ and 5
$
$ and 5
$ and 5
Type of
heating
$ and 5
$ and 5
$ and 5
$ and 5
$ and 5
$
$ and 5
$
$ and 5
$ and 5
$ and 5
$ and 5
$ and 5
Temperature in °C
170* 50–60
170* 50–60
170* 30–35
170 80–90
190 60–70
170* 25–35
170* 25–35
200* 30–40
Temperature in °C
160* 15-20
170* 20-25
170* 20-25
180* 25-35
180* 30-40
150* 30-35
170* 20-25
170* 25-30
170* 20-25
170* 10-15
170* 10-15
180* 20-25
190*
170
Cooking time
in mins
Cooking
time in mins
15
20
29
Page 30

en Tested for you in our cooking studio
Meal Accessories/cookware Shelf po-
sition
Macaroni bake Glass ovenproof dish, rectangular** 2
Potato gratin made from raw ingredients,
max. 4 cm deep
Potato gratin made from raw ingredients,
max. 4 cm deep
Meatballs with potatoes, in sauce Glass ovenproof dish, rectangular** 2
Goulash Glass ovenproof dish, rectangular** 2
Chicken with potatoes Glass ovenproof dish, rectangular** 3
Chicken with potatoes Glass ovenproof dish, rectangular** 3
Vegetable terrine Glass ovenproof dish, with lid** 2
* Preheat for 10 minutes.
** Use heat-resistant glass ovenware only. Never set hot glass ovenware down on a cold or wet surface after taking it out of the oven. This may cause
the glass ovenware to crack.
Glass ovenproof dish, rectangular** 3
Glass ovenproof dish, rectangular** 2
Type of
heating
$ and 5
$
$ and 5
$
$ and 5
$
$ and 5
$
Temperature in °C
200 40–50
190* 40–50
190* 30–40
180 70–80
170 60–70
200 70–80
200 60–70
200 75–85
Cooking time
in mins
Baking tips
You wish to bake according to your own recipe.
How to tell whether sponge cake is baked
through:
The cake collapses. Next time, add less liquid. Observe the specified mixing times in the recipe.
The cake has risen in the middle but is lower
around the edge.
The cake is too dry. Make tiny holes in the finished cake using a cocktail stick. Then drizzle fruit juice or an alcoholic drink
The bottom of a fruit cake is too light. Place the cake one level lower the next time.
The fruit juice overflows. Next time, use the deeper universal pan (if available).
The pieces of dough are sticking together
when the yeast rolls are baked.
Condensation forms when you bake moist
cakes.
Use similar items in the baking tables as a guide.
Approx. 10 minutes before the end of the baking time stated in the recipe, insert a cocktail stick into
the cake at its deepest point. If the cocktail stick comes out clean, the cake is ready.
Do not grease the edge of the springform cake tin. After baking, loosen the cake carefully with a knife.
over it. Next time, reduce the baking time.
There must be a distance of about 2 cm between the bread rolls. This gives enough space for the
bread rolls to expand and bake evenly on all sides.
Steam can form during baking, which escapes via the door. The steam may settle and form water
droplets on the control panel or on the fronts of adjacent units. This is a natural process.
30
Page 31

Tested for you in our cooking studio en
Meat, poultry, fish, toast
Table for the gas grill
The values in the table apply to dishes placed in a cold
oven.
After Z of the cooking time, turn the pieces of meat
over.
Always place the meal in the middle of the wire rack.
Meal Weight Accessories and cook-
ware
Meat
Hamburger (x8) 1 kg** Wire rack 4
Sausages (x10) 0.5 kg** Wire rack 4
Poultry
Chicken (x1) 1.5 kg Rotisserie spit 1
Chicken (x2) 3–4 kg** Rotisserie spit 1
Fish
Whole fish (x2) 0.5 kg** Wire rack 4
Fish pieces (x8) 0.5 kg** Wire rack 4
If you are grilling directly on the wire rack, you should
insert the baking tray at level 1 . The fish juices are
collected in the pan and the oven is kept cleaner.
The rotary spit is particularly good for cooking large
roasts, rolled roasting joints or poultry. The meat
becomes crispy and brown.
In the section Grilling with the rotary spit, you will find the
instructions for operating the rotary spit.
Position Type of heat-
ing
(*
(
(
(
(
(
Cooking time in minutes
30–40
20–30
90
120
20–30
20–30
Toast
Toasting bread (x18 slices) - Wire rack 5
* Preheat for 10 minutes.
** Total weight.
(*
2–4
Tips for roasting and grilling
The table does not contain information for the
weight of the joint.
How to tell when the roast is ready. Use a meat thermometer (available from specialist shops) or carry out a “spoon test”. Press down on
The roast is too dark and the crackling is
partly burnt.
The roast looks good but the juices are burnt. Next time, use a smaller roasting dish or add more liquid.
The roast looks good but the juices are too
clear and watery.
Steam rises from the roast when basted. This is normal and due to the laws of physics. The majority of the steam escapes through the steam
Select the next lowest weight from the instructions and extend the time.
the roast with a spoon. If it feels firm, it is ready. If the spoon can be pressed in, it needs to be cooked
for a little longer.
Check the shelf height and temperature.
Next time, use a larger roasting dish and use less liquid.
outlet. It may settle and form condensation on the cooler switch panel or on the fronts of adjacent
units.
31
Page 32

en Tested for you in our cooking studio
Yoghurt
You can use your appliance to make your own yoghurt.
Remove accessories and shelf supports from the
cooking compartment. The cooking compartment must
be empty.
1. Heat 1 litre of milk (3.5% fat) to 90 °C on the hob
and then leave it to cool down to 40 °C.
Dish Accessories/cookware Shelf position Heating
Yoghurt Cup/jar Cooking compart-
It is sufficient to heat UHT milk to 40 °C.
2. Stir in 30 g (approx. 1 tbsp) (chilled) yoghurt.
3. Pour into cups or small jars with lids and cover.
4. Place the cups or jars onto the cooking
compartment floor and use the settings indicated in
the table.
5. After making the yoghurt, leave it to cool in the
refrigerator.
function
^
Temperature in °C
- 4-5h
Cooking time
ment floor
Acrylamide in foodstuffs
crisps, chips, toast, rolls, bread, baked goods made
from shortcrust pastry (biscuits, gingerbread, cookies).
Acrylamide is mainly produced in grain and potato
products heated at high temperatures, such as potato
Recommendations for baking, roasting and grilling with low acrylamide values
General ■ Keep cooking times to a minimum.
■ Cook the food until it is golden brown. "Browned, not charred".
■ The larger and thicker the food, the less acrylamide it contains.
Oven chips Where possible, spread out a single layer of oven chips evenly on the baking tray. To prevent the chips
from trying out quickly, cook at least 400 g on the baking tray.
Defrosting
Remove frozen food from its packaging and place it
onto the wire rack in suitable cookware.
For defrosting frozen fruit, vegetables and baked items.
Poultry, meat and fish should ideally be defrosted in the
refrigerator. Not suitable for cream cakes or cream
gateaux.
Use the following shelf positions when defrosting:
■ 1 wire rack: Position 2
■ 2 wire racks: Positions 3 + 1
Tip: Food that has been frozen flat or in portions
Redistribute the food or turn it once or twice as it
defrosts. Large pieces of food should be turned several
times.As the food defrosts, break up any clumps and
remove items that have already defrosted from the
appliance.
To allow the temperature to equalise, leave the
defrosted food to rest for another 10 to 30 minutes in
the appliance after switching it off.
defrosts more quickly than food items frozen in a block.
Frozen food Accessories Position Heating
function
For example cream gateaux, buttercream cakes, gateaux with chocolate
Wire rack 2
5
or sugar icing, fruit, chicken, sausage and meat, bread and bread rolls,
cakes and other baked items
Temperature
The temperature selector must
remain in the "Off" position
32
Page 33

6
Page 34

6
Page 35

6
Page 36

5IBOLZPVGPSCVZJOHB
#PTDI)PNF"QQMJBODF
3FHJTUFSZPVSOFXEFWJDFPO.Z#PTDIOPXBOEQSPGJUEJSFDUMZGSPN
t&YQFSUUJQTUSJDLTGPSZPVSBQQMJBODF
t8BSSBOUZFYUFOTJPOPQUJPOT
t%JTDPVOUTGPSBDDFTTPSJFTTQBSFQBSUT
t%JHJUBMNBOVBMBOEBMMBQQMJBODFEBUBBUIBOE
t&BTZBDDFTTUP#PTDI)PNF"QQMJBODFT4FSWJDF
'SFFBOEFBTZSFHJTUSBUJPOoBMTPPONPCJMFQIPOFT
XXXCPTDIIPNFDPNXFMDPNF
-PPLJOHGPSIFMQ
:PV}MMGJOEJUIFSF
&YQFSUBEWJDFGPSZPVS#PTDIIPNFBQQMJBODFTOFFEIFMQXJUIQSPCMFNT
PSBSFQBJSGSPN#PTDIFYQFSUT
'JOEPVUFWFSZUIJOHBCPVUUIFNBOZXBZT#PTDIDBOTVQQPSUZPV
XXXCPTDIIPNFDPNTFSWJDF
$POUBDUEBUBPGBMMDPVOUSJFTBSFMJTUFEJOUIFBUUBDIFETFSWJDFEJSFDUPSZ
3PCFSU#PTDI)BVTHFSÉUF(NC)
$BSM8FSZ4USBF
.ßODIFO
(FSNBOZ
XXXCPTDIIPNFDPN
*9001493746*
9001493746
00052705
 Loading...