

Bosch HGN21F350I Instruction Manual
رﺎﮐوﺗ رﻓ
HGN21F350I
Built-in oven
[fa] هدﺎﻔﺗﺳا یﺎﻣﻧھار
[en] Instruction manual


3
Ú Table of contents
[en]Instruction manual
Important safety information..................................................... 3
Causes of damage .............................................................................5
Your new appliance .................................................................... 6
The electronic clock ...........................................................................6
The oven...............................................................................................6
Cooling fan...........................................................................................6
Accessories .........................................................................................6
Before using the oven for the first time....................................7
Baking out the oven ...........................................................................7
Cleaning the accessories..................................................................7
How to operate your oven..........................................................7
Operating modes ................................................................................7
Oven lighting........................................................................................7
Operating the oven.............................................................................7
Operating the grill ...............................................................................8
Operating the rotary spit....................................................................8
Operating the electronic clock .........................................................8
Care and cleaning ......................................................................9
Cleaning agents ..................................................................................9
Catalytic cooking compartment panels ..........................................9
Removing and installing the door panels ................................... 10
Removing and fitting the appliance door....................................10
Removing and inserting the hook-in racks ................................. 11
Troubleshooting ....................................................................... 11
Replacing the oven light bulb........................................................ 11
After-sales service ...................................................................11
Energy and environment tips..................................................12
Saving energy................................................................................... 12
Environmentally-friendly disposal.................................................. 12
Acrylamide in foodstuffs .........................................................13
Tips for using your appliance .................................................13
Baking ................................................................................................13
Roasting and grilling ....................................................................... 14
Produktinfo
Additional information on products, accessories, replacement
parts and services can be found at www.bosch-home.com and
in the online shop www.bosch-eshop.com
: Important safety information
Read these instructions carefully. Only then
will you be able to operate your appliance
safely and correctly. Retain the instruction
manual and installation instructions for
future use or for subsequent owners.
This appliance is only intended to be fully
fitted in a kitchen. Observe the special
installation instructions.
Check the appliance for damage after
unpacking it. Do not connect the appliance
if it has been damaged in transport.
Only allow a licensed professional to
connect the appliance. Damage caused by
incorrect connection is not covered under
warranty. Call the after-sales service if you
want to convert your appliance to a different
type of gas.
This appliance is intended for domestic use
and the household environment only. This
appliance must only be used to prepare
food and drinks and must never be used as
a heater. Do not leave the appliance
unattended during operation. Only use the
appliance indoors.
This appliance is intended for use up to a
maximum height of 2000 metres above sea
level.
This appliance is not intended for operation
with an external clock timer or a remote
control.
This appliance may be used by children
over the age of 8 years old and by persons
with reduced physical, sensory or mental
capabilities or by persons with a lack of
experience or knowledge if they are
supervised or are instructed by a person
responsible for their safety how to use the
appliance safely and have understood the
associated hazards.
Children must not play with, on, or around
the appliance. Children must not clean the
appliance or carry out general maintenance
unless they are at least 8 years old and are
being supervised.
Keep children below the age of 8 years old
at a safe distance from the appliance and
power cable.
Always slide accessories into the cooking
compartment correctly. See "Description of
accessories in the instruction manual.

4
Risk of overheating!
In the event of a power cut, the cooling fan
does not work. The appliance may
overheat. The touchable parts become very
hot and may cause injury. Due to the high
temperatures, the appliance and the fitted
unit could be damaged. In the event of a
power cut, the appliance must not be
manually ignited and put into operation. In
the event of a power cut, switch off the
appliance.
WHAT TO DO IF YOU SMELL GAS!
Escaping gas may cause an explosion.
If you smell gas or notice any faults in the
gas installation:
■
Immediately shut off the gas supply or
close the gas cylinder valve.
■
Immediately extinguish all naked flames
and cigarettes.
■
Do not use any light or appliance switches
and do not pull any plugs out of sockets.
Do not use any telephones or mobile
phones within the building.
■
Open windows and ventilate the room.
■
Call the aftersales service or the gas
supplier.
Risk of asphyxiation!
The use of a gas cooker leads to a build-up
of heat, moisture and products of
combustion in the room where the
appliance is installed. Ensure that the
installation room is well ventilated. The
natural ventilation openings must be kept
open or a mechanical ventilation device
must be provided (e.g. an extractor hood).
Intensive and persistent use of the
appliance may mean that it is necessary to
have additional ventilation (e.g. opening a
window), or more effective ventilation (e.g.
operating the existing mechanical
ventilation device at a higher setting).
Risk of fire!
■
A draught is created when the appliance
door is opened. Greaseproof paper may
come into contact with the heating
element and catch fire. Do not place
greaseproof paper loosely over
accessories during preheating. Always
weight down the greaseproof paper with a
dish or a baking tin. Only cover the
surface required with greaseproof paper.
Greaseproof paper must not protrude over
the accessories.
Risk of fire!
■
Combustible objects that are left in the
cooking compartment may ignite. Never
store combustible items in the cooking
compartment. Never open the appliance
door if there is smoke inside. Switch off
the appliance and unplug the mains plug
or switch off the fuse in the fuse box. Shut
off the gas supply.
Risk of fire!
■
Hot oil and fat can ignite very quickly.
Never leave hot fat or oil unattended.
Never use water to put out burning oil or
fat. Switch off the hotplate. Extinguish
flames carefully using a lid, fire blanket or
something similar.
Risk of fire!
■
The appliance becomes very hot and
flammable materials could catch fire.
Never store or use flammable
objects (e.g. spray cans, cleaning agents)
under the appliance or in its immediate
vicinity. Never place flammable items on
or in the appliance.
Risk of fire!
■
Under no circumstances should a baking
sheet, a baking tray, a pan or another form
of cookware be placed directly on the
oven floor. This causes the floor of the
appliance to overheat and can seriously
damage the bottom of the fitted unit.
Risk of fire!
■
The rear of the appliance becomes very
hot. This may cause damage to the power
cables. Electricity and gas lines must not
come into contact with the rear of the
appliance.

5
Risk of burns!
■
The appliance becomes very hot. Never
touch the interior surfaces of the cooking
compartment or the heating elements.
Always allow the appliance to cool down.
Keep children at a safe distance.
Risk of serious burns!
■
Accessories and ovenware become very
hot. Always use oven gloves to remove
accessories or ovenware from the cooking
compartment.
Risk of burns!
■
Alcoholic vapours may catch fire in the hot
cooking compartment. Never prepare food
containing large quantities of drinks with a
high alcohol content. Only use small
quantities of drinks with a high alcohol
content. Open the appliance door with
care.
Risk of burns!
■
The accessible parts become very hot
when in operation. Never touch hot parts.
Keep children at a safe distance.
Risk of scalding!
■
The accessible parts become hot during
operation. Never touch the hot parts. Keep
children at a safe distance.
Risk of scalding!
■
When you open the appliance door, hot
steam may escape. Open the appliance
door with care. Keep children at a safe
distance.
Risk of scalding!
■
Water in a hot cooking compartment may
create hot steam. Never pour water into
the hot cooking compartment.
Risk of injury!
■
Scratched glass in the appliance door
may develop into a crack. Do not use a
glass scraper, sharp or abrasive cleaning
aids or detergents.
Risk of injury!
■
Incorrect repairs are dangerous. Repairs
may only be carried out, and damaged
power and gas lines replaced, by an aftersales engineer trained by us. If the
appliance is faulty, unplug the mains plug
or switch off the fuse in the fuse box. Shut
off the gas supply. Contact the after-sales
service.
Risk of injury!
■
Faults or damage to the appliance are
dangerous. Never switch on a faulty
appliance. Unplug the appliance from the
mains or switch off the circuit breaker in
the fuse box. Shut off the gas supply.
Contact the after-sales service.
Risk of electric shock and serious injury!
■
The cable insulation on electrical
appliances may melt when touching hot
parts of the appliance. Never bring
electrical appliance cables into contact
with hot parts of the appliance.
Risk of electric shock!
■
Do not use any high-pressure cleaners or
steam cleaners, which can result in an
electric shock.
Risk of electric shock!
■
When replacing the cooking compartment
bulb, the bulb socket contacts are live.
Before replacing the bulb, unplug the
appliance from the mains or switch off the
circuit breaker in the fuse box.
Causes of damage
Caution!
■ Accessories, foil, greaseproof paper or ovenware on the
cooking compartment floor: do not place accessories on the
cooking compartment floor. Do not cover the cooking
compartment floor with any sort of foil or greaseproof paper.
Do not place ovenware on the cooking compartment floor.
This will cause heat accumulation. The baking and roasting
times will no longer be correct and the enamel will be
damaged.
■ Inserting accessories: depending on the appliance model,
accessories can scratch the door panel when closing the
appliance door. Always insert the accessories into the
cooking compartment as far as they will go.
■ Water in a hot cooking compartment: do not pour water into
the cooking compartment when it is hot. This will cause
steam. The temperature change can cause damage to the
enamel.
■ Moist food: do not store moist food in the cooking
compartment when it is closed for prolonged periods This will
damage the enamel.
■ Fruit juice: when baking particularly juicy fruit pies, do not
pack the baking tray too generously. Fruit juice dripping from
the baking tray leaves stains that cannot be removed. If
possible, use the deeper universal pan.
■ Cooling with the appliance door open: only allow the cooking
compartment to cool when it is closed. Even if the appliance
door is only open a little, front panels of adjacent units could
be damaged over time.
■ Very dirty door seal: If the door seal is very dirty, the
appliance door will no longer close properly when the
appliance is in use. The fronts of adjacent units could be
damaged.Always keep the door seal clean.
■ Oven door as a bearing surface: do not stand or place
objects on the oven door when it is open. Do not hang
objects on the oven door.
■ Carrying the appliance: do not carry or hold the appliance by
the door handle. The door handle cannot support the weight
of the appliance and could break.
■ Heavy accessories: do not pull out heavily laden accessories
too far without first unloading them sufficiently. Heavy
accessories will tip when pulled out. This causes pressure to
be exerted on the shelf supports in the cooking compartment,
which can damage the enamel. Relieve the strain on the
accessories when they are pulled out by raising them slightly
with one hand. Caution: always use an oven cloth or oven
gloves when handling hot accessories.
■ Grilling: do not insert the baking tray or universal pan higher
than level 3 when grilling. The high heat distorts it and the
enamel may be damaged when it is removed. At level 4 and
5, only grill directly on the wire rack.
6
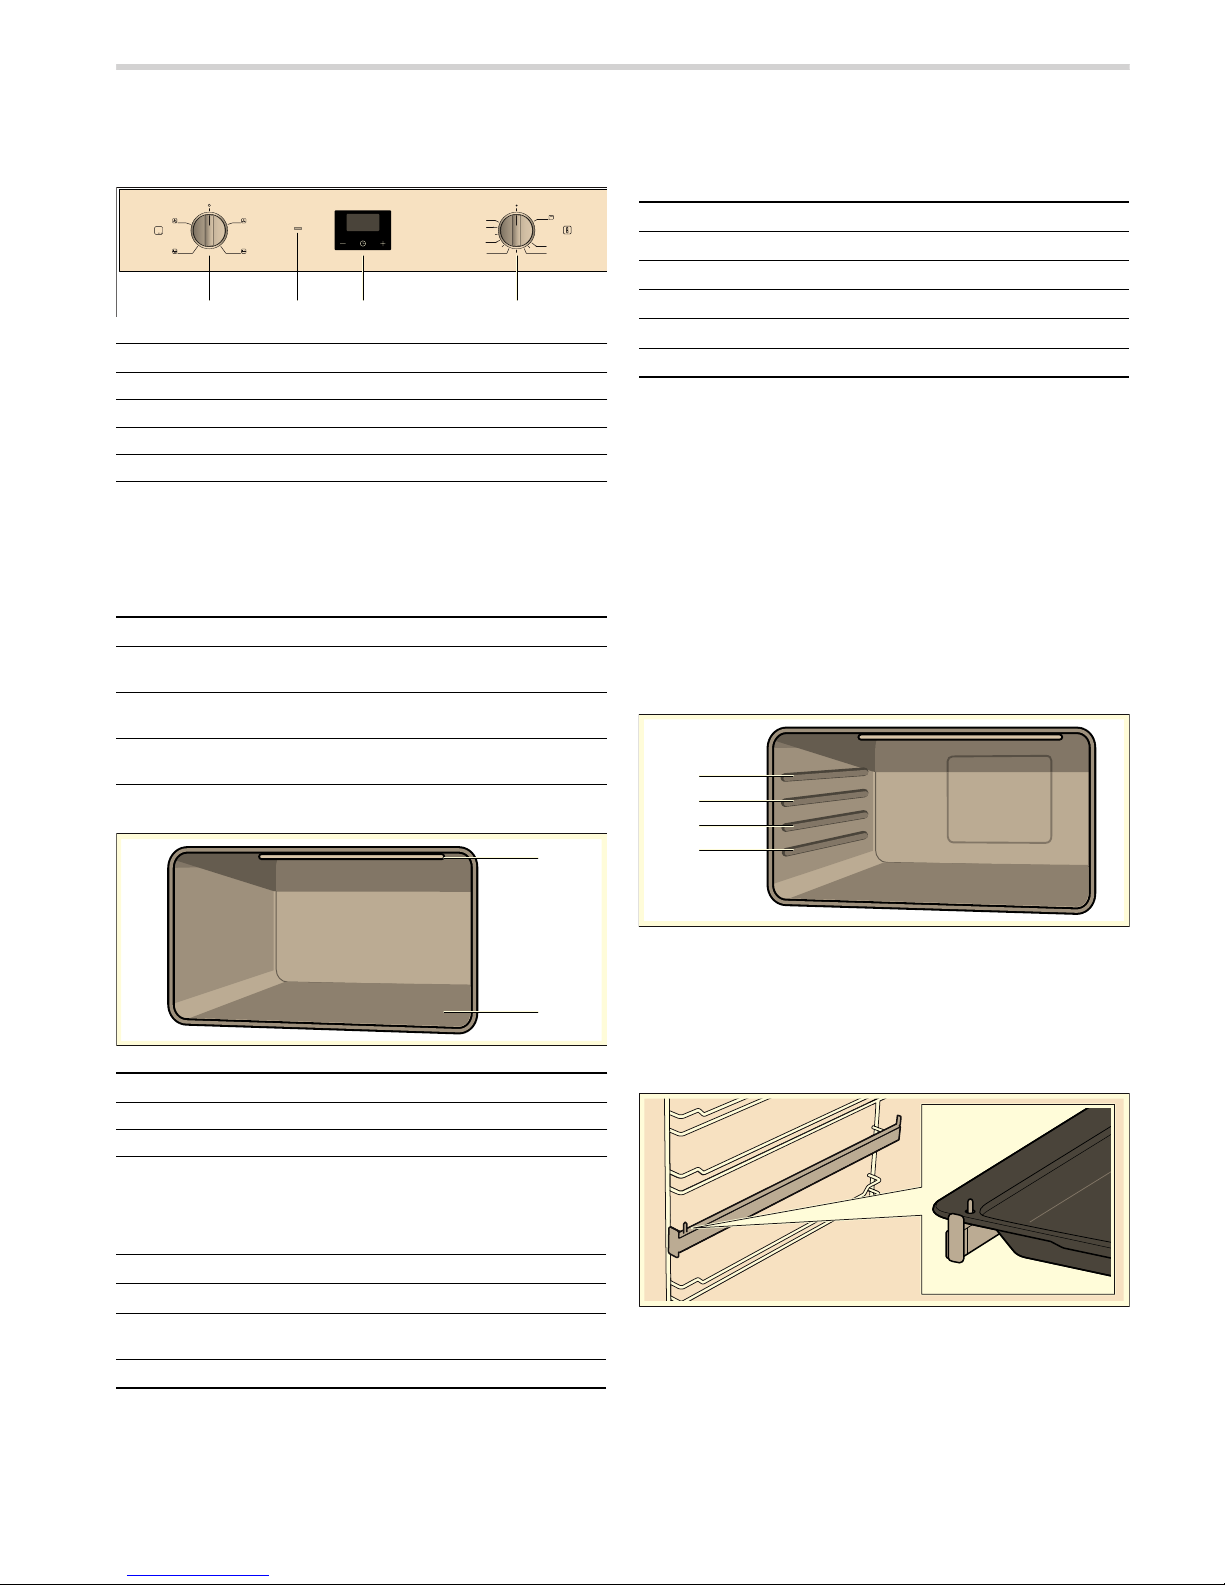
Your new appliance
Get to know your appliance. You will find information on the
control panel, the oven, types of heating and accessories.
The electronic clock
With the electronic clock, you can set a cooking time.
An audible signal sounds once the cooking time has elapsed.
Function buttons for the electronic clock
The oven
Temperature selector
Set the temperature or grill setting using the temperature
selector.
There is a limit stop between the settings "Max" and
(. Do not
turn the knob beyond this point.
Function selector
Use the function selector to set additional functions.
Cooling fan
The cooling fan switches on and off as required. The hot air
escapes above the door. Caution: Do not cover the ventilation
slots. Otherwise the oven will overheat.
So that the cooking compartment cools down more quickly
after operation, the cooling fan continues to run for a certain
period afterwards.
Accessories
The accessories can be inserted into the cooking compartment
at 4 different levels. Always insert them as far as they will go so
that the accessories do not touch the door panel. Ensure that
the accessories have always been inserted into the cooking
compartment correctly.
: Risk of fire!
Under no circumstances should a baking sheet, a baking tray,
a pan or another form of cookware be placed directly on the
oven floor. This causes the floor of the appliance to overheat
and can seriously damage the bottom of the fitted unit.
The pull-out rails allow you to pull accessories out completely.
You can pull out the accessories two thirds of the way without
them tipping. This allows dishes to be removed easily.
The accessories may become deformed when they become
hot. As soon as they have cooled down, the deformation
disappears with no effect on the function.
Explanation
1 Function selector
2 Grill indicator lamp
3 Electronic clock
4 Temperature selector
Symbol Meaning Use
0
Electronic clock Sets the cooking time or
the time
- Minus Reduces the cooking time
or the time
+ Plus Increases the cooking time
or the time
Explanation
1 Electric grill
2 Oven gas burners
Setting Meaning
Ú
Off. The oven does not heat up.
Min - Max The oven is on, temperature in the cooking
compartment in °C.
(
The grill heats up.
0LQ
0D[
Setting Meaning
Û
Off position, no function set.
5
Circulated air
F
Rotary spit mode
†
Rotary spit mode and circulated air
^
Oven lighting
7
You can buy accessories from the after-sales service, from
specialist retailers or online.
--------
Before using the oven for the first time
In this section, you can find out what you must do before using
your appliance to prepare food for the first time. Read the
Safety information section beforehand.
Remove the appliance packaging and dispose of it
appropriately.
Baking out the oven
Precleaning the oven
1. Remove accessories and hook-in racks from the cooking
compartment.
2. Fully remove any remaining packaging, such as small pieces
of polystyrene, from the cooking compartment.
3. Some parts are covered with a protective film. Remove the
protective film.
4. Clean the outside of the appliance with a soft, damp cloth.
5. Clean the cooking compartment with hot soapy water.
Heating up the oven
To remove the new cooker smell, heat up the oven when it is
empty and closed.
1. Turn the temperature selector to the maximum temperature.
2. Switch off the oven after 45 minutes.
Recleaning the oven
1. Clean the cooking compartment with hot soapy water.
2. Fit the hook-in racks.
Cleaning the accessories
Before using the accessories, clean them thoroughly using a
cloth and warm soapy water.
How to operate your oven
Operating modes
The following operating modes are available.
Oven lighting
Switching on the oven lighting
Turn the control knob to the
^ position.
Switching off the oven lighting
Turn the control knob to the
Û position.
The oven lighting switches off.
Note: The oven lighting also switches on when the oven door is
opened or a function is set.
Operating the oven
Switching on the oven gas burner
1. Open the appliance door.
2. Press the control knob for the oven and turn it to the
maximum position.
3. Keep the control knob pressed for a few seconds until the
flame stabilises.
4. Close the appliance door carefully.
5. Turn the control knob to set the desired temperature. Do not
turn the knob beyond the "Min" setting.
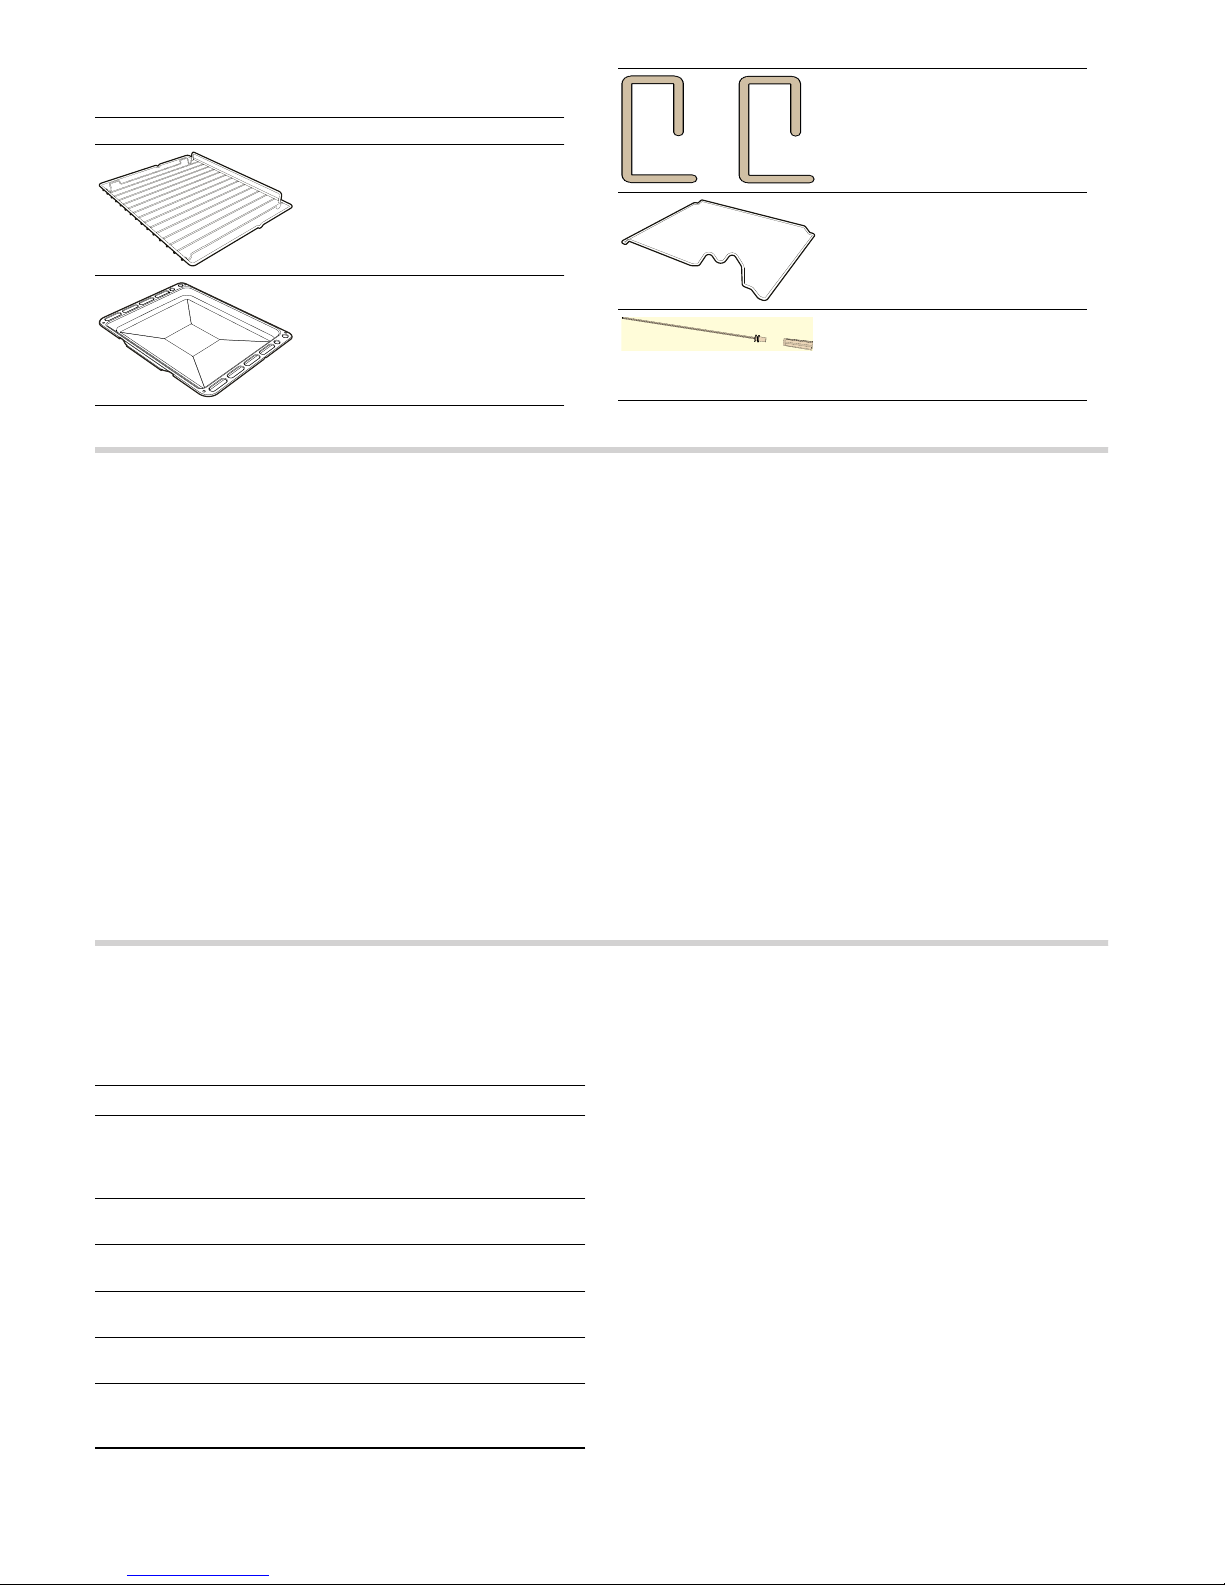
Accessories Description
Baking and roasting shelf
For ovenware, cake tins, joints,
grilled items, frozen meals.
Enamelled baking tray
For moist cakes, pastries, frozen
meals and large roasts. Can also
be used as a drip tray to collect
fat.
Locking pins
For locking the hinges.
Rotary spit holder
For holding the rotary spit.
Rotary spit
For roasts and large pieces of
poultry. Use only in combination
with the enamelled baking tray.
Operating mode Use
t
Bottom heat For cakes and pastries,
bakes, poultry, lean joints
of meat, e.g. beef, veal and
game.
t + 5
Bottom heat with circulated air
For cakes with moist toppings.
(
Grill For grilling steaks, sau-
sages, fish and toast.
( + 5
Hot air grilling For grilling meat, poultry
and whole fish.
( + F
Grill with rotary spit For grilling roasts, rolled
joints and whole poultry.
( + †
Electric grill with rotary
spit and circulated air
For grilling large roasts,
rolled joints and whole
poultry.
8
If the flame goes out
Switch off the control knob. Wait one minute and switch the
burner on again.
: Risk of fire!
If the flame goes out, gas will escape. Never leave the gas
burner unattended during operation. Ensure that there are no
draughts.
Switching off the oven gas burner
Turn the control knob to the
Ú position. Press and hold the
control knob.
Operating the grill
The appliance door must be closed when grilling.
Notes
■ It is not possible to use the oven gas burner and the grill at
the same time.
■ When using the grill, a cooking time of 60 minutes must not
be exceeded.
Switching on the grill
Press the control knob for the oven and turn it to the
(
position.
The indicator light lights up when the grill is switched on.
Switching off the grill
Turn the control knob to the
Ú position.
Operating the rotary spit
The rotary spit is particularly good for preparing roasts, such as
rolled joints and poultry. The meat is roasted thoroughly and
evenly.
Use the grill setting for the rotary spit mode.
Preparing joints
1. Place the joint as centrally as possible on the rotary spit and
secure it at both ends with the retaining clips.
You can also secure the joint using kitchen string.
2. With poultry, bind the ends of the wings underneath the back
and the thighs against the body. This prevents them from
overbrowning.
3. Pierce the skin on the underside of the wings to allow the fat
to escape.
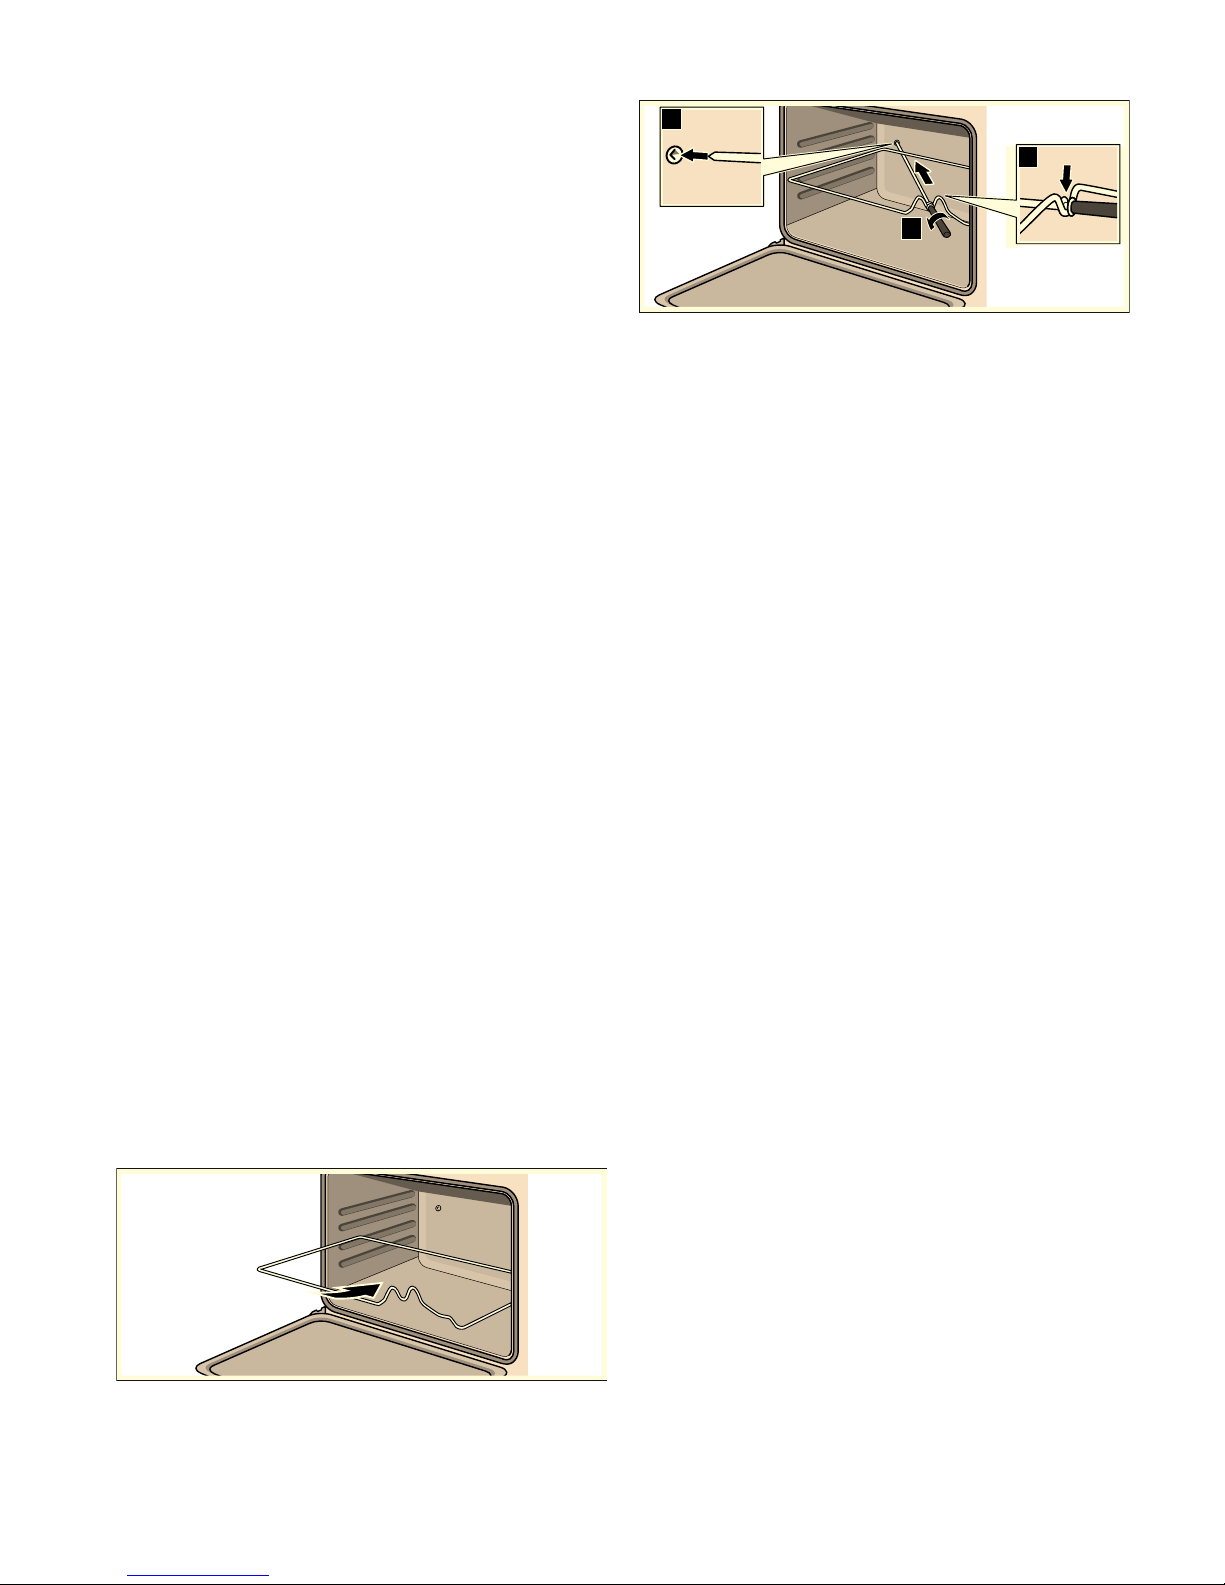
Inserting the rotary spit
: Risk of burns!
Never touch the hot surfaces of the cooking compartment or
the heating elements. Children must be kept at a safe distance
from the appliance at all times. Open the appliance door
carefully. Hot steam may escape.
1. Insert the rotary spit shelf at level 2 as far as it will go.
2. Slide the rotary spit into the motor mount in the back wall of
the cooking compartment (a).
3. Place the rotary spit on the rotary spit shelf (b).
Note: The rotary spit must engage correctly in the rotary spit
shelf.
4. Unscrew the handle (c).
5. Pour water into a baking tray and slide the baking tray into
shelf position 1 to collect the drips of fat.
6. Close the appliance door.
Switching on the rotary spit mode
1. Turn the temperature selector to the ( position.
2. Turn the function selector to the F position.
Switching off the rotary spit mode
1. Turn the temperature selector to the Ú position.
2. Turn the function selector to the Û position.
Removing the rotary spit
: Risk of burns!
Never touch the hot surfaces of the cooking compartment or
the heating elements. Children must be kept at a safe distance
from the appliance at all times. Open the appliance door
carefully. Hot steam may escape.
: Risk of burns!
Never touch the rotary spit or other accessories directly when
they are hot. Always wear oven gloves or heat-resistant gloves
when handling hot accessories.
1. Carefully open the appliance door and screw the handle back
onto the rotary spit.
2. Carefully pull the rotary spit from the mount in the back wall
and remove it.
3. Remove the rotary spit shelf and the baking tray.
Operating the electronic clock
Setting the time
After the appliance has been connected to the mains for the
first time or after a power cut, three zeros flash in the display.
1. Press the 0 button.
2. Set the current time with the "+" and "-" buttons.
After 7 seconds, the time setting is adopted.
Note: To change the set time, press the "+" and "-" buttons and
set the current time with the "+" and "-" buttons.
Setting the timer
The timer has no influence on the functions of the oven. The
duration of the timer can be set to between 1 minute and 23
hours and 59 minutes.
1. Press the "0" button.
The
V symbol flashes in the display panel and three zeros
are displayed.
2. Set the required cooking time with the "+" and "-" buttons.
A signal sounds once the time has elapsed.
Notes
■ To change the set cooking time, select the timer with the 0
button and set the cooking time using the "+" and "-" buttons.
■ To cancel the settings, select the timer with the 0 button and
press the "+" and "-" buttons simultaneously.
D
E
F

9
Switching off the acoustic signal
Press the "-" button to switch off the acoustic signal.
After seven minutes, the signal switches off automatically.
Changing the audible signal
Three different audible signals are available.
1. Press the "+" and "-" buttons simultaneously.
2. Press the 0 button.
The current audible signal is shown in the display panel, e.g.
"Tone 1".
3. Press the "-" button to select a different audible signal.
Care and cleaning
With good care and cleaning, your oven will remain clean and
fully-functioning for a long time to come. Here we will explain
how to maintain and clean your oven correctly.
Notes
■ Slight differences in the colours on the front of the oven are
caused by the use of different materials, such as glass,
plastic and metal.
■ Shadows on the door panel which look like streaks, are
caused by reflections made by the oven light.
■ Enamel is baked on at very high temperatures. This can
cause some slight colour variations. This is normal and does
not affect their function. The edges of thin trays cannot be
completely enamelled. As a result, these edges can be
rough. This will not impair the anti-corrosion protection.
: Risk of electric shock!
Do not use any high-pressure cleaners or steam cleaners,
which can result in an electric shock.
: Risk of burns!
The appliance becomes very hot. Never touch the interior
surfaces of the cooking compartment or the heating elements.
Always allow the appliance to cool down. Keep children at a
safe distance.
Cleaning agents
To ensure that the different surfaces are not damaged by using
the wrong cleaning agent, pay attention to the information in the
table. Do not use
■ sharp or abrasive cleaning agents,
■ cleaning agents with a high alcohol content,
■ hard scouring pads or cleaning sponges,
■ high-pressure cleaners or steam cleaners.
Wash new sponge cloths thoroughly before use.
Catalytic cooking compartment panels
The catalytic cooking compartment panels are coated with selfcleaning enamel.
The surfaces clean themselves while the oven is in operation.
Larger splashes will only be removed after the oven has been
used several times.
Self-cleaning surfaces
The rear and side walls are covered with catalytic panelling.
Never clean these surfaces with oven cleaner. Slight
discolouration of the enamel does not affect self-cleaning.
Area Cleaning agents
Oven front Hot soapy water:
Clean with a dish cloth and dry with a
soft cloth. Do not use glass cleaners or
glass scrapers.
Stainless steel Hot soapy water:
Clean with a dish cloth and dry with a
soft cloth. Remove flecks of limescale,
grease, starch and albumin (e.g. egg
white) immediately. Corrosion can form
under such residues.
Special stainless steel cleaning products suitable for hot surfaces are available from our after-sales service or from
specialist retailers. Apply a very thin layer
of the cleaning product with a soft cloth.
Aluminium Clean with a mild window cleaning agent.
Using a window cloth or a non-fluffing
microfibre cloth, wipe over the surfaces
lightly in a horizontal direction.
Enamel surfaces
(smooth surfaces)
Apply commercially available washing-up
liquid or a vinegar solution with a soft,
damp cloth or chamois; dry with a soft
cloth. Soak baked-on food residues with
a damp cloth and detergent. If the cooking compartment is heavily soiled, use a
gel oven cleaner. This can be applied to
the affected area. Leave the cooking
compartment open after cleaning to
allow it to dry.
Self-cleaning surfaces (rough surfaces)
Note the instructions in the section:
Catalytic cooking compartment panel
Gas burner Never clean the gas burners in the cook-
ing compartment yourself.
Door panels Glass cleaner:
Clean with a soft cloth. Do not use a
glass scraper.
Glass cover for the
oven light
Hot soapy water:
Clean with a dish cloth.
Seal
Do not remove.
Hot soapy water:
Clean with a dish cloth. Do not scour.
Rails Hot soapy water:
Soak and clean with a dish cloth or
brush.
Accessories Hot soapy water:
Soak and clean with a dish cloth or
brush.
Area Cleaning agents
 Loading...