

Page 1
Built-in oven
Four encastrable
èeóªdG ¿ôØdG
HGL10E150
[en] Instruction manual ............. 3
[ar]
∫ɪ©à°S’G π«dO
........................ 3
[fr] Notice d’utilisation ........... 15
Page 2

Page 3

Ú Table of contents
[en]Instruction manual
Important safety information..................................................... 3
Causes of damage .............................................................................5
Your new appliance.................................................................... 6
The oven...............................................................................................6
The timer...............................................................................................6
Cooling fan...........................................................................................6
Accessories .........................................................................................6
Before using the oven for the first time ...................................7
Baking out the oven ...........................................................................7
Cleaning the accessories..................................................................7
How to operate your oven .........................................................7
Oven lighting........................................................................................7
Operating modes................................................................................7
Operating the oven.............................................................................7
Operating the grill ...............................................................................7
Operating the rotary spit....................................................................8
Operating the timer.............................................................................8
Care and cleaning ......................................................................8
Cleaning agents ..................................................................................9
Catalytic cooking compartment panels..........................................9
Removing and installing the door panels ......................................9
Removing and fitting the appliance door....................................10
Removing and inserting the hook-in racks ................................. 10
Troubleshooting ....................................................................... 11
Replacing the oven light bulb........................................................ 11
After-sales service ...................................................................12
Energy and environment tips..................................................12
Saving energy................................................................................... 12
Environmentally-friendly disposal.................................................. 12
Acrylamide in foodstuffs .........................................................12
Tips for using your appliance .................................................13
Baking................................................................................................ 13
Roasting and grilling .......................................................................14
Produktinfo
Additional information on products, accessories, replacement
parts and services can be found at www.bosch-home.com and
in the online shop www.bosch-eshop.com
: Important safety information
Read these instructions carefully. Only then
will you be able to operate your appliance
safely and correctly. Retain the instruction
manual and installation instructions for
future use or for subsequent owners.
This appliance is only intended to be fully
fitted in a kitchen. Observe the special
installation instructions.
Check the appliance for damage after
unpacking it. Do not connect the appliance
if it has been damaged in transport.
Only allow a licensed professional to
connect the appliance. Damage caused by
incorrect connection is not covered under
warranty. Call the after-sales service if you
want to convert your appliance to a different
type of gas.
This appliance is intended for domestic use
and the household environment only. This
appliance must only be used to prepare
food and drinks and must never be used as
a heater. Do not leave the appliance
unattended during operation. Only use the
appliance indoors.
This appliance is intended for use up to a
maximum height of 2000 metres above sea
level.
This appliance is not intended for operation
with an external clock timer or a remote
control.
This appliance may be used by children
over the age of 8 years old and by persons
with reduced physical, sensory or mental
capabilities or by persons with a lack of
experience or knowledge if they are
supervised or are instructed by a person
responsible for their safety how to use the
appliance safely and have understood the
associated hazards.
Children must not play with, on, or around
the appliance. Children must not clean the
appliance or carry out general maintenance
unless they are at least 15 years old and
are being supervised.
Keep children below the age of 8 years old
at a safe distance from the appliance and
power cable.
Always slide accessories into the cooking
compartment correctly. See "Description of
accessories in the instruction manual.
Close the safety valve on the gas supply
line if the cooker will not be used for a
prolonged period.
3
Page 4

Risk of overheating!
In the event of a power cut, the cooling fan
does not work. The appliance may
overheat. The touchable parts become very
hot and may cause injury. Due to the high
temperatures, the appliance and the fitted
unit could be damaged. In the event of a
power cut, the appliance must not be
manually ignited and put into operation. In
the event of a power cut, switch off the
appliance.
WHAT TO DO IF YOU SMELL GAS!
Escaping gas may cause an explosion.
If you smell gas or notice any faults in the
gas installation:
■
Immediately shut off the gas supply or
close the gas cylinder valve.
■
Immediately extinguish all naked flames
and cigarettes.
■
Do not use any light or appliance switches
and do not pull any plugs out of sockets.
Do not use any telephones or mobile
phones within the building.
■
Open windows and ventilate the room.
■
Call the aftersales service or the gas
supplier.
Risk of asphyxiation!
The use of a gas cooker leads to a build-up
of heat, moisture and products of
combustion in the room where the
appliance is installed. Ensure that the
installation room is well ventilated. The
natural ventilation openings must be kept
open or a mechanical ventilation device
must be provided (e.g. an extractor hood).
Intensive and persistent use of the
appliance may mean that it is necessary to
have additional ventilation (e.g. opening a
window), or more effective ventilation (e.g.
operating the existing mechanical
ventilation device at a higher setting).
Risk of fire!
■
A draught is created when the appliance
door is opened. Greaseproof paper may
come into contact with the heating
element and catch fire. Do not place
greaseproof paper loosely over
accessories during preheating. Always
weight down the greaseproof paper with a
dish or a baking tin. Only cover the
surface required with greaseproof paper.
Greaseproof paper must not protrude over
the accessories.
Risk of fire!
■
Combustible objects that are left in the
cooking compartment may ignite. Never
store combustible items in the cooking
compartment. Never open the appliance
door if there is smoke inside. Switch off
the appliance and unplug the mains plug
or switch off the fuse in the fuse box. Shut
off the gas supply.
Risk of fire!
■
Hot oil and fat can ignite very quickly.
Never leave hot fat or oil unattended.
Never use water to put out burning oil or
fat. Switch off the hotplate. Extinguish
flames carefully using a lid, fire blanket or
something similar.
Risk of fire!
■
The appliance becomes very hot and
flammable materials could catch fire.
Never store or use flammable
objects (e.g. spray cans, cleaning agents)
under the appliance or in its immediate
vicinity. Never place flammable items on
or in the appliance.
Risk of fire!
■
Under no circumstances should a baking
sheet, a baking tray, a pan or another form
of cookware be placed directly on the
oven floor. This causes the floor of the
appliance to overheat and can seriously
damage the bottom of the fitted unit.
Risk of fire!
■
The rear of the appliance becomes very
hot. This may cause damage to the power
cables. Electricity and gas lines must not
come into contact with the rear of the
appliance.
Risk of burns!
■
The appliance becomes very hot. Never
touch the interior surfaces of the cooking
compartment or the heating elements.
Always allow the appliance to cool down.
Keep children at a safe distance.
Risk of serious burns!
■
Accessories and ovenware become very
hot. Always use oven gloves to remove
accessories or ovenware from the cooking
compartment.
Risk of burns!
■
Alcoholic vapours may catch fire in the hot
cooking compartment. Never prepare food
containing large quantities of drinks with a
high alcohol content. Only use small
quantities of drinks with a high alcohol
content. Open the appliance door with
care.
Risk of burns!
■
The accessible parts become very hot
when in operation. Never touch hot parts.
Keep children at a safe distance.
4
Page 5

Risk of scalding!
■
The accessible parts become hot during
operation. Never touch the hot parts. Keep
children at a safe distance.
Risk of scalding!
■
When you open the appliance door, hot
steam may escape. Open the appliance
door with care. Keep children at a safe
distance.
Risk of scalding!
■
Water in a hot cooking compartment may
create hot steam. Never pour water into
the cooking compartment when the
cooking compartment is hot.
Risk of injury!
■
Scratched glass in the appliance door
may develop into a crack. Do not use a
glass scraper, sharp or abrasive cleaning
aids or detergents.
Risk of injury!
■
Incorrect repairs are dangerous. Repairs
may only be carried out, and damaged
power and gas lines replaced, by an aftersales engineer trained by us. If the
appliance is faulty, unplug the mains plug
or switch off the fuse in the fuse box. Shut
off the gas supply. Contact the after-sales
service.
Risk of injury!
■
Faults or damage to the appliance are
dangerous. Never switch on a faulty
appliance. Unplug the appliance from the
mains or switch off the circuit breaker in
the fuse box. Shut off the gas supply.
Contact the after-sales service.
Risk of electric shock and serious injury!
■
The cable insulation on electrical
appliances may melt when touching hot
parts of the appliance. Never bring
electrical appliance cables into contact
with hot parts of the appliance.
Risk of electric shock!
■
Do not use any high-pressure cleaners or
steam cleaners, which can result in an
electric shock.
Risk of electric shock!
■
When replacing the cooking compartment
bulb, the bulb socket contacts are live.
Before replacing the bulb, unplug the
appliance from the mains or switch off the
circuit breaker in the fuse box.
Burn-Back (Fire in burner tube or
chamber)!
In the event of a burn-back, where the flame
burns back to the jet, immediately turn off
the gas supply at the control valve on the
panel. After ensuring the flame is
extinguished, re-light the appliance in the
normal manner. Should the appliance again
burn back, close the control valve and call a
service technician. Do not use the
appliance again until the service technician
has declared that it is safe to do so.
Causes of damage
Caution!
■ Accessories, foil, greaseproof paper or ovenware on the
cooking compartment floor: do not place accessories on the
cooking compartment floor. Do not cover the cooking
compartment floor with any sort of foil or greaseproof paper.
Do not place ovenware on the cooking compartment floor.
This will cause heat accumulation. The baking and roasting
times will no longer be correct and the enamel will be
damaged.
■ Inserting accessories: depending on the appliance model,
accessories can scratch the door panel when closing the
appliance door. Always insert the accessories into the
cooking compartment as far as they will go.
■ Water in a hot cooking compartment: do not pour water into
the cooking compartment when it is hot. This will cause
steam. The temperature change can cause damage to the
enamel.
■ Moist food: do not store moist food in the cooking
compartment when it is closed for prolonged periods This will
damage the enamel.
■ Fruit juice: when baking particularly juicy fruit pies, do not
pack the baking tray too generously. Fruit juice dripping from
the baking tray leaves stains that cannot be removed. If
possible, use the deeper universal pan.
■ Cooling with the appliance door open: only allow the cooking
compartment to cool when it is closed. Even if the appliance
door is only open a little, front panels of adjacent units could
be damaged over time.
■ Very dirty door seal: If the door seal is very dirty, the
appliance door will no longer close properly when the
appliance is in use. The fronts of adjacent units could be
damaged.Always keep the door seal clean.
■ Oven door as a bearing surface: do not stand or place
objects on the oven door when it is open. Do not hang
objects on the oven door.
■ Carrying the appliance: do not carry or hold the appliance by
the door handle. The door handle cannot support the weight
of the appliance and could break.
■ Heavy accessories: do not pull out heavily laden accessories
too far without first unloading them sufficiently. Heavy
accessories will tip when pulled out. This causes pressure to
be exerted on the shelf supports in the cooking compartment,
which can damage the enamel. Relieve the strain on the
accessories when they are pulled out by raising them slightly
with one hand. Caution: always use an oven cloth or oven
gloves when handling hot accessories.
■ Grilling: do not insert the baking tray or universal pan higher
than level 3when grilling. The high heat distorts it and the
enamel may be damaged when it is removed. At level 4and
5, only grill directly on the wire rack.
5
Page 6
Your new appliance
Get to know your appliance. You will find information on the
control panel, the oven, types of heating and accessories.
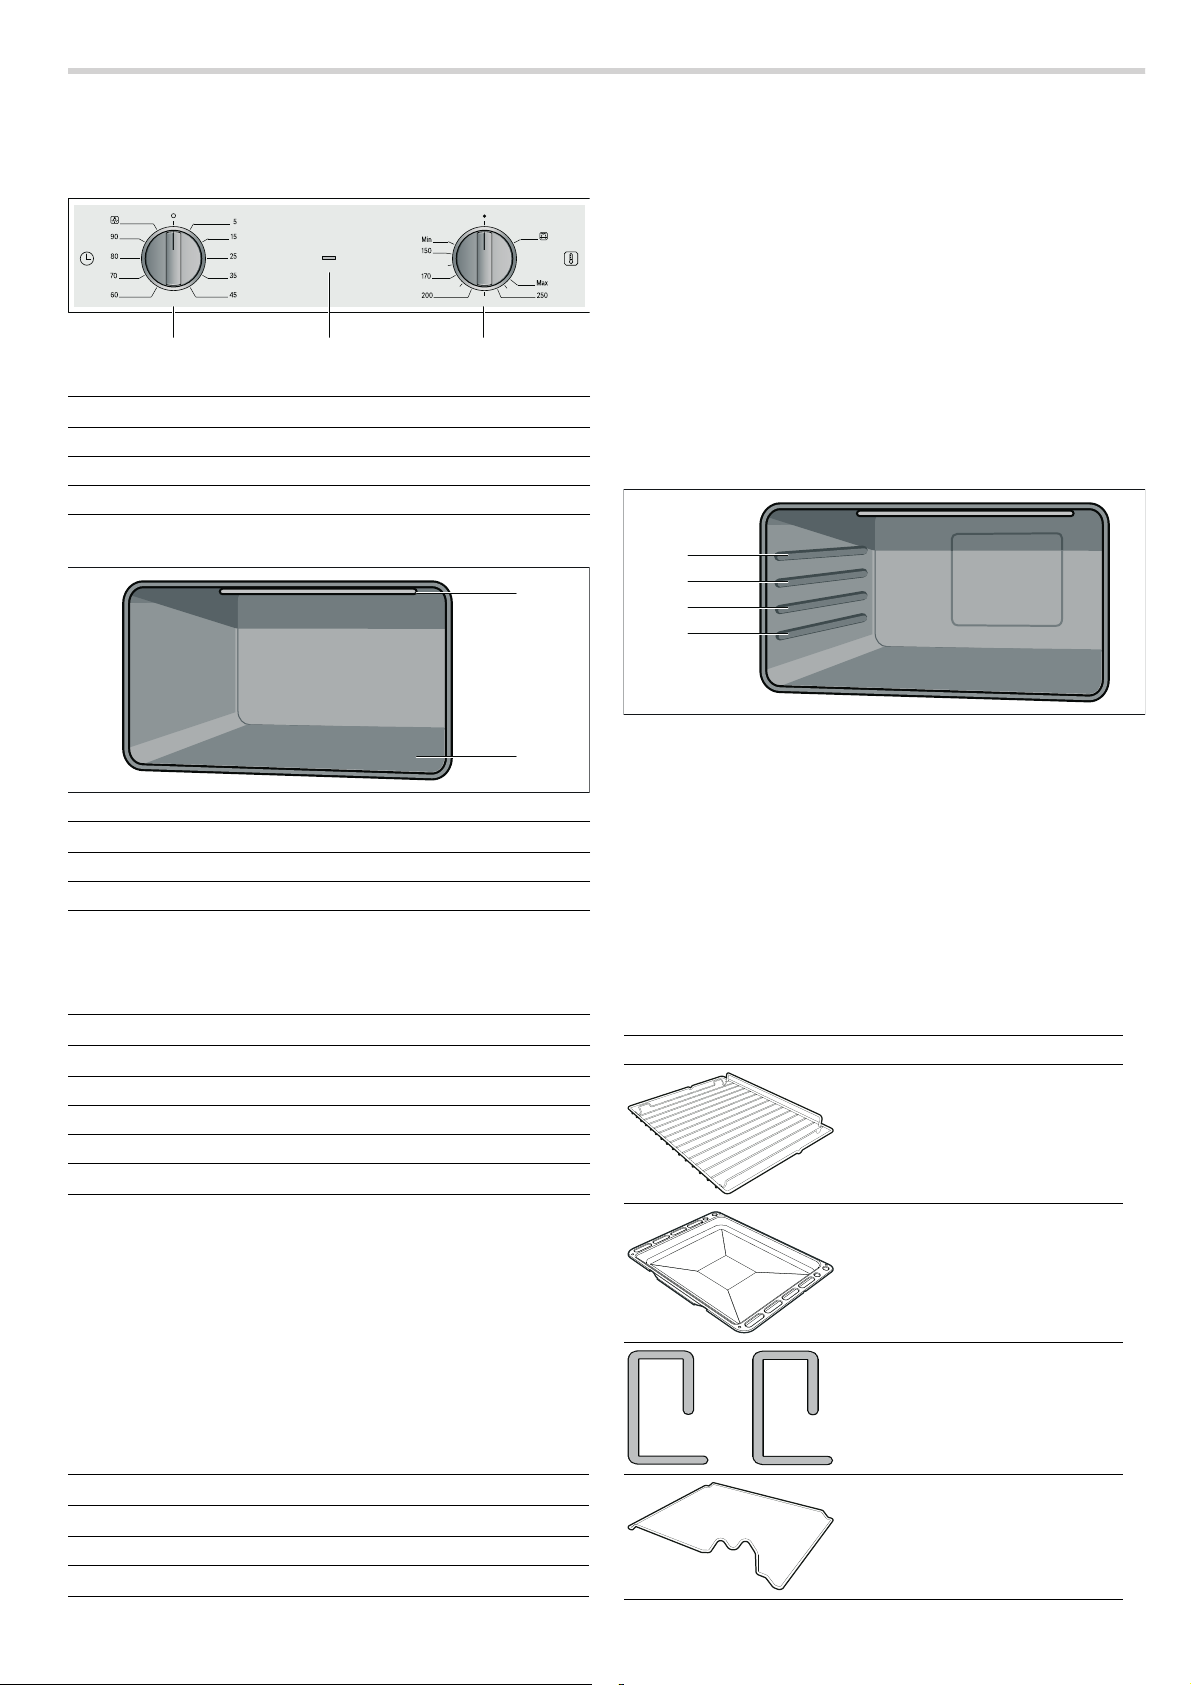
Explanation
1 Control knob for timer
2 Grill indicator light
3 Control knob for oven and grill
The oven
Cooling fan
The cooling fan switches on and off as required. The hot air
escapes above the door. Caution: Do not cover the ventilation
slots. Otherwise the oven will overheat.
So that the cooking compartment cools down more quickly
after operation, the cooling fan continues to run for a certain
period afterwards.
Accessories
The accessories can be inserted into the cooking compartment
at 4different levels. Always insert them as far as they will go so
that the accessories do not touch the door panel. Ensure that
the accessories have always been inserted into the cooking
compartment correctly.
Explanation
1 Electric grill
2 Oven gas burners
Control knob for oven
This control knob is used to adjust the heat setting of the oven
and the grill.
Setting Meaning
Ú
Min Economy flame, lowest power
150-250 Oven gas burner on, temperature range in °C
Max Large flame, highest power
G
There is a limit stop between settings
the knob beyond this point.
The indicator light will light up when the grill is switched on.
Off. The oven does not heat up.
The grill heats up and the rotary spit turns.
G and Max. Do not turn
The timer
You can use the timer to set a cooking time.
An audible signal sounds once the cooking time has elapsed.
Control knob for timer
Use this control knob to set the cooking time. You can also use
this control knob to switch the oven lighting on.
: Risk of fire!
Under no circumstances should a baking sheet, a baking tray,
a pan or another form of cookware be placed directly on the
oven floor. This causes the floor of the appliance to overheat
and can seriously damage the bottom of the fitted unit.
You can pull out the accessories two thirds of the way without
them tipping. This allows dishes to be removed easily.
The accessories may become deformed when they become
hot. As soon as they have cooled down, the deformation
disappears with no effect on the function.
You can buy accessories from the after-sales service, from
specialist retailers or online.
Accessories Description
Baking and roasting shelf
For ovenware, cake tins, joints,
grilled items, frozen meals.
Enamelled baking tray
For moist cakes, pastries, frozen
meals and large roasts. Can also
be used as a drip tray to collect
fat.
Locking pins
For locking the hinges.
Setting Meaning
Û
5- 90 Cooking time in minutes
^
6
Off
Switching on the oven lighting
Rotary spit holder
For holding the rotary spit.
Page 7

Rotary spit
For roasts and large pieces of
poultry. Use only in combination
with the enamelled baking tray.
Before using the oven for the first time
In this section, you can find out what you must do before using
your appliance to prepare food for the first time. Read the
Safety information section beforehand.
Remove the appliance packaging and dispose of it
appropriately.
Baking out the oven
Precleaning the oven
1. Remove accessories and hook-in racks from the cooking
compartment.
2. Fully remove any remaining packaging, such as small pieces
of polystyrene, from the cooking compartment.
3. Some parts are covered with a protective film. Remove the
protective film.
4. Clean the outside of the appliance with a soft, damp cloth.
How to operate your oven
Oven lighting
Switching on the oven lighting
Turn the control knob to the
The oven lighting switches on when the timer is switched on or
the oven door is opened.
Switching off the oven lighting
Turn the control knob to the
The oven lighting switches off.
Operating modes
The following operating modes are available.
Operating mode Application
t
G
Oven gas burner 150250°C
Electric grill For steaks, sausages, fish
Operating the oven
Switching on the oven gas burner
1. Open the appliance door.
2. Press the control knob for the oven and turn it to the 250°C
position.
3. Press and hold the control knob for a few seconds until the
flame stabilises.
4. Close the appliance door carefully.
5. Turn the control knob to set the desired temperature. Do not
turn the knob beyond the "Min" position.
^ position.
Û position.
For cakes and pastries,
bakes, poultry, lean joints
of meat, e.g. beef, veal and
game.
and toast.
5. Clean the cooking compartment with hot soapy water.
Heating up the oven
To remove the new cooker smell, heat up the oven when it is
empty and closed.
1. Turn the temperature selector to the maximum temperature.
2. Switch off the oven after 45minutes.
Recleaning the oven
1. Clean the cooking compartment with hot soapy water.
2. Fit the hook-in racks.
Cleaning the accessories
Before using the accessories, clean them thoroughly using a
cloth and warm soapy water.
If the flame goes out
Switch off the control knob. Wait one minute and switch the
burner on again.
: Risk of fire!
If the flame goes out, gas will escape. Never leave the gas
burner unattended during operation. Ensure that there are no
draughts.
: Risk of deflagration!
If the burner does not ignite after 15 seconds, switch off the
control knob and open the door or window in the room. Wait at
least 1minute before igniting the burner again.
Switching off the oven gas burner
Turn the control knob to the
control knob.
Operating the grill
The appliance door must be closed when grilling.
Notes
■ It is not possible to use the oven gas burner and the grill at
the same time.
■ When using the grill, a cooking time of 60 minutes must not
be exceeded.
■ When switching on the grill, the drive for the rotary spit is
automatically activated.
Switching on the grill
Press the control knob for the oven and turn it to the
position.
The indicator light will light up when the grill is switched on.
Switching off the grill
Turn the control knob to the
Ú position. Press and hold the
G
Ú position.
7
Page 8
Operating the rotary spit
The rotary spit can be used with excellent results to cook joints,
such as rolled roasting joints and poultry. The meat is roasted
thoroughly and evenly.
The drive for the rotary spit is automatically activated as soon
as you switch on the grill.
Preparing roasts
1. Place the joint as centrally as possible on the rotary spit and
secure it at both ends with the retaining clips.
You can also secure the joint using kitchen twine.
2. With poultry, bind the ends of the wings underneath the back
and the thighs against the body. This prevents them from
overbrowning.
3. Pierce the skin on the underside of the wings to allow the fat
to escape.
Inserting the rotary spit
: Risk of burns!
Never touch the hot surfaces of the cooking compartment or
the heating elements. Children must be kept at a safe distance
from the appliance at all times. Open the appliance door
carefully. Hot steam may escape.
1. Insert the rotary spit shelf at level 2as far as it will go.
4. Unscrew the handle (c).
D
E
F
5. Pour water into a baking tray and slide the baking tray into
shelf position 1to collect the drips of fat.
6. Close the appliance door.
Switching on the rotary spit
Turn the control knob for the oven to the
Switching off the rotary spit
Turn the control knob for the oven to the
Removing the rotary spit
G position.
Ú position.
: Risk of burns!
Never touch the hot surfaces of the cooking compartment or
the heating elements. Children must be kept at a safe distance
from the appliance at all times. Open the appliance door
carefully. Hot steam may escape.
2. Slide the rotary spit into the motor mount in the back wall of
the cooking compartment (a).
3. Place the rotary spit on the rotary spit shelf (b).
Note: The rotary spit must engage correctly in the rotary spit
shelf.
Care and cleaning
With good care and cleaning, your oven will remain clean and
fully-functioning for a long time to come. Here we will explain
how to maintain and clean your oven correctly.
Notes
■ Slight differences in the colours on the front of the oven are
caused by the use of different materials, such as glass,
plastic and metal.
■ Shadows on the door panel which look like streaks, are
caused by reflections made by the oven light.
■ Enamel is baked on at very high temperatures. This can
cause some slight colour variations. This is normal and does
not affect their function. The edges of thin trays cannot be
completely enamelled. As a result, these edges can be
rough. This will not impair the anti-corrosion protection.
: Risk of burns!
Never touch the rotary spit or other accessories directly when
they are hot. Always wear oven gloves or heat-resistant gloves
when handling hot accessories.
1. Carefully open the appliance door and screw the handle back
onto the rotary spit.
2. Carefully pull the rotary spit from the mount in the back wall
and remove it.
3. Remove the rotary spit shelf and the baking tray.
Operating the timer
The timer runs independently of the oven.
Setting the cooking time
1. Turn the control knob clockwise as far as the stop.
2. Turn the control knob anti-clockwise until you reach the
required cooking time.
An audible signal sounds once the time has elapsed.
: Risk of electric shock!
Do not use any high-pressure cleaners or steam cleaners,
which can result in an electric shock.
: Risk of burns!
The appliance becomes very hot. Never touch the interior
surfaces of the cooking compartment or the heating elements.
Always allow the appliance to cool down. Keep children at a
safe distance.
8
Page 9
Cleaning agents
To ensure that the different surfaces are not damaged by using
the wrong cleaning agent, pay attention to the information in the
table. Do not use
■ sharp or abrasive cleaning agents,
■ cleaning agents with a high alcohol content,
■ hard scouring pads or cleaning sponges,
■ high-pressure cleaners or steam cleaners.
Wash new sponge cloths thoroughly before use.
Catalytic cooking compartment panels
The catalytic cooking compartment panels are coated with selfcleaning enamel.
The surfaces clean themselves while the oven is in operation.
Larger splashes will only be removed after the oven has been
used several times.
Self-cleaning surfaces
The side walls are covered with catalytic panelling. Never clean
these surfaces with oven cleaner. Slight discolouration of the
enamel does not affect automatic self-cleaning.
Area Cleaning agents
Oven front Hot soapy water:
Clean with a dish cloth and dry with a
soft cloth. Do not use glass cleaners or
glass scrapers.
Stainless steel Hot soapy water:
Clean with a dish cloth and dry with a
soft cloth. Remove flecks of limescale,
grease, starch and albumin (e.g. egg
white) immediately. Corrosion can form
under such residues.
Special stainless steel cleaning products suitable for hot surfaces are available from our after-sales service or from
specialist retailers. Apply a very thin layer
of the cleaning product with a soft cloth.
Aluminium Clean with a mild window cleaning agent.
Using a window cloth or a non-fluffing
microfibre cloth, wipe over the surfaces
lightly in a horizontal direction.
Enamel surfaces
(smooth surfaces)
Apply commercially available washing-up
liquid or a vinegar solution with a soft,
damp cloth or chamois; dry with a soft
cloth. Soak baked-on food residues with
a damp cloth and detergent. If the cooking compartment is heavily soiled, use a
gel oven cleaner. This can be applied to
the affected area. Leave the cooking
compartment open after cleaning to
allow it to dry.
Self-cleaning surfaces (rough sur-
Note the instructions in the section:
Catalytic cooking compartment panel
faces)
Gas burner Never clean the gas burners in the cook-
ing compartment yourself.
Door panels Glass cleaner:
Clean with a soft cloth. Do not use a
glass scraper.
Glass cover for the
oven light
Seal
Do not remove.
Hot soapy water:
Clean with a dish cloth.
Hot soapy water:
Clean with a dish cloth. Do not scour.
Rails Hot soapy water:
Soak and clean with a dish cloth or
brush.
Accessories Hot soapy water:
Soak and clean with a dish cloth or
brush.
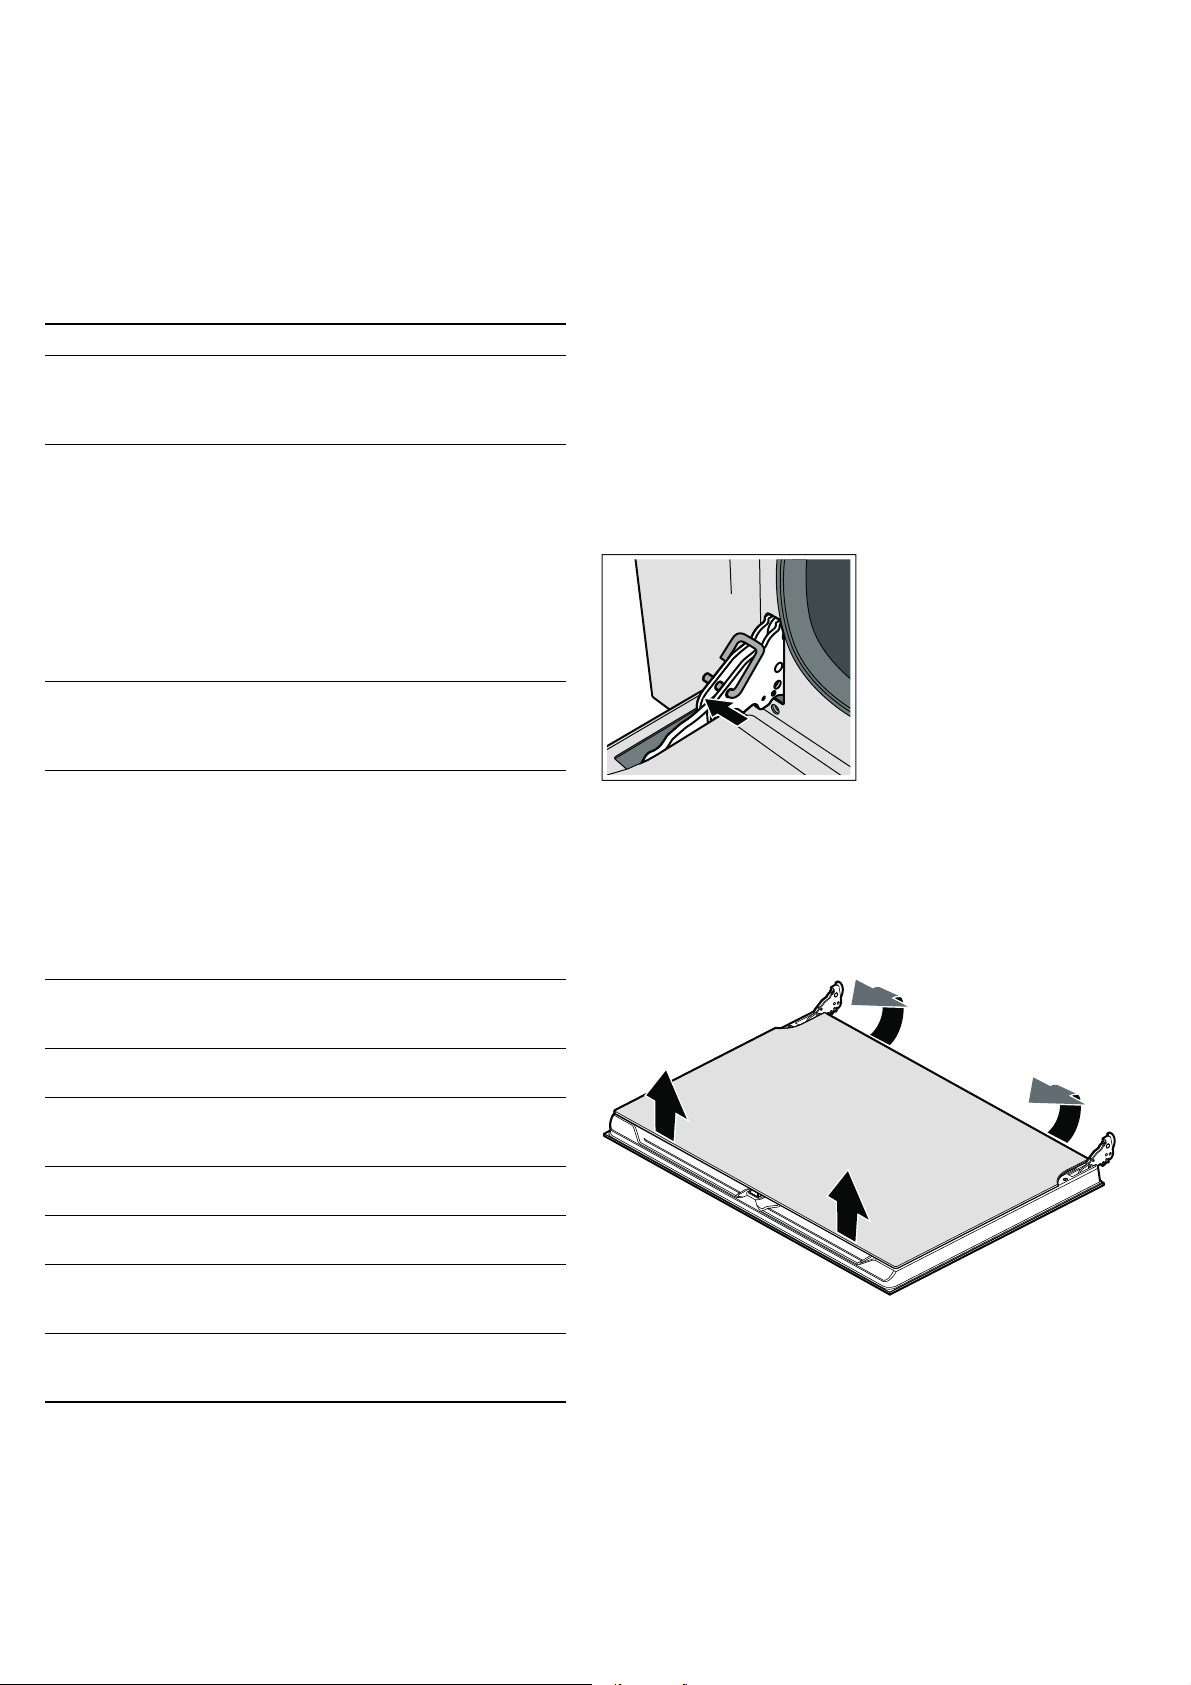
Removing and installing the door panels
To facilitate cleaning, you can remove the glass panels from the
oven door.
Removing the door panels
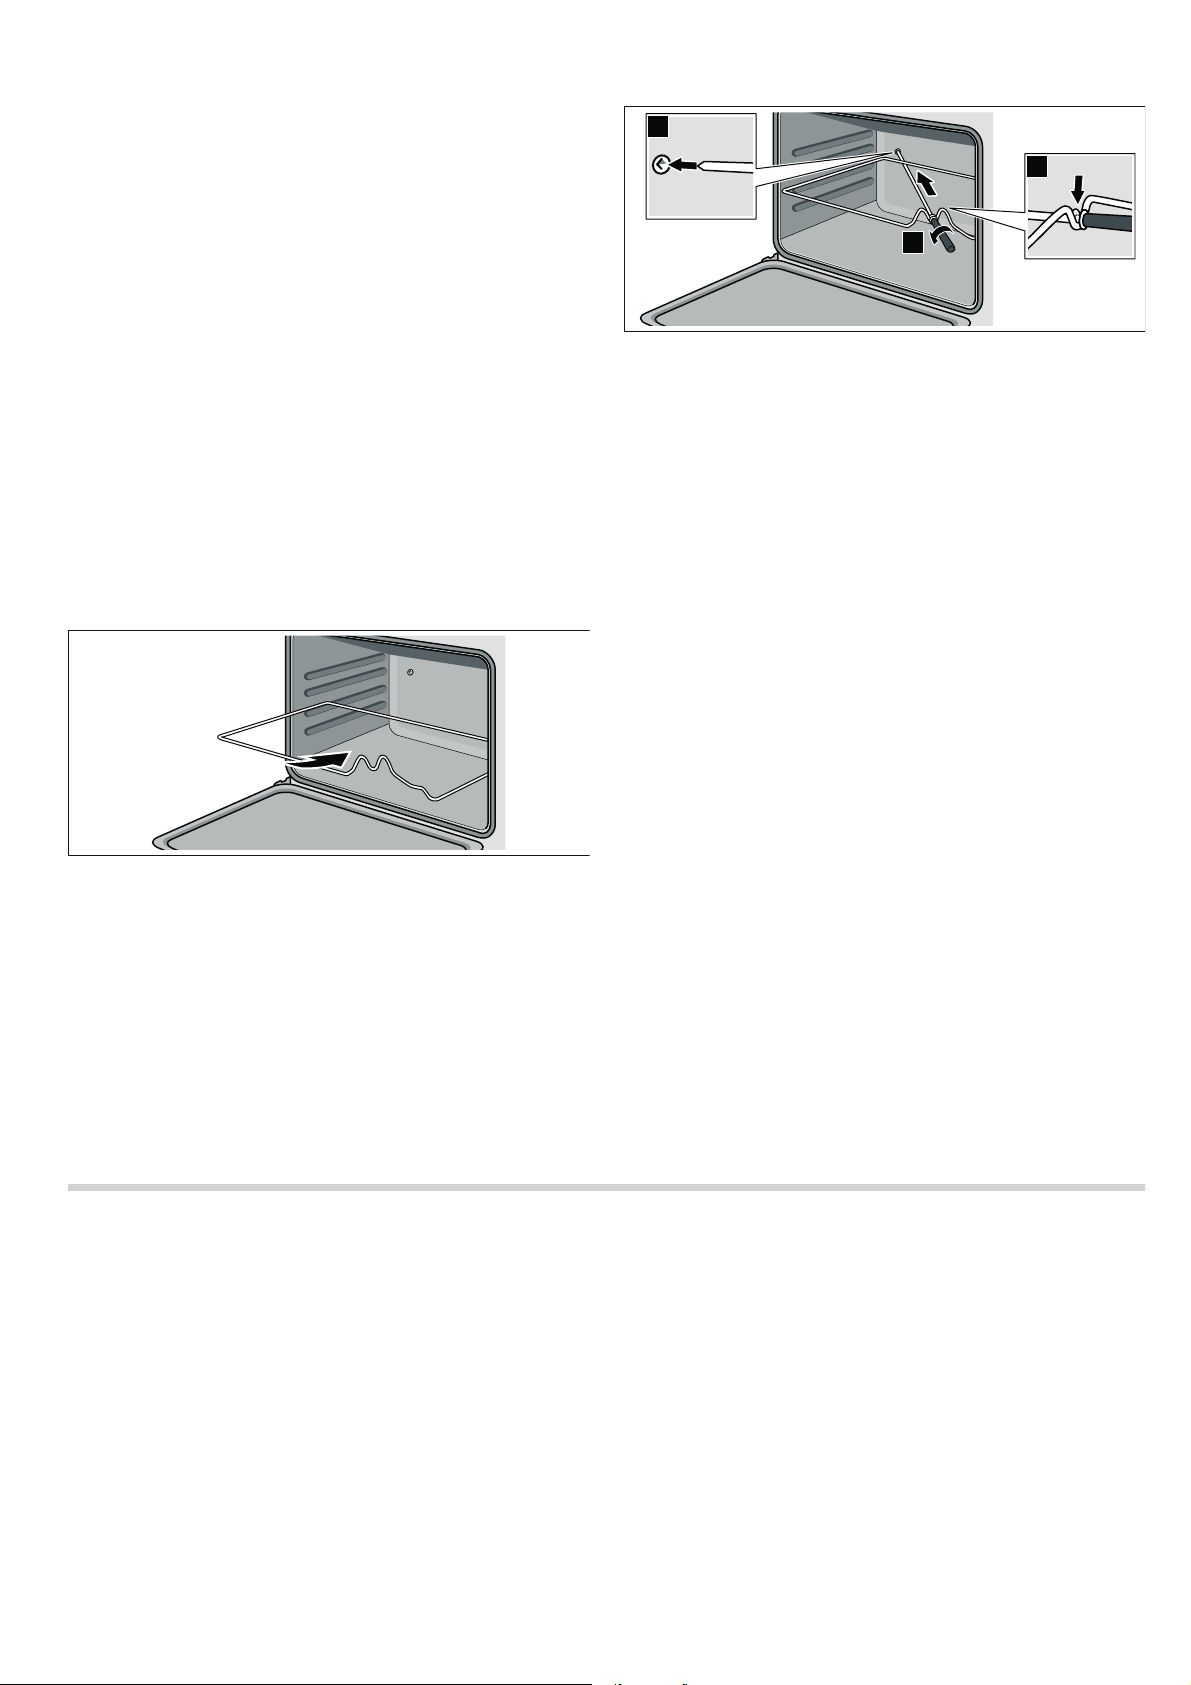
1. Open the oven door fully.
2. Lock both hinges on the left and right using the locking pin.
Note: The locking pins must be fully inserted into the holes in
the hinges.
3. Lift the bottom of the inner panel slightly until the fastening
pins come out of the holder (1).
4. Carefully lift the top of the inner panel until the fastening pins
come out of the holder (2).
Caution!
When lifting the inner panel, the middle panel may stick to the
inner panel. Make sure that the middle panel does not fall.
9
Page 10
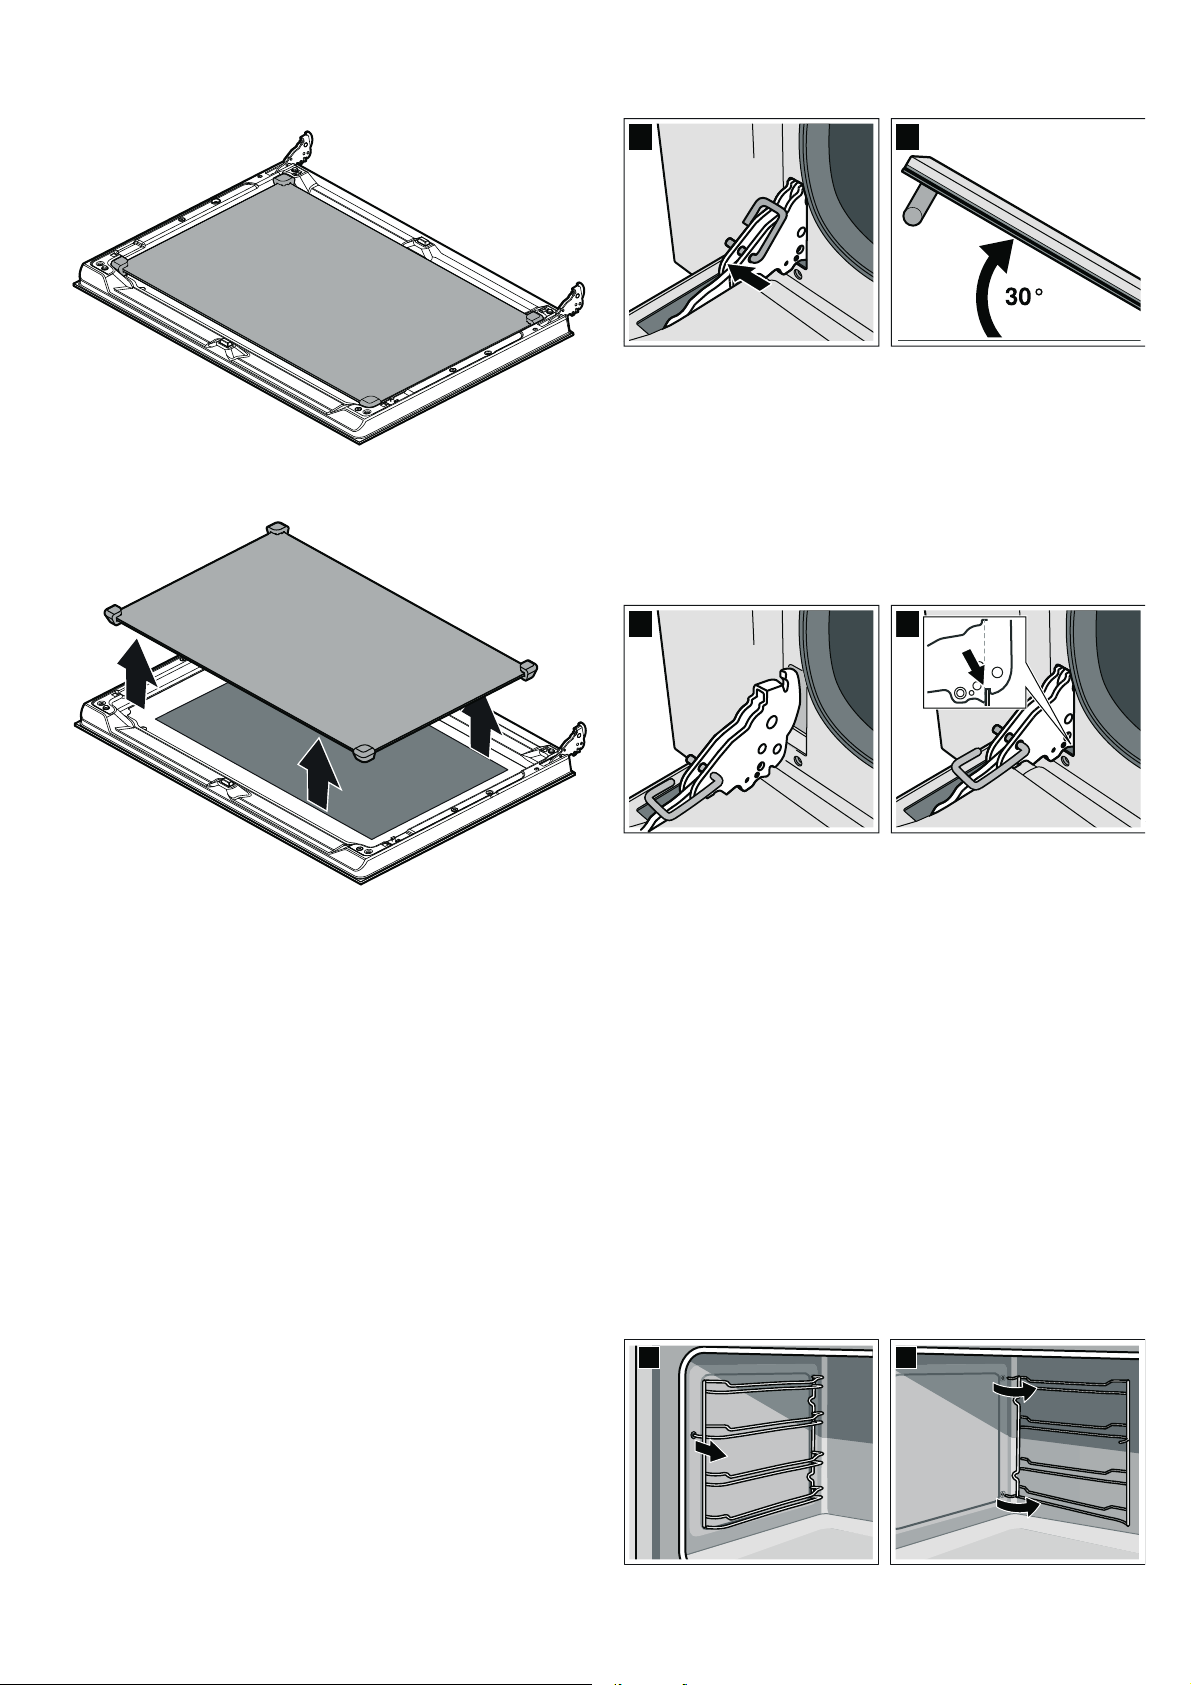
5. Remove the inner panel.
6. Remove the middle panel.
3. Grip the oven door on either side with both hands and close
the oven door by approx. 30° (b).
DE
4. Raise the oven door slightly and pull it out.
Note: Do not fully close the oven door. The hinges could
become bent and the enamel could be damaged.
Note: The middle panel is kept in place with rubber bushings
rather than retaining pins.
Clean the panels with glass cleaner and a soft cloth.
: Risk of injury!
Scratched glass in the appliance door may develop into a
crack. Do not use a glass scraper, sharp or abrasive cleaning
aids or detergents.
Fitting the door panels
1. Reinsert the middle panel.
Note: Make sure that the panel is seated correctly. All rubber
bushings must lay flat against the outer panel.
2. Reinsert the inner panel.
Note: All four fastening pins must engage in the holders
provided for them.
3. Remove the locking pins and close the oven door.
Removing and fitting the appliance door
If the oven is very heavily soiled, the oven door can be removed
for easier cleaning. Normally, however, this is not necessary.
Removing the appliance door
1. Open the oven door fully.
2. Lock both hinges on the left and right using the locking pin
(a).
Note: The locking pins must be fully inserted into the holes in
the hinges.
Fitting the appliance door
1. Grip the oven door on either side with both hands.
2. Slide the hinges into the slots in the oven (a).
Note: The notch below the hinges must engage into the
frame of the oven (b).
ED
3. Lower the door downwards.
4. Remove the locking pins.
: Risk of injury!
Do not reach into the hinge if the oven door falls out
unintentionally or a hinge snaps closed. Call after-sales service.
Removing and inserting the hook-in racks
You can remove the hook-in racks for easier cleaning.
Removing the hook-in racks
The hook-in racks are each fixed to the side panels of the
cooking compartment at three points.
1. Grip the front of the hook-in rack and pull it to the middle of
the cooking compartment.
The front hook of the hook-in rack will release from the hole.
2. Fold out the hook-in rack further and pull it from the rear
holes of the side panel.
3. Hold the catalytic cooking compartment panel in place.
4. Remove the hook-in rack from the cooking compartment.
D
E
10
Page 11

Inserting the hook-in rack
1. Hold the catalytic cooking compartment panel in place.
2. Insert the hooks of the hook-in rack into the rear holes in the
side panel.
3. Press the front hook of the hook-in rack into the hole.
Troubleshooting
Malfunctions often have simple explanations. Refer to the table
before calling the after-sales service, as you may be able to
remedy the fault yourself.
: Risk of injury!
Incorrect repairs are dangerous. Repairs may only be carried
out, and damaged power and gas lines replaced, by an aftersales engineer trained by us. If the appliance is faulty, unplug
the mains plug or switch off the fuse in the fuse box. Shut off
the gas supply. Contact the after-sales service.
Malfunction Possible cause Solution
The appliance
does not work
The oven lighting has failed.
The flame
(oven) does not
burn through all
outlet openings.
The door panel
steams up
when the oven
heats up.
--------
Power cut Check whether other
Faulty circuit
breaker
Oven light is
faulty
Normal build-up
of dirt
Normal occurrence; caused
by the difference in temperature
kitchen appliances are
working
Check in the fuse box to
make sure that the circuitbreaker for the appliance is
OK
Replace the oven light.
(See section "Replacing
oven light")
The burner must be professionally cleaned.
Not possible; this has no
effect on oven performance.
Replacing the oven light bulb
If the oven light bulb fails, it must be replaced. Replacement
heat-resistant bulbs can be obtained from the after-sales
service or from specialist retailers. Please specify the E number
and FD number of your appliance. Do not use any other type of
bulb.
: Risk of electric shock!
When replacing the cooking compartment bulb, the bulb socket
contacts are live. Before replacing the bulb, unplug the
appliance from the mains or switch off the circuit breaker in the
fuse box.
1. Allow the cooking compartment to cool down.
2. Open the appliance door.
3. Place a tea towel in the cooking compartment to prevent
damage.
4. Remove the hook-in racks.
5. Remove the glass cover. To do this, open the glass cover at
the front with your hand. Should you experience difficulties
removing the glass cover, use a spoon to help.
6. Remove the oven light bulb.
7. Replace the oven light bulb with a bulb of the same type:
Voltage: 230V;
Power: 40W;
Fitting: G9;
Temperature resistance: 300°C
8. Refit the glass cover for the oven light bulb.
9. Refit the hook-in racks.
10.Remove the tea towel.
11.Switch the circuit breaker back on.
12.Check that the oven lighting is working again.
11
Page 12
After-sales service
Our after-sales service is there for you if your appliance needs
to be repaired. We will always find the right solution in order to
avoid unnecessary visits from a service technician.
When calling us, please give the product number (E no.) and
the production number (FD no.) so that we can provide you with
the correct advice. The rating plate is located on the side
behind the oven door.
You can make a note of the numbers of your appliance and the
telephone number of the after-sales service in the space below
to save time should it be required.
E no. FD no.
After-sales service
O
Energy and environment tips
Here you can find tips on how to save energy when baking and
roasting and how to dispose of your appliance properly.
Saving energy
■ Only preheat the oven when it is specified in the recipe that
you should do so.
■ Open the oven door as little as possible while you are
cooking, baking or roasting.
■ It is best to bake several cakes one after the other. The oven
is still warm. This reduces the baking time for the second
cake. You can also place two loaf tins next to each other.
Please be aware that a visit by an after-sales engineer will be
charged if a problem turns out to be the result of operator error,
even during the warranty period.
Please find the contact data of all countries in the enclosed
customer service list.
To book an engineer visit and product advice
GB 03448928979
Calls charged at local or mobile rate.
IE 014502655
0.03 € per minute at peak. Off peak 0.0088 € per
minute.
Rely on the professionalism of the manufacturer. You can
therefore be sure that the repair is carried out by trained service
technicians who carry original spare parts for your appliances.
■ For longer cooking times, you can switch the oven off
10 minutes before the end of the cooking time and use the
residual heat to finish cooking.
Environmentally-friendly disposal
Dispose of packaging in an environmentally-friendly manner.
This appliance is labelled in accordance with
European Directive 2012/19/EU concerning used
electrical and electronic appliances (waste electrical
and electronic equipment - WEEE). The guideline
determines the framework for the return and recycling
of used appliances as applicable throughout the EU.
Acrylamide in foodstuffs
Acrylamide is mainly produced in grain and potato products
prepared at high temperatures, such as potato crisps, chips,
Tips for keeping acrylamide to a minimum when preparing food
General
Baking max. 200 °C.
Biscuits max. 190 °C.
Oven chips Spread out a single layer evenly on the baking tray. Cook at least 400 g at once on a
■ Keep cooking times to a minimum.
■ Cook meals until they are golden brown, but not too dark.
■ Large, thick pieces of food contain less acrylamide.
Egg or egg yolk reduces the production of acrylamide.
baking tray so that the chips do not dry out.
toast, bread rolls, bread or fine baked goods (biscuits,
gingerbread, cookies).
12
Page 13

Tips for using your appliance
Here you will find a selection of tips on ovenware and
preparation methods.
Notes
■ Use the accessories provided. Additional accessories may
be obtained as special accessories from specialist retailers
or from the after-sales service.
Before using the oven, remove any unnecessary accessories
and ovenware from the cooking compartment.
■ Always use an oven cloth or oven gloves when taking
accessories or cookware out of the cooking compartment.
Baking tips
How to establish whether sponge cake
is baked through.
The cake collapses. Use less fluid next time or set the oven temperature 10degrees lower. Note the stirring
The cake has risen high in the middle
and less around the edges.
The cake is too dark on the top. Place it lower in the oven, select a lower temperature and bake the cake for a little
The cake is too dry. When it is done, make small holes in the cake using a cocktail stick. Then drizzle fruit
The bread or cake (e.g. cheesecake)
looks good but is sticky on the inside
(soggy with wet streaks).
The pastries are not evenly browned. Select a slightly lower temperature to ensure that the cake is baked more evenly. Excess
The bottom of a fruit flan is too light. Place the cake one level lower the next time.
The fruit juice overflows. Next time, use the deeper universal pan, if you have one.
Small baked items made out of yeast
dough stick to one another during baking.
Condensation forms when you bake
moist cakes.
Approx. 10minutes before the end of the baking time stated in the recipe, insert a cocktail stick into the cake at its deepest point. If no cake mixture sticks to the wood, the cake
is ready.
times indicated in the recipe.
Do not grease the sides of the springform cake tin. After baking, carefully loosen the
cake using a knife.
longer.
juice or an alcoholic drink over it. Next time, set the temperature 10degrees higher and
reduce the baking time.
Next time, use less liquid and bake at a lower temperature for slightly longer. For cakes
with a moist topping, bake the base first. Sprinkle it with almonds or bread crumbs and
then place the topping on top. Take care to follow recipes and baking times.
greaseproof paper can affect the air circulation. Always cut the greaseproof paper to suit
the size of the baking tray.
There should be a gap of approx. 2 cm around each item. This gives enough space for
the baked items to expand and turn brown on all sides.
Baking may create water vapour, which escapes above the door. The steam may settle
and form water droplets on the control panel or on the fronts of adjacent units. This is a
natural process.
Baking
Baking tins
■ Use light-coloured baking tins and trays wherever possible.
■ Always place the baking tins on the middle of the baking and
roasting wire rack.
13
Page 14

Roasting and grilling
Ovenware
You may use any heatresistant ovenware. Always place the
ovenware in the middle of the wire rack. The enamelled baking
tray is also suitable for large roasts.
Roasting tips
■ A a lower temperature produces more even browning.
■ Depending on the size of the joint, add 2or 3tablespoons of
liquid to lean meat and 8to 10tablespoons of liquid to pot
roasts.
■ When cooking duck or goose, pierce the skin on the
underside of the wings to allow the fat to run out.
■ Poultry will turn out particularly crispy and brown if you baste
it towards the end of the roasting time with butter, salted
water or orange juice.
■ Turn pieces of meat halfway through the cooking time.
■ When the roast is ready, turn off the oven and allow it to rest
for an additional 10minutes. This will allow the meat juices to
distribute themselves better inside the roast.
■ When roasting large pieces of meat, you may find that the
amount of steam and condensation on the oven door is more
than usual. This is a normal occurrence which has no effect
on the oven's performance. Once roasting is complete, dry
the oven door and window with a cloth.
■ If you are roasting on the wire rack, insert the enamelled
baking tray into shelf position 1to collect the drips of fat.
Grilling tips
■ If possible, grill items should be of equal thickness. They
should be at least 2to 3cm thick. This ensures that they
brown evenly while also remaining succulent.
■ Place the food to be grilled in the centre of the wire rack.
Pour a little water into the enamelled baking tray and insert
this into the shelf position underneath the grill to collect the
drips of fat. Never place it on the cooking compartment floor.
■ Drizzle some oil over the food to be grilled before you place it
on the wire rack under the grill.
■ If the food to be grilled is thin, turn it over halfway through
grilling; if it is thick, turn it over several times during grilling.
Use tongs when turning the food to avoid piercing it and, in
the case of meat, to keep the meat juices inside the meat.
■ Dark meats such as lamb and beef brown better and more
quickly than light meats such as pork and veal.
Tips on using the rotary spit
■ Place the joint as centrally as possible on the rotary spit and
secure it at both ends with the retaining clips.
■ You can also truss the joint with string. With poultry, bind the
ends of the wings underneath the back and the thighs
against the body. This prevents them from overbrowning.
Pierce the skin on the underside of the wings to allow the fat
to escape.
Roasting tips
How can you tell when the roast is
ready?
The roast is too dark and the crackling
is burnt in places.
The roast looks good but the juices are
burnt.
The roast looks good, but the juices are
too clear and watery.
Use a meat thermometer (available from specialist retailers) or carry out a "spoon test".
Press down on the roast with a spoon. If it feels firm, it is ready. If the spoon can be
pressed in, it needs to be cooked for a little longer.
Check the shelf position and temperature.
Next time, use a smaller roasting dish and add more liquid.
Next time, use a larger roasting dish and add less liquid.
14
Page 15

Þ Table des matières
[fr]Notice d’utilisation
Précautions de sécurité importantes .....................................15
Causes de dommages ...................................................................17
Votre nouvel appareil...............................................................18
Le four................................................................................................18
Le minuteur ....................................................................................... 18
Ventilateur de refroidissement....................................................... 18
Accessoire.........................................................................................18
Avant la première utilisation ...................................................19
Chauffe à vide du four .................................................................... 19
Nettoyer les accessoires................................................................ 19
Voici comment utiliser le four ................................................. 19
Eclairage............................................................................................ 19
Modes de fonctionnement .............................................................19
Utilisation du four.............................................................................19
Utilisation du gril ..............................................................................20
Commande du tournebroche ........................................................ 20
Utilisation du minuteur ....................................................................20
Entretien et nettoyage.............................................................. 21
Nettoyants .........................................................................................21
Panneaux catalytiques du compartiment de cuisson............... 21
Dépose et pose des vitres de la porte........................................ 22
Décrocher et accrocher la porte de l'appareil ........................... 22
Retrait et montage des grilles supports ...................................... 23
Pannes et dépannage ..............................................................23
Changer la lampe du four.............................................................. 23
Service après-vente .................................................................24
Conseils concernant l'énergie et l'environnement................24
Economie d'énergie......................................................................... 24
Elimination écologique.................................................................... 24
L'acrylamide dans certains aliments......................................25
Conseils pour l'utilisation........................................................ 25
Cuisson de pain et de pâtisseries................................................25
Rôtissage et grillade .......................................................................26
Produktinfo
Vous trouverez des informations supplementaires concernant
les produits, accessoires, pièces de rechange et services sur
Internet sous : www.bosch-home.com et la boutique en ligne :
www.bosch-eshop.com
: Précautions de sécurité importantes
Lire attentivement ce manuel. Ce n'est
qu'alors que vous pourrez utiliser votre
appareil correctement et en toute sécurité.
Conserver la notice d'utilisation et de
montage pour un usage ultérieur ou pour le
propriétaire suivant.
Cet appareil est conçu pour être encastré
uniquement. Respecter la notice spéciale
de montage.
Contrôler l'état de l'appareil après l'avoir
déballé. Ne pas le raccorder s'il présente
des avaries de transport.
Seul un spécialiste agréé est habilité à
raccorder l'appareil. En cas de dommages
dus à un raccordement incorrect, il n'y a
aucun droit à la garantie. Pour la
modification à un autre type de gaz, appeler
le service après-vente.
Cet appareil est destiné exclusivement à
une utilisation domestique et non
professionnelle. Utiliser l'appareil
uniquement pour préparer des mets et des
boissons, ne jamais l'utiliser comme
appareil de chauffage. Surveiller l'appareil
pendant son fonctionnement. Utiliser
l'appareil uniquement à l'intérieur.
Cet appareil n'est pas conçu pour un
fonctionnement avec une minuterie externe
ou une commande à distance.
Cet appareil peut être utilisé par des
enfants de 8 ans ou plus et par des
personnes dotées de capacités physiques,
sensorielles ou mentales réduites ou
disposant de connaissances ou
d’expérience insuffisantes, sous la
surveillance d'un tiers responsable de leur
sécurité ou bien lorsqu'ils ont reçu des
instructions liées à l'utilisation de l'appareil
en toute sécurité et qu'ils ont intégré les
risques qui en résultent.
Les enfants ne doivent pas jouer avec
l'appareil. Le nettoyage et l'entretien
effectué par l'utilisateur ne doivent pas être
accomplis par des enfants, sauf s'ils sont
âgés de 15 ans et plus et qu'un adulte les
surveille.
Les enfants de moins de 8 ans doivent être
tenus à distance de l'appareil et du cordon
d'alimentation.
Toujours insérer les accessoires à l'endroit
dans le four. Voir la description des
accessoires dans la notice d'utilisation.
Cet appareil est conçu pour une utilisation
jusqu'à une altitude maximale de 2 000 m.
Fermer la vanne de sécurité à l'arrivée de
gaz lorsque l'appareil n'est pas utilisé
pendant une longue durée.
15
Page 16

Risque de surchauffe !
Lors d'une coupure de courant, le
ventilateur de refroidissement ne fonctionne
pas. L'appareil peut surchauffer. Les pièces
touchables deviennent très chaudes et
peuvent occasionner des blessures.
L'appareil et le meuble d'encastrement
peuvent subir des dommages en raison des
températures élevées. En cas de coupure
de courant, l'appareil ne doit pas être
allumé manuellement, ni être utilisé. En cas
de coupure de courant, mettre l'appareil
hors tension.
COMPORTEMENT EN CAS D'ODEUR DE
GAZ !
Du gaz qui s'échappe peut conduire à une
explosion.
En cas de constatation d'odeur de gaz ou
de dérangements sur l'installation de gaz :
■
Fermer immédiatement l'arrivée du gaz ou
le robinet de la bouteille de gaz.
■
Eteindre immédiatement tout feu nu et
cigarettes.
■
Ne plus actionner les interrupteurs de
lumière et d'appareils, ne pas retirer de
connecteurs de la prise. Ne pas utiliser le
téléphone ou le portable dans la maison.
■
Ouvrir les fenêtres et aérer en grand la
pièce.
■
Appeler le service après-vente ou la
société de distribution de gaz.
Risque d'asphyxie !
L'utilisation de l'appareil de cuisson au gaz
conduit à la formation de chaleur,
d'humidité et de produits de combustion
dans la pièce où l'appareil est installé.
Veiller à un bonne aération de la pièce où
l'appareil est installé. Les bouches
d'aération naturelles doivent rester ouvertes
ou il faut prévoir une installation mécanique
de ventilation (p.ex. une hotte). Une
utilisation intensive et de longue durée de
l'appareil peut rendre nécessaire une
aération supplémentaire, p.ex. en ouvrant
une fenêtre, ou une aération plus efficace,
p.ex. faire fonctionner l'installation
mécanique de ventilation à un niveau de
puissance supérieur.
Risque d'incendie !
■
Il se produit un courant d'air lors de
l'ouverture de la porte de l'appareil. Le
papier sulfurisé peut toucher les
résistances chauffantes et s'enflammer.
Ne jamais poser de papier sulfurisé non
attaché sur un accessoire lors du
préchauffage. Toujours déposer un plat ou
un moule de cuisson sur le papier
sulfurisé pour le lester. Recouvrir
uniquement la surface nécessaire de
papier sulfurisé. Le papier sulfurisé ne doit
pas dépasser des accessoires.
Risque d'incendie !
■
Des objets inflammables, rangés dans le
compartiment de cuisson peuvent
s'enflammer. Ne jamais conserver des
objets inflammables dans le compartiment
de cuisson. Ne jamais ouvrir la porte de
l'appareil en cas de production de fumée
dans l'appareil. Eteindre l'appareil et
retirer la fiche secteur ou désactiver le
fusible dans le boîtier à fusibles. Fermer
l'arrivée de gaz.
Risque d'incendie !
■
L'huile et la graisse chaude s'enflamment
rapidement. Ne jamais laisser l'huile et la
graisse chaude sans surveillance. Ne
jamais éteindre le feu avec de l'eau.
Eteindre le foyer. Etouffer les flammes
prudemment avec un couvercle, une
couverture ou similaire.
Risque d'incendie !
■
L'appareil devient très chaud, des
matières inflammables peuvent
s'enflammer. Ne jamais ranger ou utiliser
des objets inflammables (p.ex. aérosols ,
nettoyants) en-dessous de l’appareil ou à
proximité. Ne jamais poser des objets
inflammables sur ou dans l'appareil.
Risque d'incendie !
■
Ne jamais mettre une grille, une plaque à
pâtisserie, une poêle ou un autre récipient
directement sur la sole du four. Cela
conduit à une surchauffe du fond de
l'appareil et peut considérablement
endommager le fond du meuble
d'encastrement.
Risque d'incendie !
■
La face arrière de l'appareil devient très
chaud. Cela peut conduire à un
endommagement des conduites de
raccordement. Les conduites électrique et
de gaz ne doivent pas toucher la face
arrière de l'appareil.
Risque de brûlure !
■
L'appareil devient très chaud. Ne jamais
toucher les surfaces intérieures chaudes
du compartiment de cuisson ni les
résistances chauffantes. Toujours laisser
l'appareil refroidir. Tenir les enfants
éloignés.
Cet appareil et ses parties accessibles
deviennent chauds pendant leur
utilisation. Il convient de veiller à ne pas
toucher les éléments chauffants. Il
convient de maintenir à distance les
16
Page 17

enfants de moins de 8ans à moins qu’ils
ne soient sous une surveillance continue.
Risque de brûlure !
■
Les récipients ou les accessoires
deviennent très chaud. Toujours utiliser
des maniques pour retirer le récipient ou
les accessoires du compartiment de
cuisson.
Risque de brûlure !
■
Les vapeurs d'alcool peuvent s'enflammer
dans un compartiment de cuisson chaud.
Ne jamais préparer de plats contenant de
grandes quantités de boissons fortement
alcoolisées. Utiliser uniquement de petites
quantités de boissons fortement
alcoolisées. Ouvrir la porte de l'appareil
avec précaution.
Risque de brûlure !
■
Les éléments accessibles deviennent
chauds pendant le fonctionnement. Ne
jamais toucher les éléments chauds.
Eloigner les enfants.
Risque de brûlures !
■
Les éléments accessibles deviennent
chauds pendant le fonctionnement. Ne
jamais toucher les éléments chauds.
Eloigner les enfants.
Risque de brûlure !
■
De la vapeur chaude peut s'échapper lors
de l'ouverture de la porte de l'appareil.
Ouvrir la porte de l'appareil avec
précaution. Tenir les enfants éloignés.
Risque de brûlure !
■
La présence d'eau dans un compartiment
de cuisson chaud peut générer de la
vapeur d'eau chaude. Ne jamais verser
d'eau dans le compartiment de cuisson
chaud.
Risque de blessure !
■
Un verre de porte d'appareil rayé peut se
fendre. Ne pas utiliser de racloir à verre, ni
de produit de nettoyage agressif ou
abrasif.
Risque de blessure !
■
Les réparations inexpertes sont
dangereuses. Seul un technicien du
service après-vente formé par nos soins
est habilité à effectuer des réparations et à
remplacer des câbles électriques ou
conduites de gaz défectueux. Si l'appareil
est défectueux, retirer la fiche secteur ou
déconnecter le fusible dans le boîtier à
fusibles, fermer l'arrivée de gaz. Appeler le
service aprèsvente.
Risque de blessure !
■
Des dérangements ou dommages sur
l'appareil sont dangereux. Ne jamais
mettre en service un appareil défectueux.
Retirer la fiche secteur ou déconnecter le
fusible dans le boîtier à fusibles. Fermer
l'arrivée de gaz. Appeler le service après
vente.
Risque de choc électrique !
■
L'isolation des câbles des appareils
électroménagers peut fondre au contact
des pièces chaudes de l'appareil. Ne
jamais mettre le câble de raccordement
des appareils électroménagers en contact
avec des pièces chaudes de l'appareil.
Risque de choc électrique !
■
De l'humidité qui pénètre peut
occasionner un choc électrique. Ne pas
utiliser de nettoyeur haute pression ou de
nettoyeur à vapeur.
Risque de choc électrique !
■
Lors du remplacement de l'ampoule du
compartiment de cuisson, les contacts du
culot de l'ampoule sont sous tension.
Retirer la fiche secteur ou couper le
fusible dans le boîtier à fusibles avant de
procéder au remplacement.
Retour de flamme (flammes dans le tube
du brûleur ou la chambre) !
S'il y a un retour de flamme dans le brûleur,
éteindre immédiatement le brûleur
concerné.Après l'extinction de la flamme et
le refroidissement du brûleur, vérifier si
toutes les pièces du brûleur sont
correctement positionnées. Puis rallumer le
brûleur normalement. S'il y a de nouveau un
retour de flamme, éteindre le brûleur
concerné et appeler le service après-vente.
N'utiliser plus l'appareil jusqu'à ce que le
technicien du SAV ait réétabli le
fonctionnement sûr du brûleur.
Causes de dommages
Attention !
■ Accessoires, feuille, papier cuisson ou récipient sur le fond
du compartiment de cuisson : Ne posez pas d'accessoires
sur le fond du compartiment de cuisson. Ne recouvrez pas le
fond du compartiment de cuisson d'une feuille, quel que soit
le type, ni de papier cuisson. Ne pas placer de plat sur la
sole du compartiment de cuisson. Cela crée une
accumulation de chaleur. Le temps de cuisson n'est plus le
même et l'émail sera endommagé.
■ Introduire l'accessoire : Selon le modèle d'appareil, les
accessoires peuvent rayer la vitre en fermant la porte.
Introduire les accessoires toujours jusqu'en butée dans le
compartiment de cuisson.
■ Eau dans le compartiment de cuisson chaud : Ne versez
jamais d'eau dans le compartiment de cuisson chaud. Cela
produit de la vapeur d'eau. Le changement de température
peut occasionner des dommages sur l'émail.
■ Aliments humides : Ne conservez pas d'aliments humides
dans le compartiment de cuisson pendant une longue durée.
Cela endommage l'émail.
■ Jus de fruits : Ne garnissez pas trop la plaque à pâtisserie en
cas de gâteaux aux fruits très juteux. Le jus de fruits qui
goutte de la plaque laisse des taches définitives. Utilisez de
préférence la lèchefrite à bords hauts.
■ Refroidissement la porte de l'appareil ouverte : Laissez
refroidir le compartiment de cuisson uniquement la porte
fermée. Même si la porte de l'appareil n'est qu'entrouverte,
17
Page 18

les façades des meubles voisins risquent d'être
endommagées au fil du temps.
■ Joint de porte très encrassé : si le joint de la porte est très
encrassé, la porte de l'appareil ne fermera plus correctement
lors du fonctionnement. La façade des meubles voisins peut
être endommagée.Veillez à ce que le joint de l'appareil soit
toujours propre.
■ Porte du four utilisée comme surface d'assise : Il est interdit
de grimper ou de s'asseoir sur la porte du four ouverte. Ne
pas se suspendre à la porte du four.
■ Transporter l'appareil : Ne transportez ou ne portez pas
l'appareil par la poignée de la porte. La poignée ne
supportera pas le poids de l'appareil et risque de se casser.
■ Accessoires lourds : Ne retirez pas trop loin les accessoires
lourdement chargés, sans les soulager. Un accessoire lourd
Votre nouvel appareil
bascule en le retirant. Il exerce une pression sur les nervures
du compartiment de cuisson, ce qui risque d'endommager
l'émail. Soulagez l'accessoire retiré, en le relevant légèrement
avec une main. Attention ! Utilisez toujours des maniques en
cas d'accessoires chauds.
■ Grillades : Pour des grillades, n'enfournez la plaque à
pâtisserie ou la lèchefrite pas plus haut que le niveau 3. Elle
se déforme par la forte chaleur et endommage l'émail lors du
défournement. Ne grillez au niveau 4et 5que directement
sur la grille.
Les informations qui suivent vont vous permettre de vous
familiariser avec votre nouvel appareil. Vous obtenez des
informations sur le bandeau de commande, le four, les modes
de cuisson et les accessoires.
Explication
1 Manette de commande du minuteur
2 Voyant lumineux du gril
3 Manette de commande Four et Gril
Le four
Il y a une butée entre les positions
manette plus loin.
Le voyant lumineux est allumé lorsque le gril est en marche.
G et Max. Ne tournez pas la
Le minuteur
Avec le minuteur vous pouvez régler une durée.
Un signal retentit après écoulement de la durée.
Manette de commande du minuteur
Cette manette de commande permet de régler la durée. Cette
manette de commande permet aussi d'allumer l'éclairage du
four.
Position Signification
Û
5- 90 Durée en minutes
^
Eteint
Allumer l'éclairage du four
Ventilateur de refroidissement
Le ventilateur de refroidissement se met en marche et se
coupe selon les besoins. L'air chaud s'échappe au-dessus de
la porte. Attention ! Ne pas couvrir les fentes d'aération. Sinon,
le four surchauffe.
Le ventilateur continue de fonctionner un certain temps, afin
que le compartiment de cuisson refroidisse plus vite après le
fonctionnement.
Explication
1 Gril électrique
2 Brûleur du four
Manette de commande du four
Cette manette de commande sert à régler la puissance de
chauffe du four et du gril.
Position Signification
Ú
MIN Petite flamme, puissance minimale
150-250 Brûleur du four allumé, fourchette de
MAX Grande flamme, puissance maximale
G
18
Eteint. Le four ne chauffe pas.
température en °C
Le gril chauffe et le tournebroche fonctionne.
Accessoire
Les accessoires peuvent être enfournés à 4niveaux différents.
Introduisez-le toujours jusqu'en butée, afin que l'accessoire ne
touche pas la vitre de la porte. Assurez-vous d'insérer les
accessoires toujours dans le bon sens dans le compartiment
de cuisson.
Page 19

: Risque d'incendie !
Ne jamais mettre une grille, une plaque à pâtisserie, une poêle
ou un autre récipient directement sur la sole du four. Cela
conduit à une surchauffe du fond de l'appareil et peut
considérablement endommager le fond du meuble
d'encastrement.
Vous pouvez sortir l'accessoire aux deux tiers sans qu'il ne
bascule. Il est ainsi plus facile de retirer les plats du four.
Lorsque l'accessoire devient chaud il peut se déformer. Cela
n'a aucune influence sur le fonctionnement, il reprend sa forme
dès qu'il est refroidi.
Vous pouvez acheter des accessoires auprès du service aprèsvente, dans le commerce spécialisé ou sur Internet.
Accessoires Description
Grille à pâtisserie/de rôtissage
Pour de la vaisselle, des moules
à gâteau, rôtis, grillades, plats
surgelés.
Plaque à pâtisserie émaillée
Pour des gâteaux fondants, pâtisseries, plats surgelés et gros
rôtis. Egalement utilisable
comme collecteur de graisse.
Tiges de sécurité
Pour bloquer les charnières.
Support de tournebroche
Pour poser la broche.
Tournebroche
Pour des rôtis et des grosses
volailles. L'utiliser uniquement en
combinaison avec la plaque à
pâtisserie émaillée.
Avant la première utilisation
Vous apprendrez ici ce que vous devez faire avant d'utiliser
votre appareil pour la première fois pour préparer des mets.
Avant de commencer, lisez le chapitre Consignes de sécurité.
Retirez l'emballage de l'appareil et éliminez-le conformément
aux réglementations en la matière.
Chauffe à vide du four
Premier nettoyage du four
1. Retirer les accessoires et les grilles supports du
compartiment de cuisson.
2. Enlever tous les résidus d'emballage, tels que des petits
morceaux de polystyrène, du compartiment de cuisson.
3. Certaines parties sont recouvertes d'un film protecteur.
Enlever le film protecteur.
4. Nettoyer l'extérieur de l'appareil avec un chiffon doux,
humide.
Voici comment utiliser le four
Eclairage
Allumer l'éclairage du four
Régler la manette de commande sur la position
L'éclairage du four s'allume aussi quand le minuteur est en
marche ou la porte du four est ouverte.
Eteindre l'éclairage du four
Régler la manette de commande sur la position
L'éclairage du four s'éteint.
Modes de fonctionnement
Les modes de fonctionnement suivants sont disponibles.
^.
Û.
5. Nettoyer le compartiment de cuisson à l'eau chaude
additionnée de produit à vaisselle.
Chauffer le four
Pour éliminer l'odeur de neuf, chauffer le four vide et fermé.
1. Régler le thermostat sur la température maximale.
2. Eteindre le four au bout de 45minutes.
Nettoyage ultérieur du four
1. Nettoyer le compartiment de cuisson à l'eau chaude
additionnée de produit à vaisselle.
2. Monter les grilles supports.
Nettoyer les accessoires
Avant d'utiliser les accessoires, nettoyez-les soigneusement
avec de l'eau additionnée de produit à vaisselle et une lavette.
t
G
Mode de fonctionnement
Brûleur du four 150250°C
Gril électrique Pour des steaks, saucis-
Utilisation
Pour des gâteaux et pâtisseries, soufflés, volailles,
pièces de rôtis maigres de
bœuf, veau et gibier.
ses, poissons et toasts
Utilisation du four
Allumer le brûleur du four
1. Ouvrir la porte de l'appareil.
2. Appuyer sur la manette de commande du four et la régler sur
la position 250°C.
19
Page 20

3. Maintenir la manette enfoncée pendant quelques secondes
le temps que la flamme se stabilise.
4. Fermer prudemment la porte de l'appareil.
5. Régler la température désiré au moyen de la manette de
commande. Ne pas tourner plus loin que la position “Min”.
Si la flamme s'éteint de nouveau
Placez la manette de commande sur la position Arrêt. Attendez
une minute et répétez l'allumage.
: Risque d'incendie !
Du gaz s'échappe lorsque la flamme s'éteint. Ne laissez pas les
brûleurs sans surveillance pendant leur fonctionnement.
Assurez-vous qu'il n'y a pas de courant d'air.
: Risque de déflagration !
Si le brûleur ne s'allume pas au bout de 15secondes, fermez
le bouton de commande et ouvrez la porte ou la fenêtre de la
pièce. Attendez au moins une minute avant de rallumer le
brûleur.
Eteindre le brûleur du four
Régler la manette de commande sur la position
maintenir la manette de commande appuyée.
Ú. Ce faisant,
Utilisation du gril
La porte de l'appareil doit être fermée lors du fonctionnement
du gril.
Remarques
■ Il n'est pas possible d'utiliser en même temps le brûleur du
four et le gril.
■ Lors de l'utilisation du gril, le temps de cuisson ne doit pas
dépasser 60 minutes.
■ Lors de la mise en marche du gril, l'entraînement du
tournebroche est automatiquement activé.
Allumer le gril
Appuyer sur la manette de commande du four et la régler sur la
position
Le voyant lumineux est allumé lorsque le gril est en marche.
Eteindre le gril
Régler la manette de commande sur la position
G.
Ú.
Commande du tournebroche
Le tournebroche est idéal pour le rôtissage, comme pour
préparer du rôti roulé et de la volaille. La viande sera cuite
uniformément.
L'entraînement du tournebroche est automatiquement activé
dès la mise en marche du gril.
Préparer le rôti
1. Embrocher le rôti sur le tournebroche en le centrant le mieux
possible et le fixer aux deux extrémités avec les crochets.
Le rôti peut être fixé en plus avec de la ficelle de cuisine.
2. En cas de volaille, fixer les extrémités des ailes sous le dos et
les cuisses au corps. De cette sorte, elles ne brunissent pas
trop.
3. Piquer la peau en-dessous des ailes, la graisse peut ainsi
s'écouler.
Mise en place de la broche
: Risque de brûlure !
Ne jamais toucher les surfaces chaudes du compartiment de
cuisson ni les éléments chauffants. Eloigner systématiquement
les enfants. Ouvrir prudemment la porte de l'appareil. De la
vapeur chaude peut s'échapper.
1. Introduire le support de la broche au niveau
d'enfournement 2jusqu'en butée.
2. Pousser le tournebroche dans le logement du moteur situé
dans la paroi arrière du compartiment de cuisson (a).
3. Placer le tournebroche sur le support de la broche (b).
Remarque : La broche doit correctement s'encliqueter dans
le support.
4. Dévisser la poignée (c).
D
E
F
5. Verser de l'eau sur une plaque à pâtisserie et enfourner la
plaque au niveau 1comme collecteur de graisse.
6. Fermer la porte de l'appareil.
Activer le tournebroche
Régler la manette de commande du four sur la position
Désactiver le fonctionnement du tournebroche
Régler la manette de commande du four sur la position
Retirer la broche
G.
Ú.
: Risque de brûlure !
Ne jamais toucher les surfaces chaudes du compartiment de
cuisson ni les éléments chauffants. Eloigner systématiquement
les enfants. Ouvrir prudemment la porte de l'appareil. De la
vapeur chaude peut s'échapper.
: Risque de brûlure !
Ne jamais toucher directement le tournebroche chaud ou
d'autres accessoires chauds. Saisir un accessoire chaud
uniquement avec des maniques ou des gants thermoisolants.
1. Ouvrir prudemment la porte de l'appareil et revisser la
poignée sur le tournebroche.
2. Retirer prudemment le tournebroche de son logement dans
paroi arrière et l'enlever.
3. Enlever le support de la broche et la plaque à pâtisserie.
Utilisation du minuteur
Le minuteur fonctionne indépendamment du four.
Réglage de la durée
1. Tourner la manette de commande à droite jusqu'en butée.
2. La tourner à gauche jusqu'à la durée désirée.
Une fois la durée écoulée, un signal sonore retentit.
20
Page 21

Entretien et nettoyage
Si vous entretenez et nettoyez soigneusement votre four il
gardera longtemps l'aspect du neuf et restera opérationnel.
Nous vous expliquons ici comment entretenir et nettoyer
correctement votre four.
Remarques
■ Les légères variations de couleur apparaissant sur la façade
du four sont dues aux différents matériaux tels que le verre,
le plastique et le métal.
■ Des ombres sur la vitre de la porte, qui ressemblent à des
stries, sont des reflets de lumière de la lampe du four.
■ L'émail est cuit à des températures très élevées. Ceci peut
engendrer des différences de teintes. Ce phénomène est
normal et n'a aucune incidence sur le fonctionnement du
four. Les bords de plaques minces ne peuvent pas être
émaillés complètement. Ils peuvent donc présenter des
aspérités. La protection contre la corrosion n'en est pas
compromise.
: Risque de choc électrique !
De l'humidité qui pénètre peut occasionner un choc électrique.
Ne pas utiliser de nettoyeur haute pression ou de nettoyeur à
vapeur.
: Risque de brûlure !
L'appareil devient très chaud. Ne jamais toucher les surfaces
intérieures chaudes du compartiment de cuisson ni les
résistances chauffantes. Toujours laisser l'appareil refroidir.
Tenir les enfants éloignés.
Cet appareil et ses parties accessibles deviennent chauds
pendant leur utilisation. Il convient de veiller à ne pas toucher
les éléments chauffants. Il convient de maintenir à distance les
enfants de moins de 8ans à moins qu’ils ne soient sous une
surveillance continue.
Nettoyants
Afin de ne pas endommager les différentes surfaces en utilisant
des nettoyants inappropriés, veuillez respecter les indications
dans le tableau. N'utilisez pas
■ de produits agressifs ou récurants,
■ de nettoyants fortement alcoolisés,
■ de tampons en paille métallique ni d'éponges à dos récurant,
■ de nettoyeurs haute pression ni de nettoyeurs à vapeur.
Avant d'utiliser des lavettes éponges neuves, rincez-les
soigneusement.
Niveau Nettoyants
Façade du four Eau chaude additionnée de produit à
vaisselle :
Nettoyer avec une lavette et sécher avec
un chiffon doux. Ne pas utiliser de nettoyant pour vitres ou de grattoir pour
vitres.
Niveau Nettoyants
Inox Eau chaude additionnée de produit à
Aluminium Nettoyer avec un nettoyant doux pour
Surfaces émaillées
(surface lisse)
Surfaces autonettoyantes (surface
rugueuse)
Brûleurs Ne jamais nettoyer soi-même les brû-
Vitres de la porte Nettoyant pour vitres :
Cache en verre de
la lampe du four
Joint
Ne pas l'enlever !
Supports Eau chaude additionnée de produit à
Accessoires Eau chaude additionnée de produit à
vaisselle :
Nettoyer avec une lavette et sécher avec
un chiffon doux. Éliminer immédiatement
les dépôts calcaires, de graisse, de
fécule et de blanc d'œuf. De la corrosion
peut se former sous ces salissures.
Auprès du service après-vente et dans le
commerce spécialisé, vous pouvez vous
procurer des produits d'entretien spéciaux pour inox qui sont appropriés pour
des surfaces chaudes. Appliquer avec
un chiffon doux une pellicule mince de
produit d'entretien.
vitres. Passer horizontalement et sans
pression sur les surfaces avec un chiffon
pour vitres ou un chiffon à microfibres ne
peluchant pas.
Produit à vaisselle usuel du commerce
ou de l'eau au vinaigre : appliquer avec
un chiffon doux et humide ou une peau
de chamois ; sécher avec un chiffon
doux. Ramollir les résidus d'aliment
incrustés avec un chiffon humide et du
produit à vaisselle. En cas d'encrassement important, utiliser du gel de nettoyage pour four. Il peut être appliqué de
façon précise. Après le nettoyage, laisser
le compartiment de cuisson ouvert, afin
qu'il sèche.
Respecter les consignes dans le chapitre : Revêtement catalytique du com-
partiment de cuisson
leurs dans le compartiment de cuisson.
Nettoyer avec un chiffon doux. Ne pas
utiliser de racloir à verre.
Eau chaude additionnée de produit à
vaisselle :
Nettoyer avec une lavette.
Eau chaude additionnée de produit à
vaisselle :
Nettoyer avec une lavette. Ne pas récurer.
vaisselle :
Mettre à tremper et nettoyer avec une
lavette ou une brosse.
vaisselle :
Mettre à tremper et nettoyer avec une
lavette ou une brosse.
Panneaux catalytiques du compartiment de
cuisson
Les panneaux catalytiques du compartiment de cuisson sont
revêtus d'un émail autonettoyant.
Les parois se nettoient automatiquement pendant le
fonctionnement du four. Les projections plus importantes
disparaissent parfois seulement au bout de plusieurs
utilisations du four.
21
Page 22

Surfaces autonettoyantes
Les parois latérales possèdent un revêtement catalytique. Ne
nettoyez jamais ces surfaces avec un produit de nettoyage
pour four. Une légère décoloration du revêtement en émail n'a
aucune influence sur l'autonettoyage.
Dépose et pose des vitres de la porte
Pour faciliter le nettoyage, vous pouvez déposer les vitres de la
porte du four.
Dépose des vitres de la porte
1. Ouvrir complètement la porte du four.
2. Bloquer les deux charnières à gauche et à droite à l'aide de
la tige de sécurité.
Remarque : Les tiges de sécurité doivent être complètement
introduites dans les trous des charnières.
3. Lever légèrement la partie inférieure de la vitre intérieure,
jusqu'à ce que les tiges de fixation sortent de la fixation (1).
4. Lever délicatement la partie supérieure de la vitre intérieure,
jusqu'à ce que les tiges de fixation sortent de la fixation (2).
Attention !
En levant la vitre intérieure, il se peut que la vitre du milieu
reste collée à la vitre intérieure. Veiller à ce que la vitre du
milieu ne tombe pas.
Remarque : La vitre du milieu n'est pas fixée avec des tiges
de fixation mais est maintenue en position par des supports
en caoutchouc.
Nettoyez les vitres avec un nettoyant pour vitres et un chiffon
doux.
: Risque de blessure !
Un verre de porte d'appareil rayé peut se fendre. Ne pas utiliser
de racloir à verre, ni de produit de nettoyage agressif ou
abrasif.
Pose des vitres de la porte
1. Remettre la vitre du milieu.
Remarque : Veiller à ce que la vitre soit correctement en
place. Tous les supports en caoutchouc doivent reposer à
plat sur la vitre extérieure.
2. Remettre la vitre intérieure.
Remarque : Les quatre tiges de fixation doivent s'enclencher
dans les fixations prévues à cet effet.
3. Enlever les tiges de sécurité et fermer la porte du four.
5. Enlever la vitre intérieure.
6. Enlever la vitre du milieu.
Décrocher et accrocher la porte de l'appareil
En cas d'encrassement très important, la porte du four peur
être décrochée pour faciliter le nettoyage. Cependant, cela
n'est pas nécessaire en cas d'encrassement normal.
Décrocher la porte de l'appareil
1. Ouvrir complètement la porte du four.
2. Bloquer les deux charnières à gauche et à droite au moyen
de la tige de sécurité (a).
Remarque : Les tiges de sécurité doivent être complètement
introduites dans les trous des charnières.
3. Saisir la porte du four des deux mains sur les côtés et la
fermer d'env 30° (b).
DE
22
Page 23

4. Soulever légèrement la porte du four et la retirer.
Remarque : Ne pas fermer la porte du four complètement.
Cela risque de tordre les charnières et d'endommager
l'émail.
Accrocher la porte de l'appareil
1. Saisir la porte du four des deux mains sur les côtés.
2. Pousser les charnières dans les évidements du four (a).
Remarque : L'encoche en bas aux charnières doit
s'encranter dans le cadre du four (b).
ED
Retrait des grilles supports
Les grilles porte-accessoires sont fixées respectivement à trois
points aux parois latérales dans le compartiment de cuisson.
1. Saisir les grilles porte-accessoires sur le devant et les tirer
vers le milieu du compartiment de cuisson.
Le crochet avant de la grille porte-accessoires se détache du
trou.
2. Ouvrir davantage les grilles porte-accessoires et les retirer
des trous arrière de la paroi latérale.
3. Retenir les revêtements catalytiques du compartiment de
cuisson.
4. Enlever les grilles porte-accessoires du compartiment de
cuisson.
3. Abaisser la porte.
4. Retirer les tiges de sécurité.
: Risque de blessure !
Si la porte du four tombe par inadvertance ou une charnière se
ferme, ne pas mettre la main dans la charnière. Appeler le
service après-vente.
Retrait et montage des grilles supports
Pour pouvez décrocher les grilles supports pour faciliter le
nettoyage.
Pannes et dépannage
Il se peut qu'une petite panne gêne le bon fonctionnement de
votre appareil. Avant d'appeler le service après-vente, consultez
le tableau. Vous pouvez éventuellement remédier vous-même
au dérangement.
: Risque de blessure !
Les réparations inexpertes sont dangereuses. Seul un
technicien du service après-vente formé par nos soins est
habilité à effectuer des réparations et à remplacer des câbles
électriques ou conduites de gaz défectueux. Si l'appareil est
défectueux, retirer la fiche secteur ou déconnecter le fusible
dans le boîtier à fusibles, fermer l'arrivée de gaz. Appeler le
service aprèsvente.
Panne Cause possible Remède
L'appareil ne
fonctionne pas
L'éclairage du
four est tombé
en panne.
La flamme
(four) ne sort
pas de tous les
orifices.
Panne de courant
Fusible défectueux
Lampe du four
défectueuse
Salissure normale
Vérifier si d'autres appareils de cuisine fonctionnent
Vérifier dans le coffret à
fusibles, si le fusible pour
l'appareil est en bon état
Remplacer la lampe du
four. (Voir paragraphe
"Remplacement de la
lampe du four")
Le brûleur doit être nettoyé
par un spécialiste.
D
Mise en place de la grille support
1. Retenir les revêtements catalytiques du compartiment de
cuisson.
2. Engager les crochets des grilles supports dans les trous
arrière de la paroi latérale.
3. Pousser le crochet avant des grilles supports dans le trou.
De la buée se
forme sur la
vitre de la porte
lorsque le four
chauffe.
--------
C'est un phénomène normale
en raison de la
différence de
température
E
Pas possible ; aucune
influence sur le fonctionnement.
Changer la lampe du four
Si la lampe du four ne fonctionne pas, vous devez la changer.
Des ampoules de rechange résistantes aux températures
élevées sont en vente au service après-vente ou dans le
commerce spécialisé. Veuillez indiquer les numéros E et FD de
votre appareil. N'utilisez pas d'autres ampoules.
: Risque de choc électrique !
Lors du remplacement de l'ampoule du compartiment de
cuisson, les contacts du culot de l'ampoule sont sous tension.
Retirer la fiche secteur ou couper le fusible dans le boîtier à
fusibles avant de procéder au remplacement.
1. Laisser refroidir le compartiment de cuisson.
2. Ouvrir la porte de l’appareil.
3. Étaler un torchon dans le compartiment de cuisson afin
d'éviter des endommagements.
4. Enlever les grilles porte-accessoires.
5. Retirer le couvercle en verre. Pour ce faire, ouvrir le
couvercle en verre avec la main de face. Si le couvercle en
verre s'enlève difficilement, utiliser une cuillère comme aide.
23
Page 24

6. Retirer l'ampoule du four. 7. Remplacer l'ampoule du four par une ampoule de type
identique :
Voltage : 230 V ;
Puissance : 40W ;
Culot : G9;
Résistance à la température : 300°C
8. Remettre en place le couvercle en verre de la lampe du four.
9. Monter les grilles porte-accessoires.
10.Retirer le torchon à vaisselle.
11.Réarmer le fusible.
12.Vérifier que l'éclairage du four refonctionne.
Service après-vente
Si votre appareil a besoin d'être réparé, notre service aprèsvente se tient à votre disposition. Nous trouvons toujours une
solution appropriée pour éviter des visites inutiles d'un
technicien.
Lors de votre appel, veuillez indiquer le numéro de produit (n°
E) et le numéro de fabrication (n° FD), afin que nous puissions
vous apporter une assistance qualifiée. La plaque signalétique
se trouve sur le côté derrière la porte du four.
Pour éviter d'avoir à les rechercher en cas de besoin, vous
pouvez inscrire ici les données de votre appareil et le numéro
de téléphone du service après-vente.
N° E N° FD
Service après-vente
O
Tenez compte du fait que la visite d'un technicien du SAV n'est
pas gratuite en cas de manipulation incorrecte, même pendant
la période de garantie.
Vous trouverez les données de contact pour tous les pays dans
l'annuaire ci-joint du service après-vente.
Commande de réparation et conseils en cas de
dérangements
B 070222141
FR 0140101100
CH 0848840040
Faites confiance à la compétence du fabricant. Vous
garantissez ainsi que la réparation sera effectuée par des
techniciens de SAV formés qui disposent des pièces de
rechange d’origine adaptées à votre appareil.
Conseils concernant l'énergie et l'environnement
Vous trouverez ici des conseils comment vous pouvez
économiser de l'énergie lors de la cuisson et comment
correctement éliminer votre appareil.
Economie d'énergie
■ Préchauffez le four uniquement si cela est indiqué dans la
recette.
■ Pendant la cuisson ou le rôtissage, ouvrez la porte du four le
moins souvent possible.
■ Si vous voulez faire cuire plusieurs gâteaux, faitesles cuire
les uns après les autres. Le four étant encore chaud. Le
temps de cuisson est alors réduit pour le deuxième gâteau.
Vous pouvez également enfourner 2moules à cake l'un à
côté de l'autre.
■ Si les temps de cuisson sont assez longs, vous pouvez
éteindre le four 10 minutes avant la fin de la durée impartie
puis terminez la cuisson avec la chaleur résiduelle.
Elimination écologique
Eliminez l'emballage en respectant l'environnement.
Cet appareil est marqué selon la directive
européenne 2012/19/UE relative aux appareils
électriques et électroniques usagés (waste electrical
and electronic equipment - WEEE).
La directive définit le cadre pour une reprise et une
récupération des appareils usagés applicables dans
les pays de la CE.
24
Page 25

L'acrylamide dans certains aliments
L'acrylamide se forme avant tout en cas de produits céréaliers
et de pommes de terre cuits à haute température, tels que
Conseils pour la préparation de plats avec une faible formation d'acrylamide
De manière générale
Cuisson de pâtisseries max. 200 °C.
Petits gâteaux secs max. 190 °C.
Frites au four Les répartir uniformément et en une seule couche sur la plaque. Faites cuire au moins
■ Les temps de cuisson doivent être aussi courts que possible.
■ Faites uniquement dorer les aliments, sans trop les faire dorer.
■ Un aliment gros et épais contient moins d'acrylamide.
Des œufs ou des jaunes d'œuf réduisent la formation d'acrylamide.
400 g par plaque, afin que les frites ne se dessèchent pas
chips, frites, toast, petits pains, pain ou pâtisseries fines
(biscuits, pain d'épices, speculoos).
Conseils pour l'utilisation
Vous trouverez ici des conseils concernant les récipients et la
préparation.
Remarques
■ Utilisez les accessoires livrés avec l'appareil. Des
accessoires supplémentaires sont en vente dans le
commerce spécialisé ou auprès du service après-vente
comme accessoires optionnels.
Avant l'utilisation, retirez du compartiment de cuisson tous les
accessoires et récipients qui ne sont pas nécessaires.
■ Utilisez toujours des maniques pour retirer des accessoires
ou récipients chauds du compartiment de cuisson.
Cuisson de pain et de pâtisseries
Moules
■ Utilisez avant tout des moules ou plaques à pâtisserie de
couleur claire.
■ Placez toujours les moules à gâteaux au centre de la grille.
Conseils pour la pâtisserie
Vérifiez si votre cake est complètement
cuit.
Le gâteau s'affaisse. La fois suivante, veillez à ce que la pâte soit moins liquide ou bien réduisez la tempéra-
Le gâteau a levé davantage au centre
que sur les bords.
Le dessus du gâteau est trop cuit. Enfournezle jusqu'au fond, choisissez une température plus basse et faites cuire le
Le gâteau est trop sec. A l'aide d'un curedent, percez plusieurs petits trous dans le gâteau cuit. Arrosez de jus
Le pain ou le gâteau (p.ex. gâteau au
fromage blanc) a un bel aspect mais
l'intérieur est pâteux (filets d'eau à l'intérieur)
Les pâtisseries ne sont pas uniformément dorées.
Le dessous de la tarte aux fruits est trop
clair.
Le jus des fruits a coulé. La fois suivante, utilisez la lèchefrite à bords hauts (s'il y en a).
Les petites pâtisseries en pâte levée
collent ensemble pendant la cuisson.
La cuisson de gâteaux aux fruits juteux
produit de la condensation.
A l'aide d'un bâtonnet en bois, piquez le sommet du gâteau environ 10minutes avant la
fin du temps de cuisson indiqué dans la recette. Le gâteau est cuit si la pâte n'adhère
plus au bâtonnet.
ture du four de 10degrés. Respectez les temps de malaxage indiqués dans la recette.
Ne graissez pas le tour du moule démontable. Après la cuisson, détachez soigneuse-
ment le gâteau à l'aide d'un couteau.
gâteau un peu plus longtemps.
de fruit ou de liquide légèrement alcoolisé. La prochaine fois, augmentez la température
de 10degrés et réduisez les temps de cuisson.
Pour le gâteau suivant, veillez à ce que la pâte soit moins liquide. Augmentez le temps
de cuisson et réduisez la température. En cas de gâteau avec une garniture fondante,
faites d'abord précuire le fond. Saupoudrez-le de poudre d'amandes ou de chapelure et
mettez ensuite la garniture. Suivez la recette et respectez les temps de cuisson.
Baissez la température, la cuisson sera plus uniforme. Le papier cuisson dépassant de
la plaque peut gêner la circulation de l'air. Découpez toujours le papier aux dimensions
de la plaque.
La fois suivante, enfournez le gâteau un niveau plus bas.
Disposez les pièces de pâtisserie sur la plaque en respectant un espace d'env. 2 cm
autour de chaque pièce. Il y aura ainsi suffisamment de place pour que les pièces de
pâtisserie puissent gonfler et dorer tout autour.
La cuisson peut générer de la vapeur d'eau. Elle s'échappe au-dessus de la porte. Cette
vapeur peut se condenser sur le bandeau de commande ou sur les façades des
meubles situés à proximité et se mettre à goutter. C'est là une propriété physique normale.
25
Page 26

Rôtissage et grillade
Récipients
Vous pouvez utiliser tout récipient résistant à la chaleur. Placez
toujours le plat au centre de la grille. La plaque à pâtisserie
émaillée est également appropriée pour des gros rôtis.
Conseils pour les rôtis
■ Une température plus basse permet d'obtenir des mets plus
uniformément dorés.
■ Versez 2à 3 cuillerées à soupe de liquide sur la viande
maigre et 8à 10 cuillerées à soupe sur les rôtis à braiser,
selon leur taille.
■ Pour les canards ou les oies, piquez la peau sous les ailes
afin que la graisse puisse s'écouler.
■ Pour obtenir une peau de volaille dorée et croustillante,
enduisez la peau de beurre ou versez de l'eau salée ou du
jus d'orange sur la peau vers la fin de la cuisson.
■ Retournez les pièces de viande à micuisson.
■ Une fois le rôti cuit, laissez-le reposer 10 minutes de plus
dans le four éteint et fermé. Cela permet au jus de rôti de
mieux se répartir.
■ Lors du rôtissage de gros morceaux de viande une plus forte
formation de vapeur peut se produire et se condenser sur la
porte du four. C'est un phénomène normal qui n'a aucune
influence sur le bon fonctionnement. Après la cuisson,
essuyez la porte du four et la vitre avec un chiffon.
■ Si vous faites des grillades sur la grille, enfournez en plus la
plaque à pâtisserie émaillée au niveau 1pour récupérer la
graisse.
Conseils pour les grillades
■ Prenez si possible des pièces à griller de la même épaisseur.
Elles doivent faire au moins 2à 3 cm d'épaisseur. Elles
seront alors uniformément dorées et bien juteuses.
■ Placez les pièces à griller au centre de la grille. Versez un
peu d'eau sur la plaque à pâtisserie émaillée et enfournez-la
en plus sous la grille, afin de récupérer la graisse. Ne la
placez jamais sur la sole du compartiment de cuisson.
■ Badigeonnez les pièces à griller d'un peu d'huile, avant de
les placer sur la grille sous le gril.
■ Retournez à mi-cuisson les pièces peu épaisses, retournez
les pièces épaisses plusieurs fois pendant le temps de
cuisson. Utilisez pour cela une pince à grillade, les pièces à
griller ne seront ainsi pas transpercées et le jus de viande
restera p.ex. dans le rôti.
■ Des types de viande rouge telle que de l'agneau et du bœuf
brunissent davantage et plus rapidement que de la viande
blanche telle que du porc et du veau.
Conseils pour le tournebroche
■ Embrochez le rôti sur le tournebroche en le centrant le mieux
possible et fixez-le aux deux extrémités avec les crochets.
■ De plus, vous pouvez fixer le rôti avec du fil de cuisine. En
cas de volaille, fixez les extrémités des ailes sous le dos et
les cuisses au corps. De cette sorte, elles ne brunissent pas
trop.
Piquez la peau sous les ailes afin que la graisse puisse
s'écouler.
Conseils pour le rôtissage
Comment savoir si le rôti est cuit? Utilisez un thermomètre pour viande (en vente dans le commerce) ou faites le "test de la
cuillère". Appuyez sur le rôti avec la cuillère. Si vous sentez une résistance, le rôti est
cuit. Si la cuillère s'enfonce, allongez le temps de cuisson.
Le rôti est trop cuit et l'extérieur est
Vérifiez le niveau d'enfournement ainsi que la température.
brûlé par endroits.
Le rôti a un bel aspect mais la sauce est
La fois suivante, choisissez un plat à rôtir plus petit et ajoutez plus de liquide.
brûlée.
Le rôti a un bel aspect, mais la sauce
La fois suivante, choisissez un plat à rôtir plus grand et ajoutez moins de liquide.
est trop claire et insipide.
26
Page 27

ءاﻮﺸﻟا صﻮﺼﺨﺑ تادﺎﺷرإ
ﻦﻣ ﺎﻬﻜﻤُﺳ نﻮﻜﻳ نأ ﻦﻴﻌﺘﻳو
2 ﻰﻟإ 3ﺲﻧﺎﺠﺘﻣ ﻞﻜﺸﺑ ﺎهﺮﻴﻤﺤﺗ ﻢﺘﻳ ﻚﻟﺬﺑو .ﻞﻗﻷا ﻰﻠﻋ ﻢﺳ
.ﺔﻀﻏو ةﺮﻀﻧ ﻰﻘﺒﺗو
ىﻮﺘﺴﻣ ﻰﻠﻋ ﻲﻓﺎﺿإ ﻞﻜﺸﺑ ﻪﻄﺒﺿاو ،(ﻞﻴﻣﺎﻨﻳﻹا) ﺎﻨﻴﻤﻟا ﺔﻘﺒﻄﺑ ﻲﻠﻄﻤﻟا ﺰﻴﺒﺨﻟا حﻮﻟ
.ﻲﻬﻄﻟا ﺰﻴﺣ ﺔﻴﺿرأ ﻰﻠﻋ اًﺪﺑأ ﻪﻌﻀﺗ ﻻو .نﻮهﺪﻟا ﻊﻴﻤﺠﺘﻟ ﻲﻠﻔﺴﻟا عﺎﻔﺗرﻻا
.ﺔﻳاﻮﺸﻟا ﻞﻔﺳأ
ﻢﺘﻳ ﻻ ﻚﻟﺬﺑو ،ءاﻮﺸﻠﻟ ﺔﺷﺎﻣ ﻚﻟذ ﻲﻓ مﺪﺨﺘﺳا .ءاﻮﺸﻟا ةﺪﻣ ءﺎﻨﺛأ ةﺪﻳﺪﻋ تاﺮﻣ ﺎﻬﺒﻴﻠﻘﺗ ﺐﺠﻴﻓ
.ﻢﺤﻠﻟا صﻮﺼﺑ ﺔﻈﻔﺘﺤﻣ ًﻼ ﺜ ﻣ ﻢﺤﻠﻟا ﻊﻄﻗ ﻞﻈﺗو ﻩؤاﻮﺷ داﺮﻤﻟا مﺎﻌﻄﻟا ﺐﻘﺛ
.ﺢﺗﺎﻔﻟا نﻮﻠﻟﺎﺑ ﺰﻴﻤﺘﺗ ﻲﺘﻟا ﻮﻠﺘﺒﻟا مﻮﺤﻟ ﻦﻣ ﻞﻀﻓأ ةرﻮﺼﺑو عﺮﺳأ
راوﺪﻟا ﺦﻴﺴﻟا صﻮﺼﺨﺑ تادﺎﺷرإ
.ﺖﻴﺒﺜﺘﻟا ﻚﺑﺎﺸﻣ ماﺪﺨﺘﺳﺎﺑ ﻪﻴﻓﺮﻃ ﻦﻣ ﻪﺘﺒﺛو نﺎﻜﻣﻹا
.مزﻼﻟا ﻦﻣ ﺮﺜآأ ﺔﻨآاد ﺢﺒﺼﺗ ﻻ ﻚﻟﺬﺑو .عﺬﺠﻟا ﻰﻠﻋ ﻞﺟرﻷاو ﺮﻬﻈﻟا ﻞﻔﺳأ ﺔﺤﻨﺟﻷا
.ﺎﻬﺟرﺎﺧ نﻮهﺪﻟا ﻞﻴﺴﺗ نأ ﻦﻜﻤﻳ ﻚﻟﺬﺑو ،ﺔﺤﻨﺟﻷا ﻞﻔﺳأ ﺪﻠﺠﻟا ﺐﻘﺛا
ءاﻮﺸﻟاو ﺮﻴﻤﺤﺘﻟا
■ .ﻚﻤُﺴﻟا ﻲﻓ ﺔﻳوﺎﺴﺘﻣ ﺎﻬﺋاﻮﺸﺑ مﻮﻘﺗ ﻲﺘﻟا مﺎﻌﻄﻟا ﻊﻄﻗ نﻮﻜﺗ نأ نﺎﻜﻣﻹا رﺪﻗ صﺮﺣا
.ءاﻮﺸﻟا ﺔﻜﺒﺷ ﻒﺼﺘﻨﻣ ﻲﻓ ﺎًﻤﺋاد ﻲﻧاوﻷا ﻊﺿ .ﺔﻧﻮﺨﺴﻠﻟ ﺔﻣوﺎﻘﻣ ﻲﻧاوأ يأ ماﺪﺨﺘﺳا ﻚﻨﻜﻤﻳ
.ةﺮﻴﺒﻜﻟا ﻢﺤﻠﻟا ﻊﻄﻘﻟ ﺎًﺒﺳﺎﻨﻣ (ﻞﻴﻣﺎﻨﻳﻹا) ﺎﻨﻴﻤﻟا ﺔﻘﺒﻄﺑ ﻲﻠﻄﻤﻟا ﺰﻴﺒﺨﻟا حﻮﻟ ﺪﻌﻳو
■ ﻰﻠﻋ ءﺎﻤﻟا ﻦﻣ ًﻼ ﻴ ﻠ ﻗ ﻊﺿ .ءاﻮﺸﻟا ﺔﻜﺒﺷ ﻒﺼﺘﻨﻣ ﻰﻠﻋ ﻩؤاﻮﺷ داﺮﻤﻟا مﺎﻌﻄﻟا ﻊﺿ
■ ءاﻮﺸﻟا ﺔﻜﺒﺷ ﻰﻠﻋ ﻪﻌﺿو ﻞﺒﻗ ﻩؤاﻮﺷ داﺮﻤﻟا مﺎﻌﻄﻟا ﻰﻠﻋ ﺖﻳﺰﻟا ﻦﻣ ﻞﻴﻠﻘﻟا شﺮﺑ ﻢﻗ
■ ﺔﻜﻴﻤﺴﻟا ﻪﻌﻄﻘﻟا ﺎﻣأ ،ءاﻮﺸﻟا ةﺪﻣ ﻒﺼﻧ ءﺎﻀﻘﻧا ﺪﻌﺑ ﺎهؤاﻮﺷ داﺮﻤﻟا ﺔﻌﻴﻓﺮﻟا ﻊﻄﻘﻟا ﺐﻠﻗا
■ ﻞﻜﺸﺑ ﻲﻨﺒﻟا نﻮﻠﻟا ﺐﺴﺘﻜﺗ يﺮﻘﺒﻟا ﻢﺤﻠﻟاو نﺄﻀﻟا ﻢﺤﻟ ﻞﺜﻣ نﻮﻠﻟا ﺔﻤﺗﺎﻗ مﻮﺤﻠﻟا فﺎﻨﺻأ
.ﻲﻬﻄﻟا ﻦﻣز ءﺎﻬﺘﻧا ﻞﻴﺒﻗ لﺎﻘﺗﺮﺑ ﺮﻴﺼﻋ وأ ﻲﺤﻠﻣ
.ﻞﻀﻓأ ﻞﻜﺸﺑ ﻢﺤﻠﻟا صﻮﺻ عزﻮﺘﻳ ﻚﻟﺬﺑو .ﻖﻠﻐﻣو ﺄﻔﻄﻣ ﻮهو
■ رﺪﻗ ﻪﻔﺼﺘﻨﻣ ﻲﻓ ﻢﺤﻠﻟا ﻊﻄﻗ نﻮﻜﺗ ﺚﻴﺤﺑ ﻢﺤﻠﻟا ﻊﻄﻗ ﻲﻓ راوﺪﻟا ﺦﻴﺴﻟا لﺎﺧدﺈﺑ ﻢﻗ
ﺔﻴﻠﻤﻋ ﻦﻣ ءﺎﻬﺘﻧﻻا ﺪﻌﺑ .ﺔﻴﻔﻴﻇﻮﻟا ةءﺎﻔﻜﻟا ﻰﻠﻋ ﺮﻴﺛﺄﺗ يأ ﺎﻬﻟ ﺲﻴﻟ ﺔﻴﻌﻴﺒﻃ ةﺮهﺎﻇ ﻮهو
■ فاﺮﻃأ ﻂﺑرا رﻮﻴﻄﻟا ﻊﻣ .ﺦﺒﻄﻤﻟا طﻮﻴﺧ ماﺪﺨﺘﺳﺎﺑ ﻢﺤﻠﻟا ﻊﻄﻗ ﺖﻴﺒﺜﺗ ﻚﻟذ ﻰﻟإ ﺔﻓﺎﺿﻹﺎﺑ ﻚﻨﻜﻤﻳ
.شﺎﻤﻗ ﺔﻌﻄﻘﺑ ﺔﻳؤﺮﻟا ةﺬﻓﺎﻧو نﺮﻔﻟا بﺎﺑ ﻒﻴﻔﺠﺘﺑ ﻢﻗ ،ﻲﻬﻄﻟا
ﺮﻴﻤﺤﺘﻟا صﻮﺼﺨﺑ تادﺎﺷرإ
لﺎﺧدﻹا ىﻮﺘﺴﻣ ﻰﻠﻋ
1.نﻮهﺪﻟا ﻊﻴﻤﺠﺘﻟ
ﺮﻴﻤﺤﺘﻟا صﻮﺼﺨﺑ تادﺎﺷرإ
ءﺎﻧﻹا
■.تازﻮﺒﺨﻤﻠﻟ ﻲﻨﺒﻟا نﻮﻠﻟا ﺲﻧﺎﺠﺗ ﻰﻠﻋ ﻞﻤﻌﺗ ﺔﻀﻔﺨﻨﻤﻟا ةراﺮﺤﻟا ﺔﺟرد
■ ﻦﻣ ﻒﺿأو ،نﻮهﺪﻟا ﻦﻣ ﺎﻴﻟﺎﺧ ﻢﺤﻠﻟا نﺎآ اذإ ﻞﺋاﻮﺴﻟا ﻦﻣ ﺔﺛﻼﺛ وأ ﻦﻴﺘﻘﻌﻠﻣ ﻒﺿأ8
ﻰﻟإ
10.ﺎﻬﻤﺠﺣ ﺐﺴﺣ ،ﺔﻠﺣ بﺎﺒﻜﻟا ﻊﻣ ﻖﻋﻼﻣ
■.ﺎﻬﺟرﺎﺧ نﻮهﺪﻟا ﻞﻴﺴﺗ نأ ﻦﻜﻤﻳ ﻚﻟﺬﺑو ،ﺔﺤﻨﺟﻷا ﻞﻔﺳأ ﺪﻠﺠﻟا ﺐﻘﺛا ،زوﻷا وأ ﻂﺒﻟا ﻊﻣ
■ لﻮﻠﺤﻣ وأ ةﺪﺑﺰﻟا ﻦﻣ ﻞﻴﻠﻘﺑ ﺎﻬﺘﻨهد اذإ ﺔﻳﺎﻐﻠﻟ ﺔﺸﻣﺮﻘﻣ ﺔﻴﻨﺑ ﺔﻘﺒﻄﺑ رﻮﻴﻄﻟا مﻮﺤﻟ ﻲﺴﺘﻜﺗ
■.ﻲﻬﻄﻟا ﻦﻣز ﻒﺼﻧ ءﺎﻀﻘﻧا ﺪﻌﺑ ﻢﺤﻠﻟا ﻊﻄﻗ ﺐﻠﻗا
■ ةﺪﻤﻟ أﺪﻬﻳ ﻪآﺮﺗ ﺐﺠﻳ ،ﺖﺳوﺮﻟا ﻢﺤﻟ ﺞﻀﻨﻳ نأ ﺪﻌﺑ10 نﺮﻔﻟا ﻞﺧاد ﺔﻴﻓﺎﺿإ ﻖﺋﺎﻗد
■ .نﺮﻔﻟا بﺎﺑ ﻰﻠﻋ ﻒﻴﺜآ ﻞﻜﺸﺑ ءﺎﻤﻟا رﺎﺨﺑ نﻮﻜﺘﻳ ﺪﻗ ﻢﺤﻠﻟا ﻦﻣ ةﺮﻴﺒآ ﻊﻄﻗ ﻲﻬﻃ ﺪﻨﻋ
■ (ﻞﻴﻣﺎﻨﻳﻹا) ﺎﻨﻴﻤﻟا ﺔﻘﺒﻄﺑ ﻲﻠﻄﻤﻟا ﺰﻴﺒﺨﻟا حﻮﻟ ﻞﺧدأ ،ءاﻮﺸﻟا ﺔﻜﺒﺷ ﻰﻠﻋ ﻲﻬﻄﻟا ﺪﻨﻋ
جﺎﺘﺤﺗ ﺖﻟاز ﻻ ﺎﻬﻧأ ﻲﻨﻌﻳ اﺬﻬﻓ ،ﻢﺤﻠﻟا ﺔﻌﻄﻗ ﺖﻄﺒه اذإو .ﺖﺠﻀﻧ ﺪﻗ ﺎﻬﻧأ ﻲﻨﻌﻳ اﺬﻬﻓ ﺔﻜﺳﺎﻤﺘﻣ ﺎﻬﻧأ تﺮﻌﺸﺘﺳا اذﺈﻓ .ﻢﺤﻠﻟا
.ﺖﻗﻮﻟا ﺾﻌﺒﻟ
.ةراﺮﺤﻟا ﺔﺟردو لﺎﺧدﻹا ىﻮﺘﺴﻣ ﻦﻣ ﻖﻘﺤﺗ
.ﻞﺋاﻮﺴﻟا ﻦﻣ ﻞﻗأ ﺔﻴﻤآ ﻒﺿأو ءاﻮﺸﻠﻟ ﺮﺒآأ
ًء ﺎ ﻧ إ ﺮﺘﺧا ،ﺔﻣدﺎﻘﻟا ةﺮﻤﻟا ﻲﻓ
.ﻢﺤﻠﻟا ﻊﻄﻗ ﺞﻀﻧ ﻦﻣ ﻖﻘﺤﺘﻟا ﻚﻨﻜﻤﻳ ﻒﻴآ ﺔﻌﻄﻗ ﻰﻠﻋ ﺔﻘﻌﻠﻤﻟﺎﺑ ﻂﻐﺿا .«ﺔﻘﻌﻠﻤﻟا رﺎﺒﺘﺧا» ﻞﻤﻌﺑ ﻢﻗ وأ (ﺔﺼﺼﺨﺘﻤﻟا ﺮﺟﺎﺘﻤﻟا ﻲﻓ ﺮﻓﻮﺘﻣ) مﻮﺤﻠﻟا ﺮﺘﻣﻮﻣﺮﺗ مﺪﺨﺘﺳا
ﺾﻌﺑ ﺖﻗﺮﺘﺣاو ﺔﻳﺎﻐﻠﻟ ﺎًﻤﺗﺎﻗ ﺎًﻧﻮﻟ
ﻢﺤﻠﻟا ﺔﻌﻄﻗ ﺖﺒﺴﺘآا
.ﻲﺟرﺎﺨﻟا ﺎﻬﺤﻄﺳ ﻦﻣ ﻊﺿاﻮﻤﻟا
.قﺮﺘﺤﻣ صﻮﺼﻟا ﻦﻜﻟو ،ةﺪﻴﺟ ﺔﻟﺎﺤﺑ وﺪﺒﺗ ﻢﺤﻠﻟا ﺔﻌﻄﻗ.ﻞﺋاﻮﺴﻟا ﻦﻣ ﺪﻳﺰﻤﻟا ﻒﺿأو ﺮﻴﻤﺤﺘﻠﻟ ﺮﻐﺻأ ًء ﺎ ﻧ إ ﺮﺘﺧا ،ﺔﻣدﺎﻘﻟا ةﺮﻤﻟا ﻲﻓ
ﺢﺗﺎﻓ صﻮﺼﻟا ﻦﻜﻟو ،ةﺪﻴﺟ ﺔﻟﺎﺤﺑ وﺪﺒﺗ ﻢﺤﻠﻟا ﺔﻌﻄﻗ
.ﺔﻳﺎﻐﻠﻟ ﻒﻔﺨﻣو ﺔﻳﺎﻐﻠﻟ نﻮﻠﻟا
14
Page 28

ماﺪﺨﺘﺳﻻا ﺢﺋﺎﺼﻧ
تازﻮﺒﺨﻤﻟا داﺪﻋإ
ﺰﻴﺒﺨﻟا ﻲﻧاﻮﺻ
■.نﻮﻠﻟا ﺔﺤﺗﺎﻓ ﺔﻴﻧﺪﻌﻤﻟا تازﻮﺒﺨﻤﻟا داﺪﻋإ تﺎﺟﺎﺻو ﻲﻧاﻮﺻ ماﺪﺨﺘﺳا ﻞﻀﻔُﻳ
■.ﺮﻴﻤﺤﺘﻟاو ﺰﻴﺒﺨﻟا ﺔﻜﺒﺷ ﻒﺼﺘﻨﻣ ﻲﻓ ﺎًﻤﺋاد تازﻮﺒﺨﻤﻟا داﺪﻋإ ﻲﻧاﻮﺻ ﻊﺿ
.ﺖﺠﻀﻧ ﺪﻗ ﻚﻴﻜﻟا نﻮﻜﺗ ،ﺔﻠﺨﻟﺎﺑ ﻦﻴﺠﻌﻟا ﻖﺼﺘﻠﻳ
10 ﻰﻋاﺮﺗ .تﺎﺟرد
.ﻦﻴﻜﺳ ماﺪﺨﺘﺳﺎﺑ صﺮﺤﺑ ﻚﻴﻜﻟا ﻞﺼﻓا ،ﺰﻴﺒﺨﻟا ﺪﻌﺑ .ةﺪﺑﺰﻟﺎﺑ ﺐﻧاﻮﺠﻟا ﻞﺼﻔﻟ ﺔﻠﺑﺎﻘﻟا ﻚﻴﻜﻟا ﺔﻴﻨﻴﺻ ﺐﻧاﻮﺟ ﻦهﺪﺑ ﻢﻘﺗ ﻻ
راﺪﻘﻤﺑ ﻰﻠﻋأ ةراﺮﺣ ﺔﺟرد ﺮﺘﺧا ﺔﻣدﺎﻘﻟا ةﺮﻤﻟا ﻲﻓ
10.ﺰﺒﺨﻟا ﺔﻨﻣزأ ﻞﻠﻗو تﺎﺟرد
ﺔﺒﺴﻨﻟﺎﺑ .ﻞﻗأ ةراﺮﺣ ﺔﺟرد ﻰﻠﻋ ءﻲﺸﻟا ﺾﻌﺑ ﺰﻴﺒﺨﻟا ﻦﻣز ﺔﻟﺎﻃﺈﺑ ﻢﻗو ،ﺔﻣدﺎﻘﻟا ةﺮﻤﻟا ﻲﻓ ﻞﺋاﻮﺴﻟا ﻦﻣ ﻞﻗأ ﺔﻴﻤآ مﺪﺨﺘﺳا
ﻊﺿ ﻢﺛ قﻮﻗﺪﻤﻟا ﺰﺒﺨﻟا وأ زﻮﻠﻟﺎﺑ ﻪﺷﺮﺑ ﻢﻗ
.ﻚﻴﻜﻟا ةﺪﻋﺎﻘﻟ ﻖﺒﺴﻣ داﺪﻋإ ءاﺮﺟﺈﺑ ﻻوأ ﻢﻗ ﺔﺒﻃﺮﻟا ﺔﻳﻮﻠﻌﻟا ﺔﻘﺒﻄﻟا يذ ﻚﻴﻜﻠﻟ
.ﺰﺒﺨﻟا ﺔﻨﻣزأو تﺎﻔﺻﻮﻟا ةﺎﻋاﺮﻣ ﻰﺟﺮﻳ .ﻰﻠﻋﺄﺑ ﺔﻳﻮﻠﻌﻟا ﺔﻘﺒﻄﻟا
.ﺰﻴﺒﺨﻟا حﻮﻟ ﻊﻣ ﺐﺳﺎﻨﺘﻳ ﺎﻤﺑ تازﻮﺒﺨﻤﻟا داﺪﻋإ قرو
2 ﻊﻄﻗ دﺪﻤﺘﻟ فﺎآ ﺰﻴﺣ دﻮﺟﻮﺑ ﺢﻤﺴﻳ اﺬهو .ىﺮﺧﻷاو ﺔﻌﻄﻗ ﻞآ ﻦﻴﺑ ﺎًﺒﻳﺮﻘﺗ ﻢﺳ
.تﺎﻬﺠﻟا ﻊﻴﻤﺟ ﻦﻣ ﺎهﺮﻴﻤﺤﺘﻟو ﺪﻴﺟ ﻞﻜﺸﺑ تازﻮﺒﺨﻤﻟا
.ﻲﻌﻴﺒﻃ
ﺮﻣأ اﺬهو .ةروﺎﺠﻤﻟا تاﺪﺣﻮﻟا تﺎﻬﺟاو ﻰﻠﻋ وأ لﺎﻤﻌﺘﺳﻻا قﺎﻄﻧ
.ﻲﻬﻄﻟا ﺰﻴﺣ ﻦﻣ ﻲﻧاوﻷاو ﺔﻳروﺮﻀﻟا ﺮﻴﻏ تﺎﻴﻟﺎﻤﻜﻟا جﺮﺧأ ،نﺮﻔﻟا ماﺪﺨﺘﺳا ﻞﺒﻗ
.ﺔﻔﺻﻮﻟا ﻲﻓ ةدﺪﺤﻤﻟا ﻖﻔﺨﻟا تﺎﻗوأ
ﺮﺜآأ ىﻮﺘﺴﻣ ﻰﻠﻋ ﻪﻌﺿ
ﻊﻄﻘﺑ ﺎًﻤﺋاد ﻢﻗ اﺬﻟ .ءاﻮﻬﻟا ﺮﻳوﺪﺗ
راﺪﻘﻤﺑ ﻞﺻﺎﻓ كﺎﻨه نﻮﻜﻳ نأ ﻲﻐﺒﻨﻳ
.ﺮﻴﻀﺤﺘﻟا قﺮﻃو ﻲﻬﻄﻟا ﻲﻧاوأ لﻮﺣ ﺢﺋﺎﺼﻨﻟا ﻦﻣ ﺔﻋﻮﻤﺠﻣ ﺎﻨه ﺪﺠﺗ
.ءﻼﻤﻌﻟا ﺔﻣﺪﺧ ﻦﻣ وأ ﺔﺼﺼﺨﺘﻤﻟا ﺮﺟﺎﺘﻤﻟا ﻦﻣ ﺔﺻﺎﺧ تﺎﻴﻟﺎﻤﻜآ
تﺎﻈﺣﻼﻣ
■ ﺔﻴﻓﺎﺿﻹا تﺎﻴﻟﺎﻤﻜﻟا ﻰﻠﻋ لﻮﺼﺤﻟا ﻚﻨﻜﻤﻳو .زﺎﻬﺠﻟا ﻊﻣ ةدرﻮﻤﻟا تﺎﻴﻟﺎﻤﻜﻟا مﺪﺨﺘﺳا
■.ﻲﻬﻄﻟا ﺰﻴﺣ ﻦﻣ ﺔﻨﺧﺎﺴﻟا ﻲﻧاوﻷا وأ تﺎﻴﻟﺎﻤﻜﻟا جاﺮﺧإ ﺪﻨﻋ ﻲﻧاوأ ﺔﻃﻮﻓ ﺎًﻤﺋاد مﺪﺨﺘﺳا
تازﻮﺒﺨﻤﻟا داﺪﻋﻹ ﺢﺋﺎﺼﻧ
.ﻲﺠﻨﻔﺳﻹا ﻚﻴﻜﻟا ﺞﻀﻧ ﻦﻣ ﻖﻘﺤﺘﻟا ﺔﻴﻔﻴآ ﻲﻟاﻮﺣ ﻞﺒﻗ10 ﻢﻟ اذإ .ﺔﻄﻘﻧ ﻰﻠﻋأ ﻦﻣ ﻚﻴﻜﻟا ﻲﻓ ﺔﻴﺒﺸﺧ ﺔﻠﺧ سﺮﻏا ﺔﻔﺻﻮﻟا ﻲﻓ دﺪﺤﻤﻟا ﺰﻴﺒﺨﻟا ﺖﻗو ﺔﻳﺎﻬﻧ ﻦﻣ ﻖﺋﺎﻗد
.ﻂﺒﻬﻳ ﻚﻴﻜﻟا راﺪﻘﻤﺑ ﻞﻗأ ةراﺮﺣ ﺔﺟرد ﻰﻠﻋ نﺮﻔﻟا ﻂﺒﺿا وأ ﺔﻣدﺎﻘﻟا ةﺮﻤﻟا ﻲﻓ ﻞﺋاﻮﺴﻟا ﻦﻣ ﻞﻗأ ﺔﻴﻤآ مﺪﺨﺘﺳا
ﺪﻨﻋ ﺾﻔﺨﻨﻣ ﻪﻨﻜﻟو ﻒﺼﺘﻨﻤﻟا ﻦﻣ ﻊﻔﺗﺮﻣ ﻚﻴﻜﻟا
.فاﻮﺤﻟا
.ﻰﻠﻋأ ﻦﻣ اًﺪﺟ ﺎًﻤﺗﺎﻗ ﺎًﻧﻮﻟ ﺐﺴﺘﻜﻳ ﻚﻴﻜﻟا.ًﻼ ﻴ ﻠ ﻗ ﺰﺒﺨﻟا ﻦﻣز ﻞﻃأو ﻞﻗأ ةراﺮﺣ ﺔﺟرد ﺮﺘﺧاو ،نﺮﻔﻟا ﻲﻓ ﺎًﺿﺎﻔﺨﻧا
.اًﺪﺟ فﺎﺟ ﻚﻴﻜﻟا .ﻚﻴﻜﻟا ﻰﻠﻋ بوﺮﺸﻣ يأ وأ ﻪآاﻮﻓ ﺮﻴﺼﻋ شﺮﺑ ﻢﻗ ﻢﺛ .ﺔﻴﺒﺸﺧ ﺔﻠﺧ ﺔﻄﺳاﻮﺑ ﻩﺰﻴﻬﺠﺗ ﺪﻌﺑ ﻚﻴﻜﻟا ﻲﻓ ةﺮﻴﻐﺻ بﻮﻘﺛ ﻞﻤﻌﺑ ﻢﻗ
،جرﺎﺨﻟا ﻦﻣ اًﺪﻴﺟ وﺪﺒﻳ (ًﻼ ﺜ ﻣ ﻚﻴآ ﺰﻴﺸﺘﻟا) ﻚﻴﻜﻟا وأ ﺰﺒﺨﻟا
(ءﺎﻤﻟﺎﺑ ﺎًﻌﺒﺸﻣ ،ﺎًﺟﺰﻟ) ﺎًﺒﻃر لاﺰﻳ ﻻ ﻞﺧاﺪﻟا ﻦﻣ ﻦﻜﻟو
.ٍو ﺎ ﺴ ﺘ ﻣ ﺮﻴﻏ ﻞﻜﺸﺑ ةﺮﻤﺤﻣ تازﻮﺒﺨﻤﻟا ﻰﻠﻋ ﺮﺛﺆﻳ نأ ﻦﻜﻤﻳ زرﺎﺒﻟا تازﻮﺒﺨﻤﻟا قرو .ٍوﺎﺴﺘﻣ ﻞﻜﺸﺑ تازﻮﺒﺨﻤﻟا ﺞﻀﻨﺘﻓ ءﻲﺸﻟا ﺾﻌﺑ ﻞﻗأ ةراﺮﺣ ﺔﺟرد ﺮﺘﺧا
.ﻞﻔﺳأ ﻦﻣ اًﺪﺟ ﺢﺗﺎﻓ ﻪآاﻮﻔﻟا ﻚﻴآ.ﺔﻣدﺎﻘﻟا ةﺮﻤﻟا ﻲﻓ ﺪﺣاو ىﻮﺘﺴﻣ راﺪﻘﻤﺑ ﻚﻴﻜﻟا ﺾﻔﺧأ
.ﺾﻴﻔﻳ ﻪآاﻮﻔﻟا ﺮﻴﺼﻋ.ﺪﺟو نإ ،تﺎﻣاﺪﺨﺘﺳﻻا دﺪﻌﺘﻣ ﻖﻴﻤﻌﻟا حﻮﻠﻟا مﺪﺨﺘﺳا ﺔﻣدﺎﻘﻟا ةﺮﻤﻟا ﻲﻓ
ﺮﻤﺨﻤﻟا ﻦﻴﺠﻌﻟا ﻦﻣ ﺔﻋﻮﻨﺼﻤﻟا ةﺮﻴﻐﺼﻟا تازﻮﺒﺨﻤﻟا
.ﺎهﺰﺒﺧ ﺪﻨﻋ ﺎﻬﻀﻌﺒﺑ ﻖﺼﺘﻠﺗ
.ﺐﻃﺮﻟا ﻚﻴﻜﻟا عاﻮﻧأ داﺪﻋإ ﺪﻨﻋ ﻒﺜﻜﺘﻣ ءﺎﻣ نﻮﻜﺘﻳ ﻰﻠﻋ ﻒﺜﻜﺘﻣ ءﺎﻣ تاﺮﻄﻗ نﻮﻜﻳو رﺎﺨﺒﻟا اﺬه ﻒﺜﻜﺘﻳ ﺪﻗو .بﺎﺒﻟا قﻮﻓ ﻦﻣ جﺮﺨﻳ رﺎﺨﺒﻟا اﺬهو .ﺰﻴﺒﺨﻟا ﻦﻋ ءﺎﻣ رﺎﺨﺑ ﺞﺘﻨﻳ ﺪﻗ
13
Page 29

ءﻼﻤﻌﻟا ﺔﻣﺪﺧ
ﻰﺘﺣ ﺊﻃﺎﺨﻟا لﺎﻤﻌﺘﺳﻻا ﺔﻟﺎﺣ ﻲﻓ نﺎﺠﻤﻟﺎﺑ ﺖﺴﻴﻟ ءﻼﻤﻌﻟا ﺔﻣﺪﺧ ﻲﻨﻓ ةرﺎﻳز نأ ﻰﻋاﺮﻳ
.نﺎﻤﻀﻟا ةﺮﺘﻓ
ﺰآﺮﻣ بﺮﻗﺄﺑ لﺎﺼﺗﻻا تﺎﻧﺎﻴﺑ ءﻼﻤﻌﻟا ﺔﻣﺪﺧ ﺰآاﺮﻤﻟ ﻖﻓﺮﻤﻟا ﻞﻴﻟﺪﻟا ﻲﻓ وأ ﺎﻨه ﺪﺠﺗ
.ناﺪﻠﺒﻟا ﻊﻴﻤﺟ ﻲﻓ ءﻼﻤﻌﻟا ﺔﻣﺪﺨﻟ
ﺔﻣﺪﺧ ﻲﻴﻨﻓ ﺔﻓﺮﻌﻤﺑ ﻢﺘﻳ فﻮﺳ حﻼﺻﻹا نأ ﺪآﺄﺗو .ﺔﻌﻧﺎﺼﻟا ﺔﻬﺠﻟا ةﺮﺒﺧو ةءﺎﻔآ ﻲﻓ ﻖﺛ
.كزﺎﻬﺠﻟ ﺔﻴﻠﺻﻷا رﺎﻴﻐﻟا ﻊﻄﻗ ﻢﻬﻳﺪﻟو ﻦﻴﺑرﺪﻣ
ءﺎﻨﺛأ
ﺔﺌﻴﺒﻟﺎﺑ ﺮﻀﺗ ﻻ ﺔﻘﻳﺮﻄﺑ تﺎﻔﻠﺨﻤﻟا ﻦﻣ ﺺﻠﺨﺘﻟا
.ﺔﺌﻴﺒﻟﺎﺑ ﺮﻀﺗ ﻻ ﺔﻘﻳﺮﻄﺑ ﻒﻴﻠﻐﺘﻟا داﻮﻣ ﻦﻣ ﺺﻠﺨﺗ
ﺔﻴﺑوروﻷا ﺔﻔﺻاﻮﻤﻠﻟ ﺎًﻘﺒﻃ ﺰﻴﻤﻣ زﺎﻬﺠﻟا اﺬه 2012/19/EU
ﺔﻤﻳﺪﻘﻟا ﺔﻴﻧوﺮﺘﻜﻟﻹاو ﺔﻴﺋﺎﺑﺮﻬﻜﻟا ةﺰﻬﺟﻷﺎﺑ ﻖﻠﻌﺘﻳ ﺎﻤﻴﻓ
)waste electrical and electronic equipment - WEEE(.
ﻲﺑوروﻷا دﺎﺤﺗﻻا لود ﻞﺧاد يرﺎﺴﻟا مﺎﻌﻟا رﺎﻃﻹا ﺔﻔﺻاﻮﻤﻟا ﻩﺬه دﺪﺤﺗو
.ﺎﻬﻟﻼﻐﺘﺳا ةدﺎﻋإو ﺔﻤﻳﺪﻘﻟا ةﺰﻬﺟﻷا دادﺮﺘﺳا ﺔﻴﻠﻤﻌﻟ
ﻞﺻﻮﺘﻧ ﻦﺤﻧو .ﺔﺒﺳﺎﻨﻤﻟا ﻚﺘﻬﺟو ﻮه ءﻼﻤﻌﻟا ﺔﻣﺪﺨﻟ ﺎﻧﺰآﺮﻤﻓ ،حﻼﺻﻺﻟ كزﺎﻬﺟ جﺎﺘﺣا اذإ
ﻲﻨﻓ ﻦﻣ ﺔﻳروﺮﺿ ﺮﻴﻏ تارﺎﻳز ﺔﻳأ ﺐﻨﺠﺘﻟ ﺎﻀﻳأو ،ﺔﻠﻜﺸﻤﻠﻟ ﺐﺳﺎﻨﻤﻟا ﻞﺤﻟا ﻰﻟإ ﺎﻤﺋاد
ﺔﻣﺪﺨﻟا.
ﺞﺘﻨﻤﻟا ﻢﻗر ﺮآذ ﻰﺟﺮﻳ ﺔﻣﺪﺨﻟا ﺰآﺮﻤﺑ لﺎﺼﺗﻻا ﺪﻨﻋ
)E-Nr. ( ﻊﻨﺼﻟا ﻢﻗرو )FD-Nr. (
ﻒﻠﺧ ﺐﻧﺎﺠﻟا ﻲﻓ ﻊﻨﺼﻟا ﺔﺣﻮﻟ ﺪﺟﻮﺗو .ﺔﺤﻴﺤﺼﻟا ةرﻮﺸﻤﻟا ﻚﻟ مﺪﻘﻧ نأ ﻊﻴﻄﺘﺴﻧ ﻰﺘﺣ
.نﺮﻔﻟا بﺎﺑ
ﺖﻗﻮﻟ ﺚﺤﺒﻠﻟ ﺮﻄﻀﺗ ﻻ ﻲآ ،ءﻼﻤﻌﻟا ﺔﻣﺪﺧ ﻒﺗﺎه ﻢﻗرو كزﺎﻬﺟ تﺎﻧﺎﻴﺑ ﻦﻳوﺪﺗ ﺎﻨه ﻚﻨﻜﻤﻳ
.تﺎﻧﺎﻴﺒﻟا ﻩﺬه ﻰﻟإ جﺎﻴﺘﺣﻻا ﺪﻨﻋ ﻞﻳﻮﻃ
ﺞﺘﻨﻤﻟا ﻢﻗر
E-Nr. ﻊﻨﺼﻟا ﻢﻗرFD-Nr.
ءﻼﻤﻌﻟا ﺔﻣﺪﺧO
ﺔﺌﻴﺒﻟاو ﺔﻗﺎﻄﻟا لﻮﺣ ﺢﺋﺎﺼﻧ
ﺔﻴﻔﻴآ لﻮﺣو ءاﻮﺸﻟاو تازﻮﺒﺨﻤﻟا داﺪﻋإ ءﺎﻨﺛأ ﺔﻗﺎﻄﻟا ﺮﻴﻓﻮﺗ ﺔﻴﻔﻴآ لﻮﺣ ﺢﺋﺎﺼﻧ ﺎﻨه ﺪﺠﺗ
.ﺔﻤﻴﻠﺳ ﺔﻘﻳﺮﻄﺑ كزﺎﻬﺟ ﻦﻣ ﺺﻠﺨﺘﻟا
ﺔﻗﺎﻄﻟا ﺮﻴﻓﻮﺗ
.دوﺪﺤﻟا
ﺎﻤآ .ﺔﻴﻧﺎﺜﻟا ةﺮﻴﻄﻔﻠﻟ ﺔﺒﺴﻨﻟﺎﺑ تازﻮﺒﺨﻤﻟا داﺪﻋﻹ مزﻼﻟا ﺖﻗﻮﻟا ﻞﻘﻳ ﻚﻟﺬﺑو .ﻪﺘﻧﻮﺨﺴﺑ
.ﻦﻴﺗروﺎﺠﺘﻣ ﻦﻴﺘﻴﻨﻴﺻ ﻊﺿو ﺎًﻀﻳأ ﻚﻨﻜﻤﻳ
.ﻲﻬﻄﻟا ءﺎﻬﻧﻹ ﺔﻴﻘﺒﺘﻤﻟا ةراﺮﺤﻟا ماﺪﺨﺘﺳاو ،ﻖﺋﺎﻗد ﺮﺸﻌﺑ
■.ﺔﻔﺻﻮﻟا ﻲﻓ ارﻮآﺬﻣ ﻚﻟذ نﺎآ اذإ ﻻإ نﺮﻔﻟا ءﺎﻤﺣﺈﺑ ﻢﻘﺗ ﻻ
■ ﻖﻴﺿأ ﻲﻓ ﻻإ ﺮﻴﻤﺤﺘﻟا وأ تازﻮﺒﺨﻤﻟا داﺪﻋإ وأ ﻲﻬﻄﻟا ءﺎﻨﺛأ نﺮﻔﻟا بﺎﺑ ﺢﺘﻔﺗ ﻻ
■ ﺎًﻈﻔﺘﺤﻣ نﺮﻔﻟا ﻞﻈﻳ ﺚﻴﺣ .ىﺮﺧﻷا ﺪﻌﺑ ةﺪﺣاﻮﻟا ﺮﺋﺎﻄﻔﻟا ﻦﻣ ﺪﻳﺪﻌﻟا ﺰﺒﺧ ﻞﻀﻓﻷا ﻦﻣ
■ ﻲﻬﻄﻟا ﻦﻣز ﺔﻳﺎﻬﻧ ﻞﺒﻗ نﺮﻔﻟا ءﺎﻔﻃإ ﻚﻨﻜﻤﻳ ﺎًﻴﺒﺴﻧ ﺔﻠﻳﻮﻄﻟا ﻲﻬﻄﻟا تﺎﻗوﻷ ﺔﺒﺴﻨﻟﺎﺑ
ﺔﻴﺋاﺬﻐﻟا داﻮﻤﻟا ﻲﻓ ﺪﻴﻣﻼﻳﺮآﻷا
تﺎﺟرد ﻲﻓ ةﺪﻌُﻤﻟا ﺲﻃﺎﻄﺒﻟاو بﻮﺒﺤﻟا تﺎﺠﺘﻨﻣ ﻲﻓ ﻲﺴﻴﺋر ﻞﻜﺸﺑ ﺪﻴﻣﻼﻳﺮآﻷا ﺞﺘﻨﻳ
فﻮﻔﻠﻤﻟا ﺰﺒﺨﻟاو ﺖﺳﻮﺘﻟا ﺰﺒﺨﻟاو يﺮﻓ مﻮﺒﻟاو ﺲﻃﺎﻄﺒﻟا ﻖﺋﺎﻗر ﻞﺜﻣ ،ﺔﻴﻟﺎﻋ ةراﺮﺣ
.(ﻞﺒﺘﻤﻟا ﺖﻳﻮﻜﺴﺒﻟاو ،ﻞﻴﺒﺠﻧﺰﻟا ﺰﺒﺧو ،ﺖﻳﻮﻜﺴﺒﻟا) ﺔﻘﻴﻗﺮﻟا تازﻮﺒﺨﻤﻟا وأ ﺰﺒﺨﻟاو
مﺎﻌﻄﻟا ﺮﻴﻀﺤﺗ ﺪﻨﻋ ﻰﻧدﻷا ﺪﺤﻟا ﻰﻟإ ﺪﻴﻣﻼﻳﺮآﻷا ﻞﻴﻠﻘﺘﻟ ﺢﺋﺎﺼﻧ
■.ﻰﻧدﻷا ﺪﺤﻟا ﻰﻟإ ﻲﻬﻄﻟا تﺎﻗوأ ﻞﻠﻗ
■.ﺔﻳﺎﻐﻠﻟ ﺎﻤﺗﺎﻗ ﺲﻴﻟو ﻲﺒهذ ﻲﻨﺑ ﺎﻬﻧﻮﻟ ﺢﺒﺼﻳ ﻰﺘﺣ تﺎﺒﺟﻮﻟا ﻲﻬﻄﺑ ﻢﻗ
■.ﻞﻗأ ﺪﻴﻣﻼﻳﺮآأ ﻰﻠﻋ يﻮﺘﺤﺗ مﺎﻌﻄﻟا ﻦﻣ ةﺮﻴﺒﻜﻟا ﻊﻄﻘﻟا
190°.م
.ﺪﻴﻣﻼﻳﺮآﻷا ةدﺎﻣ جﺎﺘﻧإ ﻦﻣ ﻞﻠﻘﻳ ﺾﻴﺒﻟا رﺎﻔﺻ وأ ﺾﻴﺒﻟا
400 ﻒﺠﺗ ﻻ ﻰﺘﺣ ﻚﻟذو ،حﻮﻟ ﻞآ ﻰﻠﻋ ﻞﻗﻷا ﻰﻠﻋ ﻢﺟ
يﺮﻓ مﻮﺒﻟا ﺲﻃﺎﻄﺑ
نﺮﻔﻟﺎﺑ يﺮﻓ مﻮﺒﻟا ﺲﻃﺎﻄﺑ داﺪﻋﺈﺑ ﻢﻗ .ﺰﻴﺒﺨﻟا حﻮﻟ ﻰﻠﻋ يوﺎﺴﺘﻟﺎﺑ ﺎﻬﻨﻣ ةﺪﺣاو ﺔﻘﺒﻃ ﻊﻳزﻮﺘﺑ ﻢﻗ
ﺔﻣﺎﻋ طﺎﻘﻧ
تازﻮﺒﺨﻤﻟا داﺪﻋإ ﻰﺼﻗﻷا ﺪﺤﻟا200°.م
ﺖﻳﻮﻜﺴﺑ ﻰﺼﻗﻷا ﺪﺤﻟا
12
Page 30

ﻖﻴﻠﻌﺘﻟا نﺎﺒﻀﻗ تﺎﻜﺒﺷ ﺐﻴآﺮﺗ
D
E
4..ﻲﻬﻄﻟا ﺰﻴﺣ ﻦﻣ ﻖﻴﻠﻌﺘﻟا نﺎﺒﻀﻗ تﺎﻜﺒﺷ جﺮﺧأ
ﻖﻴﻠﻌﺘﻟا نﺎﺒﻀﻗ تﺎﻜﺒﺷ ﺐﻴآﺮﺗو ﻚﻓ
.ﻞﻀﻓأ ﻞﻜﺸﺑ ﻒﻴﻈﻨﺘﻠﻟ ﻖﻴﻠﻌﺘﻟا نﺎﺒﻀﻗ تﺎﻜﺒﺷ ﻚﻓ ﻚﻨﻜﻤﻳ
ﻖﻴﻠﻌﺘﻟا نﺎﺒﻀﻗ تﺎﻜﺒﺷ ﻚﻓ
ﻦﻴﻴﺒﻧﺎﺠﻟا ﻦﻳراﺪﺠﻟا ﻰﻠﻋ طﺎﻘﻧ ثﻼﺛ ﻰﻠﻋ ﺔﺘﺒﺜﻣ ﻖﻴﻠﻌﺘﻟا نﺎﺒﻀﻗ تﺎﻜﺒﺷ ﻦﻣ ﺔﻜﺒﺷ ﻞآ
.ﻒﻳﻮﺠﺘﻟا ﻦﻣ ﻖﻴﻠﻌﺘﻟا نﺎﺒﻀﻗ ﺔﻜﺒﺸﻟ ﻲﻣﺎﻣﻷا فﺎﻄﺨﻟا ﻚﻔﻨﻴﻓ
1..ﻲﻬﻄﻟا ﺰﻴﺤﻟ ةزﺎﻔﺤﻟا ﺔﻧﺎﻄﺒﻟا ﻚﺴﻣأ
2..ﻲﺒﻧﺎﺠﻟا راﺪﺠﻠﻟ ﺔﻴﻔﻠﺨﻟا ﻒﻳوﺎﺠﺘﻟا ﻲﻓ ﻖﻴﻠﻌﺘﻟا نﺎﺒﻀﻗ ﺔﻜﺒﺷ تﺎﻓﺎﻄﺧ ﻞﺧدأ
3..ﻒﻳﻮﺠﺘﻟا ﻲﻓ ﻖﻴﻠﻌﺘﻟا نﺎﺒﻀﻗ ﺔﻜﺒﺸﻟ ﻲﻣﺎﻣﻷا فﺎﻄﺨﻟا ﻂﻐﺿا
؟ﻞﻠﺧ ثوﺪﺣ ﺪﻨﻋ ﻞﻤﻌﻟا ﺎﻣ
.ﻲﻬﻄﻟا ﺰﻴﺣ ﻞﺧاد
1. .ﻲﻬﻄﻟا ﺰﻴﺣ ﻒﺼﺘﻨﻣ ﻰﻟإ ﺎﻬﺒﺤﺳاو مﺎﻣﻷا ﻦﻣ ﻖﻴﻠﻌﺘﻟا نﺎﺒﻀﻗ ﺔﻜﺒﺷ ﻚﺴﻣأ
2..ﻲﺒﻧﺎﺠﻟا راﺪﺠﻠﻟ ﺔﻴﻔﻠﺨﻟا ﻒﻳوﺎﺠﺘﻟا ﻦﻣ ﺎﻬﺒﺤﺳاو ،ﻊﺳوأ ﻞﻜﺸﺑ ﻖﻴﻠﻌﺘﻟا نﺎﺒﻀﻗ ﺔﻜﺒﺷ ﺢﺘﻓا
3..ﻲﻬﻄﻟا ﺰﻴﺤﻟ ةزﺎﻔﺤﻟا ﺔﻧﺎﻄﺒﻟا ﻚﺴﻣأ
نﺮﻔﻟا ﺔﺒﻤﻟ ﺮﻴﻴﻐﺗ
ﻞﻤﺤﺘﺗ ﻲﺘﻟا ﺔﻠﻳﺪﺒﻟا تﺎﺒﻤﻠﻟا ﻰﻠﻋ لﻮﺼﺤﻟا ﻚﻨﻜﻤﻳ .ﺎﻬﻔﻠﺗ ﺔﻟﺎﺣ ﻲﻓ نﺮﻔﻟا ﺔﺒﻤﻟ ﺮﻴﻴﻐﺗ ﺐﺠﻳ
ﻢﻗر ﺮآذ ﻰﺟﺮﻳو .ﺔﺼﺼﺨﺘﻤﻟا ﺮﺟﺎﺘﻤﻟا ﻦﻣ وأ ءﻼﻤﻌﻟا ﺔﻣﺪﺧ ﺰآﺮﻣ ﻦﻣ ﺔﻧﻮﺨﺴﻟا
E
ﻢﻗرو
FD.ىﺮﺧأ عاﻮﻧأ ﻦﻣ تﺎﺒﻤﻟ مﺪﺨﺘﺴﺗ ﻻ .كزﺎﻬﺠﻟ
:!ﻲﺋﺎﺑﺮﻬﻜﻟا ﻖﻌﺼﻟا ﺮﻄﺧ
.ﻲﺋﺎﺑﺮﻬآ رﺎﻴﺗ ﺎﻬﻴﻓ يﺮﺴﻳ ﺔﺒﻤﻠﻟا ةاود تﺎﺴﻣﻼﻣ نأ ﻲﻬﻄﻟا ﺰﻴﺣ ﺔﺒﻤﻟ ﺮﻴﻴﻐﺗ ﺪﻨﻋ ﻰﻋاﺮﻳ
ﻲﻓ دﻮﺟﻮﻤﻟا ﺮﻬﺼﻤﻟا ﻞﺼﻓا وأ ﺲﺒﻘﻤﻟا ﻦﻣ ﻲﺋﺎﺑﺮﻬﻜﻟا ﺲﺑﺎﻘﻟا عﺰﻧا ،ﺔﺒﻤﻠﻟا ﺮﻴﻴﻐﺗ ﻞﺒﻗ
.ﺮهﺎﺼﻤﻟا قوﺪﻨﺻ
.ﺔﻘﻌﻠﻤﺑ ﻦﻌﺘﺳا ﻲﺟﺎﺟﺰﻟا ءﺎﻄﻐﻟا ﻊﻠﺧ رﺬﻌﺗ
ﻊﺟار .ﺔﻄﻴﺴﺑ رﻮﻣأ دﺮﺠﻣ ﻰﻟإ نﺎﻴﺣﻷا ﺐﻠﻏأ ﻲﻓ ﻚﻟذ دﻮﻌﻳ ،ﻞﻠﺧ رﻮﻬﻇ ﺔﻟﺎﺣ ﻲﻓ
.ﻚﺴﻔﻨﺑ ﻞﻠﺨﻟا ﻰﻠﻋ ﺐﻠﻐﺘﻟا ﻚﻧﺎﻜﻣﺈﺑ نﻮﻜﻳ ﺎﻤﺑﺮﻓ .ءﻼﻤﻌﻟا ﺔﻣﺪﺨﺑ ﻞﺼﺘﺗ نأ ﻞﺒﻗ لوﺪﺠﻟا
حﻼﺻﻹا لﺎﻤﻋأ ﺬﻴﻔﻨﺗ زﻮﺠﻳ ﻻ .رﺎﻄﺧأ ﻰﻠﻋ ﺎﻴﻨﻓ ﺔﻤﻴﻠﺴﻟا ﺮﻴﻏ حﻼﺻﻹا لﺎﻤﻋأ يﻮﻄﻨﺗ
ﻦﻣ برﺪﻣ ءﻼﻤﻋ ﺔﻣﺪﺧ ﻲﻨﻓ ﺔﻓﺮﻌﻤﺑ ﻻإ ةرﺮﻀﺘﻤﻟا زﺎﻐﻟاو ءﺎﺑﺮﻬﻜﻟا تﻼﻴﺻﻮﺗ ﺮﻴﻴﻐﺗو
ﺮﻬﺼﻤﻟا ﻞﺼﻓا وأ ﺲﺒﻘﻤﻟا ﻦﻣ ﻲﺋﺎﺑﺮﻬﻜﻟا ﺲﺑﺎﻘﻟا عﺰﻧﺎﻓ ،زﺎﻬﺠﻟﺎﺑ ﻞﻠﺧ كﺎﻨه نﺎآ اذإ .ﺎﻨﻠﺒِﻗ
.ءﻼﻤﻌﻟا ﺔﻣﺪﺨﺑ ﻞﺼﺗا .زﺎﻐﻟﺎﺑ داﺪﻣﻹا رﺪﺼﻣ ﻖﻠﻏأو ،ﺮهﺎﺼﻤﻟا قوﺪﻨﺻ
1..دﺮﺒﻳ ﻰﺘﺣ ﻲﻬﻄﻟا ﺰﻴﺣ كﺮﺗا
2..زﺎﻬﺠﻟا بﺎﺑ ﺢﺘﻓا
3..راﺮﺿأ ثوﺪﺣ ﺐﻨﺠﺘﻟ ﻲﻬﻄﻟا ﺰﻴﺣ ﻲﻓ ﻲﻧاوأ ﺔﻃﻮﻓ ﻊﺿ
4..ﻖﻴﻠﻌﺘﻟا تﺎﻜﺒﺷ ﻊﻠﺧا
5. ﺔﻟﺎﺣ ﻲﻓ .ﻚﻳﺪﻴﺑ مﺎﻣﻷا ﻦﻣ ﻲﺟﺎﺟﺰﻟا ءﺎﻄﻐﻟا ﺢﺘﻓا ﻚﻟﺬﺑ مﺎﻴﻘﻠﻟ .ﻲﺟﺎﺟﺰﻟا ءﺎﻄﻐﻟا ﻊﻠﺧا
6..جرﺎﺨﻠﻟ نﺮﻔﻟا ﺔﺒﻤﻟ بﺬﺟا
ةﺰﻬﺟأ كﺎﻨه ﺖﻧﺎآ اذإ ﺎﻤﻣ ﻖﻘﺤﺗ
ﺔﻠﻐﺸﻣ ىﺮﺧأ ﺦﺒﻄﻣ
ماﺮﻳ ﺎﻣ ﻰﻠﻋ ﺮهﺎﺼﻤﻟا
(«نﺮﻔﻟا ﺔﺒﻤﻟ ﺮﻴﻴﻐﺗ»
ﻲﺋﺎﺑﺮﻬﻜﻟا
ﻒﻟﺎﺗ ﺮﻬﺼﻤﻟا قوﺪﻨﺻ ﻲﻓ زﺎﻬﺠﻟا ﺮﻬﺼﻣ نأ ﻖﻘﺤﺗ
.نﺮﻔﻟا ةءﺎﺿإ ﻞﻄﻌﺗﺔﻔﻟﺎﺗ نﺮﻔﻟا ﺔﺒﻤﻟ عﻮﺿﻮﻣ ﺮﻈﻧا) .نﺮﻔﻟا ﺔﺒﻤﻟ ﺮﻴﻴﻐﺘﺑ ﻢﻗ
يدﺎﻋ خﺎﺴﺗا ﻒﻴﻈﻨﺘﺑ ﺺﺼﺨﺘﻣ ﻲﻨﻓ مﻮﻘﻳ نأ ﺐﺠﻳ
.ﺔﻠﻌﺸﻟا
.زﺎﻐﻟا جوﺮﺧ تﺎﺤﺘﻓ
ةءﺎﻔﻜﻟا ﻰﻠﻋ ﺎﻬﻟ ﺮﻴﺛﺄﺗ ﻻ ؛حﺎﺘﻣ ﺮﻴﻏ
.ﺔﻴﻔﻴﻇﻮﻟا
اًﺮﻈﻧ ﺔﻳدﺎﻋ ةﺮهﺎﻇ
ﺔﺟرد فﻼﺘﺧﻻ
ﻰﻠﻋ ءﺎﻣ رﺎﺨﺑ ﻒﺜﻜﺘﻳ
ﺪﻨﻋ بﺎﺒﻟا جﺎﺟز
ةراﺮﺤﻟا
:!ﺔﺑﺎﺻﻹا ﺮﻄﺧ
ﻲﻓ دﻮﺟﻮﻤﻟا
ﻞﻠﺨﻟاﻞﻤﺘﺤﻤﻟا ﺐﺒﺴﻟاﻞﺤﻟا
ﻞﻤﻌﻳ ﻻ زﺎﻬﺠﻟا رﺎﻴﺘﻟا عﺎﻄﻘﻧا
(نﺮﻔﻟا) ﺐﻬﻟ
.نﺮﻔﻟا ﻦﻴﺨﺴﺗ
ﻻ ﺾﻌﺑ ﻦﻣ ﺚﻌﺒﻨﻳ
--------
7. :عﻮﻨﻟا ﺲﻔﻧ ﻦﻣ ىﺮﺧﺄﺑ نﺮﻔﻟا ﺔﺒﻤﻟ لﺪﺒﺘﺳا
:ﻲﺋﺎﺑﺮﻬﻜﻟا ﺪﻬﺠﻟا
230 ،ﻂﻠﻓ
:ةرﺪﻘﻟا
40 ،طاو
:ةاوﺪﻟا
G9 ،
:ةراﺮﺤﻟا ﺔﻣوﺎﻘﻣ
300°م
8..نﺮﻔﻟا ﺔﺒﻤﻠﻟ ﻲﺟﺎﺟﺰﻟا ءﺎﻄﻐﻟا ﺐﻴآﺮﺗ ﺪﻋأ
11
9..ﻖﻴﻠﻌﺘﻟا نﺎﺒﻀﻗ تﺎﻜﺒﺷ ﺐﻴآﺮﺘﺑ ﻢﻗ
10. .ىﺮﺧأ ةﺮﻣ ﻲﻧاوﻷا ﺔﻃﻮﻓ جﺮﺧأ
11..ﺮﻬﺼﻤﻟا ﻞﻴﺻﻮﺗ ﺪﻋأ
12..ﺪﻳﺪﺟ ﻦﻣ ﻞﻤﻌﺗ نﺮﻔﻟا ةءﺎﺿإ نأ ﺪآﺄﺗ
Page 31

زﺎﻬﺠﻟا بﺎﺑ ﺐﻴآﺮﺗو ﻚﻓ
DE
ED
.ﻞﻀﻓأ ﻒﻴﻈﻨﺗ ىﻮﺘﺴﻣ نﺎﻤﻀﻟ ةﺪﻴﻨﻌﻟا تﺎﺧﺎﺴﺗﻻا ﺔﻟﺎﺣ ﻲﻓ نﺮﻔﻟا بﺎﺑ ﻊﻠﺧ ﻦﻜﻤﻳ
ﻻو.ﺔﻳدﺎﻌﻟا تﺎﺧﺎﺴﺗﻻا ﻊﻣ ﻚﻟﺬﺑ ﺢﺼﻨﻧ
زﺎﻬﺠﻟا بﺎﺑ ﻚﻓ
ﺔﻈﺣﻼﻣ :.ﺎﻣﺎﻤﺗ تﻼﺼﻔﻤﻟا ﻒﻳوﺎﺠﺗ ﻲﻓ ﻦﻴﻣﺄﺘﻟا ﺮﻴﺑاﻮﺧ لﺎﺧدإ ﺐﺠﻳ
ﺔﻈﺣﻼﻣ : ﺐﺒﺴﺗو تﻼﺼﻔﻤﻟا ﻲﻨﺜﻨﺗ نأ ﻦﻜﻤﻳ ﺚﻴﺣ .ﺎًﻣﺎﻤﺗ نﺮﻔﻟا بﺎﺑ ﻖﻠﻐﺗ ﻻ
.(ﻞﻴﻣﺎﻨﻳﻹا) ﺎﻨﻴﻤﻟا ﺔﻘﺒﻄﺑ اراﺮﺿأ
5..ﻲﻠﺧاﺪﻟا جﺎﺟﺰﻟا ﻊﻠﺧا
6..ﻂﺳوﻷا جﺎﺟﺰﻟا ﻊﻠﺧا
1..ﺎﻣﺎﻤﺗ نﺮﻔﻟا بﺎﺑ ﺢﺘﻓا
2.ﻦﻴﻣﺄﺘﻟا رﻮﺑﺎﺨﺑ ﻰﻨﻤﻴﻟاو ىﺮﺴﻴﻟا ﻦﻴﺘﻠﺼﻔﻤﻟا ﺖﻴﺒﺜﺘﺑ ﻢﻗ)a(.
3. ﻲﻟاﻮﺣ ﺔﻳواﺰﺑ ﻪﻘﻠﻏأ ﻢﺛ ﻚﻳﺪﻳ ﺎﺘﻠﻜﺑ ﻦﻴﺒﻧﺎﺠﻟا ﻦﻣ نﺮﻔﻟا بﺎﺑ ﻚﺴﻣأ30°)b(.
ﺔﻈﺣﻼﻣ :.ﺔﻴﻃﺎﻄﻣ ﻞﻣﺎﺤﻤﺑ ﻞﺑ ،ﺖﻴﺒﺜﺗ ﺮﻴﺑاﻮﺨﺑ ﺖﺒﺜﻣ ﺮﻴﻏ ﻂﺳوﻷا جﺎﺟﺰﻟا
4..جرﺎﺨﻠﻟ ﻪﺒﺤﺳاو ﻼﻴﻠﻗ نﺮﻔﻟا بﺎﺑ ﻊﻓرا
زﺎﻬﺠﻟا بﺎﺑ ﺐﻴآﺮﺗ
)b(.
ﺔﻈﺣﻼﻣ :نﺮﻔﻟا رﺎﻃإ ﻲﻓ ﺖﺒﺜﻳ نأ ﺐﺠﻳ تﻼﺼﻔﻤﻟﺎﺑ ﻲﻠﻔﺴﻟا ﺰﺤﻟا
:!ﺔﺑﺎﺻﻹا ﺮﻄﺧ
ﻞﻜﺸﺑ ﺔﻠﺼﻔﻣ قﻼﻐﻧا ﺔﻟﺎﺣ ﻲﻓ وأ ﺪﺼﻗ نود جرﺎﺨﻠﻟ نﺮﻔﻟا بﺎﺑ طﻮﻘﺳ ﺔﻟﺎﺣ ﻲﻓ
.ءﻼﻤﻌﻟا ﺔﻣﺪﺨﺑ ﻞﺼﺗا .ﺔﻠﺼﻔﻤﻟا ﻲﻓ كﺪﻳ ﻞﺧﺪﺗ ﻻ ،يداﺪﺗرا
1..ﻦﻴﺒﻧﺎﺠﻟا ﻦﻣ ﻚﻳﺪﻳ ﺎﺘﻠﻜﺑ نﺮﻔﻟا بﺎﺑ ﻚﺴﻣأ
2.نﺮﻔﻟا ﻒﻳوﺎﺠﺗ ﻲﻓ تﻼﺼﻔﻤﻟا ﻞﺧدأ)a(.
.ﺔﻤﻋﺎﻧ ﺔﻃﻮﻓو جﺎﺟز ﻒﻈﻨﻣ ماﺪﺨﺘﺳﺎﺑ ﺔﻴﺟﺎﺟﺰﻟا حاﻮﻟﻷا ﻒﻴﻈﻨﺘﺑ ﻢﻗ
داﻮﻣ وأ جﺎﺟز ﺔﻄﺷﺎآ مﺪﺨﺘﺴﺗ ﻻ .تﺎﻘﻘﺸﺗ ﻰﻟإ رﻮﻄﺘﺗ ﺪﻗ زﺎﻬﺠﻟا بﺎﺑ جﺎﺟز شوﺪﺧ
.ﻞآﺂﺘﻠﻟ ﺔﺒﺒﺴﻣ وأ ﺔﻨﺸﺧ ﻒﻴﻈﻨﺗ
بﺎﺒﻟا جﺎﺟز ﺐﻴآﺮﺗ
3..ﻞﻔﺳﻷ بﺎﺒﻟا لﺰﻧأ
4..ﻦﻴﻣﺄﺘﻟا ﺮﻴﺑاﻮﺧ جﺮﺧأ
.ﻮﺘﺴﻣ ﻞﻜﺸﺑ ﻲﺟرﺎﺨﻟا جﺎﺟﺰﻟا ﺢﻄﺳ ﻰﻠﻋ ﺔﻴﻃﺎﻄﻤﻟا
.ﺎﻬﻟ ﺔﺼﺼﺨﻤﻟا
:!ﺔﺑﺎﺻﻹا ﺮﻄﺧ
1..ﻂﺳوﻷا جﺎﺟﺰﻟا ﺐﻴآﺮﺘﺑ ﻢﻗ
ﺔﻈﺣﻼﻣ : ﻞﻣﺎﺤﻤﻟا ﻊﻴﻤﺟ ﺰﻜﺗﺮﺗ نأ ﺐﺠﻳ .ﺢﻴﺤﺻ ﻞﻜﺸﺑ جﺎﺟﺰﻟا راﺮﻘﺘﺳا ﻦﻣ ﺪآﺄﺗ
2..ﻲﻠﺧاﺪﻟا جﺎﺟﺰﻟا ﺐﻴآﺮﺗ ﺪﻋأ
ﺔﻈﺣﻼﻣ : ﺖﻴﺒﺜﺘﻟا ﻊﺿاﻮﻣ ﻲﻓ ﺔﻌﺑرﻷا ﺖﻴﺒﺜﺘﻟا ﺮﻴﺑاﻮﺧ ﻊﻴﻤﺟ ﺮﻘﺘﺴﺗ نأ ﺐﺠﻳ
3..نﺮﻔﻟا بﺎﺑ ﻖﻠﻏأو ﻦﻴﻣﺄﺘﻟا ﺮﻴﺑاﻮﺧ ﺔﻟازﺈﺑ ﻢﻗ
10
Page 32

ﻲﻬﻄﻟا ﺰﻴﺤﻟ ةزﺎﻔﺤﻟا ﺔﻧﺎﻄﺒﻟا
.(ﻞﻴﻣﺎﻨﻳﻹا) ﺎﻨﻴﻤﻟا ﻦﻣ ﻒﻴﻈﻨﺘﻟا ﺔﻴﺗاذ ﺔﻘﺒﻄﺑ ةﺎﻄﻐﻣ ﻲﻬﻄﻟا ﺰﻴﺤﻟ ةزﺎﻔﺤﻟا تﺎﻧﺎﻄﺒﻟا
ةﺮﻴﺒﻜﻟا ذاذﺮﻟا تاﺮﻄﻗ نأ ﻰﻋاﺮﻳو .ﺎًﻴﺗاذ ﺎًﻔﻴﻈﻨﺗ ﺢﻄﺳﻷا ﻒﻴﻈﻨﺗ ﻢﺘﻳ ،نﺮﻔﻟا ﻞﻴﻐﺸﺗ ءﺎﻨﺛﺄﻓ
.تاﺮﻣ ةﺪﻋ نﺮﻔﻟا ﻞﻴﻐﺸﺗ ﺪﻌﺑ ﻻإ ﻲﻔﺘﺨﺗ ﻻ ﺎًﻴﺒﺴﻧ
ﻒﻴﻈﻨﺘﻟا ﺔﻴﺗاذ ﺢﻄﺳﻷا
ناﺮﻓأ ﻒﻈﻨﻣ ماﺪﺨﺘﺳﺎﺑ ﺢﻄﺳﻷا ﻩﺬه ﻒﻈﻨﺗ ﻻ .ةزﺎﻔﺣ ﺔﻧﺎﻄﺒﺑ ﺔﻴﻠﻄﻣ ﺔﻴﺒﻧﺎﺠﻟا نارﺪﺠﻟا
ﻰﻠﻋ ﺮﺛﺆﻳ ﻻ
(ﻞﻴﻣﺎﻨﻳﻹا) ﺎﻨﻴﻤﻟا ﺔﻘﺒﻃ ﻰﻠﻋ ﻂﻴﺴﺑ ﻲﻧﻮﻟ ﺮﻴﻐﺗ رﻮﻬﻇ نﺈﻓ ﻢﻠﻌﻠﻟو .ﺎﻘﻠﻄﻣ
.ﻲﺗاﺬﻟا ﻒﻴﻈﻨﺘﻟا ﺔﻴﺻﺎﺧ
بﺎﺒﻟا جﺎﺟز ﺐﻴآﺮﺗو ﻚﻓ
.ﻞﻀﻓأ ﻞﻜﺸﺑ ﻒﻴﻈﻨﺘﻟا ﺔﻴﻠﻤﻋ ءاﺮﺟﻹ نﺮﻔﻟا بﺎﺑ ﻦﻣ ﺔﻴﺟﺎﺟﺰﻟا حاﻮﻟﻷا ﻚﻓ ﻚﻨﻜﻤﻳ
بﺎﺒﻟا جﺎﺟز ﻚﻓ
ﺔﻈﺣﻼﻣ :.ﺎﻣﺎﻤﺗ تﻼﺼﻔﻤﻟا ﻒﻳوﺎﺠﺗ ﻲﻓ ﻦﻴﻣﺄﺘﻟا ﺮﻴﺑاﻮﺧ لﺎﺧدإ ﺐﺠﻳ
ﺖﻴﺒﺜﺘﻟا ﻊﺿﻮﻣ
)1(.
ﺖﻴﺒﺜﺘﻟا
)2(.
!ﻪﻴﺒﻨﺗ
جﺎﺟﺰﻟا نأ ﺪآﺄﺗ .ﻲﻠﺧاﺪﻟا جﺎﺟﺰﻟﺎﺑ ﺎﻘﺼﺘﻠﻣ ﻂﺳوﻷا جﺎﺟﺰﻟا ﻞﻈﻳ ﺪﻗ ﻲﻠﺧاﺪﻟا جﺎﺟﺰﻟا ﻊﻓر ﺪﻨﻋ
.ﻂﻘﺴﻳ ﻦﻟ ﻂﺳوﻷا
ﻰﻋاﺮﺗ ،ﺔﺒﺳﺎﻨﻣ ﺮﻴﻏ تﺎﻔﻈﻨﻣ ماﺪﺨﺘﺳا ﻞﻌﻔﺑ رﺮﻀﻠﻟ ﺔﻔﻠﺘﺨﻤﻟا ﺢﻄﺳﻷا ضﺮﻌﺘﺗ ﻻ ﻲآ
مﺪﺨﺘﺴﺗ ﻻ .لوﺪﺠﻟا ﻲﻓ ةدراﻮﻟا تﺎﻤﻴﻠﻌﺘﻟا
.ﺎﻬﻣاﺪﺨﺘﺳا ﻞﺒﻗ اﺪﻴﺟ ةﺪﻳﺪﺠﻟا ﺔﻴﺠﻨﻔﺳﻹا طﻮﻔﻟا ﻞﺴﻏا
ﻚﻟذ ﺪﻌﺑ ﻒﻴﻔﺠﺘﻟﺎﺑ ﻢﻗ ﻢﺛ ،ﻒﻴﻈﻨﺗ ﺔﻃﻮﻔﺑ ﻒﻴﻈﻨﺘﻟﺎﺑ ﻢﻗ
1..ﺎﻣﺎﻤﺗ نﺮﻔﻟا بﺎﺑ ﺢﺘﻓا
2..ﻦﻴﻣﺄﺘﻟا رﻮﺑﺎﺨﺑ ﻰﻨﻤﻴﻟاو ىﺮﺴﻴﻟا ﻦﻴﺘﻠﺼﻔﻤﻟا ﺖﻴﺒﺜﺘﺑ ﻢﻗ
وأ جﺎﺟز ﻒﻈﻨﻣ مﺪﺨﺘﺴﺗ ﻻ .ﻢﻋﺎﻧ ﻞﻳﺪﻨﻣ ماﺪﺨﺘﺳﺎﺑ
.جﺎﺟز ﺔﻄﺷﺎآ
ﻚﻟذ ﺪﻌﺑ ﻒﻴﻔﺠﺘﻟﺎﺑ ﻢﻗ ﻢﺛ ،ﻒﻴﻈﻨﺗ ﺔﻃﻮﻔﺑ ﻒﻴﻈﻨﺘﻟﺎﺑ ﻢﻗ
ﺔﻴﻨهﺪﻟاو ﺔﻳﺮﻴﺠﻟا ﻊﻘﺒﻟا ﺔﻟازﺈﺑ ﻢﻗ .ﻢﻋﺎﻧ ﻞﻳﺪﻨﻣ ماﺪﺨﺘﺳﺎﺑ
أﺪﺼﻟا نﱠﻮﻜﺘﻳ ﺪﻘﻓ .رﻮﻔﻟا
ﻰﻠﻋ ﺾﻴﺒﻟا ضﺎﻴﺑو ﺎﺸﻨﻟا ﻊﻘﺑو
.ﻊﻘﺒﻟا ﻩﺬه ﺖﺤﺗ
ﺔﺼﺼﺨﺘﻤﻟا ﺮﺟﺎﺘﻤﻟا وأ ءﻼﻤﻌﻟا ﺔﻣﺪﺧ ىﺪﻟ ﺮﻓاﻮﺘﺗ
ﺢﻄﺳﻷا ﺐﺳﺎﻨﺗ ﻞﻴﺘﺳ ﺲﻠﻧﺎﺘﺳﻼﻟ ﺔﺻﺎﺧ تﺎﻔﻈﻨﻣ
ﺔﻄﺳاﻮﺑ ﺔﻳﺎﻨﻌﻟا ةدﺎﻣ ﻦﻣ ﺔﻘﻴﻗر ﺔﻘﺒﻃ ﻊﺿ .ﺔﻨﺧﺎﺴﻟا
.ﺔﻤﻋﺎﻧ ﺔﻃﻮﻓ
ﺮﺑﻮﻟا ﻦﻣ ﺔﻴﻟﺎﺧو فﺎﻴﻟﻷا ﺔﻘﻴﻗد ﺔﻃﻮﻓ وأ ﺬﻓاﻮﻧ ﺔﻃﻮﻔﺑ
.ﺢﻄﺳﻷا ﻰﻠﻋ ﻂﻐﺿ
3. ﻦﻣ ﺖﻴﺒﺜﺘﻟا ﺮﻴﺑاﻮﺧ ﻚﻔﻨﺗ نأ ﻰﻟإ ءﻲﺸﻟا ﺾﻌﺑ ﻲﻠﺧاﺪﻟا جﺎﺟﺰﻠﻟ ﻲﻠﻔﺴﻟا ءﺰﺠﻟا ﻊﻓرا
ﻰﻠﻋ ﺎﻬﻌﺿ :ﺔﻟواﺪﺘﻤﻟا ﻞﺨﻟا ﻞﻴﻟﺎﺤﻣ وأ ﻒﻴﻈﻨﺘﻟا داﻮﻣ
ﺔﻤﻋﺎﻧ شﺎﻤﻗ ﺔﻌﻄﻗ وأ جﺎﺟز ةﺪﻠﺟ ماﺪﺨﺘﺳﺎﺑ زﺎﻬﺠﻟا
4.ﻊﺿﻮﻣ ﻦﻣ ﺖﻴﺒﺜﺘﻟا ﺮﻴﺑاﻮﺧ ﻚﻔﻨﺗ نأ ﻰﻟإ صﺮﺤﺑ ﻲﻠﺧاﺪﻟا جﺎﺟﺰﻠﻟ يﻮﻠﻌﻟا ءﺰﺠﻟا ﻊﻓرا
شﺎﻤﻗ ﺔﻌﻄﻗ ماﺪﺨﺘﺳﺎﺑ ﺎﻘﺣﻻ ﺎﻬﻔﻴﻔﺠﺘﺑ ﻢﻗو ؛ﺔﺒﻃرو
ماﺪﺨﺘﺳﺎﺑ مﺎﻌﻄﻟا ﻦﻣ ﺔﻗﺮﺘﺤﻤﻟا ﺎﻳﺎﻘﺒﻟا ﺢﺴﻣا .ﺔﻤﻋﺎﻧ
نوﺪﺑو ﻲﻘﻓأ ﻞﻜﺸﺑ
ﺎﻨﻴﻣ ﺔﻘﺒﻄﺑ ﺔﻴﻠﻄﻤﻟا ﺢﻄﺳﻷا
ﺢﻄﺳﻷا) (ﻞﻴﻣﺎﻨﻳإ)
ﺪﻳﺪﺸﻟا خﺎﺴﺗﻻا ﺔﻟﺎﺣ ﻲﻓ .ﻒﻴﻈﻨﺗ ةدﺎﻣو ﺔﺒﻃر ﺔﻃﻮﻓ
ﻦﻜﻤﻳو .ﻞﺠﻠﻟ
ﻪﺑﺎﺸﻣ ماﻮﻗ يذ ناﺮﻓأ ﻒﻈﻨﻣ مﺪﺨﺘﺳا
ﻲﻬﻄﻟا ﺰﻴﺣ كﺮﺗا ﻒﻴﻈﻨﺘﻟا ﺪﻌﺑو .ﺮﺷﺎﺒﻣ ﻞﻜﺸﺑ ﻪﻌﺿو
.ﻒﺠﻴﻟ ﺎﺣﻮﺘﻔﻣ
ةزﺎﻔﺤﻟا ﺔﻧﺎﻄﺒﻟا
:ﻞﺼﻓ ﻲﻓ ةدراﻮﻟا تادﺎﺷرﻹا ﻰﻋاﺮﺗ
ﻲﻬﻄﻟا ﺰﻴﺤﻟ
ﻒﻴﻈﻨﺘﻟا ﺔﻴﺗاذ ﺢﻄﺳﻷا
(ﺔﻨﺸﺨﻟا ﺢﻄﺳﻷا)
.ﻲﻬﻄﻟا ﺰﻴﺣ
ﺔﻄﺷﺎآ مﺪﺨﺘﺴﺗ ﻻ .ﻢﻋﺎﻧ ﻞﻳﺪﻨﻣ ماﺪﺨﺘﺳﺎﺑ ﻒﻴﻈﻨﺘﻟﺎﺑ ﻢﻗ
.جﺎﺟز
:ﻦﺧﺎﺳ ﻲﻧﻮﺑﺎﺻ لﻮﻠﺤﻣ
ﺔﺒﻤﻠﻟ ﻲﺟﺎﺟﺰﻟا ءﺎﻄﻐﻟا
.ﻒﻴﻈﻨﺗ ﺔﻃﻮﻔﺑ ﻒﻴﻈﻨﺘﻟﺎﺑ ﻢﻗ
:ﻦﺧﺎﺳ ﻲﻧﻮﺑﺎﺻ لﻮﻠﺤﻣ
.ﻪﻜﺤﺑ ﻢﻘﺗ ﻻ .ﻒﻴﻈﻨﺗ ﺔﻃﻮﻔﺑ ﻒﻴﻈﻨﺘﻟﺎﺑ ﻢﻗ
.ةﺎﺷﺮﻓ وأ ﻒﻴﻈﻨﺗ ﺔﻃﻮﻔﺑ ﺎﻬﻔﻴﻈﻨﺘﺑ ﻢﻗ ﻢﺛ ﺎﻬﻌﻘﻧا
.ةﺎﺷﺮﻓ وأ ﻒﻴﻈﻨﺗ ﺔﻃﻮﻔﺑ ﺎﻬﻔﻴﻈﻨﺘﺑ ﻢﻗ ﻢﺛ ﺎﻬﻌﻘﻧا
تﺎﻔﻈﻨﻤﻟا
■،ﺔﺷدﺎﺧ وأ ﺔﻨﺸﺧ تﺎﻔﻈﻨﻣ ﺔﻳأ
■،لﻮﺤﻜﻟا ﻦﻣ ﺔﻴﻟﺎﻋ ﺔﺒﺴﻧ ﻰﻠﻋ يﻮﺘﺤﺗ تﺎﻔﻈﻨﻣ ﺔﻳأ
■،ﺔﻨﺸﺧ ﻒﻴﻈﻨﺗ تﺎﺠﻨﻔﺳإ وأ تﺎﻔﻴﻟ ﺔﻳأ
■.رﺎﺨﺒﻟﺎﺑ وأ ﻲﻟﺎﻌﻟا ﻂﻐﻀﻟﺎﺑ ﻒﻴﻈﻨﺗ ةﺰﻬﺟأ ﺔﻳأ
قﺎﻄﻨﻟاتﺎﻔﻈﻨﻤﻟا
نﺮﻔﻟا ﺔﻬﺟاو :ﻦﺧﺎﺳ ﻲﻧﻮﺑﺎﺻ لﻮﻠﺤﻣ
ﻞﻴﺘﺳ ﺲﻠﻧﺎﺘﺳﻻا :ﻦﺧﺎﺳ ﻲﻧﻮﺑﺎﺻ لﻮﻠﺤﻣ
مﻮﻴﻨﻣﻮﻟﻷا ﺢﺴﻣا .ﻒﻔﺨﻣ ﺬﻓاﻮﻧ ﻒﻈﻨﻣ ماﺪﺨﺘﺳﺎﺑ ﻒﻴﻈﻨﺘﻟﺎﺑ ﻢﻗ
(ءﺎﺴﻠﻤﻟا
زﺎﻐﻟا تﻼﻌﺷ ﻲﻓ ةدﻮﺟﻮﻤﻟا زﺎﻐﻟا تﻼﻌﺷ ﻒﻴﻈﻨﺘﺑ اًﺪﺑأ ﻚﺴﻔﻨﺑ ﻢﻘﺗ ﻻ
بﺎﺒﻟا جﺎﺟز :جﺎﺟﺰﻟا تﺎﻔﻈﻨﻣ
نﺮﻔﻟا
مﺎﻜﺣﻹا رﺎﻃإ
!ﻪﻜﻔﺑ ﻢﻘﺗ ﻻ
نﺎﺒﻀﻘﻟا :ﻦﺧﺎﺳ ﻲﻧﻮﺑﺎﺻ لﻮﻠﺤﻣ
تﺎﻴﻟﺎﻤﻜﻟا :ﻦﺧﺎﺳ ﻲﻧﻮﺑﺎﺻ لﻮﻠﺤﻣ
9
Page 33

.ﺔﻄﻗﺎﺴﺘﻤﻟا نﻮهﺪﻟا
D
E
F
راوﺪﻟا ﺦﻴﺴﻟا ﺔﻘﻳﺮﻃ ﻞﻴﻐﺸﺗ
ﻊﺿﻮﻟا ﻰﻟإ نﺮﻔﻟا لﺎﻤﻌﺘﺳا ةرﺎﻃ ردأG.
راوﺪﻟا ﺦﻴﺴﻟا ﺔﻘﻳﺮﻃ فﺎﻘﻳإ
ﻊﺿﻮﻟا ﻰﻟإ نﺮﻔﻟا لﺎﻤﻌﺘﺳا ةرﺎﻃ ردأÚ.
راوﺪﻟا ﺦﻴﺴﻟا جاﺮﺧإ
:!قوﺮﺤﺑ ﺔﺑﺎﺻﻹا ﺮﻄﺧ
ﺎًﻤﺋاد لﺎﻔﻃﻷا ﺪﻌﺑأ .ﺔﻨﺧﺎﺳ ﻲهو ﻦﻴﺨﺴﺘﻟا ﺮﺻﺎﻨﻋ وأ ﻲﻬﻄﻟا ﺰﻴﺣ ﺢﻄﺳأ اﺪﺑأ ﺲﻤﻠﺗ ﻻ
.ﻦﺧﺎﺳ رﺎﺨﺑ بﺮﺴﺘﻳ ﺎﻤﺑر .صﺮﺤﺑ زﺎﻬﺠﻟا بﺎﺑ ﺢﺘﻓا .زﺎﻬﺠﻟا ﻦﻋ
:!قوﺮﺤﺑ ﺔﺑﺎﺻﻹا ﺮﻄﺧ
ﻻو .ﺔﻨﺧﺎﺳ ﻲهو ﺮﺷﺎﺒﻣ ﻞﻜﺸﺑ ىﺮﺧﻷا تﺎﻴﻟﺎﻤﻜﻟا وأ راوﺪﻟا ﺦﻴﺴﻟا ﺲﻤﻠﺑ اًﺪﺑأ ﻢﻘﺗ ﻻ ﻚﺴﻤﺗ
.يراﺮﺣ زﺎﻔﻗ وأ ﻲﻧاوﻸﻟ شﺎﻤﻗ ﺔﻌﻄﻗ ماﺪﺨﺘﺳﺎﺑ ﻻإ ﺔﻨﺧﺎﺴﻟا تﺎﻴﻟﺎﻤﻜﻟا
.جرﺎﺨﻠﻟ
ﺮﻴﺼﻘﻟا ﺖﻗﻮﻟا ﻲﺗﺎﻘﻴﻣ لﺎﻤﻌﺘﺳا
.نﺮﻔﻟا ﻦﻋ ﻞﻘﺘﺴﻣ ﻞﻜﺸﺑ ﺮﻴﺼﻘﻟا ﺖﻗﻮﻟا ﻲﺗﺎﻘﻴﻣ ﻞﻤﻌﻳ
ﺔﻴﻨﻣﺰﻟا ةﺪﻤﻟا ﻂﺒﺿ
5.عﺎﻔﺗرﻻا ىﻮﺘﺴﻣ ﻲﻓ حﻮﻠﻟا ﺐﻴآﺮﺘﺑ ﻢﻗ ﻢﺛ ﺰﻴﺒﺨﻟا حﻮﻟ ﻲﻓ ءﺎﻤﻟا ﻊﺿ1 ﻊﻴﻤﺠﺘﻟ ءﺎﻋﻮآ
6..زﺎﻬﺠﻟا بﺎﺑ ﻖﻠﻏأ
ﺎًﻤﺋاد لﺎﻔﻃﻷا ﺪﻌﺑأ .ﺔﻨﺧﺎﺳ ﻲهو ﻦﻴﺨﺴﺘﻟا ﺮﺻﺎﻨﻋ وأ ﻲﻬﻄﻟا ﺰﻴﺣ ﺢﻄﺳأ اﺪﺑأ ﺲﻤﻠﺗ ﻻ
.ﻦﺧﺎﺳ رﺎﺨﺑ بﺮﺴﺘﻳ ﺎﻤﺑر .صﺮﺤﺑ زﺎﻬﺠﻟا بﺎﺑ ﺢﺘﻓا .زﺎﻬﺠﻟا ﻦﻋ
1..راوﺪﻟا ﺦﻴﺴﻟا ﻰﻠﻋ ﺾﺒﻘﻤﻟا ﻂﺑر ﺪﻋأو صﺮﺤﺑ زﺎﻬﺠﻟا بﺎﺑ ﺢﺘﻓا
2. ﻪﺒﺤﺳاو ﻲﻔﻠﺨﻟا راﺪﺠﻟا ﻲﻓ دﻮﺟﻮﻤﻟا ﻪﺘﻴﺒﻣ ﻦﻣ صﺮﺤﺑ راوﺪﻟا ﺦﻴﺴﻟا ﺐﺤﺳا
3..ﺰﻴﺒﺨﻟا حﻮﻟو راوﺪﻟا ﺦﻴﺴﻟا ﻞﻜﻴه جاﺮﺧإ
راوﺪﻟا ﺦﻴﺴﻟا ﺐﻴآﺮﺗ
ﻲﻬﻄﻟا
)a(.
ﺔﻈﺣﻼﻣ :.ﺢﻴﺤﺻ ﻞﻜﺸﺑ راوﺪﻟا ﺦﻴﺴﻟا ﻞﻜﻴه ﻰﻠﻋ راوﺪﻟا ﺦﻴﺴﻟا ﺐﻴآﺮﺘﺑ ﻢﻗ
:!قوﺮﺤﺑ ﺔﺑﺎﺻﻹا ﺮﻄﺧ
1. لﺎﺧدﻹا ﻊﺿو ﻲﻓ راوﺪﻟا ﺦﻴﺴﻟا ﻞﻜﻴه ﻞﺧدأ2.ﺔﻳﺎﻬﻨﻟا ﻰﺘﺣ
2. ﺰﻴﺤﻟ ﻲﻔﻠﺨﻟا راﺪﺠﻟا ﻲﻓ دﻮﺟﻮﻤﻟا كﺮﺤﻤﻟا ﺖﻴﺒﻣ ﻲﻓ راوﺪﻟا ﺦﻴﺴﻟا ﻞﺧدأ
3.راوﺪﻟا ﺦﻴﺴﻟا ﻞﻜﻴه ﻰﻠﻋ راوﺪﻟا ﺦﻴﺴﻟا ﺐﻴآﺮﺘﺑ ﻢﻗ)b(.
4.ﺾﺒﻘﻤﻟا ﻚﻔﺑ ﻢﻗ)c(.
.ﺔﻴﺗﻮﺻ ةرﺎﺷإ رﺪﺼﺗ ﺖﻗﻮﻟا ءﺎﻀﻘﻧا ﺪﻌﺑ
:!ﻲﺋﺎﺑﺮﻬﻜﻟا ﻖﻌﺼﻟا ﺮﻄﺧ
ﺔﻳأ مﺪﺨﺘﺴﺗ ﻻ .ﻲﺋﺎﺑﺮﻬآ ﻖﻌﺻ ثوﺪﺣ ﻲﻓ ﺐﺒﺴﺘﺗ ﺪﻗ زﺎﻬﺠﻟا ﻲﻓ ﻞﻏﻮﺘﺗ ﻲﺘﻟا ﺔﺑﻮﻃﺮﻟا
.رﺎﺨﺒﻟﺎﺑ ﻒﻴﻈﻨﺗ ةﺰﻬﺟأ وأ ﻲﻟﺎﻌﻟا ﻂﻐﻀﻟﺎﺑ ﻒﻴﻈﻨﺗ ةﺰﻬﺟأ
:!قوﺮﺤﺑ ﺔﺑﺎﺻﻹا ﺮﻄﺧ
ﺮﺻﺎﻨﻋ وأ ﻲﻬﻄﻟا ﺰﻴﺤﻟ ﺔﻴﻠﺧاﺪﻟا ﺢﻄﺳﻷا اﺪﺑأ ﺲﻤﻠﺗ ﻻ .ﺔﻳﺎﻐﻠﻟ ﺎﻨﺧﺎﺳ زﺎﻬﺠﻟا ﺢﺒﺼﻳ
.زﺎﻬﺠﻟا ﻦﻋ لﺎﻔﻃﻷا ﺪﻌﺑأو .دﺮﺒﻳ زﺎﻬﺠﻟا كﺮﺗ ﻰﻠﻋ ﺎًﻤﺋاد صﺮﺣا .ﺔﻨﺧﺎﺳ ﻲهو ﻦﻴﺨﺴﺘﻟا
1..ﺔﻳﺎﻬﻨﻟا ﻰﺘﺣ ﻦﻴﻤﻴﻟا ﻰﻟإ لﺎﻤﻌﺘﺳﻻا ةرﺎﻃ ردأ
2..ﺔﺑﻮﻏﺮﻤﻟا ﺔﻴﻨﻣﺰﻟا ةﺪﻤﻟا ﻰﺘﺣ رﺎﺴﻴﻟا ﻰﻟإ ﺎهردأ
ﻒﻴﻈﻨﺘﻟاو ﺔﻳﺎﻨﻌﻟا
.ﺔﻠﻳﻮﻃ ةﺮﺘﻔﻟ ﺔﻴﻔﻴﻇﻮﻟا ﻪﺗءﺎﻔآو ﻪﻟﺎﻤﺟ ﻰﻠﻋ ﻆﻓﺎﺤﺗ مﺎﻤﺘهﺎﺑ ﻪﻔﻴﻈﻨﺗو نﺮﻔﻟﺎﺑ ةﺪﻴﺠﻟا ﺔﻳﺎﻨﻌﻟا
.ﺔﺤﻴﺤﺻ ﺔﻘﻳﺮﻄﺑ ﻪﻔﻴﻈﻨﺗو نﺮﻔﻟﺎﺑ ﺔﻳﺎﻨﻌﻟا ﺔﻴﻔﻴآ ﻲﻠﻳ ﺎﻤﻴﻓ ﻚﻟ ﺢﺿﻮﻧو
تﺎﻈﺣﻼﻣ
■ جﺎﺟﺰﻟا ﻞﺜﻣ ﺔﻔﻠﺘﺨﻣ تﺎﻣﺎﺧ ماﺪﺨﺘﺳﻻ ﻊﺟﺮﺗ نﺮﻔﻟا ﺔﻬﺟاو ناﻮﻟأ ﻲﻓ ﺔﻔﻴﻔﻄﻟا قوﺮﻔﻟا
.نﺪﻌﻤﻟاو ﻚﻴﺘﺳﻼﺒﻟاو
■ ﺔﻴﺋﻮﺿ تﺎﺳﺎﻜﻌﻧا ﻰﻟإ ﻊﺟﺮﺗ طﻮﻄﺨﻟﺎآ وﺪﺒﺗ ﻲﺘﻟاو بﺎﺒﻟا حﻮﻟ ﻰﻠﻋ ةدﻮﺟﻮﻤﻟا لﻼﻈﻟا
.نﺮﻔﻟا ﺔﺒﻤﻟ ﻦﻋ ﺔﺠﺗﺎﻧ
■ ﺐﺒﺴﺘﻳ ﺪﻗو .ﺔﻳﺎﻐﻠﻟ ﺔﻴﻟﺎﻋ ةراﺮﺣ تﺎﺟرد ﻰﻠﻋ (ﻞﻴﻣﺎﻨﻳﻹا) ﺎﻨﻴﻤﻟا ﺔﻘﺒﻃ ﻒﻴﻔﺠﺗ ﻢﺘﻳ
فاﻮﺣ .ﺎﻬﻠﻤﻋ ﻰﻠﻋ ﺮﺛﺆﻳ ﻻو ﻲﻌﻴﺒﻃ ﺮﻣأ اﺬهو .ﺔﻔﻴﻔﻃ ﺔﻴﻧﻮﻟ تﺎﻓﻼﺘﺧا ﻲﻓ ﻚﻟذ
،ﻚﻟﺬﻟ ًﺔﺠﻴﺘﻧو .ﻞﻣﺎآ ﻞﻜﺸﺑ (ﻞﻴﻣﺎﻨﻳﻹا) ﺎﻨﻴﻤﻟا ﺔﻘﺒﻄﺑ ﺎﻬﺋﻼﻃ ﻦﻜﻤﻳ ﻻ ﺔﻌﻴﻓﺮﻟا حاﻮﻟﻷا
.ﻞآﺂﺘﻟا ﻦﻣ ﺔﻳﺎﻤﺤﻟا ﺺﺋﺎﺼﺧ ﻰﻠﻋ ﻚﻟذ ﺮﺛﺆﻳ ﻻو .ﺔﻨﺸﺧ فاﻮﺤﻟا ﻩﺬه نﻮﻜﺗ ﺪﻘﻓ
8
Page 34

ةﺮﻣ لوﻷ ماﺪﺨﺘﺳﻻا ﻞﺒﻗ
نﺮﻔﻟا ﻦﻴﺨﺴﺗ
ﻖﻠﻐﻣ ﻮهو نﺮﻔﻟا ﻦﻴﺨﺴﺘﺑ ﻢﻗ ،ةﺪﻳﺪﺠﻟا ءﺎﻴﺷﻸﻟ ﺔﺒﺤﺘﺴﻤﻟا ﺮﻴﻏ ﺢﺋاوﺮﻟا ﻦﻣ ﺺﻠﺨﺘﻠﻟ
.غرﺎﻓو
نﺮﻔﻠﻟ ﻖﺣﻼﻟا ﻒﻴﻈﻨﺘﻟا
تﺎﻴﻟﺎﻤﻜﻟا ﻒﻴﻈﻨﺗ
.ﻒﻴﻈﻨﺗ ﺔﻃﻮﻓو ﺊﻓاد ﻲﻧﻮﺑﺎﺻ لﻮﻠﺤﻤﺑ اًﺪﻴﺟ ﺎﻬﻔﻴﻈﻨﺘﺑ ﻢﻗ تﺎﻴﻟﺎﻤﻜﻟا ماﺪﺨﺘﺳا ﻞﺒﻗ
:!رﺎﺠﻔﻧﻻا ﺮﻄﺧ
ﺪﻌﺑ ﺔﻠﻌﺸﻟا ﻞﻌﺘﺸﺗ ﻢﻟ اذإ
15 ﺢﺘﻓاو فﺎﻘﻳﻹا ﻊﺿو ﻰﻠﻋ لﺎﻤﻌﺘﺳﻻا ةرﺎﻃ ﻂﺒﺿا ،ﺔﻴﻧﺎﺛ
ﻦﻣ ﺔﻠﻌﺸﻟا لﺎﻌﺷإ ﻞﺒﻗ ﻞﻗﻷا ﻰﻠﻋ ﺔﻘﻴﻗد ةﺪﻤﻟ ﺮﻈﺘﻧا .نﺎﻜﻤﻟﺎﺑ ةدﻮﺟﻮﻤﻟا ةﺬﻓﺎﻨﻟا وأ بﺎﺒﻟا
.ﺪﻳﺪﺟ
نﺮﻔﻟا زﺎﻏ تﻼﻌﺷ ءﺎﻔﻃإ
ﻊﺿﻮﻟا ﻰﻟإ لﺎﻤﻌﺘﺳﻻا ةرﺎﻃ ردأÚ.ﺔﻃﻮﻐﻀﻣ لﺎﻤﻌﺘﺳﻻا ةرﺎﻄﺑ ﻚﻟذ ءﺎﻨﺛأ ﻆﻔﺘﺣا .
ﺔﻳاﻮﺸﻟا لﺎﻤﻌﺘﺳا
.ءاﻮﺸﻟا ءﺎﻨﺛأ ﺎًﻘﻠﻐﻣ زﺎﻬﺠﻟا بﺎﺑ نﻮﻜﻳ نأ ﺐﺠﻳ
تﺎﻈﺣﻼﻣ
ﺔﻳاﻮﺸﻟا ﻞﻴﻐﺸﺗ
ﻊﺿﻮﻟا ﻰﻟإ ﺎهردأو نﺮﻔﻟا لﺎﻤﻌﺘﺳا ةرﺎﻃ ﻰﻠﻋ ﻂﻐﺿاG.
.ﺔﻠﻐﺸﻣ ﺔﻳاﻮﺸﻟا نﻮﻜﺗ ﺎﻣﺪﻨﻋ نﺎﻴﺒﻟا ﺔﺒﻤﻟ ءﻲﻀﺗ
ﺔﻳاﻮﺸﻟا فﺎﻘﻳإ
ﻊﺿﻮﻟا ﻰﻟإ لﺎﻤﻌﺘﺳﻻا ةرﺎﻃ ردأÚ.
راوﺪﻟا ﺦﻴﺴﻟا لﺎﻤﻌﺘﺳا
ﻢﺤﻠﻟا لﺎﺜﻤﻟا ﻞﻴﺒﺳ ﻰﻠﻋ ،ﺔﻳﺎﻐﻠﻟ ﺪﻴﺟ ﻞﻜﺸﺑ ﻢﺤﻠﻟا ﻊﻄﻗ ﻲﻬﻃ راوﺪﻟا ﺦﻴﺴﻟا ماﺪﺨﺘﺳﺎﺑ ﻚﻨﻜﻤﻳ
.ﺲﻧﺎﺠﺘﻣ ﻞﻜﺸﺑ ﻢﺤﻠﻟا ﻲﻬﻃ ﻢﺘﻳ ﺚﻴﺣ .رﻮﻴﻄﻟاو فﻮﻔﻠﻤﻟا
.ﺔﻳاﻮﺸﻟا ﻞﻴﻐﺸﺗ دﺮﺠﻤﺑ راوﺪﻟا ﺦﻴﺴﻟا ةرادإ ةﺪﺣو ﻞﻴﻌﻔﺗ ﺎﻴﻜﻴﺗﺎﻣﻮﺗوأ ﻢﺘﻳ
ﻢﺤﻠﻟا ﻊﻄﻗ داﺪﻋإ
.ﺖﻴﺒﺜﺘﻟا ﻚﺑﺎﺸﻣ ماﺪﺨﺘﺳﺎﺑ ﻪﻴﻓﺮﻃ ﻦﻣ ﻪﺘﺒﺛو
.ﺦﺒﻄﻤﻟا طﻮﻴﺧ ماﺪﺨﺘﺳﺎﺑ ﻢﺤﻠﻟا ﻊﻄﻗ ﺖﻴﺒﺜﺗ ﻚﻟذ ﻰﻟإ ﺔﻓﺎﺿﻹﺎﺑ ﻚﻨﻜﻤﻳ
.مزﻼﻟا ﻦﻣ ﺮﺜآأ ﺔﻨآاد
داﺪﻋإ ﻲﻓ كزﺎﻬﺟ ماﺪﺨﺘﺳا ﻞﺒﻗ ﻪﺑ مﺎﻴﻘﻟا ﺐﺠﻳ ﺎﻣ ﻰﻠﻋ ءﺰﺠﻟا اﺬه لﻼﺧ ﻦﻣ فﺮﻌﺘﺘﺳ
نﺎﻣﻷا تادﺎﺷرإ
.
.ﺔﻤﻴﻠﺳ ﺔﻘﻳﺮﻄﺑ ﺎﻬﻨﻣ ﺺﻠﺨﺗو زﺎﻬﺠﻟا ﻦﻋ ﻒﻴﻠﻐﺘﻟا داﻮﻣ ﺔﻟازﺈﺑ ﻢﻗ
1..ىﻮﺼﻘﻟا ةراﺮﺤﻟا ﺔﺟرد ﻰﻠﻋ ةراﺮﺤﻟا ﺔﺟرد رﺎﻴﺘﺧا حﺎﺘﻔﻣ ردأ
2. ﺪﻌﺑ نﺮﻔﻟا ءﺎﻔﻃﺈﺑ ﻢﻗ45.ﺔﻘﻴﻗد
1..ﻦﺧﺎﺳ ﻲﻧﻮﺑﺎﺻ لﻮﻠﺤﻤﺑ ﻲﻬﻄﻟا ﺰﻴﺣ ﻒﻴﻈﻨﺘﺑ ﻢﻗ
2..ﻖﻴﻠﻌﺘﻟا نﺎﺒﻀﻗ تﺎﻜﺒﺷ ﺐﻴآﺮﺘﺑ ﻢﻗ
ﻞﺼﻓ ًﻻ و أ أﺮﻗا .ﻰﻟوﻷا ةﺮﻤﻠﻟ مﺎﻌﻄﻟا
نﺮﻔﻟا ﻦﻴﺨﺴﺗ
نﺮﻔﻠﻟ ﻖﺒﺴﻤﻟا ﻒﻴﻈﻨﺘﻟا
نﺮﻔﻟا لﺎﻤﻌﺘﺳا ﺔﻘﻳﺮﻃ
نﺮﻔﻟا ةءﺎﺿإ
نﺮﻔﻟا ةءﺎﺿإ ﻞﻴﻐﺸﺗ
ﻊﺿﻮﻟا ﻰﻟإ لﺎﻤﻌﺘﺳﻻا ةرﺎﻃ ردأ^.
.نﺮﻔﻟا بﺎﺑ ﺢﺘﻓ وأ ﺮﻴﺼﻘﻟا ﺖﻗﻮﻟا ﻲﺗﺎﻘﻴﻣ ﻞﻴﻐﺸﺗ ﺪﻨﻋ ﺎﻀﻳأ نﺮﻔﻟا ةءﺎﺿإ ﻞﻴﻐﺸﺗ ﻢﺘﻳ
نﺮﻔﻟا ةءﺎﺿإ ءﺎﻔﻃإ
ﻊﺿﻮﻟا ﻰﻟإ لﺎﻤﻌﺘﺳﻻا ةرﺎﻃ ردأÛ.
.نﺮﻔﻟا ةءﺎﺿإ ﺊﻔﻄﻨﺘﻓ
ﻞﻴﻐﺸﺘﻟا قﺮﻃ
■.ﺖﻗﻮﻟا ﺲﻔﻧ ﻲﻓ ﺔﻳاﻮﺸﻟاو نﺮﻔﻟا زﺎﻏ ﺔﻠﻌﺷ لﺎﻤﻌﺘﺳا ﻦﻜﻤﻳ ﻻ
■ ﻰﻄﺨﺘﻳ نأ زﻮﺠﻳ ﻻ ﻲﻬﻄﻟا ﺖﻗو60.ﺔﻳاﻮﺸﻟا ماﺪﺨﺘﺳا ﺪﻨﻋ ﺔﻘﻴﻗد
■.راوﺪﻟا ﺦﻴﺴﻟا ةرادإ ةﺪﺣو ﻞﻴﻌﻔﺗ ﺎﻴﻜﻴﺗﺎﻣﻮﺗوأ ﻢﺘﻳ ﺔﻳاﻮﺸﻟا ﻞﻴﻐﺸﺗ ﺪﻨﻋ
نﻮهﺪﻟا ﺔﻋوﺰﻨﻣ ﻢﺤﻠﻟا ﻊﻄﻗو رﻮﻴﻄﻟاو
تﺎﻧاﻮﻴﺤﻟاو لﻮﺠﻌﻟاو رﺎﻘﺑﻷا ﻦﻣ
.ﺔﻳﺮﺒﻟا
.ﺖﺳﻮﺘﻟاو كﺎﻤﺳﻷاو
1. نﺎﻜﻣﻹا رﺪﻗ ﻪﻔﺼﺘﻨﻣ ﻲﻓ ﻢﺤﻠﻟا ﻊﻄﻗ نﻮﻜﺗ ﺚﻴﺤﺑ ﻢﺤﻠﻟا ﻊﻄﻗ ﻲﻓ راوﺪﻟا ﺦﻴﺴﻟا لﺎﺧدﺈﺑ ﻢﻗ
2.ﻻ ﻚﻟﺬﺑو .عﺬﺠﻟا ﻰﻠﻋ ﻞﺟرﻷاو ﺮﻬﻈﻟا ﻞﻔﺳأ ﺔﺤﻨﺟﻷا فاﺮﻃأ ﻂﺑرا رﻮﻴﻄﻟا ﻊﻣﺢﺒﺼﺗ
.ﻞﻴﻐﺸﺘﻟا ﺔﻴﻠﻤﻋ رﺮآ ﻢﺛ ﺔﻘﻴﻗد ةﺪﻤﻟ ﺮﻈﺘﻧا .ءﺎﻔﻃﻹا ﻊﺿو ﻰﻠﻋ لﺎﻤﻌﺘﺳﻻا ةرﺎﻃ ﻂﺒﺿا
3..ﺎﻬﺟرﺎﺧ نﻮهﺪﻟا ﻞﻴﺴﺗ نأ ﻦﻜﻤﻳ ﻚﻟﺬﺑو ،ﺔﺤﻨﺟﻷا ﻞﻔﺳأ ﺪﻠﺠﻟا ﺐﻘﺛا
.ﻞﻴﻐﺸﺘﻟا ءﺎﻨﺛأ ﺔﺒﻗاﺮﻣ نود زﺎﻐﻟا ﺔﻠﻌﺷ كﺮﺘﺗ ﻼﻓ .ﺐﻬﻠﻟا ءﺎﻔﻄﻧا ﺪﻨﻋ زﺎﻐﻟا بﺮﺴﺘﻳ
.ﺔﻴﻟﺎﺘﻟا ﻞﻴﻐﺸﺘﻟا قﺮﻃ ﻚﻣﺎﻣأ حﺎﺘﺗ
ﻞﻴﻐﺸﺘﻟا ﺔﻘﻳﺮﻃماﺪﺨﺘﺳﻻا
150-250°م ةﻮﺸﺤﻤﻟا ﺮﺋﺎﻄﻔﻟاو تازﻮﺒﺨﻤﻟاو ﻚﻴﻜﻠﻟ
نﺮﻔﻟا لﺎﻤﻌﺘﺳا
نﺮﻔﻟا زﺎﻏ تﻼﻌﺷ ﻞﻴﻐﺸﺗ
ﻊﺿو ازوﺎﺠﺘﻣ.«ﻰﻧدﻷا ﺪﺤﻟا»
ىﺮﺧأ ةﺮﻣ ﺐﻬﻠﻟا ءﺎﻔﻄﻧا ﺪﻨﻋ
.ءاﻮه رﺎﻴﺗ كﺎﻨه نﻮﻜﻳ ﻻأ ﻰﻋاﺮﻳ
1..ﻲﻬﻄﻟا ﺰﻴﺣ ﻦﻣ ﻖﻴﻠﻌﺘﻟا نﺎﺒﻀﻗ ﺔﻜﺒﺷو تﺎﻴﻟﺎﻤﻜﻟا جﺮﺧأ
2..ﺎﻣﺎﻤﺗ ﻲﻬﻄﻟا ﺰﻴﺣ ﻦﻣ ،ﻦﻳﺮﻴﺘﺴﻴﻟﻮﺒﻟا تﺎﺌﻳﺰﺟ ﻞﺜﻣ ،ﻒﻴﻠﻐﺘﻟا داﻮﻣ ﺎﻳﺎﻘﺑ ﺔﻟازﺈﺑ ﻢﻗ
3..ﺔﻳﺎﻤﺤﻟا ﺔﻗﺎﻗر ﺔﻟازﺈﺑ ﻢﻗ .ﺔﻳﺎﻤﺣ ﺔﻗﺎﻗﺮﺑ ةﺎﻄﻐﻣ ءاﺰﺟﻷا ﺾﻌﺑ
4..ﺐﻃر ﻢﻋﺎﻧ ﻞﻳﺪﻨﻤﺑ جرﺎﺨﻟا ﻦﻣ زﺎﻬﺠﻟا ﻒﻴﻈﻨﺘﺑ ﻢﻗ
5..ﻦﺧﺎﺳ ﻲﻧﻮﺑﺎﺻ لﻮﻠﺤﻤﺑ ﻲﻬﻄﻟا ﺰﻴﺣ ﻒﻴﻈﻨﺘﺑ ﻢﻗ
t نﺮﻔﻟا زﺎﻏ ﺔﻠﻌﺷ
Gﺔﻴﺋﺎﺑﺮﻬﻜﻟا ﺔﻳاﻮﺸﻟا (ﻖﻧﺎﻘﻨﻟا) ﻖﺠﺴﻟاو ﻢﺤﻠﻟا ﺢﺋاﺮﺸﻟ
1..زﺎﻬﺠﻟا بﺎﺑ ﺢﺘﻓا
2. ﻊﺿﻮﻟا ﻰﻟإ ﺎهردأو نﺮﻔﻟا لﺎﻤﻌﺘﺳا ةرﺎﻃ ﻰﻠﻋ ﻂﻐﺿا250°.م
3..ﺐﻬﻠﻟا ﺲﻧﺎﺠﺘﻳ نأ ﻰﻟإ ٍن ا ﻮ ﺛ ﻊﻀﺒﻟ ﺔﻃﻮﻐﻀﻣ لﺎﻤﻌﺘﺳﻻا ةرﺎﻄﺑ ﻆﻔﺘﺣا
4..رﺬﺤﺑ زﺎﻬﺠﻟا بﺎﺑ ﻖﻠﻏأ
5. ةرﺎﻄﻟا ةرادﺈﺑ ﻢﻘﺗ ﻻو .لﺎﻤﻌﺘﺳﻻا ةرﺎﻃ ماﺪﺨﺘﺳﺎﺑ ﺔﺑﻮﻏﺮﻤﻟا ةراﺮﺤﻟا ﺔﺟرد ﻂﺒﺿا
:!ﻖﻳﺮﺤﻟا ﺮﻄﺧ
7
Page 35

ﺪﻳﺪﺠﻟا كزﺎﻬﺟ
ﺪﻳﺮﺒﺘﻟا ﺔﺣوﺮﻣ
.بﺎﺒﻟا قﻮﻓ ﻦﻣ ﻦﺧﺎﺴﻟا ءاﻮﻬﻟا جﺮﺨﻳو .ﺔﺟﺎﺤﻟا ﺪﻨﻋ ﺪﻳﺮﺒﺘﻟا ﺔﺣوﺮﻣ فﺎﻘﻳإو ﻞﻴﻐﺸﺗ ﻢﺘﻳ
.ﺔﻧﻮﺨﺴﻟا طﺮﻔﻟ نﺮﻔﻟا ضﺮﻌﺘﻳ فﻮﺴﻓ ﻻإو .ﺔﻳﻮﻬﺘﻟا تﺎﺤﺘﻓ ﺔﻴﻄﻐﺘﺑ ﻢﻘﺗ ﻻ !ﻪﻴﺒﻨﺗ
ﺪﻳﺮﺒﺘﻟا ﺔﺣوﺮﻣ ﻞﻴﻐﺸﺗ ﺮﻤﺘﺴﻳ ،ﻞﻴﻐﺸﺘﻟا ﺪﻌﺑ عﺮﺳأ ﻞﻜﺸﺑ ﻲﻬﻄﻟا ﺰﻴﺣ ﺪﻳﺮﺒﺗ ﻢﺘﻳ ﻰﺘﺣ
.ﺔﻨﻴﻌﻣ ةﺮﺘﻔﻟ
تﺎﻴﻟﺎﻤﻜﻟا
ﻰﻠﻋ ﻲﻬﻄﻟا ﺰﻴﺣ ﻲﻓ تﺎﻴﻟﺎﻤﻜﻟا لﺎﺧدإ ﻦﻜﻤﻳ4 ﺎﻤﺋاد صﺮﺣا .ﺔﻔﻠﺘﺨﻣ عﺎﻔﺗرا تﺎﻳﻮﺘﺴﻣ
لﺎﺧدإ ﺎﻤﺋاد ﻰﻋاﺮﻳ .بﺎﺒﻟا جﺎﺟز ﺲﻣﻼﺗ ﻻ ﻰﺘﺣ ﺔﻳﺎﻬﻨﻟا ﻰﺘﺣ تﺎﻴﻟﺎﻤﻜﻟا لﺎﺧدإ ﻰﻠﻋ
.ﺢﻴﺤﺻ ﻞﻜﺸﺑ ﻲﻬﻄﻟا ﺰﻴﺣ ﻲﻓ تﺎﻴﻟﺎﻤﻜﻟا
:!ﻖﻳﺮﺤﻟا ﺮﻄﺧ
ﻰﻠﻋ ﺮﺧﺁ ﻲﻬﻃ ءﺎﻋو يأ وأ ةﻼﻘﻣ وأ ﺰﻴﺒﺧ حﻮﻟ ﻊﺿو لاﻮﺣﻷا ﻦﻣ لﺎﺣ يﺄﺑ زﻮﺠﻳ ﻻ
ﻦﻜﻤﻳو زﺎﻬﺠﻟا ﺔﻴﺿرأ ﺔﻧﻮﺨﺳ طﺮﻓ ﻰﻟإ يدﺆﻳ ﻚﻟذ نإ ﺚﻴﺣ .ﺮﺷﺎﺒﻣ ﻞﻜﺸﺑ نﺮﻔﻟا ﺔﻴﺿرأ
.ﺐﻴآﺮﺘﻟا ةﺪﺣو ﺔﻴﺿرﺄﺑ اﺮﻴﺒآ ارﺮﺿ ﻖﺤﻠﻳ نأ
جاﺮﺧإ ﻚﻟ حﺎﺘﻳ ﻚﻟﺬﺑو .ﺐﻠﻘﻨﺗ نأ نود ﻦﻴﺜﻠﺜﻟا راﺪﻘﻤﺑ جرﺎﺨﻠﻟ
ﻩﻮﺸﺘﻟا اﺬه ﻲﻔﺘﺨﻳ ،ىﺮﺧأ ةﺮﻣ دﺮﺒﺗ نأ دﺮﺠﻤﺑو .ﻦﺨﺴﺗ ﺎﻣﺪﻨﻋ تﺎﻴﻟﺎﻤﻜﻠﻟ ﻩﻮﺸﺗ ثﺪﺤﻳ ﺪﻗ
ﺮﺒﻋ وأ ﺔﺼﺼﺨﺘﻤﻟا ﺮﺟﺎﺘﻤﻟا ﻦﻣ وأ ءﻼﻤﻌﻟا ﺔﻣﺪﺧ ﻦﻣ تﺎﻴﻟﺎﻤﻜﻟا ءاﺮﺷ ﺎًﻘﺣﻻ ﻚﻨﻜﻤﻳ
تﺎﻴﻟﺎﻤﻜﻟا ﺐﺤﺳ ﻚﻨﻜﻤﻳ
.ﺔﻟﻮﻬﺴﺑ ﺔﻤﻌﻃﻷا
.ﺎﻬﺘﻔﻴﻇو ﻰﻠﻋ ﺮﻴﺛﺄﺗ يأ كﺮﺗ نود
.ﺖﻧﺮﺘﻧﻹا
لﺎﻤﻌﺘﺳﻻا ﺔﺣﻮﻟ لﻮﺣ تﺎﻣﻮﻠﻌﻤﻟا ﻦﻣ ﺪﻳﺰﻤﻟا ﺎﻨه ﺪﺠﺗ ﺎﻤآ .ﺪﻳﺪﺠﻟا كزﺎﻬﺟ ﻰﻠﻋ ﺎﻨه فﺮﻌﺘﺗ
.تﺎﻴﻟﺎﻤﻜﻟاو ﻦﻴﺨﺴﺘﻟا عاﻮﻧأو نﺮﻔﻟاو
حﺮﺸﻟا
ﺮﻴﺼﻘﻟا ﺖﻗﻮﻟا ﻲﺗﺎﻘﻴﻣ لﺎﻤﻌﺘﺳا ةرﺎﻃ
ﺔﻳاﻮﺸﻟا نﺎﻴﺑ ﺔﺒﻤﻟ
ﺔﻳاﻮﺸﻟاو نﺮﻔﻟا لﺎﻤﻌﺘﺳا ةرﺎﻃ
نﺮﻔﻟا
حﺮﺸﻟا
ﺔﻴﺋﺎﺑﺮﻬﻜﻟا ﺔﻳاﻮﺸﻟا
نﺮﻔﻟا زﺎﻏ ﺔﻠﻌﺷ
1
2
3
1
2
ءاﻮﺸﻟاو ﺰﻴﺒﺨﻟا ﺔﻜﺒﺷ
ﺔﻤﻌﻃﻷاو ﻢﺤﻠﻟا ﻊﻄﻗو ﻚﻴﻜﻟا ﻲﻧاﻮﺻو ﻲﻧاوﻸﻟ
.ةﺪﻤﺠﻤﻟا تﺎﺒﺟﻮﻟاو ﺔﻳﻮﺸﻤﻟا
(ﻞﻴﻣﺎﻨﻳﻹا) ﺎﻨﻴﻤﻟا ﺔﻘﺒﻄﺑ ﻲﻠﻄﻤﻟا ﺰﻴﺒﺨﻟا حﻮﻟ
ةﺪﻤﺠﻤﻟا تﺎﺒﺟﻮﻟاو تازﻮﺒﺨﻤﻟاو ﺐﻃﺮﻟا ﻚﻴﻜﻠﻟ
ﺎًﻀﻳأ ﻪﻣاﺪﺨﺘﺳا ﻦﻜﻤﻳ .ةﺮﻴﺒﻜﻟا ﻢﺤﻠﻟا ﻊﻄﻗو
.ﺔﻄﻗﺎﺴﺘﻤﻟا نﻮهﺪﻟا ﻊﻴﻤﺠﺘﻟ ءﺎﻋﻮآ
ﻦﻴﻣﺄﺘﻟا ﺮﻴﺑاﻮﺧ
.تﻼﺼﻔﻤﻟا ﺖﻴﺒﺜﺘﻟ
راوﺪﻟا ﺦﻴﺴﻟا ﻞﻣﺎﺣ
.راوﺪﻟا ﺦﻴﺴﻟا ﺐﻴآﺮﺘﻟ
مﺪﺨﺘﺴُﻳ .ﻢﺠﺤﻟا ةﺮﻴﺒآ رﻮﻴﻄﻟاو ﻢﺤﻠﻟا ﻊﻄﻘﻟ
ﺔﻘﺒﻄﺑ ﻲﻠﻄﻤﻟا ﺰﻴﺒﺨﻟا حﻮﻟ ﻊﻣ كاﺮﺘﺷﻻﺎﺑ ﻂﻘﻓ
راوﺪﻟا ﺦﻴﺴﻟا
.(ﻞﻴﻣﺎﻨﻳﻹا) ﺎﻨﻴﻤﻟا
تﺎﻴﻟﺎﻤﻜﻟاحﺮﺸﻟا
.ﺔﻳاﻮﺸﻟاو نﺮﻔﻟا ﻦﻴﺨﺴﺗ ةرﺪﻗ ﻂﺒﺿ ﻩﺬه لﺎﻤﻌﺘﺳﻻا ةرﺎﻃ ماﺪﺨﺘﺳﺎﺑ ﻚﻨﻜﻤﻳ
ﺔﻳﻮﺌﻤﻟا ﺔﺟرﺪﻟﺎﺑ ةراﺮﺤﻟا ﺔﺟرد قﺎﻄﻧ ،ﺔﻠﻐﺸﻣ نﺮﻔﻟا زﺎﻏ ﺔﻠﻌﺷ°م
Max ةرﺎﻄﻟا ةرادﺈﺑ ﻢﻘﺗ ﻼﻓ .(ﻰﺼﻗﻷا ﺪﺤﻟا)
.ﺔﻠﻐﺸﻣ ﺔﻳاﻮﺸﻟا نﻮﻜﺗ ﺎﻣﺪﻨﻋ نﺎﻴﺒﻟا ﺔﺒﻤﻟ ءﻲﻀﺗ
نﺮﻔﻟا لﺎﻤﻌﺘﺳا ةرﺎﻃ
ﻊﺿﻮﻟاﻰﻨﻌﻤﻟا
Ú.ﻦﻴﺨﺴﺘﻟﺎﺑ نﺮﻔﻟا مﻮﻘﻳ ﻻ .ءﺎﻔﻃإ
ﻰﻧدﻷا ﺪﺤﻟاةرﺪﻗ ﻰﻧدأ ،ﺮﻓﻮﻤﻟا ﺐﻬﻠﻟا
150- 250
ﻰﺼﻗﻷا ﺪﺤﻟاةرﺪﻗ ﻰﻠﻋأ ،ﺮﻴﺒﻜﻟا ﺐﻬﻠﻟا
G.راوﺪﻟا ﺦﻴﺴﻟا روﺪﻳو ﻦﻴﺨﺴﺘﻟﺎﺑ ﺔﻳاﻮﺸﻟا مﻮﻘﺗ
ﻊﺿﻮﻟا ﻦﻴﺑ ﺪﺼﻣ ﺪﺟﻮﻳG ﻊﺿﻮﻟاو
.ﺪﺼﻤﻟا اًزوﺎﺠﺘﻣ
ﺮﻴﺼﻘﻟا ﺖﻗﻮﻟا ﺖﻗﺆﻣ
.ﺮﻴﺼﻘﻟا ﺖﻗﻮﻟا ﻲﺗﺎﻘﻴﻣ ماﺪﺨﺘﺳﺎﺑ ةﺪﻤﻟا ﻂﺒﺿ ﻚﻨﻜﻤﻳ
.ﺔﻴﺗﻮﺻ ةرﺎﺷإ رﺪﺼﺗ ﺔﻴﻨﻣﺰﻟا ةﺪﻤﻟا ءﺎﻀﻘﻧا ﺪﻌﺑ
ﺮﻴﺼﻘﻟا ﺖﻗﻮﻟا ﻲﺗﺎﻘﻴﻣ لﺎﻤﻌﺘﺳا ةرﺎﻃ
لﺎﻤﻌﺘﺳﻻا ةرﺎﻃ ماﺪﺨﺘﺳﺎﺑ .ﺔﻴﻨﻣﺰﻟا ةﺮﺘﻔﻟا ﻂﺒﺿ ﻚﻨﻜﻤﻳ ﻩﺬه لﺎﻤﻌﺘﺳﻻا ةرﺎﻃ ماﺪﺨﺘﺳﺎﺑ
.نﺮﻔﻟا ةءﺎﺿإ ﻞﻴﻐﺸﺗ ﺎﻀﻳأ ﻚﻨﻜﻤﻳ ﻩﺬه
ﻖﺋﺎﻗﺪﻟﺎﺑ ةﺪﻤﻟا
--------
ﻊﺿﻮﻟاﻰﻨﻌﻤﻟا
Ûفﺎﻘﻳإ
5 -90
^نﺮﻔﻟا ةءﺎﺿإ ﻞﻴﻐﺸﺗ
6
Page 36

!(ةﺮﻴﺠﺤﻟا وأ ﺔﻠﻌﺸﻟا ةرﻮﺳﺎﻣ ﻲﻓ ﺐﻬﻠﻟا لﺎﻌﺘﺷا) ﺐﻬﻠﻟا داﺪﺗرا
ﺔﻠﻌﺸﻟا ءﺎﻔﻃﺈﺑ ﻢﻗ ،ﺔﻠﻌﺸﻟا ﻲﻓ ﺔﻠﻌﺸﻟا ﺐﻬﻟ داﺪﺗرا ﺔﻟﺎﺣ ﻲﻓ
ﻖﻘﺤﺗ ،ﺔﻠﻌﺸﻟا
دوﺮﺑو ﺐﻬﻠﻟا ءﺎﻔﻄﻧا ﺪﻌﺑ .رﻮﻔﻟا ﻰﻠﻋ ﺔﻴﻨﻌﻤﻟا
ﻢﺛ .ﺢﻴﺤﺻ ﻞﻜﺸﺑ ةﺮﻘﺘﺴﻣ ﺔﻠﻌﺸﻟا ءاﺰﺟأ ﻊﻴﻤﺟ ﺖﻧﺎآ اذإ ﺎﻤﻣ
داﺪﺗرا ثﺪﺣ اذإ .ﻲﻌﻴﺒﻃ ﻞﻜﺸﺑ ىﺮﺧأ ةﺮﻣ ﺔﻠﻌﺸﻟا ﻞﻴﻐﺸﺘﺑ ﻢﻗ
.ﺔﻣﺪﺨﻟا ﻲﻨﻓ ﻎﻠﺑأو ﺔﻴﻨﻌﻤﻟا ﺔﻠﻌﺸﻟا ﺊﻔﻃأ ،ﺪﻳﺪﺟ ﻦﻣ ﺐﻬﻠﻟ
.ىﺮﺧأ ةﺮﻣ ﺔﻠﻌﺸﻠﻟ
راﺮﺿﻷا بﺎﺒﺳأ
!ﻪﻴﺒﻨﺗ
يﺄﺑ ﻲﻬﻄﻟا ﺰﻴﺣ ﺔﻴﺿرأ ﺔﻴﻄﻐﺘﺑ ﻢﻘﺗ ﻻ .ﻲﻬﻄﻟا ﺰﻴﺣ ﺔﻴﺿرأ ﻰﻠﻋ تﺎﻴﻟﺎﻤآ ﺔﻳأ ﻊﻀﺗ ﻻ
ﺰﻴﺣ ﺔﻴﺿرأ ﻰﻠﻋ ﻲﻧاوأ ﺔﻳأ ﻊﻀﺗ ﻻ .تازﻮﺒﺨﻤﻟا قرو وأ مﻮﻴﻨﻣﻮﻟﻷا ﻖﺋﺎﻗر ﻦﻣ عﻮﻧ
تازﻮﺒﺨﻤﻟا داﺪﻋإ ﺔﻨﻣزأ نأ ﺎﻤآ .ﺔﻧﻮﺨﺴﻟا ﻢآاﺮﺗ ﻰﻟإ
ﺎﻨﻴﻤﻟا ﺔﻘﺒﻄﺑ رﺮﻀﻟا قﺎﺤﻟإ ﻲﻓ ﻚﻟذ ﺐﺒﺴﺘﻳ فﻮﺳو ،ﺔﺤﻴﺤﺻ نﻮﻜﺗ ﻦﻟ ﺮﻴﻤﺤﺘﻟاو
ﻰﺘﺣ ﻲﻬﻄﻟا ﺰﻴﺣ ﻲﻓ تﺎﻴﻟﺎﻤﻜﻟا لﺎﺧدإ ﻰﻠﻋ ﺎﻤﺋاد صﺮﺣﺎﻓ .زﺎﻬﺠﻟا بﺎﺑ ﻖﻠﻏ ﺪﻨﻋ
ﺔﻘﺒﻄﺑ اراﺮﺿأ ﻖﺤﻠﻳ ﺪﻗ ةراﺮﺤﻟا ﺔﺟرد ﺮﻴﻐﺗ نأ ﺎﻤآ .ءﺎﻣ رﺎﺨﺑ ﺪﻴﻟﻮﺗ ﻰﻟإ يدﺆﻳ ﻚﻟذ نإ
.(ﻞﻴﻣﺎﻨﻳﻹا) ﺎﻨﻴﻤﻟا ﺔﻘﺒﻄﺑ رﺮﻀﻟا قﺎﺤﻟإ ﻲﻓ ﻚﻟذ ﺐﺒﺴﺘﻳ فﻮﺴﻓ
حﻮﻟ ﻦﻣ ﺮﻃﺎﻘﺘﺗ ﻲﺘﻟا ﺔﻬآﺎﻔﻟا ةرﺎﺼﻌﻓ .ﺪﺤﻟا ﻦﻋ ﺪﺋاز ﻞﻜﺸﺑ ﺰﻴﺒﺨﻟا حﻮﻟ ءﻞﻤﺑ ﻢﻘﺗ ﻻ
،عﺎﻄﺘﺴﻤﻟا رﺪﻗ تﺎﻣاﺪﺨﺘﺳﻻا دﺪﻌﺘﻣ حﻮﻠﻟا مﺪﺨﺘﺳا .ﺎﻬﺘﻟازإ رﺬﻌﺘﻳ ﺎًﻌﻘﺑ كﺮﺘﺗ ﺰﻴﺒﺨﻟا
ةروﺎﺠﻤﻟا تاﺪﺣﻮﻟا تﺎﻬﺟاو نﺈﻓ ،ﻂﻘﻓ ﻂﻴﺴﺑ راﺪﻘﻤﺑ ﻮﻟو ﺎًﺣﻮﺘﻔﻣ نﺎآ اذإ زﺎﻬﺠﻟا بﺎﺑ نأ
ﻖﺤﻠﺗ ﺪﻗو .ﻞﻴﻐﺸﺘﻟا ءﺎﻨﺛأ ﻦﻜﻤﻣ ﺮﻴﻏ ﺢﻴﺤﺻ ﻞﻜﺸﺑ زﺎﻬﺠﻟا بﺎﺑ قﻼﻏإ ﺢﺒﺼﻳ
رﺎﻃإ ﺔﻓﺎﻈﻧ ﻰﻠﻋ ﺎﻤﺋاد ﺔﻈﻓﺎﺤﻤﻟا ﺐﺠﻳ ﻚﻟﺬﻟ .ةروﺎﺠﻤﻟا تاﺪﺣﻮﻟا تﺎﻬﺟاﻮﺑ راﺮﺿأ
.نﺮﻔﻟا بﺎﺑ ﻰﻠﻋ ءﺎﻴﺷأ ﺔﻳأ ﻖﻴﻠﻌﺘﺑ ﻢﻘﺗ ﻻو
.ﻚﻟﺬﻟ ًﺔ ﺠ ﻴ ﺘ ﻧ ﺮﺴﻜﻨﻳ ﺪﻗو ،زﺎﻬﺠﻟا نزو ﻞﻤﺤﺘﻳ نأ
ﺄﺸﻨﻳ ﺎﻤآ .جرﺎﺨﻠﻟ ﺎﻬﺒﺤﺳ ﺪﻨﻋ ﺐﻠﻘﻨﺗ نأ ﻦﻜﻤﻳ ﺔﻠﻴﻘﺜﻟا تﺎﻴﻟﺎﻤﻜﻟﺎﻓ .ﺎﻬﻨﻋ ﻞﻤﺤﻟا ﻒﻴﻔﺨﺗ
ﻢﻗ .(ﻞﻴﻣﺎﻨﻳﻹا) ﺎﻨﻴﻤﻟا ﺔﻘﺒﻄﺑ راﺮﺿﻹا ﻰﻟإ يدﺆﻳ ﻲﻬﻄﻟا ﺰﻴﺣ زوﺰﺣ ﻰﻠﻋ ﻂﻐﺿ
كﺪﻴﺑ ﺎهﺪﻨﺳ لﻼﺧ ﻦﻣ جرﺎﺨﻠﻟ ﺎﻬﺒﺤﺳ ءﺎﻨﺛأ تﺎﻴﻟﺎﻤﻜﻟا ﻰﻠﻋ ﻊﻗاﻮﻟا ﻞﻤﺤﻟا ﻒﻴﻔﺨﺘﺑ
.ﺔﻨﺧﺎﺴﻟا تﺎﻴﻟﺎﻤﻜﻟا
ﺔﻳاﻮﺸﻟا ﻰﻠﻋ ءاﻮﺸﻟﺎﺑ ﻢﻗو .ﻪﺟاﺮﺧإ ﺪﻨﻋ (ﻞﻴﻣﺎﻨﻳﻹا) ﺎﻨﻴﻤﻟا ﺔﻘﺒﻄﺑ رﺮﻀﻟا ﻖﺤﻠﺗو
ﻊﻣ ﻲﻧاوأ ﺔﻃﻮﻓ ﺎًﻤﺋاد مﺪﺨﺘﺳا !ﻪﻴﺒﻨﺗ .ًﻼ ﻴ ﻠ ﻗ
ىﻮﺘﺴﻤﻟا ﻦﻣ ﻰﻠﻋأ عﺎﻔﺗرا ىﻮﺘﺴﻣ ﻲﻓ
3 حﻮﻠﻟا ﻩﻮﺸﺗ ﻲﻓ ﺐﺒﺴﺘﺗ ةﺪﺋاﺰﻟا ﺔﻧﻮﺨﺴﻟﺎﻓ .
يدﺆﻳ ﻚﻟذ نإ ﺚﻴﺣ .ﻲﻬﻄﻟا
.(ﻞﻴﻣﺎﻨﻳﻹا)
.ﺔﻳﺎﻬﻨﻟا
.(ﻞﻴﻣﺎﻨﻳﻹا) ﺎﻨﻴﻤﻟا
.ﺎًﻘﻤﻋ ﺮﺜآأ ﻮﻬﻓ
.ﺖﻗﻮﻟا روﺮﻤﺑ رﺮﻀﺘﺗ نأ ﻦﻜﻤﻳ
.بﺎﺒﻟا مﺎﻜﺣإ
عﺎﻔﺗرﻻا ىﻮﺘﺴﻣ ﻲﻓ ًةﺮﺷﺎﺒﻣ
4 و 5.
!قوﺮﺤﺑ ﺔﺑﺎﺻﻹا ﺮﻄﺧ
.ﻞﻴﻐﺸﺘﻟا ءﺎﻨﺛأ ﻦﺨﺴﺗ ﺎﻬﻴﻟإ لﻮﺻﻮﻟا ﻦﻜﻤﻳ ﻲﺘﻟا ءاﺰﺟﻷا
بﺎﺑ ﺢﺘﻓا .زﺎﻬﺠﻟا بﺎﺑ ﺢﺘﻓ ﺪﻨﻋ ﻦﺧﺎﺴﻟا رﺎﺨﺒﻟا بﺮﺴﺘﻳ ﺪﻗ
!قوﺮﺤﺑ ﺔﺑﺎﺻﻹا ﺮﻄﺧ
.زﺎﻬﺠﻟا ﻦﻋ لﺎﻔﻃﻷا ﺪﻌﺑأو .صﺮﺤﺑ زﺎﻬﺠﻟا
نأ ﻦﻜﻤﻳ ﻦﺧﺎﺳ ﻮهو ﻲﻬﻄﻟا ﺰﻴﺣ ﻲﻓ ءﺎﻤﻟا ﺾﻌﺑ دﻮﺟو
ﻻ ﺔﻨﻣﻵا ﺔﻔﻴﻇﻮﻟا ةدﺎﻌﺘﺳا ﻢﺘﻳ ﻰﺘﺣ ﻚﻟذ ﺪﻌﺑ زﺎﻬﺠﻟا مﺪﺨﺘﺴﺗ
!قوﺮﺤﺑ ﺔﺑﺎﺻﻹا ﺮﻄﺧ
ﺰﻴﺣ ﻲﻓ ءﺎﻤﻟا ﺐﺼﺑ اﺪﺑأ ﻢﻘﺗ ﻻ .ﻦﺧﺎﺳ ءﺎﻣ رﺎﺨﺑ ﺪﻟﻮﻳ
.ﻦﺧﺎﺴﻟا ﻲﻬﻄﻟا
■ :ﻲﻬﻄﻟا ﺰﻴﺣ ﺔﻴﺿرأ ﻰﻠﻋ ﻲﻧاوﻷا وأ تازﻮﺒﺨﻤﻟا داﺪﻋإ قرو وأ ﻖﺋﺎﻗﺮﻟا وأ تﺎﻴﻟﺎﻤﻜﻟا
ﻻ .تﺎﻘﻘﺸﺗ ﻰﻟإ رﻮﻄﺘﺗ ﺪﻗ زﺎﻬﺠﻟا بﺎﺑ جﺎﺟز شوﺪﺧ مﺪﺨﺘﺴﺗ
.ﻞآﺂﺘﻠﻟ ﺔﺒﺒﺴﻣ وأ ﺔﻨﺸﺧ ﻒﻴﻈﻨﺗ داﻮﻣ وأ جﺎﺟز ﺔﻄﺷﺎآ
.رﺎﻄﺧأ ﻰﻠﻋ ﺎﻴﻨﻓ ﺔﻤﻴﻠﺴﻟا ﺮﻴﻏ حﻼﺻﻹا لﺎﻤﻋأ يﻮﻄﻨﺗ
ﻦﻣ برﺪﻣ ءﻼﻤﻋ ﺔﻣﺪﺧ ﻲﻨﻓ ﺔﻓﺮﻌﻤﺑ ﻻإ ةرﺮﻀﺘﻤﻟا زﺎﻐﻟاو
■ بﺎﺒﻟا جﺎﺟز شﺪﺧ ﻲﻓ تﺎﻴﻟﺎﻤﻜﻟا ﺐﺒﺴﺘﺗ ﺪﻗ زﺎﻬﺠﻟا زاﺮﻃ ﺐﺴﺣ :تﺎﻴﻟﺎﻤﻜﻟا لﺎﺧدإ
ﻲﺋﺎﺑﺮﻬﻜﻟا ﺲﺑﺎﻘﻟا عﺰﻧﺎﻓ ،زﺎﻬﺠﻟﺎﺑ ﻞﻠﺧ كﺎﻨه نﺎآ اذإ .ﺎﻨﻠﺒِﻗ
قوﺪﻨﺻ ﻲﻓ دﻮﺟﻮﻤﻟا ﺮﻬﺼﻤﻟا ﻞﺼﻓا وأ ﺲﺒﻘﻤﻟا ﻦﻣ
ﺔﻣﺪﺨﺑ ﻞﺼﺗا .زﺎﻐﻟﺎﺑ داﺪﻣﻹا رﺪﺼﻣ ﻖﻠﻏأو ،ﺮهﺎﺼﻤﻟا
■ ﺚﻴﺣ .ﻦﺧﺎﺴﻟا ﻲﻬﻄﻟا ﺰﻴﺣ ﻲﻓ ءﺎﻤﻟا ﺐﺼﺑ اًﺪﺑأ ﻢﻘﺗ ﻻ :ﻦﺧﺎﺴﻟا ﻲﻬﻄﻟا ﺰﻴﺣ ﻲﻓ ءﺎﻤﻟا
.ةرﻮﻄﺨﻟا ﻎﻟﺎﺑ اًﺮﻣأ ﺮﺒﺘﻌﻳ زﺎﻬﺠﻟﺎﺑ راﺮﺿأ وأ تﻻﻼﺘﺧا دﻮﺟو
■ .ﺔﻠﻳﻮﻃ تاﺮﺘﻔﻟ ﻖﻠﻐﻣ ﻮهو ﻲﻬﻄﻟا ﺰﻴﺣ ﻲﻓ ﺔﺒﻃر ﺔﻤﻌﻃﺄﺑ ﻆﻔﺘﺤﺗ ﻻ :ﺔﺒﻃﺮﻟا ﺔﻤﻌﻃﻷا
ﻦﻣ ﻲﺋﺎﺑﺮﻬﻜﻟا ﺲﺑﺎﻘﻟا عﺰﻧا .ﻞﻄﻌﻣ زﺎﻬﺟ ﻞﻴﻐﺸﺘﺑ اًﺪﺑأ ﻢﻘﺗ ﻻ
.ﺮهﺎﺼﻤﻟا قوﺪﻨﺻ ﻲﻓ دﻮﺟﻮﻤﻟا ﺮﻬﺼﻤﻟا ﻞﺼﻓا وأ ﺲﺒﻘﻤﻟا
■ ،ةﺮﻴﺒآ ﺔﻴﻤﻜﺑ ﺔﻬآﺎﻓ ةرﺎﺼﻋ ﻰﻠﻋ يﻮﺘﺤﺗ ﻲﺘﻟا ﺮﺋﺎﻄﻔﻟا داﺪﻋإ ﺪﻨﻋ :ﺔﻬآﺎﻔﻟا ةرﺎﺼﻋ
.ءﻼﻤﻌﻟا ﺔﻣﺪﺨﺑ ﻞﺼﺗا .زﺎﻐﻟﺎﺑ داﺪﻣﻹا رﺪﺼﻣ ﻖﻠﻏأ
!ﻲﺋﺎﺑﺮﻬﻜﻟا ﻖﻌﺼﻟا ﺮﻄﺧ
■ ﻰﻋاﺮﻳو .ﻖﻠﻐﻣ ﻮهو ﻻإ ﻲﻬﻄﻟا ﺰﻴﺣ ﺪﻳﺮﺒﺘﺑ ﻢﻘﺗ ﻻ :حﻮﺘﻔﻣ زﺎﻬﺠﻟا بﺎﺑ ﺎﻤﻨﻴﺑ ﺪﻳﺮﺒﺘﻟا
ﺔﻟﺎﺣ ﻲﻓ ﺔﻴﺋﺎﺑﺮﻬﻜﻟا ةﺰﻬﺟﻷا تﻼﺑﺎﻜﻟ ﺔﻟزﺎﻌﻟا ةدﺎﻤﻟا ﺮﻬﺼﻨﺗ ﺪﻗ
ﻞﻴﺻﻮﺗ تﻼﺑﺎآ ﻞﻌﺠﺗ ﻻ .زﺎﻬﺠﻠﻟ ﺔﻨﺧﺎﺴﻟا ءاﺰﺟﻷا ﺔﺴﻣﻼﻣ
■ بﺎﺒﻟا مﺎﻜﺣإ رﺎﻃﻹ ﺪﻳﺪﺸﻟا خﺎﺴﺗﻻا ﺔﻟﺎﺣ ﻲﻓ :بﺎﺒﻟا مﺎﻜﺣإ رﺎﻃﻹ ﺪﻳﺪﺸﻟا خﺎﺴﺗﻻا
.اﺪﺑأ زﺎﻬﺠﻠﻟ ﺔﻨﺧﺎﺴﻟا ءاﺰﺟﻷا ﺲﻣﻼﺗ ﺔﻴﺋﺎﺑﺮﻬﻜﻟا ةﺰﻬﺟﻷا
ﻖﻌﺻ ثوﺪﺣ ﻲﻓ ﺐﺒﺴﺘﺗ ﺪﻗ زﺎﻬﺠﻟا ﻲﻓ ﻞﻏﻮﺘﺗ ﻲﺘﻟا ﺔﺑﻮﻃﺮﻟا
!ﻲﺋﺎﺑﺮﻬﻜﻟا ﻖﻌﺼﻟا ﺮﻄﺧ
وأ ﻲﻟﺎﻌﻟا ﻂﻐﻀﻟﺎﺑ ﻒﻴﻈﻨﺗ ةﺰﻬﺟأ ﺔﻳأ مﺪﺨﺘﺴﺗ ﻻ .ﻲﺋﺎﺑﺮﻬآ
■ .ﻪﻴﻠﻋ ﺰﻜﺗﺮﺗ وأ حﻮﺘﻔﻤﻟا نﺮﻔﻟا بﺎﺑ ﻰﻠﻋ ﺎًﺌﻴﺷ ﻊﻀﺗ ﻻ .زﺎﻜﺗرا ﺢﻄﺴآ نﺮﻔﻟا بﺎﺑ
ﺔﺒﻤﻠﻟا ةاود تﺎﺴﻣﻼﻣ نأ ﻲﻬﻄﻟا ﺰﻴﺣ ﺔﺒﻤﻟ ﺮﻴﻴﻐﺗ ﺪﻨﻋ ﻰﻋاﺮﻳ
■ ﻊﻴﻄﺘﺴﻳ ﻻ بﺎﺒﻟا ﺾﺒﻘﻤﻓ .بﺎﺒﻟا ﺾﺒﻘﻣ ﻦﻣ ﻪﻜﺴﻤﺗ وأ زﺎﻬﺠﻟا ﻞﻤﺤﺗ ﻻ :زﺎﻬﺠﻟا ﻞﻘﻧ
.رﺎﺨﺒﻟﺎﺑ ﻒﻴﻈﻨﺗ ةﺰﻬﺟأ
!ﻲﺋﺎﺑﺮﻬﻜﻟا ﻖﻌﺼﻟا ﺮﻄﺧ
ﺲﺑﺎﻘﻟا عﺰﻧا ،ﺔﺒﻤﻠﻟا ﺮﻴﻴﻐﺗ ﻞﺒﻗ .ﻲﺋﺎﺑﺮﻬآ رﺎﻴﺗ ﺎﻬﻴﻓ يﺮﺴﻳ
قوﺪﻨﺻ ﻲﻓ دﻮﺟﻮﻤﻟا ﺮﻬﺼﻤﻟا ﻞﺼﻓا وأ ﺲﺒﻘﻤﻟا ﻦﻣ ﻲﺋﺎﺑﺮﻬﻜﻟا
■ نود ةﺮﻴﺒآ ﺔﺟرﺪﺑ جرﺎﺨﻠﻟ مﺎﻌﻄﻟﺎﺑ ﺔﻠﻘﺜُﻤﻟا تﺎﻴﻟﺎﻤﻜﻟا ﺐﺤﺴﺗ ﻻ :ﺔﻠﻴﻘﺜﻟا تﺎﻴﻟﺎﻤﻜﻟا
■ تﺎﻣاﺪﺨﺘﺳﻻا دﺪﻌﺘﻣ حﻮﻠﻟا وأ ﺰﻴﺒﺨﻟا حﻮﻟ ﺐﻴآﺮﺗ ﻢﺘﻳ ﻻأ ءاﻮﺸﻟا ﺪﻨﻋ ﻰﻋاﺮﻳ :ءاﻮﺸﻟا
ﻻ.زﺎﻬﺠﻟا ﻦﻋ لﺎﻔﻃﻷا ﺪﻌﺑأو .ﺔﻨﺧﺎﺴﻟا ءاﺰﺟﻷا اﺪﺑأ ﺲﻤﻠﺗ
!ﺔﺑﺎﺻﻹا ﺮﻄﺧ
!ﺔﺑﺎﺻﻹا ﺮﻄﺧ
ﻻ ءﺎﺑﺮﻬﻜﻟا تﻼﻴﺻﻮﺗ ﺮﻴﻴﻐﺗو حﻼﺻﻹا لﺎﻤﻋأ ﺬﻴﻔﻨﺗ زﻮﺠﻳ
.ءﻼﻤﻌﻟا
!ﺔﺑﺎﺻﻹا
ﺮﻄﺧ
.ﺮهﺎﺼﻤﻟا
■
■
■
■
■
■
■
■
■
5
Page 37

ﻲﻬﻄﻟا ﺰﻴﺣ ﻲﻓ ﺎﻬﻨﻳﺰﺨﺗ ﻢﺘﻳ ﻲﺘﻟا لﺎﻌﺘﺷﻼﻟ ﺔﻠﺑﺎﻘﻟا داﻮﻤﻟا
ﻲﻓ لﺎﻌﺘﺷﻼﻟ ﺔﻠﺑﺎﻗ داﻮﻤﺑ اﺪﺑأ ﻆﻔﺘﺤﺗ ﻻ .ﻞﻌﺘﺸﺗ نأ ﻦﻜﻤﻳ
ﺔﻨﺧدأ دﻮﺟو ﺔﻟﺎﺣ ﻲﻓ اًﺪﺑأ زﺎﻬﺠﻟا بﺎﺑ ﺢﺘﻔﺗ ﻻ .ﻲﻬﻄﻟا ﺰﻴﺣ
ﺲﺒﻘﻤﻟا ﻦﻣ ﻲﺋﺎﺑﺮﻬﻜﻟا ﺲﺑﺎﻘﻟا عﺰﻧاو زﺎﻬﺠﻟا ﻒﻗوأ .ﻪﻠﺧاﺪﺑ
رﺪﺼﻣ ﻖﻠﻏأ .ﺮهﺎﺼﻤﻟا قوﺪﻨﺻ ﻲﻓ ﺮﻬﺼﻤﻟا ﻞﺼﻓا وأ
.زﺎﻐﻟﺎﺑ داﺪﻣﻹا
نﻮهﺪﻟا كﺮﺘﺗ ﻻ .ﺔﻋﺮﺴﺑ ﻞﻌﺘﺸﺗ ﺔﻨﺧﺎﺴﻟا نﻮهﺪﻟاو تﻮﻳﺰﻟا
!ﻖﻳﺮﺤﻟا ﺮﻄﺧ
ماﺪﺨﺘﺳﺎﺑ اًﺪﺑأ ﻢﻘﺗ ﻻو .ﺔﺒﻗاﺮﻣ نود اًﺪﺑأ ﺔﻨﺧﺎﺴﻟا تﻮﻳﺰﻟا وأ
ءﺎﻔﻃﺈﺑ ﻢﻗ .ﻲﻬﻄﻟا ﻊﺿﻮﻣ ءﺎﻔﻃﺈﺑ ﻢﻗو .ﻖﻳﺮﺤﻟا ءﺎﻔﻃإ ﻲﻓ ءﺎﻤﻟا
ﺎﻣ وأ ﻖﻳﺮﺤﻟا ءﺎﻔﻃﻹ ﺔﻴﻧﺎﻄﺑ وأ ءﺎﻄﻏ ماﺪﺨﺘﺳﺎﺑ صﺮﺤﺑ ﺐﻬﻠﻟا
.ﻪﺑﺎﺷ
ﺔﻠﺑﺎﻘﻟا داﻮﻤﻟا نﺈﻓ ﻲﻟﺎﺘﻟﺎﺑو ،ﺔﻳﺎﻐﻠﻟ ﺎﻨﺧﺎﺳ زﺎﻬﺠﻟا ﺢﺒﺼﻳ
!ﻖﻳﺮﺤﻟا ﺮﻄﺧ
ماﺪﺨﺘﺳا وأ ﻦﻳﺰﺨﺘﺑ اﺪﺑأ ﻢﻘﺗ ﻻ .ﻞﻌﺘﺸﺗ نأ ﻦﻜﻤﻳ لﺎﻌﺘﺷﻼﻟ
تاﻮﺒﻋ لﺎﺜﻤﻟا ﻞﻴﺒﺳ ﻰﻠﻋ) لﺎﻌﺘﺷﻼﻟ ﺔﻠﺑﺎﻗ ءﺎﻴﺷأ ﺔﻳأ
بﺮﻘﻟﺎﺑ وأ زﺎﻬﺠﻟا ﻞﻔﺳأ (ﻒﻴﻈﻨﺘﻟا داﻮﻣ وأ تﻻﻮﺳوﺮﻳﻹا
ﻞﺧاد لﺎﻌﺘﺷﻼﻟ ﺔﻠﺑﺎﻗ ءﺎﻴﺷأ ﺔﻳأ ﻦﻳﺰﺨﺘﺑ ﻢﻘﺗ ﻻو .ةﺮﺷﺎﺒﻣ ﻪﻨﻣ
.ﻪﻗﻮﻓ وأ زﺎﻬﺠﻟا
وأ ةﻼﻘﻣ وأ ﺰﻴﺒﺧ حﻮﻟ ﻊﺿو لاﻮﺣﻷا ﻦﻣ لﺎﺣ يﺄﺑ زﻮﺠﻳ ﻻ
!ﻖﻳﺮﺤﻟا ﺮﻄﺧ
ﺚﻴﺣ .ﺮﺷﺎﺒﻣ ﻞﻜﺸﺑ نﺮﻔﻟا ﺔﻴﺿرأ ﻰﻠﻋ ﺮﺧﺁ ﻲﻬﻃ ءﺎﻋو يأ
نأ ﻦﻜﻤﻳو زﺎﻬﺠﻟا ﺔﻴﺿرأ ﺔﻧﻮﺨﺳ طﺮﻓ ﻰﻟإ يدﺆﻳ ﻚﻟذ نإ
.ﺐﻴآﺮﺘﻟا ةﺪﺣو ﺔﻴﺿرﺄﺑ اﺮﻴﺒآ ارﺮﺿ ﻖﺤﻠﻳ
ﻰﻟإ ﻚﻟذ يدﺆﻳ ﺪﻗو .ﺔﻳﺎﻐﻠﻟ ﺎﻨﺧﺎﺳ زﺎﻬﺠﻟا ﺮﻬﻇ ﺢﺒﺼﻳ
!ﻖﻳﺮﺤﻟا ﺮﻄﺧ
نأ زﻮﺠﻳ ﻻ ﻪﻧأ ﻰﻋاﺮﻳو .ﻞﻴﺻﻮﺘﻟا كﻼﺳﺄﺑ راﺮﺿﻹا
.زﺎﻬﺠﻟا ﺮﻬﻇ زﺎﻐﻟاو ﻲﺋﺎﺑﺮﻬﻜﻟا رﺎﻴﺘﻟا تﻼﺻو ﺲﻣﻼﺗ
!قوﺮﺤﺑ ﺔﺑﺎﺻﻹا ﺮﻄﺧ
ﺔﻴﻠﺧاﺪﻟا ﺢﻄﺳﻷا اﺪﺑأ ﺲﻤﻠﺗ ﻻ .ﺔﻳﺎﻐﻠﻟ ﺎﻨﺧﺎﺳ زﺎﻬﺠﻟا ﺢﺒﺼﻳ
صﺮﺣا .ﺔﻨﺧﺎﺳ ﻲهو ﻦﻴﺨﺴﺘﻟا ﺮﺻﺎﻨﻋ وأ ﻲﻬﻄﻟا ﺰﻴﺤﻟ
.زﺎﻬﺠﻟا ﻦﻋ لﺎﻔﻃﻷا ﺪﻌﺑأو .دﺮﺒﻳ زﺎﻬﺠﻟا كﺮﺗ ﻰﻠﻋ ﺎًﻤﺋاد
ﺎﻤﺋاد مﺪﺨﺘﺳا .ﺔﻳﺎﻐﻠﻟ ﺔﻨﺧﺎﺳ ﺢﺒﺼﺗ نﺮﻔﻟا ﻲﻧاوأو تﺎﻴﻟﺎﻤﻜﻟا
!قوﺮﺤﺑ ﺔﺑﺎﺻﻹا ﺮﻄﺧ
ﺰﻴﺣ ﻦﻣ نﺮﻔﻟا ﻲﻧاوأ وأ تﺎﻴﻟﺎﻤﻜﻟا جاﺮﺧﻹ نﺮﻔﻠﻟ ﺔﻃﻮﻓ
.ﻲﻬﻄﻟا
.ﻦﺧﺎﺳ ﻮهو ﻲﻬﻄﻟا ﺰﻴﺣ ﻲﻓ ﻞﻌﺘﺸﺗ نأ ﻦﻜﻤﻳ لﻮﺤﻜﻟا ةﺮﺨﺑأ
!قوﺮﺤﺑ ﺔﺑﺎﺻﻹا ﺮﻄﺧ
ﻦﻣ ةﺮﻴﺒآ تﺎﻴﻤآ ﻰﻠﻋ يﻮﺘﺤﺗ ﺔﻤﻌﻃأ ﺮﻴﻀﺤﺘﺑ اًﺪﺑأ ﻢﻘﺗ ﻻ
ﺮﺼﺘﻗا .لﻮﺤﻜﻟا ﻦﻣ ﺔﻴﻟﺎﻋ ﺔﺒﺴﻧ ﻰﻠﻋ ﺔﻠﻤﺘﺸﻤﻟا ﻞﺋاﻮﺴﻟا
ﺢﺘﻓا .ةﺰآﺮﻤﻟا تﺎﺑوﺮﺸﻤﻟا ﻦﻣ ﺔﻠﻴﻠﻗ تﺎﻴﻤآ ماﺪﺨﺘﺳا ﻰﻠﻋ
.صﺮﺤﺑ زﺎﻬﺠﻟا بﺎﺑ
.ﻞﻴﻐﺸﺘﻟا ءﺎﻨﺛأ ﻦﺨﺴﺗ ﺎﻬﻴﻟإ لﻮﺻﻮﻟا ﻦﻜﻤﻳ ﻲﺘﻟا ءاﺰﺟﻷا
!قوﺮﺤﺑ ﺔﺑﺎﺻﻹا ﺮﻄﺧ
ﻻ.زﺎﻬﺠﻟا ﻦﻋ لﺎﻔﻃﻷا ﺪﻌﺑأو .ﺔﻨﺧﺎﺴﻟا ءاﺰﺟﻷا اﺪﺑأ ﺲﻤﻠﺗ
■
!ﺔﻧﻮﺨﺴﻟا طﺮﻓ ﺮﻄﺧ
.ﻲﺋﺎﺑﺮﻬﻜﻟا رﺎﻴﺘﻟا عﺎﻄﻘﻧا ﺔﻟﺎﺣ ﻲﻓ ﺪﻳﺮﺒﺘﻟا ﺔﺣوﺮﻣ ﻞﻤﻌﺗ ﻻ
ﺔﺣﺎﺘﻤﻟا ﺢﻄﺳﻷا ﺢﺒﺼﺗو .ﺔﻧﻮﺨﺴﻟا طﺮﻔﻟ زﺎﻬﺠﻟا ضﺮﻌﺘﻳ ﺪﻗو
.تﺎﺑﺎﺻإ ثوﺪﺣ ﻲﻓ ﺐﺒﺴﺘﺗ نأ ﻦﻜﻤﻳو ﺔﻳﺎﻐﻠﻟ ﺔﻨﺧﺎﺳ ﺲﻤﻠﻟ
ﻞﻌﻔﺑ ﺐﻴآﺮﺘﻟا تاﺪﺣوو زﺎﻬﺠﻟﺎﺑ راﺮﺿأ ﻖﺤﻠﺗ نأ ﻦﻜﻤﻳ ﺎﻤآ
ﻲﺋﺎﺑﺮﻬﻜﻟا رﺎﻴﺘﻟا عﺎﻄﻘﻧا ﺔﻟﺎﺣ ﻲﻓ .ةراﺮﺤﻟا تﺎﺟرد عﺎﻔﺗرا
■
.ﺎﻳوﺪﻳ ﻪﻠﻴﻐﺸﺗو زﺎﻬﺠﻟا لﺎﻌﺷإ زﻮﺠﻳ
.ءﺎﺑﺮﻬﻜﻟا عﺎﻄﻘﻧا ﺔﻟﺎﺣ
زﺎﻏ ﺔﺤﺋار ﻢﺷ ﺔﻟﺎﺣ ﻲﻓ فﺮﺼﺘﻟا!
.رﺎﺠﻔﻧا ثوﺪﺣ ﻰﻟإ يدﺆﻳ نأ ﻦﻜﻤﻳ بﺮﺴﺘﻤﻟا زﺎﻐﻟا
ﻞﻴﺻﻮﺘﻟا ﺪﻨﻋ تﻻﻼﺘﺧا ثوﺪﺣ وأ زﺎﻏ ﺔﺤﺋار ﻢﺷ ﺔﻟﺎﺣ ﻲﻓ
■
ﻰﻠﻋ زﺎﻐﻟا ﺔﻧاﻮﻄﺳأ مﺎﻤﺻ وأ زﺎﻐﻟﺎﺑ داﺪﻣﻹا رﺪﺼﻣ ﻖﻠﻏأ
.ﺮﺋﺎﺠﺴﻟاو فﻮﺸﻜﻤﻟا ﺐﻬﻠﻟا ردﺎﺼﻣ ءﺎﻔﻃﺈﺑ رﻮﻔﻟا ﻰﻠﻋ ﻢﻗ
يأ ﺐﺤﺴﺗ ﻻو ،ةﺰﻬﺟﻷا وأ ءاﻮﺿﻷا ﺢﻴﺗﺎﻔﻣ ﻞﻴﻐﺸﺘﺑ ﻢﻘﺗ ﻻ
■
لاﻮﺠﻟا وأ ﺖﺑﺎﺜﻟا ﻒﺗﺎﻬﻟا مﺪﺨﺘﺴﺗ ﻻو .ﺲﺒﻘﻣ يأ ﻦﻣ ﺲﺑﺎﻗ
.لﺰﻨﻤﻟا ﻞﺧاد
.اًﺪﻴﺟ نﺎﻜﻤﻟا ﺔﻳﻮﻬﺘﺑ ﻢﻗو ﺬﻓاﻮﻨﻟا ﺢﺘﻓا
.زﺎﻐﻟﺎﺑ داﺪﻣﻹا ﺔآﺮﺷ وأ ءﻼﻤﻌﻟا ﺔﻣﺪﺧ ﺰآﺮﻤﺑ ﻞﺼﺗا
■
!قﺎﻨﺘﺧﻻا ﺮﻄﺧ
ﺔﺑﻮﻃرو ةراﺮﺣ ﺪﻴﻟﻮﺗ ﻰﻟإ يدﺆﻳ زﺎﻏ ﺪﻗﻮﻣ ماﺪﺨﺘﺳا نأ ﻰﻋاﺮﻳ
ﺔﻳﻮﻬﺘﻟا ﻦﻣ ﻖﻘﺤﺗ .ﻪﻴﻓ دﻮﺟﻮﻤﻟا نﺎﻜﻤﻟا ﻲﻓ قاﺮﺘﺣﻼﻟ ﺔﻠﺑﺎﻗ ﺞﺗاﻮﻧو
ﺔﻳﻮﻬﺘﻟا تﺎﺤﺘﻓ نﻮﻜﺗ نأ ﻰﻠﻋ صﺮﺣاو .ﺐﻴآﺮﺘﻟا نﺎﻜﻤﻟ ةﺪﻴﺠﻟا
■
ﻞﻴﺒﺳ ﻰﻠﻋ) ﺔﻴﻟﺁ ﺔﻳﻮﻬﺗ ةﺰﻴﻬﺠﺗ ﺮﻴﻓﻮﺘﺑ ﻢﻗ وأ ﺔﺣﻮﺘﻔﻣ ﺔﻴﻌﻴﺒﻄﻟا
ﻒﺜﻜﻣ
ﻞﻜﺸﺑ زﺎﻬﺠﻟا ماﺪﺨﺘﺳا ﺔﻟﺎﺣ ﻲﻓ .(ةﺮﺨﺑأ طﺎﻔﺷ لﺎﺜﻤﻟا
ﻰﻠﻋ ،ﺔﻴﻓﺎﺿإ ﺔﻳﻮﻬﺗ ﺮﻓاﻮﺗ ﺐﻠﻄﺘﻳ ﺪﻗ ﻚﻟذ نﺈﻓ ،ﺔﻠﻳﻮﻃ تاﺮﺘﻔﻟ
■
ﻰﻠﻋ ،ﺔﻴﻟﺎﻌﻓ ﺮﺜآأ ﺔﻳﻮﻬﺗ ﺮﻓاﻮﺗ وأ ﺬﻓاﻮﻨﻟا ﺪﺣأ ﺢﺘﻓ لﺎﺜﻤﻟا ﻞﻴﺒﺳ
ﺔﺟرد ﻰﻠﻋ ةدﻮﺟﻮﻤﻟا ﺔﻴﻟﻵا ﺔﻳﻮﻬﺘﻟا ةﺰﻴﻬﺠﺗ ﻞﻴﻐﺸﺗ لﺎﺜﻤﻟا ﻞﻴﺒﺳ
■
!ﻖﻳﺮﺤﻟا ﺮﻄﺧ
ﺲﻣﻼﺗ ثﺪﺤﻳ ﺪﻗو .زﺎﻬﺠﻟا بﺎﺑ ﺢﺘﻓ ﺪﻨﻋ ﻲﺋاﻮه رﺎﻴﺗ ﺄﺸﻨﻳ
يدﺆﻳ ﺎﻤﻣ ،ﻦﻴﺨﺴﺘﻟا ﺮﺻﺎﻨﻋو تازﻮﺒﺨﻤﻟا داﺪﻋإ قرو ﻦﻴﺑ
ﻪﺘﻴﺒﺜﺗ نود تازﻮﺒﺨﻤﻟا داﺪﻋإ قرو ﻊﻀﺗ ﻻ .ﻪﻟﺎﻌﺘﺷا ﻰﻟإ
ﺖﻴﺒﺜﺗ ﻰﻠﻋ ﺎﻤﺋاد صﺮﺣا .ءﺎﻤﺣﻹا ءﺎﻨﺛأ تﺎﻴﻟﺎﻤﻜﻟا ﻰﻠﻋ
■
ﺔﻴﻨﻴﺻ وأ ﻖﺒﻃ ﻊﺿﻮﺑ ﻪﻧﺎﻜﻣ ﻲﻓ تازﻮﺒﺨﻤﻟا داﺪﻋإ قرو
داﺪﻋإ قرﻮﺑ ﻂﻘﻓ بﻮﻠﻄﻤﻟا ﺢﻄﺴﻟا ﺔﻴﻄﻐﺘﺑ
ﻢﻗو .ﻪﻴﻠﻋ ﺰﻴﺒﺧ
تازﻮﺒﺨﻤﻟا داﺪﻋإ قرو زﺮﺒﻳ نأ زﻮﺠﻳ ﻻو .تازﻮﺒﺨﻤﻟا
.تﺎﻴﻟﺎﻤﻜﻟا قﻮﻓ
ﻻ ﻲﻓ زﺎﻬﺠﻟا فﺎﻘﻳﺈﺑ ﻢﻗ
:زﺎﻐﻟﺎﺑ
■
.رﻮﻔﻟا
■
■
■
■
.ﺮﺒآأ ةرﺪﻗ
■
!ﻖﻳﺮﺤﻟا ﺮﻄﺧ
4
Page 38

]ar[لﺎﻤﻌﺘﺳﻻا ﻞﻴﻟد
Ñتﺎﻳﻮﺘﺤﻤﻟا سﺮﻬﻓ
زﺎﻬﺠﻟا بﺎﺑ ﺐﻴآﺮﺗو ﻚﻓ.....................................................................10
ﻖﻴﻠﻌﺘﻟا نﺎﺒﻀﻗ تﺎﻜﺒﺷ ﺐﻴآﺮﺗو ﻚﻓ........................................................11
؟ﻞﻠﺧ ثوﺪﺣ ﺪﻨﻋ ﻞﻤﻌﻟا ﺎﻣ..................................................................11
نﺮﻔﻟا ﺔﺒﻤﻟ ﺮﻴﻴﻐﺗ...............................................................................11
ءﻼﻤﻌﻟا ﺔﻣﺪﺧ..................................................................................12
ﺔﺌﻴﺒﻟاو ﺔﻗﺎﻄﻟا لﻮﺣ ﺢﺋﺎﺼﻧ.................................................................12
ﺔﻗﺎﻄﻟا ﺮﻴﻓﻮﺗ....................................................................................12
ﺔﺌﻴﺒﻟﺎﺑ ﺮﻀﺗ ﻻ ﺔﻘﻳﺮﻄﺑ تﺎﻔﻠﺨﻤﻟا ﻦﻣ ﺺﻠﺨﺘﻟا...........................................12
ﺔﻴﺋاﺬﻐﻟا داﻮﻤﻟا ﻲﻓ ﺪﻴﻣﻼﻳﺮآﻷا..............................................................12
ماﺪﺨﺘﺳﻻا ﺢﺋﺎﺼﻧ.............................................................................13
تازﻮﺒﺨﻤﻟا داﺪﻋإ..............................................................................13
ءاﻮﺸﻟاو ﺮﻴﻤﺤﺘﻟا...............................................................................14
تﺎﺠﺘﻨﻤﻟا تﺎﻣﻮﻠﻌﻣ
ﻰﻠﻋ تﺎﻣﺪﺨﻟاو رﺎﻴﻐﻟا ﻊﻄﻗو تﺎﻴﻟﺎﻤﻜﻟاو تﺎﺠﺘﻨﻤﻟا لﻮﺣ تﺎﻣﻮﻠﻌﻤﻟا ﻦﻣ ﺪﻳﺰﻤﻟا ﺪﺠﺗ
:ﺖﻧﺮﺘﻧﻹا ﻊﻗﻮﻣwww.bosch-home.com ﻊﻗﻮﻣ ﻰﻠﻋ ﻲﻧوﺮﺘﻜﻟﻹا ﺮﺠﺘﻤﻟا ﻲﻓو
www.bosch-eshop.com
089 69 339 339 ﺔﻋﺎﺴﻟا ﻦﻣ :ﺔﻌﻤﺠﻟا ﻰﻟإ ﻦﻴﻨﺛﻻا ﻦﻣ ﻚﻟذو) 8.00 ﺔﻋﺎﺴﻟا ﻰﻟإ
:ﺖﻧﺮﺘﻧﻹا
ﺮﺴﻳشﻮﺑ تﺎﻣﻼﻌﺘﺳا ﻖﻳﺮﻓﺔﻣزﻼﻟا تﺎﺠﺘﻨﻤﻟا تﺎﻣﻮﻠﻌﻣو ةرﻮﺸﻤﻟا ﻚﻟ مﺪﻘﻳ نأ
دﺮﻟاو ﻰﻠﻋ ةﺰﻬﺟﻷا تﺎﻣاﺪﺨﺘﺳاو تﺎﻘﻴﺒﻄﺘﺑ ﻖﻠﻌﺘﻳ ﺎﻤﻴﻓ ﻢﻜﺗارﺎﺴﻔﺘﺳا ﻰﻠﻋ ﻢﻗر :ﻒﺗﺎه
18.00.ﺎﻴﻧﺎﻤﻟأ ﻰﻠﻋ ﻂﻘﻓ يﺮﺴﻳ (
ﺔﻤﻬﻤﻟا نﺎﻣﻷا تادﺎﺷرإ........................................................................3
راﺮﺿﻷا بﺎﺒﺳأ.................................................................................5
ﺪﻳﺪﺠﻟا كزﺎﻬﺟ....................................................................................6
نﺮﻔﻟا..............................................................................................6
ﺮﻴﺼﻘﻟا ﺖﻗﻮﻟا ﺖﻗﺆﻣ...........................................................................6
ﺪﻳﺮﺒﺘﻟا ﺔﺣوﺮﻣ...................................................................................6
تﺎﻴﻟﺎﻤﻜﻟا..........................................................................................6
ةﺮﻣ لوﻷ ماﺪﺨﺘﺳﻻا ﻞﺒﻗ.......................................................................7
نﺮﻔﻟا ﻦﻴﺨﺴﺗ.....................................................................................7
تﺎﻴﻟﺎﻤﻜﻟا ﻒﻴﻈﻨﺗ................................................................................7
نﺮﻔﻟا لﺎﻤﻌﺘﺳا ﺔﻘﻳﺮﻃ..........................................................................7
نﺮﻔﻟا ةءﺎﺿإ.....................................................................................7
ﻞﻴﻐﺸﺘﻟا قﺮﻃ....................................................................................7
نﺮﻔﻟا لﺎﻤﻌﺘﺳا...................................................................................7
ﺔﻳاﻮﺸﻟا لﺎﻤﻌﺘﺳا.................................................................................7
راوﺪﻟا ﺦﻴﺴﻟا لﺎﻤﻌﺘﺳا...........................................................................7
ﺮﻴﺼﻘﻟا ﺖﻗﻮﻟا ﻲﺗﺎﻘﻴﻣ لﺎﻤﻌﺘﺳا................................................................8
ﻒﻴﻈﻨﺘﻟاو ﺔﻳﺎﻨﻌﻟا................................................................................8
تﺎﻔﻈﻨﻤﻟا..........................................................................................9
ﻲﻬﻄﻟا ﺰﻴﺤﻟ ةزﺎﻔﺤﻟا ﺔﻧﺎﻄﺒﻟا...................................................................9
بﺎﺒﻟا جﺎﺟز ﺐﻴآﺮﺗو ﻚﻓ.......................................................................9
ﺔﻄﺳاﻮﺑ وأ ﻲﺟرﺎﺧ ﻲﺗﺎﻘﻴﻣ ﻊﻣ ﻞﻴﻐﺸﺘﻠﻟ ﺎﻤﻤﺼﻣ ﺲﻴﻟ زﺎﻬﺠﻟا اﺬه
.ﺪﻌﺑ ﻦﻋ ﻞﻴﻐﺸﺗ زﺎﻬﺟ
8 تاﻮﻨﺳ
ﺮﻤﻋ ﻦﻣ لﺎﻔﻃﻷا ﻞَﺒِﻗ ﻦﻣ زﺎﻬﺠﻟا اﺬه ماﺪﺨﺘﺳا ﻦﻜﻤﻳ
وأ ﺔﻳﺪﺴﺠﻟا تارﺪﻘﻟا ﻲﻓ ﺺﻘﻧ ﻦﻣ نﻮﻧﺎﻌﻳ ﻦﻳﺬﻟا صﺎﺨﺷﻷا وأ
ةﺮﺒﺨﻟا ﻲﻓ رﻮﺼﻗ ﻢﻬﻳﺪﻟ ﻦﻳﺬﻟا صﺎﺨﺷﻷا وأ ﺔﻴﻠﻘﻌﻟا وأ ﺔﻴﺴﺤﻟا
ﻢﻬﺘﻣﻼﺳ ﻦﻋ لوﺆﺴﻣ ﺺﺨﺷ مﻮﻘﻳ نأ ﺔﻄﻳﺮﺷ ﺔﻓﺮﻌﻤﻟا وأ
فاﺮﺷﻹﺎﺑ زﺎﻬﺠﻠﻟ ﻦﻣﻵا ماﺪﺨﺘﺳﻻا ﺔﻴﻔﻴآ ﻰﻟإ ﻢﻬﻬﻴﺟﻮﺗ وأ ﻢﻬﻴﻠﻋ
.ﻚﻟﺬﺑ ﺔﻄﺒﺗﺮﻤﻟا رﺎﻄﺧﻸﻟ ﻢﻬآاردإ ﻦﻣ ﺪآﺄﺘﻟا ﻊﻣ
ﻒﻴﻈﻨﺗ لﺎﻔﻃﻸﻟ زﻮﺠﻳ ﻻ .
زﺎﻬﺠﻟﺎﺑ ﺚﺒﻌﻟا لﺎﻔﻃﻸﻟ زﻮﺠﻳ ﻻ
ﻢﻟ ﺎﻣ مﺪﺨﺘﺴﻤﻟﺎﺑ ﺔﻃﻮﻨﻤﻟا ﺔﻧﺎﻴﺼﻟا لﺎﻤﻋأ ءاﺮﺟإ وأ زﺎﻬﺠﻟا
15ﻢﻬﺘﺒﻗاﺮﻣ ﻢﺘﻳ نأ ﻰﻠﻋ ،ﺮﺜآأ وأ ﺔﻨﺳ
ﻦﺳ ﻲﻓ اﻮﻧﻮﻜﻳ
ءﺎﻨﺛأ.ﻚﻟذ
8 ﻞﺑﺎآو زﺎﻬﺠﻟا ﻦﻋ ﻢهدﺎﻌﺑإ ﺐﺠﻳ تاﻮﻨﺳ
ﻦﺳ نود لﺎﻔﻃﻷا
.ﻞﻴﺻﻮﺘﻟا
ﻞﻜﺸﺑ ﻲﻬﻄﻟا ﺰﻴﺣ ﻲﻓ تﺎﻴﻟﺎﻤﻜﻟا لﺎﺧدإ ﻰﻠﻋ ﺎﻤﺋاد صﺮﺣا
.لﺎﻤﻌﺘﺳﻻا ﻞﻴﻟد ﻲﻓ
تﺎﻴﻟﺎﻤﻜﻟا حﺮﺷ ﺮﻈﻧا
.ﺢﻴﺤﺻ
:ﺔﻤﻬﻤﻟا نﺎﻣﻷا تادﺎﺷرإ
ﻞﻜﺸﺑ زﺎﻬﺠﻟا ماﺪﺨﺘﺳا ﻚﻨﻜﻤﻴﺳ ﻂﻘﻓ ﺬﺋﺪﻨﻋ .ﺔﻳﺎﻨﻌﺑ ﻞﻴﻟﺪﻟا اﺬه أﺮﻗا
ﻪﻣاﺪﺨﺘﺳﻻ ﺐﻴآﺮﺘﻟاو لﺎﻤﻌﺘﺳﻻا ﻞﻴﻟﺪﺑ ﻆﻔﺘﺣا .ﻦﻣﺁو ﺢﻴﺤﺻ
.ﺪﻳﺪﺠﻟا ﻚﻟﺎﻤﻠﻟ ﻪﻤﻴﻠﺴﺘﻟ وأ ﺎﻘﺣﻻ
تاﺪﺣو ﻞﺧاد ﺞﻣﺪﻣ ﻞﻜﺸﺑ ﺐﻴآﺮﺘﻠﻟ ﻂﻘﻓ ﺺﺼﺨﻣ زﺎﻬﺠﻟا اﺬه
.ﺐﻴآﺮﺘﻟﺎﺑ ﺔﺻﺎﺨﻟا تﺎﻤﻴﻠﻌﺘﻟا ﻰﻋاﺮﺗ .ﺦﺒﻄﻤﻟا
ﻞﻴﺻﻮﺘﺑ ﻢﻘﺗ ﻻو .ﻒﻴﻠﻐﺘﻟا داﻮﻣ ﻦﻣ ﻪﺟاﺮﺧإ ﺪﻌﺑ زﺎﻬﺠﻟا ﺺﺤﻓا
.ﻞﻘﻨﻟا ﺔﻴﻠﻤﻋ ﻦﻋ ﺔﺠﺗﺎﻧ
ﻖﺤﻳ ﻻ ﺚﻴﺣ .زﺎﻬﺠﻟا ﻞﻴﺻﻮﺘﺑ ﻂﻘﻓ ﺪﻤﺘﻌﻣ ﻲﻨﻓ مﻮﻘﻳ نأ ﻦﻴﻌﺘﻳ
ﻞﻴﺻﻮﺘﻟا ﻦﻋ ﺔﺠﺗﺎﻨﻟا راﺮﺿﻷا ﺔﻟﺎﺣ ﻲﻓ نﺎﻤﻀﻟا قﻮﻘﺤﺑ ﺔﺒﻟﺎﻄﻤﻟا
ﻦﻣ ﺮﺧﺁ عﻮﻧ ﻊﻣ ﺐﺳﺎﻨﺘﻴﻟ زﺎﻬﺠﻟا ﻞﻳﺪﻌﺗ ﻲﻓ ﺔﺒﻏﺮﻟا ﺪﻨﻋ .ﺊﻃﺎﺨﻟا
ﻲﻠﺧاﺪﻟا قﺎﻄﻨﻟا ﻲﻓو ﻲﻟﺰﻨﻤﻟا ماﺪﺨﺘﺳﻼﻟ ﺺﺼﺨﻣ زﺎﻬﺠﻟا اﺬه
ﺮﻴﻀﺤﺗ ﻰﻠﻋ
ارﻮﺼﻘﻣ زﺎﻬﺠﻟا ماﺪﺨﺘﺳا نﻮﻜﻳ نأ ﺐﺠﻳ .ﻂﻘﻓ
زﺎﻬﺠآ ﻪﻣاﺪﺨﺘﺳا ﺎﻘﻠﻄﻣ زﻮﺠﻳ ﻻ ذإ ،تﺎﺑوﺮﺸﻤﻟاو ﺔﻤﻌﻃﻷا
زﺎﻬﺠﻟا اﺬه مﺪﺨﺘﺳا .ﻞﻴﻐﺸﺘﻟا ءﺎﻨﺛأ زﺎﻬﺠﻟا ﺔﺒﻗاﺮﻣ ﻦﻴﻌﺘﻳو .ﺔﺌﻓﺪﺗ
2000 ﺮﺘﻣ
ﻰﺘﺣ عﺎﻔﺗرا ﻰﻠﻋ ماﺪﺨﺘﺳﻼﻟ ﺐﺳﺎﻨﻣ زﺎﻬﺠﻟا اﺬه
.ﻰﺼﻗأ ﺪﺤآ ﺮﺤﺒﻟا ﺢﻄﺳ ىﻮﺘﺴﻣ قﻮﻓ
راﺮﺿأ دﻮﺟو ﺔﻟﺎﺣ ﻲﻓ زﺎﻬﺠﻟا
.ءﻼﻤﻌﻟا ﺔﻣﺪﺧ ﺰآﺮﻤﺑ ﻞﺼﺗا ،زﺎﻐﻟا
.ﻂﻘﻓ ﺔﻘﻠﻐﻤﻟا ﻦآﺎﻣﻷا ﻲﻓ
3
Page 39

Page 40

Robert Bosch Hausgeräte GmbH
Carl-Wery-Straße 34
81739 München
Germany
www.bosch-home.com
*9000856004*
9000856004
914776004
991104
 Loading...