

Bosch HGD74W455A User Manual
Free standing cooker
This cooker is approved for use with Natural and ULPG Gas.
LEAVE INSTRUCTIONS WITH OWENER
HGD74W455A
[en] Instruction manual


Table of contents
[en]Instruction manual
Important safety information..................................................... 4
Causes of damage...................................................................... 7
Damage to the oven...........................................................................7
Damage to the plinth drawer............................................................7
Set-up, gas and electricity connection..................................... 7
Gas connection ...................................................................................7
Faults in the gas installation/smell of gas .....................................7
Moving the appliance by the gas line or door handle.................8
Electrical connection ..........................................................................8
Levelling the cooker ...........................................................................8
Wall fixing .............................................................................................8
Setting up the appliance ...................................................................8
Measures to be noted during transport..........................................8
Your new appliance ....................................................................9
General information............................................................................9
Cooking area .......................................................................................9
Control panel .................................................................................... 10
The cooking compartment ............................................................. 10
Your accessories ......................................................................11
Inserting accessories ...................................................................... 11
Optional accessories ...................................................................... 11
After-sales service products .......................................................... 12
Before using the oven for the first time..................................13
Setting the time ................................................................................ 13
Heating up the oven........................................................................13
Cleaning the accessories...............................................................13
Making settings on the hob.....................................................13
Advance cleaning of burner cup and cap .................................. 13
Igniting the gas burners.................................................................. 13
Table – Cooking .............................................................................. 14
Suitable pans ............................................................................14
Precautions for use ......................................................................... 14
Programming the oven ............................................................15
Type of heating and temperature ................................................. 15
Rapid heating ................................................................................... 15
Setting the time functions .......................................................15
Timer .................................................................................................. 15
Cooking time .................................................................................... 16
End time............................................................................................. 16
Time....................................................................................................17
Childproof lock .........................................................................17
Changing the basic settings ...................................................17
Care and cleaning ....................................................................18
Cleaning agents ............................................................................... 18
Cleaning the self-cleaning surfaces in the oven ........................ 19
Detaching and refitting the rails .................................................... 20
Detaching and attaching the oven door......................................20
Removing and installing the door panels ................................... 21
Troubleshooting .......................................................................21
Malfunction table.............................................................................. 21
Replacing the bulb in the oven ceiling light ............................... 22
Glass cover .......................................................................................22
After-sales service ...................................................................22
E number and FD number ............................................................. 22
Energy and environment tips..................................................22
Saving energy with your oven ....................................................... 22
Saving energy with the gas hob ................................................... 22
Environmentally-friendly disposal.................................................. 22
Tested for you in our cooking studio .....................................23
Cakes and pastries ......................................................................... 23
Baking tips ........................................................................................ 25
Meat, poultry, fish............................................................................. 25
Tips for roasting and grilling..........................................................27
Bakes, gratins, toast with toppings .............................................. 27
Preprepared products.....................................................................28
Special dishes .................................................................................. 29
Defrosting .......................................................................................... 29
Drying.................................................................................................29
Preserving ......................................................................................... 29
Acrylamide in foodstuffs .........................................................30
Test dishes................................................................................ 31
Baking ................................................................................................31
Grilling................................................................................................31
Produktinfo
Additional information on products, accessories, replacement
parts and services can be found at www.bosch-home.com and
in the online shop www.bosch-eshop.com
3

: Important safety information
Read these instructions carefully. Only then will you be able to operate your appliance safely and correctly. Retain the instruction manual and installation instructions for future use or for subsequent owners.
These instructions are only valid if the
appropriate country symbol appears on the
appliance. If the symbol does not appear on
the appliance, it is necessary to refer to the
technical instructions which will provide the
necessary instructions concerning
modification of the appliance to the
conditions of use of the country.
Appliance category: Category 1
Check the appliance for damage after
unpacking it. Do not connect the appliance
if it has been damaged in transport.
Only allow a licensed professional to
connect the appliance and to convert the
appliance to a different type of gas. The
appliance must be installed (electric and
gas connections) in accordance with the
instruction and installation manual. An
incorrect connection or incorrect settings
may lead to serious accidents and damage
to the appliance. The appliance
manufacturer accepts no liability for
damage of this kind. The appliance's
warranty becomes void.
Caution!
This appliance is for cooking purposes only. It must not be used for other purposes, for example room heating.
DO NOT SPRAY AEROSOLS IN THE VICINITY OF THIS APPLIANCE WHILE IT IS IN OPERATION.
WHERE THIS APPLIANCE IS INSTALLED IN MARINE CRAFT OR IN CARAVANS, IT SHALL NOT BE USED AS A SPACE HEATER.
DO NOT MODIFY THIS APPLIANCE. DO NOT USE OR STORE FLAMMABLE MATERIALS IN THE APPLIANCE STORAGE DRAWER OR NEAR THE APPLIANCE.
This appliance is intended for use up to a maximum height of 2000 metres above sea level.
Caution:The use of a gas cooking
appliance results in the production of heat,
moisture and products of combustion in the
room in which it is installed. Ensure that the
kitchen is well ventilated especially when
the appliance is in use: keep natural
ventilation holes open or install a
mechanical ventilation device (mechanical
extractor hood).
Prolonged intensive use of the appliance may call for additional ventilation, for example opening of a window, or more effective ventilation, for example increasing the level of mechanical ventilation where present.
This appliance is not designed for operation with an external timer or by remote control.
Do not use inappropriate child safety shields or hob guards. These can cause accidents.
This appliance may be used by children
over the age of 8 years old and by persons
with reduced physical, sensory or mental
capabilities or by persons with a lack of
experience or knowledge if they are
supervised or are instructed by a person
responsible for their safety how to use the
appliance safely and have understood the
associated hazards.
Children must not play with, on, or around the appliance. Children must not clean the appliance or carry out general maintenance unless they are at least 8 years old and are being supervised.
Keep children below the age of 8 years old at a safe distance from the appliance and power cable.
Always slide accessories into the cooking compartment correctly. See "Description of accessories in the instruction manual.
Risk of fire!
■
A draught is created when the appliance
door is opened. Greaseproof paper may
come into contact with the heating
element and catch fire. Do not place
greaseproof paper loosely over
accessories during preheating. Always
weight down the greaseproof paper with a
dish or a baking tin. Only cover the
surface required with greaseproof paper.
Greaseproof paper must not protrude over
the accessories.
Risk of fire!
■
Combustible objects that are left in the
cooking compartment may ignite. Never
store combustible items in the cooking
compartment. Never open the appliance
door if there is smoke inside. Switch off
the appliance and unplug the mains plug
4

or switch off the fuse in the fuse box. Shut
off the gas supply.
Risk of fire!
■
Hot oil and fat can ignite very quickly.
Never leave hot fat or oil unattended.
Never use water to put out burning oil or
fat. Switch off the hotplate. Extinguish
flames carefully using a lid, fire blanket or
something similar.
Risk of fire!
■
The hotplates become very hot. Never
place combustible items on the hob.
Never place objects on the hob.
Risk of fire!
■
The appliance becomes very hot, and
flammable materials can easily catch fire.
Do not store or use any flammable
objects (e.g. aerosol cans, cleaning
agents) under or in the vicinity of the oven.
Do not store any flammable objects inside
or on top of the oven.
Risk of fire!
■
When gas hotplates are in operation
without any cookware placed on them,
they can build up a lot of heat. The
appliance and the extractor hood above it
may become damaged or be set on fire.
Grease residue in the filter of the extractor
hood may ignite. Only operate the gas
burners with cookware on them.
Risk of fire!
■
The rear of the appliance becomes very
hot. This may cause damage to the power
cables. Electricity and gas lines must not
come into contact with the rear of the
appliance.
Risk of fire!
■
Never place flammable objects on the
burners or store them in the cooking
compartment. Never open the appliance
door if there is smoke inside. Switch off
the appliance. Pull out the mains plug or
switch off the appliance at the circuit
breaker in the fuse box. Shut off the gas
supply.
Risk of fire!
■
The surfaces of the plinth drawer may
become very hot. Only store oven
accessories in the drawer. Flammable and
combustible objects must not be stored in
the plinth drawer.
Risk of burns!
■
The appliance becomes very hot. Never
touch the interior surfaces of the cooking
compartment or the heating elements.
Always allow the appliance to cool down.
Keep children at a safe distance.
Risk of serious burns!
■
Accessories and ovenware become very
hot. Always use oven gloves to remove
accessories or ovenware from the cooking
compartment.
Risk of burns!
■
Alcoholic vapours may catch fire in the hot
cooking compartment. Never prepare food
containing large quantities of drinks with a
high alcohol content. Only use small
quantities of drinks with a high alcohol
content. Open the appliance door with
care.
Risk of burns!
■
The hotplates and surrounding area
(particularly the hob surround, if fitted)
become very hot. Never touch the hot
surfaces. Keep children at a safe distance.
Risk of burns!
■
During operation, the surfaces of the
appliance become hot. Do not touch the
surfaces when they are hot. Keep children
away from the appliance.
Risk of burns!
■
Empty cookware becomes extremely hot
when set on a gas hotplate that is in
operation. Never heat up empty cookware.
Risk of burns!
■
The appliance becomes hot during
operation. Allow the appliance to cool
down before cleaning.
Risk of burns!
■
Caution: Accessible parts may be hot
when the grill is in use. Young children
should be kept away from the appliance.
Risk of burns!
■
If the liquefied gas bottle is not upright,
liquefied propane/butane can enter the
appliance. Intense darting flames may
therefore escape from the burners.
Components may become damaged and
start to leak over time so that gas escapes
uncontrollably. Both can cause burns.
Always use liquefied gas bottles in an
upright position.
Risk of scalding!
■
The accessible parts become hot during
operation. Never touch the hot parts. Keep
children at a safe distance.
Risk of scalding!
■
When you open the appliance door, hot
steam may escape. Open the appliance
door with care. Keep children at a safe
distance.
Risk of scalding!
■
Water in a hot cooking compartment may
create hot steam. Never pour water into
the hot cooking compartment.
Risk of injury!
■
Scratched glass in the appliance door
may develop into a crack. Do not use a
glass scraper, sharp or abrasive cleaning
aids or detergents.
Risk of injury!
5

■
Incorrect repairs are dangerous. Repairs
may only be carried out, and damaged
power and gas lines replaced, by an aftersales engineer trained by us. If the
appliance is faulty, unplug the mains plug
or switch off the fuse in the fuse box. Shut
off the gas supply. Contact the after-sales
service.
Risk of injury!
■
Faults or damage to the appliance are
dangerous. Never switch on a faulty
appliance. Unplug the appliance from the
mains or switch off the circuit breaker in
the fuse box. Shut off the gas supply.
Contact the after-sales service.
Risk of injury!
■
Unsuitable pan sizes, damaged or
incorrectly positioned pans can cause
serious injury. Observe the instructions
which accompany the cookware.
Risk of injury!
■
If the appliance is placed on a base and is
not secured, it may slide off the base. The
appliance must be fixed to the base.
Risk of electric shock!
■
Incorrect repairs are dangerous. Repairs
may only be carried out by one of our
trained after-sales engineers. If the
appliance is faulty, unplug the mains plug
or switch off the fuse in the fuse box.
Contact the after-sales service.
Risk of electric shock and serious injury!
■
The cable insulation on electrical
appliances may melt when touching hot
parts of the appliance. Never bring
electrical appliance cables into contact
with hot parts of the appliance.
Risk of electric shock!
■
Do not use any high-pressure cleaners or
steam cleaners, which can result in an
electric shock.
Risk of electric shock!
■
When replacing the cooking compartment
bulb, the bulb socket contacts are live.
Before replacing the bulb, unplug the
appliance from the mains or switch off the
circuit breaker in the fuse box.
Risk of electric shock!
■
A defective appliance may cause electric
shock. Never switch on a defective
appliance. Unplug the appliance from the
mains or switch off the circuit breaker in
the fuse box. Contact the after-sales
service.
Risk of fire!
■
Loose food residues, grease and meat
juices may catch fire during the Selfcleaning cycle. Remove coarse dirt from
the cooking compartment and from the
accessories before every Self-cleaning
cycle.
Risk of fire!
■
The appliance will become very hot on the
outside during the Self-cleaning cycle.
Never hang combustible objects, e.g. tea
towels, on the door handle. Do not place
anything against the front of the oven.
Keep children at a safe distance.
Risk of burns!
■
The cooking compartment will become
very hot during the Self-cleaning cycle.
Never open the appliance door or move
the locking latch by hand. Allow the
appliance to cool down. Keep children at
a safe distance.
Risk of burns!
■
; The appliance will become very hot on
the outside during the Self-cleaning cycle.
Never touch the appliance door. Allow the
appliance to cool down. Keep children at
a safe distance.
6

Causes of damage
Hob
Caution!
■ Only use the burners when cookware has been placed on
top. Do not heat up empty pots or pans. The saucepan base
will be damaged.
■ Only use pots and pans with an even base.
■ Place the pot or pan centrally over the burner. This will
optimise transfer of the heat from the burner flame to the pot
or ban base. The handle does not become damaged, and
greater energy savings are guaranteed.
■ Ensure that the gas burners are clean and dry. The burner
cup and ¶burner cap must be positioned exactly.
■ Ensure that the top cover is not closed when the oven is
started up.
Damage to the oven
Caution!
■ Accessories, foil, greaseproof paper or ovenware on the
cooking compartment floor: do not place accessories on the
cooking compartment floor. Do not cover the cooking
compartment floor with any sort of foil or greaseproof paper.
Do not place ovenware on the cooking compartment floor if a
temperature of over 50 ºC has been set. This will cause heat
to accumulate. The baking and roasting times will no longer
be correct and the enamel will be damaged.
■ Water in a hot cooking compartment: do not pour water into
the cooking compartment when it is hot. This will cause
steam. The temperature change can cause damage to the
enamel.
■ Moist food: do not store moist food in the cooking
compartment when it is closed for prolonged periods This will
damage the enamel.
■ Fruit juice: when baking particularly juicy fruit pies, do not
pack the baking tray too generously. Fruit juice dripping from
the baking tray leaves stains that cannot be removed. If
possible, use the deeper universal pan.
■ Cooling with the appliance door open: only allow the cooking
compartment to cool when it is closed. Even if the appliance
door is only open a little, front panels of adjacent units could
be damaged over time.
■ Very dirty door seal: If the door seal is very dirty, the
appliance door will no longer close properly when the
appliance is in use. The fronts of adjacent units could be
damaged.Always keep the door seal clean.
■ Appliance door as a seat, shelf or worktop: Do not sit on the
appliance door, or place or hang anything on it. Do not place
any cookware or accessories on the appliance door.
■ Inserting accessories: depending on the appliance model,
accessories can scratch the door panel when closing the
appliance door. Always insert the accessories into the
cooking compartment as far as they will go.
■ Carrying the appliance: do not carry or hold the appliance by
the door handle. The door handle cannot support the weight
of the appliance and could break.
Damage to the plinth drawer
Caution!
Do not place hot objects in the plinth drawer. It could be
damaged.
Set-up, gas and electricity connection
Gas connection
Installation must only be performed by an approved expert or a
licensed after-sales service engineer in accordance with the
instructions specified under "Gas connection and conversion to
a different gas type".
For the licensed expert or after-sales service
Caution!
■ The setting conditions for this appliance are specified on the
rating plate on the back of the appliance. The gas type set in
the factory is marked with an asterisk (*).
■ Before setting up the appliance, check the grid access
conditions (gas type and gas pressure) and ensure that the
gas setting of the appliance meets these conditions. If the
appliance settings have to be changed, follow the instructions
in the section "Gas connection and conversion to a different
gas type".
■ This appliance is not connected to a waste gas main. It must
be connected and commissioned in accordance with the
installation conditions. Do not connect the appliance to a
waste gas main. All ventilation regulations must be observed.
■ The gas connection must be made via a fixed, i.e. not mobile
connection (gas line) or via a safety hose.
■ If using the safety hose, ensure that the hose is not trapped
or crushed. The hose must not come into contact with hot
surfaces.
■ The gas line (gas pipe or safety hose) can be connected to
the right or left-hand side of the appliance. The connection
must have an easily accessible locking device.
Faults in the gas installation/smell of gas
If you notice a smell of gas or faults in the gas installation, you
must
■ immediately shut off the gas supply and/or close the gas
cylinder valve
■ immediately extinguish all naked flames and cigarettes
■ switch off electrical appliances and lights
■ open windows and ventilate the room
■ call the aftersales service or the gas supplier
7
Moving the appliance by the gas line or door handle
Do not move the appliance while holding the gas line; the gas
pipe could be damaged. There is a risk of a gas leak! Do not
move the appliance while holding it by the door handle. The
door hinges and door handle could be damaged.
Electrical connection
Caution!
■ Have the appliance set up by your after-sales service. A 16 A
fuse is required for connection. The appliance is designed for
operation at 220-240 V.
■ If the electricity supply drops below 180 V, the electrical
ignition system does not work.
■ Any damage arising from the appliance being connected
incorrectly will invalidate the guarantee.
■ If the supply cord is damaged, it must be replaced by the
manufacturer, its service agent or similarly qualified persons
in order to avoid a hazard.
For the after-sales service
Caution!
■ The appliance must be connected in accordance with the
data on the rating plate.
■ Only connect the appliance to an electrical connection that
meets the applicable provisions. The socket must be easily
accessible so that you can disconnect the appliance from the
electricity supply if necessary.
■ Please ensure the availability of a multi-pin disconnecting
system.
■ Never use extension cables or multiple plugs.
■ For safety reasons, this appliance must only be connected to
an earthed connection. If the safety earth terminal does not
comply with regulations, safety against electrical hazards is
not guaranteed.
■ An all-pole isolating switch with a contact gap of at least
3 mm must be present in the installation circuit. This is not
necessary if the appliance is connected by a plug that is
accessible to the user.
■ Electrical safety: The cooker corresponds to safety class I
and may only be used in conjunction with a safety earth
terminal.
■ You must use a H 05 W-F type cable or equivalent for the
appliance connection.
The mains voltage must correspond to the voltage specified on
the rating plate.
Caution!
All appliances with a three-wire cable must be earthed.
Connect the wires in the power cord according to the colour
coding:
Explanaions
Green and yellow
Blue (null) neutral wire
Brown phase (external conductor)
Note: If the power cord is replaced
Only connect it to the appliance as shown in the connection
diagram.
earth wire
<
Levelling the cooker
Always place the cooker directly on the floor.
The cooker has height-adjustable feet. This allows you to raise
the plinth by about 15 mm. Please observe the special
installation instructions.
Wall fixing
To prevent the cooker from tipping over, you must fix it to the
wall at the chain and with the protection angle. Please observe
the installation instructions for fixing the oven to the wall.
Setting up the appliance
0LQ
■ The appliance must be set up directly on the kitchen floor
and in line with the specified dimensions. The appliance must
not be set up on any other object.
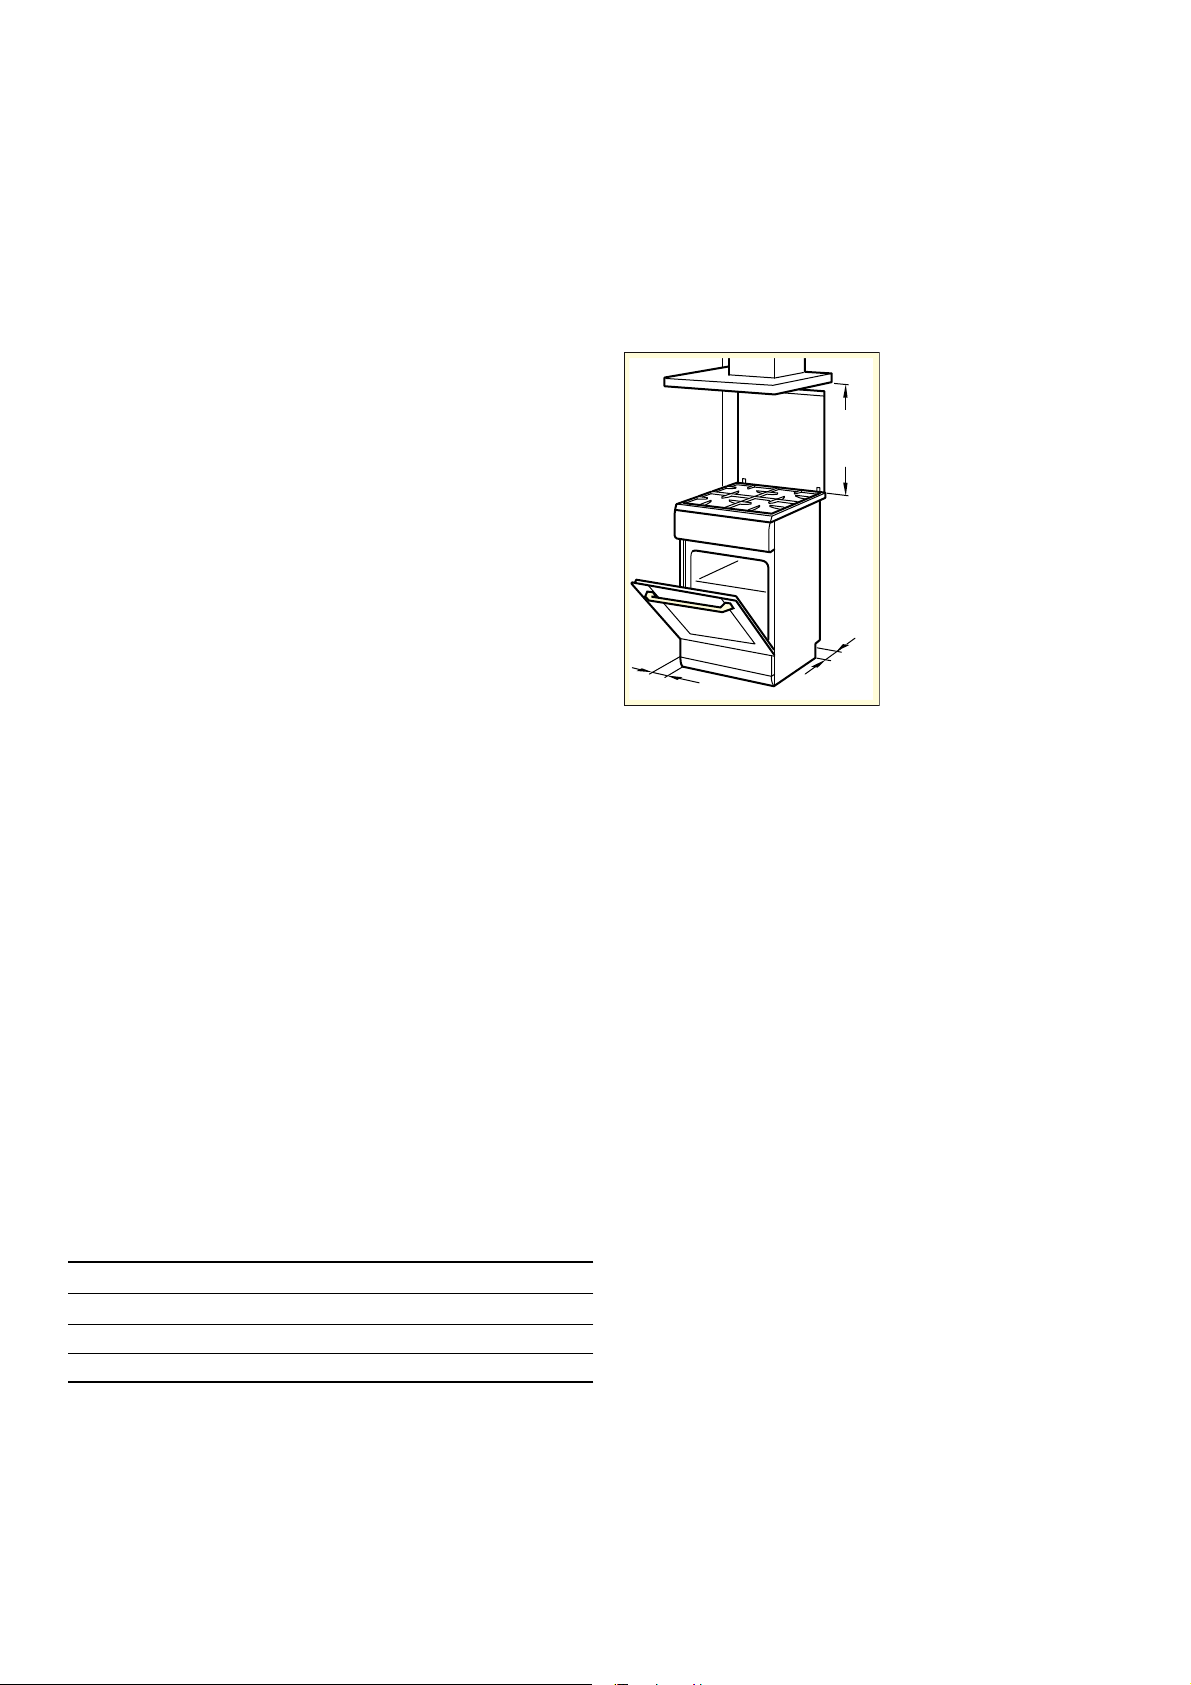
■ The distance between the top edge of the oven and the
bottom edge of the extractor hood must meet the
requirements of the extractor hood manufacturer.
■ Ensure that the appliance is not moved again after set up.
The distance from the high output burner or wok burner to
the fronts of the adjacent units or the wall must be at least 50
mm.
Appliance height (in mm): 900 mm
Appliance width (in mm): 600 mm
Appliance depth (in mm): 600 mm
Measures to be noted during transport
Secure all mobile parts in and on the appliance using an
adhesive tape that can be removed without leaving any traces.
Push all accessories (e.g. baking tray) into the corresponding
slots with cardboard at the edges, in order to avoid damaging
the appliance. Place cardboard or similar between the front and
rear side to prevent knocks against the inside of the glass door.
Secure the door and, if available, the top cover to the appliance
sides using adhesive tape.
Keep the original appliance packaging. Only transport the
appliance in the original packaging. Observe the transport
arrows on the packaging.
If the original packaging is no longer available
pack the appliance in protective packaging to guarantee
sufficient protection against any transport damage.
Transport the appliance in an upright position. Do not hold the
appliance by the door handle or the connections on the rear, as
these could be damaged. Do not place any heavy objects on
the appliance.
8

Your new appliance
In this section you will find information on the appliance, the
operating modes and the accessories.
General information
The design depends on the respective appliance model.
Cooking area
Here is an overview of the control panel. The design depends
on the respective appliance model.
Explanations
1* Hob cover**
2* Steam outlet
Caution!
When the oven is in operation, hot steam escapes
here.
3 Hob**
4 Control panel**
5* Cooling fan
6 Oven door**
7* Plinth drawer**
* Optional (available for some appliances)
** Depending on the appliance model, details may vary.
Explanaions
1 Standard burner
2 Standard burner
3 Wok burner
4 Economy burner
9

Control panel
Details may vary depending on the appliance model.
Function control knob
The function control knob is used to select the type of heating.
Setting Use
Zero setting The oven is off.
Û
3D Hot air* For cakes and pastries. These can
<
Top and bottom heat-
%
ing*
Pizza function Quick preparation of frozen foods
6
Grill with hot air For roasting joints of meat, poultry
7
Large surface grill For grilling steaks, sausages, fish
(
Grill, small surface
*
area
Bottom heating Confits, baking and cooking au
$
Defrosting Defrosting, e.g. meat, poultry,
B
Light For turning on the oven light.
^
* Type of heating used to determine the appliance's energy effi-
ciency rating according to EN60350.
Once a type of heating has been selected the oven light is
turned on.
Temperature selector
Use the temperature selector to set the temperature and the
grill setting.
Positions Function
ÿ
50-300 Temperature
1, 2, 3 Grill settings
Zero position Oven not hot.
range
be baked on three levels. A fan
located on the rear wall of the
oven disperses the heat evenly.
For cakes, au gratin dishes, and
lean meat roasts, e.g. veal or
game, on one level. The heat is
provided by the bottom and top
heating elements.
without pre-heating, e.g., pizza,
chips or puff pastry. The heat
comes from the bottom element
and the fan on the rear wall.
and fish. The grill heating element
and the fan switch on and off alternately. The fan circulates the heat
generated by the grill around the
food.
and toasting bread. The entire surface below the grill heating element is heated.
For grilling a small number of
steaks or sausages or small
amounts of fish, and toasting
bread. Only the central area of the
grill heating element heats up.
gratin. The heat comes from the
bottom heating element.
bread and cakes. The fan circulates the hot air around the food.
Temperature in °C.
Grill settings for the
small area and
area.
Setting 1 = low
Setting 2 = medium
Setting 3 = high
* Grill,
( Grill, large
While the oven is heating up, the
up in the display. If heating is interrupted, the symbol goes out.
For some settings, it does not light up.
Burner knob
You can adjust the heat setting of the hotplates using the four
burner knobs.
Positions Function/gas oven
Zero position The oven is switched off.
þ
Ignition position Ignition position
8
Settings area Large flame = highest setting
—
˜
There is a limit stop at the end of the settings area. Do not turn
the timer beyond this.
Buttons and display
You can use the buttons to set various additional functions. On
the display, you can read the values that you have set.
Button Use
Rapid heating Heats up the oven particularly
c
Time-setting options
0
Childproof lock Locks and unlocks oven functions.
D
Minus
A
Plus
@
The time-setting option that is currently selected in the display
is indicated by brackets [ ] around the corresponding symbol.
Exception: For the clock, the
is being changed.
Buttons
The sensors are located under the individual buttons. They
must not be pressed too firmly. Only touch the corresponding
symbol.
p temperature symbol lights
Economy flame = lowest setting
quickly.
Selects the timer
time
r, end time p and clock 0.
Decreases the set values.
Increases the set values.
U, cooking
0 symbol only lights up if the time
The cooking compartment
The oven light is located in the cooking compartment. A cooling
fan protects the oven from overheating.
Light
The oven light remains on while the oven is working.
However, the light can be turned on without the oven being on
by setting the function control knob to
Cooling fan
The cooling fan switches on and off as required. The hot air
escapes above the door.
So that the cooking compartment cools down more quickly
after operation, the cooling fan continues to run for a certain
period afterwards.
Caution!
do not cover the ventilation slots. Otherwise the oven will
overheat.
^.
10
 Loading...