

Page 1

Bosch Use and Care Manual:
NEM
Page 2

Table of Contents
Important Safety Instructions . . . . . . . . . . . . . . . . . . . . . . . . . . . . . . . . . . . . . . . . . . . . . . . . . . . . . . . . . . 1
About the Cooktop . . . . . . . . . . . . . . . . . . . . . . . . . . . . . . . . . . . . . . . . . . . . . . . . . . . . . . . . . . . . . . . . . .2
Parts and Accessories . . . . . . . . . . . . . . . . . . . . . . . . . . . . . . . . . . . . . . . . . . . . . . . . . . . . . . . . . . . . . . . . .2
Element ‘ON’ Indicator Light . . . . . . . . . . . . . . . . . . . . . . . . . . . . . . . . . . . . . . . . . . . . . . . . . . . . . .3
Hot Surface Indicator Light . . . . . . . . . . . . . . . . . . . . . . . . . . . . . . . . . . . . . . . . . . . . . . . . . . . . . . . 3
Control Knobs . . . . . . . . . . . . . . . . . . . . . . . . . . . . . . . . . . . . . . . . . . . . . . . . . . . . . . . . . . . . . . . . .3
Using the Cooktop . . . . . . . . . . . . . . . . . . . . . . . . . . . . . . . . . . . . . . . . . . . . . . . . . . . . . . . . . . . . . . . . . . .3
Before Using the Cooktop for the First Time . . . . . . . . . . . . . . . . . . . . . . . . . . . . . . . . . . . . . . . . . . . . . . . . 3
Precautions for Long Life and Good Appearance of the Surface . . . . . . . . . . . . . . . . . . . . . . . . . . . . . . . . 4
Operation . . . . . . . . . . . . . . . . . . . . . . . . . . . . . . . . . . . . . . . . . . . . . . . . . . . . . . . . . . . . . . . . . . . . . . . . . . . 4
Radiant Elements . . . . . . . . . . . . . . . . . . . . . . . . . . . . . . . . . . . . . . . . . . . . . . . . . . . . . . . . . . . . . . 4
Single Element . . . . . . . . . . . . . . . . . . . . . . . . . . . . . . . . . . . . . . . . . . . . . . . . . . . . . . . . . . . . . . . . 4
Dual Element . . . . . . . . . . . . . . . . . . . . . . . . . . . . . . . . . . . . . . . . . . . . . . . . . . . . . . . . . . . . . . . . .4
Temperature Limiters . . . . . . . . . . . . . . . . . . . . . . . . . . . . . . . . . . . . . . . . . . . . . . . . . . . . . . . . . . . 5
Retained Heat . . . . . . . . . . . . . . . . . . . . . . . . . . . . . . . . . . . . . . . . . . . . . . . . . . . . . . . . . . . . . . . . . 5
Note for Owners of White Cooktops . . . . . . . . . . . . . . . . . . . . . . . . . . . . . . . . . . . . . . . . . . . . . . . .5
Getting the Most Out of Your Cooktop . . . . . . . . . . . . . . . . . . . . . . . . . . . . . . . . . . . . . . . . . . . . . . . . . .5
Proper Cookware . . . . . . . . . . . . . . . . . . . . . . . . . . . . . . . . . . . . . . . . . . . . . . . . . . . . . . . . . . . . . . . . . . . . . 5
Cookware Characteristics . . . . . . . . . . . . . . . . . . . . . . . . . . . . . . . . . . . . . . . . . . . . . . . . . . . . . . . . 5
Cookware Practices . . . . . . . . . . . . . . . . . . . . . . . . . . . . . . . . . . . . . . . . . . . . . . . . . . . . . . . . . . . . 6
Cooking Chart . . . . . . . . . . . . . . . . . . . . . . . . . . . . . . . . . . . . . . . . . . . . . . . . . . . . . . . . . . . . . . . . . . . . . . . 7
208/240 Volt Connection . . . . . . . . . . . . . . . . . . . . . . . . . . . . . . . . . . . . . . . . . . . . . . . . . . . . . . . . 7
Care and Cleaning . . . . . . . . . . . . . . . . . . . . . . . . . . . . . . . . . . . . . . . . . . . . . . . . . . . . . . . . . . . . . . . . . . .7
Before Use Care . . . . . . . . . . . . . . . . . . . . . . . . . . . . . . . . . . . . . . . . . . . . . . . . . . . . . . . . . . . . . . . . . . . . . 7
Daily Cleaning Practices . . . . . . . . . . . . . . . . . . . . . . . . . . . . . . . . . . . . . . . . . . . . . . . . . . . . . . . . . . . . . . . 8
Control Knobs . . . . . . . . . . . . . . . . . . . . . . . . . . . . . . . . . . . . . . . . . . . . . . . . . . . . . . . . . . . . . . . . .8
Side Trim (Stainless Steel Models) . . . . . . . . . . . . . . . . . . . . . . . . . . . . . . . . . . . . . . . . . . . . . . . .8
Recommended Cleaners . . . . . . . . . . . . . . . . . . . . . . . . . . . . . . . . . . . . . . . . . . . . . . . . . . . . . . . . 8
Avoid These Cleaners . . . . . . . . . . . . . . . . . . . . . . . . . . . . . . . . . . . . . . . . . . . . . . . . . . . . . . . . . . 8
Daily Cleaning Techniques . . . . . . . . . . . . . . . . . . . . . . . . . . . . . . . . . . . . . . . . . . . . . . . . . . . . . . .8
Cleaning Guidelines . . . . . . . . . . . . . . . . . . . . . . . . . . . . . . . . . . . . . . . . . . . . . . . . . . . . . . . . . . . . . . . . . . 9
Service . . . . . . . . . . . . . . . . . . . . . . . . . . . . . . . . . . . . . . . . . . . . . . . . . . . . . . . . . . . . . . . . . . . . . . . . . . . 10
Before Calling Service . . . . . . . . . . . . . . . . . . . . . . . . . . . . . . . . . . . . . . . . . . . . . . . . . . . . . . . . . . . . . . . .10
Data Plate . . . . . . . . . . . . . . . . . . . . . . . . . . . . . . . . . . . . . . . . . . . . . . . . . . . . . . . . . . . . . . . . . . . . . . . . . 10
How to Obtain Service . . . . . . . . . . . . . . . . . . . . . . . . . . . . . . . . . . . . . . . . . . . . . . . . . . . . . . . . . . . . . . . .10
Warranty . . . . . . . . . . . . . . . . . . . . . . . . . . . . . . . . . . . . . . . . . . . . . . . . . . . . . . . . . . . . . . . . . . . . . . . . . .10
Standard Limited Warranty . . . . . . . . . . . . . . . . . . . . . . . . . . . . . . . . . . . . . . . . . . . . . . . . . . . . . . 11
Extended Limited Warranty . . . . . . . . . . . . . . . . . . . . . . . . . . . . . . . . . . . . . . . . . . . . . . . . . . . . . 11
Other Conditions of the Limited Warranties . . . . . . . . . . . . . . . . . . . . . . . . . . . . . . . . . . . . . . . . .11
How to Obtain Warranty Service . . . . . . . . . . . . . . . . . . . . . . . . . . . . . . . . . . . . . . . . . . . . . . . . .11
Notice to California Owners . . . . . . . . . . . . . . . . . . . . . . . . . . . . . . . . . . . . . . . . . . . . . . . . . . . . .11
Questions?
1-800-944-2904
www.boschappliances.com
5551 McFadden Ave.
Huntington Beach, CA 92649
We look forward to hearing from you!
Page 3

IMPORTANT SAFETY INSTRUCTIONS
READ AND SAVE THESE INSTRUCTIONS
Important Safety
Instructions
WARNING: Read all instructions before using this appliance. If the information
in this manual is not followed exactly, a fire or explosion may result causing property damage, personal injury or death. To reduce the risk of fire, electric shock, or
injury to persons, take these precautions:
General Safety
• Be sure your appliance is properly installed and grounded by a qualified technician.
• Do not cook on a broken cooktop. If the cooktop should break, cleaning solutions and spillovers may penetrate the broken cooktop and create a risk of
electric shock. Contact a qualified technician immediately.
• Do not store or use gasoline or other flammable vapors and liquids in the
vicinity of this or any other appliance.
• This appliance is intended for normal family household use only. See the
Warranty. If you have any questions, contact the manufacturer.
• Always have a working smoke detector near the kitchen.
• Never use the cooktop to warm or heat a room.
• Children should not be left alone or unattended in an area where appliances
are in use. They should never be allowed to sit or stand on any part of the
appliance.
• When children become old enough to use the cooktop, they must be
instructed in safe practices.
• Do not store items of interest to children above or at the back of the cooktop.
• Do not store flammable materials on or near the cooktop.
• In the event that personal clothing catches fire, drop and roll immediately to
extinguish flames.
• Never let clothing, potholders, or other flammable materials come in contact
with hot surface.
• Do not clean the cooktop while it is still hot. Some cleaners produce noxious
fumes when applied to a hot surface.
• Smother flames from food fires other than grease fires with baking soda.
Never use water on cooking fires.
• Do not allow aluminum foil, plastic, paper or cloth to come in contact with a
surface element. Do not allow pans to boil dry.
• Do not repair or replace any part of the appliance unless specifically recommended in this manual. All other servicing should be referred to a qualified
technician.
• Do not use aluminum foil to line any part of the cooktop.
• If the cooktop is near a window, be certain that curtains or any other window
covering do not blow over or near the elements; they could catch on fire.
• When using the cooktop: Do not touch the surface units or the immediate surrounding area.
• Use only dry potholders; moist or damp potholders on hot surfaces may
cause burns from steam.
• Never leave the cooktop unattended when in use. Boilovers cause smoking,
and greasy spillovers may ignite.
• Always position handles of utensils inward so they do not extend over adjacent work areas, elements, or the edge of the cooktop.
• Wear proper apparel. Loose fitting garments or hanging sleeves should never
be worn while cooking.
• Use only certain types of glass, heatproof glass, ceramic, earthenware, or
other glazed utensils that are suitable for cooktop use.
• Leave the hood ventilator on when flambéing food.
English 1
Page 4
About the Cooktop
• Smother flames from a grease fire with a close-fitting lid, cookie sheet, or
other metal tray, then turn off the element. Be careful to prevent burns. If the
flames do not go out immediately, evacuate and call the fire department.
• Do not use water, including wet dishcloths or towels on grease fires. A violent
steam explosion may result.
• Never pick up a flaming pan. You may be burned.
WARNING: To avoid electrical shock hazard, before servicing the cooktop,
switch power off at the service panel and lock the panel to prevent the power from
being switched on accidentally.
Fire Extinguishers
Use an extinguisher only if:
• You know you have a Class ABC extinguisher, and you already know how to
operate it.
• The fire is small and contained in the area where it started.
• The fire department is being called.
• You can fight the fire with your back to an exit.
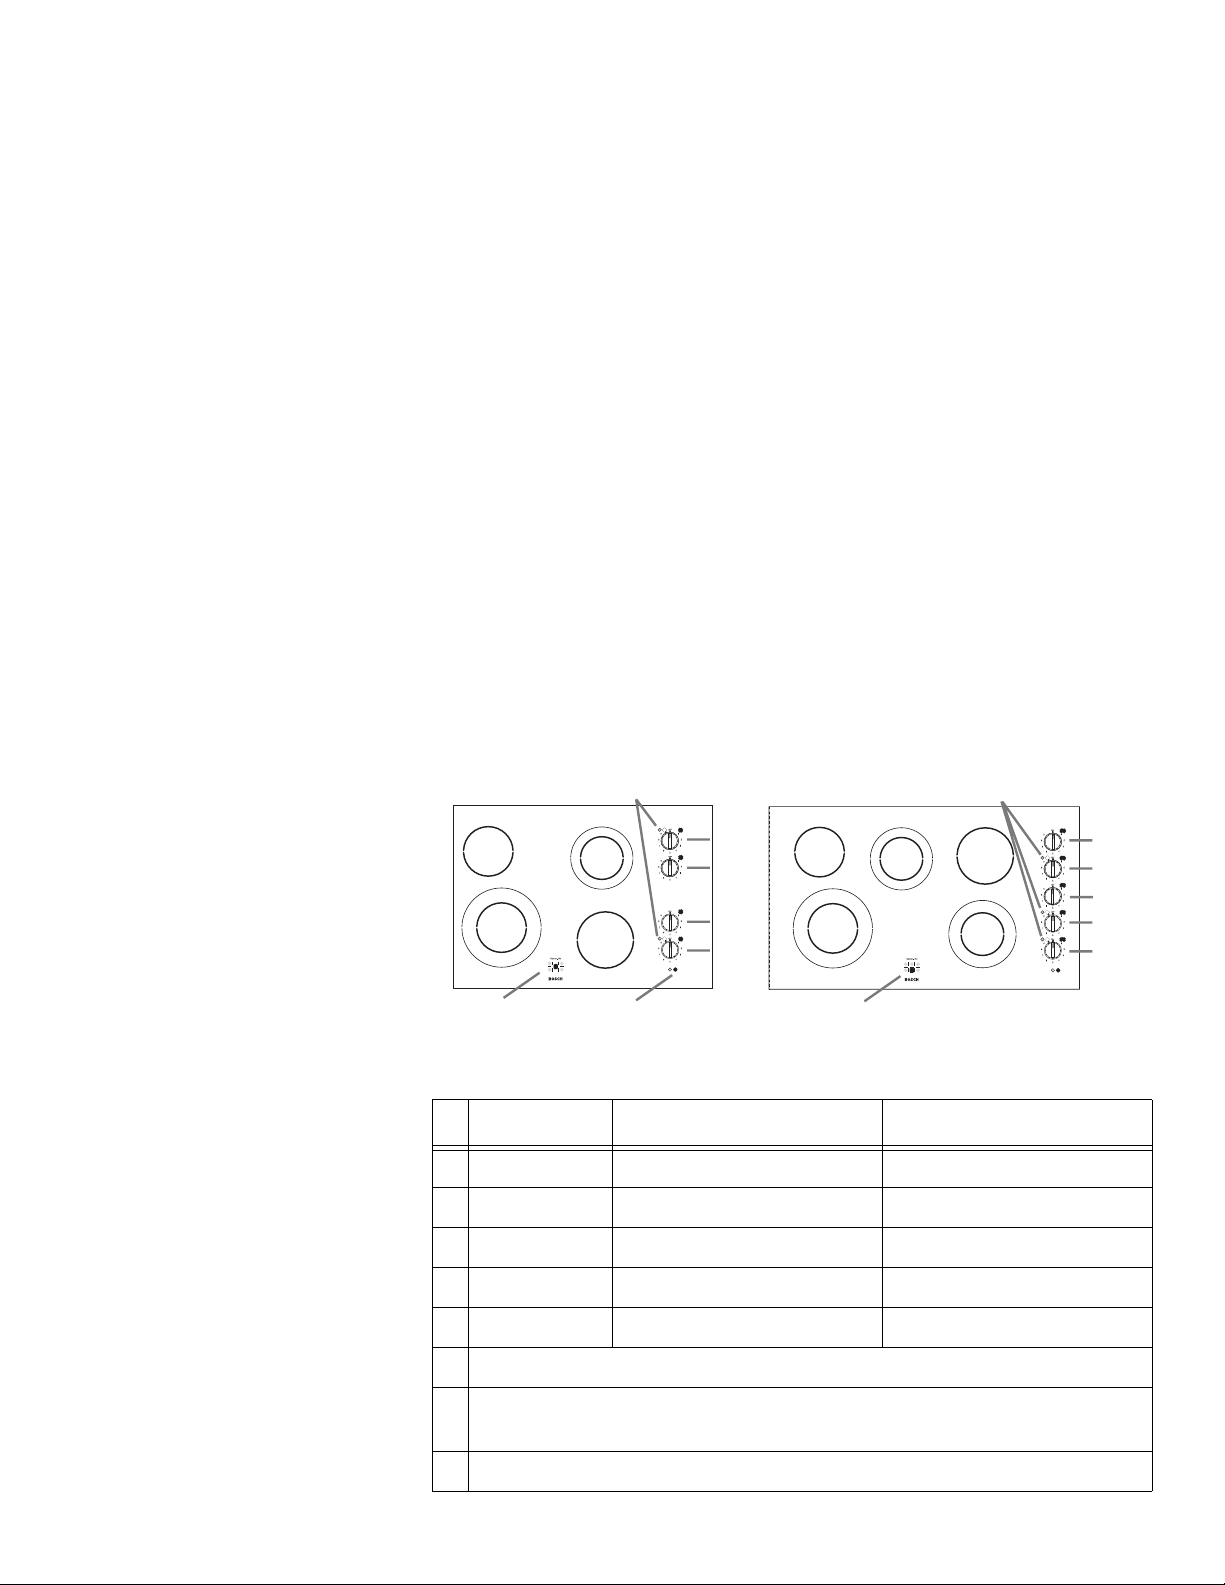
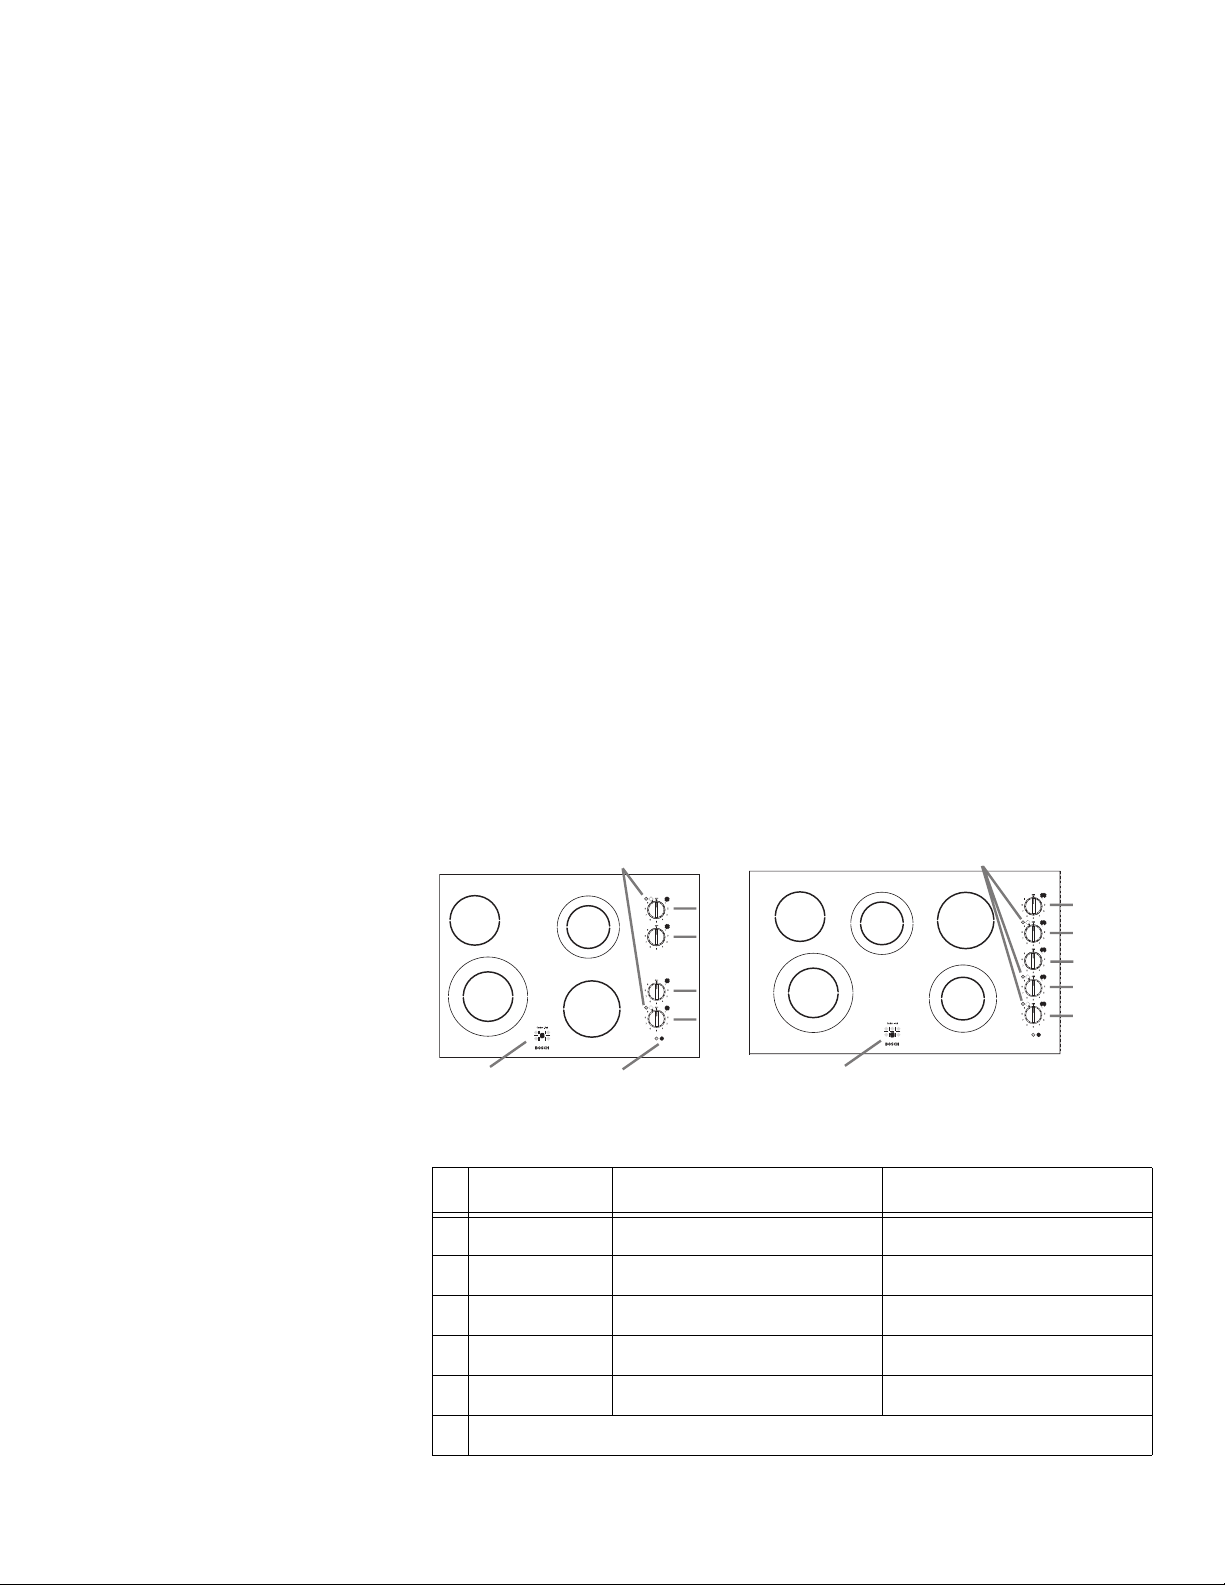
Parts and Accessories
Figure 1 - Parts
NEM73UC
2
1
6
Table 1: Cooktop Models
#Type Size Wattage
1 Dual 5-1/2" / 9" (140/230 mm) 1100/2500
2 Single 5-1/2" (140 mm) 1200
3 Dual 5" / 7"(120/180 mm) 700/1700
4 Single 6" (160 mm) 1500
7
3
4
8
3
2
4
1
NEM93UC
2
1
3
6
7
4
5
4
3
2
5
1
English 2
5 Dual 5" / 8" (120/195 mm) 800/1900
6 Hot Surface Indicator Lights
7 Dual Element "ON" Indicator Lights - indicates inner and outer elements
are on
8 Element "ON" Indicator Light (lit for any element)
Page 5
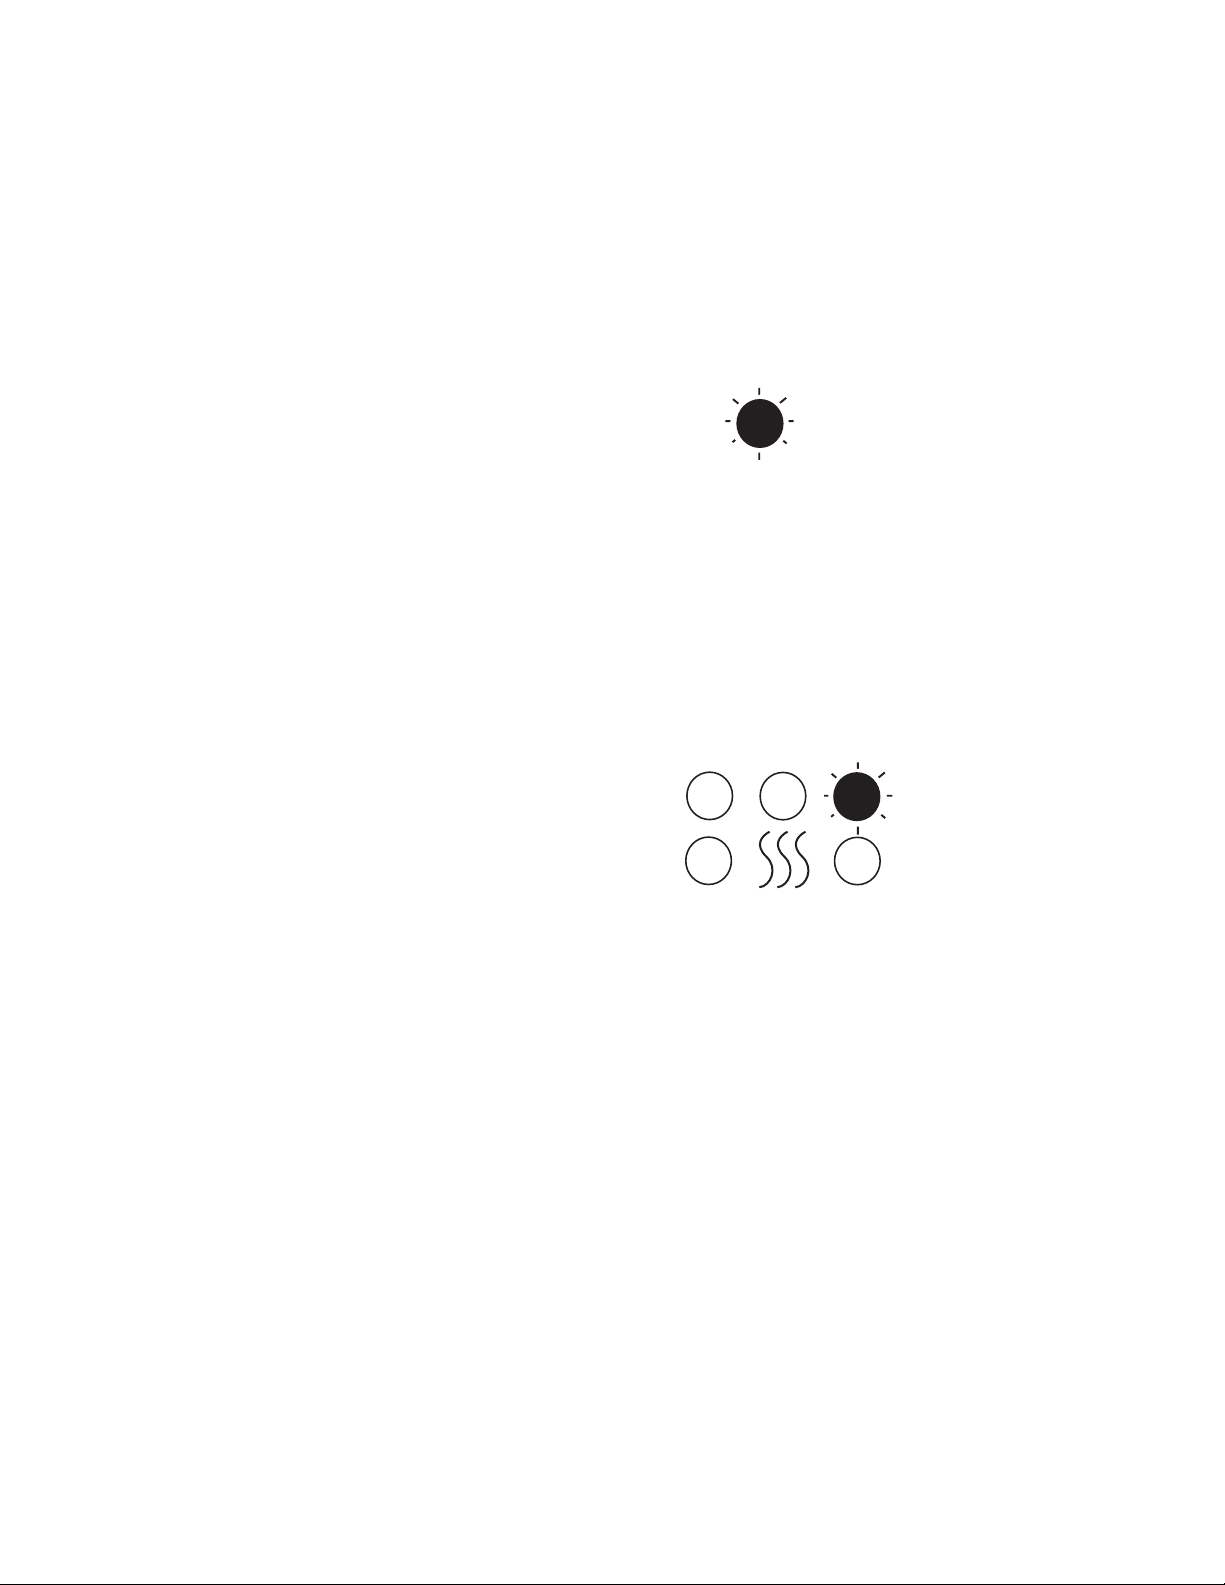
Element ‘ON’ Indicator Light The element “ON” indicator light glows whenever any element is turned on. The
light remains lit until all of the elements are turned off.
The “ON” light is located in front of the control knobs.
For dual elements there is an additional "ON" indicator light located at the top left
of the control knob. This light glows when both the inner and outer elements are
being used and the element is on. When using a setting other than 9 (High), the
light will cycle on and off as the element cycles.
Figure 2 - On Indicator
ON
Hot Surface Indicator Light Each element features a hot indicator light to show when the cooking surface is
too hot to touch. The signal light will turn on automatically in the area marked
CAUTION - HOT at the center front. The light remains on until the cooking area
has cooled to a safe-to-touch temperature.
If a hot surface light is on, use caution when working or cleaning around the cooktop as the cooktop is still hot.
Figure 3 - Hot Surface Indicator
Caution - Hot
Control Knobs The controls on the cooktop are marked to show which element they control. All
controls are marked from 1-9, with 1 being the lowest heat setting and 9 the highest setting.
Using the Cooktop
Before Using the Cooktop for the First Time
• Remove all packing materials and literature from the cooktop surface.
• While cool, wipe with a clean, damp sponge and dry.
• Apply the Cooktop Cleaning Creme® packaged with the cooktop. Buff with a
clean cloth.
• There may be a slight odor during the first several uses; this is normal and will
disappear.
• Optimum cooking results depend on the proper cookware being selected and
used.
• The cooking surface will hold the heat and remain hot up to 25 or 30 minutes
after the elements have been turned off.
• Read all safety precautions and Use and Care Manual information prior to
operating.
English 3
Page 6

Precautions for Long Life and Good Appearance of the Surface
• Regular, daily care using the Cooktop Cleaning Creme® will protect the surface and make it easier to remove food soil and water spots.
• The glass ceramic cooking surface is a durable material resistant to impact
but not unbreakable if a pan or other object is dropped on it.
• Do not use aluminum foil directly on the glass; it will melt and damage the
glass surface.
• Do not allow plastic, paper, or cloth to come in contact with the hot glass surface; these items can melt or burn and damage the glass surface.
• Do not allow pans to boil dry. This can damage the pan, element and/or the
cooktop.
• Never cook food directly on the glass.
• Avoid placing a wok support ring, trivet or other metal stand on the glass surface.
• Do not use the glass surface as a cutting board.
• Do not slide cookware across the cooking surface; it may scratch the glass.
• Do not place wet pans on the glass surface.
Operation
Radiant Elements This type of electric element uses a wire ribbon located under the ceramic glass
surface to provide the heat for cooking. Radiant elements will cycle on and off by
design (see Temperature Limiters, below.) There are an infinite number of heat
settings between the 1-9 positions.
Single Element To turn on a single element, push down on the control knob and turn in either
direction to the desired heat setting.
Figure 4 - Single Element
OFF
9
8
7
6
5
1
2
3
4
Dual Element The dual element consists of two radiant ribbon elements within the same heating
area. Either the small inner element or both the inner and outer elements may be
selected for use.
To turn ON the small, inner element, push down on the control knob and turn it
clockwise. Set to desired heat level.
To turn ON both the inner and outer elements together, push down on the control
knob and turn it clockwise past the number 9 setting to the dual element marker.
The dual ON indicator light will glow indicating that the dual element is on. Turn
the knob counterclockwise to the desired setting. To turn off the dual element, turn
the knob to the OFF position.
English 4
Page 7
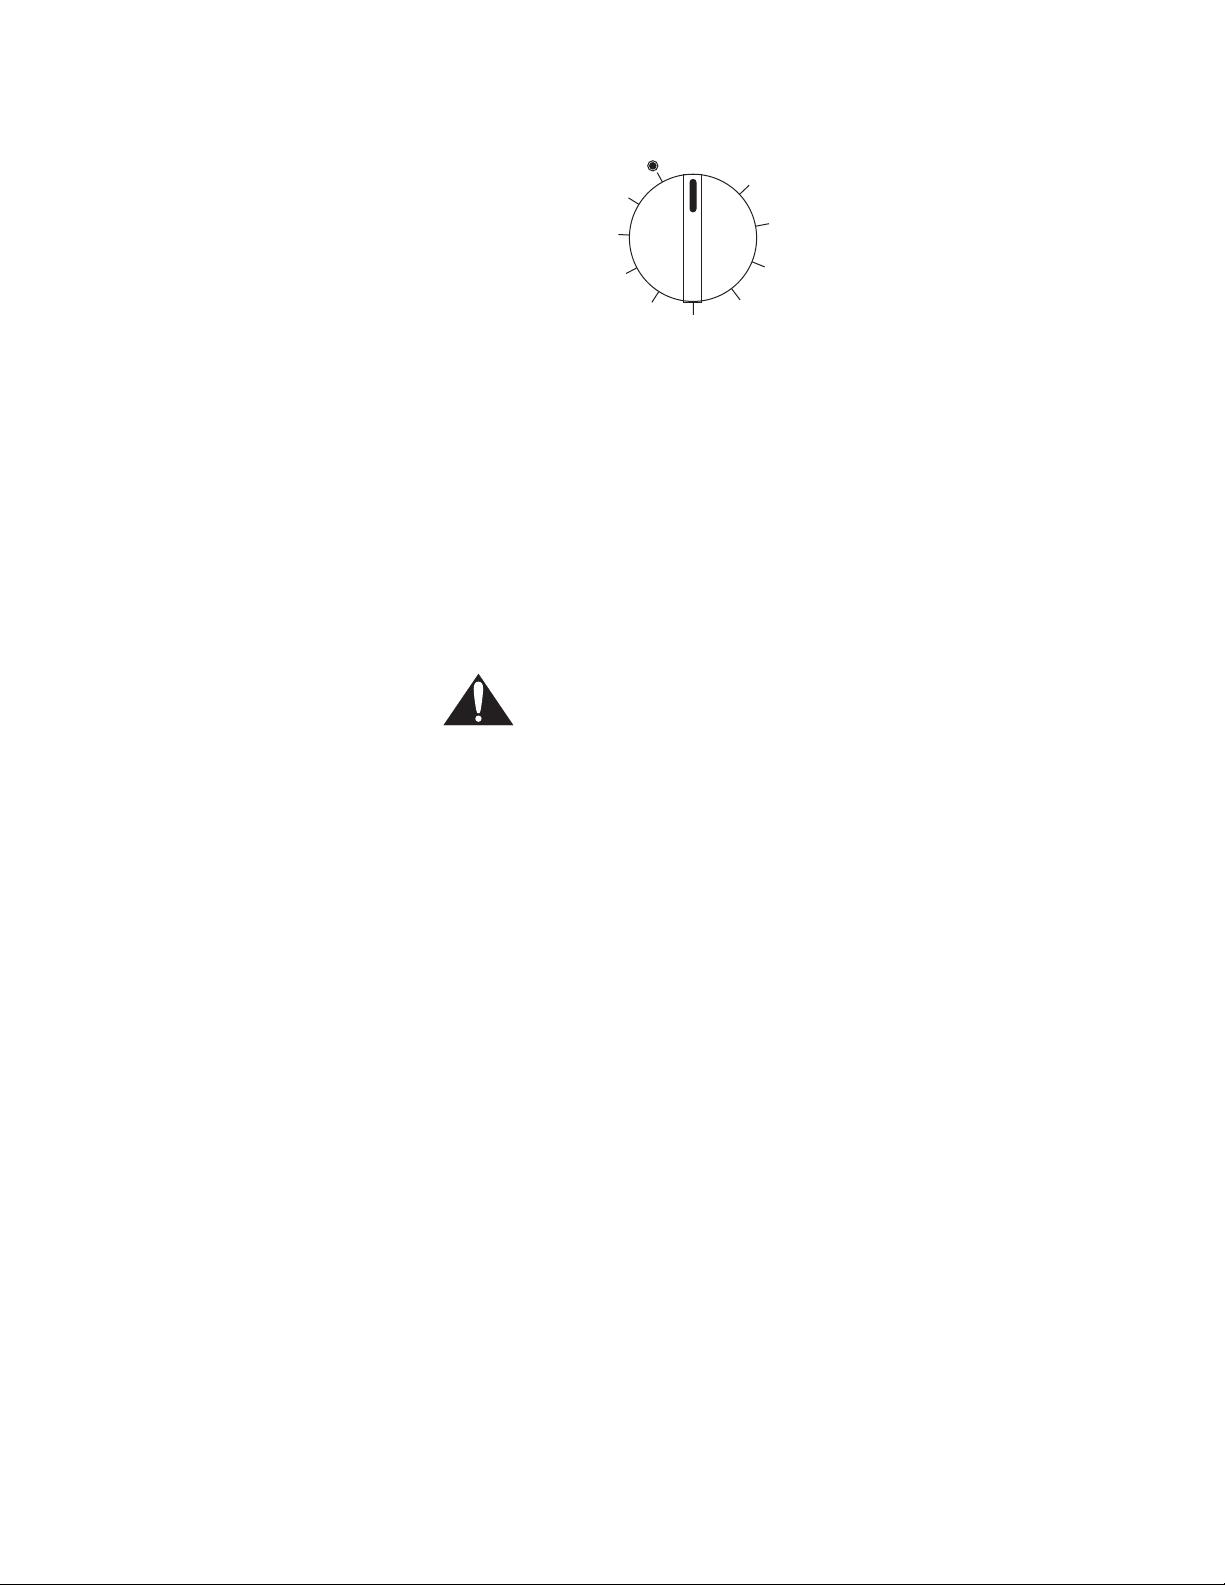
Figure 5 - Dual Element
9
8
OFF
1
2
7
6
5
3
4
Temperature Limiters Each radiant heating element has its own sensor to protect the glass cooking sur-
face from extreme high temperatures. The limiters will operate automatically by
cycling the element off regardless of the cook setting.
Although cycling is normal, any one of the following conditions can activate the
limiter and cause it to cycle on and off more than usual:
• The base of the pan is not making full contact with the heating surface (due to
a warped or uneven base).
• The pan is too small for the size of the element.
• The pan has boiled dry.
• The material or shape of the pan is slow to transfer the heat.
Retained Heat CAUTION: The glass cooking surface retains heat and stays hot after
the element(s) have been turned off. The retained heat may be used to
hold foods at serving temperatures for a short time.
Note for Owners of White Cooktops When an element is hot, there is a light green tint on the cooking surface. This is
normal and will disappear after several minutes as the surface cools down.
Getting the Most Out of Your Cooktop
Proper Cookware
Cookware Characteristics The choice of pans directly affects the cooking speed and uniformity. For best
results select pans with the following features:
Flat Bases
When a pan is hot, the base (pan bottom) should rest evenly on the surface without wobbling (rocking). Flat, medium-to-heavy-weight pans are best.
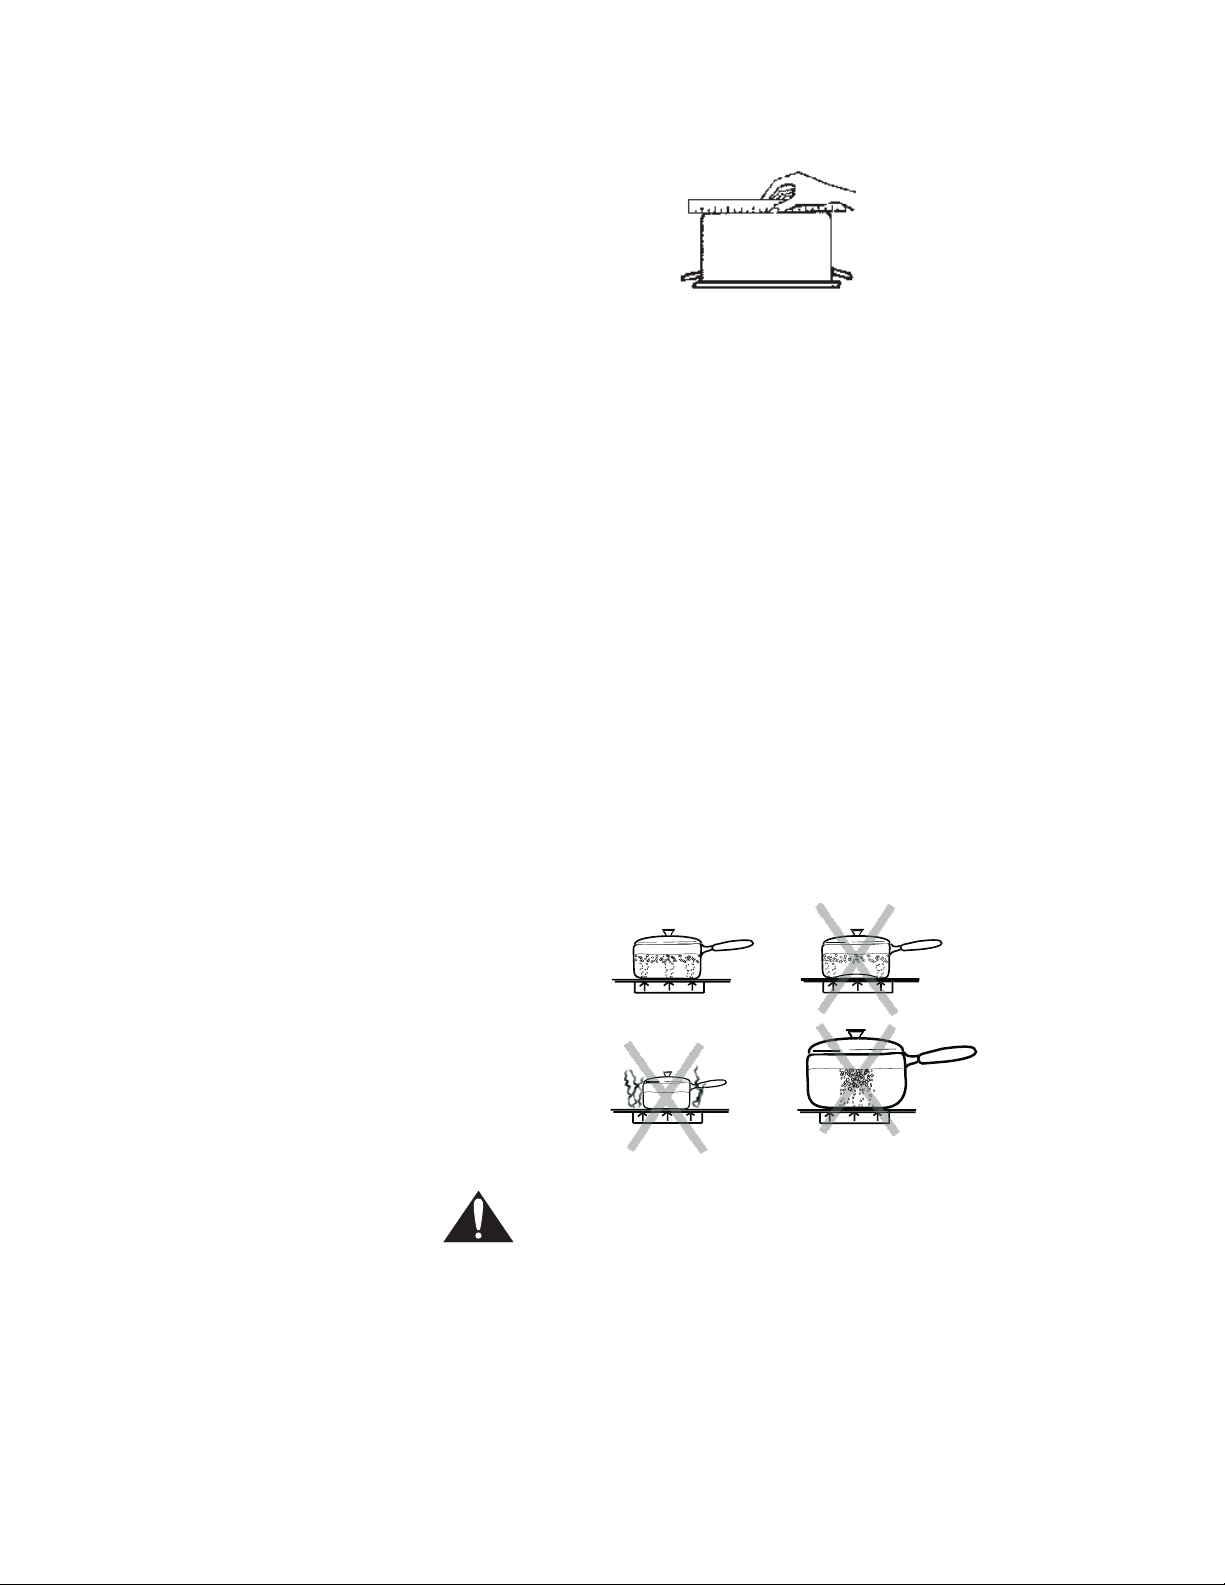
To test the flatness of your pans:
Turn the pan upside down on the countertop and place a ruler flat against the bottom of the pan. The bottom of the pan and the straight edge of the ruler should be
flush against each other.
Another simple test to determine even heat distribution across the cookware bottom is to place 1” (25.4 mm) of water in the pan. Bring the water to a boil and
English 5
Page 8
observe the location of the bubbles as the water starts to boil. Good, flat cookware
will have an even distribution of bubbles over the bottom surface area.
Figure 6 - Testing Flatness
Diameter
The base of the pan should cover or match the diameter of the element being
used. Pans may overhang the element area by 1" (25.4 mm) all around.
Tight Fitting Lid
A lid shortens cooking time by holding the heat inside the pan.
Specialty Pans
Specialty pans, such as griddles, roasters, pressure cookers, woks, water bath
canners and pressure canners must have the same features as described above.
(Use only a flat-bottom wok.) Never place a support ring, such as a wok ring or
trivet, on the cooking surface.
Cookware Practices • Use of pots and pans with rounded (either concave or convex) warped or
dented bottoms should be avoided. See drawings above. • Make sure the bottom of the pot or pan being used is clean and dry.
• Use pots and pans with thick, smooth metal bottoms. • Do not slide metal pots
across the cooktop. Pans may leave marks.
• Do not use glass pans as they may scratch the surface.
Figure 7 - Good Practices
CAUTION:
• Foods packaged in aluminum foil should not be placed directly on the glass
ceramic surface for cooking; aluminum foil can melt and cause permanent
damage.
• Plastic, paper and cloth can melt or burn when in contact with a hot surface.
Do not let these items come in contact with the hot glass ceramic surface.
• Do not allow pans to boil dry. This can permanently damage the pan, the element and the cooktop glass.
English 6
Page 9

Cooking Chart All these settings are recommended without the element being preheated. Use
this chart as a guide.
Table 2: Cooking Chart - Heat Settings
Type of Food Heat Settings
Melting butter/chocolate 1
Delicate sauces
Finishing rice
Simmering sauces with butter and
egg yolk
Bacon
Cooking vegetables, fish, broths
Eggs, fried or scrambled
Finishing cereals, pasta
Milk
Pancakes
Pudding
Simmering meats
Steaming vegetables, fish, broths
Pan frying
Spaghetti sauces
Sauteed vegetables
Stewing meat, soups
Braising meat
Pan frying meat, fish,
Stir frying
Quickly brown or sear meats
Hold rapid boil
Boiling water for vegetables, pasta,
rice, etc.
1-3
4-6
6-8
9
A range of heat settings are listed because the actual setting depends on:
1. type and quality of pan
2. type, quantity and temperature of the food
3. element used
4. the cook’s preference.
208/240 Volt Connection The Heat Settings recommended on this page are based on a 240 volt power
source. If your cooktop is connected to 208 volts, the same heat settings apply but
foods may take a little longer to finish cooking.
Care and Cleaning
Before Use Care Care is easy when preventative steps are taken. For example, apply a small
amount of Cooktop Cleaning Creme® (packaged with cooktop) on a daily basis.
This provides a protective film that makes it easy to remove water spots or food
spatters. The temperature of the cooking surface reduces the protective qualities
of this cleaner. It must be reapplied before each use. Use a clean cloth and apply
Cooktop Cleaning Creme® before each use to remove dust or metal marks that
can occur on the counterlevel surface between uses.
English 7
Page 10
Daily Cleaning Practices
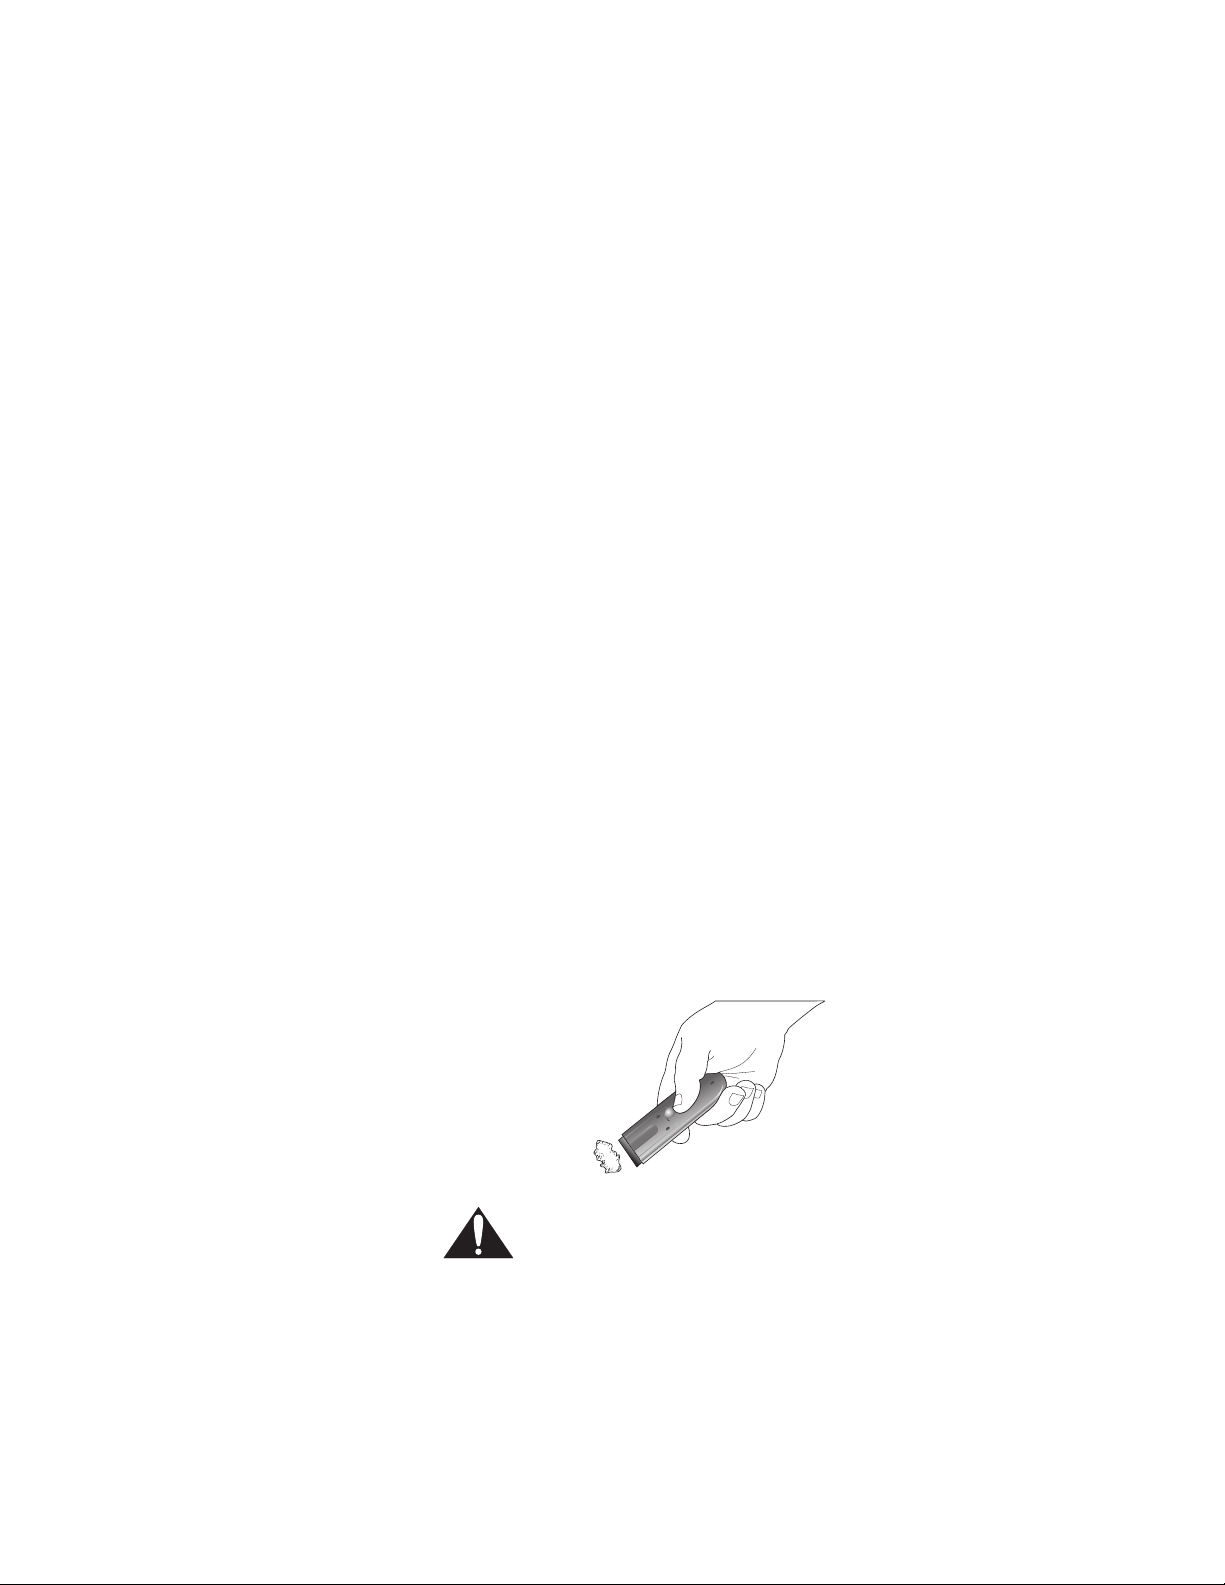
Control Knobs Pull up to remove. Slip a towel under the knob and hold edge of towel together.
Using the towel for leverage, pull up. Wipe with hot, soapy cloth, rinse and dry. Do
not soak!
Side Trim (Stainless Steel Models)
Recommended Cleaners • Cooktop Cleaning Crème®
Avoid These Cleaners • Glass cleaners which contain ammonia or chlorine bleach. These ingredients
Always wipe with the grain when cleaning. For moderate/ heavy soil, use
BonAmi® or Soft Scrub® (no bleach). Wipe using a damp sponge or cloth, rinse
and dry.
• Use only a small amount; apply to a clean paper towel or cloth. Wipe on the
surface and buff with a clean dry towel.
• BonAmi®: rinse and dry.
• Soft Scrub® (without bleach): rinse and dry.
• White Vinegar: rinse and dry.
• Razor blade scraper (packaged with cooktop)
Note: The recommended cleaners indicate a type of cleaner and do not constitute
an endorsement.
may permanently etch or stain the cooktop.
• Caustic Cleaners Oven cleaners such as Easy Off® may etch the cooktop
surface.
• Abrasive Cleaners
• Metal scouring pads and scrub sponges such as Scotch Brite® can scratch
and / or leave metal marks.
• Soap-filled scouring pads such as SOS® can scratch the surface.
• Powdery cleaners containing chlorine bleach can permanently stain the cooktop.
• Flammable cleaners such as lighter fluid or WD-40.
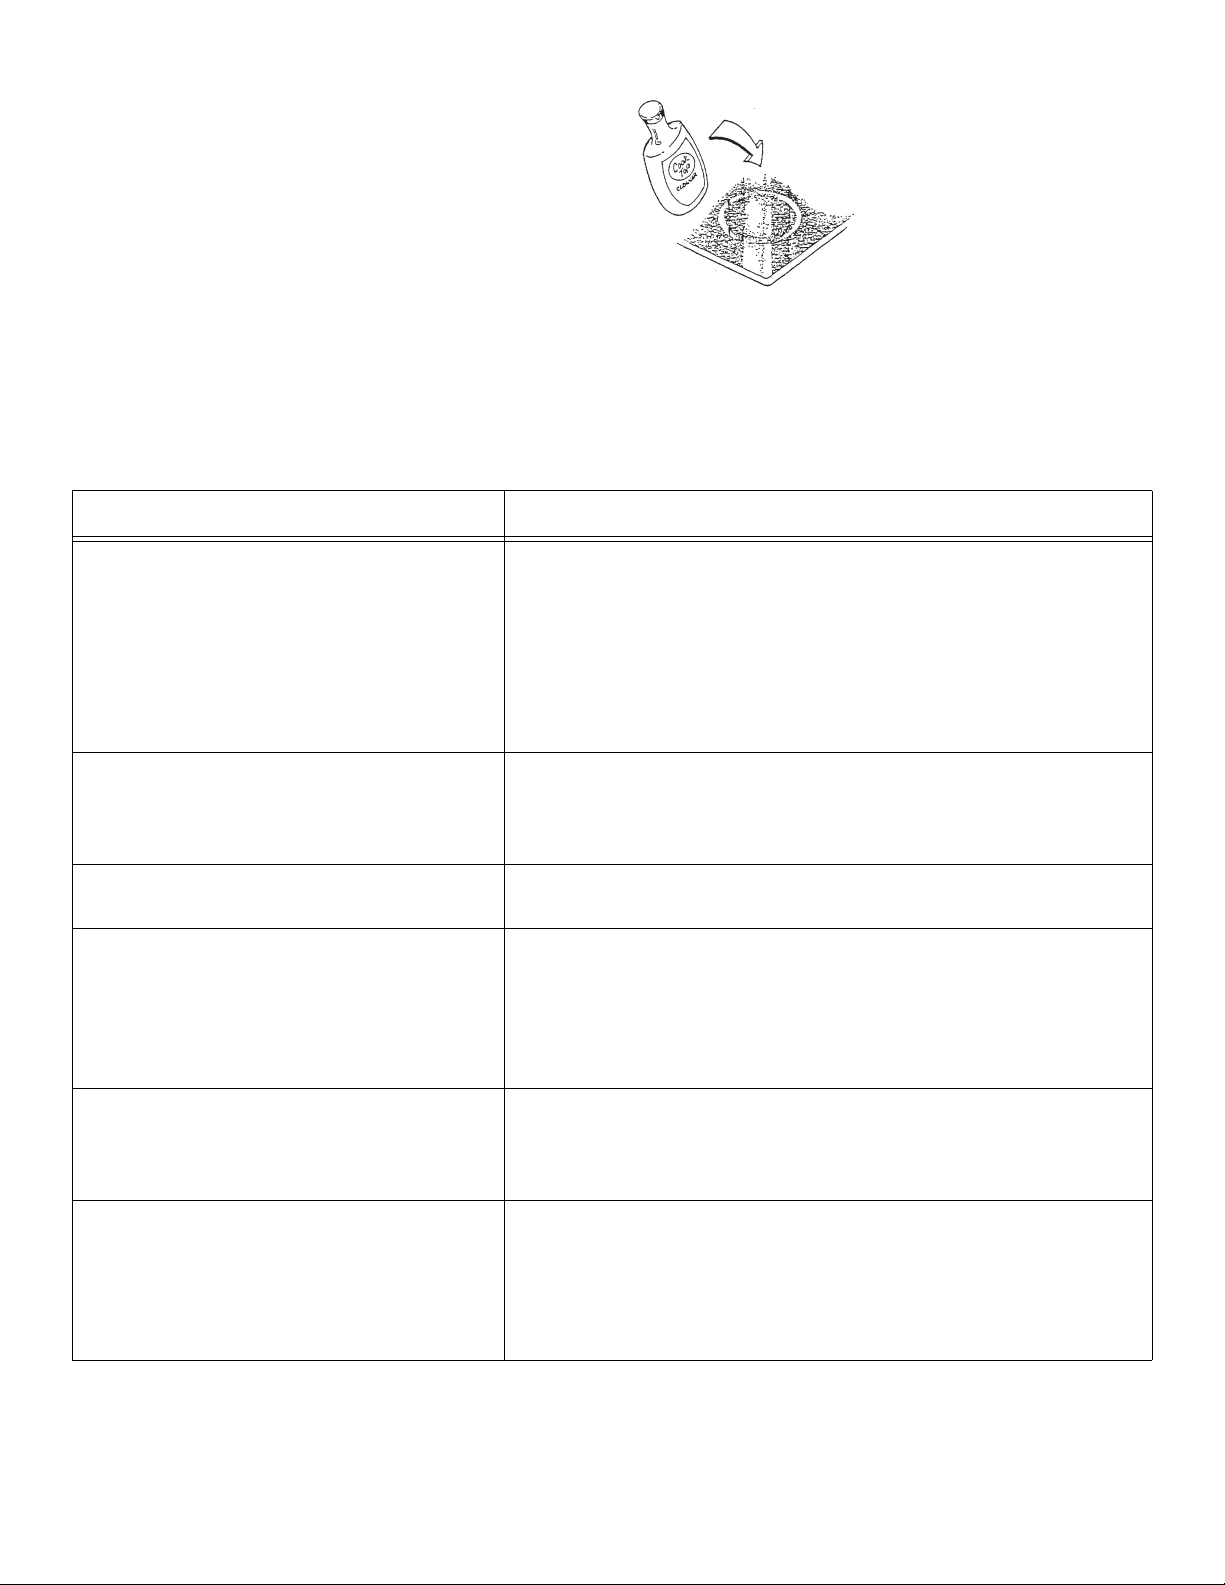
Daily Cleaning Techniques 1. Clean the surface when it is completely cool with the following exception:
remove Dry Sugar, Sugar Syrup, Tomato Products and Milk immediately with
the razor blade scraper.
Figure 8 - Scraper
CAUTION: Do not use any kind of cleaner on the glass while the sur-
face is hot; use only the razor blade scraper. The resulting fumes can
be hazardous to your health. Heating the cleaner can chemically attack
and damage the surface.
2. Wipe off spatters with a clean, damp sponge or paper towel. Rinse and dry. Use white vinegar if smudge remains; rinse.
English 8
Page 11
Cleaning Guidelines
Table 3: Special Care Chart
Type of Soil Possible Solution
Figure 9 - Cleaning
3. Apply a small amount of the Cooktop Cleaning Crème®. When dry, buff surface with a clean paper towel or cloth.
Dry sugar, sugar syrup, milk or tomato
spills. Melted plastic film or foil.
All these items REQUIRE IMMEDIATE
REMOVAL. Failure to remove these soils
immediately can permanently damage the
surface.
Burned-on food soil, dark streaks, and specks • Soften by laying a damp paper towel or sponge on top of soil for
Greasy spatters • Use a soapy sponge or cloth to remove grease; rinse thoroughly
Metal marks: Iridescent stain • Pans with aluminum, copper or stainless steel bases may leave
Hard Water Spots
Hot cooking liquids dripped on surface
• Remove only these types of spills while the surface is hot using the
razor blade scraper. Be sure to use a new, sharp razor in your
scraper.
• Remove pan and turn off the element.
• Wearing an oven mitt, hold scraper at 30
gouge or scratch the glass. Push soil off the heated area.
• After the surface has cooled, remove the residue and apply the
Cooktop Cleaning Creme®.
about 30 minutes.
• Use a plastic scrubber and Cooktop Cleaning Creme® or use the
razor blade scraper. Rinse and dry.
and dry. Apply Cooktop Cleaning Creme®.
marks. Treat immediately after surface has cooled with Cooktop
Cleaning Creme. If this does not remove the marks, try a mild
abrasive (Bon Ami®, Soft Scrub® without bleach) with a dampened paper towel. Rinse and reapply creme. Failure to remove
metal marks before the next heating makes removal very difficult.
• The minerals in some water can be transferred onto the surface
and cause stains. Use undiluted white vinegar, rinse and dry.
Recondition with Cooktop Cleaning Creme. Remove boilovers and
stains, before using the cooktop again.
o
angle, using care not to
Surface scratches
Small scratches are to be expected on the
glass surface, but do not affect cooking. In
time, small scratches will become smoother
and much less noticeable with daily use of the
Cooktop Cleaning Creme.
• Apply Cleaning Creme before using to remove sand-like grains
and grit such as salt and seasoning.
• Can be reduced by using pans with bases that are smooth, clean,
and dry before use. Use recommended Cooktop Cleaning Creme
daily on the cooktop.
Be Careful: Diamond rings will scratch the surface.
English 9
Page 12

Service
Before Calling Service Before calling for service, check these suggestions to avoid unnecessary service
charges.
Table 4: Troubleshooting Chart
Question Suggested Solution
Element cycles on the highest setting This is normal. The temperature limiter operates automatically to
protect the glass ceramic surface from extreme high temperature
damage.
Element cycles more than usual • Pan base is warped and not making full contact with the heat-
ing surface.
• Base diameter of pan is too small for the size of the element.
• Pan ingredients have boiled dry.
• Material of pan is a poor heat conductor; heat transfers too
slowly
A slight odor is noticeable when an element is
turned on
Cooktop controls will not turn on • Check the power source to see if a fuse has blown or if the cir-
Replacement razor blades for the scraper • The scraper is packaged with single-edge, stainless steel
Cooking results are not what was expected • The cooktop is not level.
Green tint on white glass • This is normal and will disappear as the surface cools down.
• This is normal with new cooktops and will disappear after sev-
eral uses
cuit breaker tripped.
• Check power supply.
blades. Use a standard single-edge blade for replacement.
• Cooking pan does not fit the surface being used.
• Cookware is not the type or size recommended.
Data Plate For handy reference, the serial tag information has been affixed to the back cover.
How to Obtain Service For authorized service or parts information, call the number or write to the address
listed inside the back cover.
We want you to remain a satisfied customer. If a problem comes up that cannot
be resolved to your satisfaction please let us know. Whether you write or call,
please provide us with the Model Number, Serial Number and Date of Original
Purchase or Installation.
Warranty The warranties provided by BSH Home Appliances Corp. in this Statement of Lim-
ited Warranty apply only to the BSH Electric Cooktops ("Cooktop") sold to you, the
first using purchaser, provided that the Cooktop was purchased (1) for your use
and not for resale and (2) in the United States or Canada and is located in the
country of purchase. As used in this Statement of Limited Warranty, the term
"Date of Installation" shall refer to the earlier of the date the Cooktop is installed or
ten (10) business days after the date the Cooktop is sold to the first using purchaser, the warranties stated herein apply only to the first using purchaser and
are not transferable.
English 10
Page 13

Standard Limited Warranty BSH warrants that its Cooktop is free from defects in materials and workmanship
for a period of twelve (12) months from the Date of Installation. During the warranty period, BSH or tis authorized service center will repair or replace, at its sole
option, any Cooktop that proves to have been defective under conditions of normal use without charge. All removed parts and components shall become the
property of BSH, at BSH's option. All replaced and/or repaired parts shall assume
the identity of the original part for purposes of this warranty and this warranty shall
not be extended with respect to such parts.
Extended Limited Warranty BSH further warrants that the electric heating elements and controls of the Cook-
top and the ceramic glass of the Cooktop shall be free from defects in materials
for a period of time beginning on the twelfth (12th) month from the Date of Installation and continuing until the sixtieth (60th) month from the Date of Installation
("extended warranty period"). During the extended warranty period,
BSH will replace any electric heating elements, controls, or ceramic glass of the
Cooktop that proves to have been defective under normal conditions of use without charge, excluding any labor (including but not limited to labor charges incurred
in the removal and reinstallation of any Cooktop), transportation, and/or shipping
costs incurred in the performance of this extended warranty. All replaced parts
covered under this paragraph shall assume the Identity of the original for purposes of this extended warranty and this warranty shall not be extended with
respect to such parts.
Other Conditions of the Limited Warranties
How to Obtain Warranty Service To obtain warranty service for the Cooktop, call the number or write to the address
The warranties provided in this Statement of Limited Warranty exclude defects or
damage resulting from (1) use of the Cooktop in other than its normal and customary manner (commercial use of the Cooktop shall not be deemed normal or customary), (2) misuse, abuse, accidents or neglect, (3) improper operation,
maintenance, installation or unauthorized service, (4) adjustment or alteration or
modification of any kind, (5) a failure to comply with applicable state, local, city,
and county electrical and/or building codes, (6) spills of food or liquid, and (7)
external forces such as floods, fires, acts of God or other circumstances beyond
BSH's control. Also excluded from this warranty are scratches and damages on
external surfaces and exposed parts of Cooktops on which the serial numbers
have been altered, defaced of removed.
To the extent allowed by law, this warranty sets out your exclusive remedies with
respect to products covered by it, whether the claim arises in contract or tort
(including strict liability and negligence) or otherwise. BSH will not be liable for
consequential or incidental damages, losses, or expenses. THIS WARRANTY IS
IN LIEU OF ALL OTHER EXPRESS WARRANTIES. ANY WARRANTY IMPLIED
BY LAW, WHETHER FOR MERCHANTABILITY OR FITNESS FOR A PARTICULAR PURPOSE OR OTHERWISE, SHALL BE EFFECTIVE ONLY FOR THE
PERIOD THAT THIS EXPRESS WARRANTY IS EFFECTIVE. No attempt to
alter, modify, or amend this warranty shall be effective unless authorized in writing
by an officer of BSH.
listed inside the back cover.
Notice to California Owners If your Cooktop needs warranty service and there is no authorized BSH service
center reasonably close to you, you may notify the BSH reseller from whom you
purchased the Cooktop. If the BSH reseller fails to repair or replace the defective
parts, or partially refund your purchase price (where applicable), you may have
the Cooktop repaired at any large appliance repair shop or center and you will be
reimbursed for all reasonable expenses provided the costs are substantiated in
writing and the work performed is covered by this warranty. BSH shall not reimburse any repair costs hereunder which exceed the depreciated value of the
Cooktop.
English 11
Page 14

Table des matières
Instructions de sécurité importantes . . . . . . . . . . . . . . . . . . . . . . . . . . . . . . . . . . . . . . . . . . . . . . . . . . .1
Concernant la plaque de cuisson . . . . . . . . . . . . . . . . . . . . . . . . . . . . . . . . . . . . . . . . . . . . . . . . . . . . . . 2
Pièces et accessoires . . . . . . . . . . . . . . . . . . . . . . . . . . . . . . . . . . . . . . . . . . . . . . . . . . . . . . . . . . . . . . . . . 2
Voyant marche d’élément . . . . . . . . . . . . . . . . . . . . . . . . . . . . . . . . . . . . . . . . . . . . . . . . . . . . . . . .3
Voyant de surface chaude . . . . . . . . . . . . . . . . . . . . . . . . . . . . . . . . . . . . . . . . . . . . . . . . . . . . . . .3
Boutons de contrôles . . . . . . . . . . . . . . . . . . . . . . . . . . . . . . . . . . . . . . . . . . . . . . . . . . . . . . . . . . .3
Utilisation de la plaque de cuisson . . . . . . . . . . . . . . . . . . . . . . . . . . . . . . . . . . . . . . . . . . . . . . . . . . . . . 3
Avant la première utilisation . . . . . . . . . . . . . . . . . . . . . . . . . . . . . . . . . . . . . . . . . . . . . . . . . . . . . . . . . . . .3
Précautions pour une longue durée et une belle apparence de la surface . . . . . . . . . . . . . . . . . . . . . . . . .4
Fonctionnement . . . . . . . . . . . . . . . . . . . . . . . . . . . . . . . . . . . . . . . . . . . . . . . . . . . . . . . . . . . . . . . . . . . . . .4
Élément radiant . . . . . . . . . . . . . . . . . . . . . . . . . . . . . . . . . . . . . . . . . . . . . . . . . . . . . . . . . . . . . . . 4
Élément simple . . . . . . . . . . . . . . . . . . . . . . . . . . . . . . . . . . . . . . . . . . . . . . . . . . . . . . . . . . . . . . . . 4
Élément jumelé . . . . . . . . . . . . . . . . . . . . . . . . . . . . . . . . . . . . . . . . . . . . . . . . . . . . . . . . . . . . . . . .4
Limiteurs de température . . . . . . . . . . . . . . . . . . . . . . . . . . . . . . . . . . . . . . . . . . . . . . . . . . . . . . . . 5
Chaleur conservée . . . . . . . . . . . . . . . . . . . . . . . . . . . . . . . . . . . . . . . . . . . . . . . . . . . . . . . . . . . . . 5
Remarque concernant les plaques de cuisson blanches . . . . . . . . . . . . . . . . . . . . . . . . . . . . . . . . 5
Pour obtenir de meilleurs résultats . . . . . . . . . . . . . . . . . . . . . . . . . . . . . . . . . . . . . . . . . . . . . . . . . . . . . 5
Casseroles appropriées . . . . . . . . . . . . . . . . . . . . . . . . . . . . . . . . . . . . . . . . . . . . . . . . . . . . . . . . . . . . . . . . 5
Caractéristiques . . . . . . . . . . . . . . . . . . . . . . . . . . . . . . . . . . . . . . . . . . . . . . . . . . . . . . . . . . . . . . . 5
Utilisation . . . . . . . . . . . . . . . . . . . . . . . . . . . . . . . . . . . . . . . . . . . . . . . . . . . . . . . . . . . . . . . . . . . .6
Tableau de cuisson . . . . . . . . . . . . . . . . . . . . . . . . . . . . . . . . . . . . . . . . . . . . . . . . . . . . . . . . . . . . . . . . . . . 7
Connexion 208/240 volts . . . . . . . . . . . . . . . . . . . . . . . . . . . . . . . . . . . . . . . . . . . . . . . . . . . . . . . . . 7
Entretien et nettoyage . . . . . . . . . . . . . . . . . . . . . . . . . . . . . . . . . . . . . . . . . . . . . . . . . . . . . . . . . . . . . . . .7
Avant l’entretien . . . . . . . . . . . . . . . . . . . . . . . . . . . . . . . . . . . . . . . . . . . . . . . . . . . . . . . . . . . . . . . . . . . . . . 7
Nettoyage quotidien . . . . . . . . . . . . . . . . . . . . . . . . . . . . . . . . . . . . . . . . . . . . . . . . . . . . . . . . . . . . . . . . . . . 8
Boutons de contrôles . . . . . . . . . . . . . . . . . . . . . . . . . . . . . . . . . . . . . . . . . . . . . . . . . . . . . . . . . . .8
Garniture latérale (modèle en acier inoxydable) . . . . . . . . . . . . . . . . . . . . . . . . . . . . . . . . . . . . . . . 8
Nettoyants recommandés . . . . . . . . . . . . . . . . . . . . . . . . . . . . . . . . . . . . . . . . . . . . . . . . . . . . . . . .8
Nettoyants à éviter . . . . . . . . . . . . . . . . . . . . . . . . . . . . . . . . . . . . . . . . . . . . . . . . . . . . . . . . . . . . . 8
Techniques quotidien . . . . . . . . . . . . . . . . . . . . . . . . . . . . . . . . . . . . . . . . . . . . . . . . . . . . . . . . . . . 8
Directives de nettoyage . . . . . . . . . . . . . . . . . . . . . . . . . . . . . . . . . . . . . . . . . . . . . . . . . . . . . . . . . . . . . . . .9
Service . . . . . . . . . . . . . . . . . . . . . . . . . . . . . . . . . . . . . . . . . . . . . . . . . . . . . . . . . . . . . . . . . . . . . . . . . . . 10
Avant d’effectuer un appel de service . . . . . . . . . . . . . . . . . . . . . . . . . . . . . . . . . . . . . . . . . . . . . . . . . . . .10
Plaque signalétique . . . . . . . . . . . . . . . . . . . . . . . . . . . . . . . . . . . . . . . . . . . . . . . . . . . . . . . . . . . . . . . . . . 10
Comment obtenir un service . . . . . . . . . . . . . . . . . . . . . . . . . . . . . . . . . . . . . . . . . . . . . . . . . . . . . . . . . . .10
Garantie . . . . . . . . . . . . . . . . . . . . . . . . . . . . . . . . . . . . . . . . . . . . . . . . . . . . . . . . . . . . . . . . . . . . . . . . . . . 10
Garantie limitée standard . . . . . . . . . . . . . . . . . . . . . . . . . . . . . . . . . . . . . . . . . . . . . . . . . . . . . . .10
Garantie limitée prolongée . . . . . . . . . . . . . . . . . . . . . . . . . . . . . . . . . . . . . . . . . . . . . . . . . . . . . . 11
Autres conditions de la garantie limitée . . . . . . . . . . . . . . . . . . . . . . . . . . . . . . . . . . . . . . . . . . . .11
Pour obtenir un service sous garantie . . . . . . . . . . . . . . . . . . . . . . . . . . . . . . . . . . . . . . . . . . . . .11
Remarques aux propriétaires en Californie . . . . . . . . . . . . . . . . . . . . . . . . . . . . . . . . . . . . . . . . . 11
Questions?
1.800.944.2904
www.boschappliances.com
5551 McFadden Ave.
Huntington Beach, CA 92649
Nous serons heureux d’avoir de vos nouvelles !
Page 15

INSTRUCTIONS DE SÉCURITÉ IMPORTANTES
LIRE ET CONSERVER CES INSTRUCTIONS
Instructions de sécurité
importantes
AVERTISSEMENT : lire toutes les instructions avant d’utiliser cet appareil. Si
l’information de ce guide n’est pas suivie, il peut en résulter un incendie ou une
explosion causant des dommages à la propriété, des blessures ou la mort. Pour
réduire le risque d’incendie, choc électrique ou blessures, prendre ces précautions:
Sécurité générale
• S’assurer que l’appareil est adéquatement installé et mis à la terre par un
technicien qualifié.
• Ne pas cuisiner sur une plaque de cuisson brisée. Si elle se brise, les nettoyants et déversements peuvent s’infiltrer et créer un risque de choc électrique. Communiquer immédiatement avec un technicien qualifié.
• Ne pas ranger ni utiliser d’essence ou autres vapeurs ou liquides inflammables à proximité de cet appareil ou tout autre appareil.
• Cet appareil est destiné à un usage domestique familial. Voir la garantie. Pour
toute question, communiquer avec le fabricant.
• Toujours avoir un détecteur de fumée à proximité de la cuisine.
• Ne jamais utiliser l’appareil pour chauffer ou réchauffer une pièce.
• Les enfants ne doivent pas être laissés seuls ou sans surveillance là où
l’appareil est utilisé. Ils ne doivent pas s’asseoir ni se tenir debout sur toute
pièce de l’appareil.
• Lorsque les enfants sont assez âgés pour utiliser l’appareil, il faut leur montrer à le faire de façon sécuritaire.
• Ne pas ranger des objets d’intérêt pour les enfants au-dessus ou à l’arrière de
l’appareil.
• Ne pas ranger des matériaux inflammables sur ou près de l’appareil.
• Si les vêtements prennent feu, se laisser tomber au sol et rouler immédiatement pour éteindre les flammes.
• Ne jamais laisser vêtements, tire-plats ou matériaux inflammables entrer en
contact avec une surface chaude.
• Ne pas nettoyer l’appareil pendant qu’il est chaud. Certains nettoyants produisent des émanations nocives lorsque appliqués sur une surface chaude.
• Étouffer les flammes d’un feu d’aliments autre qu’un feu de graisse avec du
bicarbonate de soude. Ne jamais utiliser d’eau sur un feu de graisse.
• Ne pas laisser aluminium, plastique, papier, chiffon entrer en contact avec un
élément. Ne pas laisser les casseroles chauffer à sec.
• Ne pas réparer ni remplacer toute pièce de l’appareil sauf spécifiquement
recommandé dans ce guide. Tout service doit être référé à un technicien qualifié.
• Ne pas utiliser d’aluminium pour doubler toute pièce de l’appareil.
• Si l’appareil est près d’une fenêtre, s’assurer que les rideaux ou autres ne
volent pas au-dessus ou près des éléments. Ils peuvent s’enflammer.
• Au moment d’utiliser l’appareil, ne pas toucher à la surface ou la zone environnante.
• Utiliser seulement des tire-plats secs ; humide ou mouillés sur des surfaces
chaudes, ils peuvent causer des brûlures par vapeur.
• Ne jamais laisser l’appareil sans surveillance pendant l’utilisation. Des déversements causent de la fumée ; des éclaboussures de graisse peuvent
s’enflammer.
• Toujours positionner les poignées vers l’intérieur pour ne pas qu’elles dépassent au-dessus de la zone de travail, des éléments ou bords de la plaque de
cuisson.
Français 1
Page 16

• Porter des vêtements appropriés ; des vêtements lâches, manches pendantes ne doivent pas être portés.
• Utiliser seulement certains types de verre, céramique vitrifiée à l’épreuve de
la chaleur, céramique, faïence ou autres qui conviennent à la plaque de cuisson.
• Laisser le ventilateur de hotte fonctionner au moment de flamber des aliments.
• Étouffer les flammes d’un feu de graisse avec un couvercle hermétique, tôle à
biscuits ou autre plateau en métal, puis fermer l’élément. Faire attention à ne
pas se brûler. Si les flammes ne s’éteignent pas immédiatement, évacuer et
téléphoner au service des incendies.
• Ne pas utiliser d’eau, incluant des chiffons ou serviettes humides sur un feu
de graisse. Il peut en résulter une violente explosion de vapeur.
• Ne jamais prendre une casserole en flamme. Risque de brûlures.
AVERTISSEMENT : pour éviter tout risque de choc électrique, avant d’effec-
tuer le service de l’appareil, mettre l’alimentation hors circuit au panneau de service et le verrouiller afin d’éviter toute mise en circuit accidentelle.
Extincteurs
Utiliser un extincteur seulement :
• Si l’on en possède un de classe ABC et que l’on sait s’en servir.
• Si le feu est petit et contenu dans la zone où il a commencé.
• Si le service des incendies a été appelé.
• Si l’on peut combattre le feu en ayant le dos vers une sortie.
Concernant la plaque de cuisson
Pièces et accessoires
Figure 1 - Pièces
NEM73UC
2
1
6
Tableau 1 : modèles de plaque de cuisson
N° Type Dimensions Watt
1 Jumelé 5 1/2 / 9 po (140/230 mm) 1 100/2 500
7
3
4
8
3
2
4
1
NEM93UC
2
1
7
4
3
4
3
2
5
5
1
6
Français 2
2 Simple 51/2 po (140 mm) 1 200
3 Jumelé 5 / 7 po (120/180 mm) 700/1 700
4 Simple 6 po (160 mm) 1 500
Page 17

N° Type Dimensions Watt
5 Jumelé 5 / 8 po (120/195 mm) 800/1 900
6 Voyants de surface chaude
7 Voyant marche d’élément jumelé – indiquant que les éléments intérieur et
extérieur sont en circuit
8 Voyant marche d’élément (s’allume pour tout élément)
Voyant marche d’élément Ce voyant s’allume chaque fois qu’un élément est mis en circuit et demeure
allumé tant que les éléments ne sont pas mis hors circuit.
Le voyant marche est situé devant les boutons de contrôle.
Pour les éléments jumelés, il y a un voyant additionnel situé au haut gauche du
bouton de contrôle. Ce voyant s’allume lorsque les éléments intérieur et extérieur
sont utilisés et l’élément est en circuit. Avec un réglage autre que 9 (élevé), le
voyant fait un cycle marche-arrêt comme l’élément.
Figure 2 – Voyant marche
ON
Voyant de surface chaude Chaque élément est doté d’un voyant indiquant lorsque la surface est trop chaude
pour le toucher. Ce voyant s’allume automatiquement dans la zone marquée
« CAUTION – HOT » (attention – chaud) au milieu avant. Il demeure allumé
jusqu’à ce que la zone soit sécuritaire.
Si un voyant de surface est allumé, faire attention en travaillant ou en nettoyant la
plaque de cuisson, car elle est chaude.
Figure 3 – Voyant de surface
Attention - chaud
Boutons de contrôles Les contrôles sur l’appareil sont marqués pour indiquer l’élément contrôlé. Ils sont
tous marqués de 1 à 9 ; 1 étant le réglage le plus bas et 9 le plus élevé.
Utilisation de la plaque de cuisson
Avant la première utilisation
• Enlever tout matériel d’emballage et documentation de la surface.
• Pendant que l’appareil est froid, essuyer avec une éponge humide et propre,
assécher.
• Appliquer la crème à plaque de cuisson sur la surface. Essuyer avec un chiffon propre.
• Il peut y avoir une légère odeur pendant les premières utilisations. Cela disparaîtra.
Français 3
Page 18

• Des résultats de cuisson optimum dépendent des casseroles appropriées et
de l’utilisation.
• La surface de cuisson conserve la chaleur et demeure chaude jusqu’à 25 à
30 minutes une fois l’élément hors circuit.
• Lire toutes les précautions et le guide d’utilisation et d’entretien avant de faire
fonctionner.
Précautions pour une longue durée et une belle
apparence
• Un entretien quotidien régulier avec la crème nettoyante protègera la surface
et facilitera le retrait des saletés et des dates d’eau.
• La surface en céramique vitrifiée est un matériau durable et résistant aux
impacts, mais non incassable si un objet tombe dessus.
• Ne pas utiliser d’aluminium directement sur le verre, il fondra et endommagera la surface.
• Ne pas laisser plastique, papier ou chiffon entrer en contact avec la surface
en verre chaude ; ces articles peuvent fondre ou brûler et endommager la surface en verre.
• Ne pas laisser les casseroles chauffer à sec. Ceci peut endommager la casserole, l’élément et/ou la surface en verre.
• Ne jamais cuire directement les aliments sur le verre.
• Éviter de placer un anneau pour wok, grille ou autre support en métal sur la
surface en verre.
• Ne pas utiliser la surface comme planche à découper.
• Ne pas faire glisser les casseroles sur la surface, cela peut l’égratigner.
• Ne pas déposer de casseroles mouillées sur la surface.
Fonctionnement
Éléments radiants Ce type d’élément utilise un ruban situé sous la surface en céramique vitrifiée
pour assurer la chaleur pendant la cuisson. Les éléments radiants font un cycle
marche-arrêt (voir limiteurs de température, ci-dessous). Il y a un nombre infini de
réglages de chaleur entre les positions 1 à 9.
Élément simple Pour mettre un élément en circuit, pousser sur le bouton de contrôle et tourner au
réglage de chaleur désiré.
Figure 4 – Élément simple
OFF
9
8
7
6
5
1
2
3
4
Élément jumelé L’élément jumelé consiste en deux éléments rubans radiants dans la même zone.
Le petit intérieur ou les deux éléments intérieur et extérieur peuvent être choisis.
Pour mettre le petit intérieur en circuit, pousser le bouton de contrôle et le tourner
dans le sens horaire au réglage désiré.
Pour mettre les deux éléments intérieur et extérieur en circuit ensemble, pousser
le bouton de contrôle et tourner dans le sens horaire passé le chiffre 9 au repère
d’élément jumelé. Le voyant s’allume indiquant que l’élément jumelé est en circuit. Tourner le bouton dans le sens contre horaire au réglage désiré. Pour fermer, tourner jusqu’à la position OFF (arrêt).
Français 4
Page 19

Figure 5 – Élément jumelé
OFF
9
8
1
2
7
6
5
3
4
Limiteurs de température Chaque élément radiant est doté de son capteur afin de protéger la surface en
verre des températures élevées extrêmes. Les limiteurs fonctionnent automatiquement en faisant un cycle à l’élément quel que soit le réglage de cuisson.
Quoique le cycle est normal, une des conditions suivantes peut activer le limiteur
et faire faire un cycle marche-arrêt plus souvent:
• La base de la casserole n’est pas tout en contact avec la surface chauffante
(à cause de voilage ou base inégale).
• La casserole est trop petite pour le format d’élément.
• La casserole a chauffé à sec.
• Le matériau ou la forme de la casserole transfert lentement la chaleur.
Chaleur conservée ATTENTION : la surface en verre conserve la chaleur et demeure
chaude une fois le ou les éléments sont mis hors circuit. La chaleur
conservée peut être utilisée pour maintenir les aliments à une température de service pendant un cour moment.
Remarque pour la plaque de cuisson blanche
Lorsqu’un élément est chaud, il y a une teinte verte pâle à la surface. Ceci est normal et disparaîtra après quelques minutes lorsque la surface refroidit.
Pour obtenir de meilleurs résultats
Casseroles appropriées
Caractéristiques Le choix des casseroles peut agir directement sur la vitesse et l’uniformité de la
cuisson. Pour de meilleurs résultats, choisir des casseroles ayant les caractéristiques suivantes:
Fond plat
Lorsqu’une casserole est chaude, le fond doit reposer uniformément sur la surface sans ballotter. Des casseroles de calibre moyen à robuste, à fond plat sont
idéales.
Pour vérifier le plat de la casserole :
Mettre la casserole à l’envers sur le plan de travail et déposer une règle contre le
fond ; ils doivent être un contre l’autre.
Un autre test simple pour déterminer la distribution uniforme de la chaleur dans le
fond de la casserole, est de mettre 1 po (25,4 mm) d’eau dans la casserole. Amener à ébullition et observer l’emplacement des bulles lorsque l’eau commence à
bouillir. Dans une casserole à fond plat approprié, les bulles sont uniformes.
Français 5
Page 20

Figure 6 – Vérification du plat
Diamètre
Le fond de la casserole doit couvrir ou correspondre au diamètre de l’élément utilisé. Il peut dépasser de 1 po (25,4 mm) tout autour.
Couvercle hermétique
Un couvercle réduit le temps de cuisson en gardant la chaleur dans la casserole.
Casseroles spéciales
Les casseroles spéciales comme les grilles, rôtissoires, cuiseurs, woks, bainmarie, etc. doivent avoir les mêmes caractéristiques que susmentionnées. (Utiliser seulement un wok à fond plat.) Ne jamais poser un support, tel un anneau à
wok sur la surface de cuisson.
Utilisation des casseroles • L’utilisation de casseroles et poêles à fond rond (concave ou convexe), voilé
ou autre doit être évitée. Voir le dessin ci-dessous.
• S’assurer que le fond est propre et sec
• Utiliser des casseroles et poêles à fond en métal, lisse et épais. • Ne pas faire
glisser les casseroles sur la plaque de cuisson. Elles peuvent laisser des marques.
• Ne pas utiliser des casseroles en verre, elles peuvent égratigner la surface.
Figure 7 – Utilisation adéquate
ATTENTION:
• Les aliments emballés dans l’aluminium ne doivent pas être placés directement sur la
surface en céramique vitrifiée ; l’aluminium peut fondre et causer des dommages permanents.
• Plastique, papier et chiffon peuvent fondre ou brûler lorsqu’en contact avec la surface
chaude. Ne pas laisser ces articles entrer en contact avec la surface chaude.
• Ne pas laisser les casseroles chauffer à sec. Ceci peut endommager de façon permanente la casserole, l’élément et le verre de la plaque de cuisson.
Français 6
Page 21

Tableau de cuisson Tous ces réglages sont recommandés sans préchauffer l’élément. Utiliser ce tableau
comme guide.
Tableau 2 : Tableau de cuisson – réglages de chaleur
Type d’aliments Réglages de chaleur
Fondre beurre/chocolat 1
Sauces délicates
Terminer le riz
Mijoter sauce avec beurre et jaune
d’oeuf
Bacon
Cuire légumes, poisson, bouillons
Oeufs frits, brouillés
Terminer céréales, pâtes
Lait
Crêpes
Pouding
Mijoter viandes
Légumes, poisson, bouillons à la
vapeur
Friture à la poêle
Sauces spaghetti
Légumes sautés
Viandes à ragoût, soupes
Braiser viandes
Viande, poisson frits à la poêle,
Faire sauter
Brunissage rapide, saisir viande
Ébullition rapide
1-3
4-6
6-8
Bouillir l’eau pour légumes, pâtes, riz,
etc.
Une gamme de réglages est donnée car le réglage réel dépend :
1. type et qualité de la casserole
2. type, quantité et température des aliments
3. élément utilisé
4. préférences du cuisinier.
Connexion 208/240 volts Les réglages de chaleur recommandés ici sont en fonction d’une source d’alimentation de
240 volts. Si l’appareil est branché sur le 208 volts, le même réglage de chaleur s’applique
mais les aliments peuvent prendre plus de temps à cuire.
9
Entretien et nettoyage
Avant le nettoyage L’entretien est facile lorsque des étapes préventives sont prises. Par exemple,
appliquer une petite quantité de crème nettoyante (fournie avec l’appareil) quotidiennement. Ceci assure une couche protectrice qui facilite le retrait des taches
d’eau ou des éclaboussures d’aliments. La température de la surface de cuisson
réduit les qualités protectrices de ce nettoyant. Il doit être appliqué avant chaque
utilisation. Utiliser un chiffon propre et appliquer la crème avant chaque utilisation
Français 7
Page 22

pour enlever la poussière ou les marques de métal survenant entre les utilisations.
Nettoyage quotidien
Boutons de contrôle Tirer vers le haut pour enlever. Insérer une serviette sous le bouton et tenir les
bords de la serviette ensembles. Avec la serviette, tirer. Essuyer avec un chiffon
savonneux chaud, rincer et assécher. Ne pas faire tremper !
Garnitures latérales (Modèles en acier inoxydable)
Nettoyants recommandés • Crème nettoyante pour plaque de cuisson
Nettoyants à éviter • Nettoyants à verre contenant de l’ammoniaque ou du chlore. Ces ingrédients
Toujours essuyer dans le sens du grain. Pour des taches moyennes à tenaces,
utiliser BonAmi® ou Soft Scrub® (sans javellisant). Essuyer avec une éponge ou
un chiffon humide, rincer et assécher.
• Utiliser seulement une petite quantité ; appliquer sur un essuie-tout ou un
chiffon propre. Essuyer la surface et frotter avec un essuie-tout propre.
• BonAmi® : rincer et assécher.
• Soft Scrub® (sans javellisant) : rincer et assécher.
• Vinaigre blanc : rincer et assécher.
• Grattoir à lame de rasoir (emballé avec l’appareil)
Remarque : les nettoyants recommandés indiquent le type et cela ne constitue
pas un endossement.
peuvent égratigner ou tacher de façon permanente la plaque de cuisson.
• Nettoyants caustiques pour fours tels Easy Off® peuvent égratigner la surface.
• Nettoyants abrasifs
• Tampons à récurer en métal et éponges à récurer tels Scotch Brite® peuvent
égratigner et/ou laisser des marques.
• Tampons à récurer avec savon tels SOS® peuvent égratigner la surface.
• Nettoyants en poudre contenant du javellisant avec chlore peuvent tacher de
façon permanente la surface.
• Produits inflammables tels liquides à briquet ou WD-40.
Techniques quotidiennes 1. Nettoyer la surface lorsque complètement refroidie sauf pour ce qui suit :
enlever sucre, sirop sucré, produits avec tomates et lait immédiatement avec
le grattoir à lame.
Figure 8 - Grattoir
ATTENTION : Ne pas utiliser de nettoyant sur le verre pendant que
la surface est chaude ; utiliser seulement le grattoir à lame. Les émanations peuvent être nocives pour la santé. Le nettoyant chauffé peut
attaquer chimiquement et endommager la surface.
Français 8
Page 23

Directives de nettoyage
Tableau 3 : tableau d’entretien spécial
Type de saleté Solution possible
2. Essuyer les éclaboussures avec une éponge ou un essuie-tout humide. Rincer et assécher. Utiliser du vinaigre blanc si des taches demeurent. Rincer.
Figure 9 - Nettoyage
3. Appliquer une petite quantité de crème nettoyante pour plaque de cuisson. Lorsque sèche, essuyer la surface avec un essuie-tout ou un chiffon propre.
Sucre, sirop sucré, déversements contenant lait ou tomates, pellicule plastique ou
aluminium fondus.
Ceci doit être IMMÉDIATEMENT ENLEVÉ.
Sinon cela peut causer des dommages permanents à la surface.
Aliments brûlés, rayures foncées et taches • Amollir en déposant une éponge ou un essuie-tout mouillé sur les
Éclaboussures de graisse • Utiliser une éponge ou un chiffon savonneux pour enlever la
Marques de métal, taches irisées • Les casseroles à fond en aluminium, cuivre ou acier inoxydable
• Enlever ces types de déversements pendant que la surface est
chaude à l’aide du grattoir à lame seulement. S’assurer qu’une
nouvelle lame est utilisée.
• Retirer la casserole et fermer l’élément.
• Avec des moufles à four, tenir le grattoir à un angle de 30°, faire
attention à ne pas égratigner le verre. Repousser les saletés hors
de la zone chaude.
• Une fois la surface refroidie, enlever les résidus et appliquer la
crème nettoyante pour plaque de cuisson.
taches, laisser environ 30 minutes.
• Utiliser un tampon en plastique et la crème nettoyante ou utiliser le
grattoir. Rincer et assécher.
graisse, rincer et assécher. Appliquer la crème nettoyante.
peuvent laisser des marques. Traiter immédiatement dès que la
surface a refroidi avec la crème nettoyante. Si les marques sont
tenaces, utiliser un abrasif doux (Bon Ami®, Soft Scrub® sans
javellisant) avec un essuie-tout humide. Rincer et appliquer de
nouveau la crème. Sinon ces marques peuvent devenir très difficiles à enlever
Taches d’eau calcaire
Liquides chauds égouttés sur la surface
Égratignures sur la surface
Il peut y avoir de petites égratignures sur la
surface qui ne modifient pas le rendement. À
la longue, elles deviendront plus lisses et
moins évidentes en utilisant quotidiennement
la crème nettoyante.
• Les minéraux dans l’eau peuvent se transférer sur la surface et
faire des taches. Utiliser du vinaigre blanc non dilué, rincer et
assécher. Appliquer la crème nettoyante. Enlever les déversements et les taches avant d’utiliser la plaque de cuisson de nouveau.
• Appliquer la crème nettoyante avant utilisation pour enlever les
saletés et/ou assaisonnement.
• Peuvent être réduites en utilisant des casseroles à fond lisse, propre et sec. Utiliser la crème nettoyage pour plaque de cuisson.
Attention : les bagues en diamant peuvent égratigner la surface.
Français 9
Page 24

Service
Avant d’effectuer un appel de service
Tableau 4 : guide de dépannage
Question Solution suggérée
Éléments faisant des cycles à réglage élevé Ceci est normal. Le limiteur de température fonctionne automati-
Éléments faisant des cycles souvent • Casserole voilée et ne faisant pas contact avec la surface.
Légère odeur lorsque l’élément est mis en circuit • Ceci est normal et disparaîtra avec l’usage
Les contrôles ne se mettent pas en circuit • Vérifier l’alimentation ; un fusible est peut-être grillé ou le
Lames de rechange pour le grattoir • Le grattoir est fourni avec une lame à côté simple en acier
Avant d’effectuer un appel de service, vérifier les points suivants pour éviter des
frais inutiles.
quement pour protéger la surface en céramique vitrifiée des dommages causés par des températures extrêmes.
• Diamètre de casserole trop petit pour le format d’élément.
• Casserole chauffée à sec.
• Matériaux de casserole mauvais conducteur de chaleur qui
transfert trop lentement
coupe-circuit déclenché.
• Vérifier l’alimentation.
inoxydable. Utiliser le même type pour le remplacement.
Résultats de cuisson non escomptés • Appareil non de niveau.
• Casserole non appropriée pour la surface utilisée.
• Casserole de type ou de format non recommandé.
Teinte verte sur verre blanc • Ceci est normal et disparaîtra lorsque la surface refroidie.
Plaque signalétique À des fins de références, la plaque signalétique figure à la fin du guide.
Comment obtenir un service
Pour un service autorisé ou de l’information sur les pièces, téléphoner ou écrire à l’adresse
indiquée au verso de la page couverture.
Nous désirons la satisfaction du client. Si un problème survient et qu’il ne peut être résolu à
la satisfaction du client, nous le laisser savoir. Que ce soit par écrit ou téléphone, indiquer
les numéros de modèle et de série, la date d’achat d’origine ou d’installation.
Garantie Les garanties fournies par BSH Home Appliances Corp. dans cet énoncé de garantie limi-
tée s’appliquent seulement aux plaques de cuisson électriques BSH (« plaque de
cuisson ») vendues à l’utilisateur, premier acheteur, en autant que la plaque de cuisson a
été achetée (1) pour un usage personnel et non pour la revente et (2) Aux États-Unis ou au
Canada et est située dans le pays où l’achat a été effectué. Comme utilisé dans cet énoncé
de garantie limitée, le terme « date d’installation » réfère à la date d’installation de l’appareil ou dix (10) jours ouvrables suivant la date à laquelle la plaque de cuisson a été vendue
au premier acheteur utilisateur. Les garanties indiquées s’appliquent seulement au premier
acheteur utilisateur et ne sont pas transférables.
Garantie limitée standard BSH garantit que la plaque de cuisson ne présente aucun défaut de matériaux ou de fabri-
cation pendant une période de douze (12) mois à compter de la date d’installation. Pendant
la période de garantie, BSH ou ses centres de service autorisés répareront ou remplaceront, à sa discrétion, toute plaque de cuisson présentant un défaut dans des conditions
d’utilisation normale sans frais. Toutes les pièces et composants enlevés deviennent la
propriété de BSH, à sa discrétion. Toutes les pièces de rechange et/ou réparées doivent
Français 10
Page 25

prendre la même identité que celle de la pièce d’origine à des fins de cette garantie et cette
garantie ne sera pas prolongée en regard de telles pièces.
Garantie limitée prolongée BSH garantit de plus que les éléments chauffants électriques et les contrôles ainsi que la
surface en céramique vitrifiée de la plaque de cuisson ne présentent pas de défaut de
matériaux pendant une période commençant au douzième (12
tallation jusqu’au soixantième (60
prolongée »). Pendant cette période de garantie prolongée, BSH remplacera tout élément
chauffant électrique, contrôle ou céramique vitrifiée de la plaque de cuisson présentant un
défaut dans des conditions d’utilisation normale sans frais, excluant main-d’oeuvre
(incluant mais non limité aux frais de main-d’oeuvre encourus dans le retrait et la réinstallation de la plaque de cuisson), transport et/ou frais d’expédition encourus en regard à la
garantie prolongée. Toutes les pièces de rechange couvertes conformément à ce paragraphe doivent prendre la même identité que celle de la pièce d’origine à des fins de cette
garantie prolongée et cette garantie ne sera pas prolongée en regard de telles pièces.
e
) mois de la date d’installation (« période de garantie
e
) mois suivant la date d’ins-
Autres conditions des garanties limitées
Les garanties offertes dans l’énoncé de garantie limitée excluent les défauts ou dommages
résultant de (1) utilisation de la plaque de cuisson autre qu’une utilisation normale et habituelle (utilisation commerciale de la plaque de cuisson n’est pas reconnue normale ou habituelle), (2) mauvaise utilisation, abus, accidents, négligence, (3) fonctionnement, entretien,
installation inadéquats ou service non autorisé, (4) réglage ou modification de toute sorte,
(5) manquement à se conformer aux codes de construction et/ou électriques de l’état,
municipaux, locaux applicables, (6) déversements d’aliments ou liquides et (7) forces extérieures tels inondations, incendies, actes de Dieu ou autres circonstances en dehors du
contrôle de BSH. Également exclus de cette garantie, égratignures et dommages sur les
surfaces externes et les pièces exposées de la plaque de cuisson sur lesquels les numéros
de série ont été effacés, modifiés ou enlevés.
Selon ce qui est permis par la loi, cette garantie donne des solutions exclusives en regard
aux produits couverts, qu’une plainte survienne par contrat ou tort (incluant responsabilité
stricte et négligence) ou autre. BSH ne sera pas tenu responsable des dommages accessoires ou indirects, pertes ou dépenses. CETTE GARANTIE EST EN LIEU DE TOUTE
AUTRE GARANTIE EXPRESSE. TOUTE GARANTIE TACITE PAR LOI, POUR COMMERCIALISATION OU À DES FINS PARTICULIÈRES OU AUTRES, NE SERA EN
VIGUEUR QUE POUR LA PÉRIODE EFFECTIVE DE CETTE GARANTIE EXPRESSE.
Aucune tentative de modification ou d’amender cette garantie ne sera effective à moins
d’une autorisation écrite par un responsable de BSH.
Pour obtenir un service Pour un service autorisé ou de l’information sur les pièces, téléphoner ou écrire à l’adresse
indiquée au verso de la page couverture.
Avis aux propriétaires en Californie Si la plaque de cuisson requiert un service sous garantie et qu’il n’y a pas de centre de ser-
vice autorisé BSH dans une région raisonnablement proche, aviser le marchand BSH où
l’appareil a été acheté. Si le marchand BSH ne répare ou ne remplace pas les pièces
défectueuses ou ne rembourse pas partiellement le prix d’achat (si applicable), il est possible de faire réparer la plaque de cuisson à tout centre de service pour électroménagers et
les frais raisonnables seront remboursés en autant que les coûts soient motivés par écrit et
que le travail effectué soit couvert par cette garantie. BSH ne remboursera pas les frais de
réparations aux termes des présentes qui excèdent la valeur de dépréciation de la plaque
de cuisson.
Français 11
Page 26

Contenido
Instrucciones Importantes de Seguridad . . . . . . . . . . . . . . . . . . . . . . . . . . . . . . . . . . . . . . . . . . . . . . . .1
Acerca de la parrilla . . . . . . . . . . . . . . . . . . . . . . . . . . . . . . . . . . . . . . . . . . . . . . . . . . . . . . . . . . . . . . . . .2
Partes y accesorios . . . . . . . . . . . . . . . . . . . . . . . . . . . . . . . . . . . . . . . . . . . . . . . . . . . . . . . . . . . . . . . . . . . 2
Luz indicadora de ‘Encendido’ del elemento . . . . . . . . . . . . . . . . . . . . . . . . . . . . . . . . . . . . . . . . .3
Luz indicadora de superficie caliente . . . . . . . . . . . . . . . . . . . . . . . . . . . . . . . . . . . . . . . . . . . . . . .3
Perillas de control . . . . . . . . . . . . . . . . . . . . . . . . . . . . . . . . . . . . . . . . . . . . . . . . . . . . . . . . . . . . . .3
Usar la parrilla . . . . . . . . . . . . . . . . . . . . . . . . . . . . . . . . . . . . . . . . . . . . . . . . . . . . . . . . . . . . . . . . . . . . . . 3
Antes de usar la parrilla por primera vez . . . . . . . . . . . . . . . . . . . . . . . . . . . . . . . . . . . . . . . . . . . . . . . . . . . 3
Precauciones para una larga vida y una buena apariencia de la superficie . . . . . . . . . . . . . . . . . . . . . . . .4
Operación . . . . . . . . . . . . . . . . . . . . . . . . . . . . . . . . . . . . . . . . . . . . . . . . . . . . . . . . . . . . . . . . . . . . . . . . . .4
Elementos radiantes . . . . . . . . . . . . . . . . . . . . . . . . . . . . . . . . . . . . . . . . . . . . . . . . . . . . . . . . . . . .4
Elemento sencillo . . . . . . . . . . . . . . . . . . . . . . . . . . . . . . . . . . . . . . . . . . . . . . . . . . . . . . . . . . . . . .4
Elemento doble . . . . . . . . . . . . . . . . . . . . . . . . . . . . . . . . . . . . . . . . . . . . . . . . . . . . . . . . . . . . . . . . 4
Reguladores de temperatura . . . . . . . . . . . . . . . . . . . . . . . . . . . . . . . . . . . . . . . . . . . . . . . . . . . . . 5
Calor retenido . . . . . . . . . . . . . . . . . . . . . . . . . . . . . . . . . . . . . . . . . . . . . . . . . . . . . . . . . . . . . . . . .5
Nota para propietarios de parrillas blancas . . . . . . . . . . . . . . . . . . . . . . . . . . . . . . . . . . . . . . . . . .5
Sacar el mayor provecho de su parrilla . . . . . . . . . . . . . . . . . . . . . . . . . . . . . . . . . . . . . . . . . . . . . . . . . 5
Utensilios apropiados de cocina . . . . . . . . . . . . . . . . . . . . . . . . . . . . . . . . . . . . . . . . . . . . . . . . . . . . . . . . . 5
Características de los utensilios de cocina . . . . . . . . . . . . . . . . . . . . . . . . . . . . . . . . . . . . . . . . . . .5
Prácticas de los utensilios de cocina . . . . . . . . . . . . . . . . . . . . . . . . . . . . . . . . . . . . . . . . . . . . . . . 6
Tabla para cocinar . . . . . . . . . . . . . . . . . . . . . . . . . . . . . . . . . . . . . . . . . . . . . . . . . . . . . . . . . . . . . . . . . . . . 7
Conexión de 208/240 Voltios . . . . . . . . . . . . . . . . . . . . . . . . . . . . . . . . . . . . . . . . . . . . . . . . . . . . .7
Cuidado y limpieza . . . . . . . . . . . . . . . . . . . . . . . . . . . . . . . . . . . . . . . . . . . . . . . . . . . . . . . . . . . . . . . . . . 7
Cuidarla antes de usarla . . . . . . . . . . . . . . . . . . . . . . . . . . . . . . . . . . . . . . . . . . . . . . . . . . . . . . . . . . . . . . . 7
Prácticas de limpieza diaria . . . . . . . . . . . . . . . . . . . . . . . . . . . . . . . . . . . . . . . . . . . . . . . . . . . . . . . . . . . . .8
Perillas de control . . . . . . . . . . . . . . . . . . . . . . . . . . . . . . . . . . . . . . . . . . . . . . . . . . . . . . . . . . . . . .8
Moldura lateral (Modelos de acero inoxidable) . . . . . . . . . . . . . . . . . . . . . . . . . . . . . . . . . . . . . . . . 8
Detergentes recomendados . . . . . . . . . . . . . . . . . . . . . . . . . . . . . . . . . . . . . . . . . . . . . . . . . . . . . .8
Evitar estos detergentes . . . . . . . . . . . . . . . . . . . . . . . . . . . . . . . . . . . . . . . . . . . . . . . . . . . . . . . . . 8
Técnicas de limpieza diaria . . . . . . . . . . . . . . . . . . . . . . . . . . . . . . . . . . . . . . . . . . . . . . . . . . . . . .8
Consejos de limpieza . . . . . . . . . . . . . . . . . . . . . . . . . . . . . . . . . . . . . . . . . . . . . . . . . . . . . . . . . . . . . . . . . 9
Servicio . . . . . . . . . . . . . . . . . . . . . . . . . . . . . . . . . . . . . . . . . . . . . . . . . . . . . . . . . . . . . . . . . . . . . . . . . . . 10
Antes de solicitar servicio . . . . . . . . . . . . . . . . . . . . . . . . . . . . . . . . . . . . . . . . . . . . . . . . . . . . . . . . . . . . . 10
Placa con información . . . . . . . . . . . . . . . . . . . . . . . . . . . . . . . . . . . . . . . . . . . . . . . . . . . . . . . . . . . . . . . . 10
Cómo obtener servicio . . . . . . . . . . . . . . . . . . . . . . . . . . . . . . . . . . . . . . . . . . . . . . . . . . . . . . . . . . . . . . . . 10
Garantía . . . . . . . . . . . . . . . . . . . . . . . . . . . . . . . . . . . . . . . . . . . . . . . . . . . . . . . . . . . . . . . . . . . . . . . . . . . 10
Garantía limitada estándar . . . . . . . . . . . . . . . . . . . . . . . . . . . . . . . . . . . . . . . . . . . . . . . . . . . . . .11
Garantía limitada extendida . . . . . . . . . . . . . . . . . . . . . . . . . . . . . . . . . . . . . . . . . . . . . . . . . . . . .11
Otras condiciones de las garantías limitadas . . . . . . . . . . . . . . . . . . . . . . . . . . . . . . . . . . . . . . . .11
Cómo obtener servicio de garantía . . . . . . . . . . . . . . . . . . . . . . . . . . . . . . . . . . . . . . . . . . . . . . .11
Aviso para propietarios en California . . . . . . . . . . . . . . . . . . . . . . . . . . . . . . . . . . . . . . . . . . . . . . 11
¿Preguntas?
1-800-944-2904
www.boschappliances.com
5551 McFadden Ave.
Huntington Beach, CA 92649
¡Estamos a sus ordenes!
Page 27

INSTRUCCIONES IMPORTANTES DE SEGURIDAD
LEA Y GUARDE ESTAS INSTRUCCIONES
Instrucciones
Importantes
de Seguridad
ADVERTENCIA: Lea todas las instrucciones antes de usar este aparato. El
hecho de no observar exactamente la información contenida en este manual
puede causar un fuego o explosión, dañar la propiedad o causar lesiones o la
muerte. Para reducir el riesgo de un fuego, descarga eléctrica o sufrir lesiones,
observe estas precauciones:
Seguridad general
• Un técnico calificado debe instalar la parrilla y conectarla a tierra.
• No use la parrilla cuando esté rota. En caso que se rompa la parrilla, las soluciones de limpieza y los derrames alimenticios pueden penetrar la parrilla rota
y crear el riesgo de una descarga eléctrica. Contacte a un técnico calificado
de inmediato.
• No guarde o use gasolina u otros vapores y líquidos inflamables cerca de
este o cualquier otro aparato.
• Este aparato está diseñado solamente para el uso casero normal. Vea la
garantía. Contacte al fabricante si tiene alguna pregunta.
• Siempre tenga un detector de humo funcional cerca de la cocina.
• Nunca use la parrilla para calentar una habitación.
•
Nunca se deben dejar solos a los niños en el área donde se usa el aparato.
Nunca se les debe permitir sentarse o pararse sobre ninguna parte de la parrilla.
• Cuando los niños llegan a la edad para hacer uso de la parrilla, se les debe
dar instrucciones sobre prácticas seguras.
• No almacene cosas de interés para los niños arriba de la parrilla o en la parte
trasera de ésta.
• No guarde materiales inflamables arriba o cerca de la parrilla.
• En el caso de encenderse la ropa personal, échese al piso y dése vueltas de
inmediato para extinguir las llamas.
• Nunca permita que la ropa, agarraderas u otros materiales inflamables tengan contacto con las superficies calientes.
• No limpie la parrilla mientras que esté caliente. Algunos detergentes producen vapores nocivos cuando son aplicados a una superficie caliente.
• Apague las llamas de incendios alimenticios, que no son de grasa, con bicarbonato de sodio. Nunca use agua con incendios alimenticios.
• No permita el contacto de papel de aluminio, plástico, papel o tela con un elemento superficial. No permita que se sequen las ollas hirviendo.
• No repare o reemplace ninguna parte de la parrilla a menos que fue recomendado específicamente en este manual. Todo servicio demás debe ser
realizado por un técnico calificado.
• No use papel de aluminio para forrar alguna parte de la parrilla.
• Si la parrilla está cerca de una ventana, asegúrese que las cortinas no cuelguen encima o cerca de los elementos; se podrían encender.
• Cuando usa la parrilla: No toque las unidades superficiales o el área alrededor de éstas.
• Use solamente guantes o agarraderas secas para las ollas; agarraderas
húmedas sobre superficies calientes pueden causar quemaduras de vapor.
• Nunca deje la parrilla sin atención cuando cocine con alto calor. Los derrames causan humo y se puede encender la grasa derramada.
• Siempre posicione las agarraderas de los utensilios hacia dentro, de modo
que no se extiendan sobre las áreas de trabajo cercanas, los elementos o el
borde de la parrilla.
• Use ropa adecuada. Nunca debe usar ropa holgada o mangas que cuelgan
flojas cuando cocine.
Español 1
Page 28
• Use solamente ciertos tipos de utensilios de vidrio, vidrio cerámico refractario,
cerámica, barro u otros vidriados que están disponibles para el uso con la parrilla.
• Prenda el ventilador de la campana cuando flamee alimentos.
• Apague las llamas con una tapa ajustada, bandeja de horno u otra bandeja de
metal, luego apague el elemento. Tenga cuidado y evite quemaduras. Si las
llamas no se apagan de inmediato, evacúe el lugar y llame a los bomberos.
• No use agua, incluyendo trapos o toallas húmedas con un incendio de grasa.
Puede resultar una explosión violenta de vapor.
• Nunca levante una olla en llamas. Se puede quemar.
ADVERTENCIA: Para evitar una descarga eléctrica antes de dar servicio a la
parrilla, apague la corriente en el panel de servicio y bloquee este panel para evitar que se prenda accidentalmente.
Extinguidores de fuego
Use un extinguidor de fuego solamente cuando:
• Usted sepa que tiene un extinguidor de fuego de la Clase ABC, y sabe cómo
manejarlo.
• El incendio es pequeño y está contenido en el área donde comenzó.
• Se está llamando a los bomberos.
• Usted puede combatir el fuego con su espalda hacia la salida.
Acerca de la parrilla
Partes y accesorios
Figura 1 - Partes
Tabla 1: Modelos de parrillas
7
4
5
3
2
4
1
NEM93UC
2
1
3
6
NEM73UC
2
1
6
# Tipo Tamaño Potencia
1 Doble 5-1/2" / 9" (140/230 mm) 1100/2500
2 Sencilla 5-1/2" (140 mm) 1200
7
3
4
8
4
3
2
5
1
Español 2
3 Doble 5" / 7"(120/180 mm) 700/1700
4 Sencilla 6" (160 mm) 1500
5 Doble 5" / 8" (120/195 mm) 800/1900
6 Luces indicadoras de superficies calientes
Page 29

Tabla 1: Modelos de parrillas
# Tipo Tamaño Potencia
7 Luces indicadoras de "Encendido" del elemento doble - indica que los ele-
mentos interiores y exteriores están encendidos
8 Luz indicadora de "Encendido" de un elemento (se prende para cualquier
elemento)
Luz indicadora de ‘Encendido’ del elemento
Luz indicadora de superficie caliente Cada elemento viene con una luz indicadora de calor para mostrar cuando la
Se prende la luz indicadora de “Encendido” cada vez que se prende un elemento.
La luz queda prendida hasta que se apaguen todos los elementos.
La luz de “Encendido” se encuentra en frente de las perillas de control.
Para los elementos dobles hay una luz indicadora de “Encendido” adicional que
se encuentra en la parte superior izquierda de la perilla de control. Esta luz se ilumina cuando se usan ambos elementos (el interior y el exterior) y cuando el elemento está prendido. Cuando usa un ajuste de calor diferente que 9 (alto), se
prende y se apaga la luz a medida que se prende y se apaga el elemento.
Figura 2 - Indicador de encendido
ON
superficie de cocinar queda demasiado caliente para tocarla. La luz indicadora se
prende en forma automática en el área marcada CAUTION - HOT (PRECAUCIÓN - CALIENTE) en la parte central delantera. La luz permanece prendida
hasta que la superficie se haya enfriado a una temperatura segura para tocarla.
Cuando se prende una luz de superficie caliente, tenga cuidado al trabajar o limpiar alrededor de la parrilla, ya que ésta aún puede estar muy caliente.
Figura 3 - Indicador de superficie caliente
Caution - Hot
Perillas de control Los controles en la parrilla están marcados para indicar cuál elemento controlan.
Todos los controles están marcados de 1-9, con 1 siendo el ajuste de calor más
bajo y 9 el calor más alto.
Usar la parrilla
Antes de usar la parrilla por primera vez
• Quite todo el material de empaque y la literatura de la superficie de la parrilla.
• Estando fría, límpie la parrilla con una esponja limpia, húmeda y séquela.
• Aplique la crema de limpieza para la parrilla (Cooktop Cleaning Creme®) que
se incluye con la parrilla. Saque brillo con un trapo limpio.
• Durante los primeros usos puede haber un ligero mal olor; esto es normal y
desaparecerá.
Español 3
Page 30

• Resultados óptimos de cocinar dependen de seleccionar y usar los utensilios
correctos.
• La superficie de cocinar retiene el calor y permanece caliente hasta 25 o 30
minutos después de apagar los elementos.
• Lea todas las precauciones de seguridad y la información en el manual de
uso y cuidado antes de operar la parrilla.
Precauciones para una larga vida y una buena apariencia de la superficie
• El cuidado diario, regular con la crema de limpieza (Cooktop Cleaning
Creme®) protegerá la superficie y facilitará la eliminación de manchas de
agua y residuos de alimentos.
• La superficie de vidrio cerámico es un material duradero resistente al impacto
pero sí se puede romper cuando se deja caer encima una olla u otro objeto.
• No use papel de aluminio directamente sobre el vidrio; se puede derretir y
dañar la superficie de vidrio.
• No permita que plástico, papel o tela tenga contacto con la superficie caliente de
vidrio; se pueden derretir o quemar estas cosas y dañar la superficie de vidrio.
•
No permita que las ollas hiervan hasta quedar secas. Esto puede dañar la
olla, el elemento y/o la parrilla
.
• Nunca cocine los alimentos directamente sobre el vidrio.
• Evite colocar un anillo de soporte para wok, un trébedes u otra base metálica
sobre la superficie de vidrio.
• No use la superficie de vidrio para cortar cosas.
• No deslice las ollas encima de la superficie de cocinar; esto puede rayar el vidrio.
• No coloque ollas húmedas sobre la superficie de vidrio.
Operación
Elementos radiantes Este tipo de elemento eléctrico usa una cinta de alambre ubicada debajo de la
superficie de vidrio cerámico que genera el calor para cocinar. Los elementos
radiantes están diseñados para prender y apagarse
ratura, abajo). Hay un número infinito de ajustes de calor entre las posiciones 1-9.
(vea Reguladores de tempe-
Elemento sencillo Para prender un elemento sencillo, presione la perilla de control y gírela en cual-
quier dirección al ajuste de calor deseado.
Figura 4 - Elemento sencillo
OFF
9
8
7
6
5
1
2
3
4
Elemento doble El elemento doble consiste en dos elementos radiantes de cinta dentro de la
misma área para calentar. Se puede seleccionar ya sea el elemento interior o
ambos elementos, el interior y el exterior para ser utilizados.
Para prender el pequeño elemento interior, presione la perilla de control y gírela
en sentido del reloj. Ajústela al nivel de calor deseado.
Para prender ambos elementos juntos (inteiror y exterior), presione la perilla de
control y gírela en sentido del reloj pasando el ajuste de calor 9 hasta el marcador
del elemento doble. Se prenderá la luz indicadora de encendido del elemento
doble indicando que el elemento doble está prendido. Gire la perilla en sentido
contrario del reloj hasta el ajuste de calor deseado. Para apagar el elemento
doble, gire la perilla a la posición de OFF (Apagado).
Español 4
Page 31

Figura 5 - Elemento doble
9
8
OFF
1
2
7
6
5
3
4
Reguladores de temperatura Cada elemento radiante tiene su propio sensor para proteger la superficie de vid-
rio contra temperaturas extremas. Los reguladores funcionan automáticamente al
prender y apagar el elemento sin importar el ajuste para cocinar
.
Aunque el ciclo de prender y apagar es normal, cualquiera de las siguientes
condiciones puede activar el regulador y causar que se prenda y se apague el
elemento más de lo normal:
• La base de la olla no hace contacto completo con la superficie caliente
(debido a una base deformada o poco uniforme).
• La olla está muy pequeña para el tamaño del elemento.
• La olla se secó hirviendo.
• El material o la forma de la olla transfiere el calor lentamente.
Calor retenido PRECAUCIÓN: La superficie de vidrio para cocinar retiene el calor y
permanece caliente después de apagar el elemento(s). Se puede usar
el calor retenido para conservar calientes los alimentos a temperaturas
de servir por un breve período de tiempo.
Nota para propietarios de parrillas blancas
Cuando un elemento está caliente, se ve una luz verde en la superficie de cocinar. Esto es normal y desaparece trás algunos minutos a medida que se enfría la
superficie.
Sacar el mayor provecho de su parrilla
Utensilios apropiados de cocina
Características de los utensilios de cocina
La selección de ollas afecta directamente la velocidad y uniformidad del proceso
de cocinar. Para lograr mejores resultados, seleccione ollas con las siguientes
características:
Bases planas
Cuando se calienta una olla, la base (fondo de la olla) debe descansar uniformemente sobre la superficie sin moverse (balancearse). Ollas planas de peso mediano a alto son las mejores.
Comprobar lo plano de sus ollas:
Voltee la olla sobre la cubierta y coloque una regla plana contra el fondo de la olla.
El fondo de la olla y el borde recto de la regla deben estar al ras uno contra el otro.
Otra prueba sencilla para determinar la distribución térmica uniforme sobre el fondo
de las ollas es poner 1” (25.4mm) de agua en la olla. Hervir el agua y observar la
Español 5
Page 32

ubicación de las burbujas a medida que el agua comienza a hervir. Una buena olla
plana tendrá una distribución homogénea de burbujas en toda la superficie del
fondo.
Figura 6 - Comprobar lo plano de las ollas
Diámetro
La base de la olla debe cubrir o igualar el diámetro del elemento que se está
usando. Las ollas pueden rebasar el área del elemento por 1” (25.4 mm) en total.
Tapa mu y aj ustada
Una tapa acorta el tiempo de cocinar al mantener el calor dentro de la olla.
Ollas especiales
Ollas especiales como asadores, tostadoras, ollas de presión, woks, enlatadoras
con baño de agua y enlatadoras de presión deben tener las mismas características que se describen arriba. (Use sólo un wok con fondo plano.) Nunca coloque
un anillo de soporte como para wok, un trébedes u otra base metálica sobre la
superficie de vidrio
Prácticas de los utensilios de cocina
• No use ollas y sartenes con fondos redondos (concavos o convexos), deformados o dentados. Vea los dibujos abajo. • Asegúrese que el fondo de la olla
o del sartén que se está usando esté limpio y seco.
• Use ollas y sartenes con fondos metálicos gruesos, suaves. • No deslice ollas
metálicas sobre la parrilla. Las ollas pueden dejar marcas.
• No use ollas de vidrio ya que pueden rayar la superficie.
Figura 7 - Buenas prácticas
PRECAUCIÓN:
• No se deben colocar alimentos empacados en papel de aluminio directamente sobre la superficie de vidrio cerámico para cocerlos; se puede derretir
el papel de aluminio y causar daños permanentes.
• Plástico, papel y tela pueden derretirse o quemarse cuando tienen contacto
con una superficie caliente. No permita que estas cosas tengan contacto con
la superficie caliente de vidrio cerámico.
• No permita que las ollas se sequen hirviendo. Esto puede dañar la olla, el elemento y el vidrio de la parrilla en forma permanente.
Español 6
Page 33

Tabla para cocinar Se recomiendan todos estos ajustes sin precalentar el elemento. Use esta tabla
como una guía.
Tabla 2: Tabla para cocinar - ajustes de calor
Tipo de alimento Ajustes de calor
Derretir mantequilla/chocolate 1
Salsas delicadas
Ter mi na r a rro z
Hervir salsas con matequilla y yema a fuego lento
To ci n o
Cocer verduras, pescado, caldos
Huevos fritos o revueltos
Terminar cereales, pasta
Leche
Panqués
Pudín
Hervir carnes a fuego lento
Cocer verduras, pescado, caldos a vapor
Freir en sartén
Salsas de espaguetis
Verduras sofreidas
Guisar carne, sopas
Estofar carne
Freir carne, pescado en el sartén
Freir en poco aceite
Dorar carnes rápidamente
Hervir rápidamente
Hervir agua para verduras, pasta, arroz, etc. 9
1-3
4-6
6-8
Se lista una gama de ajustes de calor porque el ajuste verdadero depende de:
1. tipo y calidad de la olla
2. tipo, calidad y temperatura del alimento
3. elemento utilizado; y
4. las preferencias del cocinero.
Conexión de 208/240 Voltios Los ajustes de calor que se recomiendan en esta página se basan en una fuente
de alimentación de 240 voltios. Si su parrilla está conectada a 208 voltios, aplican
los mismos ajustes de calor, pero tal vez los alimentos toman un poco más de
tiempo para terminar el proceso de cocinarse.
Cuidado y Limpieza
Cuidarla antes de usarla
El cuidado es fácil cuando se toman pasos preventivos. Por ejemplo, aplique una
cantidad pequeña de Crema para Limpieza de Parrillas (Cooktop Cleaning Creme®)
(incluida con la parrilla) diariamente. Esto proporciona una película de protección
que facilita la eliminación de las manchas de agua o salpicaduras. La temperatura
de la superficie para cocinar reduce las cualidades de protección de la crema de
limpieza. Se debe volver a aplicar antes de cada uso. Use un trapo limpio y aplique
la crema para limpieza de parrillas antes de cada uso para eliminar polvo o marcas
metálicas que puedan presentarse en la superficie de la cubierta entre los usos.
Español 7
Page 34

Prácticas de limpieza diaria
Perillas de control Jale las perillas para arriba para quitarlas. Ponga una toalla abajo de la perilla y
mantenga unidos los bordes de la toalla. Usando la toalla como apoyo, jale hacia
arriba. Limpie con un trapo caliente, jabonoso, enjuague y seque. No las remoje!
Moldura lateral (Modelos de acero inoxidable)
Detergentes recomendados • Crema para limpieza de parrillas (Cooktop Cleaning Crème®)
Evitar estos detergentes • Limpiadores para vidrio que contienen amoníaco o blanqueador con cloro.
Siempre limpie con el grano. Para suciedades moderadas/pesadas, use
BonAmi® o Soft Scrub® (sin blanqueador). Limpie con una esponja o un trapo
húmedo, enjuague y seque.
• Use solamente una cantidad pequeña; aplique a una toalla limpia de papel o
un trapo. Limpie la superficie y saque brillo con una toalla limpia de papel.
• BonAmi®: enjuagar y secar.
• Soft Scrub® (sin blanqueador); enjuagar y secar.
• Vinagre: enjuagar y secar.
• Rasquete con navaja de rasurar (incluido con la parrilla)
Nota: Los limpiadores recomendados indican un tipo de limpiador y no constituyen una promoción.
Estos ingredientes pueden atacar o manchar la parrilla permanentemente.
• Limpiadores cáusticos de horno como Easy Off® pueden atacar la superficie
de la parrilla.
• Limpiadores abrasivos
• Esponjillas metálicas y esponjas para fregadero como Scotch Brite® pueden
rayar y/o dejar marcas metálicas.
• Esponjillas con jabón como SOS® pueden rayar la superficie.
• Limpiadores en polvo que contienen blanqueador con cloro pueden manchar
la parrilla permanentemente.
• Limpiadores inflamables como líquido para encendedor o WD-40.
Técnicas de limpieza diaria 1. Limpie la superficie cuando esté totalmente fría con la siguiente excepción:
quite Azúcar Seca, Jarabe Seco, Productos de Jitomate y Leche de inmediato con la rasqueta con navaja de rasurar.
Figura 8 - Rasqueta
PRECAUCIÓN: No use ningún tipo de limpiador sobre el vidrio
mientras que la superficie esté caliente; use sólo la rasqueta con
navaja de rasurar. Los humos que se producen pueden ser peligrosos
para su salud. Calentar el detergente puede producir un ataque
qúmico y dañar la superficie.
2. Limpie las salpicaduras con una esponja limpia, húmeda o con una toalla de papel. Enjuague y seque. Use vinagre si la mancha permanece; enjuague.
Español 8
Page 35

Consejos de limpieza
Tabla 3: Tabla de cuidado especial
Tipo de suciedad Posible solución
Figura 7 - Limpieza
3. Aplique una pequeña cantidad de la crema de limpieza para la parrilla. Cuando esté seca, saque brillo a la superficie con una toalla limpia de papel o un trapo.
Derrames de azúcar seca, jarabe de azúcar, leche o jitomate. Película de plástico o
papel de aluminio derretido.
Todas estas cosas se deben QUITAR DE
INMEDIATO. El hecho de no quitar estas
suciedades de inmediato puede dañar la
superficie en forma permanente.
Restos quemados de comida, rayas oscuras,
y manchas
Salpicaduras grasosas
Marcas metálicas: Tono iridiscente • Ollas con base de aluminio, cobre o acero inoxidable pueden dejar
• Quite estos tipos de derrames solamente cuando la superficie está
caliente usando la rasqueta con navaja de rasurar. Asegúrese de
usar una rasqueta nueva, filosa.
• Quite la olla (sartén) y apague el elemento.
• Usando un guante para horno, mantenga la rasqueta a un ángulo
o
de 30
, teniendo cuidado de no dañar o raspar el vidrio. Quite la
suciedad del área caliente.
• Después de que se haya enfriado la superficie, quite los residuos y
aplique la Crema de limpieza (Cooktop Cleaning Creme®).
• Suavice colocando una toalla de papel o esponja húmeda encima
de la suciedad por 30 minutos.
• Use un rastrillo de plástico y crema para limpieza de parrillas o use
la rasqueta con navaja de rasurar. Enjuague y seque.
• Use una esponja o un trapo jabonoso para quitar grasa; enjuague
cuidadosamente y seque. Aplique crema para limpieza de parrillas.
marcas. Trate la superficie de inmediato, después de que se haya
enfriado, con la Crema para Limpieza de Parrillas. Si esto no quita
las marcas metálicas, intente usar un abrasivo suave (Bon Ami®,
Soft Scrub® sin blanqueador) con una toalla húmeda de papel.
Enjuague y vuelva a aplicar la crema. Si no quita las marcas
metálicas antes del siguiente calentamiento, dificulta mucho su
remoción posterior.
Manchas de Agua Dura
Líquidos calientes para cocinar vertidos en la
superficie
Raspaduras en la superficie
Se pueden esperar raspaduras pequeñas en
la superficie del vidrio, pero éstas no afectan
el trabajo de cocinar. Con el tiempo, las raspaduras pequeñas se vuelven más suaves y
menos visibles con el uso diario de la Crema
para limpieza de parrillas.
• Los minerales en algunos tipos de agua pueden ser transferidos a
la superficie y causar manchas. Debe usar vinagre blanco no diluido, enjuagar y secar. Vuelva a acondicionar con la crema para
limpieza de parrillas. Quite la comida rebosada durante el proceso
de cocinar y las manchas, antes de volver a usar la parrilla.
• Aplique la crema de limpieza antes de usar la parrilla para quitar
granos arenosos y polvo como sal y condimentos.
• Se puede reducir usando ollas con bases que están suaves, limpias y secas antes de cada uso. Use la crema recomendada para
limpieza de parrillas diariamente en la parrilla.
Tenga cuidado: Diamantes van a rayar la superficie.
Español 9
Page 36

Servicio
Antes de solicitar servicio
Tabla 4: Tabla para resolver problemas
Pregunta Solución sugerida
El elemento cicla (se prende y se apaga) en el
ajuste de calor más alto
El elemento cicla más de lo normal • La base de la olla está deformada y no hace contacto com-
Se puede notar un ligero olor al prender un elemento
No se prenden los controles de la parrilla • Revise la fuente de alimentación para ver si se quemó un fus-
Antes de solicitar servicio, revise estas sugerencias para evitar gastos innecesarios por servicio.
Esto es normal. El regulador de la temperatura opera automáticamente para proteger la superficie de vidrio cerámico de daños
debido a extremas temperaturas altas.
pleto con la superficie de calentar.
• El diámetro de la base de la olla es muy pequeño para el
tamaño del elemento.
• Se secaron los ingredientes en la olla por dejarla hervir dema-
siado tiempo.
• El material de la olla es un mal conductor térmico; el calor se
transfiere lentamente
• Esto es normal con parrillas nuevas y desaparece después de
varios usos
ible o si se desconectó el interruptor.
• Revise el suministro eléctrico.
Repuestos de las navajas de rasurar para la
rasqueta
Los resultados de cocción no fueron como se
esperaba
Color verde sobre vidrio blanco • Esto es normal y desaparecerá cuando se enfría la superficie.
Placa con información
La etiqueta con la información del número de serie ha sido fijada en la contraportada
• La rasqueta viene con navajas de acero inoxidable, de una
sola hoja. Use una navaja estándar de una sola hoja como
repuesto.
• La parrilla no está nivelada.
• La olla no cabe en la superficie que se está usando.
• El utensilio de cocina no es del tipo o tamaño recomendado.
Cómo obtener servicio Para información sobre servicio autorizado o refacciones, llame al número o
escriba a la dirección listada dentro de la contraportada.
Queremos que usted quede satisfecho con su producto. Si ocurre algún problema
que no se puede resolver a su entera satisfacción, por favor, déjenoslo saber.
Cuando nos escriba o llame, por favor incluya el número de modelo, número de
serie y la fecha de la compra original o de la instalación.
Garantía
Las garantías ofrecidas por BSH Home Appliances Corp. en esta Declaratoria de Garantía
Limitada aplican sólo a las Parrillas Eléctricas (“Parrilla”) de BSH que usted compró, el
primer usuario comprador, siempre y cuando la Parrilla fue adquirida (1) para su uso y no
para la reventa y (2) en los Estados Unidos o Canadá y que se encuentra en el país de la
compra. El término “Fecha de Instalación” que se usa en esta Declaratoria de Garantía Limitada, se refiere a la fecha más temprana cuando se instala la Parrilla o diez (10) días laborales después de la fecha de compra de la Parrilla por el primer usuario comprador. Las
garantías declaradas aquí aplican sólo al primer usuario comprador y no se pueden transferir.
.
Español 10
Page 37

Garantía limitada estándar
BSH garantiza que su Parrilla está libre de defectos en materiales y mano de obra por un
período de doce (12) meses a partir de la Fecha de Instalación. Durante el período de
garantía, BSH o su centro de servicio autorizado va a reparar o reemplazar, a su discreción, cualquier Parrilla que resulte defectuosa bajo condiciones de uso normal sin costo
alguno. Todas las partes y componentes removidos se volverán propiedad de BSH, a discreción de BSH. Todas las partes reemplazadas y/o reparadas asumirán la identidad de la
parte original para los propósitos de esta garantía y esta garantía no se puede extender
con respecto a tales partes.
Garantía limitada extendida BSH garantiza que el elemento eléctrico de calentamiento y los controles de la Parrilla y el
vidrio cerámico de la Parrilla están libres de defectos en materiales por un período de
tiempo comenzando el doceavo (12vo) mes a partir de la Fecha de Instalación y continuando hasta el sexagésimo (60mo) mes a partir de la Fecha de Instalación (“período de
garantía extendida”). Durante el período de la garantía extendida, BSH reemplazará cualquier elemento eléctrico de calentamiento, controles o vidrio cerámico de la Parrilla que
resulte defectuoso bajo condiciones normales de uso sin costo alguno, con excepción de
la mano de obra (incluyendo, pero no limitado al costo de mano de obra para quitar y
volver a instalar la Parrilla), transporte y/o gastos de envío generados durante la vigencia
de esta garantía extendida. Todas las partes cubiertas bajo este párrafo deberán asumir la
identidad de las partes originales para los propósitos de esta garantía extendida y esta
garantía no se debe extender con respecto a tales partes.
Otras condiciones de las garantías limitadas
Las garantías otorgadas en esta Declaratoria de Garantía Limitada excluyen defectos o
daños que resultan de (1) el uso de la Parrilla en un modo diferente de su uso normal y
usual (el uso comercial de la Parrilla no se considera normal o usual), (2) mal uso, abuso,
accidentes o negligencia, (3) operación, mantenimiento, instalación no apropiada o servicio no autorizado, (4) ajustes o alteraciones o modificaciones de cualquier tipo, (5) el
hecho de no cumplir con los códigos eléctricos y/o de construcción estatales, local y
municipales que pueden aplicar, (6) derrames de alimentos o líquidos, y (7) fuerzas externas como inundaciones, fuegos, casos fortuitos u otras circunstancias más allá del control
de BSH. También se excluyen raspaduras y daños en superficies externas y partes
expuestas de Parrillas donde se alteró o se quitó el número de serie.
Al grado permitido por la ley, esta garantía establece sus remedios exclusivos con
respecto a los productos cubiertos por ésta, sin importar si la reclamación surge en contrato o agravio (incluyendo la responsabilidad estricta, y negligencia), etc. BSH no será
responsable de daños, pérdidas o gastos consecuenciales o incidentales. ESTA
GARANTÍA SUSTITUYE TODAS LAS OTRAS GARANTÍAS EXPRESAS. CUALQUIER
GARANTÍA IMPLICADA POR LA LEY, YA SEA DE COMERCIABILIDAD O APTITUD
PARA ALGÚN PROPÓSITO PARTICULAR, SERÁ EFECTIVA SOLAMENTE POR EL
PERÍODO EFECTIVO EXPRESADO EN ESTA GARANTÍA. Ningún intento de alterar,
modificar o enmendar esta garantía será efectivo a menos que haya sido autorizado por
escrito por un ejecutivo de BSH.
Cómo obtener servicio de garantía Para obtener servicio de garantía para la Parrilla, llame al número o escriba a la dirección
listada dentro de la contraportada.
Aviso para propietarios en California Si su Parrilla requiere de servicio de garantía y no existe un centro de servicio autorizado
de BSH cerca de usted, puede notificar al revendedor de BSH con el cual usted compró la
Parrilla. Si el revendedor de BSH no repara o reemplaza las partes defectuosas, o no le
devuelve parcialmente el precio de su compra (donde aplica), usted puede llevar la Parrilla
a cualquier taller grande o centro de repa-ración de aparatos electrodomésticos para su
reparación y todos los gastos razonables serán reembolsados, siempre y cuando los costos están justificados por escrito y el trabajo realizado está cubierto por esta garantía. BSH
no reembolsará ningún gasto de reparación bajo la presente que exceda el valor depreciado de la Parrilla.
Español 11
Page 38

Page 39

Page 40

Specifications are for planning purposes only. Refer to installation instructions and
consult your countertop supplier prior to making counter opening. Consult with a
heating and ventilating engineer for your specific ventilation requirements. For the
most detailed information, refer to Installation Instructions accompanying product
or write BSH Home Appliances Corp. indicating the model number.
We reserve the right to change specifications or design without notice. Some
models are certified for use in Canada. BSH is not responsible for products which
are transported from the United States for use in Canada. Check with your local
Canadian distributor or dealer.
For the most up to date critical installation dimensions by fax, use your fax handset and call 702/833-3600. Use code #8317.
Note: The Bosch cooktop referred to throughout this manual is manufactured by
BSH Home Appliances Corp.
5551 McFadden Avenue, Huntington Beach, CA 92649 • 800/944-2904 • www.boschappliances.com
• 9000065789 (ECO# 5V03MD) • 10038 Rev A • 04/05 © BSH Home Appliances Corporation 2005 • Litho in USA
 Loading...