

Page 1
Installation instructions
Electric Heat Pump Water Heater
Compress 3000 DW FOO
6720801244-00.1V
HP 270-2E 0 FOOV/S...
6 720 808 869 (2014/06) AU
Please read the installation instructions before installing the appliance!
Please read the operating instructions before commissioning the appliance!
Please observe the safety instructions in the operating instructions!
The installation location must meet the requirements for sufficient ventilation!
Installation must only be carried out by an authorised contractor!
Page 2

6 720 808 869 (2014/06) Compress 3000 DW FOO
2 | Index
Index
1 Key to symbols and safety instructions . . . . . . . . . . . . . 3
1.1 Key to symbols . . . . . . . . . . . . . . . . . . . . . . . . . . 3
1.2 Safety information . . . . . . . . . . . . . . . . . . . . . . . 3
2 Standard delivery . . . . . . . . . . . . . . . . . . . . . . . . . . . . . . . 6
3 Appliance details . . . . . . . . . . . . . . . . . . . . . . . . . . . . . . . . 7
3.1 Overview . . . . . . . . . . . . . . . . . . . . . . . . . . . . . . 7
3.2 Features and safety devices . . . . . . . . . . . . . . . 7
3.3 Specification tables . . . . . . . . . . . . . . . . . . . . . . 9
3.4 Storing and transportation . . . . . . . . . . . . . . 10
3.4.1 Transport using a forklift . . . . . . . . . . . . . . . . 10
3.5 Operational principle (brief overview
of modes) . . . . . . . . . . . . . . . . . . . . . . . . . . . . 11
3.6 Dimensions . . . . . . . . . . . . . . . . . . . . . . . . . . 13
3.7 Clearances . . . . . . . . . . . . . . . . . . . . . . . . . . . 14
4 Installation instructions . . . . . . . . . . . . . . . . . . . . . . . . 14
4.1 Tools required . . . . . . . . . . . . . . . . . . . . . . . . 15
4.2 Location requirements . . . . . . . . . . . . . . . . . 15
4.3 Secure the appliance . . . . . . . . . . . . . . . . . . . 16
4.4 Water piping . . . . . . . . . . . . . . . . . . . . . . . . . . 16
4.4.1 Inlet - Outlet connections . . . . . . . . . . . . . . . 16
4.4.2 Dielectric joint (not supplied with
the appliance) . . . . . . . . . . . . . . . . . . . . . . . . . 17
4.4.3 Condensate Drain Tubes (not supplied with
the appliance) . . . . . . . . . . . . . . . . . . . . . . . . . 17
4.4.4 PTR Valve (supplied with the appliance) . . . 17
4.4.5 Thermal expansion tank (not supplied with
the appliance) . . . . . . . . . . . . . . . . . . . . . . . . . 18
4.4.6 Temperature mixing device (not supplied
with the appliance) . . . . . . . . . . . . . . . . . . . . . 18
4.4.7 Pressure limiting valve (not supplied with
the appliance) . . . . . . . . . . . . . . . . . . . . . . . . . 18
4.4.8 Expansion control valve (not supplied with
the appliance) . . . . . . . . . . . . . . . . . . . . . . . . . 18
4.5 Electric requirements . . . . . . . . . . . . . . . . . . 19
4.6 Installation configurations . . . . . . . . . . . . . . . 20
4.6.1 Ecological ambient heat recovery . . . . . . . . . 20
4.7 Insulation blanket . . . . . . . . . . . . . . . . . . . . . 20
4.8 Fill the water storage tank . . . . . . . . . . . . . . . 20
4.8.1 Water characteristics . . . . . . . . . . . . . . . . . . 21
4.9 Installation checklist . . . . . . . . . . . . . . . . . . . 22
4.10 What to expect from a “normal startup” . . . . 23
4.11 Off-peak compatibility . . . . . . . . . . . . . . . . . . 23
4.12 Demand response . . . . . . . . . . . . . . . . . . . . . 23
5 Appliance status information . . . . . . . . . . . . . . . . . . . 24
5.1 Safety warnings . . . . . . . . . . . . . . . . . . . . . . . 24
5.2 Working display . . . . . . . . . . . . . . . . . . . . . . . 25
5.3 Operation programs . . . . . . . . . . . . . . . . . . . 25
5.4 Setting the domestic hot water temperature 25
5.5 Main menu . . . . . . . . . . . . . . . . . . . . . . . . . . . . 26
5.6 "Prog" submenu - Operating programs . . . . . 26
5.6.1 "Manual" operating mode . . . . . . . . . . . . . . . . 26
5.6.2 "P1", "P2" and "P3" operating modes . . . . . . 26
5.6.3 "Hol" mode . . . . . . . . . . . . . . . . . . . . . . . . . . . . 26
5.6.4 "OFF" operating mode . . . . . . . . . . . . . . . . . . 27
5.7 "Set" submenu - Settings . . . . . . . . . . . . . . . . 27
5.7.1 Date - Setting the temperature unit, date, time
and day of the week . . . . . . . . . . . . . . . . . . . . 28
5.7.2 Prog - Timetable operating programing . . . . . 28
5.7.3 „Leg“ function - automatic thermal
disinfection . . . . . . . . . . . . . . . . . . . . . . . . . . . 31
5.7.4 „PLUS“ - enhanced comfort function . . . . . . . 33
5.7.5 „HEA“ - heating by electrical assistance . . . . 33
5.7.6 „Purg“ function - purge . . . . . . . . . . . . . . . . . . 33
5.7.7 „Fset“ function - factory resetting . . . . . . . . . 34
5.8 „Info“ - information . . . . . . . . . . . . . . . . . . . . . 34
5.9 „Sft“ - software version . . . . . . . . . . . . . . . . . . 34
5.10 One shot boost and auto boost at negative
temperatures . . . . . . . . . . . . . . . . . . . . . . . . . 35
5.11 Troubleshooting . . . . . . . . . . . . . . . . . . . . . . . 36
5.12 Factory configurations . . . . . . . . . . . . . . . . . . 36
5.13 Controls . . . . . . . . . . . . . . . . . . . . . . . . . . . . . . 37
6 Maintenance and repair . . . . . . . . . . . . . . . . . . . . . . . . 38
6.1 Periodic Inspection . . . . . . . . . . . . . . . . . . . . . 38
6.2 Temperature and pressure relief valve
(PTR Valve) . . . . . . . . . . . . . . . . . . . . . . . . . . . 38
6.3 Flushing tank . . . . . . . . . . . . . . . . . . . . . . . . . . 38
6.4 Draining the Water Heater . . . . . . . . . . . . . . . 38
6.5 Vacation and Extended Shutdown . . . . . . . . . 39
6.6 Clearing the Condensation Drain Tubes . . . . 39
6.7 Refrigerant circuit . . . . . . . . . . . . . . . . . . . . . . 39
6.8 Anode Rod servicing . . . . . . . . . . . . . . . . . . . . 39
6.9 Checking/replacing the magnesium anode . . 39
6.10 Service menu . . . . . . . . . . . . . . . . . . . . . . . . . . 40
7 Display . . . . . . . . . . . . . . . . . . . . . . . . . . . . . . . . . . . . . . . 43
7.1 Fault display . . . . . . . . . . . . . . . . . . . . . . . . . . 43
7.2 Displays . . . . . . . . . . . . . . . . . . . . . . . . . . . . . . 44
8 Electrical diagram . . . . . . . . . . . . . . . . . . . . . . . . . . . . . 45
9 Environmental protection . . . . . . . . . . . . . . . . . . . . . . . 46
10 Warranty details . . . . . . . . . . . . . . . . . . . . . . . . . . . . . . . 47
Page 3
6 720 808 869 (2014/06)Compress 3000 DW FOO
Key to symbols and safety instructions | 3
1 Key to symbols and safety instructions
1.1 Key to symbols
Warnings
The following keywords are defined and can be used in this
document:
• NOTICE indicates a situation that could result in damage to
property or equipment.
• CAUTION indicates a situation that could result in minor to
medium injury.
• WARNING indicates a situation that could result in severe
injury or death.
• DANGER indicates a situation that will result in severe
injury or death.
Important information
Additional symbols
1.2 Safety information
„Water“ safety warnings
Warnings in this document are identified by a
warning triangle printed against a grey
background.
Keywords at the start of a warning indicate
the type and seriousness of the ensuing risk
if measures to prevent the risk are not taken.
This symbol indicates important information
where there is no risk to people or property.
Symbol Explanation
▶ Step in an action sequence
Cross-reference to another part of the document
•List entry
– List entry (second level)
Table 1
WARNING:
This water heater is not suitable for pool
heating.
WARNING:
The appliance should be located in an area
where leakage of the heater or connections
will not result in damage to the area adjacent
to the appliance or to lower floors of the
structure. When such locations cannot be
avoided, it is recommended that a suitable
drain pan, adequately drained, be installed
under the appliance.
WARNING:
If a water heater is installed in a closed water
supply system, such as one having a
backflow preventer in the cold water supply
line, means shall be provided to control
thermal expansion. Contact the water
supplier or local plumber on how to control
this situation.
WARNING:
Precautions must be taken prior to manually
operating the relief valve to avoid contact
with hot water coming out of the relief valve
and to prevent water damage.
WARNING:
If a relief valve discharges periodically, this
may be due to thermal expansion in a closed
water supply system. Contact the water
supplier or local plumber on how to correct
this situation. Do not plug the relief valve.
WARNING:
The temperature pressure relief valve
should be checked for performance every
six months or replaced at intervals not
exceeding 3 years, or more frequently in
areas where there is a high incidence of
water deposits.
Page 4
6 720 808 869 (2014/06) Compress 3000 DW FOO
4 | Key to symbols and safety instructions
Refrigerant
▶ Please observe the relevant environmental regulations
when using and reusing refrigerant. Do not allow
refrigerant to be discharged into the environment. Use the
refrigerant R134a. It is non-flammable and does not have a
destructive impact on the ozone layer.
▶ Before working on parts of the refrigerant circuit, remove
the refrigerant to ensure work safety.
Use HFC-134a and PAG-OIL for maintenance purposes. It
contains fluorinated greenhouse gas and is rated with a
greenhouse potential of 1300 in the Kyoto Protocol.
„Electric“ safety warnings
„General“ safety warnings
Do not store or use gasoline or other flammable, combustible
or corrosive vapors and liquids in the vicinity of this or any
other appliance.
For your safety
WARNING:
This water heater contains electronic
equipment and 500V insulation tests must
only be conducted between active and earth
and between neutral and earth. An active to
neutral test WILL damage the electronics.
WARNING:
All electrical work and fixed wiring must be
carried out by a qualified person and in
accordance with the Wiring Rules AS/NZS
3000 and local authority requirements.
DANGER:
Shock hazard: line voltage is present. Before
servicing the water heater, please cut the
power supply. Failure to do so could result in
severe personal injury or death.
CAUTION:
Label all wires prior to disconnection when
servicing controls. Wiring errors can result in
improper and dangerous operation.
Verify proper operation after servicing.
WARNING:
Do not turn power off to the appliance if cold
weather is expected as components may be
damaged by freezing. If power needs to be
turned off or power failure occurs and
freezing conditions are expected, water
should be drained from the appliance.
WARNING:
Do not operate this system before reading
the manual.
WARNING:
This appliance must be installed,
commissioned and serviced by an
authorised person in accordance with all
applicable local rules and regulations.
WARNING:
Keep appliance area clear and free from
combustible materials, gasoline and other
flammable vapors and liquids.
WARNING:
The power supply to the appliance must not
be activated until the system is filled with
water.
WARNING:
To meet the requirements of the National
Plumbing Standard, the appliance runs a
weekly legionella disinfection cycle
automatically.
Page 5
6 720 808 869 (2014/06)Compress 3000 DW FOO
Key to symbols and safety instructions | 5
Fig. 1
To prevent serious injury, unit damage or damage to other
property, please use the unit properly. Read this manual
carefully and understand the following information correctly.
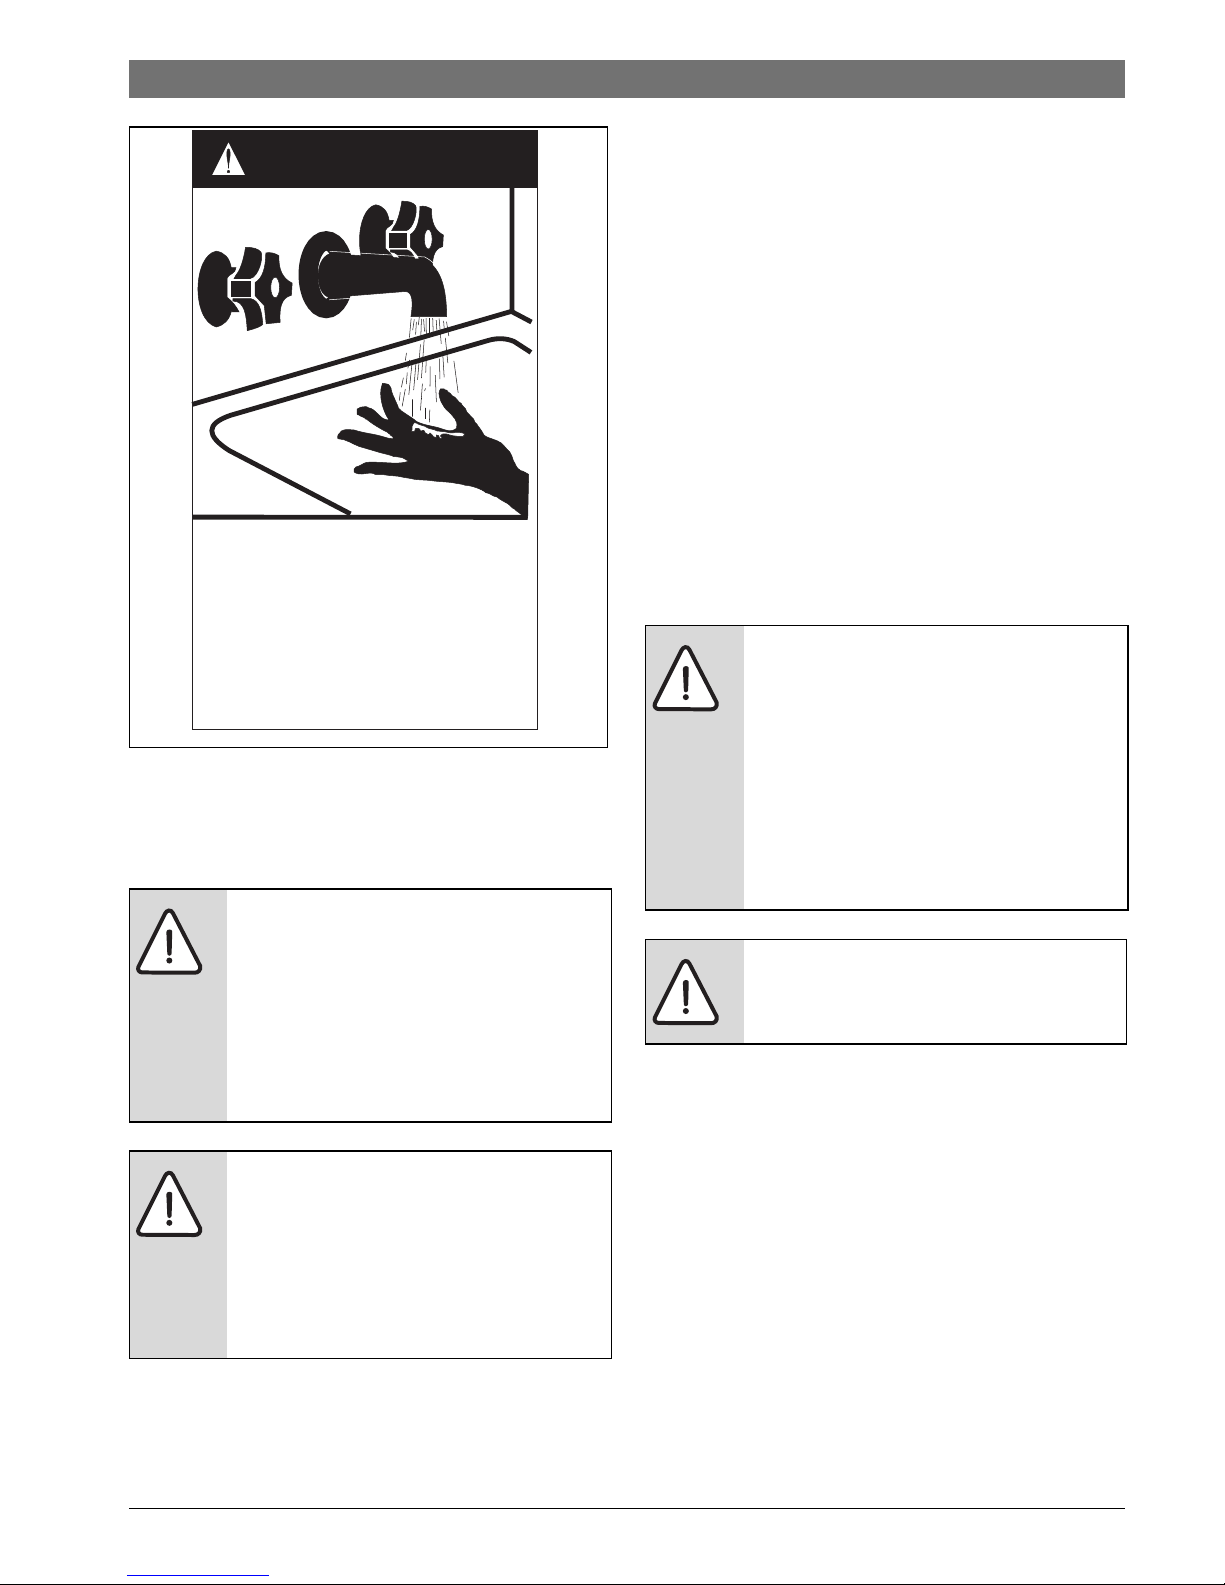
High temperature water increases the risk of scald injury
This water heater can heat up water to temperatures which can
cause scalding. Always feel the water temperature before use,
either before having a shower or when filling a bath tub to
ensure it will not cause scald injuries.
We rec om men d, a nd i t m ay a lso be r eq uir ed b y re gu lat ion s th at
an approved temperature limiting device is fitted into the hot
water pipe connected to sanitary outlets (i.e. bathroom and
ensuite). This will keep the water temperature below 50 °C at
these outlets. The risk of scald injury will be reduced and still
allow hotter water to the kitchen and laundry.
Notice to Victorian Customers from the Victorian Plumbing
Industry Commission.
This water heater must be installed by a licensed person as
required by the Victorian Building Act 1993. Only a licensed
professional will give you a Compliance Certificate, showing
that the work complies with all the relevant standards. Only a
licensed person will have insurance protecting their
workmanship.
Make sure you use a licensed person to install this water heater
and ask for your Compliance Certificate.
Every care has been taken to ensure accuracy in preparing this
document.
No liability can be accepted for any consequences, which may
arise as a result of its application.
WARNING:
This appliance is not intended for use by
persons, including children, with reduced
physical, sensory or mental capabilities, or
lack of experience and knowledge, unless
they have been given supervision or
instruction concerning use of the appliance
by a person responsible for their safety.
WARNING:
Water temperatures over 50 °C can cause
severe scalds. Local regulations and/or the
requirements of AS/NZS 3500.4 must be
considered regarding the temperature
limitations of hot water used primarily for
personal hygiene.
HOT
BURN
DANGER
Water temperature over 50°C can
cause severe burns instantly or
death from scalds.
Children, disabled and elderly are
at highest risk of being scalded.
Feel water before bathing or
showering.
6720801244-15.1V
WARNING:
Installation requirements are described in
chapter 4. The water heater must be
installed by an authorised person and the
installation must comply with Standards AS/
NZS 3500.4, AS/NZS 3000 and all local
codes and regulatory authority
requirements. In New Zealand, the
installation must c onform with Clause G12 of
the New Zealand Building Code.
WARNING:
A wrong operation may lead to death or
serious injury to people.
Page 6
6 720 808 869 (2014/06) Compress 3000 DW FOO
6 | Standard delivery
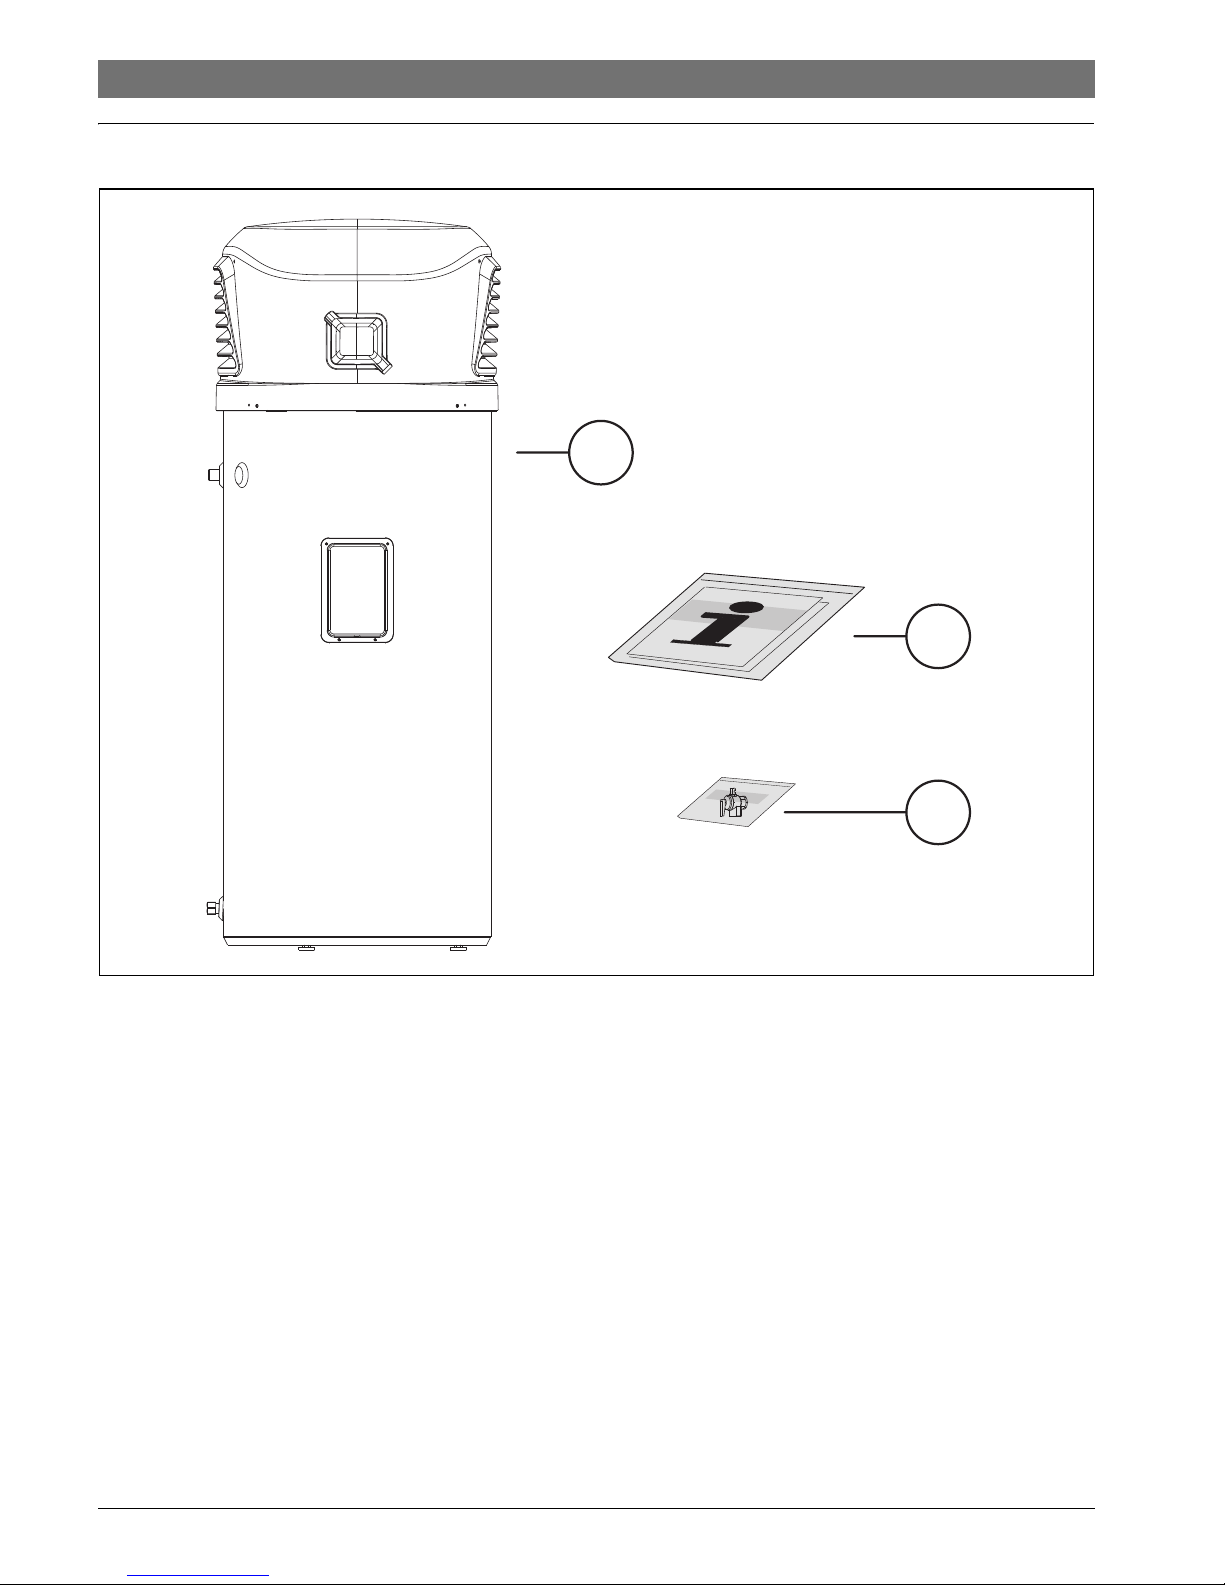
2 Standard delivery
Fig. 2
[1] Heat pump
[2] Set of printed documents for the appliance
[3] PTR valve (located)
1
2
6720801244-02.1V
3
Page 7
6 720 808 869 (2014/06)Compress 3000 DW FOO
Appliance details | 7
3 Appliance details
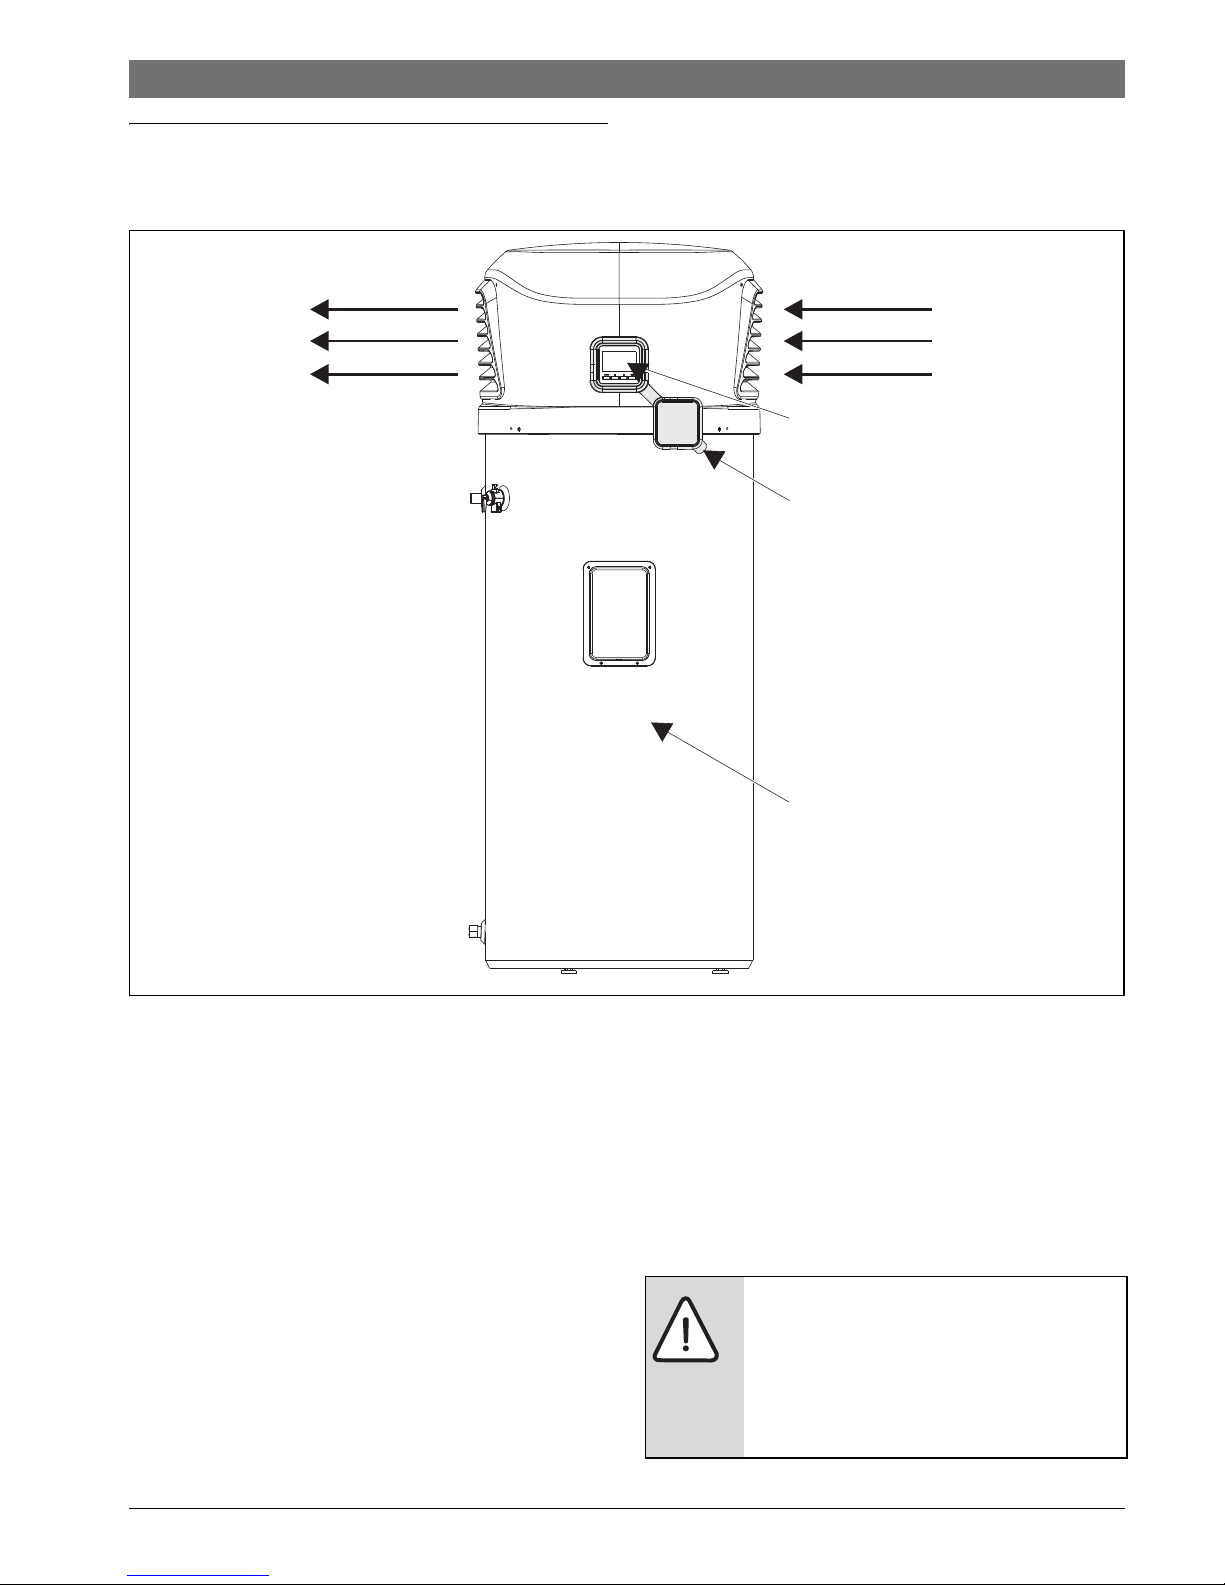
3.1 Overview
Fig. 3 Appliance overview
3.2 Features and safety devices
Easy to operate and environmentally friendly
The heat pump has user interface with easy use menu keys for
programming. The heat pump is also environmentally friendly
as it transfers heat from the surrounding area into the water.
Heating capacity
The unit absorbs ambient energy and releases the heat into the
water stored in the tank. If the ambient temperature is low, the
heating capacity of the heat pump will be reduced, but you can
still rely on the electric element for backup: the electrical
element will automatically turn on below 0 °C to assist the heat
pump module.
Thermal Cut Out (TCOs)
The water heater is equipped with one thermal cut-out (TCO)
located near the heating element. If for any reason the water
temperature becomes excessively high, the thermal cut-out
(TCO) cuts the power circuit to the heating element. Once
activated, the TCO must be reset manually. Resetting of the
temperature limiting control must be done by a qualified
service technician.
Air inletAir outlet
User
interface
User
interface
cap
Tank
6720801244-03.1V
CAUTION:
The cause of the high temperature condition
must be investigated by a qualified service
technician and corrective actions must be
taken before placing the water heater in
service again.
Page 8

6 720 808 869 (2014/06) Compress 3000 DW FOO
8 | Appliance details
Defrosting
During the heating, when the air temperature is between -7 °C
and 10 °C frost may be formed at the evaporator, thus blocking
the air flow and reducing the heat transfer efficiency.
To avoid this occuring, the appliance will automatically defrost
the evaporator by injecting hot refrigerant gas into the
evaporator circuit via a bypass valve. The control of this
functionality relies on the temperature readings of the air and
fins sensors.
The defrost cycles last typically between 5 and 15 minutes and
their frequency depends on the environmental conditions (air
temperature and relative humidity).
During the defrost cycles only the compressor runs. After the
evaporator defrost is concluded the unit returns to normal
operation.
In case the air flow is restraint, for instance due to high wind
intensity at the air outlet, the frequency of defrost cycles might
increase.
Working condition
The appliance is designed to operate with best efficiency when
the air temperature is between -7 °C and +40 °C.
Care should be taken to feed the unit only with potable water
( section 4.8.1). Do not use untreated water from lakes,
rivers or groundwater!
Overheating protection
In case the water temperature near the electrical heating
element reaches 84 4 °C the power to the electrical element
is cut off by a thermostat mounted together with the electrical
heater and will require a manual reset.
Water temperature and pressure protection
The unit is supplied with a PTR valve for your safety (supplied
accessory). If the tank pressure reaches 1000kPa or the
temperature reaches 99 °C, the PTR valve will open
automatically to allow the pressure or temperature to decrease
to safe values.
The warranty can become void if relief valves or other safety
devices are tampered with or if the installation is not in
accordance with the instructions in this manual.
Mains Pressure
This water heater is designed for direct connection to mains
water supply. In case the mains supply pressure exceeds
800kPa, a pressure limiting valve must be installed
(section 4.4.6). A minimum water supply pressure of
200kPa is required to assure the effective operation of this
water heater.
Page 9

6 720 808 869 (2014/06)Compress 3000 DW FOO
Appliance details | 9
3.3 Specification tables
Model HP 270-2E 0 FOOV/S
Running ambient air temp. °C -7 °C/+40 °C
Outlet Water Temp. °C setpoint 1°C
Minimum Inlet Water Temp. °C 3 °C
Maximum Inlet Water Temp. °C 70 °C
Power supply Ph-V-Hz 1ph / 230V-240V / 50 Hz
IP rating IP X4
Storage size l 270
Water heating (HP cycle)
1)
Heating capacity kW 1.5
Max. input
kW 0.6
Max. current
A2.6
Water heating (Full mode)
1)
Heating capacity kW 3.15
Max. input
kW 2.25
Max. current
A9.8
COP
2)
3.3
Unit Dimension (D×H) mm 705 x 1840
Packing (W×H×D)
mm 730 x 2004 x 730
Net/gross weight
kg 113/128
Sound pressure level at 2 m dB (A) 43
Refrigerant type/Mass kg R134a / 0.375
Max. refrigerant circuit pressure kPa 2700
PTR valve setting
3)
kPa 1000
Throttling type Thermal expansion valve
System protection High pressure limiter, Temperature limiter
Compressor Model WHP01900
Type
Rotary
Brand
Highly
Input
W 700
Fan motor Model W1G230EB
Brand
EBM Papst
Input
W28
Speed
r/min 1500
Water connections Water inlet ¾ BSP inch
Water outlet
¾ BSP inch
Max. water working pressure
kPa 1000
PTR valve joint
½ BSP inch
Max inlet pressure
kPa 800
Heat exchanger
Double wall plate heat exchanger
Electric heating element Rated power input at 230 V kW 1.65
Rated current at 230 V
A7.2
Table 2
1) Air at 15 °C and voltage supply 230V
2) According to EN255-3 by using air at 20 °C, water inlet at 15 °C and factory settings
3) PTR valve power capacity: 10 kW
Page 10
6 720 808 869 (2014/06) Compress 3000 DW FOO
10 | Appliance details
Operating ambient air temperature range:
Operating ambient temperature range of the heat pump cycle:
-7/ +40 °C.
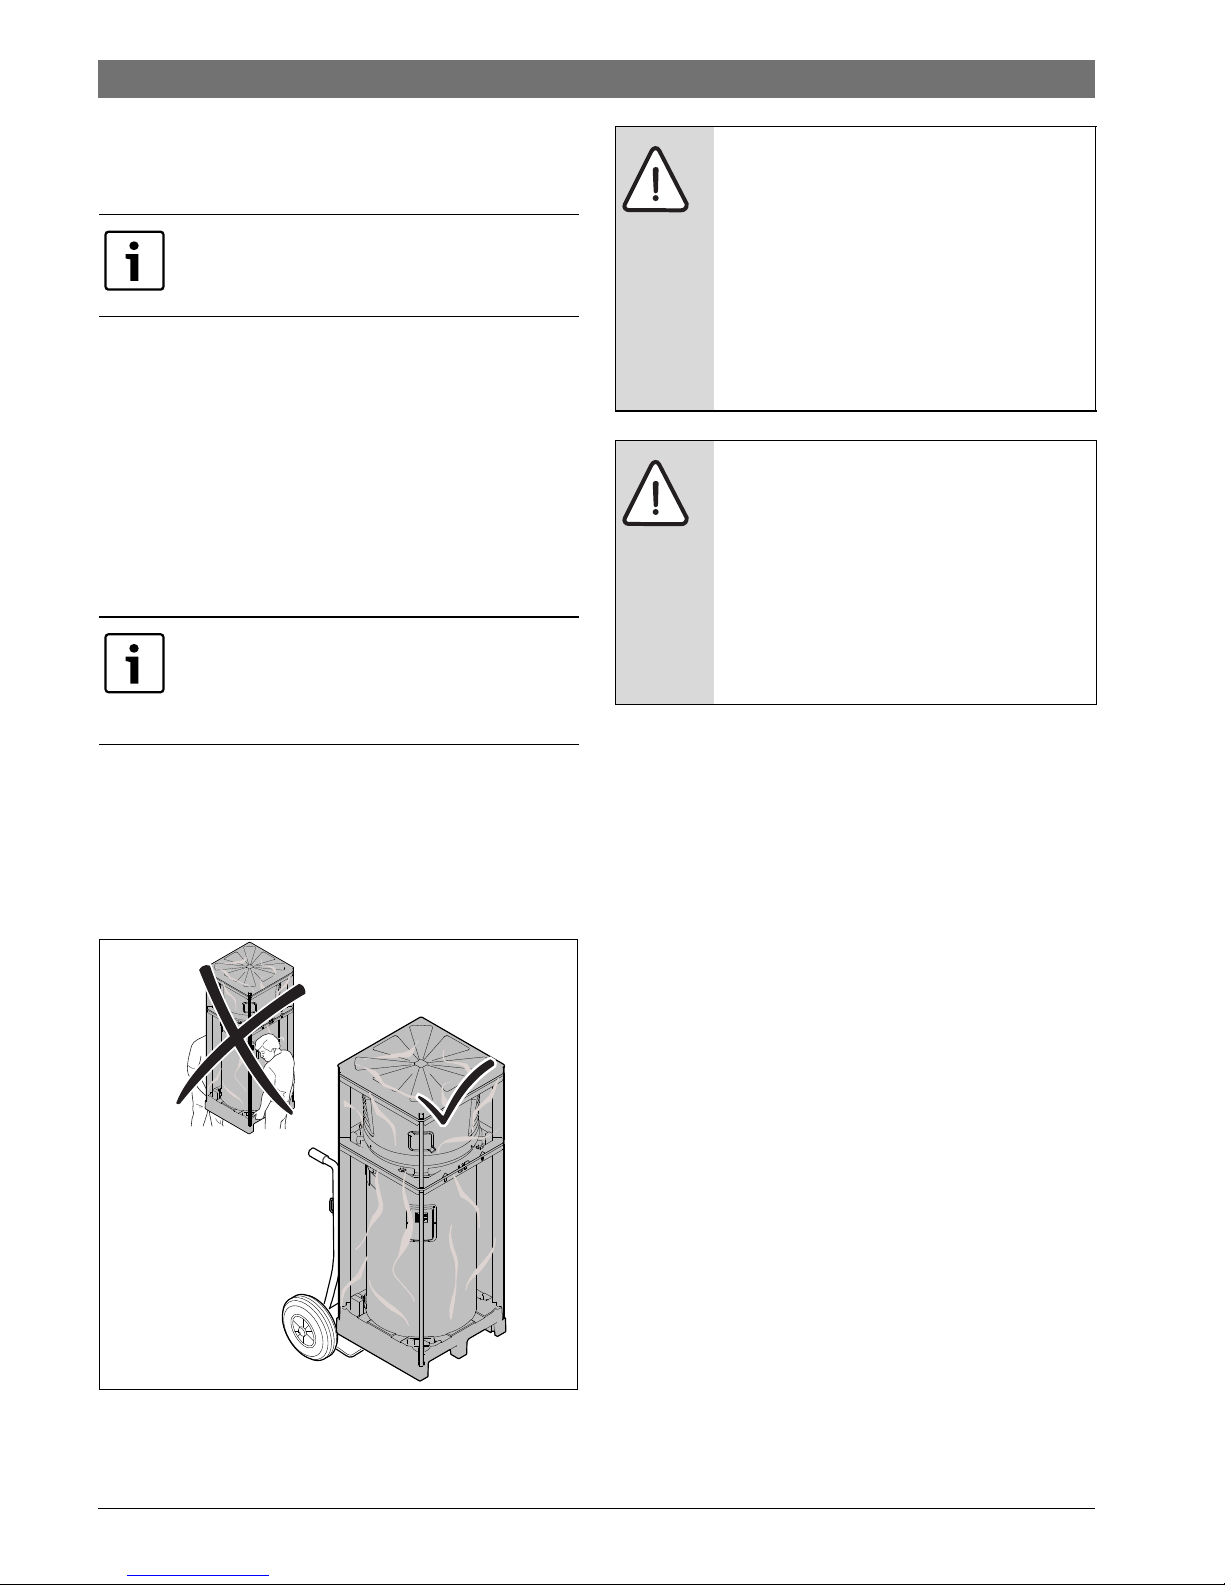
3.4 Storing and transportation
As a rule, the unit is to be stored and/or transported in its
original packaging, in upright position.
For transport over short distances (<500km), and provided
that original packaging is kept and due care is taken, horizontal
transportation is permitted. Nevertheless, an inclination angle
of up to 90° must be ensured, for compressor lifetime
assurance.
Both during transport and storage, ambient temperatures
between -20 °C and +60 °C are permissible.
3.4.1 Transport using a forklift
When transported by a forklift, the unit must remain mounted
in the base. The lifting rate should be kept to a minimum. Due to
its top-heaviness, the unit must be secured to avoid tipping
over. To prevent any damage, the unit must be placed on a level
surface!
Fig. 4
The appliance can operate beyond the
normal temperature range by using the
electrical heater only.
In case the unit has been horizontally
transported to place, it must be positioned
upright at least one hour before it can be
turned on for the first time.
6720807918-08.1V
WARNING:
Heat pumps are heavy and bulky. Australian
States and Territories have a Principal
Occupational Health and Safety (OH&S) Act
which contains requirements relating to the
handling of large, bulky or awkward items.
Persons installing this heat pump system
must be aware of their responsibilities and
be adequately trained and qualified in
accordance with local OH&S requirements.
WARNING: Transport damage!
▶ To avoid transport damage, wait until the
appliance is at the installation location to
remove the protective packaging.
▶ Use straps to prevent the appliance from
becoming scratched.
▶ Use suitable means of transport to bring
the appliance to the installation location
(special car, pallet truck, etc).
Page 11
6 720 808 869 (2014/06)Compress 3000 DW FOO
Appliance details | 11
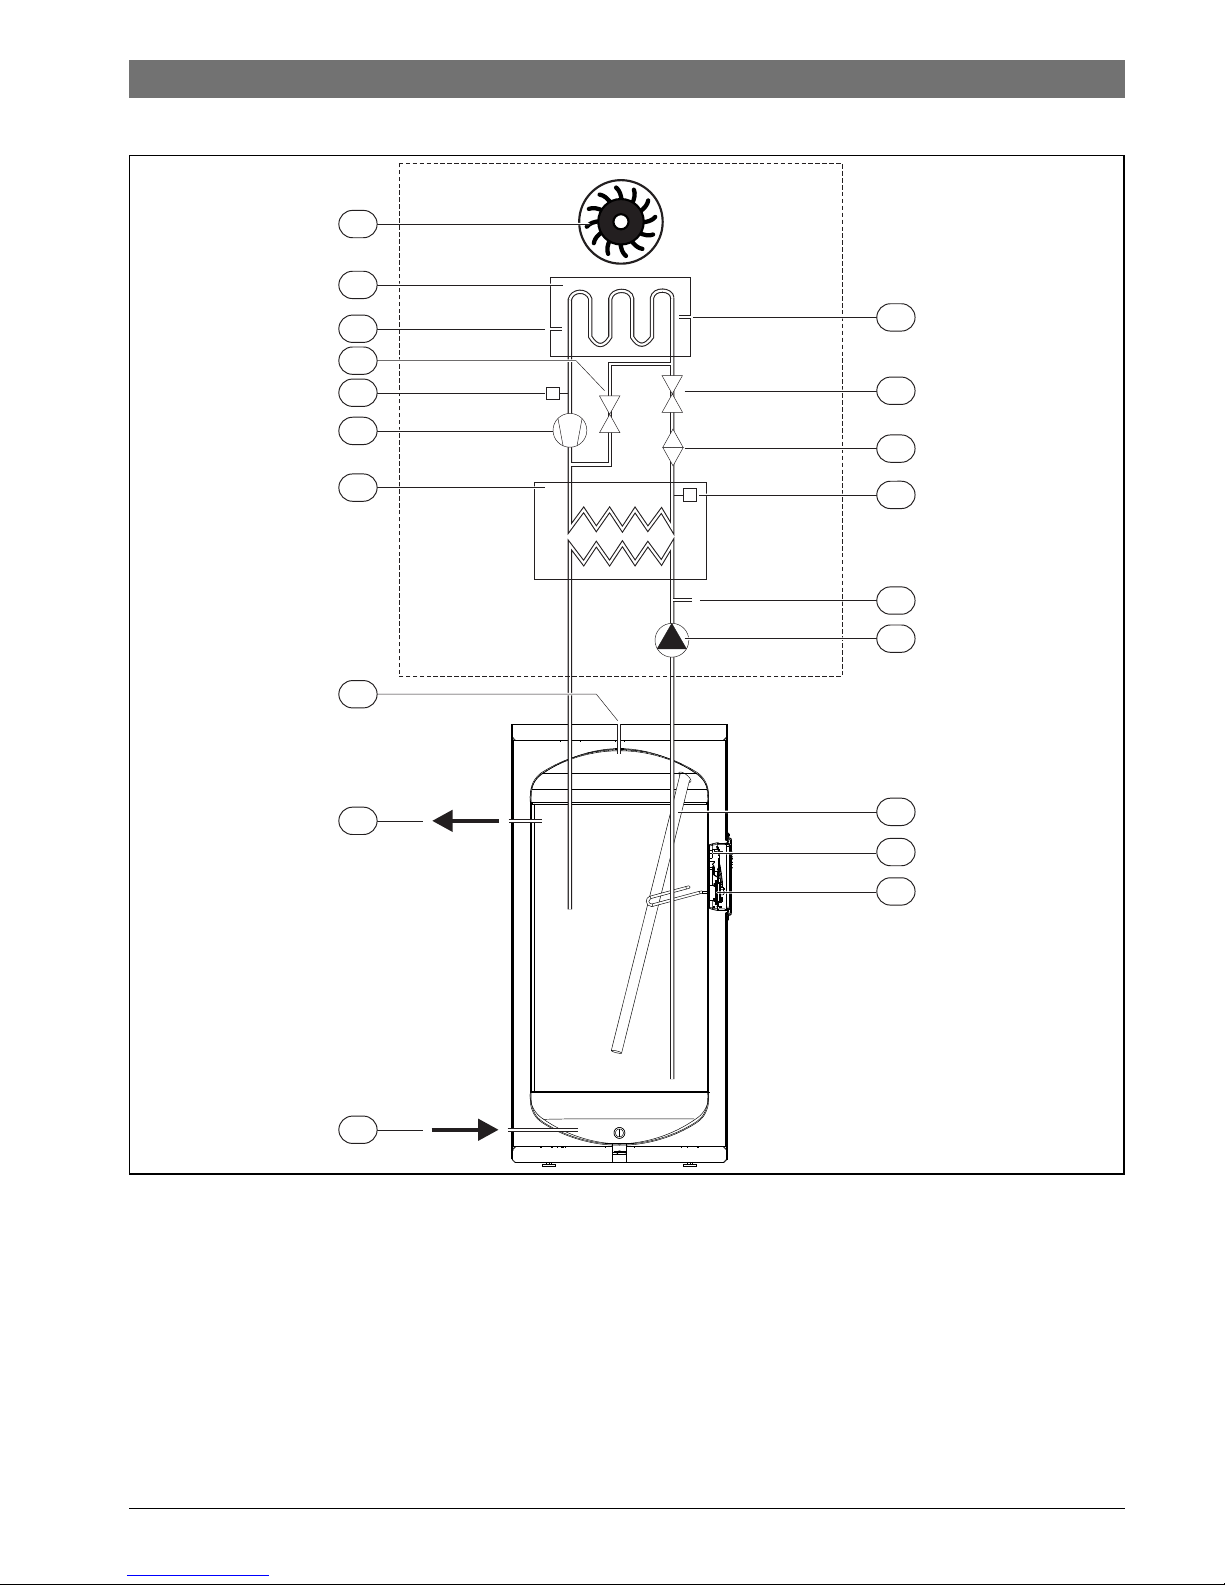
3.5 Operational principle (brief overview of modes)
Fig. 5
[1] Air fan
[2] Evaporator
[3] Compressor
[4] Condenser (gas/water heat exchanger)
[5] NTC temperature sensor (air inlet)
[6] Hot water outlet
[7] Cold water inlet
[8] Electric heating element
[9] NTC temperature sensor (top of storage tank)
[10] DHW circulation pump
[11] NTC temperature sensor (bottom of storage tank)
[12] High-pressure pressure switch
[13] Expansion valve
[14] Filter dryer
[15] Low-pressure pressure switch
[16] Magnesium anode
[17] Temperature sensor at the evaporator fins
[18] Solenoid Valve
[19] Thermal Cut Out (TCO)
1
2
3
4
6
7
16
10
11
14
13
6720807918-02.3V
5
12
15
9
17
18
8
19
Page 12

6 720 808 869 (2014/06) Compress 3000 DW FOO
12 | Appliance details
System basic theory
The refrigerant circuit is a closed system in which the
refrigerant R134a circulates as a heat transfer medium.
The evaporator transfers the heat from the air to the refrigerant
circuit, and the refrigerant evaporates into a gas.
The compressor compresses the refrigerant R134a, thus
increasing its temperature.
Then, the heat is transferred via a heat exchanger, also referred
to as a condenser, to the storage water tank. The refrigerant
R134a condenses in the process.
R134a flows through the expansion valve in a liquid state with
decreasing pressure, thus completing the cycle by being
routed back to the evaporator.
Brief overview of the appliance operation
Between 0 °C and 40 °C air temperature the appliance only
uses the economical heat pump cycle.
However, it is possible to manually turn on the electrical heater
together with the heat pump when the air is above 0 °C (One
shot boost). Once the set point is reached the boost is
automatically switched off.
Between -7 °C and 0 °C the appliance automatically switches
on the electrical heater together with heat pump cycle.
When the appliance has conditions to activate both electric and
compressor "FULL" is displayed at the HMI, alternating with the
top tank temperature.
When compressor and electrical heater are operating together,
the upper part of the tank will rise much faster than the lower
part, thus boosting the recovering time for the next hot water
load. Hence, with "FULL" active, if the top temperature gets
near the set point and the bottom is still rather at low
temperature, the appliance, will automatically switch off the
electrical heater and continues the heating with the heat pump
cycle only but "FULL" will remain being displayed.
After the electrical heater is switched off, it is normal that the
top temperature start to decrease slowly. Therefore, while
rising the bottom temperature by only using the heat pump
cycle and until the top temperature start to increase to set
point, the electrical heater will b e sw itc hed on as m any tim es as
required to keep the top near the set point.
Outside the air ambient range temperature, the unit operates
by only using the electrical heater.
Page 13
6 720 808 869 (2014/06)Compress 3000 DW FOO
Appliance details | 13
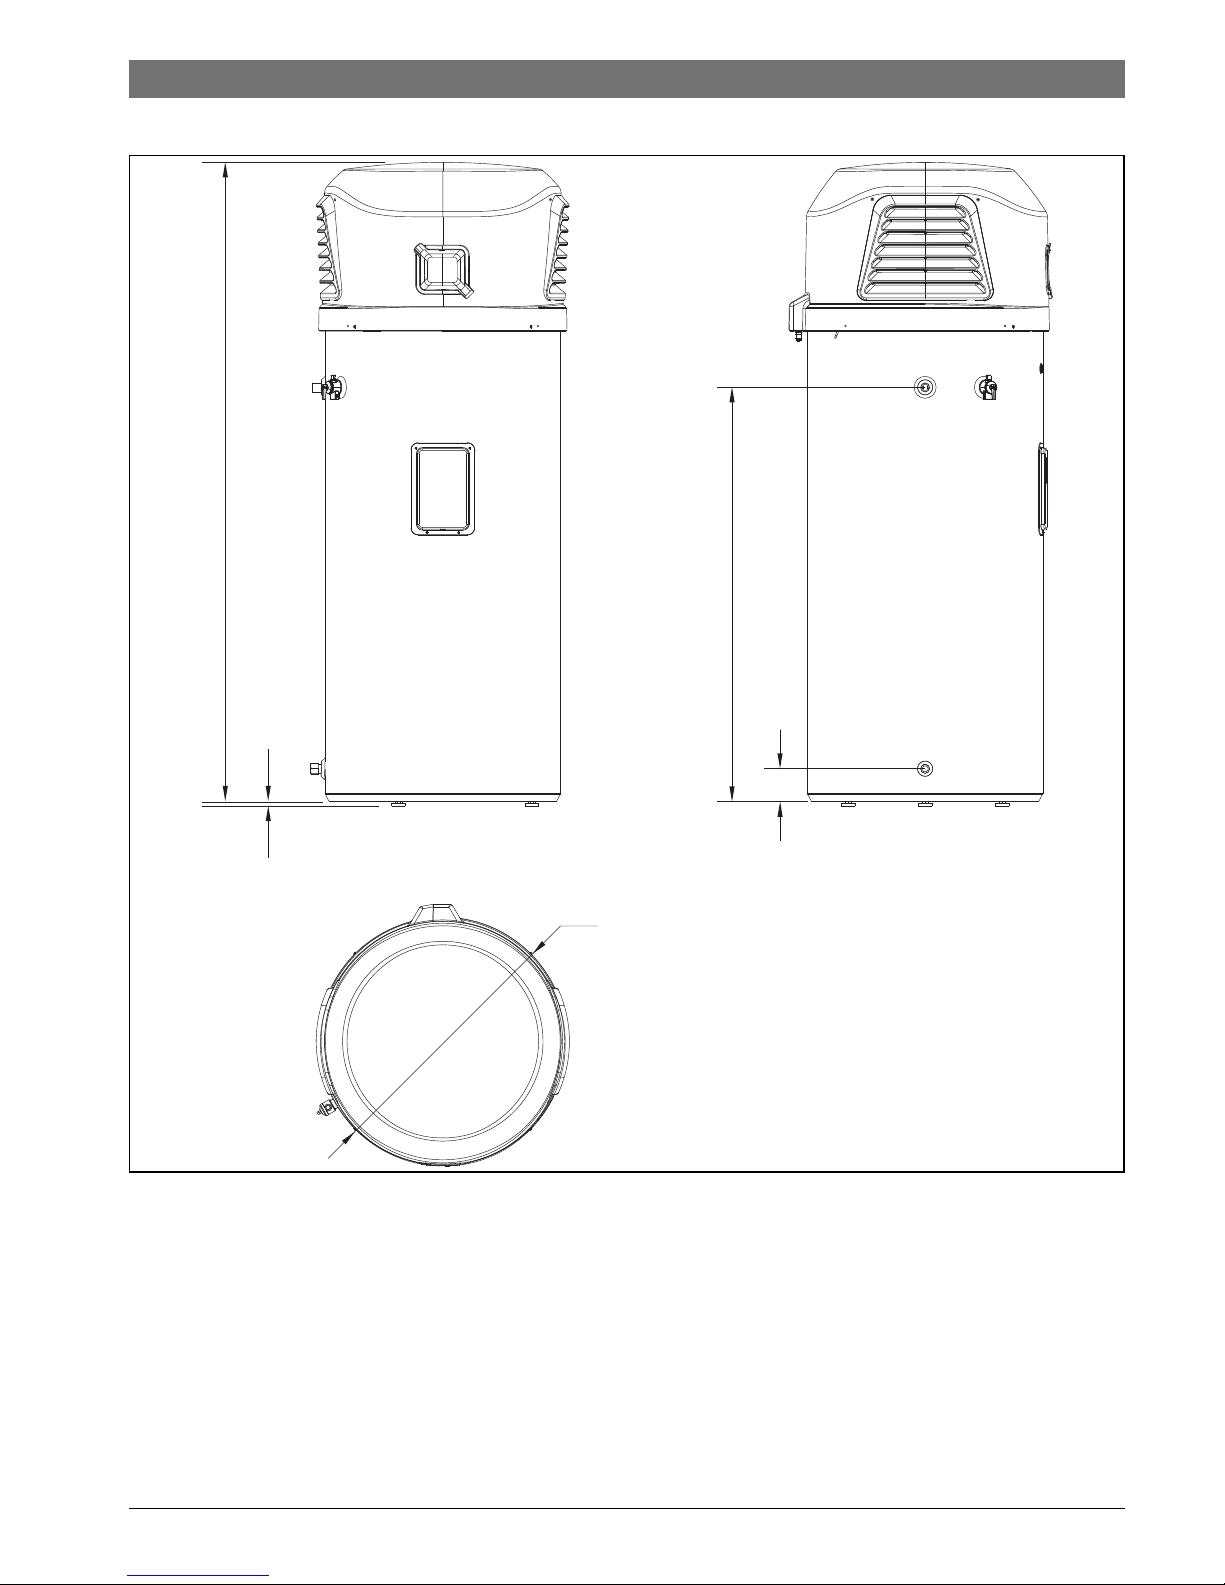
3.6 Dimensions
Fig. 6 Dimensions (in mm)
1840
16,5
1180
64
Ø 670
6720801244-06.1V
Page 14
6 720 808 869 (2014/06) Compress 3000 DW FOO
14 | Installation instructions
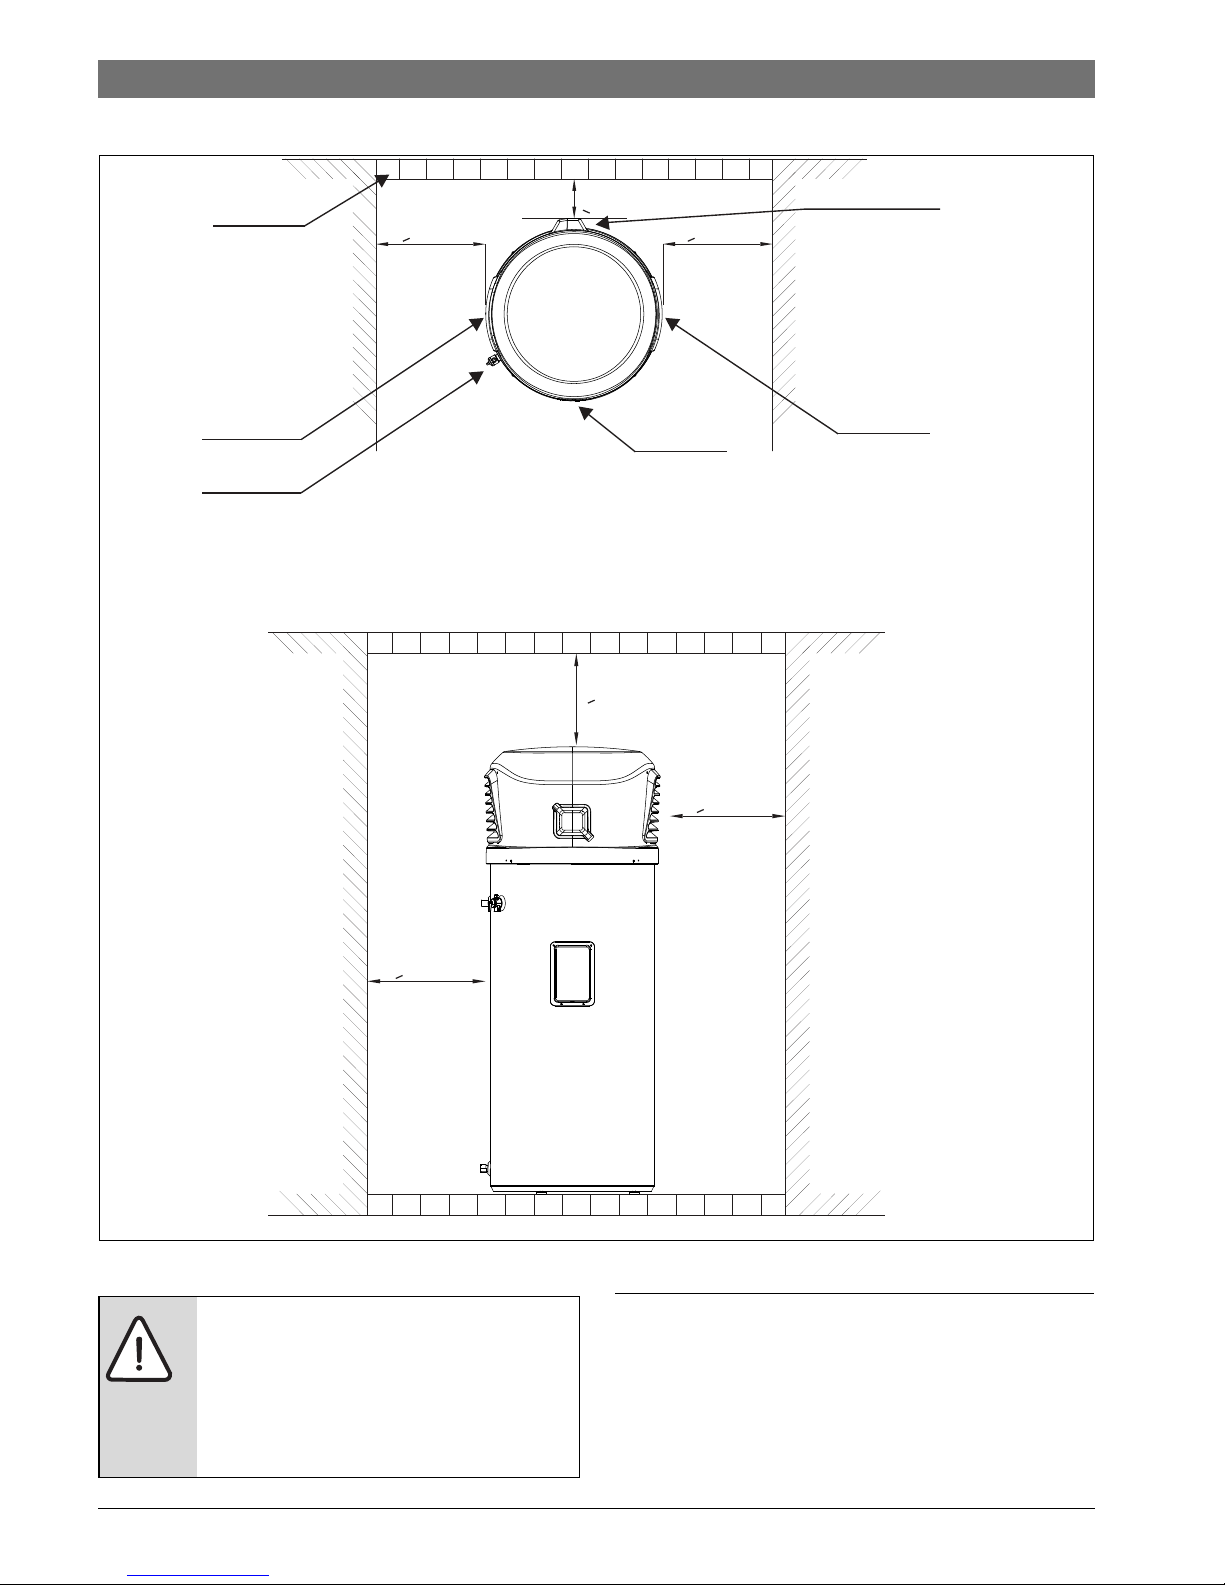
3.7 Clearances
Fig. 7
4 Installation instructions
The manufacturer’s warranty does not cover any damage or
defect caused by improper installation, attachment or use of
any type of accessories (other than those listed in this user
manual) with this water heater. The use of unauthorized
>400mm
<50mm
>400mm
>400mm
>400mm
>600mm
Air outlet
Display
Barrier
Air inlet
6720807918-11.1V
Condensate drain
PTR valve
DANGER:
The Temperature and Pressure relief valve
delivered with the unit must be installed and
must not be sealed or blocked. Failing to do
so will result in a dangerous situation
(section 4.4.4).
Page 15
6 720 808 869 (2014/06)Compress 3000 DW FOO
Installation instructions | 15
energy-saving devices may shorten the life of the water heater
and may endanger life and cause property damage.
The manufacturer disclaims any responsibility for such loss or
injury resulting from the use of such unauthorized devices.
4.1 Tools required
• Wrenchs ¾ ", 10mm and 13mm.
• Philips screwdriver
4.2 Location requirements
Locate the water heater in a clean area as near as possible to
the area of biggest hot water demand. Long uninsulated hot
water lines can waste energy and water.
Note: Because this unit draws in ambient air to heat the water,
wh en us ing the u nit indoo rs, t he roo m must be at l east 3m x 3m
x 2,5m (22,5 m
3
) or larger, and preferably vented. If the room
is smaller, there must be a louvered door with minimum
500cm
2
venting area.
Place the water heater in such a way that clearance for proper
servicing is considered (section 3.7), namely for top cover
removal, PTR valve access and anode rod removal and
installation.
Remember you may need to remove the entire unit later for
servicing.
The water heater and water lines should be protected from
freezing temperatures and highly corrosive atmospheres.
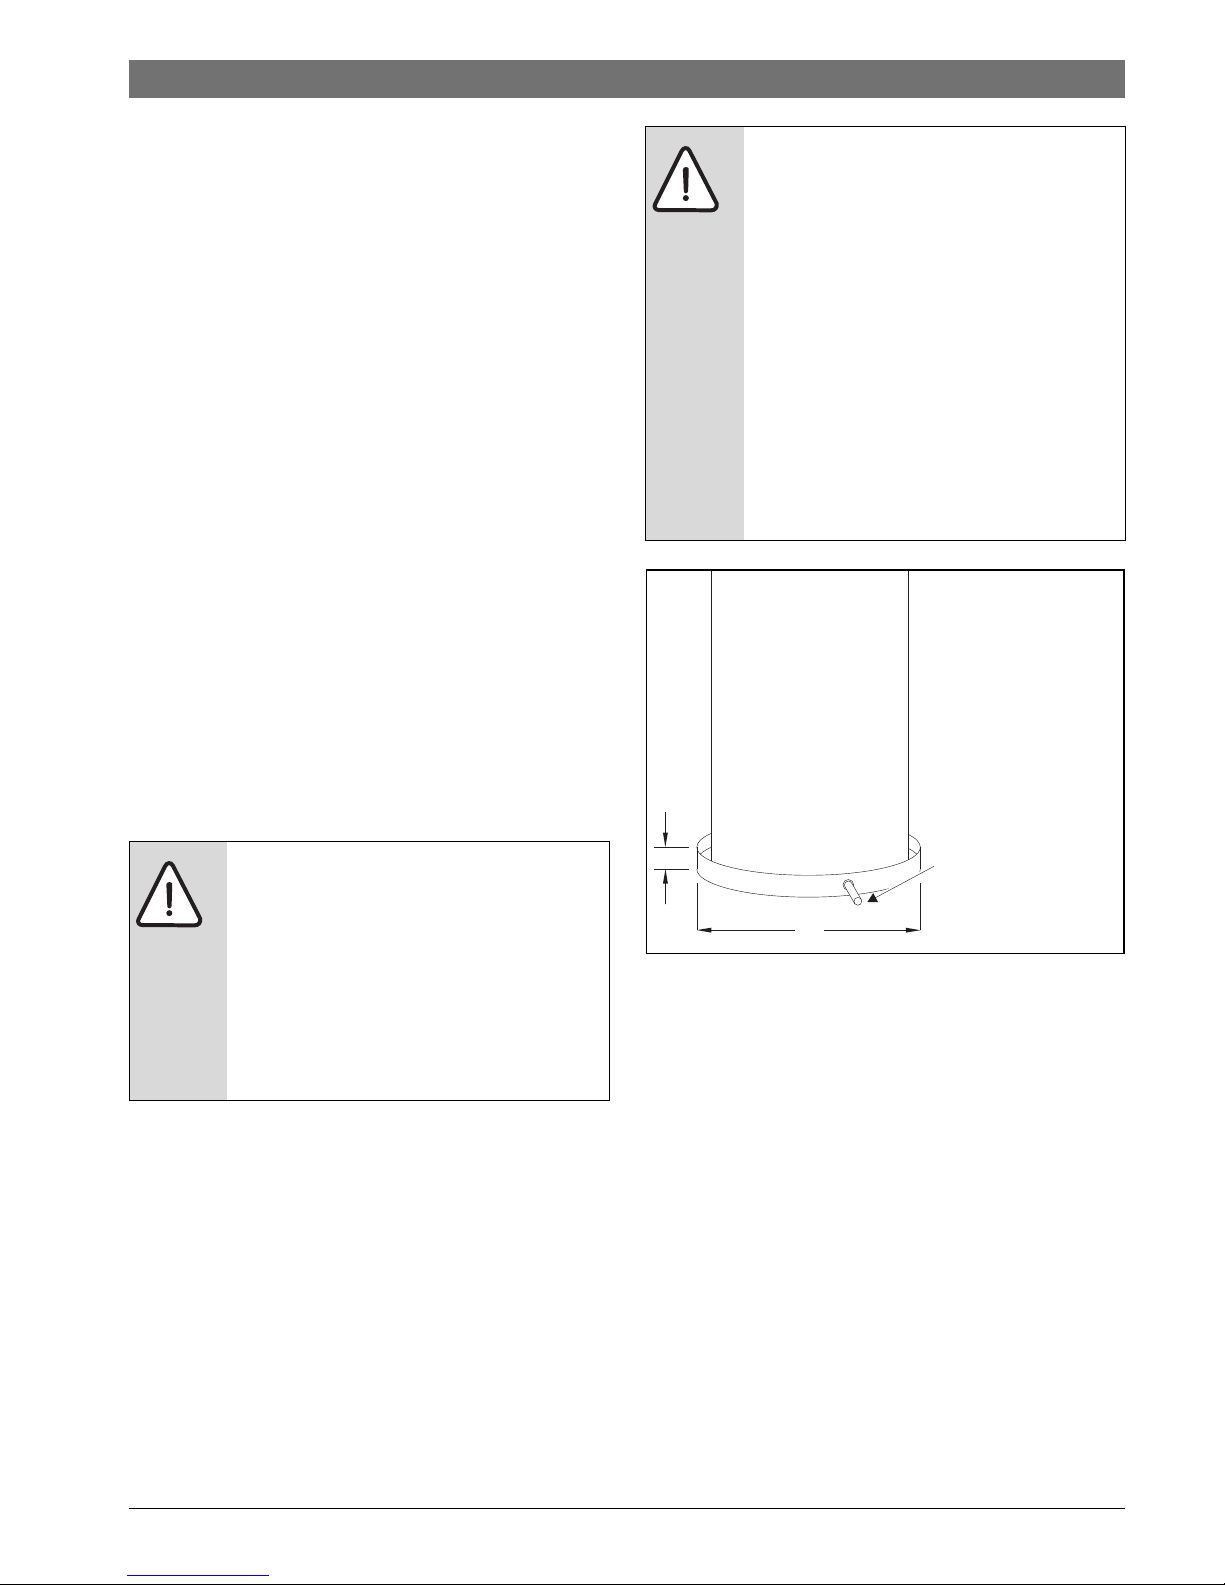
Fig. 8 Water heater support as specified in AS3500.4
NOTE: Auxiliary catch pan MUST conform to local codes. Catch
Pan Kits are available from the store where the water heater
was purchased, a builder store or any water heater distributor.
Recommendation
Even if this unit runs at very low noise levels, it is advisable to
install it away from any living area windows.
▶ Check council laws for specific localized rules in relation to
location requirements for this appliance.
Outdoor installation
This unit was designed both for outdoor and indoor installation.
Proper clearances must be observed.
Local installation regulations
The installation must comply with the requirements of AS/NZS
3500.4 and AS/NZS 3000 standards and all additional local
codes and regulatory authority requirements.
CAUTION:
The water heater should not be located in an
area where leakage of the tank or connection
will result in damage to the area adjacent to
it or to lower floors of the structure. In places
where installation in such areas cannot be
avoided, it is recommended that a suitable
catch pan, adequately drained, be installed
under the water heater (Fig. 8).
WARNING:
This water heater SHOULD NOT be installed
in an area with a corrosive atmosphere
where chemicals or flammable liquids are
stored or where aerosol propellants are
released. When using outdoors, because of
natural air movement in a room or other
enclosed space, these corrosive/flammable
vapours can be carried from where they are
being used or stored. Any electric arc drawn
within the water heater's electronic controls
can ignite these vapours causing an
explosion or fire, which may result in severe
burns or death to those in range, as well as
property damage.
6720801244-11.1V
B
A
Route to open drain.
Line should be at least
DN50 and pitched for
proper drainage.
A= Ø of appliance
plus 50 mm min
B= Maximum 50 mm
Page 16
6 720 808 869 (2014/06) Compress 3000 DW FOO
16 | Installation instructions
In New Zealand, the installation must comply with Clause G12
of the New Zealand Building Code.
All packaging materials must be removed from the water heater
prior to its installation.
Required clearances
There must be a 60 cm vertical clearance, a 40 cm minimum
clearance in front of the inlet/outlet grilles and 5 cm clearance
from the back of the appliance (where the drain is) to any
object ( Fig. 7). This will ensure a proper air flow through the
appliance and facilitate the service any time is needed.
Appliance orientation
In case of possible direct exposure to strong wind:
▶ Face the air outlet to the most protected area.
The direct incidence of strong wind in the outlet grille during
long periods may affect the performance of the heat pump
increasing the heating times and the frequency of defrost
cycles. The use of the noise reduction mode is not
recommended in case of moderate or strong wind.
Condensation drain
The unit has a condensate drain, therefore a drain must be
available in close proximity to the unit. The drain must be no
higher than 90 cm above the ground. Discharge point must
comply with AS/NZS 3500.4.
If no drain is available, then a common condensate pump with
a capacity no less than 4 liters/day must be purchased from a
local builder and supply store and installed.
4.3 Secure the appliance
▶ Adjust the height of the adjustable feet to correctly align
the appliance at the installation location.
4.4 Water piping
4.4.1 Inlet - Outlet connections
Installation of the water inlet or outlet pipes: The water inlet and
outlet thread are ¾ BSP (internal thread). Pipes must be heatresistant, durable, and UV resistant (when doing outdoor
installation).
Installation of the pipe for PTR valve: The specification of the
valve connecting thread is ½ BSP (internal thread).
All pipe work should be insulated with proper insulating
material (weatherproof and UV resistant if exposed) to
optimize energy efficiency. Water piping sizing should be
performed in accordance with AS/NZS 3500.4.
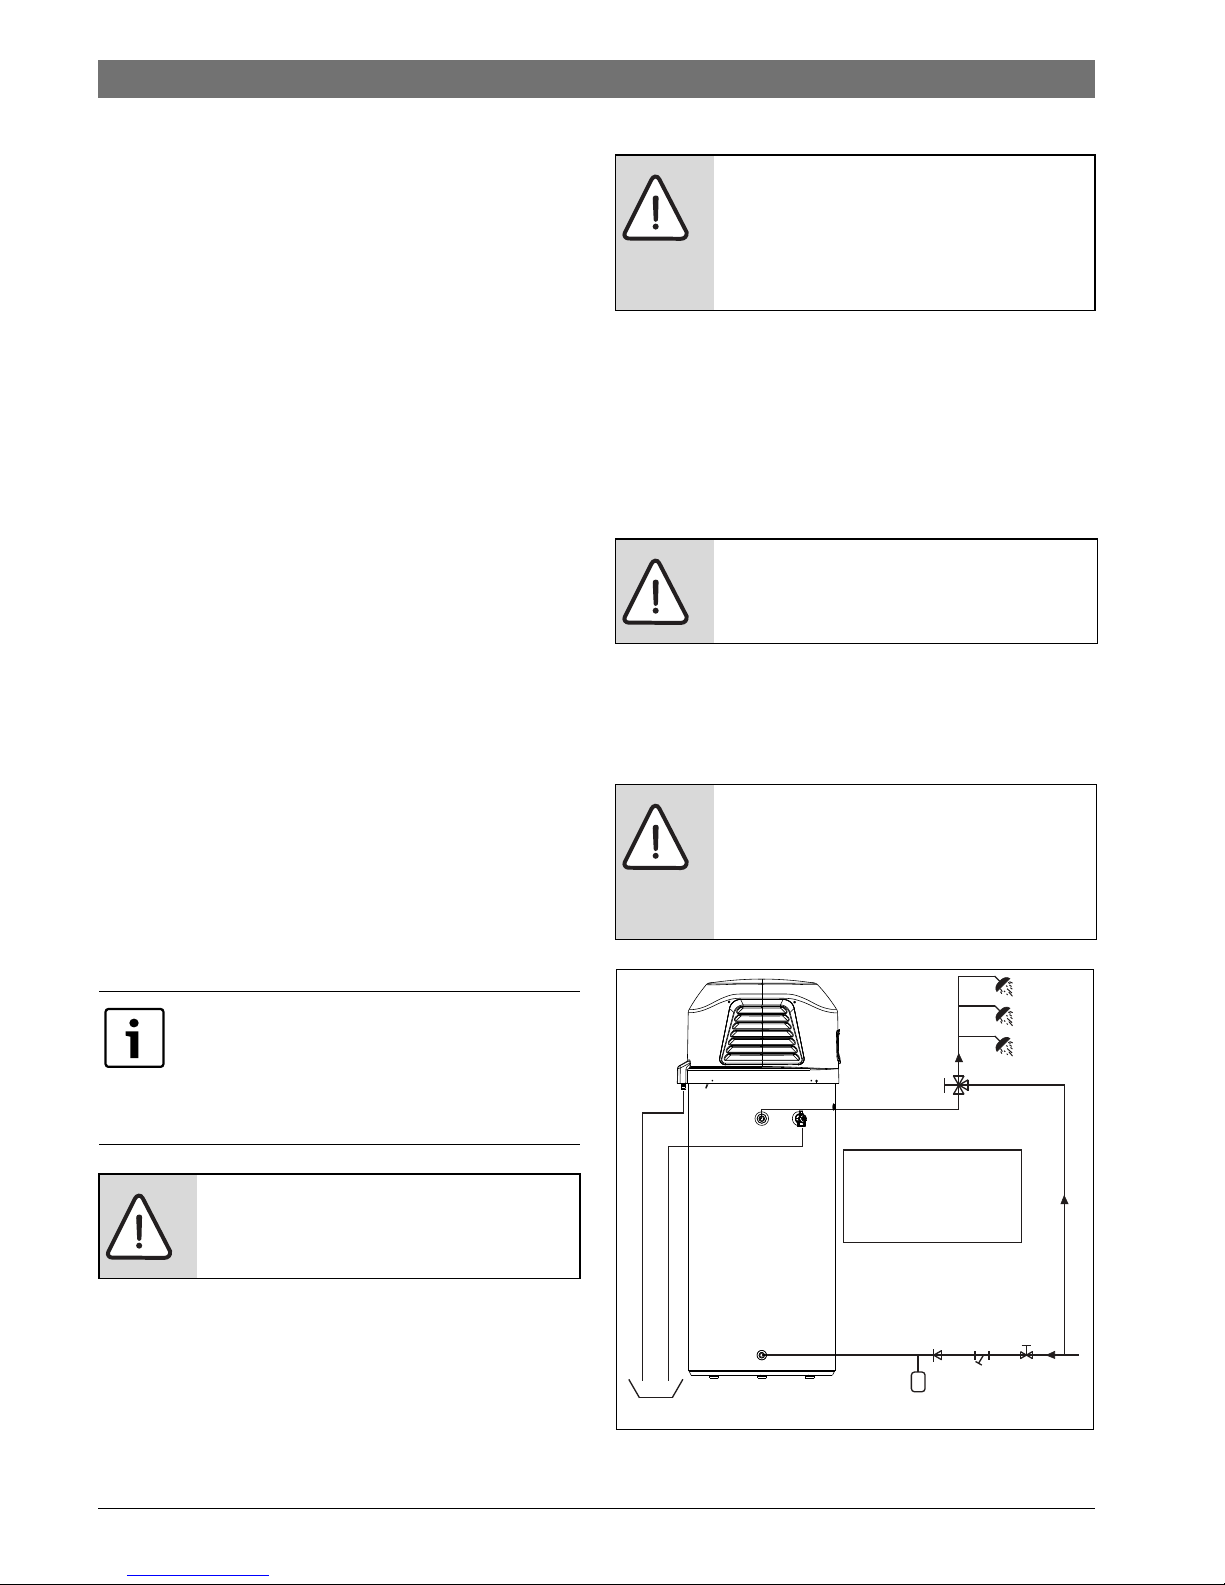
Fig. 9 Typical installation
To ensure faultless operation, the unit must
be installed vertically, with a tilt no more than
1°, preferable in the direction of the
condensate drain in order to favor the
condensates drainage.
WARNING: Damage to external tank casing!
▶ Do not tilt more than 20° without
packaging.
WARNING:
All plumbing work must be carried out by a
qualified professional and in accordance
with the Plumbing Standard AS/NZS
3500.4 and local authority requirements.
WARNING:
Care should be taken not to touch the pipe
work as it may be hot.
CAUTION:
The temperature and pressure-relive valve
must be installed according to local code.
Not doing so will cause damage to the
appliance and damage to other property.
P&T Valve
Condensate drain
Water outlet
Notice:
the mixer tap is required
on the hot water usage
terminal
One way valve
Tap water
Y-shaped filter
Water inlet
Barrel-drain
Thermal expansion tank
(if required)
6720808869-07.1V
Page 17

6 720 808 869 (2014/06)Compress 3000 DW FOO
Installation instructions | 17
4.4.2 Dielectric joint (not supplied with the appliance)
Different metals between plumbing and tank materials and
additionally the effect of hot water can cause the corrosion of
one of the metals (generally the one in the tank is the metal
attacked).
The Dielectric Joint will basically avoid any physical contact
between the two metals, acting as an effective insulator and
prevent this attack. How quickly this, or if at all, this happens
depends a lot on the content of your water; its pH, the dissolved
minerals and the metals involved.
BOSCH therefore advises the use of the dielectric joint, that is
to be installed between the house piping and the tank water
connections.
4.4.3 Condensate Drain Tubes (not supplied with the
appliance)
This unit has an integrated condensation tray. The water
collected in the tray drains out of the tube coming off the back
of the unit. It is important that a hose is attached to the drain
port at the back of the unit.
▶ Attach one end of the condensate drain pipe(15mm inner
diameter recommended) to the drain port at the back of
the unit.
▶ Direct the other end to a drain in the floor or no higher than
8 cm above the ground in an outdoor installation.
If such drain is unavailable, a condensate drain pump (not
provided) must be purchased and installed.
Fig. 10
4.4.4 PTR Valve (supplied with the appliance)
A temperature and pressure-relief valve is supplied and must
be installed in the tank port marked for this purpose. No valve
or accessory of any type should be installed between the relief
valve and the tank. Please observe local codes for the correct
installation of relief valves.
The kW rating of the relief valve must be higher than 6kW, to
ensure that is always above the maximum output power of the
6720808869-08.1V
WARNING:
The pressure rating of the relief valve must
not exceed 1000 kPa, the maximum working
pressure of the water heater as marked on
the rating plate.
WARNING:
Relief valve easing gear should be operated
AT LEAST ONCE EVERY SIX MONTHS. If
water does not discharge freely when the
lever is operated, the valve should be
checked by an authorized agent.
WARNING:
The relief valve and relief valve drain pipe
must not be sealed or blocked. Small
amounts of water may leak from relief valve
during heating cycles.
WARNING:
Relief valves should be checked every six
months, or replaced at intervals not
exceeding 3 years or more frequently in
areas where there is a high incidence of
water deposits.
WARNING:
The function of the temperature and
pressure relief valve once installed on this
water heater is to discharge high
temperature water under certain
conditions. Therefore it is strongly
recommended that the pipe work connected
to the relief valve is able to withstand water
temperatures exceeding 99 °C. Failure to
follow this recommendation may result in a
dangerous situation.
Page 18

6 720 808 869 (2014/06) Compress 3000 DW FOO
18 | Installation instructions
water heater when operating with both electrical heater and
heat pump and air at 40 °C. The supplied PTR valve complies
with this by having a power capacity of 10kW.
Connect the outlet of the relief valve to a suitable open drain so
that the discharge water cannot contact any electrical parts,
persons or animals and to eliminate any other possible risks.
A drain line from a relief valve must comply with the
requirements of AS/NZS 3500.4.
Always use a valve of the same rated pressure and temperature
as the PTR Valve supplied with the unit.
4.4.5 Thermal expansion tank (not supplied with the
appliance)
Thermal expansion is a natural process where heated water
increases its volume. When this water is stored in a tank, this
volume increase will in fact mean a pressure increase. This
pressure increase can result in a dangerous situation. If the
safety settings on the relief valve are reached, then the relief
valve will operate during the heating cycle. Thermal expansion,
if normally reaching the relief valve nominal values, can cause
premature valve failure and contribute to increased
components stress.
Bosch recommends therefore the installation of an expansion
tank in order to relieve this over-pressure, avoiding repeated
relief valve operation.
Please contact a licensed professional, water supplier or
plumbing inspector for more information about this subject.
Table 3 can be used as guideline to help choosing the capacity
of a thermal expansion tank according to the installations mains
pressure and the PTR valve supplied.
4.4.6 Temperature mixing device (not supplied with the
appliance)
Bosch recommends the installation of a temperature limiting
device between the water heater and the hot water outlets in a
bathroom or similar usage point, in order to reduce the risk of
scalding.
Additionally, a certified plumber may have the legal obligation
to ensure the water heater installation meets the hot water
delivery requirements listed in AS/NZS 3500.4.
4.4.7 Pressure limiting valve (not supplied with the
appliance)
In installations where the mains water sup ply pressure exceeds
that specified for this product (listed in chapter 3), an
approved pressure limiting valve is required and must be fitted.
If the water heater is supplied with low pressure water, below
the minimum working pressure specified for this product
(listed in chapter 3), then a pressure pump should be installed
in order to minimize the forming of air traps in the hydraulic
circuit.
4.4.8 Expansion control valve (not supplied with the
appliance)
Local regulations, a saturation index greater than +0.4 or in
corrosive water areas where there are sufficient quantities of
silica dissolved in the water may require the installation of an
expansion control valve (ECV) in the cold water line, being the
last valve installed prior to the water heater.
WARNING:
Never block or seal the outlet of the PTR
valve or it's drain for any reason.
The warranty will be void if the relief valve or
other safety devices are tampered with or if
the installation is not in accordance with this
manual.
WARNING:
To reduce the risk of excessive pressures
and temperatures in this water heater, install
temperature and pressure protective
equipment required by local codes and no
less than a combination temperature and
pressure relief valve certified by a nationally
recognized testing laboratory that maintains
periodic inspection of production of listed
equipment or materials, as meeting the
requirements of AS/NZS 3500.4, AS/NZS
3000 and all local codes and regulatory
authority requirements.
Mains water
pressure (bar)
Capacity of the thermal expansion
tank (l)
212
314
418
Table 3
WARNING:
This water heater can heat water to
temperatures which can cause scalding.
Page 19

6 720 808 869 (2014/06)Compress 3000 DW FOO
Installation instructions | 19
4.5 Electric requirements
Power requirements
Check the markings on the rating plate of the water heater to be
certain the available power supply corresponds to the water
heater requirements.
This water heater must be directly connected to a 230V-240V
AC, 50Hz mains power supply. When connected off grid,
please make sure a 230V-240V AC 50Hz true sine wave power
supply is available.
Do not connect this unit to inverters providing square sine
waves.
Electrical connections
The water heater must be installed on its own circuit with a
breaker switch installed directly at the switchboard.
▶ Remove the top cover.
▶ Route the power supply cord through the orifice next to the
drain port.
▶ Open the electric connection box.
▶ Connect the power supply wires and earth tab directly to
the provided terminal block, ensuring there are no
unnecessary excess wire loops inside the electric
connection box.
▶ Close connection box and place in dedicated slot in the
module base.
▶ Close the electric connection box.
Fig. 11
The appliance must be power for the first time during the purge
procedure after the tank was filled with water (section 4.8)
Electrical test requirements
AS/NZS 3000:2000, clause "Results" (6.3.3.3.2) states:
"The value of 1 MOhm may be reduced to 0.01 MO for sheathed
heating elements"
This water heater has been tested to AS/NZS 3350.1:2002
clause 16 "Leakage current and electric strength" and passed
the requirements of this Standard. Therefore, this water heater
CAUTION:
Do not incorrectly connect electrical
connections. 230-240V AC must be applied
to L and N wires as shown in Fig. 11. Failure
to do so will VOID the warranty and can result
in irreversible damage to the appliance.
WARNING:
All electrical work and fixed wiring must be
carried out by a qualified professional and in
accordance with the Wiring Rules AS/NZS
3000 and local authority requirements.
Required 15A installation to be available in
place.
WARNING:
Proper ground connection is essential.
The presence of water in the piping and
water heater does not provide sufficient
conduction for a ground. Non metallic
piping, dielectric unions, flexible
connectors, etc., can cause the water heater
to be electrically isolated.
WARNING:
This water heater contains electronic
equipment and 500V insulation tests must
only be conducted between active and earth
and between neutral and earth. An active to
neutral test WILL damage the electronics.
6720801244-12.2V
1.
2.
Page 20

6 720 808 869 (2014/06) Compress 3000 DW FOO
20 | Installation instructions
complies with the conditions stated in AS/NZS 3000:2000
clause 6.3.3.3.2 (b).
4.6 Installation configurations
4.6.1 Ecological ambient heat recovery
Ev en on col d day s, h eat i s dr awn f rom surr oundi ng amb ient air .
The heat pump will operate at temperatures between a
minimum of -7 °C and maximum of 40 °C. The electrical
element will operate together with the heap pump cycle when
the air falls below 0ºC. The electrical element will operate only
by its own when air temperature is below -7 °C or higher than
40 °C and heating is required. The efficiency of the water
heater increases as the surrounding ambient air temperature
increases.
Automatic safety controls are fitted to the water heater to
provide safe and efficient operation.
Additionally, the heat pump water heater enables direct
connection in series to a second heat generator, e.g. a solar
heating system or a boiler as backup hot water generation
sources.
4.7 Insulation blanket
If local codes require external application of thermal insulation
blankets kits, the manufacturer’s instructions included with the
kit must be carefully followed.
Application of any external insulation, blankets, or water pipe
insulation to this water heater will require careful attention to
the following:
• Do not cover the temperature and pressure-relief valve.
• Do not cover access panels to the heating elements.
• Do not cover the operating or warning labels attached to
the water heater or attempt to relocate them to the exterior
of the insulation blanket.
• Do not block the air inlets/outlets and the top cover.
• Do not cover water heater control unit.
4.8 Fill the water storage tank
▶ Open hot water outlet (Fig. 5, [6]) and one or more hot
water taps.
▶ Open storage tank cold water inlet (Fig. 5, [8]).
Storage tank filling starts.
▶ Close hot water taps only when water flow is free of air
pockets.
▶ With the cold water inlet open and the hot water taps
closed, open the purge valve (at least one complete
rotation, Fig. 13 [1]) until water drops out through the
purge valve outlet.
▶ Close the valve after a few moments, once the water flow is
smooth without air bubbling.
▶ Connect the appliance to the power supply via fixed wiring
installation, including earth conductor (section 4.5).
▶ Rotate circulation pump speed selector to position „III“
(Fig. 12)
Fig. 12 Circulation pump
▶Activate „Purg“ function ( page 33, section 5.7.6).
CAUTION:
▶ Choose the right path to move the unit.
▶ Only move the unit in its original
packaging.
▶ If the unit is installed in a metal building,
proper insulation and compliance with
the relevant technical standards of
electrical equipment is to be provided.
CAUTION: Damage to the appliance!
▶ Prior to commissioning the appliance,
fill the storage tank wi th water and purge
tank through hot water piping and
fixtures.
Adjust the purge valve in order to facilitate
the coupling to a draining hose and minimize
any water splash to other components
including the EPP base.
▶ Rotate the gray head (Fig. 13, [3]) of the
purge valve clockwise (tightening) to
adjust it.
6720646160-51.2V
Page 21

6 720 808 869 (2014/06)Compress 3000 DW FOO
Installation instructions | 21
▶ Open purge valve (at least one complete rotation, Fig. 13,
[1]) until water drops out through the purge valve outlet.
Ensure that water drains correctly.
Fig. 13 Purge valve
[1] Purge valve
[2] Condenser (gas/water heat exchanger)
▶ Close purge valve.
▶ Open the purge screw of the circulation pump and leave it
opened until the water leaks uniformly without visible air
bubbles.
Fig. 14 Circulation pump purge screw
▶ Close the circulation pump purge screw.
▶ Wait for about 5 minutes until „Purg“ mode goes off.
The number of minutes remaining are displayed.
▶ Rotate circulation pump speed selector to position „I“.
Filling and purge procedures are now completed.
If, after a few minutes of operation (up to 20-30 minutes),
display shows „E09“,you should:
▶ Reset the appliance ( page 36, paragraph „Resetting the
system“).
▶Activate „Purg“ function ( page 33, section 5.7.6) and
repeat the subsequent purge steps described above.
4.8.1 Water characteristics
Usage of water with unsuitable characteristics can result in
shortened product life.
Fig. 15 Water treatment vs water characteristics
Please note that the Langelier saturation Index depends on the
water temperature and the above information considers two
extremes: 10 °C and 70 °C.
While corrosion is higher at low water temperature, scaling is
more important at higher water temperature.
In case of water hardness above 600 mg/l, the Langelier
saturation index must be determined to evaluate the necessity
for water treatment.
Please require help from your technical assistance.
To ensure that the sacrificial anode works properly, the water
conductivity must be within the limits of Tab. 4. In case not,
treatment is required. Always ensure the water characteristics
described in Fig. 15 when applying water treatment targeting
the water conductivity
Make sure that the appliance is in “manual”
mode before activating the „Purg“.
“man” must be written on the display.
If “auto” is displayed:
▶ Select “man” mode ( page 26,
section 5.6).
CAUTION: Risk of scalding!
▶ Ensure that draining water from the
purge valve presents no risk to people or
property.
1
2
6720646160-50.2V
6720801244-19.2V
During the 5min the „Purg“ function lasts,
open the purge valve for a few seconds
several times. This will release some air
excess from the water loop.
pH
9.0 9.5
<50
50 - 100
100 - 150
150 - 250
total hardness mg/l
Water treatment not required (-0.5 < LSI < 1.5)
6720801244-17.3V
5.5
6.0 6.5 7.0
7.5
8.0 8.5
250 - 350
350 - 600
Water treatment required against scaling (LSI > 1.5)
Water treatment required against corrosion (LSI < -1.5)
Water treatment may be needed against corrosion (-1.5 < LSI < -0.5)
LSI: Langelier Saturation Index
Page 22

6 720 808 869 (2014/06) Compress 3000 DW FOO
22 | Installation instructions
4.9 Installation checklist
1. Tank location
• Is the room size less than 3 m x 3 m x 2,5 m (22,5 m
3
)?
If yes, louvered door or similar ventilation is needed with
minimum 500cm
2
venting area.
• Clearances according to figure 7 (section 3.7, page 14).
• Front of unit is free and clear.
• Is the water heater leveled? If not, adjust the adjustable
feet, or add shims under the base of the unit.
• Are fixing straps (if required) in place?
2. Plumbing connections
• No leaks after filling the tank with water, either when water
is flowing or is stationary.
3. Condensate lines are in place
• Condensate drain pipe connected to drain connection, and
directed into a floor drain or a condensate pump
4. Temperature and pressure-relief valve is working and
drain line completed per local code.
5. Electrical connections
• Electrical connections are properly isolated
6. Water filling and purge procedure
• Water filling and purge procedure done according to
section 4.8.
7. Sensors location
• Are the sensors at their correct place (Fig. 16, [A - fins
temperature], [B - top tank temperature], [C - air
temperature] and [D - bottom tank temperature])?
If not:
▶ Locate the sensors according to Fig. 16.
8. Verify control panel displays the water temperature
inside the tank.
9. Top cover in place.
Fig. 16 Sensor positioning
Water conductivity for sacrificial anodes
130 S/cm - 1500 S/cm
Table 4 Water conductivity
Enamelled tanks must not be used with
completely desalted, distilled or de-ionised
potable water.
WARNING:
The power supply to the appliance must not
be activated until the system is filled with
water.
6720807918-07.2V
Page 23

6 720 808 869 (2014/06)Compress 3000 DW FOO
Installation instructions | 23
4.10 What to expect from a “normal startup”
After the unit has been installed, with all electrical and water
connections secured and checked, the unit should be filled
with water and purged ( section 4.8). The appliance will
perform according to table 5 after purge function has been
selected. In case the appliance is unplugged from mains and
switched on again, the display will remain inactive for a few
moments and the normal startup will be according to table 6.
4.11 Off-peak compatibility
The appliance is technically compatible to be connected to a fix
line for off-peak tariff. However, the off-peak must be wisely
used.
Off-peak periods of less than 16 hours might not ensure the reheating, depending on the hot water demand and on the
temperature of the air and inlet water. Ensure that your offpeak periods are suitable for your needs.
The weekly LEG mode requires additionally 6 to 8 hours.
Therefore once a week this additional period must be ensured
to complete the thermal disinfection. It is recommended to
program the LEG to be done when extended off-peak periods
are available, typically weekends.
To optimize the comfort and maximize the savings, it is
recommended the use of a power commutator between the
normal line and the off peak line together with a programmed
working period (section 5.7.2). The best strategy will
depend up on the hot water needs and ambient conditions.
In case time of use tariffs are available, it is recommended to
use the programmed working periods (section 5.7.2) to
take full advantage of them.
In case of a temporary suspension on the water supply during a
off-peak period the appliance may get unpurged and stop
working during its restart. An error message will be displayed
and the appliance will remain blocked. To minimize the
possible inconveniences from a suppression on the water
supply service, always check the appliance after such incident
occurred.
4.12 Demand response
In a near future electrical energy management is foreseen to
use communication with the electrical appliances to minimize
grid load peaks and increase electrical energy distribution
efficiency. This communication, named demand response, will
be based in signals sent through the grid to which the electrical
appliances are required to react accordingly. The end user is
expected to benefit from lower tariffs when using appliances
demand response capable.
The Compress 3000 is technically demand response ready.
The Compress 3000 is technically prepared to what is
expected to be known as Demand Response Modes 1 and 4
(DRM1 and DRM4). Under DRM1 the appliance is
automatically switched ON or OFF according to the grid signal.
Under DRM4 the appliance will automatically increase the set
point to 66 °C (10% higher than the highest set point possible
to be set) when the respective signal is sent through the grid.
The interface between the grid and the appliance requires a
Demand Response Enabling Device (DRED) and a BOSCH
accessory. The availability of this feature and accessories
requires regulation approval and release by the government
authorities.
Elapsed time HPWH actions
0 to 5 minutes Unit is silent.
Water pump runs to complete the purge
procedure.
5 to 7 minutes Fan starts operating
7 minutes and
beyond
Compressor in operation
Table 5 Normal startup when purge procedure is selected
Elapsed time HPWH actions
0 to 2 minutes Unit is silent.
Water pump runs during the first minute.
2 to 4 minutes Fan starts operating
4 minutes and
beyond
Compressor in operation
Table 6 Normal startup when the appliance is switched on
after have been unplugged from mains.
If the ambient temperature is outside of the
range -7 °C / +40 °C, the appliance will not be
able to run by using the heat pump cycle. The
electric element will be used until the
ambient air temperature returns to the
operating range, therefore, the unit will not
follow the startup described in tables 5
and 6.
NOTICE: Damage to the appliance!
Never use the off-peak in case the appliance
is set to OFF mode and temperatures around
0 °C or below are expected: the anti-freeze
mechanism will not be ensure!
Page 24

6 720 808 869 (2014/06) Compress 3000 DW FOO
24 | Appliance status information
5 Appliance status information
Fig. 17 Control panel
[1] Display
[2] Selection keys
Fig. 18 Display
[1] Electric heater ON/OFF indicator
[2] Heat pump cycle ON/OFF indicator
[3] Not used
[4] Information
[5] Parameter adjustment entry
[6] Error indicator
[7] „Service“ menu entry
[8] Days of the week
[9] „auto/man“ functioning
[10] Active/inactive periods indicator
[11] „Prog“ menu entry
[12] Clock adjustment
[13] Timetable
[14] Energy consumption unit
[15] Storage tank sensor positions
[16] „anti-freeze“ function
5.1 Safety warnings
6720808869-15.1V
1
2
2 3
4
5
6
8
9
12
11
16
14
13
6720645393-10.1V
1 7
15
10
WARNING:
If the hot water system is not used for two
weeks or more, flammable hydrogen gas
may accumulate in the water heater. To
dissipate this gas safely, it is recommended
that a non-electrically operated hot tap be
fully opened for 2 minutes. During this
procedure, smoking, open flames or
operating electric appliances should be
avoided.
DANGER:
Do not store or use gasoline or other
flammable vapors and liquids, such as
adhesives or paint thinner, in the vicinity of
this or any other appliance. If such
flammables must be used, open doors and
windows for ventilation.
CAUTION: Turn off power to water heater if
it has been subjected to overheating, fire,
flood or physical damage.
CAUTION:
Do not turn on water heater unless it is filled
with water.
CAUTION:
Do not turn on water heater if cold water
supply shut-off valve is closed.
WARNING:
If there's any difficulty in understanding or
following the Operating Instructions or the
Care and Cleaning section, it is
recommended to have a qualified person or
serviceman performing the work.
Flammable vapours may be drawn by air
currents from surrounding areas to the water
heater.
Page 25

6 720 808 869 (2014/06)Compress 3000 DW FOO
Appliance status information | 25
5.2 Working display
Visible display symbol
Appliance allowed to operated (according to selected
operation program).
A square around the electric element symbol and/or around the
compressor symbol indicates if they are switched on.
Fig. 19 shows the display when only the compressor is
operating.
Fig. 19 Device operating
Visible display symbol
Appliance inhibited to operate (according to selected
operation program).
The electric element and compressor symbols are shown
without a square around them.
Fig. 20 shows the display when the appliance is inactive
(inhibit to operate according to the selected program mode).
Fig. 20 Device inactive
5.3 Operation programs
Visible display symbol „ “
Operating periods in accordance with defined programming
(P1, P2 or P3).
Visible display symbol „ “
Permanent operation (24 h/7 days) without defined
programming.
5.4 Setting the domestic hot water temperature
▶ Press the "+" or "-" button to set the desired value between
30 °C and 60 °C.
Fig. 21 Setting the temperature
▶ Press the "ok" button to confirm the setting.
6720808869-09.2V
6720808869-10.2V
The water temperature is set to 56 °C at the
factory.
The set value flashes until the setting is
confirmed.
If the setting is not confirmed within
10 seconds, the previously set value is
retained.
Once the temperature has been set, the
display indicates the water temperature in
the tank.
DANGER: Scalding!
A hot water scald potential exists if the water
temperature is set above 50 °C. Children,
disabled, and elderly people are at higher
risk of being scalded.
▶ Always feel water temperature before
bathing or showering.
6720646160-13.1V
Page 26

6 720 808 869 (2014/06) Compress 3000 DW FOO
26 | Appliance status information
Time/Temperature Relationship in Scalds
5.5 Main menu
Calling up the main menu
▶ Press and hold the "Menu" button for max. 3 seconds.
Fig. 22 Calling up the main menu
Once you have called up the main menu, you can select the
following menus/submenus:
• Prog - Operating programs
–Manual
–P1
–P2
–P3
–Hol
–Off
• Set - Settings
–Date
– Prog - programming of the operating times
– Leg - thermal legionella disinfection
– Plus - enhanced comfort function
– Hea - heating by electric assistance
–Purg - purge
– Fset - factory settings
• Info - Information
• Sft - Software version
▶ Use the "+" or "-" button to select the required menu.
▶ Confirm by pressing "ok".
5.6 "Prog" submenu - Operating programs
You can set 6 different operating times in the "Prog" submenu.
• Manual
•P1
•P2
•P3
•Hol
•Off
5.6.1 "Manual" operating mode
Selecting this operating mode puts the appliance into
continuous operation in order to keep the temperature at the
set value for a longer period of time.
Fig. 23 "Manual" operating mode
5.6.2 "P1", "P2" and "P3" operating modes
"P1" operating mode
Selecting this menu causes the appliance to run according to
the factory-set operating times ( "P1" operating mode,
page 26).
"P2" and "P3" operating modes
Selecting this menu causes the appliance to run according to
the user-set operating times ( "P2" and "P3" operating
modes, page 29).
5.6.3 "Hol" mode
In this operating mode, the appliance is switched off 12 hours
after the mode has been set and is switched back on two days
before the end of the set holiday. If necessary, the electric
booster heater is switched on during the set holiday period to
provide "freeze protection".
Time to produce a serious burn
Tempera
-ture
Aged persons/
children under 5 years
Adults
50 °C 2-1/2 minutes More than 5 minutes
52 °C Less than 1 minute 1-1/2 to 2 minutes
55 °C About 15 seconds About 30 seconds
57 °C About 5 seconds About 10 seconds
60 °C About 2-1/2 seconds Less than 5 seconds
62 °C About 1-1/2 second Less than 3 seconds
65 °C About 1 second About 1-1/2 seconds
68 °C Less than 1 second About 1 second
Table 7
6720646160-14.1V
menu
-
ok
+
<3s
To switch to the previous menu:
▶ Press the "Menu" button.
-or-
▶ Do not press any buttons for 15 seconds.
6720646160-37.1V
Page 27

6 720 808 869 (2014/06)Compress 3000 DW FOO
Appliance status information | 27
Fig. 24 "Hol" operating mode
Switching on the "Hol" function
▶ Call up the "Hol" function.
▶Press "ok".
The current month flashes on the display.
▶ Use the "+" and "-" buttons to set the month in which the
holiday ends.
▶Press "ok".
The current day flashes on the display.
▶ Use the "+" and "-" buttons to set the day on which the
holiday ends.
▶Press "ok".
The "Hol" function is active.
Deactivating the "Hol" function manually
To deactivate the "Hol" operating mode before the set date:
▶ Call up the "Prog" menu.
▶Press “ok”
▶ Select "man" (manual mode).
The heat pump will start operating and will initiate a
legionella disinfection.
Tank freeze protection
The electric booster heater starts up when the water
temperature in the tank falls below 5 °C and switches off again
when the temperature reaches 8 °C.
5.6.4 "OFF" operating mode
In this operating mode, the appliance is switched off. If
necessary, the electric booster heater is switched on by itself
for the tank anti-freeze protection function.
The legionella disinfection cycle is ensured once per week
according to the schedule, to ensure that the appliance is ready
to be safely used immediately after being set back to any of the
normal operation modes.
Fig. 25 "OFF" operating mode
5.7 "Set" submenu - Settings
You can set various parameters in the "Set" submenu:
•Date
• Prog - timetable operating programing
• Leg - legionella
• Plus - enhanced comfort function
• Hea - heating by electric assistance
•Purg - purge
• Fset - factory settings
Once the appliance is switched back on, the
"Leg" function ( section 5.7.3) is execu ted
automatically.
In "Hol" mode, the appliance still operates for
12 hours.
The "Hol" operating mode can be set for a
maximum of 4 months.
▶ Check that the date is correct
(section 5.7.1).
▶ The appliance must be connected to the
mains power supply for correctly run the
Holiday mode.
6720804054-01.1V
In case of manual “Hol” deactivation do not
use hot water before the legionella
disinfection is completed, unless the last
disinfection has occurred less than 7 days
ago.
In "OFF" mode the anti-freeze and weekly
LEG functions are assured.
6720646160-10.1V
Page 28

6 720 808 869 (2014/06) Compress 3000 DW FOO
28 | Appliance status information
Fig. 26 "Set" function
5.7.1 Date - Setting the temperature unit, date, time and
day of the week
Setting the temperature unit
On the 1
st
use, the user must select the temperature unit.
Fig. 27 Selecting the temperature units
▶ Press the „+“ or „-“ key to select the temperature unit.
▶ Confirm the selection by using the „ok“ key.
The year flashes on the display.
Setting the date
▶ Set the year by using the “+” or “-” key.
▶ Confirm by pressing “ok”.
The month flashes on the display.
▶ Set the month using the “+” or “-” key.
▶ Confirm by pressing “ok”.
The date is set and the day flashes on the display.
Setting day of the week and the time
▶ Set the day of the week using the „+“ or „-“ key.
▶ Confirm by pressing “ok”.
The hour flashes on the display.
Fig. 28 Setting the day of the week
Fig. 29 Setting the time
▶ Set the hour by using the “+” or “-” key.
▶ Confirm by pressing “ok“.
Display shows the minute digits flashing.
▶ Set the minutes by using „+“ or „-“ key.
▶ Confirm by pressing “ok“.
5.7.2 Prog - Timetable operating programing
In the "Prog" submenu, you can set the operation period for the
heat pump.
Fig. 30 "Prog" function
The following menus can be called up in the "Prog" submenu:
• "P1" operating time (days 1 to 5)
Days 1,2,3,4, and 5 corresponds to Monday ,
Tuesday, Wednesday, Thursday and Friday,
respectively. Days 6 and 7 corresponds to
Saturday and Sunday, respectively.
6720646160-18.1V
6720646160-34.1V
The „am/pm“ selection is only valid if „°F“ is
selected as temperature units.
If set to °C, time will be displayed in the 24
hour format.
6720646160-12.1V
6720646160-11.1V
6720646160-15.1V
Page 29

6 720 808 869 (2014/06)Compress 3000 DW FOO
Appliance status information | 29
• "P1" operating time (days 6 and 7)
• "P2" operating time (days 1 to 5)
• "P2" operating time (days 6 and 7)
• "P3" operating time (days 1 to 5)
• "P3" operating time (days 6 and 7)
• "SIL" operating time (days 1 to 5)
• "SIL" operating time (days 6 and 7)
"P1" operating time
The heat pump only goes into operation during the operating
times set at the factory. These cannot be changed:
Days 1 - 5: [00:00 06:00] and [16:00 19:00]
Days 6 - 7: [02:00 08:00]
Fig. 31 "P1" operating time
"P2" and "P3" operating times
The heat pump runs according to the operating times set by the
user.
Fig. 32 "P2" and "P3" operating times
Setting the operating times for "P2" and "P3"
4 operating times are set for each function:
• 2 operating times for days 1 to 5
• 2 operating times for days 6 and 7
Setting the operating times
▶ Call up function "P2" or "P3" ( section 5.6).
▶Press "ok".
The start of the first operating time flashes.
Fig. 33 Start of the first operating time
▶ Set the start of the operating time by using the "+" and "-"
buttons.
▶Press "ok".
The end of the first operating time flashes.
▶ Set the run time by using the "+" and "-" buttons.
▶Press "ok".
The start of the second operating time flashes.
Fig. 34 Start of the second operating time
▶ Set the start of the second operating time by using the "+"
and "-" buttons.
▶Press "ok".
The end of the second operating time flashes.
▶ Set the run time by using the "+" and "-" buttons.
6720646160-16.1V
6720646160-35.1V
If the start of the second operating time is set
so that it is within the first operating time, the
first operating time ends automatically when
the second operating time starts.
6720646160-39.2V
6720646160-40.2V
Page 30

6 720 808 869 (2014/06) Compress 3000 DW FOO
30 | Appliance status information
▶Press "ok".
The operating time for days 1 to 5 is saved.
Fig. 35 Start of the first operating time for days 6 and 7
▶ Repeat the steps above for the operating times for days 6
and 7.
Once you have set the second operating time for days 6 and
7,
the process of setting the operating times is complete.
Fig. 36 Setting operating times
[1] Start of the first operating time
[2] End of the first operating time
[3] Start of the second operating time
[4] End of the second operating time
Deleting the operating time
▶ Set the start and end of the operating time to the same
time.
The operating time is deleted.
If you do not wish to set a second operating time:
▶ Set the start and end of the second operating time to the
same time.
The display will show "--:--".
Fig. 37
" " symbol is displayed
During appliance operating time.
" " symbol is displayed
Outside of appliance operating time.
Noise reduction mode programming - „Sil“ function
The „Sil“ function allows the selection of the ventilator speed in
order to get lower noise levels.
The device is factory set with the highest fan speed activated.
Fig. 38 „Sil“ function
Setting the noise reduction mode periods
2 noise reduction mode periods will be set in each of the
programming steps:
• 2 periods for days „1 to 5“ and 2 periods for days 6 and 7
6720646160-41.1V
6720646160-38.1V
1 2 3 4
Setting a lower speed will decrease the
appliance efficiency marginally. Activate the
lower speed only in situations where lower
noise levels are to be achieved.
In cases of moderate/strong wind it is highly
recommended to DO NOT use the noise
reduction mode, unless the air outlet of the
appliance is not directly exposed to the wind.
Direct and moderate/strong wind on the air
outlet grille may result in an abnormal
operation of the appliance and consequent
larger heating times.
6720804054-14.1V
6720801244-14.1V
Page 31

6 720 808 869 (2014/06)Compress 3000 DW FOO
Appliance status information | 31
– Start of 1st period
– End of 1st period
– Start of 2nd period
– End of 2nd period
Programming of noise reduction mode periods
▶ Access the „Sil“ function.
▶Press „ok“.
A bar flashes at the start schedule of the 1st noise
reduction mode period and " " is shown.
▶ Use the „+“ and „-“ keys to set the noise reduction mode
start schedule.
▶Press „ok“.
The flashing bar shows now the stop schedule of the 1st
period and " " is shown.
▶ Use the „+“ and „-“ keys to set the noise reduction mode
duration.
▶Press „ok“.
The flashing bar shows the start schedule for the 2nd noise
reduction mode period and " " is shown.
▶ Use the „+“ and „-“ keys to set the noise reduction mode
start schedule of the 2nd period.
▶Press „ok“.
The flashing bar shows now the noise reduction mode stop
schedule for the 2nd period and " " is shown.
▶ Use the „+“ and „-“ keys to set the noise reduction mode
duration.
▶Press „ok“.
The noise reduction mode periods for days „1 to 5" are now
set.
▶ Repeat the above described operations to set the noise
reduction mode periods for days „6 and 7“.
Completed definition of the 2nd noise reduction mode
period for days „6 and 7“ concludes the noise reduction
mode programming.
After programming, the display, in the "Prog" sub-menu,
shows SIL with the time bars indicating the periods when
the noise reduction mode will be activated.
Select only one day period
▶ Select the first period according to the previously
mentioned.
▶ Use "+" and "-" keys to set the the start and finish time to the
same period.
The display shows “----”.
▶ Press „ok“ to confirm.
Switching off the noise reduction mode period
▶ Access the „Sil“ function.
▶Press „ok“.
Display shows the start schedule of the 1st noise reduction
mode period flashing.
▶ Use the „+“ and „-“ keys to set the noise reduction mode
start and finish time to the same period.
The display shows “----”.
Repeat for 2nd noise reduction mode period, in case is set.
▶Press „ok“ to confirm.
▶ Press „ok“ again and hold it for more than 3s until “Prog”
and " " goes off.
The first element of the time bar blinks.
▶ Press “menu” to go out of the SIL mode submenu (no
blinking).
The SIL menu will show no time bar.
5.7.3 „Leg“ function - automatic thermal disinfection
The „Leg“ function allows for the thermal disinfection process.
The bacteria elimination process will be performed
automatically once a week.
Fig. 39 „Leg“ function
Activation of the disinfection mode
temporarily replaces any defined
programming.
DANGER: Beware of burns!
Hot water can cause serious burns.
▶ During thermal disinfection the
temperature may rise up to 72 °C at the
top of the tank.
▶ Warn all users of the danger of burns and
the need to perform thermal
disinfection.
The disinfection process will run until stored
water tank temperature at the bottom
reaches more than 60 °C for at least 35
minutes.
6720646160-17.1V
Page 32

6 720 808 869 (2014/06) Compress 3000 DW FOO
32 | Appliance status information
Weekday programming of the "Leg" function
▶ Select " " by using "+" and "-" keys.
▶Press „ok“.
„Leg“ function activated and day of the week for the
disinfection flashing.
Define the day of the week for disinfection.
▶ Select the day, by using the „+“ and „-“ keys.
▶Press „ok“.
Define the time to start disinfection
▶ Select the time, by using the „+“ and „-“ keys.
▶Press „ok“.
Upon reaching a temperature of 60 °C at the bottom part of the
tank for more than 35 minutes, the appliance returns to normal
operation according with the previous settings.
Manual activation of the „Leg“ function
▶ Access the „Leg“ function and press „ok“.
▶ Select " " by using "+" and "-" keys.
▶Press „ok“.
„Leg“ function activated.
Upon reaching a temperature of 60 °C at the bottom part of the
tank for more than 35 minutes, the device returns to the
previously selected mode.
In case a programed period (P1, P2 or P3) is
selected, the auto-activation of the LEG
mode will be postponed to the next
activation of the selected programed period.
The finalization of the thermal disinfection
will have priority over the end of the
programed period,i.e., in case the
programed period is too short to allow the
conclusion of the LEG mode, the appliance
will be forced to operate until the thermal
disinfection is concluded.
The disinfection cycle manually activated will
not inhibit the automatically scheduled
disinfection cycle.
The legionella disinfection may take
additional 6 to 8 hours to be conclude after
the regular heating assured by the heat pump
cycle. To draw off hot water from the tank
during the last stage of the legionella
disinfection may extend the process. In case
24 hours have passed since the legionella
process has been activated, the appliance
will turn on the auto-boost to speed it up.
Therefore, to maximize the appliance
efficiency, it is recommended to always
program the legionella to a period where no
hot water consumption is expected for a
longer period of time combined with low
energy tariffs: for instance, progra m the start
of the legionella cycle to the end of the
afternoon allowing the appliance to recover
during the evening and conclude the
disinfection during dawn.
In situations where high consumption of hot
water are combined with shorter periods of
no consumption, the water speed selector
should be adjust to position "III" (see
section 4.8) in order to minimize the
probability of not having the disinfection
process concluded in due time (less than
48h after starting).
During the final period of the legionella
control cycle, when the electrical element
ensures the disinfection, the appliance will
remain silent while flashing LEG on the
display screen.
Furthermore, to increase the energy savings
and ensure that the water is not overheated,
the electrical element works intermittently.
Hence, there are periods when the electrical
heater remains off but the unit is still
performing the legionella disinfection.
Page 33

6 720 808 869 (2014/06)Compress 3000 DW FOO
Appliance status information | 33
5.7.4 „PLUS“ - enhanced comfort function
The "PLUS" is a comfort function which is factory set to be
active but can be deactivated.
This function enables the appliance to automatically switch on
the electrical heater together with the heat pump cycle when
the air temperature is below 10 °C, the water temperature at
the bottom is cold, and a rapid temperature decrease at the top
of the tank is detected. Hence, by activating the auto boost, the
appliance will initiate a fast recover at the top of the tank to face
a potential lack of hot water. Once a hot water buffer is created
at the top, the appliance will proceed the recover by using the
heat pump cycle only.
Fig. 40 „PLUS“ function
To deactivate/activate the „PLUS“ function
▶ Access „PLUS“ function and press „ok“.
▶ Use "+" and "-" keys to select "on" or "off" and press "ok" to
confirm selection.
▶ Press "menu" to exit.
"PLUS" is displayed.
5.7.5 „HEA“ - heating by electrical assistance
The „HEA“ function is only available in case of malfunctioning of
the heat pump cycle and requires technical assistance
guidance.
Fig. 41 „HEA“ function
5.7.6 „Purg“ function - purge
„Purg“ function is an auxiliary feature for the system purging
process.
Fig. 42 „Purg“ function
To activate „Purg“ function
▶ Access „Purg“ function and press „ok“. The circulation
pump will start functioning and the timetable is displayed
below "Purg". After 5 minutes the appliance returns to the
normal operation according to the settings previously
selected.
After the LEG cycle has concluded, it is
possible that the appliance will starts
operating even though the temperature
displayed is above the selected set point.
This is an advanced comfort feature
incorporated in to the appliance to heat up
only the lower part of the tank (if required).
Therefore, this feature ensures a quick
temperature recovery for the lower half of
the storage tank when hot water is tapped
after a legionella disinfection cycle and the
top of the tank remains around the set point.
6720807918-03.1V
During the period the "Purg" function is
active, the display shows the remaining time
(minutes) until the procedure is completed.
6720807918-04.1V
6720801967-02.1V
Page 34

6 720 808 869 (2014/06) Compress 3000 DW FOO
34 | Appliance status information
5.7.7 „Fset“ function - factory resetting
„Fset“ function can be used to restore the original factory
settings.
Fig. 43 „Fset“ function
To restore the original factory settings
▶ Access „Fset“ function and press „ok“.
“rset” is displayed.
▶Press „ok“.
After 10 seconds the default settings are restored (
section 5.12).
5.8 „Info“ - information
The „Info“ sub-menu displays the cumulative consumption.
Fig. 44 „Info“ function
Displaying the consumption
▶ Access the „Info“ function and press „ok“.
The cumulative consumption in kWh is displayed.
„reset“ consumption
Display showing the cumulative consumption.
▶ Press „-“.
„del“ indication is displayed.
Fig. 45 „del“ function
▶ Press „ok“.
The meter restarts the count.
5.9 „Sft“ - software version
The „Sft“ sub-menu allows the visualization of the current
software version.
Fig. 46 „Sft“ function
Displaying the software version
▶ Access the „Sft“ sub-menu and press „ok“.
▶ Press “+” and “-” keys to navigate between 4 characters
and 4 digits.
The software version is identified by 4 characters followed
by 4 digits (Ex: HPAF 0836).
6720804054-10.1V
6720646160-36.1V
6720646160-42.1V
6720808869-14.1V
Page 35

6 720 808 869 (2014/06)Compress 3000 DW FOO
Appliance status information | 35
5.10 One shot boost and auto boost at negative
temperatures
In order to guarantee faster recovering times when the air
temperature is low and the thermal power of the heat pump
cycle decreases, the appliance is equipped with two boost
functions:
• auto-boost
• one shot boost
Auto-boost function
The auto-boost function switches on the electric heater
together with the heat pump cycle when the air temperatures
drops below 0 °C.
As soon as the air temperature rises above 0 °C the electric
element is switched off and the heating is ensured by the heat
pump cycle alone.
Below 0 °C air temperature, when the auto-boost is on,
typically only one third of the heating is provided by the heat
pump cycle.
The auto-boost is switched on as well, when the LEG
disinfection is not finalized in 24h.
One shot boost function
The one shot boost needs to be manually activated and is
automatically deactivated once the water reaches the set
point.
Activation and deactivation of the one shot boost function
▶ Press and hold the "+" and "-" buttons together for more
than 3 seconds to activate or deactivate the one shot
boost.
When the auto-boost function or the one shot boost function is
active, "FULL" is displayed on the HMI, alternating with the to
tank temperature.
Fig. 47 Auto-boost or one shot boost active
The appliance efficiency decreases when
boost is active, as part of the heating is
ensured by the backup electric heater. For
this reason, the auto boost is limited to very
low air temperatures and the one shot boost
is recommended to be used only when large
loads of hot water were drawn and a faster
recovering time is required to fulfill the next
hot water needs.
Note that, between 0 °C and 15 °C air
temperature when the boost is active the
heat pump cycle ensures only 1/3 to 1/2 of
the heating.
For higher air ambient temperatures the
fraction of the heating ensured by the heat
pump cycle increases due to the higher
thermal power.
When the boost was activated automatically
(air temperature below 0 °C, activated by
PLUS function, LEG cycle running for more
than 24h) it can not be manually deactivated.
6720646160-08.1V
Page 36

6 720 808 869 (2014/06) Compress 3000 DW FOO
36 | Appliance status information
5.11 Troubleshooting
This device is equipped with a troubleshooting function. Error
indication is performed by means of a code (Table 8, page 43)
corresponding to the error indication symbol in the digital
display (Fig. 18, [6]). In most cases, the device will only return
to normal functioning following elimination of the cause of the
malfunction and resetting of the device.
To identify the malfunction, see chapter 7.
Fig. 48 Error code
Resetting the system
▶ Press the „ok“ key and hold it down for more than 3
seconds.
Fig. 49 Resetting the system
5.12 Factory configurations
Upon setting the temperature units and timetable, the device
will operate according to the factory set values:
• Manual functioning: „manual“ ( section 5.3)
•Set point: 56°C
• Legionella: Week day 6 and Time 00:00
•PLUS: ON
• Noise reduction mode: Disable
Fig. 50 Initial menu
6720800765-04.1V
menu
-
ok
+
6720646160-21.1V
menu
-
ok
+
>3s
6720807918-05.1V
Page 37

6 720 808 869 (2014/06)Compress 3000 DW FOO
Appliance status information | 37
5.13 Controls
Fig. 51
menu
-
ok
+
6720808869-11.2V
> 3 s
FULL
One shot
boost
-
+
Set
-
+
Prog
Info
menu
-
ok
+
-
+
kWh
ok
ok
ok
Man
-
+
P1
-
+
P2
-
+
P3
-
+
HOL
-
+
OFF
-
+
5.6.1
5.6.2
5.6.4
5.6.3
5.6.2
5.6.2
5.6
5.7
5.8
< 3 s
Prog
-
+
5.7.1
Date
-
+
5.7.2
Leg
-
+
5.7.3
5.10
-
+
Sft
5.9
Plus
-
+
5.7.4
Hea
Purg
-
+
5.7.5
5.7.6
-
+
Fset
-
+
5.7.7
Page 38

6 720 808 869 (2014/06) Compress 3000 DW FOO
38 | Maintenance and repair
6 Maintenance and repair
Properly maintained, your water heater will provide years of
dependable trouble-free and economic service.
It is suggested that a routine preventive maintenance program
is established and strictly followed by the user.
6.1 Periodic Inspection
It is recommended that a periodic inspection of the operating
controls, heating elements and wiring should be made by
service personnel qualified in electric appliance repair.
Most electrical appliances, even when new, make some sound
when in operation. If the hissing or singing sound level
increases excessively, the electric heating element may require
cleaning. Contact a qualified installer or service agent.
Additionally it is also recommended that the evaporator and
refrigeration circuit are checked every two years for dust and
residues. In dusty environments it may be necessary to have
the appliance checked and cleaned on a more regular basis.
6.2 Temperature and pressure relief valve (PTR
Valve)
At least every 6 months:
▶ Lift and release the lever handle on the temperature and
pressure-relief valve, to make certain the valve operates
freely.
Allow several liters to flush through the discharge line to an
open drain.
Never replace the PTR Valve with one which has a higher
pressure rating than is specified for your water heater.
If the valve does not discharge water when the release lever is
opened or does not seal properly when release lever is closed,
replacement by an authorised person must be arranged
without delay.
The PTR Valve is not serviceable.
6.3 Flushing tank
A water heater’s tank can act as a settling basin for solids
suspended in the water. It is therefore not uncommon for hard
water deposits to accumulate in the bottom of the tank.
It is advisable to periodically flush the tank of these deposits by
draining and then refilling the unit (see section 6.4).
6.4 Draining the Water Heater
WARNING:
The water heater should be serviced by a
qualified professional and in accordance
with the Plumbing Standard AS/NZS
3500.4 and local authority requirements.
WARNING:
Before manually operating the relief valve,
make certain no one will be exposed to the
danger of coming in contact with the hot
water released by the valve. The water may
be hot enough to create a scald hazard. The
water should be released into a suitable
drain to prevent injury or property damage.
It is part of normal operation for the
Temperature and Pressure Relief valve to
discharge periodically. This is due to thermal
expansion in a closed water system. If this
discharge becomes excessive and runs
continuously, contact plumbing contractor.
Do not plug the relief valve outlet.
DANGER:
Before manually operating the relief valve,
make certain no one will be exposed to the
hot water released by the valve. The water
drained from the tank may be hot enough to
present a scald hazard and should be
directed to a suitable drain to prevent injury
or damage.
CAUTION:
Shut off power to the water heater before
draining water.
CAUTION: Risk of scalding!
Check the appliance's DHW temperature
before opening the safety valve.
▶ Wait until the water temperature has
dropped enough to prevent burns and
other damage.
Large volumes of water will drain from the
cold water inlet (>270 liters).
▶ Ensure proper drainage of water.
Page 39

6 720 808 869 (2014/06)Compress 3000 DW FOO
Maintenance and repair | 39
▶ Close cold water supply.
▶ Open a hot water tap (preferably one installed at the same
level as the appliance) to relieve pressure and wait until
flow substantially decreases.
The pressure can also be released by manually opening the
PTR valve after ensuring all safety conditions are met to
avoid any scald hazard (section 6.2)
▶ After ensuring a proper drainage solution, remove cold
water inlet connection and wait until water is drained.
6.5 Vacation and Extended Shutdown
If the water heater is to remain idle for an extended period of
time, the power and water to the appliance should be turned off
to conserve energy and prevent the build up of dangerous
hydrogen gas.
The water heater and piping should be drained if they might be
subjected to freezing temperatures. After a long shutdown
period, the water heater’s operation and controls should be
checked by qualified service personnel. Make certain the water
heater is completely filled again before placing it in operation.
6.6 Clearing the Condensation Drain Tubes
The condensate drain is located at the back of the water heater.
If blocked, water will spill down the outside of the unit.
▶ Remove the condensate drain pipe.
▶ Clear any debris and reattach.
▶ Periodically inspect the drain line and clear any debris that
may have collected in the line.
▶ See Installation Instructions for more information.
6.7 Refrigerant circuit
6.8 Anode Rod servicing
A water heater anode rod is the most important safeguard any
storage tank has against corrosion and premature failure.
Inspecting the anode rod is therefore very important.
Sacrificial anodes are designed to deteriorate overtime. Most
water heating industry professionals recommend inspecting
the anode yearly.
Homes with salty or softened water supplies should consider
more frequent inspection. When in doubt consult a local water
heating professional.
▶ Arrange for an authorised person to inspect the anode and
replace it if required.
6.9 Checking/replacing the magnesium anode
The internal wall of the DHW storage tank is coated with a
double glass lining. The coating is designed for normal quality
water (section 4.8.1, page 21). When using more corrosive
water, the warranty only applies if additional safety measures
(i.e. dielectric joints) have been taken, and the magnesium
anode is checked more frequently.
To check the protective anode:
▶ Isolate the appliance from the power supply.
▶ Isolate appliance from water supply.
▶ Open a hot water tap (preferable one install at the same
level as the appliance) to relieve pressure and wait until
flow substantially decreases.
The pressure can be released as well by manually open the
PTR valve after ensuring all safety conditions to avoid any
scald hazard (section 6.2)
▶ Remove the anode rod protective cap.
Note: refer to the Hydrogen Gas Caution in
the Operating Instructions (section 5.1).
NOTICE: Refrigerant leak!
▶ Repairs to the refrigerant circuit (e.g. to
the compressor, condenser,
evaporator, expansion vessel) may only
be carried out by an authorised
contractor.
The appliance is protected against corrosion
by an internal magnesium anode.
WARNING: Damage to the appliance!
The magnesium anode must be installed
before commissioning the appliance.
WARNING: Damage to the appliance!
Appliances operated without this protection
are excluded from our warranty.
▶ Check the magnesium anode yearly and
replace it if required.
Page 40

6 720 808 869 (2014/06) Compress 3000 DW FOO
40 | Maintenance and repair
▶ Remove the anode rod.
Fig. 52 Check state of magnesium anode
▶ Visually inspect and replace it if necessary.
▶ Refill tank and purge the system (section 4.8).
6.10 Service menu
Calling up the service menu
▶ Press and hold "menu" and "ok" simultaneously for 3
seconds.
Fig. 53 „Service“ menu
When the service icon " " appears, the service
functions can be accessed.
▶ Use "+" or "-" key to select the required menu.
▶ Confirm by pressing "ok".
"0d" function
The "0d" function can be used to check the water temperature
set value.
Fig. 54 DHW outlet temperature
"1d" function
The "1d" function can be used to check the temperature at the
top part of the storage tank.
Fig. 55 Temperature at the top part of the storage tank
"2d" function
The "2d" function can be used to check the temperature of the
water entering the module and comming from the bottom of the
tank.
Fig. 56 Temperature at the bottom part of the storage tank
This menu is meant to assist the contractor
and may be used by the contractor only.
6720807918-09.2V
1.
2.
menu
-
ok
+
6720807918-10.1V
> 3 s
The value displayed only corresponds to the
bottom temperature if the water pump is
working: when the compressor is ON; during
all the LEG cycle; or when the "Purg" function
is active. Otherwise the value shown
corresponds to the temperature of the
stagnated water inside the piping at the
module.
6720646160-29.1V
6720646160-01.1V
6720646160-02.1V
Page 41

6 720 808 869 (2014/06)Compress 3000 DW FOO
Maintenance and repair | 41
"3d" function
The "3d" function can be used to check the ambient air
temperature.
Fig. 57 Ambient air temperature
"4d" function
The "4d" function can be used to check the evaporator fins
temperature.
Fig. 58 Evaporator fins temperature
"5d" function
The "5d" function can be used to check the current
consumption of the appliance.
Fig. 59 Current consumption of the appliance
"6d" function
Suppressed.
"7d" function
The "7d" function is not used.
"8d" function
The "8d" function can be used to check the number of gas
defrosts performed.
Fig. 60 Number of gas defrost cycles
Functions "1F" to "10F"
The functions "1F" to "10F" can be used to display the last 10
faults that occurred.
•"1F" - last fault
• "2F" - second to last fault
• .....
• "10F" - tenth to last fault
Fig. 61 Last fault
"EE" function
The "EE" function can be used to delete the fault history.
Fig. 62 Deleting the service history
6720646160-03.1V
6720801659-02.1V
6720646160-04.2V
6720808869-13.1V
6720646160-31.1V
6720646160-32.1V
Page 42

6 720 808 869 (2014/06) Compress 3000 DW FOO
42 | Maintenance and repair
"AL" function
The "AL" function can be used to show all the display's
segments.
Fig. 63 Showing all the display's segments
Exit “Service menu”
▶Press “menu” key.
6720646160-33.1V
Page 43

6 720 808 869 (2014/06)Compress 3000 DW FOO
Display | 43
7Display
7.1 Fault display
Installation, maintenance and repairs may only be carried out by an authorised contractor. The following table lists the fault codes.
Display Description Solution
E01 Fault in the top storage tank temperature sensor ▶ Notify authorised contractor
E02 Fault in the bottom storage tank temperature sensor ▶ Notify authorised contractor
E03 Fault in the temperature sensor at the air inlet ▶ Notify authorised contractor
E05 Fault in the temperature sensor at the evaporator fins ▶ Notify authorised contractor
E09 Incorrect system purging
Water pump blocked (water not recirculating)
Hydraulic circuit blocked (water not recirculating)
System unpurged due to water shortage
▶ Notify authorised contractor
▶ Reset the system
E10 Heating element faulty
Fault in the high limit safety cut-out
▶ Notify authorised contractor
E11 Fault in the fan
Leak in refrigerant circuit
Fault in the compressor
Fault in the expansion valve
Fault in the dry filter
▶ Reset the system and notify authorised contractor
E13 Fault in the positioning of top storage tank temperature
sensor
▶ Notify authorised contractor
E14 Fault in the fan
Air flow blockage
▶ Notify authorised contractor
Table 8 Fault codes
Page 44

6 720 808 869 (2014/06) Compress 3000 DW FOO
44 | Display
7.2 Displays
Display Description Note
E04 Temperature in storage tank 80 °C ▶ Isolate electrical connection
▶ Notify authorised contractor
E06 Hold down setting keys longer than 30 seconds ▶ Release keys
LEG Thermal disinfection process running When temperature reaches and holds 60 °C for 35 mins,
the appliance goes back to the mode previously selected.
HOT Temperature of inlet air 40 °C Occurs when air inlet is higher than 40 °C or lower than
-7 °C, respectively.
The appliance will automatically switches off the heat
pump cycle and operates with the electrical heater if
heating is required.
COLD Temperature of the inlet air -7 °C
LFLO Appliance may be with low air flow which will transform
into an E14 if conditions persist for 24 hours
▶ Notify authorised contractor
Table 9 Display indications
Page 45

6 720 808 869 (2014/06)Compress 3000 DW FOO
Electrical diagram | 45
8 Electrical diagram
Fig. 64
[1] Temperature sensor for air inlet
[2] Storage tank temperature sensor for DHW
[3] Storage tank temperature sensor for cold water
[4] High-pressure pressure switch
[5] Compressor startup capacitor
[6] Compressor
[7] Compressor thermal protector
[8] Low-pressure pressure switch
[9] DHW circulation pump
[10] Air fan
[11] Heating element thermal cut-out
[12] Heating element
[13] Control unit
[14] Temperature sensor at evaporator fins
[15] Solenoid valve
1
2
3
13
6720807918-01.1V
12
11
6
8
4
7
9
M
M
5
10
M
SV
15
14
Page 46

6 720 808 869 (2014/06) Compress 3000 DW FOO
46 | Environmental protection
9 Environmental protection
Environmental protection is a basic company strategy of
Bosch. The quality of our products, profitability and
environmental protection are equal-ranking goals for us. Laws
and regulations concerning environmental protection are
strictly observed. We use the best possible technology and
materials, under economic considerations, to protect the
environment.
Packaging
We participate in the recycling program of the respective
country to ensure optimal recycling. All of our packaging
materials are environmental-friendly and can be recycled.
Old appliances
Old appliances contain valuable materials that should be
recycled. The assemblies can be easily detached and synthetic
materials are marked accordingly. The assemblies can
therefore be sorted out and passed on for recycling or disposal.
At the end of the service life of this appliance and prior to it's
environmental disposal, a person qualified to work with
refrigerant circuits must recover the refrigerant from within the
sealed system.
WARNING:
The refrigerant must not be vented to the
atmosphere.
Page 47

6 720 808 869 (2014/06)Compress 3000 DW FOO
Warranty details | 47
10 Warranty details
Robert Bosch (Australia) Pty Ltd Thermotechnology
Division
Voluntary Repair or Replacement Warranty for Bosch Heat
Pump
All Bosch products are carefully checked, tested and certified
to Australian and New Zealand standards.
1. Warranty
Bosch warrants, at its option, to repair or replace your water
heater or relevant part thereof (Product) if such Product are
faulty or defective in manufacture or materials during the
warranty period specified below.
The warranty period commences on the date of purchase. If the
date of original purchase cannot be determined, then the
wa rran ty p erio d wi ll com menc e si x (6) months after the date of
manufacture stamped on the Product. Bosch may require
evidence to verify the date of purchase.
This warranty only covers repair or replacement of defective
Product (including labour costs where indicated). It does not
cover:
• any costs incurred by the end user in normal or scheduled
maintenance of the Product; or
• subject to any law to the contrary, any damage to property,
personal injury, direct or indirect loss, consequential
losses or other expenses arising from breach of this
warranty. Any end user concerned with this exclusion
should consider the "Important Note: Mandatory Australian
Consumer Law statement” above.
2. Warranty periods & coverage
Bosch will provide warranty service for Product purchased and
installed in Australia and New Zealand as follows:
"Parts & Labour" means free of charge repair and/or
replacement, including labour.
"Parts only" means a replacement heat exchanger, free of
charge. All installation and repair labour costs are the
responsibility of the owner.
"Domestic use" warranty period applies to Product installed
to supply hot water for use by individuals in domestic
dwellings. For Product used for all other uses, the commercial
use warranty period will apply. This includes, without
limitation, installations such as centralised or bulk hot systems,
hotels, sporting complexes, caravan parks, laundry facilities,
restaurants and cafes.
For “Parts only” warranty, the end user will be charged for
service call costs and service technician fees in effecting the
replacement.
For valid claims within "Parts & Labour" warranty periods, the
end user will not be charged for costs associated with making a
warranty claim, including service call costs, any service
technician fees or the cost of replacement parts and freight,
provided that:
Important Note: Mandatory Australian
Consumer Law statement
If you have purchased your product in
Australia, you should be aware that:
This warra nty i s prov ided in a ddit ion to ot her
rights and remedies held by a consumer at
law. Our goods come with guarantees that
cannot be excluded under the Australian
Consumer Law. You are entitled to a
replacement or refund for a major failure and
for compensation for any other reasonably
foreseeable loss or damage. You are also
entitled to have the goods repaired or
replaced if the goods fail to be of acceptable
quality and the failure does not amount to a
major failure.
Important Note: New Zealand law
If you have purchased your product in New
Zealand, you should be aware that:
This warranty is supplemental to any other
rights and remedies you have under the
Consumer Guarantees Act 1993 NZ, unless
your purchase is made for commercial
purposes, in which case Bosch excludes all
consumer guarantees implied in the
Consumer Guarantees Act 1993 NZ in
respect of your product.
Components
The period after
purchase within which
the fault must appear
What Bosch will
do (see below for
definitions)
Domestic Use (see below for definition)
All
components
Year 1 to 2 Parts & Labour
Water tank Year 2 to 5 Parts only
Commercial Use (see below for definition)
All
components
Year 1 to 1 Parts & Labour
Water tank Year 1 to 1 Parts only
Table 10
Page 48

6 720 808 869 (2014/06) Compress 3000 DW FOO
48 | Warranty details
• the Product is located within the usual operating area of an
authorised service technician; and
• the Product has been installed according to the installation
instructions so as to provide adequate service access.
If the Product is not located within the usual operating area of
an authorised service technician, the end user will be required
to pay the service call costs associated with a service call under
this voluntary warranty.
Notwithstanding the above, if the Product has not been
installed in accordance with the installation instructions in
regards to access, or has been otherwise installed in location
where service access is difficult, the end user will be required
to pay charges associated with the difficult access. This
includes, but is not limited to, the removal of walls or doors to
gain access and the use of specialised equipment to move the
Product or components to safe working levels. Where the
Product cannot be safely accessed, Bosch may refuse to
service the Product under this voluntary warranty.
For invalid claims under this voluntary warranty, the end user
will be liable for the costs of making the warranty claim
including any service call costs.
3. Warranty exclusions
This voluntary warranty is subject to the following conditions:
• The Product must have been installed and correctly
commissioned by an authorised and licensed installer in
compliance with applicable Australian Plumbing and Gas
Standards. Proof may be required of correct
commissioning of the Product (such as certificate of
compliance). Claims for failures due to incorrect
installation or commissioning are not covered under this
voluntary warranty and may be rejected by Bosch.
• Where a Product or part thereof is replaced or repaired
under this voluntary warranty, the balance of the original
voluntary warranty will apply. The replacement Product or
part does not carry a new voluntary warranty.
• The Product must have its original serial numbers and
rating labels intact.
• The warranty does not extend to any Product that have
been completely or partially disassembled.
• These warranty terms cannot be amended except in writing
by an authorised officer of Bosch.
• The warranty only applies to Product installed for an end
user in Australia or New Zealand and purchased from
Bosch or from a reseller where the Product have been
originally sold by Bosch.
• Any claim made under this voluntary warranty meets the
requirements set out below in the “How to Make a Warranty
Claim” section.
4. Warranty Exclusions
This warranty will not apply to a defect or fault to the extent to
which it arises:
• due to storage, handling or installation of the Product
otherwise than in accordance with instructions provided
for the Product by Bosch or without reasonable care,
including installation of a Product which is of inappropriate
size or type for the intended purpose;
• due to operation, use or maintenance of the Product
otherwise than in accordance with instructions provided
for the Product by Bosch or without reasonable care,
including use of the Product with faulty or unsuitable
plumbing, water pressure, power or gas supply;
• due to accidental damage or use of the Product for a
purpose or in environmental conditions for which the
Product were not designed or sold, or use of the products
outside the specified or normal operating ranges for such
Product;
• as a result of changes which occur in the condition or
operational qualities of the Product due to climate or other
environmental influence, foreign material contamination or
water entry or as a result of exposure to excessive heat or
solvents or because of use of non-potable water or bore
water in the Product or damage as result of an Act of Nature
including but not limited to storms, fires, floods and
lightning strikes;
• from normal wear and tear or when replacement or repair
of parts would be part of normal maintenance or service of
the Product or where the damage is only to surface coating,
varnish or enamel;
• as a result of repairs, alterations or modifications to the
Product which have been performed by a person who is not
suitably qualified and experienced to perform works on the
Product; or
• from the use of any spare parts not manufactured, sold or
approved by Bosch in connection with the repair or
replacement of Product.
This voluntary warranty does not apply to damage that has
been caused by continued use of a Product after it is known, or
would have been known with regular servicing, it is defective.
Failure to service Product in accordance with
recommendations in instruction manuals for Product may
result in a warranty claim under this voluntary warranty
being rejected by Bosch. Bosch alerts end users that
instruction manuals for Product contain specific
recommendations for servicing and safety checks to be
carried out on Product.
5. Wrong Deliveries and Transit Damage
Wrong deliveries, incorrect or damaged packing and transit
damage claims are not warranty claims. Such cases should be
Page 49

6 720 808 869 (2014/06)Compress 3000 DW FOO
Warranty details | 49
directed to Bosch's Customer Service line in Australia on ph:
1300 307 037 or in New Zealand on ph: 0800 543 352.
6. How to Make a Warranty Claim
If a Product fails within the warranty period, the end user must
stop using the Product and make a claim as soon as possible, in
any event before the end of the Warranty Period (see Deadlines
for Submitting Warranty Claims below).
To make a warranty claim under this voluntary warranty, call
the Bosch Customer Contact Centre (in Australia on ph: 1300
307 037 or in New Zealand on ph: 0800 543 352). Please be
ready to provide the model and serial number, date of
installation, purchase details and a full description of the
problem. Alternatively, for claims in Australia, you can post
details of your claim to Robert Bosch (Aust) Pty Ltd, Attn TT
Warranty Department, Locked Bag 66, Clayton Sth, Victoria,
3169. Claims received by post will take longer to process and
we encourage you to call. Bosch may refer you to one of its
Bosch Warranty Authorised Service Dealers.
Proof of purchase and purchase date, as well as proof of
installation and proper commissioning by a licensed installer,
may be required by Bosch or an authorised service technician.
All warranty service calls will be conducted by an authorised
service technician during normal business hours. Bosch will
not accept claims under this voluntary warranty for attendance
and repair of the Product by third parties not authorised by
Bosch.
7. Deadlines for Submitting Warranty Claims
Bosch aims to rectify genuine quality problems as a priority.
This is generally achieved by investigating why defective
products have failed and by introducing immediate corrective
action measures to prevent re-occurring warranty failures. It is
therefore critical that all warranty claims are promptly
submitted to Bosch as soon as the product fails, and in any
event before the end of the warranty period.
8. Product Liability and Product Safety
Bosch should be informed immediately about any potential
product safety concerns within and outside the warranty
period. Bosch is well aware of its product liability and product
safety obligations and responsibilities. It is our aim to ensure
appropriate product safety standards are met in order to avoid
injury, loss and damage caused by defects in any Product.
9. Privacy
Bosch is required to seek personal information from an end
user who seeks to make a claim under this warranty.
Such personal information may be used by Bosch and/or any
authorised service technician (who is authorised to process
warranty claims and/or carry out warranty repairs on behalf of
Bosch) for the purpose of processing such warranty claim and
also for the provision of customer support and further
information about Bosch’s products and services (Purpose).
If an end user does not wish to provide Bosch and/or its
authorised service technician with personal information,
Bosch may be unable to process the end user’s warranty claim
or to provide the end user with additional customer support,
services and information.
Bosch is committed to protecting the privacy of personal
information and will act in compliance with applicable privacy
laws, including the National Privacy Principles under the
Australian Privacy Act 1988 (Cth) (as amended) and New
Zealand’s Information Privacy Principles described in the
Privacy Act 1993 (NZ).
Bosch takes security measures in order to protect any personal
information collected in the warranty claim process against
manipulation, loss, destruction, access by unauthorized
persons or unauthorized disclosure.
Bosch will not disclose any personal information to third
parties other than for the Purpose or except as required by law.
An end user has the right to access the personal information
Bosch or its authorised service technician hold about them.
The end user can request to see, change or modify the personal
information held about them, or withdraw consent for its
usage, by contacting Bosch at the Bosch Contact Details below.
10. Bosch Contact Details
This warranty is offered by Robert Bosch (Australia) Pty Ltd
(ACN 004 315 628) of 1555 Centre Road, Clayton, Victoria
3168. Please call the Customer Contact Centre on 1300 30 70
37 in Australia or 0800 543 352 in New Zealand if you have
any queries in relation to this warranty or contact us using the
online form at www.bosch-climate.com.au.
Page 50

6 720 808 869 (2014/06) Compress 3000 DW FOO
50 |
Notes
Page 51

6 720 808 869 (2014/06)Compress 3000 DW FOO
| 51
Notes
Page 52

Robert Bosch (Australia) Pty Ltd
Thermotechnology Division
1555 Centre Road
Clayton Victoria 3168
Australia
Phone: 1300 30 70 37
Fax: 1300 30 70 38
www.bosch-climate.com.au
Phone: 0800 54 33 52
Fax: 0800 54 33 55
www.bosch-climate.co.nz
New Zealand
6720809948
 Loading...