

Bosch BIS 2.3 Installation Manual

BIS 2.3 - Access Engine
en Installation manual


BIS 2.3 - Access Engine Table of Contents | en 3
Bosch Sicherheitssysteme GmbH Installation manual F.01U.028.713 | V 2.3.0.1 | 2009.11
Table of Contents
1 Introduction 8
2Upgrade 10
2.1 Upgrade matrix 10
2.2 BIS upgrade since version 2.1 or higher 10
2.3 Updating Controller (LAC) Software 15
3 Server installation 17
3.1 Standalone system 18
3.2 Distributed system 19
3.2.1 Login server 20
3.2.2 Remote server 21
3.2.3 Configuring a distributed system 22
3.3 Server workstation 23
4 System configuration 24
4.1 Starting the Configuration Browser 24
4.2 Setting up a configuration 25
4.2.1 Creating an initial configuration 25
4.2.2 Creating additional configurations 27
4.3 Loading a configuration 29
4.4 Copying configuration changes 30
4.5 Setting up BIS user 31
4.6 Further Settings 31
4.6.1 Definition of Custom fields 31
4.6.2 PIN Code Settings 32
4.6.3 Card encoding 32
4.6.4 Card readers at Access Engine workstations 32
5 Setting up additional workstations 33
5.1 General Settings 33
5.1.1 Installation at a workstation 33
5.1.2 Setting up the Configuration Browser 34

4 en | Table of Contents BIS 2.3 - Access Engine
F.01U.028.713 | V 2.3.0.1 | 2009.11 Installation manual Bosch Sicherheitssysteme GmbH
5.1.3 Configuring Internet Explorer 35
5.1.4 Connecting a dialog reader 38
5.2 Setting up Card Personalization 41
5.2.1 Software 41
5.2.2 Hardware 42
5.2.3 Creating Badge Layouts 42
5.2.4 Printing Badges 43
5.2.5 Creating card layouts 46
5.2.6 Creating cards 47
6 User administration 48
6.1 Standard users 49
6.2 User and workstation profiles 49
6.2.1 Setting up user profiles 49
6.2.2 Setting up workstation profiles 51
6.2.3 How profiles work 54
6.3 Creating new Access Engine users 58
6.4 Users of a server workstation 60
6.4.1 User with Administrator profile 60
6.4.2 User with new profile 61
6.5 Users of other workstations 62
6.5.1 Existing user on new workstation 62
6.5.2 New user on existing workstation 63
6.5.3 New user on new workstation 63
7 Connecting the controllers 65
7.1 General 65
7.1.1 Creating the controllers in the device editor 66
7.2 Ethernet 67
7.3 I/O - Extension boards 67
7.3.1 Hardware installation 67
7.3.2 Software configuration 67
8 Connecting readers and doors 69
8.1 Readers for AMC2 69
8.2 Interface allocations 70

BIS 2.3 - Access Engine Table of Contents | en 5
Bosch Sicherheitssysteme GmbH Installation manual F.01U.028.713 | V 2.3.0.1 | 2009.11
8.2.1 Printout of the configuration data 70
8.2.2 Installation documentation 72
9 Setting System Parameters with SPEdit 73
9.1 Starting the SPEdit 73
9.2 Display the Last Access in the Status Bar 74
9.3 Listbox or Search Dialog for Companies 74
9.4 Making Company a required field 75
9.5 Toolbar of the Reports Preview 75
9.6 Valid-From Date for Authorizations 76
9.7 Valid-From Date for Lockouts 77
9.8 Visitor Profiles Only 77
10 DMS - Data Management System 78
10.1 System operation 78
10.1.1 Starting 78
10.1.2 Closing 81
10.1.3 The master console 81
10.1.4 Process control 86
10.2 Server Processes 90
10.2.1 Summary 90
10.2.2 Loggifier 92
10.2.3 ACSP - process for access control 93
10.2.4 Transactors 96
10.2.5 AEOPC 101
10.2.6 MDS (QueryServer) 101
10.2.7 Report Server (REPS) 102
10.2.8 State Information Process (SIPServer) 103
10.2.9 Time Attendant Account Exchange (TAccEXC) 104
10.3 Batch processes 104
10.3.1 Overview 104
10.3.2 Lock-Out Process (LOP) 105
10.3.3 Authorization Monitoring Process (AMP) 105
10.3.4 Cleanup Visitor Data (CLV) 105
10.3.5 Cleanup Utility (CLU) 106
10.3.6 Backup 107

6 en | Table of Contents BIS 2.3 - Access Engine
F.01U.028.713 | V 2.3.0.1 | 2009.11 Installation manual Bosch Sicherheitssysteme GmbH
11 MAC - Main Access Controller 108
11.1 Functions 108
11.1.1 Basic functions 108
11.1.2 Access Control functions 108
11.2 Data defintions 109
11.3 Operating the MAC 111
11.3.1 Startup 111
11.3.2 Shutdown 111
11.3.3 Warm start 112
11.3.4 Cold start 112
11.4 Process Control 113
11.5 The processes of the MAC 115
11.5.1 MAC-Process: Master 116
11.5.2 MAC-Process: Messenger 116
11.5.3 MAC-Process: System 117
11.5.4 MAC-Process: AC 117
11.5.5 MAC-Process: DMS 118
11.5.6 MAC-Process: LAC 119
11.5.7 MAC-Process: Info 120
12 Setting up Video Verification 121
13 Backup and Restore 135
13.1 Standalone-Server 135
13.1.1 Backup 135
13.1.2 Restore 136
13.2 Remote- and Login-Server 138
13.2.1 Backup 138
13.2.2 Restore 138
14 Troubleshooting 141
14.1 User administration 141
14.1.1 Dialog system of the Access Engine does not start 141
14.1.2 Login is denied 141
14.1.3 Empty Access Engine Internet Explorer 142
14.2 System settings 143

BIS 2.3 - Access Engine Table of Contents | en 7
Bosch Sicherheitssysteme GmbH Installation manual F.01U.028.713 | V 2.3.0.1 | 2009.11
14.2.1 Change the timezone 143
14.2.2 Regional and Language Options 143
14.3 Date and time formats 144
Index 146
8 en | Introduction BIS 2.3 - Access Engine
F.01U.028.713 | V 2.3.0.1 | 2009.11 Installation manual Bosch Sicherheitssysteme GmbH
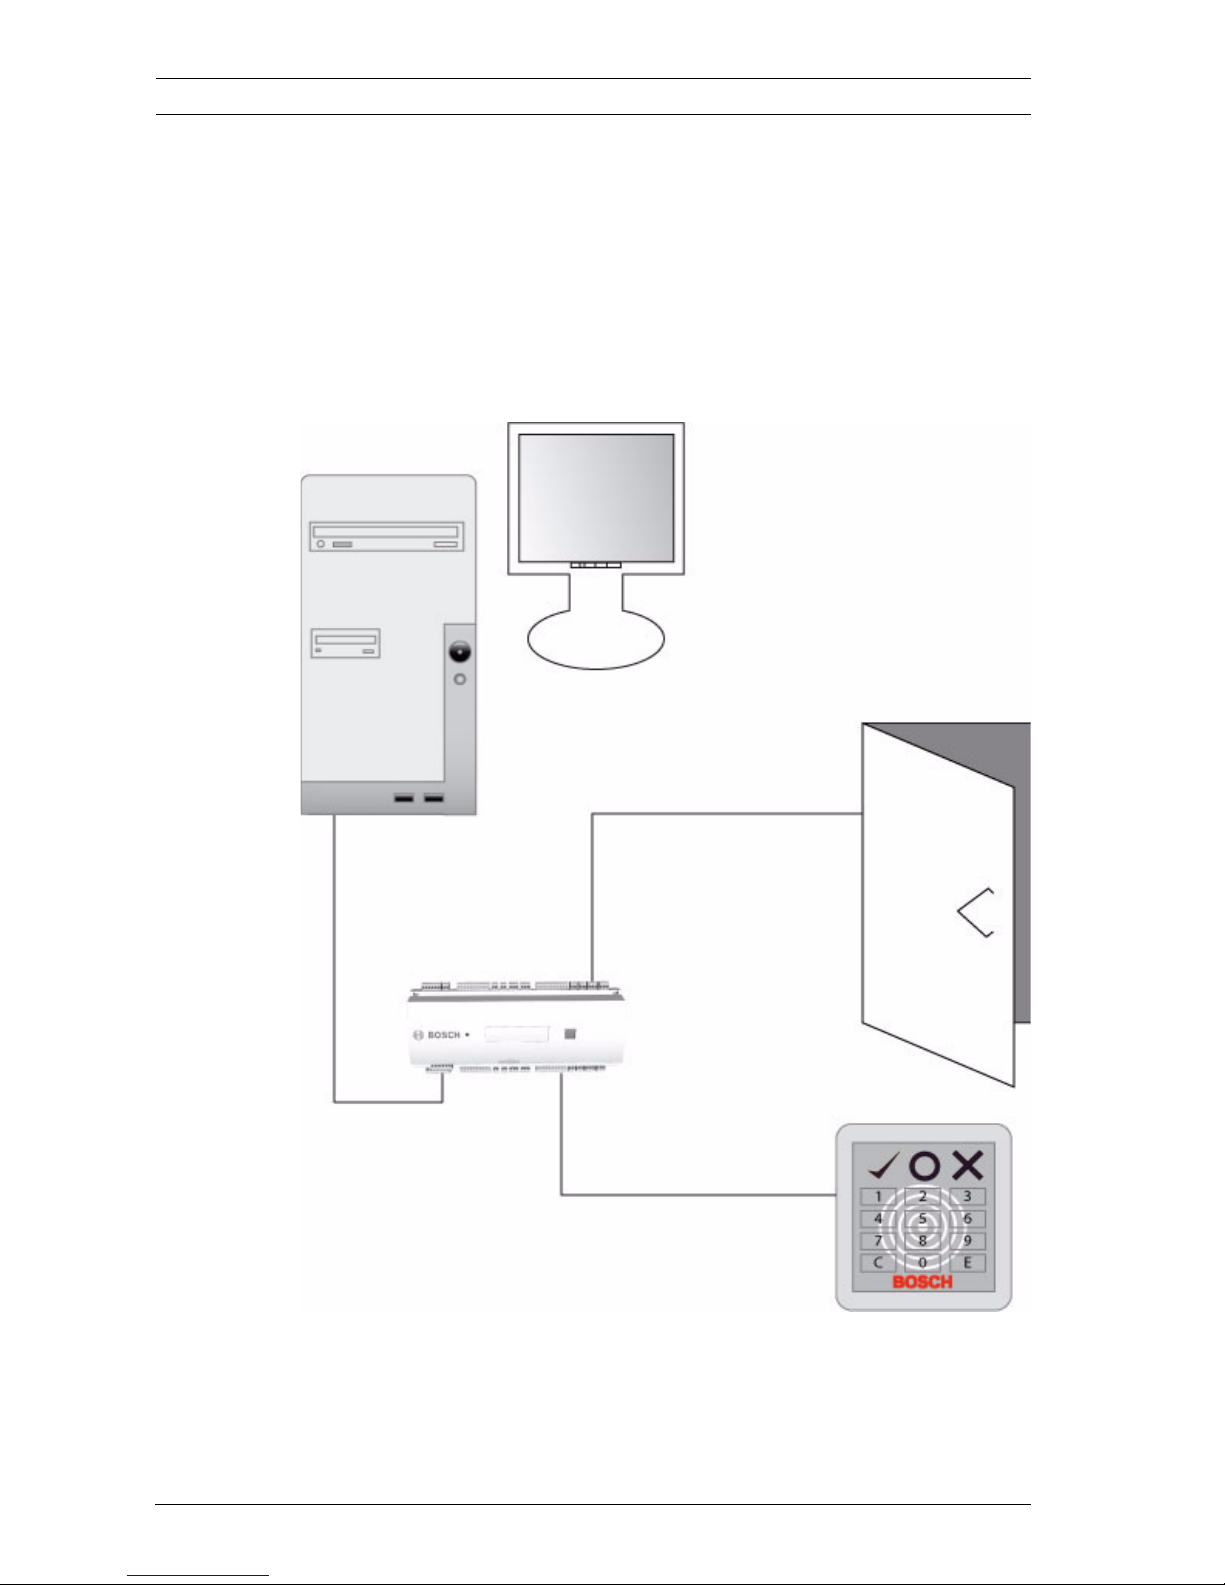
1 Introduction
Starting with a rough overview of the system the following
chapters will describe the installation of the access control
system Access Engine, with its possible variations. This will
enable the installer of the system to install and configure the
system components according to his/her own needs and
wishes.
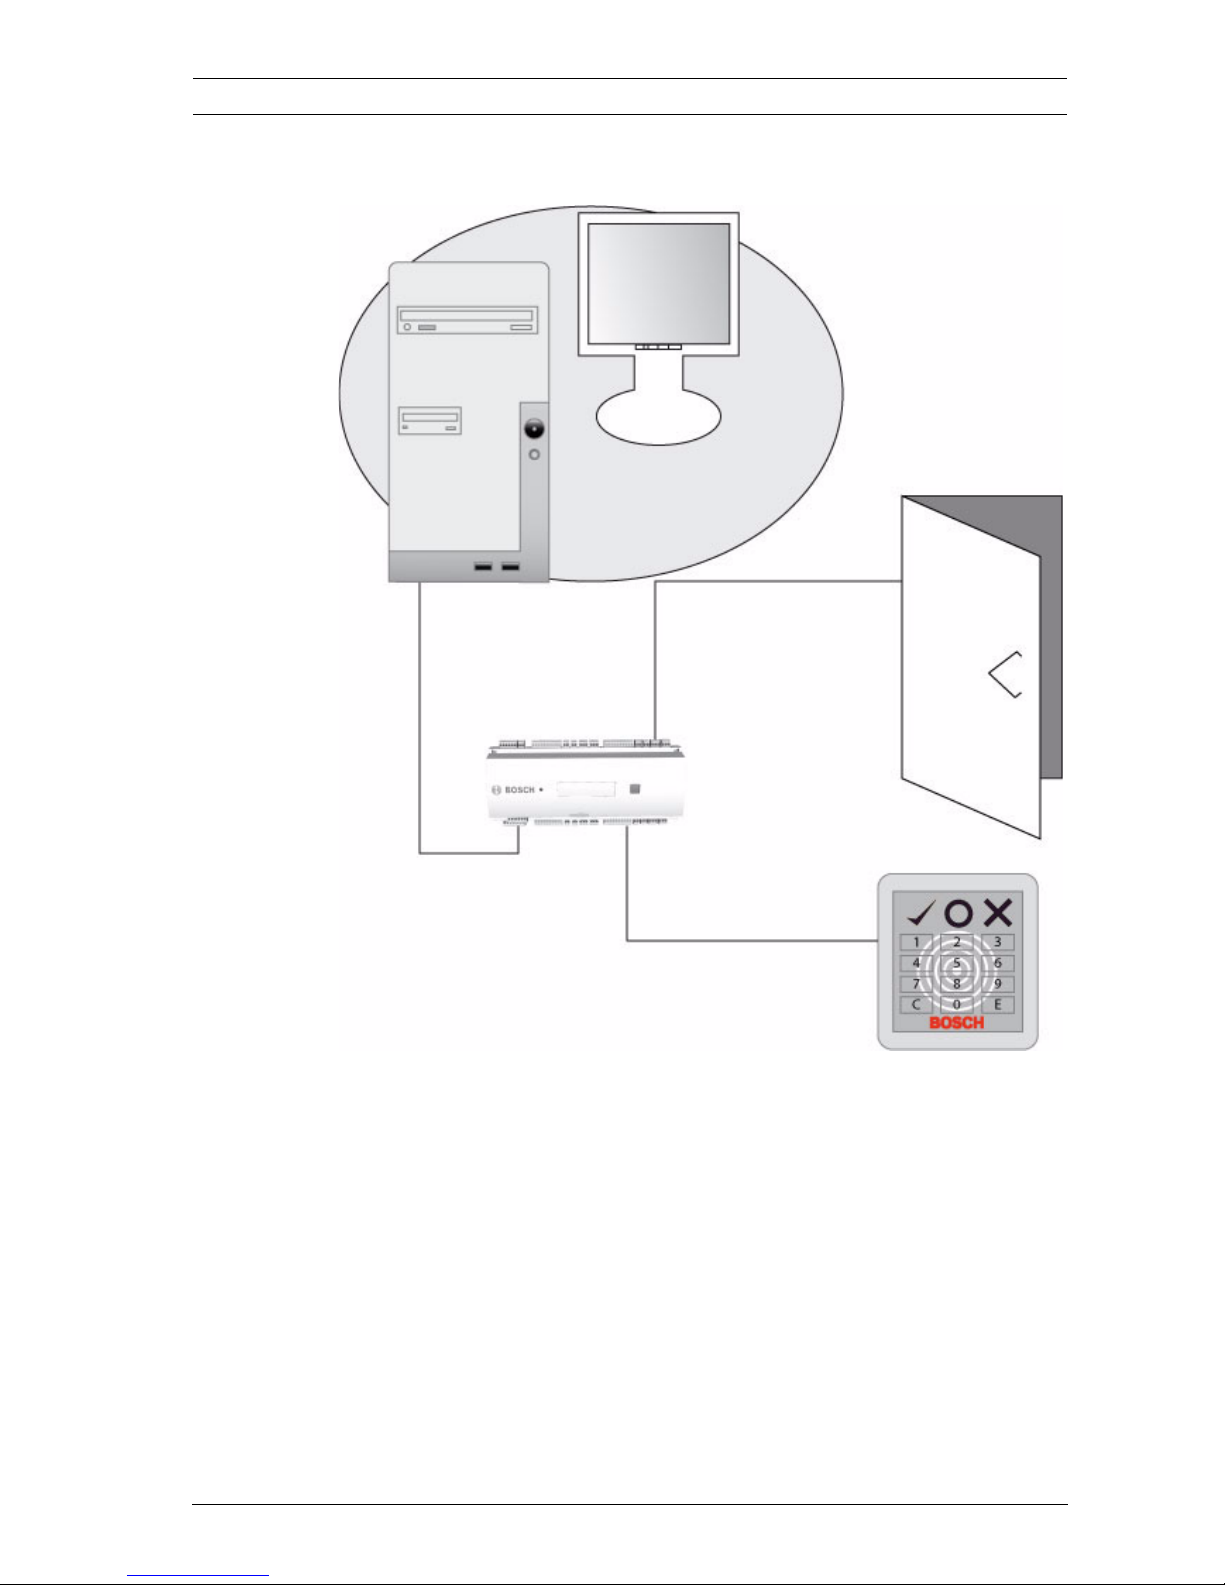
Figure 1.1 Example configuration - initial setup
The following chapters will now take each of the above
configuration elements in turn and explain their features,
alternatives and options.

BIS 2.3 - Access Engine Introduction | en 9
Bosch Sicherheitssysteme GmbH Installation manual F.01U.028.713 | V 2.3.0.1 | 2009.11

10 en | Upgrade BIS 2.3 - Access Engine
F.01U.028.713 | V 2.3.0.1 | 2009.11 Installation manual Bosch Sicherheitssysteme GmbH
2 Upgrade
2.1 Upgrade matrix
BIS-Software without Access Engine:
BIS-Software with Access Engine:
2.2 BIS upgrade since version 2.1 or higher
You can upgrade your BIS system since version 2.1 without
deinstalling the actual version.
1. Insert the new installation CD; the setup program starts
automatically. You may also start the installation manually
by invoking the application setup.exe on the CD.
to BIS 1.4.8 BIS 2.0 BIS 2.1 BIS 2.2 BIS 2.3
from
BIS 1.4.1 yes yes yes no no
BIS 1.4.8 yes yes yes yes
BIS 2.0 yes yes yes
BIS 2.1 yes yes
BIS 2.2 yes
Table 2.1 Upgrade matrix BIS without Access Engine
to BIS 1.4.8 BIS 2.0 BIS 2.1 BIS 2.2 BIS 2.3
from
BIS 1.4.1
(ACE >= 1.2.50)
yes no no no no
BIS 1.4.8 yes no no no
BIS 2.0 yes no no
BIS 2.1 yes yes
BIS 2.2 yes
Table 2.2 Upgrade matrix BIS with Access Engine
!
CAUTION!
Please exit the BIS system before begining the upgrade.

BIS 2.3 - Access Engine Upgrade | en 11
Bosch Sicherheitssysteme GmbH Installation manual F.01U.028.713 | V 2.3.0.1 | 2009.11
2. Select the functions you wish to install as if you were
installing from scratch. In this upgrade you may also add
components which were not previously installed.
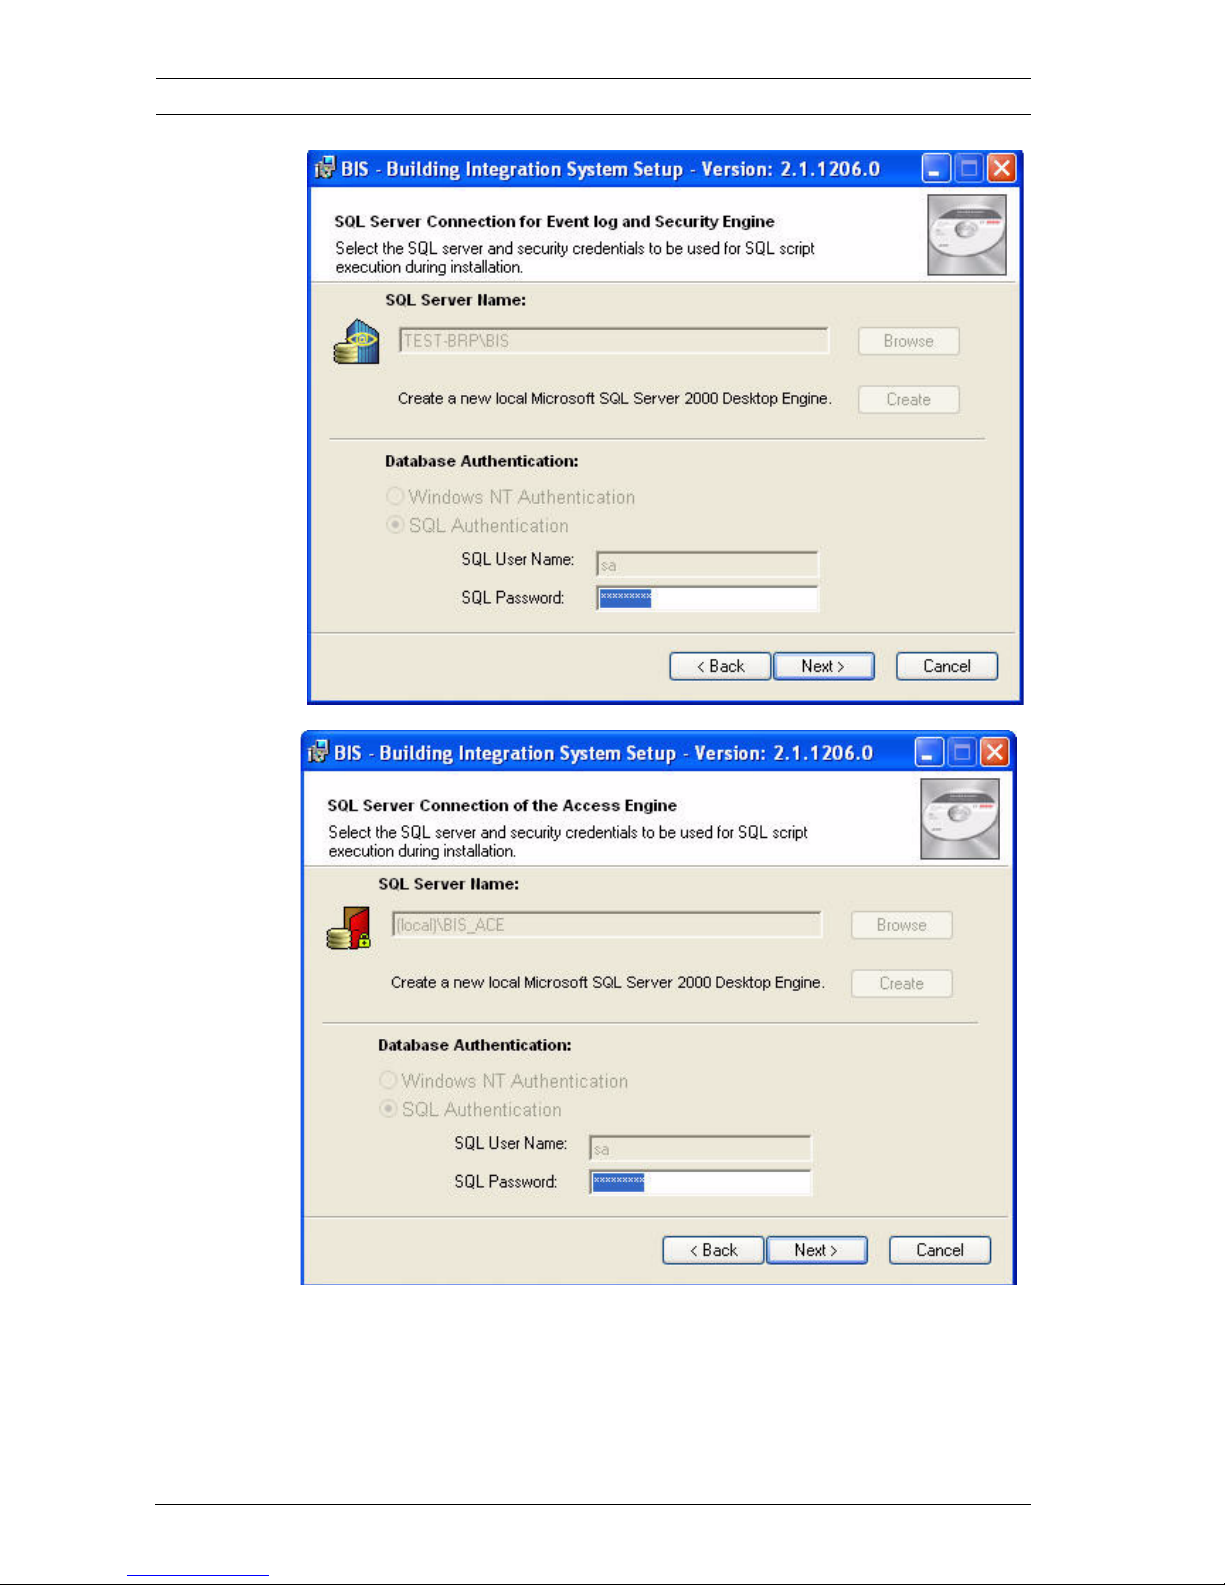
3. The databases for the logs and access engine with their
corresponding user data are located and displayed. Click
Next if you do not wish to create any new databases.
!
CAUTION!
If you make changes to any of the entries on the following two
dialogs then a new database will be installed. You previous data
will be lost!
12 en | Upgrade BIS 2.3 - Access Engine
F.01U.028.713 | V 2.3.0.1 | 2009.11 Installation manual Bosch Sicherheitssysteme GmbH
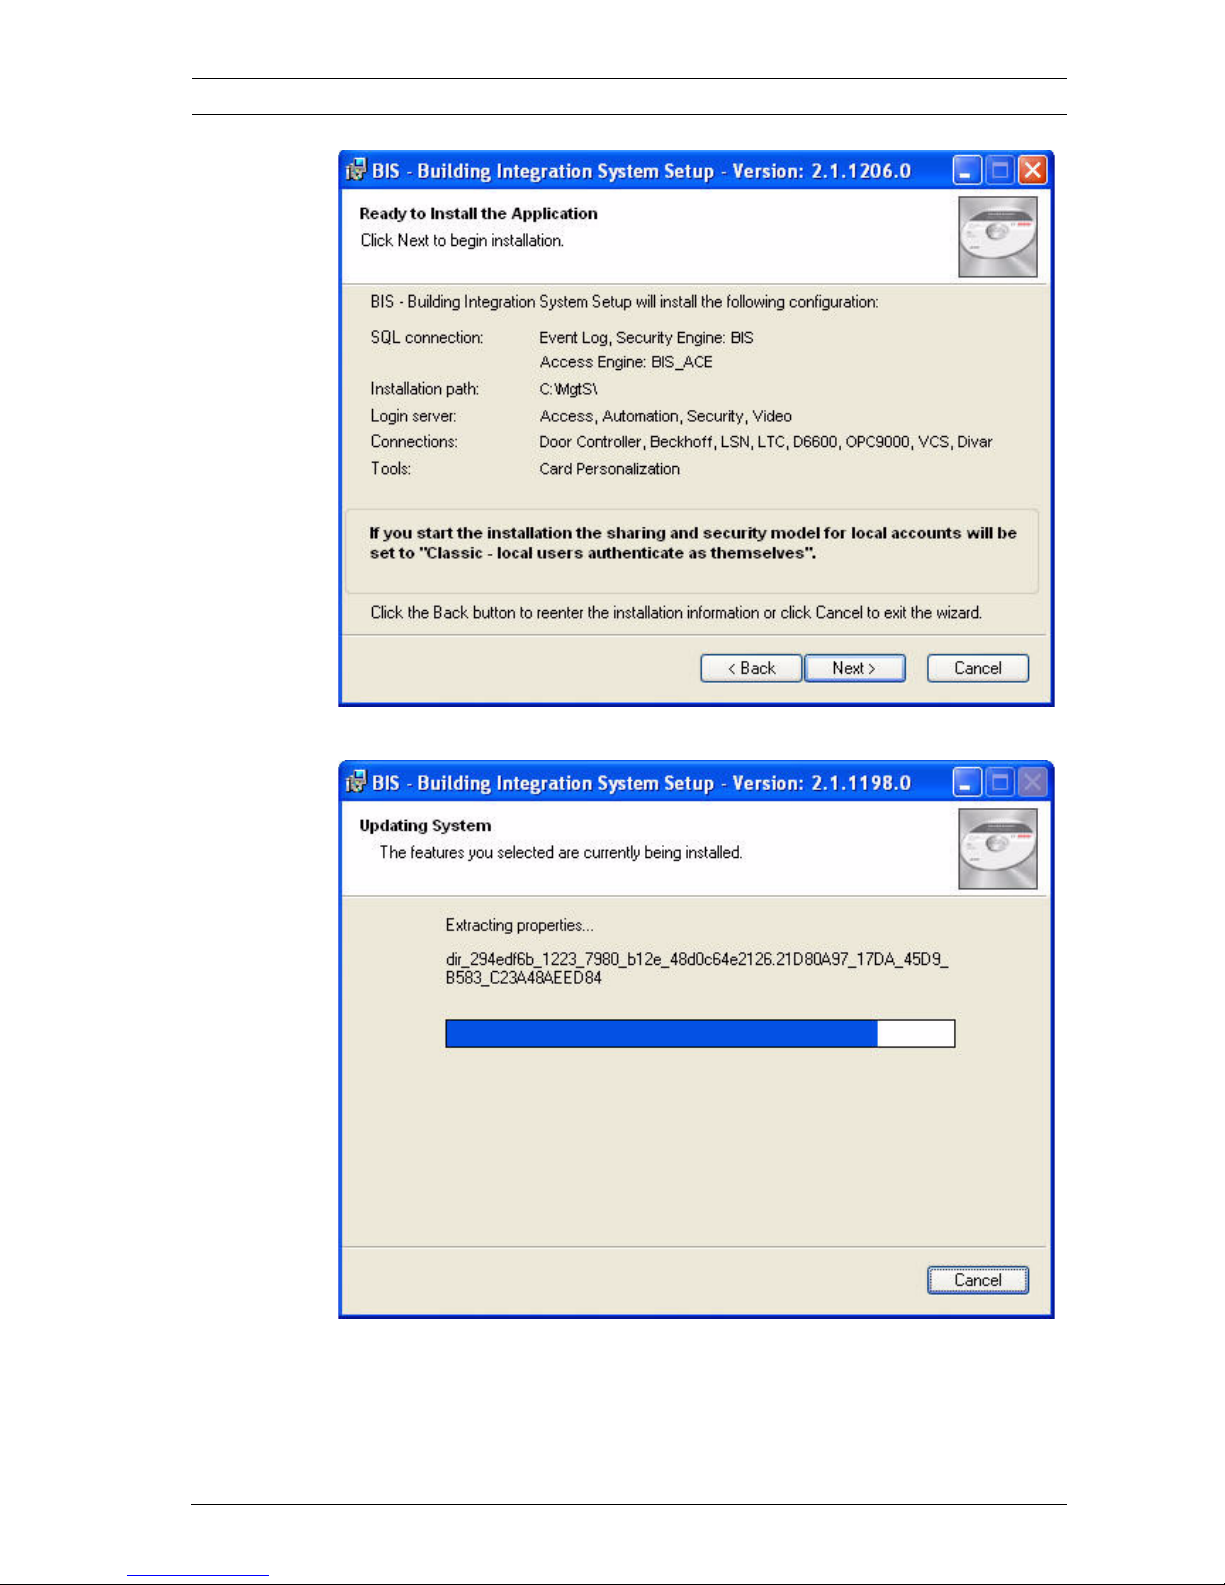
4. The chosen settings are summarized for confirmation.
BIS 2.3 - Access Engine Upgrade | en 13
Bosch Sicherheitssysteme GmbH Installation manual F.01U.028.713 | V 2.3.0.1 | 2009.11
Clicking Next will start the upgrade.
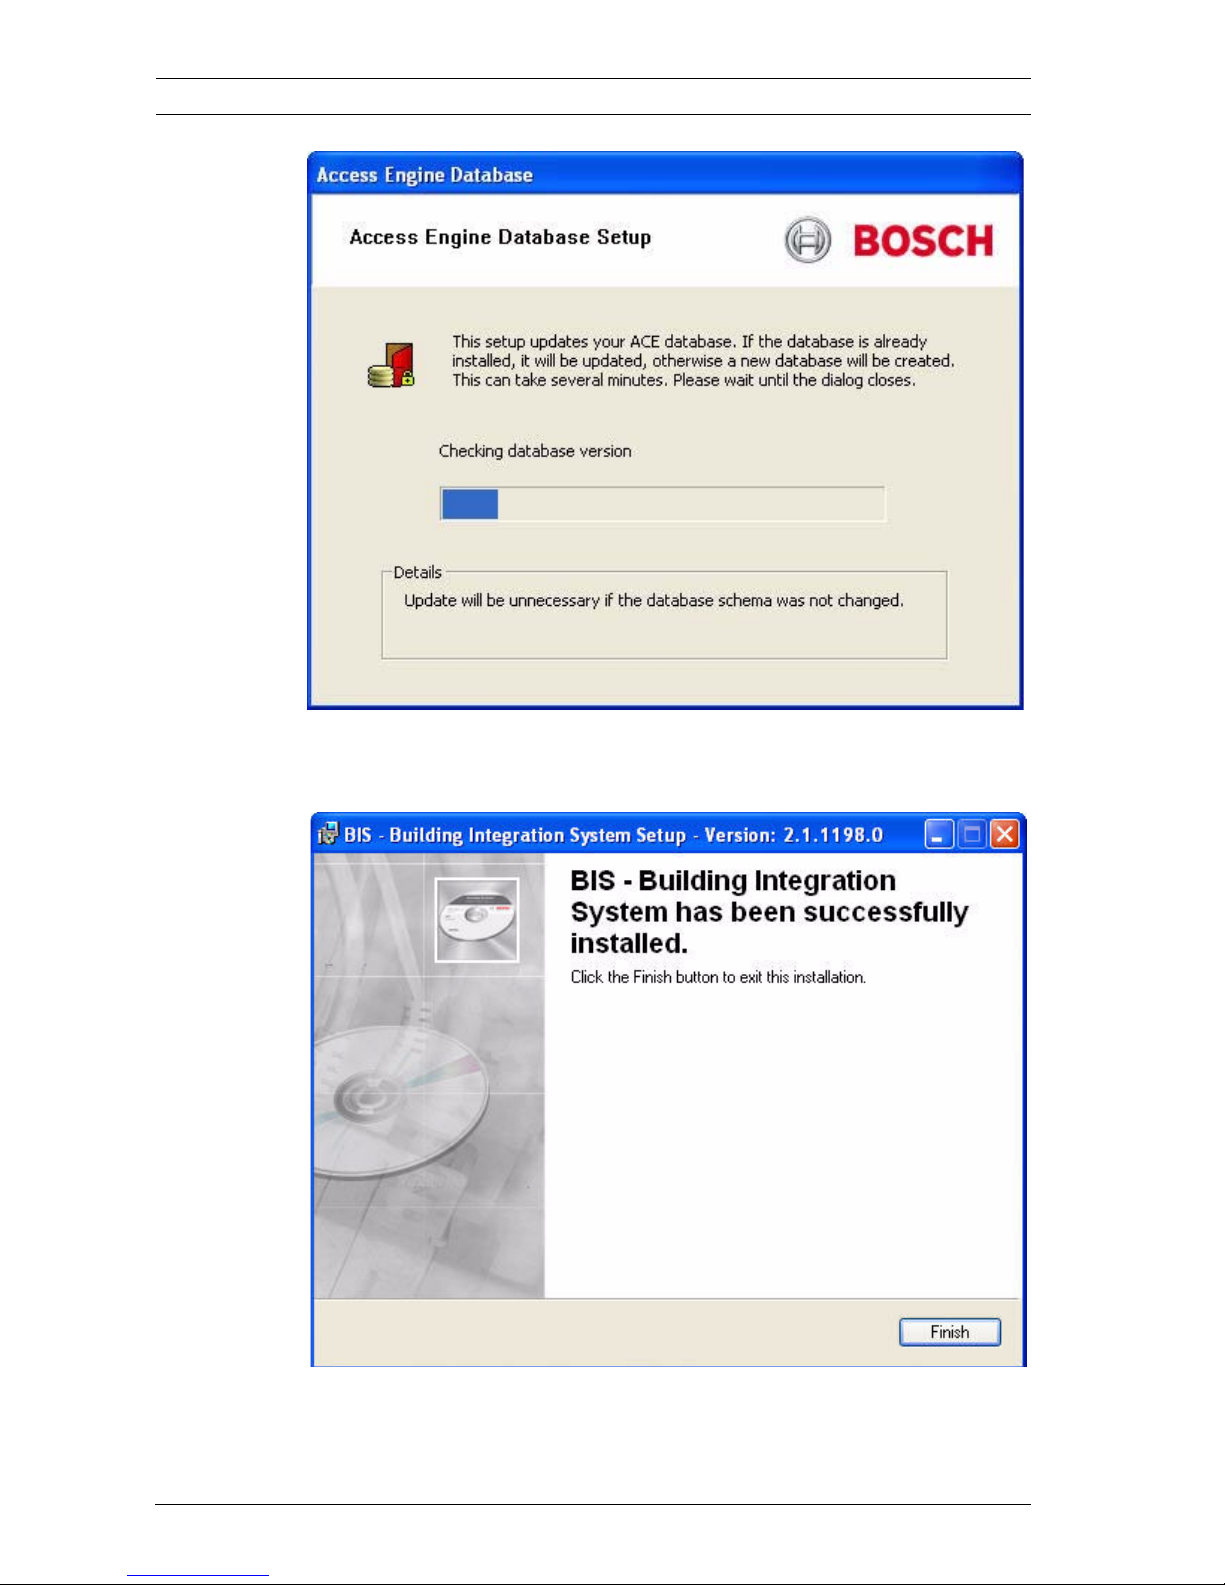
The Access Engine Database is also updated, as shown in the
next screenshot
14 en | Upgrade BIS 2.3 - Access Engine
F.01U.028.713 | V 2.3.0.1 | 2009.11 Installation manual Bosch Sicherheitssysteme GmbH
5. When you receive confirmation of a successful upgrade
click Finish to end the process.
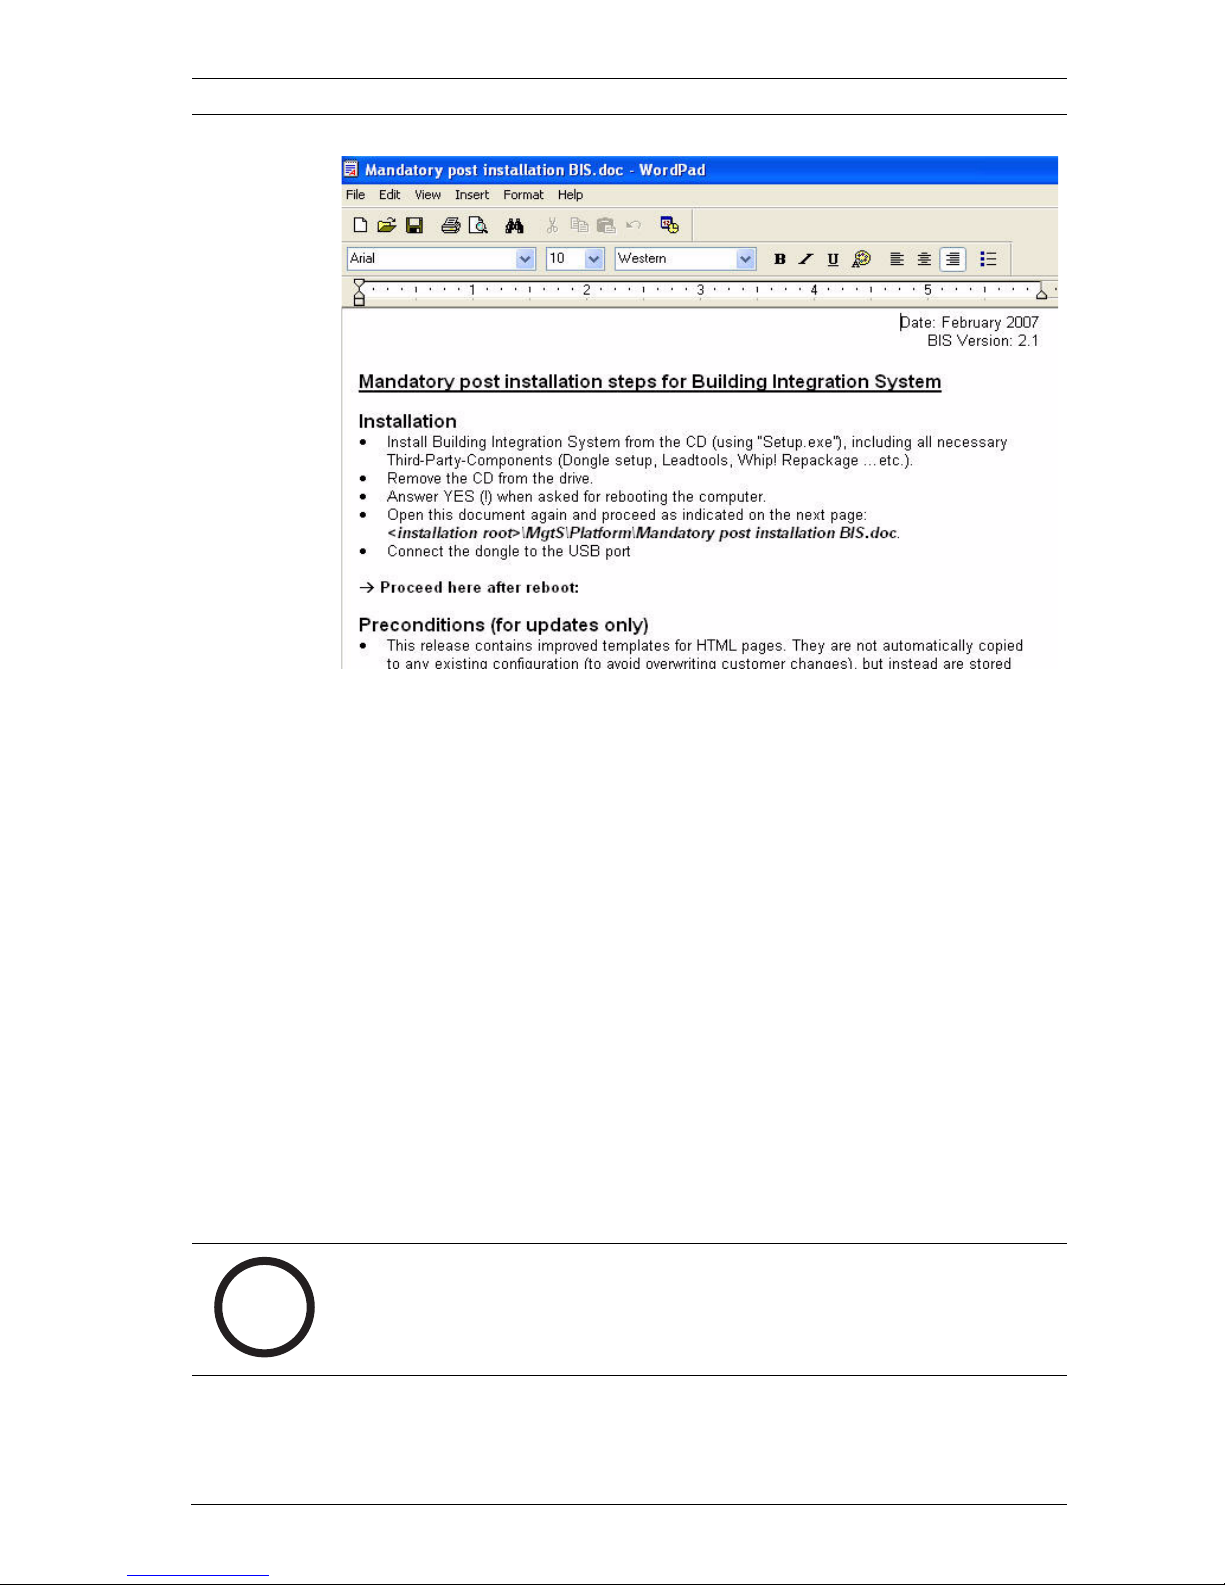
6. A text file is shown detailing a number of mandatory post
installation steps, including a reboot. Please print the file
and carry out all steps as instructed.
BIS 2.3 - Access Engine Upgrade | en 15
Bosch Sicherheitssysteme GmbH Installation manual F.01U.028.713 | V 2.3.0.1 | 2009.11
All configuration and access control data are preserved.
Upon starting the BIS Configuration browser and loading your
configuration the access Engine database will have to be
synchronized. Affirm the synchronization dialog in order to use
your accustomed data and settings.
2.3 Updating Controller (LAC) Software
The software upgrade installs new programs which enable LACs
to make use of new functionality usable in access control.
In order for the controllers to use the new software they may
first need a firmware upgrade (Bootloader), therefore in order
to prevent the controllers from automatically downloading the
software from the MAC prematurely all configured LACs are set
offline by the upgrade process. Hence they initially have no
connection with the MAC.
In the device editor on the first page/tab of the LACs you can
view the de-/activation of the MAC-connection.
i
NOTICE!
The controllers continue to work with the same settings, in
order to ensure as smooth a transition as possible.

16 en | Upgrade BIS 2.3 - Access Engine
F.01U.028.713 | V 2.3.0.1 | 2009.11 Installation manual Bosch Sicherheitssysteme GmbH
The system manager can now decide whether, when and which
LACs should be included in the new installation. To do this
simply check the box Connection to MAC active on the first
tab/page of each controller in the Device Editor, and then save
the changes by clicking Apply.
Supplementary information regarding upgrades
When the LAC-MAC connection is established the MAC first
makes sure that the LAC’s bootloader is compatible with the
new program. The bootloader changes much less often than the
program, so this occurence is relatively rare. If not compatible
the MAC first downloads a new bootloader to the LAC, then the
updated program and finally the access data. After the MAC has
downloaded the program the LAC is able to function by
verifying data across the network with the MAC, with some cost
to performance, until it has finished downloading its local copy
of the data.
!
CAUTION!
For each LAC activated a cold start needs to be performed, i.e.
all data and programs are initially deleted and then restored
and reloaded by the MAC.
The program is loaded very quickly but, in the case of high
volumes and/or slow network connections, the loading of data
can take up to 30 minutes. Until the LAC has received its local
copy of the data, it needs to check all access requests with the
MAC via the network. Hence delays need to be taken into
account at the relevant entrances.
BIS 2.3 - Access Engine Server installation | en 17
Bosch Sicherheitssysteme GmbH Installation manual F.01U.028.713 | V 2.3.0.1 | 2009.11
3 Server installation
Figure 3.1 System configuration - Management view
The Building Integration System (BIS) with its modules
(Engines) is generally installed on one computer. When Access
Engine is installed on the same computer as the BIS manager,
this is termed a standalone system.
It is also possible to install on multiple computers (i.e. a
distributed system), where the BIS Manager runs on a so-called
Login Server and the Access Engine on a separate computer
with a network connection to the first. The second is termed a
Remote Server.

18 en | Server installation BIS 2.3 - Access Engine
F.01U.028.713 | V 2.3.0.1 | 2009.11 Installation manual Bosch Sicherheitssysteme GmbH
3.1 Standalone system
The installation of a standalone system is described in the BIS
installation manual. There you will find a detailed explanation of
the setup of the computer and the inclusion/exclusion of the
components to be installed.
The following components are functionally co-dependent and
should selected from the feature selection dialog when
installing BIS with Access Engine:
Under Login Server: Access Engine
Under Login Server: Door Controller
Under Connections:
Card Personalization, an application found in the Tools menu,
can be deactivated if the server is not to be used for the
creation of access cards. It must however be installed on all
workstations used for card creation.
i
NOTICE!
The Access Engine (ACE 2.3) does not run with SP3 of
Microsoft SQL-Server 2005.
BIS 2.3 - Access Engine Server installation | en 19
Bosch Sicherheitssysteme GmbH Installation manual F.01U.028.713 | V 2.3.0.1 | 2009.11
3.2 Distributed system
In order to install BIS with Access Engine on a distrubuted
system it is necessary for all computers involved to be
networked together. For instructions on setting up the network
please consult the notes in the BIS installation manual.
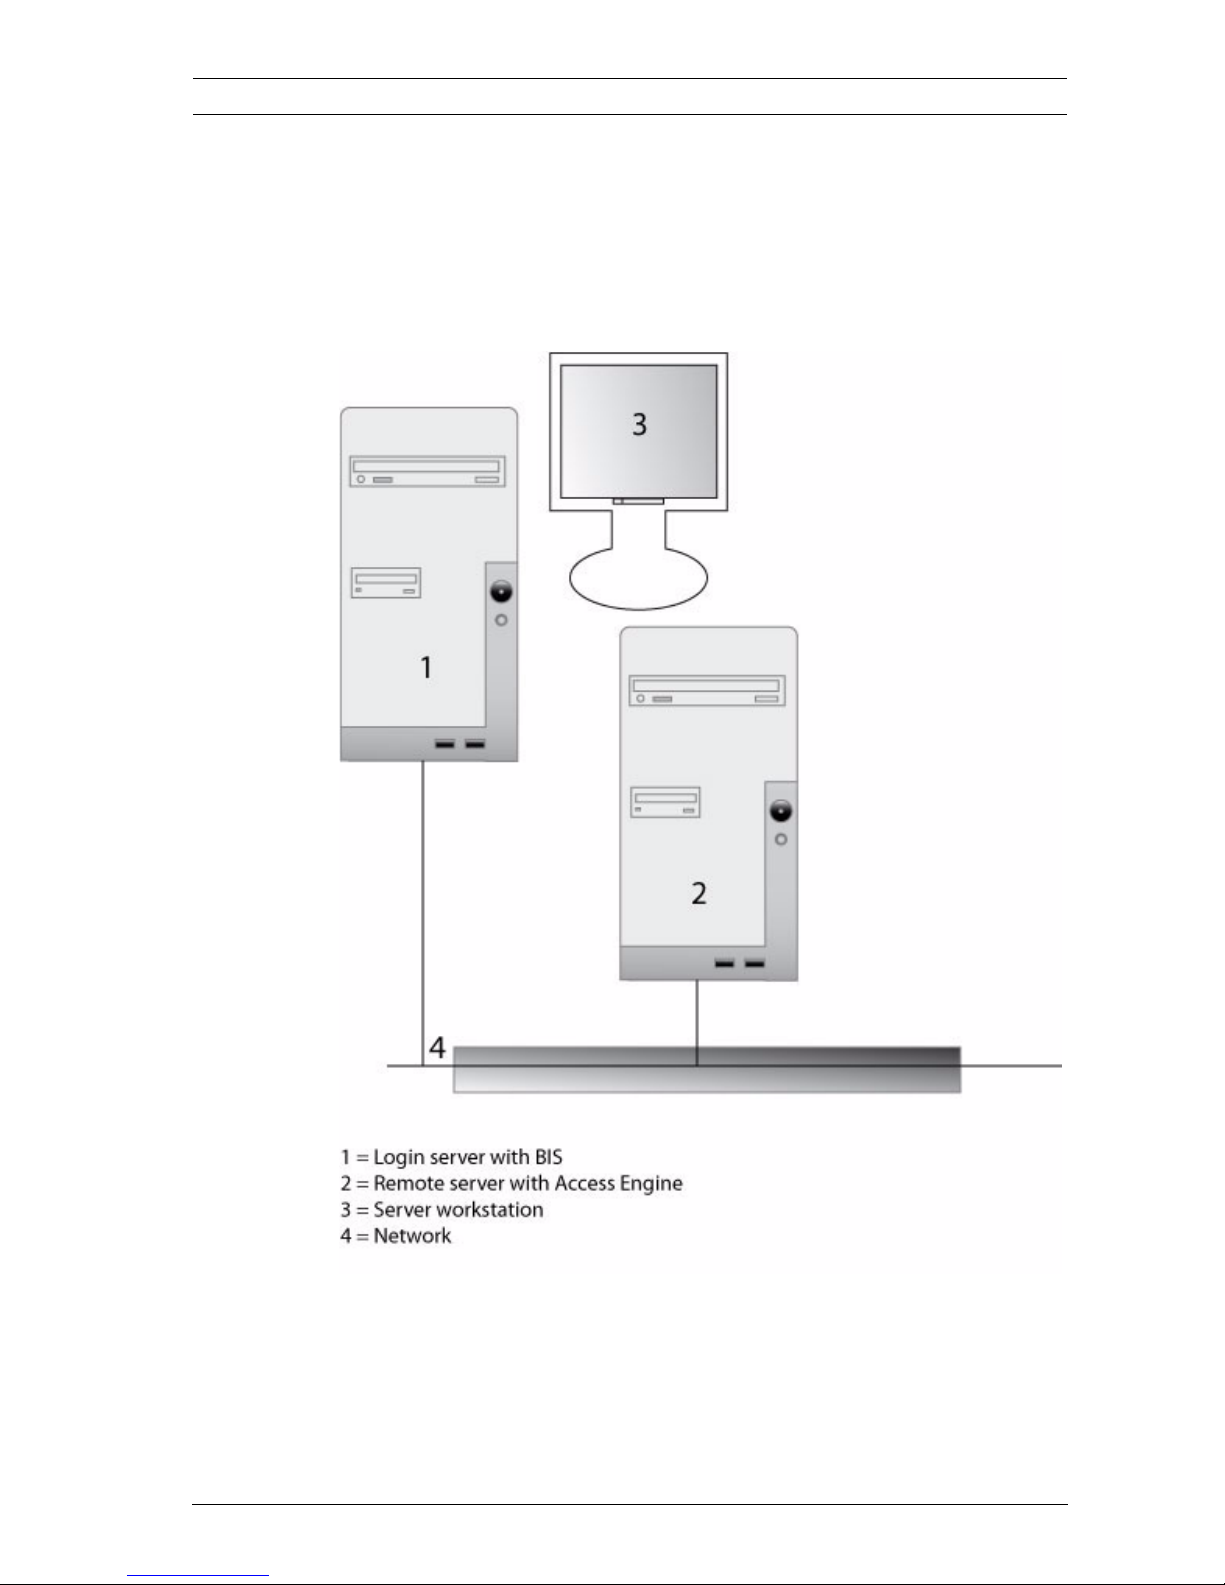
Figure 3.2 Servers in a distributed system
20 en | Server installation BIS 2.3 - Access Engine
F.01U.028.713 | V 2.3.0.1 | 2009.11 Installation manual Bosch Sicherheitssysteme GmbH
3.2.1 Login server
The Login Server is installed from the same CD as the
standalone server. In the feature selection box however only
the following features are selected.
Figure 3.3 Selection of features for the Login Servers
If no other engines are to be installed besides the Access
Engine then this is the only selected node under Login Server.
The rest of the installation is identical to that of the Standalone
Server.
i
NOTICE!
As long as no Connections for other engines are to be installed
on the login server then the entire Connections node can be
deactivated.
On no account should Door Controller be one of the elements
selected.
BIS 2.3 - Access Engine Server installation | en 21
Bosch Sicherheitssysteme GmbH Installation manual F.01U.028.713 | V 2.3.0.1 | 2009.11
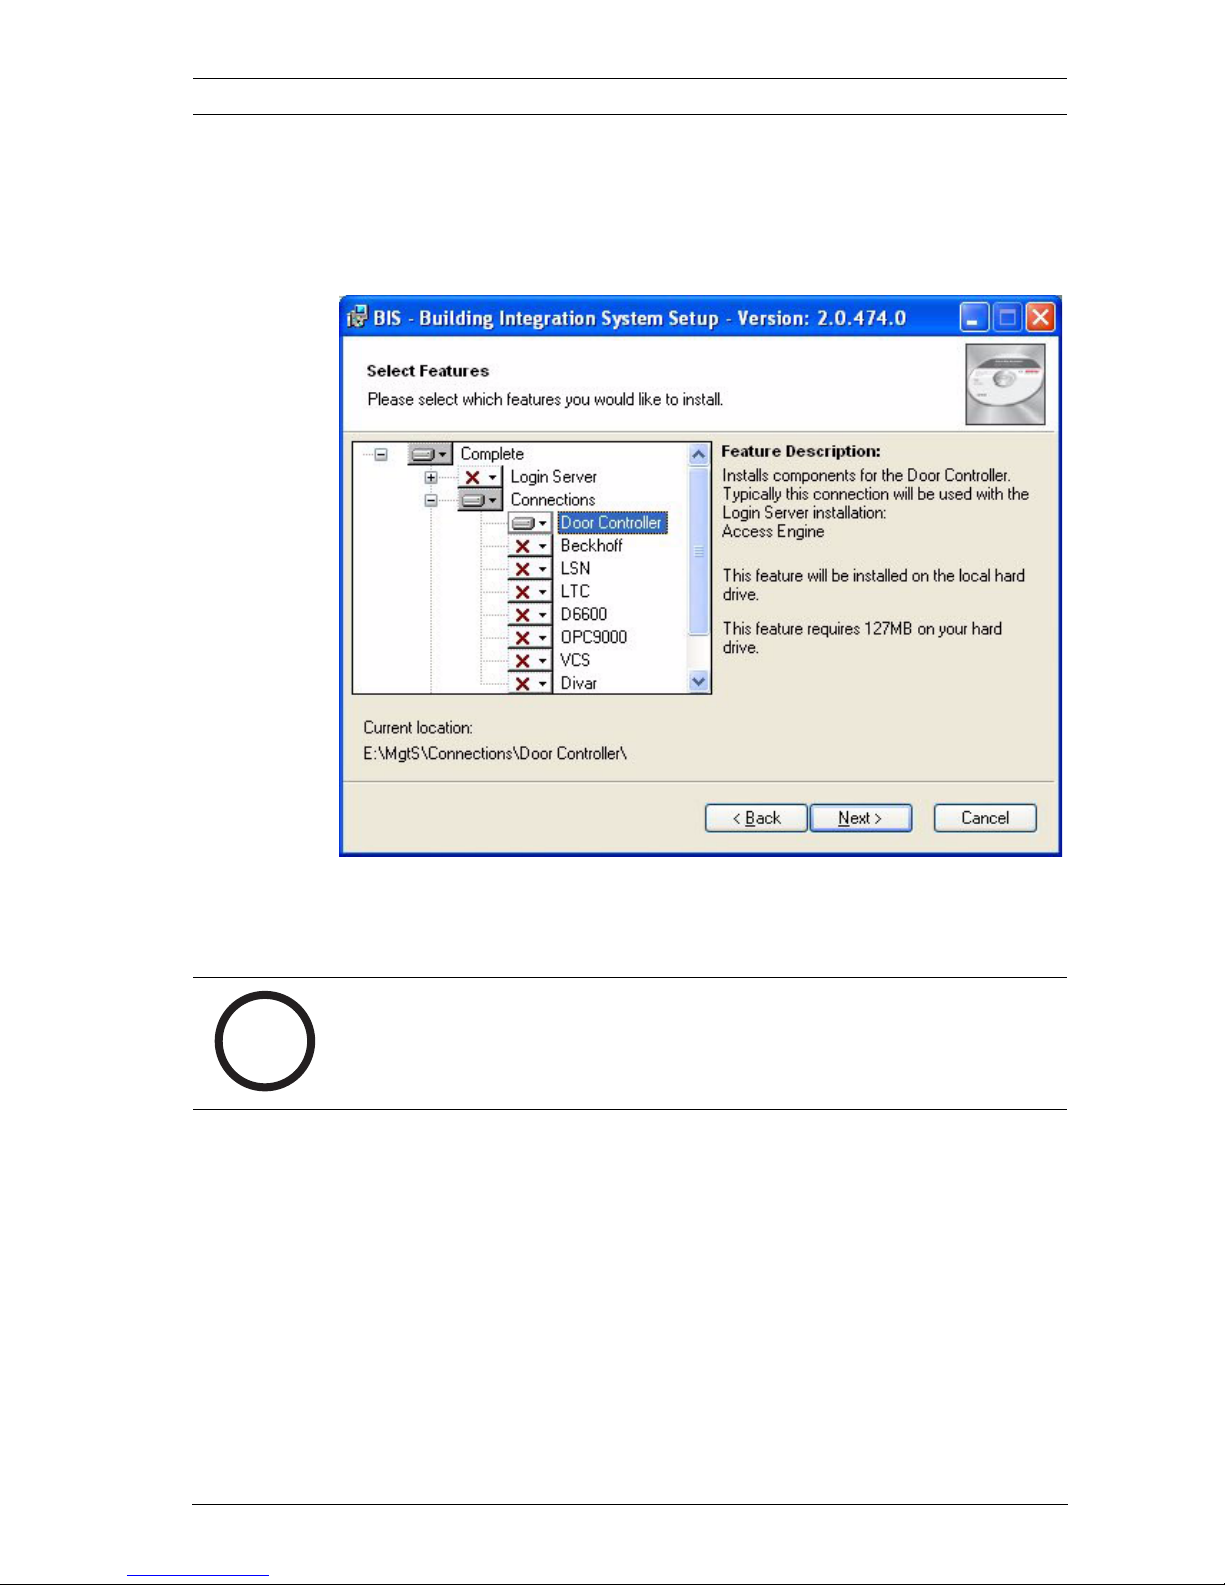
3.2.2 Remote server
The installation of the Remote Server too is the same as that of
other systems. The feature selection however is somewhat
different.
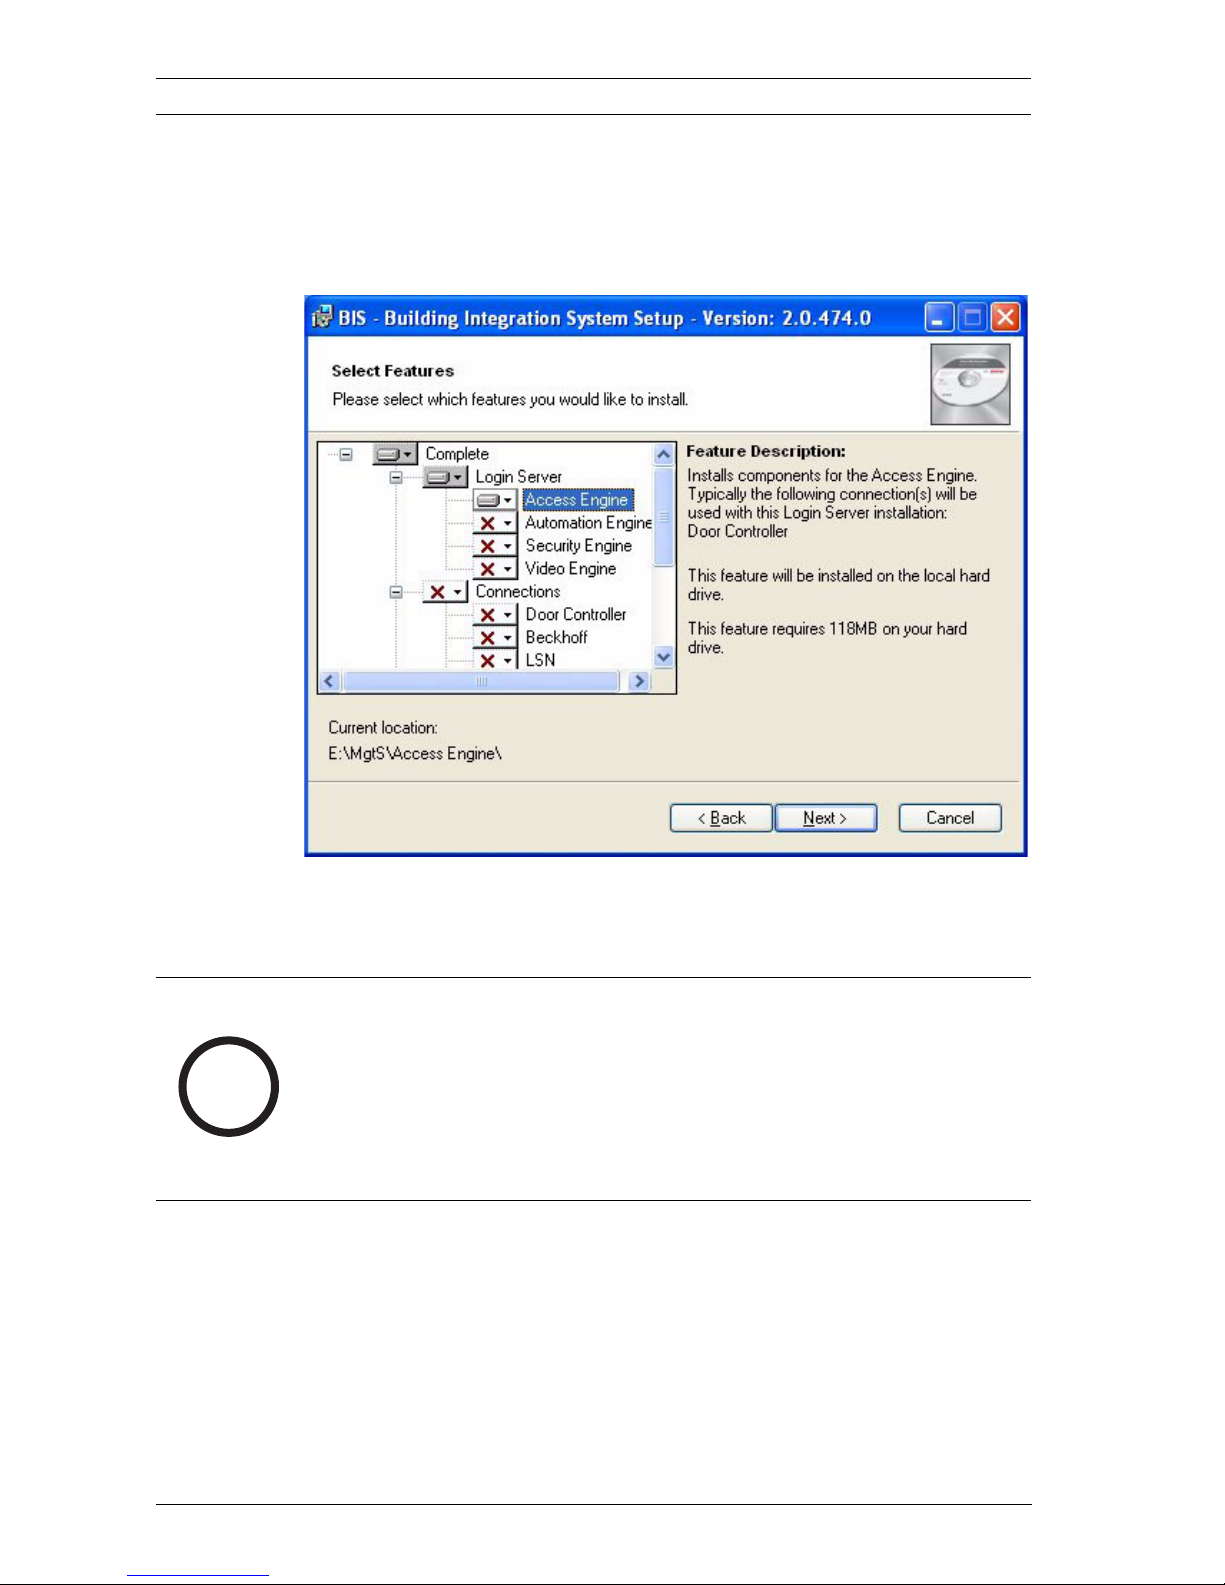
Figure 3.4 Feature selection for a Remote Server
Here it is essential that Door Controller be selected under the
Connections node.
i
NOTICE!
The entire Login Server node must be deselected.
22 en | Server installation BIS 2.3 - Access Engine
F.01U.028.713 | V 2.3.0.1 | 2009.11 Installation manual Bosch Sicherheitssysteme GmbH
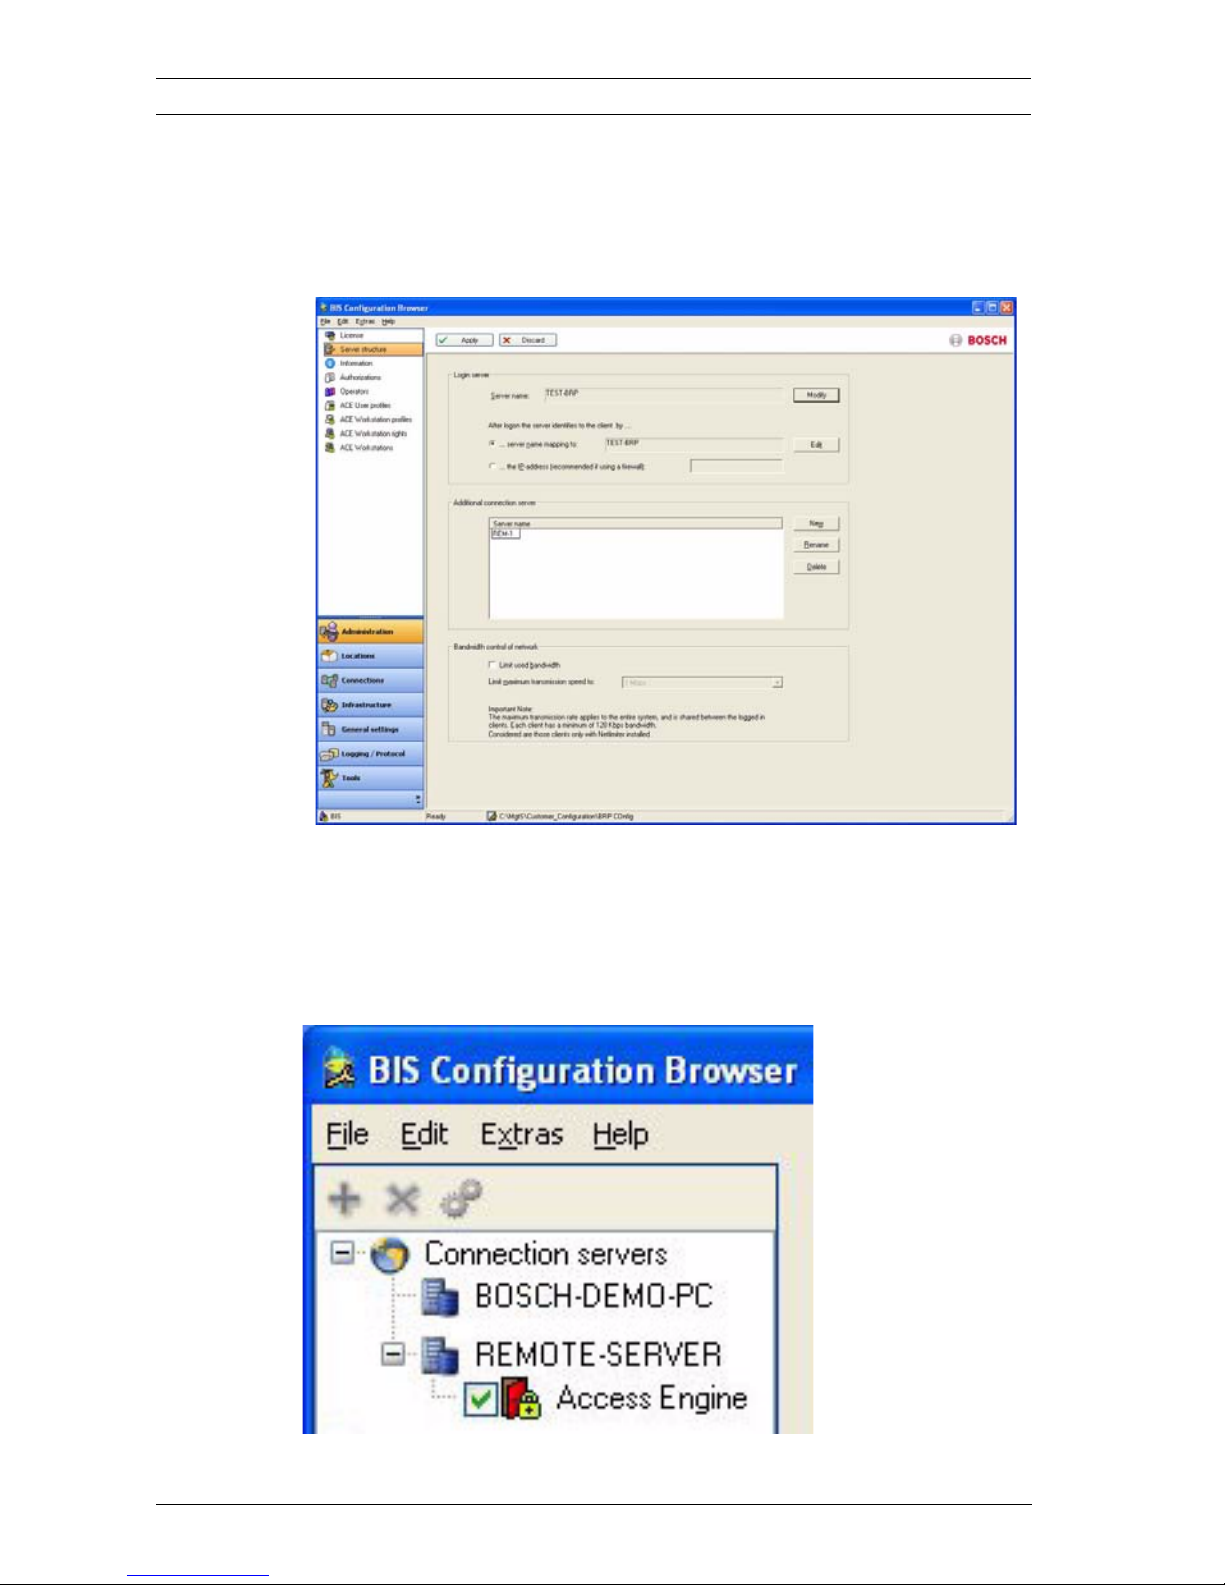
3.2.3 Configuring a distributed system
In the Configuration Browser, which runs on the login server,
the remote server is entered in the appropriate list in the
Server Structure dialog.
This entry will appear subsequently in the menu Connections. If
Access Engine is not listed underneath the remote server then
it will need to be added here. For more details on creating
Connections please consult the online help for the
Configuration Browser.

BIS 2.3 - Access Engine Server installation | en 23
Bosch Sicherheitssysteme GmbH Installation manual F.01U.028.713 | V 2.3.0.1 | 2009.11
3.3 Server workstation
The installation of the BIS system turns the server into a
workstation where all applications and dialogs can be executed
from the same computer, and where configuration of the
system software can be undertaken cf. Section 4.2 Setting up a
configuration, Page 25.
TThe pre-installed User Adminstrator can log onto the platform
as soon as s/he has configured the Internet Explorer (cf. BIS
Installation manual) and can then use the full functionality of
the dialogs and the Access Engine applications. Only the user
BIS requires additional adjustments in order to use Access
Engine cf. Section 4.5 Setting up BIS user, Page 31.
Further details about creating administrative accounts can be
found in Section 5 Setting up additional workstations, Page 33.
i
NOTICE!
The server workstation account is protected and can not be
deleted or modified.
Even if the server is not used as a workstation the account will
still remain.

24 en | System configuration BIS 2.3 - Access Engine
F.01U.028.713 | V 2.3.0.1 | 2009.11 Installation manual Bosch Sicherheitssysteme GmbH
4 System configuration
The installed BIS software and its integrated engines cannot be
used until the system has been configured. Configuration
means adapting the system to a particular client’s environment
individual requirements.
It is possible create multiple different configurations,
nevertheless only one can be activated, i.e. loaded, at any one
time.
4.1 Starting the Configuration Browser
To create a system configuration or to modify an existing one,
you must first start the Configuration Browser.
To start the Browser proceed as follows:
1. If the BIS Manager has not yet been started:
– Start the BIS Manager by double-clicking the desktop
icon.
– Log in with your username and password.
2. On the System start/stop tab, click the Start button to the
left-hand side of the Configuration Browser label
3. A new window is opened for creating and reopening
configurations. Select the configuration you require in the
Recent configuration field by clicking the corresponding
entry.
1. Another login dialog appears; log in with an Administrator
username and password.
i
NOTICE!
In the case of Access Engine, the configuration selected in the
Configuration Browser must also be loaded so that the specific
applications can be called.
i
NOTICE!
To create a new configuration, first carry out the steps
described in Section 4.2 Setting up a configuration, Page 25.

BIS 2.3 - Access Engine System configuration | en 25
Bosch Sicherheitssysteme GmbH Installation manual F.01U.028.713 | V 2.3.0.1 | 2009.11
The Configuration Browser is started and can be used as far as
the user’s authorization allows, to edit or view the current
configuration.
4.2 Setting up a configuration
With Access Engine there is a difference between the creation
of an initial configuration and adding additional configurations.
4.2.1 Creating an initial configuration
Once the BIS software has been installed as described in the
BIS installation manual, a client-specific configuration can be
created using the Configuration Browser. Once the settings
specified in this configuration have been made, the BIS system
is ready for use and can be started.
To create the first configuration proceed as follows:
1. Make sure that the hardware dongle is plugged in.
2. Start the BIS Manager by double-clicking its desktop icon.
3. Log in with your username and password.
4. Call the License page.
– The serial number and order number of the hardware
dongle are displayed in the Dongle information field.
You can call up this information again by clicking the
Update button to make sure that the dongle is being
read correctly.
– The contents of the license file that is currently loaded
are displayed in the License information list field.
After the installation, this field does not generally
contain any information. Click the Import button in
the Import license file field to search for and import
the directory containing the license file.
The serial and order numbers displayed in the list field
must match the specifications of the hardware
dongle.
5. Switch to the System start/stop page and click the Start
button to the left of the Configuration Browser entry.
6. The Recent configurations field in the configuration
selection window of the Configuration Browser does not

26 en | System configuration BIS 2.3 - Access Engine
F.01U.028.713 | V 2.3.0.1 | 2009.11 Installation manual Bosch Sicherheitssysteme GmbH
yet contain any entries - therefore select the New
configuration entry in the Configuration management
field.
7. Another dialog is opened offering a choice of pre-installed
default configurations.
– Select the Access Engine entry in the Group field and
confirm with OK.
– For the new configuration, you must first create a new
folder in the Customer Configuration directory.
Rename the folder as desired.
– When you confirm the new directory structure, the
default values of the Access Engine configuration are
copied into this folder.
– Confirm the message that appears regarding the
update of the version with Yes.
8. Clicking a configuration in the Configuration Browser
brings up the Operator logon window. Log on with the
user data of the preinstalled Administrator user or the BIS
user.
9. Two messages appear regarding the synchronization of the
platform; confirm both messages with Yes.
10. A message then appears telling you that the
synchronization was successful; confirm this message with
OK.
The Configuration Browser is opened initially displaying the
standard License page in the Administration menu.
i
NOTICE!
As this is the initial configuration of the system, it is
automatically loaded. Later when multiple configurations exist
they will need to be explicitly loaded using the Configuration
Browser Load/save configuration tab.

BIS 2.3 - Access Engine System configuration | en 27
Bosch Sicherheitssysteme GmbH Installation manual F.01U.028.713 | V 2.3.0.1 | 2009.11
1. Check the license file contents in the License dialog are
correct.
– If these do not match the file imported in the BIS
Manager, you can copy the imported file for the
configuration using the Read button.
2. Make sure that the correct login server is entered in the
Server structure dialog (this applies mainly to distributed
systems).
4.2.2 Creating additional configurations
To create additional configurations proceed as follows:
1. If the BIS Manager has not yet been started:
– Start the BIS Manager by double-clicking the desktop
icon.
– Log in with your username and password.
2. On System start/stop tab, click the Start button to the left
of the Configuration Browser entry (not the button
marked BIS Server).
3. Perform steps 6 to 9 from Section 4.2.1 Creating an initial
configuration, Page 25.
i
NOTICE!
If you performed this setup using the user BIS then see also the
instructions in Section 4.5 Setting up BIS user, Page 31.
i
NOTICE!
Unlike the setup of the initial configuration a loaded one already
exists. However, since the configuration to be modified must be
loaded (i.e. made current) in order to configure the Access
Engine, an error message appears at this point.
28 en | System configuration BIS 2.3 - Access Engine
F.01U.028.713 | V 2.3.0.1 | 2009.11 Installation manual Bosch Sicherheitssysteme GmbH
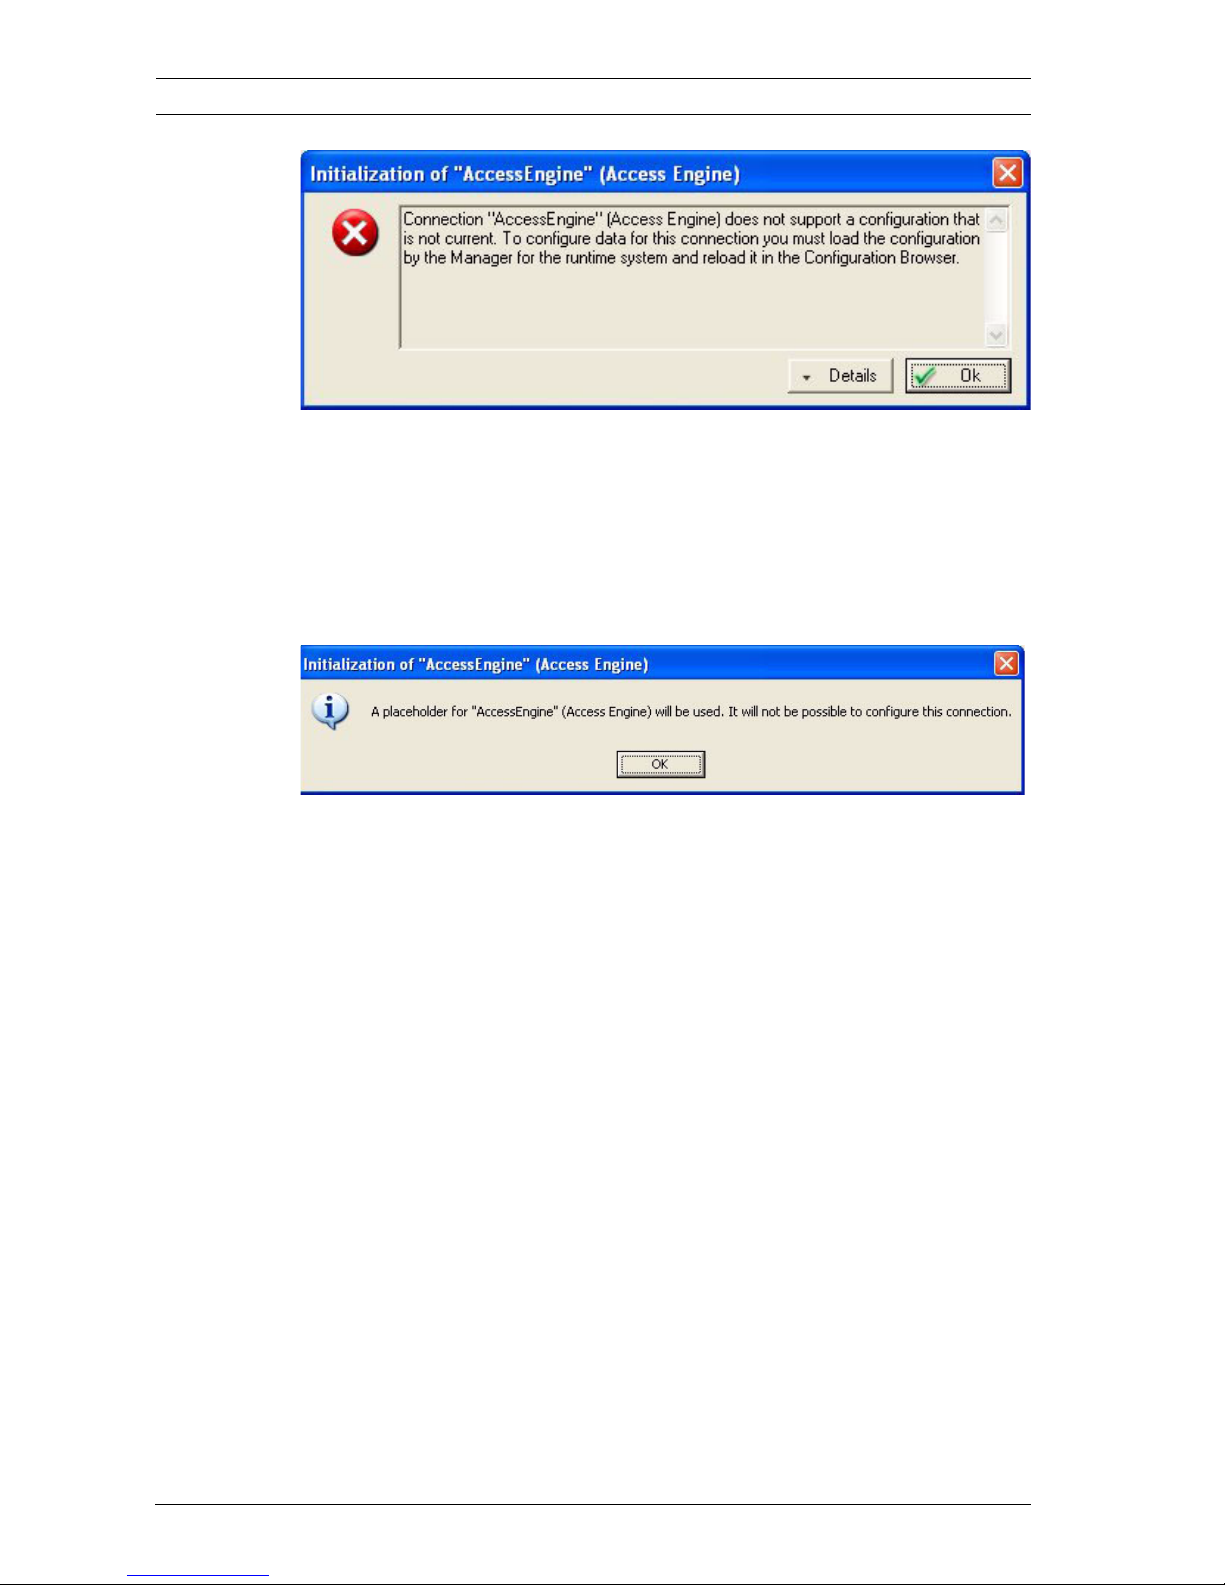
Figure 4.1 Error message when the configuration is not loaded
1. Confirm both this message and the message that follows
regarding the creation of placeholders with OK. A
placeholder is a dummy configuration which supports
connections but can not be edited. We will replace it in the
following steps.
Figure 4.2 Message regarding the use of placeholders
1. Close the Configuration Browser.
2. Switch the current configurations as described in
Section 4.3 Loading a configuration, Page 29 - however,
respond with No when asked whether to start the system
(i.e. the BIS Server component).
3. Now restart the Configuration Browser on the System
start/stop tab.
–In the blue configuration selection window click open
current configuration to open it for editing.
– Log on to the Configuration Browser.
– Check the entries on the License and Server
structure dialog pages as described in steps 11 and
12 in Section 4.2.1 Creating an initial configuration,
Page 25.

BIS 2.3 - Access Engine System configuration | en 29
Bosch Sicherheitssysteme GmbH Installation manual F.01U.028.713 | V 2.3.0.1 | 2009.11
4. Switch to the Connections menu and select the Access
Engine placeholder entry in the Explorer.
– Remove the Access Engine placeholder entry using
the x button or the Remove command in the context
menu (right-click on Access Engine).
– Answer Yes to the confirmation prompt following the
deletion.
– Next select the server entry and click the + button or
select the Add subsystem command in the context
menu.
– Select the Access Engine entry from the list in the
Select new subsystem dialog and confirm the
selection with OK.
5. The synchronization messages and the completion
message appear (see step 9 and 10 in
Section 4.2.1 Creating an initial configuration, Page 25)
The Access Engine applications and dialogs can now be used.
4.3 Loading a configuration
Only one of the configurations you have created can run in the
BIS be loaded at a time. To swap/exchange configurations
proceed as follows:
1. If the BIS Manager has not yet been started:
– Start the BIS Manager by double-clicking the desktop
icon.
– Log in with your username and password.

30 en | System configuration BIS 2.3 - Access Engine
F.01U.028.713 | V 2.3.0.1 | 2009.11 Installation manual Bosch Sicherheitssysteme GmbH
2. In the BIS Manager switch to the Load/Save configuration
page.
–In the Load new configuration field click the ellipsis
button (…) and select the directory with the new
configuration.
– Check that the paths in the Configuration display
field are correct and press the Load button beneath.
– Confirm the confirmation prompt about the
configuration change with Yes.
– Answer Yes to the question regarding the system (BIS
Server component) start.
While changing the configuration change a progress dialog is
shown, followed by confirmation of completion.
1. Close the confirmation of completion by clicking the Close
button.
4.4 Copying configuration changes
If the changes were made when the BIS Server was not running,
then the changes just need to be saved using the Apply buttons
in the Configuration Browser dialogs. The current settings will
be loaded automatically when the system is started.
However, if changes are made while the system is running,
these do not come into effect until the changed configuration is
reloaded. To load a changed configuration follow steps 2 and 3
in Section 4.3 Loading a configuration, Page 29.
i
NOTICE!
If the BIS Manager is already running with a configuration, the
question regarding the system start is omitted and the
configuration change starts immediately.
i
NOTICE!
If the platform has been started on a workstation, any BIS user
who is logged on will be automatically logged off with a
message informing him of the configuration change.
 Loading...