

Page 1

Robert Bosch Hausgeräte GmbH
$BSM8FSZ4USBF
.ßODIFO
www.bosch-home.com
(&3."/:
*9001280506*
9001280506
980227
Page 2

Page 3

Page 4

Page 5

en Environmental protection
7Environmental protection
Environmental protection
Environmentally-friendly disposal
Dispose of packaging in an environmentally-friendly
manner.
This appliance is labelled in accordance with
European Directive 2012/19/EU concerning
used electrical and electronic appliances
(waste electrical and electronic equipment WEEE). The guideline determines the
framework for the return and recycling of used
appliances as applicable throughout the EU.
16
Page 6
Trouble shooting en
3Trouble shooting
Trouble shooting
Malfunctions often have simple explanations. Please read the following notes before calling the after-sales service:
The crockery or food stays cold. Check whether:
■ The appliance is switched on
■ There is a power cut
■ The drawer is completely closed
The crockery or food does not get warm enough. It may be that:
■ The crockery or food has not been warmed for long enough
■ The drawer was open for a long time
The operating indicator light is flashing. Check whether the drawer is completely closed.
The indicator light is flashing quickly when the warming
drawer is closed.
The operating indicator light does not light up. The indicator light is defective. Consult the after-sales service.
The fuse in the fuse box blows. Pull out the mains plug and consult the after-sales service.
Call the after-sales service.
4Customer service
Customer service
Our after-sales service is there for you if your appliance
needs to be repaired. We will always find an
appropriate solution, also in order to avoid after-sales
personnel having to make unnecessary visits.
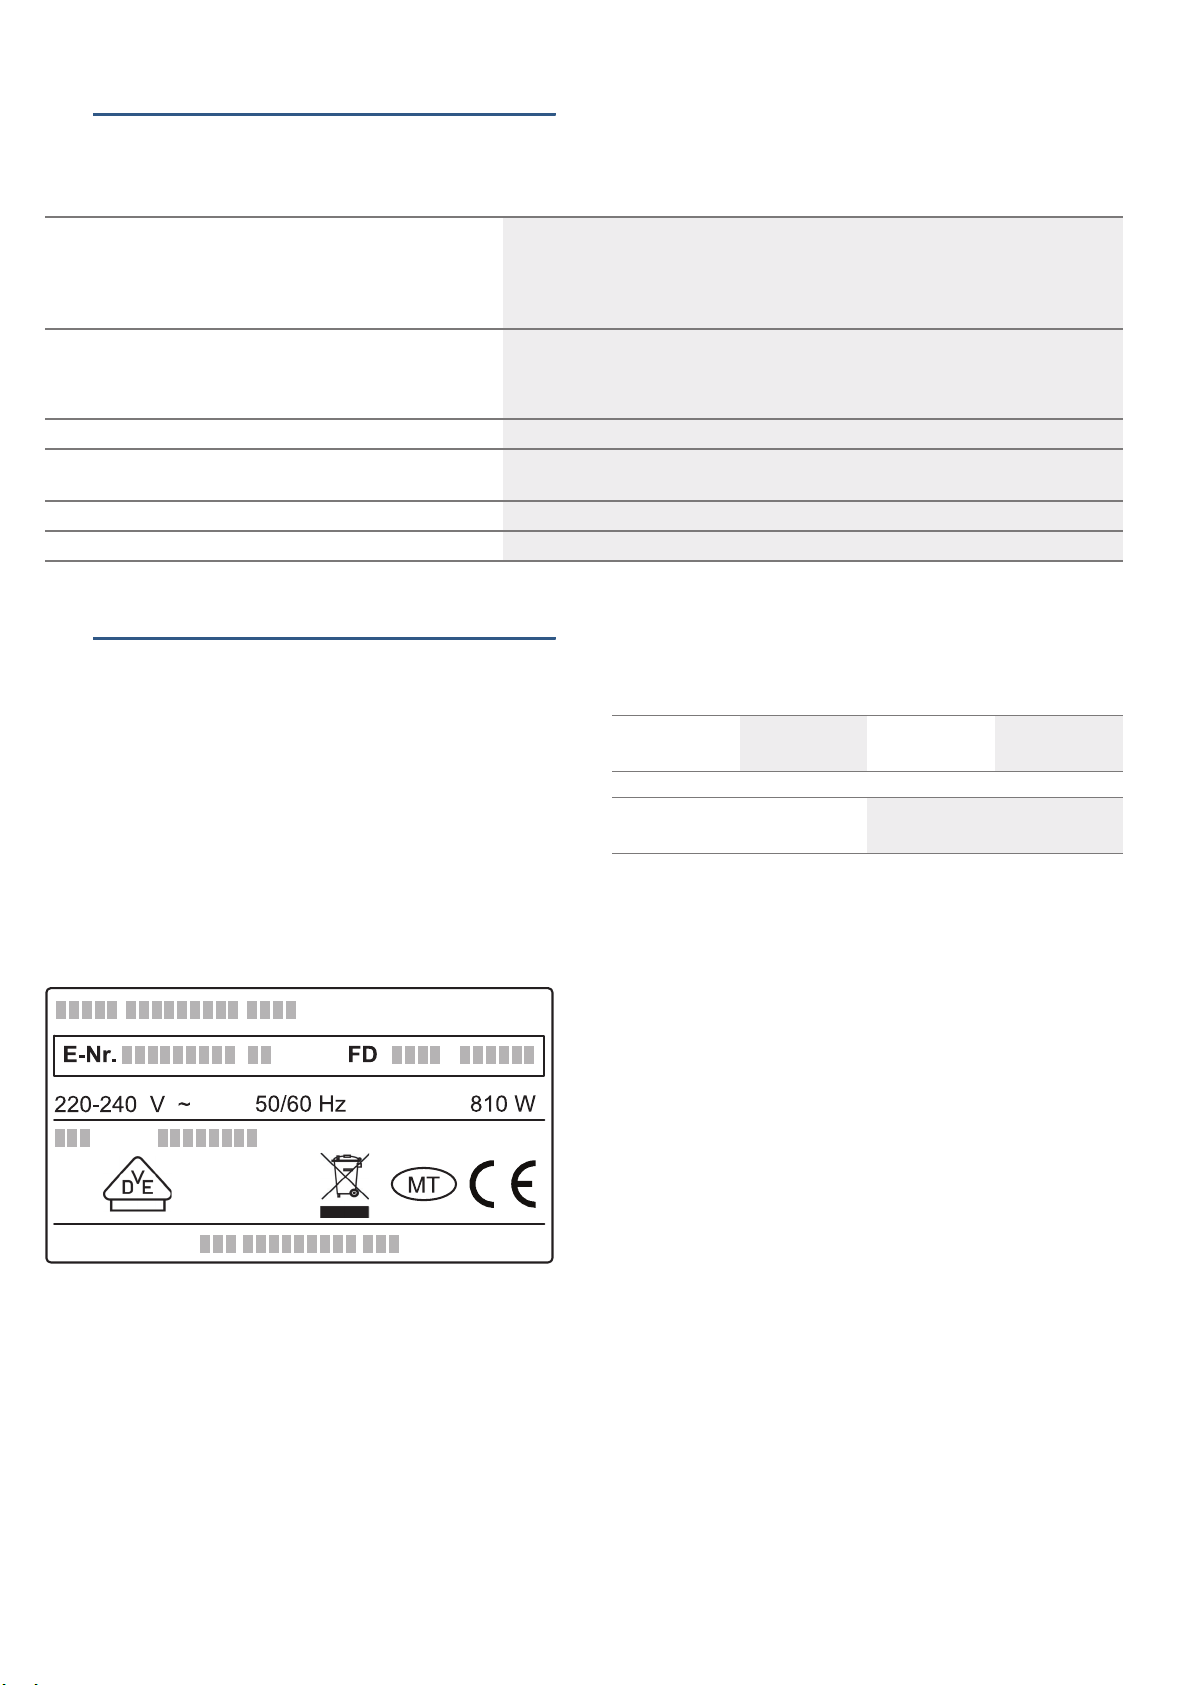
E number and FD number
When calling us, please give the full product number (E
no.) and the production number (FD no.) so that we can
provide you with the correct advice. The rating plate
bearing these numbers can be found when you open
the appliance door.
To save time, you can make a note of the number of
your appliance and the telephone number of the aftersales service in the space below, should it be required.
E no. FD no.
After-sales service O
Please note that a visit from an after-sales service
engineer is not free of charge, even during the warranty
period.
Please find the contact data of all countries in the
enclosed customer service list.
To book an engineer visit and product advice
GB 0844 8928979
Calls from a BT landline will be charged at up to
3 pence per minute. A call set-up fee of up to
6 pence may apply.
IE 01450 2655
0.03 € per minute at peak. Off peak 0.0088 €
per minute.
Rely on the professionalism of the manufacturer. You
can therefore be sure that the repair is carried out by
trained service technicians who carry original spare
parts for your appliances.
Technical data
Power supply: 220-240 V
50/60 Hz
Total connected load: 810 W
VDE-inspected: yes
CE mark: yes
15
Page 7

en Cleaning
Notes on slow cooking
Only use high-quality, fresh meat for this. Carefully
remove sinews and fat. Fat develops a strong, distinct
taste during slow cooking.
The meat should not be turned even if it is a large joint.
You can cut the meat immediately after slow cooking. It
is not necessary to leave the meat to stand.
This particular cooking method always leaves the inside
of the meat medium rare. However, this does not mean
that it is raw or not properly cooked.
Table
All tender joints of beef, pork, veal, lamb, game and poultry are suitable for slow cooking. Searing and braising times
depend on the size of the piece of meat. The times for searing refer to the meat being placed in hot fat.
Meal Searing on the hotplate Completing in the oven
Small pieces of meat
Cubes or strips 1-2 minutes all over 20-30 minutes
Small cutlets, steaks or médaillons 1-2 minutes per side 35-50 minutes
Medium-sized pieces of meat
Fillet (400-800g) 4-5 minutes all over 75-120 minutes
Saddle of lamb (approx. 450g) 2-3 minutes per side 50-60 minutes
Lean joint (600-1000g) 10-15 minutes all over 120-180 minutes
Large pieces of meat
Fillet (from 900g) 6-8 minutes all over 120-180 minutes
Roast beef (1,1-2kg) 8-10 minutes all over 210-300 minutes
Meat that has been slow-cooked is not as hot as meat
that has been cooked conventionally. Serve the sauce
very hot. Place the plates in the warming drawer for the
last 20-30 minutes.
Turn the oven back to setting 2 after slow cooking in
order to keep the slow-cooked meat warm. You can
keep small pieces of meat warm for up to 45 minutes,
and large pieces for up to two hours.
DCleaning
Cleaning
Do not use high-pressure cleaners or steam jets. Only
clean the appliance when it is switched off. Function
selector: Position = 0.
Appliance exterior
Wipe the appliance with water and a little detergent.
Then dry it with a soft cloth.
Caustic or abrasive cleaning products are not suitable.
If a caustic or abrasive substance comes into contact
with the frontage, wash it off immediately with water.
Stainless steel surfaces
Always remove any spots of limescale, grease,
cornflour and egg white immediately. Corrosion can
form under such spots. Clean the appliance using water
and a little detergent. Then dry the surface with a soft
cloth.
Appliances with glass fronts
Clean the glass front with glass cleaner and a soft cloth.
Do not use a glass scraper.
Heating plate
Clean the heating plate using warm water and a little
detergent.
14
Page 8

Settings table and tips en
Removing ovenware
Remove ovenware from the drawer using oven gloves
or an oven cloth.
:Warning
Risk of burning!
The upper surface of the heating plate will be hot. The
base of the ovenware will be hotter than the top.
Keeping food warm
Do not place hot saucepans or pans on the glass
surface of the warming drawer immediately after
removing them from the hot drawer. This could damage
the glass surface.
Do not fill the ovenware to such an extent that food
spills over.
Cover the food with a heat-resistant lid or aluminium foil.
It is recommended that you do not keep food warm for
longer than an hour.
Suitable foods: The appliance is suitable for keeping
meat, poultry, fish, sauces, vegetables, side dishes and
soups warm.
Method
1. Place the ovenware in the drawer.
2. Set the function selector to setting 3 and preheat the
appliance for 10 minutes.
3. Add the food to the preheated ovenware.
4. Close the drawer again.
The "power on" indicator light lights up. The
appliance heats up.
Switching off
Switch off the function selector. Remove the food from
the drawer using oven gloves or an oven cloth.
JSettings table and tips
Settings table and tips
The table lists the various uses of your warming drawer. Turn the function selector to the desired level. Preheat
crockery if it is listed in the table.
Level Food/crockery Note
1 Thawing delicate frozen foods, e.g. cream cakes, butter, sausages, cheese thaw
1 Proving (covering) yeast dough cover
2 Thawing frozen foods, e.g. meat, cakes, bread thaw
2 Keeping eggs warm, e.g. cooked eggs, scrambled eggs Preheating crockery, covering food
2 Keeping bread warm, e.g. toast, rolls Preheating crockery, covering food
2 Preheating cups and glasses e.g. espresso cups
2 Delicate foods, e.g. cooked meat Covering crockery
3 Keeping food warm Preheating crockery, covering food
3 Keeping drinks warm Preheating crockery, covering drinks
3 Keeping flatbreads warm, e.g. pancakes, wraps, tacos Preheating crockery, covering food
3 Keeping cakes warm, e.g. crumbles, muffins Preheating crockery, covering food
3 Melting blocks of chocolate or couverture chocolate Preheating crockery, reducing liquids
3 Melting gelatin Open, approx. 20 minutes
4 Preheating crockery Not suitable for cups and glasses
Slow cooking
Slow cooking is the ideal cooking method for all tender
pieces of meat which are to be cooked rare or very
rare. The meat remains very juicy and turns out as soft
as butter. Advantage: this gives you flexibility when
planning meals, since the cooking times for slow
cooking are generally longer. Slow-cooked meat can be
kept warm easily.
Suitable ovenware: Use ovenware made out of glass,
porcelain or ceramic and with a lid, e.g. a glass roasting
dish.
Method
1. Preheat the warming drawer containing the
ovenware at setting 4.
2. Rapidly heat a little fat in a pan. Sear the meat over a
high heat and then place it directly in the warmed
ovenware. Place the lid on top.
3. Put the ovenware with the meat back in the warning
drawer and complete the cooking. Set the function
selector to setting 3.
13
Page 9

en Getting to know your appliance
#
*Getting to know your
appliance
Getting to know your appliance
The warming drawer can be used to preheat crockery
or keep food warm.
(
0
8
@
Heating plate
Fan and heating element
Operation at level 4 = Crockery preheating on
Operating indicator
The indicator light flashes when you switch the
appliance on. It lights up when you close the
appliance.
Function selector
0 = Off
1 = Proving yeast dough, thawing frozen food
2 = Keeping bread warm, thawing frozen food,
preheating cups and glasses
3 = Keeping food warm
4 = Preheating crockery
1Operating the appliance
Operating the appliance
Preheating ovenware
Food stays warm for longer in preheated ovenware.
Drinks also remain warm for longer.
General ovenware
Only load the warming drawer up to 25 kg. You can
preheat dinnerware for 6 or 12 people, for example.
Low drawer,
(14 cm in height)
6 dinner plates Ø 24 cm 12 dinner plates Ø 24 cm
6 soup bowls Ø 10 cm 12 soup bowls Ø 10 cm
1 serving dish Ø 19 cm 1 serving dish Ø 22 cm
1 serving dish Ø 17 cm 1 serving dish Ø 19 cm
1 meat plate 32 cm 1 serving dish Ø 17 cm
Arranging ovenware
As far as possible, distribute the ovenware over the
entire surface. It takes longer to warm through tall
stacks of plates than individual pieces of ovenware, e.g.
2 serving dishes.
Drinks containers
Always heat drinks containers, e.g. espresso cups,
using setting 2.
:Warning
Risk of burning!
At setting 3 or 4, the drinks containers will get very hot
and may cause serious injury.
Tall drawer,
(29 cm in height)
2 meat plates 32 cm
Opening and closing
For appliances with no handle:
Press the middle of the drawer to open or close it.
When opening, the drawer pops out slightly. You can
then pull it out towards you.
Method
1. Place the ovenware in the drawer.
2. Set the function selector to setting 4. Always heat
drinks containers using setting 2.
The "power on" indicator light flashes.
3. Close the warming drawer.
The "power on" indicator light lights up. The
appliance heats up.
How long does preheating take
The length of time required for preheating depends on
the material the ovenware is made of and its thickness,
as well as the quantity, height and arrangement of the
ovenware. As far as possible, distribute the ovenware
over the entire surface.
It takes approximately 15-25 minutes to preheat
dinnerware for 6 people.
Switching off
Open the drawer. Switch off the function selector.
12
Page 10

Intended use en
8Intended use
Intended use
Read these instructions carefully. Only then will you be
able to operate your appliance safely and correctly.
Retain the instruction manual and installation
instructions for future use or for subsequent owners.
Check the appliance for damage after unpacking it. Do
not connect the appliance if it has been damaged in
transport.
This appliance is intended for domestic use and the
household environment only. The appliance should be
used for keeping food warm and warming plates only.
This appliance may be used by children over the age of
8 years old and by persons with reduced physical,
sensory or mental capabilities or by persons with a lack
of experience or knowledge if they are supervised or
are instructed by a person responsible for their safety
how to use the appliance safely and have understood
the associated hazards.
Children must not play with, on, or around the
appliance. Children must not clean the appliance or
carry out general maintenance unless they are at least
8 years old and are being supervised.
Keep children below the age of 8 years old at a safe
distance from the appliance and power cable.
This appliance is intended for use up to a maximum
height of 4000 metres above sea level.
(Important safety
information
Important safety information
:Warning
Risk of serious burns!
■ The heating plate in the warming drawer
becomes very hot.
Do not touch the heating plate when it is
hot. Keep children at a safe distance.
Risk of serious burns!
■ Accessories and ovenware become very
hot. Always use oven gloves to remove
accessories or ovenware from the cooking
compartment.
:Warning
Risk of electric shock and serious injury!
■ The cable insulation on electrical
appliances may melt when touching hot
parts of the appliance. Never bring
electrical appliance cables into contact with
hot parts of the appliance.
Risk of electric shock!
■ Do not use any high-pressure cleaners or
steam cleaners, which can result in an
electric shock.
Risk of electric shock!
■ A defective appliance may cause electric
shock. Never switch on a defective
appliance. Unplug the appliance from the
mains or switch off the circuit breaker in the
fuse box. Contact the after-sales service.
Risk of electric shock!
■ Cracks or fractures in the glass plate could
cause electric shocks. Switch off the circuit
breaker in the fuse box. Contact the aftersales service.
Risk of electric shock!
■ Incorrect repairs are dangerous. Repairs
may only be carried out by one of our
trained after-sales engineers. If the
appliance is faulty, unplug the mains plug or
switch off the fuse in the fuse box. Contact
the after-sales service.
:Warning
Risk of fire and serious injury!
The heating plate in the warming drawer
becomes very hot and flammable materials
may catch fire.
Do not store flammable objects or plastic
containers in the warming drawer.
11
Page 11

en
Table of contents
[en]Instruction manual
8 Intended use . . . . . . . . . . . . . . . . . . . . . . . . . . . 11
( Important safety information . . . . . . . . . . . . . . 11
* Getting to know your appliance . . . . . . . . . . . . 12
Opening and closing . . . . . . . . . . . . . . . . . . . . . . . . 12
1 Operating the appliance . . . . . . . . . . . . . . . . . . 12
Preheating ovenware . . . . . . . . . . . . . . . . . . . . . . . . 12
Drinks containers . . . . . . . . . . . . . . . . . . . . . . . . . . 12
Method . . . . . . . . . . . . . . . . . . . . . . . . . . . . . . . . . . 12
Keeping food warm . . . . . . . . . . . . . . . . . . . . . . . . . 13
J Settings table and tips . . . . . . . . . . . . . . . . . . . 13
Slow cooking . . . . . . . . . . . . . . . . . . . . . . . . . . . . . . 13
D Cleaning . . . . . . . . . . . . . . . . . . . . . . . . . . . . . . . 14
Appliance exterior . . . . . . . . . . . . . . . . . . . . . . . . . . 14
Heating plate . . . . . . . . . . . . . . . . . . . . . . . . . . . . . . 14
Produktinfo
Additional information on products, accessories,
replacement parts and services can be found at
www.bosch-home.com and in the online shop
www.bosch-eshop.com
3 Trouble shooting . . . . . . . . . . . . . . . . . . . . . . . . 15
4 Customer service . . . . . . . . . . . . . . . . . . . . . . . 15
E number and FD number . . . . . . . . . . . . . . . . . . . 15
Technical data . . . . . . . . . . . . . . . . . . . . . . . . . . . . . 15
7 Environmental protection . . . . . . . . . . . . . . . . . 16
Environmentally-friendly disposal . . . . . . . . . . . . . . 16
10
Page 12

ar
AÓª©dG áeóN
áÄ«ÑdG ájɪM
≈∏Y á¶aÉëe á≤jô£H äÉØ∏îªdG øe ¢ü∏îàdG
.áÄ«ÑdG ≈∏Y á¶aÉëe á≤jô£H ∞«∏¨àdG IƒÑY øe ¢ü∏îJ
2012/19/EU á«HhQhC’G áØ°UGƒª∏d É≤ÑW õ«ªe RÉ¡édG Gòg
áªjó≤dG á«fhôàμdE’Gh á«FÉHô¡μdG Iõ¡LC’ÉH ≥∏©àj ɪ«a
.
(waste electrical and electronic equipment - WEEE)
á∏ª©à°ùªdG Iõ¡LC’G ´ÉLôà°S’ ΩÉ©dG QÉWE’G áØ°UGƒªdG √òg OóëJh
OÉëJ’G ∫hO ™«ªL »a ¬H ∫ƒª©e ƒg ɪc ÉgôjhóJ IOÉYEGh
.»HhQhC’G
7
áÄ«ÑdG
AÓª©dG áeóN
∑RÉ¡L êÉàMG Ée GPEG ¿ƒ©dG ÉæH á°UÉîdG ™«ÑdG ó©H Ée áeóN õcGôe ∂d Ωó≤J
»«æa ÜÉgP Öæéàd ∂dPh ,ÉÑ°SÉæe ÓM óéf ±ƒ°S .ìÓ°UEG ∫ɪYCG ájC’
.´GO ¿hO ∂«dEG äÉ©«ÑªdG áeóN
FD ™æ°üdG ºbQh E èàæªdG ºbQ
≈àM (FD) ™æ°üdG ºbQh (E) èàæªdG ºbQ ºjó≤J ≈Lôj ÉæH ∫É°üJ’G óæY
πªëJ »àdG ™æ°üdG áMƒd óéJh .áë«ë°üdG IQƒ°ûªdG ∂d Ωó≤f ¿CG ™«£à°ùf
.RÉ¡édG ÜÉH íàa óæY ΩÉbQC’G √òg
ºbQh ∑RÉ¡L ºbôH áXƒë∏e øjhóJ ∂æμªj ,∂dP AGôLE’ ΩRÓdG âbƒdG ô«aƒàd
.√ÉfOCG IOƒLƒªdG äÉZGôØdG »a ™«ÑdG ó©H Ée áeóN õcôe ∞JÉg
4
™æ°üdG ºbQ
FD no.
™«ÑdG ó©H Ée áeóN
O
≈àM ,á«fÉée â°ù«d ™«ÑdG ó©H Ée áeóN õcôe »æa IQÉjR ¿CG IÉYGôe ≈Lôoj
.¿Éª°†dG ¿Éjô°S Iôàa AÉæKCG
AÓª©dG áeóN áëF’ »a ∫hódG ™«ªéH á°UÉîdG ∫É°üJ’G äÉfÉ«H óéJ
èàæªdG ºbQ
E no.
.á≤aôªdG
èàæªdG øY QÉ°ùØà°SÓdh »æØdG øe IQÉjR õéëd
0344 892 8979
á«∏ëªdG ä’É°üJ’G áØjô©àH äɪdÉμªdG áØ∏μJ ÜÉ°ùàMG ºàj
.ádGƒédG hCG
01450 2655
IhQòdG äÉYÉ°S êQÉNh .IhQòdG äÉbhCG »a á≤«bó∏d hQƒj 0.03
.á≤«bó∏d hQƒj 0.0088
…òdG ¿CG kÉæĪ£e øμà∏a .á©fÉ°üdG á¡édG á«aGôàMG ≈∏Y OɪàY’G ∂æμªj
.∂Jõ¡LC’ á«∏°UCG QÉ«Z ™£b ¿ƒeóîà°ùj ø«HQóe ø««æa ìÓ°UE’G òØæ«°S
É«fÉ£jôH
GóædôjCG
á«æØdG äÉØ°UGƒªdG
:AÉHô¡μdG Qó°üe§∏" 240-220
õJôg 60/50
:π°UƒªdG »dɪLE’G πªëdG•Gh 810
AÉHô¡μdG »°Sóæ¡e OÉëJG πÑb øe ¢üëØdG ºJ
º©f
:VDE ¿ÉªdC’G
CE á«HhQhC’G á≤HÉ£ªdG áeÓYº©f
:
9
Page 13

∞«¶æàdG ar
π«à°S ¢ù∏fÉà°S’G í£°SCG
≈∏Y ¢†«ÑdG ¢VÉ«Hh É°ûædG ™≤Hh ¿ƒgO hCG ájô«L ™≤H …CG ádGREÉH ɪFGO ºb
RÉ¡édG ∞«¶æàH ºb .™≤ÑdG √òg πØ°SCG CGó°üdG ¿ƒμàj ¿CG ø쪪dG øªa .QƒØdG
»LQÉîdG í£°ùdG ∞«ØéàH ºb ºK .∞«¶æàdG IOÉe øe π«∏bh AɪdG ΩGóîà°SÉH
.áªYÉf ¢Tɪb á©£b ΩGóîà°SÉH
á«LÉLR äÉ¡LGƒH IOhõªdG Iõ¡LC’G
¢Tɪb á©£bh êÉLõ∏d ∞¶æe ΩGóîà°SÉH á«LÉLõdG á¡LGƒdG ∞«¶æàH ºb
.êÉLR ᣰTÉc Ωóîà°ùJ ’ .áªYÉf
ø«î°ùàdG ìƒd
.∞«¶æàdG IOÉe øe π«∏bh ÅaGódG AɪdG ΩGóîà°SÉH ø«î°ùàdG ìƒd ∞«¶æàH ºb
:»∏j Ée ≈dEG ∂dP ™Lôj ób
.πeÉμdÉH êQódG ≥∏Z øe ócCÉJ
.™«ÑdG ó©H Ée áeóN õcôªH π°üJG
.™«ÑdG ó©H Ée áeóîH π°üJG .á∏£©e ô°TDƒªdG áѪd
.™«ÑdG ó©H Ée áeóîH π°üJGh AÉHô¡μdG ¢ùÑ≤e Öë°SG
ΩGóîà°SÉH ¬Ø«ØéàH ºb ºK .∞«¶æàdG IOÉe øe π«∏bh AɪdÉH RÉ¡édG í°ùeG
ádÉM »ah .¢Vô¨dG Gò¡d áªFÓe ô«Z á°TOÉîdG hCG ájhÉμdG ∞«¶æàdG OGƒe
GQƒa É¡∏°ùZ ≈∏Y πªYÉa RÉ¡édG á¡LGƒd á°TOÉN hCG ájhÉc IOÉe á°ùeÓe
äɶMÓªdG IAGôb ≈Lôoj .ᣫ°ùH ÜÉÑ°SCG ≈dEG ä’ÓàN’G Oƒ©J Ée ÉÑdÉZ
:»∏j ɪe ≥≤ëJ
■π¨°ûe RÉ¡édG πg
■»FÉHô¡μdG QÉ«à∏d ´É£≤fG çhóM
■πeÉμdÉH ≥∏¨e êQódG πg
■á«aÉc IôàØd ᪩WC’G hCG »fGhC’G ø«î°ùJ ºàj ºd
■á∏jƒW IôàØd ÉMƒàØe êQódG ∑ôJ
∞«¶æàdG
º≤J ’ .QÉîÑdG äÉKÉØf hCG »dÉ©dG §¨°†dÉH ∞«¶æàdG Iõ¡LCG Ωóîà°ùJ ’
.
0 = ™°VƒdG :áØ«XƒdG QÉ«àNG ìÉàØe .∞bƒàe ƒgh ’EG RÉ¡édG ∞«¶æàH
D
êQÉîdG øe RÉ¡édG
.áªYÉf ¢Tɪb á©£b
.AɪdÉH
∫É£YC’G ≈∏Y Ö∏¨àdG
:™«ÑdG ó©H Ée áeóN õcôªH ∫É°üJ’G πÑb á«dÉàdG
.IOQÉH ᪩WC’G hCG »fGhC’G π¶J
.m±Éc πμ°ûH øî°ùJ ’ ᪩WC’G hCG »fGhC’G
.𫨰ûàdG ô°TDƒe áѪd ¢†eƒJ
ø«î°ùàdG êQOh áYô°ùH 𫨰ûàdG ô°TDƒe áѪd ¢†eƒJ
.𫨰ûàdG ¿É«H áѪd A»°†J ’
.äGQƒ«ØdG ¥hóæ°U »a OƒLƒªdG Rƒ«ØdG ¥GôàMG
3
.≥∏¨e
8
Page 14

ar
íFÉ°üædGh §Ñ°†dG ´É°VhCG ∫hóL
øeR ójóëJ ºJ .ºë∏dG á©£b ºéM ≈∏Y óªà©J »æî«dG OGóYEG hCG íjƒ°ûà∏d
.áæNÉ°S á«ægO IOÉe »a É¡©°Vh ¢VGôàaG ≈∏Y ºë∏dG íjƒ°ûJ
∫hóédG
Ωƒëd hCG ¿CÉ°†dG ºëd hCG ƒ∏àÑdG ºëd hCG …ô≤ÑdG ºë∏dG øe ájô£dG ™£≤dG ™«ªL
áeRÓdG áæeRC’G .A»£ÑdG »¡£∏d áÑ°SÉæe Qƒ«£dG hCG ájôÑdG äÉfGƒ«ëdG
áÑLƒdGø«î°ùàdG í£°S ≈∏Y íjƒ°ûàdG¿ôØdG »a ∫ɪμà°S’G
ºë∏dG øe Iô«¨°U ™£b
™HÉ°UCG hCG äÉÑ©μe»dɪLEG πμ°ûH ≥FÉbO 2-1á≤«bO 30-20
Iôjóà°ùe ™£b ∂«à°SG hCG Iô«¨°U áà«∏à°ùcÖfÉL πμd á≤«bO 2-1á≤«bO 50-35
ºéëdG ᣰSƒàe ºëd ™£b
(ºL 800-400) ¬«∏«a»dɪLEG πμ°ûH ≥FÉbO 5-4á≤«bO 120-75
(ºL 450 »dGƒM) ¿CÉ°V π°üØeÖfÉL πμd á≤«bO 3-2á≤«bO 60-50
(ºL 1000-600) ¿ƒgódG øe ∫ÉN π°üØe»dɪLEG πμ°ûH á≤«bO 10-15á≤«bO 180-120
ºë∏dG øe Iô«Ñc ™£b
(ºL 900 øe AóàHG) ¬«∏«a»dɪLEG πμ°ûH ≥FÉbO 8-6á≤«bO 180-120
(ºéc 2-1,1) ∞«H RhQ»dɪLEG πμ°ûH ≥FÉbO 10-8á≤«bO 300-210
7
Page 15

íFÉ°üædGh §Ñ°†dG ´É°VhCG ∫hóL ar
óªéàdG áHGPEG
᪩WC’G á«£¨J ,»fGhCÓd ≥Ñ°ùªdG ø«î°ùàdG
᪩WC’G á«£¨J ,»fGhCÓd ≥Ñ°ùªdG ø«î°ùàdG
᪩WC’G á«£¨J ,»fGhCÓd ≥Ñ°ùªdG ø«î°ùàdG
᪩WC’G á«£¨J ,»fGhCÓd ≥Ñ°ùªdG ø«î°ùàdG
íFÉ°üædGh §Ñ°†dG ´É°VhCG ∫hóL
.∂H ¢UÉîdG ø«î°ùàdG êQód Iójó©dG äÉeGóîà°S’G ≈∏Y ∫hóédG Gòg …ƒàëj
≥Ñ°ùªdG ø«î°ùàdÉH ºb .܃ZôªdG iƒà°ùªdG ≈∏Y áØ«XƒdG QÉ«àNG ìÉàØe QOCG
.∫hóédG »a GQƒcòe ¿Éc GPEG »fGhCÓd
∂«μdG ∫ÉãªdG π«Ñ°S ≈∏Y ,IóªéªdG á°SÉ°ùëdG ᪩WC’G øY óªéàdG áHGPEG
øÑédG ,(≥fÉ≤ædG) ≥é°ùdG ,óHõdG ,áªjôμdÉH ƒ°ûëªdG
(≈£¨ªdG) ø«é©dG ô«ªîJá«£¨J
õÑîdG ,∂«μdG ,Ωƒë∏dG πãe ,IóªéªdG ᪩WC’G øY óªéàdG áHGPEGóªéàdG áHGPEG
,¥ƒ∏°ùªdG ¢†«ÑdG ∫ÉãªdG π«Ñ°S ≈∏Y ,¢†«ÑdG áfƒî°S ≈∏Y ®ÉØëdG
¥ƒØîªdG »∏≤ªdG ¢†«ÑdGh
,â°SƒàdG õÑN ∫ÉãªdG π«Ñ°S ≈∏Y ,õÑîdG áfƒî°S ≈∏Y ®ÉØëdG
±ƒØ∏ªdG õÑîdG
äÉLÉLõdGh ÜGƒcCÓd ≥Ñ°ùªdG ø«î°ùàdGƒ°ùjôÑ°SE’G ø«LÉæa ∫ÉãªdG π«Ñ°S ≈∏Y
»¡£ªdG ºë∏dG ∫ÉãªdG π«Ñ°S ≈∏Y ,á°SÉ°ùëdG ᪩WC’G»fGhC’G á«£¨J
ΩÉ©£dG áfƒî°S ≈∏Y ®ÉØëdG᪩WC’G á«£¨J ,»fGhCÓd ≥Ñ°ùªdG ø«î°ùàdG
äÉHhô°ûªdG áfƒî°S ≈∏Y ®ÉØëdGäÉHhô°ûªdG á«£¨J ,»fGhCÓd ≥Ñ°ùªdG ø«î°ùàdG
,∂«c ¿ÉÑdG ∫ÉãªdG π«Ñ°S ≈∏Y ,OhôتdG õÑîdG áfƒî°S ≈∏Y ®ÉØëdG
ƒcÉàdG ,±ƒØ∏ªdG
,¢û¡dG ∂«μdG ,∫ÉãªdG π«Ñ°S ≈∏Y ,∂«μdG áfƒî°S ≈∏Y ®ÉØëdG
∂«c øaɪdG
á«£¨àdG áJ’ƒμ«°T hCG áJ’ƒμ«°ûdG ™£b ô¡°UπFGƒ°ùdG π«∏≤J ,»fGhCÓd ≥Ñ°ùªdG ø«î°ùàdG
ø«JÓ«édG ô¡°U≥FÉbO 20 »dGƒM ,íàa
IóFɪdG äGhOC’ ≥Ñ°ùªdG ø«î°ùàdGäÉLÉLõdGh ÜGƒcCÓd Ö°SÉæe ô«Z
J
iƒà°ùªdG»fGhC’G/ΩÉ©£dGá¶MÓe
1
1
2
2
2
2
2
3
3
3
3
3
3
4
A»£ÑdG »¡£dG ∫ƒM äɶMÓe
ádGREÉH ºb .¢Vô¨dG Gò¡d IOƒédG »dÉY êRÉ£dG ºë∏dG ΩGóîà°SG ≈∏Y ô°üàbG
»¡£dG AÉæKCG õ«ªe …ƒb ¥GòªH ¿ƒgódG íÑ°üJ å«M .ájÉæ©H ¿ƒgódGh QÉJhC’G
.A»£ÑdG
.Iô«Ñc âfÉc ¿EGh ≈àM ºë∏dG á©£b Ö∏b Rƒéj ’
ºë∏dG ∑ôJ …Qhô°†dG øe ¢ù«dh .A§ÑH ¬«¡W ó©H GQƒa ºë∏dG ™«£≤J ∂æμªj
.CGó¡j
øe á«¡£e ∞°üf ºë∏dG á©£b AÉ≤H ∂d øª°†J »¡£∏d á°UÉîdG á≤jô£dG √òg
.º«∏°S πμ°ûH á«¡£e ô«Z hCG áÄ«f É¡fCG »æ©j ’ ∂dP ¿CG ô«Z .ɪFGO πNGódG
»¡£ªdG ºë∏dG áfƒî°S áLQO ¢ùØæH ¿ƒμj ’ A§ÑH ¬«¡W ºJ …òdG ºë∏dG
»a ¥ÉÑWC’G ™°V .GóL øNÉ°S ƒgh ¢Uƒ°üdG ºjó≤àH ºb .ájó«∏≤àdG á≤jô£dÉH
20-30 ôNBG ∫ÓN ø«î°ùàdG êQO
.á≤«bO
≈∏Y ®ÉØë∏d A»£ÑdG »¡£dG ó©H
ºë∏dG ™£b áfƒî°S ≈∏Y ®ÉØëdG ∂æμªj .A§ÑH »¡£ªdG ºë∏dG áfƒî°S
π°üJ Ióªd Iô«ÑμdG ºë∏dG ™£b ∂dòch ,á≤«bO 45 ≈dEG π°üJ Ióªd Iô«¨°üdG
2 §Ñ°†dG ™°Vh ≈dEG ¿ôØdG ´ÉLQEÉH ºb
.ø«àYÉ°S ≈dEG
A»£ÑdG »¡£dG
ºë∏dG øe á°SÉ°ùëdG ™£≤dG ™«ªéd ≈∏ãªdG »¡£dG á≤jôW ƒg A»£ÑdG »¡£dG
ájɨ∏d á°†Z Ωƒë∏dG π¶Jh .áÄ«f ¬Ñ°T hCG á«¡£e ∞°üf É¡ªjó≤J ºàj »àdGh
,äÉÑLƒdG ô«°†ëJ óæY áfhôªdG ∂dP ∂d í«àj :Iõ«ªdG .óHõdÉc ájôW íÑ°üJh
ádƒ¡°ùH øμªjh .ΩÉY ¬LƒH ∫ƒWCG ¿ƒμJ A»£ÑdG »¡£dG áæeRCG ¿C’ ∂dPh
.A§ÑH »¡£ªdG ºë∏dG áfƒî°S ≈∏Y ®ÉØëdG
hCG êÉLõdG øe áYƒæ°üªdG ¿ôØdG »fGhCG Ωóîà°SG
ô«ªëJ ≥ÑW ∫ÉãªdG π«Ñ°S ≈∏Y ,AÉ£¨H IOhõªdG ±õîdG hCG ø«∏°SQƒÑdG
™°V ºK .kIô°TÉÑe áæî°ùªdG ¿ôØdG »fGhCG »a É¡©°V ºK á©ØJôe IQGôM
.3 §Ñ°†dG ™°Vh ≈∏Y áØ«XƒdG QÉ«àNG ìÉàØe §Ñ°VG .¬«¡W
:áÑ°SÉæªdG ¿ôØdG »fGhCG
.»LÉLR
á≤jô£dG
.
4 §Ñ°†dG ™°Vh
.É¡bƒa AÉ£¨dG
.1 ≈∏Y ¿ôØdG »fGhCG ¬∏NGóH OƒLƒªdG ø«î°ùàdG êQód »dhC’G ø«î°ùàdÉH ºb
.2 áLQO ≈∏Y Ωƒë∏dG íjƒ°ûàH ºb .IÓ≤e »a øgódG øe π«∏b ø«î°ùàH ºb
.3 πªμà°SGh ø«î°ùàdG êQO IôNDƒe »a ºë∏dG ¬∏NGóHh ¿ôØdG AÉfEG ™°V
6
Page 16

ar
RÉ¡édG 𫨰ûJ
!äGAGƒàcÉH áHÉ°UE’G ô£N - ôjòëJ
íÑ°üJ ¿ôØdG »fGhCG IóYÉb .ÉæNÉ°S íÑ°üj ø«î°ùàdG ìƒ∏d …ƒ∏©dG í£°ùdG
.…ƒ∏©dG AõédG áfƒî°S ôãcCG
:
ΩÉ©£dG áfƒî°S ≈∏Y ®ÉØëdG
ø«î°ùàdG êQód »LÉLõdG í£°ùdG ≈∏Y áæNÉ°ùdG á«YhC’G hCG »fGhC’G ™°†J ’
í£°ùdÉH Qô°†dG ≥ë∏J ób É¡fEG å«M .øNÉ°ùdG êQódG øY ÉgOÉ©HEG Qƒa
.»LÉLõdG
.É¡æe Öμ°ùæJ É¡∏©éj …òdG Qó≤dÉH ΩÉ©£dÉH ¿ôØdG »fGhCG CÓªJ ’
.Ωƒ«æeƒdCG ≥FÉbôH hCG áfƒî°ù∏d ΩhÉ≤e AÉ£¨H ᪩WC’G á«£¨àH ºb
.IóMGh áYÉ°S ≈∏Y ójõJ Ióªd ᪩WC’G áfƒî°S ≈∏Y ®ÉØëdG Ωó©H ≈°Uƒj
Qƒ«£dGh Ωƒë∏dG áfƒî°S ≈∏Y ®ÉØë∏d Ö°SÉæe RÉ¡édG
∞∏àîªH AÉ°ùëdGh á«ÑfÉédG ¥ÉÑWC’Gh äGhô°†îdGh äÉ°Uƒ°üdGh ∑ɪ°SC’Gh
.ø«î°ùàdG »a RÉ¡édG CGóÑj .z𫨰ûàdG{ ¿É«H áѪd A»°†J
RÉØb ΩGóîà°SÉH êQódG øe ΩÉ©£dG êGôNEÉH ºb .áØ«XƒdG QÉ«àNG ìÉàØe ∞bhCG
:áÑ°SÉæªdG ᪩WC’G
10 Ióªd RÉ¡édG
.≥FÉbO
.¿ôØ∏d ¢Tɪb á©£b hCG
.¬YGƒfCG
á≤jô£dG
.1 .êQódG »a ¿ôØdG »fGhCG ™°V
.2 AɪMEÉH ºb ºK 3 §Ñ°†dG ™°Vh ≈∏Y áØ«XƒdG QÉ«àNG ìÉàØe §Ñ°VG
.3 .≥Ñ°ùe πμ°ûH É¡æ«î°ùJ ó©H ¿ôØdG »fGhCG »a ΩÉ©£dG ™°V
.4 .iôNCG Iôe êQódG ≥∏ZCG
±É≤jE’G
RÉ¡édG 𫨰ûJ
1
¿ôØdG »fGhC’ ≥Ñ°ùªdG ø«î°ùàdG
πμ°ûH É¡æ«î°ùJ ºàj »àdG ¿ôØdG »fGhCG »a ∫ƒWCG IôàØd ÉæNÉ°S ΩÉ©£dG π¶j
.∫ƒWCG IôàØd áæNÉ°S äÉHhô°ûªdG π¶J ɪc .≥Ñ°ùe
áeÉY áØ°üH ¿ôØdG »fGhCG
∫ÉãªdG π«Ñ°S ≈∏Y ∂æμªj .ºéc 25 ≈∏Y ójõj Ée ø«î°ùàdG êQO »a ™°†J ’
.GOôa 12 hCG 6 Oó©d ≥Ñ°ùe πμ°ûH AÉ°û©dG »fGhCG ø«î°ùJ
,™ØJôe êQO
(º°S 29 ´ÉØJQG)
Ωƒëd ≥ÑW
2º°S 32
,¢†Øîæe êQO
(º°S 14 ´ÉØJQG)
AÉ°ûY ≥ÑW 6º°S 24 ô£bAÉ°ûY ≥ÑW 12º°S 24 ô£b
AÉ°ùM á«fÉ£∏°S
ºjó≤J ≥ÑW
ºjó≤J ≥ÑW
Ωƒëd ≥ÑW
6º°S 10 ô£bAÉ°ùM á«fÉ£∏°S 12º°S 10 ô£b
1º°S 19 ô£bºjó≤J ≥ÑW 1º°S 22 ô£b
1º°S 17 ô£bºjó≤J ≥ÑW 1º°S 19 ô£b
1º°S 32ºjó≤J ≥ÑW 1º°S 17 ô£b
¿ôØdG »fGhCG Ö«JôJ
∞°U ø«î°ùJ .¿ÉμeE’G Qób πeÉμdÉH í£°ùdG ≈∏Y ¿ôØdG »fGhCG ™jRƒàH ºb
¿ôØdG »fGhCG ø«î°ùJ øe ∫ƒWCG Éàbh ¥ô¨à°ùj á°Uƒ°UôªdG ¥ÉÑWC’G øe πjƒW
.ºjó≤J ≥ÑW 2 ∫ÉãªdG π«Ñ°S ≈∏Y ,IOôتdG
äÉHhô°ûªdG á«YhCG
,ƒ°ùjôÑ°SE’G ø«LÉæa ∫ÉãªdG π«Ñ°S ≈∏Y ,äÉHhô°ûªdG á«YhCG ø«î°ùàH ɪFGO ºb
.
2 §Ñ°†dG ™°Vh ΩGóîà°SÉH
!äGAGƒàcÉH áHÉ°UE’G ô£N - ôjòëJ
óbh ájɨ∏d áæNÉ°S äÉHhô°ûªdG á«YhCG íÑ°üJ ,4 hCG 3 iƒà°ùªdG §Ñ°V ó©H
.á¨dÉH äÉHÉ°UEG »a ÖÑ°ùàJ
:
á≤jô£dG
.1 .êQódG »a ¿ôØdG »fGhCG ™°V
.2 ≈∏Y ɪFGO ¢UôMG .4 §Ñ°†dG ™°Vh ≈∏Y áØ«XƒdG QÉ«àNG ìÉàØe §Ñ°VG
.2 §Ñ°†dG ™°Vh ΩGóîà°SÉH äÉHhô°ûªdG á«YhCG ø«î°ùJ
.z𫨰ûàdG{ ¿É«H áѪd ¢†eƒJ
.3 .ø«î°ùàdG êQO ≥∏ZCG
.ø«î°ùàdG »a RÉ¡édG CGóÑj .z𫨰ûàdG{ ¿É«H áѪd A»°†J
≥Ñ°ùªdG ø«î°ùàdG á«∏ªY ¥ô¨à°ùJ âbƒdG øe ºc
»fGhCG É¡æe áYƒæ°üªdG IOɪdG ≈∏Y ≥Ñ°ùªdG ø«î°ùà∏d á«æeõdG IóªdG ∞bƒàJ
ºb .¿ôØdG »fGhCG á«©°Vhh ´ÉØJQ’Gh ᫪μdG ≈∏Y ∂dòch ,É¡μª°Sh ¿ôØdG
.¿ÉμeE’G Qób πeÉμdÉH í£°ùdG ≈∏Y ¿ôØdG »fGhCG ™jRƒàH
25-15 ¥ô¨à°ùj ¢UÉî°TCG 6 Oó©d AÉ°ûY ¥ÉÑWC’ ≥Ñ°ùªdG ø«î°ùàdG
.á≤«bO
±É≤jE’G
.áØ«XƒdG QÉ«àNG ìÉàØe ∞bhCG .êQódG íàaG
¿ôØdG »fGhCG êGôNEG
.¿ôØ∏d ¢Tɪb á©£b hCG RÉØb ΩGóîà°SÉH êQódG øe ¿ôØdG »fGhCG êGôNEÉH ºb
5
Page 17

᪡ªdG ¿ÉeC’G äGOÉ°TQEG ar
@
∑RÉ¡L ≈∏Y ±ô©àdG
®ÉØëdGh »fGhCÓd ≥Ñ°ùªdG ø«î°ùàdG ¢Vô¨d ø«î°ùàdG êQO ΩGóîà°SG øμªj
.᪩WC’G áfƒî°S ≈∏Y
(0 8
ø«î°ùàdG ìƒd
ø«î°ùàdG ô°üæYh áMhôªdG
»fGhCÓd ≥Ñ°ùªdG ø«î°ùàdG 𫨰ûJ = 4 iƒà°ùªdG ≈∏Y 𫨰ûàdG
𫨰ûàdG ô°TDƒe
óæY A»°†Jh .RÉ¡édG 𫨰ûàH Ωƒ≤J ÉeóæY ô°TDƒªdG áѪd ¢†eƒJ
.RÉ¡édG ¥ÓZEÉH ∂eÉ«b
áØ«XƒdG QÉ«àNG ìÉàØe
±É≤jEG = 0
IóªéªdG ᪩WC’G ≈∏Y óªéàdG áHGPEG ,ø«é©dG ô«ªîJ = 1
᪩WC’G ≈∏Y óªéàdG áHGPEG ,õÑîdG áfƒî°S ≈∏Y ®ÉØëdG = 2
äÉLÉLõdGh ÜGƒcCÓd ≥Ñ°ùªdG ø«î°ùàdG ,IóªéªdG
ΩÉ©£dG áfƒî°S ≈∏Y ®ÉØëdG = 3
»fGhCÓd ≥Ñ°ùªdG ø«î°ùàdG = 4
*
(
0
8
@
≥∏¨dGh íàØdG
:¢†Ñ≤ªH IOhõªdG ô«Z Iõ¡LCÓd áÑ°ùædÉH
.¬≤∏Z hCG ¬ëàØd êQódG ∞°üàæe ≈∏Y §¨°VG
.∂gÉéJ ¬Ñë°S òFóæY ∂æμªjh .Ó«∏b êQódG RôÑj ,íàØdG óæY
᪡ªdG ¿ÉeC’G äGOÉ°TQEG
!á¨dÉH ¥hôëH áHÉ°UE’G ô£N - ôjòëJ
(
:
■.ájɨ∏d ÉæNÉ°S íÑ°üj ø«î°ùàdG êQO »a ø«î°ùàdG ìƒd
áaÉ°ùªd ∫ÉØWC’G ó©HCGh .øNÉ°S ƒgh ø«î°ùàdG ìƒd ¢ùª∏J ’
.á«aÉc
■ Ωóîà°SG .ájɨ∏d áæNÉ°S íÑ°üJ ób ¿ôØdG »fGhCGh äÉ«dɪμdG
øe ¿ôØdG »fGhCG hCG äÉ«dɪμdG êGôNE’ ¿ôØdG äGRÉØb kɪFGO
.»¡£dG õ«M
áHÉ°UE’Gh »FÉHô¡μdG ≥©°üdG ô£N - ôjòëJ
:
!á¨dÉÑdG
■»a á«FÉHô¡μdG Iõ¡LC’G äÓHÉμd ádRÉ©dG IOɪdG ô¡°üæJ ób
äÓHÉc π©éJ ’ .RÉ¡é∏d áæNÉ°ùdG AGõLC’G á°ùeÓe ádÉM
.kGóHCG RÉ¡é∏d áæNÉ°ùdG AGõLC’G ¢ùeÓJ »FÉHô¡μdG RÉ¡édG
■ ,QÉîÑdÉH hCG »dÉ©dG §¨°†dÉH ∞«¶æJ Iõ¡LCG ájCG Ωóîà°ùJ ’
.»FÉHô¡c ≥©°U çhóM »a ÖÑ°ùàJ ¿CG øμªj å«M
■ ≥©°üdG »a ÖÑ°ùàj ¿CG øμªj RÉ¡édG »a π£Y OƒLh
.π£Y ¬H ¿Éc GPEG RÉ¡édG 𫨰ûàH GóHCG º≤J ’ Gòd .»FÉHô¡μdG
™WÉb π°üaG hCG »FÉHô¡μdG QÉ«àdG áμÑ°T øY RÉ¡édG π°üaG
áeóN õcôªH π°üJG .ôgÉ°üªdG ¥hóæ°U »a á«FÉHô¡μdG IôFGódG
.™«ÑdG ó©H Ée
■ ÖÑ°ùàJ ¿CG øμªj »LÉLõdG ìƒ∏dG »a Qƒ°ùμdG hCG äÉ≤≤°ûàdG
á«FÉHô¡μdG IôFGódG ™WÉb π°üaG .á«FÉHô¡μdG äÉ≤©°üdG »a
ó©H Ée áeóN õcôªH π°üJG .ôgÉ°üªdG ¥hóæ°U »a OƒLƒªdG
.™«ÑdG
■ ò«ØæJ »¨Ñæj Gòd .IQƒ£N πãªJ ᪫∏°ùdG ô«Z ìÓ°UE’G ∫ɪYCG
ø«∏eÉ©dG ø«HQóªdG ø««æØdG óMCG áaô©ªH §≤a ìÓ°UE’G ∫ɪYCG
RÉ¡édG ¿Éc GPEG .Éæd á©HÉàdG ™«ÑdG ó©H Ée áeóN õcGôe »a
OƒLƒªdG ô¡°üªdG π°üaG hCG »FÉHô¡μdG ¢ùHÉ≤dG ´õfG ,kÓ£©e
.™«ÑdG ó©H Ée áeóN õcôªH π°üJG .ôgÉ°üªdG ¥hóæ°U »a
áHÉ°UEG çhóMh ≥jôM ܃°ûf ô£N - ôjòëJ
:
!á¨dÉH
π©à°ûJ óbh ájɨ∏d ÉæNÉ°S íÑ°üj ø«î°ùàdG êQO »a ø«î°ùàdG ìƒd
.∫É©à°TÓd á∏HÉ≤dG OGƒªdG
êQO »a á«μ«à°SÓH á«YhCG hCG ∫É©à°TÓd á∏HÉb AÉ«°TCG ™°†J ’
.ø«î°ùàdG
4
Page 18

ar
äÉjƒàëªdG ¢Sô¡a
äɪ«∏©à∏d ≥HÉ£ªdG ∫ɪ©à°S’G
8
∑RÉ¡L ΩGóîà°SG ∂æ쪫°S §≤a òFóæ©a .ájÉæ©H äɪ«∏©àdG √òg CGôbG
Ö«côàdG π«dOh ∫ɪ©à°S’G π«dóH ßØàMG .øeBGh í«ë°U πμ°ûH
.ójóédG ∂dɪ∏d ɪ¡ª«∏°ùàd hCG É≤M’ ɪ¡eGóîà°S’
IƒÑY øe ¬LGôNEG ó©H RÉ¡édÉH QGô°VCG OƒLh ΩóY øe ≥≤ëJ
QGô°VCG ±É°ûàcG ádÉM »a RÉ¡édG π«°UƒàH º≤J ’h .∞«∏¨àdG
.π≤ædG á«∏ªY øY áéJÉf
áÄ«Ñ∏dh §≤a »dõæªdG ΩGóîà°SÓd §≤a ¢ü°üîe RÉ¡édG Gòg
®ÉØàM’G ≈∏Y GQƒ°ü≤e RÉ¡édG ΩGóîà°SG ¿ƒμj ¿CG Öéj .á«dõæªdG
.¥ÉÑWC’G ø«î°ùJh ᪩WC’G áfƒî°ùH
¥ƒa ôàe
2000 ´ÉØJQG ≈àM ΩGóîà°SÓd Ö°SÉæe RÉ¡édG Gòg
4000
.≈°übCG óëc ôëÑdG í£°S iƒà°ùe
äGƒæ°S
8 ø°S ¥ƒa ∫ÉØWC’G π
Ñpb øe RÉ¡édG Gòg ΩGóîà°SÉH íª°ùoj
n
á«fɪ°ùédG äGQó≤dG »a ¢ü≤f øe ¿ƒfÉ©j øjòdG ¢UÉî°TC’G hCG
IôÑîdG »a Qƒ°üb º¡jód øjòdG ¢UÉî°TC’G hCG á«∏≤©dG hCG á«°ùëdG hCG
º¡àeÓ°S øY ∫hDƒ°ùe ¢üî°T Ωƒ≤j ¿CG á£jô°T áaô©ªdG hCG
øe ócCÉàdG ™e RÉ¡édG ΩGóîà°SG á«Ø«c ≈dEG º¡¡«LƒJ hCG º¡àÑbGôªH
.∂dòH á£ÑJôªdG QÉ£NCÓd º¡cGQOEG
hCG ¬«∏Y Ö©∏dG hCG RÉ¡édÉH åÑ©dÉH ∫ÉØWCÓd ìɪ°ùdG Rƒéj ’
∫ɪYCG AGôLEG hCG RÉ¡édG ∞«¶æJ ∫ÉØWCÓd Rƒéj ’ .¬æe Üô≤dÉH
,πbC’G ≈∏Y äGƒæ°S
8 ø°S »a Gƒfƒμj ºd Ée ¬«∏Y áeÉ©dG áfÉ«°üdG
.∂dP AÉæKCG º¡àÑbGôe ºàj ¿CG ≈∏Y
πHÉch RÉ¡édG øY ºgOÉ©HEG Öéj äGƒæ°S
8 ø°S ¿hO ∫ÉØWC’G
.áæeBG áaÉ°ùªd AÉHô¡μdG
3 . . . . . . . . . . . . . . . . . . . äɪ«∏©à∏d ≥HÉ£ªdG ∫ɪ©à°S’G
4 . . . . . . . . . . . . . . . . . . . . . . . . . ᪡ªdG ¿ÉeC’G äGOÉ°TQEG
4 . . . . . . . . . . . . . . . . . . . . . . . . . . .∑RÉ¡L ≈∏Y ±ô©àdG
4 . . . . . . . . . . . . . . . . . . . . . . . . . . . . . . . . . . . . . . . . . . . . . . . . ≥∏¨dGh íàØdG
5 . . . . . . . . . . . . . . . . . . . . . . . . . . . . . . . RÉ¡édG 𫨰ûJ
5 . . . . . . . . . . . . . . . . . . . . . . . . . . . . . . . . . . ¿ôØdG »fGhC’ ≥Ñ°ùªdG ø«î°ùàdG
5 . . . . . . . . . . . . . . . . . . . . . . . . . . . . . . . . . . . . . . . . . . . . äÉHhô°ûªdG á«YhCG
5 . . . . . . . . . . . . . . . . . . . . . . . . . . . . . . . . . . . . . . . . . . . . . . . . . . . . á≤jô£dG
5 . . . . . . . . . . . . . . . . . . . . . . . . . . . . . . . . . . . . ΩÉ©£dG áfƒî°S ≈∏Y ®ÉØëdG
6 . . . . . . . . . . . . . . . . . . íFÉ°üædGh §Ñ°†dG ´É°VhCG ∫hóL
6 . . . . . . . . . . . . . . . . . . . . . . . . . . . . . . . . . . . . . . . . . . . . . . . A»£ÑdG »¡£dG
8 . . . . . . . . . . . . . . . . . . . . . . . . . . . . . . . . . . . ∞«¶æàdG
8 . . . . . . . . . . . . . . . . . . . . . . . . . . . . . . . . . . . . . . . . . . . êQÉîdG øe RÉ¡édG
8 . . . . . . . . . . . . . . . . . . . . . . . . . . . . . . . . . . . . . . . . . . . . . . . .ø«î°ùàdG ìƒd
8 . . . . . . . . . . . . . . . . . . . . . . . . . . ∫É£YC’G ≈∏Y Ö∏¨àdG
9 . . . . . . . . . . . . . . . . . . . . . . . . . . . . . . . AÓª©dG áeóN
9 . . . . . . . . . . . . . . . . . . . . . . . . . . . . . . . . . .FD ™æ°üdG ºbQh E èàæªdG ºbQ
9 . . . . . . . . . . . . . . . . . . . . . . . . . . . . . . . . . . . . . . . . . . . .á«æØdG äÉØ°UGƒªdG
9 . . . . . . . . . . . . . . . . . . . . . . . . . . . . . . . .áÄ«ÑdG ájɪM
9 . . . . . . . . . . . . . . . . . áÄ«ÑdG ≈∏Y á¶aÉëe á≤jô£H äÉØ∏îªdG øe ¢ü∏îàdG
8
(
*
1
J
D
3
4
7
ﻣﻌﻠﻮﻣﺎﺕ ﺍﻟﻤﻨﺘﺠﺎﺕ
äÉeóîdGh QÉ«¨dG ™£bh äÉ«dɪμdGh дЙйажªdG ∫ƒM äÉeƒ∏©ªdG øe ójõªdG
ôéàªdG »ah
www.bosch-home.com âfôàfE’G ™bƒe ≈∏Y ÉgóéJ
www.bosch-eshop.com ™bƒe ≈∏Y »fhôàμdE’G
3
Page 19

Page 20

ar
[en] Instruction manual
ø«î°ùàdG êQO
Warming drawer
BID630NS1M BIC630NS1M
[ar] ∫ɪ©à°S’G π«dO
 Loading...