

Page 1

Register your
new device on
MyBosch now and
get free benefits:
bosch-home.com/
welcome
BBH7...
[en] Instruction manual 2
[fr] Mode d’emploi 38
[nl] Gebruiksaanwijzing 74
[es] Instrucciones de uso 110
1
Page 2

Technical data ............................................4
en
Intended use .............................................5
Safety ...................................................6
Proper use ...............................................7
Li-ion battery ..............................................9
Notes on transport .........................................9
Your vacuum cleaner .......................................10
Before using your appliance for the first time ...................12
Connecting the handle and appliance ..........................12
Connecting the appliance and floor nozzle ......................12
Charging the battery .......................................13
Vacuuming ...............................................14
Battery charging status indicator. . . . . . . . . . . . . . . . . . . . . . . . . . . . . .14
Switching on/off ..........................................14
Controlling the suction level .................................15
Transport ................................................16
Vacuuming with accessories .................................17
Vacuuming stairs ..........................................20
After using the appliance ...................................21
Switching off the appliance ..................................21
Parking the appliance ......................................21
Emptying the dust container .................................22
Removing the dust container .................................23
Removing the filter unit .....................................24
Inserting the dust container .................................25
Removal. . . . . . . . . . . . . . . . . . . . . . . . . . . . . . . . . . . . . . . . . . . . . . . . .26
Loosening the handle and appliance ...........................26
Loosening the appliance and the floor nozzle ....................26
Table of contents
2
Page 3

Filter care ...............................................27
en
Sensor Control ...........................................27
Cleaning the fluff filter ......................................28
Cleaning the fin filter (motor protection filter) ...................29
Tapping out the fin filter (motor protection filter) .................30
Cleaning the floor nozzle ...................................31
Cleaning the brush roller ....................................31
Cleaning instructions ......................................32
Troubleshooting ..........................................33
Customer service .........................................34
Disposal. . . . . . . . . . . . . . . . . . . . . . . . . . . . . . . . . . . . . . . . . . . . . . . . .35
Guarantee ...............................................37
Table of contents
3
Page 4

Technical data
Charging station
Input: 100 - 240 V ~50/60 Hz
Output: 39 V ᄍ 500 mA
Appliance
Type of battery: Lithium-ion
Nominal voltage: 32,4 V
Noise 78 dB (A)*
(depending on the power setting)
* Measured in accordance with DIN EN 60704-2-1
4
Page 5

Intended use
Congratulations on your purchase of the BBH7 vacuum
cleaner. You should only use original accessories from
Bosch that were specially developed for your vacuum
cleaner, so that you achieve the best possible vacuuming results.
Please keep this instruction manual for future reference.
When passing the vacuum cleaner on to a third party,
please also pass on this instruction manual.
Intended use
This appliance is intended for domestic use only. This
appliance is intended for use up to a maximum height
of 2000 metres above sea level.
Only use this vacuum cleaner in accordance with the
instructions in this instruction manual.
In order to prevent injuries and damage, the robot vacuum must not be used for:
Vacuuming persons or animals
Vacuuming up
−Hazardous, sharp-edged, hot or red-hot substances.
−Damp or liquid substances.
−Highly flammable or explosive substances and gases.
−Ash, soot from tiled stoves and central heating systems.
−Toner dust from printers and copiers.
5
Page 6

Safety
Spare parts, accessories
Our original spare parts, original (special) accessories
are designed to work with the features and requirements
of our vacuum cleaners. We therefore recommend that
you only use our original spare parts, original (special)
accessories. This will ensure that your vacuum cleaner
has a long service life and that the quality of its cleaning
performance will remain consistently high throughout.
Please note:
!
Using unsuitable or inferior-quality spare parts, (special) accessories and dust bags can damage your vacuum cleaner. Damage caused by the use of such products is not covered by our guarantee.
Safety information
This vacuum cleaner complies with the recognised rules of technology and the relevant safety regulations.
The appliance may be used by children over the age of
8 years and by persons with reduced physical, sensory or mental capacity or by persons with a lack of experience or knowledge if they are supervised or have
been instructed on the safe use of the appliance and
have understood the potential dangers of using the
appliance.
Children must never play with the appliance.
Cleaning and user maintenance must never be carried
out by children without supervision.
Plastic bags and films must be kept out of the reach of
children and disposed of.
>= There is a risk of suffocation.
6
Page 7

Proper use
Proper use
To charge, only use the charging cable included in the
scope of supply.
The charging cable must only be connected and ope-
rated as specified on the rating plate.
The appliance must only be stored and charged in-
doors.
To make best use of the battery capacity, the appliance
should be stored and operated at room temperature.
Do not expose the appliance to temperatures below
0 °C or above 40 °C.
Never vacuum without the dust bag or dust container,
motor protection or exhaust filter.
>= This may damage the vacuum cleaner.
Keep the vacuum cleaner away from your head when
using nozzles and tubes. => This could cause injury.
Do not use a damaged charging cable. Replace it with
an original charging cable.
When disconnecting the charging cable from the
mains, pull the plug itself to remove it; do not pull on
the power cord.
Do not pull the charging cable over sharp edges or al-
low it to become trapped.
Before carrying out any work on the vacuum cleaner,
switch off the appliance and disconnect it from the
charging cable and the mains.
Do not operate the vacuum cleaner if it is damaged.
If a fault is detected, switch off the appliance and dis-
connect it from the charging cable and the mains.
7
Page 8

Proper use
For safety reasons, only authorised after-sales service
personnel are permitted to carry out repairs and fit
replacement parts to the vacuum cleaner.
In the following cases, you must stop the appliance
immediately and contact the after-sales service:
−If you have accidentally vacuumed up some liquid or
liquid has entered the inside of the appliance;
−If the appliance has been dropped and damaged.
Protect the vacuum cleaner from outside weather con-
ditions, moisture and sources of heat.
Do not pour flammable substances or substances con-
taining alcohol onto the filters (motor protection filter,
exhaust filter, etc.).
For safety reasons, the appliance is fitted with an over-
heating protection system to safeguard the battery and
motors. The appliance will switch off automatically if
it or the battery is too hot.
>= The appliance will need around 30 minutes to cool
down before it can be used again.
The packaging is designed to protect the vacuum clea-
ner from being damaged during transportation. We
therefore recommend keeping the packaging for the
purpose of future transportation.
8
Page 9

Proper use
Li-ion battery
Your appliance is fitted with lithium-ion batteries which,
for safety reasons, are only accessible to professional
repair specialists.
For battery replacement, please contact your nearest
after-sales centre or an authorised specialist dealer.
Notes on transport
The lithium-ion batteries in the appliance are subject to
the requirements of dangerous goods legislation. The
batteries can be transported by the user by road without any further requirements. In the event that they
are dispatched by a third party (e.g. transported by air
or freight carrier), special requirements regarding packaging and identification must be met. In this case, a
dangerous goods expert must be consulted when preparing the goods for dispatch.
9
Page 10
Your vacuum cleaner
11*
7
10*
6
5
4
3
2
9
8
12
13
14*
15*
10
16*
1
Page 11

Your vacuum cleaner
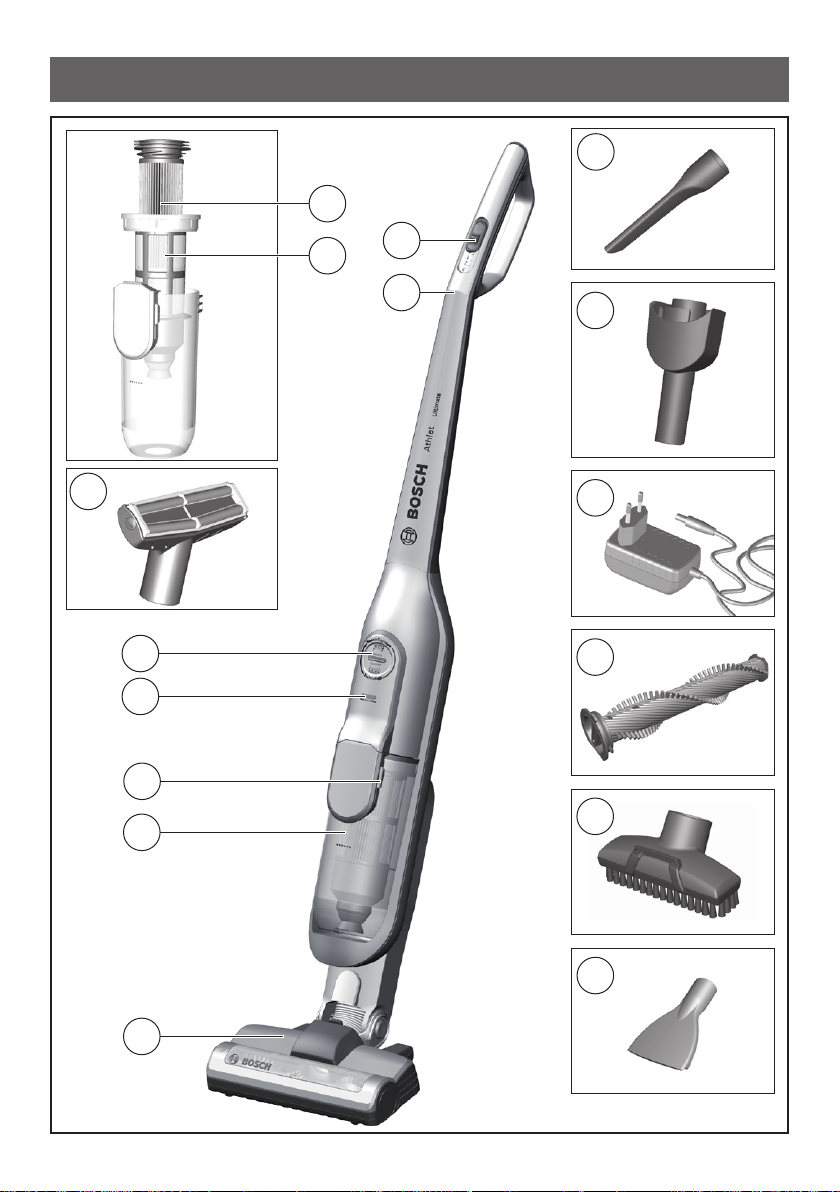
1 Floor tool with electric
brush
2 Dust box with filter unit
3 Dirt container release
button
4 Battery charging status
indicator
5 Sensor Control indicator
6 Fluff filter
7 Fin filter
8 Handle
9 On/off switch
10 Professional upholstery
nozzle*
11 Professional crevice
nozzle*
12 Short suction pipe
13 Charging cable
14 Replacement rotary brush*
15 Furniture nozzle*
16 Mattress nozzle*
* the equipment may vary depending on the appliance type
11
Page 12
Before using your appliance for the first time
1
2
Click!
Click!
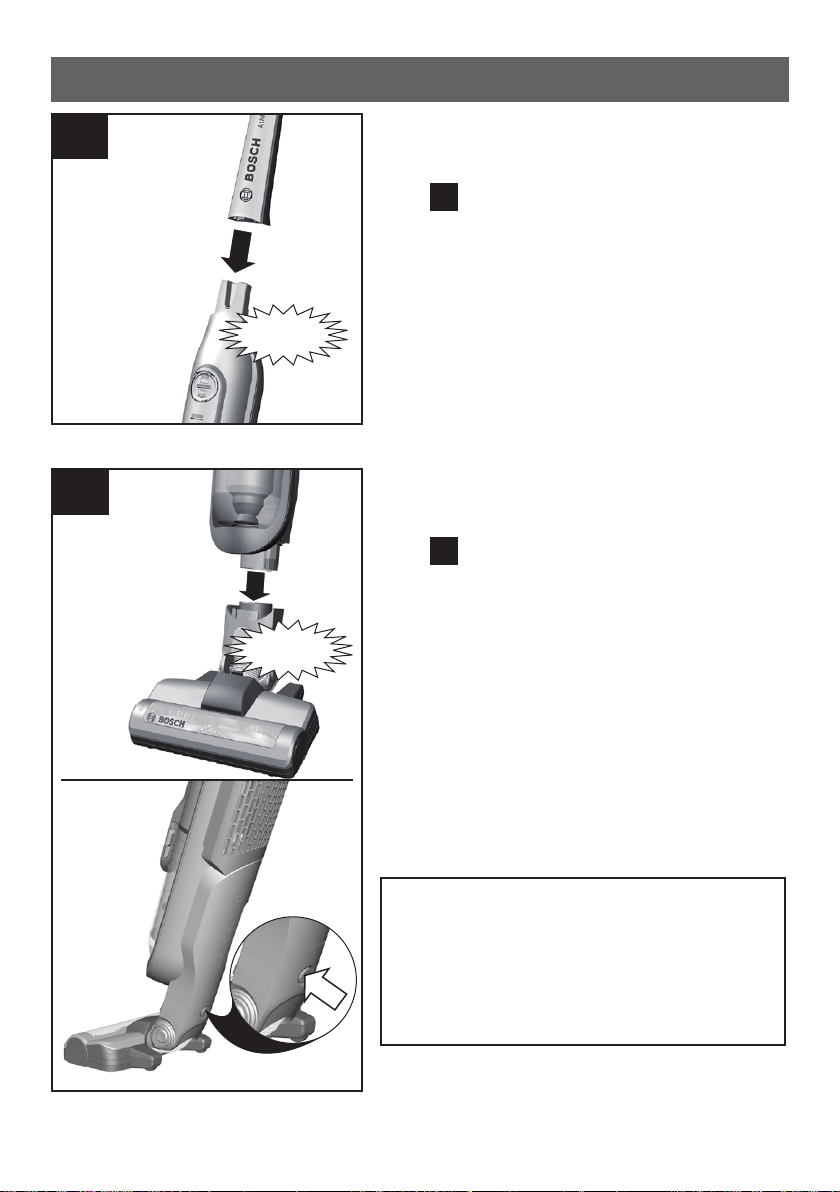
Connecting the handle and appliance
1
Fig.
Carefully plug the handle onto the
main housing and lock into place.
Connecting the appliance and floor
nozzle
2
Fig.
Plug the hand vacuum cleaner into
the floor tool and lock into place.
12
To release the floor tool, press the
release button and pull the hand
vacuum cleaner out of the tool.
Caution!
The floor nozzle is not suitable for vacuuming up small parts
1
such as shards, toys, pins, paper
clips, etc.
Page 13
Before using your appliance for the first time
3
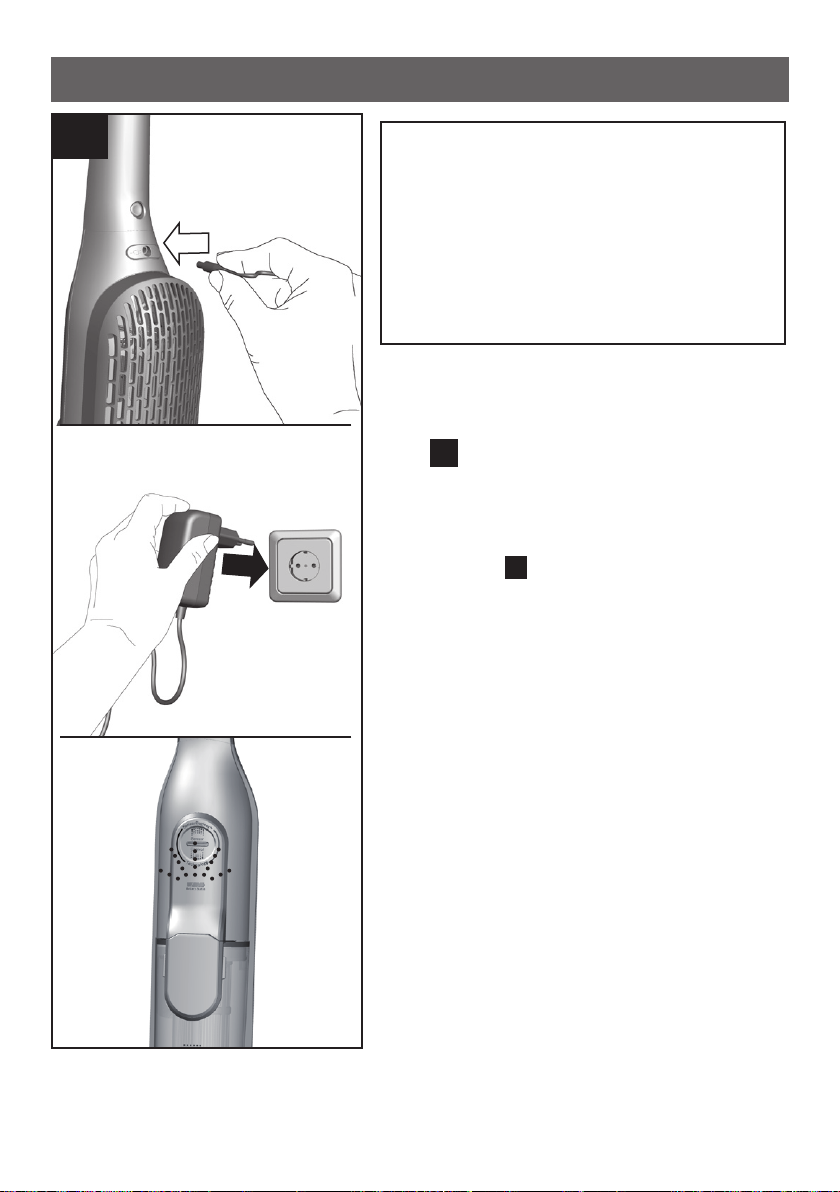
Caution!
Before using the vacuum cleaner
for the first time, the batteries
1
must be charged for at least 6
hours.
Only charge the appliance using
the charging cable supplied.
Charging the battery
3
Fig.
To charge the vacuum cleaner, place
it near to a socket. The appliance can
be left standing anywhere in the
1
room.
Plug the charging cable into the con-
nection at the rear of the appliance.
Plug the charging cable plug into the
socket.
Fig.
12
The charging indicator flashes during
the charging process.
Once the battery is fully charged, the
charging indicator lights up in blue
and no longer flashes.
The LED goes out after two minu-
tes in order to save energy.
It is normal for the charging cable
and hand vacuum cleaner to become
hot and not a cause for concern.
13
Page 14
Charging
4
Vacuuming
5
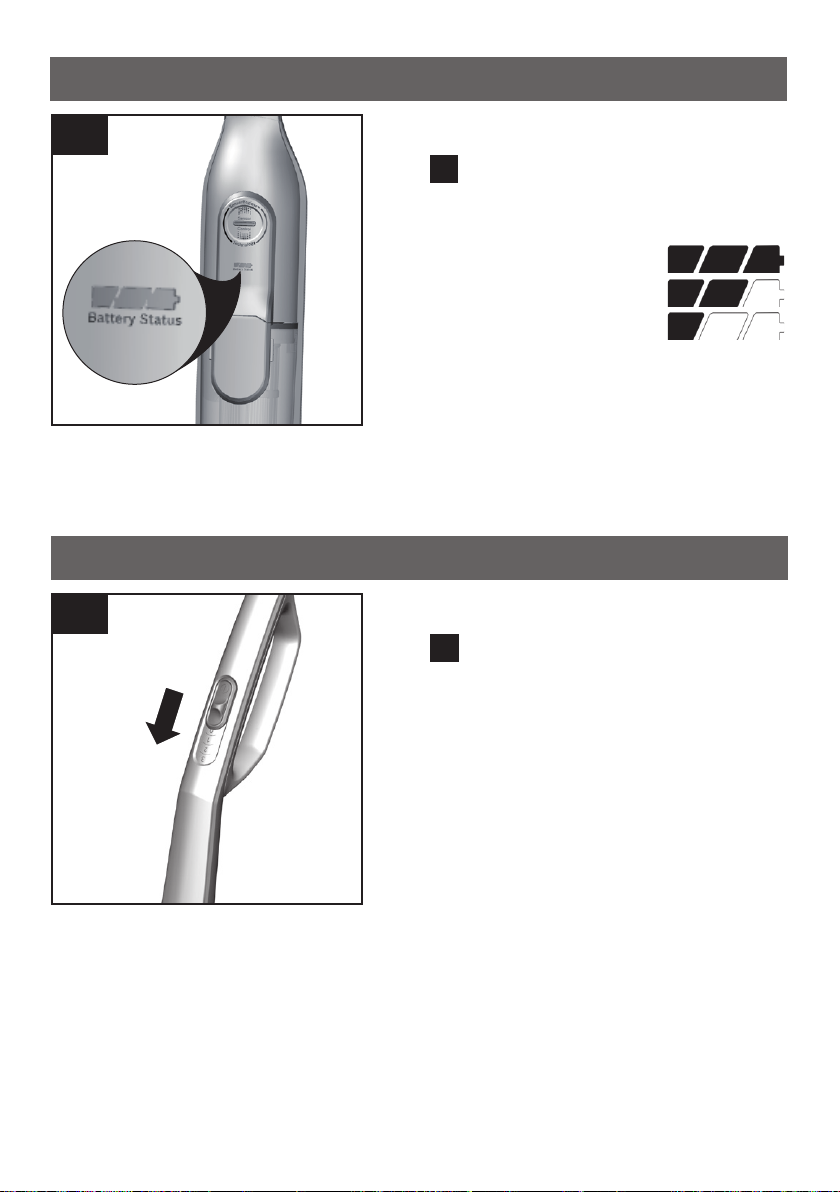
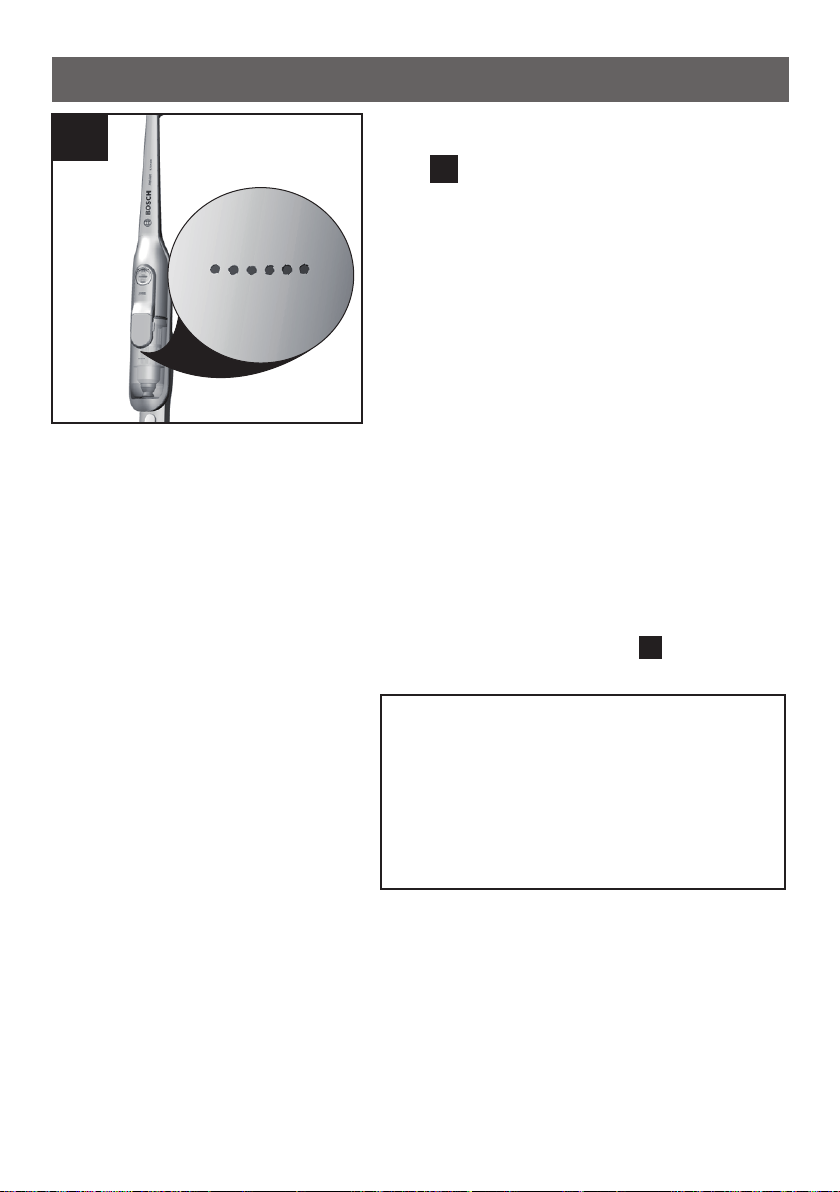
Battery charging status indicator
4
Fig.
The indicator LEDs show the charging status of the battery.
Battery fully charged
Battery semi-charged
Battery low
When the final LED flashes, the battery must be recharged.
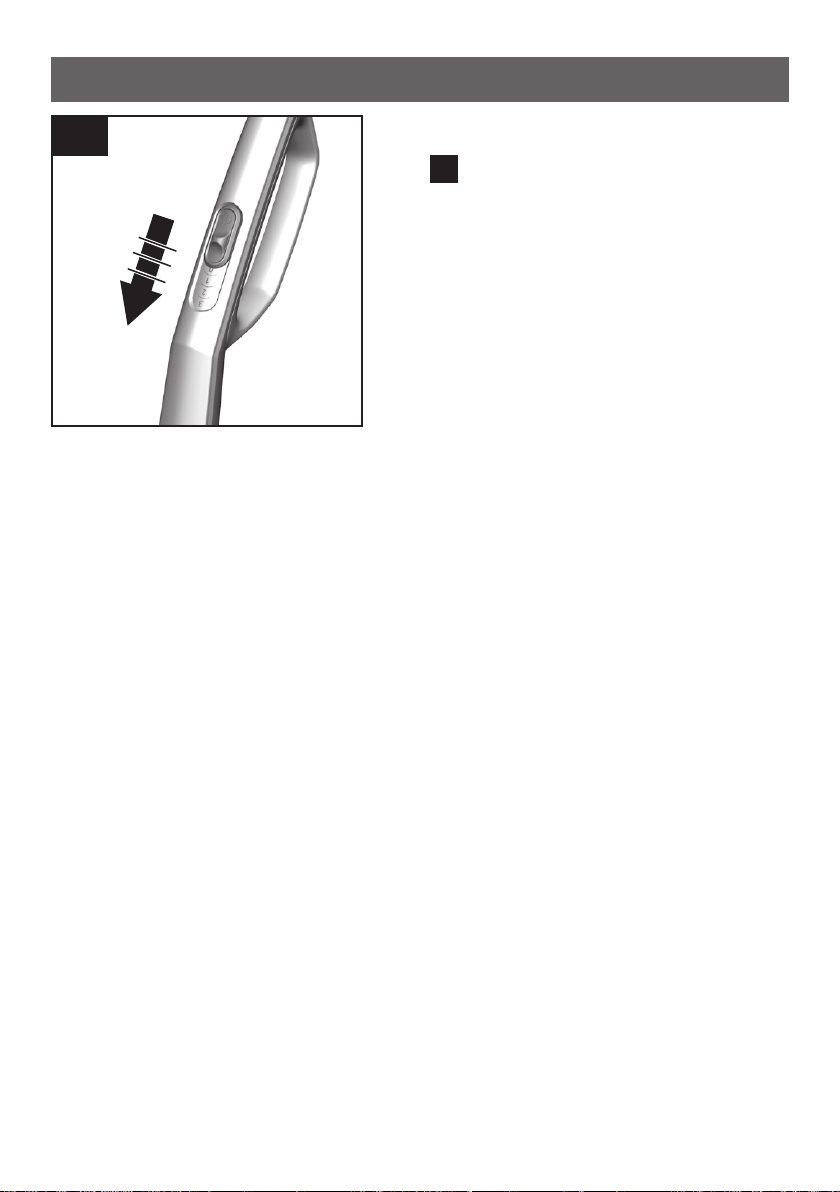
Switching on/off
5
Fig.
Move the on/off button in the di-
rection of the arrow.
14
Page 15
Vacuuming
6
Controlling the suction level
6
Fig.
To change the suction power, sli-
1
2
3
de the on/off switch to the desired
position:
Power level 1 1
For simple cleaning tasks, such as
rugs or lightly soiled hard floors.
The appliance achieves the maxi-
mum runtime at this level.
Power level 2 2
For vacuuming delicate rugs und
for daily vacuuming of lightly soiled
floors.
Power level 3 3
For vacuuming hard floors and
heavily soiled rugs and carpets.
The appliance achieves a shorter
run time at this level.
When vacuum-cleaning using ac-
cessories at level 3 only.
15
Page 16
Vacuuming
7
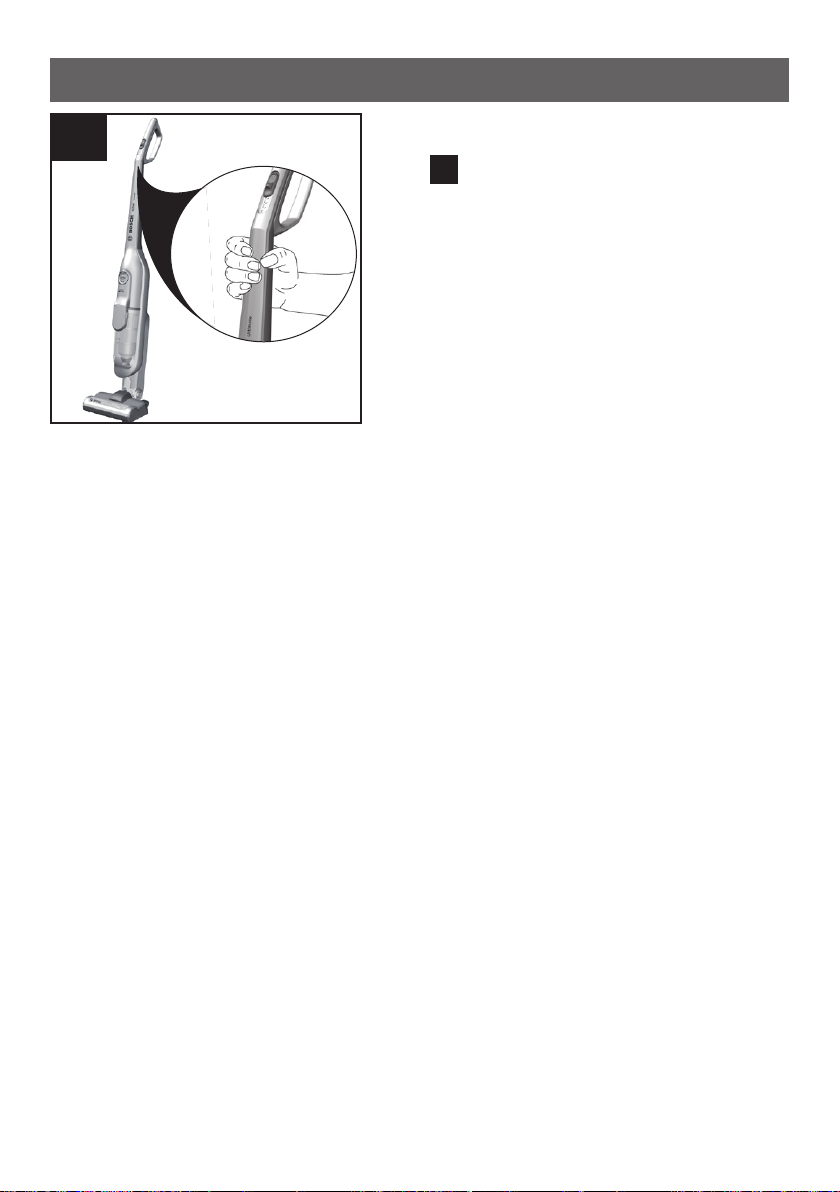
Transport
7
Fig.
To overcome obstacles, e.g. steps,
the appliance can also be carried
by the handle on the appliance
body.
16
Page 17
Vacuuming
8
2
Click!
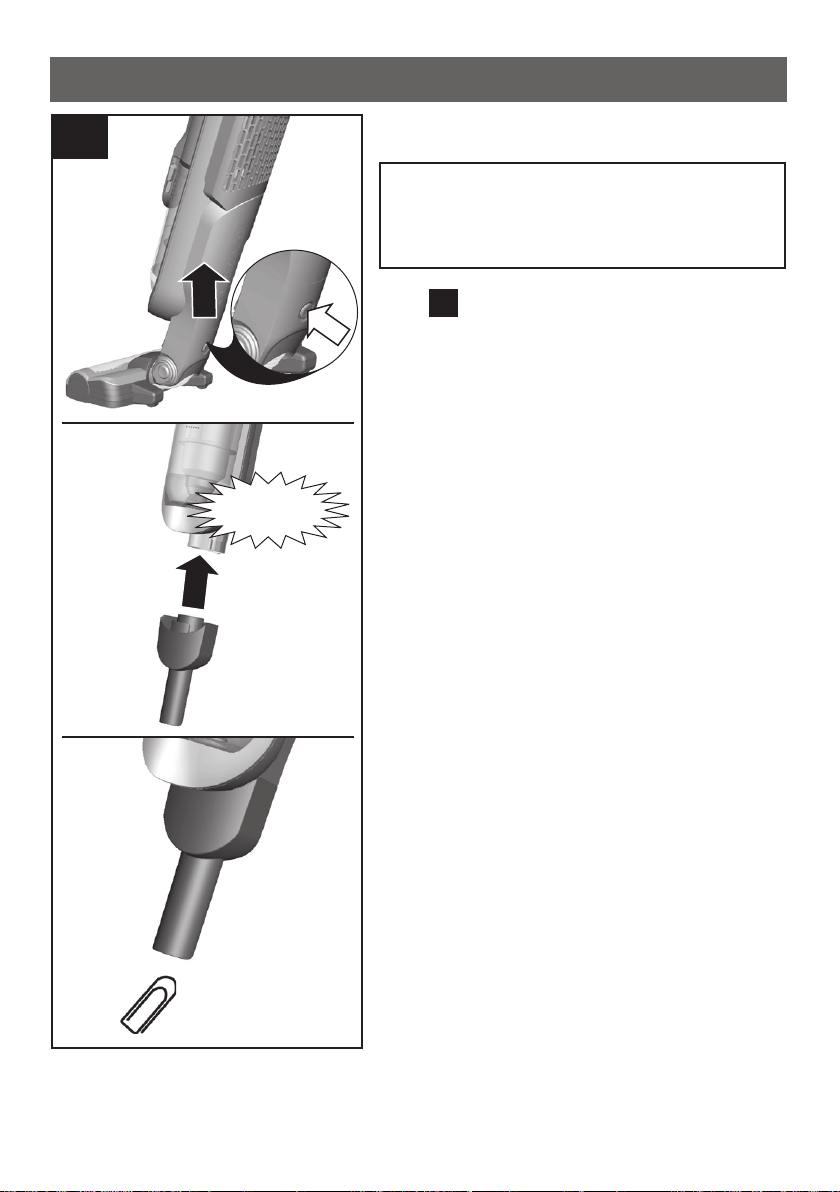
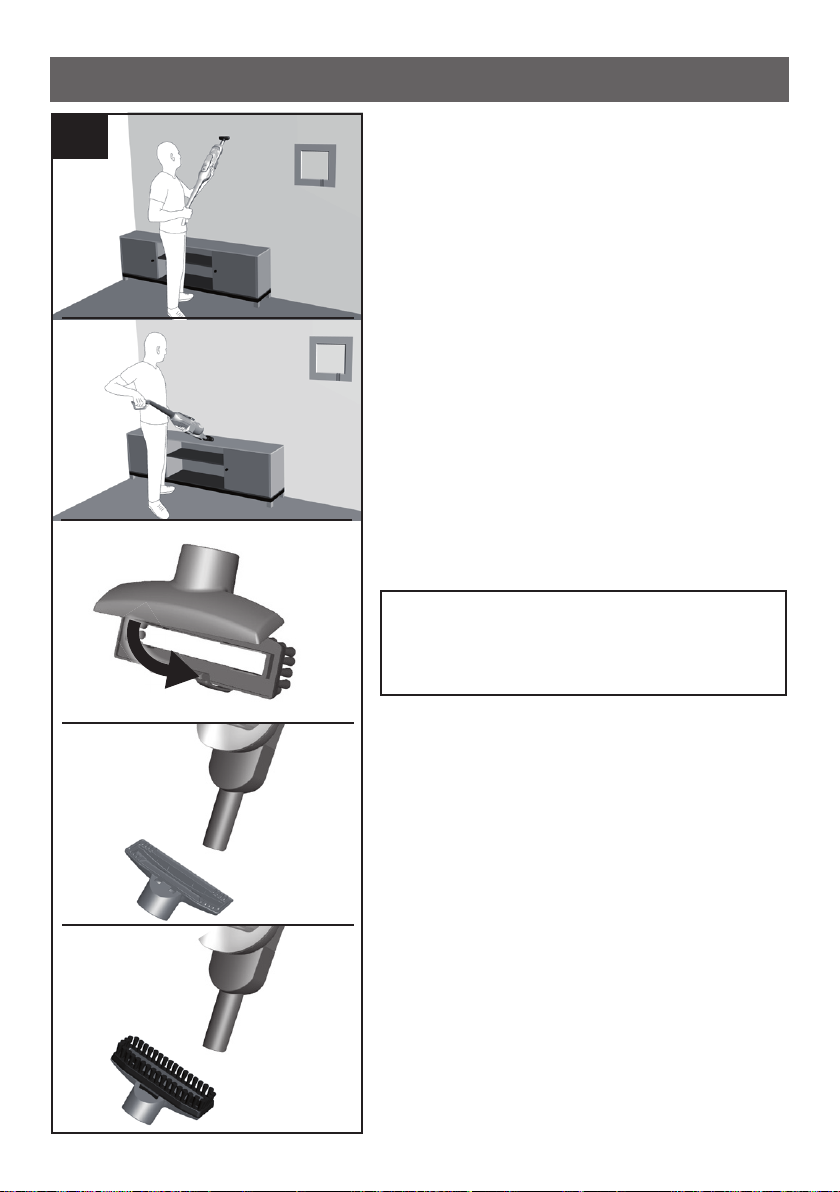
Vacuuming with accessories
For all work with the accessory,
set the appliance to the highest
performance level (level 3).
Fig. 8 Short suction pipe
1
Pull the appliance out of the floor
nozzle.
Place the suction pipe onto the
appliance and lock it in place.
For vacuuming up larger particles
of dirt or small parts, such as confetti, paper clips, cornflakes, etc.
For vacuuming car footwells.
17
Page 18
Vacuuming
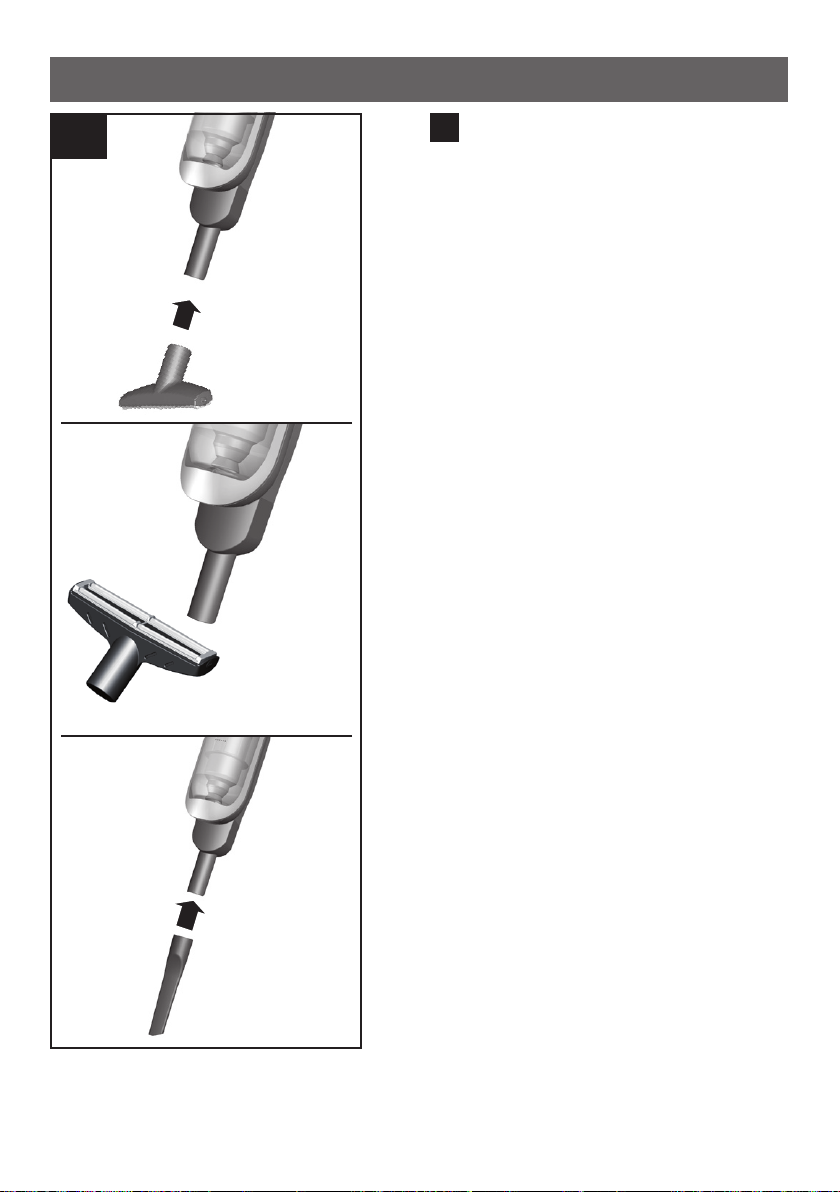
9
9
Fig.
Attach the nozzles to the short suction pipe as required:
Professional upholstery nozzle
For vacuuming upholstery, car
seats, etc.
To clean the professional uphols-
tery nozzle, simply vacuum it using
the appliance.
18
Professional crevice nozzle
For vacuuming crevices and cor-
ners, etc.
Page 19
Vacuuming
9
Furniture nozzle with brush ring
For vacuuming walls, sensitive sur-
faces, tables, etc.
Furniture nozzle without brush
ring
For vacuuming curtains, etc., re-
move the brush ring from the nozzle.
For cleaning sensitive materials
such as curtains, return the power setting to the lowest setting.
Cleaning the furniture nozzle
For cleaning the furniture nozzle,
simply vacuum it using the appliance.
19
Page 20
Vacuuming
9
9
Fig.
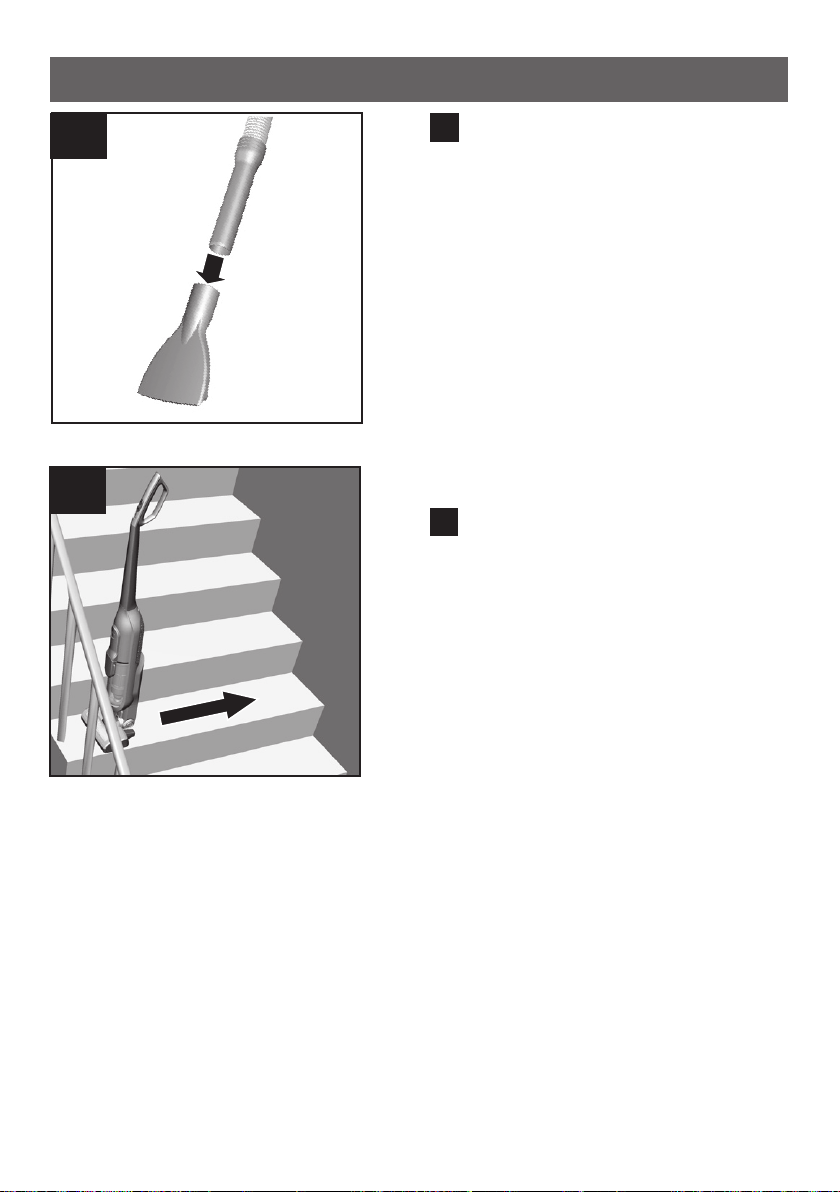
Mattress nozzle
For vacuuming mattresses
10
Vacuuming stairs
10
Fig.
Easily vacuum stairs using the ap-
pliance.
Vacuum steps crosswise from left
to right.
Remove the remaining dirt at the
edges by rotating the floor nozzle.
20
Page 21

After using the appliance
11
12
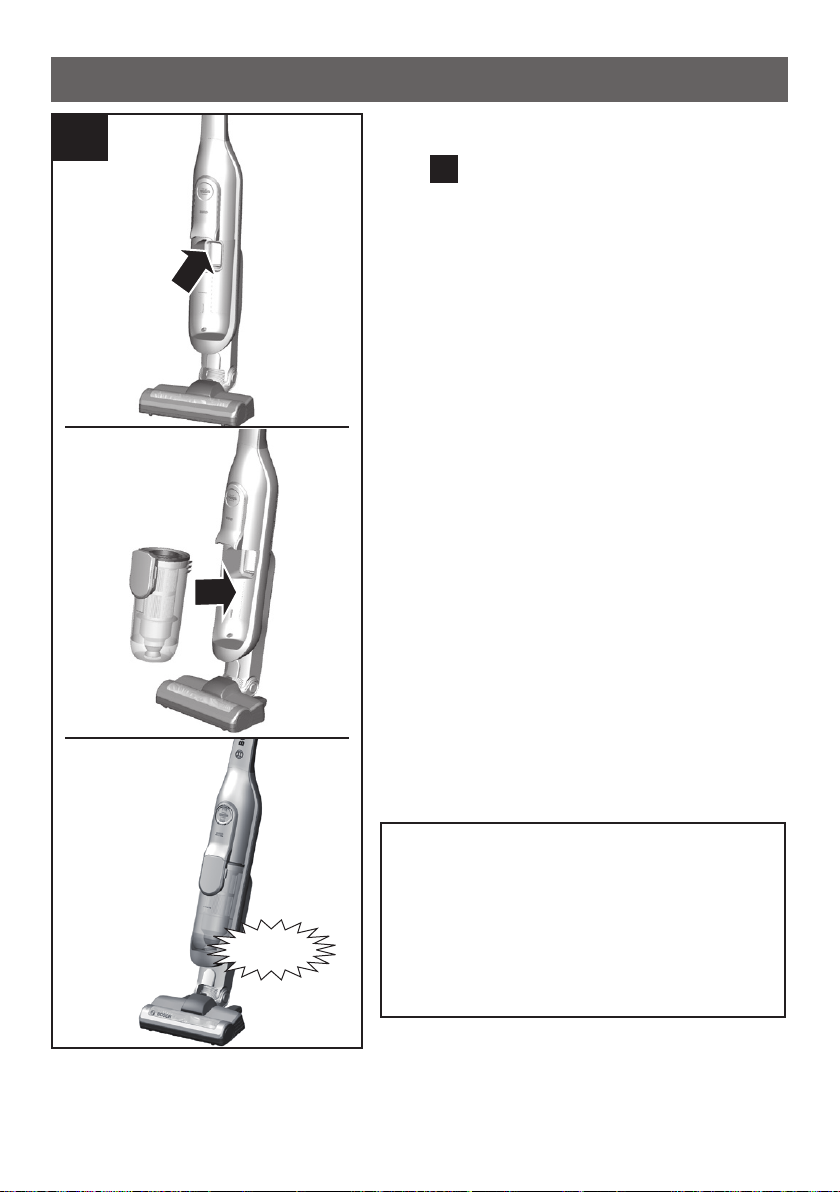
Switching off the appliance
11
Fig.
Switch off the appliance after va-
cuuming.
Parking the appliance
12
Fig.
During short pauses in vacuuming,
the appliance can be left standing
anywhere in the room. To do this,
tilt the vacuum cleaner forwards
slightly in the direction of the
nozzle.
Caution!
When the appliance is left standing, it must be switched off, because if the brush is turning while
the appliance is standing still, it
could cause damage to the floor
covering.
21
Page 22
After using the appliance
13
max
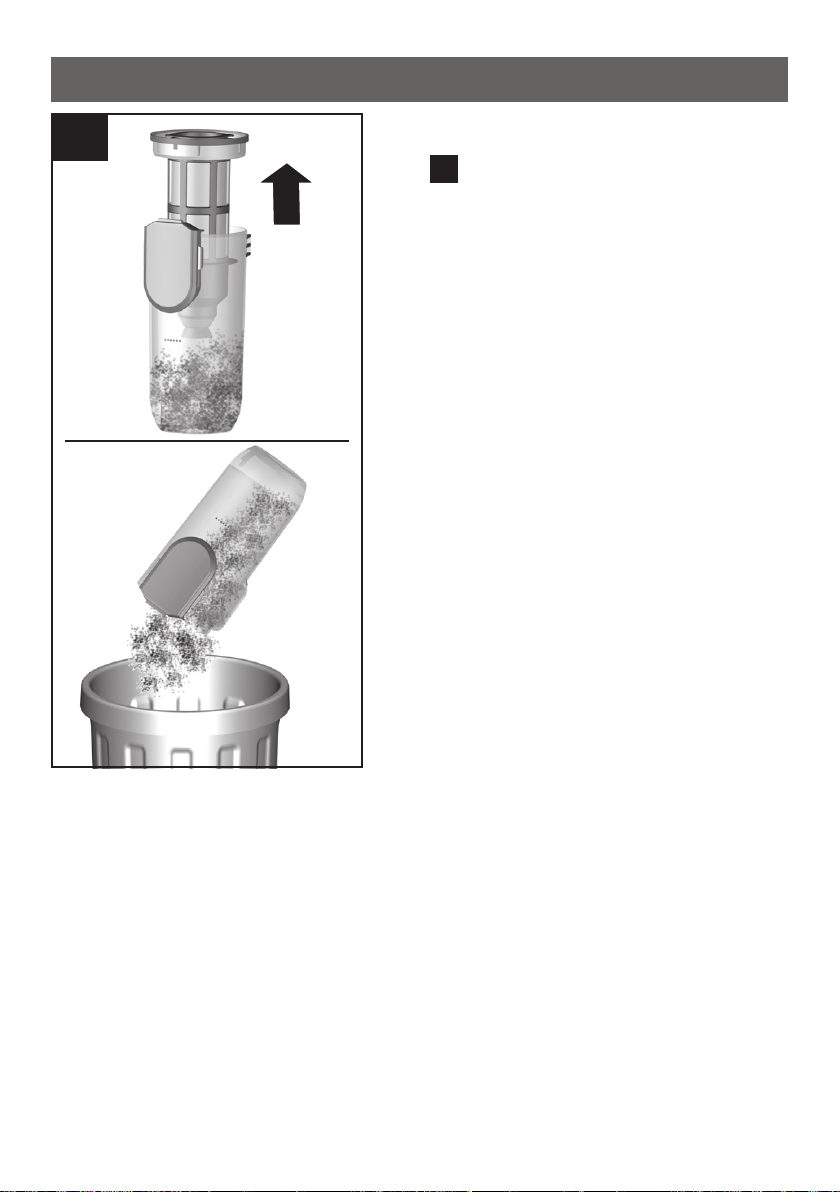
Emptying the dust container
13
Fig.
In order to achieve the best possible vacuuming results, the dust container should be emptied after every use or, at the latest, when dust at
one point in the dust container has
reached the marking.
We recommend that you not fill the
dust container beyond the marking,
as this leads to considerable soiling
of the filter.
When emptying the dust container,
always check how dirty the outer filter unit is and, if necessary, clean it
as detailed in the "Cleaning the fluff
20
filter" instructions.
Fig.
22
Caution!
The filter can only be cleaned if
the appliance is switched off.
Never vacuum without the outer
filter unit and its fitted filter cartridge.
Page 23
After using the appliance
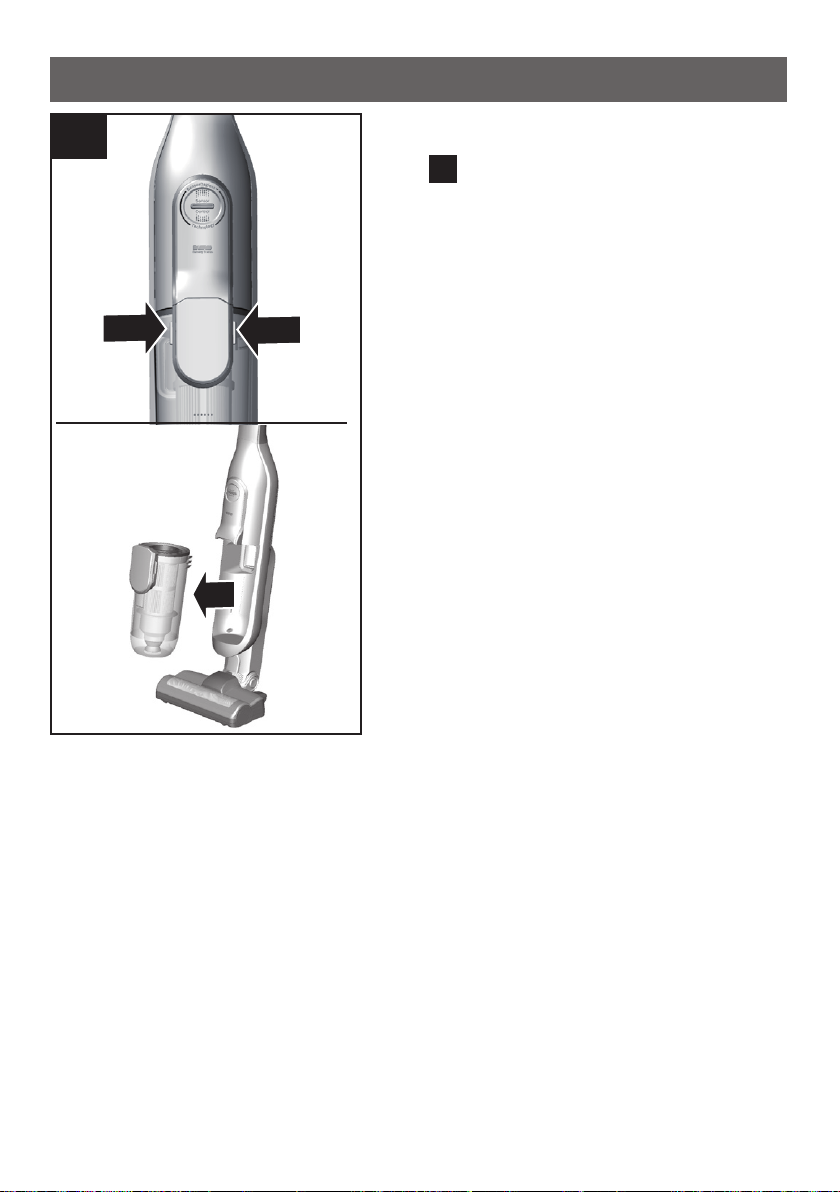
14
Removing the dust container
14
Fig.
Using the release button, unlock
the dust container and remove it
from the appliance.
23
Page 24
After using the appliance
15
Removing the filter unit
15
Fig.
Take the filter unit out of the dust
container.
Empty the dust container.
You can wipe out the dust container, if required, using a damp cloth.
24
Page 25
Vacuuming
16
Inserting the dust container
16
Fig.
Remove any dirt which may have
been lodged underneath the container ejector opening.
Insert the filter unit into the dust
container, making sure it is correctly seated.
Click!
Insert the dust container in the ap-
pliance, so that it 'clicks' audibly
into place.
Caution!
If you notice any resistance when
inserting the dust container,
check that the filter is complete
and that the filter unit and dust
container are correctly seated.
25
Page 26
Removal
17
18
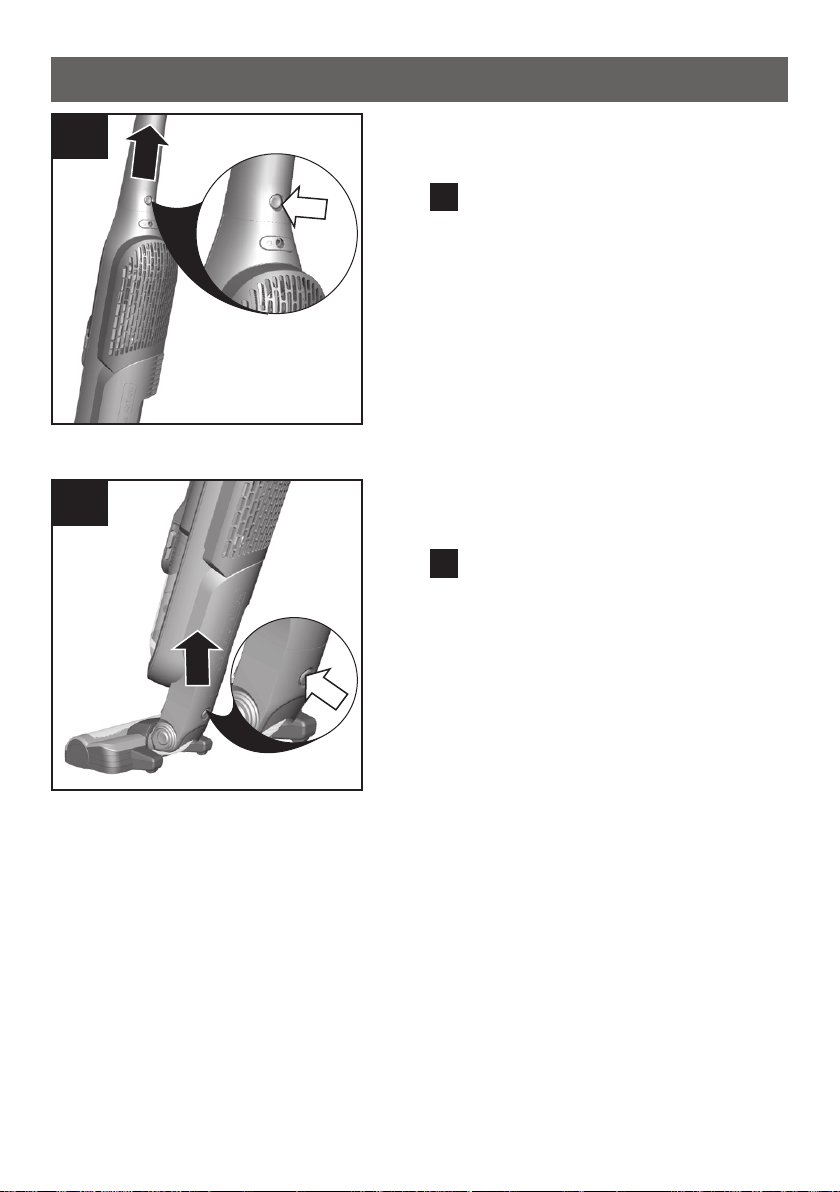
Loosening the handle and appli-
2
1
ance
Fig.
17
To release the handle, press the
release button and carefully lift
the handle upwards to remove it.
Loosening the appliance and the
floor nozzle
18
Fig.
To release the floor tool, press the
release button and pull the hand
2
1
vacuum cleaner out of the tool.
26
Page 27
Filter care
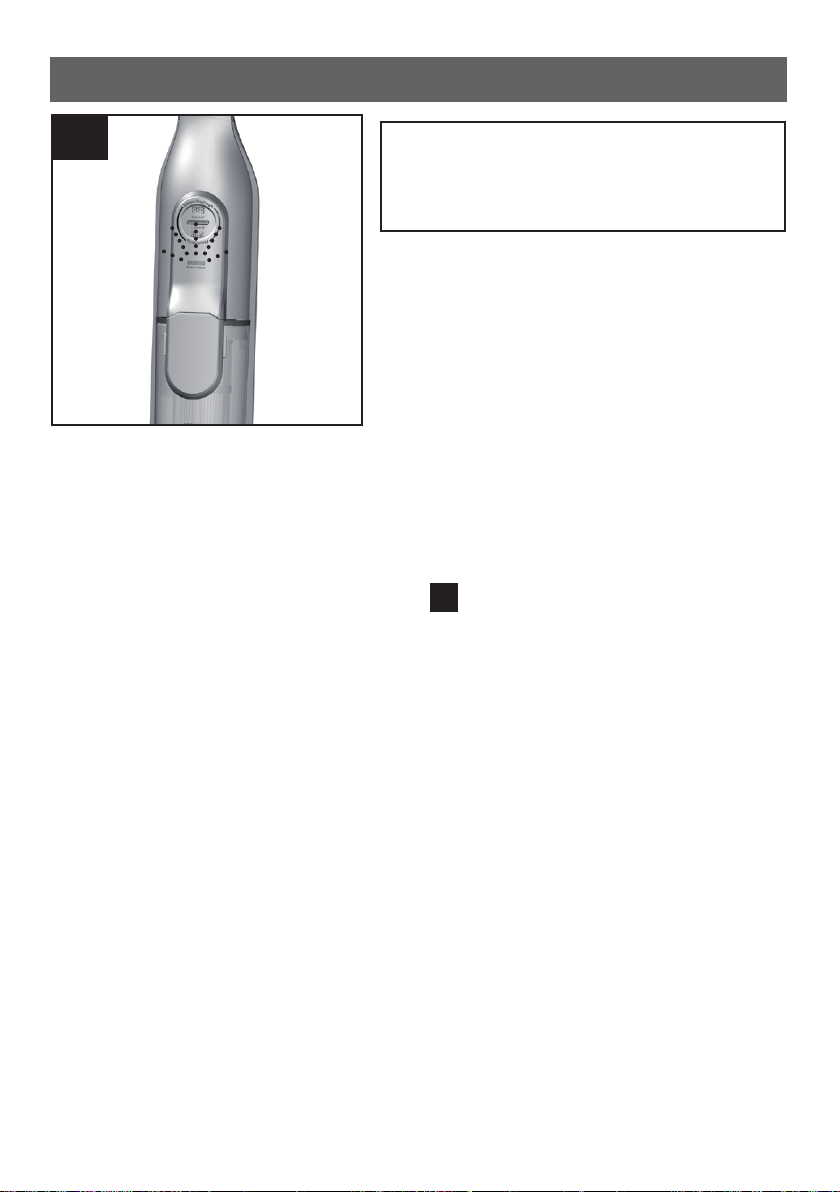
19
Caution!
The filter can only be cleaned if
the appliance is switched off.
Your appliance is equipped with a
"Sensor Control" Function.
This function constantly monitors
whether your vacuum cleaner is reaching its optimum power level. The
indicator light lets you know when
you need to clean the plate filter, so
that the vacuum cleaner can reach
its optimum power level once more.
Sensor Control
19
Fig.
The indicator lights up blue when
the appliance is working optimally.
As soon as the indicator turns red
and flashes, the fluff filter and fin filter must be cleaned.
The appliance is automatically adjusted to power level 1.
27
Page 28
Filter care
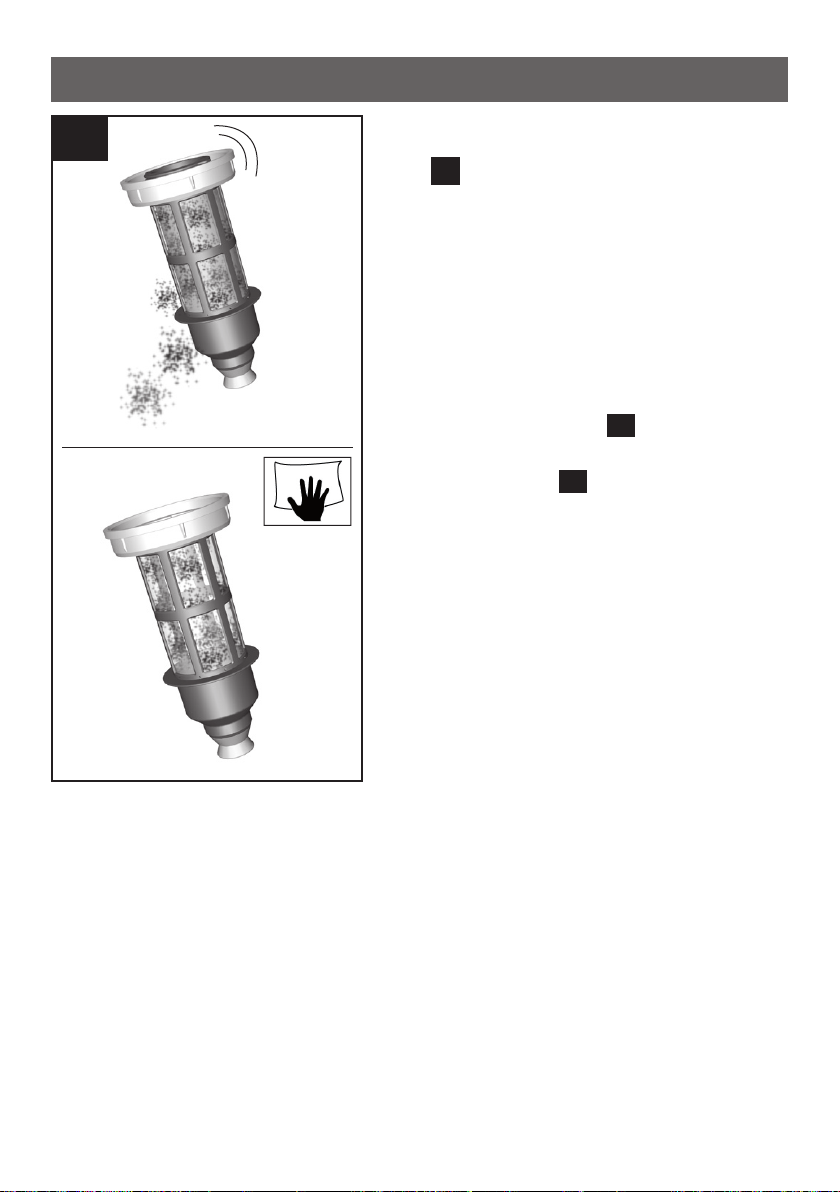
20
b
a
Cleaning the fluff filter
20
Fig.
The fluff filter should be cleaned at
regular intervals in order to ensure
optimum operation of the vacuum
cleaner.
Please switch off the appliance to
clean the outer filter unit.
Remove the dust container from
14
the appliance.
Fig.
Take the filter unit out of the dust
15
container.
Fig.
Clean the outer filter unit.
a) It is usually sufficient to lightly
shake or tap out the whole filter
unit when the dust container is
emptied in order to dislodge any
particles of dirt.
b) If this is not sufficient, you can
use a damp cloth to remove dirt
particles from the surface.
28
Page 29
Filter care
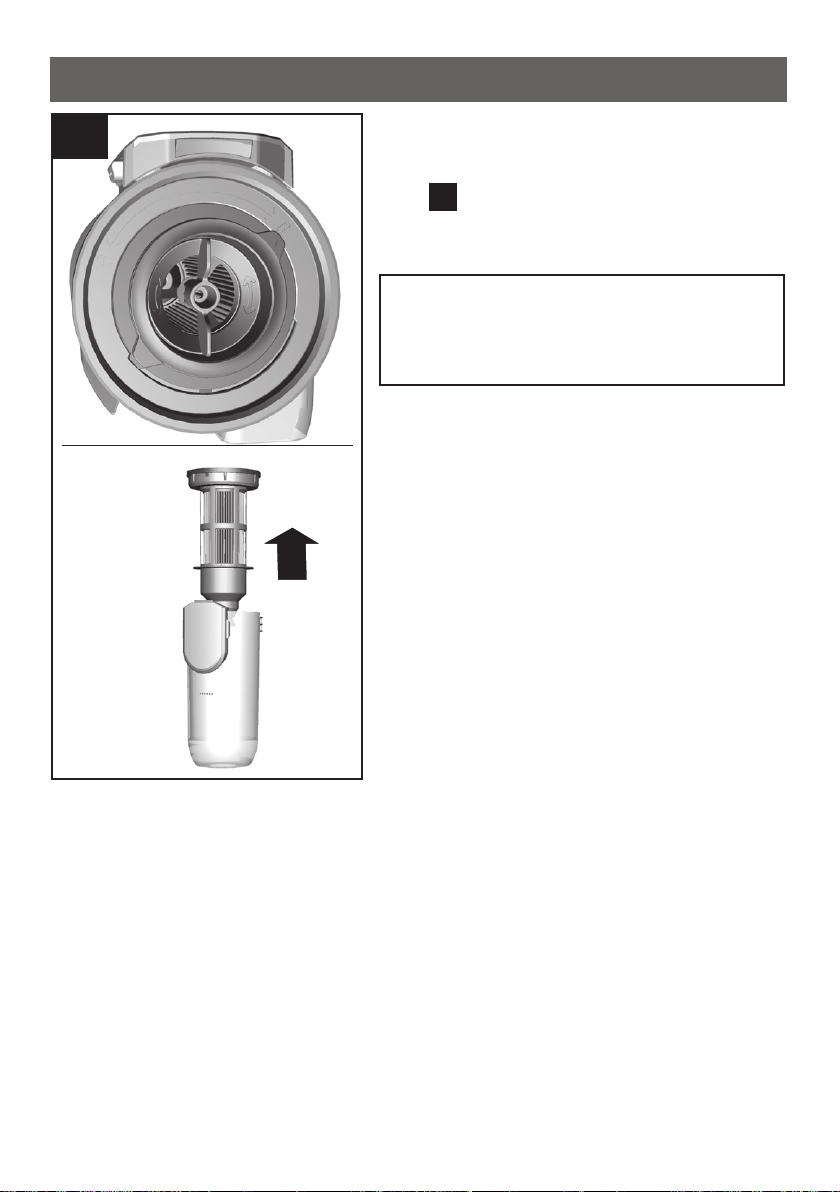
21
Cleaning the fin filter (motor protection filter)
21
Fig.
Switch the appliance off in order
to clean the plate filter.
Caution!
the filter can only be cleaned if
the appliance is switched off.
To clean the fin filter, turn the knob
at least three turns through 180°.
You can also clean the filter if the
suction is becoming less powerful,
even if the indicator has not lit up.
We recommend that you clean the
plate filter each time before emptying the dust container. It must
be cleaned at the latest when the
“Sensor Control” indicator lights
up.
29
Page 30
Filter care
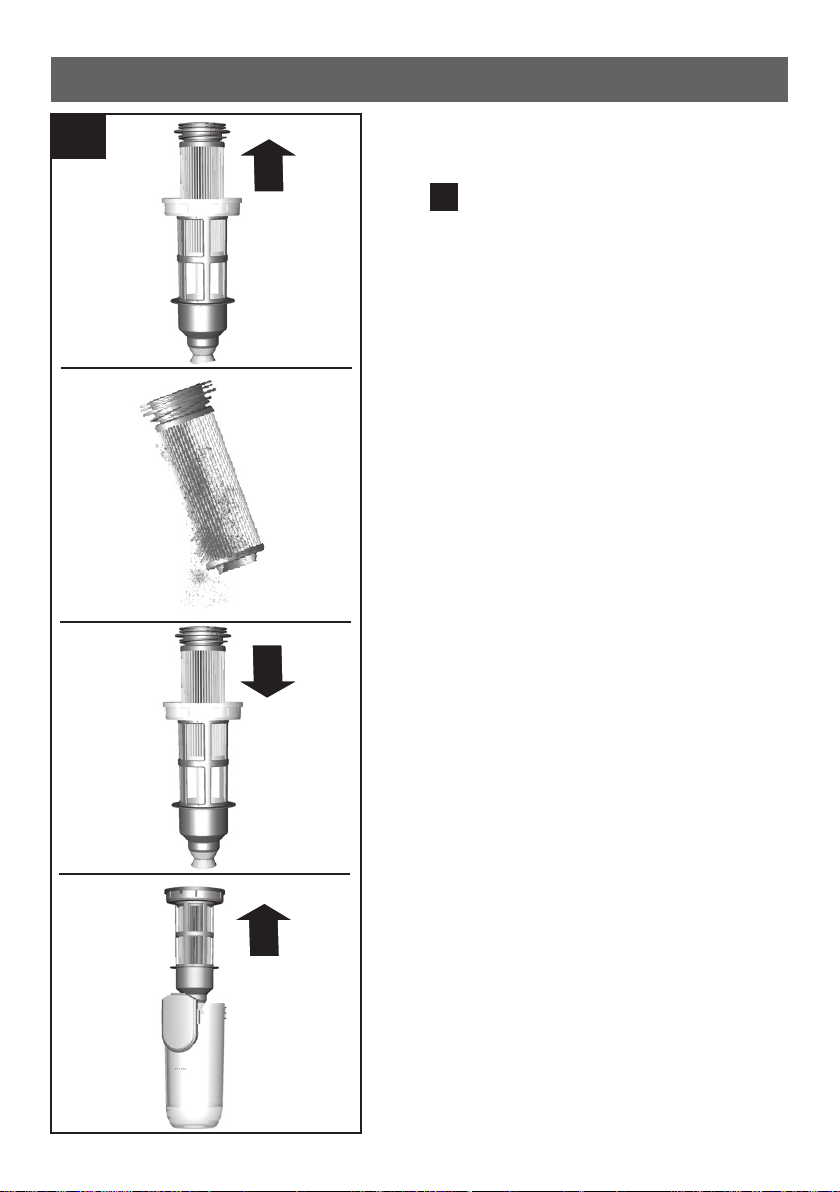
22
Tapping out the fin filter (motor
protection filter)
22
Fig.
If the plate filter is particularly dirty,
the dirt can also be tapped out.
Tap out the filter over a dustbin.
The dirt will fall down out of the
filter.
If the fin filter is defective, you can
order a new one via our after-sales
service using the following spare
part number: 12015942.
30
Page 31

Cleaning the floor nozzle
23
b
c
a
Cleaning the brush roller
Before carrying out any maintenance, switch off the vacuum cleaner and disconnect it from the charging cable.
1
23
Fig.
a) Turn the rotary brush anti-clock-
wise to unlock it and pull it out to
2
the side of the floor nozzle.
b) Use scissors to cut through th-
reads and hairs wound round the
rollers along the cutting groove.
c) Slide the rotary brush into the
floor nozzle and turn it clockwise
to lock it in place.
The brush roller is also self-
cleaning. Use scissors to cut
through the hairs and fibres
lengthways on two opposite sides.
Then operate the brush roller for
30 seconds to vacuum these up
automatically.
Caution!
The floor tool must only be put
2
into operation with the brush roller fitted.
1
31
Page 32

Cleaning instructions
Before cleaning the hand vacuum cleaner, it must be switched off
and disconnected from the charging cable. The vacuum cleaner
and plastic accessories can be cleaned with an ordinary plastic
cleaner.
Do not use abrasive materials, glass-cleaning agents or
all-purpose cleaning products.
Never immerse the vacuum cleaner in water.
Subject to change
32
Page 33

Troubleshooting
In the following cases, you should stop using the appliance immediately and contact customer service:
If you have accidentally vacuumed up some liquid or liquid has
entered the inside of the appliance.
If the appliance has been dropped.
In these cases, the electrical safety of the appliance can no longer be guaranteed, even if no damage is visible on the outside.
Possible fault Remedial action
The electric brush is not
working or is making unusu-
al noises
The brush switches off when
the appliance is in operation
Clean the brush and remove any
foreign objects where necessary
Check whether the brush was inserted correctly and is locked in
place
If the problem continues, contact
customer service
Switch off the appliance and
check the nozzle for blockages.
Remove any blockages and clean
the nozzle.
On carpets, select a lower performance level and start the
cleaning process again.
If you cannot switch the nozzle
back on again, contact after-sales
service.
33
Page 34

Customer service
BSH Home Appliances Ltd.
Grand Union House
Old Wolverton Road
Wolverton
Milton Keynes MK12 5PT
To arrange an engineer visit, to order spare parts and accessories
or for product advice please visit www.bosch-home.co.uk or call
Tel.: 0344 892 8979*
* Calls are charged at the basic rate, please check with your telephone service provider for exact charges.
34
Page 35

Disposal
This appliance is labelled in accordance
with European Directive 2012/19/EU on
waste electrical and electronic equipment
(WEEE). This directive provides an EU-wide
framework for returning and recycling old
appliances.
Information on disposal
Vacuum cleaners, batteries, accessories and packaging should
be recycled in an environmentally friendly manner.
Do not dispose of the vacuum cleaner or the batteries in the
household rubbish.
Packaging
The packaging is designed to protect the vacuum cleaner from
being damaged during transportation. It is made of environmentally friendly materials and can be recycled. Dispose of packaging that is no longer required at an appropriate recycling
point.
Old appliance
Old appliances often still contain valuable materials. You should
therefore take appliances that have reached the end of their
service life to your dealer or a recycling centre so that they can
be recycled. Please ask your dealer or your local council about
current disposal methods.
35
Page 36

Disposal
Batteries
According to European Directive 2006/66/EC, de-
fective or exhausted batteries/rechargeable batteries must be collected separately and recycled in
an environmentally friendly manner.
Please follow the notes in the section "Notes on transport".
Subject to change
36
Page 37

Guarantee
Conditions of guarantee
For this appliance the guarantee conditions as set out by our
representatives in the country of sale apply. Details regarding
same may be obtained from the dealer from whom the appliance was purchased. For claims under guarantee the sales
receipt must be produced.
37
Page 38

Données techniques .......................................40
fr
Utilisation conforme à l’usage prévu .........................41
Sécurité .................................................42
Utilisation correcte ........................................44
Batterie au lithium-ion ......................................45
Remarques sur le transport ..................................45
Description de l'appareil ...................................46
Avant la première utilisation ................................48
Assembler la poignée et l'appareil .............................48
Assembler l'appareil et la brosse pour sols ......................48
Charger la batterie .........................................49
Aspiration ...............................................50
Indicateur de l'état de charge de la batterie .....................50
Allumer/Éteindre ..........................................50
Réglage de la puissance d'aspiration ...........................51
Transport ................................................52
Aspiration avec des accessoires supplémentaires .................53
Passer l'aspirateur sur des escaliers ...........................56
38
Après utilisation ..........................................57
Éteindre l'appareil .........................................57
Ranger l'appareil ..........................................57
Vider le collecteur de poussières ..............................58
Retirer le collecteur de poussières ............................59
Extraire l'unité de filtre .....................................60
Insérer le collecteur de poussières ............................61
Démontage ..............................................62
Enlever la poignée de l'appareil ...............................62
Enlever l'appareil et la brosse pour sols ........................62
Table des matières
Page 39

Entretien des filtres .......................................63
fr
Sensor Control ...........................................63
Nettoyer le filtre à peluches ..................................64
Nettoyer le filtre à lamelles (filtre de protection du moteur) .........65
Tapoter le filtre à lamelles (filtre de protection du moteur) .........66
Nettoyer la brosse cylindrique ................................67
Consignes de nettoyage ....................................68
Résolution de problème ....................................69
Service clientèle ..........................................70
Mise au rebut ............................................71
Garantie ................................................73
Table des matières
39
Page 40

Données techniques
Bloc secteur
Entrée : 100 - 240 V ~50/60 Hz
Sortie : 39 V ᄍ 500 mA
Appareil
Type de cellules de batterie : lithium-ion
Tension nominale : 32,4 V
Bruit 78 dB (A)*
(selon le réglage de la puissance)
* mesuré selon DIN EN 60704-2-1
40
Page 41

Utilisation conforme à l’usage prévu
Nous vous remercions d'avoir choisi un aspirateur Bosch
de la série BBH7. Utilisez exclusivement les accessoires
d'origine Bosch. Ils sont spécialement conçus pour votre
aspirateur, afin d'obtenir un résultat de nettoyage optimal.
Conservez la présente notice d'utilisation. Si vous remettez le aspirateur à une tierce personne, veuillez-y joindre sa
notice d'utilisation.
Utilisation conforme à l’usage prévu
Cet appareil est destiné exclusivement à une utilisation domestique et non professionnelle. Cet appareil est conçu pour
une utilisation jusqu'à une altitude maximale de 2000
Utilisez l'aspirateur exclusivement selon les indications figurant dans cette notice d'utilisation.
Pour éviter des blessures et des dommages, l'aspirateur
ne doit pas être utilisé pour :
m.
aspirer sur des personnes ou des animaux.
l'aspiration de :
−substances nocives, coupantes, chaudes ou incandescentes.
−substances humides ou liquides.
−substances et gaz facilement inflammables ou explosifs.
−cendres, suie des poêles et d'installations de chauffage
central.
−poussières de toner provenant d'imprimantes et de photocopieurs.
41
Page 42

Sécurité
Pièces détachées, accessoires
Tout comme nos pièces détachées d'origine, nos accessoires d'origine et nos accessoires spéciaux sont adaptés
aux propriétés et aux exigences de nos aspirateurs. Par conséquent, nous vous recommandons d'utiliser exclusivement
nos pièces détachées d'origine, nos accessoires d'origine,
nos accessoires spéciaux. Ainsi, vous pouvez garantir une
grande durée de vie ainsi qu'une qualité supérieure durable
de la puissance de nettoyage de votre aspirateur.
Remarque:
!
L'utilisation de pièces détachées, d'accessoires/accessoires spéciaux peut entraîner des dommages sur votre aspirateur qui ne sont pas couverts par notre garantie dans
la mesure où ces dommages ont expressément été causés
par l'utilisation de tels produits.
Consignes de sécurité
Cet aspirateur répond aux règles techniques reconnues
et aux prescriptions de sécurité applicables.
L'appareil peut être utilisé par des enfants à partir de
8 ans et par des personnes ayant des capacités physiques, sensorielles ou mentales restreintes ou ayant
un manque d'expérience et / ou de connaissances s'ils
sont sous surveillance ou ont été informés de la manipulation sûre de l'appareil et ont compris les dangers
qui en résultent.
Ne permettez jamais aux enfants de jouer avec
l’appareil.
Le nettoyage de l’appareil, et l’entretien par l’utilisateur,
sont des activités qu’il ne faut pas permettre aux enfants sans surveillance.
42
Page 43

Sécurité
Les sacs plastiques et les films doivent être conservés
hors de la portée de jeunes enfants et être éliminés.
>= Il y a risque d'asphyxie !
Utilisation correcte
Pour recharger, utiliser exclusivement le câble de char-
ge compris dans la livraison.
Raccorder et mettre en service le cordon de charge
uniquement selon les indications figurant sur la plaque
signalétique.
Rangez et chargez l'appareil uniquement à l'intérieur.
Afin de pouvoir utiliser les capacités de la batterie de
manière optimale, l'appareil doit être uniquement stoc-
ké et utilisé à température ambiante.
N'exposez pas l'appareil à des températures inférieu-
res à 0°C et supérieures à 40°C.
Ne jamais aspirer sans sac aspirateur ou bac à pous-
sières, filtre de protection du moteur et filtre de sortie
d'air.
>= L'appareil risque d'être endommagé !
Evitez d'aspirer avec le suceur et le tube à proximité
de la tête.
>= Il y a risque de blessure !
Ne plus utiliser le cordon de charge s'il est endomma-
gé ; le remplacer par un câble de chargement d'origine.
Pour débrancher le cordon de charge, ne pas tirer sur
le cordon d'alimentation mais sur la fiche.
Ne pas tirer le cordon de charge par-dessus d'arêtes
coupantes et ne pas le coincer.
Avant tous travaux sur l'aspirateur, éteindre l'appareil
ou bien débrancher le cordon de charge du secteur.
43
Page 44

Utilisation correcte
Ne pas mettre l'aspirateur en service s'il est défectu-
eux.
En cas de panne, éteindre l'appareil ou bien débran-
cher le cordon de charge du secteur.
Pour éviter tout danger, seul le service après-vente ag-
réé est autorisé à effectuer des réparations et à rem-
placer des pièces sur l’aspirateur.
Dans les cas suivants, il faut immédiatement mettre
l'appareil hors service et appeler le service après-ven-
te :
−si par inadvertance vous avez aspiré du liquide ou si
du liquide est parvenu à l'intérieur de l'appareil
−si l'appareil est tombé et est endommagé.
Ne pas exposer l'aspirateur aux influences atmos-
phériques, à l'humidité ni aux sources de chaleur.
Ne pas mettre des substances inflammables ou à base
d'alcool sur les filtres (filtre de protection du moteur,
filtre de sortie d'air etc.).
Pour des raisons de sécurité, afin de protéger la batte-
rie et les moteurs, l'appareil est équipé d'une sécurité
anti-surchauffe. Si la batterie ou l'appareil deviennent
trop chauds, l'appareil s'éteint automatiquement.
>= L'appareil doit refroidir pendant environ 30 minutes
avant de pouvoir de nouveau être utilisé.
L'emballage protège l'aspirateur des dommages pen-
dant le transport. Nous recommandons par conséquent de conserver l'emballage pour des transports
ultérieurs.
44
Page 45

Utilisation correcte
Batterie au lithium-ion
Votre appareil est équipé d'accus lithium-ion qui ne
sont accessibles qu'aux réparateurs professionnels,
pour des raisons de sécurité.
Pour le remplacement des accus, veuillez-vous adresser
au centre de service après-vente le plus proche ou au
revendeur agréé.
Remarques sur le transport
Les accus lithium-ions intégrés sont soumis aux exigences du droit relatif aux marchandises dangereuses. Les
accus peuvent être utilisés transportés par l'utilisateur
sur la route sans autres dispositions. En cas d'expédition
par des tiers (par ex. transport aérien ou routier), des
exigences particulières doivent être respectées en termes d'emballage et de marquage. Dans ce cas, pour
la préparation de l'équipement à envoyer, il faut faire
appel à un expert en termes de marchandises dangereuses.
45
Page 46

Description de l'appareil
7
11*
10*
6
5
4
3
2
9
8
12
13
14*
15*
46
16*
1
Page 47

Description de l'appareil
1 Brosse pour sols avec
électrobrosse
2 Unité du filtre avec bac à
poussières
3 Bouton de déverrouillage
du collecteur de saletés
4 Indicateur de l'état de
charge de la batterie
5 Indicateur Sensor Control
6 Filtre à peluches
7 Filtre à lamelles
8 Poignée
9 Interrupteur Marche /
Arrêt
10 Suceur ameublement
professionnel*
11 Suceur long professionnel*
12 Tuyau d'aspiration court
13 Cordon de charge
14 Brosse cylindrique de
rechange*
15 Brosse pour meubles*
16 Suceur matelas*
* l'équipement peut varier selon le type d'appareil
47
Page 48

Avant la première utilisation
1
2
Click!
Click!
Assembler la poignée et l'appareil
1
Fig.
Fixer la poignée délicatement sur
le boîtier principal et l'encliqueter.
Assembler l'appareil et la brosse
pour sols
2
Fig.
Fixer l'aspirateur balai dans la
brosse pour sols et l'encliqueter.
48
Pour désenclencher la brosse pour
sols, appuyer sur le bouton de déverrouillage et retirer l'aspirateur
balai de la brosse.
Attention !
La brosse pour sols ne convient
1
pas pour aspirer des petites pièces, telles que des tessons, jouets, épingles, trombones, etc.
Page 49

Avant la première utilisation
3
Attention !
Les accus de l'aspirateur doivent
être chargés au moins 6 heures
1
avant la première utilisation.
Chargez uniquement l'appareil
avec le cordon de charge fourni.
Charger la batterie
3
Fig.
Pour charger l'aspirateur, posez-le
à proximité d'une prise. L'appareil
1
peut être posé librement dans la
12
pièce.
Fig.
Connecter le cordon de char-
ge dans la prise à l'arrière de
l'appareil.
Connecter la fiche du cordon de
charge dans la prise secteur.
Le témoin de charge clignote pen-
dant le chargement.
Quand l'accu est complètement
chargé, le témoin de charge est allumé en bleu et ne clignote plus.
La LED s'éteint après 2 minutes
pour économiser l'énergie.
Un chauffement du cordon de
charge et de l'aspirateur balai est
normal et sans risque.
49
Page 50

Avant la première utilisation
4
Aspiration
5
Indicateur de l'état de charge de la
batterie
4
Fig.
Les LED de l'indicateur indiquent
l'état de charge de l'accu.
Accu complètement chargé
Charge résiduelle moyenne
Charge résiduelle faible
Lorsque la dernière LED clignote,
l'accu doit être rechargé.
Allumer/Éteindre
5
Fig.
Actionner l'interrupteur marche/
arrêt dans le sens de la flèche.
50
Page 51

Aspiration
6
Réglage de la puissance
d'aspiration
6
Fig.
1
2
3
Poussez l'interrupteur marche/arrêt
dans la position souhaitée pour régler la puissance d'aspiration :
Niveau de puissance 1 1
Pour des tâches de nettoyage sim-
ples telles que les tapis de sol ou
les sols durs légèrement sales.
L'appareil atteint la durée de mar-
che maximale.
Niveau de puissance 2 2
Pour passer l'aspirateur sur des
tapis délicats et pour un nettoyage
quotidien en cas de faible salissure.
Niveau de puissance 3 3
Pour passer l'aspirateur sur des
sols durs ou des tapis et moquettes très sales. La durée de marche
de l'appareil est plus courte.
Aspirer avec des accessoires sup-
plémentaires uniquement au niveau 3.
51
Page 52

Aspiration
7
Transport
7
Fig.
Pour franchir des obstacles, com-
me des escaliers, l'appareil peut
également être porté par la poignée.
52
Page 53

Aspiration
8
2
Click!
Aspiration avec des accessoires
supplémentaires
Réglez toujours l'appareil au niveau de puissance le plus élevé
(niveau 3) lorsque vous travaillez
avec les accessoires supplémen-
1
taires.
Fig. 8 Tuyau d'aspiration court
Retirez l'appareil de la brosse pour
sols.
Placez le tuyau d'aspiration cours
sur l'appareil et encliquetez-le.
Pour aspirer les plus grosses parti-
cules de poussières ou les petites
pièces, telles que des confettis,
des trombones, des cornflakes,
etc.
Pour aspirer le plancher de la vo-
iture
53
Page 54

Aspiration
9
9
Fig.
Insérez les brosses sur le tube
d'aspiration court selon les besoins:
Suceur ameublement profession-
nel
Pour passer l'aspirateur sur les tis-
sus d’ameublement, sièges auto,
etc.
Pour nettoyer, il suffit d'aspirer le
suceur ameublement professionnel avec l'appareil.
54
Suceur long professionnel
Pour passer l'aspirateur sur les
joints et dans les coins, etc.
Page 55

Aspiration
9
Brosse pour meubles avec couron-
ne de soies
Pour passer l'aspirateur sur les
parois, les surfaces délicates, les
tables, etc.
Brosse pour meubles sans couron-
ne de soies
Pour passer l'aspirateur sur des ri-
deaux, etc. Retirez la couronne de
soies de la brosse.
Pour nettoyer des matières délicates, telles que des rideaux et
voilages, réduisez la puissance à
la plage de puissance la plus faible.
Nettoyer la brosse pour meubles
Pour nettoyer, il suffit d'aspirer
la brosse pour meubles avec
l'appareil.
55
Page 56

Aspiration
9
9
Fig.
Suceur matelas
Pour passer l'aspirateur sur des
matelas
10
Passer l'aspirateur sur des esca-
liers
10
Fig.
L'appareil permet de passer faci-
lement l'aspirateur sur des escaliers.
Les marches doivent être aspirées
dans le sens transversal, de gauche à droite.
Retirez la saleté restante sur les
bords en tournant la brosse pour
sols.
56
Page 57

Après utilisation
11
12
Éteindre l'appareil
11
Fig.
Eteindre l'appareil après le netto-
yage.
Ranger l'appareil
12
Fig.
Lors de courtes pauses
d'aspiration, l'appareil peut être
posé librement dans la pièce. Pour
cela, basculez l'aspirateur légèrement vers l'avant en direction de
la brosse.
Attention!
Pour garer l'appareil, l'éteindre impérativement du fait que la brosse rotative risque d'endommager
le revêtement de sol lors de
l'immobilisation de l'aspirateur.
57
Page 58

Après utilisation
13
max
Vider le collecteur de poussières
13
Fig.
Afin d'obtenir un résultat de nettoyage optimal, il est recommandé de
vider le collecteur de poussières après chaque utilisation, mais au plus
tard lorsque la poussière a atteint
le repère à un endroit dans le collecteur de poussières.
Nous recommandons de ne pas
remplir le collecteur de poussières
en dépassant le repère, car cela
conduit à un important encrassement du filtre.
Lorsque vous videz le bac à poussières, contrôlez aussi le degré de
salissure de l'unité de filtre extérieure et nettoyez celle-ci si besoin en
procédant selon les instructions «
Nettoyage du filtre à peluche ».
20
Fig.
58
Attention!
Le nettoyage du filtre est uniquement possible, l'appareil éteint.
Ne jamais aspirer sans unité de
filtre extérieure avec la cartouche
de filtre en place.
Page 59

Après utilisation
14
Retirer le collecteur de poussières
14
Fig.
Déverrouiller le collecteur de
poussières à l'aide des boutons
de déverrouillage et le retirer de
l'appareil.
59
Page 60

Après utilisation
15
Extraire l'unité de filtre
15
Fig.
Extraire l'unité de filtre du collecteur
de poussières
Vider le collecteur de poussières.
Si nécessaire, vous pouvez essuyer
le bac à poussières avec un chiffon
humide.
60
Page 61

Aspiration
16
Insérer le collecteur de poussières
16
Fig.
Eliminer les saletés éventuelle-
ment présentes en-dessous de
l'ouverture d'éjection.
Placer l'unité de filtre dans le coll-
ecteur de poussières, tout en veillant à ce qu'elle soit correctement
en place.
Click!
Placer le collecteur de poussières
dans l'appareil et l'encliqueter audiblement.
Attention!
Si vous sentez une résistance en
installant le collecteur de poussières, vérifiez si les filtres sont
au complet ainsi que la position
correcte des filtres et du collecteur de poussières.
61
Page 62

Démontage
17
18
Enlever la poignée de l'appareil
2
17
Fig.
1
Pour détacher la poignée, presser
le bouton de déverrouillage et enlever délicatement la poignée par
le haut.
Enlever l'appareil et la brosse pour
sols
18
Fig.
Pour désenclencher la brosse pour
sols, appuyer sur le bouton de dé-
2
1
verrouillage et retirer l'aspirateur
balai de la brosse.
62
Page 63

Entretien des filtres
19
Attention!
Le nettoyage du filtre est uniquement possible, l'appareil éteint.
Votre appareil est équipé de la fonction « Sensor Control.
Cette fonction contrôle en permanence si votre aspirateur atteint sa
performance optimale. Le voyant lumineux signale si le filtre à lamelles
doit être nettoyé afin d'atteindre de
nouveau sa performance optimale.
Sensor Control
19
Fig.
Le voyant s'allume en bleu lorsque
l'appareil fonctionne à sa puissance
optimale. Dès que le voyant clignote
en rouge, le filtre à peluches et le
filtre à lamelles doivent être nettoyés.
L'appareil passe automatiquement
en puissance 1.
63
Page 64

Entretien des filtres
20
b
a
Nettoyer le filtre à peluches
20
Fig.
Le crible à peluches doit être nettoyé
régulièrement, afin que l'aspirateur
fonctionne de façon optimale.
Veuillez éteindre l'appareil, pour
nettoyer l'unité de filtre extérieure.
Enlever le collecteur de poussières
14
de l'appareil.
Fig.
Extraire l'unité de filtre du coll-
15
ecteur de poussières.
Fig.
Nettoyer l'unité de filtre extérieu-
re.
a) Généralement il suffit de secou-
er ou de tapoter légèrement toute l'unité de filtre lors du vidage
du collecteur de poussières, afin
que les éventuelles saletés se décollent.
b) Si cela n'est pas suffisant, veuillez
utiliser un chiffon humide pour
enlever les saletés sur la surface.
64
Page 65

Entretien des filtres
21
Nettoyer le filtre à lamelles (filtre
de protection du moteur)
21
Fig.
Veuillez éteindre l'appareil pour
nettoyer le filtre à lamelles.
Attention!
Le nettoyage du filtre est uniquement possible lorsque l'appareil
est éteint.
Pour nettoyer le filtre à lamelles,
tournez la manette 3 fois à 180°.
Si la puissance d'aspiration baisse,
vous pouvez aussi nettoyer le filtre
si le voyant ne s'allume pas. Nous
recommandons de nettoyer le filtre à lamelles avant chaque vidage
du collecteur de poussières. Mais
le nettoyage doit être effectué
au plus tard lorsque l'indicateur
«Sensor Control» s'allume.
65
Page 66

Entretien des filtres
22
Tapoter le filtre à lamelles (filtre
de protection du moteur)
22
Fig.
Le filtre à cartouche peut aussi être
débourré s'il est très encrassé.
Débourrer le filtre au-dessus d'une
poubelle. La poussière tombe du
filtre vers le bas.
Si le filtre à lamelles est défectueux,
vous pouvez en commander un nouveau auprès de notre service aprèsvente sous le numéro de pièce de
rechange suivant : 12015942.
66
Page 67

Nettoyage de la brosse pour sols
23
b
c
a
Nettoyer la brosse cylindrique
Avant chaque entretien, éteindre
l'aspirateur et débrancher ou bien
le séparer du cordon de charge.
1
Fig.
23
a) Déverrouillez la brosse cylin-
drique en la tournant dans le sens
horaire et retirez-la latéralement
2
de la brosse pour sols.
b) Coupez les fils et cheveux enrou-
lés avec des ciseaux le long de la
rainure de coupe.
c) Introduisez la brosse cylindrique
dans la brosse pour sols, puis
verrouillez-la dans le sens horaire.
La brosse cylindrique est égale-
ment dotée d'une fonction d'autonettoyage. Pour ce faire, coupez
avec des ciseaux les cheveux et
les fils sur les deux côtés opposés.
Lors du fonctionnement ultérieur
de la brosse cylindrique de plus de
30 secondes, ceux-ci sont automatiquement aspirés.
2
Attention!
La brosse pour sols doit unique-
1
ment être utilisée avec la brosse
rotative en place.
67
Page 68

Consignes de nettoyage
Avant chaque nettoyage de l'aspirateur balai, il faut l'éteindre et
le séparer du cordon de charge. L'aspirateur et les accessoires en
plastique peuvent être entretenus avec un produit de nettoyage
pour plastique usuel du commerce.
Ne pas utiliser de produits récurants, de nettoyants
pour vitres ni de nettoyants universels.
Ne jamais plonger l'aspirateur dans l'eau.
Sous réserve de modifications techniques.
68
Page 69

Résolution de problème
Dans les cas suivants, vous devez immédiatement mettre l'appareil
hors service et appeler le service après-vente :
Si par inadvertance vous avez aspiré du liquide ou si du liquide
est parvenu à l'intérieur de l'appareil.
Si l'appareil est tombé.
Dans ces cas, la sécurité électrique de l'appareil n'est éventuellement plus garantie, même si aucun endommagement apparent
n'est décelable.
Dérangement se produisant Solution
L'électrobrosse ne fonction-
ne pas ou émet des bruits
inhabituels
La brosse s'éteint pendant
l'aspiration
Nettoyez la brosse et le cas
échéant, retirez les corps étrangers
Vérifiez si la brosse est correctement en place et verrouillée
Si le problème persiste, contactez le service après-vente
Éteignez l'appareil et vérifiez si la
brosse est bloquée.
Éliminez le blocage et nettoyez la
brosse.
Choisissez une puissance moins
élevée sur des tapis et recommencez le processus de nettoyage.
Si la brosse ne s'allume plus, contactez le service après-vente.
69
Page 70

Service clientèle
BSH Electroménager S.A.S.
50 rue Ardoin – CS 50037
93406 SAINT-OUEN cedex
Service interventions à domicile:
01 40 10 11 00
Service Consommateurs:
0 892 698 010 Service 0,40€/min + prix appel
mailto:soa-bosch-conso@bshg.com
Service Pièces Détachées et Accessoires:
0 892 698 009 Service 0,40€/min + prix appel
www.bosch-home.fr
70
Page 71

Mise au rebut
Cet appareil est marqué selon la directive
européenne 2012/19/ UE relative aux appareils électriques et électroniques usagés
(waste electrical and electronic equipment
- WEEE). Cette directive fixe le cadre, en
vigueur sur tout le territoire de l'UE, d'une
reprise et d'un recyclage des appareils usagés.
Conseils pour la mise au rebut
Les aspirateurs, les accus, les accessoires et les emballages doivent être recyclés de manière écologique.
Ne pas éliminer les aspirateurs ni les accus/piles avec les ordures
ménagères!
L`emballage
L'emballage protège l'aspirateur des dommages pendant le
transport. Il est constitué de matériaux écologiques et est donc
recyclable. Les matériaux d'emballage qui ne sont plus utilisés
doivent être mis au rebut aux points collecteurs du système de
recyclage « Point vert ».
Appareil usagé
Les appareils usagés contiennent encore souvent des matéri-
aux précieux. Veuillez par conséquent rapporter votre appareil
usagé à votre revendeur ou à un centre de recyclage pour qu'il
soit recyclé. Pour connaître les possibilités de mise au rebut actuelles, renseignez-vous auprès de votre revendeur ou de votre
mairie.
71
Page 72

Mise au rebut
Accus/piles
Conformément à la directive européenne 2006/66/
CE, les batteries/accumulateurs usagés ou défectueux doivent être triés et recyclés dans le respect
de l'environnement.
Veuillez observer les remarques de la section « Remarques sur
le transport »
Sous réserve de modifications
72
Page 73

Garantie
Conditions de garantie
A l’étranger, les conditions de garantie applicables à cet ap-
pareil sont celles s’accordées par la filiale du pays concerné.
Celles-ci peuvent être fournies par le Revendeur auprès duquel
vous avez acheté l’appareil ou directement auprès de notre filiale. Si vous aviez besoin d’utiliser la garantie, la présentation
de la facture d’achat sera nécessaire.
73
Page 74

Technische gegevens ......................................76
nl
Gebruik volgens de voorschriften ............................77
Veiligheidsvoorschriften ....................................78
Zakelijk gebruik ..........................................79
Li-ion-accu ...............................................81
Aanwijzingen voor het transport ..............................81
Beschrijving van het apparaat ...............................82
Voor het eerste gebruik ....................................84
Handgreep en apparaat koppelen .............................84
Apparaat en vloermondstuk koppelen ..........................84
Accu opladen .............................................85
Zuigen ..................................................86
Indicatie Laadstatus accu ...................................86
In-/uitschakelen ...........................................86
Zuigkracht regelen .........................................87
Transport ................................................88
Zuigen met extra toebehoren .................................89
Schoonzuigen van trappen ..................................92
74
Na gebruik ...............................................93
Apparaat uitschakelen ......................................93
Apparaat uitzetten .........................................93
Stofreservoir legen ........................................94
Stofreservoir verwijderen ...................................95
Filtereenheid verwijderen ...................................96
Stofreservoir plaatsen ......................................97
Demontage ..............................................98
Handgreep en apparaat ontkoppelen ..........................98
Apparaat en vloermondstuk loskoppelen .......................98
Inhoudsopgave
Page 75

Filteronderhoud ..........................................99
nl
Sensor Control ...........................................99
Pluiszeef reinigen ........................................100
Lamellenfilter (motorbeschermingsfilter) reinigen ...............101
Lamellenfilter (motorbeschermingsfilter) uitkloppen .............102
Reinigen van het vloermondstuk ............................103
Borstelrol reinigen ........................................103
Schoonmaakinstructies ...................................104
Verhelpen van storingen ...................................105
Servicedienst ...........................................106
Afvoer .................................................107
Garantievoorwaarden .....................................109
Inhoudsopgave
75
Page 76

Technische gegevens
Laadstation
Input: 100 - 240 V ~50/60 Hz
Output: 39 V ᄍ 500 mA
Apparaat
Type accucellen: Li-ion
Nominale spanning: 32,4 V
Geluid 78 dB (A)*
(al naar gelang de vermogensinstelling)
* gemeten conform DIN EN 60704-2-1
76
Page 77

Gebruik volgens de voorschriften
Het verheugt ons dat u voor een Bosch robotstofzuiger
uit de serie BBH7 heeft gekozen. Voor het beste resultaat raden wij u aan alleen de originele toebehoren van
Bosch te gebruiken die speciaal voor uw stofzuiger zijn
ontwikkeld.
De gebruiksaanwijzing goed bewaren. Geeft u de robotstofzuiger door aan derden, voeg de gebruiksaanwijzing
er dan bij.
Gebruik volgens de voorschriften
Dit apparaat is alleen bestemd voor huishoudelijk gebruik
en de huiselijke omgeving. Dit apparaat is bestemd voor
gebruik tot op hoogten van maximaal 2.000 meter boven zeeniveau. De stofzuiger uitsluitend gebruiken zoals
aangegeven in deze gebruiksaanwijzing.
Om letsel en schade te voorkomen mag de stofzuiger
niet worden gebruikt voor:
het schoonzuigen van mensen of dieren.
het opzuigen van:
−substanties die schadelijk voor de gezondheid, heet
of gloeiend zijn, of scherpe randen hebben.
−vochtige of vloeibare stoffen
−licht ontvlambare of explosieve stoffen en gassen.
−as, roest van open haarden en centrale verwarmingsinstallaties
−tonerstof van printers en kopieerapparaten.
77
Page 78

Veiligheidsvoorschriften
Onderdelen, toebehoren
Onze originele onderdelen en originele en aanvullende onderdelen zijn afgestemd op de kenmerken en vereisten van onze stofzuigers. We raden u daarom aan alleen originele reserveonderdelen
en onze originele en extra accessoires te gebruiken. Dit zorgt
ervoor dat uw stofzuiger een lange levensduur heeft en dat de
reinigingsprestaties constant hoog blijven.
Aanwijzing:
!
Door het gebruik van niet goed passende of kwalitatief mindere
onderdelen, toebehoren/ extra toebehoren kan uw stofzuiger
beschadigd raken. Indien deze schade veroorzaakt is door het
gebruik van dergelijke producten valt hij niet onder de garantie.
Veiligheidsvoorschriften
Deze stofzuiger voldoet aan de erkende regels van de
techniek en de geldende veiligheidsbepalingen.
Het toestel kan worden gebruikt door kinderen vanaf 8
jaar en door personen met beperkte fysieke, sensorische of geestelijke vermogens of personen die gebrek
aan kennis of ervaring hebben, wanneer zij onder toezicht staan of met het oog op een veilig gebruik volledig over de bediening van het apparaat zijn geïnformeerd en op de hoogte zijn van de gevaren die hieruit
kunnen voortvloeien.
Kinderen mogen niet met het apparaat spelen.
Reiniging en onderhoud mogen niet worden uitgevo-
erd door kinderen die niet onder toezicht staan.
Plastic zakken en folie dienen buiten het bereik van
kleine kinderen te worden gehouden en te worden ge-
recycled.
>= Er bestaat een risico van verstikking!
78
Page 79

Zakelijk gebruik
Zakelijk gebruik
Gebruik voor het laden alleen de meegeleverde laad-
kabel.
Het aansluitsnoer alleen volgens het typeplaatje aans-
luiten en in gebruik nemen.
Het toestel mag alleen binnen worden bewaard en op-
geladen.
Om de capaciteit van de accu optimaal te kunnen be-
nutten, dient het apparaat alleen bij kamertemperatu-
ur te worden opgeslagen en gebruikt.
Stel het toestel niet bloot aan temperaturen beneden
0°C en boven 40°C.
Nooit zuigen zonder filterzak resp. stofreservoir, mo-
torbeveiligings- en uitblaasfilter.
>= Het toestel kan beschadigd raken!
Zuig niet met mondstuk en buis in de nabijheid van het
hoofd.
>= Dit brengt het risico van letsel met zich mee!
Een beschadigd aansluitsnoer mag niet meer worden
gebruikt en dient te worden vervangen door een origi-
neel exemplaar.
Het toestel met behulp van de stekker van de stroom
halen, niet aan het elektriciteitssnoer trekken.
Het elektriciteitssnoer niet over scherpe randen trek-
ken en niet bekneld laten raken.
Voor alle werkzaamheden aan de stofzuiger het toestel
uitschakelen resp. het elektriciteitssnoer ontkoppelen
en het van de stroom halen.
79
Page 80

Zakelijk gebruik
Wanneer de stofzuiger beschadigd is, mag hij niet in
gebruik worden genomen.
In geval van een storing het toestel uitschakelen resp.
van de stroom halen en het elektriciteitssnoer ontkop-
pelen.
Om risico's te voorkomen mogen reparaties aan de
stofzuiger en het vervangen van onderdelen alleen
worden uitgevoerd door onze klantenservice.
In de volgende gevallen moet het apparaat onmiddelli-
jk worden uitgeschakeld en moet contact worden op-
genomen met de klantenservice:
−als u per ongeluk vloeistof hebt geabsorbeerd of als
er vloeistof in de binnenkant van het apparaat is binnengedrongen
−Als het apparaat is gevallen en beschadigd is.
De stofzuiger beschermen tegen weersinvloeden,
vocht en hittebronnen.
Zorg ervoor dat er geen brandbare of alcoholhouden-
de stoffen op de filters (filterzak, motorbeveiligingsfilter, uitblaasfilter, etc.) terechtkomen.
Om veiligheidsredenen is het apparaat, ter bescher-
ming van accu en motoren, voorzien van een beveiliging tegen oververhitting. Wanneer de accu of het
apparaat te warm worden, schakelt het apparaat automatisch uit.
>= Het apparaat moet ca. 30 minuten afkoelen voor het
weer kan worden gebruikt.
De verpakking beschermt de stofzuiger tegen be-
schadiging tijdens het transport. Daarom raden wij u
aan de verpakking voor transportdoeleinden te bewaren.
80
Page 81

Zakelijk gebruik
Li-ion-accu
Uw toestel is uitgerust met Lithium-ion accu's. Vanwege
de veiligheid zijn deze alleen toegankelijk voor vaklui
die bevoegd zijn tot het uitvoeren van reparaties.
Neem voor vervanging van de accu's contact op met de
dichtstbijzijnde klantenservice of een geautoriseerde
dealer.
Aanwijzingen voor het transport
De ontvangen Lithium-ion accu's voldoen aan de wettelijke voorschriften voor het transport van gevaarlijke
stoffen.
De accu's kunnen door de gebruiker zonder verdere
voorschriften over straat getransporteerd worden. Bij
verzending door derden (bijv. luchttransport of een expeditiebedrijf) dienen bijzondere eisen ten aanzien van
de verpakking en het transport in acht te worden genomen. Hier moet bij de voorbereiding van het verzendstuk een expert op het gebied van gevaarlijke stoffen
worden geraadpleegd.
81
Page 82

Beschrijving van het apparaat
7
11*
10*
6
5
4
3
2
9
8
12
13
14*
15*
82
16*
1
Page 83

Beschrijving van het apparaat
1 Vloermondstuk met
elektrische borstel
2 Stofreservoir met
filtereenheid
3 Ontgrendelingstoets
vuilcontainer
4 Indicatie Laadstatus accu
5 Sensor Control indicatie
6 Pluiszeef
7 Lamellen-filter
8 Handvat
9 Aan-/uit-schakelaar
10 Professioneel bekledings-
mondstuk*
11 Professioneel mondstuk
voor kieren*
12 korte zuigbuis
13 Aansluitsnoer
14 Vervangende borstelrol*
15 Meubelmondstuk*
16 Matrasmondstuk*
* uitrusting kan variëren afhankelijk van apparaattype
83
Page 84

Voor het eerste gebruik
1
2
Click!
Click!
Handgreep en apparaat koppelen
1
Afb.
Handvat voorzichtig aan de hoof-
dbehuizing bevestigen en vergrendelen.
Apparaat en vloermondstuk koppelen
Afb.
2
Handstofzuiger in het vloermond-
stuk steken en vergrendelen.
84
U verwijdert het vloermondstuk
door op de ontgrendelingsknop te
drukken en de handstofzuiger uit
het mondstuk te trekken.
Let op!
Vloermondstuk is niet geschikt
1
voor het opzuigen van kleine onderdelen zoals scherven, speelgoed, spelden, paperclips, etc.
Page 85

Voor het eerste gebruik
3
Let op!
Voor het eerste gebruik moeten
de accu's van de stofzuiger mins-
1
tens 6 uur worden opgeladen.
Apparaat alleen met meegeleverde oplaadkabel laden.
Accu opladen
Afb.
1
3
Om de stofzuiger op te laden zet u
hem in de nabijheid van een stopcontact. Het apparaat kan vrij in de ruim-
12
te worden geplaatst
Aansluitsnoer achter in de aansluiting
van het toestel steken.
Stekker van het aansluitsnoer in het
stopcontact steken.
Tijdens het laden knippert de laadin-
dicatie.
Is de accu volledig opgeladen, dan
is de laadindicatie blauw verlicht en
knippert niet meer.
Afb.
Na 2 minuten dooft de LED om
energie te besparen.
Het is mogelijk dat het aansluitsnoer
warm wordt. Dit is normaal en niet
bezwaarlijk.
85
Page 86

Voor het eerste gebruik
4
Zuigen
5
Indicatie Laadstatus accu
Afb.
4
De LED's in de indicatie geven de
laadtoestand van de accu weer.
Accu volledig
opgeladen
gemiddelde
restlading
geringe restlading
Knippert de laatste LED, dan moet
de accu weer worden opgeladen.
In-/uitschakelen
Afb.
5
Aan-/Uitschakelaar in de richting
van de pijl draaien.
86
Page 87

Zuigen
6
Zuigkracht regelen
Afb.
6
Om het zuigvermogen in te stellen,
1
2
3
zet u de Aan-/Uit-schakelaar in de
gewenste stand:
Vermogensstand 1 1
Voor eenvoudige schoonmaakta-
ken zoals kleedjes of licht verontreinigde harde vloer.
Het apparaat behaalt hier de maxi-
male gebruikstijd.
Vermogensstand 2 2
Voor het afzuigen van kwetsbaar
tapijt en de dagelijkse reiniging bij
geringe verontreiniging.
Vermogensstand 3 3
Voor het zuigen van harde vloeren
en sterk verontreinigde tapijten en
vloerbedekking. Het apparaat realiseert hierbij een kortere gebruikstijd.
Stofzuigen met extra accessoires
uitsluitend op stand 3.
87
Page 88

Zuigen
7
Transport
Afb.
7
Om hindernissen te nemen, bijv.
trappen, kan het toestel ook aan
het handvat getransporteerd worden.
88
Page 89

Zuigen
8
2
Click!
Zuigen met extra toebehoren
Bij alle werkzaamheden met de
extra accessoires het apparaat
in principe op de hoogste vermogensstand (stand 3) instellen.
1
Afb. 8 Korte zuigbuis
Apparaat uit het vloermondstuk
trekken.
Korte zuigbuis op het apparaat
koppelen en borgen.
Voor het opzuigen van grotere vuil-
deeltjes of kleine deeltjes, zoals
bijvoorbeeld confetti, paperclips,
conflakes, etc.
Voor het uitzuigen van de voeten-
ruimte in de auto
89
Page 90

Zuigen
9
Afb.
9
Mondstukken naar behoefte op de
korte zuigbuis steken:
Professioneel bekledingsmond-
stuk
Voor het afzuigen van met stof be-
klede meubels, autostoelen, etc.
Voor het schoonmaken gewoon
het professionele bekledingsmondstuk gebruiken.
90
Professionele plintenzuigmond
Voor het schoonzuigen van kieren,
hoeken etc.
Page 91

Zuigen
9
Meubelzuigmond met borstelrand
Voor het afzuigen van muren,
kwetsbare oppervlakken, tafels,
etc.
Meubelzuigmond zonder borstel-
rand
Voor het afzuigen van gordijnen
etc. De borstelrand van de zuigmond nemen.
Zet voor het reinigen van kwetsbare materialen, zoals bijv. gordijnen, het vermogen op de laagste
stand.
Meubelmondstuk reinigen
Voor het reinigen van het meubel-
mondstuk dit gewoon met het apparaat afzuigen.
91
Page 92

Zuigen
9
10
Afb.
9
Matrasmondstuk
Voor het afzuigen van matrassen
Schoonzuigen van trappen
10
Afb.
Het zuigen van trappen is gemak-
kelijk mogelijk met het apparaat.
Treden moeten overdwars, links
en rechts beginnend worden afgezogen.
Het resterende vuil aan de randen
door het draaien van de vloerborstel opnemen.
92
Page 93

Na gebruik
11
12
Apparaat uitschakelen
11
Afb.
Het toestel na gebruik uitschakelen.
Apparaat uitzetten
12
Afb.
Bij korte zuigpauzes kan het toestel
vrij in de ruimte worden geplaatst.
Hiervoor de stofzuiger licht naar voren kantelen in de richting van het
mondstuk.
Let op!
Schakel het apparaat uit voordat
u het neerzet, omdat een draaiende borstel bij stilstand van het
toestel tot schade aan de vloerbedekking kan leiden.
93
Page 94

Na gebruik
13
max
Stofreservoir legen
13
Afb.
Voor een goed zuigresultaat dient
de stofzuiger na gebruik altijd te
worden leeggemaakt. Dit dient echter op zijn laatst te gebeuren op het
moment dat het stof op een plek in
het stofreservoir de markering heeft
bereikt.
Wij raden u aan het stofreservoir
niet verder te vullen dan de markering, omdat dit tot sterke verontreiniging van de filter leidt.
Bij het leegmaken van het stofreservoir ook altijd controleren hoe verontreinigd de buitenste filtereenheid is en deze zo nodig schoonmaken
volgens de aanwijzingen in "Reini-
20
gen van het pluizenfilter". Afb.
94
Let op!
De filter kan alleen worden
schoongemaakt wanneer het toestel uitgeschakeld is.
Nooit zuigen met ingebrachte filterpatronen zonder buitenste filtereenheid.
Page 95

Na gebruik
14
Stofreservoir verwijderen
14
Afb.
Stofreservoir met de ontgrende-
lingstoets loskoppelen en uit het
apparaat nemen.
95
Page 96

Na gebruik
15
Filtereenheid verwijderen
15
Afb.
Filtereenheid uit het stofreservoir
nemen.
Stofreservoir leegmaken.
U kunt het stofreservoir eventueel
met een vochtige doek van binnen
schoonmaken.
96
Page 97

Zuigen
16
Stofreservoir plaatsen
16
Afb.
Verwijder zo nodig vuil dat zich on-
der de afvoer bevindt.
Filtereenheid in het stofreservoir
plaatsen. Let er hierbij op dat hij
op de juiste wijze is ingebracht.
Click!
Stofreservoir in het toestel plaats-
en en hoorbaar laten inklikken.
Let op!
Stuit u bij het sluiten van het deksel op een weerstand, controleer
de filter dan op volledigheid en ga
na of filters en stofreservoir op
de juiste wijze zijn ingebracht.
97
Page 98

Demontage
17
18
Handgreep en apparaat ontkop-
2
1
pelen
Afb.
17
Het handvat verwijderen met behulp van de ontgrendelingsknop en
het voorzichtig naar boven afnemen.
Apparaat en vloermondstuk los-
koppelen
18
Afb.
U verwijdert het vloermondstuk
door op de ontgrendelingsknop te
2
1
drukken en de handstofzuiger uit
het mondstuk te trekken.
98
Page 99

Filteronderhoud
19
Let op!
De filter kan alleen worden gereinigd wanneer het apparaat is uitgeschakeld.
Uw toestel is uitgerust met de zog.
"Sensor Control" - functie.
Deze functie bewaakt permanent of
uw stofzuiger zijn optimale vermogen bereikt. Het lampje geeft aan
wanneer de lamellenfilter gereinigd
moet worden, om weer een optimaal vermogensniveau te bereiken.
Sensor Control
19
Afb.
Het lampje brandt blauw wanneer
het apparaat werkt bij haar optimale
vermogensniveau. Zodra het lampje
rood knippert, moeten het pluizenfilter en het lamellenfilter worden
gereinigd.
Het toestel gaat automatisch terug
naar vermogensstand 1.
99
Page 100

Filteronderhoud
20
b
a
Pluiszeef reinigen
20
Afb.
Om de stofzuiger optimaal te laten
functioneren dient de pluiszeef regelmatig te worden schoongemaakt.
Alvorens de buitenste filtereen-
heid schoon te maken dient u het
toestel uit te schakelen.
Stofreservoir uit het toestel ne-
14
men.
Afb.
Filtereenheid uit het stofreservoir
15
nemen.
Afb.
Buitenste filtereenheid schoonma-
ken.
a) In de regel volstaat het de totale
filtereenheid tijdens het leegmaken van het stofreservoir even te
schudden of uit te kloppen, zodat
mogelijke stofdeeltjes losraken.
b) Is dit niet afdoende, gebruik dan
een vochtige doek om de vuildeeltjes te verwijderen van het
oppervlak.
100
 Loading...