

Bosch 7 620 320 029 Operating Instructions Manual
Coach Media Router
7 620 320 029
de Bedienungsanleitung
en Operating instructions
fr Mode d’emploi
it Istruzioni d’uso
es Instrucciones de manejo
pt Instruções de serviço
nl Gebruiksaanwijzing
sw Bruksanvisning
no Bruksanvisning
dk Brugsanvisning
pl Instrukcja obsługi
tr Kullanım kılavuzu

2 | de
Inhalt
Inhalt | Geräteübersicht
2 Geräteübersicht
2 Bedienelemente
3 LED-Anzeigen
4 Wichtige Hinweise
4 Bestimmungsgemäßer Gebrauch
4 CE Zulassung
4 E-Mark Zulassung
5 Systemanforderungen
5 Sofort-Inbetriebnahme
5 1. SIM-Karte einlegen und Gerät starten
5 2. Verbindung zum Gerät über WLAN herstel-
len.
5 3. Benutzeroberfläche des Gerätes öffnen und
mobilen Internetzugang einrichten
Geräteübersicht
Bedienelemente
6 Internet-Router
6 Media-Server
6 Medien von USB-Datenträger zur Verfügung
stellen
6 Zugriff über die Benutzeroberfläche des
Gerätes
7 Zugriff über UPnP
7 Einstellungen
7 Sprache
7 Einstellungen für die mobile Internet-Verbin-
dung
8 WLAN-Einstellungen
9 Kaskadierung
9 Systemeinstellungen
10 Gerätesoftware-Aktualisierung
10 Geräteinformationen
10 Logout
10 Technische Daten
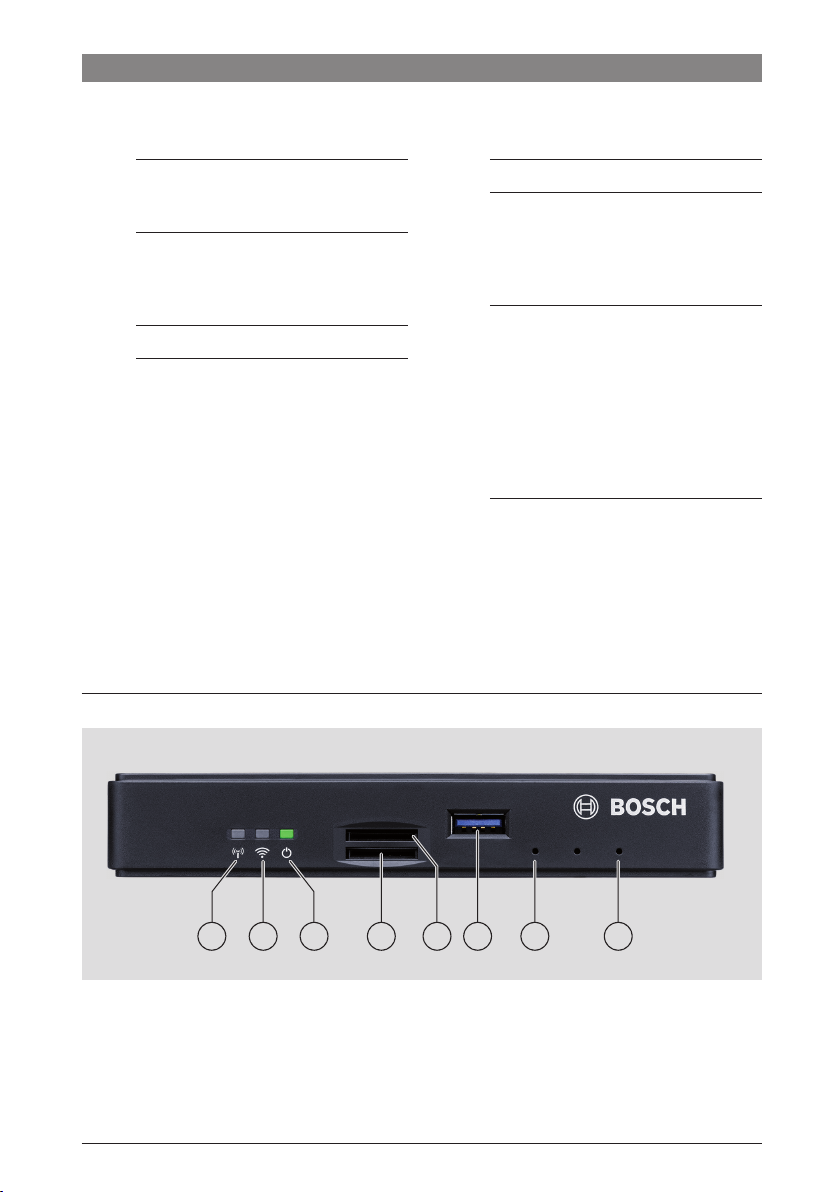
368 4 1257
1 Reset-Taster
2 Firmware-Reset-Taster
3 USB-Buchse
4 SIM-Karteneinschub
7 620 320 029 | 09.2014 Robert Bosch Car Multimedia GmbH
5 SIM-Karteneinschub
6 LED Stromversorgung
7 LED WLAN
8 LED Mobilfunk

Geräteübersicht
LED-Anzeigen
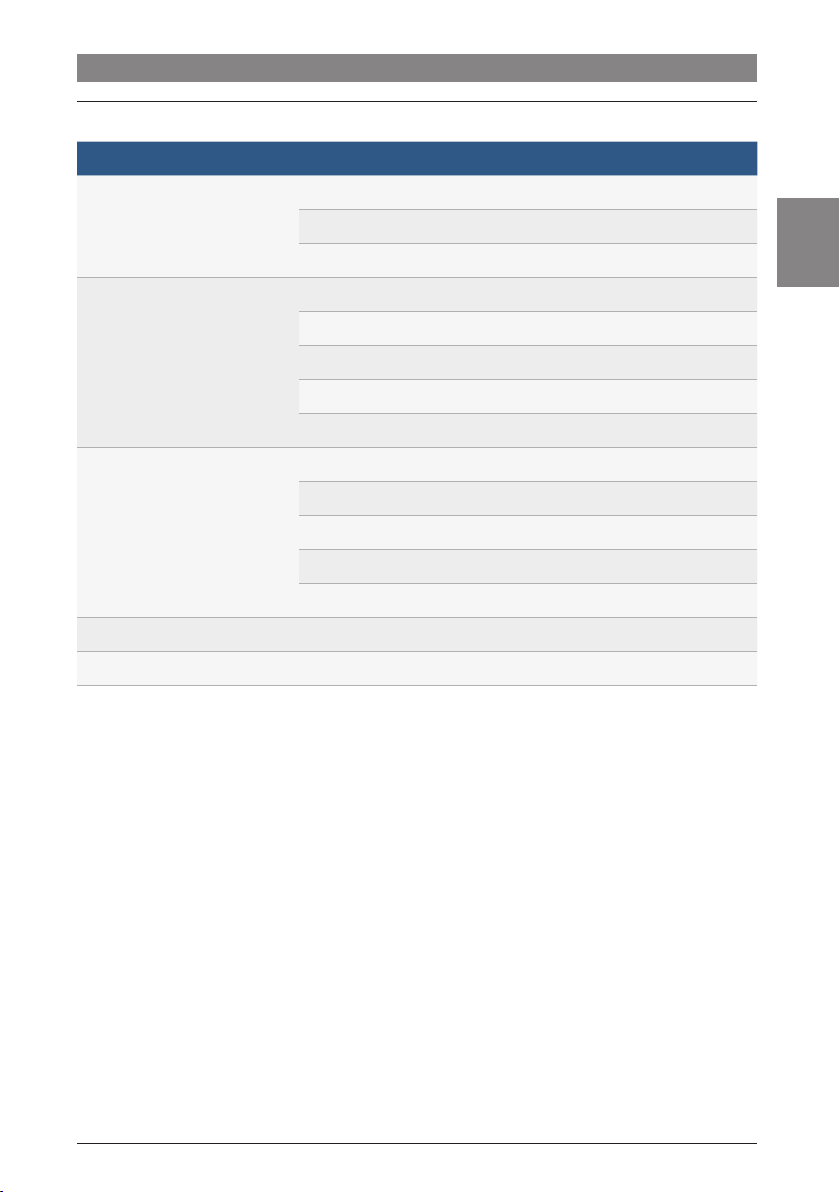
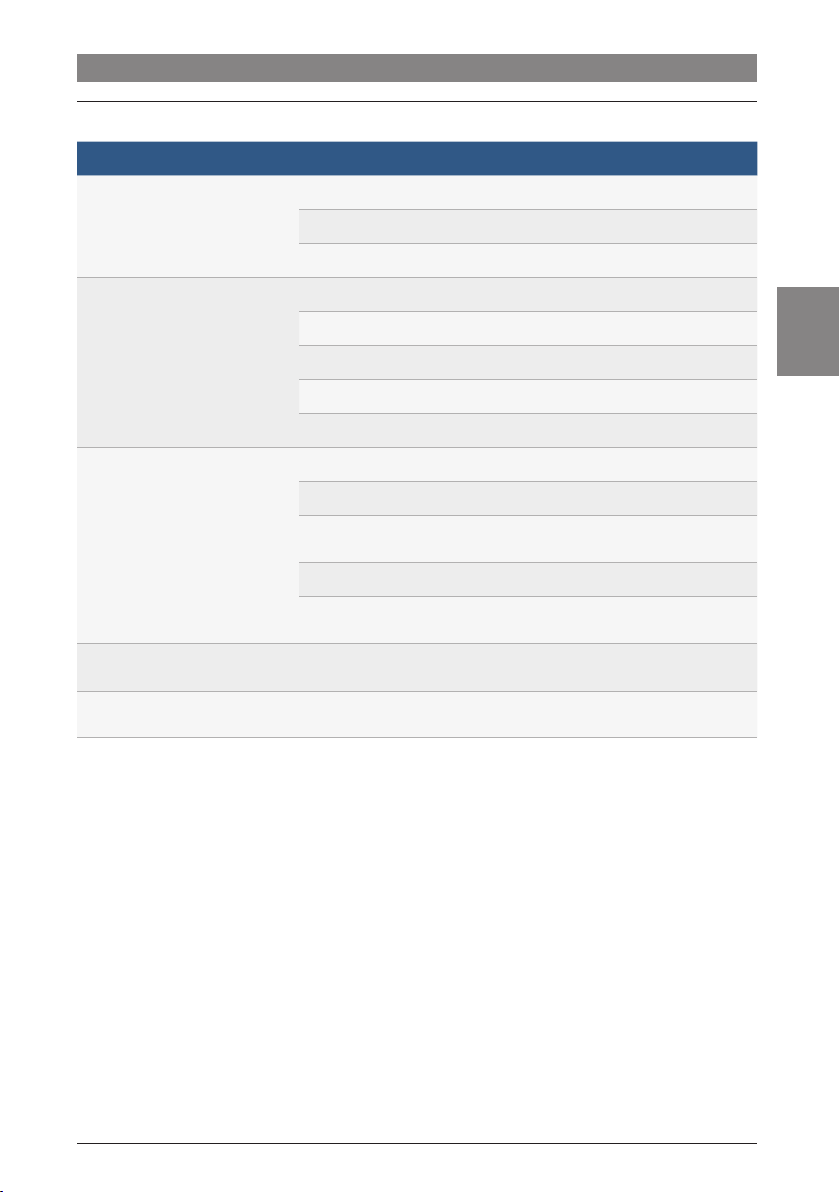
Funktion LED LED-Zustand Gerätestatus
Stromversorgung
LED 6
leuchtet grün Spannungsversorgung gewährleistet
blinkt grün Gerät im Standby-Modus
leutet rot Fehler in der Spannungsversorgung
WLAN
LED 7
aus WLAN nicht gestartet
leuchtet rot WLAN-Fehler
blinkt blau WLAN Access Point wird gestartet
leuchtet blau WLAN verfügbar
flackert blau WLAN-Datenübertragung
Mobilfunk
LED 8
aus Mobilfunk nicht gestartet
leuchtet rot Mobilfunk-Fehler
blinkt orange Mobilfunk-Verbindungsaufbau
leuchtet orange Mobilfunk verfügbar
flackert orange Mobilfunk-Datenübertragung
de | 3
de
Firmware-Update
Reset
LED 6 /7 blinken abwechselnd Laufendes Firmware-Update
LED 6 /7 blinken gleichzeitig Laufendes Reset auf Werkseinstellungen
7 620 320 029 | 09.2014Robert Bosch Car Multimedia GmbH
4 | de
Wichtige Hinweise
Wichtige Hinweise
Bevor Sie Ihr Gerät in Betrieb nehmen, lesen Sie diese
Anleitung sorgfältig und machen Sie sich mit dem Gerät
vertraut. Bewahren Sie diese Anleitung für spätere
Fragen im Fahrzeug auf.
Jedwede Änderungen oder Modifikationen, die durch
die für die Erfüllung der geltenden Konformitätsauflagen
verantwortliche Partei nicht ausdrücklich freigegeben
wurden, können zu einem Erlöschen der Betriebserlaubnis für den Nutzer führen.
Bestimmungsgemäßer Gebrauch
Das Gerät ist für den Betrieb in einem Nutzfahrzeug mit
12 V- bzw. 24 V-Bordnetzspannung konzipiert.
CE Zulassung
Der Bosch Coach MediaRouter wurde entsprechend den
regulatorischen Anforderungen der Europäischen Union
(EU) nach der Norm R&TTE 1999/5/EC getestet und
entspricht allen Anforderungen für das CE-Label.
E-Mark Zulassung
Der Bosch Coach MediaRouter wurde entsprechend den
regulatorischen Anforderungen der Europäischen Union
(EU) nach der EMV-Richtlinie 72/245/EEC mit der
Ergänzung 2009/19/EC sowie der Norm ECE 324-R10
Rev.3 für den Einsatz im KFZ zertifiziert und entspricht
allen Anforderungen für das E-Mark-Label.
Verkehrssicherheit
f Die Verkehrssicherheit ist oberstes Gebot.
Bedienen Sie das Gerät nur bei stehendem Fahrzeug. Wenn eine Bedienung des
Gerätes während der Fahrt nötig wird,
suchen Sie einen sicheren Stellplatz und
stellen das Fahrzeug ab.
f Akustische Warnsignale von Polizei,
Feuerwehr und Rettungsdiensten müssen
im Fahrzeug rechtzeitig wahrgenommen
werden können.
Achten Sie deshalb auf eine Medienwiedergabe in angemessener Lautstärke.
f Achten Sie darauf, dass die Sie beim
Führen des Fahrzeugs nicht vom Gerät,
den angeschlossenen Antennen und der
Verkabelung beeinträchtigt oder in der
Sicht behindert werden.
Radiointerferenz
Betreiben Sie das Gerät nicht in einem
Bereich, wo medizinische Geräte, lebensret-
tende Geräte oder andere Geräte, die
empfindlich auf Interferenz von Radiosignalen
reagieren, benutzt werden.
Hinweis:
Die Mobilfunkantennen sollten nicht in der
Nähe einer anderen Antenne betrieben
werden.
Die Mobilfunkantennen sollten mindestens
2 cm Abstand von Metall und 20 cm Abstand
vom Körper haben.
Die richtige Antennenposition im Fahrzeug hat
signifikanten Einfluss auf die Verbindungsqua-
lität.
Hinweis:
Das Zustandekommen einer Internetverbin-
dung ist abhängig von der Nutzung eines
Mobilfunktarifs mit integrierter Datenoption.
Die Übertragungsgeschwindigkeit ist abhängig
von der Infrastruktur des jeweiligen Netzbetrei-
bers, der aktuellen Signalstärke sowie der
Anzahl Nutzer in einer Funkzelle. Das Gerät hat
keinen SIM-Lock und kann daher mit allen
SIM-Karten mit Datentarif betrieben werden.
7 620 320 029 | 09.2014 Robert Bosch Car Multimedia GmbH
Systemanforderungen | Sofort-Inbetriebnahme
de | 5
Systemanforderungen
Zum Zugriff auf das Gerät benötigen Sie einen Computer
mit
f Internet-Browser (Internet Explorer 6.0 oder höher,
Firefox, Opera oder Safari) und
f WLAN 802.11 b/g/n.
Sofort-Inbetriebnahme
1. SIM-Karte einlegen und Gerät starten
f Legen Sie die SIM-Karte(n) mit den Kontakten nach
oben und der Aussparung in Geräterichtung in den
SIM-Karteneinschub 4 /5 ein.
f Schalten Sie die Fahrzeugzündung ein.
Der Router wird gestartet. Die LED Stromversorgung 6
leuchtet.
Hinweis:
Durch Verwendung einer zweiten SIM-Karte
eines geeigneten zweiten Netzbetreibers
können Sie auf internationalen Routen ggf.
anfallende Roaming-Kosten senken bzw.
vermeiden. Die Umschaltung zwischen beiden
SIM-Karten erfolgt automatisch.
2. Verbindung zum Gerät über WLAN
herstellen.
Hinweis:
Zur Herstellung einer WLAN-Verbindung
benötigen Sie die SSID (Netzwerkname) und
den WLAN-Schlüssel des Gerätes. SSID und
WLAN-Schlüssel sind werksseitig voreingestellt. Sie finden beide Angaben auf der
Geräterückseite bzw. auf der ID-Karte Ihres
Gerätes.
f Identifizieren Sie mit einer WLAN-Verbindungs-
Applikation auf Ihrem Computer das Netzwerk des
Gerätes anhand seiner SSID.
f Verbinden Sie Ihren Computer mit dem Netzwerk
unter Verwendung des WLAN-Schlüssels.
3. Benutzeroberfläche des Gerätes öffnen
und mobilen Internetzugang einrichten
f Starten Sie den Internet Browser auf Ihrem
Computer und geben Sie diese Adresse ein:
http://bosch.router
Der geräteeigene Webserver fordert Sie zur Eingabe der
PIN Ihrer SIM-Karte auf.
f Geben Sie die PIN für Ihre SIM-Karte ein und klicken
Sie Speichern.
Das APN-Profil (APN = Access Point Name) Ihres
Mobilfunk-Providers für den mobilen Internetzugang
wird automatisch ausgewählt.
Hinweise:
f Das APN-Profil enthält alle Angaben, die
für die mobile Internetverbindung über
Ihren Provider benötigt werden.
f Sie können ein APN-Profil auch aus dem
Aufklappmenü wählen.
f Falls das Gerät Ihren Provider oder das
gewünschte APN-Profil nicht kennt,
können Sie diese Einstellung später unter
dem Menüpunkt Einstellungen/Internet
ändern (siehe Kapitel „Einstellungen“,
Abschnitt „Einstellungen für die mobile
Internet-Verbindung“, Option Zugangs-
punkt (APN)). Erfragen Sie das richtige
APN-Profil ggf. bei Ihrem Provider.
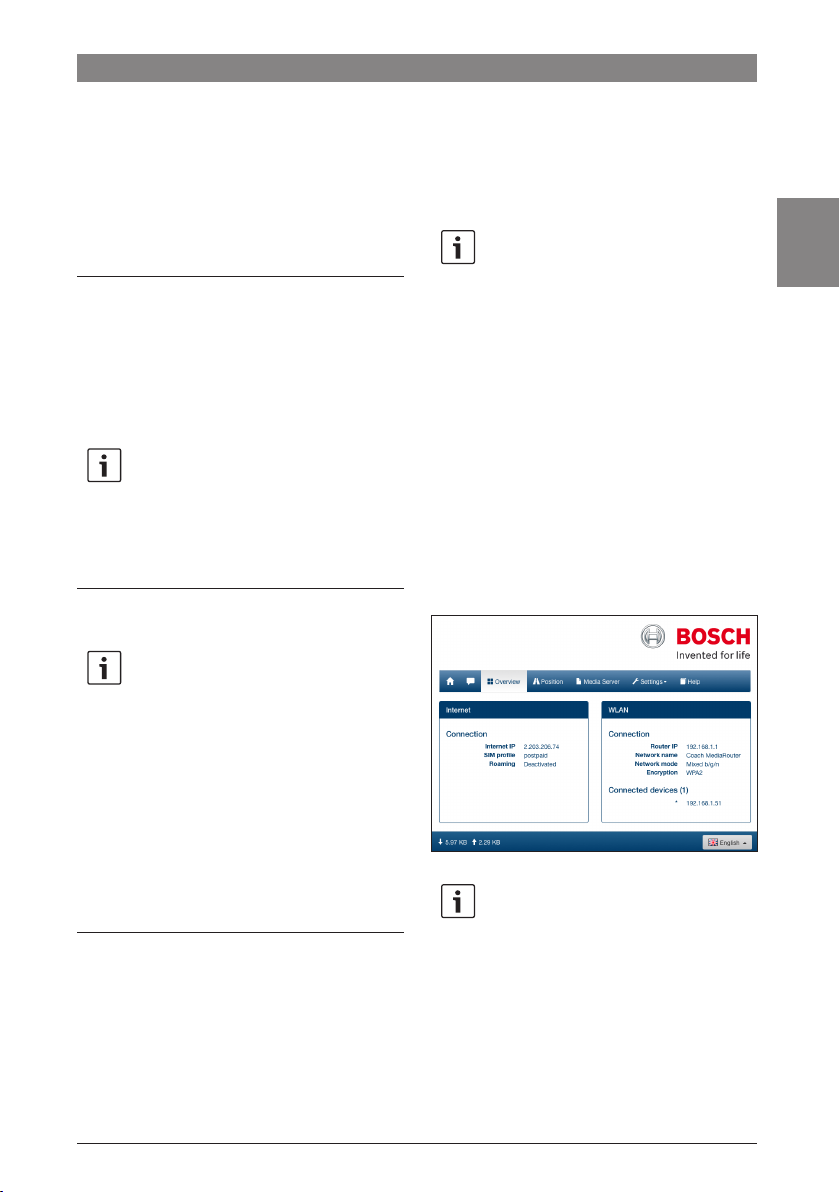
f Klicken Sie Übernehmen.
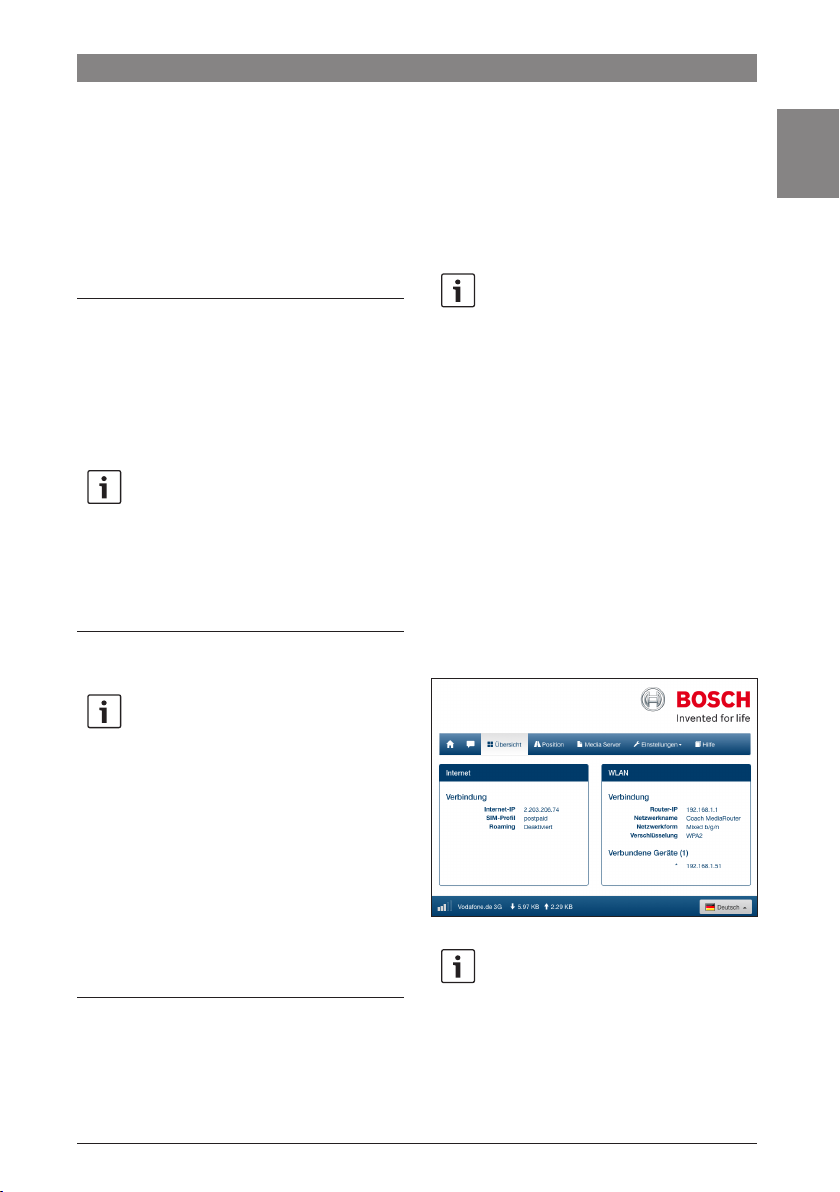
Das Startfenster des geräteeigenen Webservers wird
angezeigt:
Hinweis:
Sie können das APN-Profil nachträglich unter
dem Menüpunkt Einstellungen/Internet ändern
(siehe Kapitel „Einstellungen“, Abschnitt
„Einstellungen für die mobile Internet-Verbindung“, Option Zugangspunkt (APN)).
de
7 620 320 029 | 09.2014Robert Bosch Car Multimedia GmbH
6 | de
Sofort-Inbetriebnahme | Internet-Router | Media-Server
Das Gerät verfügt jetzt über mobilen Internetzugang. Die
LED Mobilfunk 8 leuchtet.
Hinweise:
f Alle Konfigurationseinstellungen des
Gerätes sind im Kapitel „Einstellungen“
beschrieben.
f Roaming ist werksseitig deaktiviert. Sie
können Roaming unter dem Menüpunkt
Einstellungen/Internet aktivieren (siehe
Kapitel „Einstellungen“, Abschnitt „Einstellungen für die mobile Internet-Verbindung“, Option Roaming).
Internet-Router
Um das Gerät als Internet-Router zu nutzen, verbinden
Sie Ihr Endgerät einfach über WLAN mit dem Gerät
(siehe Kapitel „Sofortinbetriebnahme“, Abschnitt „2.
Verbindung zum Gerät über WLAN herstellen“).
Media-Server
Das Gerät kann im WLAN als Media-Server dienen, um
Endgeräten im WLAN Medieninhalte zur Verfügung zu
stellen.
Hinweis:
Das Gerät unterstützt DLNA (Digital Living
Network Alliance).
f Starten Sie den Internet Browser auf Ihrem
Endgerät und geben Sie diese Adresse ein:
http://bosch.router
Hinweis:
Falls der Zugriff auf die gesamte Bedienoberfläche des Geräts passwortgeschützt ist,
werden Sie Eingabe des Passworts aufgefordert (siehe Kapitel „Einstellungen“, Abschnitt
„Systemeinstellungen“, Option Passwort-
schutz).
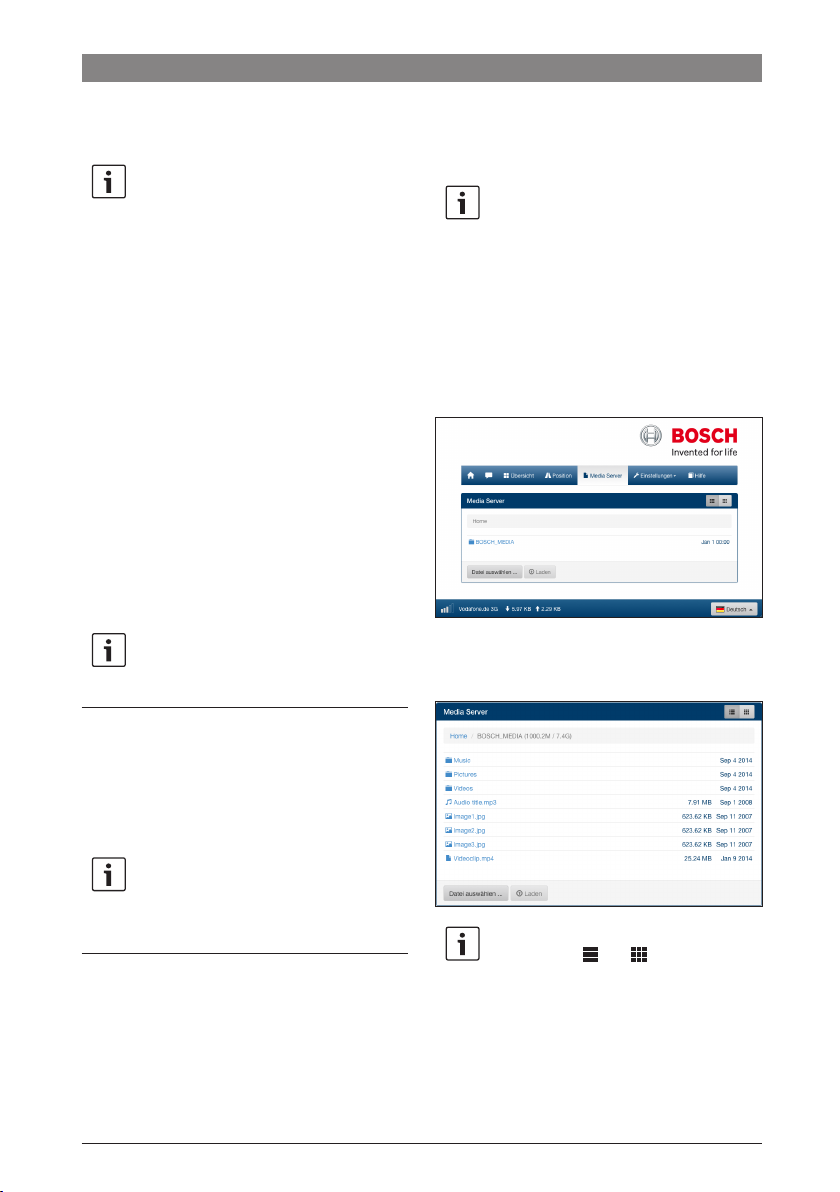
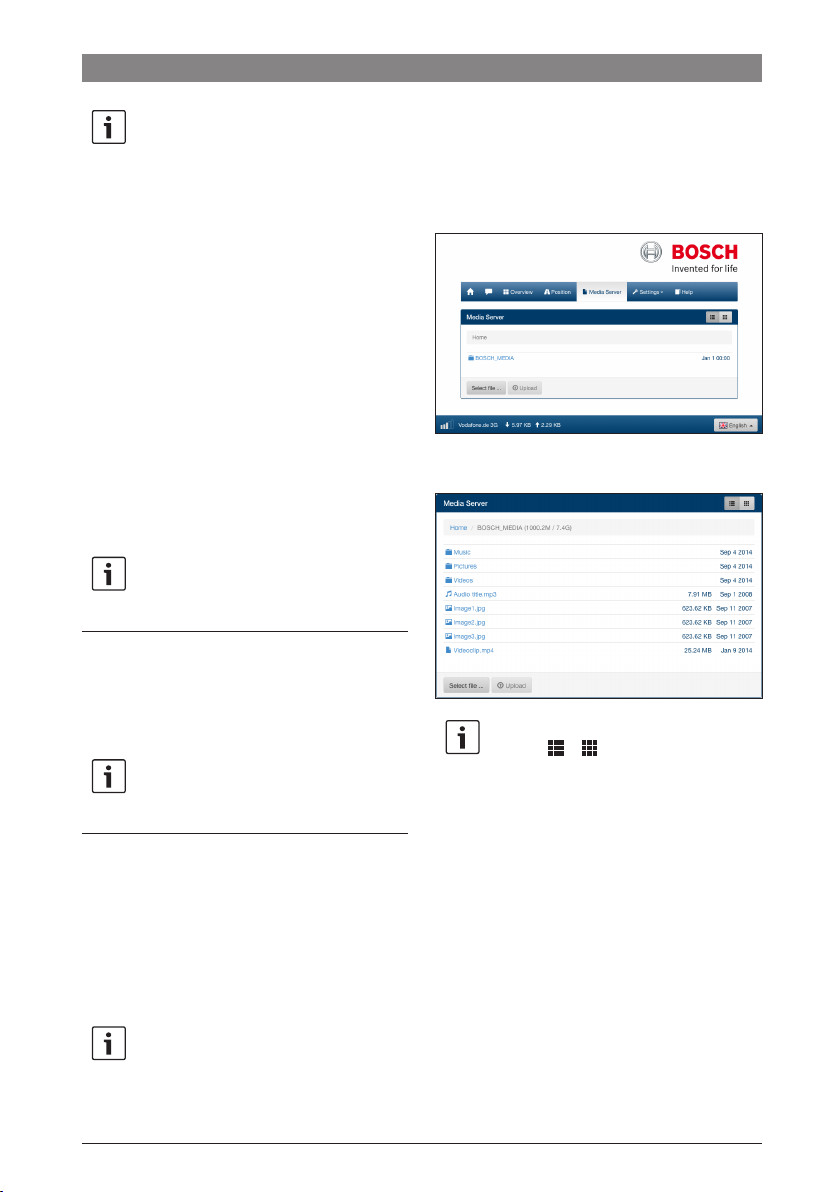
f Klicken Sie den Menüpunkt Media Server.
Im Home-Bereich wird der angeschlossene Datenträger
angezeigt:
f Klicken Sie auf den Datenträger.
Die Ordner und Dateien des Datenträgers werden
angezeigt:
Medien von USB-Datenträger zur Verfügung stellen
f Schließen Sie einen USB-Datenträger, der die
gewünschten Medien-Dateien enthält, an der
frontseitigen USB-Buchse 3 oder an der rückseitigen USB-Buchse an.
Hinweis:
Der Zugang zur rückseitigen USB-Buchse wird
durch ein entsprechend verlegtes USBAnschlusskabel erleichtert.
Zugriff über die Benutzeroberfläche des
Gerätes
f Stellen Sie ggf. von Ihrem Endgerät eine WLAN-
Verbindung zum Coach MediaRouter her (siehe
Kapitel „Sofortinbetriebnahme“, Abschnitt „2.
Verbindung zum Gerät über WLAN herstellen“).
7 620 320 029 | 09.2014 Robert Bosch Car Multimedia GmbH
Hinweise:
f Klicken Sie bzw. , um zwischen
Listen- und Symbolansicht umzuschalten.
f Sie können eine Datei vom Ihrem Endgerät
auf das aktuell geöffnete Verzeichnis des
Media Servers hochladen.
Klicken Sie Datei auswählen ... , um die
Datei auf Ihrem Endgerät auszuwählen,
Media-Server | Einstellungen
de | 7
und dann Laden, um die Datei hochzuladen.
f Klicken Sie auf einen Ordner, um ihn zu öffnen, bzw.
auf eine Datei, um sie abzuspielen bzw. anzuzeigen.
Hinweis:
Der Internet-Browser Ihres Endgerätes muss
ggf. über geeignete Erweiterungen verfügen,
um bestimmte Dateiformate wiederzugeben.
Zugriff über UPnP
f Stellen Sie ggf. von Ihrem Endgerät eine WLAN-
Verbindung zum Coach MediaRouter her (siehe
Kapitel „Sofortinbetriebnahme“, Abschnitt „2.
Verbindung zum Gerät über WLAN herstellen“).
f Starten Sie auf Ihrem Endgerät eine geeignete
UPnP-fähige App.
f Greifen Sie über den Netzwerknamen des Gerätes
auf dessen Medien-Dateien zu.
Einstellungen
Im Menü Einstellungen konfigurieren Sie das Gerät und
seine WLAN- und mobile Internet-Verbindung.
f Stellen Sie ggf. von Ihrem Endgerät eine WLAN-
Verbindung zum Gerät her (siehe Kapitel „Sofortinbetriebnahme“, Abschnitt „2. Verbindung zum
Gerät über WLAN herstellen“).
f Starten Sie den Internet Browser auf Ihrem
Endgerät und geben Sie diese Adresse ein:
http://bosch.router
Das Menü Einstellungen ist passwortgeschützt. Das
Standard-Passwort lautet: admin
f Geben Sie das Passwort ein und klicken Sie Login.
Hinweise:
f Aus Sicherheitsgründen läuft Ihr Login
nach einiger Zeit ab, wenn Sie keine
Einstellungen mehr vornehmen. Sie
werden dann erneut zur Eingabe Ihres
Passworts aufgefordert.
f Aus Sicherheitsgründen sollten Sie das
Standard-Passwort durch ein individuelles
Passwort ersetzen. Unter dem Menüpunkt
Einstellungen/System können Sie das
Passwort ändern.
f Unter dem Menüpunkt Einstellungen/
System können Sie den Passwortschutz
auf alle Seiten des geräteeigenen
Webservers ausdehnen und so die
gesamte Bedienoberfläche des Gerätes
vor unberechtigtem Zugriff schützen.
Sprache
Sie können die gewünschte Sprache der Bedienoberfläche unten rechts in der Statuszeile auswählen.
Einstellungen für die mobile InternetVerbindung
f Wählen Sie den Menüpunkt Einstellungen/Internet.
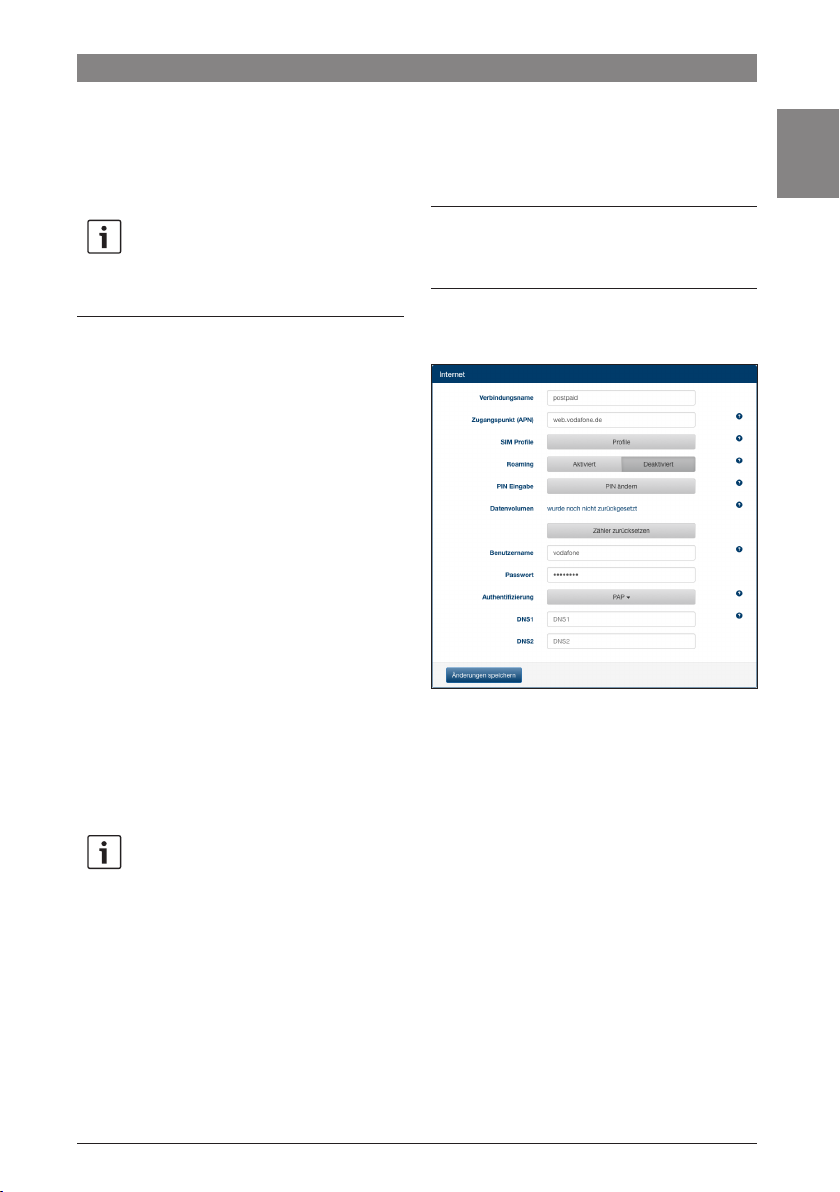
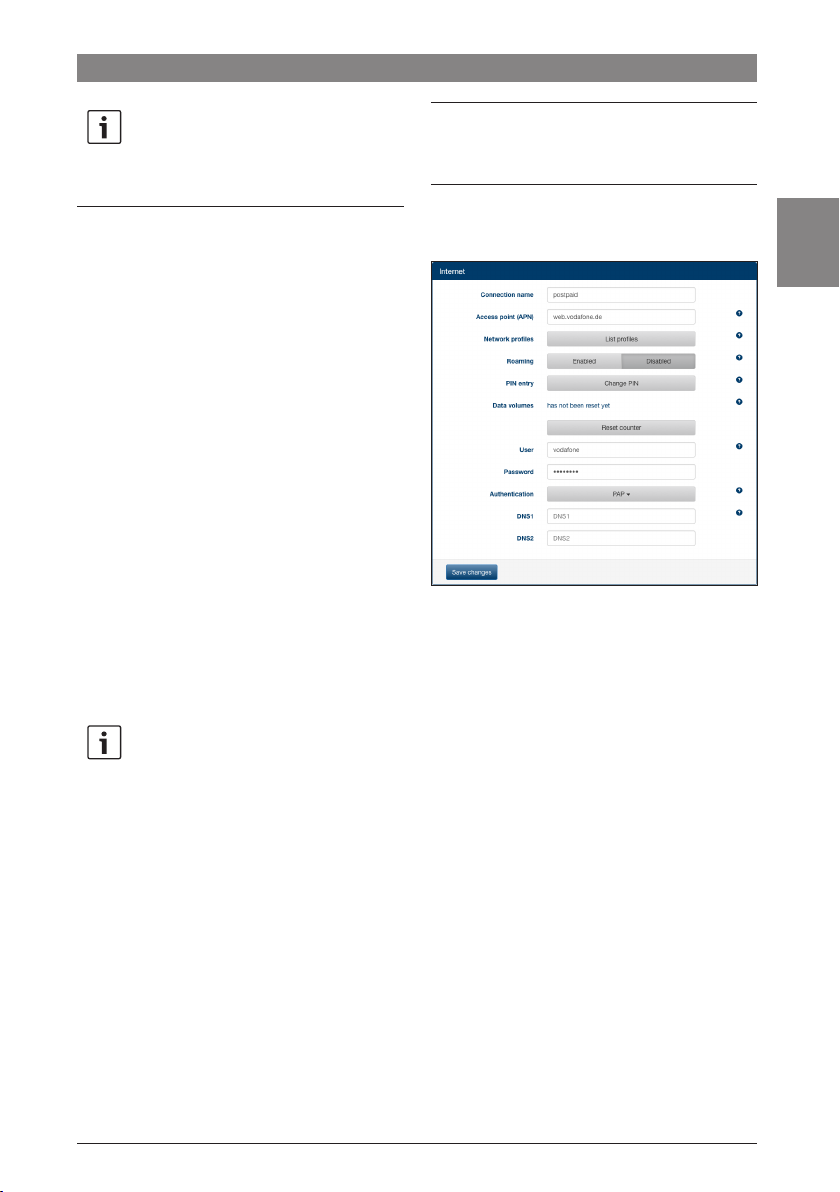
Im Menü Internet finden Sie diese Einstellungen:
f Verbindungsname
Die Einstellungen zu Ihrer SIM-Karte werden
standardmäßig unter dem Namen Ihres Providers
verwaltet. Sie können den Verbindungsnamen
ändern.
f Zugangspunkt (APN)
Geben Sie hier den Namen des APN-Profils Ihres
Providers an. Das APN-Profil enthält die erforderlichen Informationen für die mobile Internetverbindung und ermöglicht dem Gerät, die Verbindung
automatisch herzustellen. Ggf. müssen Sie lediglich
die PIN Ihrer SIM-Karte eingeben (z. B. beim ersten
Herstellen der Verbindung).
f SIM Profile
Wählen Sie hier ein APN-Profil aus. Klicken Sie
Profile, um die dem Gerät bekannten APN-Profile
anzuzeigen. Klicken Sie dann auf das gewünschte
APN-Profil in der Liste.
de
7 620 320 029 | 09.2014Robert Bosch Car Multimedia GmbH
8 | de
Einstellungen
f Roaming
Wenn Roaming aktiviert ist, kann das Gerät
außerhalb seines Heimnetzes (z. B. im Ausland)
eine Verbindung über ein Fremdnetz herstellen.
Achtung: Durch Roaming fallen zusätzliche
Gebühren an.
f PIN Eingabe
Ändern Sie hier die PIN der eingelegten SIM-Karte.
Halten Sie dafür die aktuelle PIN bereit.
f Datenvolumen
Anzeige des Zeitpunkts, an dem der Datenvolumenzähler zuletzt auf „0“ zurückgesetzt wurde.
Das Datenvolumen für Up- und Downloads seit dem
letzten Rücksetzen wird unten links in der Statuszeile angezeigt angezeigt.
Um den Zähler zurückzusetzen, klicken Sie Zähler
zurücksetzen.
f Benutzername / Passwort
Falls Ihr Provider dies verlangt, geben Sie hier
Benutzername und Passwort für die mobile
Internet-Verbindung ein.
f Authentifizierung
Falls Benutzername und Passwort benötigt werden,
geben Sie hier den Modus der Authentifizierung
(PAP, CHAP).
f DNS1/2
Falls DNS-Servernamen nicht automatisch
zugewiesen werden, geben Sie diese hier die an.
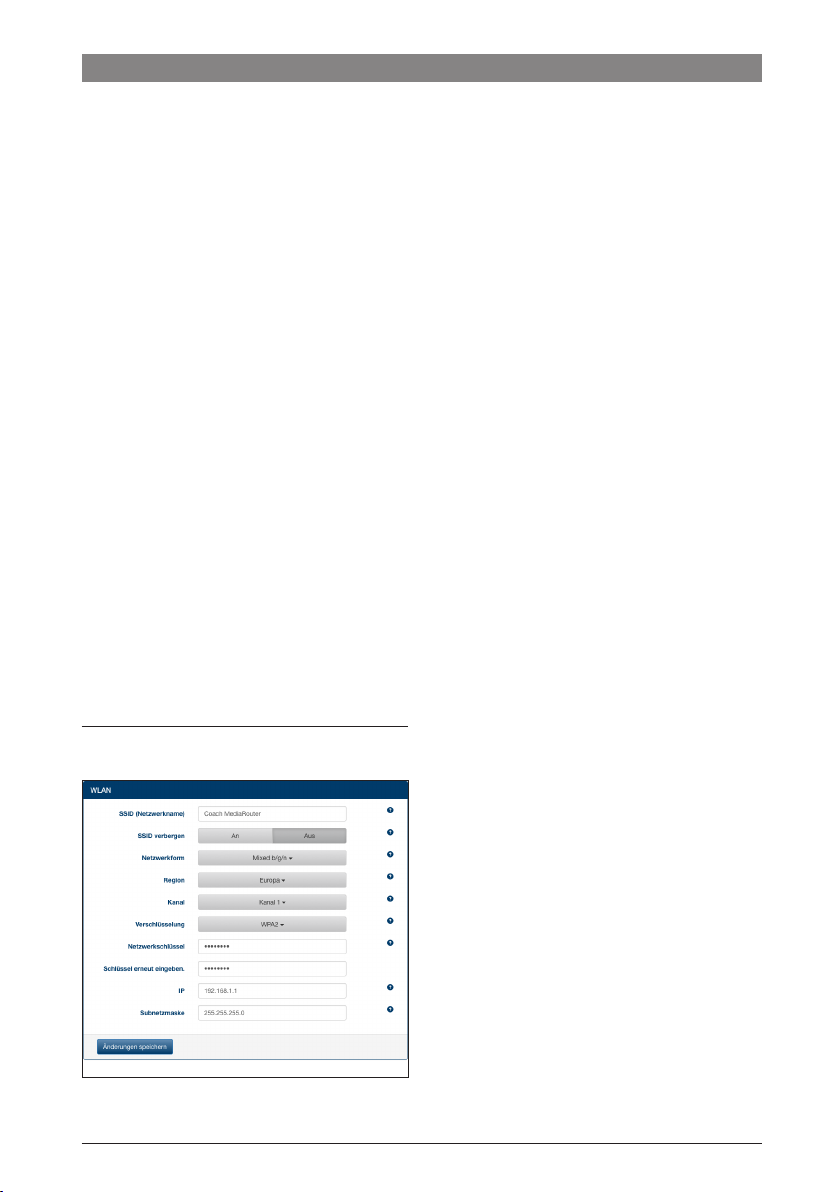
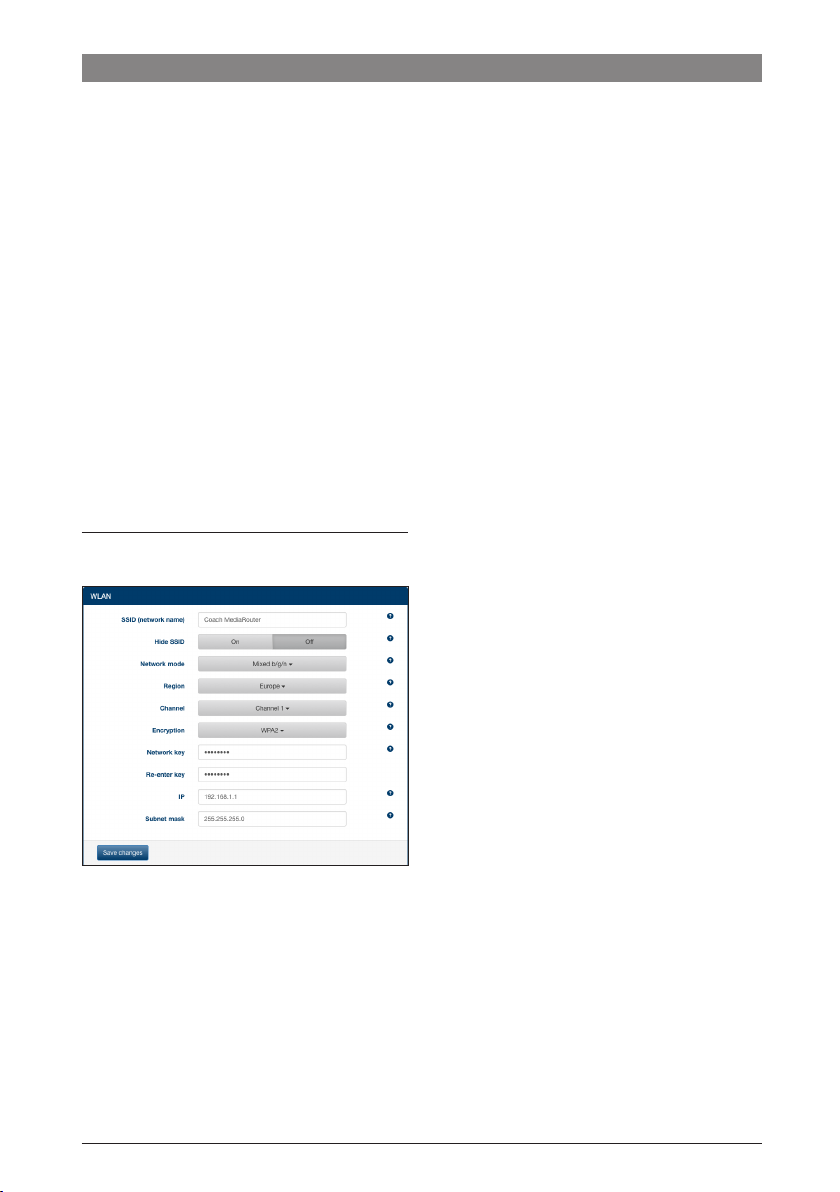
WLAN-Einstellungen
f Wählen Sie den Menüpunkt Einstellungen/WLAN.
Im Menü WLAN finden Sie diese Einstellungen:
f SSID (Netzwerkname)
Die SSID (Service Set Identifier) ist der Netzwerkname des Geräts im WLAN und lautet werksseitig
„Coach MediaRouter“.
Sie können einen individuellen Netzwerknamen von
bis zu 32 Zeichen Länge angeben.
f SSID verbergen
Wenn diese Option eingeschaltet ist, ist das
WLAN-Netzwerk des Gerätes für andere WLANGeräte unsichtbar.
f Netzwerkform
Wählen Sie hier den gewünschten WLAN-Standard
aus (Mixed b/g/n / Mixed b/g / nur-b / nur-g / nur-n).
f Region
Wählen Sie hier die Region aus, in der Sie das Gerät
benutzen werden. Die Zahl der verfügbaren Kanäle
(siehe nächster Punkt) ist regional unterschiedlich.
f Kanal
Wählen Sie hier den Kanal aus, den das Gerät im
Funknetz verwenden soll. Der eingestellte Kanal
bestimmt die Frequenz, auf dem das Gerät sendet
bzw. empfangen wird.
f Verschlüsselung
Wählen Sie hier die Verschlüsselungsmethode für
den WLAN-Datenverkehr zwischen dem Gerät und
den Endgeräten aus (WPA / WPA2 / WPA & WPA2
gemischt) bzw. schalten Sie die Verschlüsselung
aus (Offen). Verschlüsselter Datenverkehr verhindert unautorisierten Zugriff auf die ausgetauschten
Daten.
f Netzwerkschlüssel / Schlüssel erneut eingeben
Mit Hilfe des Schlüssels wird der WLAN-Datenverkehrs (siehe voriger Punkt) verschlüsselt. Der
Schlüssel muss beim Herstellen der WLAN-Verbindung vom Endgerät eingegeben werden. Der
werksseitig eingestellte Schlüssel ist auf der
Geräteunterseite angegeben.
Sie können einen individuellen Schlüssel von bis zu
63 Zeichen Länge angeben.
f IP
Geben Sie hier die Netzwerkadresse (IP-Adresse)
an, über die auf das Gerät bzw. seine Butzeroberfläche zugegriffen werden kann.
Werksseitig lautet die IP-Adresse des Gerätes:
192.168.1.1
7 620 320 029 | 09.2014 Robert Bosch Car Multimedia GmbH
Einstellungen
de | 9
f Subnetzmaske
Geben Sie hier die Subnetzmaske für das WLANNetzwerk des Gerätes an.
Die Subnetzmaske legt fest, welche IP-Adressbereich für Endgeräte im WLAN-Netzwerk des Gerätes
zur Verfügung steht.
Werksseitig lautet die Subnetzmaske des Gerätes:
255.255.255.0
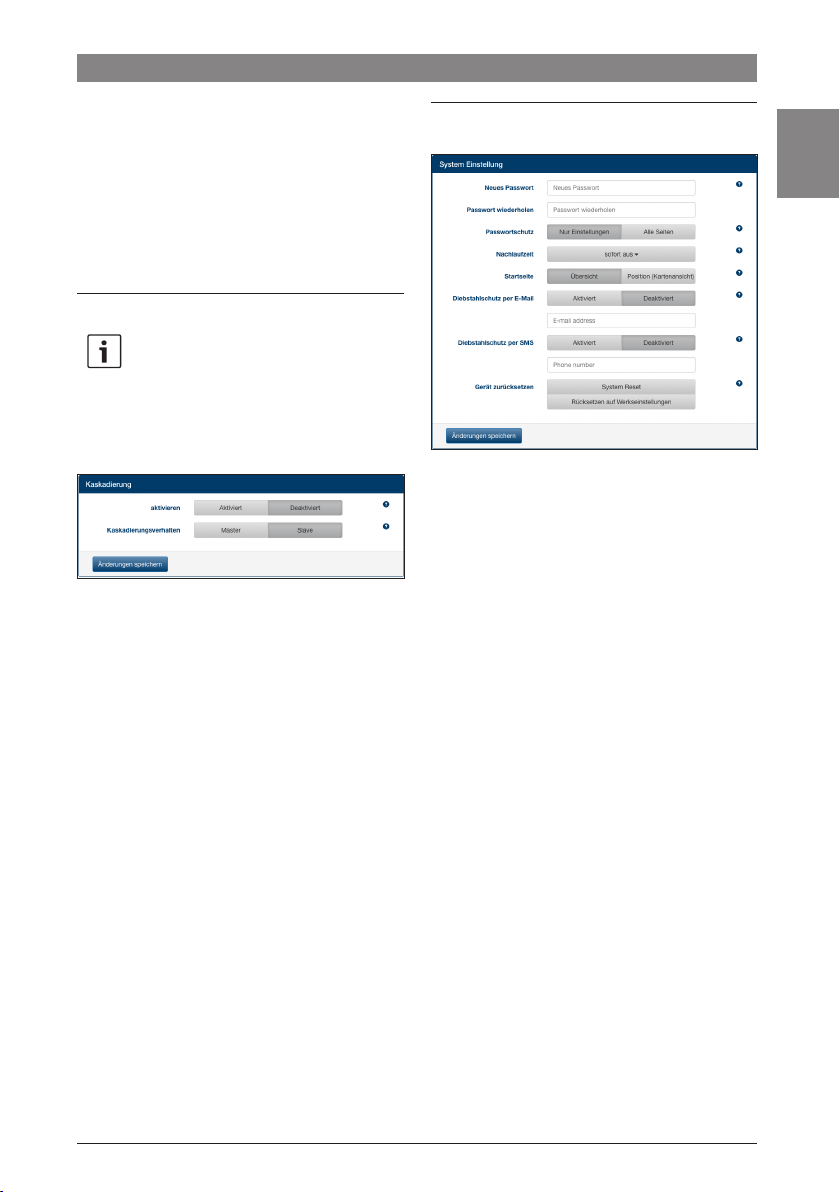
Kaskadierung
Hinweis:
Durch Kaskadierung mehrerer Geräte können
Sie die Reichweite des WLAN-Netzwerkes
erhöhen.
f Wählen Sie den Menüpunkt Einstellungen/Kaskadie-
rung.
Im Menü Cascading finden Sie diese Einstellungen:
f aktivieren
Stellen Sie hier ein, ob Kaskadierung aktiviert oder
deaktiviert werden soll.
f Kaskadierungsverhalten
Stellen Sie hier ein, ob das Gerät als Basisstation
(Master) oder Repeater (Slave) dienen soll.
Systemeinstellungen
f Wählen Sie den Menüpunkt Einstellungen/System.
de
Im Menü Systemeinstellungen finden Sie diese Einstel-
lungen:
f Neues Passwort / Passwort wiederholen
Geben Sie hier ein neues Passwort für den Zugriff
auf das Menü Einstellungen bzw. die ganze
Bedienoberfläche (siehe nächsten Punkt) an.
Das werksseitig eingestellte Passwort lautet
„admin“.
f Passwortschutz
Stellen Sie hier ein, ob der Passwortschutz nur für
das Menü Einstellungen (Option Nur Einstellungen)
oder für die gesamte Bedienoberfläche des Gerätes
(Option Alle Seiten) gelten soll.
f Nachlaufzeit
Geben Sie hier an, wie lang das Gerät nach
Ausschalten der Fahrzeugzündung noch eingeschaltet und aktiv bleiben soll.
f Startseite
Legen Sie hier die Startseite der Bedienoberfläche
fest (Option Übersicht oder Position).
f Diebstahlschutz per E-Mail / SMS
Hier können Sie den Diebstahlschutz per E-Mail
bzw. SMS aktivieren bzw. deaktivieren. Bei
aktiviertem Dienstahlschutz wird jeweils beim
Ein- und Ausschalten des Gerätes eine E-Mail bzw.
Textnachricht mit der Geräteposition gesendet.
Wenn Sie den Diebstahlschutz aktivieren, geben Sie
die E-Mail-Adresse bzw. Telefonnummer an, an die
die Nachrichten gesendet werden sollen.
7 620 320 029 | 09.2014Robert Bosch Car Multimedia GmbH
10 | de
Einstellungen | Technische Daten
f Gerät zurücksetzen
Hier können Sie das Gerät neu starten (Option
System Reset; alle Einstellungen bleiben erhalten)
bzw. die Firmware des Gerätes zurücksetzen
(Option Rücksetzen auf Werkseinstellungen; alle
Einstellungen werden auf Werkseinstellungen
zurückgesetzt).
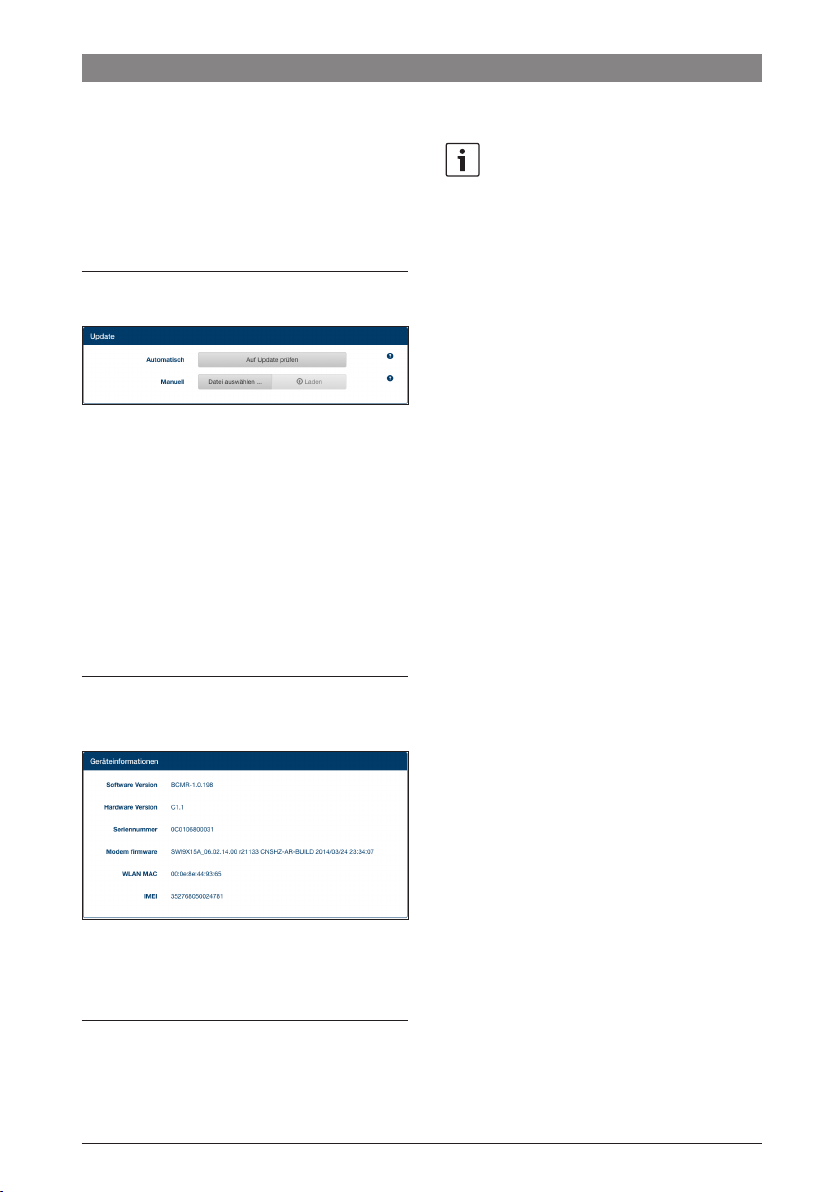
Gerätesoftware-Aktualisierung
f Wählen Sie den Menüpunkt Einstellungen/Update.
f Automatisch
Klicken Sie Auf Update prüfen, um zu prüfen ob
auf dem Update-Server aktualisierte Software für
das Gerät vorliegt. Falls ja können Sie das Update
direkt auf das Gerät herunterladen.
f Manuell
Falls auf einem mit dem Gerät verbundenen Computer eine Update-Datei gespeichert ist, klicken Sie
Datei auswählen ... , um die Update-Datei
auszuwählen, und dann Laden, um die neue
Software zu installieren.
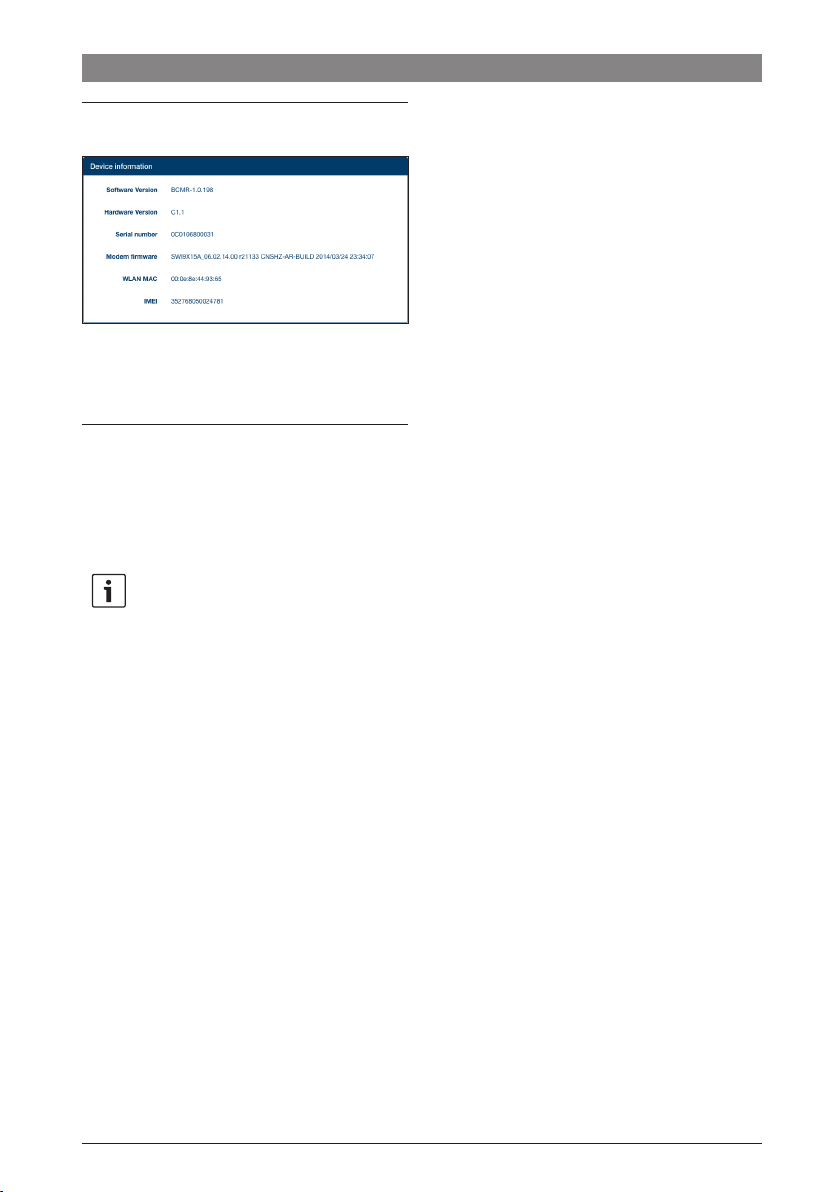
Geräteinformationen
f Wählen Sie den Menüpunkt Einstellungen/Gerätein-
formation.
Hier finden Sie Informationen über das Gerät, z. B. die
aktuelle Software- und Hardware-Version und die
Seriennummer.
Die Startseite bzw. die Passworteingabe wird angezeigt.
Hinweis:
Das Menü Einstellungen bzw. die gesamte
Bedienoberfläche des Gerätes wird automatisch gesperrt, wenn für längere Zeit keine
Einstellungen vorgenommen wurden.
Technische Daten
WLAN Standards IEEE 802.11b, g, n
Mobilfunkstandards GSM, GPRS, EDGE
UMTS (Multimode HSUPA /
HSDPA)
LTE
LTE (HSPA) Penta-Band (800/900/1800/
2100/2600)
UMTS (HSDPA) Tri-Band (850/900/2100)
GSM / GPRS Quad-Band (850/900/1800/
1900)
Positioning A-GPS / S-GPS
Firmware Update via Internet / manuell
Antennenstecker UMTS (2x Fakra D, Bordeaux),
GPS (Fakra C, Blau),
WLAN interne Antenne
Power Supply 12 V DC / 24 V DC von der
Fahrzeugversorgungsspannung
Betriebstemperatur -20 °C bis +65 °C,
-40 °C bis +85 °C (erweitert)
Lagertemperatur -40 °C bis +105 °C
Reset Funktion Firmware Reset für Rück setzen auf Werkseinstellung,
Hardware-Reset zum Neustart
des Gerätes
Schutzart DIN 40050-9 nach IP30
Security/Verschlüsselung
WPA (TKIP, AES),
WPA2 (CCMP, AES)
Zertifizierungen CE, E1
Maße (L x B x H) 150 x 110 x 30 mm
Gewicht 192 g
Logout
Um das Menü Einstellungen bzw. die gesamte Bedienoberfläche des Gerätes wieder zu sperren,
f wählen Sie den Menüpunkt Einstellungen/Logout.
7 620 320 029 | 09.2014 Robert Bosch Car Multimedia GmbH

de | 11
de
7 620 320 029 | 09.2014Robert Bosch Car Multimedia GmbH

12 | en
Contents
Contents | Device overview
12 Device overview
12 Controls
13 LED indicators
14 Important information
14 Agreed product use
14 CE approval
14 E-Mark approval
15 System requirements
15 Immediate start-up
15 1. Insert the SIM card and start the device
15 2. Establishing a connection to the device via
WLAN.
15 3. Open the user interface to the device and
set up mobile internet access
Device overview
Controls
16 Internet router
16 Media server
16 Making media available from a USB data carrier
16 Access via the device's user interface
17 Access via UPnP
17 Settings
17 Language
17 Settings for the mobile internet connection
18 WLAN settings
19 Cascading
19 System settings
19 Device software update
20 Device information
20 Logout
20 Technical data
368 4 1257
1 Reset button
2 Firmware reset button
3 USB port
4 SIM card slot
7 620 320 029 | 09.2014 Robert Bosch Car Multimedia GmbH
5 SIM card slot
6 Power supply LED
7 WLAN LED
8 Cellular network LED
Device overview
LED indicators
Function LED LED state Device status
Electrical power
LED 6
lit green electrical power present
supply
flashes green device is in stand-by mode
en | 13
WLAN
Cellphone
Firmware update
Reset
flashes red fault in the power supply
LED 7
off WLAN not started
lit red WLAN fault
flashes blue WLAN access point has started
lit blue WLAN available
flickers blue WLAN data transfer
LED 8
off cellphone not started
lit red cellphone fault
flashes orange cellphone establishing connection
lit orange cellphone available
flickers orange cellphone data transfer
LEDs 6 /7 flash alternately firmware being updated
LEDs 6 /7 flash simultaneously resetting to factory settings
en
7 620 320 029 | 09.2014Robert Bosch Car Multimedia GmbH
14 | en
Important information
Important information
Before using the device, please read these instructions
carefully and familiarize yourself with the device. Keep
these instructions in your vehicle for later reference.
Changes or modifications not expressly approved by the
party responsible for compliance could void the user's
authority to operate the equipment.
Agreed product use
The device has been designed for operation in a
commercial vehicle with a 12 V or 24 V electrical
system.
CE approval
The Bosch Coach MediaRouter has been tested
according to the regulatory requirements of the
European Union (EU) in accordance with the R&TTE
1999/5/EC standard, and meets all the requirements
for the CE label.
E-Mark approval
The Bosch Coach MediaRouter has been certified
according to the regulatory requirements of the
European Union (EU) in accordance with the EMC
Directive 72/245/EEC as supplemented by 2009/19/
EC and with the ECE 324-R10 Rev.3 standard for use in
motor vehicles, and meets all the requirements for the
E-Mark label.
Road safety
f Road safety has absolute priority. Only use
the device when the vehicle is stationary.
If it is necessary to use the device when
traveling, find a safe stopping place, and
stop the vehicle.
f You must always be able to hear police,
fire service and ambulance sirens in good
time from inside your vehicle.
Therefore make sure that media play is at
a suitable volume.
f Make sure that your ability to drive is not
impaired and your vision is not blocked by
the device, the antennas connected to it,
or the wiring.
Radio interference
Do not operate the device in an area where
medical devices, life-saving devices or other
devices that react sensitively to interference
from radio signals are in use.
Note:
The cellphone antennas should not be used
close to other antennas.
The cellphone antennas should be at least
2 cm from any metal and 20 cm away from the
body.
Correct positioning of the antenna within the
vehicle has a significant effect on the quality of
the connection.
Note:
Establishing an internet connection relies on
the use of a cell phone plan with an integrated
data option. The data transfer rate depends on
the infrastructure of the network operator
concerned, the current signal strength, and on
the number of users within one cell. The device
does not have a SIM lock, and can therefore be
used with any SIM card that supports a data
plan.
7 620 320 029 | 09.2014 Robert Bosch Car Multimedia GmbH
System requirements | Immediate start-up
en | 15
System requirements
For access to the device you need a computer with
f an internet browser (Internet Explorer 6.0 or
higher, Firefox, Opera or Safari), and
f WLAN 802.11 b/g/n.
Immediate start-up
1. Insert the SIM card and start the
device
f Insert the SIM card(s) with the contacts facing
upwards and the recess in the direction of the
device into the SIM card slot 4 /5.
f Switch on the vehicle ignition.
The router will start. The power supply LED 6 lights up.
Note:
If you use a second SIM card from a suitable
second network operator, you can reduce or
avoid roaming costs that can arise on international routes. Switching between the two SIM
cards is automatic.
2. Establishing a connection to the device
via WLAN.
Note:
To establish a WLAN connection you need the
SSID (network name) and the device's WLAN
key. The SSID and WLAN keys are preset at the
factory. You will find both of these numbers on
the rear of the device or on your device's ID
card.
f Use a WLAN connection application on your
computer to identify the network of the device by
referring to its SSID.
f Connect your computer to the network using the
WLAN key.
3. Open the user interface to the device
and set up mobile internet access
f Start the internet browser on your computer, and
enter this address:
http://bosch.router
The device's own web server asks you to enter the PIN
for your SIM card.
f Enter the PIN for your SIM card, and click Save
changes.
The APN (APN = Access Point Name) profile of your
cellphone provider for mobile internet access will be
selected automatically.
Notes:
f The APN profile contains all the informa-
tion that is necessary for the mobile
internet connection via your provider.
f You can also choose an APN profile from
the pull-down menu.
f If the device does not know your provider
or the desired APN profile, you can change
this setting later under the Settings/
Internet menu (see the "Settings" chapter,
the section for "Settings for the mobile
internet connection", Access point (APN)
option). If necessary, ask for the correct
APN profile from your provider.
f Click Apply.
The start window of the device's own web server will be
displayed:
Note:
You can change the APN profile later under the
Settings/Internet menu (see the "Settings"
chapter, the section for "Settings for the
mobile internet connection", Access point
(APN) option).
The device now has mobile internet access. The
cellphone LED 8 lights up.
en
7 620 320 029 | 09.2014Robert Bosch Car Multimedia GmbH
16 | en
Immediate start-up | Internet router | Media server | Settings
Notes:
f All the device's configuration settings are
described in the "Settings" chapter.
f Roaming is inactive under the factory
settings. You can activate roaming under
the Settings/Internet menu item (see the
"Settings" chapter, the section on
"Settings for the mobile internet connection", Roaming option).
Internet router
To use the device as an internet router, simply connect
your end device via WLAN to the device (see the
"Immediate start-up" chapter, section "2. Establishing a
connection to the device via WLAN").
Media server
The device can act as a media server in the WLAN, in
order to make WLAN media contents available to end
devices.
Note:
The device supports DLNA (Digital Living
Network Alliance).
Making media available from a USB data
carrier
f Connect a USB data carrier containing the desired
media files to the USB port 3 on the front, or to
the USB port on the rear.
Note:
Access to the rear USB port is made easier
through a suitably laid USB connecting cable.
Access via the device's user interface
f If necessary, establish a WLAN connection from
your end device to the Coach MediaRouter (see the
"Immediate start-up" chapter, Section "2. Establishing a connection to the device via WLAN").
f Start the internet browser on your end device, and
enter this address:
http://bosch.router
Note:
If access to the entire user interface of the
device is password-protected, you will be
asked to enter the password (see the "Set-
tings" chapter, the section on "System
settings", Password protection option).
f Click the Media Server menu item.
The connected data carrier will be displayed in the Home
area:
f Click the data carrier.
The data carrier's folders and files will be displayed:
Notes:
f Click or to switch between list and
symbol views.
f You can upload a file from your end device
to the currently open folder of the media
server.
Click Select file ... , to select the file on
your end device, and then Upload to
upload the file.
f Click a folder to open it, or a file to play or display it.
7 620 320 029 | 09.2014 Robert Bosch Car Multimedia GmbH
Media server | Settings
en | 17
Note:
The internet browser of your end device may
need to have suitable extensions in order to
play certain file formats.
Access via UPnP
f If necessary, establish a WLAN connection from
your end device to the Coach MediaRouter (see the
"Immediate start-up" chapter, Section "2. Establishing a connection to the device via WLAN").
f Start an app that can handle UPnP protocols on
your end device.
f Use the network name of the device to access its
media files.
Settings
You configure the device and its WLAN and mobile
internet connection in the Settings menu.
f If necessary, establish a WLAN connection from
your end device to the device (see the "Immediate
start-up" chapter, Section "2. Establishing a
connection to the device via WLAN").
f Start the internet browser on your end device, and
enter this address:
http://bosch.router
The Settings menu is protected by password. The
default password is: admin
f Enter the password, and click Login.
Notes:
f For security reasons, your login will expire
after a certain time if you no longer make
any settings. In that case you would be
asked to enter your password again.
f For security reasons you should replace
the default password with your own. You
can change the password under the
Settings/System menu item.
f You can extend the password protection
to every page of the device's own web
server under the Settings/System menu
item, and in that way protect the whole of
the device user interface against unauthorized access.
Language
You can choose the language you want for the user
interface at the bottom right in the status line.
Settings for the mobile internet connection
f Choose the Settings/Internet menu item.
en
You will find these settings in the Internet menu:
f Connection name
Normally the settings for your SIM card are
managed under the name of your provider. You can
change the connection name.
f Access point (APN)
Enter the name of your provider's APN profile here.
The APN profile contains the information needed
for the mobile internet connection, and allows the
device to establish the connection automatically. It
is possible that you will just have to enter the PIN for
your SIM card (e.g. when first establishing the
connection).
f Network profiles
Choose an APN profile here. Click List Profiles to
display the APN profiles that are known to the
device. Then click the APN profile in the list that you
want.
f Roaming
When roaming is active, the device can establish a
connection via a third-party network outside its
home network (e.g. when abroad).
Attention: Additional fees are payable for roaming.
7 620 320 029 | 09.2014Robert Bosch Car Multimedia GmbH
18 | en
Settings
f PIN entry
Change the PIN of the inserted SIM card here. Have
the current PIN ready before you start.
f Data volumes
Display the time at which the data volume counter
was last reset to "0".
The data volume for uploads and downloads since
the last reset is shown on the status line at the
bottom left.
Click Reset counter to reset the counter.
f User / Password
If your provider requires it, enter the username and
password for the mobile internet connection here.
f Authentication
If the username and password are necessary, enter
the authentication mode (PAP, CHAP) here.
f DNS1/2
If DNS server names are not assigned automatically,
enter them here.
WLAN settings
f Choose the Settings/WLAN menu item.
You will find these settings in the WLAN menu:
f SSID (network name)
The SSID (Service Set Identifier) is the network
name of the device in the WLAN, and is factory-set
to "Coach MediaRouter".
You can enter an individual network name of up to
32 characters in length.
f Hide SSID
When this option is switched on, the WLAN network
of the device is invisible to other WLAN devices.
f Network mode
Choose the WLAN standard you want here (Mixed
b/g/n / Mixed b/g / b-only / g-only / n-only).
f Region
Choose the region in which you will use the device
here. The number of available channels (see next
point) differs between regions.
f Channel
Choose the channel that the device is to use in the
wireless network here. The set channel determines
the frequency on which the device will send and
receive.
f Encryption
Choose the encryption method that will be used for
the data traffic between the WLAN and the device
here (WPA / WPA2 / WPA & WPA2 mixed), or else
turn encryption off (Open). Encrypted data traffic
prevents unauthorized access to the data being
exchanged.
f Network key / Re-enter key
The WLAN data traffic (see previous point) is
encrypted with the help of the key. The key must be
supplied by the end device when establishing the
WLAN connection. The factory-set key is given on
the underneath of the device.
You can enter an individual key of up to 63 characters in length.
f IP
Enter the network address (IP address) that allows
access to the device or to its user interface here.
The factory setting for the IP address of the device
is:
192.168.1.1
f Subnet mask
Enter the subnet mask for the WLAN network of the
device here.
The subnet mask specifies what range of IP
addresses is available for end devices in the WLAN
network of the device.
The factory setting for the subnet mask of the
device is: 255.255.255.0
7 620 320 029 | 09.2014 Robert Bosch Car Multimedia GmbH

Settings
en | 19
Cascading
Note:
You can extend the range of the WLAN network
by cascading a number of devices.
f Choose the Settings/Cascading menu item.
You will find these settings in the Cascading menu:
f Enable Cascading
Set whether cascading is active or inactive here.
f Cascading Role
Set whether the device is to operate as a base
station (Master) or repeater (Slave) here.
System settings
f Choose the Settings/System menu item.
or to the entire user interface of the device (option
All pages).
f Shut-off delay
Enter how long the device should remain switched
on and active after the vehicle ignition has been
switched off here.
f Homepage
Specify the start page for the user interface here
(option: Overview or Position).
f Theft protection by email / SMS
You can activate or deactivate theft protection by
email or SMS here. If theft protection is active, then
an email or a text message with the position of the
device is sent every time it is switched on or off.
Enter the email address or telephone number to
which the messages should be sent when you
activate theft protection.
f Reset device
You can restart the device here (option: System
reset; all settings are retained), or you can reset the
firmware of the device (option: Factory reset; all
settings are returned to the factory settings).
Device software update
f Choose the Settings/Update menu item.
en
You will find these settings in the Systemeinstellungen
menu:
f New password / Repeat password
Enter a new password here for access to the Setting
menu, or to the entire user interface (see next
point).
The password set at the factory is "admin".
f Password protection
Set here whether the password protection is only to
apply to the Settings menu (option: Settings only)
f Automatical
Click Check for update to see whether updated
software for the device is available on the update
server. If so, you can download the update directly
onto the device.
f Manual
If an update file is saved on a computer connected
to the device, click Select file ... to select the
update file, then Upload in order to install the new
software.
7 620 320 029 | 09.2014Robert Bosch Car Multimedia GmbH
20 | en
Settings | Technical data
Device information
f Choose the Settings/Device information menu item.
You will find information about the device, such as the
current software and hardware versions and the serial
number, here.
Logout
To lock the Settings menu – or the entire user interface
of the device – again,
f choose the Settings/Logout menu item.
The start page, or the password input screen, will be
displayed.
Note:
The Settings menu, or the entire user interface
of the device, is locked automatically if no
settings are made for some period of time.
Technical data
WLAN Standards IEEE 802.11b, g, n
Cellphone standards GSM, GPRS, EDGE
UMTS (Multimode HSUPA /
HSDPA)
LTE
LTE (HSPA) Penta-Band (800/900/1800/
2100/2600)
UMTS (HSDPA) Tri-Band (850/900/2100)
GSM / GPRS Quad-Band (850/900/1800/
1900)
Positioning A-GPS / S-GPS
Firmware Update via internet / manual
Antenna plug UMTS (2x Fakra D, Bordeaux),
GPS (Fakra C, blue),
Internal WLAN antenna
Power supply 12 V DC / 24 V DC from the
vehicle's electrical system
Operating temperature -20 °C to +65 °C,
-40 °C to +85 °C (extended)
Storage temperature -40 °C to +105 °C
Reset function Firmware reset for resetting to
factory settings,
Hardware reset for rebooting
the device
Protection type DIN 40050-9 to IP30
Security/encryption WPA (TKIP, AES),
WPA2 (CCMP, AES)
Certifications CE, E1
Dimensions (L x W x H) 150 x 110 x 30 mm
Weight 192 g
7 620 320 029 | 09.2014 Robert Bosch Car Multimedia GmbH

en | 21
en
7 620 320 029 | 09.2014Robert Bosch Car Multimedia GmbH
22 | fr
Sommaire
Sommaire | Aperçu de l’appareil
22 Aperçu de l’appareil
22 Éléments de commande
23 Indicateurs LED
24 Consignes importantes
24 Utilisation conforme
24 Homologation CE
24 Homologation E-Mark
25 Configuration requise
25 Mise en service immédiate
25 1. Insérer la carte SIM et démarrer l’appareil
25 2. Établir la connexion vers l’appareil via le
réseau WiFi
25 3. Ouvrir l’interface utilisateur et configurer
l’accès Internet mobile
Aperçu de l’appareil
Éléments de commande
26 Routeur Internet
26 Serveur multimédia
26 Mettre à disposition les contenus multimédia
de supports de données USB
26 Accès via l’interface utilisateur de l’appareil
27 Accès via UPnP
27 Paramètres
27 Langue
27 Paramètres pour la connexion Internet mobile
28 Paramètres WiFi
29 Connexion en cascade
29 Paramètres du système
30 Mise à jour du logiciel de l’appareil
30 Informations sur l’appareil
30 Déconnexion
30 Caractéristiques techniques
368 4 1257
1 Touche de réinitialisation
2 Touche de réinitialisation du firmware
3 Prise USB
4 Fente d’insertion de la carte SIM
7 620 320 029 | 09.2014 Robert Bosch Car Multimedia GmbH
5 Fente d’insertion de la carte SIM
6 Indicateur LED de l’alimentation électrique
7 Indicateur LED de la connexion WiFi
8 Indicateur LED de la téléphonie mobile
Aperçu de l’appareil
Indicateurs LED
Fonction LED État de la LED État de l’appareil
Alimentation
LED 6
Lumière verte permanente Alimentation assurée
Lumière verte clignotante Appareil en mode Veille
Lumière rouge permanente Défaut d’alimentation
WLAN
LED 7
Éteint WiFi non connecté
Lumière rouge permanente Erreur du réseau WiFi
Lumière bleue clignotante Démarrage du point d’accès WiFi
Lumière bleue permanente WiFi disponible
Lumière bleue scintillante Transfert de données WiFi
Téléphonie
LED 8
Éteint Téléphonie mobile non démarrée
mobile
Lumière rouge permanente Erreur du réseau de téléphonie mobile
Lumière orange clignotante
Établissement de la connexion de la
téléphonie mobile
Lumière orange permanente Téléphonie mobile disponible
Transfert de données de téléphonie
mobile
Réinitialisation en cours des paramètres
par défaut
Mise à jour du
firmware
Réinitialisation
Lumière orange scintillante
LED 6 /7 Clignotement en alternance Mise à jour en cours du firmware
LED 6 /7 Clignotement simultané
fr | 23
fr
7 620 320 029 | 09.2014Robert Bosch Car Multimedia GmbH
24 | fr
Consignes importantes
Consignes importantes
Avant de mettre l’appareil en service, lisez attentivement
le présent mode d’emploi et familiarisez-vous avec
l’appareil. Conservez ce mode d’emploi dans le véhicule
pour pouvoir le consulter ultérieurement si besoin est.
Toute modification ou tout changement qui n’a pas été
expressément validé par la partie responsable du
respect des obligations de conformité en vigueur
peuvent entrainer l’annulation de la licence d’exploitation pour l’utilisateur.
Utilisation conforme
L’appareil est conçu pour fonctionner dans un véhicule
utilitaire avec une tension de bord de 12 V ou de 24 V.
Homologation CE
Le Bosch Coach MediaRouter a été testé conformément
aux exigences réglementaires de l’Union Européenne
(UE) selon la norme R&TTE 1999/5/EC et est conforme
à toutes les exigences relatives au label CE.
Homologation E-Mark
Le Bosch Coach MediaRouter a été certifié conformément aux exigences réglementaires de l’Union Européenne (UE) selon la directive CEM 72/245/EEC avec
l’amendement 2009/19/CE et à la norme ECE 324-R10
rév. 3 pour l’utilisation dans les automobiles et est
conforme à toutes les exigences relatives au label
E-Mark.
Sécurité routière
f La sécurité routière est une priorité
absolue. Utilisez l’appareil seulement
quand le véhicule est à l’arrêt. S’il vous
faut utiliser l’appareil pendant la marche,
recherchez une place de stationnement
sécurisée et arrêtez le véhicule.
f Les avertisseurs sonores de la police, des
sapeurs-pompiers et des services de
secours doivent pouvoir être perçus à
temps dans le véhicule.
Réglez l’appareil à un volume modéré pour
la lecture des médias.
f Assurez-vous à ce que l’appareil, les
antennes connectées et le câblage ne vous
gênent pas dans vos mouvements ni
n’altèrent votre visibilité en conduisant le
véhicule.
Interférences radio
N’utilisez pas l’appareil dans une zone où sont
utilisés des appareils médicaux, des dispositifs
de sauvetage ou autres équipements réagis-
sant de manière sensible aux interférences de
signaux radio.
Note :
Les antennes de téléphonie mobile ne doivent
pas être utilisées à proximité d’une autre
antenne.
Les antennes de téléphonie mobile doivent
être à une distance minimale de 2 cm du métal
et à 20 cm du corps.
La position correcte de l’antenne dans le
véhicule a un impact significatif sur la qualité
de la connexion.
Note :
L’établissement d’une connexion internet
dépend de l’utilisation d’un forfait de télépho-
nie mobile intégrant une option Données. La
vitesse de transfert dépend de l’infrastructure
de l’opérateur de réseau respectif, de
l’intensité actuelle du signal et du nombre
d’utilisateurs connectés. L’appareil n’est pas
bloqué et peut donc être utilisé avec n’importe
quelle carte SIM offrant un forfait de données.
7 620 320 029 | 09.2014 Robert Bosch Car Multimedia GmbH
Configuration requise | Mise en service immédiate
fr | 25
Configuration requise
Pour accéder à l’appareil, vous avez besoin d’un
ordinateur équipé
f d’un navigateur internet (Internet Explorer 6.0 ou
supérieur, Firefox, Opera ou Safari) et
f d’un réseau WiFi 802.11 b/g/n.
Mise en service immédiate
1. Insérer la carte SIM et démarrer
l’appareil
f Insérez la ou les cartes SIM, les contacts étant
dirigés vers le haut et l’encoche dans le sens de
l’appareil, dans la fente d’insertion de la carte SIM
4 /5.
f Mettez le contact du véhicule.
Le routeur démarre. L’indicateur LED de l’alimentation
6 s’allume.
Note :
En utilisant une seconde carte SIM d’un second
opérateur de réseau adéquat, vous pouvez
éventuellement réduire ou bien éviter les frais
d’itinérance sur les routes internationales. La
commutation entre les deux cartes SIM se fait
automatiquement.
2. Établir la connexion vers l’appareil via
le réseau WiFi
Note :
Pour établir une connexion WiFi, vous avez
besoin du SSID (nom du réseau) et de la clé
WiFi de l’appareil. Le SSID et la clé WiFi sont
prédéfinis par défaut. Ces informations sont
indiquées au verso de l’appareil ou sur la carte
d’identification de votre appareil.
f Identifiez le réseau de l’appareil à l’aide de son SSID
avec une application de connexion WiFI intallée sur
votre ordinateur.
f Connectez votre ordinateur au réseau à l’aide de la
clé WiFi.
3. Ouvrir l’interface utilisateur et configurer l’accès Internet mobile
f Démarrez le navigateur sur votre ordinateur et tapez
l’adresse suivante :
http://bosch.router
Le serveur web de l’appareil vous demande de saisir le
code PIN de votre carte SIM.
f Tapez le code PIN de votre carte SIM et cliquez sur
Enregistrer les modifications.
Le profil APN (APN = Access Point Name - Nom du point
d’accès) de votre opérateur de téléphonie mobile
valable pour l’accès Internet mobile est sélectionné
automatiquement.
Notes :
f Le profil APN contient toutes les informa-
tions nécessaires à la connexion Internet
mobile via votre opérateur.
f Vous pouvez également sélectionner un
profil APN à partir du menu déroulant.
f Si l’appareil ne connait pas votre opéra-
teur ou le profil APN voulu, vous pouvez
modifier ultérieurement ce paramètre
dans le menu Réglages/Internet (cf.
chapitre « Paramètres », paragraphe «
Paramètres pour la connexion Internet
mobile », option Point d’accès (APN)).
Pour connaître le profil APN qu’il vous
faut, adressez-vous également à votre
opérateur.
f Cliquez sur Confirmer.
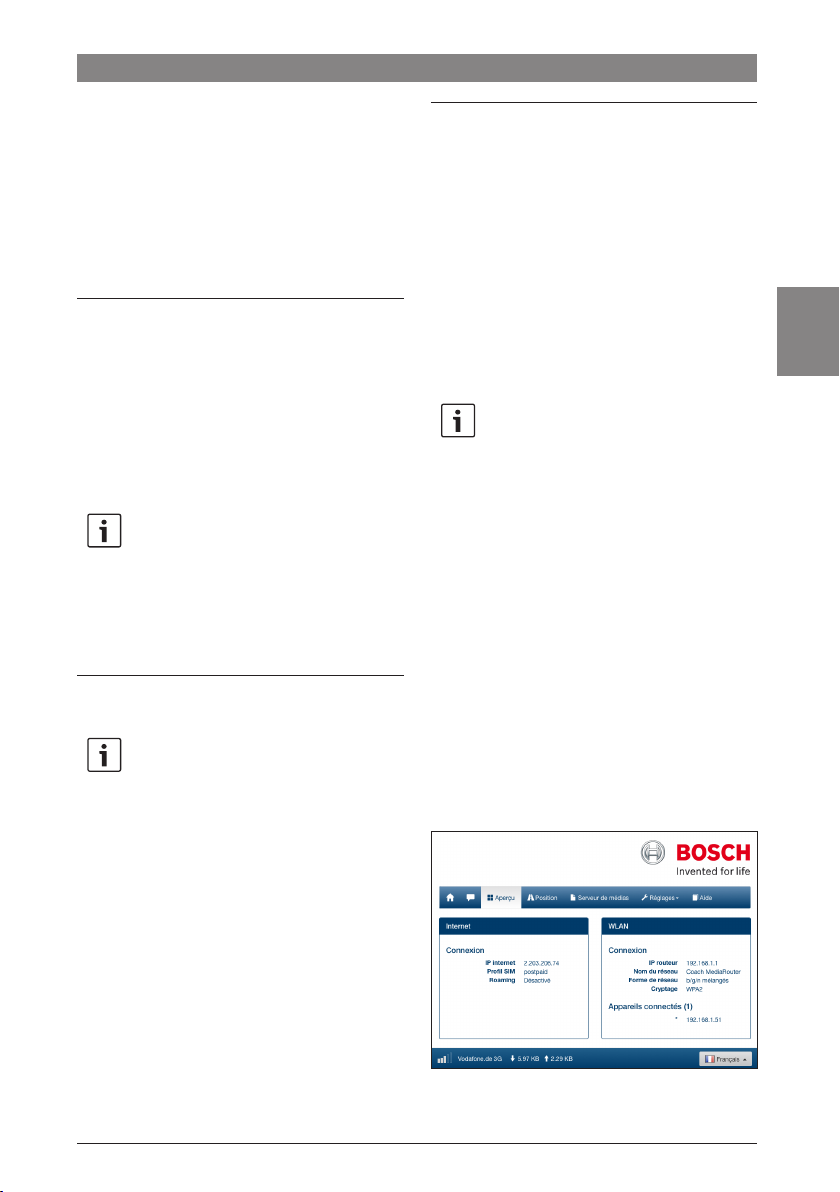
La fenêtre de démarrage du serveur web de l’appareil
apparaît :
fr
7 620 320 029 | 09.2014Robert Bosch Car Multimedia GmbH
26 | fr
Mise en service immédiate | Routeur Internet | Serveur multimédia
Note :
Vous pouvez modifier ultérieurement le profil
APN dans le menu Réglages/Internet (cf.
chapitre « Paramètres », paragraphe « Paramètres pour la connexion Internet mobile »,
option Point d’accès (APN)).
L’appareil dispose maintenant d’un accès Internet
mobile. L’indicateur LED de la téléphonie mobile 8 est
allumé.
Notes :
f Tous les paramètres de configuration de
l’appareil sont décrits dans le chapitre
« Paramètres ».
f Le service d’itinérance est désactivé par
défaut. Vous pouvez activer l’itinérance
dans le menu Réglages/Internet (cf.
chapitre « Paramètres », paragraphe «
Paramètres pour la connexion Internet
mobile », option Roaming).
Routeur Internet
Pour utiliser l’appareil comme routeur Internet, reliez
simplement votre périphérique avec l’appareil via le
réseau WiFi (cf. chapitre « Mise en service immédiate »,
section « 2. Établir la connexion vers l’appareil via le
réseau WiFi »).
Accès via l’interface utilisateur de
l’appareil
f Établissez si nécessaire une connexion WiFi vers le
Coach MediaRouter à partir de votre périphérique
(cf. chapitre « Mise en service immédiate », section
« 2. Établir la connexion vers l’appareil via le réseau
WiFi »).
f Démarrez le navigateur sur votre périphérique et
tapez l’adresse suivante :
http://bosch.router
Note :
Si l’accès à l’interface utilisateur entière de
l’appareil est protégé par un mot de passe,
vous serez invité à saisir le mot de passe (cf.
chapitre « Paramètres », paragraphe « Paramètres du système », option Protection par
mot de passe).
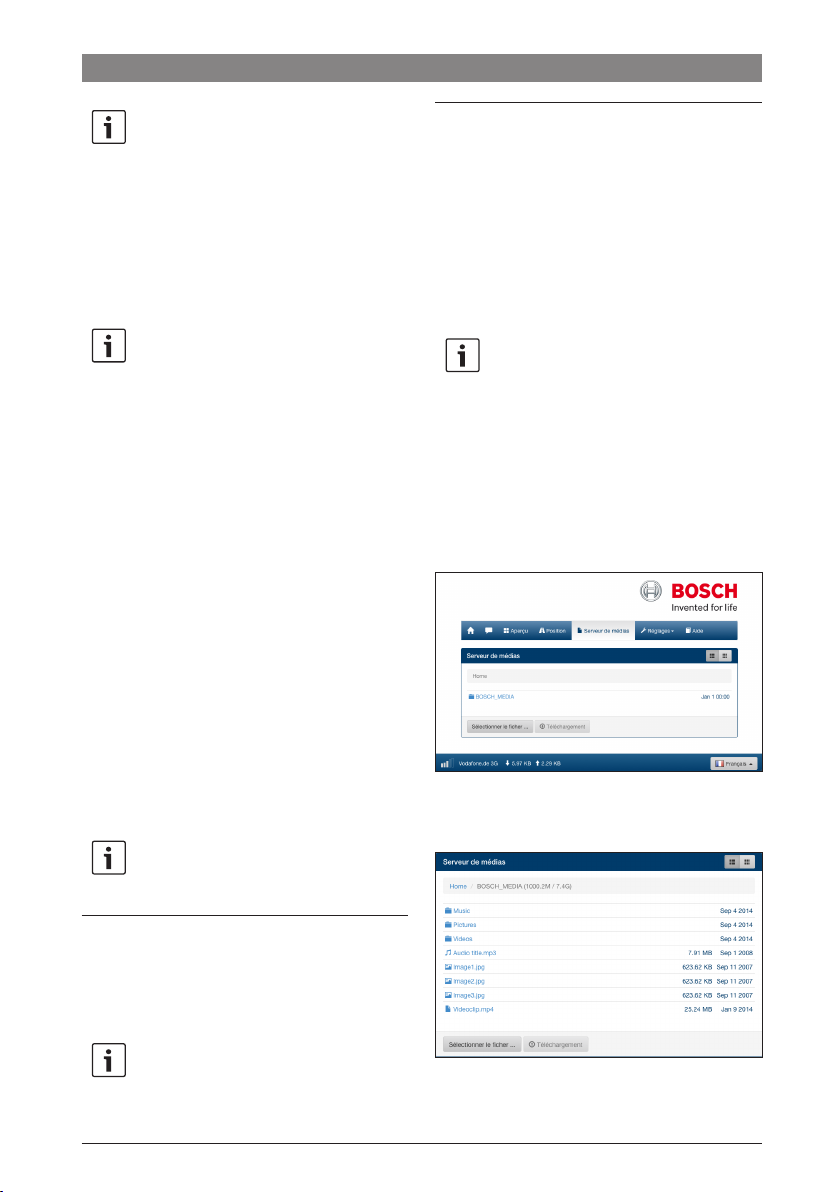
f Cliquez sur Serveur de médias.
Le support de données connecté s’affiche dans le
panneau Home :
Serveur multimédia
Dans le réseau WiFi, l’appareil peut faire office de
serveur multimédia afin de mettre des contenus
multimédia à la disposition de périphériques dans le
réseau WiFi.
Note :
L’appareil prend en charge DLNA (Digital Living
Network Alliance).
Mettre à disposition les contenus multimédia de supports de données USB
f Connectez un support de données USB, contenant
les fichiers multimédia de votre choix, à la prise
USB en façade 3 ou à l’arrière.
Note :
L’accès à la prise USB à l’arrière est facilité par
un câble de connexion USB posé à l’avenant.
7 620 320 029 | 09.2014 Robert Bosch Car Multimedia GmbH
f Cliquez sur le support de données.
Les dossiers et fichiers du support de données apparaissent :
Serveur multimédia | Paramètres
fr | 27
Notes :
f Cliquez sur ou pour passer de la vue
Liste à la vue Icône et vice-versa.
f Vous pouvez télécharger un fichier à partir
de votre périphérique vers le répertoire
actuellement ouvert du serveur multimédia.
Cliquez sur Sélectionner le fiche ... pour
sélectionner le fichier sur votre périphérique, et ensuite sur Téléchargement
pour télécharger le fichier.
f Cliquez sur un dossier pour l’ouvrir ou sur un fichier
pour le lire ou l’afficher.
Note :
Le navigateur de votre périphérique doit si
nécessaire disposer d’extensions adéquates
permettant la lecture de formats de fichier
spécifiques.
Accès via UPnP
f Établissez si nécessaire une connexion WiFi vers le
Coach MediaRouter à partir de votre périphérique
(cf. chapitre « Mise en service immédiate », section
« 2. Établir la connexion vers l’appareil via le réseau
WiFi »).
f Démarrez une application compatible UPnP sur
votre périphérique.
f Accédez aux fichiers multimédia à l’aide du nom de
réseau de l’appareil.
Notes :
f Pour des raisons de sécurité, votre
session se ferme après quelques temps si
vous ne définissez aucun paramètre. Le
système vous demande ensuite de saisir à
nouveau votre mot de passe.
f Pour des raisons de sécurité, il est
vivement conseillé de remplacer le mot de
passe par défaut par un mot de passe
personnel. Vous pouvez modifier le mot de
passe dans le menu Réglages/Système.
f Dans le menu Réglages/Système, vous
pouvez étendre la protection par mot de
passe sur toutes les pages du serveur web
spécifique à l’appareil et protéger ainsi
l’interface utilisateur de l’appareil contre
tout accès non autorisé.
Langue
Vous pouvez sélectionner la langue de l’interface-utilisateur, que vous souhaitez utiliser, en bas à droite dans la
barre d’état.
Paramètres pour la connexion Internet
mobile
f Sélectionnez Réglages/Internet.
fr
Paramètres
Configurez l’appareil et ses connexions WiFi et Internet
mobile dans le menu Réglages.
f Établissez si nécessaire une connexion WiFi vers
l’appareil à partir de votre périphérique (cf.
chapitre « Mise en marche rapide », section « 2.
Établir la connexion vers l’appareil via le réseau
WiFi »).
f Démarrez le navigateur sur votre périphérique et
tapez l’adresse suivante :
http://bosch.router
Le menu Réglages est protégé par un mot de passe. Le
mot de passe par défaut est : admin
f Tapez le mot de passe et cliquez sur Login.
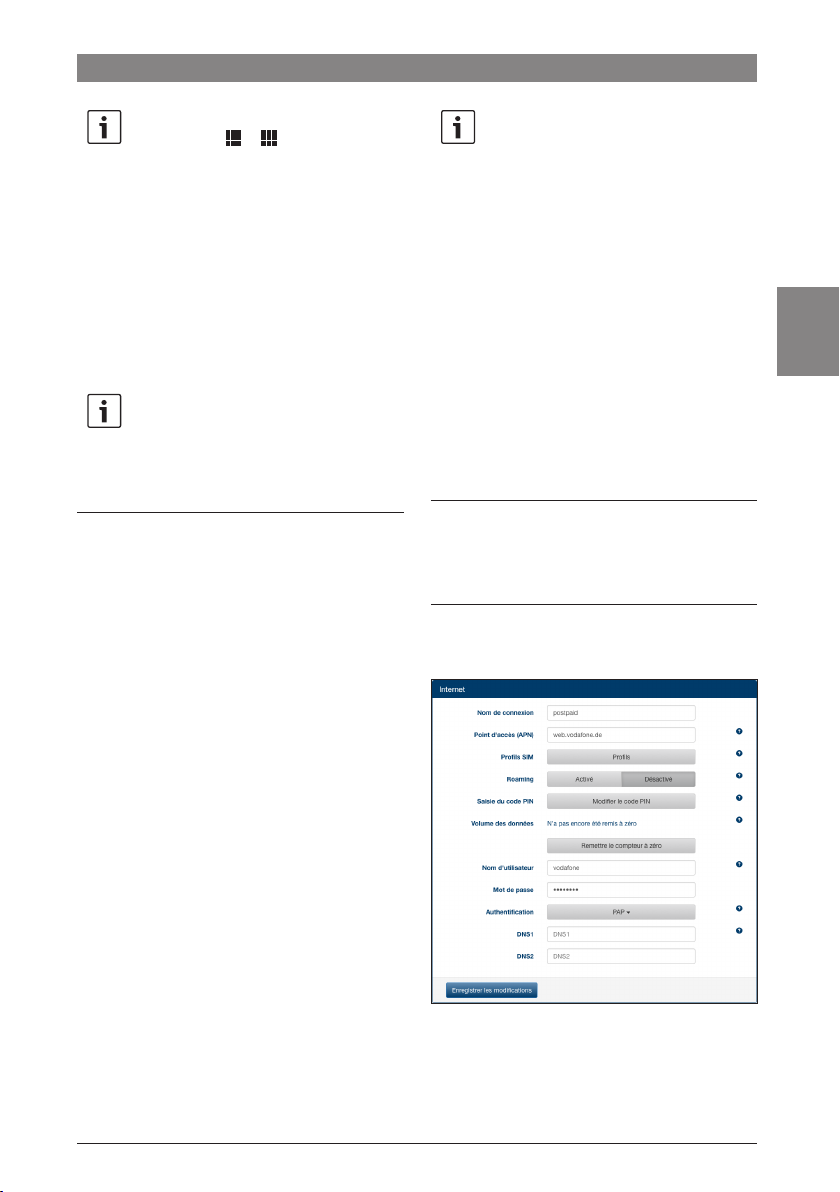
Le menu Internet propose les options suivantes :
f Nom de connexion
Les paramètres de votre carte SIM sont gérés par
défaut sous le nom de votre opérateur. Vous pouvez
modifier le nom de la connexion à votre guise.
7 620 320 029 | 09.2014Robert Bosch Car Multimedia GmbH
28 | fr
Paramètres
f Point d’accès (APN)
Spécifiez ici le nom du profil APN de votre opérateur. Le profil APN contient les informations
nécessaires à la connexion Internet mobile et
permet à l’appareil d’établir la connexion automatiquement. Dans ce cas, il vous suffit de saisir le code
PIN de votre carte SIM (par ex. lorsque vous
établissez la connexion pour la première fois).
f Profils SIM
Sélectionnez ici un profil APN. Cliquez sur Profils
pour afficher les profils APN connus de l’appareil.
Cliquez ensuite sur le profil APN de votre choix
figurant sur la liste.
f Roaming
Lorsque le service d’itinérance est activé, l’appareil
peut établir une connexion en dehors de son réseau
domestique (par ex. à l’étranger) via un réseau
externe.
Attention : L’itinérance occasionne des coûts
supplémentaires.
f Saisie du code PIN
Modifiez ici le code PIN de la carte SIM insérée.
Gardez à cette fin le code PIN actuel à votre
disposition.
f Volume des données
Cette option vous permet d’afficher le moment où le
compteur de volume de données a été remis à zéro
pour la dernière fois.
Le volume de données pour le chargement et le
téléchargement depuis la dernière remise à zéro est
affiché en bas à gauche dans la barre d’état.
Pour remettre le compteur à zéro, cliquez sur
Remettre le compteur á zéro.
f Nom d’utilisateur / Mot de passe
Si votre opérateur vous le demande, saisissez ici le
nom d’utilisateur et le mot de passe pour la
connexion Internet mobile.
f Authentification
Au cas où le nom d’utilisateur et le mot de passe
sont requis, spécifiez ici le mode d’authentification
(PAP, CHAP).
f DNS1/2
Si les noms de serveur DNS ne sont pas automatiquement assignés, spécifiez-les ici.
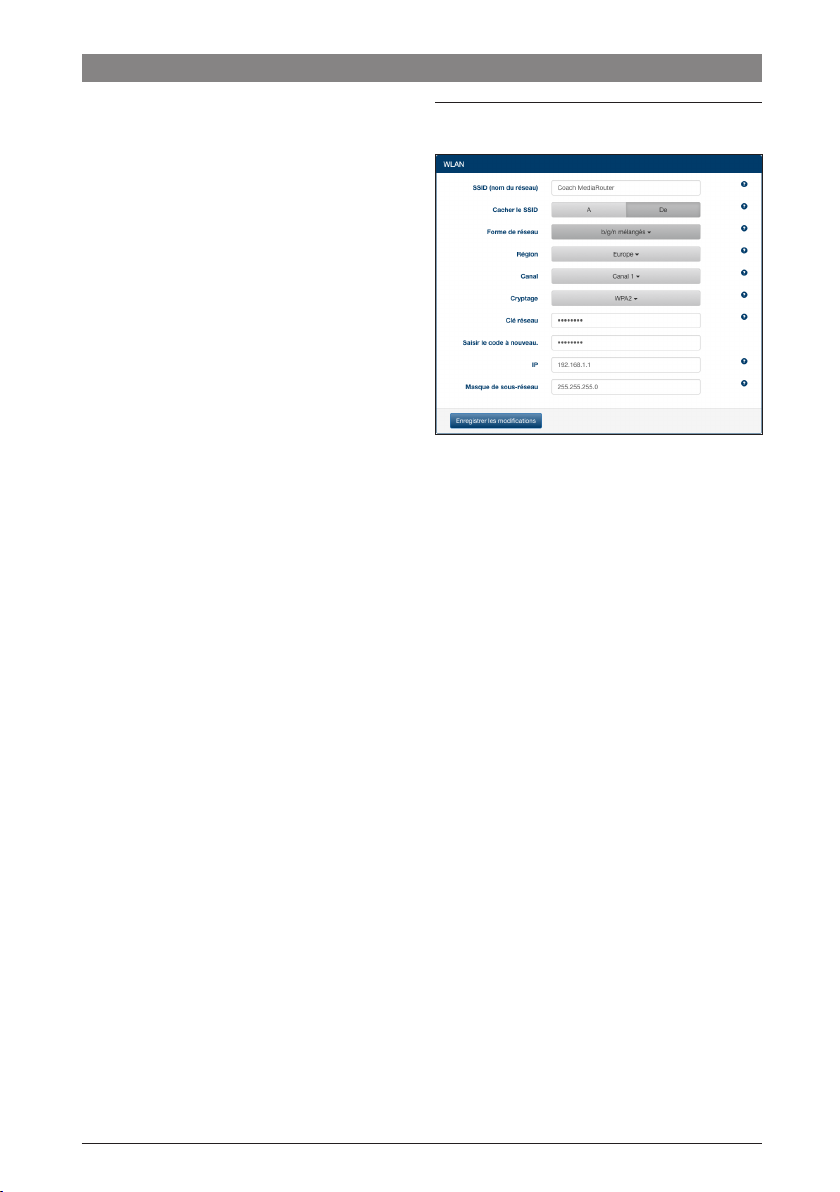
Paramètres WiFi
f Sélectionnez Réglages/WLAN.
Le menu WLAN propose les options suivantes :
f SSID (nom du réseau)
Le SSID (Service Set Identifier) est le nom du
réseau de l’appareil dans le réseau WiFi. Le nom
prédéfini est « Coach MediaRouter ».
Vous pouvez spécifier un nom de réseau personnalisé constitué d’un maximum de 32 caractères.
f Cacher le SSID
Si cette option est activée, le réseau WiFi de
l’appareil sera invisible pour d’autres appareils
WiFi.
f Forme de réseau
Sélectionnez ici la norme WiFi voulue (b/g/n
mélangés / b/g mélangés / uniquement b / uniquement g / uniquement n).
f Région
Sélectionnez ici la région dans laquelle vous
utiliserez l’appareil. Le nombre de canaux disponibles (cf. option suivante) dépend de la région.
f Canal
Sélectionnez ici le canal que l’appareil utilisera dans
le réseau mobile. Le canal sélectionné définit la
fréquence sur laquelle l’appareil émettra ou recevra
les signaux.
f Cryptage
Sélectionnez ici la méthode de chiffrement pour le
trafic de données WiFi entre l’appareil et les
périphériques (WPA / WPA2 / WPA & WPA2
mélangés) ou désactivez le chiffrement (Ouvert). Le
7 620 320 029 | 09.2014 Robert Bosch Car Multimedia GmbH

Paramètres
fr | 29
transfert de données chiffré empêche l’accès non
autorisé aux données échangées.
f Clé réseau / Saisir le code à nouveau.
Le transfert de données en WiFi (cf. option
précédente) est chiffré à l’aide de la clé. La clé doit
être saisie lorsque la connexion WiFi est établie à
partir du périphérique. La clé par défaut est
indiquée sur la face inférieure de l’appareil.
Vous avez la possibilité de spécifier une clé
personnelle d’une longueur maximale de 63
caractères.
f IP
Spécifiez ici l’adresse réseau (adresse IP) via
laquelle il sera possible d’accéder à l’appareil ou à
son interface utilisateur.
L’adresse IP par défaut de l’appareil est :
192.168.1.1
f Masque de sous-réseau
Spécifiez ici le masque de sous-réseau pour le
réseau WiFi de l’appareil.
Le masque de sous-réseau définit la plage
d’adresses IP disponibles pour les périphériques
dans le réseau WiFi de l’appareil.
Le masque de sous-réseau par défaut de l’appareil
est : 255.255.255.0
Connexion en cascade
Note :
La connexion en cascade de plusieurs
appareils permet d’élargir la couverture du
réseau WiFi.
f Sélectionnez Réglages/Mise en cascade.
Le menu Mise en cascade propose les options suivantes:
f Activer
Activez ou désactivez ici la connexion en cascade.
f Gestion de la mise en cascade
Définissez ici si l’appareil servira de station de base
(Mâitre) ou de répétiteur (Esclave).
Paramètres du système
f Sélectionnez Réglages/Système.
fr
Le menu des paramètres du système propose les
options suivantes :
f Nouveau mot de passe / Ressaisir le mot de
passe
Spécifiez ici un nouveau mot de passe pour l’accès
au menu Réglages ou à l’ensemble de l’interface
utilisateur (cf. option suivante).
Le mot de passe par défaut est « admin ».
f Passwortschutz
Définissez ici si la protection par mot de passe
s’appliquera seulement au menu Réglages (option
Réglages uniquement) ou à l’ensemble de l’interface
utilisateur de l’appareil (option Toutes les pages).
f Phase postfonctionnelle
Spécifiez ici la durée pendant laquelle l’appareil
restera encore en marche et actif une fois que le
contact du véhicule ait été coupé.
f Page d’accueil
Définissez ici la page de démarrage de l’interface
utilisateur (option Aperçu ou Position).
f Protection contre le vol par e-mail / SMS
Activez ou désactivez ici la protection antivol par
e-mail ou SMS. Quand la protection antivol est
activée, un e-mail ou un texto indiquant la position
de l’appareil est envoyé à chaque fois que celui-ci
est mis en marche ou à l’arrêt.
Lorsque vous activez la protection antivol, spécifiez
7 620 320 029 | 09.2014Robert Bosch Car Multimedia GmbH
30 | fr
Paramètres | Caractéristiques techniques
l’adresse e-mail ou le numéro de téléphone auquel
les messages seront envoyés.
f Réinitialiser l’appareil
Vous pouvez ici redémarrer l’appareil (option
Réinitialisation du système; tous les paramètres
restent maintenus) ou réinitialiser le firmware de
l’appareil (option Rétablir les réglages usine; tous
les paramètres sont rétablis par défaut).
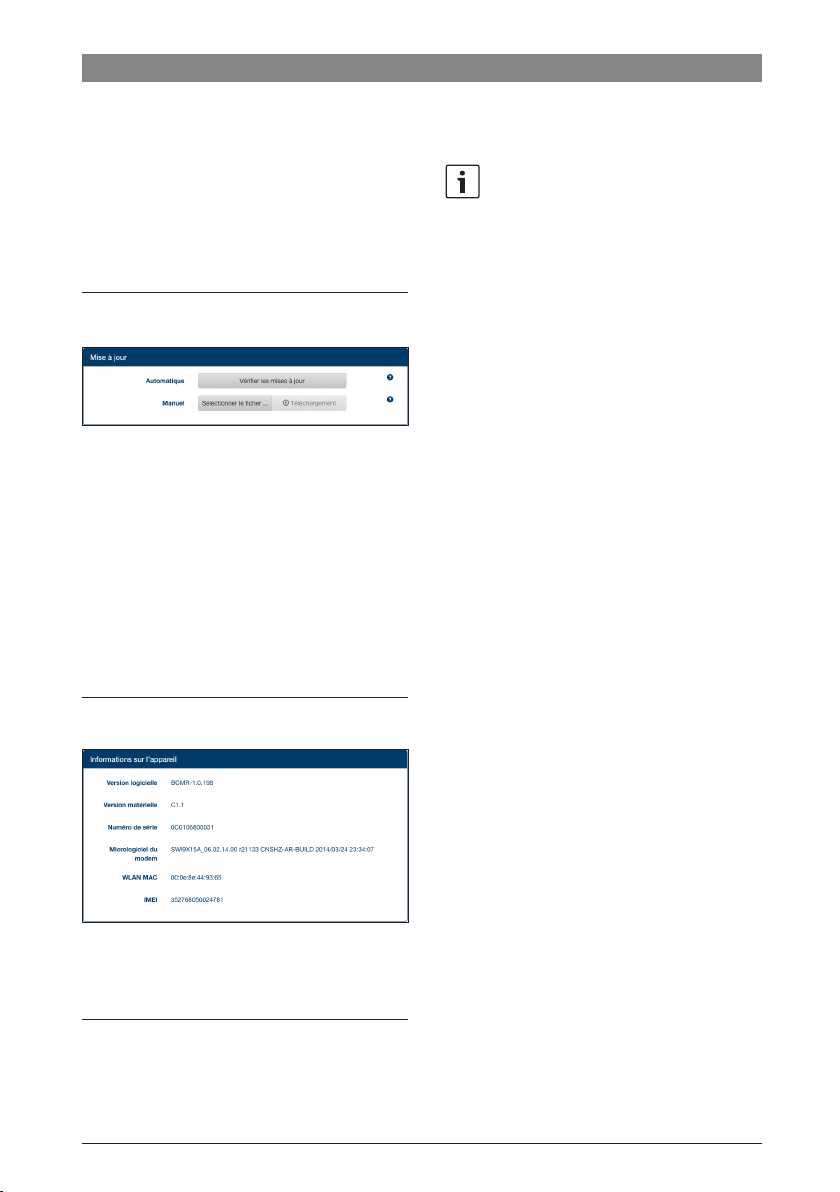
Mise à jour du logiciel de l’appareil
f Sélectionnez Réglages/Mise à jour.
f Automatique
Cliquez sur Vérifer les mises à jour pour vérifier s’il
existe pour l’appareil des logiciels mis à jour sur le
serveur de mises à jour. Si oui, vous pouvez
télécharger directement la mise à jour sur l’appareil.
f Manuel
Au cas où un fichier de mise à jour est enregistré sur
un ordinateur connecté à l’appareil, cliquez sur
Sélectionner le fiche ... pour sélectionner le fichier
de mise à jour, et ensuite sur Téléchargement pour
installer le nouveau logiciel.
Informations sur l’appareil
f Sélectionnez Réglages/Informations sur l’appareil.
Vous trouvez ici des informations relatives à l’appareil,
par ex. la version actuelle du logiciel et du matériel ainsi
que le numéro de série
Déconnexion
Pour sortir du menu Réglages ou de l’interface utilisateur
de l’appareil,
f sélectionnez Réglages/Déconnecter.
La page de démarrage ou la page de saisie du mot de
passe apparaît.
Note :
Le menu Réglages ou l’ensemble de l’interface
utilisateur de l’appareil se ferme automatiquement si vous ne définissez aucun paramètre
pendant une durée prolongée.
Caractéristiques techniques
Normes WiFI IEEE 802.11b, g, n
Normes de téléphonie mobile
GSM, GPRS, EDGE
UMTS (HSUPA multi-mode /
HSDPA)
LTE
LTE (HSPA) Pentabande (800/900/1800/
2100/2600)
UMTS (HSDPA) Tri-bande (850/900/2100)
GSM / GPRS Quadri-bande
(850/900/1800/1900)
Positionnement A-GPS / S-GPS
Mise à jour du firmware via Internet / manuelle
Connecteur d’antenne UMTS (2x Fakra D, bordeaux),
GPS (Fakra C, bleu),
Antenne WiFi interne
Alimentation 12 V DC / 24 V DC de la tension
d’alimentation du véhicule
Température de service -20 °C à +65 °C,
-40 °C à +85 °C (plage étendue)
Température de stockage -40 °C à +105 °C
Fonction de rénitialisation
Réinitialisation du firmware
pour rétablir les paramètres
par défaut, réinitialisation du
matériel pour redémarrer
l’appareil
Protection DIN 40050-9 selon IP30
Sécurité/Chiffremen WPA (TKIP, AES),
WPA2 (CCMP, AES)
Certifications CE, E1
Dimensions (L x L x H) 150 x 110 x 30 mm
Poids 192 g
7 620 320 029 | 09.2014 Robert Bosch Car Multimedia GmbH
 Loading...