

Page 1

Table of Contents
About This User’s Guide...............................................................................2
Introduction.................................................................................................... 2
Security System Basics..................................................................................3
What is a Point?......................................................................................... 3
What is a “Faulted” Point?........................................................................3
Are All Points the Same? .......................................................................... 3
Controlled Points ........................................................................................... 4
24-Hour Points...............................................................................................5
Fire Points .................................................................................................5
Non-fire 24-Hour Points............................................................................ 5
Keypad Keys.................................................................................................. 5
Keypad Tones................................................................................................ 6
System Events................................................................................................ 7
Fire Alarms................................................................................................ 7
Burglary Alarms........................................................................................ 7
Fire Trouble Events................................................................................... 7
Non-Fire Trouble Events...........................................................................7
How Your System Reports Alarms...........................................................8
Keypad Backlighting ..................................................................................... 8
Checking System Status................................................................................. 8
Silencing Alarms............................................................................................9
Turning the System Off ............................................................................... 10
Turning the System All On.......................................................................... 11
Turning the System All On, with No Delay................................................. 12
Turning On Part of the System (Part On).....................................................13
Turning the System Part On, with No Delay ............................................... 14
Turning System On, With Points Open (Bypass Points) ............................. 15
Viewing Faulted Points................................................................................ 17
Viewing Alarm Memory.............................................................................. 18
Resetting the System.................................................................................... 19
Selecting Watch Tone.................................................................................. 20
Selecting Watch Points................................................................................21
Checking System Troubles.......................................................................... 22
Changing Passcodes..................................................................................... 23
Step Outside................................................................................................. 24
Exit Only...................................................................................................... 25
Show Passcode Types.................................................................................. 26
Change Passcode Type ................................................................................ 27
Change Other Users’ Passcodes................................................................... 29
Renew One-Time Passcodes........................................................................ 31
System Test.................................................................................................. 32
Security System Limitations........................................................................ 34
Fire Safety and Evacuation.......................................................................... 35
Security System Glossary............................................................................42
Maintenance and Service............................................................................. 44
Power Failure ............................................................................................... 44
How to Clean the Keypad............................................................................ 44
1
Page 2

About This User’s Guide
This User’s Guide shows you how to use and maintain your security
system. It covers basic functions, such as turning the system on and off.
The functions described in this guide are programmed by your security
company. Some of them may not be included in your system. Some of
the functions covered may require you to enter your personal passcode.
Introduction
Your system helps to secure life, property, and investments against fire,
theft, and bodily harm. It consists of a keypad (or keypads), sensors
such as motion detectors or devices located on doors and windows, and
other sensing devices designed to detect the presence of smoke or
combustion. Each of these devices is connected to a sophisticated
electronic “brain,” which processes all events registered by the system.
Control of your security system is achieved through the keypad, which
offers a variety of basic and advanced features. Its function, versatility,
and ease of operation, make it ideal for home or office. The keypad is
tailored to meet your individual needs. Moreover, it has been designed
with you, the user, in mind.
2
Page 3
Security System Basics
What is a Point?
A “point” is a detection device, or group of devices connected to your
security system. Points are identified by the area they monitor, such as
front door, bedroom window, or hallway. View the current status of
each point in your system through the keypad’s display.
What is a “Faulted” Point?
When a point (such as a door or window) is closed, it is said to be
“normal.” When the door or window is open, the point is said to be
“faulted,” or not normal. When you turn your system on, you usually
want all of the points in your system to be normal, although you can
turn your system on with faulted points by using the Bypass Points
procedure.
You can see whether there are faulted points by pressing [CLEAR] when
the system is off.
Are All Points the Same?
No. There are two basic types of points, Controlled and 24-hour.
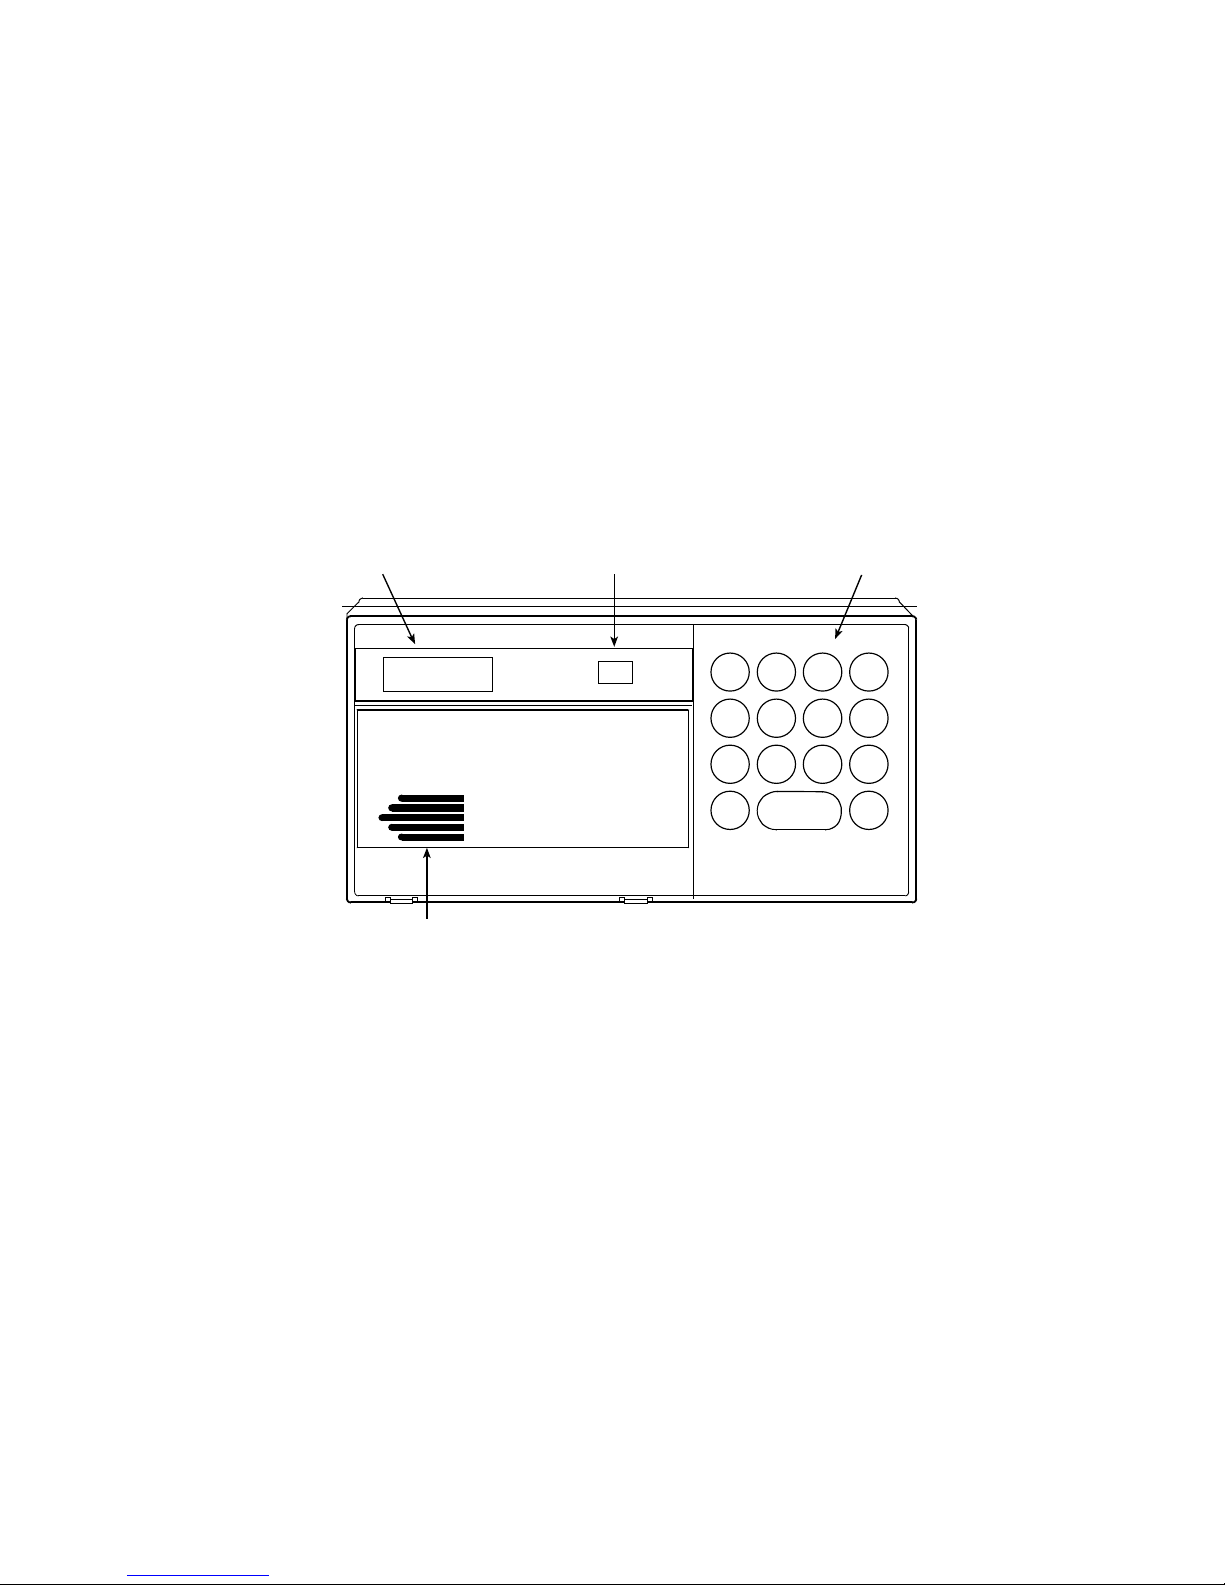
ENGLISH TEXT DISPLAY
ALL ON
SYSTEM OK
SOUNDER
STATUS LIGHT
On
FUNCTION KEYS
23
1
456
789
CLEAR
0
A
B
C
*
3
Page 4
Controlled Points
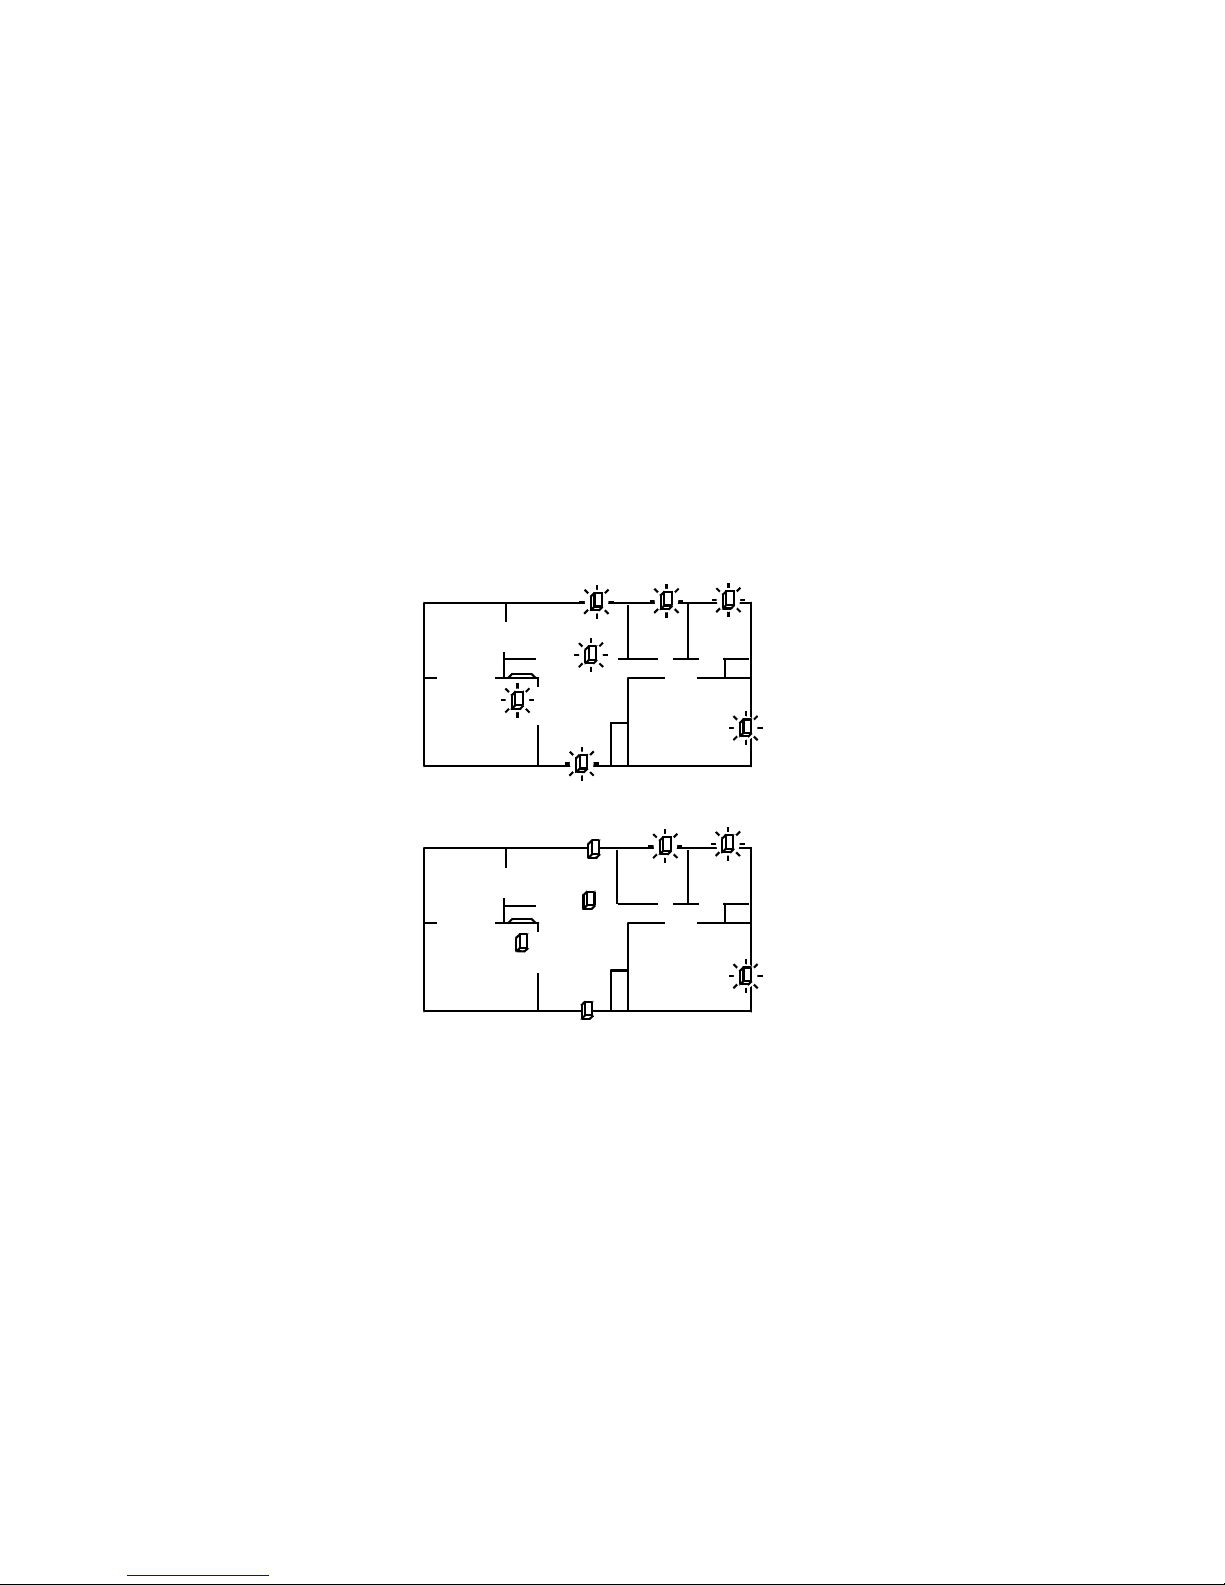
Controlled points respond to alarm conditions depending upon
whether the system is turned on or turned off. They are programmed to
either respond instantly to alarm conditions or to provide a delay for
you to reach the keypad and turn the system off. Various controlled
points may be located throughout your house. When you turn your
system on, you have the option of turning on all controlled points (All
On) or just some of the controlled points (Part On).
All On
When you turn your system All On, you are turning on all controlled
points, both interior (motion detectors) and exterior (doors and
windows of the building).
Part On
When you turn your system Part On, you are turning on a portion of
the controlled points. The particular points included in this portion are
determined by your alarm company. Part points may include only the
exterior (doors and windows) of your system, or the points on the first
floor of a two story house. Check with your security company to learn
which points are Part points.
Controlled Points are
DINING
LIVING
ROOM
Controlled Points are
DINING
LIVING
ROOM
KITCHEN
KITCHEN
All On
BEDROOM BEDROOM
BEDROOM
Part On
BEDROOM BEDROOM
BEDROOM
4
Page 5

24-Hour Points
24-hour points are always on, even when the system is turned off. There
are two types of 24-hour points, fire points and Non-fire points.
Fire Points
Fire points only monitor fire detection devices, such as smoke
detectors. They are always on and cannot be turned off.
Non-fire 24-Hour Points
Non-fire 24-hour points are always on and cannot be turned off.
Keypad Keys
Your keypad has fifteen keys. These keys perform various functions, as
described below.
1, 2, 3, 4, 5, 6, 7, 8, 9, 0
Each of the numeric keys performs a different function. For a
description of each, refer to the section of this guide that describes the
various system functions.
CLEAR: Use the [CLEAR] key to exit any function and start over. Press
[CLEAR] when the system is off to see system status.
A: A special function may be assigned to this key by your security
company. Press this key twice to activate the special function.
For your system, this key is_________________________.
B: A special function may be assigned to this key by your security
company. Press this key twice to activate the special function.
For your system, this key is_________________________.
C: A special function may be assigned to this key by your security
company. Press this key twice to activate the special function.
For your system, this key is_________________________.
: Press the [ ] key to advance to the next display (when available).
5
Page 6

Keypad Tones
Your keypad emits several distinct tones and displays text to alert you to
system events. Additional bells or sirens may also be connected to your
system. Bells or sirens mounted on the exterior of your premises alert
neighbors to emergencies and provide an audible guide for police and
fire fighters.
1. Fire Alarm Tone: When a fire point activates, the keypad emits
a repeated warble tone (on for one second, then briefly off).
2. Burglary Alarm Tone: When a burglary point activates while
your system is turned on, your keypad emits a continuous
warble tone. It sounds for the time set by your security
company.
3. Trouble Tone: When a system component is not functioning
properly, your keypad emits a repeated warble tone (on briefly,
followed by a pause, followed by the warble tone). If the
problem is with a point, the system display indicates which
point is faulted.
4. Keypress Tone: Pressing any key on the keypad sounds a short
pip, indicating that the entry is accepted.
5. Entry Delay Tone: When you enter the premises through a
point programmed for entry delay, the keypad emits a repeating
short beep, long beep tone to remind you to turn off your
system. If the system is not turned off before the entry delay
expires, an Alarm Report may be sent to your alarm company.
6. Exit Delay Tone: After you turn your system on, the keypad
emits an intermittent beep tone and counts down the exit delay
time. If you don’t exit before the delay time expires, and an exit
delay door is faulted, an alarm occurs.
7. Error Tone: If you press an incorrect key, your keypad emits an
error tone to indicate an invalid entry. The error tone is the
same warble tone as the Trouble Tone, but it is not repeated.
8. OK Tone: Indicates that a keypad entry is accepted; for example,
that a correct passcode has been entered. The keypad emits a
single, high-pitched beep tone for one second.
9. Watch Tone: The keypad emits a tone to alert you when any
watched point is faulted. The tone varies in duration, depending
upon the Watch Tone selected (see Selecting Watch Tone).
6
Page 7

System Events
Your system responds to four types of events. If more than one event
occurs, your system sorts them into one of four groups. The groups
(highest priority first) are: Fire Alarms, Burglary Alarms, Fire Troubles,
and Non-fire Troubles.
Fire Alarms
Fire alarms are the highest priority events. When a fire point activates,
your keypad repeatedly emits a warble tone that is on for 1 sec., then
briefly off. The tone sounds for the time set by your security company.
Evacuate all occupants and investigate for smoke or fire. Ensure that all
occupants know the difference between the burglary tone and the fire
tone. The keypad display shows the first point that went into alarm.
Press [
alarm.
Burglary Alarms
Burglary alarms are the second priority. When a burglary point
activates while your system is turned on, your keypad emits a constant
warble tone. The tone sounds for the time set by your security
company.
The keypad display shows each burglary point that went into alarm.
Press [
oldest to the newest.
Fire Trouble Events
When a fire trouble (such as a loose wire) occurs, your keypad
repeatedly emits a trouble tone, which is a warble tone that is on briefly,
then followed by a pause, followed by the warble tone.
The keypad displays the SYSTEM TROUBLE message. See Checking
System Troubles to determine the nature of the trouble.
Non-Fire Trouble Events
When a trouble event such as a power failure occurs, your keypad
repeatedly emits a trouble tone, which is a warble tone that is on briefly,
followed by a pause, followed by the warble tone.
The keypad displays the SYSTEM TROUBLE message. See Checking
System Troubles, to determine the nature of the trouble.
] to manually display additional points (if any) that went into
] to manually scroll the list if you wish. Events scroll from the
7
Page 8

How Your System Reports Alarms
Your security system may be programmed to automatically disconnect
your telephones when sending reports to your security company. Once
the report is completed, the system returns the telephones to normal
operation (check with your security company).
Your system makes repeated attempts to send reports to your security
company. If your system fails to report, the keypad signals a system
trouble. Follow the Checking System Troubles procedure.
Note: If your telephone service is interrupted, your security system
cannot send reports to your security company unless it has an alternate
means of transmitting them.
Keypad Backlighting
You can choose to have the keypad’s display constantly backlit (Option
1), or to have the display light when a key is pressed (Option 2). When
(Option 2) is chosen, the display times out after twenty seconds.
To change the current setting, press and hold [CLEAR] for five seconds.
If you’re changing the backlighting from Option 1 to Option 2, you see
the backlight go off. If changing from Option 2 to Option 1, you hear a
short beep to indicate the change.
Checking System Status
When the system is off, pressing [CLEAR] shows current system status.
The following messages might appear:
SYSTEM OK Indicates that the system is ready to turn on.
NOT READY TO TURN ON Indicates that a Part point is faulted.
Either return the point to normal or turn the system on with
points open (see Bypass Points).
NOT READY TO TURN ALL ON Indicates that an All point is
faulted. You can either turn the system Part On, return the
point to normal, or turn the system on with points open (see
Bypass Points).
ALARM MEMORY Indicates that an alarm event was placed into
memory (see Viewing Alarm Memory).
8
Page 9

Silencing Alarms
When there is an alarm, the alarm tone sounds and the point or points
in alarm are shown in the display. If you enter your passcode before the
system dials your security company, the alarm is canceled.
1. The point in alarm is shown on the display:
ALARM PT 8
MOTION DETECTOR
ENTER CODE TO
TURN SYSTEM OFF
2. Enter your passcode to silence the alarm and turn the system off
(if it was turned on). If you enter your passcode before the
system dials your alarm company, the alarm is canceled. If not,
an alarm report is sent to your alarm company. To determine
whether the alarm was reported, follow the procedure to View
Alarm Memory. The display continues to show the point or
points that caused the alarm:
ALARM PT 8
MOTION DETECTOR
TO REMOVE ALARMS
PRESS [CLEAR]
3. Press [CLEAR] to remove the alarm messages from the display.
4. Use Viewing Alarm Memory to review the points that caused the
alarm. Use Resetting the System to reset system points.
9
Page 10

Turning the System Off
You turn off your security system by entering your personal passcode.
When the system is on, you must enter through a designated entry door
to prevent an instant alarm condition. Opening a designated door starts
entry delay time and the keypad emits a pulsing beep tone to remind
you to turn the system off. Enter your passcode before the delay time
expires to turn the system off.
If you enter through the wrong door or fail to turn the system off before
the entry delay time expires, you may cause an alarm. If this happens,
silence the alarm (by entering your personal passcode) and call your
security company to let them know that it is not an emergency
situation.
1. When the system is on, the On light is lit. If the system is All On,
the display shows:
ALL ON
SYSTEM OK
If the system is Part On, the display shows:
PART ON
SYSTEM OK
2. Enter your passcode to turn the system off. The idle display is
shown.
10
Page 11

Turning the System All On
Use this function to turn on the entire system. Once you’ve pressed [9],
exit delay time starts to count down. The length of exit delay time is
programmed by your security company. Check with them to learn how
much exit delay time your system allows. In this example, exit delay is
30 seconds. You should leave before the exit delay time expires. Leaving
after exit delay expires causes an alarm event.
1. Make sure all points are normal (not faulted).
2. Press [9]. If all points are normal, exit delay time begins. You
should leave now. If your system has a faulted point, you should
return it to normal, or refer to Bypass Points.
30 SEC TO EXIT!
During exit delay, you may stop the system from turning on by
pressing [CLEAR]:
TO STOP
PRESS CLEAR
If you wish to, you can turn the system All On with No Delay by
pressing [9] again:
FOR NO DELAY
PRESS 9
If you wish to, you may bypass points by pressing [
]. The
system prompts you through the procedure:
TO BYPASS POINTS
PRESS
3. When exit delay time expires, the keypad beeps three times and
the system turns on.
ALL ON
SYSTEM OK
4. To turn the system off, enter your personal passcode.
11
Page 12

Turning the System All On, with No Delay
I have this feature.
I do not have this feature.
Use this function to turn on the entire system, both All and Part
without entry or exit delays. Remember that turning the system on with
no delay allows no exit or entry delay time through the designated delay
door.
This function is useful when you’re staying home and you want your
system on.
1. Make sure all points are normal (not faulted).
2. Press [9] twice. If all points are normal, the display shows the
following for 3 seconds and the keypad beeps three times. If
your system has faulted points, you should return them to
normal, or refer to Bypass Points.
TO STOP
PRESS [CLEAR]
3. After 3 seconds, the system turns on.
ALL ON NO DELAY
SYSTEM OK
4. To turn the system off, enter your personal passcode.
12
Page 13

Turning On Part of the System (Part On)
I have this feature.
I do not have this feature.
Part On turns on only a part of your system, leaving the rest of the
system turned off. Refer to the Point Identification section of your
keypad’s reference card to identify Part points. Once you’ve pressed [0],
exit delay time starts to count down. You should leave before exit delay
time expires. Leaving after exit delay expires causes an alarm event. Use
Part On when you want part of your system turned on.
1. Make sure Part points are normal (not faulted).
2. Press [0]. If all Part points are normal, exit delay time begins. If
your system has faulted points, you should return them to
normal, or refer to Bypass Points.
30 SEC TO EXIT!
During exit delay, you may stop the system from turning on by
pressing [CLEAR]:
TO STOP
PRESS [CLEAR]
If you wish to, you can turn the system Part On with No Delay
by pressing [0] again:
FOR NO DELAY
PRESS 0
If you wish to, you may bypass points by pressing [
]. The
system prompts you through the procedure:
TO BYPASS POINTS
PRESS
3. When exit delay time expires, the keypad beeps three times and
then the system turns on.
PART ON
SYSTEM OK
4. To turn the system off, enter your personal passcode.
13
Page 14

Turning the System Part On, with No Delay
I have this feature.
I do not have this feature.
Use this function to turn on Part of the system without entry or exit
delays. Remember that turning the system on with no delay allows no
exit or entry delay time through the designated delay door.
1. Make sure Part points are normal (not faulted).
2. Press [0] twice. If all Part points are normal, the display shows
the following for 3 sec. and the keypad beeps three times. If your
system has faulted points, you should return them to normal, or
refer to Bypass Points.
TO STOP
PRESS [CLEAR]
3. After 3 seconds, the system turns on.
PART ON NO DELAY
SYSTEM OK
4. To turn the system off, enter your personal passcode.
14
Page 15

Turning System On, With Points Open (Bypass
Points)
❏ I have this feature.
❏ I do not have this feature.
The Bypass Points feature is used to exclude points you do not wish to
turn on with the rest of the system. If you try to turn your system on
and there is a faulted point (door or window open), you can either close
it or bypass it. If a point becomes faulted after exit delay has begun, you
must either close the point, bypass it, or cancel exit delay. If the system
is allowed to turn on with a point faulted, an alarm is generated. If you
wish, you can bypass a point even if it is not faulted.
1. Press [9] or [0] to turn the system All or Part On.
2. If a point is faulted, the error tone sounds and the following
display is shown for three seconds:
POINTS FAULTED
If a point becomes faulted after exit delay has begun, the display
shows the following. Go to Step 3:
POINTS FAULTED
## SEC TO EXIT!
3. The system then identifies the faulted point (in this example,
Point 5), followed by instructions for bypassing the point:
POINT 5 FAULTED
BEDROOM WINDOW
PRESS 5
BYPASS PT 5
4. Press the key for the point you want to bypass and then [
this example, you would press [5] [
you’ve bypassed the point.
PT 5 BYPASSED
BEDROOM WINDOW
TO
]. The display shows that
]. In
15
Page 16

5. If there are other faulted points, they are displayed in turn. If
there are no more faulted points, exit delay begins. The display
indicates that the system is being turned on with a bypassed
point:
30 SEC TO EXIT!
1 PTS BYPASSED
6. If you bypass a point in error, press [CLEAR] and start over at
step 1.
7. Turning the system off clears all bypassed points.
16
Page 17

Viewing Faulted Points
To properly turn your system on, all doors and windows must be in the
normal (not faulted) condition. Use this feature to locate faulted points.
1. Ensure that the system is turned off (On light is off).
2. Press [CLEAR]. If points are faulted, the display shows:
NOT READY TO
TURN ON
HOLD
TO VIEW
FAULTED POINTS
3. Hold [
] to view faulted points:
POINT 2 FAULTED
FRONT DOOR
POINT 7 FAULTED
BACK DOOR
3. Now that you know which points are faulted, you can return
them to normal. In this example, you would close the front door
and the back door.
4. Once you correct the faults, the system is ready to turn on.
17
Page 18

Viewing Alarm Memory
After an alarm has been silenced and cleared from the display, you may
still review the points that were in alarm.
1. Ensure that the system is turned off (On light is off).
2. Press [4]. The following display shows that there are alarms in
memory:
ALARM MEMORY
HOLD 6 TO VIEW
3. Hold [6] to view those points which were in alarm. This
display shows that there was an alarm on Point 8:
ALARM PT 8
BEDROOM WINDOW
4. If you entered your passcode before the system dialed your
alarm company, the display shows:
CANCELED PT 8
BEDROOM WINDOW
5. Continue to hold [6] to view all points that were in alarm.
When the last alarm has been shown, the display shows:
TO CLEAR MEMORY
TURN SYSTEM ON
6. Turn the system on again to clear alarm memory.
18
Page 19

Resetting the System
Use this feature to reset the system (including fire points) after an
alarm. Detection devices, such as smoke detectors and shock sensors,
must be reset after being activated. Resetting the system takes about 20
seconds.
If points do not reset, contact your alarm company for help.
1. Ensure that your system is off (On light is off).
2. Press [3]. The display shows the following:
ENTER CODE TO
RESET SENSORS
3. Enter your passcode (Owner type passcode required). Resetting
begins and the display shows the following. This procedure
takes about 20 seconds:
RESETTING . . .
4. After the system is reset, the display returns to the off state.
19
Page 20

Selecting Watch Tone
Your system gives you the ability to watch points when it’s turned off,
meaning that it can be programmed to alert you to opened doors and
windows. For example, parents with small children may want a tone to
be sounded whenever a door or window is opened as a way of
monitoring their whereabouts.
Use this feature to set the type of response your system produces when
a watch point is faulted. If you wish, you may tell your system to display
the identity of the point and sound a short tone whenever certain doors
or windows are opened. Use the Selecting Watch Points feature to
specify which points in your system are to be watched.
If you just want to review (not change) the current watch tone setting,
press [7].
1. Make sure that the system is off (On light is off).
2. Press [7]. The display shows the current watch tone selected. In
this example, the current watch tone setting is Short Beep:
WATCH TONE IS
SHORT BEEP
ENTER OWNER CODE
TO CHANGE TONE
3. Enter your passcode (Owner type required). The display again
shows the current watch tone selected, followed by the four
watch tone options. Select the type of watch tone you want by
pressing the indicated digit:
1 Off. Display point identity, but sound no tone when points
are faulted.
2 Short Beep. Display point identity and sound a short tone
when points are faulted.
3 Beep Till Key. Display point identity and sound a tone until
[CLEAR] is pressed.
4 Beep Till Closed. Display point identity and sound a tone
until the point is returned to normal (door or window is
closed). Pressing [CLEAR] also silences the tone.
4. After making your selection (for example, Option 3), the display
confirms the selection before returning to the off state:
WATCH TONE IS
BEEP TILL KEY
20
Page 21

Selecting Watch Points
Once you’ve decided how your system will respond to watched points
(see Selecting Watch Tone), you need to decide which of the points in
your system are to be watched. Use this feature to tell your system
which points to watch. You cannot watch fire points.
Choosing which points to watch depends upon your goals. If you have
small children, you may choose to watch points of entry and exit. Each
time a watch point is faulted (door or window is opened) the keypad
responds as programmed. For example, you may tell your system to
produce a short beep when a watch point is faulted.
If you just want to review (not change) current watch point settings,
press [8]. The display scrolls the current setting for each point.
1. Make sure that your system is off (On light is off).
2. Press [8] and enter your passcode. The display shows the points
that are currently being watched (Watch On) and those that are
not (Watch Off), followed by instructions for changing the
current setting. The example below shows that watch is off for
Point 2:
PT 2 WATCH OFF
FRONT DOOR
PRESS
TO
TURN PT 2 ON
Follow the displayed instructions to change the current setting.
In this case, to make Point 2 a watch point you would press [2]
[
]. The display confirms your choice:
PT 2 WATCH ON
FRONT DOOR
3. The display continues to scroll the remaining points. You may
continue to select or deselect as many watch points as are
available. When finished, press [CLEAR] to return to the off
state.
21
Page 22

Checking System Troubles
Your system emits a trouble tone and displays the SYSTEM TROUBLE
message to alert you to system trouble events, caused by such things as
low batteries. Use this feature to learn what is causing the trouble and
the steps to take to correct it.
1. The system may be on or off when a system trouble occurs. If
the system is on, turn it off. The display shows:
SYSTEM TROUBLE
PRESS 4 TO VIEW
2. Press [4]. The trouble tone is silenced and the display scrolls
through the list of troubles. Follow the displayed instructions to
see the troubles:
FIRE TROUBLE
HOLD 1 TO VIEW
POINT TROUBLE
HOLD 2 TO VIEW
SYSTEM RUNNING
ON BATTERY ONLY
PHONE TROUBLE
CHECK DIAL TONE
CALL FOR SERVICE
ALARM MEMORY
HOLD 6 TO VIEW
3. Pressing [CLEAR] returns the system to the off state.
22
Page 23
Changing Passcodes
I have this feature.
I do not have this feature.
This feature lets you change your personal passcode at any time,
without assistance from your alarm company. It is recommended that
you write down your old and new passcodes before you begin.
1. Make sure that your system is off (On light is off).
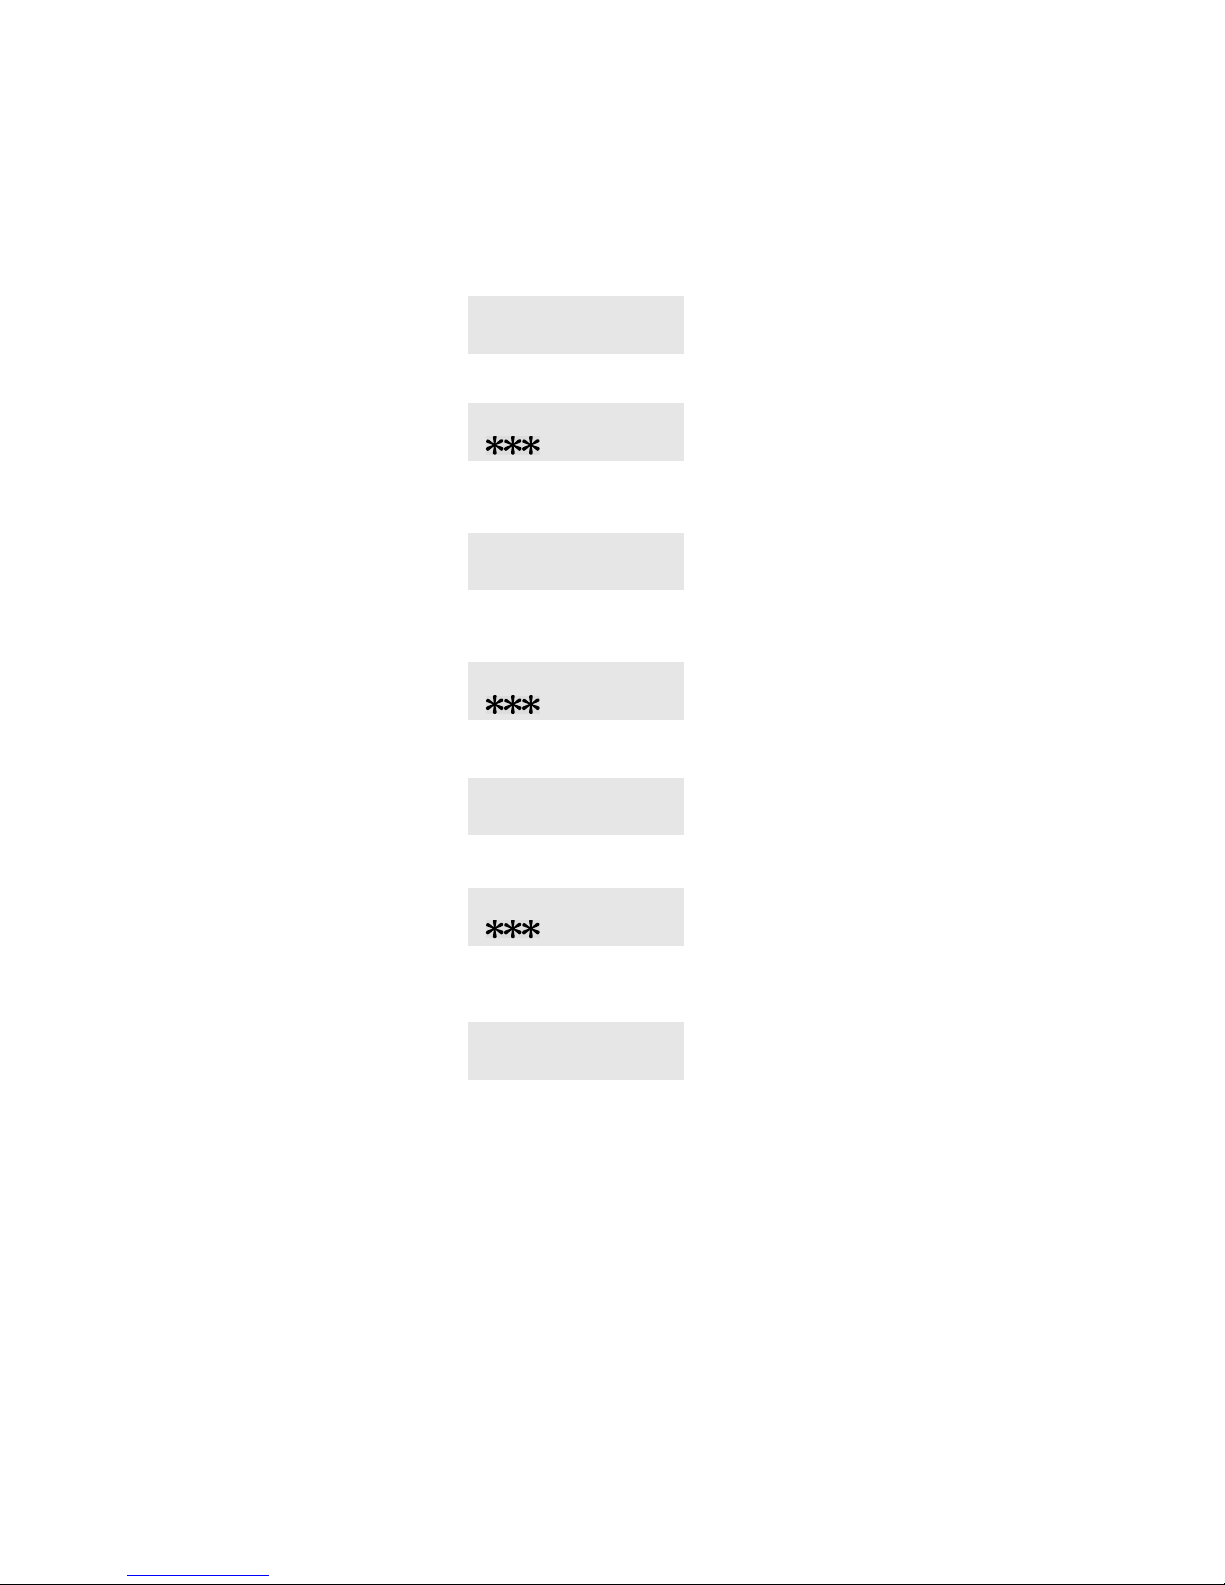
2. Press [5]. The OK tone sounds and the display changes to:
ENTER OLD CODE
3. Enter your current passcode. The display shows:
ENTER CODE
4. If the passcode you’ve entered is valid, you are prompted to
enter your new passcode:
ENTER NEW CODE
5. Enter a new passcode with the same number of digits as your
old passcode. If the error tone emits, try a different passcode.
ENTER CODE
6. If you’ve entered a valid new passcode, the display changes to:
ENTER NEW AGAIN
7. Enter your new passcode again. The display shows:
ENTER CODE
8. The following display confirms the change, and the Change
Passcode mode is turned off. If the error tone sounds, start over:
CODE CHANGED
23
Page 24

Step Outside
I have this feature.
I do not have this feature.
Use the Step Outside feature to temporarily turn off protection to an
entrance door (or doors) when your system is All or Part On with No
Delay. You can exit and reenter without turning your system off.
Use this feature to pick up the newspaper or to take the dog out. Once
you come back inside, simply press [CLEAR] to reactivate protection to
the door.
1. The system must be All or Part On with No Delay.
1. Press [CLEAR]. The display tells you to step outside now:
OK TO STEP
OUTSIDE NOW
TO END
PRESS [CLEAR]
2. When you come back inside, press [CLEAR] to return the door
to the system. The system returns to its previous state.
24
Page 25

Exit Only
I have this feature.
I do not have this feature.
The Exit Only feature allows you to exit the premises when the system is
All or Part On with No Delay. After exit delay expires, the door is
returned to the system so that opening the door causes an alarm.
You may, for example, use the Exit Only feature when you are going
out but your family is staying home, saving you the trouble of having to
turn the system off and then on again.
1. The system must be All or Part On with No Delay.
ALL ON NO DELAY
SYSTEM OK
2. Press [CLEAR]. The exit delay tone starts and the display shows
the following:
30 SEC TO EXIT!
TO STOP
PRESS [CLEAR]
3. Leave through the designated entry/exit delay door. After exit
delay expires, the door is returned to the system.
25
Page 26

Show Passcode Types
I have this feature.
I do not have this feature.
Use this feature to find out which passcode type is currently assigned to
each of the users of your system. See Change Passcode Types, for a
description of passcode types.
1. Make sure the system is turned off (On light is off).
2. Press [6]. The first display prompts you to enter an Owner Type
passcode to modify passcode types. Since you are only interested
in looking at current assignments, you do not need to enter a
passcode. The displays that follow show the passcode type
currently assigned to each user:
ENTER OWNER CODE
TO MODIFY CODES
CODE 1 OWNER
CODE 2 USER
CODE 3 USER
CODE 4 USER
CODE 5 ONE-TIME
CODE 6 ONE-TIME
CODE 7 NOT USED
CODE 8 NOT USED
3. Press [CLEAR] to return to the off state.
26
Page 27

Change Passcode Type
I have this feature.
I do not have this feature.
This feature allows those with Owner Type passcodes to change the
passcode type for each of the users in the system. You cannot change
your own passcode type.
Passcodes can be one of three types: owner, user, or one-time.
• Owner: Use to re-configure how the system responds to
“watched” points and to change other users’ types and
passcodes.
• User: Given to most users of the system, user passcodes
allow all but Owner functions to be performed.
• One-Time: Use to turn the system off one time only. You
can give them to temporary users, such as housekeepers or
service workers.
1. Make sure that the system is turned off (On light is off).
2. Press [6] and enter your passcode (Owner type required). The
display scrolls the following:
PUSH 9 TO RENEW
ALL ONE-TIME
PUSH 1 TO CHANGE
CODE TYPES
PUSH 0 TO CHANGE
CODES
PUSH CLEAR
TO EXIT
3. Press [1] to change passcode types. The display shows:
SELECT CODE
(1 TO 8)
4. Choose the number of the user whose passcode type you want
to change. For example, to change the passcode type for user
number 3, press [3].
27
Page 28

5. The following displays identify the current passcode type
assigned to user 3 and then instruct you on how to change the
passcode type for this user.
CODE 3 IS NOW
OWNER TYPE
PRESS 1 FOR
OWNER TYPE
PRESS 2 FOR
USER TYPE
PRESS 3 FOR
ONE-TIME
PRESS 4 FOR
DISABLED
6. The passcode type currently assigned to user 3 is Owner. To
change it to User Type, press [2].
CODE 3 IS NOW
USER TYPE
7. You may continue to change passcode types by following the
displayed instructions, or press [CLEAR] to exit.
28
Page 29

Change Other Users’ Passcodes
I have this feature.
I do not have this feature.
This feature allows those with Owner type passcodes to change the
passcodes of system users.
1. Make sure the system is turned off (On light is off).
2. Press [6] and enter your passcode (Owner type required). The
display scrolls the following:
PUSH 9 TO RENEW
ALL ONE-TIME
PUSH 1 TO CHANGE
CODE TYPES
PUSH 0 TO CHANGE
CODES
PUSH CLEAR
TO EXIT
3. Press [0] to change passcodes. The display shows:
SELECT CODE
(1 TO 8)
4. Enter the number of the user whose passcode you want to
change (one to eight). The display shows:
ENTER NEW CODE
5. Enter a new passcode with the same number of digits.
6. The OK tone sounds (if the error tone sounds, try a different
passcode). The system asks you to enter the new passcode again:
ENTER NEW AGAIN
29
Page 30

7. If the change was successful, the following display is shown. If
the error tone sounds, return to step 3. Be sure to enter the same
passcode in steps 5 and 6:
CODE CHANGED
8. After changing a passcode you should check to see which type it
is.
9. You may continue to change passcodes by following the
displayed instructions, or press [CLEAR] to exit.
30
Page 31

Renew One-Time Passcodes
I have this feature.
I do not have this feature.
One-Time passcodes may be used only once to turn the system off. This
feature allows those with Owner Type passcodes to renew One-Time
passcodes that have been used. Once renewed, the One-Time passcode
again turns the system off one time.
1. Make sure the system is turned off (On light is off).
2. Press [6] and enter your passcode (Owner type required). The
display scrolls the following:
PUSH 9 TO RENEW
ALL ONE-TIME
PUSH 1 TO CHANGE
CODE TYPES
PUSH 0 TO CHANGE
CODES
PUSH CLEAR
TO EXIT
3. Press [9]. The display shows:
ONE-TIME CODES
RENEWD
4. The system returns to the off state.
31
Page 32

System Test
I have this feature.
I do not have this feature.
This feature helps to ensure that your system is operating properly by
testing the system’s bell, battery, and phone line. If any of these
components fails the test, contact your security company for assistance.
Be sure to contact your security company before you begin.
1. Make sure that the system is turned off (On light is off).
2. Press [1]. The display shows:
ENTER CODE TO
START TEST
3. Enter your passcode (Owner type required). If your passcode is
valid, the system test begins. The bell is the first component to
be tested. It rings for approximately three seconds:
TESTING BELL
4. The next component to be tested is the battery. This test could
take up to four minutes:
TESTING BATTERY
MAY TAKE 4 MIN.
32
If the battery passes the test, the display shows:
BATTERY TEST
PASSED
If the battery test fails, the display shows:
BATTERY TEST
FAILED
Page 33

5. Finally, the phone connection is tested. This test could take up
to ten minutes:
TESTING PHONE
MAY TAKE 10 MIN.
If the phone line passes the test, the display shows:
PHONE TEST
PASSED
If the phone test fails, the display shows:
PHONE TEST
FAILED
6. When the test is concluded, the system returns to the off state.
33
Page 34

Security System Limitations
Not even the most advanced security system can guarantee protection
against burglary, fire, or environmental threats. All security systems are
subject to possible compromise or failure-to-warn for a variety of
reasons including, but not limited to, the following:
• If sirens or horns are placed outside the hearing range of
people in remote areas of the building or in areas which are
frequently closed off, they do not provide the intended
protection.
• If intruders gain access through unprotected points of entry,
the system does not detect their entrance.
• If intruders have the technical means of bypassing, jamming,
or disconnecting all or part of the system, they are not
detected.
• If the AC power supply is off and the back up battery is
either missing or dead, sensors do not detect intrusion.
• Smoke detectors cannot detect smoke in chimneys, walls, or
roofs, or smoke blocked by a closed door. They may not
detect smoke or fire on a level of the building different from
the one on which they are located. Smoke detectors may not
be able to warn in time about fires started by explosions,
improper storage of flammables, overloaded electrical
circuits, or other types of hazardous conditions.
• If phone lines are out of service, reports from the security
system to the security company cannot be sent. Telephone
lines are vulnerable to compromise by several means.
Inadequate maintenance and failure to test are the most common
causes of alarm failure. It is strongly recommended that you test your
system once a week to be sure that all system components are working
properly.
Although having a security system may make you eligible for reduced
insurance premiums, the system is no substitute for insurance. Warning
devices cannot compensate you for loss of life or property.
34
Page 35
Fire Safety and Evacuation
Residential fire is a leading cause of accidental death. Most fire related
deaths occur at night when occupants suffocate in their sleep from
smoke and toxic gases, rather than from burns. To help reduce this risk,
the following program should be implemented.
1. Minimize fire hazards. Smoking in bed,
cleaning with flammable liquids such
ROOM
as gasoline, leaving children home
alone, and using unsafe holiday
decorations are some of the common
ROOM
causes of household fire.
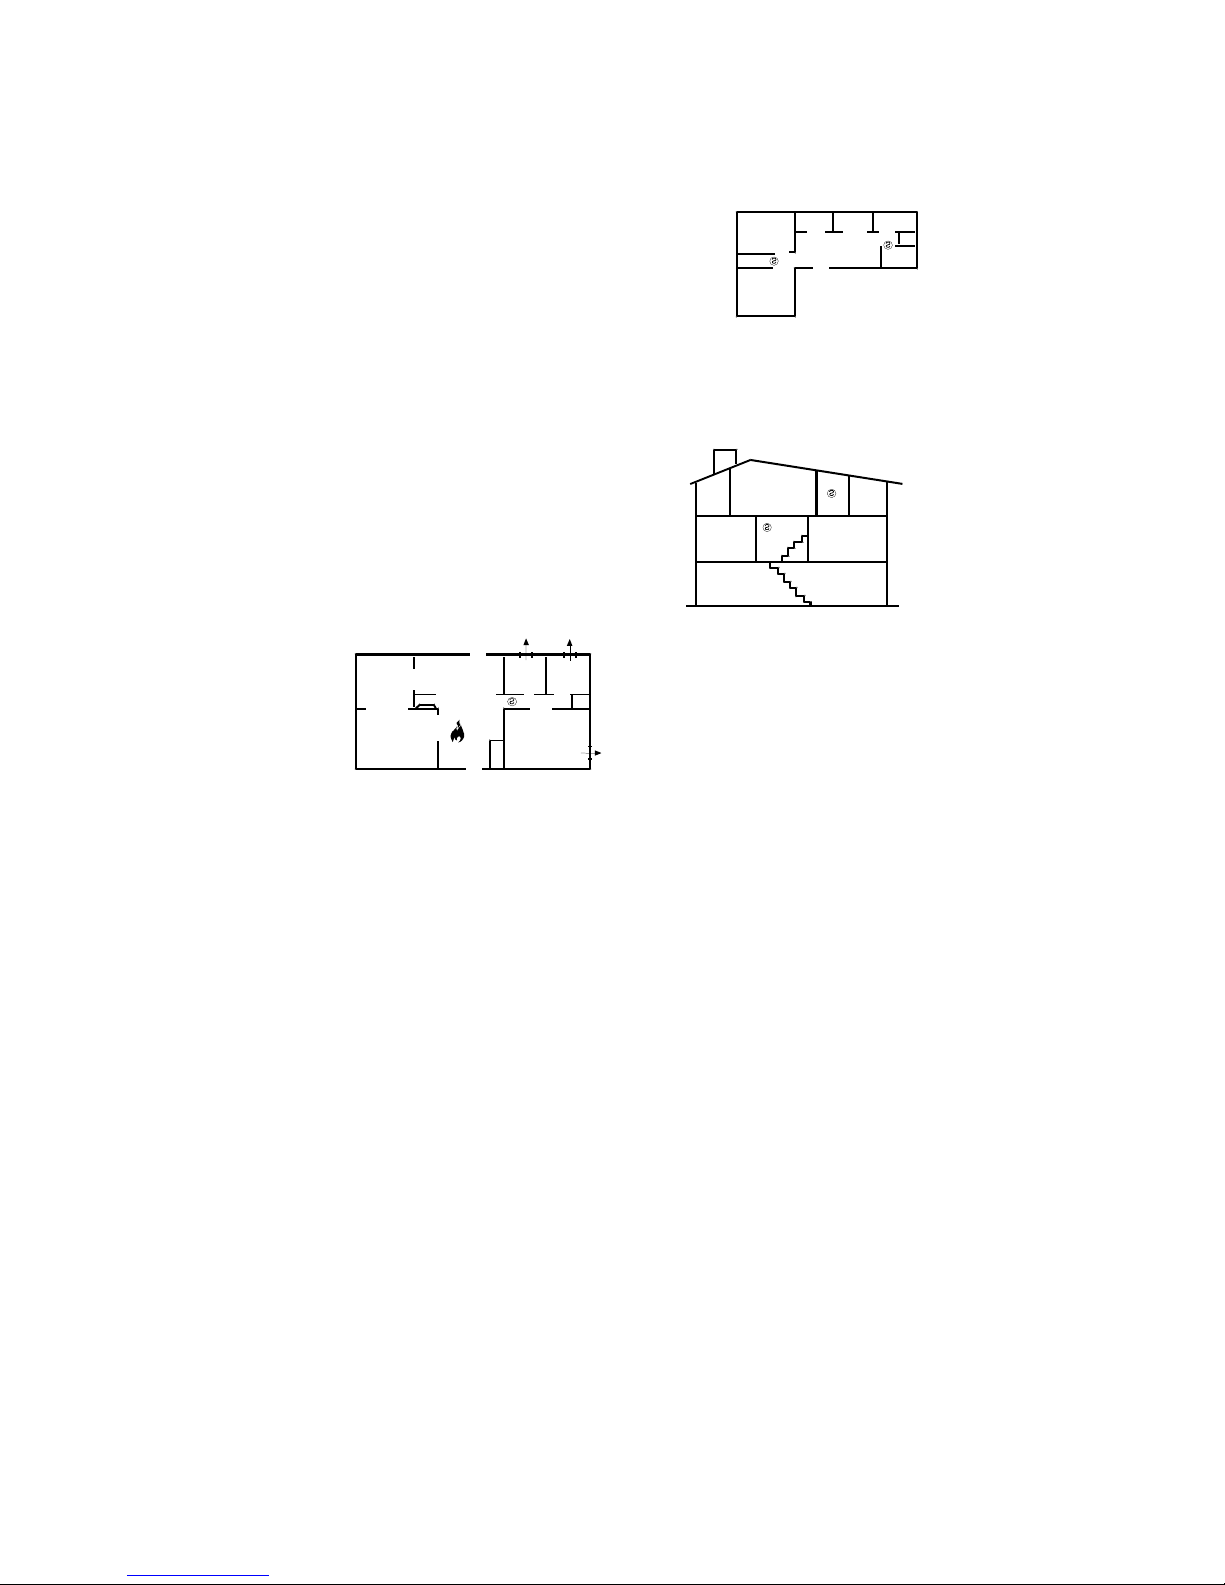
2. Install a fire alarm system. The primary purpose of this system is
to protect lives by giving the earliest possible warning of danger.
3. A smoke detector (an inverted “s” in a circle, see figure) should
be provided to protect each sleeping area in a home.
4. Practice an escape plan. Because
there may be very little time
between detection of a fire and
the time it becomes deadly, it is
important that every member of
BED
ROOM
the family understand how to
quickly evacuate according to
the plan.
Plan both primary and alternate
DINING
KITCHEN
ROOM
BED
BED
ROOM
escape routes. Since stairwells and
hallways may be blocked during a
fire, exiting through a bedroom
LIVING
ROOM FIRE
BEDROOM
window must be a part of the escape
plan. If the sleeping area is above the
ground floor, install a means of
safely descending outside the
building if one does not already exist.
As a part of this plan, all family members should arrange to meet at a
location away from the house (such as a neighbor’s house) so you know
that everyone is accounted for.
If it is determined that the alarm was accidentally sounded, the bell
should be silenced, the detectors reset, and your security company
notified immediately that there is no emergency situation.
TV
BED
BED
ROOM
DR K BR
BED
ROOM
BR
35
Page 36

System Displays
Your security system communicates its status and provides instruction
to you through keypad displays. The following list presents all possible
displays along with an explanation for each. Your system might not use
all of them.
ALARM PT ##
[point text]
ALL ON
SYSTEM OK
ALL ON NO DELAY
SYSTEM OK
AUTOBYPASS PT ##
[point text]
Indicates a point in alarm, the second
line shows the point’s name.
Indicates the entire system is turned
on and all points are normal.
Indicates the entire system is turned
on with no entry or exit delays.
Indicates a point has been
automatically bypassed. Call your
alarm company for service.
BATTERY FAILED
TESTING ENDED
BATTERY TEST
PASSED
CALL FOR SERVICE
CANCELED PT ##
[point text]
CHECK DIAL TONE
CODE # IS NOW
DISABLED
CODE # IS NOW
ONE-TIME
CODE # IS NOW
OWNER TYPE
CODE # IS NOW
USER TYPE
CODE # ONE-TIME
Indicates the battery test was
completed unsuccessfully and the test
session is ended.
Indicates the battery test was
completed successfully.
Call your alarm company. The
system requires service.
Indicates a cancelled alarm.
Check the phone line for a dial tone.
Indicates the passcode is disabled.
Indicates the passcode is currently a
One-Time passcode.
Indicates the passcode is currently an
Owner type passcode.
Indicates the passcode is currently a
User type passcode.
Indicates the passcode is an Owner
type.
36
Page 37

CODE # OWNER
Indicates the passcode is an Owner
type.
CODE # USER
CODE CHANGED
CODE NOT CHANGED
ENTER CODE
ENTER CODE TO
TURN SYSTEM OFF
ENTER CODE TO
SILENCE ALARM
ENTER CODE TO
SILENCE BELL
ENTER CODE TO
START TEST
ENTER NEW AGAIN
ENTER NEW CODE
ENTER OLD CODE
ENTER OWNER CODE
TO MODIFY CODES
ENTER OWNER CODE
TO CHANGE POINTS
Indicates the passcode is a User type.
Indicates the passcode has been
changed.
Indicates the attempt to change the
passcode was unsuccessful.
This display is shown when a
passcode is being entered.
Prompt to enter your passcode to
turn the system off.
Prompt to enter your passcode to
silence an alarm.
Prompt to enter a passcode to silence
the alarm bell.
Prompt to enter a passcode to start
the system test.
Prompt to enter your new passcode
again.
Prompt to enter your new passcode.
Prompt to enter your current
passcode.
Prompt to enter an Owner type
passcode to change passcodes.
Prompt to enter an Owner type
passcode in order to change watch
points.
## sec to exit !
## SEC TO EXIT !
[#] PTS BYPASSED
FOR NO DELAY
PRESS 9
FOR NO DELAY
PRESS 0
Displayed during exit delay to show
how much time remains before the
system turns on.
Indicates the system is turned on
with points bypassed.
Prompt to press [9] to turn system
All On with No Delay.
Prompt to press [0] to turn system
Part On with No Delay.
37
Page 38
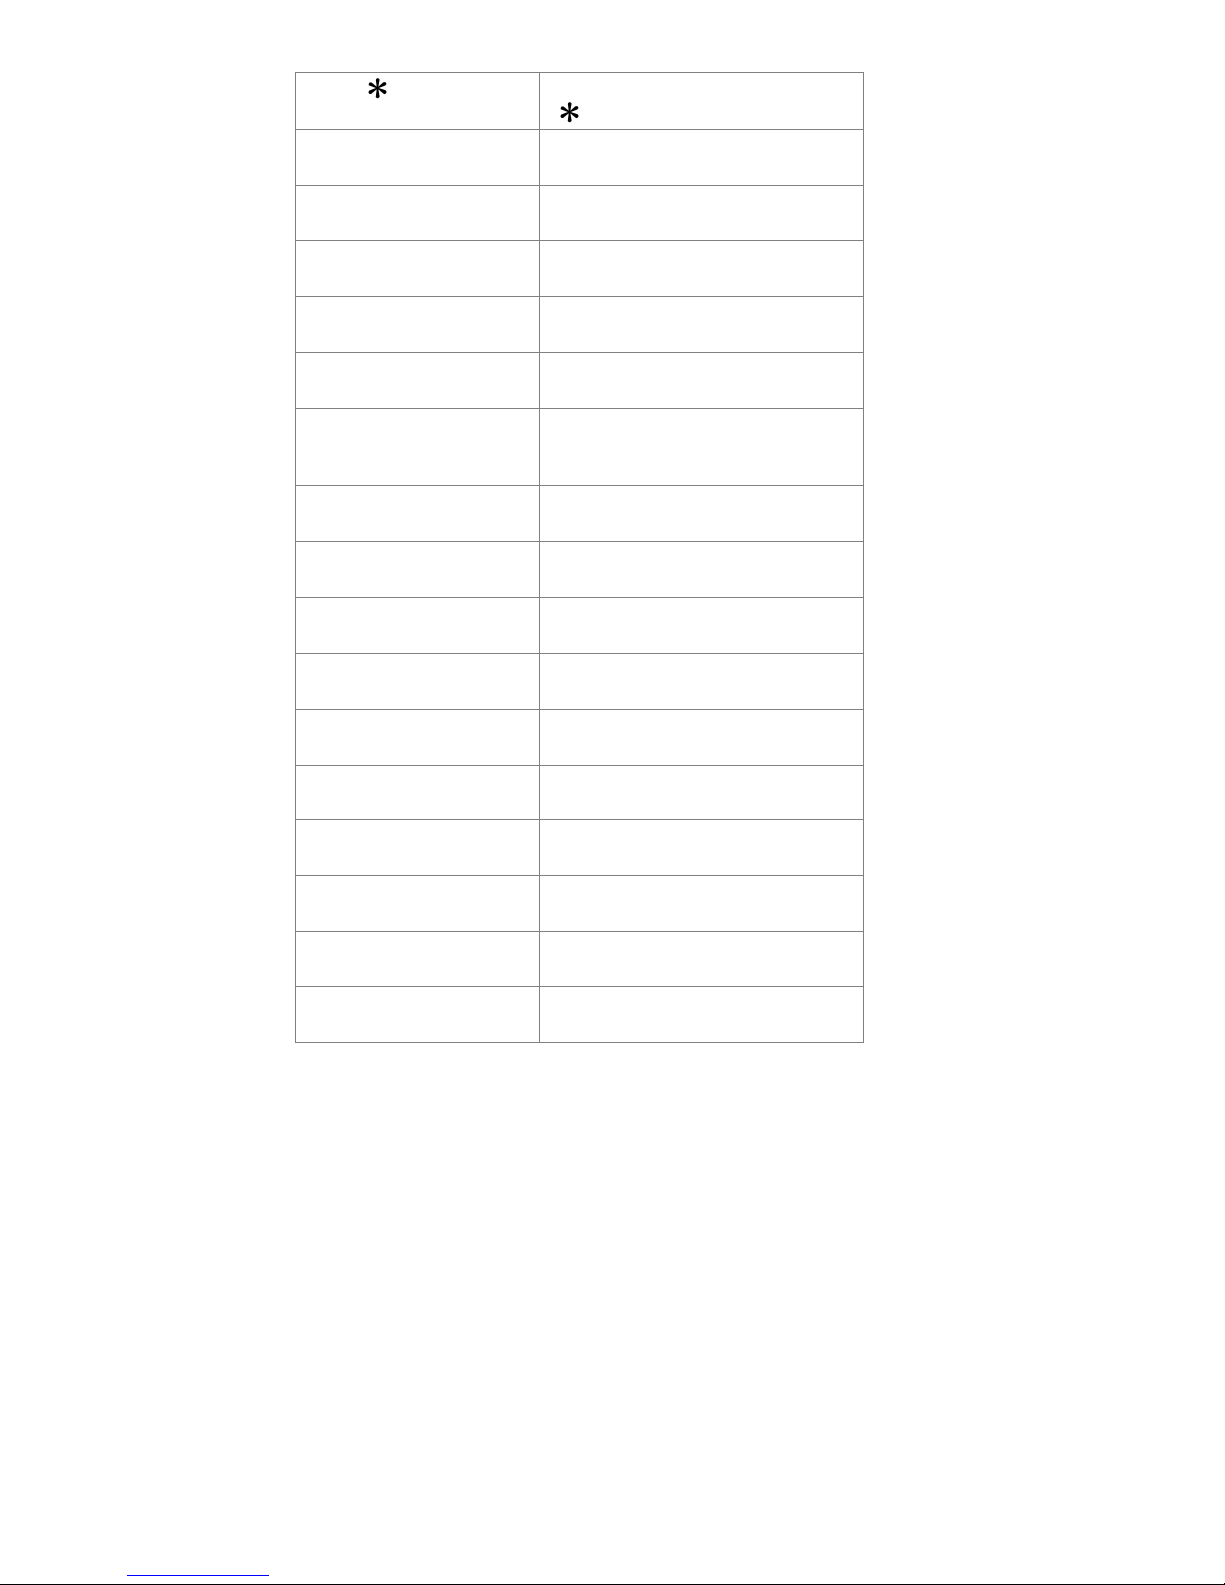
HOLD
TO VIEW
FAULTED POINTS
(IDLE TEXT LINE 1)
(IDLE TEXT LINE 2)
LOW BATTRY PT ##
[point text]
MISSING PT ##
[point text]
NO FIRE TROUBLES
NO POINT
TROUBLES
NOT READY TO
TURN ALL ON
NOT READY TO
TURN ON
OK TO STEP
OUTSIDE NOW
PART ON NO DELAY
SYSTEM OK
PART ON
SYSTEM OK
PHONE TEST
PASSED
PHONE TEST
FAILED
PHONE TROUBLE
CHECK DIAL TONE
POINT ##
NOT A WATCH POINT
POINT ##
NOT BYPASSABLE
POINT ##
ALREADY BYPASSED
Indicates a point is faulted. Hold
[
] to see which point it is.
This display is shown when the
system is turned off.
Indicates a point has a low battery.
Call your alarm company for service.
Indicates an RF point is in trouble.
Call your alarm company for service.
Indicates the system has no fire
troubles.
Indicates the system has no point
troubles.
An All point is faulted. Correct the
fault, bypass the point, or turn the
system Part On.
A Part point is faulted. Correct the
fault or bypass the point.
Indicates the Step Outside feature is
activated.
Indicates part of the system is turned
on, with no entry or exit delays.
Indicates part of the system is turned
on and all points are normal.
Indicates the phone test was
completed successfully.
Indicates the phone test has failed.
Indicates a problem with the phone
line. Check for a dial tone.
Indicates the point cannot be
watched.
Indicates the point cannot be
bypassed.
Indicates the point cannot be
bypassed.
38
Page 39
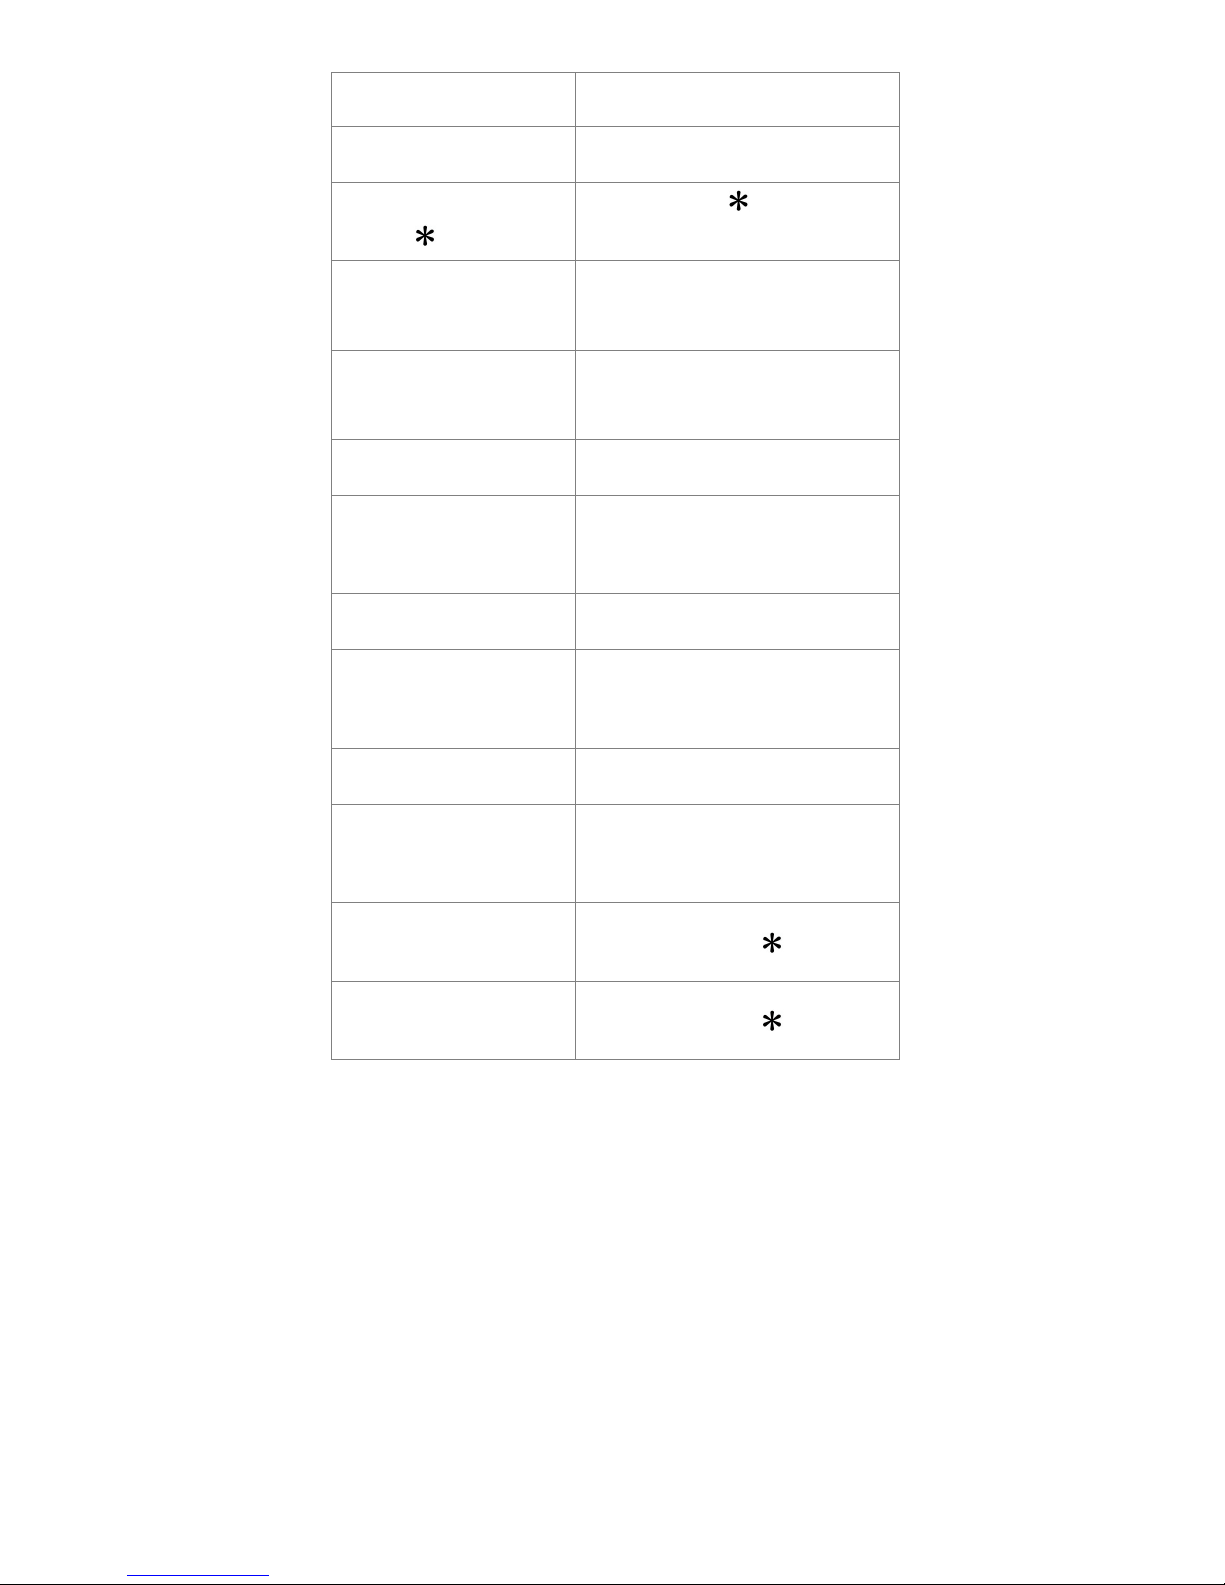
POINT ## FAULTED
[point text]
POINTS FAULTED
Indicates the named point is faulted.
Indicates the system has faulted
points.
POINTS FAULTED
press
PRESS 1 FOR
OWNER TYPE
PRESS 1 FOR
TONE OFF
PRESS 2 FOR
USER TYPE
PRESS 2 FOR
SHORT BEEP
PRESS 3 FOR
ONE-TIME
PRESS 3 FOR
BEEP TILL KEY
PRESS 4 FOR
DISABLED
PRESS 4 FOR
BEEP TILL CLOSED
PRESS [##] TO
TURN WATCH
[ON/OFF]
PRESS [##]] TO
BYPASS PT ##
Prompt to press [ ] to bypass a
point that became faulted during exit
delay.
Prompt to press [1] to assign an
Owner type passcode to a given user.
Prompt to press [1] to turn off the
watch tone feature.
Prompt to press [2] to assign a User
type passcode to a given user.
Prompt to press [2] to activate the
watch tone feature. Faulted watch
points causes the keypad to emit a
short beep.
Prompt to press [3] to assign a OneTime type passcode to a given user.
Prompt to press [3] to activate the
watch tone feature. Faulted watch
points causes the keypad to beep
until a key is pressed.
Prompt to press [4] to disable a
passcode.
Prompt to press [4] to activate the
watch tone feature. Faulted watch
points causes the keypad to beep
until the point is returned to normal.
Instructs you to enter the point
number followed by [
] to toggle a
watch point on and off.
Instructs you to press the point
number followed by [
] to bypass
the point.
39
Page 40

PT ## BYPASSED
[point text]
PT ## FAULTED
[point text]
PT ## WATCH OFF
[point text]
PT ## WATCH ON
[point text]
PUSH [CLEAR]
TO EXIT
PUSH 1 TO CHANGE
CODE TYPES
PUSH 0 TO CHANGE
CODES
PUSH 9 TO RENEW
ALL ONE-TIME
RESET SYSTEM
Indicates the point shown was
bypassed.
Indicates point shown is faulted.
Indicates the point is not being
watched.
Indicates point is being watched.
Prompt to press [CLEAR] to return
to the off display.
Prompt to press the [1] to modify
passcode types.
Prompt to press the [0] to modify
passcodes.
Prompt to press [9] to renew all OneTime passcodes.
Instruction to reset the system to
clear alarm memory.
RCVR ## TAMPER
RCVR ## TROUBLE
RESETTING . . .
SELECT CODE TO
CHANGE (1-8)
SYSTEM OK
PRESS [CLEAR]
SYSTEM PROGRAM
IN PROGRESS
SYSTEM RUNNING
ON BATTERY ONLY
SYSTEM TROUBLE
PRESS 4 TO VIEW
40
Indicates a receiver was tampered
with.
Indicates that receiver has a trouble
condition.
Indicates the system is resetting.
Process takes approximately 20
seconds.
Prompt to select a passcode to change
(User 1 through User 8).
Indicates the system has no troubles
and to press [CLEAR] to return to
the off display.
Indicates the system is being remotely
programmed.
Indicates AC power to the security
system is interrupted.
Instructs you to press [4] to view
system troubles.
Page 41
SYSTEM TROUBLE
TAMPER PT ##
[point text]
TESTING BATTERY
MAY TAKE 4 MIN.
TESTING BELL
TESTING PHONE
MAY TAKE 10 MIN.
TIMED OUT
TO BYPASS POINTS
PRESS
TO CLEAR ALARM
MEMORY
TO END
PRESS [CLEAR]
TO EXIT
PRESS [CLEAR]
TO REMOVE ALARMS
PRESS [CLEAR]
TO STOP
PRESS [CLEAR]
TROUBLE PT ##
[point text]
WATCH TONE IS
OFF
WATCH TONE IS
SHORT BEEP
WATCH TONE IS
BEEP till key
WATCH TONE IS
BEEP till closed
Indicates there is a system trouble
condition.
Indicates a point was tampered with.
Indicates the battery test is in
progress.
Indicates the bell test is in progress.
Indicates the phone test is in process.
Indicates system was expecting a key
to be pressed, but did not receive it.
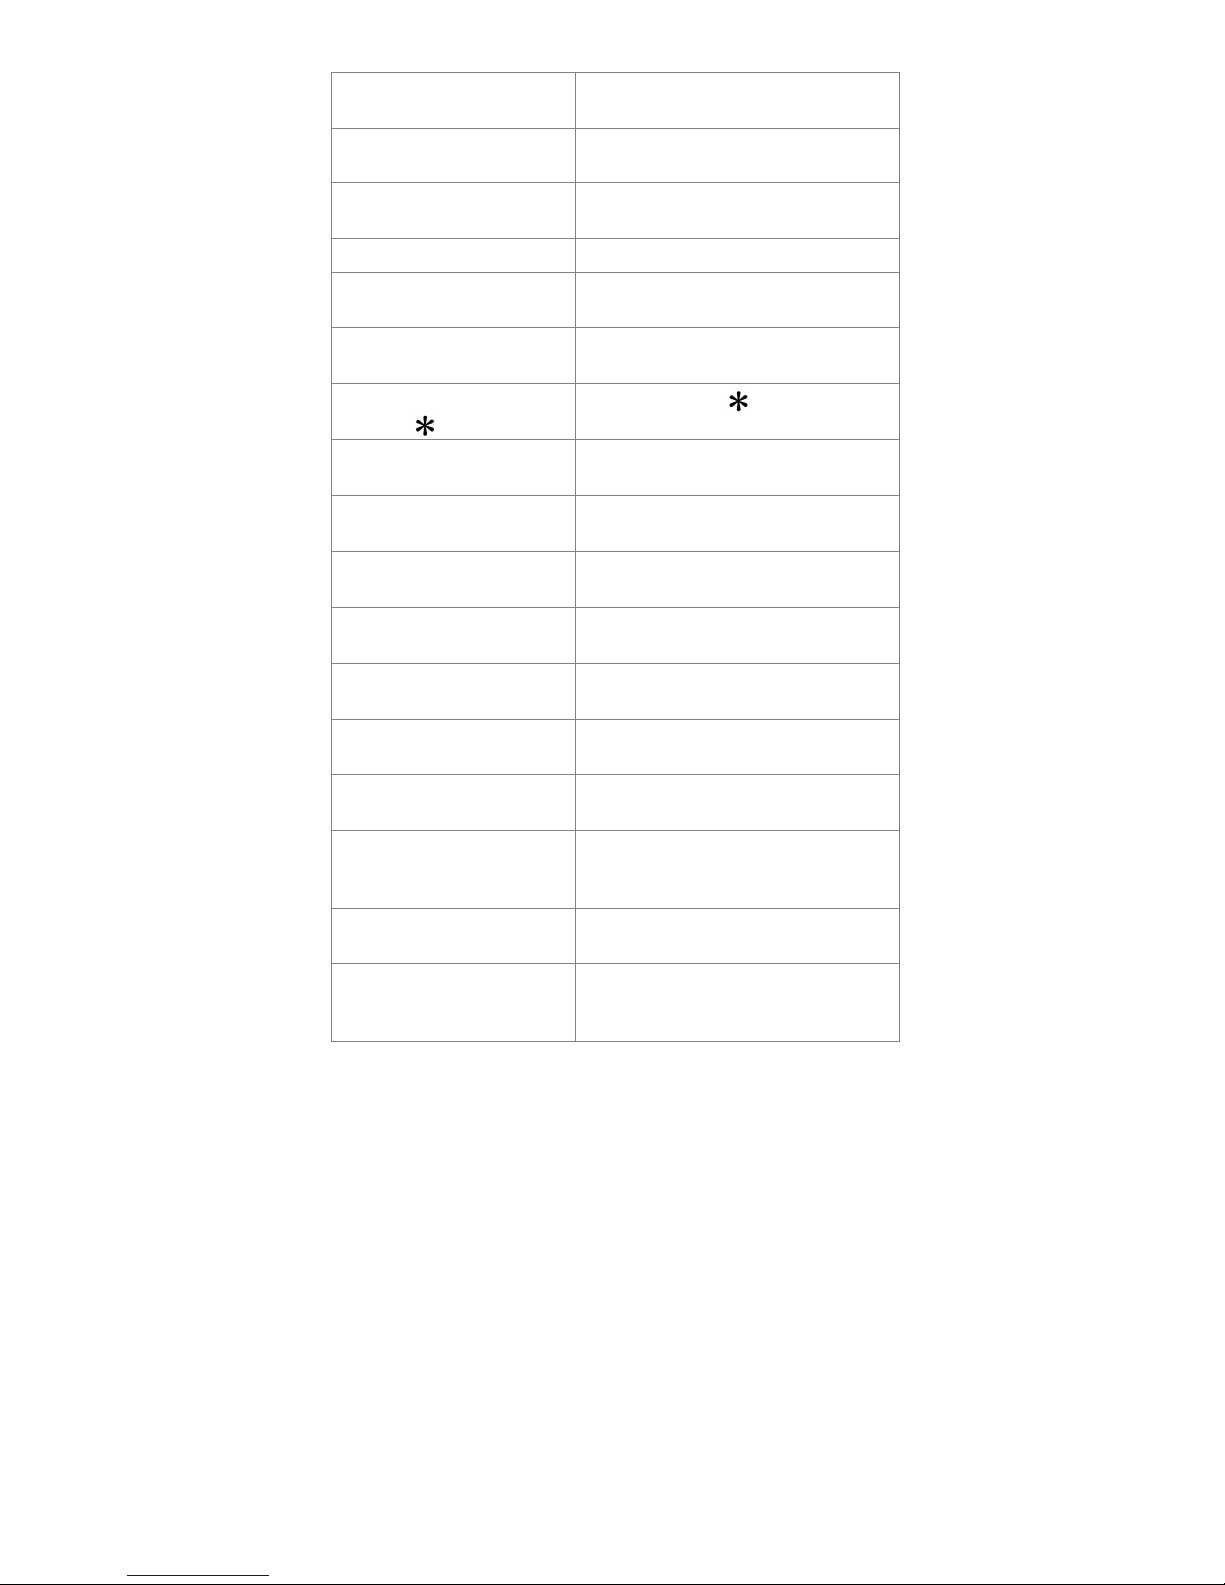
Prompt to press [ ] to bypass
points.
Instructions to follow regarding
clearing alarm memory.
Prompt to press [CLEAR] to end the
Step Outside feature.
Prompt to press [CLEAR] to exit
current function.
Press the [CLEAR] to remove alarm
messages from the display.
Prompt to press [CLEAR] to stop exit
delay and return system to off state.
Indicates point trouble. Call your
alarm company for service.
Indicates the watch tone is turned
off.
Indicates the watch tone is currently
set to produce a short beep when a
point is faulted.
Indicates the watch tone is currently
set to beep until a key is pressed.
Indicates the watch tone is currently
set to beep until the point is returned
to normal.
41
Page 42

Security System Glossary
All On
Turns on all of the points in the system.
Burglary Alarm Tone
Constant warble tone.
Bypass
Selectively removes points from the security system temporarily.
Central Station
Facility where trained personnel monitor your security system 24 hours
a day. Your security system may be programmed to contact the central
station during alarm conditions, enabling central station personnel to
dispatch the proper authorities.
Entry Delay
Programmed delay of the system alarm response that allows you to
enter the building (through the entry door) to turn your system off. If
you don’t turn the system off before the delay time expires, the system
begins an alarm response, which may include reports to the central
station. Entry delay time is programmed by your security company.
Error Tone
Same warble tone as the Trouble Tone, but is not repeated.
Exit Delay
Programmed delay of system alarm response that allows you to exit
after turning the system on. If you don’t exit before the delay time
expires, entry delay begins. You must turn the system off. If you don’t
turn the system off before the delay time expires, the system begins an
alarm response which may include reports to the central station. Exit
delay time is programmed by your security company.
Faulted Point
Point that is not normal (a door or window is open).
Fire Alarm Tone
Repeating warble tone that is on for 1 sec., then briefly off.
Hold
Instruction to press and hold a key down to perform a function.
No Delay
Turns the system on without entry or exit delay.
Off Display
Display that appears when the system is turned off and no keys are
pressed.
Part On
Turns on part of the points in the system.
42
Page 43

Point (PT)
Detection device, or group of devices connected to your security
system. Points display individually at the keypad on lights one to eight.
Press/Push
Used interchangeably to instruct you to momentarily push down and
then release a key.
Trouble
Service condition that needs to be corrected, such as a broken wire.
Trouble Tone
Repeating warble tone that is on briefly, then followed by a pause,
followed by the warble tone.
43
Page 44

Maintenance and Service
This security system requires very little maintenance; however, you
should test the system weekly to ensure it is working properly. A test
schedule and maintenance program can be arranged. If you notice a
change in operation during normal use or testing, call for service as
soon as possible. Do not attempt to repair the control panel, keypads,
or detectors yourself.
Call___________________________________ before testing.
The security system is connected to this telephone number:
__________________________________________________ .
The security control panel is connected to the phone jack
located: ___________________________________________ .
Power Failure
If the keypad indicates a power failure, and you have power in the rest
of your premises, there may be a problem with the electrical
transformer or circuit breaker supplying power to your security control
panel. First, check to be sure that the transformer is securely plugged
into the electrical outlet. If it appears to be damaged in any way, do not
attempt to repair it. Call your security company for service.
Transformer location:__________________________________
If the transformer is plugged in, check the circuit breaker supplying
power to the outlet. If the breaker is tripped, check the appliances on
the circuit for signs of electrical problems. Make sure someone did not
intentionally turned the breaker off. When all is clear, reset the breaker.
Circuit breaker number:________________________________
How to Clean the Keypad
If your keypad gets dirty, apply a household glass cleaner to a clean
cloth or paper towel and wipe the surface. Do not spray any liquid
directly onto the keypad. It could run inside the case and damage
electrical circuits.
71-07382-000-C 12/03 D222TD/D223TD
 Loading...