

Page 1
USER MANUAL
Page 2
Terms and conditions
BOS MTB offers warranty on its products on the following terms :
BOS MTB warrants to the original purchaser that BOS products for which
they received this warranty is free from defects in material and workmanship
for one year from the date of original retail purchase. A proof a purchase
will be asked for any warranty claim. This warranty is not transferable to a
subsequent purchaser.
Wear and tear parts (such as seals and bushings) are not covered under this
warranty.
Terms
This warranty is subject to legal jurisdictional or warranty rights of the
countries where it has been originally purchased, which will prevail if different
from the terms herein listed.
Limits
BOS MTB cannot be liable for any loss, inconvenience damages, whether
direct, incidental, consequential, resulting from the use of its products, local
legislation prevailing.
Warranty exclusions
This warranty does not cover the following :
• Damage to products resulting from improper assembly other than listed below
• Products that have been modified by the owner or a third party
• Improper use
• Damages resulting from an accident, crash under any circumstances
• Invalid servicing procedures and servicing time frame not respected
• Replacement of the original parts by parts from others manufacturers
• Products whose serial numbers has been altered defaced or removed .
Warranty procedure
The owner should always refer to its local reseller or distributor where he
originally bought the product from for any warranty claim. A proof a purchase
is compulsory for any warranty claim. Otherwise the warranty claim will
not be considered. Always contact BOS MTB warranty department before
returning any products that may fall under this warranty. Should “the faulty
parts” do not fall under warranty, the customer will be charged for any costs
in respect with warranty such as transport and package back and forth.
WARRANTY
Page 3
Fitting your Idylle onto your bike demands care and attention.
For your safety, please do respect to following instructions.
1.1. The steerer tube
Before cutting the steerer tube, first you have to take some measurements :
Height of the headset, length of the headtube of the frame, height of the stem and then add 5 to 10mm.
With a standard stem clamped on the steerer tube :
Add the length of the headtube of the frame to the height of the headset and to height of the headset plus 5 to 10mm.
With a stem bolted onto the upper crown :
Add the length of the headtube of the frame to the height of the headset plus 5 to 10mm.
CAUTION
The steerer tube should never be removed from the lower crown. If it has been cut too short or in the event of
a frame swap with different dimensions please obtain the correct lower crown/steerer from your distributor.
1.2 . Stanchions and Crowns
Depending on the bike, the position of the stanchions in the crowns may slightly differ. Nevertheless, it is actually
very important to follow all the measurement advices listed below, to ensure a perfect function, and a total security.
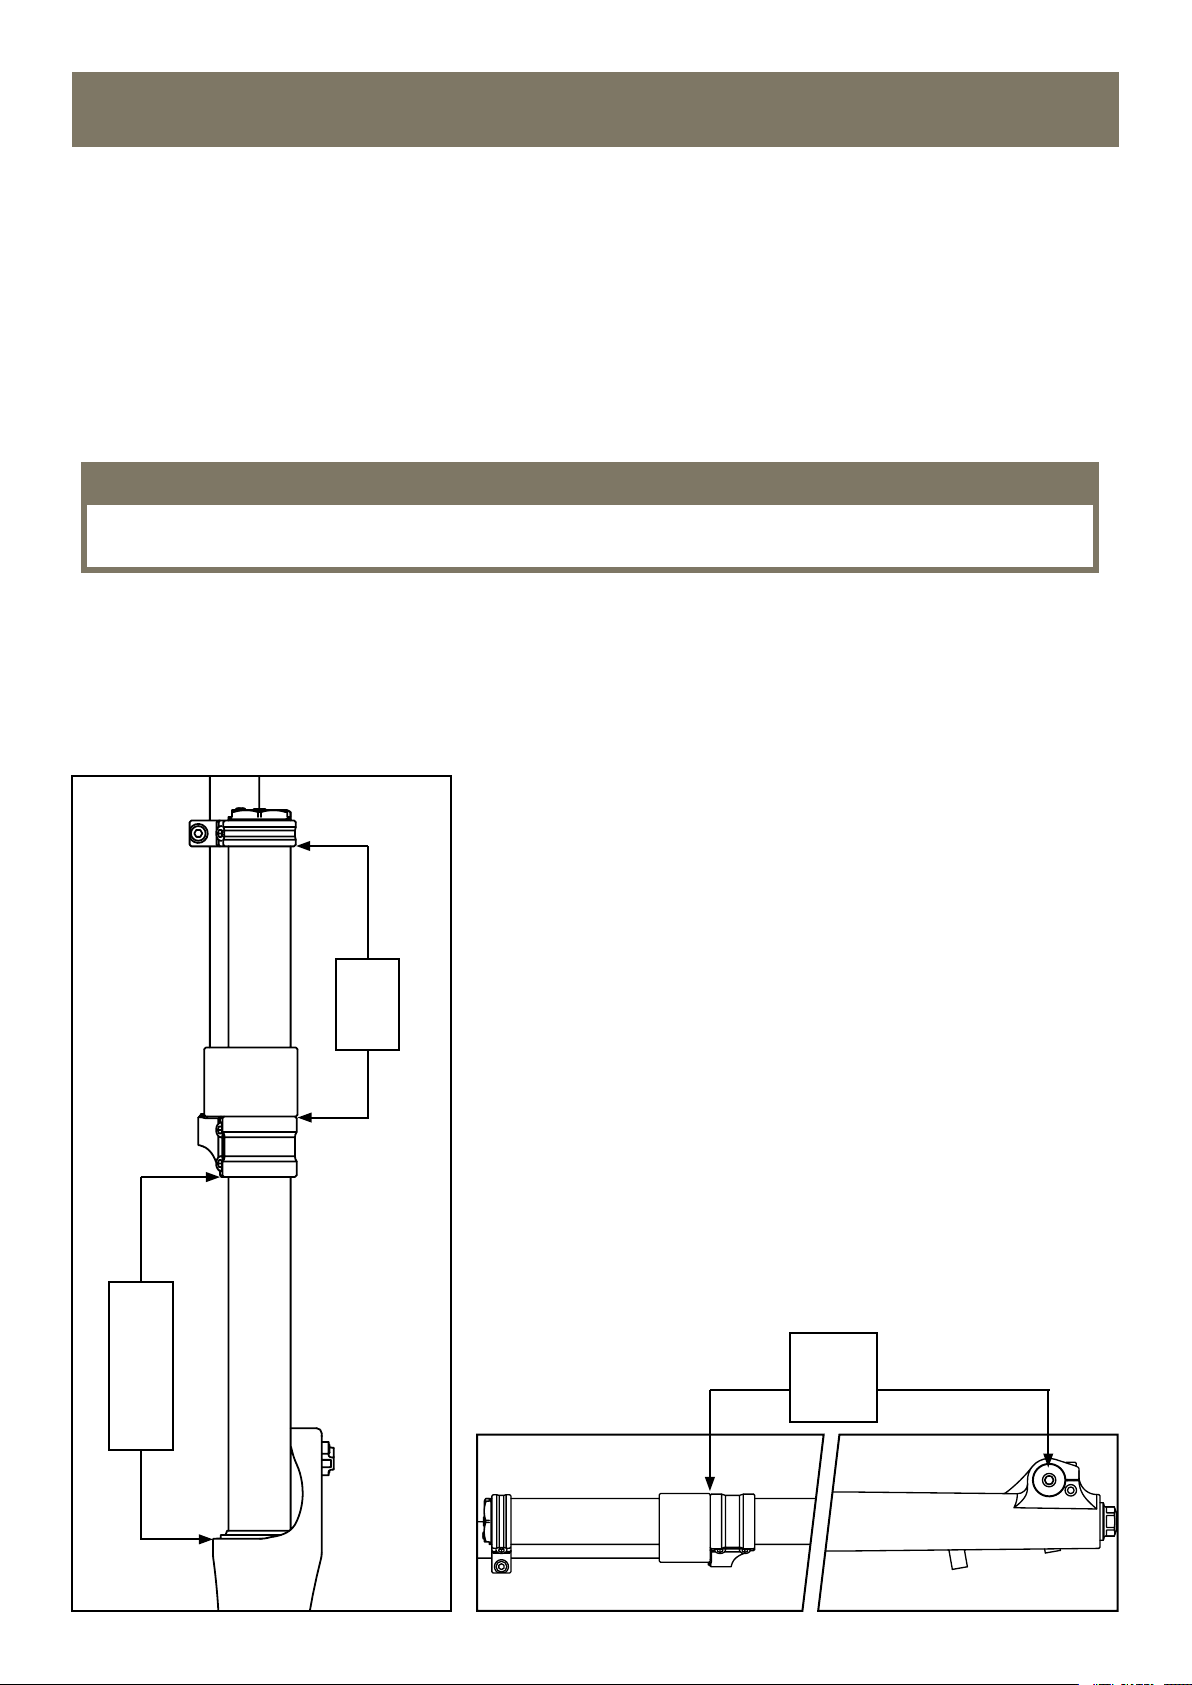
When installing the wheel with a properly inflated tyre check to make
sure that the forks achieve minimum tyre clearance. Simply measure
the distance from the top of the leg (lower part of the seal) to the
outer of the lower crown, it has to be between 210mm to 220mm (A).
IMPORTANT
This distance is for tyres of a maximum diameter of 705mm.
The inner distance between the lower crown and the upper crown
should never exceed 157mm (B).
The distance from the axle of the front wheel to the inner side of the
lower crown (bottom cup of the headset) has to be between 565mm
to 575mm (C).
Once the forks assembled to the measurements listed above you can
then tighten but always refer to the recommended tightening torque.
Tightening torque for all bolts of the upper and lower crown : 4 to 5 Nm.
1. ASSEMBLY
B
157
mm
MAX
A
MINI
210
mm
MAX
220
mm
C
565
to 575
mm
Page 4
1.3 . The front wheel
To assemble the front wheel, check the following instructions :
1. Undo the 4 bolts at the bottom of the legs of your forks.
2. Put the front wheel in-between the legs.
3. Put a small amount of grease on the thread of the axle of the front wheel.
4. Put the axle in and tighten, no need to over tighten it, stop when you start feeling resistance.
Tighten first the 2 bolts on caliper side and then the 2 bolts on the other side,
to the same tightening torque : 2 to 3 nm.
1.4. Installation of the braking system.
Please refer to the manuals of the manufacturers. Meanwhile, apply the folowing instructions :
Minimul lenght of thread of the caliper screws into the fork : 10 mm
Tightening torque : 9 to 10 Nm
2.1. Spring
Before giving your forks their first spin, please do check that you are using the right spring rate.
With your forks (providing that it is not an original equipment) come extra springs in order to adjust to most of the
riders. By default, your forks come with the orange spring within.
The table below is for own use, please refer to it.
Less than 55 kg 55 to 65 kg 65 to 75 kg 75 to 90 kg 90 kg and more
green red orange yellow silver
option
supplied
with the forks
supplied
with the forks
supplied
with the forks
option
Spring Preload
The sag on your forks shouldn’t exceed 30 to 50 mm (15% to 25% of the travel) therefore it is very important not to
preload the forks more than what‘s necessary. The sag has to be considered in dynamic situations (going down the
hill for instance) not static situations before preloading the spring, and it allows to raise the chassis at its right height.
The preload of the spring is made through some spacers. Never use less than two spacers and more than four
spacers. Below and above these numbers, change the spring for a softer or a stiffer one.
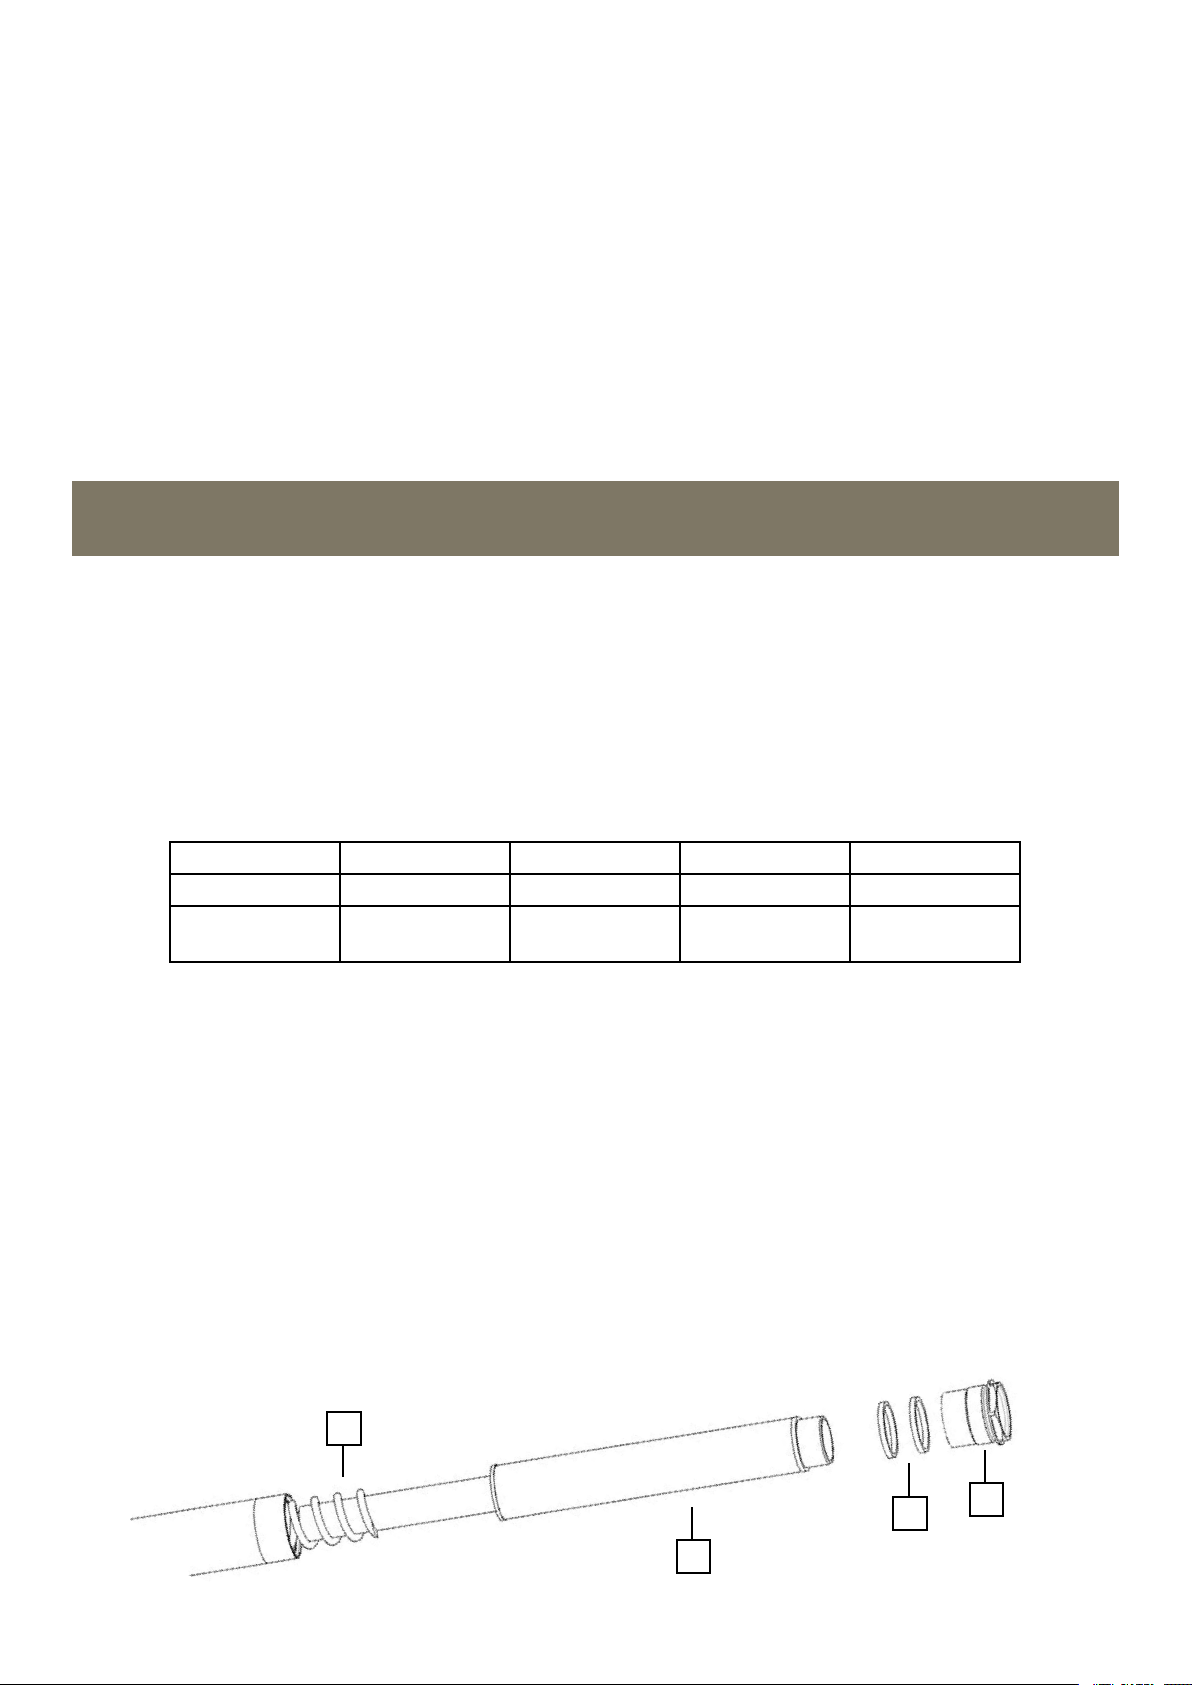
Premoad adjustment and pring swap
1. Unscrew the triple crown on left side.Unscrew and remove the stanchion cap(1).
2. Adjust the number of spacers depending on the required preload (2).
3. To change the spring : remove the spacers (2), and the preloader (3).
4. Push down the stanchionto get access to the spring (4), remove it, replace it, and re-assemble the whole thing.
2. SETTINGS
1
2
3
4
Page 5
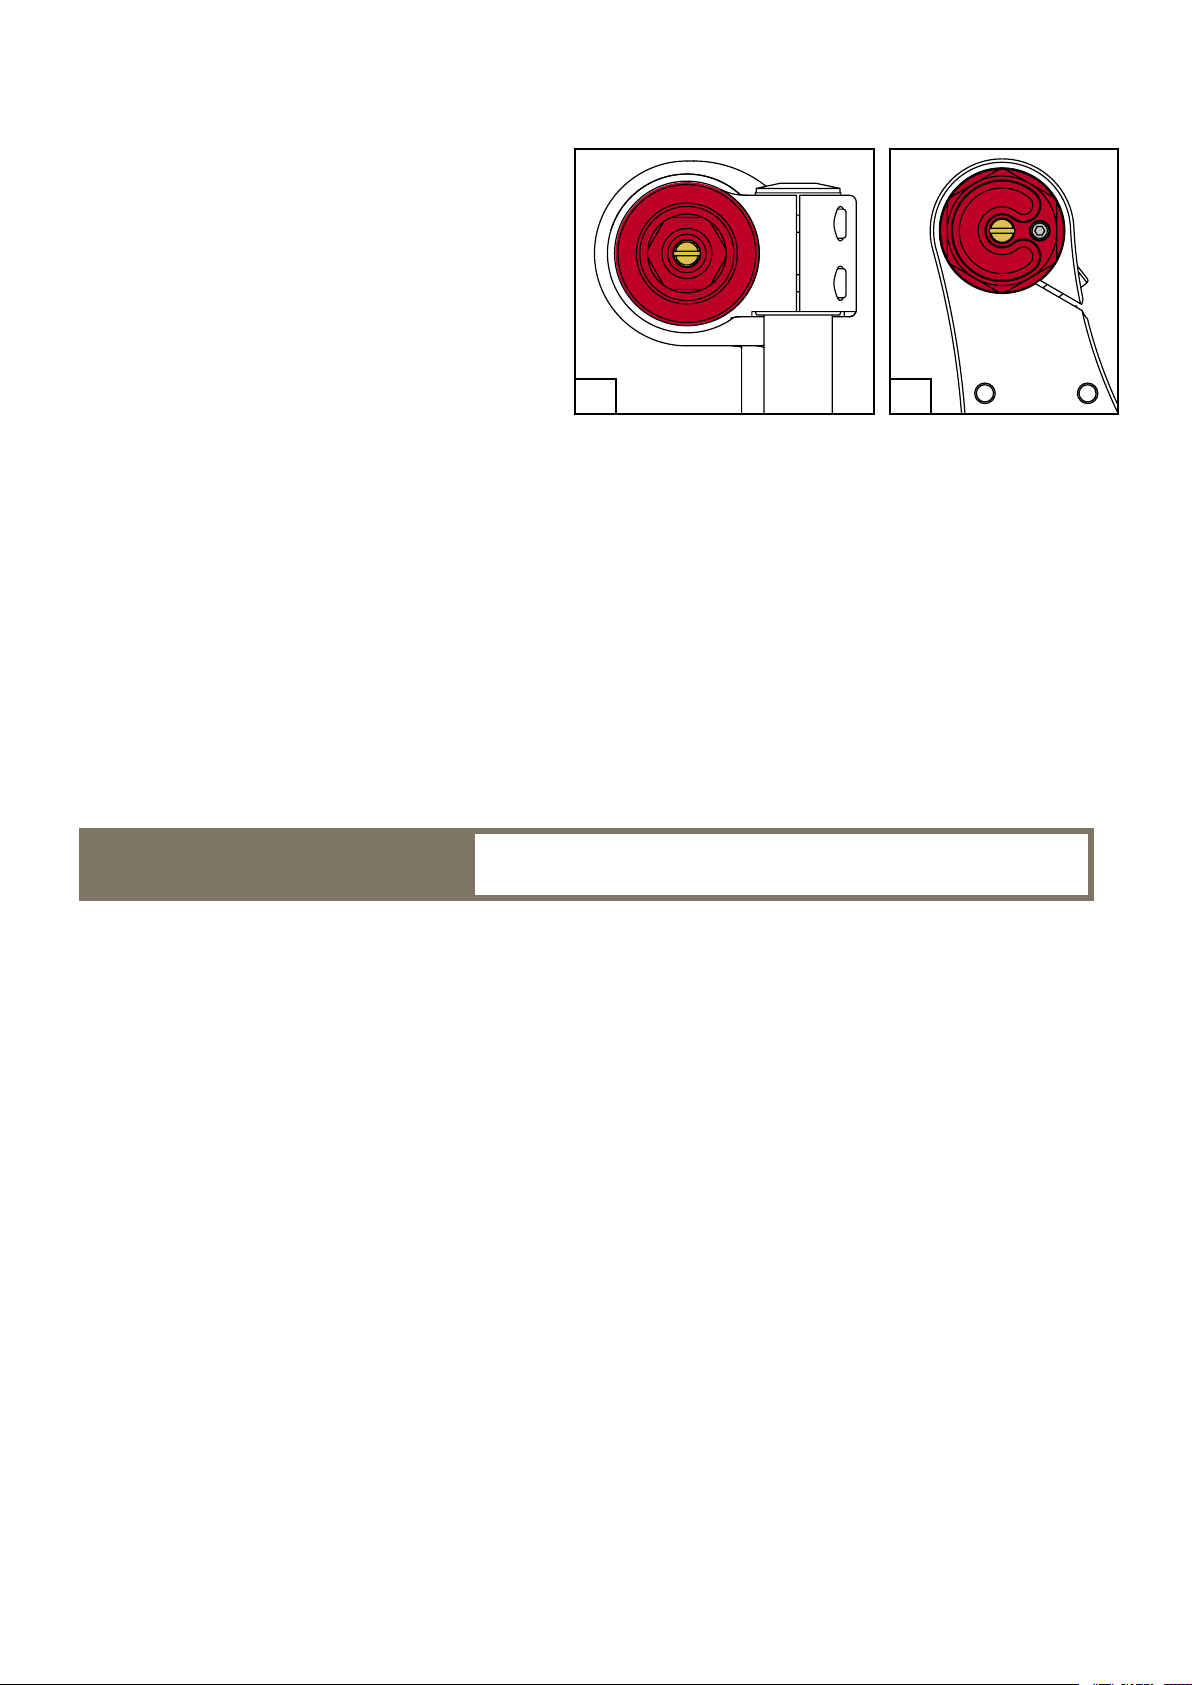
2.2. Hydraulic adjustments
Idylle has 2 hydraulics adjustments: compression and rebound.
The compression adjustment seats at the bottom of
the right hand leg (flat head screw).
The rebound adjustment is on the top of the right
hand stanchion (the non-disc side).
Always start from fully tighten position, then tighten
down counting the clicks to adjust your settings.
Tighten (anticlockwise) = close / harden
Undo (clockwise) = open / soften
A short tutorial : main setting solutions
When it comes down to hydraulic setting there is no such thing as a magical formula, many factors have to be taken
into account (influence of the rear end of the bike, spring rate, the height of the front end, geometry of the bike…).
Having said that you still draw conclusions from what follows :
- Excessive dive of the front end upon braking : harden the compression.
- The front end keeps on bottoming out : harden the compression.
- Uncomfortable front end (pumped forearms) : soften rebound.
- The forks don’t spring back and stay low after succession of bumps : soften rebound.
- Front end too high (in dynamic situation) : harden the rebound.
Whenever you are far from the standard settings (factory settings) It’s always best to consider what influences the
performance of the forks. Proceed step by step, one setting at the time by hardening or softening few click each time.
If you ever get lost whilst you are setting up the forks always go back to its original settings.
Idylle standard settings :
Compression : undo 13 clicks from fully tighten position
Rebound : undo 18 clicks from fully tighten position
1 2
Page 6
3. MAINTENANCE
3.1 Air Bleeding
Idylle is fitted with two bleeding screws on the top of each stanchion.
Bleeding your forks on regular basis will reduce the pressurising effect that always happen with those forks.
We recommend to bleed your forks every 5 hours of effective riding.
All you have to do is to undo the 2 bleeding screws and put them back on, no need to compress the forks.
3.2 Cleaning your forks
It is compulsory to clean your forks every time you use them, without waiting !
Nothing’s worse for your fork’s seals than dry mud.
It is very simple to clean your forks : wipe off the stanchion with a clean rag and then slightly lube the stanchion
(with silicon based product). Use of degreaser is totally forbidden.
On the same note do not power wash the forks! It will only push the mud inside the forks and get it stuck between
the stanchion and the seals.
3.3 Maintenance frequency
cleaning air bleeding oil change full service
occasional use
after every ride every riding 5Hrs
once a year every two years
intensive use twice a year once a year
3.4 oil level
When changing the oil, it’s very important to respect the correct oil level, in both leg (cartridge and spring),
following the datas mentionned below in the table.
CAUTION
To get the correct oil level in the cartridge side, you must bleed the air while you are pouring the oil.
Once there is no air remaining in the cartridge you can adjust the level, reffering to the table below.
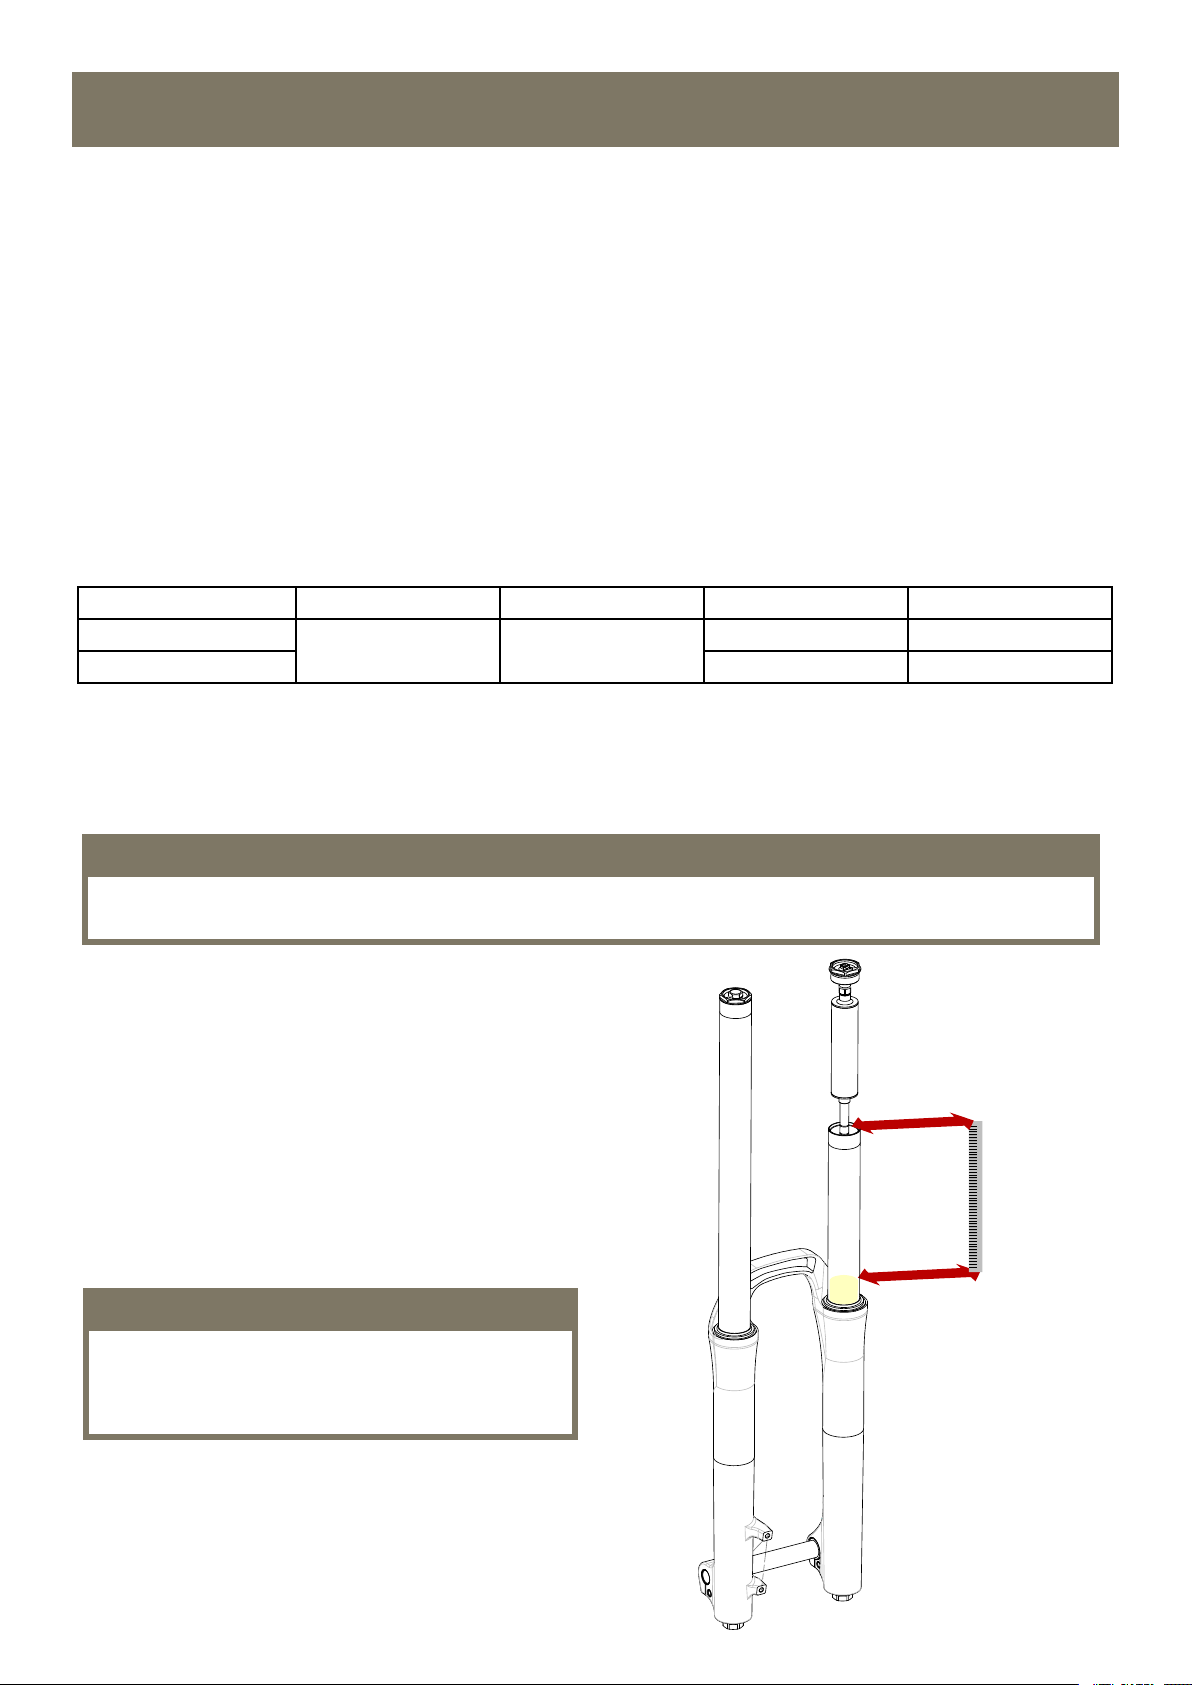
How to measure the oil level, in the cartridge side :
Push down the stanchion
Pull out the rebound rod
Measure the distance between the top of the stanchion and the oil
185 mm
Spring side : Pour the quantity of oil indicated below
Idylle oil level
Cartridge side : 185 mm
Spring side : 100 ml
 Loading...