

Page 1
BSS-2400N
98292800
Bedienungsanleitung
User’s Manual
Mode d’emploi
Инструкция по эксплуатации
Page 2

Page 3
A
B
)[
87
-NJO
N-
LH
Page 4

DE
Staubsauger ohne
Ansaugleistungsverlust, mit
True Multi-Cyclone-System
V12
SEHR GEEHRTE KUNDIN, SEHR
GEEHRTER KUNDE!
Wir gratulieren Ihnen zum Erwerb des Produkts der
Firma BORT. Unsere Produkte sind durch fortgeschrittenes Design sowie hohe Qualität der Ausführung gekennzeichnet. Wir hoffen, dass unser Erzeugnis Ihnen
als zuverlässiger Kamerad lange Jahre dienen wird.
Zwecks maximal sicherer und wirksamer Nutzung des
Produktes lesen Sie bitte diese Bedienungsanleitung
aufmerksam durch und bewahren Sie diese zur weiteren Benutzung auf.
VORTEILE
1. Dank true multi-cyclone system V12 mit zwei Staubsammelbehältern wird ständige Ansaugleistung gesichert.
2. Dank der langen Nutzdauer der HEPA-Filter entstehen keine Mehrkosten wegen Filteraustausch.
3. Das true multi-cyclone system mit HEPA-Filter im
Luftzufuhr- und Entlüftungssystem im Motorraum garantiert die beste Filterung.
Das erlaubt den Reiz der Atmungsorgane bei den Personen, die an Allergie und Asthma leiden zu vermeiden.
TECHNISCHE DATEN A
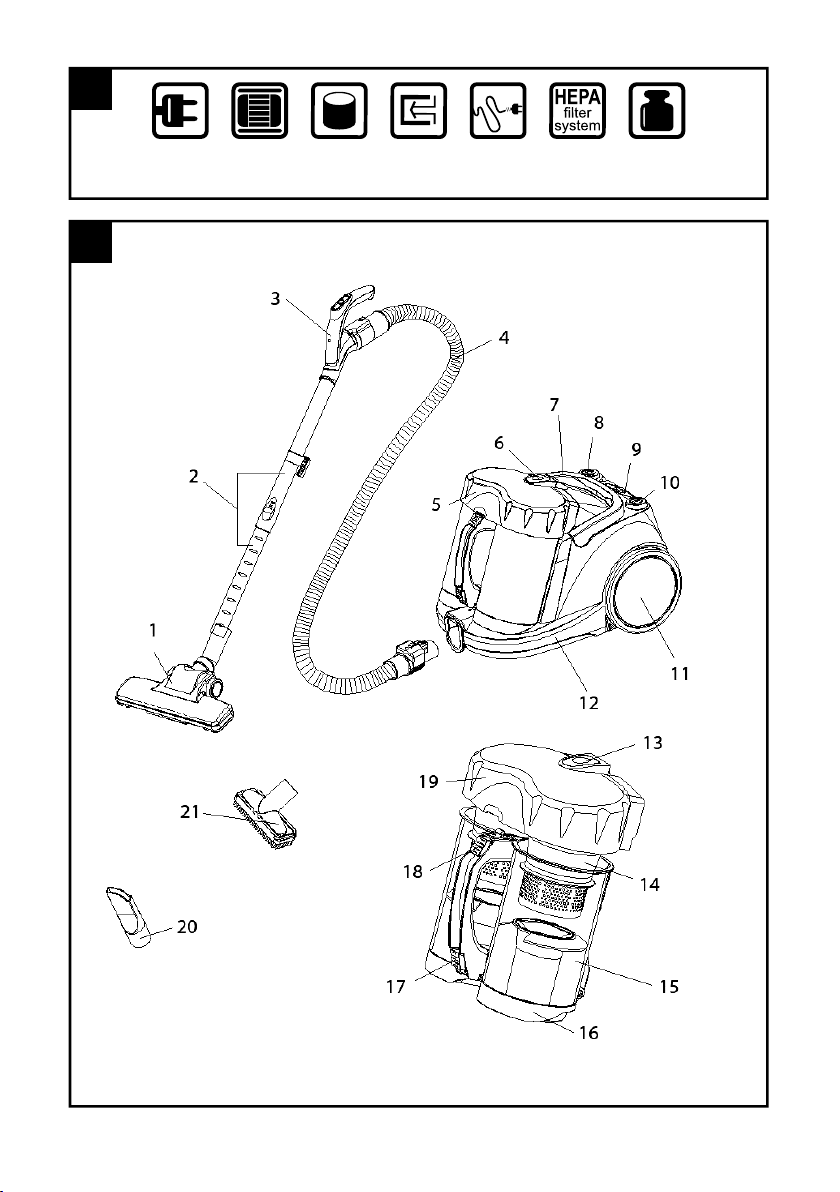
AUFBAU B
1. Universalbürste
2. Teleskopisches Verlängerungsrohr
3. Griff mit Schlauch
4. fl exibler Schlauch
5. Deckel des Staubsammelbehälters
6. Sperrtaste des Containers des Staubsammelbehälters
7. Tragegriff
8. Taste zur Aufwicklung des Netzkabels
9. Staubsaugeranschaltindikator
10. Ein-/Ausschalttaste
11. Rädchen
12. Gehäuse des Staubsaugers
13. Sperrtaste des Containers des Staubsammelbehälters
14. Filter
15. Staubsammelbehälter
16. Unterer Deckel des Containers
17. Sperrtaste des unteren Deckels des Containers
18. Sperrtaste des oberen Deckels des Containers
19. Deckel des Staubsammelbehälters
20. Fugendüse
21. Bürste für Reinigung der Teppiche
ACHTUNG: Alle Bilder sind schematisch dargestellt
und können vom tatsächlichen Produkt abweichen.
AUSSTATTUNG
Standardausstattung beinhaltet:
Staubsauger
Schlauch
Teleskopisches Verlängerungsrohr
Fugendüse
Universalbürste
Bürste für Reinigung der Teppiche
Betriebsanleitung
Im Zusammenhang mit ständiger Verbesserung von
technischen Daten der Modelle behalten wir uns das
Recht vor, Bauart und Lieferumfang zu ändern.
SICHERHEITSHINWEISE
1. Benutzen Sie dieses Gerät nur für den Hausgebrauch und entsprechend der Bestimmung, die in
dieser Bedienungsanleitung beschrieben wurde. Verwenden Sie nur die vom Hersteller empfohlenen Verbindungselemente.
2. Lassen Sie den eingeschalteten Staubsauger nicht
ohne Aufsicht. Drücken Sie die Taste EIN/AUS und
ziehen Sie immer den Netzstecker aus der Steckdose,
wenn Sie den Staubsauger nicht benutzen oder vor der
Wartung- oder Pfl egemaßnahmen.
3. Es ist verboten, ans Netzkabel zu ziehen oder das
Netzkabel als Tragegriff zu benutzen. Es ist verboten,
das Netzkabel durch die Tür oder durch das Gehäuse
des Staubsaugers einzuklemmen.
4. Staubsauger ist kein Spielzeug! Lassen Sie die Kinder den Staubsauger nicht als Spielzeug benutzen.
Seien Sie besonders aufmerksam in dem Fall, wenn
sich neben dem laufenden Gerät Kinder befi nden.
5. Es ist verboten, den Staubsauger mit beschädigtem
Netzkabel zu benutzen. Betrieb des Staubsaugers ist
nur nach dem Ersatz des Netzkabels durch ein autorisiertes Servicezentrum zulässig.
6. Berühren Sie den Netzstecker oder den Staubsauger nicht, wenn Ihre Hände nass sind.
7. Bei Benutzung des Staubsaugers ist dabei zu achten, dass die Teilchen des Mülls die Saugöffnung der
Luftrohrleitung (inkl. Schlauch und dessen Aufsatz)
nicht verstopfen, um Überhitzung und Ausfall des
Motors und Beschädigung des Gehäuses vom Staubsauger zu vermeiden. Wenn Sie aber feststellen, dass
Verstopfung entsteht, schalten Sie den Staubsauger
sofort aus, danach trennen Sie ihn vom Netz ab und
beseitigen Sie die Verstopfung.
8. Es ist verboten, beim Betrieb des Staubsaugers die
Auslassöffnung mit dem Handtuch oder ähnlichen Materialen zu verschließen, sonst wird die Saugleistung
des Staubsaugers erheblich gemindert, Motor wird
überhitzt und kann ausfallen.
9. Es ist verboten, den Staubsauger auf unebenen
Oberfl ächen zu verwenden. Seien Sie besonders auf-
merksam beim Reinigen des Treppenhauses, um Abstürzen des Gerätes zu vermeiden.
10. Es ist verboten, mit Hilfe des Staubsaugers brennende oder qualmende Zigaretten aufzufangen. Das
kann zu erheblichen Schäden des Motors führen.
4
Page 5

gg
11. Halten Sie das Netzkabel fern von den Wärmequel-
len (z. B. Heizkörper der Zentralheizung, Ofen usw.),
um die Beschädigung der Plastikteile des Gerätes zu
vermeiden.
12. Vor dem Beginn der Reinigung sammeln Sie große
und scharfe Gegenstände vom Fußboden, um die
Beschädigung der Plastik-Teile, Filter und Motor nicht
zuzulassen.
13. Es ist verboten, mit Hilfe des Staubsaugers Wasser
oder andere Flüssigkeiten aufzufangen, um die Beschädigung des Staubsaugers zu vermeiden.
14. Es ist verboten für die behinderten Personen (Per-
sonen mit eingeschränkten physischen, und geistigen
Fähigkeiten) sowie für Kinder, dieses Gerät zu betreiben. Das Gerät darf nicht von Personen mit ungenügender Erfahrung in Betrieb von solchen Geräten ohne
entsprechende Instruktion bzw. ohne fachliche Aufsicht
betrieben werden.
MONTAGEHINWEISE
Schalten Sie den Staubsauger vom Speisenetz immer
ab, wenn Sie Aufsatzbürsten und Zubehör wechseln!
1. Vorbereitung des Staubsaugers
1.1 Anschluss des fl exiblen Schlauches:
Setzen Sie die Spitze des fl exiblen Schlauchs in die
Lufteintrittsöffnung ein, die sich im vorderen Teil des
Gehäuses des Staubsaugers befi ndet. Beim korrekten
Anschluss hören Sie ein Knacken.
(Achtung: Der Betrieb des Staubsaugers ist nur beim
richtigen Anschluss des fl exiblen Schlauchs möglich).
1.2 Für die Abnahme des fl exiblen Schlauches aus
der Anschlussstelle:
Schalten Sie den Staubsauger vom Speisenetz ab. Um
den fl exiblen Schlauch aus der Anschlussstelle abzu-
nehmen, drücken Sie die Sperrtaste auf dem Griff des
Schlauchs.
2. Anwendung der Düsenaufsätze
1. Fugendüse:
Für die Reinigung von Heizkörpern, Fugen, Ecken und
zwischen den Sofa-Polstern
2. Bürste zur Reinigung des Fußbodens/des Teppich-
bodens (2 in 1) dient für die Reinigung von Möbeln,
Rippenoberfl ächen von Jalousie, Büchern, Stehlam-
pen, Fächern usw. Getrennt kann als Aufsatz für Reinigung der Sofas verwendet werden.
GEBRAUCHSHINWEISE
Vor der Inbetriebnahme ziehen Sie das Netzkabel um
die erforderliche Länge aus, setzen Sie den Netzstecker in die Steckdose ein. Das gelbe Zeichen am Netzkabel warnt über die maximale Länge des Kabels. Es
ist verboten, das Kabel länger auszuziehen, als das
rote Zeichen anzeigt.
1. Ein-/Ausschalttaste
Setzen Sie den Netzstecker in die Steckdose ein.
Schalten Sie den Staubsauger ein mit dem Drücken
der Ein-/Ausschalttaste, nach dem leuchtet die Anzeigelicht, was bedeutet, dass der Staubsauger betriebsbereit ist.
Dann schieben Sie die Taste auf dem Griff des
Schlauchs, um den Motor einzuschalten. Danach stellen Sie die Ansaugleistung ein.
2. Kabelaufwicklungstaste
Um das Netzkabel aufzuwickeln, drücken Sie die Kabelaufwicklungstaste und halten Sie mit der Hand das
aufwickelnde Kabel, um seinen Überschlag und Beschädigung zu vermeiden.
NACHVERKAUFSSERVICE
Bei Betriebsstörungen wenden Sie sich an ein autorisiertes Servicezentrum, um das Gerät reparieren zu
lassen oder um beraten zu werden.
3. Ansaugleistungsregler
Drücken Sie die Ein-/Ausschalttaste auf dem Gehäuse des Staubsaugers. Der Lichtanzeiger leuchtet.
Der Staubsauger ist betriebsbereit. Schieben Sie den
Leistungsregler auf dem Schlauchgriff für Ein- und
Ausschalten des Motors und Einstellen der Ansaugleistung. Wenn Sie den Reinigungsvorgang für bestimmte Zeit unterbrechen – stellen Sie den Regler auf
dem Griff in die Position AUS ein. Nach der Reinigung
schalten Sie den Staubsauger aus mit dem Drücken
der Ein-/Ausschalttaste. Die Spannungsversorgung
des Stabsaugers hört auf (Lichtanzeiger leuchtet nicht)
und der Staubsauger kann weggenommen werden. .
WARTUNG
1. Reinigung des Staubsammelcontainers
Der Staubsauger muss nur mit richtig eingesetztem
Staubsammelcontainer betreiben werden.
1. Drücken Sie die Sperrtaste des Containers des
Staubsammelbehälters und nehmen Sie den Container
vom Gehäuse ab, halten Sie dabei am Griff.
5
Page 6

2. Drücken Sie die Öffnungstaste am unteren Deckel
und entfernen Sie den Müll.
3. Bei zu starker Verschmutzung nehmen Sie den Fil-
terblock aus dem Container aus. Reinigen Sie den Filter mit einer weichen Bürste vom Staub und Müll oder
spülen Sie die Filter unter dem Wasser aus. Trocknen
Sie den Filter sorgfältig aus vor dem weiteren Einsatz.
2. Montage des Staubsammelcontainers auf dem Ge-
häuse des Staubsaugers:
1. Drücken Sie den unteren Deckel des Staubsammel-
containers an das Containergehäuse bis zur Stoppung.
2. Setzen Sie den Staubsammelcontainer an seinen
Platz auf dem Gehäuse des Staubsaugers (s. die
Zeichnung).
3. Befestigen den Staubsammelcontainer auf dem
Gehäuse des Staubsaugers, indem Sie darauf leicht
drücken.
3. Austausch oder Reinigung der HEPA-Filter
a. Nehmen Sie das Gitter des HEPA-Filters vom Gehäuse des Staubsaugers ab, indem Sie den Knopf des
Gitters drücken. Nehmen Sie den Filter heraus.
Reinigen Sie den HEPA-Filter mit einer weichen Bürste
oder spülen Sie ihn unter einem lauwarmen Wasserstrahl. Danach trocknen Sie den Filter sorgfältig aus
und legen Sie den Filter wieder ein. Bei der Saugkraftminderung muss der Vorgang der Filterreinigung wiederholt werden.
Setzen Sie das Gitter des Ausgangsfi lters an seinen
Platz zurück.
Anmerkung: Beim Betrieb des Staubsaugers muss der
Filter richtig an seinem Platz eingesetzt werden.
6
Page 7

No Loss of Suction,
True Multi-Cyclone V12
Vacuum Cleaner
DEAR CUSTOMER!
Congratulations on the purchase of BORT product,
which has progressive design and high quality. We
hope that our products will be your companion for
many years.
For the effi cient and safe use of the product, please
read this manual and save it for future reference.
THE ADVANTAGES
1. With advanced exclusive Dual-bins plastic centering
true multi-cyclone system, no loss of suction.
2. Long life use of HEPA fi lters, no need often to main-
tenance, no need extra cost.
3. Multi-cyclones plus motor inlet and outlet two HEPA
fi lters, enabling a highest cleaning effi ciency. Good for
allergy people and asthmatics.
SPECIFICATIONS A
MAINTENANCE INSTRUCTIONS B
1. Brush
2. Extension tube
3. Hose handle
4. Flexible hose
5. Dust cup
6. Dust cup release button
7. Handle
8. Rewind button
9. Power indicate
10. Switch button
11. Wheel
12. Base body
13. Dust cup release
14. Plastic centre fi lter system
15. Dust cup
16. Dust cup bottom
17. Dust cup bottom release bottom
18. Dust cup cover release bottom
19. Dust cup cover
20. Crevice nozzle
21. Duster brush
ATTENTION: All schematic pictures may differ from the
actual product
COMPLETE SET
Standard complete set of the product includes:
Vacuum Cleaner
Hose
Telescopic tube
Crevice nozzle
Multi brush
Brush for upholstery and carpets
Owner’s manual
Due to the constant improvement of the technical characteristics of the models, we reserve the right to make changes in construc-
tion and/or complete set of product.
SAFETY AND SECURITY
1.Be sure to use the cleaner in compliance with the
contents of this manual, and use the fi ttings designated
by the manufacturer.
2. Please do not leave the cleaner when it is powered
on. Turn off the power switch and pull out the power
plug when not using or before maintenance.
3. Please do not pull or carry the cleaner by the power
cord, or nip it when closing a door; keep the cord free
from the press of the cleaner.
4. Please do not let children take the cleaner as a toy,
and close attention is necessary when the cleaner approaches children.
5. Please do not use the cleaner when its power cord or
plug is damaged. Send it to the appointed service center. Please do not unplug by pulling the cord or plug. To
unplug, grasp the plug, not the cord.
6. Never pull the power plug or use the cleaner with
wet hands.
7. When using the cleaner, pay attention to prevent any
hair roll or other rubbish block up the air inlet (including the hose and the spile), otherwise motor failure and
housing distortion may be caused. If the matters absorbed in forms a blockage, stop the cleaner by pulling
out the power plug immediately to clean the blockage.
8. When using the cleaner, don’t plug up the air outlet
by towel or other matters, otherwise the effi ciency of
dust absorbance will be infl uenced, and the motor will
be at high risk of being burnt out.
9. Never use the cleaner at uneven fl oor or ground;
and be very careful when cleaning stairs to prevent the
cleaner from falling down.
10. Never absorb live stumps with the cleaner, otherwise the motor may be damaged.
11. The cleaner should be kept far away from heat
sources (such as central heating, oven, etc) to avoid
the distortion of plastic parts as well as the infl uence
caused by such distortion.
7
Page 8

12. Before using the cleaner, please remove big and
sharp matters on the fl oor to avoid damaging the plas-
tic parts, fi lter gauzes and motor.
13. Never absorb water or other liquid with this cleaner,
otherwise, the motor will be damaged.
14. This appliance is not intended for use by persons
(including children), with reduced physical, sensory or
mental capabilities, or lack of experience and knowledge, unless they have been given supervision or instruction concerning use of the appliance by a person
responsible for their safety.
ASSEMBLY INSTRUCTIONS
Always remove the plug from the power socket before
fi tting or removing accessories!
1. Equiping vacuum cleaner
1. Fixing the fl exible hose on vacuum machine:
REPLACEMENT OF REAR
FILTER FOR MOTOR
The rear fi lter for motor is installed behind the air outlet
grid, which can be washed due to the materials used.
When the surface is jammed seriously by dust, the fi lter
should be replaced by a new one or washed by water
to maintain enough suction force.
It is usually necessary to clean and replace the fi lters
for motor only after they have been used for 6 months
to 12 months. Please remember to confi rm that all
fi lters have been correctly installed into the machine
before turning on the cleaner to use.
Key Points:
The power supply of the cleaner must be cut off before
replacing any fi lter!
FAULTS AND REPAIR
In case of abnormality with this product, please treat
it in the way as stated hereinafter; if the cleaner still
refuses to work normally, please contact the stop from
where this product was bought or with the appointed
service point.
Insert hose joint into the air intake duct on the front of
appliance. Press until it clicks into position.
( Attention: The fl exible hose must be fi xed into the
vacuum body, then the vacuum can work. Otherwise,
the vacuum can’t work without the fl exible hose fi xed
in.)
** Removing the fl exible hose from vacuum machine:
Removing the plug from the power socket. Press
release button on hose joint to remove the fl exible hose
from the vacuum machine.
2.Fixing the extension tubes and accessories
a. Fixing the telescopic tube to the handle.
b. Fixing the brush to the extension tube.
c. Fixing Floor brush Ideal for the daily cleaning on
carpets and hard fl oors.
2.Cleaning tools use
1. Crevice tool:
For radiators, crevices, corners, baseboards and
between cushions.
2. Dusting brush(2 in 1 ) is used for the furniture,
venation, blinds, book, lamp shades and shelves,etc.
Separately it can be used as a sofa nozzle.
INSTRUCTIONS FOR USE
Before using appliance, pull out a suffi cient length
of cable and insert the plug into the power socket. A
yellow mark on the power cable shows the ideal cable
length. Don’t expend the cable beyond the red mark.
1. Switch Button
Insert the power plug into the socket. Press the main
ON/OFF Switch button on vacuum body to switch on
the vacuum machine, then the power indicating lamp
(neo-lamp) will be lighting, it is ready for work.
Then you can slide the power button on the hose handle
to switch on and adjust the power of this vacuum.
2. Auto Cord Rewind Button
To rewind the power cord, press the rewind button with
one hand and guide the cable with the other hand to
ensure that it does not whip causing damage.
3. Power Control Button
Turn on the main switch on the vacuum machine, then
the power neon-light will be turn on. Then it is ready
for work. You can slide the power control button on
the handle to switch off or adjust the suction power
of the machine. If you stop the cleaning for a while,
please just slide the power control button on handle
to ‘OFF’, then the vacuum will stop to sucking. When
you fi nish all cleaning work, please again push the
main ‘ON/OFF’ switch on vacuum body, to switch off
the electricity supply to this vacuum. (The neon-light
will be turn off at that time.), and storage your vacuum
properly.
( Attention: The fl exible hose must be fi xed into the
vacuum body, then the vacuum can work. Otherwise,
the vacuum can’t work without the fl exible hose fi xed
in.)
8
Page 9

MAINTENANCE
1. How to drop dust and clean the dust cup
Always operate the cleaner with dust cup installed.
1. Press the dust cup release button, handing the dust
cup handle, take off the dust cup from the vacuum
cleaner.
2. Press the dust cup bottom release button, then the
dust will full down automatically. Usually you may only
do like this to drop the dust.
3. If fi nd the plastic centre system too dirty, please
press the dust cup cover release button, take out the
fi lter assembly out of the dust cup, then you can clean
them with soft brush or wash them with water. You
should dry them completely before you use again.
2. Install dust cup on the body:
1. Pull the dust cup bottom back to the dust cup until
the button be locked.
2. Put the dust cup onto the body case properly.
3. Push on the dust cup to fi x with body.
4. Change or cleaning the inlet and exhaust HEPA fi lter
a. Push the dust cup release button, handing the dust
cup handle to rear side, take off the dust cup from the
vacuum cleaner. Draw out the inlet sponge and HEPA
fi lter set (Note: Please draw out the whole set with case
box.).
Pull up the knob of the fi lter frame, and pull out the
sponge fi lter and HEPA fi lter from the case box.
Cleaning the Sponge and HEPA fi lter by soft brush
or rinse it in lukewarm water and dry them completely
before use again. All the fi lters are washable. ( we
recommend you to clean the fi lters when feeling the
suction power becoming weak.)
For exhaust HEPA fi lter, press the button on the grid,
take out the grid out (at back of vacuum ).
Hand fi rmly and pull out the HEPA fi lter out .
Cleaning the HEPA fi lter by soft brush or rinse it in
lukewarm water and dry them completely before use
again. Or replace the HEPA fi lter with a new one.
This fi lter is also washable. ( we recommend you to
clean the exhaust HEPA fi lter at least one time every
3 months.)
Assemble the grid back to the body.
Note: The above fi lters should be equipped in correct
places when work the vacuum machine.
Change or cleaning the inlet and exhaust HEPA fi lter
b. Push the dust cup release button, handing the dust
cup handle to rear side, take off the dust cup from the
vacuum cleaner. Draw out the inlet sponge and HEPA
fi lter set (Note: Please draw out the whole set with case
box.).
Pull up the knob of the fi lter frame, and pull out the
sponge fi lter and HEPA fi lter from the case box.
Cleaning the Sponge and HEPA fi lter by soft brush
or rinse it in lukewarm water and dry them completely
before use again. All the fi lters are washable. ( we
recommend you to clean the fi lters when feeling the
suction power becoming weak.)
9
Page 10
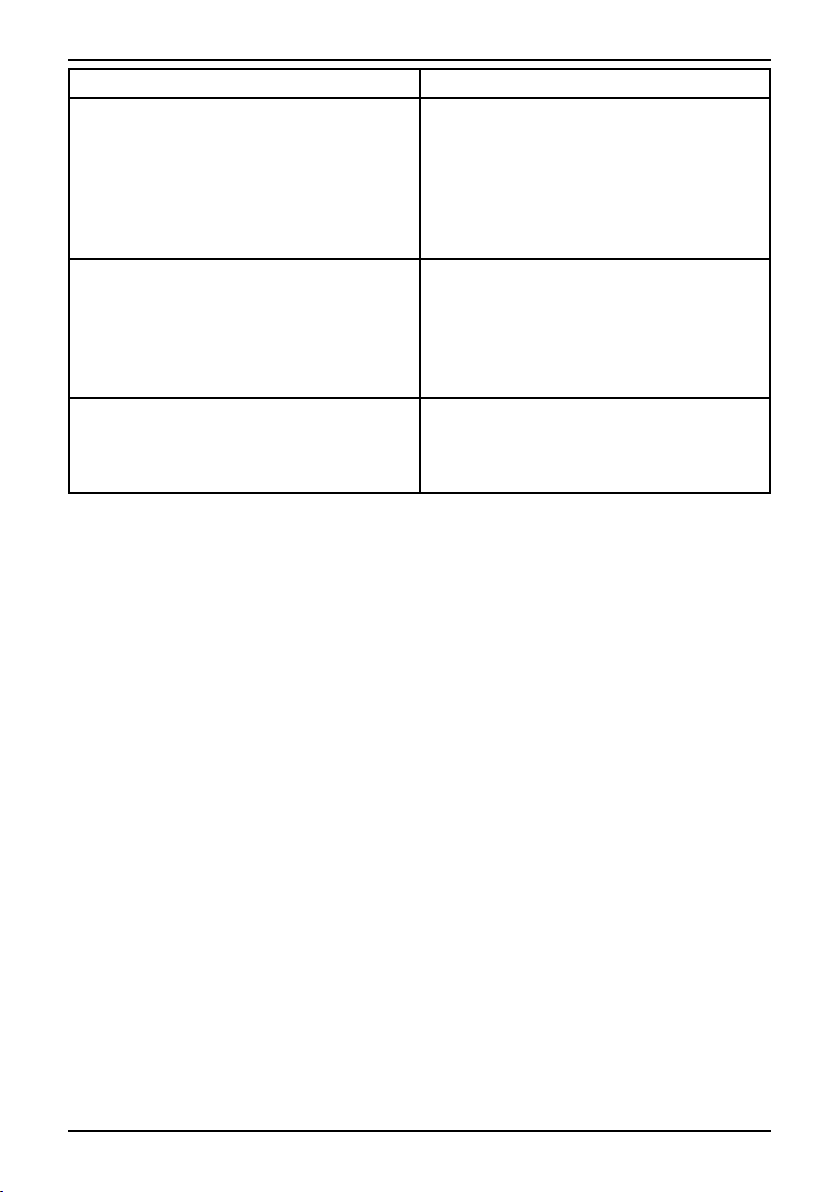
Fault Treatment
The cleaner cannot operate. 1. Check whether the power plug is
inserted securely; pull out the plug and
then reinsert it in the power socket;
2. Check whether the power socket is
electrified;
3. Check whether the switch of the cleaner
is in “ON” position.
The suction force is reduced. 1. Check whether the floor brush, the hose
and the spile are jammed, and remove any
blockage immediately;
2. Check whether the air-inlet filter gauze
is dusty; frequently clean rubbish or
replace air-inlet and air-outlet HEPA;
There is abnormal sound when the motor
is under operation.
1. Stop the cleaner immediately;
Check whether the floor brush, the hose
and the spile are jammed, and remove any
blockage immediately.
10
Page 11

Aspirateur sans perte de
puissance d’aspiration,
utilisation du système True
Multi-Cyclone V12
CHER ACHETEUR,
Nous vous félicitons à l’occasion de l’achat de ce produit BORT qui se distingue par un design avancé et
une haute qualité d’exécution. Nous espérons que
notre produit deviendra votre compagnon pour de longues années.
Pour l’utilisation sécuritaire et effi cace du produit au
maximum, veuillez lire attentivement ce manuel d’utilisation et gardez-le pour référence future.
AVANTAGES
1. Grâce à la présence du système True Multi-Cyclone
System V12 avec deux réceptacles de poussière, sans
perte de puissance d’aspiration.
2. Grâce à la longue durée de vie des fi ltres HEPA, des
frais supplémentaires pour le remplacement des fi ltres
ne sont plus nécessaires.
3. La présence du double système de nettoyage cyclo-
nique et l’utilisation de fi ltres HEPA dans les systèmes
d’amenée d’air et d’évacuation d’air du moteur permet
d’atteindre un niveau élevé de nettoyage.
Bon pour les allergiques et les asthmatiques.
CARACTERISTIQUES TECHNIQUES A
ORGANISATION B
1. Brosse universelle
2. Tube télescopique
3. Pistolet avec boyau
4. Boyau fl exible
5. Couvercle du container du collecteur de pous-
sières
6. Bouton de fi xation du container
7. Manette de transport de l’aspirateur
8. Bouton pour l’enroulage du câble électrique
9. Indicateur du branchement de l’aspirateur
10. Bouton branché / débranché
11. Roue
12. Base de l’aspirateur
13. Bouton de fi xation du container
14. Filtre
15. Container de poussière
16. Couvercle inférieur du container
17. Bouton de fi xation du couvercle inférieur du contai-
ner
18. Bouton de fi xation du couvercle supérieur du
container
19. Couvercle du container du collecteur de pous-
sières
20. Embout à fente
21. Brosse à nettoyer les tapis
ATTENTION : Toutes les images sont schématiques et
peuvent différer du produit réel.
COMPOSITION
La composition standard de cet équipement comprend
les parties suivantes :
Aspirateur
Boyau
Tube télescopique
Embout à fente
Brosse universelle
Brosse à nettoyer les tapis
Manuel d’utilisation
En raison du perfectionnement permanent des caractéristiques des modèles, nous nous réservons le droit
d’apporter des modifi cations à la construction et à la
composition du produit.
PRECAUTIONS ET MESURES DE SECURITE
1. Assurez-vous que vous allez utiliser le produit selon sa destination décrite dans ce manuel, et que les
pièces-raccords appropriés recommandés par le fabricant sont utilisés.
2. Ne laissez pas l’aspirateur branché sans surveillance. Avant de commencer la procédure de l’entretien
de l’aspirateur ou avant la mise en stockage, débranchez-le en appuyant sur le bouton « débr. » puis sortez
la fi che d’alimentation de la prise électrique.
3. Il est interdit de tirer sur le cordon d’alimentation ou
traîner l’aspirateur en tirant sur le cordon d’alimentation. Il est interdit de pincer le cordon d’alimentation,
par exemple, avec une porte ou le corps de l’aspirateur.
4. L’aspirateur n’est pas un jouet ! Ne laissez pas les
enfants jouer avec l’aspirateur. Veillez à ce que les
enfants ne soient pas traumatisés lors de l’utilisation
de l’aspirateur.
5. Il est interdit d’utiliser l’aspirateur avec le cordon
d’alimentation défectueux. L’exploitation n’est permise
qu’après le remplacement du cordon d’alimentation par
un atelier autorisé.
6. Il est interdit de toucher le cordon d’alimentation
avec les mains mouillées.
7. Lors de l’utilisation de l’aspirateur, veillez à ce que
des particules d’ordures ne bouchent pas l’orifi ce d’en-
trée de la gaine d’air (y compris le boyau et l’embout)
afi n d’éviter la surchauffe et la défaillance du moteur
et la détérioration du corps de l’aspirateur. En cas de
bouchage, débranchez immédiatement l’aspirateur,
mettez-le hors circuit et éliminez le bouchage.
8. Lors de l’utilisation de l’aspirateur, il est interdit de
couvrir l’orifi ce de sortie d’air avec une serviette ou des
matériaux pareils, autrement l’effi cacité d’aspiration de
poussière baisserait brusquement, et le moteur serait
surchauffé et pourrait défaillir.
9. Il est interdit d’utiliser l’aspirateur sur des surfaces
irrégulières. Il faut prendre des précautions spéciales
lors du nettoyage d’escaliers afi n d’éviter la chute de
l’aspirateur.
10. Il est interdit d’utiliser l’aspirateur pour ramasser
des bouts de cigarettes non éteints afi n d’éviter la
défaillance du moteur.
11
Page 12

11. Protégez l’aspirateur des sources de températures
élevées (radiateur de chauffage central, poêles etc.)
afi n d’éviter la détérioration des parties plastiques de
l’aspirateur.
12. Avant de commencer l’utilisation de l’aspirateur, il
est nécessaire d’éloigner du plancher à nettoyer des
objets grands et aigus qui pourraient endommager les
parties plastiques de l’aspirateur, les éléments fi ltrants
et le moteur.
13. Il est interdit d’aspirer de l’eau ou d’autres liquides
avec l’aspirateur afi n d’éviter la détérioration de l’aspi-
rateur.
14. Ce produit n’est pas destiné à l’utilisation par des
personnes handicapées physiques, psychiques ou
mentales, y compris les enfants. L’utilisation de l’aspirateur est aussi interdite aux personnes qui manquent
de l’expérience du travail avec de pareilles machines
sans instructions appropriées ou surveillance d’un spécialiste.
INSTRUCTIONS D’ASSEMBLAGE
Débranchez toujours l’aspirateur du réseau électrique
lors de l’installation ou du démontage d’embouts ou
d’accessoires !
1. Préparation de l’aspirateur
1.1 Installation du boyau fl exible sur l’aspirateur :
Insérez le raccord approprié du boyau fl exible dans la
prise d’air de l’aspirateur dans la partie avant de son
corps. Un clic signifi e le montage correct.
(Attention ! L’aspirateur ne peut fonctionner qu’avec le
boyau fl exible correctement raccordé.)
1.2 Pour sortir le boyau fl exible de la prise de l’aspi-
rateur :
D’abord, débranchez l’aspirateur du réseau électrique.
Appuyez sur le bouton sur la manette du boyau pour
sortir le boyau de la prise de l’aspirateur.
2. Utilisation des embouts de nettoyage
1. Embout à fente :
Pour nettoyer des radiateurs, des coins, des plinthes et
entre les coussins
2. La brosse à tapis (2 en 1) est destinée à nettoyer des
meubles, des surfaces nervurées de persiennes, des
livres, des abat-jour, des rayons etc. On peut l’utiliser
séparément comme embout à nettoyer les canapés.
REGLES D’UTILISATION
Avant de commencer l’utilisation de l’aspirateur, tirez
le cordon d’alimentation sur une longueur suffi sante
et insérez la fi che d’alimentation dans la prise élec-
trique. Le marquage jaune sur le cordon d’alimentation
montre la longueur idéale pour le travail. Ne tirez las le
cordon au-delà de la marque rouge.
1. Bouton branché-débranché.
Insérez la fi che d’alimentation dans la prise électrique.
Branchez l’aspirateur en appuyant sur le bouton principal branché / débranché ; l’indicateur s’allumera ce qui
signifi era que l’aspirateur est prêt au fonctionnement.
Après cela, glissez le bouton sur la manette du boyau
pour faire marcher le moteur. Après cela, réglez la puis-
12
sance d’aspiration.
2. Bouton de la fonction de l’enroulage automatique du
câble électrique
Pour faire enrouler automatiquement le câble électrique, appuyez sur le bouton approprié d’une main
et orientez le cordon de l’autre main de la façon qu’il
s’enroule sans obstacles.
SERVICE APRES-VENTE
En cas d’irrégularités dans le fonctionnement de l’aspirateur, veuillez contacter des spécialistes de service
autorisés pour une consultation ou réparation.
3. Régulateur de la puissance d’aspiration
Appuyez sur le bouton principal branché / débranché
sur le corps de l’aspirateur. L’indicateur s’allumera.
L’aspirateur est prêt au travail. Glissez le régulateur de
puissance sur la manette du boyau pour brancher le
moteur, régler la puissance d’aspiration ou débrancher
le moteur. En cas d’arrêt provisoire du nettoyage, glissez le régulateur sur la manette dans la position DEBR.
A la fi n du processus de nettoyage, débranchez l’aspi-
rateur en appuyant sur le bouton principal Branché /
débranché. L’alimentation de l’aspirateur sera coupée.
(L’indicateur s’éteindra.) Après cela, mettez l’aspirateur
en stockage.
REGLES D’ENTRETIEN DE L’ASPIRATEUR
1. Pour vider container du collecteur de poussières
Utilisez l’aspirateur seulement avec le container du collecteur de poussières correctement installé.
1. Appuyez sur le bouton de détachage du container
du collecteur de poussières ; puis, en tenant par la
manette, détachez le container du corps.
Page 13

s
PA
ave
ave
ave
ve
ssedodduce
ou
’eau
ède
. F
. F
ait
es-les sé
che
r srr
oi-
g
n p
osi
ailaa
ous
ncé
s à
s à
s à
l’
eau
eau
eau
2. Appuyez sur le bouton de fi xation du couvercle infé-
rieur du container et videz le container.
3. En cas d’engorgement, retirez le bloc à fi ltre du
container. Nettoyez le fi ltre avec une brosse douce ou
rincez-le avec de l’eau. Avant de réinstaller le bloc à
fi ltre pour continuer le travail, faites-le sécher soigneusement.
2. Pour installer le container du collecteur de pous-
sières sur le corps de l’aspirateur :
1. Appuyez sur le couvercle inférieur du container du
collecteur de poussières dans la direction du corps du
container jusqu’à ce qu’il se verrouille.
2. Installez le container du collecteur de poussières en
place sur le corps de l’aspirateur (voir fi gure).
3. En appuyant légèrement sur le container du collec-
teur de poussières, verrouillez-le sur le corps de l’aspirateur.
3. Pour remplacer ou nettoyer les fi ltres HEPA.
a. Appuyez sur le bouton de la grille du fi ltre HEPA.
Enlevez la grille du corps de l’aspirateur. Après cela,
sortez le fi ltre HEPA.
Nettoyez le fi ltre HEPA avec une brosse douce ou rin-
cez-le avec de l’eau tiède. Faites-le sécher soigneusement et réinstallez en position de travail. En cas de
réduction de la puissance d’aspiration, procédez au
rinçage du fi ltre.
b. Appuyez sur le bouton de fi xation du container. Enle-
vez le container du corps de l’aspirateur.
Tirant sur la manette du cadre du fi ltre, sortez le fi ltre
pongieux et le fi ltre HEPA du boîtier à cassette. Net
spongieux et le fi ltre HEPA du boîtier à cassette. Net-
toyez l’éponge et le fi ltre HE
toyez l’éponge et le fi ltre HEPA avec une brosse douce
rincez-les avec de l
ou rincez-les avec de l’eau tiède. Faites-les sécher soi-
neusement et réinstallez e
gneusement et réinstallez en position de travail. Tous
es fi ltres peuvent être ri
les fi ltres peuvent être rincés à l’eau.
c une bro
ti
tion de t
.
. T
Réinstallez la grille dans sa position.
Note : le fi ltre doit être placé correctement en position
appropriée lors de l’utilisation de l’aspirateur.
13
Page 14

Пылесос
Без потери мощности
всасывания,
применение системы
True Multi-Cyclone V12
УВАЖАЕМЫЙ ПОКУПАТЕЛЬ!
Поздравляем Вас с приобретением продукции
BORT, которая отличается прогрессивным дизай-
ном и высоким качеством исполнения. Мы надеемся, что наша продукция станет Вашим спутником на
долгие годы.
Для максимально безопасного и эффективного использования изделия, пожалуйста, внимательно
прочтите данное руководство по эксплуатации и сохраните его для дальнейшего использования.
ПРЕИМУЩЕСТВА
1. Благодаря наличию системы true multi-cyclone
system V12 с двумя ёмкостями для сбора пыли, от-
сутствует потеря мощности всасывания.
2. Благодаря длительному сроку службы HEPA
фильтров, не требуется дополнительных расходов
на замену фильтров.
3. Наличие двойной системы циклонной очистки
и применение HEPA фильтров в системах подачи
воздуха и вывода воздуха от мотора позволяет достичь высочайшего уровня очистки
Подходит аллергикам и астматикам.
ТЕХНИЧЕСКИЕ ХАРАКТЕРИСТИКИ A
УСТРОЙСТВО B
1. Щётка универсальная
2. Телескопическая трубка
3. Пистолет со шлангом
4. Гибкий шланг
5. Крышка контейнера пылесборника
6. Кнопка фиксации контейнера
7. Рукоятка для транспортировки пылесоса
8. Кнопка для смотки электрического кабеля
9. Индикатор включения пылесоса
10. Кнопка вкл./выкл.
11. Колесо
12. Основание пылесоса
13. Кнопка фиксации контейнера
14. Фильтр
15. Контейнер для сбора пыли
16. Нижняя крышка контейнера
17. Кнопка фиксации нижней крышки контейнера
18. Кнопка
19. Крышка контейнера пылесборника
20. Щелевая насадка
21. Щётка для чистки ковров
фиксации верхней крышки контейнера
.
ВНИМАНИЕ: Все рисунки являются схематическими и могут отличаться от реального изделия
КОМПЛЕКТАЦИЯ
Стандартная Комплектация данного оборудования
включает в себя следующие части:
Пылесос
Шланг
Трубк а телескопическая
Насадка щелевая
Щетка универсальная
Щетка для чистки ковров
Руководство по эксплуатации
В связи с постоянным совершенствованием технических характеристик моделей,
оставляем за собой право вносить изме-
нения в конструкцию и комплектность изделия.
МЕРЫ ПРЕДОСТОРОЖНОСТИ
И БЕЗОПАСНОСТИ
1. Убедитесь в том, что собираетесь применять изделие в соответствии с назначением, приведенным
в данной инструкции и применяются соответствующие соединительные элементы, рекомендованные
производителем.
2. Не оставляйте пылесос включенным без присмотра. Перед началом процедуры по уходу и обслуживанию пылесоса или укладкой его на хранение,
его следует отключить, нажав на
вынуть вилку шнура питания из розетки.
3. Запрещается дергать шнур питания или тащить
пылесос, удерживая за шнур питания. Нельзя защемлять шнур питания, например, дверью или корпусом пылесоса.
4. Пылесос не игрушка! Не давайте играть c ним детям. Следите за тем, чтобы дети не пострадали во
эксплуатации пылесоса.
время
5. Запрещено пользоваться пылесосом при поврежденном шнуре питания. Эксплуатация разрешается
только после замены шнура питания в авторизованной мастерской.
6. Нельзя браться за шнур питания мокрыми руками.
7. При применении пылесоса следует следить
за тем, чтобы частицы мусора не заблокировали
впускное отверстие воздуховода (включая шланг и
его наконечник)
из строя мотора и повреждения корпуса пылесоса.
Если блокирование все же произошло – работу пылесоса следует немедленно прекратить, отключить
его от источника питания и прочистить загрязнение.
8. При применении пылесоса запрещено накрывать
выпускное отверстие для воздуха полотенцем и
подобными материалами, иначе эффективность
всасывания пыли резко упадет,
перегреваться и может выйти из строя.
во избежание перегрева и выхода
копку выкл., затем
а двигатель начнет
14
Page 15

9. Запрещено применять пылесос на неровных по-
верхностях. Следует проявлять особую осторожность при очистке лестниц во избежание падения
пылесоса.
10. Запрещено применять пылесос для уборки не-
погашенных окурков во избежание повреждения
мотора.
11. Держите пылесос на удалении от источников
высокой температуры (батарей центрального отопления, печей и т.п.) во избежание
пластиковых частей пылесоса.
12. Перед началом использования пылесоса следу-
ет устранить с пола, подлежащего уборке, крупные
и острые предметы, которые могут повредить пластиковые части пылесоса, фильтрующие элементы
и мотор.
13. Запрещено всасывать воду или другие виды
жидкости при помощи пылесоса во избежание повреждения пылесоса.
14. Данный аппарат не предназначен
тации лицами с ограниченными физическими, психическими или умственными возможностями, включая детей. Запрещено эксплуатировать пылесос
также лицами с недостатком опыта работы с такими
устройствами без соответствующего инструктажа
или надзора специалиста.
повреждения
для эксплуа-
ИНСТРУКЦИИ ПО СБОРКЕ
Всегда отключайте пылесос от сети питания при
установке или съеме насадок и принадлежностей!
1. Подготовка пылесоса
1.1 Установка гибкого шланга на пылесосе:
Вставьте соответствующий разъем гибкого шланга
в воздухозаборный разъем пылесоса в передней
части его корпуса. При правильной установке раздастся щелчок.
( Внимание: Пылесос может работать только при
правильно подсоединенном гибком шланге
1.2 Для снятия гибкого шланга из разъема пылесо-
са:
Сначала отключите пылесос от сети эл.питания.
Нажмите кнопку на рукоятке шланга для отсоединения его от разъема пылесоса.
2. Применение чистящих насадок
1. Щелевая насадка:
Для чистки радиаторов, щелей, углов, плинтусов и
между диванных подушек
2. Щетка для ковров (2 в 1) предназначена для чист-
ки мебели, ребристых поверхностей жалюзей, книг,
абажуров, полок и т.п. Отдельно можно применять
как насадку для чистки диванов.
.)
ПРАВИЛА ПОЛЬЗОВАНИЯ
Перед началом использования пылесоса следует
вытянуть шнур питания на достаточную длину и
вставить вилку в розетку. Желтая маркировка на
шнуре питания показывает идеальную длину для
работы. Не вытягивайте шнур за пределы красной
метки.
1. Кнопка ВКЛ./ВЫКЛ.
Вставьте вилку в розетку. Включите пылесос, нажав
основную кнопку ВКЛ./ВЫКЛ., после чего включится
лампа индикатора, что означает готовность пылесоса к работе.
После этого следует сдвинуть кнопку на рукоятке
шланга для включения мотора. После чего следует
отрегулировать мощность всасывания.
2. Кнопка функции автоматического сматывания
эл.шнура
Для того, чтобы шнур автоматически смотался – нажмите на соответствующую кнопку одной рукой, а
второй рукой направляйте шнур так
тывался без помех.
, чтобы он сма-
ПОСЛЕПРОДАЖНОЕ ОБСЛУЖИВАНИЕ
В случае обнаружения нарушений в работе пылесоса следует обратиться к авторизованным сервисным специалистам на предмет ремонта или за
консультацией
3. Регулятор мощности всасывания
Включите основную кнопку ВКЛ./ ВЫКЛ. на корпусе
пылесоса. Загорится индикатор. Пылесос готов к
работе. Сдвиньте регулятор мощности на рукоятке
шланга для включения мотора, регулировки мощности всасывания
процесс уборки вы временно приостановили – переведите регулятор на рукоятке в позицию ВЫКЛ.
По окончании процесса уборки следует выключить
пылесос нажатием на основную кнопку ВКЛ/.ВЫКЛ.
и подача питания к пылесосу прекратится.(Индикатор погаснет.).После чего следует убрать пылесос
на хранение.
или выключения мотора. Если
15
Page 16

ПРАВИЛА УХОДА ЗА ПЫЛЕСОСОМ
1. Как очистить контейнер пылесборника
Пылесос использовать только с правильно вставленным контейнером пылесборника.
1. Нажмите кнопку отсоединения контейнера пы-
лесборника, затем, удерживая за ручку, отсоедините контейнер от корпуса пылесоса.
3. Как заменить или очистить HEPA фильтры
a. Нажать кнопку решётки HEPA фильтра. Снимите решётку с корпуса пылесоса. После чего выньте
HEPA фильтр.
Прочистите HEPA фильтр мягкой щеткой или прополощите в теплой воде. После чего тщательно
просушите и снова устанавливайте в рабочее положение. При уменьшении силы всасывания следует
провести процедуру промывки фильтра.
2. Нажмите кнопку фиксации нижней крышки кон-
тейнера и высыпьте мусор.
3. При сильном засорении выньте фильтровальный
блок из контейнера. Прочистите фильтр мягкой
щеткой или промойте его водой. Перед тем как вернуть фильтровальный блок на место для продолжения работы его следует тщательно просушить.
2. Как установить контейнер пылесборника на кор-
пусе пылесоса:
1. Нажать на нижнюю крышку контейнера пылес-
борника по направлению к корпусу контейнера до
упора, пока она не зафиксируется.
2. Установить контейнер пылесборника в предна-
значенное для него место на корпусе пылесоса как
показано на рисунке.
3. Нажав на контейнер пылесборника с легким уси-
лием зафиксировать его на корпусе пылесоса.
Вставьте решетку на прежнее место.
Примечание: фильтр должен быть правильно размещен в предназначенном для него месте при эксплуатации пылесоса.
б. Нажмите на кнопку фиксации контейнера. Снимите контейнер с корпуса пылесоса
Потянув за ручку рамы фильтра, выньте губчатый
фильтр и HEPA фильтр из кассетного корпуса. После чего прочистите губку
щеткой или прополоскайте их в теплой воде. После
чего тщательно просушите и снова устанавливайте
в рабочее положение. Все фильтры можно промывать водой.
и HEPA фильтр мягкой
16
Page 17

Недостатки Способ устранения
Пылесос не работает 1. Убедитесь в том, что вилка шнура пи-
тания правильно подсоединена к розетке источника питания. Выньте вилку из
розетки и снова вставьте ее в розетку.
Попробуйте включить.
2. Убедитесь в наличии питания в розетке.
3. Убедитесь в том, что выключатель
вкл./выкл. находится в положении
“ВКЛ
”.)
Сила всасывания уменьшилась. 1. Проверьте на предмет наличия за-
сорения щетку, шланг и наконечник. В
случае наличия засорения – следует их
немедленно устранить;
2. Следует проверить фильтр впускного отверстия воздуховода на предмет
наличия сильной загрязненности. Следует прочистить или заменить HEPA
фильтры во впускных и выпускных отверстиях.
Наличие нехарактерного звука при ра
боте пылесоса .
-
1. Немедленно прекратите работу;
2. Проверьте щетку, шланг и наконечник
на предмет наличия засорения и устраните его.
17
Page 18

Exploded view
Page 19

Spare parts list
No. Part Name
63 Electric motor
73 Switch
DE
Wir erklären in alleiniger Verantwortung, daß dieses
Produkt mit den folgenden Normen oder normativen Dokumenten übereinstimmt: EN 55011:2009,
EN 55014-2:1997+A1:2001+A2:2008, EN 61000-32:2006+A2:2009, EN 61000-3-3:2008 gemäß den
Bestimmungen der Richtlinien 2006/42/ЕG, 2006/95/
ЕG, 2004/108/ЕGС.
GB
We declare under our sole responsibility that this
product is in conformity with the following standards or standardized documents: EN 55011:2009,
EN 55014-2:1997+A1:2001+A2:2008, EN 61000-32:2006+A2:2009, EN 61000-3-3:2008 in accordance
with the regulations 2006/42/ЕEС, 2006/95/ЕEС,
2004/108/ЕEС.
KONFORMITÄTSERKLÄRUNG
DECLARATION OF CONFORMITY
FR
DÉCLARATION DE CONFORMITÉ
Nous déclarons sous notre propre responsabilité
que ce produit est en conformité avec les normes
ou documents normalisés suivants: EN 55011:2009,
EN 55014-2:1997+A1:2001+A2:2008, EN 610003-2:2006+A2:2009, EN 61000-3-3:2008 conforme
aux réglementations 2006/42/СEE, 2006/95/СEE,
2004/108/СEE.
RU
ЗАЯВЛЕНИЕ О СООТВЕТСТВИИ
Мы с полной ответственностью заявляем, что настоящее изделие соответствует следующим стандартам и нормативным документам: EN 55011:2009,
EN 55014-2:1997+A1:2001+A2:2008, EN 61000-32:2006+A2:2009, EN 61000-3-3:2008 - согласно пра-
вилам: 2006/42/EEC, 2006/95/EEC, 2004/108/EEC.
Product management
V. Nosik
SBM group GmbH
Kurfürstendamm 21
10719 Berlin, Germany
Page 20

20
Page 21

GB
Warranty terms
DE
Garantiebedingungen
FR
Conditions de garantie
RU
Условия гарантии
21
Page 22

Das vorliegende Dokument beschränkt die gesetzlich festgelegten Verbraucherrechte nicht, sonst ergänzt und präzisiert die
gesetzlich vorgesehenen Verbindlichkeiten, bei denen es sich
um Abkommen bzw. Vertrag handelt.
Machen Sie sich mit dem Garantieschein vertraulich und überprüfen Sie, dass er vom Verkäufer richtig ausgefüllt und gestempelt wird.
Wenn der Stempel fehlt und das Verkaufsdatum (oder Kassenzettel mit Verkaufsdatum) nicht angegeben ist, beginnt Garantiefrist ab dem Tag der Herstellung des Produkts.
Kontrollieren Sie sorgfältig den äußeren Zustand des Produkts
und Vollständigkeit des Lieferumfangs, alle Ansprüche an den
äußeren Zustand und den Lieferumfang stellen Sie an den Verkäufer beim Kauf des Produkts.
Die Garantieleistungen in Bezug auf das von Ihnen gekauften
Gerät erfolgt durch den Verkäufer, speziellen Servicezentrum
oder Montagefi rma, die die Installation des Gerätes durchge-
führt wurde (wenn das Produkt eine spezielle Montage, Einschaltung oder Zusammenbau braucht).
Mit allen Fragen über die Wartung des Produkts wenden Sie
sich bitte an die speziellen Servicezentren. Ausführliche Information zu den Servicezentren, die zugelassen sind, Reparatur
und Wartung des Produktes durchzuführen, gibt es auf der Seite
http://www.sbm-group.com.
Zusätzliche Information können Sie beim Verkäufer erhalten.
Falls das Gerät durch Verschulden des Herstellers ausfällt, wird
die Verpfl ichtung zur Beseitigung des Fehlers an die autorisier-
te vom Hersteller Organisation auferlegt. In diesem Fall kann
der Käufer an den Verkäufer wenden. Die Haftung für die durch
Verschulden der Montagefi rma entstandenen Fehler wird auf
die Firma auferlegt, die die Installation (Montage) des Geräts
durchgeführt hat. In diesem Fall ist an die Firma zu wenden, die
Installation (Montage) des Geräts durchführte.
Zur Installation (Anschluss) des Produkts (wenn das Produkt
eine spezielle Montage, Anschluss oder Aufstellung benötigt)
empfehlen wir, sich an die speziellen Servicezentren zu wenden. Sie sind berechtigt, beliebige Fachkräfte heranzuziehen,
jedoch übernehmen der Verkäufer, die durch den Hersteller autorisierte Organisation, der Importeur und der Hersteller keine
Haftung für die Fehler, die wegen falscher Installation (Einschaltung) entstanden sind.
Die Konstruktion, Lieferumfang oder Produkt können zwecks
Verbesserung der technischen Eigenschaften des Produktes
geändert werden. Diese Änderungen werden vorgenommen,
ohne dass der Käufer darüber im Voraus benachrichtigt wird
und haben keine Pfl icht zur Änderung / Verbesserung der früher
produzierten Modelle zur Folge. Wir bitten Sie ausdrücklich, zur
Vermeidung von Missverständnissen vor der Installation/Betrieb
des Produktes die Betriebsanleitung aufmerksam durchzulesen. Es ist verboten, etwaige Änderungen am Garantieschein
vorzunehmen, sowie die hier angegebenen Daten zu löschen
oder umzuschreiben. Die vorliegende Garantie gilt, wenn der
Garantieschein richtig/leserlich ausgefüllt ist und Angaben über
Modell des Produktes, seine Seriennummer, Verkaufsdatum,
sowie Unterschrift der zuständigen Person und den Stempel
des Verkäufers enthält.
• Lebensdauer der Klimageräte, der Trockner und elektrischen
Heizgeräte (Konvektoren) beträgt 10 (zehn) Jahre.
• Lebensdauer der elektrischen Heizkanonen und Schleier be-
trägt 7 (sieben) Jahre, Infrarotheizer 8 (acht) Jahre.
• Lebensdauer anderer Geräte beträgt 5 (fünf) Jahre.
• Garantiefrist für Klimageräte, elektrische Heizkanonen, Infra-
rotheizer, elektrische Schleier und Wasserschleier beträgt 3
(drei) Jahre.
• Garantiefrist für andere Geräte beträgt 3 (drei) Jahre ab dem
Tag, an dem das Produkts an Käufer verkauft wurde.
Die vorliegende Garantie gilt für Produktions- oder Konstruktionsdefekte des Produkts.
Ein autorisiertes Servicezentrum macht Reparaturen und ersetzt defekte Teile daheim oder beim Käufer (nach Ermessen
des Servicezentrums).
DE
Garantiereparatur des Produktes erfolgt spätesten in 45 Tagen.
Falls bei Beseitigung der Fehler klar wird, dass sie nicht in dem
durch die Parteien vereinbarten Zeitraum beseitigt werden,
können die Parteien eine neue Vereinbarung über einen neuen
Termin zur Beseitigung abschließen. Der angegebene Termin
der Garantiereparatur des Produkts gilt nur für die Produkte,
die zu Privat-, Familien oder Haushaltszwecken, aber nicht zu
Geschäftszwecken verwendet werden.
Garantiefrist für das Zubehör (Teile, die ohne Werkzeug abgenommen werden können, d.h. Fächer, Börde, Gitter, Körbe,
Aufsätze, Bürste, Röhre, Schläuche u.a. ähnliches Zubehör)
beträgt drei Monate.
Garantiefrist für neues Zubehör, das am Produkt bei der Garantie- oder Entgelt- Reparatur montiert wird, oder separat vom
Produkt erworben wurden, beträgt drei Monate ab dem Tag der
Ausgabe des Produkts an den Käufer nach Beendung der Reparatur oder Verkauf für das letzte Erzeugnis dieses Zubehörs.
Die vorliegende Garantie gilt nur innerhalb der Russischen Föderation für Produkte, die innerhalb der Russischen Föderation
gekauft wurden.
Die vorliegende Garantie gibt kein Recht für Erstattung und
Begleichung des Schadens, der infolge der Überarbeitung oder
Anpassung des Produkts entstanden ist, indem diese ohne vorherige schriftliche Zustimmung des Herstellers zwecks der Anpassung an die nationalen oder lokalen technischen Standarten
und Normen der Sicherheit, die im beliebigen anderen Land,
außer der Russischen Föderation gelten, wo dieses Produkt ursprünglich verkauft wurde, vorgenommen wurden.
Die vorliegende Garantie gilt nicht für:
• periodische Wartung und Nachverkaufsservice des Produktes
(Reinigung, Ersatz der Filter oder der Vorrichtungen, die als Filter dienen);
• verschiedene Anpassungen und Änderungen des Produkts,
u.a. zwecks Verbesserung und Ausbreitung des normalen Einsatzbereiches gemäß der Bedienungsanleitung, ohne vorheriger schriftlicher Zustimmung des Herstellers.
Die vorliegende Garantie gilt nicht auch in den Fällen:
• wenn die Seriennummer vollkommen/teilweise geändert, abgelöscht, entfernt oder unleserlich aufgeschrieben wird;
• wenn das Produkt nicht gemäß seiner direkten Bestimmung,
nicht gemäß seiner Bedienungsanleitung betrieben wird, u.a.
bei Betrieb des Produkts mit Überbelastung oder gemeinsam
mit Zusatzeinrichtungen, die von dem Verkäufer, der vom Hersteller autorisierten Organisation, der Importeur und der Hersteller nicht empfohlen sind;
• wenn am Produkt mechanische Beschädigungen (Ausbrüche,
Risse usw.), Einwirkungen der übermäßigen Kraft, chemisch
aggressiven Stoffen, hohen Temperaturen, vermehrten Feuchtigkeit/Verstäubung, konzentrierten Dämpfe vorhanden sind,
und wenn eine der oben genannten Tatsachen den Ausfall des
Geräts verursachte;
• wenn die Reparatur/Einstellung /Installation/Anpassung/Inbetriebnahme nicht durch eine zugelassene Organisation/Person
durchgeführt wird;
• wenn Beschädigung des Produktes durch Naturkatastrophen
(Brand, Überfl utung usw.) und andere Ursachen hervorgerufen
wurde, die außer Kontrolle des Verkäufers, der vom Hersteller
autorisierten Organisation, des Importeurs und der Herstellers
sind;
• wenn das Produkt ans Strom-, Wassernetz inkorrekt angeschlossen wurde, sowie infolge Fehler (Abweichung der Betriebsdaten) der Strom-, Wassernetz und anderen Versorgungsnetze;
• wenn die Defekte durch Gelangen von Fremdkörpern, Flüssigkeiten (außer der von der Betriebsanleitung vorgesehen),
Insekten und ihren Ausscheidungsprodukte usw. in das Produkt
hervorgerufen wurden;
• wenn es um mangelhafter Lagerung des Produkts handelt;
• wenn es notwendig ist, Lampen, Filter, Primärzellen, Akkus,
Sicherungen, sowie Glas/ Porzellan/Stoff und manuell verstellte Teile und andere zusätzliche schnellverschleißende/
Umsteckteile des Produktes zu wechseln, die seinen eigenen
22
Page 23

bemessenen Lebensdauer haben, infolge ihrer natürlichen Abnutzung, oder wenn solcher Wechsel durch die Konstruktion des
Produktes vorgesehen ist und nicht mit Ausbau des Produkts
verbunden ist;
• bei Defekten des Systems, in welchem das Produkt als Syste-
melement benutzt wurde;
• bei Defekten, die wegen Nichteinhaltung des unten angege-
benen Merkblattes für Bedienung des Klimageräts durch den
Käufer.
Betriebssonderheiten der Luftbefeuchter, Luftreiniger und Trockner
1. Bei Betrieb der Ultraschallluftbefeuchter ist unbedingt ein
Original (Firmen) Filtereinsatz für Wasserenthärtung, wenn
er in der Konstruktion vorgesehen ist. Bei Vorhandensein des
Filtereinsatzes ist es empfohlen, Wasser aus der Leitung ohne Aufbereitung zu nehmen. Lebensdauer des Filtereinsatzes
kommt auf Härtegrad des verwendeten Wasser auf und kann
nichtvorherbestimmbar verringern, als Folge kann ein weißer
Abschlag dem Luftbefeuchter herum und an der Membran des
Luftbefeuchters bilden. Um die Wahrscheinlichkeit der Bildung
dieses Abschlags zu verringern, ist der Filtereinsatz termingerecht rechtzeitig auszutauschen. Wegen der Abnutzung der
Filter kann bei den Luftbefeuchter die Leistung des Wasserauslaufs abnehmen, um dies zu vermeiden, ist termingerechter und
regelmäßiger Filteraustausch gemäß der Bedienungsanleitung
zu empfehlen. Für die in diesem Punkt angegebenen Störungen
des Luftbefeuchters und die hieraus resultierenden Schäden für
den Käufer und den Dritten haften nicht der Verkäufer, die vom
Hersteller autorisierte Organisation, der Importeur und der Hersteller, die vorliegende Garantie gilt für solche Störungen des
Luftbefeuchters nicht.
Beim Betrieb des Luftbefeuchters ist es empfohlen, nur die Original- (Firmen) Ersatzteile des Herstellers anzuwenden.
Wenn der Luftbefeuchter keinen Filtereinsatz hat, so ist es empfohlen, Destillationswasser oder enthärtetes Wasser zu nutzen.
Infolge dessen wird die Bildung des Abschlages an der Membran erheblich reduziert. Der Abschlag an der Membran kann
zur Verringerung der Wirksamkeit und dem Ausfall des Produkts
führen und ist kein Garantiefall.
2. Vor der Inbetriebnahme des Luftreinigers nehmen Sie die Fil-
ter aus dem Beutel aus. Für normale Verteilung des gereinigten
Lufts durch das Volumen des Raums stellen Sie den Luftreiniger nicht in einem Luftfl uss (am Luftzug, vor dem Ventilator
usw.). Die Beschädigung des Filters kann zur Verringerung der
Wirksamkeit der Luftreinigung führen. Der am Filter gesammelte Staub ist mit dem Staubsauger vorsichtig zu entfernen. Waschen des Filters mit Wasser ist nicht erlaubt.
3. Beim Betrieb des Trockners stellen Sie diesen auf eine ebe-
nen Oberfl äche zur Vermeidung des Wasserverlustes und des
starken Geräusches. Für effektiven Trocknung machen Sie Fenster und die Türen im Zimmer zu. Bei Verstellung des Gerätes
verhalten Sie besonders vorsichtig: nicht stoßen, nicht kippen
und nicht fallen lassen. Vor dem Einschalten des Geräts prüfen
Sie, ob der Kondenswassersammler richtig montiert ist.
Merkblatt zur Bedienung des Klimagerätes
1. Mindestens einmal je zwei Wochen, bei Bedarf noch öfter, die
Luftfi lter in innerem Block (siehe Bedienungsanleitung) zu reini-
gen. Zugrunde der Schutzwirkung von diesen Filter ist elektrostatische Prinzip gelegt, deswegen ist der Filter sogar bei kleiner
Verschmutzung außer Funktion.
2. Reinigen Sie den Wärmetauscher im innerem Block minde-
stens einmal jährlich. Dazu öffnen Sie das vorder Gitter, nehmen
Sie die Luftfi lter ab, mit einem Staubsauger oder einem langhaa-
rigen Pinsel vorsichtig die Rippen des Wärmetauschers sauber
machen (achten Sie drauf, dass gedrückte Rippen die Effi zienz
des Klimageräts verringern).
Seien Sie bei dieser Arbeit vorsichtig und beschädigen Sie Ihre
Hände an den scharfen Kanten der Rippen nicht!
З. Einmal im Jahr (am besten im Frühjahr), bei Bedarf, ist Wärmetauscher des Außenblocks zu reinigen und den Betrieb der
Klimageräts in allen Modes zu kontrollieren. Das sichert effektive Arbeit Ihres Klimageräts.
4. Es ist zu berücksichtigen, dass Betrieb des Klimageräts im
Winter einige Besonderheiten aufweist. Erstens, bei sehr niedrigen Temperaturen: von –10°С und tiefer für Klimageräte vom
nicht Invertortyp und von –15° С und tiefer für Klimageräte vom
Invertortyp ist es empfohlen, das Klimagerät nur im Ventilatorbetrieb zu nutzen. Anlass des Klimageräts in Betrieb der Abkühlung oder der Heizung kann zu den Störungen oder Ausfall des
Kompressors führen. Zweitens, wenn draußen Minustemperatur
ist, und das Kondensat (Wasser aus dem inneren Block) draußen abfl ießt, so ist Einfrieren des Abfl ussrohrs möglich und
Wasser aus inneren Block fl ießt dann in Raum.
Der Käufer-Verbraucher ist davor gewarnt, dass gemäß dem P.
11 „Des Verzeichnisses der Industriewaren von der ordnungsgemäßen Qualität, die nicht der Rückgabe oder dem Austausch für
gleiche Waren mit einer anderen Größe, Form, Abmessungen,
Fasson, Farbe oder Lieferumfang unterliegen“ der Anordnung
der Regierung der Russischen Föderation vom 19.01.1998. Nr.
55 ist er nicht berechtigt, den Austausch des gekauften Produkts
laut dem Art. 25 des Gesetzes “Über den Schutz der Verbraucherrechte” und dem Art. 502 des Zivilgesetzbuches der Russischen Föderation.
Nach der Unterzeichnung des Garantiescheins durch den Käufer gilt es wie folgt:
• Alle notwendige Information über dem gekauften Produkt und
seinen Gebrauchseigenschaften ist dem Käufer vollkommen gewährt, gemäß dem Art. 10 des Gesetzes “Über den Schutz der
Verbraucherrechte”;
• Der Käufer ist mit Bedingungen der Garantiebedienung/Besonderheiten des Betriebs des gekauften Produkts vertraut gemacht und einverstanden ist;
• Der Käufer hat keine Ansprüche an den äußeren Zustand/Lieferumfang des gekauften Produkts.
23
Page 24

This document does not restrict statutory rights of
GB
consumers; it clarifi es the obligations stipulated by law,
this document binds the proposed agreement between
the parties in the contract.
Carefully read the warranty and make sure it is com-
pleted correctly and has the stamp of the Seller.
In the absence of the stamp and the date of sale (or
sales receipt with the date of sale) this warranty period
will begin from the date of production.
Carefully check the condition of the product and its
components, all claims about condition of the product
and its components present it to the Seller before purchasing.
Warranty service of the device will be purchased
through the Seller, specialized service centers and
fi eld technicians who installed the device (if the device
needed a special installation, connection or assembly).
For all matters relating to the product maintenance,
please contact a qualifi ed service center. Details of the
service centers, authorized to carry out repairs and
maintenance of the product is available at http://www.
sbm-group.com. For more information, please contact
the Seller.
In case of malfunction caused by the manufacturer’s
assembly line the solution of the problem lies with the
organization designated by the manufacturer. In this
case, the buyer has the right to appeal to the Seller.
Responsibility for the malfunction caused by the fi eld
technicians that conducted the installation of the device lies on the fi eld technicians. In this case, please
refer to the organization that conducted the installation
of the device.
For installation (connection) of the product (if the
product requires special installation, connection or assembly) we recommend you contact a qualifi ed service
center. You can use the services of any qualifi ed tech-
nicians, in this case the Seller, the Organization designated by the manufacturer, Importer, Manufacturer
is not liable for product defects arising from improper
installation (connection).
In order to improve the design, constructions, or manufacturing techniques with its technical characteristics,
we may do so without prior notice to the Buyer and
shall not entail obligation to update / improve the previously released products. In order for proper installation
and operation of the product, we urge you to carefully
examine the operating instructions to avoid any problems. Do not make any changes to the warranty card
(do not add or erase any information on this card). This
warranty is valid if the warranty card contains correctly
and clearly the full information (the name and the product model, serial number, date of sale, a signature of
the authorized person and stamp of the Seller).
● Service life of air conditioners, dehumidifi ers and
electric heaters (convectors) is 10 (ten) years.
● Service life of electric heat guns and thermal veils is
7 (seven) years, infrared heaters 8 (eight) years.
● Service life of other products is 5 (fi ve) years.
● The warranty period for air-conditioners, electric
fan heaters, infrared heaters, electric and water thermal veils is 3 (three) years.
● The warranty period for other products is 3 (three)
years from the date of sale of the product to the Buyer.
This warranty applies to manufacturing or construc-
tion defects of the product.
For any authorized repair or replacement of defective parts will be at discretion of the service center, to
determent where service will take effect (Buyer’s home
or service centre). With a period of not exceeding 45
days.
If for any reasons repairs require more than 45 days
service center will notify the Buyer and new agreement
will be drawn.
Specifi ed period covered repair applies only to prod-
ucts that are used for personal, family or household
purposes not related to business activities.
● The warranty period for the component parts (parts
that can be removed from the product without any
tools, like boxes, shelves, grills, baskets, tools, brushes, tubes, hoses, and other similar components) is 3
(three months).
● The warranty period for new components, installed
on the product with warranty repair or paid repair, or
purchased separately from the product is 3 (three)
months from the date of delivery after the repair, or
sales to the Buyer of these components.
This warranty does not give right to compensation
and coverage for damage that occurred as a result of
alteration or adjustment of product, without the prior
written consent of the manufacturer, in order to bring
it into compliance with local or national technical standards and safety regulations in force in any country.
This warranty does not cover:
● Periodic maintenance and service products (clean-
ing, replacing fi lters or device used as a fi lter);
● Any adaptation or any changes of use outside of
manual, including with a view to improving and expanding the scope of its normal use, as instructed by the
product, without prior written consent.
This warranty is also void in the following cases:
● If it is fully or partially altered, deleted or removed or
illegible serial number;
● Use of the product for other than its intended use
and not following the instruction manual, including use
of the product or in conjunction with an overload of
accessories not recommended by the Seller, the organization authorized by the manufacturer, importer,
manufacturer;
● If any mechanical damage (chips, cracks, etc.), the
impact on the product of excessive force, aggressive
chemicals, high temperatures, high humidity / dust,
concentrated vapors, was the cause of the malfunction
of the product;
● repair / setup / installation / adaptation / start-up of
product by non-authorized organizations / individuals;
● natural disasters (fi re, fl ood, etc.), and other causes
beyond the control of the Seller, organization authorized by the manufacturer, importer, manufacturer and
Buyers;
24
Page 25

● Improper connections for electricity or water supply, as well as failures (does not meet the operating
parameters) of electricity or water supply system and
other external networks;
● defects resulting from foreign objects inside product
or liquids, (except those provided by the operating instructions, insects, and their metabolic products, etc.);
● Improper storage of the product;
● Replacement of the bulbs, fi lters, batteries, fuses,
and glass / porcelain / fabric and manually operated
parts and other extra wear and tear parts or product,
which have their own limited life, due to the natural
wear and tear, or if replacement is by construction and
is not associated with the assembly of the product;
● defects caused by other system, in which the product is used as an element of the system.
● defects resulting from failure by not following the
Buyer’s Manual as follows.
Operation features humidifi ers, air purifi ers and de-
humidifi ers
1. It is mandatory for operation of ultrasonic humidifi ers use the original (brand) fi lter cartridge for water
softening if applicable by construction. With the fi lter
cartridge it is recommended to use tap water without
treatment or purifi cation. Life of the fi
pends on the hardness of the water and can be unpredictable decrease, resulting in a white precipitate
around the humidifi er and on the membrane of the
humidifi er. To reduce the likelihood of occurrence of
such sediment fi lter cartridge requires periodic timely
replacement. Service life of fi lters in humidifi ers can
decrease performance out moisture in time, which
requires regular periodic replacement of fi lters accord-
ing to the instructions. For any and all listed in this
paragraph and above faults which caused defects,
damage by the Buyer or a third party, the Seller, organization designated by the manufacturer, importer,
manufacturer are not liable and the real guarantee for
such problems humidifi ers are not covered.
For operating the product is recommended to use
only the original (branded) accessories of manufacturer.
If a humidifi er does not have a fi lter cartridge, it is
recommended to use distilled or softened water. This
will reduce calcium build-up on the membrane. Calcium build-up on the membrane can lead to lower effi ciency and product malfunction and is not covered by
warranty.
2. Before to start use the air cleaner, take out fi lter
from the bag. For a normal distribution of purifi ed air in
the room do not install an air cleaner in the air fl ow (in
the draft, the fan, etc.). Any damage of the fi lter may
reduce the effectiveness of air purifi cation. Accumu-
lated on the fi lter dust can be carefully removed with
a vacuum cleaner. Water wash of the air cleaner fi lter
is not allowed.
lter cartridge de-
3. To prevent water leaks and excessive noise, it is
recommended to install the dehumidifi er on a fl at sur-
face. To ensure effi cient drainage, close windows and
doors of the room where is dehumidifi er working. When
moved particularly careful: do not hit the unit, do not tilt
or allow it to fall. Before switching on, make sure that
the condensate tank is installed correctly.
Guide to care for an air conditioning:
1. At least once in 2 weeks, and if necessary, more
frequently, clean the air fi lters inside the unit (check the
Manual). The protective properties of the fi lters based
on electrostatic effect, so even with a slight contamination, the fi lter does not operate as well.
2. At least once a year, clean the heat exchanger inside the unit. To do this: Open the front framework, take
out the air fi lter and by using a vacuum cleaner or a
brush with long bristles gently clean the ribs of the heat
exchanger (note: crushed ribs reduce the effi ciency of
the air conditioner.)
When you do this, be careful not to hurt your hands
by the sharp edges of the ribs!
3. Once a year (better in spring), when necessary,
clean the heat exchanger of the outdoor unit and check
the air conditioner how it works in all modes. This will
ensure reliable operation of your air conditioner.
4. Please remember that the operation of the air conditioner in the winter time has a number of features.
At fi rst, at very low temperatures: -10° C or below for
non-inverter air conditioners and -15° C and below, for
inverter air conditioners, it is recommended to use the
air conditioning only in the ventilation mode. To use the
air conditioner for cooling or heating can be a reason
of malfunction of the air conditioner and compressor
failure. Second, if the outside temperature is negative,
and the condensate (water from the indoor unit) is output outside, it may freeze drain pipe and water, having
no outlet, will fl ow from the indoor unit to the room.
Buyer-Consumer is warned that, by paragraph 11
“List of non-food products of good quality, are not
subject to return or exchange for a similar product of
a different size, shape, size, style, color or confi gura-
tion” Post. Government of the Russian Federation of
19.01.1998. № 55, he has no right to require the exchange of products purchased in the order of art. 25 of
the Law “On Protection of Consumer Rights” ist. 502 of
the Civil Code.
Since the signing by the Buyer of the warranty card
is considered that:
● All information about the product and its consumer
properties provided to Buyer fully, in accordance with
Article 10 of the Law “On Protection of Consumer
Rights”;
● The Buyer has read and agrees to the terms of the
warranty service and features operation of the product;
● The buyer does not have claims to the appearance
and completeness of the product.
25
Page 26

Ce document ne limite pas les droits des consommateurs
prescrits par la législation, mais complète et spécifi e les obli-
gations statutaires en cadre d’un accord entre des parties ou
d’un contrat.
Veuillez lire attentivement la carte de garantie et s’assurer
qu’elle est correctement remplie et revêtue du cachet du Vendeur.
En l’absence du cachet et de la date d’achat (ou d’un ticket de
caisse avec mention de la date d’achat) la période de garantie
du produit est calculée à partir de la date de sa fabrication.
Veuillez vérifi er attentivement l’aspect extérieure du produit et
de son équipement, toute réclamation sur l’aspect extérieure et
l’équipement du produit doit être adressée au Vendeur lors de
l’achat du produit.
Les réparations sous garantie de l’appareil que vous avez acheté s’effectuent par le Vendeur, les services après-vente agréés
ou la société de montage qui a effectué l’installation de l’appareil
(si l’appareil exige l’installation, le branchement ou assemblage
particuliers).
Pour toutes les questions relatives à l’entretien de l’appareil,
veuillez contacter nos services après-vente agréés. Des informations détaillées sur les services après-vente autorisés à
effectuer la réparation et l’entretien du produit, sont disponibles
sur le site http://www.sbm-group.com. Pour toutes informations
complémentaires veuillez contacter le Vendeur.
En cas de dysfonctionnement de l’appareil par la faute du fabricant, la responsabilité de la réparation incombe à une organisation autorisée par le fabricant. En ce cas, l’acheteur a le droit
de s’adresser au Vendeur. La responsabilité de la réparation de
l’appareil endommagé par la faute d’une société qui a effectué
l’installation (le montage) de l’appareil incombe à la société de
montage. Dans ce cas, il est nécessaire de s’adresser à la société qui a effectué l’installation (le montage) de l’appareil.
Pour l’installation (le branchement) de l’appareil (si l’appareil
exige l’installation, branchement ou assemblage particuliers),
il est recommandé de s’adresser aux services après-vente
agréés. Vous pouvez vous adressez aux services d’experts
qualifi és, cependant, le Vendeur, l’Organisation autorisée par
le fabricant, l’Importateur, le Fabricant n’assument pas la responsabilité des défauts du produit résultant de son installation
(branchement) incorrecte.
Il est possible d’apporter des modifi cations à la structure, l’équi-
pement et la technologie de la fabrication du produit visant à
améliorer ses caractéristiques techniques. Telles modifi cations
sont faites sans préavis de l’Acheteur et ne peuvent entraîner
aucune obligation de modifi er/améliorer les produits déjà exis-
tants. On vous demande d’étudier attentivement ce manuel
d’utilisation avant l’installation/l’exploitation du produit pour
éviter toute confusion. Ne pas apporter de modifi cations à la
Carte de garantie, ne pas effacer ou récrire des données qu’elle
contient. Cette garantie n’est valable que si la Carte de garantie
est dûment/complètement remplie et contient: la dénomination
et le modèle du produit, son numéro de série, la date d’achat,
ainsi que la signature de la personne autorisée et le cachet du
Vendeur.
• La durée de service de climatiseurs, déshumidifi cateurs et
radiateurs électriques (convecteurs) est 10 (dix) ans.
• La durée de service de canons à chaleur électriques et de
rideaux thermiques est 7 (sept) ans, celle de radiateurs infrarouges est 8 (huit) ans.
• La durée de service des autres produits est 5 (cinq) ans.
• La période de garantie de climatiseurs, canons à chaleur
électriques, radiateurs infrarouges, rideaux électriques et rideaux d’eau est 3 (trois) ans.
• La période de garantie des autres produits est 3 (trois) ans à
compter de la date de la vente du produit à l’Acheteur.
Cette garantie s’applique aux défauts dans la fabrication et dans
la structure du produit.
FR
Le service après-vente autorisé effectue la réparation et le remplacement d’éléments défectueux du produit dans un centre des
services après-vente ou chez l’Acheteur (à la discrétion du service après-vente). La réparation sous garantie s’effectue dans
un délai n’excédant pas 45 jours. S’il devient évident lors de
l’élimination des défauts du produit qu’ils ne seront pas éliminés
dans un délai fi xé par l’accord entre les parties, ceux-ci peuvent
s’entendre sur les modalités nouvelles de l’élimination des défauts du produit. La période de réparation du produit sous garantie spécifi ée ci-dessus, s’applique uniquement aux produits qui
sont utilisés à des fi ns personnelles, familiales ou domestiques
et pas liés à des activités commerciales.
La période de garantie des pièces détachées (pièces qui
peuvent être enlevées du produit sans aucun outil, à savoir,
boîtes, étagères, grilles, paniers, ajutages, brosses, tubes,
tuyaux et autres composants similaires) est trois mois. La
période de garantie de nouvelles pièces détachées installées
sur le produit lors d’une réparation sous garantie ou d’une réparation payante ou celles achetées séparément du produit, est
trois mois à compter de la date de la remise du produit réparé
à l’Acheteur ou de la vente de ces pièces à l’Acheteur. Cette
garantie n’est valable que sur le territoire de la Fédération de
Russie pour les produits achetés sur le territoire de la Fédération de Russie.
Cette garantie ne donne pas droit à l’indemnisation et la couverture des dommages résultant de la modifi cation ou de l’ajustage
du produit, sans le consentement écrit préalable du fabricant,
effectués en raison de le faire correspondre à des standards
techniques et des normes de sécurité nationaux ou locaux qui
sont en vigueur dans n’importe quel pays, sauf la Fédération de
Russie, où le produit a été originairement vendu.
Cette garantie ne s’applique pas à:
l’entretien périodique et la maintenance du produit (nettoyage,
remplacement des fi ltres ou des mécanismes agissant comme
les fi ltres)
toutes les adaptations et modifi cations du produit, notamment
ceux, visant à améliorer et étendre la portée de son utilisation
normale, spécifi ée dans le Manuel d’utilisation du produit, sans
le consentement écrit préalable du fabricant.
Cette garantie ne s’applique pas également dans les cas suivants:
• si le numéro de série du produit est complètement/partiellement modifi é, effacé; enlevé ou illisible;
• si le produit est désaffecté et n’est pas exploité conformément à son manuel d’utilisation, y compris l’exploitation excessive du produit ou son exploitation en conjonction avec un
équipement complémentaire qui n’est pas recommandé par le
Vendeur, l’organisation autorisée par le fabricant, l’importateur,
le fabricant;
• au cas où le produit contient des dommages mécaniques
(clivages, fi ssures, etc.), il est soumis à l’impact d’une force
excessive, des produits chimiques agressifs, des températures
élevées, d’une forte humidité/empoussiérage, des vapeurs
concentrées, si tout ce qui précède a causé le dysfonctionnement du produit;
• si la réparation/réglage/installation/adaptation/mise en
marche s’effectue par des organisations/individus non autorisés;
• dans le cas des catastrophes naturelles (incendies, inondations, etc.) et autres causes indépendantes de la volonté du
Vendeur, organisation autorisée par le fabricant, importateur,
fabricant et Acheteur, qui ont apporté des dommages au produit.
• en cas de branchement incorrect du produit au réseau électrique ou au système d’approvisionnement en eau, ainsi qu’en
cas de panne (paramètres de fonctionnement non alignées) du
réseau électrique ou du système d’approvisionnement en eau et
autres réseaux externes;
• en cas de défauts causés par l’ingestion dans l’intérieure du
produit de corps étrangers, produits liquides, sauf ceux spécifi és
dans le manuel d’utilisation, insectes et produits de leur activité
vitale, etc.;
• en cas d’entreposage inadéquat du produit;
26
Page 27

• quand il faut remplacer les lampes, fi ltres, batteries, piles,
fusibles, des pièces en verre/porcelaine/tissu qui sont déplacées manuellement, ainsi que d’autres pièces du produit supplémentaires d’usure/d’accompagnement qui ont leur propre
période de vie limitée, en raison de leur usure naturelle, ou si
tel remplacement est prévu par la structure et n’est pas associé
avec le démontage du produit;
• en cas des défauts dans le système, dans lequel le produit
est utilisé comme un de ses éléments;
• en cas de défauts qui ont résulté du non-respect par l’Acheteur du Guide d’entretien du climatiseur indiqué ci-dessous.
Caractéristiques de fonctionnement des humidifi cateurs d’air,
purifi cateurs d’air et déshumidifi cateurs.
1. Il est obligatoire d’utiliser pour le bon fonctionnement des
humidifi cateurs d’air à ultrasons une cartouche fi ltrante originale
(de marque) pour l’adoucissement de l’eau, si elle est prévue
par la structure. Pour la cartouche fi ltrante il est recommandé
d’utiliser l’eau du robinet sans traitement ou purifi cation préa-
lables. La durée de vie d’une cartouche fi ltrante dépend de la
dureté de l’eau et peut être diminuée imprévisiblement, ce qui
entraîne l’apparition possible d’un précipité blanc autour de l’humidifi cateur d’air et sur la membrane de l’humidifi cateur d’air.
Afi n de réduire la probabilité d’apparition d’un tel précipité, la
cartouche fi ltrante doit être périodiquement remplacée en temps
opportun. A la suite de la durée de vie des fi ltres limitée, la capa-
cité de sortie de l’humidité dans les humidifi cateurs d’air peut
réduire, ce qui exige le remplacement périodique et en temps
opportun des fi ltres, en conformité avec le manuel d’utilisa-
tion. Les défauts des humidifi cateurs d’air énumérés dans ce
paragraphe et des dommages encourus suite à ces défauts à
l’Acheteur et aux tiers ne font pas partie de la responsabilité du
Vendeur, de l’Organisation autorisée par le fabricant, de l’Importateur, du Fabricant, et cette garantie ne s’applique pas à ce
type de défauts des humidifi cateurs d’air.
Lors de l’utilisation de l’humidifi cateur d’air, il est recommandé
d’utiliser uniquement des accessoires originaux (de marque) du
fabricant.
Si l’humidifi cateur d’air ne contient pas de cartouche de fi ltre,
il est recommandé d’utiliser une eau distillée ou adoucie. Cela
permettra de réduire considérablement la formation de buée sur
la membrane. La buée (dépôts) sur la membrane peut provoquer la diminution de l’effi cacité et l’endommagement du produit
et ne pas être couvert par la garantie.
2. Avant d’utiliser le purifi cateur d’air, sortir le fi ltres du sac. Pour
une distribution normale d’air purifi é partout dans le logement,
ne pas installer le purifi cateur d’air dans le fl ux d’air (dans le
courant d’air, devant un ventilateur, etc.) L’endommagement du
fi ltre peut causer la diminution de l’effi cacité de la purifi cation
d’air. La poussière accumulée sur le fi ltre peut être soigneuse-
ment enlevée à l’aide d’un aspirateur. Il n’est pas admis de laver
à l’eau le fi ltre du purifi
3. Lors de l’utilisation du déshumidifi cateur, placer l’appareil sur
une surface plane pour empêcher la fuite d’eau et un bruit fort.
Afi n d’assurer une déshumidifi cation effi cace, fermer les les fe-
nêtres et les portes du logement surveillé. Lorsque vous déplacez l’appareil, soyez très prudent pour ne pas heurter, ne pas
incliner et ne pas le laisser tomber. Avant de faire fonctionner
l’appareil, s’assurer que le réservoir de collecte de condensat
soit installé correctement.
Guide d’entretien du climatiseur:
1. Nettoyer les fi ltres à air dans l’unité intérieure (voir le manuel
d’utilisation) au moins une fois toutes les 2 semaines ou plus
souvent si nécessaire. Les propriétés protectrices de ces fi ltres
sont basées sur l’effet électrostatique, pour cette raison fi ltre
cesse de fonctionner même s’il ne reçoit qu’une quantité minimale de pollution.
2. Nettoyer l’échangeur thermique de l’unité intérieure au moins
une fois par an. Pour le faire: ouvrir la grille frontale, enlever
les fi ltres à air en utilisant un aspirateur ou une brosse à poils
longs, nettoyer délicatement les ailettes de l’échangeur thermique (notez que les ailettes froissées diminuent l’effi cacité du
fonctionnement du climatiseur).
En réalisant cette opération, soyez attentifs pour ne pas blesser
les mains par des arêtes vives des ailettes!
cateur d’air.
Une fois par an (il est préférable au printemps), si nécessaire,
nettoyer l’échangeur thermique de l’unité extérieure et vérifi er
le fonctionnement du climatiseur dans tous les régimes. Cela
assurera le fonctionnement fi able de votre climatiseur.
4. Il est nécessaire de prendre en considération que l’utilisation
du climatiseur en hiver acquiet certaines caractéristiques particulières. Premièremement, à très basse température: de –10°С
et inférieure pour des climatiseurs de type traditionnel et de –15°
С et inférieure pour des climatiseurs de type «Inverter», il est
recommandé d’utiliser le climatiseur seulement en régime de
ventilation. L’activisation du climatiseur en régime de refroidissement ou d’échauffement peut entraîner un dysfonctionnement
du climatiseur et une panne du compresseur. Deuxièmement, si
la température extérieure est négative, et le condensat (eau de
l’unité intérieure) s’évacue à l’extérieur du logement, le tuyau de
vidange peut geler et l’eau, n’ayant aucune sortie, coulera de
l’unité intérieure à l’intérieure du logement.
L’acheteur-consommateur est averti que conformément au
paragraphe 11 de la «Liste des produits non alimentaires de
bonne qualité non remboursables et non échangeables pour un
produit similaire d’une autre taille, forme, dimension, style, couleur ou structure» de l’Arrêté du Gouvernement de la Fédération de Russie du 19.01.1998. No 55, il n’a aucun droit d’exiger
l’échange d’un produit acheté selon l’article 25 de la loi «Sur
la protection des droits des consommateurs» et l’article 502 du
Code civil de la Fédération de Russie.
Depuis la signature de la Carte de garantie par l’Acheteur, il est
considéré que:
• Toutes les informations nécessaires concernant le produit
acheté et ses propriétés de consommation sont fournies à
l’Acheteur dans leur intégralité, conformément à l’article 10 de la
loi «Sur la protection des droits des consommateurs»;
• L’Acheteur a lu et accepte les conditions de garantie/caractéristiques de fonctionnement du produit acheté;
• L’acheteur n’a pas de réclamation à l’égard de l’aspect
extérieure/l’équipement du produit acheté.
27
Page 28

Настоящий документ не ограничивает определенные законом права потребителей, но дополняет и уточняет оговоренные законом обязательства, предполагающие соглашение сторон либо договор.
Внимательно ознакомьтесь с гарантийным талоном и проследите, чтобы он был правильно заполнен и имел штамп
Продавца.
При отсутствии штампа и даты продажи (либо кассового
чека с датой
ется со дня его изготовления.
Тщательно проверьте внешний вид изделия и его комплектность, все претензии по внешнему виду и комплектности изделия предъявляйте Продавцу при покупке изделия.
Гарантийное обслуживание купленного Вами прибора
осуществляется через Продавца, специализированные сервисные центры или монтажную организацию, проводившую
установку
установке, подключении или сборке).
По всем вопросам, связанным с техобслуживанием изделия, обращайтесь в специализированные сервисные
центры. Подробная информация о сервисных центрах,
уполномоченных осуществлять ремонт и техническое обслуживание изделия, находится на сайте http://www.sbmgroup.com. Дополнительную информацию Вы можете получить у Продавца.
В случае неисправности
обязательство по устранению неисправности ложится на
уполномоченную изготовителем организацию. В данном
случае покупатель в праве обратиться к Продавцу. Ответственность за неисправность прибора по вине организации, проводившей установку (монтаж) прибора, ложится
на монтажную организацию. В данном случае необходимо
обратиться к организации, проводившей установку (монтаж)
прибора.
Для
дается в специальной установке, подключении или сборке)
рекомендуем обращаться в специализированные сервисные центры. Вы можете воспользоваться услугами любых
квалифицированных специалистов, однако Продавец,
Уполномоченная изготовителем организация, Импортер,
Изготовитель не несут ответственности за недостатки изделия, возникшие из-за его неправильной установки (подключения).
В
ния изделия, с целью улучшения его технических характеристик, могут быть внесены изменения. Такие изменения
вносятся в изделие без предварительного уведомления Покупателя и не влекут обязательств по изменению/улучшению ранее выпущенных изделий. Убедительно просим Вас
во избежание недоразумений до установки/эксплуатации
изделия внимательно изучить
ции. Запрещается вносить в Гарантийный талон какие-либо
изменения, а так же стирать или переписывать какие-либо
указанные в нем данные. Настоящая гарантия имеет силу,
если Гарантийный талон правильно/четко заполнен и в нем
указаны: наименование и модель изделия, его серийные
номера, дата продажи, а так
ченного лица и штамп Продавца.
• Cрок службы кондиционеров, осушителей и электрических обогревателей (конвекторов) составляет 10 (десять)
лет.
• Срок службы электрических тепловых пушек и завес составляет 7 (семь) лет, инфракрасных обогревателей 8 (восемь) лет.
• Cрок службы остальных изделий составляет 5 (пять) лет.
• Гарантийный срок на кондиционеры, электрические
пловые пушки, инфракрасные обогреватели, электрические
и водяные завесы составляет 3 (три) года.
• Гарантийный срок на прочие изделия составляет 3 (три)
года со дня продажи изделия Покупателю.
Настоящая гарантия распространяется на производствен-
ный или конструкционный дефект изделия.
продажи) гарантийный срок изделия исчисля-
прибора (если изделие нуждается в специальной
прибора по вине изготовителя
установки (подключения) изделия (если изделие нуж-
конструкцию, комплектацию или технологию изготовле-
его инструкцию по эксплуата-
же имеется подпись уполномо-
RU
те-
Выполнение уполномоченным сервисным центром ремонтных работ и замена дефектных деталей изделия производится в сервисном центре или у Покупателя (по усмотрению сервисного центра). Гарантийный ремонт изделия
выполняется в срок не более 45 дней. В случае, если во
время устранения недостатков товара станет очевидным,
что они не будут устранены в определенный
сторон срок, стороны могут заключить соглашение о новом
сроке устранения недостатков товара. Указанный срок гарантийного ремонта изделия распространяется только на
изделия, которые используются в личных, семейных или
домашних целях, не связанных с предпринимательской деятельностью.
Гарантийный срок на комплектующие изделия (детали
которые могут быть сняты с изделия без
либо инструментов, т.е. ящики, полки, решетки, корзины,
насадки, щетки, трубки, шланги и др. подобные комплектующие) составляет три месяца. Гарантийный срок на новые
комплектующие изделия, установленные на изделие при
гарантийном или платном ремонте, либо приобретенные отдельно от изделия, составляет три месяца со дня выдачи
Покупателю изделия по
последнему этих комплектующих. Настоящая гарантия действительна только на территории РФ на изделия, купленные
на территории РФ.
Настоящая гарантия не дает права на возмещение и покрытие ущерба, произошедшего в результате переделки или
регулировки изделия, без предварительного письменного
согласия изготовителя, с целью приведения его в
ствие с национальными или местными техническими стандартами и нормами безопасности, действующим и в любой
другой стране ,кромеРФ, в которой это изделие было первоначально продано.
Настоящая гарантия не распространяется на:
• периодическое обслуживание и сервисное обслуживание изделия (чистку, замену фильтров или устройств выполняющих функции фильтров);
• любые адаптациии
усовершенствования и расширения обычной сферы его
применения, которая указана в Инструкции по эксплуатации
изделия, без предварительного письменного согласия изготовителя.
Настоящая гарантия также не предоставляется в случаях:
• если будет полностью/частично изменен, стерт, удален
или будет неразборчив серийный номер изделия;
• использования
не в соответствии сего Инструкцией по эк сплуатации, в том
числе, эксплуатации изделия с перегрузкой или совместно
со вспомогательным оборудованием, не рекомендуемым
Продавцом, уполномоченной изготовителем организацией,
импортером, изготовителем;
• наличия на изделии механических повреждений (сколов,
трещин и т.д.), воздействий на изделие чрезмерной силы,
химически агрессивных
вышенной влажности/запыленности, концентрированных
паров, если что-либо из перечисленного стало причиной неисправности изделия;
• ремонта/наладки/инсталляции/адаптации/пуска изделия
в эксплуатацию не уполномоченным и на то организациями/
лицами;
• стихийных бедствий (пожар, наводнение и т.д.) и других
причин находящихся вне контроля Продавца, уполномочен-
изготовителем организации, импортера, изготовителя и
ной
Покупателя, которые причинили вред изделию;
• неправильного подключения изделия к электрической
или водопроводной сети, а так же неисправностей (не соответствие рабочих параметров) электрической или водопроводной сети и прочих внешних сетей;
• дефек тов, возникших вследствие попадания внутрь изделия посторонних предметов, жидкостей, кроме предусмо-
инструкцией по эксплуатации, насекомых и продук-
тренных
тов их жизнедеятельности и т. д.;
• неправильного хранения изделия;
окончании ремонта, либо продаж и
и зменения изделия, в т. ч. с целью
изделия не по его прямому назначению,
веществ, высоких температур, по-
с оглашением
применения каких-
соответ-
28
Page 29

• необходимости замены ламп, фильтров, элементов
тания, аккумуляторов, предохранителей, а также стеклянных/фарфоровых/матерчатых и перемещаемых вручную
деталей и других дополнительных быстроизнашивающихся/
сменных деталей изделия, которые имеют собственный
ограниченный период работоспособности, в связи с их естественным износом, или если такая замена предусмотрена
конструкцией и не связана с разборкой изделия;
• дефектов системы, в которой
как элемент этой системы.
• дефектов, возникших вследствие невыполнения Покупа-
телем указанной ниже Памятки по уходу за кондиционером.
Особенности эксплуатации увлажнителей воздуха, возду-
хоочистителей и осушителей
1. В обязательном порядке при эксплуатации ультразвуковых увлажнителей воздуха следует использовать оригинальный (фирменный) фильтр-картридж для умягчения
воды, если он предусмотрен конструкцией.
фильтра-картриджа рекомендуется использовать водопроводную воду без предварительной обработки или очистки.
Срок службы фильтра-картриджа зависит от степени жесткости используемой воды и может непрогнозируемо уменьшаться, в результате чего возможно образование белого
осадка вокруг увлажнителя воздуха и на мембране самого
увлажнителя воздуха. Для снижения вероятности возник-
такого осадка фильтр-картридж требует периоди-
новения
ческой своевременной замены. Вследствие выработки ресурса фильтров у увлажнителей воздуха может снижаться
производительность выхода влаги, что требует регулярной
периодической замены фильтров в соответствии с инструкцией по эксплуатации. За перечисленные в настоящем
пункте неисправности увлажнителей воздуха и возникший в
связи с такими неисправностями
пателя и третьих лиц Продавец, Уполномоченная изготовителем организация, Импортер, Изготовитель ответственности не несут и настоящая гарантия на такие неисправности
увлажнителей воздуха не распространяется.
При эксплуатации увлажнителе воздуха рекомендуется
использовать только оригинальные (фирменные)аксессуары изготовителя.
Если увлажнитель воздуха не содержит фильтр-картридж,
то рекомендуется использовать
умягченную воду. Это позволит значительно уменьшить образование накипи на мембране. Наличие накипи (налета) на
мембране может привести к снижению эффективности и выходу изделия из строя и не является гарантийным случаем.
2. Перед началом эксплуатации воздухоочистителя извлеките фильтры из пакета. Для нормального распределения
очищенного воздуха по объему
вайте воздухоочиститель в воздушном потоке (на сквозняке, перед вентилятором и т.д.). Повреждение фильтра может привести к снижению эффективности очистки воздуха.
Скопившуюся на фильтре пыль можно аккуратно удалить с
помощью пылесоса. Мыть фильтр воздухоочистителя водой
не допускается.
3. При эксплуатации осушителя во избежание утечек
сильного шума устанавливайте прибор на ровной
воды и
поверхности. Для обеспечения эффективного осушения
закрывайте окна и двери обслуживаемого помещения. При
перемещении прибора соблюдайте особую осторожность:
неударяйте, не наклоняйте и не допускайте его падения.
Перед включением прибора убедитесь, что бак для сбора
конденсата установлен правильно.
Памятка по уходу за кондиционером:
1. Не реже одного
и чаще, прочищайте воздушные фильтры во внутреннем
блоке (см.инструкцию по эксплуатации). Защитные свойства
этих фильтров основаны на электростатическом эффекте,
поэтому даже при незначительном загрязнении фильтр
перестает выполнять свои функции.
раза в 2 недели, а при необходимости
изделие использовалось
какой-либо ущербу Поку-
дистиллированную или
помещения не устанавли-
пи-
При наличии
2. Минимум один раз в год очистите теплообменник внутреннего блока. Для этого необходимо: открыть переднюю
решетку, снять воздушные фильтры, используя пылесос
или кисть с длинным ворсом, осторожно прочистить ребра
теплообменника (учтите, что смятые ребра уменьшают эффективность работы кондиционера).
При выполнении этой операции будьте внимательны и не
повредите себе руки
З. Раз в год (лучше весной), при необходимости, следует вычистить теплообменник наружного блока и проверить
работу кондиционера на всех режимах. Это обеспечит надежную работу Вашего кондиционера.
4. Необходимо учесть, что эксплуатация кондиционера в
зимних условиях имеет ря д особенностей. Во-первых, при
крайне низких температурах: от –10°
онеров не инверторного типа и от –15° С и ниже для кондиционеров инверторного типа, рекомендуется использовать
кондиционер только в режиме вентиляции. Запуск кондиционера для работы в режимах охлаждения или обогрева
может привести к сбоям в работе кондиционера и поломке
компрессора. Во-вторых, если на улице
пература, а конденсат (вода из внутреннего блока) выводится на улицу, то возможно замерзание дренажной трубки и
вода, не имея выхода, будет протекать из внутреннего блока
в помещение.
Покупатель-потребитель предупрежден о том, что в соответствии с п.11 “Перечня непродовольственных товаров
надлежащего качества, не подлежащих возврату или
ну на аналогичный товар другого размера, формы, габарита,
фасона, расцветки или комплектации ”Пост. Правительства
РФ от 19.01.1998. №55 он не в праве требовать обмена купленного изделия в порядке ст. 25 Закона “О защите прав
потребителей” ист. 502 ГК РФ.
С момента подписания Покупателем Гарантийного талона
считается, что:
• Вся необходимая информация о
его потребительских свойствах предоставлена Покупателю
в полном объеме, в соответствии со ст.10 Закона “О защите
прав потребителей”;
• Покупатель ознакомлен и согласен с условиями гарантийного обслуживания/особенностями эксплуатации купленного изделия;
• Покупатель претензий к внешнему виду/комплектности
купленного изделия не имеет.
об острые края ребер!
С и ниже для кондици-
отрицательная тем-
обме-
купленном изделии и
29
Page 30

Page 31

GUARANTEE CERTIFICATE
GUARANTEE
CERTIFICATE
GARANTIESCHEIN
CERTIFICAT
DE GARANTIE
ГАРАНТИЙНЫЙ
ТАЛОН.
Sello del vendedor ● Corimbo do comerciante ● Timbro commerciante ● Αντιπροσώπου ●
Pieczęć sprzedawcy ● Ticarethane mührü ● Razítko prodejce ● Kereskedő bélyegzője ●
Terms and Conditions of the
extended warranty online at
www.sbm-group.com
Geschaftsbedingungen der
verlangerten Garantie online
unter www.sbm-group.com
Termes et Conditions de la
garantie prolongee en ligne
a www.sbm-group.com
расширенной гарантии
Allgemeine
Условия и сроки
на сайте по адресу
www.sbm-group.com
Hampila comerciantului ● Наименование и штамп торговой организации
Artykuł ● Mal •Výrobní číslo ● Cikk ● Articol ● Προϊόν ● Articulo ●
Articolo ● Наименование изделия
Modelleren ● πρότυπο ● Model ● Model ●
Model ● Modell ● Модель
Serial Number ● Fabrikationsnummer ● No. ●
Nr. ● Num. ● № ● Серийный номер
Data zakupu ● Satir tarihi ● Datum prodeje ●
Vásárlás kelte ● Data achizilionfrii ●
Ημερομηνία αγοράς ● Дата продажи
Selger ● Πωλητής ● Sprzedavca ● Satici ●
Prodavač ● Elado ● Подпись продавца
After having read the warranty terms and pre-purchase inspection I certify that
I’ve got no complaints in respect of the appearance and performance of the tool.
С условиями гарантии ознакомлен, предпродажная проверка произведена,
к внешнему виду и качеству работы инструмента претензий не имею.
Firma ● Podpis ● Řmza ● Podpis ●
Aláirás ● Semnłtura ● Υπογραφή ●
Подпись покупателя
SBM group GmbH
Kurfürstendamm 21, 10719 Berlin, Germany
www.sbm-group.com
Page 32

GUARANTEE CERTIFICATE
GUARANTEE
CERTIFICATE
GARANTIESCHEIN
CERTIFICAT
DE GARANTIE
ГАРАНТИЙНЫЙ
ТАЛОН.
Stamp dealer ● Stempel Handler ● Stempel handelaar ● Timbre marchand ●
Stämpel återförsäljare ● Kauppiaan leima ● Stempel forhandler ● Stempel forhandler
Terms and Conditions of the
extended warranty online at
www.sbm-group.com
Geschaftsbedingungen der
verlangerten Garantie online
unter www.sbm-group.com
Termes et Conditions de la
garantie prolongee en ligne
a www.sbm-group.com
расширенной гарантии
Allgemeine
Условия и сроки
на сайте по адресу
www.sbm-group.com
Article ● Artikel ● Artikel ● Article ● Artikel ● Tuote ● Artikel ● Artikkel ● Artigo
Model ● Modell ● Model ● Modèle ● Modelo ●
Modello ● Modelo ● Modell ● Malli
Serial Number ● Fabrikationsnummer ●
No. ● Nr. ● Num. ● №
Date of purchase ● Kaufdatum ● Koopdatum ●
Date d’achet ● Inköpsdatum ● Ostopäivä ●
Købsdato ● Kjøpsdato ● Fecha de compra ●
Data da compra ● Data di acquisto
Salesman ● Verkäufer ● Verkoper ● Vendeur ●
Vendedor ● Commesso ● Försäljare ● Myyjä
After having read the warranty terms and pre-purchase inspection I certify that
I’ve got no complaints in respect of the appearance and performance of the tool.
С условиями гарантии ознакомлен, предпродажная проверка произведена,
к внешнему виду и качеству работы инструмента претензий не имею.
Signature ● Unterschrift ● Handtekening ●
Signature ● Underskrift ● Allekirjoitus ●
Underskrift ● Signatur ● Firma ● Assinatura
SBM group GmbH
Kurfürstendamm 21, 10719 Berlin, Germany
www.sbm-group.com
 Loading...