

Page 1
All information is subject to change without notice Page 1 of 9
Borroughs Document Number: DOC-HTS-0001 Rev. 1.0
www.borroughs.com 1-800-748-0227
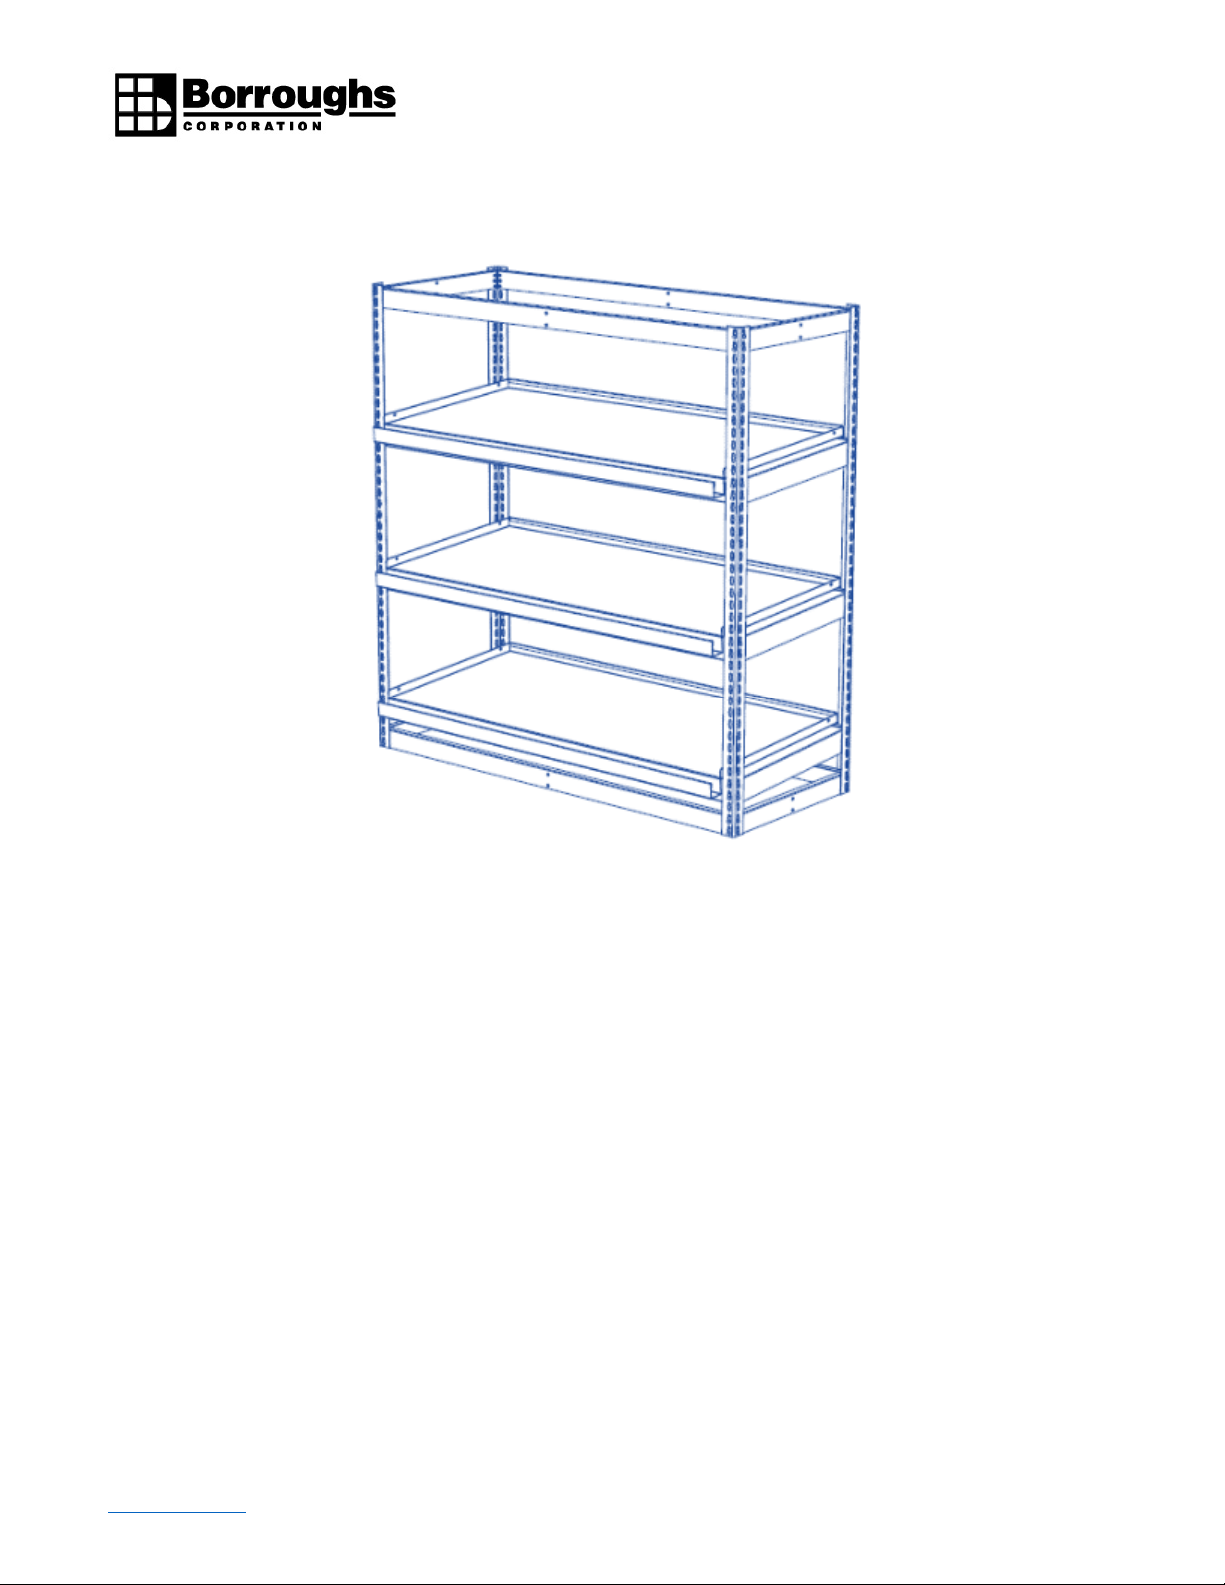
HORTICULTURE TROUGH/DRAIN SHELVING
(HTS/HDS)
INSTALLATION INSTRUCTIONS
IMPORTANT: To reduce the risk of serious injury, read and
understand this entire guide before beginning any installation.
Page 2

All information is subject to change without notice Page 2 of 9
Borroughs Document Number: DOC-HTS-0001 Rev. 1.0
www.borroughs.com 1-800-748-0227
Contents
BEFORE YOU BEGIN: ...................................................................................................................................................3
SAFETY WARNINGS: ....................................................................................................................................................3
HTS/HDS INSTALLATION .............................................................................................................................................4
TROUGH SHELVES .......................................................................................................................................................6
DRAIN SHELVES ...........................................................................................................................................................7
WARRANTY .................................................................................................................................................................9
Page 3

All information is subject to change without notice Page 3 of 9
Borroughs Document Number: DOC-HTS-0001 Rev. 1.0
www.borroughs.com 1-800-748-0227
BEFORE YOU BEGIN:
1. Check your inventory to be sure you received your entire order. If there are any missing or damaged
parts, contact your Dealer or Borroughs Corporation Customer Service Manager.
2. Read and understand the entire installation instructions prior to beginning the install.
SAFETY WARNINGS:
This symbol is used to address practices not related to personal injury.
A potentially hazardous condition exists that may result in death or serious injury,
property damage, or destruction if instructions are not strictly observed.
This symbol is used to address practices not related to physical injury.
Once installation is completed, a copy of the installation instruction booklet MUST remain with the customer.
Tools Required:
7/16”
Socket Size:
7/16”
Page 4
All information is subject to change without notice Page 4 of 9
Borroughs Document Number: DOC-HTS-0001 Rev. 1.0
www.borroughs.com 1-800-748-0227
HTS/HDS INSTALLATION
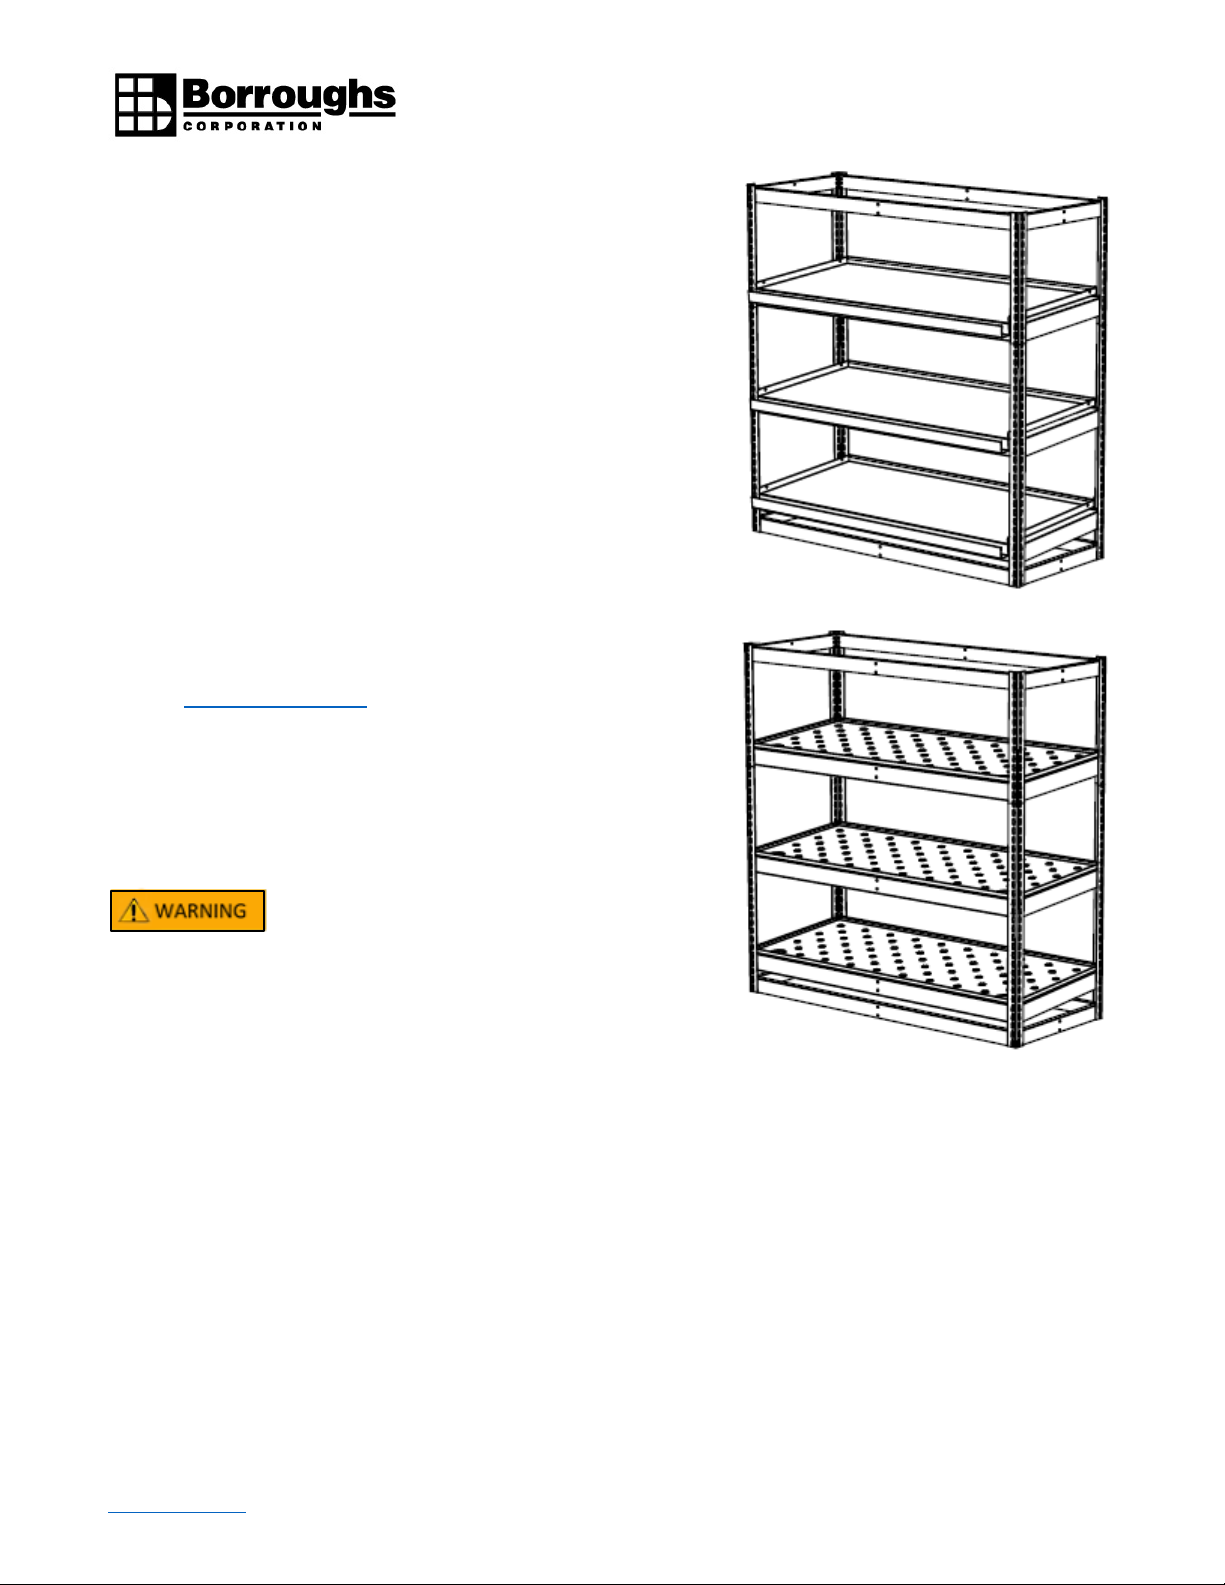
Horticulture shelving comes in two (2) categories. Trough and
Corner Drain shelving. The underlying framework and support
beams are identical with common installation practices.
This installation guide begins by showing the assembly of the rivetspan frame. Followed by installation of tapered support beams and
shelf installation. Refer to steps 1 through 8.
For more specific information regarding the corner drain shelf and
final adjustments refer to steps 5 through 7.
For anchoring units to floor and linking multiple units together
please reference the Rivet-Span Installation Instructions #32-50500000A @ www.borroughs.com.
NOTE: Lights and watering systems may be installed on each level
with the understanding weight of lights and water systems directly
affect maximum shelf load capacity.
Maximum load capacity per shelf is 500 lbs.
evenly distributed.
TROUGH
DRAIN
Page 5
All information is subject to change without notice Page 5 of 9
Borroughs Document Number: DOC-HTS-0001 Rev. 1.0
www.borroughs.com 1-800-748-0227
STEPS
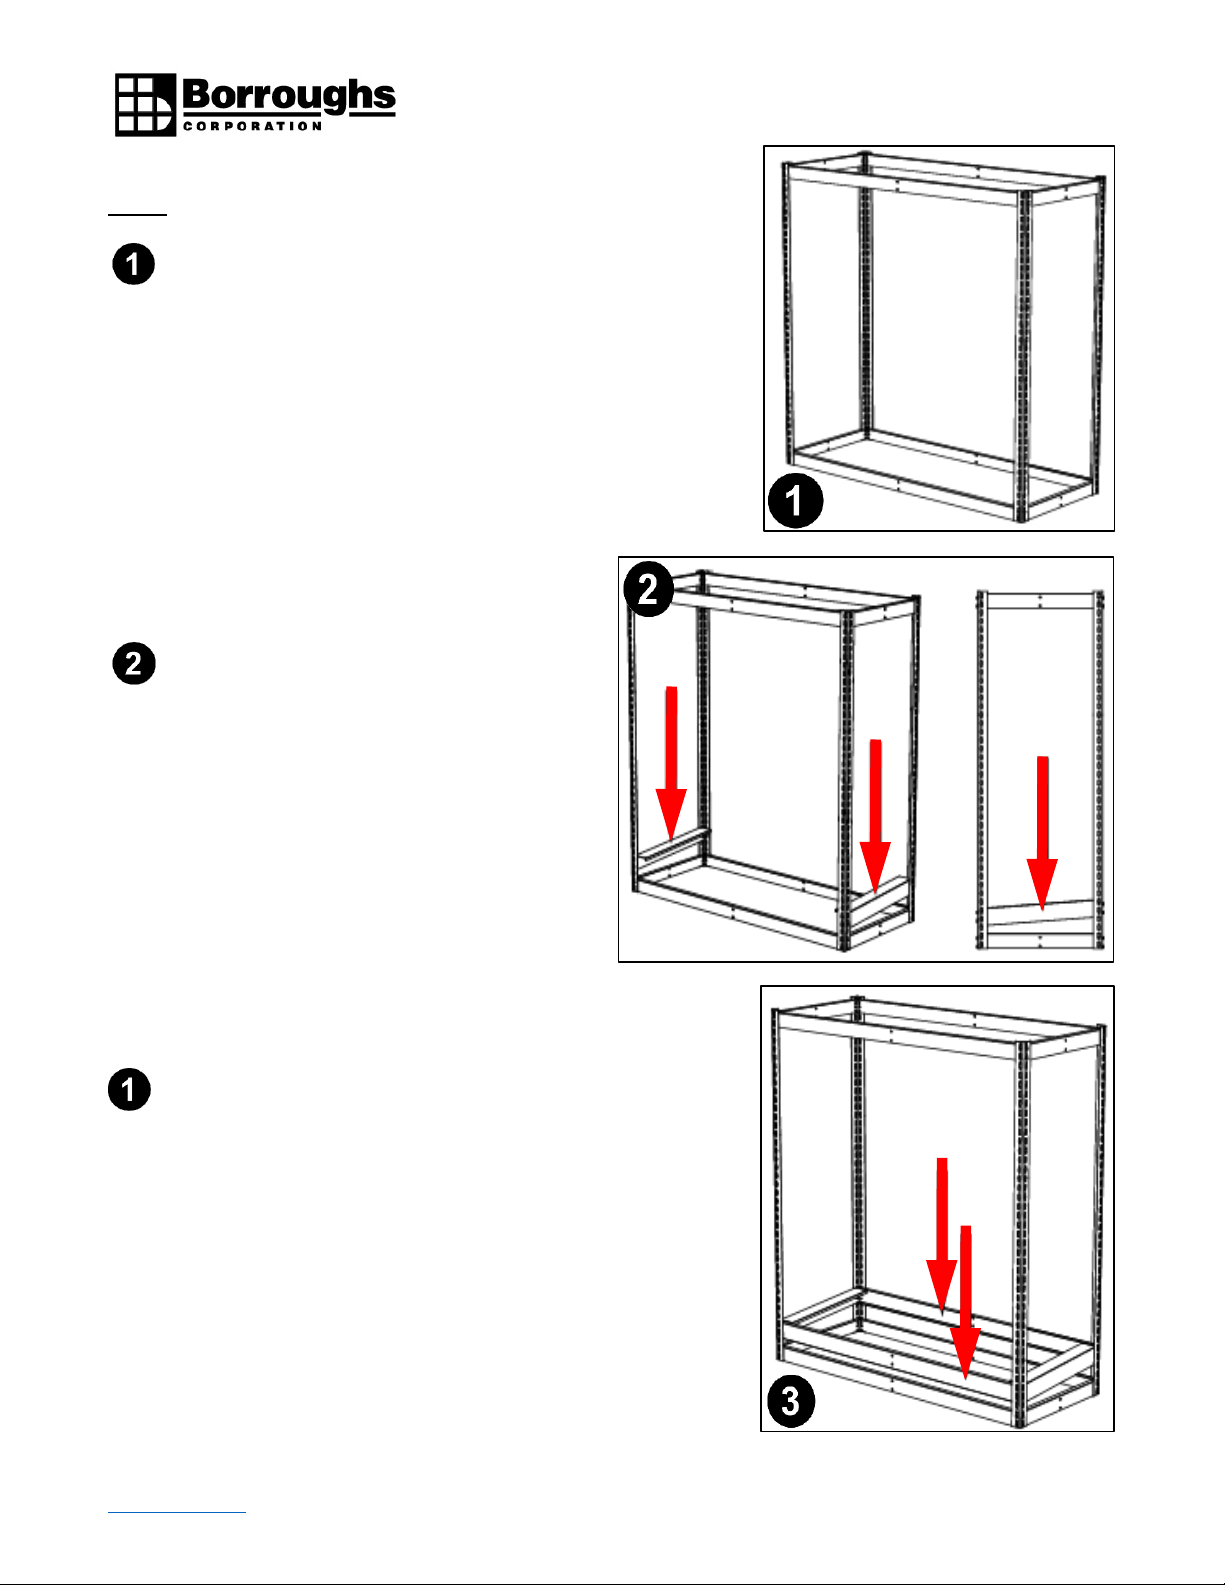
Begin assembly of shelving system by fitting
together the standard double rivet angle
beams creating a frame at top and bottom.
Shelves are set on a taper to encourage
proper drainage. Right and left-hand side shelf
supports are supplied for this. Ensure proper
orientation of brackets (stamped “L” & “R”)
and use a mallet to fully seat rivets into posts.
NOTE: Front set of rivets will be one place
below rear.
Install front and back double rivet channel
beams. Ensure that the perimeter is flush
creating an angled plane towards front. Use a
mallet to ensure rivets are fully seated into
posts.
Page 6
All information is subject to change without notice Page 6 of 9
Borroughs Document Number: DOC-HTS-0001 Rev. 1.0
www.borroughs.com 1-800-748-0227
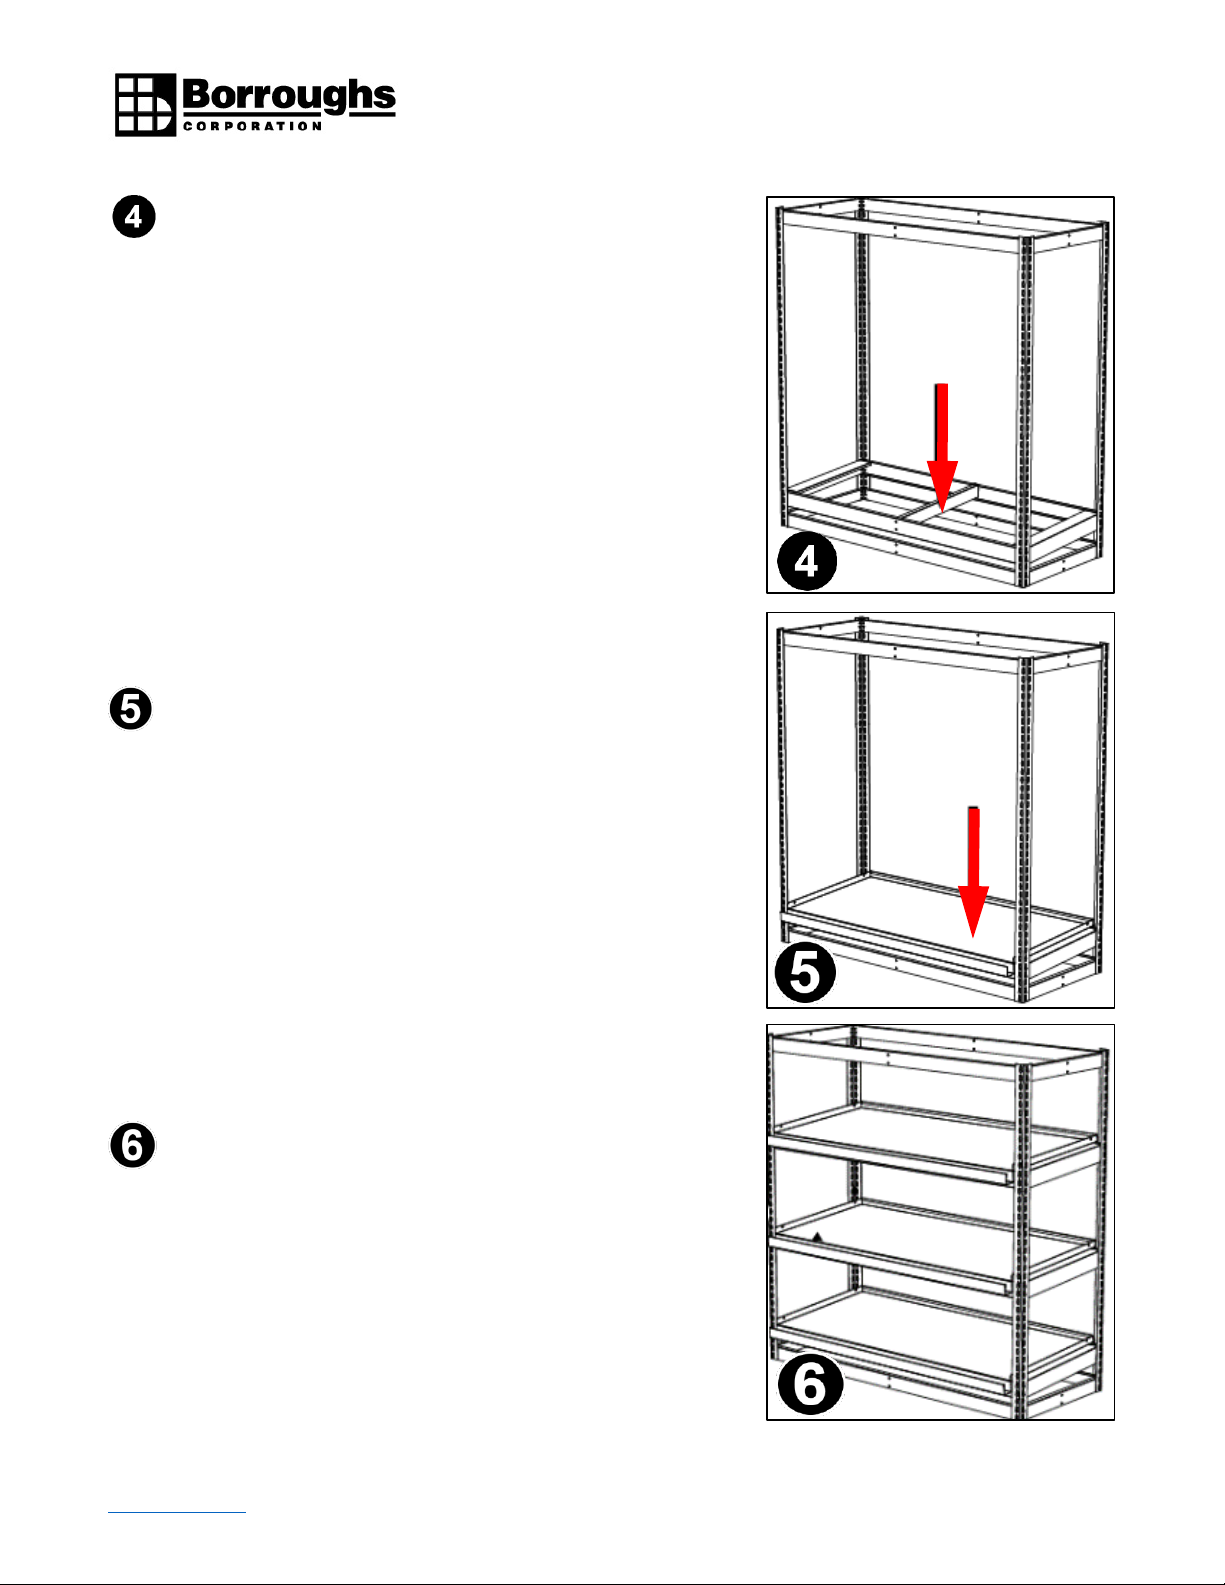
Install one (1) tie support for 48-inch-wide, 60-inch-wide, 72inch-wide, and two (2) for 96-inch-wide shelves per level.
These are also angled and can only be installed one way. Use
supplied ¼-20 hardware and fasten into place with a 7/16-inch
socket and wrench.
TROUGH SHELVES
Place shelf flush on supports with gutter towards front of unit.
The back of shelf has a welded back splash which also aids in
preventing shelf front sliding forward.
To complete installation repeat steps and install additional
levels.
Page 7
All information is subject to change without notice Page 7 of 9
Borroughs Document Number: DOC-HTS-0001 Rev. 1.0
www.borroughs.com 1-800-748-0227
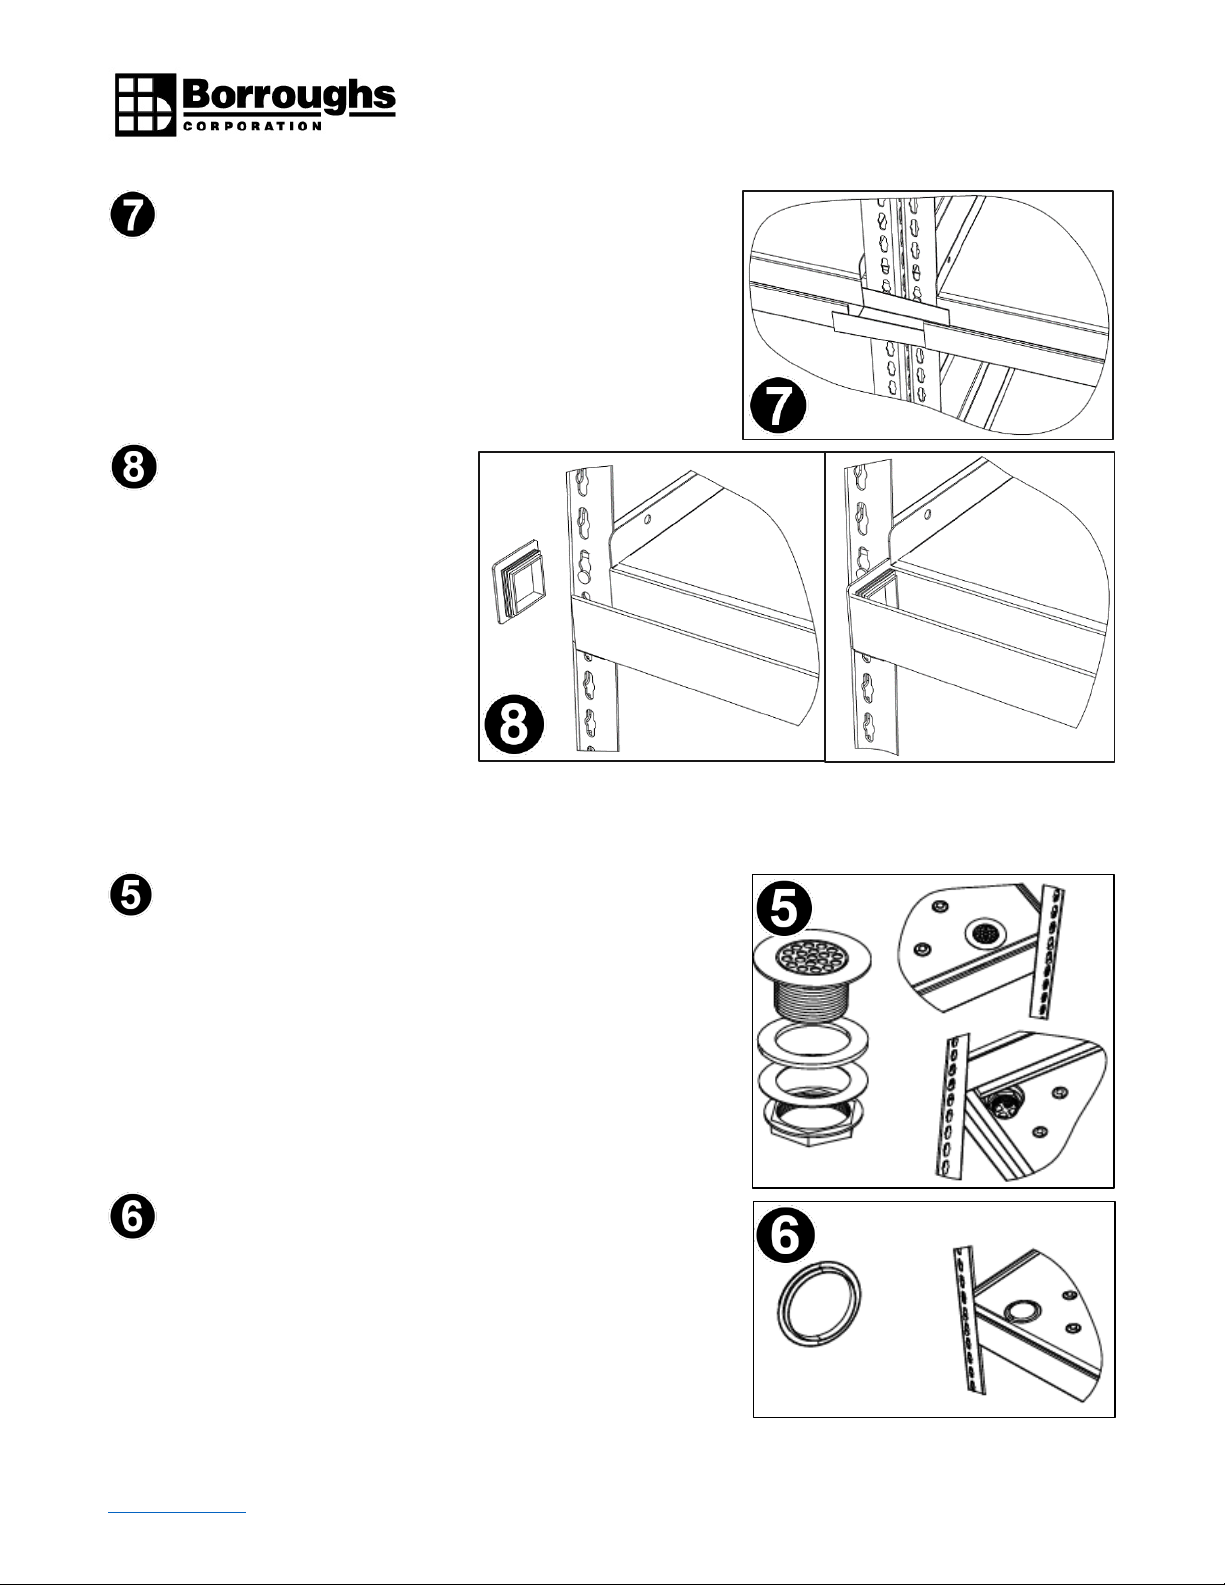
Splice plates (optional) are installed to connect two (2)
troughs together. Wider end of slice plate is installed
outside the trough and narrower end is inside connecting
trough. Once in place, hold and glue using a bead of silicone
on all edges. Allow silicone to dry.
To cap end of trough off. Place
cap into end of trough, hold
and glue using a bead of
silicone on all edges. Allow
silicone to dry.
DRAIN SHELVES
Each corner drain shelf is supplied with a drain and plastic
plug. To install drain, insert plug in existing hole on topside of
shelf. Put gasket and threaded retainer onto protruding plug
under shelf and tighten. Silicone or similar sealant can aid in a
water tight shelf.
Similarly, for opposite side from drain, install plastic plug. The
plug is a press fit application.
Page 8
All information is subject to change without notice Page 8 of 9
Borroughs Document Number: DOC-HTS-0001 Rev. 1.0
www.borroughs.com 1-800-748-0227
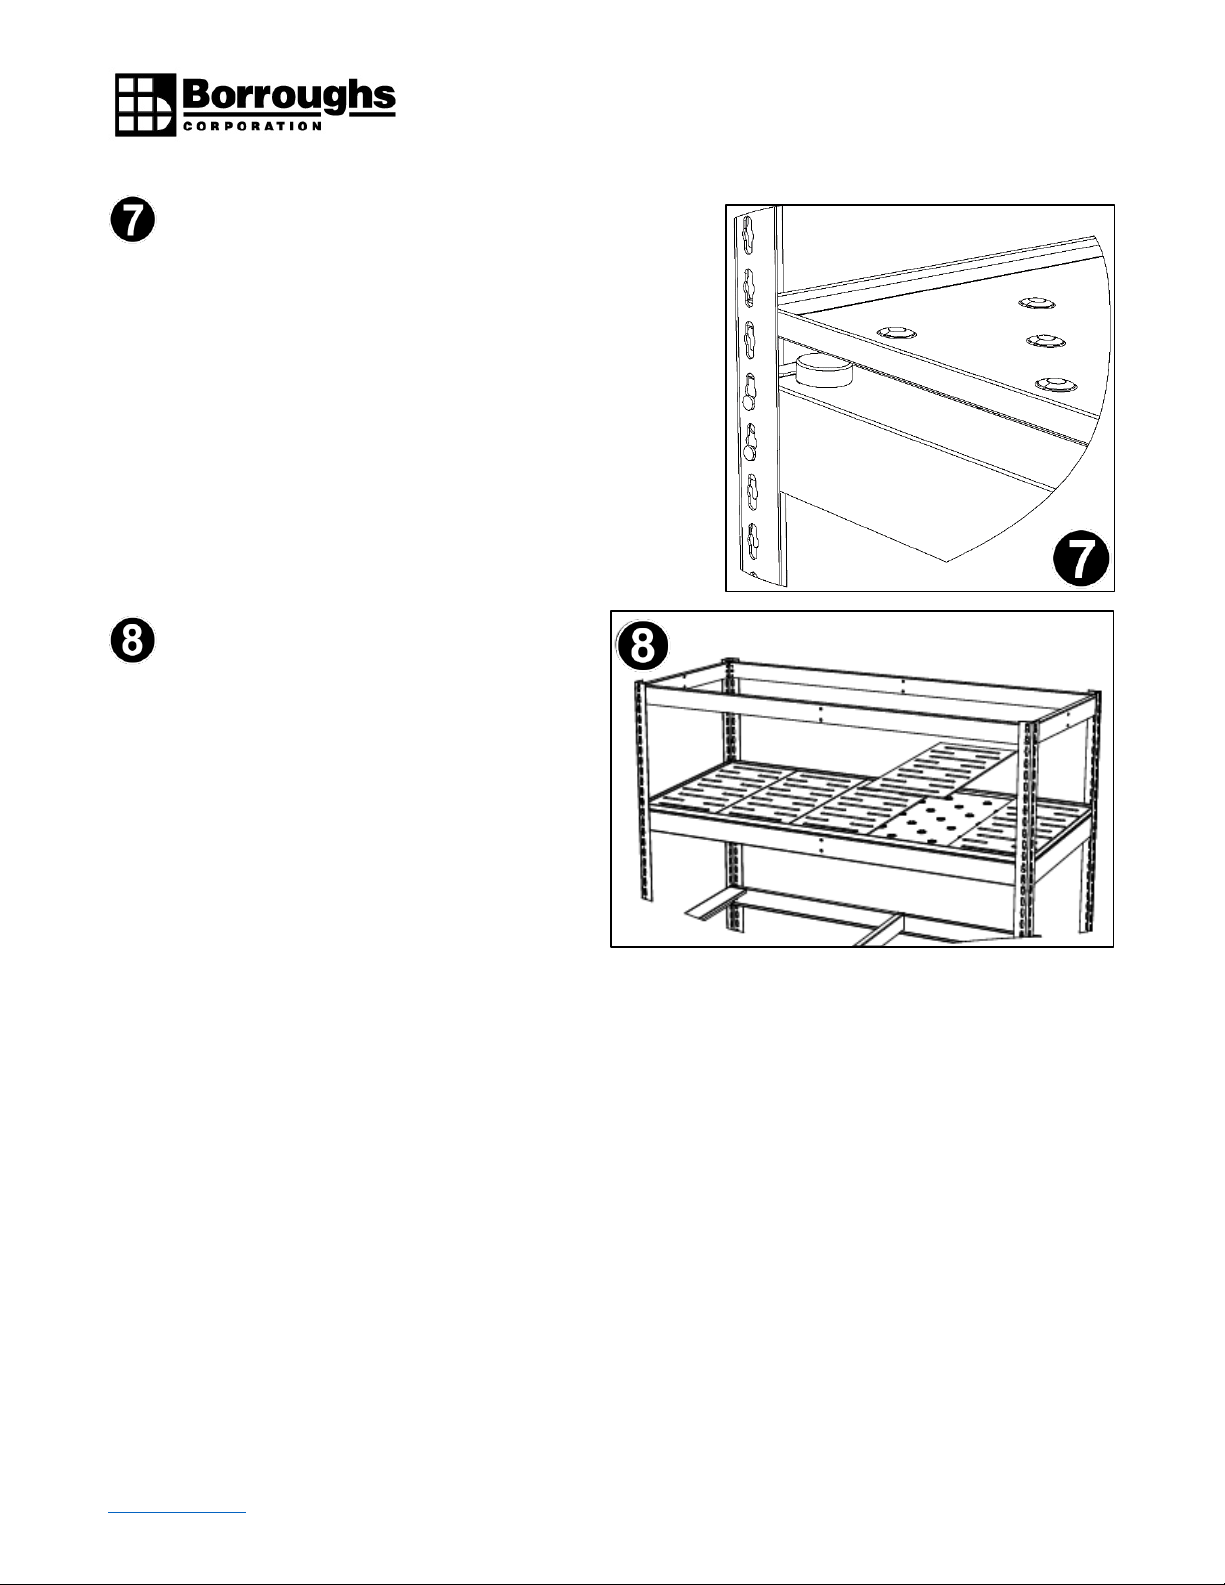
Locate shins at the opposite corner to the drain to pitch
water drainage.
Drain shelf trays (optional) can be placed on
shelf to allow more air circulation and
moisture control as shown.
Once installation is completed, a copy of the installation instruction booklet MUST
remain with the customer.
Page 9

All information is subject to change without notice Page 9 of 9
Borroughs Document Number: DOC-HTS-0001 Rev. 1.0
www.borroughs.com 1-800-748-0227
WARRANTY
Borroughs Corporation extends to the original purchaser from the date of purchase a limited lifetime warranty for
Borroughs’ Automotive Workstations and Modular Drawer Cabinets against manufacturing defects in material
and workmanship. For all other products Borroughs extends to the original purchaser from the date of purchase
a 5-year limited warranty against manufacturing defects in material and workmanship.
If a Borroughs product fails to perform because of a manufacturing defect, Borroughs will examine it. If found
defective, it will be repaired or replaced at our option. This warranty applies only to Borroughs products acquired
directly from Borroughs Corporation or from Authorized Borroughs Dealers.
This warranty does not apply to any product which has been subject to misuse, negligence, or accident; has been
damaged in shipment, storage, or installation; has been misapplied or has been modified or repaired by
unauthorized persons or been repaired with non-standard Borroughs replacement parts. This warranty specifically
excludes claims for indirect, incidental, or consequential damages arising in any way from a product defect. This
warranty is exclusive, and exists in lieu of all other warranties, either expressed or implied.
This warranty gives you specific legal rights; you may also have other rights which may vary from state to state.
Contact your Borroughs Selling Dealer, to obtain warranty service. You must make a written claim. Provide a copy
of your purchase record and a written description of the warranty problem with your claim.
If you are unable to contact your Dealer, contact:
Borroughs Corporation, Customer Service Manager
3002 N. Burdick St., Kalamazoo, MI 49004-3483.
Phone: 1-800-748-0227
 Loading...