

Page 1

BORLA PERFORMANCE INDUSTRIES
500 Borla Drive
Johnson City TN, 37604-7523
805-986-8600
Chevrolet Camaro (Gen6) Installation Guide
PN– 60605
***** Please compare the parts in the box with the bill of materials provided *****
(view the following pages) to assure that you have all the parts necessary for this installation.
These instructions have been written to help you with the installation of your Borla Performance System. Please read this document completely before beginning the installation of your system.
To ensure this part number fits your specific model year, please visit our website for the latest model year listings at www.BORLA.com
Thank you for purchasing a Borla Performance Exhaust System.
The Borla Performance Exhaust Tail Pipe Assembly (PN 60605) is designed for Borla Mufflers for the Chevrolet Camaro with a 6.2L-V8 or 3.6L-V6 engines, manual or automatic transmissions.
Borla Performance Industries recommends that an exhaust shop or professional after market parts installer, who has all the ne cessary equipment, tools and experienced personnel needed for proper installation, should perform the installation of this syste m.
However, if you decide to perform the installation, we recommend someone should help you. Ensure the installer uses all under
car safety precautions including eye protection.
Please take time to read and understand the following…
By installing your Borla Performance Exhaust System, you indicate that you have read this document and you agree with the ter ms
stated below.
It is the responsibility of the purchaser to follow all installation instruction guidelines and safety procedures supplied with your
Borla Performance Exhaust System.
Borla Performance Industries assumes no responsibility for damages occurring from misuse, abuse, improper installation, improper operation, lack of responsible care, or all previously stated reasons resulting from incompatibility with other manufacturer’s
products and/or systems.
Included with your Borla Performance Exhaust System is a warranty card. Please read it carefully before you begin any work on
your vehicle. If you should have any questions regarding our warranty policy, installation, or any other matter pertaining to your
new Borla Performance Exhaust System, please give us a call at the number provided on the warranty card.
INSTALLATION GUIDE
Chevrolet Camaro (Gen6)
DOCUMENT PART NUMBER
A-35867 Rev. E
PAGE
1 of 5
Page 2

TOOLS:
1. 3/8” Drive Ratchet
2. 3/8” Drive Extension 9”
3. 15mm Socket
4. 15mm Wrench
5. 14mm Socket
6. 14mm Wrench
7. Pry Bar
SHOP SUPPLIES:
1 Spray Lubricant
BORLA PERFORMANCE INDUSTRIES
500 Borla Drive
Johnson City TN, 37604-7523
805-986-8600
Minimum Required Tool List:
Borla Performance - Bill of Materials
INSTALLATION GUIDE
Chevrolet Camaro (Gen6)
DOCUMENT PART NUMBER
A-35867 Rev. E
60605
PAGE
2 of 5
Page 3
Caution!!! Never work on a hot exhaust system. Serious injury in the form of burns can result If the vehicle
has been in use and the exhaust system is hot, allow vehicle to cool for at least 1 hour. Always wear eye
protection when working under any vehicle.
Note: It is our recommendation that you use a hoist or hydraulic lift to facilitate the installation of your new
Borla Performance Exhaust System.
Taking all under car safety precautions, lift the vehicle using a hoist or hydraulic lift. Once this has been
done, you may begin the removal of your old exhaust system from your vehicle.
Note: Before removing the original exhaust system from your vehicle, please compare the parts you have
received with the bill of materials provided on the previous page to assure that you have all the parts necessary for the installation of your new Borla Performance Exhaust System.
Note: With a used vehicle, we suggest a penetrating spray lubricant to be applied liberally
to all exhaust fasteners and allowing a significant period of time for the chemical to lubricate the threads before attempting to disassemble.
BORLA PERFORMANCE INDUSTRIES
500 Borla Drive
Johnson City TN, 37604-7523
805-986-8600
1
Original Exhaust System Removal
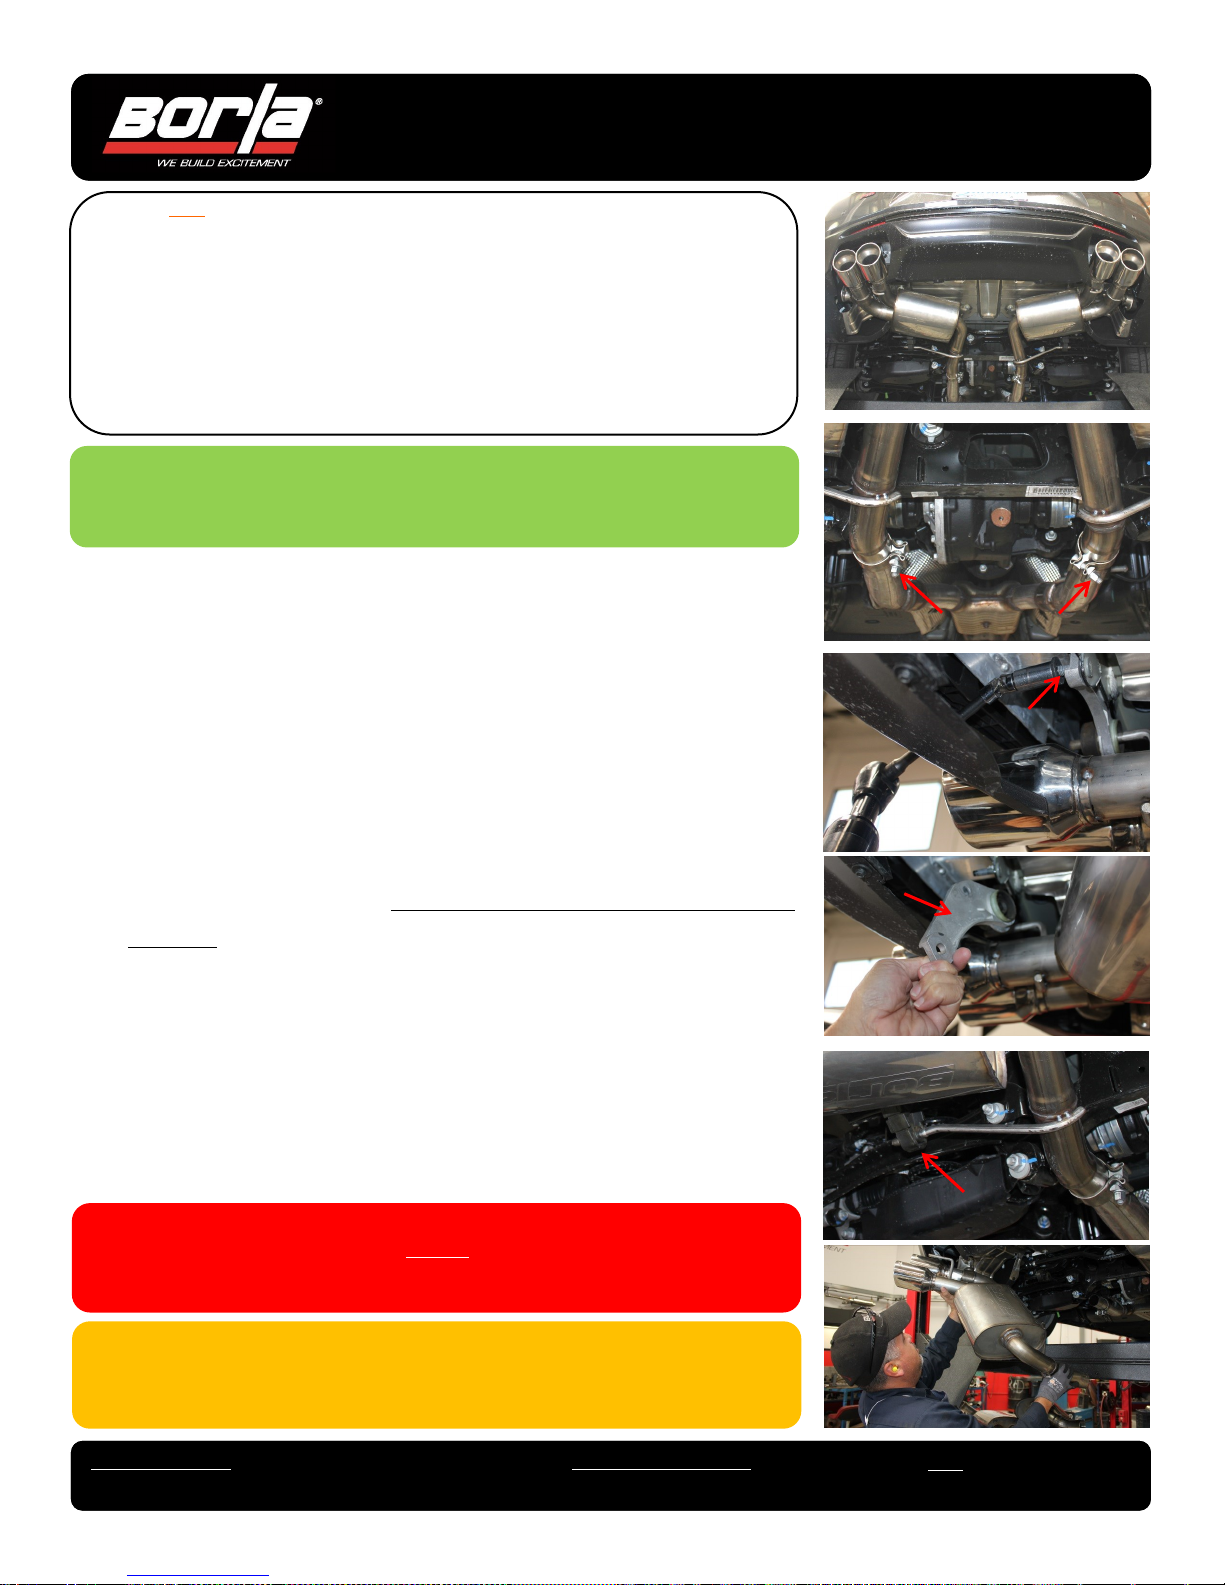
1. Disconnect left-side and right-side wire harness to factory electronic
actuators.
2. Loosen (2) clamps on securing rear muffler assemblies. (See Figs. 1 & 2)
3. Starting on the left-side, locate and remove (2) nuts on Hanger Bracket and
remove hanger from bracket. Keep Hanger Bracket and hardware for rein-
stallation. (See Figs. 3A & 3B)
4. Repeat STEP 2 for right-ride Hanger.
5. Support muffler assembly with stand. Carefully remove hangers from rub-
ber isolators and remove both rear muffler assemblies from vehicle. (See
Figs. 4A & 4B)
2
3A
3B
4A
Left Side
Left Side
WARNING: Use extreme caution during installation. Torque all fasteners according to manufacturer’s torque values and tightening sequence. DO NOT use air impact tools to tighten fasteners on
Borla Performance Exhaust Systems. Use of such tools may result in bent flanges or gasket contact
areas leading to exhaust leaks.
NOTE: When you first start your vehicle after the installation of your new Borla Performance
Exhaust System, there may be some smoke and fumes coming from the system. This is a protective
oil based coating used in the manufacturing of mandrel bent performance exhaust tubing. This is
not a problem and will disappear within a very short period of time after the exhaust has reached
normal operating temperatures.
INSTALLATION GUIDE
Chevrolet Camaro (Gen6)
DOCUMENT PART NUMBER
A-35867 Rev. E
4B
Left Side
Left Side
PAGE
3 of 5
Page 4
Replace Tail Pipe Assembly (60605)
BORLA PERFORMANCE INDUSTRIES
500 Borla Drive
Johnson City TN, 37604-7523
805-986-8600
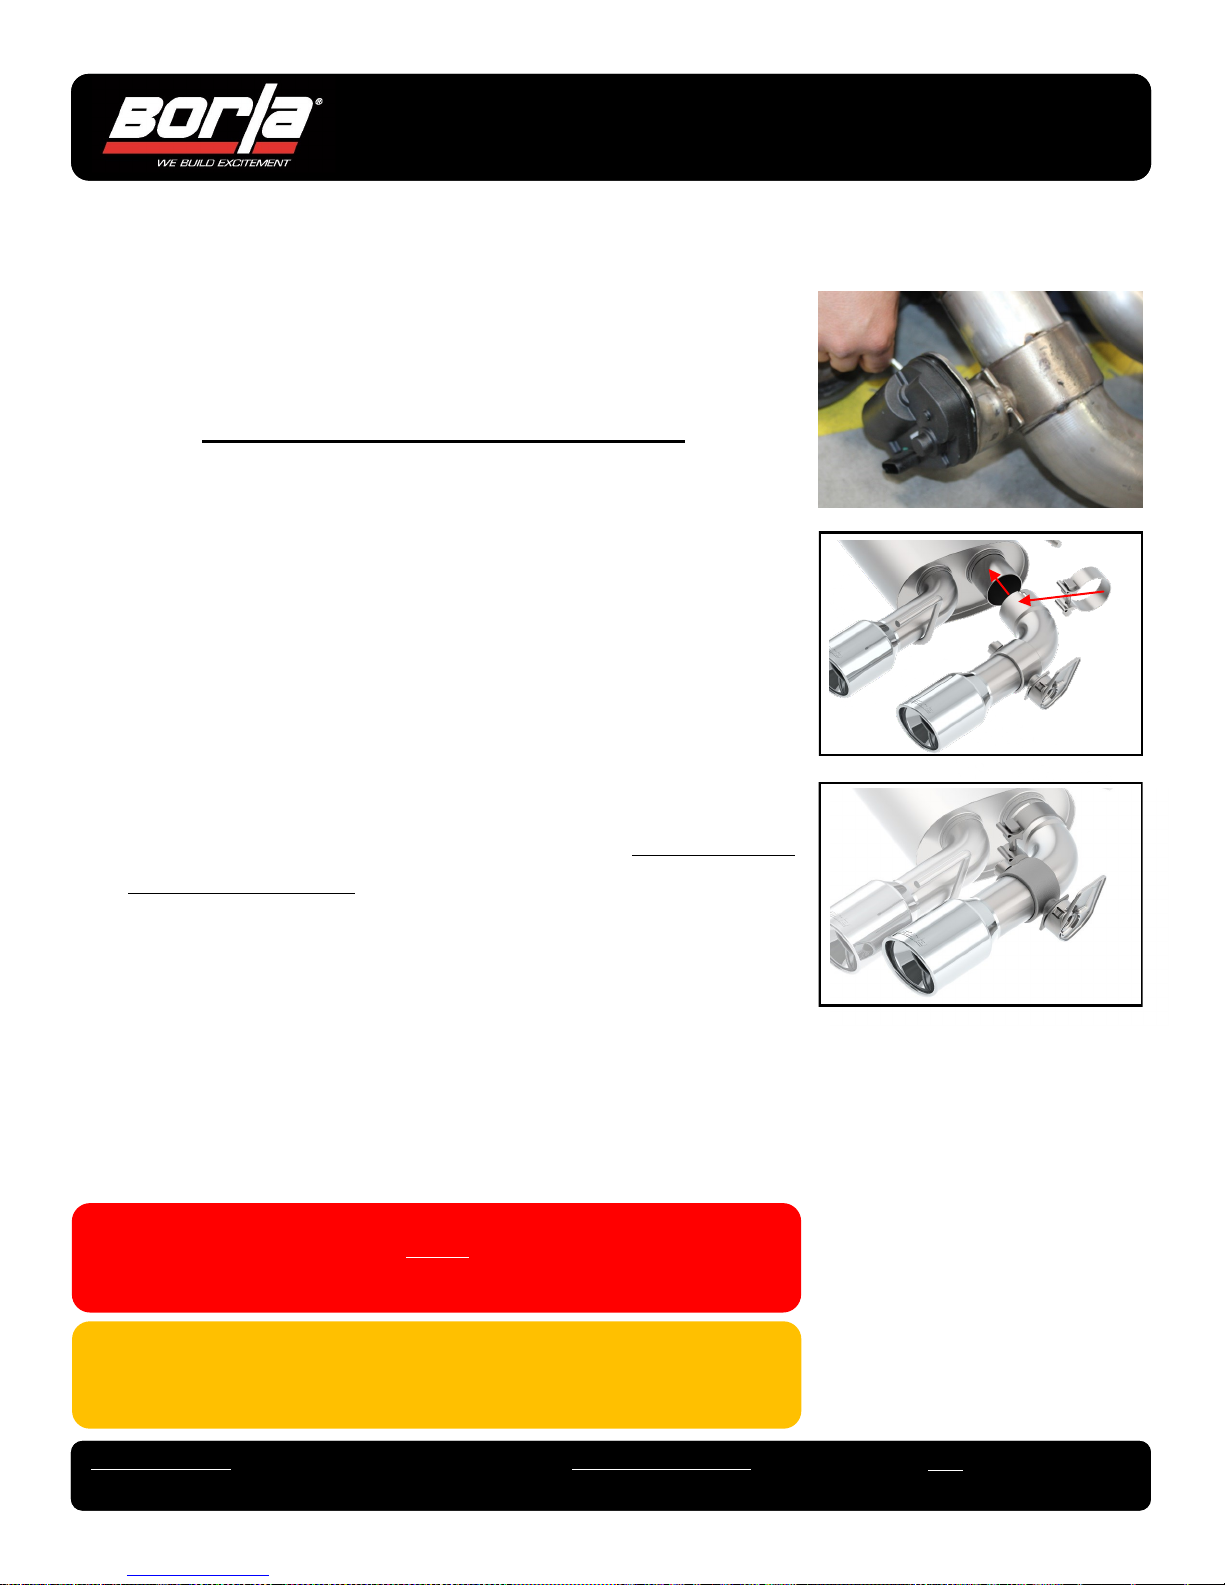
1. Begin with R/S Muffler Assembly. Loosen clamp on right-side clamp and
remove old R/S Tail Pipe Assembly from muffler assembly.
2. Remove the electronic actuator on vehicle right-side rear muffler assembly.
(See Fig. A)
3. Transfer (removed) factory electronic actuator to new R/S Tailpipe As-
sembly using factory hardware. Verify alignment of components and tight-
en bolts 8 ft. lbs.
4. Place a clamp on the expanded edge of the R/S Tailpipe Assembly and
place over the exposed muffler tube. (See Figs. B & C) DO NOT TIGHT-
EN THE CLAMP BOLT.
5. Repeat STEPS 1-4 to replace the L/S Tailpipe Assembly to L/S Muffler.
A
B
C
Right Side
Right Side
Right Side
WARNING: Use extreme caution during installation. Torque all fasteners according to manufacturer’s torque values and tightening sequence. DO NOT use air impact tools to tighten fasteners on
Borla Performance Exhaust Systems. Use of such tools may result in bent flanges or gasket contact
areas leading to exhaust leaks.
NOTE: When you first start your vehicle after the installation of your new Borla Performance
Exhaust System, there may be some smoke and fumes coming from the system. This is a protective
oil based coating used in the manufacturing of mandrel bent performance exhaust tubing. This is
not a problem and will disappear within a very short period of time after the exhaust has reached
normal operating temperatures.
INSTALLATION GUIDE
Chevrolet Camaro (Gen6)
DOCUMENT PART NUMBER
A-35867 Rev. E
PAGE
4 of 5
Page 5

Borla Performance
Exhaust Installation
1. Starting on Left Side, place a clamp on expanded end of L/H Muffler As-
sembly. Carefully insert (2) hangers into rubber isolators. DO NOT TIGHT-
EN CLAMP BOLTS (See Figs. 5A & 5B)
2. Repeat Step 1 to install R/S Muffler Assembly to vehicle.
BORLA PERFORMANCE INDUSTRIES
500 Borla Drive
Johnson City TN, 37604-7523
805-986-8600
5A
Left Side
5B
3. Reinstall L/S Muffler Assembly to vehicle using factory Left Side Hanger
Bracket using factory hardware. Tighten nuts to 12 ft. lbs. (See Figs. 6A &
6B)
4. Repeat Step 3 to reinstall factory R/S Muffler Assembly to vehicle.
5. Reconnect left-side and right-side wire harness to factory electronic ac-
tuators.
6. Check your exhaust system for proper clearance under the vehicle and also
for tip centering to valence. (See Fig. 7)
7. Once position has been determined to be correct, tighten the Muffler Assembly inlet clamp bolts; then the Tailpipe Assembly Tip clamp bolts, 32-35 ft.
lbs. (See Fig. 8)
8. Before starting your vehicle, make sure to check all wires, hoses, brake
lines, body parts and tires for safe clearance from the exhaust system.
9. Start vehicle and check for any leaks. If any leaks are found, determine
cause (such as loose or incorrectly positioned clamp) and repair as necessary.
6A
6B
7
Left Side
Left Side
Left Side
WARNING: Use extreme caution during installation. Torque all fasteners according to manufacturer’s torque values and tightening sequence. DO NOT use air impact tools to tighten fasteners on
Borla Performance Exhaust Systems. Use of such tools may result in bent flanges or gasket contact
areas leading to exhaust leaks.
NOTE: When you first start your vehicle after the installation of your new Borla Performance
Exhaust System, there may be some smoke and fumes coming from the system. This is a protective
oil based coating used in the manufacturing of mandrel bent performance exhaust tubing. This is
not a problem and will disappear within a very short period of time after the exhaust has reached
normal operating temperatures.
INSTALLATION GUIDE
Chevrolet Camaro (Gen6)
DOCUMENT PART NUMBER
A-35867 Rev. E
8
PAGE
5 of 5
 Loading...