

Page 1
Parts List,
Installation
and
General
Information
‚
ƒ
BL2605MG
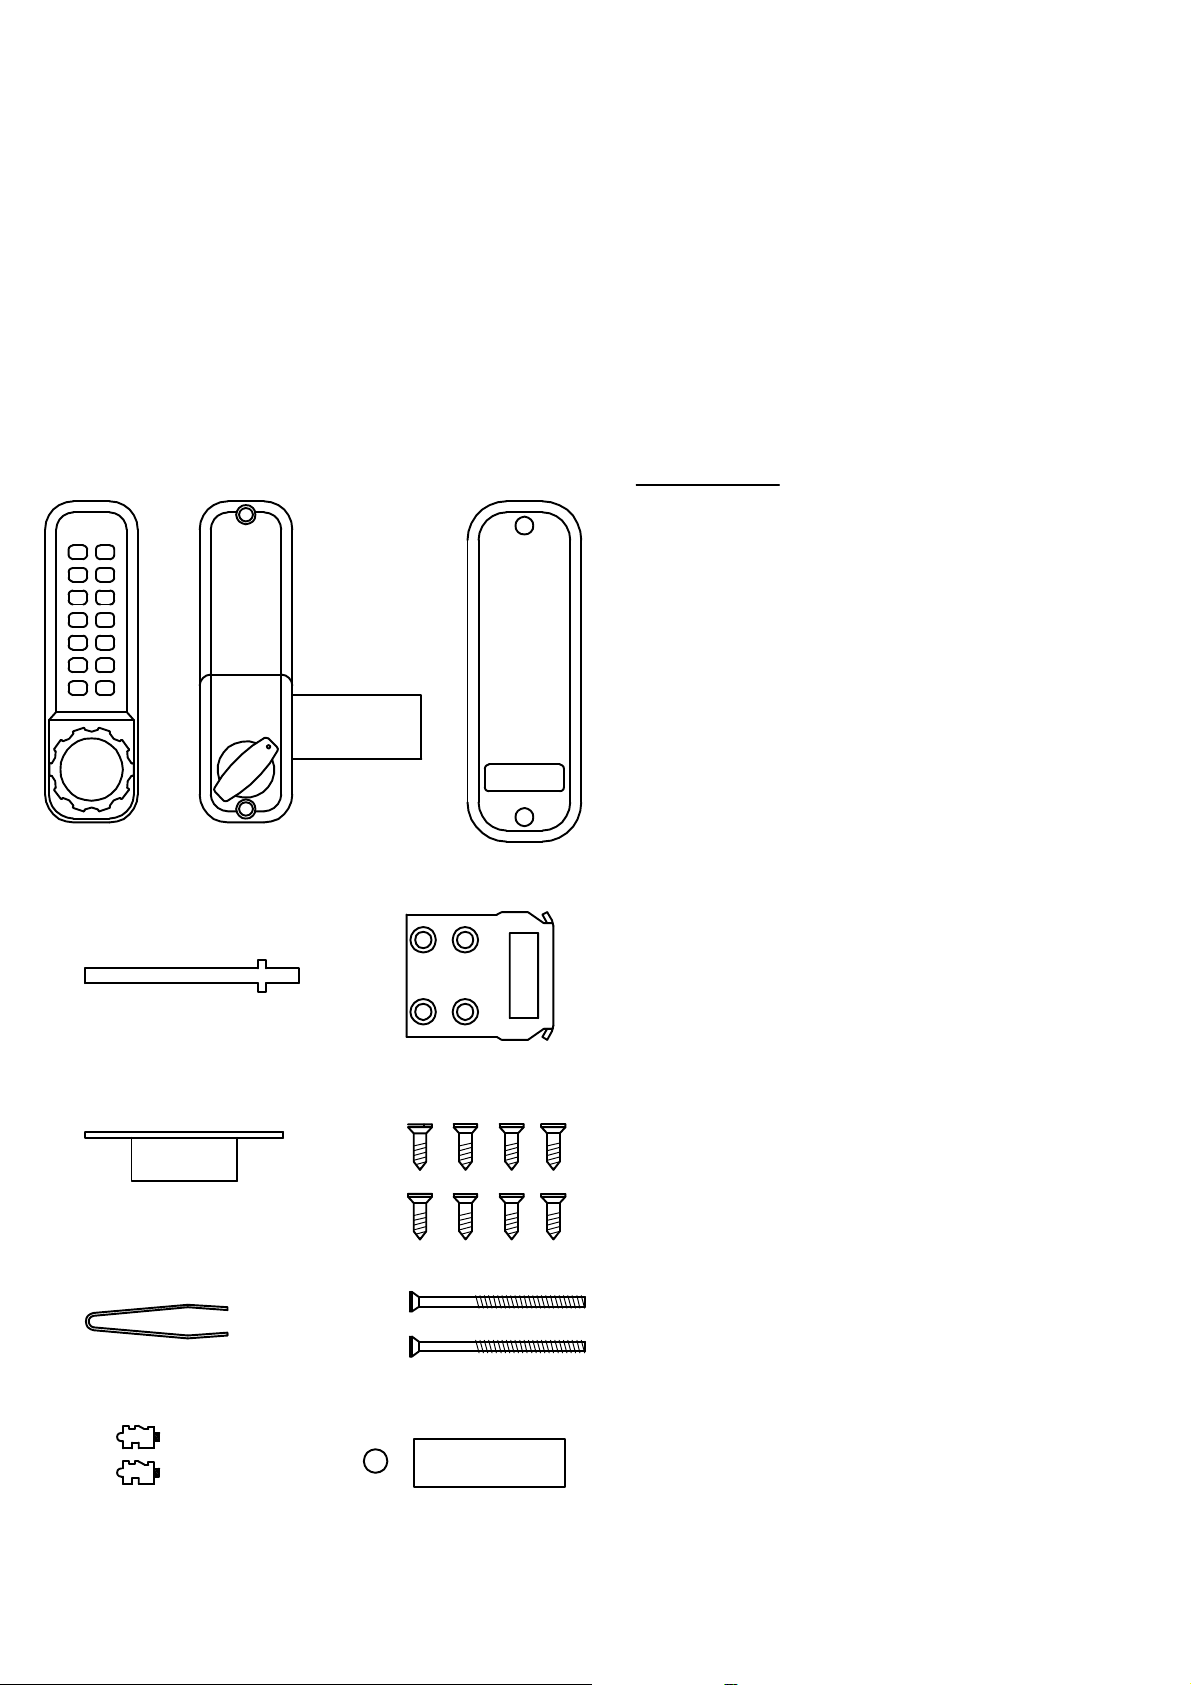
PARTS LIST
Please make sure you have received all the
following parts:
(1) Keypad
(2) Inside lock body
(3) Neoprene seals x 2
„
†
ˆ
…
‡
‰
(4) Spindles
(5) Surface lock keep
(6) Morticed lock keep
(7)Wood screws x 8
(8) Tweezers (For changing the code)
(9) Fixing bolts. 6 supplied
(10) Spare tumblers. 2 x Coded
2 x Uncoded
(11) Code card
Š
11
FACTORY
PRE-SET CODE
.1.
Page 2
SPECLAL NOTES
HOW TO CHANGE YOUR CODE NUMBER
Before commencing installation check that all
parts are working correctly: Press the code
according to the code card and then the knob
should turn and return easily under spring pressure.
lf you intend to change the code, you should do it
before installing the lock, See the code change
instructions.
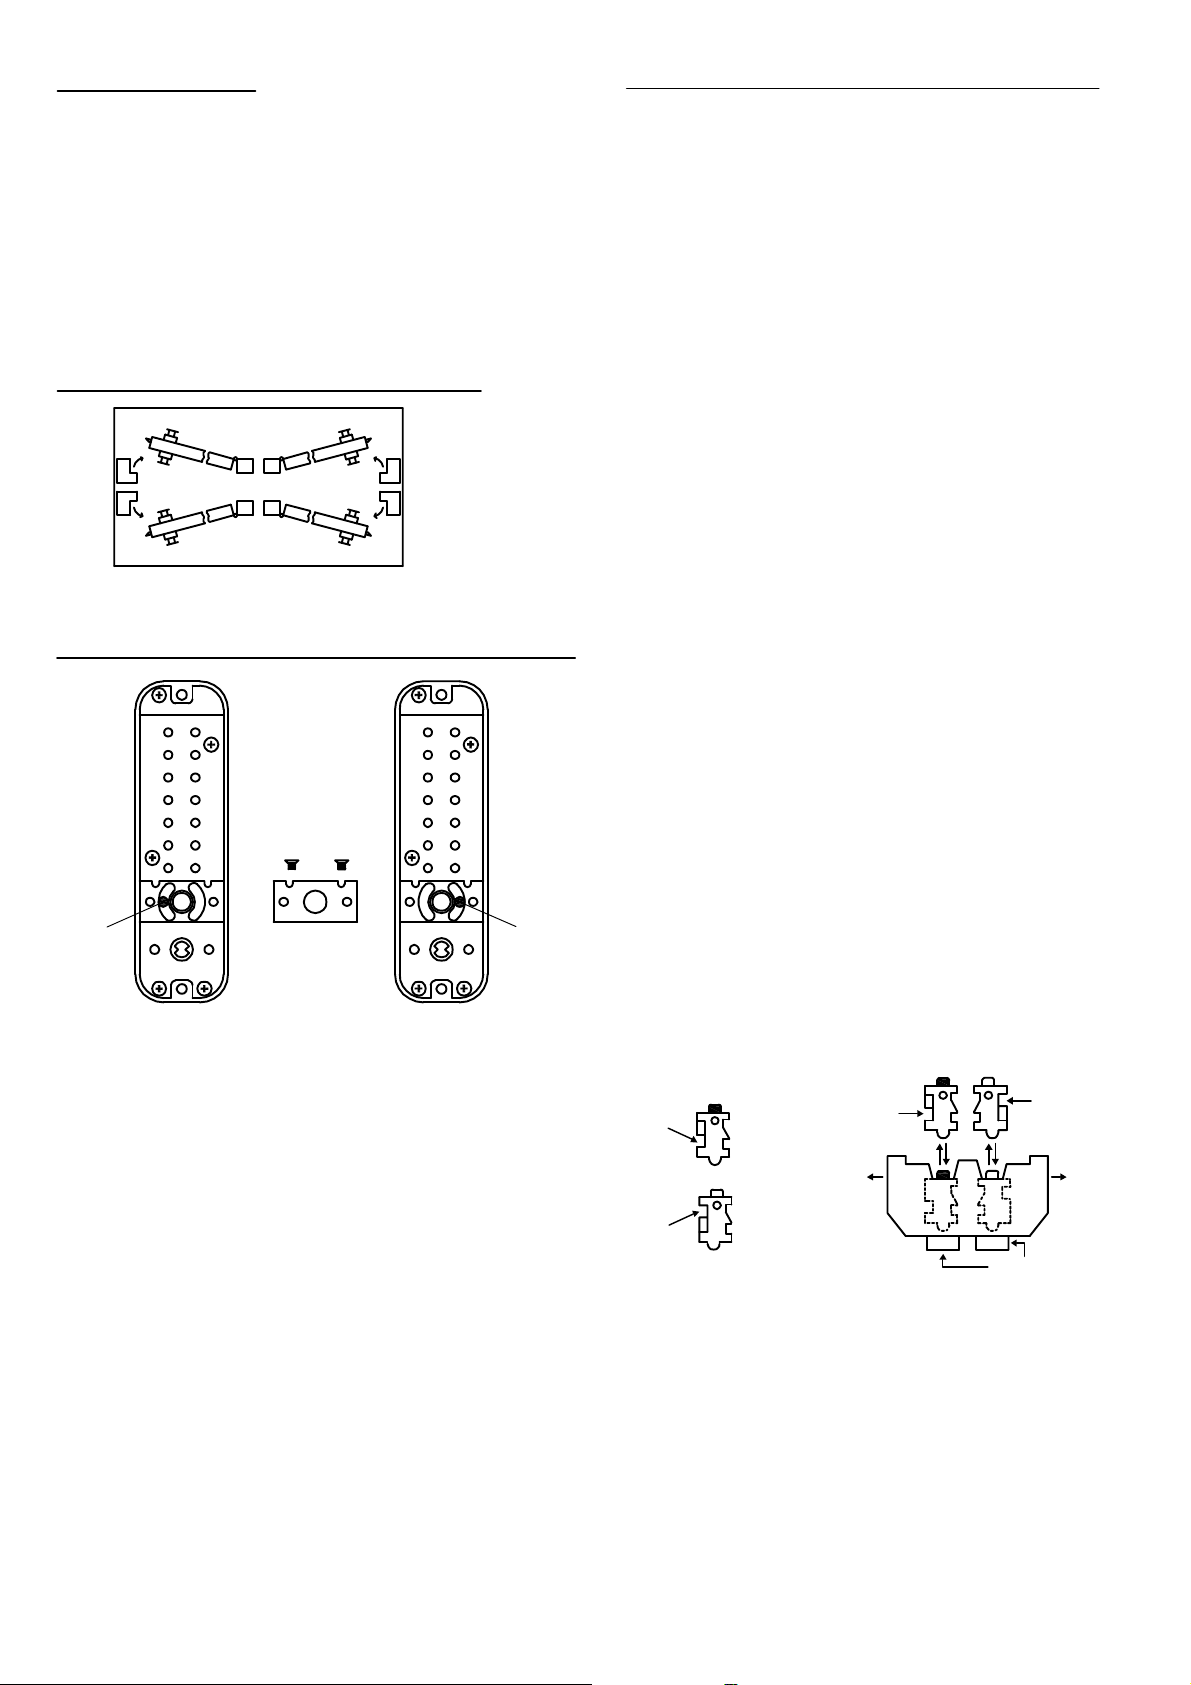
CHECK THE HAND OF YOUR DOOR
INSIDE
Your door is right-
RIGHT AHND
LEFT HAND
OUTSIDE
handed, if viewed,
form the outside the
hinges are on the
right.
CHANGING THE HANDING OF THE UNIT
1
PIN
6
7
8
9
Z
BLUE
2
3
COLOUR
4
SCREW
50
X
YC
6
7
8
9
0 5
Z
C Y
1
2
3
4
X
PIN
1) Remove the lock from the door .
2) Remove the 2 retaining screws from the back
of the keypad. Take EXTRA care to keep the
keypad on a flat surface, when you are
removing the covering plate, because there are
a lot of small components inside.
3) You will now see that there are 5 red coloured
coded tumblers & 8 blue coloured uncoded
tumblers plus 1 clear tumbler ('C' button).
4) To change your code, push the 'C' button down
and hold it. You can then easily remove one or
more of your coded & uncoded tumblers, using
the tweezers supplied.
Remember, the red tumblers represent
coded digits and the blue tumblers
represent non-coded digits
5) Please note you should NEVER remove the 'C'
tumbler.
6) Please note the different shapes of tumblers,
before reinserting them into the lock body.
Firstly there is a difference in shape between
the coded & uncoded tumblers, illustrated
below. And secondly when refitting the
tumblers into the lock body, they must be fitted
facing the right way, again see the illustration
Below. (All square cutouts must face outwards)
7) After you have refitted the tumblers and made
a note of the new code, please replace the
metal plate with the 2 screws
8) PLEASE NOTE.With the spare tumblers
provided, you can either increase the number
of digits in your code to 6 - 7 or reduce to 3 - 4.
FOR RIGHT HAND
DOOR
Dismantling the lock will invalidate your warranty
FOR LEFT HAND
DOOR
Square
cut-out
Square
cut-out
Square
cut-out
Red Coded
Tumbler
Outwards
Blue Non-Coded
Tumbler
Square
cut-out
Outwards
Buttons
If you expericnce any problems when fitting
this lock or changing the code please
contact the:
BORG HELPLINE
00800 44 88 377
.2.
Page 3
Keypad
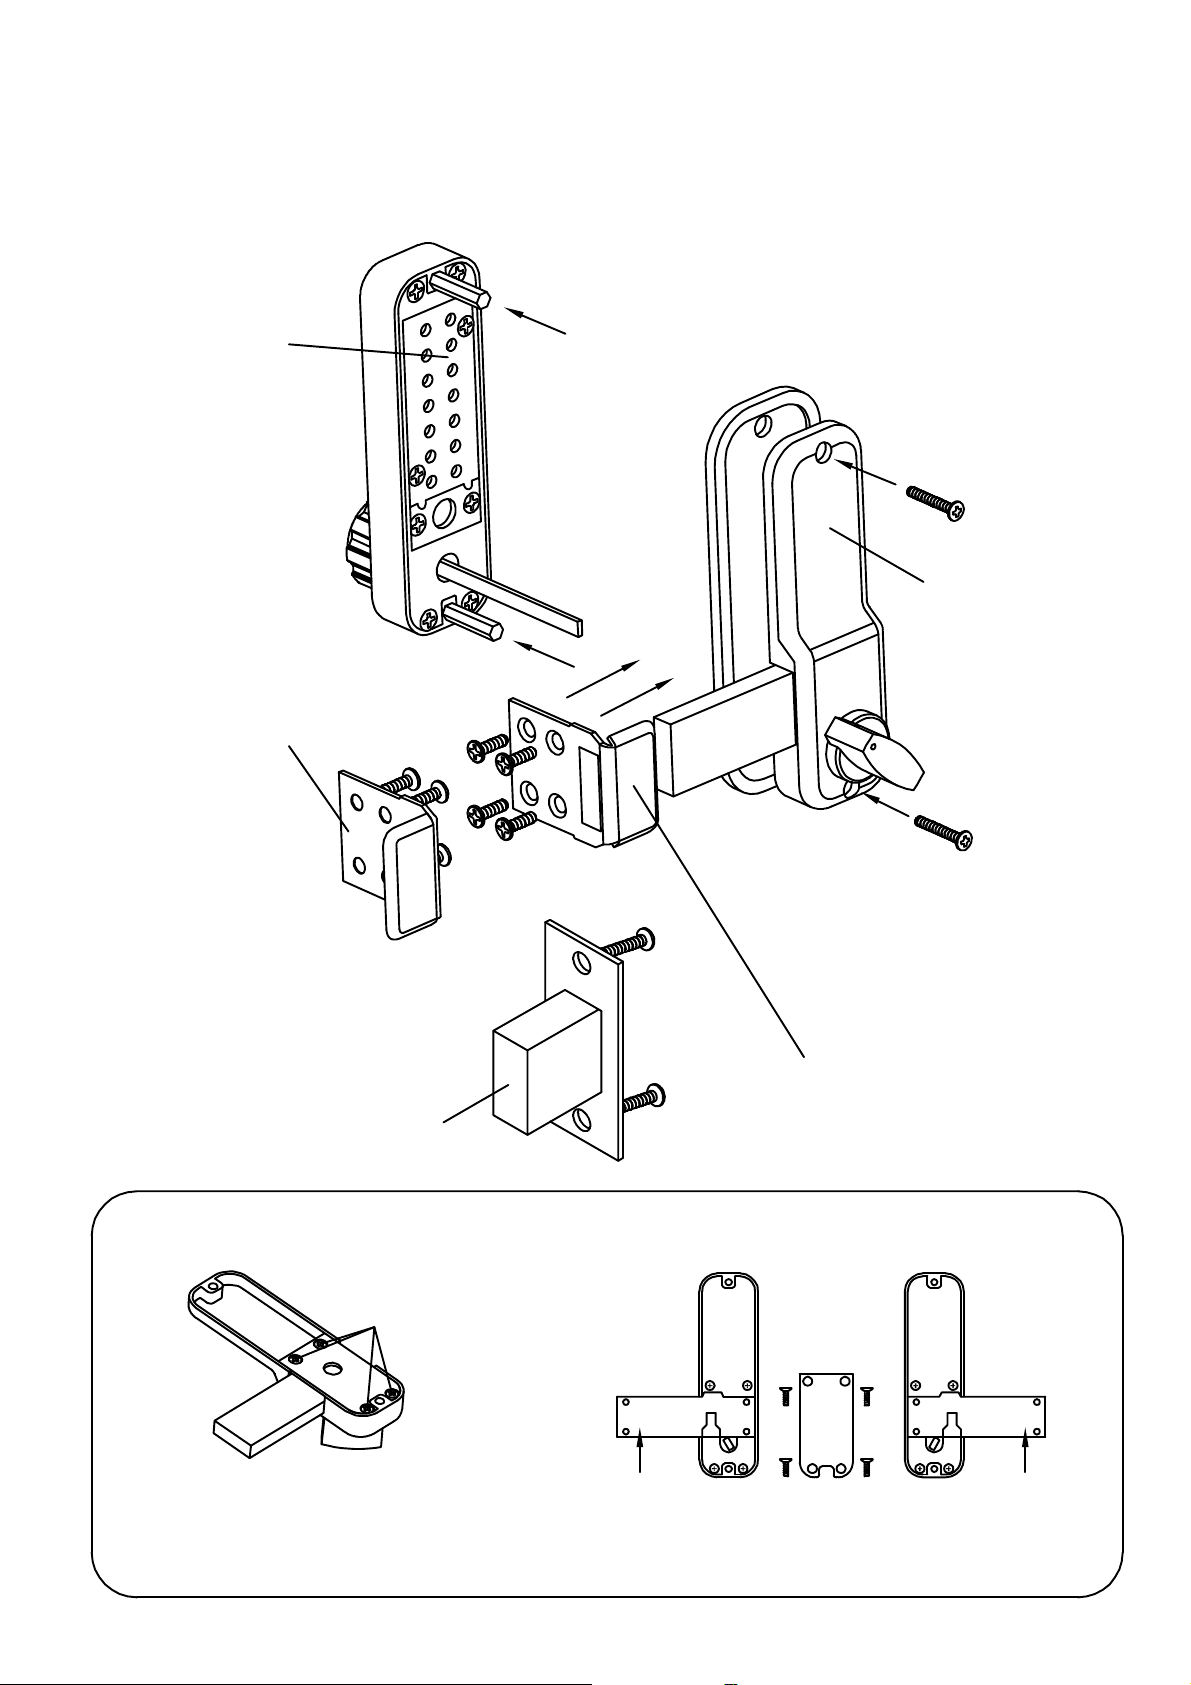
Assembling and Fitting
·
·
Inside lock
body
Surface lock
keep
Morticed lock keep
·
·
Unscrew the four
screws and remove
the plate
·
Right
Surface lock keep
Left
Dead bolt
.3.
Dead bolt
Plate to be removed
Page 4

MAINTENANCE INSTRUCTIONS
WEEKLY
ANNUALLY
CLEAN THE SURFACE OF THE LOCK WITH MARINE GRADE CHROME
POLISHING LIQUID. SPRAY THE EXPOSED PARTS OF THE LATCH WITH
WD40 OR EQUIVALENT.
1. REMOVE THE LOCK FROM THE DOOR.
2. SPRAY THE INSIDE OF THE LOCK THOROUGHLY WITH WD40 OR
EQUIVALENT, THROUGH THE TUMBLER HOLES AT THE BACK OF
THE LOCK.
3. SPRAY ALL THE FIXING ACCESSORIES AND THE LATCH WITH
WD40 OR EQUIVALENT.
4. PUSH EACH OF THE BUTTONS AND ROTATE THE KNOB SEVERAL
TIMES TO MAKE SURE THE LOCK IS WORKING SMOOTHLY.
REMARKS
THE ABOVE MAINTENANCE PROCEDURES CAN BE CARRIED OUT
WHENEVER THE OPERATION OF THE LOCK IS STICKY.
.4.
 Loading...