

Page 1

User
Manual
Manuel
D’instructions
Page 2

Thank you for
choosing Boostmi!
Nous vous remercions
d’avoir choisi Boostmi!
Always follow basic safety precautions when using electrical
devices and when working on vehicles. Read all instructions
carefully and please keep this instruction manual for quick reference.
––
Veuillez toujours prendre les précautions de base lorsque vous
utilisez un appareil électrique et lorsque vous travaillez sur un
véhicule. Veuillez lire toutes les instructions attentivement et
garder ce manuel pour référence future.
boostmi.com
Page 3

Contents
Contenu
Product Layout
Plan du Produit
Operation Guide
Guide D’opération
What’s Included
Ce qui est Inclus
Technical Specications
Spécications Techniques
FAQ
Toxic & Harmful Substances
Substances Toxiques et Nocives
Warning
Avertissement
Warranty Information
Informations sur la Garantie
4
6
14
15
16
18
19
22
Page 4
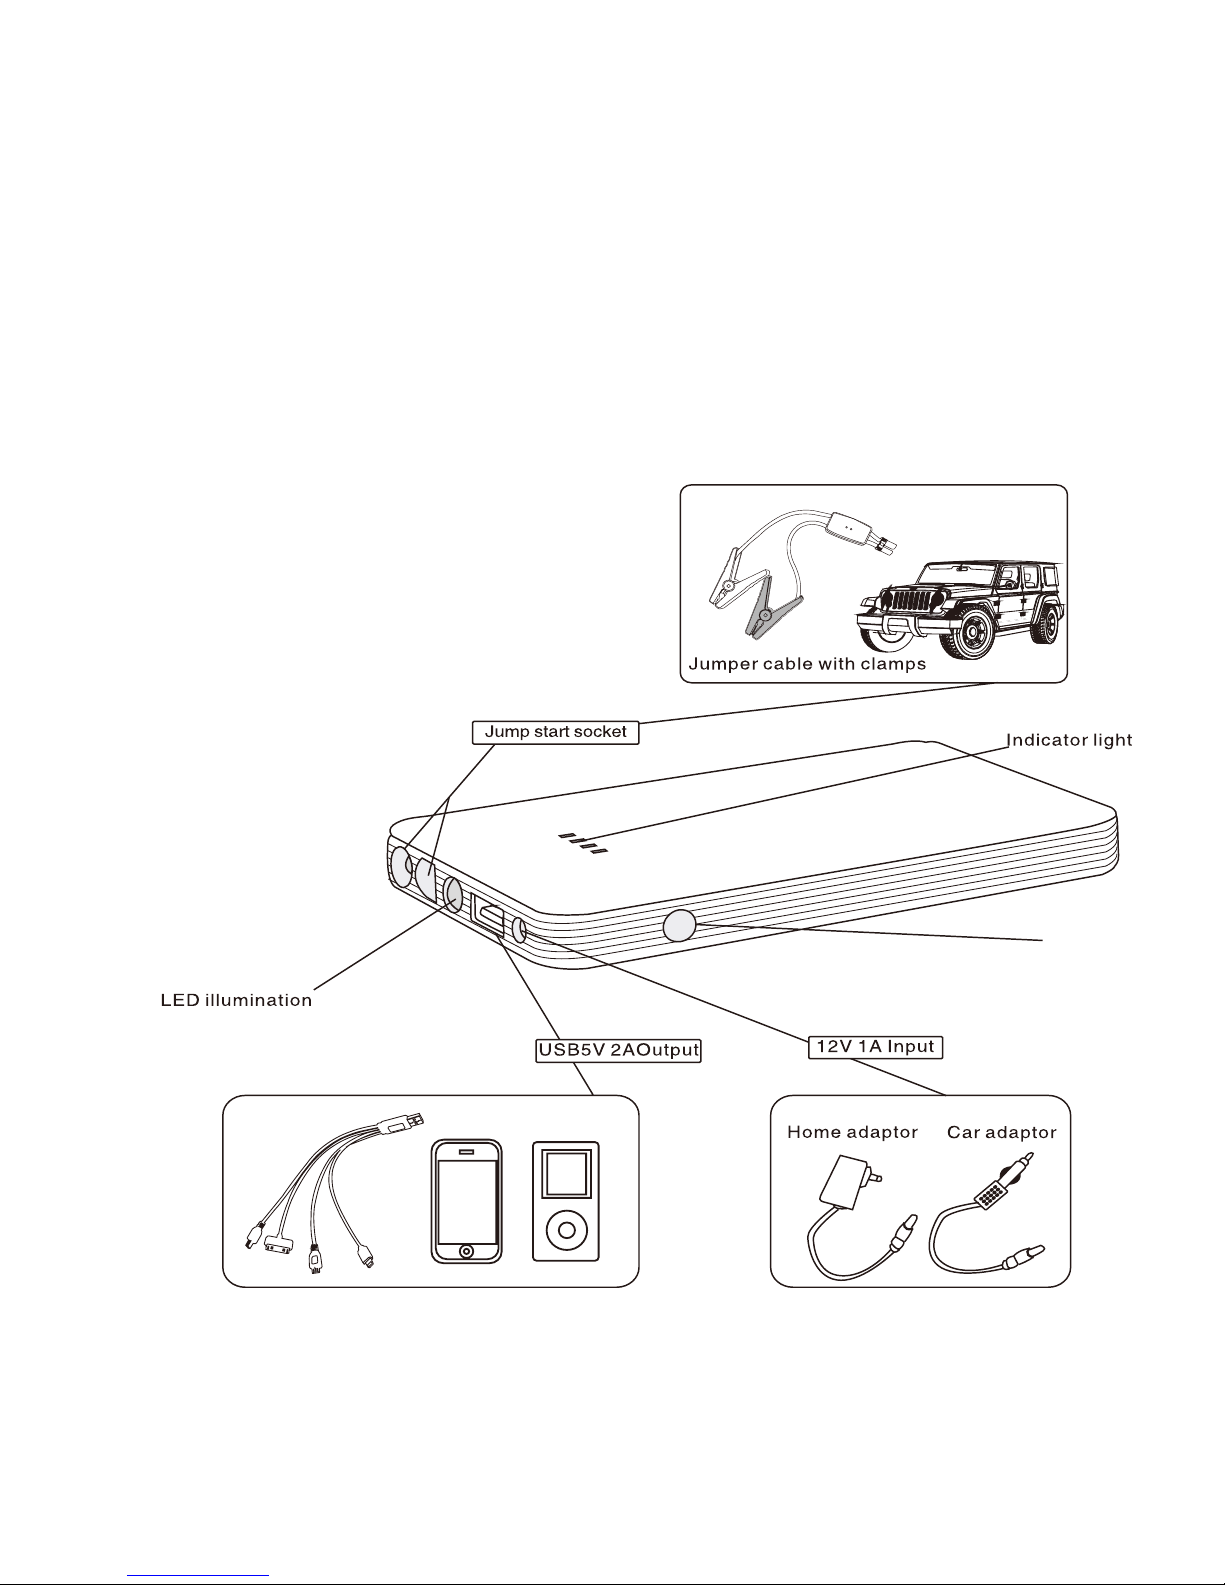
Product Layout
Plan du Produit
4
Power
Page 5

• 12V/1A Input
• Jump Start Socket (12V)
• 5V/2.1A USB Output
• Power Level Indicators
• Power Button
• LED Flashlight
––
• Vehicle w/ 12V smart cables
indicating the correct port
• Mobile devices w/ 3 in 1 USB
multicord (5V/2.1A USB port)
• Charging Accessories (Home & Car)
indicating the correct port
• Entrée 12V/1A
• Prise de survoltage (12V)
• Port USB 5V/2.1A
• Indicateurs du niveau de puissance
• Interrupteur
• Lampe de poche DEL
––
• Véhicule avec câbles intelligents indiquant
la bonne prise (Prise de survoltage)
• Appareils mobiles avec le câble « Multicord
» USB 3 dans 1 USB (5V/2.1A USB)
• Accessoires de chargement (maison et
voiture) indiquant la bonne prise
5
Page 6

Operation Guide
Guide D’opération
POWER LEVEL INDICATORS
Indicator Lights 1 Flashing 1 Solid 2 Solid 3 Solid 4 Solid
Battery Capacity 0% 25% 50% 75% 100%
Press the Power Button to check the power level of the jump starter.
The power indicator will illuminate one bar at a time while charging.
The number of solid lights indicates the battery capacity of the device.
All of the indicator lights will illuminate when charging is completed.
––
INDICATEURS DU NIVEAU DE PUISSANCE
Lumières indicatrices 0 Pleine 1 Pleine 2 pleines 3 Pleines 4 Pleines
Capacité de la pile 0 % 25 % 50 % 75 % 100 %
Appuyez sur l’interrupteur pour vérier le niveau de la charge de votre survolteur.
L’indicateur de puissance s’allumera une lumière à la fois durant la charge.
Le nombre de lumières pleines indique la capacité de la pile de l’appareil.
Toutes les lumières seront allumées quand la charge sera complétée.
6
Page 7

7
JUMP STARTER CHARGING
Wall Adaptor
1. Connect the home adaptor to wall plug.
2. Connect the wall adaptor to the “12V/1A INPUT” to start charging
the jump starter.
Car Adaptor
1. Connect the car adaptor to cigarette lighter socket.
2. Connect the car adaptor to the port “12V/1A INPUT” to start
charging the jump starter.
––
CHARGEMENT DU
SURVOLTEUR MULTIFONCTIONNEL
Adaptateur mural
1. Brancher l’adaptateur à une prise murale.
2. Brancher l’adaptateur à l’entrée 12V/1A pour charger le survolteur.
Adaptateur pour la voiture
1. Brancher l’adaptateur dans la prise de l’allume-cigarette.
2. Brancher l’adaptateur pour la voiture à l’entrée 12V/1A pour commencer
le chargement du survolteur.
Page 8

8
JUMP START 12V VEHICLE
1. Press the “Power Button” to check the power level of the device.
If the power level indicator lights up 3 or 4 bars, proceed to next step.
If 2 or 1 bar light up, recharge the device to above 50%.
2. Connect the Smart Boost Cables to the Compact device by inserting
the blue end into the Jump Start Socket.
3. Connect the RED clamp to the positive (+) terminal and connect the
BLACK clamp to the negative (–) terminal.
4. Check the Smart Booster Cables to ensure the GREEN Start light is solid.
If the GREEN light is not solid, adjust the clamps.
5. Start the vehicle.
6. Once the vehicle has started, remove the smart cables from the car
battery within 30 seconds.
Note: The time relay in the smart cables in 30 seconds. After 30 seconds
without use, the device will automatically shut down. Unplug the Smart
Booster Cables and then reconnect to the device. Improper connections,
short circuit and low voltage will trigger the alarm and turn the Start and
Error lights red.
Page 9

9
SURVOLTER UN VÉHICULE DE 12V
1. Appuyer sur l’interrupteur pour vérier la charge. Si l’indicateur
de puissance indique 3/4/5 lumières, passez à l’étape suivante.
Si seulement 1 ou 2 lumières sont allumées, recharger l’appareil
pour qu’il soit au-dessus de 50 %.
2. Brancher les câbles intelligents l’appareil compact en insérant le
bout bleu dans la prise à survoltage.
3. Brancher la pince ROUGE à la borne positive (+) et la pince NOIRE
à la borne négative (–).
4. Vérier les cables intelligents pour vous assurer que la lumière de
démarrage est allumée. Si la lumière VERTE n’est pas allumée,
ajuster les pinces.
5. Démarrer le véhicule.
6. Lorsque le véhicule est en marche, retirer les câbles des bornes de
la batterie de la voiture dans les 30 secondes.
Note: Le temps de relais des câbles est de 30 secondes, après 30 secondes
sans être utilisé, l’appareil s’éteindra automatiquement. Débrancher les
câbles avant de les brancher à nouveau. Un mauvais branchement, un court
circuit ou un voltage faible déclenchera l’alarme et fera passer les lumières
« Start » et « Error » au rouge.
Page 10

10
SMART BOOSTER CABLES
Functions
1. Low voltage protection
2. Reverse Polarity protection with alarm
3. Short circuit protection
4. Overload Protection
5. Over charge and discharge protection
––
CÂBLES INTELLIGENTS
Fonctions
1. Protection contre le faible voltage
2. Protection en cas d’inversion de polarité avec alarme
3. Protection en cas de court circuit
4. Protection contre la surtention
5. Protection contre la surcharge et la décharge
Page 11
11
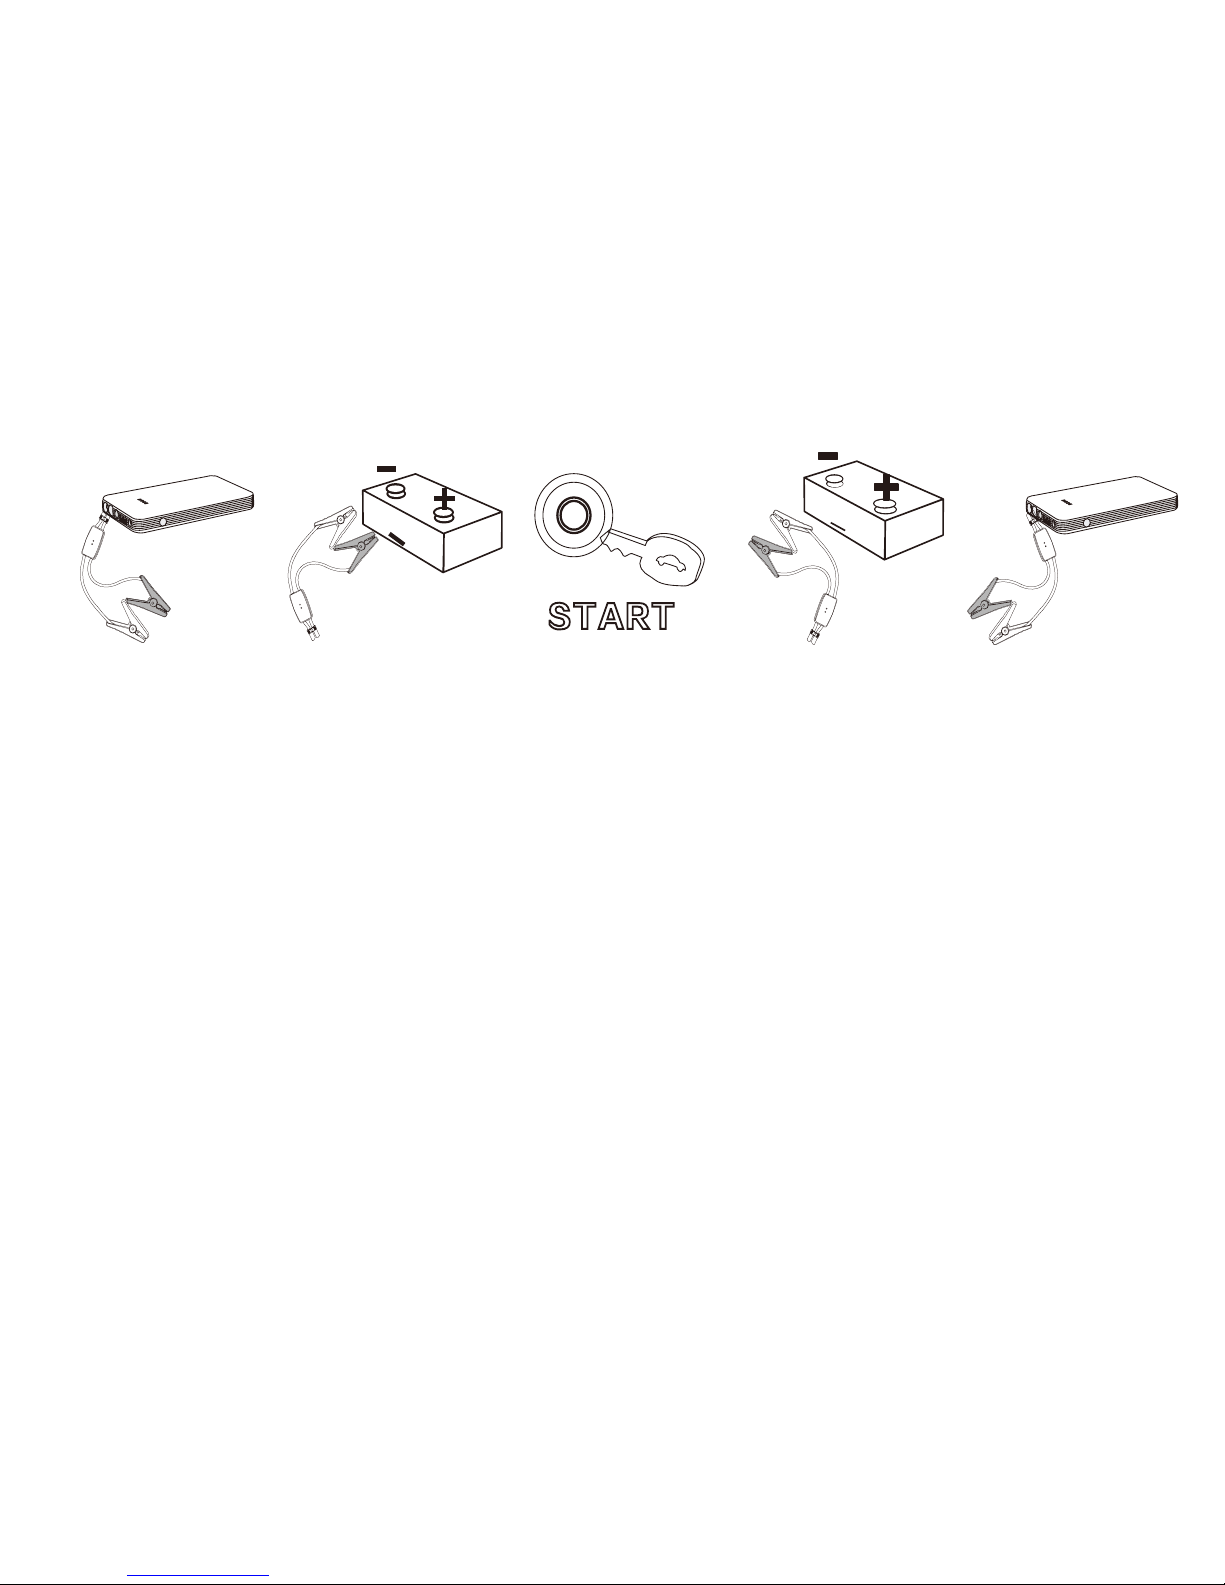
• Connect Smart Booster Cables to
Boostmi COMPACT
• Connect Smart Booster Cables to
car battery
• Start Engine
• Disconnect Smart Booster Cables
from car battery
• Disconnect Smart Booster Cables
from Boostmi COMPACT
• Brancher les câbles intelligents au
Boostmi COMPACT
• Brancher les câbles intelligents à la
batterie de la voiture
• Démarrer le moteur
• Débrancher les câbles intelligents de
la batterie de la voiture
• Débrancher les câbles intelligents du
Boostmi COMPACT
Page 12

CELL PHONE & TABLET CHARGING
1. Insert the 3 in 1 USB multicord into the 5V/2.1A USB port.
2. Select appropriate end for your mobile device and plug into device.
3. Press the “Power Button” to start charging. The Power Level Indicator
lights will stay on when charging.
––
RECHARGE POUR TÉLÉPHONE
PORTABLE & TABLETTE
1. Insérer le câble “Multicord” USB 3 en 1 dans l’un des ports USB.
2. Choisir l’embout approprié pour votre appareil et le brancher dans
l’appareil.
3. Appuyer sur l’interrupteur pour commencer le chargement. Les lumières
de l’indicateur de puissance restent allumées pendant le chargement.
12
Page 13

FLASHLIGHT
1. Press and hold the “Power Button” for 3 seconds to turn
on the ashlight.
2. Press the “Power Button” to cycle through the different
light modes. (Solid, Strobe, SOS)
3. To turn off the light, cycle through the three light modes.
After the SOS mode, the light will turn off.
––
LAMPE DE POCHE
1. Appuyer sur l’interrupteur et le tenir pendant 3 secondes
pour allumer la lampe de poche.
2. Appyuer sur l’interrupteur pour passer d’un mode d’éclairage
à l’autre. (Allumé, Clignotant rapide, SOS)
3. Pour éteindre la lumière, passer appuyer sur le bouton pour
naviguer sur trois cycles, après le mode SOS, la lumière s’éteindra.
13
Page 14

What’s Included
Ce qui est inclus
# Part Name / Nom de la pièce Quantity / Quantité
1 Boostmi COMPACT Jump Starter 1
Survolter Boostmi COMPACT
2 3-in-1 USB multicord 1
Câble multicord 3 en 1 USB
3 12V smart booster cables 1
Câbles intelligents 12V
4 Home charging adaptor 1
Adaptateur mural
5 Car charging adaptor 1
Adaptateur de voiture
6 User Manual 1
Manuel de l’utilisateur
14
Page 15

Technical Specications
Spécications Techniques
Size: 135 x 76 x 14 mm
Weight: 225g
Battery Capacity: 7500mAh
Output: 5V=2A (USB), 12V Jump Start
Input: 12V=1A
Charging time: 2 hours
Starting current: 200A
Peak current: 400A
Operating temperature: -20ºC to 60ºC / – 4ºF to 140ºF
Battery Lifetime: >1000 cycles
Format : 135 x 76 x 14 mm
Poids : 225 g
Capacité de la pile : 7500 mAh
Sortie : 5V/2A (USB), 12 V survoltage
Entrée : 12V=1A
Temps de chargement complet : 2 heures
Courant minimal: 200A
Courant maximal: 400A
Températures opérationnelles : -20 ºC à 60 ºC/ – 4 ºF à 140 ºF
Vie de la pile : >1000 cycles
15
Page 16

FAQ
How do you turn off the Boostmi COMPACT?
The device will automatically shut off after a period of inactivity.
How many times can the Boostmi COMPACT charge my electronic devices?
It depends on the capacity of the battery, but for example most cell phones
would be able to get around 4 charges. Devices with larger batteries will get
around 2 charges.
How long will it take to fully charge my mobile phone?
It takes between 1-3 hours to fully charge a mobile phone depending on the
manufacturer.
How many times can the Boostmi COMPACT jump start a vehicle?
On a full charge, the Compact can jump start a car up to 15 times. Do not try
to start a car multiple times without a break between attempts. Otherwise the
battery might overheat and cause damage.
How long will the Boostmi COMPACT hold its charge?
3-6 months. However, we suggest recharging it every 3 months to make sure its
ready to go in the time of need.
16
Page 17

Comment est-ce que Boostmi COMPACT s’éteint?
L’appareil s’éteint automatiquement après une certaine période d’inactivité.
Combien de fois est-ce que le Boostmi COMPACT peut charger mes
appareils électroniques?
Cela dépend de la capacité de la pile, mais, par exemple, pour la majorité des
téléphones cellulaires vous obtiendrez 4 chargements. Pour les appareils avec
des piles plus grosses, vous obtiendrez environ 2 chargements.
Combien de temps faudra-t-il pour charger mon téléphone cellulaire?
Il faut entre 1 et 3 heures pour charger un téléphone cellulaire en entier,
selon le fabricant.
Combien de fois est-ce que le Boostmi COMPACT peut survolter
un véhicule?
Sur une charge complète, le COMPACT peut survolter une voiture jusqu’à 15
fois. Ne jamais essayer de faire démarrer une voiture plusieurs fois sans prendre
de pauses entre les tentatives. Dans le cas contraire, la batterie peut surchauffer
et causer des dommages.
Combien de temps le Boostmi COMPACT conserve-t-il sa charge?
3-6 mois. Nous suggérons toutefois de le recharger tous les 3 mois pour
s’assurer qu’il soit prêt quand vous en aurez besoin.
17
Page 18

Toxic & Harmful
Substances
Substances
Toxiques et Nocives
18
Composition and amount of toxic and harmful substance in Jump Starter
Pb = 0, Hg = 0, Cd =0, Cr(Vi)=0, PBB=0, PBDE=0
0: Indicates all homogeneous materials and hazardous substances content
are below the MCW limit specied in the standard 2002/95/EC (RoHS).
––
Composition et quantité de substances toxiques et dangereuses dans le démarreur.
Pb = 0, Hg = 0, Cd =0, Cr (Vi)=0, PBB=0, PBDE=0
0 : Indique que tout le contenu de matériaux homogènes et dangereux est sous la limite
MCW décrit dans les standards 2002/95/EC (RoHS).
Page 19

19
Warning
Avertissement
1. DO ensure that the smart booster cables are rmly and securely plugged into
the jump starter port (blue). If not, the device will not jump start a vehicle, and
could damage the device.
2. DO disconnect the jump starter from vehicle within 30 seconds after starting.
3. DO check the clamps to ensure proper connection to battery terminals. If the
battery terminals are dirty, you may need to clean them. Jump start after cleaning.
4. DO NOT continue to jump start if 3 attempts are unsuccessful. Check vehicle for
other reasons.
5. DO NOT puncture or damage the Boostmi COMPACT.
––
1. Veuillez vous assurer que les câbles ‘Smart Cables’ sont bien branchés dans la prise du
survolteur (bleue). Si ce n’Est pas le cas, l’appareil ne pourra faire démarrer la voiture et cela
pourrait endommager l’appareil.
2. Veuillez déconnecter le survolteur du véhicule 30 secondes après le démarrage.
3. Veuillez vérier les pinces pour assurer une bonne connexion avec les bornes. Si les bornes
de la batterie sont sales, vous aurez peut-être à les nettoyer. Faire le démarrage après avoir
nettoyé les bornes.
4. NE PAS continuer à essayer de démarrer le véhicule après trois essais infructueux. Vérier
si le véhicule a un autre problème.
5. NE PAS percer ou endommager le Boostmi COMPACT.
Page 20

Warning
Avertissement
• Always take care when using the device
• This device is not intended for use by young or inexperienced people
without proper supervision
• Do not use as a toy
• Do not allow the device to become wet
• Do not immerse the device in water
• Do not operate the device in explosive atmospheres, such as in the presence of
ammable liquids or gases.
• Do not modify or disassemble the jump starter. Only a qualied repair technician
may repair this device.
• Do not expose the device to heat
• Do not store in locations where the temperature may exceed 70°C
• Charge only at ambient temperatures between -20°C to 60°C
• Charge only using the charger provided with the device
• Under extreme conditions, battery leakage may occur. Carefully wipe the liquid off using
a cloth and avoid skin contact as soon as you notice liquid. In case of skin or eye contact,
rinse immediately with clean water and seek immediate medical attention.
• At the end of the useful life, properly discard the device with due care for our environment.
20
Page 21

• Soyez toujours prudent lors de l’utilisation de l’appareil
• Cet appareil n’est pas fait pour être utilisé sans supervision par des personnes très
jeunes ou inexpérimentées
• Ne pas utiliser comme un jouet
• Ne pas laisser l’appareil se mouiller
• Ne pas submerger dans l’eau
• Ne pas utiliser cet appareil dans un environnement explosif, par exemple en présence
de liquides inammables ou de gaz
• Ne pas modier ou démonter le survolteur. Seul un technicien qualié peut réparer
cet appareil.
• Ne pas exposer l’appareil à la chaleur
• Ne pas entreposer dans un endroit où la température dépasse 70 °C
• Charger uniquement à une température ambiante comprise entre -20 °C et 60 °C
• Charger uniquement avec le chargeur fourni avec
• Lors de conditions extrêmes, la pile peut couler. Essuyer le liquide soigneusement avec
un linge et éviter le contact avec la peau dès que vous remarquez la fuite. En cas de
contact avec les yeux ou la peau, rincer immédiatement à l’eau claire et consulter un
médecin immédiatement.
• À la n de sa vie utile, jeter l’appareil en prenant soin de respecter l’environnement.
21
Page 22

Warranty Information
Informations sur la Garantie
We offer a limited warranty for this product against any defects in material
and workmanship for a period of 1 year from the date of purchase by the
end user/consumer.
The conditions of the warranty are as follows:
––
Nous offrons une garantie limitée de ce produit contre les défauts matériels
et de fabrication pour une période d’un an à partir de la date d’achat par le
consommateur/utilisateur.
Les conditions de la garantie sont comme suit:
22
Page 23

1. The warranty is only valid upon presentation of the original receipt (from dealer/retailer)
by the original purchaser with the product to be repaired or replaced
2. The warranty is void if the serial number, date of purchase and label has been removed
3. The warranty does not cover damage or product failure resulting from normal wear and
tear, physical abuse, improper installation, misuse, modication or repairs by unauthorized
third parties
4. We do not assume responsibility for any loss or damage incurred during shipment or as
a result of a force majeure
5. We are not liable for any incidental or consequential damages arising from the use or
misuse of the product
6. All warranty claims are limited to repair or replacement of the defective product and at
the sole discretion of Boostmi Technologies Inc.
7. If we repair or replace the product, the product will be covered for the remaining time
of the original warranty period. Repair or replacement may involve the use of
reconditioned units which are equivalent in function. Replaced part or product becomes
the property of us.
23
Page 24

1. La garantie n’est valide que sur présentation du reçu original (du marchand) par
l’acheteur original avec le produit à être réparé ou remplacé.
2. La garantie est nulle si le numéro de série, la date d’achat et l’étiquette ont été enlevés.
3. La garantie ne couvre pas les dommages ou un problème d’utilisation cause par l’usure
normale, le mauvais traitement, une mauvaise installation ou utilisation, une modication
or une réparation par une tierce partie non autorisée.
4. Nous ne sommes pas responsables de toute perte ou tout dommage survenu durant
le transport or résultant d’une force majeure.
5. Nous ne sommes pas responsables de tout dommage accidentel ou consécutif causé
par une mauvaise utilisation du produit
6. Toute réclamation de garantie se limite à l’échange ou à la réparation du produit
défectueux et est à la seule discrétion Boostmi Technologies inc.
7. Si nous réparons ou remplaçons le produit, celui-ci sera couvert par le reste de la
période de garantie originale. La réparation ou le remplacement peut inclure des
pièces reconditionnées qui sont leur équivalent fonctionnel. La pièce remplacée
devient notre propriété.
Warranty Information
Informations sur la Garantie
24
Page 25

Page 26

For more information,
visit boostmi.com
 Loading...