


BMP-2400USB
- 1 -
BMP-2400USB
Manual de Instruções
USB / SD / MP3 PLAYER
THE PERFECT SOUND

BMP-2400USB
- 2 -
Índice analítico
Instalação................................................................................................................................3
Conexão iso............................................................................................................................9
Localização dos botões.............................................................................................................10
Ligar e desligar o aparelho ..................................................................................................11
Ajuste de som........................................................................................................................11
Informações do Visor ............................................................................................................11
Visor LCD ..............................................................................................................................11
Entrada auxiliar .....................................................................................................................11
Função Reset ........................................................................................................................12
Operações de rádio .......................................................... .....................................................12
Alternar para o modo de rádio...............................................................................................12
Selecionar a banda de frequência.........................................................................................12
Selecionar estação.................................................................................................................12
Armazenamento Automático de Memória & Busca programada.........................................12
Estação de armazenamento..................................................................................................13
Operação USB ......................................................................................................................13
Seleção de faixas .............................................................. ......................................................13
Selecionar diretório de cima/baixo ............................ ..................................................13
Pausar a reprodução................................................. ..................................................13
Visualização de todas as faixas ................................ ..................................................13
Repetindo a mesma faixa ......................................... ..................................................13
Reproduzindo todas as faixas em modo Aleatório .... ..................................................13
Operação SD/MMC ............................................................................................................ ...14
Controle Remoto ....................................................................................................................15
Especificação ....................................................................................................................... ...17
Solução de problemas ...................................................... ......................................................18

BMP-2400USB
- 3 -
INSTALAÇÃO
Notas:
Escolha do local de montagem em que a unidade não irá interferir com a função normal de
condução.
Antes de instalar o aparelho, conecte os fios temporariamente e se certifique de que todos
estejam conectados corretamente e se o aparelho e o sistema funcionem corretamente.
Use somente as partes incluídas com a unidade para garantir a instalação adequada. A utilização
de partes não autorizadas pode causar mau funcionamento.
Consulte com o seu revendedor mais próximo, se a instalação requer a perfuração de furos ou
outras modificações do veículo.
Instale o produto onde ele não atrapalhe na direção do veiculo e não possa ferir o passageiro em
caso de parada de emergência.
Se o modo de instalação for superior a 30 ° da horizontal, a unidade não pôde dar seu
desempenho ideal.
Evite instalar a unidade em que seria sujeito a alta temperatura, tais como de luz solar direta ou
de ar quente, partir do aquecedor, ou em que seria sujeito a poeira, sujeira ou vibração excessiva.
30

BMP-2400USB
- 4 -
MONTAGEM FRONTAL DIN
Abertura de Instalação
Este aparelho pode ser instalado em qualquer painel tendo uma abertura como mostrado abaixo:
Instalando a unidade
Teste todas as conexões primeiro, então, siga o seguinte procedimento para instalar a unidade.
1. Verifique se a ignição está desligada, e então, desconecte o cabo do terminal negativo(-) da
bateria do veículo.
2. Desconecte os fios e a antena.
3. Pressione o botão release no painel frontal e remova o painel de controle (veja os passos na
seção “removendo o painel frontal”).
4. Erga a parte superior externa da moldura e puxe-o para remover.
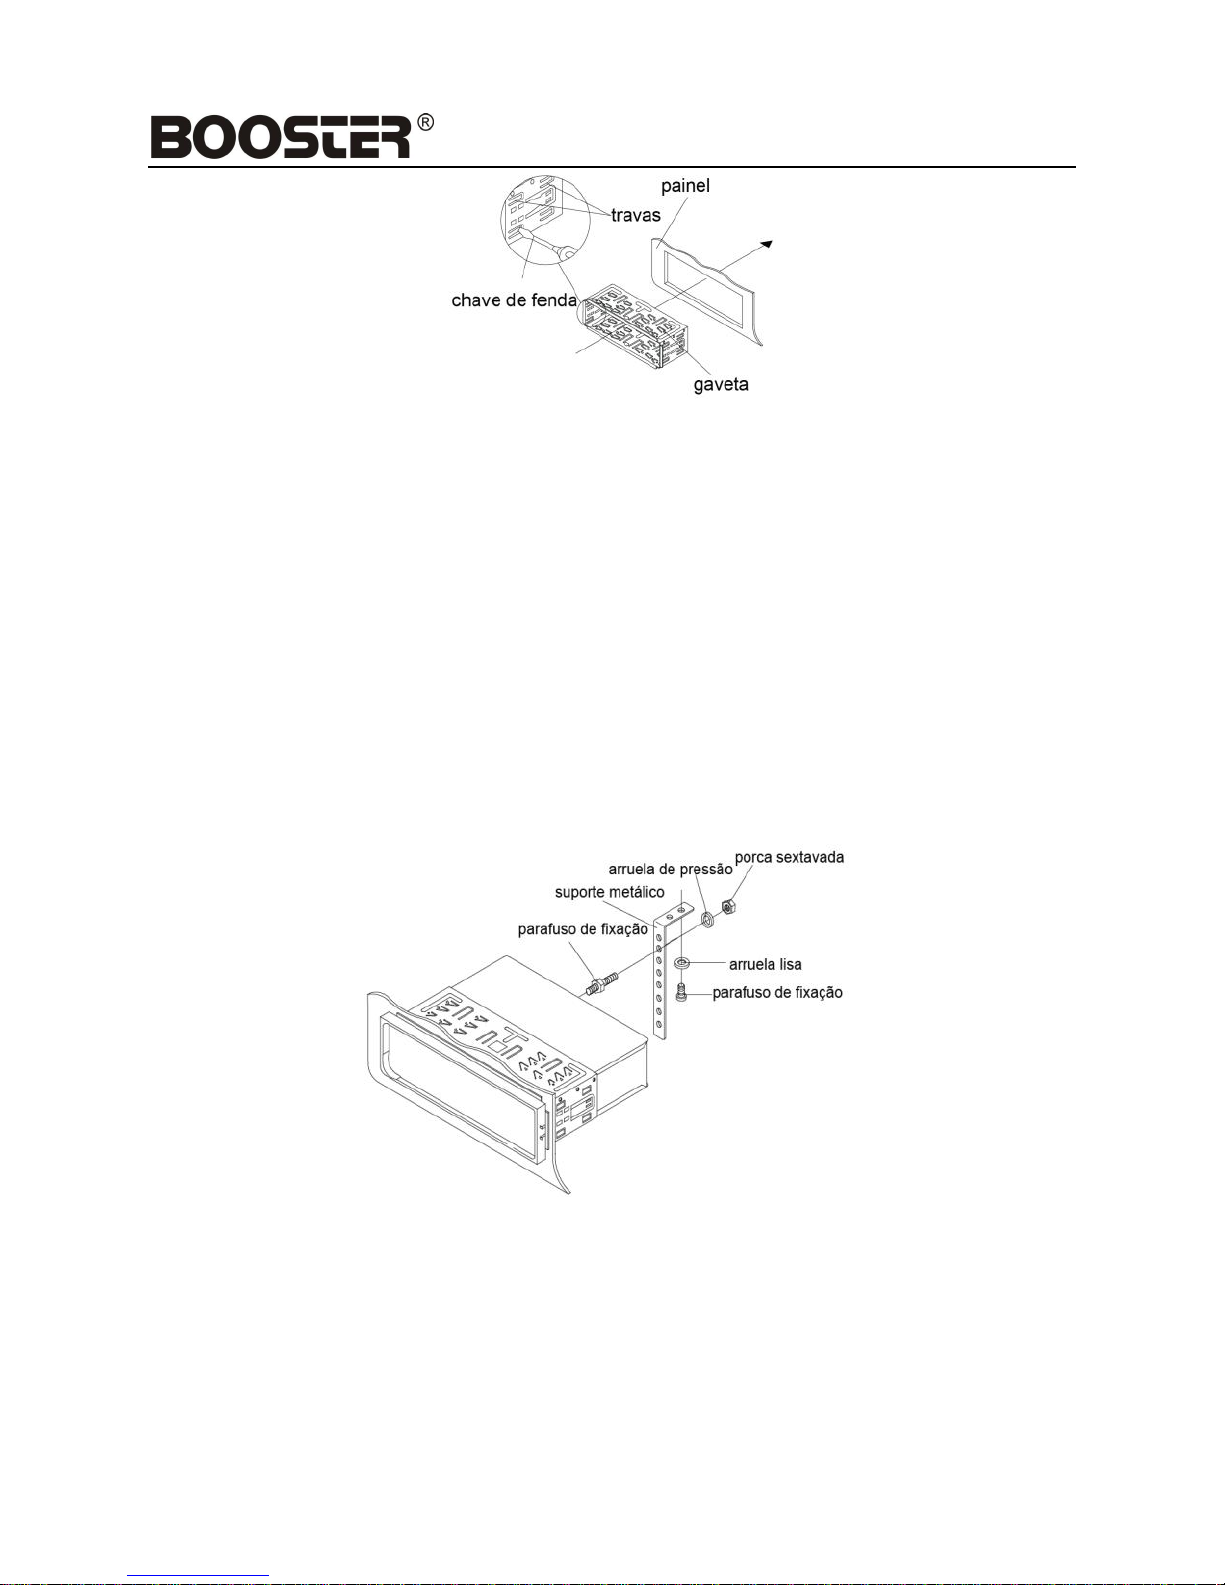
5. Coloque as duas chaves nas aberturas laterais para poder remover. Insira as chaves o mais
profundo possível (com as travas voltadas para cima) nas
aberturas apropriadas nas laterais esquerda e direita da unidade. Então, deslize a gaveta para trás
da unidade.
6. Instale a gaveta inserindo-a na abertura do painel e dobre as travas localizadas em torno da
gaveta com uma chave de fenda. Nem todas as travas poderão ser dobradas, portanto,
observe quais podem fazer contato para que sejam mais efetivos. Dobre as travas
apropriadas atrás do painel para fixar a gaveta no painel.
53mm
182mm
BMP-2400USB
- 5 -
7. Reconecte o chicote de fios e a antena tomando cuidado para não prensar nenhum dos fios
ou cabos.
8. Deslize a unidade na gaveta até que ela se encaixe em seu lugar.
9. Para fixar melhor a unidade, use o suporte metálico fornecido para fixar a parte traseira da
unidade. Use os parafusos fornecidos (parafuso sextavado (M5mm) e arruela de pressão)
para fixar uma das extremidades do suporte no parafuso
localizado na parte traseira da unidade. Se necessário, dobre o suporte metálico para se
adequar ao espaço de seu veículo. Então, use as peças fornecidas (parafuso de vedação
(5x25mm) e arruela lisa) para fixar a outra extremidade do suporte metálico em uma parte
sólida do veículo no interior do painel. Este suporte também ajuda a obter um bom
aterramento elétrico da unidade.
Observe para instalar a ponta curta do suporte na parte de trás da unidade e a ponta longa no
painel.
10. Reconecte o cabo do terminal negativo (-) da bateria do veículo. Então, instale a moldura
externa e instala o painel frontal da unidade (veja o procedimento em “instalando o painel
frontal”).
Removendo a unidade
1. Verifique se a ignição está desligada, então, desconecte o cabo do terminal negativo (-) da
bateria do veículo.

BMP-2400USB
- 6 -
2. Remova o suporte metálico da parte traseira da unidade (se existir).
3. Pressione o botão release para remover o painel frontal.
4. Erga a parte superior da moldura externa e puxe-o para remover.
5. Coloque as duas chaves nas aberturas laterais para poder remover. Insira as chaves o mais
profundo possível (com as travas voltadas para cima) nas aberturas apropriadas nas laterais
esquerda e direita da unidade. Então, deslize a gaveta para trás da unidade.
INSTALAÇÃO DIN REAR (Método B)
Se o seu veículo é um Nissan, Toyota, siga estas instruções de instalação.
Use os furos marcados com T (Toyota), N (Nissan) localizados nas laterais da unidade para fixar a
unidade na abertura existente em seu veículo.
Para fixar a unidade no suporte original para rádio.
Alinhe os furos dos parafusos do suporte com os furos da unidade e então, aperte os parafusos
(5x5mm) em cada lado.
Nota: A moldura externa, a gaveta e o suporte metálico não são usados para a instalação no
método B.

BMP-2400USB
- 7 -
USANDO O PAINEL FRONTAL DESTACÁVEL
REMOVENDO O PAINEL FRONTAL
1. Pressione o botão release ( ) no painel frontal e puxe-o.
2. Guarde o painel frontal no estojo.
INSTALANDO O PAINEL FRONTAL
Para instalar o painel frontal, insira o painel no encaixe e confira se o painel está bem instalado. Caso
contrário, podem ocorrer anomalias no visor ou alguns botões podem falhar.

BMP-2400USB
- 8 -
Cuidados no manuseio
1. Não derrube o painel frontal.
2. Não pressione o visor ou os botões de comando ao remover ou instalar o painel frontal.
3. Não toque nos contatos do painel frontal ou no corpo da unidade principal. Pode resultar em falso
contato elétrico.
4. Se alguma sujeira ou substância estranha se aderir nos contatos, remova com um pano limpo e
seco.
5. Não exponha o painel frontal a alta temperatura ou aos raios solares.
6. Mantenha distância de produtos voláteis (ex. benzina, thinner, ou inseticidas) evitando contato
com o painel frontal
7. Não tente desmontar o painel frontal.

BMP-2400USB
- 9 -
CONEXÃO ISO

BMP-2400USB
- 10 -
OPERAÇÃO
LOCALIZAÇÃO DOS BOTÕES
1. Botão “ ”
2. Botão “BAND”.
3. Botão “2 INT”.
4. Botão “VOL / SEL/ENT”
5. Botão “DISP”
6. Botão “3 RPT”
7. Infravermelho “IR”
8. Visor de LCD “ 3" ”
9. Conector “AUX IN”.
10. Porta USB
11. Botão “ / MODE”
12. Botão “6 DIR+”
13. Botão “ ”
14. Botão “AS/PS”.
15. Botão “ ”
16. Botão “5 DIR-”.
17. Botão “4 RDM”.
18. “ ” (Botão release)
19. Botão Reset
20. Interface SD/MMC

BMP-2400USB
- 11 -
Pressione o botão PWR (11) para ligar a unidade. Pressione e
segure por 2 segundos para desligar a unidade.
Pressione o botão release (18) para remover o painel
frontal.
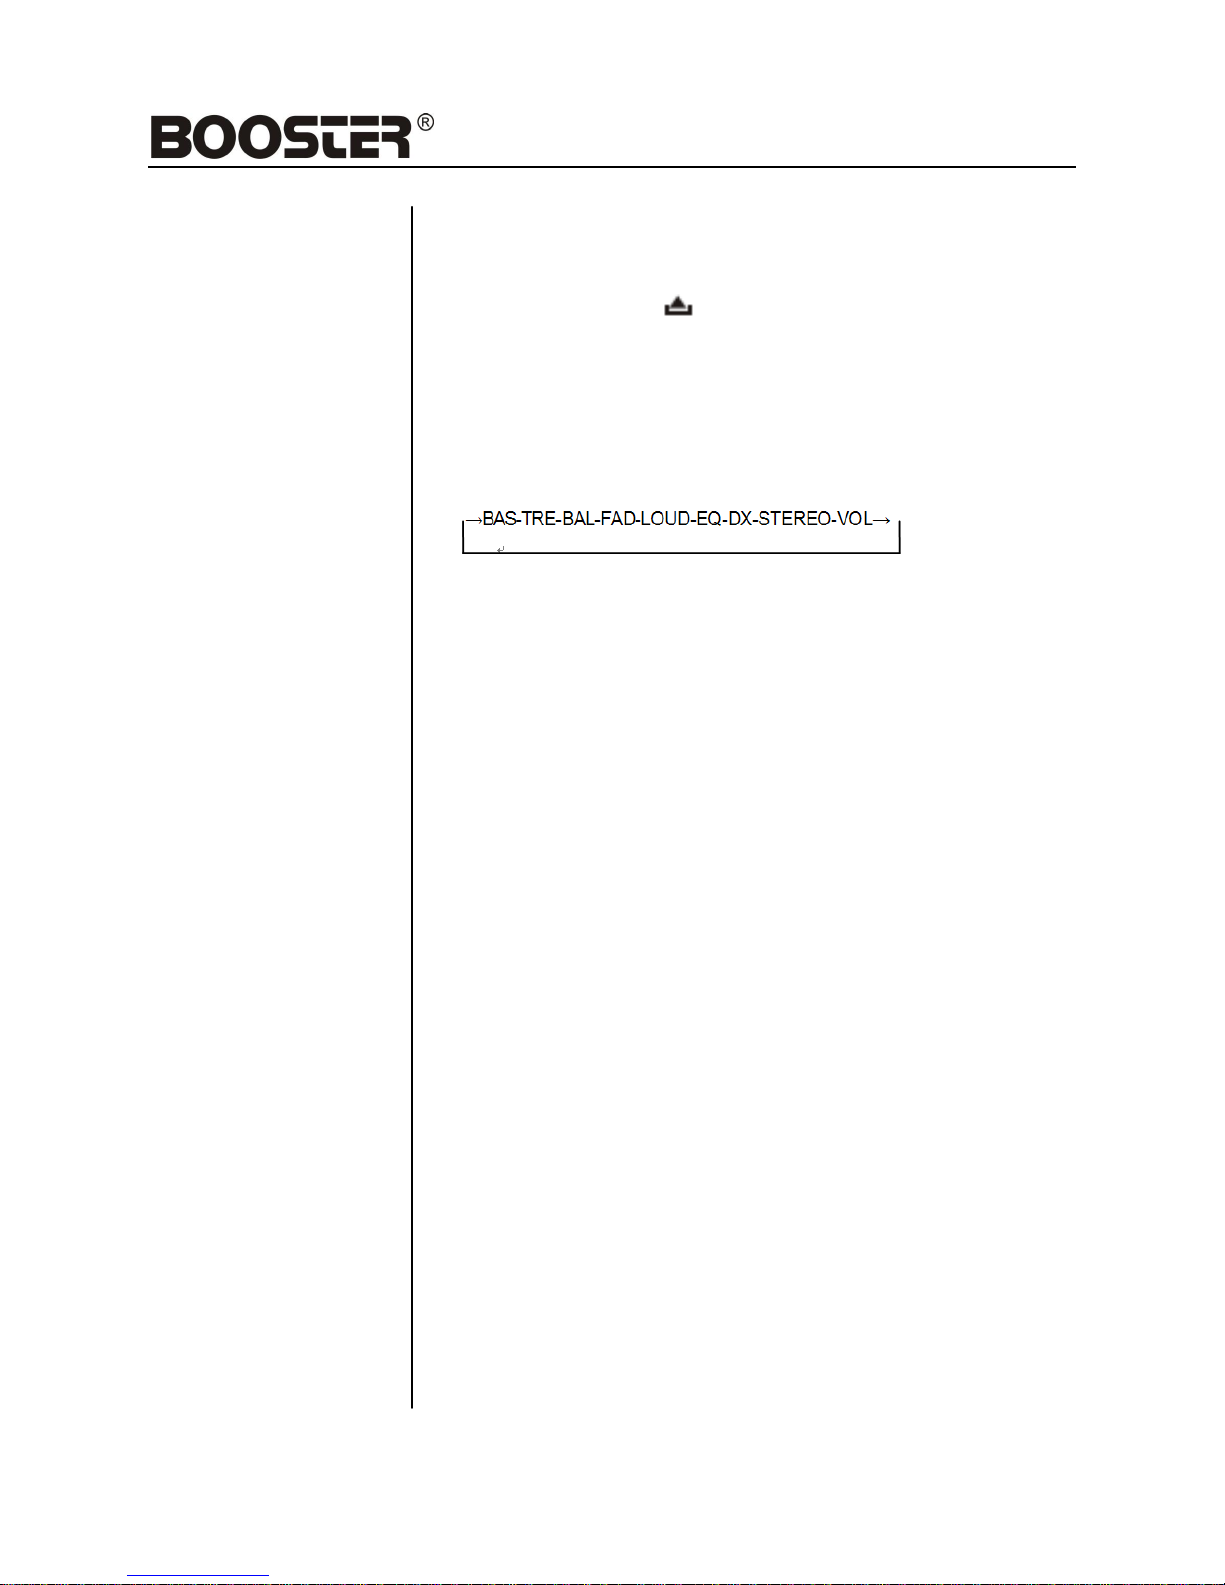
Pressione a tecla SEL (4) para selecionar o modo de ajuste
desejado. O modo de ajuste será alterado na seguinte ordem:
BAS: bass
TRE: treble
BAL: balance
FAD: fader
LOUD: loudness
EQ: equalization
DX: distance
LOC: local
VOL: volume
By rotating the audio knob (4) clockwise or counter-clockwise, it is
possible to adjust the desired sound quality.
Press and hold SEL for 2 seconds. You can choose the area
between USA and EUROPE by rotating the knob 4.
Press DISP button (5) to show the time.
Exposição atual de freqüência e funções ativadas no visor .
No painel frontal da unidade, há uma interface USB (10). Você
pode conectar um dispositivo USB através desta interface.
O aparelho pode ser ligado a um leitor portátil de áudio através
da entrada AUX IN (9)
LIGAR/DESLIGAR O
APARELHO
AJUSTE DE SOM
VISOR LCD
INTERFACE USB
ENTRADA AUXILIAR
VISOR DE INFORMAÇÕES
ABRINDO OPAINEL
FRONTAL

BMP-2400USB
- 12 -
Botão RESET (19) deve ser ativado com uma caneta
esferográfica ou objeto de metal fino.
O botão RESET é para ser ativado pelas seguintes razões:
- Após a instalação inicial do aparelho.
- Se não funcionar todos os botões de função.
- Símbolo de erro no visor.
Nota: Se pressionar o botão RESET e o aparelho não funcionar
ainda, use um cotonete embebido em álcool isopropílico para
limpar o soquete no painel frontal.
ALTERNAR PARA O MODO DE RÁDIO
Pressione o botão de modo (11) para selecionar o modo de rádio.
SELECIONANDO A BANDA DE FREQUÊNCIA
No modo rádio, pressione o botão de banda (2) em breve para
selecionar a faixa pretendida. A banda de recepção será alterada
na seguinte ordem:
→FM1→ FM2→ FM3 → AM1→AM2→
ESTAÇÃO DE SELEÇÃO
Pressione o botão ou em breve para ativar a função de
busca automática. Pressione por alguns segundos até que
"MANUAL" aparecerá no visor, o manual do modo de ajuste é
selecionado. Se ambos os botões não tenham sido pressionados
durante vários segundos, eles vão voltar a procurar "AUTO" e o
modo de ajuste aparecerá no visor.
Armazenamento Automático de Memória & Busca
Programada.
- Armazenamento Automático de Memória
Pressione o botão AS / PS durante vários segundos, as buscas
de rádio de freqüência atual verifica a intensidade do sinal, até
que seja concluído um ciclo de pesquisa. E, em seguida, 6
estações mais fortes serão armazenadas no botão predefinido.
- Busca Programada
Pressione o botão AS / PS a para iniciar a busca da próxima
estação. Quando o sinal da estação buscada for forte, a busca
será encerrada e a reprodução desta iniciada.
FUNÇÂO RESET
OPERAÇÃO DE RÁDIO

BMP-2400USB
- 13 -
ESTAÇÃO DE ARMAZENAMENTO
Para armazenar uma estação, pressione os botões (1/6)
predefinidos durante 2 segundos. A estação atual é
armazenada no botão número.
No painel frontal do aparelho, há uma interface USB. Você
pode conectar um dispositivo USB através esta interface.
Quando você se conectar a um controlador USB através da
interface, o aparelho irá procurar os arquivos de MP3 ou WMA
no USB e iniciar a reprodução de arquivos automaticamente.
Em caso de outro modo, você também pode pressionar o botão
MODE para selecionar o modo USB.
Selecionando Faixas
Pressione o botão ou para mover-se para a faixa
seguinte ou a faixa anterior.
Selecionando Diretório de Cima/Baixo
Pressione o botão 5 DIR- ou 6 DIR+ para selecionar o diretório
anterior ou seguinte.
PAUSAR A REPRODUÇÃO
Pressione o botão para pausar a reprodução. Pressione
novamente para reiniciar a reprodução.
VISUALIZAÇÃO DE TODOS OS ARQUIVOS
Pressione a tecla INT e INTRO para Reproduzir rapidamente
cada arquivo. Pressione novamente a tecla INTRO para parar e
começar a reproduzir normalmente
REPETIR REPRODUÇÃO
Tecla RPT repetir continuamente no mesmo arquivo. Pressione
novamente para repetir todos os arquivos.
REPRODUÇÃO EM ORDEM ALEATÓRIA
Pressione a tecla 4 RDM para reproduzir todos os arquivos em
ordem aleatória. Pressione-a novamente para cancelar a
função.
OPERAÇÃO USB

BMP-2400USB
- 14 -
Há uma interface SD/MMC no painel frontal do aparelho.
Quando você insere um cartão SD/MMC na interface SD/MMC,
o aparelho irá procurar os arquivos de MP3 ou WMA e começa
a tocar automaticamente. A operação com o USB reproduz a
mesma operação descrita acima. Em caso de outro modo,
você também pode pressionar o botão MODE para selecionar
o modo SD/MMC.
ATENÇÃO:
Quando o dispositivo USB ou SD/card possuírem arquivos
importantes, não a os conecte no aparelho principal para
reprodução, porque qualquer operação errada pode causar perda
de arquivos. E nossa empresa não assume nenhuma
responsabilidade por isso.
OPERAÇÃO SD/MMC

BMP-2400USB
- 15 -
CONTROLE REMOTO
BMP-2400USB

BMP-2400USB
- 16 -
1. POWER Botão liga/desliga
2. MODE Botão Mode
3. TUNE/SKIP (8) Botão sintonizador/SKIP Down
4. 7/BND Botão seletor de banda/ Botão Loudness
5. SCN Botão de busca
6. PAU Botão Pause
7. SHF Botão Shuffle
8. DIR▼ DIR▼Botão
9. VOL▲ Botão para aumentar o Volume
10. SEL (LOU/ENT) Botão seletor de modo sonoro
11. TUNE/SKIP (9) Botão sintonizador /SKIP Up
12. VOL ▼ Botão para diminuir o Volume
13. DSP(0) Botão Display
14. RPT Botão Repeat
15. AS/PS(D-AUD) Botão para memorização automática & de busca de programas
(botão seletor de modo para operação MP3/WMA)
16. LOC Botão seletor Local/Distante
17. DIR▲ DIR▲Botão

BMP-2400USB
- 17 -
Especificação
GERAL
Requisitos de energia……………………………….:DC 12 Volts, Negative Ground
Dimensões do chassi……………………………….:178 (W) x 97 (D) x 50 (H)
Controles de Tom
Grave (at 100 Hz) ………………………………….:±10 dB
Agudo (at 10 kHz) …………………………………:±10 dB
Potência de saída máxima…………………………:4x15 watts
Corrente …………………………………………..: 5Ampere (max.)
RADIO
FM
Cobertura de freqüência……………………………:87.5 to 108 MHz.
IF…………………………………………………..:10.7 MHz
Sensibilidade (S/N=30dB)………………………….:4μV
Separação estéreo…………………………………:>25dB
AM
Cobertura de freqüência……………………………:520 to 1710 KHz
IF…………………………………………………..:450 kHz
Sensibilidade (S/N=20dB) ………………………….:36 dBuV

BMP-2400USB
- 18 -
SOLUÇÃO DE PROBLEMAS
Antes de atravessar a lista de verificação, verifique a conexão de cabos. Se os problemas persistirem
após ter sido feita a lista de verificação, consulte o seu revendedor mais próximo de serviço.
Sintoma
Causa
Solução
Sem energia.
A ignição do veículo
não está ligada.
Caso a alimentação do
aparelho esteja conectada
ao veículo, porém o motor
não esteja operando, mova
a ignição para a posição
“ACC”.
O fusível está queimado.
Substitua o fusível.
Nenhum som.
Volume esta no mínimo
Regule o volume para um nível desejado.
As conexões não estão
corretas.
Verifique a conexão dos cabos.
As teclas de
operação não
funcionam.
O microcomputador não
esta operando de modo
correto.
Pressione o botão de reset.
O rádio não
funciona. A seleção
automática de
estações não
funciona.
O cabo da antena não
está conectado.
Conecte o cabo corretamente.
O sinal de rádio está
muito fraco.
Selecione uma estação manualmente.

BMP-2400USB
- 19 -
BMP-2400USB
INSTALLATION/OWNER’S MANUAL
USB / SD / MP3 PLAYER
THE PERFECT SOUND

BMP-2400USB
- 20 -
Table of Contents
Installation……………………………………………………………………………........…… 21
Wiring Connection…………………………………………………………………………….. 28
Location of keys ………………………………………………………………………………. 29
Switching on/off the unit……………………………………………………………………… 30
Faceplate release…………………………………………………………………………….. 30
Sound adjustment…………………………………………………………………………….. 30
Display information……………………………………………………………………………. 30
Liquid crystal display………………………………………………………………………….. 30
Auxiliary input………………………………………………………………………………….. 30
Reset function…………………………………………………………………………………. 31
Radio operation……………………………………………………………………………..… 31
Switching to radio mode…………………………………………………………………….... 31
Selecting the frequency band………………………………………………………………... 31
Selecting station …………………………………………………………………………….… 31
Automatic memory storing & program scanning…………………………………………… 31
Station storing………………………………………………………………………………… 32
USB play operation…………………………………………………………………………... 32
Selecting tracks in single step………………………………………………………………. 32
Selecting directory up/down………………………………………………………………… 32
Pausing playing ……………………………………………………………………………… 32
Previewing all tracks…………………………………………………………………………. 32
Repeating the same track…………………………………………………………………… 32
Playing all tracks in random …………………………………………………………………. 32
SD/MMC operation…………………………………………………………………………… 33
Remote control………………………………………………………………………………... 34
Specification…………………………………………………………………………………… 36
Trouble shooting………………………………………………………………………………. 37

BMP-2400USB
- 21 -
INSTALLATION
Notes:
Choose the mounting location where the unit will not interfere with the normal driving function of
the driver.
Before finally installing the unit, connect the wiring temporarily and make sure it is all connected up
properly and the unit and the system work properly.
Use only the parts included with the unit to ensure proper installation. The use of unauthorized
parts can cause malfunctions.
Consult with your nearest dealer if installation requires the drilling of holes or other modifications of
the vehicle.
Install the unit where it does not get in the driver’s way and cannot injure the passenger if there is a
sudden stop, like an emergency stop.
If installation angel exceeds 30°from horizontal, the unit might not give its optimum performance.
Avoid installing the unit where it would be subject to high temperature, such as from direct sunlight,
or from hot air, from the heater, or where it would be subject to dust, dirt or excessive vibration.
30

BMP-2400USB
- 22 -
DIN FRONT/REAR-MOUNT
This unit can be properly installed either from “Front” (conventional DIN Front-mount) or “Rear” (DIN
Rear-mount installation, utilizing threaded screw holes at the sides of the unit chassis). For details, refer
to the following illustrated installation methods.
DIN FRONT-MOUNT (Method A)
Installation Opening
This unit can be installed in any dashboard having an opening as shown below:
Installing the unit
Be sure you test all connections first, and then follow these steps to install the unit.
1. Make sure the ignition is turned off, and then disconnect the cable from the vehicle battery’s
negative (-) terminal.
2. Disconnect the wire harness and the antenna.
3. Press the release button on the front panel and remove the control panel (see the steps of
“removing the front panel”).
4. Lift the top of the outer trim ring then pull it out to remove it.
5. The two supplied keys release tabs inside the unit’s sleeve so you can remove it. Insert the
keys as far as
they will go (with the notches facing up) into the appropriate slots at the middle left and right
sides of the unit. Then slide the sleeve off the back of the unit.
53mm
182mm

BMP-2400USB
- 23 -
6. Mount the sleeve by inserting the sleeve into the opening of the dashboard and bend open the
tabs located around the sleeve with a screwdriver. Not all tabs will be able to make contact, so
examine which ones will be most effective. Bending open the appropriate tabs behind the
dashboard to secure the sleeve in place.
Tabs
Screwdriver
Sleeve
Dashboard
7. Reconnect the wire harness and the antenna and be careful not to pinch any wires or cables.
8. Slide the unit into the sleeve until it locks into place.
9. To further secure the unit, use the supplied metal strap to secure the back of the unit in place.
Use the supplied hardware (Hex Nut (M5mm) and Spring Washer) to attach one end of the
strap to the mounting bolt on the back of the unit. If necessary, bend the metal strap to fit your
vehicle’s mounting area. Then use the supplied hardware (Tapping Screw (5x25mm) and
Plain Washer) to attach the other end of metal strap to a solid metal part of the vehicle under
Outer Trim Ring
Front Panel
L Key
Sleeve
R Key

BMP-2400USB
- 24 -
the dashboard. This strap also helps ensure proper electrical grounding of the unit.
Note to install the short threading terminal of the mounting bolt to the back of the unit and the
other long threading terminal to the dashboard.
Mounting Bolt
Spring Washer
Plain Washer
Tapping Screw
Hex Nut
Metal Strap
10. Reconnect the cable to the vehicle battery’s negative (-) terminal. Then replace the outer trim
ring and install the unit’s front panel (see the steps of “installing the front panel”).
Removing the unit
1. Make sure the ignition is turned off, then disconnect the cable from the vehicle battery’s
negative (-) terminal.
2. Remove the metal strap attached the back of the unit (if attached).
3. Press the release button to remove the front panel.
4. Lift the top of the outer trim ring then pull it out to remove it.
5. Insert both of the supplied keys into the slots at the middle left and right sides of the unit, then
pull the unit out of the dashboard.

BMP-2400USB
- 25 -
DIN REAR-MOUNT (Method B)
If your vehicle is a Nissan, Toyota, follow these mounting instructions.Use the screw holes marked
T (Toyota), N (Nissan) located on both sides of the unit to asten the unit to the factory radio
mounting brackets supplied with your vehicle.
Dashboard or Console
Screw
Factory Radio
Mounting Bracket
Side View showing
Screw Holes marked
T, N
Screw

BMP-2400USB
- 26 -
USING THE DETACHABLE FRONT PAN
REMOVING THE FRONT PANEL
- Press the release button ( ) on the front panel and pull off the front panel.
- Keep front panel into the case.

BMP-2400USB
- 27 -
INSTALLING THE FRONT PANEL
To install the front panel, insert the panel into the housing and make sure the panel is properly installed.
Otherwise, abnormality occurs on the display or some keys will not function properly.
Precautions when handling
1. Do not drop the front panel.
2. Do not put pressure on the display or control buttons when removing or installing the front panel.
3. Do not touch the contacts on the front panel or on the main unit body. It may result in poor electrical
contact.
4. If any dirt or foreign substances adhered on the contacts, they can be removed with a clean and
dry cloth.
5. Do not expose the front panel to high temperatures or direct sunlight in anywhere.
6. Keep away any volatile agents (e.g. benzene, thinner, or insecticides) from touching the surface of
the front panel
7. Do not attempt to disassemble the front panel.

BMP-2400USB
- 28 -
Wire Connection Diagram

BMP-2400USB
- 29 -
LOCATION OF KEYS
1. “ ” button.
2. “BAND” button.
3. “2 INT” button.
4. “VOL / SEL/ENT” button.
5. “DISP” button.
6. “3 RPT” button.
7. “IR”Infra Sensor.
8. “ 3" ” TFT display.
9. “AUX IN” jack.
10.USB port.
11 “ / MODE” button
12 “6 DIR+” button.
13 “ ” button
14 “AS/PS” button.
15 “ ” button.
16 “5 DIR-” button.
17 “4 RDM” button.
18 “ ” button
19 RESET button.
20 SD card slot.
BMP-2400USB
- 30 -
Press PWR button (11) to turn on the unit. When the unit is on.
Press and hold for 2 seconds to turn off the unit.
Press release button (18) to detach the removable
faceplate.
Press SEL button (4) shortly to select the desired adjustment
mode. The adjustment
mode will be changed in the following order:
BAS: bass
TRE: treble
BAL: balance
FAD: fader
LOUD: loudness
EQ: equalization
DX: distance
LOC: local
VOL: volume
By rotating the audio knob (4) clockwise or counter-clockwise, it is
possible to adjust the desired sound quality.
Press and hold SEL for 2 seconds. You can choose the area
between USA and EUROPE by rotating the knob 4.
Press DISP button (5) to show the time.
Exhibit current frequency and activated functions on the display
On the front panel of the unit, there is an USB interface (10).
You can connect an USB driver through this interface (10).
The unit can be connected to a portable audio player through
the AUX IN jack (9).
SWITCHING
ON/OFF THE UNIT
FACEPLATE RELEASE
SOUND ADJUSTMENT
DISPLAY INFORMATION
LIQUID CRYSTAL
DISPLAY
AUXILIARY INPUT

BMP-2400USB
- 31 -
RESET button (19) must be activated with either a ballpoint pen
or thin metal object. The RESET button is to be activated for the
following reasons:
- Initial installation of the unit when all wiring is completed.
- All the function buttons do not operate.
- Error symbol on the display.
Note: if press RESET button (19), the unit
can’t work yet, please use a cotton swab soaked in isopropyl
alcohol to clean the socket on the front panel.
SWITCHING TO RADIO MODE
Press MODE button (11) to select radio mode, the radio mode
appears in the display together with the memory band and
frequency.
SELECTING THE FREQUENCY BAND
At radio mode, press BAND button (2) shortly to select the
desired band.The reception band will change in the following
order:
→FM1→ FM2→ FM3 → AM1→AM2→
SELECTING STATION
Press button (13) or button (15) shortly to activate
automatic seek function. Press for several seconds until
“MANUAL” appears on the display, the manual tuning mode is
selected. If both buttons have not been pressed for several
seconds, they will return to seek tuning mode and “AUTO”
appears on the display.
AUTOMATIC MEMORY STORING & PROGRAM SCANNING
- Automatic memory storing
Press AS/PS button (14) for several seconds, the radio
searches from the current frequency and checks the signal
strength until one cycle search is finished. And then 6 strongest
stations are stored into the corresponding preset number
button.
- Program scanning
Press AS/PS button (14) shortly to scan preset station. The
radio is holding at that preset number for several seconds with
release mute, then searches again.
RESET FUNCTION
RADIO OPERATION

BMP-2400USB
- 32 -
STATION STORING
To receive a station, Press one of the preset button(1~6) for 2
seconds. The current station is stored into the number button.
On the front panel of the unit, there is an USB interface (10).
You can connect an USB driver through this interface (10).
When you connect an USB driver through the interface, the unit
will search the MP3 files or WMA files in the USB driver and
start to play MP3 or WMA files automatically. If in other mode,
you can also press MODE button (11) to select USB mode.It
supports the MP3/WMA file in the device.The operation please
refer to the following instruction.
SELECTING SONGS IN SINGLE STEP
Press button (13) or button (15) to move to the
following song or the previous song. Track number shows on
display.
SELECTING DIRECTORY UP/DOWN
Press 5 DIR-button (16) or 6 DIR+ button (12) to select previous
directory or next directory.
PAUSING PLAYING
Press 1 button (1) to pause playing. Press it again to
resume playing.
PREVIEWING ALL FILES
Press 2 INT button (3) to INTRO each file. Press again to stop
intro and start to play.
REPEATING PLAYING
Press 3 RPT button (6) to continuously repeat the same file.
Press it again to repeat all files.
PLAYING IN RANDOM ORDER
Shortly press 4 RDM button (17) to play all files in random
order. Press it again to cancel the function.
USB PLAY OPERATION

BMP-2400USB
- 33 -
There is a SD/MMC interface (20) on the front panel of the unit.
When you insert a SD/MMC card in the
SD/MMC interface, the unit will search the MP3 files or WMA
files in the card and start to play automatically. The operation is
the same with the USB play operation described above.
If in other mode, you can also press MODE button (11) to select
SD/MMC mode.
CAUTION:
When there are important files in the USB.Device or SD card, do
not connect it to the main unit to play, because any wrong operation
may cause files loss. And our company assumes no responsibility
for this.
SD/MMC OPERATION

BMP-2400USB
- 34 -
Control Locations – Remote Handset
BMP-2400USB

BMP-2400USB
- 35 -
1. POWER Power ON/OFF Button
2. MODE Mode Botton
3. TUNE/SKIP (8) Tune/SKIP Down Button
4. 7/BND Band Select Button(When pressed shortly)
5. SCN Scanning Button
6. PAU Pause Button
7. SHF Shuffle Button
8. DIR▼ DIR▼ Button
9. VOL▲ Volume Up Button
10. SEL (LOU/ENT) Sound Mode Select Button
Loudness Button (When pressed long)
11. TUNE/SKIP (9) Tune/SKIP Up Button
12. VOL ▼ Volume Down Button
13. DISP(0) Display Button
14. RPT Repeat Button
15. AS/PS(D-AUD) Automatic Memory Storing & Program Scanning Button
(Mode Select Button For MP3/WMA Operation)
16. LOC Local/Distant Select Button
17. DIR▲ DIR▲ Button

BMP-2400USB
- 36 -
SPECIFICATION
GENERAL
Power Supply Requirements DC 12 Volts, Negative Ground
Chassis Dimensions 178 (W) x 97 (D) x 50 (H)
Tone Controls
- Bass (at 100 Hz) ±10 dB
- Treble (at 10 kHz) ±10 dB
Maximum Output Power
- Version V 4x15 watts
Current Drain
Version V : 5Ampere (max.)
RADIO
For 2 Bands
FM
Frequency Coverage 87.5 to 108 MHz.
IF 10.7 MHz
Sensitivity (S/N=30dB) 4μV
Stereo Separation >25dB
AM
Frequency Coverage 520 to 1710 KHz
IF 450 kHz
Sensitivity (S/N=20dB) 36 dBuV
.......................
...............................
.............................
...........................
..................................
......................................
............................
.............................................
.............................
.............................
.............................
..............................................
.............................

BMP-2400USB
- 37 -
TROUBLE SHOOTING
Before going through the checklist, check wiring connection. If any of the problems persist after checklist
has been made, consult your nearest service dealer
Symptom
Cause
Solution
No power.
The car ignition switch
is not on.
If the power supply is
connected to the car
accessory circuits, but the
engine is not moving, switch
the ignition key to “ACC”.
The fuse is blown.
Replace the fuse.
No sound.
Volume is in minimum
Adjust volume to a desired level.
Wiring is not properly
connected.
Check wiring connection.
The operation keys
do not work.
The built-in
microcomputer is not
operating properly due to
noise.
Press the reset button.
The radio does not
Work. The radio
station automatic
selection does not
work.
The antenna cable is not
connected.
Insert the antenna cable firmly.
The signals are too
weak.
Select a station manually.
 Loading...