

Page 1

www.boomgear.com
MP-700
MP3 Player
User Manual
Thank you for your purchasing MP-700
Page 2
1
Contents
PC System Requirements
.........................................................................................................
2
Description of Product Part
......................................................................................................
2
Direction of USB Cable Connection
............................................................................
3
Accessories
....................................................................................................................................................
3
USB Port Inspection
...........................................................................................................................
3
Program Installation
...........................................................................................................................
4
Program Deletion
...................................................................................................................................
6
Formatting (After installing the program)
..............................................................
7
Updating (After installing the program)
...................................................................
8
How to download a music file to the product
..............................................
10
Text to Speech Transformation (TTS)
..................................................................
12
TTS File Storage
.................................................................................................................................
13
Dictionary Use
........................................................................................................................................
14
Inserting a Battery
.............................................................................................................................
14
Button Operation by Modes
................................................................................................
15
Menu Function
.......................................................................................................................................
15
Music File Playing
.............................................................................................................................
17
Voice Recording and Playback
........................................................................................
18
Encoding
........................................................................................................................................................
18
Playback of Encoded Files
.....................................................................................................
19
Presetting FM Stations
...............................................................................................................
19
Listening to the FM Radio
......................................................................................................
20
Listening and Recording FM Radio Broadcasts
.....................................
21
Equalizer Function (EQUALIZER)
.............................................................................
22
Repeat Playing (REPEAT)
....................................................................................................
22
Section Repeat (REPEAT A-B)
......................................................................................
23
Scroll
....................................................................................................................................................................
23
Backlight Duration
.............................................................................................................................
24
Backlight Color
.......................................................................................................................................
25
Setting the Encoding Bit Rate
..........................................................................................
26
Automatic Power Off (AI-OFF)
........................................................................................
26
Bookmark Function (BOOKMARK)
..........................................................................
27
Folder List
.....................................................................................................................................................
28
Deleting File (DELETE)
.............................................................................................................
30
Hold Function (HOLD)
................................................................................................................
30
Troubleshooting Tips
....................................................................................................................
31
Product Specification
....................................................................................................................
32
Guarantee
.....................................................................................................................................................
33
■
Design and specifications are subject to change without
notice for product improvement purposes.
THIS DEVICE COMPLIES WITH PART 15 OF THE FCC RULES.
OPERATION IS SUBJECT TO THE FOLLOWING TWO CONDITIONS :
(1) THIS DEVICE MAY NOT CAUSE HARMFUL INTERFERENCE, AND
(2) THIS DEVICE MUST ACCEPT ANY INTERFERENCE RECEIVED,
INCLUDING INTERFERENCE THAT MAY CAUSE UNDESIRED
OPERATION.
FCC RF INTERFERENCE STATEMENT
■ Note
This equipment has been tested and found to comply with the limits for a
Class B digital device, pursuant to part 15 of the FCC Rules. These limits are
designed to provide reasonable protection against harmful interference in a
residential installation. This equipment generates, uses and can radiate radio
frequency energy and, if not installed and used in accordance with the
instructions, may cause harmful interference to radio communications.
However, there is no guarantee that interference will not occur in a particular
installation.
If this equipment does cause harmful interference to radio or television
reception, which can be determined by turning the equipment off and on, the
user is encouraged to try to correct the interference by one or more of the
following measures :
1. Reorient or relocate the receiving antenna.
2. Increase the separation between the equipment and receiver.
3. Connect the equipment into an outlet on a circuit different from that to
which the receiver is connected.
4. Consult the dealer or an experienced radio/TV technician for help.
■
Caution ( )
Do not change or modify the product without permission or authority of
manufacturer.
It may cause undesirable operations, permanent damages or harmful
interferences.
Page 3
3
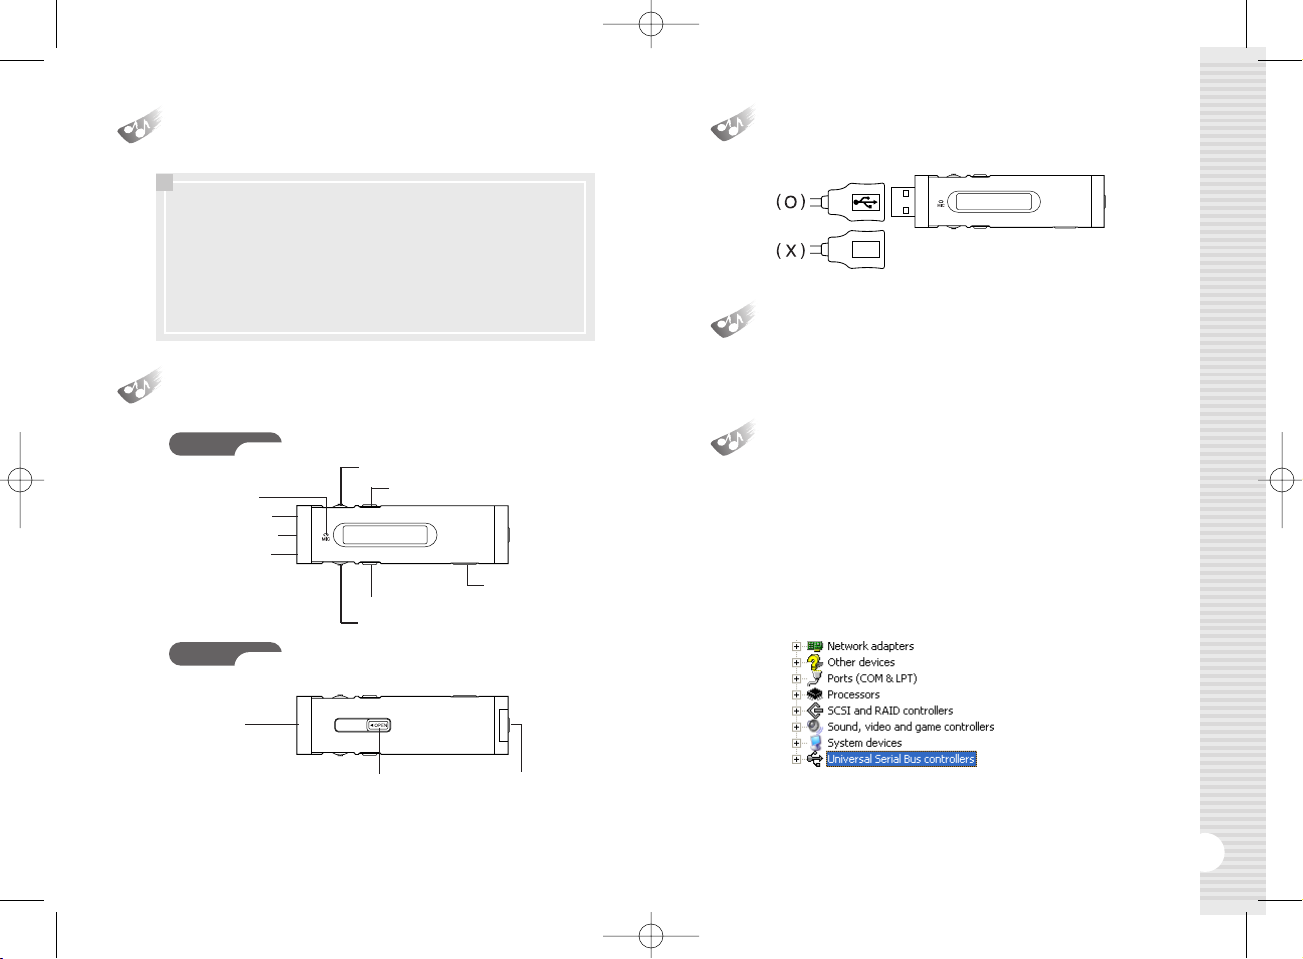
Direction of USB Cable Connection
Accessories
PC System Requirements
2
Description of Product Part
■
Processor: Pentium 233MHz or better
■
Windows98 / 98SE / ME / 2000PRO / XP
■
Hard Disc: 1GB or more available
■
Memory: 64MB DRAM or better
■
Monitor Resolution: 1024 x 768,16Bit Color or better
recommended
■
USB Port mounted
■
CD-ROM drive to install Software
■ User’s Manual / Installation CD / USB Cable / Small-sized USB
Adaptor / Earphone / Portable Bag / Battery 1 (1.5V AAA Type)
USB Port Inspection
1.
Before program installation, please inspect the USB port first.
2.
Execution Order: 'My Computer ➞ View system Information
➞
Hardware ➞Device Manager'
3.
Check if there is ‘Universal Serial Bus Controllers’ in the device
controller list.
4.
It will be displayed as ‘General Serial Bus Controllers’ or ‘Universal
Serial Bus Controllers’ depending on the PC environment.
5.
USB port cannot be used if there is no 'Universal Serial Bus Controllers'.
In such a case, please ask the sales agent of your PC for its service
before installation.
Repeat A-B/Preset • Memory Button
Play • Pause/Volume Control Button
Menu/Fast Forward • Rewind Button
Microphone
Encoding/Recording Button
USB Jack
Battery Cover
USB Jack Slide Switch
Hold Switch
Earphone Jack
Necklace Holder
Encoding Jack
Front
Back
Page 4

5
Program Installation
4
1.
Insert the supplied CD-ROM into the CD-ROM drive of your PC.
The dialog box shown below should appear.
If the installation program does not start automatically, double-click
'Install.exe' of the CD.
2.
Click the 'Install' button on the picture to begin installation. Select the
'MP3 Driver+TTS' button to use the TTS function.
(Usually it takes about 5 minutes if TTS is selected. The necessary
time is somewhat different depending on the PC environment.)
3.
Click "Next" ➞"Finish" to complete the installation and restart your PC.
4.
After your PC has restarted, you will see the 'Live Music_H Explorer'
icon on your PC.
5.
With the battery installed in the product, connect the product to the USB
port on your PC, and then press the '
❿
/❙❙
' button to turn on the
product.
6.
Execute 'Live Music_H Explorer' and a window will appear as shown
below.
●
Before installation, please disconnect other USB
products connected to the USB port.
●
Do not connect the product to your PC until
successfully installing the program. If you have already
connected the product to your PC, disconnect it before
proceeding.
●
This manual is based on Windows XP. Appearance
can be different depending on the version of Windows
you are using.
Page 5
7
Formatting
(After installing the program)
1.
In order to use the device's memory efficiently, please format the device
periodically.
2.
If you format the device, all of the files and folders on the device will be
deleted.
3.
For Windows 98 and Windows 98 SE, you must use the Install CD.
4.
On Windows ME, 2000, or XP, the device will automatically be
recognized as a "Removable Disk" and you can directly format the
device as follows:
5.
With the battery remove from the device, connect the device to the
USB port on your PC, and then press the '
❿
/❙❙
' button to power on
the device.
6.
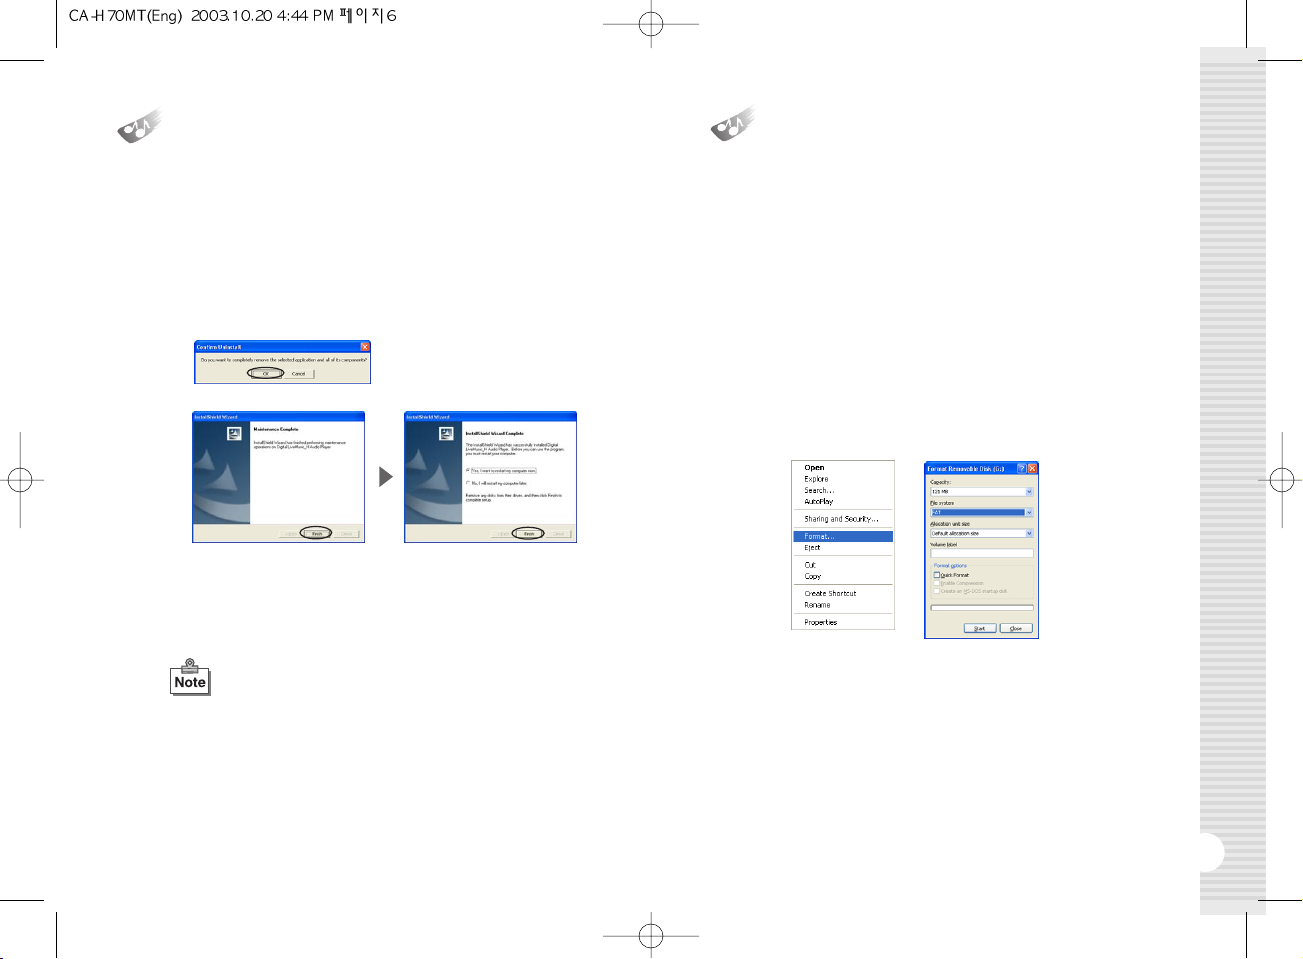
You can right-click on the removable disk and select Format from the
popup menu, as shown below.
7.
If you are formatting as shown above, select "FAT" as the file system. If
you select "FAT32" to format the device, the device's memory
information will be displayed incorrectly. In such case, please re-format
the device using FAT.
8.
When the formatting is complete, click "Close" to close the Format
window.
9.
When the formatting is complete, disconnect the device from your PC,
install the battery, and then press the '
❿
/❙❙
' button. Once the device is
powered on, re-connect it to your PC.
6
1.
If the product is already connected to your PC, disconnect it.
2.
Execute “Control Panel” ➞“Add or Remove Programs” to see a list of
the installed programs.
3.
Search the list for 'Digital LiveMusic_H Audio Player' and click on the
“Change/Remove” button. A window will appear as shown below. click
"OK" and “Finish” to complete the deletion. Restart your computer after
deletion.
4.
If the installation was not successful or if you need to reinstall the
program for any reason, follow the program deletion procedure and put
the CD-ROM in for installation.
Program Deletion
●
If you want to delete the TTS program, execute 'Control
Panel' ➞ 'Add or Remove Programs’. Then search the
list for 'TTSPad 2.0' and click “Change/Remove” to start
deleting.
Page 6
9
Updating
(After installing the program)
8
1.
Update the firmware of the product.
2.
With the battery removed from the product, connect the product to
the USB port of your PC and press the '❿/❙❙' button for more than
10 seconds.
3.
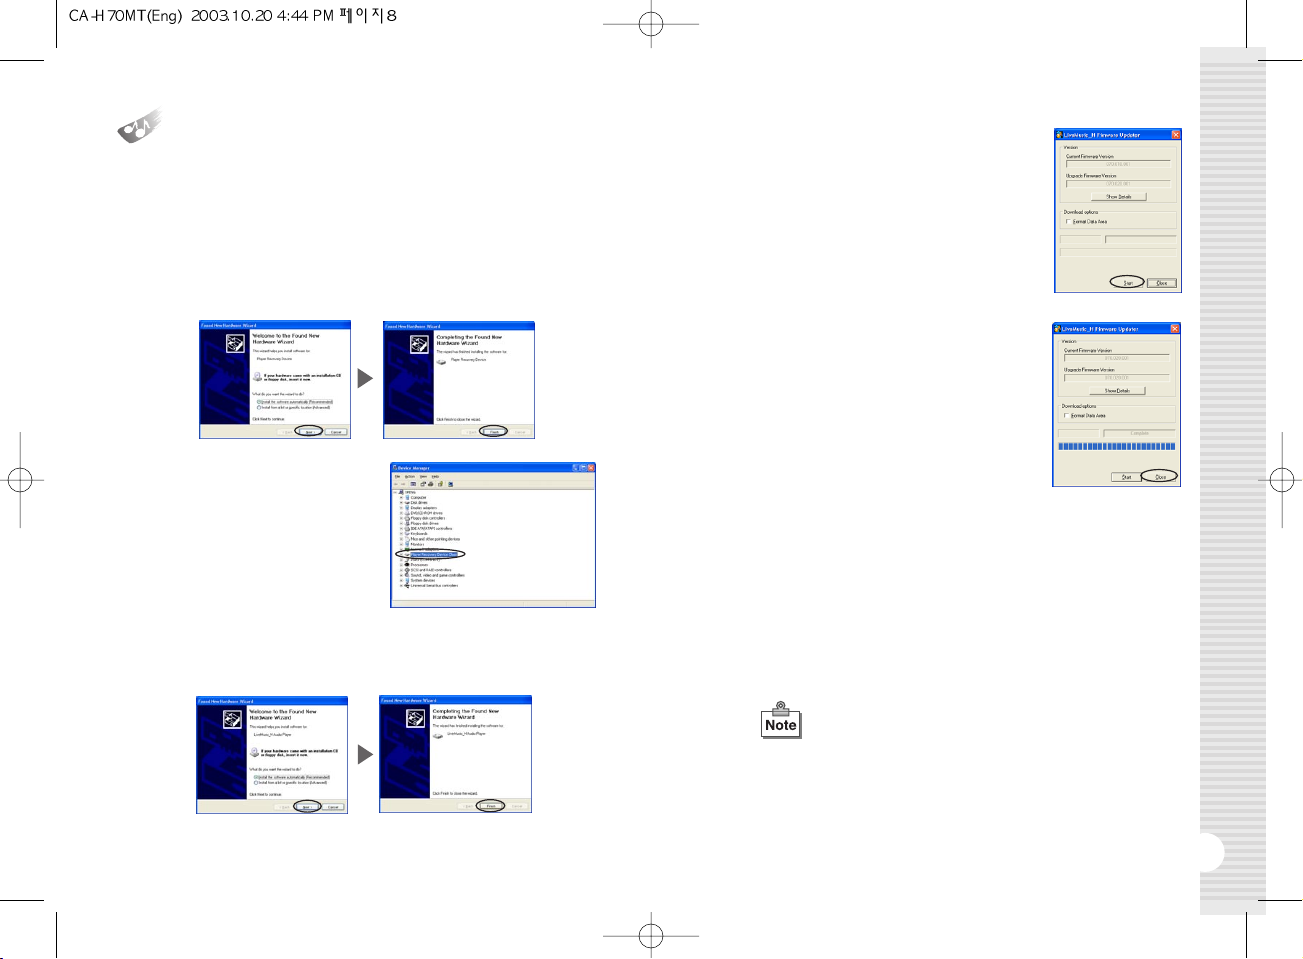
When the “Found New Hardware Wizard” appears as shown below,
click "Next" ➞ "Finish".
4.
After installation is completed,
check if there is 'Player
Recovery Device Class' in the
device controller.
(Device controller:
My computer ➞ View system
information ➞ Hardware ➞
Device Manager)
5.
Click “Start” ➞“Programs” ➞“Digital LiveMusic_H Audio Player” ➞“
LiveMusic_H Update”. When a window appears as shown, click “Next”
➞
“Finish”.
6.
The update window will appear as shown
below. Then click “Start” to start updating.
(In case of Window98/98SE, you need to
click “Start” ➞ “Program” ➞ “LiveMusic_H
Audio Player” ➞ “LiveMusic_H Update”
again to see the update window.
7.
When updating is completed, press the
“Close” button to close the update window.
8.
To use the program, disconnect the USB cable from the product, wait
10 seconds, and then reconnect the USB cable to the product. When
the "READY" message appears on LCD, start 'Live Music_H Explorer'
on your PC. If you do not disconnect and reconnect the USB cable, the
program will not run.
9.
Always use the Format utility according to the “formatting procedure”
after updating.
10.
The pictures may be different in case of Window98 / 98SE.
●
The update as above is only for the initial installation.
If you update 2 or more times in a PC, the 3rd and 5th
items will not appear.
●
When a removable disc appears in My Computer,
please click the right button of the mouse to start
formatting.
Page 7
11
How to download a music file
to the product
10
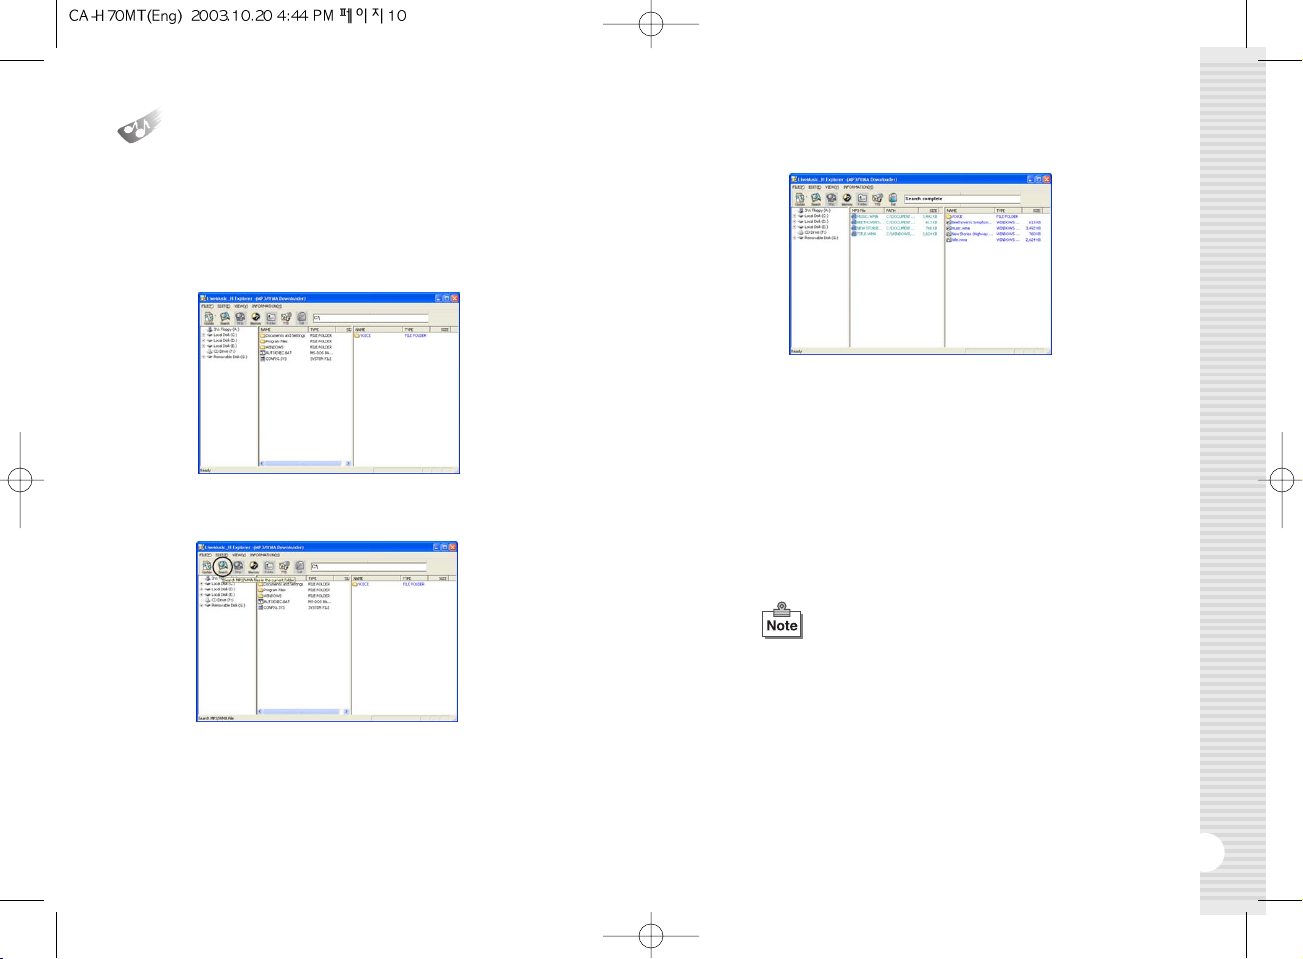
5.
Drag and drop those music files you want to download from the middle
pane onto the designated folder in the right window.
1.
With the battery installed in the device, power up the device and
connect it to the USB port on your PC.
2.
When the "READY" message appears on the LCD, click the
'Live Music_H Explorer' icon on your PC to launch the program.
3.
Press the 'Search' button in the upper end of the program to search for
the music files stored in your PC.
4.
To search a drive for music files, select a folder or drive you want to
search in the left window and press the ‘search’ button. The MP3 /
WMA files that are found in the selected drive or folder will be displayed
in the middle pane of the interface.
6.
While the files are being downloaded, the "WRITING" message will
flash on the LCD of the product, and when the download is completed,
the "READY" message will be displayed. An error may occur if you
disconnect the USB cable as soon as the "READY" message is
displayed. Please wait approximately 10 seconds before disconnecting
the cable.
7.
Once the USB cable is disconnected, the device will be automatically
powered on. Press the
'
❿
/❙❙
'
button to play the music.
8.
If an error occurs, follow the formatting procedure described above.
●
When you open My Computer or launch Windows
Searcher, you will see the removable disk icon. You
can then copy MP3 / WMA files to the removable disk.
●
The order of songs played by the device depends on
the file name, especially on the first letter of the name.
If the first letter of a song is a special character, that
song will be played first. Next, comes a song with a
numeral. After the numeral, the order is then arranged
by an English character, a Chinese character, and a
Japanese character.
Page 8
13
Text to Speech Transformation
(TTS)
TTS File Storage
12
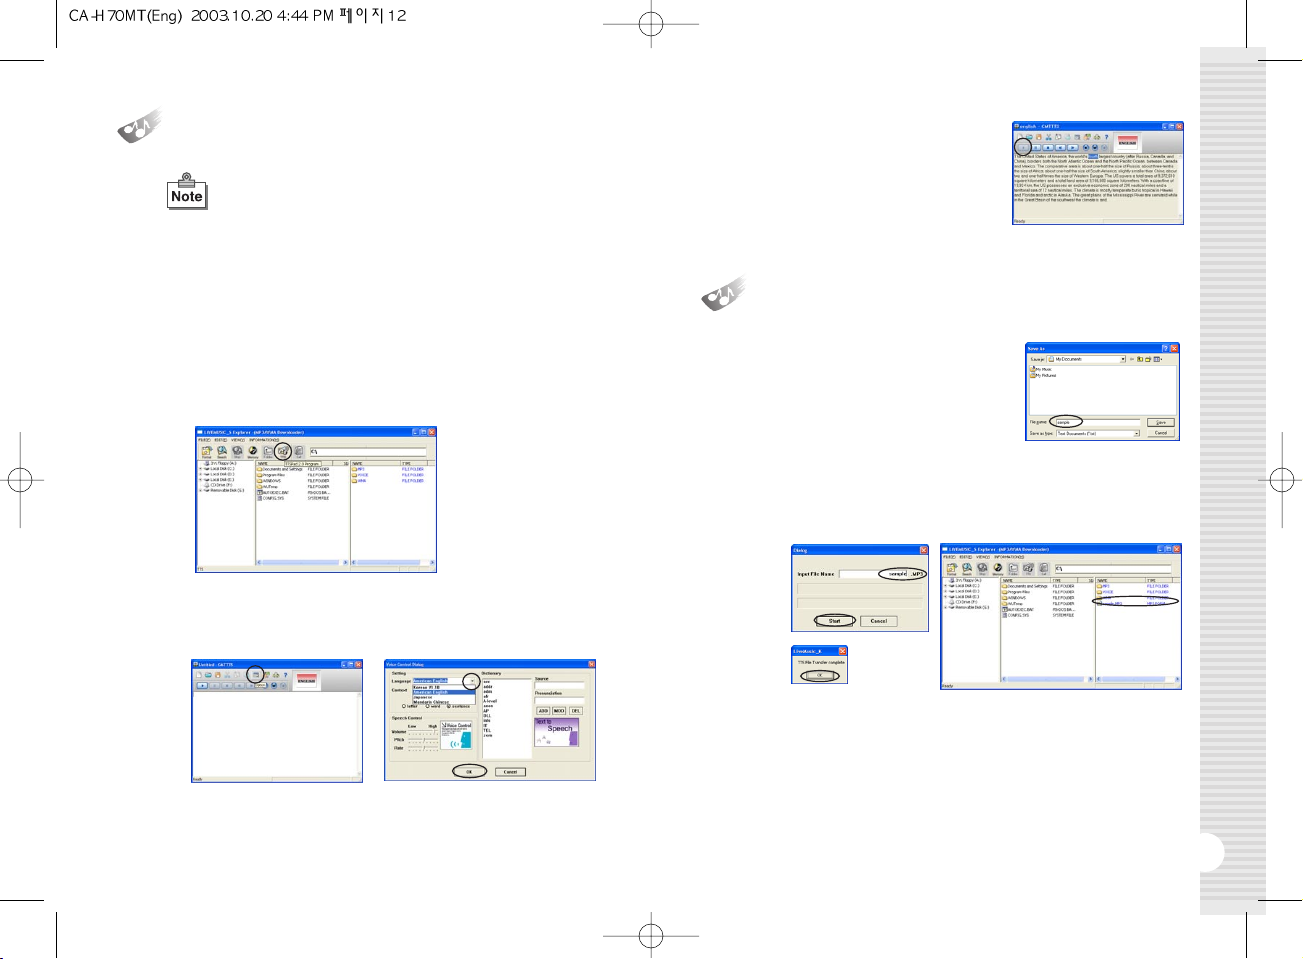
1.
Click the TTS icon in the upper end of the program in 'LIVE MUSIC_H
Explorer'.
2.
Press 'Option' ➞'▼' ➞'OK' in the window to choose a language you
want.
●
TTS(Text to Speech) is a system for transforming text
into voice.
TTS transforms letters from the Internet or text files
input by users into MP3-format voice files. (4 languages:
Korean, English, Japanese, and Simplified/Traditional
Chinese)
●
Voice files stored in the device are portable and can be
heard anywhere, anytime. Please connect the device to
your PC first to execute TTS.
●
For the details of TTS function, please click the ‘?’
button in the upper end of the TTS program.
3.
Input a sentence and press the
'
❿
' button to hear the sentence.
2.
TTS files can be stored in MP3. Click the ‘Generator’ icon in the upper
end of TTS program and you will see a window as shown below.
Input a file name and click the ‘Start’ button.
3.
To complete generating a file, click the ‘OK’ button in the ‘LiveMusic_H’
window after clicking the ‘Start’ button.
1.
TTS files can be stored in the form of
'txt" files. Click the ‘Save’ icon in the
upper end of TTS program and you will
see a window as shown here. Choose
a folder and store the contents you
input as ‘txt’ file.
Page 9

15
Button Operation by Modes
14
1.
In Dictionary, reading and defining words are possible. Words are
stored by languages (Korean, English, and Japanese) and the stored
‘reading and definition’ will be played.
2.
Click 'Option' on the TTS window.
3.
Input a word and click 'ADD' ➞'OK'.
1.
Open the cover on the right side of the product by pushing it to the
arrow direction and pulling it up.
2.
Insert the battery according to the direction inscribed on the back and
push the cover shut.
Dictionary Use
Inserting a Battery
Button Normal Mode Menu Mode FM Mode
❿
/❙❙
●
Power on / off
●
Playback / Pause
●
FM Recording / Stop
●
Power on / off
❿❿/➛➛
●
Search
●
Stop (Pause)
●
Memory Address Change
●
Menu
Cha
nge
●
Frequency search
MENU
●
Menu
●
Menu
●
Frequency Storage
ENC/REC
MUSIC VOICE
●
Encoding Start
●
Encoding Stop
●
Voice Record Start
●
Voice Record Stop
●
FM Record Start
●
FM Record Stop
-
A-B
PRE/MEM
●
Repeat A-B Setting
●
Frequency Save
●
SCAN-PRESET Mode
Converting
-
+ / -
●
Volume Control (0~32 stages)
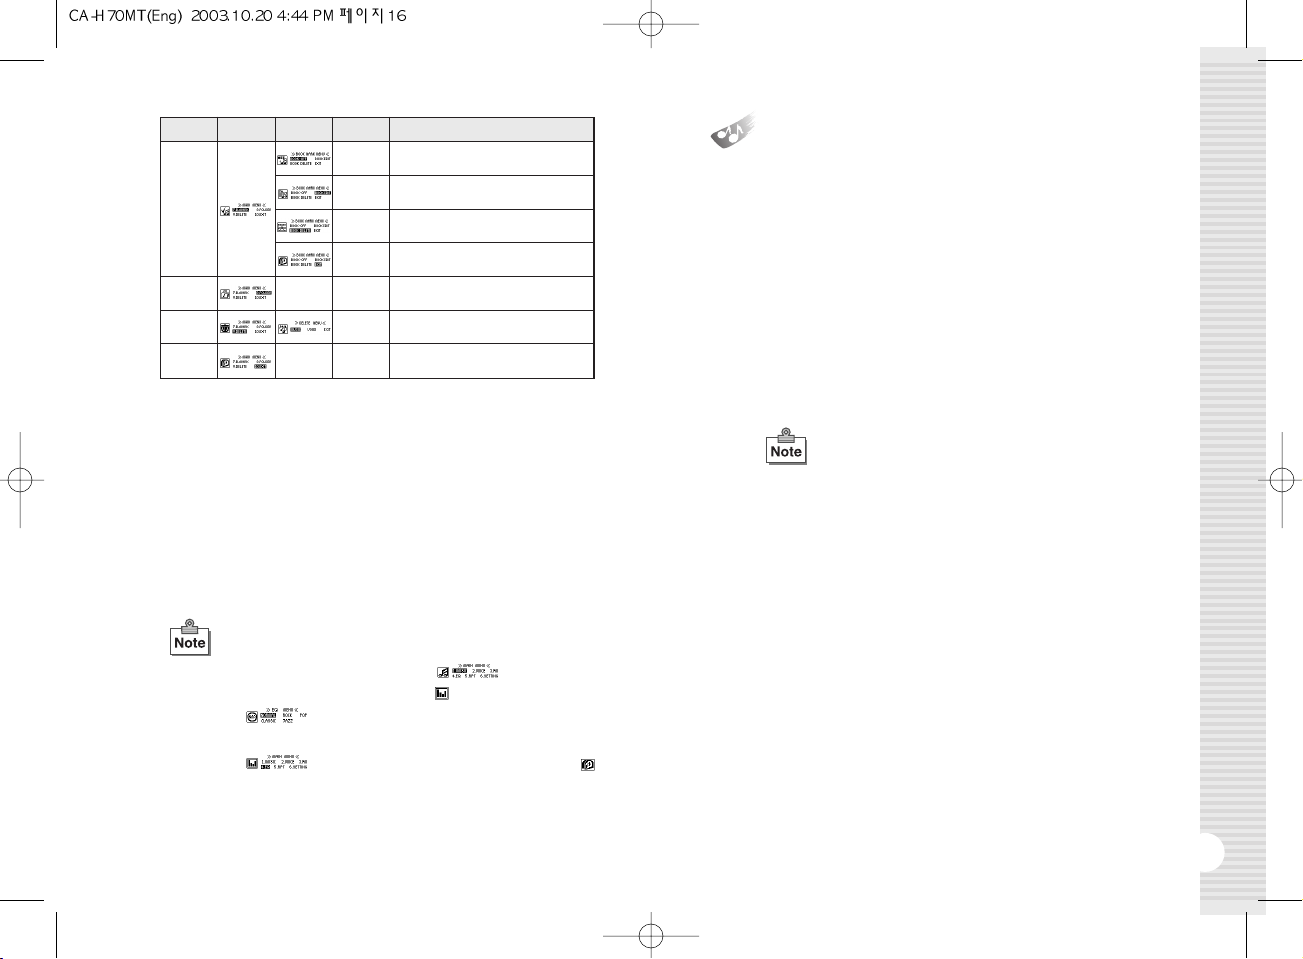
Menu Function
Mode Main Menu Sub Menu
2nd Sub Menu
Contents
<Music File Playing>
●
Play MP3 or WMA files
MUSIC
VOICE
FM
EQ
RPT
SETTING
<Voice Playing>
●
Play recorded voice files
<FM Radio>
●
Listen to FM radio and set broadcasting frequency
<EQ Setting>
●
ROCK, POP, CLASSIC, JAZZ, NORMAL
<Repeat Playing>
●
RPT-1, RPT-ALL, RAND-1, RAND-ALL, NORMAL
<SCR -Title Display Speed>
●
x 0, x 1, x 2, x 3, x 4
<B-LIGHT>
●
0sec, 3sec, 5sec, 10sec, CON (Consecutive on)
<B-LIGHT Color>
●
GREEN, RED, BLUE, MAGENTA, YELLOW,
CYAN, WHITE, RANDOM
<AI-OFF-Automatic Power Off>
●
1min, 2min, 5min, 10min, DISABLE (Consecutive off)
<Exit>
<ENCODING>
Page 10
17
Music File Playing
16
1.
Turn on the product and press the 'MENU' button while it is stopped
to move to the menu mode.
2.
There are MUSIC, VOICE, FM, EQ, RPT, SETTING, B-MARK, FOLDER,
DELETE
and EXIT functions in the menu mode. Press the '❿❿' or
'
➛➛
' button to switch the menu to one you want.
3.
Select 'EXIT' at the end of the menu and press the 'MENU' button to
come out of the menu mode.
4.
The menu mode is automatically released if there is no button entry for
8 seconds.
How to Use Menu (In case of setting EQ)
●
Stop state ➞ 'MENU' button ➞➞Pressing
the '
❿❿/➛➛
' button to select 'EQ' ➞ 'MENU' button
●
➞ Pressing the '
❿❿/➛➛
' button to choose
EQ (ROCK, POP, CLASSIC, JAZZ) ➞ 'MENU' button
●
➞ Pressing the '
❿❿/➛➛
' button to choose
'EXIT' ➞ 'MENU' button ➞ Set EQ display on the upper
end of LCD
●
This product can store up to 256 music and voice files.
●
In the event of MP3 file’s playing, a text display of song
titles may vary depending on the way ID3 tag was
written.
●
This product supports ID3v1/v2. It will display the song
title of ID3 if there is ID3 data.
1.
Turn on the product and press the
'
❿
/❙❙
'
button to play music.
Press the button one more time to pause.
2.
Select a song you want to play and press the playback button. When
the button is pressed, the song title will scroll across the LCD from right
to left.
3.
If you want to stop, press the '❿❿' or '➛➛' button while it is in pause.
4.
If you want to play another song while a song is playing, press the '❿❿'
or '
➛➛
' button and choose another song.
5.
By pressing the '+' or '-' button in front of the product, you can control
the volume up to 32 stages.
Mode Main Menu Sub Menu
2nd Sub Menu
Contents
<Bookmark not used>
B_MARK
FOLDER
EXIT
<Edit the play list>
<Delete all the songs selected in the play list>
<Move to Main Menu>
<Folder List>
●
Selectively play the songs in the folder only
<Menu Mode Cancel>
DELETE
<File deletion>
●
MUSIC(MP3, WMA), VOICE, EXIT
Page 11
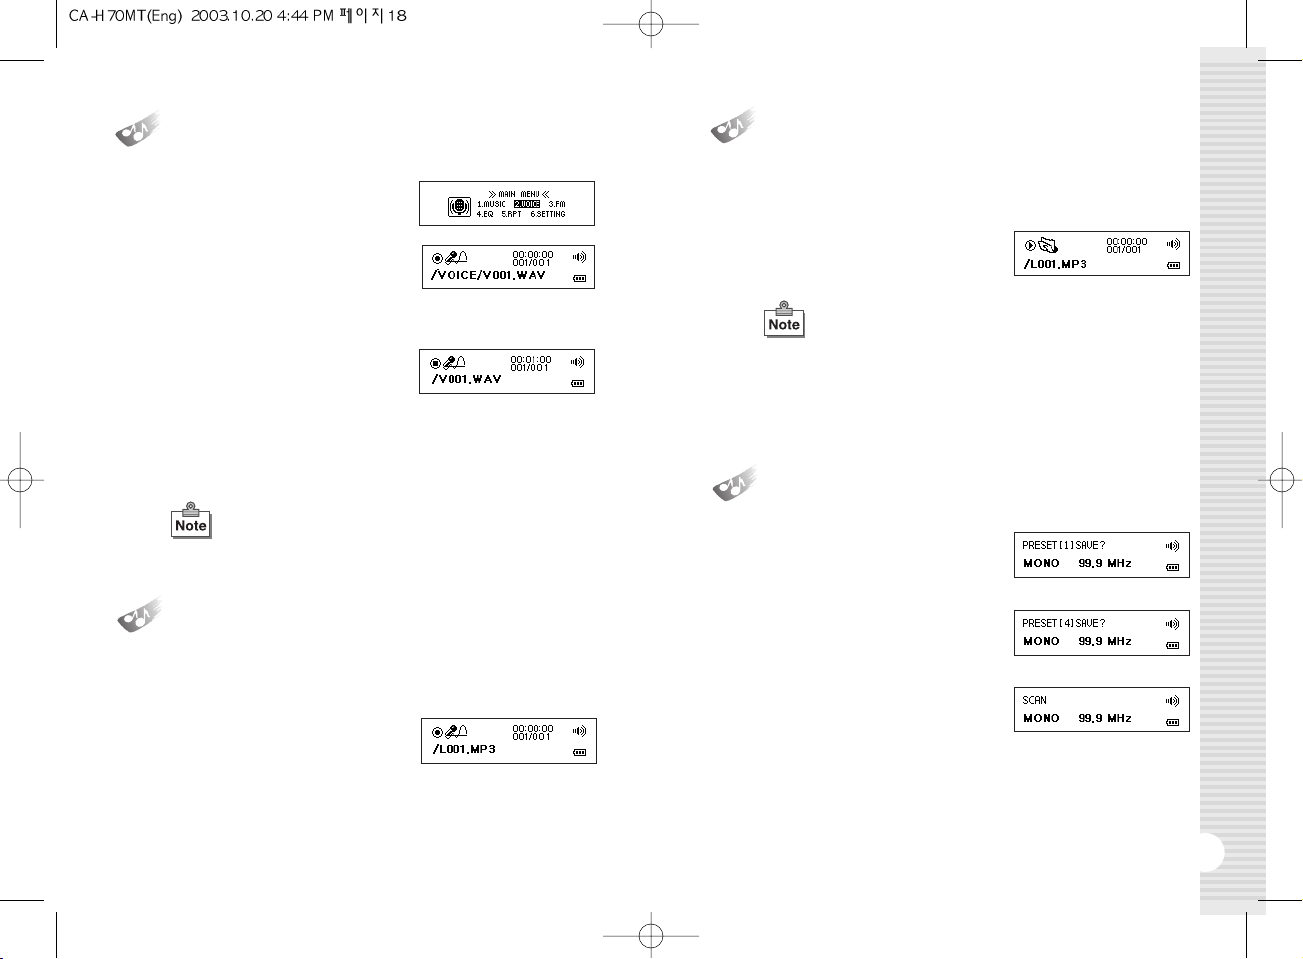
1.
To record voice, press '❿❿' in MENU
mode to select VOICE mode, and then
press the MENU button.
2.
Once in VOICE mode, press the
ENC/REC button to start recording.
3.
To pause recording, press the A-B PRE/MEM button.
To resume recording, press the A-B PRE/MEM button again.
4.
To stop recording, press the
ENC/REC button.
5.
To play back the recording, press the
'
❿
/❙❙
'
button. To pause playback,
press the button again.
6.
To return to the beginning, press '❿❿' in PAUSE mode to switch to
STOP mode, and then press the MENU button.
19
1.
To preset an FM station, use '❿❿'
and '
➛➛
' in FM mode to tune in to the
desired station, and the press and
hold the A-B PRE/MEM button.
2.
Use '❿❿' and '➛➛' to select the
desired preset number.
3.
Then, press the A-B PRE/MEM
button to save the station to the
selected preset number.
Presetting FM Stations
18
Encoding
1.
Use the audio cable to connect the speaker output to the device's ENC
jack.
2.
Play back the song you want to
encode, and then press the
ENC/REC button in MP3 mode.
3.
When encoding is finished, press the ENC/REC button again to return
to MUSIC mode.
Playback of Encoded Files
1.
In MENU mode, select FOLDER, use '❿❿' and '➛➛' to select the ENC
folder, and then press
'
❿
/❙❙
'
button to pull up a list of encoded files.
2.
Press
'
❿
/❙❙
'
button to play back
the encoded file.
Voice Recording and Playback
●
Recordings will automatically be assigned a file name in
the "V***.wav" format.
●
The minimum recording length is 2 seconds. Recordings
with a length of less than 2 seconds cannot be made.
●
Encoded files will automatically be assigned a file name in
the "L***.mp3" format.
●
The minimum encoding length is 2 seconds.
Encoding cannot be stopped within 2 seconds.
●
The total number of files and folders, including the encoded
files, is 256. (If the number exceeds 256, the last file will be
overwritten.)
Page 12
21
Listening to the FM Radio
20
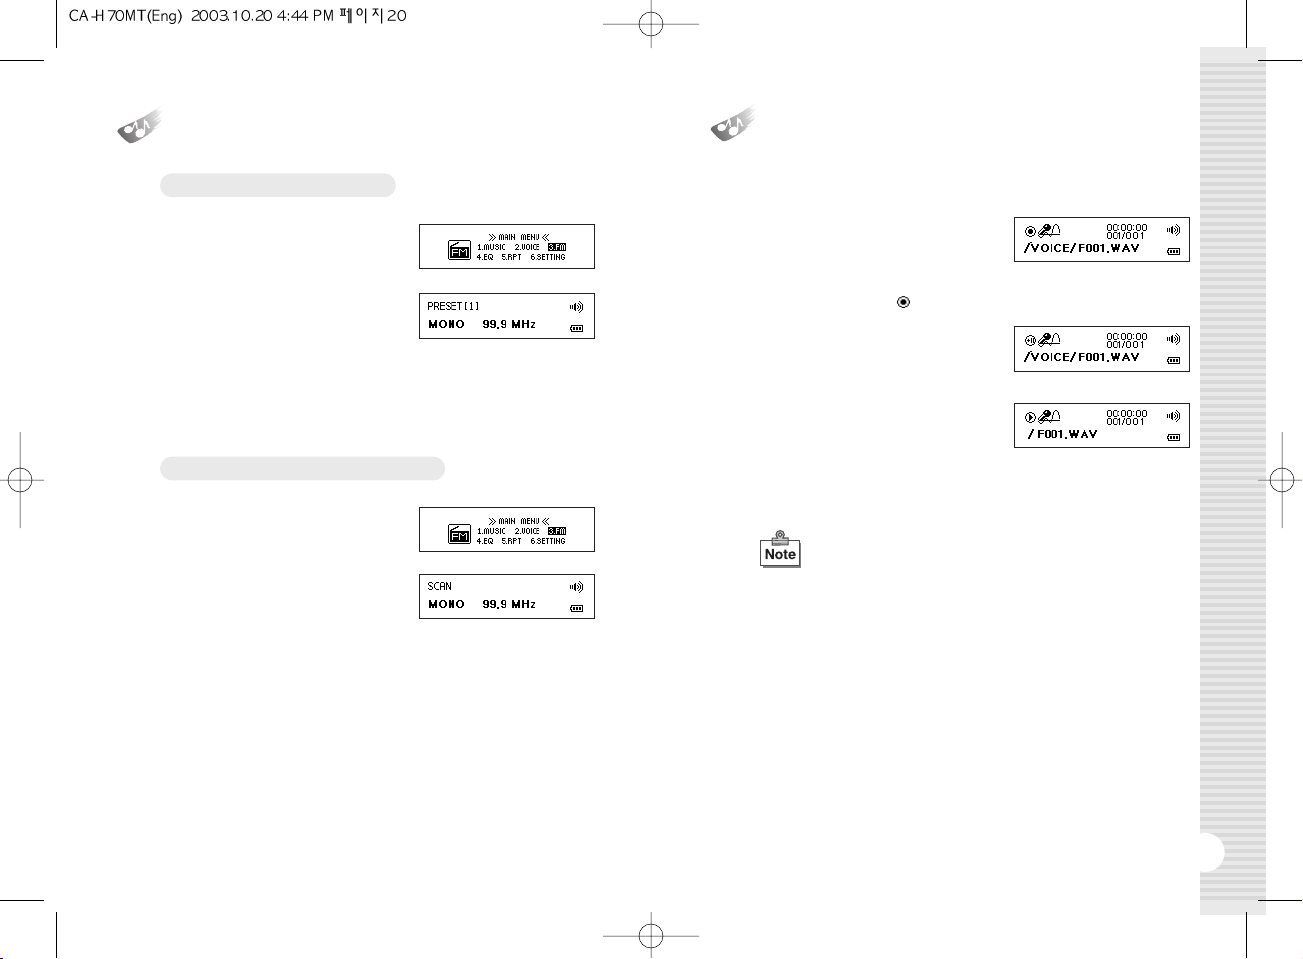
1.
In INITIAL MENU mode, use '❿❿'
and '
➛➛
' to select FM mode, and
then press the MENU button.
2.
In SCAN mode, briefly press the
A-B PRE/MEM button to switch to
PRESET mode.
3.
Use '❿❿' and '➛➛' to select the desired preset number.
4.
To exit FM mode, press the MENU button to enter MENU mode.
Tuning in to a Preset Station
1.
In INITIAL MENU mode, use '❿❿'
and '
➛➛
' to select FM mode, and
then press the MENU button.
2.
Use '❿❿' and '➛➛' to tune in to the
desired station.
3.
To exit FM mode, press the MENU button to enter MENU mode.
Tuning in to an FM Station Manually
Listening and Recording FM Radio
Broadcasts
1.
To record while listening to an FM
station, press the ENC/REC button.
To stop recording, press the button
again.
2.
During recording, " " will appear on the LCD screen.
3.
To pause recording, press the
A-B PRE/MEM button.
To resume recording, press the
A-B PRE/MEM button again.
4.
The recording will be saved to the
VOICE folder and can be played
back in VOICE mode.
5.
With a 128MB memory card, an FM radio broadcast can be recorded
for up to about 1 hour 40 minutes.
●
Recordings will automatically be assigned a file name in the
"F***.wav" format.
●
The minimum recording length is 2 seconds. Recordings with
a length of less than 2 seconds cannot be made.
Page 13

23
Repeat Playing
(REPEAT)
1.
If you want to listen to a song
repeatedly, press '
❿❿
' in the menu
mode to move to 'REPEAT' mode
and press the ‘MENU’ button.
2.
In this status, you can change the mode 'RPT-1 ➞RPT-ALL
➞
RAND-1 ➞RAND-ALL ➞NORMAL' by pressing the '❿❿' button.
Select a mode you want and press the 'MENU' button.
3.
If you want to return to the initial state, press the 'MENU' button to move
to 'REPEAT' mode, select ‘EXIT’ by pressing the '
❿❿
' button, and
press the 'MENU' button again.
22
Section Repeat
(REPEAT A-B)
1.
Press the ‘MENU’ button on the front to select a repeat while a song or
voice message is playing.
2.
Press the ‘MENU’ button to select the first and the last point of the file to
repeat. ‘A-B’ message will appear in the LCD screen.
3.
Press the ‘MENU’ button again to cancel.
Equalizer Function
(EQUALIZER)
1.
To control the music tone, press the
'
❿❿
' button in the menu mode to
move to the 'EQ' mode and press
the 'MENU' button.
2.
In this state, you can change the mode 'ROCK ➞POP ➞CLASSIC
➞
JAZZ ➞NORMAL' until you find the tone you want by pressing the
'
❿❿
' button and press the ‘MENU’ button to select one.
3.
To return to the menu mode, move to EQ mode by pressing the
‘MENU’ button and press the ‘MENU’ button again after selecting
EXIT by using the '
❿❿
' button.
Scroll
1.
If you want to change the speed of
what is being displayed on the LCD,
press the '
❿❿
' button on the menu
mode to move to 'SET' mode and
press the ‘MENU’ button.
2.
In this status, press the '❿❿' button
to move to ‘SCROLL’ and press the
'MENU' button.
3.
You can change the mode 'x4 ➞x0 ➞x1 ➞x2 ➞x3' by pressing the
'
❿❿
' button. Select a mode you want and press the 'MENU' button to
return to the menu mode.
Page 14
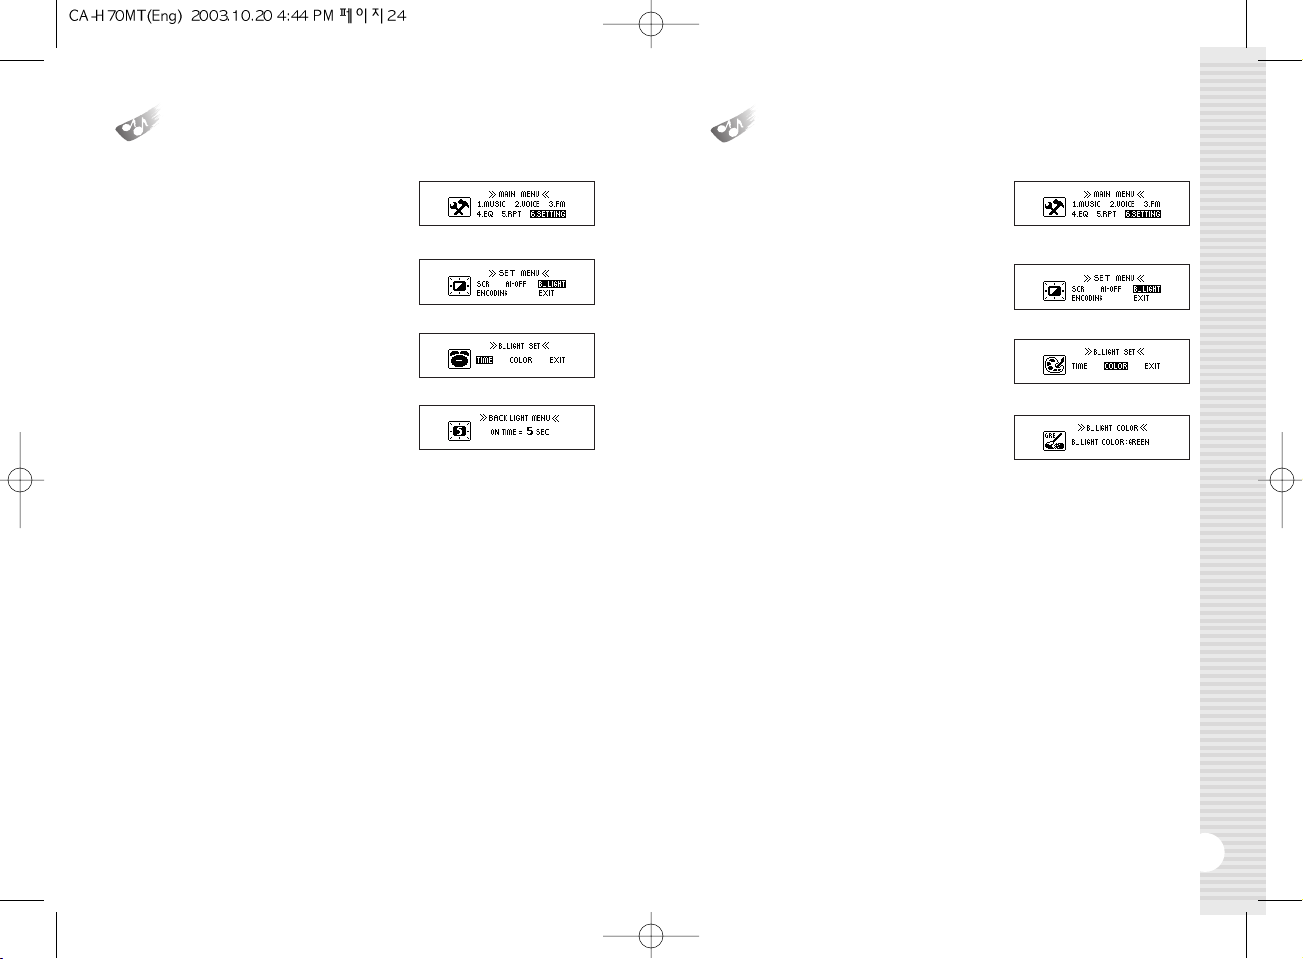
1.
To change the backlight duration,
use '
❿❿
' and '➛➛' in MENU mode
to select SETTING mode, and then
press the MENU button.
2.
Use '❿❿' and '➛➛' to select
B_LIGHT mode, and then press
the MENU button.
3.
Use '❿❿' and '➛➛' to select TIME
mode, and then press the MENU
button.
4.
Each time '❿❿' is pressed, the
selection changes as follows:
5sec
➞
10sec ➞CONTINUE
➞
0sec ➞3sec.
5.
Select the desired duration, and then press the MENU button to return
to MENU mode.
25
Backlight Duration
24
Backlight Color
1.
To change the backlight color, use
'
❿❿
' and '➛➛' in MENU mode to
select SETTING mode, and then
press the MENU button.
2.
Use '❿❿' and '➛➛' to select
B_LIGHT mode, and then press
the MENU button.
3.
Use '❿❿' and '➛➛' to select
COLOR mode, and then press
the MENU button.
4.
Each time '❿❿' is pressed, the
selection changes as follows:
GREEN
➞
RED ➞BLUE
➞
MAGENTA ➞YELLOW
➞
CYAN ➞WHITE ➞RANDOM.
5.
Select the desired color, and then press the MENU button to return to
MENU mode.
Page 15
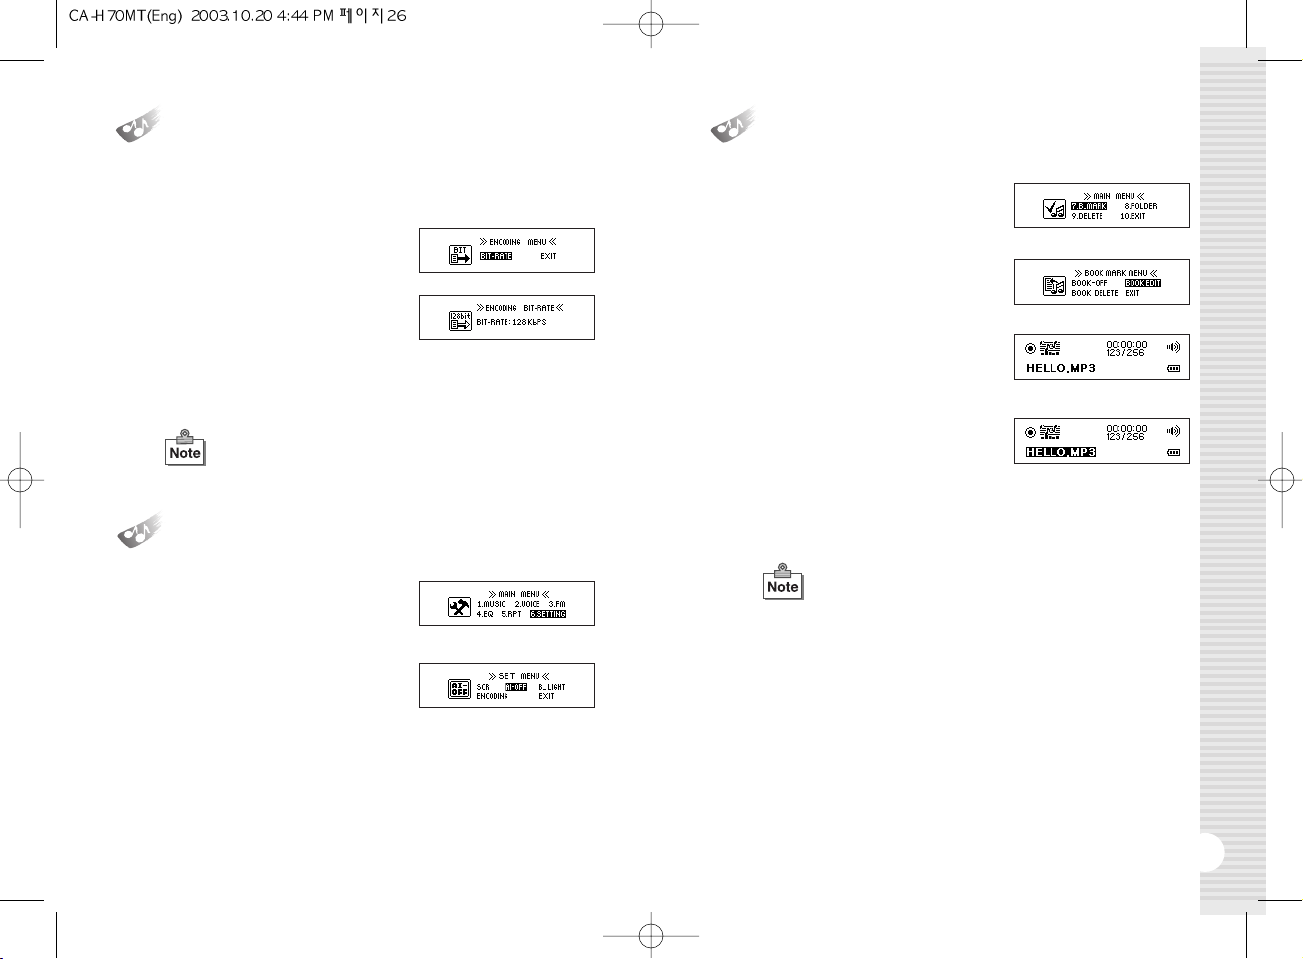
1.
If you want to make a playback file
list, press the '
❿❿
' button in the menu
mode to move to 'BOOKMARK' mode
and press the 'MENU' button.
2.
In this status, press the '❿❿' button
to move to 'EDIT' and press the
'MENU' button.
3.
If you have chosen a folder, only the
songs in that folder will appear.
If you haven’t, all the songs in the
current removable disc will appear.
4.
Move to a song you want to choose
by pressing the '
❿❿
' or '➛➛' button
and press the 'MENU' button to
select it.
5.
After selection, press the '
❿
/❙❙
' button to play the songs you have
chosen.
26
27
1.
If you want to change the backlight
time on LCD, press the '
❿❿
' button
in the menu mode to move to 'SET'
mode and press the ‘MENU’ button.
2.
In this status, press the '❿❿' button
to move to ‘BACKLIGHT’ and press
the 'MENU' button.
3.
AI-OFF is displayed in LCD. Now you can change the mode 'DISABLE
(consecutive off)
➞
1min ➞2min ➞5min ➞10min' by pressing the
'
❿❿
' button. Select a mode you want and press the 'MENU' button to
return to the menu mode.
Automatic Power Off
(AI-OFF)
Bookmark Function
(BOOKMARK)
●
If you select ‘Delete/Add File’ or ‘Folder’ with ‘Bookmark’
displayed, all the chosen songs will be deleted and the
file list be initialized.
Setting the Encoding Bit Rate
1.
To change the encoding bit rate, use '❿❿' and '➛➛' in MENU mode to
select SET mode, and then press the MENU button.
2.
Use '❿❿' and '➛➛' to select
ENCODING mode, and then
press the MENU button.
3.
Use '❿❿' and '➛➛' to select
BIT-RATE, and then press the
MENU button.
4.
Each time '❿❿' is pressed, the selection changes as follows: 128Kbps
➞
32Kbps ➞48Kbps ➞64Kbps ➞96Kbps. Select the desired bit
rate, and then press the MENU button to return to MENU mode.
●
32Kbps and 48Kbps are for mono encoding and 64Kbps,
96Kbps, and 128Kbps are for stereo encoding.
Page 16
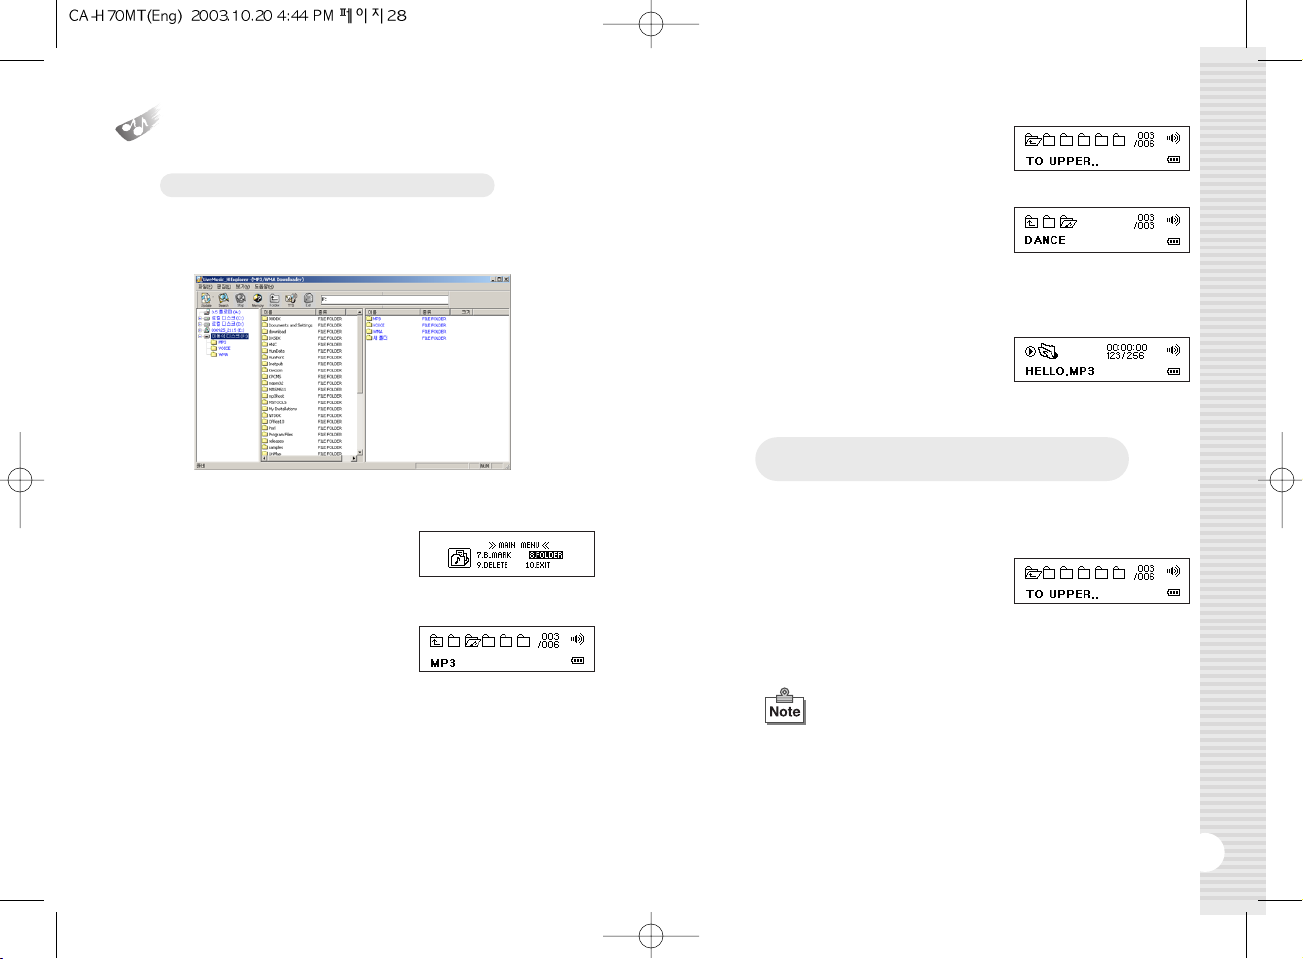
29
Folder List
1.
To use FOLDER LIST, right-click on the removable disk on the right
side of the program window and create a new folder.
2.
Copy the desired song(s) to the folder.
3.
To play back only the songs in the
desired folder, use '
❿❿
' and '➛➛' in
MENU mode to select FOLDER
mode, and then press the MENU
button.
4.
Use '❿❿' and '➛➛' to select the
desired folder. To browse to a
subfolder, use ''
❿❿
' and '➛➛' to
select the subfolder, and then
press the MENU button.
28
Playing Back All Songs in a Specific Folder
Deselecting the Previously Selected Folder and
Playing Back All Songs on the Device
1.
To deselect a selected folder, use '❿❿' and '➛➛' in MENU mode to
select FODLER mode, and then press the MENU button.
2.
Once in FOLDER mode, use '❿❿'
and '
➛➛
' to select the folder named
"TO UPPER…"', and then press the
MENU button.
3.
The "FOLDER DISABLE!" message will be displayed on the LCD
screen and the previously selected folder will be deselected.
5.
To browse to the upper folder, use
'
❿❿
' and '➛➛' to select the folder
named "UPPER..", and then press
the MENU button.
6.
To play back the songs in a folder of
your choosing, select the desired
folder, and the press the '
❿
/❙❙
'
button. The "FOLDER SELECTED!"
message will be displayed on the
LCD screen and a list of the songs in
the folder will come up.
7.
When a folder is selected and a list
comes up, the shape of the MUSIC
mode icon will change.
●
If the previously selected folder is deleted or renamed,
a list of all the files on the device will come up.
Page 17
31
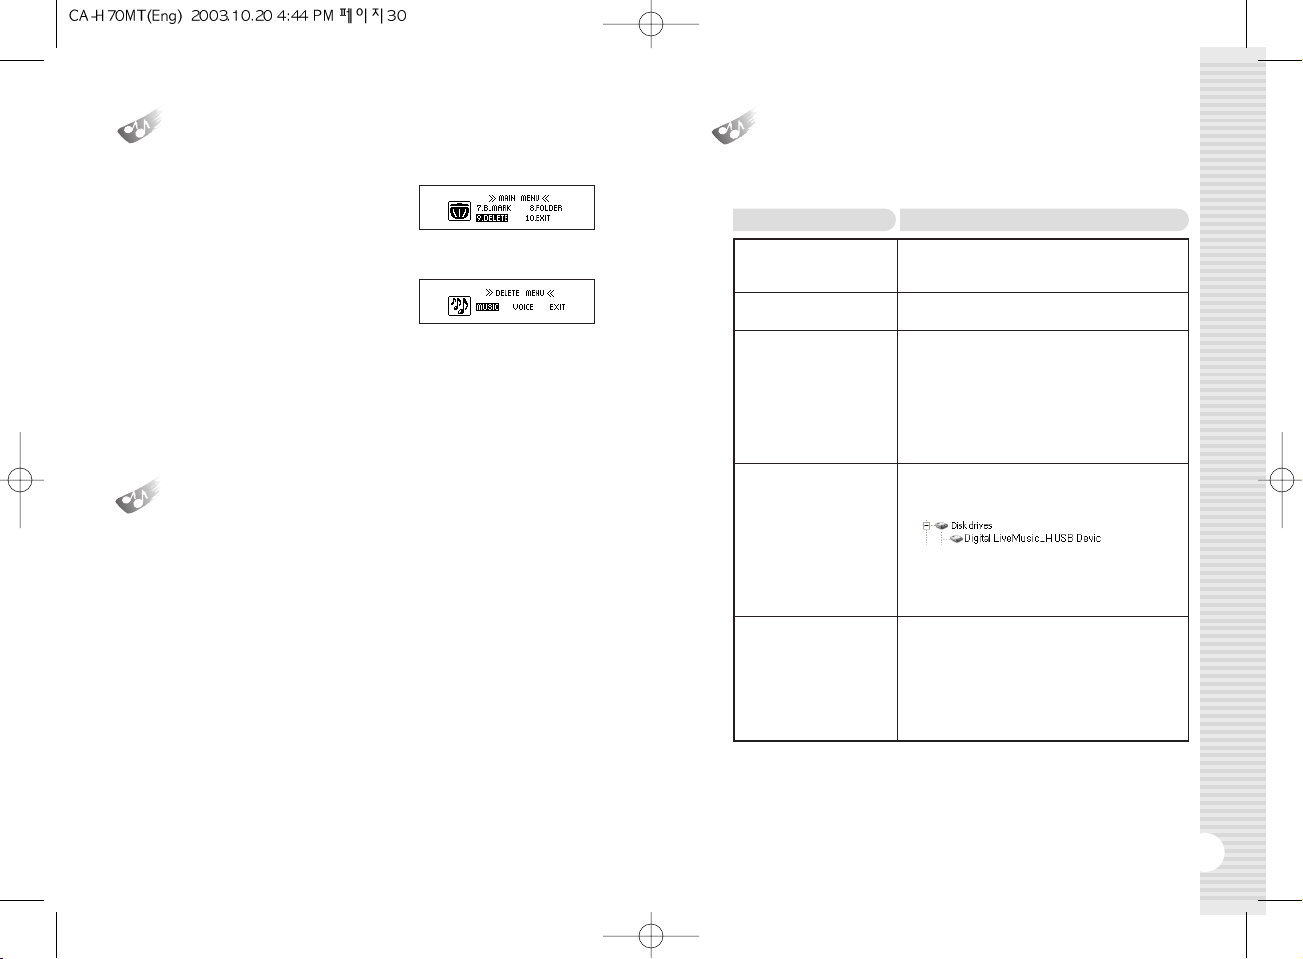
Deleting File
(DELETE)
30
1.
If you want to delete a file stored in
the product, press the '
❿❿
' button
in the menu mode to move to
'DELETE' mode and press the
‘MENU’ button.
2.
In this status, press the '❿❿' button
to select a music or voice file and
press the 'MENU' button.
3.
Now, ‘YES NO EXIT’ is displayed in LCD with the file you want to
delete. Using the '
❿❿
' or '➛➛' button, select 'YES' if you want to delete
the file or select 'NO' if you don’t. If you want to change the mode,
select 'EXIT' and press the 'MENU' button.
1.
This function is used to keep other functions from working while the
product is running.
2.
Push the 'HOLD' switch at the bottom of the product to the arrow
direction and the other key function will not work.
3.
At this state, the 'Lock Mark will be displayed at LCD panel. To escape,
return the HOLD switch to the other side.
Hold Function
(HOLD)
Troubleshooting Tips
●
Please check the followings first if the product does not work properly.
●
The buttons of the
product do not work.
●
The music file is not
played.
●
Power is not on.
●
It stops in an initial state.
●
Used space is displayed
while there is no file
stored.
●
Other errors of the
product.
●
Check if the 'HOLD' switch on the lower end of the product
is locked.
●
Turn the 'HOLD' switch to the original direction.
●
Check if the extension is 'MP3' or 'WMA'.
●
This product can play only the 'MP3' and 'WMA' files.
●
Check the polarity of the battery.
●
Check the remained capacity of the battery.
●
Remove the battery from the product, connect the product
to a PC using a USB cable and power it on. When you
power the product on, ‘READY’ sign will appear on the LCD.
●
In this status, refer to the Formatting Procedure of this
manual.
●
If it stops in an initial state and the problem is not solved by
formatting, please start 'Live Music_H Update'.
●
Check 'Control Board ➞ System (System Registration
Information) ➞ Device Controller and see if there is ‘USB
Controller (General Series Bus Controller, Universal Series Bus
Controller).
●
If you do not have the above devices in your PC, you cannot use
a USB port. In this case, you have to so set the bios (CMOS)
environment that you can use a USB port.
●
Contact the sales agent for a detailed setting method.
●
Although the product is
connected to a PC, the
removable disk is not
generated.
●
If there isn’t any new
hardware detected
●
Remove the battery from the product and reinsert it.
●
If it is not caught normally as below, click the right button of the
mouse to delete it.
●
After deletion, click 'hardware change search' icon in the upper
end to newly install the device.
●
When it is normally installed, the yellow exclamation mark in the
front will disappear.
Problems
Solution
Page 18
33
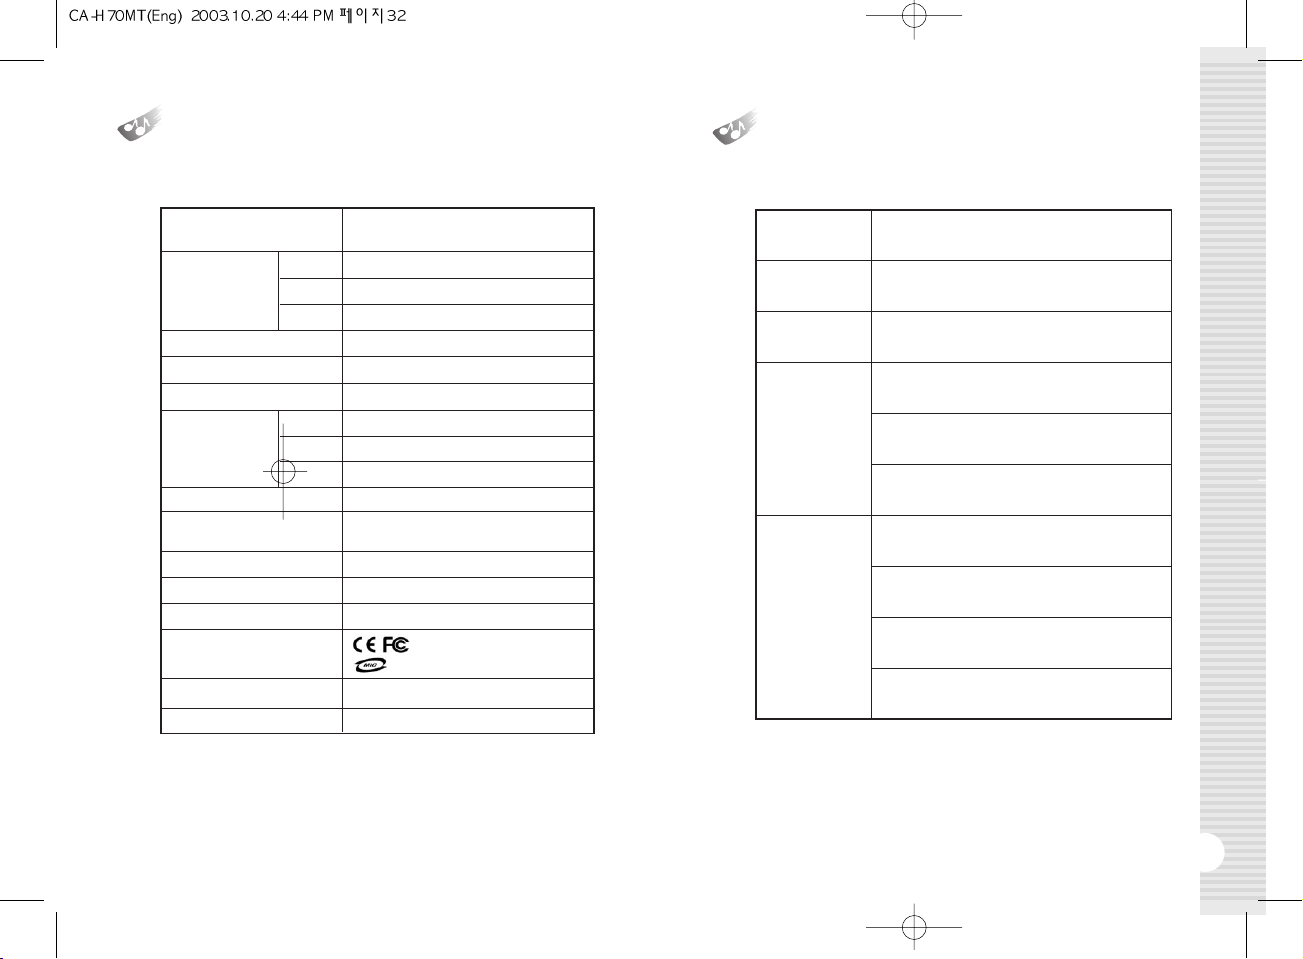
Product Specification
32
Guarantee
Main Function
Memory
Interface
File Transmission Speed
Display
Voice
Recording
Time
Battery
Operating Time
Output Power
S/N (Noise Ratio)
Case
Safety Standard
Dimension (W x H x D)
Net Weight (without Battery)
MP3 Player / WMA Player / FM Tuner /
Voice Recorder / Removable Disc
512MB Flash Memory
256MB Flash Memory
128MB Flash Memory
USB Port
7Mbps
128x 32 dot FSTN LCD (EL backlight)
32 hours
16 hours
8 hours
AAA Type 1EA
12-hour consecutive play
(Alkaline battery used)
5mW x 2 (16Ω)
90dB (20KHz LPF)
Aluminum
(FCC ID : QHBCMT2003H),
(E-D900-03-4371(B))
88 x 24 x 24(mm)
36g
512MB
256MB
128MB
512MB
256MB
128MB
Product
Assurance
Period
Sales Date
Customer
Sales
Agency
MP3 Player
1 year
●
If an error occurs, please contact the sales agency.
Name
Address
Telephone
Name
Address
Telephone
Customer Support Center
Month Day Year
 Loading...