

Page 1
ver.2016 r3
BONFIRE GAS GRILL
QUICK START GUIDE
IMPORTANT: Register your BONFIRE grill at bonfireoutdoor.com and download the full
version of the installation instructions and owner’s manual. For your safety, read the
installation instructions and owner’s manual before installing or operating your
BONFIRE grill.
Toll Free: (855) 678-0088
bonfireoutdoor.com
1
Page 2
ver.2016 r3
1 - SAFETY
This grill must be installed in accordance with local codes and ordinances, or, in the absence of
local codes, with either the latest National Fuel Gas Code (ANSIZ223.1/NFPA 54), and Natural
Gas and Propane Storage and Handling Installation Code (CSA-B149.1).
This appliance and its individual shutoff valves must be disconnected from the gas-supply piping
system when testing the system at pressures in excess of 1⁄2 psig. This appliance must be
isolated from the gas-supply piping system by closing its dedicated manual shutoff valve during
any pressure testing of the gas-supply system at pressures up to and including 1⁄2 psig.
This grill is designed for outdoor use only. DO NOT use this grill under unprotected flammable
surfaces. DO NOT use this grill inside a building, garage, enclosed area, or an unprotected
covered area (see paragraph below). DO NOT use this grill in or on a recreational vehicle or
boat. Important: When installing this grill in a COMBUSTIBLE surround, an insulating liner must
be used.
If installed or used under a patio roof, the cooking grid area must be covered by an exhaust
hood (with a vent) larger than the cooking surface. Refer to exhaust fan manufacturer
specifications. An exhaust fan with a rating of 1,000 CFM (cubic feet per minute) (472 liters per
second) or more may be necessary to effectively remove smoke and other cooking by-products
from the area under the hood. This grill must not be used under unprotected overhead
combustible construction. THIS UNIT MUST NOT BE LOCATED IN A FULLY ENCLOSED
AREA OF ANY KIND.
Installation must be performed by a qualified professional service technician.
2 - UNPACKING
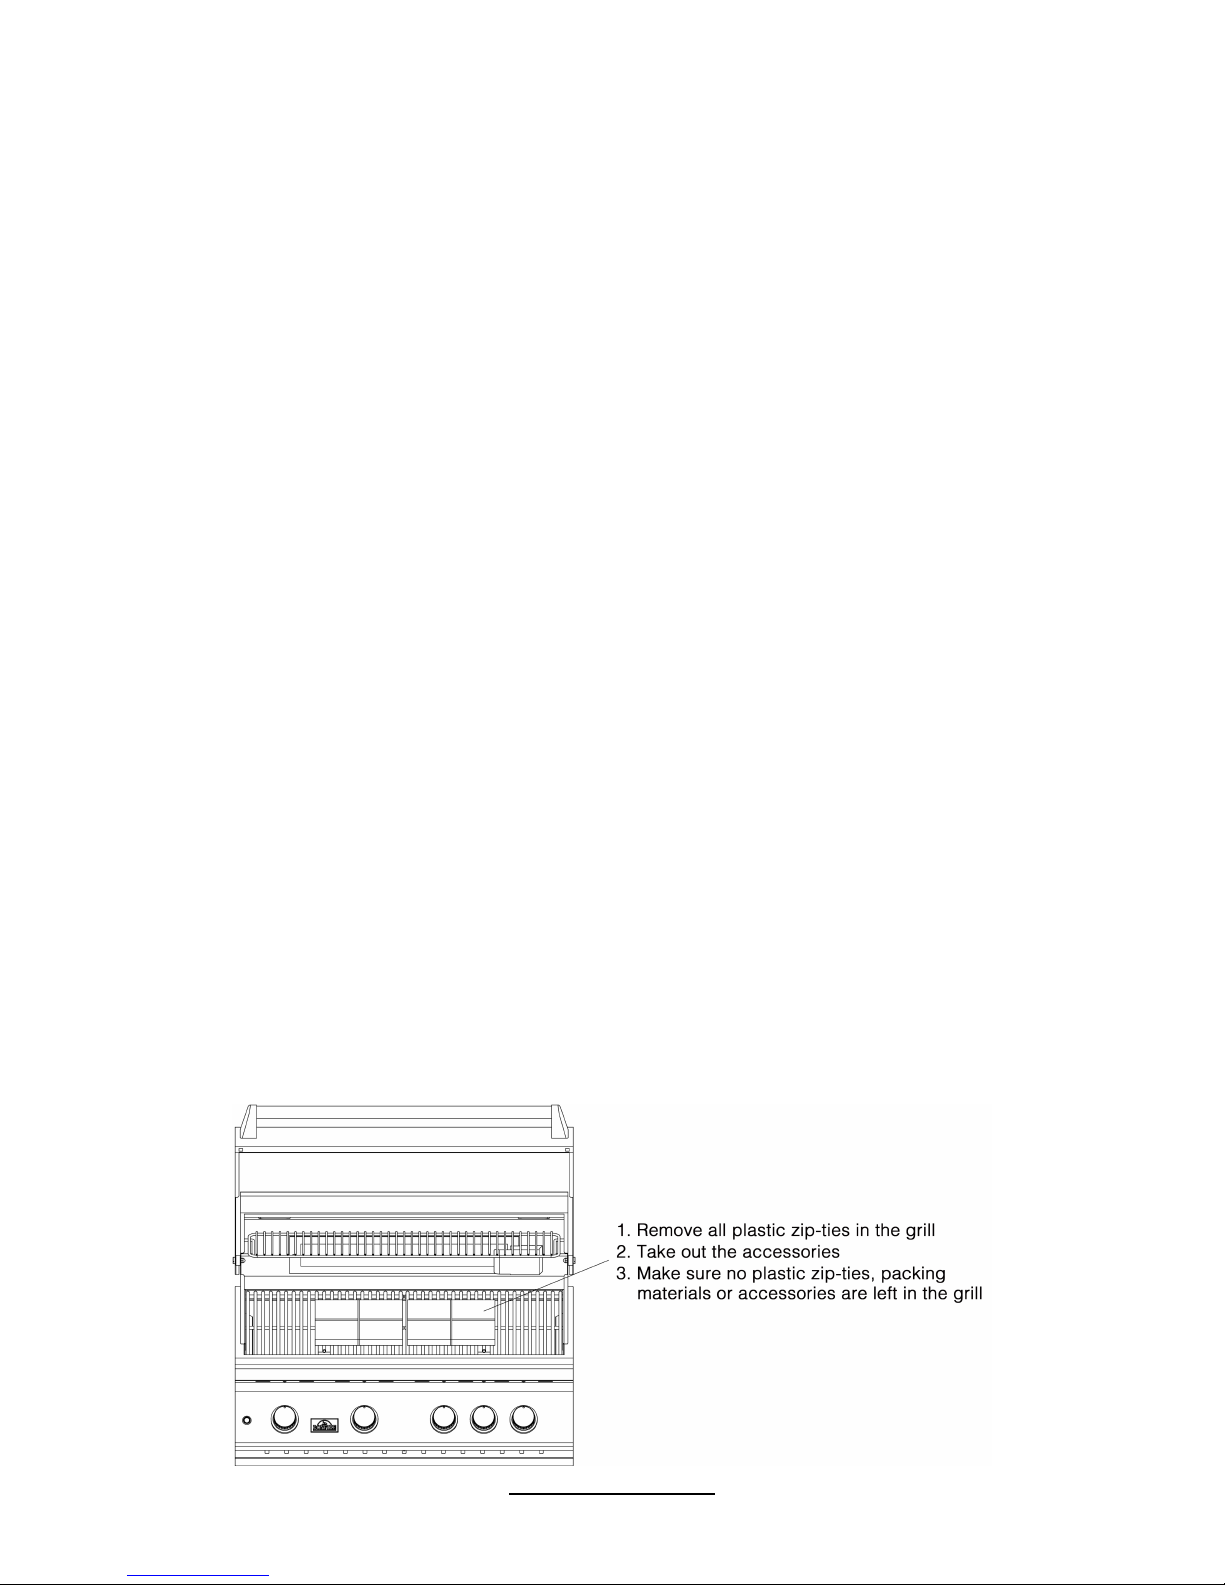
Carefully unpack the grill, removing all packing material and protective film. Remove foam
packed hardware from oven area (see diagram below). Consult the parts list that comes with the
grill. If any parts are missing or damaged, immediately contact the BONFIRE dealer before
beginning installation.
Toll Free: (855) 678-0088
bonfireoutdoor.com
2
Page 3
ver.2016 r3
3 - INSTALLATION
Location
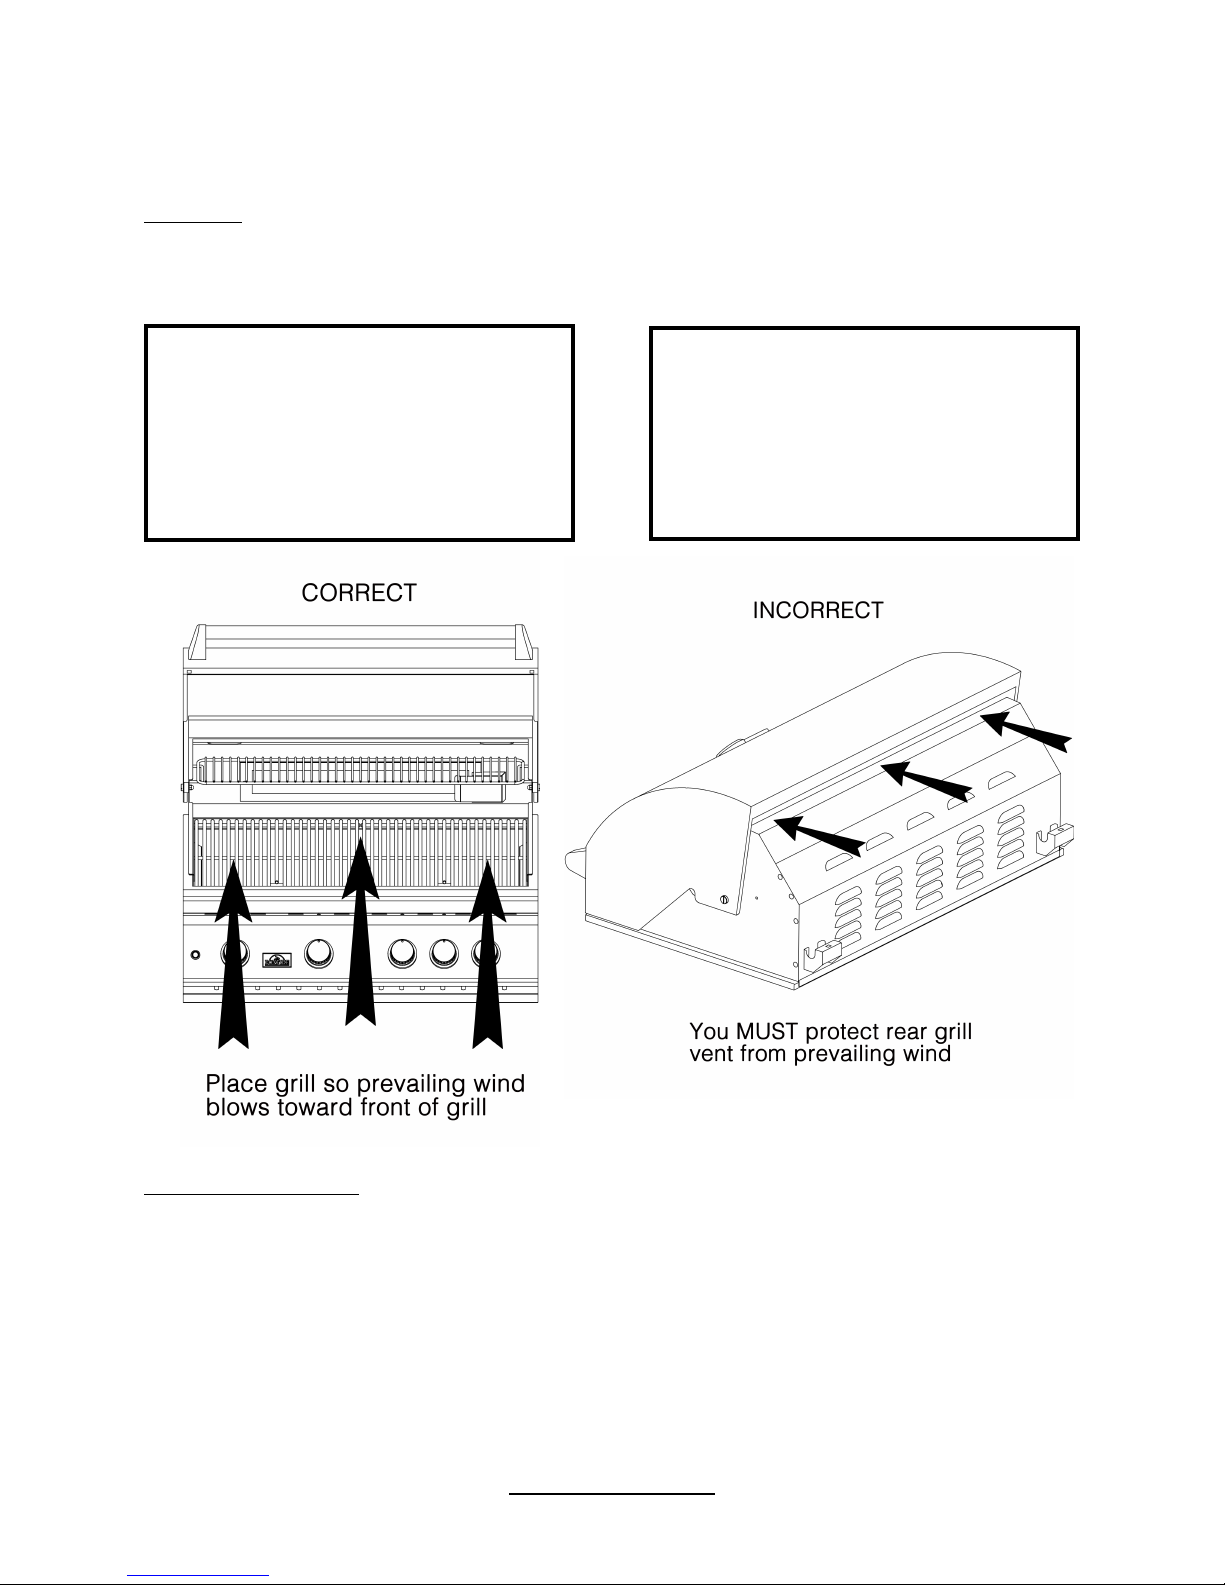
Refer to the INSTALLATION INSTRUCTIONS section of your grill owner’s manual for complete
details.
Connect Gas Supply
These quick start instructions assume a natural gas or household propane configured unit. See
owner’s manual for propane cylinder units.
Note: This section is only an overview of installation to the gas supply. Refer to the Installation
Instructions And Owner’s Manual for complete grill installation details.
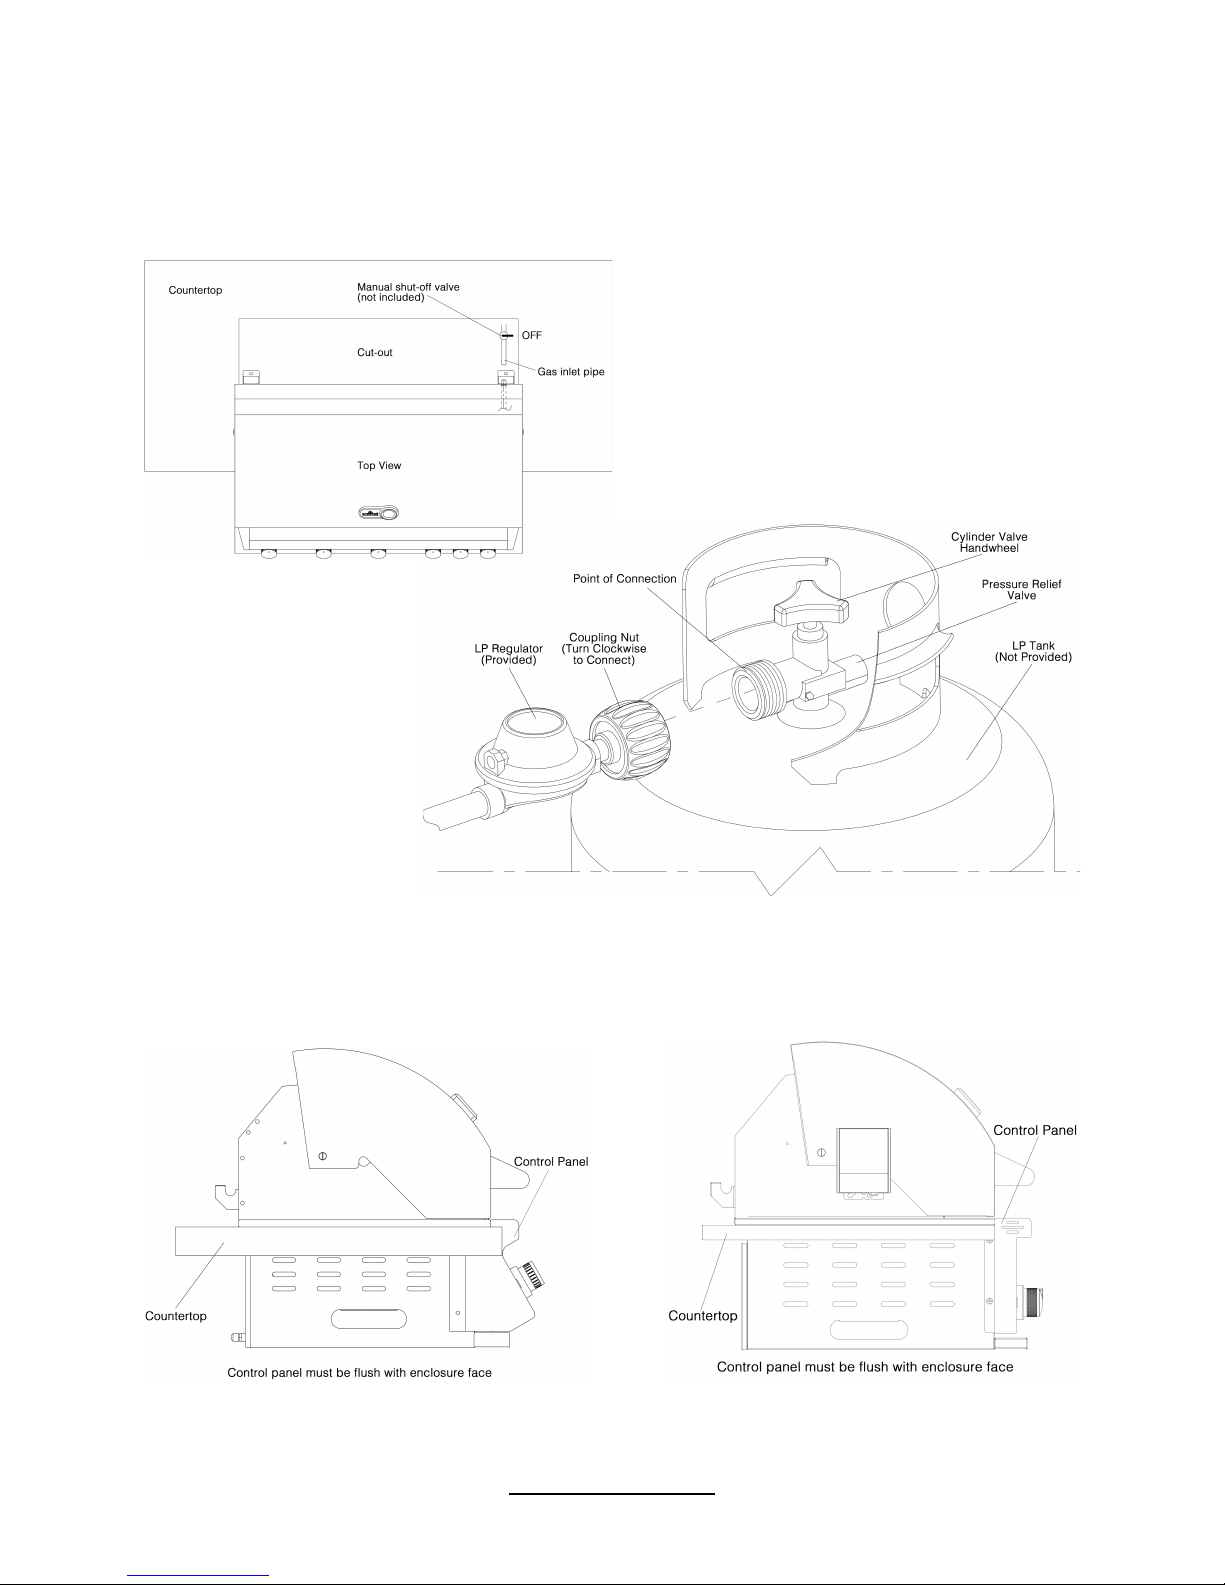
Remove screw protector cap from gas input pipe at back of grill. Turn OFF the gas supply at
the source. Then connect the 1/2” pipe adapter fitting supplied with the thermoplastic hose to
Toll Free: (855) 678-0088
bonfireoutdoor.com
3
CAUTION:
Wind blowing into or across the rear grill
lid vent can cause poor performance and/
or dangerous overheating. Orient the grill
so that the prevailing wind blows toward
the front of the grill.
CAUTION:
To prevent dangerous overheating, the
rear of the unit must have a minimum
clearance of 4” (10.2 cm) from any
backsplash/wall.
Page 4
ver.2016 r3
the gas input pipe. Use pipe joint compound that is resistant to all gasses on the male pipe
fitting and tighten securely. When connecting to a LP cylinder use the regulator supplied with the
hose to connect to a LP cylinder and tighten securely.
Turn all burner control knobs to the OFF
position. Turn the gas supply on. Then
carefully check all gas connections for leaks
with a brush and half-soap/half-water solution
before lighting. See CHECKING FOR GAS
LEAKS in the Installation Instructions And
Owner’s Manual. NEVER USE A MATCH OR
OPEN FLAME TO TEST FOR LEAKS.
The control panel must be flush with the enclosure face as shown below. Proper grill airflow
must be maintained. Do not block. It is not necessary to remove the control panel or knobs for
installation.
Toll Free: (855) 678-0088
bonfireoutdoor.com
4
BONFIRE 3 And BONFIRE 4
BONFIRE Prime 500
Page 5
ver.2016 r3
4 - GRILL SETUP
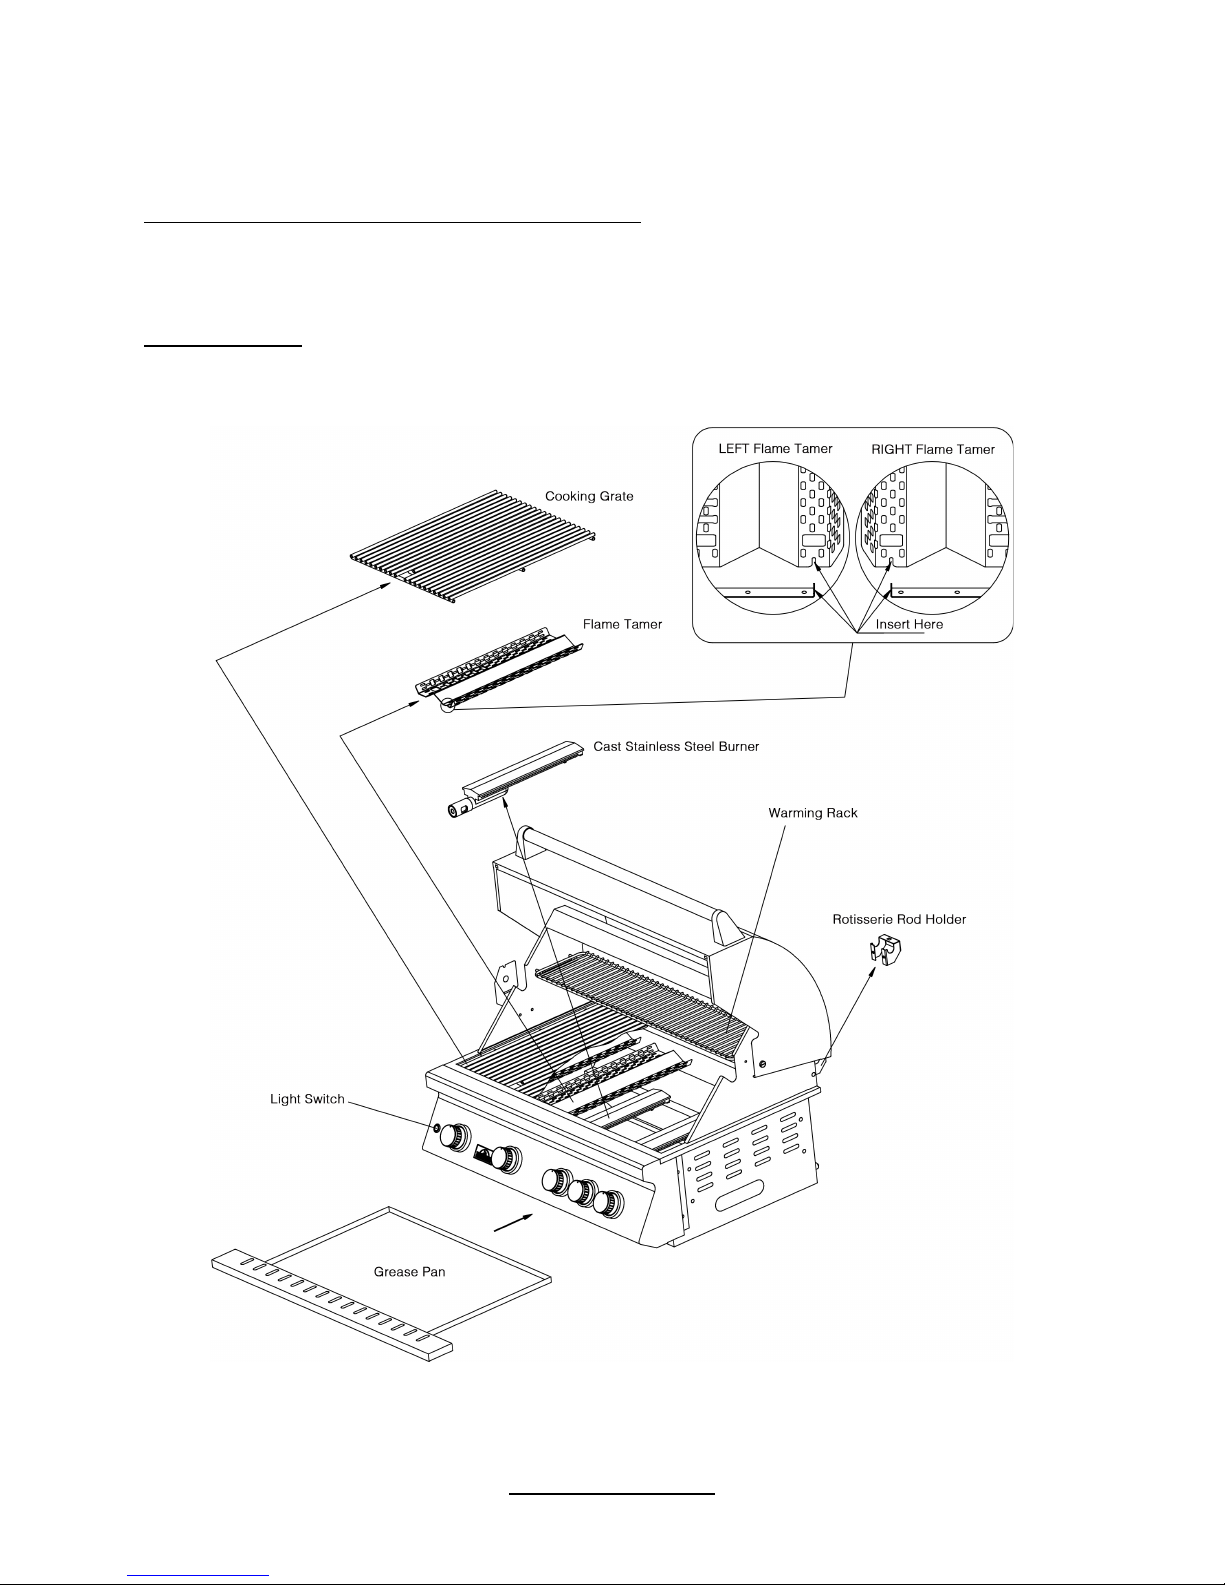
For BONFIRE 3 and BONFIRE 4 Built-In Models
Place the items according to their position and orientation in the diagram below.
Leave pre-installed burners in place to maintain proper alignment.
Warming Rack
The warming rack comes pre-installed. Remove zip ties before use.
Toll Free: (855) 678-0088
bonfireoutdoor.com
5
Page 6
ver.2016 r3
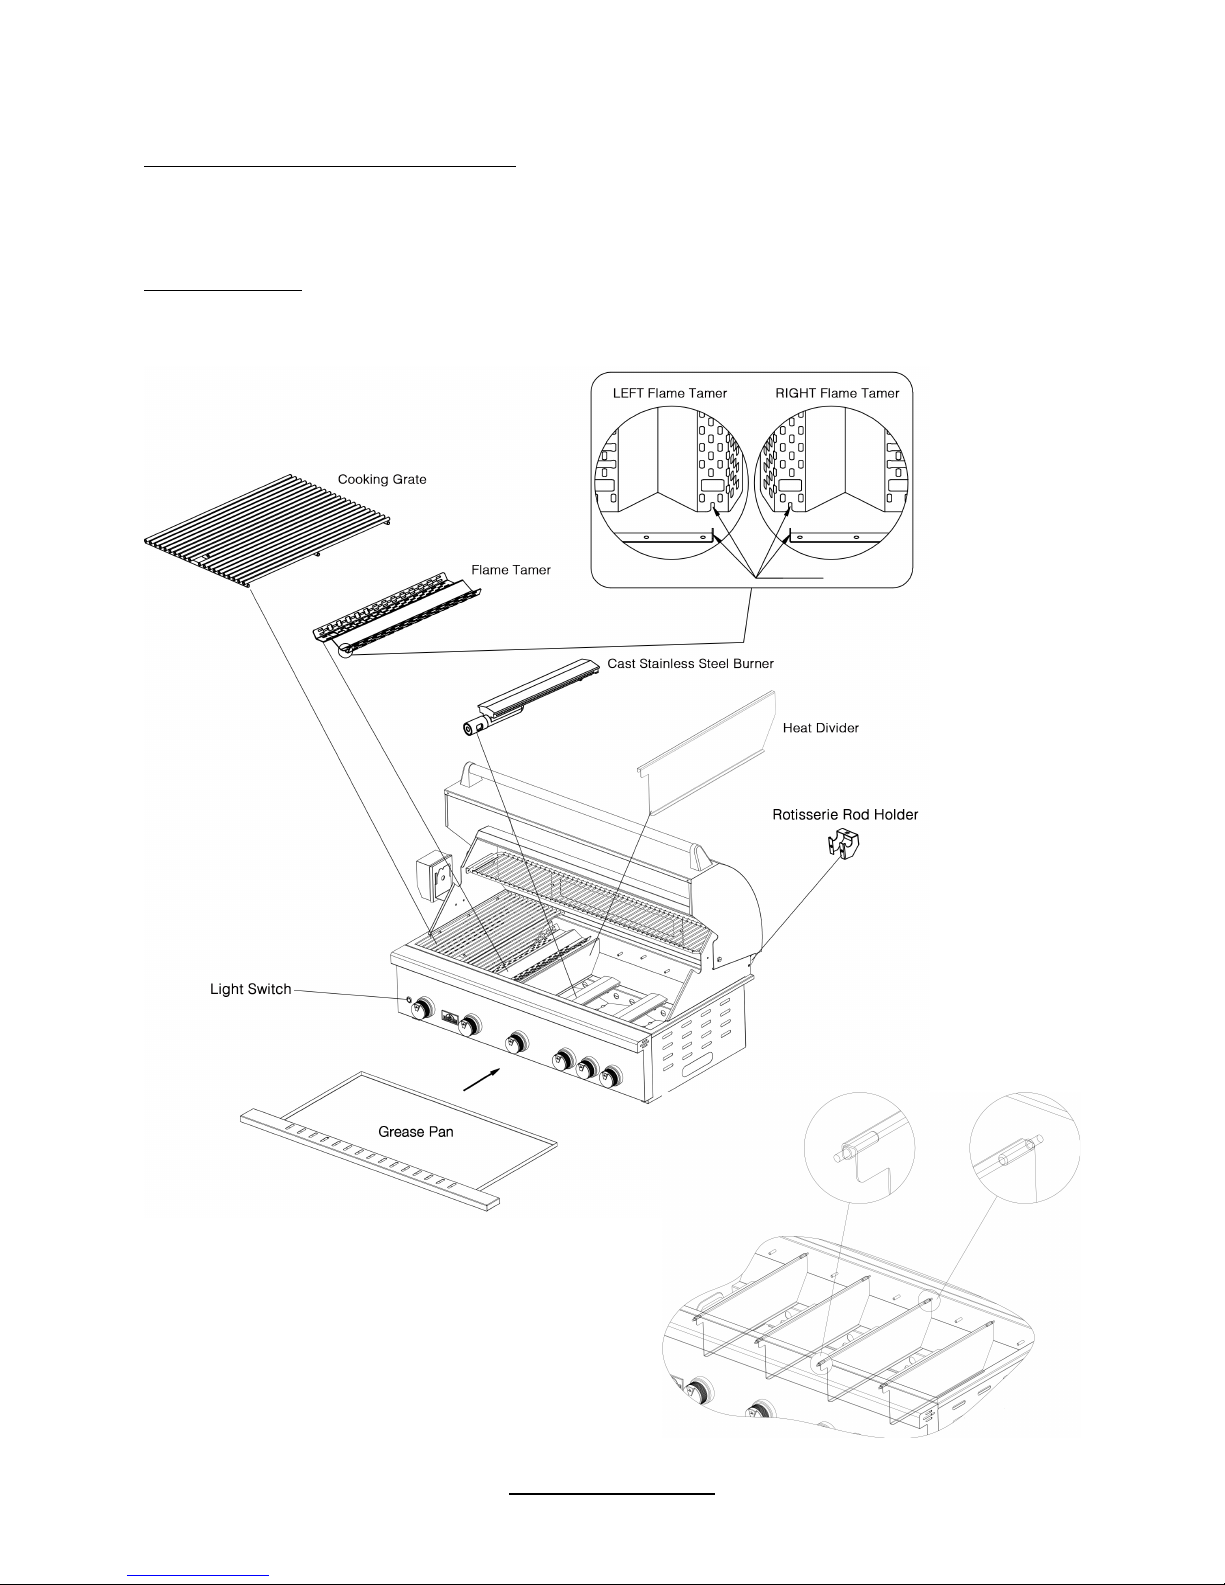
For BONFIRE Prime Built-In Models
Place the items according to their position and orientation in the diagram below.
Leave pre-installed burners in place to maintain proper alignment.
Warming Rack
The warming rack comes pre-installed. Remove zip ties before use.
Toll Free: (855) 678-0088
bonfireoutdoor.com
6
Heat Divider Installation
Page 7
ver.2016 r3
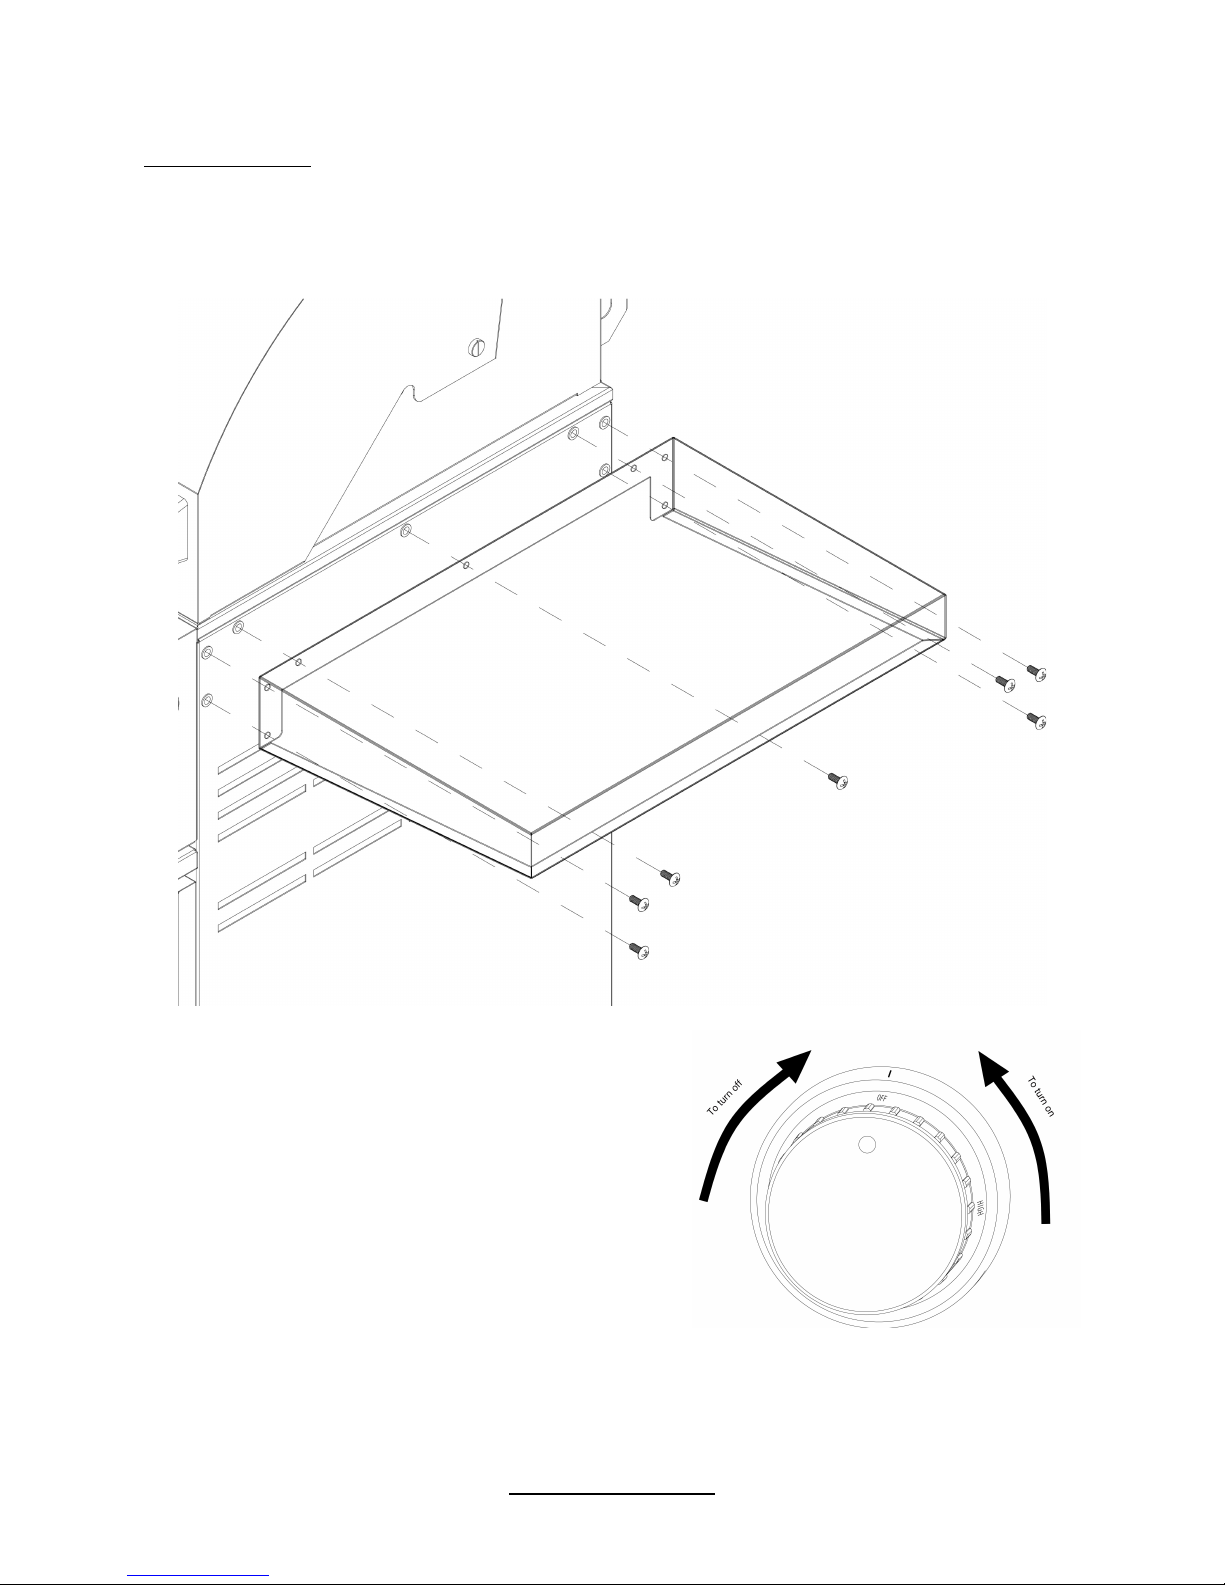
For Cart Models
The cat models come with side tables. Please follow the diagram below for installation of the
side tables.
5 - TEST
1.Open lid.
2.Turn all gas control knob(s) to their OFF position(s).
3.Turn on the gas at its source.
Note: DO NOT turn on more than one valve at a time
for either electronic or manual lighting.
4. Depress the desired control knob, then while
pressing turn it slowly (3-4 seconds for the main
burner and 5-10 seconds for the rear burner)
counterclockwise to the HIGH position (hold it for 5 seconds if lighting the rear burner).
Once the burner lights, release the knob. CAUTION: If a burner does not ignite, depress the
Toll Free: (855) 678-0088
bonfireoutdoor.com
7
Page 8
ver.2016 r3
knob and turn it to the OFF position. WAIT FIVE (5) MINUTES before repeating step 4. If the
burners still do not light after several attempts, refer to the LIGHTING AND OPERATING
INSTRUCTIONS in your grill owner's manual.
Toll Free: (855) 678-0088
bonfireoutdoor.com
8
WARNING:
WHEN OPERATING THIS APPLIANCE WITH PROPANE, ALL INSTRUCTIONS AND
WARNINGS MUST BE OBSERVED. FAILURE TO DO SO MAY RESULT IN A FIRE OR
EXPLOSION CAUSING SERIOUS INJURY OR DEATH.
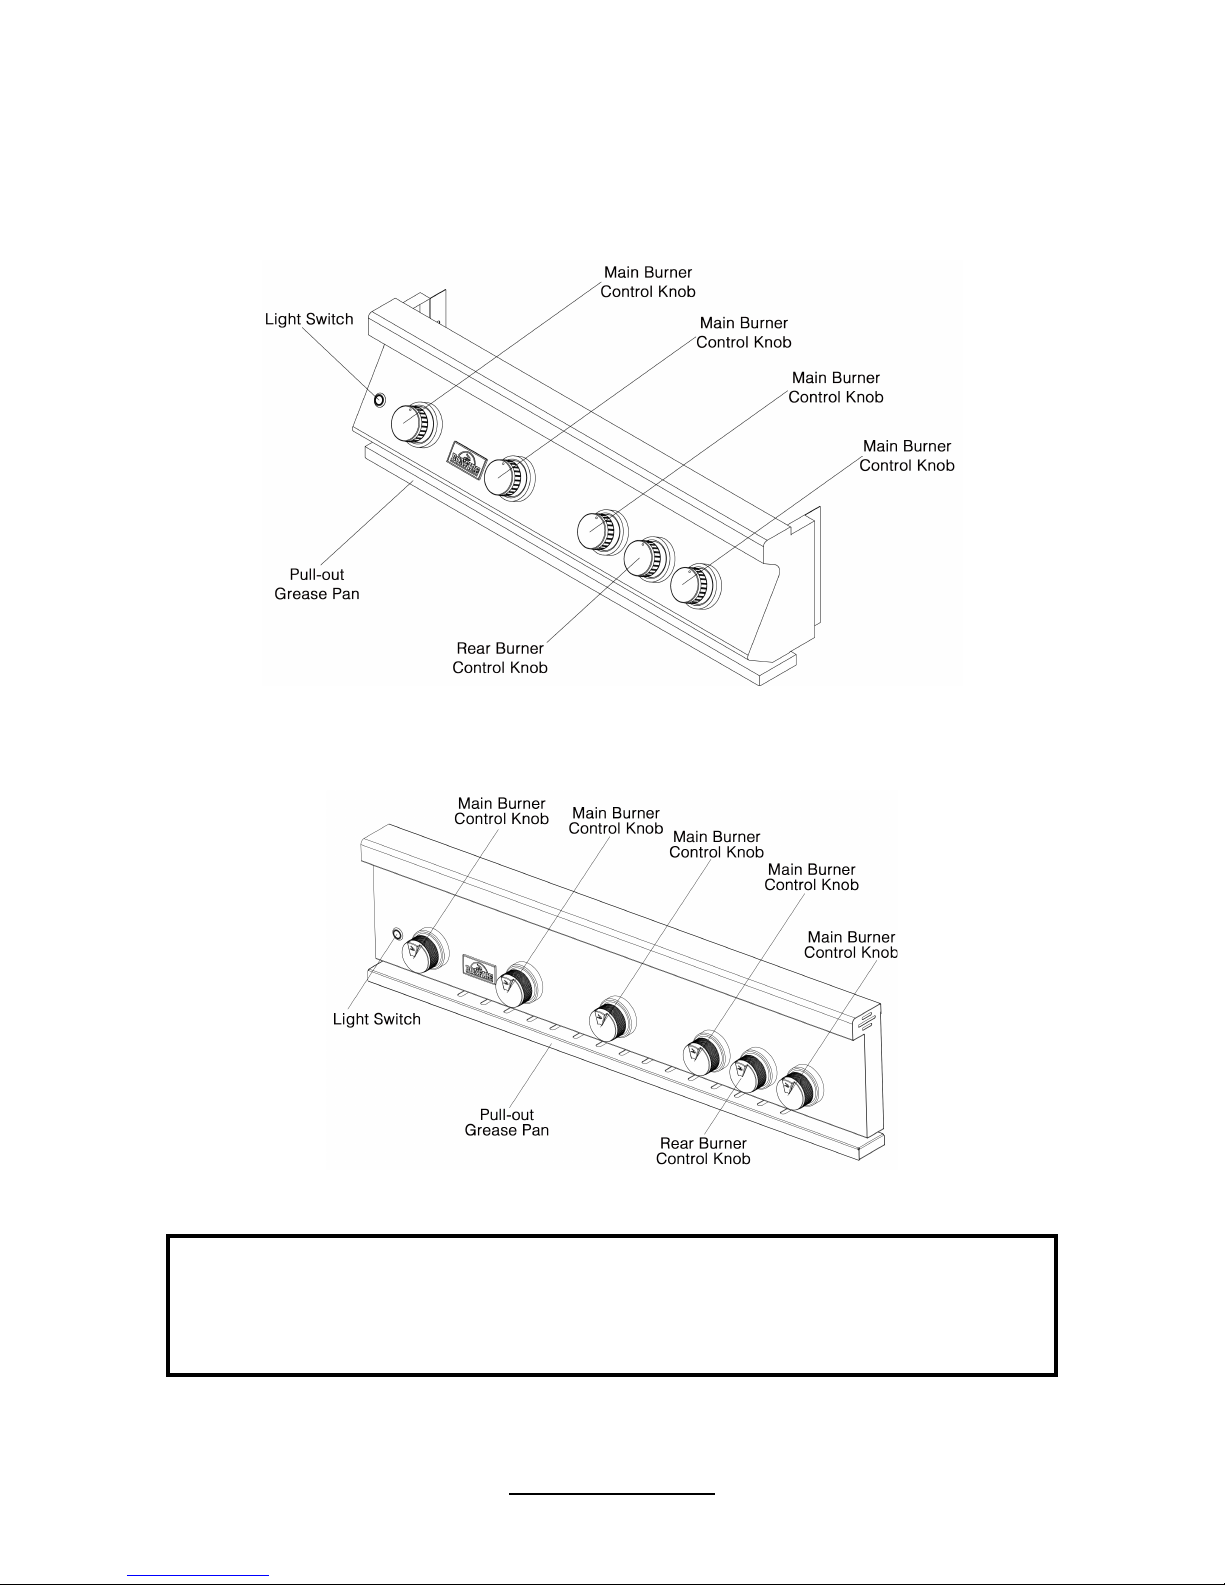
BONFIRE 3 And 4 Control Panel
BONFIRE Prime 500 Control Panel
Page 9

ver.2016 r3
6 - PROPANE SAFETY
FOR PROPANE CONFIGURATIONS; READ ALL SAFETY INSTRUCTIONS AND WARNINGS
REGARDING THE USE OF PROPANE GAS FOUND IN YOUR OWNERS MANUAL.
7 - PACKING LIST
BONFIRE 3
Grill Head x 1
Cast Stainless Steel Burner x 3
Cooking grate x 2
Flame Tamer x 3
Warming Rack x 1
Grease Pan x 1
Rotisserie Kit x 1 set
Motor x 1
Motor Mount Bracket x 1
Left Roller x 1
Spit Fork x 1
Spit Rod x 1
Right Roller x 1
Washer x 2
Counter Balance x 1
Handle x 1
Bracket Screw x 2
Rotisserie Rod Holder x 2
Side Table x 2 (Cart Model Only)
Transformer x 1
LP Regulator x 1
Conversion Nut Driver x 1
Grill Cover x 1
Toll Free: (855) 678-0088
bonfireoutdoor.com
9
Page 10

ver.2016 r3
BONFIRE 4
Grill Head x 1
Cast Stainless Steel Burner x 4
Cooking grate x 2
Flame Tamer x 4
Warming Rack x 1
Grease Pan x 1
Rotisserie Kit x 1 set
Motor x 1
Motor Mount Bracket x 1
Left Roller x 1
Spit Fork x 1
Spit Rod x 1
Right Roller x 1
Washer x 2
Counter Balance x 1
Handle x 1
Bracket Screw x 2
Rotisserie Rod Holder x 2
Side Table x 2 (Cart Model Only)
Transformer x 1
LP Regulator x 1
Conversion Nut Driver x 1
Grill Cover x 1
Toll Free: (855) 678-0088
bonfireoutdoor.com
10
Page 11

ver.2016 r3
BONFIRE Prime 500
Grill Head x 1
Cast Stainless Steel Burner x 5
Cooking grate x 3
Flame Tamer x 5
Heat Divider x 4
Warming Rack x 1
Grease Pan x 1
Rotisserie Kit x 1 set
Motor x 1
Motor Mount Bracket x 1
Left Roller x 1
Spit Fork x 1
Spit Rod x 1
Right Roller x 1
Washer x 2
Counter Balance x 1
Handle x 1
Bracket Screw x 2
Rotisserie Rod Holder x 2
Side Table x 2 (Cart Model Only)
Transformer x 1
LP Regulator x 1
Conversion Nut Driver x 1
Grill Cover x 1
Thank you for choosing BONFIRE!
Toll Free: (855) 678-0088
bonfireoutdoor.com
11
 Loading...