


BONEX-SCOOTER
Instruction for use
INSTRUCTION FOR USE
Version: 2016_08
BONEX-SCOOTER
ECOS
REFERENCE
DISCOVERY
REFERENCE RS
DISCOVERY RS

BONEX-SCOOTER
Instruction for use
Content
1. Safety Instructions .................................................................................... 1
1.1 User Instructions ................................................................................ 1
1.2 To Be Noted ....................................................................................... 1
1.3 Warning Instructions .......................................................................... 3
2. Brief instructions for Bonex-Scooter ......................................................... 4
3. Purpose ..................................................................................................... 6
4. Guarantee ................................................................................................. 7
5. Disclaimer ................................................................................................. 8
6. Technical Data .......................................................................................... 9
7. Technical description .............................................................................. 10
Illustration 7a (Scooter schematic drawing) .......................................... 10
Illustration 7b (Scooter top side) ............................................................ 10
Illustration 7c (Scooter bottom side) ...................................................... 11
8. Starting up............................................................................................... 13
8.1 Proper opening / closing procedure of Bonex-Scooters .................. 14
8.2 Scoter Trim ...................................................................................... 17
8.3 Controls to perform before starting up ............................................. 17
9. Use .......................................................................................................... 20
9.1 Most important points to be mentioned ........................................... 21
9.2 Average performance and range ..................................................... 22
9.2a UNIVERSAL-Model „ECOS“ .......................................................... 22
9.2b „EXPLORER“ Models .................................................................... 23
9.2c „PERFORMANCE“ Models (RS) ................................................... 24
10. Transport and storage .......................................................................... 25
11. Charging the battery ............................................................................. 26
12. Maintenance and care .......................................................................... 27
12.1 Maintenance intervals of Bonex-Scooter ....................................... 27
12.2 Table of performed maintenance................................................... 28
13. Accessories and spare parts ................................................................ 29
13.1a Accessories ................................................................................. 29
13.1b Accessories ................................................................................. 30
13.2 Spare parts .................................................................................... 31
13.3 Blow-up drawing Scooter ............................................................... 32
14. Troubleshooting .................................................................................... 35
15. Declaration of Conformity ................ Fehler! Textmarke nicht definiert.
Version: 2016_08

BONEX-SCOOTER
Instruction for use
1. Safety Instructions
The Bonex-Scooter is a top quality product made in Germany. However,
the product is only as good as can be guaranteed with proper, careful
handling and care of all parts.
We therefore ask you to read the following instructions for use and care of
the scooter carefully.
Please read and understand the instructions for use carefully, before
using your Bonex-Scooter for the first time! (PRTFM ☺)
1.1 User Instructions
Check that the scooter has been assembled properly before
use.
All screw connections and seals must be checked
carefully!
The scooter is pre-charged and ready to use.
However the battery only reaches its maximum capacity
after being charged three or four times!
The scooter must be opened to charge the battery and for
inspection purposes.
It is necessary to remove the Tube complete!
The scooter is fitted with an „ON“ / „OFF“ switch.
However, the connecting cable must be connected to the
battery before first use.
DISCOVERY (RS) with 2 batteries and connecting cables!
The speed of the scooter can be regulated during normal
operation mode by a rotary switch.
Depending on model, the scooter is equipped with an
emergency drive switch.
The emergency drive switch is intended for operating in diving
situations in which normal operation is no longer possible.
In such cases, the driving speed cannot be controlled!
1.2 To Be Noted
Version: 2016_08 Page 1

Batter
y should not be thrown in the domestic waste but
BONEX-SCOOTER
Instruction for use
The scooter has double seals on all shaft openings and
housing seals.
To ensure that the seals seal perfectly, the seals must be
cleaned and greased regularly!
The scooter is supplied with a control voltage after switching
on the main switch. The scooter therefore consumes power
even when the scooter is not in use (approx. 3W).
Make sure that the main switch is turned to „OFF“ after use.
In case of longer transports we strong advise you to
disconnect the plug from the battery.
Failure to do so may lead to a total discharge of battery
over a prolonged time and this can cause irreparable
battery damage!
The scooter must be locked according to the instructions prior
to usage.
The scooter may only be operated closed and with the
silver eccentric locking lever in the folded locked
position!
disposed of separately!
Either return the used battery to the manufacturer (disposal is
free of charge) or take them along to a collection point for
used batteries.
The battery may not be exposed to direct sunlight.
Temperatures below freezing point should also be avoided
during storage.
Heating or very low temperatures reduce the service life
of the battery!
The battery should ideally be stored in a safe, dry place
between 15°C and 20°C.
If you will store the scooter for a prolonged time, keep
the battery partially charged, this will ensure a long
service life of battery!
Version: 2016_08 Page 2

In case any flooding,
stop immediately the driving and
Batter
y may not come into contact with water!
In case of undefined and vague terms of description the
BONEX-SCOOTER
Instruction for use
1.3 Warning Instructions
use. In case of a flooded battery, the battery and the
scooter can burn or explode. This is extremely
dangerous. The extinguishing can only be done with the
fire extinguishing device for lithium batteries.
Do not attempt to drill through battery, disassemble or
expose them to force!
Battery may only be recharged with suitable battery chargers.
Never leave the scooter unattended during charging!
Only operate the scooter in perfect condition!
Defective cables, switches, plugs, power packs, drive
motors or seals must be replaced immediately!
Ensure that persons who use the scooter are instructed on
how to do so.
For a perfect, skilful handling of your scooter we strongly
recommend a proper training course!
When operating, make sure that no part of your equipment is
hanging loose so that it gets caught in the propeller!
When operating do not reach into the rotating propeller!
There is a danger of injury despite the saftey cut off!
instructions mentioned in the „German-Version” of the
„Instruction for use” are binding!
Should the English translation differ from the German
original, the German version is binding!
Version: 2016_08 Page 3

BONEX-SCOOTER
Instruction for use
2. Brief instructions for Bonex-Scooter
1. Read the manual carefully before operating the device!
2. Storage:
Main switch „OFF“ (otherwise total damage of battery is possible!)
Place scooter with “Shroud“ down on flat ground or store it in the
transport box with the label “TOP” on the top.
Place scooter in shadow (sun heats up the interior)!
Remove Tube O-rings before prolonged storage!
Store the battery in partially charged conditions!
(Recharge battery immediately before intended usage)
3. Transport (with parcel service etc.):
Remove battery plug and put safety cap on battery connector!
Check the reliable fit of the battery inside the scooter!
Transport the scooter only in the original transport box or in the
additional transport bag fitted in a carton with foam!
4. Starting up:
Charge battery (or check status with capacitance meter)!
Check the battery connector cable for proper connection to battery!
ATTENTION AT DISCOVERY SERIES THERE ARE 2 BATTERIES!
BOTH BATTERIES HAS TO BE CHARGED AND CONNECTED!
Remove all dirt (hair, dust, greenery, etc.) from the seal seats!
Lightly grease all Tube O-rings!
Lightly grease Tube at both seal seats!
For saltwater use, mount the salt water lead on top of the basic lead!
Mount the Tube with the „Bottom-Sticker” in direction to the shroud
and align it towards the zinc anode!
Wrong mounting of Tube can cause leakage!
Don’t place the scooter in direct sun (Battery can be damaged)!
Version: 2016_08 Page 4

BONEX-SCOOTER
Instruction for use
5. Aftertreatment:
Rinse the scooter completely well after operating in saltwater!
After usage in saltwater remove the propeller and rinse the glide
sealing from the outside!
DO NOT ATTEMPT TO CLEAN GLIDE SEAL MECHANICALY!
Switch „OFF“ scooter on main switch!
Check the inside of the scooter occasionally.
Remove Tube during charging operations!
Charge each battery separately (DISCOVERY series)!
6. Maintenance:
Clean occasionally and wipe the scooter backend with silicon spray!
Check Tube O-rings after 6 month and change them at least once a
year (long storage will cause deformation of the O-rings)!
Once a year grease the shaft of all switches (disassemble the knob)!
Once a year grease the O-rings of the slide sealing!
Once a year grease the O-rings of the shaft inside the nose!
(Lift up the pressure plate)
Exchange all O-rings every two to three years!
Occasionally check or exchange the zinc anode.
Please heed the advice for a smooth run of the scooter and a long joy over
your Bonex-Scooter! This is just a quick check. This does not show the
complete maintenance.
If desired, Bonex will do the service for you.
Version: 2016_08 Page 5

BONEX-SCOOTER
Instruction for use
3. Purpose
The Bonex-Scooter was designed and developed for use under water.
Use on land, or in media other then water, is not an intended use.
Operation in other media can lead to malfunctions or overheating of the
motor and to damage or even destruction of the Bonex-Scooter.
The Bonex-Scooter is designed to pull a diver and his personal and
auxiliary equipment.
The maximum performance values depend on the weight and the
streamlined arrangement of the equipment in the water.
With increased loads the maximal possible drive speed is reduced.
The Bonex-Scooter has been designed for private use.
All kinds of commercial use necessitate special precautions for instruction
and use of the Bonex-Scooter!
Version: 2016_08 Page 6

BONEX-SCOOTER
Instruction for use
4. Guarantee
Under consideration of the following instructions for use and care we
provide the following manufacturer’s guarantee for private users:
We provide a two year guarantee on all housing and control elements
made of aluminium, plastic, carbon and stainless steel.
We provide a 12 month guarantee on all electronic components and
battery.
Sensors, springs, propellers and seals are wearable parts and are
excluded as such from this guarantee.
Intervention in the housing and electronic connections by unauthorised
persons or workshops will lead to voiding of the guarantee.
Defective sealing elements must be replaced immediately.
Bonex will accept no liability for penetration by water (especially salt water)
which is due to defective elements and poor maintenance.
The replacement or exchange of single parts (i.e. battery) does not extend
the guarantee.
Severability Clause:
In case one clause should prove to be or become ineffective or incomplete
these terms and conditions shall remain in legal effect.
Version: 2016_08 Page 7

BONEX-SCOOTER
Instruction for use
5. Disclaimer
The owner is solely responsible for the trouble-free, proper and orderly
operation of the Bonex-Scooter!
Bonex will accept no liability for damage due to improper use of the
scooter. This includes damage to natural banks, jetties and harbours and
diving in private, protected and security areas.
Bonex will not accept liability either for collisions which take place in
restricted visibility conditions or due to failure to observe safety distances.
Liability for personal injury on exceeding the depth limits and failure to
observe surfacing speeds and decompression obligations is also excluded.
Bonex will not be liable for consequential damage resulting from failure to
function or malfunctioning of the Bonex-Scooter.
This includes property damage and personal injury.
Severability Clause:
In case one clause should prove to be or become ineffective or incomplete
these terms and conditions shall remain in legal effect.
Version: 2016_08 Page 8

Model
REFERENCE
BONEX-SCOOTER
Instruction for use
6. Technical Data
Dimensions:
Battery:
Weight:
Battery
weight:
Operating
depth:
Operating
temp.:
Runtime
Max.:
Runtime
Min.:
Range Max.:
ECOS ECOS Plus ECOS S
Ø 223/300
L 600 mm
25,2 V
1x Akku
15 kg 15 kg 15 kg 19 kg
3,2 kg 3,2 kg 3,2 kg 5,6 kg
120 / 200 m* 200 m 200 m 200 m 150 / 200 m*
0° - 40°C 0° - 40°C 0° - 40°C 0° - 40°C
200 min 200 min 200 min 210 min
110 min 100 min 90 min 105 min
8 km 8 km 8 km 9 km
Ø 223/300
L 600 mm
25,2 V
1x Akku
Ø 223/300
L 600 mm
25,2 V
1x Akku
RS
Ø 218/300
L 690 mm
43,2 V
1x Akku
DISCOVERY
RS
Ø 218/300
L 850 mm
43,2 V
2x Akku
25 kg
11,2 kg
0° - 40°C
420 min
210 min
18 km
Thrust Max.:
Speed Max.:
Trim:
Charger:
Charging
time:
*
Standard Tube operating depth 120 / 150 m, 200 m Tube as optional order!
220 N 260 N 270 N 330 N
60 m/min 67 m/min 70 m/min 85 m/min
neutral neutral neutral neutral
230V-50Hz
110V-60Hz
4-5 hrs. 4-5 hrs. 4-5 hrs. 4 hrs.
230V-50Hz
110V-60Hz
230V-50Hz
110V-60Hz
230V-50Hz
110V-60Hz
330 N
85 m/min
neutral
230V-50Hz
110V-60Hz
8 hrs.
Version: 2016_08 Page 9

Emergency drive
-
switch
Emergency drive
switch
BONEX-SCOOTER
Instruction for use
7. Technical description
Illustration 7a (Scooter schematic drawing)
Scooter nose
System handle
Battery
(2X at DISCOVERY series!)
Stop ring
(Battery fixation)
Connecting rod
Tube
Motor
Main switch
(ECOS with 5 speed steps)
Zinc anode
Cross member
Tow cord fixation point
(NOT at ECOS)
Round handle
Version: 2016_08 Page 10
Drive switch (Trigger)
Main switch
Speed governor
(NOT at ECOS)
(NOT at ECOS)
Propeller
Shroud

BONEX-SCOOTER
Instruction for use
Version: 2016_08 Page 11

BONEX-SCOOTER
Instruction for use
Version: 2016_08 Page 12

BONEX-SCOOTER
Instruction for use
8. Starting up
The Bonex-Scooter is prepared for starting already prior to delivery.
The battery is charged and the scooter is parameterized with the latest
software.
On manufacture, the scooter is subjected to a function and pressure test.
Before using for the first time, remove the scooter from the transport
packaging.
Please keep the original transport packaging for further usage (return of
scooter in case of maintenance / repair)!
Open the scooter at the silver eccentric lever.
To do this, set down the scooter with the jet on a level surface and pull the
lever up so that it is pointing vertically upwards, turn it 90° and pull out
completely.
To pull off the nose, fix the scooter on the jet with one foot to obtain
sufficient holding force.
The nose can then be pulled up and off together with the lock.
Hold the Tube tight with both hands and also pull this up.
NOSE CLOSED NOSE OPEN
Below you will find an illustrated instruction for proper „Opening“ and
„Closing“ procedure of Bonex-Scooters.
Version: 2016_08 Page 13

in alignment are
silver eccentric lever to left or right
:
red dot
sort of
one hand at the
the other hand at the
sufficient
Now you can lift he nose
BONEX-SCOOTER
Instruction for use
8.1 Proper opening / closing procedure of Bonex-Scooters
Closed state of scooter in „Nose view”
Lift the silver eccentric lever up to complete
vertical position.
Now two red dots arranged
visible.
Turn the
side for 90°.
Now the two red dots lose their alignment
One stays fix at 6 a clock, the inner
moves right to 3 a clock or alternative left at
9 a clock.
Version: 2016_08 Page 14
Now lift the silver eccentric lever complete.
Performing this way you can hear a
„venting noise“.
Now you are able to pull off the nose.
For removing the nose put
silver eccentric lever
system handle and one foot on the shroud,
fixing the scooter for obtaining a
holding force.
straight upwards.

,
the smear layer and you need an
has
normally
is
nose
must be aligned downwards in
BONEX-SCOOTER
Instruction for use
View of scooter with nose removed.
If Tube has not been removed for a longer
time it is possible that the two O-ring
displace
intensified force to remove the Tube.
In case of this, use the proper fixed „TubeRemover“ as shown in the picture.
View of the lower Tube edge after Tube
been lifted slightly.
You will find the „Bottom-Sticker”
at the inner surface of the Tube and it
aligned to the zinc anode.
Version: 2016_08 Page 15
View of the scooter after removing the
and the Tube
Inner view of the Tube with the „BottomSticker“ at lower edge.
This edge
direction to the propeller.
It is advised to align the „Bottom-Sticker“
towards the zinc anode.

ube pay attention to the
Push
refit
the system handle must be
the red dot on the
sure plate must be aligned to a position
uring this procedure the second red dot
Push the silver eccentric lever downwards
During this procedure the lever is orientated
e
until the two red
To do so, the lever must be aligned into a
lever
contact to the
### NEVER USE EXTREME FORCE TO
BONEX-SCOOTER
Instruction for use
When refitting the T
correct position of the “Logo-Signs”.
the nose with slight force downwards to
it to the scooter.
To do this way,
aligned to the drive switch (trigger).
To close the nose,
pres
at 3 a clock or a position at 9 a clock.
D
remains at 6 a clock.
until it gets in contact to the pressure plate.
backwards.
Now turn the silver eccentric lever to th
right or the left side for 90°,
dots are aligned again.
complete vertical position.
At least force the silver eccentric
downwards until it becomes
nose surface.
The scooter is now closed.
CLOSE THE SCOOTER ###
If necessary control complete mounting!
Version: 2016_08 Page 16
BONEX-SCOOTER
Instruction for use
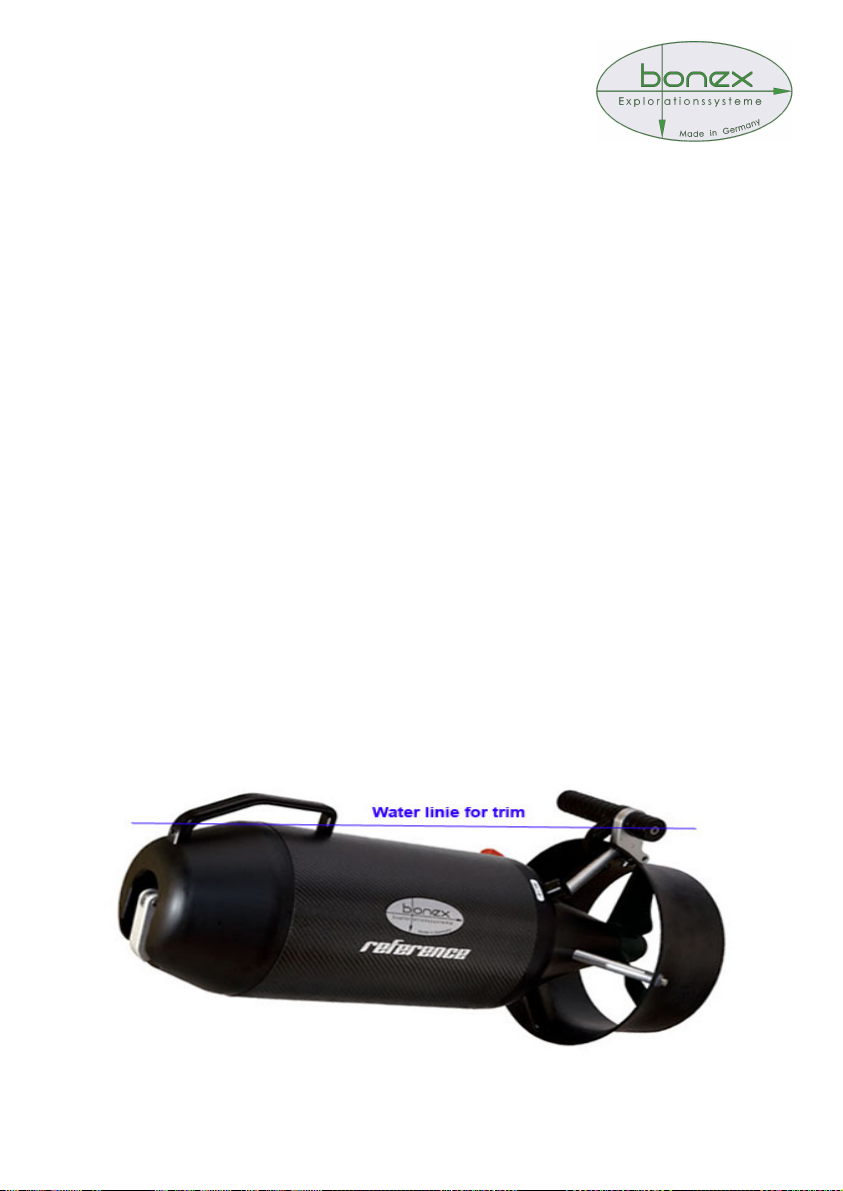
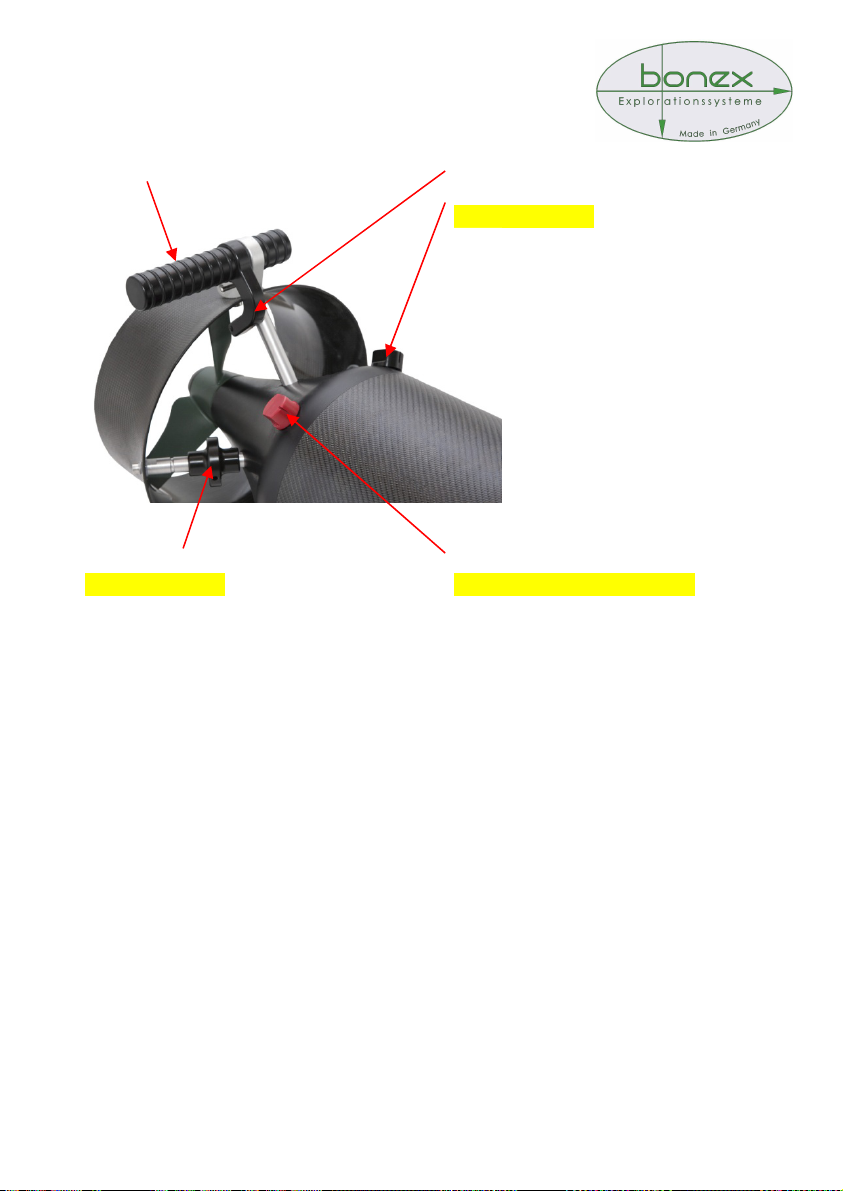
8.2 Scooter Trim:
For using our scooters in saltwater, please use the additional lead balance
weights as follows:
For determination of the needed quantity of lead, please put your scooter
into saltwater and put some of the big lead (thin and/or thick) on the front
of the tube. Only until the tube of the scooter is under water. For a slight
positive trim, the system handle should stay outside of the water.
Please repeat this with the back/bottom of the scooter – put here the small
lead onto the shroud. The main handle should stay half outside of
the water (as you can see in the attached picture).
Now you know the exact amount of lead to be added. Now take your
scooter out of the water, dry it, open the scooter and screw the big front
lead plates into the nose and the rear lead onto the motor bracket.
Please, keep attention, that the lead will only be added on top of the inside
existing lead.
For the assembling please use an Allen key with ball button, so as not to
damage the screws.
For military use, it might be necessary to trim the scooter negative. In this
case, add more lead.
Version: 2016_08 Page 17

BONEX-SCOOTER
Instruction for use
8.3 Controls to perform before starting up
Ensure that the power pack is sitting tight and connect the battery plug. The
battery plug only fits in one position so that the union nut also engages.
Screw the union nut of the battery plug to the end of its thread so that the
plug is also tight.
Make sure that the cable is laid without twisting and in one loop upwards.
Look at Illustration 7b (Scooter top side) page 11.
(ATTENTION: DISCOVERY series owns 2 battery connectors)
Make sure that all balancing weights are firmly in place and no loose parts
fall around in the scooter. Check visually that all the cable plugs are tight
and the cables are not damaged.
Check the firm fitting of the battery pack(s).
Grease the sealing rings and the inside edge of the Tube lightly with
silicone grease. Push the Tube downwards („Bottom-Sticker“ must be
aligned towards the zinc anode) until it came in contact to the housing.
Please act in same procedure with scooter nose. In the nose there are two
center poles to be aligned to the traverse. Please note that the scooter
housing cannot be closed correctly if the center poles in the nose are not
aligned in correct position and the tube isn´t assembled in the right
direction. While mounting the nose the System handle has to be on the
opposite side of the zinc anode!
Hold the silver eccentric lever up when setting down the nose and push the
nose in up to the mechanical stop.
To close the nose, the red dot on the pressure plate must be aligned to a
position at 3 a clock or a position at 9 a clock. During this procedure the
second red dot remains at 6 a clock. Push the silver eccentric lever
downwards until it gets in contact to the pressure plate. Now turn the silver
eccentric lever to the right or the left side for 90°, until the two red dots are
aligned again. At least force the silver eccentric lever downwards until it
becomes contact to the nose surface.
NEVER USE EXTREME FORCE TO CLOSE THE SCOOTER
If necessary control complete mounting procedure!
At the delivery the scooter is trimmed a little bit positive (approx. 50gr). If
you assemble additional gear at the scooter, it could become necessary to
trim it again. Also you have to trim the scooter again if you intend to use it
in saltwater. For this option you can add some additional balance weights
inside the scooter nose and in the back tail underneath the screws. Optimal
trim is reached if front system handle is approx. 25mm outside water and
round handle at tail is approx. 15mm outside water surface. Please take
care that the flattened lead plate inside the nose are assembled at last!
Version: 2016_08 Page 18
BONEX-SCOOTER
Instruction for use
Round handle Drive switch (Trigger)
Speed governor
(NOT at ECOS)
Abb.: 8a
Emergency drive switch Main switch
(NOT at ECOS) (ECOS with 5 speed steps)
The Bonex-Scooter is now ready for operation.
To check the correct function, place the scooter on a flat surface and
secure it against accidentally rolling away. Switch the main switch to „ON“.
to get scooter ready for operation. In models with two separate battery
packs (DISCOVERY series) the respective pack can be activated by
turning the main switch in position 1 | 2. The position in the middle is means
„OFF”. The propeller starts to turn when you activate the drive switch. The
revs of the prop and therefore the pulling speed can be varied by adjusting
the speed governor. When the mark on the governor switch is at 12 a clock
you reach a pull speed of approx. 60%. The main switch of the ECOS
model also functions as a five speed step switch. After releasing the drive
switch press the emergency drive switch by pushing the round piece to its
outer rest position. When performing this way the propeller turns at a
constant speed. Now push the emergency drive switch back to its initial
position. The model ECOS is not equipped with this option. You can
choose the speed on the central knob in five positions.
The scooter has now been tested again for all functions and is ready to go.
Schalten Sie den Hauptschalter wieder in die Stellung „OFF“.
In case off malfunctions or failure occur please proceed as described in
chapter (14. Troubleshooting) at page 355.
Version: 2016_08 Page 19

BONEX-SCOOTER
Instruction for use
9. Use
You should use a backplate with harness and crotch belt for riding the
scooter. When using an ADV or stabilizing jacket you can attach a crotch
strap additionally to your lead belt, or use a separate waist belt with crotch
strap while using a lead-integrated jacket.
Prepare your equipment as for a normal dive. Make sure to attach or place
loose objects such as inflator pipes, reels, knives, lamps etc. so that they
cannot get caught in the propeller during operation!
Make sure that pipes and cables are laid close to the body because
protruding parts can increase the resistance and flap during riding!
Make your first test runs under expert supervision. Reduce your equipment
to a minimum and increase the objects you will need for your dives
gradually from trip to trip!
Important: These short instructions are NO REPLACEMENTS for a
professional practical course!
On the first run fasten your items of equipment such as computer, watch,
depth gauge and lamp so that you can operate the scooter with your right
hand. Connect the tow cord with the bolt snap on the ring of the crotch belt.
The pull of the scooter should pull the diver with the tow cord by means of
the D-ring. You therefore need little strength to steer the scooter.
During the first test runs try to keep your right arm slightly bent on the
round handle whilst being pulled. You can now operate the drive switch
with your thumb. You can also steer with your left hand on the handle stub
to the left of the drive switch to take the strain off your right arm during long
trips.
Set the speed regulator to a medium speed for the first run.
The scooter should pull you exactly horizontally in a balanced state.
This can be adjusted with the positioning of the bolt snap on the tow cord.
If the scooter pulls UP, the UPPER TOW CORD must be extended.
If the scooter pulls DOWN the LOWER TOW CORD must be extended.
In both cases you can also shorten the opposite site of tow cord!
If necessary you can also adjust the lead amount for trimming the
Bonex-Scooter.
Version: 2016_08 Page 20

BONEX-SCOOTER
Instruction for use
9.1 Most important points to be mentioned
Increase your speed gradually. Make sure that the use of electric powered
scooters is not prohibited in the waters you are using. Look out for other
divers or swimmers. When using the scooter near to marine and wildlife
sanctuaries, be careful to keep a good distance to avoid entering these
areas under water.
Please bear in mind that while operating a scooter much greater distances
can be covered. This circumstance has to be taken into account in your
range planning and gas logistics too.
Make sure you stay a safe distance from the bottom and note that the
water jet can whirl up sediment which can considerably restrict visibility
under some circumstances. If you use the scooter in caves or wrecks we
strongly recommend the appropriate training or courses!
Secure your retreat with a buddy with a scooter or a back-up scooter. Also
bear in mind that additional equipment slows down the scooter and may
reduce your range.
Scooters in buddy formation
Version: 2016_08 Page 21

BONEX-SCOOTER
Instruction for use
9.2 Average performance and range
9.2a UNIVERSAL-Model „ECOS“
ECOS Slow Medium Fast
Little equipment
Speed: 45 m / min 53 m / min 60 m / min
Run time: 200 min 150 min 110 min
Range: 8-9 km 8 km 6,6 km
Double unit with 1-2 stages
Speed: 45 m / min 50 m / min 55 m / min
Run time: 170 min 140 min 110 min
Range: 7,6 km 7 km 6 km
Heavy equipment or towing
Speed: 40 m / min 45 m / min 50 m / min
Run time: 140 min 110 min 100 min
Range: 5,6 km 4,9 km 5 km
ECOS + Slow Medium Fast
Little equipment
Speed: 45 m / min 53 m / min 60 m / min
Run time: 200 min 150 min 100 min
Range: 8-9 km 8 km 6 km
Double unit with 1-2 stages
Speed: 45 m / min 50 m / min 55 m / min
Run time: 170 min 140 min 100 min
Range: 7,6 km 7 km 5,5 km
Heavy equipment or towing
Speed: 40 m / min 45 m / min 50 m / min
Run time: 140 min 110 min 90 min
Range: 5,6 km 4,9 km 4,5 km
Version: 2016_08 Page 22

BONEX-SCOOTER
Instruction for use
ECOS S Slow Medium Fast
Little equipment
Speed: 45 m / min 53 m / min 60 m / min
Run time: 200 min 150 min 90min
Range: 8-9 km 8 km 5,4 km
Double unit with 1-2 stages
Speed: 45 m / min 50 m / min 55 m / min
Run time: 170 min 140 min 90 min
Range: 7,6 km 7 km 5 km
Heavy equipment or towing
Speed: 40 m / min 45 m / min 50 m / min
Run time: 140 min 110 min 80 min
Range: 5,6 km 4,9 km 4 km
9.2b „EXPLORER“ Models
No longer in program
Version: 2016_08 Page 23

BONEX-SCOOTER
Instruction for use
9.2c „PERFORMANCE“ Models (RS)
REFERENCE RS Langsam Mittel Schnell
Little equipment
Speed: 45 m / min 60 m / min 85 m / min
Run time: 210 min 150 min 105 min
Range: 9,4 km 9,0 km 8,9 km
Double unit with 1-2 stages
Speed: 45 m / min 55 m / min 70 m / min
Run time: 200 min 140 min 105 min
Range: 9,0 km 7,7 km 7,3 km
Heavy equipment or towing
Speed: 40 m / min 50 m / min 55 m / min
Run time: 160 min 125 min 95 min
Range: 6,4 km 6,2 km 5,2 km
DISCOVERY RS Langsam Mittel Schnell
Little equipment
Speed: 45 m / min 60 m /min 85 m / min
Run time: 420 min 300 min 210 min
Range: 18,8 km 18,0 km 17,8 km
Double unit with 1-2 stages
Speed: 45 m / min 55 m / min 70 m / min
Run time: 400 min 280 min 210 min
Range: 18,0 km 15,4 km 14,6 km
Heavy equipment or towing
Speed: 40 m / min 50 m / min 55 m / min
Run time: 320 min 250 min 190 min
Range: 12,8 km 12,4 km 10,5km
Version: 2016_08 Page 24

BONEX-SCOOTER
Instruction for use
10. Transport and storage
The battery should be disconnected from the scooter at the plug for storage
and transport. This also prevents the scooter from being accidentally
switched on.
This is absolutely essential for transport by courier or parcel service.
Always put the box straight up if stored or transport it in a transportation
box. The label TOP must stay at the top or rather the scooter should stand
inside the box on his shroud.
A transport backpack is available as an option for safe transport. The
scooter is centred at the front and rear and bedded in foam padding. It is
therefore optimally protected against knocks and bumps.
If extreme external influences are to be feared, the battery and the charger
should be removed and stored separately.
A carton should be used for additional outer protection if the scooter is
transported by a parcel service or courier.
Please observe the valid regulations regarding the transport.
You should dry the scooter thoroughly before opening after use. Open the
scooter after every dive to remove dirt and any moisture which may have
penetrated. Water can lead to corrosion spots on aluminium surfaces which
can be avoided if they are removed immediately. Keep your scooter in a
safe, dry place. It should be stood on the jet. The silver eccentric lever
should be left in the open position during longer periods of storage.
The battery should be tested after long breaks. Pay attention to formation
of corrosion or oxidation on the power pack. A white coating may be an
indication of defective cells. If the power pack does not work perfectly after
restarting, it must be sent to the manufacturer for inspection.
Store the battery at a save place at approx. 15°C – 20°C.
If you intend to store the scooter for a prolonged time (> 4 weeks), store
the battery in partially charged conditions! Recharge battery immediately
before intended usage. You should also remove the Tube O-rings before
prolonged storage. Store the O-rings in a bag inside of the scooter.
Attention: Keep in mind to reinstate the O-rings before intended usage!
Risk of damage due to inrush of water!
Version: 2016_08 Page 25

BONEX-SCOOTER
Instruction for use
11. Charging the battery
Only use the Bonex-Scooter charger to charge the battery!
Always remove the tube during charging!
Disconnect the battery from the battery plug with the plug system.
Connect the charger to the power supply before you switch it on (switch at
backside) LED_1 red (Voltage ready); LED_2 green (Charger ready to
charge), now connect the charger plug with battery connector. LED_2 light
changes green to red and indicates start of charging. Charging procedure
is finished when LED_2 lights green.
The connection can be operated in Europe on the 230V DC mains or in
other countries with 110V.
The charging time may increase under such conditions.
Standard-Charger for ECOS models – 110 / 230V charger switches
automatically
The charger has 1 diode (red / green).
The diode lights „RED“ when charging starts.
Afterwards the diode changes to „GREEN“. Charging is complete.
QCS Quick-Charger – 110 / 230V
The charger has 2 diodes (red and red / green).
1. diode lights „RED“ when charger is connected to the power supply and /
or charger is connected to battery.
2. diode lights „RED“ when the main switch of the charger is on and
charger operates.
2. diode lights „GREEN“ when charging is complete.
During the charging process the vent in the charger will operate all time.
Do not cover the charger during the charging process!
The charger serves exclusively for charging lithium-ion batteries!
Charger cannot be used to charge a lead gel, NiCd or NiMh battery!
Never leave the scooter unattended during charging!
In the event of excessive heating of the battery pull out the main plug,
disconnect battery from charger and contact the manufacturer!
Version: 2016_08 Page 26

To be
BONEX-SCOOTER
Instruction for use
12. Maintenance and care
Rinse the scooter with fresh water after every dive, especially after using it
in salt water or brackish water. The outside of the scooter can be cleaned
with mild soapy water. A toothbrush can also be used to get into
inaccessible places. After being used several times the aluminium housing
should be sprayed with a thin viscous silicone spray. This closes the fine
pores and protects against dirt and corrosion.
The propeller should be removed after using in salt water. While watching
from shroud side, turn the prop nut clockwise to release it. Wash the
propeller and drive shaft with fresh water and spray with a silicone spray.
After longer use, the spring of the sliding ring seal should be removed and
its O-rings greased.
12.1 Maintenance intervals of Bonex-Scooter
Maintenance point Interval
Oil housing with silicone Occasionally Diver
Visually inspect battery and cable Before every dive Diver
Oil rotary switch Occasionally Diver
Change housing O-rings Annually Diver
Change scooter nose O-rings Every 2 years Diver
Change O-rings axles / shaft Every 2 years Diver
Change sliding ring seal Every 5 years Diver
Change pressure disk As required Diver
Check cable for breaks Annually Diver
Check propeller for wear Occasionally Diver
Check housing for wear Occasionally Diver
Renew battery Appr. 500–1000 cycles
Performance upgrade
(Motor performance curve)
Pressure and performance test All 2 years Bonex
Version: 2016_08 Page 27
As required Bonex
done by
Diver

BONEX-SCOOTER
Instruction for use
12.2 Table of performed maintenance
Wartung Date Date Date Date
Oil housing with silicone
Check battery and cable
Oil rotary switch
Change housing O-rings
Change scooter nose O-rings
Change O-rings axles / shaft
Change sliding ring seal
Change pressure disk
Check cable for breaks
Check propeller for wear
Check housing for wear
Renew battery
Performance upgrade
(Motor performance curve)
Pressure and performance test
Notes:
__________________________________________
__________________________________________
__________________________________________
__________________________________________
__________________________________________
__________________________________________
__________________________________________
__________________________________________
__________________________________________
Version: 2016_08 Page 28

Arti
cle Arti
cle-No.
BONEX-SCOOTER
Instruction for use
13. Accessories and spare parts
13.1a Accessories
Spare battery ECOS LiMn SC-710
Spare battery REFERENCE, DISCOVERY (RS) LiMn SC-705-2
System handle SC-501
Round handle extension “Left-Side” SC-514
Standard-Charger ECOS SC-504
QCS-Charger REFERENCE, DISCOVERY (RS) SC-506
Capacitance meter SC-513
Transport case (Special order only)
Transport bag SC-510
Transport cradle Sc-516
Navigation unit (Compass + Bottom timer) SC-509
Hip belt with crotch strap SC-508
Torque Control SC-512
Saltwater lead for nose and stern SC-511
Video mounting for GoPro© camera SC-517
Version: 2016_08 Page 29

Arti
cle Arti
cle-No.
BONEX-SCOOTER
Instruction for use
13.1b Accessories
Spare parts - Travel SC-701
Spare parts - Maintenance SC-708
Maintenance fluids SC-709
O-ring Tube ET-00120
Standard propeller SC-702
Propeller 5 Blades (THRUST) SC-706
Propeller 3 Blades (SPEED) SC-707
Upgrade set REFERENCE (RS) > DISCOVERY (RS) SC-205
Upgrade set DISCOVERY (RS) > REFERENCE (RS) SC-207
Bonex ECOS Scooter - Set SC-007
Bonex REFERENCE Scooter - Set SC-002
Bonex REFERENCE RS Scooter - Set
SC-003
Bonex DISCOVERY Scooter - Set SC-005
Bonex DISCOVERY RS Scooter - Set
Performance upgrade
(Motor performance curve)
SC-801
SC-006
Version: 2016_08 Page 30

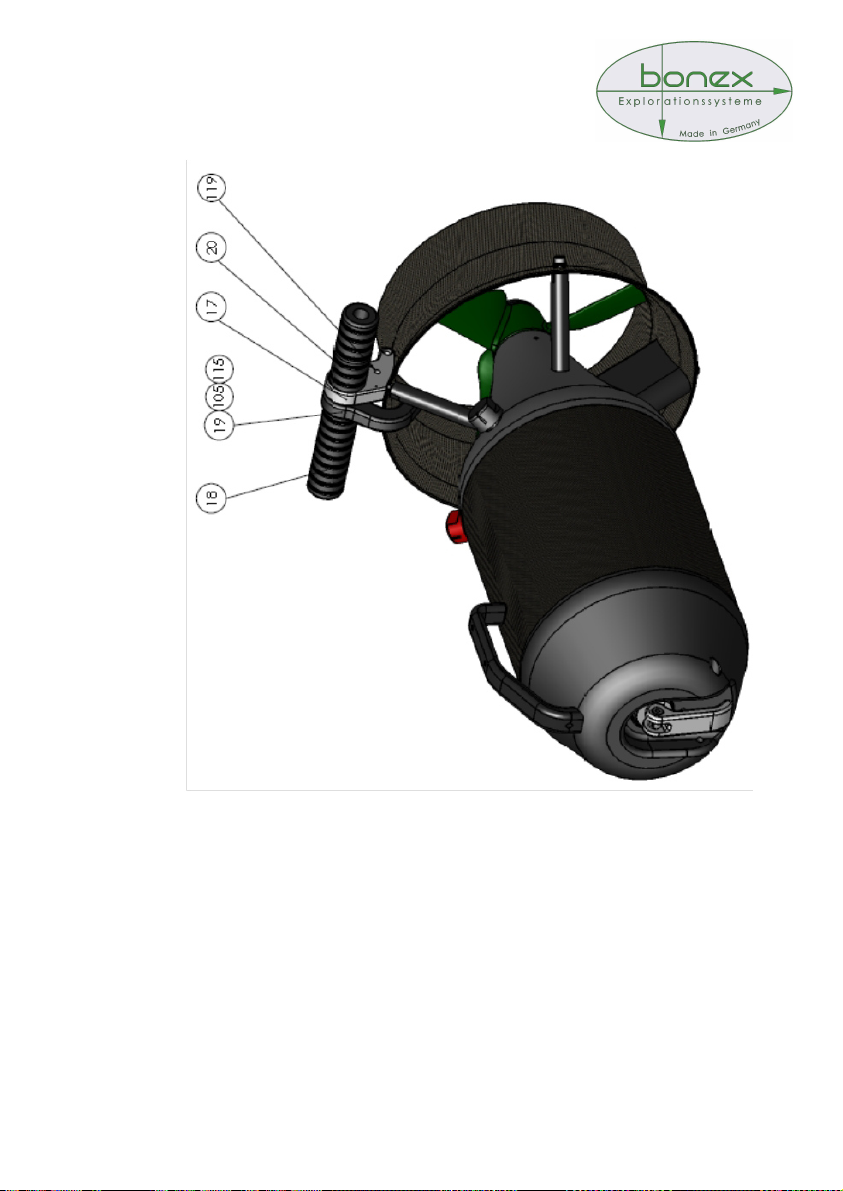
Pos.
Count
Name
Order n
umber
BONEX-SCOOTER
Instruction for use
13.2 Spare parts
2 1 Zinc anode 11-11009
8 1 Locking screw 11-11007
10 1 Propeller 11-13003 / -13007
28 1 Pressure disc 19-41006
101 1 Synchronous motor; 48V
102 1 Sliding ring seal; D=12mm
103 1 Grooved ball bearing; D=15mm
104 2 Reed sensor; D=6mm
105 2 Magnet; D=6mm;
106 1 Speed governor;
107 1 Mainswitch unit;
108 2 Power plug; 4-pole
111 1 Control plug; 12-pole
114 1 Pressure piece M8
115 1 Arm spring 11-31004
118 1 Locating pin; D=3mm;
119 1 Locating pin; D=5mm;
120 1 Eyebolt; M=6;
121 8 Polyamid washers; M=6mm
122-1
122-2
123 4 O-ring; D=12 x 2,5mm
124 4 O-ring; D=12 x 2,5mm
125 4 O-ring; D=6 x 1,5mm
126 12 O-ring; D=25 x 3,0mm
127 1 O-ring; D=18 x 3,0mm
128 1 O-ring; D=15 x 3,0mm
131 4 Stop ring; D=15mm
2 O-ring; D=190 x 5,3mm
2 O-ring; D=190 x 4,0mm
Version: 2016_08 Page 31

BONEX-SCOOTER
Instruction for use
13.3 Blow-up drawing Scooter
Version: 2016_08 Page 32

BONEX-SCOOTER
Instruction for use
Version: 2016_08 Page 33
BONEX-SCOOTER
Instruction for use
Version: 2016_08 Page 34

s does
BONEX-SCOOTER
Instruction for use
14. Troubleshooting
In case of malfunctions or failure, the table below presents a list of the most
typical problems.
Fault Cause of failure Remedy
>Battery plug not connected >Connect
>Battery empty >Recharge battery
>Main switch „OFF” >Switch main switch to „ON”
Scooter does not
operate
>Magnet of drive switch is missing >Glue a new magnet
Speed governor
does not work
Emergency drive
switch does not work
Scooter immediately
starts after switching
main switch „ON”
Drive immediately
stops again after
starting
Charger diode
not light
Inrush of water
>Fuse defective >Replace fuse
>Reed sensor defective >Replace reed sensor
>Main switch defective >Replace main switch unit
>Cable break >Replace cable / switch unit
>Motor defective >Return to manufacturer
>Speed governor defective >Replace speed governor unit
>Emergency drive switch activated >Deactivate emergency switch
>Reed sensor defective >Replace reed sensor
>Magnet removed from round piece >Stick magnet in round piece
>Emergency drive switch activated >Deactivate emergency switch
>Drive switch (Trigger) pressed >Release drive switch
>Torque control >Switch „OFF” and „ON”
>Temperature controlg >Switch „OFF” and „ON”
>Battery voltage too low >Recharge battery
>No current at socket >Choose other socket
>Charging plug not connected >Insert plug
>Charger defective >Return to manufacturer
>Battery defective >Return to manufacturer
>O-rings leakage >Replace O-ring
>Sliding ring seal leakage >Replace sliding ring seal
>Broken housing >Return to manufacturer
Version: 2016_08 Page 35

> Disconnect all batteries and
BONEX-SCOOTER
Instruction for use
Fault Cause of failure Remedy
Switches sluggish >Dirt / sand on axle
Housing, tube
sluggish
Eccentric lever
sluggish
Eccentric lever loose
Main switch does
not turn off
Scooter has reduced
power
>O-rings soiled
>Axle dry >Achse mit Silikon fetten
>Pressure disc worn >Replace pressure disc
>Pressure disc worn >Replace pressure disc
>Eccentric lever worn >Replace eccentric lever
>Pressure disc, Eccentric lever greasy >Clean and degrease
>Temporarily malfunction of main
switch
>Battery capacity too low >Replace battery
>Propeller defective >Replace propeller
>Contacts corroded >Return to manufacturer
>Drive defectivet >Return to manufacturer
>Rinse with water and
>oil axle afterwards
>Clean grooves
>Clean / change O-rings
>Grease housing with silicone
> turn a few times slowly the
switch until you hear a click
sound
repeat turning the switch
Version: 2016_08 Page 36

BONEX-SCOOTER
Instruction for use
Version: 2016_08 Page 37
 Loading...