

Page 1

U7145 / U7147
Page 2

Page 3

Gebrauchsanweisung (5 – 16)
de
Bruksanvisning (101 – 112)
se
Instructions for use (17 – 28)
Instructions d’utilisation (29 – 40)
Istruzioni per l’uso (41 – 52)
Gebruiksaanwijzing (53 – 64)
Instrucciones para el uso (65 – 76)
Használati útmutató (77 – 88)
Instrukcja obsługi (89 – 100)
en
es
hu
Käyttöohje (113 – 124)
fr
it
nl
Brugsanvisning (125 – 136)
Bruksanvisning (137 – 148)
Lietošanas instrukcija (149 – 160)
Naudojimo instrukcija (161 – 172)
Kasutusjuhend (173 – 184)
pl
使用说明书 (185 – 197)
fi
dk
no
lv
lt
ee
cn
3
Page 4

4
Page 5

Gebrauchsanweisung
de
5
Page 6

Vorwort
de
Herzlichen Glückwunsch, dass Sie sich für den Ultraschallvernebler U7145 / U7147 entschieden haben!
Bestimmungsgemässer Gebrauch:
Das Gerät dient ausschliesslich zur Befeuchtung der Raumluft in Innenräumen.
Wussten Sie, dass zu trockene Raumluft
• Schleimhäute austrocknet sowie spröde Lippen und
Augenbrennen verursacht?
• Infektionen und Erkrankungen der Atemwege
begünstigt?
• zu Abgespanntheit, Müdigkeit und Konzentrationsschwäche führt?
• Haustiere und Zimmerpflanzen belastet?
• Staubentwicklung fördert und die elektrostatische
Aufladung von Textilien aus Kunststofffasern,
Teppichen und Kunststoffböden erhöht?
• Einrichtungsgegenstände aus Holz und speziell
Parkettböden beschädigt?
• Musikinstrumente verstimmt?
Allgemeines
Angenehm ist das Raumklima in der Regel dann, wenn
die relative Feuchtigkeit zwischen 40 und 60% beträgt. Ihr
Gerät kontrolliert die von Ihnen gewünschte und eingestellte
Luftfeuchtigkeit automatisch. Ist es zu trocken, schaltet das
Gerät automatisch ein. Ist die gewünschte Luftfeuchtigkeit
erreicht, schaltet es automatisch aus.
6
Sicherheitshinweise
• Gebrauchsanweisung vor der Inbetriebnahme vollständig durchlesen und zum späteren Nachschlagen gut
aufbewahren.
• Das Gerät nur an Wechselstrom anschliessen – mit
Spannung gemäss dem Typenschild am Gerät.
• Das Gerät nur in Wohnräumen und innerhalb der
spezifizierten technischen Daten verwenden. Ein nicht
bestimmungsgemässer Gebrauch kann Gesundheit
und Leben gefährden.
• Kinder können die Gefahren beim Umgang mit
Elektrogeräten nicht erkennen. Deshalb Kinder immer
beaufsichtigen, wenn sie sich in der Umgebung des
Geräts aufhalten (Bild 1).
• Personen, die mit der Gebrauchsanweisung nicht
vertraut sind, sowie Kinder und Personen unter Medikamenten-, Alkohol- oder Drogeneinfluss, dürfen das
Gerät nicht oder nur unter Aufsicht bedienen.
• Das Gerät nie in Betrieb nehmen, wenn ein Kabel oder
Stecker beschädigt ist (2), nach Fehlfunktionen des
Gerätes oder wenn dieses heruntergefallen ist (3) oder
auf eine andere Art beschädigt wurde.
• Das Gerät darf nur in komplett zusammengebautem
Zustand in Betrieb genommen werden.
• Reparaturen an Elektrogeräten dürfen nur von Fachkräften durchgeführt werden (4). Durch unsachgemässe Reparaturen können erhebliche Gefahren für
den Benutzer entstehen.
• Der Netzstecker ist bei jedem Füllen/Entleeren des
Wassertanks, vor jeder Reinigung, vor jeder Montage/
Demontage einzelner Teile, vor jeder Umplatzierung
aus der Steckdose zu ziehen.
• Greifen Sie während des Betriebes nicht in den
Verneblerraum. Die Membrane wird durch die Hochfrequenzschwingung heiss.
• Niemals den Netzstecker am Kabel oder mit nassen
Händen aus der Steckdose ziehen.
• Das Gerät nur auf eine ebene, trockene Fläche stellen
(5).
• Gerät nicht direkt auf den Boden oder neben eine
Heizung stellen. Wenn der austretende Nebel vor dem
vollständigen Verdunsten auf den Boden gelangt, so
kann er diesen beschädigen (6). Wir können keine
Schadenersatzansprüche, basierend auf falscher
Platzierung, anerkennen.
• Das Gerät sollte erhöht positioniert werden (7), z.B.
auf einem Tisch, einer Kommode etc.
• Keinesfalls Wasser durch die Düsenöffnung einfüllen.
• Unterteil nie in Wasser oder andere Flüssigkeiten
tauchen.
• Das Gerät so platzieren, dass es nicht umgestossen
werden kann (8).
• Bei Nichtgebrauch Netzstecker ausstecken.
• Das Kabel nicht mit einem Teppich oder anderen
Dingen bedecken. Gerät so platzieren, dass Sie nicht
über das Kabel stolpern.
• Betreiben Sie das Gerät nicht in Räumen, in denen sich
feuergefährliche Güter, Gase oder Dämpfe befinden.
• Stellen Sie das Gerät nicht in den Regen und verwenden Sie es nicht in feuchten Räumen.
• Keine Fremdgegenstände in das Gerät stecken.
• Lufteintritt und Nebelaustritt unbedingt freihalten.
• Setzen Sie sich keinesfalls auf das Gerät und platzieren
Sie keine Gegenstände darauf.
• Um die Gesundheit zu schützen und um die Funktion
des Gerätes zu gewährleisten, verwenden Sie in Ihrem
Gerät nur sauberes, kontaminationsfreies, kaltes Leitungswasser. Sollte das Wasser nicht sauber sein oder
sollten Sie sich hinsichtlich der Qualität des Wassers
nicht sicher sein, so verwenden Sie destilliertes Wasser. Daneben ist es wichtig, dass Sie Ihr Gerät gemäss
dieser Bedienungsanleitung regelmässig reinigen
und warten.
• Füllen Sie keine Zusätze wie ätherische Öle, Wasserreinhaltemittel und Duftstoffe ein. Diese Zusätze
beschädigen Ihr Gerät! Geräte die durch Zusätze beschädigt werden, sind von der Garantie ausgenommen.
• Die Ultraschallschwingung ist für Mensch und Tier
nicht hörbar und völlig ungefährlich.
Page 7

1
4
7
de
2 5
3
8
6
9
7
Page 8

Auspacken
de
• Gerät vorsichtig aus der Verpackung nehmen.
• Entfernen Sie den Plastikbeutel vom Gerät.
• Angaben zum Netzanschluss auf dem Typenschild
überprüfen.
• Verwenden Sie die Originalverpackung zum Lagern,
wenn Sie das Gerät nicht ganzjährig benützen.
Inbetriebnahme
Der beste Standort für Ihr Gerät ist:
• Gerät nicht direkt auf den Boden oder neben eine
Heizung stellen. Die Feuchtigkeit des Nebels kann die
Bodenoberfläche (6 und 7) beschädigen (siehe Sicherheitshinweise).
• Die Düse soll nicht direkt auf Pflanzen oder Gegenstände gerichtet sein. Einen Abstand von mind. 50 cm
einhalten (10).
• Legen Sie die Entkalkungspatrone für mind. 24h in
ein mit Wasser gefülltes Becken. Das Granulat muss
Wasser aufsaugen, um die volle Leistung zu erreichen.
• Im Durchschnitt sollte die Entkalkungspatrone alle
2 bis 3 Monate ausgewechselt werden. Je nach
Wasserhärte kann dies früher oder später nötig sein.
• Lesen Sie den Abschnitt «Wasser einfüllen», um den
Wassertank zu befüllen (12).
• Stellen Sie den Wassertank auf das Unterteil (13).
• Schliessen Sie das Netzkabel am Netz an und schalten
Sie das Gerät am Ein/Aus-Schalter ein (15).
• Etwa 10 – 15 Minuten nachdem Sie das Gerät eingeschaltet haben, erreicht es seine volle Leistung.
• Stellen Sie sicher, dass das Netzkabel nicht eingeklemmt wird (9). Schalten Sie das Gerät bei defektem
Netzkabel nicht ein (2).
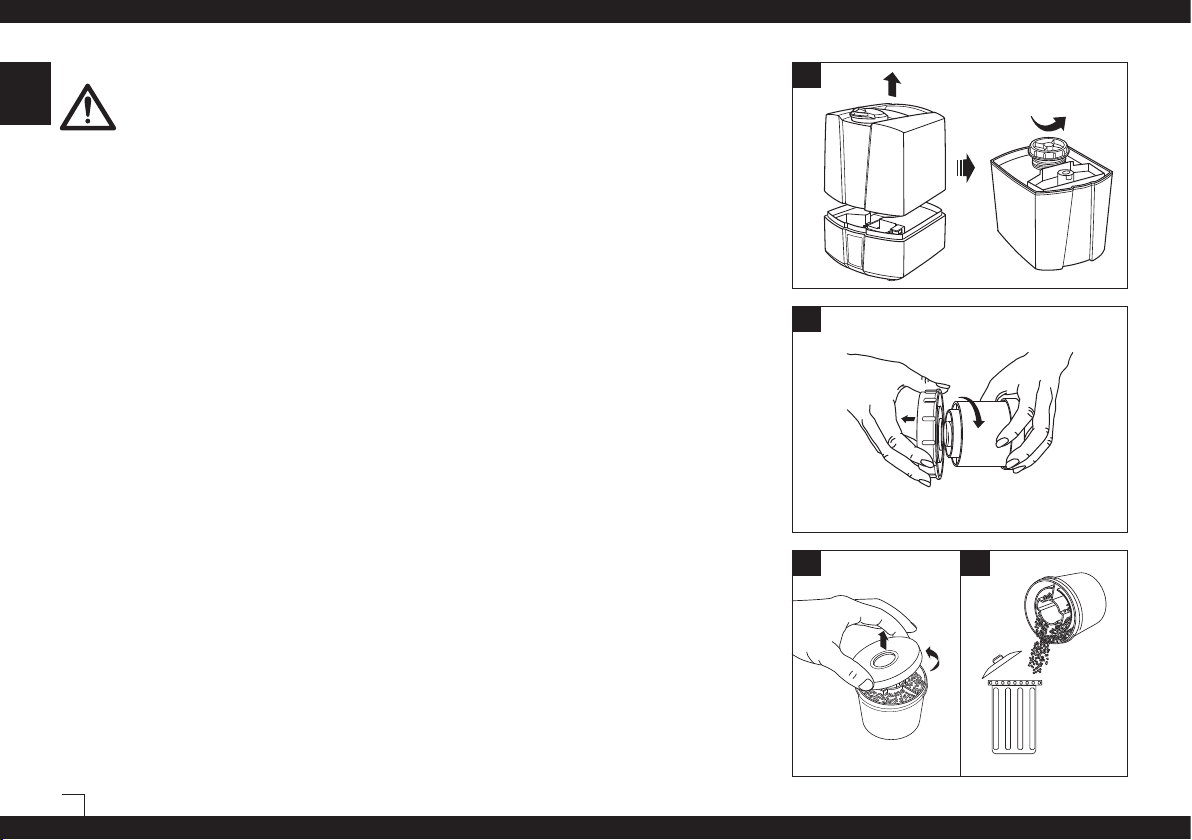
Gerätebeschreibung
Düse (drehbar)
Wassertank
Verneblerkammer
Entkalkungspatrone
Wassertankdeckel
Ionic Silver Stick
®
Wasser einfüllen
Schalten Sie das Gerät immer aus, bevor Sie
den Wassertank vom Gerät nehmen. Greifen Sie
während des Betriebes nicht in den Verneblerraum!
Um die Gesundheit zu schützen und um
die Funktion des Gerätes zu gewährleisten,
verwenden Sie in Ihrem Gerät nur sauberes,
kontaminationsfreies, kaltes Leitungswasser.
Sollte das Wasser nicht sauber sein oder sollten Sie sich
hinsichtlich der Qualität des Wassers nicht sicher sein, so
verwenden Sie destilliertes Wasser.
Nehmen Sie das Gerät bei leerem Wassertank nicht in Betrieb! Bei Unterschreiten des minimalen Wasserstandes,
schaltet das Gerät automatisch aus.
• Stellen Sie sicher, dass sich keine fremden Gegen-
stände im Wassertank befinden.
• Entfernen Sie den Wassertankdeckel vom Tank (11).
Füllen Sie den Tank mit frischem, kalten Leitungswasser (12). Tankdeckel gut verschliessen! Stellen
Sie den Wassertank auf das Unterteil (13). Geben
Sie keine Zusätze zum Wasser (14)!
• Schliessen Sie das Netzkabel am Netz an und schalten
Sie das Gerät ein (15).
Bürste
Membrane
Bedienungspanel
Unterteil
Verneblerraum
8
Page 9

10
11
13
14
Wasserreinhaltung
Der Ionic Silver Stick (ISS) nutzt die antimikrobielle
Wirkung von Silber und sorgt eine Saison für optimale
Wasserreinhaltung in allen BONECO Luftbefeuchtern. Der
ISS wirkt, sobald er mit Wasser in Berührung kommt – auch
bei ausgeschaltetem Gerät. Der ISS ist ausschliesslich für
den Einsatz in Luftbefeuchtern bestimmt. Auf dem Bild 16
ist die Position im Gerät sichtbar. Greifen Sie während des
Betriebes nicht in den Verneblerraum. Schalten Sie das
Gerät zuerst aus.
Keine Verwendung von Duftstoffen
Wasserzusätze (z.B. ätherische Öle, Duftstoffe, Wasserreinhaltemittel) dürfen NICHT verwendet werden! Auch
eine kleine Menge kann den Kunststoff beschädigen/Risse
bilden. Das Material ist nicht für den Gebrauch von Zusätzen geeignet. Ein Tropfen genügt, um den Wassertank zu
beschädigen und damit das Gerät unbrauchbar zu machen.
Geräte die durch Zusätze beschädigt werden, sind von der
Garantie ausgenommen.
de
12
15 16
9
Page 10

Bedienung U7145
de
C
B
A
A) Ein-/Ausschalten
Durch Drehen des Drehknopfes im Uhrzeigersinn schalten
Sie einerseits das Gerät ein und regulieren zudem den Nebelausstoss von niedrig zu hoch.
B) Hygrostat (Feuchtigkeit einstellen)
Durch Drehen des Drehknopfes im Uhrzeigersinn stellen
Sie die gewünschte Feuchtigkeit ein. Empfehlenswert ist
eine relative Luftfeuchtigkeit zwischen 40 und 60%. Sie
können diesen Wert einstellen, indem Sie den Drehknopf
ungefähr in die vertikale Position drehen. Die Messgenauigkeit beträgt +/- 5%. Überschreitet die Feuchtigkeit die
gewünschte Einstellung, schaltet das Gerät ab. Das Gerät
schaltet nicht ab, wenn der Drehknopf ganz nach rechts
gedreht wird. Dann ist die Funktion Dauerbetrieb aktiviert.
C) Wasserstandsanzeige (rot)
Durch den transparenten Wassertank ist die Wassermenge
gut ersichtlich. Das Gerät zeigt ebenfalls an, wenn der
Wassertank leer ist. Die rote Wasserstandsanzeige leuchtet
auf (Symbol C). Für weitere Informationen lesen Sie bitte
das Kapitel «Wasser einfüllen». Nach dem Einsetzen des
vollen Tankes kann es einige Sekunden dauern, bis das rote
Symbol C erlischt.
10
Page 11

Bedienung U7147 I) Vorheizung-Anzeige
D) Nebelausstoss,
Verdunstungsleistung regulieren
H
E
L
F
I
D
J
A
G
C
M
B
K
A) Ein-/Ausschalten
Durch Drücken der Taste A schalten Sie das Gerät ein oder
aus. Diese Taste kann auch benutzt werden, um die Reinigungsanzeige zurückzusetzen (gedrückt halten).
B) Hygrostat (Feuchtigkeit einstellen)
Durch Drücken der Taste B stellen Sie die gewünschte
Feuchtigkeit in % ein. Empfehlenswert ist eine relative
Luftfeuchtigkeit zwischen 40 und 60%. Die Messgenauigkeit beträgt +/- 5%. Überschreitet die Feuchtigkeit die gewünschte Einstellung, schaltet das Gerät ab. Während der
Auswahl wird der Sollwert angezeigt (Symbol DESIRED).
Die Anzeige wechselt nach einigen Sekunden automatisch
auf den aktuellen Feuchtigkeitswert (Symbol CURRENT).
C) Timer
Mit der Taste C können Sie die Betriebsdauer be stimmen –
regulierbar zwischen 1 bis 8 Stunden oder Dauerbetrieb
(CO). Symbol G zeigt an, welche Dauer eingestellt ist
(1h/2h/3h/4h/5h/6h/7h/8h/CO). Die Anzeige wechselt nach
einigen Sekunden automatisch auf den aktuellen Wert.
Durch mehrmaliges Drücken der Taste D können Sie den
Nebelausstoss regulieren. Das Symbol H zeigt an, welche
der drei Stufen (niedrig/mittel/hoch) Sie gewählt haben.
E) Betrieb mit Vorheizung
Die Taste E dient dazu, die Vorheizung ein- (Symbol I
leuchtet auf) oder auszuschalten. Das Wasser wird dadurch vor dem Eintreten in den Verneblerraum auf 80 °C
vorgeheizt. Das Gerät benötigt ca. 10 –15 Minuten, um das
Wasser zu erwärmen. Der Nebel tritt jetzt mit angenehmen
40 °C aus. Dies hat den Vorteil, dass die Raumtemperatur
nicht absinkt und sich ausserdem die Wasserreinhaltung
entscheidend verbessert.
F) Auto/Sleep-Modus
Durch Drücken der Taste F kann der Automatik- und SleepModus aktiviert werden. Durch einmaliges Drücken schaltet sich die Automatik-Funktion ein (Symbol J erscheint
auf dem Display), durch welche die optimale Luftfeuchtigkeit in Abhängigkeit zur Temperatur beibehalten wird. Die
Regelung erfolgt über Ausstossmenge und vorgegebenen
Sollwert. Wird die Sleep-Funktion ein gestellt (Symbol K erscheint auf dem Display), ist die Sollfeuchtigkeit 50 – 65%;
die Zeiteinstellung geht automatisch auf 6 Stunden; die
Heizung ist eingeschaltet. Zusätzlich wird noch die Ausstossmenge reguliert, abhängig von der Differenz Soll- zu
Ist-Wert.
Die Hygrostat- und Nebelausstoss-Einstellung kann nicht
verändert werden. Sobald die Taste B oder D gedrückt wird,
arbeitet das Gerät nicht weiter im Automatik- oder SleepModus.
G) Timer-Anzeige
H) Nebelausstoss-Anzeige
J) Auto-Modus-Anzeige
K) Sleep-Modus-Anzeige
L) Wasserstandsanzeige
Durch den transparenten Wassertank ist die Wassermenge
gut ersichtlich. Zusätzlich zeigt das Gerät auf dem Display
(L) an, wann Wasser nachgefüllt werden muss.
Für weitere Informationen lesen Sie bitte das Kapitel «Wasser einfüllen». Nach dem Einsetzen des vollen Tankes kann
es einige Sekunden dauern, bis das Symbol L erlischt.
M) Reinigungsanzeige
Erscheint auf dem Display das Symbol M mit «CLEAN»,
sollte das Gerät nach Empfehlung des Herstellers gereinigt
werden. Dieses Symbol leuchtet automatisch, je nach Gebrauch, alle 2 Wochen auf. Durch anhaltendes Drücken (ca.
10 – 15 Sekunden) der Taste A kann die Anzeige gelöscht
werden.
de
11
Page 12

Reinigung/Wartung
de
• Schalten Sie das Gerät aus (17) und ziehen Sie den
• Reinigen Sie den Wassertank und den Verneblerraum
• Entkalken Sie den Verneblerraum regelmässig mit han-
• Entfernen der Düse (21): Drehen Sie die Düse, bis die
Schalten Sie das Gerät immer aus, bevor Sie den
Wassertank vom Gerät nehmen. Greifen Sie während des Betriebes nicht in den Verneblerraum!
Netzstecker aus der Steckdose (18), bevor Sie das
Gerät reinigen.
regelmässig einmal pro Woche (nur mit Wasser, ohne
Spülmittel) (19).
delsüblichem Entkalkungsmittel (20). Spülen Sie das
Entkalkungsmittel mit viel Wasser gut aus.
Pfeil-Markierungen der Düse und des Düsenrings auf
gleicher Höhe sind. Entfernen Sie nun die Düse an der
Stelle der beiden Pfeil-Markierungen indem Sie das
Innenteil nach oben ziehen.
17
19
20
2118
12
Page 13

Achtung!
• Achten Sie darauf, dass kein Wasser in die untere Seite
des Geräteunterteils gelangt (22).
• Reinigen Sie die Innenteile mit einem weichen Tuch
und verwenden Sie auf keinen Fall Benzin, Fensterputzmittel und Lösungsmittel (23).
• Benutzen Sie zur wöchentlichen Reinigung der Membrane ausschliesslich die Bürste (24).
• Wechseln Sie das Wasser im Wassertank mindestens
1 x pro Woche.
22 24
23
de
13
Page 14
Austausch Entkalkungspatrone
de
Schalten Sie das Gerät immer aus, bevor Sie den
Wassertank vom Gerät nehmen. Greifen Sie während des Betriebes nicht in den Verneblerraum!
Die Patrone muss alle 2 bis 3 Monate ersetzt werden. Bei
sehr hartem Wasser kann ein Wechsel der Patrone bereits
früher nötig sein. Weisser Niederschlag rund um das Gerät
ist ein sicheres Zeichen, dass die Patrone verbraucht ist.
Bildet sich trotz neuer Patrone weisser Niederschlag um
das Gerät, so prüfen Sie bitte, ob das verwendete Wasser
wirklich unbehandelt ist. Fliesst das Wasser vor der Verwendung im Gerät durch eine Hausentkalkungsanlage, so
wird sich Salz rund um das Gerät niederschlagen.
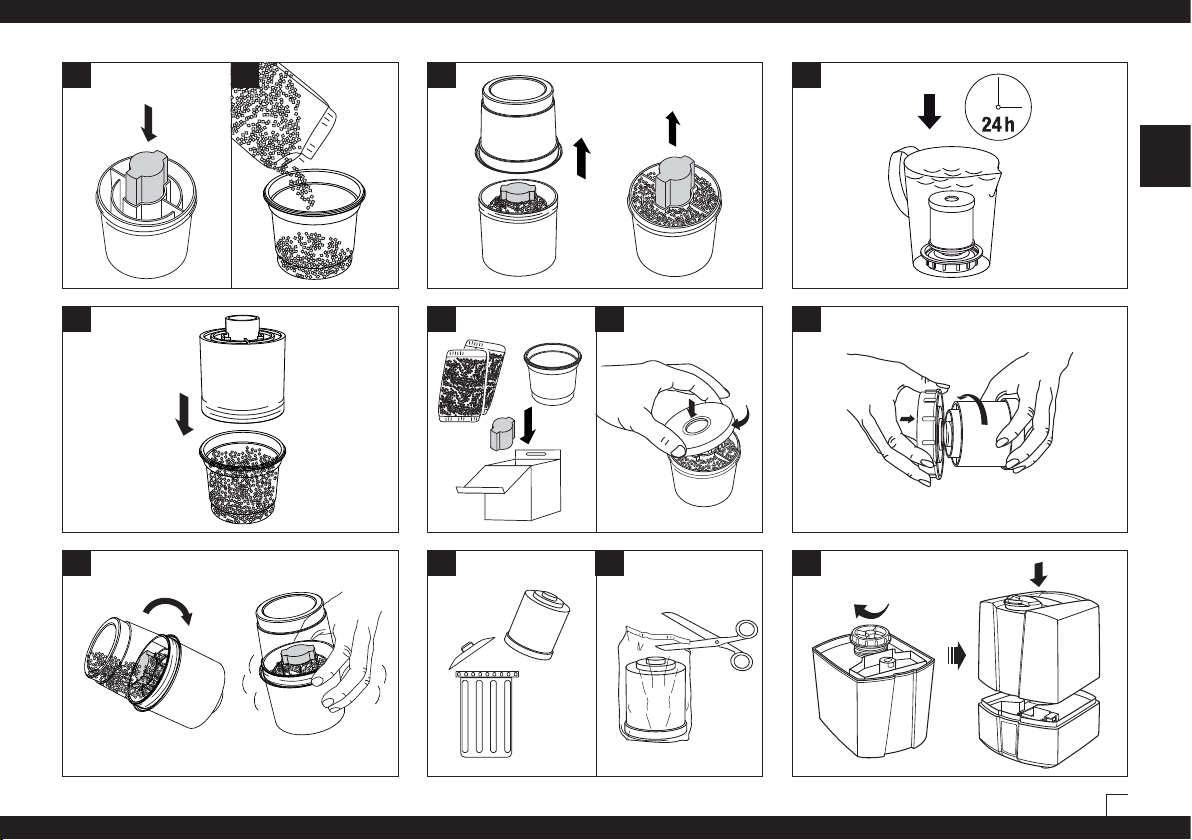
Möglichkeit A: Granulat auswechseln
• Nehmen Sie den Wassertank vom Unterteil und drehen
Sie den Wassertankdeckel ab (25).
• Die Entkalkungspatrone befindet sich auf der Innenseite des Tankdeckels. Schrauben Sie die Patrone im
Gegenuhrzeigersinn vom Deckel (26). Achtung: Tankdeckel NICHT entsorgen!
• Öffnen Sie die Patrone (27).
• Übergeben Sie den Inhalt (Granulat) der Patrone dem
Abfall (28). Achtung: Ausgeschüttetes Granulat auf
glattem Fussboden ist sehr rutschig!
• Stecken Sie das beigelegte rosa Styroporstück in die
Öffnung in der Mitte der Entkalkungspatrone. Drücken
Sie das Styroporstück nicht zu weit in die Öffnung, da
es sonst nur schwer wieder entfernt werden kann (29).
• Schütten Sie den Inhalt eines Nachfüllbeutels in den in
der Packung enthaltenen Plastikbecher (30).
• Stecken Sie die leere Entkalkungspatrone mit dem
Styroporstück auf den Plastikbecher (31).
• Drehen Sie die Entkalkungspatrone mit dem Plastikbecher um und schütteln Sie diese, bis sich das gesamte
Granulat in der Entkalkungspatrone befindet (32).
• Entfernen Sie den Plastikbecher und das rosa Styroporstück aus der Entkalkungspatrone (33) und heben Sie
es für den späteren Wiedergebrauch auf (die Packung
beinhaltet 3 Nachfüllbeutel) (34).
• Schliessen Sie den Deckel (35).
• Legen Sie die Entkalkungspatrone für mind. 24h in ein
mit Wasser gefülltes Becken (38). Das Granulat muss
Wasser aufsaugen, um die volle Leistung zu erreichen.
• Drehen Sie die Patrone nun auf den Wassertankdeckel
(39). Tankdeckel gut verschliessen! Stellen Sie den
Wassertank auf das Unterteil (40).
Möglichkeit B: Gesamte Patrone ersetzen
• Nehmen Sie den Wassertank vom Unterteil und drehen
Sie den Wassertankdeckel ab (25).
• Die Entkalkungspatrone befindet sich auf der Innenseite des Tankdeckels. Schrauben Sie die Patrone im
Gegenuhrzeigersinn vom Deckel (26). Achtung: Tankdeckel NICHT entsorgen!
• Übergeben Sie die Patrone dem Abfall (36).
• Nehmen Sie die neue Entkalkungspatrone aus der Verpackung (37).
• Legen Sie die Entkalkungspatrone für mind. 24h in ein
mit Wasser gefülltes Becken (38). Das Granulat muss
Wasser aufsaugen, um die volle Leistung zu erreichen.
• Drehen Sie die Patrone nun auf den Wassertankdeckel
(39). Tankdeckel gut verschliessen! Stellen Sie den
Wassertank auf das Unterteil (40).
25
26
27 28
14
Page 15

29 30
33
38
de
31
32
34
36
35
39
37 40
15
Page 16

Lagerung bei längerem Nichtgebrauch
de
Gerät wie beschrieben reinigen, vollständig trocknen lassen
und vorzugsweise in der Originalverpackung an einem
trockenen, nicht zu heissen Ort aufbewahren.
Garantie
Die Garantiebestimmungen sind von unserer Landesvertretung festgelegt. Wenden Sie sich vertrauensvoll an Ihren
Fachhändler, wenn am Gerät trotz strenger Qualitätskontrollen ein Mangel auftritt. Für eine Garantieleistung ist die
Entsorgen
Übergeben Sie das ausgediente Gerät Ihrem
Händler zur fachgerechten Entsorgung. Weitere
Entsorgungsmöglichkeiten erfahren Sie von
Ihrer Gemeinde- oder Stadtverwaltung.
Vorlage des Kaufbelegs unbedingt erforderlich. Reparaturen an Elektrogeräten dürfen nur Fachkräfte durchführen.
Durch unsachgemässe Reparaturen können erhebliche
Gefahren für den Benutzer entstehen und der Garantieanspruch erlischt.
Störungen beheben
Problem Mögliche Ursache Was tun
Gerät funktioniert nicht Netzstecker nicht eingesteckt Netzstecker an Steckdose anschliessen
Kein Wasser im Wassertank Wasser nachfüllen
(Leerstandsanzeige leuchtet auf)
Kein Nebelausstoss Luftfeuchtigkeitseinstellung ist geringer Luftfeuchtigkeitseinstellung erhöhen
als Raumluftfeuchtigkeit
Spülmittelrückstände Gerät mit klarem Wasser reinigen
Zu geringer Nebelausstoss Wassertemperatur zu niedrig Nebelausstoss auf Stufe Maximum
stellen, nach 10 Min. arbeitet das Gerät wieder
einwandfrei
Kalkablagerung auf der Membrane Membrane reinigen
Weisser Niederschlag Entkalkungspatrone verbraucht Entkalkungspatrone oder Granulat auswechseln
rund um das Gerät
Technische Daten U7145
Netzspannung 230 V ~ 50 Hz
Leistungsaufnahme 22 W / 39 W
Befeuchtungsleistung 400 g/h
2
Geeignet für Raumgrössen bis 60 m
/ 150 m
3
Fassungsvermögen 5.0 Liter
Abmessungen 240 x 260 x 310 mm
Leergewicht ca. 3.0 kg
Betriebsgeräusch < 25 dB(A)
Zubehör A7531 Entkalkungspatrone
A7017 Ionic Silver Stick (ISS)
Technische Daten U7147
Netzspannung 230 V ~ 50 Hz
Leistungsaufnahme 27 W / 42 W / 120 W*
Befeuchtungsleistung 400 / 550 g/h*
Geeignet für Raumgrössen bis 60 m
Fassungsvermögen 5.0 Liter
Abmessungen 240 x 260 x 310 mm
Leergewicht ca. 3.0 kg
Betriebsgeräusch < 25 dB(A)
Zubehör A7531 Entkalkungspatrone
A7017 Ionic Silver Stick (ISS)
* bei Betrieb mit Vorheizung auf 80 °C
2
/ 150 m
3
16
Page 17

Instructions for use
en
17
Page 18

Foreword
Congratulations on choosing the Ultrasonic Humidifier
U7145 / U7147!
en
Proper use:
The appliance must only be used for the humidification of
the air indoors.
Did you know that dry room air:
• Dries out the mucous membranes, and also causes
chapped lips and stinging eyes?
• Encourages infections and illnesses of the respiratory
system?
• Causes weariness, tiredness and poor concentration?
• Stresses household pets and house plants?
• Encourages the formation of dust and the electrostatic
charging of textiles made of synthetic fibers, as well as
carpets and plastic flooring?
• Damages wooden furniture and especially parquet
floors?
• Causes musical instruments to go out of tune?
General information
A comfortable indoor atmosphere is achieved at a relative
humidity of between 40 and 60%. Your appliance automatically controls the humidity level according to your chosen
setting. If the air is too dry, the unit will automatically switch
on. As soon as the desired humidity level is reached, it will
automatically switch off.
Safety instructions
• Read the operating instructions carefully before using
the appliance and keep them in a safe place for later
reference.
• Connect the unit only to an AC supply with a voltage
according to the rating label.
• Only use the appliance indoors and within the parameters stated in the technical specifications. Using the
appliance for a purpose for which it is not intended
could pose a serious hazard to health and life.
• Children cannot recognize the hazards associated with
the usage of electrical appliances. For this reason,
always supervise children when they are near the appliance (image 1).
• Persons who are unfamiliar with the operating instructions, as well as children and persons under the
influence of medication, alcohol or drugs are not permitted to operate the appliance, or are only permitted
to operate it under supervision.
• Never use the appliance if there is any damage to the
appliance or cable (2), after malfunction has occurred,
after the appliance has been dropped (3) or damaged
in any other way.
• Only operate the appliance when it is completely assembled.
• Repairs to electrical appliances may only be carried out
by qualified service engineers (4). Improper repair work
can pose a considerable hazard to the user.
• Disconnect the appliance from the mains power before
filling/emptying the water tank, before cleaning, before
assembling/dismantling of individual parts and before
moving the appliance.
• Do not reach inside the nebuliser space during operation. The high frequency oscillation causes the membrane to become hot.
• Never pull the plug from the mains socket by the cable
or with wet hands.
• Always place the appliance on a dry, level surface (5).
• Do not place the appliance directly on the floor or next
to heating. If the mist comes in contact with the floor
before it has fully evaporated, the surface could be damaged (6). We do not accept any liability for damages
due to the incorrect placement of the unit.
• The unit should be placed in an elevated position (7),
e.g. on a table, chest, etc.
• Do not pour water into the mist outlet of the appliance.
Do not immerge the main body in water or other liquids.
•
• Position the appliance where it cannot be easily knocked over (8).
• Always disconnect from the mains power when not in
use.
• Do not run the power cord under a carpet or other
objects. Position the appliance so that you will not trip
over the cord.
• Do not use the appliance in areas where combustible
materials, gases or vapours are present.
• Do not expose the appliance to rain, and do not use it
in damp locations.
• Do not insert foreign objects in the device.
• Do not block the air intake or mist outlet.
• Do not sit, stand or place any heavy objects on the
appliance.
• To protect health safety and proper humidifier func-
tion use only clean, contamination-free, cold, fresh tap
water in your humidifier. If your water source is contaminated or if you are uncertain of its safety use distilled
water. In addition, it is advised to clean and maintain
your humidifier in a timely manner as instructed in
this manual.
• The use of fragances, such as essential oils, water
conditioners and aromas will damage your appliance!
Appliances that are damaged by such additives will not
be covered by the manufacturer‘s warranty.
• The high frequency vibrations cannot be heard by
humans or animals, and are completely safe.
18
Page 19

1
4
7
en
2 5
3
8
6
9
19
Page 20

Unpacking
• Carefully remove the unit from its box.
• Remove the unit from the plastic bag.
• Review the information given on the rating plate about
en
the mains supply.
• Use the original packaging for storing the appliance if
you do not use it all year round.
Putting into operation
Find the ideal location for your appliance:
• Do not place it directly next to a radiator or on a
floor with floor heating. The moisture of the mist can
damage the floor surface (6 and 7) (see Safety Instructions).
• The mist outlet must not be pointed directly at plants or
other objects. Keep a distance of at least 50 cm) (10).
• Soak the demineralisation cartridge in a bowl of water
for at least 24 hours before using it. The granules have
to absorb water to reach full performance.
• On average the demineralisation cartridge should be
replaced every 2 – 3 months. This interval can be
shorter or longer depending on the hardness of your
water.
• Read the instructions under «Filling the Tank» for filling
the water tank (12).
• Place the water tank onto the base (13).
• Insert the plug into the mains socket and switch on
the appliance using the on/off switch (15).
• The appliance will reach full capacity about 10 to
15 minutes after being switched on.
• Make sure that the power cord is not pinched anywhere (9). Do not operate the appliance if the cord is
damaged (2).
Description of the appliance
Mist outlet (rotating)
Water tank
Evaporation
chamber
Demineralisation cartridge
Water tank cap
Ionic Silver Stick
®
Filling the tank
Always switch off the appliance before removing
the water tank. Do not reach inside the nebuliser
space while the appliance is running!
To protect health safety and proper humidifier
function use only clean, contamination-free,
cold, fresh tap water in your humidifier. If your
water source is contaminated or if you are uncertain of its
safety use distilled water.
Do not operate the appliance when the water tank is empty!
When the water reaches the minimum level, the unit switches off automatically.
• Make sure that there are no foreign objects inside the
water tank.
• Remove the water tank cap from the tank (11). Fill the
tank with clean, cold tap water (12). Close the cap of
the water tank securely! Place the water tank onto the
base (13). Do not add any additives to the water (14)!
• Insert the plug into the power socket and switch on the
appliance (15).
Brush
Membrane
Control panel
Main body
Nebuliser space
20
Page 21

10
11
13
14
Water quality maintenance
The Ionic Silver Stick utilizes the antimicrobial property of
silver and provides one season of optimum water quality
maintenance in all BONECO humidifiers. The ISS begins
working as soon as it comes into contact with water – even
if the unit is switched off. The ISS is intended exclusively
for use in humidifiers. Look at picture 16 for the position of
the ISS in the appliance. Do not reach inside the nebuliser
space during operation. Switch off the unit first.
Do not use additives
Water additives (e.g. essential oils, fragrances, water conditioners etc.) must NOT be used! Even a small amount
can cause damage to the tank material. The material is not
suitable for the use of such additives. One drop is enough
to damage the tank and render the appliance unusable.
Appliances that are damaged by such additives will not be
covered by the manufacturer’s warranty.
en
12
15 16
21
Page 22

Operation U7145
en
C
B
A
A) On-off switch
Turning the rotary switch clockwise switches the appliance
on and at the same time regulates the mist output from
low to high.
B) Hygrostat (setting the humidity level)
The desired humidity level can be set by turning the rotary
switch clockwise. A relative humidity between 40 and 60%
is recommended. You can achieve this level by rotating the
switch until it is roughly in the vertical position. The accuracy of measurement is +/- 5%. The unit will switch off
when the moisture level exceeds the desired setting. The
appliance does not switch off if the switch is turned all the
way to the right. This activates the continuous operation
function.
C) Empty indicator (red)
The water level is easy to see, thanks to the transparent
water tank. The appliance also alerts you when the water tank is empty. The red empty indicator is illuminated
(symbol C). Please read the chapter «Filling the tank» for
more information. The red symbol C may stay illuminated
for some seconds with a refilled tank until the base is filled
with water.
22
Page 23

Operation U7147 I) Pre-heating Indicator
D) Controlling mist output and Evaporator
output
H
E
L
F
I
D
J
A
G
C
M
B
K
A) Switching on/off
You can switch the unit on or off by pressing button A. This
button is also used to reset the cleaning indicator light (by
holding down).
B) Hygrostat (pre-set moisture level)
By pressing button B you can set the desired moisture level in %. A relative moisture of between 40 and 60% is
recommended. The accuracy of measurement is +/- 5%.
The unit will switch off when the moisture level exceeds
the desired setting. During selection the target value is
displayed (symbol DESIRED). The display will automatically show the current humidity value after a few seconds
(symbol CURRENT).
By repeatedly pressing button D you can control the mist
output. Symbol H shows which of the three levels (low/
medium/high) you have selected.
E) Operation with pre-heating
Button E is used for switching the pre-heating on and off
(symbol I lights up). As a result, the water is pre-heated to
a temperature of 80 °C before entering the nebuliser space.
It takes approx. 10 to 15 minutes for the water in the base
to warm up. The mist now leaves the nebuliser space at a
pleasant temperature of 40 °C. The advantage of this is
that the room temperature does not drop and, in addition, it
significantly improves the water quality maintenance.
F) Auto/Sleep Mode
The automatic and sleep modes can be activated by pressing button F. By pressing the button once, the automatic
function is switched on (symbol J appears on the display),
maintaining the optimum humidity subject to the temperature. Control takes place by means of output quantity and
pre-set target value. If the sleep function is switched on
(the symbol K appears on the display), the target humidity
is 50 – 65%; the operation time is automatically set at 6
hours; the heating is switched on. In addition, the output
quantity is also controlled subject to the difference between
the target value and the actual value.
The hygrostat and mist output settings cannot be changed
in either mode. If the buttons B or D are pressed, the unit
will no longer be in auto or sleep mode.
J) Auto Mode Indicator
K) Sleep Mode Indicator
L) Empty indicator
The transparent water tank makes it possible to see the
water level well. Furthermore, the unit shows on the display
(L) when water must be added.
Please read the chapter «Filling the tank» for more information. The symbol L may stay illuminated for some seconds
with a refilled tank until the base is filled with water.
M) Cleaning indicator
If symbol M and «CLEAN» appear on the display, the appliance should be cleaned as recommended by the manufacturer. This symbol comes on automatically every 2 weeks,
depending on the level of use. The display can be cancelled
by depressing button A for between 10 and 15 seconds.
C) Timer
Using button C, the operation time can be set – adjustable
between 1 and 8 hours, or continuous operation (CO).
Symbol G shows the operating period that has been set
(1h/2h/3h/4h/5h/6h/7h/8h/CO). The display will automatically show the current value after a few seconds.
G) Timer Indicator
H) Mist Output Indicator
en
23
Page 24
Cleaning/Maintenance
Always switch the appliance off before removing
the water tank. Do not reach inside the nebuliser
en
• Switch off the appliance (17) and remove the plug from
• Clean the water tank and the nebuliser space regularly
• Decalcify the water base regularly using commercially
• To remove the mist outlet (21): Twist the mist outlet to
space while the appliance is running!
the mains socket (18) before cleaning.
once a week (use only water, without detergent) (19).
available decalcification agents (20). Rinse out the
decalcification agent thoroughly with plenty of water.
either the right or the left. Align the arrow on the mist
outlet with the arrow on the ring around the mist outlet.
Pull up on the mist outlet once the arrows are aligned.
17
18
19
20
21
24
Page 25

Important
• Make sure that no water gets into the lower part of the
main body (22).
• Clean the inner parts with a soft cloth. Never use any
solvents or aggressive cleaning agents (23).
• Only use the brush to clean the membrane (24). This
should be done once a week.
• Change the water in the tank at least once a week.
22 24
en
23
25
Page 26

Replacement of the demineralisation
cartridge
Always switch off the appliance before removing
en
the water tank. Do not reach inside the nebuliser
space while the appliance is running!
The cartridge must be replaced every 2 – 3 months. If the
water is very hard, it may be necessary to replace the cartridge earlier. White dust around the appliance is a sure sign
that the cartridge needs replacing. If white residues continues to form around the appliance after a new cartridge
has been inserted, please make sure that the water you are
using is untreated. If the water flows through a domestic
decalcification system before it is used in the unit, salt will
precipitate around the appliance.
Option A: Replace the granules
• Remove the water tank from the base and unscrew the
water tank cap (25).
• The demineralisation cartridge is attached to the inside
of the cap. Unscrew the cartridge from the cap by
turning it counter-clockwise (26). Important: do NOT
dispose of the tank cap!
• Open the cartridge (27).
• Throw the content (granules) into the waste (28). Attention! Disposed granules can make the floor slippery!
• Place the enclosed pink styrofoam piece in the center
of the cartridge. Do not push it to the bottom as it will
be difficult to remove afterwards (29).
• Pour the contents of one refill resin bag into the plastic
cup that is included with the refill resin packaging (30).
• Place the empty cartridge with the plug in the center
onto the plastic cup (31).
• Turn the plastic cup and cartridge over and shake until
all granules are in the cartridge (32).
• Remove the plastic cup and the pink styrofoam piece
from the cartridge (33) and retain for future use (the
refill resin consists of 3 refill bags) (34).
• Close the cap (35).
• Soak the demineralisation cartridge in a bowl of water
for at least 24 hours before use (38). The granules have
to absorb water to reach full performance.
• Now screw the cartridge onto the water tank cap (39).
Close the tank cap securely! Place the water tank onto
the base (40).
Option B: Replace the entire cartridge
• Remove the water tank from the base and unscrew the
water tank cap (25).
• The demineralisation cartridge is attached to the inside
of the tank cap. Unscrew the cartridge from the cap by
turning it counter-clockwise (26). Important: do NOT
dispose of the tank cap!
• Dispose of the old cartridge (36).
• Unpack the new cartridge (37).
• Soak the new cartridge in a bowl of water for at least
24 hours before use (38). The granules have to absorb
water to reach full performance.
• Now screw the cartridge onto the water tank cap (39).
Close the tank cap securely! Place the water tank onto
the base (40).
25
26
27 28
26
Page 27
29 30
33
38
en
31
32
34
36
35
39
37 40
27
Page 28

Storing the appliance for extended periods
Clean the appliance as described earlier and allow to dry
thoroughly. Preferably store the appliance in its original box,
in a dry place away from high temperatures.
en
Disposal
Return your worn out unit to your dealer for
proper disposal. You can obtain information on
other ways to dispose of the unit from your local
Warranty
The warranty conditions are defined by our representative
in the country of sale. Please contact your dealer if, despite
strict quality control, your appliance becomes defective. You
must present your original receipt when making a claim
under the warranty. Repairs to electric appliances can only
be carried out by specialists. Through improper repairs,
considerable danger for the operator can result and warranty claims lapse.
district or town council.
Troubleshooting
Problem Possible cause What to do
Unit does not operate Power plug not plugged in Plug in power plug into mains socket
No water in the tank Fill tank with water
(Empty indicator is on)
No mist output Desired humidity level lower Increase humidity setting
than actual
Cleaning agent residues Rinse with clear water
Weak mist output Water temperature too low Set mist output to maximum. The
appliance will work properly again
after 10 minutes.
Mineral deposits on membrane Clean membrane
White deposit around the Demineralisation cartridge exhausted Replace demineralisation cartridge or granules
appliance
Technical specifications U7145
Mains voltage 230 V ~ 50 Hz
Power consumption 22 W / 39 W
Humidity output 400 g/h
2
Suitable for rooms up to 60 m
/ 150 m
3
Water capacity 5.0 litres
Dimensions 240 x 260 x 310 mm
Weight (empty) 3.0 kg
Operating noise level < 25 dB(A)
Accessories A7531 Demineralisation cartridge
A7017 Ionic Silver Stick (ISS)
Technical specifications U7147
Mains voltage 230 V ~ 50 Hz
Power consumption 27 W / 42 W / 120 W*
Humidity output 400 / 550 g/h*
Suitable for rooms up to 60 m
Water capacity 5.0 litres
Dimensions 240 x 260 x 310 mm
Weight (empty) 3.0 kg
Operating noise level < 25 dB(A)
Accessories A7531 Demineralisation cartridge
A7017 Ionic Silver Stick (ISS)
* when used with pre-heating to 80 °C
2
/ 150 m
3
28
Page 29

Instructions d’utilisation
fr
29
Page 30

Avant-propos
Félicitations, avec le humidificateur à ultrason U7145 /
U7147, vous avez choisi le bon produit !
Utilisation conforme:
L‘appareil sert exclusivement à l‘humidification de l‘air
ambiant dans des espaces intérieurs.
fr
Savez-vous qu’un air desséché :
• provoque le dessèchement des membranes muqueuses, des gerçures aux lèvres et des irritations aux
yeux ?
• favorise les infections et les maladies des voies respiratoires ?
• mène à un état de lassitude ou de fatigue permanent
et à des pertes de concentration ?
• est néfaste pour les animaux domestiques et les
plantes d’intérieur ?
• favorise l’accumulation de poussière et le chargement
des textiles en fibres synthétiques, tapis et revêtements de sol synthétiques en électricité statique ?
• endommage les meubles et certains parquets en
bois ?
• désaccorde certains instruments de musique ?
Remarques générales
Le climat ambiant est agréable quand l’humidité relative
de l’air se situe entre 40% et 60 %. Votre appareil contrôle
automatiquement le taux d’humidité désiré que vous avez
prédéterminé. Quand l’air est trop sec, l’appareil démarre
automatiquement. Quand le taux d’humidité désiré est atteint, il s’arrête automatiquement.
Consignes de sécurité
• Lisez attentivement le mode d’emploi complet avant la
mise en service, et conservez-le bien pour pouvoir le
consulter ultérieurement.
• Ne branchez l’appareil qu’à l’alimentation électrique ;
la tension doit correspondre à celle indiquée sur la
plaquette signalétique de l’appareil.
30
• N’utilisez l’appareil que dans des locaux d’habitation et
dans les conditions précisées dans les spécifications
techniques. Une utilisation non conforme aux spécifications peut mettre en danger la santé et la vie.
• Les enfants ne sont pas encore conscients des dangers
résultant de la manipulation d’appareils électriques. Ne
les laissez donc pas sans surveillance lorsqu’ils sont à
proximité de l’appareil (figure 1).
• Les personnes qui ne sont pas familiarisées avec le
mode d’emploi, de même que les enfants ou les personnes sous l’influence de médicaments, d’alcool ou de
drogues, ne doivent en aucun cas manipuler l’appareil
si ce n’est sous surveillance.
• Ne mettez jamais l’appareil en service quand un câble
ou l’appareil est détérioré (2), ni après des disfonctionnements ou après une chute (3) ou autre dommage
quelconque de l’appareil.
• L’appareil ne doit être mis en service qu’entièrement
assemblé.
• Les réparations d’appareils électriques ne doivent
être exécutées que par des experts autorisés (4). Des
réparations non professionnelles peuvent causer des
dangers considérables pour l’utilisateur.
• La prise au secteur doit être débranchée lors de
chaque remplissage/vidage du réservoir d’eau, avant
chaque nettoyage, avant chaque montage/démontage
de pièces particulières et avant chaque déplacement
de l’appareil.
• Ne mettez pas les mains dans l’espace de nébulisation
lorsque l’appareil fonctionne. La membrane se réchauffe en raison des vibrations à haute fréquence.
• Ne débranchez jamais la prise au secteur en tirant sur
le câble ou lorsque vos mains sont mouillées.
• Ne posez l’appareil que sur une surface sèche et plane (5).
• Ne posez pas l’appareil directement sur le plancher ni
à côté du chauffage. Si la brume entre en contact avec
le plancher avant l’évaporation complète, la surface du
plancher peut être endommagée (6). Nous déclinons
toute responsabilité pour les dommages liés à un emplacement inapproprié de l’appareil.
• L’appareil doit être posé en hauteur (7), par ex. sur une
table, une commode, etc.
• Ne versez de l’eau en aucun cas dans la buse de brumisation.
• Ne plongez jamais le bac de fond dans de l’eau ou
d’autres liquides.
• Placez l’appareil à un endroit tel que personne ne
puisse le heurter (8).
• Retirez toujours la prise lorsque l’appareil n’est pas
utilisé.
• Ne mettez pas le cordon d’alimentation sous la moquette et ne le couvrez pas par des tapis. Placez le
cordon de sorte que personne ne puisse trébucher.
• N’utilisez pas l’appareil dans des pièces renfermant
des produits, gaz ou vapeurs inflammables.
• N’exposez pas l’appareil à la pluie, ne l’utilisez pas
dans les pièces humides.
• N’insérez aucun objet étranger dans l’appareil.
• Ne bloquez pas les arrivées d’air ni les buses de brumisation.
• Ne vous asseyez pas sur l’appareil et ne posez pas
d’objets dessus.
• Afin de protéger la santé et sécurité et la fonction
adéquate d‘humidification n‘utilisez que de l‘eau potable propre, froide, et exempte de contaminants dans
votre humidificateur. Si votre source d‘eau est contaminée ou si vous êtes incertain de son innocuité, veuillez utiliser de l‘eau distillée. De plus, il est conseillé
de nettoyer et d‘entretenir votre humidificateur en
temps opportun, comme indiqué dans ce manuel.
• L’utilisation d’additifs tels que les huiles essentielles,
les conditionneurs d’eau, les parfums, peut endommager votre appareil. Tout usage de ces additifs annulera la garantie du fabricant.
• Les vibrations haute fréquence ne sont ni audibles ni
dangereuses pour les êtres humains et les animaux.
Page 31

1
4
7
fr
2 5
3
8
6
9
31
Page 32

Désemballage
• Retirez l’appareil de la boîte avec soin.
• Retirez l’appareil du sac en plastique.
• Observez les informations figurant sur la plaquette
signalétique concernant l’alimentation électrique.
• Utilisez l’emballage original pour entreposer l’appareil
si vous ne l’utilisez pas toute l’année.
fr
Mise en service
Le meilleur emplacement de votre appareil :
• Ne le placez pas à proximité immédiate d’un radiateur
ni sur un sol chauffant. L’humidité de la brume peut
endommager la surface du plancher (6 et 7) (voir les
Consignes de sécurité).
• Veillez à ce que la buse de brumisation ne soit pas
orientée en direction de plantes ou d’objets. Respectez
une distance min. de 50 cm (10).
• Laissez tremper la cartouche anticalcaire dans un
réservoir d’eau pendant 24 heures avant de l’utiliser.
Les granules doivent absorber de l’eau pour atteindre
le rendement optimal.
• La cartouche anticalcaire devra être remplacée en
moyenne tous les 2 à 3 mois. Il faut la changer plus ou
moins souvent selon la dureté de l’eau.
• Pour remplir le réservoir de l’humidificateur, lisez les
instructions dans la section « Remplissage du réservoir » (12).
• Mettez le réservoir sur le socle (13).
• Branchez le câble à la prise secteur et démarrez
l’appareil en appuyant sur l’interrupteur marche/arrêt
(15).
• L’appareil atteint son plein régime de fonctionnement
environ 10 à 15 minutes après la mise sous tension.
• Assurez-vous que le câble n’est pas coincé (9).
N’utilisez pas l’appareil si le câble est endommagé (2).
Description de l’appareil
Buse de brumisation
(rotative)
Réservoir d’eau
Chambre
d’évaporation
Cartouche anticalcaire
Bouchon du réservoir d’eau
Ionic Silver Stick
Tableau de contrôle
®
Remplissage du réservoir
Débranchez toujours l’appareil avant de retirer
le réservoir d’eau. Ne touchez pas à l’eau dans
l’espace de nébulisation lorsque l’appareil est
en marche.
Afin de protéger la santé et sécurité et la fonc-
tion adéquate d‘humidification n‘utilisez que
de l‘eau potable propre, froide, et exempte de
source d‘eau est contaminée ou si vous êtes incertain de
son innocuité, veuillez utiliser de l‘eau distillée.
Ne mettez pas l’appareil en marche si le réservoir d’eau
est vide ! Lorsque l’eau atteint le niveau minimal, l’appareil
s’arrête automatiquement.
• Assurez-vous qu’aucun objet étranger ne se trouve
• Retirez le bouchon du réservoir d’eau (11). Remplissez
• Insérez la fiche dans la prise de courant et mettez
contaminants dans votre humidificateur. Si votre
dans le réservoir d’eau.
le réservoir d’eau courante froide (12). Bien fermer le
réservoir ! Mettez le réservoir sur le socle (13). Ne mettez aucun additif dans l’eau (14) !
l’appareil sous tension (15).
Brosse
Membrane
Espace de
nebulisation
Partie inférieure
32
Page 33

10
11
13
14
Préservation de l’eau
L’Ionic Silver Stick utilise l’action antimicrobienne de l’argent
et assure pendant une saison une épuration optimale
de l’eau dans tous les humidificateurs BONECO.
L’ISS agit dès qu’il entre en contact avec l’eau –
également lorsque l’appareil est désactivé. L’ISS est exclusivement destiné à l’utilisation dans des humidificateurs.
La figure 16 montre la position du dispositif «ISS» dans
l’appareil. Ne touchez pas à l’eau dans l’espace de nébulisation lorsque l’appareil est en marche ! Mettez d’abord
l’appareil hors tension.
Aucune utilisation d’additifs
N’utilisez AUCUN additif d’eau (huiles essentielles, parfums,
conditionneurs d’eau etc.) ! Même une quantité moindre
peut endommager le matériau du réservoir. Celui-ci n’a pas
été conçu pour l’usage de tels additifs. Une seule goutte
suffit pour endommager le réservoir et, par conséquent,
pour rendre l’appareil inutilisable. L’utilisation de tels additifs annulera la garantie du fabricant.
fr
12
15 16
33
Page 34

Commande U7145
C
fr
B
A
A) Allumer/Eteindre
La sollicitation du bouton rotatif dans le sens horaire active
l’appareil et, en même temps, règle la sortie de brume du
bas vers le haut.
B) Hygrostat (régler l’humidité)
Le niveau d’humidité souhaité se règle en tournant le
bouton rotatif dans le sens horaire. La valeur recommandée
est une humidité relative entre 40 et 60%. Vous pouvez
obtenir ce niveau en tournant le bouton rotatif jusqu’à ce
qu’il occupe environ la position verticale. La précision de
mesure est de +/- 5%. Si l’humidité dépasse le réglage
souhaité, l’appareil s’éteint. L’appareil ne se désactive pas
lorsque le bouton se trouve entièrement vers la droite. Dans
cette position, la fonction fonctionnement continu est activée.
34
C) Indicateur de (réservoir) vide (rouge)
Grâce au réservoir d’eau transparent, la quantité d’eau est
bien visible. L’appareil vous avertit aussi lorsque le réservoir d’eau est vide. L’indicateur vide rouge est alors allumé
(symbole C). Veuillez lire le chapitre « Remplissage du réservoir » pour de plus amples informations. Le symbole
rouge C peut rester allumé pendant quelques secondes
lors de l’appoint du réservoir, jusqu’à ce que la base soit
remplie d’eau.
Page 35

Commande U7147 I) Symbole du préchauffage
D) Régler la puissance de brumisation,
la puissance d’évaporation
H
E
L
F
I
D
J
A
G
C
M
B
K
A) Allumer/Eteindre
En appuyant sur la touche A, vous allumez ou éteignez
l’appareil. Ce bouton est aussi utilisé pour réinitialiser le
témoin de nettoyage (en l’enfonçant).
B) Hygrostat (régler l’humidité)
En appuyant sur la touche B, vous réglez l’humidité souhaitée en %. La valeur recommandée est une humidité relative
entre 40 et 60%. La précision de mesure est de +/- 5%. Si
l’humidité dépasse le réglage souhaité, l’appareil s’éteint.
Pendant la sélection, la valeur de consigne s’affiche (sym-
bole DESIRED). L’affichage change automatiquement
après quelques secondes sur la valeur d’humidité actuelle
(symbole CURRENT).
C) Temporisateur
La touche C vous permet de définir la durée de fonctionnement – réglable de 1 à 8 heures ou le fonctionnement
continu (CO). Le symbole G indique quelle durée est réglée (1h/2h/3h/4h/5h/6h/7h/8h/CO). L’affichage change
automatiquement après quelques secondes sur la valeur
actuelle.
En appuyant plusieurs fois sur la touche D, vous pouvez
réguler la puissance de brumisation. Le symbole H indique
lequel des trois niveaux (bas/moyen/élevé) vous avez
choisi.
E) Fonctionnement avec préchauffage
La touche E sert à activer (le symbole I s’allume) ou
désactiver le préchauffage. L’eau est ainsi préchauffée à
80 °C avant d’entrer dans l’espace de nébulisation. Le
chauffage de l’eau dans la base dure environ 10 à 15
minutes.La brume sort alors à une température agréable
de 40 °C. Cela permet que la température de la pièce ne
baisse pas et que la propreté de l’eau s’améliore considérablement.
F) Mode Auto / Veille
En appuyant sur la touche F, il est possible d’activer le mode
automatique et le mode veille. Une pression unique sur la
touche permet d’activer la fonction automatique (le sym-
bole J apparaît à l’écran), par laquelle l’humidité optimale
de l’air est conservée en fonction de la température. La
régulation se fait via la quantité émise et la valeur de consigne prescrite. Si la fonction Veille est activée (le symbole
K apparaît à l’écran), l’humidité de consigne est de 50 –
65% ; le réglage du temps se met automatiquement sur 6
heures ; le chauffage est activé. En outre, la quantité émise
est régulée en fonction de la différence entre la valeur de
consigne et la valeur réelle.
Ces modes ne permettent pas de modifier l’hygrostat et
les réglages du variateur de puissance de brumisation. En
appuyant sur les touches B ou D, l’appareil quittera le mode
Auto ou Veille.
G) Symbole du temporisateur
H) Symbole de la puissance de brumisation
J) Symbole du mode Auto
K) Symbole du mode Veille
L) Indicateur de (réservoir) vide
Grâce au réservoir d’eau transparent, la quantité d’eau
est bien visible. En outre, l’appareil indique sur l’écran (L)
quand il faut remettre de l’eau.
Veuillez lire le chapitre « Remplissage du réservoir » pour de
plus amples informations. Le symbole L peut rester allumé
pendant quelques secondes lors de l’appoint du réservoir,
jusqu’à ce que la base soit remplie d’eau.
M) Indicateur de nettoyage
Si le symbole 2 apparaît à l’écran avec «CLEAN», l’appareil
devrait être nettoyé selon les recommandations du fabricant. Ce symbole s’allume automatiquement toutes les
2 semaines, en fonction de l’utilisation. En maintenant la
pression (env. 10 – 15 secondes) sur la touche A, l’écran
s’efface.
fr
35
Page 36

Nettoyage/entretien
Débranchez toujours l’appareil avant de retirer
le réservoir d’eau. Ne touchez pas à l’eau dans
l’espace de nébulisation lorsque l’appareil est
en marche.
• Mettez l’appareil hors service (17) et débranchez la
prise au secteur (18) avant le nettoyage de l’appareil.
fr
• Nettoyez régulièrement le réservoir d’eau et l’espace
de nébulisation une fois par semaine (seulement avec
de l’eau, sans produit de nettoyage) (19).
• Détartrez régulièrement l’espace de nébulisation avec
un produit de détartrage ordinaire (20). Rincez bien le
produit de détartrage avec beaucoup d’eau.
• Pour ôter la buse de brumisation (21) : tourner la
buse soit vers la gauche soit vers la droite. Aligner les
flèches de la buse avec les flèches de l’anneau qui se
trouve autour de la buse. Enlever la buse une fois que
les flèches sont alignées.
17
18
19
20
21
36
Page 37

Attention
• Veillez à ce qu’il n’y ait pas d’eau dans le fond du
bac (22).
• Nettoyez les parties intérieures avec un chiffon doux
et n’utilisez en aucun cas de l’essence, des produits
pour nettoyer les vitres ou des solvants (23).
• N’utilisez que la brosse pour le nettoyage hebdomadaire de la membrane (24).
• Changez l’eau du réservoir au moins une fois par
semaine.
22 24
fr
23
37
Page 38

Remplacement de la cartouche
anticalcaire
Débranchez toujours l’appareil avant de retirer
le réservoir d’eau. Ne touchez pas à l’eau située
dans l’espace de nébulisation lorsque l’appareil
est en marche.
Cette cartouche doit être remplacée tous les deux à trois
fr
mois. Si votre eau est très dure, vous devrez peut-être
remplacer la cartouche plus tôt. La présence de poussière
blanche autour de l’appareil est un signe indubitable que
la cartouche doit être remplacée. Si un dépôt blanc se
forme toujours autour de l’appareil alors que la cartouche
est neuve, veuillez vous assurer que l’eau que vous utilisez
n’est pas déjà traitée. Si l’eau passe par un système de
détartrage domestique avant d’être utilisée dans l’appareil,
du sel se déposera autour de l’appareil.
Option A : remplacement des granules
• Retirez le réservoir du socle et fermez le bouchon du
réservoir d’eau (25).
• La cartouche anticalcaire se trouve sur la surface
interne du bouchon du réservoir. Enlevez la cartouche
anticalcaire du bouchon en la tournant dans le sens
inverse des aiguilles d’une montre (26). Attention ! Ne
jetez pas le bouchon du réservoir !
• Ouvrez la cartouche (27).
• Jetez le contenu de la cartouche (granules) à la poubelle (28). Attention ! Les granules peuvent rendre le
plancher très glissant !
• Placez la pièce rose en mousse de polystyrène livrée
au centre du cartouche. Ne la poussez pas dans le bas
car elle pourrait être difficile à retirer ultérieurement
(29).
• Versez le contenu d’un sachet d’appoint de résine
dans le gobelet plastique compris dans le kit d’appoint
de résine (30).
• Placez le cartouche vide avec le bouchon au centre
sur le gobelet plastique (31).
• Retournez le gobelet plastique et le cartouche et
secouez jusqu’à ce que tous les granules se trouvent
dans le cartouche (32).
• Retirez le gobelet plastique et la pièce en mousse
de polystyrène du cartouche (33) et conservez-les
pour réutilisation (le kit d’appoint de résine comporte
3 sachets d’appoint) (34).
• Refermez le bouchon (35).
• Trempez la cartouche anticalcaire pendant 24 h avant
de l’utiliser (38). Pour atteindre le rendement optimal,
les granules doivent absorber de l’eau.
• Tournez la cartouche sur le bouchon du réservoir d’eau
(39). Bien fermer le réservoir ! Mettez le réservoir sur le
socle (40).
Option B : remplacement de la cartouche
complète
• Retirez le réservoir du socle et fermez le couvercle
du réservoir d’eau (25).
• La cartouche anticalcaire se trouve sur la surface
interne du bouchon du réservoir. Enlevez la cartouche
anticalcaire du bouchon en la tournant dans le sens
inverse des aiguilles d’une montre (26). Attention !
NE jetez PAS le bouchon du réservoir !
• Jetez la cartouche usagée dans la poubelle (36).
• Retirez la cartouche neuve de son emballage (37).
• Trempez les granulés neufs dans un réservoir d’eau
pendant 24 h avant de les utiliser (36). Pour atteindre
le rendement optimal, les granules doivent absorber de
l’eau.
• Tournez la cartouche sur le bouchon du réservoir d’eau
(38). Bien fermer le réservoir ! Mettez le réservoir sur le
socle (39).
25
26
27 28
38
Page 39

29 30
33
38
fr
31
32
34
36
35
39
37 40
39
Page 40

Conservation de l’appareil en cas de
non-utilisation prolongée
Nettoyez l’appareil comme indiqué plus haut, séchez-le
entièrement et conservez-le, de préférence, dans son emballage original, dans un endroit sec et frais.
Garantie
Les conditions de garantie sont déterminées par notre représentant national. Si, en dépit des contrôles de qualité
stricts, vous deviez constater un défaut, n‘hésitez pas à
vous adresser à votre distributeur spécialisé. Pour chaque
prestation de garantie, il est indispensable de présenter la
Elimination
Retournez l’appareil usé à votre distributeur
fr
spécialisé pour une élimination conforme à la
législation en vigueur. Renseignez-vous sur les
autres possibilités d’élimination auprès de votre
facture. Les travaux de réparation d‘appareils électriques
peuvent uniquement être effectués par des spécialistes.
Des réparations inappropriées peuvent constituer un danger énorme pour l‘utilisateur et le droit à la garantie est
annulé.
administration municipale.
Que faire en cas de panne ?
Problème Cause éventuelle Que faire
L’appareil ne fonctionne pas La prise n’est pas branchée Branchez la prise
Réservoir vide Remplissez le réservoir d’eau
(le témoin «vide» s’allume)
Aucun débit de brumisation Le taux d’humidité désiré est inférieur au Augmentez le degré d’humidité
taux d’humidité actuel
Résidus de produits de nettoyage Nettoyez l’appareil avec de l’eau claire
Débit de brumisation trop faible Température de l’eau est trop faible Réglez le débit de brumisation au maximum.
Au bout de 10 minutes, l’appareil fonctionnera
de nouveau correctement.
Dépôts minéraux sur la membrane Nettoyez la membrane
Dépôt blanc Cartouche anticalcaire usée Changez la cartouche de anticalcaire
autour de l’appareil entière ou les granules
Spécifications techniques U7145
Voltage 230 V ~ 50 Hz
Consommation électrique 22 W / 39 W
Débit d’humidification 400 g/h
2
Convient aux pièces jusqu’à 60 m
/ 150 m
3
Capacité du réservoir 5.0 litres
Dimensions 240 x 260 x 310 mm
Poids (à vide) 3.0 kg
Niveau de bruit < 25 dB(A)
Accessoires A7531 Cartouche anticalcaire
A7017 Ionic Silver Stick (ISS)
Spécifications techniques U7147
Voltage 230 V ~ 50 Hz
Consommation électrique 27 W / 42 W / 120 W*
Débit d’humidification 400 / 550 g/h*
Convient aux pièces jusqu’à 60 m
Capacité du réservoir 5.0 litres
Dimensions 240 x 260 x 310 mm
Poids (à vide) 3.0 kg
Niveau de bruit < 25 dB(A)
Accessoires A7531 Cartouche anticalcaire
A7017 Ionic Silver Stick (ISS)
* Quand utiliser avec préchauffage à 80 °C
2
/ 150 m
3
40
Page 41

Istruzioni per l’uso
it
41
Page 42

Introduzione
Complimenti per aver scelto l’umidificatore ad ultrasuoni
U7145 / U7147!
Impiego previsto:
L’apparecchio deve essere unicamente impiegato per
l’umidificazione dell’aria all’interno di abitazioni.
Lo sapevate che l’aria troppo secca
• asciuga le mucose e provoca labbra screpolate e bruciore agli occhi?
it
• facilita le infezioni e le malattie alle vie respiratorie?
• provoca spossatezza, stanchezza e difficoltà di concentrazione?
• è dannosa per gli animali domestici e le piante
d’appartamento?
• contribuisce alla formazione della polvere e aumenta la
carica elettrostatica di tessuti sintetici, tappeti e pavimenti in materiale sintetico?
• danneggia gli oggetti d’arredamento in legno e in particolare i pavimenti in parquet?
• rovina l’accordatura degli strumenti musicali?
Note generali
Di norma il clima ambientale è gradevole quando l’umidità
relativa oscilla tra il 40 e il 60%. L’apparecchio controlla
automaticamente l’umidità dell’aria da Voi desiderata ed
impostata. Quando l’aria è troppo secca, l’apparecchio si
avvia automaticamente. Una volta raggiunto il livello di
umidità dell’aria desiderato, l’apparecchio si disinserisce
automaticamente.
Avvertenze sulla sicurezza
• Si prega di leggere interamente le istruzioni per l’uso
prima della messa in funzione e di conservarle accuratamente per future consultazioni.
• Collegare l’apparecchio esclusivamente ad una presa
di corrente alternata, dopo essersi assicurati che la
tensione corrisponda a quella indicata sulla targhetta
dati dell’apparecchio.
42
• Utilizzare l’apparecchio soltanto in ambienti abitati e
nel rispetto dei dati tecnici specificati. Un uso improprio
può mettere a rischio la salute e la vita.
• I bambini non possono conoscere i rischi provocati
dalla manipolazione di apparecchi elettrici. Per questo
motivo non devono mai essere persi di vista quando si
trovano in prossimità dell’apparecchio (illustrazione 1).
• Le persone che non conoscono le istruzioni per l’uso,
così come i bambini e le persone sotto l’effetto di farmaci, alcol o droga, non possono usare l’apparecchio,
oppure possono usarlo soltanto sotto stretta sorveglianza.
• Non mettere mai in funzione l’apparecchio quando
un cavo o una spina sono danneggiati (2), dopo che
si sono verificati difetti di funzionamento oppure se
l’apparecchio stesso è caduto (3) o è stato danneggiato
in altro modo.
• L’apparecchio può essere messo in funzione soltanto
dopo essere stato completamente assemblato.
• Le riparazioni di apparecchi elettrici debbono essere
eseguite soltanto da personale specializzato (4). Se le
riparazioni non vengono eseguite a regola d’arte possono determinarsi gravi rischi per l’utente.
• Occorre staccare la spina dalla presa in caso di riempimento/svuotamento del serbatoio dell’acqua, prima
di ogni pulizia, prima del montaggio/smontaggio di
singole parti e prima di ogni spostamento.
• Non mettere le mani nella camera di nebulizzazione durante il funzionamento. La membrana si scalda a causa
dell’oscillazione ad alta frequenza e diventa rovente.
• Non estrarre mai la spina dalla presa tirando il cavo o
afferrando la spina con le mani bagnate.
• Sistemare l’apparecchio soltanto su una superficie
piana ed asciutta (5).
• Non posizionare l’apparecchio direttamente a terra o
vicino a fonti di calore. Se la nebbia d’acqua che fuoriesce raggiunge il pavimento prima dell’evaporazione
completa, lo può danneggiare (6). Non possiamo
accettare richieste di risarcimento danni dovute ad un
posizionamento errato.
• Collocare il nebulizzatore a ultrasuoni in posizione
rialzata (7), ad esempio su un tavolo, un comò ecc.
• Non caricare in nessun caso l’acqua attraverso l’ugello
della nebbia.
• Non immergere mai la base in acqua o in altri liquidi.
• Posizionare l’apparecchio in modo tale da non poter
essere rovesciato (8).
• In caso di non utilizzo togliere la spina.
• Non coprire il cavo con un tappeto o altri oggetti. Posizionare l’apparecchio in modo tale da non inciampare
sul cavo.
• Non azionare l’apparecchio in spazi nei quali si trovano
materiali infiammabili, gas o vapori.
• Non posizionare l’apparecchio sotto la pioggia e non
utilizzarlo in ambienti umidi.
• Non inserire oggetti estranei nell’apparecchio.
• Lasciare completamente liberi la presa d’aria e l’ugello
della nebbia.
• Non sedersi in nessun caso sull’apparecchio e non
posizionare alcun oggetto su quest’ultimo.
• Per proteggere la vostra salute e garantire un fun-
zionamento corretto dell’umidificatore, rifornite il
vostro apparecchio solo con acqua potabile pulita, non
inquinata, fredda ed appena prelevata dal rubinetto. Se
la sorgente d’acqua è inquinata o temete che non sia
sicura, utilizzate acqua distillata. Si raccomanda inoltre
di effettuare regolarmente la pulizia e la manutenzi-
one dell’umidificatore, secondo le istruzioni fornite
in questo manuale.
• Non versare additivi come oli essenziali, condizionatori
dell’acqua e fragranze. Questi additivi danneggiano
l’apparecchio! Apparecchi danneggiati in questo modo
sono esclusi dalla garanzia.
• Le vibrazioni ad alta frequenza non sono percettibili
dall’uomo e dall’animale e sono completamente innocue.
Page 43

1
4
7
it
2 5
3
8
6
9
43
Page 44

Aprire l’imballaggio
• Togliete l’apparecchio dall’imballaggio con cautela.
• Togliete il sacchetto di plastica dall’apparecchio.
• Per l’alimentazione di rete controllate le indicazioni
sulla targhetta dati.
• Utilizzate l’imballaggio originale per conservare
l’apparecchio, se questo non viene utilizzato tutto
l’anno.
Messa in funzione
Il miglior luogo di installazione per il Vostro apparecchio è:
it
• non direttamente sul pavimento oppure nelle immediate vicinanze di un riscaldamento. L’umidità della
nebbia può danneggiare la superficie del pavimento
(6 e 7) (vedere istruzioni di sicurezza).
• L’ugello della nebbia non deve mai essere orientato
direttamente su piante o oggetti. Mantenete una
distanza di almeno 50 cm (10).
• Mettete la cartuccia decalcificante per almeno 24h in
una bacinella piena d’acqua. Per raggiungere la piena
prestazione, il granulato deve assorbire l’acqua.
• La cartuccia decalcificante deve essere cambiata in
media ogni 2 o 3 mesi. Questa frequenza può variare in
funzione della durezza dell’acqua.
• Per riempire il serbatoio dell’acqua, leggete il paragrafo
«Riempire con acqua» (12).
• Posate il serbatoio dell’acqua sulla base (13).
• Collegate il cavo alla rete e accendete l’apparecchio
utilizzando l’interruttore ON/OFF (15).
• L’apparecchio raggiungerà la piena potenza dopo
10 – 15 minuti dall’accensione.
• Assicuratevi che il cavo di rete non rimanga incastrato
(9). Nel caso in cui il cavo di rete fosse difettoso non
accendete l’apparecchio (2).
Descrizione dell’apparecchio
Ugello della nebbia
(rotante)
Serbatoio dell’acqua
Camera di
evaporazione
Cartuccia decalcificante
Coperchio del
serbatoio dell’acqua
Ionic Silver Stick
Pannello di controllo
®
Riempire con acqua
Spegnete sempre l’apparecchio prima di rimuovere il serbatoio dell’acqua. Non mettete le
mani nella camera di nebulizzazione durante il
funzionamento!
Per proteggere la vostra salute e garantire un
funzionamento corretto dell’umidificatore,
rifornite il vostro apparecchio solo con acqua
prelevata dal rubinetto. Se la sorgente d’acqua è inquinata o
temete che non sia sicura, utilizzate acqua distillata.
Non mettete in funzione l’apparecchio nel caso in cui il serbatoio dell’acqua fosse vuoto! Qualora il livello dell’acqua
si trovasse al di sotto del livello minimo, l’apparecchio si
spegne automaticamente.
• Assicuratevi che non ci siano oggetti estranei nel
serbatoio dell’acqua.
• Rimuovete il coperchio del serbatoio dell’acqua (11).
• Collegate il cavo alla rete e accendete l’apparecchio (15).
potabile pulita, non inquinata, fredda ed appena
Riempite il serbatoio con acqua fresca del rubinetto
(12). Chiudete bene il coperchio del serbatoio! Posate
il serbatoio dell’acqua sulla base (13). Non aggiungete
additivi all’acqua (14)!
Spazzola
Membrana
Camera di
nebulizzazione
Base
44
Page 45

10
11
13
14
Preservazione della qualità
Lo Ionic Silver Stick sfrutta l’azione antimicrobia
dell’argento ed assicura un stagione di preservazione
della qualità dell’acqua ottimale in tutti gli umidificatori
dell’aria BONECO. L’ISS agisce appena viene a contatto
con l’acqua, anche se l’apparecchio è spento. L’ISS deve
essere utilizzato esclusivamente in umidificatori dell’aria.
Nell’illustrazione 16 è visibile la posizione nell’apparecchio.
Non mettete le mani nella camera di nebulizzazione durante
il funzionamento. Spegnete prima l’apparecchio.
Non utilizzare fragranze
NON devono essere utilizzati additivi dell’acqua (ad esempio oli essenziali, fragranze, condizionatori dell’acqua)!
Anche una piccola quantità può danneggiare la plastica o
formare delle fessure. Il materiale non è adatto all’utilizzo
di tali additivi. Una goccia è sufficiente per danneggiare il
serbatoio dell’acqua, e con ciò per rendere inutilizzabile
l’apparecchio. Apparecchi danneggiati da additivi sono esclusi dalla garanzia.
it
12
15 16
45
Page 46

Funzionamento U7145
C
B
it
A
A) Accensione/spegnimento
Ruotando la manopola in senso orario si mette in funzione
l’apparecchio ed al tempo stesso si aumenta l’intensità
della nebulizzazione.
B) Igrostato (impostazione dell’umidità)
Il grado d’umidità desiderato si imposta ruotando la manopola in senso orario. Si consiglia di impostare l’umidità
relativa dell’aria a un valore tra il 40 e il 60%. Generalmente il grado d’umidità più conveniente si ottiene quando
la manopola è in una posizione prossima alla verticale. Il
grado di precisione della misurazione è pari al +/- 5%. Se
l’umidità supera i valori impostati, l’apparecchio si spegne.
Se la manopola è ruotata completamente verso destra
l’apparecchio resta sempre in funzione. In questo caso è
attivato il funzionamento continuo.
46
C) Indicatore serbatoio vuoto (rosso)
Il serbatoio dell’acqua trasparente consente vedere la
quantità d’acqua presente. L’apparecchio avverte l’utente
quando il serbatoio dell’acqua è vuoto. Quando questa condizione si verifica, l’apposita indicazione (lettera C in rosso)
s’illumina. Per ulteriori informazioni consultare il capitolo
«Riempimento del serbatoio». Dopo l’inserimento del serbatoio dell’acqua pieno, lo spegnimento del simbolo rosso
C può richiedere alcuni secondi.
Page 47

Funzionamento U7147 I) Indicatore preriscaldamento
D) Emissione di nebbia; regolazione
dell’evaporatore
H
E
L
F
I
D
J
È possibile controllare l’emissione di nebbia premendo ripetutamente il tasto D. Il simbolo H segnala il livello (basso/
medio/alto) selezionato.
A
E) Funzionamento con preriscaldamento
G
Il tasto E serve ad attivare o a disattivare il preriscaldamento (il simbolo I si illumina). L’acqua viene preriscaldata
C
a 80 °C prima dell’immissione nella camera di nebuliz-
M
zazione. Perché l’acqua presente nella base si riscaldi occorrono da 10 a 15 minuti circa. La nebbia fuoriesce ora alla
B
temperatura di 40 °C. Il vantaggio consiste nel fatto che la
temperatura dell’ambiente non si abbassa e oltre a questo
K
la qualità dell’acqua viene preservata.
J) Indicatore modalità Auto
K) Indicatore modalità Sleep
L) Indicatore serbatoio vuoto
Il serbatoio dell’acqua trasparente consente di vedere la
quantità d’acqua presente. Inoltre il display (L) segnala
quando è necessario riempire il serbatoio di acqua.
Ulteriori informazioni sono riportate nel capitolo «Riempimento del serbatoio». Dopo l’inserimento del serbatoio
dell’acqua pieno, lo spegnimento del simbolo L può richiedere alcuni secondi.
M) Indicatore di pulizia
A) Accendere/spegnere
Premendo il tasto A si accende o si spegne l’apparecchio.
Questo pulsante serve anche per spegnere la spia di richiesta pulizia (mantenere premuto).
B) Igrostato (impostazione dell’umidità)
Premendo il tasto B si imposta l’umidità desiderata in %. Si
consiglia di impostare l’umidità relativa dell’aria a un valore
tra il 40 e il 60%. Il grado di precisione della misurazione
è pari al +/- 5%. Se l’umidità supera i valori impostati,
l’apparecchio si spegne. Durante la selezione viene visualizzato il valore desiderato (simbolo DESIRED). Dopo alcuni secondi compare automaticamente il valore di umidità
effettivo (simbolo CURRENT).
C) Timer
Mediante il tasto C è possibile determinare la durata di
esercizio, regolabile da 1 a 8 ore oppure in funzionamento
continuo (CO). Il simbolo G indica la durata che è stata
impostata (1h/2h/3h/4h/5h/6h/7h/8h/CO). Dopo alcuni secondi compare automaticamente il valore effettivo.
F) Modalità Auto/Sleep
Premendo il tasto F si può attivare la modalità automatica
e Sleep. Una sola pressione attiva la funzione automatica
(compare il simbolo J sul display) che consente di mantenere un livello ottimale di umidità dell’aria rispetto alla
temperatura. La regolazione avviene mediante la quantità
di emissione e il valore desiderato predefinito. Se si imposta la funzione Sleep (il simbolo K compare sul display),
l’umidità teorica è del 50 – 65%, la regolazione del tempo
è impostata automaticamente a 6 ore, il riscaldamento
è attivato. Inoltre viene controllata la quantità emessa a
seconda delle differenze tra valore desiderato e valore
effettivo.
Non è possibile cambiare l’impostazione dell’igrostato e
dell’emissione di nebbia sia nell’una che nell’altra modalità.
Premendo il tasto B o D, l’apparecchio esce dalla modalità
Auto o Sleep.
G) Indicatore timer
H) Indicatore emissione di nebbia
Qualora sul display appaia il simbolo M con «CLEAN», il
produttore raccomanda di pulire l’apparecchio. Il simbolo
si accende automaticamente, a seconda dell’uso, ogni 2
settimane. Tenendo premuto per circa 10 – 15 secondi il
tasto A è possibile spegnere l’indicatore.
it
47
Page 48

Pulizia/manutenzione
Spegnete sempre l’apparecchio prima di togliere il serbatoio dell’acqua da quest’ultimo. Non mettete le mani nella
camera di nebulizzazione durante il funzionamento!
• Spegnete l’apparecchio (17) e staccate la spina dalla
presa (18) prima di pulire l’apparecchio.
• Pulite regolarmente il serbatoio dell’acqua e la camera
di nebulizzazione una volta alla settimana (soltanto con
acqua, senza detergenti) (19).
• Decalcificate regolarmente la camera del nebulizzatore
it
con agenti decalcificanti del tipo abitualmente reperibile in commercio (20). Sciacquate abbondantemente
l’agente decalcificante con acqua.
• Rimozione dell’ugello (21): ruotare l’ugello finché le
frecce presenti sull’ugello e sull’anello si trovano alla
stessa altezza. Rimuovere ora l’ugello agendo sui punti
delle due frecce tirando la parte interna verso l’alto.
17
18
19
20
21
48
Page 49

Attenzione
• Fate attenzione che non penetri acqua nella parte
inferiore della base (22).
• Pulite le parti interne con un panno morbido, non
utilizzando mai benzina, detersivi per finestre e solventi
(23).
• Utilizzate esclusivamente la spazzola per la pulizia
settimanale della membrana (24).
• Sostituite l’acqua nell’apposito serbatoio almeno una
volta la settimana.
22 24
it
23
49
Page 50

Sostituzione della cartuccia decalcificante
Spegnete sempre l’apparecchio prima di togliere
il serbatoio dell’acqua da quest’ultimo. Non
mettete le mani nella camera di nebulizzazione
durante il funzionamento!
Questa cartuccia deve essere sostituita ogni 2 – 3 mesi.
Nel caso in cui l’acqua fosse molto dura, potrebbe essere
necessario cambiare la cartuccia anticipatamente. La polvere bianca intorno all’apparecchio indica con certezza
che la cartuccia è consumata. Qualora si dovesse formare
it
un deposito bianco intorno all’apparecchio nonostante ci
sia una nuova cartuccia, controllate che l’acqua utilizzata
sia veramente non trattata. Qualora prima dell’utilizzo
nell’apparecchio l’acqua scorra attraverso un impianto di
decalcificazione domestico, si depositerà del sale intorno
all’apparecchio.
Opzione A: sostituire il granulato
• Togliere il serbatoio dell’acqua dalla base e svitare il
coperchio (25).
• La cartuccia decalcificante si trova sul lato interno
del coperchio del serbatoio. Svitate la cartuccia decalcificante dal coperchio, ruotando in senso antiorario
(26). Attenzione: NON gettate il coperchio del serbatoio!
• Aprite la cartuccia (27).
• Gettate il contenuto della cartuccia (granulato) nella
spazzatura (28). Attenzione: il granulato rovesciato su
un pavimento liscio è molto scivoloso!
• Collocate la spugna plastica rosa compresa nella confezione al centro della cartuccia. Non spingerla a fondo
perché questo renderebbe difficile rimuoverla alla fine
della procedura (29).
• Versate il contenuto di un sacchetto di resina nel
bicchiere di plastica compreso nella confezione di
rifornimento (30).
• Collocate la cartuccia col tappo al centro sopra al
bicchiere (31).
• Capovolgete bicchiere e cartuccia e scuotere finché
tutto il granulato non sia sceso nella cartuccia (32).
• Rimuovete dalla cartuccia il bicchiere di plastica e la
spugna plastica rosa (33) e conservateli per un riutilizzo futuro (il corredo di rifornimento comprende tre
sacchetti di resina) (34).
• Chiudete il coperchio (35).
• Mettete la cartuccia decalcificante per almeno 24h in
una bacinella piena d’acqua (38). Per raggiungere la
piena prestazione, il granulato deve assorbire l’acqua.
• Ora ruotate la cartuccia sul coperchio del serbatoio
(39). Chiudete bene il coperchio del serbatoio! Posate
il serbatoio dell’acqua sulla base (40).
Opzione B: sostituire completamente la
cartuccia
• Togliere il serbatoio dell’acqua dalla base e svitare il
coperchio (25).
• La cartuccia decalcificante si trova sul lato interno del
coperchio del serbatoio. Svitate la cartuccia decalcificante dal coperchio, ruotando in senso antiorario (26).
Attenzione: NON gettate il coperchio del serbatoio!
• Gettate la cartuccia nella spazzatura (36).
• Togliete la nuova cartuccia decalcificante
dall’imballaggio (37).
• Mettete la cartuccia decalcificante per almeno 24h in
una bacinella piena d’acqua (38). Per raggiungere la
piena prestazione, il granulato deve assorbire l’acqua.
• Ora ruotate la cartuccia sul coperchio del serbatoio
(39). Chiudete bene il coperchio del serbatoio! Posate il
serbatoio dell’acqua sulla base (40).
25
26
27 28
50
Page 51

29 30
33
38
it
31
32
34
36
35
39
37 40
51
Page 52

Conservazione dell’apparecchio
in caso di lungo periodo di inattività
Pulite l’apparecchio come descritto, fatelo asciugare completamente e conservate preferibilmente nell’imballaggio
originale in un luogo asciutto e non troppo caldo.
Garanzia
Le disposizioni di garanzia vengono fissate dalla nostra
rappresentanza nazionale. RivolgeteVi con fiducia al Vostro
venditore specializzato qualora, malgrado i rigidi controlli
sulla qualità, doveste riscontrare un difetto nell’apparecchio.
Per poter usufruire della garanzia è assolutamente neces-
Smaltimento
Consegnate l’apparecchio fuori uso al Vostro
fornitore per uno smaltimento adeguato. Potete
informarVi presso la Vostra autorità comunale o
cittadina competente circa ulteriori possibilità di
it
smaltimento.
sario presentare la documentazione di acquisto. La riparazione di apparecchi elettrici deve essere eseguita solo
da tecnici qualificati. Riparazioni effettuate da persone non
qualificate possono causare gravi pericoli all’utilizzatore e
rendere nulla la garanzia.
Risoluzione dei problemi
Problema Possibile causa Cosa fare
L’apparecchio non funziona Spina non inserita Collegare la spina di rete all’apposita presa
Manca acqua nell’apposito serbatoio Rabboccare acqua
(si illumina l’indicatore di serbatoio vuoto)
Nessuna fuoriuscita di nebbia Il livello di umidità dell’aria impostato è Aumentare l’impostazione dell’umidità
inferiore all’umidità dell’aria nell’ambiente dell’aria
Residui di detersivo Pulire l’apparecchio con acqua pulita
Scarsa fuoriuscita di nebbia Temperatura dell’acqua troppo bassa Impostare al massimo la fuoriuscita di nebbia;
dopo 10 minuti l’apparecchio funzionerà di
nuovo correttamente
Sedimentazione di calcio sulla membrana Pulire la membrana
Deposito biancastro Cartuccia decalcificante esaurita Sostituire la cartuccia decalcificante o il
intorno all’apparecchio granulato
Dati tecnici U7145
Tensione di rete 230 V ~ 50 Hz
Consumo di energia 22 W / 39 W
Potenza di umidificazione 400 g/h
2
Adatto per ambienti di dimensioni max 60 m
/ 150 m
3
Capacità d’acqua 5.0 litri
Dimensioni 240 x 260 x 310 mm
Peso (vuoto) 3.0 kg
Rumorosità in funzione < 25 dB(A)
Accessori A7531 Cartuccia decalcificante
A7017 Ionic Silver Stick (ISS)
Dati tecnici U7147
Tensione di rete 230 V ~ 50 Hz
Consumo di energia 27 W / 42 W / 120 W*
Potenza di umidificazione 400 / 550 g/h*
Adatto per ambienti di dimensioni max 60 m
Capacità d’acqua 5.0 litri
Dimensioni 240 x 260 x 310 mm
Peso (vuoto) 3.0 kg
Rumorosità in funzione < 25 dB(A)
Accessori A7531 Cartuccia decalcificante
A7017 Ionic Silver Stick (ISS)
* Se usata con acqua preriscaldata a 80 °C
2
/ 150 m
3
52
Page 53

Gebruiksaanwijzing
nl
53
Page 54

Voorwoord
Van harte gefeliciteerd met uw aankoop van de ultrasone
vernevelaar U7145 / U7147!
Correct gebruik:
Het apparaat mag uitsluitend worden gebruikt voor het
bevochtigen van lucht binnenshuis.
Wist u dat te droge kamerlucht
• Slijmvliezen uitdroogt en ook droge en gesprongen
lippen en brandende ogen veroorzaakt?
• Infecties en ziekten van de luchtwegen stimuleert?
• Tot traagheid, moeheid en verzwakte concentratie
leidt?
• Huisdieren en kamerplanten belast?
nl
• Stofontwikkeling bevordert en de elektrostatische
lading van textiel gemaakt van kunststofvezels en ook
van tapijt en kunststofvloeren?
• Houten meubels en vooral ook parketvloeren
beschadigt?
• Muziekinstrumenten ontstemt?
Algemeenheden
De kamerlucht is doorgaans aangenaam wanneer de relatieve vochtigheid 40 tot 60% bedraagt. Dit toestel controleert de door u gewenste en ingestelde luchtvochtigheid
automatisch. Als de kamerlucht te droog is, schakelt het
apparaat automatisch in. Als de gewenste luchtvochtigheid
bereikt is, schakelt het automatisch uit.
Veiligheidsinstructies
• Alvorens het toestel te gaan gebruiken, dient u de gebruiksaanwijzing volledig door te nemen en voor later
gebruik goed te bewaren.
• Het toestel uitsluitend op wisselstroom aansluiten
– met spanning in overeenstemming met het typeidentificatieplaatje op het toestel.
• Het toestel uitsluitend in woonkamers en in overeenstemming met de gespecificeerde technische gegevens gebruiken. Een toepassing, die niet volgens de
54
voorschriften wordt doorgevoerd, kan de gezondheid
en uw leven in gevaar brengen.
• Kinderen kunnen de gevaren die het gebruik van elektrische toestellen met zich meebrengt, niet overzien.
Daarom moeten kinderen steeds onder toezicht staan
wanneer ze zich in de nabijheid van het toestel bevinden (afbeelding 1).
• Personen, die niet met de gebruiksaanwijzing vertrouwd zijn, alsook kinderen en personen onder de
invloed van geneesmiddelen, alcohol of verdovende
middelen, mogen het toestel niet of uitsluitend onder
toezicht bedienen.
• Het toestel nooit in bedrijf stellen wanneer een kabel of
stekker beschadigd is (2), bij een slechte of verkeerde
werking van het toestel, wanneer het op de grond gevallen is (3) of op een andere manier beschadigd werd.
• Het toestel mag uitsluitend in volledig gemonteerde
toestand in bedrijf gesteld worden.
• Herstellingen aan elektrische toestellen mogen uitsluitend door vakmensen doorgevoerd worden (4).
Door ondeskundige herstellingen kan er aanzienlijk
gevaar voor de gebruiker ontstaan.
• De netstekker moet uit het stopcontact getrokken
worden telkens wanneer de watertank gevuld/geledigd
wordt, alvorens te reinigen, alvorens afzonderlijke
onderdelen gemonteerd/gedemonteerd worden en
wanneer het toestel verplaatst wordt.
• Grijp tijdens de werking niet in de nevelkamer. Het
membraan wordt heet door de hoogfrequente trillingen.
• Trek de netstekker nooit aan de kabel of met natte
handen uit het stopcontact.
• Het toestel uitsluitend op een effen, droog oppervlak
plaatsen (5).
• Toestel niet direct op de vloer of naast de verwarming
plaatsen. Als de vrijkomende waternevel vóór het verdampen de vloer raakt, kan de vloer beschadigingen
oplopen (6). Wij kunnen niet aansprakelijk worden
gesteld voor schade die voortvloeit uit verkeerde plaatsing.
• U dient het toestel hoog te plaatsen (7) bijv. op een
tafel, een kast, etc.
• In geen geval met water vullen via de uitstootopening.
• Het toestel nooit in water of andere vloeistoffen onderdompelen.
• Plaats het toestel zo dat het niet omgestoten kan worden (8).
• Trek altijd de netstekker uit het stopcontact als u het
toestel niet gebruikt.
• Bedek de kabel nooit met een tapijt of andere voorwerpen. Het toestel zodanig plaatsen dat u niet over de
kabel kunt struikelen.
• Gebruik het toestel niet in ruimtes waarin zich brandgevaarlijke materialen, gas of dampen bevinden.
• Zet het toestel niet in de regen en gebruik het niet in
vochtige ruimtes.
• Steek geen vreemde voorwerpen in het toestel.
• Luchtingang en neveluitgang dienen altijd vrij te zijn.
• Plaats geen zware voorwerpen op het toestel.
• Ter bescherming van de gezondheid en om een
correcte werking van de bevochtiger te waarborgen,
dient u uitsluitend schoon, niet-verontreinigd, koud,
vers kraanwater in uw luchtbevochtiger te gebruiken.
Is uw waterbron verontreinigd of twijfelt u of het water
veilig is om te gebruiken, neem dan gedistilleerd water.
Bovendien wordt geadviseerd om uw bevochtiger
regelmatig te reinigen en te onderhouden volgens de
instructies in deze handleiding.
• Het gebruik van geurstoffen zoals etherische oliën,
schoonmaakmiddelen voor water of aroma’s beschadigt uw toestel! Toestellen die door dergelijke
additieven zijn beschadigd, zijn van de fabrieksgarantie
buitengesloten.
• De hoogfrequente trillingen kunnen door mens en dier
niet gehoord worden en zijn geheel ongevaarlijk.
Page 55

1
4
7
2 5
3
8
6
9
nl
55
Page 56

Uitpakken
• Haal het toestel voorzichtig uit de verpakking.
• Verwijder de plastic zak van het toestel.
• Controleer de informatie m.b.t. de netaansluiting op het
typeplaatje.
• Gebruik de originele verpakking voor het bewaren van
het toestel, als u het niet gedurende het hele jaar gebruikt.
Inbedrijfstelling
Zoek de beste opstellingsplaats voor uw toestel:
• Plaats het toestel niet vlak naast een radiator of op
een vloer met vloerverwarming. De vochtigheid van de
nevel zou het vloeroppervlak (6 en 7) kunnen beschadigen (zie veiligheidsinstructies).
nl
• De uitstootopening mag niet direct op planten of voorwerpen gericht zijn. Bewaar een afstand van minstens
50 cm (10).
• Leg het demineralisatiepatroon gedurende minstens
24 uur in een met water gevulde schaal. Het granulaat
moet water kunnen opzuigen om zijn volle vermogen te
bereiken.
• Gemiddeld moet u het demineralisatiepatroon om de
2 tot 3 maanden verwisselen. Afhankelijk van de hardheid van het water kan dat ook later of vroeger kunnen
gebeuren.
• Lees het hoofdstuk «Water vullen» om de watertank te
vullen (12).
• De watertank op het onderste gedeelte plaatsen (13).
• Sluit de netkabel op het stroomnet aan en schakel het
toestel via de Aan/uit-schakelaar in (15).
• Ongeveer 10 à 15 min. nadat u het toestel heeft ingeschakeld, bereikt het toestel het maximale vermogen.
• Verzeker u er van dat de netkabel niet vastgeklemd
wordt (9). Schakel het toestel niet in als de netkabel
beschadigd is (2).
Beschrijving toestel De tank vullen
Schakel het toestel altijd uit als u de watertank
van het toestel verwijdert. Grijp tijdens de werking nooit in de nevelkamer!
Uitstootopening (draaibaar)
Watertank
Verdampingskamer
Demineralisatiepatroon
Watertankdeksel
Ionic Silver Stick
Bedieningspaneel
®
bevochtiger te gebruiken. Is uw waterbron verontreinigd of
twijfelt u of het water veilig is om te gebruiken, neem dan
gedistilleerd water.
Schakel het toestel niet in als de watertank leeg is! Als de
waterstand onder het normale niveau gedaald is, schakelt
het toestel automatisch uit.
• Verzeker u ervan dat zich geen vreemde voorwerpen in
• Het watertankdeksel van de tank verwijderen (11).
• Sluit de netkabel op het stroomnet aan en schakel het
Ter bescherming van de gezondheid en om
een correcte werking van de bevochtiger te
waarborgen, dient u uitsluitend schoon, niet-verontreinigd, koud, vers kraanwater in uw lucht-
de watertank bevinden.
De tank met vers, koud leidingwater vullen (12). Tankdeksel goed afsluiten! De watertank op het onderste
gedeelte plaatsen (13). Geen additieven aan het water
toevoegen (14)!
toestel in (15).
Borstel
Membraan
Vernevelkamer
Onderste gedeelte
56
Page 57

10
11
13
14
Schoonmaken van het water
De lonic Silver Stick maakt gebruik van de antimicrobiële werking van zilver en zorgt een seizoen lang
voor optimaal schoon water in alle BONECO luchtbevochtigers. De ISS werkt zodra hij met water in
contact komt – ook wanneer het apparaat is uitgeschakeld. De ISS is uitsluitend bedoeld voor gebruik in
luchtbevochtigers. In afbeelding 16 kunt u de positie van
de ISS in het toestel zien. Grijp tijdens de werking niet in de
nevelkamer. Schakel het toestel eerst uit.
Gebruik geen geurstoffen
Additieven (bijv. etherische oliën, aroma’s, schoonmaakmiddelen voor het water) mogen NIET worden gebruikt!
Zelfs een kleine hoeveelheid zou het kunststof kunnen beschadigen. Het materiaal is niet geschikt voor het gebruik
van dergelijke additieven. Een druppel is al voldoende om
de watertank te beschadigen en het toestel onbruikbaar
te maken. Toestellen die door dergelijke additieven worden
beschadigd, zijn van de fabrieksgarantie uitgesloten.
nl
12
15
16
57
Page 58

Bediening U7145
C
B
nl
A
A) In-/uitschakelen
Het toestel wordt ingeschakeld door de draaiknop rechtsom
te draaien, hiermee kan eveneens de stoomcapaciteit van
laag naar hoog gedraaid worden.
B) Hygrostaat (vochtigheid instellen)
Het gewenste luchtvochtigheidsniveau kan ingesteld worden door de draaiknop rechtsom te draaien. Wij adviseren
een relatieve luchtvochtigheid tussen 40 en 60%. Dit niveau
kan bereikt worden door de draaiknop te draaien tot deze
ongeveer in de verticale stand staat. De meetnauwkeurigheid bedraagt+/- 5% Overschrijdt de vochtigheid de gewenste instelling dan schakelt het toestel uit. Het toestel
kan niet uitgeschakeld worden als de draaiknop helemaal
naar rechts gedraaid is. De functie «continue werking» is
dan geactiveerd.
58
C) Leegstandindicator (rood)
Door de transparante watertank is de waterhoeveelheid
goed zichtbaar. Het toestel waarschuwt u ook als de watertank leeg is. De rode leegstandindicator gaat dan branden
(symbool C). Voor meer informatie kunt u het hoofdstuk «De
tank vullen» raadplegen. Het rode symbool C kan nog enkele seconden blijven branden bij een gevulde tank, tot het
onderste gedeelte met water gevuld is.
Page 59

Bediening U7147 J) Automodus-indicator
D) Neveluitstoot,
verdampingsvermogen regelen
H
E
L
F
I
D
J
A
G
C
M
B
K
A) Aan-/uitschakelen
Als u op toets A drukt, schakelt u het toestel aan of uit. Deze
toets wordt ook gebruikt om het lampje van de reinigingsindicator terug te zetten (ingedrukt houden).
B) Hygrostaat (vochtigheid instellen)
Als u op de toets B drukt, stelt u de gewenste vochtigheid
in, in %. Wij adviseren een relatieve luchtvochtigheid tussen 40 en 60%. De meetnauwkeurigheid bedraagt +/- 5%
Overschrijdt de vochtigheid de gewenste instelling dan
schakelt het toestel uit. Tijdens de selectie wordt de gewenste waarde afgebeeld (symbool DESIRED). De display
toont na enkele seconden automatische de huidige vochtigheidswaarde (symbool CURRENT).
C) Timer
Met de toets C kunt u de bedrijfsduur bepalen – in te
stellen tussen 1 en 8 uur of op continue werking (CO).
Symbool G geeft aan welke bedrijfsduur is ingsteld
(1u/2u/3u/4u/5u/6u/7u/8u/CO). De display toont na enkele
seconden automatische de huidige waarde.
Door meerdere malen op toets D te drukken, kunt u de
neveluitstoot regelen. Symbool H geeft aan welke van de
drie niveaus (laag.midden/hoog) u heeft gekozen.
E) Werking met voorverwarming
Met toets E kunt u de voorverwarming aan- (symbool I
gaat branden) of uitschakelen. Het water wordt dan voor
het in de vernevelkamer komt, voorverwarmd op 80 °C.
Het opwarmen van het water in het onderste gedeelte duurt
ca. 10 tot 15 minuten. De stoom wordt uitgestoten met een
aangename 40 °C. Dit heeft het voordeel dat de kamertemperatuur niet daalt en dat bovendien het water aanmerkelijk
schoner blijft.
F) Auto/Slaapmodus
Als u op toets F drukt, kunt u de stand Automatisch of Sleep
activeren. Als u de toets eenmaal indrukt, wordt de functie
«Automatisch» ingeschakeld (het symbool J verschijnt op
de display) waardoor de luchtvochtigheid wordt afgeregeld
in verhouding tot de temperatuur. Dat wordt geregeld aan
de hand van de uitstoothoeveelheid en de ingevoerde gewenste waarde. Als de sleep-functie wordt ingesteld (sym-
bool K verschijnt op de display) is de gewenste waarde
50 – 65%, de tijdinstelliing wordt automatisch op 6 uur
ingesteld en de verwarming is ingeschakeld. Bovendien
wordt ook de uitstoothoeveelheid geregeld, afhankelijk van
het verschil tussen de gewenste en de aanwezige waarde.
De Hygrostaat- en neveluitstoot-instelling kan niet in elke
stand worden gewijzigd. Als de toets B of D worden ingedrukt, staat het toestel niet langer in auto- of slaapstand.
G) Timer-indicator
H) Neveluitstoot-indicator
K) Slaapmodus-indicator
L) Leegstandindicator
Door de transparante watertank is de waterhoeveelheid
goed zichtbaar. Bovendien geeft het toestel op de display
(L) aan wanneer water bijgevuld moet worden.
Lees voor meer informatie het hoofdstuk «De tank vullen».
Het symbool L kan bij een gevulde tank enkele seconden
blijven branden, tot het onderste gedeelte met water gevuld is.
M) Reinigingsweergave
Als op het display symbool M met «CLEAN» wordt weergegeven, dient het apparaat volgens advies van de fabrikant
gereinigd te worden. Dit symbool gaat automatisch elke 2
weken branden, afhankelijk van het gebruik. Door knop A
langer in te drukken (ca. 10 – 15 seconden) kan de weergave gedoofd worden.
I) Voorverwarmingsindicator
nl
59
Page 60

Reiniging/onderhoud
Schakel het toestel altijd uit voordat u de watertank van het toestel verwijdert. Grijp tijdens de
werking niet in de nevelkamer!
• Schakel het toestel uit (17) en trek de netstekker uit
het stopcontact (18) voordat u het toestel reinigt.
• De watertank en de vernevelkamer dienen regelmatig,
één keer per week, gereinigd te worden (alleen met
water, geen schoonmaakmiddel gebruiken) (19)
• Ontkalk de vernevelkamer regelmatig met een gangbaar ontkalkingsmiddel (20). Spoel het ontkalkingsmiddel met overvloedig water goed uit.
• Verstuiver (21) verwijderen: Draai de verstuiver totdat
de pijlmarkeringen van de verstuiver en de verstuiver-
nl
ring tegenover elkaar staan. Verwijder nu de verstuiver
op de plek van de beide pijlmarkeringen door het binnenste deel naar boven te trekken.
17
19
20
2118
60
Page 61

Belangrijk
• Let erop dat er geen water in het onderste gedeelte
van het apparaat komt (20).
• Reinig de binnenste onderdelen met een zachte doek.
Maak in geen geval gebruik van benzine, schoonmaakmiddelen voor ramen of oplosmiddelen (21).
• Voor de wekelijkse reiniging van het membraan maakt
u uitsluitend gebruik van de borstel (22).
• Vervang het water in de watertank minstens 1 keer per
week.
22 24
23
nl
61
Page 62

Vervangen van het Ontkalkingspatroon
Schakel het toestel altijd uit voordat u de watertank van het toestel verwijdert. Grijp tijdens de
werkiing niet in de nevelkamer!
Deze patroon moet telkens na 2 tot 3 maanden worden vervangen. Bij heel hard water kan vervanging van het patroon
al eerder nodig zijn. Wit stof rond het toestel wijst er zeker
op dat de patroon verbruikt is. Indien er zich ondanks een
nieuwe patroon een witte neerslag vormt rond het toestel, moet gecontroleerd worden of het gebruikte water
werkelijk onbehandeld is. Indien het water voor gebruik in
het toestel door een thuisontkalkingsinstallatie stroomt, zal
rond het toestel zout afgezet worden.
nl
Mogelijkheid A: granulaat verwisselen
• De watertank van het onderste gedeelte verwijderen
en het watertankdeksel losdraaien (25).
• Het kalkfilter bevindt zich aan de binnenzijde van het
tankdeksel. Schroef de filterpatroon linksom van het
deksel (26). Let op: Tankdeksel NIET weggooien!
• Open de patroon (27).
• Gooi de inhoud van de patroon (granulaat) weg (28).
Let op: gemorst granulaat op een gladde vloer kan erg
glad zijn!
• Plaats het bijgevoegde stuk roze schuimplastic in het
midden van de patroon. Druk het niet naar de bodem,
want dan is het achteraf moeilijk te verwijderen (29).
• Strooi de inhoud van een hervulzakje hars in het plastic
bekertje dat in de verpakking van de hervulling is
bijgevoegd (30).
• Plaats de lege patroon met de pen in het midden op
het plastic bekertje (31).
• Keer plastic bekertje en patroon om en schud tot alle
granulaat in de patroon zit (32).
• Verwijder het plastic bekertje en het stuk roze schuimplastic van de patroon (33) en bewaar deze voor later
gebruik (de hervulverpakking bevat 3 zakjes) (34).
• Sluit de patroon (35).
• Leg de demineralisatiepatroon gedurende minstens
24 uur in een met water gevulde schaal (38). Het
granulaat moet water kunnen opzuigen om zijn volle
vermogen te bereiken.
• Vervolgens het patroon op het watertankdeksel draaien
(39). Tankdeksel goed afsluiten! De watertank op het
onderste gedeelte plaatsen (40).
Mogelijkheid B: gehele filter vervangen
• De watertank van het onderste gedeelte verwijderen
en het watertankdeksel losdraaien (25).
• Het kalkfilter bevindt zich aan de binnenzijde van het
tankdeksel. Schroef het kalkfilter linksom van het deksel (26). Let op: tankdeksel NIET weggooien!
• Gooi de filterpatroon weg (36).
• Haal een nieuw patroon uit de verpakking (37).
• Leg de demineralisatiepatroon gedurende minstens
24 uur in een met water gevulde schaal (38). Het
granulaat moet water kunnen opzuigen om zijn volle
vermogen te bereiken.
• Vervolgens het patroon op het watertankdeksel draaien
(39). Tankdeksel goed afsluiten! De watertank op het
onderste gedeelte plaatsen (40).
25
26
27 28
62
Page 63

29 30
33
38
31
32
34
36
35
39
37 40
nl
63
Page 64

Opslag wanneer het toestel langere
tijd niet gebruikt wordt
Toestel reinigen zoals hiervoor beschreven, volledig laten
drogen en bij voorkeur in de oorspronkelijke verpakking op
een droge, niet te warme plaats bewaren.
Garantie
De garantiebepalingen zijn vastgelegd voor onze landelijke
verkooporganisatie. Wendt u tot uw vakhandelaar wanneer
dit toestel ondanks strenge kwaliteitscontroles toch defect
raakt. Voor een beroep op de garantie dient u een aankoopbewijs te kunnen tonen. Reparaties aan elektrische
Verwijdering
Overhandig uw handelaar het versleten toestel
om dit op deskundige wijze te laten verwijderen.
apparatuur mogen uitsluitend door een vakman worden
uitgevoerd. Door ondeskundige reparaties kunnen gevaren
ontstaan voor de gebruiker en vervalt tevens de garantie.
Andere verwijderingsmogelijkheden kunt u opvragen bij uw gemeente of deelraad.
nl
Storingen verhelpen
Probleem Mogelijke oorzaken Wat doen
Toestel functioneert niet Netstekker niet ingestoken Netstekker op stopcontact aansluiten
Geen water in de watertank Water bijvullen
(waterstandalarm knippert)
Geen neveluitstoot Gewenste vochtigheidsgraad is lager Instelling van de luchtvochtigheid verhogen
dan de aanwezige vochtigheidsgraad
Overblijfselen van reinigingsmiddelen Toestel met helder water reinigen
Te geringe neveluitstoot Watertemperatuur te laag Neveluitstoot op maximum
instellen, na 10 minuten werkt het toestel
weer vlekkeloos
Kalkafzetting op het membraan Membraan reinigen
Witte neerslag rondom Demineralisatiepatroon opgebruikt Demineralisatiepatroon of hars verwisselen
het toestel
Technische informatie U7145
Netspanning 230 V ~ 50 Hz
Vermogensopname 22 W / 39 W
Bevochtigingscapaciteit 400 g/h
2
Geschikt voor kameroppervlakken tot 60 m
/ 150 m
3
Waterinhoud 5.0 liter
Afmetingen 240 x 260 x 310 mm
Ledig gewicht 3.0 kg
Werkgeluid < 25 dB(A)
Accessoires A7531 Demineralisatiepatroon
A7017 Ionic Silver Stick (ISS)
Technische informatie U7147
Netspanning 230 V ~ 50 Hz
Vermogensopname 27 W / 42 W / 120 W*
Bevochtigingscapaciteit 400 / 550 g/h*
Geschikt voor kameroppervlakken tot 60 m
Waterinhoud 5.0 liter
Afmetingen 240 x 260 x 310 mm
Leergewicht 3.0 kg
Werkgeluid < 25 dB(A)
Accessoires A7531 Demineralisatiepatroon
A7017 Ionic Silver Stick (ISS)
* Indien gebruikt met voorverwarming tot 80 °C
2
/ 150 m
3
64
Page 65

Instrucciones para el uso
es
65
Page 66

Introducción
¡Felicidades por haber adquirido el nebulizador ultrasónico
U7145 / U7147!
Uso adecuado:
El dispositivo sólo debe utilizarse para la humidificación del
aire en interiores.
¿Sabía usted que una habitación con aire demasiado seco
• reseca las membranas de las mucosas, agrieta los
labios e irrita los ojos?
• facilita las infecciones y enfermedades de las vías
respiratorias?
• provoca cansancio, somnolencia y dificultades para la
concentración?
• provoca molestias a los animales domésticos y a las
plantas de interior?
• favorece la formación de polvo y aumenta la electri-
es
cidad estática de textiles sintéticos, fibras, así como
alfombras y pavimentos de materiales plásticos?
• deteriora los muebles de madera y en especial, los
suelos de parqué?
• desafina instrumentos musicales?
En general
Como regla general, los niveles de humedad aconsejables
se sitúan entre el 40% y 60%. El aparato proporciona el
nivel deseado de humedad según los ajustes que establezca. Si el ambiente está seco, el humidificador se pone
en marcha automáticamente. En cuanto se alcanza el nivel
deseado de humedad se apagará automáticamente.
66
Indicaciones de seguridad
• Antes de poner en funcionamiento el aparato lea
atentamente las instrucciones; guárdelas bien para
posteriores consultas.
• Conecte la unidad sólo a la corriente alterna siguiendo
las instrucciones de la etiqueta adjunta sobre voltaje.
• El humidificador debe ser utilizado exclusivamente
para interiores según las especificaciones técnicas.
Una utilización o aplicación distinta puede causar serios perjuicios para su salud y para su entorno.
• Los niños no son conscientes de los peligros asociados
a los aparatos electrónicos, por lo que tendrá que vigilarlos siempre que estén cerca del aparato (figura 1).
• Las personas que no estén familiarizadas con las instrucciones de uso, como los niños o las personas bajo
la influencia de medicamentos, alcohol o drogas, no
deben manipular el aparato o bien hacerlo supervisados.
• Nunca use el aparato si el enchufe o cable estuviera
dañado (2) ni tras sufrir daños, si el equipo se ha caído
(3) o cualquier si sufre otro daño.
• Nunca ponga en funcionamiento el aparato si no está
completamente instalado.
• Los aparatos eléctricos sólo deben ser reparados por
personal cualificado (4); una reparación inapropiada
puede resultar peligrosa para el usuario.
• Desconecte la unidad del enchufe antes de llenar o
vaciar el depósito de agua, antes de limpiarlo, antes de
montar o desmontar alguna de sus partes o cuando lo
mueva o traslade de lugar.
• ¡No toque la cámara de nebulización mientras esté
funcionando! La oscilación de alta frecuencia provoca
el calentamiento de la membrana.
• Nunca desconecte el equipo del enchufe tirando del
cable o con las manos húmedas.
• Sitúe el humidificador sobre una superficie seca y
plana (5).
• No coloque el aparato directamente sobre el suelo ni
junto a un radiador de calefacción. Si el niebla toca el
suelo antes de evaporarse por completo, puede dañar
la superficie (6). No se aceptaráninguna responsabilidad por daños debidos a la ubicación inadecuada de la
unidad.
• El humidificador debe instalarse en una posición
elevada (7) como, por ejemplo, sobre una mesa, una
cómoda, etc.
• Nunca rellene el agua a través de la salida de niebla
del aparato.
• No sumerja nunca el cuerpo del aparato en agua u otro
líquido.
• Coloque el aparato en un lugar en el cual no pueda ser
volcado fácilmente (8).
• Mantenga el aparato desenchufado siempre que no lo
use.
• No coloque el cable eléctrico debajo de alfombras u
otros objetos. Coloque el cable de tal forma que no
pueda tropezar con él.
• No use el aparato en habitaciones donde haya una presencia de sustancias, gases o vapores combustibles.
• No exponga el aparato a la lluvia ni lo use cerca en
entornos húmedos.
• No introduzca objetos extraños en el aparato.
• No bloquee las salidas de niebla o las entradas de aire.
• No se siente, pise o coloque encima del aparato ningún
objeto pesado.
• Para proteger la seguridad de la salud y el funciona-
miento correcto del humidificador, use únicamente
agua limpia, sin contaminantes, fría y fresca de la llave
en su humidificador. Si su fuente de agua está
contaminada o si no está seguro de su calidad, use
agua destilada. Además, le recomendamos limpiar y
hacerle mantenimiento a su humidificador cuando
sea necesario, tal como se indica en este manual.
• El uso de aditivos en el agua, tales como aceites o
esencias, tratamientos de agua y fragancias pueden
dañar el aparato. El uso de cualquiera de esos aditivos
anulará la garantía del fabricante.
• Las vibraciones de alta frecuencia no pueden ser percibidas por personas y animales y resultan totalmente
seguras.
Page 67

1
4
7
2 5
3
8
es
6
9
67
Page 68

Desembalaje
• Extraiga con cuidado la unidad de la caja.
• Saque la unidad de la bolsa.
• Lea la información de la placa de especificaciones con
respecto al voltaje de alimentación.
• Si no utiliza el humidificador durante todo el año, guár delo en el embalaje original.
Puesta en marcha
El sitio adecuado para su humidificador es:
• Nunca cerca de radiador o sobre un suelo con calefac ción. La humedad del niebla puede dañar la superficie
del piso (6 y 7) (lea las Indicaciones de seguridad).
• Asegúrese de que la boquilla de niebla no apunte
directamente sobre plantas u otros objetos cercanos.
Mantenga una distancia de por lo menos 50 cm (10).
• Sumerja el cartucho desmineralizador en agua durante
un mínimo de 24 horas antes de utlizarlo. Los gránulos
es
deben absorber agua para alcanzar un alto rendimiento.
• El cartucho desmineralizador deberá reemplazarse
cada 2 – 3 meses de media. Este plazo podrá variar
en función de la dureza del agua.
• Lea las instrucciones en «Llenado del Tanque» para
agregar agua al humidificador (12).
• Coloque el tanque de agua sobre la parte inferior (13).
• Enchufe el cable a la corriente y ponga en funciona miento el humidificador pulsando el botón de encen dido/apagado (15).
• El aparato alcanza su potencia máxima entre 10 y 15
minutos tras haberlo encendido.
• Verifique que el cable no esté dañado por ninguna
parte (9), en tal caso no use el aparato (2).
Descripción de la aplicación Llenado del Tanque
Desenchufe siempre la unidad antes de extraer
el tanque de agua. ¡No toque la área del nebulización mientras esté funcionando!
Boquilla de niebla (giratoria)
Tanque para el agua
Cámara de
evaporización
Cartucho desmineralizador
Cubierta del
tanque de agua
Ionic Silver Stick
®
fuente de agua está contaminada o si no está seguro de su
calidad, use agua destilada.
¡No encienda el humidificador con el tanque de agua vacío!
Cuando el agua llegue al nivel mínimo, el humidificador se
apagará automáticamente.
• Asegúrese de que no hay objetos extraños en el
• Retire la cubierta del tanque de agua (11). Llene el
• Enchufe el cable a la corriente y encienda la unidad
Para proteger la seguridad de la salud y el funcionamiento correcto del humidificador, use
únicamente agua limpia, sin contaminantes, fría
y fresca de la llave en su humidificador. Si su
tanque de agua.
tanque con agua fresca del grifo (12). ¡Cierre bien la
cubierta del tanque de agua! Coloque el tanque de
agua sobre la parte inferior (13). ¡No vierta ningún
aditivo al agua (14)!
(15).
Cepillo
Membrana
Panel de control
Parte inferior
Area del
nebulización
68
Page 69

10
11
13
14
Depuración del agua
El lonic Silver Stick utiliza la acción antimicrobiana de la
plata y permite mantener la calidad del agua de todos los
humidificadores de aire BONECO en un estado óptimo durante una temporada. El ISS actúa al entrar en contacto
con el agua, incluso con el aparato apagado. El ISS ha sido
concebido exclusivamente para su utilización en humidificadores de aire. Observe la figura 16 para ubicar el ISS en
la la unidad. ¡No toque la cámara de nebulización mientras
esté funcionando! Primero apague la unidad.
No uso de aditivos
¡No deben usarse aditivos en el agua (aceites, esencias, fragancias, acondicionadores de agua, etc.)! Incluso pequeñas
cantidades pueden dañar el material del tanque de agua.
No está diseñado para el uso de dichos aditivos. Una gota
bastaría para dañar el tanque, y en consecuencia toda la
unidad. El uso de cualquiera de esos aditivos anulará la
garantía del fabricante.
es
12
15 16
69
Page 70

Manejo U7145
C
B
es
A
A) Encendido y apagado
Al girar el botón rotatorio en el sentido de las agujas del
reloj, se enciende el aparato y al mismo tiempo se regula
la producción de vapor de baja a alta.
B) Higrostato (ajustar humedad)
Puede ajustarse el nivel deseado de humedad girando el
botón rotatorio en el sentido de las agujas del reloj. Se
recomienda una humedad relativa comprendida entre el 40
y el 60 %. Puede conseguir este nivel girando el botón hasta
que esté en posición vertical. La precisión de medición es
de ± 5%. Si la humedad sobrepasa el ajuste deseado, el
aparato se desconecta. El aparato no se apaga si el botón
está girado totalmente a la derecha. A continuación, queda
activado el modo de funcionamiento continuo.
C) Indicador de vacío (rojo)
El tanque del agua transparente permite ver con claridad la
cantidad de agua. El aparato también le alerta de cuando el
depósito de agua esté vacío. El indicador rojo de vacío está
iluminado (símbolo C). Para más información, lea el capítulo
«Llenar el depósito». El símbolo rojo C puede permanecer
iluminado durante algunos segundos con un depósito rellenado hasta que la base esté llena de agua.
70
Page 71

Manejo U7147 I) Indicador de precalentamiento
D) Descarga del nebulizador, regulador de
la potencia de evaporación
H
E
L
F
I
D
J
Vuelva a presionar el botón D para regular la descarga del
nebulizador. El símbolo H indicar cuál de los tres niveles
(bajo/medio/alto) que se ha seleccionado.
A
E) Funcionamiento con precalentamiento
G
El botón E sirve para conectar o desconectar el precalentamiento (el símbolo I se enciende). De esta manera el agua
C
se precalienta a 80 °C antes de entrar en el área del nebu-
M
lizador. El agua de la base tarda aproximadamente de 10 a
15 minutos en calentarse. El nebulizador se descarga ahora
B
a una agradable temperatura de 40 °C. Esto tiene la ventaja
de que la temperatura ambiente no disminuye y, además, el
K
mantenimiento del agua mejora considerablemente.
J) Indicador de modo automático
K) Indicador de modo de reposo
L) Indicador de vacío
El tanque del agua transparente permite ver con claridad
la cantidad de agua. Además, el aparato de la pantalla (L)
indica cuándo es preciso rellenar de agua.
Por favor, lea el capítulo «Llenar el depósito» para más
información. El símbolo L puede permanecer iluminado
durante algunos segundos con un depósito rellenado hasta
que la base esté llena de agua.
M) Indicador de limpieza
A) Encendido y apagado
Pulse el botón A para encender o apagar el aparato. Este
botón también se utiliza para reiniciar la luz del indicador
de limpieza (manteniéndolo presionado).
B) Higrostato (ajustar humedad)
Al presionar el botón B, puede ajustar el nivel de humedad
deseado en %. Se recomienda una humedad relativa comprendida entre el 40 y el 60 %. La precisión de medición
es de ± 5%. Si la humedad sobrepasa el ajuste deseado, el
aparato se desconecta. Durante la selección se muestra el
valor nominal (símbolo DESIRED). Pasados unos segundos,
el indicador cambia automáticamente a la humedad actual
(símbolo CURRENT).
C) Temporizador
El botón C permite determinar la duración de funcionamiento; regulable entre 1 y 8 segundos o como funcionamiento continuo (CO). El símbolo G indica la duración
que está ajustada (1h/2h/3h/4h/5h/6h/7h/8h/CO). Pasados
unos segundos, el indicador cambia automáticamente al
valor actual.
F) Modos automático y de reposo
Presione el botón F para activar el modo automático y el
modo de reposo (sleep). Si presiona una vez el botón, el
modo de funcionamiento automático (el símbolo J aparece
en la pantalla), que mantiene la humedad óptima en función
de la temperatura. La regulación se realiza a través de la
cantidad de descarga y el valor nominal predeterminado.
Si se ajusta la función de reposo (el símbolo K aparece en
la pantalla), la humedad nominal es del 50 – 65 %; el ajuste
del tiempo pasa automáticamente a 6 horas y la calefacción se conecta. Además, la cantidad de descarga se regula
en función de la diferencia entre valor nominal y real.
Las funciones de higrostato y de salida de niebla no se
puede cambiar en ningún modo. Si se presionan botones
B o D, la unidad no estará más en los modos automático
o reposo.
G) Indicador de temporizador
H) Indicador de salida de niebla
Cuando en la pantalla aparezca el símbolo M con «CLEAN»,
debería proceder a limpiar el aparato (así lo recomienda
el fabricante). Este símbolo se ilumina automáticamente,
según el uso, cada 2 semanas. Se puede apagar el indicador presionando la tecla A repetidamente (aprox. durante
10 – 15 segundos).
es
71
Page 72

Limpieza/mantenimiento
Desenchufe siempre la unidad antes de extraer el
tanque de agua. ¡No toque el interior del tanque de
nebulización mientras esté en funcionamiento!
• Apague el equipo (17) y desenchúfelo de las tomas
principales (18) antes de limpiarlo.
• Limpie el depósito de agua y el nebulizador regularmente una vez por semana. (sólo con agua, sin
jabón) (19).
• Elimine la cal del nebulizador regularmente con un
desincrustante anti-cal de uso comercial (20). Enjuague bien el desincrustante anti-cal con abundante
agua.
• Para remover la boquilla de niebla (21): Gire la boquilla
de niebla hacia la derecha o hacia la izquierda. Alinee
la flecha de la salida de niebla con la flecha del anillo
que está alrededor de la salida de niebla. Una vez que
es
las flechas estén alineadas, tire de la salida de niebla
hacia arriba.
17
19
20
2118
72
Page 73

Atención
• Tenga especial cuidado en que no entre agua en la
parte inferior del aparato (20).
• Limpie el interior del humidificador con un trapo
suave, y no utilice nunca gasolina, limpia cristales
o disolventes (21).
• Para limpiar la membrana utilice exclusivamente el
cepillo (22). Deberá realizarla una vez por semana.
• Cambie el agua del depósito como mínimo una vez
por semana.
22 24
23
es
73
Page 74

Sustitución del cartucho desmineralizador
Desenchufe siempre la unidad antes de extraer
el tanque de agua. ¡No toque la área del nebulización mientras esté funcionando el aparato!
El cartucho desmineralizador debe ser sustituido cada 2
o 3 meses. Si el agua es muy dura, puede ser necesario
sustituir el cartucho antes. La presencia de polvo blanco
alrededor del aparato es un signo seguro de que el cartucho está gastado. Si pese a sustituir el cartucho se forma
un depósito blanco alrededor del aparato, compruebe que
el agua usada no esté tratada. En ese caso, el cartucho
desmineralizador no funcionará más. Si antes de usarla
en el humidificador de aire, el agua pasa por un sistema
doméstico de descalcificación, se depositará sal alrededor
del aparato.
Opción A: reemplace los gránulos
es
• Separe el tanque de agua de la parte inferior y gire la
cubierta del tanque (25).
• El cartucho desmineralizador se encuentra en el interior de la cubierta del tanque. Desenrosque el cartucho
desmineralizador de la cubierta en el sentido contrario
a las agujas del reloj (26). Atención: ¡NO deseche la
cubierta del tanque!
• Abra el cartucho (27).
• Arroje el contenido del cartucho (gránulos) a la basura
(28). Atención: ¡Los gránulos derramados pueden hacer
que el suelo se vuelva resbaladizo!
• Coloque la pieza rosa de poliestireno que se adjunta en
el centro del cartucho. No la presione hasta el fondo ya
que luego será difícil de retirar (29).
• Vierta el contenido de una bolsa de resina de relleno
en la cubeta de plástico que se incluye con el embalaje
de resina de relleno (30).
• Coloque el cartucho vacío con el enchufe en el centro
en la cubeta de plástico (31).
• Gire la cubeta de plástico y el cartucho y agite hasta
que todos los gránulos entren en el cartucho (32).
• Retire la cubeta de plástico y la pieza rosa de poliestireno del cartucho (33) y consérvela para utilizarla en
el futuro (la resina de relleno consta de 3 bolsas de
relleno) (34).
• Cierre la cubierta (35).
• ¡Sumerja el cartucho nuevo en agua durante un
mínimo de 24 horas antes de usarlo (38)!
deben absorber agua para alcanzar un alto rendimiento.
• Enrosque el cartucho en la cubierta del tanque de agua
(39). ¡Cierre bien la tapadera! Coloque el tanque de
agua sobre la parte inferior (40).
Los gránulos
Opción B: reemplace todo el cartucho
• Separe el tanque de agua de la parte inferior y gire la
cubierta del tanque (25).
• El cartucho desmineralizador está unido al interior de
la cubierta del tanque. Desenrosque el cartucho de
la cubierta en el sentido contrario a las agujas del reloj
(26). Atención: ¡No deseche la cubierta del tanque!
• Tire el cartucho antiguo a la basura (36).
• Saque el cartucho nuevo del embalaje (37).
• ¡Sumerja el cartucho nuevo en agua durante un
mínimo de 24 horas antes de usarlo (38)!
deben absorber agua para alcanzar un alto rendimiento.
• Enrosque el cartucho en la cubierta del tanque de agua
(39). ¡Cierre bien la tapadera! Coloque el tanque de
agua sobre la parte inferior (40).
Los gránulos
25
26
27 28
74
Page 75

29 30
33
38
31
32
34
36
35
39
37 40
es
75
Page 76

Almacenamiento durante períodos
prolongados
Limpie el aparato como se ha descrito anteriormente y deje
que se seque totalmente. Guarde preferentemente el humidificador dentro del embalaje original en un lugar seco y
alejado de focos de calor.
Garantía
Nuestros representantes en cada país establecen las
condiciones de la garantía. Diríjase a su distribuidor especializado si su aparato, a pesar de los estrictos controles
de calidad, presenta algún defecto. Para la realización de
cualquier servicio bajo garantía es necesario presentar el
comprobante de compra. Las reparaciones de los aparatos
Retirada de aparatos fuera de servicio
Para una eliminación competente, entregue a
su vendedor el aparato fuera de servicio. Podrá
informarse sobre otras posibilidades para des-
electrónicos las debe realizar únicamente personal especializado. Si se realizan reparaciones inadecuadas pueden
producirse peligros considerables para el usuario y expira
la garantía
hacerse de la unidad en su administración local
o ayuntamiento.
es
Solución de problemas
Problema Posible causa Qué hacer
El humidificador no funciona No está enchufado Enchufe la toma a la corriente
El tanque no tiene agua Llene el depósito de agua
No sale vapor La humedad fijada está por debajo Aumente la humedad deseada
de la que hay en la habitación
Residuos de productos de limpieza Lave el aparato con agua
Escasa emisión de vapor La temperatura del agua es baja Ponga el nivel máximo de salida de
vapor, después de 10 minutos el
humidificador volverá a funcionar
Existe una capa de cal en la membrana Limpie la membrana
Sedimentos blancos El cartucho desmineralizador está gastado Recambie el cartucho de descalcificación
alrededor del humidificador o la resina
Datos técnicos U7145
Tensión de la red 230 V ~ 50 Hz
Consumo de energía 22 W / 39 W
Capacidad de humidificación 400 g/h
2
Adecuado para habitaciones de hasta 60 m
/ 150 m
3
Capacidad de agua 5.0 litro
Dimensiones 240 x 260 x 310 mm
Peso (vacío) 3.0 kg
Ruido de funcionamiento < 25 dB(A)
Accesorios A7531 Cartucho desmineralizador
A7017 Ionic Silver Stick (ISS)
Datos técnicos U7147
Tensión de la red 230 V ~ 50 Hz
Consumo de energía 27 W / 42 W / 120 W*
Capacidad de humidificación 400 / 550 g/h*
Adecuado para habitaciones de hasta 60 m
Capacidad de agua 5.0 litro
Dimensiones 240 x 260 x 310 mm
Peso (vacío) 3.0 kg
Ruido de funcionamiento < 25 dB(A)
Accesorios A7531 Cartucho desmineralizador
A7017 Ionic Silver Stick (ISS)
* En caso de funcionamiento con precalentamiento a 80 °C
2
/ 150 m
3
76
Page 77

Használati útmutató
hu
77
Page 78

Előszó
Szívből gratulálunk Önnek, hogy az U7145 / U7147 Ultrahangos párásító megvásárlása mellett döntött.
Felhasználási terület:
A készülék kizárólag a beltéri levegő párásítására használható.
Tudta, hogy ha túl száraz a levegő lakásában:
• kiszárítja nyálkahártyáját, merevvé válnak ajkai és
szemégést okoz
• hogy az ilyen állapot kedvez a fertőzésnek, és bete-
gséget okozhat
• hogy a következmény lehangoltság, fáradtság és
gyengült koncentrálóképesség
• hogy a háziállatainak és növényeinek sem kedvez az
ilyen állapot
• hogy a porképződés elősegíti a műanyag szálú tex-
tíliák, szőnyegek és a műanyag padló elektrosztatikus
feltöltődését
• hogy fából készült berendezési tárgyai és különleges
padlója ennek kárát látja
hu
• hogy hangszereinek sem válik hasznára
Általános tudnivaló
A szoba levegője akkor biztosít kellemes érzetet, ha relatív
pártatartalma 40 – 60% között mozog. A párásító készülék
ellenőrzi és biztosítja az Ön által beállított páratartalom
automatikus fenntartását. Ha a levegő páratartalma a
beállított érték alá süllyed, magától bekapcsol. Ha a levegő
pártartalma elérte a kívánt szintet, a készülék magától kikapcsol.
78
Biztonsági útmutatások
• A használati útmutatót még üzembehelyezés előtt
olvassa el és a későbbi tájékozódás érdekében őrizze
meg.
• A készüléket csatlakoztassa a készülék típustábláján
feltüntetett feszültségű váltóáramú hálózathoz.
• A légpárásítót csak lakóhelyiségekben és a megadott
műszaki paraméterek tiszteletben tartásával használja.
A nem rendeltetésszerű használat veszélyeztetheti
egészségét és életét.
• A gyermekek még nem ismerhetik az elektromos
készülék használatával járó veszélyforrásokat. Ezért
vigyázzon gyermekére mikor a légpárásító közelében
tartózkodik (1 kép).
• A készüléket ne kezeljék olyan személyek, akik nincsenek tisztában annak használatával, és gyógyszer,
alkohol vagy más drog hatása alatt állók szintén tartózkodjanak a kezelésétől, vagy csak felügyelet mellett
kezeljék.
• A légpárásítót ne helyezze üzembe, ha sérült a kábele
vagy konnektordugója (2), ha a készülék hibásan
működik (3), vagy ha leesett vagy más módon megsérült.
• A légpárásítót csak teljesen összeszerelt állapotában
szabad üzembe helyezni.
• A készülék javítását csak elektromos készülékeket
szerelő szakemberre bízza (4). A szakszerűtlenül
végzett javítással a készülék használója súlyos veszélynek teheti ki magát.
• A konnektordugót húzza ki a víztartály feltöltése ill.
ürítése előtt minden alkalommal, mielőtt a készüléket
tisztítani kezdi, az egyes alkatrészek szerelése ill.
szétszerelése előtt és a készüléknek egyik helyről a
másikra történő költöztetését megelőzően.
• Működés közben ne nyúljon a készülék párásító terébe.
A nagyfrekvenciás rezgés következtében a membrán
felmelegszik.
• A konnektordugót soha ne próbálja a kábelnél fogva
vagy nedves kézzel kihúzni a konnektorból.
• A légpárásítót sík, sima felületű helyen használja (5).
• Ne tegye a készüléket közvetlenül a padlóra vagy
fűtőtest, kályha közelébe. Ha a teljes elpárologtatás
előtt kilépő vízköd a padlót éri, azon sérülést okozhat
(6). A készülék helytelen elhelyezéséből származó
kárért nem vállalunk felelősséget.
• Az ultrahangos párásítót valamliyen magasítóra kell
tenni (7), pl. székre vagy komódra.
• A fúvókanyíláson keresztül soha ne töltse be a vizet.
• A készüléket soha ne merítse vízbe vagy más folyadékba.
• Úgy helyezze el a készüléket, hogy az soha ne
borulhasson fel (8).
• Ha nem használja a készüléket, húzza ki ennek
konnektordugóját.
• A kábelt szőnyeg vagy más tárgy ne takarja. A készüléket úgy helyezze el, hogy annak kábelében meg
ne botolhassanak.
• Ne használja a készüléket olyan helyiségben, ahol
tűzveszélyes anyag, gáz vagy gőzök találhatók.
• Ne tegye ki a készüléket eső hatásának, és ne használja magas nedvességtartalmú helyiségben.
• A készülékbe semmiféle tárgyat ne helyezzen bele.
• Feltétlenül tartsa szabadon a légbevezető- és
párakivezető nyílást.
• A készülékre semmi esetre ne üljön rá és ne helyezzen
rá tárgyakat.
• Az egészségbiztonság és a megfelelő párásító
funkció érdekében kizárólag tiszta, szennyeződésektől
mentes, hideg, friss csapvizet használjon a párásítóban.
Ha a víz szennyezett, vagy ha Ön nincs meggyőződve
a biztonságosságáról, használjon desztillált vizet.
Ezenfelül javasoljuk, hogy végezze el időben a párásító
tisztítását és karbantartását a jelen útmutatóban
foglaltak szerint.
• NE TÖLTSÖN A KÉSZÜLÉKBE ILLÓOLAJAT, víz-tartósítót
és illatósító anyagot. Az ilyen anyagok ártanak a
készüléknek! Az adalékoktól hibássá vált készülék
esetében a garancia érvényét veszti.
• Az ultrahang rezgéseit ember és állat nem hallja és az
teljesen veszélytelen.
Page 79

1
4
7
2 5
3
8
hu
6
9
79
Page 80

Kicsomagolás
• A készüléket óvatosan vegye ki csomagolásából.
• A készülékről távolítsa el a műanyag zacskót.
• Ellenőrizze a típustábla adatainak a hálózati feszültséggel való egyezését.
• Tároláshoz használja a készülék eredeti csomagolását,
amennyiben a készüléket nem használja egész évben.
Üzembe helyezés
A légpárásító legjobb elhelyezése:
• Ne tegye a készüléket közvetlenül a padlóra vagy
fűtőtest, kályha közelébe. A köd páratartalma árthat a
padló (6 és 7) felületének (lásd a biztonsági útmutatásokat).
• A fúvókát ne irányítsa közvetlenül növényre vagy tárgyra. Legkisebb távolságként tartsa be az 50 cm-t (10).
• A vízlágyító patront legalább 24 óráig tartsa a vízzel
töltött tartályban, az első használat előtt, mielőtt elindítaná a készüléket. A granulátumnak telítődnie kell a
vízzel, a teljes teljesítmény eléréséhez.
• A vízlágyító patront minden 2 - 3 hónapban ki
kell cserélni. A csere időpontja a felhasznált víz
hu
keménységétől függ. Ahol nagyon kemény a víz, ott
gyakoribb cserére is szükség lehet.
• Olvassa el a «Víz betöltése» fejezetet a víztartály feltöltéséhez (12).
• Kérjük tegye a helyére a víztartályt (13).
• Dugja be a konnektordugót a konnektorba és kapcsolja
be a készülék Be/Ki kapcsolóját (15).
• A készülék bekapcsolása után mintegy 10-15 perccel
a készülék maximális teljesítményen fog működni.
• Bizonyosodjon meg, hogy a hálózati kábel nincs-e
becsípődve valahová (9). Amennyiben a hálózati kábel
hibás, ne kapcsolja be a készüléket (2).
Készülék leírása Víz betöltése
Mindig kapcsolja ki a készüléket, mielőtt a víztartályt leveszi a készülékről. Működés közben
ne nyúljon a készülék párásító terébe!
Fúvóka (elfordítható)
Víztartály
Párologtató kamra
Vízlágyító patron
Víztartály fedele
Ionic Silver Stick
Kezelőpanel
®
zett, vagy ha Ön nincs meggyőződve a biztonságosságáról,
használjon desztillált vizet.
A készüléket üres víztartállyal ne kapcsolja be! Ha már
nincs meg a minimális vízszint, akkor a készülék a
párásítást magától kikapcsolja.
• Győződjön meg róla, hogy nincs idegen tárgy a
• Vegye le a víztartály fedelét (11). Töltse fel a tartályt tis-
• Dugja be a konnektordugót a konnektorba és kapcsolja
Az egészségbiztonság és a megfelelő
párásító funkció érdekében kizárólag tiszta,
szennyeződésektől mentes, hideg, friss csapvizet használjon a párásítóban. Ha a víz szennye-
víztartályban.
zta, hideg vízzel (12). Kérjük tegye a helyére a víztartályt (13), és ne adjon adalékot a vízhez (14)!
be a készüléket (15).
Tisztító kefe
Membrán
Párásodó terület
Géptest
80
Page 81

10
11
13
14
A víz tisztán tartása
Az Ionic Silver Stick, azaz az ionizáló ezüstrúd az ezüst antimikrobiális hatását használja ki, és így az összes BONECO
légpárásító készülék esetében a teljes szezonban képes az
optimális vízminőséget fenntartani. Az ISS akkor fejti ki
hatását, amikor az a vízzel érintkezésbe kerül – akkor is
ha a készülék ki van kapcsolva. Az ISS kizárólag levegőpárásítókban történő alkalmazásra szolgál. A 16. kép szemlélteti a készülékben való elhelyezést. Működés közben ne
nyúljon a készülék párásító terébe. Először kapcsolja ki a
készüléket.
Ne használjon adalékokat
A vízhez adalékanyagokat (pl. illóolajat, illatanyagot, víz
tartósítót) NEM szabad használni! A kiporlasztott illóolaj
egészségre ártalmas lehet. A műanyagot már egészen
csekély mennyiség is károsíthatja, repedéseket okozhat. A
készülék anyaga nem alkalmas adalékok használatához.
Már egy csepp is elég a víztartály sérüléséhez és a ké-szülék használhatatlanná tételéhez. Az adalékoktól hibássá
vált készülék esetében a garancia érvényét veszti.
hu
12
15 16
81
Page 82

Az U7145 használata
A készülék nem kapcsol ki, ha a kapcsoló teljesen jobb irányba van fordítva. Ebben az esetben a készülék folyamatos
üzemmódra van beállítva.
C
B
A
hu
A) Be-/Kikapcsolás
A forgókapcsolónak az óramutató mozgásával megegyező
irányba történő elfordításával a készülék bekapcsol, ezzel
egyidőben pedig a páratartalmat alacsony fokozatról magas fokozatra állítja.
B) Higrosztát (Páratartalom beállítása)
A megkívánt páratartalom a forgókapcsolónak az óramutató mozgásával megegyező irányba történő elfordításával
állítható be. A javasolt relatív páratartalom értéke 40% és
60% közötti. Ez úgy érhető el, hogy a forgókapcsolót addig
fordítja, míg hozzávetőlegesen függőleges állásba nem kerül. A mérési pontosság +/- 5%. Ha a páratartalom meghaladja a kívánt beállítást, a készülék magától kikapcsol.
C) Vízszintjelzés (vörös)
Az átlátszó víztartálynak köszönhetően jól látható a vízmennyiség. A készülék ugyanakkor figyelmezteti, ha a víztartály
kiürült. A piros kijelző, mely a tartály megüresedésére hívja
fel a figyelmet, kigyúl (C jelkulcs). Kérjük olvassa el a
«Tartály megtöltése» című fejezetet további információkért.
A «C» piros jelkulcs az újratöltést követően néhány másodpercig még tovább világíthat, míg az alaptartály fel nem
telik vízzel.
82
Page 83

Az U7147 használata J) Automata mód kijelző
D) Párásítás mértéke,
párásítási teljesítmény szabályozása
H
E
L
F
I
D
J
A
G
C
M
B
K
A) Be-/Kikapcsolás
Az A gomb megnyomásával lehet be- vagy kikapcsolni a
készüléket. Ha a kapcsolót lenyomva tartja, az a tisztító
ellenőrző jelzőlámpájának kikapcsolására is használható.
B) Higrosztát/Páramérés
(Páratartalom beállítása)
A B gomb lenyomásával beállíthatja a nedvességet a kívánt
színvonalra (%-ban). A javasolt relatív páratartalom értéke
40% és 60% közötti. A mérési pontosság +/- 5%. Ha a
páratartalom meghaladja a kívánt beállítást, a készülék
magától kikapcsol. A beállítás alatt a kívánt érték kijelzése
látható (DESIRED felirat). A kijelző automatikusan néhány
másodperc után mutatni fogja az aktuális páratartalom értéket (CURRENT felirat).
C) Időzítő
A C gombbal beállíthatja a párásítás időtartamát –
amely 1 és 8 óra között szabályozható vagy folyamatos
üzemmódra állítható be (CO). A «G» jelzés mutatja jelzi a
beállított időtartamot (1/2/3/4/5/6/7/8 óra/CO). A kijelzés
néhány másodperc után automatikusan átvált az aktuális
értékre.
A D gomb többszöri megnyomásával szabályozhatja a párásítás mértékét. A «H» jelzés azt mutatja, hogy a három
fokozat közül (alacsony/közepes/magas) melyiket választotta ki.
E) Működés előmelegítéssel
Az E gomb az előmelegítés be- (az I jelzés világít) vagy
kikapcsolására szolgál. A víz ekkor a porlasztótérbe való
belépés előtt körülbelül 80 °C-ra melegszik. A tápaljzatban
lévő víz kb. 10-15 perc alatt melegszik fel. A pára ekkor
kellemes körülbelül 40 °C-os hőmérsékleten áramlik ki.
Ennek az az előnye, hogy nem csökkenti a szoba hőmérsékletét, illetve jelentősen segíti a vízminőség fenntartását.
F) Automata/éjszaka üzemmód
Az F gomb megnyomásával működésbe hozható az automata és a éjszakai üzemmód. Egyszeri megnyomásra bekapcsolódik az automata funkció (a J jelzés megjelenik a
kijelzőn), amely a hőmérséklet függvényében szabályozza
az optimális páratartalmat. A szabályozás a kibocsátott
páramennyiség és az előírt célérték alapján történik.
Ha beállítja a éjszakai funkciót (a K jelzés megjelenik a
kijelzőn), a beállított páratartalom 50 – 65%, az időbeállítás
automatikusan 6 órára áll be, a fűtés pedig bekapcsolódik.
Ezen kívül a kibocsátott mennyiség az előírt és tényleges
érték közötti különbség függvényében is szabályozódik.
A páramérő és páraerősség kibocsájtási-beállításokat nem
változtathatja meg. Ha a B vagy D gombbal elállítja, akkor
a egység már nem lesz automata vagy éjszakai üzemmódban.
G) Időzítés kijelző
H) Páraerősség kijelző
I) Elő-fűtés kijelző
K) Éjszakai üzemmód
L) Vízszintjelzés
Az átlátszó víztartálynak köszönhetően jól látható a vízmennyiség. Ezen kívül a készülék a kijelzőn (L) mutatja, ha
víztartáylt újra kell tölteni.
További információkért lásd. «A víztartály feltöltése» című
fejezetet. Az L jel néhány másodpercig világíthat akkor is,
ha a víztartály újra van töltve, amíg a tápaljzat is megtelik
vízzel.
M) Tisztítás jelzés
Ha a kijelzőn megjelenik a M-es jelzés a «CLEAN» (TISZTÍTÁS) felirattal, akkor a készüléket a gyártó útmutatásainak megfelelően meg kell tisztítani. Ez a jelzés használattól
függően 2 hetente automatikusan világítani kezd. A jelzés
törölhető az A gomb folyamatos (kb. 10-15 másodperces)
megnyomásával.
hu
83
Page 84

Tisztítás/karbantartás
Mindig kapcsolja ki a készüléket, mielőtt a
víztartályt leveszi a készülékről. Működés közben ne nyúljon a készülék párásító terébe!
• Kapcsolja ki a készüléket (17) és húzza ki a konnektordugót (18), mielőtt a készüléket tisztítani kezdené.
• A víztartályt és készülék minden olyan részét ahol vízzel érintkezik hetenként egyszer rendszeresen tisztítsa
ki (19). Használjon étkezési ecet oldatot (20%-os)
• Kérjük, rendszeresen vízkőtelenítse a párásító teret
kereskedelemben kapható étkezési ecet oldattal (20).
Tisztítás után öblítse ki a készüléket alaposan tiszta
vízzel.
• Kifújó tető eltávolítás (21): Forgassa a kettős kifújó
tetőt úgy, hogy a nyilak egymás mellett álljanak a
gyűrűn és a kifújó tetőn. A kifújó tető csak a helyes
állásban vehető ki. Vegye ki a kifújó tetőt ha egy vonalban vannak a nyilak.
hu
17
19
20
2118
84
Page 85

Figyelem
• Vigyázzon hogy a készülék alsó részébe ne jusson be
víz (22).
• A belső részeket puha törlőkendővel tisztítsa és ne
használjon benzint, ablaktisztítót és oldószert (23).
• A kefét csak a membrán tisztítására használja! (24)
A tisztítást hetente egyszer végezze el.
• A víztartályban a vizet legalább hetente egyszer
cserélje ki.
22 24
23
hu
85
Page 86

A vízlágyító patron cseréje
Mindig kapcsolja ki a készüléket, mielőtt a
víztartályt leveszi a készülékről. Működés közben ne nyúljon a készülék párásító terébe!
A patront cserélje kb. 2-3 havonta. Ha a víz ásványi anyag
tartalma magas, akkor a patront esetleg korábban kell
kicserélni. A készülék körül képződő fehér por egyértelműen
azt jelzi, hogy a patron elhasználódott. Ha új patron ellenére
is fehér por képződik a készülék körül, akkor ellenőrizze,
hogy a felhasznált víz valóban nem volt-e valamivel kezelve. Néhány házi vizlágyitó rendszer jelentösen csökkenti
a vizlágyitó patron élettartamát. Ha vízlágyító rendszert
használ, akkor patron nélkül használja a készüléket.
«A» lehetőség: A granulátum cseréje
• Vegye le a víztartályt az alapzatról, és csavarja le a
víztartály fedelét (25).
• A vízlágyító patron a tartályfedél belső oldalán található. Csavarja le a fedélről a patront (26) az óramutató
járásával ellentétes irányban- Vigyázat: a víztartály
fedelét NE dobja el!
hu
• Nyissa fel a patront (27).
• A patron tartalmát (granulátum) tegye a háztartási
hulladékgyűjtőbe. Figyelem: a kiömlött granulátum a
sima padlón nagyon csúszós! (28).
• Helyezze a mellékelt rózsaszínű styrohab részecskét a
szűrőbetét közepébe. Ne nyomja le egészen az aljára,
mivel akkor később nehéz lesz eltávolítani (29).
• Töltse egy újratöltő gyanta csomag tartalmát a
műanyag edénybe, amely az újratöltő gyanta csomagolásához van mellékelve (30).
• Helyezze az üres szűrőbetétet a műanyag edénybe
úgy, hogy a nyílása az edény közepén legyen (31).
• Fordítsa fel és rázza össze a műanyag edényt és a
szűrőbetétet, amíg az összes gyanta át nem jut a
szűrőbetétbe (32).
• Távolítsa el a műanyag edényt és a rózsaszínű styrohab részecskét a szűrőbetétből (33) és őrizze meg
későbbi használatra (3 újratöltő gyanta csomag van
mellékelve) (34).
• Zárja le a fedelet (35).
• A vízlágyító patront legalább 24 óráig tartsa a vízzel
töltött tartályban (38). A granulátumnak a vizet fel kell
szívnia a teljes teljesítmény eléréséhez.
• Csavarja rá a patront a víztartály fedelére (39). Zárja
le gondosan a tartályt! A víztartályt helyezze a tápaljzatba (40).
«B» lehetőség: Az egész patron cseréje
• Vegye le a víztartályt az alapzatról, és csavarja le a
víztartály fedelét (25).
• A vízlágyító patron a tartályfedél belső oldalán található. Csavarja le a fedélről a patront az óramutató
járásával ellentétes irányban- Vigyázat: a víztartály
fedelét NE dobja el! (26).
• A patront helyezze a háztartási hulladékgyűjtőbe (36)
• Vegyen ki egy új vízlágyító patront a csomagból (37)
• A vízlágyító patront legalább 24 óráig tartsa a vízzel
töltött tartályban (38). A granulátumnak a vizet fel kell
szívnia a teljes teljesítmény eléréséhez.
• Csavarja rá a patront a víztartály fedelére (39). Zárja
le gondosan a tartályt! A víztartályt helyezze a tápaljzatba (40).
25
26
27 28
86
Page 87

29 30
33
38
31
32
34
36
35
39
37 40
hu
87
Page 88

Hosszabb ideig nem használt
készülék tárolása
A készüléket a leírtak szerint tisztítsa ki, szárítsa ki teljesen,
a vízlágyító patront vegye ki a tartályból és a granulátumot dobja ki a háztartási hulladékgyűjtőbe. Lehetőleg az
eredeti csomagolásában tárolja egy száraz, nem túl meleg
helyiségben.
Garancia
A garanciális feltételeket az országban levő képviseletünk
határozta meg. Kérjük, forduljon bizalommal szakkereskedőjéhez, ha a légpárásító készülékén a szigorú minőségellenőrzés ellenére hibát talál. A garancia érvényesítéséhez feltétlenül szükséges a vásárlási számla bemutatása.
A villamos készülékek javításait csak szakember végezheti
el. Szakszerűtlen javítások következtében jelentős veszély
Ártalmatlanítás
A már kiszolgált készüléket adja le a kereskedő-
fenyegeti a készülék használóját és a garancia is érvényét
veszti.
jénél, vagy tegye a speciális hulladékgyűjtőbe
a helyi előírások szerint. Egyéb ártalmatlanítási
lehetőséget tudakolja meg az illetékes helyi hatóságnál. Tilos a készüléket a háztartási hulladékgyűjtőbe dobni!
Az elektromos berendezés veszélyes hulladéknak minősülő
alkatrészt nem tartalmaz. Az elektromos készülék nem helyezhető el a települési szilárd hulladékokkal együtt, hanem
gyűjtése elkülönítve történik a vonatkozó környezetvédelmi
előírásoknak megfelelően.
hu
Hibaelhárítás
Hibajelenség Lehetséges oka Mi tegyek
A készülék nem működik Konnektordugó nincs bedugva Csatlakoztassa a készüléket a hálózathoz
Nincs víz a víztartályban Víz utántöltése
(kigyullad az üres jelzés)
Nincs ködkibocsátás A páratartalom beállítása alacsonyabb Növelje a páratartalom beállítási fokozatát
mint a helyiség páratartalma
Öblítőszer maradványok Tisztítsa ki a készüléket tiszta vízzel
Túl kevés a ködkibocsátás Túl alacsony a vízhőmérséklet Állítsa a ködkibocsátást a legmagasabb
fokozatra, 10 perc után a készülék ismét
kifogástalanul működik
Vízkőlerakódás a membránon Tisztítsa meg a membránt
Fehér por képződik Elhasználódott a vízlágyító patron Cserélje ki a vízlágyító patront
a készülék körül
Műszaki adatok U7145
Feszültség 230 V ~ 50 Hz
Teljesítmény felvétel 22 W / 39 W
Párásítási teljesítmény 400 g/h
2
Max. helyiségméret 60 m
/ 150 m
3
Víztartalom 5.0 liter
Méretei 240 x 260 x 310 mm
Súly (üresen) 3.0 kg
Működési zaj < 25 dB(A)
Tartozék A7531 vízlágyító patron
A7017 Ionic Silver Stick (ISS)
Műszaki adatok U7147
Feszültség 230 V ~ 50 Hz
Teljesítmény felvétel 27 W / 42 W / 120 W*
Párásítási teljesítmény 400 / 550 g/h*
Max. helyiségméret 60 m
Víztartalom 5.0 liter
Méretei 240 x 260 x 310 mm
Súly (üresen) 3.0 kg
Működési zaj < 25 dB(A)
Tartozék A7531 vízlágyító patron
A7017 Ionic Silver Stick (ISS)
* Működtetés közben, akár 80 °C hőmérsékletű
előmelegítéssel
2
/ 150 m
3
88
Page 89

Instrukcja obsługi
pl
89
Page 90

Wstęp
Dziękujemy Państwu za zakup ultradźwiękowego
nawilżacza powietrza U7145 / U7147.
Prawidłowy zakres zastosowania:
Urządzenie może być używane wyłącznie do nawilżania
powietrza wewnątrz budynku.
Czy wiedzieliście Państwo, że suche powietrze
• wysusza błony śluzowe, powoduje pękanie ust i
pieczenie oczu?
• zwiększa ryzyko infekcji i schorzeń dróg
oddechowych?
• powoduje znużenie, zmęczenie i kłopoty z
koncentracją?
• jest niekorzystne dla zwierząt domowych i roślin
pokojowych?
• powoduje gromadzenie się kurzu i wyładowania
elektrostatyczne ubrań, dywanów i wykładzin
podłogowych wykonanych z włókien sztucznych?
• prowadzi do uszkodzenia drewnianych elementów
wyposażenia mieszkań i parkietów?
• rozstraja instrumenty muzyczne?
Informacje ogólne
pl
Komfort w pomieszczeniach występuje wtedy, gdy poziom
względnej wilgotności wynosi 40% – 60%. Nawilżacz
automatycznie steruje poziomem wilgotności zgodnie z
pożądanym ustawieniem. Jeśli powietrze jest zbyt suche nawilżacz włączy się automatycznie. Po osiągnięciu
żądanej wilgotności wyłączy się.
Wskazówki dotyczące bezpieczeństwa:
• Przed uruchomieniem urządzenia zaleca się dokładne
zapoznanie się z instrukcją obsługi oraz pozostawienie
jej do dalszego wglądu.
• Podłączyć urządzenie do zasilania o napięciu zgodnym
z napięciem podanym na tabliczce znamionowej
urządzenia.
• Urządzenia używać wyłącznie w pomieszczeniach
oraz zgodnie z danymi technicznymi. Wykorzystywanie
nawilżacza do celów innych niż jego przeznaczenie
może spowodować zagrożenie zdrowia lub życia.
• Dzieci nie rozpoznają zagrożeń związanych z
użytkowaniem urządzeń elektrycznych, dlatego zawsze
należy zwracać szczególną uwagę na dzieci znajdujące
się w pobliżu nawilżacza (rys.1).
• Osobom, które nie zaznajomiły się z instrukcją obsługi,
jak również dzieciom oraz osobom pozostającym pod
wpływem alkoholu, leków, narkotyków nie wolno
obsługiwać urządzenia, chyba że pod nadzorem.
• Nie należy używać urządzenia w przypadku jego
upuszczenia (rys.3) lub uszkodzenia kabla (rys.2).
• Używać należy tylko kompletnego i sprawnego urządzenia.
• Ewentualne naprawy mogą być przeprowadzane
wyłącznie przez punkty serwisowe. (rys.4)
• Próby samodzielnego naprawiania urządzenia mogą
wywołać zagrożenie dla użytkownika.
• Urządzenie należy odłączyć od zasilania przed
napełnianiem / opróżnianiem zbiornika, czyszczeniem,
montażem/ demontażem poszczególnych elementów
oraz przed przestawianiem urządzenia.
• Nie demontować urządzenia podczas jego pracy –
powierzchnia przetwornika pod wpływem wysokich
częstotliwości drgań może być gorąca.
• Umieścić nawilżacz na suchej i płaskiej powierzchni.
• Nie podłączać do zasilania ani nie uruchamiać urządzenia mokrymi rękoma.
• Nie wlewać wody do dyszy wylotowej.
• Zawsze umieszczać urządzenie na równej i suchej
powierzchni (rys.5).
• Nie zanurzać korpusu urządzenia w wodzie lub innych
cieczach.
• Nie umieszczać nawilżacza w bezpośredniej bliskości
elementów grzejnych lub na podłodze- w przypadku
ogrzewania podłogowego.
• Urządzenie powinno stać na podwyższeniu np.: stół.
(rys.7)
• W przypadku kiedy urządzenie nie jest w użytku należy
je wyłączyć oraz odłączyć od zasilania.
• Nie umieszczać żadnych ciał obcych w urządzeniu.
• Nie blokować wlotu powietrza oraz dyszy wylotowej.
• Aby zapewnić bezpieczne dla zdrowia i właściwe
działanie nawilżacza, należy używać wyłącznie czystej, pozbawionej zanieczyszczeń, zimnej i świeżej
wody z kranu. W przypadku podejrzeń o możliwość
pojawienia się w wodzie zanieczyszczeń należy użyć
wody destylowanej. Ponadto zaleca się czyścić i
dokonywać konserwacji nawilżacza w przewidzianym czasie, zgodnie z instrukcjami zawartymi w
niniejszym podręczniku.
• Nie należy siadać, stawać ani stawiać żadnych ciężkich
przedmiotów na urządzeniu.
• Zastosowane dźwięki o wysokiej częstotliwości nie
są słyszalne przez ludzi ani zwierzęta – są całkowicie
bezpieczne.
90
Page 91

1
4
7
2 5
3
8
pl
6
9
91
Page 92

Rozpakowanie urządzenia
• Ostrożnie wyjąć urządzenie z kartonu.
• Następnie wyjąć urządzenie z plastikowej torby.
• Należy zapoznać się z informacjami podanymi na
tabliczce znamionowej.
• Jeżeli urządzenie nie będzie używane przez dłuższy czas,
należy przechowywać je w oryginalnym opakowaniu.
Uruchamianie urządzenia
Optymalne miejsce dla nawilżacza
• nie umieszczać nawilżacza w bezpośredniej bliskości
elementów grzewczych lub na podłodze- w przypadku
ogrzewania podłogowego.
• dysza wylotowa nie może być skierowana bezpośrednio
na meble i inne przedmioty narażone na działanie wilgoci
(minimalna odległość około 50 cm).(rys.10)
• Przed rozpoczęciem użytkowania urządzenia należy
umieścić filtr odwapniający na co najmniej 24 godziny w
wodzie. Żywica powinna wchłonąć wodę aby osiągnąć
największą wydajność.
•
Filtr odwapniający powinien być wymieniany co 2 – 3 miesiące lub częściej w zależności od stopnia twardości wody.
• Zdjąć zbiornik z urządzenia i odkręcić nakrętkę (rys.11).
• Upewnić się, czy w zbiorniku na wodę nie ma żadnych ciał
obcych.
pl
• Napełnić zbiornik czystą, zimną wodą z kranu (nie
cieplejszą niż 40°C). (rys.12)
• Nie dodawać do wody żadnych dodatkowych środków
utrzymujących wodę w czystości.
• Dokładnie dokręcić nakrętkę zbiornika wody.
• NIGDY nie dodawać żadnych substancji do wody.
• Kabel zasilający należy podłączyć do gniazdka sieciowego.
• Po włączeniu nawilżacza maksymalna wydajność
nawilżania osiągana jest po 10 – 15 minutach.
• Upewnić się, że kabel zasilający nie jest przygnieciony
(rys.9). Nie uruchamiać urządzenia jeżeli kabel zasilający
jest uszkodzony (rys.2)
Opis urządzenia Napełnianie zbiornika na wodę
Przed wyjęciem zbiornika wody z urządzenia najpierw należy je wyłączyć (oraz odłączyć od zasilania). Podczas, gdy urządzenie jest włączone,
Aby zapewnić bezpieczne i właściwe działanie
nawilżacza, należy używać wyłącznie czystej,
niezanieczyszczonej zimnej wody z kranu. W
ciał obcych.
na wodę (rys.11). Napełnić zbiornik świeżą wodą (rys.12).
Zakręcić nakrętkę zbiornika wody. Ustawić zbiornik na
podstawie i zamontować dyszę wylotową (rys.13). Do
wody nie należy dodawać środków uszlachetniających.
ciskiem ON/OFF. Po uruchomieniu urządzenia powinno
pojawić się zielone światełko (rys.15).
Dysza wylotowa
(obrotowa)
Zbiornik na wodę
Komora parowania
Filtr odwapniający
Nakrętka zbiornika
Ionic Silver Stick
Panel sterowania
nie należy sięgać do wnętrza komory parowania!
przypadku możliwości zanieczyszczenia wody należy użyć
wody destylowanej.
Nie należy włączać nawilżacza gdy w zbiorniku na wodę nie
ma wody, lub gdy poziom wody jest zbyt niski. Kiedy poziom
wody w zbiorniku będzie zbyt niski urządzenie samoczynnie wyłączy się. Zapali się wówczas czerwone światełko.
• Upewnić się, że w zbiorniku na wodę nie ma żadnych
• Zdjąć zbiornik z urządzenia i odkręcić nakrętkę zbiornika
• Podłączyć urządzenie do zasilania i uruchomić je przy-
®
Szczotka
Przetwornik
piezoelektrycz ny
Korytko
Korpus
92
Page 93

10
11
13
14
Utrzymanie wody w czystości
Elektroda lonic Silver Stick wykorzystuje antybakteryjne
działanie srebra i zapewnia przez cały sezon optymalne
utrzymanie czystości wody we wszystkich nawilżaczach
powietrza BONECO. ISS działa od razu po zetknięciu z
wodą, również przy wyłączonym urządzeniu. ISS przeznaczona jest wyłącznie do użycia w nawilżaczach powietrza.
W celu zlokalizowania położenia elektrody ISS w urządzeniu
– patrz rys. 16. Nie sięgać do wnętrza komory parowania,
gdy urządzenie jest załączone. Należy je najpierw wyłączyć.
Użycie aromatów
Do wody NIE należy dodawać żadnych innych aromatów
(perfum, olejków zapachowych, odświeżaczy, itp.) Nawet
bardzo mała ilość tych substancji może spowodować
uszkodzenie nawilżacza. Uszkodzenie takie nie podlega
naprawie gwarancyjnej.
pl
12
15 16
93
Page 94

Obsługa U7145
C
B
A
A) Włączanie i wyłączanie urządzenia
pl
W celu uruchomienia urządzenia należy przekręcić pokrętło
zgodnie z ruchem wskazówek zegara. W takim sam sposób
przebiega regulacja mgiełki.
B) Higrostat
(regulacja wilgotności powietrza)
Żądany poziom wilgotności można ustawić poprzez przekręcenie pokrętła zgodnie z ruchem wskazówek zegara.
Zalecana względna wilgotność powietrza powinna się
wahać w zakresie pomiędzy 40 i 60%. Poziom ten można
uzyskać poprzez przekręcenie pokrętła do momentu kiedy
będzie ono w pionie. Urządzenie oferuje możliwość regulacji w zakresie od 40 do 75%. Precyzja pomiaru wynosi
+/- 5%. Urządzenie automatycznie się wyłączy kiedy
wilgotność w pomieszczeniu przekroczy poziom żądanej
wilgotności. Urządzenie nie wyłączy się jeżeli pokrętło
będzie przekręcone całkowicie w prawą stronę. Urządzenie
nie wyłączy się, jeżeli wskaźnik został ustawiony na «Co»
(tryb pracy stałej).
C) Wskaźnik pustego zbiornika (czerwony)
Zbiornik wody jest wykonany z przezroczystego materiału,
dzięki czemu poziom wody jest dobrze widoczny. Urządzenie
również informuje kiedy w zbiorniku nie ma wody = świeci
się czerwona lampka (C). Zaleca się zapoznanie się z
rozdziałem «Napełnianie zbiornika wody». Światełko może
świecić się przez kilka sekund dopóki zbiornik nie zostanie
napełniony wodą.
94
Page 95

Obsługa U7147 Ustawienia higrostatu i mgiełki nie mogą być zmienione na
H
E
L
F
I
D
J
A) Włączanie i wyłączanie urządzenia
Naciśnięcie przycisku A powoduje włączenie lub wyłączenie
nawilżacza powietrza. Przycisk ten służy również do zresetowania światełka wskaźnika czyszczenia (przytrzymanie
przycisku).
B) Higrostat
(regulacja wilgotności powietrza)
Poziom żądanej wilgotności (%) można ustawić poprzez
wciśnięcie przycisku B. Zalecana względna wilgotność powietrza powinna się wahać w zakresie pomiędzy 40 i 60%.
Urządzenie posiada możliwość regulacji w zakresie od 40
do 75%. Precyzja pomiaru wynosi +/- 5%. Urządzenie automatycznie się wyłączy kiedy wilgotność w pomieszczeniu przekroczy poziom żądanej wilgotności. Podczas wybierania żądanej wilgotności dana wartość pokazana jest
na wyświetlaczu (symbol DESIRED). Po kilku sekundach
na wyświetlaczu pojawi się obecna wilgotność (symbol
CURRENT).
C) Zegar
W celu ustawienia czasu działania urządzenia należy
wcisnąć przycisk C (możliwy czas działania od 1 do 8
godzin lub praca ciągła (CO)). Litera G wskazuje wybrany
czas działania urządzenia (1h/2h/3h/4h/5h/6h/7h/8h(CO).
A
Aktywowanie zegara powoduje zniknięcie symbolu z
wyświetlacza.
G
D) Ustawianie nawilżania
C
(regulacja intenywności mgiełki)
M
Kilkukrotne naciśnięcie przycisku D umożliwia regulację
intensywności mgiełki. Poziom intensywności mgiełki (ni-
B
ski (LO) / średni (ME) /wysoki (HI)) widoczny jest na wyświetlaczu (symbol H).
K
E) Praca w trybie z podgrzewaniem wody
Przycisk E służy do włączania lub wyłączania podgrzewania wody (symbol I na wyświetlaczu). Podgrzanie wody
do temperatury około 80°C następuje przed jej dostaniem
się do komory parowania. Woda podgrzewa się w czasie
około 10 – 15 minut. Wydobywająca się z urządzenia para
wodna ma przyjemną dla skóry temperaturę około 40°C.
Rozwiązanie to sprawia, że temperatura panująca w pomieszczeniu nie obniża się, a ponadto w znacznym stopniu
pozwala na utrzymanie wilgotności powietrza.
F) Tryb automatyczny / tryb nocny
Naciśnięcie przycisku F umożliwia aktywowanie trybu
automatycznego lub trybu nocnego «ZZZ» (symbol K na
wyświetlaczu). Po włączeniu trybu automatycznego (na
wyświetlaczu pojawia się symbol J) optymalna wilgotność
powietrza jest utrzymywana w zależności od temperatury
panującej w pomieszczeniu. Regulacja odbywa się za
pośrednictwem ilości wydobywającej się mgiełki i ustalonej
wartości żądanej. W przypadku aktywowania funkcji «ZZZ»
żądany poziom wilgotności zostaje ustawiony na 50 – 65%;
regulacja czasowa zostaje automatycznie ustawiona na 6
godzin pracy; opcja podgrzewania zostaje włączona.
inny tryb. Jeżeli przyciski B i D są włączone, urządzenie
nie będzie dłużej pracowało w trybie automatycznych bądź
nocnym.
G) Wskaźnik czasu
H) Wskaźnik intensywności mgiełki
I) Wskaźnik podgrzewania wody
J) Wskaźnik trybu automatycznego
K) Wskaźnik trybu nocnego
L) Wskaźnik pustego zbiornika
Zbiornik wody jest wykonany z przezroczystego materiału,
dzięki czemu poziom wody jest dobrze widoczny. Dodatkowo urządzenie pokazuje na wyświetlaczu (symbol L)
kiedy zbiornik powinien zostać napełniony. Zaleca się zapoznanie się z rozdziałem «Napełnianie zbiornika wody».
Symbol L może pozostać na wyświetlaczu przez kilka sekund dopóki zbiornik nie zostanie napełniony wodą.
M) Wskaźnik czyszczenia
W sytuacji, gdy na wyświetlaczu pojawi się symbol M
«CLEAN», urządzenie należy wyczyścić zgodnie ze wskazaniami producenta. Symbol jest wyświetlany automatycznie
co dwa tygodnie użytkowania. Po wyczyszczeniu należy
podłączyć zasilanie i nacisnąć oraz przytrzymać przycisk
A (ok. 10 – 15 sekund) co spowoduje zniknięcie symbolu
z wyświetlacza.
pl
95
Page 96

Czyszczenie / Konserwacja
Przed wyjęciem zbiornika wody z urządzenia
najpierw należy je wyłączyć oraz odłączyć od zasilania. Podczas, gdy urządzenie jest włączone,
nie należy sięgać do komory parowania!
• Przed czyszczeniem wyłączyć urządzenie (rys.17) i
odłączyć je od zasilania (rys.18).
• Regularnie czyścić zbiornik wody i korytko z przetwornikiem kwarcowym oraz komorę parowania. W tym
celu należy użyć czystej wody bez dodatku jakichkolwiek detergentów (rys.19).
• Należy wyczyścić zbiornik wody przy użyciu środków
odwapniających (rys.20), po czym dokładnie go
opłukać dużą ilością wody.
• Aby usunąć nakrętkę komory parowania (rys.21),
należy przekręcić nakrętkę w lewo lub w prawo tak, by
zrównać strzałkę na nakrętce ze strzałką na obręczy.
Tylko w sytuacji zrównania strzałek możliwe jest
usunięcie nakrętki.
pl
17
19
20
2118
96
Page 97

Uwaga
• Upewnić się, że woda nie dostaje się do dolnej
wewnętrznej części korpusu urządzenia (rys.22)
• Czyścić części wewnętrzne miękką szmatką. Do
czyszczenia nawilżacza nie używać żadnych rozpuszczalników ani agresywnych środków czyszczących
(rys.23).
• Do czyszczenia przetwornika piezoelektrycznego
można używać szczoteczki (rys.24).
• Wodę w zbiorniku należy zmieniać przynajmniej raz
w tygodniu.
22 24
23
pl
97
Page 98

Wymiana filtra odwapniającego
Przed wyjęciem zbiornika wody z urządzenia najpierw należy je wyłączyć oraz odłączyć od zasilania. Podczas, gdy urządzenie jest włączone, nie
należy sięgać do komory parowania!
Granulat w filtrze odwapniającym powinien być wymieniany co 2 – 3 miesiące (w zależności od stopnia twardości
wody). Jeśli woda jest bardzo twarda należy wymieniać
granulat w filtrze częściej. Jeśli granulat nie zostanie
wymieniony w odpowiednim czasie urządzenie może ulec
uszkodzeniu. Uszkodzenie takie nie podlega naprawie gwarancyjnej. Biały pył wokół urządzenia będzie sygnalizował,
iż granulat w filtrze jest zużyty. Jeśli mimo wymiany granulatu w filtrze na nowy dalej będzie widoczny charakterystyczny biały pył wokół urządzenia należy skontaktować
się z autoryzowanym serwisem.
Opcja A: Wymiana granulatu
• Zdjąć zbiornik z podstawy, odkręcić nakrętkę zbiornika
(25).
• Filtr odwapniający jest przymocowany do nakrętki.
W celu wyjęcia filtra należy odkręcić go ruchem
odwrotnym do ruchu wskazówek zegara (26). Uwaga:
Nie należy wyrzucać nakrętki.
pl
• Otworzyć filtr (27).
• Usunąć zawartość filtra (28). Uwaga: Nie należy
wyrzucać żywicy na gładką powierzchnie, która przez
to może być bardzo śliska!
• Umieścić różową piankę polisterynową w środku filtra.
Nie należy umieszczać jej przy samym dnie, gdyż
następnie będzie ją trudno usunąć (29).
• Wsypać zawartość jednej torebki z granulatem do plastikowego pojemnika (30).
• Umieścić pusty filtr w środku plastikowego pojemnika
(31).
• Przykręcić plastikowy pojemnik do filtra i potrząsać
dopóki granulat nie znajdzie się w filtrze (32).
• Usunąć plastikowy pojemnik oraz różową piankę
polisterynową z filtra (33) oraz pozostawić do dalszego
użytkowania (dodatkowe opakowanie zawiera 3 torebki
z granulatem (34).
• Założyć nakrętkę (35).
• Przed rozpoczęciem użytkowania urządzenia należy
umieścić filtr odwapniający na co najmniej 24 godziny
w wodzie (38). Żywica powinna wchłonąć wodę, aby
osiągnąć największą wydajność i będzie gotowa do
prawidłowego działania.
• Przykręcić filtr na nakrętce zbiornika wody (39).
Odpowiednio zamknąć zbiornik. Ustawić zbiornik na
podstawie (40).
Opcja B: Wymiana całego filtra
• Zdjąć zbiornik z podstawy, odkręcić nakrętkę zbiornika
(25).
• Filtr odwapniający jest przymocowany do nakrętki.
W celu wyjęcia filtra należy odkręcić go ruchem
odwrotnym do ruchu wskazówek zegara (26). Uwaga:
Nie należy wyrzucać nakrętki.
• Wyrzuć stary filtr odwapniający (36).
• Odpakować nowy filtr (37).
• Przed rozpoczęciem użytkowania urządzenia należy
umieścić filtr odwapniający na co najmniej 24 godziny
w wodzie (38). Żywica powinna wchłonąć wodę, aby
osiągnąć największą wydajność i będzie gotowa do
prawidłowego działania.
• Przykręcić filtr na nakrętce zbiornika wody (39).
Odpowiednio zamknąć zbiornik. Ustawić zbiornik na
podstawie (40).
25
26
27 28
98
Page 99

29 30
33
38
31
32
34
36
35
39
37 40
pl
99
Page 100

Przechowywanie urządzenia
Wyczyścić nawilżacz i dokładnie osuszyć. Zalecane jest
przechowywanie urządzenia w oryginalnym opakowaniu.
Unikać wysokich temperatur.
Gwarancja
Warunki gwarancji określane są przez przedstawiciela w
Polsce odrębną Kartą Gwarancyjna. Naprawy urządzeń
elektrycznych mogą być przeprowadzane tylko przez wyspecjalizowane osoby. Naprawy wykonane przez osoby
Złomowanie
Nawilżacz powietrza niezdatny do użytku należy
przekazać sprzedawcy do prawidłowego złomo-
niewykwalifikowane stanowią bardzo duże zagrożenie dla
użytkownika i są przyczyną wygaśnięcia roszczenia gwa-
rancyjnego.
wania. W kwestiach sposobów złomowania prosimy skontaktować się z władzami lokalnymi.
Problemy i rozwiązanie
pl
Problem Przyczyna Postępowanie
Nawilżacz nie działa Urządzenie nie podłączone do zasilania Podłączyć urządzenie do zasilania
Brak wody w zbiorniku Napełnić zbiornik wodą
Świeci się lampka wskazująca brak wody
Brak mgiełki Ustawiona wartość wilgotności jest niższa Zwiększyć ustawienie
od aktualnej wilgotności
Pozostałości płynu czyszczącego Przepłukać czystą wodą
Mała intensywność mgiełki Zbyt niska temperatura wody Ustawić intensywność mgły na wartość
maksymalną, po 10 – 15 min. nawilżacz
będzie działał prawidłowo
Osad mineralny (kamień) na przetworniku Wyczyścić przetwornik
(np. odkamieniaczem EKAM)
Biały pył wokoło nawilżacza Zużyty granulat w filtrze Wymienić granulat w filtrze
Dane techniczne U7145
Napięcie 230 V ~ 50 Hz
Zużycie energii 22 W / 39 W
Wydajność nawilżania 400 g/h
2
Przeznaczony do pomieszczeń 60 m
/ 150 m
3
Pojemność zbiornika 5.0 Litra
Wymiary 240 x 260 x 310 mm
Waga (pusty) 3.0 kg
Poziom hałasu < 25 dB(A)
Materiały eksploatacyjne A7531 filtr odwapniający
A7017 Ionic Silver Stick (ISS)
Dane techniczne U7147
Napięcie 230 V ~ 50 Hz
Zużycie energii 27 W / 42 W / 120 W*
Wydajność nawilżania 400 / 550 g/h*
Przeznaczony do pomieszczeń 60 m
Pojemność zbiornika 5.0 Litra
Wymiary 240 x 260 x 310 mm
Waga (pusty) 3.0 kg
Poziom hałasu < 25 dB(A)
Materiały eksploatacyjne A7531 filtr odwapniający
A7017 Ionic Silver Stick (ISS)
* kiedy uruchomiona opcja podgrzewania do 80 °C
2
/ 150 m
3
100
 Loading...