

Page 1

PLEASE READ AND SAVE
ALL INSTRUCTIONS!
LISEZ ET CONSERVEZ
TOUTES LES INSTRUCTIONS!
¡POR FAVOR LEA Y
GUARDE TODAS
LAS INSTRUCCIONES!
7144
Page 2

Page 3

Instructions for use (5 – 20)
Instructions d’utilisation (21 – 36)
Instrucciones para el uso (37 – 51)
en
a
fr
a
es
3
Page 4

4
Page 5

Instructions for use
en
5
Page 6

en
PLEASE READ AND SAVE ALL THESE INSTRUCTIONS!
Important safety instructions
• Prior to using the appliance, read through the
in structions for complete use and retain in a safe
place for later reference.
• WARNING – Only use the Ultrasonic indoors and within
the specified technical data. Improper use can be
hazardous for the health and lead to critical injury.
• Connect the unit only to alternating current (AC) with
voltage according to the rating label.
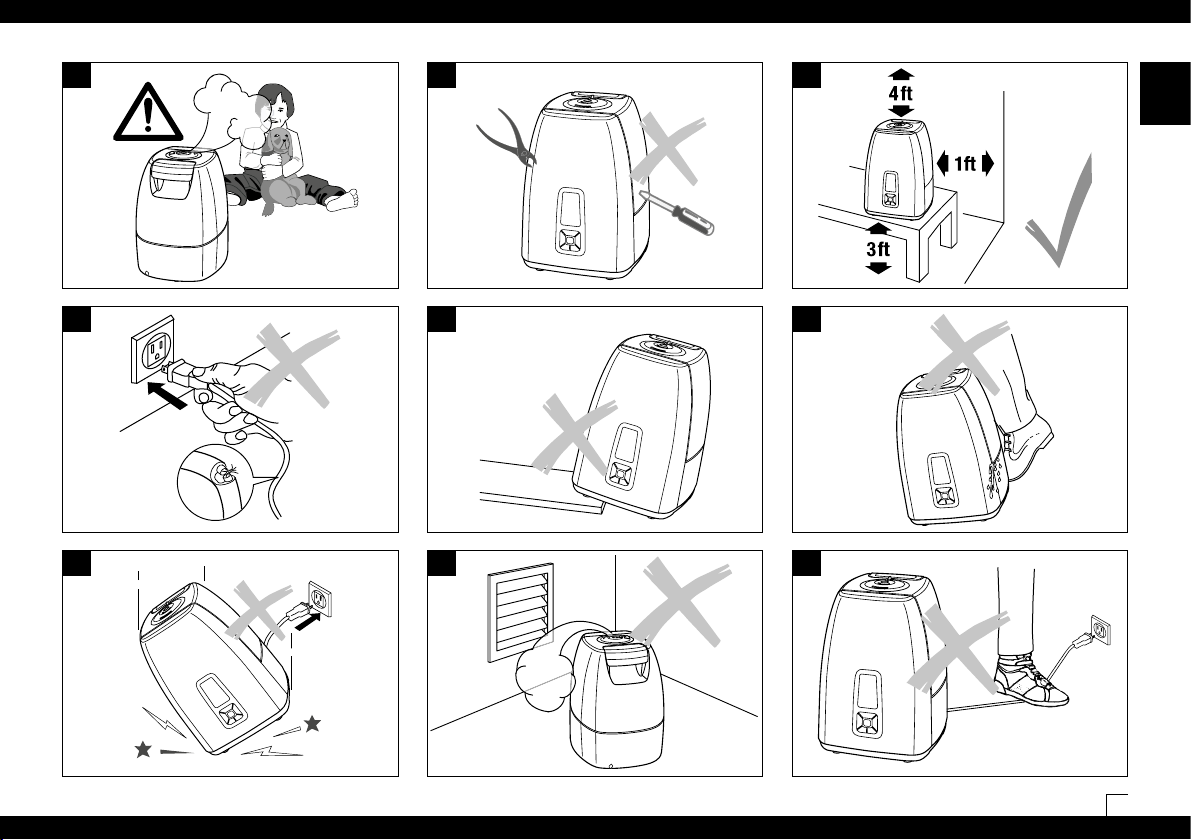
• Children cannot recognize the hazards associated
with the usage of electrical appliances. For this reason,
always supervise children when they are near the
humidifier (image 1).
• Never use the appliance if there is any damage to the
appliance or cable (2), after malfunction, after the
appliance has been dropped (3) or damaged in any
other way.
• Repairs of electrical appliances are only to be made by
qualified service engineers (4). Improper repair work
can cause considerable danger to the user.
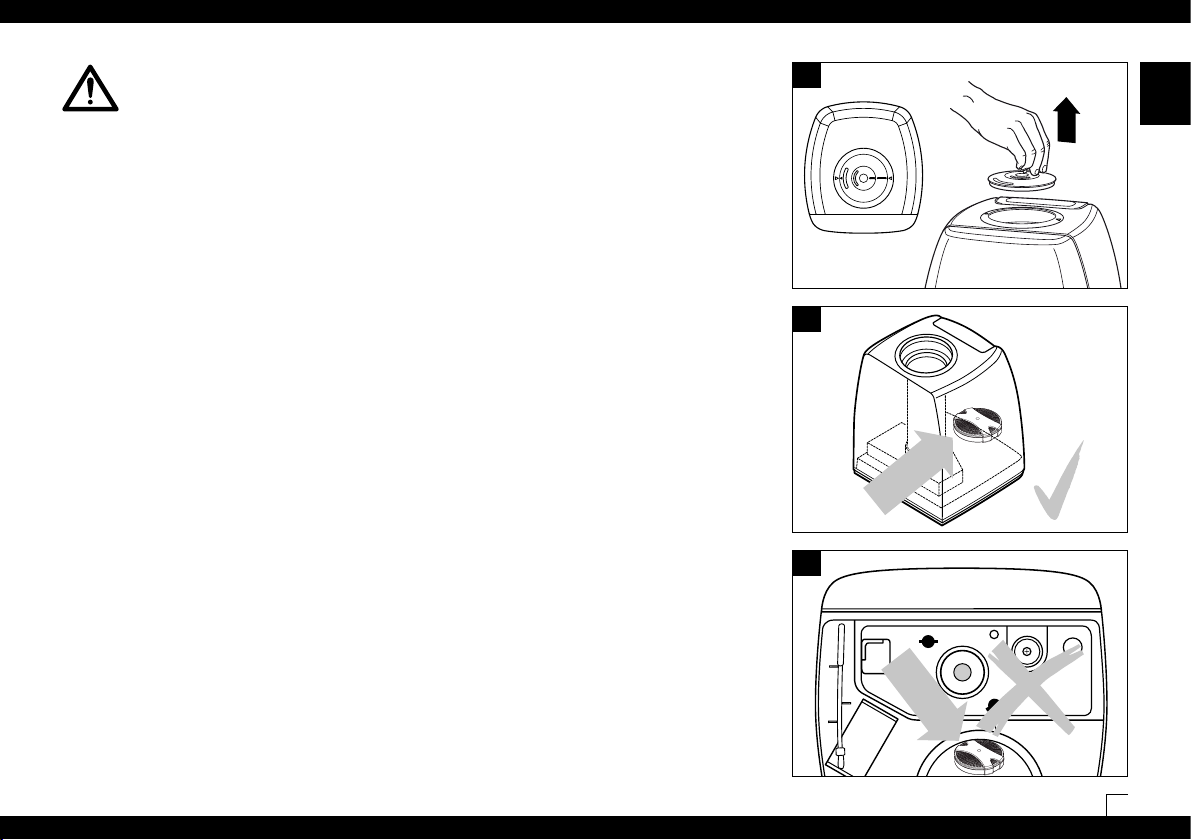
• Place the humidifier on a dry, level surface (5).
• Do not place the appliance directly on the floor or
next to a heating vent (6).
• If the mist comes in contact with the floor prior to
evaporating, the floor surface can become damaged.
We do not accept any liability for damages in the case
of incorrect placement of the unit.
• The unit should be placed in an elevated position (7),
e.g. on a table, chest of drawers, etc.
• Place appliance where it is not easily knocked over (8).
• Always unplug when not in use.
• Only operate the humidifier when it is completely
assembled.
• ALWAYS unplug before removing/filling/emptying the
water tank, before cleaning/maintaining, assembling/
dismantling of individual parts and before moving the
appliance.
6
• Do not touch the water in the base during operation
because of high frequency vibrations in the water.
• Do not run power cords under carpets, and do not
cover with throw rugs. Arrange cord so that it will not
be tripped over.
• Never pull the plug from the outlet by the cable or with
wet hands.
• Do not use the appliance where combustible gases or
vapors are present.
• Do not expose the appliance to rain, or use near water,
in a bathroom, laundry area or other damp location.
• This unit must be used in its upright position.
• Do not allow foreign objects to enter ventilation or
ex haust opening as this may cause electric shock or
damage to the appliance. Do not block air outlets or
intakes.
• Do not pour water into the mist outlet of the appliance.
• This appliance has a polarized plug (one blade is wider
than the other). To reduce risk of shock, this plug is
intended to fit in a polarized outlet only one way. If the
plug does not fit fully in the outlet, reverse the plug. If it
still does not fit, contact a qualified electrician. DO NOT
attempt to defeat this safety feature.
• A loose fit between the plug (receptacle) and the
AC outlet may cause overheating and a distortion
of the plug. Contact a qualified electrician to replace
loose or worn receptacles.
• Do not sit, stand or place any heavy objects on the
appliance.
• Do not submerge the main body in water or other
liquids.
• Disconnect power supply before servicing.
• Persons who are not familiar with the instructions
for use, as well as children and persons under the
influence of medication, alcohol, or drugs are not
permitted to operate the appliance, or are only
per mitted to operate it under supervision.
• To protect health safety and proper humidifier function
use only clean, contamination-free, cold, fresh tap water in your humidifier. If your water source is contaminated or if you are uncertain of its safety use distilled
water. In addition, it is advised to clean and maintain
your humidifier in a timely manner as instructed in
this manual.
• The use of water additives, such as ethereal/essential
oils, fragrances, eucalyptus, water conditioners etc.,
damages the tank material and as a consequence
the whole unit. Any use of such additives will void the
manufacturer’s warranty.
• Remark: Neither humans nor animals can hear the high
frequency vibrations.
Page 7
en
1
4
7
en
2
3
5
8
96
7
Page 8
Foreword
en
Congratulations on choosing the Ultrasonic Humidifier
7144!
Did you know that dry room air:
• Causes the membranes in your respiratory system to
dry out, and also causes chapped lips and stinging
eyes?
• Encourages infections and illnesses of respiratory
system?
• Causes weariness, tiredness and poor concentration?
• Stresses household pets and house plants?
• Encourages the formation of dust and the electrostatic
charging of textiles made of synthetic fibers, carpets
and plastic flooring?
• Damages furnishings made of wood and parquet?
• Detunes musical instruments?
General information
A comfortable atmosphere indoors is reached with a relative humidity level between 40 and 60%. Your humidifier automatically controls the humidity level according
to desired setting. If the air is too dry, the humidifier will
automatically switch on. As soon as the desired humidity
level is reached, it will switch off.
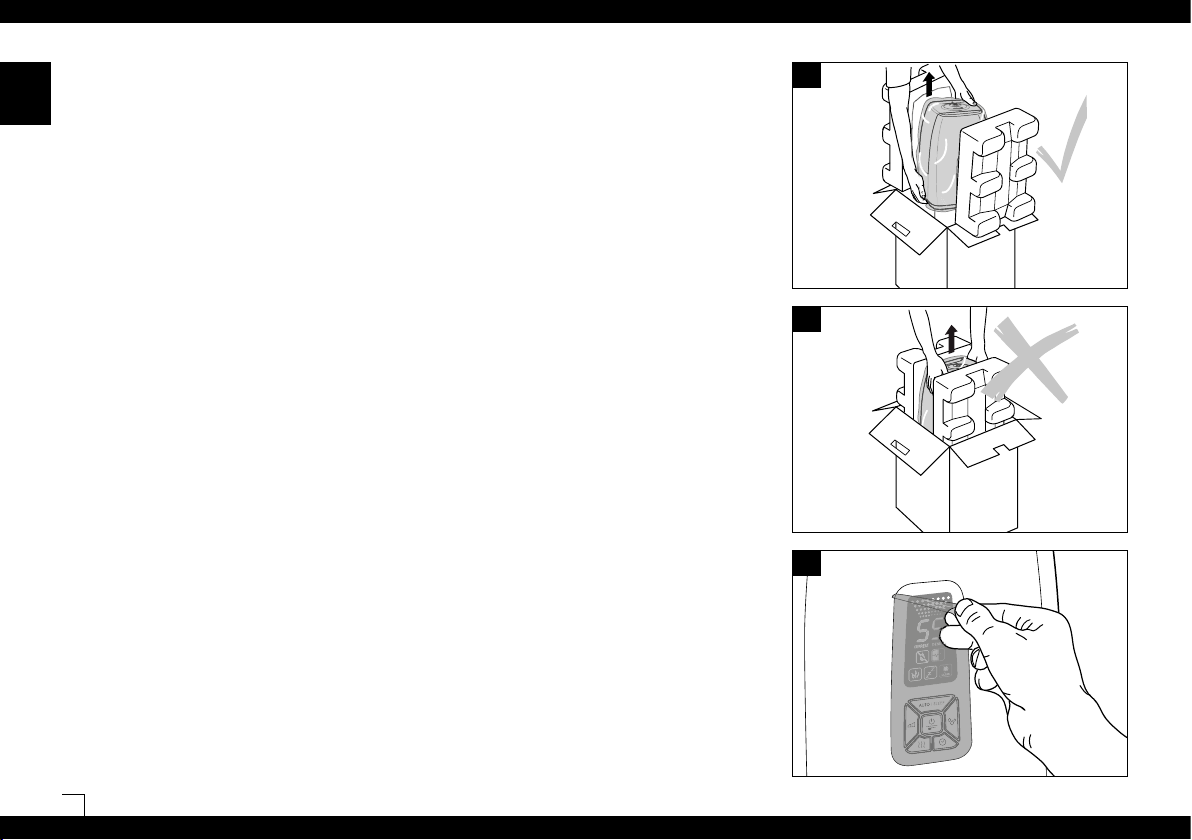
Unpacking
• Carefully remove the humidifier from the box. Place
your hands underneath the product to pull it out of the
box (10).
• Warning: Do not take the unit out of the box by pulling
up on the tank handle - base may fall and will be damaged (11).
• Remove the plastic bag from the humidifier.
• Observe the information given on the rating plate about
the voltage.
• There is a protective label on the control panel in order
to protect the surface. Please remove it as shown before the first use (12).
• Use the original packaging for storing the appliance if
you do not use the humidifier all year round.
10
11
12
8
Page 9
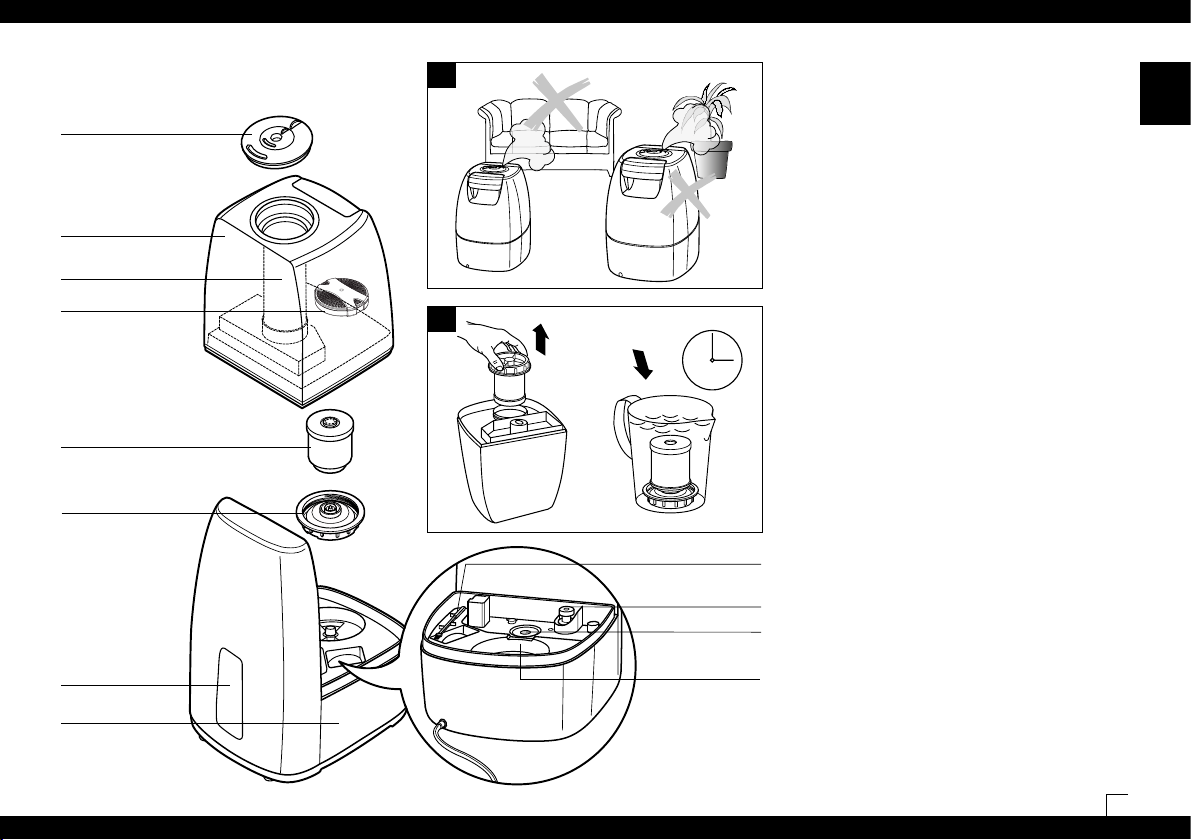
Description of the appliance
Mist outlet (rotating)
Water tank
Evaporation chamber
Hydro Cell
Demineralization cartridge
Water tank cap
Control panel
13
14
24 h
Brush
Water Level Sensor
Membrane
Nebulizer space
Setting up
Finding the ideal location for your unit:
• Do not place the humidifier directly next to a heating
vent or on a floor with floor heating. The moisture of
the mist can damage the floor surface (6) (see Safety
Instructions).
• The unit should be placed in an elevated position (7),
e.g. on a table, chest, etc. at least 3 ft off the floor.
• The mist outlet must not be pointed directly at
plants, furniture, or other objects (13). Keep distance of
at least 20 inches (50cm).
• Soak the demineralization cartridge in a water bath
24 hours before using it (14). The granules have to
absorb water to reach maximum performance. If it is
soaked in the tank, make sure to exchange the water
and empty the water from the base before using the
humidifier.
• On average the demineralization cartridge should
be replaced every 2 – 3 months depending on your
water hardness. Some areas may need to replace the
cartridge sooner, some may last longer. The cartridge
must be exchanged at the latest after 6 months or the
unit does not reach its full performance anymore.
See «Replacement of the demineralization cartridge».
• Read the instructions under «Filling the Tank» for
adding water in the humidifier (15 and 16).
• Place the water tank onto the base.
• Insert the plug into the socket and switch on the
appliance using the on/off button (19).
• About 10 to 15 minutes after it is switched on the device will reach its full output level.
• Make sure that the cable is not pinched anywhere (9).
Do not operate the humidifier if the cable is damaged
(2).
en
Main body
9
Page 10
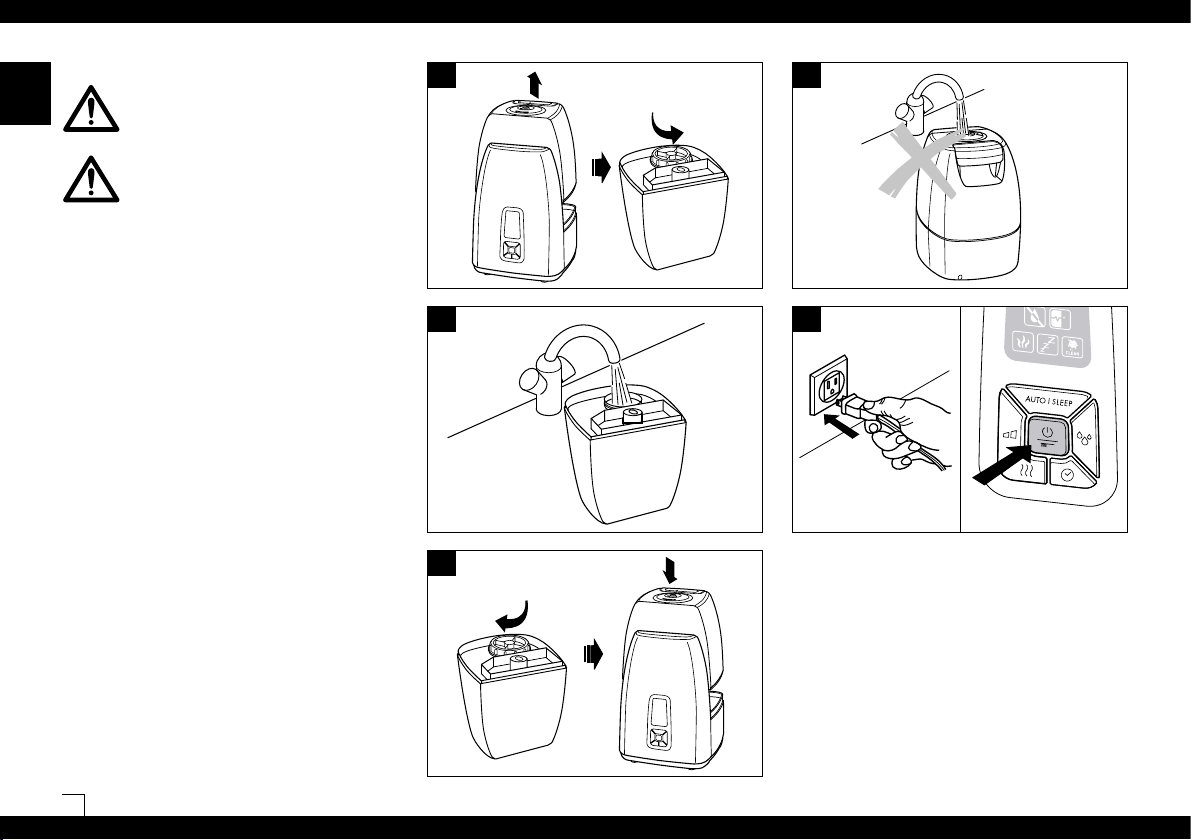
Filling the tank
en
water source is contaminated or if you are uncertain of its
safety use distilled water.
Do not operate the humidifier when the water tank is
empty! When the water reaches the minimum level, the unit
switches off the nebulizer function automatically. The red
light comes on indicating tank is empty.
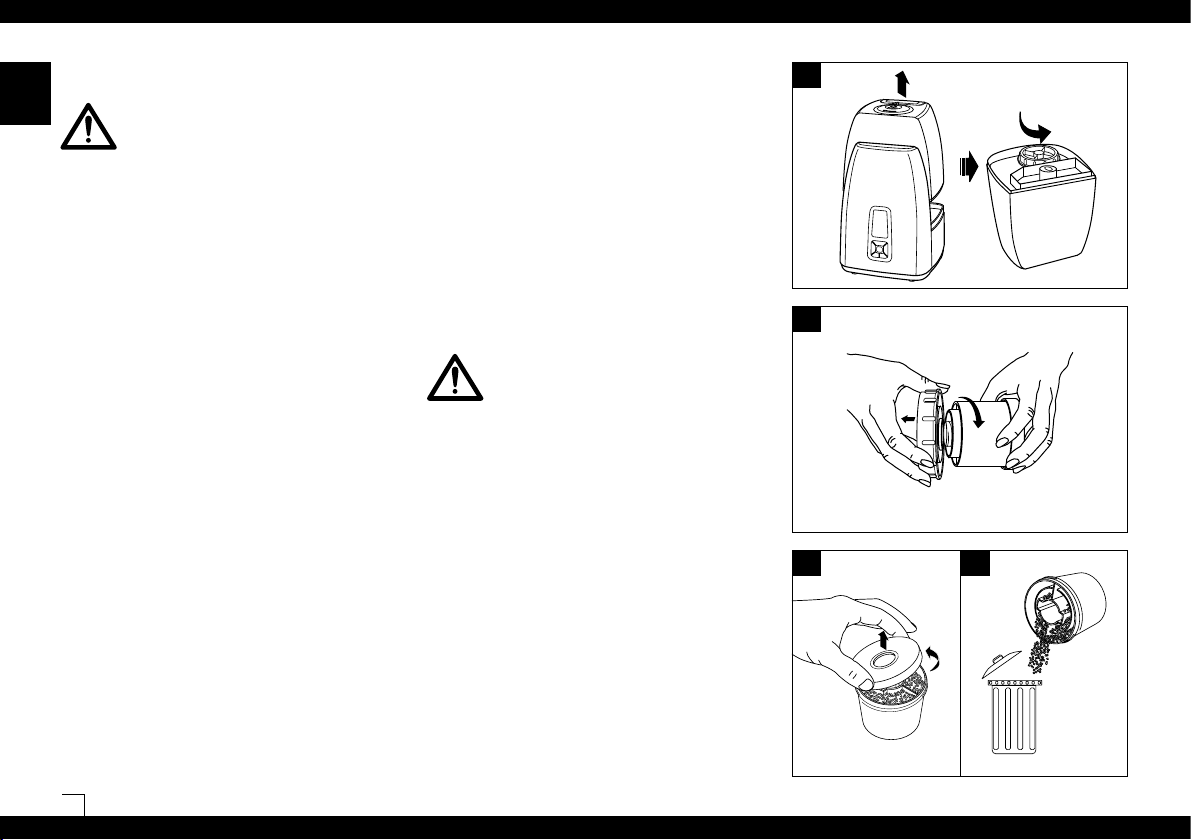
• Remove the water tank from the base and unscrew the
• Make sure that no foreign objects are in the water
• Fill the tank with clean, cold water from the tap (16).
• Do not pour water into the mist outlet of the appliance
• Insert the plug into the socket and switch on the
Always unplug the unit before removing the
water tank. Do not touch the water in the base
during operation!
To protect health safety and proper humidi-
fier function use only clean, contamination-free,
cold, fresh tap water in your humidifier. If your
water tank cap (15).
tank.
Close the cap of the water tank securely, place the water tank onto the base (17). The water is now running
from the tank into the base.
(18).
appliance using the on/off button (19). The red empty
indicator light may stay illuminated for some seconds
until the base is filled with water.
Do not use additives
Water additives (ethereal/essential oils, fragrances,
eucalyptus, water conditioners, etc.) must not be used!
Even a small amount can cause cracks in the material. The
material isn’t made for the use of such additives. One drop
is enough to damage the tank and as a consequence the
unit. Any use of such additives will void the manufacturer’s
warranty.
15
18
16 19
17
10
Page 11
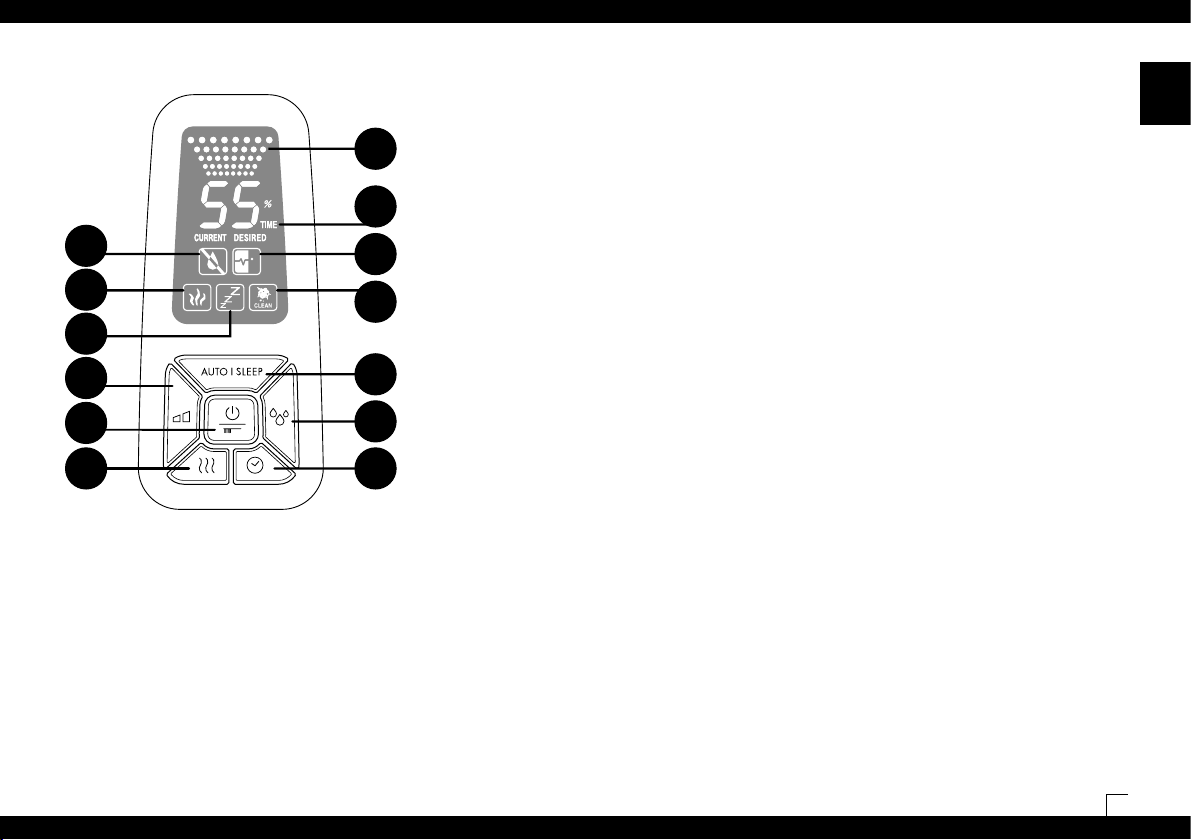
Operation 7144 C) Timer
Using button C, the operation time can be set adjustable
between 1 and 8 hours or CO (continuous operation).
Symbol G shows the operating period that has been set
(1h/2h/3h/4h/5h/6h/7h/8h/CO). The display will automatically
H
show the current value after a few seconds.
G
L
I
M
K
D
A
E
A) On/Off Button
You can switch the unit on or off by pressing button A. This
button is also used to reset the cleaning indicator light (by
holding down).
B) Hygrostat (setting the humidity level)
By pressing button B you can set the desired humidity level
in %. A relative humidity between 40 and 60% is recommended. The accuracy of measurement is +/- 5%. The unit
will switch off when the moisture level exceeds the desired
setting. During selection the target value is displayed. The
display will automatically show the current value after a
few seconds.
D) Mist output (regulating mist output)
By repeatedly pressing button D you can control the mist
output. The display (symbol H) shows which of the three
levels (low/medium/high) you have selected.
J
E) Operation with pre-heating (warm mist)
Button E is used for switching the pre-heating on and off
(symbol I lights up). As a result, the water is pre-heated
to a temperature of 176 °F (80 °C) before entering the
nebulizer space. It takes approx. 10 to 15 minutes for the
water in the base to warm up. The mist now leaves the
F
humidifier at a pleasant temperature of 104 °F (40 °C). The
advantage of this is that the room temperature does not
B
drop and, in addition, it significantly improves the water
quality maintenance.
C
F) Automatic mode and Sleep mode
The automatic and sleep modes can be activated by pressing button F. By pressing the button once, the automatic
function is switched on (symbol J appears on the display),
maintaining the optimum humidity subject to the temperature. Control takes place by means of output quantity and
pre-set target value. If the sleep function is switched on
(the symbol K appears on the display), the target humidity
is 60%; the operation time is automatically set at 6 hours;
the heating is switched on. In addition, the output quantity is
also controlled subject to the difference between the target
value and the actual value.
The Timer cannot be changed in either mode. If other buttons are pressed, the unit will no longer be in auto or sleep
mode.
G) Timer Indicator
H) Mist Output Indicator
I) Pre-heating Indicator
J) Automatic Mode Indicator
K) Sleep Mode Indicator
L) Empty indicator
The water level is easy to see, thanks to the transparent
water tank. The appliance also alerts you when the water
tank is empty. The empty indicator is illuminated (symbol L).
Please read the chapter «Filling the tank» for more information. The symbol L may stay illuminated for some seconds
with a refilled tank until the base is filled with water.
M) Cleaning indicator
If symbol M and «CLEAN» appear on the display, the appliance should be cleaned as recommended by the manufacturer. This symbol comes on automatically every 2 weeks,
depending on the level of use. The display can be reset
by holding down button A until the light disappears.
11
en
Page 12

Cleaning/Maintenance
en
Always unplug the unit before removing the
water tank. Do not touch the water in the base
during operation!
Caution – risk of electric shock and
damage of the product!
• Switch off the appliance and unplug it from the socket
before cleaning it (20).
• Clean the water tank and the base regularly. Use water
only, no detergents (21).
• Use EZCal and EZCal PRO custom cleaning and descaling agents only to remove deposits from the membrane regularly (22 and 23). There is a sample of EZCal
included in the packaging of your humidifier. Instructions for using are on the packet. Only use 1 packet for
32 oz of water. Do not change the ratio. Do NOT run the
unit when using EZCal and EZCal PRO. This can cause
damage to the product and voids the warranty.
Thoroughly rinse the base with tap water after using
EZCal and EZCal PRO and make sure no EZCal and
EZCal PRO residues remains in the base.
20 24
2521
ACID
22
12
23 26
WARM
WARM
Page 13
EZCal and EZCal PRO are the only recommended
cleaning and descaling solution. Do NOT use any
other cleaning solutions since it can damage the
product. An y use of cleaning solutions apart from
EZCal and EZCal PRO will void the warranty.
• Make sure main body is never submerged in water
(24)!
• The cleaning indicator still appears on the display after
cleaning. To reset it hold down the ON/OFF button until
the clean light stops flashing.
• Clean the inner parts with a soft cloth. Do not use any
solvents or aggressive cleaning agents to clean the
appliance (25).
• Only use the brush to clean the membrane. This should
be done once a week. Only use the soft-bristle portion
of the brush (26).
• Change the water in the tank at least once a week if
water is standing for more than a week.
Water quality maintenance
The Hydro Cell keeps humidifiers operating at their highest
level between recommended cleanings. Good for approximately one to two months, depending on the water quality,
the Hydro Cell ensures the humidifier’s functionality while
providing fresh humidification performance. It starts to
work as soon as it comes in to contact with water, even
if the unit is turned off. The Hydro Cell should be changed
every one to two months*. Look at picture 28/29 for the position of the Hydro Cell in the water tank of the unit. Switch
off the unit first. Contact your local retailer or check our
website www.boneco.us for reorder information.
* Depending on the water quality.
27
28
29
en
13
Page 14
Replacement of the demineralization
en
cartridge
The water tank is equipped with a demineralization cartridge.
This cartridge has to be replaced every 2 – 3 months. If
the water is very hard, it may be necessary to replace the
cartridge earlier. White dust around the device is a sure sign
that the cartridge needs replacing. Please note white dust
is not harmful. If white residue still forms around the device
after a new cartridge has been inserted, please make sure
that the water you are using is untreated. If the water flows
through a decalcification system – such as an ion exchanger
– (sodium is added to remove calcium) in the building before
it is used in the humidifier, salt can precipitate as white dust
around the device. The demineralization cartridge and or the
granules must be exchanged at the latest after 6 months or
the unit does not reach its full performance anymore.
Always unplug the unit before removing the
water tank. Do not touch the water in the base
during operation!
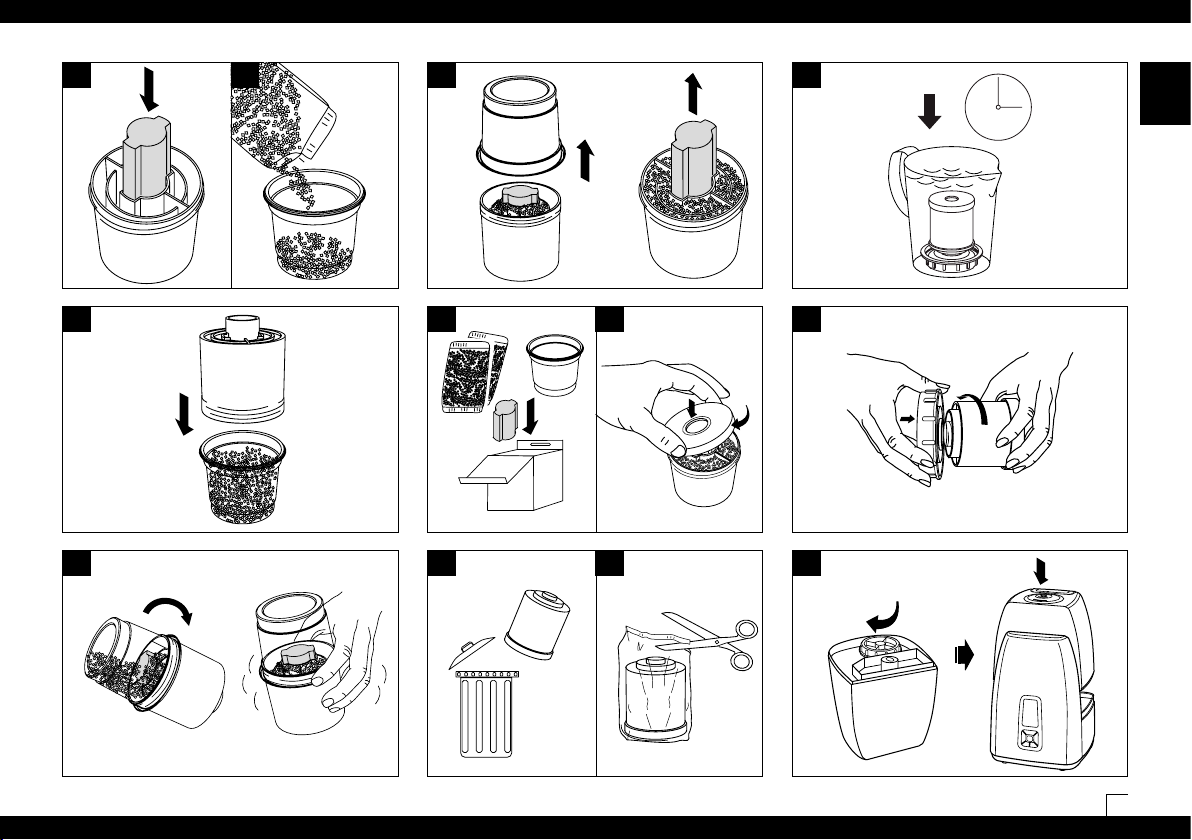
• Turn the plastic cup and cartridge over and shake until
all granules is in the cartridge (37).
• Remove the plastic cup and the pink styrofoam piece
from the cartridge (38) and retain for future use (the
refill granules consists of 3 refill bags) (39).
• Close the cartridge (40).
• Soak the demineralization cartridge in a water bath
24 hours before using it (43). The granules have to
absorb water to reach maximum performance. If it is
soaked in the tank, make sure to exchange the water
and empty the water from the base before using the
humidifier.
• Screw the cartridge on the water tank cap (44).
• Screw the cartridge on the bottom side of the water
tank, put the tank on the main body (45).
Placing granules in the center of the cartridge
allows them to escape in the unit or to clog the
unit. The unit will no longer operate properly and
the granules need to be cleaned out thoroughly.
30
31
Option A: replace the granules
• Remove the water tank from the base and unscrew the
water tank cap (30).
• The demineralization cartridge is attached to the tank
cap. Unscrew the cartridge from the cap by turning it
counter-clockwise (31). Important: do NOT dispose of
the water tank cap!
• Open the cartridge (32).
• Throw the content into the waste (Attention! Disposed
granules can make the floor slippery!) (33).
• Place the enclosed pink styrofoam piece in the center
of the cartridge. Do not push it to the bottom as it will
be difficult to remove afterwards (34).
• Pour the contents of one refill granules bag into the
plastic cup that is included with the refill granules packaging (35).
• Place the empty cartridge with the plug in the center
onto the plastic cup (36).
14
Option B: replace the whole cartridge
• Remove the water tank from the base and unscrew the
water tank cap (30).
• The demineralization cartridge is attached to the tank
cap. Unscrew the cartridge from the cap by turning it
counter-clockwise (31). Important: do NOT dispose of
the water tank cap!
• Throw the whole cartridge into the waste (41).
• Unpack the new cartridge (42).
• Soak the demineralization cartridge in a water bath 24
hours before using it (43). The granules have to absorb
water to reach maximum performance. If it is soaked in
the tank, make sure to exchange the water and empty
the water from the base before using the humidifier.
• Screw the cartridge on the water tank cap (44). Close
tank cap well and place the tank on the main body
(45).
32 33
Page 15
34 35 38
43
en
24 h
39 40
37 41
42
4436
45
15
Page 16
Storing the appliance for extended periods
en
Clean the appliance as described earlier and allow to dry
thoroughly. Preferably store the appliance in its original box,
in a dry place away from high temperatures.
Legal notice
The humidifier is cUL-listed.
Subject to technical change. The instructions for use are
protected by copyright © BONECO AG.
Accessories
Contact your local retailer or check our website
www.boneco.us for re-order information.
Customer Service
Customer Service (USA) 1-800-336-0326
www.boneco.us
Technical data
Electrical voltage 120 V / 60 Hz
Power consumption up to 45 W / (125W*)
Humidity output up to 3.5 gallons / 24 h*
Suitable for rooms up to 650 sq ft / 60 m
Dimensions (LxWxH) 10 x 11.4 x 13.7 in
25.4 x 29 x 34.7 cm
Weight (empty) 8.8 lbs / 4 kg
Accessories Demineralization cartridge A7531
Hydro Cell A200
EZCal A7417
EZCal PRO A100
* when used with pre-heating to 176 °F (80 °C)
Troubleshooting
Problem Possible cause What to do
Unit does not operate Power cable not plugged in Plug in power cable
No water in the tank (Empty-light red) Fill tank with water and wait 10 min.
No mist output Unit needs cleaning Descale the water base using EZCal and EZCal PRO
DMC exhausted Replace cartridge or granules
DMC overfilled with granules Take out 2 tablespoons of granules and throw
them away
Weak mist output Water temperature too low Set mist output to maximum, after 15 min.
the humidifier will work properly again
Mineral deposits on membrane Clean membrane using EZCal and EZCal PRO and brush
Unit running intermittently Replace demineralization cartridge or granules
White dust around the humidifier Demineralization cartridge exhausted Used granules must go in waste
2
16
Page 17

General Humidifier Questions
Q. Why isn’t there enough moisture in my room?
A. How often do you run the unit? If the unit is only run at
night, then during the day the moisture level will drop if
moisture is not constantly added to the air.
Q. Do you leave your door open or closed when the
unit is running?
A. a) By leaving the door open, this allows moisture to
leave the room and go into other areas of the house.
If you would like the moisture to stay within one
specific room you should consider closing the door
while the unit is running.
A. b) Wood, leather, carpet, curtains, and other types of
fabric soak up a lot of moisture, thus not leaving
enough moisture for the air. If the window is left
open, then this allows moisture to escape the room.
Another factor is a lot of times the unit is placed next
to a heating device. The idea is that the air blowing
into the room will quickly place moisture around the
room. Unfortunately, this concept does not work
because the hot air coming out of a vent will soak
up most of the moisture, and none of the air within
the room will receive any.
Q. How much moisture do I need in my room?
A. Suggested humidity levels are between 40 – 60%.
Q. What are the effects of too little or too much
humidity?
A. Dry air can cause dry skin, static electricity, out of tune
musical instruments, increased levels of dust (dry air
causes dust to rise), damage to wooden objects (dry
out and eventually cracks appear), discomfort, sickness, and dries out nasal membranes.
Over-humidifying the air can cause mold and wallpaper
to peel.
Q. Why do I need a humidifier when I can just open
my window?
A. The moisture level within the outside air is not high
enough to humidify a room. The colder the air the less
moisture it is capable to hold, and the more the air is
heated up the percentage of relative humidity is lower.
Relative humidity means the amount of water vapor in
the air, compared to the amount the air could hold if it
was totally saturated. The difference is higher between
outside and inside temperatures; more humidification
is needed because of the dry air in the room.
Q. Where should I place my humidifier?
A. The unit should be free-standing and not close to a
wall, window, door, or thermal bridge so that air may
circulate around the unit.
Ultrasonic Frequent Questions
Q. Why does it say open/close on the demineralization
cartridge cap?
A. Those directions are there in case you decide to use
the refill option to replace the granules; the purpose is
for how to open and close the cap. If you did open the
cap before placing it in the water tank, you will most
likely notice that there are granules in the water tank
and the base of the unit. Immediately turn off the unit,
and empty the water out of the base and the water
tank. Begin removing all granules from base and water
tank. Use brush to clean around membrane.
Caution: Do not dispose of granules in sink! Used
granules must go in waste!
Q. I just replaced my cartridge, and the contents and
water in the base has turned a blue-green color.
A. This sometimes occurs when the cartridge, or even
the granules, are replaced. This does not occur with all
replacement cartridges or granules, and is a reaction of
water content and the Ultrasonic vibrations. This is not
an indicator to replace the cartridge.
Q. There is no fill-line on the water tank, how far
may I fill it up?
A. There is no fill line on the water tank, and it may be
filled all the way to the top.
Q. What is the purpose of the demineralization
cartridge (DMC)?
A. The DMC removes minerals from the water to prevent
white dust. The contents of the cartridge need to be soaked for 24 hrs prior to first using the unit so that they
may fully expand and remove minerals from the water.
The contents of the DMC have a life of 2 – 3 months.
The cartridge may need to be replaced more often
depending on water hardness and how often the unit
is used. An indication of when the DMC needs to be
changed can be white dust or reduced amount of mist
output.
Q. Is it ok to use distilled water with the unit?
A. For best results with your ultrasonic humidifier use
distilled or reverse-osmosis water and remove the
demineralization cartridge.
Q. I just replaced the contents of the cartridge and
now have granules everywhere.
A. First, make sure there are no granules in the middle
of the cartridge. Placing granules in the middle of the
DMC allows them to escape in the unit. Immediately
turn off the unit, and empty the water out of the base
and the water tank. Begin removing all granules
from base and water tank. Use brush to clean around
membrane.
Caution: Do not dispose of granules in sink! Used
granules must go in waste!
Q. The directions tell me not to place the unit directly
on the floor, why do I have to elevate the unit?
A. The idea with this unit is to allow one to force humidity
into the air. Because of this, the carpeting or wood floor
surrounding the unit may become damp. If the unit is
17
en
Page 18

placed at least 3 feet off the floor, the mist will have the
en
opportunity to evaporate before hitting the floor.
Q. Water does not go into the tank.
A. In order to fill the tank, it must be turned upside down.
The cartridge is placed on the water tank cap. Do not
pour water in the tube which is the mist outlet.
Q. White dust is emitted from the unit
A. White dust particles are minerals that are broken up in
tiny pieces by the ultrasonic process.
Solve the problem:
• Soak the demineralization cartridge in a bowl of water
for a minimum of 24 hours. If the cartridge is soaked
in the water tank, the water in the tank and the base
needs to be replaced before using the unit.
• Exchange the demineralization cartridge after 1-2
months when you use very hard water (for softer water
after 2-3 months). No matter how hard your water
is, exchange the cartridge at the very latest after 6
months.
• Don’t use water from a pre-installed water softener,
or sodium instead of calcium will be emitted from the
unit. Use distilled water instead and remove the demineralization cartridge.
• For very hard water areas use only distilled water and
remove the demineralization cartridge.
• Use Reverse-Osmosis water (R-O water) instead of distilled water and remove the demineralization cartridge.
• Cleaning light is flashing (digital models)
Switch off the unit and unplug it. Empty the water in
the base. Rinse the base with warm/clean water. Do
not submerge the base! Visually inspect the base for
dirt or mineral build up. If soft water is used decalcifying the unit every 4 weeks with EZ Cal is suggested.
If hard water is used the unit should be decalcified
every 2 weeks. Do not forget to reset the clean light
after resetting the unit.
18
Q. Reset cleaning light (digital models)
A. The cleaning light does not automatically reset. Hold
down the power button (button A in instruction manual)
until the light stops flashing. The light automatically
comes on approx. after 14 days of plugging in the unit.
Q. The hygrometer on unit reads a different humidity
level than external hygrometer.
A. Not all hygrometers are calibrated the same, and most
are off by +/- 5%. Plus the humidity level is not the
same in the whole room. The air circulation is different
in every corner of the room. The unit should not be
placed near a heating vent or a radiator as the heat will
absorb all of the moisture.
Q. Humidity level is not changing or does not reach
the desired humidity level.
A. If the water tank needs refilling more than once per
day, the unit is working properly and the climatic condition in the room has an influence on the humidity.
Reasons for low humidity level:
• air circulation is very high (air is fully exchanged several times per day – the humidifier needs to starts its
work from scratch)
• insulation of home (see air circulation)
• open space with high ceilings (not only the footage of
the room counts but also the height) – high-rise buildings require more humidification.
• open windows – works similar to air circulation (if it is
very cold outside don’t open the window more than 2
times per day for 3 minutes)
• big difference between outside temperature and inside
temperature – the colder the air the less moisture it
is capable to hold and the more the air is heated up
the lower is the percentage of relative humidity (=the
amount of water vapor in the air, compared to the
amount the air could hold if it was totally saturated)
• position of the unit - if it is placed close to a door, window or air vent. This increases the air circulation.
Q. Tank is leaking
A. Check if there are any hairline cracks. Dropped units or
water tanks that are cracked will not be covered under
the warranty. Please contact the retailer the unit was
purchased from in case your unit arrives damaged.
Q. Placing the face in the mist
A. It is not recommended that anybody places their face
in the mist. It is an electrical product and should not be
played with.
Q. No mist / unit is not working / empty indicator
keeps flashing
A. Fill up the water tank. Check if water is flowing through
the demineralization cartridge (attached to the water
tank cap). If the water tank is full but there is only little
water in the base it indicates that the water is now
flowing through the demineralization cartridge.
• Wait for 15 minutes to allow the mist to come out of
the unit.
• If the unit is not working and the empty light is not flashing you might have set the desired humidity too low
and the current humidity level in the room is higher.
That is why the unit switches off automatically.
• If the empty indicator keeps flashing and the tank is
full, the water is not flowing through the cartridge.
Exchange the cartridge or the granules in the cartridge
after 2-3 months, in areas with hard water exchange
the cartridge after 1 -2 months. However, the demineralization cartridge and or the granules must be
exchanged at the latest after 6 months or the unit does
not reach its full performance anymore
• If the granules are new, see the following instructions:
• Make sure the cartridge and/or granules were soaked
for 24 hours, dry granules take even longer for water
to filter through the cartridge and into the base. Next,
please remove 2 tablespoons of granules from the
cartridge, and throw them away. When there are too
many granules in the cartridge it does not allow water
to flow from the tank to the base.
Page 19

Q. Water tank cap is too tight to unscrew
A. This could be a cause of the air pressure within the
water tank. Depress the spring on the bottom of the
water tank cap to release air from the water tank.
Continue to do this until you are able to unscrew the
water tank cap.
Q. Unit is running intermittently.
A. How long has it been since the contents of the
cartridge were replaced? If 2-3 months have passed,
it is time to replace the contents of the cartridge.
However the demineralization cartridge and or the
granules must be exchanged at the latest after 6
months or the unit does not reach its full performance
anymore.
• If the contents of the cartridge were just replaced there
are probably too many granules in the cartridge. Remove 2 tablespoons of granules from the cartridge.
Accessories
Q. Do I need to keep any parts before I replace the
demineralization cartridge?
A. Yes, always keep the water tank cap (this is the piece
that attaches the demineralization cartridge to the
water tank).
Q. What is the Hydro Cell and how long is it good for?
A. The Hydro Cell keeps humidifiers operating at their
highest level between recommended cleanings*. Good
for approximately one to two months, depending on the
water quality, the Hydro Cell ensures the humidifier’s
functionality while providing fresh humidification
performance. It needs to be replaced every one to two
months*.
Q. Placement of the Hydro Cell
A. Please see picture 28/29 for instructions.
Q. What is EZCal and EZCal PRO?
A. There is a sample packet of EZCal included in the
packaging of your humidifier. EZCal and EZCal PRO are
used for cleaning and descaling any of the humidifiers
and cleans mineral build-up. EZCal and EZCal PRO are
the only recommended cleaning and descaling solution. Do NOT use any other cleaning solutions since it
can damage the product. Any use of cleaning solutions
apart from EZCal and EZCal PRO will void the warranty.
Instructions for using are on the packet. Only use 1 packet for 32oz of water. Do not change the ratio. It can
also be used for other humidifier brands. Thoroughly
rinse the base with tap water and make sure no EZCal
and EZCal PRO residues remains in the base! EZCal
and EZCal PRO are available at selected retail stores
and online www.boneco.us.
en
* Depending on the water quality.
19
Page 20

en
20
Page 21

Instructions d’utilisation
fr
21
Page 22

LISEZ ET CONSERVEZ TOUTES LES INSTRUCTIONS!
Consignes de sécurité importantes
fr
• Avant la mise en service, lisez attentive ment et entièrement les instructions, puis rangez soigneusement ces
dernières pour tout besoin ultérieur.
• AVERTISSEMENT – N’utilisez l’appareil qu’à l’intérieur
et dans les conditions recommandées. Toute utilisation
non conforme est susceptible de mettre votre santé en
danger.
• Ne branchez l’appareil qu’au courant alternatif – la
tension doit correspondre à celle indiquée sur la plaque
signalétique de l’appareil.
• Les enfants n’ont pas conscience des risques liés à
l’utilisation d’appareils élec triques. Surveillez-les donc
en permanence lorsqu’ils se trouvent à proximité de
l’humi dificateur (image 1).
• Ne mettez jamais l’appareil en service lorsqu‘un
câble ou une prise est détérioré (2), ni après des
dis fonctionnements ou lorsque l‘appareil a été échappé
(3) ou autre dommage quelconque.
• Les réparations d’appareils électriques ne doivent
être exécutées que par des experts autorisés (4). Des
réparations non professionnelles peuvent causer des
dangers considérables pour l’utili sa teur.
• Ne posez l’humidificateur que sur une surface sèche
et plane (5).
• Ne posez pas l’appareil directement sur le plancher
ni à côté du chauffage (6). Si la brume entre en contact
avec le plancher avant l’évaporation, la surface du
plancher peut être endommagée. Nous n’acceptons
aucune responsabilité pour les dommages en cas d’un
emplacement inapproprié de l’appareil.
• L’appareil doit être posé en hauteur (7), par exemple
sur une table, une commode, etc.
• Placez l’appareil à un endroit tel qu’il ne soit pas
facilement heurté par quiconque (8).
• Débranchez toujours l‘appareil lorsqu‘il n‘est pas
utilisé.
22
• L’humidificateur doit être mis en service uniquement
lorsqu‘il est entièrement assemblé.
• Débranchez TOUJOURS la prise avant d‘enlever, de
remplir et de vider le réservoir d’eau; avant de nettoyer,
d’effectuer la maintenance, l’assemblage, le désassemblage des pièces et avant de déplacer l‘appareil.
• Ne mettez pas les mains dans la chambre de vaporisation lorsque l’appareil fonctionne et émet de hautes
fréquences.
• Ne mettez pas le cordon d’alimentation sous le tapis et
ne le couvrez pas par des moquettes. Placez le cordon
de sorte que personne ne puisse trébucher.
• Ne débranchez jamais la fiche de la prise en tirant sur
le cordon ou lorsque vos mains sont mouillées.
• N’utilisez pas l’appareil en présence de gaz ou de
vapeurs inflammables.
• N’exposez pas l’appareil à la pluie, ne l’utilisez pas à
proximité de l’eau, dans une salle de bain, dans une
buan derie, ni dans toute autre pièce humide.
• Utilisez uniquement l’appareil en position verticale.
• Veillez à ce qu’aucun objet étranger ne pénètre dans
les ouvertures de ventilation ou d’évacuation. Cela
pourrait engendrer des chocs électriques ou endommager l’appareil. Ne bloquez pas les sorties ni les
entrées d’air.
• Ne versez pas d’eau dans la sortie de brume de
l’appareil!
• La fiche de cet appareil est polari sée (une lame est
plus large que l’autre). Afin de réduire les risques de
chocs électriques, cette fiche est conçue de fa çon à ne
pouvoir être introduite dans une prise que d’une seule
manière. Si la fiche ne s’insère pas totalement dans la
prise, retournez-la. Si elle ne s’insère toujours pas dans
la prise, con tactez un électricien qualifié. N’essayez
PAS de contourner ce dispositif de sécurité.
• Une mauvaise adaptation entre la fiche et la prise
CA peut entraîner une surchauffe et une déformation
de la fiche. Contactez un électricien qualifié pour le
remplacement de toute prise lâche ou trop usée.
• Ne montez pas, ne vous assoyez pas et ne posez pas
d’objets lourds sur l‘appareil.
• Ne plongez jamais le boîtier principal dans de l’eau ou
d’autres liquides.
• Retirez la fiche de la prise de courant avant d’effectuer
l’entretien.
• Ne laissez pas les personnes qui n’ont pas pris
connaissance du mode d’emploi, les enfants et les
personnes sous l’effet de médicaments, d’alcool ou
de drogues manipuler l’appareil, ou bien, uniquement
sous votre surveillance.
• Afin de protéger la santé et sécurité et la fonction
adéquate d‘humidification n‘utilisez que de l‘eau potable propre, froide, et exempte de contaminants dans
votre humidificateur. Si votre source d‘eau est contaminée ou si vous êtes incertain de son innocuité, veuillez utiliser de l‘eau distillée. De plus, il est conseillé
de nettoyer et d‘entretenir votre humidificateur en
temps opportun, comme indiqué dans ce manuel.
• L’utilisation d’additifs comme les huiles éthérées/
les huiles essentielles, les parfums, l’euca lyptus,
les adoucisseurs d‘eau, etc., peut endommager les
matériaux du réservoir et par conséquent, l’appareil
entier. Tout usage de ces additifs annulera la garantie
du fabricant.
• Remarque : Ni les êtres humains ni les animaux ne
peuvent entendre les vibrations haute fréquence.
Page 23

1
4
7
en
fr
2
3
5
8
96
23
Page 24

Avant-propos
Félicitations pour l‘achat de l‘humidificateur à ultrasons
7144!
fr
Savez-vous qu’un air desseché :
• provoque le dessèchement des muqueuses, des
gerçures aux lèvres et des irritations aux yeux?
• favorise les infections et les maladies des voies
respiratoires?
• mène à un état de lassitude ou de fatigue permanent
et à des pertes de concentration?
• est néfaste pour les animaux domestiques et les
plantes d’intérieur?
• favorise l’accumulation de poussière et accroît
l‘électricité statique des textiles, des tapis et des
revêtements de sol synthétiques?
• endommage les meubles et certains parquets en bois?
• désaccorde certains instruments de musique?
Renseignements généraux
Le climat ambiant est agréable quand l’humidité relative
de l’air se situe entre 40 % et 60 %. Votre humidificateur
contrôle automatiquement l’humidité désirée que vous
avez prédéterminée. Lorsque l’air est trop sec, il démarre
automatiquement. Lorsque le degré d’humidité désiré est
atteint, il s’arrête automatiquement.
Désemballage
• Retirez l’humidificateur de la boîte avec soin (10).
• Attention : Ne tirez pas l’appareil de la boîte par la
poignée du réservoir – la base pourrait tomber et être
endommagée (11).
• Retirez le sac en plastique de l’humidificateur.
• Observez les renseignements figurant sur la plaque
signalétique concernant l’alimentation principale.
• Le panneau avant est doté d’une étiquette de protection afin d’en protéger la surface. Veuillez la retirer
avant la première utilisation (12).
• Si vous n’utilisez pas l‘humidificateur pendant toute
l’année, rangez-le dans l’emballage d’origine.
10
11
12
24
Page 25

Description de l’appareil
Buse de brumisation
(rotative)
Réservoir d’eau
Chambre d’évaporation
Hydro Cell
Cartouche anticalcaire
Bouchon du réservoir
d’eau
Panneau de commande
Boîtier principal
13
14
24 h
Brosse
Détecteur du niveau d’eau
Membrane
Espace de nébulisation
Mise en service
Le meilleur emplacement pour votre humidificateur :
• Ne placez pas l‘humidificateur près d’un radiateur
ou sur un sol chauffé. L’humidité de la vapeur peut
endommager la surface du plancher (6) (voir les
Con signes de sécurité).
• L’appareil doit être posé en hauteur (7), par exemple
sur une table, une commode, à au moins 1 m (3 pi)
du sol.
• Veillez à ce que la bouche de diffusion ne soit pas
orientée en direction de plantes, de meubles ou
d’autres objets (13). Distance min. de 50 cm (20 inch).
• Plongez la cartouche anticalcaire dans un bain d’eau
pendant 24 heures avant de l’utiliser (14). Les granules doivent absorber de l’eau pour atteindre des
performances élevées. Si elle est plongée dans l’eau,
assurez-vous de remplacer l’eau et de vider l’eau de la
base avant d’utiliser l’humidificateur.
• En général, la cartouche anticalcaire devra être remplacée tous les 2 à 3 mois, en fonction de la dureté
de l’eau de votre région. La cartouche doit être remplacée après 6 mois au plus tard sinon l’appareil
n’atteint plus ses performances les plus élevées. Voir
« Remplacement de la cartouche anticalcaire ».
• Pour remplir le réservoir de l’humidificateur, lisez
les instructions dans la section « Remplissage du
réservoir » (15 et 16).
• Placez le réservoir d’eau sur la base.
• Insérez la fiche dans la prise de courant et mettez
l’appareil sous tension en actionnant l’interrupteur
marche/arrêt. (19).
• L’appareil atteint son plein régime de fonctionnement
environ 10 à 15 minutes après la mise sous tension.
• Assurez-vous que le câble n’est pas coincé (9).
N’utilisez pas l’humidificateur si le câble est
en dommagé (2).
fr
25
Page 26

Remplissage du réservoir
Débranchez toujours l’appareil avant de retirer
le réservoir d’eau. Ne touchez pas à l’eau dans
fr
contaminants dans votre humidificateur. Si votre source
d‘eau est contaminée ou si vous êtes incertain de son innocuité, veuillez utiliser de l‘eau distillée.
Ne mettez pas l’humidificateur en marche si le réservoir
d’eau est vide! Lorsque l’eau atteint le niveau minimum,
l’appareil arrête automatiquement la fonction de nébulisation et le témoin rouge s’allume.
• Enlevez le réservoir d‘eau de la base et dévissez le
• Assurez-vous qu’aucun objet étranger ne se trouve
• Remplissez le réservoir d’eau avec de l’eau propre et
• Ne versez pas d’eau dans la buse de brumisation de
• Insérez la fiche dans la prise de courant et mettez
la base lorsque l’appareil est en marche!
Afin de protéger la santé et sécurité et la fonction adéquate d‘humidification n‘utilisez que
de l‘eau potable propre, froide, et exempte de
bouchon du réservoir d‘eau (15).
dans le réservoir d’eau.
froide du robinet (16) et fermez bien le bouchon du réservoir (17). Placez le réservoir d’eau sur la base. L’eau
peut maintenant s’écouler du réservoir vers la base.
l’appareil (18).
l’appareil sous tension en actionnant l’interrupteur
marche/arrêt (19). L’indicateur rouge du niveau d’eau
peut rester illuminé quelques secondes, pendant que la
base se remplit d’eau.
Aucune utilisation d’additifs
N’utilisez aucun additif d’eau (huiles éthérées/huiles essentielles, parfums, eucalyptus, adoucisseurs d‘eau, etc.)!
Même une petite quantité peut causer des fissures dans le
matériau du réservoir. Le matériau n’a pas été conçu pour
l’usage de tels additifs. Une seule goutte suffit pour endommager le réservoir et, par conséquent, l’appareil aussi.
L’utilisation de tels additifs annulera la garantie du fabricant.
26
15
18
16 19
17
Page 27

Fonctionnement 7144 C) Minuterie
La touche C vous permet de définir la durée de fonctionnement – réglable de 1 à 8 heures CO (fonctionnement
continu). Le symbole G indique quelle durée est réglée
(1h/2h/3h/4h/5h/6h/7h/8h/CO). L’affichage change auto-
H
matiquement au bout de quelques secondes sur la valeur
actuelle.
K
D
A
E
G
L
I
M
D) Réglage de la puissance de brumisation
En appuyant plusieurs fois sur la touche D, vous pouvez
réguler la puissance de brumisation. L’affichage (Symbole
J
H) indique lequel des trois niveaux (bas/moyen/élevé) vous
avez choisi.
E) Fonctionnement avec préchauffage
(brume tiède)
La touche E sert à activer (le symbole I s’allume) ou
désactiver le préchauffage. L’eau est ainsi préchauffée à
F
176 °F (80 °C) avant d’entrer dans l’espace de nébulisation. L’eau dans la base prend entre 10 à 15 minutes à se
B
réchauffer. La brume sort alors à une température agréable
de 104 °F (40 °C). Cela permet à la température de la pièce
de ne pas baisser et que la propreté de l’eau s’améliore
C
considérablement.
F) Mode automatique et veille
A) Touche Marche/Arrêt
En appuyant sur la touche A, vous allumez ou éteignez
l’appareil. Cette touche permet également de réinitialiser
l’indicateur de nettoyage (en appuyant dessus).
B) Hygrostat (réglage de l’humidité)
En appuyant sur la touche B, vous réglez l’humidité souhaitée en %. La valeur recommandée est une humidité relative entre 40 % et 60%. La précision de mesure est de
+/- 5 %. Si l’humidité dépasse le réglage souhaité,
l’appareil s’éteint. Pendant la sélection, la valeur de consigne s’affiche. L’affichage change automatiquement après
quelques secondes sur la valeur actuelle.
En appuyant sur la touche F, il est possible d’activer le
mode automatique et le mode veille. Une pression unique
sur la touche permet d’activer la fonction automatique (le
symbole J apparaît à l’écran), par laquelle l’humidité optimale de l’air est conservée en fonction de la température.
La régulation se fait via la quantité émise et la valeur de
consigne prescrite. Si le mode veille est activé (le symbole
K apparaît à l’écran), l’humidité de consigne est de 60 %; le
réglage du temps se met automatiquement sur 6 heures; le
chauffage est activé. De plus, la quantité émise est régulée
en fonction de la différence entre la valeur de consigne et
la valeur réelle.
Ces modes ne permettent pas de modifier la minuterie. En
appuyant sur d’autres touches, l’appareil quittera le mode
automatique ou veille.
G) Symbole de la minuterie
H) Symbole de la puissance de brumisation
I) Symbole du préchauffage
J) Symbole du mode automatique
K) Symbole du mode veille
L) Indicateur du niveau d’eau
Grâce au réservoir d’eau transparent, la quantité d’eau est
bien visible. De plus, l’appareil indique sur l’écran (symbole L) quand il faut remettre de l’eau. Le symbole L peut
demeurer illuminé pendant quelques secondes au remplissage du réservoir, jusqu’à ce que a base soit pleine d’eau.
M) Indicateur de nettoyage
Si le symbole M apparaît à l’écran avec « CLEAN », l’appareil
devrait être nettoyé selon les recommandations du fabricant. Ce symbole s’allume automatiquement toutes les
2 semaines, en fonction de l’utilisation. L’écran peut être
réinitialisé en appuyant sur la touche A jusqu’à ce que
la lumière disparaisse.
fr
27
Page 28

Nettoyage/entretien
Débranchez toujours l’appareil avant de retirer le
réservoir d’eau. Ne touchez pas à l’eau dans la
fr
base lorsque l’appareil est en marche.
Attention – risque d’électrocution et
dommage au du produit!
• Mettez l’appareil hors tension et débranchez la prise
avant de nettoyer l’appareil (20).
• Nettoyez régulièrement le réservoir d’eau et la base.
N’utilisez que de l‘eau, et aucun détergent (21).
• Utilisez uniquement le nettoyant et détartrant EZCal
et EZCal PRO personnalisé pour l’élimination régulière
des dépôts de la membrane (22 et 23). Un échantillon d’EZCal est inclus avec votre humidificateur. Les
instructions d’utilisation figurent sur l’emballage.
N’utilisez qu’un seul paquet pour 1 litre (32 oz) d’eau.
Ne modifiez pas ce rapport. NE FAITES PAS fonctionner
l’appareil lorsque vous utilisez EZCal et EZCal PRO.
Ce faire pourrait endommager le produit et annule la
garantie. Rincez complètement la base à l’eau potable après avoir utilisé EZCal et EZCal PRO et vérifiez
qu’aucun résidu d’EZCal et EZCal PRO n’y demeure.
20 24
2521
ACID
22 23
WARM
28
WARM
26
Page 29

EZCal et EZCal PRO sont les seuls nettoyants et
détartrants recommandés. N’UTILISEZ AUCUNE
autre solution nettoyante : vous risqueriez d’endommager l’appareil. L’utilisation de toute autre
solution autre qu’EZCal et EZCal PRO annule la
garantie.
• Ne plongez jamais le boîtier dans de l’eau ou d’autres
liquides (24)!
• L’indicateur de nettoyage reste présent sur l’affichage
après le nettoyage. Pour le réinitialiser, maintenez la
touche ON/OFF enfoncée jusqu’à ce que le témoin
d’entretien arrête de clignoter.
• Nettoyez les parties intérieures avec un chiffon doux et
n’utilisez en aucun cas de l‘essence, des produits pour
nettoyer des vitres ou des détergents (25).
• N’utilisez que la brosse pour le nettoyage hebdomadaire de la membrane. Ce nettoyage doit être
réalisé une fois par semaine. N’utilisez que la partie
en soie douce de la brosse (26).
• Changez l’eau du réservoir au moins une fois par
semaine si l’eau s’y trouve depuis plus d’une semaine.
Préservation de la qualité de l‘eau
L‘Hydro Cell assure le bon fonctionnement des humidificateurs à leur niveau le plus élevé entre les nettoyages
recommandés. Bon pour environ un à deux mois, selon la
qualité de l‘eau, l’Hydro Cell assure le bon fonctionnement
de votre humidificateur tout en procurant un rendement
d‘humidification fraîche. Il commence à fonctionner dès
qu’il entre en contact avec l’eau, même si l’unité est éteinte.
L’Hydro Cell devrait être remplacé sur une période d‘un à
deux mois.* Regardez l‘illustration [NRs] pour voir la position du dispositif Hydro Cell à l‘intérieur du réservoir d‘eau
de l‘unité. Mettez d’abord l’appareil hors tension. Pour toute
information de commande ultérieure, contactez votre détaillant local ou consultez notre site Web www.boneco.us.
Remplacement de la cartouche anticalcaire
Débranchez toujours l’appareil avant de retirer le
réservoir d’eau. Ne touchez pas à l’eau dans la
base lorsque l’appareil est en marche.
Le réservoir d‘eau est équipé d‘une cartouche anticalcaire.
Cette cartouche doit être remplacée tous les deux à trois
mois. Si votre eau est très dure, vous devez peut-être remplacer plus tôt la cartouche. La présence de poussière blanche autour de l’appareil est un signe indubitable que la cartouche doit être remplacée. Veuillez noter que la poussière
blanche n’est pas nocive. Si un dépôt blanc se forme toujours
autour de l’appareil alors que la cartouche est neuve, veuillez vous assurer que l’eau que vous utilisez n’est pas déjà
traitée. Si l’eau passe à travers un système de détartrage –
comme un échangeur d’ions – (avec addition de sodium
pour l’élimination du tartre) dans le bâtiment avant d’arriver
à l’humidificateur, du sel pourrait se précipiter autour de
l’appareil, formant une poussière blanche. La cartouche
anticalcaire et/ou les granulés doivent être remplacés après
6 mois au plus tard sinon l’appareil n’atteint plus ses performances les plus élevées.
27
fr
28
29
* Selon la qualité de l‘eau.
29
Page 30

Option A : Remplacement des granulés :
• Retirez le réservoir d’eau de la base et dévissez le
bouchon du réservoir d’eau (30).
• La cartouche anticalcaire est attachée à l’intérieur
fr
du bouchon du réservoir. Dévissez la cartouche du
bouchon en tournant dans le sens inverse des aiguilles
d’une montre (31). Important : NE JETEZ PAS le
bouchon du réservoir d‘eau!
• Ouvrez la cartouche (32).
• Jetez le contenu à la poubelle (Attention! les granulés
répandue peut rendre le sol glissant!) (33).
• Placez le morceau de mousse de polystyrène rose au
centre de la cartouche. Ne le poussez pas au fond,
puisqu’il sera difficile de le retirer par la suite (34).
• Versez le contenu d’un sac de granulés de rechange
dans le godet en plastique inclus dans l’emballage de
granulés de rechange (35).
• Insérez la cartouche vide et la fiche, au centre du godet
en plastique (36).
• Retournez le godet et la cartouche à l’envers et secouez-les jusqu’à ce que toute les granulés se retrouve
dans la cartouche (37).
• Retirez le godet en plastique et le morceau en de
mousse de polystyrène rose de la cartouche (38) et
conservez-les pour plus tard (les granulés de rechange
consiste en 3 sacs de rechange) (39).
• Fermez la cartouche (40).
• Plongez la cartouche anticalcaire dans un bain d’eau
pendant 24 heures avant de l’utiliser (43). Les granulés
doit absorber de l’eau pour atteindre des performances
élevées. Si elle est plongée dans l’eau, assurez-vous
de remplacer l’eau et de vider l’eau de la base avant
d’utiliser l’humidificateur.
• Vissez la cartouche sur le bouchon du réservoir d’eau
(44).
• Vissez la cartouche sur le côté inférieur du réservoir
d’eau, mettez le réservoir sur le boîtier principal (45).
Le fait de mettre les granules au centre de la cartouche leur permet d’être libérées dans l’appareil
ou de l’obstruer. L’appareil ne fonctionnera plus
correctement et les granules devront être éliminées complètement.
Option B : Remplacement de la cartouche
au complet :
• Retirez le réservoir d’eau de la base et dévissez le
bouchon du réservoir d’eau (30).
• La cartouche anticalcaire est attachée au bouchon du
réservoir. Dévissez la cartouche du bouchon en tournant dans le sens inverse des aiguilles d’une montre
(31). Important : NE JETEZ PAS le bouchon du réservoir
d‘eau!
• Jetez toute la cartouche à la poubelle (41).
• Déballez la cartouche (42).
• Plongez la cartouche anticalcaire dans un bain d’eau
pendant 24 heures avant de l’utiliser (43). Les granulés
doit absorber de l’eau pour atteindre des performances
élevées. Si elle est plongée dans l’eau, assurez-vous
de remplacer l’eau et de vider l’eau de la base avant
d’utiliser l’humidificateur.
• Vissez la cartouche sur le bouchon du réservoir d’eau
(44). Fermez bien le bouchon de réservoir et placez le
réservoir sur le boîtier principal (45).
30
31
32 33
30
Page 31

34 35 38
43
39 40
37 41
42
4436
45
24 h
fr
31
Page 32

Entreposage de l’appareil
Spécifications techniques
Nettoyez l’appareil de la manière décrite plus haut, séchezle entièrement et conservez-le, de préférence dans son
emballage original, dans un endroit sec et frais.
fr
Mentions légales
L’humidificateur est référencé cUL.
Le fabricant se réserve le droit d’apporter des modifications
d’ordre technique. Les instructions sont couvertes par les
lois relatives aux droits d’auteur © BONECO AG.
Alimentation 120 V / 60 Hz
Consommation d’énergie jusqu’à 45 W / (125 W*)
Production d’humidité jusqu’à 13,25 L / 24 h*
Convient pour les pièces jusqu’à 60 m
Dimensions (LxPxH) 25,4 x 29 x 34,7 cm
10 x 11,4 x 13,7 in
Poids (à vide) 4,0 kg / 8,8 lb
Accessoires
Pour toute information de commande ultérieure, prenez contact avec votre détaillant ou visitez notre site
www.boneco.us.
Service après-vente
Accessoires Cartouche anticalcaire A7531
Hydro Cell A200
EZCal A7417
EZCal PRO A100
* lorsqu‘utilisé avec le préchauffage à 80 °C (176 °F)
www.boneco.us
Guide de dépannage
Problème Cause Que faire
L’appareil ne fonctionne pas Le cordon d’alimentation n’est pas branché Branchez le cordon d’alimentation
Réservoir vide (l‘indicateur du niveau Remplissez le réservoir d’eau et attendez 10 min.
d‘eau s‘allume)
Aucune brumisation L’appareil doit être nettoyé Détartrez le base d’eau à l’aide d’EZCal et EZCal PRO
Cartouche anticalcaire expirée Remplacez la cartouche ou les granules
Cartouche anticalcaire débordante Retirez 2 cuillers à soupe de granules et jetez-les
de granules
Débit de vapeur trop faible Température de l’eau est trop faible Réglez le débit de vapeur au maximum; au
bout de 15 minutes, l’appareil fonctionnera
adéquatement
Dépôts de calcaire sur la membrane Nettoyez la membrane à l’aide d’une brosse,
EZCal et EZCal PRO
Appareil à fonctionnement intermittent Remplacez la cartouche anticalcaire ou les granules
déminéralisation
Poussière blanche s’accumulant Cartouche anticalcaire épuisée Les granules usées doivent être jetées
autour de l’appareil
2
/ 650 pi2
32
Page 33

Questions générales sur l’humidificateur
Q. Pourquoi n’y a-t-il pas assez d’humidité dans ma
pièce?
R. Combien de fois faites-vous fonctionner l’appareil? Si
l’appareil fonctionne uniquement pendant la nuit, alors
le niveau d’humidité tombera pendant la journée si de
l’humidité n’est pas constamment ajoutée à l’air.
Q. Fermez-vous ou laissez-vous votre porte ouverte
lorsque l’appareil fonctionne?
A. a) En laissant la porte ouverte, l’humidité quitte la
pièce et se répand dans d’autres endroits de la
maison. Si vous souhaitez que l’humidité reste dans
une pièce spécifique, vous devriez envisager de
fermer la porte lorsque l’appareil fonctionne.
A. b) Le bois, le cuir, les tapis, les rideaux et autres types
de tissu absorbent une certaine quantité d’humidité,
ne laissant ainsi pas assez d’humidité pour l’air. Si
la fenêtre est ouverte, l’humidité s’échappera alors
de la pièce. Un autre facteur est souvent le positionnement de l’appareil à proximité d’un appareil
chauffant. L’idée repose sur le fait que l’air soufflant
dans la pièce répartira rapidement l’humidité dans
toute la pièce. Malheureusement, ce concept
ne fonctionne pas puisque l’air chaud sortant
d’une bouche d’aération absorbera presque toute
l’humidité. L’air contenu dans la pièce ne recevra
ainsi aucune humidité.
Q. Quelle quantité d’humidité ai-je besoin dans ma
pièce?
R. Les niveaux d’humidité suggérés sont compris entre 40
et 60 %.
Q. Quels sont les effets d’un surplus ou d’un manque
d’humidité?
R. Un air sec peut entraîner l’assèchement de la peau,
de l’électricité statique, des instruments désaccordés,
augmenter le niveau de poussière (un air sec engendre
une accumulation de la poussière), une dégradation
des objets en bois (assèchement et apparition éventuelle de fissures), l’inconfort, des nausées, et un assèchement des membranes nasales.
Un surplus d’humidité de l’air peut entraîner l’appari-
tion de moisissures et le décollement du papier peint.
Q. Pourquoi ai-je besoin d’un humidificateur alors que
je peux simplement ouvrir la fenêtre?
R. Le niveau d’humidité de l’air extérieur ne suffit pas
à humidifier une pièce. Plus l’air est froid, moins il
retient l’humidité. Plus l’air est chaud, plus le niveau
d’humidité relative est faible. On entend par humidité
relative la quantité de vapeur d’eau dans l’air, comparativement à la quantité pouvant être retenue par un air
totalement saturé. La différence est plus élevée entre
les températures extérieure et intérieure. L’air sec de la
pièce exige une plus grande humidification.
Q. Où dois-je installer mon humidificateur?
R. L’appareil doit être mobile et ne pas être installé à
proximité d’un mur, d’une fenêtre, d’une porte ou d’un
pont thermique afin que l’air puisse circuler autour de
l’appareil.
Foire aux questions :
Humidificateur à ultrasons
Q. Pourquoi la mention open/close (ouvrir/fermer)
est-elle inscrite sur le bouchon de la cartouche
anticalcaire?
R. Ces directives sont présentées ici dans le cas où vous
décideriez d’utiliser l’option de remplissage pour
remplacer les granules. L’objectif consiste à savoir
comment ouvrir et fermer le bouchon.
Si vous décidez d’ouvrir le bouchon avant de l’installer
dans le réservoir d’eau, vous remarquerez vraisemblablement la présence de granules dans le réservoir
d’eau et le bac de fond. Arrêtez immédiatement
l’appareil et videz l’eau du bac et du réservoir. Com-
mencez à retirer toutes les granules du bac et du
réservoir. Utilisez une brosse pour nettoyer le pourtour
de la membrane.
Mise en garde: Ne jetez pas les granules dans l’évier!
Les granules usagées doivent être jetées à la poubelle!
Q. Je viens juste de remplacer ma cartouche et le
contenu ainsi que l’eau du bac ont viré au bleuvert.
R. Cela se produit parfois lorsque la cartouche, voire les
granules, est remplacée. Cela ne se produit pas avec
toutes les cartouches ou toutes les granules remplacées. Cela provient d’une réaction du contenu de l’eau
et des vibrations ultrasons et n’indique pas qu’il faille
remplacer la cartouche.
Q. Le réservoir d’eau n’a pas de démarcation,
jusqu’où dois-je le remplir d’eau?
R. Le réservoir n’a pas de démarcation. On peut le remplir
d’eau jusqu’en haut.
Q. Quel est le rôle de la cartouche anticalcaire
(DMC: demineralization cartridge)?
R. La cartouche anticalcaire retire les minéraux de l’eau
pour empêcher l’accumulation de poussière blanche.
Le contenu de la cartouche doit être mis dans l‘eau
24 heures avant la première utilisation de l’appareil
afin qu’il puisse s‘étendre et retirer entièrement les
minéraux de l’eau.
Le contenu de la cartouche anticalcaire dure 2 à 3
mois. Il peut s’avérer nécessaire de remplacer la
cartouche plus souvent selon la dureté de l’eau et la
fréquence d’utilisation de l’appareil. L’accumulation
de poussière blanche ou la réduction de la quantité de
vapeur sortante sont des indicateurs de remplacement
de la cartouche anticalcaire.
33
fr
Page 34

Q. Est-il possible d’utiliser de l’eau distillée avec cet
appareil?
R. Oui, il est possible d’utiliser de l’eau distillée avec cet
appareil. Si vous utilisez de l’eau distillée, retirez la
fr
cartouche anticalcaire.
Q. Je viens tout juste de remplacer le contenu de la
cartouche et il y a des granules partout.
R. Tout d’abord, assurez-vous qu’aucune granule n’est
présente au milieu de la cartouche. Le fait de mettre
les granules au milieu de la DMC leur permet d’être
libérées dans l’appareil. Arrêtez immédiatement
l’appareil, et videz l’eau du bac et du réservoir. Commencez à retirer toutes les granules du bac et du
réservoir. Utilisez une brosse pour nettoyer le pourtour
de la membrane.
Mise en garde : Ne jetez pas les granules dans l’évier!
Les granules usagées doivent être jetées à la poubelle!
Q. Les conseils d’utilisation m’indiquent de ne pas
installer l’appareil directement au sol. Pourquoi
dois-je surélever l’appareil?
R. Cet appareil a été conçu pour propulser l’humidité dans
l’air. C’est pourquoi les parquets ou les sols recouverts
de tapis à proximité de l’appareil peuvent devenir humides. Si l’appareil est installé à soixante centimètres
au-dessus du sol, la brume aura la possibilité de
s’évaporer avant de toucher le sol.
Q. L’eau ne va pas dans le réservoir.
R. Pour remplir le réservoir, il doit être retourné. La
cartouche se place sur le le bouchon du réservoir d’eau.
Ne versez pas d’eau dans la buse de brumisation.
Q. Une poussière blanche sort de l’appareil
R. Les particules de poussière blanches sont des minéraux
qui sont coupés en minuscules parties par le processus
ultrasonique.
34
Comment résoudre le problème :
• Laissez tremper la cartouche anticalcaire dans un bol
d’eau pendant 24 heures minimum. Si la cartouche
trempe dans le réservoir d’eau, il faut remplacer l’eau
du réservoir et de la base avant d’utiliser l’appareil.
• Remplacez la cartouche anticalcaire après 1 à 2 mois
quand vous utilisez de l’eau très dure (pour de l’eau
plus douce, après 2 à 3 mois). Quelle que soit la dureté
de l’eau, remplacez la cartouche après 6 mois au plus
tard.
• N‘utilisez pas de l’eau en provenance d’un adoucisseur
d’eau installé au préalable sinon du sodium sera émis
de l’appareil au lieu du calcium. Utilisez plutôt de l’eau
distillée et retirez la cartouche anticalcaire.
• Dans les zones où l’eau est très dure, utilisez uniquement de l’eau distillée et retirez la cartouche anticalcaire.
• Utilisez de l’eau à osmose inverse plutôt que de l’eau
distillée et retirez la cartouche anticalcaire.
Q. Le témoin de nettoyage clignote (modèle
numérique)
R. Éteignez l’appareil et débranchez-le. Videz l’eau de
la base. Rincez de la base avec de l’eau chaude et
propre. N’immergez pas la base ! Vérifiez si le socle
présente des poussières ou des dépôts de minéraux. Si
de l’eau douce est utilisée, un détartrage de l’appareil
est recommandé toutes les 4 semaines avec EZCal. En
cas d’utilisation d’eau dure, l’appareil doit être détartré
toutes les 2 semaines. N’oubliez pas de réinitialiser
le témoin de nettoyage après la réinitialisation de
l’appareil.
Q. Réinitialisation du témoin de nettoyage (modèle
numérique)
R. Le témoin de nettoyage ne se réinitialise pas automa-
tiquement. Maintenez la touche d’alimentation enfoncée (touche A dans le manuel d’instruction) jusqu’à ce
que le témoin arrête de clignoter. Il s’allume automatiquement 14 jours après le branchement de l’appareil.
Q. L’hygromètre de l’appareil lit un autre niveau
d’humidité que l’hygromètre externe.
R. Tous les hygromètres ne sont pas calibrés de la même
manière et la plupart le sont à +/- 5%. De plus, le niveau d’humidité n’est pas le même dans toute la pièce.
La circulation d’air est différente à chaque coin de la
pièce. L’appareil ne devrait pas être placé près d’une
bouche d’aération ou d’un radiateur puisque la chaleur
absorbera toute l’humidité.
Q. Le niveau d’humidité ne change pas ou n’atteint
pas le niveau d’humidité souhaitée.
R. Si le réservoir d’eau doit être rempli plus d’une fois
par jour, cela signifie que l’appareil fonctionne bien et
que ce sont les conditions climatiques de la pièce qui
ont une incidence sur l’humidité.
Raisons d’un niveau d’humidité bas :
• La circulation d’air est très élevée (l’air est entièrement
renouvelé plusieurs fois par jour – l’humidificateur doit
recommencer son travail depuis le début)
• Isolation de la maison (voir circulation d’air)
• Espace ouvert avec hauts plafonds (non seulement la
superficie de la pièce compte, mais aussi sa hauteur) –
des bâtiments élevés nécessitent plus d’humidification
• Fenêtres ouvertes – effet similaire à la circulation d’air
(s’il fait très froid dehors, n’ouvrez pas la fenêtre plus
de 2 fois par jour pendant 3 minutes)
• Grande différence entre la température extérieure et
la température intérieure – plus l’air est froid, moins il
est capable de retenir l’humidité et plus l’air est chaud,
plus le pourcentage d’humidité relative est moindre
(= quantité de vapeur d’eau dans l’air par rapport à
la quantité que l’air peut absorber s’iI est totalement
saturé)
• Position de l’appareil – s’il est placé près d’être porte,
fenêtre ou bouche d’aération. Cela augmente la circulation d’air
Page 35

Q. Le réservoir fuit
R. Vérifiez s’il n’y a pas de légères fissures. Les appareils
qui ont été échappés ou les réservoirs d’eau fissurés
ne sont pas couverts par la garantie.
Q. Mettre le visage dans la brume
R. Il n’est pas recommandé de mettre son visage dans la
brume. C’est un produit électrique et on ne devrait pas
jouer avec.
Q. Pas de brume / l’appareil ne fonctionne pas /
l’indicateur de vide continue de clignoter
R. Remplissez le réservoir d’eau. Vérifiez si l’eau circule
dans la cartouche anticalcaire (attachée au bouchon du
réservoir d’eau). Si le réservoir d’eau est rempli alors
qu’il n’y a que peu d’eau dans la base, l’eau circule
dans la cartouche anticalcaire.
• Attendez 15 minutes pour permettre à la brume de
sortir de l’appareil.
• Si l’appareil ne fonctionne pas et que le témoin vide ne
clignote pas, il se peut que vous ayez réglé l’humidité
souhaitée trop basse et que le niveau d’humidité actuel
de la pièce soit plus élevé. C’est pourquoi l’appareil
s’éteint automatiquement.
• Si l’indicateur vide continue de clignoter et que le
réservoir est plein, l’eau ne circule pas dans la cartouche. Remplacez la cartouche ou les granules de la
cartouche après 2 à 3 mois. Dans des zones où l’eau
est dure, remplacez la cartouche après 1 à 2 mois. La
cartouche anticalcaire et/ou les granules doivent être
remplacées après 6 mois au plus tard sinon l’appareil
n’atteint plus ses performances les plus élevées.
• Si les granules sont nouvelles, voir les instructions
suivantes :
• Assurez-vous que la cartouche et/ou les granules ont
été immergées pendant 24 heures. Dans le cas de
granules sèches, l’eau met encore plus de temps à
s’infiltrer par la cartouche et dans la base. Ensuite, retirez deux cuillères à soupe de granules de la cartouche
et jetez-les. Un excès de granules dans la cartouche
empêche l’eau de circuler du réservoir vers la base.
Q. Le bouchon du réservoir d’eau est trop difficile à
desserrer
R. Cela peut être dû à la pression d’air dans le réservoir
d’eau. Desserrez le ressort en bas du couvercle du
réservoir d’eau pour libérer l’air du réservoir d’eau.
Continuez jusqu’à ce que vous soyez capable de des-
serrer le couvercle du réservoir d’eau.
Q. L’appareil fonctionne par intermittence
R. Depuis combien de temps n’avez-vous pas remplacé
le contenu de la cartouche? Si 2 à 3 mois se sont
écoulés, il est temps de remplacer le contenu de la
cartouche. La cartouche anticalcaire et/ou les granules
doivent être remplacées après 6 mois au plus tard sinon l’appareil n’atteint plus ses performances les plus
élevées.
• Si le contenu de la cartouche vient d’être remplacé, il
y a probablement trop de granules dans la cartouche.
Retirez deux cuillères à soupe de granules de la cartouche.
Accessoires
Q. Dois-je garder des pièces avant de remplacer la
cartouche anticalcaire?
R. Oui, gardez toujours le bouchon du réservoir d’eau
(c’est la pièce qui attache la cartouche anticalcaire au
réservoir d’eau).
Q. Qu’est-ce qu’un Hydro Cell et quelle est sa
longévité?
A. L‘Hydro Cell assure le bon fonctionnement des hu-
midificateurs à leur niveau le plus élevé entre les
nettoyages recommandés.* Bon pour environ un à
deux mois, selon la qualité de l‘eau, l’Hydro Cell assure
le bon fonctionnement de votre humidificateur tout en
procurant un rendement d‘humidification fraîche. Il doit
être remplacé sur une période d‘un à deux mois *.
* Selon la qualité de l‘eau.
Q. Positionnement de l’Hydro Cell
A. Se reporter à l’illustration 28/29 pour les instructions.
Q. Qu’est-ce que EZCal et EZCal PRO?
R. Un échantillon d’EZCal est inclus avec votre humidi-
ficateur. EZCal et EZCal PRO sont utilisés pour le nettoyage et le détartrage de tous les humidificateurs et
éliminent les dépôts de minéraux. EZCal et EZCal PRO
sont les seuls nettoyants et détartrans recommandés.
N’UTILISEZ AUCUNE autre solution nettoyante : vous
risqueriez d’endommager l’appareil. L’utilisation de
toute autre solution autre qu’EZCal et EZCal PRO annule la garantie. Les instructions d’utilisation sont sur
le paquet. Utilisez 1 seul paquet pour 1 l (32 oz) d’eau.
Ne changez pas les proportions. Il peut également être
utilisé pour d’autres marques d’humidificateur. Rincez
complètement la base à l’eau potable après avoir
utilisé EZCal et EZCal PRO et vérifiez qu’aucun résidu
d’EZCal et EZCal PRO n’y demeure. EZCal et EZCal PRO
sont offerts par certains détaillants choisis et en ligne
sur www.boneco.us.
fr
35
Page 36

fr
36
Page 37

Instrucciones para el uso
es
37
Page 38

¡POR FAVOR LEA Y GUARDE TODAS ESTAS INSTRUCCIONES!
Instrucciones importantes de seguridad
• Antes de usar el artefacto, lea atentamente
las instrucciones y guárdelas bien para posteriores
consultas.
• ADVERTENCIA – Use el humidificador en interiores y
es
teniendo en cuenta los datos técnicos. Un empleo no
conforme con las especificaciones puede poner en
peligro la salud y la vida.
• Conecte el humidificador sólo a corriente alterna (CA)
según los datos de la etiqueta de especificaciones.
• Los niños no reconocen los peligros de los aparatos
eléctricos por lo que hay que vigilarlos siempre que
estén cerca del humidificador (figura 1).
• Nunca use el artefacto si ha sufrido algún daño en el
aparato o en el cable (2), luego de un desperfecto o
luego de que haya sufrido una caída (3) o cualquier
otro daño.
• Sólo debe ser reparado por personal calificado (4);
una reparación inapropiada puede ser peligrosa para
el usuario.
• Sitúe el humidificador sobre una superficie seca y
plana (5).
• No coloque el artefacto sobre el piso o cerca de una
salida de aire caliente (6).
• Si la vaporización toca el piso antes de evaporarse
puede dañar la superficie del piso. No aceptamos
ninguna responsabilidad por daños debidos a la
ubicación inadecuada de la unidad.
• El humidificador debe instalarse en una posición
elevada (7) como, por ejemplo, sobre una mesa, una
cómoda, etc.
• Coloque el aparato en un lugar en el cual no pueda ser
volcado fácilmente (8).
• Desenchufe siempre el aparato cuando no lo usa.
• Haga funcionar el humidificador únicamente luego de
armarlo por completo.
• SIEMPRE desenchufe la unidad antes de quitar/llenar/
vaciar el tanque de agua, antes de limpiarlo, antes de
montar o desmontar alguna de sus partes, cuando lo
mueva o traslade de lugar.
• No toque el agua de la base cuando esté en funcio namiento ya que contiene vibraciones de alta frecuencia.
• No coloque el cable de alimentación por debajo de
alfombras ni lo cubra con tapetes. Coloque el cable de
tal forma que nadie pueda tropezarse con él.
• Nunca desconecte el equipo del tomacorriente tirando
del cable o con las manos húmedas.
• No use el aparato en presencia de gases o vapores
combustibles.
• No exponga el aparato a la lluvia ni lo use cerca del
agua, en el baño, en lavaderos ni en lugares húmedos.
• El aparato siempre se tiene que usar en posición
vertical.
• No permita que objetos extraños penetren en la ventilación u obturen las aberturas. Ésto podría provocar
una descarga eléctrica o dañar el aparato. No bloquee
las salidas o entradas de aire.
• No introduzca agua en la salida de vapor del aparato.
• Este aparato tiene un enchufe polarizado (una de las
patas es más ancha que la otra). Para reducir el riesgo
de una descarga eléctrica, el enchufe debe conectarse
a un tomacorriente polarizado de una sola forma. Si el
enchufe no se adapta perfectamente al tomacorriente,
dé vuelta el enchufe. Si ésto no basta, consulte con
un electricista calificado. NO trate de modificar esta
medida de seguridad.
• Si el enchufe y el tomacorriente no están perfectamente adaptados uno al otro, el enchufe puede calentarse
en exceso y deformarse. Llame a un electricista para
cambiar los tomacorrientes flojos o gastados.
• No coloque o apoye ningún objeto pesado encima del
artefacto.
• No sumerja nunca el cuerpo del humidificador en agua
u otro líquido.
• Desenchufe el aparato antes de realizar cualquier
mantenimiento.
• Las personas que no estén familiarzadas con las instrucciones para el uso, así como los niños o personas
bajo la influencia de medicamentos, alcohol o drogas
no deben manejar el aparato o hacerlo sólo bajo vigilancia.
• Para proteger la seguridad de la salud y el funciona-
miento correcto del humidificador, use únicamente
agua limpia, sin contaminantes, fría y fresca de la llave
en su humidificador. Si su fuente de agua está
contaminada o si no está seguro de su calidad, use
agua destilada. Además, le recomendamos limpiar y
hacerle mantenimiento a su humidificador cuando
sea necesario, tal como se indica en este manual.
• El uso de aditivos en el agua, tales como aceites o
esencias, fragancias, eucalipto, acondicionadores de
agua, etc. pueden dañar el material del tanque y como
consecuencia, la unidad entera. El uso de cualquiera
de esos aditivos anulará la garantía del fabricante.
• Nota: Las vibraciones de alta frecuencia no son
audibles para las personas ni para los animales.
38
Page 39

1
4
7
en
es
2
3
5
8
96
39
Page 40

Introducción
¡Felicitaciones por haberse decidido por el humidificador
ultrasónico 7144!
¿Sabía usted que el aire demasiado seco de una habitación:
• reseca las membranas del sistema respiratorio, lastima
los labios y produce escozor de ojos?
• promueve las infecciones y enfermedades de las vías
es
respiratorias?
• ocasiona debilidad, cansancio y dificultades de
concentración?
• tensiona a los animales domésticos y plantas de
interior?
• promueve la formación de polvo y aumenta la electricidad estática en las telas hechas de fibra sintética,
alfombras y pisos de plástico?
• deteriora los muebles de madera y los pisos de
madera?
• desafina instrumentos musicales?
Información general
Se obtiene una atmósfera confortable en interiores con
un nivel entre el 40% y el 60% de humedad relativa. Su
humidificador controla el nivel deseado de humedad de
manera totalmente automática; si el ambiente está seco,
su humidificador se pone en marcha, y se apaga cuando
se supera el nivel deseado.
Desembalaje
• Saque cuidadosamente el humidificador de la caja.
Coloque sus manos debajo del producto para sacarlo
de la caja (10).
• Atención: No saque nunca la unidad de la caja tirando
de la manija del tanque. La base podría caer y resultar
dañada (11).
• Saque el humidificador de la bolsa de plástico.
• Observe la información en la etiqueta con respecto al
voltaje de alimentación.
• El control panel frontal tiene una etiqueta protectora
para protejer la superficie. Retírela de la manera indicada antes del primer uso (12).
• Si no utiliza el humidificador durante todo el año,
guárdelo en el embalaje original.
10
11
12
40
Page 41

Descripción del artefacto
Boquilla de vapor (giratoria)
Tanque para el agua
Cámara de evaporización
Hydro Cell
Cartucho desmineralizador
Tapa del tanque de
agua
Panel de control
13
14
24 h
Cepillo
Indicador del nivel de agua
Membrane
Área de nebulización
Puesta en marcha
Encontrando el lugar ideal para su unidad:
• No coloque el humidificador cerca de una salida de
calefacción o sobre suelo radiante si lo tiene. La humedad del vapor puede dañar la superficie del piso (6) (lea
las Instrucciones de Seguridad).
• El humidificador debe instalarse en una posición
elevada (7) como, por ejemplo, sobre una mesa, una
cómoda, etc. Por lo menos a 3 pies (1 m) del piso.
• La boquilla no debe apuntar directamente a plantas,
muebles u otros objetos cercanos (13). Mantenga una
distancia de por lo menos 20 pulgadas (50 cm).
• Antes de utilizarlo, sumerja el cartucho desmineralizador en agua durante 24 horas (14). Los gránulos
deben absorber el agua para alcanzar el máximo
rendimiento. Si lo sumerge en el tanque, cambie el
agua y vacíe el agua de la base antes de utilizar el
humidificador.
• El cartucho desmineralizador deberá reemplazarse
cada 2 – 3 meses en promedio dependiendo de la
dureza del agua. Algunas áreas requerirán cambiarlo
antes, otras después. El cartucho deberá reemplazarse
al menos después de los 6 meses. De lo contrario, la
unidad no volverá a alcanzar su máximo rendimiento.
Vea «Reemplazo del cartucho desmineralizador».
• Lea las instrucciones en «Llenado del Tanque» para
agregar agua al humidificador (15 – 16).
• Coloque el tanque de agua en la base.
• Enchufe el cable en el tomacorriente y ponga en
funcionamento el humidificador con la perilla de
encndido/apagado (19).
• El aparato alcanza su máximo nivel de salida después
de 10 o 15 minutos de haberlo conectado.
• Verifique que el cable no esté pellizcado en ningún lado
(9). No use el humidificador si el cable está dañado (2).
es
Cuerpo principal
41
Page 42

Llenado del Tanque
Siempre desenchufe la unidad antes de remover
el tanque de agua. ¡No toque el agua de la base
mientras esté funcionando!
Para proteger la seguridad de la salud y el funcionamiento correcto del humidificador, use
es
y fresca de la llave en su humidificador. Si su fuente de
agua está contaminada o si no está seguro de su calidad,
use agua destilada.
¡No encienda el humidificador con el tanque de agua vacío!
Cuando el agua llegue el nivel mínimo, el humidificador
se apaga automáticamente. Se enciende la luz roja indicando que el tanque está vacío.
• Saque el tanque de agua de la base y desenrósquele la
• Asegúrese de que en el tanque de agua no se encu-
• Llene el tanque con agua fría del grifo (16) y cierre bien
• No vierta agua en la boquilla de vapor del aparato (18).
• Enchufe el cable en el tomacorriente y encienda la
únicamente agua limpia, sin contaminantes, fría
tapa (15).
entren objetos extraños.
la tapa del tanque. Coloque el tanque de agua en la
base (17). El agua fluye entonces del tanque a la base.
unidad usando el botón de encendido (19). La luz
roja puede permanecer encendida durante algunos
segundos hasta que la base se llene con agua.
No use aditivos
¡No deben usarse aditivos en el agua (aceites, esencias,
fragancias, eucaliptos, acondicionadores de agua, etc.)!
Incluso pequeñas cantidades pueden dañar el material del
tanque de agua. No está diseñado para el uso de dichos
aditivos. Una gota es suficiente como para dañar el tanque,
y en consecuencia toda la unidad. El uso de cualquiera de
esos aditivos anulará la garantía del fabricante.
15
18
16 19
17
42
Page 43

Operación del 7144 C) Temporizador
El botón C permite seleccionar la duración de funcionamiento; ajustable entre 1 y 8 horas o funcionamiento continuo (CO). El símbolo G indica el período de funcionamiento
seleccionado (1h/2h/3h/4h/5h/6h/7h/8h/CO). Pasados
H
unos segundos, el indicador cambia automáticamente al
valor actual.
G
D) Salida de vapor
(ajuste de la salida de vapor)
K
D
A
E
L
I
M
Puede ajustar la salida del vapor presionando el botón D
J
varias veces. El indicador (símbolo H) indica cuál de los tres
niveles (bajo/medio/alto) se ha seleccionado.
E) Funcionamiento con precalentamiento
(vapor caliente)
El botón E sirve para activar o desactivar el precalentamiento (el símbolo I se enciende). De esta manera el agua
F
se precalienta a 176 °F (80 °C) antes de entrar en el área
del nebulizador. El agua de la base tarda aproximadamente
B
10 - 15 minutos en precalentarse. El humidificador se
descarga ahora a una agradable temperatura de 104 °F
(40 °C). Esto tiene la ventaja de que la temperatura am-
C
biente no disminuye y, además, mejora considerablemente
el mantenimiento de la calidad del agua.
F) Modos automático y nocturno
A) Botón de encendido/apagado
Pulse el botón A para encender o apagar el aparato. Este
botón también se usa para reiniciar la luz indicadora de
limpieza (manteniéndolo presionado).
B) Higrostato (ajuste de humedad)
Al presionar el botón B, se ajusta la humedad deseada en
%. Se recomienda una humedad relativa comprendida entre el 40 y el 60 %. La precisión de medición es de ± 5%.
Si la humedad sobrepasa el ajuste deseado, la unidad se
apaga. Durante la selección, la pantalla muestra el valor
seleccionado. Pasados unos segundos, el indicador cambia
automáticamente al valor actual.
Presione el botón F para activar el modo automático y el
modo nocturno (sleep). Si presiona una vez el botón, se
activa el modo de funcionamiento automático (el símbolo
J aparece en la pantalla), que mantiene la humedad óptima
en función de la temperatura. La regulación se realiza a
través de la cantidad de descarga y el valor nominal predeterminado. Si se selecciona el modo nocturno o sleep (el
símbolo K aparece en la pantalla), el ajuste de humedad
es del 60 %; el ajuste del tiempo pasa automáticamente a
6 horas y la calefacción se activa. Además, la cantidad de
descarga se regula en función de la diferencia entre valor
ajustado y el real.
El temporizador no se puede cambiar en ninguno de estos
modos. Si se presionan otros botones, la unidad no estará
más en los modos automático o nocturno.
G) Indicador de temporizador
H) Indicador de salida de vapor
I) Indicador de precalentamiento
J) Indicador de modo automático
K) Indicador de modo nocturno
L) Indicador del falta de agua
El tanque del agua transparente permite ver con claridad
el nivel de agua. Además, el aparato le indica cuando
el tanque de agua está vacío encendiendo el indicador
correspondiente (símbolo L). Lea la sección «Llenado del
tanque» para mayor información. El símbolo L también puede permanecer encendido durante algunos segundos al
colocar un tanque recién lleno, hasta que la base se llene
de agua.
M) Indicador de limpieza
Cuando en la pantalla aparezca el símbolo M con «CLEAN»,
debería proceder a limpiar el aparato (así lo recomienda
el fabricante). Este símbolo se enciende automáticamente,
según el uso, cada 2 semanas. Se puede reiniciar la pan-
talla manteniendo presionado el botón A hasta que se
apague la luz.
43
es
Page 44

Limpieza/mantenimiento
Siempre desenchufe la unidad antes de quitarle
el tanque de agua. ¡No toque el agua de la base
mientras esté funcionando!
Atención – ¡riesgo de electrocución
y daños del aparato!
es
• Apague el equipo y desenchúfelo antes de limpiarlo
(20).
• Limpie regularmente el tanque de agua y la base. Use
únicamente agua, no use detergentes (21).
• Use únicamente el agente limpiador y descalcificador
EZCal y EZCal PRO para quitar los depósitos de la
membrana regularmente (22 y 23). La caja de su humidificador viene con una muestra de EZCal incluida.
Las instrucciones de uso están en el paquete. Use solo
1 paquete por cada 32 onzas de agua. No cambie esta
proporción. No haga funcionar la unidad con EZCal y
EZCal PRO. Esto podría dañar la unidad y anular la
garantía. Enjuague completamente la base con agua
potable después de usar EZCal y EZCal PRO y
asegúrese de que no quede nada de EZCal y EZCal
PRO en la base.
20 24
2521
ACID
22 23
WARM
44
WARM
26
Page 45

EZCal y EZCal PRO de es el único producto limpiador y descalcificador recomendado. No use
ningún otro producto limpiador ya que podría
dañar la unidad. El uso de cualquier solución de
limpieza que no sea EZCal y EZCal PRO anulará
la garantía.
• ¡No sumerja nunca el cuerpo del humidificador en agua
(24)!
• El aviso de limpieza sigue apareciendo en la pantalla
después de la limpieza. Para apagarlo, mantenga
presionado el botón de ON/OFF hasta que la luz de
limpieza deje de parpadear.
• Limpie la parte interior del humidificador con un trapo
suave, y no utilice solventes o agentes de limpieza
agresivos para limpiar la unidad (25).
• Para la limpieza semanal de la membrana utilice
sólo el cepillo adjunto. Este procedimiento debería
realizarse una vez por semana. Sólo utilice la parte de
cerdas suaves del cepillo (26).
• Cambie el agua del tanque como mínimo una vez
por semana ya que el agua no debería permanecer
estancada por más de ese período.
Mantenimiento de la calidad del agua
El Hydro Cell mantiene los humidificadores funcionando
a su máximo nivel entre las limpiezas recomendadas. El
Hydro Cell, que dura aproximadamente uno o dos meses,
dependiendo de la calidad del agua, asegura que el humidificador siga funcionando y manteniendo un rendimiento
óptimo. Comienza a funcionar ni bien entra en contacto con
el agua, aún cuando la unidad está apagada. Debe cambiar
el Hydro Cell cada uno o dos meses*. Mire la figura 28/29
para ubicar el Hydro Cell en la base de la unidad. Primero
apague la unidad. Llame a su distribuidor local o visite nuestro sitio Web www.boneco.us para comprar repuestos.
*Depende de la calidad del agua.
27
es
28
29
45
Page 46

Reemplazo del cartucho desmineralizador
Siempre desenchufe la unidad antes de quitarle
el tanque de agua. ¡No toque el agua de la base
mientras esté funcionando!
El tanque de agua viene equipado con un cartucho desmineralizador. El cartucho desmineralizador debe ser reemplazado cada 2 o 3 meses. Si el agua es muy dura, puede
es
ser necesario reemplazarlo más seguido. La presencia de
polvo blanco alrededor del aparato es una indicación segura de que el cartucho debe ser reemplazado. Tenga en
cuenta que el polvo blanco es inofensivo. Si pese a reemplazar el cartucho se forma un depósito blanco alrededor
del aparato, com pruebe que el agua usada no esté tratada.
Si el agua fluye a través de un sistema de descalcificación
– como un intercambiador de iones – (con el agregado de
sodio para descalcificar) en el edificio antes de ser usada
en el humidificador, la sal puede precipitarse como polvo
blanco alrededor del aparato. El cartucho desmineralizador
o los gránulos deben reemplazarse a los 6 meses como
máximo. De lo contrario, la unidad no volverá a alcanzar su
máximo rendimiento.
Opción A, reemplace los gránulos:
• Saque el tanque de agua de la base y desenrósquele la
tapa (30).
• El cartucho desmineralizador se encuentra en la tapa
del tanque de agua. Desenrosque el cartucho de la
tapa haciéndolo girar en dirección contraria a las
agujas del reloj (31). Importante: ¡NO tire la tapa del
tanque!
• Abra el cartucho (32).
• Tire el contenido a la basura (¡Atención! ¡Los gránulos
podría hacer el suelo resbaladizo!) (33).
• Coloque la pieza rosa de goma espuma en el centro
del cartucho. No la empuje hasta el fondo ya que sería
difícil quitarla en el futuro (34).
• Vierta el contenido de una bolsa de gránulos dentro del
recipiente plástico incluido en el paquete de los gránulos (35).
46
• Coloque el cartucho vacío con el tapón en el centro
dentro del recipiente plástico (36).
• Dé vuelta el recipiente plástico y el cartucho y sacúdalos
hasta que toda los gránulos quede en el cartucho (37).
• Saque el recipiente plástico y la pieza rosa de goma
espuma del cartucho (38) y guárdelos para usarlos nuevamente (el paquete de gránulos viene con 3 bolsas) (39).
• Cierre el cartucho (40).
• Antes de utilizarlo, sumerja el cartucho desmineralizador en agua durante 24 horas (43). Los gránulos deben
absorber el agua para alcanzar el máximo rendimiento.
Si lo sumerge en el tanque, cambie el agua y vacíe el
agua de la base antes de utilizar el humidificador.
• Enrosque el cartucho en la tapa del tanque de agua (44).
• Enrosque el cartucho en la parte inferior del tanque de
agua y ponga el tanque en la bandeja de la base (45).
Si coloca gránulos en el centro del cartucho, podrían escaparse dentro de la unidad o tapar la
unidad. La unidad no funcionará correctamente
y deberá limpiar completamente los gránulos.
Opción B, reemplace todo el cartucho:
• Saque el tanque de agua de la base y desenrósquele la
tapa (30).
• El cartucho desmineralizador se encuentra en la tapa
del tanque. Desenrosque el cartucho de la tapa haciéndolo girar en dirección contraria a las agujas del reloj
(31). Importante: ¡NO tire la tapa del tanque!
• Tire el cartucho entero a la basura (41).
• Desenvuelva el nuevo cartucho (42).
• Antes de utilizarlo, sumerja el cartucho desmineralizador en agua durante 24 horas (43). Los gránulos
deben absorber el agua para alcanzar el máximo
rendimiento. Si lo sumerge en el tanque, cambie el
agua y vacíe el agua de la base antes de utilizar el
humidificador.
• Enrosque el cartucho en la tapa del tanque de agua
(44). Cierre bien la tapa del tanque y coloque el tanque
en la base (45).
30
31
32 33
Page 47

34 35 38
43
24 h
es
39 40
37 41
42
4436
45
47
Page 48

Guardando el artefacto por mucho tiempo
Datos técnicos
Limpie el humidificador como se ha descrito y deje que
se seque totalmente. Guarde preferentemente el humidificador dentro del embalaje original en un lugar seco y no
demasiado caliente.
Tensión de la red 120 V / 60 Hz
Consumo de energía 45 W / (125 W*)
Capacidad de humidificación 3.5 gallons /24 h*
Referencias legales
El humidificador cuenta con la certificación cUL.
es
Reservado el derecho de efectuar modificaciones técnicas.
Las instrucciones para el uso están protegidas por las leyes
de copyright © BONECO AG.
Accesorios
Llame a su agente de ventas local o consulte nuestra
página web www.boneco.us para comprar repuestos.
Servicio de atención al cliente
www.boneco.us
Adecuado para habitaciones de hasta 650 sq ft / 60 m
Dimensiones (LxPxA) 10 x 11.4 x 13.7 in
25.4 x 29 x 34.7 cm
Peso (vacío) 8.8 lbs / 4 kg
Accesorios Cartucho desmineralizador A7531
Hydro Cell A200
EZCal A7417
EZCal PRO A100
* En caso de funcionamiento con precalentamiento a
176 °F (80 °C)
Solución de problemas
Problema Posible causa Qué hacer
El humidificador no funciona No está enchufado al tomacorriente Enchufe el cable en el tomacorriente
El tanque no tiene agua Llene el tanque con agua y espere 10 minutos
No sale vapor Hay que limpiar la unidad Limpie la base con EZCal y EZCal PRO
Cartucho desmineralizafor gastado Reemplace el cartucho o los gránulos
Cartucho desmineralizafor obstruido con gránulos Saque 2 cucharadas de gránulos y deséchelos
Muy poca salida de vapor Temperatura del agua demasiado baja Seleccione el nivel máximo de producción de
vapor, después de 15 minutos el
humidificador volverá a funcionar
Existe una capa de cal en la membrana Limpie la membrana con un cepillo
y EZCal y EZCal PRO
La unidad funciona intermitentemente Reemplace el cartucho de desmineralización
o los gránulos
Polvo blanco alrededor del aparato Cartucho desmineralizador gastado Los gránulos usados deben desecharse
2
48
Page 49

Preguntas generales acerca
del humidificador
P. ¿Por qué no hay suficiente humedad en la habita-
ción?
R. ¿Con qué frecuencia pone en funcionamiento la uni-
dad? Si la unidad solo funciona por la noche, el nivel
de humedad durante el día descenderá si no se le
añade más humedad constantemente al aire.
R. ¿Dejo la puerta abierta o cerrada cuando la unidad
está funcionando?
A. Si deja la puerta abierta, la humedad saldrá de la habi-
tación y pasará a otras zonas de la casa. Si quiere que
la humedad se mantenga en una habitación específica
deberá tener en cuenta que debe cerrar la puerta
mientras la unidad esté funcionando.
B. La lana, piel, alfombras, cortinas y otros tipos de tejidos
absorben mucha humedad, no dejando así suficiente
humedad en el aire. Si ha dejado la ventana abierta,
la humedad se escapará de la habitación. Otro factor
muy frecuente es que la unidad se coloque cerca de un
dispositivo que genere calor. La idea es que el aire que
calienta en la habitación distribuirá humedad rápidamente por todo el espacio de ésta. Lamentablemente,
este concepto no funciona debido a que el aire caliente
procedente de un calefactor absorberá la mayor parte
de la humedad y el aire de la habitación no recibirá
nada.
P. ¿Cuánta humedad se necesita en la habitación?
R. Los niveles de humedad recomendados son entre el 40
y el 60 por ciento.
P. ¿Cuáles son los efectos de tener muy poca o dema-
siada humedad?
R. Un aire seco reseca la piel, crea electricidad estática,
desafina los instrumentos musicales, aumenta los niveles de polvo (el aire seco hace que se levante polvo),
daña los objetos de madera (los reseca y a veces los
agrieta), produce una sensación incómoda, enferme-
dades y seca las membranas nasales.
Un exceso de humidificación del aire puede producir
moho y que se levante el papel de las paredes.
P. ¿Por qué se necesita un humidificador cuando
sencillamente se puede abrir la ventana?
R. El nivel de humedad del aire exterior no es lo suficien-
temente elevado para humidificar las habitaciones.
P. ¿Dónde se debe colocar el humidificador?
R. La unidad debe estar apartada y no demasiado cerca
de paredes, ventanas, puertas o puentes térmicos para
que el aire pueda circular alrededor de la unidad.
Preguntas frecuentes acerca de los
humidificadores ultrasónicos
P. ¿Por qué dice abrir/cerrar (open/close) en la tapa
del cartucho de desmineralización?
R. Esas direcciones sirven en el caso de que decida usar
la opción de rellenado para reponer gránulos. Su finalidad es saber la forma de abrir y cerrar la tapa.
Si se abre la tapa antes de colocarlo en el tanque de
agua, es probable que advierta que hay gránulos en
el tanque de agua y en la base de la unidad. Apague
inmediatamente la unidad y vacíe el agua de la base y
del tanque. Retire todos los gránulos tanto de la base
como del tanque de agua. Utilice el cepillo para limpiar
la zona alrededor de la membrana.
Precaución: No tire los gránulos en el fregadero. Los
gránulos usados deberán desecharse.
P. Acabo de cambiar el cartucho y tanto el contenido
como el agua de la base se han vuelto de un color
azul verdoso.
R. Esto ocurre a veces cuando se cambia el cartucho, o
incluso los gránulos. No sucede todas las veces que
reemplace los cartuchos o gránulos y se trata de una
reacción del contenido del agua y las vibraciones
ultrasónicas. No es un indicador para reemplazar el
cartucho.
P. No hay una línea de llenado en el tanque de agua,
¿cuánto se debe llenar?
R. No hay, efectivamente, línea de nivel de llenado en el
tanque de agua y puede llenarlo completamente hasta
arriba.
P. ¿Qué finalidad tiene el cartucho de desmineraliza-
ción (DMC)?
R. El DMC elimina los minerales del agua para evitar la
generación de polvo blanco.. Es preciso empapar el
contenido del cartucho durante 24 horas antes de usar
la unidad por primera vez para que pueda expandirse
por completo y eliminar las sustancias minerales del
agua.
El contenido del DMC dura 2-3 meses. Puede ser
necesario cambiar el cartucho con más frecuencia
dependiendo de la dureza del agua y de la frecuencia
de uso de la unidad. Una indicación de cuando debe
cambiarse el DMC puede ser polvo blanco o una
cantidad reducida de vapor emitido.
P. ¿Se puede usar agua destilada en la unidad?
R. Para obtener los mejores resultados con su humidifi-
cador ultrasónico, use agua destilada o de ósmosisinversa y remueva el cartucho desmineralizador.
P. Acabo de cambiar el contenido del cartucho y
ahora hay gránulos por todas partes.
R. En primer lugar, asegúrese de que no haya gránulos en
el medio del cartucho. Si coloca gránulos en el centro
del cartucho, podrían escaparse dentro de la unidad.
Apague inmediatamente la unidad y vacíe el agua de la
base y el tanque. Retire todos los gránulos tanto de la
base como del tanque de agua. Utilice el cepillo para
limpiar la zona alrededor de la membrana.
Precaución: No tire los gránulos en el fregadero. Los
gránulos usados deberán desecharse.
49
es
Page 50

P. Las indicaciones explican que no se debe colocar
la unidad directamente sobre el suelo, ¿por qué
hay que elevarla?
R. El objetivo de esta unidad es forzar humedad en el aire.
Debido a ello, los pisos de alfombra o de madera que
rodean la unidad pueden mojarse. Si la unidad se coloca al menos a 5 centímetros del suelo, el vapor podrá
evaporarse antes de llegar el mismo.
es
P. El agua no entra en el tanque.
R. Para poder llenarlo, el tanque debe estar boca abajo. El
cartucho se encuentra en la tapa del tanque. No eche
agua en el tubo que sirve de salida para el vapor.
P. La unidad desprende polvo blanco.
R. El polvo blanco son minerales desintegrados en minús-
culas partículas por el proceso ultrasónico.
Cómo resolver el problema:
• Sumerja el cartucho desmineralizador en un recipiente con agua, durante un mínimo de 24 horas. Si
utiliza para ello el tanque de agua de la unidad, deberá
cambiar el agua del tanque y de la base antes de
volver a utilizar el aparato.
• Reemplace el cartucho desmineralizador después de
1-2 meses si utiliza agua muy dura, o 2-3 meses en
caso de usar agua más blanda. Independientemente
del tipo de agua que utilice, no utilice nunca el mismo
cartucho durante más de 6 meses.
• No utilice agua procedente de un ablandador de agua
preinstalado, pues en tal caso la unidad emitirá sodio
en vez de calcio. Utilice agua destilada y saque el
cartucho desmineralizador.
• En zonas donde únicamente haya disponible agua muy
dura, utilice sólo agua destilada y retire el cartucho
desmineralizador.
• Utilice agua de ósmosis inversa (agua R-O) en vez de
agua destilada y saque el cartucho desmineralizador.
50
P. La luz indicadora de limpieza parpadea
(digital modelo)
R. Apague y desenchufe el aparato. Vacíe de agua la base
de la unidad. Enjuague la base con agua caliente (y
limpia). ¡No sumerja la base! Inspeccione visualmente
la base y elimine los restos minerales o la suciedad
que detecte. Si utiliza agua blanda, es aconsejable
descalcificar la unidad cada 4 semanas con EZCal. Si
utiliza agua dura descalcifique la unidad cada 2 semanas. No olvide reiniciar la luz indicadora de limpieza
después de limpiar la unidad.
P. Reinicio de la luz indicadora de limpieza
(digital modelo)
R. La luz indicadora de limpieza no se reinicia automáti-
camente. Mantenga presionado el botón de encendido
(botón A en el manual de instrucciones) hasta que la
luz deje de parpadear. La luz se enciende de forma
automática aproximadamente 14 días después de
enchufar la unidad.
P. El higrómetro de la unidad indica un nivel de
humedad distinto que un higrómetro externo.
R. No todos los higrómetros están calibrados del mismo
modo. La mayoría presenta un margen de error de
+/-5%. Además, el nivel de humedad no es el mismo
en todos los puntos de la habitación. La circulación del
aire es diferente en cada parte del cuarto. No coloque
la unidad cerca de un radiador, pues el calor absorberá
toda la humedad.
P. El nivel de humedad no varía, o no se alcanza el
nivel de humedad deseado.
R. Si el tanque de agua debe ser rellenado más de una
vez al día, la unidad funciona correctamente y las condiciones climáticas de la habitación tienen influencia
sobre el nivel de humedad.
Posibles motivos de un nivel de humedad bajo:
• Exceso de ventilación (el aire de la habitación se renueva por completo varias veces al día, por lo que el
humidificador debe empezar su trabajo desde cero).
• Aislamiento del hogar (ver circulación del aire).
• Espacio abierto con techos altos (además de los metros cuadrados de la casa, hay que tener en cuenta la
altura del techo) – los edificios con techos altos requieren mayor humidificación.
• Ventanas abiertas – sucede lo mismo que cuando hay
exceso de ventilación (si en el exterior hace mucho frío,
no abra la ventana más de 2 veces al día, durante un
intervalo de 3 minutos).
• Mucha diferencia entre la temperatura exterior e interior – cuanto más frío sea el aire, más bajo será el nivel
de humedad; y cuanto más caliente sea el aire, menor
será el porcentaje de humedad relativa (=cantidad de
vapor de agua presente en el aire, comparado con la
cantidad máxima que podría admitir el aire si estuviera
completamente saturado).
• Posición de la unidad. Si está situada cerca de una
puerta, ventana o punto de ventilación, aumentará la
circulación del aire.
P. El tanque pierde agua.
R. Compruebe que no haya ninguna rajadura. La garantía
no cubrirá unidades o tanques que se hayan dejado
caer. Por favor, póngase en contacto con la tienda
donde haya comprado la unidad en caso de haberla
recibido dañada.
P. No acerque su cara demasiado al chorro de vapor.
R. No es recomendable colocar la cara directamente so-
bre el chorro de vapor. El humidificador es un aparato
eléctrico, no un juguete.
P. No sale vapor / El aparato no funciona / El indica-
dor de «tanque vacío» no deja de parpadear.
R. Llene el tanque de agua. Compruebe que el agua fluye
por el cartucho desmineralizador (ubicado en la tapa
Page 51

del tanque). Si el tanque de agua está lleno y en la
base hay poca agua, esto indica que el agua no está
fluyendo a través del cartucho desmineralizador.
• Espere 15 minutos hasta que la unidad comience a
emitir vapor.
• Si la unidad no funciona y el indicador de ‘tanque
vacío’ no parpadea, podría ser que usted haya puesto
el nivel de humedad deseado demasiado bajo y que el
nivel de humedad actual en la casa sea mayor. En tal
caso, la unidad se apaga automáticamente.
• Si el indicador de ‘tanque vacío’ parpadea, pero el
tanque está lleno, el agua no fluye a través del cartucho. Cambie el cartucho o los gránulos del cartucho
cada 2-3 meses. Si utiliza exclusivamente agua dura,
cambie el cartucho cada 1-2 meses. El cartucho desmineralizador y los gránulos deben reemplazarse a los
6 meses como máximo. De lo contrario, la unidad no
volverá a alcanzar su máximo rendimiento.
• Si los gránulos son nuevos, siga estas instrucciones:
• Asegúrese de que el cartucho y los gránulos han
estado sumergidos en agua durante 24 horas. Los gránulos secos hacen que el agua tarde más en filtrarse
hacia la base a través del cartucho. Luego saque 2
cucharadas de gránulos del cartucho y tírelos. El
exceso de gránulos en el cartucho impide al agua fluir
desde el tanque hacia la base.
P. La tapa del tanque no se puede desenroscar.
R. Esto podría ser debido a la presión del aire dentro del
tanque de agua. Para sacar aire del tanque, presione el
resorte en la base de la tapa del tanque de agua.
Repita este proceso hasta que pueda desenroscar la
tapa del tanque de agua.
P: La unidad funciona de forma intermitente.
R: ¿Cuándo cambió el contenido del cartucho por última
vez? Si ya han pasado 2-3 meses, cambie el contenido
del cartucho. El cartucho desmineralizador y los gránulos deben reemplazarse a los 6 meses como máximo.
De lo contrario, la unidad no volverá a alcanzar su
máximo rendimiento.
• Si cambió el contenido del cartucho recientemente, es
posible que haya exceso de gránulos en el mismo.
Saque 2 cucharadas de gránulos del cartucho.
Accesorios
P: ¿Debo conservar algún componente antes de
reemplazar el cartucho desmineralizador?
R: Sí, conserve siempre la tapa del tanque de agua (la
pieza que une el cartucho desmineralizador al tanque
de agua).
P. ¿Qué es el Hydro Cell y cuánto dura?
R. El Hydro Cell mantiene los humidificadores
funcionando a su máximo nivel entre las limpiezas
recomendadas*. El Hydro Cell, que dura aproximadamente uno o dos meses, dependiendo de la calidad
del agua, asegura que el humidificador siga
funcionando y manteniendo un rendimiento óptimo.
Debe reemplazarlo cada uno o dos meses*.
*Depende de la calidad del agua.
P. Colocación del Hydro Cell
A. Ver la figura 28/29 por instrucciones.
P. ¿Qué es EZCal y EZCal PRO?
R. La caja de su humidificador viene con una muestra de
EZCal y EZCal PRO incluida. EZCal y EZCal PRO sirve
para limpiar y descalcificar cualquier humidificador.
También elimina restos minerales. EZCal y EZCal PRO
es la única solución de limpieza y descalcificación recomendada. No use ningún otro producto limpiador ya
que podría dañar la unidad. El uso de cualquier solución de limpieza que no sea EZCal y EZCal PRO anulará
la garantía. Las instrucciones de uso están en la caja.
Utilice sólo un envase por cada 32 onzas de agua. No
modifique la proporción. EZCal y EZCal PRO también
se puede utilizar con humidificadores de otras marcas.
Enjuague completamente la base con agua potable
después de usar EZCal y EZCal PRO y asegúrese de
que no quede nada de EZCal y EZCal PRO en la base.
EZCal y EZCal PRO está disponible en algunas tiendas
y www.boneco.us.
es
51
Page 52

Please check our website www.boneco.us
for further information.
BONECO is a registered trademark of BONECO AG, Switzerland
36879-04
 Loading...