


HYFP50095-3
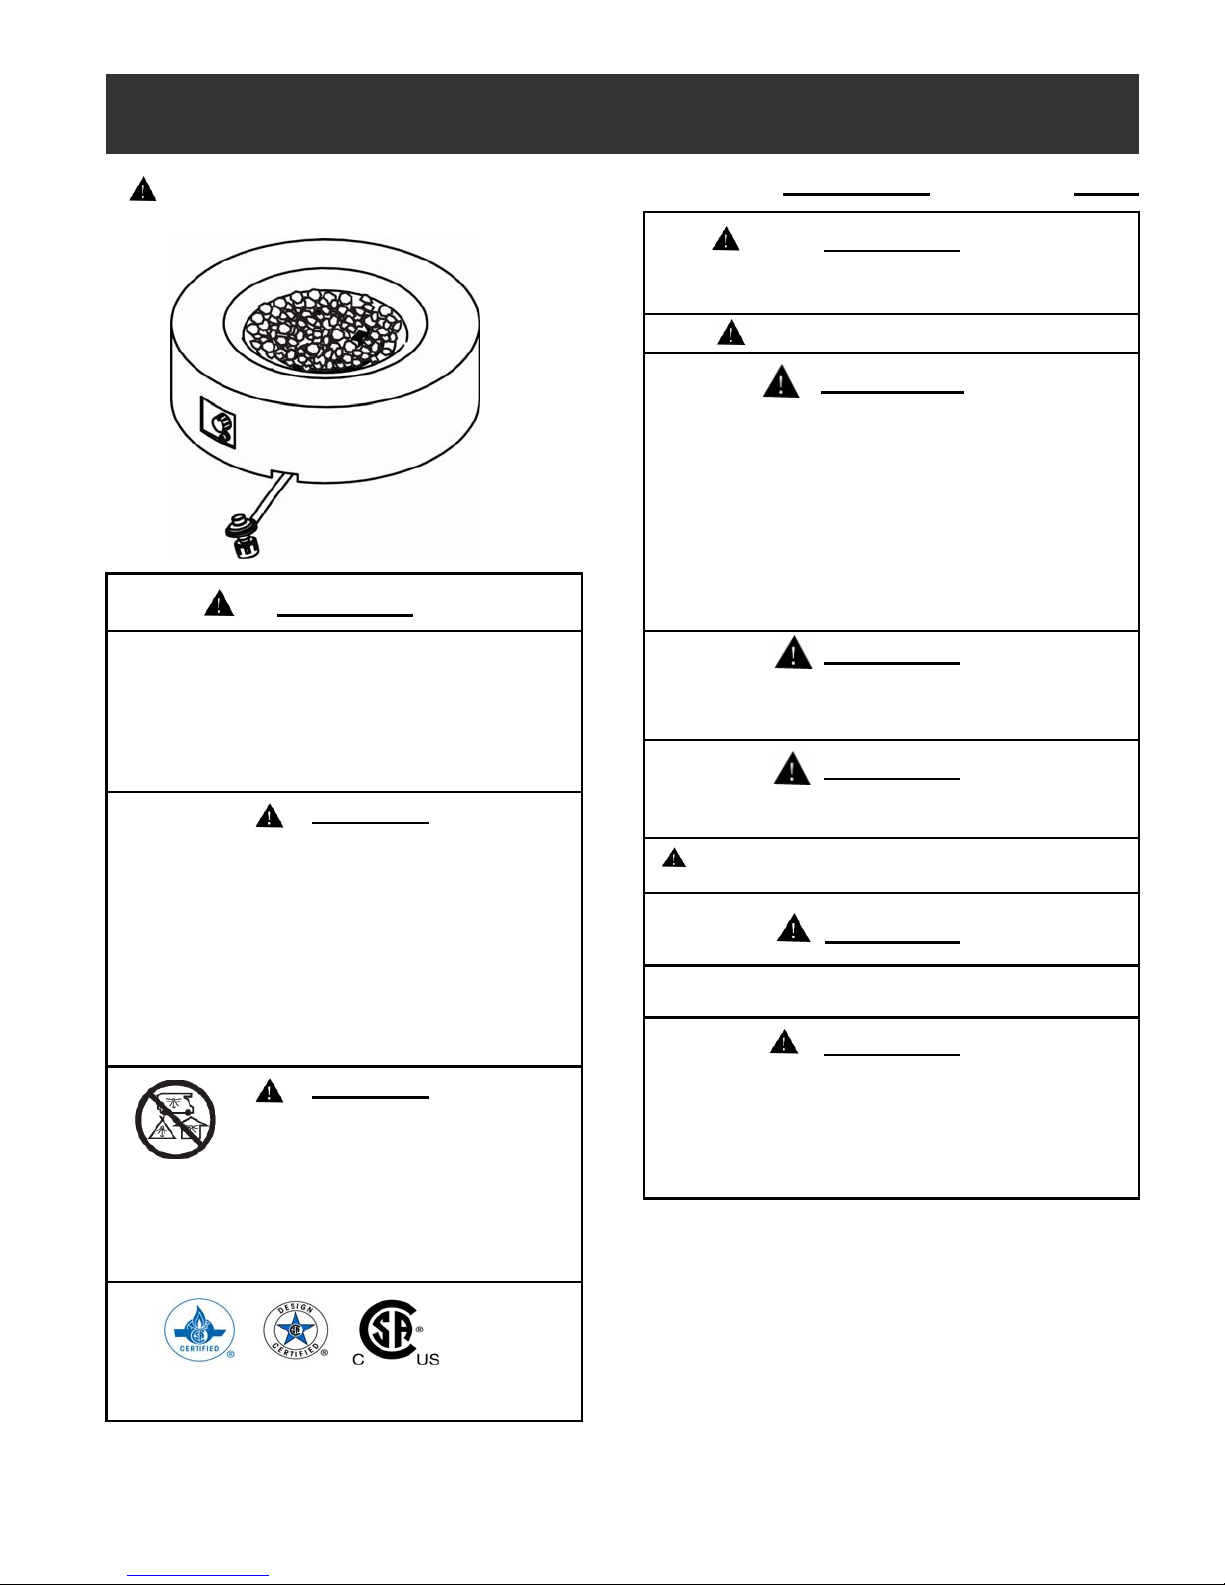
OWNERS MANUAL
y
READ BEFORE USE!
WARNING
Do not store or use gasoline or other flammable vapors
•
and liquids in the vicinity of this or any other appliance.
Service must be performed by a qualified installer,
•
service agency or the gas supplier.
USE LIQUID PROPANE GAS ONLY!
Model No.: HYFP50095-3 Style No.: 66600
WARNING
For Outdoor Use Only!
Use Liquid Propane Gas (LP-Gas) Only !
Propane cylinders sold separately.
WARNING
Improper installation, adjustment, alteration, service or
maintenance can cause injury or property damage. Read the
owners manual thoroughly before installing or servicing this
equipment. If the information in this manual is not followed
exactly, a fire or explosion may result causing property damage,
personal injury or loss of life. Save these instructions for future
use. If you are assembling this unit for someone else, give this
manual to him or her to read and save for the future.
WARNING
Turn off gas supply when the appliance is not in use.
An LP cylinder not connected for us should not be stored in the
vicinity of this or any other appliance.
WARNING
DANGER
WHAT TO DO IF YOU SMELL GAS:
Do not try to light any appliance.
•
Immediately shut off gas supply at tank.
•
•
Do not touch any electrical switch; do not use any phone in
your building.
Immediately call your gas supplier from a neighbor’s
•
phone. Follow the gas supplier’s instructions.
•
If you cannot reach your gas supplier, call the fire
department.
DANGER
CARBON MONOXIDE HAZARD
This appliance can produce carbon monoxide which
has no odor.
Using it in an enclosed space can kill you
Never use this appliance in an enclosed space such as a
camper. Tent, car or home.
Design certified under ANS Z21.97 • CSA 2.41-(2012)
Requirements for Outdoor Gas Fireplaces
Turn off gas supply when the appliance is not in use.
If the appliance is stored indoors, detach and leave
LP-Gas c
linder outdoors.
WARNING
This appliance must be attended at all times!
WARNING
Battery may contain mercury. Do not deposit in fire or put in trash.
Recycle the battery as hazardous waste.
1

DANGER
Failure to follow the Dangers, Warnings and Cautions contained in this Owner’s Manual may result in serious bodily injury or death, or
in a fire or an explosion causing damage to property. During ignition procedure, one should NEVER get his/her face close to and/or
above the burner in a case an unnoticed flame were to suddenly light up and cause injury.
WARNING
Do not use this appliance for cooking.
•
Remove the PVC Cover from the appliance before operating the appliance.
•
Do not lay the PVC Cover over the appliance until it is turned off and completely cooled down.
•
Do not burn any other materials than are supplied with and intended for use in this appliance.
•
Do not pour water into appliance.
•
The use and installation of this product must conform with local codes or, in the absence of local codes, use the National Fuel
•
Gas Code, ANSI Z223.1/ NFPA5A, Natural Gas and Propane Installation code CSA B149.1 or Propane Storage and Handling
code B149.2.
•
Do not use this appliance if any part has been under water.
Remove the battery when not using the appliance for an extended length of time.
•
Do not store a spare or disconnected liquid propane cylinder under or near this appliance.
•
After a period of storage, and/or non use, the propane appliance should be checked for gas leaks and burner obstructions before
•
This propane appliance must be used ONLY in a well ventilated space and shall not be used inside a building or garage.
•
Do not operate the propane appliance if there is a gas leak present.
•
DO not use this outdoor gas appliance for indoor heating. TOXIC carbon monoxide fumes can accumulate and cause
•
Never use a flame to check for gas leaks.
•
Do not locate this appliance under any overhead enclosure. Avoid using near or under overhanging trees and shrubs.
•
Combustible materials should never be within 10 feet of the top, back or sides of your propane appliance.
•
The propane appliance should never be operated by children. Children must be supervised and kept at a safe distance while the
•
appliance is in use.
Children and adults should be alerted to the hazards of high surface temperatures and keep a safe distance to avoid burns or
•
clothing ignition.
Do NOT use in windy conditions.
•
Pay attention when operating the appliance. It is hot in use and should never be left unattended. Do not attempt to transport it
•
while in operation.
Do not attempt to transport this appliance until all parts are cooled or while it is in operation
•
Should the fire go out while burning, turn the control knob to "off". Follow the instruction and wait five minutes before
•
attempting to relight.
Never use charcoal or any other solid fuel in the appliance. Never hang clothing or other flammable materials on or near the
•
appliance.
Never lean over the open appliance or place hands or fingers on the upper portion of an operational unit.
•
Do not rest feet on the appliance.
•
Do not enlarge valve orifices or burner ports when cleaning the valve or burner.
•
Liquid propane gas is not natural gas. This appliance is manufactured and preset for use with propane gas ONLY.
•
The conversion or attempted use of natural gas in a liquid propane unit or liquid propane gas in a natural gas unit is dangerous.
•
Do not use this appliance on vehicles or boats. Always operate the appliance on flat ground outdoors.
•
Keep any electrical supply cord and the fuel supply hose away from any heated surfaces.
•
Do not use this appliance unless all parts are in place.
•
Any guard or other protective device removed for servicing this appliance must be replaced prior to operating this appliance.
•
This appliance is designed for use with a 20 lb. liquid propane gas (LP) tank, not included with this appliance. Never connect
•
your appliance to an LP gas tank that exceeds this capacity.
•
Storage of this outdoor appliance indoors is permissible only if the tank is disconnected and properly stored outdoors.
Do not store or use gasoline or other flammable vapors and liquids within 25 feet (7.62m) of this or any other appliance.
•
Cylinders must be stored outdoors in a well-ventilated area out of the reach of children.
•
2
•
The use of alcohol, prescription or non-prescription drugs may impair an individual’s ability to properly assemble or safely
operate this outdoor appliance
•
Do not use in an explosive atmosphere. Keep gas appliance area clear and free from combustible materials, gasoline and other
flammable vapors and liquids.
•
This outdoor appliance is NOT to be operated by children. Young children should be closely supervised when in the vicinity of
this outdoor appliance.
•
This outdoor appliance is not to be installed or used in or on recreation vehicles and/or boats
•
Always use in accordance with all applicable local, state and national codes. Contact your local fire department for details on
outdoor burning.
•
Use the same precautions you would with any open fire when using this outdoor appliance
•
Do not use this outdoor appliance until it is COMPLETELY assembled and all parts are securely fastened and tightened.
•
Do not store another LP gas tank within 10 feet (3.05 m) of this outdoor appliance while it is in operation.
•
Do not use this outdoor appliance near automobiles, trucks, vans or recreational vehicles.
•
Certain areas of this outdoor appliance when in use will become too hot to touch. Do not touch hot surfaces until the unit has
cooled unless you are wearing protective gear such as insulated pot holders or heat resistant gloves or mittens to avoid burns.
•
Keep all electrical cords away from a hot outdoor appliance.
•
Do not sit on the mantle when the unit is in operation.
•
Do not throw anything onto the fire when the unit is in operation.
•
Lava rocks are very hot; please keep the children or pets away at a safe distance.
•
Place the hose out of pathways where someone might trip over it or it where it may be subjected to accidental damage.
FOR LIQUID PROPANE GAS UNITS
WARNING
This outdoor appliance is for use with liquid propane (LP) gas only. The conversion to or attempted use of natural gas
in this outdoor appliance is dangerous and will void your warranty.
•
LP gas is flammable and hazardous if handled improperly. Become aware of the characteristics before using any LP gas product.
Propane Characteristics:
- Flammable, explosive under pressure, heavier than air and settles in pools in low areas.
- In its natural state, propane has no odor. For your safety, an odorant has been added.
- Contact with propane could burn the skin.
•
A dented or rusty liquid propane cylinder may be hazardous and should be checked by your gas supplier prior to use.
•
Do not use a liquid propane cylinder with a damaged valve and any other worn out parts.
•
Transport and store the empty gas cylinders carefully and properly. Cylinders must be stored outdoors in a well-ventilated area
out of the reach of children.
•
Young children should be carefully supervised when they are in the area of the appliance.
•
Disconnected cylinders must have threaded valve plugs tightly installed and must not be stored in a building, garage or any other
enclosed area.
•
Never use a propane cylinder with a damaged body, valve, collar or footing.
If you see, smell or hear the hiss of gas escaping from the propane cylinder:
•
Turn off the gas supply and get away from the gas cylinder at once.
1
Do not attempt to correct the problem yourself.
2
Contact your gas supplier and/or fire departement for help.
3
•
The LP gas supply tank must be constructed and marked in accordance with the Specifications for LP gas tanks of the U.S.
Department of Transportation (DOT) or the National Standard of Canada, CAN/CSA-B339, LP gas tanks, Spheres and Tubes for
the Transportation of Dangerous Goods; and Commission.
•
LP gas tank must be arranged for vapor withdrawal.
•
It is essential to keep the outdoor appliance’s valve compartment, burners, and circulating air passages clean. Inspect outdoor
appliance before each use. This outdoor appliance should be thoroughly inspected and cleaned on a regular basis. This outdoor
appliance should be thoroughly cleaned and inspected on a regular basis. Clean and inspect the hose before each use of the
appliance. If there is evidence of abrasion, wear, cuts, or leaks, the hose must be replaced prior to the appliance being put into
operation.
•
LP Tank used must include a collar to protect the cylinder valve
•
The LP gas tank must have a listed overfilling prevention device (OPD) and a QCCI or Type I (CGA810) LP gas tank connection.
3

•
The LP gas tank should not be dropped or handled roughly.
•
Tanks must be stored outdoors out of the reach of children. Do NOT store in a building, garage, or any other enclosed area.
•
Never store your LP gas tank where temperatures can reach over 125°F.
•
Never keep a filled LP gas tank in a hot car or car trunk. Heat will cause the gas pressure to increase, which may open the relief
valve and allow gas to escape.
•
Place dust cap on valve outlet whenever the LP gas tank is not in use. Only install the type of dust cap on the LP gas tank valve
outlet that is provided with the LP gas tank valve. Other types of caps or plugs may result in leakage of propane.
•
Do not store a spare LP gas tank under or near this gas appliance.
•
Never fill the tank beyond 80 percent full.
•
LP gas cylinders should only be filled by a certified LP gas dealer.
•
The pressure regulator is set for 11 inches of water column (pressure).
•
The maximum inlet gas pressure for this outdoor appliance is 14 inches of water column pressure.
•
Any guard or other protective device removed for servicing the appliance must be replaced prior to operating the appliance.
•
Installation and repair should be done by a qualified service person. The appliance should be inspected before use and at least
annually by a qualified service person. More frequent cleaning may be required as necessary. It is imperative that control
compartment, burners and circulating air passageways of the appliance be kept clean.
•
The appliance should be inspected before use and at least annually by a qualified service person.
•
Do not attempt to disconnect the gas regulator from the tank or any gas fitting while the outdoor appliance is in use.
•
Keep gas appliance away from location where it can get excessively wet. Do not use gas appliance if any part has been
underwater. Immediately call a qualified service technician to inspect the appliance and to replace any part of the control system
and any gas control which has been under water.
•
This appliance shall be used only outdoors in a well-ventilated space and shall not be used in a building, garage or any other
enclosed area.
•
The LP-gas supply cylinder must be disconnected when this appliance is not in use
•
Only cylinder marked “propane” shall be used.
Be sure to use only one 20 lb (9.1 kg) LP gas cylinder with a Type 1 valve with this appliance as required by the American
•
National Standards Institute (ANSI) and the Canadian Standards Steering Committee.
•
LP gas cylinder must contain a shut-off valve as specified in the Standard for Compressed Gas Cylinder Valve Outlet and Inlet
Connection, ANSI/CGA-V-1-1977, CSA B96.
•
Never attempt to attach this appliance to the self-contained LP gas system of a camper trailer, motor home or house.
•
Hand turn the manual gas control valve. Never use tools. If the valve will not turn by hand, do not try to repair it. Call a Certified
Gas Technician. The use of force or any self attempted repair may result in a fire or explosion.
•
WARNING: Improper installation, adjustment, alteration, service or maintenance can cause injury or property damage. Refer to
the owner’s information manual provided with this appliance. For assistance or additional information consult a qualified
installer, service agency or the gas supplier.
1
This appliance comes equipped with a standard LP gas hose and regulator including the appliance side connection for a CGA No
791 Cylinder Connection Device. The LP gas hose and regulator supplied with this appliance must be used. Only a hose and
regulator specified by manufacturer can be used for replacement.
The CGA No 791 connection incorporates an excess flow limiting device that acts to limit the flow of gas if a leak is detected
a)
between the regulator and the burner valve.
b)
If the burner valve is open prior to the LP gas cylinder service valve being opened, the connection will interpret this free flow of
gas to be a leak
c)
The connection safety feature will reduce gas flow from the regulator to the appliance to a minimal level.
d)
Be sure that the burner control valve is closed prior to opening the LP gas cylinder service valve to ensure that the connection
flow limiting device is not triggered mistakenly.
e)
If the connection flow limiting device is triggered mistakenly, close the LP gas cylinder service valve and the burner valve, wait
10 seconds to allow the device to reset, open the cylinder service valve, then open the burner.
valve and light the appliance as per lighting instructions.
2
Be sure to protect the hose from any hot surfaces. Serious danger may result if the hose contacts any hot surface.
3
Regular maintenance of the hose and regulator:
LP Hose and Regulator Assembly and Replacement
4
a)
Inspect the hose before each use of the appliance. If the hose shows signs of cracks, abrasions, cuts or damage of any kind, do not
operate the appliance. Fix or replace the hose as required before using the appliance. For assistance with repair or
replacement of the hose, call Bond Manufacturing at 1-866-771-2663. Use only replacement parts from the manufacturer.
b)
Inspect the seal inside the CGA No 791 service valve on the LP gas cylinder when replacing the cylinder or at least once per year.
If there is any indication of damage, have the seal replaced by a certified gas dealer before operating the appliance.
4
Do not use tools to tighten the CGA No 791 connection nut onto the LP gas cylinder service valve.
Hand tighten only.
5
Be careful to not cross the threads on the connection when tightening the CGA No 791 connection on to the LP gas cylinder
service valve.
6
“Leak Test” should always be performed after attaching the connection to the LP gas cylinder service valve.
(See “Leak Test” section of this manual)
7
For the connection of the hose and regulator to the LP tank, refer to the “Connection” section of the LP gas cylinder
section above.
WARNING
LAVA ROCK USE
1. Do not light or use gas unit if lava rocks are wet. Ensure lava rocks are completely dry before lighting as intense heat could
cause the lava rocks to crack.
2. Lava rocks could hit somebody' face or eyes during the initial start of this unit, so please keep away from the appliance for the
first 20 minutes.
5
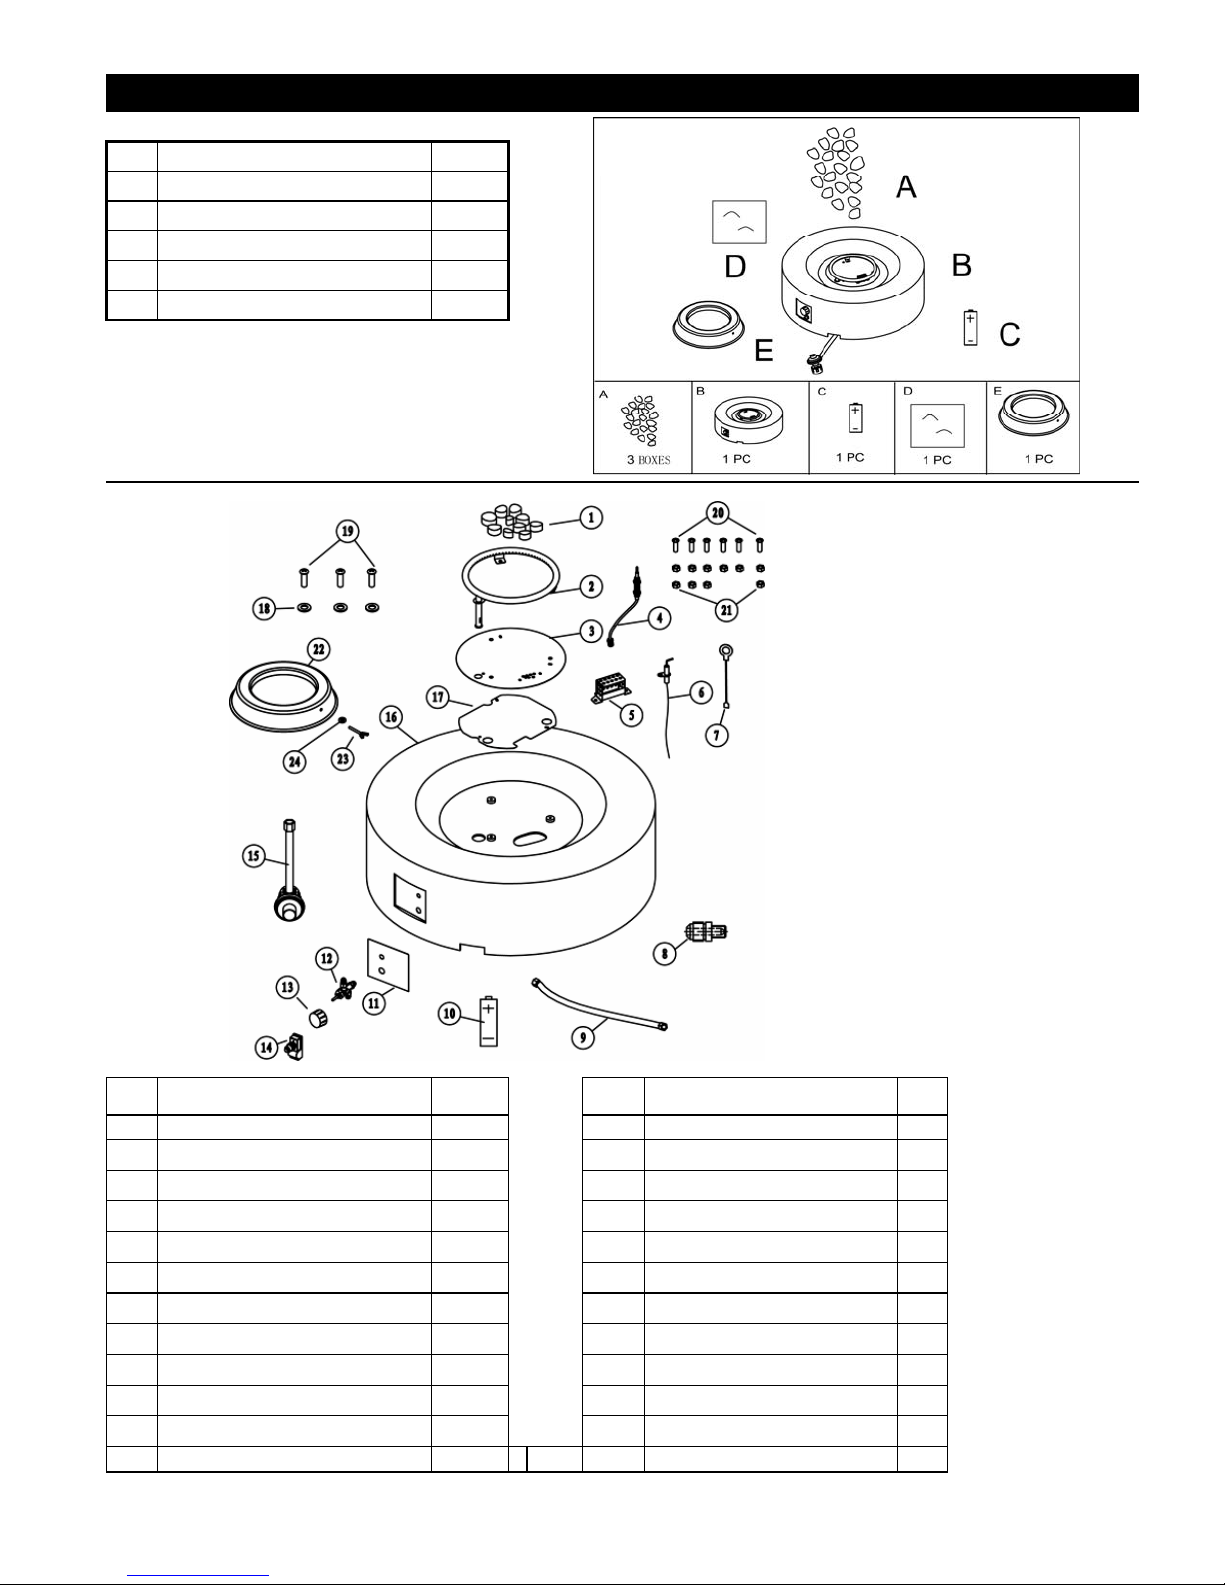
Accessories
ITEM DESCRIPTION QTY
A LAVA ROCKS 3 BOXES
B BODY 1PC
C BATTERY AAA 1PC
D COVER 1PC
E TANK SEAT 1PC
ITEM
NO. SPECIFICATION QTY
1 Lava rock 3 boxes 13 Control knob 1
2 Burner 1 14 Igniter 1
3 Firepan 1 15 Regulator & hose 1
4 Thermocouple 1 16 Body 1
5 Screen 1 17 Heat Shield 1
6 Ignition Pin 1 18
7 Ground wire 1 19 M6*20 Screw 3
8 Nozzle 1 20 M5*12 Screw 6
9 Metal hose 1 21 M5 Nut 10
10 AAA Battery 1 22 Tank Seat 1
11 Lighting plate 1 23 Wing Screw 1
12 Valve 1 24 Lock cover 1
ITEM
NO. SPECIFICATION QTY
6 Washer
6
3
ASSEMBLY INSTRUCTIONS
* Please keep these owner's manual for future reference.
*If you have opened the carton and removed all packages, please disregard the STEP 1 and 2. See the STEP 3 directly.
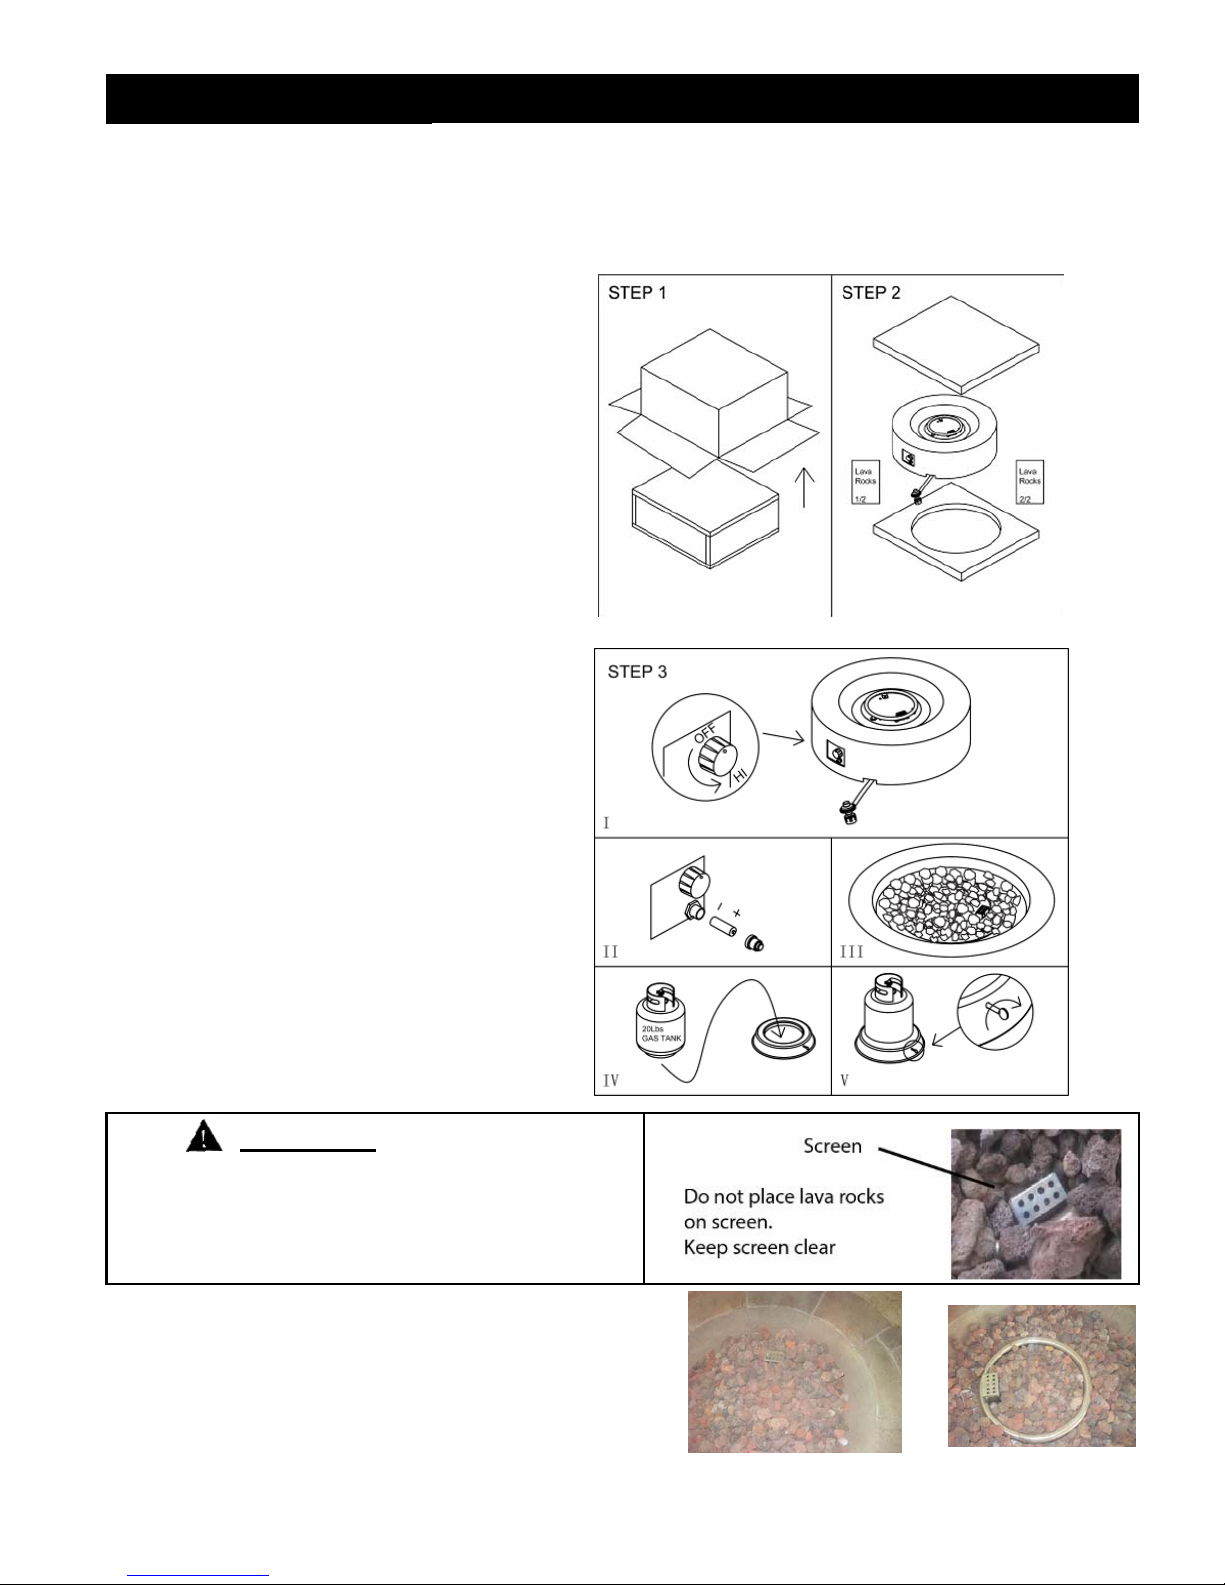
.STEP 1
Open the carton and turn it upside down, make sure the 4 pieces of
(1)
the carton being open up as below.
off the carton carefully and be wary of the accessories inside falling
away. Take away the boxes containing lava rocks.
(3) Take all the packing materials away except for the polyfoam
rounding the top of the firebowl.
See Figure STEP 1.
STEP 2
(1) Turn the firebowl heads up on a flat ground.
(2) Cut off the binding tape on the polyfoam and remove all the
polyfoam rounding the top of the firebowl.
(3) Cut off the tie fastened the regulator at the metal stand and set it free
for installation to Pronane Tank.
See Figure STEP 2
STEP 3.
1) Check each part before using the product. Make sure the
gas supply system is turned "OFF" before assembling. See
Figure I.
(2) Lift
2) Locate the battery, remove the plastic cover first. Unscrew
the rubber cap of the Electric Ignitor, place a AAA battery
into the battery case. Make sure the positive pole ("+")
towards the cap. Screw the cap back to the battery case
tightly. See Figure II
3)Place the lava rocks evenly in the fire bowl on the top of
the firebowl. See Figure III.
4) Put the gas tank in the metal stand. Make sure the gas tank
sits on the metal stand completely. Turn the wing screw on
the outer part of metal stand clockwise to secure the gas tank
tightly.
See Figure IV & V
See "LP (Liquid Propane) gas supply
connection" for tank connection
WARNING
** DO NOT COVER THE IGNITION SCREEN when placing the
lava rocks into the fire bowl. Always keep Ignition Screen visible.
This screen must be clear and free of obstructions at all times to insure
proper operation.
The burner of the firebowl must be
covered by lava rocks completely.
Otherwise the flame may be extinguished
occasionally. See the Figure CORRECT
and INCORRECT for reference.
7
CORRECT INCORRECT
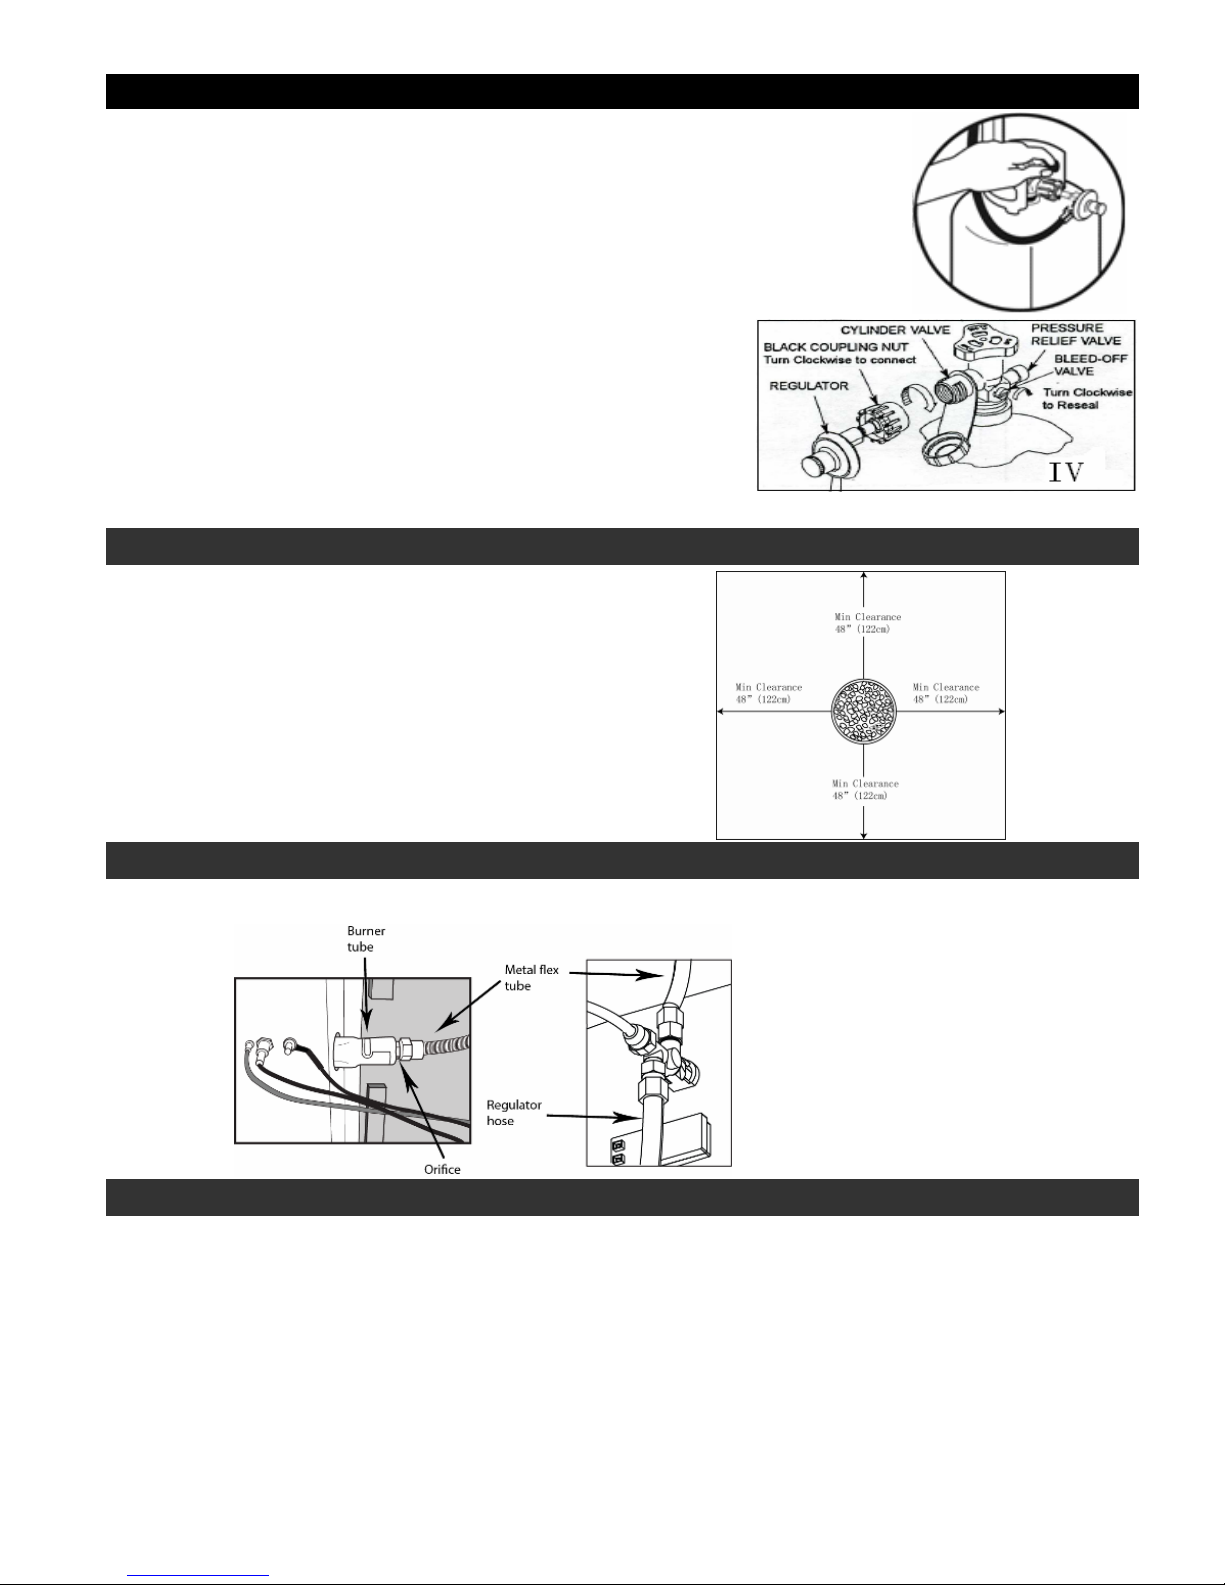
LP (Liquid Propane) gas supply connection
Always confirm that the burner control knob is in the OFF position before connecting the gas supply.
•
•
Do not obstruct the flow of combustion air and ventilation air to the appliance.
To Connect:
Ensure that there is no debris caught in the head of gas cylinder, head of the regulator valve.
1
2
Insert the nipple of the valve coupling into the cylinder valve and tighten the black coupling nut
by turning it clockwise with one hand while holding the regulator with the other hand. (See
diagram.) Hand tighten only.
To Disconnect:
Always confirm that the cylinder valve is in the OFF position
1
before disconnecting the gas supply.
Hold the regulator with the one hand and loosen the black
2
coupling nut by turning it counter-clockwise with the other
hand. (See diagram.)
IMPORTANT
Disconnect the propane cylinder from the regulator valve when the appliance is not in use.
SELECTING A LOCATION
Always place this outdoor appliance on a hard, level non-combustible
surface such a concrete, rock or stone.
Minimum Clearance from Unit to Combustible Materials
72”(182.9cm) from the top; 48” (121.9 cm) from all sides and back.
Do not locate this appliance under any overhead enclosure.
Position the appliance so that you have easy access to the control
knob.
VISUAL CHECK
Prior to each use, check the hose and valve for excessive wear or abrasions.
LEAK TEST
1
Perform a leak test in a well ventilated area outside
2
Make sure any open flames or cigarettes are extinguished.
3
Remove the battery.
4
Ensure the burner control knob is in the "OFF" position
5
In a bowl, create a soap solution using 1 part water and 1 part liquid detergent
6
Apply the soapy water solution to all connections.
7
Open LP tank valve.
8
A gas leak will be detected by expanding bubbles originating from the point of the leak
If a leak is found at any connection point or if you smell gas, close the tank valve, disconnect the tank and do not use the
9
appliance until repairs can be made.
8
TO LIGHT
Before Beginning ●Read and understand the instructions thoroughly.
TIPS:
●Check and make sure that all parts are present.
●For future reference, save this instruction sheet.
1
Locate the burner control knob and make sure it is in the "OFF" position.
Connect propane (LP) cylinder. (See above pages).
2
3 Open LP tank valve slowly.
Push in igniter button to create sparks at the electrode and hold.
4
Push and turn burner control knob to the "LOW" position. Continue to push the control knob for 15-30 seconds after ignition.
5
If ignition does occur within 30 seconds, turn the burner control knob to "OFF", wait 5 minutes for gas to clear and repeat the
6
lighting procedure. If burner still will not light, refer to the Troubleshooting Section.
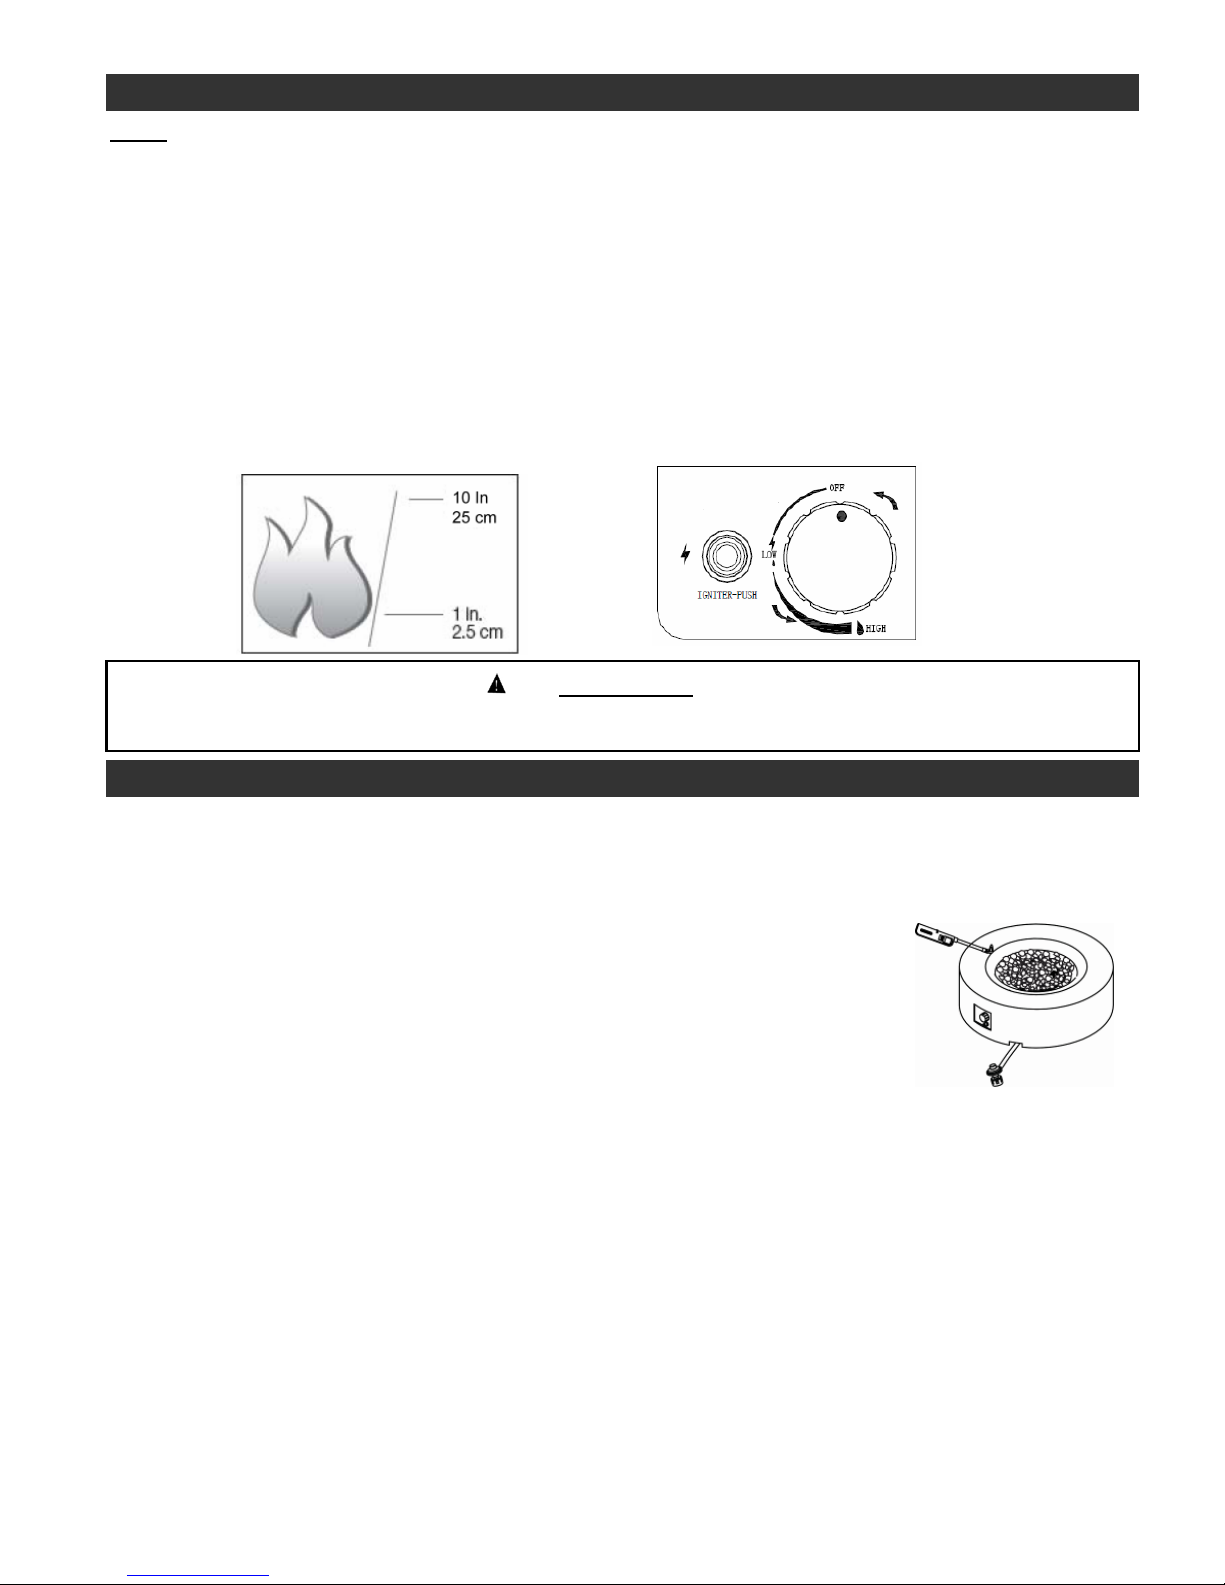
Once the appliance is lit, flame height can be changed by adjusting the burner control knob between the "High" and "Low"
7
Always check burner flames periodically to ensure proper operation. Flames should be mostly yellow with some blue for best
8
performance. (See diagram)
CAUTION
If the burner does not ignite with the burner control valve open, gas will continue to flow out of the burner and could
accidentally ignite causing injury or property damage.
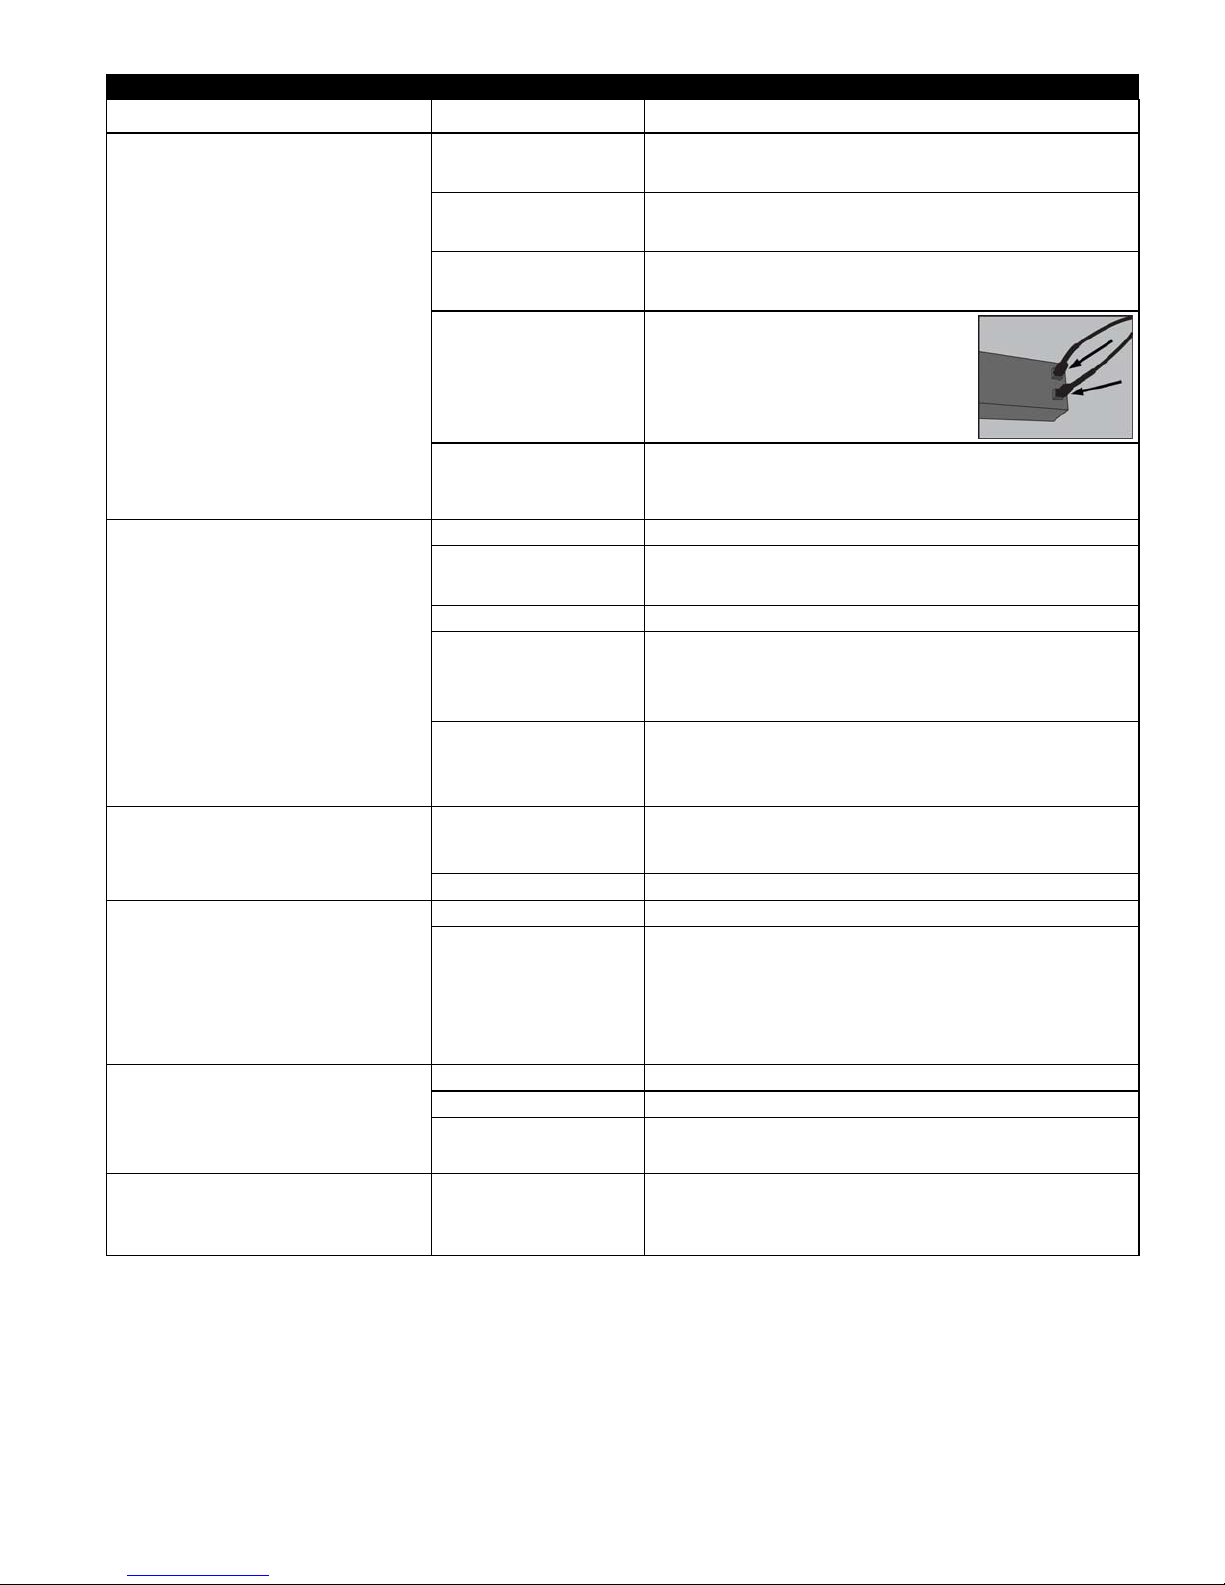
USING A LONG MATCH OR LIGHTER
Connect propane (LP) cylinder (see above pages).
1
Before lighting, move the lava rocks with a small shovel to allow access to the burner.
2
WARNING: Lava rocks can become very hot. DO NOT touch unless they are completely cooled.
Locate the burner control knob and make sure it is in the "OFF" position.
3
Wearing heat resistant gloves, position a long lit match or lit long neck lighter close to the burner
4
ports. DO NOT lean over the burner while lighting.
Push and turn burner control knob to the "LOW" position. The burner should lit within 5 seconds.
5
If ignition does occur within 5 seconds, turn the burner control knob to "OFF", wait 5 minutes for
6
gas to clear and repeat the lighting procedure. If burner still will not light, refer to the
Troubleshooting Section.
Flame height can be changed by adjusting the burner control knob between the "LOW" and
7
"HIGH" positions.
Always check burner flames periodically to ensure proper operation. Flames should be mostly
8
yellow with some blue for best performance.
9

TO EXTINGUISH
Push and turn burner control knob to the "OFF" position.
1
Close the LP tank valve.
2
Disconnect the regulator from the LP tank to close the
3
gas supply when not in use.
Make sure that the unit is completely cooled before
4
touching any of the components or putting on the cover.
ROUTINE CARE
•
Keep your appliance free and clear from combustible materials.
•
Visually inspect burner for obstructions, keep tank enclosure free and clear from debris.
•
After the burner and lava rocks are completely cooled down, use a soft brush to get rid of the mild stains, loose dirt and soil.
Wipe with a soft cloth.
STUBBORN STAINS
• Stubborn stains, discoloration and possibly rust pitting can occur from exposure to harsh outdoor conditions.
• Be careful not let any powder or solvent come in contact with painted or plastic components as damage may occur.
MAINTENANCE
• Store the appliance in a cool dry place away from direct sunlight.
Make sure both the gas and the appliance are turned off before changing battery. Please refer to the process of inserting battery.
•
• Protect your appliance with the cover when not in use.
• The propane cylinder must be disconnected and stored outdoors before the appliance can be stored indoors.
•
Use Manufacturer approved or supplied replacement parts and accessories only. Otherwise may void the warranty of this product
and result in a hazardous condition.
•
Please contact the Manufacturer for information regarding replacement hoses, thermocouples, ignitors, lava rocks, ceramic
logs,etc.
10
TROUBLESHOOTING
PROBLEM
CAUSE
Igniter pin and burner are
wet
CORRECTIVE ACTION
Wipe dry with a cloth
Appliance won't light
Burner will not light using a match
Igniter battery is
incorrectly inserted.
Igniter pin cracked or
broken
Electrode wire is loose or
disconnected
Electrode wire is shorting
between valve and igniter
pin
No gas flow
Regulator is not fully
connected to the tank
Gas flow is obstructed
Spider webs or insect nest
in the venturi (end of
burner tube)
Burner ports are clogged
Check that battery is correctly inserted.
Call customer service for replacement part
Reconnect wire to the igniter box
located inside the table base behind
the igniter button
Call customer service for replacement part
Check if gas cylinder is empty. If yes, replace.
Check LP tank connection.
Check hose for bends or kinks
Clean the venturi
Insert an opened paperclip into each of the burner ports to clean
them. Ensure the appliance is off and all parts are cooled before
attempting to clean the burner ports
Appliance emits a lot of black smoke
when lit
Sudden drop in gas flow
Flame blow out
Irregular flame pattern or flame does not
come out of the entire length of the burner
OR LOG IN TO OUR WEBSITE UNDER CUSTOMER SERVICE SUPPORT
Flame is obstructed at
burner ports
Regulator hose is pinched
No gas flow
Make sure all the gas burner ports are free of any lava rocks or
debris to allow the gas to flow freely.
Check the regulator hose for bends or kinks
Check if gas cylinder is empty. If yes, replace.
Turn the control knob to "OFF", Close the LP tank valve and
Excess flow safety valve
has been activated
disconnect the regulator from the tank. Turn the control knob to
"HIGH". Wait 1 minute. Turner the control knob to "OFF".
Reconnect regulator to LP tank. Open tank valve slowly. Light
appliance as indicated in "To Light" section.
High or gusting winds
No gas flow
Excess flow safety valve
has been activated
Burner ports are clogged
IF YOU HAVE QUESTIONS OR CONCERNS
PLEASE CALL BOND TOLL FREE #
1-866-771-BOND(2663) OR TO BETTER
EXPEDITE YOUR REQUEST FEEL FREE TO EMAIL US
customerservice@bondmfg.com
www.bondmfg.com
BOND MANUFACTURING CO.
1700 West 4th Street, Antioch CA 94509
Increase flame to "High"
Check if gas cylinder is empty. If yes, replace.
See "Sudden drop in gas flow" above
See "Burner will not light using a match" above.
11
 Loading...