

Page 1
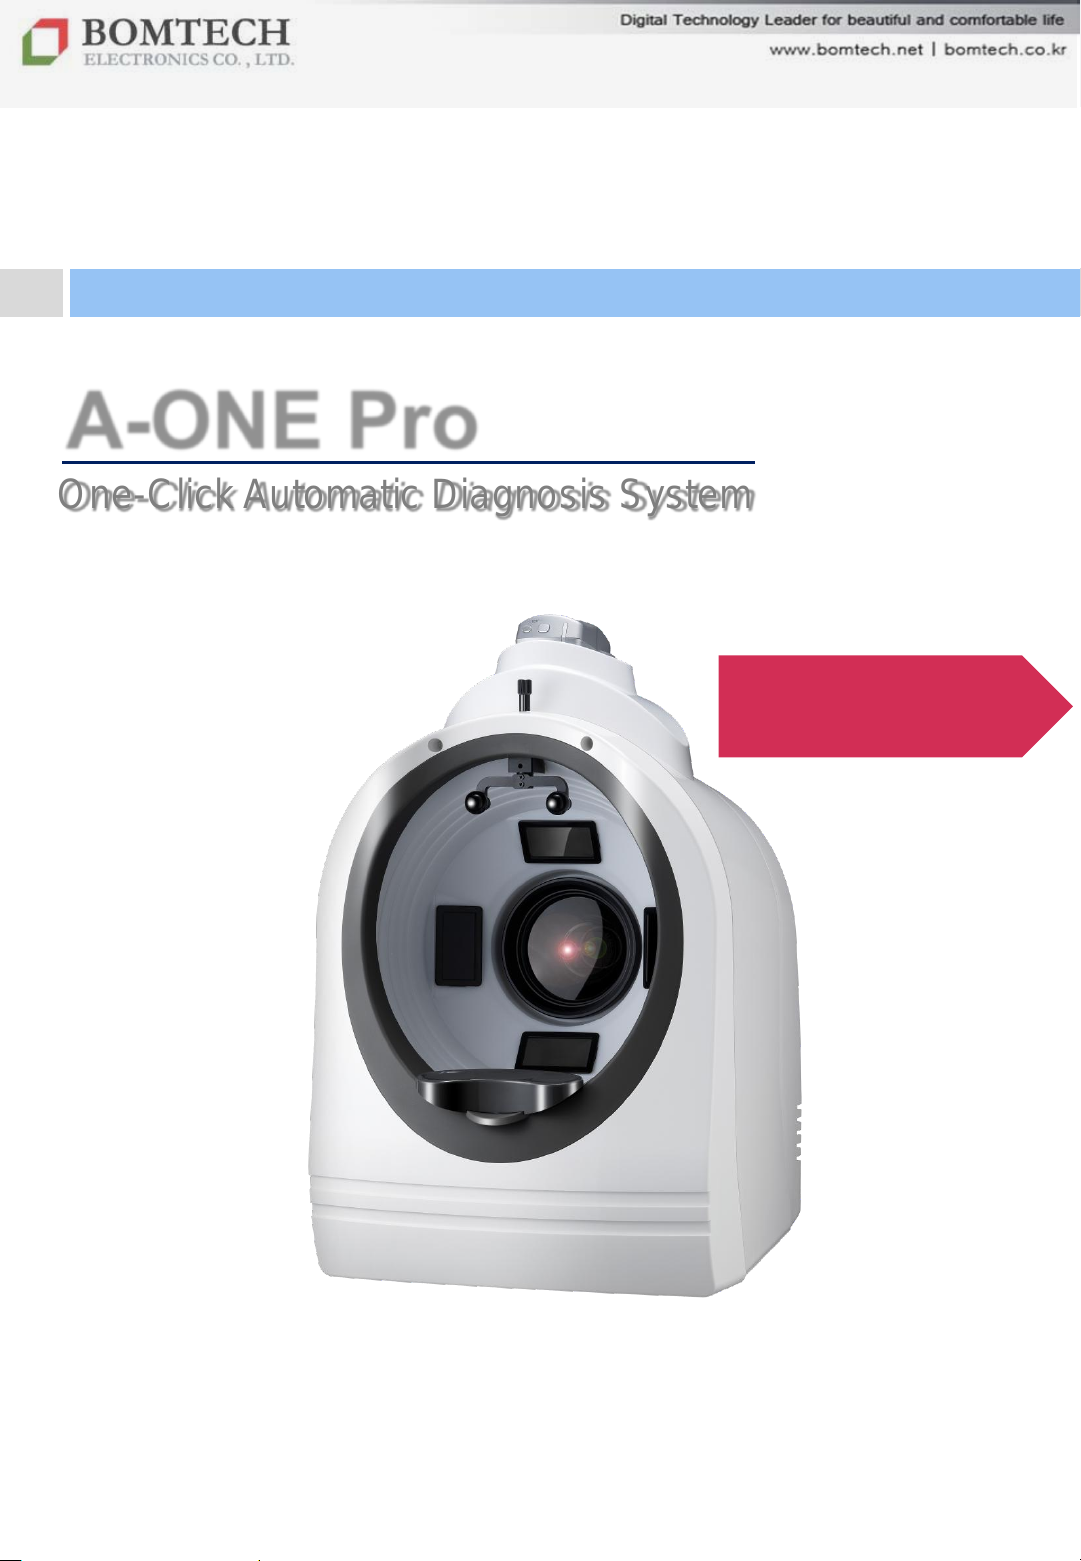
A-ONE Pro
Sterilized by UV
– Infection Free
마스터 부제목 스타일 편집
Page 2
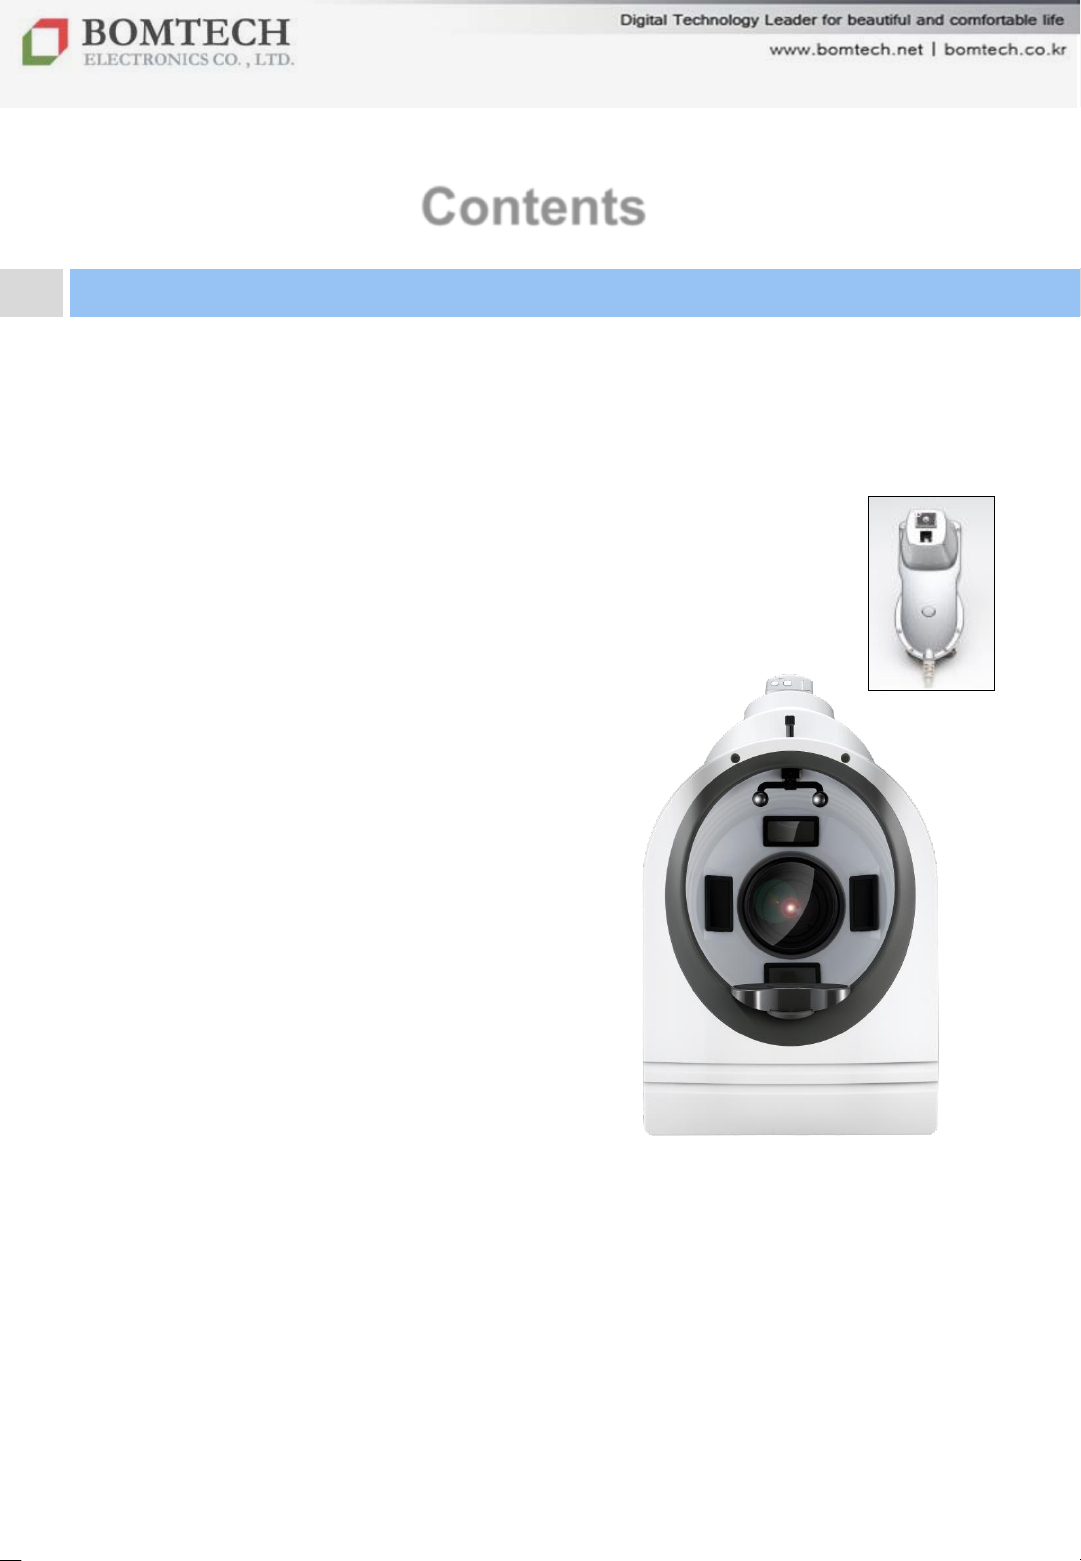
Contents
Ⅰ. Introduction
1. Characteristics
2. Composition
3. Specification
Ⅱ. Installation
1. Installation
2. Connection
Ⅲ. Instruction
1. Precaution
2. Diagnosis
① Customer Information
② Diagnosis
③ Result
④ Product Recommendation
3. Additional Function
4. Product Update
5. Configuration
① Sensitivity Control
② Camera
③ Screen Saver
④ Logo
⑤ Guide line
⑥ Display of Standard Value
⑦ Usage Count of Flash
⑧ Doctor Mode
⑨ Outline (Drawing Picture)
⑩ Control Mode
⑪ Age of Skin
⑫ Network
⑬ Backup
⑭ Restore
Ⅳ. FAQ
Ⅴ. Maintenance & Warranty
마스터 부제목 스타일 편집
For your beautiful and comfortable life, BOMTECH skin diagnosis system A-ONE
2
Page 3
Ⅰ. Introduction
1. Characteristics
High Resolution Cannon Camera
- 14.7 mega pixel: vivid and high resolution image
Automatic, Full-Face Skin Diagnosis
- Scanner: pore, sebum, wrinkle, pigmentation
- P-Sensor: moisture, elasticity, skin tone, skin temperature
Providing High level visual effect: UV & Polarization function
- Accurate sebum quantity and pigmentation measurement
Automatic Recommendation of Product and Treatment
- Based on a client‟s result
Accurate Analysis
- Accurate understanding on diagnosis result by photos and graphs
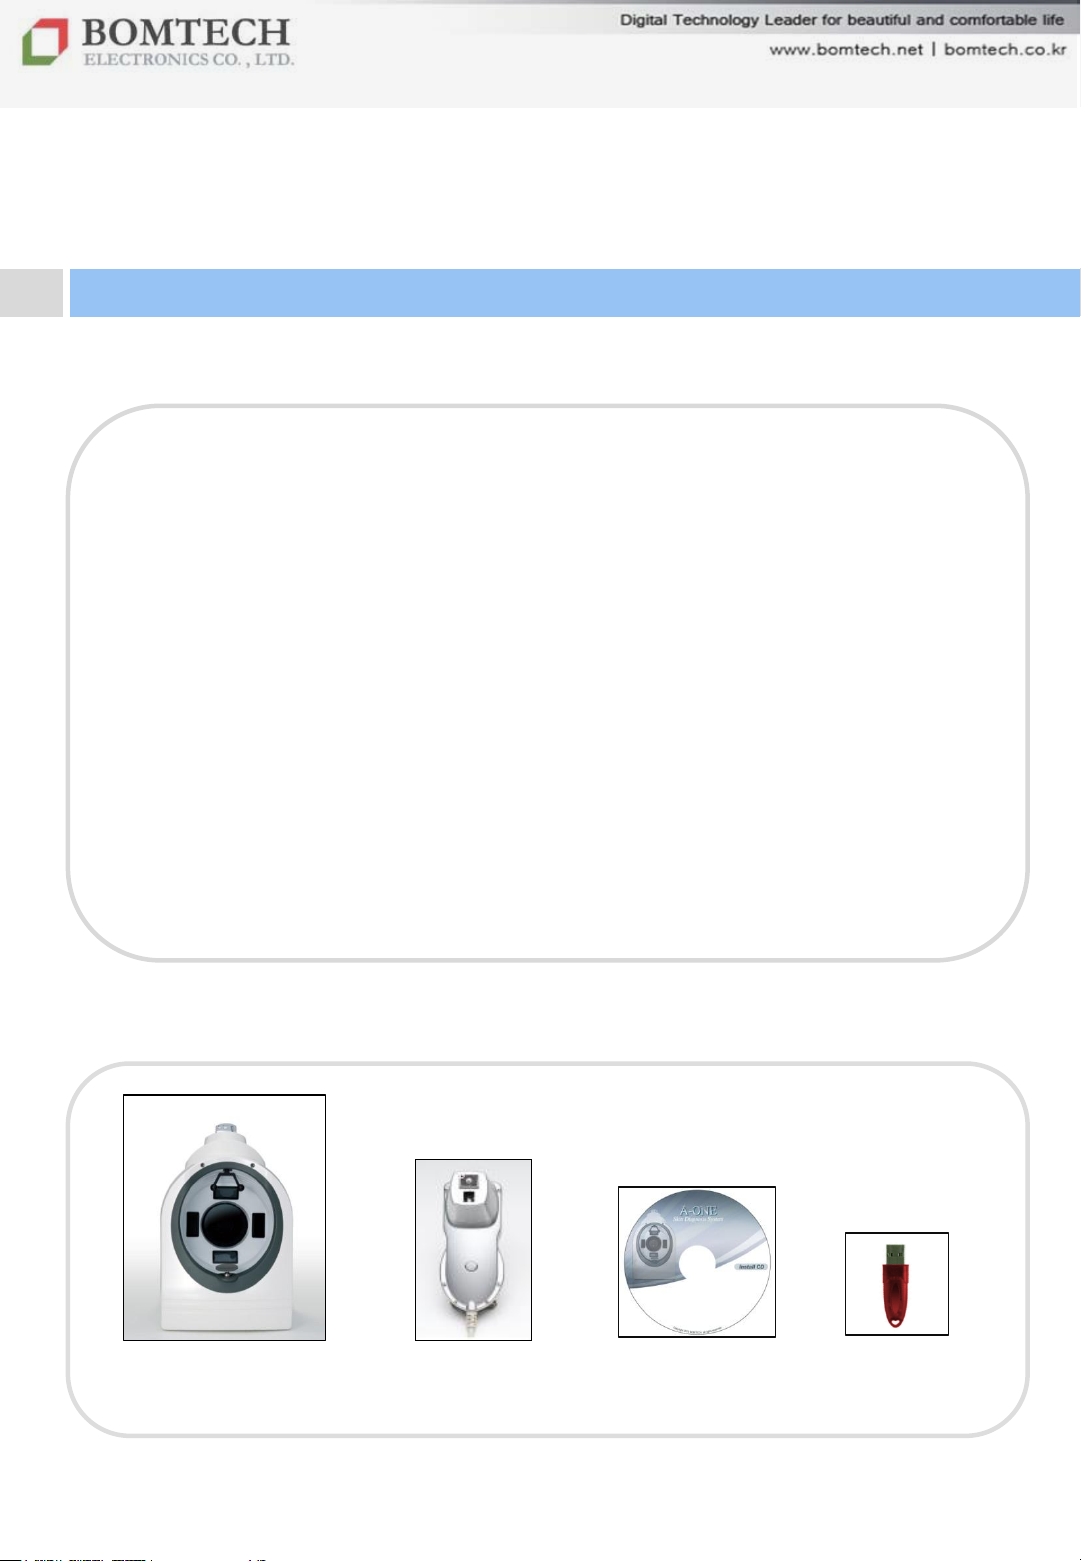
2. Composition
마스터 부제목 스타일 편집
A-ONE
** USB cable and power cord included
P-sensor
For your beautiful and comfortable life, BOMTECH skin diagnosis system A-ONE
Installation
CD
Lock Key
3
Page 4
Ⅰ. Introduction
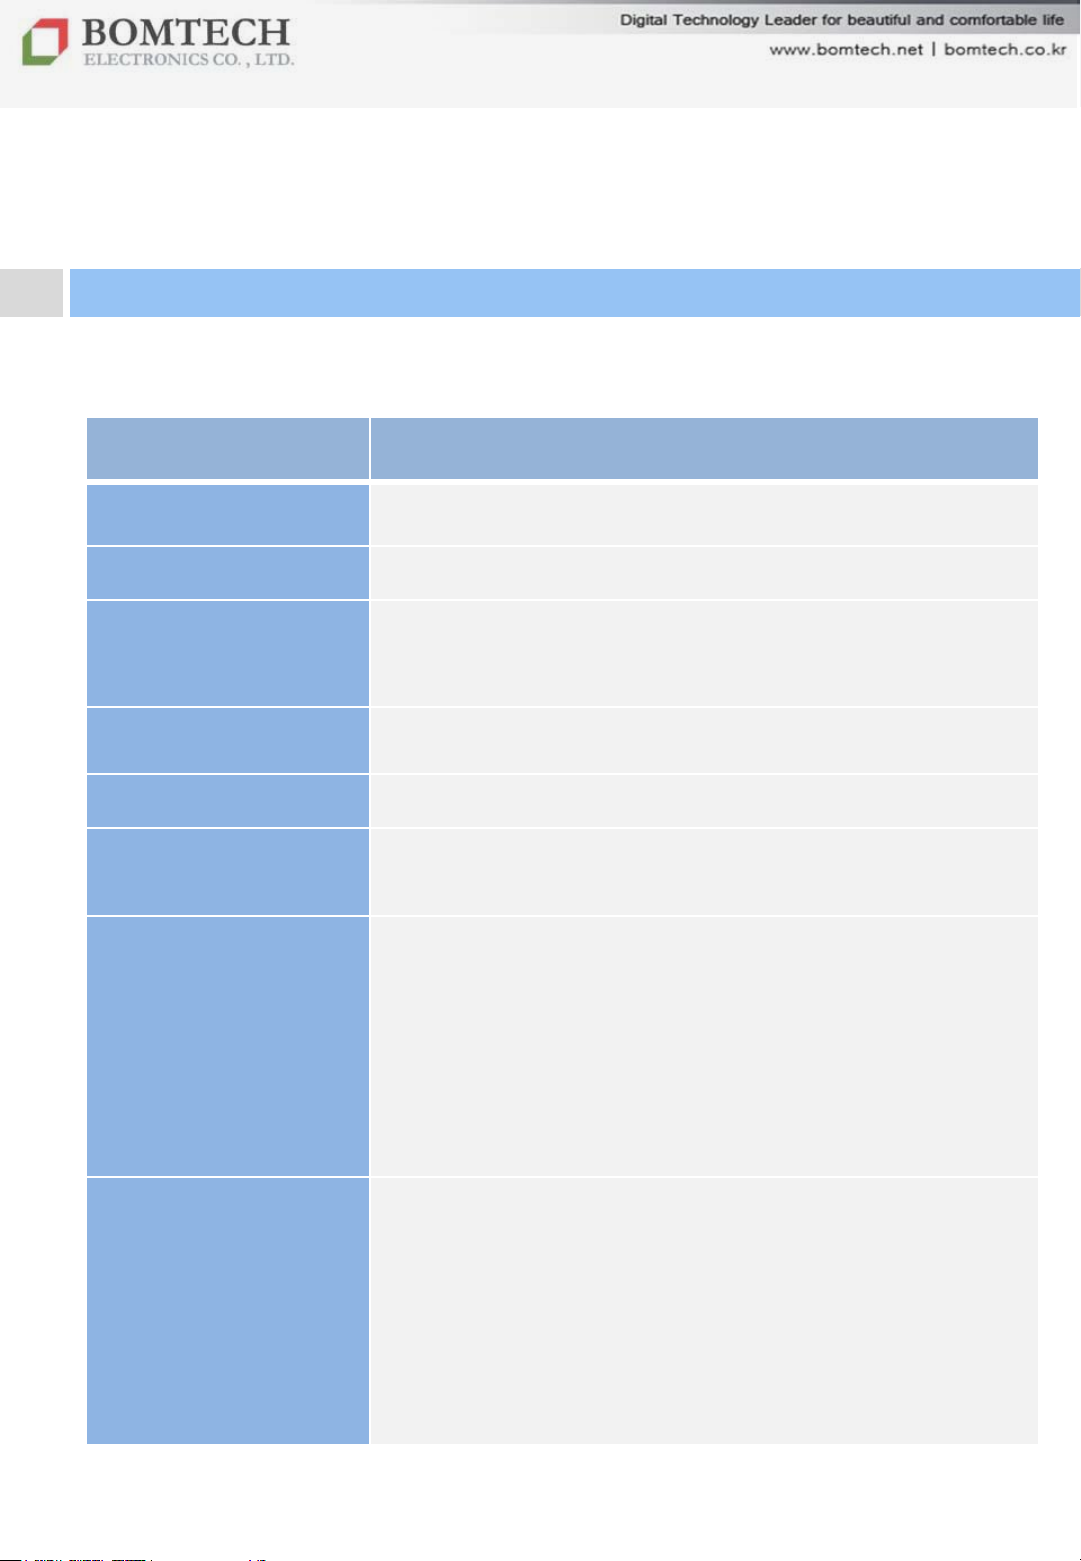
Classification
Description
Size
Width
Weight
7
Rated
AC 100
INTERNAL OUTPUT: DC12V (4.2A),DC 5V(10A)
Power
Consumption
50W (Max.)
Weight
7
Compatible
Operating
Windows
Minimum
Hardware
Requirements
Graphic
3. Specification
Input Power
System
CPU: Over Pentium4
RAM: Over 1G (Recommendation: over 2G)
VGA: Video card memory – over 32MB
HDD: Over 10GB
Monitor: Over 17”, Resolution 1024×768
: 302mm, Length: 369mm, Height: 480mm
,800g (Scanner only)
-120V, 200-240V
,800g (Scanner only)
XP/ Vista / 7 / 8
Card
마스터 부제목 스타일 편집
3Dfx Voodoo classes
ATI RageⅡ, Rage Pro, Radeon classes
Matrox classes
Nvidia Riva 128, Riva TNT, Geforce classes
Intel i740
S3 Virge GX/GX2, Trio 3D, Savage 3D classes
For your beautiful and comfortable life, BOMTECH skin diagnosis system A-ONE
Page 5
Ⅱ. Installation
1. Program Installation
1) Insert program CD into CD-ROM drive.
2) Autorun file is automatically executed.
3) Install software and lock key driver.
** No need to install camera driver and P-Sensor driver as they are
automatically recognized by PC.
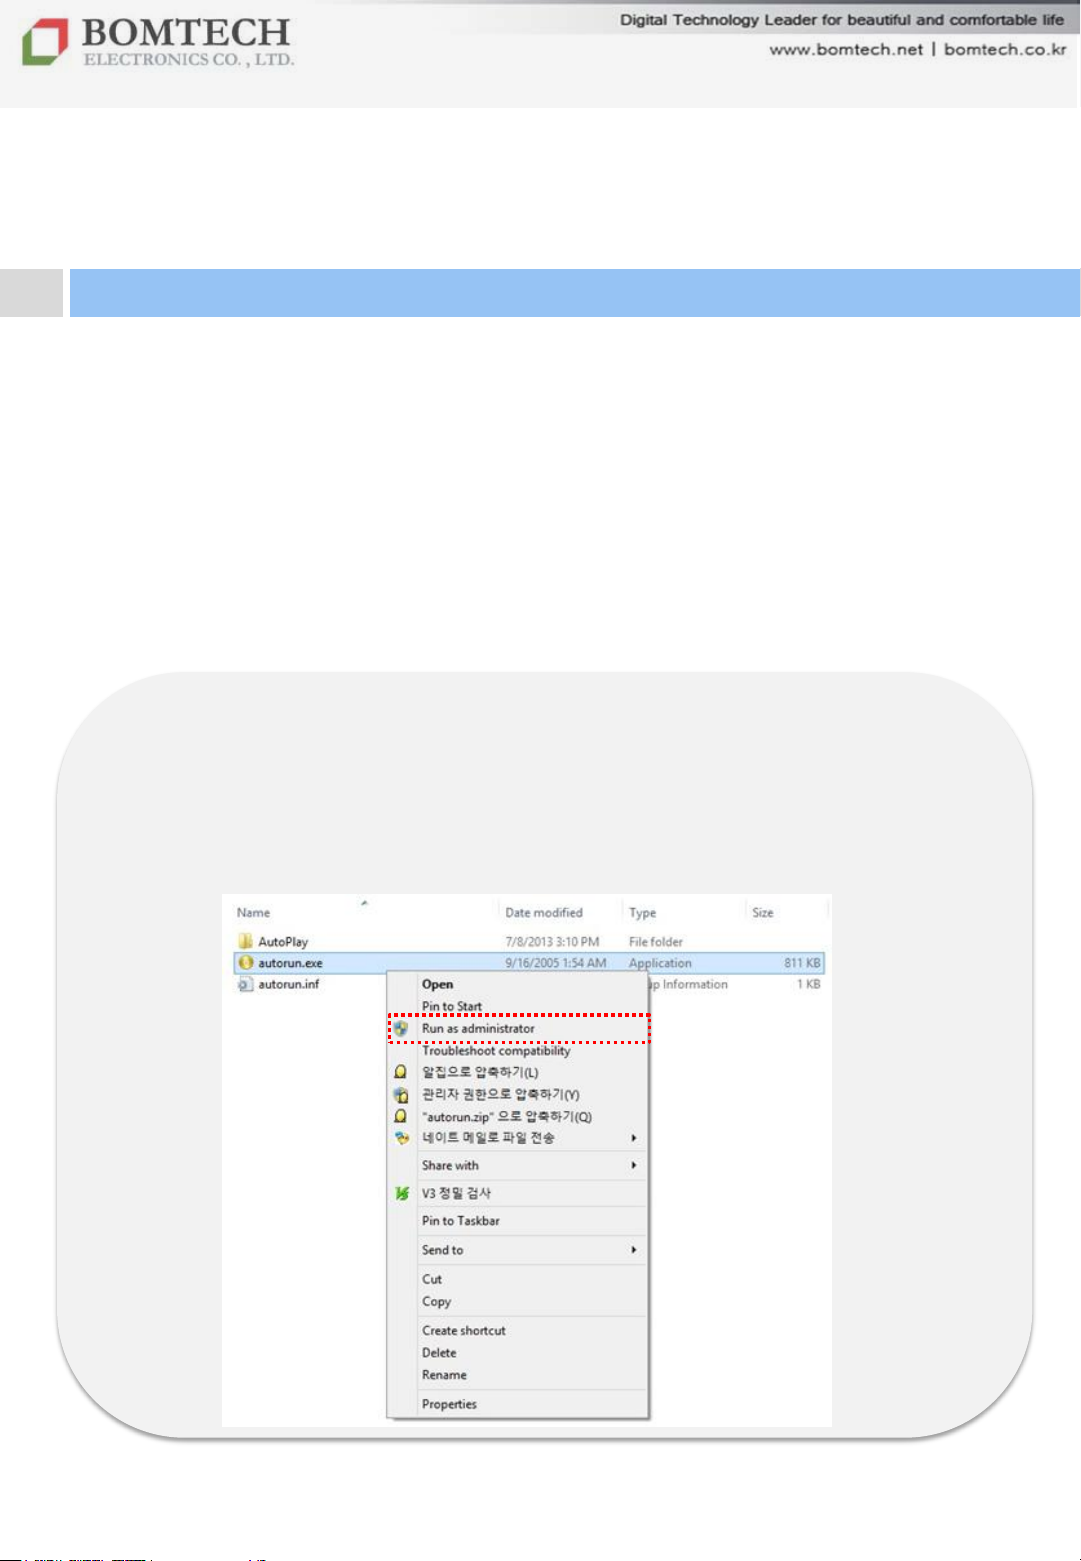
** Caution
To install the software on Windows 8, Autorun file should be
executed as administrator. Open CD-ROM drive, right-click the
Autorun.exe file and select „Run as administrator‟.
If unknown publisher security warning pops up, select „Yes(Y)‟.
마스터 부제목 스타일 편집
5
For your beautiful and comfortable life, BOMTECH skin diagnosis system A-ONE
Page 6
Ⅱ. Installation
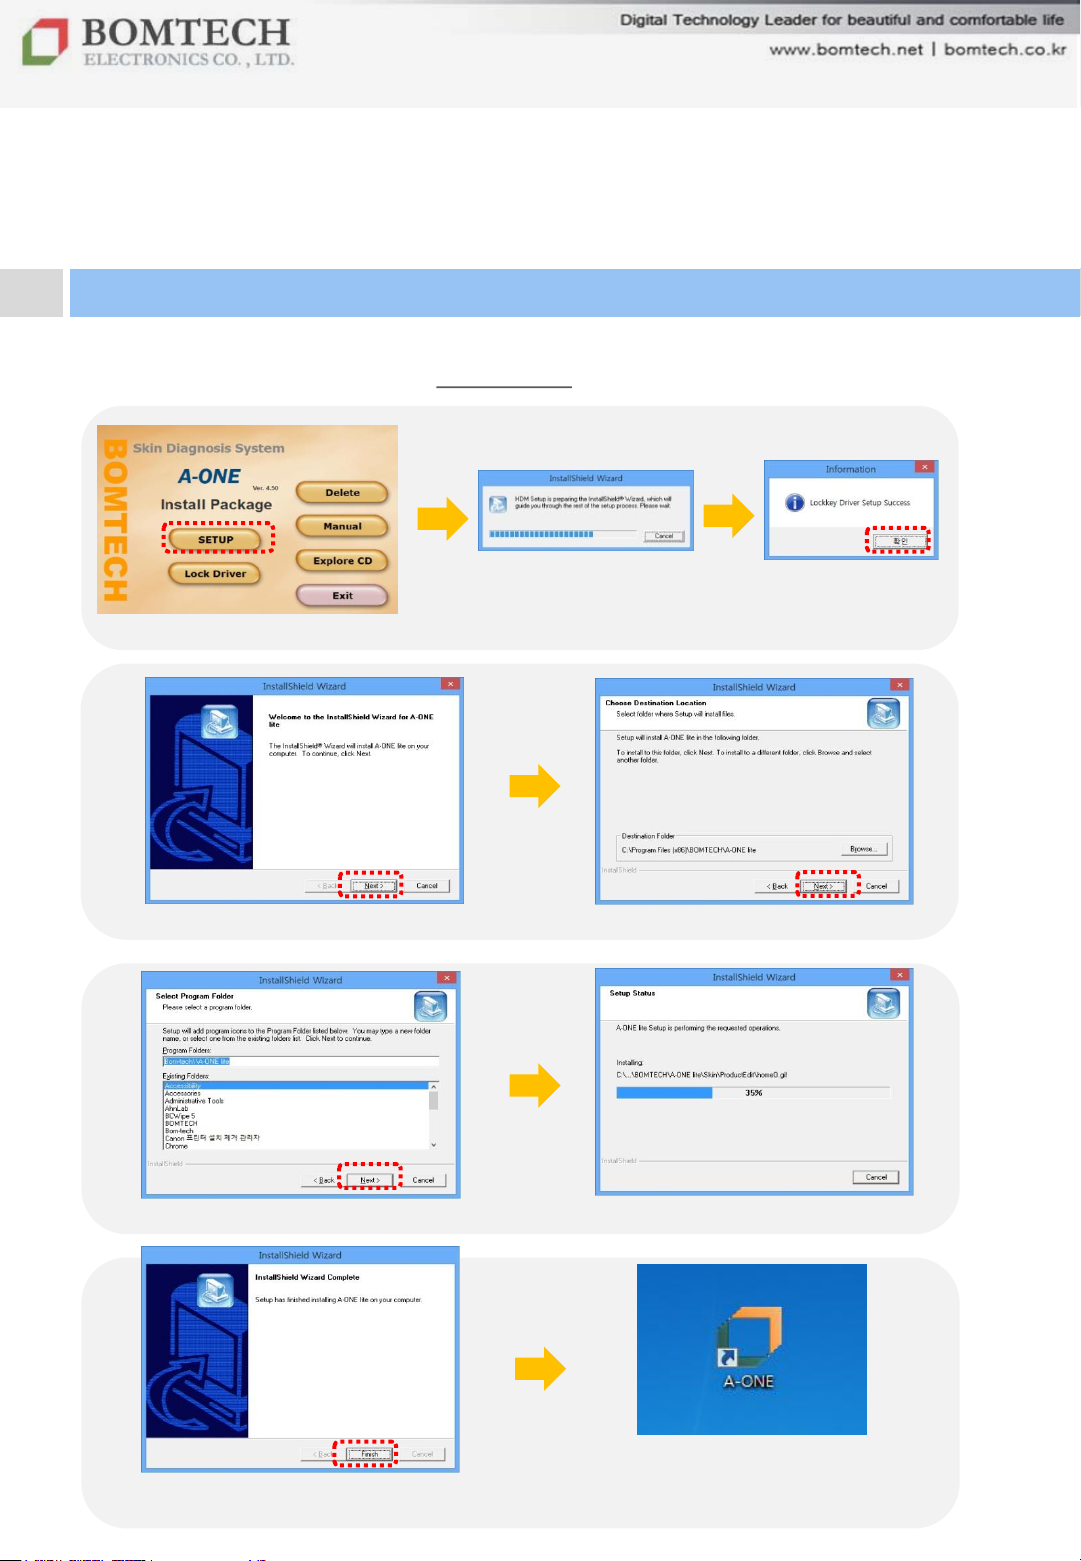
1. Program Installation: Software
Click „Setup‟
Click „OK‟
Click „Next‟
Click „Next‟
Click „Next‟
마스터 부제목 스타일 편집
A-One shortcut icon is
automatically created
on desktop.
6
Page 7
Ⅱ. Installation
2. Program Installation: Lock Key Driver
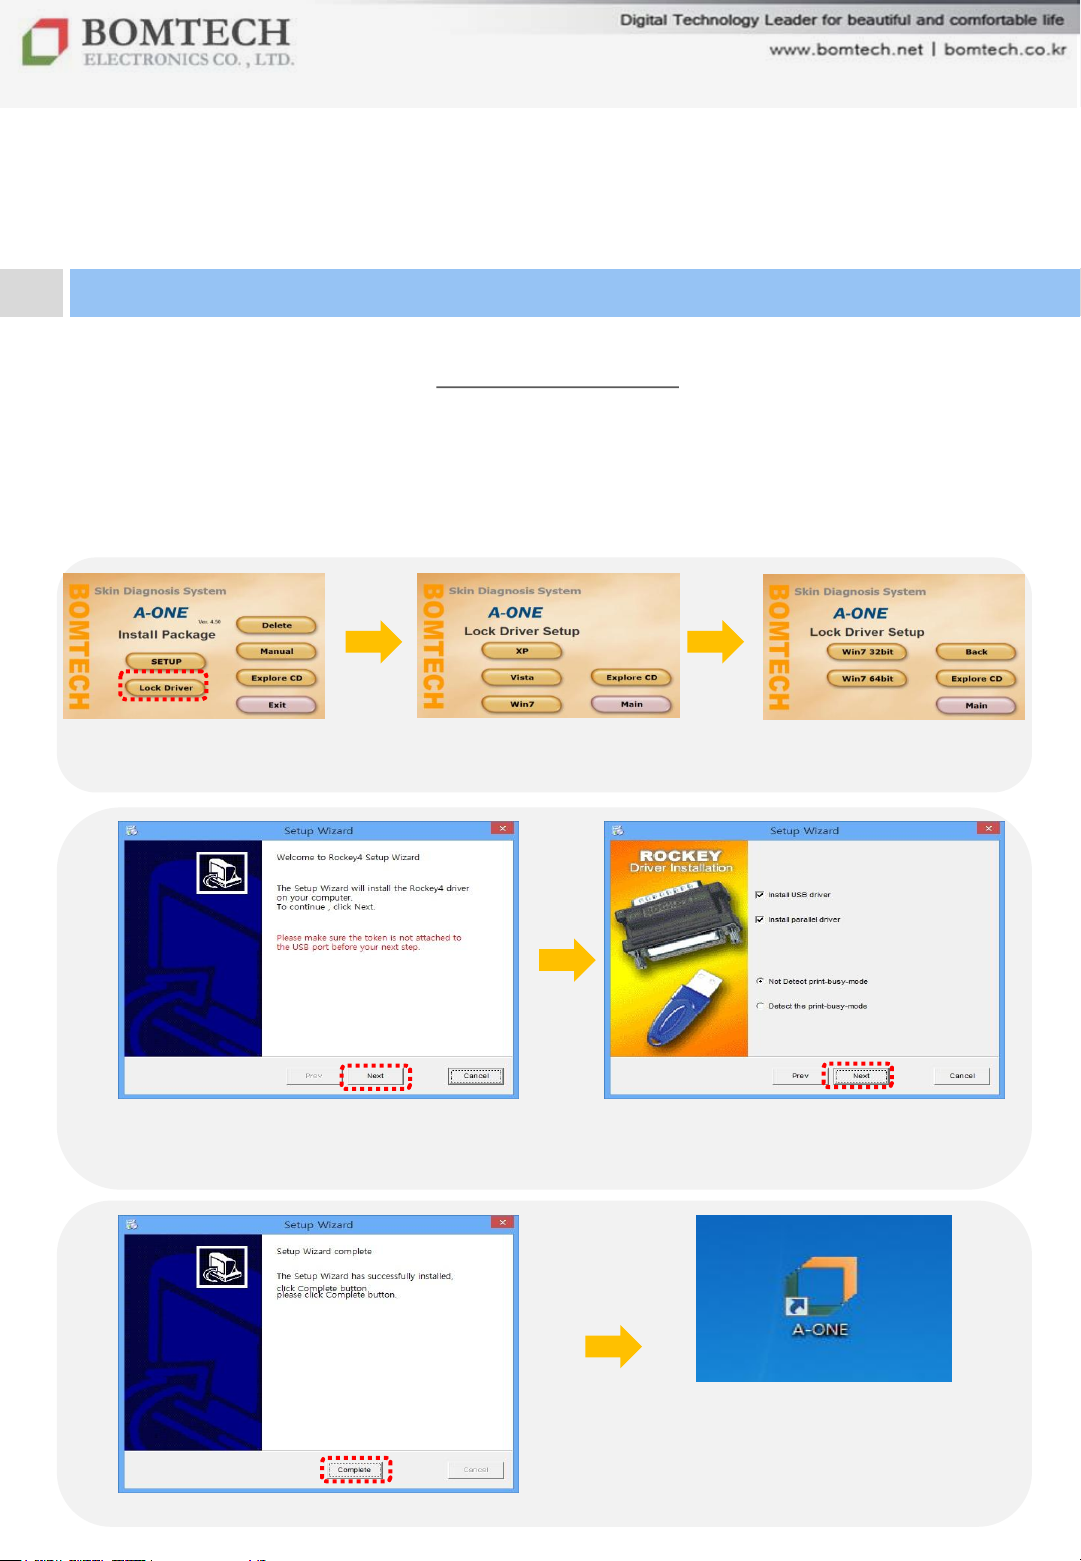
There are two kinds of USB lock key:
- Red lock key : It is automatically recognized by PC. No need to install
lock key driver.
- Blue lock key: Install lock key driver following the below instruction.
Click „Lock Driver‟
Click „Next‟
(Lock key should be disconnected to PC
before clicking „Next‟.)
Select „Windows OS‟
(Win 8 user selects Win 7.)
In case of Vista/ Win7/ Win8,
select 32bit or 64bit
Click Next
마스터 부제목 스타일 편집
Click „Complete‟
For your beautiful and comfortable life, BOMTECH skin diagnosis system A-ONE
Double-click A-One shortcut
icon on desktop to execute the
software.
7
Page 8
Ⅱ. Installation
2. Connection
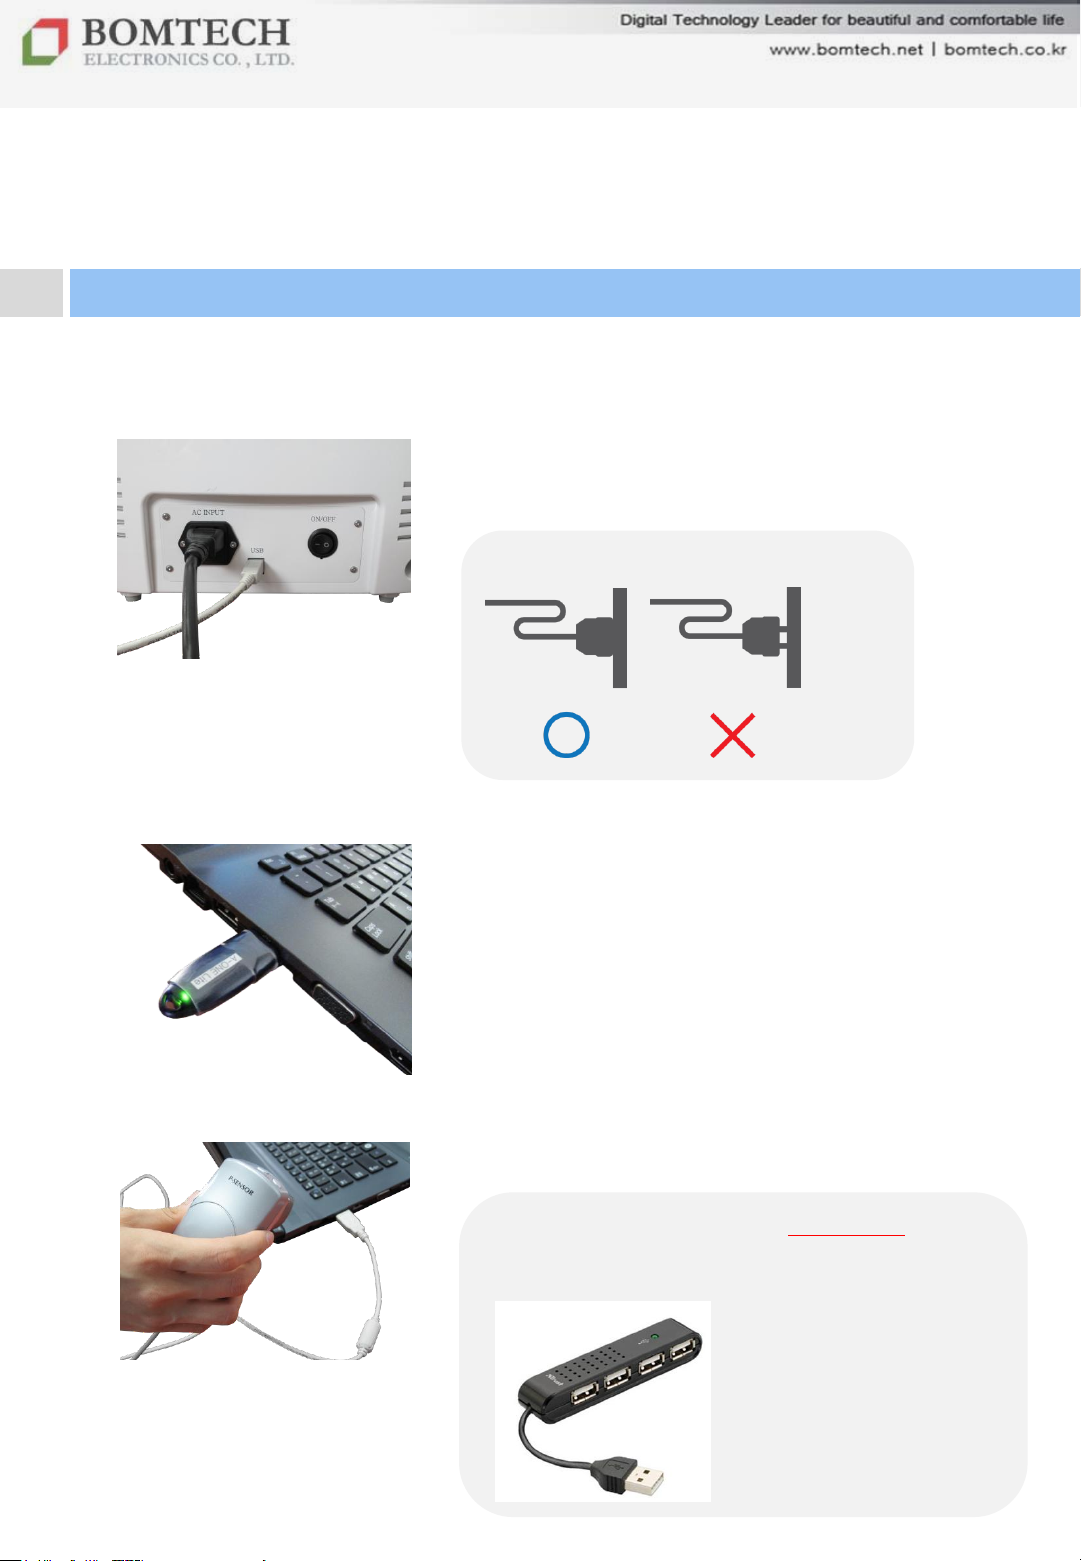
1) Plug in with power cord and connect it to PC
with USB cable.
** Check connection of power cord.
2) Plug lock key into PC.
3) Connect P-Sensor to PC.
*** We recommend to use USB hub in case
the number of USB port is not enough or PC
doesn’t support stable USB 2.0.
마스터 부제목 스타일 편집
Page 9

Ⅲ. Instruction
1. Precaution
Please be sure to read the instructions before use and follow as described.
1. Do not use it with other electronic devices.
It may cause malfunction.
2. Do not keep it in the humid place.
It may cause malfunction.
3. Do not use it on the power other than AC 100~120 or 200~240V.
It may cause fires, electric shocks or malfunction.
4. Do not put on the device nearby the containing water.
It may cause fires, electric shocks or malfunction as water flows into it.
If water does flow, stop using it immediately and make sure to inspect it.
5. Do not use it near the place with high temperature, dust or humidity
(Near the humidifier). It may cause electric shock (sparks) and
malfunction.
6. Do not repair, disassemble or alter the main body under unauthorized person.
It may cause malfunction, fires or burns.
7. Do not touch the device or detach the power cords with wet hands.
It may cause electric shock.
8. Do not use the stripped or bent cord by force.
It may cause fires or electric shock (Be sure to replace defective one
with another).
9. Do not run the scanner or sensor into a hard object, or drop it.
It may cause injuries and malfunction.
10. When you don‟t use it for a long time, unplug it from the outlet.
마스터 부제목 스타일 편집
9
For your beautiful and comfortable life, BOMTECH skin diagnosis system A-ONE
Page 10
Ⅲ. Instruction
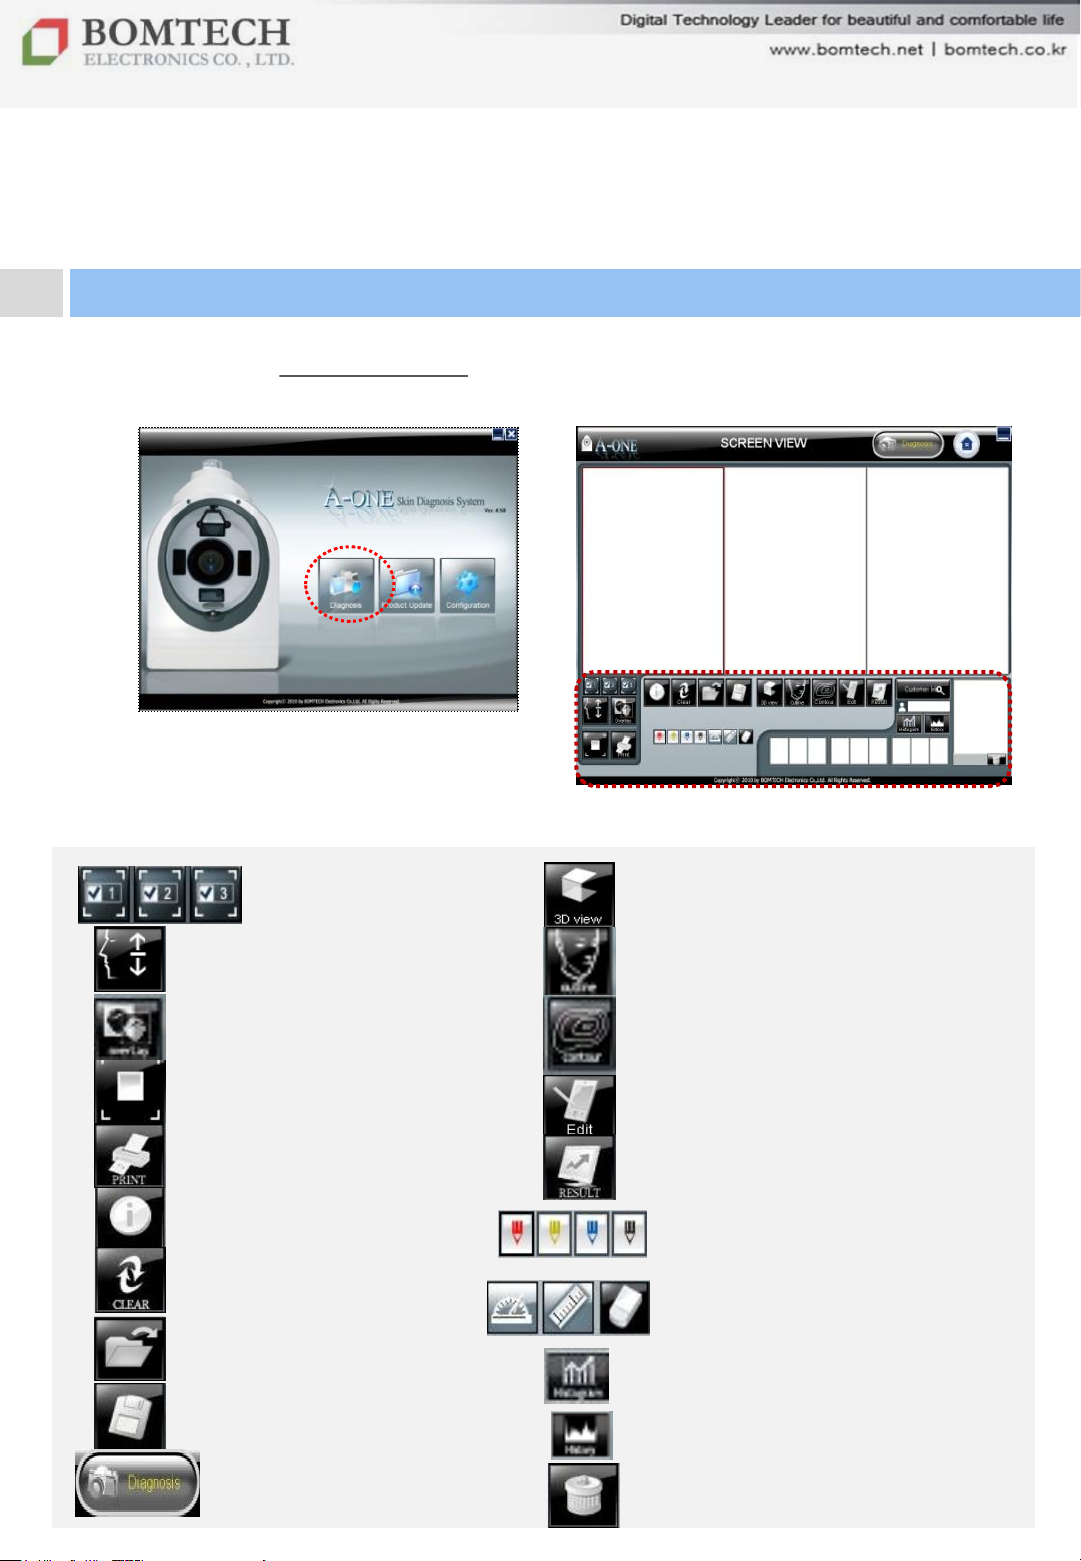
2. Diagnosis: Screen View
Click „Diagnosis‟ on startup page
to start diagnosis.
Simulation
:
Comparison of two photos
by overlapping
Full screen with zoom function
:
Print out image
Hide test value
Clear screen view
Open image
Save image
Select the number of screen
마스터 부제목 스타일 편집
Start diagnosis
Show 3D View of skin
Outline of face
Contour
Edit
Move to result page
Histogram of data
History of photos
Delete diagnosis date list
Color pencil function
Protractor, ruler and eraser function
10
Page 11
Ⅲ. Instruction
2. Diagnosis
Client
Registration
Diagnosis Result
Recommendation
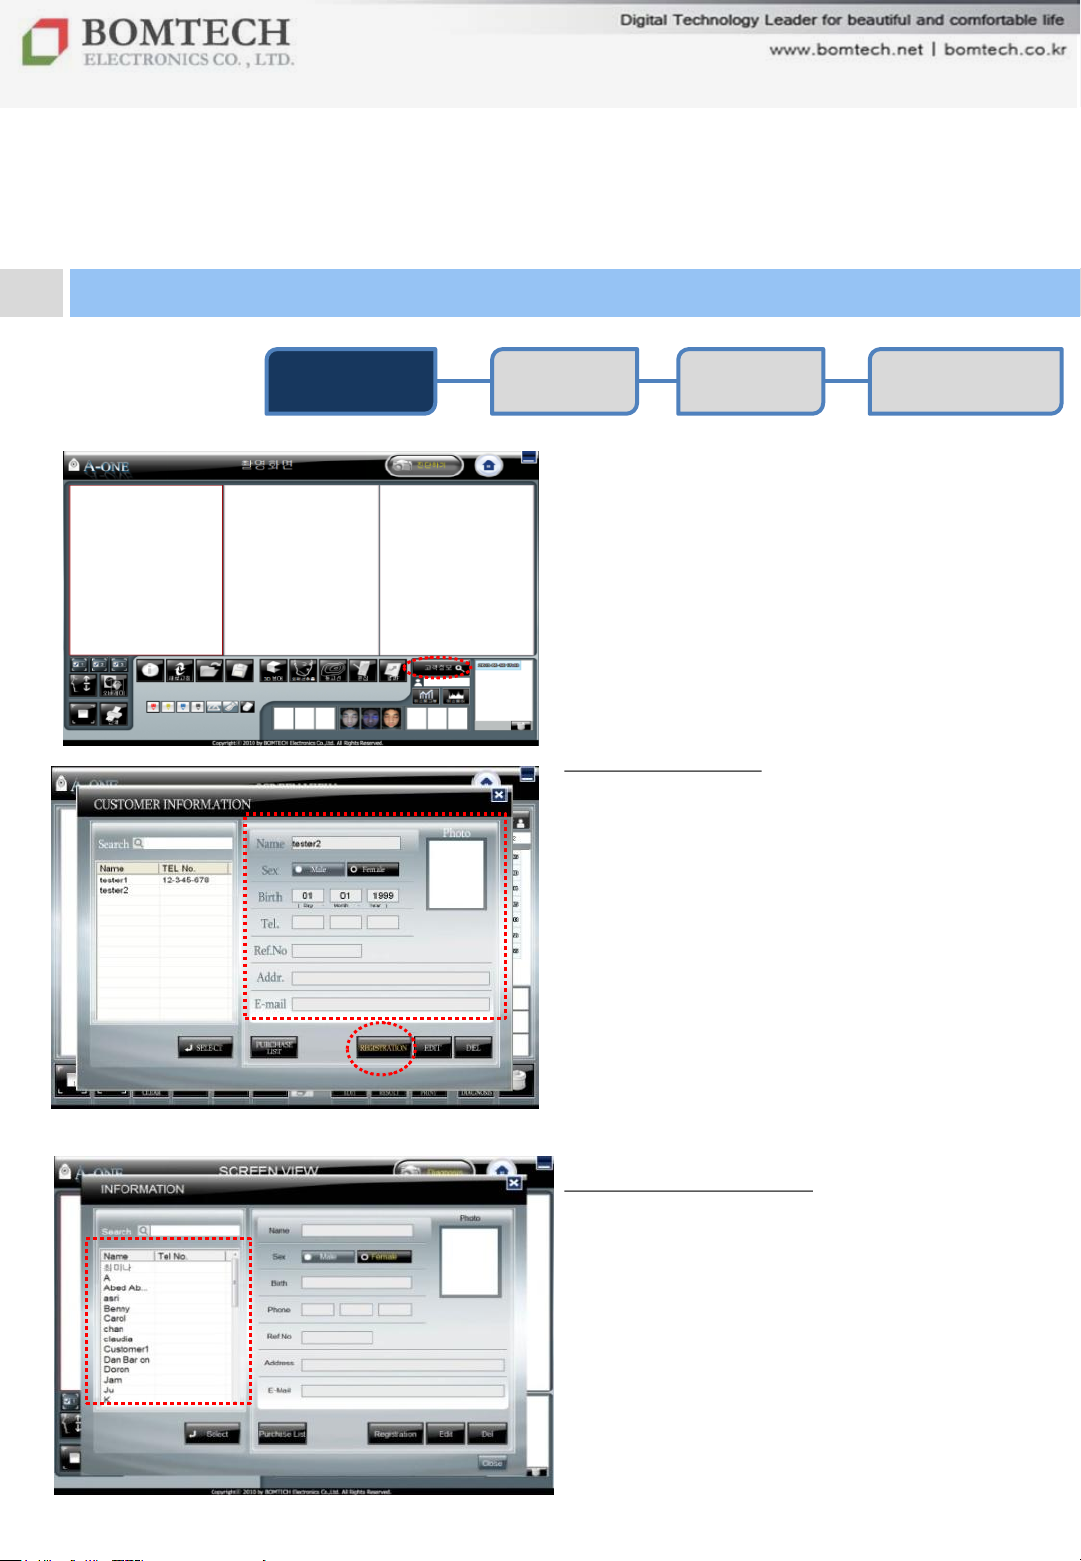
Click „CUSTOMER INFORMATION‟.
For new client:
① Click „REGISTRATION‟.
② Input the client's name, gender, age
and other information.
Product
** Please enter birth date and gender as
the result is based on age and gender.
③ Click „SAVE‟ and move to camera
screen.
For existing client:
Search the name of the client and click
„SELECT‟.
마스터 부제목 스타일 편집
11
Page 12
Ⅲ. Instruction
2. Diagnosis
Client
Registration
Diagnosis Result
Customer Information
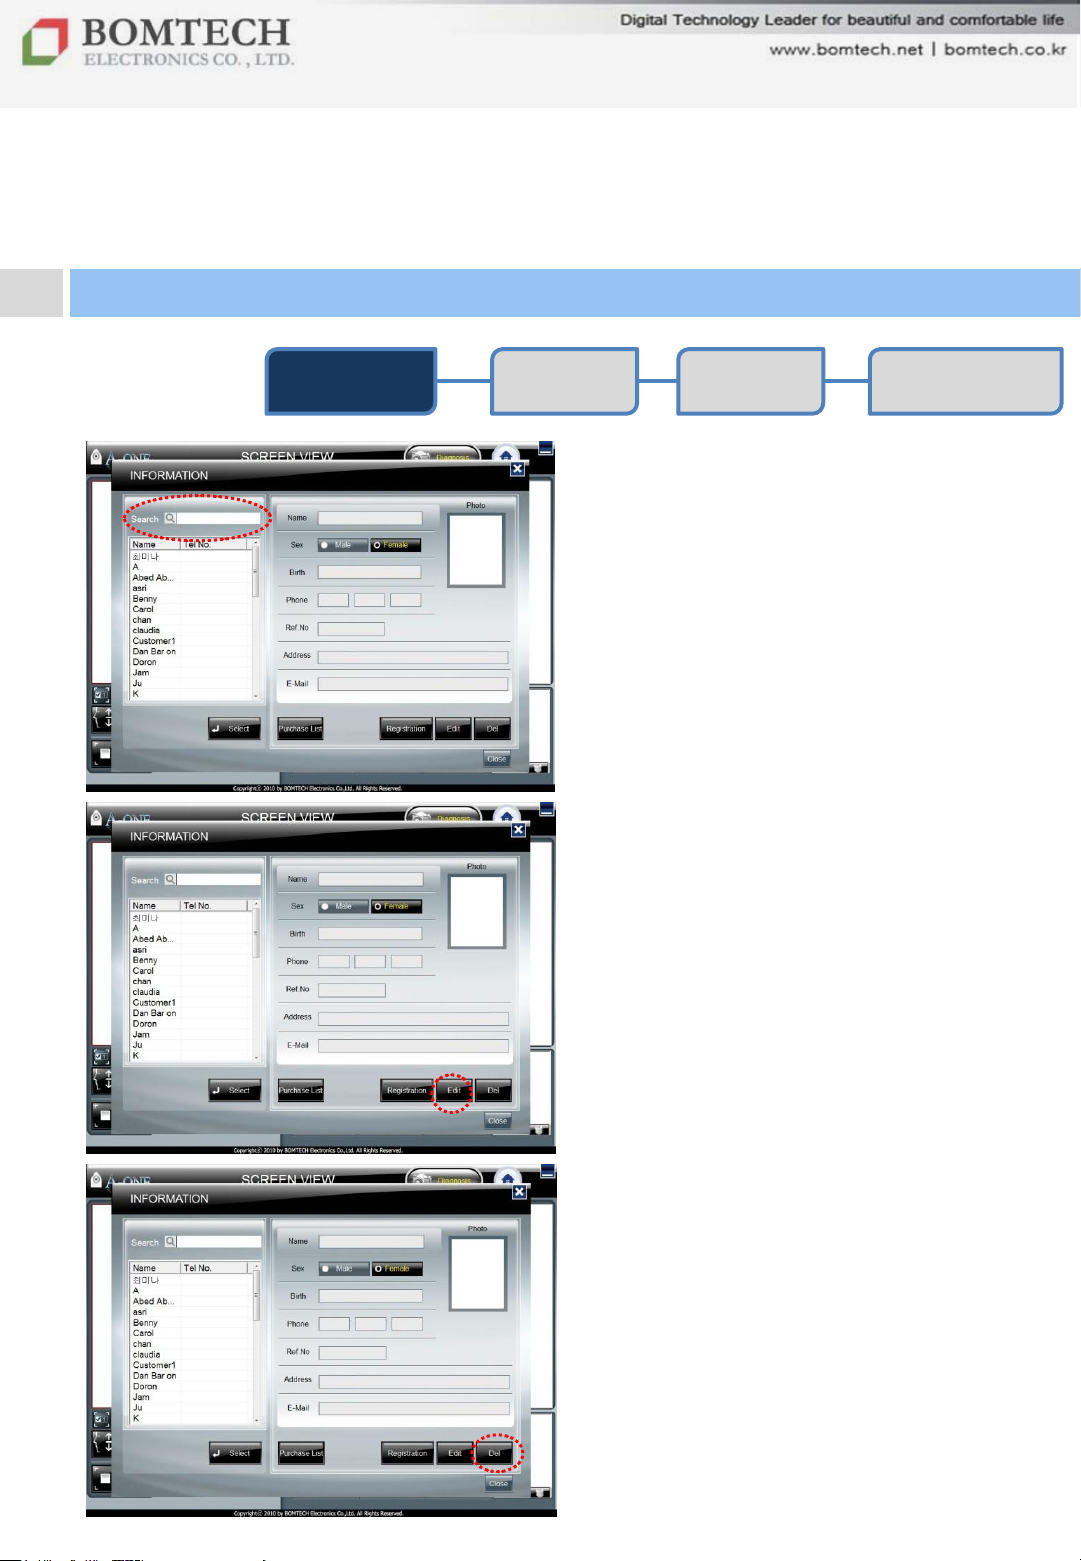
: Search / Edit / Delete
Search
Enter name or phone number of the
registered customer.
** If you want to re-diagnose, double-
click the client’s name or click
customer’s name and click ‘select’ .
Edit
Product
Recommendation
To change client information, select
client name on the list and click „edit‟.
After editing, click „save‟.
Delete
To delete a registered client‟s
information and data, select the client„s
마스터 부제목 스타일 편집
name on the list and click „delete‟.
** Note that deleted data cannot be
restored.
12
Page 13
Ⅲ. Instruction
2. Diagnosis
Client
Registration
Diagnosis Result
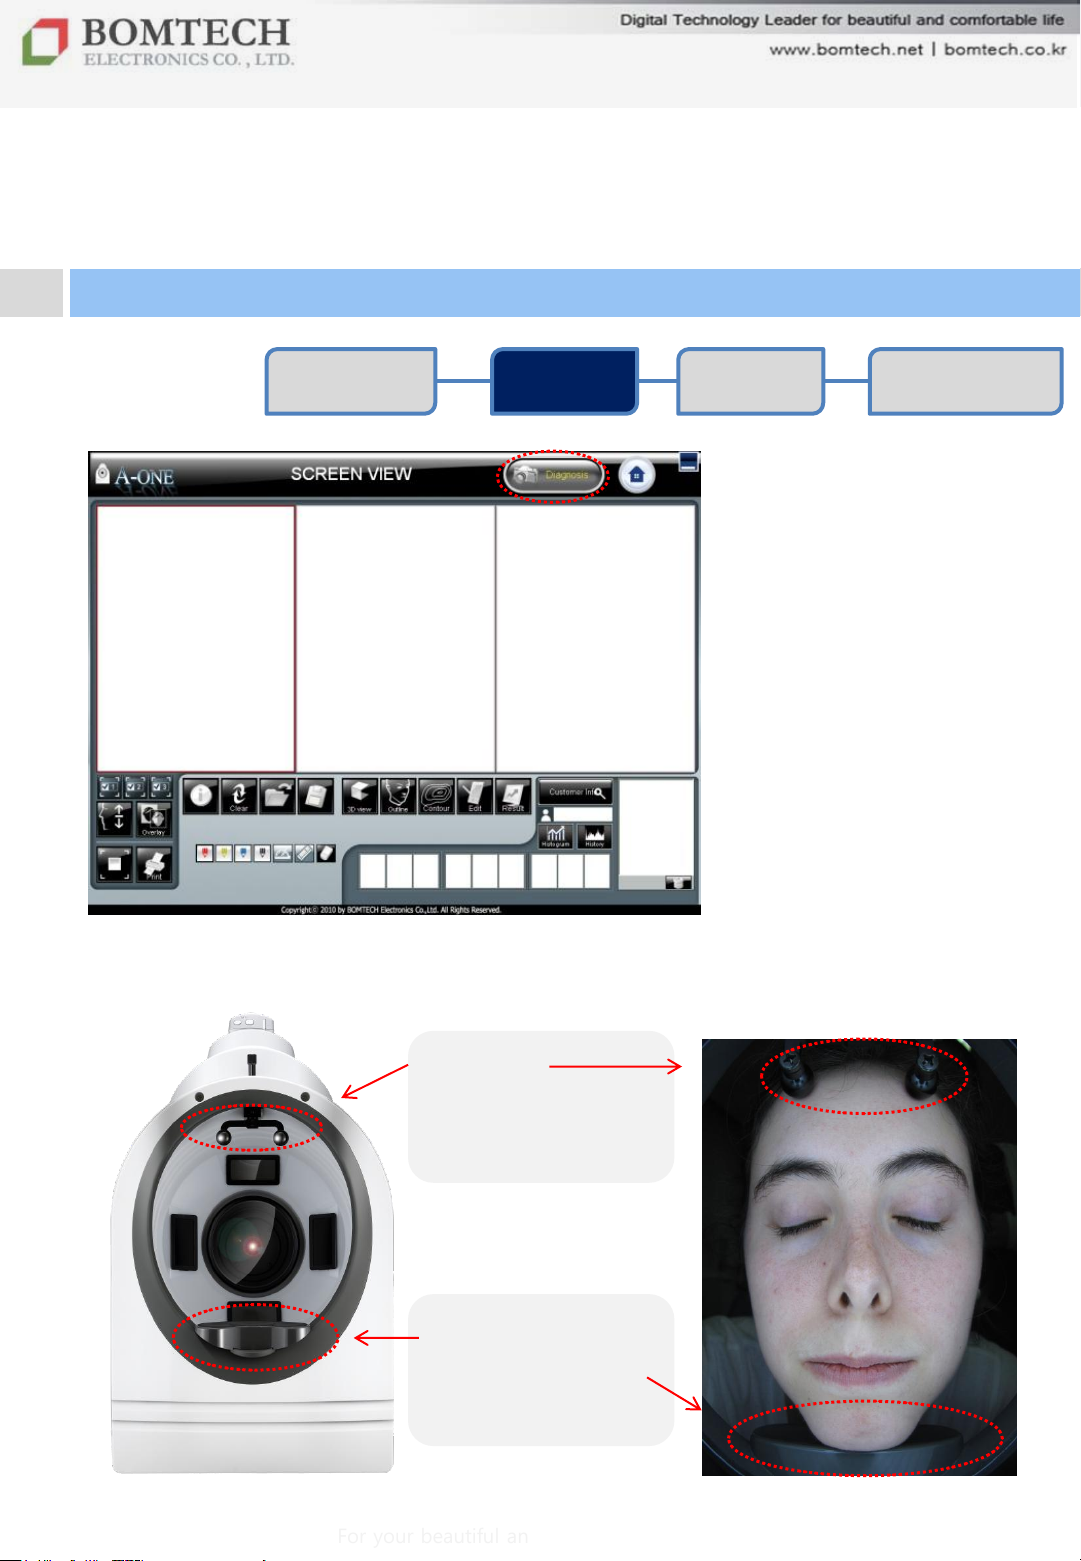
2) Place your face referring to the below.
Product
Recommendation
1) To Start,
For Initial Diagnosis:
Register a client‟s
Information, save and
then click „Diagnosis‟.
For Re- Diagnosis:
Bring the client‟s
information and click
„Diagnosis‟.
Headrest
Put your forehead.
** Adjust the height by
turning the screw.
마스터 부제목 스타일 편집
Chin rest
Place your chin.
** Left / Center / Right
13
For your beautiful and comfortable life, BOMTECH skin diagnosis system A-ONE
Page 14
Ⅲ. Instruction
2. Diagnosis
Client
Registration
Diagnosis Result
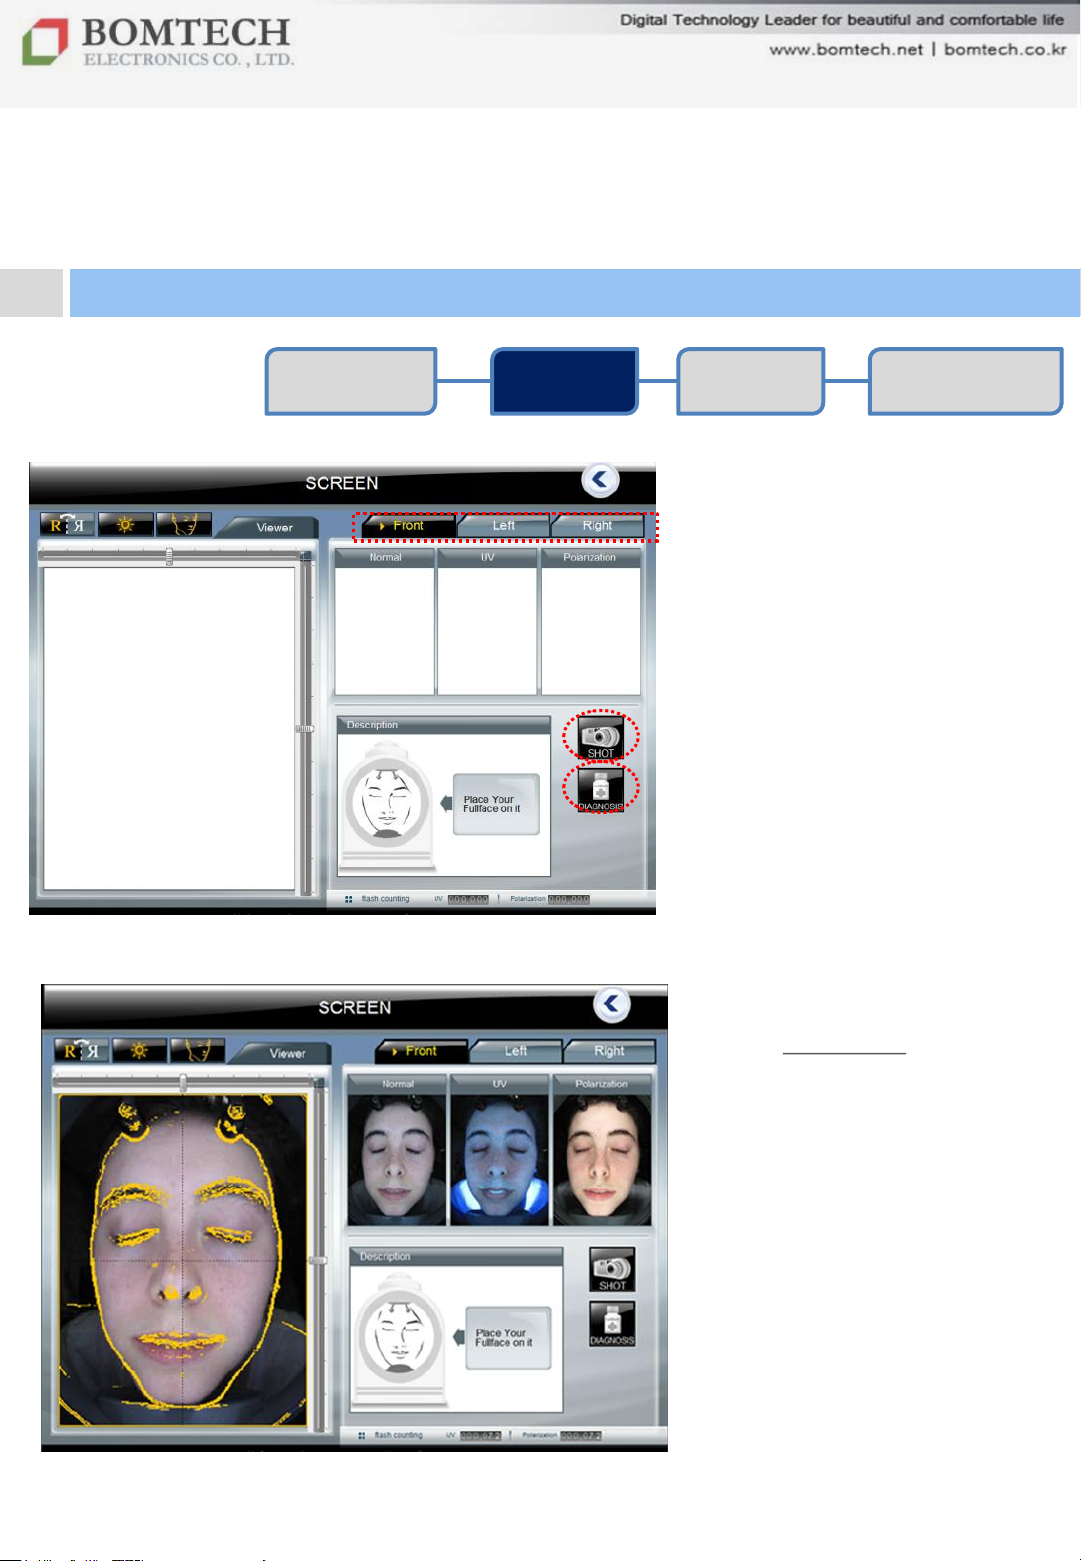
3) Place your face properly
and click „Shot‟.
Stay still until you finish taking
three shots in a row.
(normal / UV / polarized light)
** You can take front, left and
right side of your face.
Product
Recommendation
4) When you are done,
click „Diagnosis‟ to move
onto result page.
** When re-diagnosing,
fit your face to yellow outline.
It is to compare with the
previous results.
마스터 부제목 스타일 편집
For your beautiful and comfortable life, BOMTECH skin diagnosis system A-ONE
Page 15
Ⅲ. Instruction
2. Diagnosis
Client
Registration
Diagnosis Result
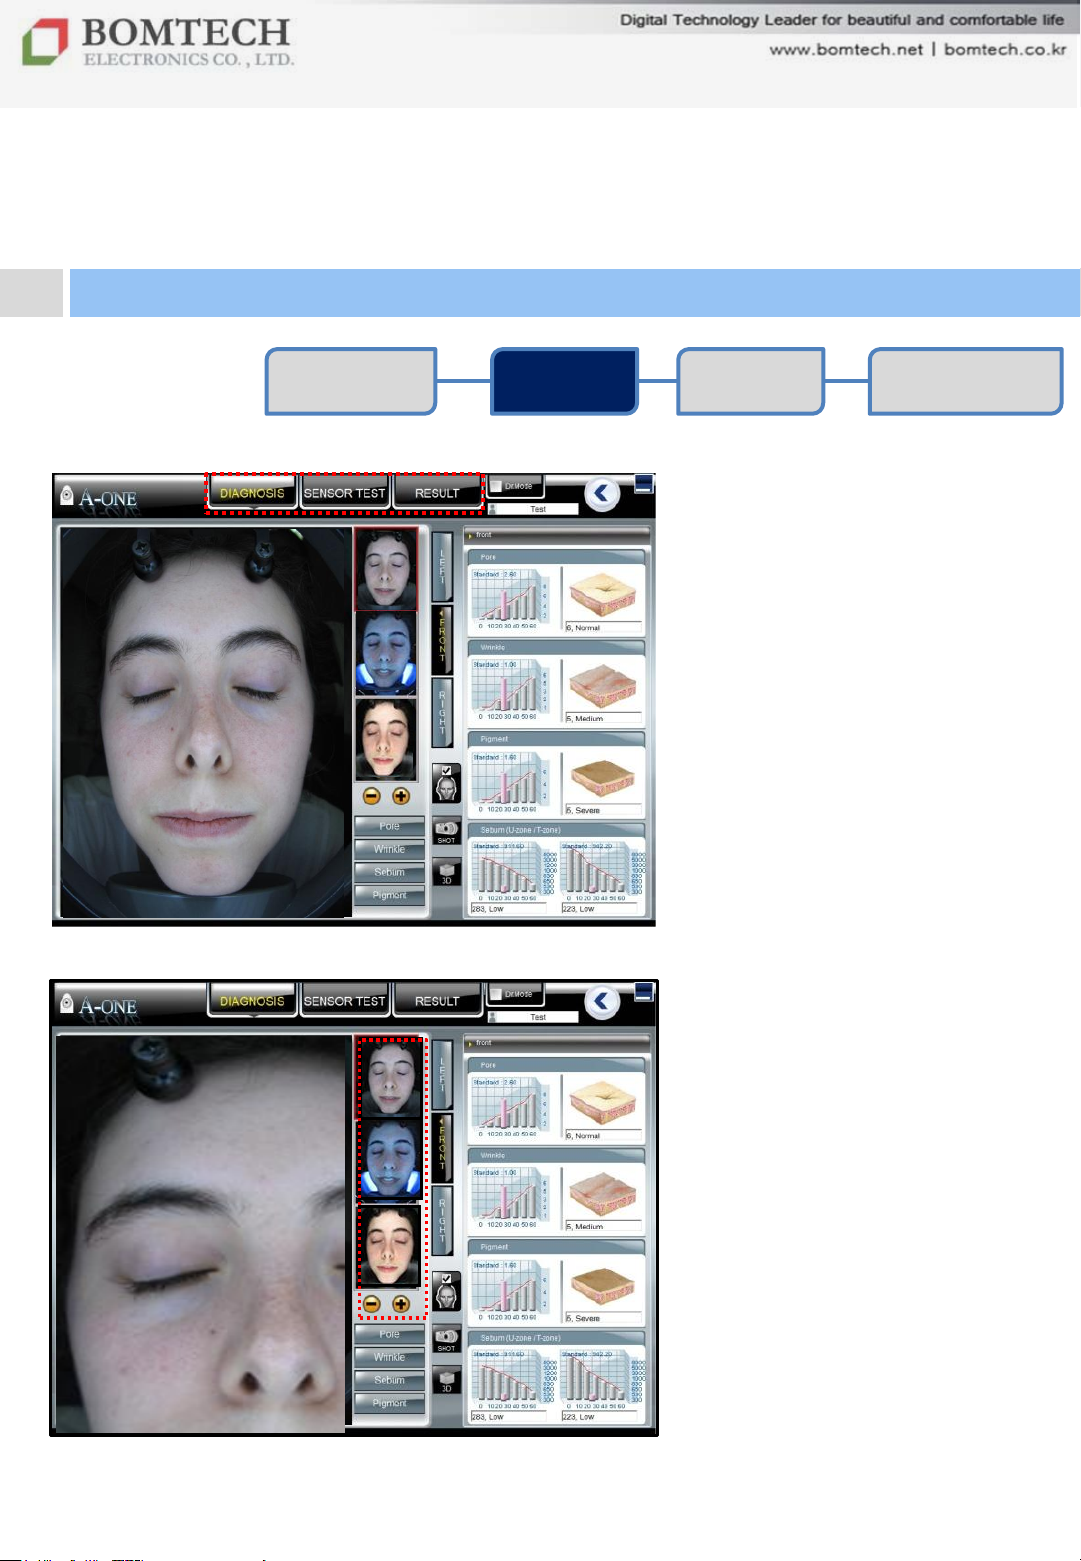
Click below menu.
Diagnosis
Based on scanned images.
Sensor test
Measuring moisture, elasticity,
skin tone and skin temperature
using P-Sensor. (p.19)
Result: Diagnosis result.
- , + button
To magnify or minimize the
selected image.
Product
Recommendation
마스터 부제목 스타일 편집
Page 16
Ⅲ. Instruction
2. Diagnosis
Client
Registration
Diagnosis Result
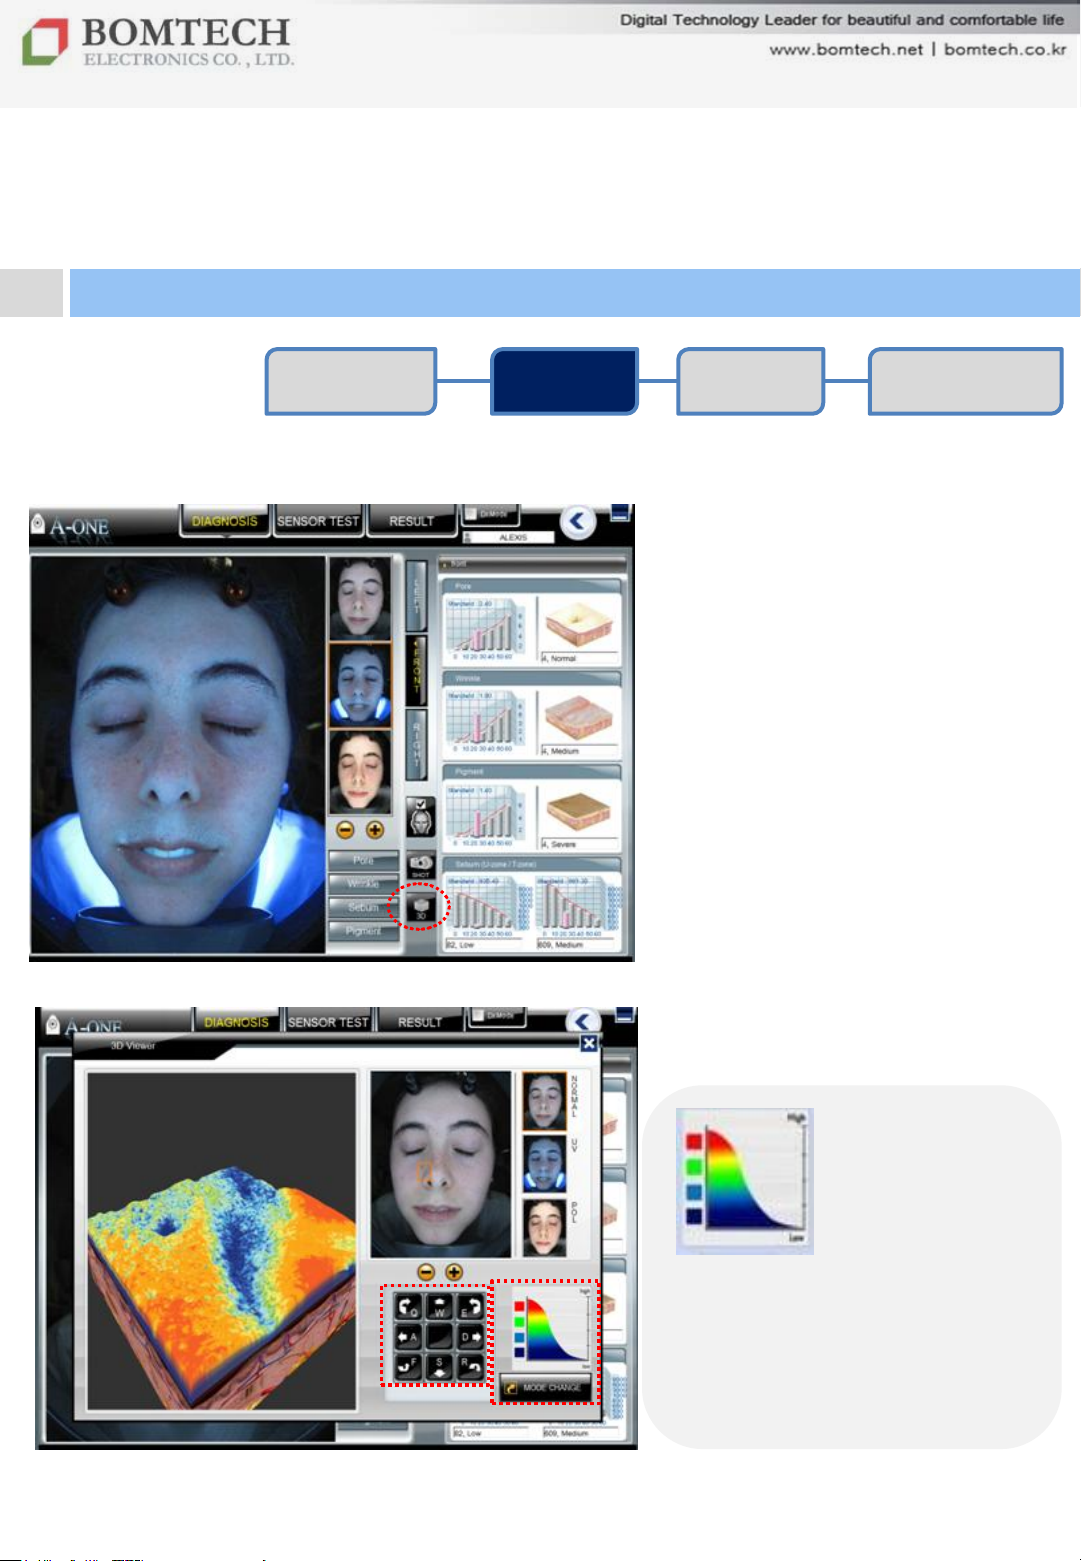
3D Viewer
To see visualized pore and skin
roughness.
① Select a image and click „3D‟.
② Drag the orange box and
put on the part as you wish.
③ Adjust a viewing angle using
direction control keys below.
Product
Recommendation
④ Click „Mode Change‟ to see
the contour of the selected part.
Red: High parts of skin
Blue: Low parts of skin
마스터 부제목 스타일 편집
For your beautiful and comfortable life, BOMTECH skin diagnosis system A-ONE
(ex. Pores and wrinkles appear
as blue.)
16
Page 17
Ⅲ. Instruction
2. Diagnosis
Client
Registration
Diagnosis Result
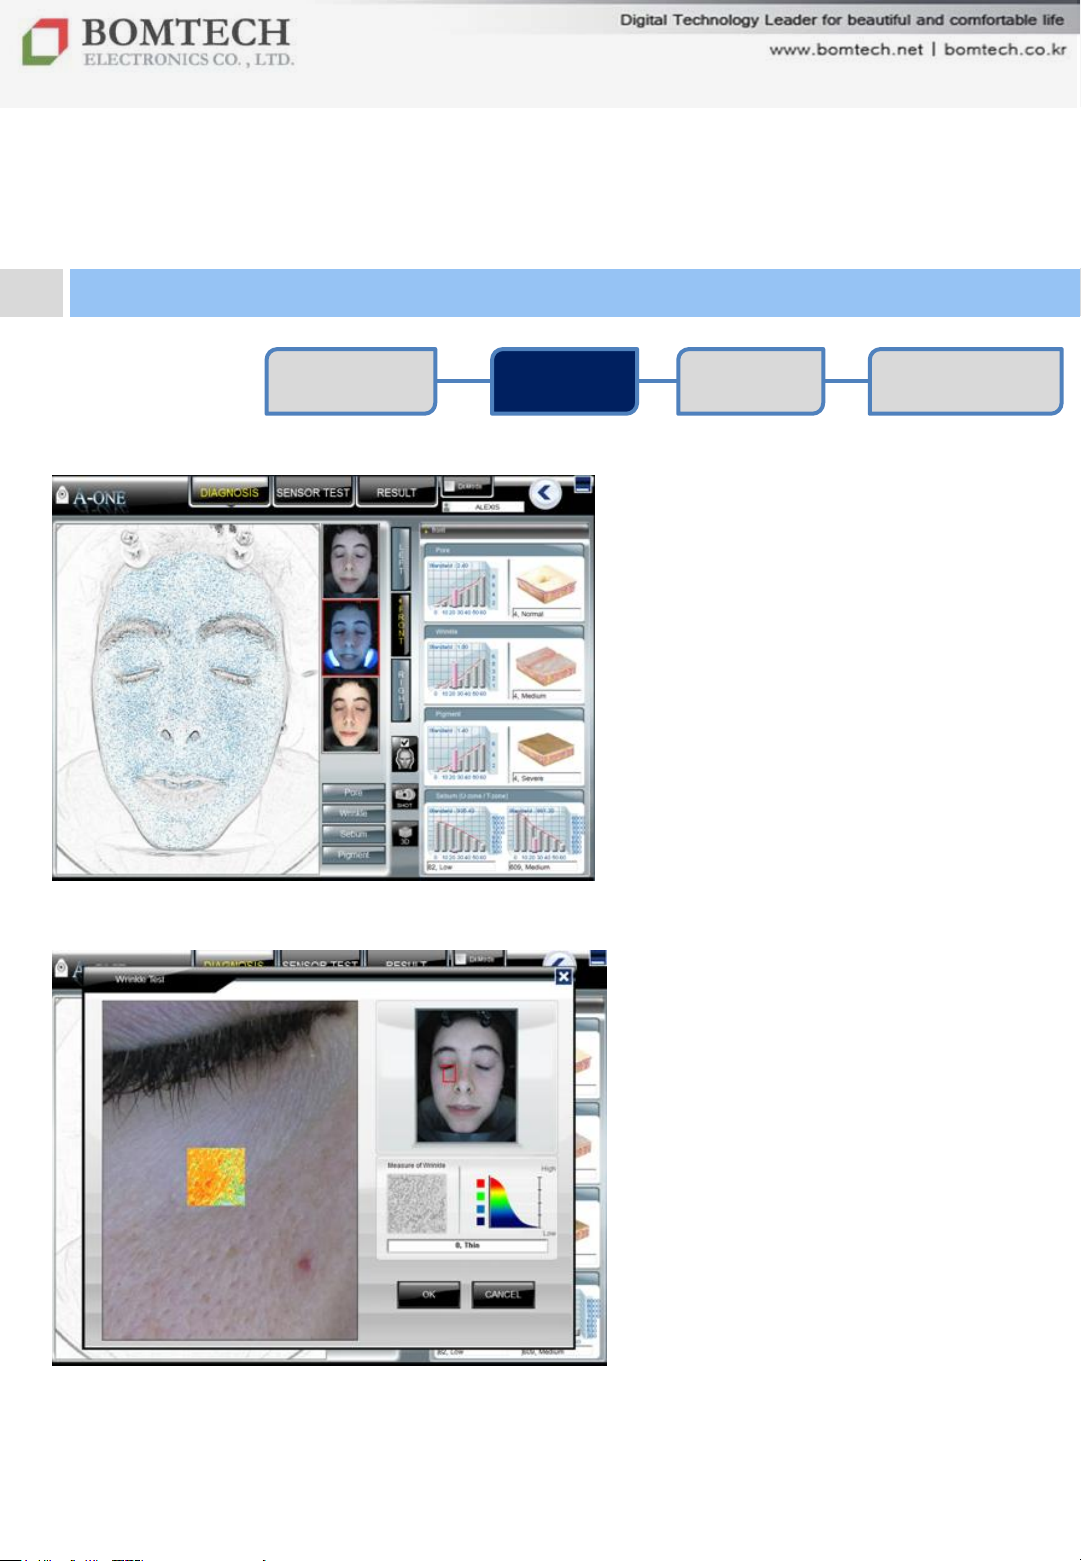
Click each test:
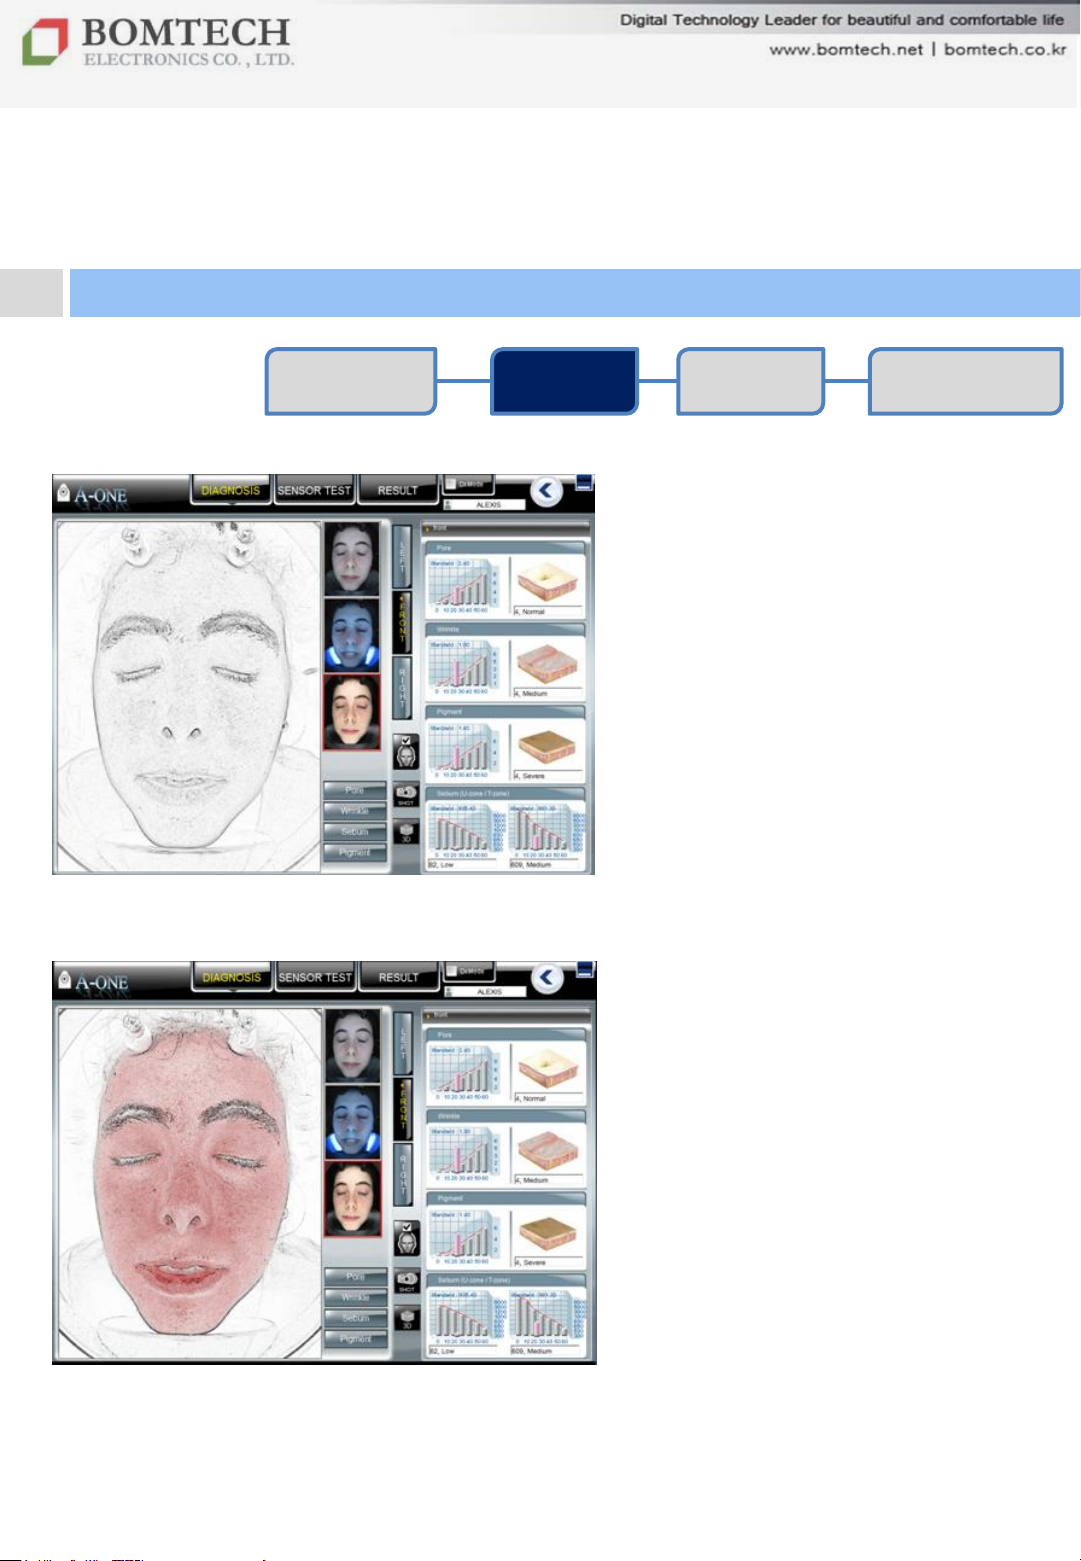
Pore, Wrinkle, Sebum, Pigment
Pore
Pores appear as black dots.
Product
Recommendation
Wrinkle
① Drag and move the red square
on the face and select an area to
be measured such as around the
eyes and the mouth or forehead.
② Click the wrinkle. Its value
appear on the right side.
③ Click „OK‟ to keep the value you
just measured.
마스터 부제목 스타일 편집
Or click „Cancel‟ to keep the
automatically measured value.
17
For your beautiful and comfortable life, BOMTECH skin diagnosis system A-ONE
Page 18
Ⅲ. Instruction
2. Diagnosis
Client
Registration
Diagnosis Result
Sebum
Select UV image and click „+‟ to see
sebum condition of a specific part.
- Red : Suppurative sebum
- White : Daily sebum
- Blue : Dust
Product
Recommendation
Pigmentation
Pigment condition appears as
brown color in polarized image.
마스터 부제목 스타일 편집
18
For your beautiful and comfortable life, BOMTECH skin diagnosis system A-ONE
Page 19
Ⅲ. Instruction
2. Diagnosis
Client
Registration
Diagnosis Result
Recommendation
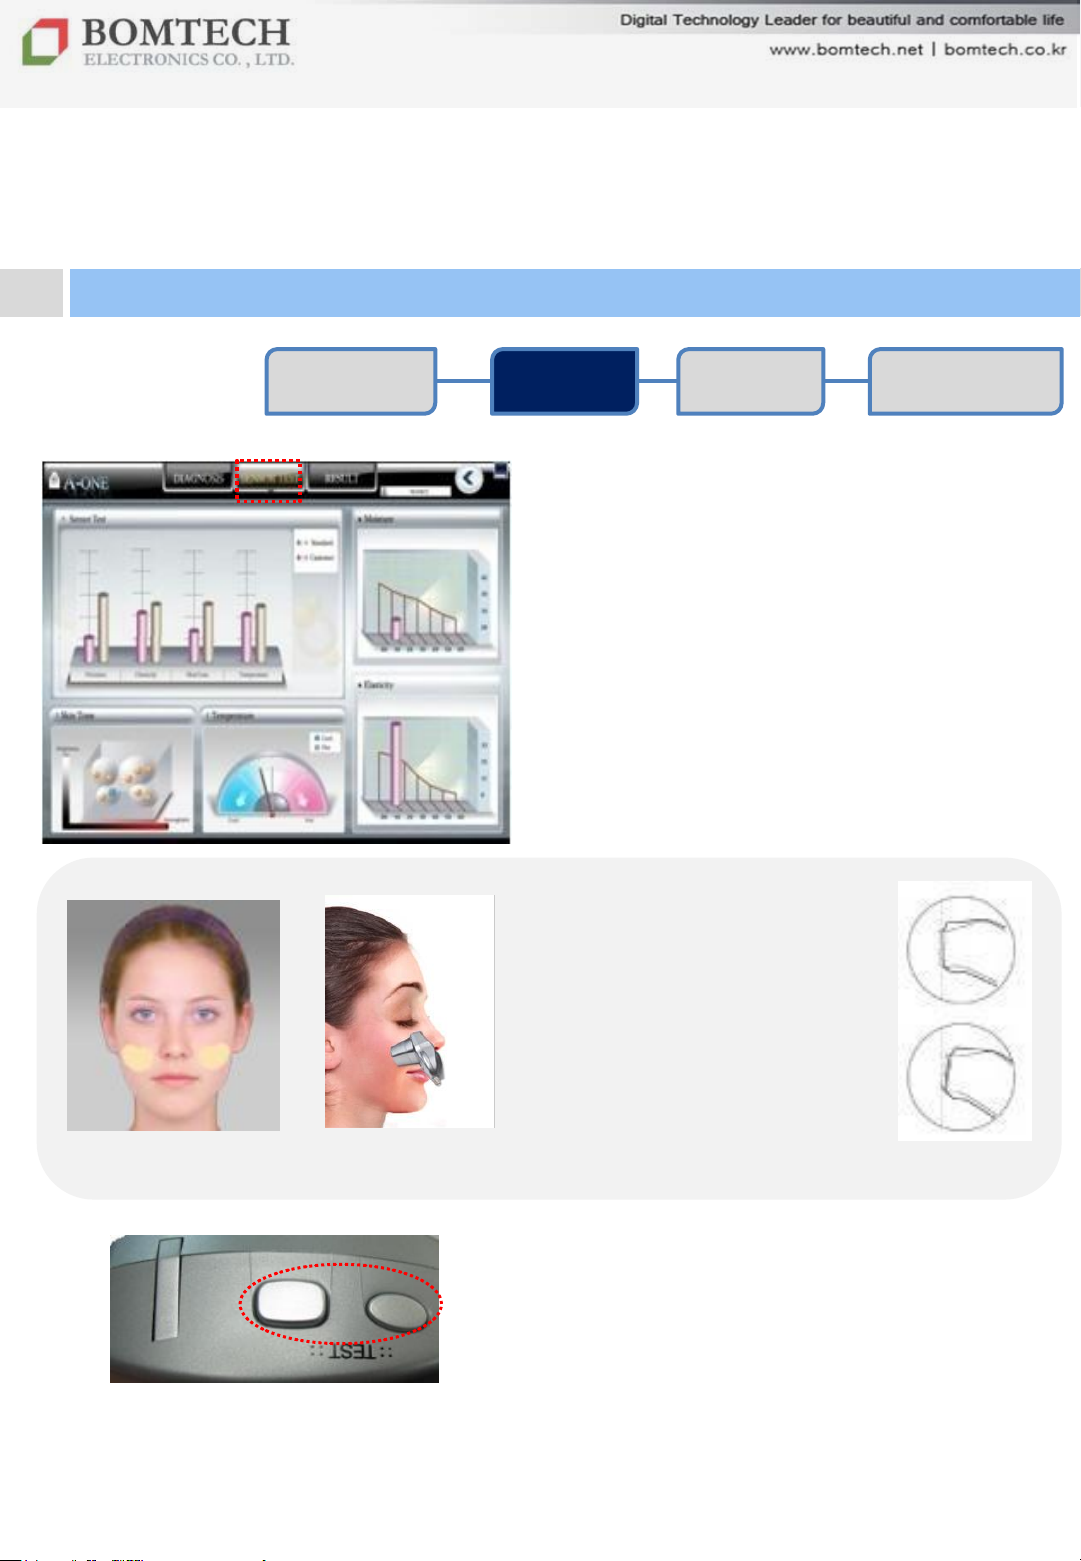
Click „SENSOR TEST’ above to
measure moisture, elasticity, skin
tone and temperature.
** How to put P-Sensor
Product
correctly.
Make sure to put it
Correct Use
vertically on the surface
of your skin.
Incorrect Use
Click either button and wait until it
beeps 5 times.
마스터 부제목 스타일 편집
19
Page 20
Ⅲ. Instruction
2. Diagnosis
Client
Registration
Diagnosis Result
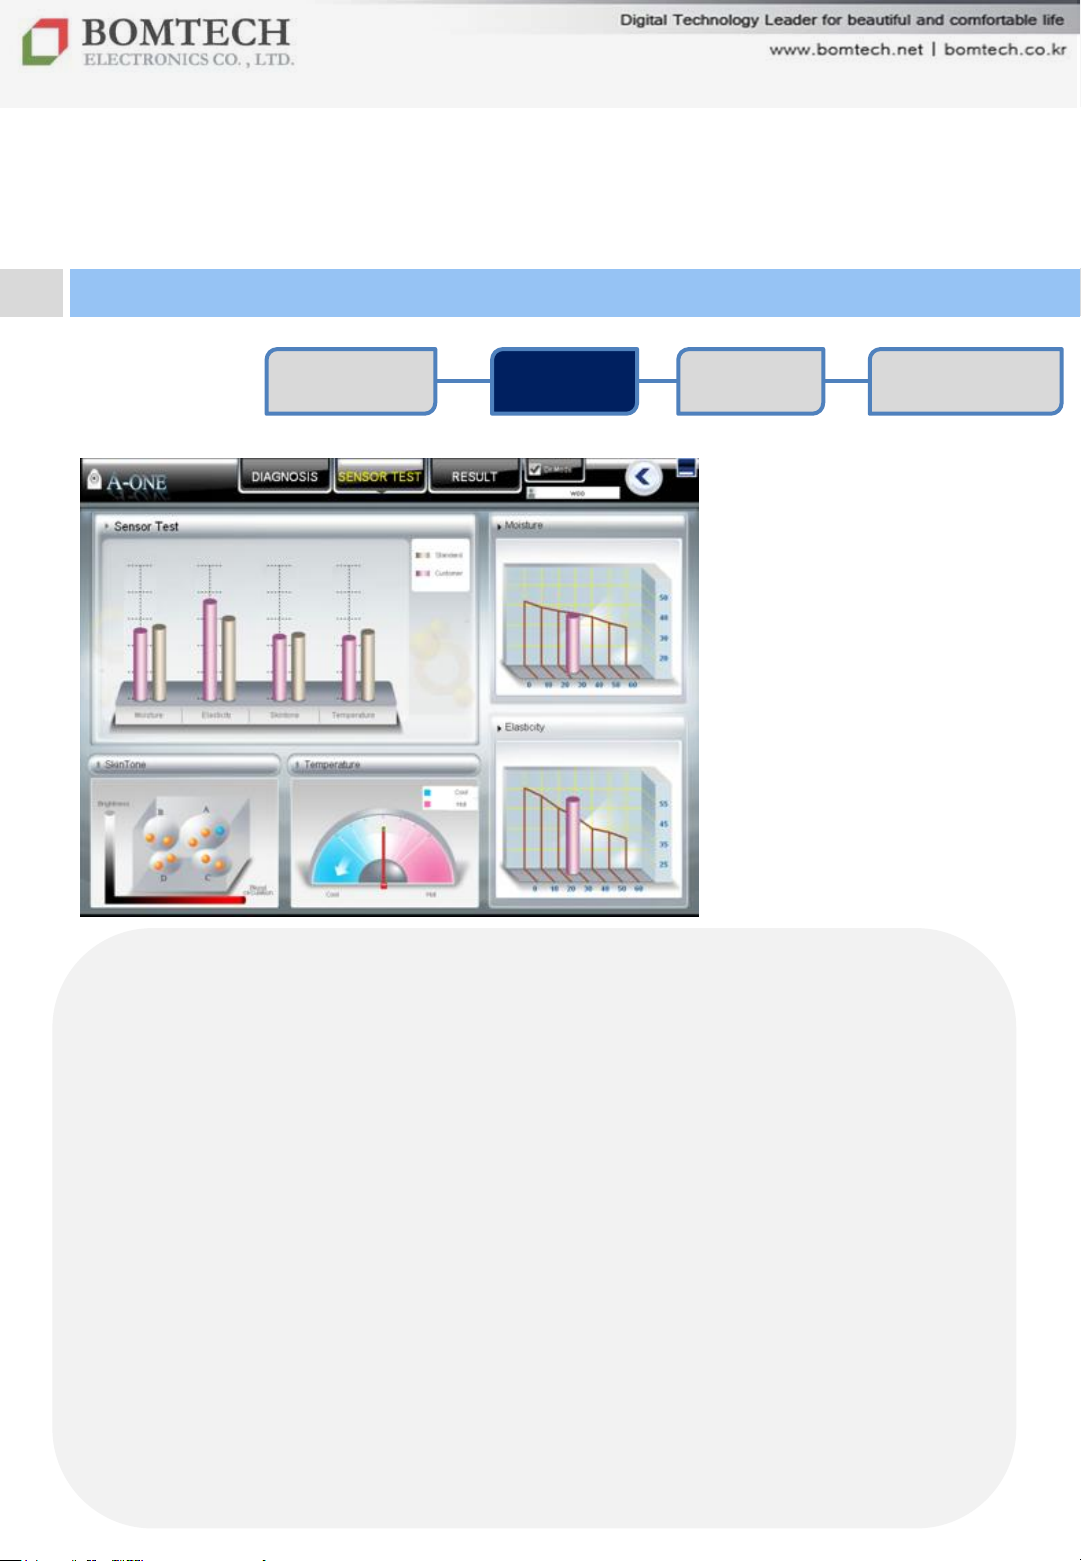
Skin Tone
- After sensor test, one of the balls in the box turns into green.
X axis: skin redness (blood circulation)
Y axis: skin brightness
- Your skin is classified into one of the four groups:
A group: You look bright and red enough. (=very good)
B group: You look bright, but pale with but no redness.
C group: You look a little dark and red.
D group: You look a little dark tone and pale with no redness.
Skin Temperature
마스터 부제목 스타일 편집
Moisture
Elasticity
Product
Recommendation
20
For your beautiful and comfortable life, BOMTECH skin diagnosis system A-ONE
Page 21
Ⅲ. Instruction
2. Diagnosis
①
Client
Registration
②
③
Diagnosis Result
Product
Recommendation
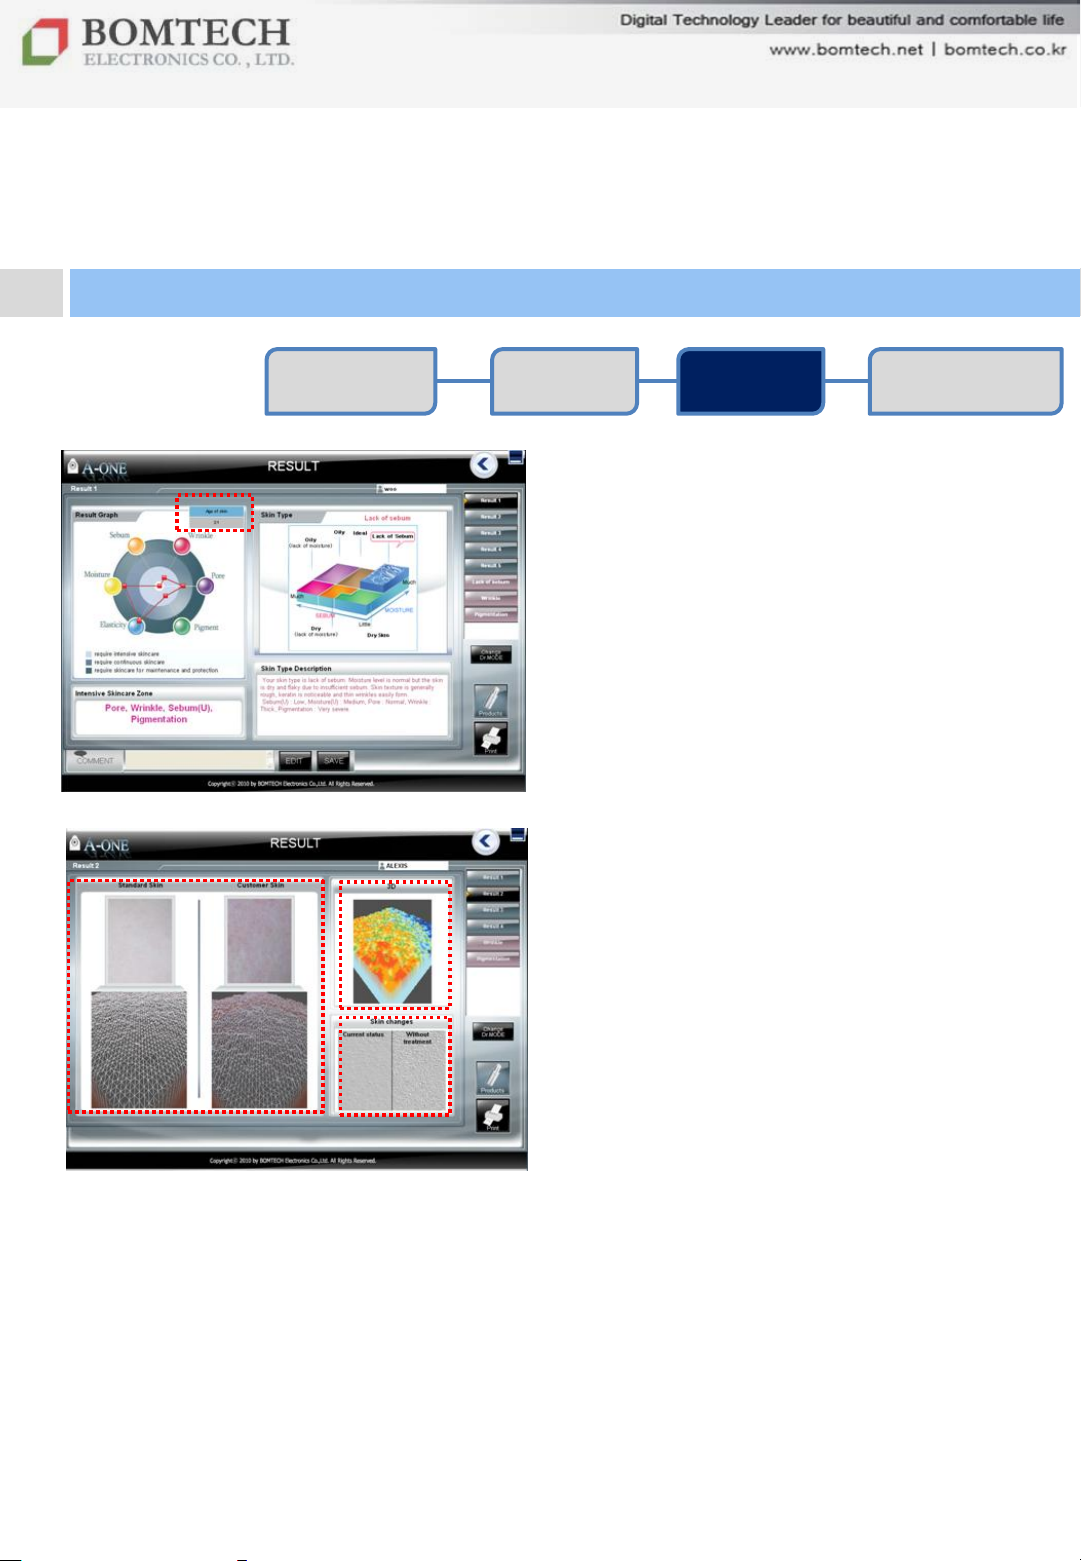
Result 1
Shows skin type with overall descriptions,
including parts that need intensive care.
** Skin age appears on left-top.
Result 2
① Comparison between a client’s
skin condition and standard (ideal)
skin condition
② 3D skin image
To see the 3D image of the selected
part through 3D function on main
screen. (Reference: page 16)
③ Skin status simulation
- Current status: Client‟s current skin
state
마스터 부제목 스타일 편집
- Without treatment: If the customer‟s
skin is left untreated, the skin condition
may worsen than its current state.
21
For your beautiful and comfortable life, BOMTECH skin diagnosis system A-ONE
Page 22
Ⅲ. Instruction
2. Diagnosis
Client
Registration
Diagnosis Result
Recommendation
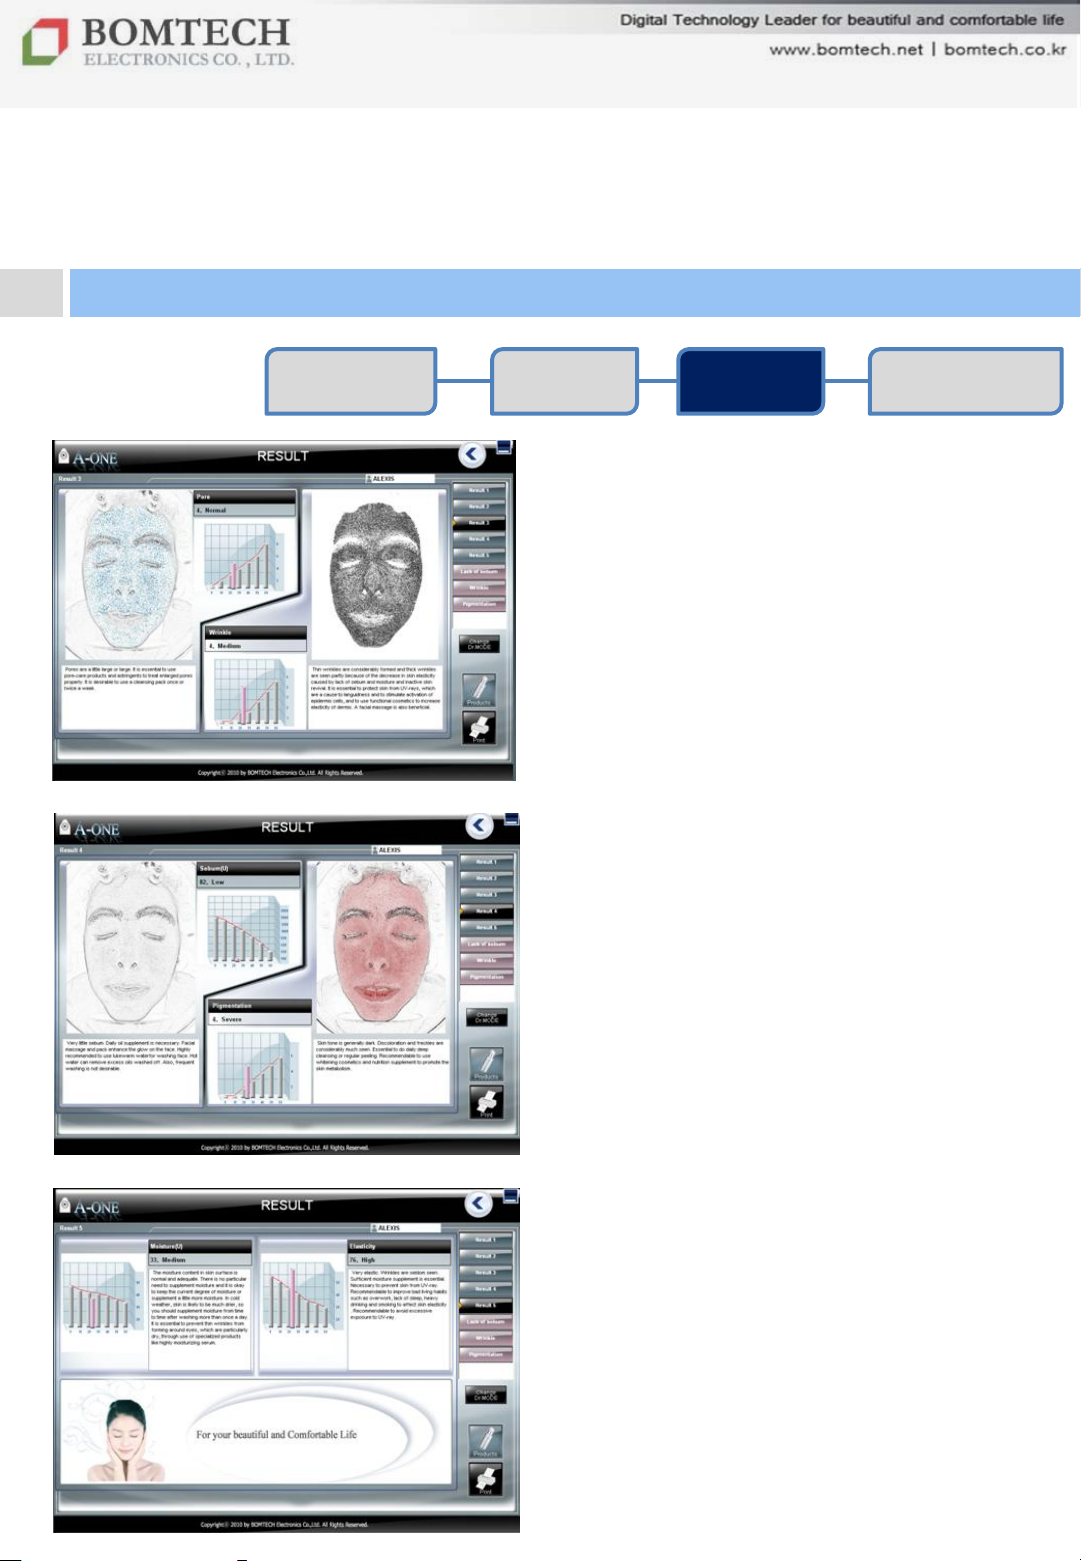
Result 3
Shows the result of pore and wrinkle.
Result 4
Shows the result of sebum and
pigmentation.
Product
Result 5
Shows the result of moisture and
elasticity.
마스터 부제목 스타일 편집
22
For your beautiful and comfortable life, BOMTECH skin diagnosis system A-ONE
Page 23
Ⅲ. Instruction
2. Diagnosis
Client
Registration
Diagnosis Result
Product
Recommendation
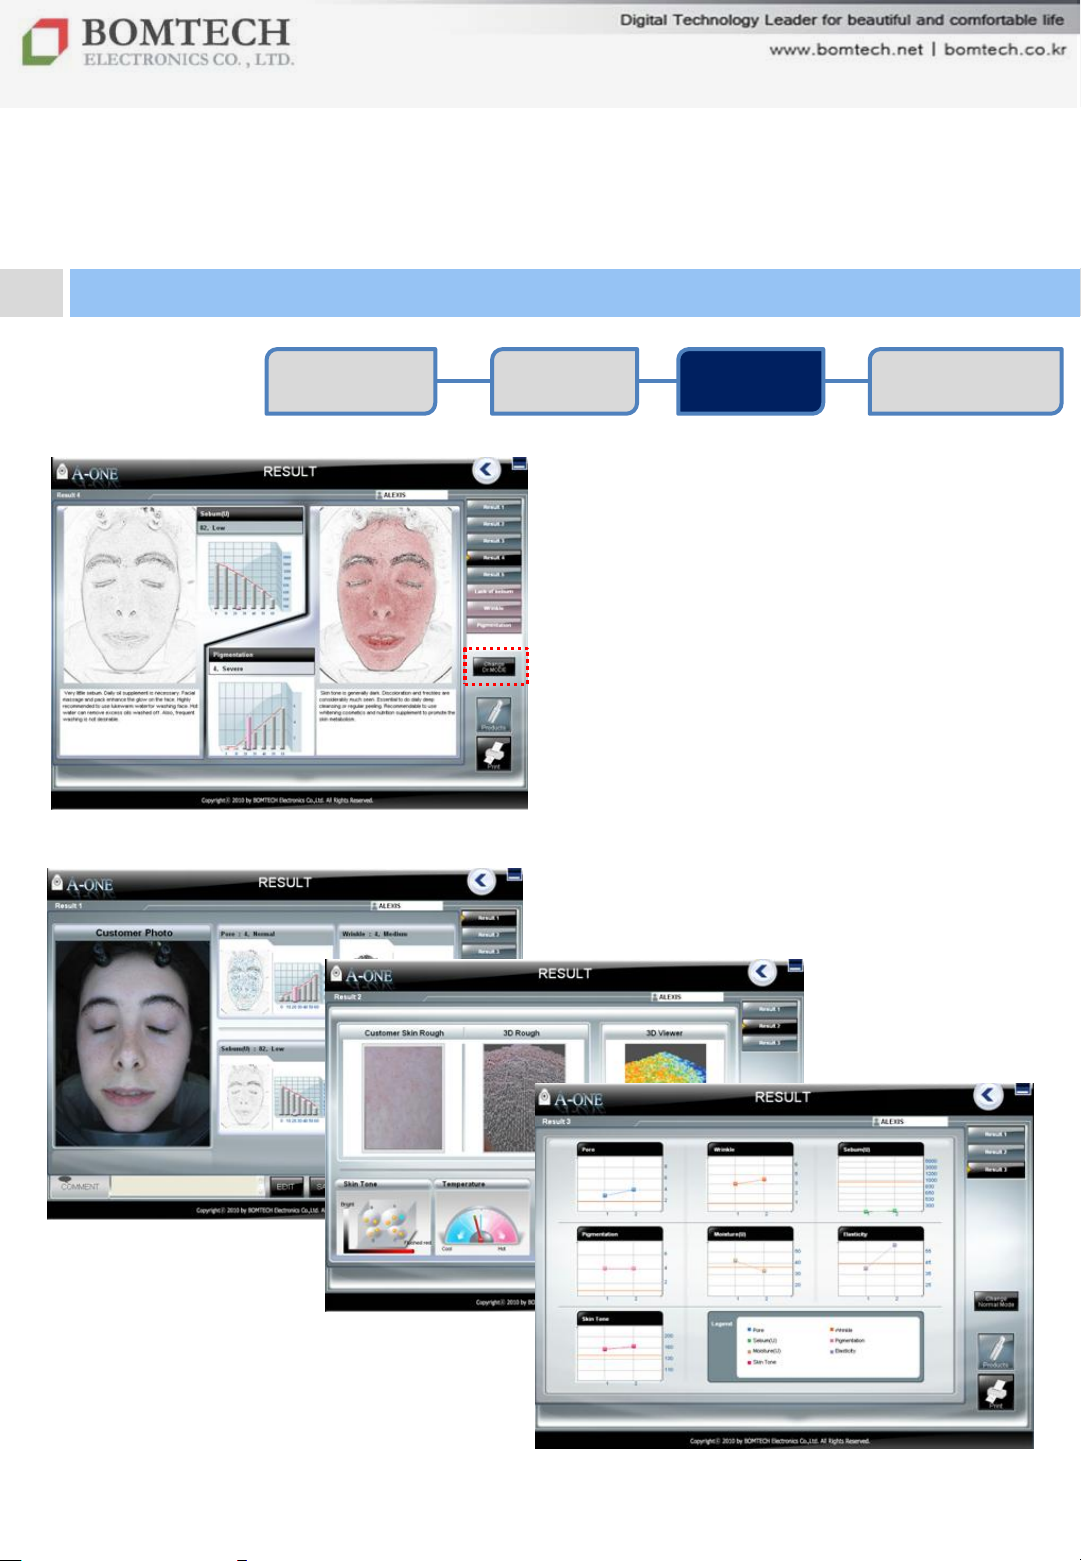
Dr. Mode
Click „Dr. Mode‟ to see the result without
description.
마스터 부제목 스타일 편집
23
For your beautiful and comfortable life, BOMTECH skin diagnosis system A-ONE
Page 24
Ⅲ. Instruction
2. Diagnosis
Client
Registration
Diagnosis Result
Product
Recommendation
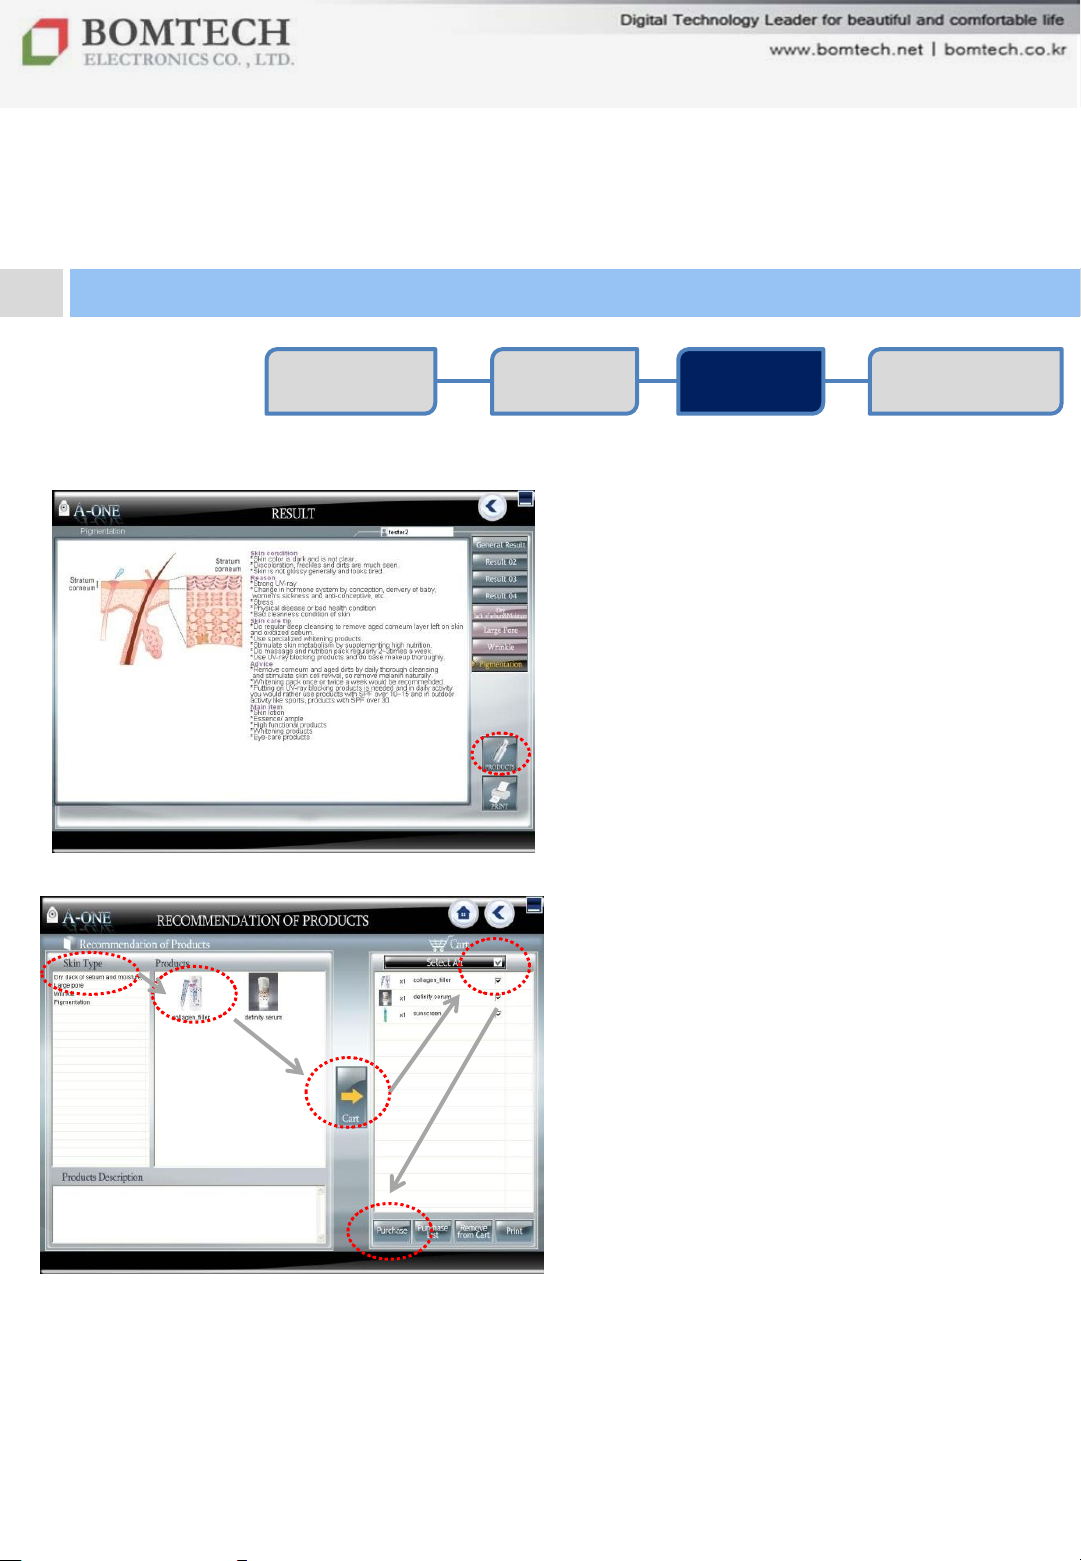
Click ‘Product’ to recommend suitable
product to a client‟s skin condition.
① According to your skin diagnosis
result, registered products are shown
on product list.
①
②
③
⑤
** Please refer to page 33 to register
recommendable products.
④
⑥
② Click each „Skin Type‟ category.
Registered products in each category
pop up.
③ Select a product and click it.
④ Click „cart‟ button.
마스터 부제목 스타일 편집
⑤ Check the cart list. If you want to
select all products, click „Select ALL‟.
24
⑥ Click „Purchase‟ below.
For your beautiful and comfortable life, BOMTECH skin diagnosis system A-ONE
Page 25
Ⅲ. Instruction
2. Diagnosis
Client
Registration
Diagnosis Result
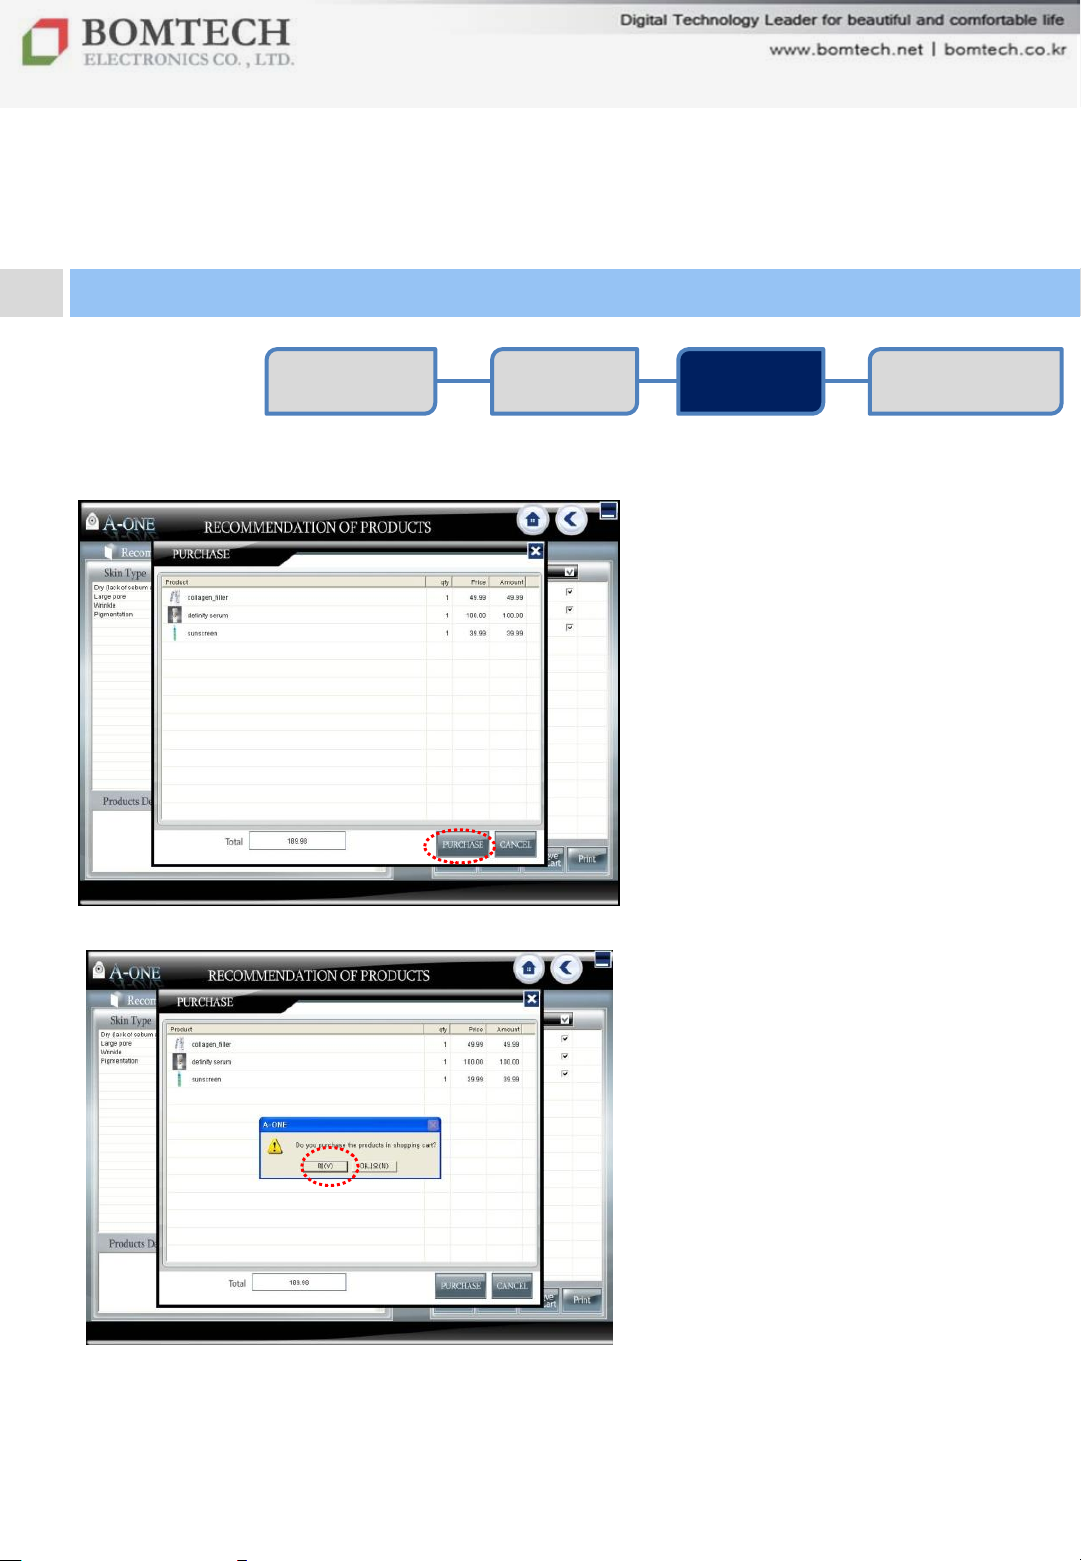
⑦ Check quantity, unit price and
total amount.
⑧ Click 'Purchase„ and 'Yes'
to make your purchase.
** The purchase record is
automatically saved in the
client’s information.
Product
Recommendation
마스터 부제목 스타일 편집
25
For your beautiful and comfortable life, BOMTECH skin diagnosis system A-ONE
Page 26
Ⅲ. Instruction
2. Diagnosis
Client
Registration
Diagnosis Result
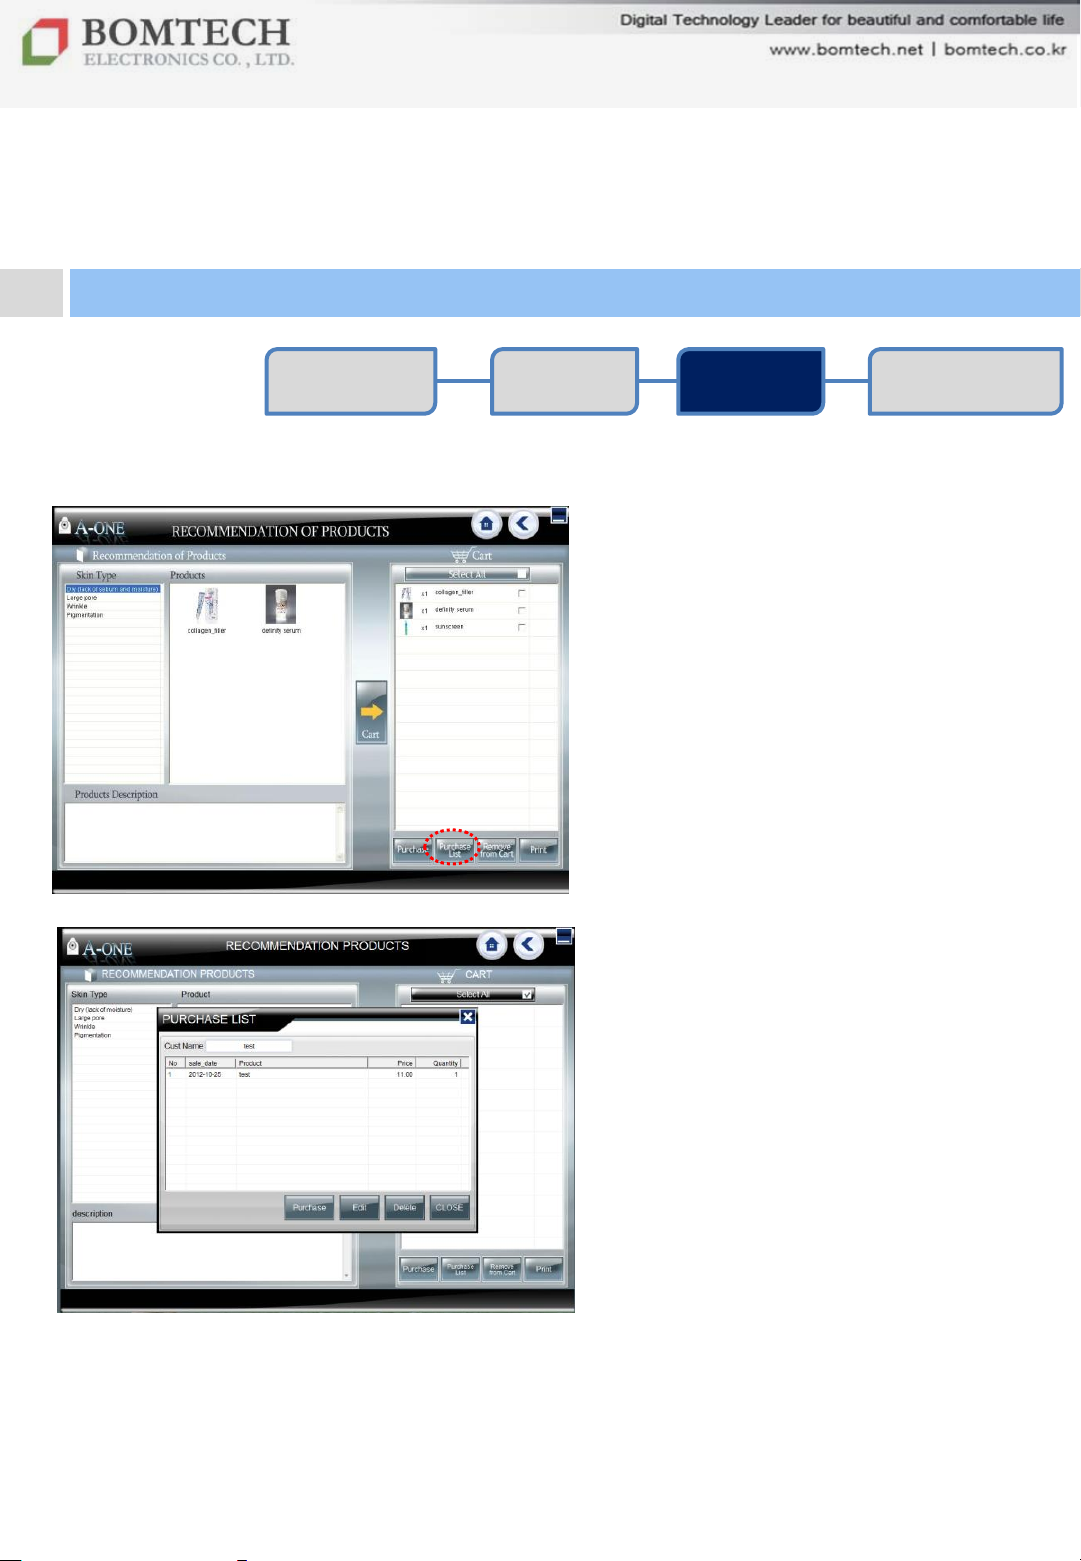
Purchase List:
(Product recommendation page)
You can see a client‟s purchase
history on recommendation of
products page.
① Click „Purchase list‟
② You can see the client‟s previous
purchasing record.
Product
Recommendation
마스터 부제목 스타일 편집
26
For your beautiful and comfortable life, BOMTECH skin diagnosis system A-ONE
Page 27
Ⅲ. Instruction
2. Diagnosis
Client
Registration
Diagnosis Result
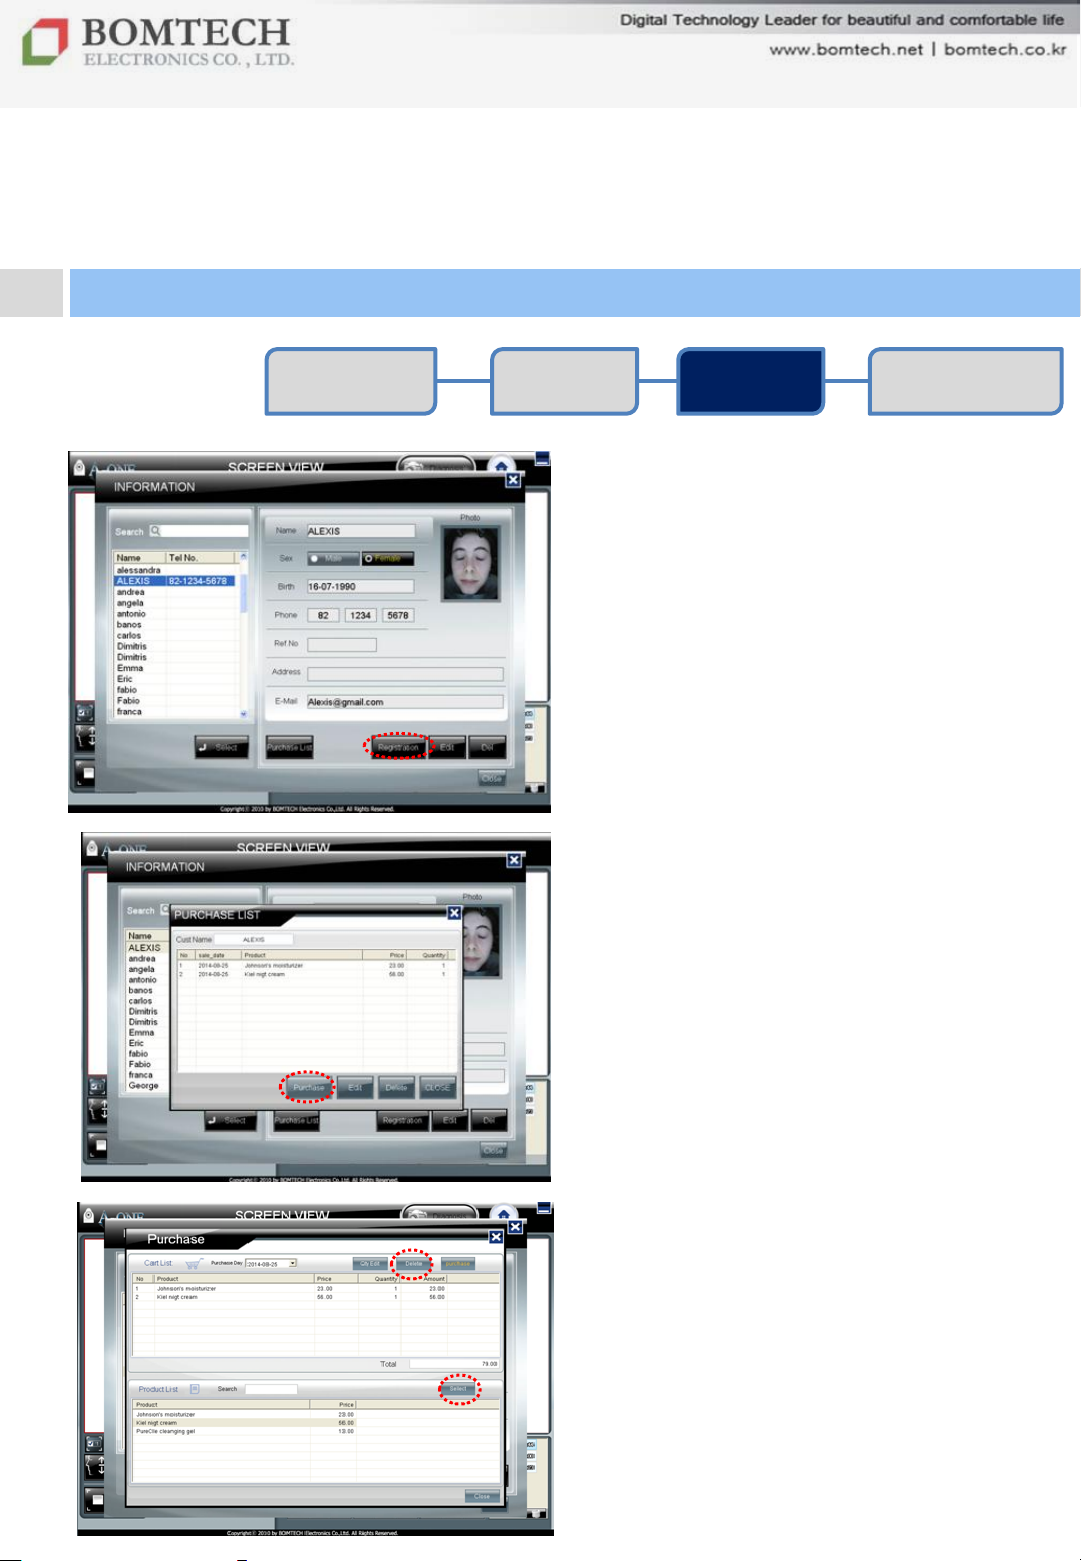
Purchase List:
(on client’s page)
You can see a client‟s purchase
history on client‟s information page.
① Select a client and click
„Purchase list‟.
② You can see the client‟s previous
purchasing record.
Click „Purchase‟ to make a
purchase.
Product
Recommendation
③ Double-click or select a product in
the list. The selected item moves to
the cart.
Select the product in the cart and
click „Purchase‟ button.
마스터 부제목 스타일 편집
** Ctrl click: to select multiple items
one by one
Shift click: to select multiple items
listed continuously.
For your beautiful and comfortable life, BOMTECH skin diagnosis system A-ONE
27
Page 28
(
Ⅲ. Instruction
3. Additional Function
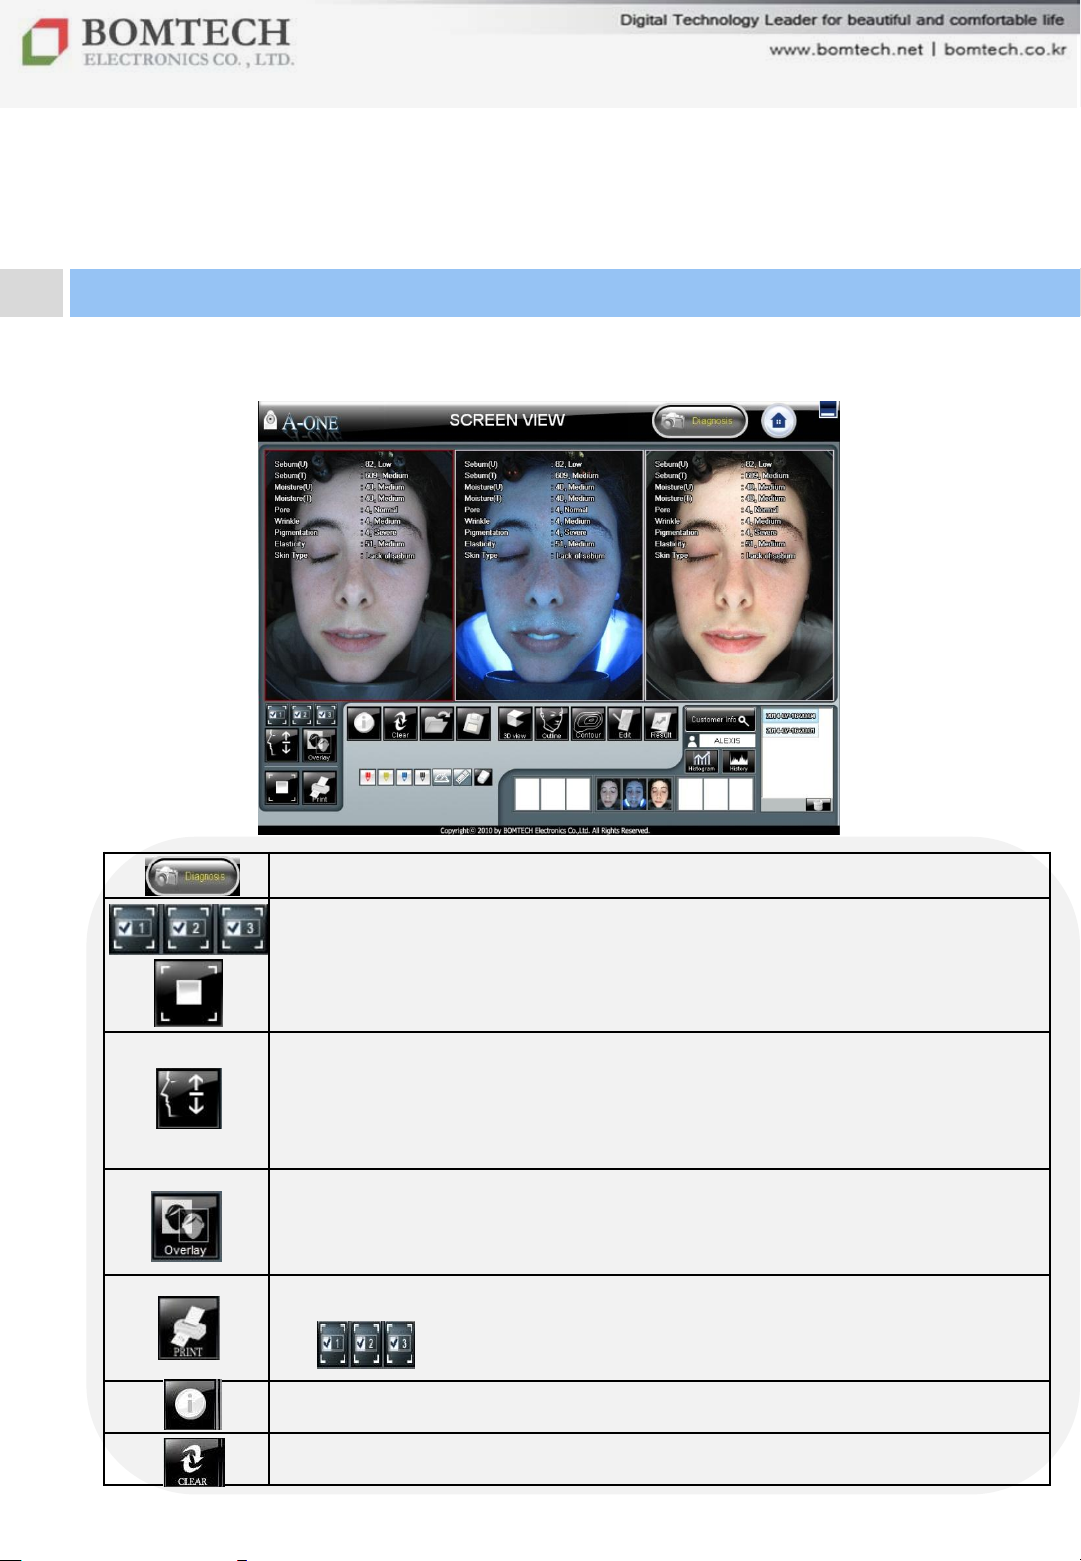
Start diagnosis
Select the number of screen
1: picture on the left, 2: picture in the middle, 3: picture on the right)
Full screen with zoom function
- Select an image, click the button.
Virtual simulation function
- Shows before & after treatment and compares them for
client‟s better understanding of treatment effect.
(Reference page 31 – Simulation)
Overlay function
- Shows the face‟s change by overlapping two images.
(Reference page 33, 34 – Overlay)
Print out images
- You can print out the checked images.
마스터 부제목 스타일 편집
Show test value with simple text or hide it.
Initialize SCREEN VIEW.
28
Page 29
after plastic
Ⅲ. Instruction
3. Additional Function
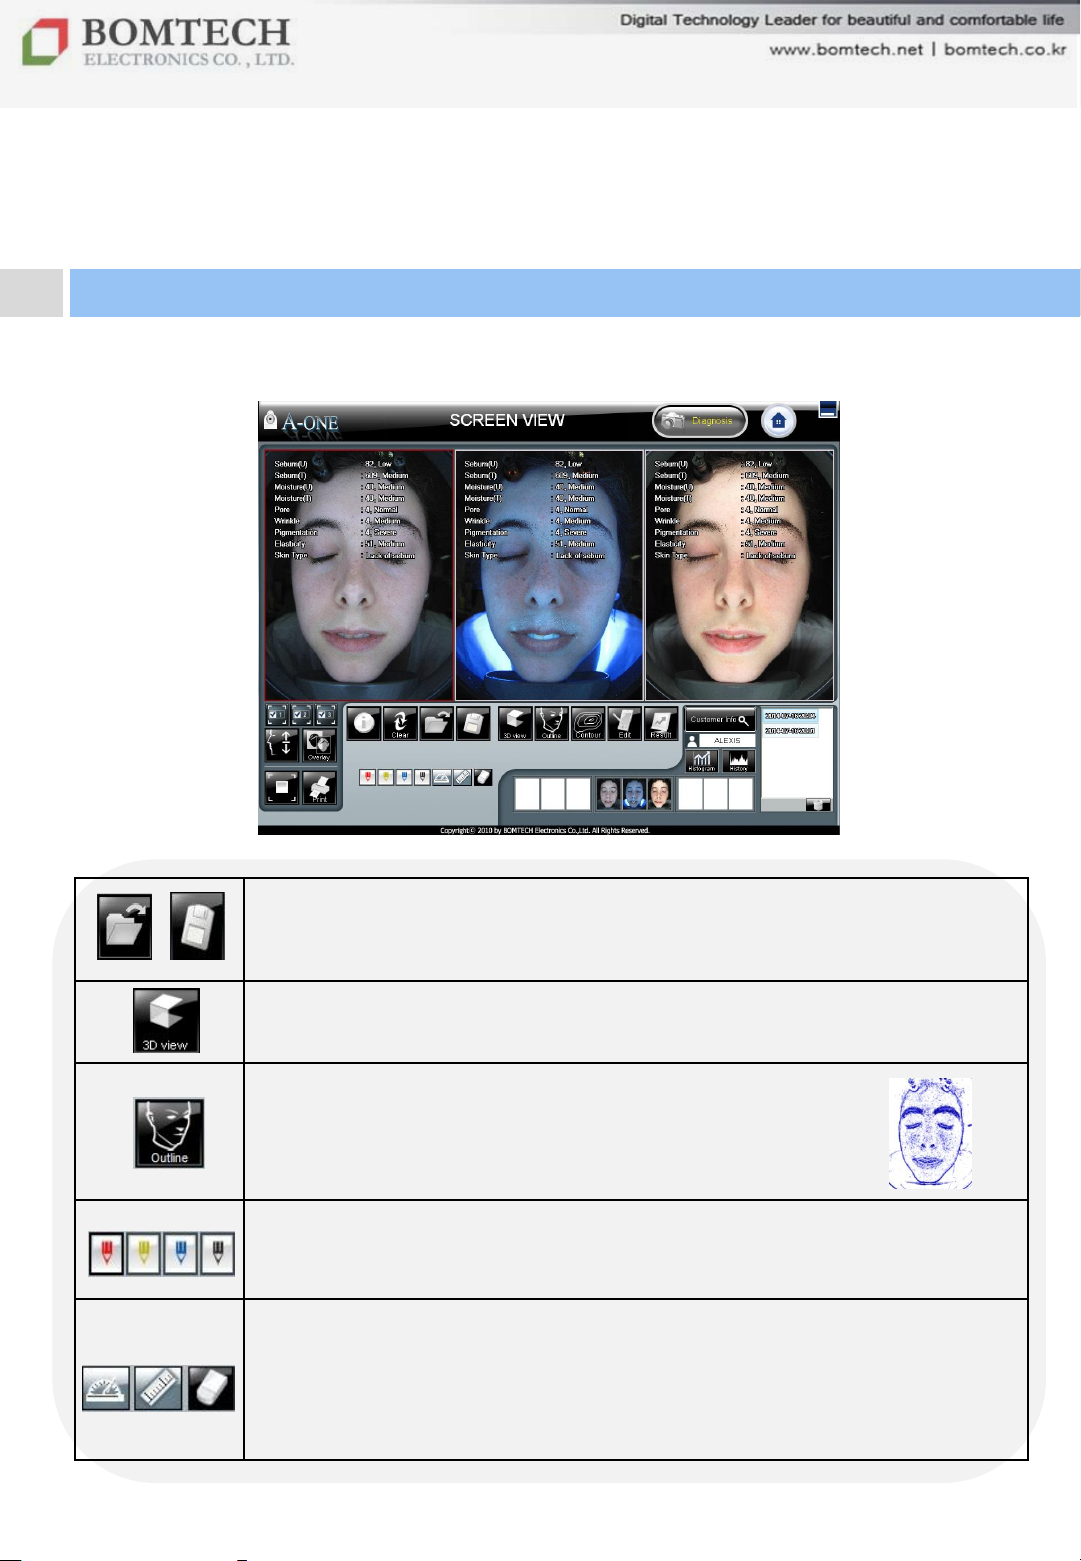
Open saved sample image from PC
Save the selected image in PC (designated file path) as jpg or bmp
format
3D View function
- Show skin with 3D view (Reference: page 16)
Outline function
- To see the change of face line after plastic surgery
or Botox, etc.
Color pencil function
- Mark or draw on image with color pencil.
Protractor, ruler function
- To see detailed change by measuring length and angle
마스터 부제목 스타일 편집
surgery or Botox, etc.
Eraser function
- Delete all mark or drawing on image.
29
Page 30
Ⅲ. Instruction
3. Additional Function
⑥
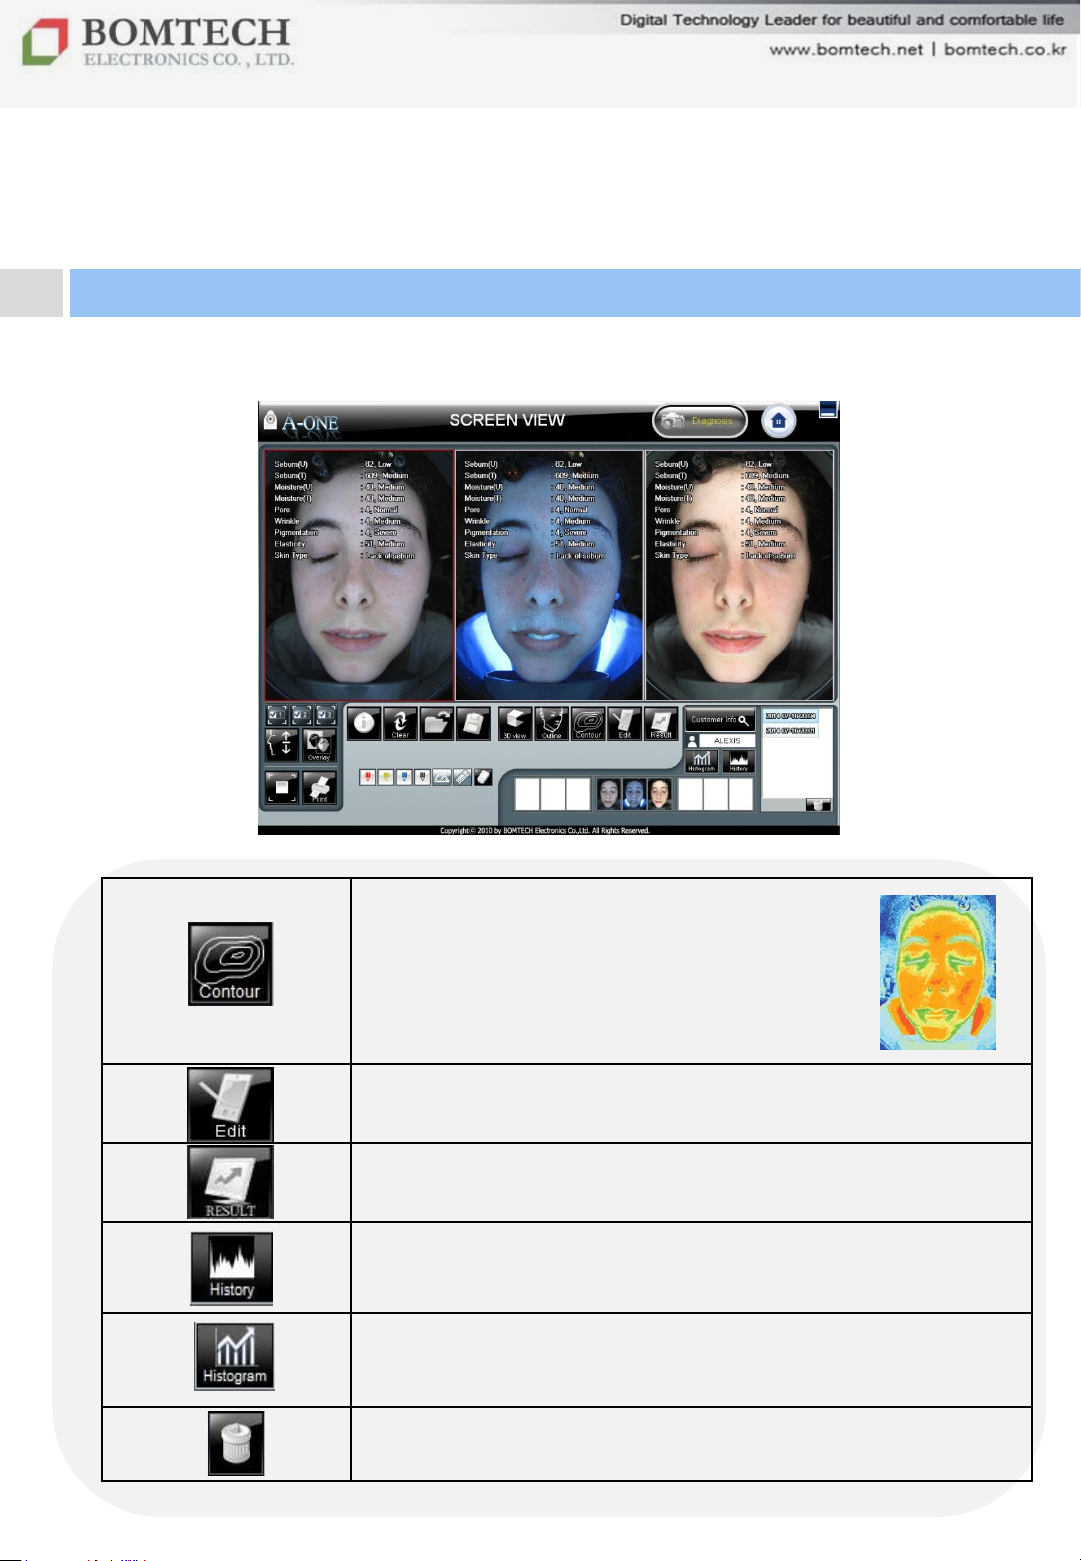
Contour function
- To see the balance of face after plastic
surgery or Botox, etc.
- Low part appears blue, part appears red.
Return to diagnosis page
Return to result page
Show the history of pictures to compare.
마스터 부제목 스타일 편집
Show the histogram of the data to compare by graphs
Delete diagnosis data of the selected date
30
For your beautiful and comfortable life, BOMTECH skin diagnosis system A-ONE
Page 31
Ⅲ. Instruction
3. Additional Function
마스터 부제목 스타일 편집
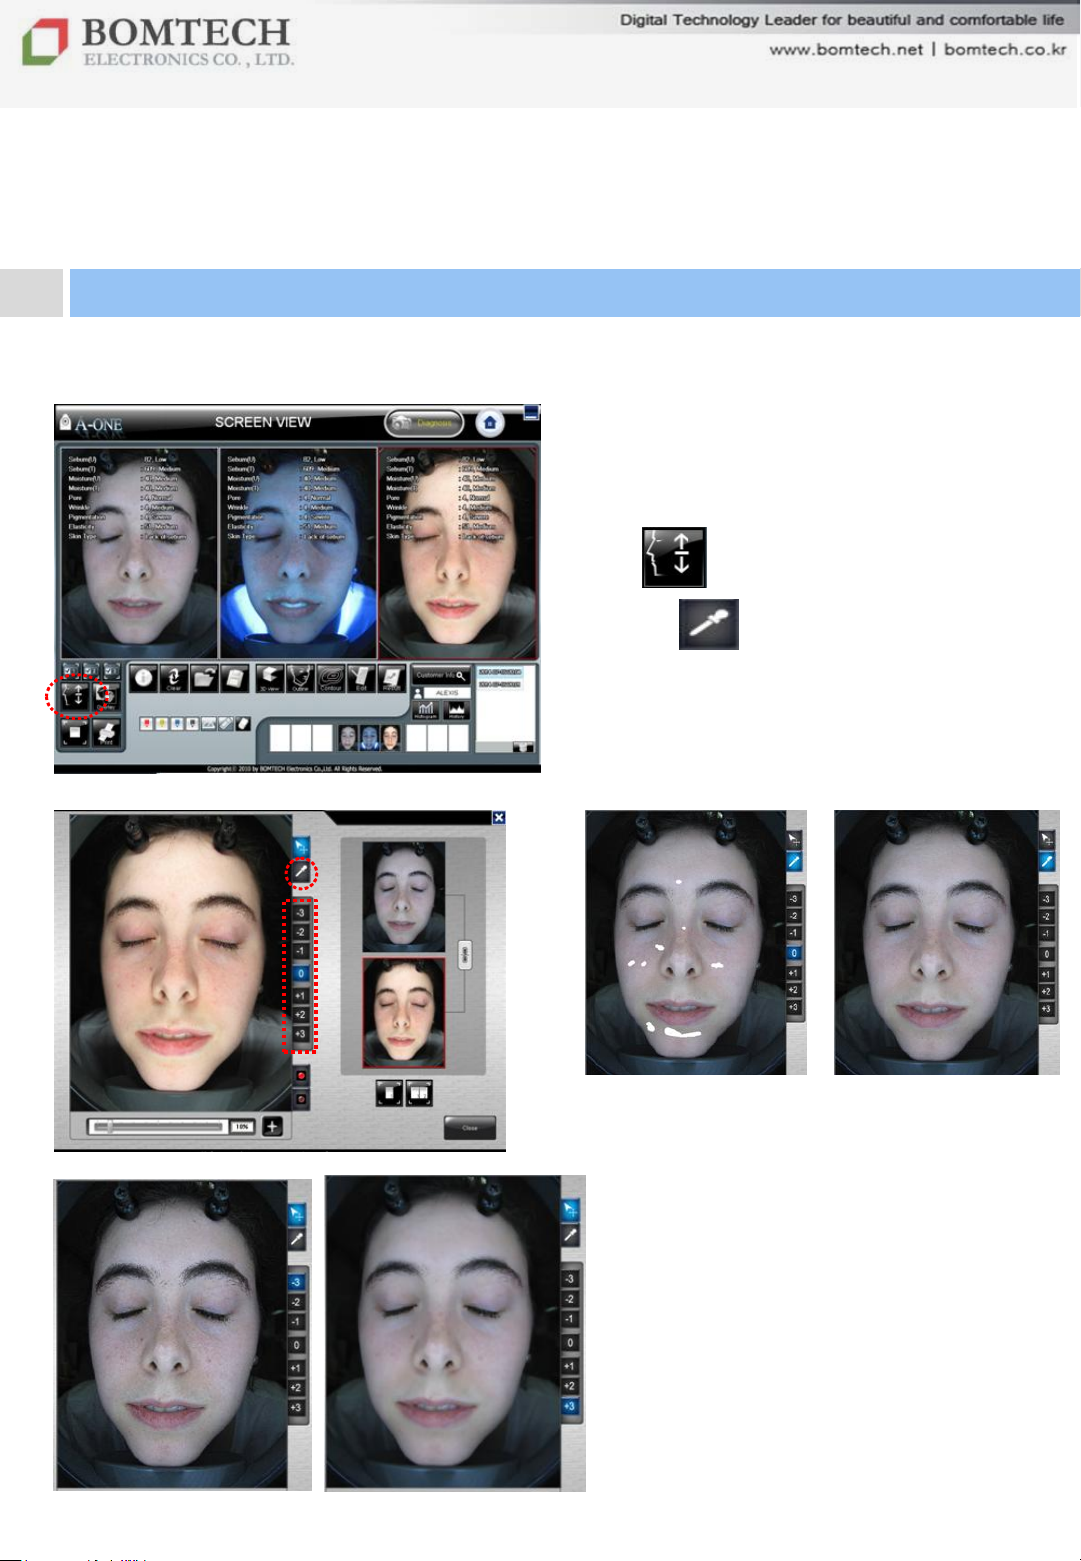
Simulation
To compare the predicted image of
Before and After treatment
Click .
① Click .
Move mouse cursor and click
wrinkle, pigmentation, spots, etc.
to remove them.
(effect of treatment)
② Click „-3‟ ~ „+3‟ .
-3 ~ -1 : Predicted result with no or
careless treatment
0 : Current state
+1 ~ +3 : Predicted result after
treatment
31
For your beautiful and comfortable life, BOMTECH skin diagnosis system A-ONE
Page 32
Ⅲ. Instruction
3. Additional Function
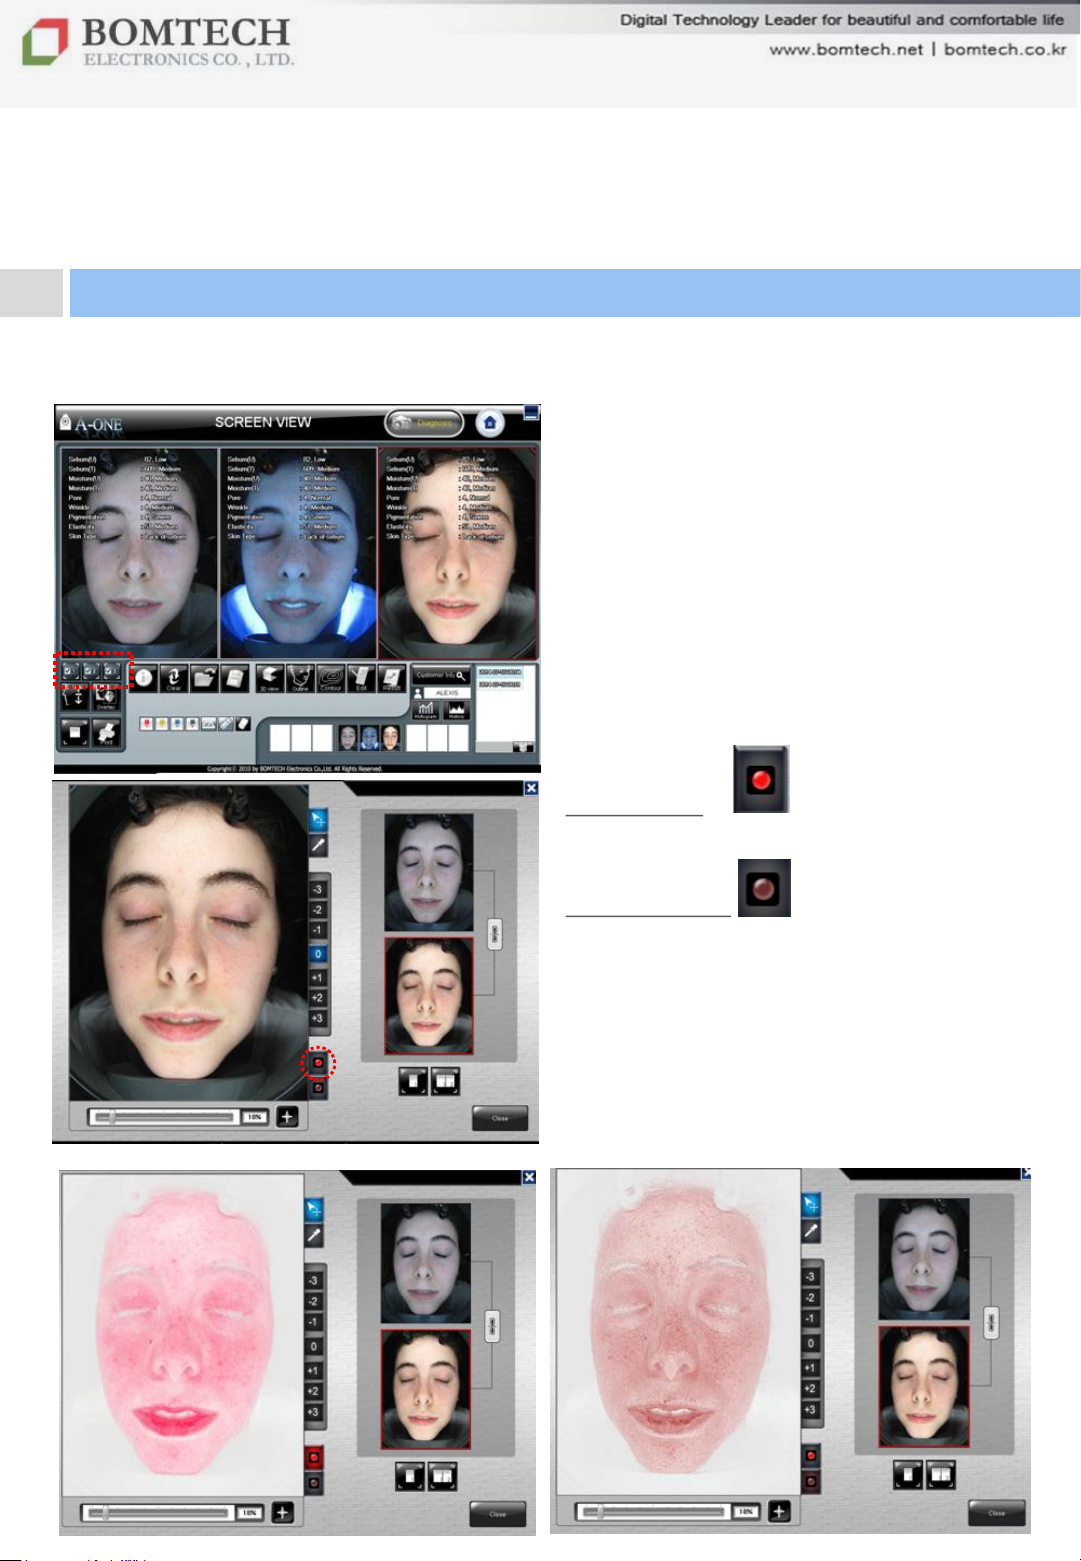
Visualization of skin condition
Select polarized image on main screen
and click the image on simulation page.
Red button
Visualization of skin redness
Brown button
Visualization of Melanin concentration
and pigmentation.
마스터 부제목 스타일 편집
32
For your beautiful and comfortable life, BOMTECH skin diagnosis system A-ONE
Page 33
Ⅲ. Instruction
3. Additional Function
③
②
②
①
①
마스터 부제목 스타일 편집
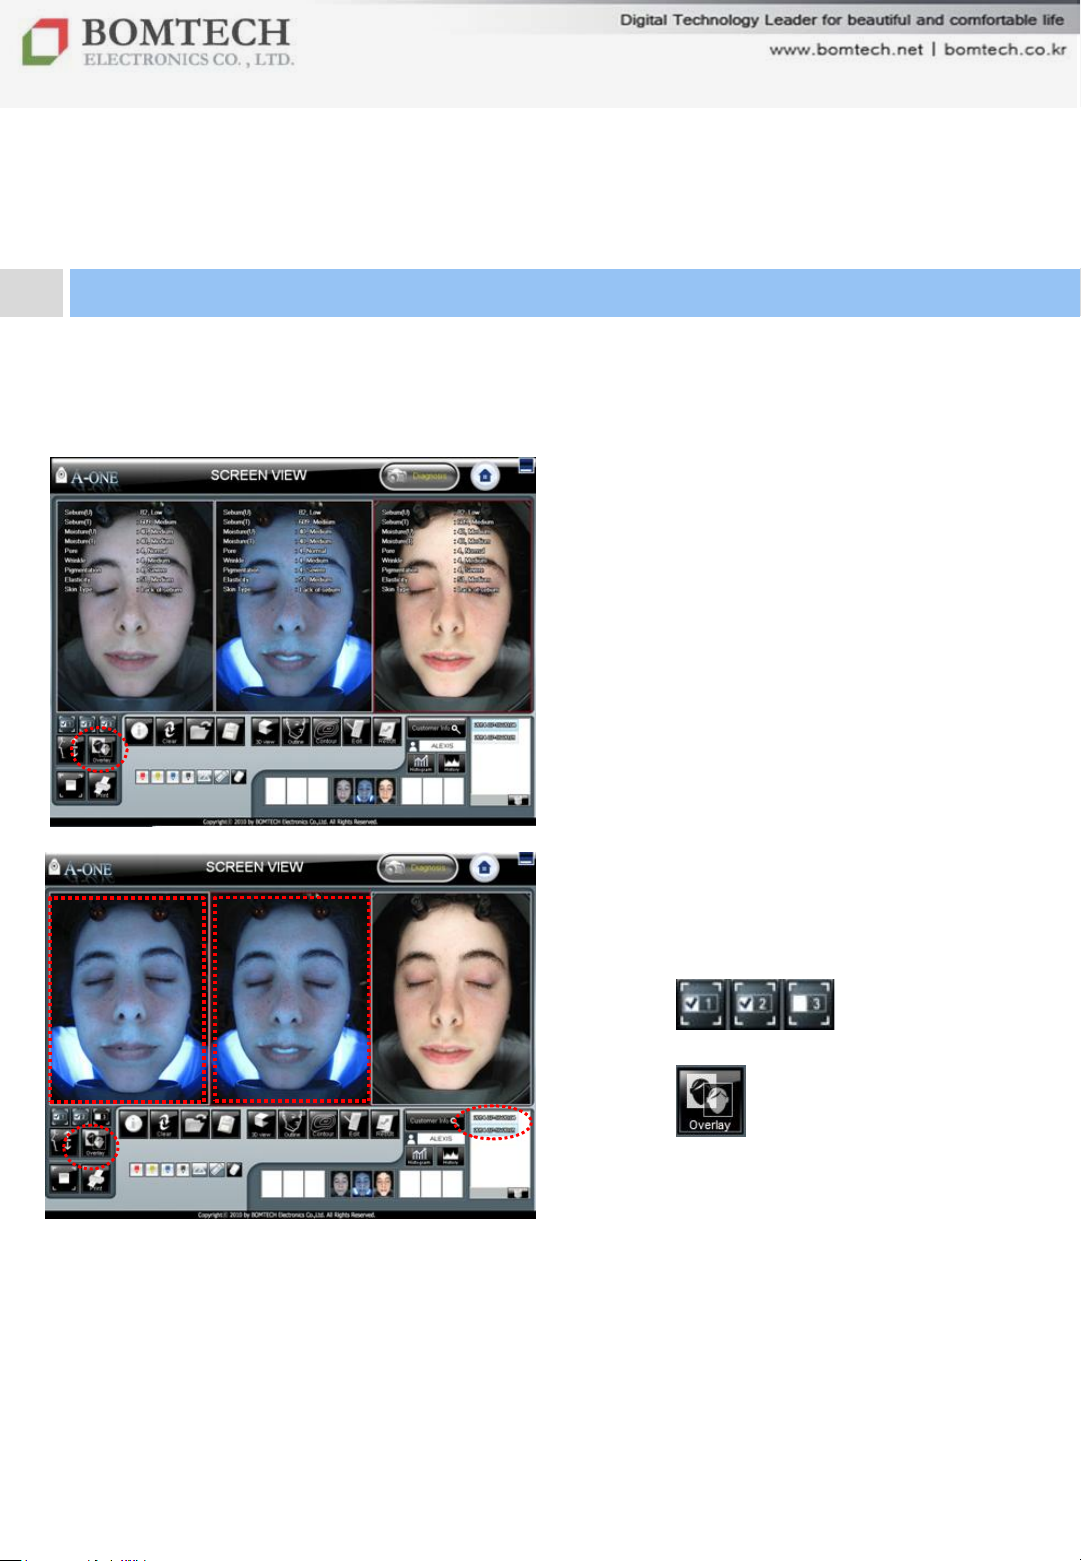
Overlay
To see difference or change between
the selected two photos from different
test dates
① Click the date below to bring the
image you want and load on the screen
view.
② Click to select the two
photos.
③ Click .
33
For your beautiful and comfortable life, BOMTECH skin diagnosis system A-ONE
Page 34
Ⅲ. Instruction
3. Additional Function
①
②
마스터 부제목 스타일 편집
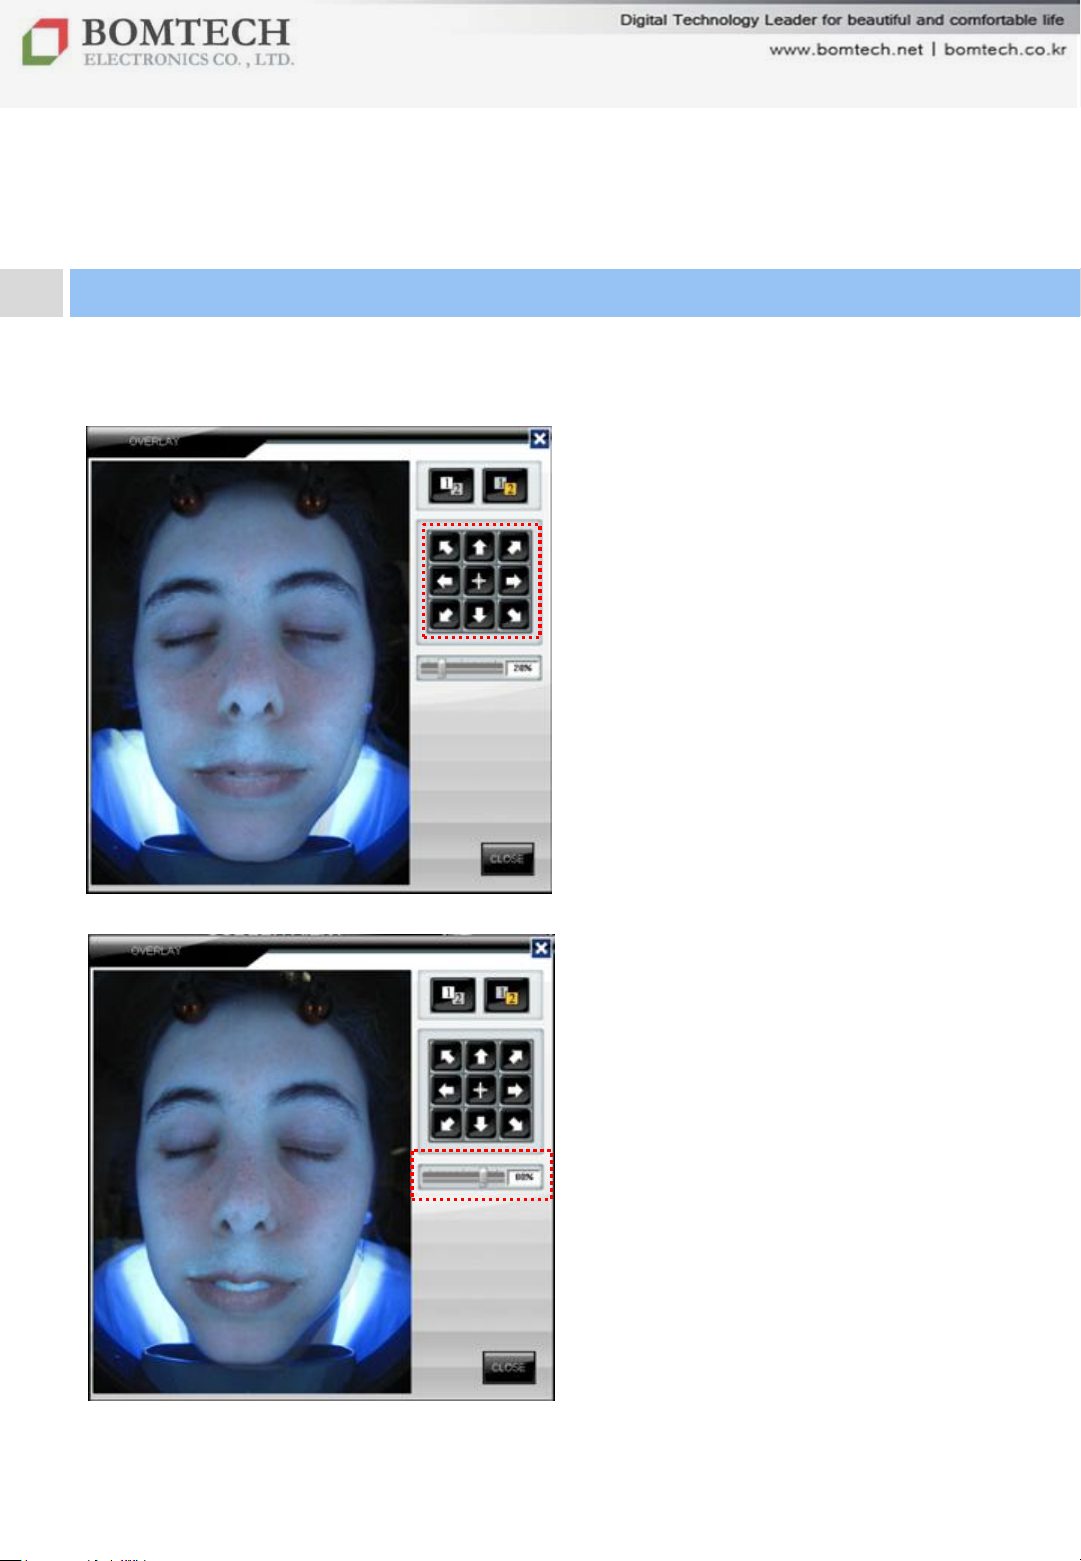
Overlay
The selected two photos are overlapped.
① Adjust the position of the photo by
clicking the marked buttons.
② Move the bar to see the change
between the two photos.
34
For your beautiful and comfortable life, BOMTECH skin diagnosis system A-ONE
Page 35
Ⅲ. Instruction
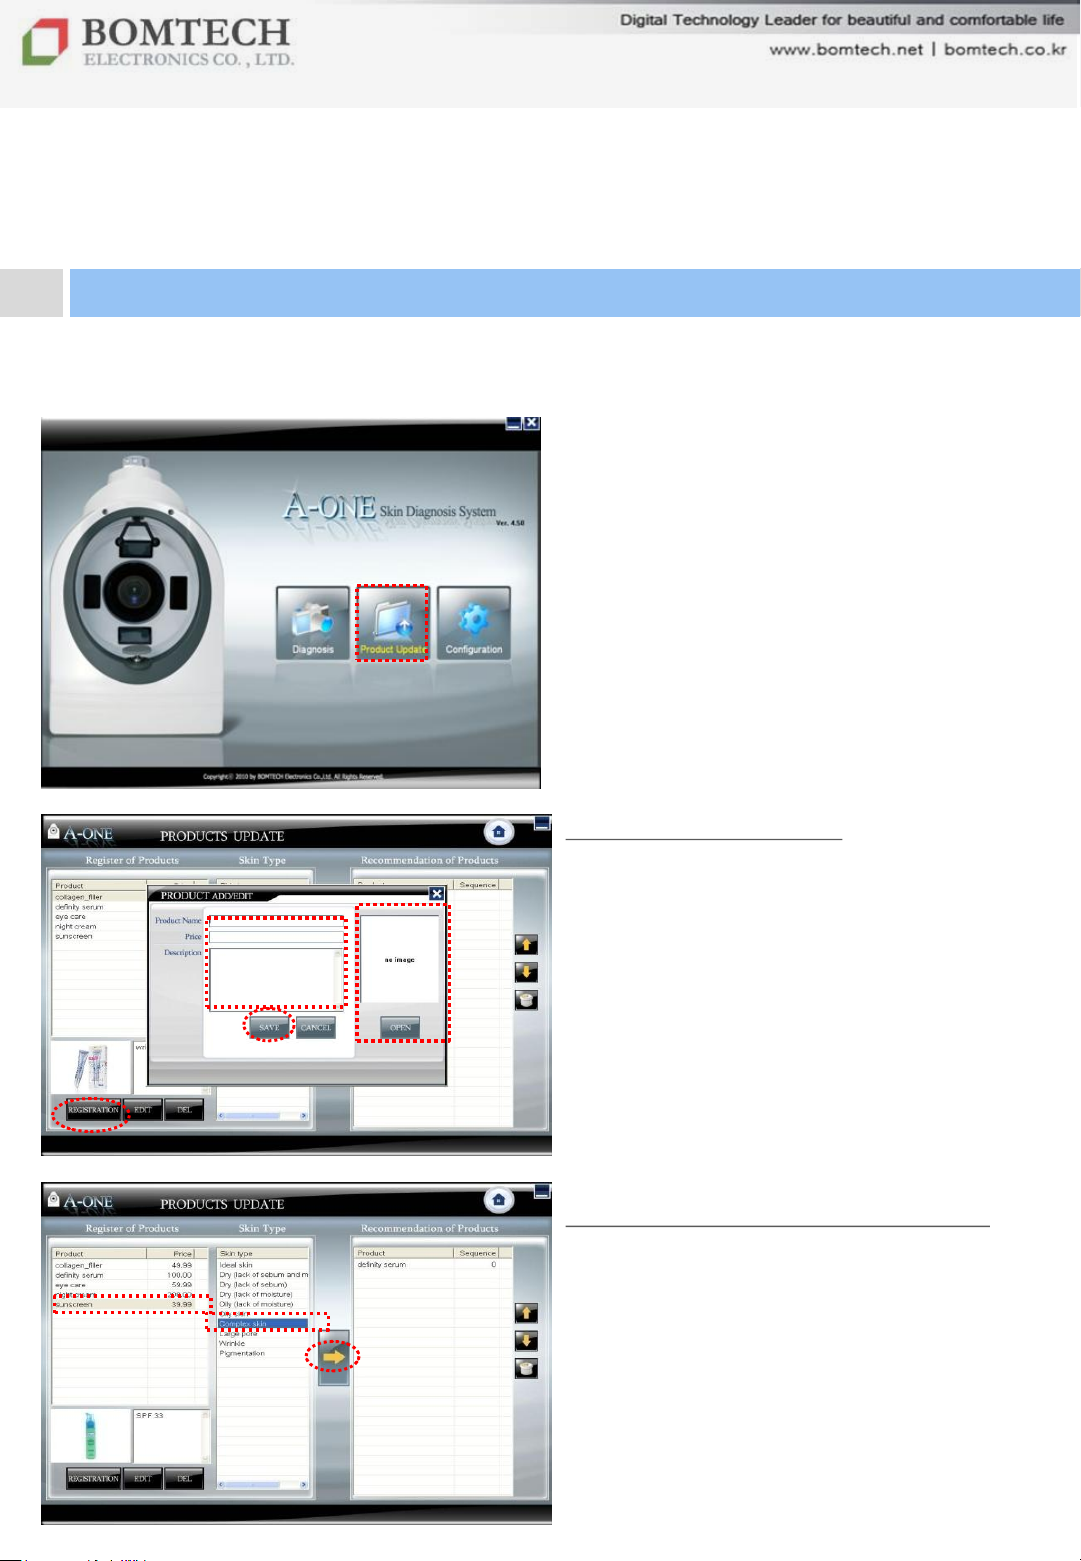
4. Product Update
Click „Product Update‟ on the start-up
page.
①
①
②
④
②
Product Registration
① Click „REGISTRATION‟ below.
③
② Enter product name, price,
description.
③ Click „OPEN‟ and bring product image
from your PC.
④ Click „SAVE‟ below.
Product Category Classification
After product registration,
① Select a product.
마스터 부제목 스타일 편집
③
② Select the skin type the product is for.
③ Click the yellow arrow button.
The registered product will be shown on
Product Recommendation page.
For your beautiful and comfortable life, BOMTECH skin diagnosis system A-ONE
35
Page 36
Ⅲ. Instruction
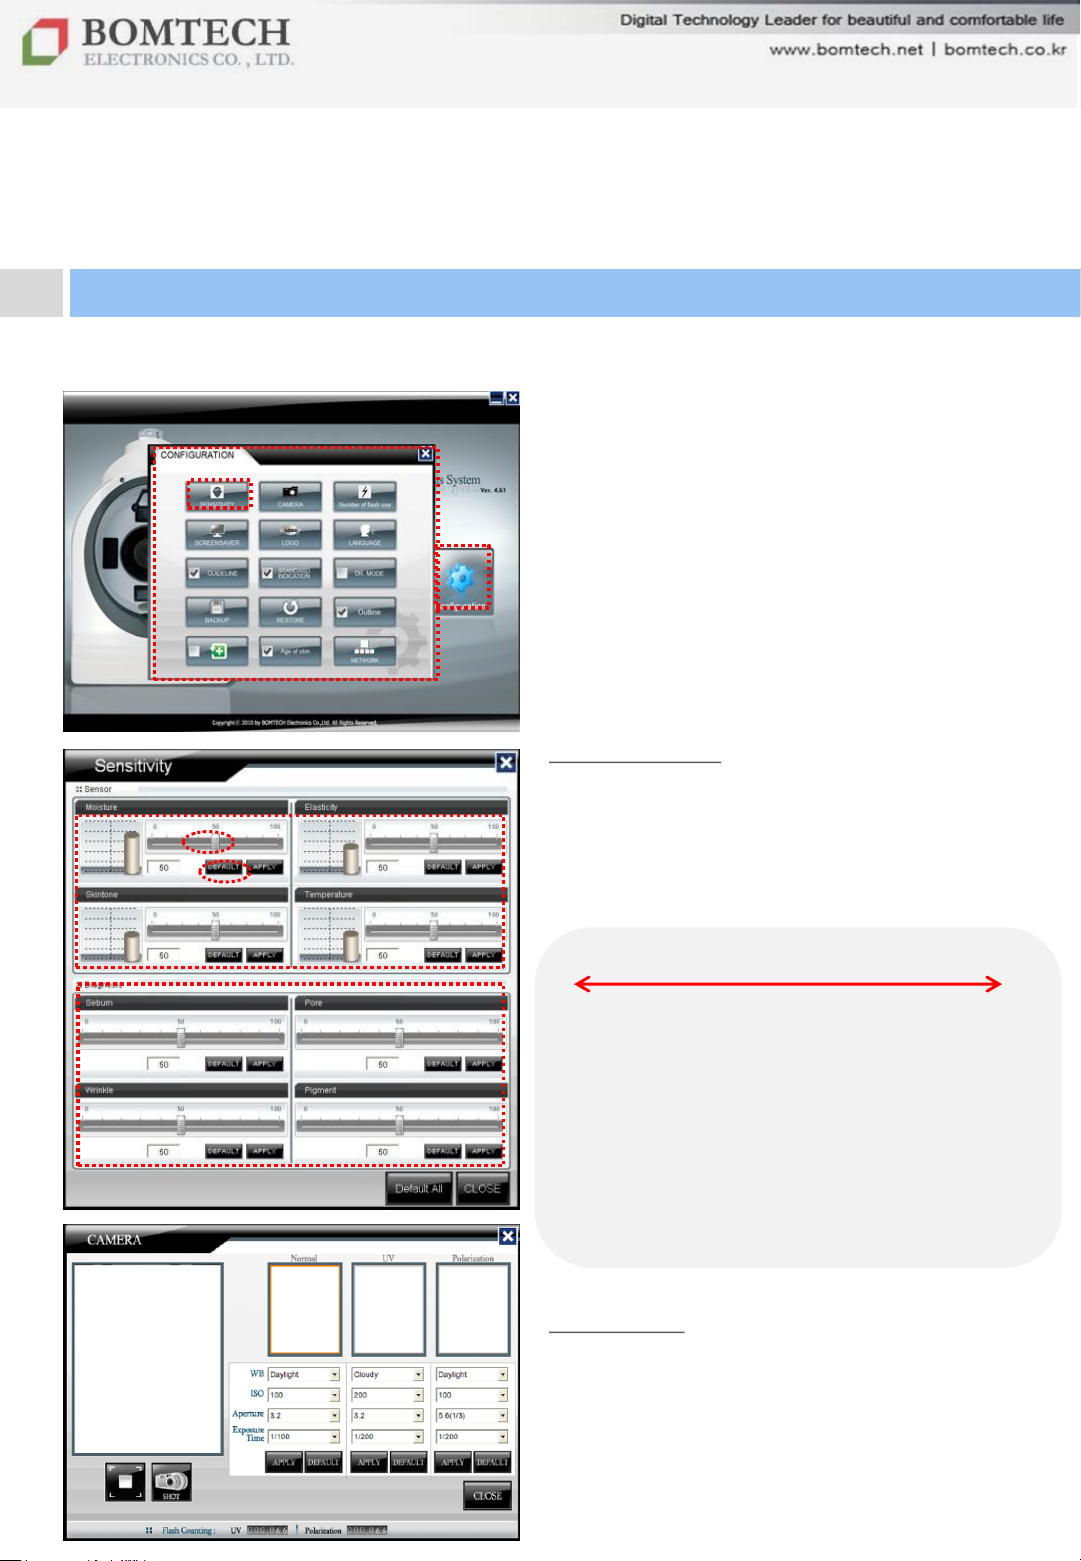
5. Configuration
Click „Configuration‟ on the start-up page.
1) Sensitivity
To adjust the sensitivity of each
diagnosis value
Adjust the sensitivity by pulling the bar
and click „APPLY‟.
** Default value: 50
0
Moisture: Less
Elasticity: Lower
Skin tone: Darker
Temperature: Lower
Sebum: Less
Pore: Smaller
Wrinkle: Thinner
Pigmentation: Better
100
Moisture: Much
Elasticity: Higher
Skin tone: Brighter
Temperature: Higher
Sebum: Much
Pore: Larger
Wrinkle: Thicker
Pigmentation: Worse
2) Camera
마스터 부제목 스타일 편집
To adjust camera setting such as WB,
ISO, aperture, normal light, UV light,
polarization light.. etc.
We recommend to maintain factory
default.)
36
For your beautiful and comfortable life, BOMTECH skin diagnosis system A-ONE
Page 37
Ⅲ. Instruction
5. Configuration
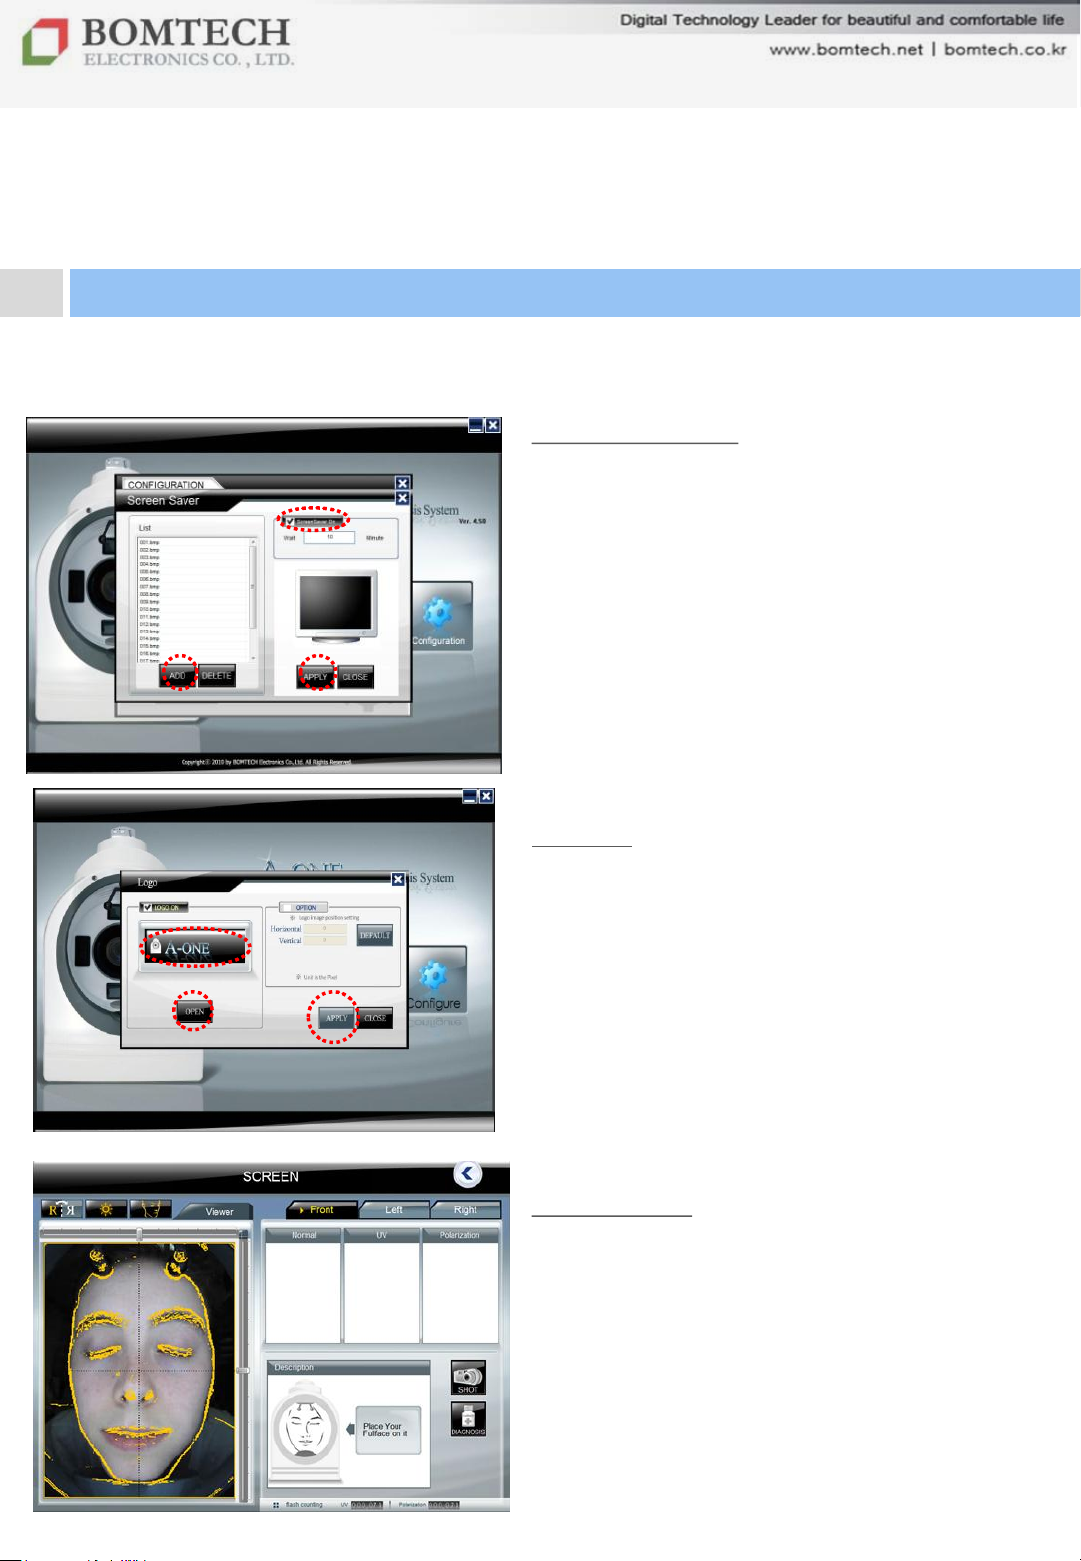
3) Screen saver
Mark „Screen saver on‟ first, set the lasting
time, bring image you want from your PC
and click „APPLY‟.
** If screen saver on Windows turns on, this
screen saver of the program doesn’t work.
4) Logo
Mark „LOGO ON‟ first, click „OPEN‟ to bring
your logo image from your PC and click
„APPLY‟.
5) Guideline
To adjust head position when
re-diagnosis
마스터 부제목 스타일 편집
37
For your beautiful and comfortable life, BOMTECH skin diagnosis system A-ONE
Page 38
Ⅲ. Instruction
5. Configuration
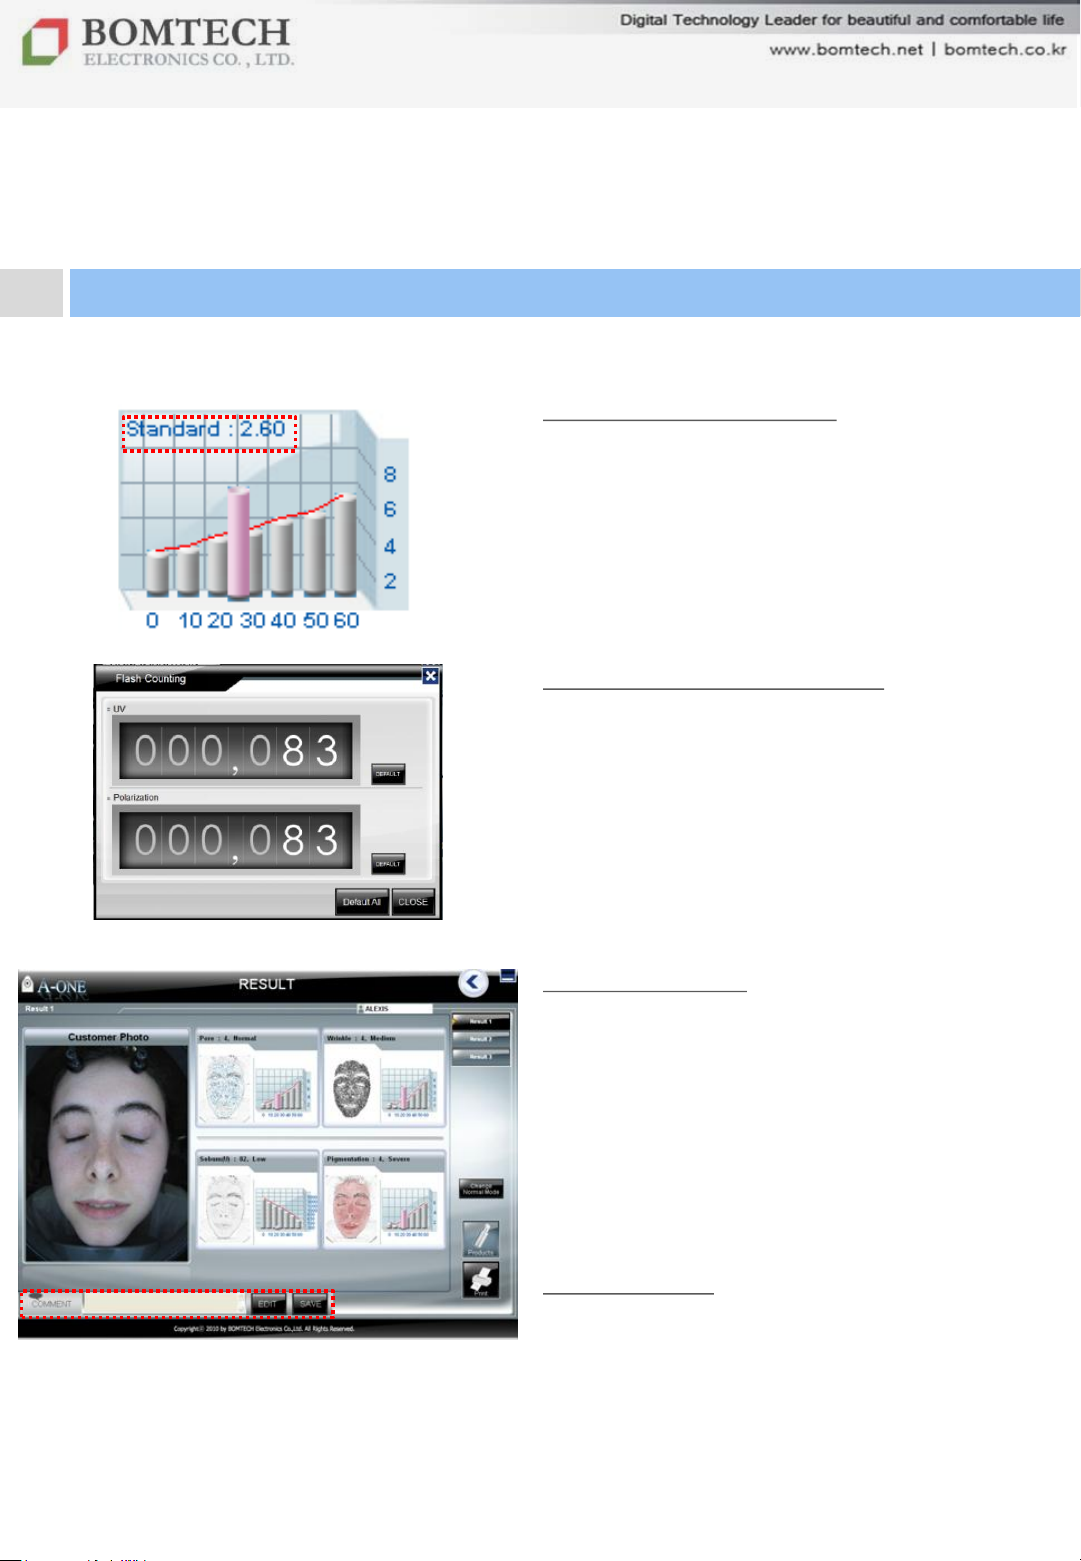
6) Standard Indication
To show average test value of the age of a
client.
7) Flash counting number
** The flash of A-ONE is a consumable
item with 5,000 ~7,000 shooting times.
8) Doctor Mode
No diagnosis text.
Only picture and graph displayed for
each test
Edit function: to write a memo about
a client condition, diagnosis,
마스터 부제목 스타일 편집
recommended treatment, etc.
38
For your beautiful and comfortable life, BOMTECH skin diagnosis system A-ONE
Page 39
Ⅲ. Instruction
5. Configuration
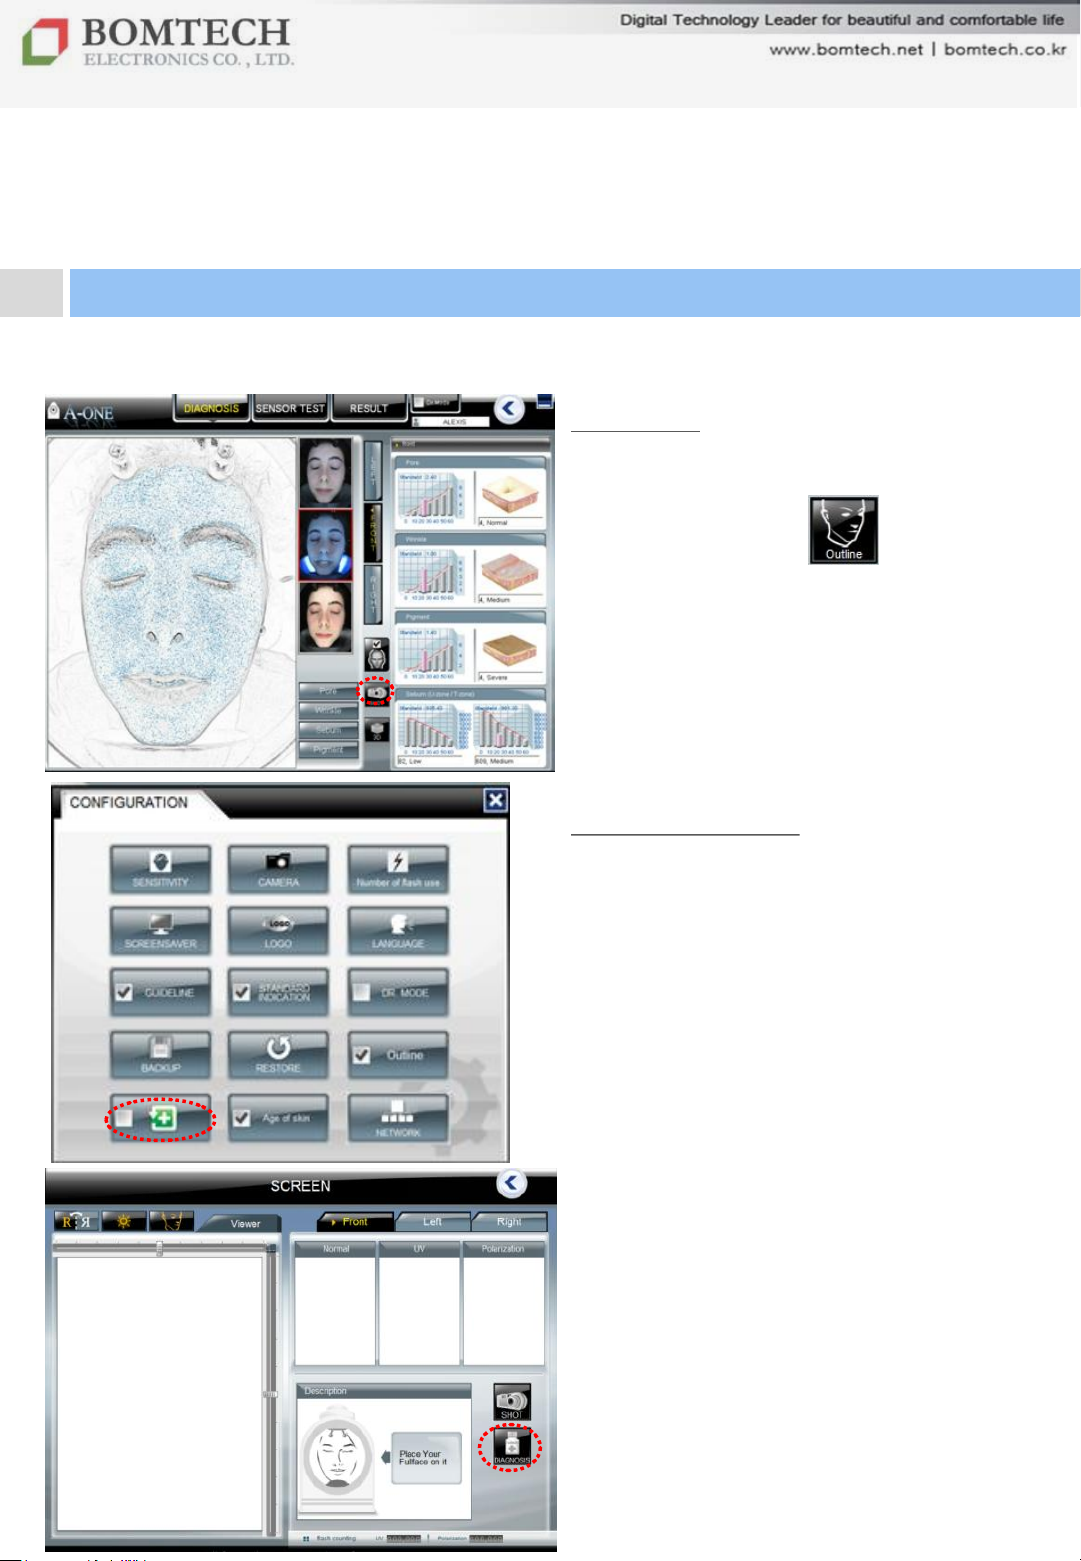
9) Outline
To see more visualized image
** Outline function on the main
screen is different from this.
(Refer to page 24)
10) Control Mode
To prevent diagnosis result not to
be worse than previous result
Click the marked button on
configuration page and „Diagnosis‟
button on diagnosis page..
마스터 부제목 스타일 편집
39
Page 40
Ⅲ. Instruction
5. Configuration
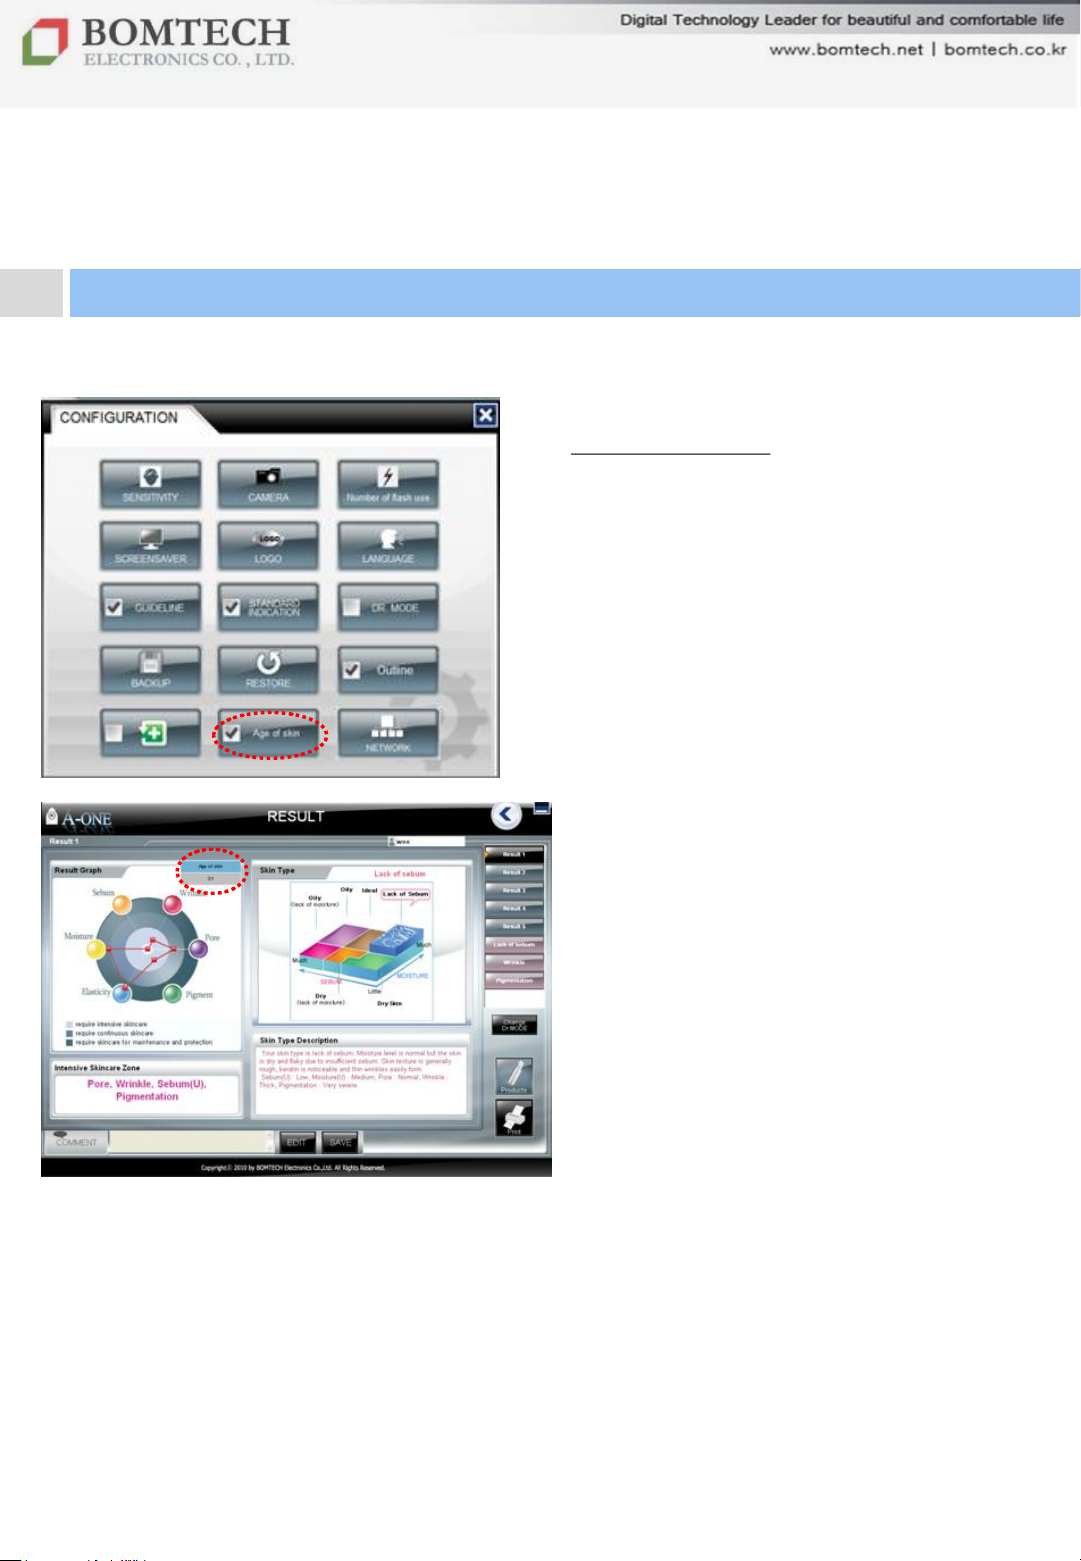
11) Age of Skin
To show the age of skin on result page
** Age of skin ranges from -5 to +5 of the
client’s age.
마스터 부제목 스타일 편집
40
For your beautiful and comfortable life, BOMTECH skin diagnosis system A-ONE
Page 41
Ⅲ. Instruction
5. Configuration
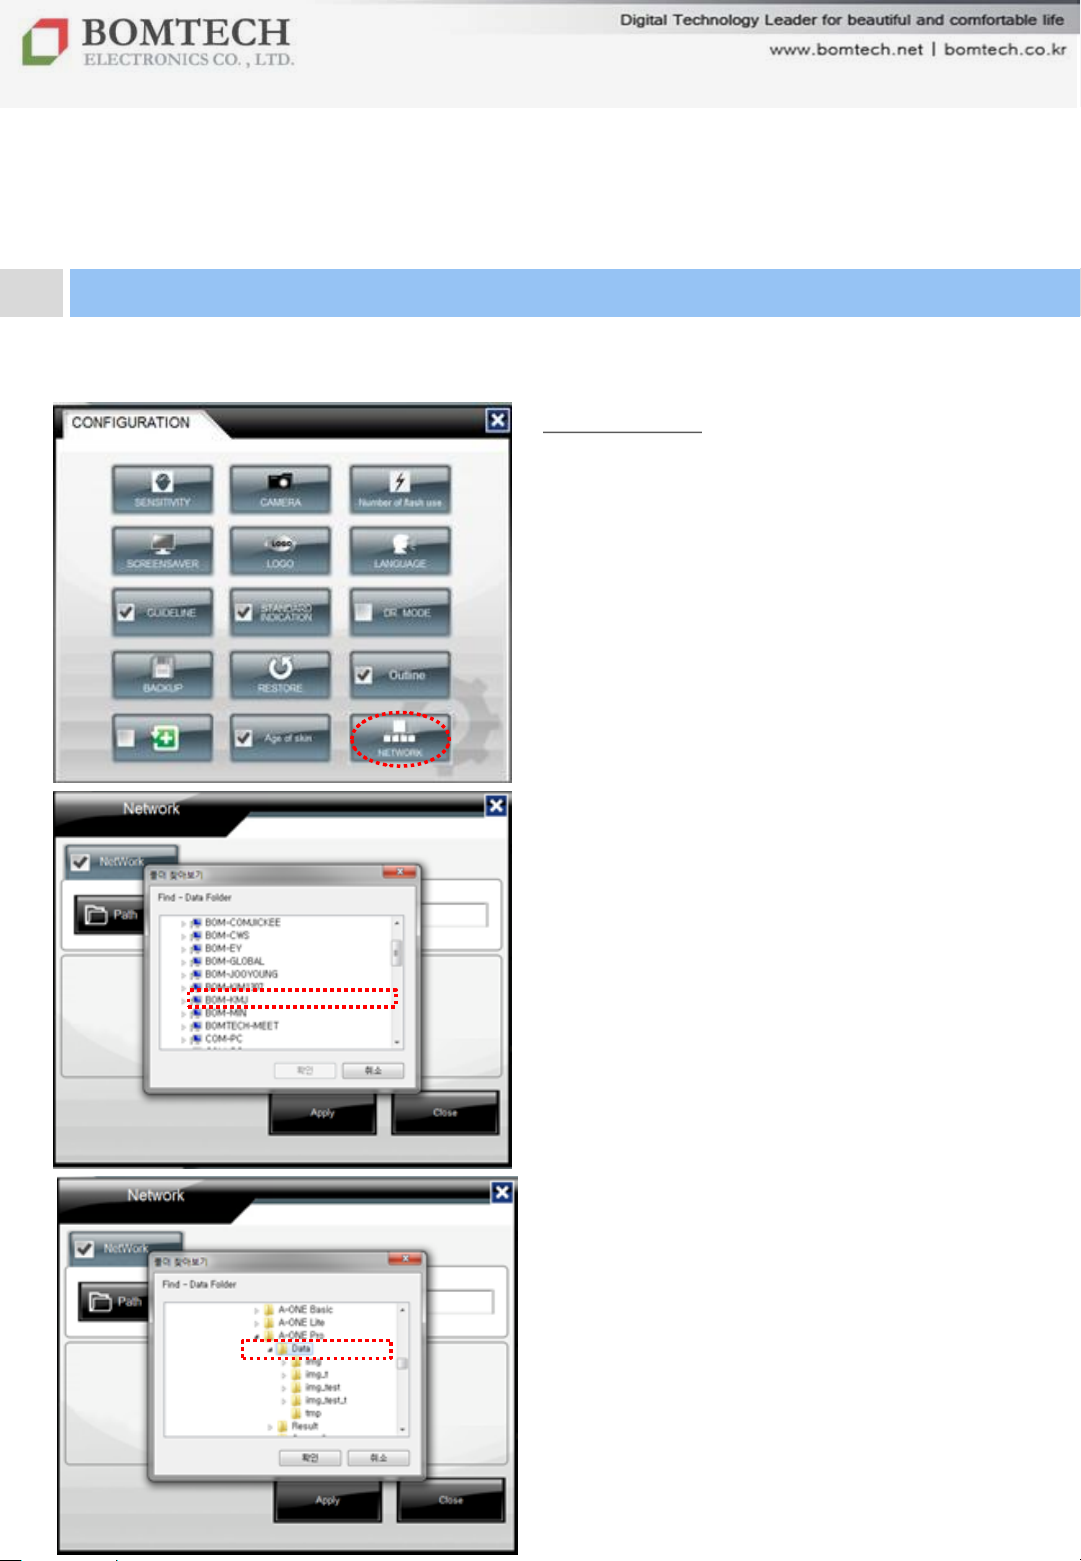
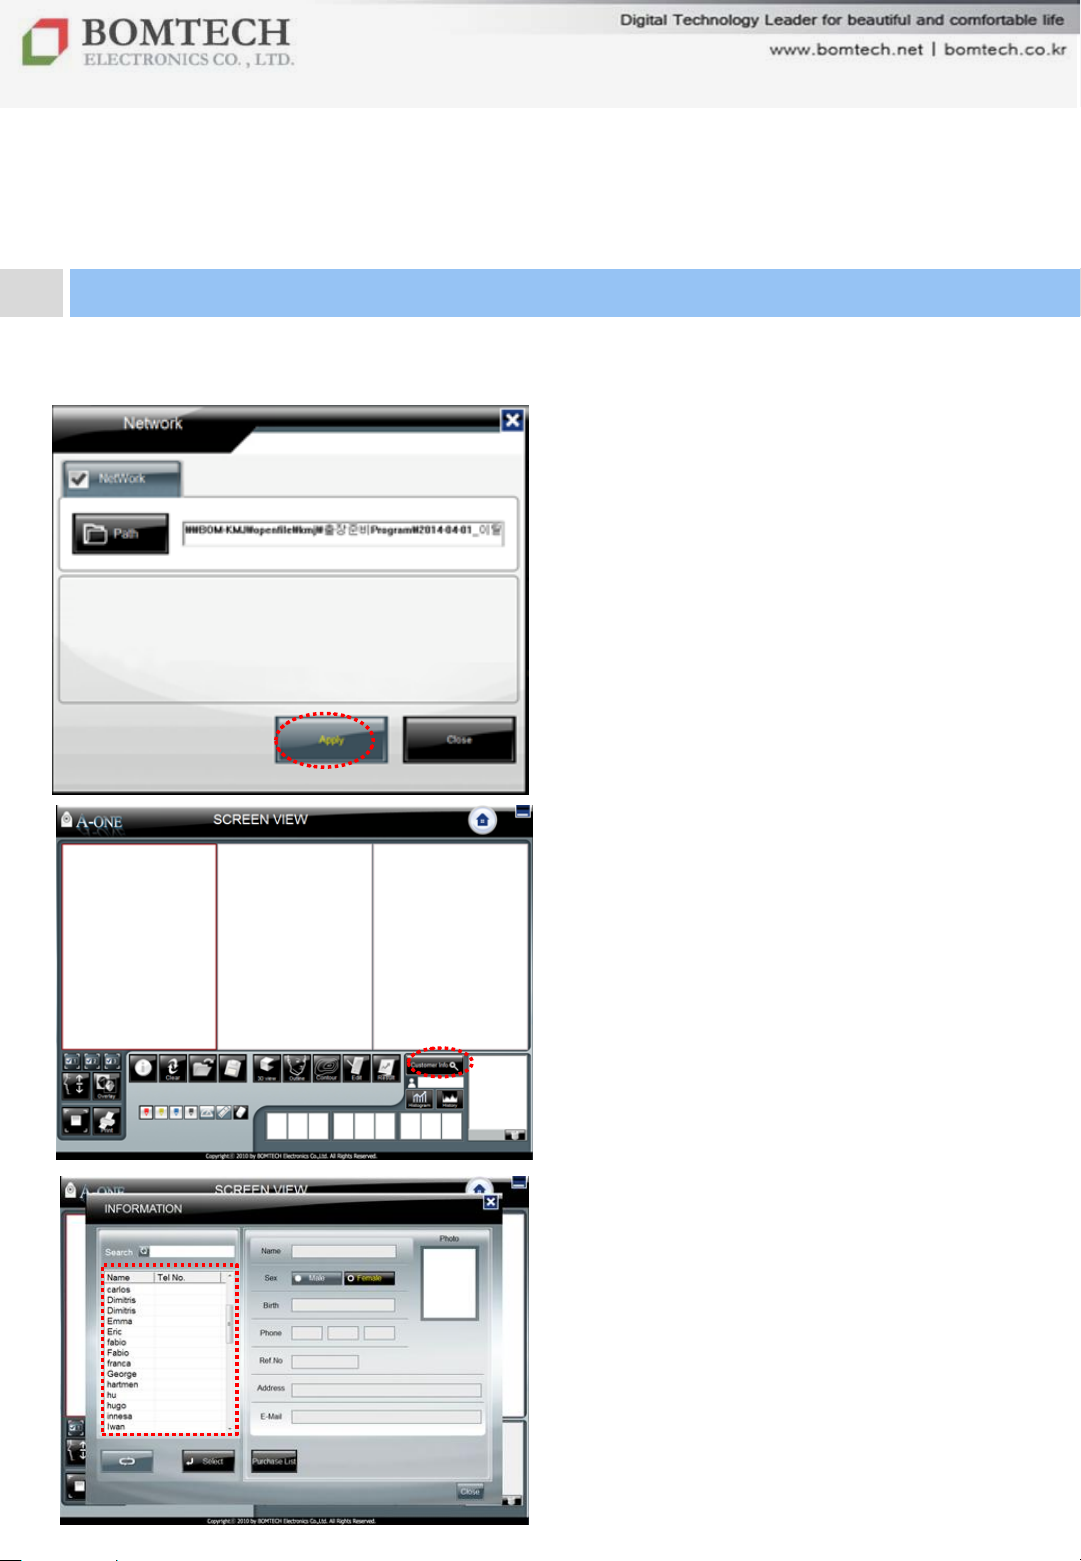
12) Network
To share clients‟ data in different PCs
which are connected in network.
(** For example, at a hospital, places for
shooting, consultation and client
management could be different.
By using this function, you can bring
clients’ data from one place to another
such as from a doctor’s PC to a
receptionist’s PC .)
①
②
① Click the PC where you would like to
bring clients‟ data from.
② Select „A-ONE Pro‟ folder and click
„Data‟ folder.
** Make sure again to click up to ‘Data’
마스터 부제목 스타일 편집
folder.
41
For your beautiful and comfortable life, BOMTECH skin diagnosis system A-ONE
Page 42
Ⅲ. Instruction
5. Configuration
③
③ Click „Apply‟.
⑤
④ Back on Diagnosis main page,
click „Customer Info‟.
④
⑤ You see the list of clients you brought
from other PC.
마스터 부제목 스타일 편집
42
For your beautiful and comfortable life, BOMTECH skin diagnosis system A-ONE
Page 43
Ⅲ. Instruction
5. Configuration
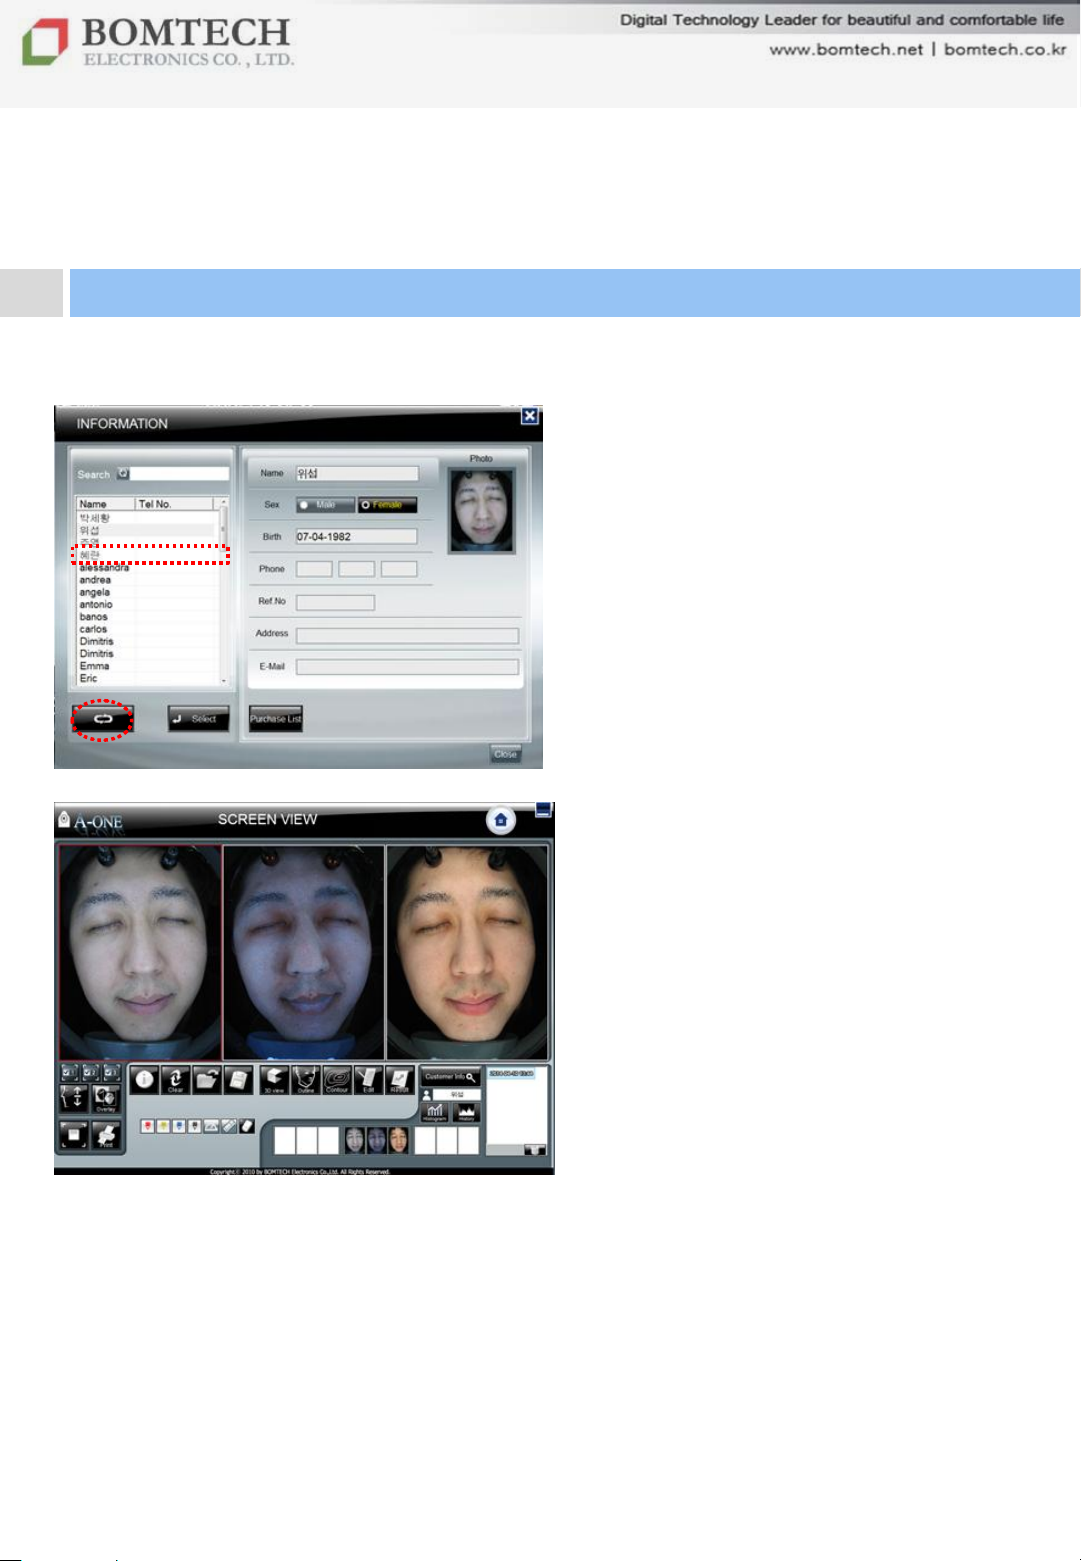
⑥
⑦
⑥ Click the name of the client you would
like to bring.
⑦ Click the marked button at the bottom.
** If you do not click the button, no data
appears.
⑧ You will see the photos and data of
the client.
마스터 부제목 스타일 편집
43
For your beautiful and comfortable life, BOMTECH skin diagnosis system A-ONE
Page 44
Ⅲ. Instruction
5. Configuration
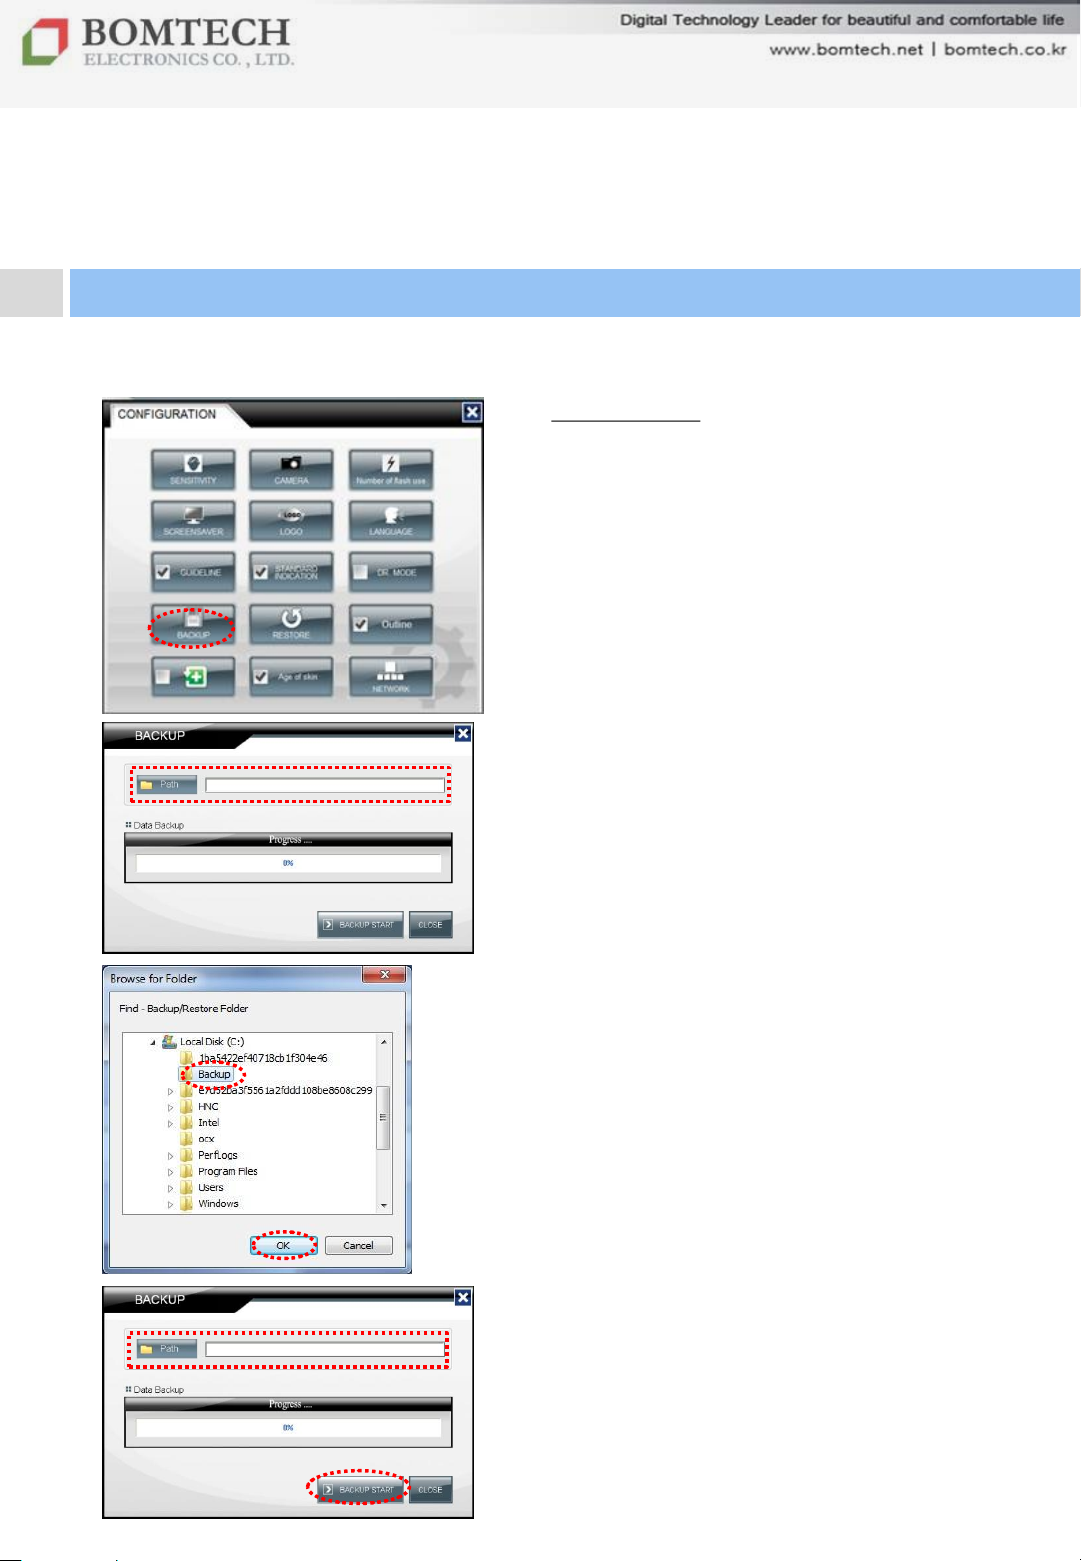
①
②
③
④
⑤
13) Backup
To transfer data from one PC to
another PC
Click „BACKUP‟ on Configuration
page.
When the backup window pops up,
① Click the “Path”
② Click the folder to back up
(Created the new folder named
Backup before starting Backup.)
③ Click the “OK”
마스터 부제목 스타일 편집
④ Check the file path again
⑤ Click the “BACKUP START”.
44
For your beautiful and comfortable life, BOMTECH skin diagnosis system A-ONE
Page 45
Ⅲ. Instruction
5. Configuration
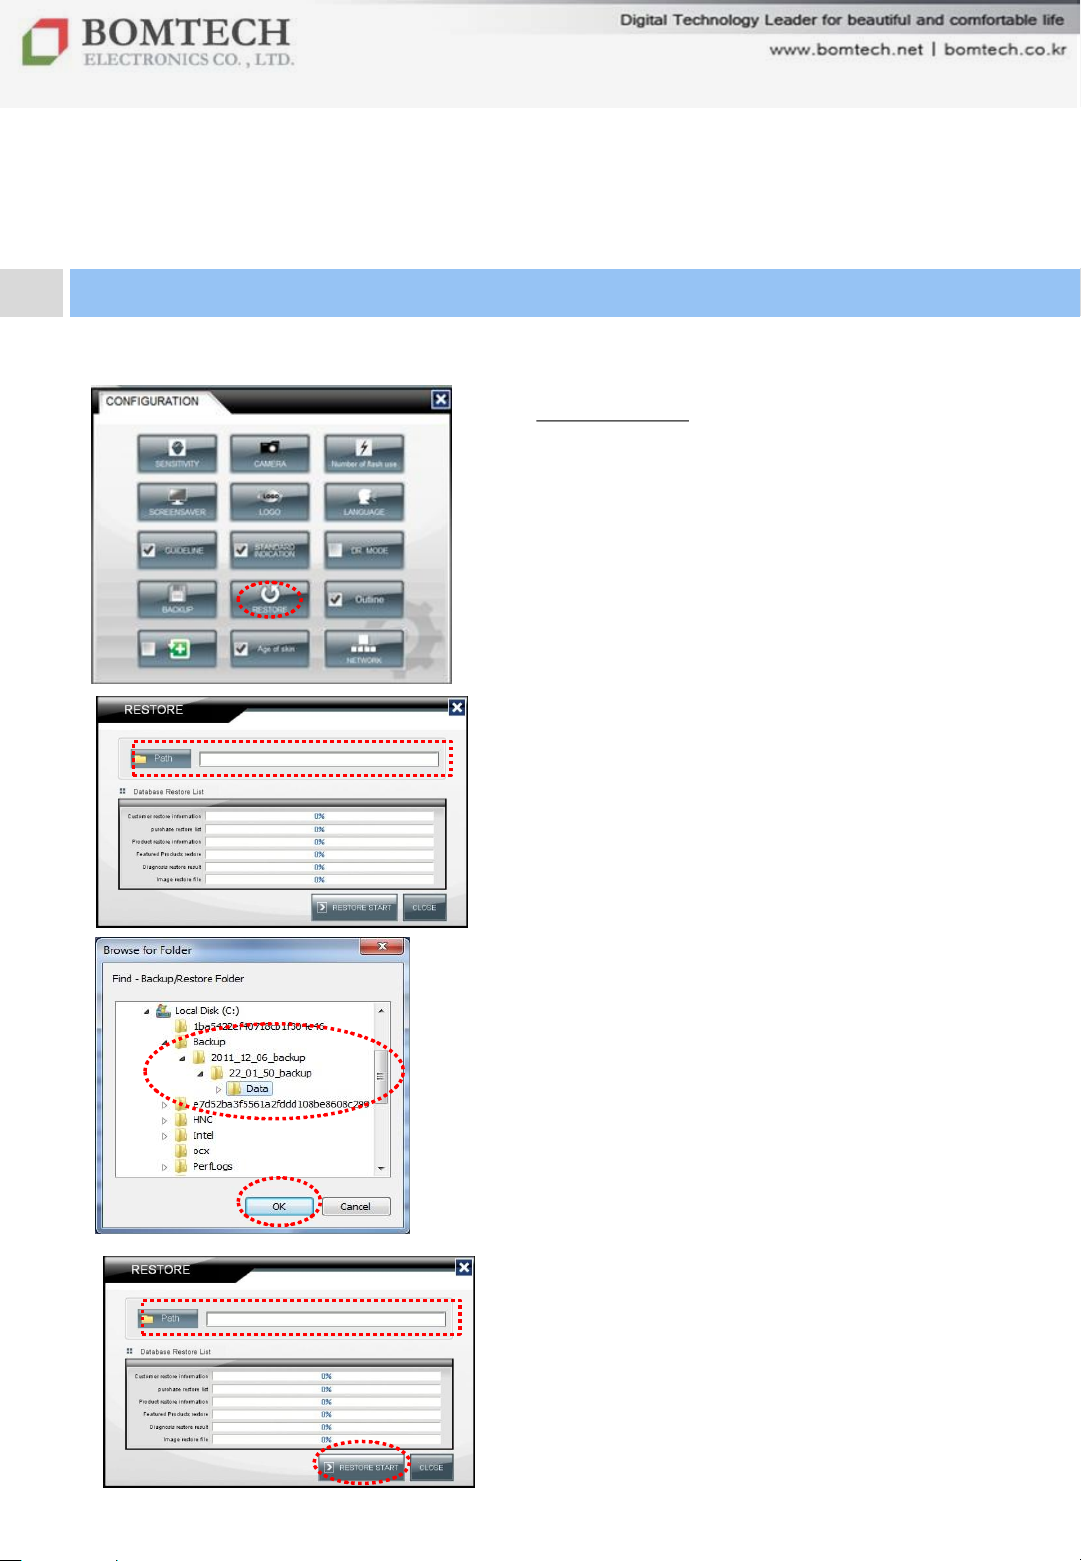
①
②
③
④
14) Restore
To restore back-up data files
Click „RESTORE‟ on Configuration.
When the restore window pops up,
① Click „Path‟.
② Select the folder to back up.
②-1. Select the date that you want to
restore.
②-2. Select the time that you want to
restore.
②-3. Click „Data‟ folder.
③ Click „OK‟.
④ Check whether the path is correct or
마스터 부제목 스타일 편집
not.
⑤ Click „RESTORE START‟.
⑤
45
For your beautiful and comfortable life, BOMTECH skin diagnosis system A-ONE
Page 46

Please check the number of flash counting in Configuration and replace the flash with a
for over 6 years and the clinical tests were made by dermatologist and professional skin
Sebum value is the number of each pixel. The figures of wrinkle, pore and pigmentation
Ⅳ. FAQ (Diagnosis-related)
Q1. Is it possible to diagnose Make-up skin?
Yes, but If the client makes up or applies sunblock cream, it reflects UV light and could
disturb an accurate diagnosis, especially sebum test.
Please wash face to get an accurate result.
Q2. Sebum value is too low.
If the client makes up or applies sunblock cream, UV light would be reflected and
couldn‟t detect the sebum value.
Q3. The taken image under UV light is too dark or black.
Life cycle of flash is around 5,000 ~7,000 times.
new one if it is more than 5,000~7,000 times.
Q4. How the scanner analyze the image and the result?
The program analyzes the image by pixel and the results of skin diagnosis is based on
customer’s age and its own value. The age standard data was made by clinical test
care consultants who belong to cosmetic companies.
Q5. What does the result values of each test mean?
are just set to show a level of skin condition in the program. So, they have no specific
unit of measurement.
Q6. What is the difference between normal light, UV light and polarization light?
Each light shows the condition of each part more effectively.
Normal light – Wrinkles & Pores, UV light – Sebum condition Polarization – Pigmentatio
n
Q7. Is it possible to diagnose tanned skin?
Yes. if tanning is applied on the skin equally, it doesn’t affect the pigmentation result.
Diagnosis for pigmentation reads noticeable spot in the whole skin such as freckle, sun
spot, etc.
But in case the skin was too much tanned, it could disturb an accurate diagnosis.
마스터 부제목 스타일 편집
46
For your beautiful and comfortable life, BOMTECH skin diagnosis system A-ONE
Page 47

Q8. What is highlighted in UV photo?
UV light shows Sebum condition with more detailed image.
White dot : Daily sebum
Red dot :
Blue dot : Dust
Q9. When I need to adjust sensitivity?
Generally, skin condition is affected by weather, food, or country,… etc.
So, if you want more accurate diagnosis, you can adjust the sensitivity of the sensor or
each section regarding to your territory or weather. Then the sensor would react more
or less sensitive and affect the result.
Q10. Do I need to make any adjustments depending on the skin color?
No. You don
Q11. What is the recommended cycle for diagnosis?
If you want to see the diagnosis result of a client, we
times for comparison
In case receiving skincare(treatment) for long term, you may do the test three times for
comparison
Skin cells are renewing everyday but it needs 28 days(=4 weeks) for skin renewal.
So, even if you take images often, you cannot see the noticeable changes.
We don‟t recommend frequent diagnosis.
Q12. How many photo we can take again?
There is no limit on the program, so you can take new photo again if you have enough
memory in your PC.
If you don‟t have enough memory or want to transfer the saved photo, you can use
external hard disk drive.
Ⅳ. FAQ (Diagnosis-related)
Suppurative sebum
’t need to make any adjustments depending on the skin color.
– before treatment, during treatment, after treatment.
– before treatment & after treatment.
recommend to do the test two
마스터 부제목 스타일 편집
47
For your beautiful and comfortable life, BOMTECH skin diagnosis system A-ONE
Page 48
Ⅳ. FAQ (Program, device-related)
1. Lock key error message pops up.
Please check if you put the right lock key into PC.
Please try to connect another PC USB port.
Please re-install Lock key driver.
2. Camera connection error message pops up.
- Check if the USB cable is connected well between PC and the machine.
- Connect the machine to another PC USB port and try it again.
- Check if the power switch( at back of the machine) turned on. If not, turn it on and try
again.
- Check if the power cord is well plugged into an electrical outlet.
3. I lost the program CD or USB lock key.
CD and USB lock key can‟t be provided in free due to our copyright.
Especially, USB Lock key can be lost or damaged during use. please be extra careful.
Please contact to us if you would like to purchase a new one.
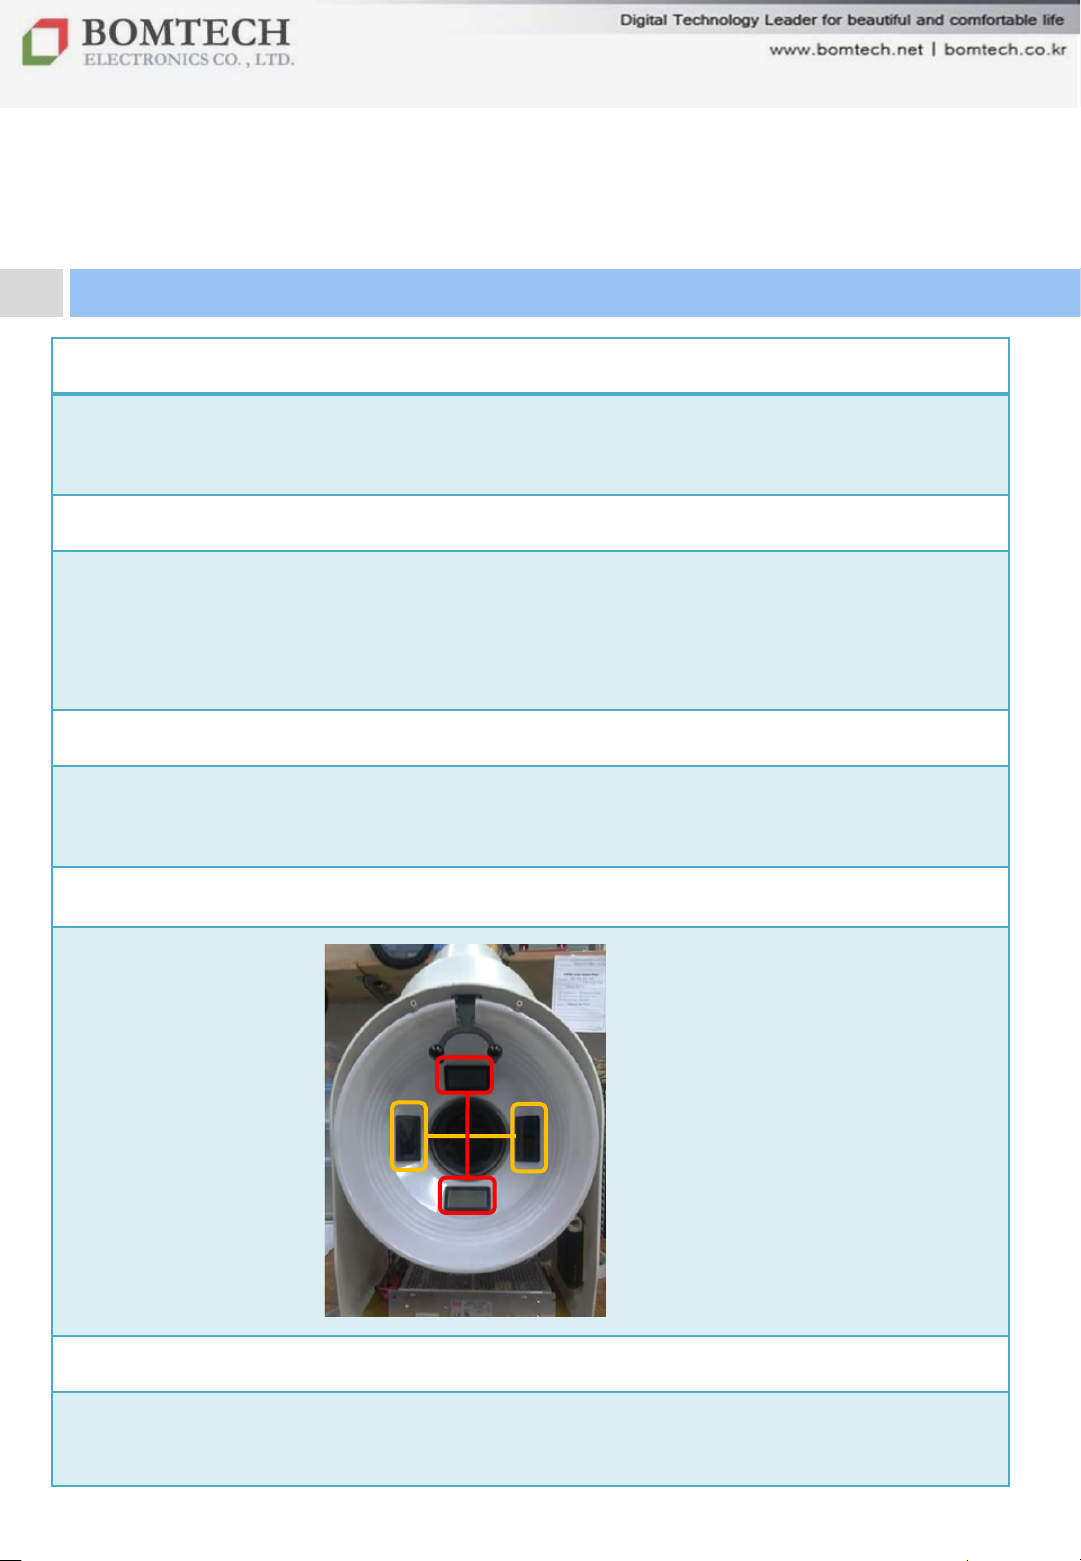
4. What is UV flash and polarization flash?
Polarization
5. 2. P-sensor seems to be broken.
마스터 부제목 스타일 편집
UV
P-sensor is consumable item. Please contact to us if you would like to purchase a new
one.
48
For your beautiful and comfortable life, BOMTECH skin diagnosis system A-ONE
Page 49
V. Maintenance & Warranty
V-1. Maintenance
1. General maintenance
- Keep it with its power off. Wipe its surface out with a dry cloth.
- Keep it away from direct sunlight or high temperature and humidity.
- Do not repair, disassemble or alter of the device to non-professional staff.
2. Routine inspection
- Make sure to inspect the device and adapter before use.
-When you use the device which has not been used for a long time, make
sure to check if it works properly with safety.
V-2. Warranty
1. We guarantee the products as follows.
2. For troubles of the products in use, contact __________________.
3. We provide the after-sales service within 7days from the receipt of an
application form.
4. The period when the parts of A-ONE stock is 2 years after stopping of the
production of the parts.
5. We offer free repair to our products within 12 months (warranty period) from
the day they are purchased. If any of our products has damages or natural
troubles, we offer free repairs or replacements.
6. If they are included in the following problems, you have to pay for the repair
even during warranty period.
- Troubles due to a user‟s careless treatment, voluntary repair or alteration
- Troubles due to the repairs by a man other than the technician from a dealer
shop or the customer center appointed by manufacturer
- Troubles or damages due to shocks while in movement
- Troubles due to the accessories or options not appointed by manufacturer
- Troubles due to other natural disasters (fires, salt or water, etc.)
7. This warranty card is limited to apply in the domestic area. Keep it with its
instructions.
마스터 부제목 스타일 편집
Model Name A-ONE Serial No.
Delivered by Signature
For your beautiful and comfortable life, BOMTECH skin diagnosis system A-ONE
49
Page 50

Bomtech Bldg., 34, Hyoryeong-ro 49-gil,
Seocho-gu, Seoul, Korea
Global Business Dept.
TEL: +82-2-523-8295
FAX: +82-2-523-8297
E-mail: [email protected]
Homepage: www.bomtech.net
Copyrightⓒ2001 BOMTECH ELETRONICS Co., Ltd. All right reserved.
마스터 부제목 스타일 편집
50
For your beautiful and comfortable life, BOMTECH skin diagnosis system A-ONE
 Loading...