

Page 1
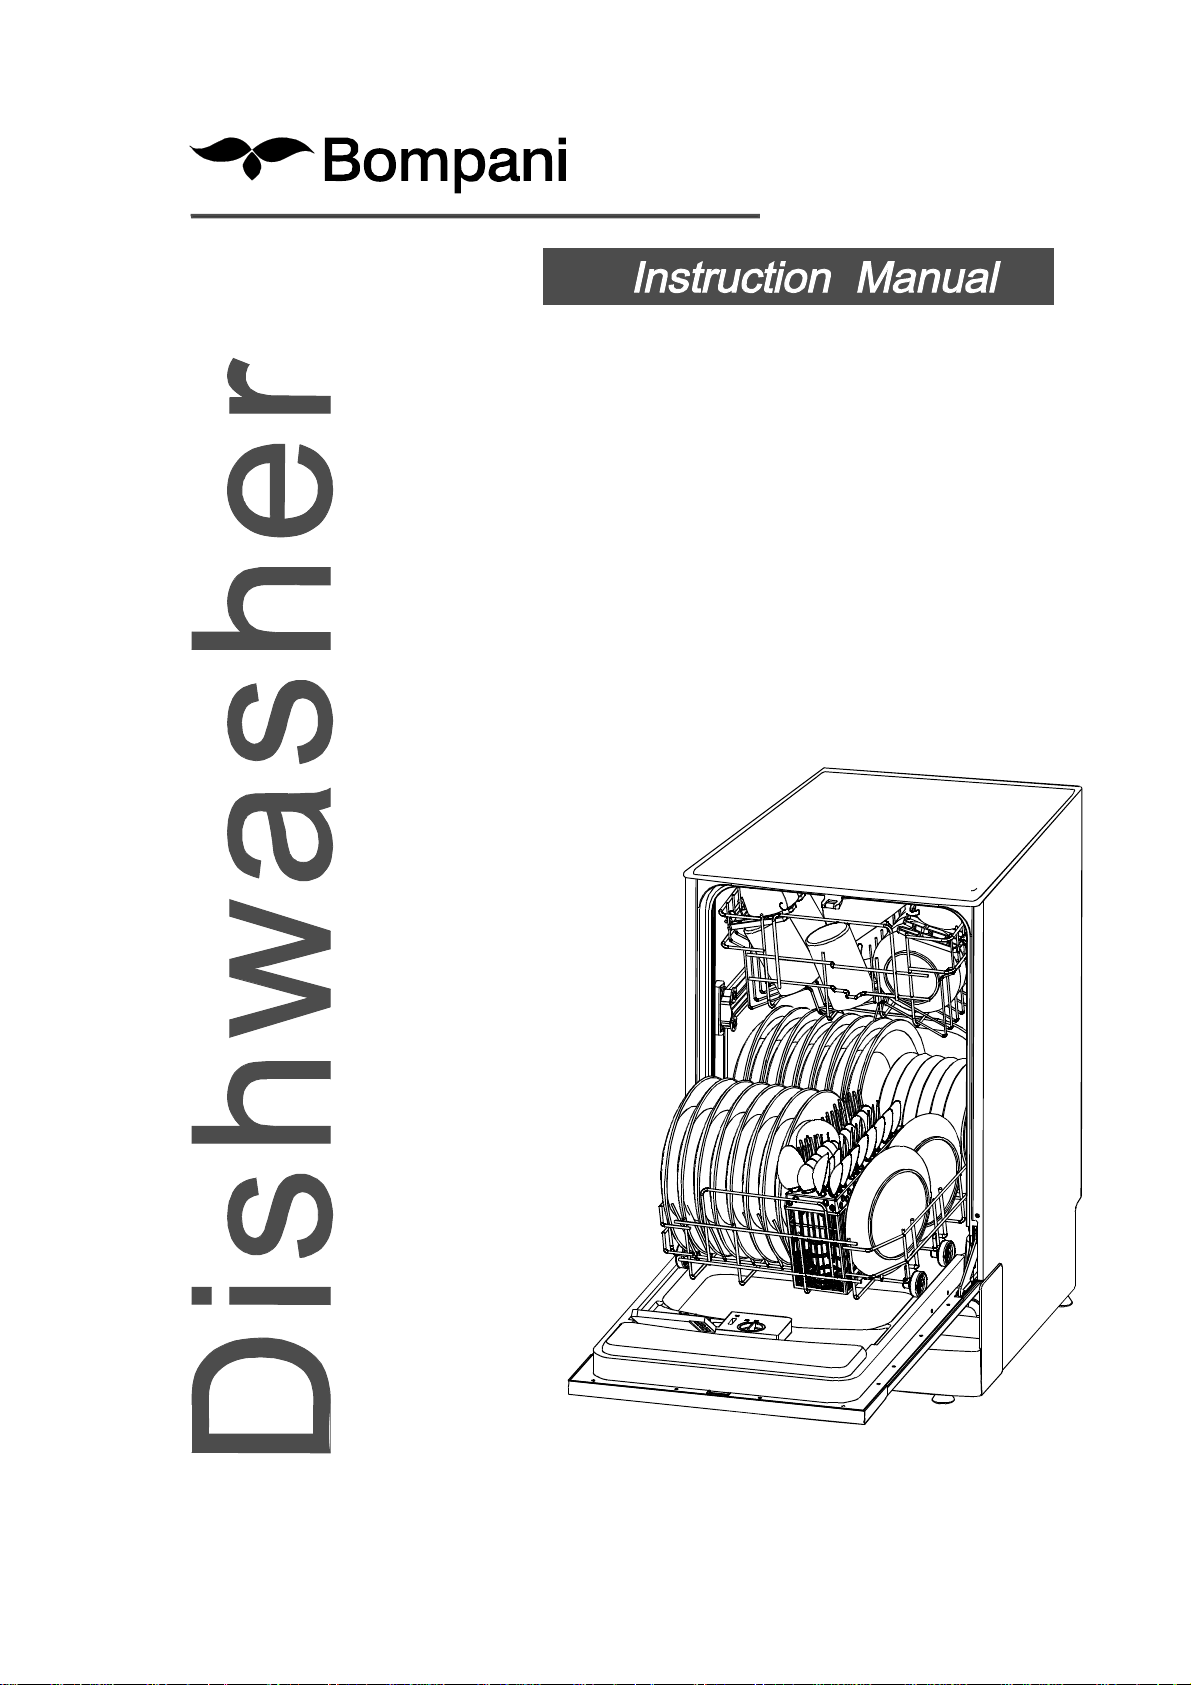
BOLT945/E
Page 2
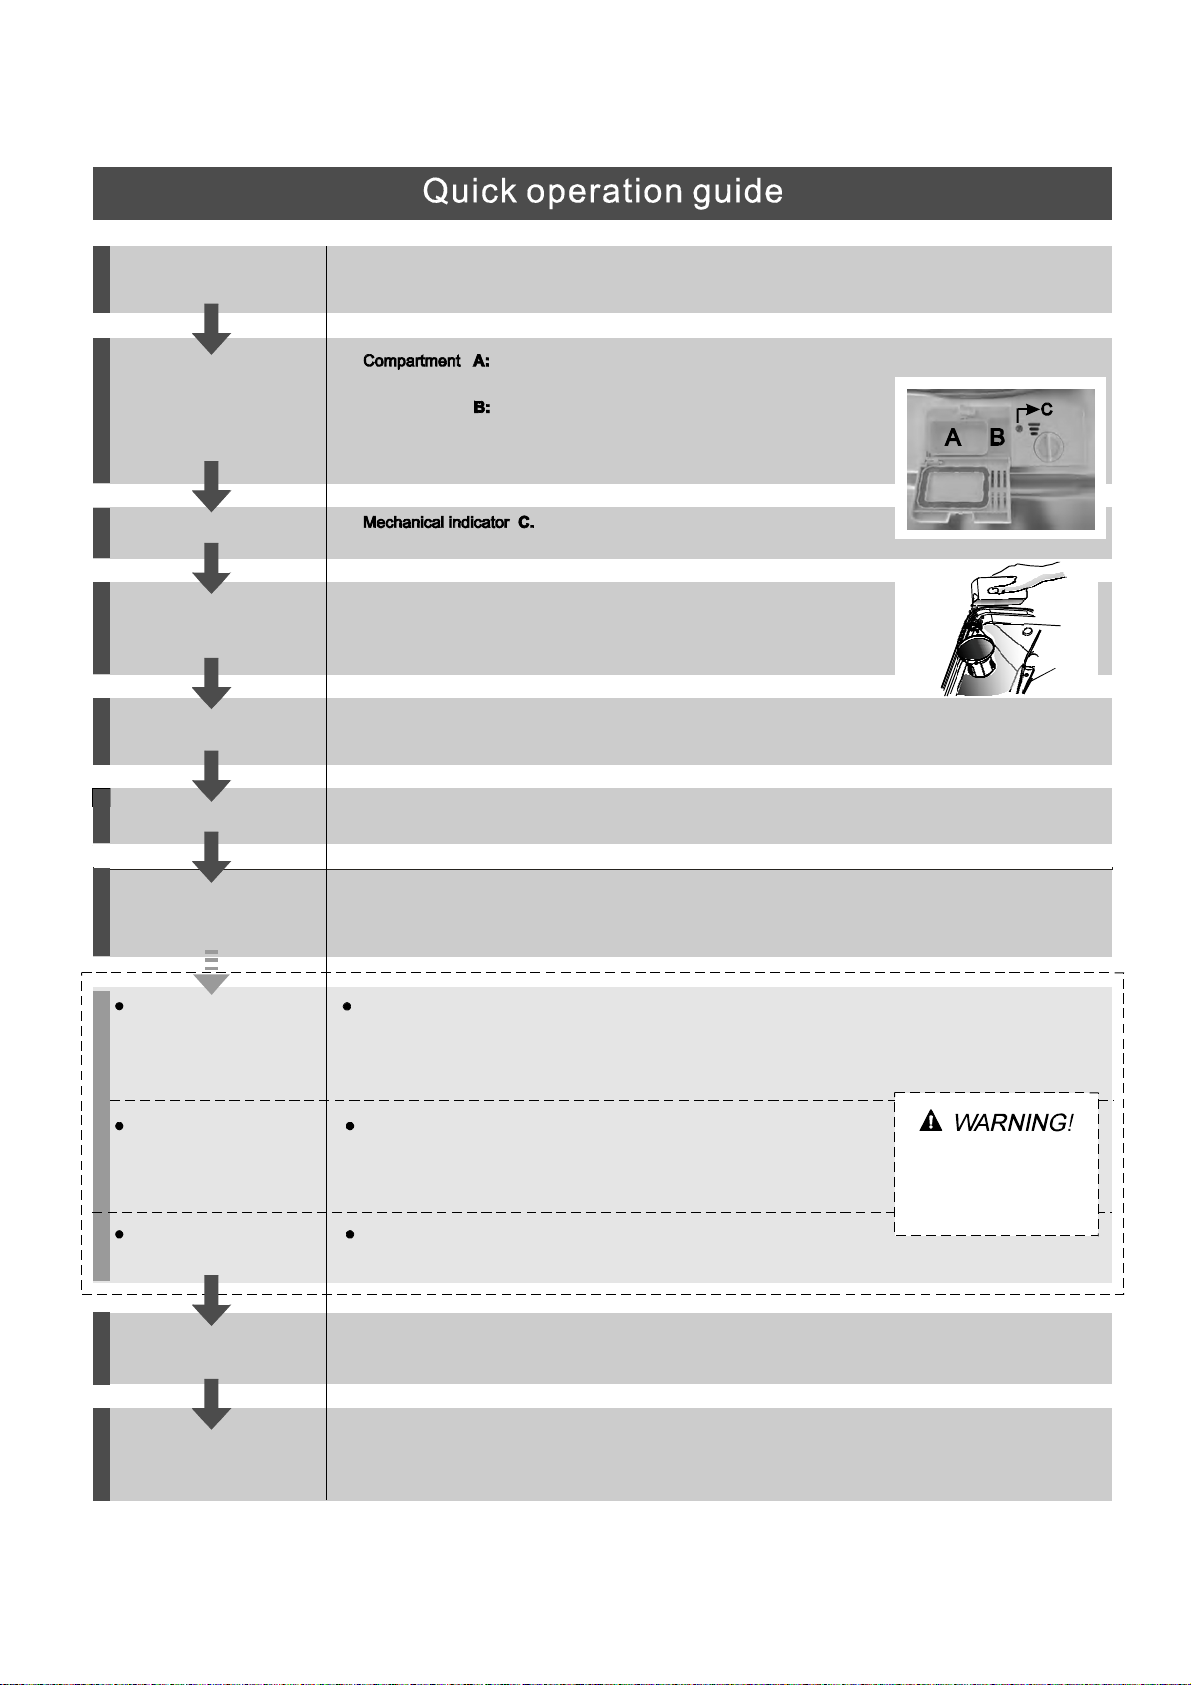
Fordetailed o peratingmethodread the corresponding content on the instructionmanual.
Switch on the appliance Press the On/Off button to switch on the appliance, Open the door.
Witheachwashcycle.
Fill the detergent dispenser
Compartment
For programmes with pre-wash only.
(Follow the user instructions!)
Check the rinse aid level
Checkthe regeneratio n
salt level
Load the baskets
Select a programme
Running the dishwasher
Changing t he programme
Electric indicator on control panel(if provided).
(On models with water softener system only.)
Electric indicator on control panel (if provided).
If there is no salt warning light in the control panel
(for some models), you can estimate when to fill the salt into
the softener by the number of cycles the dishwasher has run.
Scrapeoff any largeamount of leftover food.Soften remnants ofburnt foodin pans,
thenloadthe baskets. Refer to the dishwasher loading instructions.
Press the Programme button until the selected programme lights up.
( See the section entitled Operationg instruction )“”
Close the door, turn on the water tap. The machine will start working after about 10 seconds.
1.A running cycle can only be modified if it has been runningfor a short time.Otherwise thedetergent
may have already been released and the water already drained. If this is the case, the detergent
dispenser mustbe refilled.
2. Open the door a little to stop the washing, then press the Program button for more than 3 seconds to
cancel the running programme.
3. Select a new programme, then close the door.The machine will restart after about 10 seconds.
Add forgotten dishes in the
dishwasher.
If the appliance is switched
off during a wash cycle.
Switch off the appliance
Turn off the water tap,
unload the baskets
1.Open the door a little to stop the dishwasher.
2.After the spray arms stop working, you can open the door completely.
3.Add the forgotten dishes.
4.Close the door, the dishwasher will start running again after 10 seconds.
If the appliance is switched off during a wash cycle, when switched
on again, please re-select the washing cycle and operate the dishwasher
according to the original Power-on state ).
When the working cycle has finished, the buzzer of the
dishwasher will sound 8 times, then stop.
Turn off the appliance using the ON/OFF button.
Warning: wait a few minutes (about 15 minutes) before unloading the dishwasher to avoid handling
the dishes and utensils while they are still hot and more susceptible to break.
They willalsodry better.Unload the appliance, startingfrom the lower basket.
Open t he door carefull y.
Hotsteam may escape
when the door is opened!
Page 3
Dear Custom e r,
This appliance is intended to b e u sed in hou sehold
and simil ar app lic ati ons such as:
-staffkitchen areasin shops, offices a nd other
working environments ;
-farm houses;
-by clie nt s in hotels , mot els a nd ot her res iden tial
type environments;
-bed and br eakfast t ype e nv ir onment s .
Pleasecarefully read this manual bef oreusingthe
dishwasher,it willhelpyou t o use andmaintainthe
dishw ash er properly.
Keepit toreferto itat a laterdate.
Passit on to any s ubsequent owner of the applianc e.
ControlPanel...................................................3
Dishwasher Features.......................................3
A Water So ftener..... .... ......... ... ....... ..... .... ....4、 ..
B Loading theSalt into theSoftener.................5、
C F ill the RinseAidDispenser.........................5、
D Function of Detergent . ................................6
、
This ma nual c on tain s sec t ion s on safety In stru ct ion s ,
Operating Instructions,InstallationInstructions and
Troubles hooti ng Tips, etc .
To re view the section on t roublesho oting Tips
will help youto solvesomecommon problems
byyourself .
Ifyou can not solve the pro blems by yo urself ,
please ask fo r t he help o f professiona l technician s.
Attention b efore or after lo ading the Dishwash er
Bas kets.... ..... ...... .... .. .. .. ..... ... . .. .... ... . .. ... ..... . .. .9
Loading the upper ............ ....... ..... ....... 10Basket
LoadingtheLower ............................. ..10Basket
Ther ecomme nded meth od loading big
dishware........................................ ............ ...11
CutleryBasket..............................................12
WashCycleTable...........................................13
Turning on theAppliance................................14
Changethe Programme.............. ................14....
At the End of the WashC ycle...........................14
FilteringSystem............................................. 15
Caring for the Dishwasher..................... .........16.
.................................. 17Installationpreparation
...18Aesthe ti c p an el' s dim ensi o ns and instal l ati on
..............20Tension adjustment of the door spring
........................... ...20Connection of drai n hoses
.........................21Dishwasher i nstallation steps
Abo ut E lec tri city Connec t in g.... ... .. ... . ... ........ ... 2 2
Cold WaterConnection. ................................. 23
The man ufacturer, f ollowing a policy of c onstant
development and u pdati ng of the pr oduct, may
make m odifications witho ut giving prior notice.
Befo re cal l ing fo r ser vic e.. ... ... ... . ....... . ... .... ... ..2 4.
Errorcodes.................................... ..............25.
Technicalinformation.............................. .....26..
Page 4

When using your dishwasher, follow the prec aut ions listed below:
This appliance must be grounded. In the event of a
malfunction or breakdown, grounding will reduce
the risk of anelectric shock by providing a path of
least resistance of electric current. This appliance
is equipped with a cord having an equipmentgrounding conductor and a grounding plug.
The plug must be plugged into an appropriate outlet
that is installed and grounded in accordance with
all local codes and ordinances.
Do not abuse, sit on, or stand on the door or dish
rack of the dishwasher.
Do not touch the heating element during or
immediately after use.
(This instruction is only applicable to machines
with a visual heating element.)
Do not operate your dishwasher unless all
enclosure panels are properly in place. Open
the door very carefully if the dishwasher is
operating, there is a risk of water squirting out.
Do not place any heavy objects the
door when it is open. The appliance could tip
forward.
When lo ad ing ite ms to be w ashed :
1) L ocate sharpitems sothattheyarenot likely
todamage thedoorseal;
2 Warni ng: Knives and othe r u tensils with
)
sh a rp poin ts must be loade d in t h e basket
with their points d own or p laced in a
horizontal position.
When us ing your dishwasher, yo u sh ould
prevent plastic items from coming i nto contact
with t he heating element.(This inst ruction is only
applicable to m achines with a visual h eating
element.)
Check thatthe detergentcomparment is empty
after completion of thewash cycle.
Do not wash plastic items unless they are marked
dishwasher safe or the equivalent. For plastic items
n
ot so marked, check the manufacturer's
recommendations.
Use o nly detergent and rinse additives
designed for an aut omatic dishwasher.
Never use s oap, laundr y de terg ent, or h and
washing detergent in you r dishwasher. Keep
these products out of t he reach of chi ldren.
on or stand on
Improper connection of the equipment-grounding
conductor can result in the risk of an electric shock.
Check with a qualified electrician or service
representative if you are in doubt whether the
appliance is properly grounded. Do not modify the
plug provided with the appliance; If it does not fit
the outlet. Have a proper outlet installed by a
qualified electrician.
Keep children away from detergent and rinse aid, keep
child away fromthe opendoorof the dishwasher,
ren
there could still be some detergent left inside.
This appliance is not intended for use by persons
(including children with reduced physical, sensory or
mental capabilities, or lack of experience and
knowledge ,unless they have been given supervision
or instruction concerning use of the appliance by a
person responsible for their safety.
Children should be supervised to ensure that they do
not play with the appliance.
Dishwasher detergents are strongly alkaline, they
can be ext r emely danger ous if s wallo we d.Avoi d
contact with skin and eyes and ke ep children away
from th e dishwasher when the door is open.
The doo r sh ould not be left o pen,
since th is could increase the risk of trippi ng.
If th e s upply cord is d amaged, it must be rep laced
by th e m anu facturer or its se rvice agent or a
similar ly quali fie d person in order to avoid a
hazard.
Remove thedoor to the washingcompartment when
removing an old dishwasher from service or discarding it.
Please d ispose of packing materials properl y.
Use the dishwasher only for its intended function.
During installation, the powersupply mustnot
beexcessively or dangerouslybentorflattened.
Do not tamper with controls.
The app liance i s to b e connected to t he water
mainsusingnewhose setsandthat old hose-sets
sho ul d not b e reused.
Themaximumnumber of placesettingsto be
washed i s 9.
Themaximumpermissible inlet water pressureis
1MP a .
Theminimumpermissible inlet w ater pressureis
0.0 4 M Pa.
)
Page 5

Dispose of the d ishwasher packaging mater ial c orrectly.
All packaging materials can be r ecycled .
Plastic parts are m arked with the s tandar d i nternati onal abbreviations:
PE for polyethylene, e.g. sheet wrapping material
PS forpolystyrene,e.g.padding m aterial
POM polyoxymethylene, e.g. plastic clips
PP polypropylene , e.g. Salt filler
ABS Acrylonitri le B utad iene Styrene, e.g. Control Panel .
Packagingmaterialcould bedangerous for children!
For disposing of pa ckage and the a ppliance ple ase go to a recycling centre. Therefore cut
offthe power supply cableandmake the door closing deviceunusable.
Cardboardpackagingismanufactured fromrecycledpaper andshouldbe disposed in the
waste paper c ollec tion for recycling.
By ensuring t his product is disposed of correctly,you will help pr event potent ialn egativ e
consequences for the environment and human health, w hich could otherwise be caused
byinappropriate wastehandlingofthisproduct.
For more d etail ed information about recycling of this product, please contact your local
city of fice and your household w aste disposal service.
DISPOSAL: Do no t dispose this product as unsort ed municipal waste. Collection of such
waste s epara tely for spe cial treatment is necessary.
Page 6
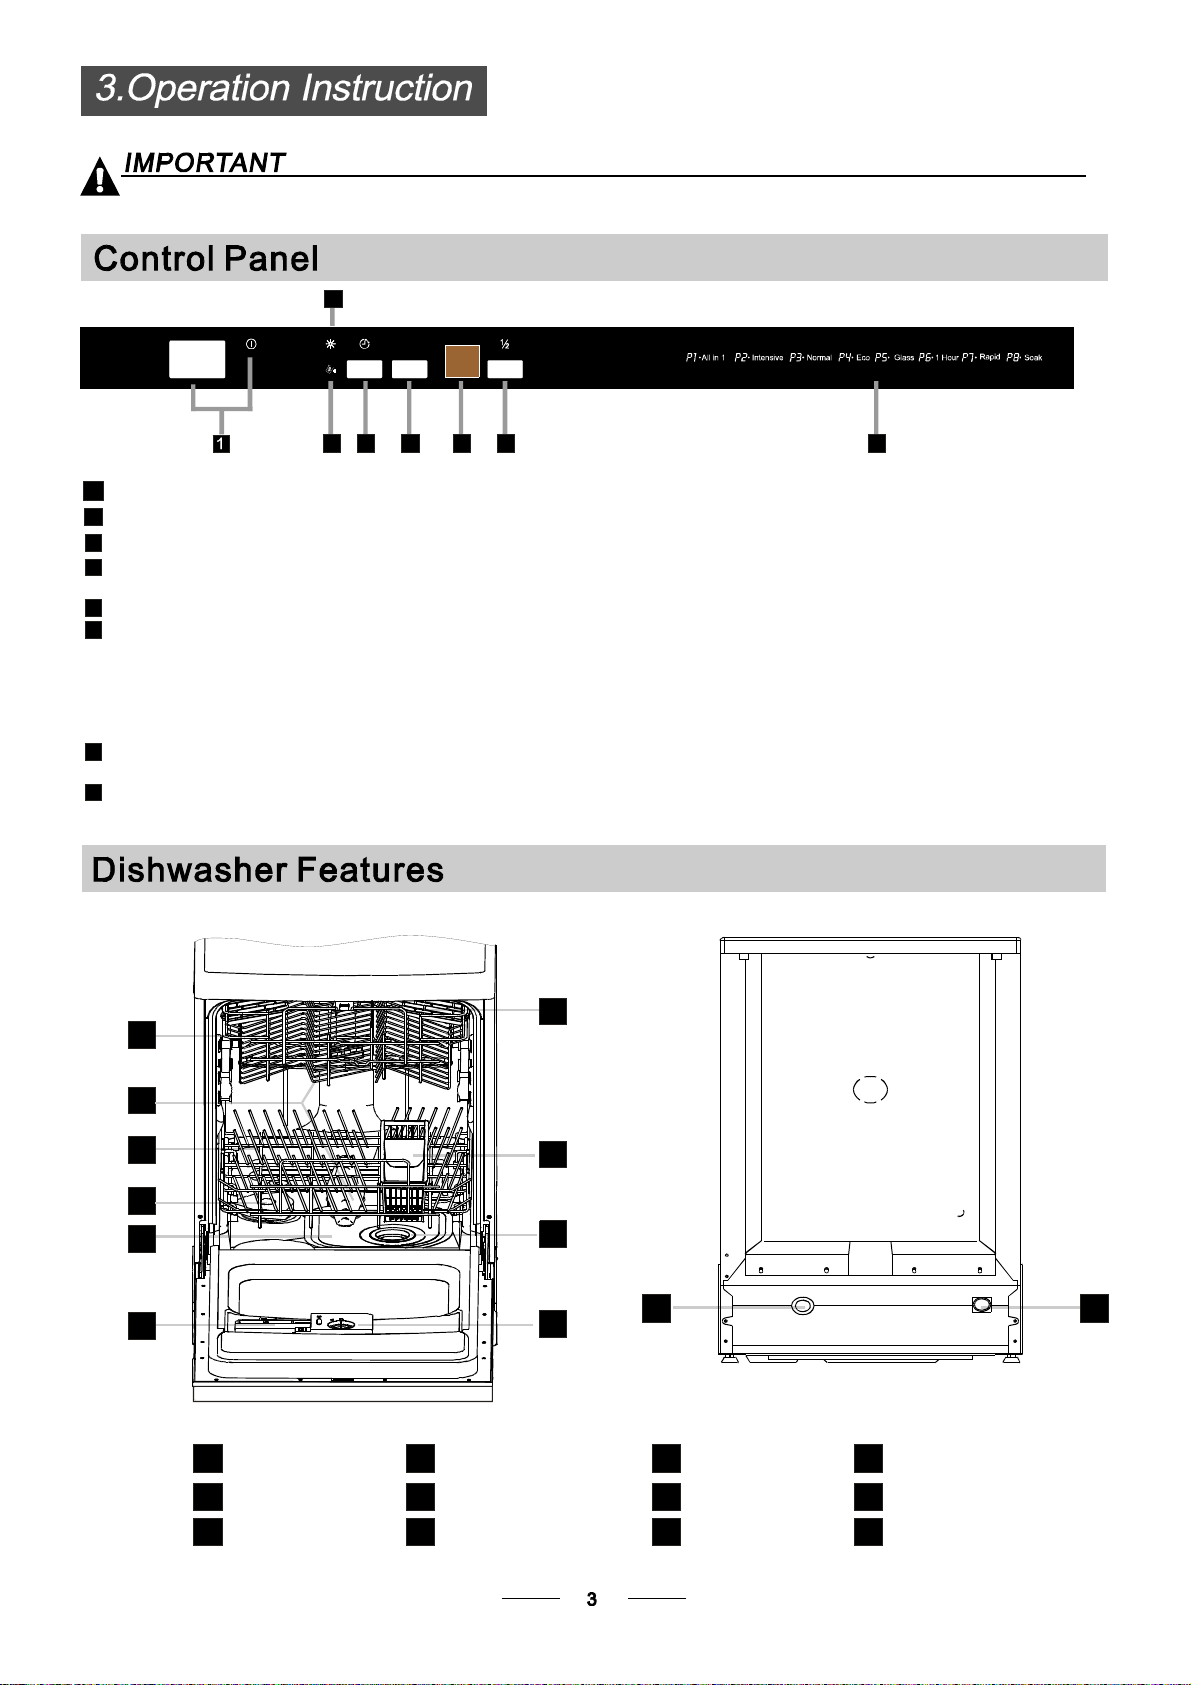
Tog etthe best performancefrom yourdi shwasher,r ead alloperatinginstructions
beforeusing it for the firsttime.
3
P
2 4 5 6 7 8
Power indicato r light and switc h: To turn on/off and show the power supply.
1
Salt w arni ng li ght: Toshow when the salt c ontaine r need t o be re filled.
2
Rinse aid warning l ight: To s how when the d ispenser need to be r efill ed.
3
3
Delayed Start Button: To preset the w ash timer an d delay the starting time t o 24 hours. E very press of
34
this b utton increases the time by one hour. for example: one press fo r an hour,two for two hours.. . .. .()
35
Program button: Toselect one of the8 programs.
Display window: To s how the delay time, Error co des and the s elected program which shown as P1,
36
P2 etc.
P1: Al l in 1
P2: In tensive
P3: Norm al
P4: Eco
37
Half l oad function button and indicator light: Toselect and show H alf load functions.
The 1 / 2 function is option
38
Program show: Show t he program that P1,P2 etc m ean for.
P5: Gla ss
P6: 1 h our
P7: Rapid
P8:Soak
.
Front view
Back View
7
1
2
3
8
4
5
6
on
Off
UpperBasket
1
Spra yArm s
2
Lower Basket
3
Salt Container
4
MainFilter
5
Detergent Dispenser
6
9
10
11 12
Cup Shelf
7
CutleryBasket
8
Coarse Filter
9
RinseAidDispenser
10
Drain pipe connector
11
Inlet pipe c onne ctor
12
Page 7
Before u sing your dishwasher for the first time:
A. Set the water softener
B.
Add 1.5Kg di shwashe r salt and thenf ull fill the salt con tainer with water
C. Filltherinseaiddispenser
D. Fill i n dete rgent
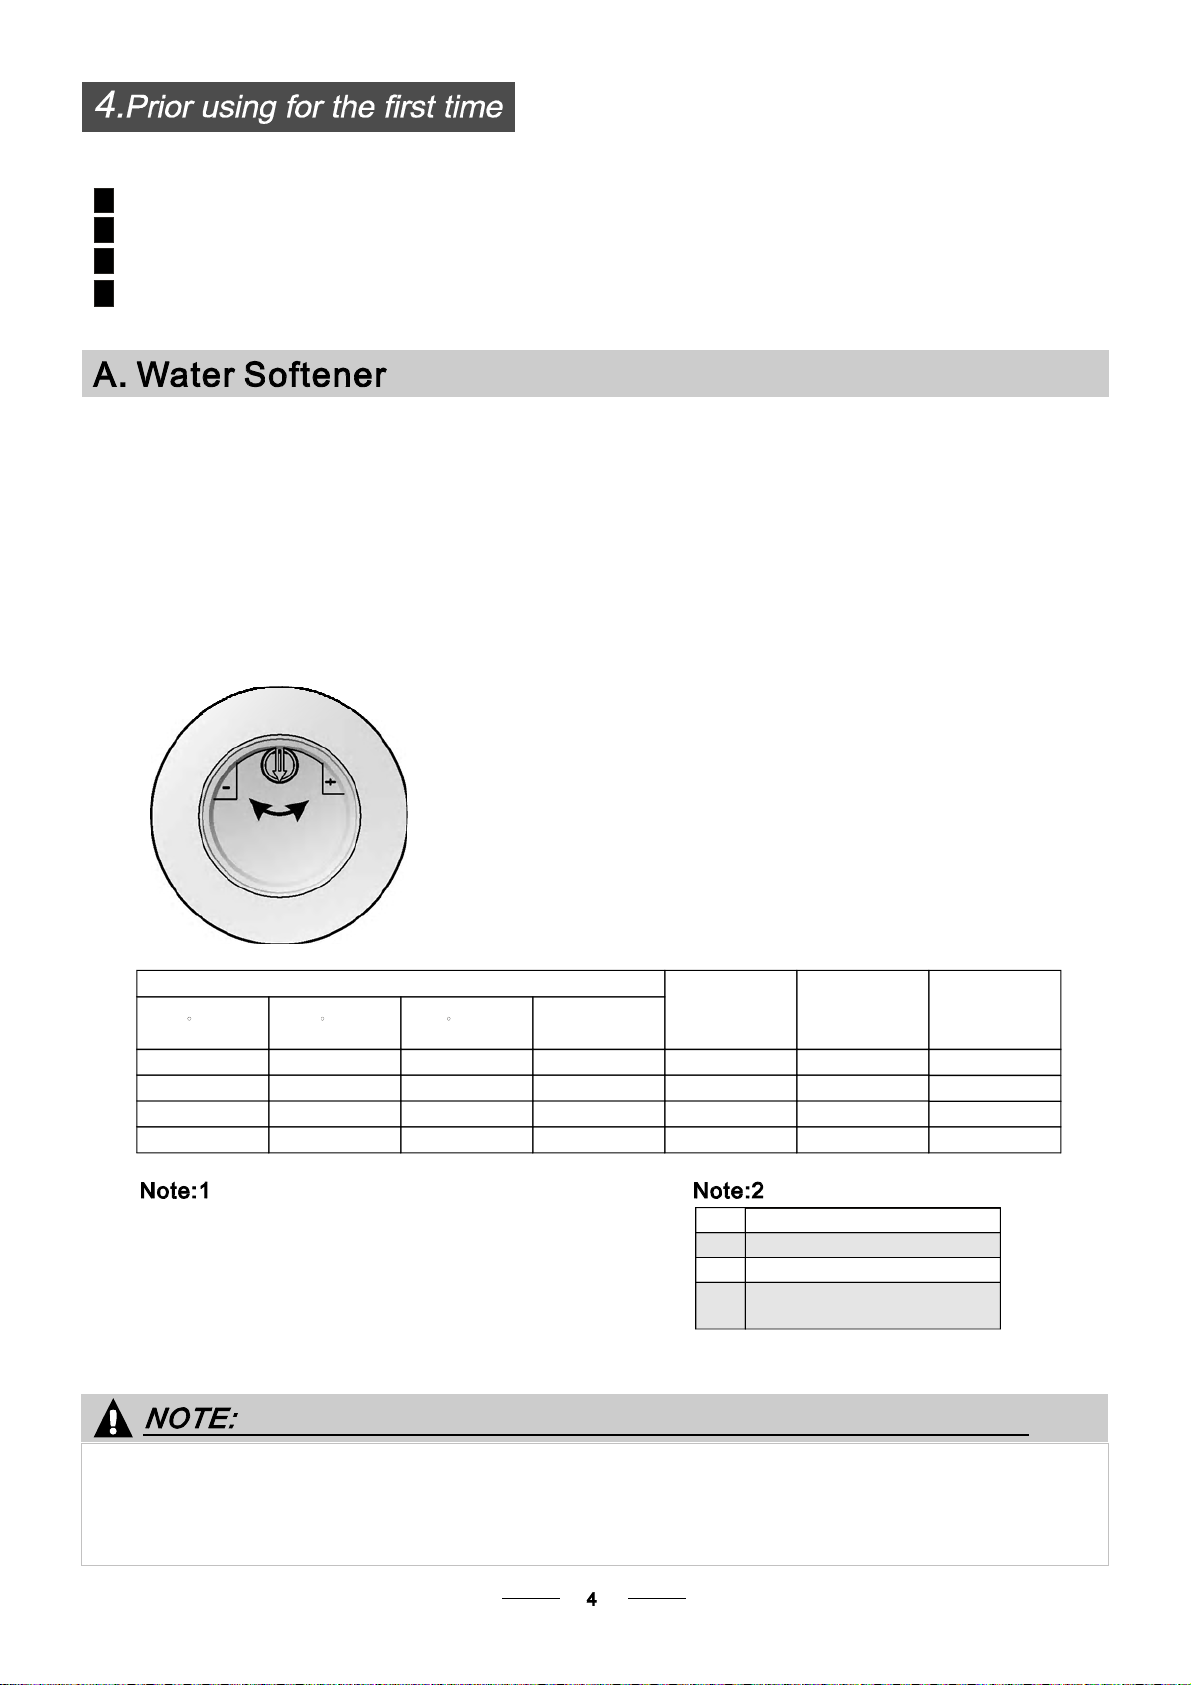
The wat er so ftener must be set m anu ally,using the w ater hardness dial.
The wat er so ftener is designed to remove minerals and sa lts from thewat er,wh ich woul d have
a detrim ental or adverse effect on the operation of the appliance. T he higher the
content ofthese mineral s an d salts, the har der your w ater is. The s oftener should be
adjusted acco rding to the ha rdness of the water in you r ar ea. Your local WaterA uthority
can advise you on the hardness o fthe waterinyourarea.
Adjusting Salt Consumption
The dishwas her is designed to al low for adjustment in the amount of sa lt consumed bas ed onthe ha rdness of
the waterused. This is intended to optimiseandcustomisethe levelo f saltconsumption.
Pleas e follo w the steps bel ow for a djus tmen t in salt cons ump tion .
1. Unscrew the cap from the salt container.
2. T here is aring on the container with ana rrow on it ( see figure
onthe side),ifnecessary, ro tate thering intheanticlockwise
direction from the "-" Setting toward the "+"sign, b asedon the
hardness o f the water be ing used.
It is recomm ended that adjustme nts should b e made in
accord ance wit h the followin g sch eme:
WATER HARDNESS
dH
45~60 80~107 56~75 8~11
°
dH=1.25 Clarke=1.78 fH=0.178mmol/l
DH: Ger man degree
°
fH: Frenchdegree
°
Clark: British degree
°
fH
0~140~8 0~1.4
14~398~22 1.4~3.9 - 20 50
39~8022~45 3.9~8 Mid 40 25
°°
Clarke
0~10
10~28
28~56
mmol/l
Selector Position
/
+
""/
No sa lt need added
"-"
Settingtowardthe"-"sign
"+"
Settingtowardthe"+"sign
Settingtowardbetween
"Mid"
the "-" sign and "+" sign
Salt consumption
(gram/cycle)
0
60 16
Auto nomy
(cycles/1kgs)
/
Contact your local w ater board for i nformation on the hardness of your w ater supply.
If your model doe snot have a nyw ater so ftener,you m ays kip this section.
WATER SOFTENER
Thehar dness of the wa ter v aries from place t o place. If hard water is used in the dis hwasher,de posits will
form on the dishes and utensils.
Theapplian ce i s equipped with a sp ecial softener that uses a salt container specific ally designed to eliminate
lime and minera ls from the wate r.
Page 8
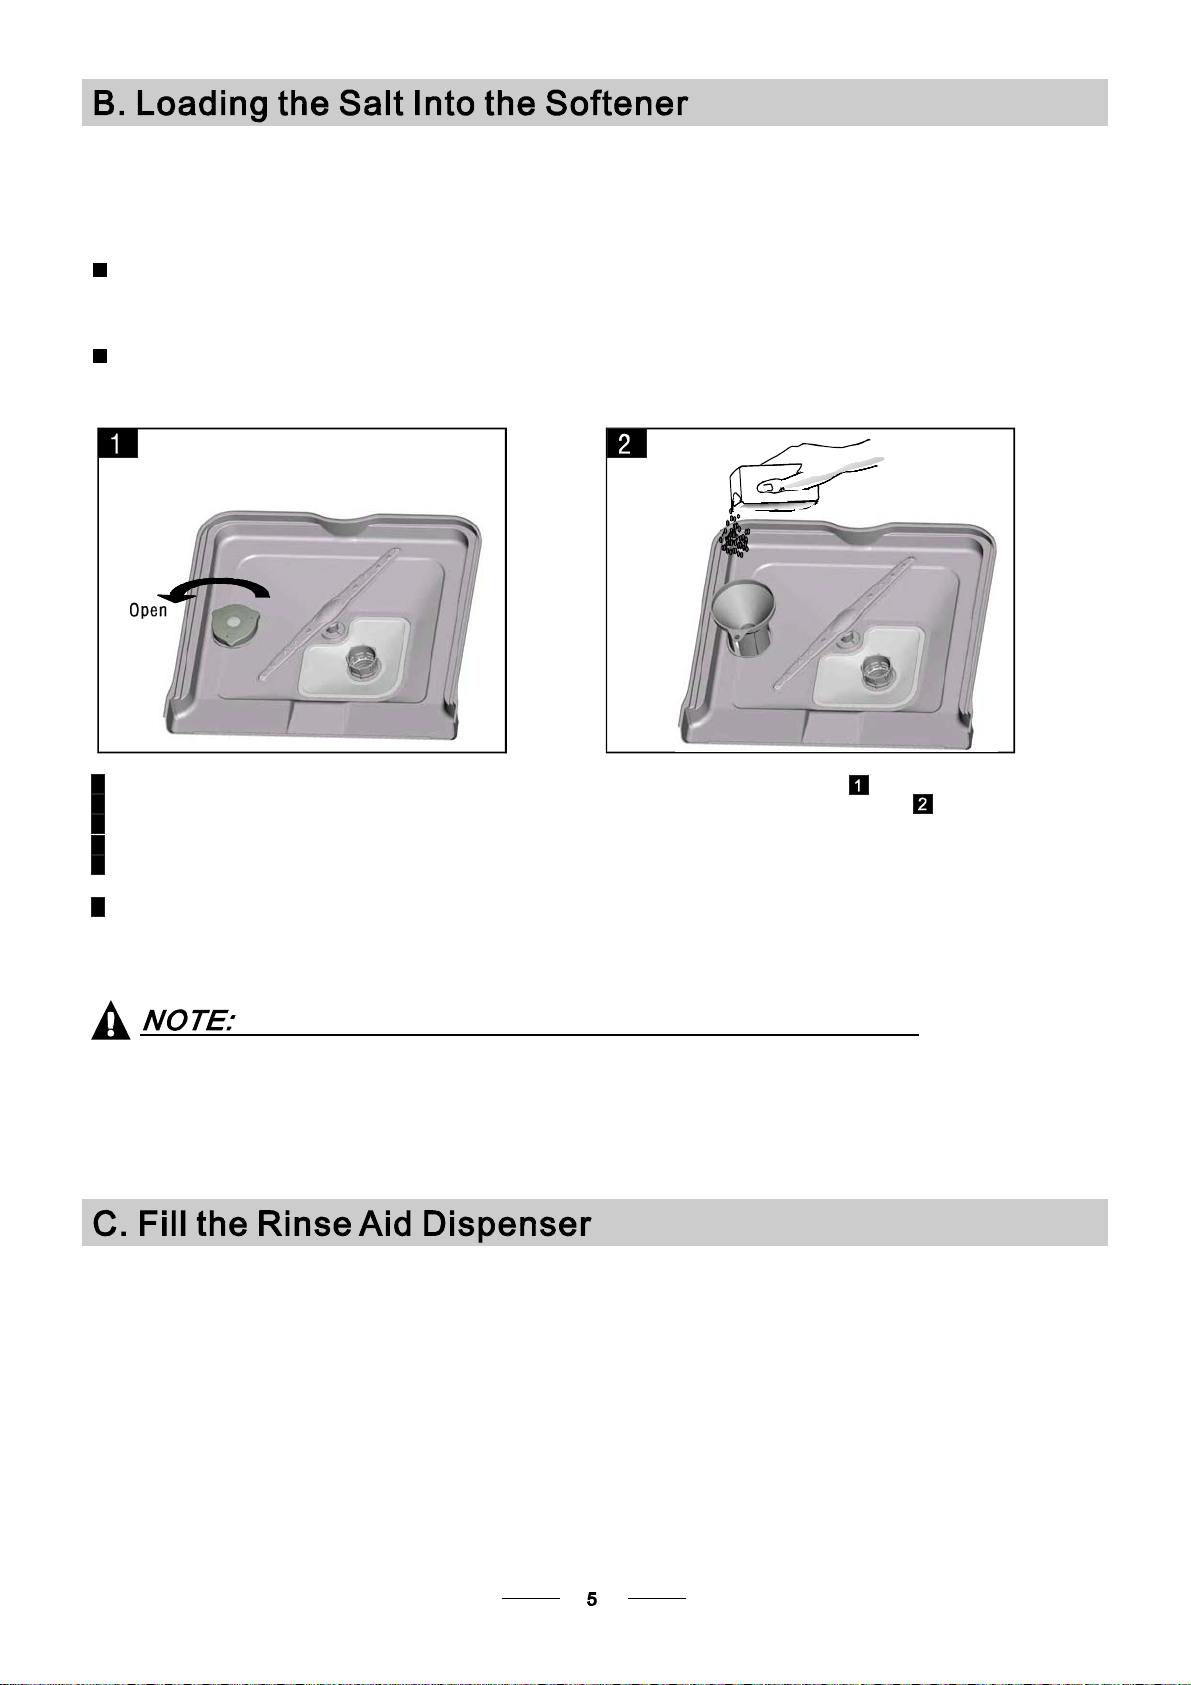
Always use the salt int ended for use w ith dishwasher.
The sa lt c o ntainer is located beneath the lower basket and should be filled a s explained
int he following:
Attention!
Only use salt specifi cally designed for t he use i n d ishwash ers! E very other type of
salt no t specifically designed for the u se in ad ishwas her,especially table salt, will
damage the w ater softener.I n case of da mages caused by the useof unsuitab le
salt t he manufacturer does not give any wa rranty nor is liable for a ny damages caused.
Only fillwi th s alt just b efore starting one of the co mplete washi ngp rograms.
This will p revent any g rains of salt or salty water,which may have been spilled,
remaining on the bottom o f th e machine for any p eriod of time, which may cause
corrosion.
A Removethelower basket andthenunscrewandremove the cap fromthesalt container.
B Place th e e nd of the funnel(su pplied) into the hole and introduce ab out 1.5kg of dishwash er salt.
C Fullfill thesaltcontainer w ith water.Itis normalforasmall amount of water to come outofthe salt container.
D Af ter filling the contain er , screw the c ap tightly back clo ckwise.
E Usually,the salt warning light will stop being illuminat ed with in 2- 6 days after the salt contain er has be en filled wit h
salt.
F Immediately a ft er f illin g the salt into the salt container, a washin g program should be sta rted
soak orrapid ).
bysalty water.This is outof warranty.
program Otherwis e the filter system, pump or other importan t parts of the machine may be damaged
1.The salt container must only be r efilled when the salt warning light in the contr ol panel comes on.
Depending on how wel l the s alt dissolve s, the s alt warning light may still be on even though the
salt cont ainer is filled.
If the re is n o sa lt warning light in the con trol panel ( for some Models),you can estimate when t o fill
the s alt i nto the softener by the cycles t hat the dishwasher has run.
2. If there are spills of the salt , a soak or a rap id program should be ru n t o remove t he excessive salt.
(Wesu ggest to use the
RinseAi dDispe nser
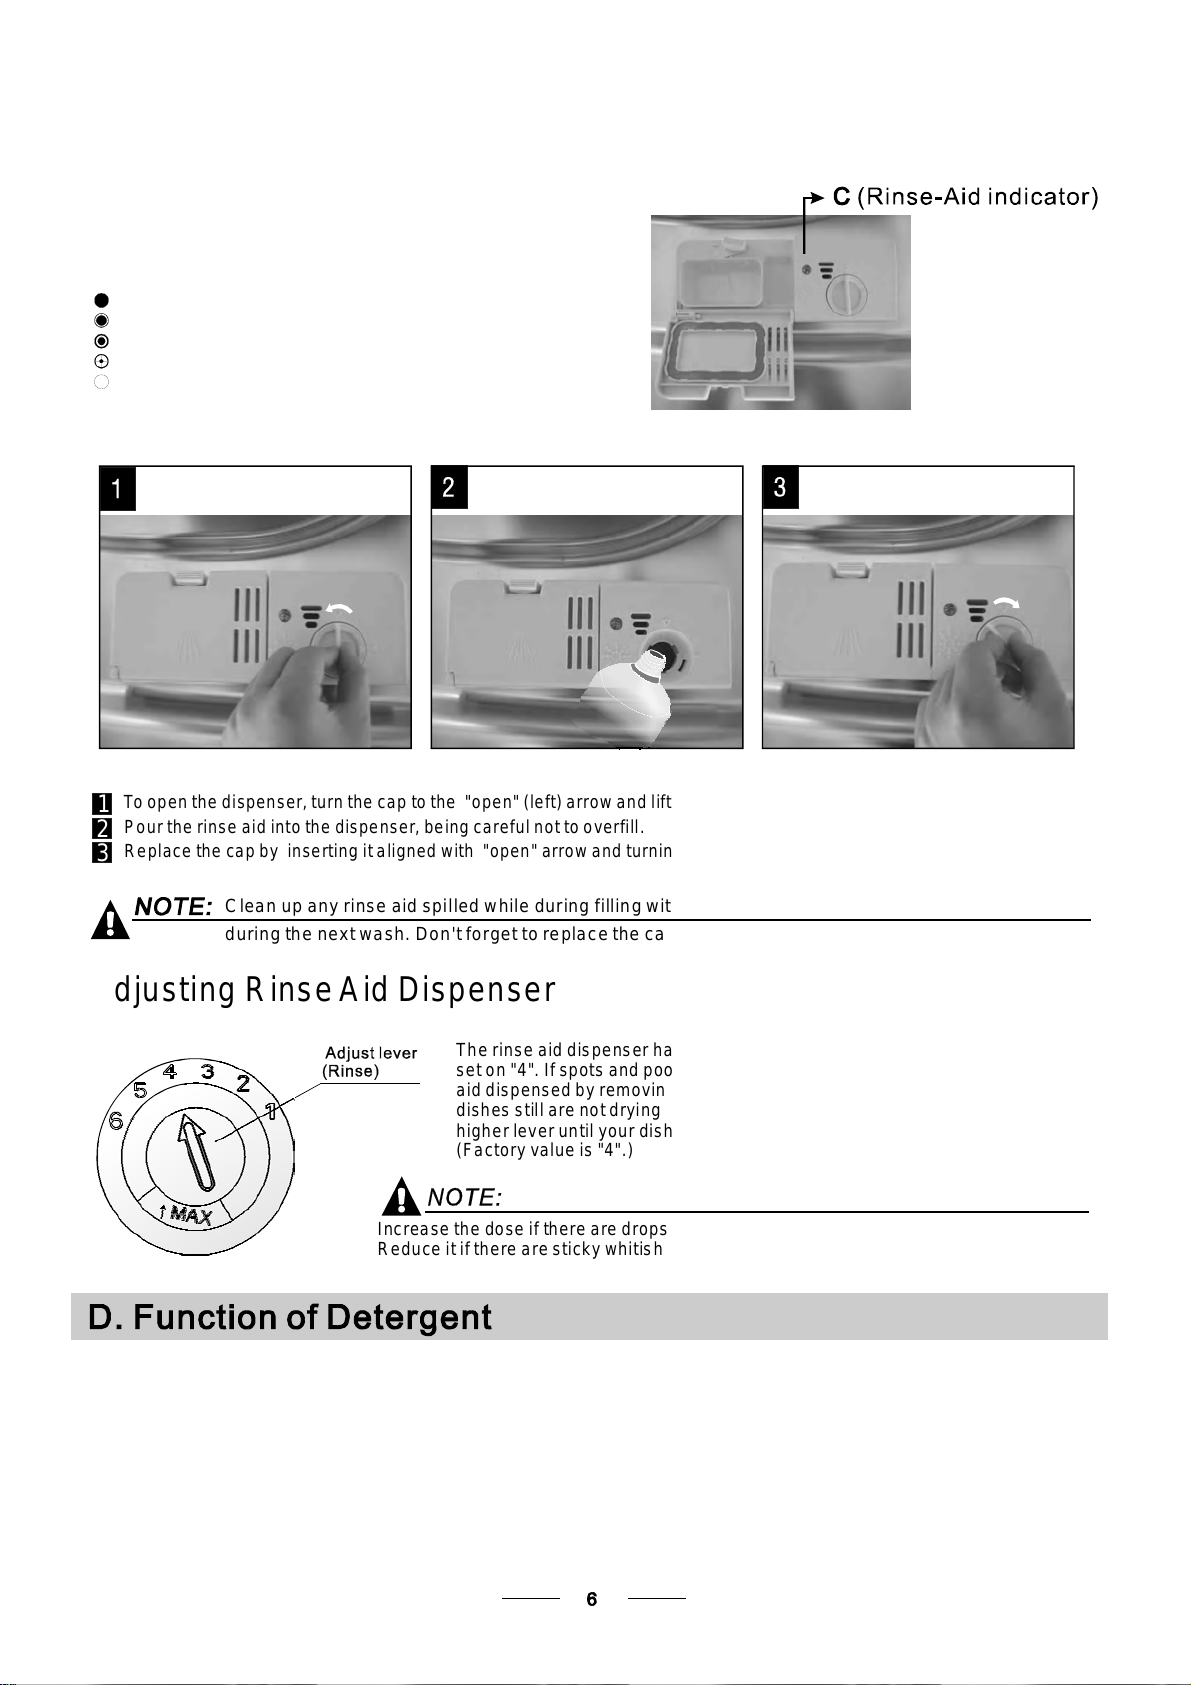
The r inse a id is r elea se d d u ring the final rin se to prevent wat er from f orming drop lets o n y our dis hes, whic h can
leave spots and streaks. It also improves dry ing by allowing water t or oll offthe dishes. Your dishwasher is
designed touseliquidrins eaids. The rinseaid dispenser islocated inside the door nexttothedetergentdispenser.
To fi l l the dispens er, ope n the cap and pour the rinse aid into the dispens er until t he lev el i n dicator turns complete ly
black. The volume of the rinseai d co ntainer is about 110ml.
Function of R inseAid
Rinse ai d is automat ically added during the last rinse, ensuring th orough rinsi ng, and spot and streak free drying.
Attention!
Only use brandedrinse aid for dishwasher. Neverfill the rinseaiddispenserwith anyothersubstances
(e.g. Dishwasher cleani ng agent, liqu id deterge nt). Th is would damage the app liance.
Page 9
Whento Refill the RinseAidDispenser
Ifth ere i s no rinse-aid warning light in thecont rol panel, you can estimate the amount from the colour
ofthe optica l level indicator C loc ated next to the c ap. When th e rinse-aid contai ner i s fu ll, the whole
indicator will bedark .As the rinse-aid diminishes, the size of the dark dot decreases. You should never let
the r inse aid l evel fall 1 / 4 full.
Asth e ri nse aid d imin ishes, the size o f the black do t
ontherinse aidlevelindicatorchanges, as illustrated b elow.
Full
3/4full
1/2full
1/ 4 full - Shouldrefilltoeliminatespotting
Empty
""
To open the di spenser, turn the cap to the "open" (le ft) arrow an d lift it out.
1
Pour the rinse ai d into the dispe nser, being caref ul not to over fill .
2
Replace the capby inserting it a ligned with "open" arrow and turning it to t he closed (right) arrow.
3
Cl ean up any rins e aid sp il l ed whi le du rin g fill i ng wi th an abso r be nt cloth t o a void exc e ssi v e f oam i n g
during the next wa sh.
Don't f orget to replace the cap be fore you close dishwasher door.
Adjusti ng RinseAid Di spenser
The r inse aid dispenser has six or four s etti ngs.Always sta rt with the d ispens er
set o n "4". If sp ots and p oor drying are a p roble m, increase the amount of r inse
aid d ispensed by removing the dispenser li d an d rotating the d ial to "5". If the
dishes s till are not d ryi ng properly o r are show spots, adjust the dial to t he n ext
higher lever until your dishes a re spot-free. The recommend ed setting is "4".
(Factoryvalue is "4".)
Increasethedose ifthere aredropsofwateror limespots on t hedishesafter washing.
Reduce it if th erearestickywhitis h stainson your dishesor a bluishfilmonglassware o r
knifeblades.
Prop er Use o f Det ergent
Detergent swi th its c hemic al i ngredien ts are ne cessary to remove dirt, crush dirt and transport it o ut of the dishwasher.
Use only det ergen t s pe ci f ic al ly mad e for use in dishwa sher s. Keep you r detergen t f resh
Don't put powder d etergen t int o t he dispenser until you're ready to w ash dishes.
and dry.
Deterg ents
The re ar e 3 sor ts of d etergent s
1.Withphosphate and with ch lorine
2.Withphosphate and without chlorine
3.Withoutphosphate and without chlorine
Page 10

Normally ne w pulverised detergent is without phosphate. Thus the water so ftener function of
phosph ate is not given. In this cas e w e r e commend to fill sal t i n the sa lt container even when
the hard ness o f water is o nly 6 d H. I f detergents without phosphate are used in the case of hard water
often wh ite spots appear ond ishes a nd glasses. In this case pl ease add more detergent to r each
better r esu l ts. D ete r gents with o ut ch lorine do only bl e ach a lit t le. Stro ng and colou red spo ts will not
bere moved completely.In this case please choose a p rogram with a hi gher tempera ture.
°
Concentr ated Deter gent
Basedon theirchemicalcomposition, detergents can be splitintwobasic types:
conventional, alkaline detergentswith caustic components
lo w alk aline concent r at ed det erge nt s w ith natu ral e nzymes
DetergentTablets
Detergent tablets ofdiffe rent brandsdissolve atdifferentspeeds. Forthis r eason some
detergent t ablets cannot dissolve and develop their fu ll cleaning power during short
programs. T herefore please use long programs when u sin g d eterg ent t ablets, to
ens ure t he compl ete re moval of de ter g e n t res i duals.
Detergent Dispenser
The disp enser m ust be refilled before the start of each wash cycle f ollowing the instructi ons
provided i n t he wash cycle table . Yourdishwa sher uses le ss detergent and rinse aid tha n
Conventionaldishwasher.Generally, only onetablespoon ofdetergentisneeded for
anormal washload. More heavilysoileditemsneed moredetergent. Always add the
detergen t just be fore star ting the dishwas her, otherwis e it could ge t da mp and w ill not
dissol v e proper ly.
AmountofDetergent to Use
If th e l id is cl osed: press release button. T he lid will sp ring open.
Always a dd the d etergent just before starting each wash cycle.
Only usebrandeddetergentaid f ordishwasher.
Dishwasher detergent is corrosive! Take c are to keepi t out ofreach of c hildr en.
Page 11

A
B
Fillin Detergent
Fillthe de tergent dispenser with detergent.
The m ark ing in d icates the dos i ng levels , as
illus t ra ted on the r ight:
The p lace of m ain wash cyc le detergent placed.
A
The p lace of pre-wash c ycle detergent placed.
B
Pleaseo bserve the m anufact urers dosing and stor age
Recommendations as statedonthedetergentpackaging.
Closethelid andpressuntilit locks inplace.
If th e d i sh es are heavil y soi led , pla c e an ad dit i o nal
detergent dosein the pre-w ash detergent chamber.This detergent will take effect d uring the pre-wash p has e.
Youf ind informatio n ab out the amount of de tergent for the si ngle program me ont he last p age.
Please aware, that according to the levelsoiling and the specific hardnes s of wat er d ifference s a re possible.
Please observe the manufacturer's recommendationsonthedetergent packaging.
Page 12

Considerbuying utensils whichareidentified as dishwasher-proof.
Use a milddetergent thatis describedas 'kindtodishes'.Ifnecessary, seekfurther
information from thedetergent manufacturers.
Forparticular items, selectaprogramwithaslowa temperature as possible.
To prev ent dama ge, do not take gla ss and cutl ery out of the dish wash er imme diat ely
after the prog ramm e has ende d.
Are not suit able
Cutlerywith w ooden,hornchina or
mother-of-pearl han dles
Plastic items that are n ot heat resistant
Older cutlery with glued partst hat are n ot
temperature resistant
Bonded c utler y items or dishes
Pewter or cooper i tems
Crystal gl ass
Steel items subject to r usting
Wooden pl atters
Items madefrom synthetic fibres
(For b est performance of the di shwasher, f ollow these loading guidelines.
Features and ap pearance of baskets and cut ler y ba skets may vary from your model.)
Scrape off any larg e amo unts of leftover food. S often remnants of burnt food in pa ns.
It i s not necessary tori nse the d ishes under running water.
Place objects in t he dishwasher in following way:
1.Itemssuch as cups,gla sses, pots/pans, etc. a re faced downwards.
2.Curveditems, or ones with reces ses, should be l oaded aslant so that w ater can run off.
3.Allutensils are stacked securely and can not ti p o ver.
4.Allutensils are placed in the way t hat t he spray arms can rot ate freely during washing.
Very small items should not b e washed in the dishwasher as they could easily fall out o f the basket.
Are o flimitedsuitability
Some ty pes of g lasses can become
dull aftera large number of washes
Silver and alumi num par ts have a
tendencytodiscolourduring washing
Glazedpatterns mayfadeifmachine
washed frequently
Load h ollow i tems such as cups, glasses, p ans etc. With the opening f acing downwards so that
wat e r can n o t c o lle ct in t he containe r or a deep b a se.
Dishes and items of cutlerymust not lie inside oneanother,orcover eachother.
To avoid d ama ge to glasses, th ey must not touch.
Load large items w hich are most difficult to c lean into th e lower basket.
The u pper basket is designed to ho ld m ore delicate and lighter dishware such as glasses, coffee
andteacups
Long bladed knives stored in a n upright position are a p otenti al hazard!
Long and/or sharp items o f cutlery such as carving knives must be p ositione d
horizon tally in the upper b asket.
Please do not overload your dishwashe r. This is important for g ood results and for
reasonab le consumption of energy.
To prevent water dripping from the uppe r basket into the lower basket, w e recommend that you
empty the lower ba sket first and t he n the upper bask et.
Page 13

The upperbasket isdesignedtohold more delicate andlighter dishware suchas glasses,coffee
and tea c u ps and saucer s, as well as pl ate s , s mall bowls a nd shall ow pans ( a s long as they are
not toodirty).
Posit ion t he dishe s a nd cookwar e so t h at they will not get m ov ed by the s p r ay o f wa ter.
6
7
4
5
1
1
Cups
1
Sm al l s er ving b o wl
2
3
Larges erving b owl
Glasses
4
5
Saucers
Dish
6
Dessert dis hes
7
1
4
2
1
3
1
4
Wesuggest that you place large i tems and the most d ifficult to clean items a re to be plac ed into thel ower basket:
such as pots, pans, lids, serving dishes and b owls, as shown i n the figure b elow.
It is prefer able to place ser ving dishes and lids onthe side of the ra cks in or der to a void blocking the rotation of t he
topspray arm.
Pleas e be re m ind e d that :
Pots, serving b owls, etc, must always b e placed top down .
Deep pots s hould be s lanted to allow water to fl ow o ut.
The B ottom Basket features folding spikes so that larger or mo re pots and pan s can be loaded .
8
5
7
9
7
10
10
9
Dessert dishes
7
Oval platter
8
Dinnerplates
9
Soup plates
10
Silverware basket
11
Page 14

Page 15

Adju sting th e U pper Bask et
The heig ht of the upper basket can be ad justed in order to create mor e space f or large utensils
both for the upper/lowe r basket. The he ight of the u pper basket can be adj usted by placing the
wheels on different height of the r ails. Long items, serving cutlery,salad servers and knives
should b e pl aced on the s helf so t hat they do not o bstruct the rotat ion of the s pray arms.
The she lf can be folded back or be remo ved when not requ ired for use.
Foldin g Spikes of Lower Bask et
For better stacki ng o f po ts and pa ns,
the spikes can be f olded down as
show in the p ict u re ri gh t.
Cutlery should be placed in the cutlery basket with the handles at the bottom. If the rack has side bas kets, the
spoons shoul d be loaded separately into the ap pr opriate slots, especially long utensils should be placed in the
horizontal p osition at the front of t he upper bask et as shown in thepictu re.
111
1
555
4
11
2
5
7
11
5555
2
33
44
22
33
44
22
33
44
22
33
44
5
8
361
72
1.fork
2.soup spoon
3.dessert spoon
4.tea spoon
5.knife
6.serving fork
7.serving spoon
8.gravy ladle
Do not let any item exte nd th rough the bottom.
Always load sh arp utensils with the sharp point down!
Page 16

()
Means:need tofill rinse i ntothe Rinse-AidDispenser.
For normally soiled loads,
use multifunctional detergent
P
Pre-wash(50℃)
Wash(55℃)
Rinse
Rinse(65℃)
Drying
All in 1
150
1.08
13.5
(*E N 50242)
For heaviest soiled crockery, and
normally soiled pots pans
dishes etc with dried on soiling;
For normally soiled loads, such
as pots plates glasses and
、、
lightly soiled pans.
Standard daily cycle for normally
soiled loads, such as pots
、
plates glasses.
For lightly soiled crockery and
glass
For lightly soiled loads that
do not need excell ent drying
efficiency.
Ashorterwashforlightly
soiled l oads andquick wash
、、
、
Pre -wash( 5 0 )
Wash (65 )
℃
℃
Rin s e
Rin s e
Rinse(55 )
℃
Dry ing
Pre-wash(50 )
Wash (55 )
Rinse
Rinse(65 )
Drying
pre-wash
Wash (50 )
Rinse(60 )
Drying
Pre-w ash
Wash (40 )
Rinse
Rinse(60 )
Drying
Wash( 60 )℃
Rinse
Rinse(50 )
Drying
Wash (40 )
Rinse
Rinse(40 )
℃
℃
℃
℃
℃
℃
℃
℃
℃
℃
4/23g
4/23g
4/23g
15g.
27g
15g.
120
155
160 0.77 10.5
95 0.71 13.0
60
30
1.13
1.09
0.77
0.50
16.0
13.0
10.0
9.0
To rinse dishes that you
plan to wash later that day.
Pre-wash
8
*EN 50242 : This programme is the test cycle.T he inf ormation for comparabi lity t est
in acc ordance with EN 50242, as fo llows:
Capacity: 9 setting
Position U pper basket: upper wheels onrai ls
Rinse ai d setting: 6
The p ower consumption of off-mode i s 0w
left-on mode i s 0.6w
0.01
3.0
Page 17

1 D raw out the lower an d up per basket, load the d ishes and push t hem back.
It iscommendedtoloadthelowerbasketfirst,thentheupperone(seethe sectionentitled
Loading th e Dishwa she r ).
“”
2 P ou r in th e d eterg en t (see the se c ti on ent i t led Sal t, Deter gent and Rinse A id ) .
3 I nsert the plug into the socket. The pow er s uppl y is 220- 240 VAC/50 HZ, thespec ification of the
socket is 10A 250VAC. Make sure that the water supply is turned on tofull pressure.
4 P ress the ON/OFF button, and the ON/OFF light w ill turn on. Press t he program button to select
a de sired wash cycle. fter 10 seconds, the machine w ill work.
Premi se
1 A c ycle that is un derway ca n on ly be modified if i t has only been r unning fo r a short
time. Otherwise, the detergent may have already been relea sed, and the a ppliance may
have already drained the wash water.If this is the case, t he detergen t di spenser must
be refilled (see the section entitled " Loading the Detergent " ).
2 Open the door a l ittle to stop t he washing. Pre ss th e programme butto n or t he washing pr ogra m m ore than 3
second sto cancel the runn ing p rogramme. Then you ca n select other programmes (see the section entitled "
Startingawashcycle...").
If you open the door , the mach ine will pause. When you cl ose the d oor ,during awash cycle
the machine wi ll wor king after 10 seconds.continue
Close th e door,a
“”
Aforgotten dish can be added any time before the detergentcup opens.
Open the door a little to stop the washing.
1
After the spray arms stop working,you can open the door
2
completely.
Add forgotten dishes.
3
When t he working c ycle has finished, the bu zzer of the d ishwasher will sound f or 8 sec onds, then stop. Turn off
the appliance using th e ON/OFF button, shut off the water supply and open the door of the dishwasher.
Waitfor a f ew minutes before unloading the dishwasher to avoid handling the dishes and utensils while they
are still hot and more suscept ible to br eakage. They will also d ry better.
Close the door
4
The dishwasher will run after 10 seconds.
5
SwitchOffthe Dishwasher
1.Switchoff the dishwasher by p ressin g t he ON/OFF button.
2.Turn offthewater tap!
Openthedoorcarefully.
Hot di shes are sensitive to kn ocks. The di shes should therefore be a llowed to cool d own around 15 minutes
beforeremovingfromtheappliance.
Open t he dishwasher's door, l eave it ajar and wai t a few minutes befor e removing the dishes. In this way they
will be cooler and the drying will be im proved.
Unloading the dishwasher
Itis normal that the dishwasher is wet in side.
Empty the low er basket first a nd then the up per o ne. This will avoid water dripping from t he upper Basket onto
the dishes in the lower one.
It i s d an gero u s to open the do or wh en w as hi ng, bec a us e the hot water ma y scal d y ou .
Page 18

The filter prevents larger remnants of food or ot her objects from getting inside the p um.
Theresiduesmayblock thefilter, in thiscasethey mustberemoved.
The fi lter system c onsists of a coarse filter,a flat (Main filter)
An d a mic ro fi lter( F i ne fi l ter).
1
2
3
2
1
3
Main filter
Foodand soilparticlestrappedinthis filterarepulverized by a
special jet onthe lower spray arm and w ashed down to d rain.
Coarse filter
Larger item s, such as pi e c es of bon e s o r gla s s, that cou ld bl o ck
thedrain aretrapped in the coarsefilter.Toremovethe items
caught by the filter,gently squeeze the tap o n th e top of t his
filter andliftout.
Fine filter
This filterholds soil andfoodresiduesinthesump areaand
preventsitfrombeing r edepositonthedishesduring wash cycle.
Filterassembly
Thefilter efficiently
For best performance and results, the filter must b e cleaned regularly. thisreaso n, it isa goo dide a t o
remove the l arger food particl es tr app ed in the filter after each wash cycle by ri nsing the semicirc ular filter and
cup u nder runnin gwa ter.Tore move the f ilter device , p ull the c up handle in t he upward d irection.
removes f ood particle s fromth e wa sh water,allowin g it t o be rec ycled d ur ing the cycl e.
For
Th e dish was her must never b e u sed w i thout the filt er s.
Improper replace ment of thefilter may reduce the performance level of t he appliance
anddamage dishesandutensils.
Step 1 Turn the filter in anti-clockwise direction,
1
2
3
When following this procedure from step1 to step 3, the filter system will be removed;
when following it from Step 3 to Step 1, the f ilter systemwill be installed.
:
then li ft it u p.
Step 2 lift the Main filter up:
Step3 liftthe F inefilter up:
Page 19

Remarks:
- Inspec t the filters fo r blocking a fter every time the dishwasher has been u sed.
- By unscrew ing the c oarse filter, you can remove the filter system. Remove a ny food remnants and
clean the filters under runni ng water.
Theentirefilter assembly should be cleanedonce a week.
Cleaning the Filter
To cle an the co a rs e fil t er and the fi n e filter , us e aclean i n g bru sh. Reas sem ble t he filt er parts as sho wn in the f igu r es
on th e last pa ge and reins ert the enti re assem b ly in the dishwa sher, positio ning i t i n it s s eat and pres sing downwar ds.
Whencleaning thefilters, don't knockon them.O therwise, the filterscould be
contortedand theperformance ofthedishwashercouldbedecreased.
The cont rol panel can be cleaned by using a l ightly dampened cloth .
After cle aning, make sure to dry it thoroughly.
For t he ext erior, use a go od appli ance pol i s h wax .
Neveruse sharp objects, scouring pads or h arsh cleaners on any part o f t he dishwasher.
Cleaning The Door
To clean thee dge around the door, you sho uld use only a soft warm, damp cloth.
To avoid penetration o f water into the d oor lock and elect rical components, do not
usea spray cleaner of any kind.
Never u se a spr ay cleaner to cl ean the door panel as it may damage the door loc k
and electricalcomponents.
Abrasive ag ents or some pa per towels should not be used because of the ri sk o f
scra tching or le av in g spot s on the stainless ste el su r f a ce.
Protec tA gainst Freezing
please take frost protection measures on t he dishwasher in winter.Every fte r washing c ycles,
please operate as follows
1.Cut offtheelectrical powertothedishwasher.
2.Turnoff the water suppl y and d isconnect the water inlet pipe from the wate r valve.
3.Drainthewater fromtheinlet pipeandwater valve.(Use apantocatchthe water)
4.Reconnect the water inlet pipe to the water valve.
5.Remove the filter at the bottom o f the tub and use a sponge to soak up water in the sump.
:
If your dishwasher cannot work because of t he ice,
please contact professiona l service persons.
timea
Cleani ng the Spra yAr ms
It i s n e ces sary to clean the sp r ay ar ms regula rly for ha rd
water chemicals w ill clogthespray arm jetsandbearings.
To remove the spray ar ms, screw off the nut clockwise to
ta ke out t h e w asher on t op of th e spr a y a r m a nd re mo ve
the arm.
Wash the arms in soapy and wa rm w ater and use a soft
brushtocleanthe jets.Replacethem afterrinsing them
thoroughly.
Page 20

AfterEveryWash
After every wash, turn offthe water supply to the
appliance and leave t he door slightly open so th at
moisture and odours are n ot trapped inside.
Removethe Plug
Before cleaning or p erformi ng maintenance, always
remove theplug from the socket.
No Solvent s orA bras ive Clea ning
To clean the exterior andrubber parts of thedishwasher,
donotusesolventsor abrasivecleaning products.
Only use acloth with w arm soapy wate r.
Tor em ove spots o r stains f rom the sur f ace of the
interior, use a clothda mpenedwithwateran a little
vinegar,or a cleaning product made s pecifical ly f or
dishwashers.
Whennot in Use foraLongTime
It isrecommend t hatyou run a washcycle with the
dishwasher e mpty and the n remove the plug fro m t he
socket, t urn offth e wa ter supply and leave the door of
the appl ian c e slight ly ope n. This wil l hel p the door
seals to lastlonger andprevent odoursfrom forming
withintheappliance.
Moving the Ap plia nce
If th e appliance must be mo ved, try t o keep it in the
verticalposition.Ifabsolutelynecessary,itcanbe
positioned on its back .
Seals
Oneofthefactorsthatcauseodourstoforminthe
dishwasher is foo d that re mains trapped in the seal s.
Periodic cleaning with a d amp sponge will prevent this
fro m occurrin g.
Electrical ShockHazard
The i nstallati on of t he pipes
and elect rical equipments
should be d one by p rofessionals .
Disconnect electricalpower
before
installingd ishwasher.
Failureto doso can result in
deathorelectricalshock.
●
Installationpreparation
Th e inst al la t io n posi t ion of dishw ash er shoul d be n e a r the exis t ing i nlet and drain hoses and
power cord.
Oneside of thecabinet sinkshould be chosentofacilitatetheconnection of drain hosesof
the dishwasher.
Note: please c heck the accompanying installation accessor ies(hook for aesthetic panel,screw)
Page 21

【】Figure 1
Cabinetdimensions
Lessthan5mm
betweenthe top
ofdishwasherand
cabinetand the
outerdooraligned
tocabinet.
820m m
580mm
90 °
Electrical, drain and
water supply line
entrances
Spacebetweencabinet
bottom and floor
450 mm
90 °
80
100
【】Figure2
Dishwasher
Minimumspace when
the door is opened
Doorof
dishwasher
Minimum space of 50mm
1
Theaestheticwoodenpanelcouldbe processed accordingto the Figure 3.
390
418
Cabinet
15
【】Figure3
Theaestheticpanel should
beprocessedin accordance
withthe illustrated dimensions
(Unit: mm)
38
179 175
444
Page 22

2 Installthehookon the aesthetic wooden panelandput the hook into the slotof the
outerdoor ofdishwasher(see figure 4a).After positioning ofthepanel, fix the panel
ontothe outerdoorby screws and bolts(Seefigure4b) .
Hop hook
【】Figure 4a
Installationof aestheticpanel
【】Figure4b
Installation of aesthetic
woodenpanel
1
.Takeaway thecover
2
.Pinupthescrew
.G et back thecover
3
St4 countersunk
head screw
Lower hook
4X18 screw
Cover
Spacerfor furniture door
Outerdoorof
dishwasher
Hook for aesthetic door
Furniture door
Page 23

●
Tension adjustmentofthe doorspring
The door spri ngs are set at the factor y t o the prope r tensi on for the oute r door. If aes the tic
woodenpanelare installed, you will have toadjustthe doorspring te nsion.Rotate
theadjustingscrew to drivethe adjustor to strainor relaxthesteelcable(seefigure 5).
Doo r spri ng ten sio n is co rre ct when
the doorremainshorizontalinthe
fullyopenedposition yetrises
toaclosewiththeslightliftofa
finger.
,
relax
【】Figure5
Tension adjustment
ofthedoor spring
●
Connectionof drain hoses
Insertthe drainh ose into adrainpipe witha m inimumdiameterof 4 cm, or let it r uninto th esink, makingsure to
avoid bendingorcrimpingit.Usethespecialplasticsupport thatcomes with the appliance. The topofthehose
must be at a height b etween 40 and 100cm. Th e free end o f the hose m ust n ot be immersed in water toav oid the
back f low of it.
PLEASEHANG UPTHEDRAIN HOSE EITHERWAYOFA, B, C
Close the drain hose hook to the counter
Front
Drainhose hook
Counter
A
B
Drain pipe
C
φ
40mm
Page 24

●
Dishwash er instal lation s teps
1 Install the furnituredoor to theouterdooroft hedishwasher usingthebrackets
provid ed.Refertothe template forpositioningof theb rackets.
2 Adjustthetensionofthe door springsby using anAllenkeyturningin aclockwise
motion totightenthe leftandright doorsprings. Failure to do thiscould cause damage
toyour dishwasher(Illustration 2)
3 Con ne ct t h e i nle t hose to the cold water su pply
4 Con nec t t he drain hose. Ref er to d iagra m ( Figure 6)
5 Con nec t t he power cord
Affix thecondensation stripunder the worksurfaceof cabinet.Please ensure
6
.
.
.
.
thecondensation stripis flushwithedgeof work surface.
Placethe dishwasher into p osition.
7
8
Levelthe dishwasher.The rear feetcan be adjusted fromthe front of the dishwasher
by t urni ng t he screw s on th e le f t a nd right hand side of the cabin et (Illust rati on 6A).
Toadjustthefrontfeet,use awrenchandturnthefrontfeetuntilth edishwasher islevel
(Illustration 6B).
9Thedishwashermust be secured in place.There are twoways to dothis:
A. Normalwork surface-secureto the work surface by using twowoodscrewsensuring
thedishwasher weightis notbeing h itbythe surface(Illustration 7 ).
B. Marble or grani te work top-s ecure t he b ra cke t to t he side pan el of the di shwa sher
andsecurethedishwasherto the furniture housing. Put the r ubbercapover thescrew
(Illustrat ion 8).
SCREW
CONE GEAR
2
7
5
6A
6
6B
RUBBER
8
COVER
【】Figure7
SCREW
Page 25

Dishw ashe r must be level for prop er dish rack oper ati on and wash perfo rman ce.
Placea spiritlevelondoor and rack track inside the tub as shown tocheckthatthe
1
dishwasheris level.
levelthe dishwasher by adjustingt hefour leveling legs individually.
2
3
Whenlevelthedishwasher,please payattentionnot to letthedishwashertip over.
Check
【】Figu re 8
Level
Front
to Back
Illustra tion of fe et ad justment
NOTE:
Themaximumadjustment
heightof the feetis60 mm.
Check level
side to side
For personal safety:
WARNING!
Please look at the rating label to know the r at ing v olta ge and c onnect the dishwash er to the appropriate power s upply.
Use the r equired fuse 10 amp, time delay fuse or circuit breaker recommen ded and provide separate circuit serv ing
only this appliance.
This appliancemustbe e arthed.Intheevent
of a malf unction or breakdow n, earthing will
reduce t he risk of electric shock by providing a
path o f least resistance for the electric current.
This applian ce is eq uipped with a cord having an
equipment-earthing conductor and anearthing
plug.Th e plug must b e plugged into an appropriat e
outlet that i s inst alled a n d ea rthe d in accordance
with all local sta ndards and requireme nts .
DONOTUSEAN EXTENSIONCORD OR ANADAPTERPLUGWITHTHISAPPLIANCE.
DO NOT, UNDER A NYCIRCUMSTANCES, CUT OR REMOVETHE EARTHING
CONNECTIONFROM THE POWERCORD.
Ensure the voltage and frequen cy of the power being correspond s to
those on th e rating plate. Only insert the plug into an electric al s ocket
which i s earthed properly.If the electrica l socket to which the appl iance
must be conn ected is not appropria te for the plu g , re place the socket,
rather t han using a adaptors or the like as they coul d cause overheati ng and bu rns.
Impr oper conn ecti on of the equipme nt grou nding con ducto r can resul t i n th e risk
of an electric sho ck. C heck with a q ualifi ed
electricianorservicerepresentativeifyou
are in doubt whe ther the app lian ce is
prop erly grou nded. Do no t modify the plug
providedwiththeappliance;Ifitisnotfit
forthe outlet.Have a properoutlet i nstalled
by a qual ified electrician.
Page 26

The appliance must be connected to the water mains using new hose-sets.
The old hose-sets should not be reused.
Water pressure must be between 0,04 MPa and 1 MPa. If the pressure is below the minimum
consult our Service Department for advice.
Pull The safety supply hoses completely out from storage compartment located at rear of dishwasher.
1
Tighter the screws of the safety supply hose to the faucet with thread 3/4inch.
2
Turn water fully on before starting the dishwasher.
3
The safety supplyhose consists of the double walls.The hose's system guaranteesits intervention by blocking the flow ofwater
in case of the supply hose breaking and when the air space between the supply hose itself and the outer corrugated hose is full
of water.
A hose that attaches to a sink spray can burst if it is installed on the same water line as the dishwasher. If your sink has one, it is
recommended thet the hose be disconnected and the hole plugged.
Turn off the water.
1
Release the water pressure by depressing the pressure release button. This relieves water pressure and protects you, and
2
theroom,from severe splashing.
Unscrew The safety supply hose from the faucet..
3
Connect the cold water supply hose to a threaded 3/4(inch) connector and make sure that it is fastened tightly in place.
If the water pipes are new or have not been used for an extended period of time, let the water run to make sure that the
water is clear and free of impurities. If this precaution is not taken, there is a risk that the water inlet can get blocked and
damage theappliance.
Thefollowingthingsshouldbe checked before startingthe dishwasher.
1 The dishwasheris level and fixed properly
2 The inlet valve is open
3 Thereis a leakageat the connectionsofthe conducts
4 The wires are tightly connected
5 The power is switched on
6 The inlet and drain hosesareknotted
7 All packing materials and printings should be taken out fromthedishwasher
Afterinstallation,please make sure to keepthis manual.
Thecontentof this manual is veryhelpfulto the users.
Page 27

Fuse blown, or the
circuit breaker acted
Replace fuse or reset circuit breaker. Remove any other
appliance s sharing the same circuit with the dishwasher
Power supply is not
turned on
Water pressure is low
Door of dishwasher
not properly closed.
Kink in drain hose
Filter clogged
Kitchen sink clogged
Improper detergent
Spilled rinse-aid
Make sure the dishwasher is turned on and the door is
closed securely.
Make sure the power cord is properly plugged into the
wall socket.
Check that the water supply is connected properly and
the water is turned on.
Make sure to close the door properly and latch it.
Check drain hose.
Check coarse the filter
(see section titled )" Cleaning The Filter "
Check the kitchen sink to make sure it is draining well.
If the problem is the kitchen sink not draining ,you may
need a plumber rather than a serviceman for dishwashers.
Use only the special dishwasher detergent to avoid suds.
If this occurs, open the dishwasher and let suds evaporate.
Add 1 gallon of cold water to the tub. Close and latch the
dishwasher, then select anycycle. Dishwasher willdrain
outthe waterat the first step.Open the door after draining
is stop and check if the suds is disappeared.
Repeat if necessary.
Always wipe up rinse-aid spills immediately.
Detergent with
colourant was used
Hard water minerals
The affected items are
notcorrosion resistant.
A progra mm e was not
run after dishwasher
salt wasadded.
Traces of salt have
gotten into the wash cycle.
The lid of the softer
is loose
Aspayarmis
r
knocking against
an item in a basket
Items of crockery
are loose in the
wash cabinet
This may be caused
by on-site installation
or the cross-section of
the piping.
Make sure that the detergent is the one without
colourant.
To clean the interior, use a damp sponge with
dishwasher detergent and wear rubber gloves.
Never use any other cleaner than dishwasher
detergent for the risk of foaming or suds.
Always run the quick wash programme .
without any crockery in the dishwasher and
without selecting the Turbo function (if present),
after adding dishwasher salt.
Check the lip .Ensure the fix is fine.
Interrupt the programme, and rearrange the items
which are obstructing the sp ay arm.r
Interrupt the programme,
and rearrange the items of crockery.
This has no influence on the dishwasherfunction.
if in doubt, contact a suitably qualified plumber.
Page 28

The dishes were not
loaded correctly.
See notes in " Loading the Dishwasher Baskets ".
Theprogramme was
notpowerful enough.
Not enough detergent
wasdispensed.
Items are blocking
the path of sp ay arms.r
The filter combination
inthebaseofwash
cabinet is not clean or
is not correctly fitted.
This may cause
the sp ay arm jets
r
to get blocked.
Combination of soft
water and too much
detergent.
Aluminum utensils
have rubbed against
dishes.
Dishes block
detergent cups.
Improper loading
Too little rinse-aid
Select a more intensive programme.
See" Wash Cycle Table ."
Use more detergent, or change your detergent.
Rearrange the items so that the sp ay can rotate freely.r
Clean and/or fit the filter combination correctly.
Clean the sp ay arm jets. See "Cleaning the Spray
Arms".
Use less detergent if you have soft water and select
a shortest cycle to wash the glassware and to get
them clean.
Use a mild abrasive cleaner to eliminate those marks.
Re-loadin g the dishes properly.
Load the dishwasher as suggested in the directions.
Increase the amount of rinse-aid/refill the rinse-aid
dispenser.
r
Dishes are removed
too soon
Wrong program
has been selected
Use of cutlerywith
a low-quality coating
Do not empty your dishwasher immediately after
washing. Open the door slightly so that the steam can
escape. Begin unloading the dishwasher only once t
he dishes are barely warm to the touch. Empty the low
basket first.This prevents water form dropping off
dishes in the upper basket.
In short program the washing temperature is lower.
This also lowers cleaning performance. Choose
a program with a long washing time.
Water drainage is more difficult with these items.
Cutlery or dishes of this type are not suitable for
washing in the dishwasher.
When some malfunctions come on, the appliance will display error codes to warn you:
E1
E4
Longer inlet time.
Overfilled.
Tap is not opened, or water intake is restricted,or water pressure
is too low.
Some element of dishwasher leaks.
If overflow occurs, turn off the main water supply before calling a service.
If there is water in the base pan because of an overfill or small leak,
the water should be removed before restarting the dishwasher.
Page 29

Height : 820mm(adjustable+60mm)
Width : 445mm
Depth : 540mm
Voltage connected Load : see rating label
Water pressure: 0.04-1.0MPa
Power supply: see rating label
Capacity: 9 Place settings
Page 30

TechnicalData Sheet
Sheetof household dishwasheraccordingto EU Directive 1059/2010:
Manufacturer
Type/ D escription
Standard place s ettings
Energy e fficiency class
Annual e nergy consumpti on
Energy c onsumpti on ofthe standar d c leaning cycle
Power consumption of off-mode
Power consumption of left-on mode
Annual w ater consumptio n
Dryingefficiencyclass
Stand ard c lea ni ng cycl e
Prog ra m durat i on o f th e st a nd ard clea ni ng cycle
Noise l evel
Mounting
Couldbebuilt-in
Bompani
BOLT945/E
9
A+
222 kW h
0.77 k Wh
0W
0.6 W
2940 l iter
A
ECO 50
160 m in
49 dB (A) r e 1 pW
build under
Yes
℃
Height
Width
Depth (withconnectors)
Power consumption
Rated voltage /frequency
Waterpressure (flow pressure)
NOTE:
A+ + + (highest e fficiency) to D (lowest efficiency)
Energy consumption 22 2 kWh per year,based on 2 80 s tand ard cleaning cycles using col d water filla nd
the consumption of t he low p ower modes. Actual e nergy consumption will depend on howth e appliance is us ed.
Waterconsumption 2940 litresperyear,based on280standardcleaningcycles.Actualwaterconsumption
will dependonhow the appliance is used.
A(highest efficiency) to G (low est efficiency)
This program is s uitable for cleaning soiled normally soiled tableware and that i t is th e
most efficient programme in t erms of its co mbined ene rgy a nd water consumptio n fo r
that type ofta bleware.
The devic e m ee ts the Eu ropea n stan dar d s and t h e dire cti ves in the curre nt version at deli ver y:
-LVD2006/95/EC
- EMC2004/108/EC
- EUP2009/1 25/EC
“”
“”
82 cm
44.5 c m
54 cm
1930 W
230 V ~ / 50 Hz
0.4-10 bar =0.04-1 M
Pa
The above va lues have been m easure d in acco rdance with standards under specifie dop erating conditions.
Resultsmay varygreatlyaccordingto quantity and pollutionof thedishes,waterhardness,
amount of detergent, etc.
The manual i s based on th e E uropean Uni on's standards a nd rules.
 Loading...