

Page 1

BOLF12B/E
Page 2

With each wash cycle.
Compartment
For programmes with pre-wash only.
(Follow the user instructions!)
Electric indicator on control panel (if provided).
Check the rinse a id level
(On models with water softener system only. )
Electric indicator on control panel (if provided).
If there is no salt warning light in the control panel
(for some models), you can estimate when to fill the salt into
the softener by the number of cycles the dishwasher has run.
Check the regeneration
salt level
Load the baskets
Select a programme
Close the door, t urn on the water tap and press the S tart/reset button. The machine will start working
after about 10 seconds.
Running the dishwasher
Switch off the appliance
Tu r n o f f t h e w a t e r t a p ,
unload the baskets
Fill the d etergent dispenser
Wa r n i n g : w a i t a f e w m i n ute s ( a b o u t 1 5 m i n u t e s ) b e f o r e u n l o adi n g t h e d i s hwa s h e r t o a v o i d h a n d lin g
the dishes and u tensils while th ey are still hot and m ore su sceptible to break.
They will also dry b etter .Unload the a pplianc e, starting fro m the lower basket .
Changing the programme
Add forgotte n dishes in the
dishwashe r.
Scrape off any large amou nt of leftover food. Soften remnants of burnt food in pans,
then l oad the baskets. Refer to the dishwasher loadin g instr uctions.
Press the Programme button until the selected programme lights up.
(Seethe sectionentitled Operationginstruction )
When the workin g cycle has fin ished, the bu zzer of the
dish washe r will s ound 8 time s, then stop.
Tur n off the a pp li a nc e usi ng t he ON/O FF b utton .
If the appliance is switched
off during a wash cycle.
Open the door carefully.
Hot steam may escape
when the door is opened!
If the app liance is swi tch ed off during a was h cycle, when switche d
on ag ain, please re -select the w ashing cycle a nd operate the dishwasher
according to the origina l Power -on state ).
Switch on the appliance Press the On/Off button to switch on the appliance, Open the door.
1.Open the door a little to stop the dishwasher.
2.After the spray a rms st op wor king, y ou can open th e door completely.
3.Add the for gotten dishes.
4.Close the door, the dishwasher will start run ning a gain after 10 seconds.
For detailed operating method read th e correspon ding content on th e instruction manual.
1. A runnin g cycle can o nly be modified if it h as been run ning for a s hort time. Ot herwise the detergent
may have alread y been released and the w ater al re ady drained. I f this is the case, the detergent
disp enser m ust be refil le d.
2. Press th e Start/Reset button for mo re than 3 seconds to ca nce l the ru nning progr amme.
3. Select a n ew programme.
4. Restar t the dish wash er.
Page 3

To r e vi e w t h e s e c t i o n o n t r o u b l e s h o o t i n g T i p s
will h el p you t o sol ve some common pro ble m s
by y o u rse l f .
Dear Cus to m er ,
Please carefully read this manual bef ore using the
dishwasher, i t will help you to use and maintain the
dishwasher properly.
Pass it on to any subsequent owner of the appliance.
This manual con tain s sect ion s on safe ty In stru ction s ,
Oper at i ng In stru ct io ns, In sta l lation Ins truc tio ns an d
Trou ble s hoo t i ng Tip s , et c .
The ma nufa ctu re r, follo wi ng a pol icy of con sta nt
development a nd updat ing of the product , may
make modifications without giving prior notice.
Dishw as h er Feat ure s.... .. .. .. .. . ... ... .. .. . ... . ... .. . .. ...3
AWaterSoftener.........................................4 ..
Attention before or after loading the Dishwasher
Baskets..........................................................9
Filtering System.............................................15
Caring for the Di shw ash er..... ..... .... .. .... . ... . ... .. 16.
BLoadingtheSaltintotheSoftener.................5
CFilltheRinseAidDispenser.........................5
DFunctionofDetergent.................................6
Loading the upper ................... ... ........ .10Basket
Loading th e L ower .......... ..... ..... ..... .... ..10Basket
Cutlery Basket........................................... ...11
Th e r ec o mmend e d method load i ng b i g
dis hw ar e..... . ... .. . . .. . . . ... ... . ... .. . ... .. .. . . ..... . . . ... . ... 12
Wash Cyc l e Table.. .. ... ... .. . . ... . . ... . ..... . ..... .. . . ... .. 13
Turnin g on th e Ap p l iance .... ... .. .... ... .. . .. .... .......14
Chan ge the Pr ogra mm e. ... .. .... ... . ...... . ..... . ... 14....
At the End of the Wash Cycl e... .. .... ... ... .... .... ... .14
Positioning the Appliance................... ..........17..
Water Connec ti on. . . . .. . . ..... .. . .... .... .......... .. . . . ..1 8.
About P ower C onnection........................ .......17.
Start of dishw ashe r.. . . .. ... . .. .... .... . . .. . .. ... . . ... . . . 19..
Befor e c al l ing for servi ce.... . ... .... .. .. ... ... . ... . ..... 20.
Error codes.................................... ..............21.
Tec h n i c al i n f o rm a t i on ... . . . . ... . . . .. . . .. . . ... . . . . .. . . . . . 2 2..
Control Panel...................................................3
Keep it to refer to it at a later date.
If you can not solve the problems by yourself ,
plea se ask for the help of pr o fess iona l t echn ici ans.
Thi s appli a nce is i ntende d to b e used i n h o u seho ld
and sim i lar ap p l ications s uch as :
-sta ff k i tc h en are as in sho p s, offi ce s a n d o t he r
working env i ron me nt s ;
-farm ho us es ;
-by clien t s in ho t e ls , mote l s and o t h er res id entia l
type environments;
-bed and brea kfa st type envi r o nm e nt s.
Page 4

This appliance must be grounded. In the event of a
malfunction or breakdown, grounding will reduce
the risk of anelectric shock by providing a path of
least resistance of electric current. This appliance
is equipped with a cord having an equipmentgrounding conductor and a grounding plug.
The plug must be plugged into an appropriate outlet
that is installed and grounded in accordance with
all local codes and ordinances.
Keep children away from detergent and rinse aid, keep
child away from the open door of the dishwasher,
there could still be some detergent left inside.
ren
Do not abuse, sit on, or stand on the door or dish
rack of the dishwasher.
Do not touch the heating element during or
immediately after use.
(This instruction is only applicable to machines
with a visual heating element.)
Do not wash plastic items u nless they are marked
dishwasher safe or the equivalent. For plastic items
n
ot so marked, check the manufacturer's
recommendations.
Use only detergent and rinse additives
designed for an automatic dishwasher.
Never use soap, laundry detergent, or hand
washing detergent in your dishwasher. Keep
these products out of the reach of children.
During installation, the power supply must not
be exces sively or dangerously be nt or flattened.
Do not tamper with controls.
Do not place any heavy objects the
door when it is open. The appliance could tip
forward.
on or stand on
When loading items to be washed:
1) Locate sharp items so that they are not likel y
to damage the door seal;
2Warning:Knivesandotherutensilswith
sharp poin ts must be loade d in the basket
with their points down or placed in a
horizontal position.
)
When using your dishwasher, you should
prevent plastic items from coming into contact
with the heating element.(This instruction is only
applicable to machines with a visual heating
element.)
If the s upply cord is damaged, it must be replaced
by the man ufact ur er or its se rv ic e age n t or a
similarly quali fi e d pers on in orde r t o av o id a
haz ar d.
Plea s e dispos e of pac k in g m ater ia ls proper l y.
Use the dishwasher only for its intended function.
Remove t he door to the washing compartment when
remo ving an old dishwasher from service or discarding it.
Dishwasher detergents are strongly alkaline, they
can be extr emely da ngerous if swallowed. Avoid
contact with skin and eyes and keep ch ildren away
from the dish was her when t he door is ope n.
Check that the detergent comparment is empty
after complet ion of the wash cycle .
The a ppli anc e i s to be connec ted to the water
mains using new hose sets and that old hose-sets
should not be reused.
The ma xim um number of p lace sett ings to be
washed i s 12.
The ma xim um permis sib le inlet water pressure is
1MPa.
The mi nim um permissi bl e i nle t w at er p ress ur e i s
0.04MPa.
Children should be supervised to ensure that they do
not play with the appliance.
This appliance is not intended for use by persons
(including children with reduced physical, sensory or
mental capabilities, or lack of experience and
knowledge ,unless they have been given supervision
or instruction concerning use of the appliance by a
person responsible for their safety.
)
When using your di shw as he r, fo ll ow the precaut ions lis t ed below:
The door should not be left o pen,
since this could increase t he ris k of tripping.
Improper connection of the equipment-grounding
conductor can result in the risk of an electric shock.
Check with a qualified electrician or service
representative if you are in doubt whether the
appliance is properly grounded. Do not modify the
plug provided with the appliance; If it does not fit
the outlet. Have a proper outlet installed by a
qualified electrician.
Do not operate your dishwasher unless all
enclosure panels are properly in place. Open
the door very carefully if the dishwasher is
operating, there is a risk of water squirting out.
Page 5

Dispose of t he dishwasher packaging material correctly.
All pack aging m a t e ri als can be r ecycle d .
Plasti c parts are m a rked with the standa r d in t erna ti on al a bbre viat ions :
PE for polyet hylene, e .g. sheet wrapping m aterial
PS for pol ystyrene, e.g. padding material
POM polyoxym ethyle ne, e.g. pla stic clips
PP polypropylene, e.g. Salt filler
ABS Acrylonitrile Bu tadiene Styrene, e .g. Contr ol P anel .
Packag in g mater ial coul d be dan ger ou s f or child re n!
For disposing of package and the appliance ple ase go to a re cycling cen tre. The refore cut
off the power supply cabl e and m ake t he door closing devic e unusab le.
Cardboard packaging is manufactured f rom recycled paper and should be disposed in the
waste paper collection for recycling.
By en sur ing thi s p rod uc t is dis po se d of cor rec tl y, you will help p re ve nt poten tia l negat iv e
consequences for the envi ronment a nd human health, w hich co uld other wise be caused
by inapprop riate wast e han dling of this product .
For more de tailed information about recycling of this prod uct, please contact your local
city office an d your household w aste dispo sal servi ce.
DISPOS AL : Do n ot d ispose th is pr oduc t as unsorte d muni ci p al wa ste. Coll e c t io n of su c h
was te s epa r a te ly for spe cial trea t ment is nec essary.
Page 6

11 12
Back View
Front vi ew
2
3
4
Power in dicator light: To show the power supply.
Start /Pause button: To start the selected
washing program or pause the washing program
when the machine is working.
Salt a nd rinse aid warning lights: To show
when the salt container or dispenser need to be
refilled.
Power switch: To t urn on/off the power supply.
Main Filter
Detergent Dispenser
Cup Shelf
Cutlery Basket
Coarse Filter
Rinse Aid D ispen ser
Inlet pi pe conne ctor
Drain pipe connector
Lower Basket
Spray Arms
Upper Basket
1
Salt Contai ner
before usin g it fo r the f irst tim e.
To g e t t h e b e st p e r for m an c e fr o m y o u r d i s h was h er, r e a d a l l o p e r at i n g i n s t r u ct i o n s
5
6
7
8
9
10
12
11
3
2
4
5
Washi n g Prog ram Sele c t o r : To se l e c t on e o f
the six wa shin g pro gra m s.
7
8
9
6
Program in dic ator l ights: To show the washi ng
program.
Delay Button : To Press the button to delay.
Display window: Program remaining time,
delay time, running ind icat or, fault code s
and etc.
Half load functions Button: To select Half load
functions.
1
2
3
4
5
6
7
8
9
10
on
Off
DELAY 1 2/
1HOUR
3IN1
INTEN.
NORMAL
ECO
RAPID
PROG. START/PAUSE ON/OFF
7 98
6
5
4
3
12
Page 7

Befo re us ing you r dishwashe r for the f i rst ti m e :
The wat er sof ten e r mu s t be s et m an u ally, using the w a ter ha r d ness d i al.
The wat er so ften e r is de signed to remove mi nerals an d sa l ts f rom the wa t er, w hich wo u l d h a ve
adetrimentaloradverseeffectontheoperationoftheappliance.Thehigherthe
content of thes e mine r a l s an d salts, the harde r you r water is. The sof t e ner sh ou ld be
adju ste d ac c ord i n g t o the ha r d ness o f the wa ter in y o u r a rea. Your loca l Wa t e r Auth ori ty
can adv i se y ou on the hardness o f t he w a t e r in you r ar ea.
Adjusting Salt Consumption
The dis hwas he r is de s i g ned t o al l ow f or adju stme n t i n the amou n t of sa lt co ns u med bas ed on the ha rdn e ss of
the wate r used. Thi s is in ten d ed t o op tim ise and c us tomi se the le vel o f salt consum ptio n.
1. Unsc re w the cap fro m t h e s alt con tai n e r.
2. T he r e is a r i ng on t he con t a i n e r w ith an a rr ow o n it (see figu re
on the side) , if n ecessar y, rotate the r ing in the anticlo ckwise
direction fro m the "-" Setting toward the " +" s ign, b ased on the
hardness of the water be ing u sed.
It is recomm ende d t hat adju st ments shou ld b e made i n
accordance wit h the following sch eme:
WATER SOFTE NER
The har dne ss of t he water varie s fr o m pl a c e t o plac e. If har d w a ter i s us ed i n th e di shw asher, d e pos its w il l
form on the dishes a nd uten sils .
The app l ian ce is eq ui pp e d wi t h a sp e c i al s oftener th at uses a sal t c on tainer spe cif ically des igned to eli m i na t e
lime an d mi nera ls fr om the wat er.
Contact your local water board for information on the hardness of your water supply.
dH
mmol/l
0~140~8 0~1.4
/
0
/
14~398~22 1.4~ 3 . 9 - 20 50
39~8022~45 3.9~8 Mid 40 25
+
60 16
fH
0~10
10~28
28~56
Clarke
WATER HARDNESS
Selecto r P o sitio n
Salt consumption
(gra m/c ycl e )
Auto no my
(cycles/1kgs)
Please follow the steps below f or a djustment in salt consumption.
""/
"-"
"+"
"Mid "
Setti n g tow ar d the " + " s ig n
Setti n g tow ar d the " - " sig n
Setti n g tow ar d bet w e en
the "-" sign and "+" sign
No salt need added
45~60 80~107 56~75 8~11
If your m odel doe s n ot have any wate r softener, you may s kip this sectio n.
A. Set the wa te r sof t ener
B. Add 1.5Kg dishw ash er salt and t h en f ul l fill t he salt con tain er with w ater
C. Fill t he ri nse aid dis pen ser
D. Fill i n dete rgen t
Clark: British degree
fH: French degree
DH: German degree
dH=1. 2 5 C l a rk e = 1 .7 8 fH=0 .1 7 8 m m o l/l
1
Page 8

1. T h e sa l t co n tai ne r must only be refi l le d whe n t h e sa lt wa rn i n g li g h t i n t he c on t ro l pan el comes on.
Depending on how well the salt dissolves, th e salt warning light may still be on even though the
salt container is filled.
If th e re is n o salt war ni ng lig ht in the c on trol pane l (fo r s o me Mode ls), you can est im at e when to fill
the s a lt into the soft en e r by th e cyc les tha t the dish w ash e r has ru n.
2. If th e re a r e sp ills o f the sa l t , a so ak or a rap id pro gra m s h ould be ru n to rem ove the ex c essi ve sa lt .
Always use the salt intend ed for u se w i th d ishw ash er.
The salt c ontain er is located ben eath the lower basket and should be f illed a s e xplained
in t he following:
Attention!
Only use salt spe cifically designed for t he use in dishwashers! Every other type of
salt not specifically de signed for the use in a d ishwasher, especially table salt, will
damage the w ater softener. In case of damages caused by the use of unsuitable
salt the manufacturer doe s not give any wa rranty nor is liable for a ny damages caused.
Only fill with salt just before starting one of the complete washing p rograms.
This will prevent any g rains of salt or salty wate r, which may have b een spill ed,
remaining on the bottom of the machine for any period of time, which may cause
corrosion.
The ri nse aid is rel eas ed d uri ng the final rinse to preve nt water fro m forming droplets on yo ur dis he s, w hich can
leave spots and streaks. It also improves drying by allowing water to r oll off the dishes. Your dishwasher is
designed to use liquid rins e aids. The rinse aid dis penser i s located inside the doo r next to the detergen t dispense r.
To f i l l t h e d i s p e ns e r , o p e n t h e c a p an d po u r t h e r i n s e a i d i n t o th e d i s p e ns e r unt i l t h e l e v el i n d icat o r t u r n s c o m plete l y
black. The vol ume of the rinse ai d container i s about 110ml.
Rinse Aid Dispenser
Function of Rinse Aid
Rinse aid is aut oma t ica lly added duri ng the last rinse , ensur ing tho rou gh rins ing , and spot a n d s t reak free dryi ng.
Attent ion!
Only us e brand ed rinse aid f or dis hwas her. N ever fill the rinse aid dispens er with any o ther substa nce s
(e.g. Di shwa sh er cle ani n g agent , liqu id dete rg e nt) . Th is would damag e the a pp lian ce .
A Remove the l o we r bask et a nd the n unscre w a n d r emove the ca p fr o m th e sal t c o ntain er.
B Place the e n d o f the fu nn el ( su p pl ie d ) in to t h e hole and i ntroduc e a bout 1.5 kg of dis hwash er salt .
C Full f il l the sa l t co nt a i n er wi th wate r. I t is n or ma l for a sm all amo u nt o f water to com e out of the sa l t c o n ta i ner.
D Afte r filling the contain er , scr ew the c ap t ightly b a c k cl o ckwise.
E Usually, the salt wa rni ng light will s top being illumin at ed within 2 -6 days afte r th e s alt cont ain er ha s been filled wit h
salt.
F Immediat ely a ft er f illin g t he salt into the sa lt c on tain er, a washing progr am should be started
program Otherwise t he fil ter system, pump or ot her important parts of the machin e m ay be damaged
by salty water. This is out of warranty.
(We su ggest to use the
soak or rapid ).
Page 9
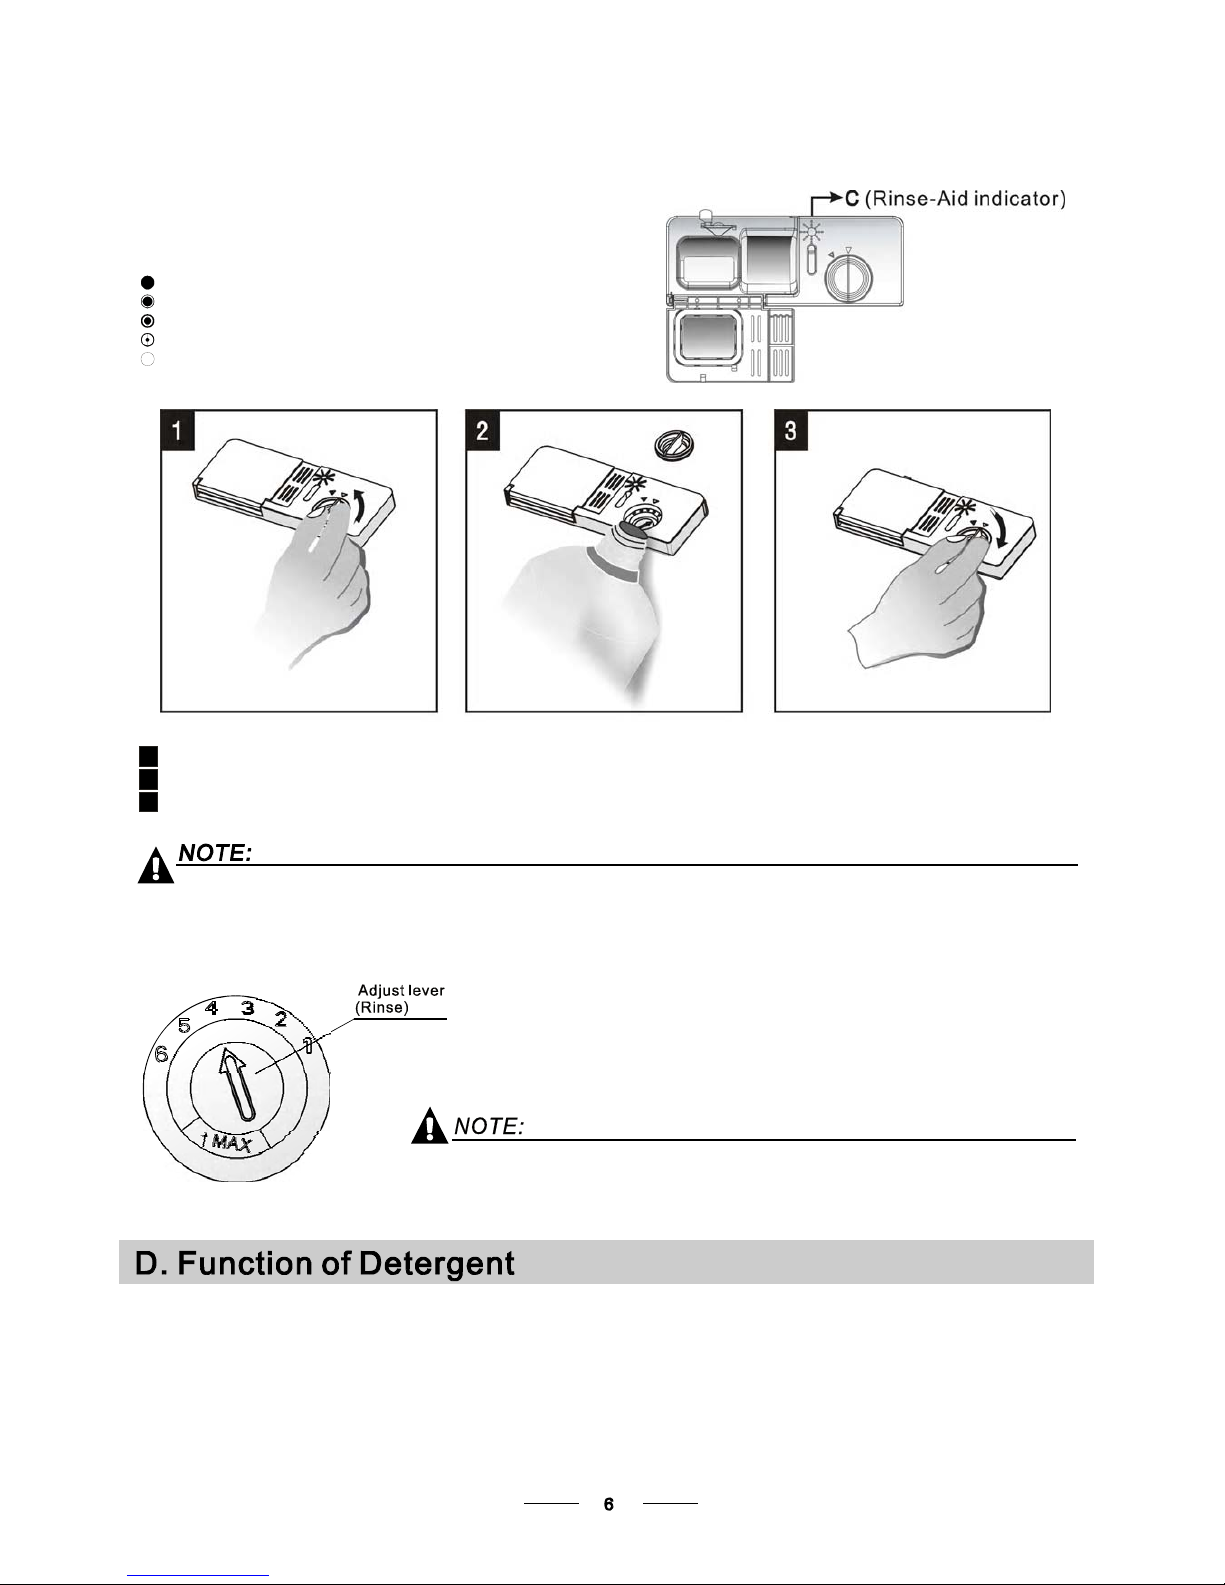
To op en t h e d i s pense r , turn t h e c a p to t h e " open" (le ft ) a r r ow and l if t it o ut .
Pour t he rinse ai d into th e dispenser, be ing careful not to overfi ll .
Repl ace the cap by insertin g it a li gne d with "open " arrow and turn in g i t to the cl os ed (rig h t) arrow.
Adj us ti ng R inse A id Di sp e nse r
The rinse aid di s pe ns er ha s si x or four sett i ngs. Always st art wit h th e di spe n s er
set on "4". If spots and poor drying are a p roblem, increase the amount of rinse
aid dispensed by remov ing the dispenser lid and r otating the dial to "5". If the
dishes st ill are not drying properly o r ar e show spots, adj ust th e di al to t he next
higher lev er until your dish es ar e spot-f ree. The recommend ed set ting is "4".
(Factory value is "4".)
Increase the dose if there are drops of water or lime spots on the dishes after washing.
Reduce i t if there are sticky whitish stains on your dishes o r a bluish film on glassware or
knife bl ades.
1
2
3
As the rinse ai d dimi n is h e s, th e size o f the bl ack do t
on the rin se aid l evel indicator changes, as illu strated b elow.
Full
3/4full
1/2full
1/4full-Shouldrefilltoeliminatespotting
Emp t y
When to Re fil l the Rin se Aid Di spen ser
If there i s no rinse-aid warning light in the c ontrol panel, you can estimate the amount from the colour
of the opti cal l evel indi cator C located next to the cap. When th e rinse-ai d conta iner i s full, the whole
indicator will be dark .As the rinse-aid diminishes, the size of the dark dot decreases. You should never let
the rinse aid level fall 1 / 4 full.
during the next wash.
Don't f or get t o re pla ce t he cap be fore you cl ose dishwa sher d o or.
Clean up any rinse aid spilled while during filling with an absorbent cloth to avoid excessive foaming
Detergents with its chemical ingredients are necessary to remove dirt, crush dirt and transport it out of the dishwasher.
Most of the commercial qu ality d etergents are suitable for this purpose.
Detergents
Ther e are 3 s or ts of detergen t s
1.With phosphate and with chlorin e
2.With phos phate and without chlorine
3.Without phosphate and without chlo rine
Page 10
Amount of Detergent to Use
Proper Use o f Deterg ent
Use only detergent specifically made for the u se in dishwashers. Keep your detergent fr esh and dry.
Don't put powdered detergent into the dispenser u ntil y ou're ready to wash dishes.
Dishwasher detergent is corrosive! Take care to keep it out of reach of children.
Based o n t h e ir c hem i cal co m po sit io n, det er ge nts can b e spl it i n t w o b a s ic ty pes :
Deterg e nt t a ble t s of di ffe ren t brand s d i sso lve at di ffer e nt s p ee ds. For this reas on some
dete rge n t t a ble ts ca nno t d i s solv e and de velop the ir full cleani ng po w e r du r ing s hort
prog ra m s. Th e r e fo re plea se u se l on g prog ra m s w h en u sin g det e rg ent t ab l ets, t o
ensu re the complete rem ova l of de t erg e nt re s idu a ls.
The dis p en ser m us t be refilled be fore th e st a r t of e ach wa s h c y cle f ollo w i ng t h e inst r u c t i ons
prov ide d in t he w as h c y c le ta ble . You r dis hwa she r u s es less de te r g ent and r i n s e a i d th a n
Convention a l d is hwa sher. Ge ner al ly, onl y one ta b lesp oon of d et er gent is neede d for
anormalwashload.Moreheavilysoileditemsneedmoredetergent.Alwaysaddthe
dete rge n t j u s t b e for e st a r tin g t h e dis h was her, ot h erwi se it coul d g et damp and w il l n ot
diss olve properly.
Concentrated Detergent
Detergent Tablets
Detergent Dispenser
Alway s a dd the d e terg en t just b ef ore star t ing each wash cycle.
Only use branded detergent aid for dishwasher.
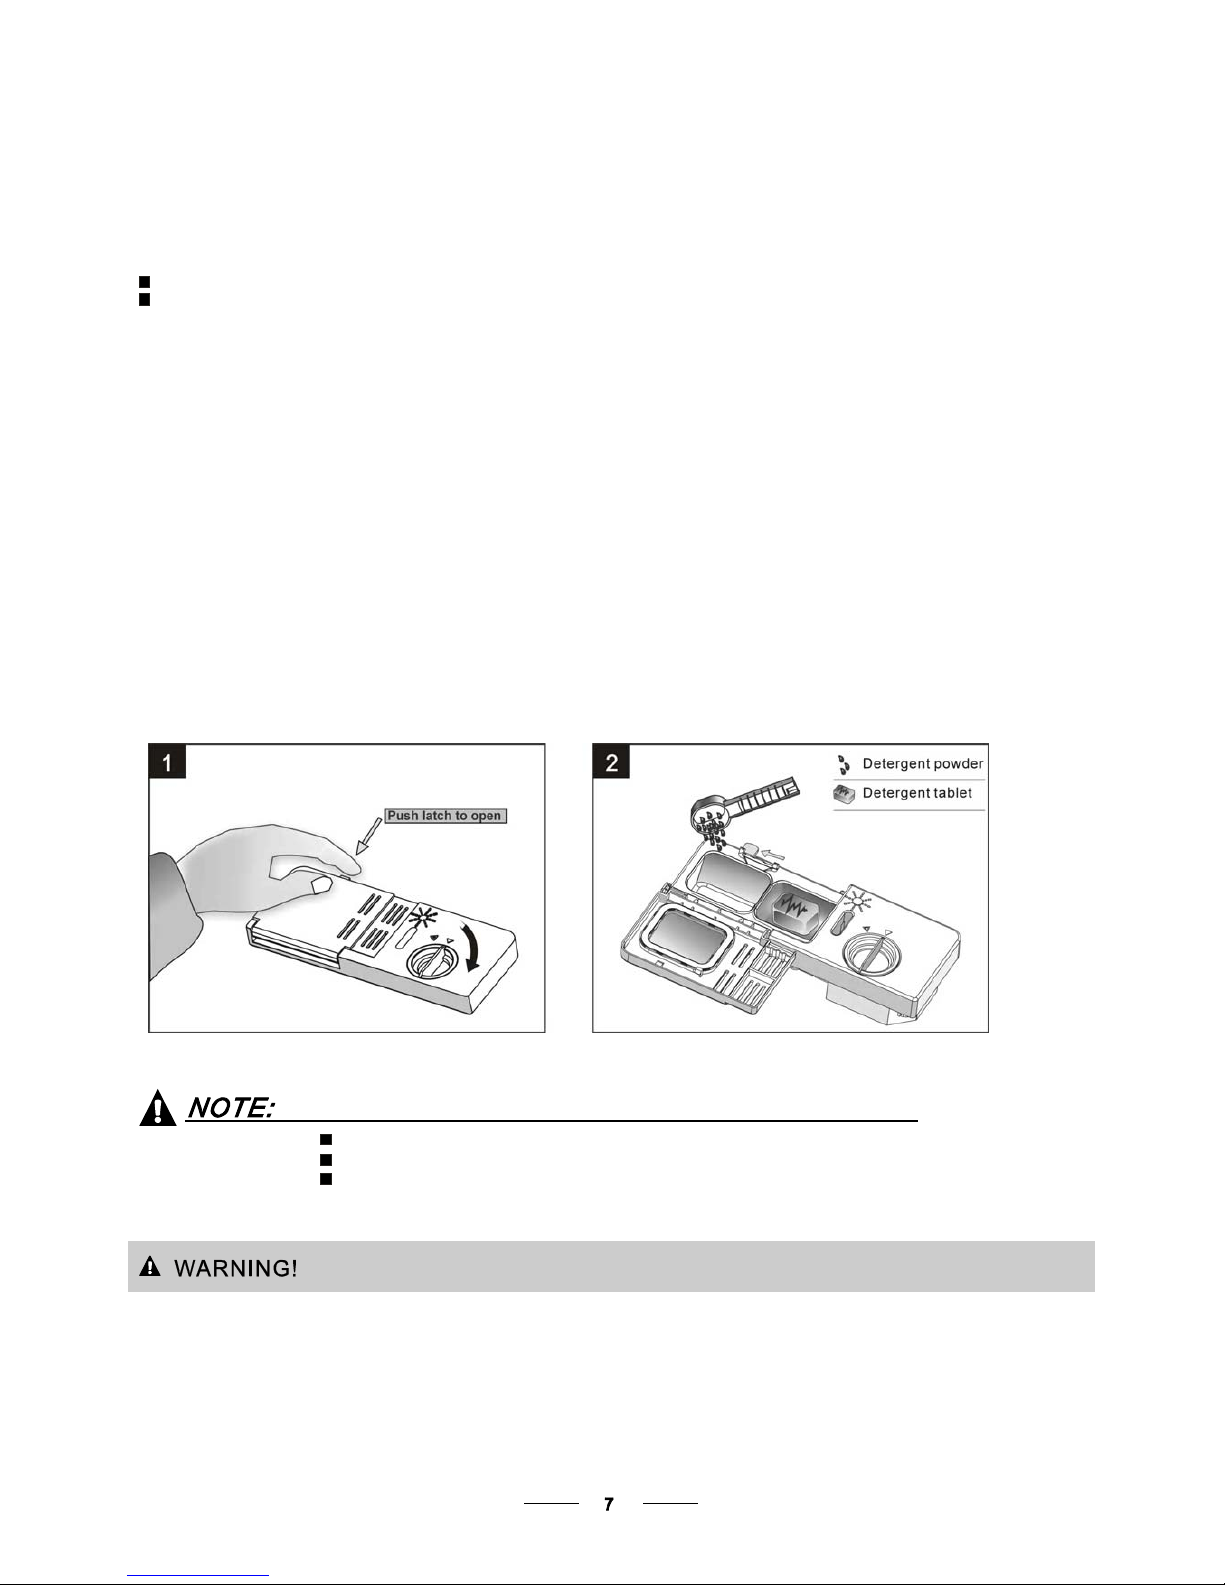
If the lid is closed: press release button. The lid will spring open.
conventional, alkaline detergents w ith caustic c omponents
low alkaline concentrated detergents with natural enzymes
Normall y new pulver ised dete rge nt is with out phos pha te . T hus the wate r s o fte n er funct ion of
phos pha te i s no t give n. In t h i s c as e we r ec ommen d to fil l sa l t in the sa lt con t a in e r e v en whe n
the hardness o f water is only 6 dH. If detergents w ithout phosphate are used in the case of hard water
ofte n w hite sp o ts ap pea r o n d ish es an d gl a s s e s. I n this ca s e p l eas e ad d mo re det e r gent to reach
bett er result s . De t e rgent s wit h o ut ch lor ine do onl y bl e ach a litt le. S tron g and co lo u r ed spots w i l l no t
be r e mo ve d co m ple tel y. I n th is ca se p l e a s e c hoose a pro gram wi th a higher tempe ratu re.
Page 11
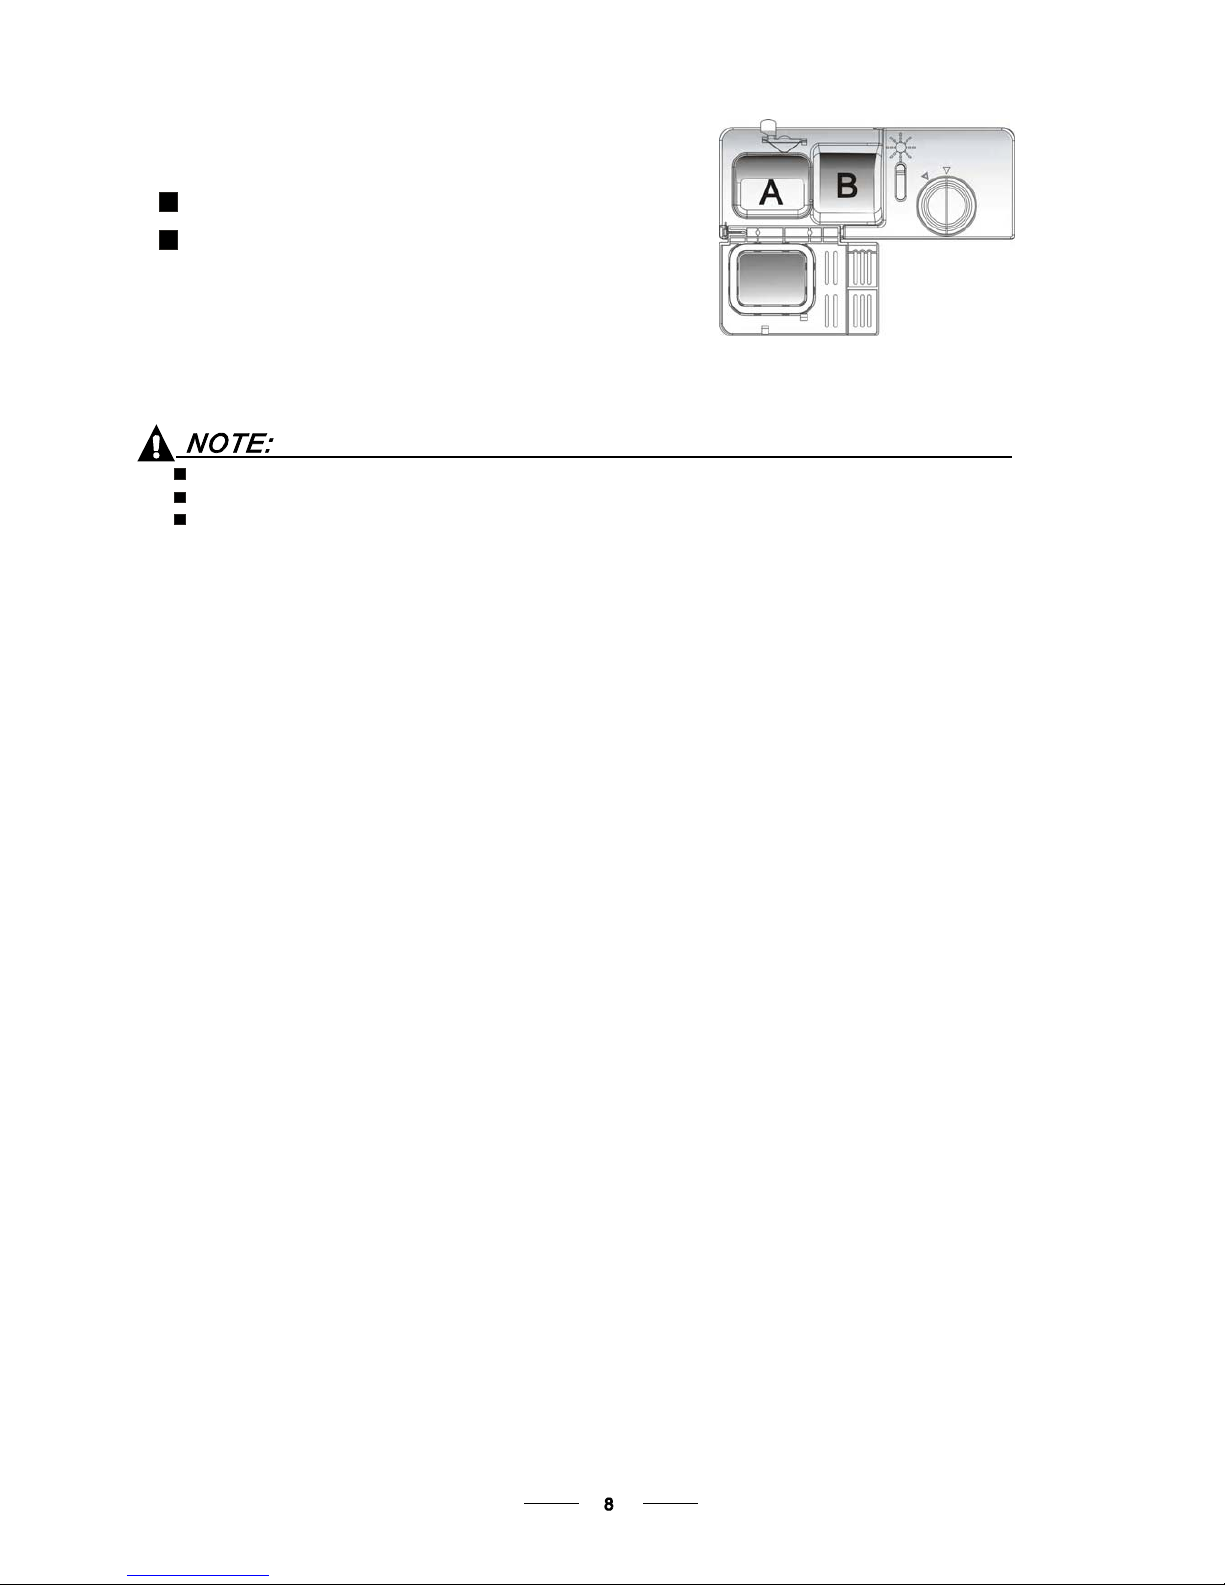
Fill t he d e tergen t dispens er w ith d eter gen t.
The mar ki ng indica tes the do sing leve ls , as
illustrated on the right:
The place o f main wash cycle detergent placed.
The place o f pre-wash cycle detergent placed.
Pleas e o bse rv e t h e m anu fa ct ur ers dosing and stora ge
Recommend ations as stated on the detergent packaging.
Close the lid and press until i t locks in place.
If the dishes are heavily soiled, place an additional
detergen t dose in the pre -w ash detergent chamber. This deterg ent will take effe ct d urin g the pre -wa sh p has e.
A
B
Fill in Detergent
You fin d inf or matio n about the amount of deterg en t f or th e s i ng le pr ogram me on t he las t page.
Please aware, that according t o the level soiling and the specific hardness of water differenc es are possible.
Please observe the manufacturer's recommendations on the detergent packaging.
Page 12
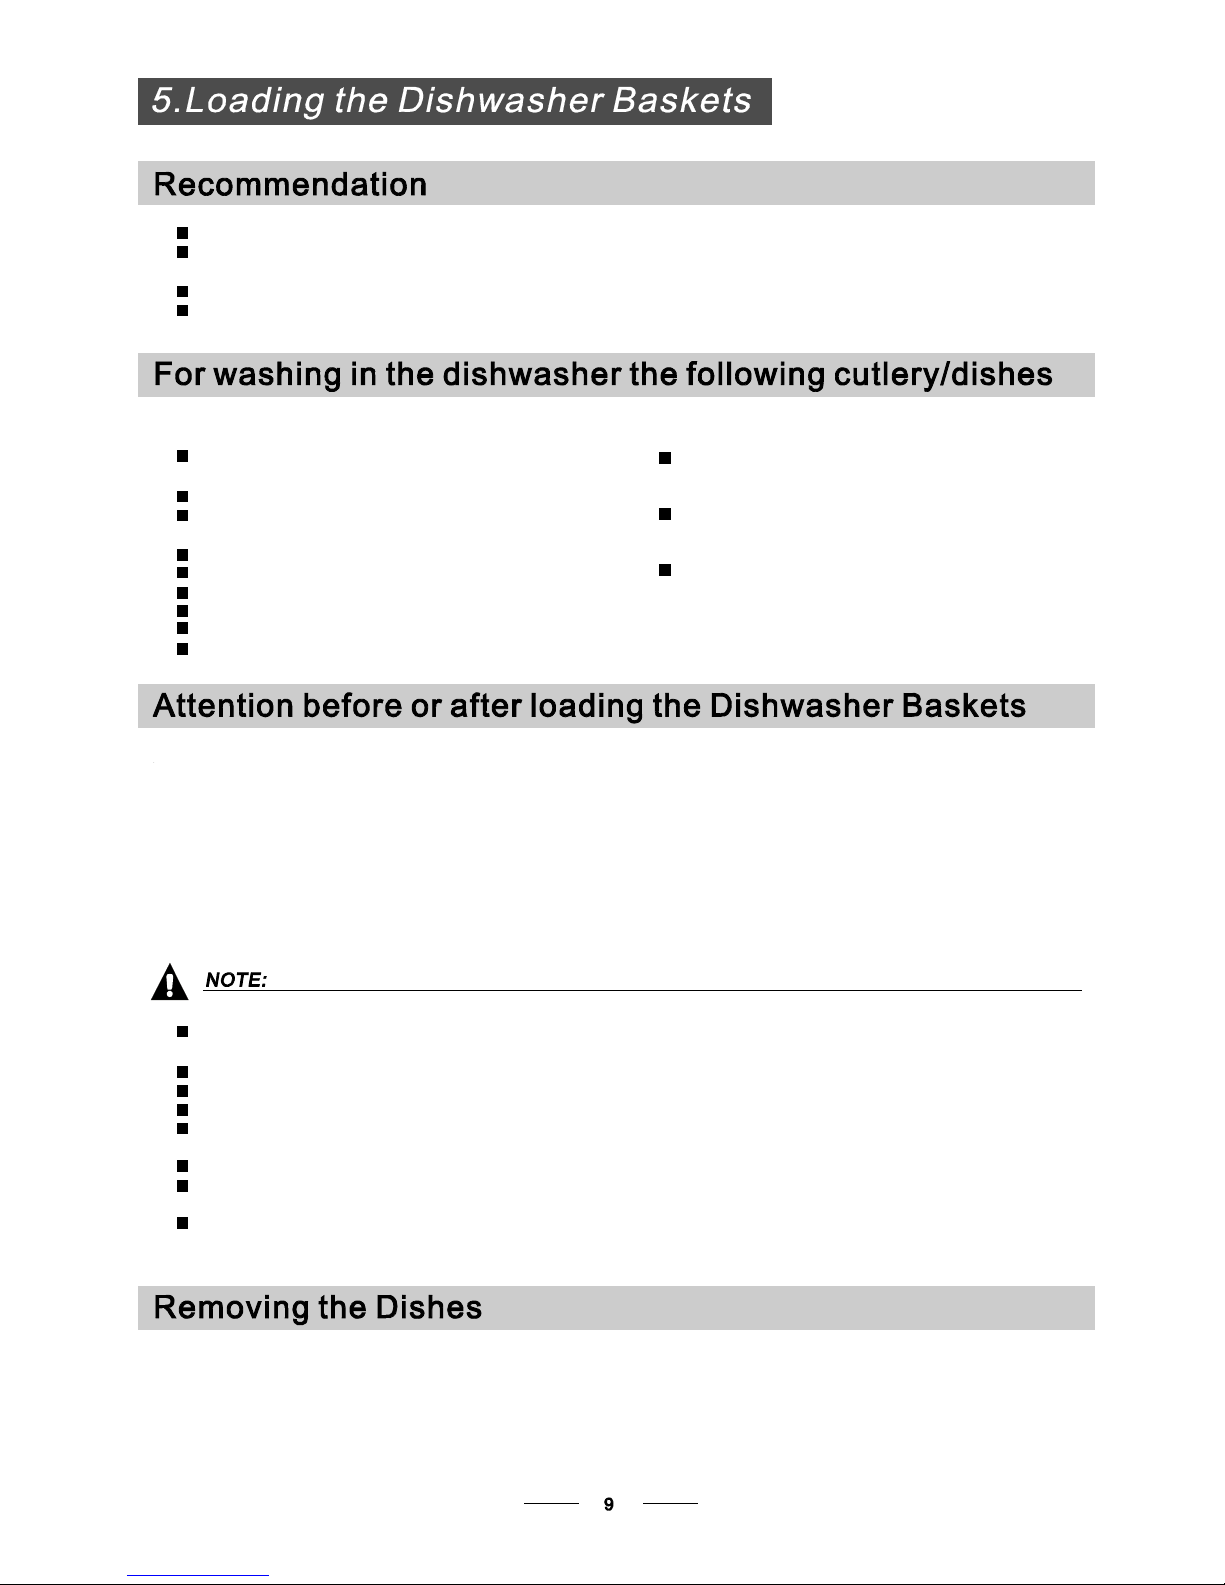
Cutlery with wooden, horn china or
mother-of-pearl handles
Plastic ite ms t hat are n ot h eat r esistant
Older cutlery with glued parts that are not
temp er atu r e resis t ant
Bonded cutl ery ite ms or dishes
Pewter or cooper ite ms
Crystal glass
Steel items subject t o rusti ng
Wood en pl a tt ers
Items mad e fro m s ynt h et ic fib res
Some t y pes of g las s es can b ec o m e
dull af ter a la rg e nu m b e r of w ashes
Sil ver an d aluminum p a r ts ha v e a
tendenc y to disc olou r d ur ing washing
Glazed pattern s may fa de if mach ine
washed frequently
Are not su itable
Are of limited suit ability
Dishes and items of cutlery must not lie inside one another, or cover each other.
To av oi d d a ma ge to gl ass e s , th ey m us t no t t o uc h.
Load large items w hich are most difficult to clean into the lower basket.
The upper basket is designed to hold m ore d elicate and lighter dishware such as glasses, coffee
and t ea cups
Long bladed knives stored in an upright position are a potential hazard!
Long and/or sharp items o f cutlery such as carving knives must be positioned
horizontally in the upper basket.
Please do not ove rload your dishwasher. This is important for good results and for
reasonable co ns umption of en er gy.
Load hollow it ems suc h as cups, glasses, pans etc. With the opening facing downwards so that
water cannot collect in the container or a deep b ase.
Consider buying utensils which are identified as dishwasher-proof.
Us e a m il d detergent tha t i s describ ed a s 'k ind to dishes'. I f n ecessary, seek further
informa tion from t he deterge nt m anu factur ers.
For part icular items, select a progr am w ith as low a temperature a s po ssible.
To pr e v e n t da mage , d o n o t t a k e g la ss a nd c ut l ery out of t he dishw a s her i mmed i a t ely
after the p rogramm e has e nded.
(For best per f or m an ce of the dish wa sh er, foll ow the se l oa d in g guid e lines .
Features and appearance of baskets and cutlery ba skets may vary from your model.)
Scrap e off any larg e a mo unt s of le ft over foo d. Soften remn an ts of b urn t food in pan s.
It is not necessary to rinse t he dishes under running water.
Place obje cts in t he dishwa s her in fo ll owi ng way :
1.Items su ch a s cups, gla sse s, pots/pa ns, etc. a re f a ced downwards.
2.Curved it ems, or o nes with r eces s es, sh oul d b e l oade d a sla nt s o th at wate r can run off.
3.All utens ils are st acked secu rely and can not tip ov er.
4.All utens ils are pl aced in t he way t hat th e spray ar ms can rot ate freely durin g wa shin g.
Very sm all item s s ho u l d n o t b e w a s hed i n t he dishwas he r a s t h e y c o u ld eas il y fall out of the b aske t .
To p r e v e n t w a t er d r ip p i ng f r om t he u p pe r b a s k e t i n to t h e l o wer b a s k e t, w e r e c om m e nd t h a t y o u
empty the lowe r basket first an d t he n th e u ppe r ba sk et.
Page 13
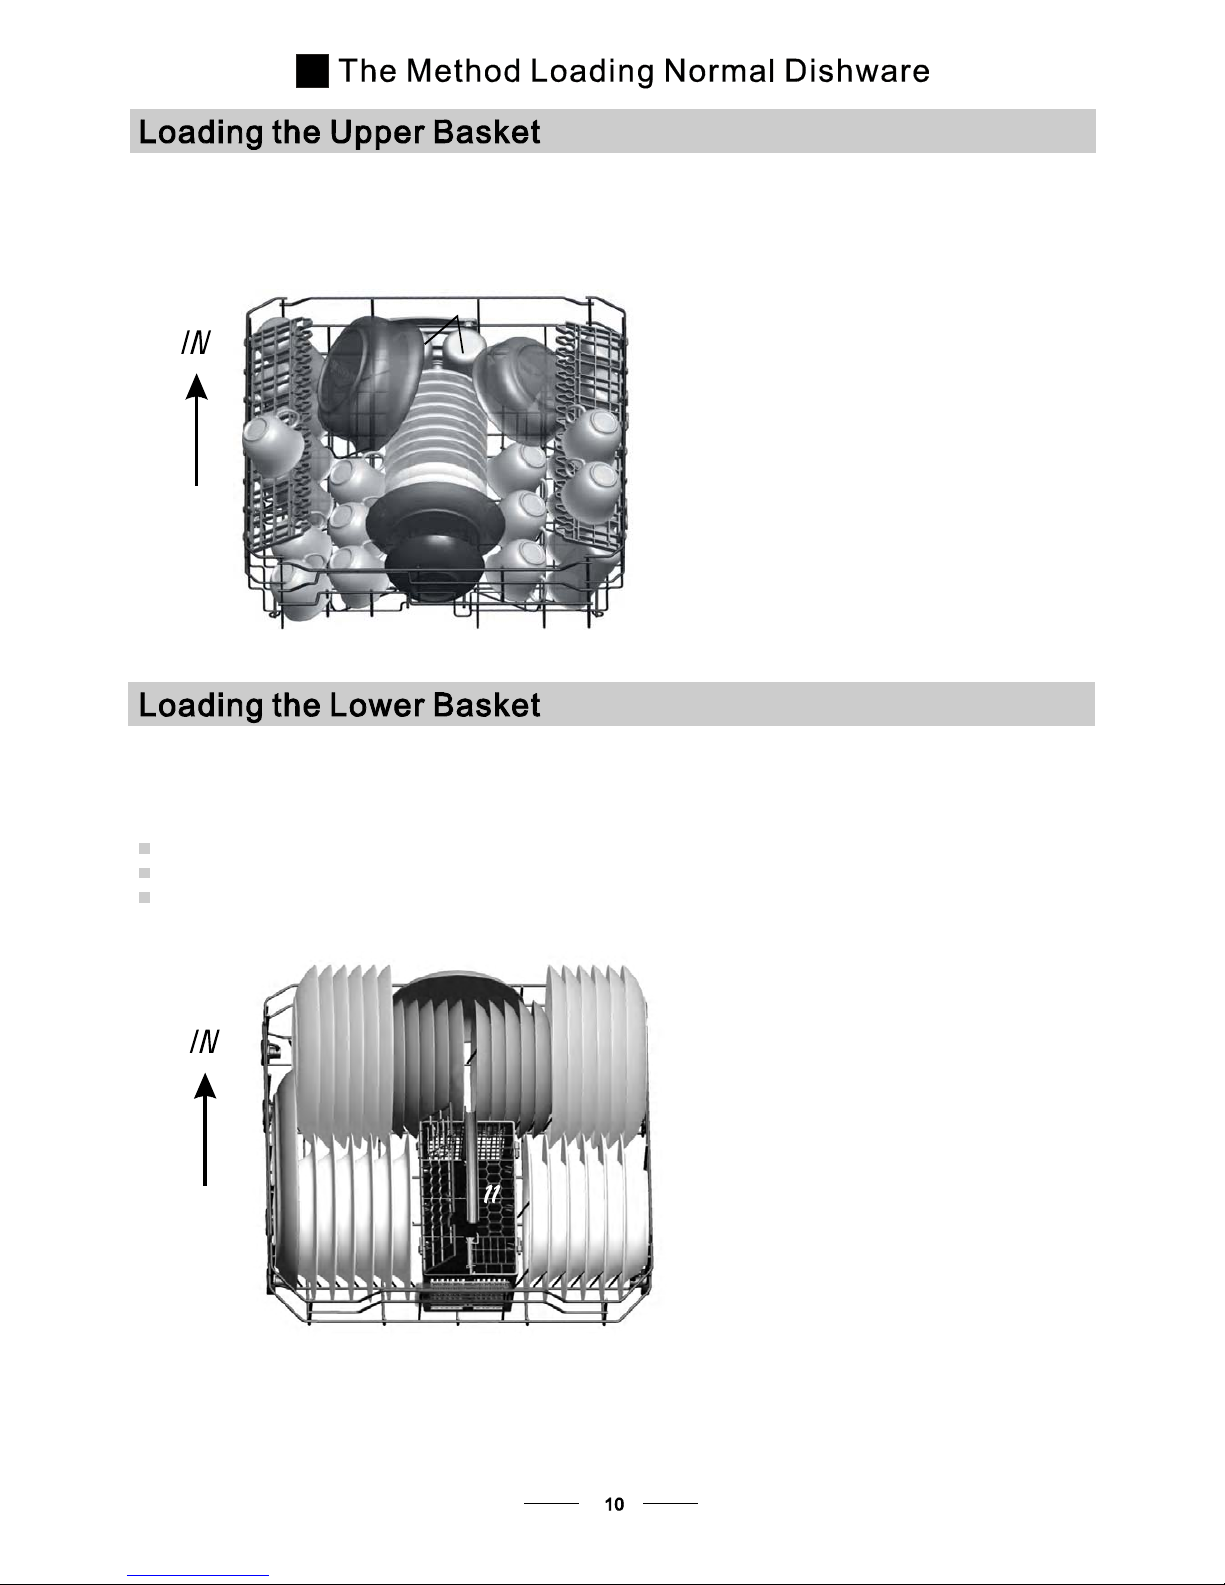
The upper b asket is desig ned t o hold more del icate and light er dish ware su ch a s glas ses, co ffee
and tea c ups and saucers, as well as p lates, s mall bowls and s hallow p ans ( as l ong as they are
not too di rty).
Position the dish es a nd c ookw are so that they w ill not get m oved b y the spra y o f wat er.
We s ug g e st t hat y ou pla ce la r g e it ems an d the mo st d iff icu lt to clea n ite ms a re to be p la ced in to th e low e r ba sk et :
such as pots, pans, lid s, servi ng di shes an d bowls, as shown in the figure b elow.
It is preferable to place serving dishes and lids on the side of the racks in order to avoid blocking the rotation of the
top s pray arm.
Pots, serv ing bowls , etc, m ust alwa ys be placed top d own .
Deep pots should be slanted to allow water to flow out.
Pleas e b e remind ed that:
Th e Botto m Bas ket feat ure s fol ding spi kes so that la rg er or m o re pot s an d pans ca n be l oa ded.
Page 14
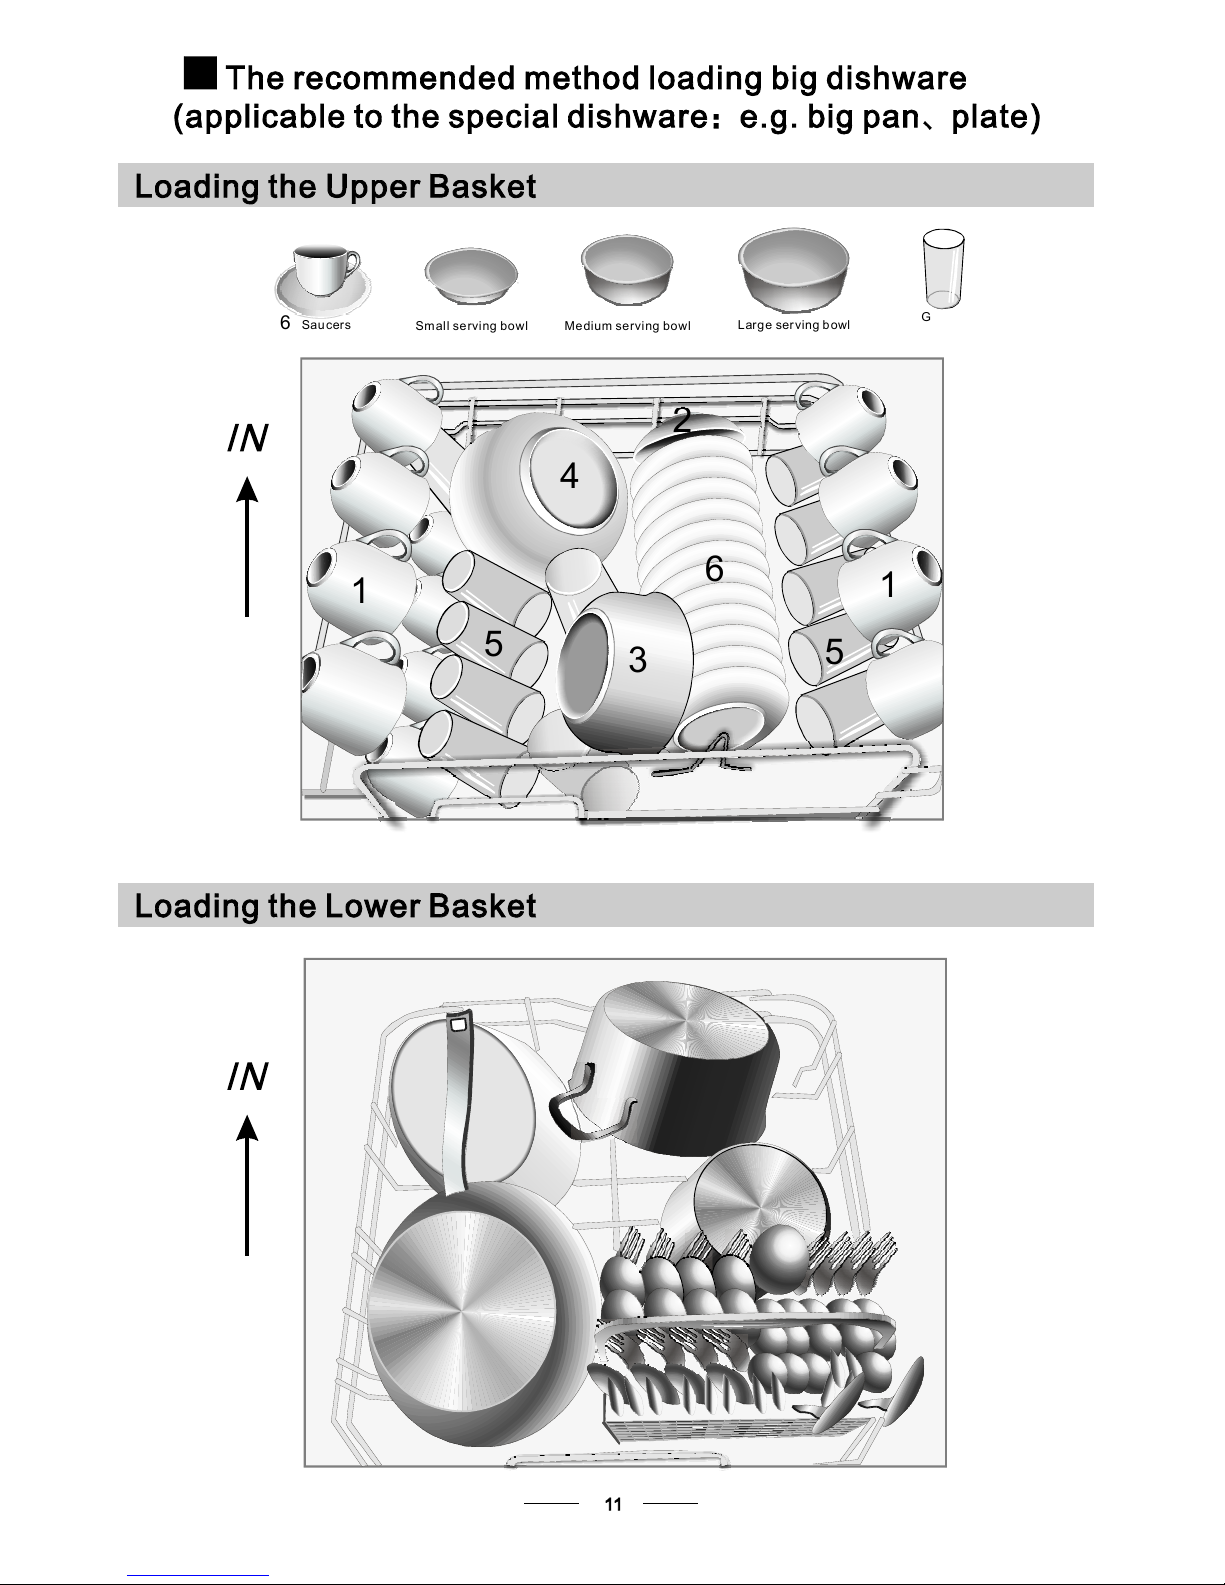
2
4
3
1
5
1
5
6
1
Cups
Saucers
6
Medium serving bowl
3
Large serving bowl
4
5
Glasses
1cups
Small serv i ng bow l
2
Page 15
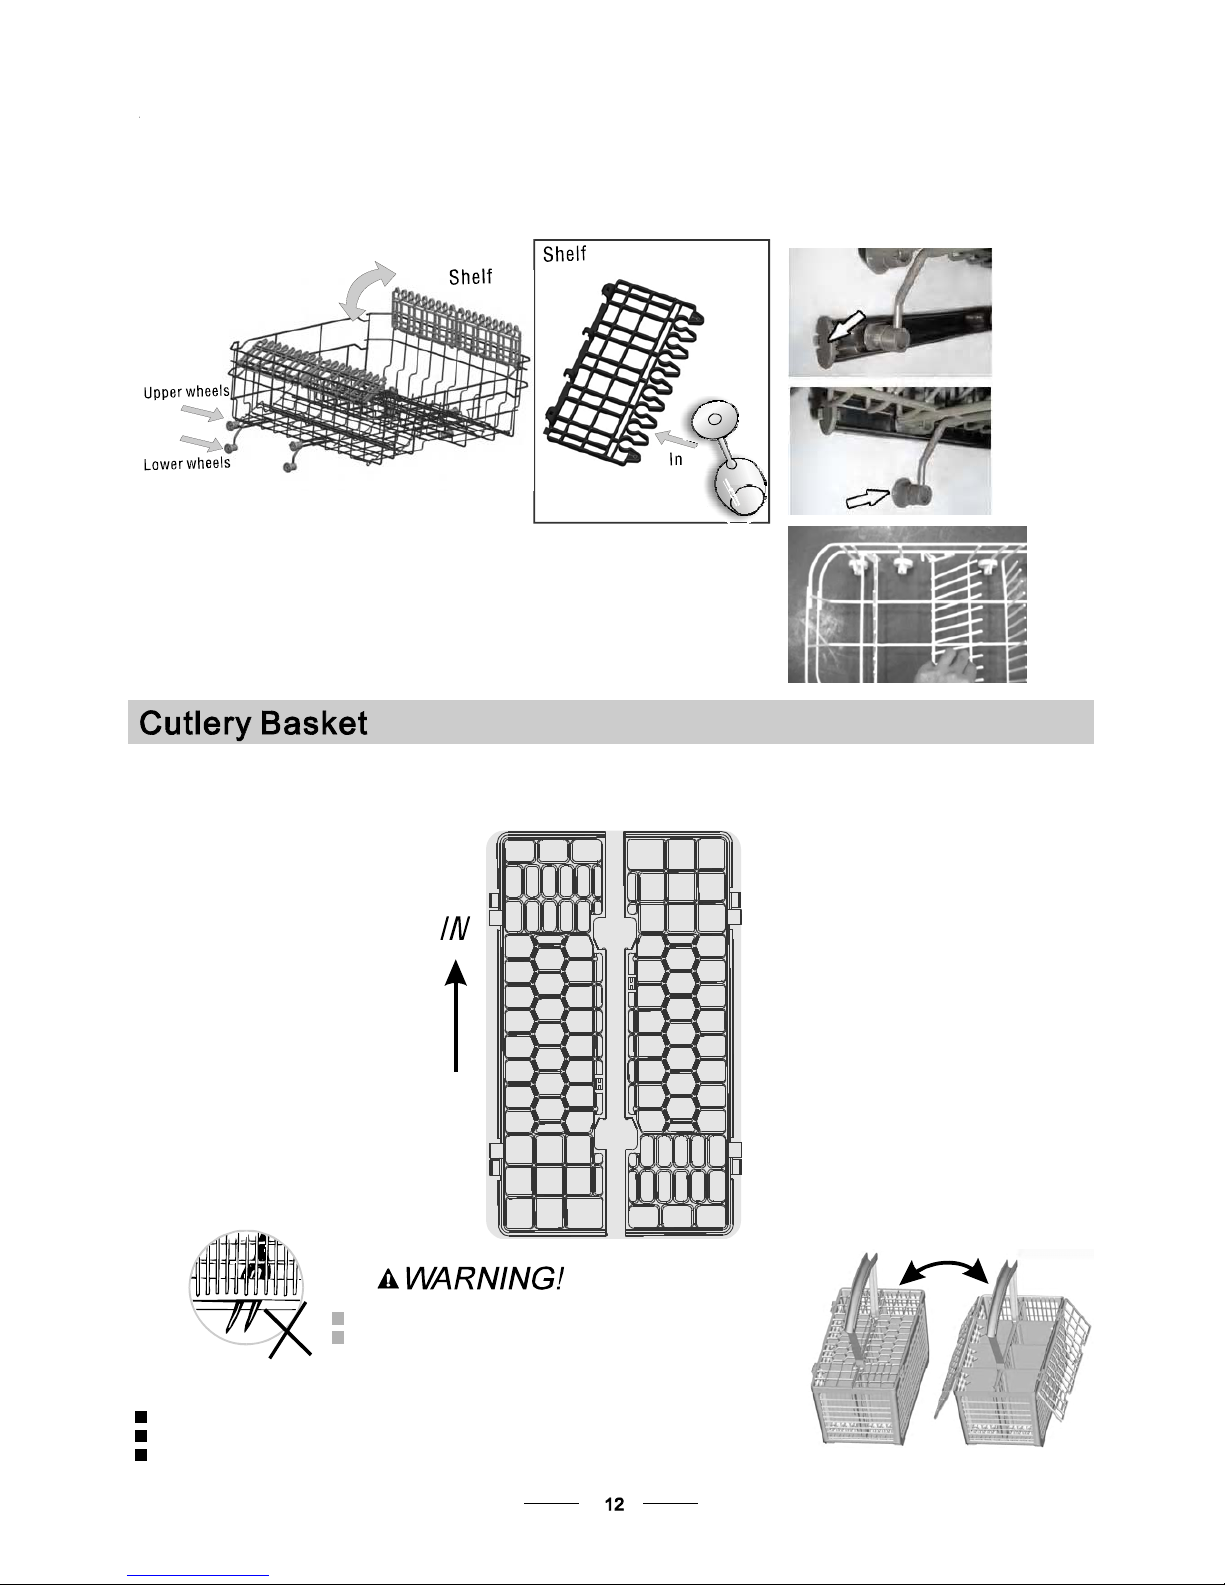
Cutlery should be place d in the cutlery basket with the han dles at the b ott om. If the rack has side baskets , the
spoo n s sho u ld b e loa ded sep ar a t e ly int o the appr op r i a t e s lo t s , es p ecia l l y lon g ut e nsil s sh o u l d b e p l a c ed i n the
hori zon t al pos i t i on at the fr o n t o f t he up p e r b a s k et as sho w n i n th e pi c ture .
Folding Spikes of Low er Basket
For better st ack i ng of po t s an d pans,
the spi kes can b e f olde d down as
show in the pic t u re ri ght.
Do not let any item extend through the bottom.
Always load sharp utensils with the sharp point down!
Adjusting the Upper Basket
The he ig ht of the up p er ba s k et c an b e adjusted in ord er to cre a te mo r e space fo r l a r ge ut e n s ils
both for t h e up p er/lower ba s k et. Th e heigh t of the up per b ask e t c a n be adjusted by pl aci ng the
wheels o n d iffere nt h eig ht o f the r ails. L ong items, serving cutler y, salad servers and kn ives
shou l d be pl ac e d on th e she lf s o th a t the y do not o bs t r uct the rot a t i on o f th e spr ay arm s .
The sh elf can be fol d ed ba c k or be re mo ve d when not re q u ired for use .
For person al safety and a top quality clea ning, pl ace t he s ilver ware in the baske t
making sure that:
They d o n o t ne s t to geth er.
Sil ver ware is p l aced with t he handl e s-d own .
But pl ace knives a nd other potentia ll y dangerous utensi ls ar e placed handle s-up .
2
4
525
32
3
2
1
1
1
1
1
555
4
555
4
632367
3
2
3
4
555
1
1
1
1
1
5
4
2
2
3
33
33
2
2
3
2
2
1
4
4
4
4
8
4
4
4
1
Page 16
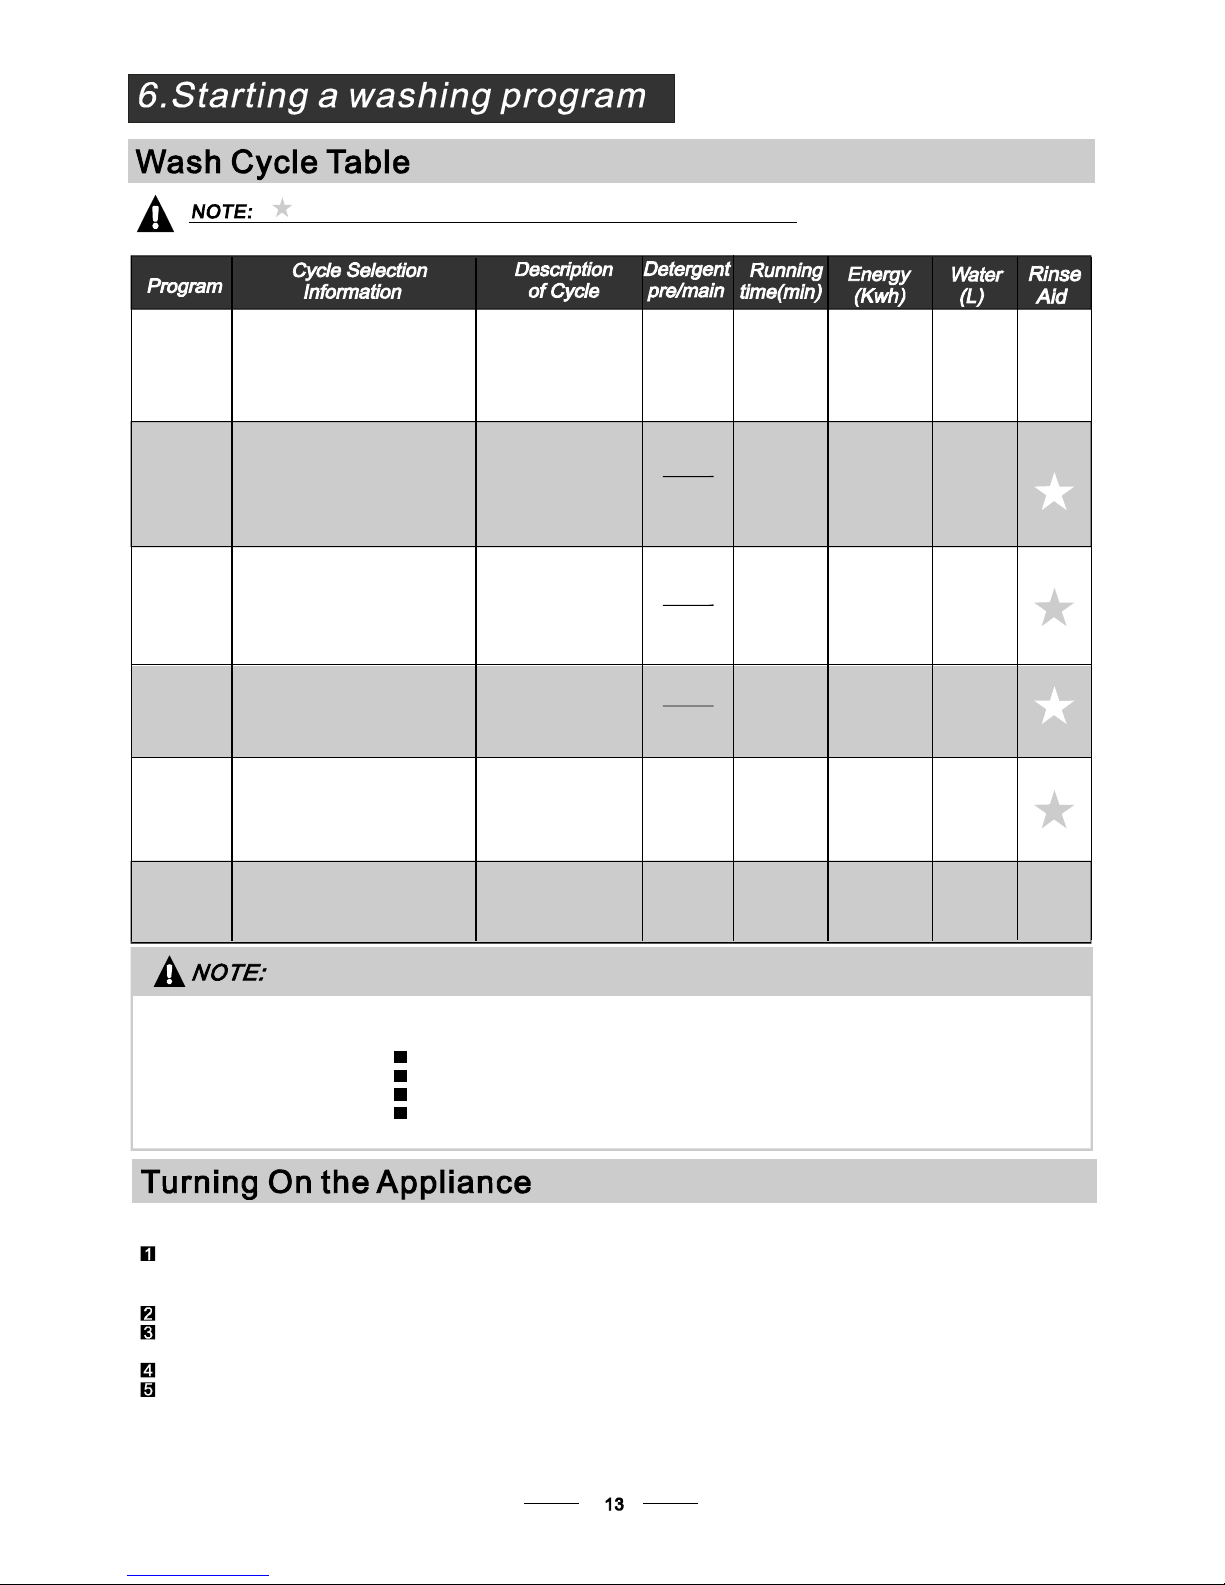
16.0
Eco.
Intensive
Normal
(*EN 50242)
160
1.35
3in1
(or )3in1
5/25g
(or )3in1
5/25g
(or )3in1
5/25g
3in1
For normally soi led loads,such
as pots glasses and lightly
soiled pans.
Ashorter washforlightly
soiled loads and quick wash
For lig htly soiled load that
do not need excellent drying
efficiency.
Rapid
1Hour
Pre-wash(50 )
Wash (65 )
Rinse
Rinse
Rinse (55 )
Drying
Pre-wash(50 )
Wash (55 )
Rinse
Rinse (65 )
Drying
Wash (50 )
Rinse
Drying
Pre-wash
(65 )
Wash (40 )
Rinse
Rinse (40 )
20g.
30g.
Wash( 60 )
Rinse
Rinse (50 )
Drying
Pre - was h 50
Wash 55
Rinse
Rinse 65
Drying
160
165
125
30
60
1.30
1.02
1.36
0.50
0.95
19.5
16.0
12.0
12.0
11.0
Mea ns : nee d to fi l l rinse int o t h e R i nse -A i d D is pe n se r.
()
*EN 50242 : This programme is the test cycle. The information for comparability test
in acco rdanc e w ith EN 502 42, as fol lows :
Capacity: 12 setting
Positi on Uppe r ba s ket : upper wheels on r ai ls
Rinse aid setting: 6
The power consumption of off-mode is 0w
left-on mode is 1.4w
Startin g a cycl e wash
Draw out the lower and up per basket, l oad the dishes and p ush them back.
It is commended to load the lower basket first, then the upper one (see the section entitled
Loa di ng th e Dis hwash e r ).
Pour in the detergent (see the section entitled Salt, Detergent and Rinse Aid ).
Insert the plug into the socket. The power supply is 220-240 VAC /50 HZ, the specification
of the socket is 10A 250VAC. Make sure that the water supply is turned on to full pressure.
Close the door, press the ON/OFF button, and the ON/OFF light will turn on.
Press the program button , the wash program will be changed as follows direction:
If a program is selected, the response ligh t will light. Then press the Start/Reset button, the
dishwasher begins to start.
3in1->Intensive->Normal->Eco->1 Hour->Rapid;
For heaviest soi led cr ocke ry,
and normal ly soiled pots pa ns
dishes etc with dr ied on soiling
Stan dard daily cycle for
normally soiled loa ds,such as
pots pl ates glasses
For normally soi led lo ads,
use mu ltifunctional de tergent
Page 17
It is d angerou s to open the do or w hen washing, bec ause the hot water may s cald you.
When the wo rking cycle has finished, the buzzer of the dishwasher will soun d for 8 s econds, then stop. Turn off
the appliance using the ON/OFF button, shut off the water supply and open the door of the dishwasher.
Wait for a f ew mi nutes bef ore unlo adi n g th e d i s hwash er to avo i d ha ndlin g t h e dis h es and ut e ns i l s wh i le th ey
are still hot and more susceptible to breakage. They will also dry better.
Switch Off the Dishwasher
"H:MM" but not blinking
1.Switch off the di shwa sher by p res sing the O N/OF F button.
2.Turn off the water tap!
The p rogr am light is on and t he display window show , only in t hi s ca se the pr ogr amm e
has en ded.
Open the door carefully.
Hot dishes are sensitive to knocks. The dishes should therefore be allowed to cool down around 15 minutes
before removi ng f rom the app li ance .
Open t he dishwasher's door, leave it ajar and wait a few minutes before removing the dishes. In this way they
will be cooler and the drying will be improved.
Unloading the dishwasher
It is normal that the dishwasher is wet inside.
Empty the l ow er baske t f ir st and then t he upper o n e. This will avoid water dripp ing fro m t he uppe r Basket onto
the dishes in the lower one.
If you open the door , the machine will pause. The program light will
stop blinking and the buzzer will mooin g every minute unless you clos e the do or . After
you c lose the door ,the machin e will keep o n worki ng after 10 seconds.
during a wash cycle
Premise:
Acycle that isunderwaycanonlybemodifiedifithasonlybeenrunning forashort time.Otherwise,the
detergent may have already been released, and the appliance may have already drained the wash water.
If this is the case, the detergent dispenser must be refilled (see the section entitled " Loading the
Detergent " ).
Press the start/reset button , the machine will be in standby state, then you can
change the program to the desired cycle setting (see th e section entitled " Starting a wash cycle. . ." ).
more than 3 secon d s
The Display window shows the state of the dishwasher:
a) Display window shows "H:MM" ----------- -------- ------ ---------> stand by;
b) Display window shows "H:MM" and not bli nking -------------> pause;
c) Display window sh ows "H:MM" and blinking --------------------- ---> run.
1
2
3
Aforgottendish can beaddedany time beforethe detergentcupopens.
Add forgotten dishes.
Close the door
After the spray arms stop working,you can open the door
completely.
2
3
Open the door a little to stop the washing.
1
4
5
6
Press the start/reset button
Press the start/reset button, the dishwasher will run
after 10 seconds.
When you press the Start/Reset bu tton to pa use during w ashing, the p rogram light will
stop b linking and the dishwasher will mooing every minute unless you press the
Start/Reset button to start.
Page 18
The filter prevents larger remnants of food or other objects from getting inside the pum.
The residues may block the filter, in this case t hey must be removed.
The filter system c onsists of a coarse filter,a flat (Main f ilter)
And a microfilter(Fine filter).
Food and soil particles trap ped in this fi lter are pulverize d by a
special jet on the l ower spray arm an d washe d down to drain.
Larger items, such as pieces of bones o r glass, that coul d block
the drain are trapped in the coarse filter. To remove the i tems
caught by the fil ter, gently sque eze the tap on th e top of this
filter and lift out.
This fil ter ho lds soil and f ood re sidues i n the sump a rea a nd
preve nts i t f rom being redepos it on the dishes during wash c ycle .
Main f i lt er
1
Coarse filter
2
Fine filter
3
Filter assembly
The filter efficiently
For best performance and results, the filter must be cleaned regularly. this r eason, it is a good idea to
remove the larger food particles trapped in the filter after each wash cycle by rinsing the semicircular filter and
cup under running water. To remove the filter device, pull the cup handle in the upward direction.
removes f o od par t i cle s fr o m t h e wa sh w ate r, al l ow in g it to be re c ycle d d ur ing the cycl e.
For
The d ishwasher must never b e us ed without the filters.
Improper replacement of the f ilter may reduce the performance level of the appliance
and damage dishes and utensils.
Step 1 Turn the filter in anti-clockwise direction,
then lift it up.
Step 2 lift the Main fil te r up
Step 3 lift the Fine filter up
When following th is procedure from step1 to step 3, the filter system will be removed;
when following it from Step 3 to Step 1, the filter system will be installed.
2
3
1
2
3
Page 19
The control p ane l c a n be cl e a ned by u si ng a ligh t ly dam p e ned c lo t h .
After clean in g, make sure to d r y i t th o r oughly.
For t he exter ior, use a good a ppl ianc e po l is h wax.
Never u s e s ha rp obj ect s, scour in g pads or ha r sh clean er s on a ny part of th e dishw a sher.
Protect Against Freezing
1.Cut off the electrical power to the dishwasher.
2.Turn off the water supply and disconnect the water inlet pipe from the water valve.
3.Drain the water from the inlet pipe and water valve. (Use a pan to catch the water)
4.Reconnect the water inlet pipe to the water valve.
5.Remove the filter at the bottom of the tub and use a sponge to soak up water in the sump.
please take frost protection measures on the dishwasher in winter. Every fter washing cycles,
please operate as follows
time a
-Inspectthefiltersforblockingaftereverytimethedishwasherhasbeenused.
-Byunscrewingthecoarsefilter,youcanremovethefiltersystem.Removeanyfoodremnantsand
clean t he filt ers und e r r u nni ng water.
Remarks:
Cleaning the Filter
Cleaning The Door
To c l e an t h e c o a r s e f i lter a nd t h e f i n e f i l ter, use a c l e a ni n g b ru s h . R e ass e m b le t h e f i l t e r p a r t s a s s h o w n i n th e f i gu r e s
on the last pa ge a nd reinsert the e nti re assemb ly in the dishwa sher, pos itio ning it in its se at and pres sing downwa r ds.
The entir e filter assembly s hould b e cleane d once a week.
When cle a nin g t he fi lt ers , don 't k no ck on th e m. O therwi se, th e fil t e rs co uld b e
contor ted and the p erformanc e of the d i shw a s he r cou l d be decr e as e d .
To c l e an t h e e d g e ar o u n d t h e d o o r, y o u s h o ul d u se o n l y a so f t wa r m , d a m p c l o t h.
To a v o i d p e n e tr at i o n o f wa t e r i n t o t h e d oo r l ock a n d e l e c tr i c a l co m p o nen t s , d o n o t
use a spray cleaner of any kind.
Never u se a spray c l eaner to cle an t he d oor panel a s i t m ay damage the door lock
and electr i cal com p one nts .
Abr asive a g en t s o r some paper towel s shou ld not be used becau se o f t he ri s k o f
scra t c h ing or leavin g s pots on the stainl ess st e e l su rfa c e.
Cleaning the Spray Arms
If your dishwasher cannot work because of the ice,
please contact professional service persons.
It is necessary to clean the spray arms regularly for hard
water chemicals will clog the spray arm jets and bearings.
To r e m o v e t h e up p e r s p r a y a r m , s c r e w o f f t h e n ut c lock w i s e t h e n
remove th e arm.
To r e m ov e t h e l o w e r s pr a y a r m , p u l l o u t t h e s p ra y a r m u p w a r d .
Was h th e arms in soapy and warm water and u se a soft bru sh t o
clean t h e jet s. R e p l a ce th em aft e r ri ns in g the m th or ou ghl y.
Page 20
It is recommend t hat you run a wash cycle with the
dish was h e r e mpt y an d t h e n r e move t h e p l u g from the
sock et, tur n off th e wa ter supply a n d leave the doo r of
the appliance slightly open. This w ill help the door
seals to l as t l ong er and pr ev ent odo u r s fr o m fo r mi ng
withi n t h e ap p li an ce.
If the appliance must be moved, tr y to keep it in the
vertical position. If absolutely necessary, it can be
positioned on its back.
One of the fa c tors that cause odours to for m i n the
dishwasher is f ood th at re mains tr apped in the seals.
Periodic cleaning with a damp sponge will p revent t his
from occurring.
Ensure the voltage and frequency of the power being corresponds to
those on the rating plate. Only insert the plug into an electrical socket which is earthed
properly. If the electrical socket to which the appliance must be connected is not
appropriate f or the plug , replace the socket, rather than using a adaptors or the like as
they could cause overheating and burns.
Please look at th e rat ing label to know t he r ating v oltage and connect t he d ishwasher to the appropriate power supply.
Use the required fuse 10 amp, time delay fuse or c ircuit breaker recommended and provide separate circuit serving
only this appliance.
This appliance must be earthed. In the event of a malfunction or breakdown, earthing will reduce the risk of
electric shock by providing a path of least resistance for the electric current. This appliance is equipped with a
cord having an eq uipment- earthing conductor and an earthing plug. The plug must be plugged into an
appropriate outlet that is installed and earthed in accordance with all local standards and requirements.
Position the appliance i n t he desired location. T he back should r est again st t he w all behin d it, and the sides,
along the adjacent ca binets or walls. T he dishwash er is equipped with water supply and drain hoses th at can
be positio ned eith er to the righ t or the left s ides to facilitate pro per in stallatio n.
Once the appliance is positioned for levelling, the height of the dishwashe r
may be altered via adjustment of the screwing level of the feet. In any case,
the appliance should not be inclined more than 2 .
For personal safety:
DO NOT USE AN EXTENSION CORD OR AN ADAPTER PLUG WITH THIS APPLIANCE.
DO NOT, UNDER ANY CIRCUMSTANCE S, CUT OR REMOV E THE EARTHING
CONNECTION FRO M THE PO WER CORD.
After every wash, turn off the water supply to the
appliance and leave the door slightly op en so that
moisture and odours are not trapped inside.
Before cleani ng or performing maintenance, always
remove the plug from the socket.
To cle an t h e e x terior a nd r ub b er p art s of t h e d i s hw ash e r,
do not use solvents or abrasive cleaning products.
Only use a cloth with warm soapy water.
To rem ov e s p ots o r stain s f r om t he surfac e of t he
interior, u se a cloth dampened with wa ter an a little
vinegar, or a cleaning product made specifically for
dishwashers.
After Every Wash
Remove the Plug
No Solvents or Abrasive Cleaning
Moving the A pplia nce
Seals
When not in Use for a LongTime
Page 21
for personal safety:
DO NOT USE AN EXTENSION CORD OR AN ADAPTER PLUG WITH THIS APPLIANCE.
DO NOT, UNDER ANY CIRCUMST ANCES, CUT OR REMOVE THE
FROM THE POWER CORD.
EARTHING
CONNECTION
Improper connection of the equipment earthing conductor can result in the risk of an
electric shock.
Check with a qualified electrician or service representative if you are in doubt whether the
appliance is properly earthed.
Do not modify the plug provided with the appliance. If the plug d oes not fit properly to the
outlet, please have a qualified electrician to install a proper outlet.
Ahosethatattachesto asinkspray canburstifitisinstalledon thesamewaterlineasthedishwasher.Ifyoursink
has one, it is recom mended t hat the hose be d isconnected and the hole plugged.
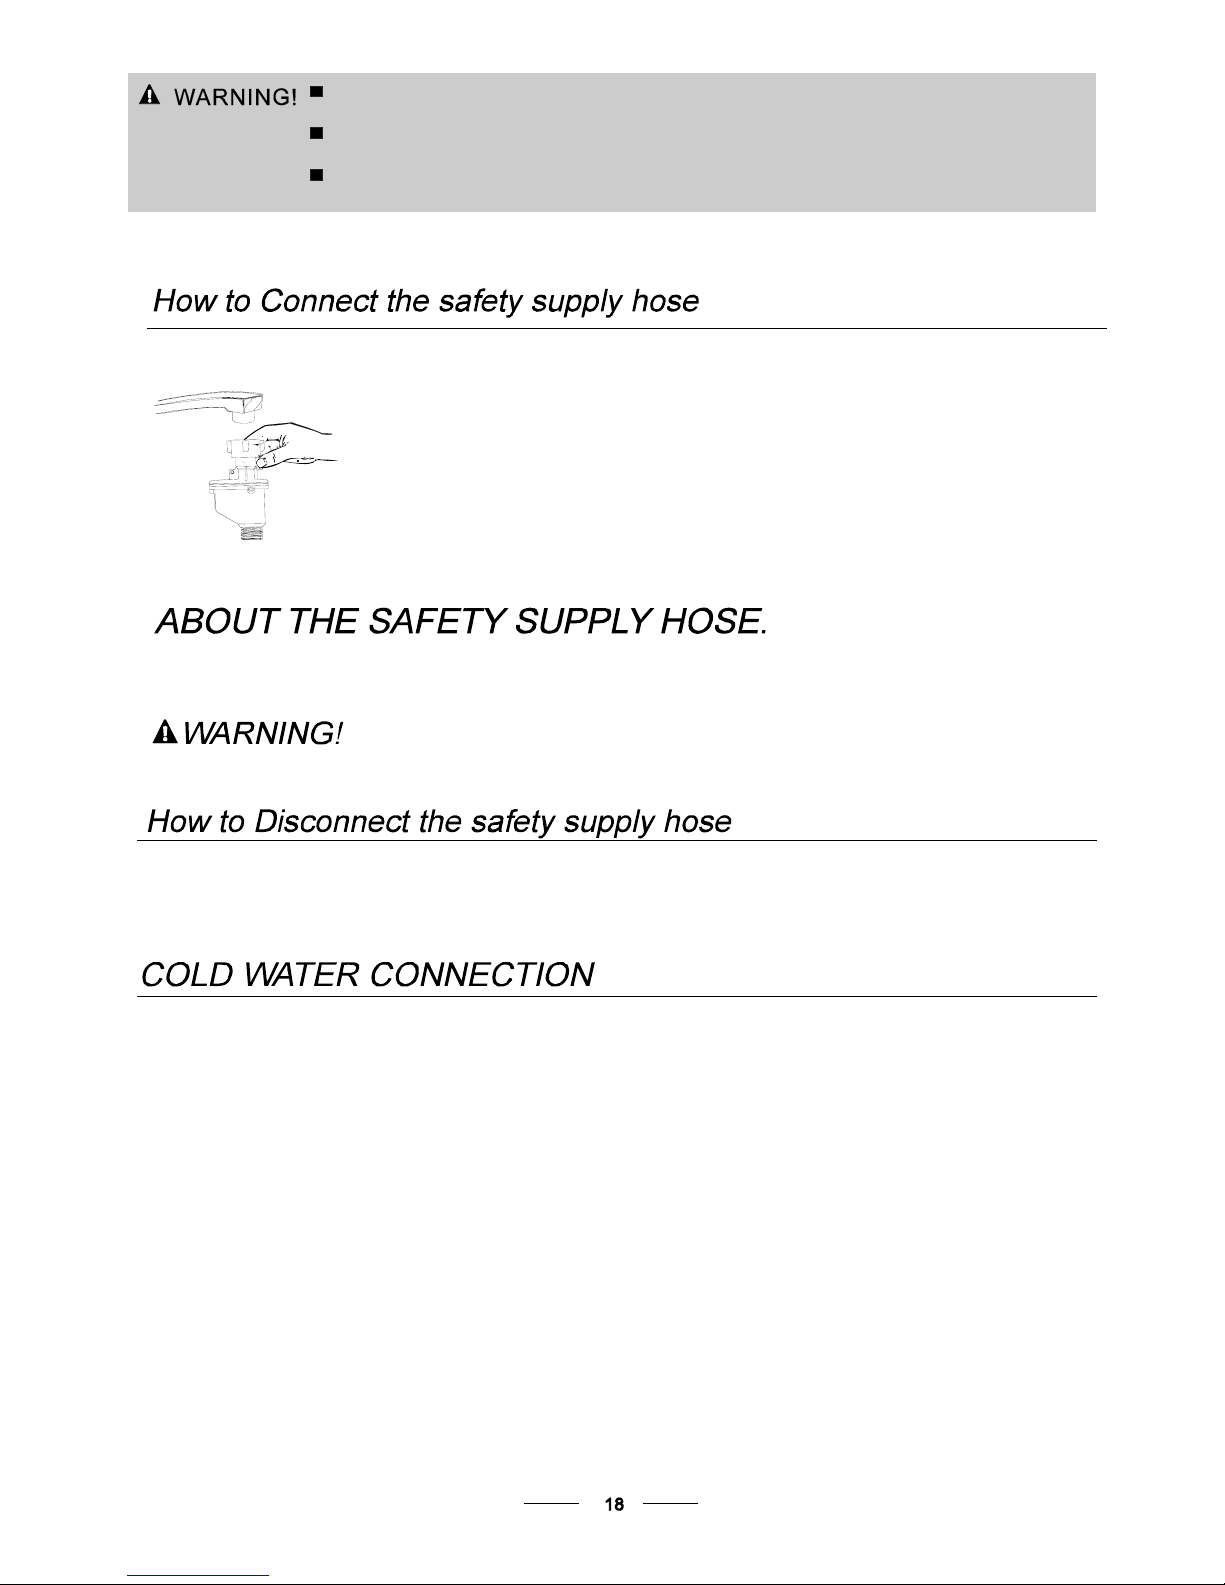
Pull The safety supply hoses completely out from storage compartment located at rear of dishwasher.
Turn water fully on before starting the dishwasher.
1
Tighter the screws of the safety supply hose to the faucet with thread 3/4inch.
The safety supply hose consists of the doub le walls. The hose's s ystem guara ntees it s inter vention b y b locking the
flow of water in case of the supply hose breaking and when the air space between the supply hose itself and the outer
corrugated hose is full of water.
Turn o ff the wat e r.
Release the water pressure by depressing the pressure release button. This relieves water pressure and protects you, and the
room, from severe splashing.
Unscrew the safety supply hose from the faucet.
3
2
1
2
3
The a ppliance must be connected to the water mains using new hose-sets.
The o ld hose-sets should not be reused.
Wate r pre ss u re must b e b etween 0 , 04 MP a and 1 MPa. If th e press u re is be low the
minimum consult our Service Department for a dvice.
Connec t the cold water s upp ly hose to a thr eade d 3 /4(i nch) connect or and mak e s ure that i t is faste ned tightly in pl ace.
If the water pipes are new or have not been used for an extended period of time, let the water run t o make s ure that the
water is clea r an d free of impur itie s. If this precauti on i s not ta ken, there is a risk th at t he water inlet c an get bl ocked
and damage the applian ce.
Page 22
The follow ing thin gs shoul d be che cked be fore star ting the dishwas her.
The content of this manual is very helpful to the users.
After insta llation , please make sure to keep this ma nual.
1
The dishwasher is level and fixed properly
2
The inlet valve is open
3
There is a leakage at the connections of the conducts
4
The wires are tightly connected
5
The power is switched on
6
The inlet and drain hoses are knotted
7
All packing materials and printings should be taken out from the dishwasher
Syphon Connection
Extension Hose
If you need a drain hose extension, make sure to use a similar drain hose.
It must b e no longer than 4 metres; otherwise the c leaning effect of the dishwasher could be reduced.
Wat e r O u t l e t
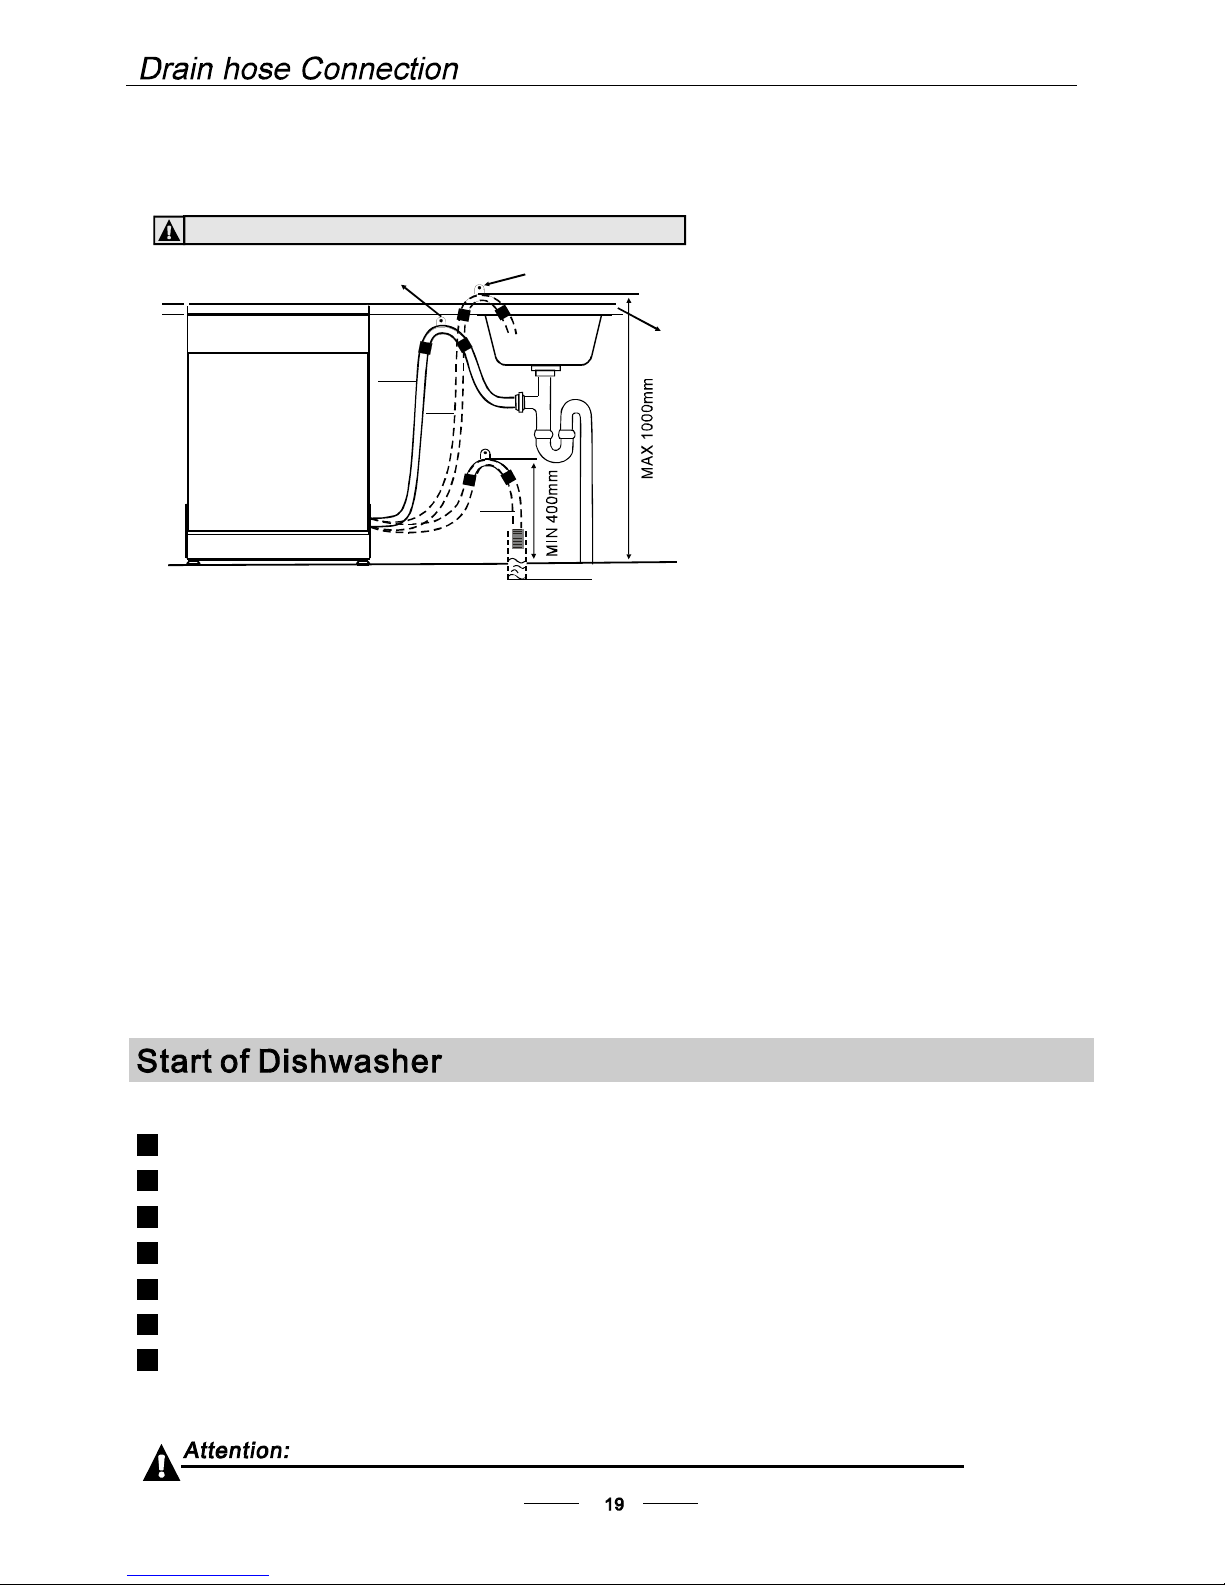
Connect the water drain hose. The drain hose must be correctly fitted to avoid water leaks.
Ensure that the water drain hose is no t kinked or squashed .
The waste connection must be at a he ight of b etween 40 cm (minimum) and 100 cm (maximum)
from the bottom of the dish. T he water drain hose should b e fixed by a hose clip. The free end of
the hose must no t be immersed in water.
If the sink is 1000 higher from the floor, the excess water in hoses cannot be drained directly
into the sink. It will be necessary to d rain excess w ater from hoses into a bowl or suitable
container that is held outside and low er th an the s ink.
How to Drain Excess Water From Hoses
PLEASE HANG UP THE DRAIN HOSE EITHER WAY OF A, B, C
40mm
A
B
C
Counte r
Front
Drain pipe
Drain hose hook
Close the drain hose hook to the counter
NOTE
The top of the hose
must be at a height
between
40 and 100cm.
The free end of the
hose must not be
immersed in water.
Insert the drai n hose int o a dra in pi pe with a m ini m um diam e te r of 4 cm , or l et it run into the s i nk, ma k ing sure to
avo id be n ding o r crimp ing it. Us e the sp e cial p l asti c su ppor t th at c o mes wit h th e ap p lia n c e . The top of the hose
must b e at a he ig h t betw e en 40 and 100c m. The free end of t h e hose must no t be im m er s ed in wat er to a v oi d the
bac k flow o f it .
Page 23
Fuse blown, or the
circuit breaker acted
Replace fuse or reset circuit breaker. Remove any other
appliances sharing the same circuit with the dishwasher
Spilled rinse-aid
Always wipe up rinse-aid spills immediately.
Hard water minerals
The affected items are
not corrosion resistant.
The lid of the softer
is loose
Asp ayarmis
knocking against
an item in a basket
r
Items of crockery
are loose in the
wash cabinet
This may be caused
by on-site installation
or the cross-section of
the piping.
Aprogrammewasnot
run after dishwasher
salt was added.
Traces of salt have
gotten into the wash cycle.
To clean the interior, use a damp sponge with
dishwashe r detergent and wear rubber gloves.
Never use any other cleaner than dishwasher
detergent for the risk of foaming or suds.
Always run the quick wash programme .
without any crockery in the dishwasher and
without selecting the Turbo function (if present),
after adding dishwasher salt.
Check the lip .Ensure the fix is fine.
Interrupt the programme, and rearrange the items
which are obstructing the sp ay arm.r
Interrupt the programme,
and rearrange the items of crockery.
This has no influence on the dishwasher function.
if in doubt, contact a suitably qualified plumber.
Detergent with
colourant was used
Make sure that the detergent is the one without
colourant.
Improper detergent
Make sure the dishwasher is turned on and the door is
closed securely.
Check that the water supply is connected properly and
the water is turned on.
Make sure to close the door properly and latch it.
Make s ure the power cord i s proper ly plugged into the
wall socket.
Power supply is not
turned on
Water pres sure is low
Door of dishwasher
not properly closed.
Kink in drain hose
Filter clogged
Kitchen sink clogged
Check drain hose.
Check coarse the filter
(see section titled )"CleaningTheFilter"
Check the kitchen sink to make sure it is draining well.
If the problem is the kitchen sink not draining ,you may
need a plumber rather than a serviceman for dishwashers.
Use only the special dishwasher detergent to avoid
suds. If this occurs, open the dishwasher and let suds
evaporate. Add 1 gallon of cold water to the tub. Close
and latch the dishwasher, then Start any wash cycle to
drain out the water . Repeat if necessary.
Page 24
The dishes were not
loaded correctly.
See notes in " Loading the Dishwasher Baskets ".
Select a more intensive programme.
See" Wash Cycle Table ."
Use more detergent, or change your detergent.
Rearrange the items so that the sp ay can rotate freely.r
Clean and/or fit the filter combination correctly.
Clean the sp ay arm jets. See "Cleaning the Spray
Arms".
r
Use less detergent if you have soft water and select
a shortest cycle to wash the glassware and to get
them clean.
Use a mild abrasive cleaner to eliminate those marks.
Re-loading the dishes properly.
Load the dishwasher as suggested in the directions.
Increase the amount of rinse-aid/refill the rinse-aid
dispenser.
Do not empty your dishwasher immediately after
washing. Open the door slightly so that the steam can
escape. Begin unloading the dishwasher only once t
he dishes are barely warm to the touch. Empty the low
basket first. This prevents water form dropping off
dishes in the upper basket.
In short program the washing temperature is lower.
This also lowers cleaning performance. Choose
a program with a long washing time.
Water drainage is more difficult with these items.
Cutlery or dishes of this type are not suitable for
washing in the dishwasher.
The programme was
not powerful enough.
Not enough detergent
was dispensed.
Items are blocking
the path of sp ay arms.r
The filter combination
in the base of wash
cabinet is not clean or
is not correctly fitted.
This may cause
the sp ay arm jets
to get blocked.
r
Combination of soft
water and too much
detergent.
Aluminum utensils
have rubbed against
dishes.
Dishes block
detergent cups.
Improper loading
Too lit t l e r i n se- a id
Dishes are removed
too soon
Wrong program
has been selected
Use of cutlery with
a low-quality coating
Overflow.
When some malfunctions come on, the appliance will display error codes to warn you:
If overflow occurs, turn off the main water supply before calling a service.
If there is water in the base pan because of an overfill or small leak,
the water should be removed before restarting the dishwasher.
Longer inlet time.
Faucets is not opened, or water intake is restricted,
or water pressure is too low.
Some element of dishwasher leaks .
E1
E4
Page 25
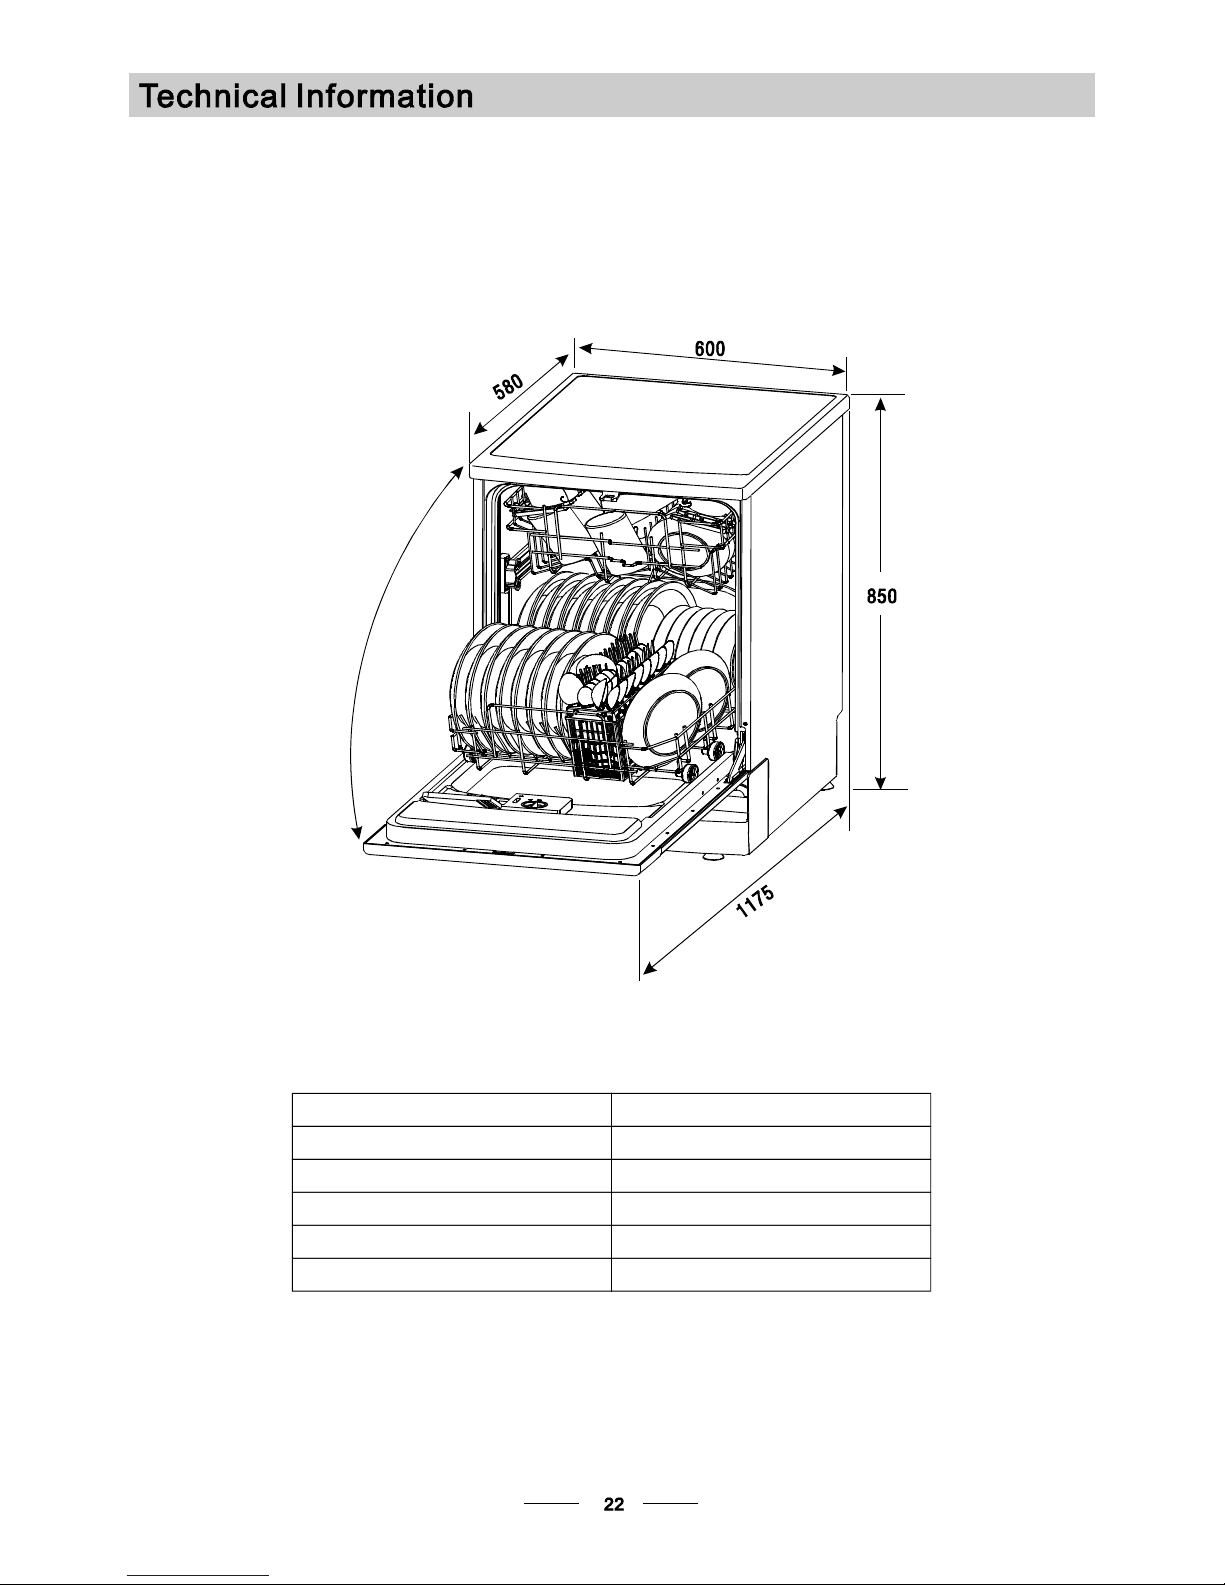
Height : 850mm
Width : 600 mm
Depth : 58 0mm
Wa te r pre ss ure: 0.0 4-1.0MPa
Power supply: see rating label
Capacity: 12 place settings
Page 26
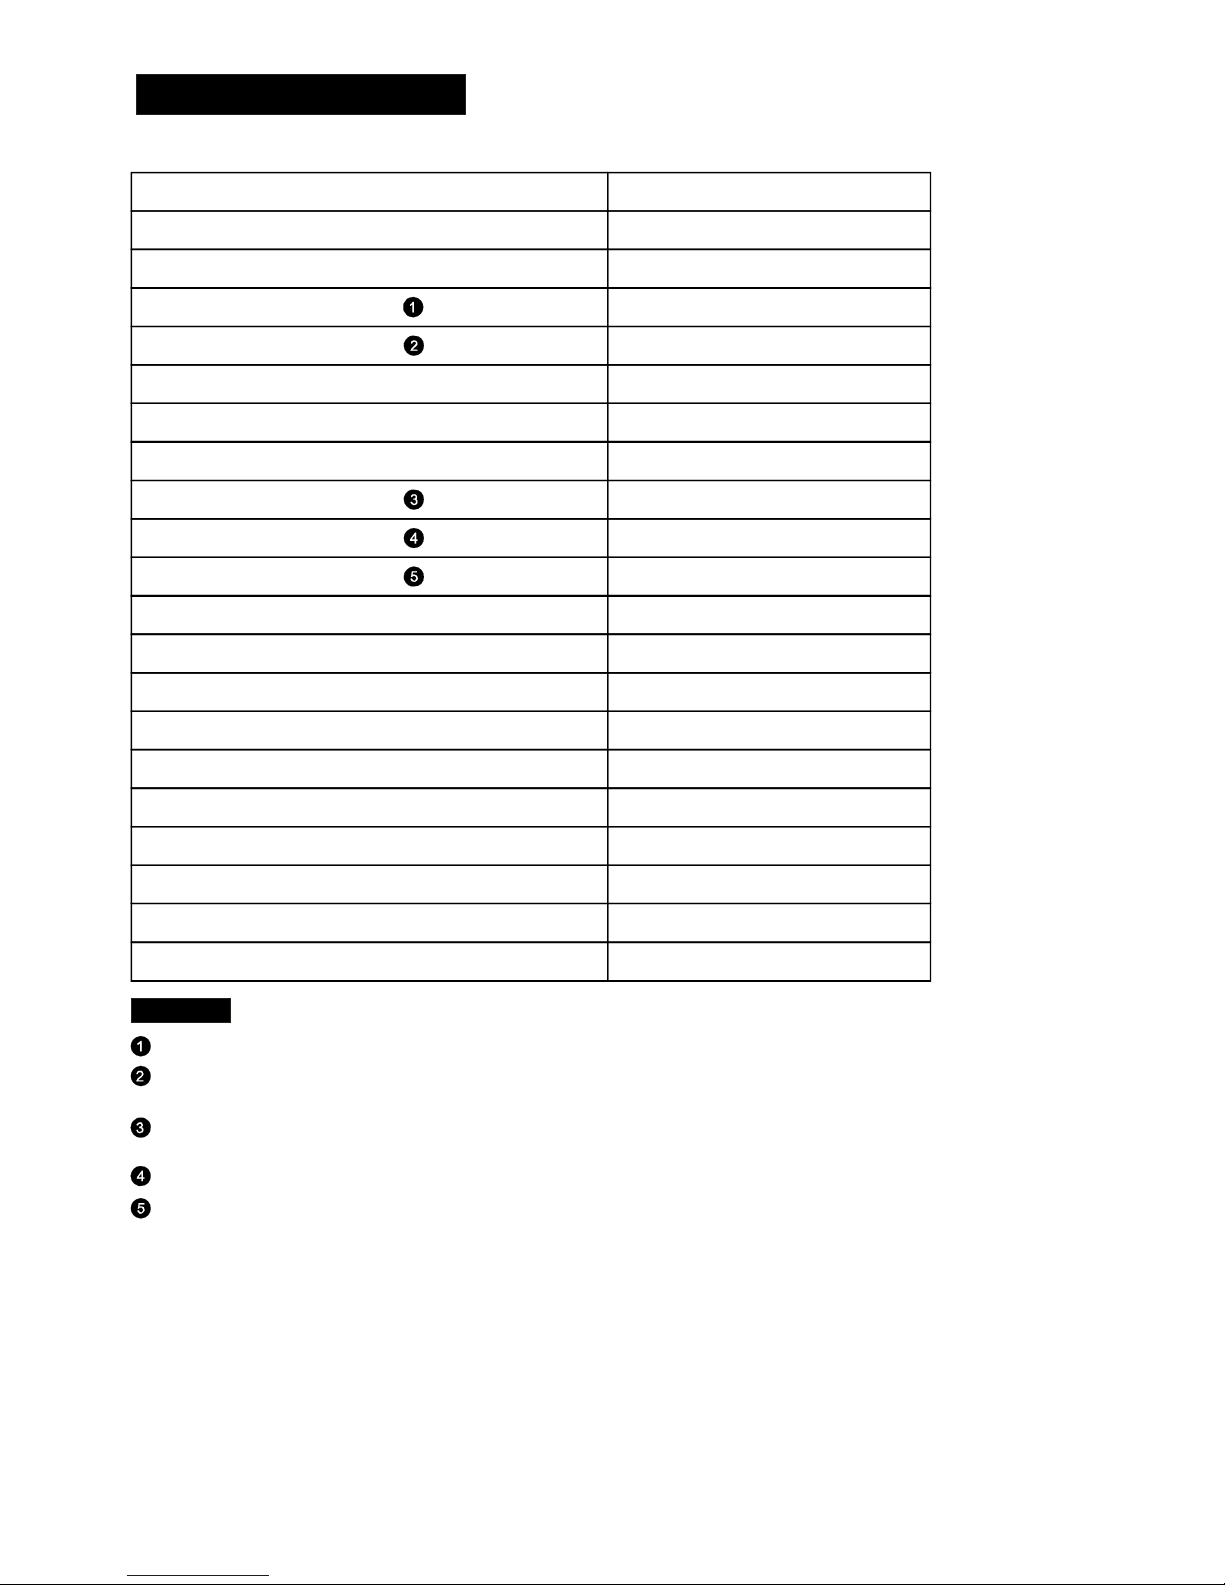
BOLF12B/E
12
A+
291 kWh
1.02 kW h
0W
1.4 W
3360 lit er
A
165 min
85 cm
60 cm
58 cm
1930 W
Sheet of household dishwasher according to EU D irective 1 059/2010:
Manufacturer
Type / Des cri p tion
Standard place settings
Energy efficiency class
Annual energy consumption
Energy consumption of the standard cleaning cycle
Power consumption of off-mode
Power consumption of left-on mode
Annual water consumption
Drying efficiency class
Standard cleaning cycle
Program duration of the standard cleaning cycle
Noise level
Mounting
Height
Width
Depth (with connectors)
Power consumption
Rated voltage / frequency
A+++(highestefficiency) toD(lowest efficiency)
Energ y consump ti on 291 kWh pe r y ea r, bas ed on 28 0 sta nd ard clea n ing cycle s us in g cold water fill a n d
the consumption of the low power m odes. A ctual energy con sumption will depend on how the appliance is used.
Water consumption 3360 litres p er year, based on 280 standard c leaning cycles. Actual water consumption
will depend on how the appliance is used.
A(highestefficiency)toG(lowestefficiency)
This program is su itab l e fo r c le anin g so i led normall y so i led table ware and t hat it is the
most efficient programme in terms of its combined energy and water consumption for
that type of tableware.
The d evic e m eet s the Eur o pean s ta nda rds and t he directi ves in t he c urre nt ver si on at deli ver y:
-LVD2006/95/EC
-EMC2004/108/EC
-EUP2009/125/EC
The a bove values have been m ea sure d in acc or dance with standard s under s pe c ified operat ing condi tions .
Results m ay vary greatly according to q uantity a nd pollution of the dishes, water hardness,
amount of dete rgent, etc.
The m anu al i s based on the Europe an U nion's stand ards and rules.
Techn ical Da ta Sh eet
NOTE
ECO 50
49 dB(A ) re 1 pW
Free st andi ng
230 V~ / 50 H z
Water pressure (flow pressure)
0.4-10 bar = 0.04-1 M
Could be built-in
Yes
Pa
Bompani
 Loading...