

Page 1
Page 2

Copyright © Boyen Technology Co. Ltd.
2
FCC Statement
This equipment has been tested and found to comply with the limits for a Class B digital device, pursuant to Part 15 of the FCC Rules.
These limits are designed to provide reasonable protection against harmful interference in a residential installation.
This equipment generates, uses and can radiate radio frequency energy and, if not installed and used in accordance with the
instructions, may cause harmful interference to radio communications. However, there is no guarantee that interference will not
occur in a particular installation. If this equipment does cause harmful interference to radio or television reception, which can be
determined by turning the equipment off and on, the user is encouraged to try to correct the interference by one of the following
measures:
. Reorient or relocate the receiving antenna.
. Increase the separation between the equipment and receiver.
. Connect the equipment into an outlet on a circuit different from that to which the receiver is connected.
. Consult the dealer or an experienced radio/TV technician for help.
FCC Caution: To assure continued compliance, any changes or modifications not expressly approved by the party responsible for
compliance could void the user's authority to operate this equipment. (Example - use only shielded interface cables when
connecting to computer or peripheral devices).
FCC Radiation Exposure Statement
This equipment complies with FCC RF radiation exposure limits set forth for an uncontrolled environment. This equipment should be
installed and operated with a minimum distance of 20 centimeters between the radiator and your body.
This transmitter must not be co-located or operating in conjunction with any other antenna or transmitter.
The antennas used for this transmitter must be installed to provide a separation distance of at least 20 cm from all persons and
must not be co-located or operating in conjunction with any other antenna or transmitter.
This device complies with Part 15 of the FCC Rules. Operation is subject to the following two conditions:
(1) This device may not cause harmful interference, and
(2) This device must accept any interference received, including interference that may cause undesired operation.
Page 3

Copyright © Boyen Technology Co. Ltd.
3
Contents
1. Overview
Package Content
-----------------------------------------------------------------------------
4
Quick Tour
-----------------------------------------------------------------------------
5
LED Status
-----------------------------------------------------------------------------
6
2. Product Installation
Battery & Charging
-----------------------------------------------------------------------------
8
Micro SD Card Slot
-----------------------------------------------------------------------------
9
Power On / Off
-----------------------------------------------------------------------------
9
Sleep Mode
-----------------------------------------------------------------------------
9
Soft Reset
-----------------------------------------------------------------------------
10
Hard Reset
-----------------------------------------------------------------------------
11- 12
3. Power Management
Battery Status
-----------------------------------------------------------------------------
12
4. System Utilities
Device Information
-----------------------------------------------------------------------------
14
Device Software Upgrade
-----------------------------------------------------------------------------
15- 16
Vibration Motor Testing
-----------------------------------------------------------------------------
16 - 17
5. ActiveSync
Install USB Driver
-----------------------------------------------------------------------------
17 - 20
Setup Partnership
-----------------------------------------------------------------------------
20 - 21
Install ActiveSync 4.5
-----------------------------------------------------------------------------
22 - 25
6. WiFi
Configure Static IP
-----------------------------------------------------------------------------
27 - 28
Configure SSID
-----------------------------------------------------------------------------
29 - 32
7. Miscellaneous Configurations
Volume Adjustment
-----------------------------------------------------------------------------
33
Click Tone
-----------------------------------------------------------------------------
33
Backlight
-----------------------------------------------------------------------------
33
Screen Rotation
-----------------------------------------------------------------------------
34
Page 4

Copyright © Boyen Technology Co. Ltd.
4
Contents
8. Administrator & User Mode
Introduction
-----------------------------------------------------------------------------
35
Change Administrator’s Passoword
-----------------------------------------------------------------------------
36
Switch to User Mode
-----------------------------------------------------------------------------
37 -38
Switch to Administrator Mode
-----------------------------------------------------------------------------
39 - 40
Customize User Mode
-----------------------------------------------------------------------------
40 - 41
Page 5
Copyright © Boyen Technology Co. Ltd.
5
1
Overview
Package Content
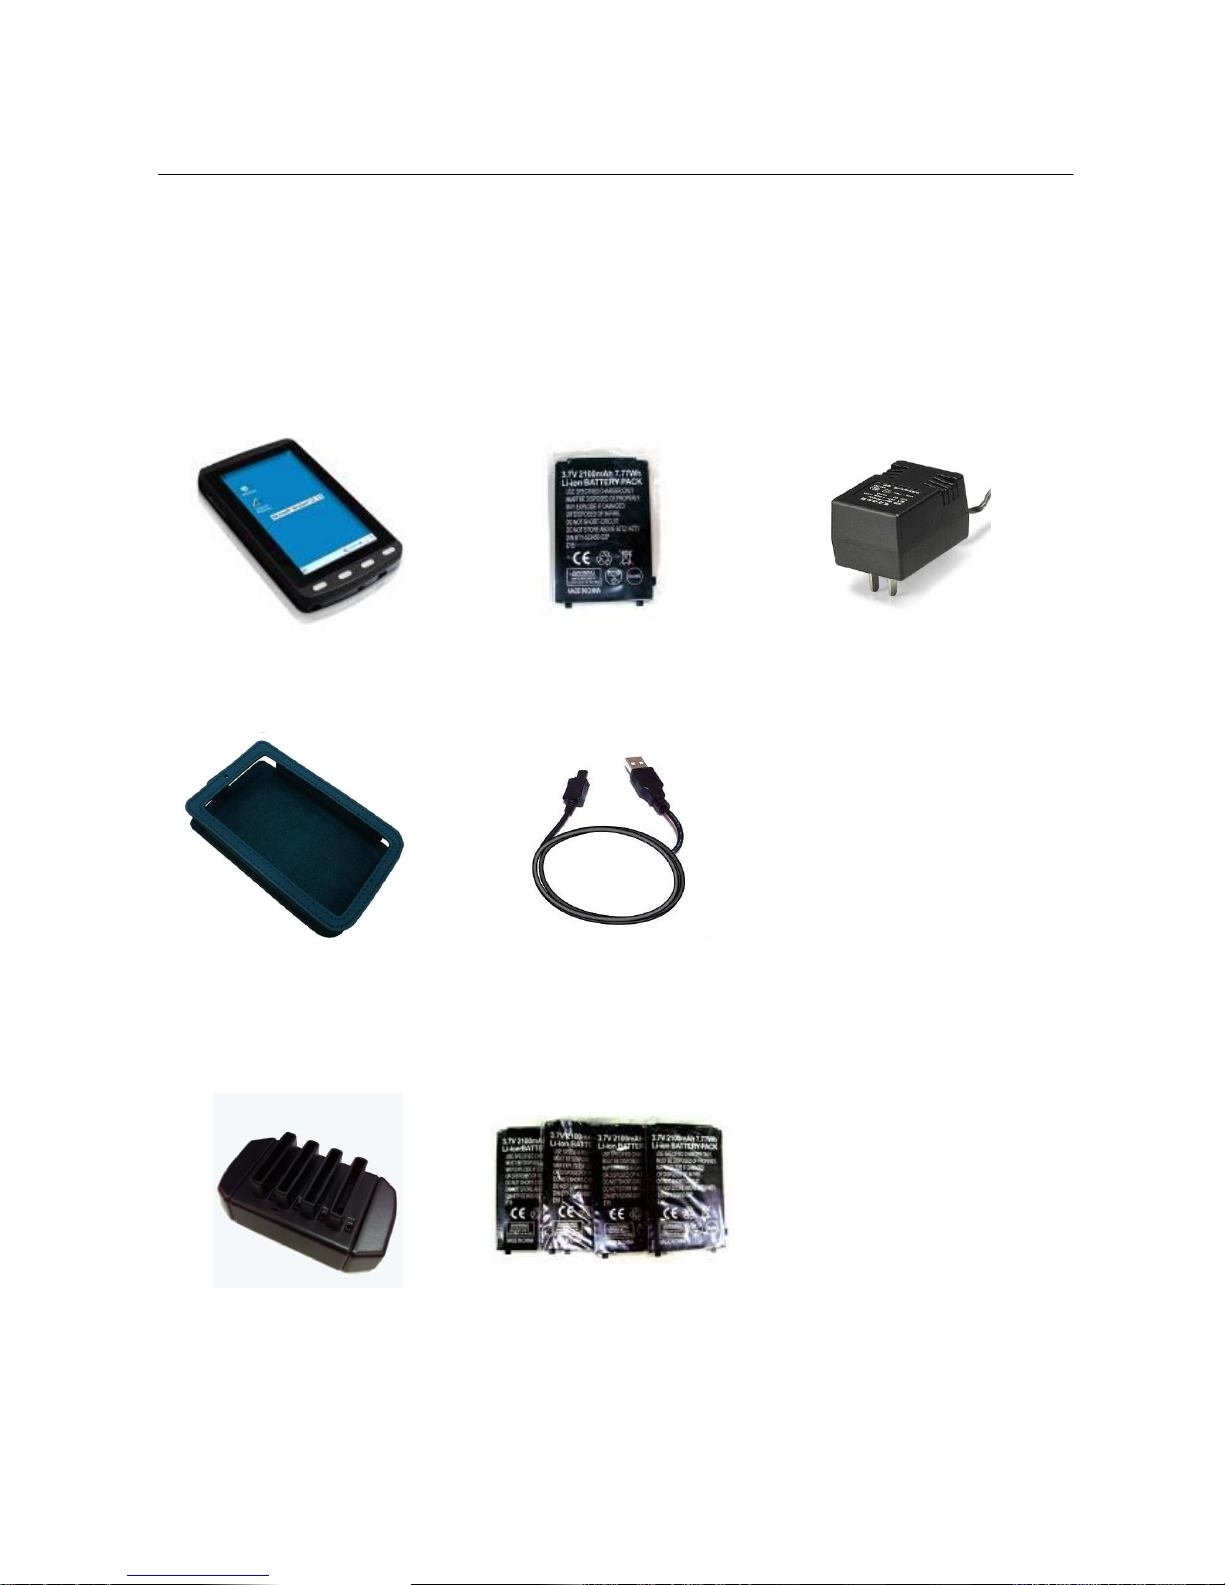
Before starting, check that all the following items have been included with your ordering terminal.
Contact your dealer if anything is missing.
Main Unit
Battery Pack
(2100 mhA)
Adapter
(5V)
Holster
USB Cable
(Transmission cable)
Optional Accessories
Battery Charger
Battery Pack
Page 6
Copyright © Boyen Technology Co. Ltd.
6
1
Overview
Quick Tour
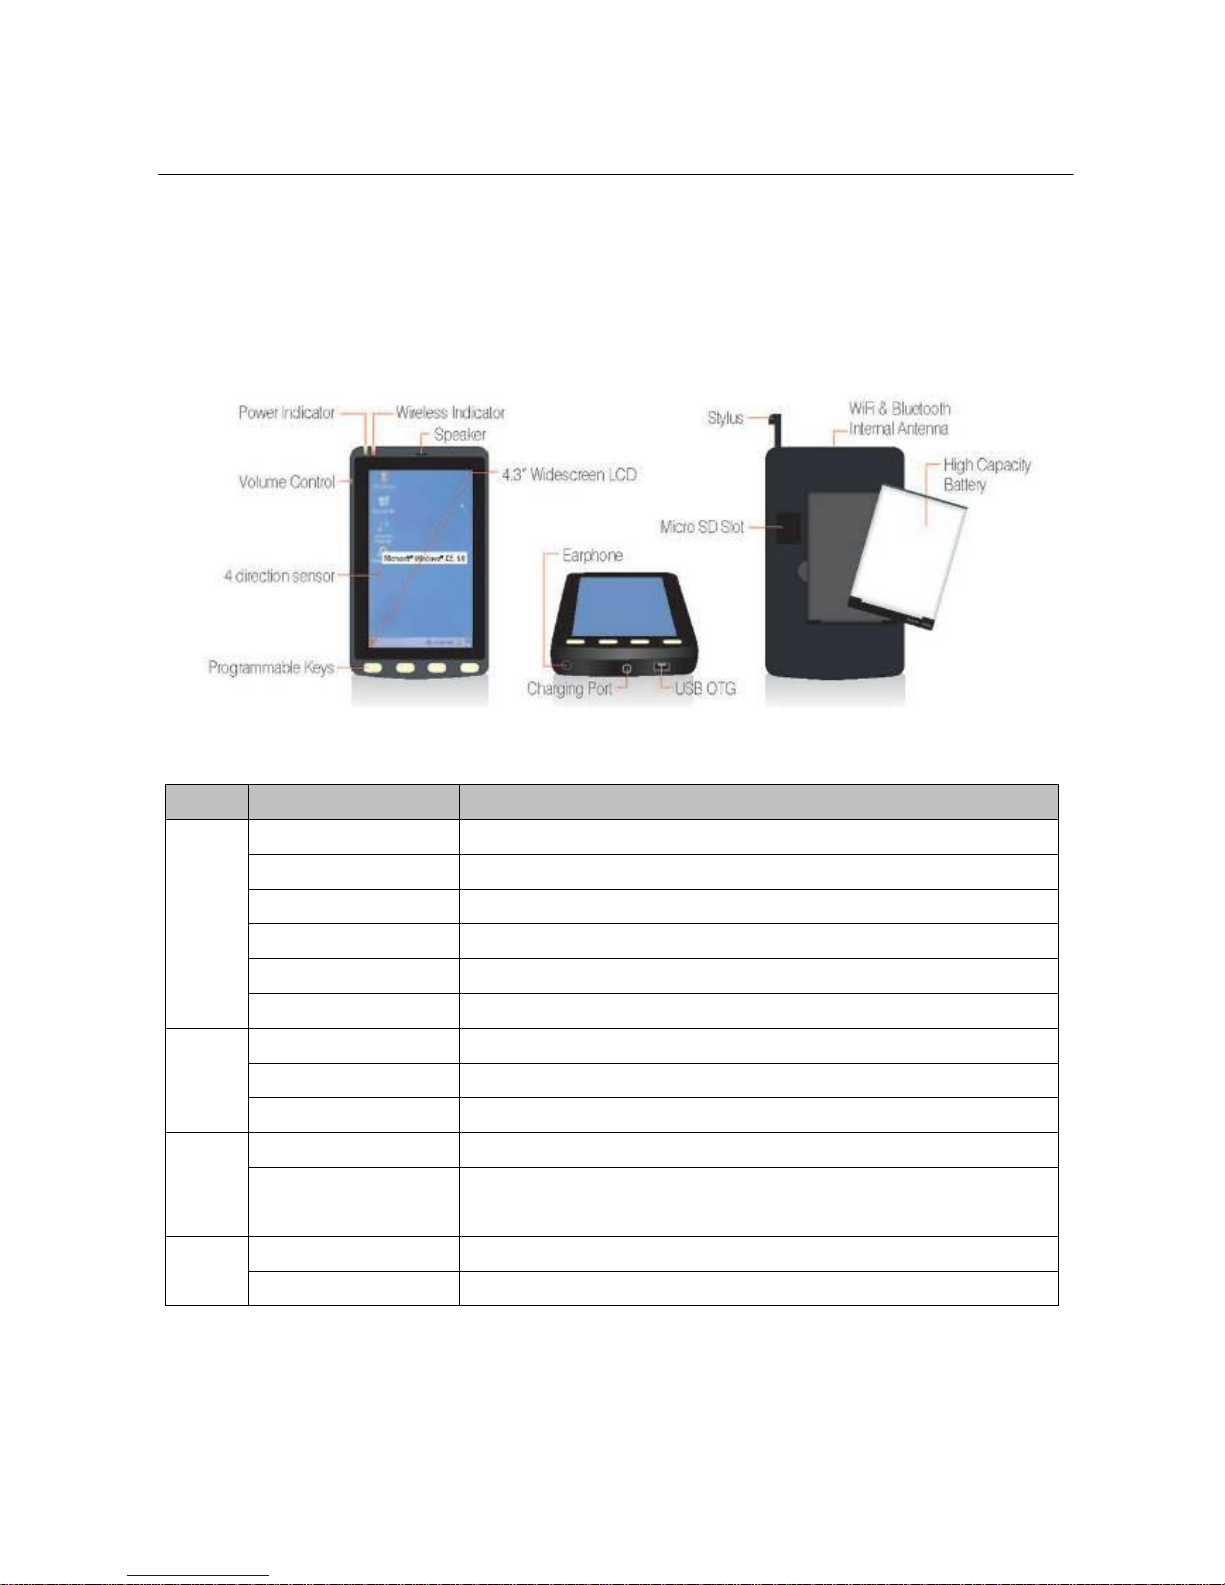
Part Names
Descriptions
Front
Power Indicator
LED to indicate if power is on
Wireless Indicator
LED to indicate if WiFi is connected
Speaker
Built-in speaker (1W)
Volume Control
Volume up and down (These keys are programmable.)
4 direction sensor
Resistive touch screen panel
Programmable Keys
F1~F4 keys
Bottom
Earphone
2.5mm phone headset
Charging Port
Connect to AC to DC adapter for power charging
USB OTG
OTG, Flash image update / USB Device control
Top
Stylus
WiFi & Bluetooth
Antenna
Built-in 802.11b/g/n WiFi, Class 2 Bluetooth
Back
Micro SD Slot
Socket for Micro SD card
Battery
Li-ON battery pack 3.7V 2100 mAh
Page 7
Copyright © Boyen Technology Co. Ltd.
7
1
Overview
LED Status
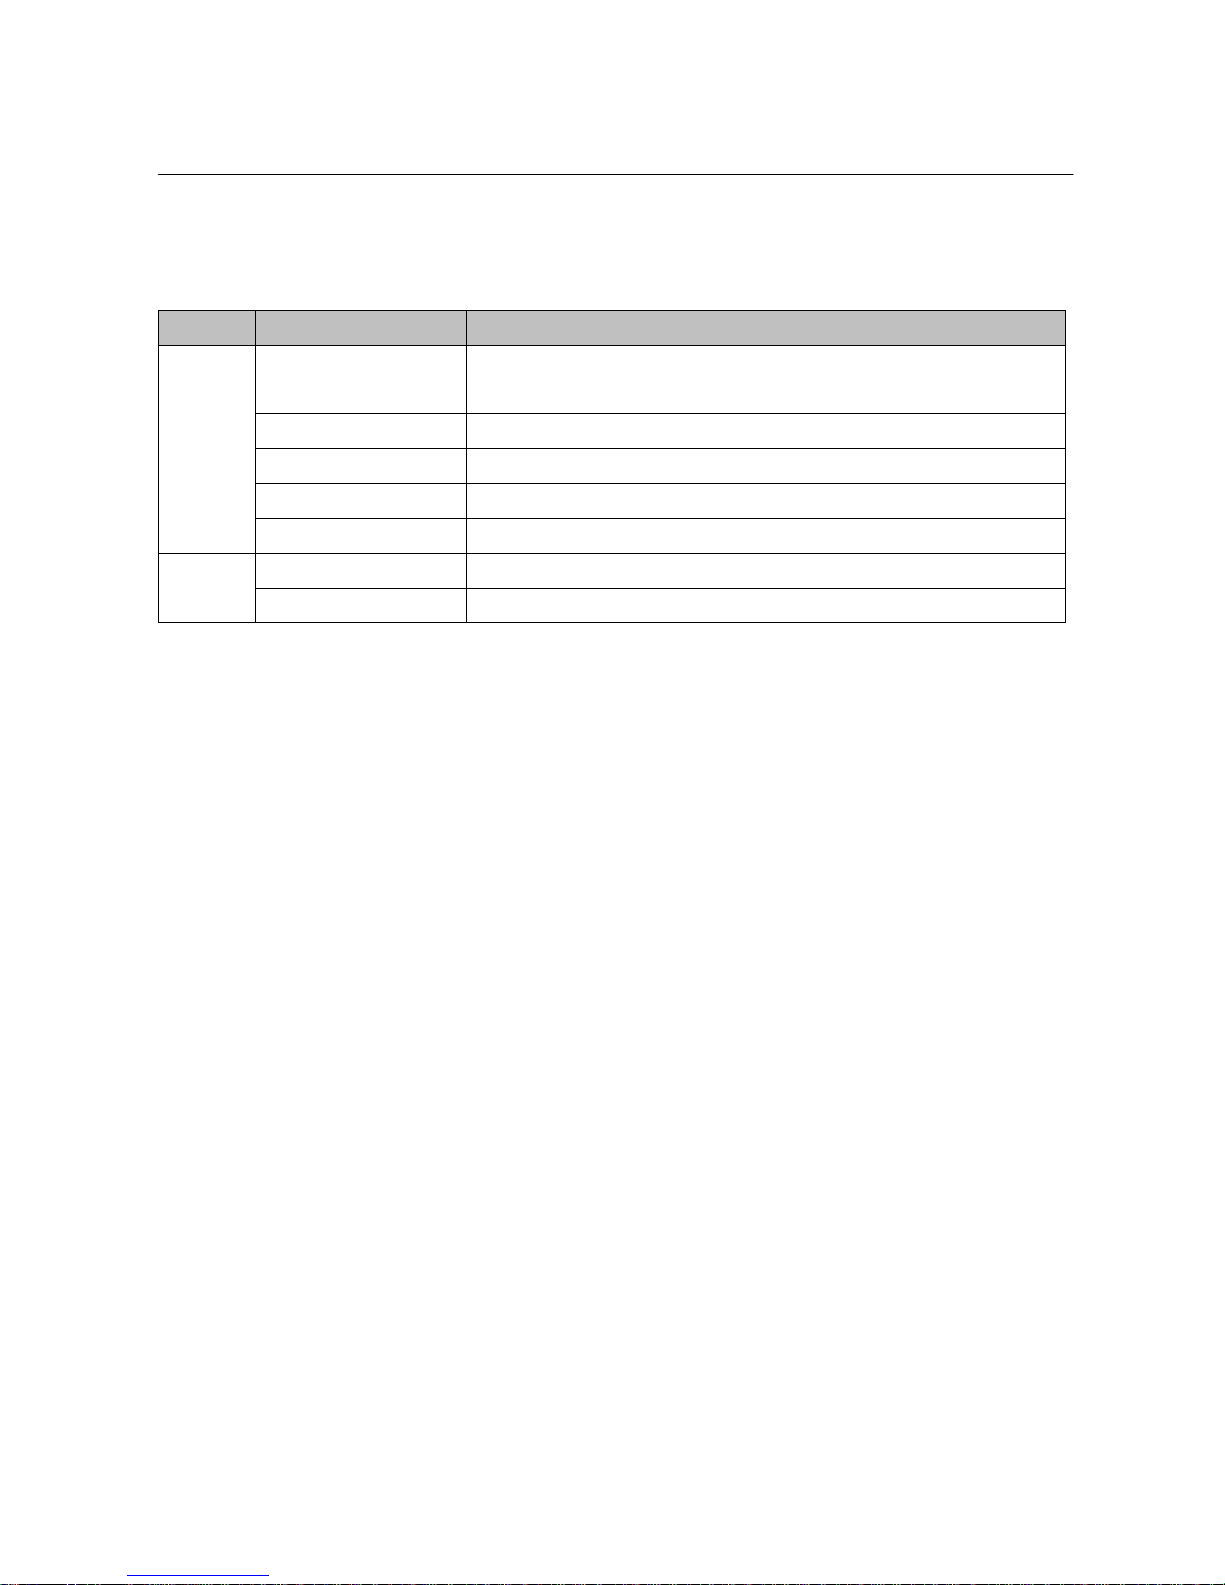
Category
LED Status
Descriptions
Power
Indicator
Green (Solid)
PDA is on working mode or screen off mode after the device is not
used for 1 minute.
Orange (Solid)
Screen off mode after the device is not used for 3 minutes.
Orange (Flash)
Sleep Mode (WiFi is still connected)
Red (Solid)
Battery Charging
Off
Device is power off
Wireless
Indicator
Blue (Solid)
WiFi is connected
Off
WiFi is disconnected
Page 8
Copyright © Boyen Technology Co. Ltd.
8
2
Product Installation
Battery & Charging
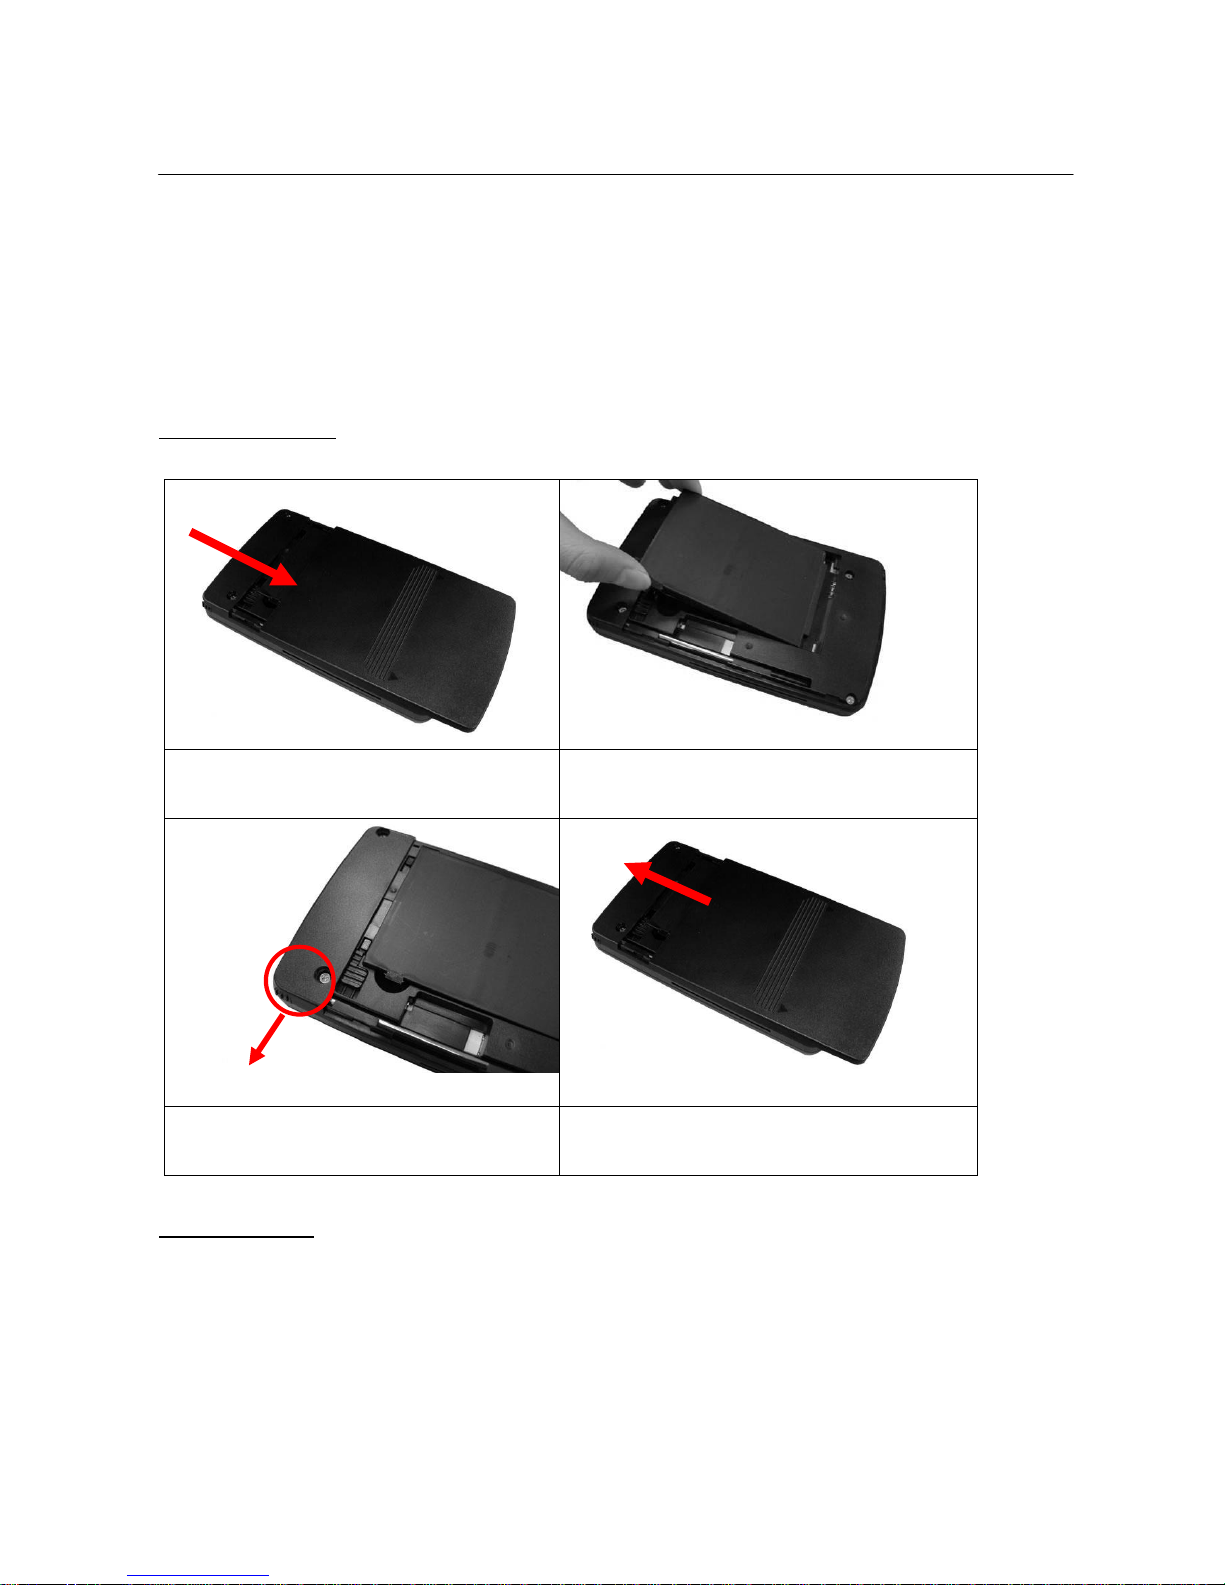
At the time of purchase, the battery is not installed into the main unit. Insert the battery provided with
this unit before use.
Inserting the battery:
1. Slide the battery cover from top to
bottom
2. Place the battery to the compartment from
bottom to top.
3. Slide the battery lock to the left then push
the battery into the compartment.
4. Slide the battery cover from bottom to top
Charge the device:
There are two ways to charge the device:
1. Using the adapter -- Charge the PDA by connecting the charger to the charging port.
2. Using the USB cable -- Charge the PDA by connecting the USB cable to a PC
Page 9
Copyright © Boyen Technology Co. Ltd.
9
2
Product Installation
Micro SD Card Slot
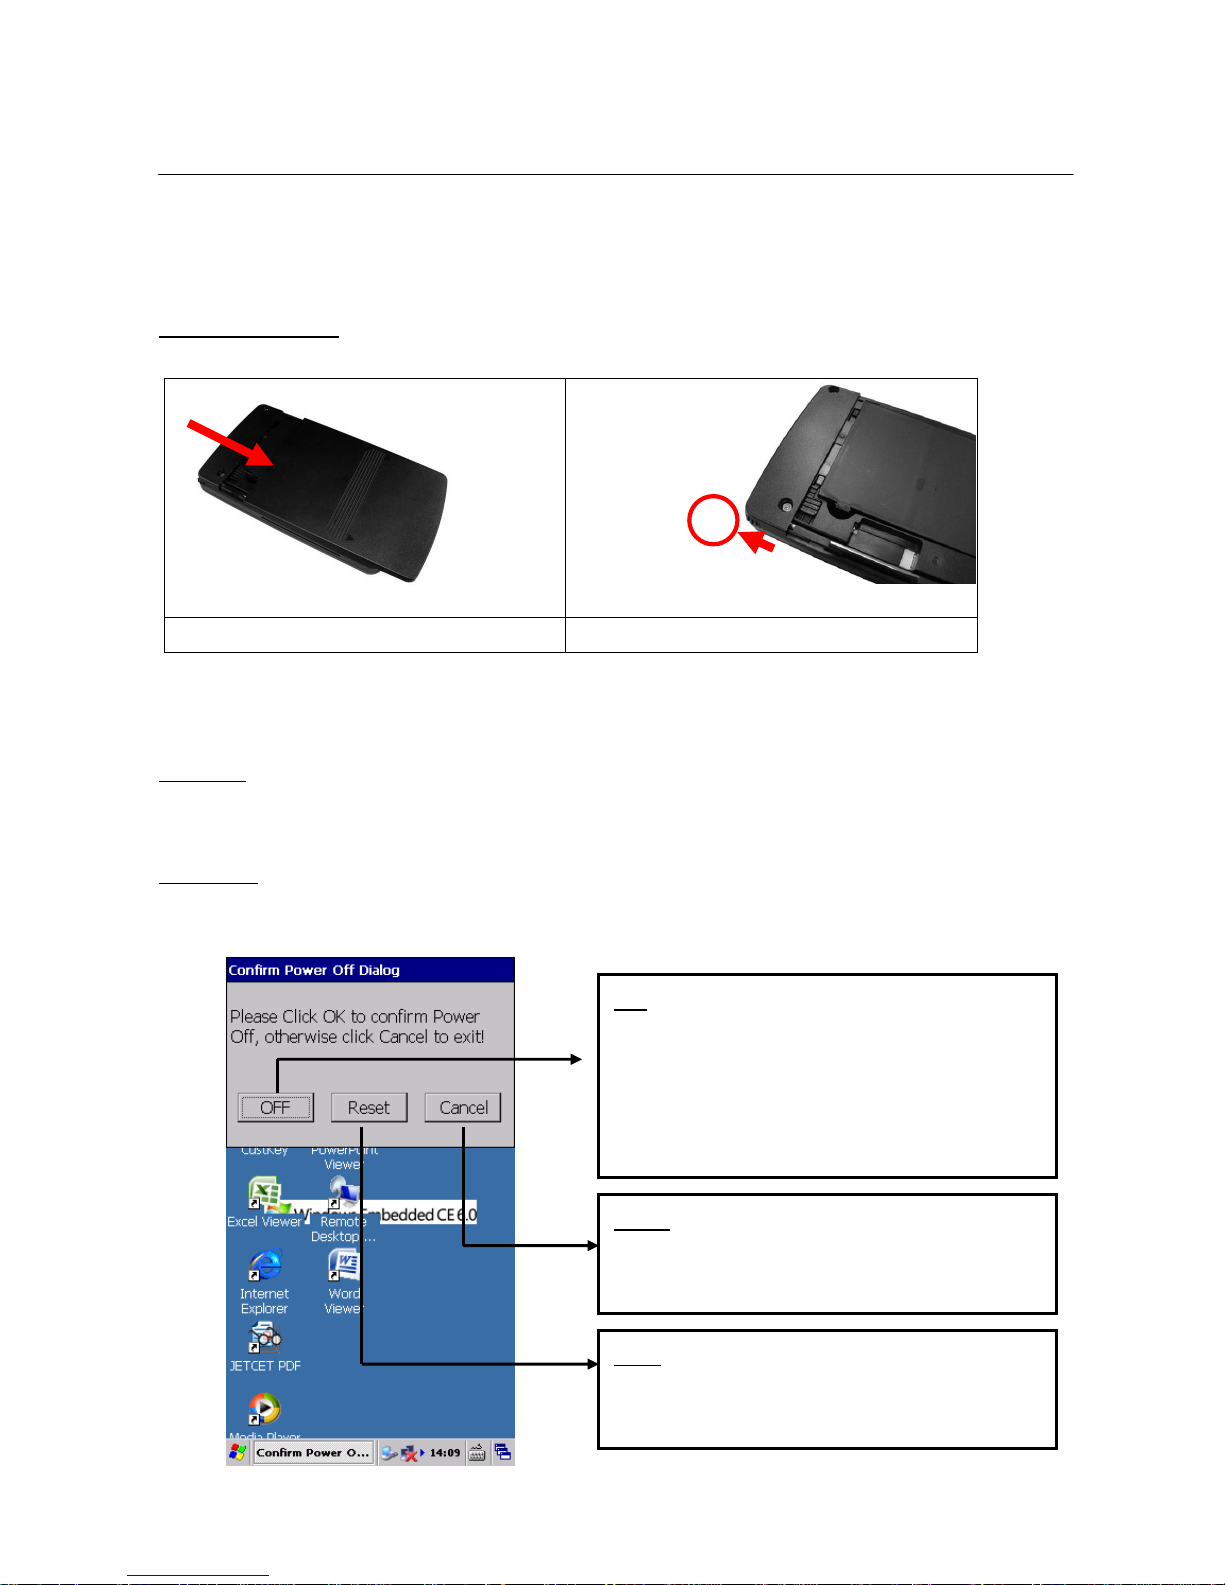
Inserting the SD card:
1. Slide the battery cover from top to bottom
2. Remove the Stylus and insert the SD card.
Power On/Off
Power On:
To power on the main unit, press the power button for 2 seconds. The green LED light will be on if
the device is power on.
Power Off:
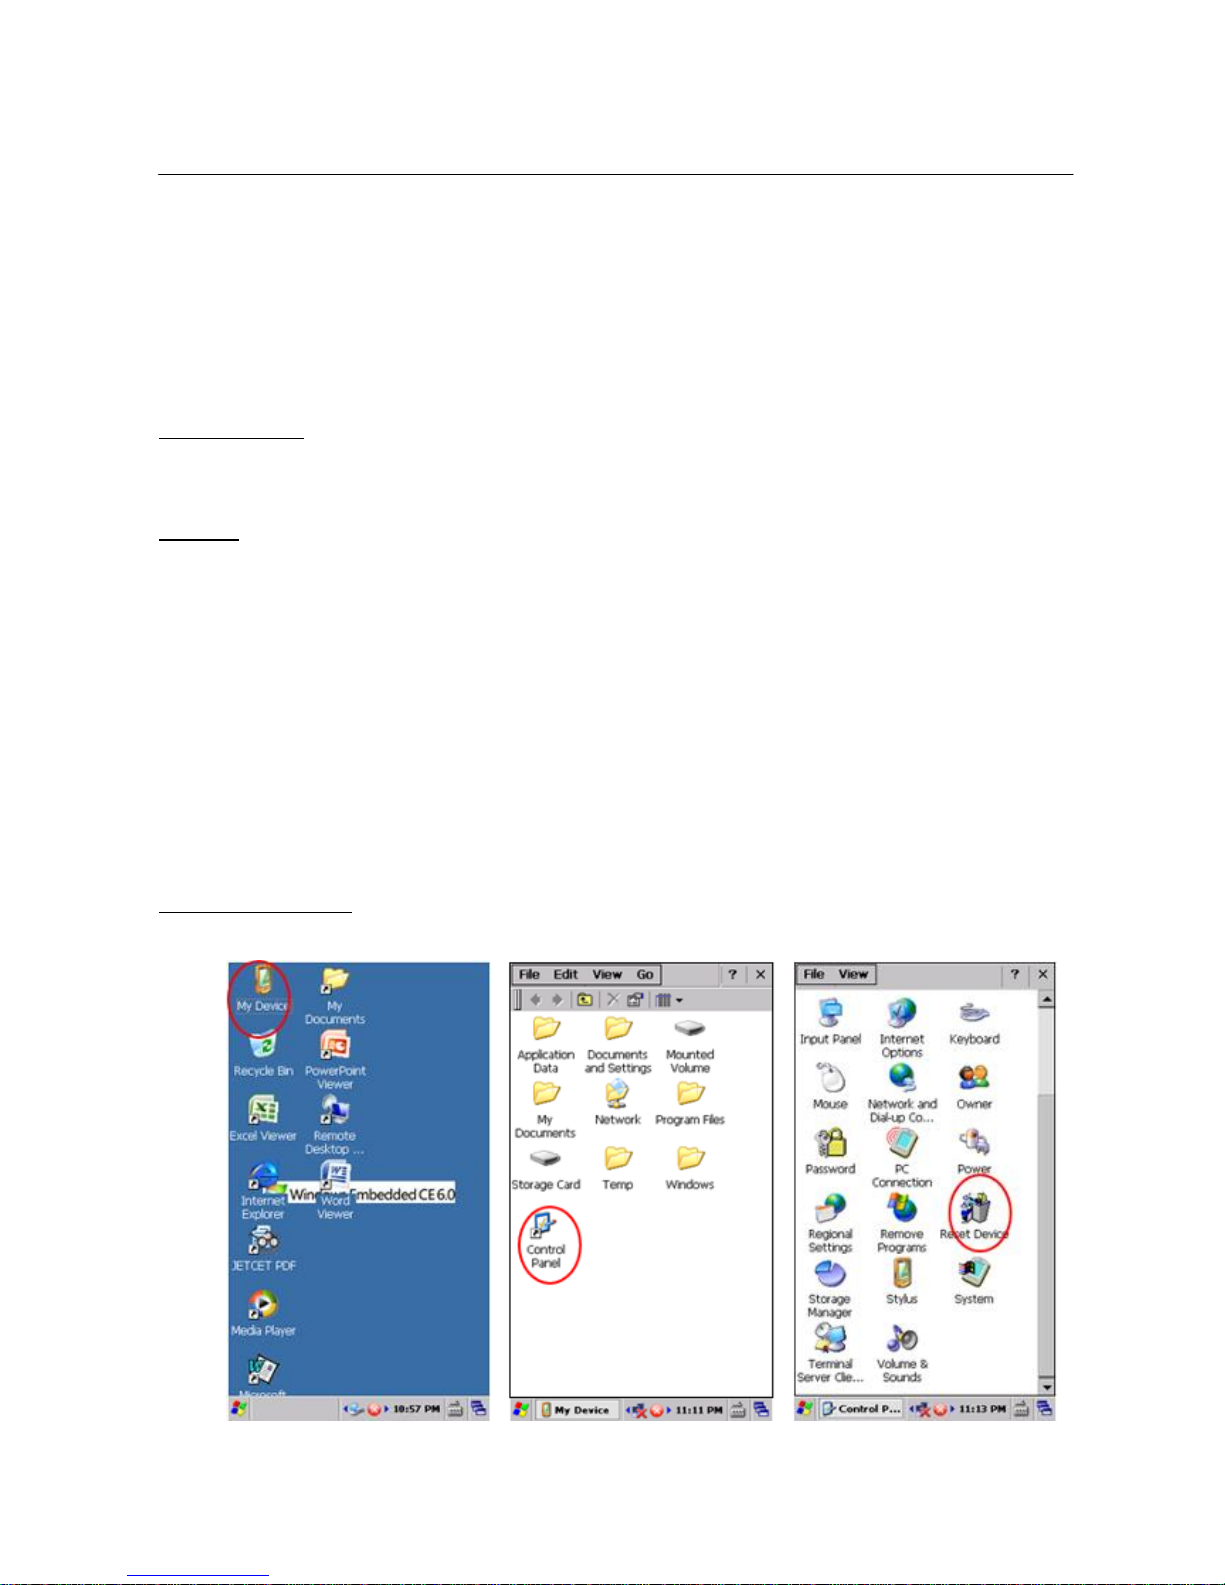
To shut off the device, press the power button for 10 seconds, then you will see the following
screen:
OFF
The device will be totally shut down. Wi-Fi
connection will be off. Press the power button
again to turn on the device. The device will
reload the Win CE OS.
Reset
Restart the device. The device will shut down
and reload the OS.
Cancel
The shut off dialog will be closed and return to the
desktop screen.
Page 10
Copyright © Boyen Technology Co. Ltd.
10
2
Product Installation
Sleep Mode
The device can be turned to sleep mode for power savings. When the device is in sleep mode, the LCD
backlight, panel and CPU are off. However, the WiFi is still connected.
Sleep Mode On:
Press the power button gently. When you see the screen is off, the product is in sleep mode.
The Wireless LED indicator is still on blue solid, which means the WiFi is still connected.
Wake Up:
Press the power button gently again then the product will be back to working mode. The backlight,
panel and CPU will be back to Power On status.
Soft Reset
Please refer to “Power On/Off”. Follow the steps on Power Off, then click on the “Reset” button on the
Confirm power off screen.
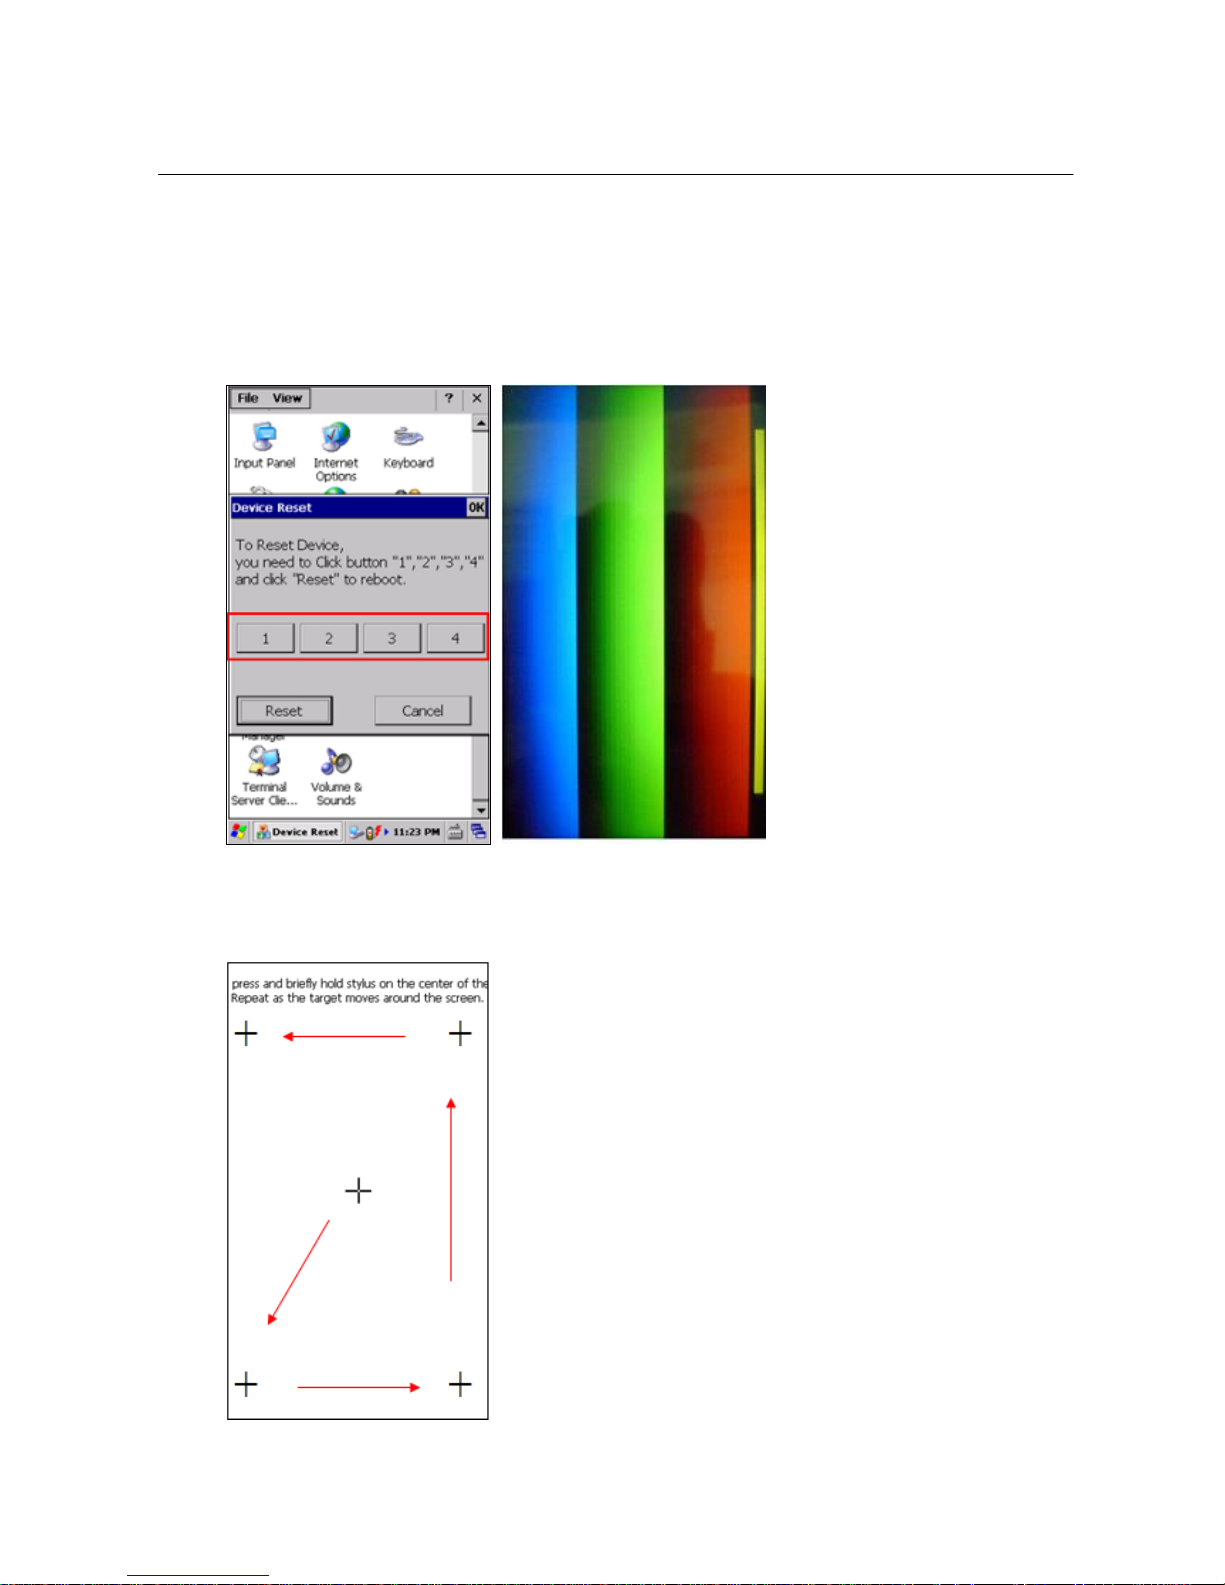
Hard Reset (System reset to factory default)
To Perform Hard Reset:
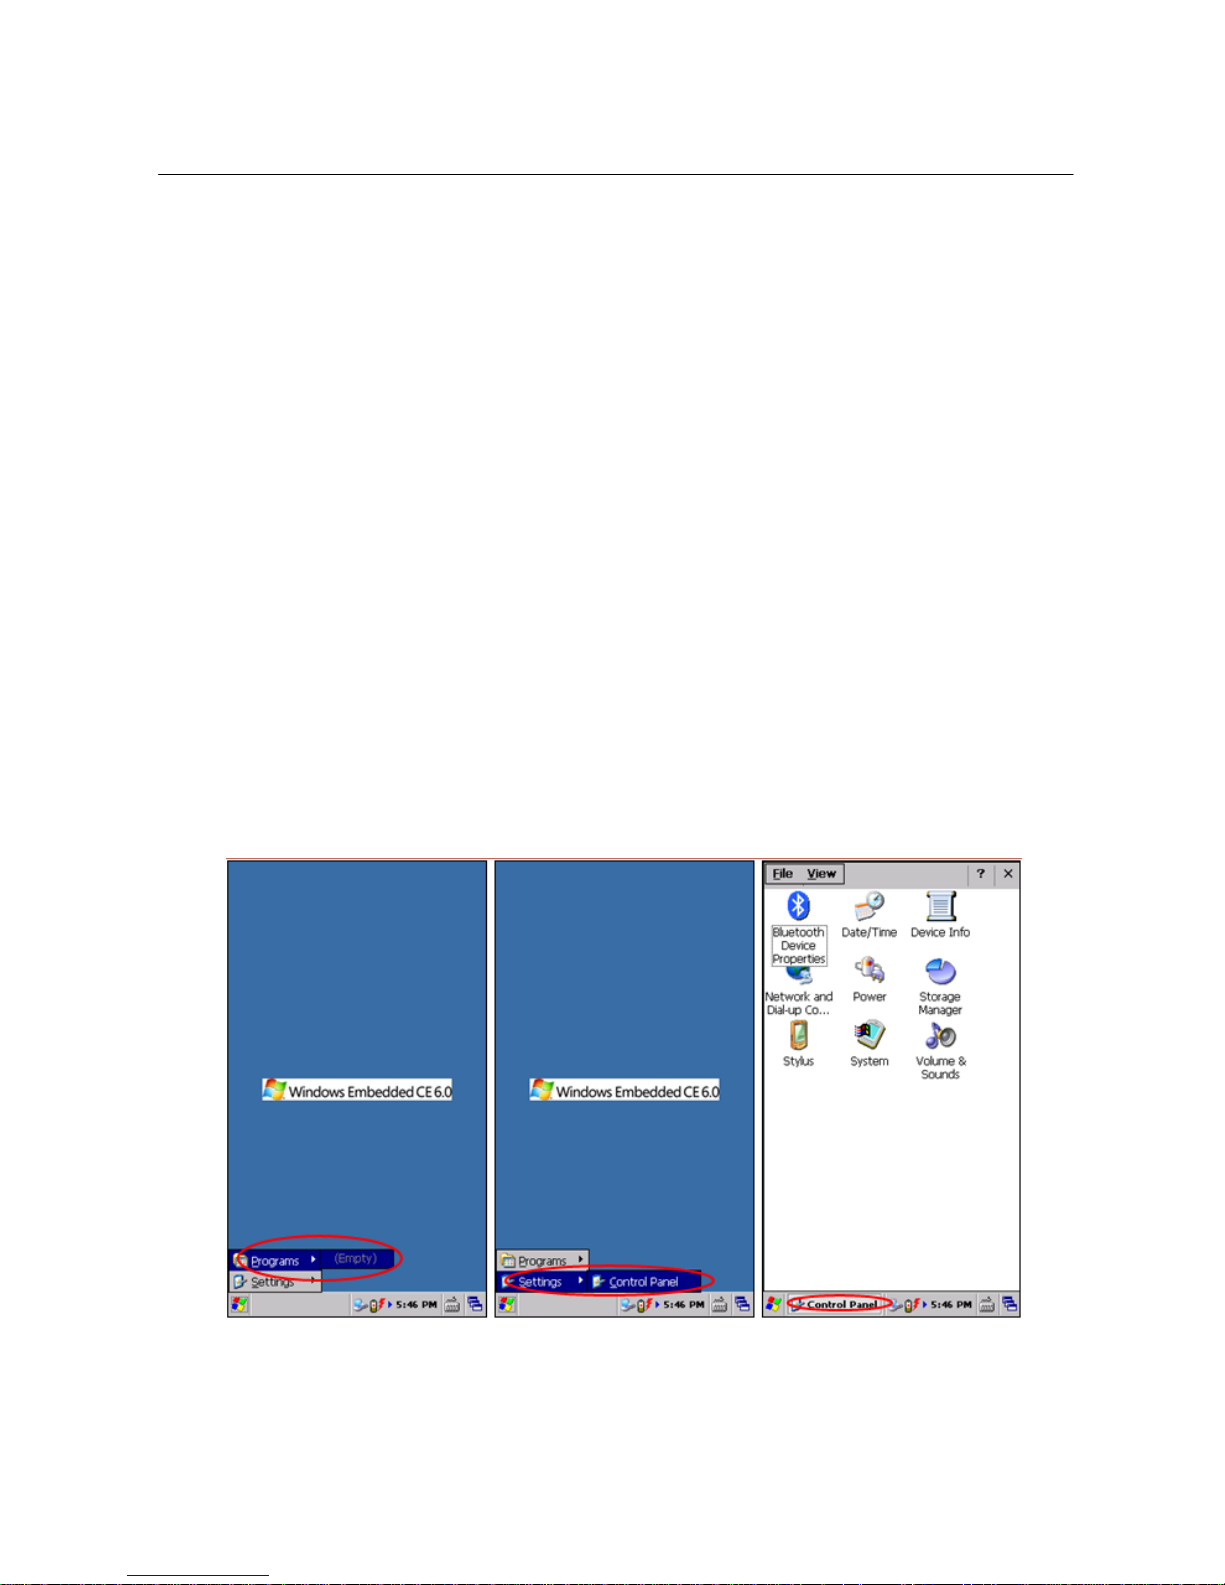
Select “My Device” → “Control Panel” → “Reset Device”
Page 11
Copyright © Boyen Technology Co. Ltd.
11
2
Product Installation
Click the “1,2,3,4 “buttons in sequence, then click the “Reset” button. You will see the screen turn
into blue, green, red, and yellow progress lines.
On the calibration screen, click the central flash point and 5 other cursers. Then randomly click on
the screen. The product will be restored to original factory settings.
Page 12

Copyright © Boyen Technology Co. Ltd.
12
2
Product Installation
To perform Hard Reset if the screen is totally off for some reasons:
Remove the battery and place it back to the device.
Hold the F1,F2,F3 and volume down button, the press the power button.
Caution: By performing a hard reset, the product will be resumed to default factory settings. Thus,
all data and programs will be lost.
Page 13
Copyright © Boyen Technology Co. Ltd.
13
3
Power Management
Battery Status
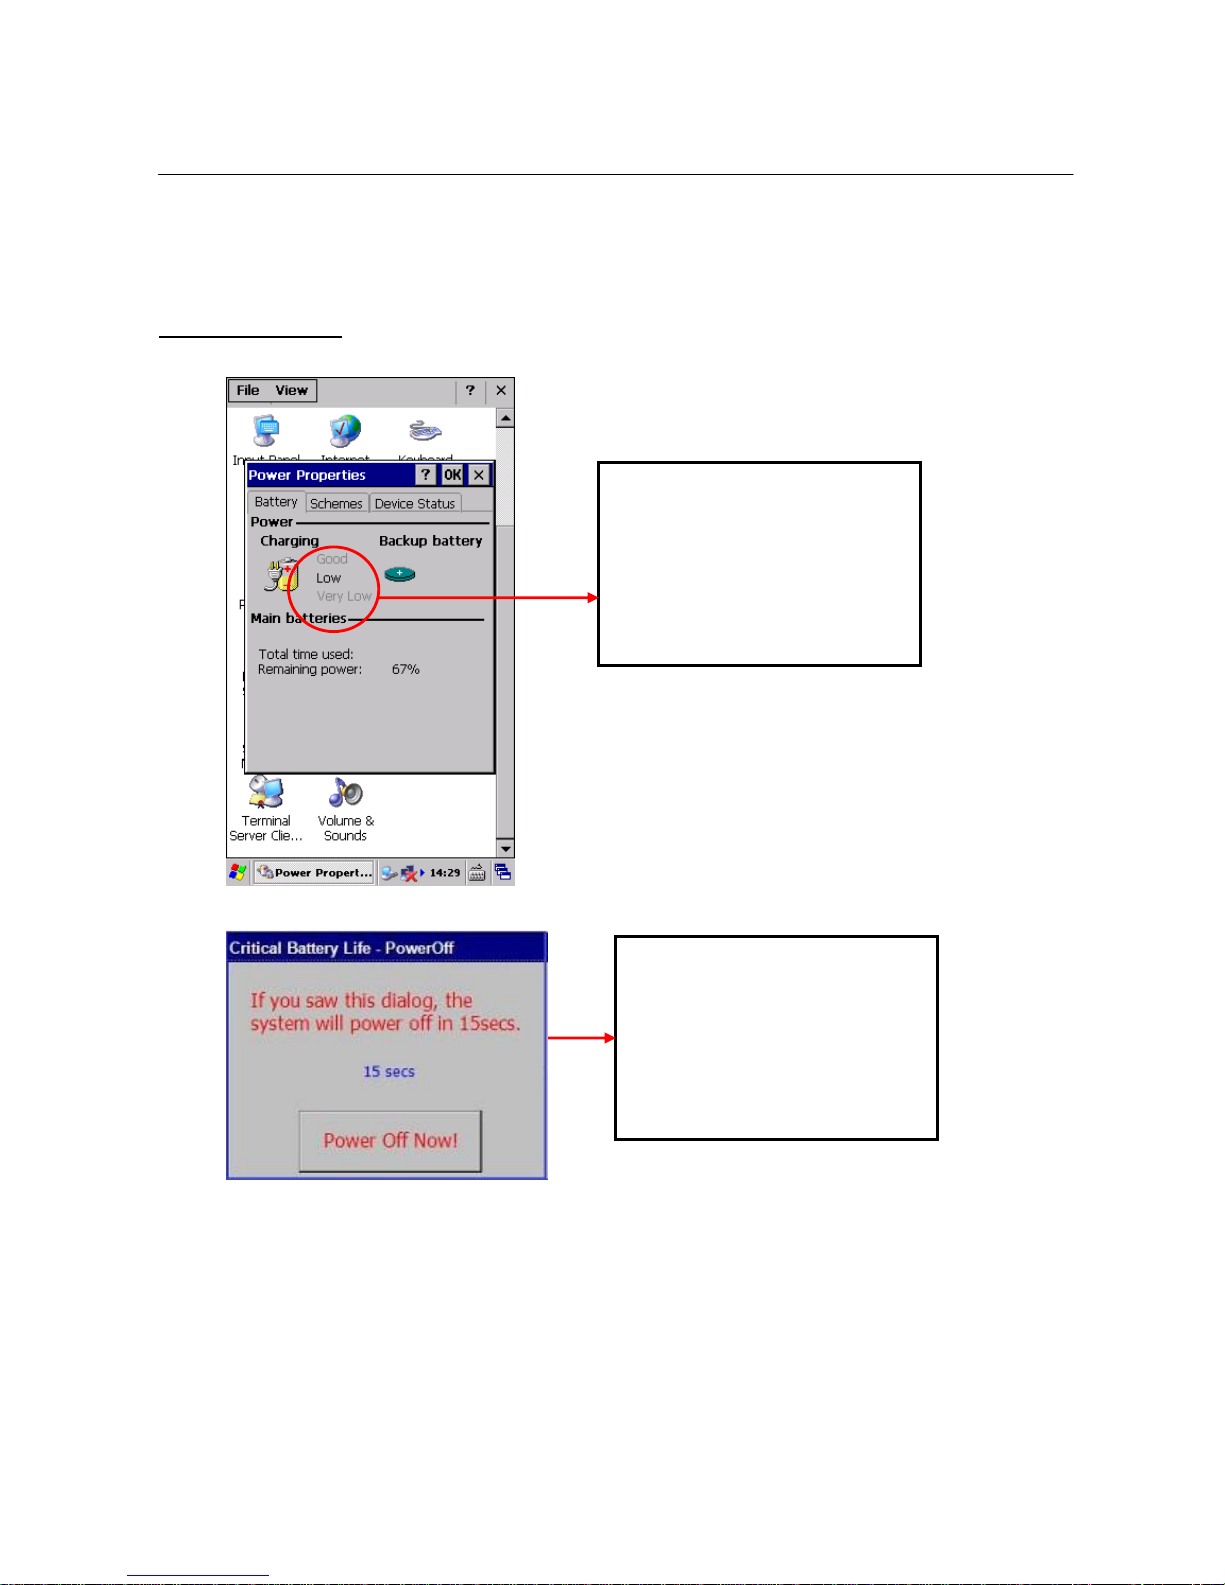
View Charging Status:
Click “My Device” Click “Control Panel” Click “Power”
Battery Levels:
Good – 100%~70%
Low – 69% ~ 30%
Very Low – 29% ~ 10%
Battery Very Low:
The battery level is below 10% and
the device will be forced to shut
down in 10 seconds.
Page 14
Copyright © Boyen Technology Co. Ltd.
14
4
System Utilities
Device Information
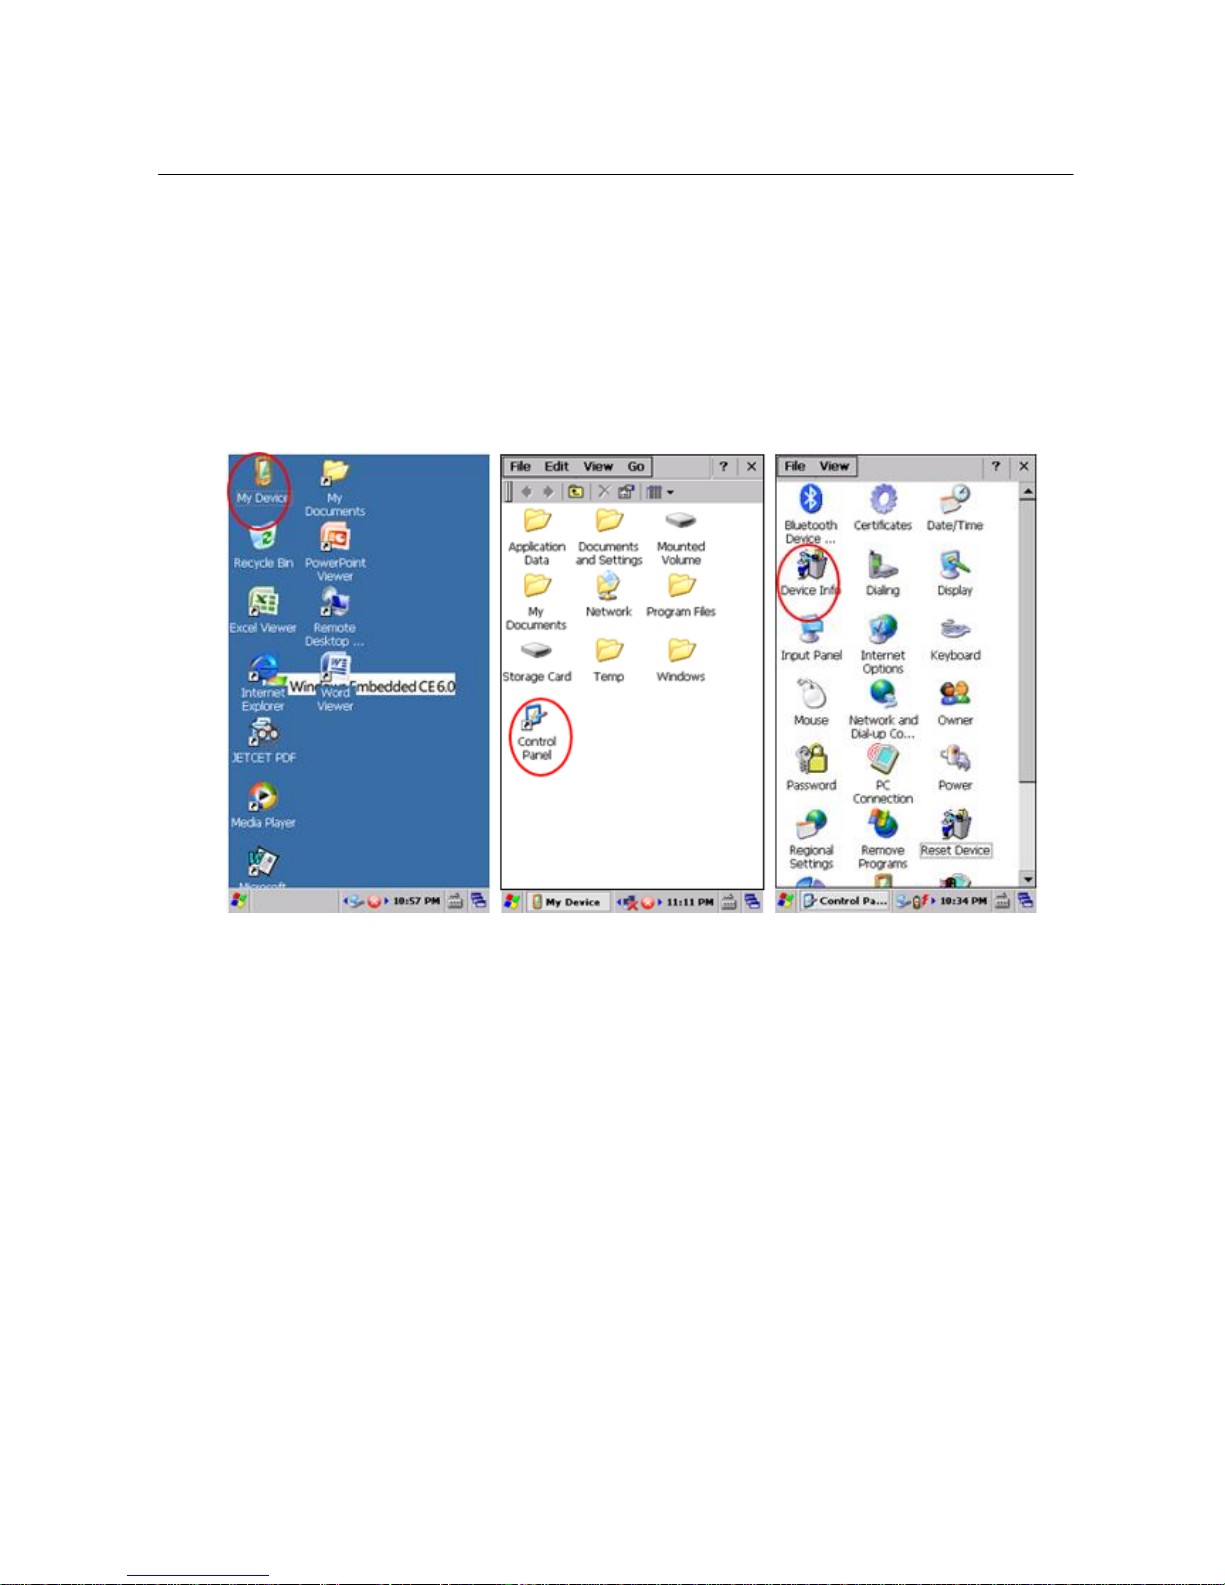
Device information such as device name, firmware version, firmware build date and time can be found by
performing the following steps.
Click “My Device” → “Control Panel” → Device Info
Page 15
Copyright © Boyen Technology Co. Ltd.
15
4
System Utilities
Device Software Upgrade
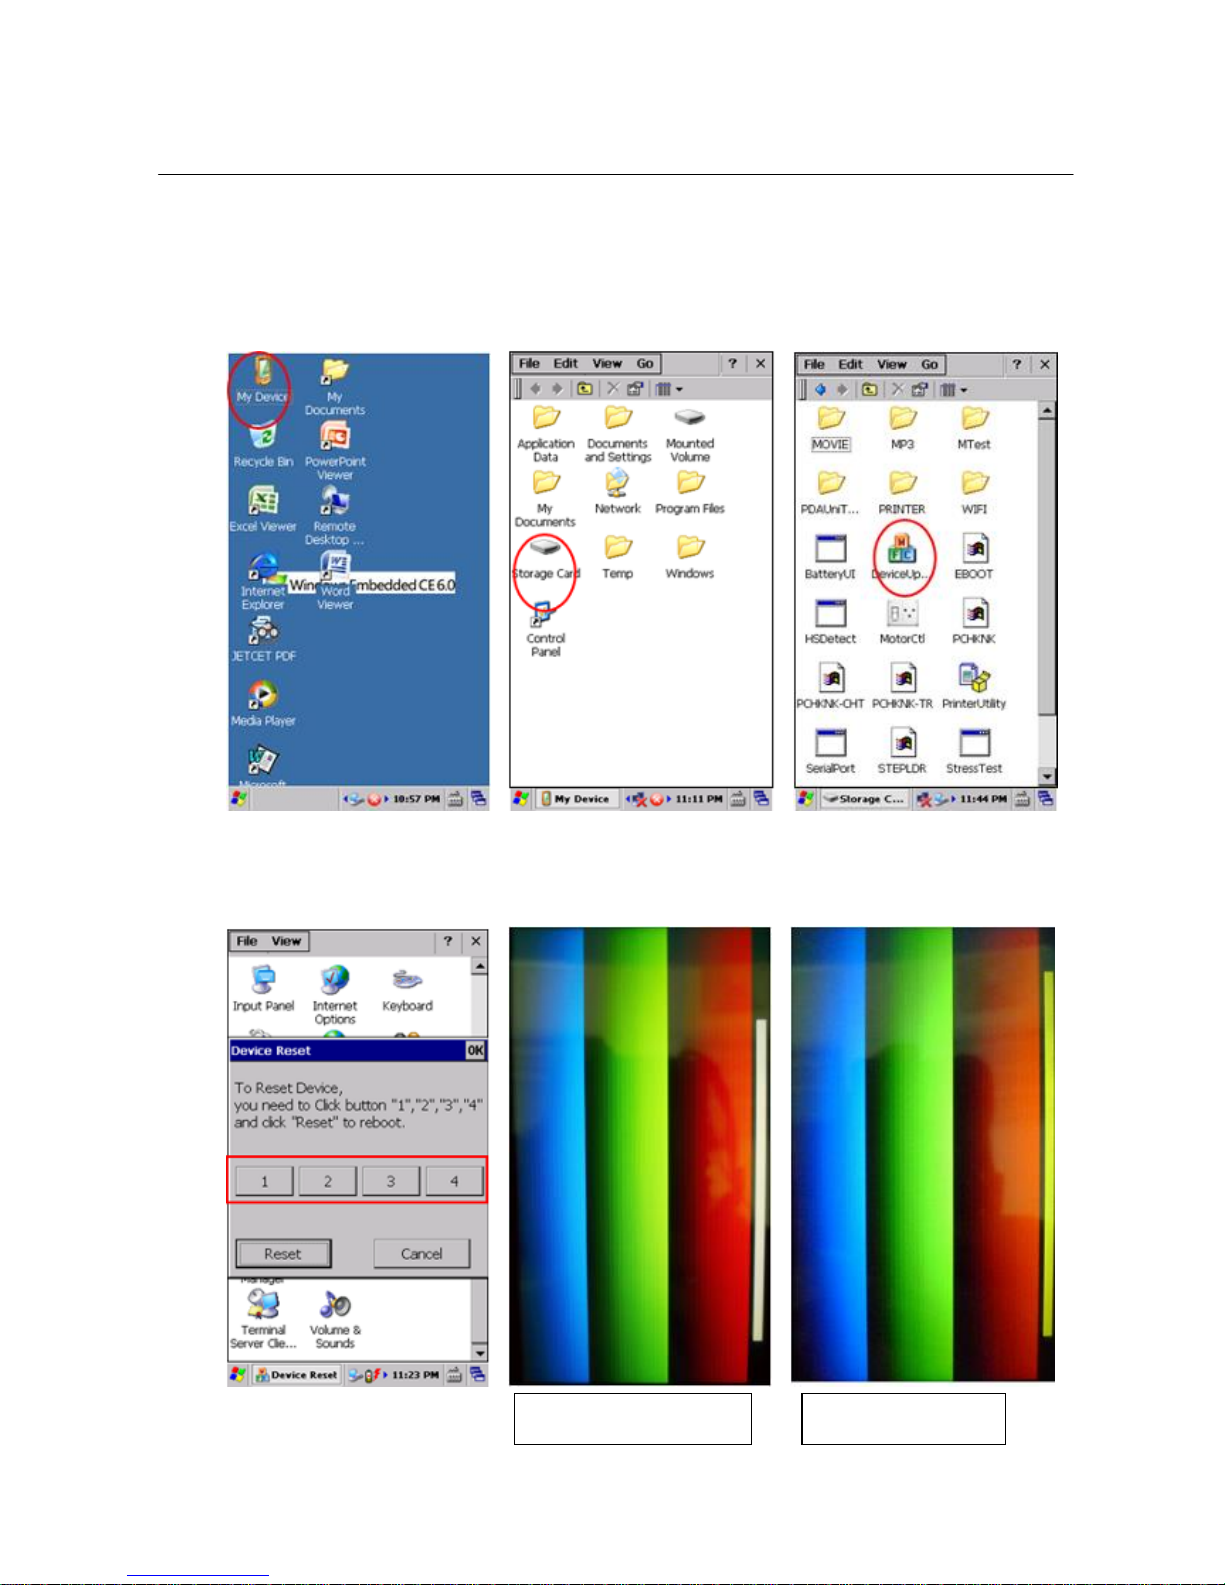
Click “My Device” → “Storage Card” → “Device Upgrade”
Click “1,2,3,4” buttons in sequence, then click the “Upgrade” button. You will see the screen turn into
blue, green, red, and yellow progress lines.
Clearing original data
Loading new data
Page 16
Copyright © Boyen Technology Co. Ltd.
16
4
System Utilities
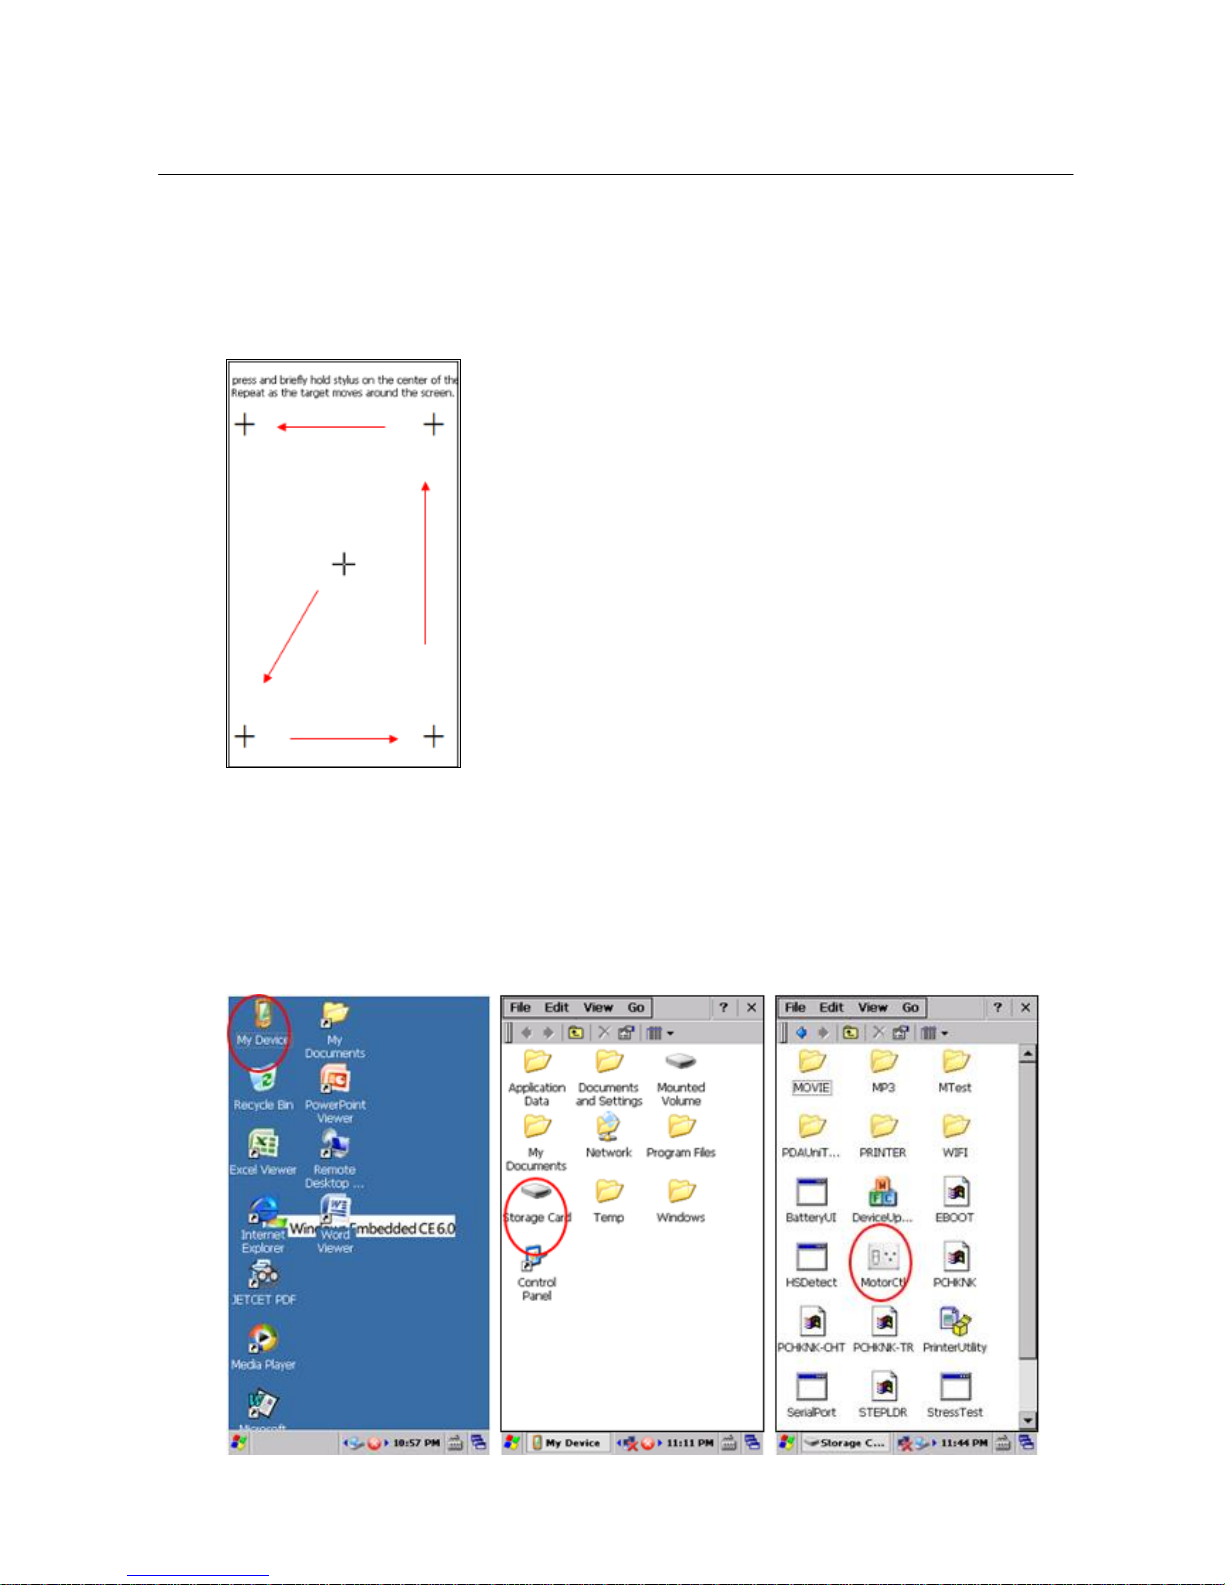
On the calibration screen, click the central flash point and 5 other cursers. Then randomly click on
the screen. The software upgrade is complete.
Vibration Motor Testing
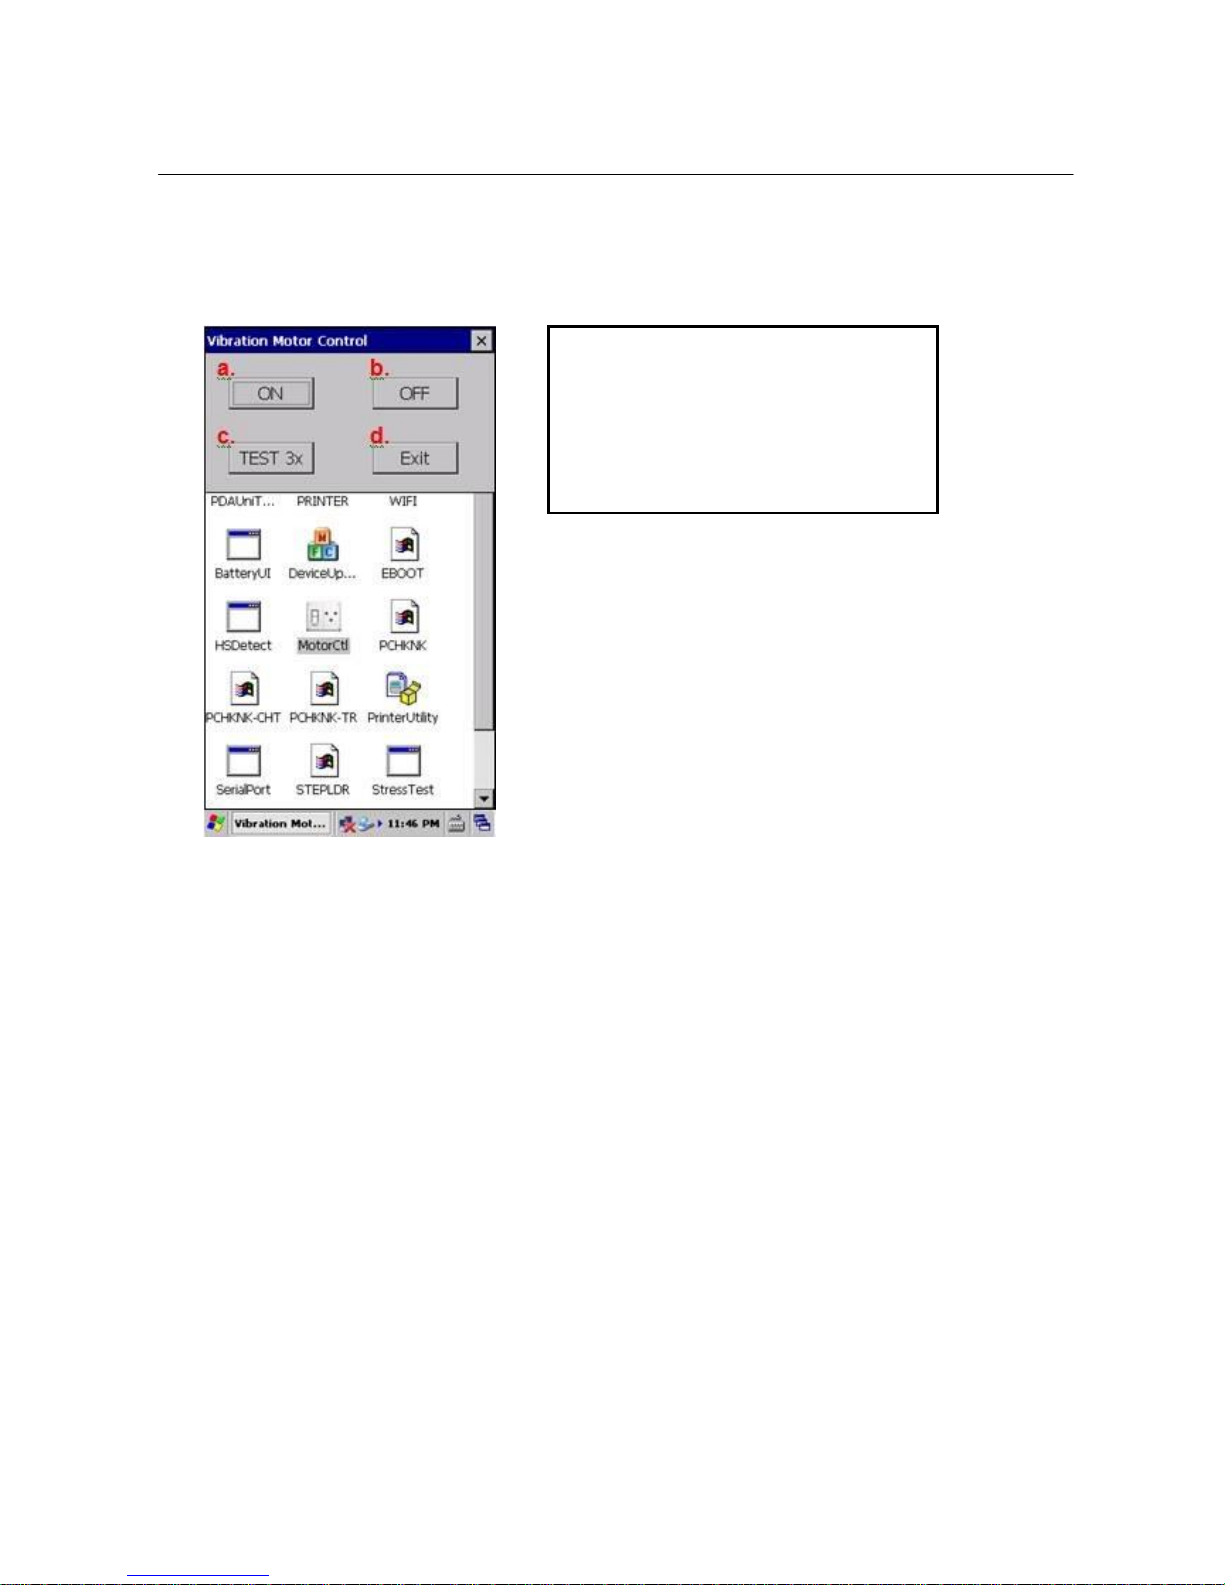
This program is to let users feel the different levels of vibration alerts so that they can choose the alerts that
they prefer.
Click “My Device” → “Storage Card” → “MotorCtl”
Page 17
Copyright © Boyen Technology Co. Ltd.
17
4
System Utilities
3. Testing Options:
Vibration Levels:
a. ON – Continuos
b. OFF – Vibration off
c. TEST 3X – Vibrates 3 times in a row
Page 18
Copyright © Boyen Technology Co. Ltd.
18
5
ActiveSync
ActiveSync is developed by Microsoft that allows mobile device to be synchronized with a desktop PC. It
provides for the manual transfer of files to a mobile device, along with limited backup/restore functionality,
and the ability to install and uninstall mobile device applications.
PC running on Windows Vista and above will synchronize the mobile device through Windows Mobile
Device Center. Thus, ActiveSync is only needed for Windows XP and earlier versions of Windows.
Install USB Driver
In order for the USB cable to work with your host PC, you will have to install the USB driver.
Acquire the USB driver:
Download the USB driver “ActiveSync_USB Driver” from
download the driver from the website.
Steps for installing the USB driver:
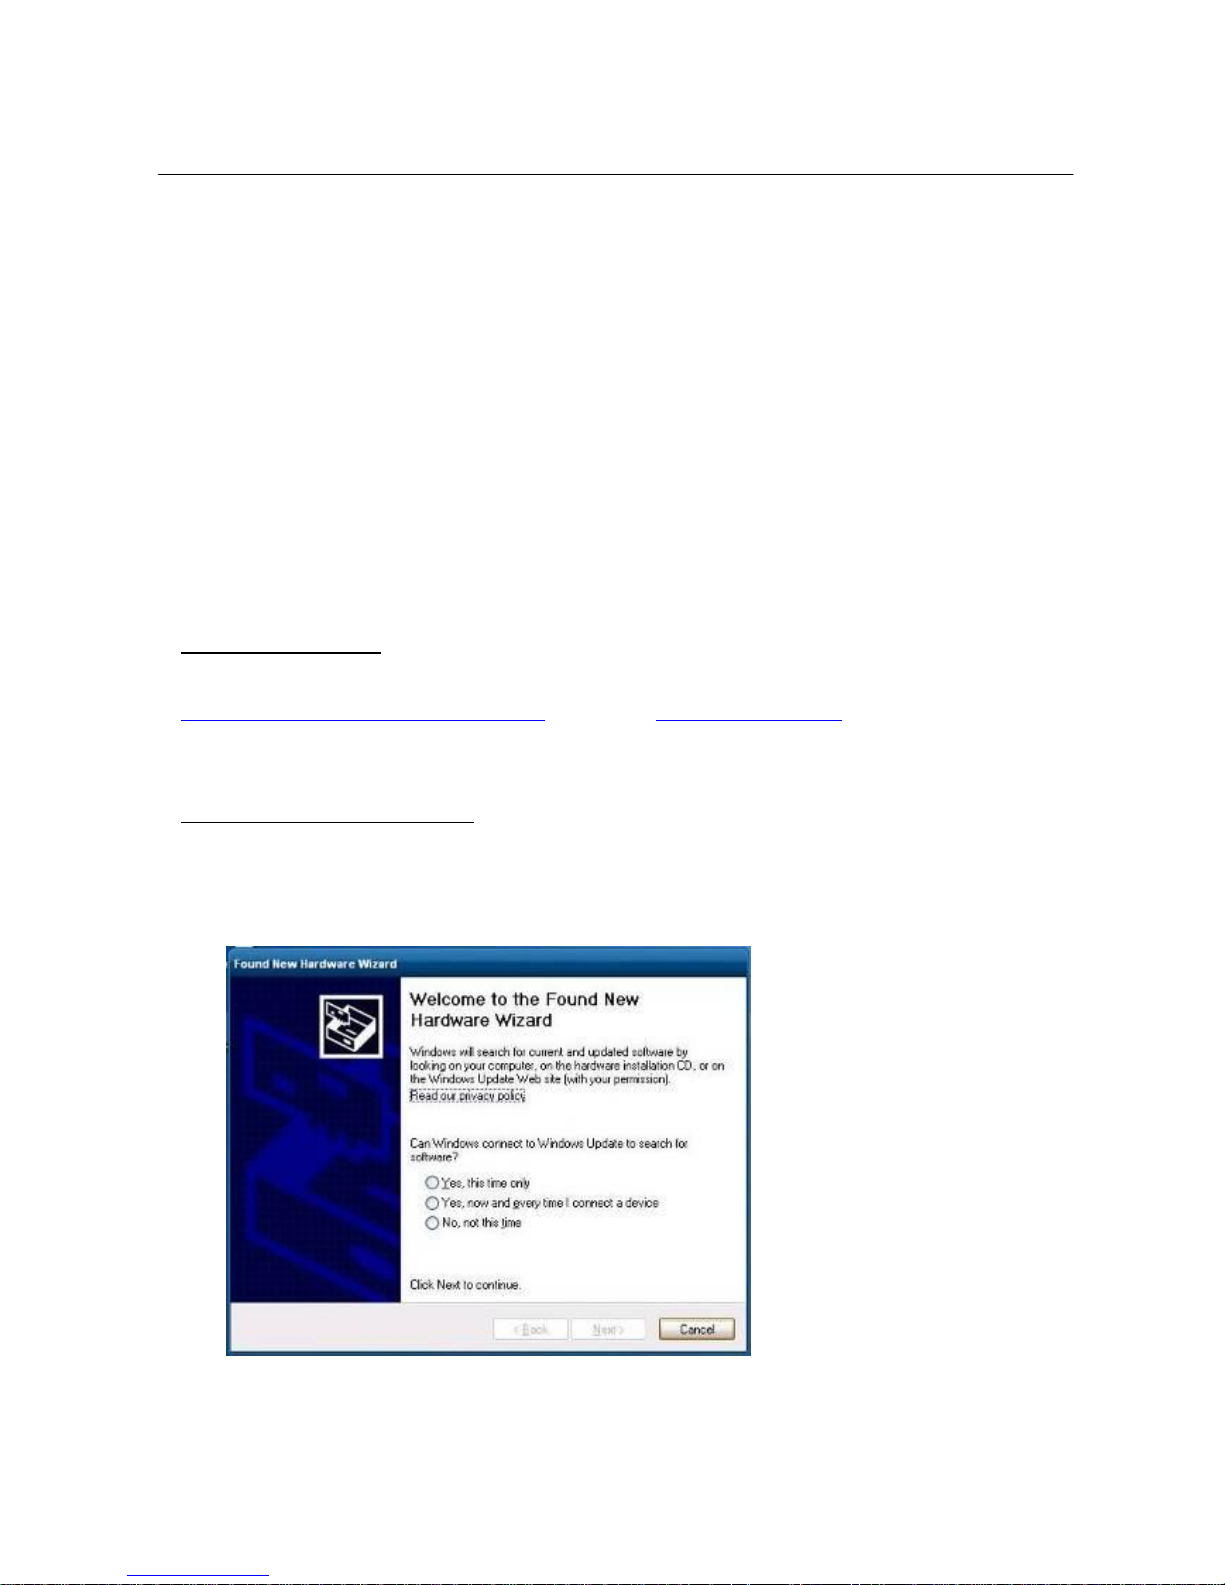
Connect the PDA with USB cable to the host PC. You will see the following screen after the host PC
detects a new hardware.
Page 19
Copyright © Boyen Technology Co. Ltd.
19
5
ActiveSync
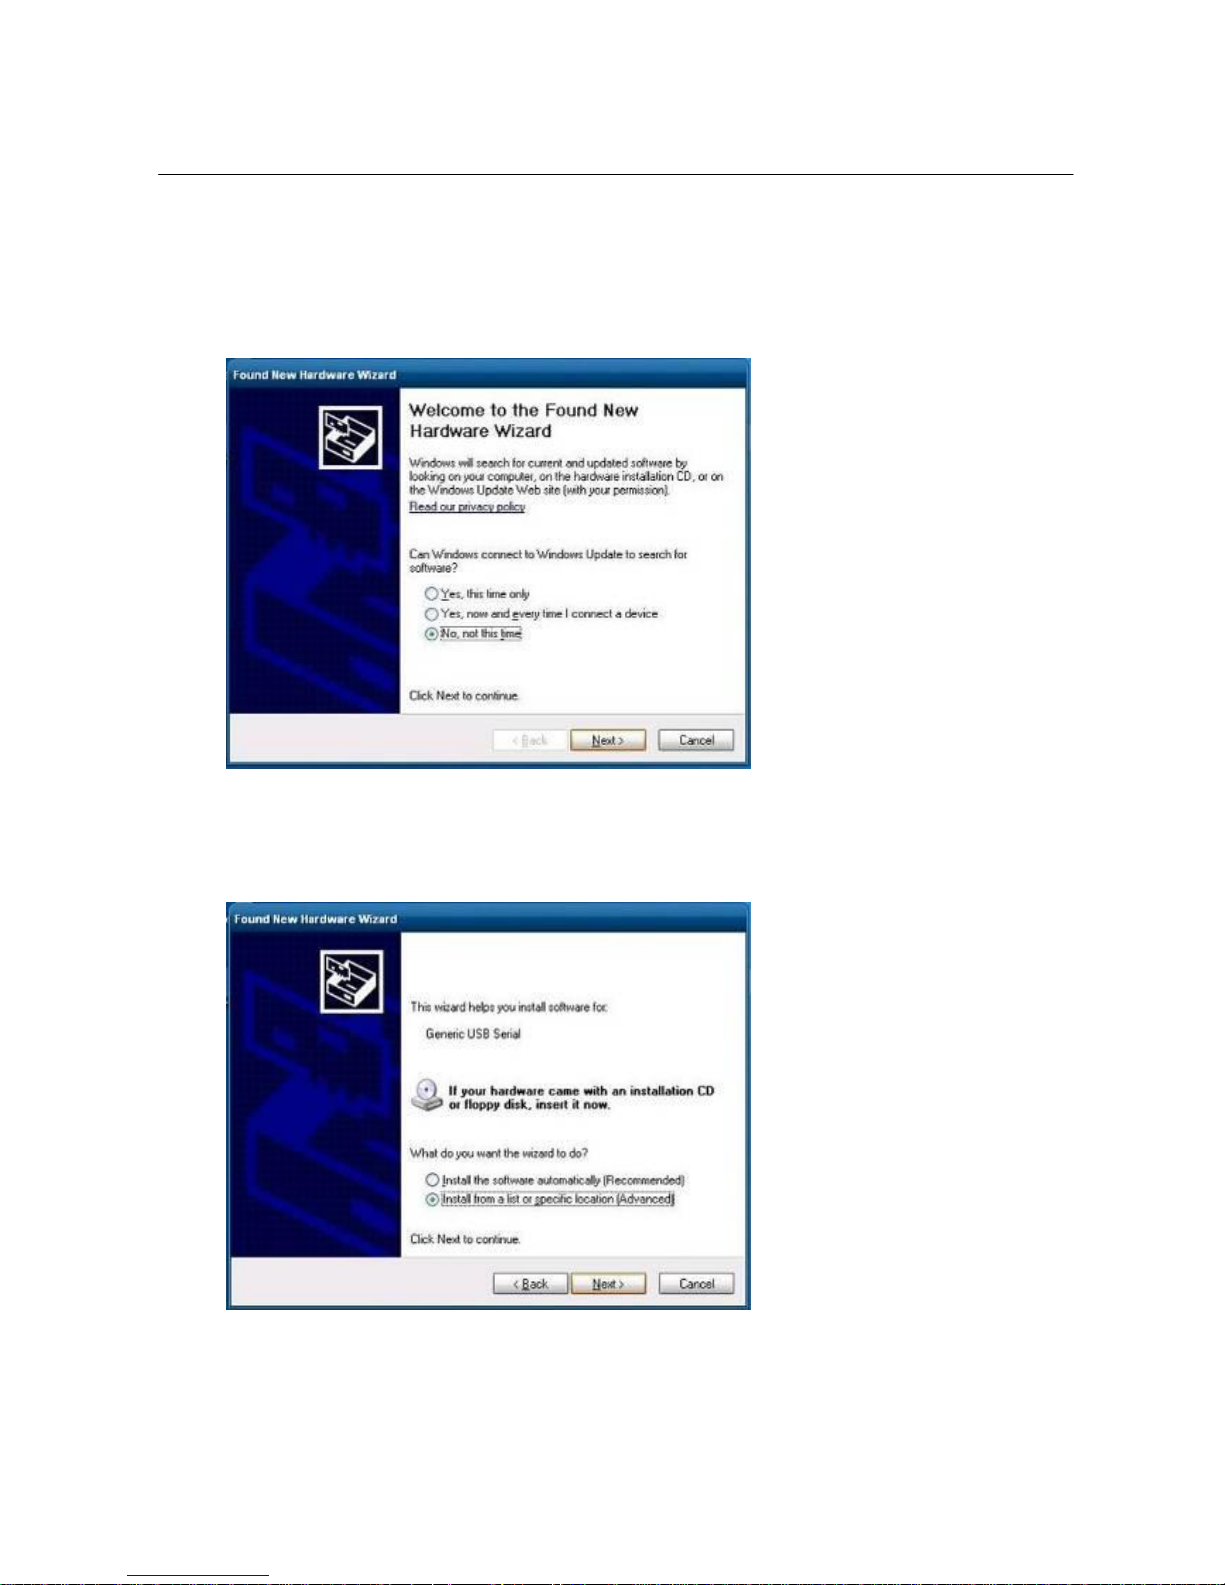
Select “No, not this time” from the option buttons, then click “Next” to continue.
Select “Install from a list or specific location” from the option buttons, then click “Next” to
continue.
Page 20
Copyright © Boyen Technology Co. Ltd.
20
5
ActiveSync
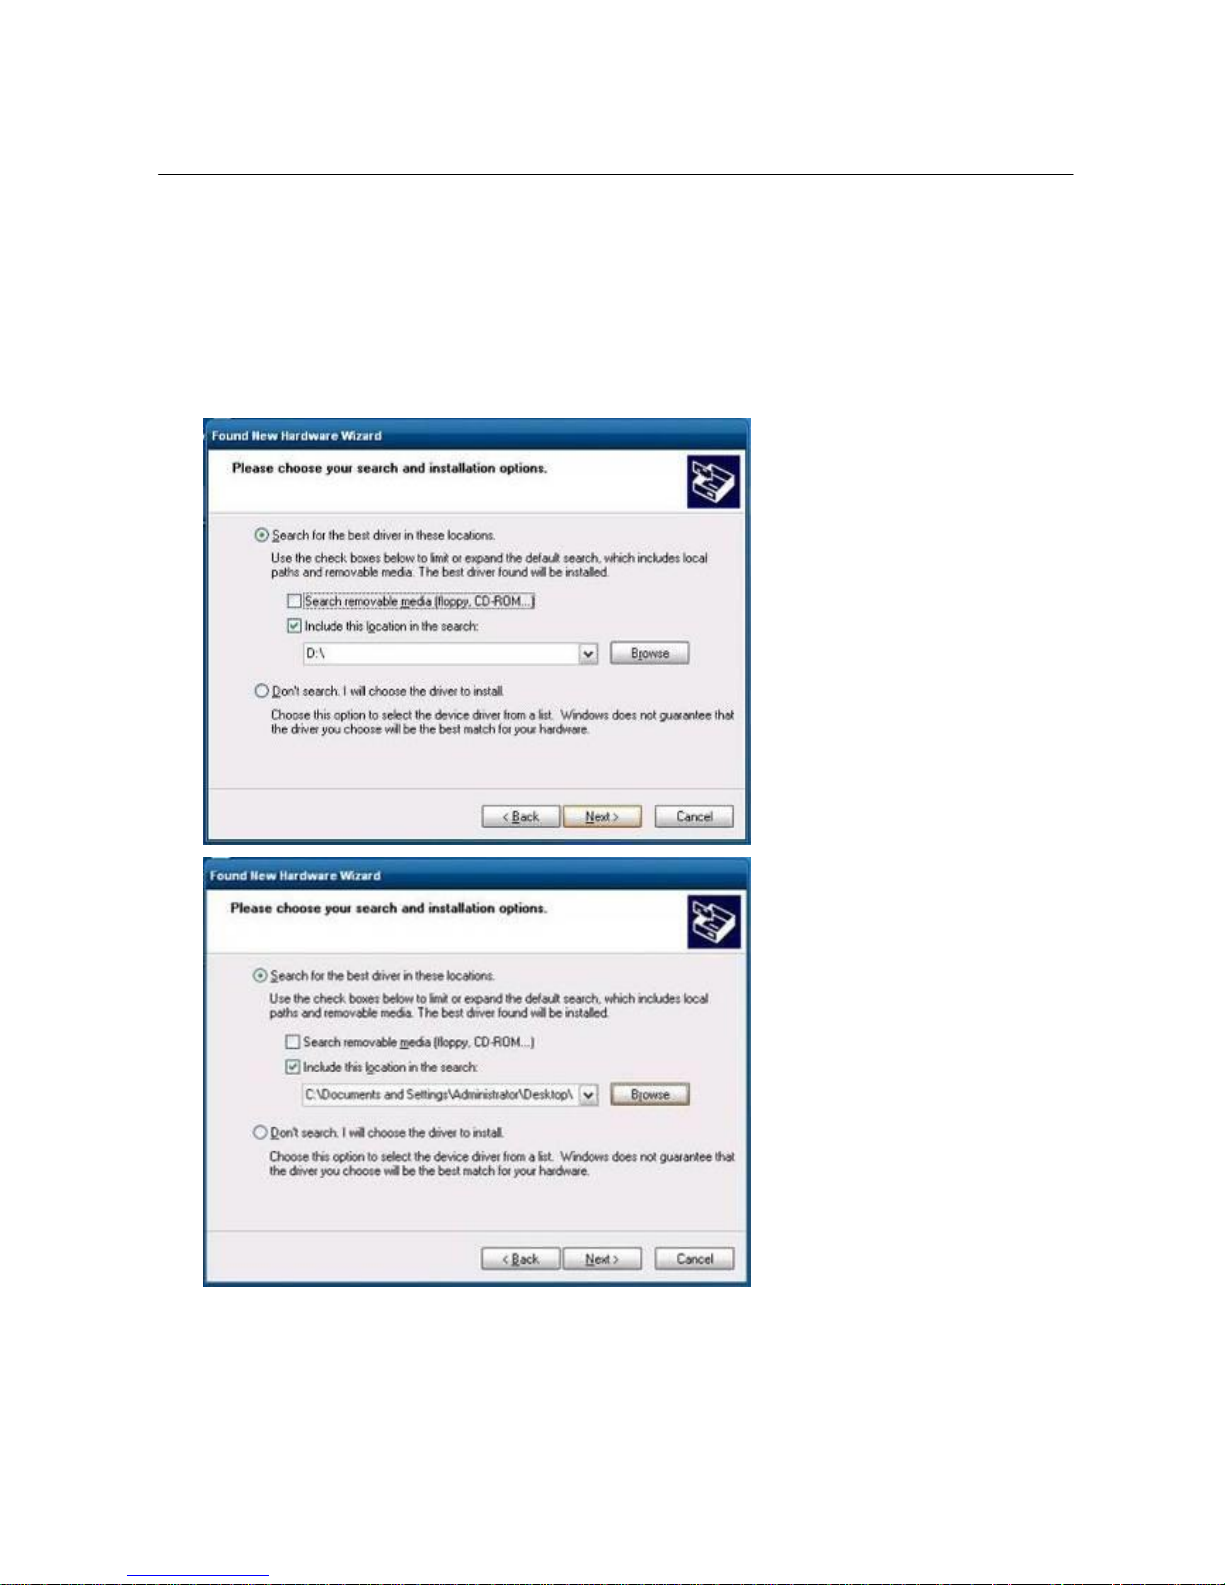
Select “Search for the best driver in these locations” Check “Include this location in the search:”
check button, then browse the desktop where you have saved the folder “ActiveSync_ USB Driver”.
Click “Next” after you have selected the driver location.
Page 21
Copyright © Boyen Technology Co. Ltd.
21
5
ActiveSync
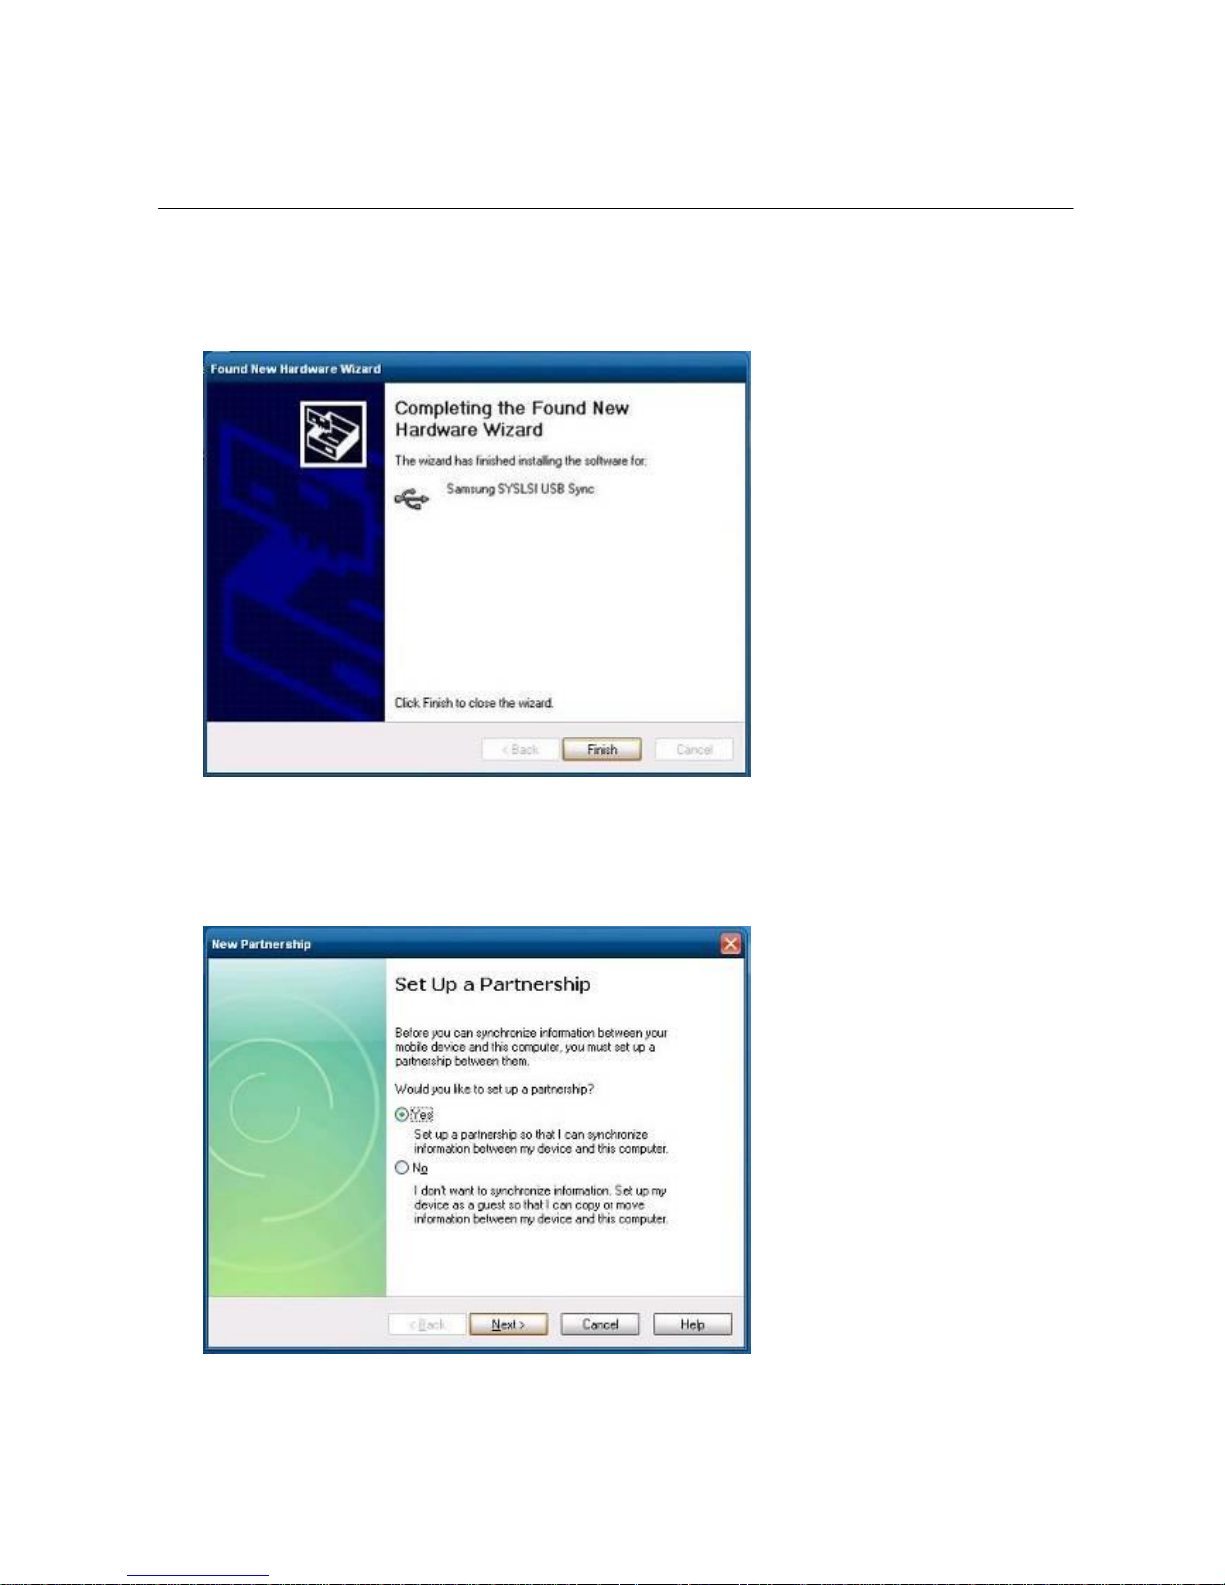
Click “Finish” after the installation is complete.
Setup Partnership
Click on “Yes”.
Page 22
Copyright © Boyen Technology Co. Ltd.
22
5
ActiveSync
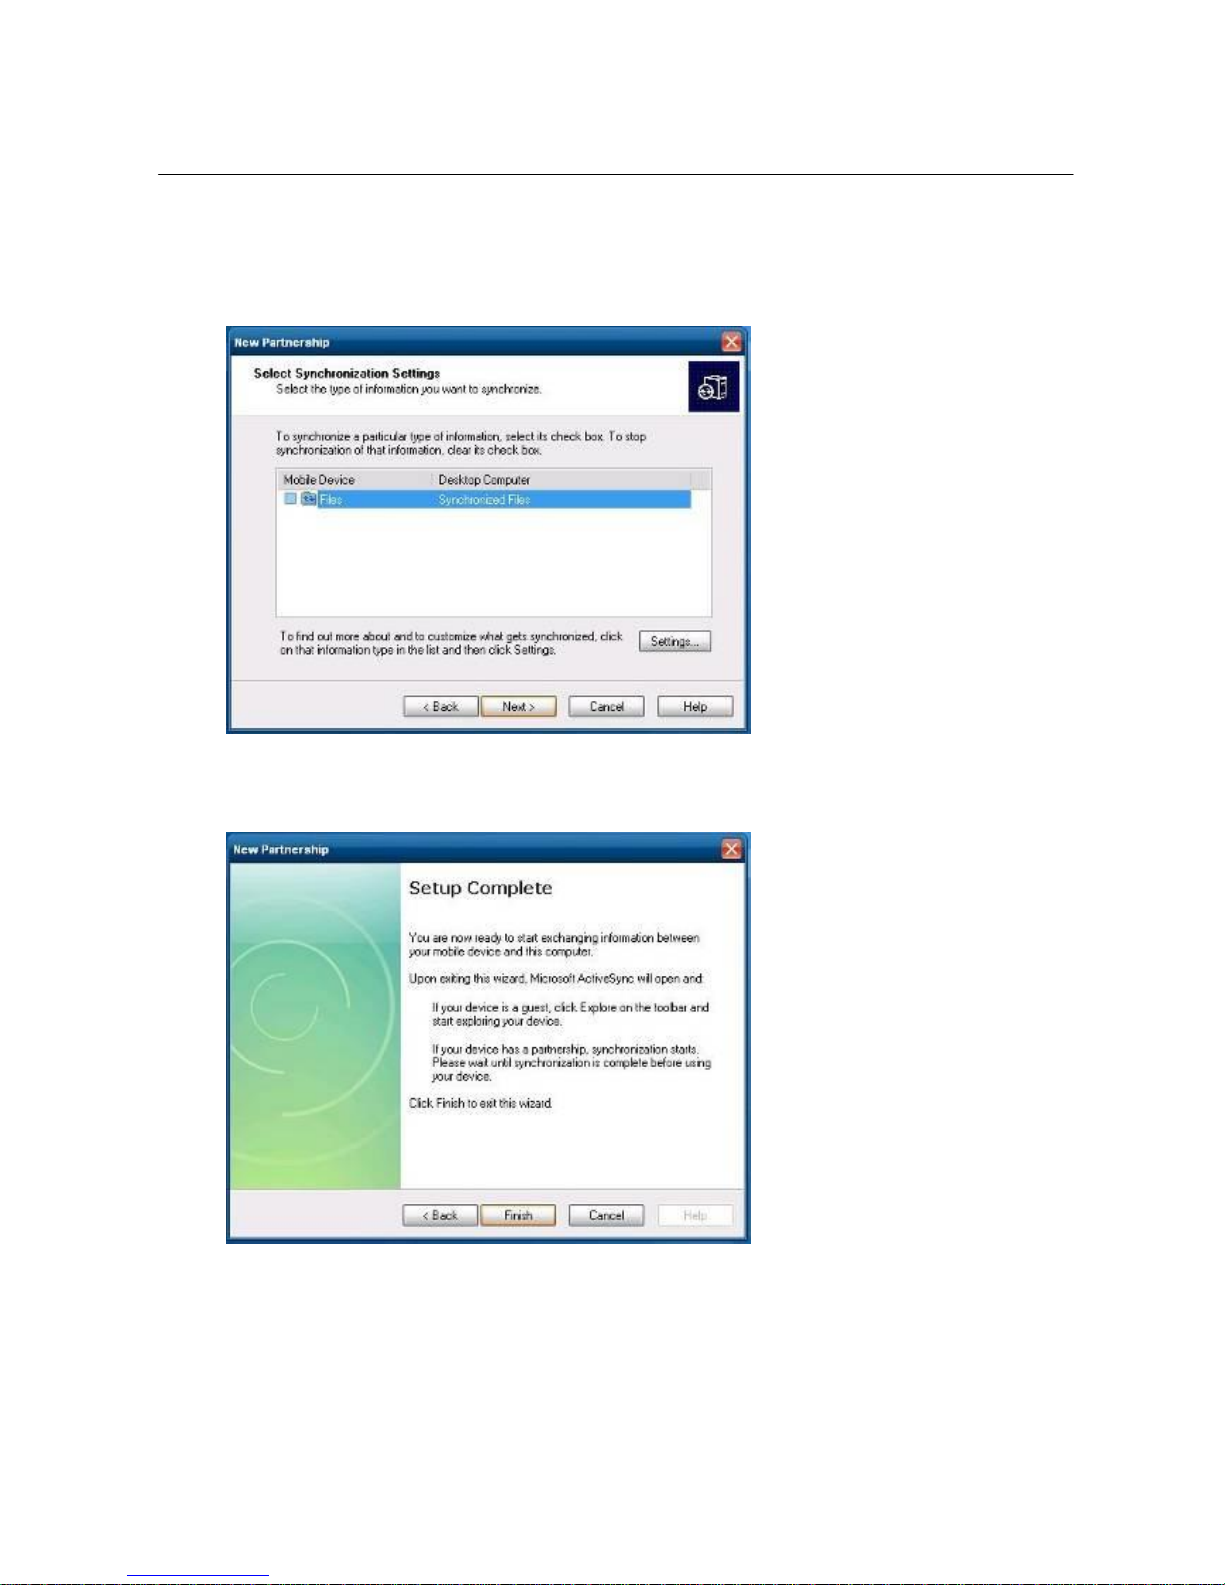
Click “Next”
Click “Finish” after the setup is complete.
Page 23
Copyright © Boyen Technology Co. Ltd.
23
5
ActiveSync
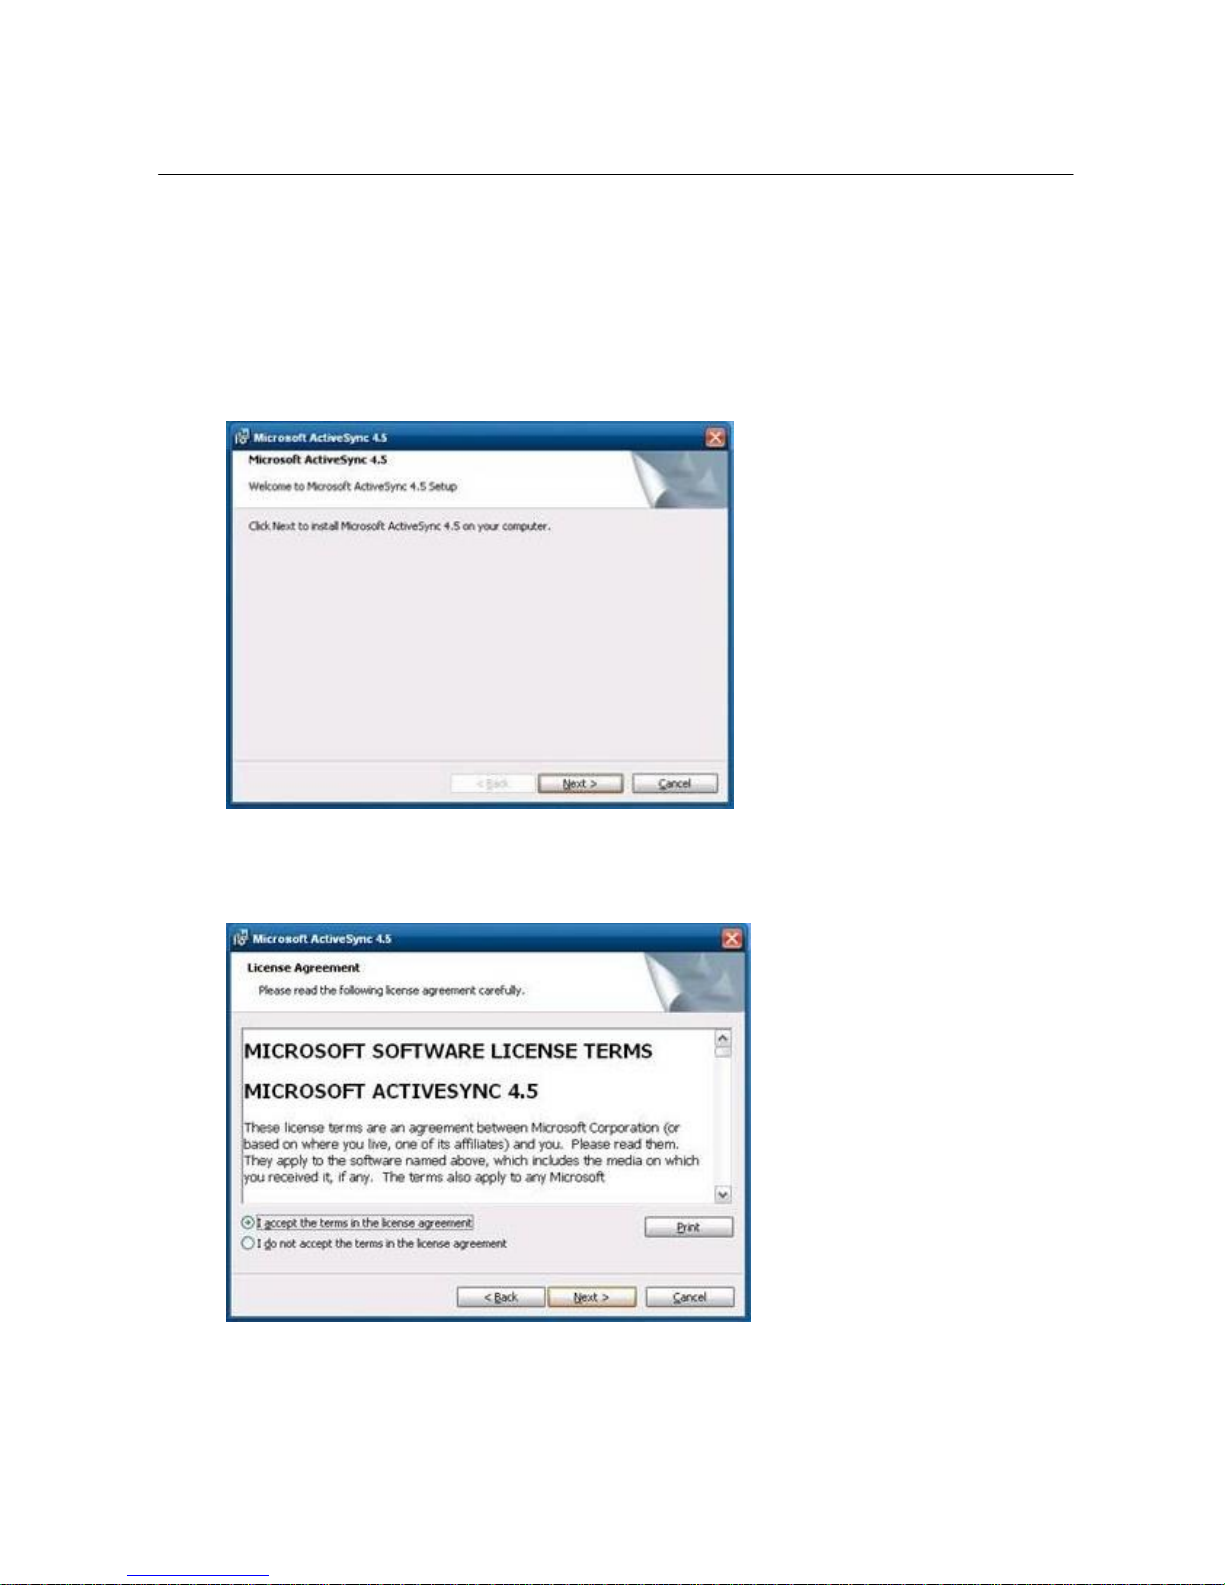
Install “Active Sync4.5”
Run Active Sync4.5, Select “Next”
Select “I accept the terms in the license agreement” from the option buttons, then click “Next”.
Page 24
Copyright © Boyen Technology Co. Ltd.
24
5
ActiveSync
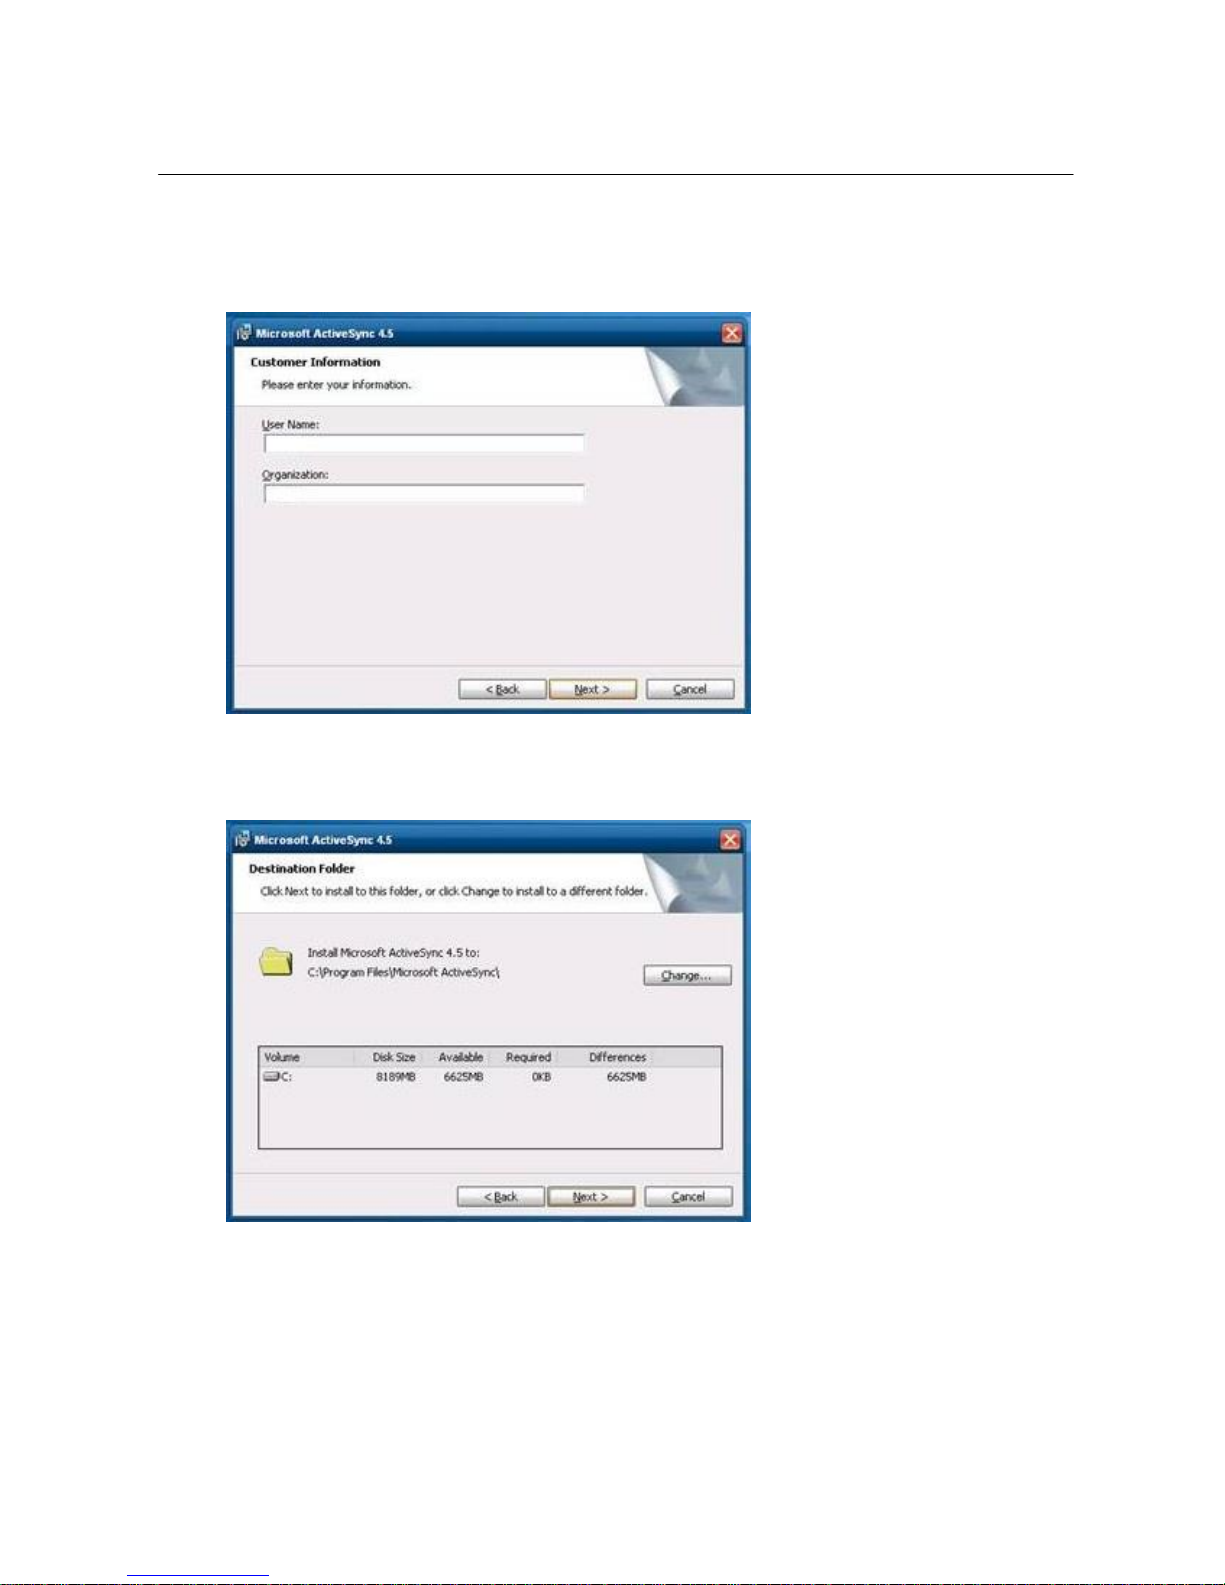
Enter your information then click “Next” to continue.
Click “Next” to continue.
Page 25
Copyright © Boyen Technology Co. Ltd.
25
5
ActiveSync
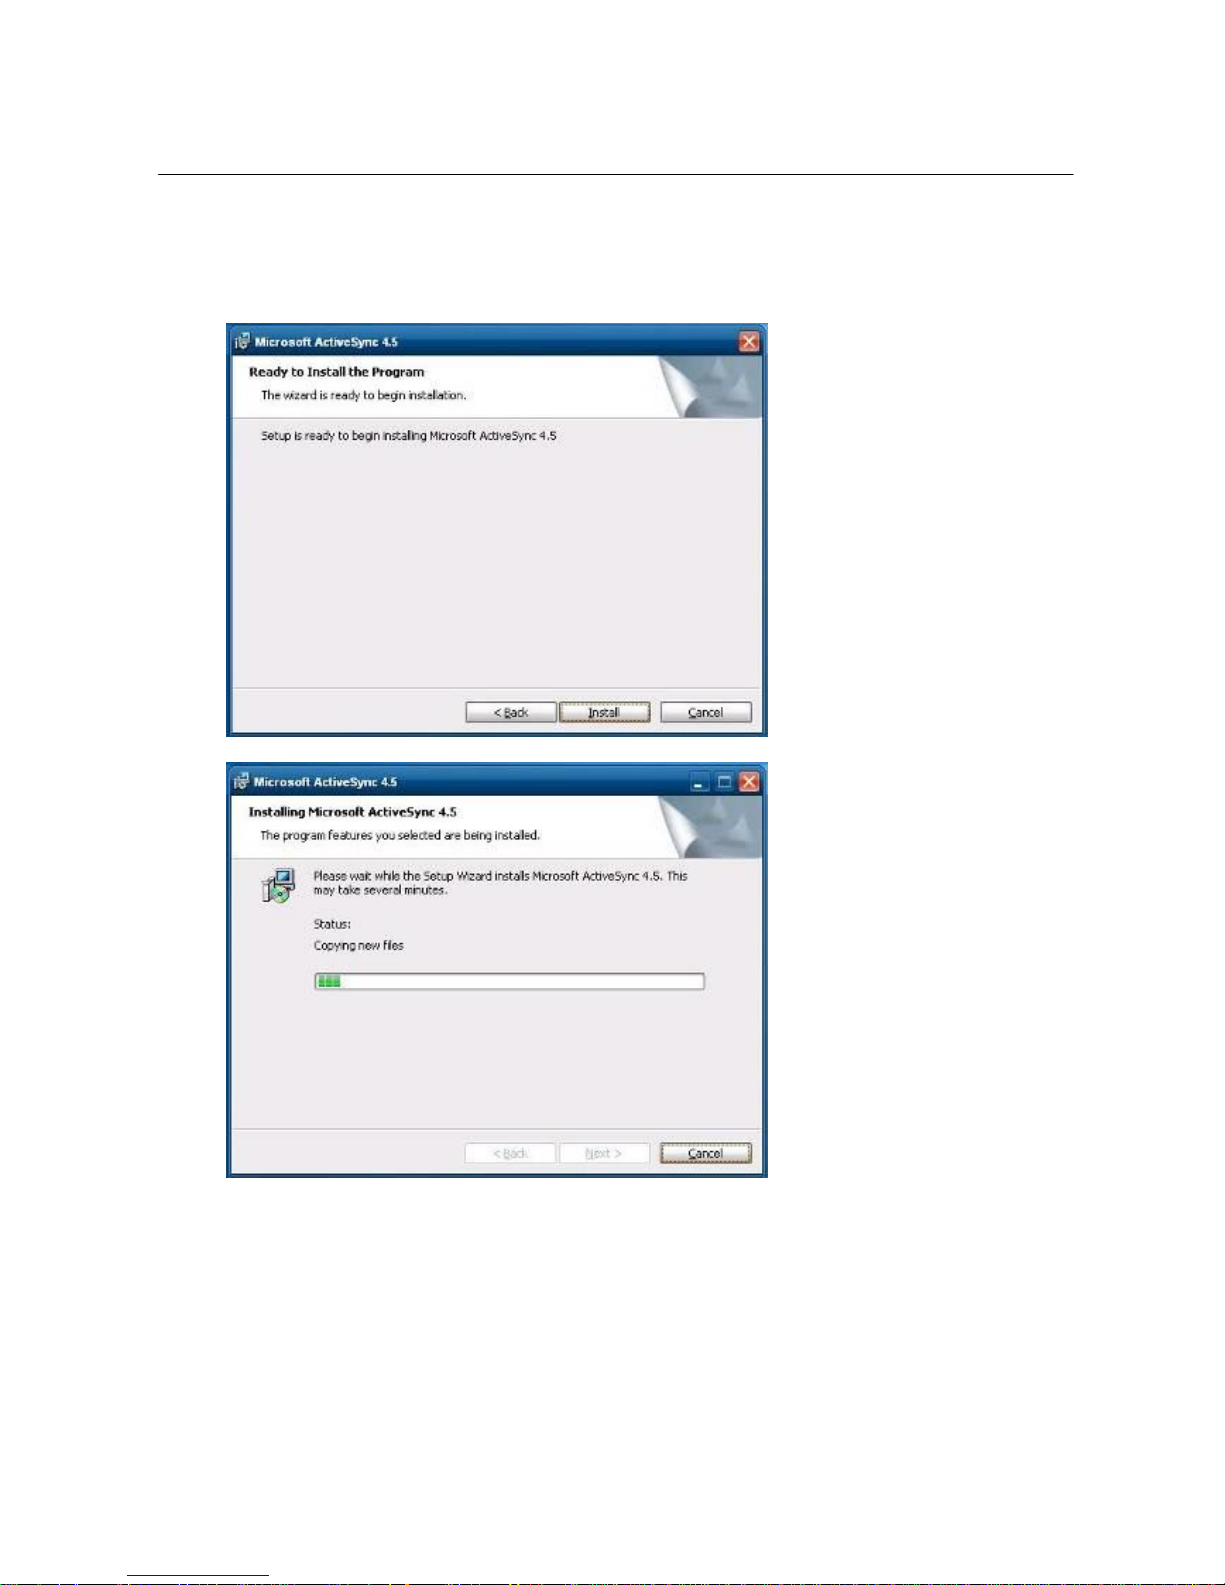
Click “Install”
Page 26
Copyright © Boyen Technology Co. Ltd.
26
5
ActiveSync
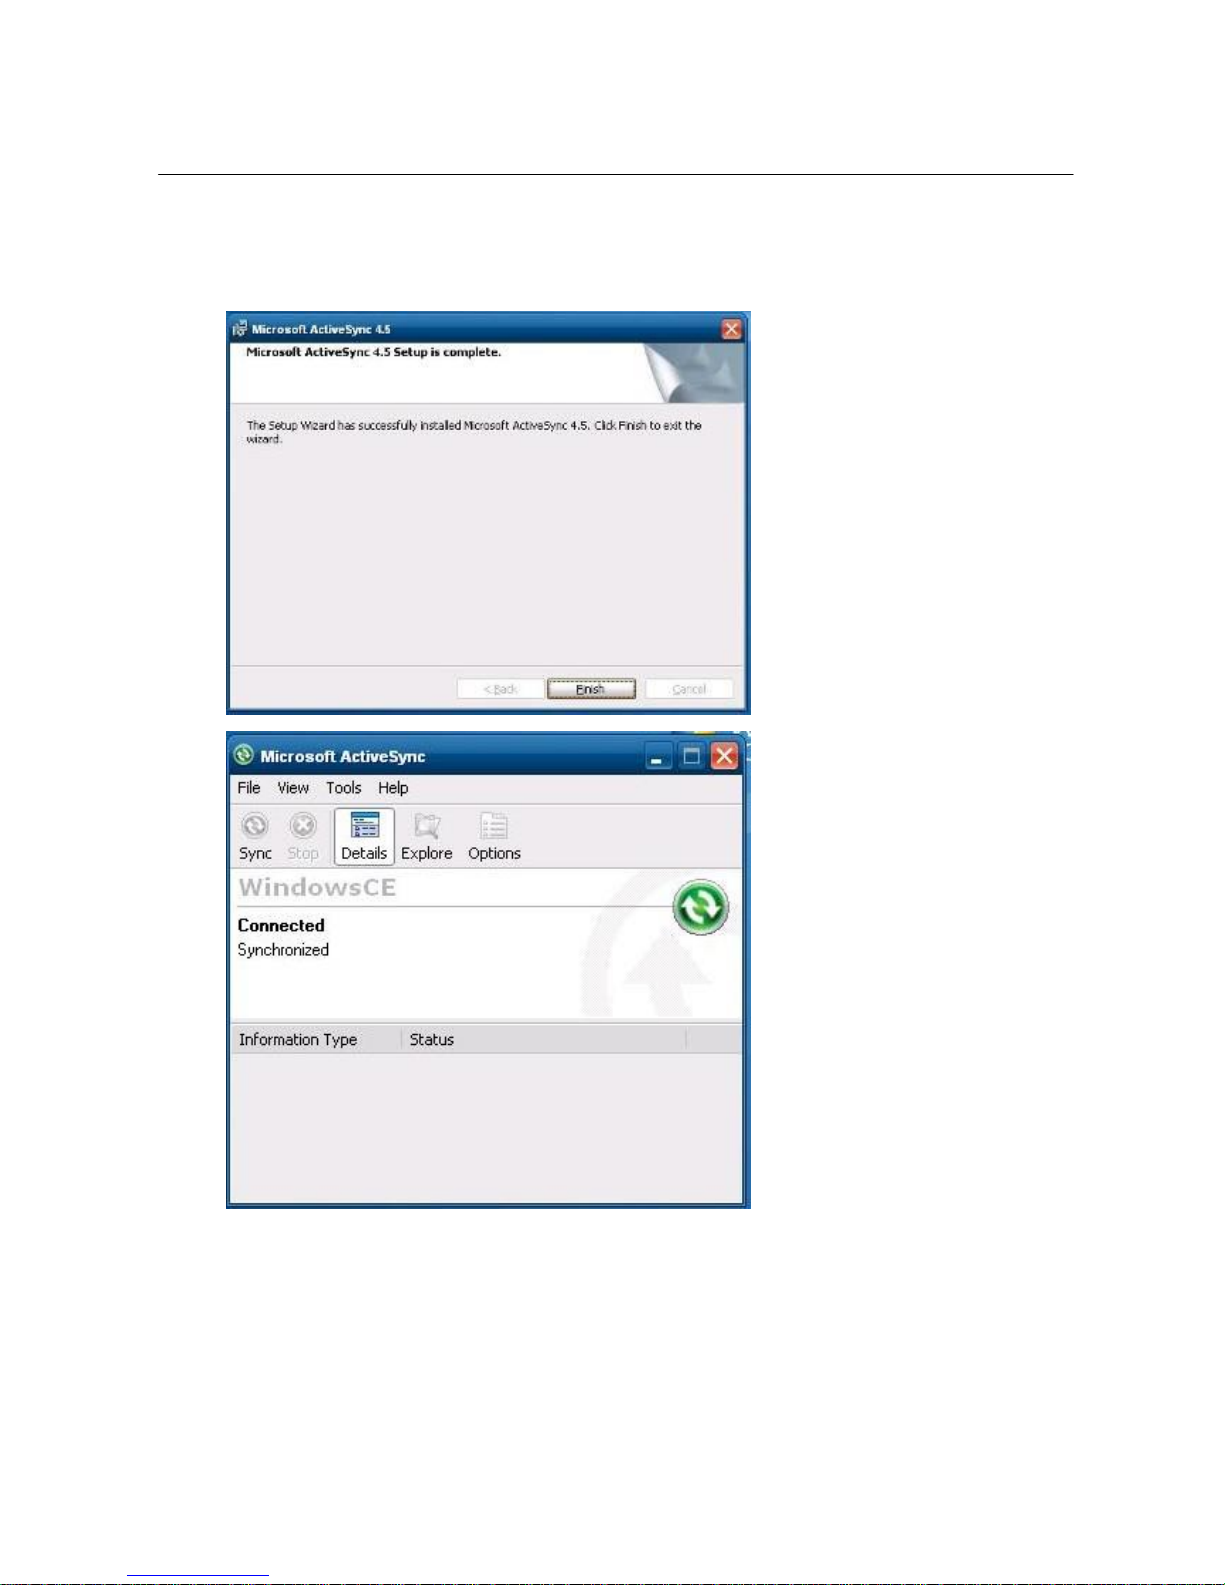
Click “Finish” after the setup is complete.
Page 27
Copyright © Boyen Technology Co. Ltd.
27
6
WiFi
Configure Static IP
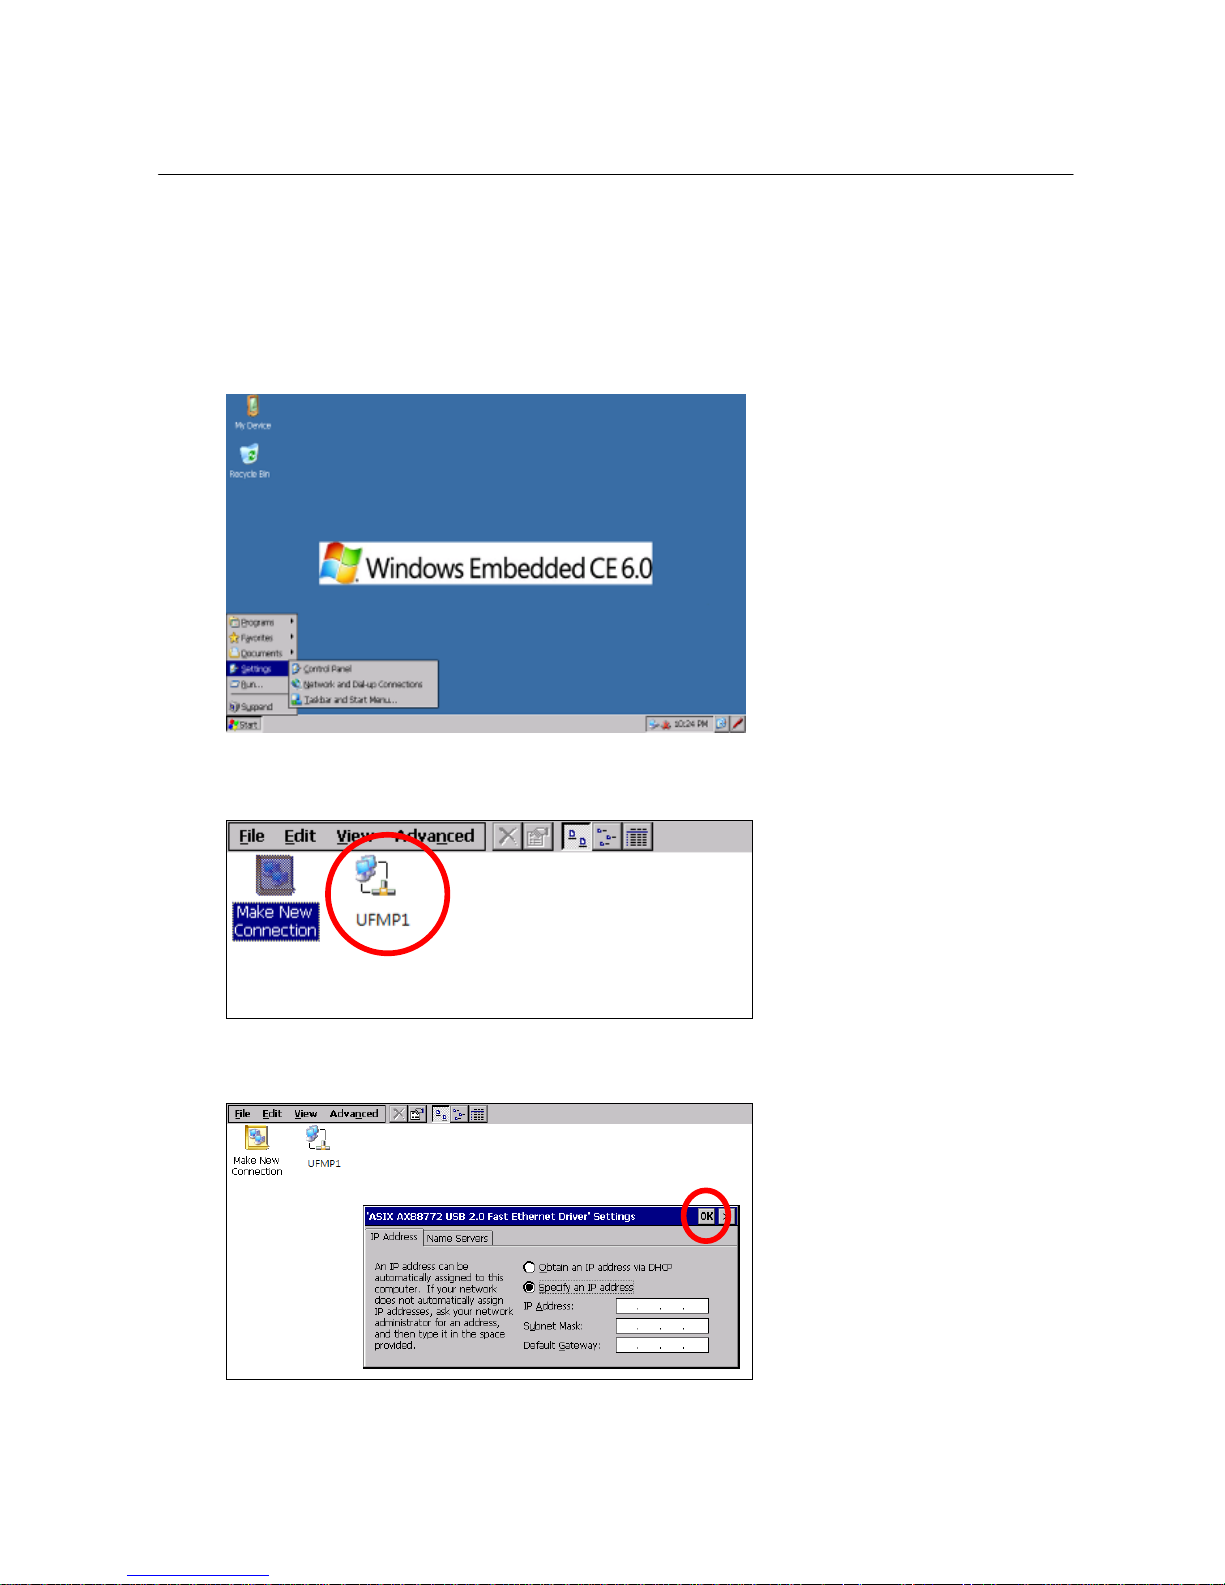
Select “Start” “Settings” “Network and Dial-up Connections”.
Select “UFMP1”
Select “Specify an IP address”
Page 28
Copyright © Boyen Technology Co. Ltd.
28
6
WiFi
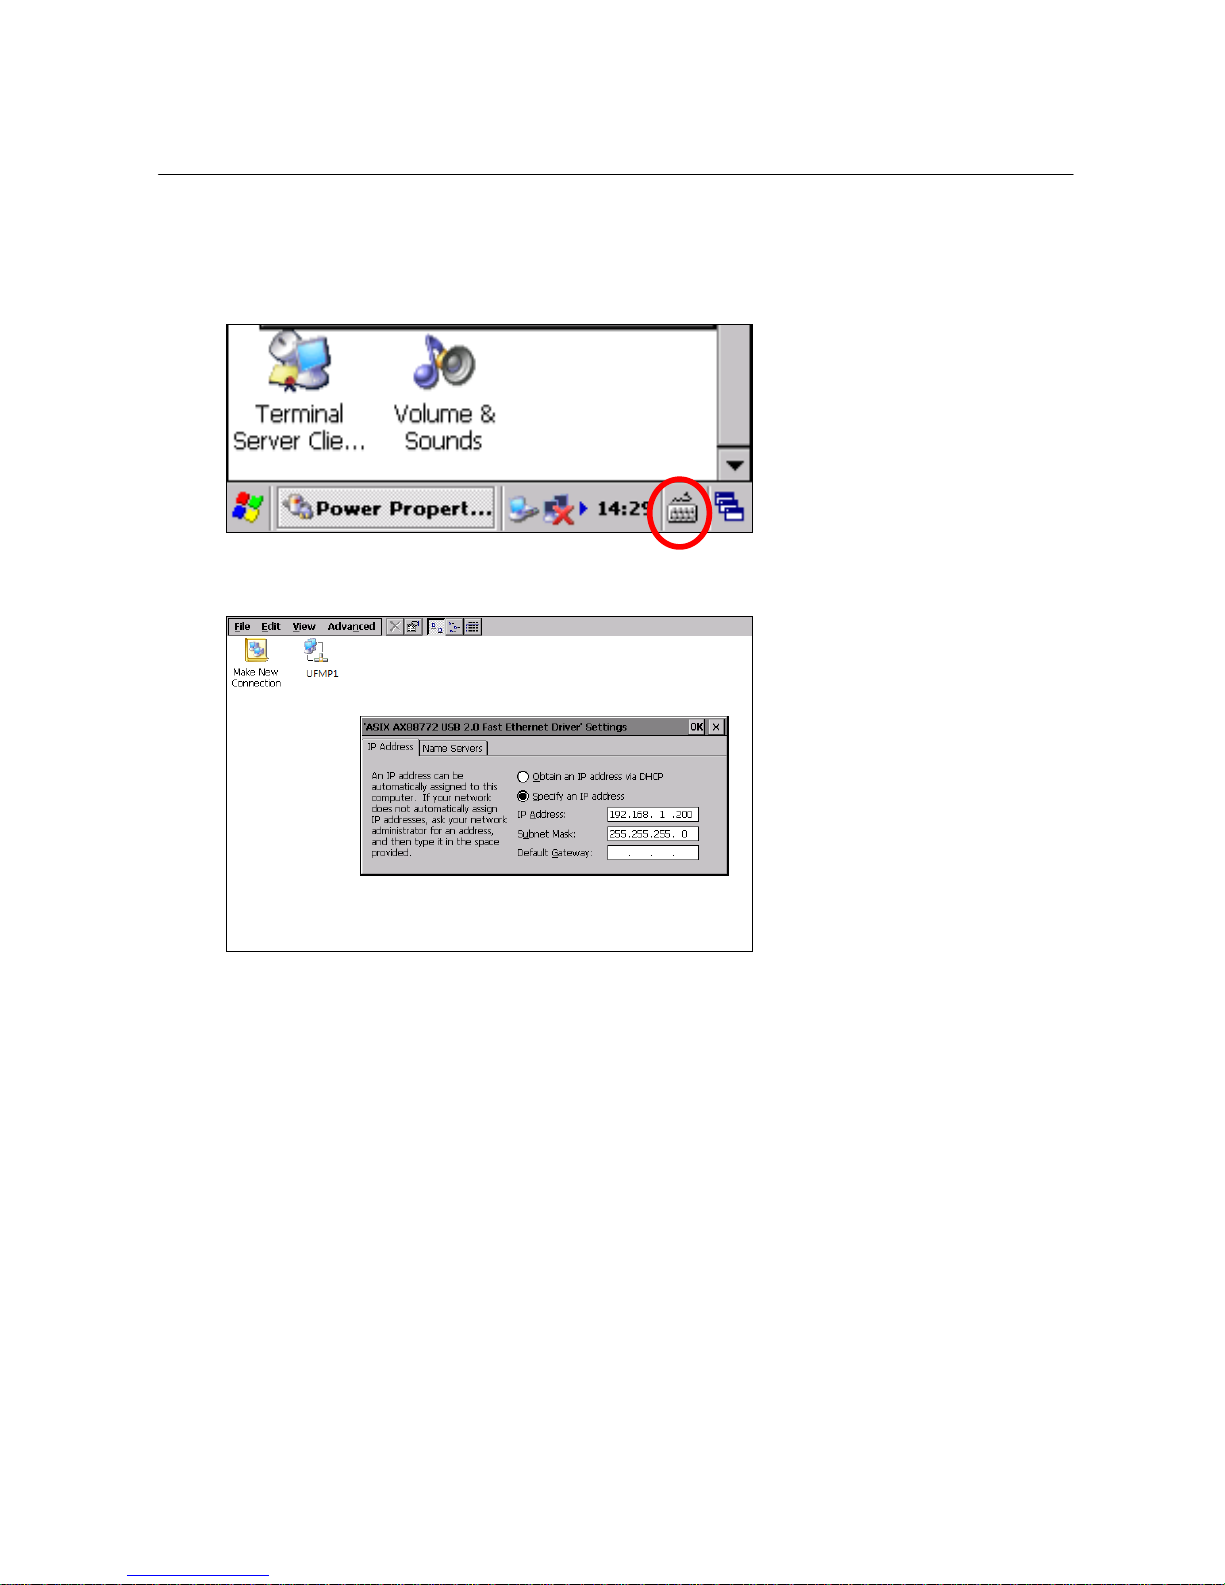
Click on the “keyboard” icon at the bottom of the screen to display the input keyboard.
Enter the IP address and Subnet Mask. Then click “OK”. Static IP setup is complete.
Page 29
Copyright © Boyen Technology Co. Ltd.
29
6
WiFi
Configure SSID
The PDA will not automatically connect to other wireless networks unless the users purposely set the device
to search for others available SSID. Thus, the PDA is locked to the SSID that is configured by users in
default settings.
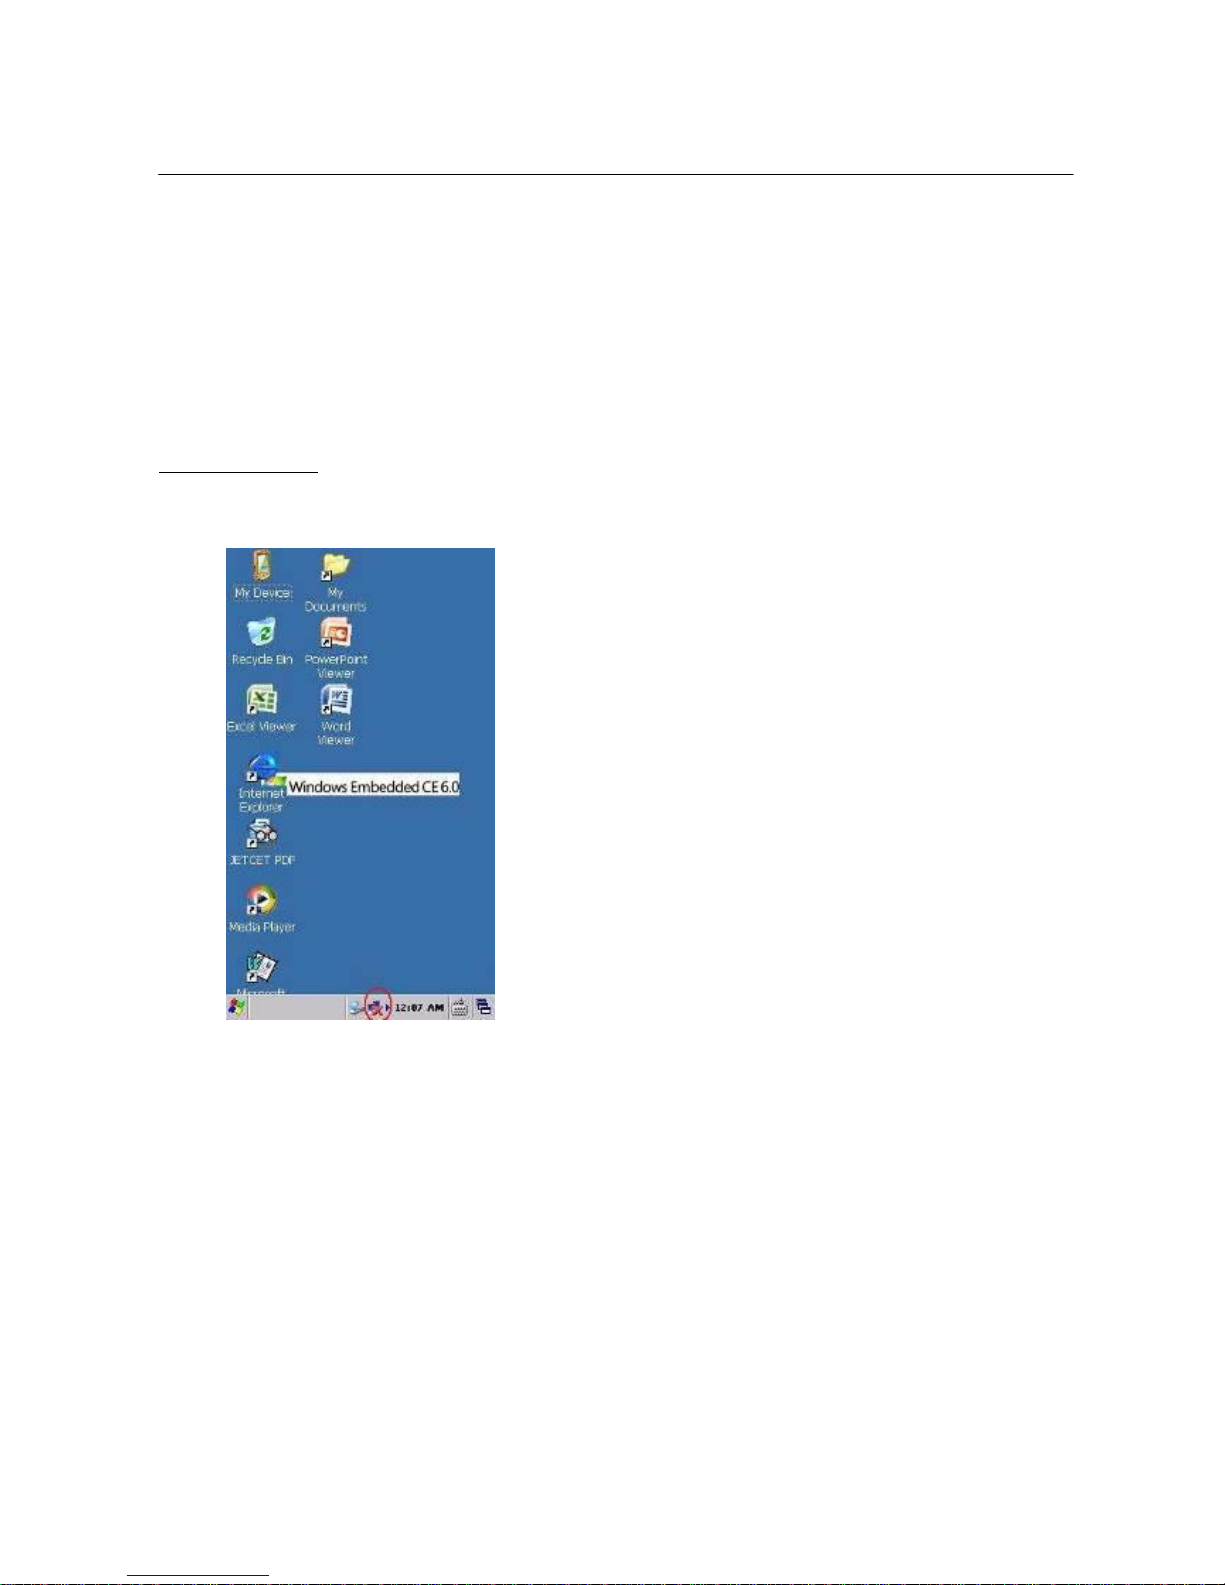
To configure a SSID
Click on the following icon on task bar.
Page 30
Copyright © Boyen Technology Co. Ltd.
30
6
WiFi
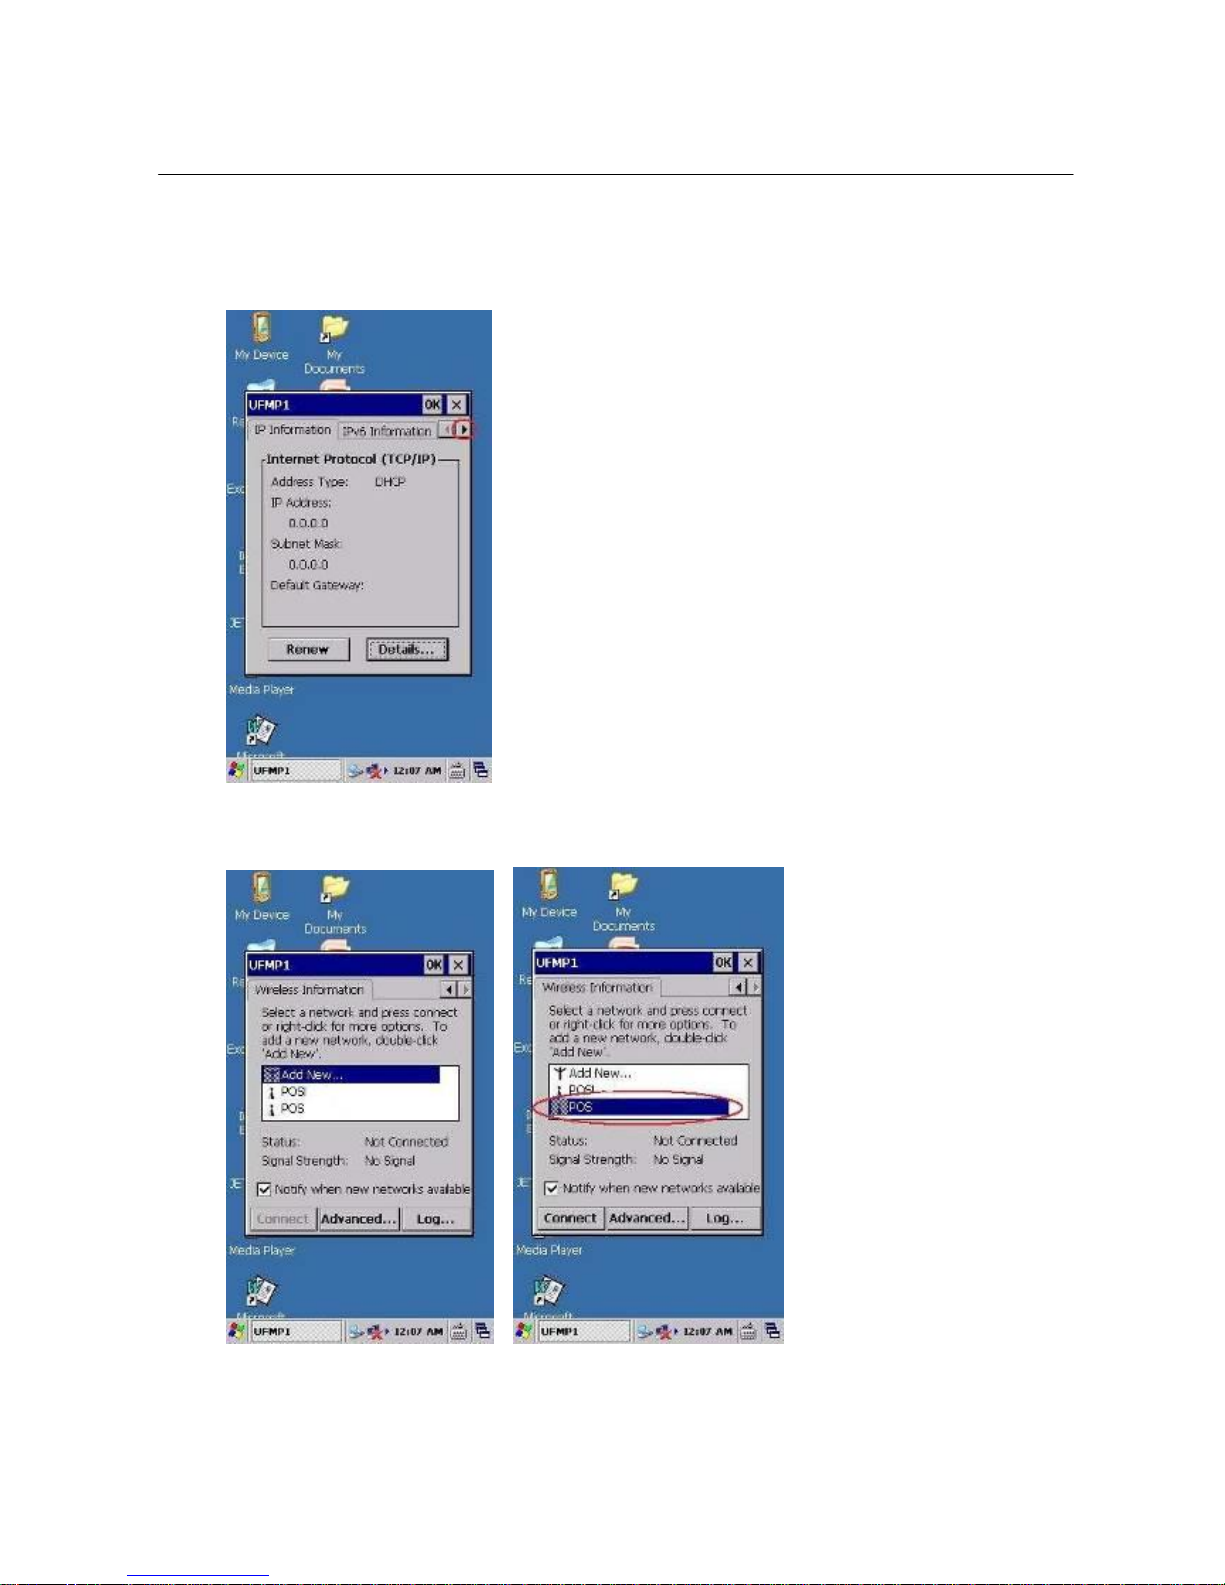
Switch to “Wireless Information” tab.
All the available SSID will be shown on the list. Choose the SSID you would like to connect to.
Page 31
Copyright © Boyen Technology Co. Ltd.
31
6
WiFi
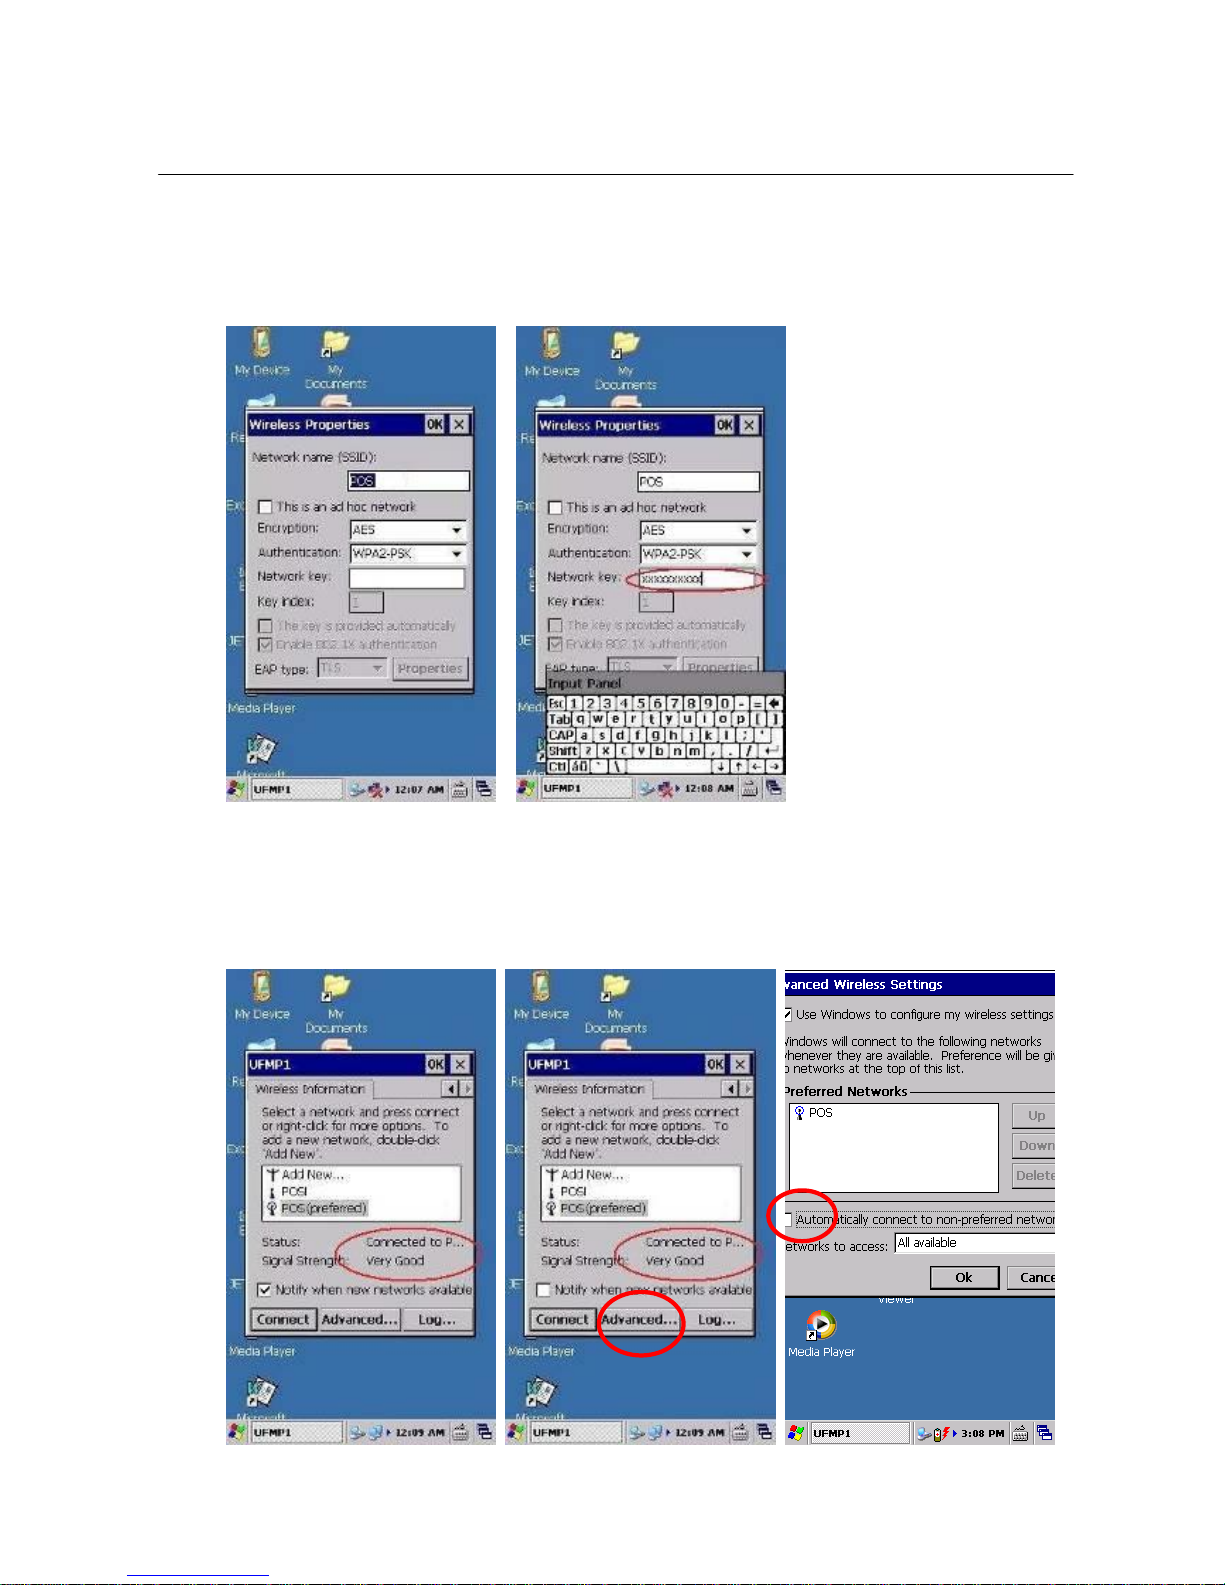
The Wireless Properties window will be displayed. Enter the Network key, then click “OK” on the
top right of the Wireless Properties window.
After all the settings are done correctly, you will see the status “Connected to….”. If you would like
to lock this SSID, please click on “Advanced”, then make sure the checkbox “Automatically connect
to non-preferred network” is not checked.
Page 32
Copyright © Boyen Technology Co. Ltd.
32
6
WiFi
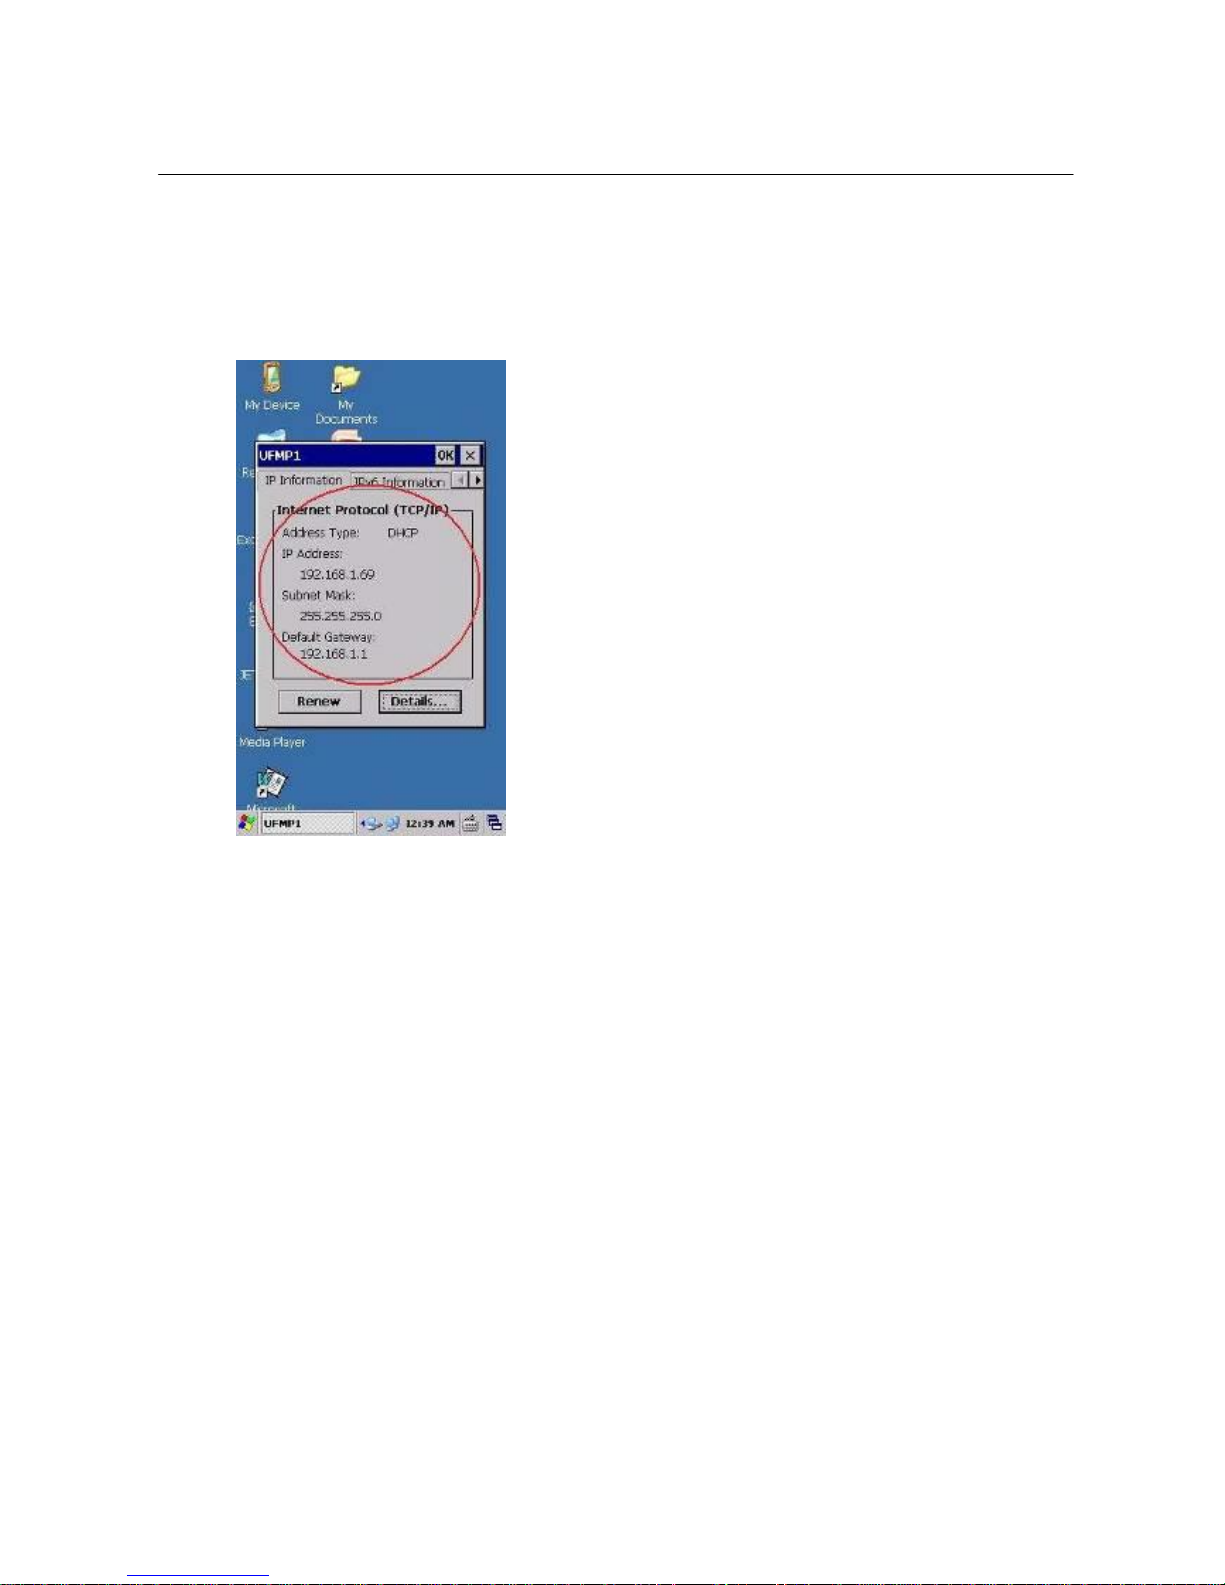
Click on the “IP Information” tab to view the the IP address and other TCP/IP information and make
sure you have setup the correct IP address.
Page 33
Copyright © Boyen Technology Co. Ltd.
33
7
Miscellaneous Configurations
Volume Adjustment
There are two ways to adjust the volume of the device.
1. Method 1:
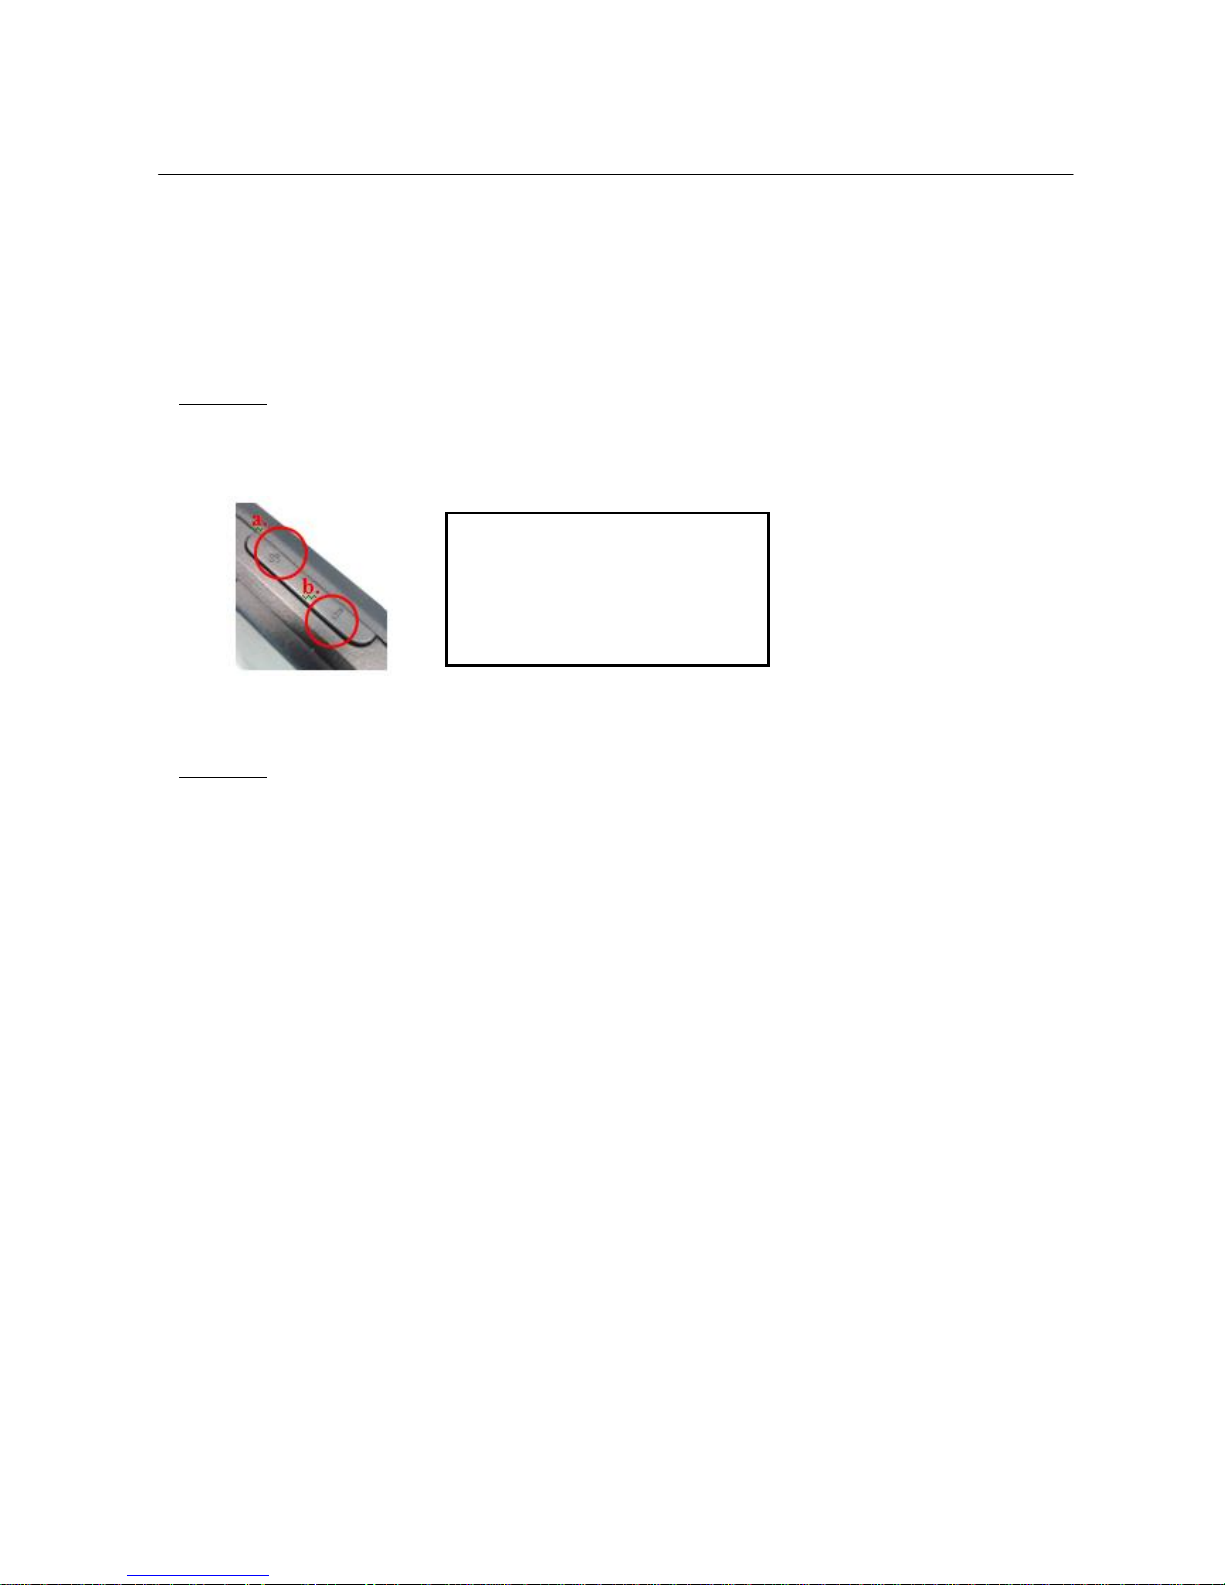
Adjust the volume key on the upper left hand side of the device. The volume level bar will appear
on the screen during volume adjustments.
2. Method 2:
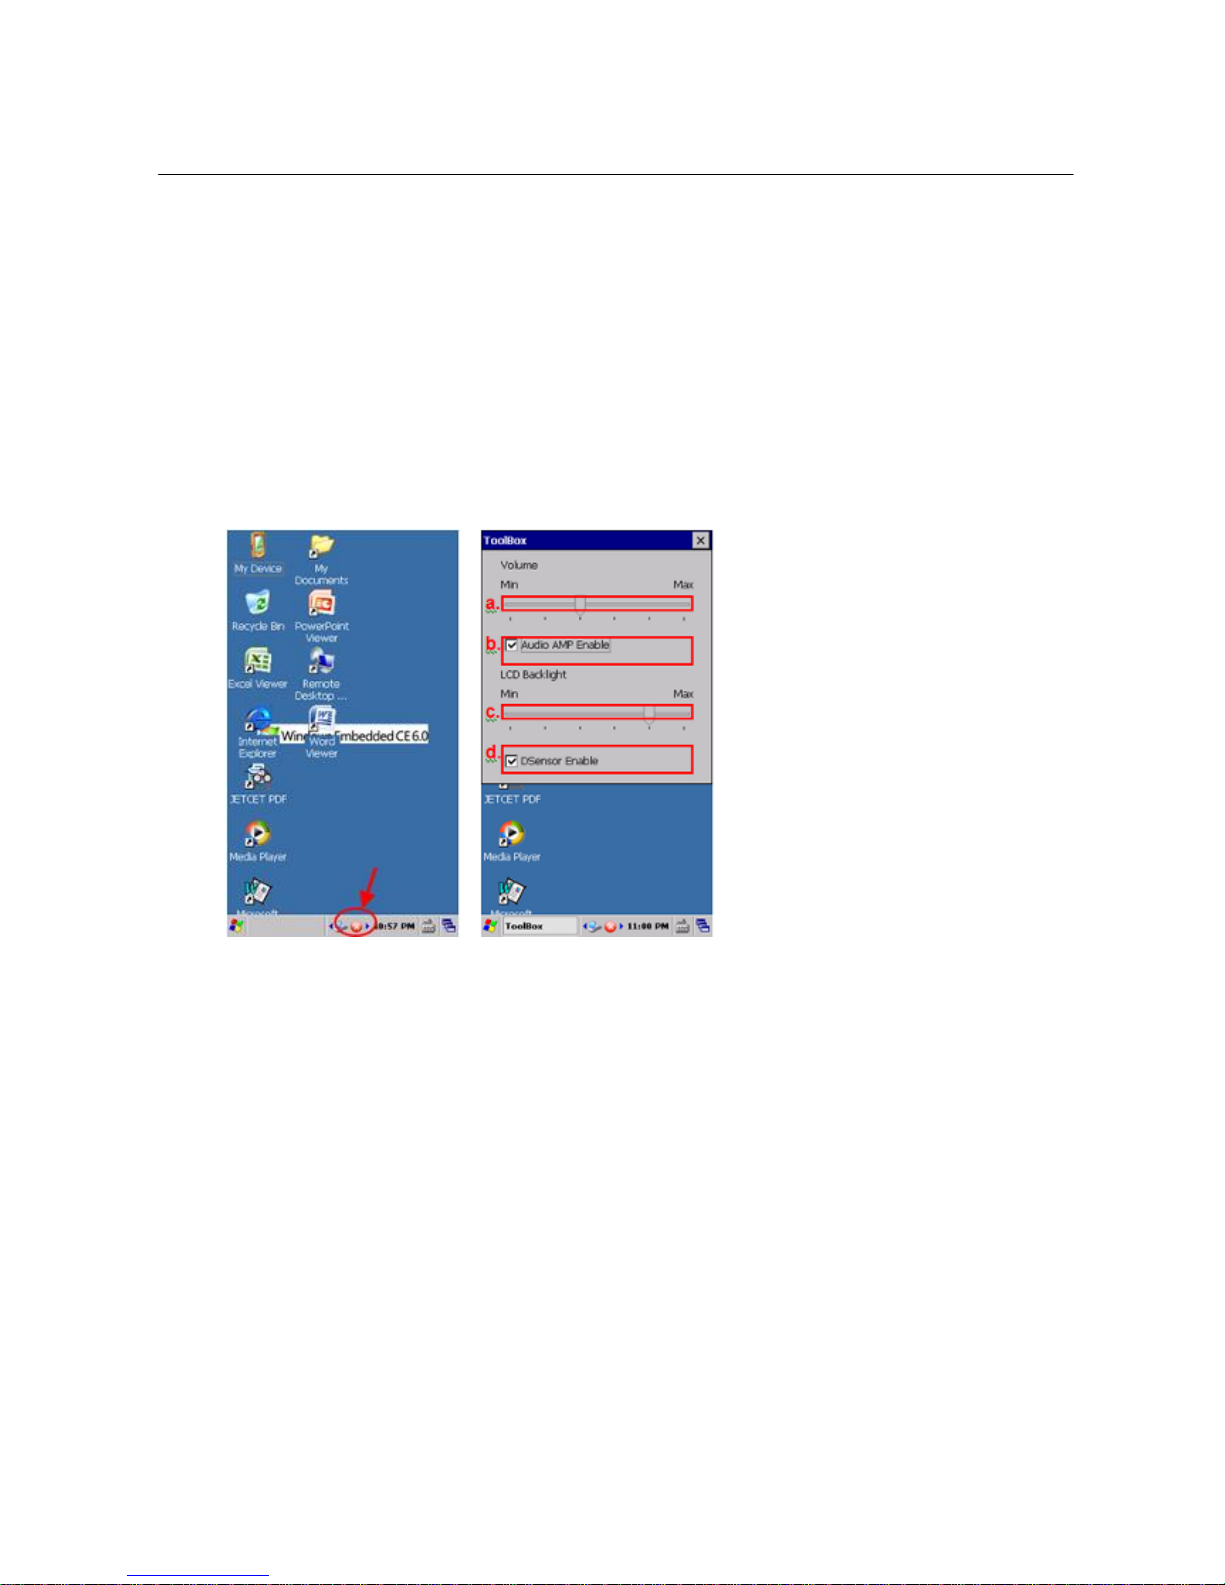
Click on the “System Toolbox” icon at the bottom of the screen. (Pic 1)
Adjust the “Volume” bar. (Pic 2-a)
Click Tone
Click on the “System Toolbox” icon at the bottom of the screen. (Pic 1)
Uncheck the “Audio AMP Enable” checkbox. (Pic 2-b)
Backlight
Click on the “System Toolbox” icon at the bottom of the screen. (Pic 1)
Adjust the “LCD Backlight” bar. (Pic 2-c)
Volume buttons
a. Volume up
b. Volume down
Page 34
Copyright © Boyen Technology Co. Ltd.
34
7
Miscellaneous Configurations
Screen Rotation
The screen will automatically rotate to the same direction as you rotate the PDA. You may turn off the
screen rotation function by performing the following steps.
Click on the “System Toolbox” icon at the bottom of the screen. (PIC 1)
Uncheck the “Sensor Enable” checkbox. (PIC 2-d)
<PIC 1>
<PIC 2>
Page 35
Copyright © Boyen Technology Co. Ltd.
35
8
Administrator & User Mode
Introduction
Mobi-POS offers two operation modes, which are administrator mode and user mode. The user mode is
to prevent users to modify the PDA settings like system settings, programs shortcuts, etc. On the other
hand, the administrator mode gives administrators full access to all settings in control panels, as well as
capability in configuring system settings, creating shortcuts to desktops, and installing/un-installing
programs, firmware and driver to the PDA. This mode is typically used for initial stage of setup and
ongoing maintenance.
The major restrictions in user mode:
System settings change
Application shortcuts
Program, driver, firmware installation/un-installation
Device access to files and local databases
Active Sync Connections
The PDA in user mode:
Page 36
Copyright © Boyen Technology Co. Ltd.
36
8
Administrator & User Mode
Change Administrator’s Password
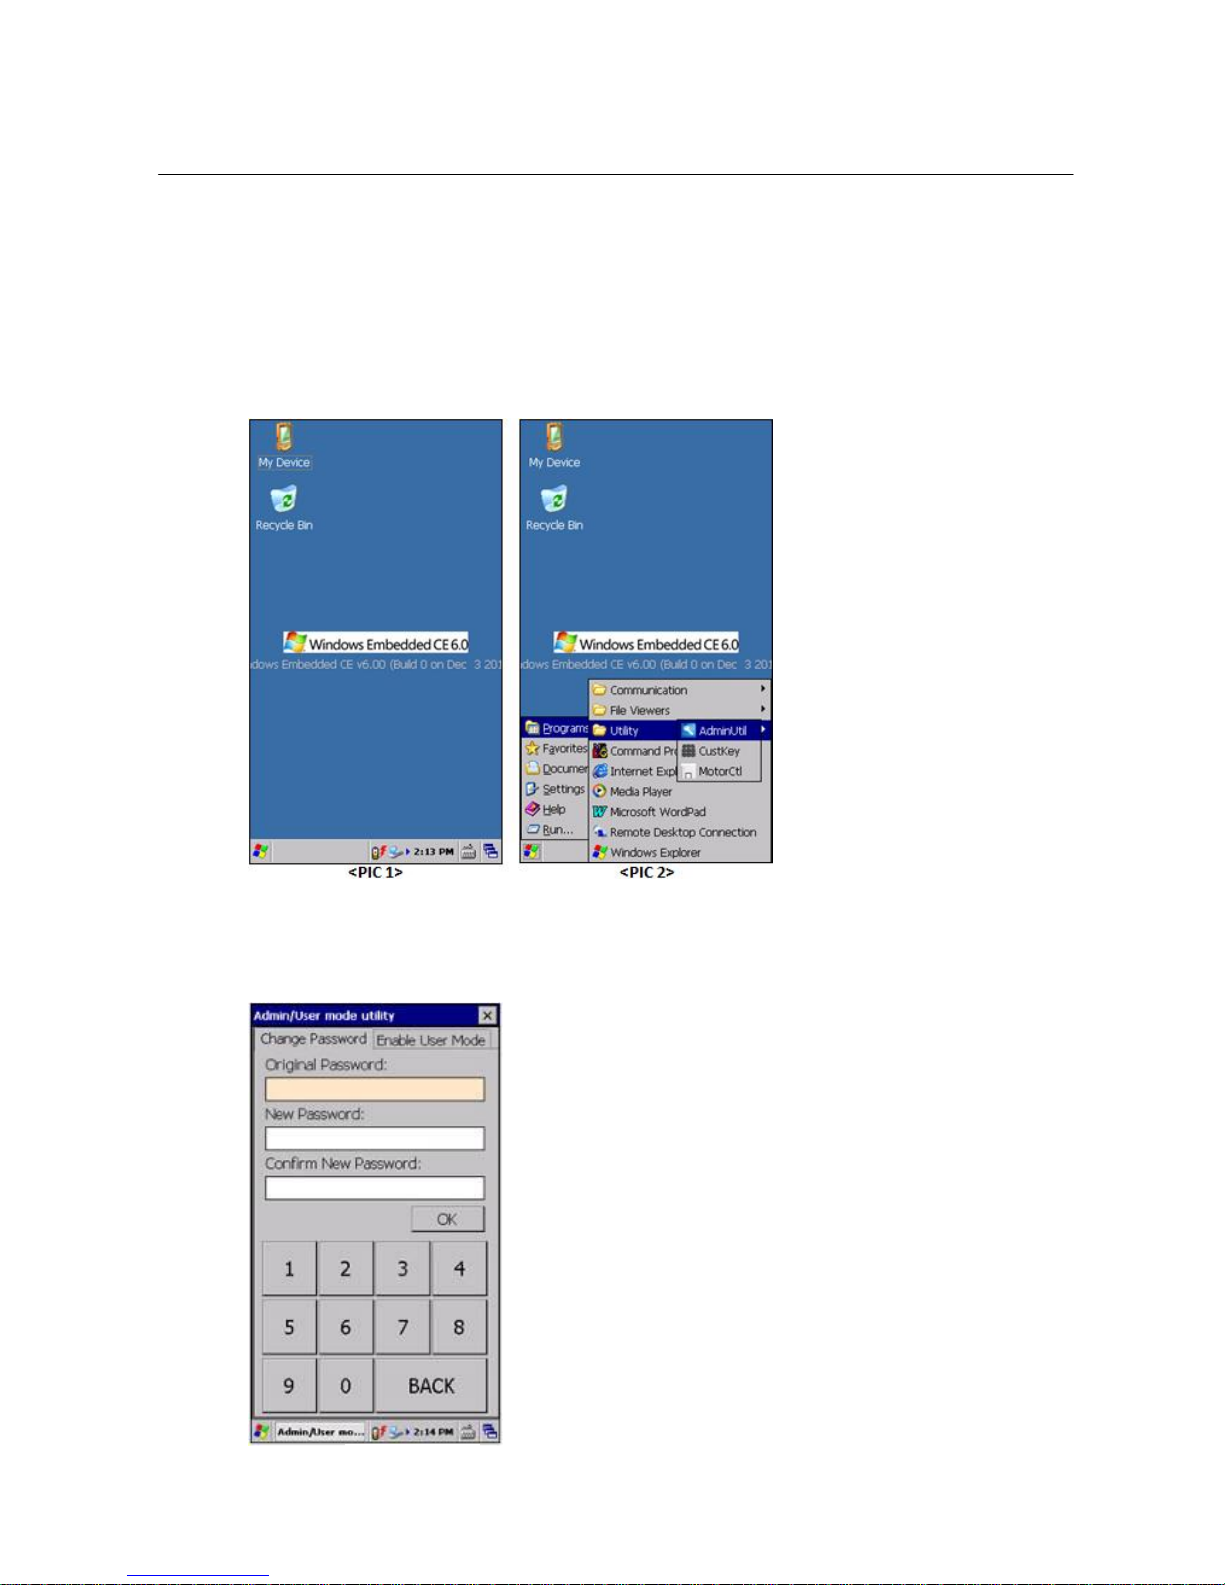
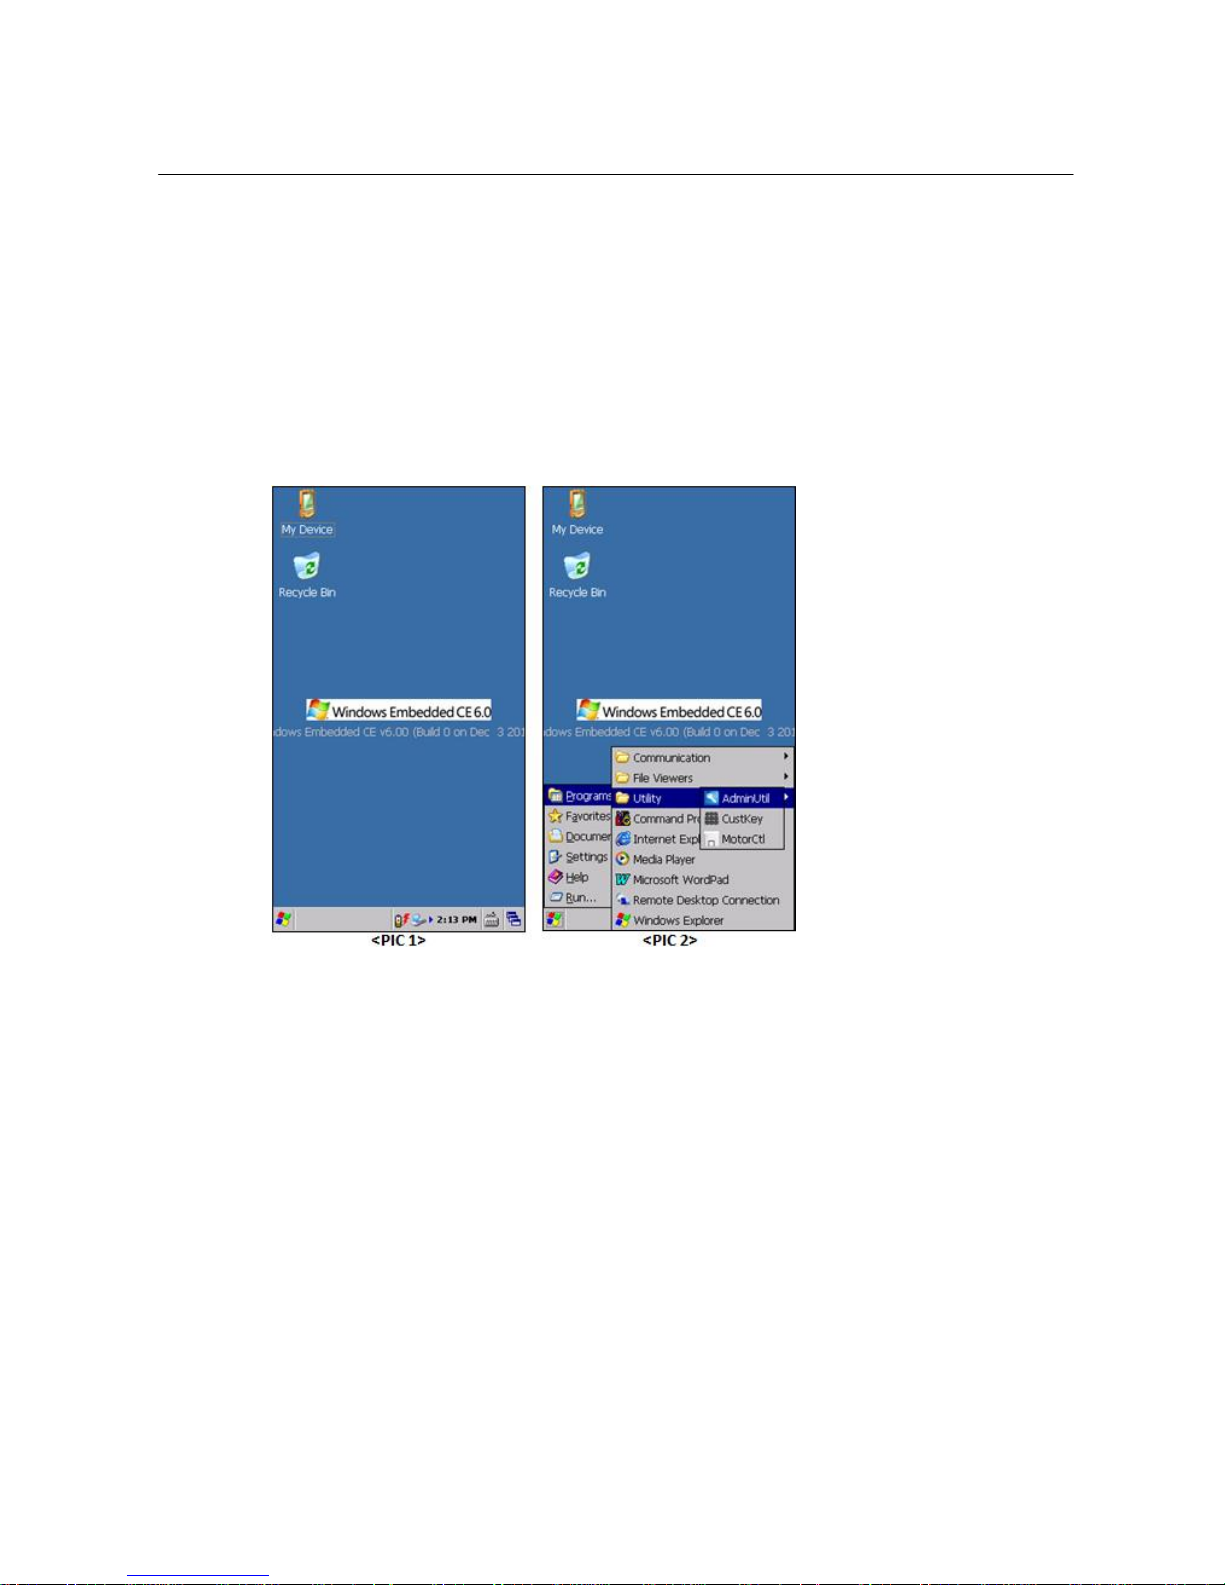
Click on “Windows” icon <PIC1>
Select “Programs” → “Utlity” → “AdminUtil” <PIC2>
On the “Admin/User mode Utility” screen, enter the original password (default password is
123456) and the new password then click “OK” <PIC3>
<PIC3>
Page 37
Copyright © Boyen Technology Co. Ltd.
37
8
Administrator & User Mode
Switch to User Mode
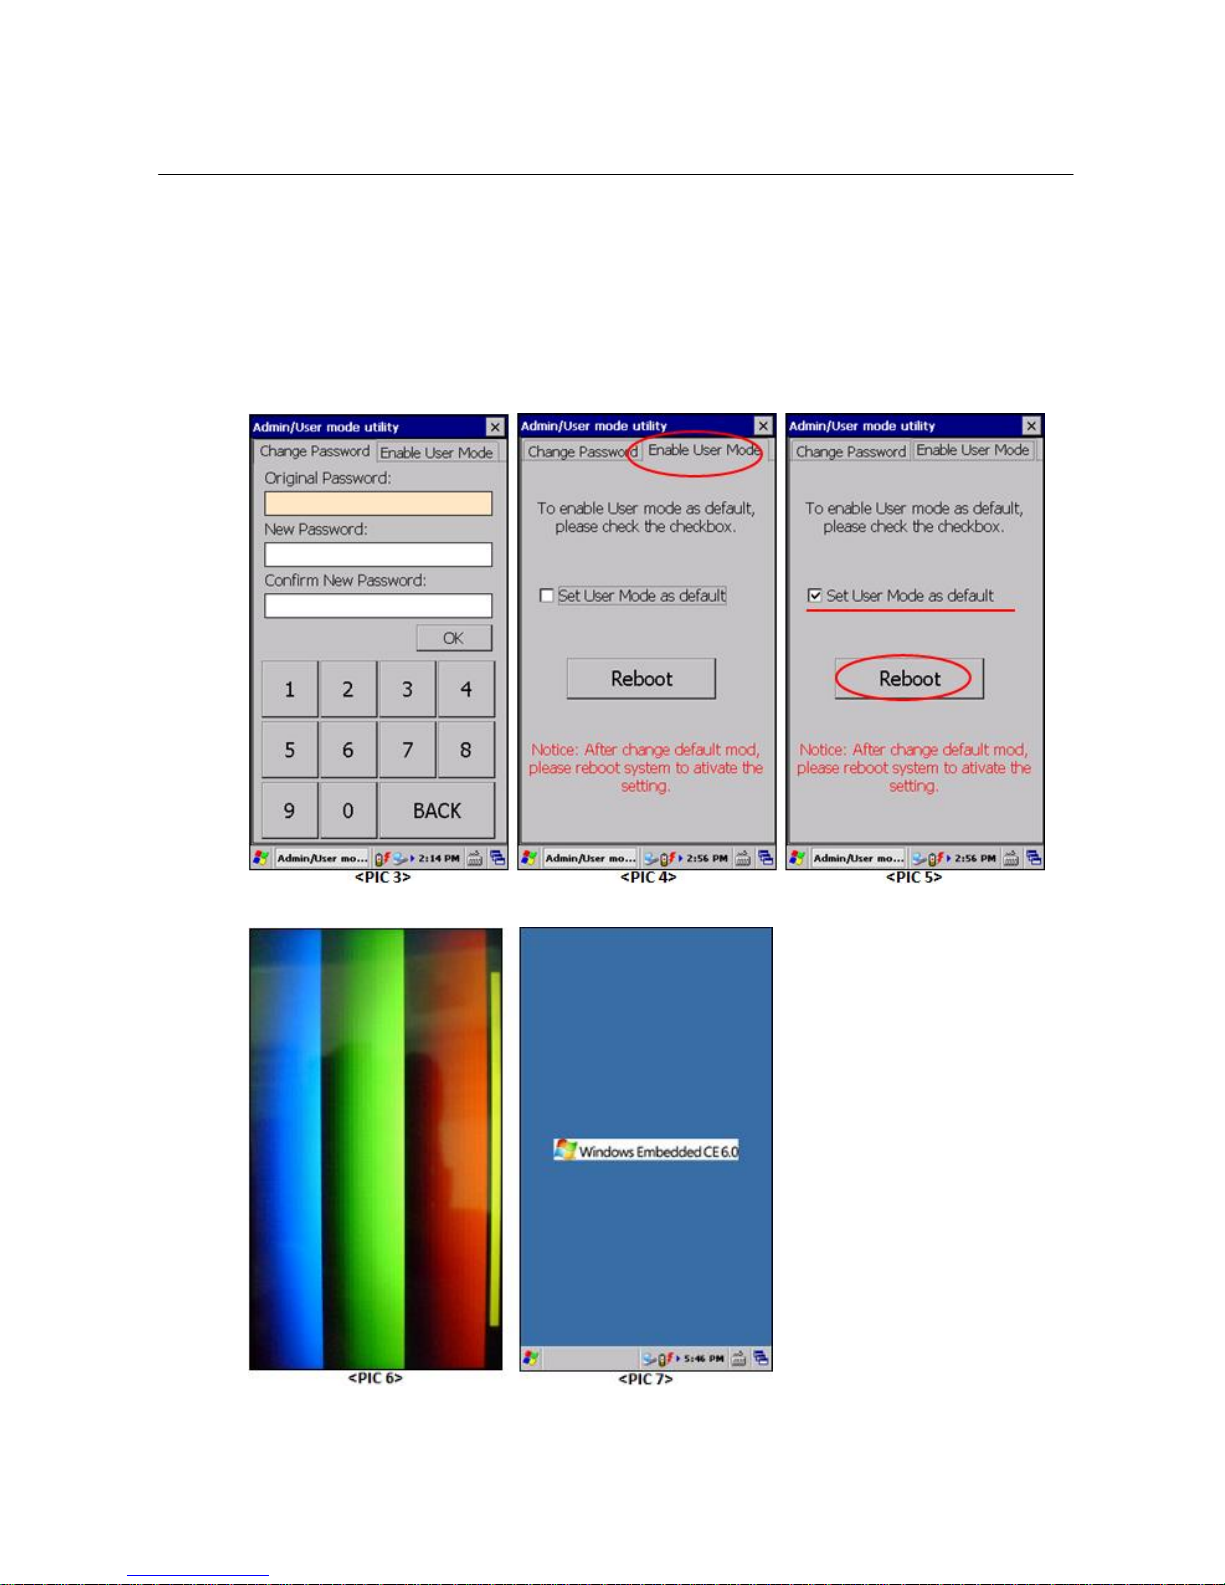
Mobi-POS is pre-configured to run as Administrator mode. To change the default to user mode:
Click on “Windows” icon <PIC1>
Select “Programs” → “Utlity” → “AdminUtil” <PIC2>
Page 38
Copyright © Boyen Technology Co. Ltd.
38
8
Administrator & User Mode
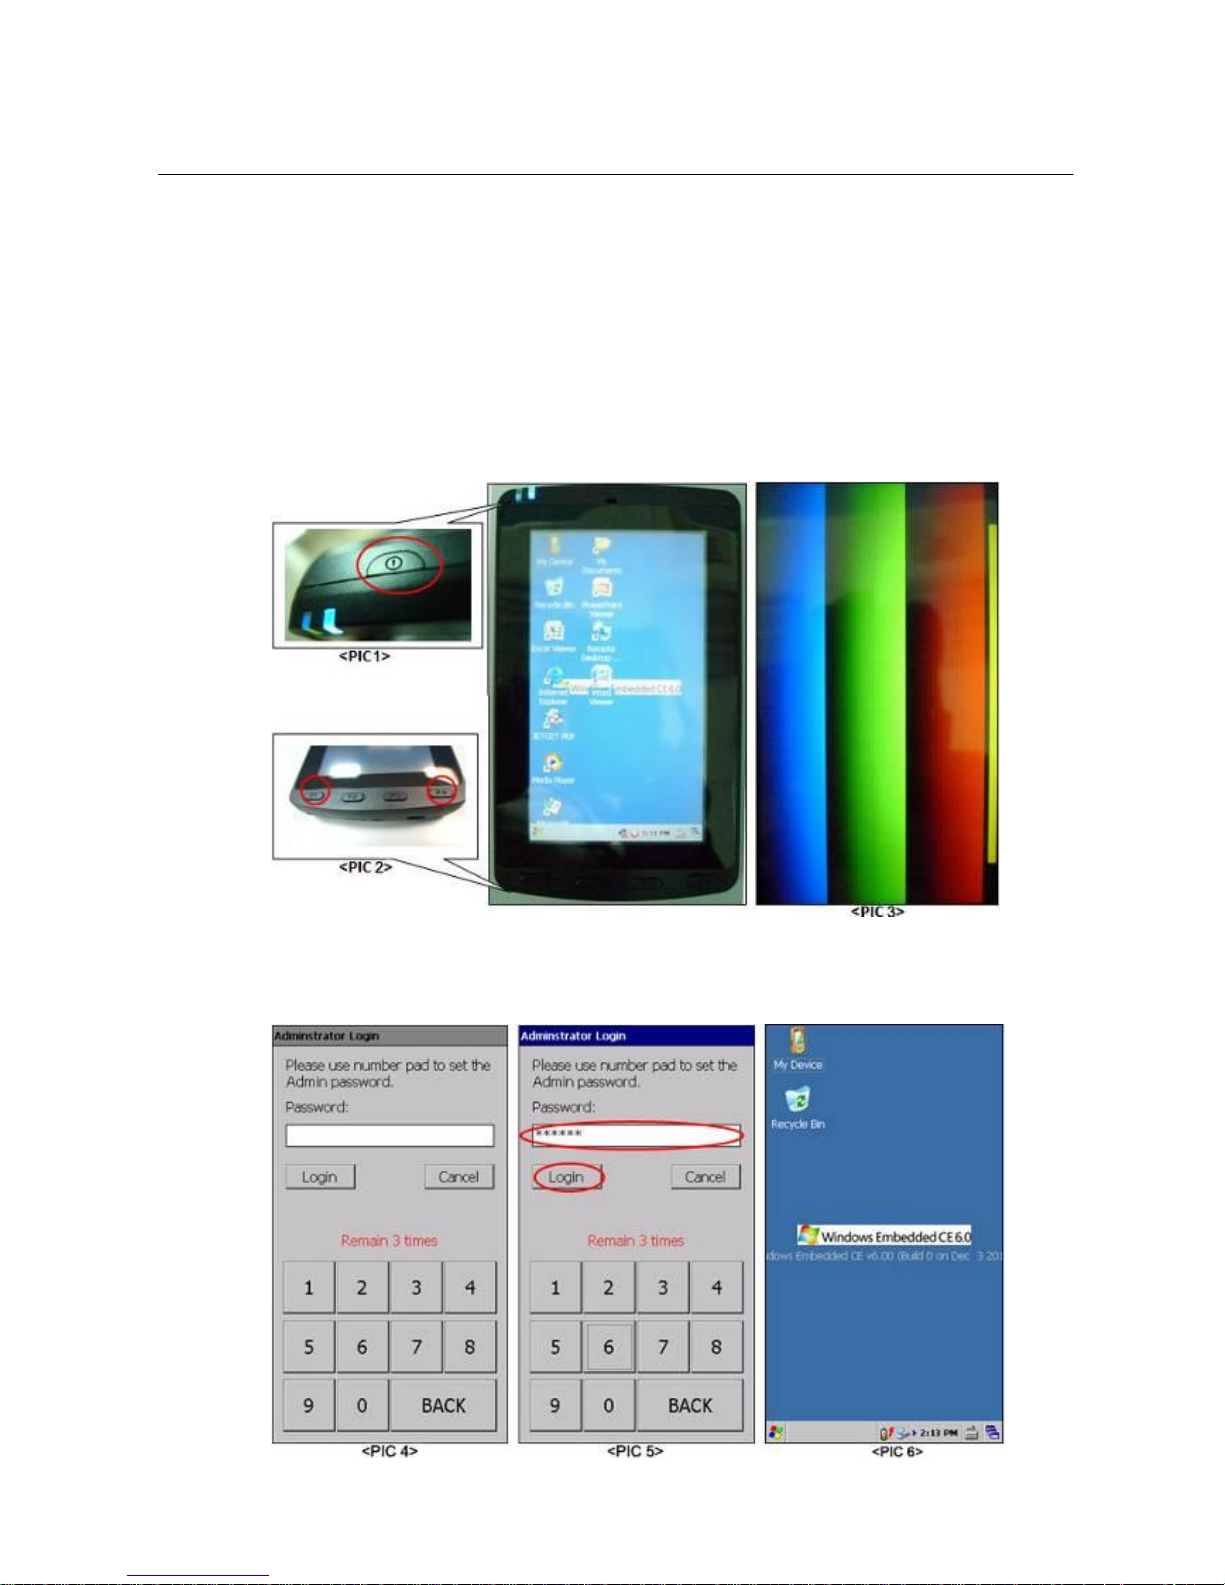
On the “Admin/User mode Utility” screen <PIC3>, click on the “Enable User Mode” Tab <PIC4>
Check on the “Set User Mode as default” checkbox. <PIC5>
Click “Reboot” <PIC5>
After the PDA reboot, you will see the PDA in user mode <PIC7>
Page 39
Copyright © Boyen Technology Co. Ltd.
39
8
Administrator & User Mode
Switch to Administrator Mode
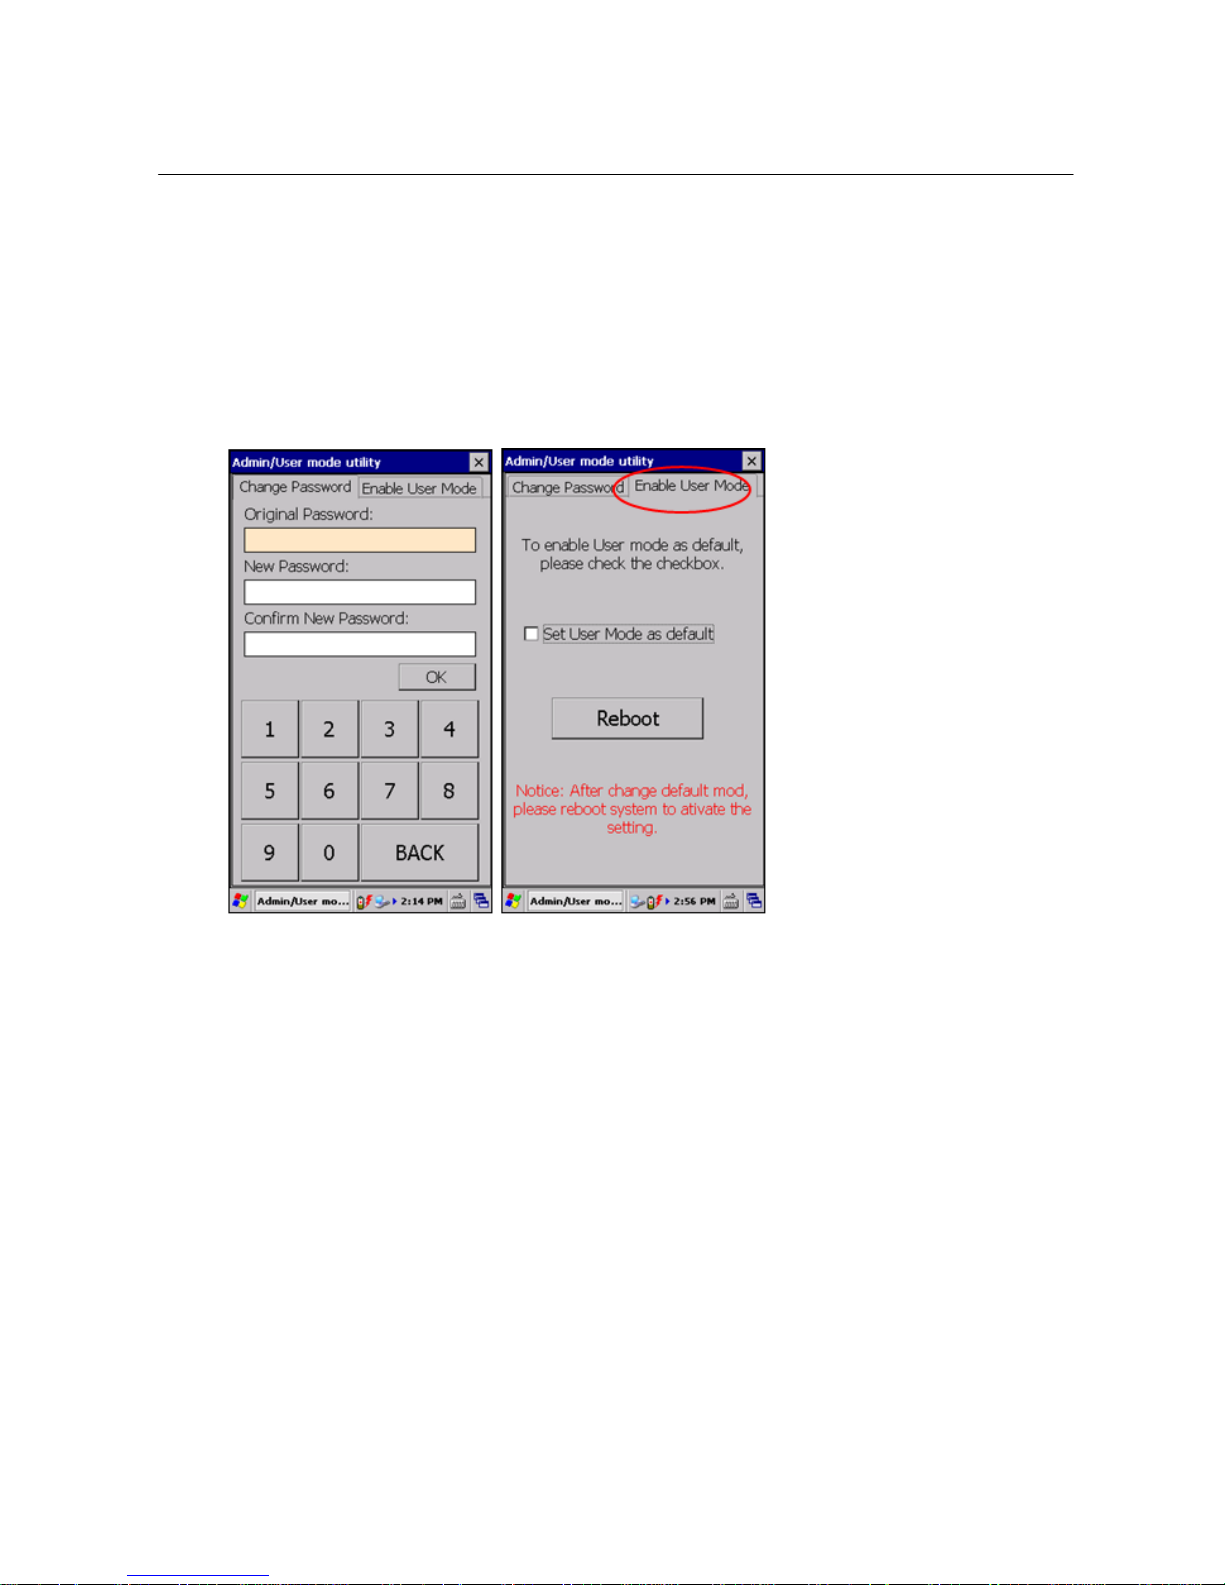
To set the PDA to Administrator Mode:
Press on the “Power button” until you see the color screen <PIC1, PIC3>
When you are on the color screen, press “F1” and “F4” buttons until you see the
“Administrator Login” screen <PIC2, PIC4>
Enter your password then click “Login”. The default password is “123456” <PIC4~5>
You will be in the Admin Mode <PIC6>
Page 40
Copyright © Boyen Technology Co. Ltd.
40
8
Administrator & User Mode
REMAKRS:
Please note that after you restart the Mobi-POS, you will be back to the User Mode.
If you would like to set the default to Admin mode, please refer to the instructions on “Switch to User
Mode” <pg37>. In the Admin/User mode utility, uncheck the “Set User Mode as default”, then click
“Reboot”.
Customize User Mode
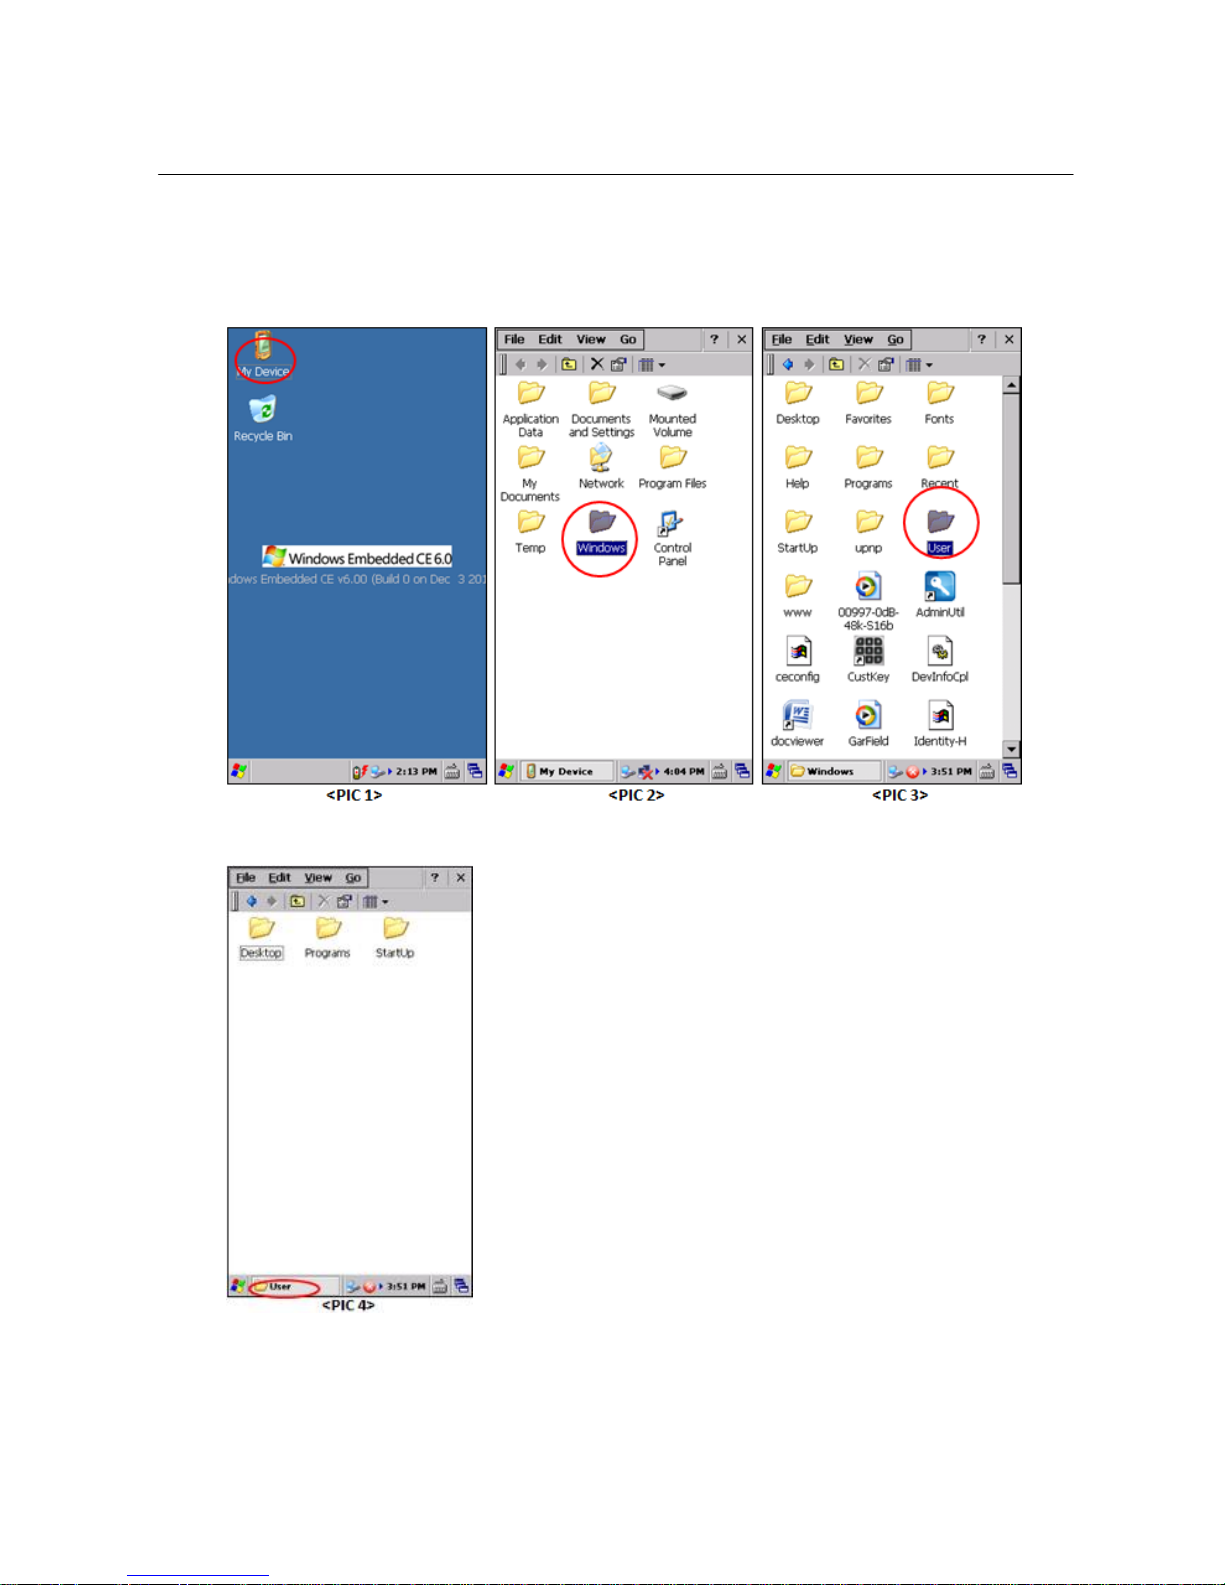
To customize the displays and applications in user mode, go to the directory of the user’s folder while you
are in Admin mode.
Directory of the User Folder
Click on “My Device” <PIC1>
Open the “Windows” folder <PIC2>
Open the “User” folder <PIC3>
You will see three folders “Desktop”, “Programs”, “Startup” <PIC4>. Copy and paste any
programs or shortcuts to each directory that you would like to displays when the PDA is in user
mode.
Page 41
Copyright © Boyen Technology Co. Ltd.
41
8
Administrator & User Mode
 Loading...