

Page 1

DW-15 (V2)
Page 2

1.0 Introduction
Thank you for choosing the BOMBFROG DW-15 (V2) watch. This
watch contains major functions as below:
Current time, alarm, chronograph, timer, pacer, dual time;
Pedometer, calorie counter, sport mileage;
Weather forecast, thermometer, altimeter, barometer,
compass;
Detailed specification please see attached appendix.
In order to operate and perform the watch well, please follow the
below instructions:
Read the instruction carefully and keep it well before usage;
Avoid using the watch in extreme conditions;
Do not disassemble the watch yourself;
Clean the watch with one soft cloth, do not use the organic
solvent;
Keep the watch away from the magnet or magnetic objects;
Keep the watch in one dry place when not in use.
Page 3
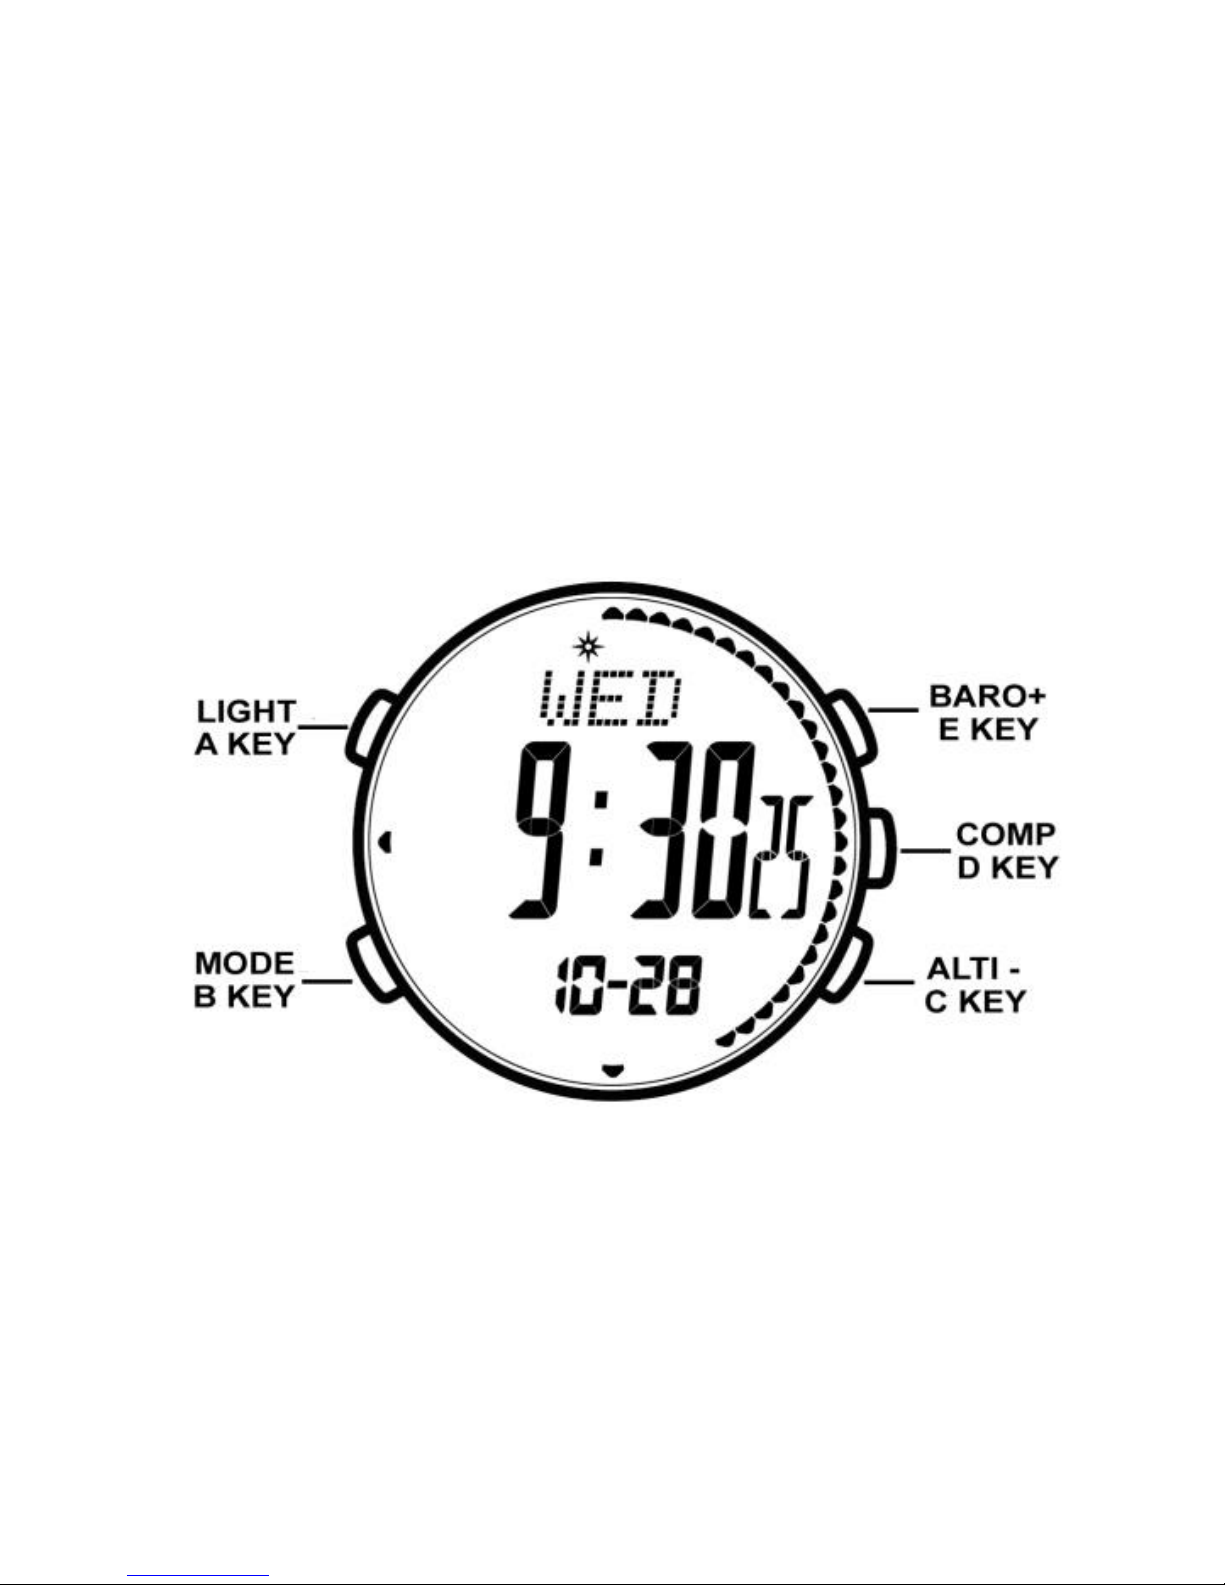
2.0 Button Introduction
LIGHT(A):switch on EL back light for 3 seconds/zero-clear/delete data;
MODE(B):function convert/press and hold will start setting;
Page 4
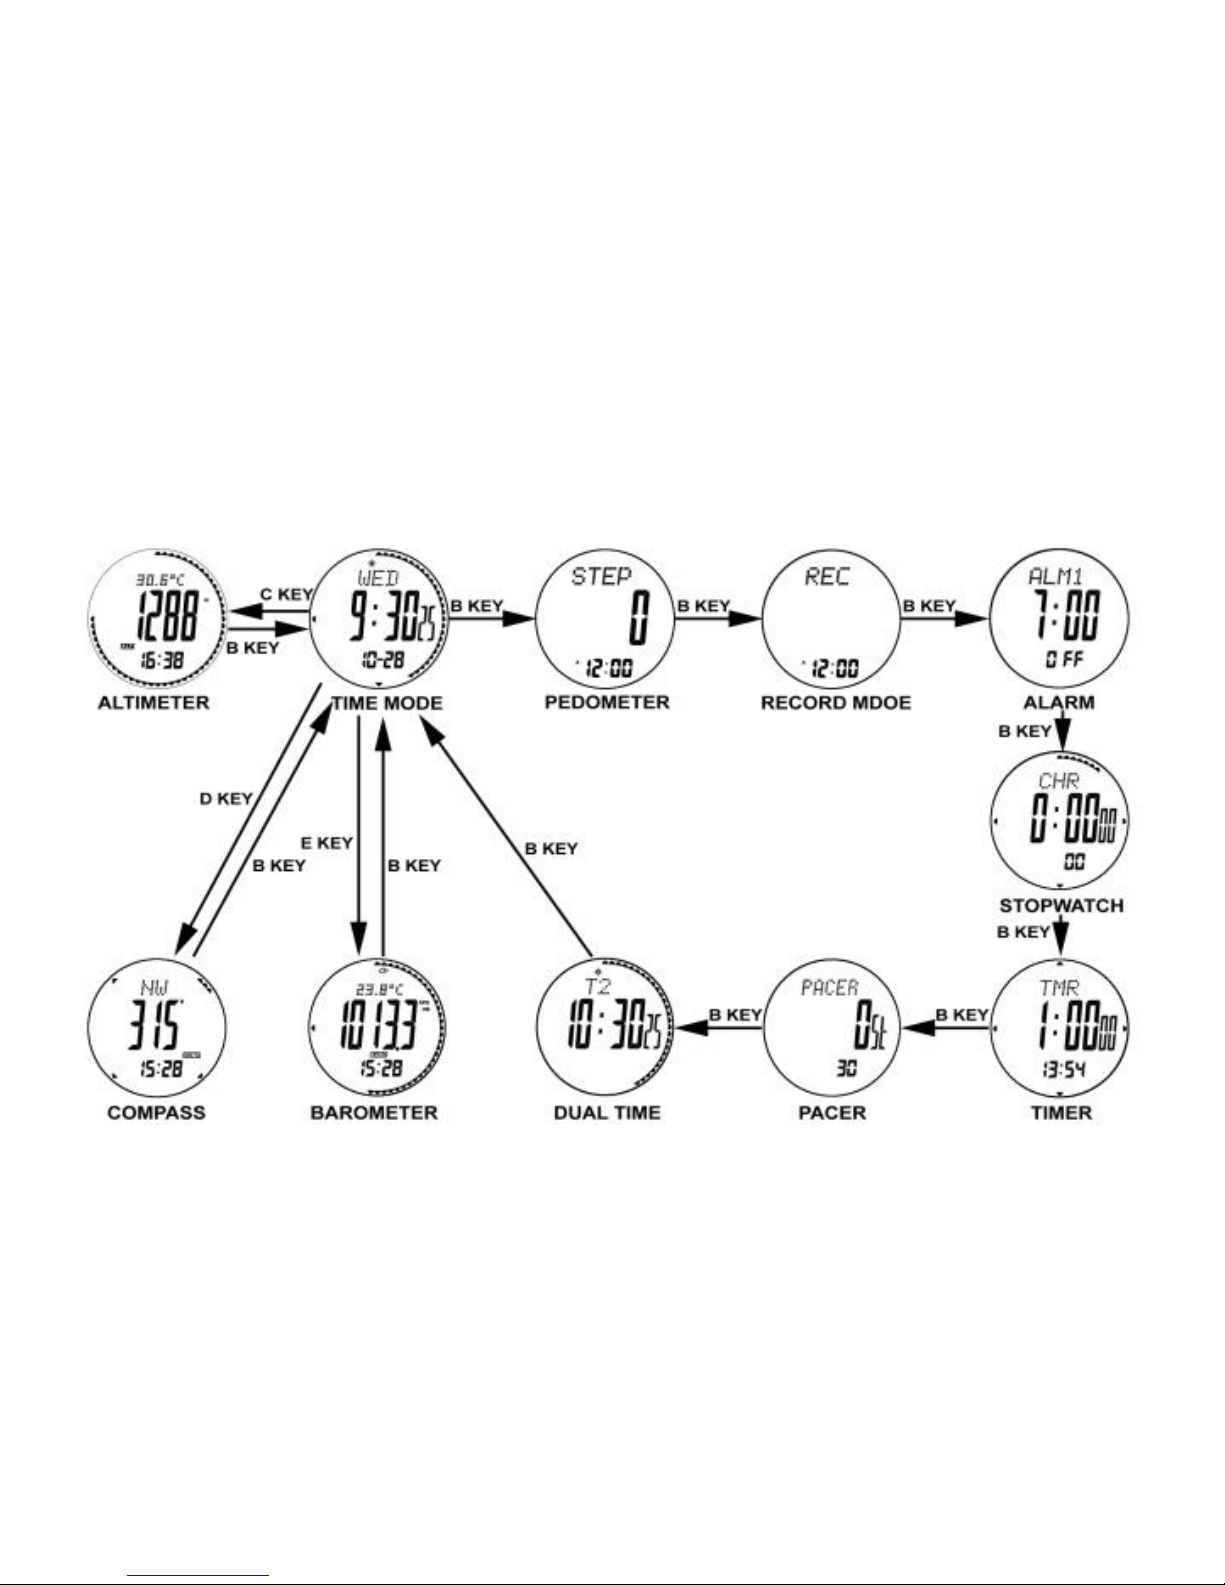
ALTI-(C):altimeter mode/decrease;
COMP(D):compass mode;
BARO+(E):barometer mode/increase.
3.0 Function Diagram
Page 5
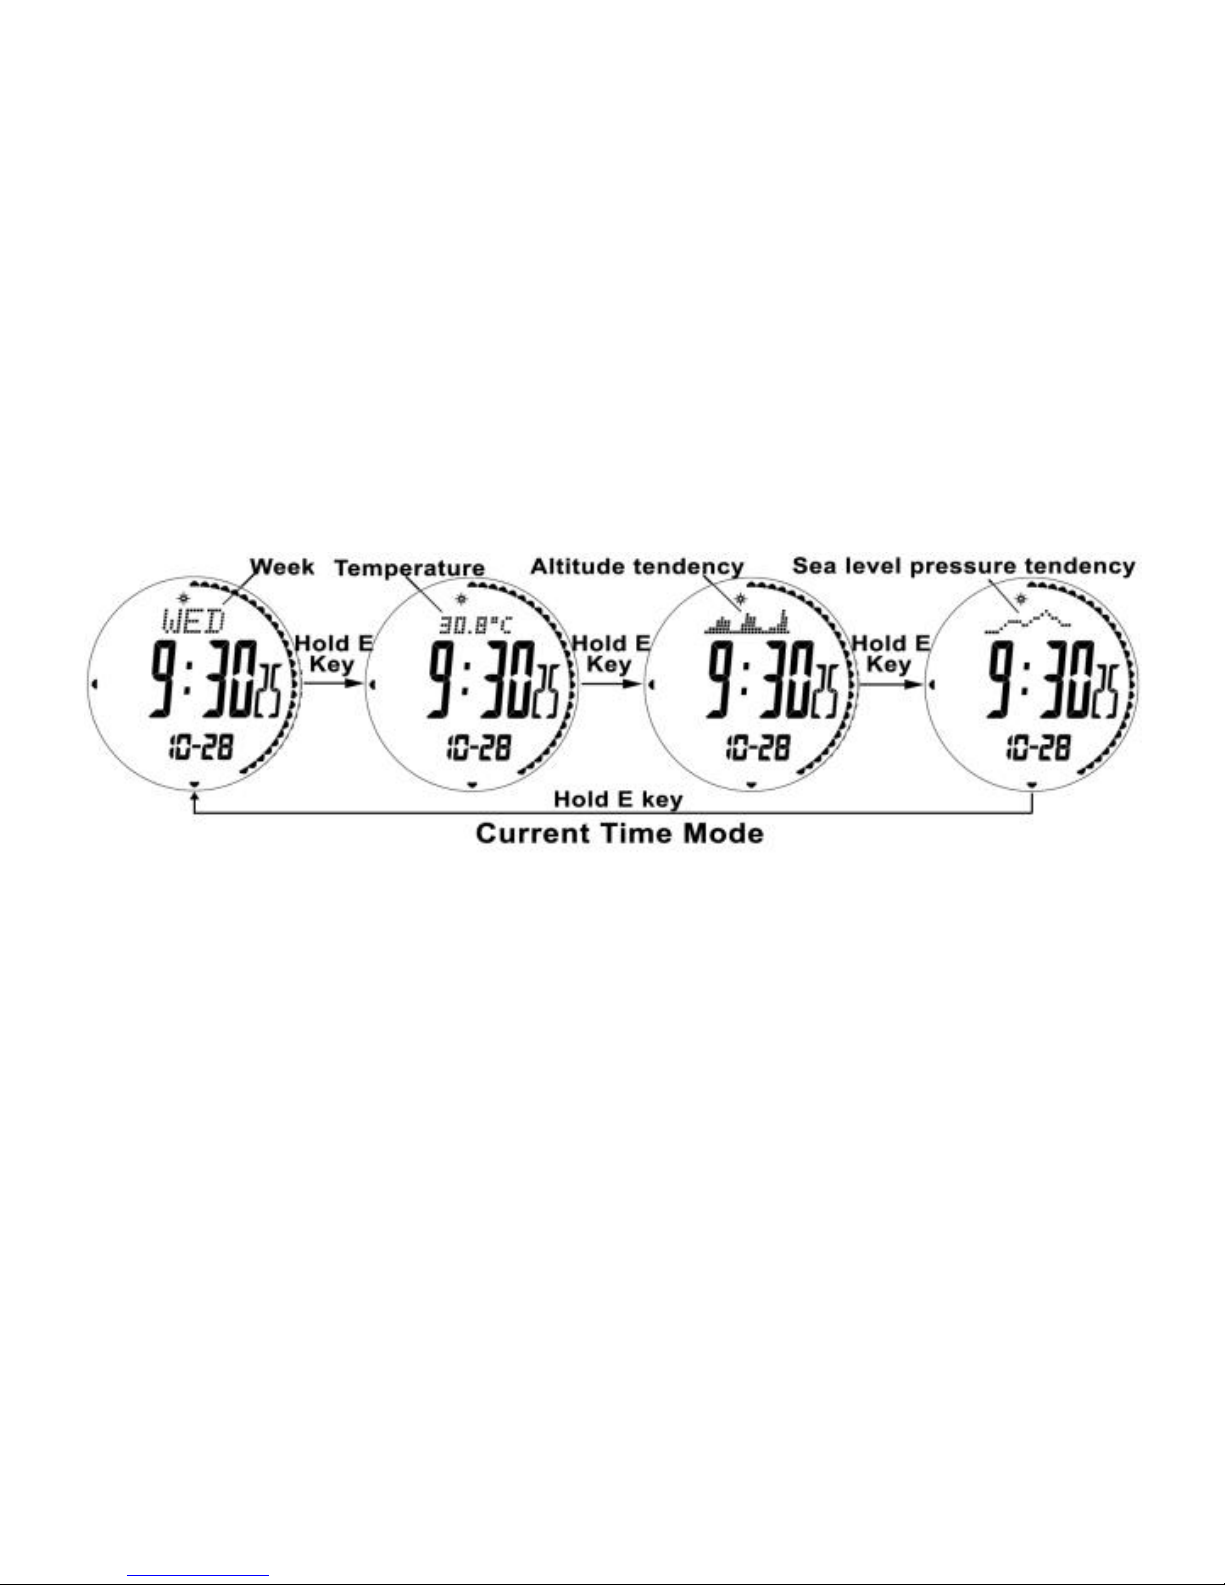
4.0 Current Time Mode—Function Display
Function Display
Top: weather forecast and press E button for 2 seconds will convert
the following 4 functions,
Weekday
Temperature
Altitude tendency chart
Sea level air pressure tendency chart
Medium: time
Page 6
Bottom: date
NOTE: If you want to achieve one accurate atmosphere temperature,
you need to take the watch down for 20-30 minutes, in order to
eliminate the influence of body temperature.
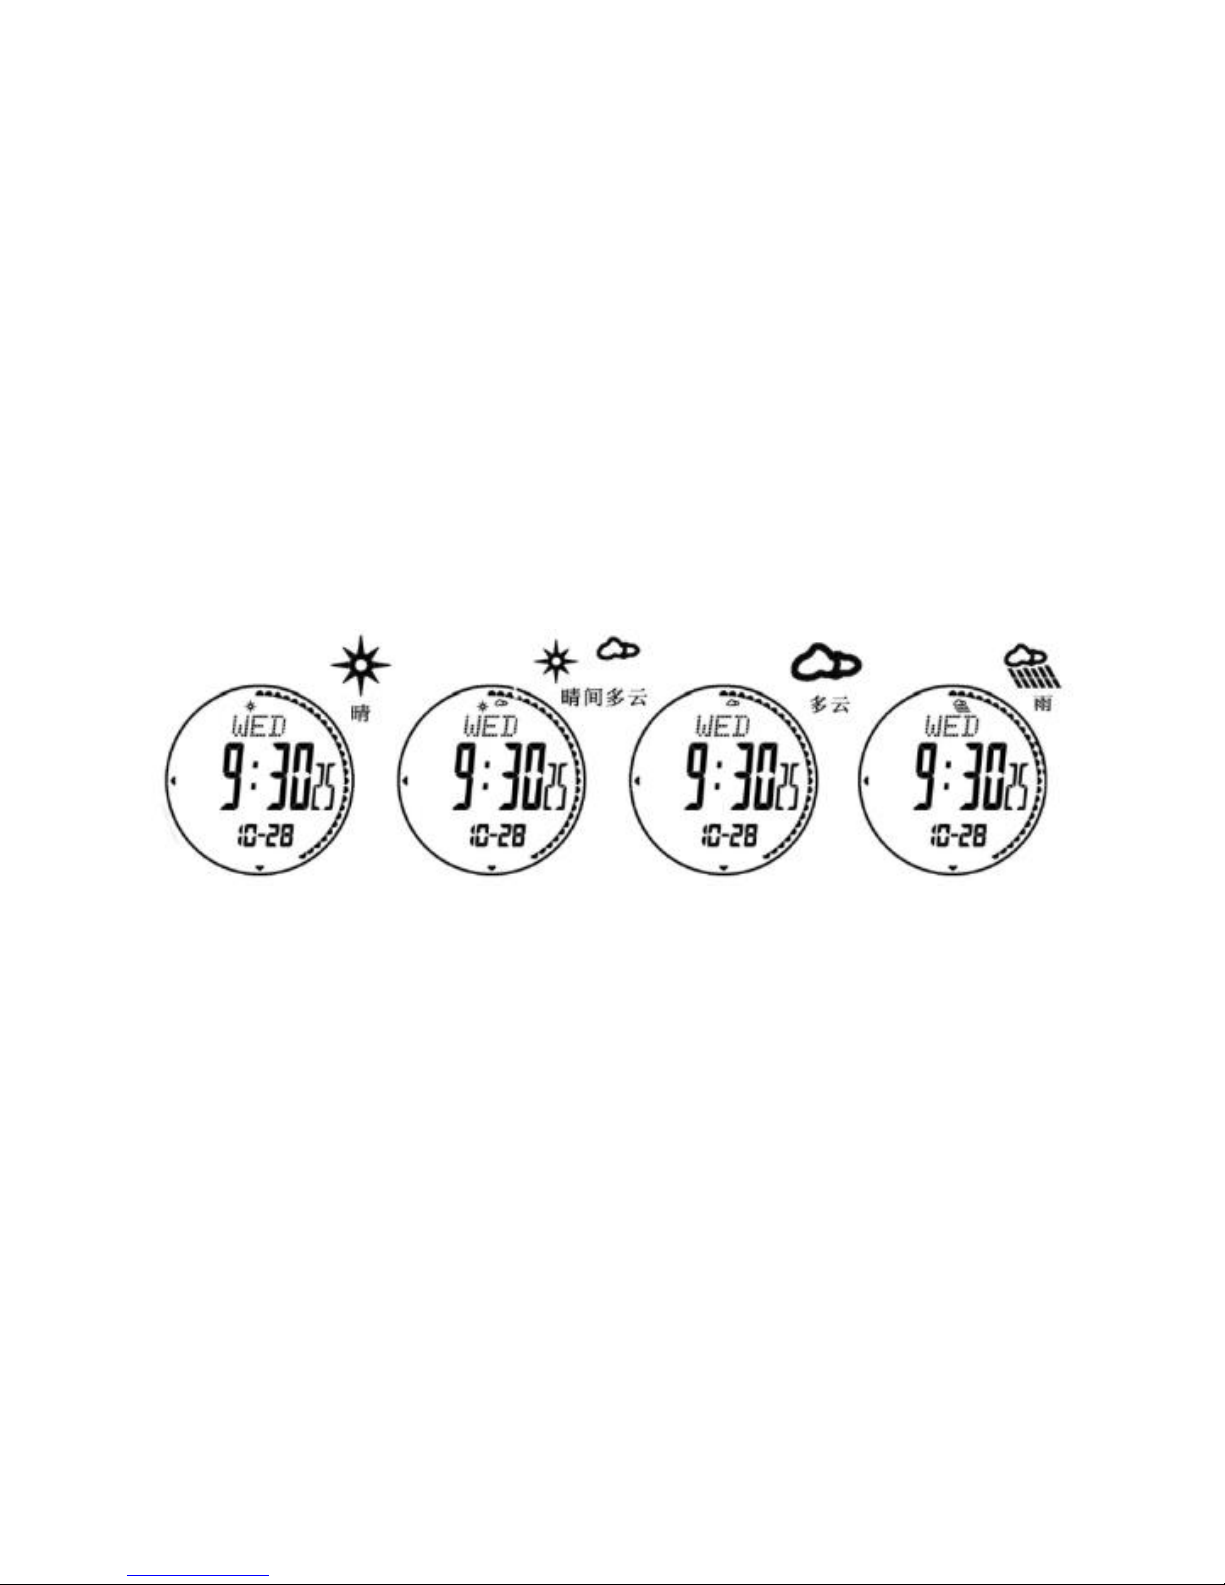
4.1 Current Time Mode-Weather Forecast
Weather Forecast
With the change of air pressure before, the watch will achieve the
corresponding weather forecast, but it will be different from the
actual weather;
How to Display the Weather in Future
The watch will display the weather in future by the following 4 icons:
Sunny
Page 7
Partly cloudy
Cloudy
Rainy
This function only could display under current time and dual time
mode.
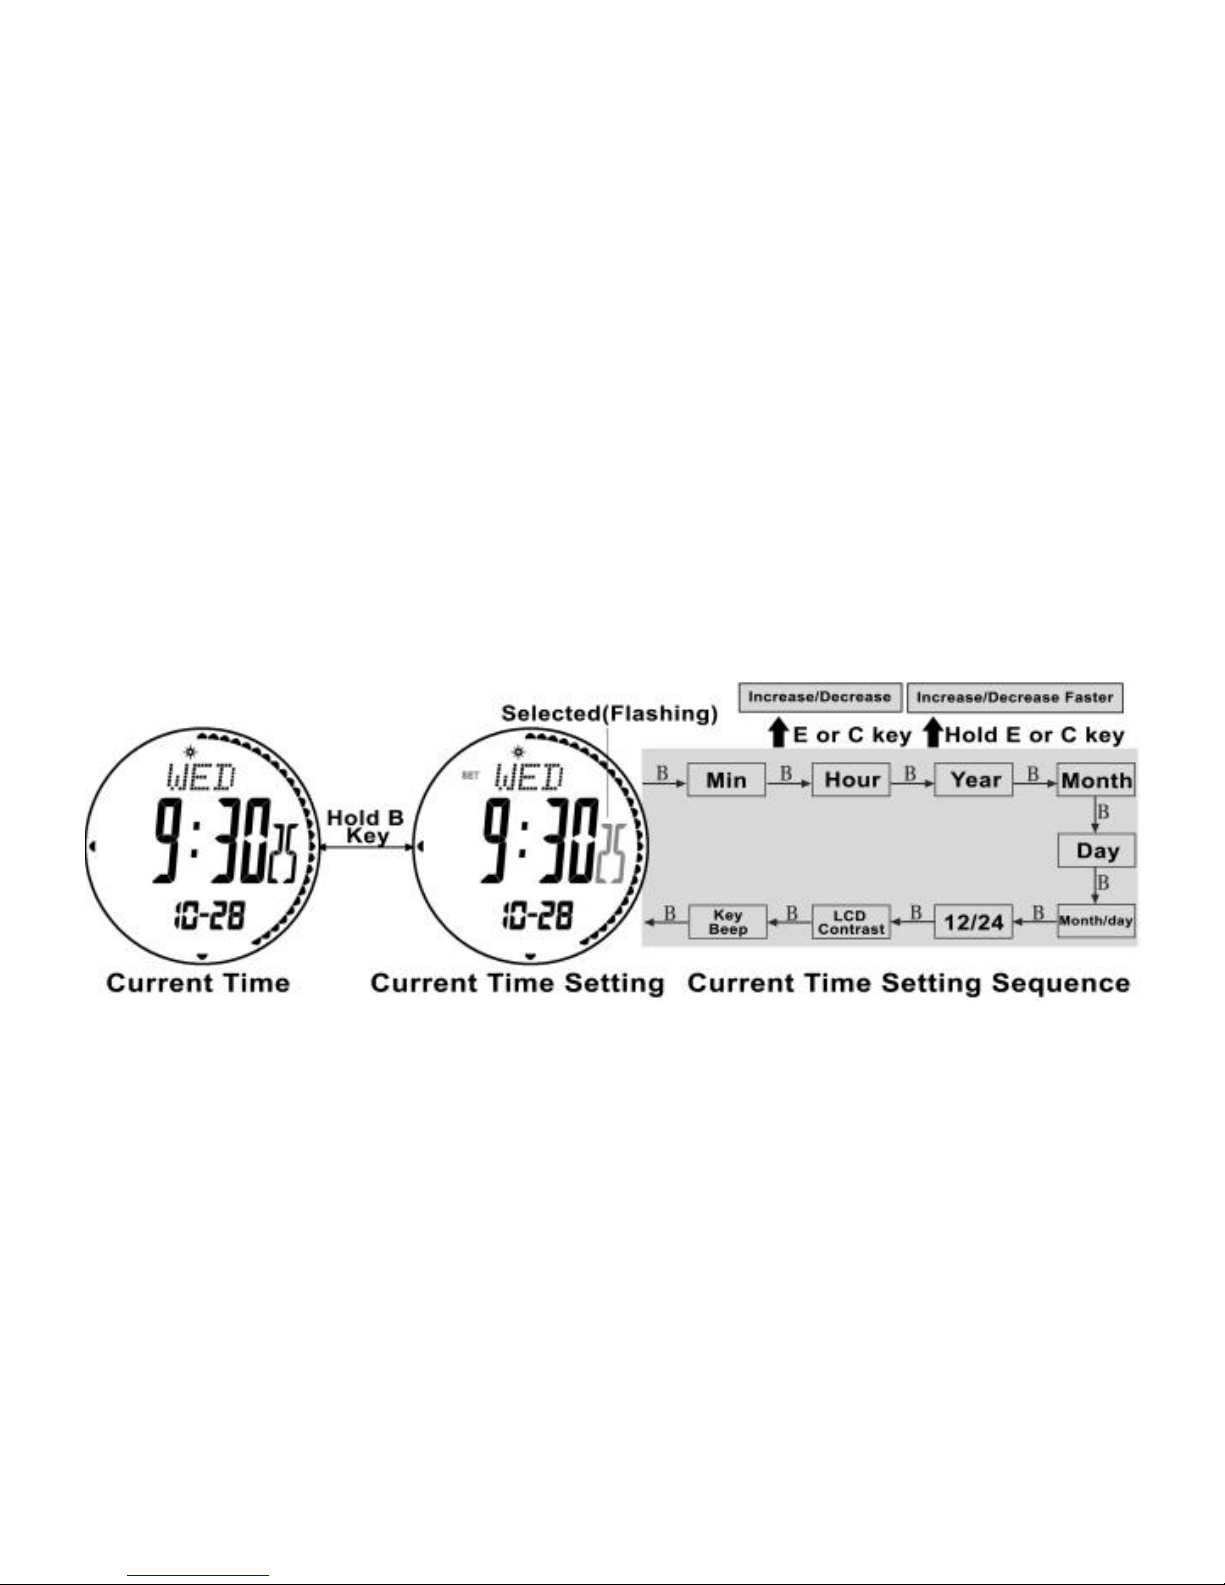
4.2 Current Time Mode-Current Time Setting
How to Set the Current Time
1. Under time mode, press and hold B button until the flashing icon
“SET” and second digit appear;
2. Press B button to convert;
Page 8

3. When the digit of second is flashing (selected), press E/C button to
clear the digit to “00”.
4. When the other digit of minute, hour, year, month or day is flashing
(selected), press E/C button to increase/decrease the digit (press and
hold button to change faster);
5. When the month/day and 12/24 hour format is flashing, press E/C
button to convert;
6. When the LCD contrast is flashing, press E/C button to
increase/decrease the contrast level (1-10);
7. When the beep is flashing, press E/C button to switch ON/OFF it;
8. Press and hold B button to save and exit.
Page 9

5.0 Pedometer Mode
Under time mode, press B button to enter into pedometer
mode and the step value will be 0;
Under pedometer mode, press A button, EL back-light will last
3 seconds;
Press and hold A button for 3 seconds to zero-clear the step
value;
Press B button to enter into pedometer storage mode, press
and hold B button to enter into pedometer setting mode;
Press C button, nothing will happen; press and hold C button
to switch ON/OFF pedometer;
Press D button, nothing will happen;
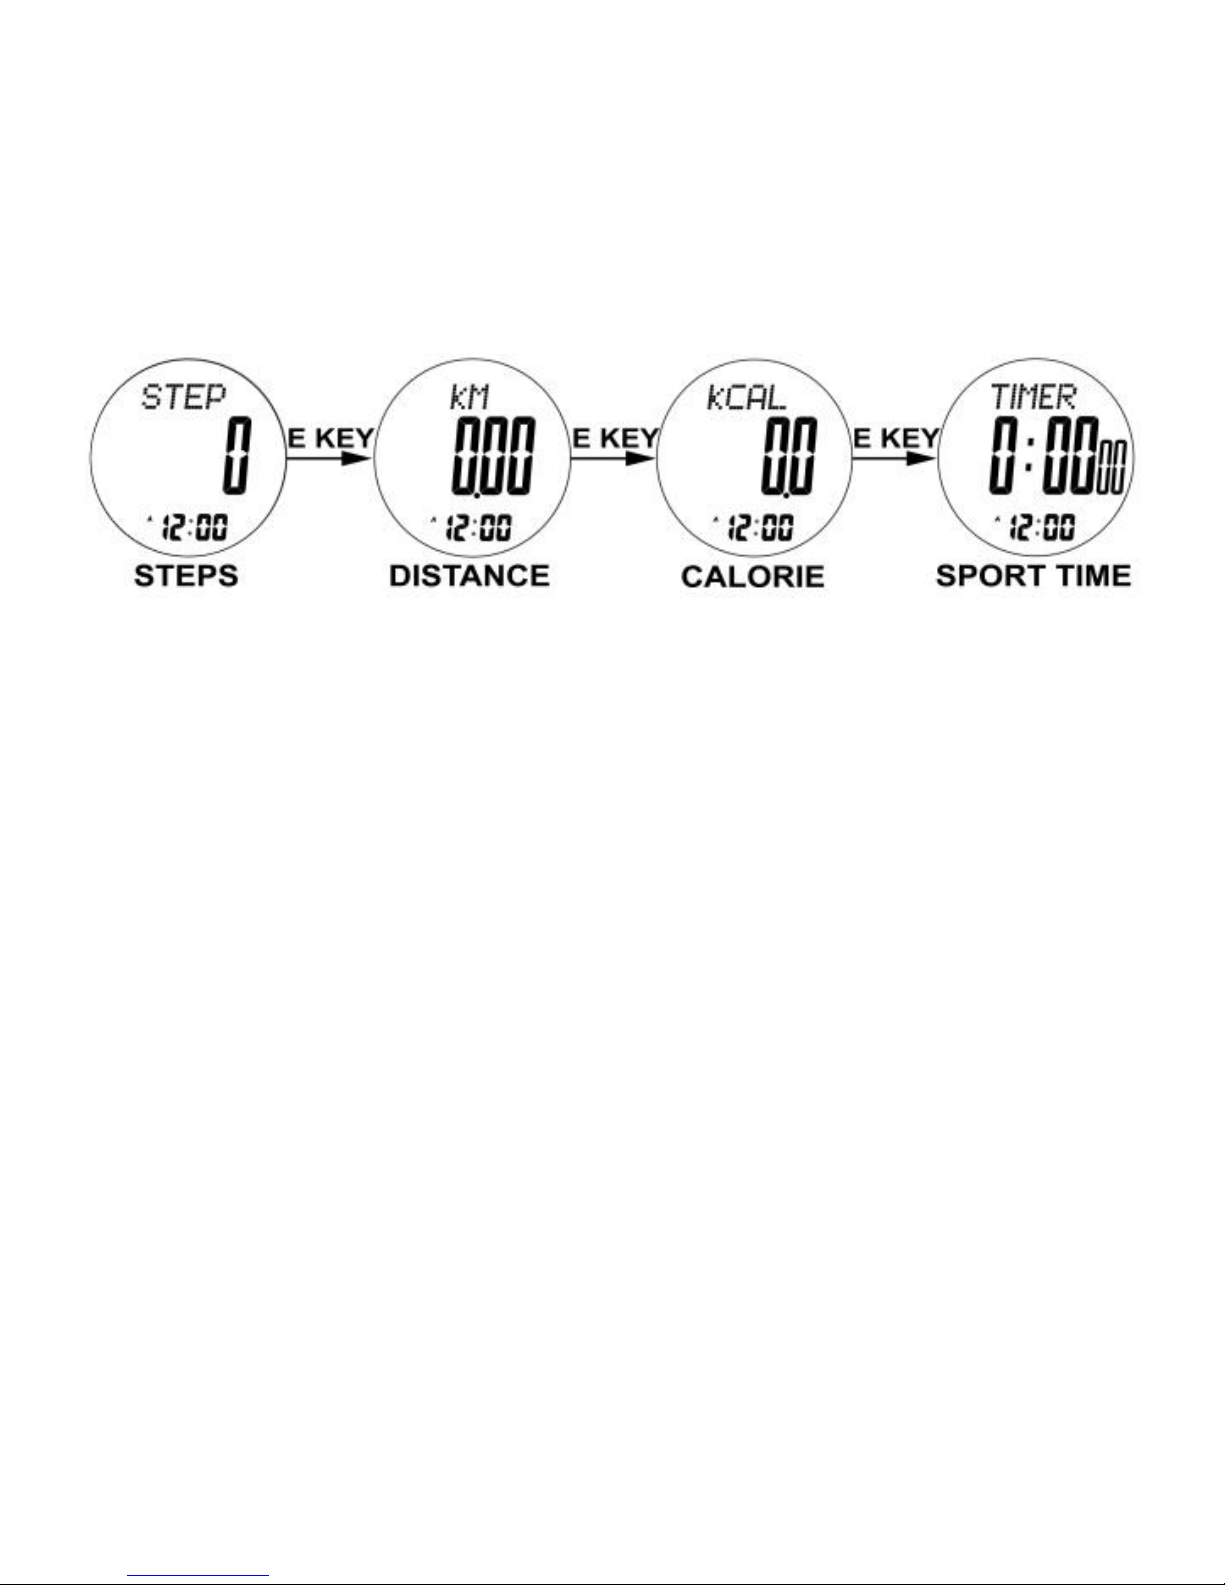
Press E button to convert the modes sequentially as below:
Step→Mileage→Calorie→Sport time→Step
Page 10
NOTE:
1. The step icon will appear if pedometer starts;
2. Only under pedometer mode, press and hold C button to
switch ON/OFF pedometer.
5.1 Pedometer Setting Mode
Under pedometer mode, press and hold B button to enter into
setting and reviewing user information, the default setting of
metric system will flash;
Press B button to convert the modes sequentially as below:
Metric/Imperial System→Step distance→Weight→Metric/Imperial
System
Page 11
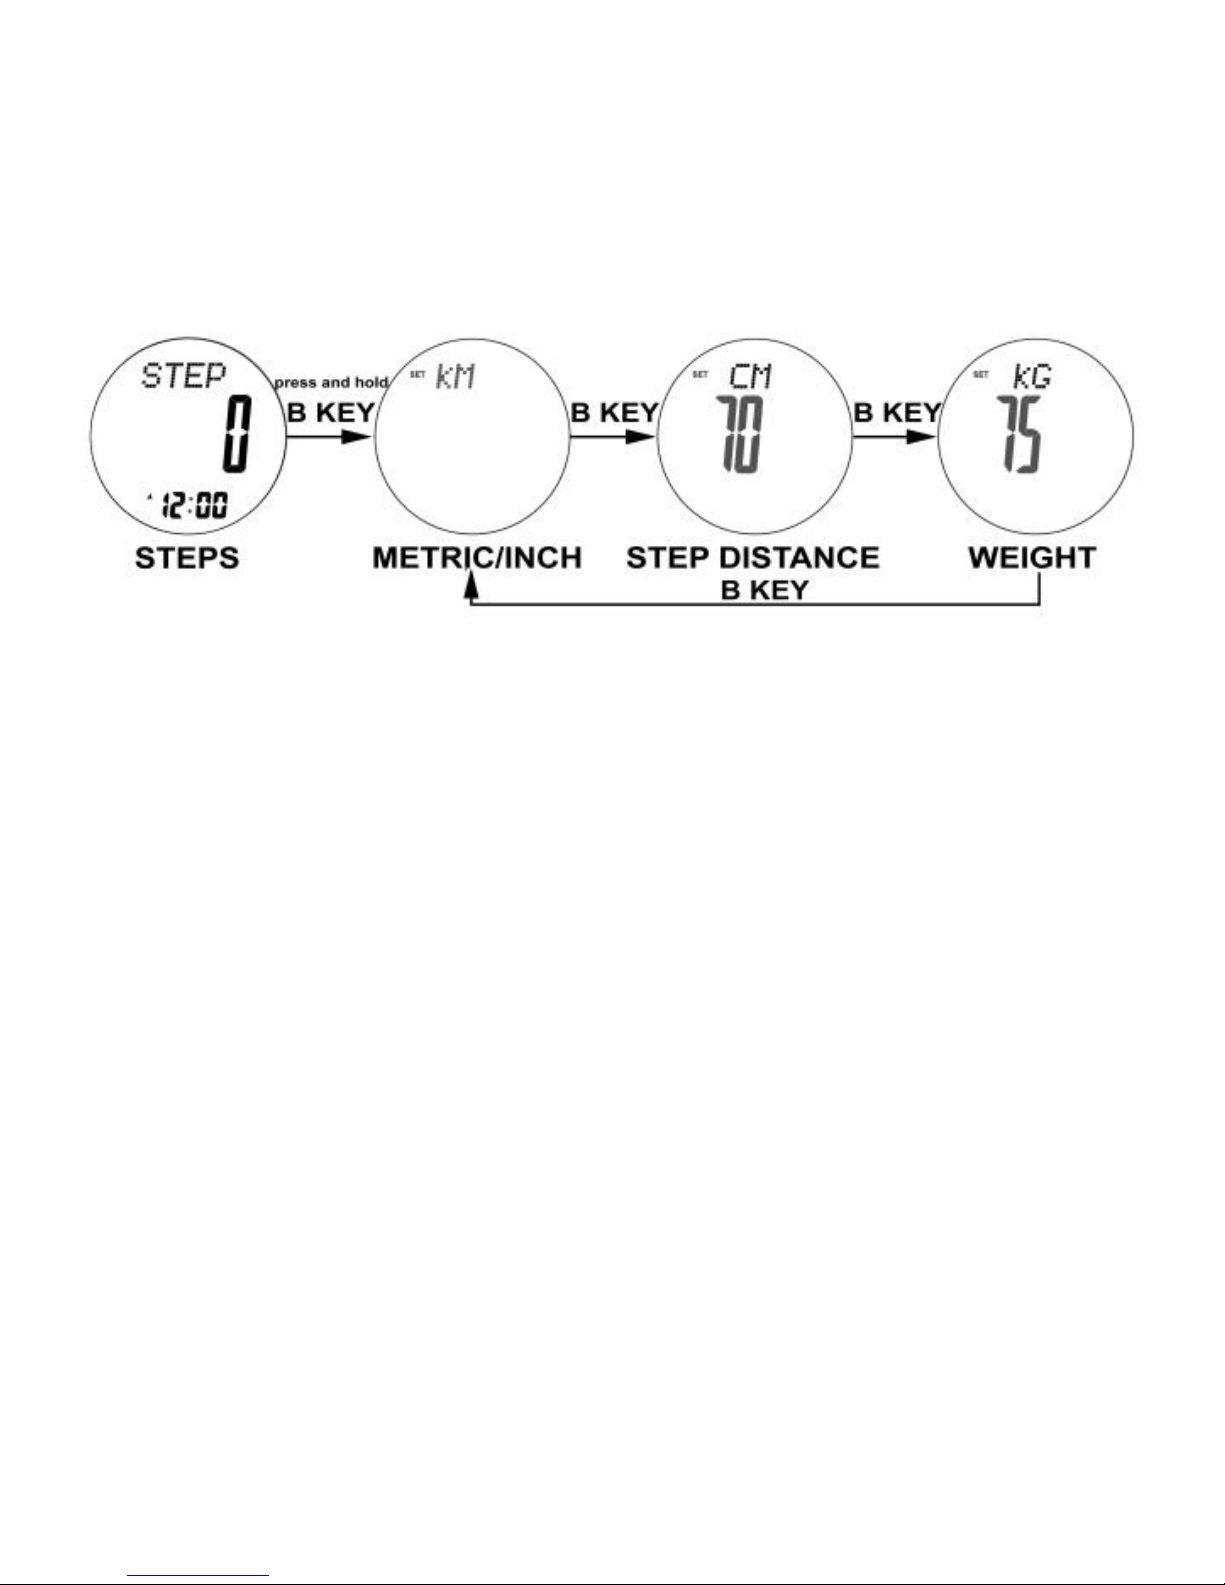
Metric/Imperial system: the default system is metric, press
E/C button to convert metric/imperial system. After
adjustment, weight and step distance unit will be changed
automatically;
Weight setting: the default value is 75 kg(165LB), the setting
range is: 20-200KG/44-441LB;
Step distance setting: the default value is 70CM(28INCH), the
setting range is: 30-180CM/12-77INCH;
Press E/C button to increase/decrease the digit, press and
hold E/C button to change faster;
Press B button to save and exit.
Page 12
6.0 Pedometer Storage Mode
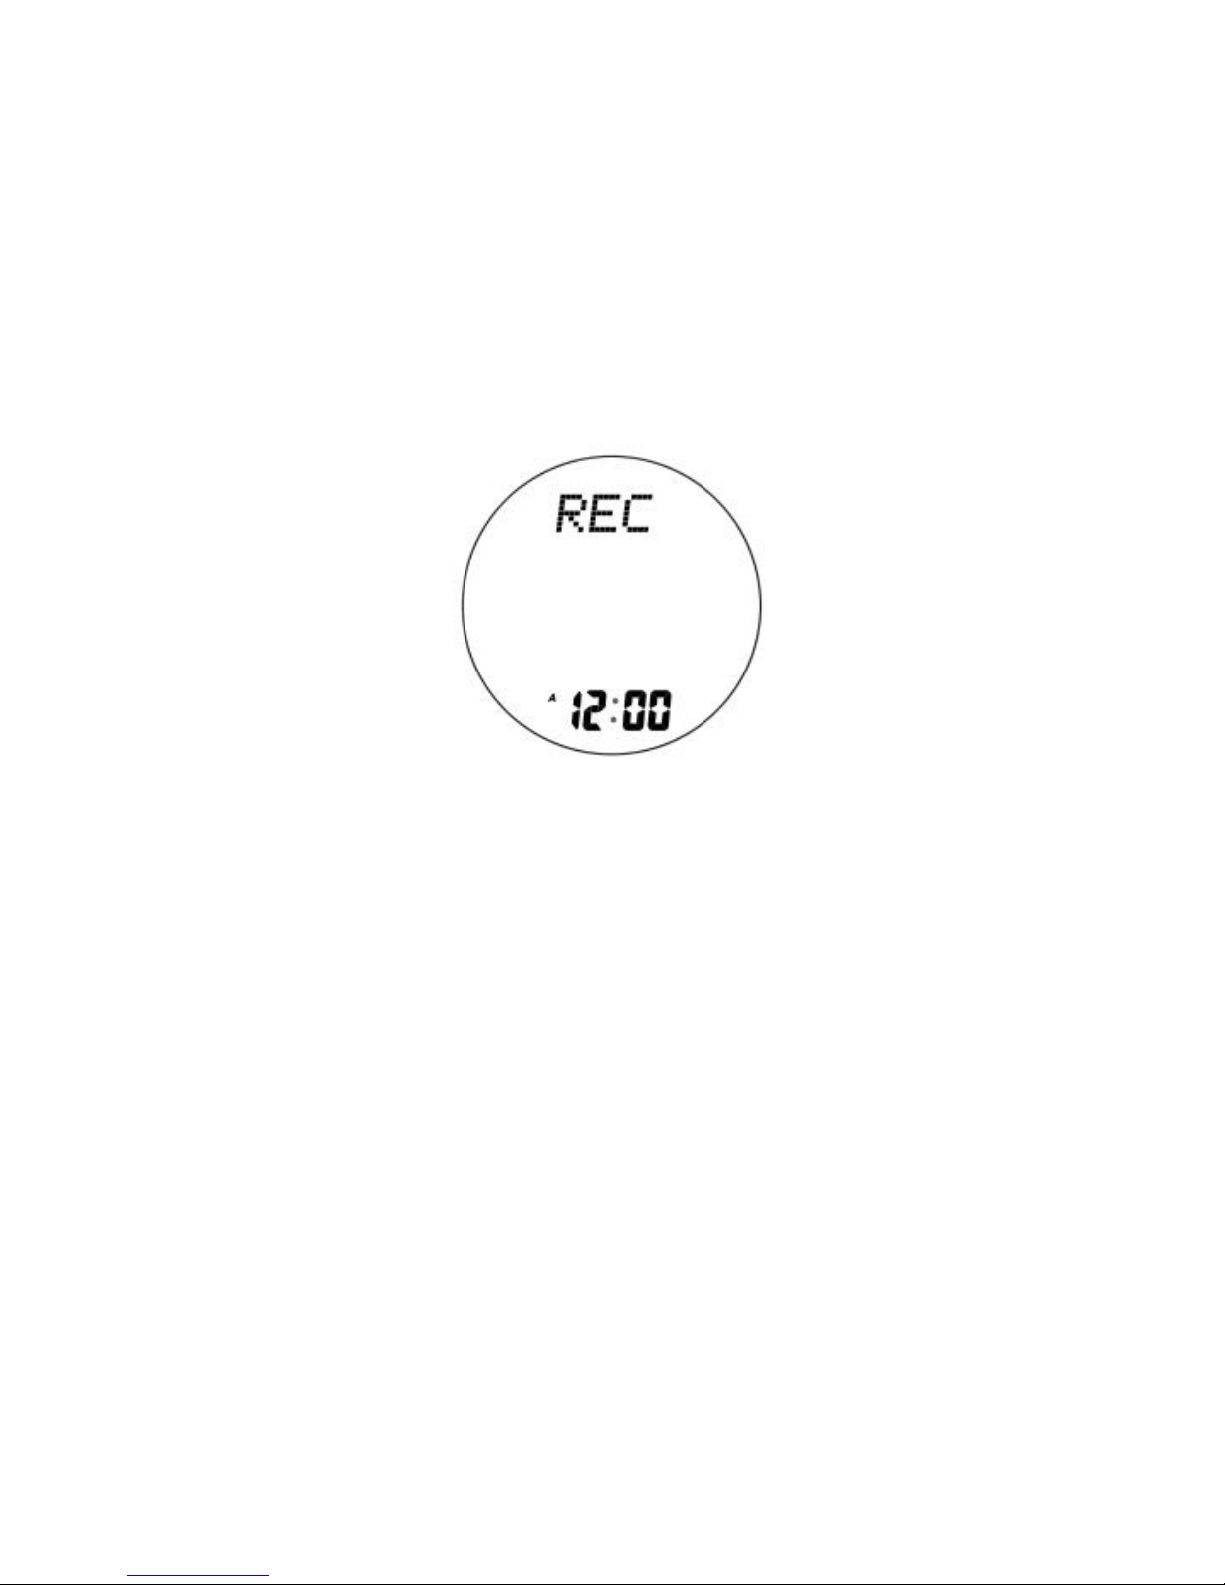
1. Under time mode, press B button two times to enter into
pedometer storage mode, then will display the default data;
2. Under pedometer storage mode, press A button, EL back-light
will last for 3 seconds;
3. Press and hold A button over 3 seconds, then the storage data
will be cleared;
4. Press B button to enter into alarm mode;
5. Press C button, nothing will happen;
6. Press C button to review 7 days history data (if any);
Page 13
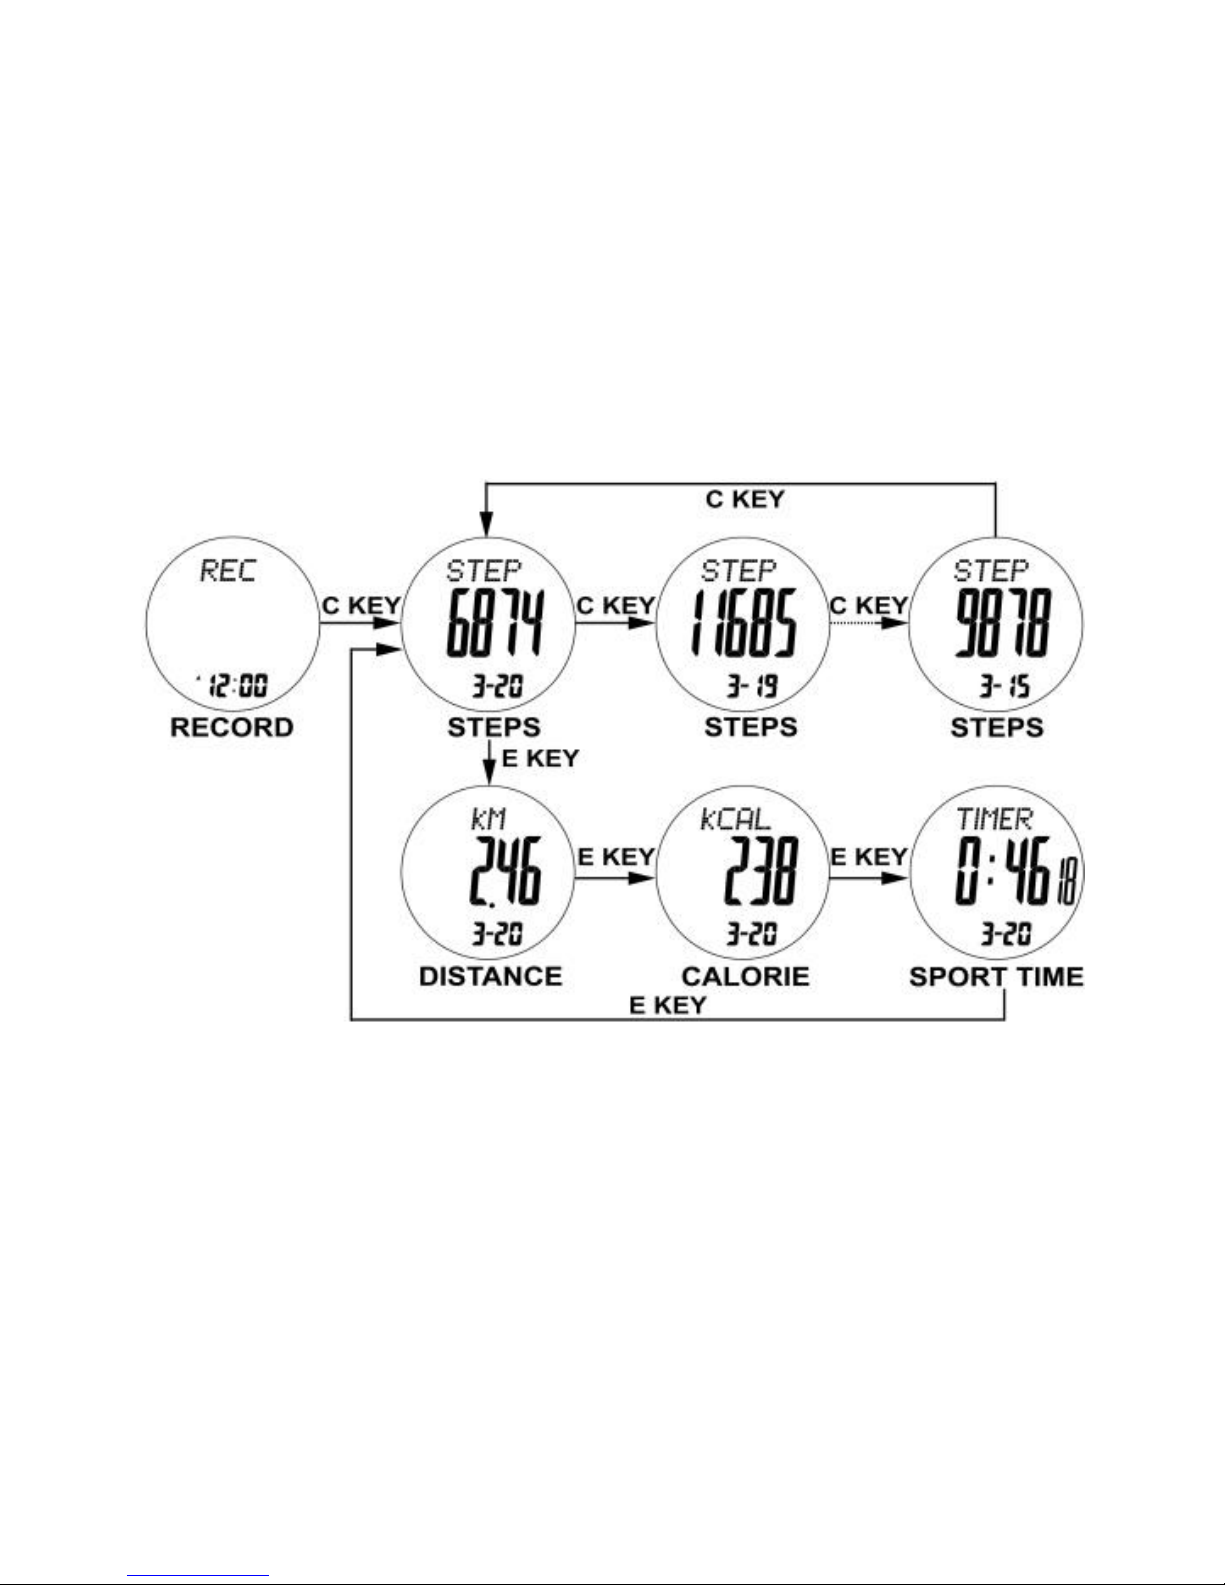
7. Press E button to convert the data of each day sequentially (if
any):
steps-->distance-->calorie-->sport time
Page 14
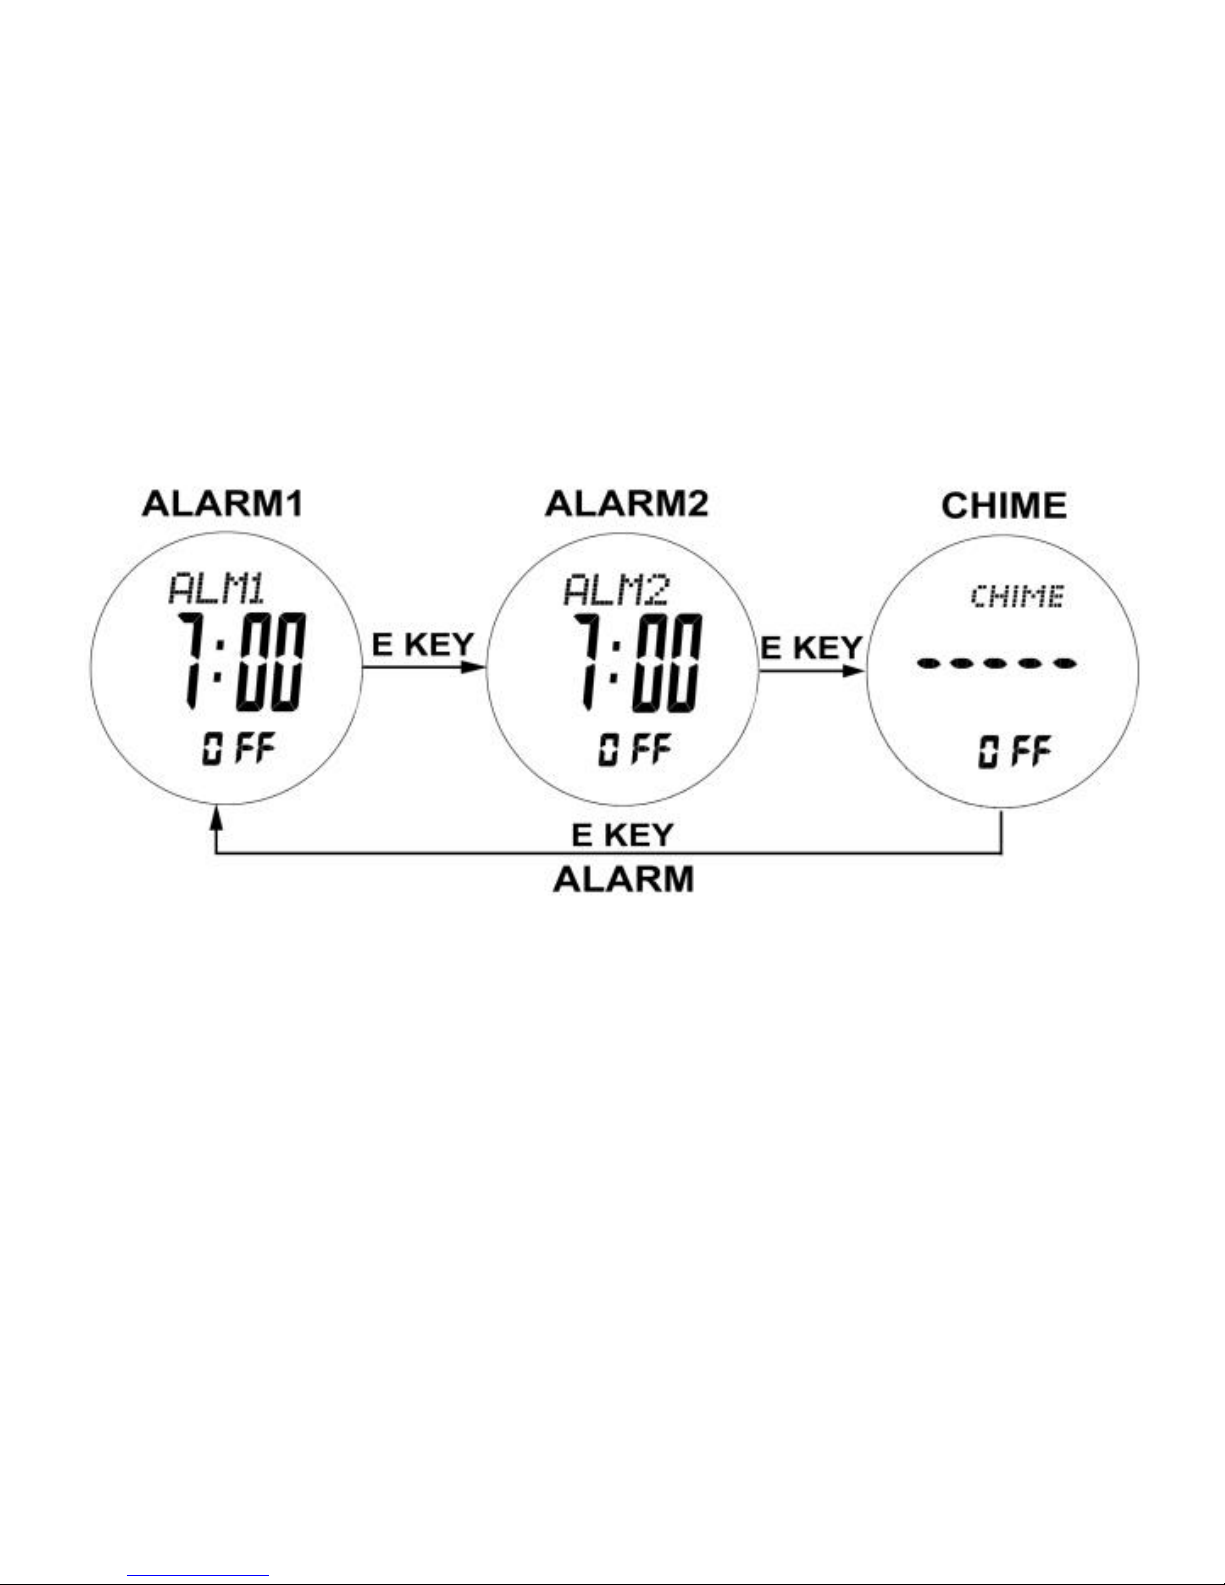
7.0 Alarm Mode-Alarm 1, Alarm 2 and Hourly
Chime
Alarm 1, Alarm 2
The watch contains 2 sets of alarm: alarm 1 and alarm 2,
working independently;
Press E button to convert among alarm 1, alarm 2 and hourly
chime;
How to Switch ON/OFF Alarms
1. Under alarm 1 (2) mode, press C button to switch ON/OFF alarm
Page 15
1 (2);
2. When alarm 1 (2) is ON, the icon will appear;
3. If the alarm icon appears, the watch will beep at the presetting
alarm time every day, then press any buttons to stop the sound or it
will stop automatically after 30 seconds;
How to Switch ON/OFF Hourly Chime
1. Under hourly chime mode, press C button to switch ON/OFF;
2. When hourly chime is ON, the icon “CHIME”will appear, and the
watch will beep at the hourly time.
7.1 Alarm Mode-Alarm Setting
Page 16

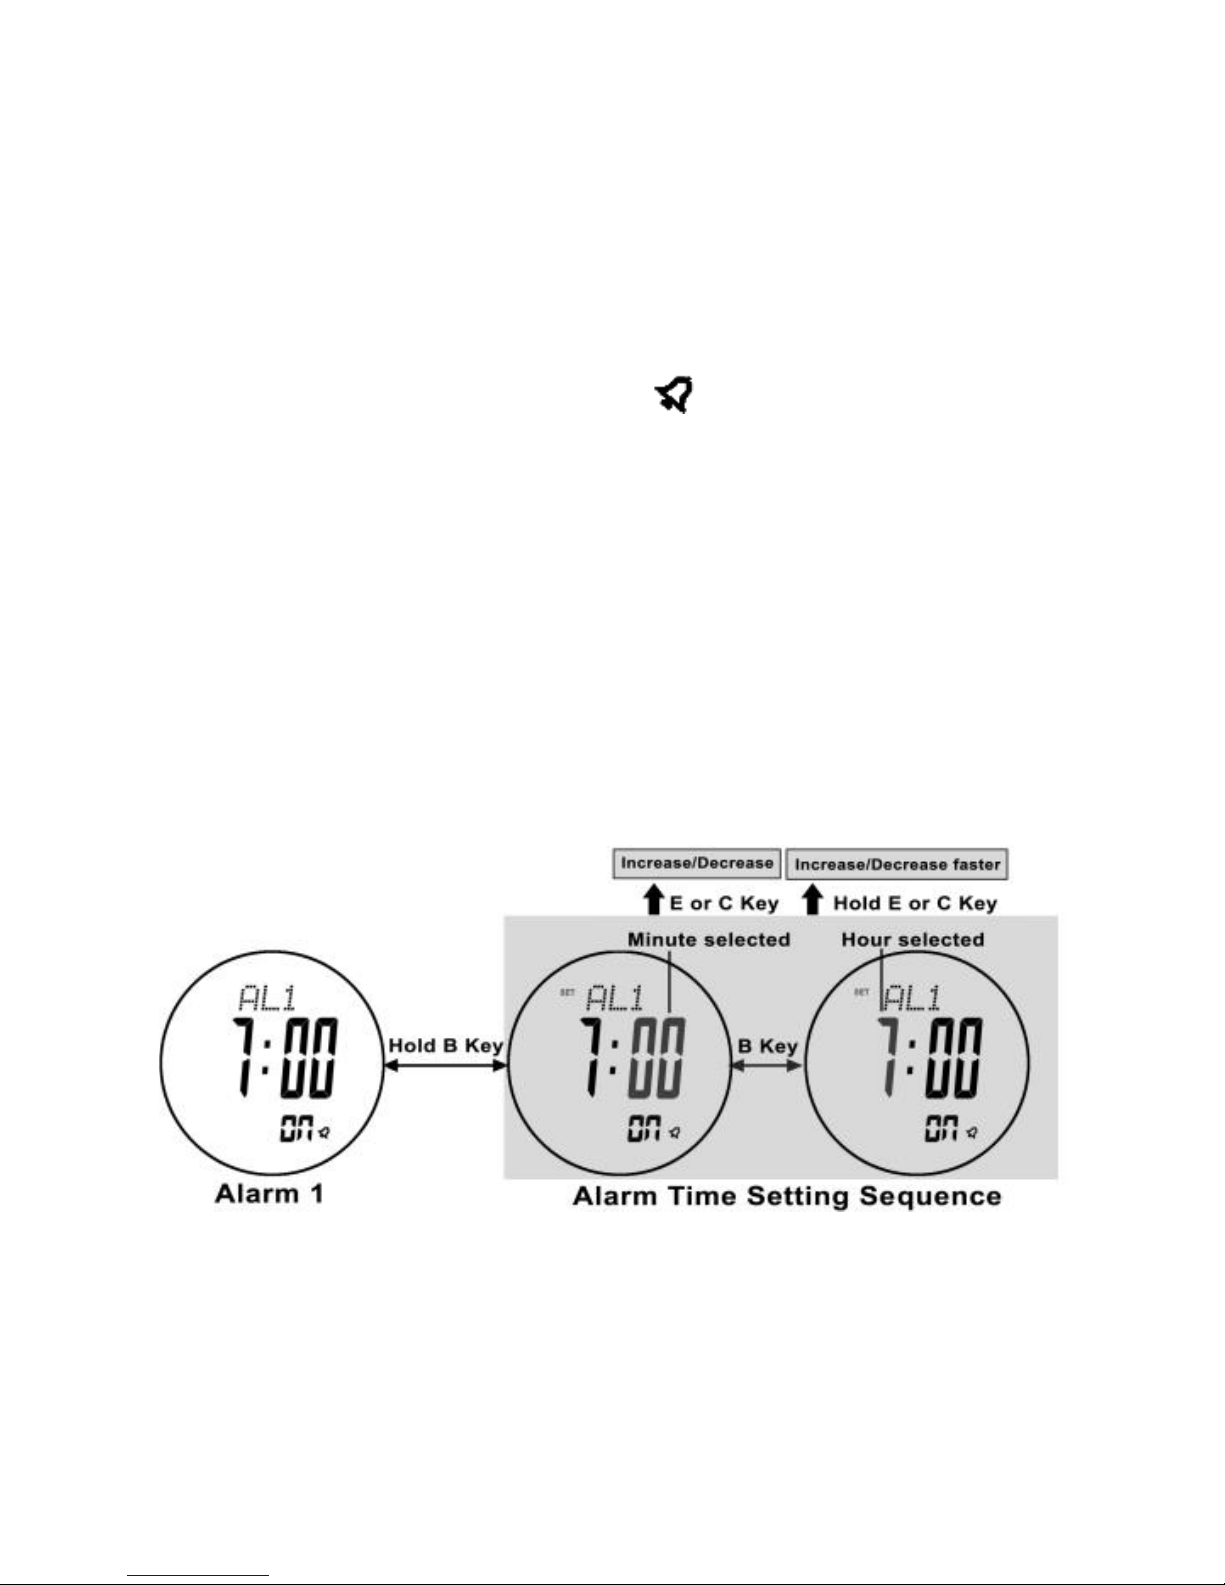
How to Set the Alarm 1 and Alarm 2
1. Under alarm 1 (2) mode, press and hold B button until the
flashing icon “SET” appears;
2. Press B button to convert between minute and hour;
3. When the minute or hour is flashed (selected), press E/C button
to increase/decrease the digits (press and hold button to change
faster);
4. Press and hold B button to save and exit.
Page 17
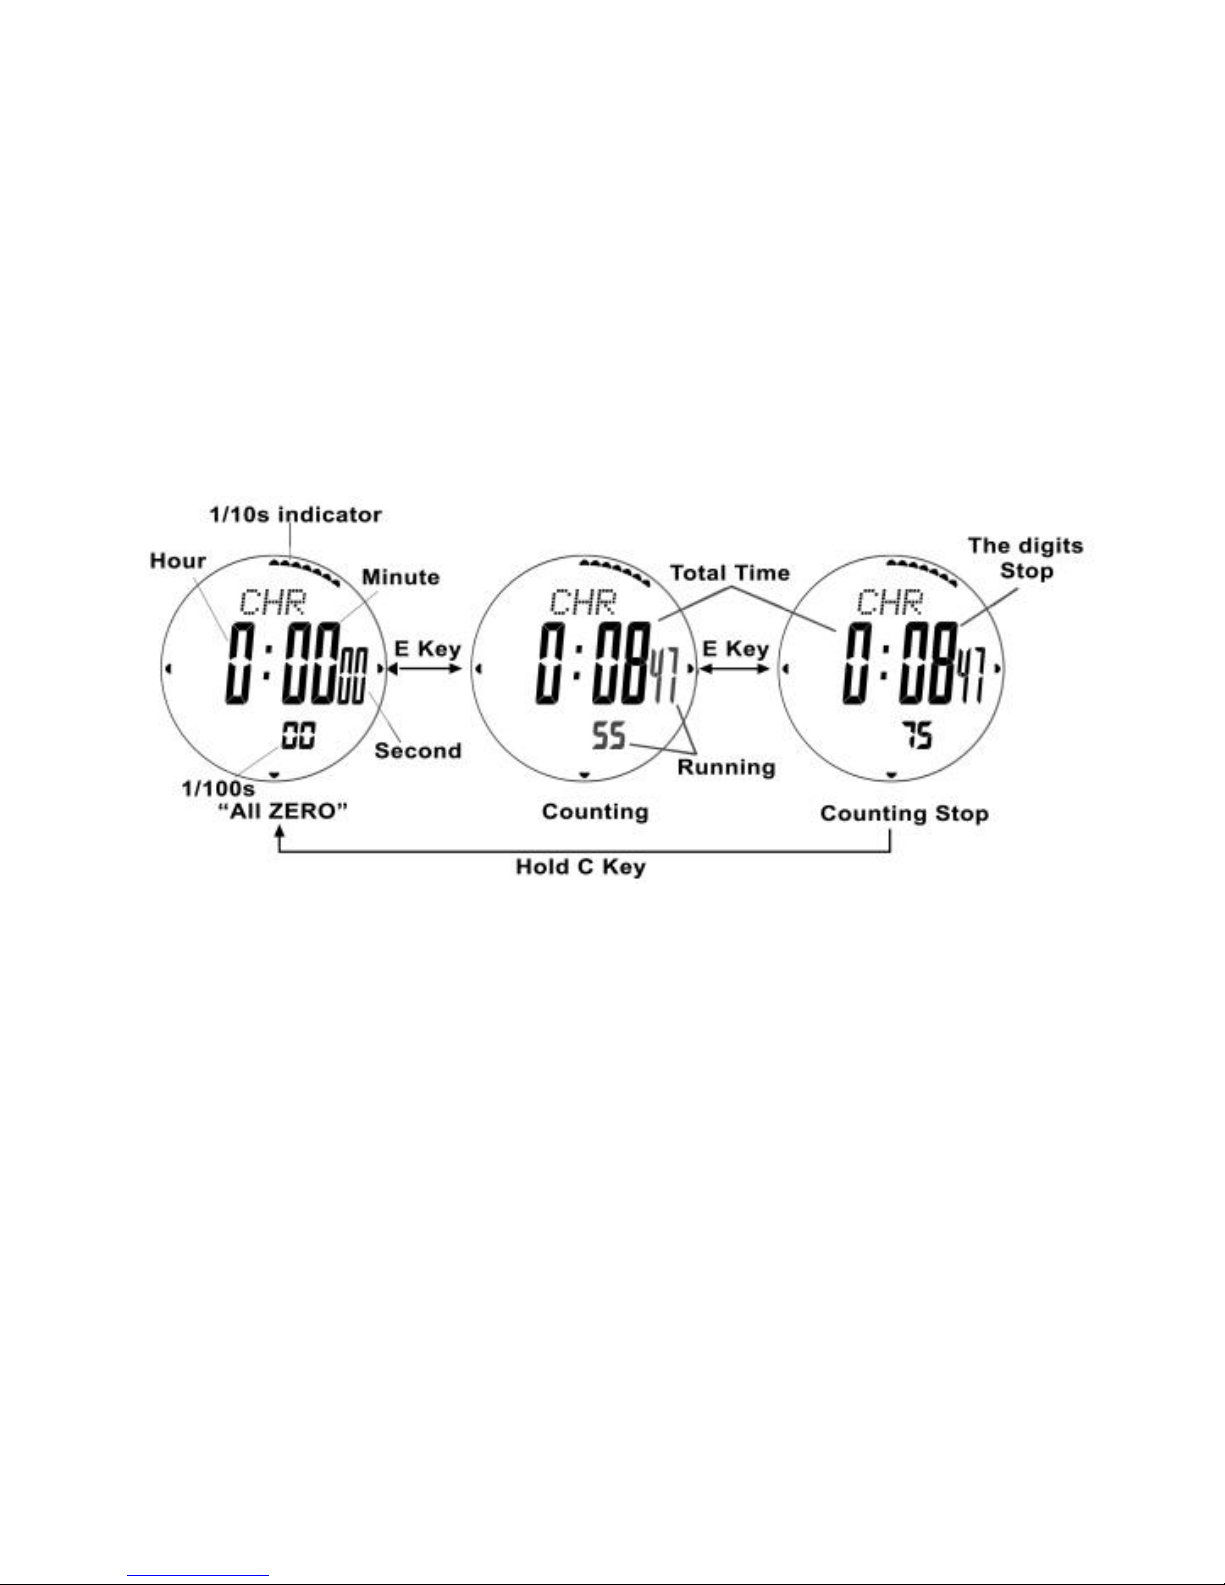
8.0 Chronograph Mode-Switch ON/OFF
Chronograph
Chronograph Mode
The watch contains functions of cumulative time and lap time;
The digits are 0 in the first use or after zero clearing;.
How to Switch ON/OFF the Chronograph
1. Under chronograph mode, press E button to switch ON/OFF the
chronograph;
2. Repeat the above mentioned steps, the watch will start
Page 18
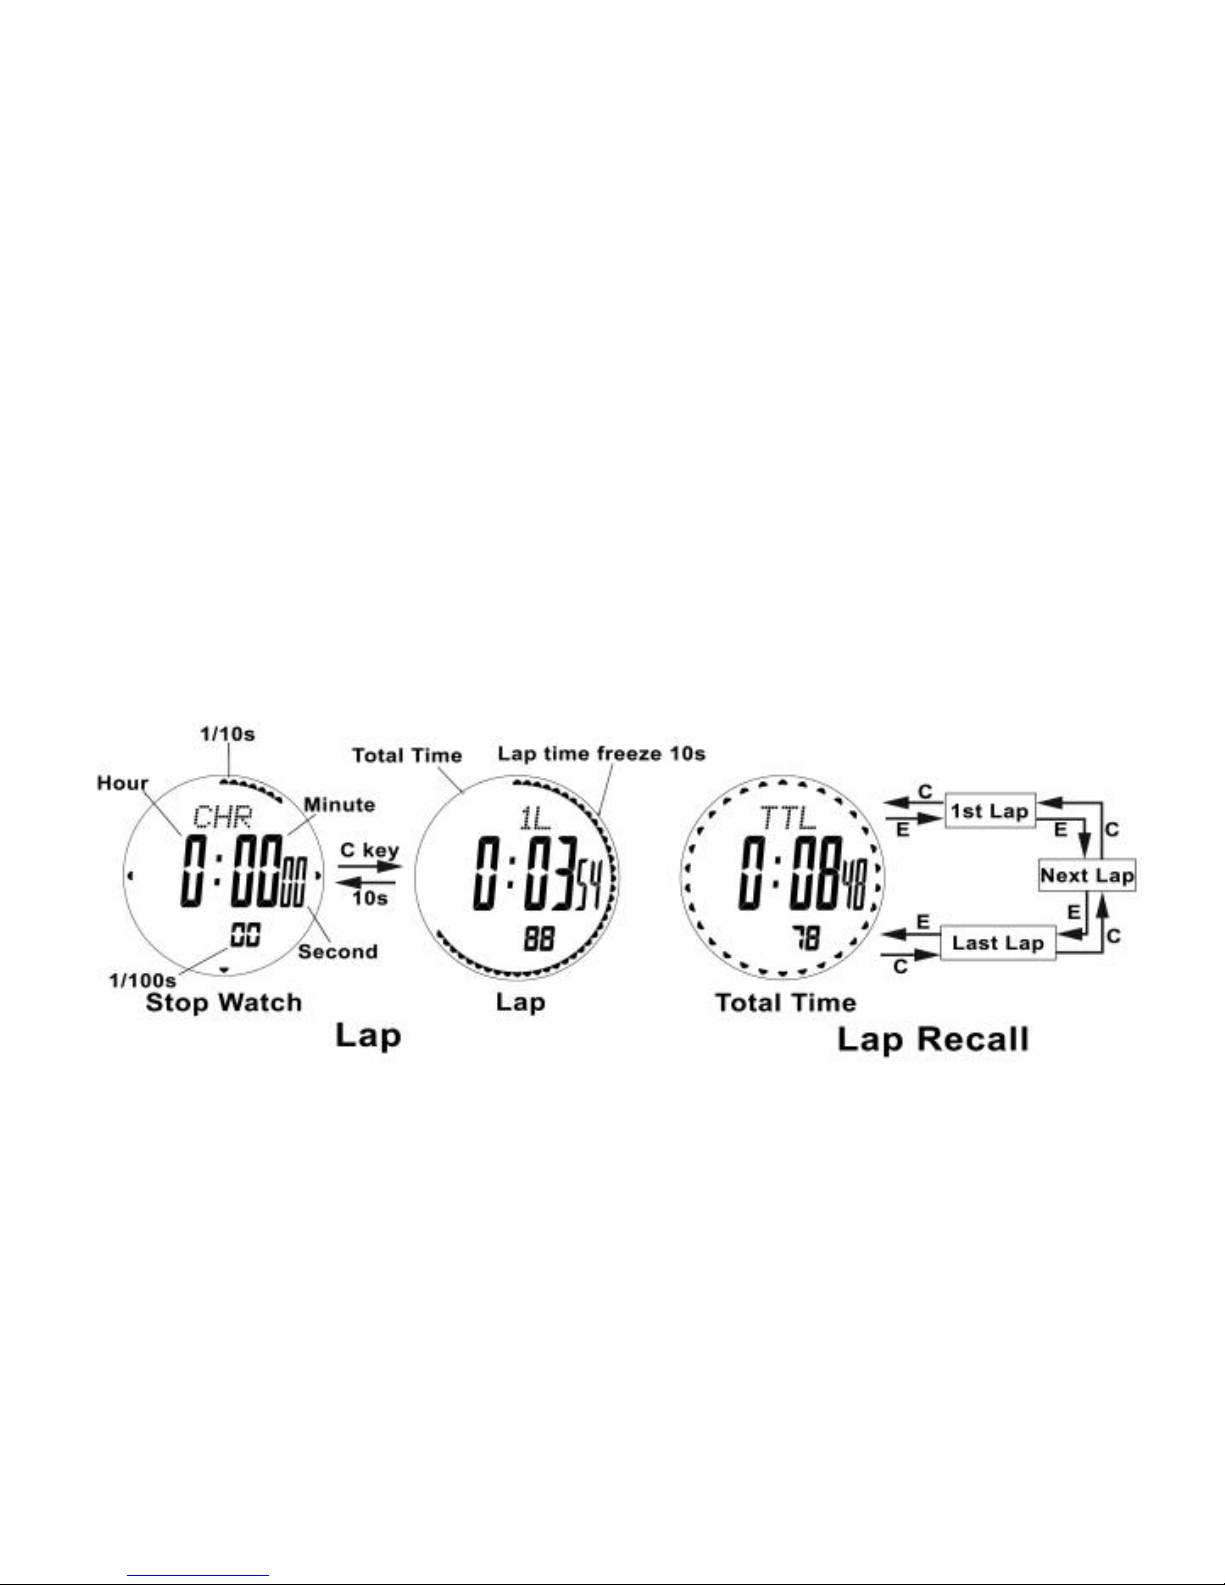
accumulative time;
How to Reset the Chronograph
Press and hold C button, the chronograph will be reset after it
has been switched off.
NOTE: The lap time before also will be deleted after zero clearing
the chronograph.
8.1 Chronograph Mode-Record and Review Lap Time
Lap Time
The watch could start lap time up to 100 laps, even if switch
on accumulative time;
Page 19

How to Record Lap Time
1. When start the chronograph, press C button one time will record
one lap (it will not influence the accumulative time);
2. The lap and time will be displayed; the watch will return to timing
display after 15 seconds and the lap icon will disappear;
3. Repeat the above mentioned steps to achieve the other lap time.
How to Review Lap Time
1. Under chronograph mode, press and hold B button to enter into
reviewing display;
2. Press E/C button to review the lap time before or after (press and
hold button will change faster);
3. Press and hold B button to exit
How to Delete Lap Time
Press and hold C button, the digits will be zero cleared when
switch off the chronograph.
Page 20
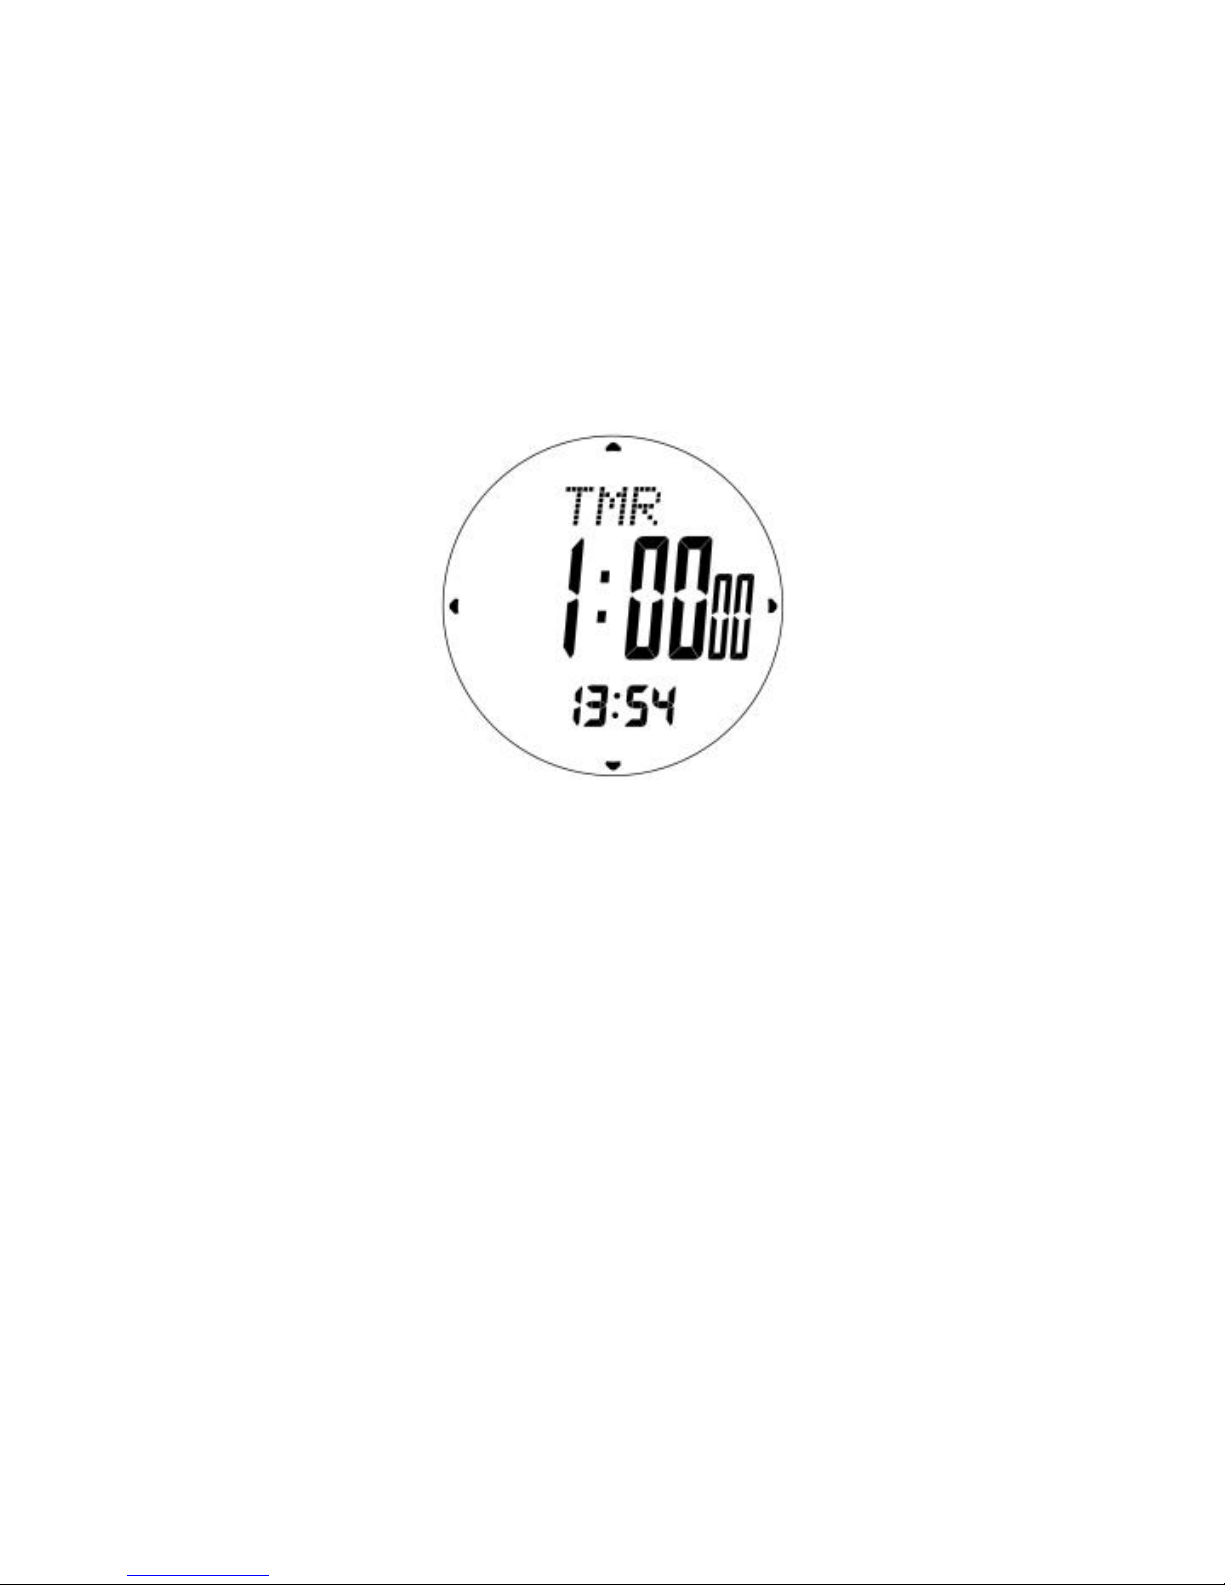
9.0 Timer Mode
Timer
The watch will count down from starting time to 0;
The starting time could be preset.
Page 21
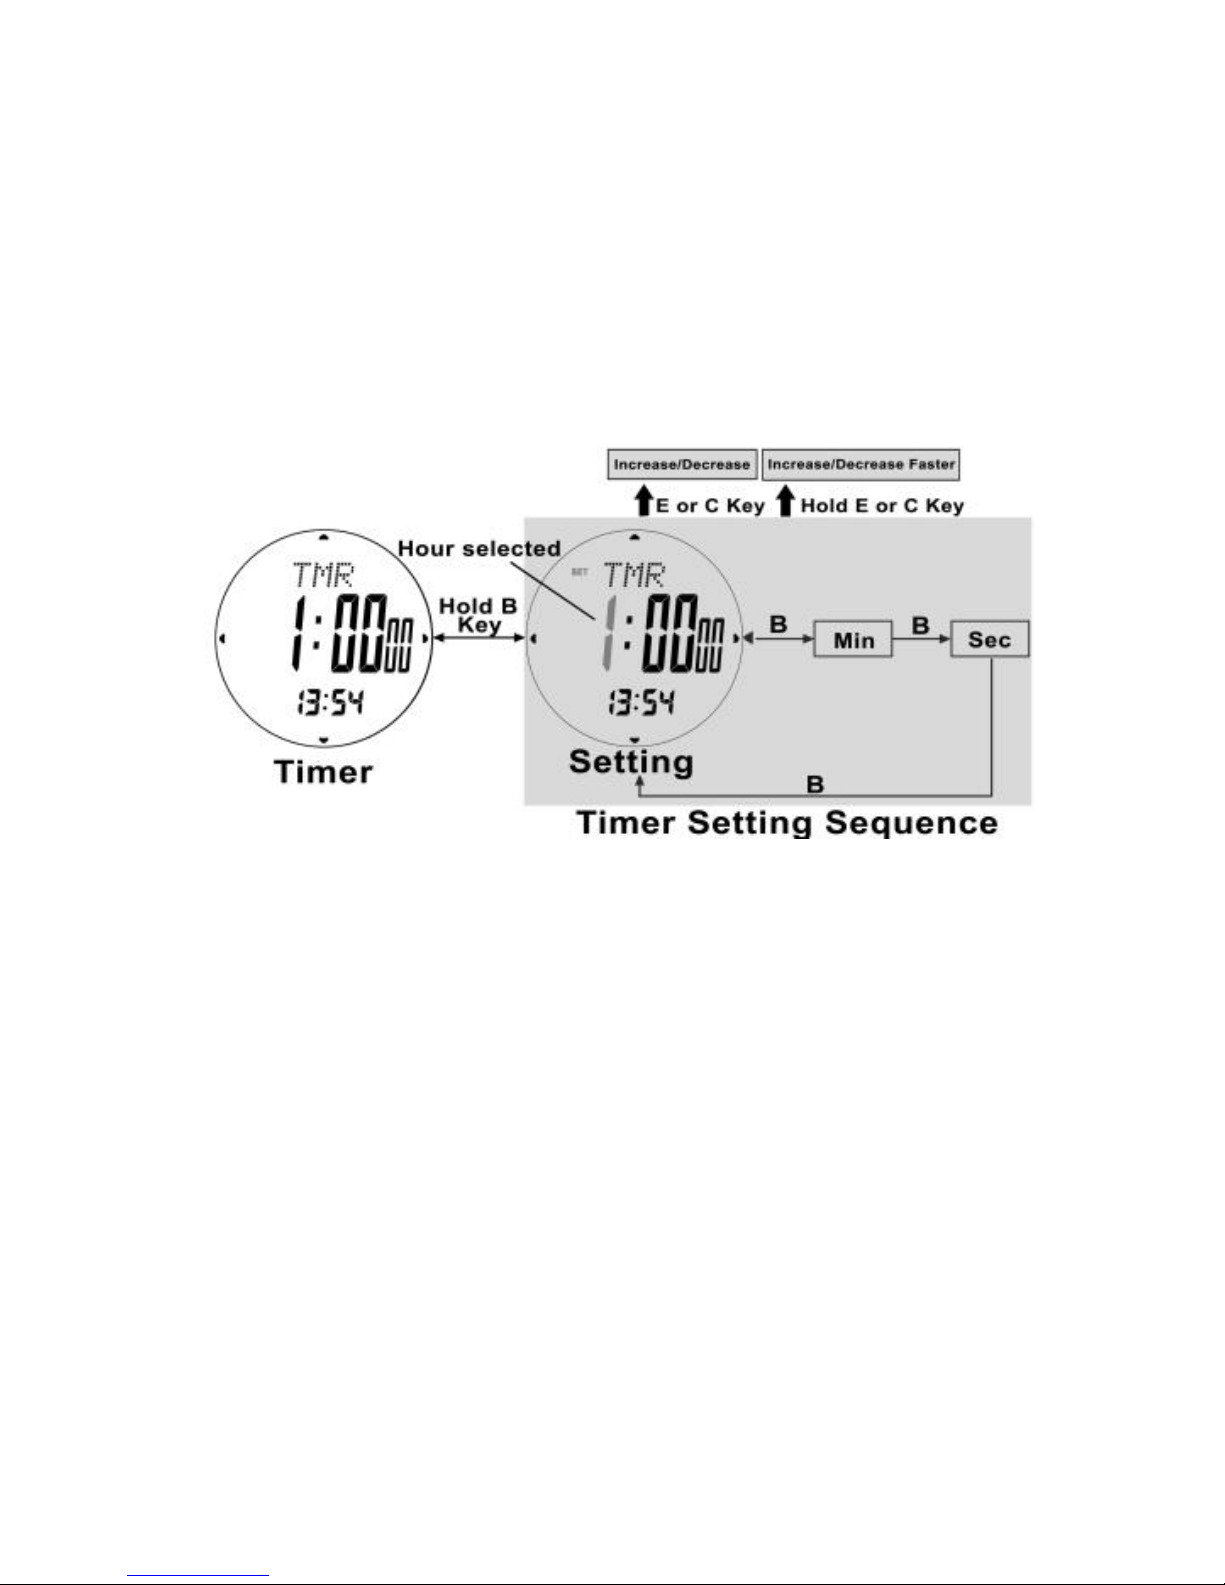
9.1 Timer Mode-How to Preset the Starting Time
How to Preset the Starting Time
1. Under timer mode, press and hold B button until the flashing icon
“SET” appears;
2. Press B button to convert hour, minute and second;
3. Press E/C button to increase/decrease the digit (press and hold
button to change faster);
4. Press and hold B button to save and exit.
Page 22
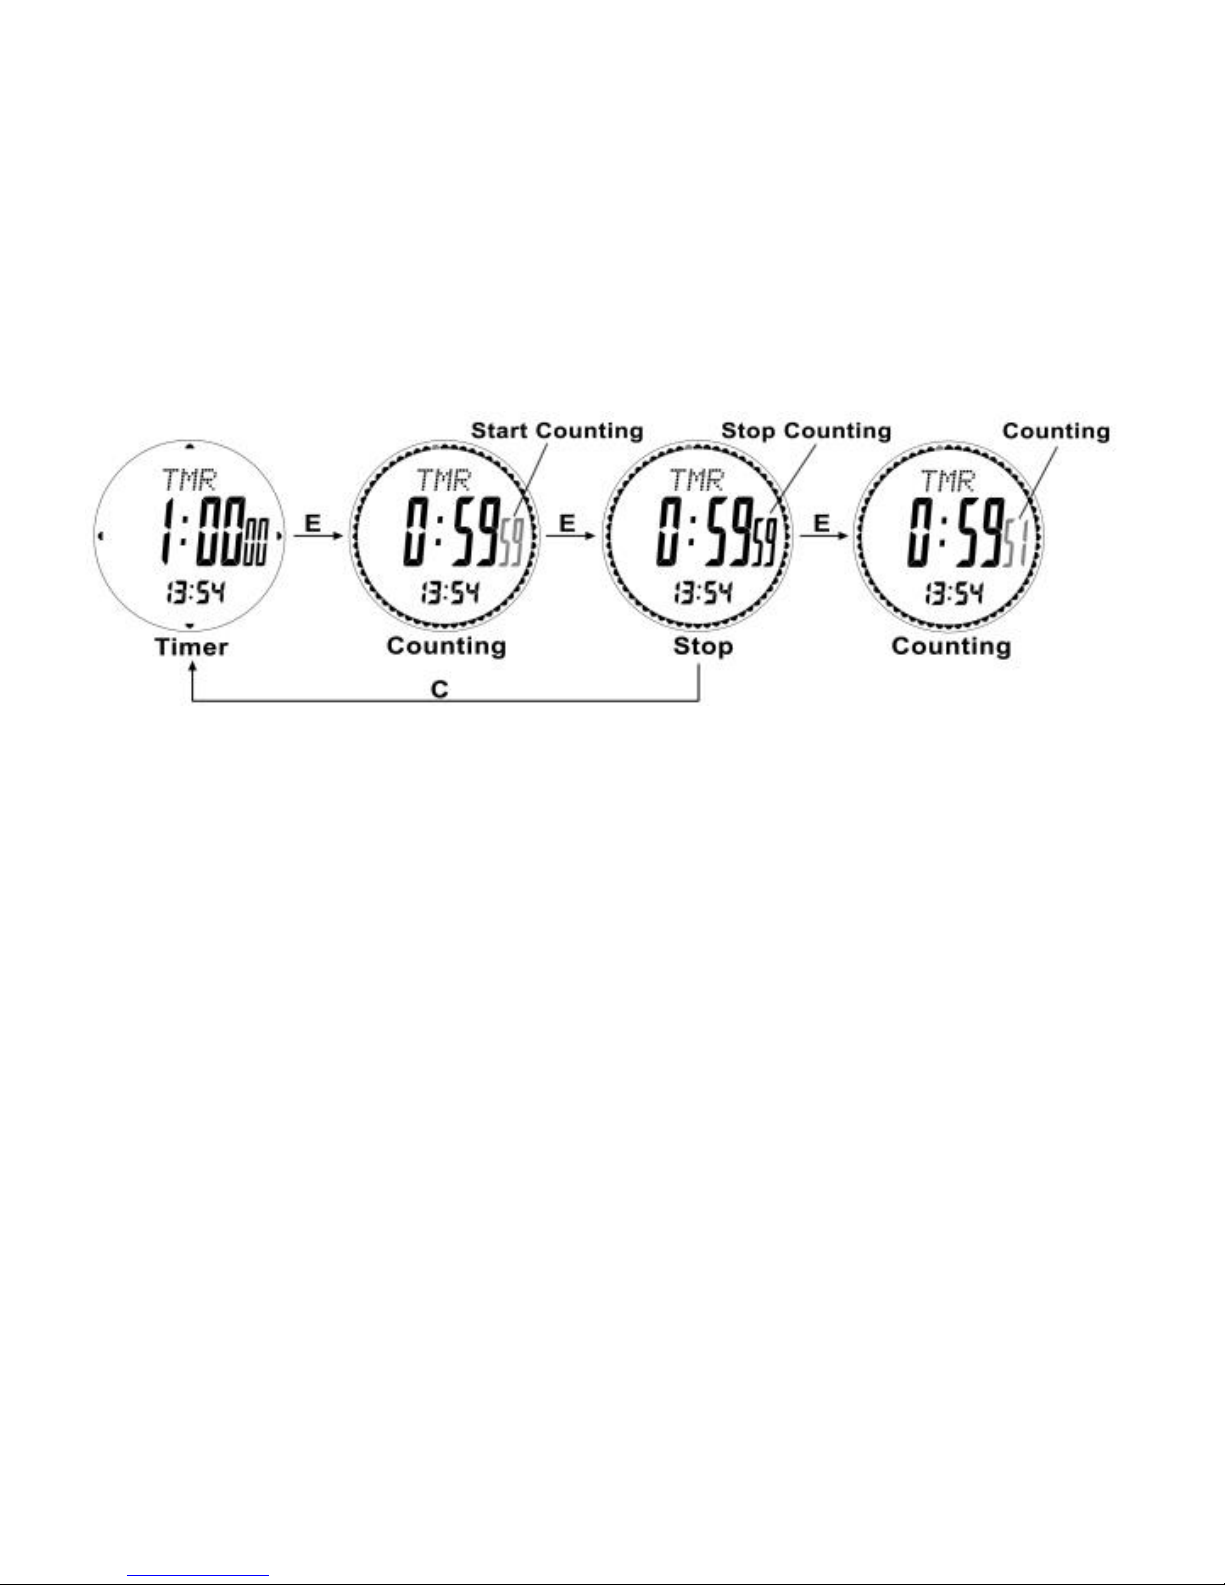
9.2 Timer Mode-Timer Usage
Timer Usage
1. After presetting the starting time, press E button to start/stop
timer;
2. After stopping timer, press C button, then it will recover to the
presetting value before. The watch will return to time mode
automatically if there are no any button operations after pausing for
5 minutes.
Timer Beeping Sound
After timer stopped, the beeping sound will last for 30 seconds.
Press any button to terminate it.
Page 23
NOTE: Do not switch on EL back-light during timer.
10.0 Pacer Mode-Pacer Usage
Pacer Introduction
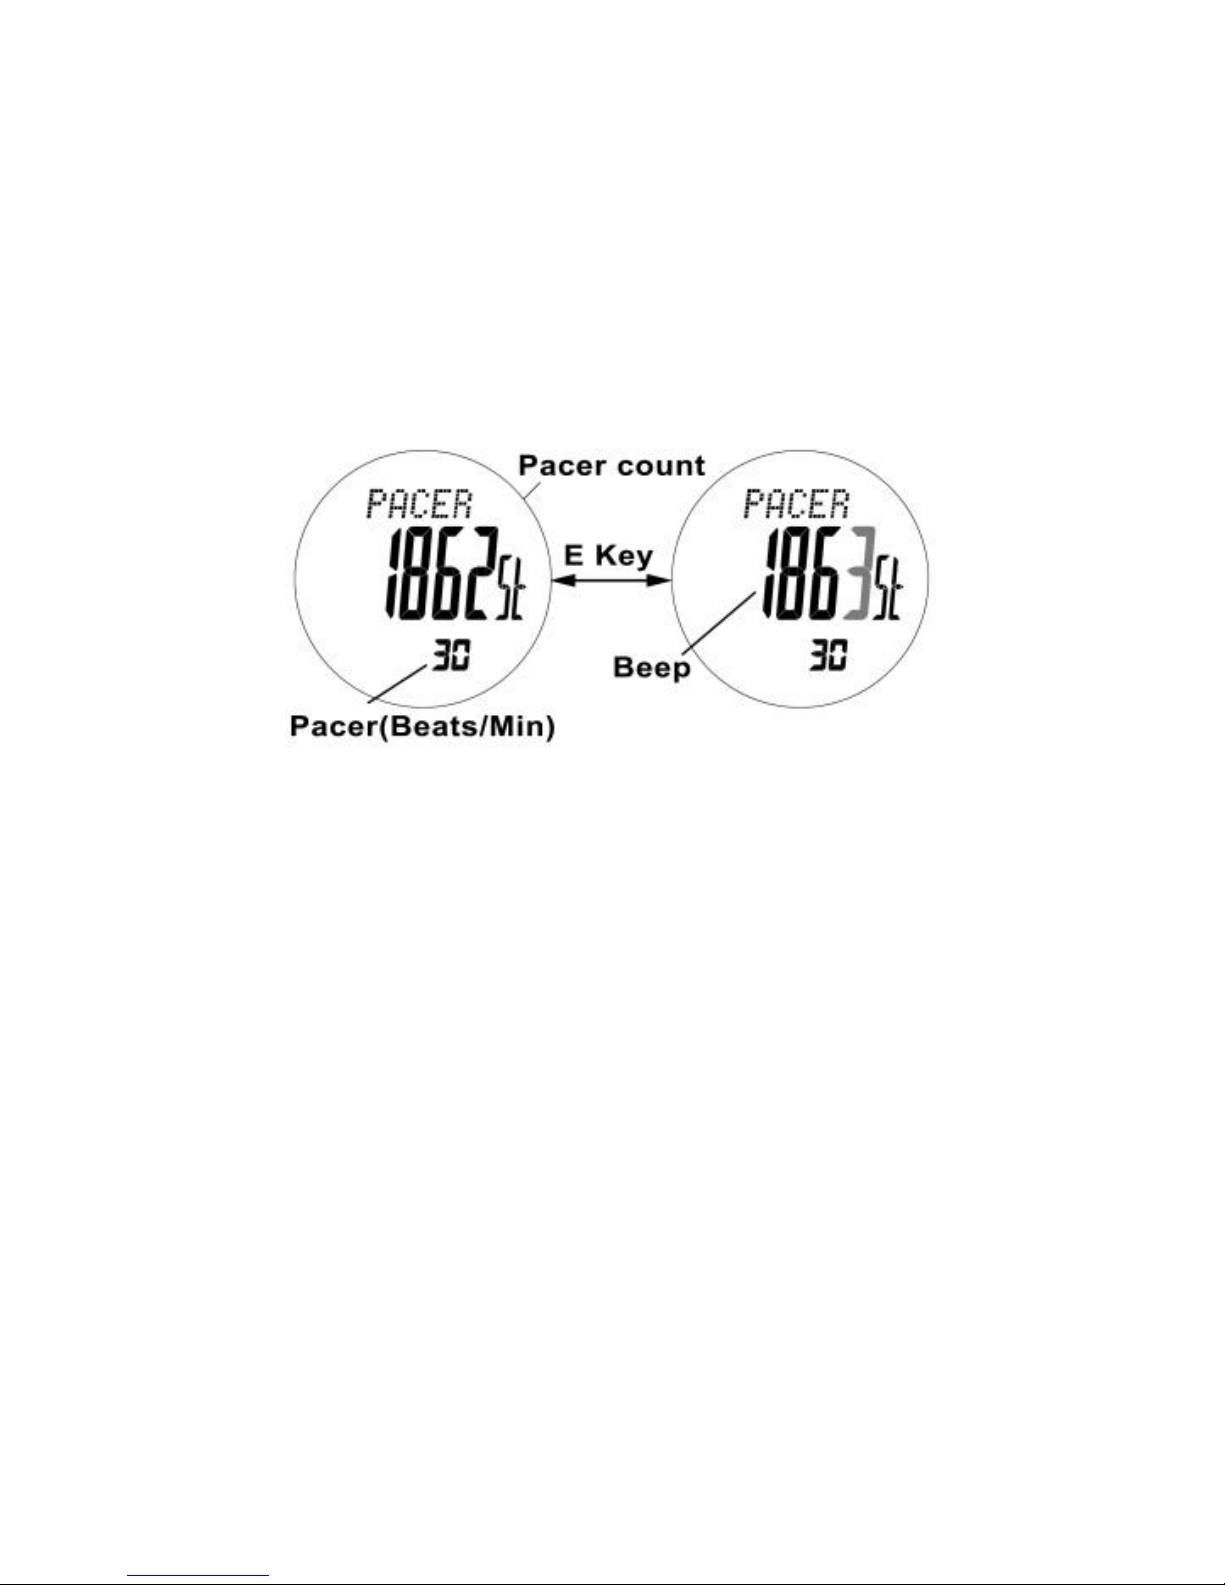
When start the pacer, the watch will work according to setting
BPM;
BPM setting ranges from 30 to 180, minimum step value is
5BPM;
The pacer will return to zero and start again under maximum
step value 99999;
Pacer Usage
Under pacer mode, press E button to start setting and
recording BPM. Press E button again, the pacer will stop.
Page 24
Repeat the above mentioned steps, it could record
cumulatively;
Press and hold C button, the record will be cleared;
Convert to other modes, the pacer will pause; return to pacer
or chronograph mode, it will start beeping;
10.1 Pacer Mode-Pacer Setting
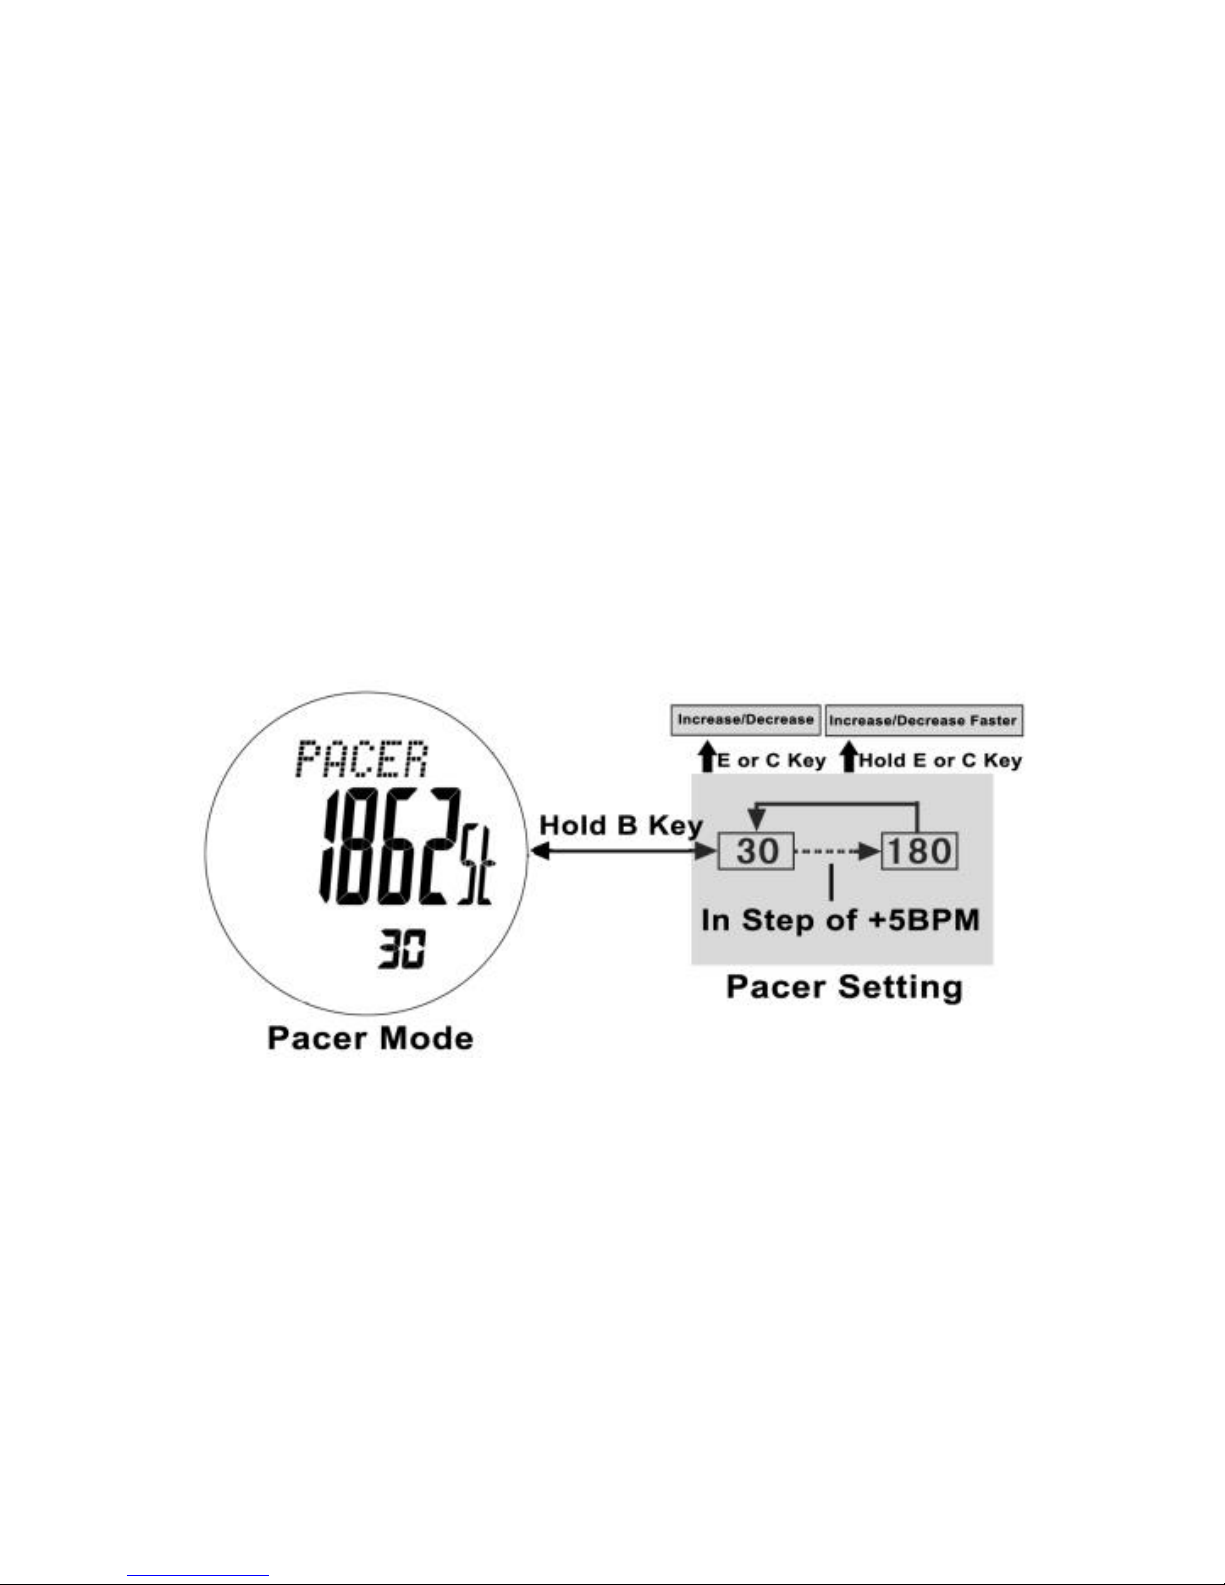
How to Set BPM (frequency)
1. Under pacer mode, press and hold B button to start setting;
2. Press E/C button to increase/decrease the digits (press and hold
Page 25

button to change faster);
3. Press and hold B button to save and exit.
Walk in accordance with the beeping sound of watch (suitable BPM
is 80-120).
NOTE: To save the power, the watch will exit the pacer mode if it
lasts over 8 hours.
Page 26
11.0 Dual Time Mode-Dual Time Setting
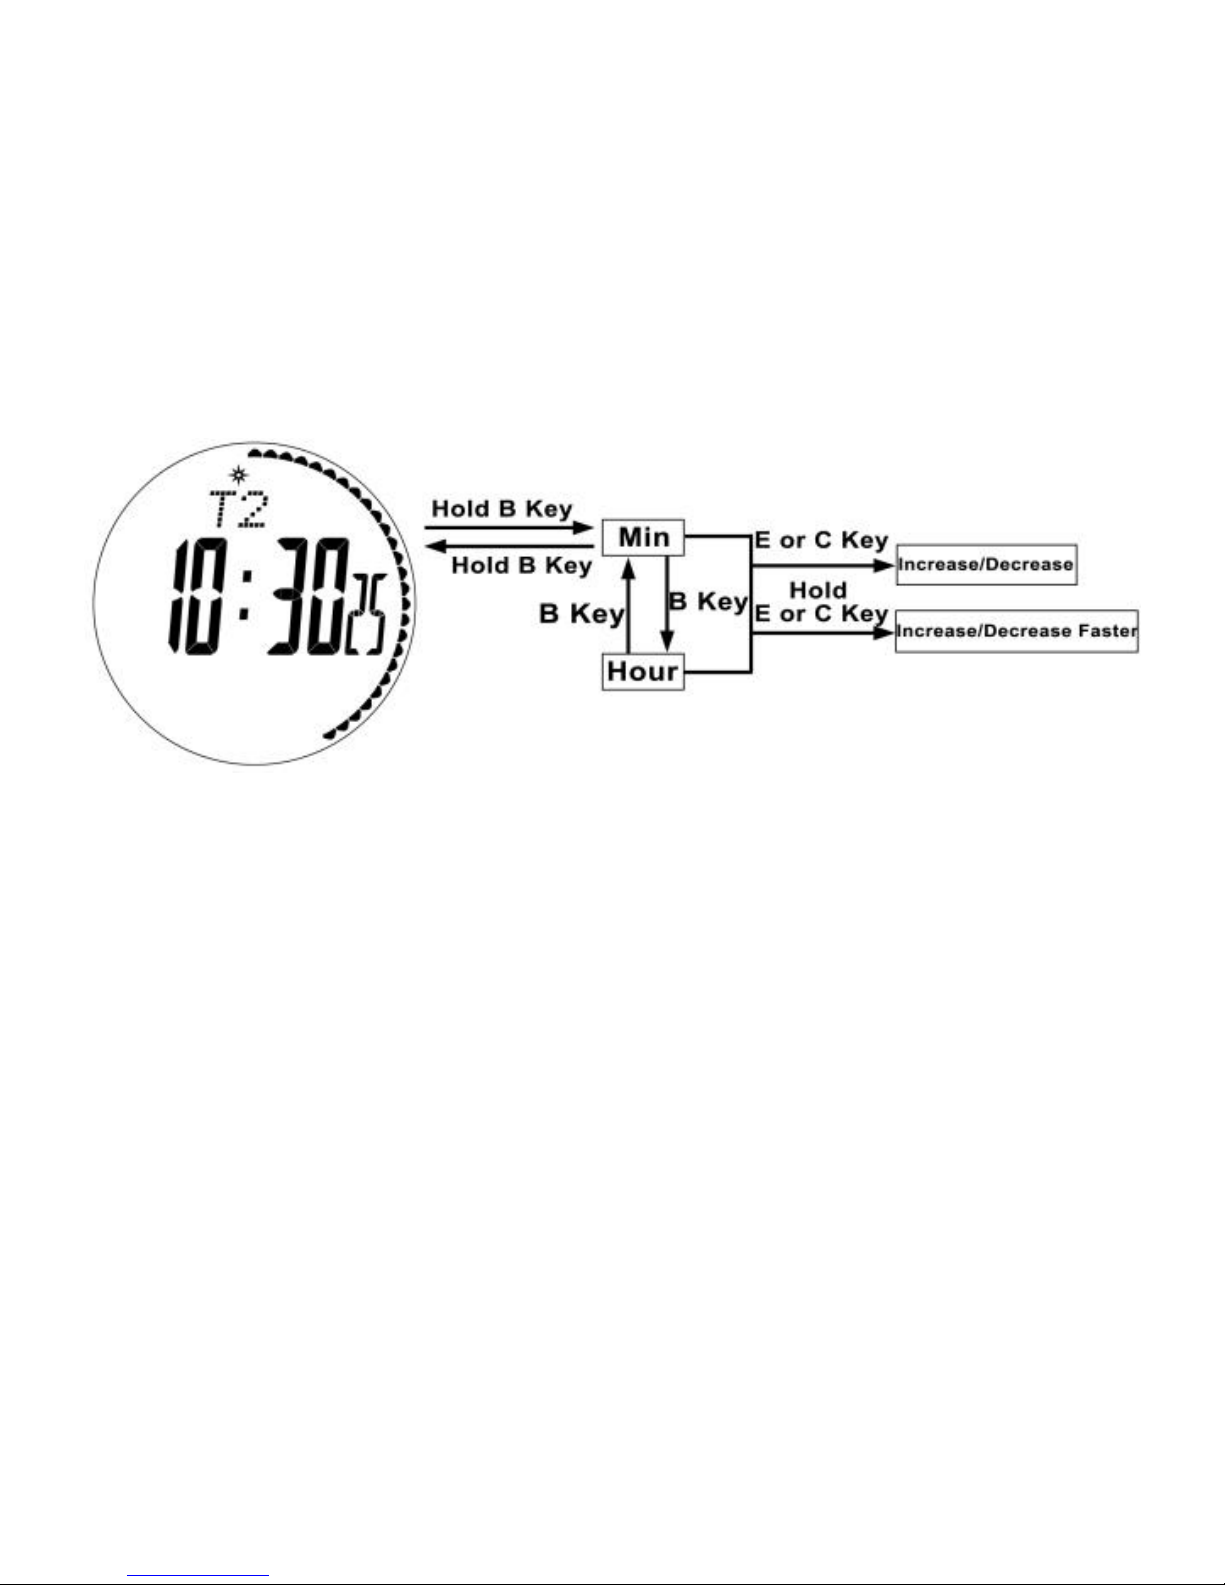
Dual time and current time is working independently.
How to Set Dual Time
1. Under dual time mode, press and hold B button until the flashing
icon “SET” appears;
2. Press B button to convert minute and hour;
3. Press E/C button to increase/decrease the digit (press and hold
button to change faster);
4. Press and hold B button to save and exit.
Page 27
12.0 Altimeter Mode-Temperature and Altitude
Historical Chart
Function Display
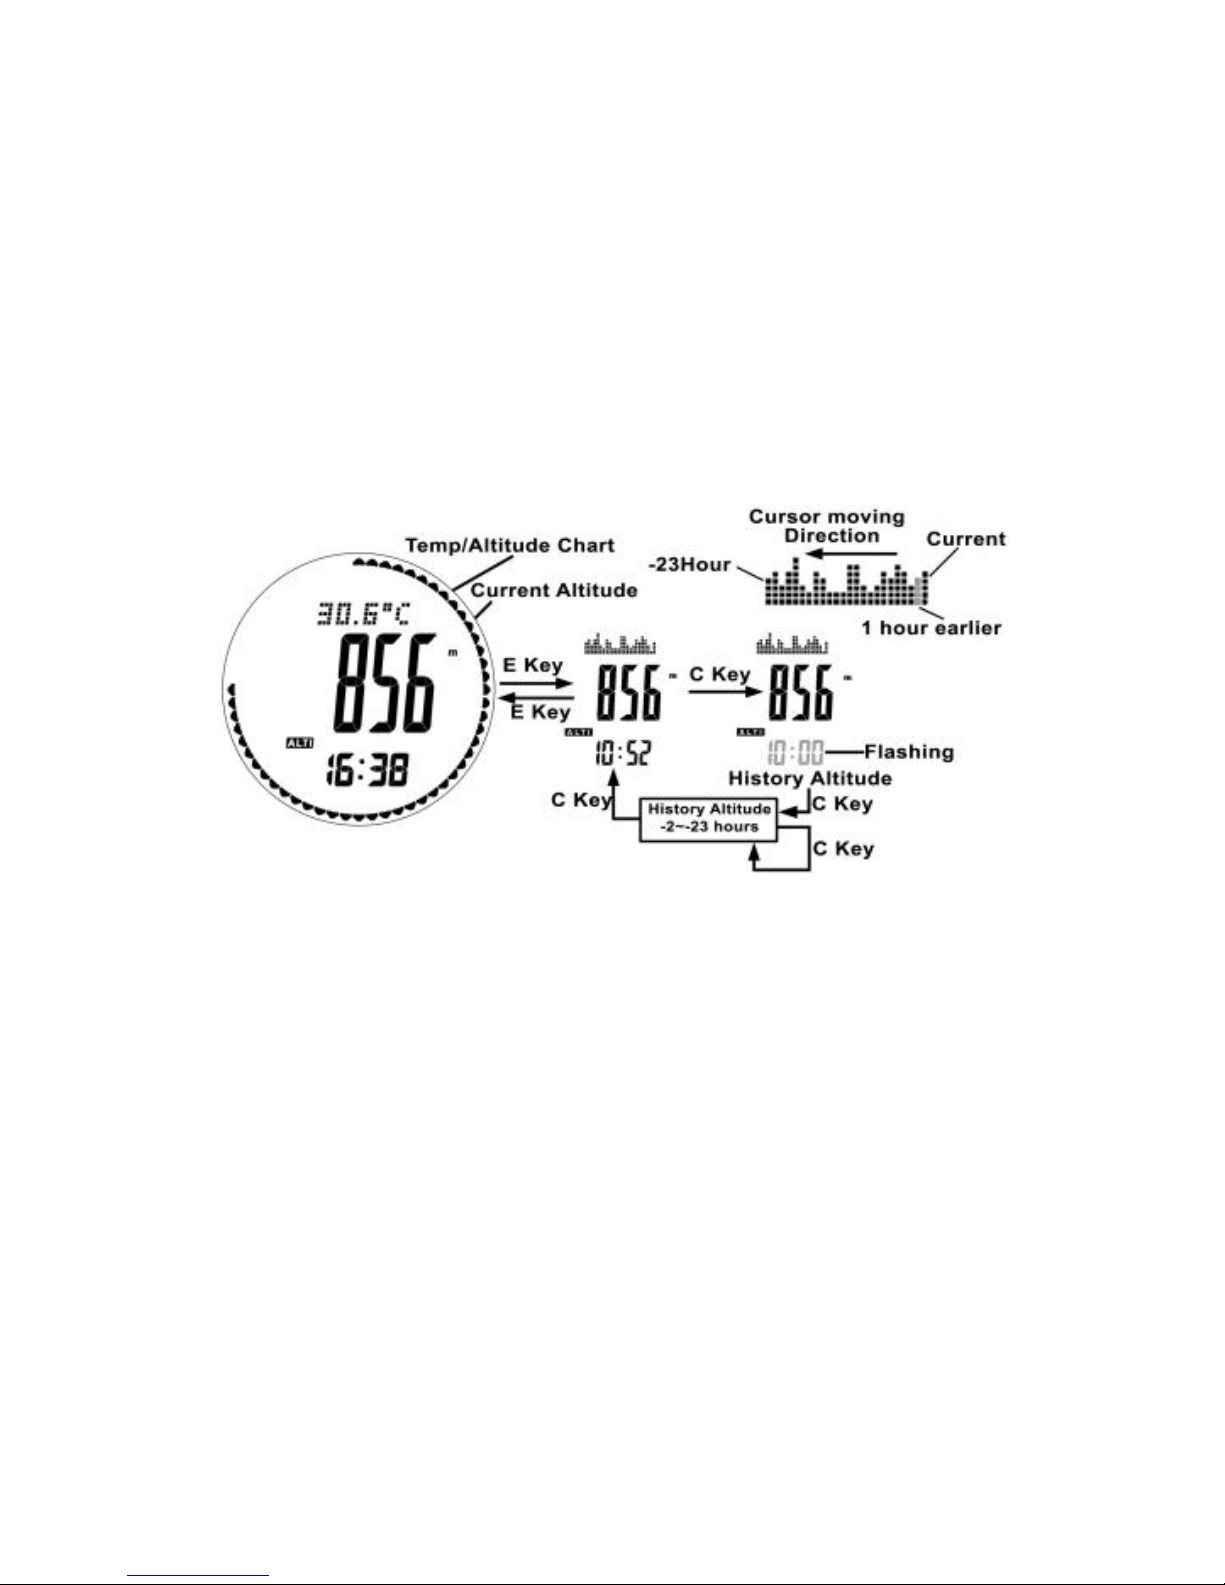
The watch contains 2 functions: temperature and altitude
historical chart;
Press E button to convert temperature and altitude historical
chart;
Temperature Display
Temperature could be displayed with two units: degree Celsius (℃)
Page 28
or degree Fahrenheit(℉);
Historical Altitude Display
The watch could record the current altitude value
automatically at every o’clock and generate the historical
altitude chart;
If the user wants to review the historical altitude value in the
past 23 hours, press C button, then the corresponding altitude
record and its recording time (flashing) will appear on the
display;
12.1 Altimeter Mode-Units Convert
How to Convert between Units?
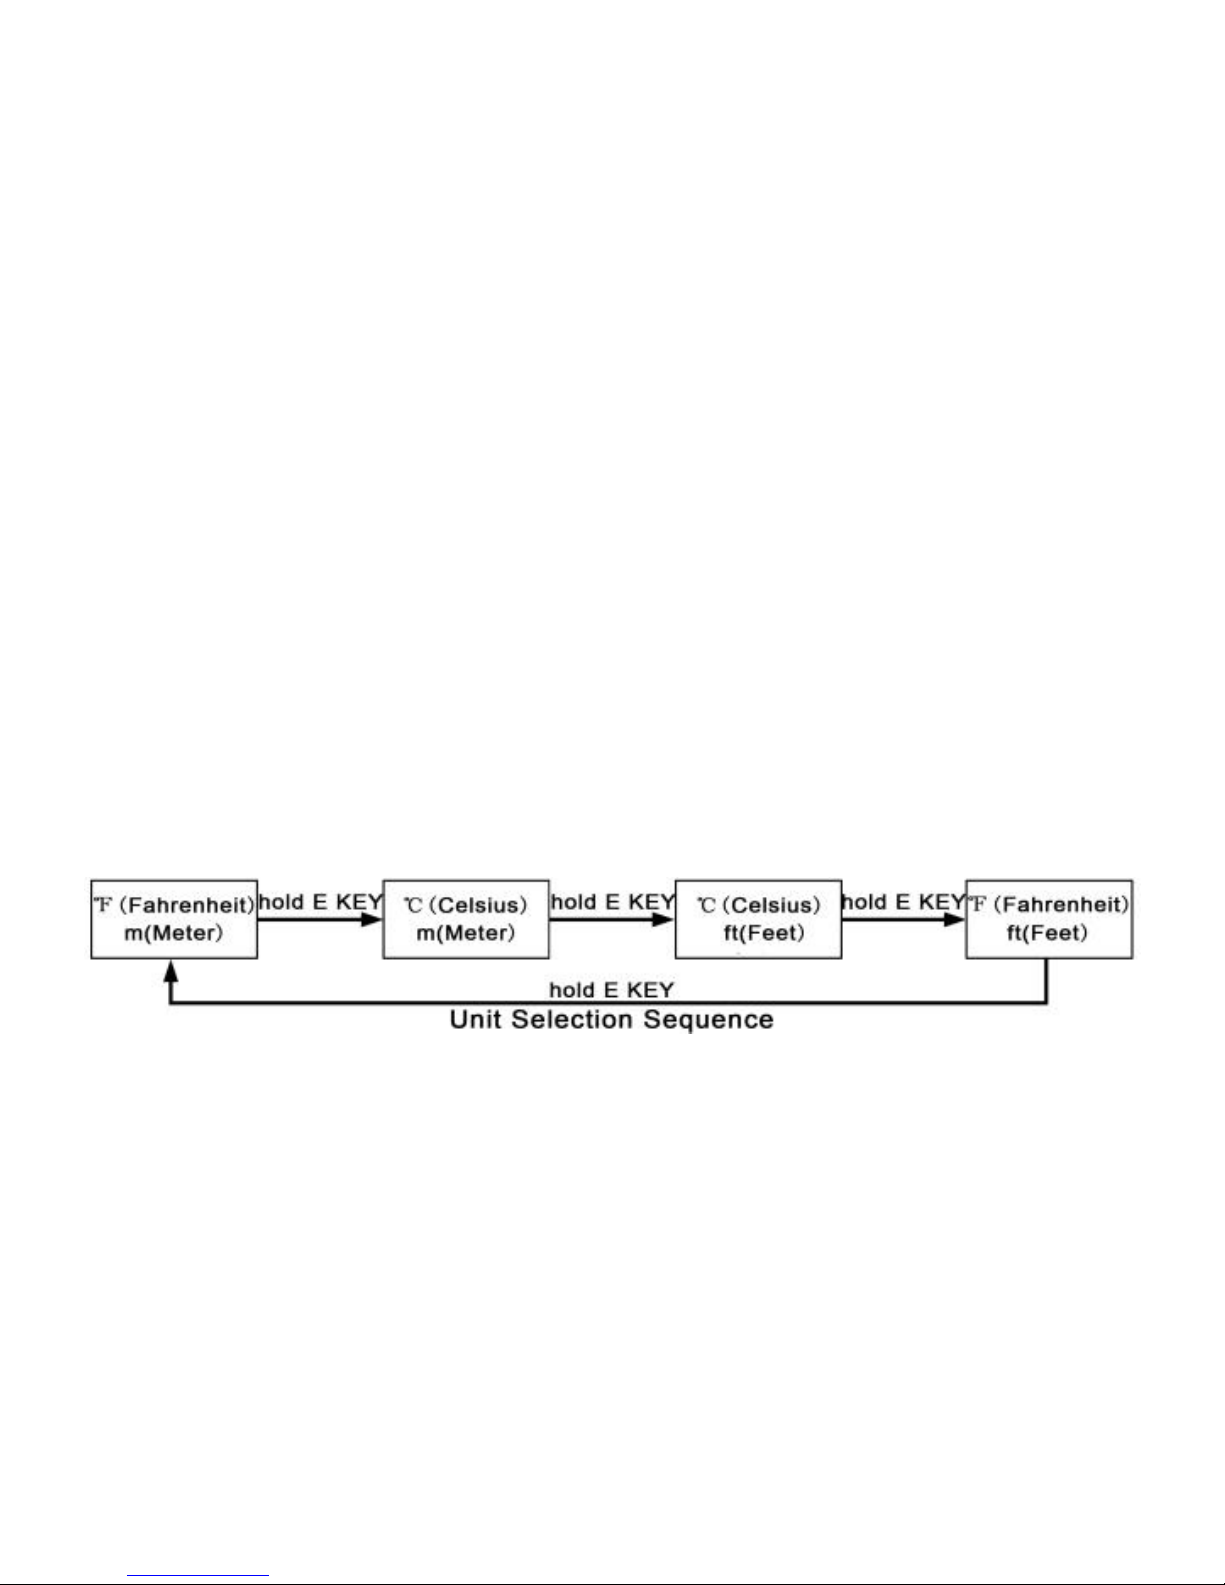
Altitude unit: meter(m) or feet(ft);
Temperature unit: degree Celsius (℃) or degree Fahrenheit
Page 29

(℉);
Press and hold E button to convert the units as above.
12.2 Altimeter Mode-Absolute Altitude and Relative
Altitude
Absolute Altitude and Relative Altitude
Absolute altitude is the vertical distance from the current
location to the sea level;
Relative altitude is the vertical distance from the current
location to the presetting zero height.
12.3 Altimeter Mode-Altimeter Adjustment
Page 30
Why the altimeter needs to be adjusted?
As the altitude value is calculated from the air pressure, but
the air pressure varies often;.
To achieve a more accurate value, the altimeter needs to be
calibrated appropriately.
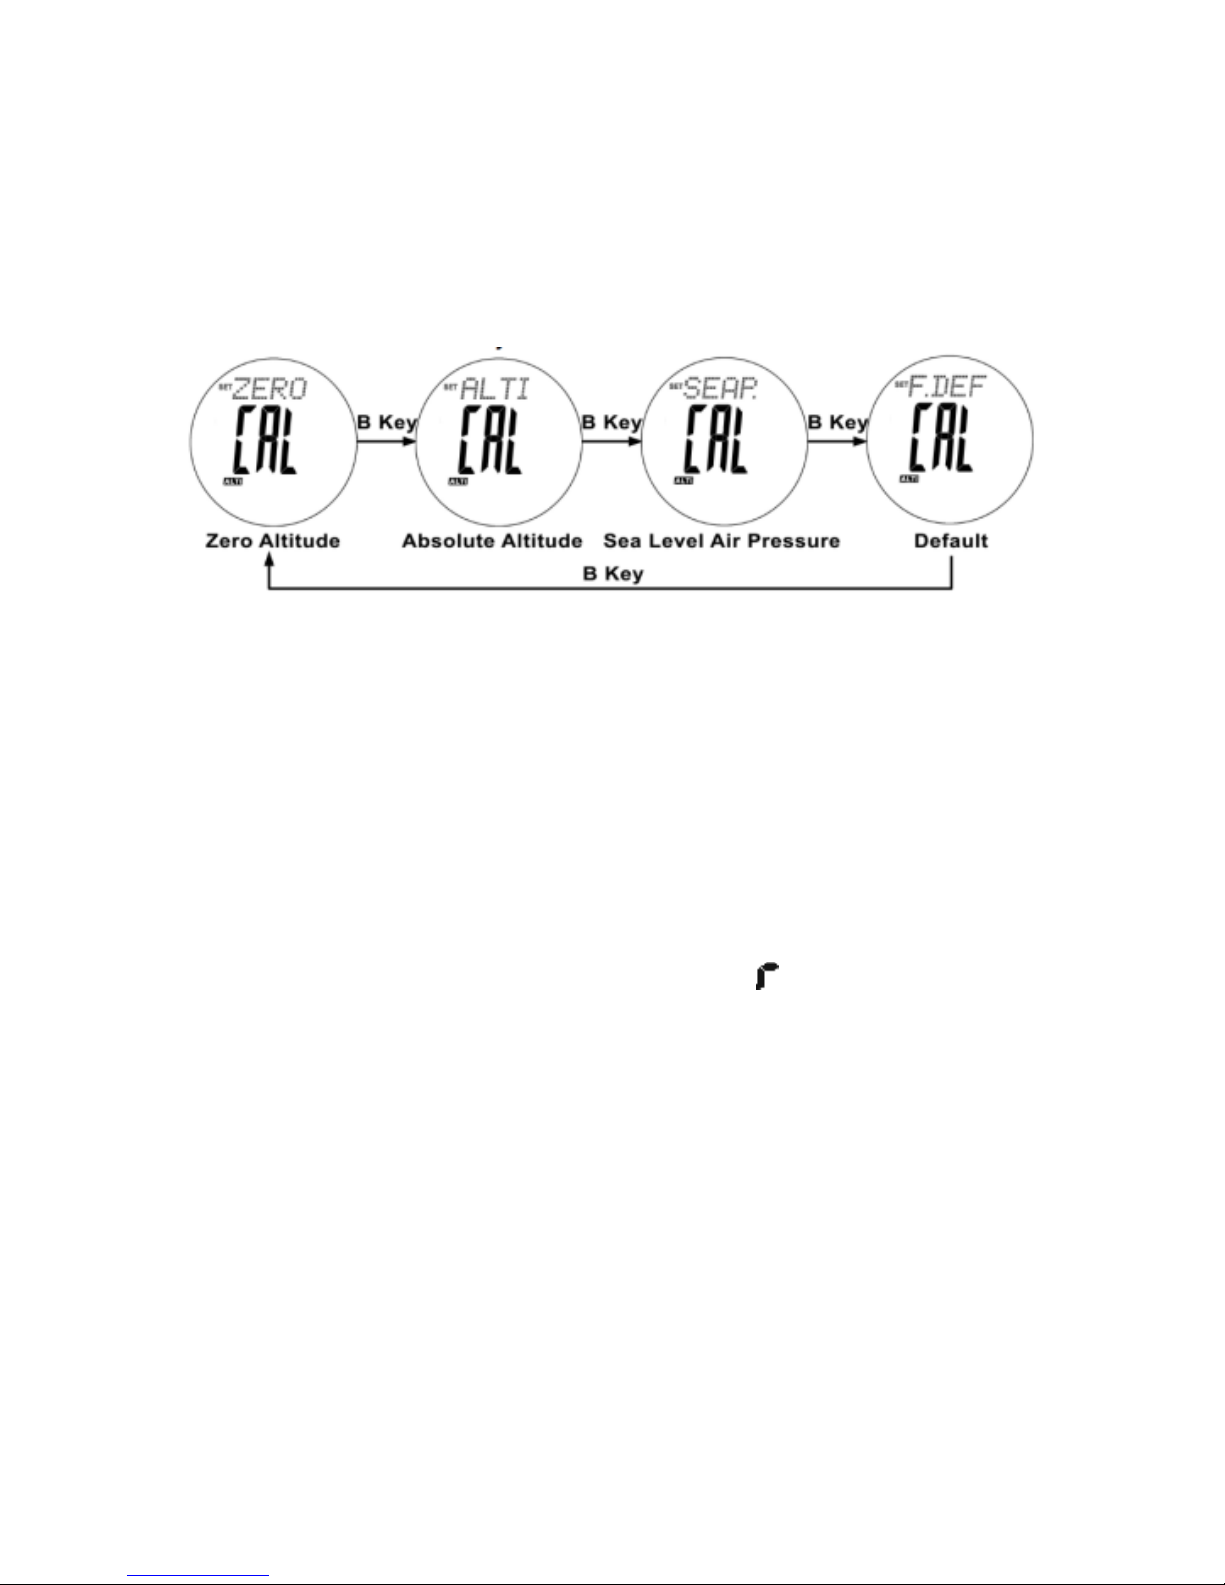
4 kinds of altimeter adjustment method
Zero altitude: set an altitude as 0, in order to measure the
relative altitude easily, until the icon “ ” appears;
Absolute altitude: set altitude to a target value;
Sea level air pressure: input a target sea level air pressure
value;
Factory default setting: reset the watch to factory default
setting, meaning sea level air pressure is 1013.2mb.
Page 31
NOTE: the above 4 methods work independently, if you choose one
method, then the previous setting of other 3 methods will not work
NOTE: the watch contains the feature of sea level air pressure
correction automatically. It means that the sea level air pressure will
be corrected automatically beneath one same altitude.
12.4 Altimeter Mode-Zero Altitude Adjustment
Page 32
Zero Altitude Adjustment
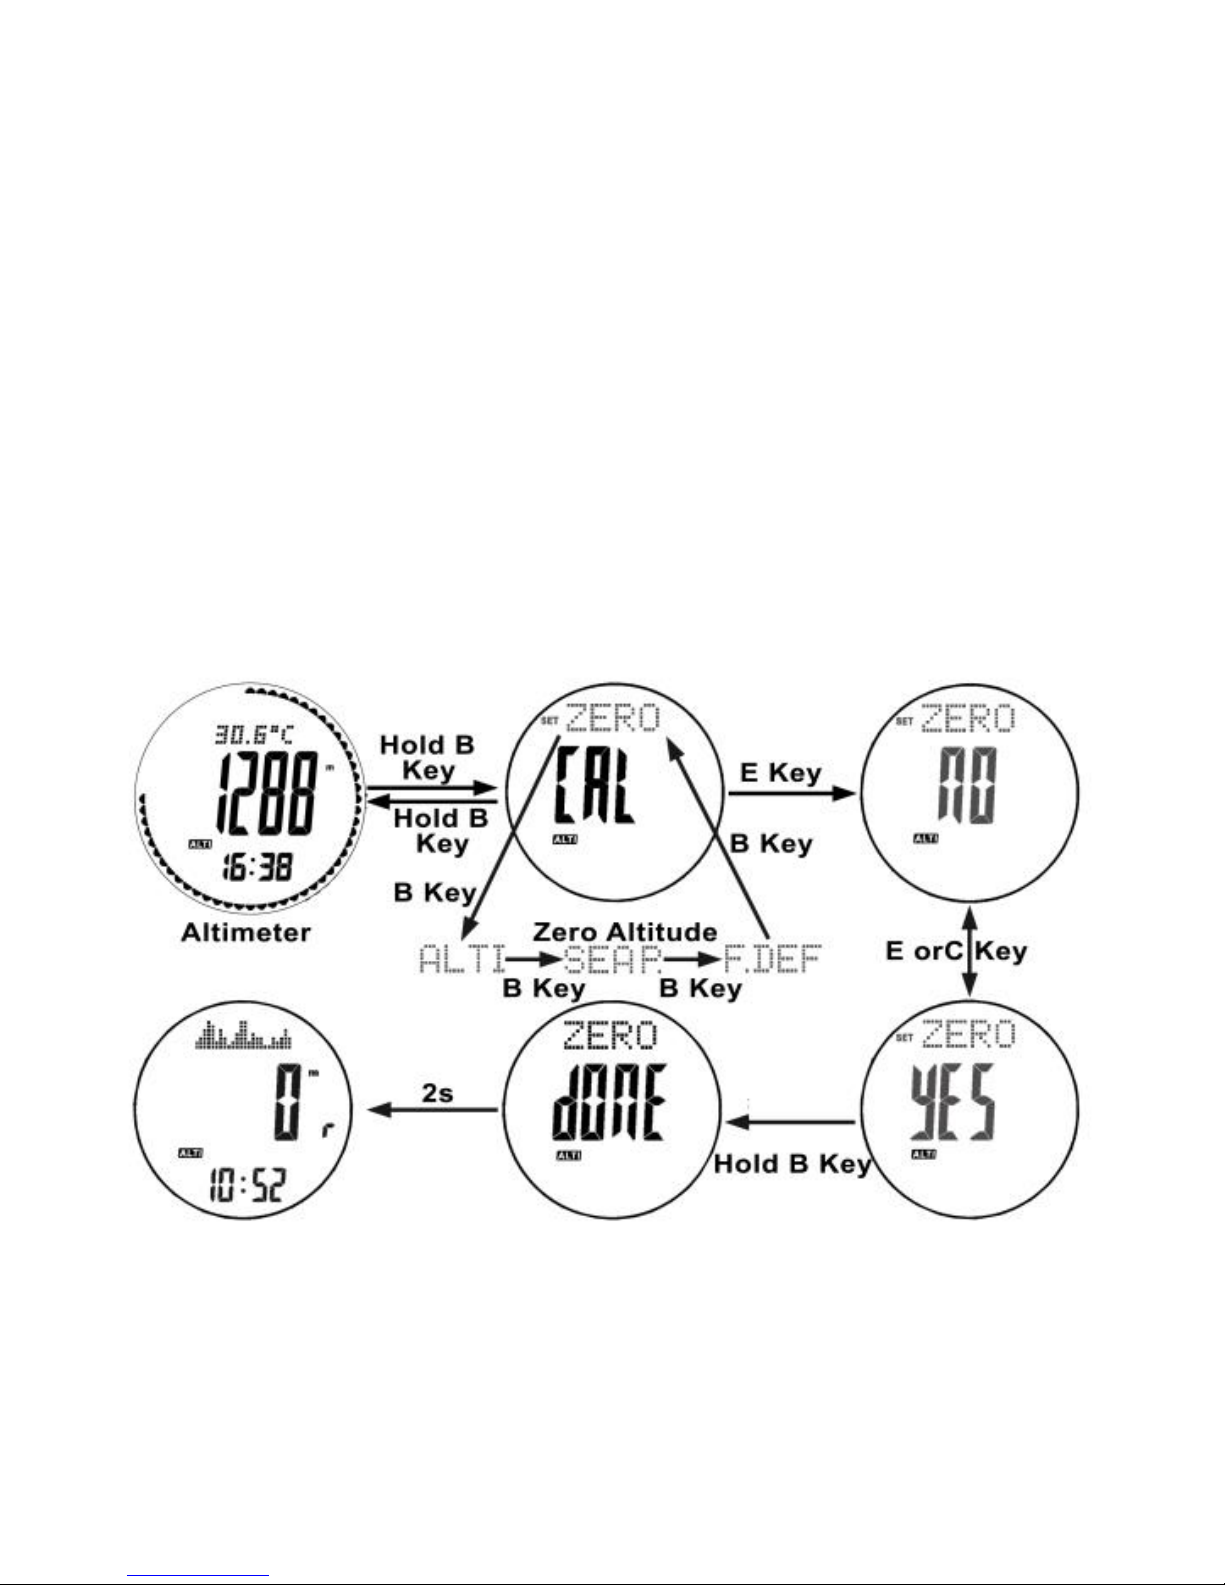
1. Under altimeter mode, press and hold B button to convert the
following 4 kinds of adjustment method: zero altitude, absolute
altitude, sea level air pressure and factory default setting;
2. Under zero altitude, press E button, the icon “NO” will appear;
3. When the icon “NO” appears, press E/C button to select “YES”
(adjust the altitude to zero)or “NO”(cancel the adjustment);
4. Press B button to save and exit. If “YES” is selected, then exit
after icon “DONE” for 2 seconds.
12.5 Altimeter Mode-Absolute Altitude Adjustment
Absolute Altitude Adjustment
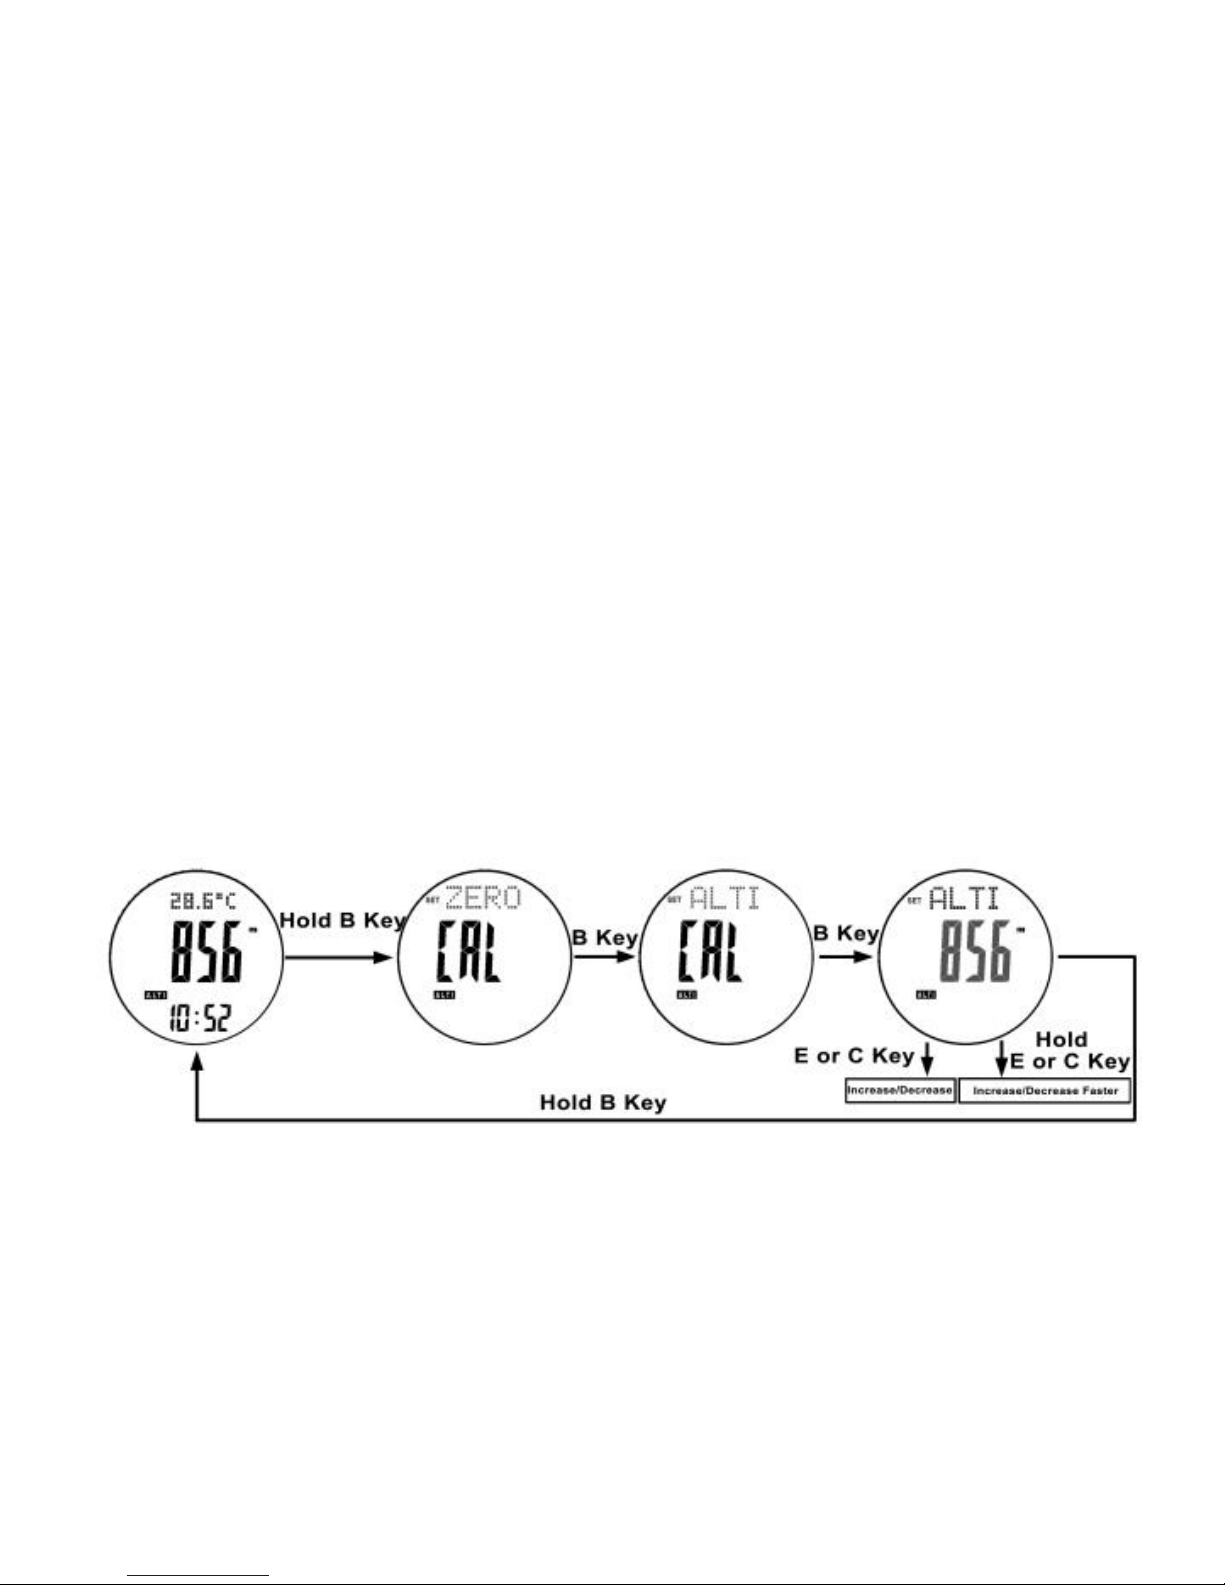
1. Under altimeter mode, press and hold B button to convert the
Page 33
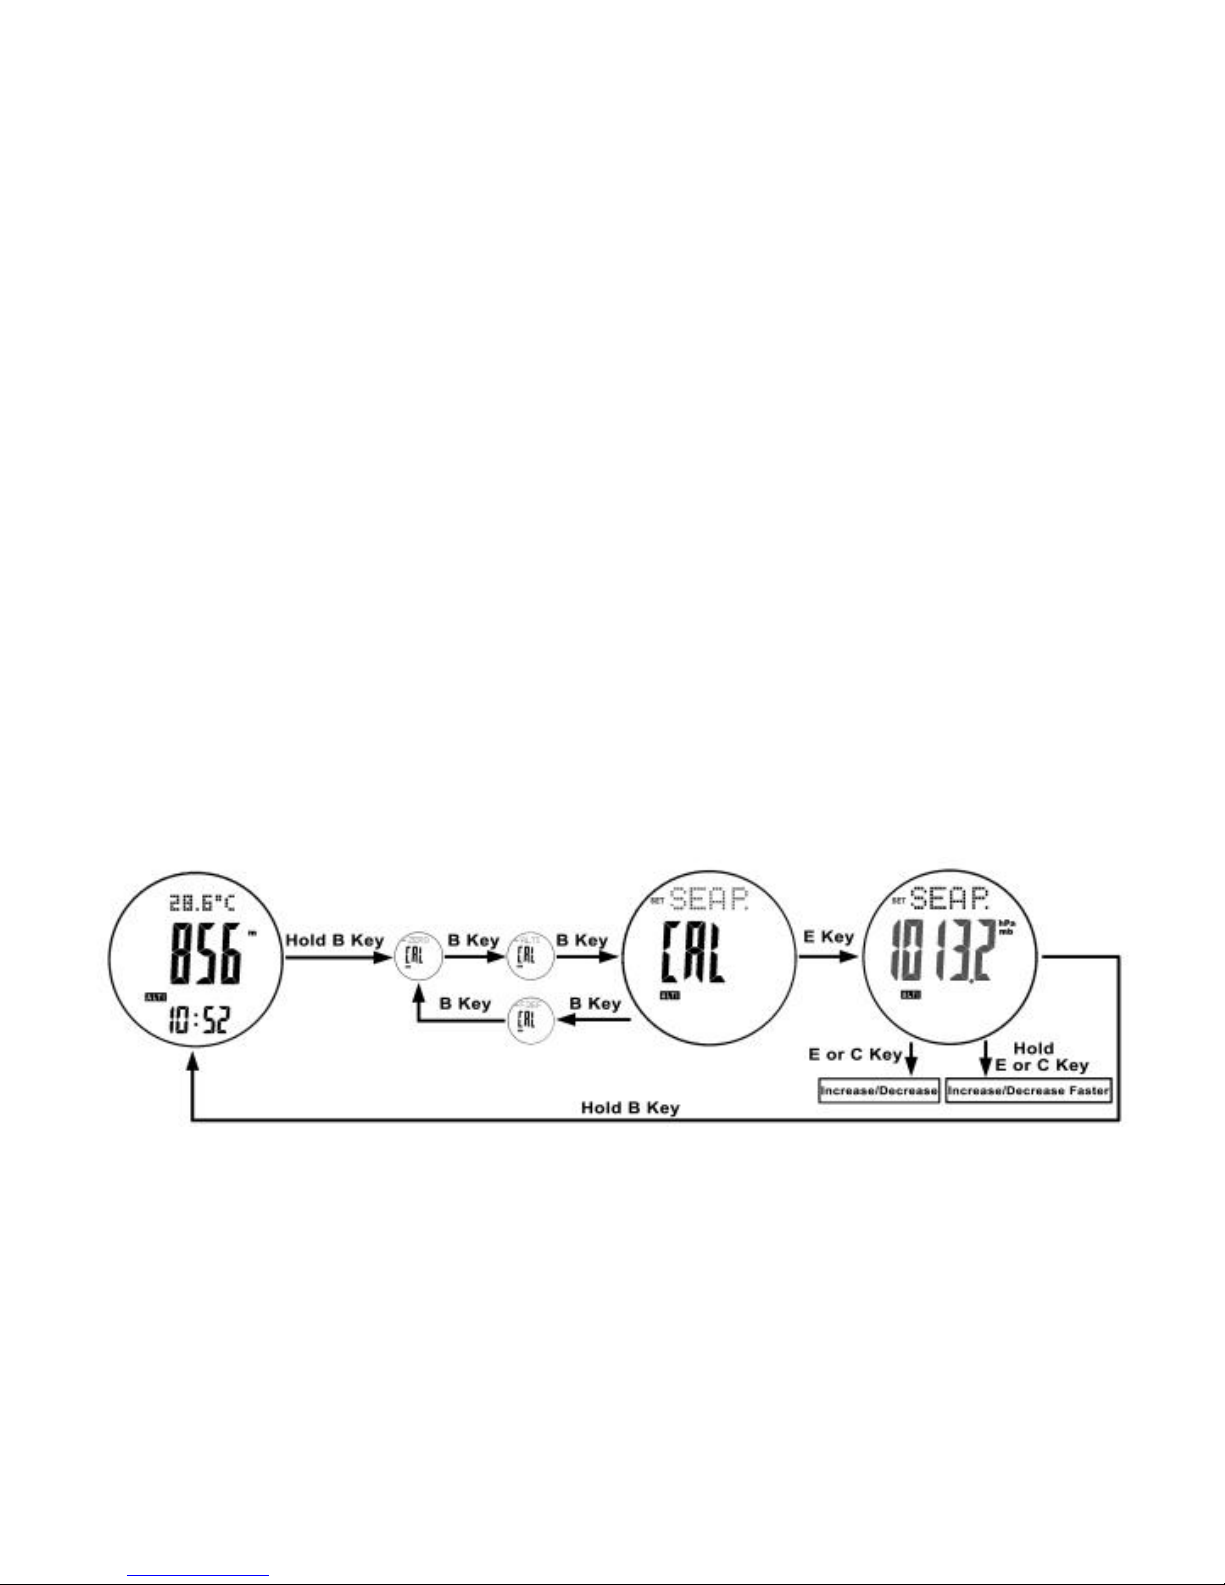
following 4 kinds of adjustment method: zero altitude, absolute
altitude, sea level air pressure and factory default setting;
2. Under absolute altitude, press E button, the altitude value will
appear;
3. When the altitude value appears, press E/C button to increase or
decrease the digits to the target altitude value (Press and hold the
button to change faster);
4. Press and hold B button to save and exit.
12.6 Altimeter Mode-Sea Level Air Pressure
Adjustment
Sea Level Air Pressure Adjustment
1. Under altimeter mode, press and hold B button to convert the
Page 34

following 4 kinds of adjustment method: zero altitude, absolute
altitude, sea level air pressure and factory default setting;
2. Under sea level air pressure (SEAP), press E button, the SEAP
value will appear;
3. When the SEAP value appears, press E/C button to increase or
decrease the digits to the target SEAP value (Press and hold the
button to change faster);
4. Press and hold B button to save and exit.
12.7 Altimeter Mode-Factory Default Setting
Adjustment
Page 35
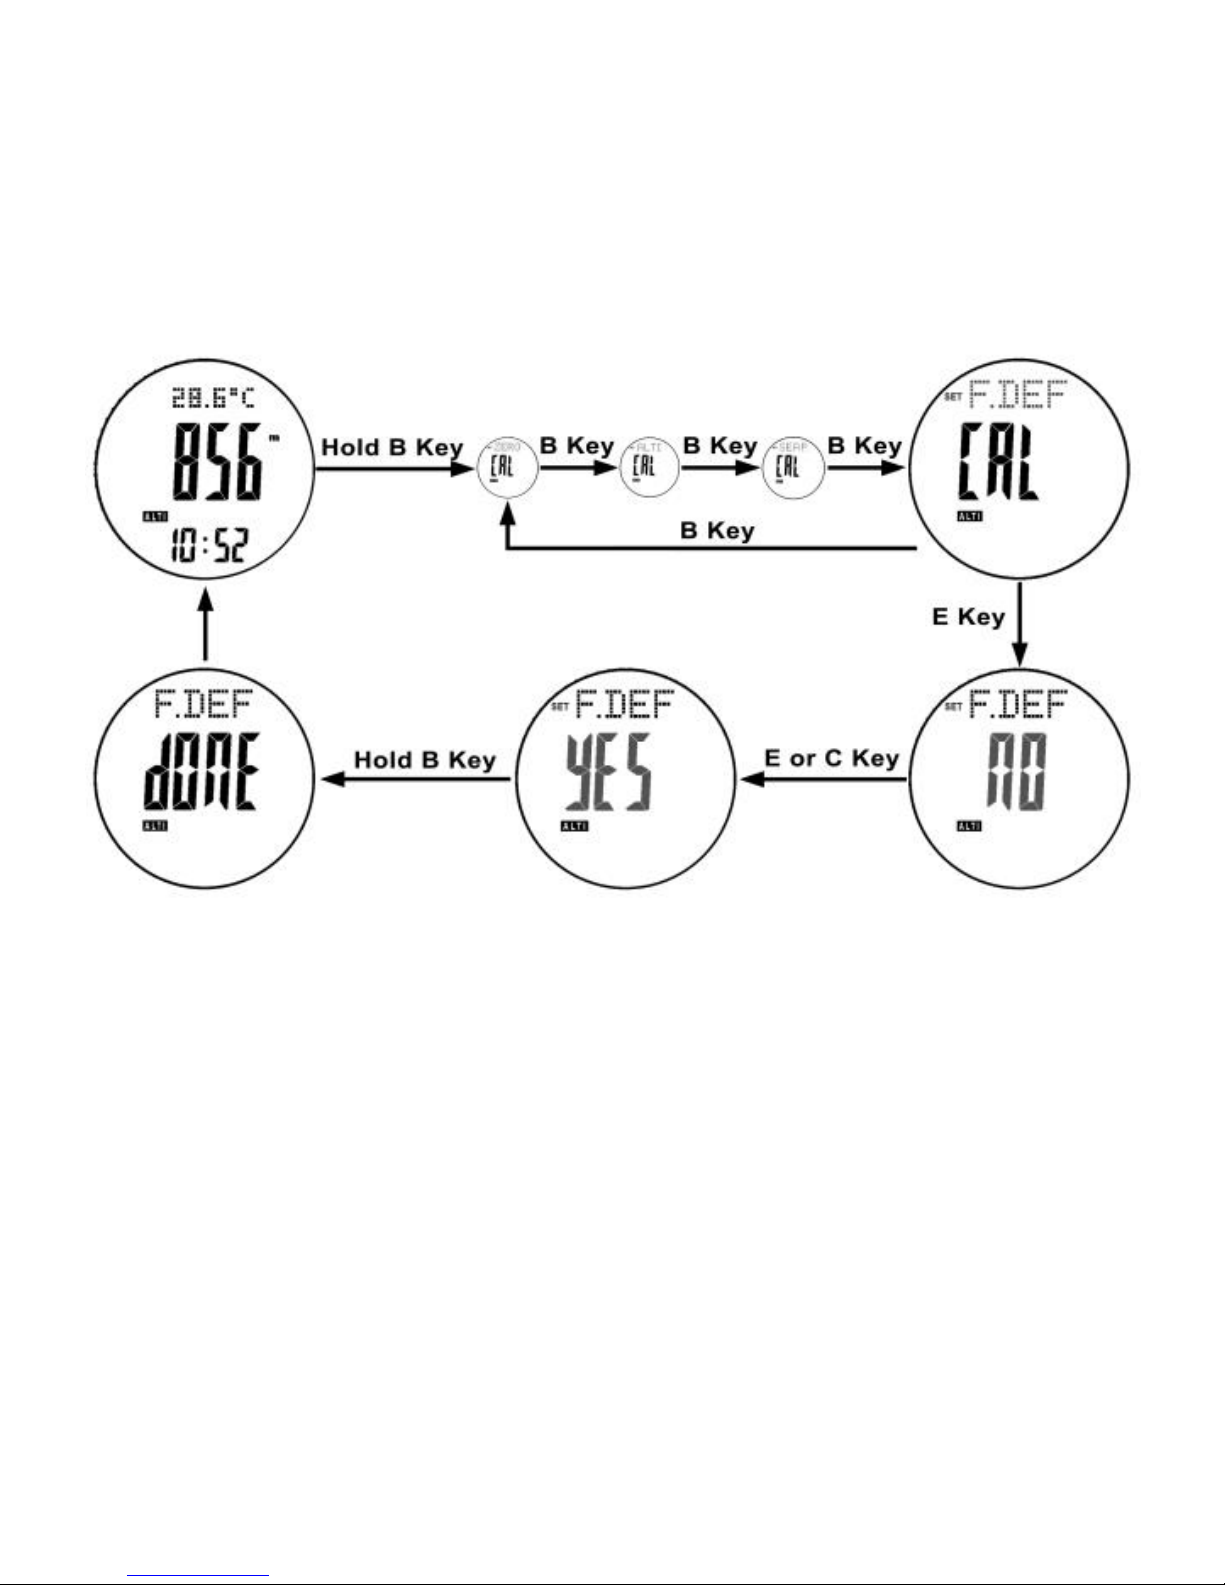
Factory Default Setting Adjustment
1. Under altimeter mode, press and hold B button to convert the
following 4 kinds of adjustment method: zero altitude, absolute
altitude, sea level air pressure and factory default setting;
2. Under factory default setting (F.DEF), press E button, the icon
“NO” will appear;
3. When the icon “NO” appears, press E/C button to select “YES”
Page 36

(factory default setting)or “NO”(cancel the adjustment);
4. Press B button to save and exit. If “YES” is selected, then exit
after icon “DONE” for 2 seconds.
13.0 Barometer Mode-Temperature and Air
Pressure Historical Chart
Page 37
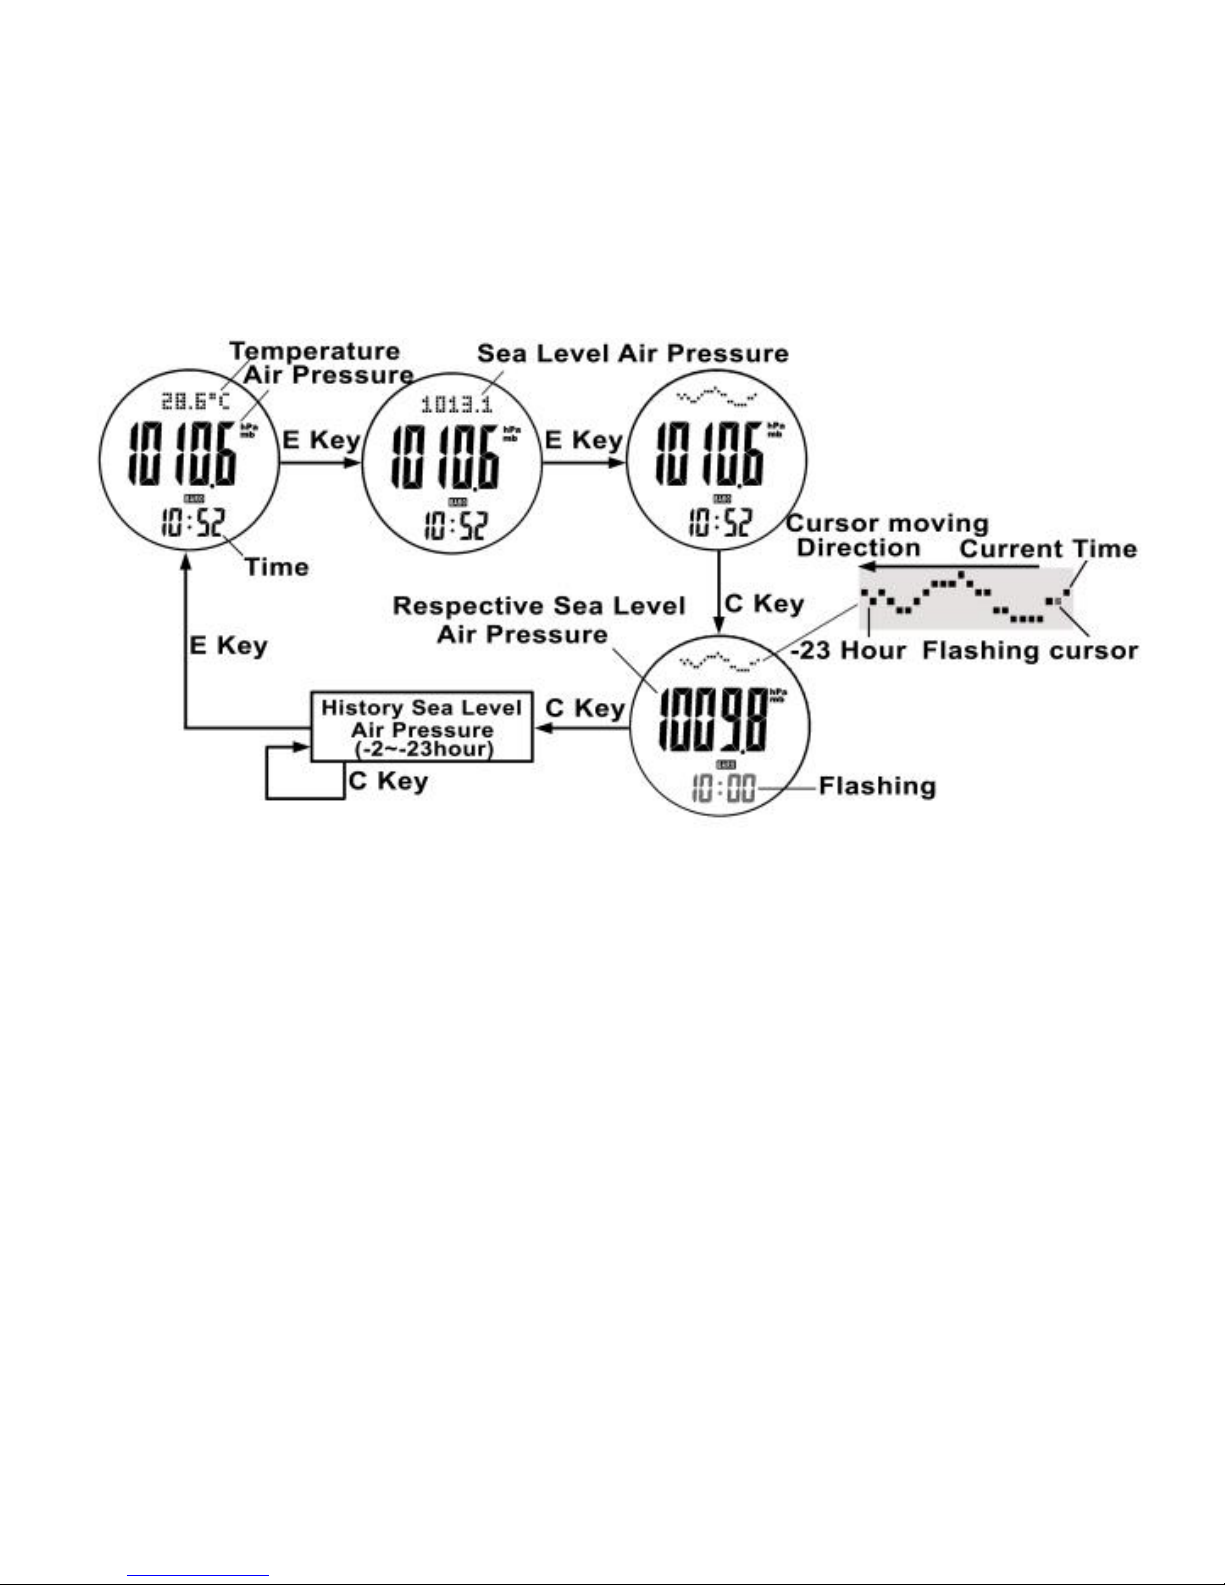
Function Display
The watch contains 3 functions: temperature, sea level air
pressure and air pressure historical chart;
Temperature Display
Temperature could be displayed by degree Celsius (℃) or
degree Fahrenheit(℉);
Air Pressure Historical Chart
The watch could record the current SEAP value automatically
at every o’clock and generate the air pressure historical chart;
Page 38
If the user wants to review the air pressure historical value in
the past 23 hours, press C button, then the corresponding air
pressure record and its recording time (flashing) will appear
on the display;
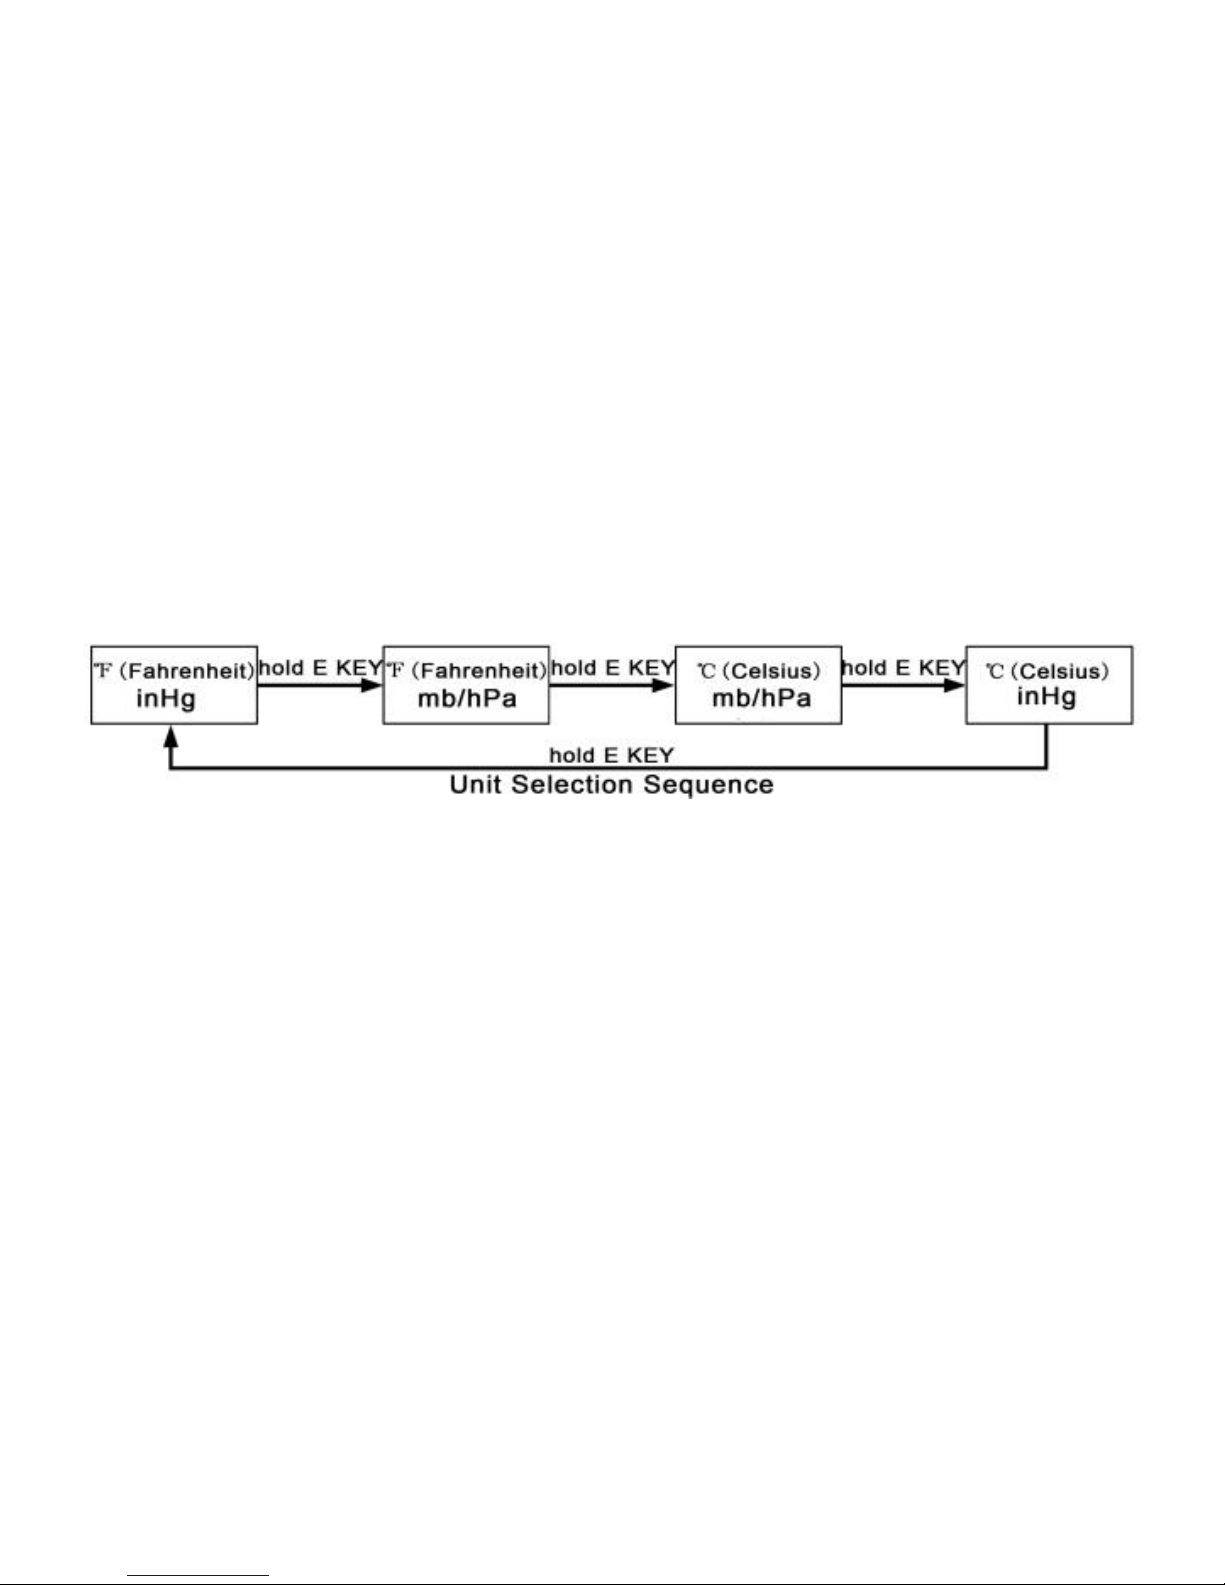
13.1 Barometer Mode-Unit Convert
How to convert between units
Air pressure unit: mb/hPa / inHg;
Temperature unit: degree Celsius (℃) or degree Fahrenheit
(℉);
Press and hold E button to convert the 4 units as above.
Page 39
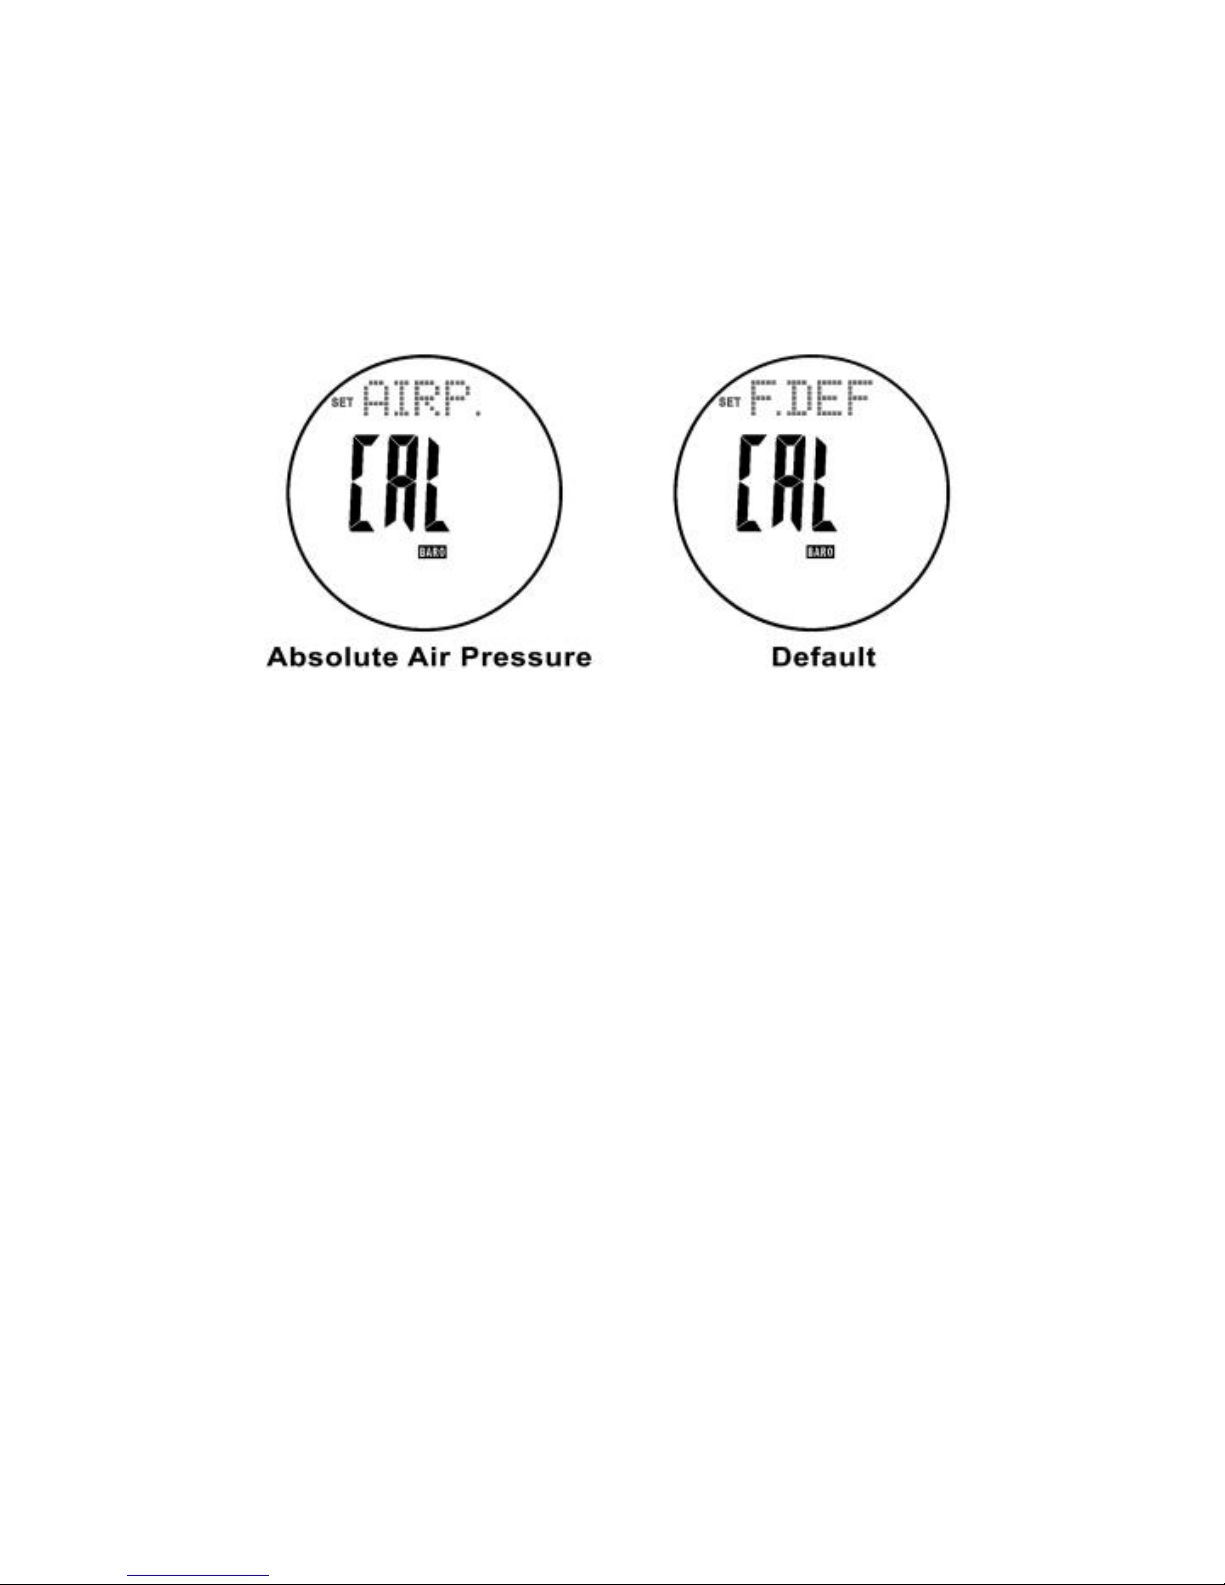
2 kinds of Barometer Adjustment
Absolute air pressure: adjust the air pressure value to the
target one.
Factory default setting: reset the watch to factory default
setting.
13.2 Barometer Mode-Absolute Air Pressure
Adjustment
Page 40
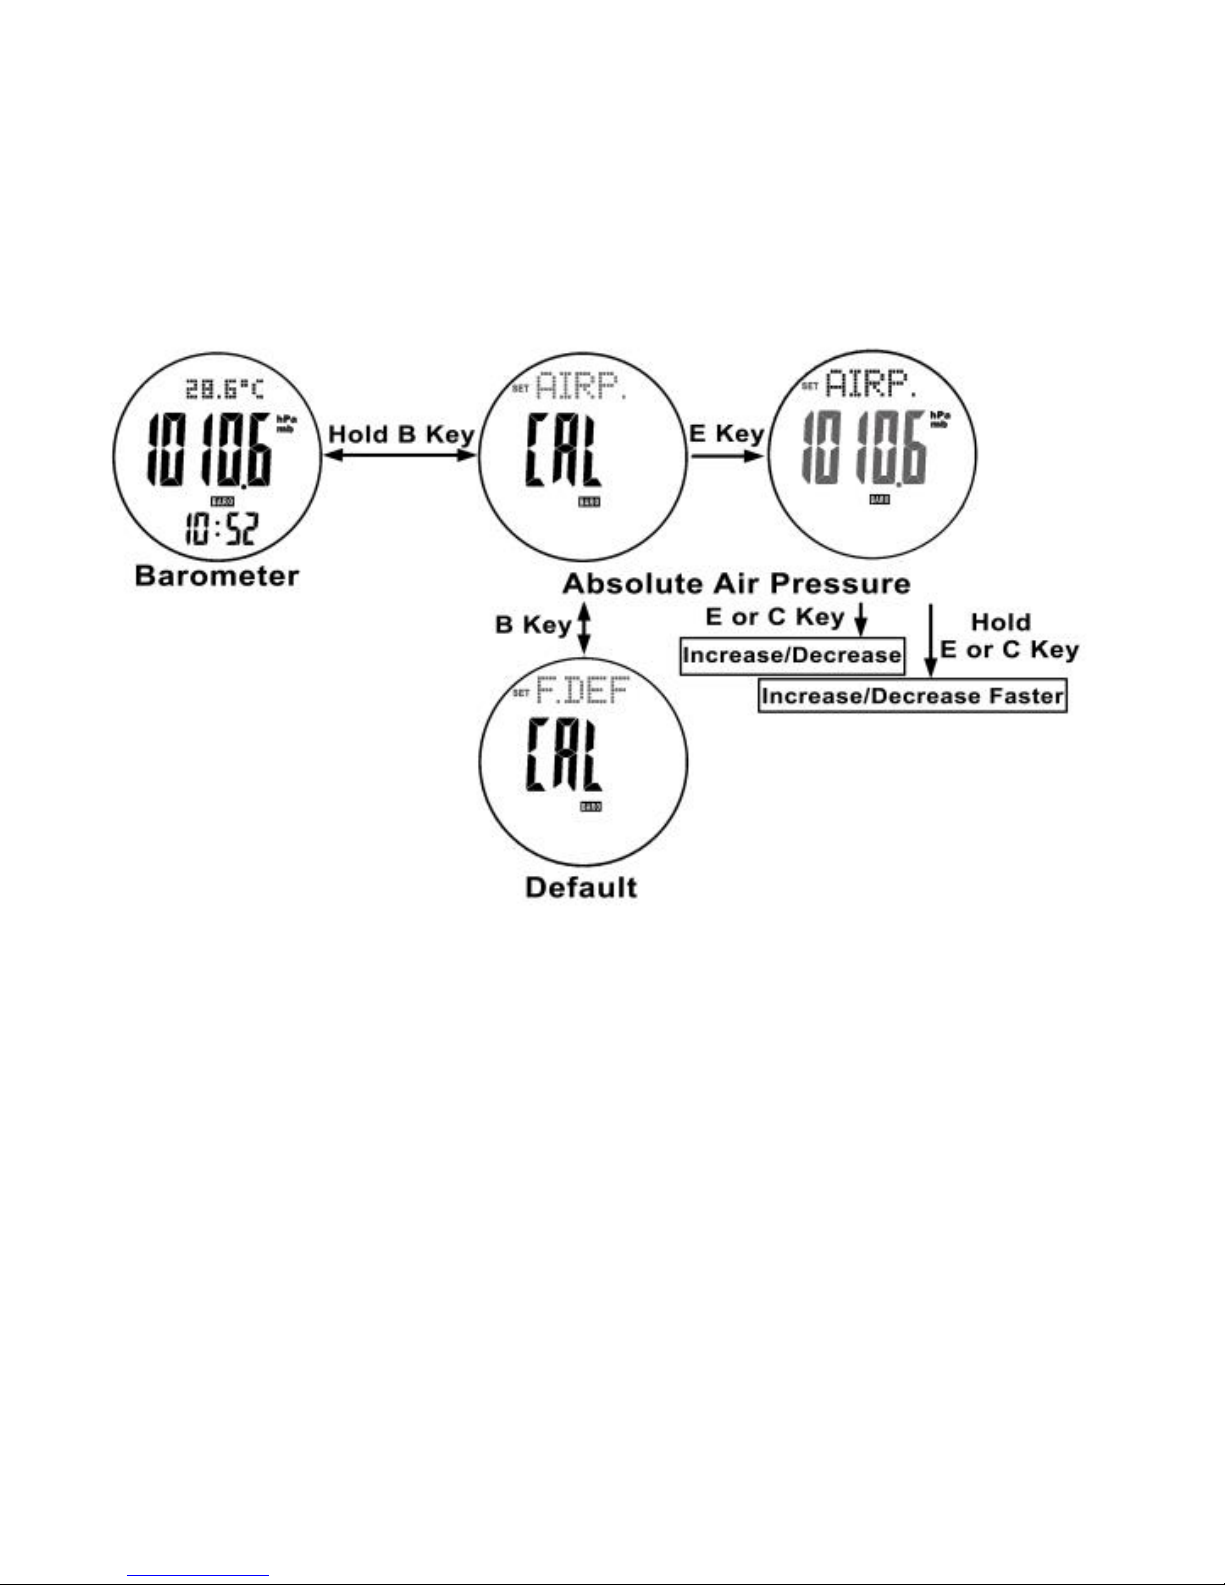
Absolute Air Pressure Adjustment
1. Under barometer mode, press and hold B button to convert the
following 2 kinds of adjustment method: absolute air pressure and
factory default setting;
2. Under absolute air pressure, press E button, the air pressure
value will appear;
3. When the air pressure appears, press E/C button to increase or
Page 41
decrease the digits to the target air pressure value (Press and hold
the button to change faster);
4. Press B button to save and exit.
13.3 Barometer Mode-Factory Default Setting
Adjustment
Page 42

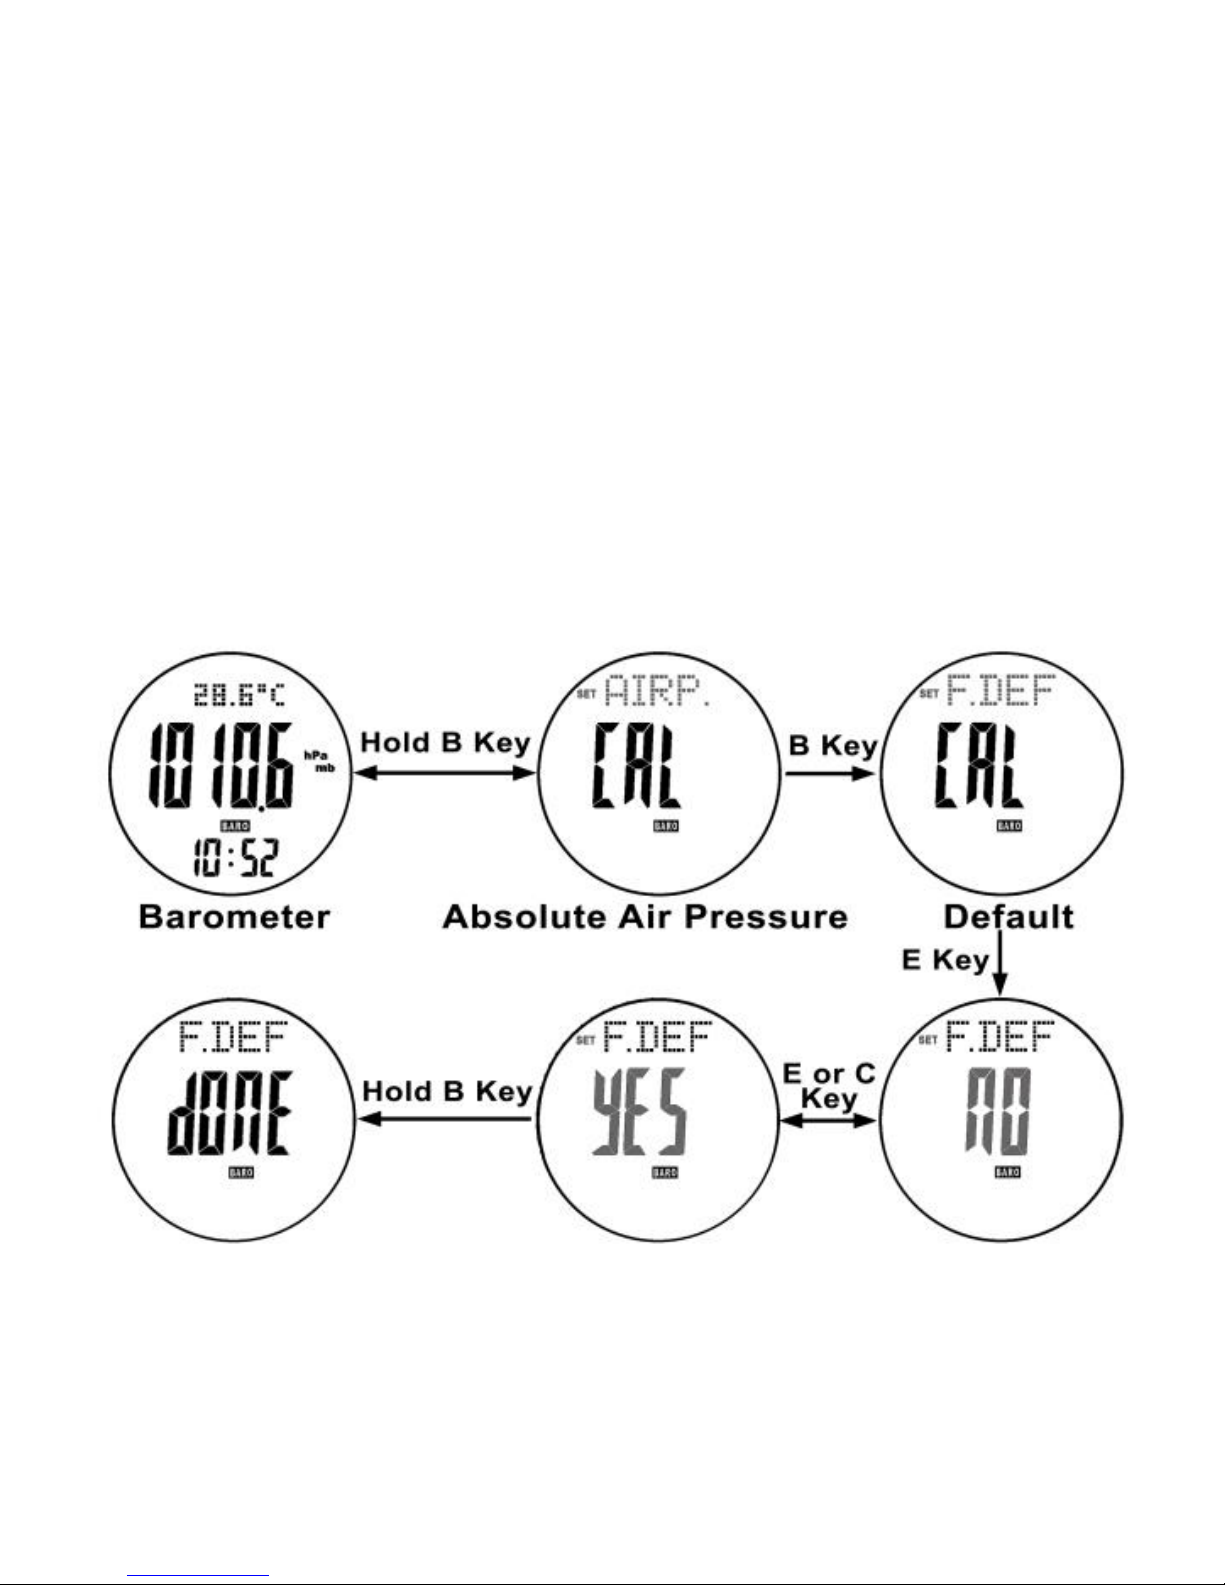
Factory Default Setting Adjustment
1. Under barometer mode, press and hold B button to convert the
following 2 kinds of adjustment method: absolute altitude and
factory default setting;
2. Under factory default setting (F.DEF), press E button, the icon
“NO” will appear;
3. When the icon “NO” appears, press E/C button to select “YES”
(factory default setting)or “NO”(cancel the adjustment);
4. Press B button to save and exit. If “YES” is selected, then exit
after icon “DONE” for 2 seconds.
Page 43
14.0 Compass Mode-Notices
Notices
Keep your watch away from magnets or magnetic objects;
Pay attention to the difference between north magnetic pole
and north pole, see more details afterwards;
Calibrate the compass regularly.
14.1 Compass Mode-Direction and Azimuth
Page 44
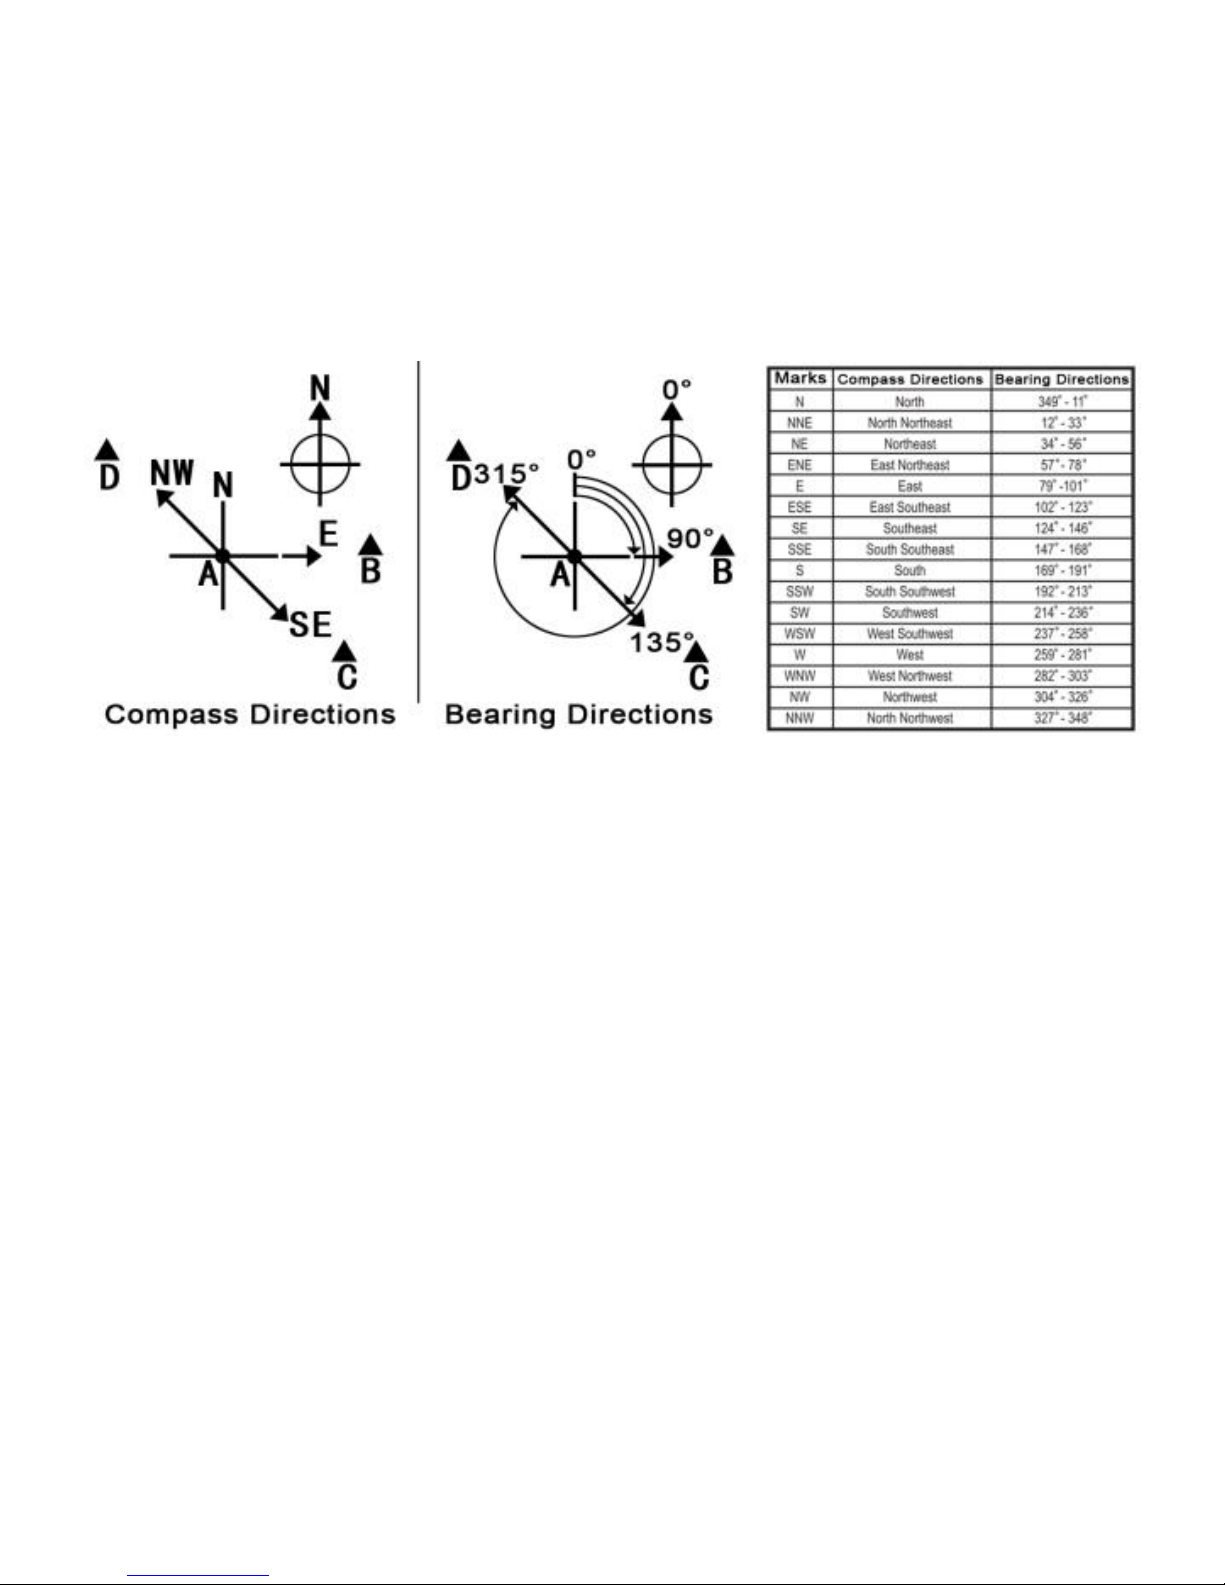
Direction
As shown in figure, the direction of object B, C, D relative to
object A is separately East, Southeast, Northwest;
Azimuth
Azimuth is one angle between the object and the true north
(clockwise);
As shown in figure, the azimuth of object B, C, D relative to
object A is separately 90°, 135°, 315°.
14.2 Compass Mode-Compass Mode
Page 45
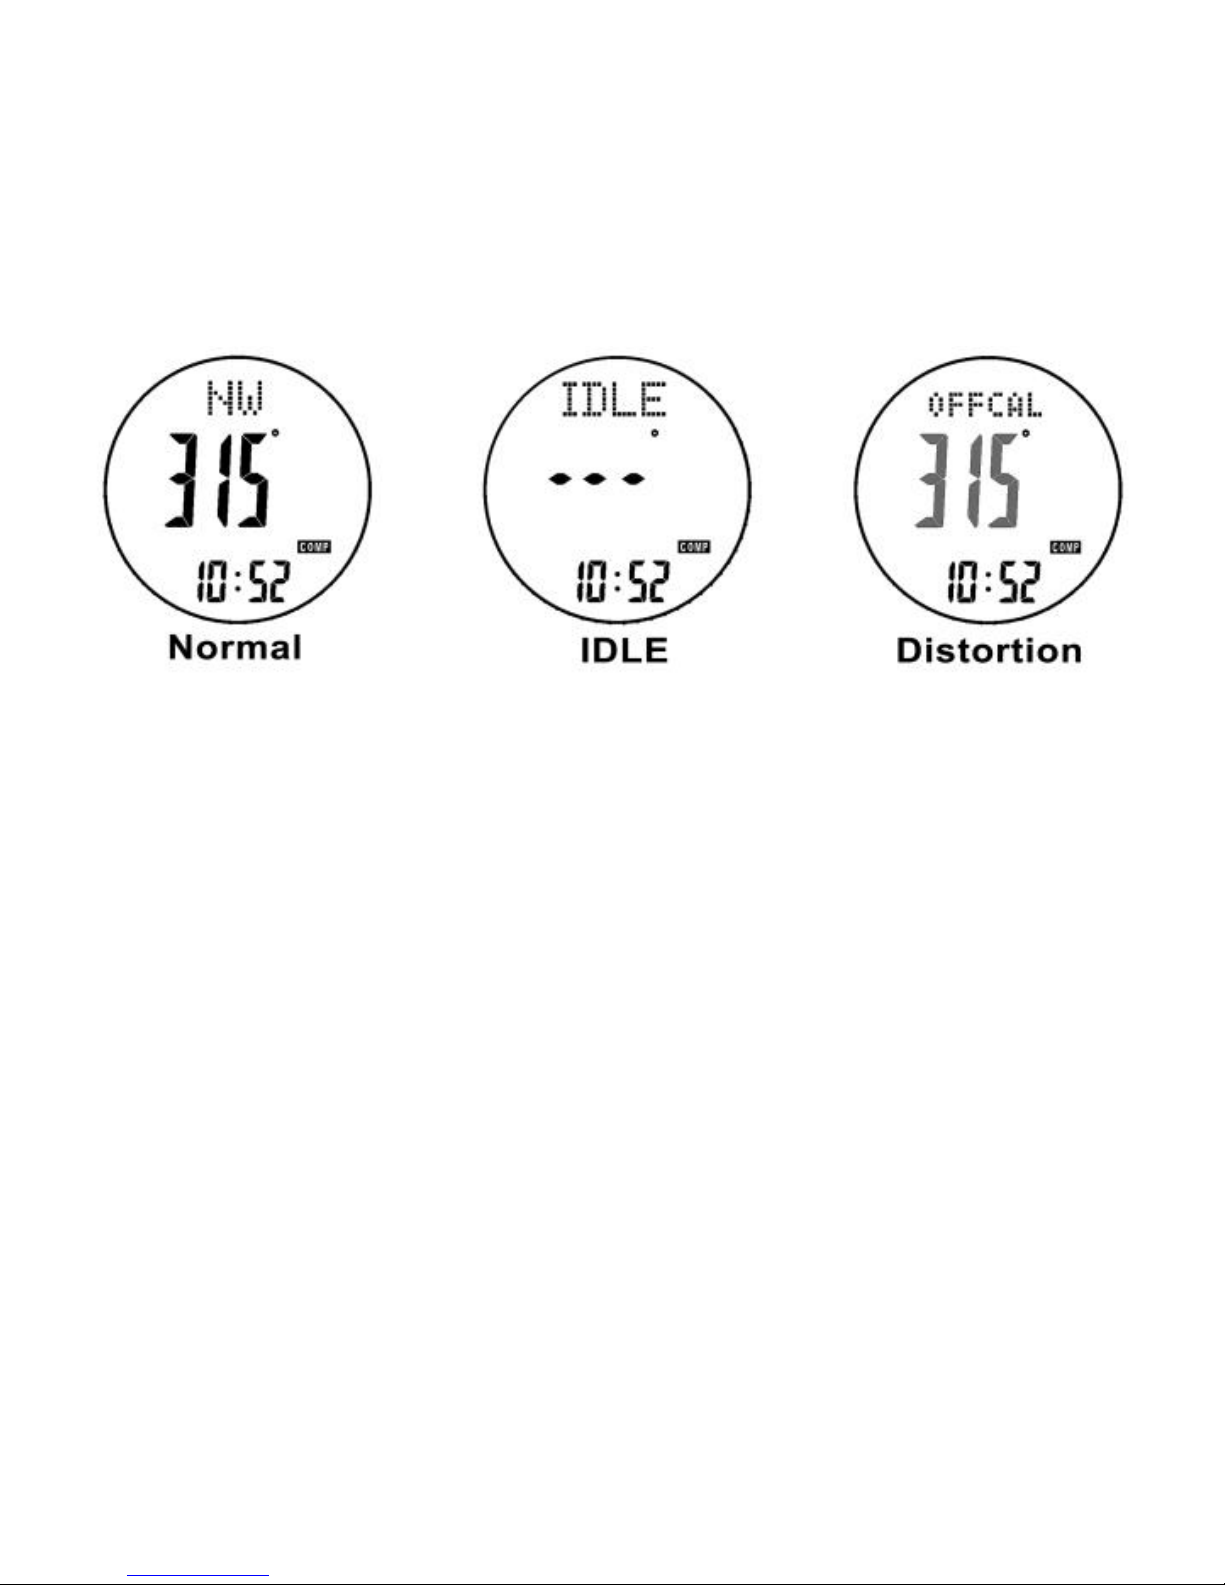
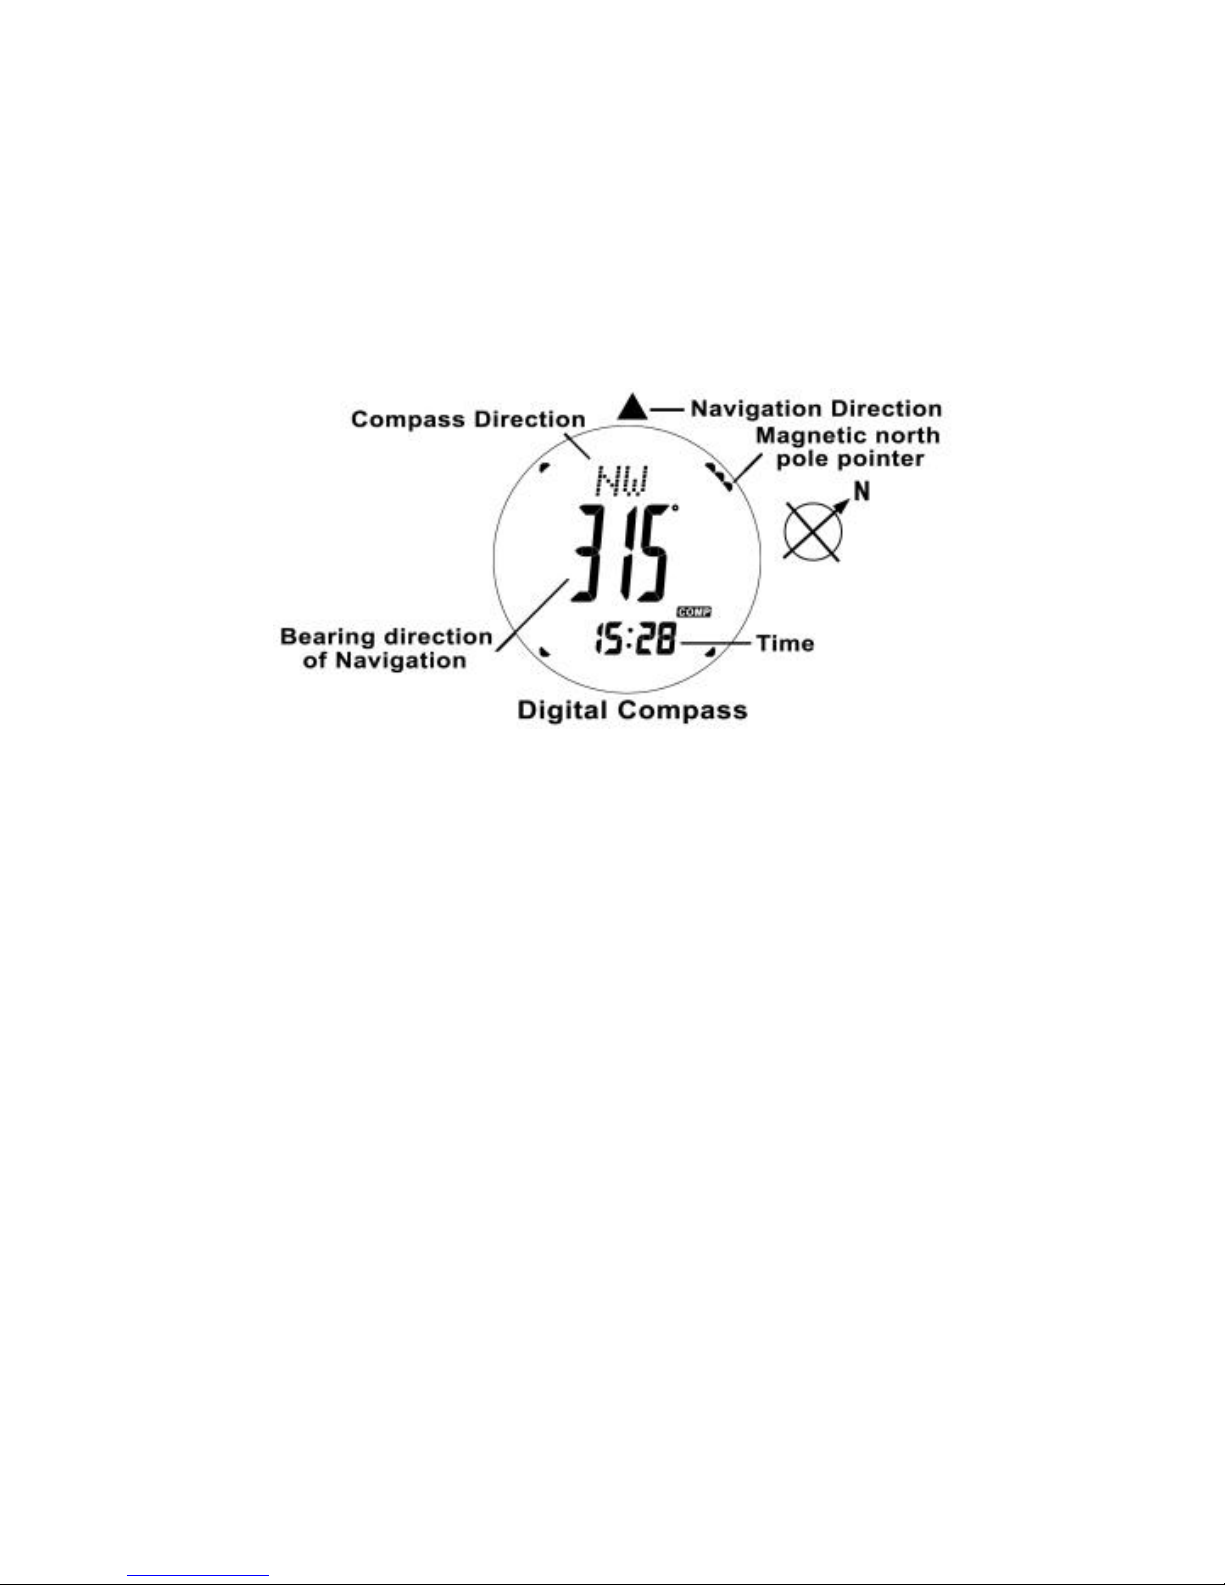
Compass Mode Display
TOP: direction;
Middle: azimuth;
Bottom: current time;
Digital compass rotation display (imitate the traditional
compass);
IDLE Mode
The watch will enter into the IDLE mode automatically, if no
any key operation for 1 minutes. Then press any buttons, the
compass will be activated again;
Distortion Mode
Page 46
If distortion is being detected, the flashing icon “OFFCAL” will
appear; If it is being occurred, please re-calibrate the
compass. See more details afterwards.
14.3 Compass Mode-Compass Mode
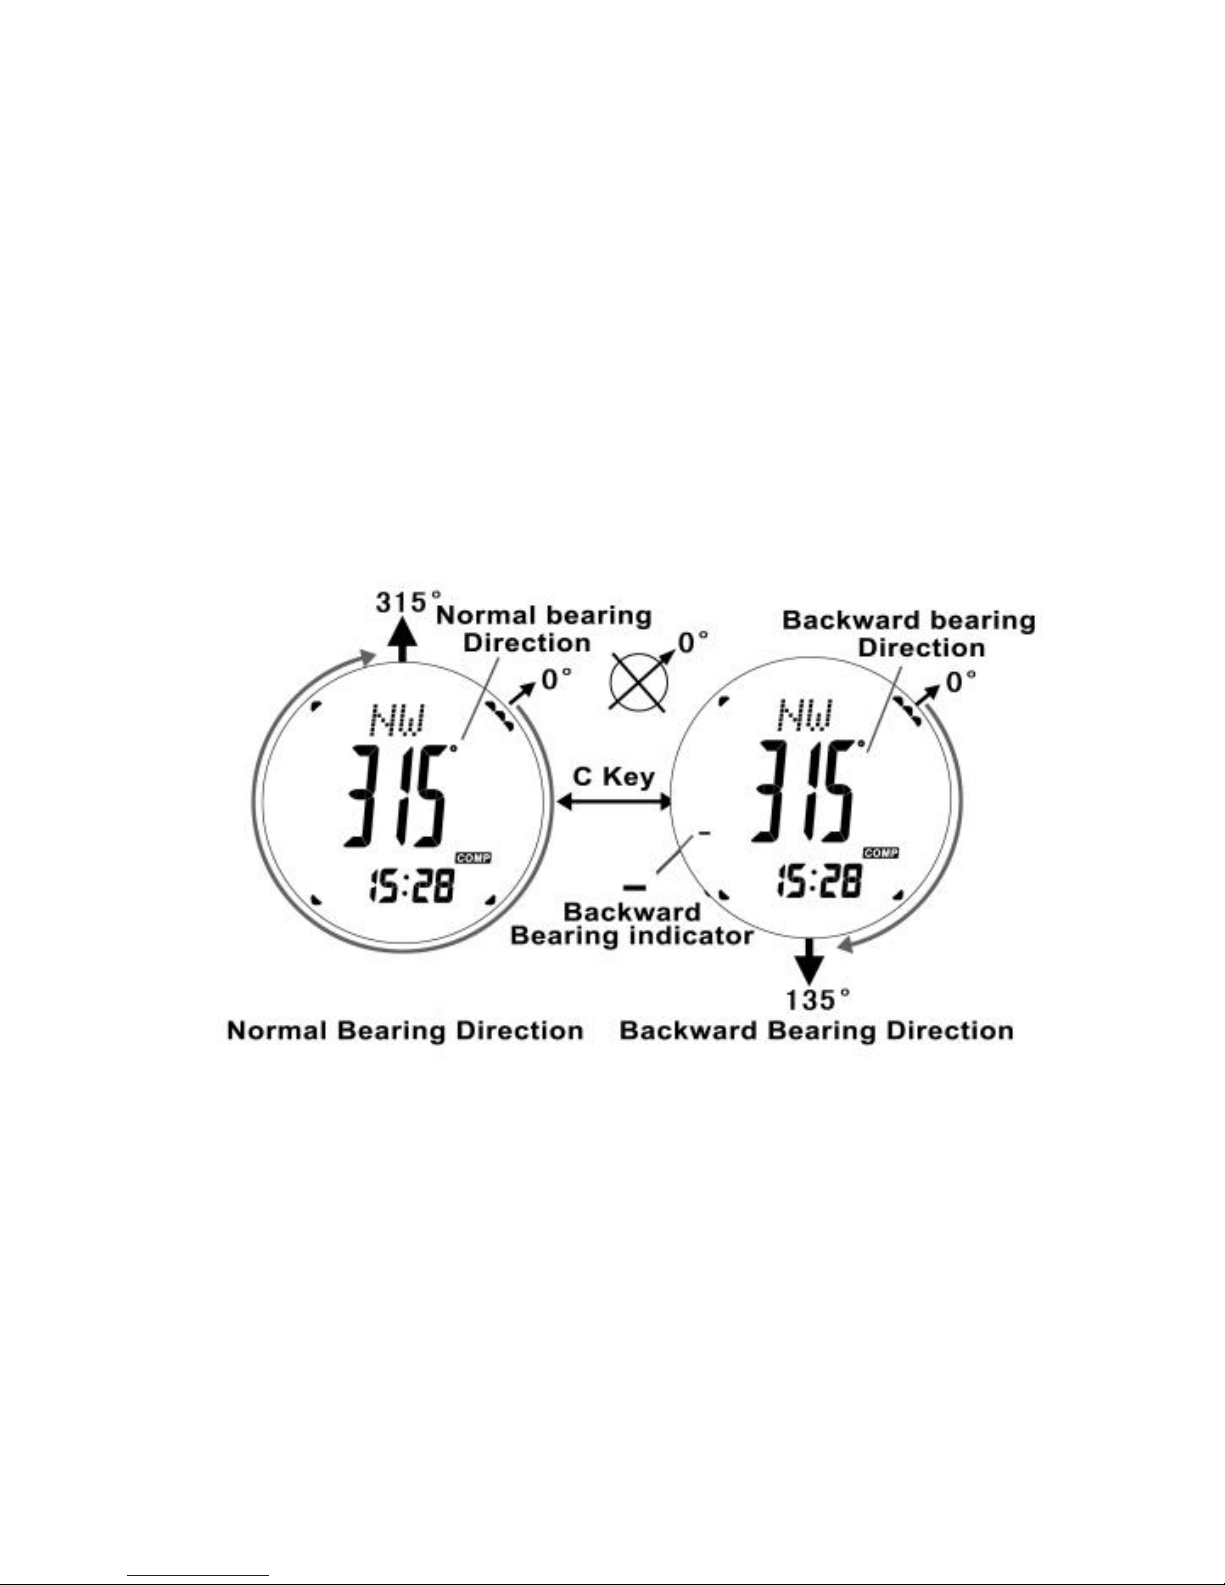
Back Azimuth
Back azimuth is opposite to azimuth (180°);
Under compass mode, press C button to convert azimuth and
back azimuth;
Page 47
If back azimuth is selected, the icon “-” will appear.
14.4 Compass Mode-Applications of the Compass
Determine the Current Location
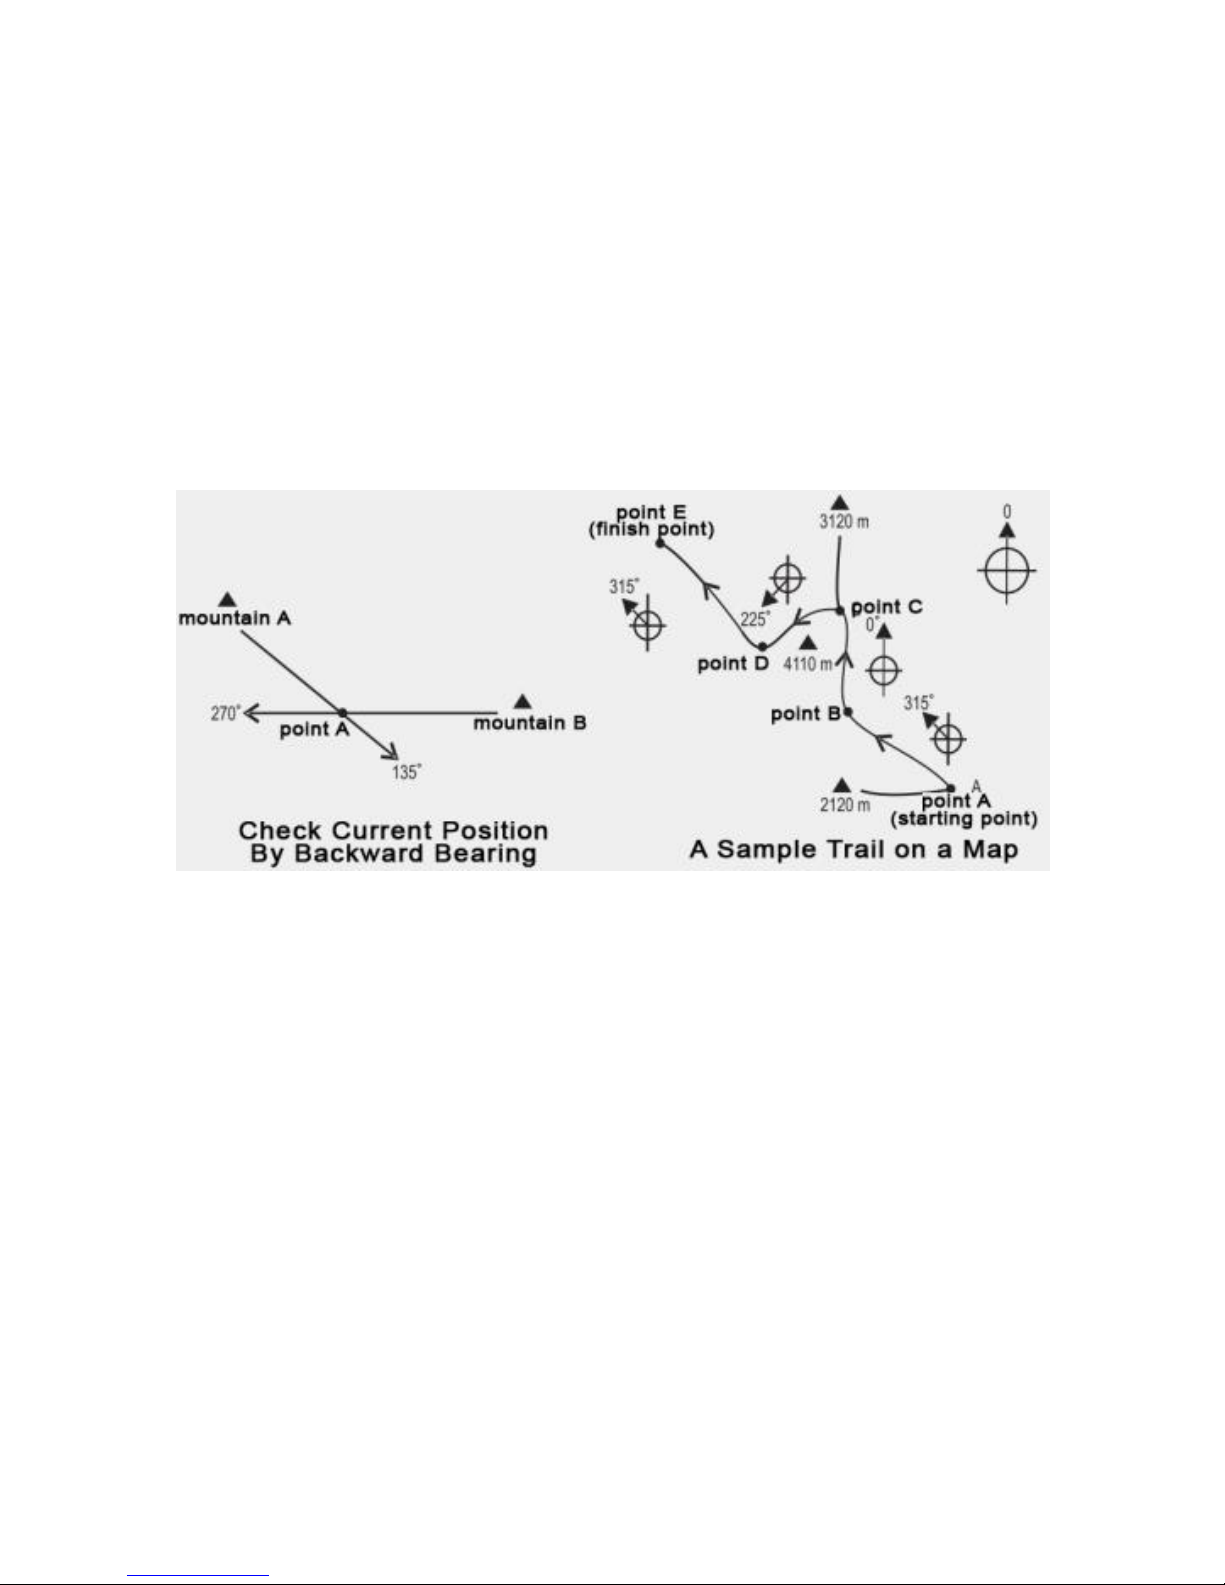
Choose two landmarks in the distance, like mountains,
lighthouses, or buildings, such as mountain A and B as shown
in figure;
Measure the back azimuth between mountain A/B and your
current location, which is 135°and 270°;
Draw two straight lines separately in accordance to the
Page 48

corresponding back azimuth on the map, starting from
mountain A and B;
The crossing of two lines will be your current location;
Determine the Accuracy of Heading
Starting from A and ending at E, as shown in figure;
Mark the inflection point of every direction respectively , which
is B, C, D
Find out the azimuth of adjacent points, i.e. the azimuth from
A to B is 315°;
From A to B, you could head according to this azimuth. So
you will arrive at E finally.
14.5 Compass Mode-Magnetic Declination
Page 49
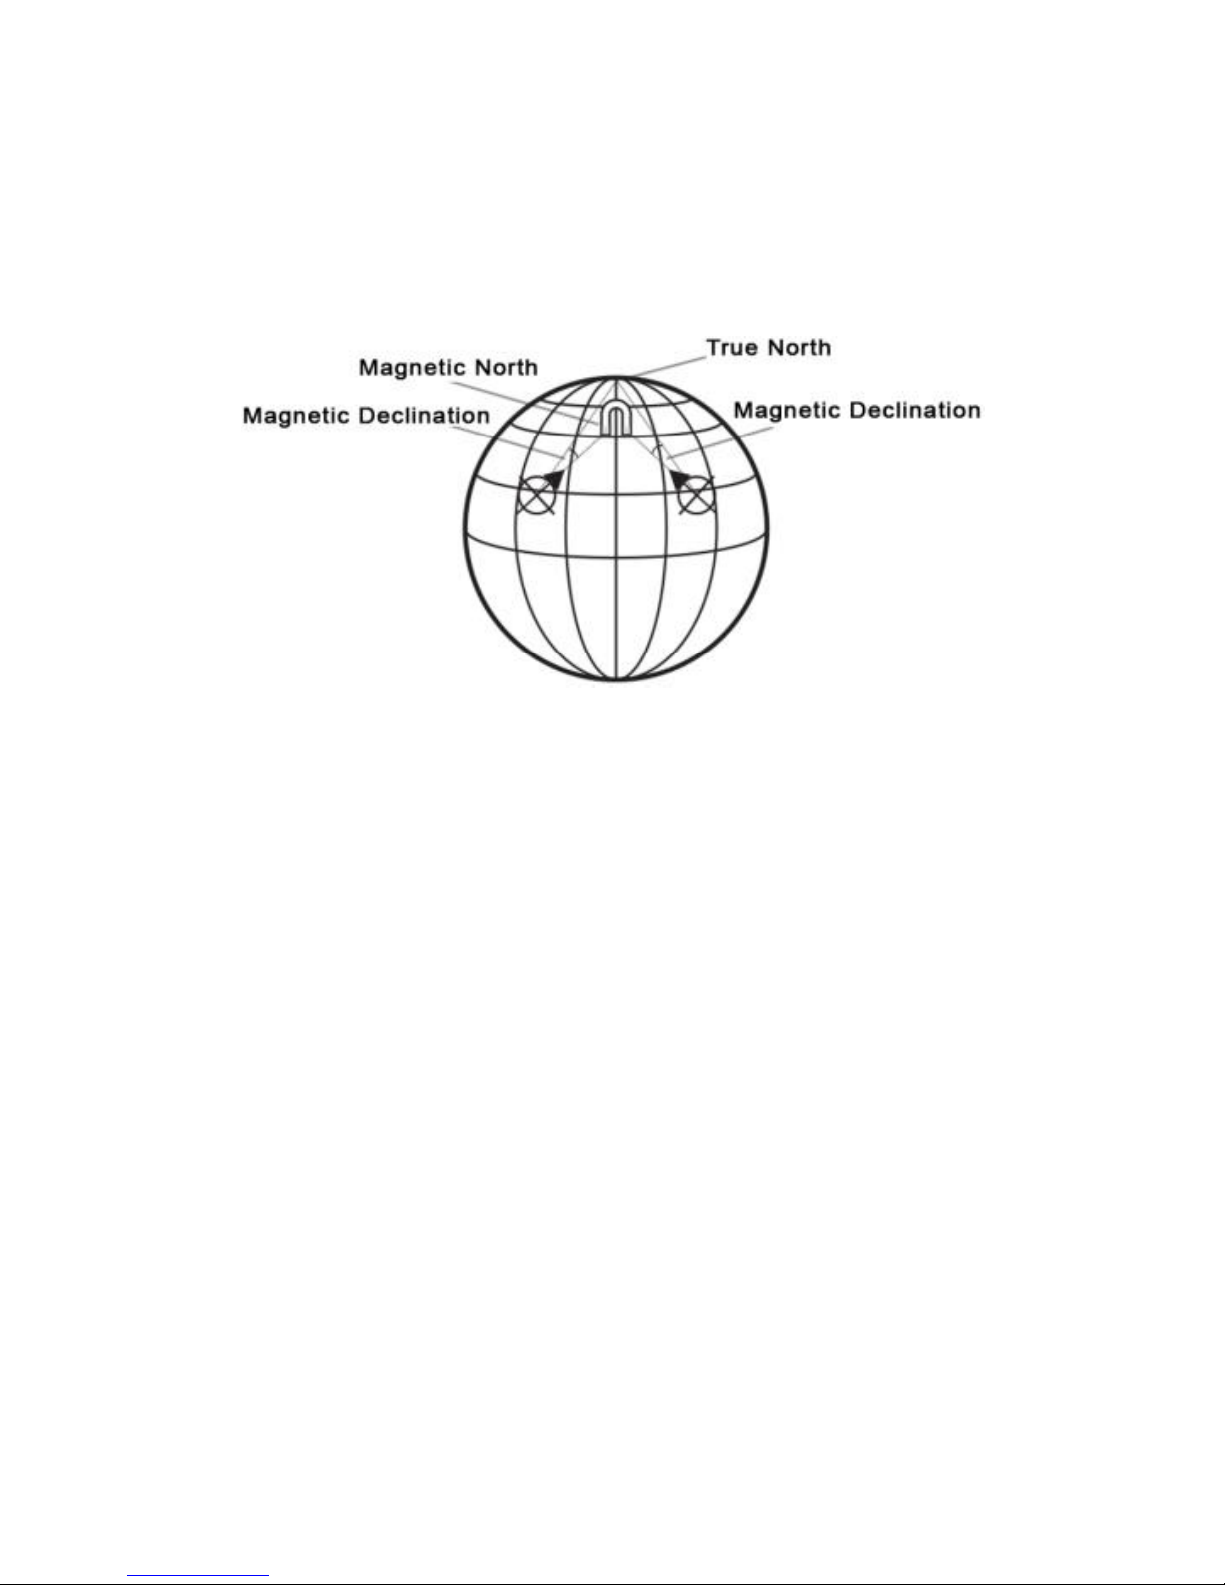
What is Magnetic Declination
As shown in figure, there are differences between magnetic
north pole and true north pole. The angle between them is
called magnetic declination;
The size and orientation of magnetic declination depends on
your location on the earth;
Calibrations of magnetic declination see the following chapter;
Magnetic Declination Information
Most professional maps will mark the magnetic declination
information;
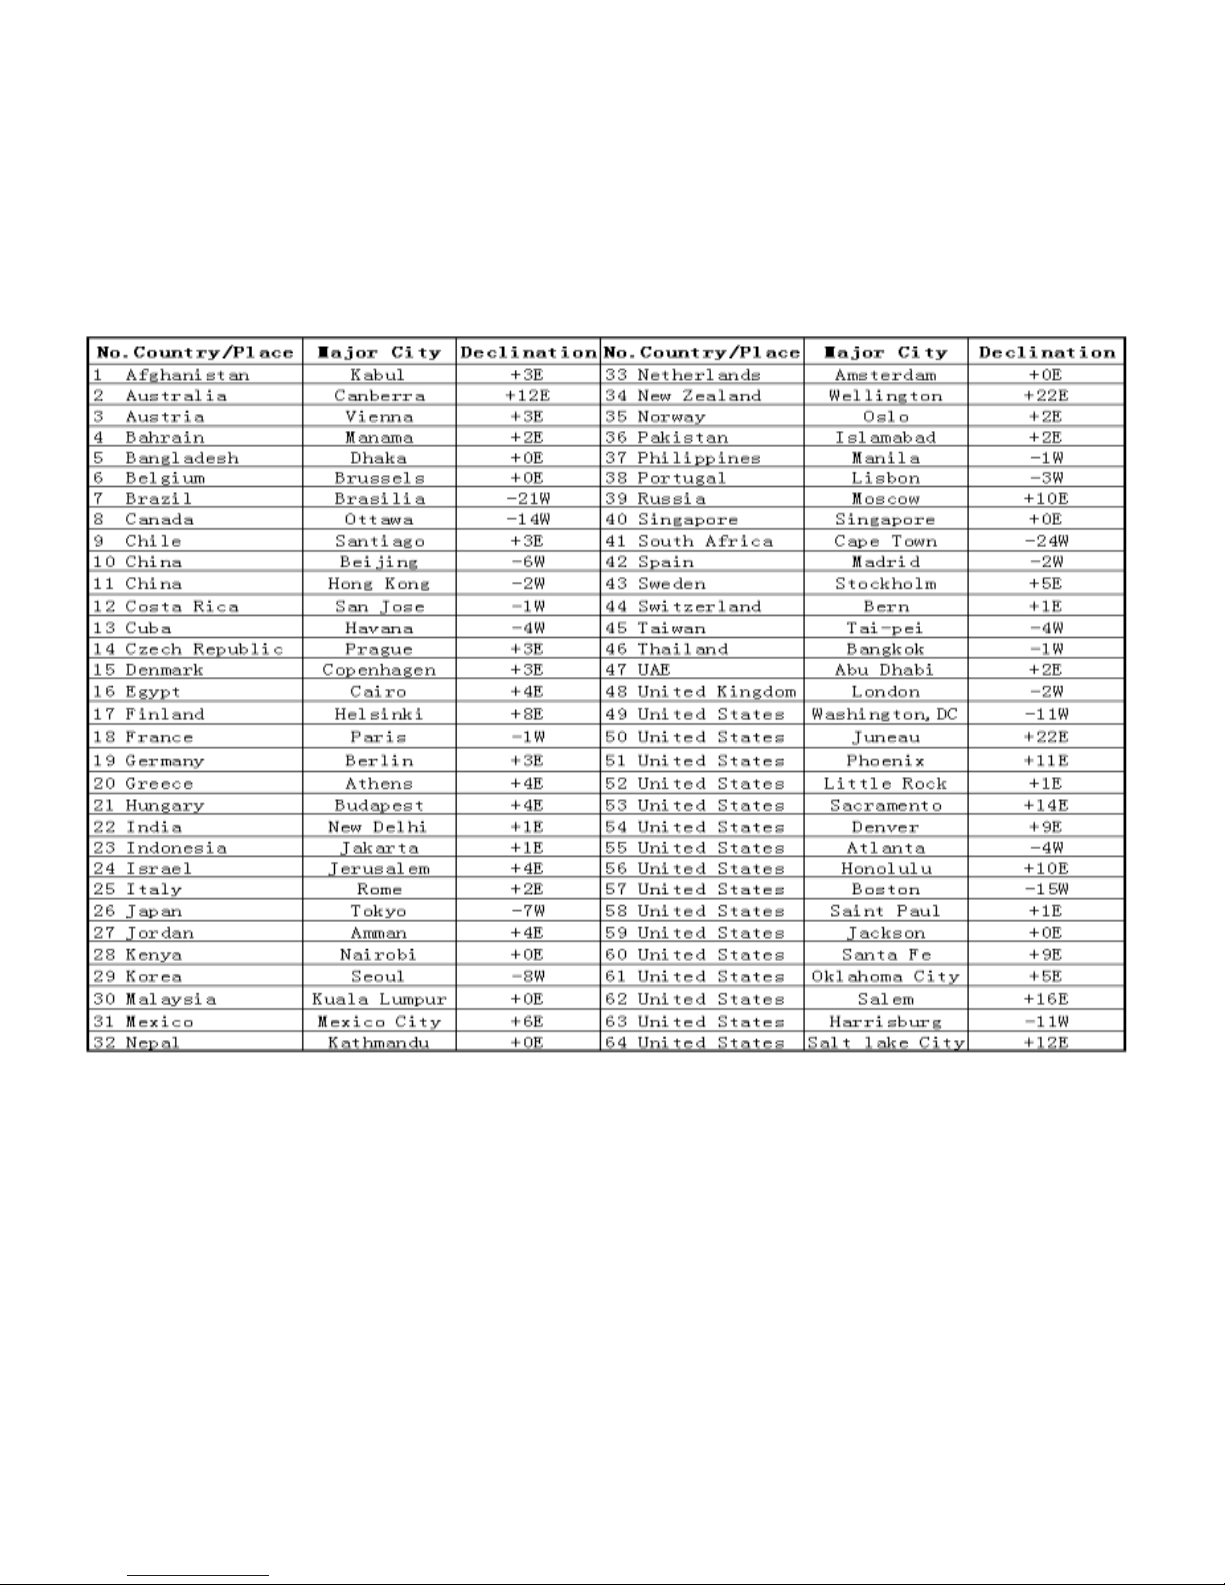
The magnetic declination information of major cities in the
Page 50
world is given on Chapter 15.7;
If the magnetic declination information of your city is not given,
then it could obtain from the internet.
14.6 Compass Mode-Magnetic Declination
Compensation
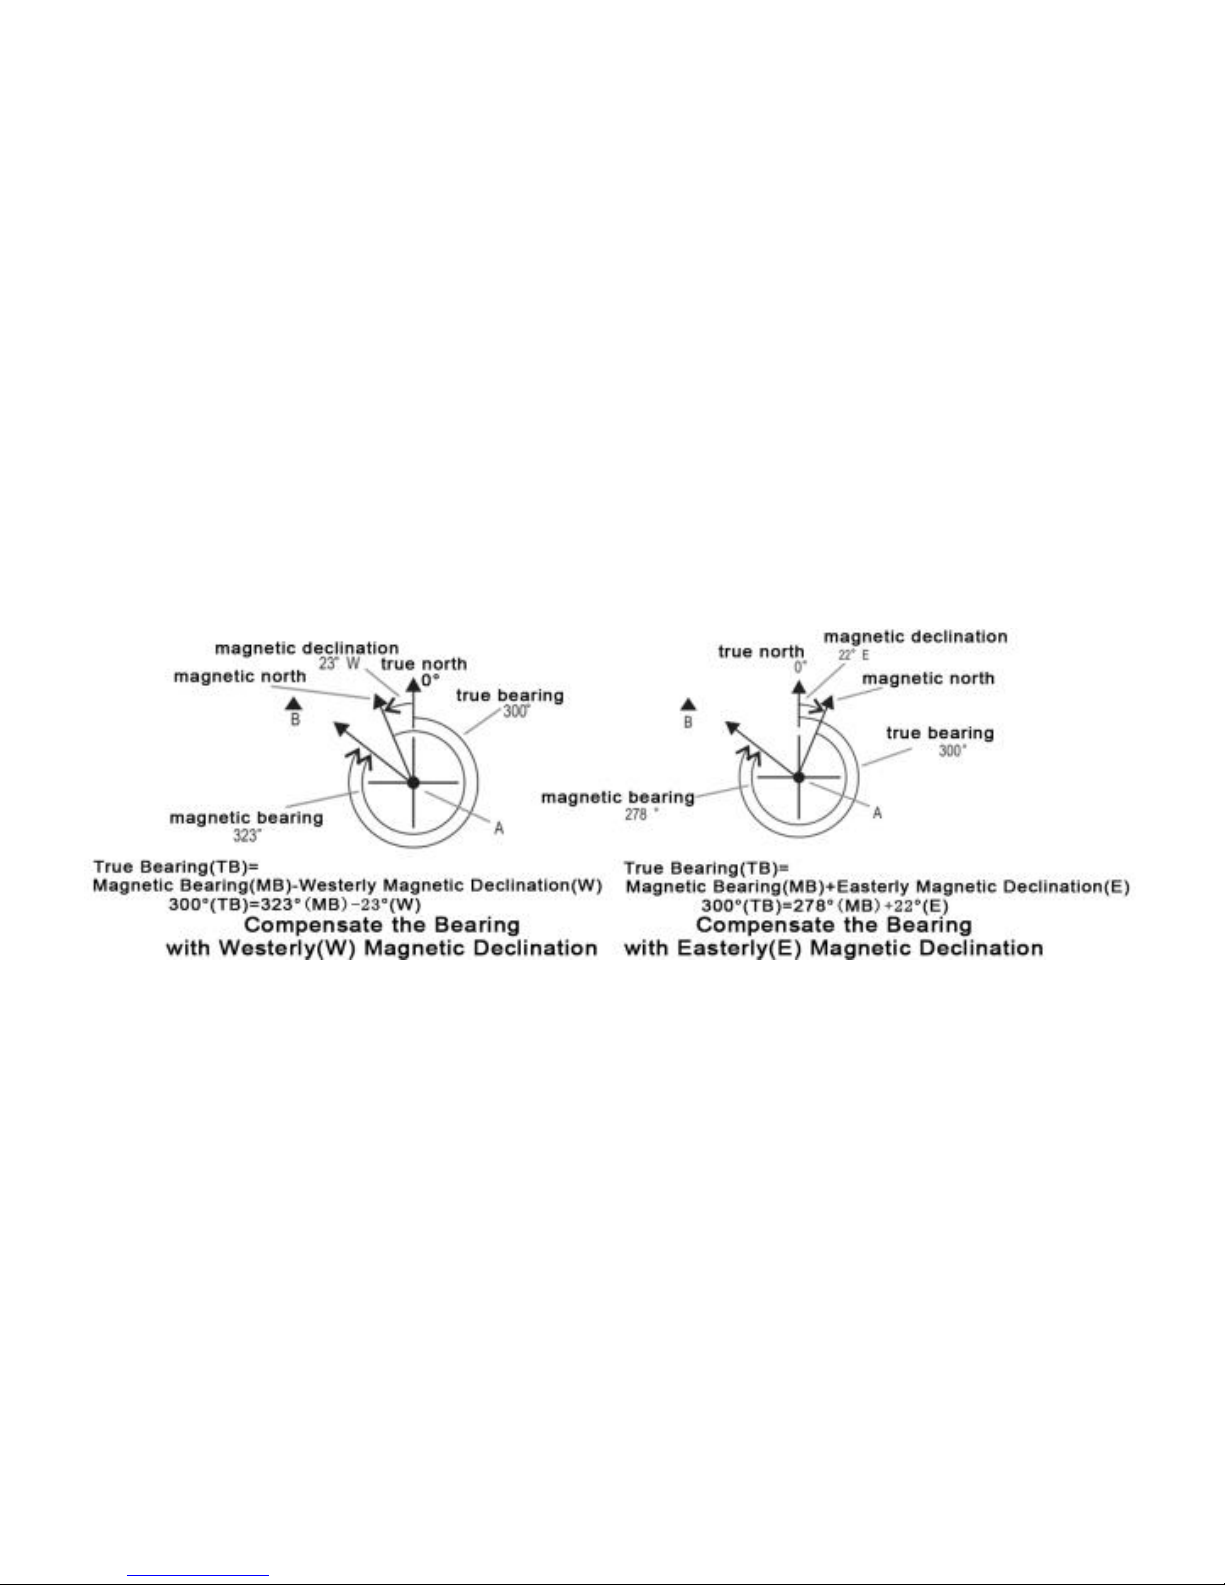
Examples of Magnetic Declination Compensation
Pay attention to the way of magnetic declination
compensation, minus in west and plus in east
Example 1: west magnetic declination is 23°and the
azimuth (magnetic north pole) of object B is 323°,
Page 51

TB=MB-WMB=323°W-23°
TB=323°-23°
TB=300°
The true azimuth is 300°;
Example 2: east magnetic declination is 22°and the azimuth
(magnetic north pole) of object B is 278°,
TB=MB+EMB=278°E+22°
TB=278°+22°
TB=300°
The true azimuth is 300°.
14.7 Compass Mode-Magnetic Declination in Major
Cities
Page 52
14.8 Compass Mode-Compass Calibration
Page 53
When needs to calibrate the compass
The watch needs to calibrate the compass in the following
situations:
first use;
battery replacement;
distortion status;
the magnetic declination differs from the before one
after changing location;
How to calibrate the compass
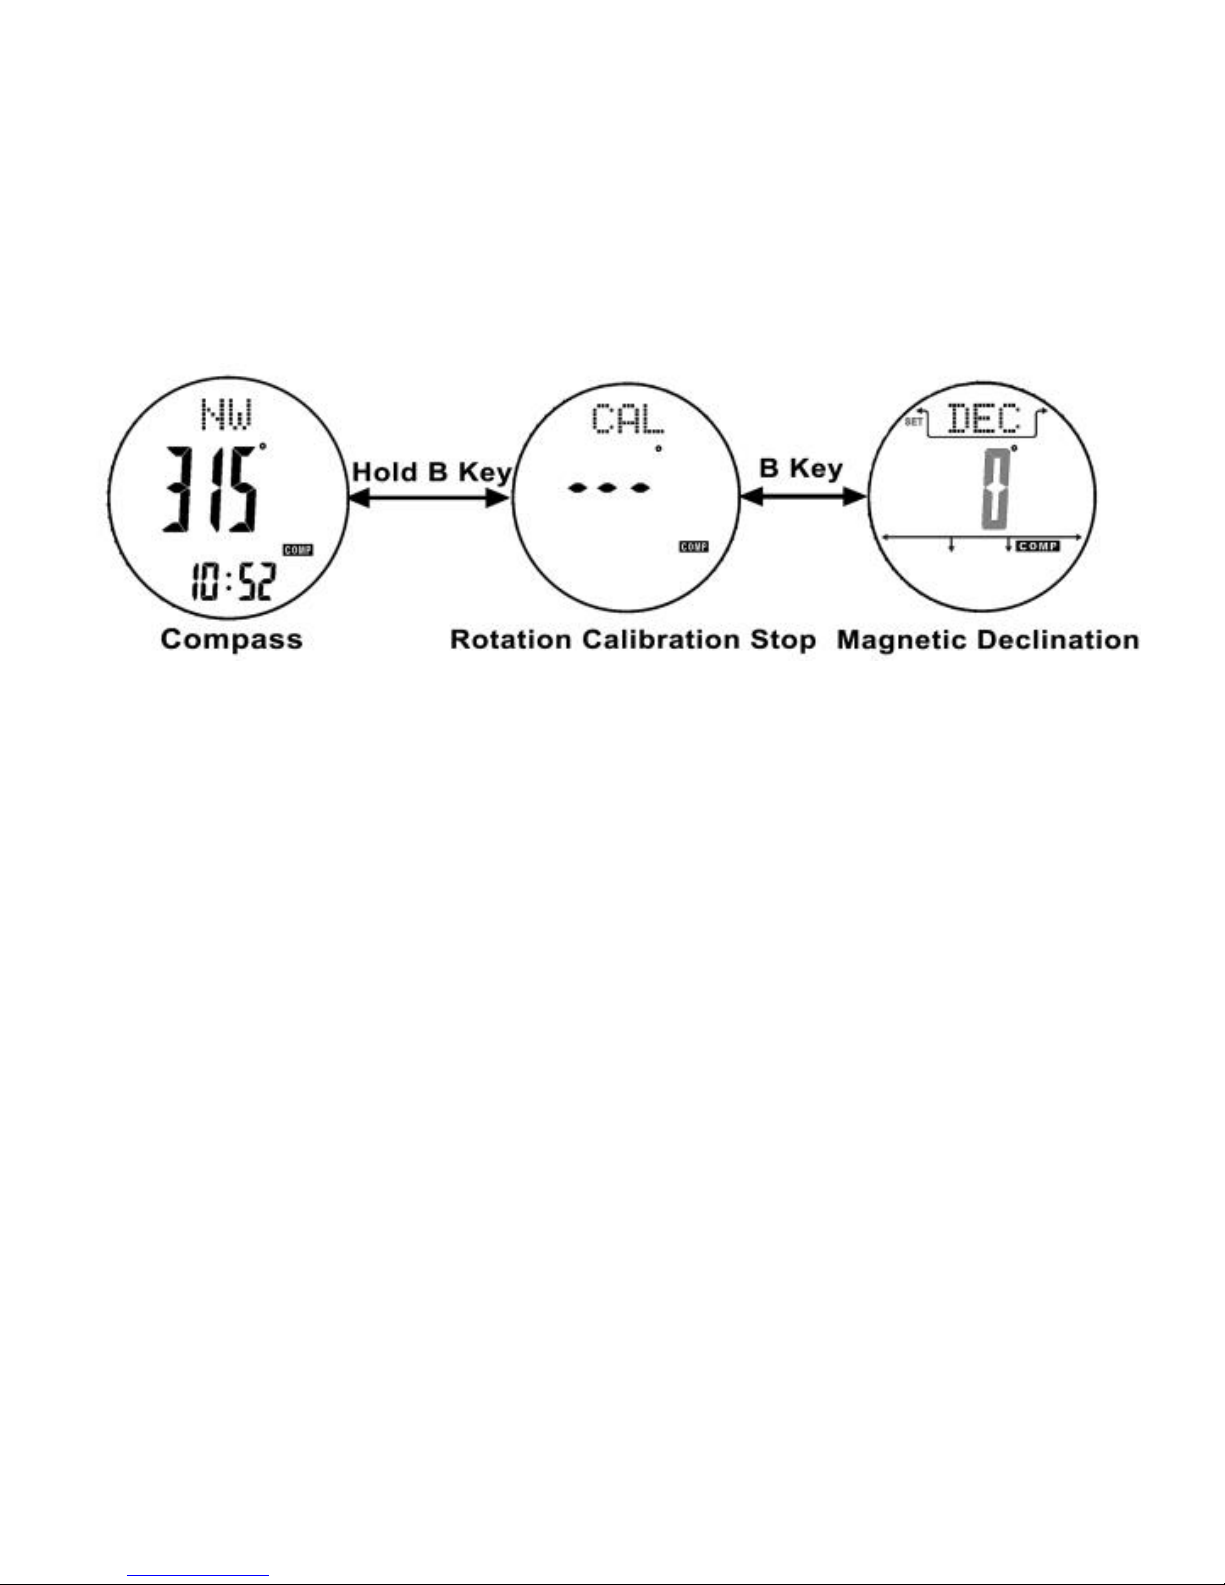
The compass calibration contains 2 modes: rotation
calibration and magnetic declination calibration;
Page 54
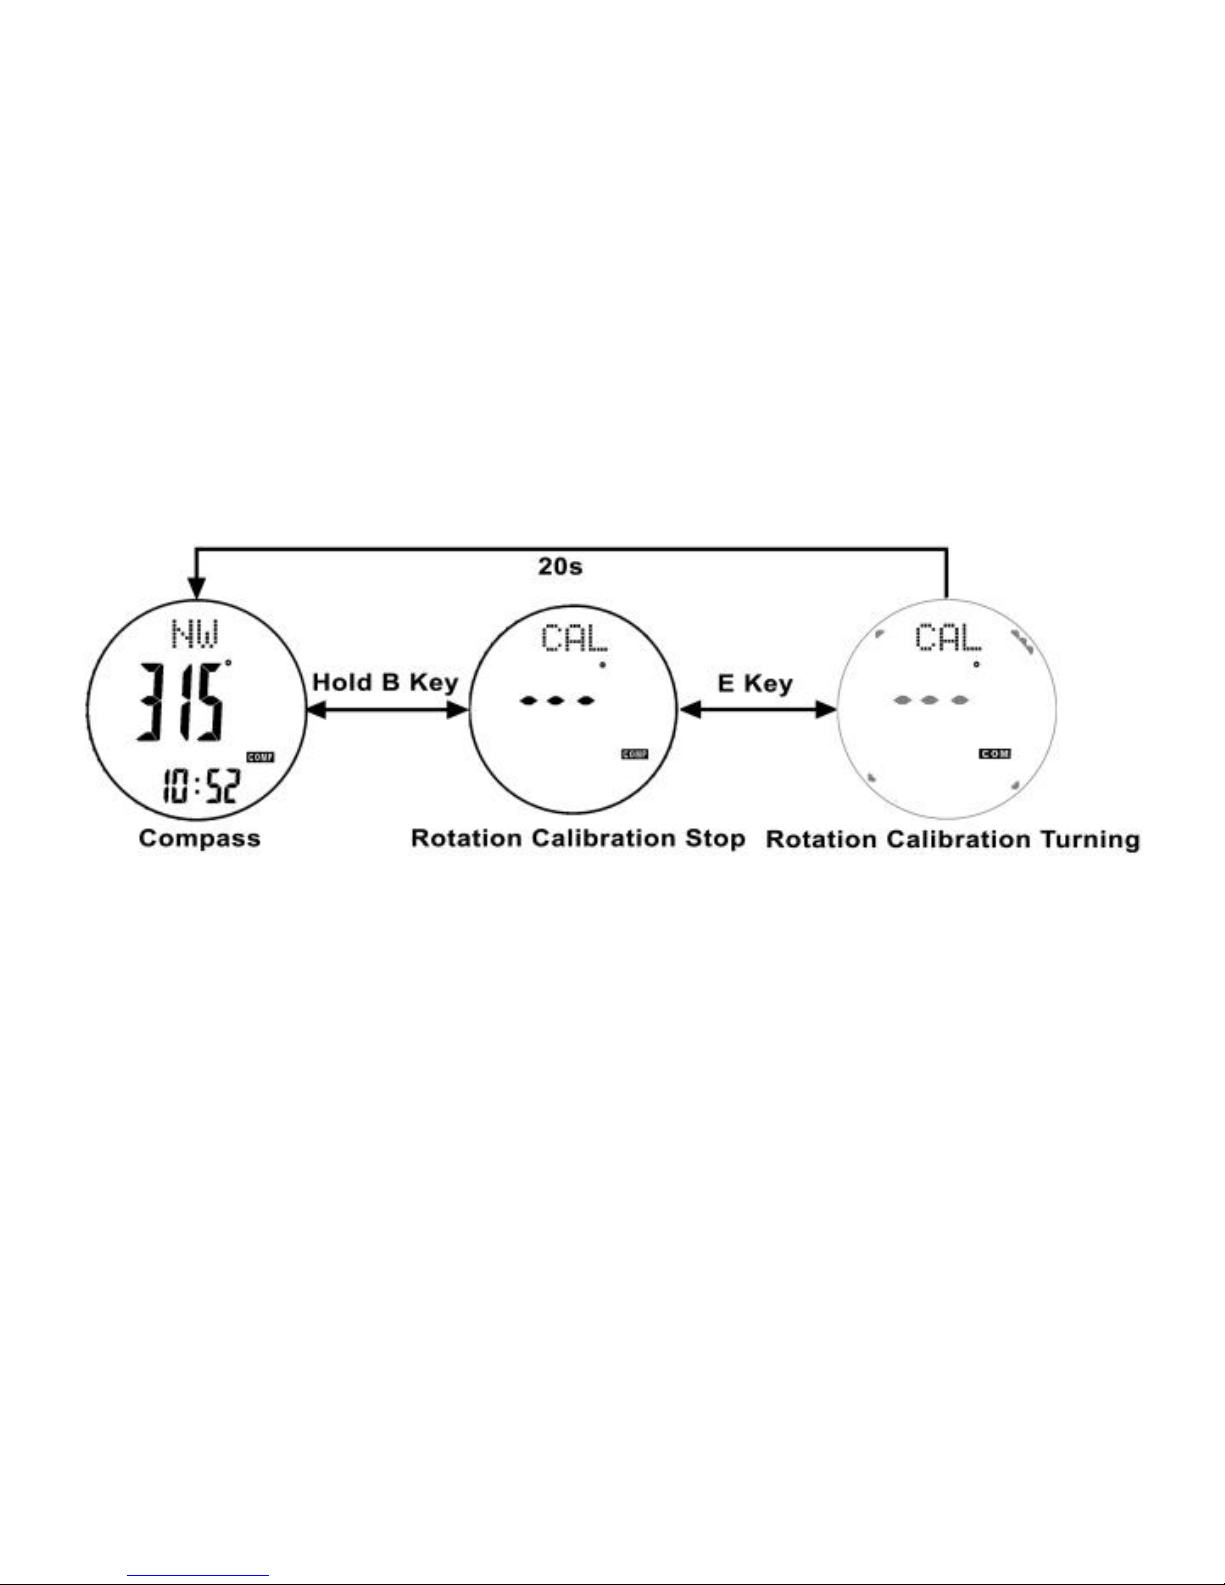
The compass accuracy will be improved if 2 modes are being
operated together.
14.9 Compass Mode-Rotation Calibration
Rotation Calibration
1. Under compass mode, press and hold B button;
2. Press B button to convert rotation calibration and magnetic
declination calibration;
3. Press E button to start rotation calibration (digital compass starts
to rotate), meanwhile, rotate the watch horizontally and gradually in
one direction;
4. After 2 circles rotation, it will back to the compass mode.
Page 55
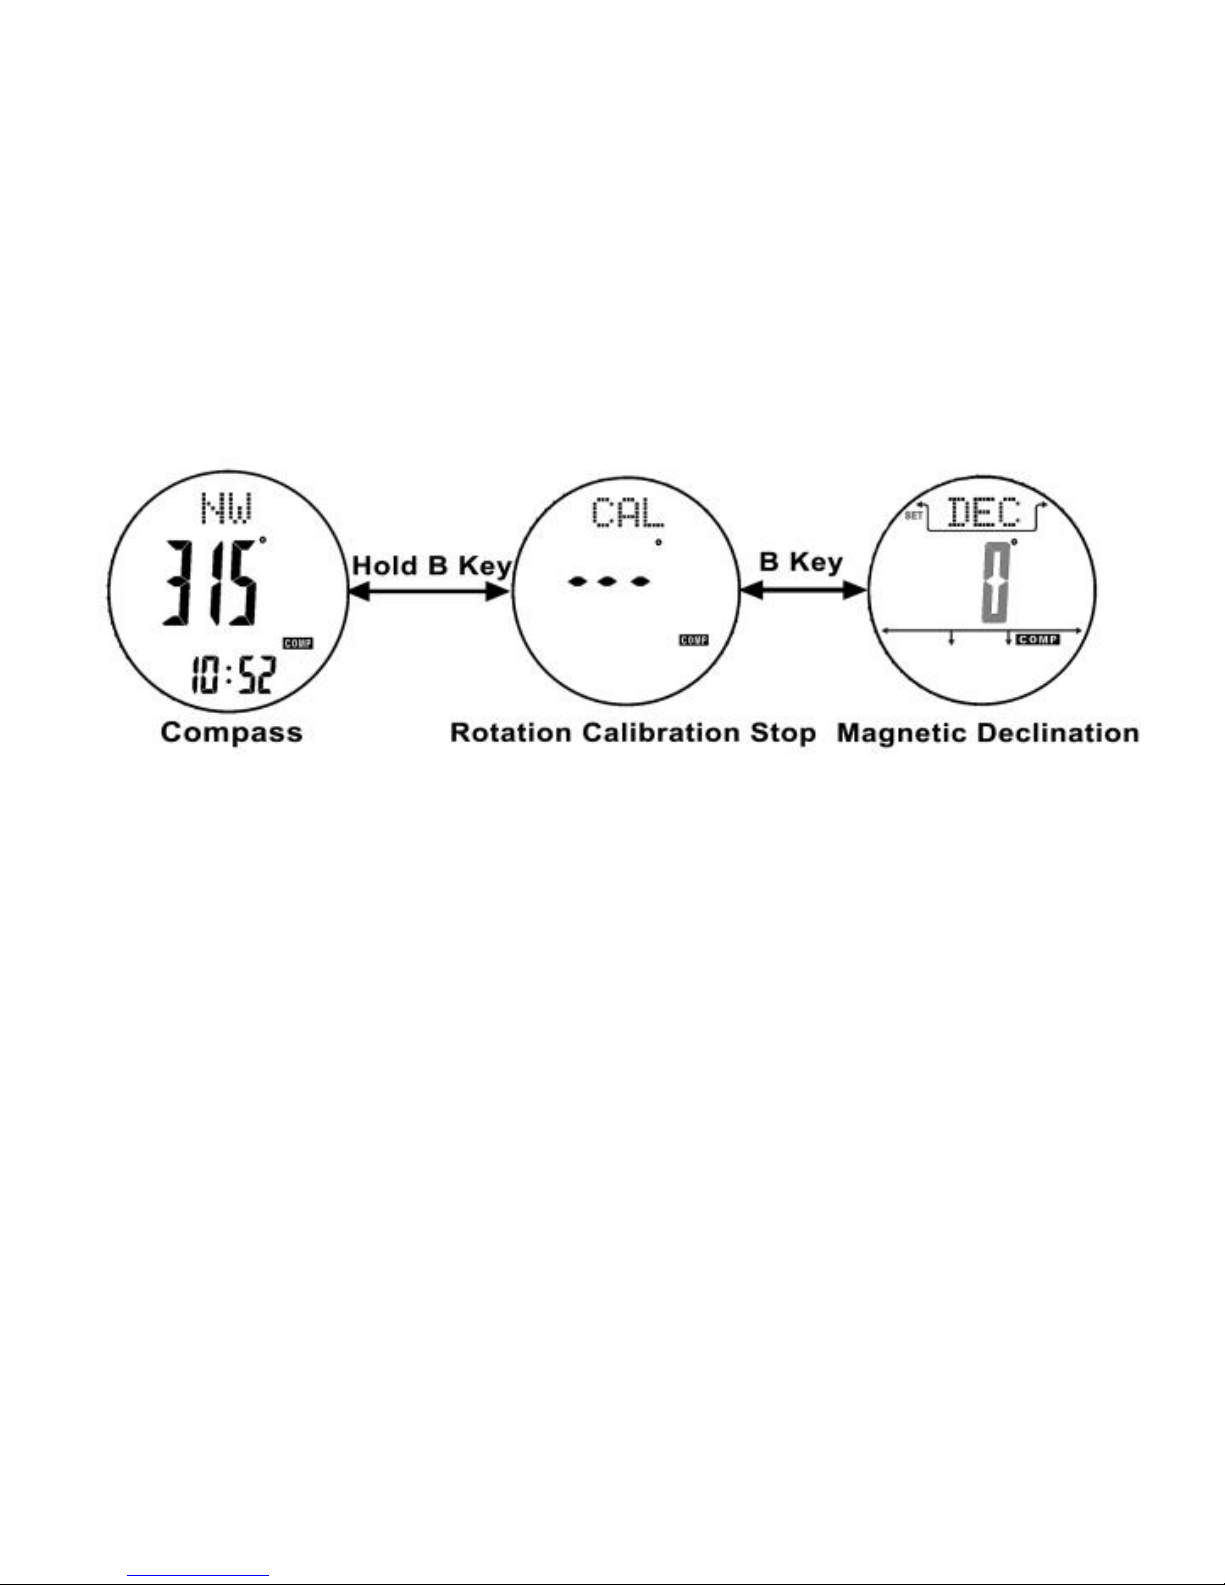
14.10 Compass Mode-Magnetic Declination
Calibration
Magnetic Declination Calibration
1. Check the magnetic declination of your location firstly;
2. Under compass mode, press and hold B button;
3. Press B button to convert rotation calibration and magnetic
declination calibration;
4. Under magnetic declination calibration mode, press E/C button to
increase/decrease to the target magnetic declination (press and
hold the button to change faster);
5. Press and hold B button to save and exit.
Page 56
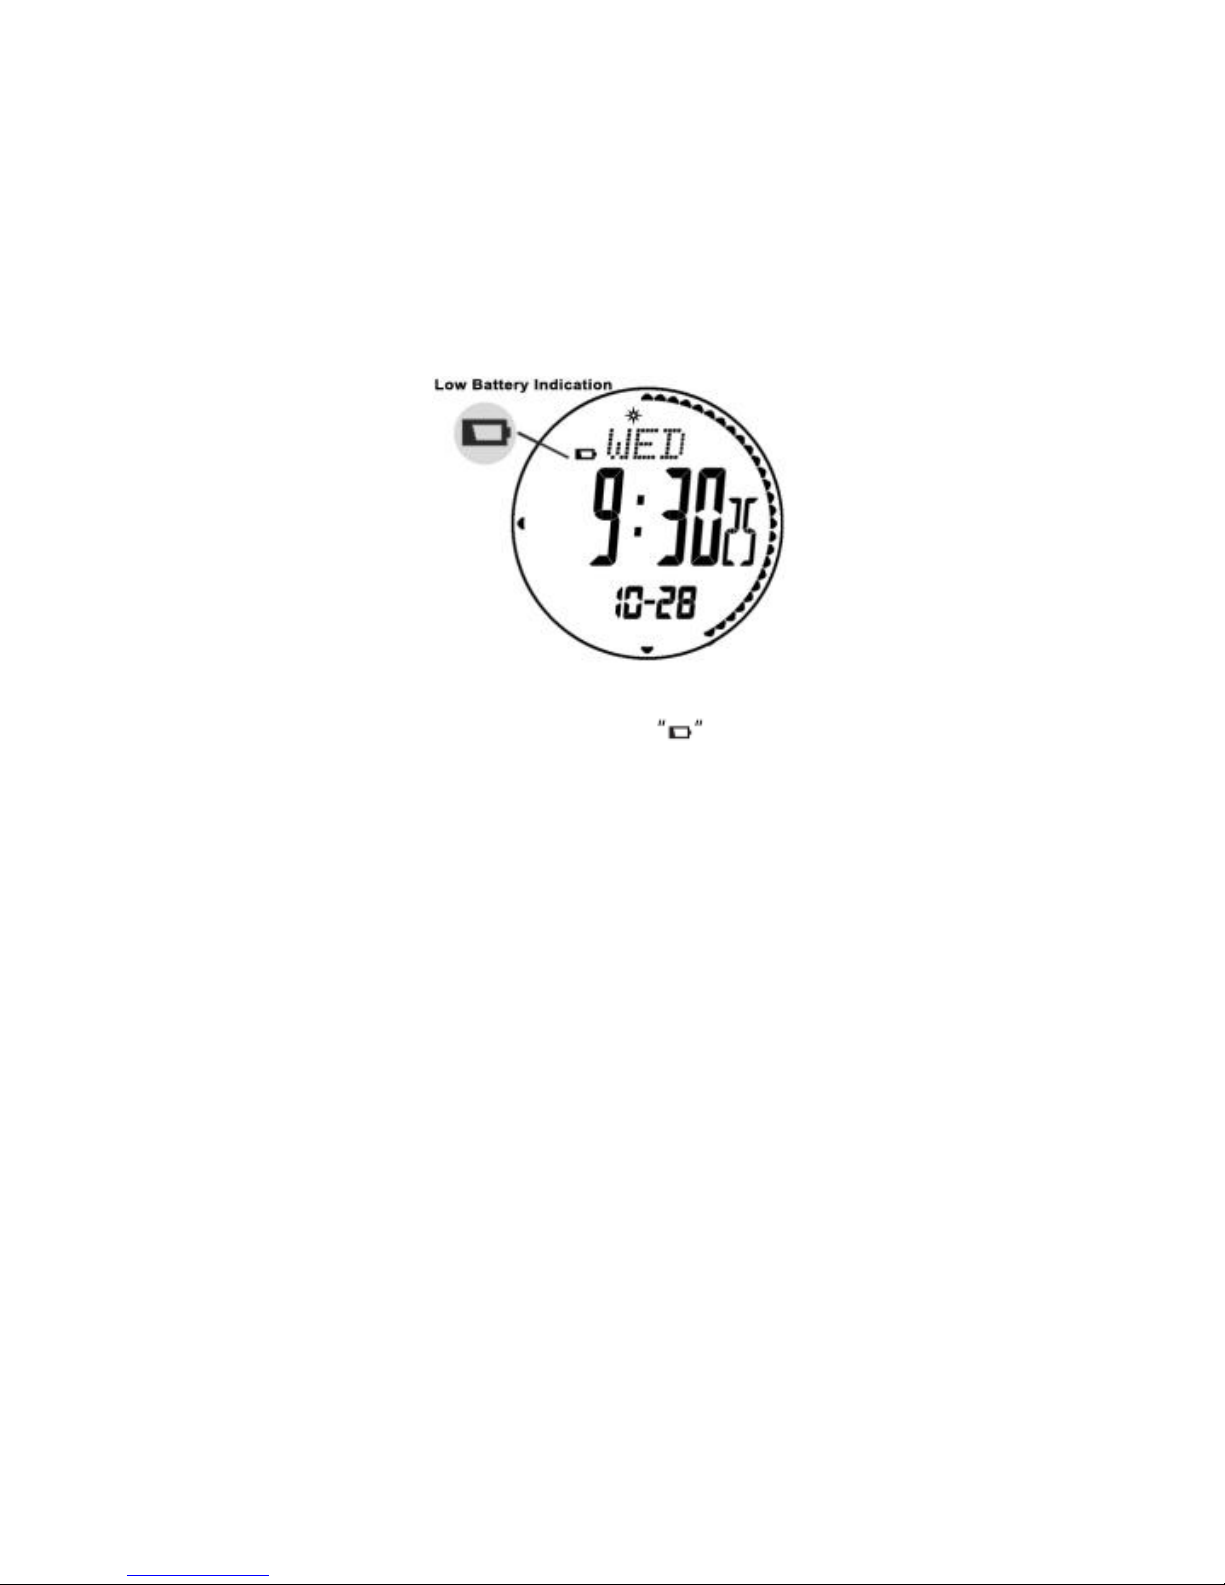
15.0 Battery-Low Battery Reminding
Low Battery Reminding
Under low battery, the icon of will appear. Please
replace the battery CR2032 immediately;
Under extremely cold environment, the low battery icon will
appear, and it will disappear in normal environment;
NOTE: All the records of the watch before will be cleared, please
keep the records and reset.
Page 57

16.0 Appendix-Major Functions
Current Time Mode
Hour, minute, second, AM/PM, month, day, weekday,
temperature, barometer chart, altitude chart;
Time Format
12/24 hour format;
Perpetual Calendar
2004-2099;
Weather Forecast
4 kinds of weather;
Pedometer Mode
Accuracy: 1 step;
Range: 0~999999 steps;
Calorie, distance and exercise time;
Alarm
Alarm 1, alarm 2;
Hourly chime;
Chronograph
Accuracy: 1/100 second;
Range: 99 hours 59 minutes 59.99 seconds;
Page 58

Cumulative time and 100 laps time;
Lap review;
Timer
Accuracy: 1 second;
Range: 99 hours 59 minutes 59 seconds;
Beep sound;
Pacer
Range: 30 BPM to 180 BPM;
Stepping unit: 5 BPM per step;
Dual Time
Hour, minute, second, AM, PM;
Page 59

17.0 Appendix-Major Specifications
Altimeter Mode
Accuracy: 1m (1ft);
Range: -706m to 9164m (-2316ft to 30065ft);
Altitude chart: historical altitude chart in last 24 hours;
Barometer Mode
Accuracy: 0.1 mb/hpa (0.1inHg);
Range: 300-1100 mb/hpa (8.85inHg-32.48 inHg);
Altitude chart: historical altitude chart in last 24 hours;
Compass Mode
Accuracy: 1°;
Range: 0°-360°;
Method: 16 directions, azimuth, digital compass, back
azimuth;
Thermometer Mode
Accuracy: 0.1℃ (0.1℉);
Range: -10.0℃-60℃ (14℉ to 140℉);
Pedometer Mode
Accuracy: 1 step;
Range: 0-999999 steps;
Page 60

Calorie: 0-99999.9 Kcal;
Distance: 0-9999.99 KM (0-9999.99 Miles);
Battery
3V lithium battery (CR2032);
Low battery reminding;
Waterproof
10 ATM
 Loading...