

Page 1
249 Professional Drive, Morrisville, VT
Web Site: www.boltonfurniture.biz
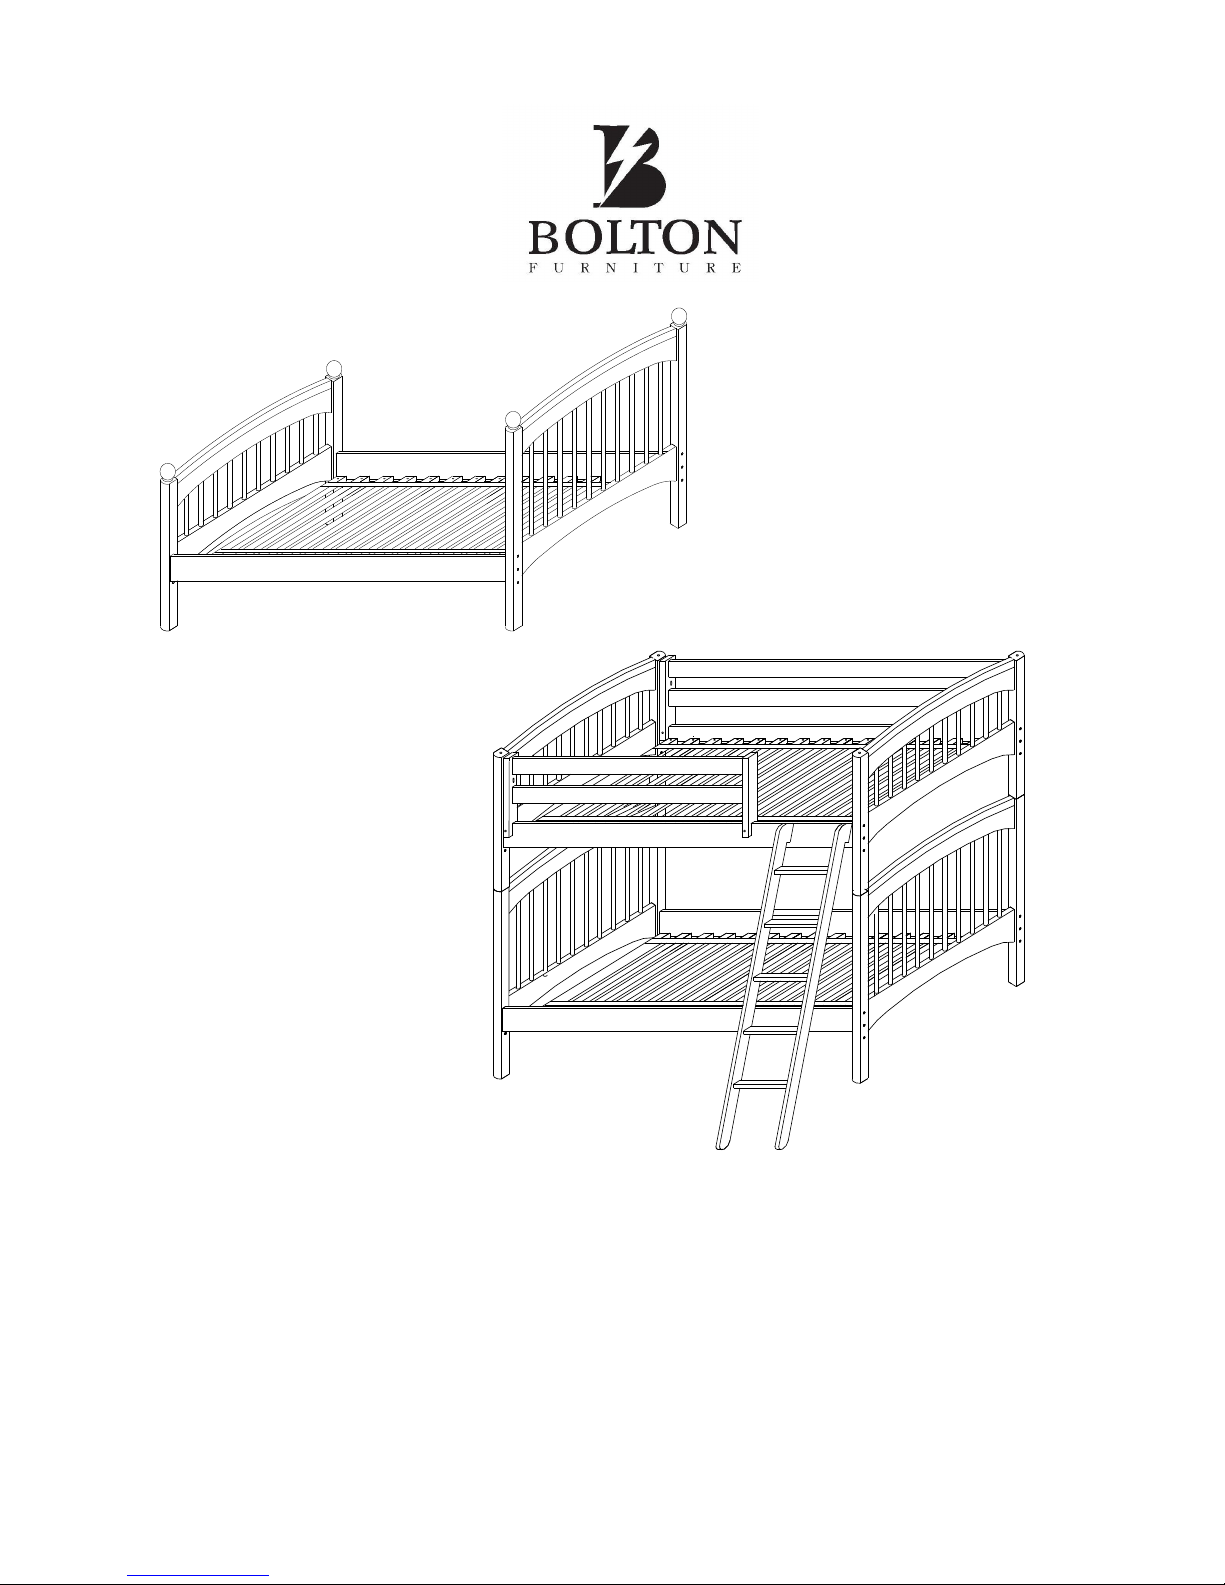
Assembly Instructions For
Windsor Twin, Full & Bunk Beds
Page 2
249 Professional Drive, Morrisville, VT
Web Site: www.boltonfurniture.biz
Replacement parts can be obtained from any Authorized Bolton Furniture dealer.
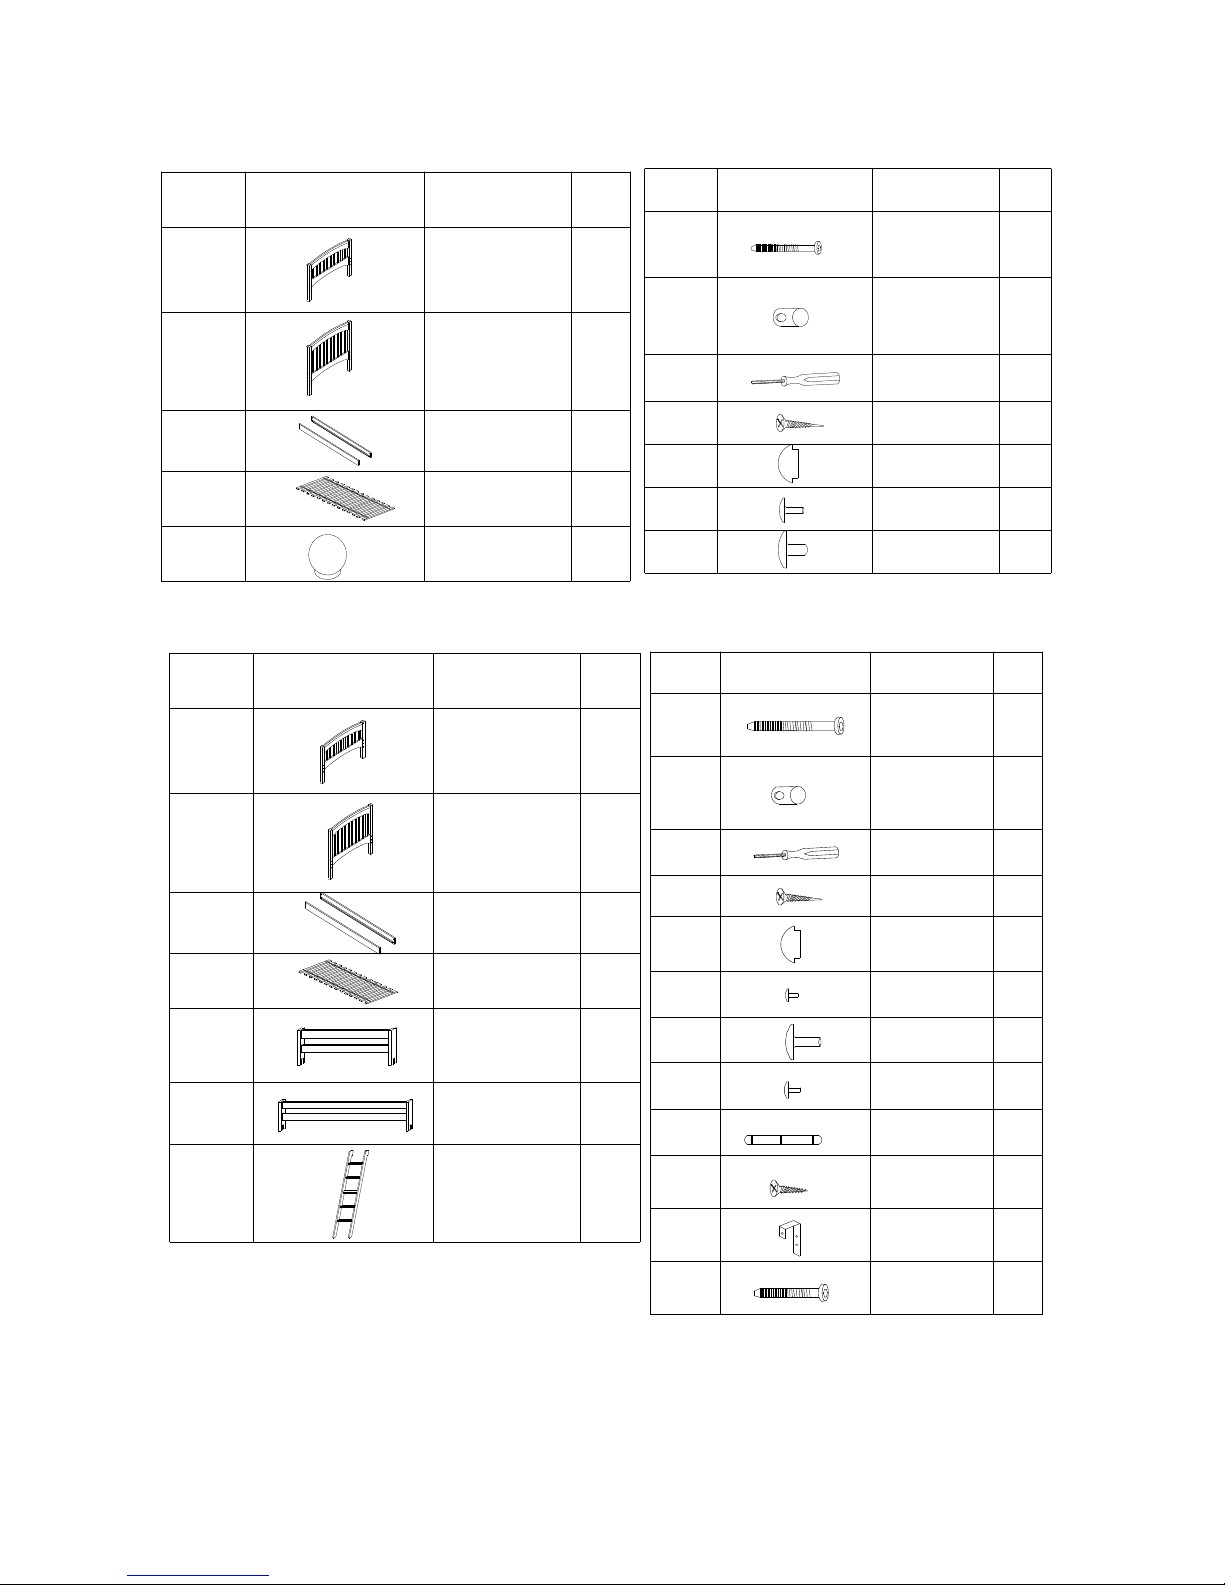
Parts List For Bennington Twin or Full Bed
Parts List For Windsor Twin/Twin or Full/Full Bunk Bed
NO.
Drawing Description
Qty.
H
I
J
K
80mm Hex Bolt
8
Cross Dowel
8
1
30
Hex Wrench
30mm Wood Screw
N
4
Mushroom Plugs
2
Insert Plugs
M
L
13
Wooden Plugs
S
8
Mushroom Plug
3
50mm Hex Bolt
2
Ladder hook
6
20mm wood screw
4
Steel Dowel
1
Insert plug
2
Safety rail plug
Wooden Plug
R
24
64
1
16
Q
30mm wood screw
Hex Wrench
Cross Dowel
16
80mm Hex Bolt
P
O
N
M
L
K
J
I
Qty.
DescriptionDrawing
NO.
H
Bed Slats
Side Rails
1
2
1
Headboard
1
Footboard
D
C
B
A
Qty.
DescriptionDrawing
NO.
FN
Finials
4
Ladder
Bed Slats
Side Rails
1
2
4
1
Back Safety Rail
1
Front Safety Rail
2
Headboard
2
Footboard
G
F
E
D
C
B
A
Qty.
DescriptionDrawing
NO.
Page 3
249 Professional Drive, Morrisville, VT
Web Site: www.boltonfurniture.biz
Step 1
Verify that you have all the parts.
Step 2
Step 3
Step 4
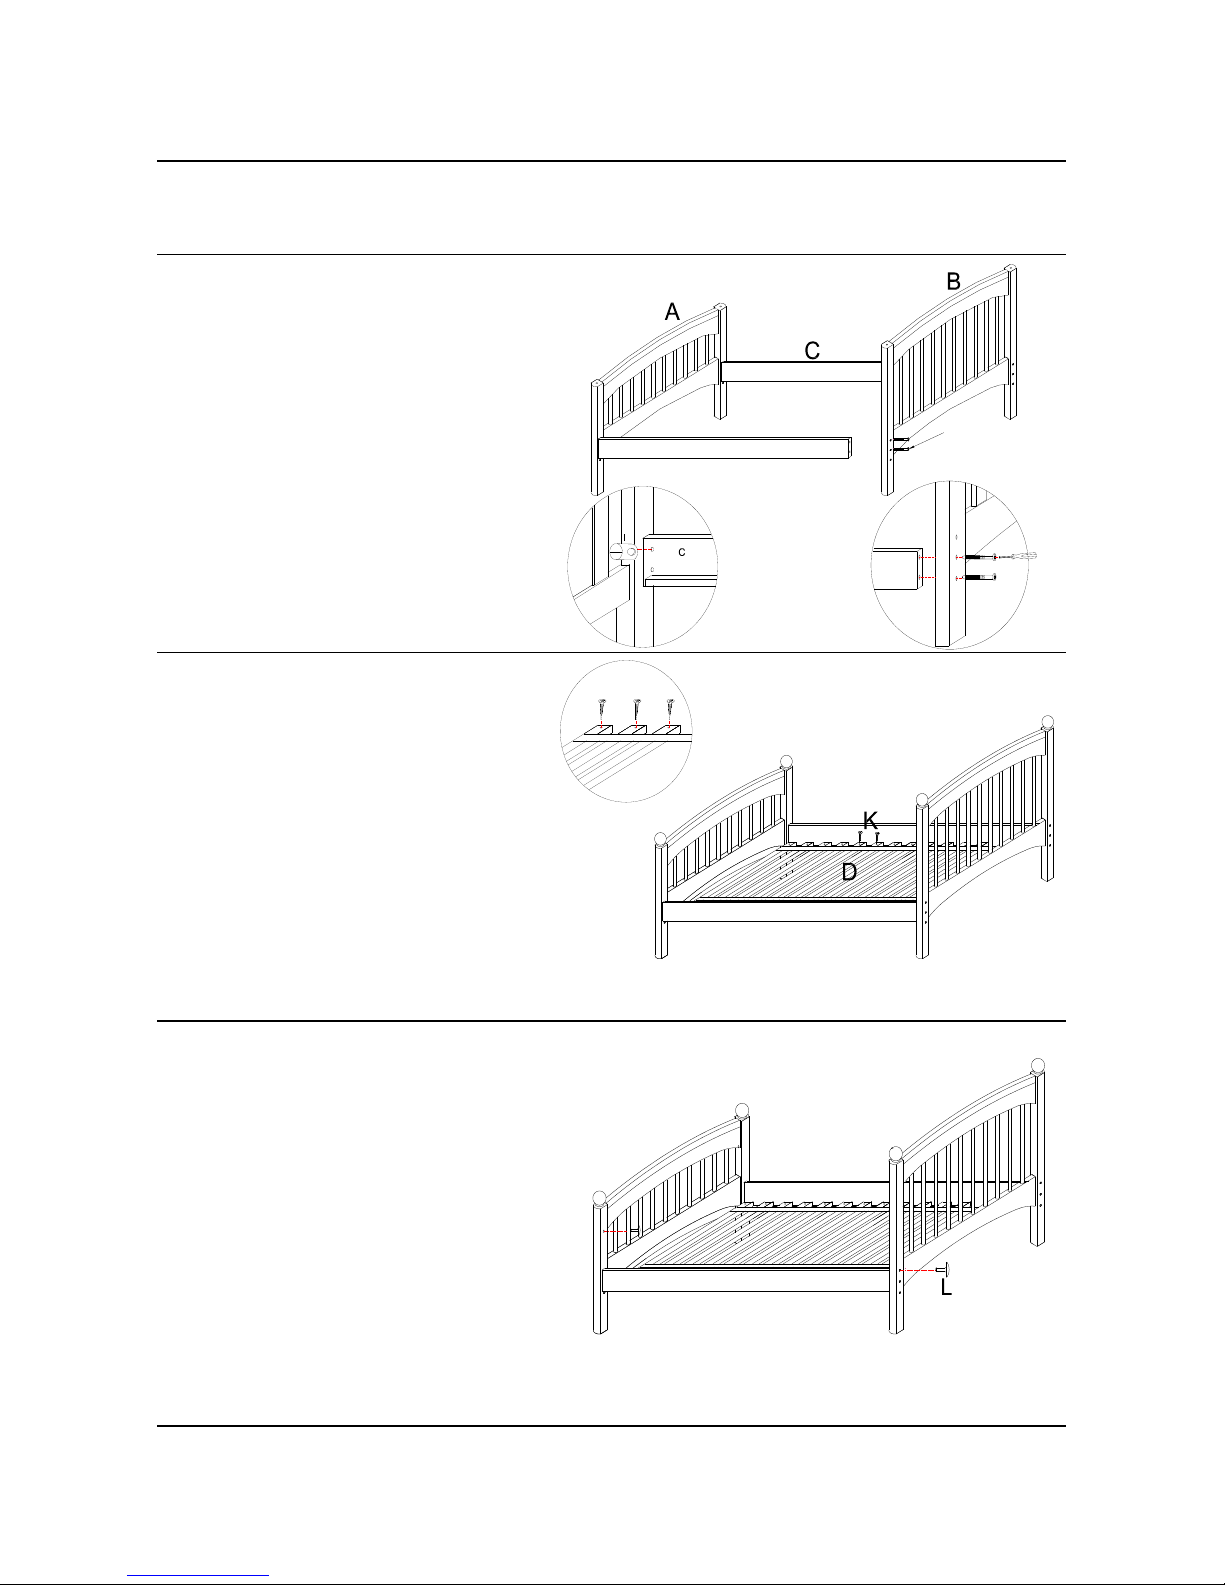
Windsor Bed Assembly Instructions: Two people recommended for this assembly.
Insert Wooden plugs (L) into counter sunk
holes in Headboard & Footboard to cover
hex bolt heads - 12 places. Place Insert
Plug (M) in threaded inserts on footboard 2 places.
Place Slat Roll (D) on the wooden cleats
of side rails. With counter sunk holes in
slats up, center slats between Headboard
& Footboard. Make sure the spacing
between both beds ends and first & last
slat are less than 3 1/2". Screw slats to
wooden cleats using 30mm Wood Screws
(K) - 28 places. Inserts Finials (FN) into
pre-drilled holes in top the Headboard and
Footboard bed post - 4 places.
You are now ready to enjoy your new Bed from Bolton Furniture
Bed Assembly: Position Headboard &
Footboard (A & B) and Side Rails (C) in
approximate location where you want bed.
Insert Cross Dowels (I) in pre-drilled holes
on inside of side rails. Determine position
of side rails - upper or lower. NOTE: If
using optional under bed accessories,
side rails must be in upper position.
Attach side rails to bed ends by inserting
80mm Hex Bolt (H) into thru holes on bed
ends - 8 places. Thread hex bolt into
cross dowels in side rails. Using Hex
Wrench (J) tighten hex bolts.
JCH
H
FN
K
D
M
Page 4
249 Professional Drive, Morrisville, VT
Web Site: www.boltonfurniture.biz
Step 1
Verify that you have all the parts.
Step 2
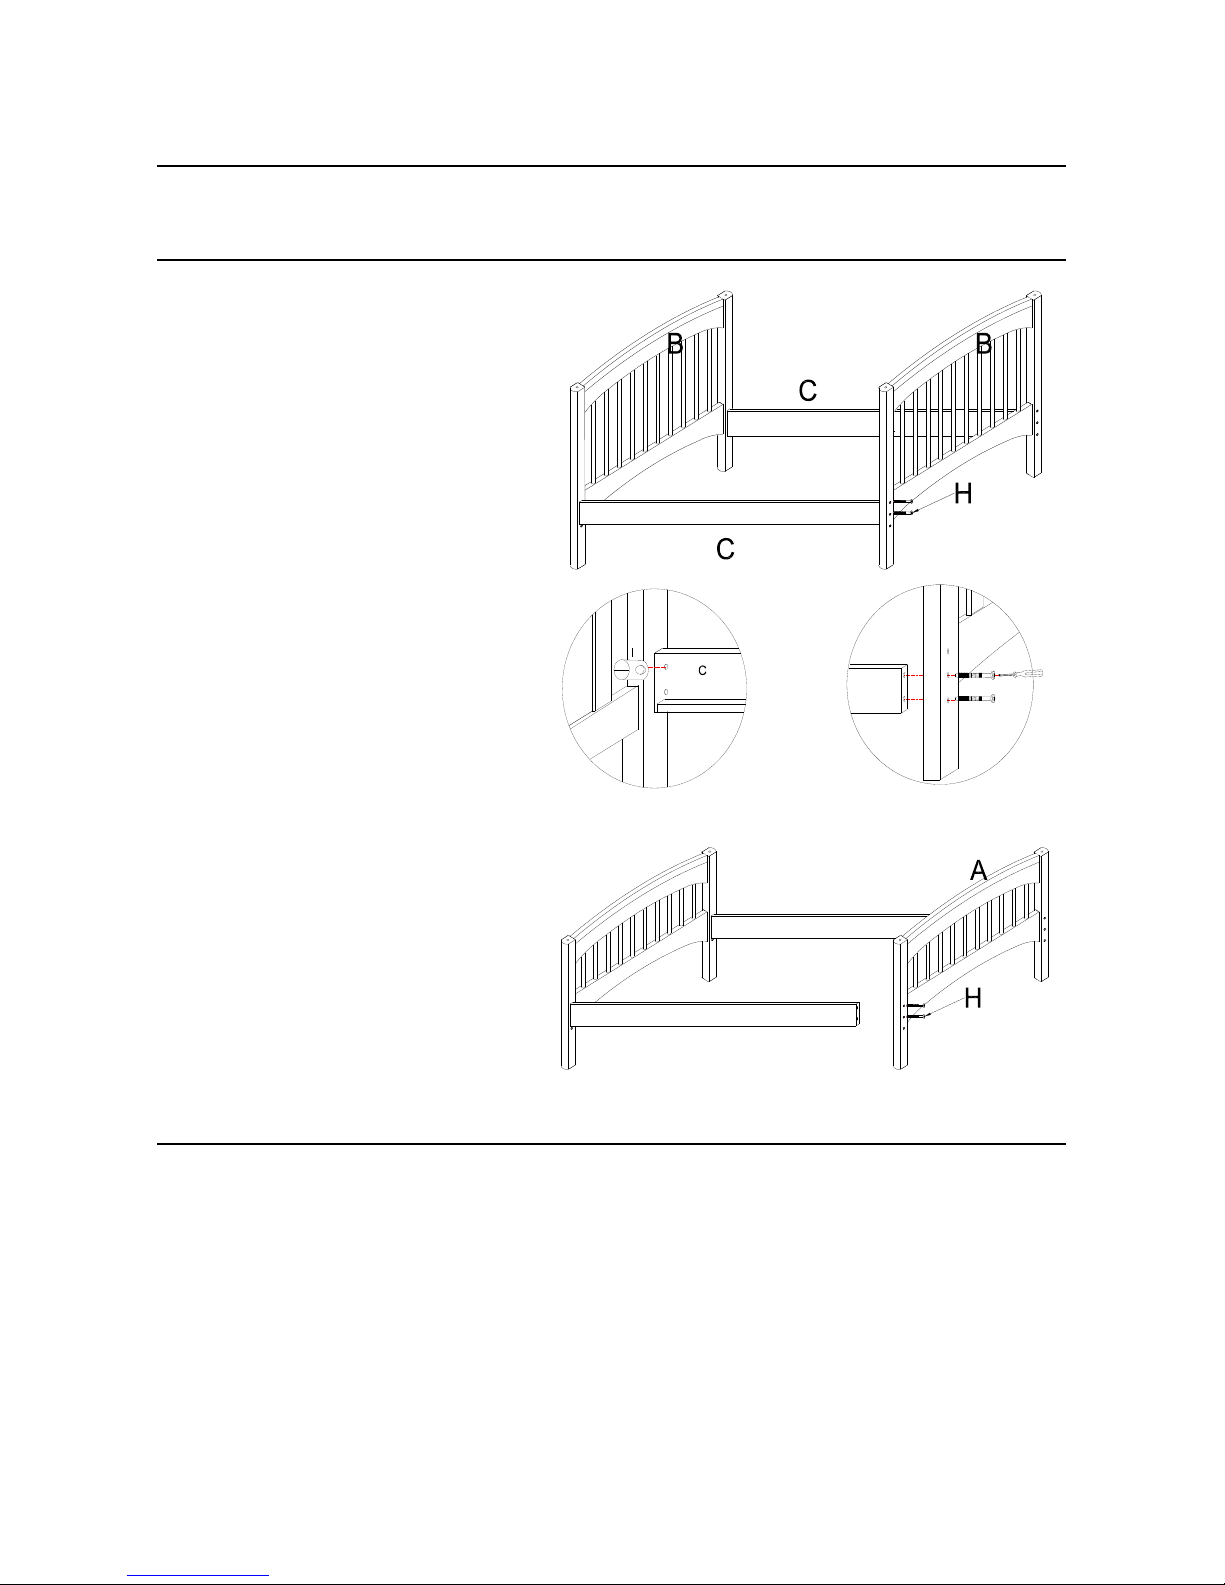
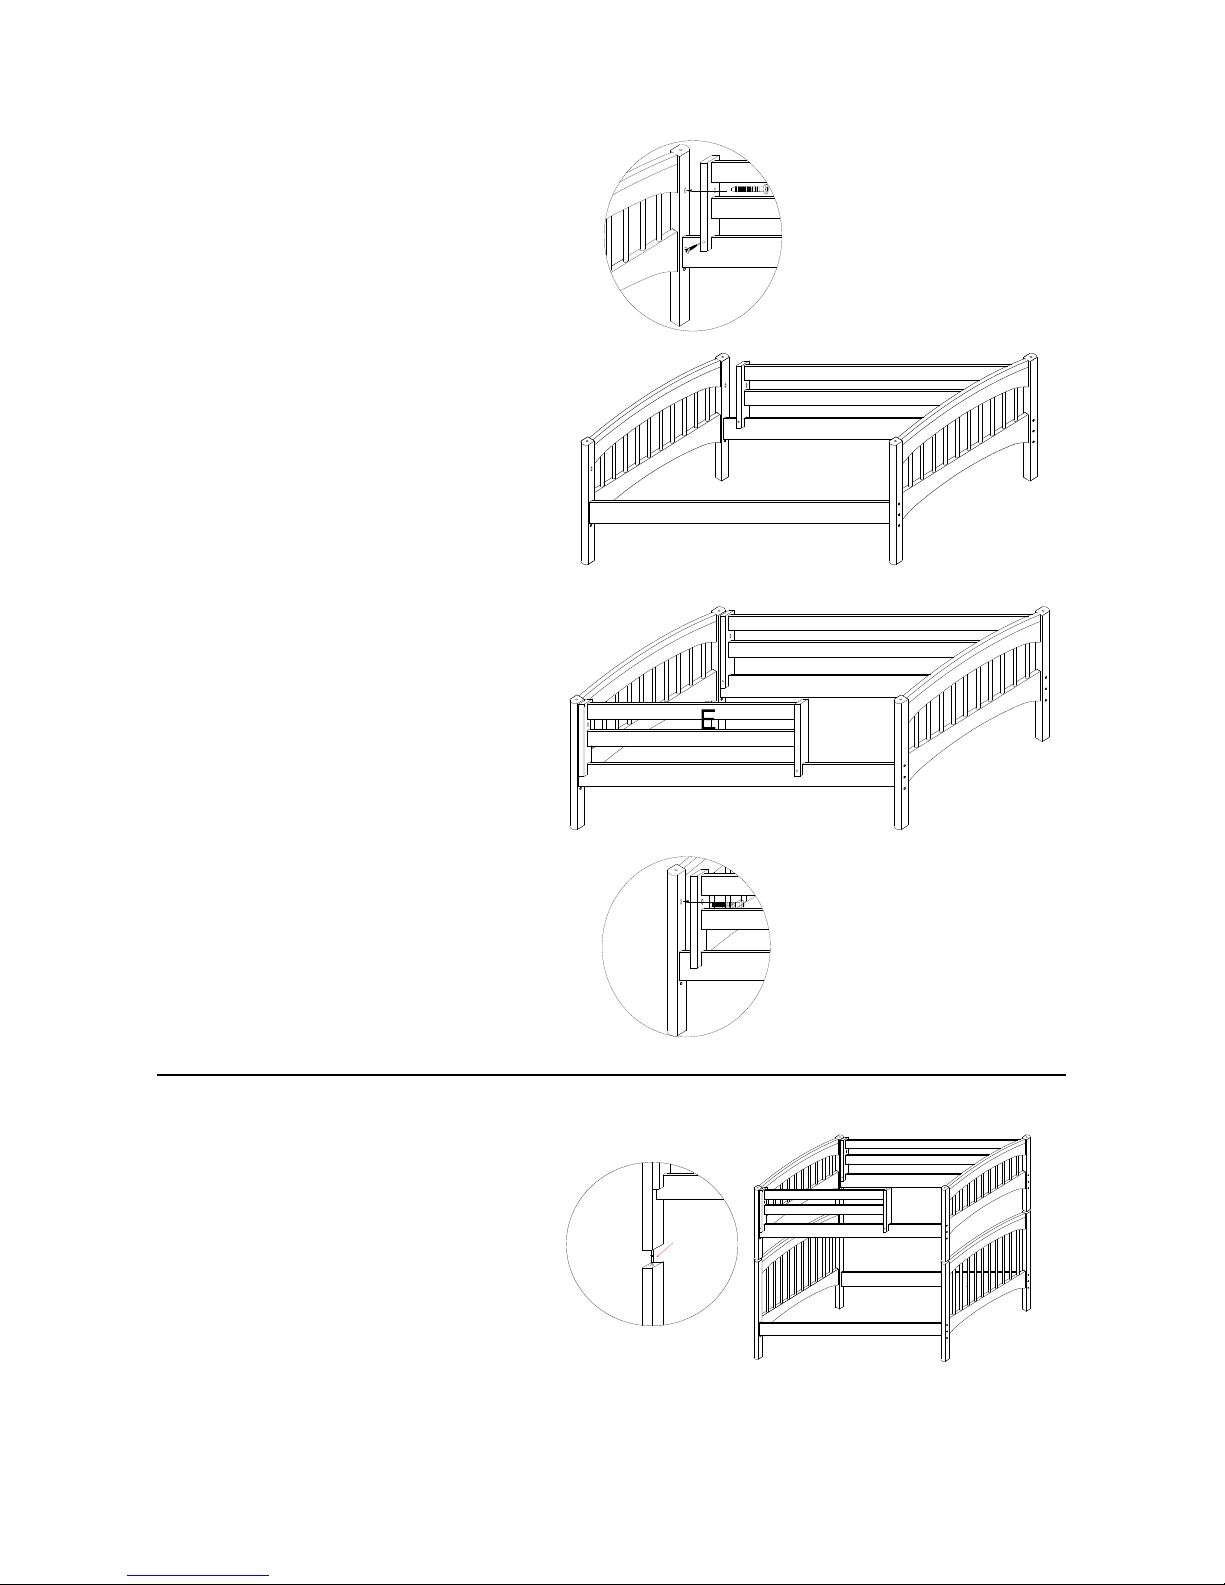
Top Bed Assembly: Position (2)
Footboards (A) and Side Rails (C) in
approximate location where you want bed.
Insert Cross Dowels (I) in pre-drilled holes
on inside of side rails. NOTE: Side rails
must be in upper position on top bunk
assembly. Attach side rails to bed ends
by inserting 80mm Hex Bolt (H) into thru
holes on bed ends. Thread hex bolt into
cross dowels in side rails. NOTE: Do not
tighten hex Bolts at this time! You will
need adjustibility to position Back Safety
Rail between the two bed ends and over
the back side rail.
Windsor Bunk Bed Assembly Instructions: Two people recommended for this
assembly.
Botton Bed Assembly: Position (2)
Headboards (B) and Side Rails (C) in
approximate location where you want bed.
Insert Cross Dowels (I) in pre-drilled holes
on inside of side rails. Determine position
of side rails - upper or lower. NOTE: If
using optional under bed accessaries,
side rails must be in upper position.
Attach side rails to bed ends by inserting
80mm Hex Bolt (H) into thru holes on bed
ends. Thread hex bolt into cross dowels
in side rails. Using Hex Wrench (J)
tighten hex bolts.
HCJ
C
C
A
Page 5
249 Professional Drive, Morrisville, VT
Web Site: www.boltonfurniture.biz
Step 3
Secure Back Safety Rail to the bed ends
by inserting 50 MM Hex Bolt (S) into the
thru holes in safety rail posts, threading
them into the inserts in both bed ends tighten using Hex Wrench (J). Secure
safety rail posts to inside of side rail using
30 MM Wood Screw (K) - 2 places.
Secure Front Safety Rail to bed ends by
inserting 50 MM Hex Bolt (S) into thru
hole in front safety rail post, threading it
into insert in bed end - tighten using Hex
Wrench (J).. Secure safety rail posts to
inside of side rail using 30 MM Wood
Screw (K) - 2 places.
Step 4
Attach Back Safety Rail: Make sure the
pilot holes on the posts of the Back Safety
Rail (F) are facing the inside of the siderail
(side with the cleat). Position Back Safety
Rail (F) between 2 bed ends. Slide the
Safety Rail over Side Rail. Using Hex
Wrench (J), tighten the 80MM Hex Bolts
securing the bed ends to the side rails.
Attach Front Safety Rail: Make sure
the pilot holes on the posts of the Front
Safety Rail (E) are facing the inside of the
siderail (side with the cleat). Slide the
Front Safety Rail (E) over Side Rail.
Position front safety rail to left or right end
of bed.
Position Upper assembly on Lower
Assembly: Insert Steel Dowel (P) into
predrilled holes in top rails/posts of Lower
Bed Assembly (4 places). Positon the
upper bunk bed assembly by Aliegning the
pre-drilled holes in bottom of bed post of
Upper Bed Assembly to the Steel Dowels
(P) in Lower Bunk Assembly. Seat the
Upper Bunk Assembly firmly down on top
of the Lower bunk Assembly.
P
F
S
K
S
Page 6
249 Professional Drive, Morrisville, VT
Web Site: www.boltonfurniture.biz
Step 5
Step 6
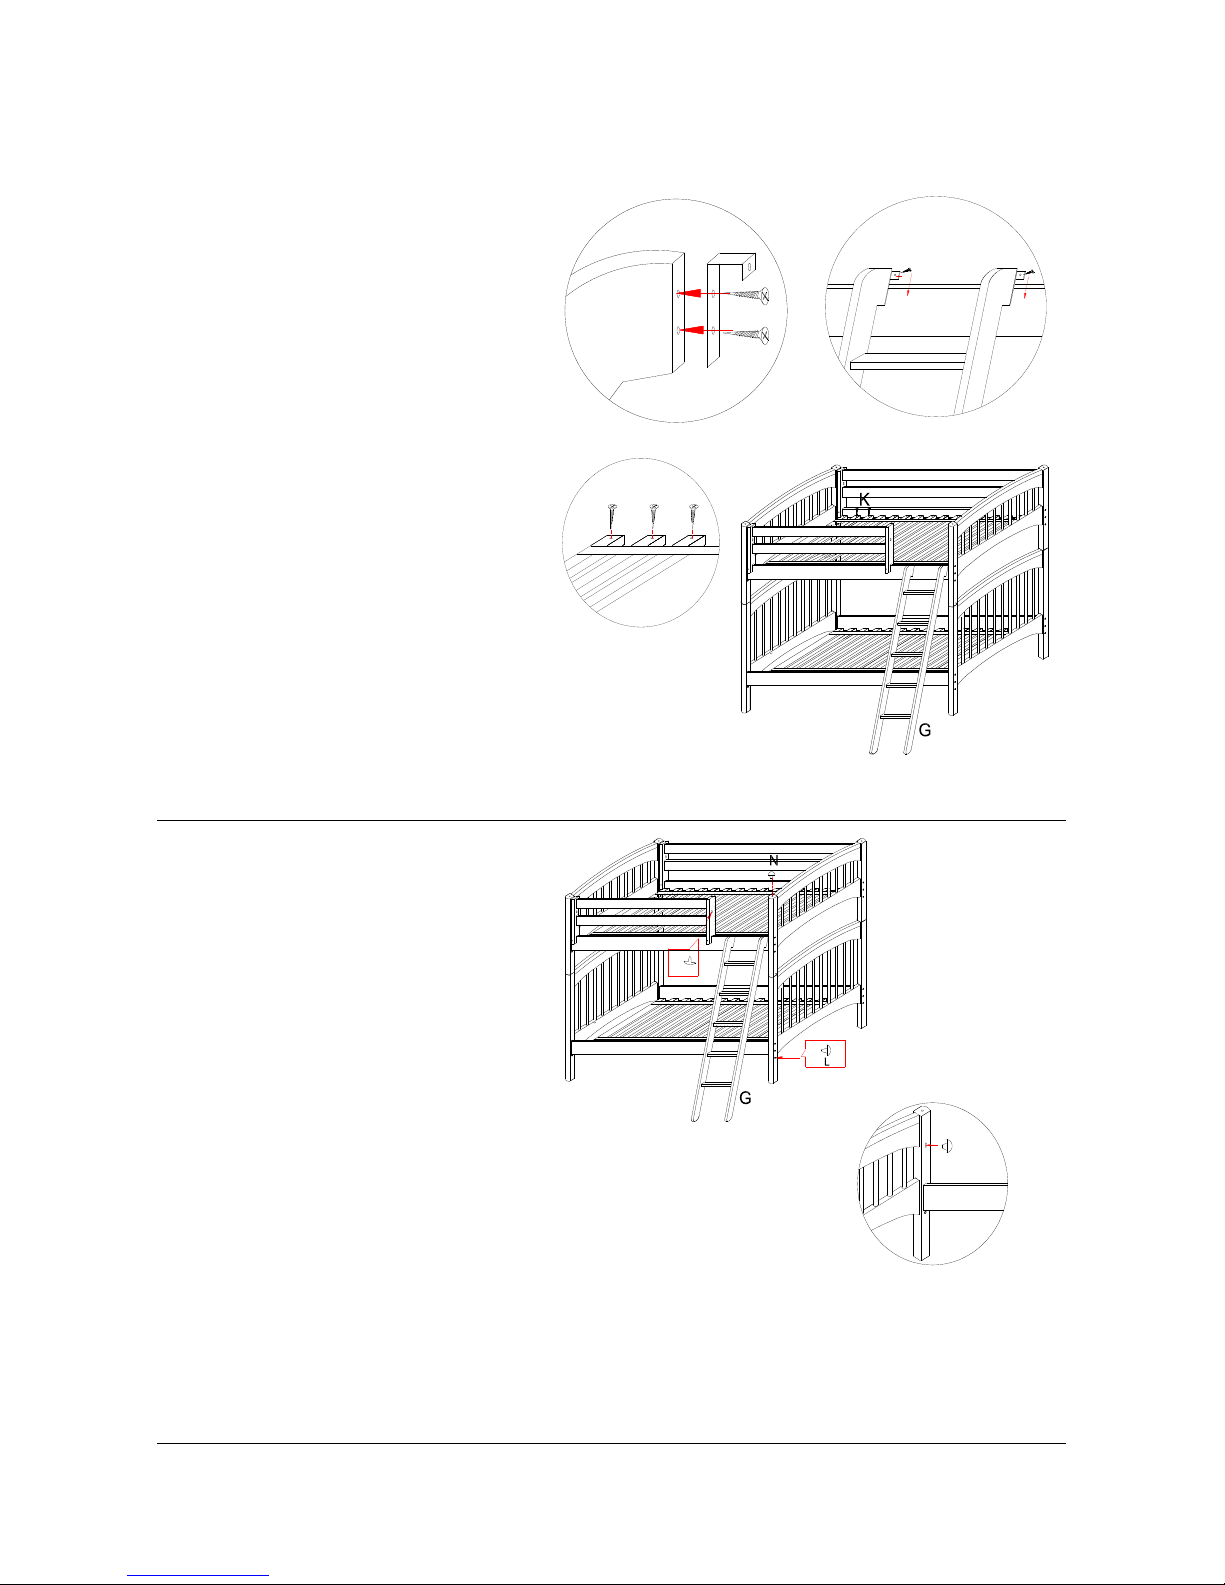
Place Insert Plug (M) into threaded insert
in bed end (A) of upper structure of bunk
on opposite end of where the front safety
rail is attached.
You are now ready to enjoy your new Bunk Bed from Bolton Furniture
Insert Safety Rail Plug (O) into thru hole in
front safety rail. Insert Mushroom Plug
(N) into predrilled holes in top of post of
upper bunk structure - 4 places. NOTE:
Do not use Finials that come with this
bed when configured as a Bunk Bed!!
Place Slat Roll (D) on the wooden cleats
of side rails in the upper and lower bunks.
With counter sunk holes in slats up, center
slats between the bed ends. Make sure
the spacing between the bed ends and
first & last slat are less than 3 1/2". Screw
slats to wooden cleats using 30mm wood
screw (K) - in 56 places
Ladder Assembly: Attach Ladder Hooks
(R) using 20MM screws (Q) into the
predrille holes in ladder (G) - 2 places.
Hook the ladder over the side rails in the
upper bunk - secure the ladder to the
inside of the side rail using 20MM screws
(Q) - 2 places
Insert Wooden Plugs (L) into counter sunk
holes in Bed ends of the upper and lower
structures of bunk to cover hex bolt heads
- 24 places.
K
D
Q
R
R
Q
G
C
O
M
Page 7

249 Professional Drive, Morrisville, VT
Web Site: www.boltonfurniture.biz
Safety Warnings:
STRANGULATION HAZARD
2) Always use the recommended size mattress to help prevent the likelihood of entrapment or
falls. Use a mattress which is 75” long and 38 ½” wide for Twin, 53 1/2" wide for Full on the top
bunk.
1) Follow the information on the warning label attached to the upper bunk end structure. Do not
remove this label.
4) Do not allow children under 6 years of age to use the upper bunk.
3) Surface of mattress must be at least 5 inches below the upper edge of the guard rails.
Ensure thickness of mattress and foundation combined does not exceed 8”.
12) Always use guard rails on both sides of the upper bunk.
5) Prohibit more than one person on the upper bunk.
6) Periodically check to ensure that the guard rails, ladder, and other components are in their
proper position, free from damage, and that all connectors are tight.
7) Do not allow horseplay on or under the bed and prohibit jumping on the bed.
8) Always use the ladder for entering and leaving the upper bunk.
9) Do not use substitute parts. Contact the manufacturer or dealer for replacement parts.
11) If the bunk bed will be placed next to a wall, the guard rail that runs the full length of the bed
should be placed against the wall to prevent entrapment.
10) Use of a night light may provide an added safety precaution for a child using the bunk.
13) The use of water or sleep flotation mattresses is prohibited.
14) Keep these instructions for future reference.
Never attach or hang items to any part of the bunk bed that are not designed for use with
the bed. For example, but not limited to hooks, belts or jump ropes.
These finials are never to be used in the upper structure in a Bunk Bed configuration.
A flat Mushroom Cap made to conform to the requirement is provided to take the place of
finials in the upper structure in Bunk Bed configurations.
Using the finials in the upper structure of a Bunk Bed will create a strangulation hazard.
Never use finials in the upper structure of a Bunk Bed.
** Warning - On Beds with finials that can be configured as Bunk Beds!
Effective on Bunk Beds manufactured on or after March 10th, 2008, finials cannot be used.
The finials provided with certain beds, which are part of the design of the bed, are to be
used only in one of the lower configuration – that is as a Twin, Full, Queen or King
configuration.
 Loading...