

Bolt VX-710C User manual

VX-710C
TTL FLASH
User’s Manual
Inspiration strikes.
Inspiration strikes.
Copyright © 2012 Gradus Group.
Bolt and other names of Bolt products are trademarks of Gradus Group. Other product and corporate names mentioned herein are trademarks of their respective holders.
2 | Introduction

Introduction
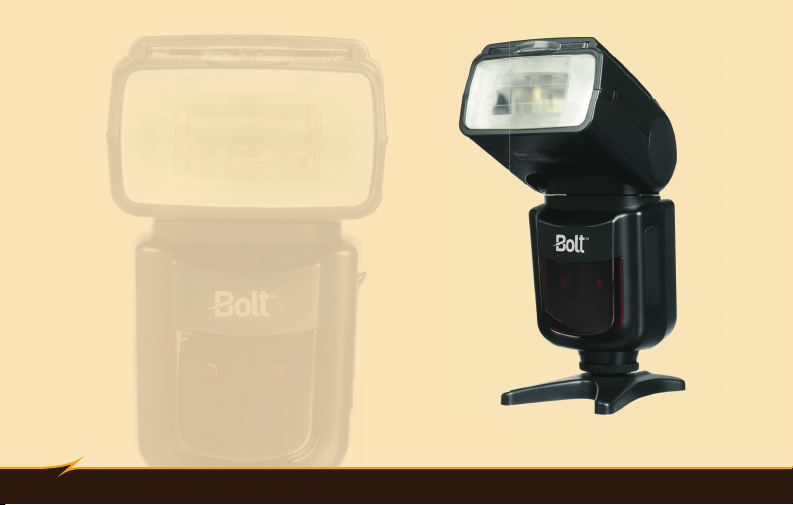
Thank you for choosing the Bolt VX-710C Flash. This advanced digital ash unit puts creative control in your
hands with a broad range of automatic and manual features. It can be used as both an on-camera ash and as
a wireless slave ash. Among the benets you’ll enjoy:
• Full compatibility with Canon’s E-TTL and E-TTL II metering systems
• Flash exposure bracketing
• Automatic and manual zoom from 24mm to 180mm
• Tilt and swivel head: -7° down, 90° up, 180° right, and 90° left
• Two-inch backlit LCD
• Eight manual ash levels: full to 1/128 power, plus ne-tuning by 1/3
• Autofocus-assist for low-light photography
• Wireless optical slave
• Rear-curtain sync
• Built-in reector and diffuser panels
• Automatic power-saving function
Introduction | 3

Contents
Introduction ..................................................................................................................................................2-3
Overview ......................................................................................................................................................6-9
Warnings ..................................................................................................................................................10-12
Installing Batteries ....................................................................................................................................12-13
Mounting the Flash ...................................................................................................................................14-15
Turning on the Flash and Firing a Test .......................................................................................................16-18
Extended Interface ....................................................................................................................................19-20
Using the Automatic TTL Flash Mode ............................................................................................................. 21
Locking Flash Value .......................................................................................................................................22
Using Flash Exposure Compensation .............................................................................................................. 23
Using Flash Exposure Bracketing ..............................................................................................................24-25
Using the Manual Flash Mode ...................................................................................................................26-27
4 | Contents

Controlling Flash Coverage (Zoom) ............................................................................................................27-30
Using the Autofocus-Assist Light .................................................................................................................... 31
Bouncing Your Flash..................................................................................................................................31-33
Red-Eye Reduction ........................................................................................................................................34
Using Rear- or Second-Curtain Synchronization ........................................................................................34-35
Using Your VX-710C as a Wireless Manual Slave .......................................................................................36-38
Positioning Slave Flash Units.....................................................................................................................38-39
Troubleshooting ........................................................................................................................................40-41
Specications ................................................................................................................................................ 42
Customer Service ..........................................................................................................................................42
FCC Notices ................................................................................................................................................... 43
Limited Warranty ........................................................................................................................................... 44
Contents | 5
1
11
2
3
4
5
6 | Overview
9
12
VX-710C
13
8
14
15
22
21
16
17
6
10
18
7
20
19

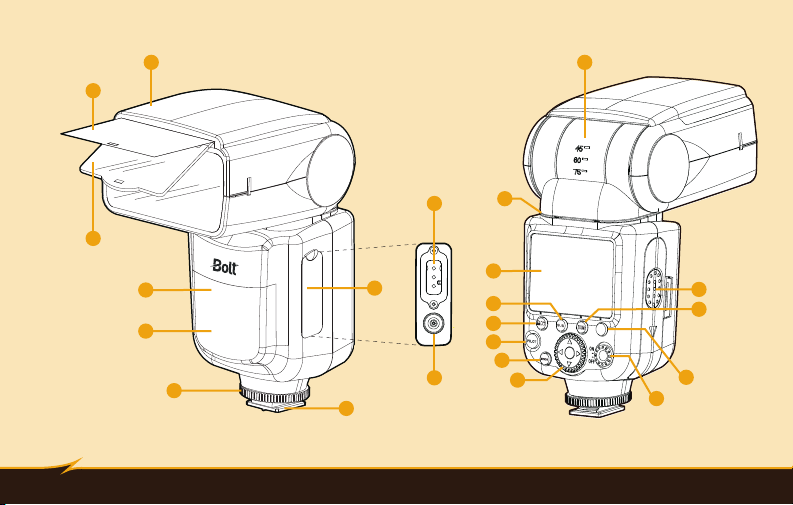
Overview
1. Flash head
2. Reector panel
3. Diffuser panel
4. AF assist light
5. Wireless slave sensor
6. Locking wheel
7. Mounting foot
8. Extended interface cover
9. Power source socket
10. PC sync terminal
11. Flash head position indicator (tilt)
12. Flash head position indicator (swivel)
13. LCD
14. Sub button
15. Lock / audio button
16. Pilot button
17. Mode button
18. Navigation buttons
19. Power switch
20. Flash ready light
21. Zoom position button
22. Battery compartment cover
Overview | 7
23 24 25
39
26
27
28
29
8 | Overview
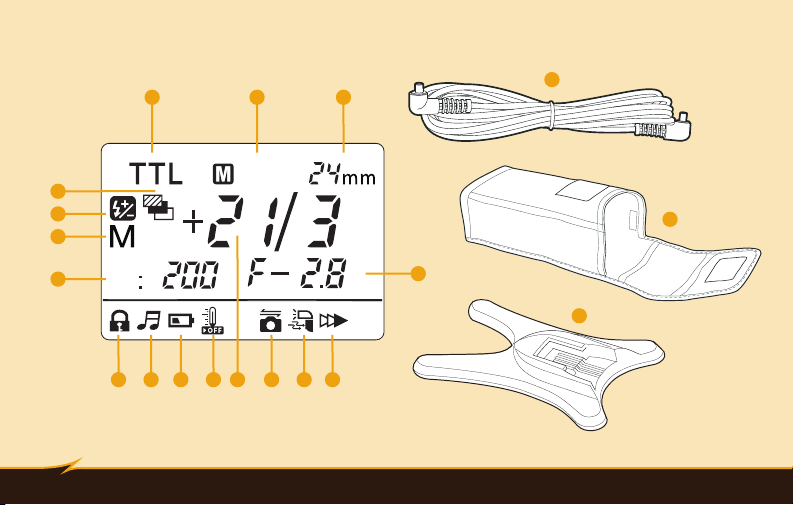
ISO
30 31 32 33 35 36 3734
Zoom
40
38
41

23. TTL mode
24. Manual zoom mode
25. Zoom position
26. Flash exposure bracketing
27. Flash exposure compensation
28. Manual mode
29. ISO speed
30. Lock icon
31. Sound icon
32. Low battery icon
33. Thermal warning icon
34. Manual ash output / Flash
exposure compensation value /
Flash exposure bracketing value
35. Camera communication icon
36. S1/S2 wireless ash mode icon
37. Rear-curtain sync icon
38. Camera aperture (f-stop) / Manual
ash 1/3-stop increment
39. PC sync cord
40. Soft case
41. Stand / Tripod mount
Overview | 9

Warnings
Before using your VX-710C, please read the following safety notices carefully and thoroughly to ensure safe
use, and to help prevent damage to your ash or injury to yourself or others.
• Do not re the ash at close range directly into the eyes of people or animals. This can cause damage to
the retina and may even lead to blindness.
• To avoid overheating and damaging your ash unit, please wait for at least ten minutes after twenty-ve
continuous ashes at full power.
• Do not disassemble or attempt to repair this product yourself. There are high-voltage components inside
that can produce a hazardous electric shock.
• Keep this product and its batteries out of the reach of children.
• Use only the power sources specied in this manual.
• Always switch the ash off before changing the batteries.
• Always install AA batteries of the same type, brand, and age. Do not combine different types or brands, or
old and new batteries. This can cause the batteries to leak, overheat, or explode.
• Install the batteries in the proper orientation, according to the indicator in the battery chamber. Installing
batteries in the reverse orientation may cause them to leak, overheat, or explode.
10 | Warnings

• Do not use or store the VX-710C in ammable conditions (such as environments containing ammable
gases or liquid chemicals). This can damage the ash, start a re, or cause an electric shock.
• Do not clean the VX-710C with agents containing corrosive or ammable substances such as paint thinner,
benzene, or nail polish remover.
• This product is not water resistant. Keep it away from rain, snow, humidity, and general moisture.
• Should the VX-710C sustain physical damage, do not touch any exposed interior metal parts. If touched,
they may generate an electric shock or cause a malfunction. Promptly remove the batteries and take the
product to an authorized service center for repair.
• If you detect excessive heat, smoke, or a burning smell coming from the ash, immediately stop operation
and remove the batteries to prevent the product from igniting or melting. Take the product to an authorized
service center for repair.
• Do not drop or otherwise cause a strong physical impact to the VX-710C, as this can cause a malfunction
that may cause it to explode or ignite.
• Remove all batteries from the VX-710C before long-term storage in order to prevent the product from
igniting or leaking corrosive liquids.
• Do not store or use this product at temperatures above 104°F (40°C).
• Keep the metal contacts in the battery compartment clean and free of corrosion and dirt. Do not touch
them with your ngers. Corrosive elements on the contacts can damage the VX-710C and prevent it from
functioning properly. Contacts may be cleaned with isopropyl alcohol on a cotton swab.
Warnings | 11

• Dispose of used batteries properly. Never heat them or throw them into a re, as this can cause the
batteries to leak corrosive liquids, generate heat, or explode.
Installing Batteries
The VX-710C can be powered by four AA batteries of several types:
• Lithium (1.5 V)
• Nickel-metal hydride (Ni-MH) (1.2 V)
• Alkaline (1.5 V)
Note: For the fastest recycle times and longest battery life, lithium or Ni-MH batteries are recommended.
To install batteries, make sure the VX-710C is turned off and follow these steps:
1. Press on the battery compartment cover and slide it in the direction of the arrow to open it.
2. Insert batteries in the orientations indicated by the illustrations inside the compartment.
12 | Installing Batteries
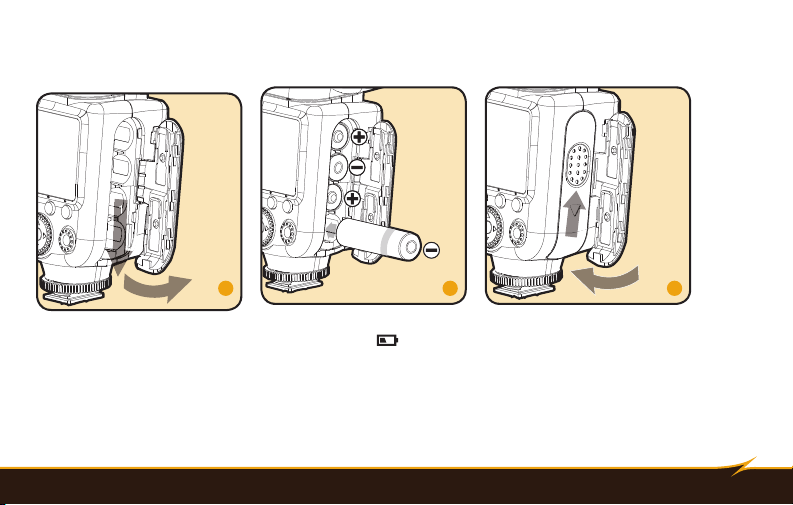
3. Close the battery compartment cover by pressing and sliding it into place, in the opposite direction of the
arrow on the cover.
1
2
1 2 3
2
1
When the battery power is low, the low battery indicator ( ) will appear on the LCD, the ash ready light will
turn red for twenty seconds or longer, and the ash will continuously beep for approximately ten seconds.
Important! Replace all four batteries at the same time. Do not mix battery types or brands, or use old and new
batteries together.
Installing Batteries | 13
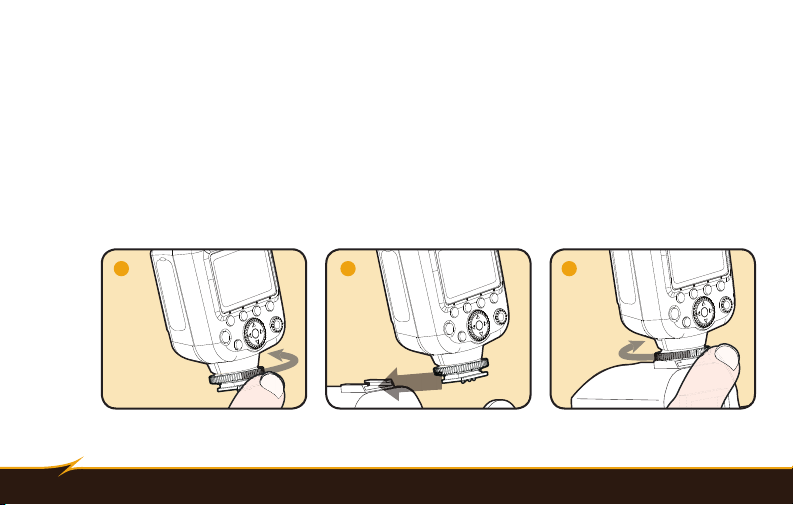
Mounting the Flash
To mount the ash on your camera, make sure the VX-710C is turned off and follow these steps:
1. Rotate the locking wheel counterclockwise to loosen it.
2. Slide the mounting foot all the way into your camera’s hot shoe.
3. Rotate the locking wheel clockwise until secure.
2 31
14 | Mounting the Flash
 Loading...