


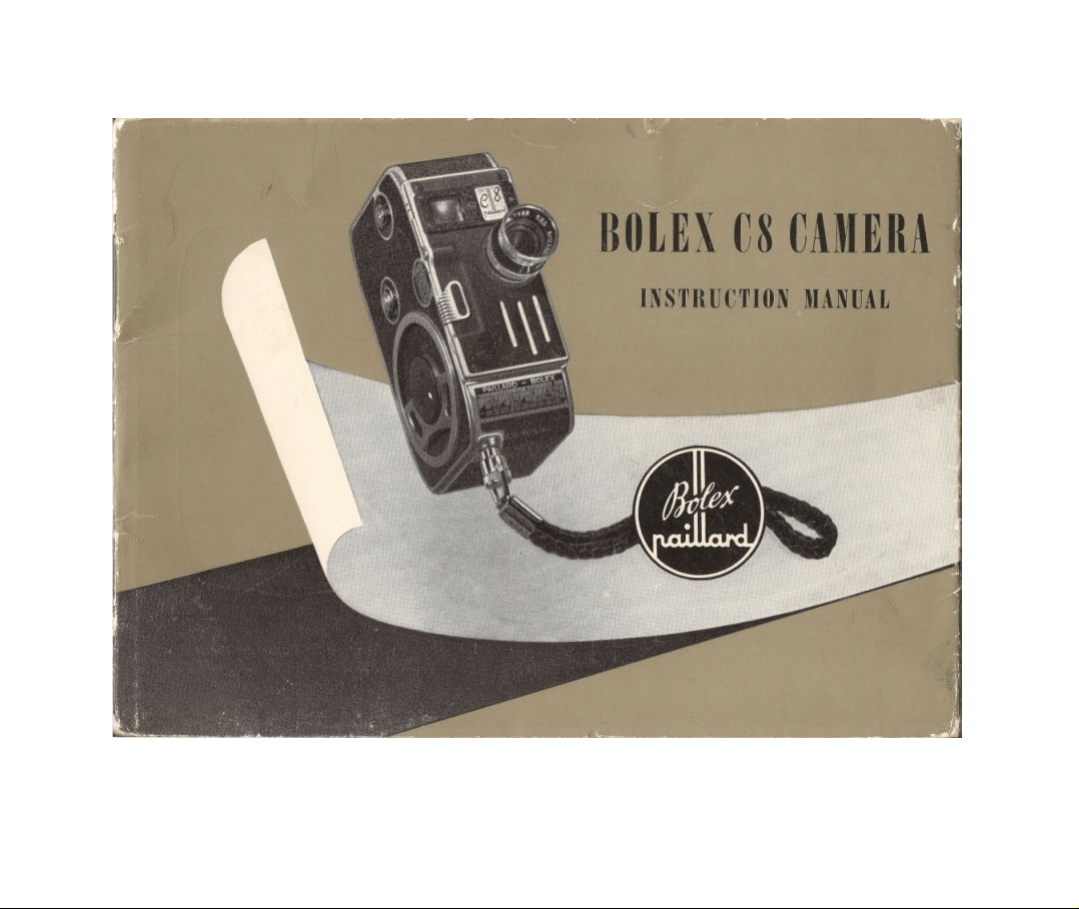
C8

Foreword
You have just acquired a Paillard-Bolex C 8 cine camera. The name of Paillard-Bolex is considered the
world over as a hallmark of technical perfection and precision craftsmanship, Before leaving the factory,
your camera was checked over and adjusted with meticulous thoroughness.
Like any other precision instrument, your camera should be treated with the utmost care. Always
remember that any one of the countless Paillard-Bolex distributors the world over will be glad to advise
you as to how to get the best out of your Bolex C8.
Every Paillard-Bolex C 8 Motion picture camera carries a serial number engraved engraved on it's base,
where the carrying-strap is fitted. This number should be quoted in all correspondence with your dealer.
If your camera needs overhauling or repairs these should only be done by a Paillard-Bolex authorised
agent, as the makers' guarantee is automatically forfeited if such work is carried out by other persons. In
the event of your contemplating a trip abroad, it will be a wise move to ask your dealer for a list of
Pilllard-Bolex distributes in all countries, since they alone are in the position to offer you faultless
service.

INSTRUCTIONS FOR USE OF
PAILLARD-BOLEX C 8 CINE CAMERA
Page
Equipment – Films ............................................................................................... 2 - 3
Loading the camera ............................................................................................. 4
Operation. Intermittent and continuous running – Single frame exposures – Cable
release – Locking mechanism ....................................................................................
6
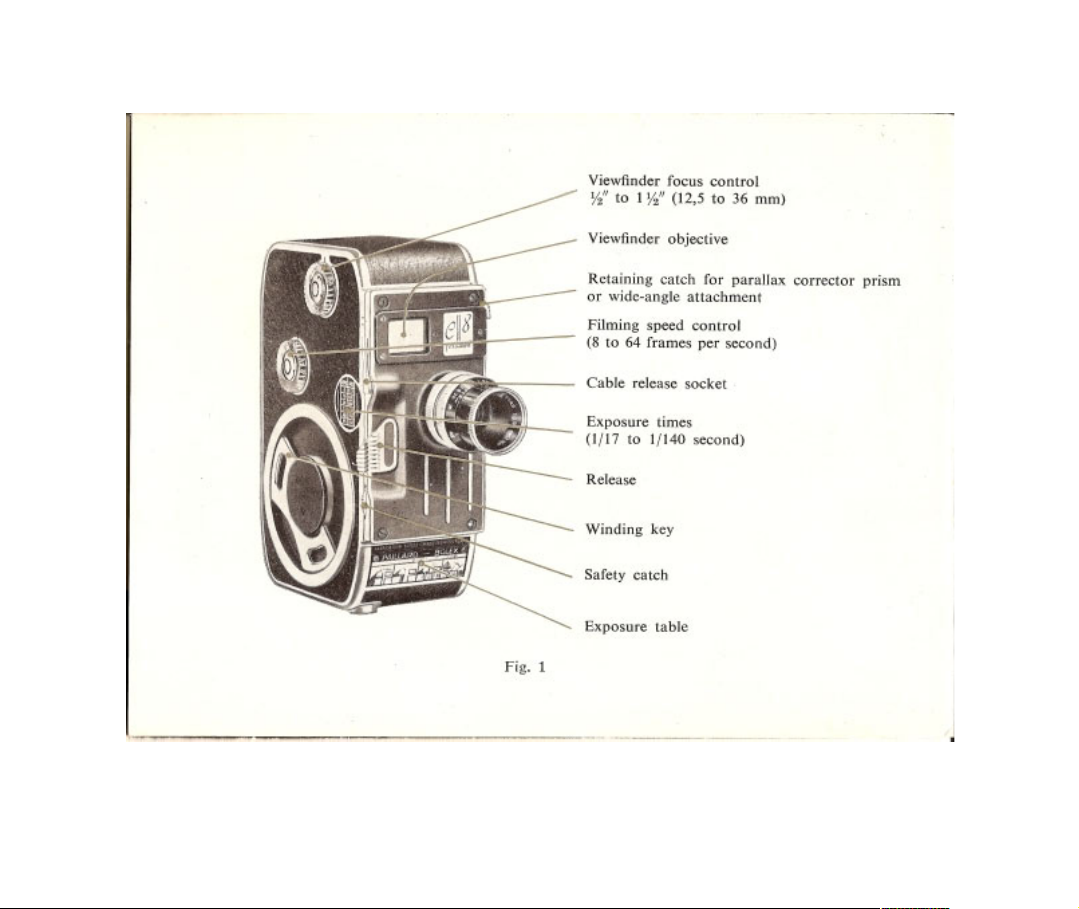
Main parts. Footage counter – Speed control – Exposure time and filming speed –
View finder – Parallax correction ...............................................................................
8
Inserting the spool – Unloading. At end of the film, or before use .........................
10
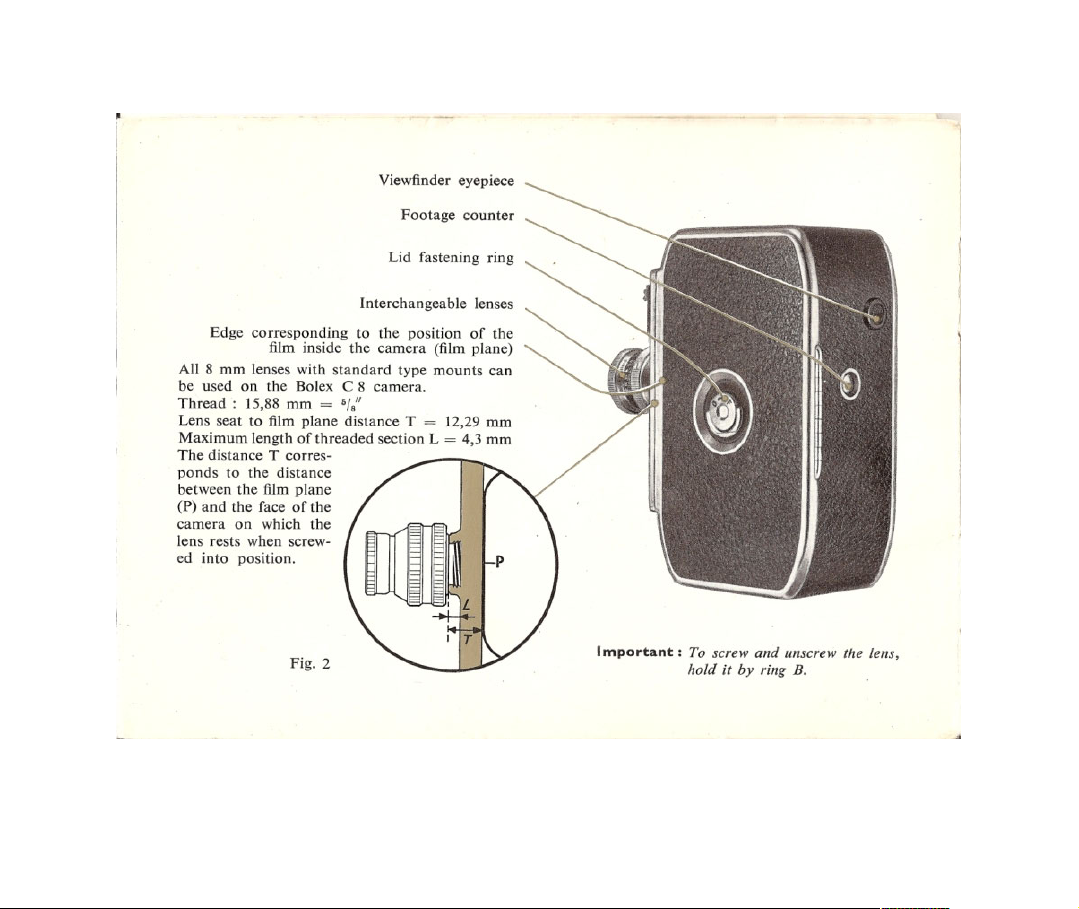
Lenses. Standard lenses – Wide angle lenses – Telephoto lenses .................................
13
Shooting. Winding – Selecting the lens – Exposure table – Exposure meters – Setting
the diaphragm – Focusing – Filming speeds – Stability of the camera – Length of scenes
...................................................................................................................... 14
Accessories. Filters for black-and-white and colour film – Sunshades – Adapter ring –
Parallax correction prisms – Wide angle attachments – Cable releases – Tripod – Camera
handle – Movie titler ................................................................................................
19
Upkeep .................................................................................................................. 22
The Bolex Cine-Guide, on sale at all good photo and cine equipment stores,
contains all essential information on how to shoot good movies.
1

EQUIPMENT
The standard equipment of the Bolex C 8 camera comprises the
following items:
a) 1 lens
b) 1 empty Lake-up spool
c) 1 short cable release
d) 1 instruction manual
e) 1 depth of field chart per focusing mount lens supplied with the camera
Before using your camera, we strongly recommend that
you read through this manual very carefully from cover
to cover
A thorough prior acquaintance with the purpose and use of the various controls
will save the beginner many false starts and will help him to get good results
right from the outset
2
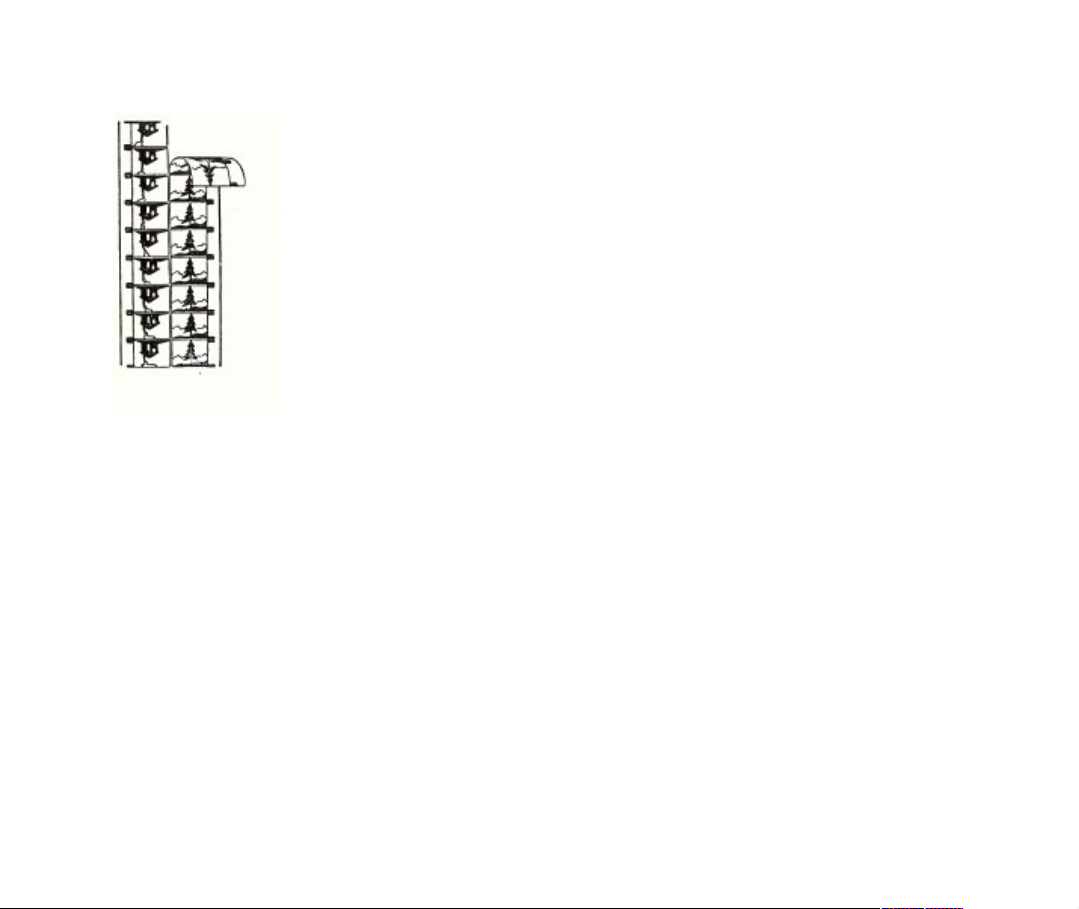
8 mm FILM
Capacity. The Bolex C 8 camera is designed to take "double" 8 mm film on 25-ft. Spools.
Leader. In reality, unexposed 25ft. spools of double-8 mm film contain somewhat over
33ft. of film, due to the fact that a length of leader about 4ft. long is allowed for at each end,
so that the camera can be loaded and unloaded without fogging the film. The leaders are
removed after development, and the film is finally returned as a single strip of ordinary 8mm
film, 50 feet (i.e. 2 x 25 ft.) in length yielding about 4 minutes' screening time.
Choice of film. There are several different types of double-run 8 mm black-and-white or
colour film available on the marker. Each category is determined by the speed of the emulsion and the figures in
which this speed is expressed are used as a reference when consulting exposure tables or meters.
Black-and-white film. Depending on the lighting conditions, the movie-maker has, generally speaking, a
choice between either:
a film of medium speed (22 degrees Scheiner, or 10 ASA), for outdoor shots in daylight, or a flim of higher speed (28
degrees Scheiner, or 40 ASA), for outdoor shots in poor light and more
especially, for indoor shots.
Colour film. Double-run 8 mm colour film is manufactured in two types :
a) for use in daylight.
b) for use in artificial light with flood-type lighting.
3

LOADING
Winding Lift up the hinged winding key and wind up the motor
fully by turning the key in a clockwise direction. The
camera can also be wound by turning the key back and
forth.
Do not attempt to wind further after the check.
To open the camera
Lift up the hinged semicircular ring on the camera lid and
turn it to the left (towards ‘O’).
To open the pressure-pad
Lay the open camera down with the lid towards you, and
open the pressure-pad by moving the lever, as shown in
the sketch.
Then remove the take-up spool from the camera.
Readying the film
Place the full spool in the palm of the right hand, holding it in such a manner
as to prevent the film from coming loose and unwinding.
Slip the end of the Film into one of the slits in the core of the empty spool,
which should be held in the left hand, with the side marked ‘I' uppermost.
Then wind 2 or 3 turns of film onto the take-up spool by turning the latter in a
clockwise direction, keeping both spools held firmly.
4
The camera
should be loaded
in shade, to avoid
any risk of
fogging the edges
of the film.
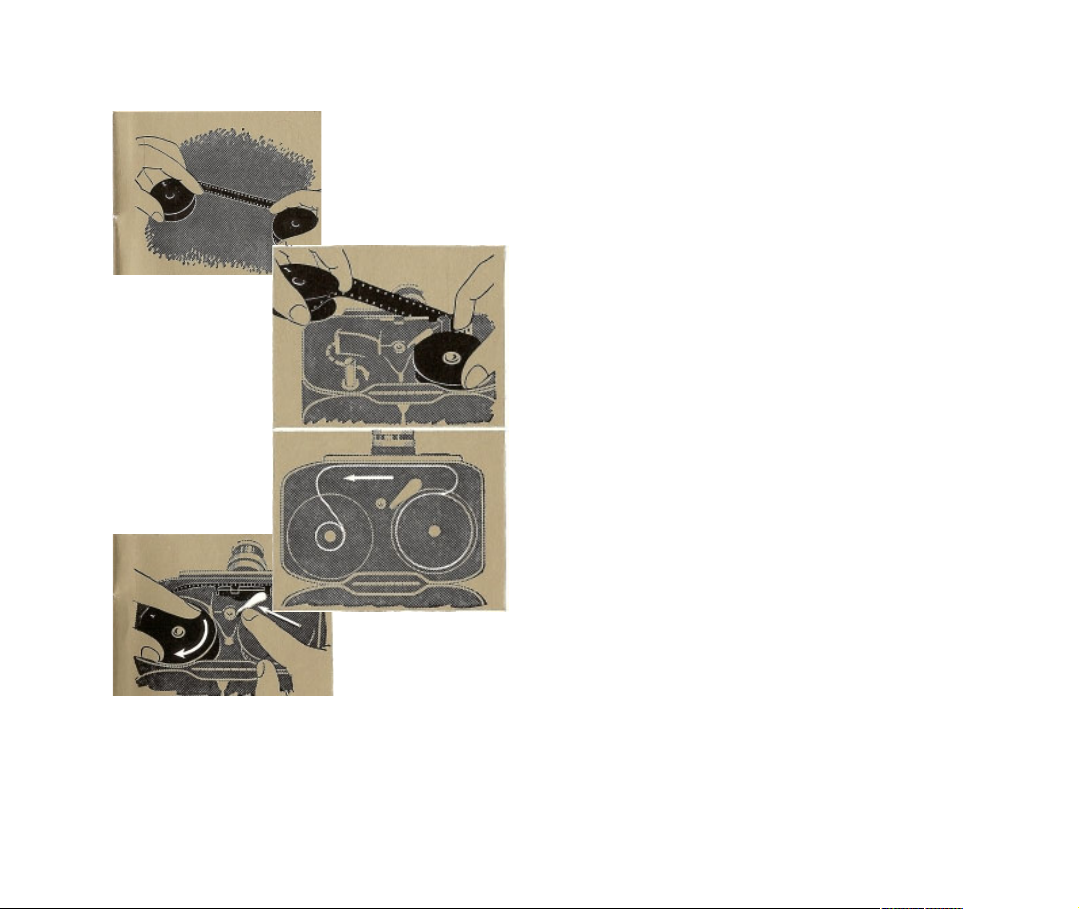
Now move the full spool away from the take-up spool until a length of about
6 ins. of film has been unwound.
Insert the index finger of the left. and right hand behind the film, as shown
in the sketch.
To insert the film in the camera
Slip the fu1l spool onto its spindle and insert the film into the
gate, guiding it with the left index finger.
The dark, shiny side of the film must be turned towards you and the
light side towards the lens. Slip the take-up spool onto its
spindle regardless of the position of the notches.
Final check-up
When the spools and film are in in place, turn the
take-up spool by hand in order to tighten up the film.
Close the pressure-pad by pushing the lever hack
into position. Then press on the filming button for at
fraction of a second in order to check that the film is
drawn correctly through the camera.
Lastly, clone this lid of the camera again and fasten it, by turning the catch
toward ‘F‘.
5
 Loading...