

Page 1

OXC1Sync Charger
© 2012 Bogen Communications, Inc.
54-2208-01A 1204
Specifications subject to change without notice.
S
YNC CHARGER
S
YNC
C
HARGER
SYNC
CHARGE R
External Sync Charger for OMX1 MIC/Transmitters
Page 2
SYNC CHARGERSYNC
CHARGER
Orator OXC1 Sync Charger
The Bogen Orator OXC1 Sync Charger provides a means to charge and set the
operating frequencies of OMX1 MIC/Transmitters external to the Orator base
unit. Because of its compact size, the OXC1 may be located in more convenient
locations than the Orator base unit but still provide the necessary functions of
charging and frequency selection for OMX1 units. The OXC1 Sync Charger
allows wall mounting with included brackets.
OXC1
Frequency Band Selection
This switch, located on the bottom of the unit, is used to
set the operating frequency band for the Orator system.
This switch must be set to the same band that the
Orator base unit is set to (HIGH or LOW, DIP switch 1).
Each time an OMX1 is inserted into a charging bay, its
operating frequency will be synchronized with the Orator
receiver. A charge only center position will charge an
OMX1 unit without disturbing its current operating setting.
SYNC
CHARGER
S
YNC
C
H
ARGER
1
2
3
4
6
7
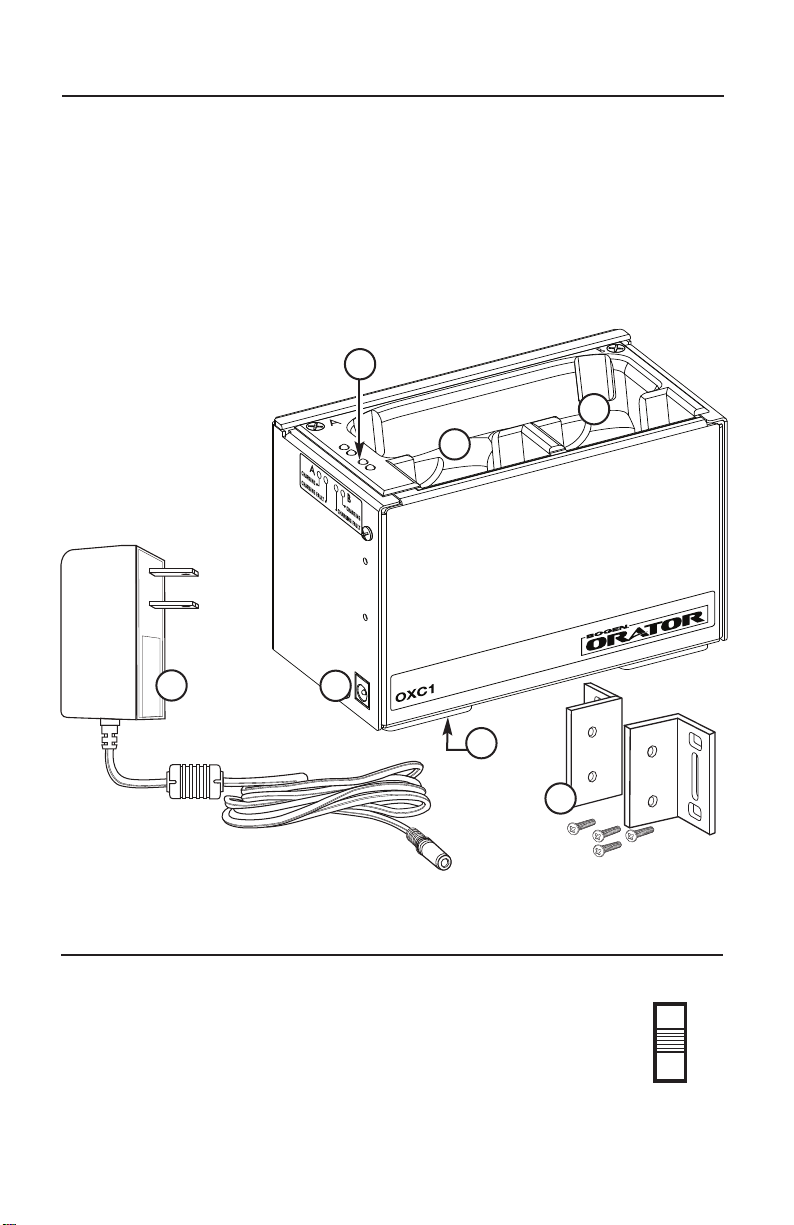
1. LED Charging Indicators
2. Charging Dock A
3. Charging Dock B
4. Mounting Brackets & Screws
5. Frequency Band
Switch (underside
of unit)
6. DC Power Connector
7. Power Supply5V DC, 2A Output
5
HI BAND
CHARGE
ONLY
LO BAND
Page 3

Charging OMX1 MIC/Transmitter Units
Begin by connecting the included Power Supply into the DC Power Connector on
the OXC1, plug the power supply into an AC outlet, and set the bottom Frequency
Band switch. The OMX1 MIC/Transmitter units are inserted into the OXC1 Sync
Charger as shown. A MIC/Transmitter using the “A” Channel should only be
inserted in the “A” charging dock in the OXC1, a “B” Channel MIC/Transmitter only
into the “B” dock. The OXC1 syncs the transmittersʼ operating frequencies to the
Orator base unit, depending on the setting of the bottom switch. A mechanical
“click” is noticeable when the OMX1 is fully inserted into the OXC1 dock. When
an OMX1 has been inserted, the OXC1 charge indicator will illuminate. The Orator
manual contains more information regarding charging bays and charge dock
selection tabs.
Charging Dock Indicators
Charge
When an OMX1 is being charged, the OXC1
charge indicator will illuminate GREEN.
Charging is complete when the indicator is
extinguished.
Fault
A fault condition will be signaled by a RED
indicator, and may indicate a problem with
the OMX1 battery.
MIC/Transmitter Accessory Storage Area
Charge
Indicators
Charging
Dock
OXC1
SIDE
VIEW
SYNC
CHARGER
S
YNC
C
H
ARGER
Insert OMX1
MIC/Transmitters
into OXC1 Docks
LED Indicators
A
B
B
Charging
Dock
A
Page 4

50 Spring Street, Ramsey, NJ 07446, U.S.A.
Tel.: 201-934-8500 • Fax: 201-934-9832
www.bogen.com
The Orator OXC1 is warranted to be free from defects in material or workmanship
for five (5) years from the date of sale to the original purchaser. This warranty does
not extend to any of our products that have been subjected to abuse, misuse,
improper storage, neglect, accident, improper installation or have been modified
or repaired or altered in any manner whatsoever, or where the serial number or
date code has been removed or defaced.
5-YEAR WARRANTY
S
YNC CHARGER
S
YNC
C
HARGER
SYNC
CHARGE R
Mounting the OXC1
The OXC1 Sync Charger unit can be placed in an upright stationary position on
any flat surface such as a desk or shelf, or by employing the enclosed mounting
brackets, the unit can be easily mounted onto a wall surface.
To mount to a wall surface area,
begin by attaching the supplied
mounting brackets into position
on the OXC1 unit shown here
using the supplied screws.
Once the mounting brackets
have been properly attached,
user-supplied screws are used
to mount the unit to a wall or
similar flat surface area. Be
careful that the mounting area
and hardware selected are able
to hold the unit weight and the
insertion force of the MIC/
Transmitters.
SYNC CHARGERSYNC CHARG ER
FRONT VIEW
TO WALL
SURFACE
User-supplied
Screws
Mounting Brackets
& Screws
 Loading...