

Page 1
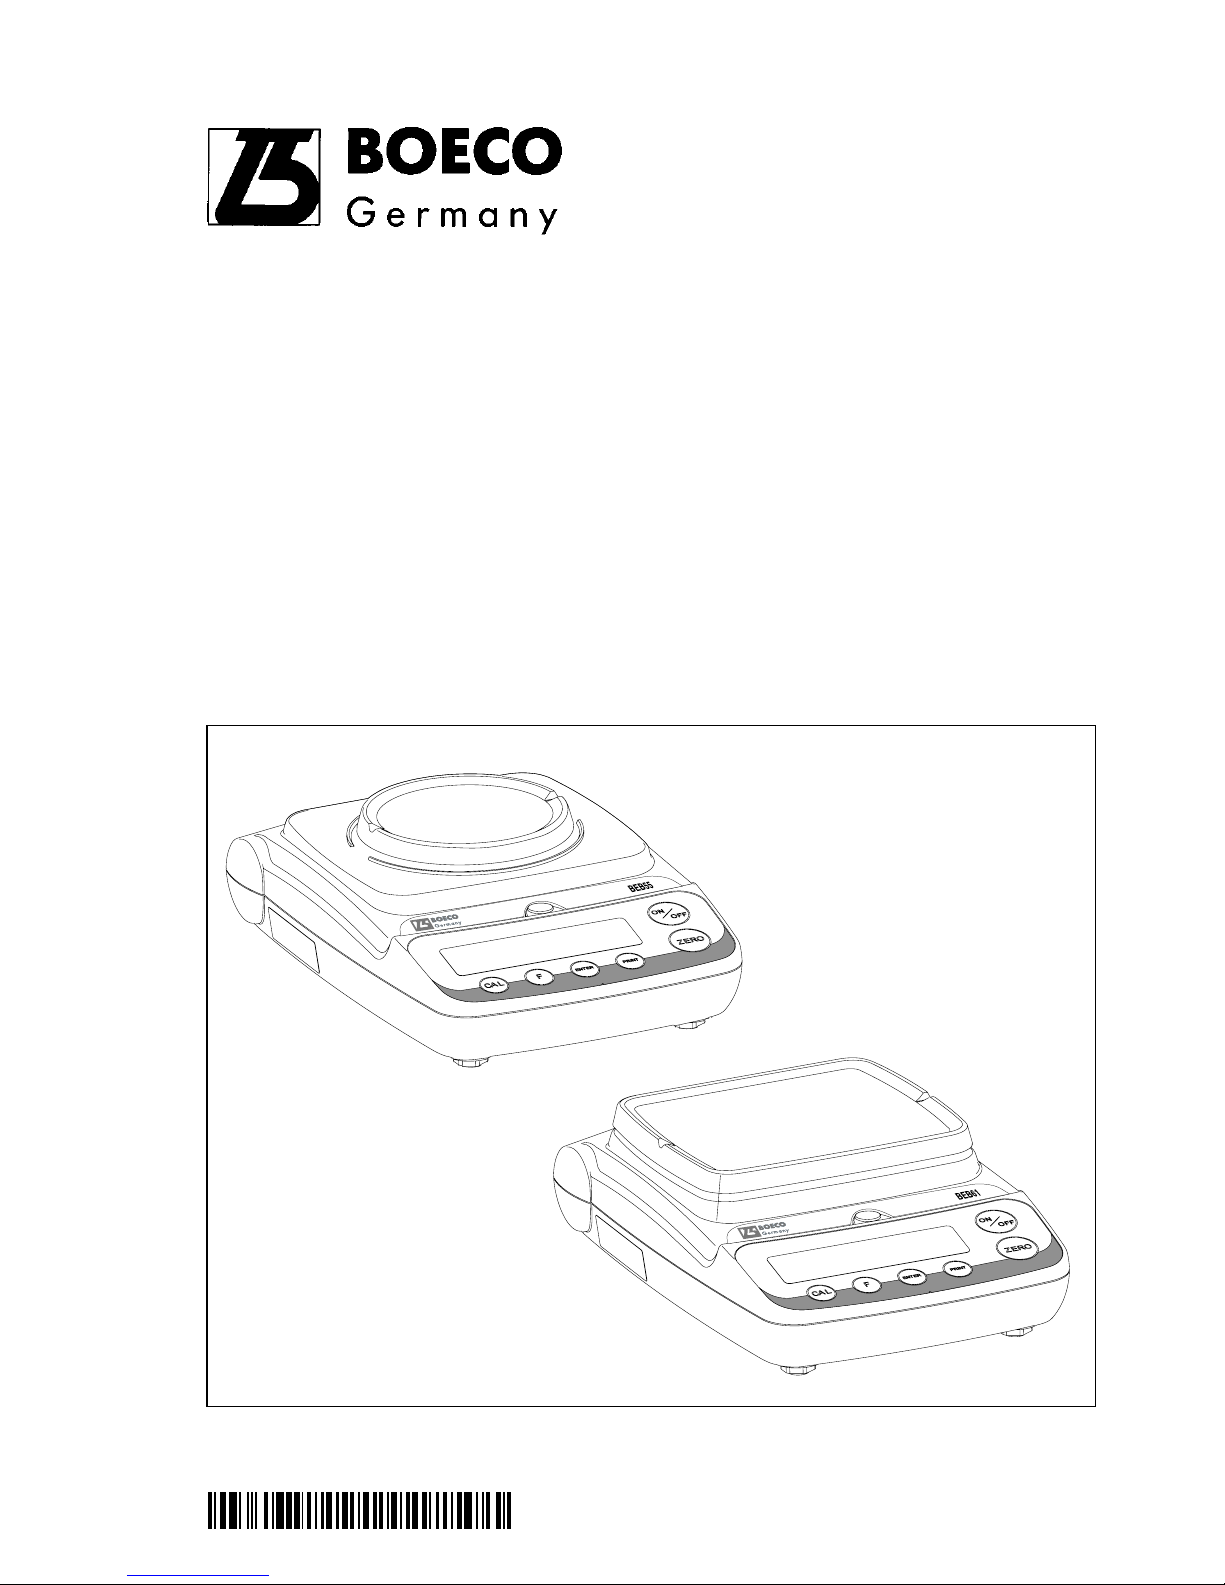
BEB Series
Serie BEB
Electronic Precision Scales/Balances
Balanzas electrónicas de precisión
Operating Instructions/Manual de instrucciones
98648-013-8 4
Page 2

2
English page 3
In cases involving questions of
interpretation, the German-language
version shall prevail.
Español página 20
En caso de interpretación,
la versión en lengua alemana
será determinante.
Page 3

3
Page
Warnings and Safety Precautions 4
Getting Started 5
Operation 8
Basic Weighing Function 8
Description of the Keys 8
Application Programs 9
Toggling between Weigh Units 9
Counting 10
Weighing in Percent 11
Display Lock Mode 12
Total/Formulation 13
Specific Gravity 14
Calibration/Span Adjustment 15
Advanced Features (Setup Menu) 16
Error Codes 17
Overview 18
Specifications 18
C Marking 19
3
Contents
Page 4

4
Safety Information
● T o pr event damage to the equip-
ment, please read these operating
instructions carefully before using
your balance/scale.
! Do not use this equipment in
hazardous areas.
! Make sure the voltage rating print-
ed on the power supply is identical
to your local line voltage.
! Use only commercially available
9 V batteries (not included).
If desired, you can use a
rechargeable battery.
– The balance/scale is energized
at all times unless you disconnect
the AC adapter and, if connected,
the battery.
– Protect the AC adapter from
contact with liquid
! Exposure to excessive electro-
magnetic interference can cause
the readout value to change.
Once the disturbance has ceased,
the instrument can be used again
in accordance with its intended
purpose.
Installation
– It is recommended to connect only
BOECO accessories and options,
as these are optimally designed
for use with your
balance/scale.
– Do not open the balance/scale
housing as this will void the
manufacturer’s warranty.
Symbols
The following symbols are used in
these instructions:
● indicates steps you must
perform
$ indicates steps you must
perform only under certain
conditions
> describes what happens after you
have performed a certain step
– indicates an item in a list
! indicates a hazard
4
W arnings and Safety Precautions
Page 5
5
Getting Started
Equipment Supplied
– Balance/scale
– Weighing pan
– AC adapter
Additional equipment with models
BEB53, BEB55:
– Calibration weight
Additional equipment with model
BEB43:
– Calibration weight
– Round glass draft ring
– Level indicator and adjustable feet
Installation
Choose a location that is not subject
to the following negative influences:
– Heat (heater or direct sunlight)
– Drafts from open windows and doors
– Extreme vibrations during weighing
– Excessive moisture
Setting Up the Balance/Scale
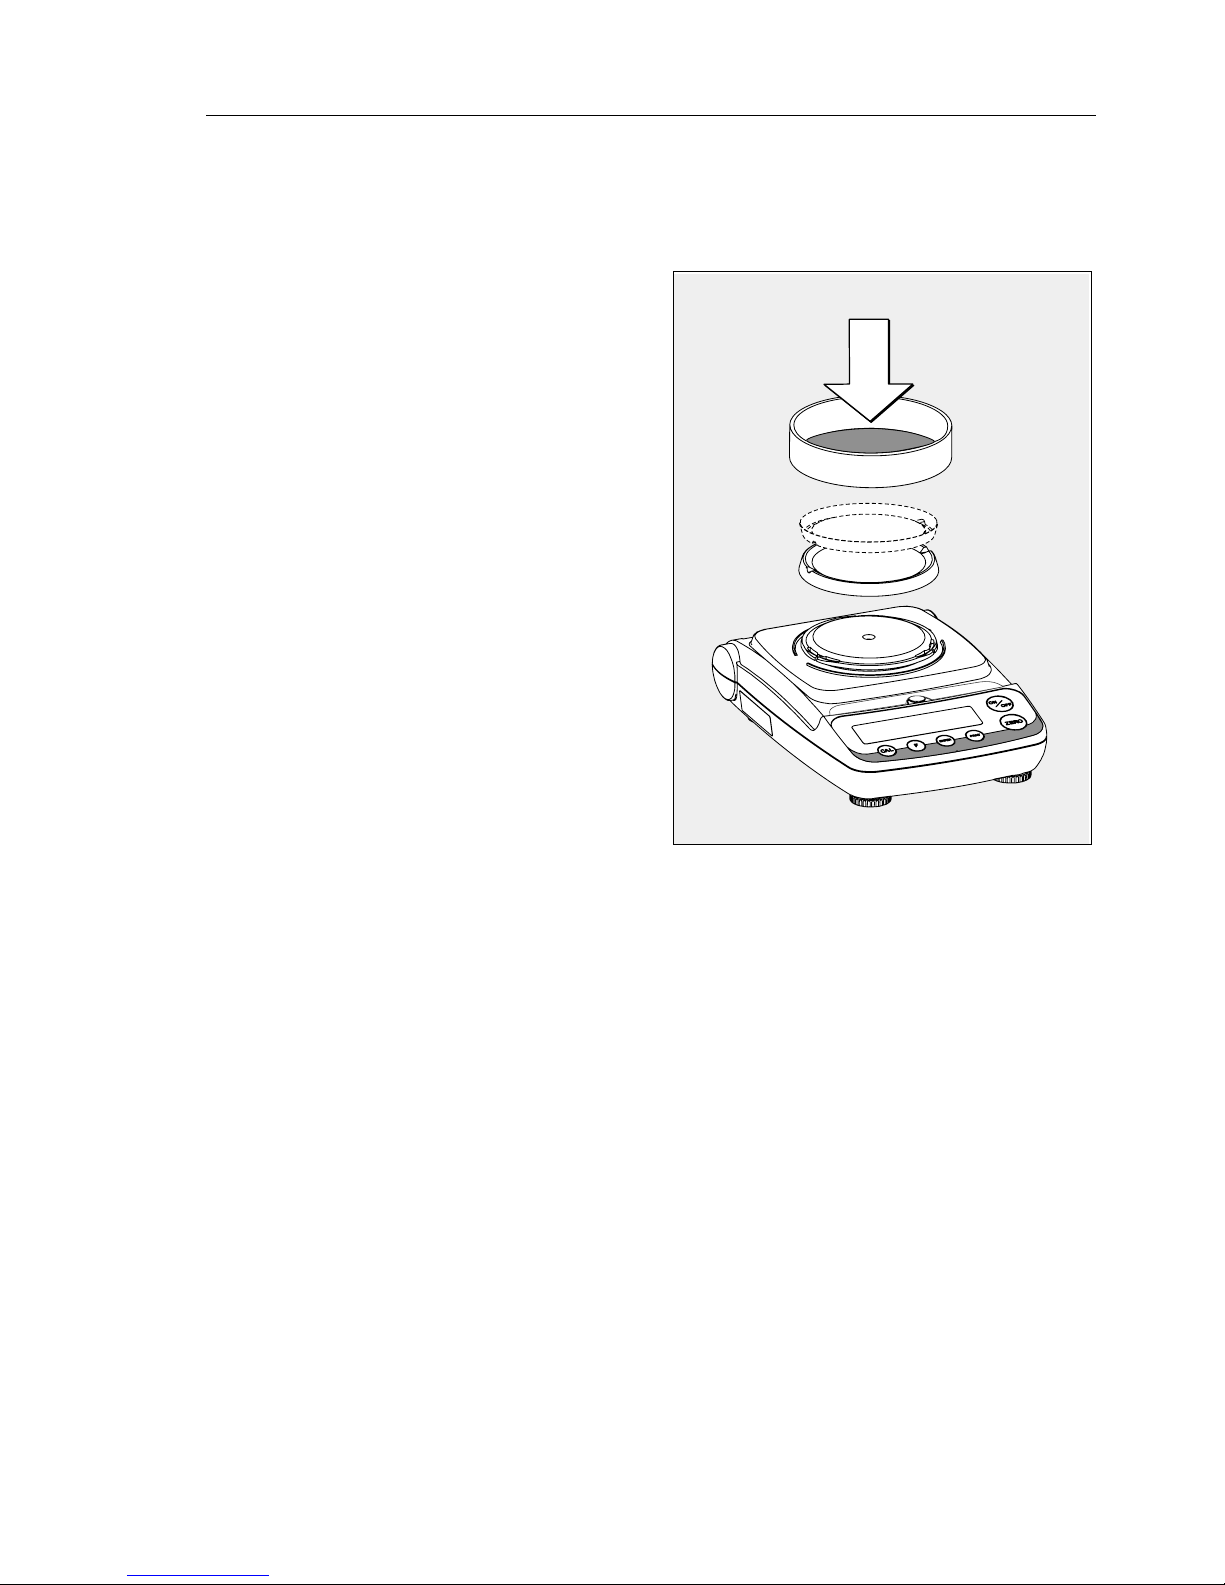
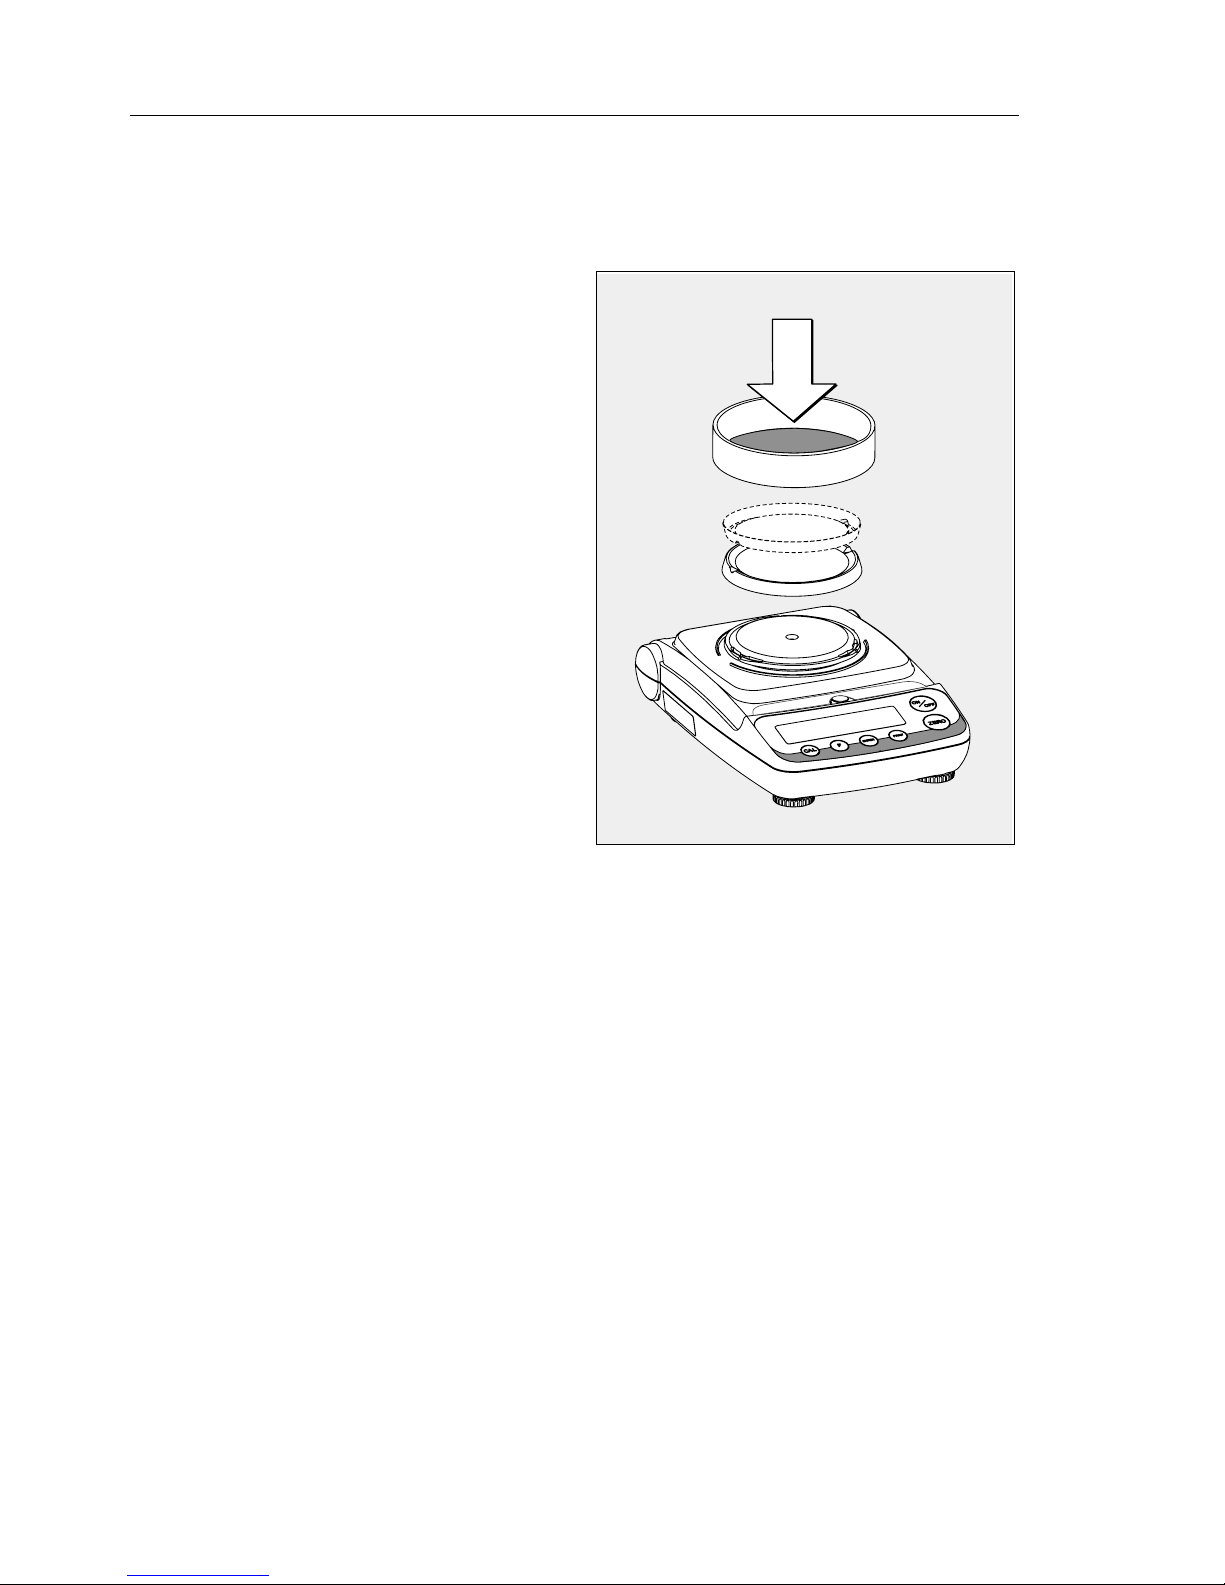
● Place the components on the
balance/scale in the following order:
– Reversible weighing pan
– Round glass draft ring on model
BEB43
Page 6
6
Connecting the Balance/Scale
to AC Power
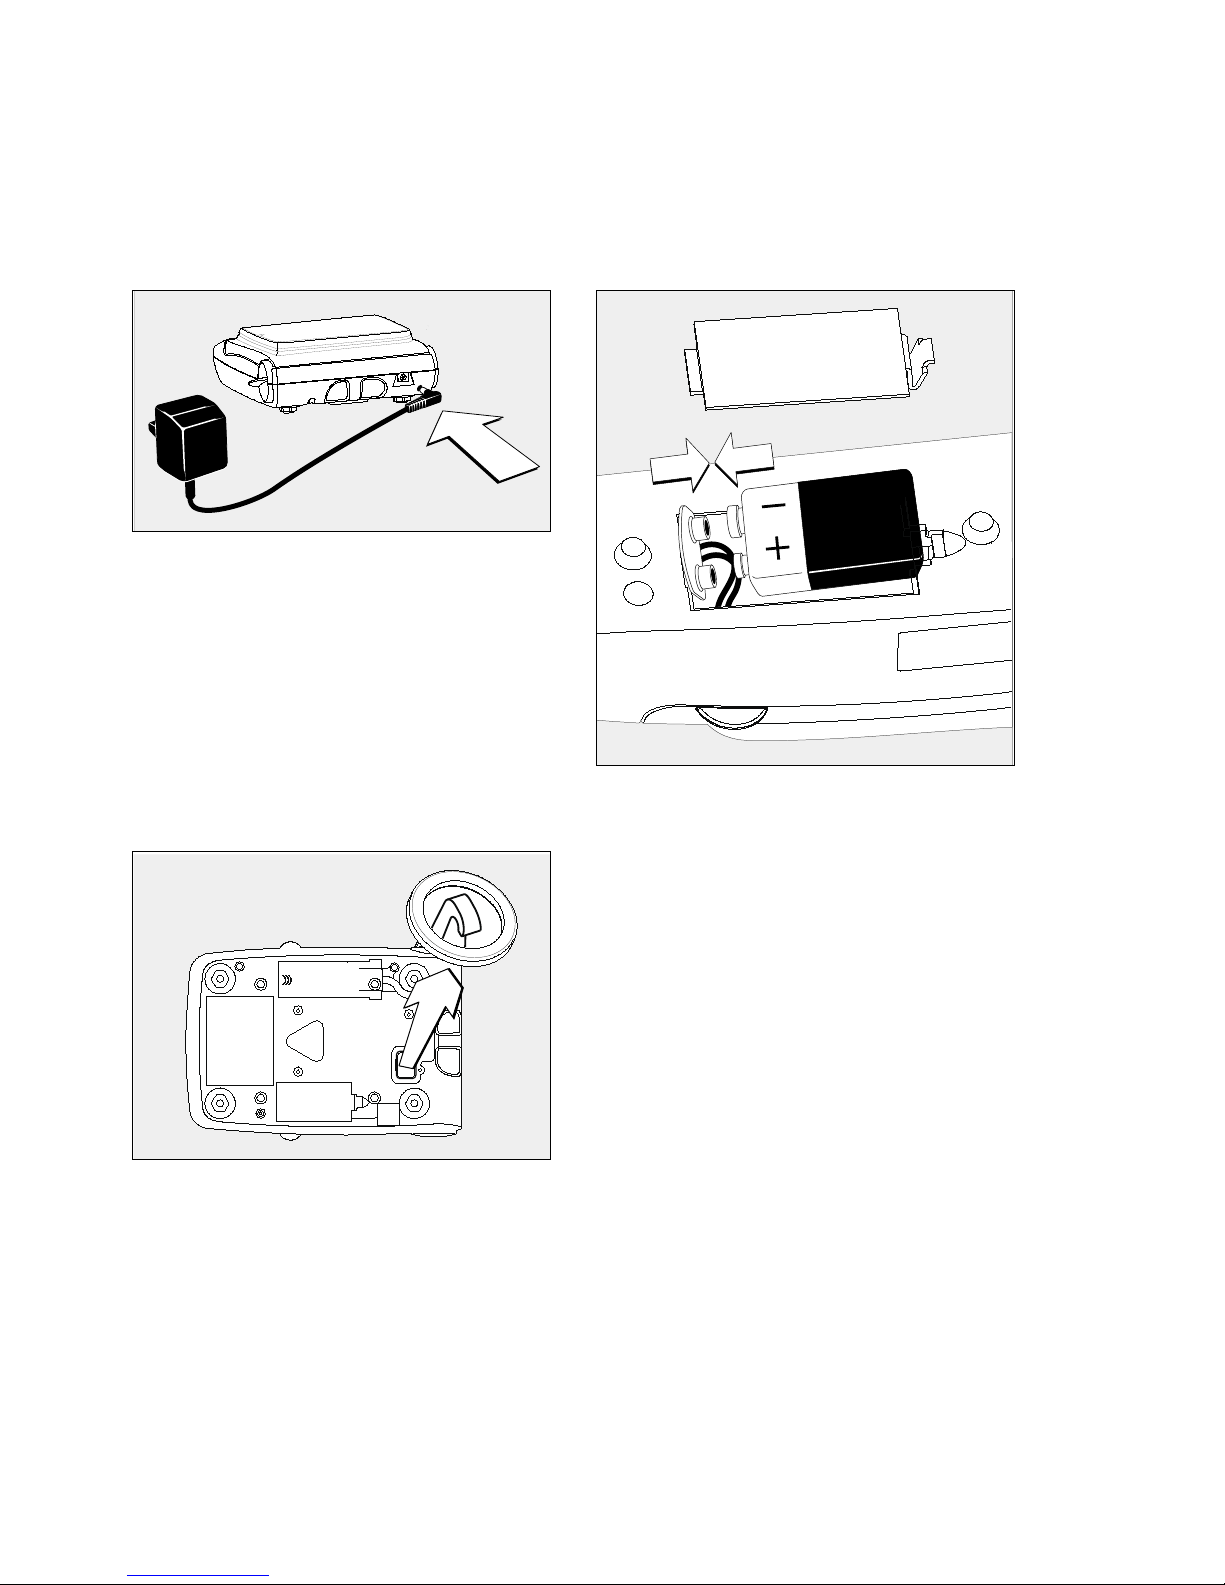
! Use only the AC adapter for
optimal performance and safety.
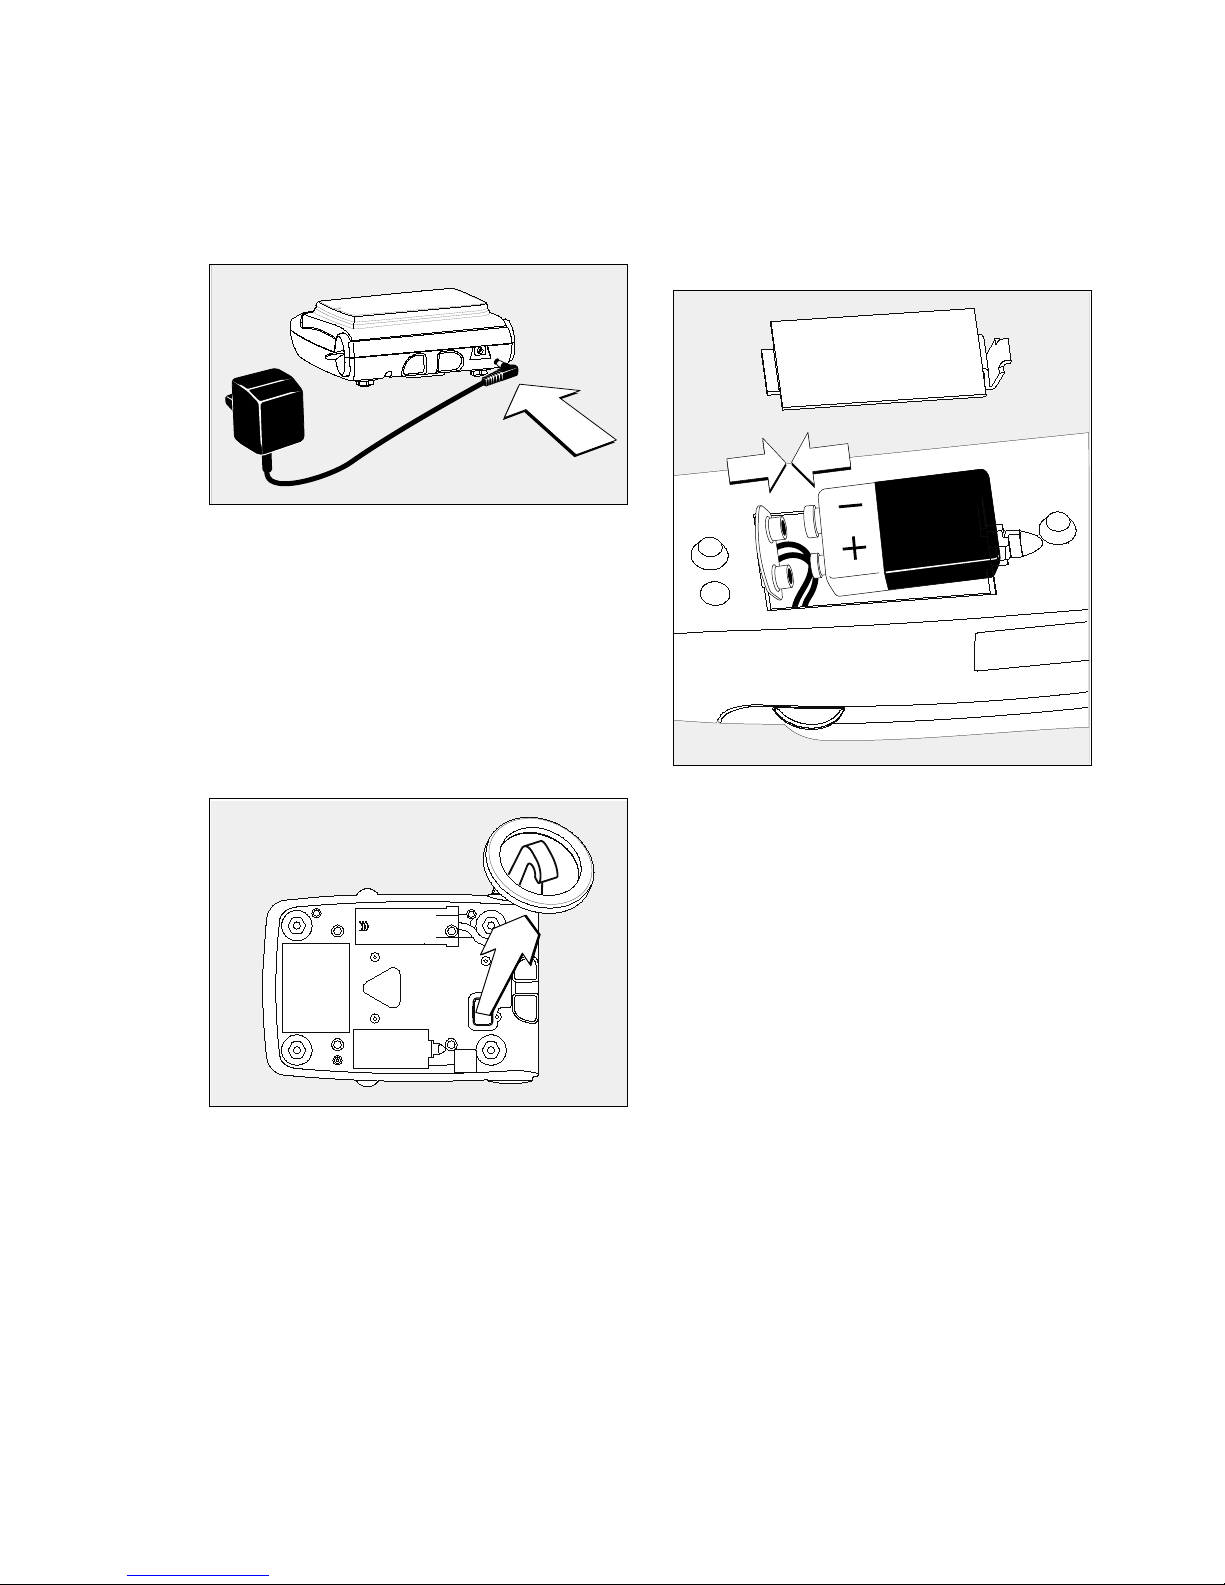
§ Insert plug into the jack (located
on back of balance/scale)
§ Plug the AC adapter into an
electrical outlet
! LISTED power supply 11 V–21 V
compliant with NEC Class 2 output.
Below-Balance/Under-Scale W eighing
A port for a below-balance weighing
hanger is located on the bottom of the
balance/scale.
§ Open the cover plate on the
bottom of the balance/scale.
§ Attach the sample (e.g., using
a suspension wire) to the hanger.
$ Install a shield for protection
against drafts if necessary.
Installing the Battery
(not for model BEB43)
$ Batteries are not included with the
equipment supplied
! Use only commercially available
9 V batteries.
! If you use a rechargeable battery,
recharge it with an external battery
charger.
§ Lay the balance/scale on its side
§ Open the battery compartment:
remove the compartment cover
§ Install the battery in the compartment
$ Make sure the polarity is correct.
§ Close the battery compartment:
slide the cover into position until
it snaps into place
! Do not throw away used batteries
with normal household waste.
Rechargeable batteries contain
toxic materials and must be disposed of in accordance with local
waste disposal regulations.
Page 7
7
Leveling the Balance/Scale
(only for model BEB43)
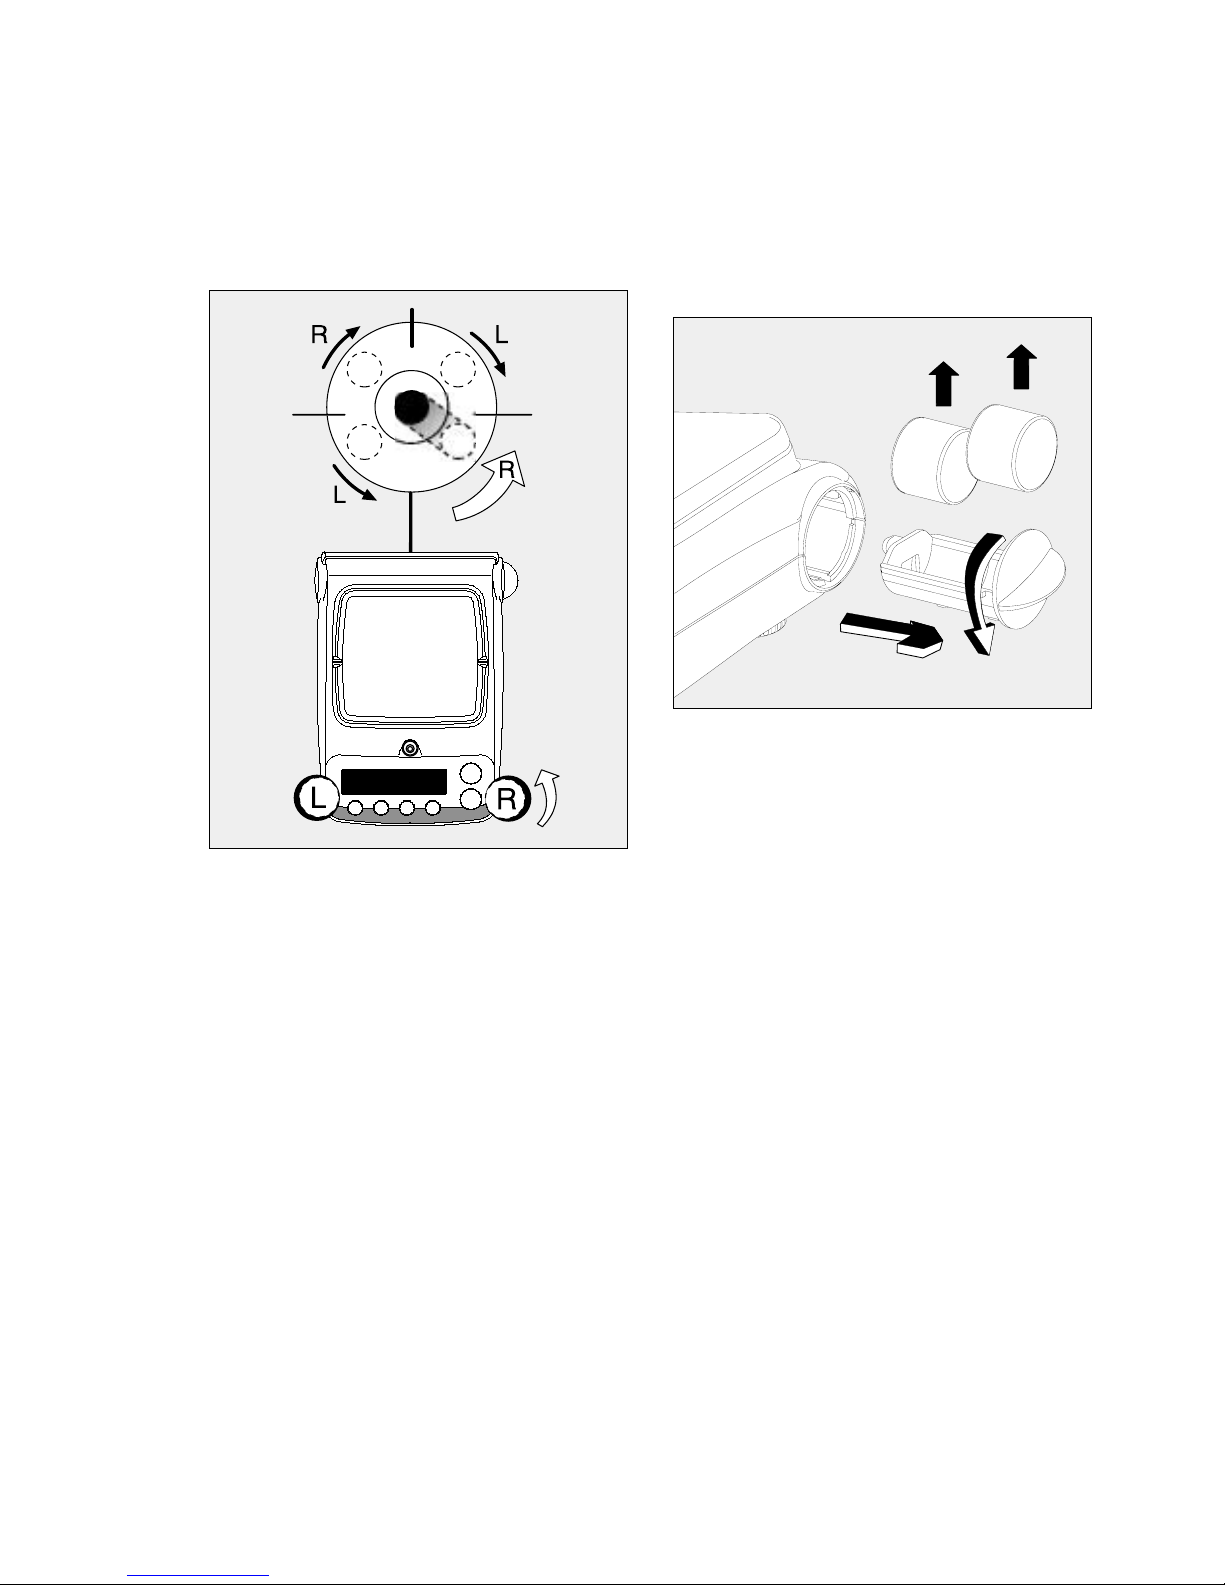
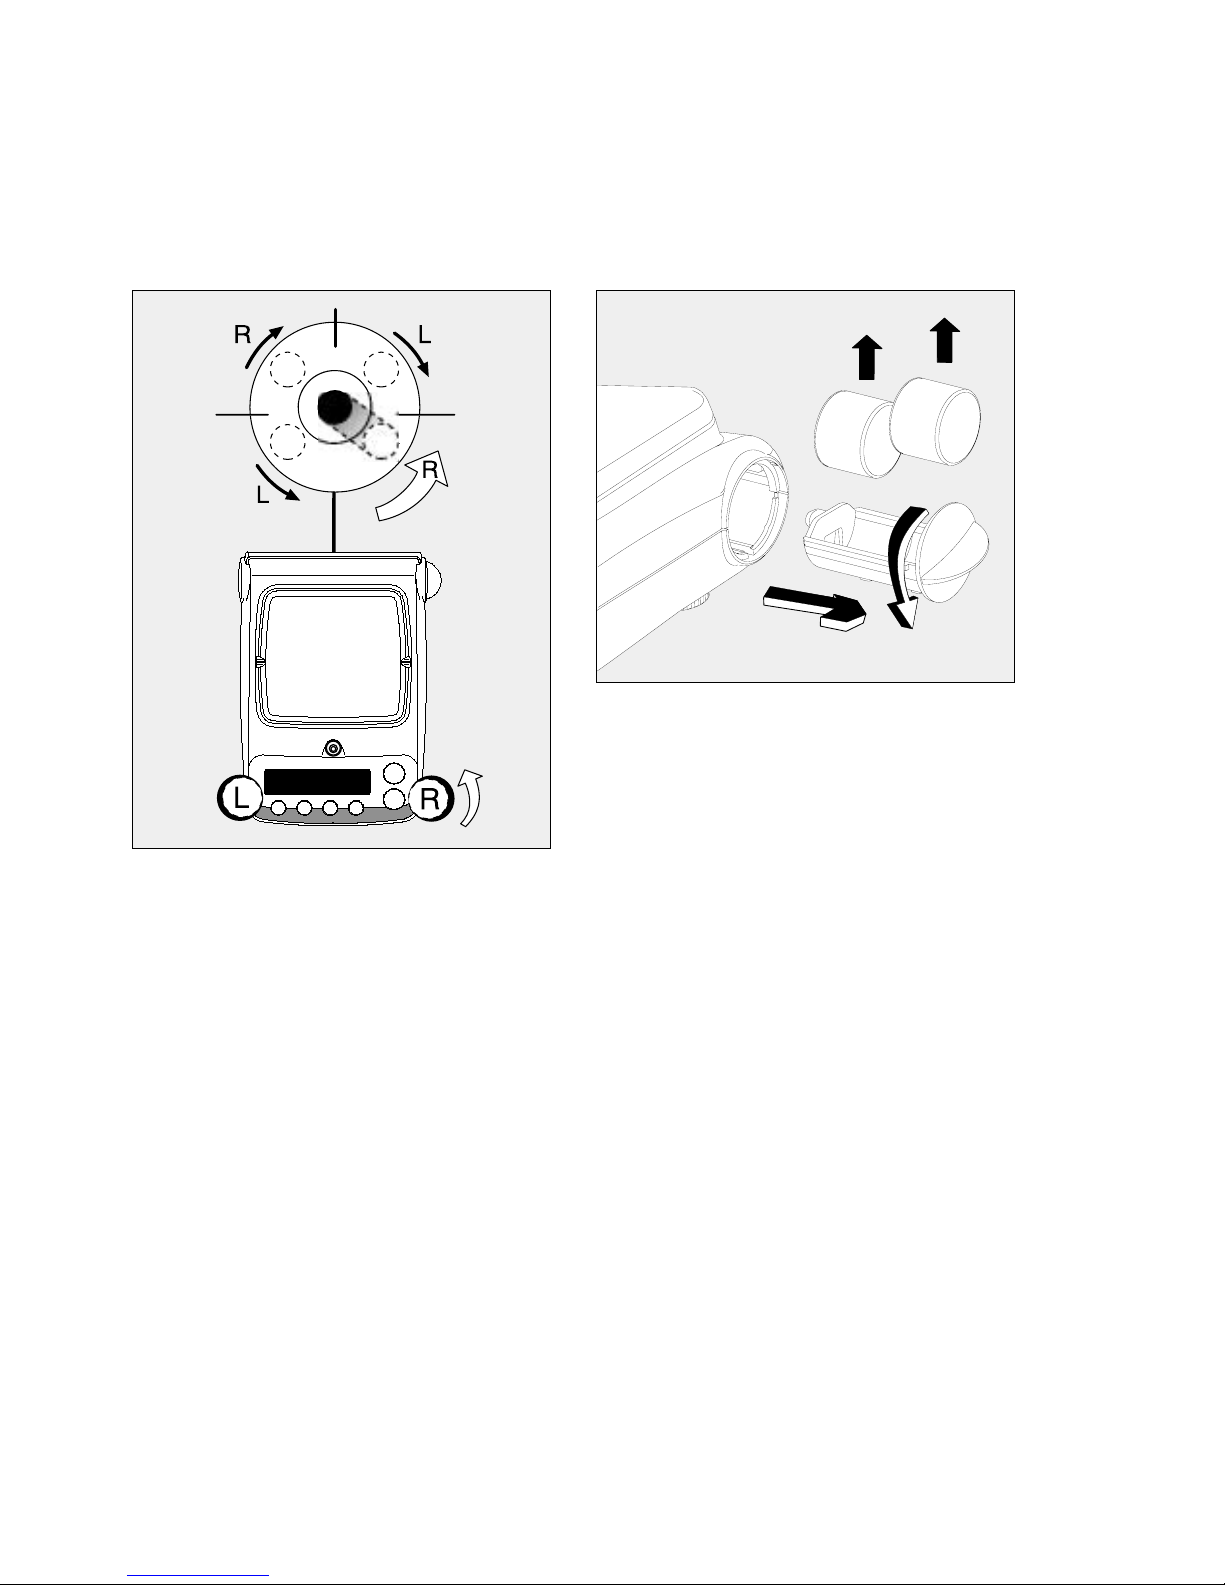
§ Always level the balance/scale again
any time after it has been moved to
a different location.
§ Turn the front feet as shown in the
diagram until the air bubble is centered within the circle of the level
indicator.
§ Lower all feet to touch the countertop so the balance/scale does not
rock.
> In most cases this will require
several adjustment steps.
Removing Weights for
Calibration/Span Adjustment
(not for model BEB61)
§ Grasp the tab to turn and pull out the
weight compartment.
§ Always wear gloves or use tweezers
when handling weights.
$ Follow instructions on page 15 for
calibration/span adjustment.
Warm up Time for Model BEB43:
To ensure accurate results, the scale
must warm up for 1 hour before operation. Only after this time will the scale
have reached the required operating
temperature.
Page 8
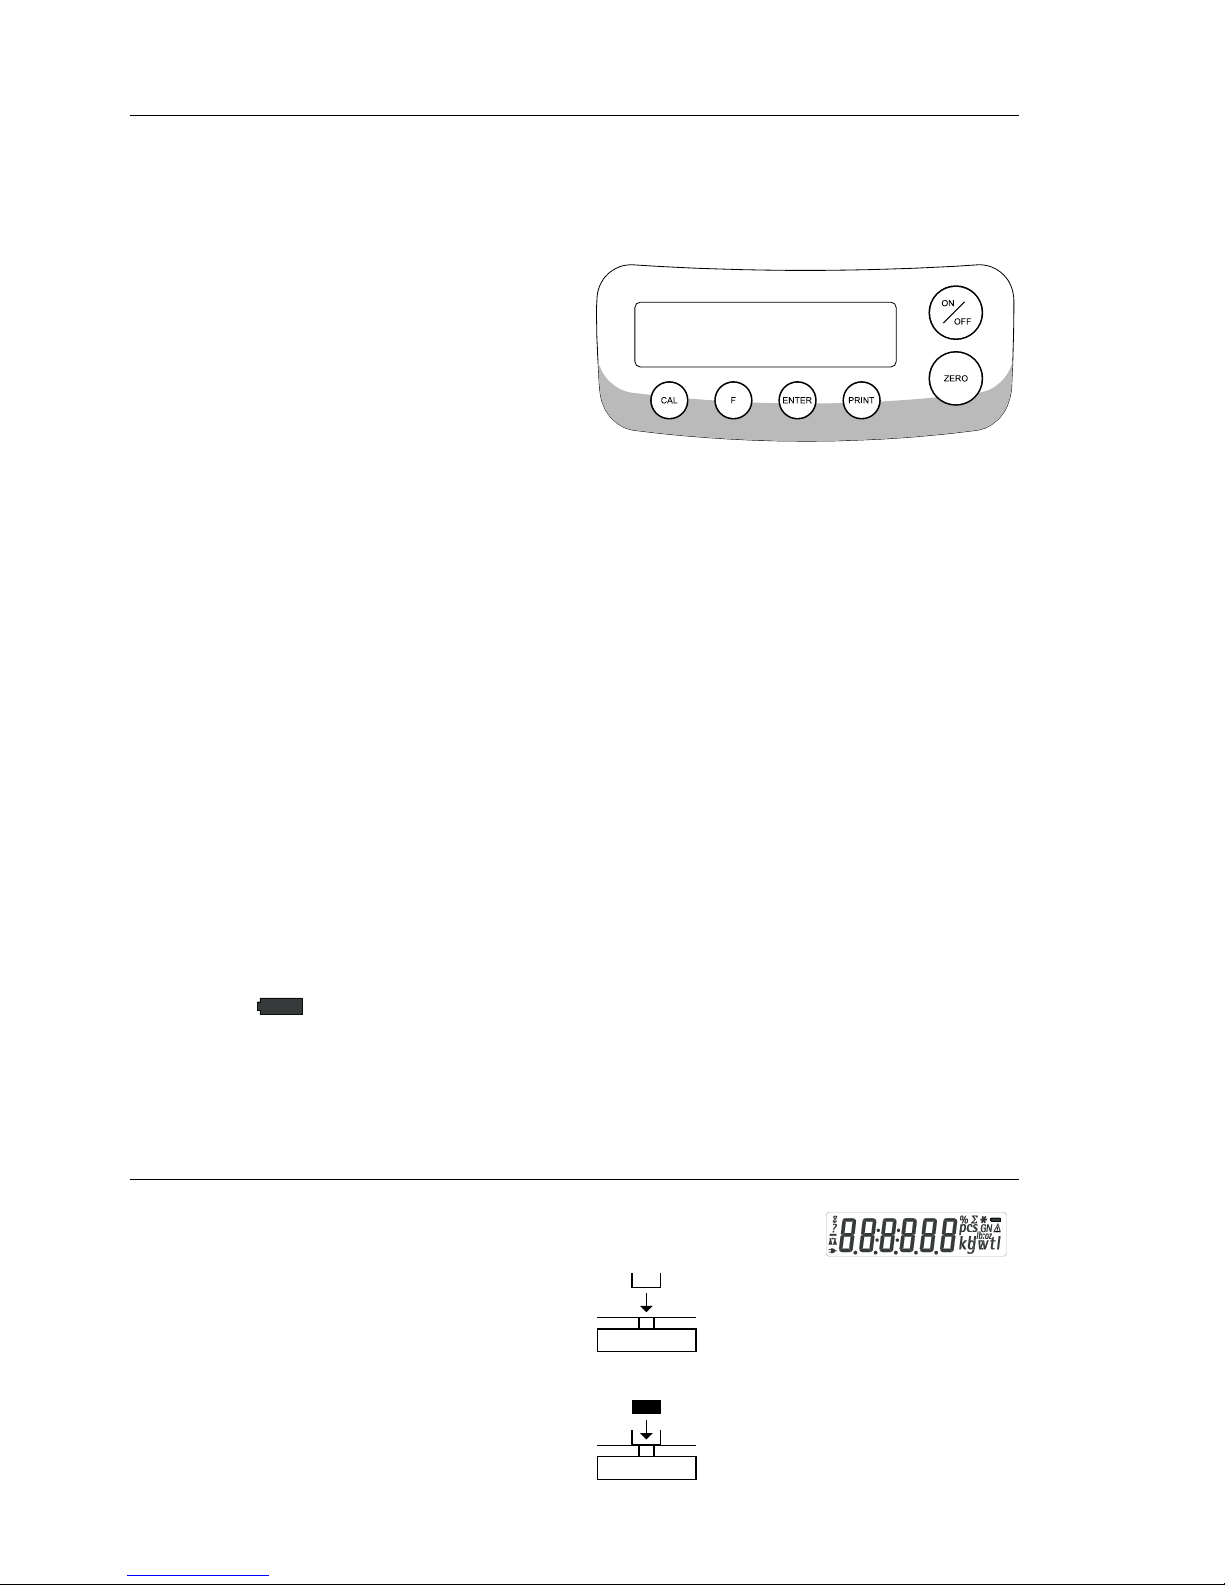
8
Operation
Basic Weighing Function
Features
– Zeroing the balance/scale
You can zero the balance/scale within
the entire weighing range, up to the
maximum capacity.
Preparation
§ Switch on the balance/scale:
press the (ON/OFF) key
§ If necessary, zero the balance/scale:
press the (ZERO) key
$ If necessary, change the configura-
tion settings: see the chapter entitled
“Configuration”
$ If desired, reset the factory settings:
see the chapter entitled “Advanced
Features,” menu item 9.– 1
Additional functions:
$ Switching off the balance/scale:
press the (ON/OFF) key
$ Battery operation: automatic shut-off
after 2, 5 or 10 minutes; see chapter
on configuration. Example: 2 minutes. If the weight readout remains
unchanged and no keys are pressed
for at least two minutes, the battery
symbol “ “ starts flashing.
After another 2 seconds, the balance/scale shuts off automatically,
unless a key is pressed.
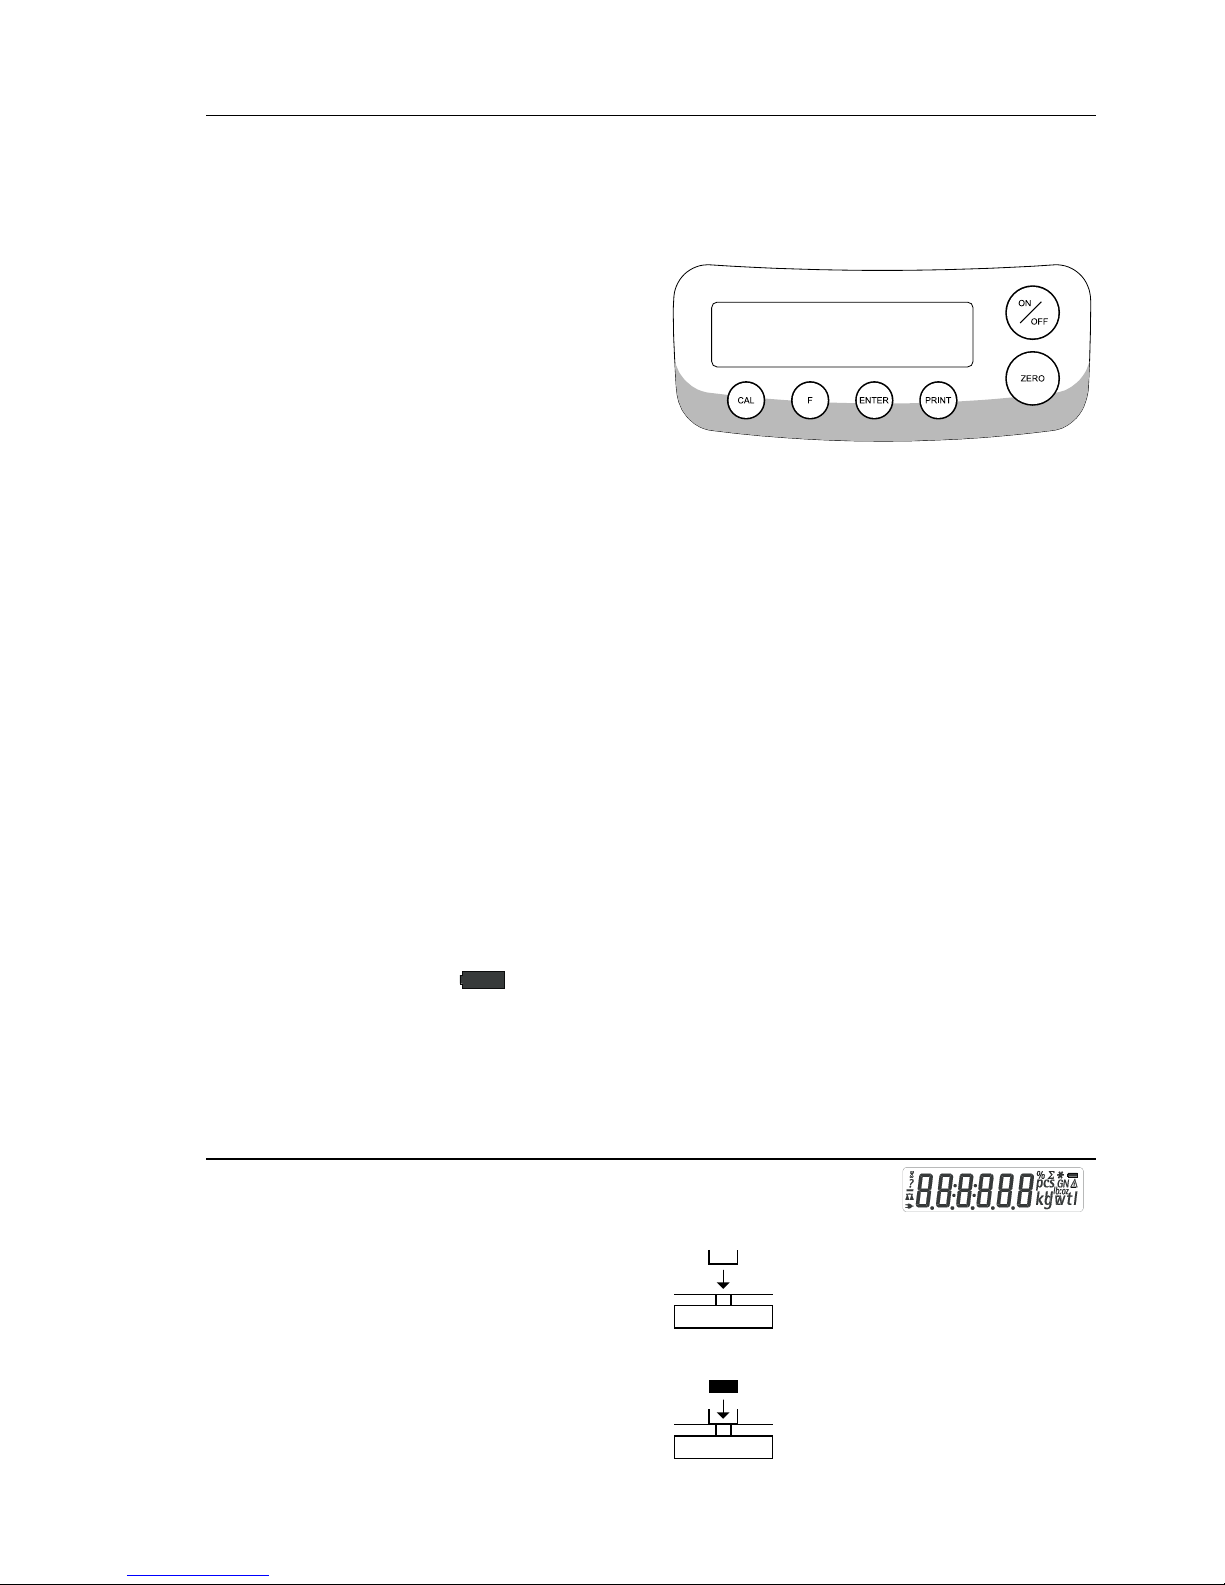
Description of the Keys
(ON/OFF) On/off key: switches the bal-
ance/scale on and off or
switches it to the standby
mode.
Battery operation: on; turns
backlight on; off
(ZERO) Zeros the balance/scale;
press and hold 2 seconds:
enters application menu
(CAL) Starts calibration/adjustment
(F) Starts an application pro-
gram; scrolling in application menu, configuration
menu and calibration menu
(ENTER) Confirms the selected
setting; exits application,
configuration & calibration
menu if key is pressed
and held for at least
2 seconds.
(PRINT) Generates a printout or data
output
Example: Determine weight of sample
Step Key (or instruction) Display
1. Switch on the balance/scale (ON/OFF)
Self-test runs
Display: Software version
r 31.01 g
2. Place container on the balance/scale
(in this example, 52 g) 52.0 g
3. Zero the balance/scale (ZERO) 0.0 g
4. Place sample in container on
balance/scale (in this example, 150.2 g). 150.2 g
Page 9
9
Application Programs
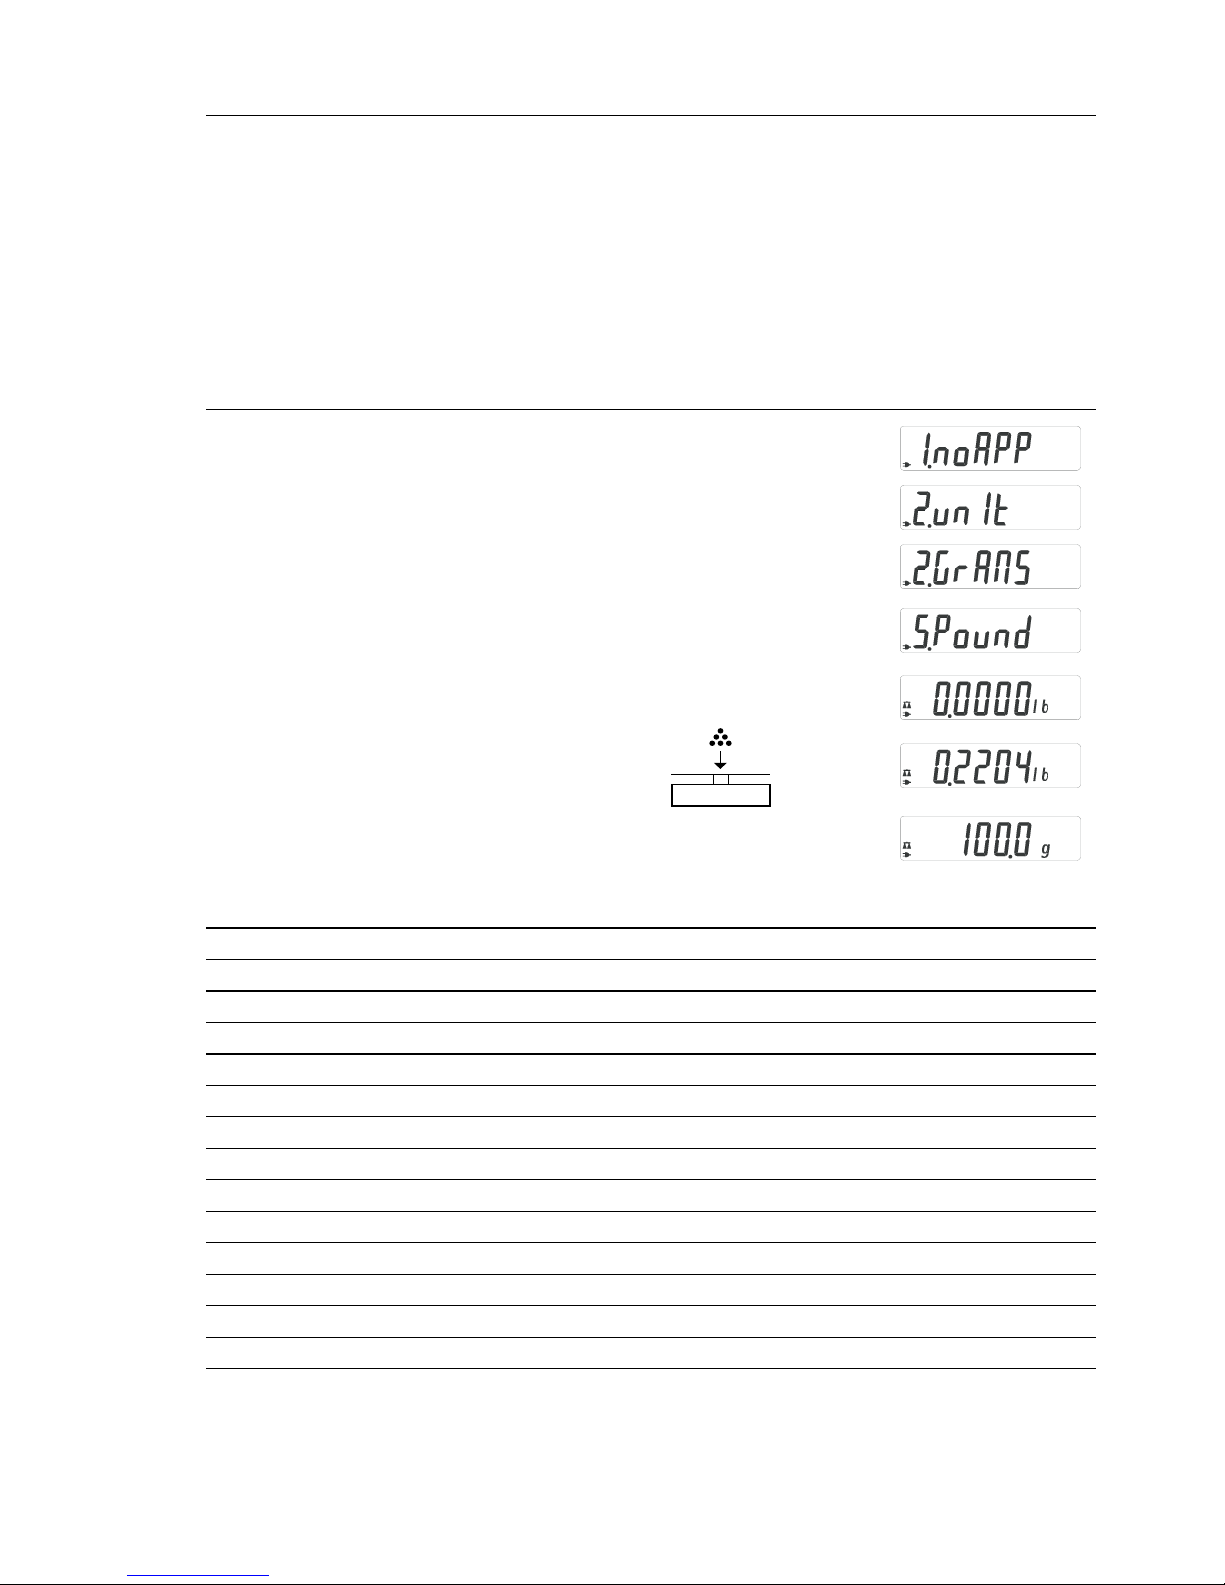
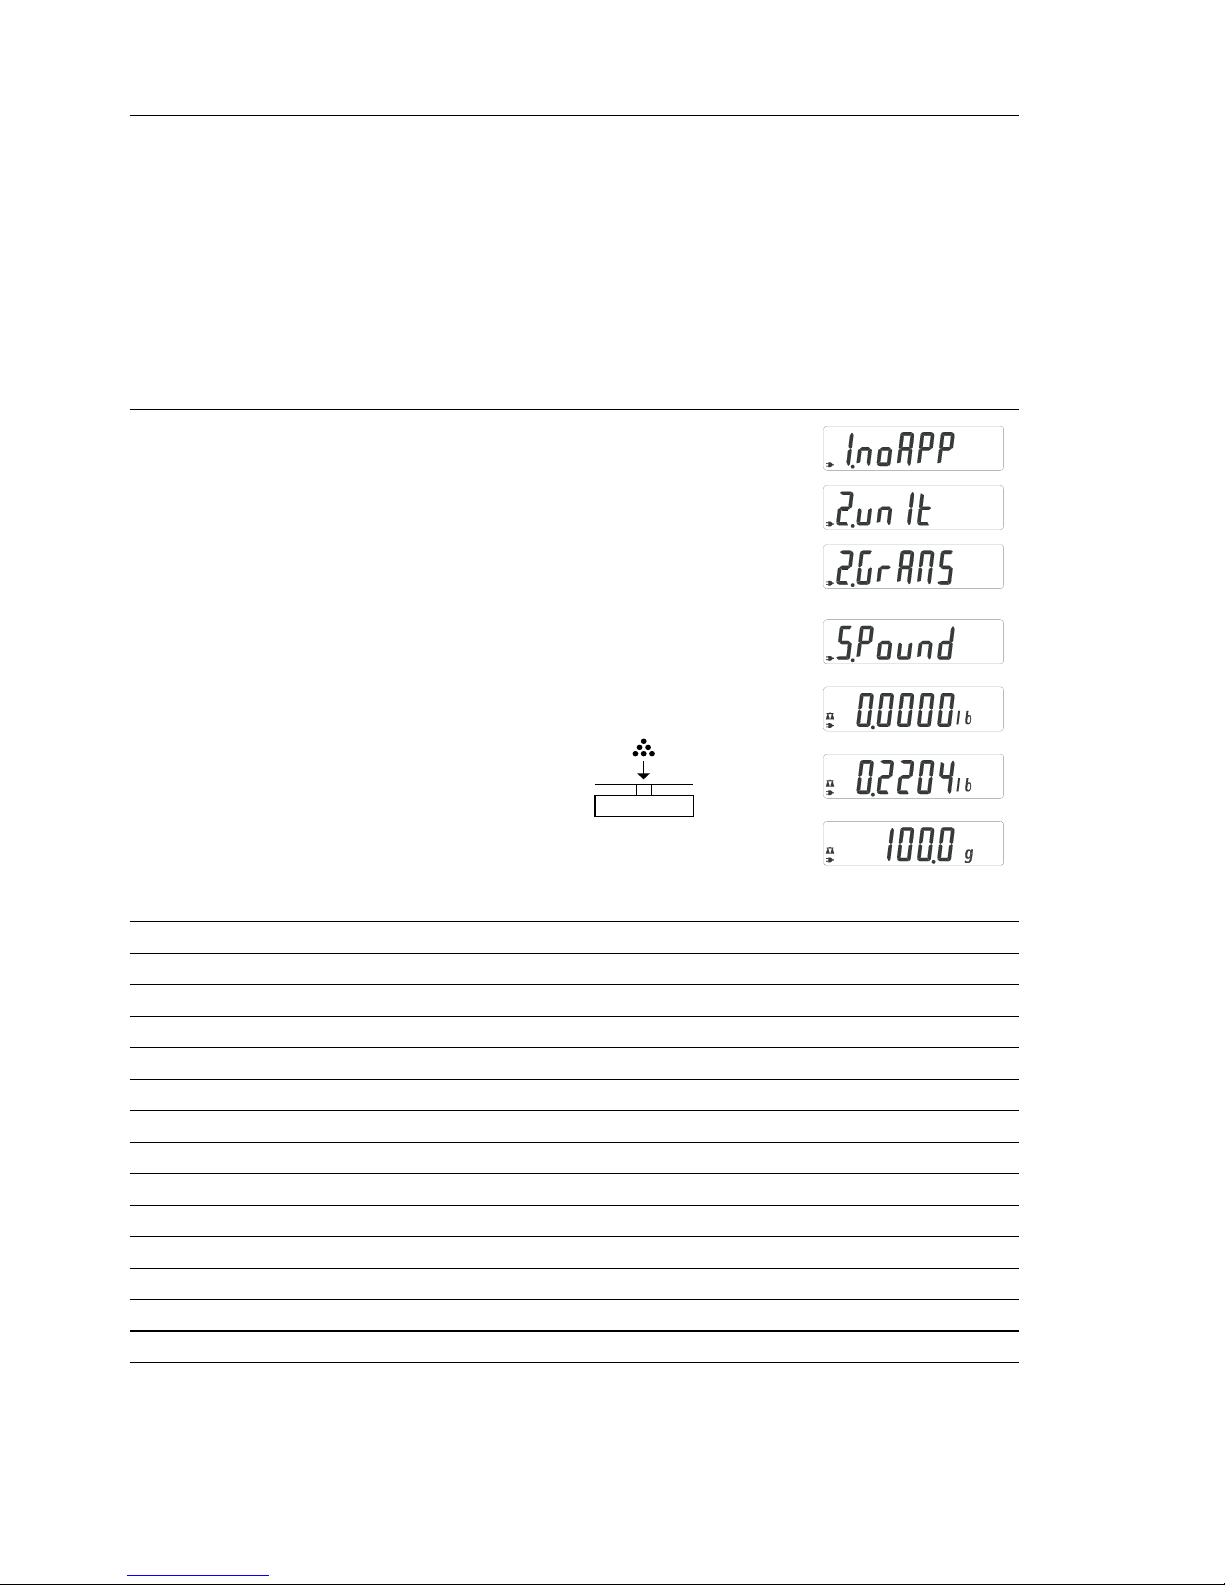
Toggling between Weigh Units
With this application program you can toggle the display of a weight value back
and forth between two weigh units (see table below).
Example: Toggle weigh unit from pounds [lb] (application) to grams [g] (basic unit)
Step Key (or instruction) Display
1. Select application program (ZERO) ≥ 2 sec
2. Select Toggling between Weigh Units (F) repeatedly
3. Confirm unit of application* (ENTER)
4. Select weigh unit; in this example: (F) repeatedly
“5. Pounds” (see table below)
5. Confirm weigh unit (pounds) (ENTER)
6. Place sample on balance/scale
7. Toggle weigh unit (F)
Menu code Unit Conversion factor Display
1. user** Grams 1.00000000000 o
2.grams (factory setting) Grams 1.00000000000 g
4.carat Carats 5.00000000000 o
5.Pound Pounds 0.00220462260 lb
6.ounce Ounces 0.03527396200 oz
7.tryo Troy ounces 0.03215074700 ozt
8.tl.hon Hong Kong taels 0.02671725000 tlk
9.tl.sin Singapore taels 0.02645544638 tl
10.tl.ta Taiwanese taels 0.02666666000 tl
11.grai Grains 15.4323583500 GN
12.peny Pennyweights 0.64301493100 dwt
15.tl.ch Chinese taels 0.02645547175 tl
22.pdoz lb/oz 0.03527396200 lb:oz
23.newt Newtons 0.00980665000 N
* Grams is chosen as 1st unit; to changes 1st unit, see Advanced Features section.
** User-defined conversion can be loaded in balance/scale with RS-232 or USB
program option. Contact BOECO for more information.
Page 10
10
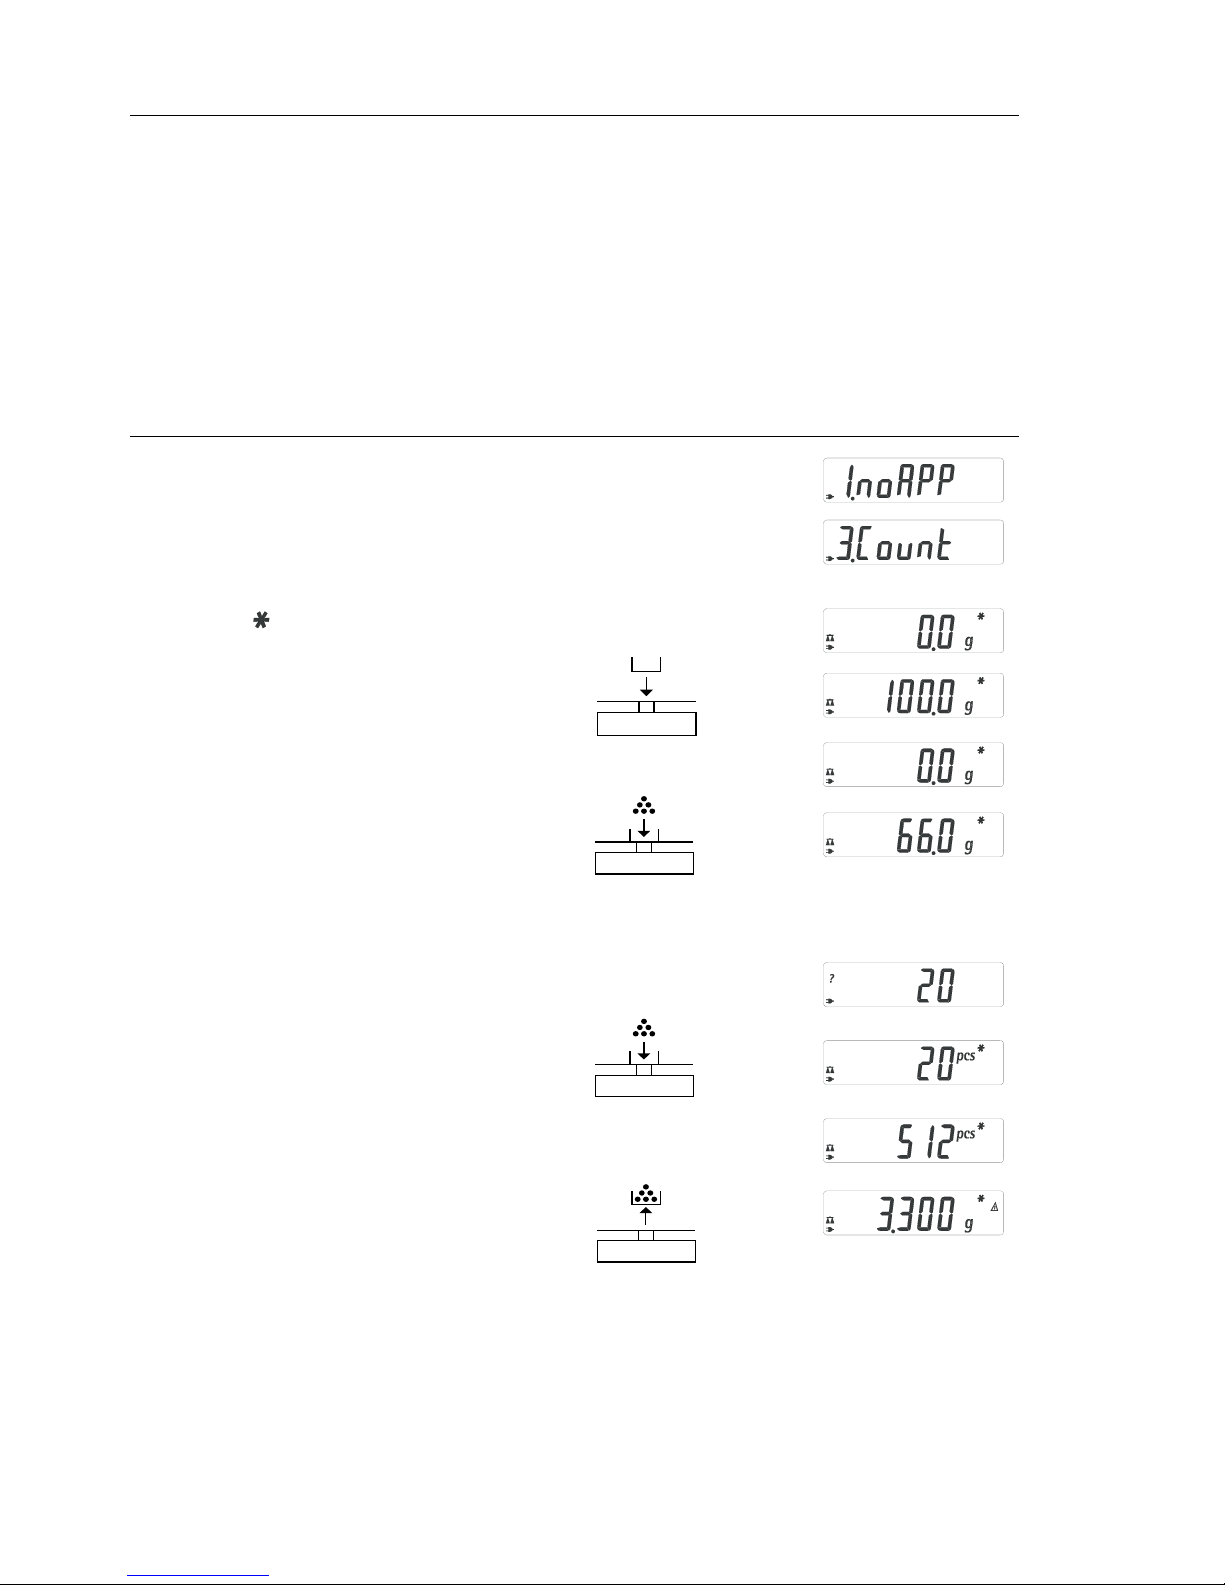
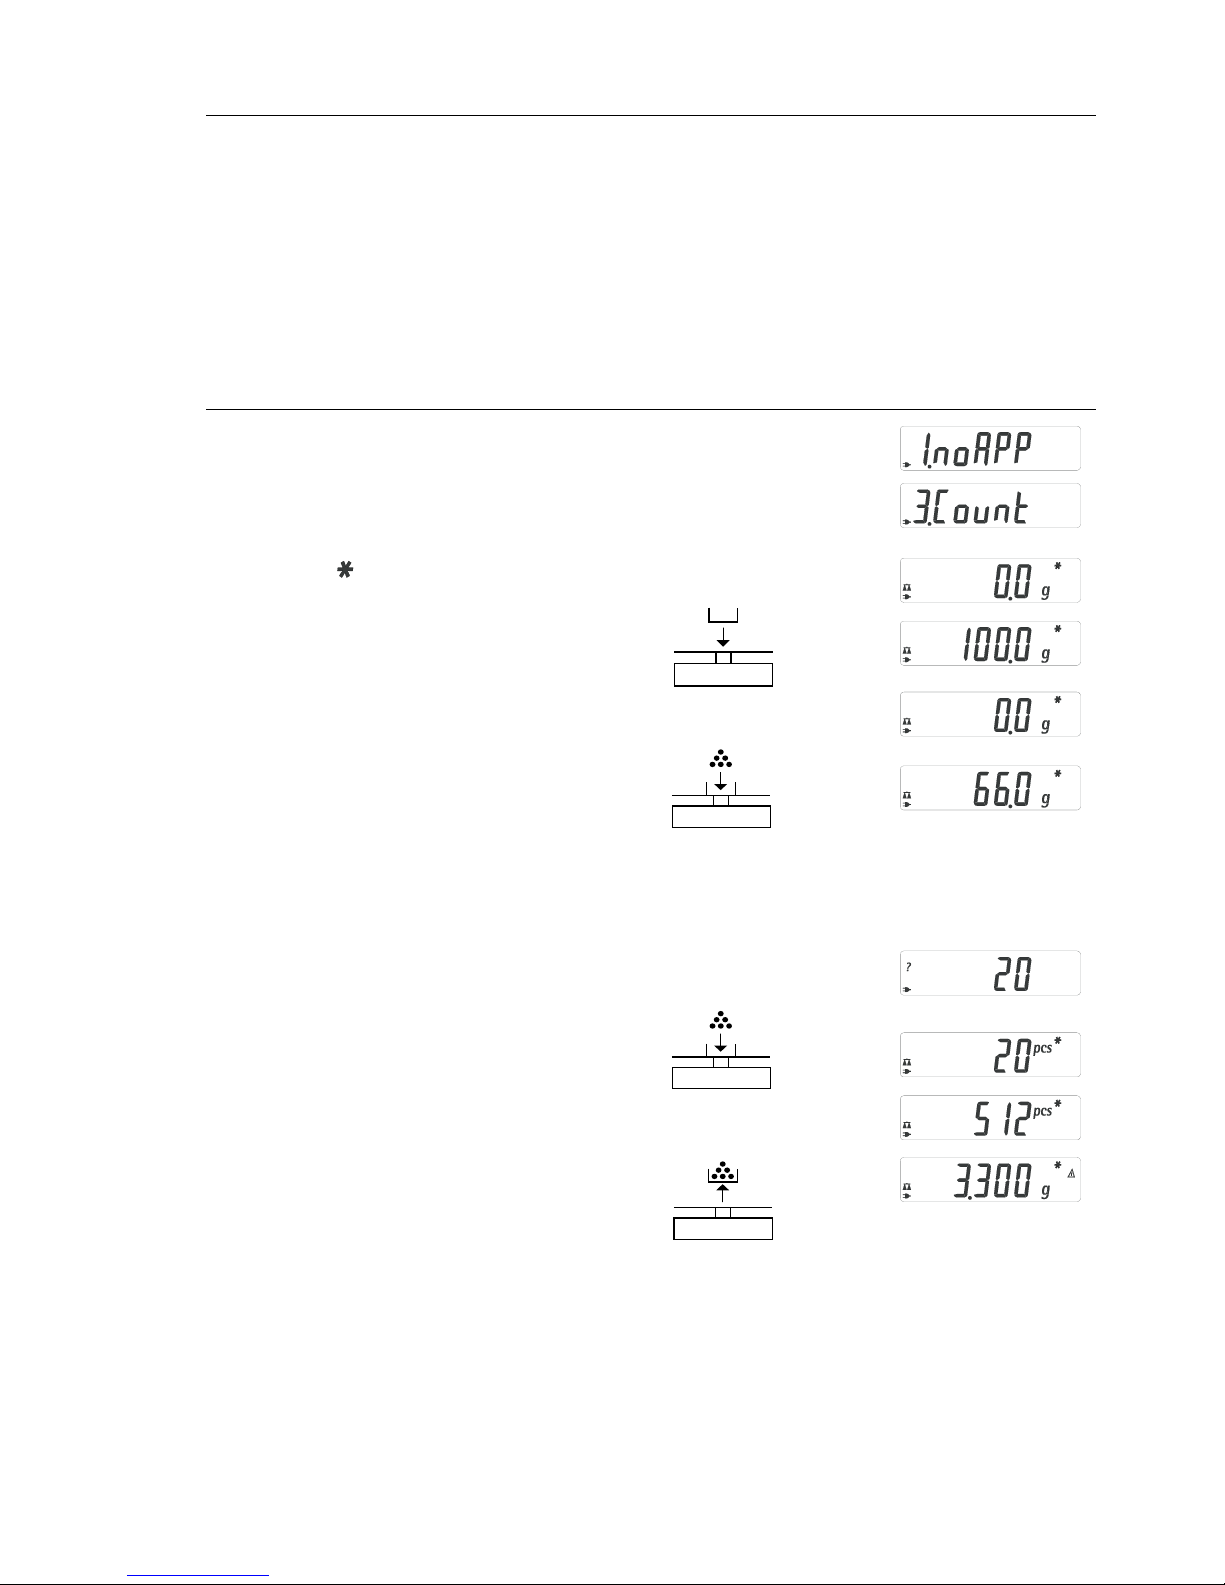
Counting
Purpose
With the Counting program you can determine the number of parts or pieces by
weight.
Example: Determine the number of uncounted parts; calculate the sample
reference quantity (in this example: 20)
Step Key (or instruction) Display
1. Select application program (ZERO) ≥ 2 sec
2. Select Counting (F) repeatedly
3. Confirm application (ENTER)
Symbol “ “ on the display:
application is active
4. Place empty container on the
balance/scale
5. Zero the balance/scale (ZERO)
6. Place sample reference quantity (20)
on the balance/scale
7. Select sample reference quantity:
in increments of 1 (1, 2, 3, ..., 99) or (F) repeatedly (briefly) or
in increments of 10 (10, 20, 30, ...,100) (F) ≥ 2 sec.
8. Confirm selected sample reference
quantity (ENTER)
9. Place uncounted parts on balance/scale
10. Toggle display between mean piece
weight, total weight, and quantity (F) repeatedly
11. Unload the balance/scale
12. Start new Count application
or exit application (ENTER) ≥ 2 sec
13. Reactivate Counting (if no other (F)
application program has been selected)
14. Repeat procedure starting from Step 5.
Page 11
11
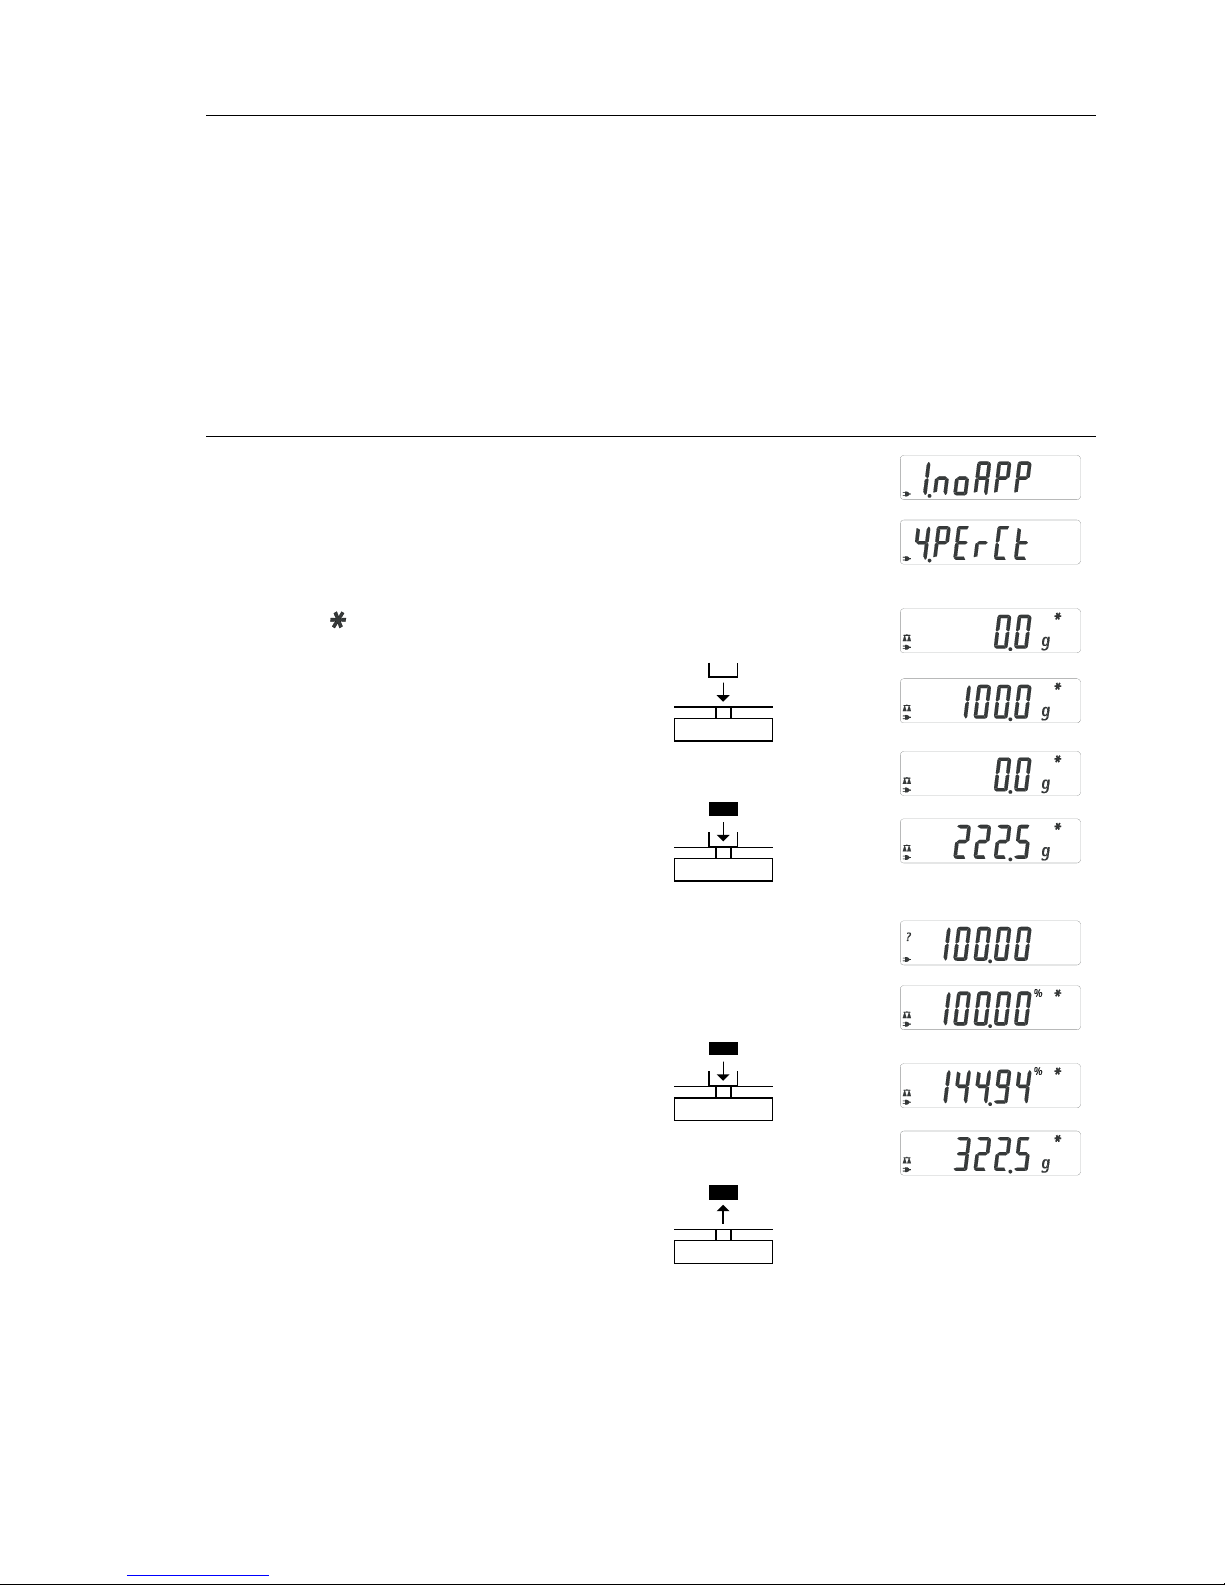
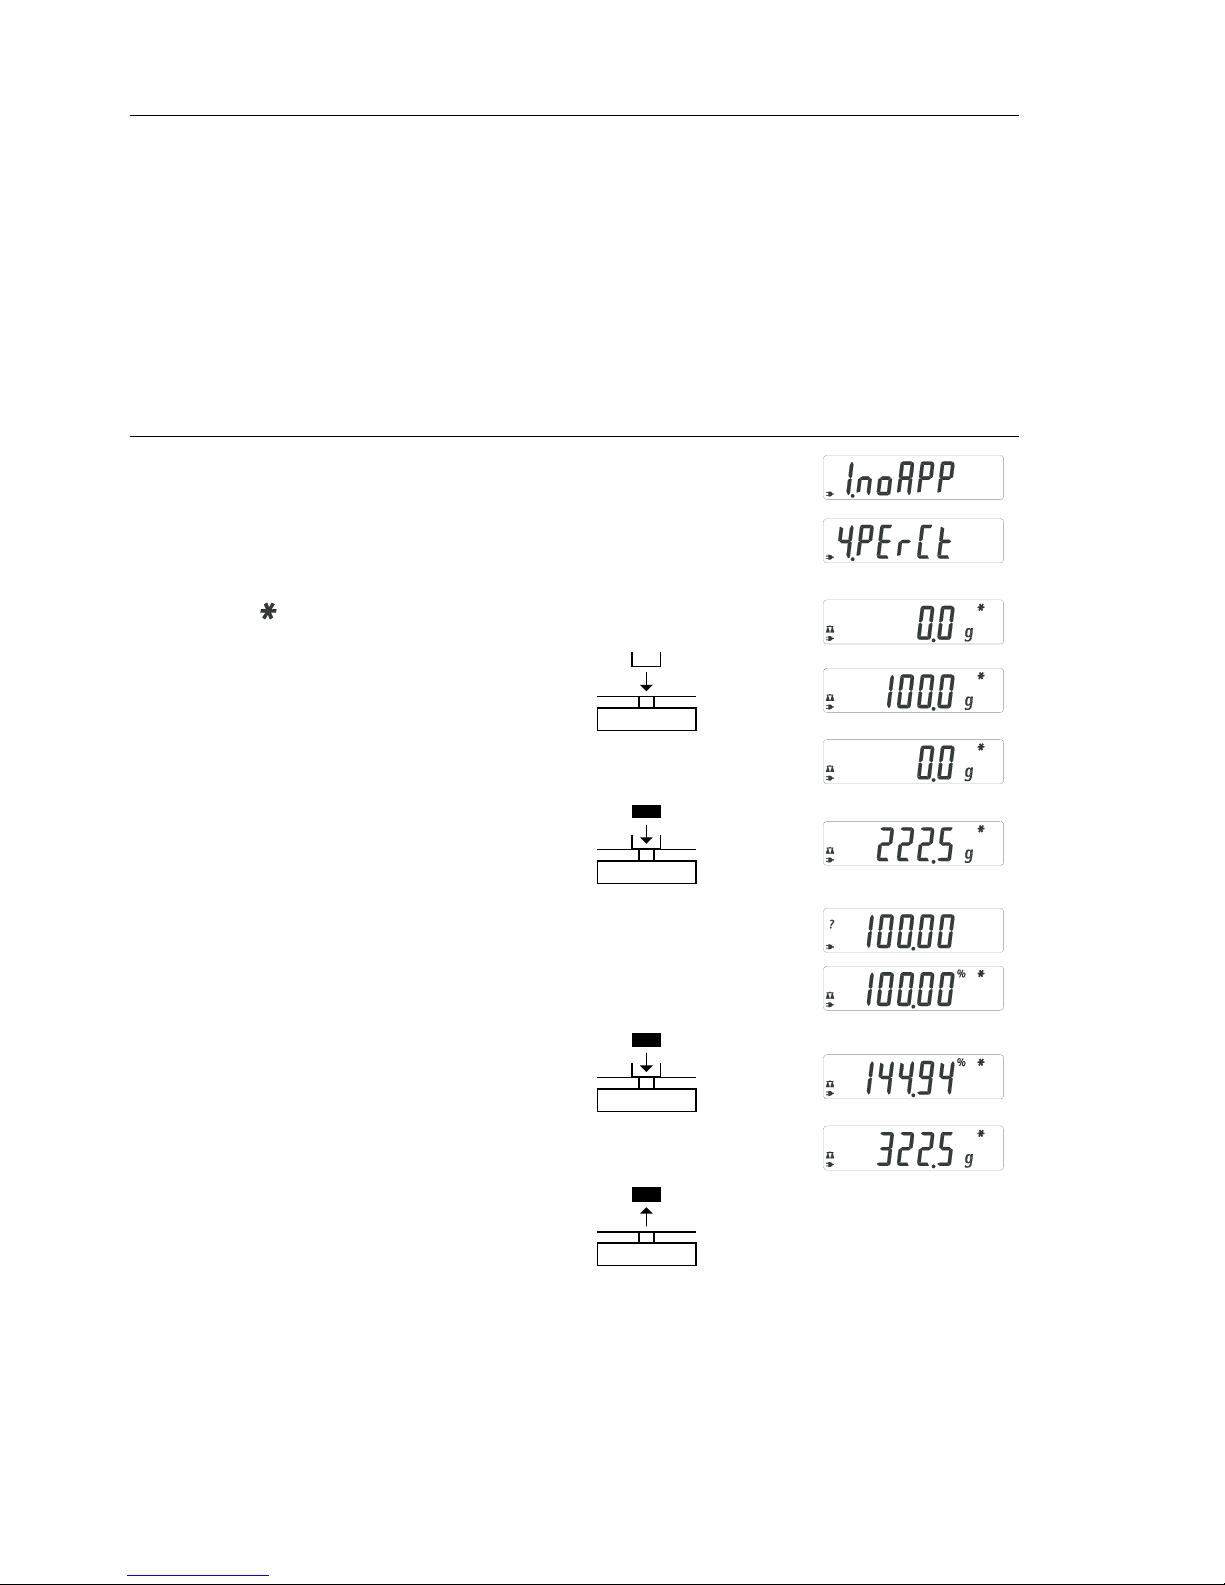
Weighing in Percent
Purpose
This application program allows you to obtain weight readouts in percent which are
in proportion to a reference weight.
Example: Determine an unknown percentage; store the weight on the
balance/scale as the reference percentage (100%)
Step Key (or instruction) Display
1. Select application program (ZERO) ≥ 2 sec
2. Select Weighing in Percent (F) repeatedly
3. Confirm application (ENTER)
Symbol “ “ on the display:
application is active
4. Place empty container on the
balance/scale
5. Zero the balance/scale (ZERO)
6. Place the reference weight
for 100% on the balance/scale
7. If desired, change the number
of decimal places displayed: 100.0%,
100.00% or 100% (factory setting) (F) repeatedly
8. Confirm selected no. of decimal places (ENTER)
9. Place unknown weight on the
balance/scale
10. Toggle display between weight
and percentage (F) repeatedly
11. Unload the balance/scale
12. Start new Weighing in Percent
application or exit application (ENTER) ≥ 2 sec
13. Reactivate Weighing in Percent
(if no other application program
has been selected) (F)
14. Repeat procedure starting from Step 5
.
Page 12
12
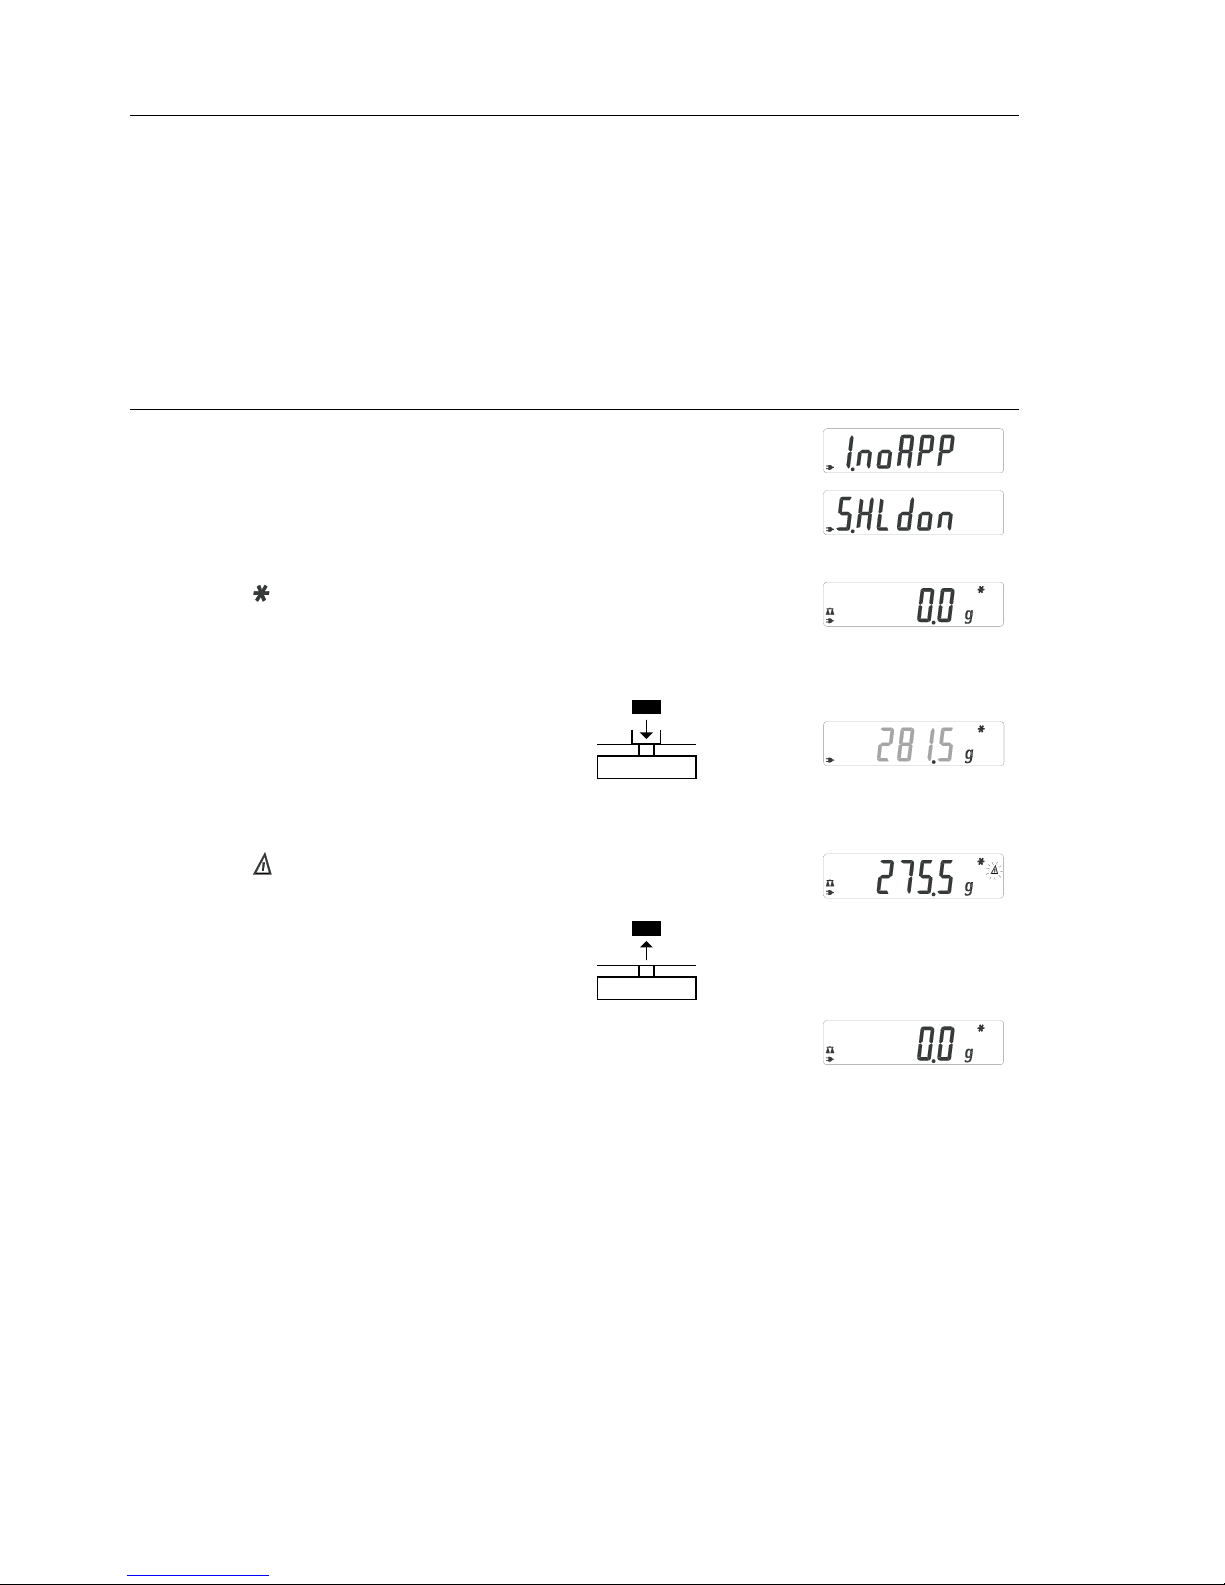
Purpose
The last stable value remains displayed for 5 seconds after removing the sample
from the pan.
Example: Determine weight of oversized sample
Step Key (or instruction) Display
1. Select application program (ZERO) ≥ 2 sec
2. Select Display Lock (“HLdon”) (F) repeatedly
3. Confirm application (ENTER)
Symbol “ ” on the display:
application is active
4. If necessary: zero the balance/scale (ZERO)
5. Place sample on balance/scale
6. Start application program (F)
Symbol “ ” flashes on the display:
when stability conditions are met
7. Unload the balance/scale:
the weight value remains displayed
for a further 5 seconds; or
8. Zero the balance/scale (ZERO)
9. End the Display Lock application (ENTER) ≥ 2 sec
10. Reactivate Display Lock (if no other (F)
application program has been selected)
11. Repeat procedure starting from Step 5.
Display Loc k Mode
Page 13
13
Total/Formulation
Purpose
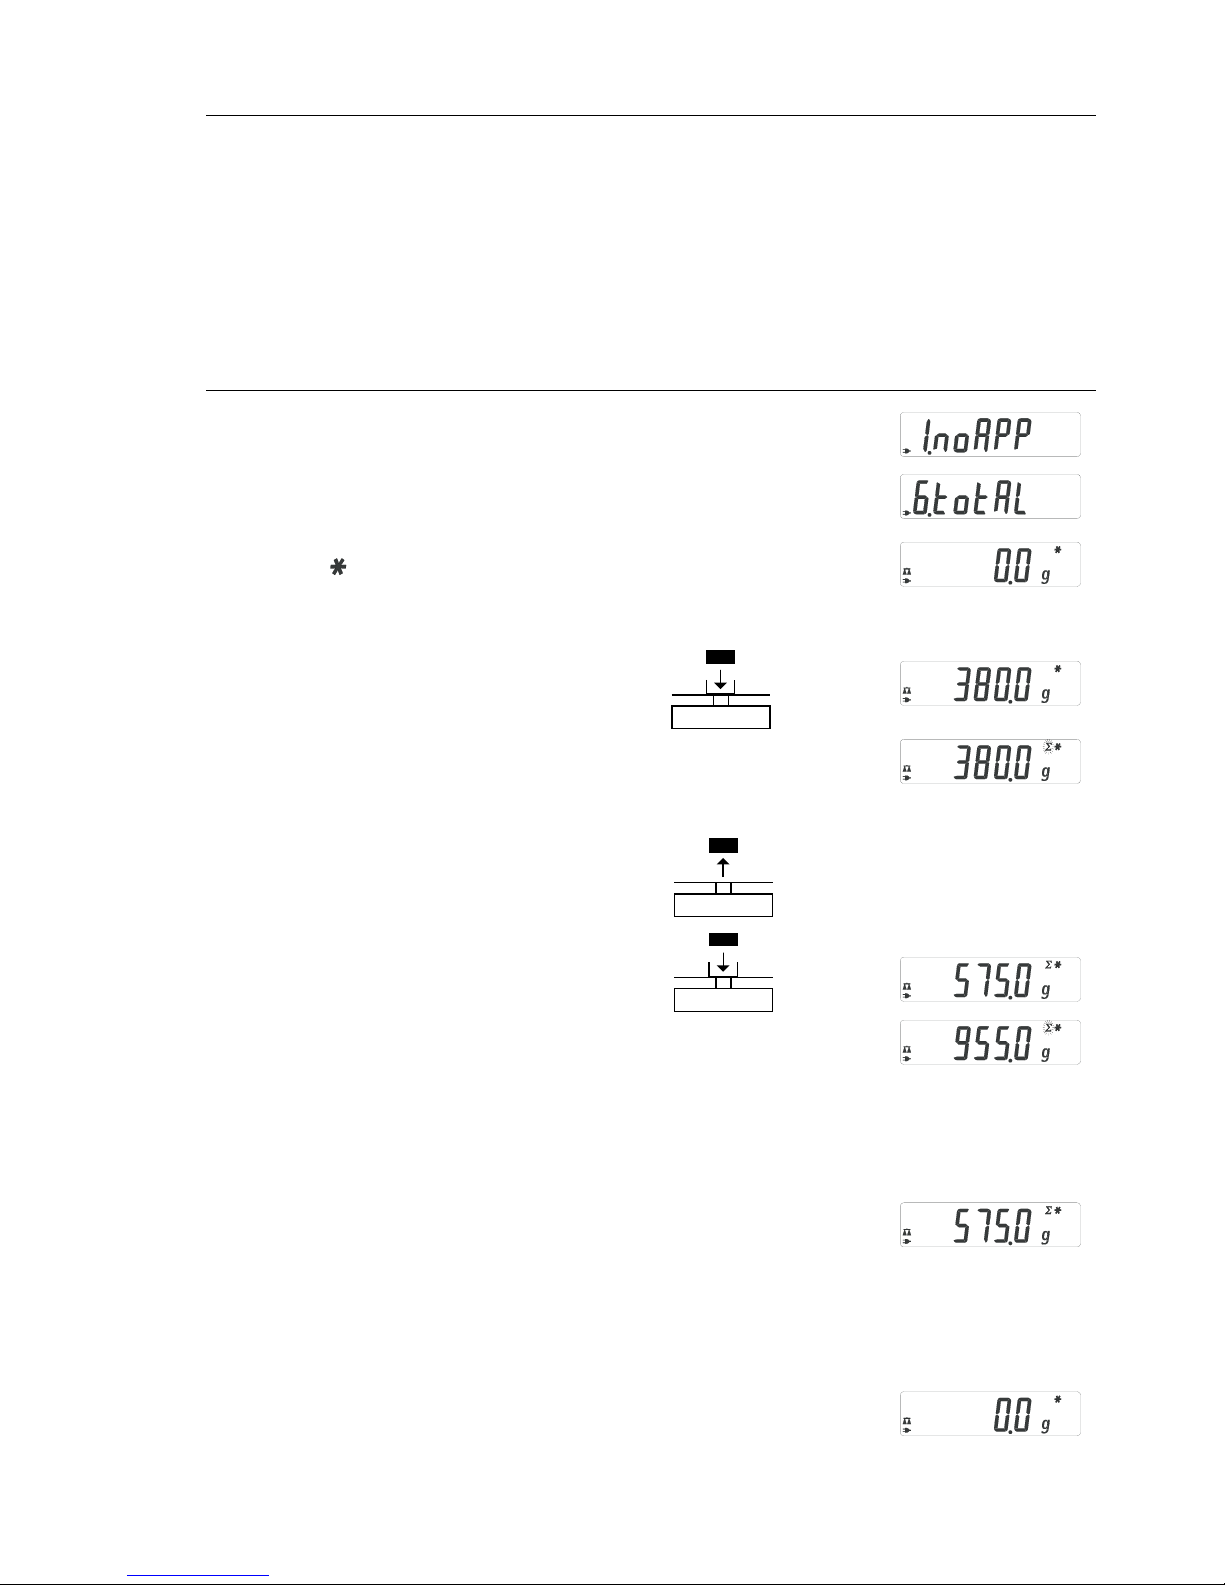
With this application program you can add successive weight values.
The cumulative weight can infinitely exceed the capacity of the balance/scale.
Example: Obtaining the total/formulation
Step Key (or instruction) Display
1. Select application program (ZERO) ≥ 2 sec
2. Select Total (formulation) (F) repeatedly
3. Confirm application (ENTER)
Symbol “ “ on the display:
application is active
4. If necessary: zero the balance/scale (ZERO)
5. Place sample on balance/scale
(in this example, 380 g)
6. Store value in memory. (ENTER)
Total weight is displayed
steadily; ∑ symbol flashes.
If interface is connected, sample
weight is outputted automatically
7. Remove sample or press ZERO
8. Place the next sample
on the balance/scale
(in this example, 575 g)
9. Store value in memory. Total weight is (ENTER)
displayed; along with the flashing
∑ icon.
Note: ∑ symbol remains on, indicating
stored value in memory until cleared
(if interface is connected, sample weight
is outputted automatically).
10. To view current individual weight for (F)
2 seconds (if a printer is connected,
a printout is generated)
11. Clear Total memory (F) ≥ 2 sec
(if a printer is connected, total is printed)
12. Exit Total/Formulation (ENTER) ≥ 2 sec
13. Reactivate Totalizing (if no other (F)
application program has been selected)
(if a printer is connected, total is printed).
14. Repeat procedure starting from Step 6.
Page 14
14
Specific Gravity
Purpose
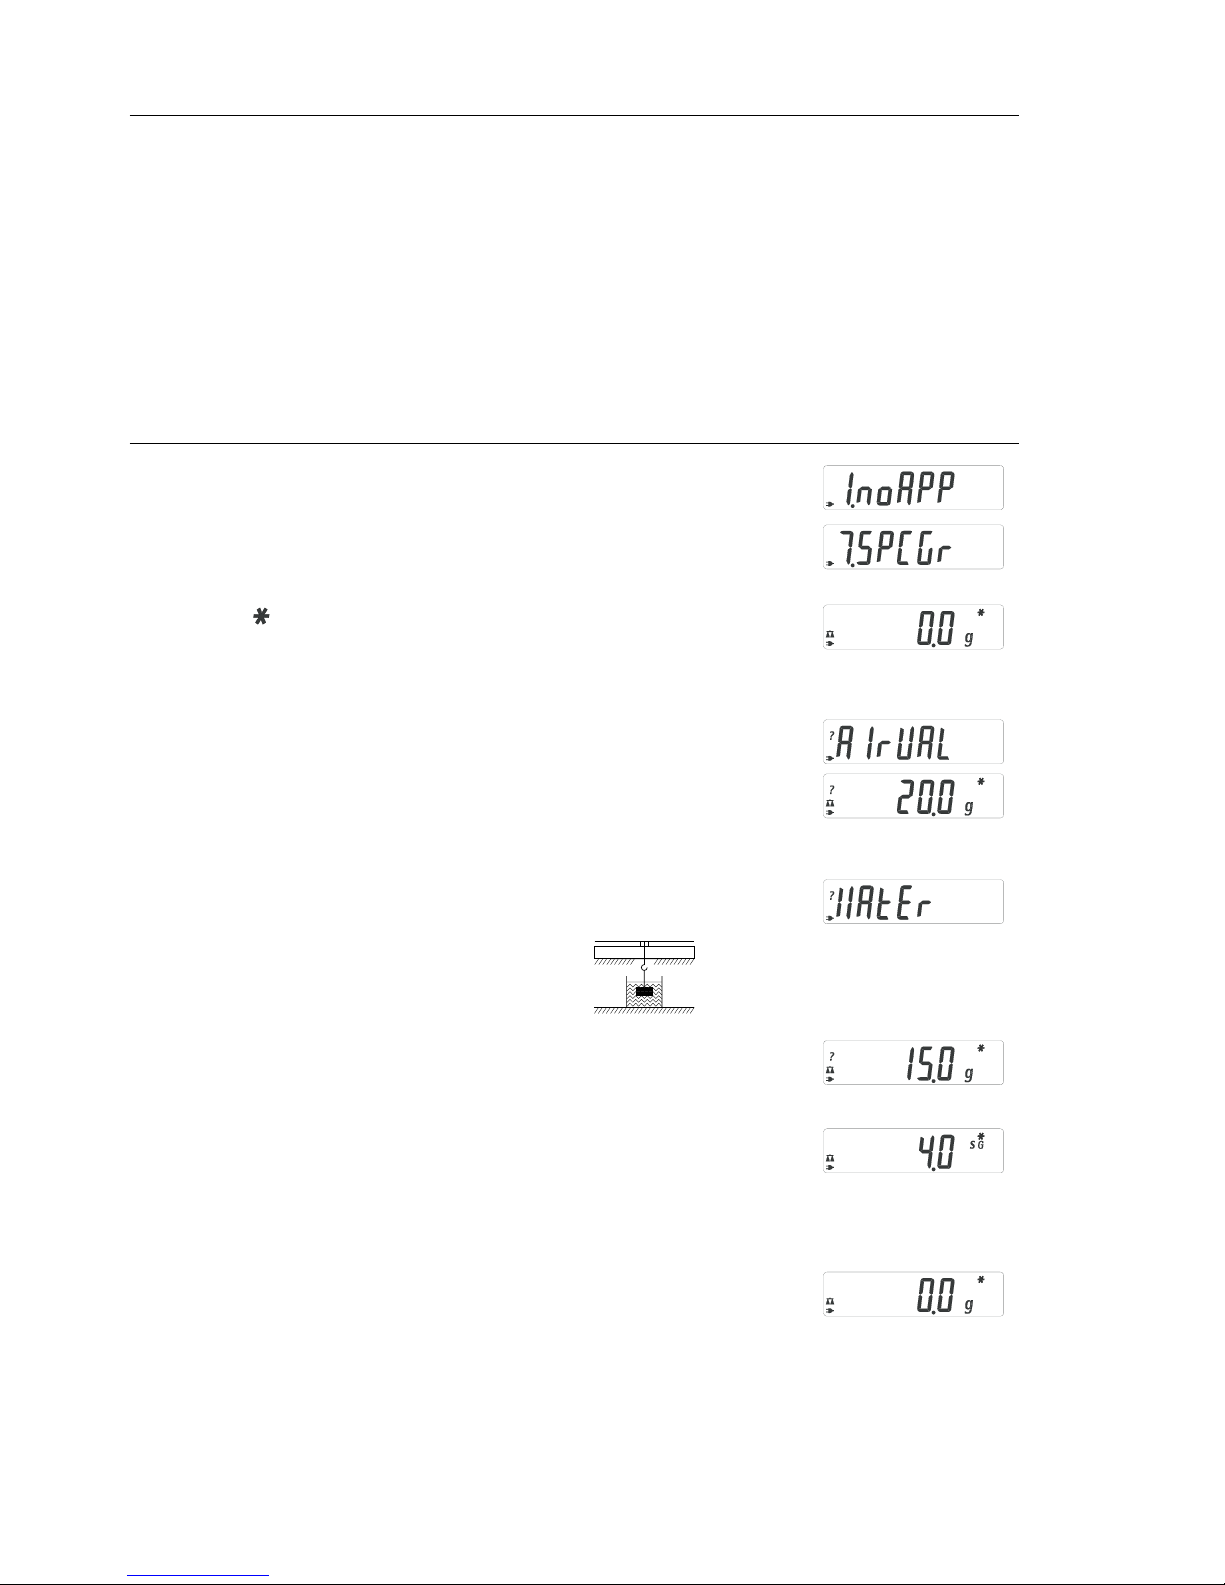
Use this application program to determine the specific gravity of a sample.
The calculation used is Result = Weight in air/(Weight in air – Weight in water).
The result is displayed with one decimal place.
Beaker and wire not included with balance/scale.
Example: Determine the specific gravity of a solid.
Step Key (or instruction) Display
1. Select application program (ZERO) ≥ 2 sec
2. Select Specific Gravity (F) repeatedly
3. Confirm application (ENTER)
Symbol “ “ on the display:
application is active
4. If necessary, zero the balance/scale (ZERO)
5. Start application program (F)
6. Confirm the display, “
airval” (ENTER)
7. Determine weight of the sample in air:
place sample on the balance/scale
8. Store weight-in-air value (ENTER)
9. Remove sample from balance/scale
10. Determine weight of sample in liquid:
connect wire and set up beaker
11. Confirm the display “Water” (ENTER)
12. Place sample in liquid
13. Store the weight-in-liquid value
and view the result (ENTER)
14. Clear the display (ZERO)
15. Exit the Specific Gravity application (ENTER) ≥ 2 sec
16. Reactivate Specific Gravity (if no other (F)
application program has been selected)
17. Repeat procedure starting from Step 5.
Page 15
15
Calibration/Span Adjustment
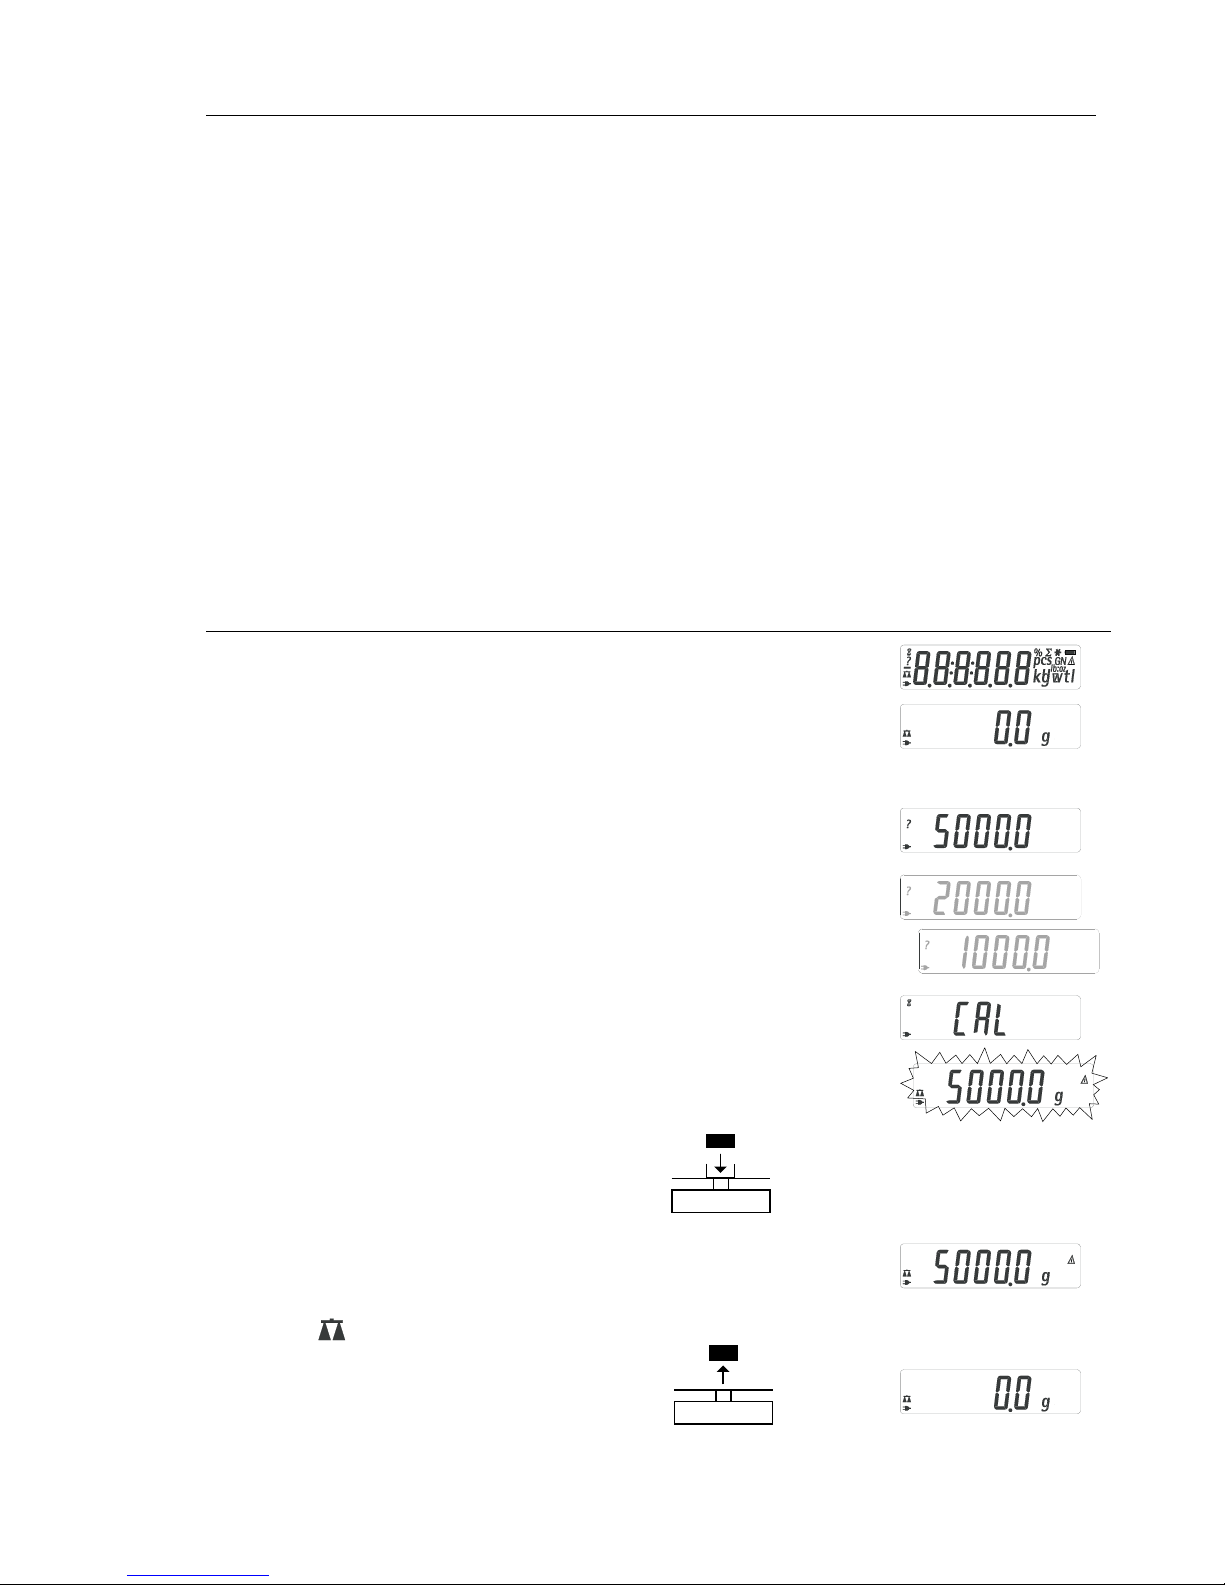
Features
Calibration/adjustment can be
performed only when:
– there is no load on the balance/scale,
– the scale is zeroed, and
– the internal signal is stable.
If these conditions are not met, an error
message is displayed.
The weight required for calibration/span
adjustment is displayed.
Standard calibration weights for selected
models: to remove, see instructions on
page 7.
Press (F) to select a different weight
value.
To cancel the procedure: press and
hold the (ENTER) key (≥ 2 sec.).
Example: Calibrate/adjust span of the balance/scale (here: model BEB61)
Step Key (or instruction) Display
1. Switch on the balance/scale (ON/OFF)
2. Zero the balance/scale (ZERO)
3. Start calibration (CAL)
The preset calibration weight
is displayed without the weigh unit
(in this example, 5000 g)
4. To select a different calibration
weight value (F) repeatedly
5. Start calibration/span adjustment (ENTER)
After the zero point is stored, the requir ed
calibration weight flashes on the display.
6. Place the required calibration
weight on the balance/scale
The readout stops flashing if the weight
is applied within the defined time limit and
tolerance. If the weight value is accepted,
the display stops flashing and the stability
symbol appears on the display.
7. Remove the calibration weight
8. Calibration/span adjustment has
been completed
Calibration is recommended after initial installation and each time the
balance/scale is moved.
Page 16
16
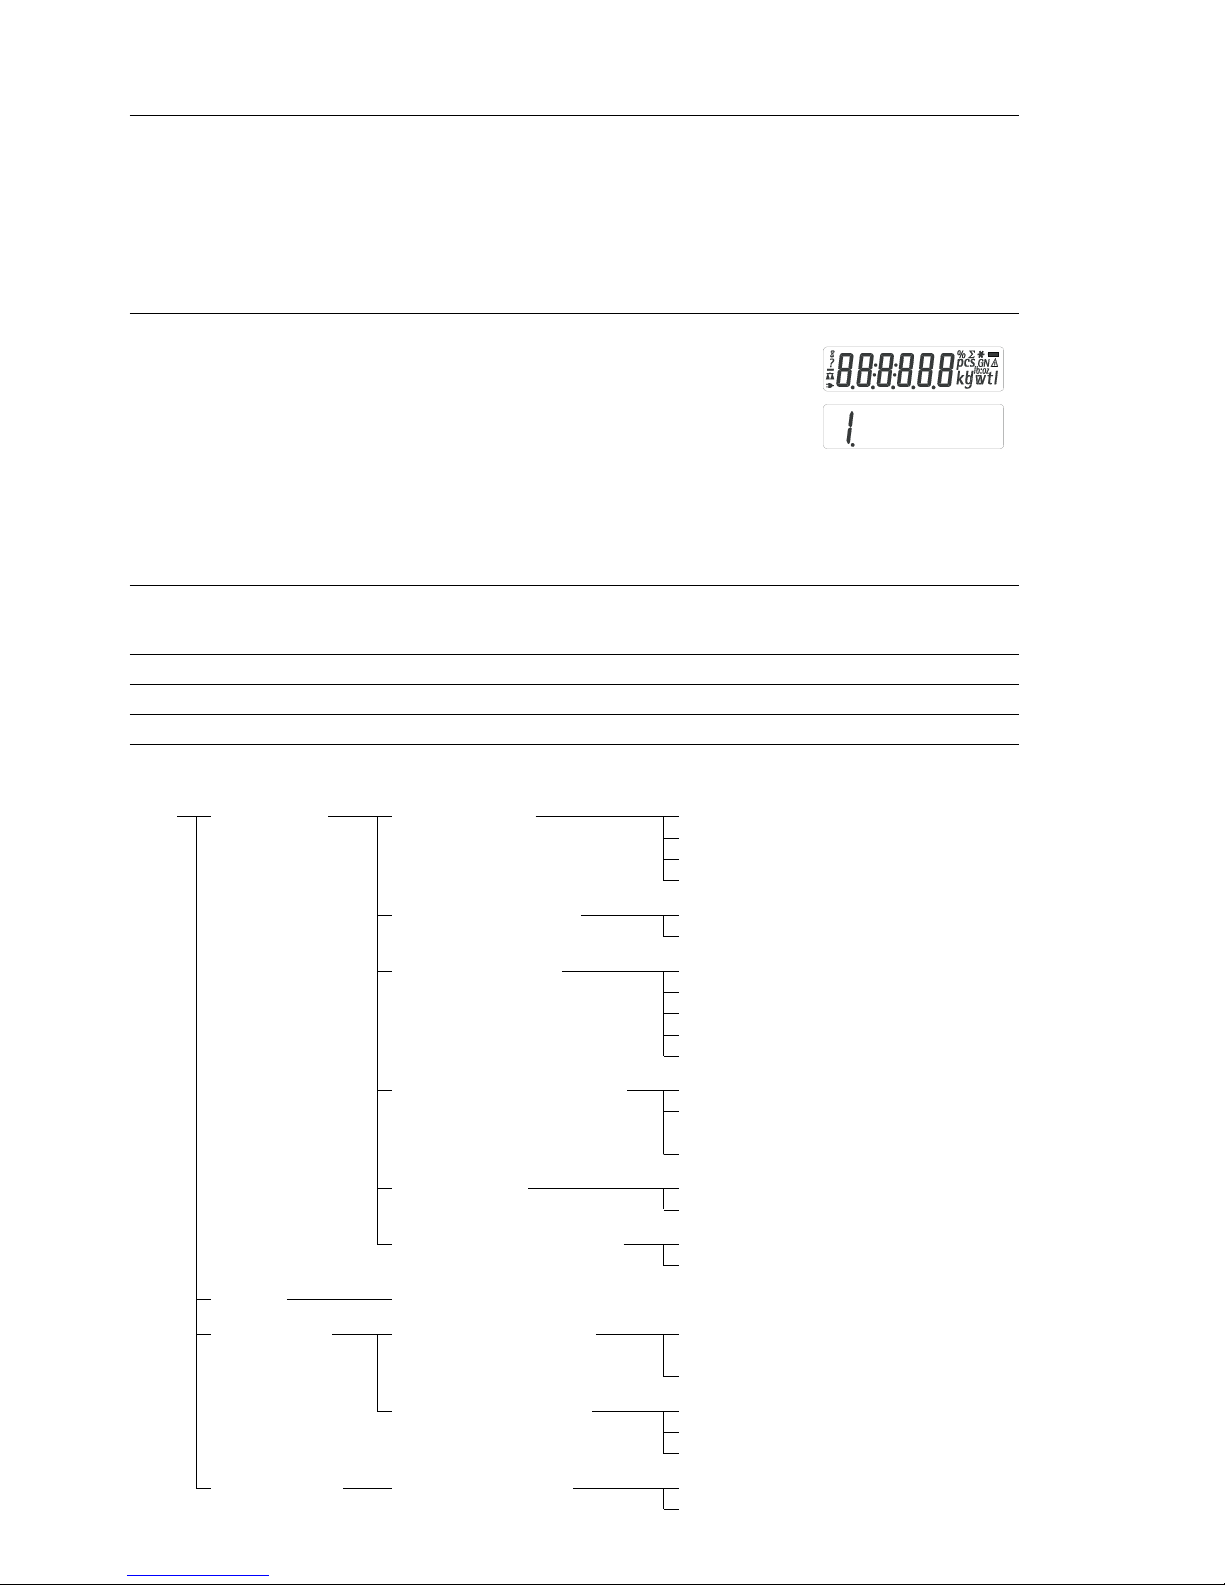
Advanced Features (Setup Men u)
Purpose: Serveral advanced balance operations can be changed through menu codes.
Select the desired codes from the list below . Then follow the steps to change the menu codes.
Step Key (or instruction) Display
1. T urn balance off. (ON/OFF)
2. Turn the balance back on. While all segments ZERO
are displayed, press ZERO key once.
3. Increase the number on display to desired value. MODE
4. Move to the 2nd number of the code. ENTER
5. Increase the second number on display MODE
to desired value.
6. Move to the 3rd number of the code (when you ENTER
move to the third number, the previously set menu
code will appear).
7. Increase the third number on display to desired value. MODE
8. Confirm new code Hold down the ENTER key until ”0“ appears after
the desired code.
9. Exit setup menu. Press ZERO for more than 2 seconds
Special Keyfinctions for Menu Code Operation
Key Press briefly Press and hold
(F) Increase a number by one with each press
(ENTER) Moves to the next of three numbers of a code; hold to confirm setting
(ZERO) Moves to the previous number of a codes; hold to exit set-up.
Parameter Settings (Overview) ο Factory setting
Setup 1 Weighing 1.1. Adapt filter 1.1.1 Very stable conditions
menu 1.1.2
ο Stable conditions
1.1.3 Unstable conditions
1.1.4 Very unstable conditions
1.2. Application filter 1.2.1
ο Final readout
1.2.2 Filling
1.3. Stability range 1.3.1 1/4 digit
1.3.2 1/2 digit
1.3.3 1 digit
1.3.4
ο 2 digits
1.3.5 4 digits
1.5. Calib./adjust./linearization: 1.5.1
ο Calibration/span adjustment
Function of the (CAL) key 1.5.2 Linearization: for service
personnel only
1.5.3 Key blocked
1.6. Auto zero 1.6.1
ο On
1.6.2 Off
1.7. 1st weigh unit, or 2nd unit 1.7.1 User-defined unit: see
in Toggle Weigh Units app. to 1.7.23 “Toggling between Weigh Units”
5. and 6. Interface settings; see manual for interface accessory
8. Additional 8.1. Block key functions 8.1.1 All keys blocked except
functions (with battery use only) for (ON/OFF) and (ZERO)
8.1.2
ο All keys unblocked
8.2. Automatic shut-off 8.2.1
ο After 2 minutes
(with battery use only) 8.2.2 After 5 minutes
8.2.3 After 10 minutes
9. Reset menu 9.1. Factory settings 9.1.1 Restore
9.1.2
ο Do not restore
Page 17

17
Error Codes
Most error codes are shown on the main display for approx. 2 seconds.
The program then returns automatically to the previous mode.
Display/Problem Cause Solution
No segments appear No power available Check the power supply
on the display
The AC adapter is not plugged in Plug in the AC adapter
Battery is drained Replace battery; recharge
battery using external charger
oL The load exceeds the Unload the balance/scale
balance/scale capacity
UL Weighing pan not in place Place the weighing pan
on the balance/scale
Something is touching Move the object that is
the weighing pan touching the weighing pan
disErr Display overflow: Reduce load on the balance/scale
Value cannot be shown on the display
calErr Calibration parameter not met; e.g.: Calibrate only when zero
is displayed
– Balance/scale not zeroed Press (ZERO) to tare the
balance/scale
– Balance/scale is loaded Unload the balance/scale
appErr Weight is too light or there is Increase the weight
no sample on the balance/scale on the balance/scale
with application in use
PrtErr Data interface for Contact the BOECO
printing is blocked customer service center
Bal.Err Balance/scale loaded or defective Unload balance/scale before
when power was turned on switching on or contact
BOECO customer service*
Sep.Err Balance/scale defective Contact BOECO customer service
Max. weighing capacity The balance/scale was Place the weighing pan
is less than indicated switched on without on the balance/scale and
under “Specifications” the weighing pan in place press (ON/OFF)
The weight readout The balance/scale was not Calibrate/adjust the balance/scale
is obviously wrong calibrated/adjusted before weighing
Balance/scale not zeroed Zero the balance/scale
If any other errors occur, contact your local BOECO customer service center
* This fault will appear on the display when the unit is powered on. This occurs when the electronics are no longer within the factory set parameters.
The most common cause is from objects being dropped onto the weighing pan or from the balance itself being dropped. The balance must be returned for service.
Page 18

18
Overview
Specifications
Model BEB43 BEB53 BEB55
Weighing capacity g 120 610 210
Readability g 0.001 0.01 0.01
Tare range (subtractive) g 120 610 210
Linearity ≤± g 0.003 0.03 0.03
Operating temperature range 10°C to 30°C (273°K to 303°K; 50°F to 86°F)
Response time (average) s 2.5 2 2
Adaptation to ambient conditions By selection of 1 of 4 optimized filter levels; display update:
s 0.1–0.8 sec. (depends on filter level selected)
Calibration weight g 100* 200* 200*
Net weight, approx. kg/lb 1.2/2.6 1.35/2.9 1.2/2.6
Pan size mm/in 97/3.8 d 142 + 130/5.6 + 5.1 97/3.8 d
Power source/voltage/frequency AC adapter, 230 V or 115 V, +15% to – 20%, 48–60 Hz
Power consumption (average) W 1 0.75 0.75
Hours of operation w/ 9V battery:
– Alkaline (approx.) h – 11 14
– Rechargeable, fully ch. (NiMH), avg. h – 2.5 4
Model BEB61
Weighing capacity g 5000
Readability g 0.1
Tare range (subtractive) g 5000
Linearity ≤±g 0.2
Operating temperature range 10°C to 30°C (273°K to 303°K; 50°F to 86°F)
Response time (average) s 2
Adaptation to ambient conditions By selection of 1 of 4 optimized filter levels; display update:
s 0.1–0.8 sec. (depends on filter level selected)
Calibration weight kg 5*
Net weight, approx. kg/lb 1.1/2.4
Pan size mm/in 142+130/5.6 + 5.1
Power source/voltage/frequency AC adapter, 230 V or 115 V, +15% to – 20%, 48–60 Hz
Power consumption (average) W 1
Hours of operation w/ 9V battery:
– Alkaline (approx.) h 11
– Rechargeable, fully ch. (NiMH), avg. h 2.5
* included with the balance
Page 19

19
C Marking
The balance/scale complies with the
following EC Directives and European
Standards:
Council Directive 89/336/EEC
“Electromagnetic compatibility
(EMC)”
Applicable European Standards:
Limitation of emissions:
In accordance with product standard
EN 61326-1 Class B (residential area)
Defined immunity to interference:
in accordance with product standard
EN 61326-1
(minimum test requirements,
non-continuous operation)
Important Note:
The operator shall be responsible
for any modifications to BOECO equipment and must check and, if necessary,
correct these modifications.
On request, BOECO will provide
information on the minimum operating
specifications (in accordance with the
Standards listed above for defined
immunity to interference).
73/23/EEC “Electrical equipment
designed for use within certain
voltage limits”
Applicable European Standards:
EN 60950
Safety of information technology
equipment including electrical business
equipment
EN 61010
Safety requirements for electrical
equipment for measurement, control
and laboratory use
Part 1: General requirements
If you use electrical equipment in
installations and under ambient conditions requiring higher safety standards,
you must comply with the provisions as
specified in the applicable regulations
for installation in your country.
Page 20

20
Contenido
Página
Contenido 20
Advertencias de seguridad 21
Puesta en marcha
Funcionamiento 25
Función básica: Pesar 25
Descripción de teclas 25
Programas de aplicación 26
Conmutación de unidades 26
Conteo 27
Pesada en porcentaje 28
Lectura estática 29
Totalización 30
Densidad/Peso específico 31
Calibración 32
Ajustes previos (menú Setup) 33
Mensajes de error 34
Sinopsis 35
Especificaciones técnicas 35
Marca C 36
Page 21

21
Advertencias de seguridad
Seguridad
● Leer con atención este manual
de instrucciones antes de poner
en marcha el aparato. De esta
manera se evitarán daños.
! No usar el aparato en zonas con
riesgo de explosión.
! El valor de tensión impreso en
el alimentador tiene que coincidir
con la tensión de red local.
! Usar solamente pila o batería
monoblock de 9 V, adquirible en
el comercio; el uso de otro tipo
de pila/batería puede causar
explosión!
– La balanza puede ser conectada
solamente después de desconectar el alimentador o desactivar
la batería, es decir exenta de
tensión.
– Proteger el alimentador contra la
humedad.
! Perturbaciones electromagnéticas
extremas pueden influir en la
lectura de los valores de peso.
Después de eliminarse las perturbaciones, el producto funcionará
nuevamente en la forma prevista.
– Utilizar accesorios y opciones
BOECO, que están óptimamente
adaptados a la balanza.
– No abrir la balanza. Al violarse
los sellos (marcas) de seguridad
caducan los derechos de garantía.
Page 22
22
Puesta en marcha
Suministro
– balanza con cubierta protectora
transparente
– plato de carga redondo o cuadrado
– alimentador
Adicional en BEB53, BEB55:
– pesa de calibración
Adicional en BEB43:
– pesa de calibración
– protector contra corrientes de aire
– anillo de vidrio
– nivel de burbuja y patas de regula-
ción
Instalación
En la instalación, evitar lugares con las
siguientes influencias negativas:
– calor (calefacción, rayos solares)
– corrientes de aire directas, debido a
puertas y ventanas abiertas
– vibraciones durante el pesaje
– humedad extrema
Instalar la balanza
§ Montar los siguientes componentes
en la balanza:
– plato de carga redondo con la cara
inferior o superior
– Protectores contra corrientes
de aire-anillo de vidrio en los modelos: BEB43
Page 23
23
Conexión a la red
! Utilizar solamente alimentador
original.
§ Insertar conector en la parte
trasera de balanza
§ Conectar el alimentador a la red
Pesaje por debajo de la balanza
Para los pesajes por debajo de
la balanza existe un dispositivo en
la base de la balanza.
§ Desatornillar la placa de cierre de
la base de la balanza.
§ Colgar la muestra, p. ej. con un
alambre, en el gancho.
$ En caso dado, montar protección
contra las corrientes de aire.
Instalar pila/batería
(excepto en los modelos BEB43)
$ Pila o batería no forman parte del
suministro de la balanza
! Usar solamente pila o batería
monoblock de 9 V, adquirible en
el comercio.
! Cargar batería solamente con un
aparato recargador externo
§ Voltear la balanza
§ Abrir el compartimento de pila:
levantar la cubierta del compartimento
§ Colocar la pila o batería de 9 V
$ Observar la polaridad
§ Cerrar el compartimento de pila:
presionar la cubierta del compartimento y encajar
! Pilas o baterías usadas son dese-
chos especiales (no es basura
domiciliaria): eliminar las baterías
según las prescripciones sobre
desechos especiales.
Page 24
24
Nivelar la balanza
(sólo en el modelo BEB43)
§ Nivelar la balanza después de cada
cambio del lugar de instalación.
§ Girar las patas de regulación según
la ilustración adjunta, hasta que la
burbuja de aire del nivel esté en el
centro del círculo.
> Por lo general se necesitan
algunos pasos más para nivelar.
Sacar las pesas
(Excepto en el modelo BEB61)
§ Girar la tapa del compartimento y
jalar
$ Proceso de calibración, ver pág. 32
Calentamiento previo para modelo
BEB43:
Para alcanzar resultados exactos,
el aparato necesita un tiempo de
calentamiento previo de 1 hora.
Hasta entonces alcanza la temperatura
necesaria.
Page 25
25
Funcionamiento
Función básica: Pesar
Características
– Tarar la balanza:
La tara puede realizarse dentro de
todo el rango de pesaje.
Preparación
§ Encender la balanza: pulsar tecla
(ON/OFF)
§ En caso dado, tarar: pulsar tecla
(ZERO)
$ En caso dado, modificar ajustes de
fábrica: ver en el capítulo “Ajustes
de fábrica”
$ En caso dado, cargar ajustes de
fábrica: ver en el capítulo “Ajustes
de fábrica”, parámetro 9.–1
Otras funciones:
$ Apagar balanza: pulsar tecla
(ON/OFF)
$ Funcionamiento en modo batería:
apaga autom. después de 2, 5 ó
10 minutos.
Si el valor de peso no varía dentro
de 2 minutos, mínimo, y si no se
pulsa tecla alguna, parpadeará el
símbolo de batería « ».
Después de transcurrir otros
10 segundos, la balanza se apaga
automáticamente.
Descripción de teclas
(ON/OFF) Encender/apagar: el aparato
se enciende, se apaga, o bien
pasa al modo Standby
Modo batería: encender, retroiluminación, apagar
(ZERO) Tarar balanza; mantener pulsa-
da la tecla por 2 segundos: iniciar el menú de aplicaciones
(CAL) Iniciar calibración
(F) Iniciar programas de aplicación
En el menú de aplicaciones
y en calibración:
seleccionar parámetros (scroll)
(ENTER) Confirmar ajustes de paráme-
tros seleccionados;
– aplicaciones
– configuración
– calibración
Finalizar aplicación:
mantener pulsada la tecla por
2 segundos
(PRINT) Imprimir/salida de datos
Ejemplo: determinar el valor de peso
Paso Pulsar tecla Lectura
1. encender balanza (ON/OFF)
se realiza autochequeo
Lectura: versión de Software r 31.01 g
2. colocar recipiente para la 52.0 g
muestra (aquí, p. ej. 52 g)
3. tarar balanza (ZERO)
0.0 g
4. poner muestra en recipiente 150.2 g
(aquí, p. ej. 150,2 g)
Page 26
26
Programas de aplicación
Conmutación de unidades
Con este programa de aplicación puede indicarse el valor de peso en una
unidad seleccionada (ver tabla) y en gramos.
Ejemplo: conmutar unidad: de libras [lb] (aplicación) a gramos [g] (unidad básica)
Paso Pulsar tecla Lectura
1 conmutar programa aplicación (ZERO) pulsión larga
2. seleccionar unidad a conmutar (F)
3. confirmar ajuste (ENTER)
4. seleccionar unidad peso; aquí “5. libras” repetidam (F)
(ver tabla, abajo)
5. confirmar unidad libras (ENTER)
6. poner muestra
7. conmutar unidad peso (F)
Num. de menú Unidad Conversión Lectura
1. user* Gramos 1,00000000000 o
2.grams (ajuste fábrica) Gramos 1,00000000000 g
4.carat Quilates 5,00000000000 o
5.Pound Libras 0,00220462260 lb
6.ounce Onzas 0,03527396200 oz
7.tryo Onzas Troy 0,03215074700 ozt
8.tl.hon Taeles Hongkong 0,02671725000 tl
9.tl.sin Taeles Singapur 0,02645544638 tl
10.tl.ta Taeles Taiwan 0,02666666000 tl
11.grai Granos 15,4323583500 GN
12.peny Pennyweights 0,64301493100 dwt
15.tl.ch Taeles China 0,02645547175 tl
22.pdoz lb/oz 0,03527396200 lb:oz
23.newt Newton 0,00980665000 N
* = Unidad definida por el usuario, cargable con progr. PC en la balanza mediante
interfaz opcional RS232, o bien USB.
Page 27
27
Conteo
Objetivo
Con este programa de aplicación puede determinarse la cantidad de piezas.
Ejemplo: determinación de una cantidad desconocida de piezas: pesar cantidad
de referencia definida (cantidad de referencia 20)
Paso Pulsar tecla Lectura
1. conmutar programa aplicación (ZERO) pulsión larga
2. seleccionar Conteo 2x (F)
3. confirmar ajuste (ENTER)
símbolo « » en la lectura:
aplicación está activa
4. colocar recipiente en la balanza
5. tarar (ZERO)
6. colocar cantidad referencial (20 piezas)
7. seleccionar cant. referencia: repetidam.
en escalones de uno (1, 2, 3, ..., 99) (F) pulsión breve,
en escalones de diez (10, 20, 30, ..., 100) o bien mantenerla
(F) pulsada
8. confirmar cant. ref. seleccionada (ENTER)
9. poner cant. desconocida de piezas
10. conmutar lectura entre promedio
peso de pieza, peso, cant. piezas repetidam. (F)
11. descargar balanza
12. aplicación Conteo:
borrar valor ref. (Enter) pulsión larga
13. reactivar Conteo, si previamente no se (F)
ha seleccionado otro progr. aplicación
14. en caso dado, seguir desde paso 5.
Page 28
28
Pesada en por centaje
Objetivo
Con este programa de aplicación puede determinarse la proporción porcentual de
una muestra, según un peso referencial.
Ejemplo: determinar valor porcentaje con: memorizar peso referencial colocando
el peso en la balanza, cantidad porcentual de referencia 100 %
Paso Pulsar tecla Lectura
1. conmutar programa aplicación (ZERO) pulsión larga
2. seleccionar Pesada en porcentaje repetidam. (F)
3. confirmar ajuste (ENTER)
símbolo « » en la lectura:
aplicación está activa
4. colocar recipiente en la balanza
5. tarar (ZERO)
6. colocar peso referencial
para el 100 %
7. en caso dado, modificar decimal
para lectura porcentaje: 100,0 %,
100,00 % o bien 100 % (ajuste fábrica) repetidam. (F)
8. confirmar posic. decimal seleccionada (ENTER)
9. poner peso desconocido
10. conmutar lectura entre peso
y cantidad porcentaje repetidam. (F)
11. descargar balanza
12. aplicación Pesada porcentaje:
borrar cant. porcentaje ref. (Enter) pulsión larga
13. reactivar Pesada en porcentaje,
si previamente no se ha seleccionado
otro programa de aplicación (F)
14. en caso dado, seguir desde paso 5.
Page 29
29
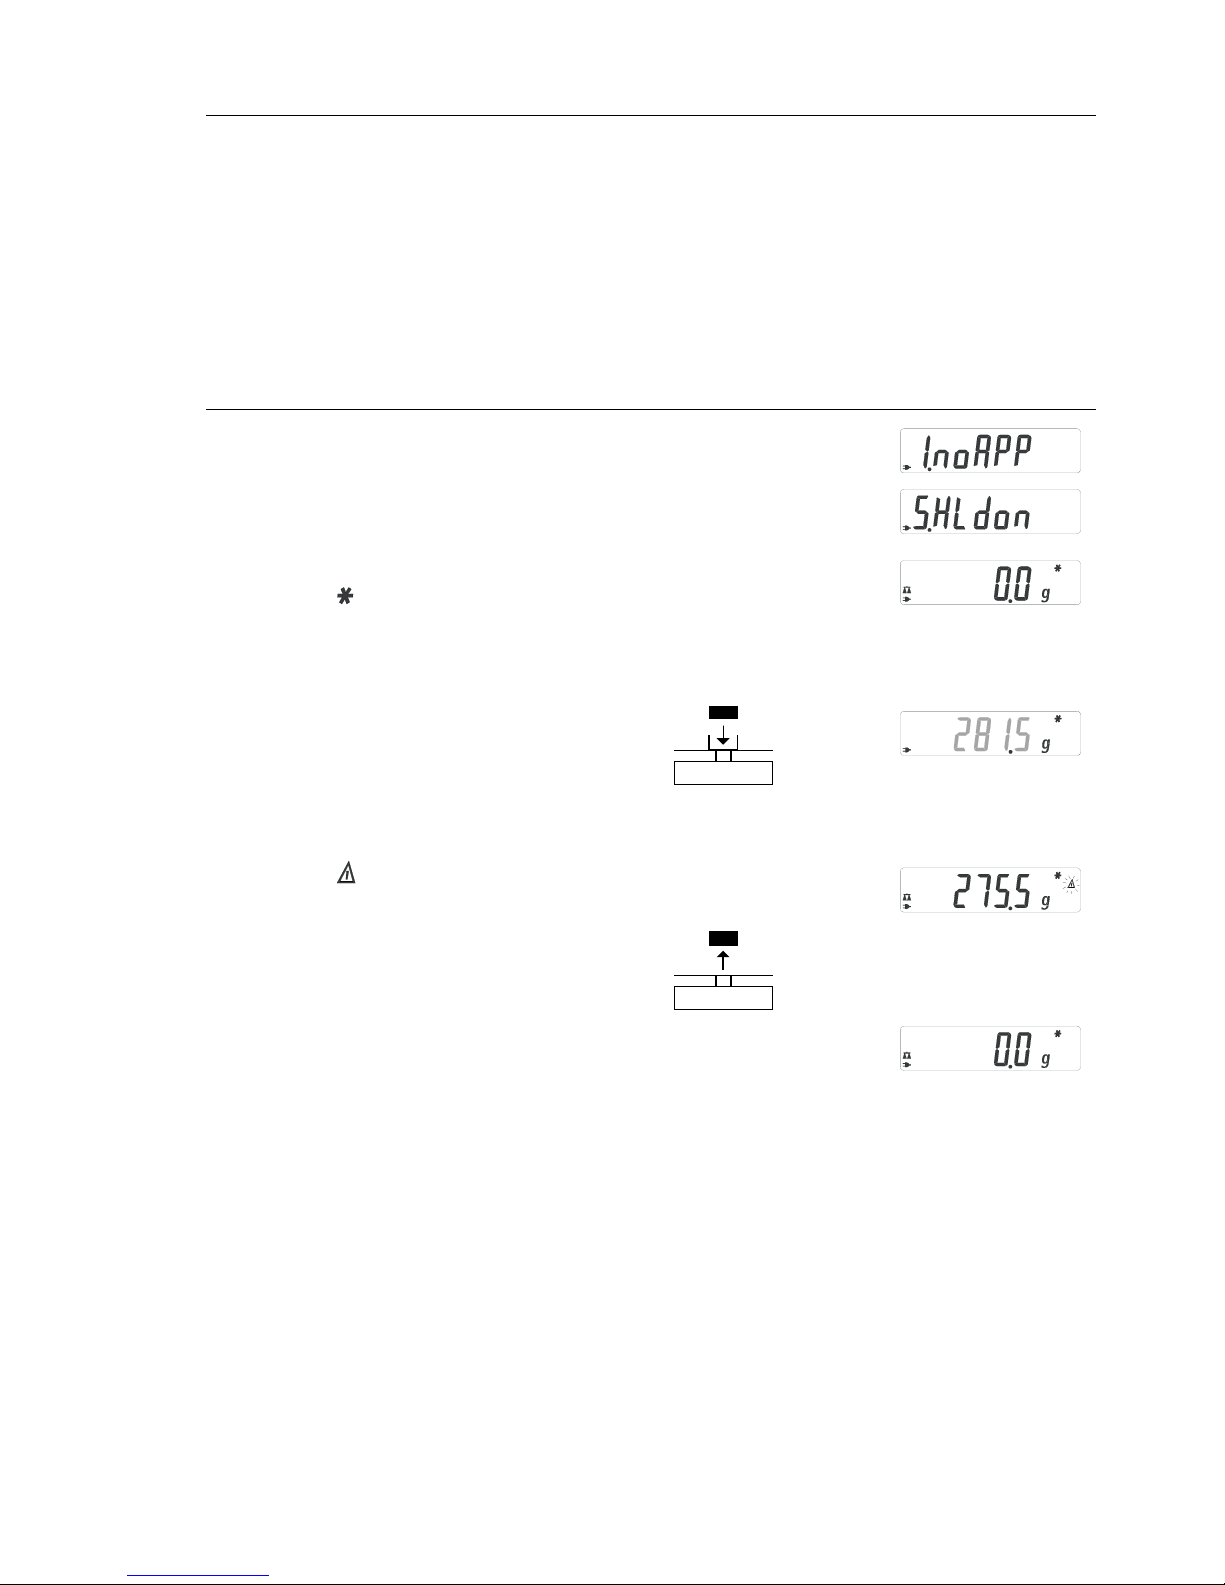
Lectura estática
Objetivo
Indicar último valor en pantalla cuando se usan cajas u objetos más grandes que
el plato de pesada.
Ejemplo: determinar muestra sobredimensionada
Paso Pulsar tecla Lectura
1. conmutar programa aplicación (ZERO) pulsión larga
2. seleccionar «Lectura estática» repetidam. (F)
3. confirmar ajuste (ENTER)
símbolo « » en la lectura:
aplicación está activa
4. en caso dado, tarar (ZERO)
5. poner muestra
6. iniciar aplicación (F)
símbolo « » parpadea en la lectura:
valor peso estable, fijo en la lectura
7. descargar balanza: valor peso estable
permanece aún 5 seg. en la lectura
8. o bien, tarar balanza y borrar
valor estable indicado (ZERO)
9. finalizar aplicación «Lectura estática» (Enter) pulsión larga
10. reactivar »Lectura estática«, (F)
si previamente no se ha seleccionado
otro programa de aplicación
11. en caso dado, seguir desde paso 5.
Page 30
30
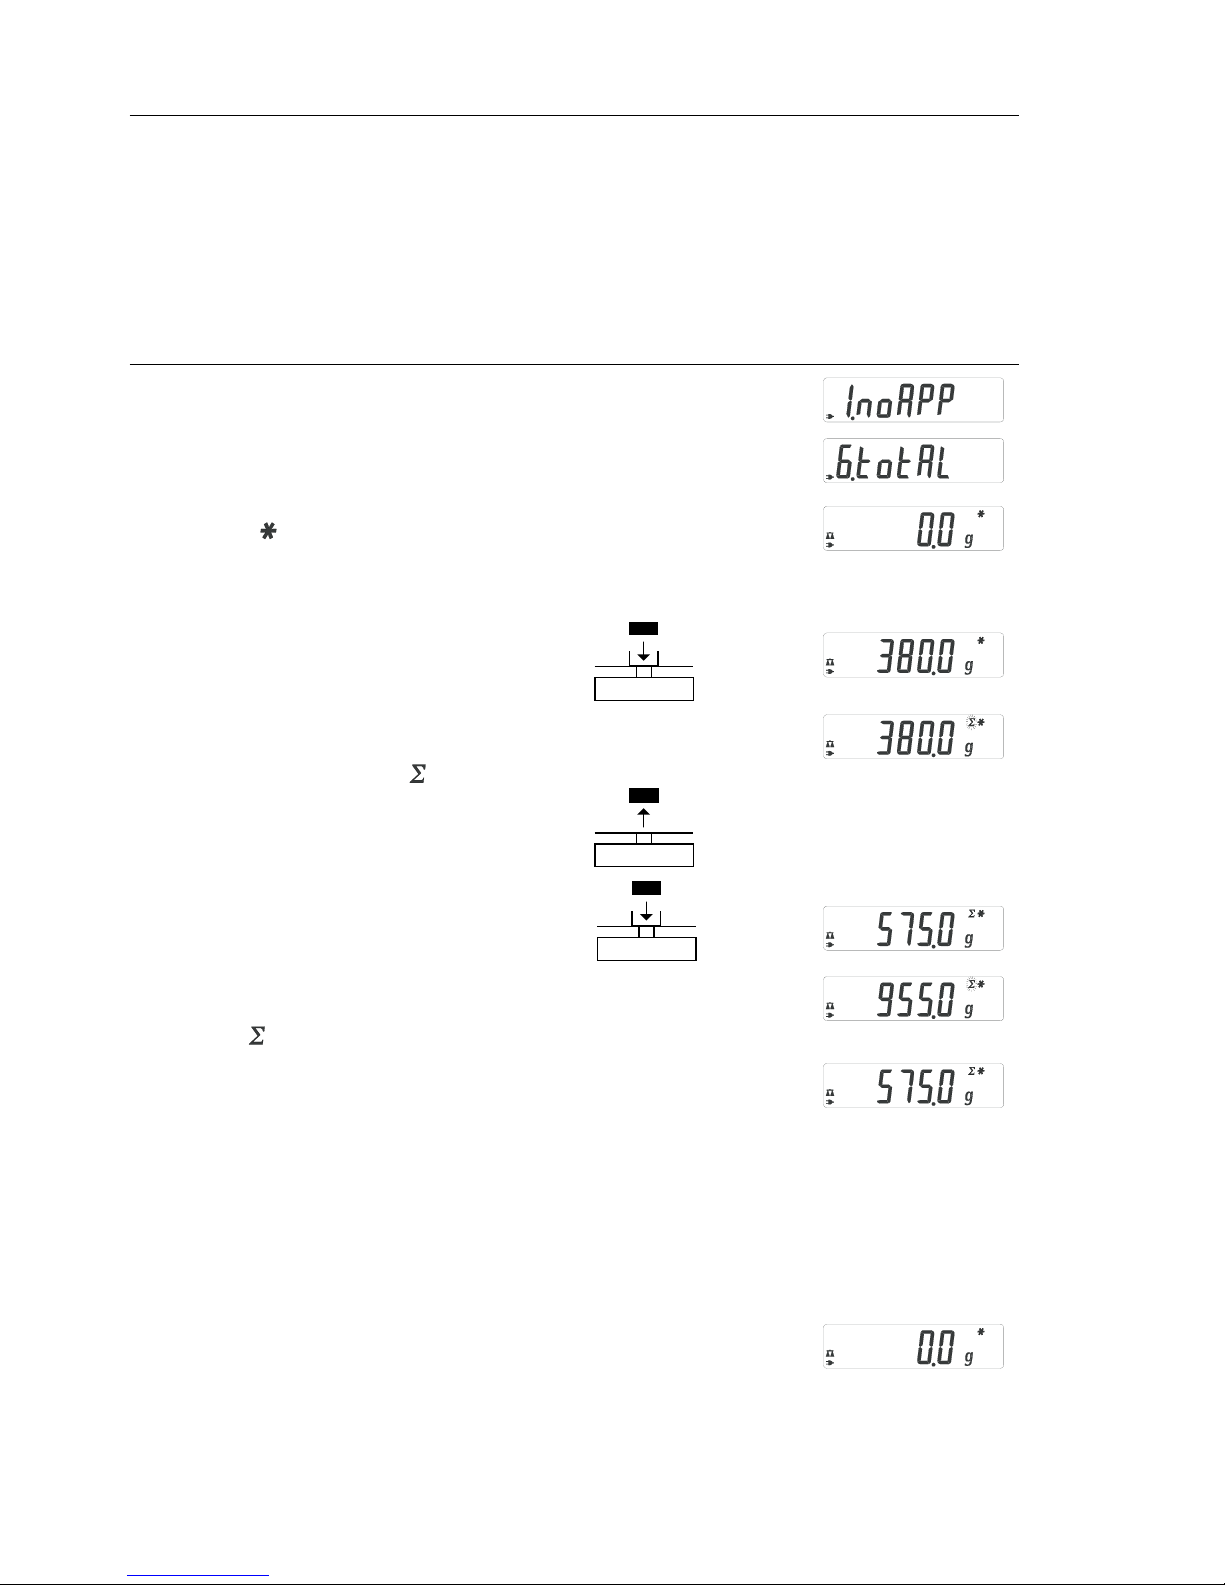
Totalización
Objetivo: con este programa de aplicación pueden sumarse valores de peso
en una memoria aún cuando se rebasa el rango de pesaje de la balanza.
Ejemplo: sumar valores de peso
Paso Pulsar tecla Lectura
1. conmutar programa aplicación (ZERO) pulsión larga
2. seleccionar Totalización repetidam. (F)
3. confirmar ajuste (ENTER)
símbolo « » en la lectura:
aplicación está activa
4. en caso dado, tarar balanza (ZERO)
5. poner muestra en la balanza
(aquí, p. ej. 380 g)
6. guardar valor en memoria; total (ENTER)
fijo en la lectura: símbolo parpadea
7. quitar muestra
8. poner siguiente muestra
en la balanza
(aquí, p. ej. 575 g)
9. guardar valor en memoria; (ENTER)
total fijo en la lectura:
símbolo parpadea
10. indicar componente actual por 3 seg. (F)
(con impresora conectada:
impresión simultánea
11. borrar memoria totalización (F) pulsión larga
(con impresora conectada:
imprimir totalización)
12. finalizar Totalización (Enter) pulsión larga
13. reactivar Totalización, si previamente (F)
no se ha seleccionado otro programa
aplicación (con impresora conectada:
imprimir Totalización).
14. en caso dado, seguir desde paso 6.
Page 31
31
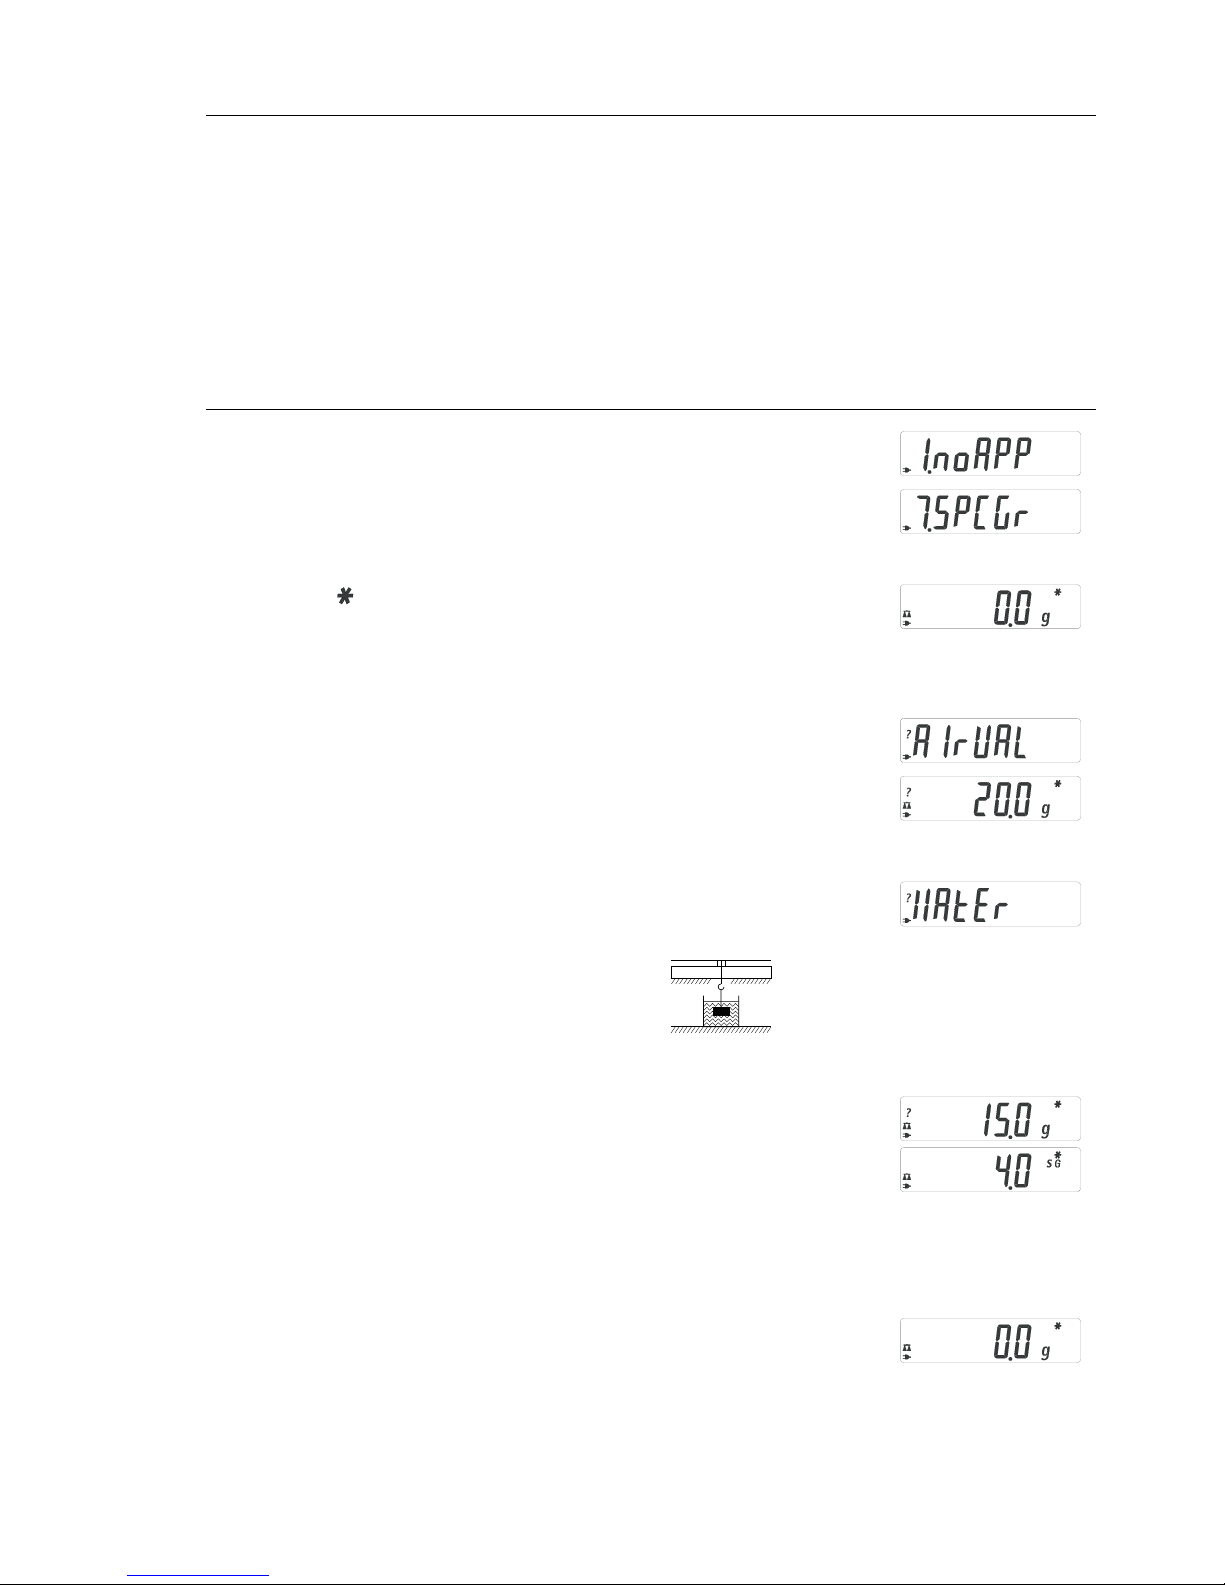
Densidad/Peso específico
Objetivo: con este programa de aplicación puede determinarse el peso específico
de una muestra; el resultado se indica generalmente con una posición decimal. No
suministrado: vaso medidor y alambre
Ejemplo: determinar el peso específico de una muestra sólida.
Paso Pulsar tecla Lectura
1. conmutar programa aplicación (ZERO) pulsión larga
2. seleccionar «Peso específico» repetidam. (F)
3. confirmar ajuste (ENTER)
símbolo « » en la lectura:
aplicación está activa
4. en caso dado, tarar balanza (ZERO)
5. iniciar aplicación (F)
6. confirmar lectura «airval» (ENTER)
7. determinar peso de muestra en el aire:
poner muestra en la balanza
8. memorizar valor peso en aire (ENTER)
9. Quitar muestra
10. determinar valor peso en líquido:
poner muestra en el canastillo
11. poner muestra en el líquido
12. confirmar lectura «water» (ENTER)
13. memorizar valor peso en líquido (ENTER)
e indicar resultado
14. borrar resultado (ZERO)
15. finalizar aplicación «Peso específico» (ENTER) pulsión larga
16. reactivar «Peso específico», (F)
si previamente no se ha seleccionado otro
programa de aplicación
17. en caso dado, seguir desde paso 5.
Page 32
32
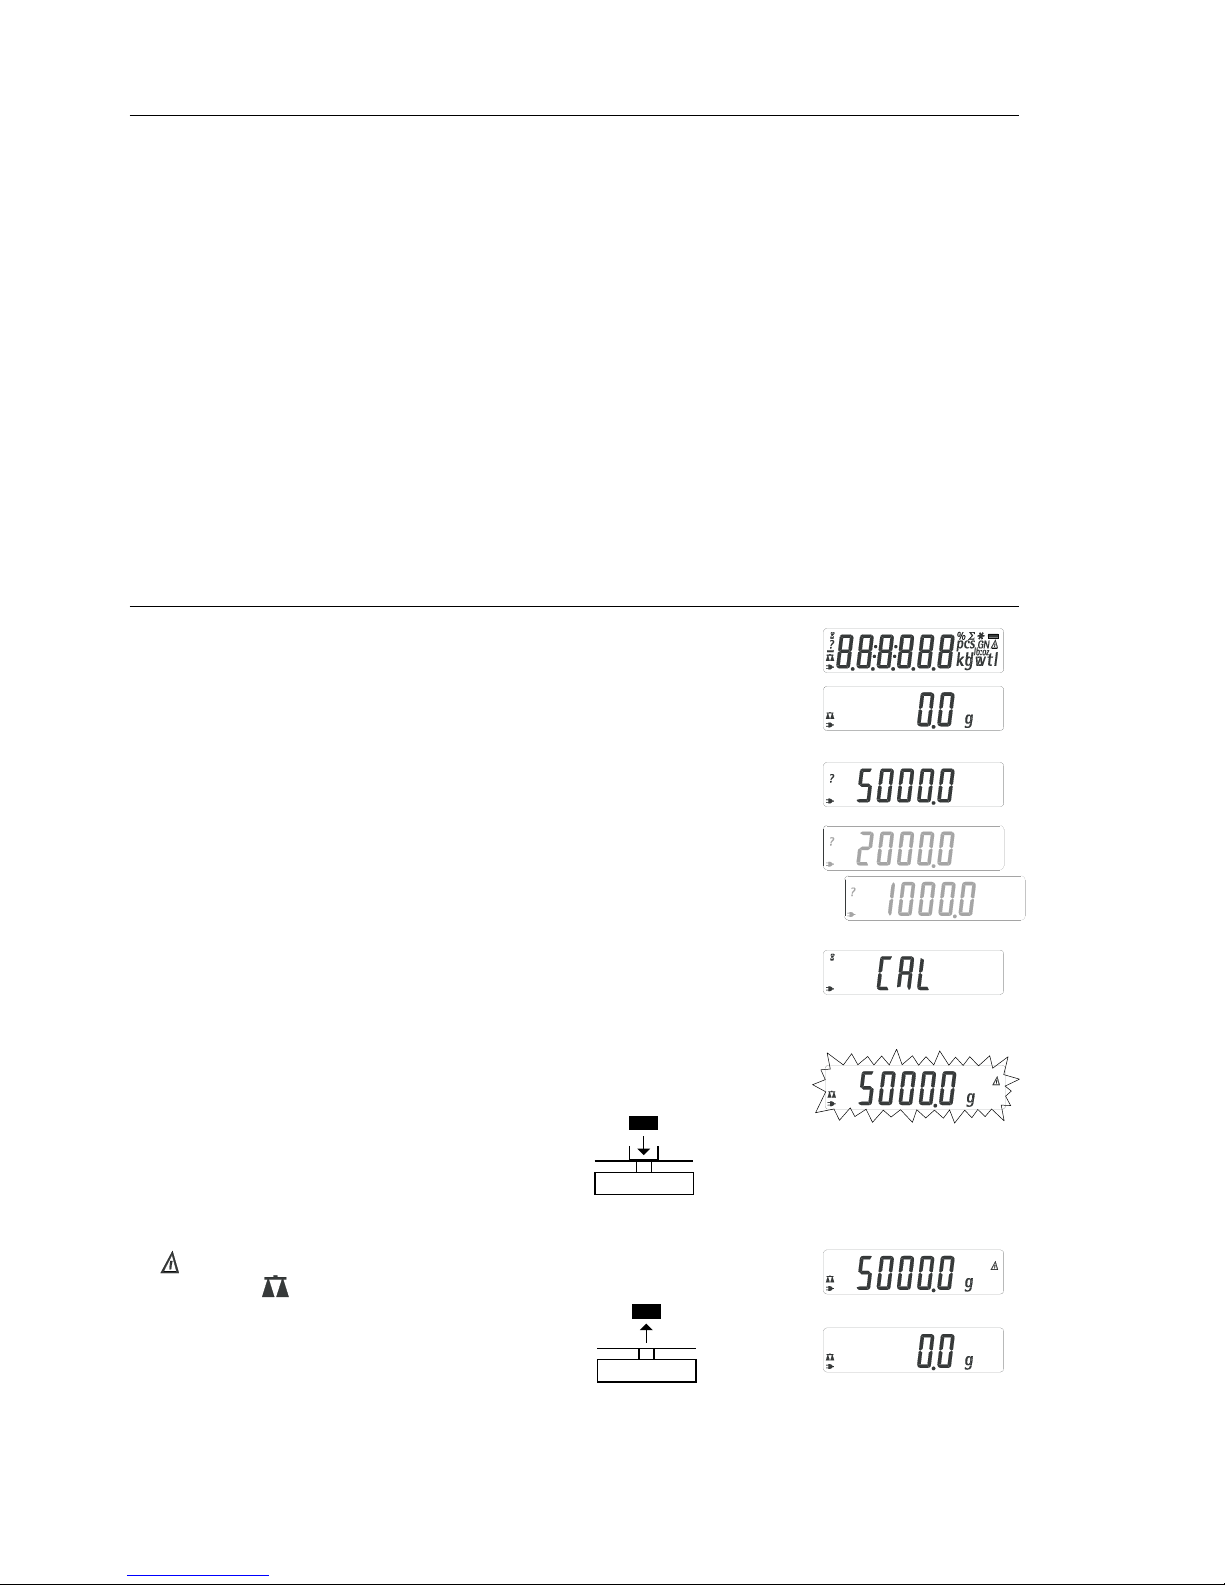
Calibración
Características
El proceso de calibración sólo puede iniciarse, si
– la balanza está descargada
– la balanza está tarada
– la señal interna del peso es estable
Si estas condiciones no se cumplen,
aparece un mensaje de error.
La pesa requerida para la calibración se
indica en la pantalla.
Pesas de calibr. estándares en los modelos
seleccionados,
ver en la pág. 24
Otros valores de pesa seleccionables
mediante la tecla (F). En caso dado, cancelar
proceso de calibración:
pulsión larga de la tecla (ENTER) > 2 seg.
Calibrar la balanza en el lugar, cada vez que se cambie de lugar de instalación.
Ejemplo: calibrar balanza (aquí modelo BEB61)
Paso Pulsar tecla Lectura
1. en caso dado, encender bal. (ON/OFF)
2. tarar balanza (ZERO)
3. iniciar proceso calibración se indica (CAL)
pesa calibración predefinida, sin unidad
(aquí, p. ej. 5000 g)
4. en caso dado, seleccionar
valor pesa cal. r epetidam. (F)
5. confirmar valor pesa cal. e iniciar (ENTER)
calibración
después de memorizar el punto cero,
se indica la pesa de calibración a aplicar
6. colocar ahora la pesa
de calibración
finaliza el parpadeo, si la pesa está
dentro de los límites predefinidos;
después de calibrar, desaparece
el símbolo .
7. quitar la pesa de calibración
8. calibración finalizada.
Page 33
33
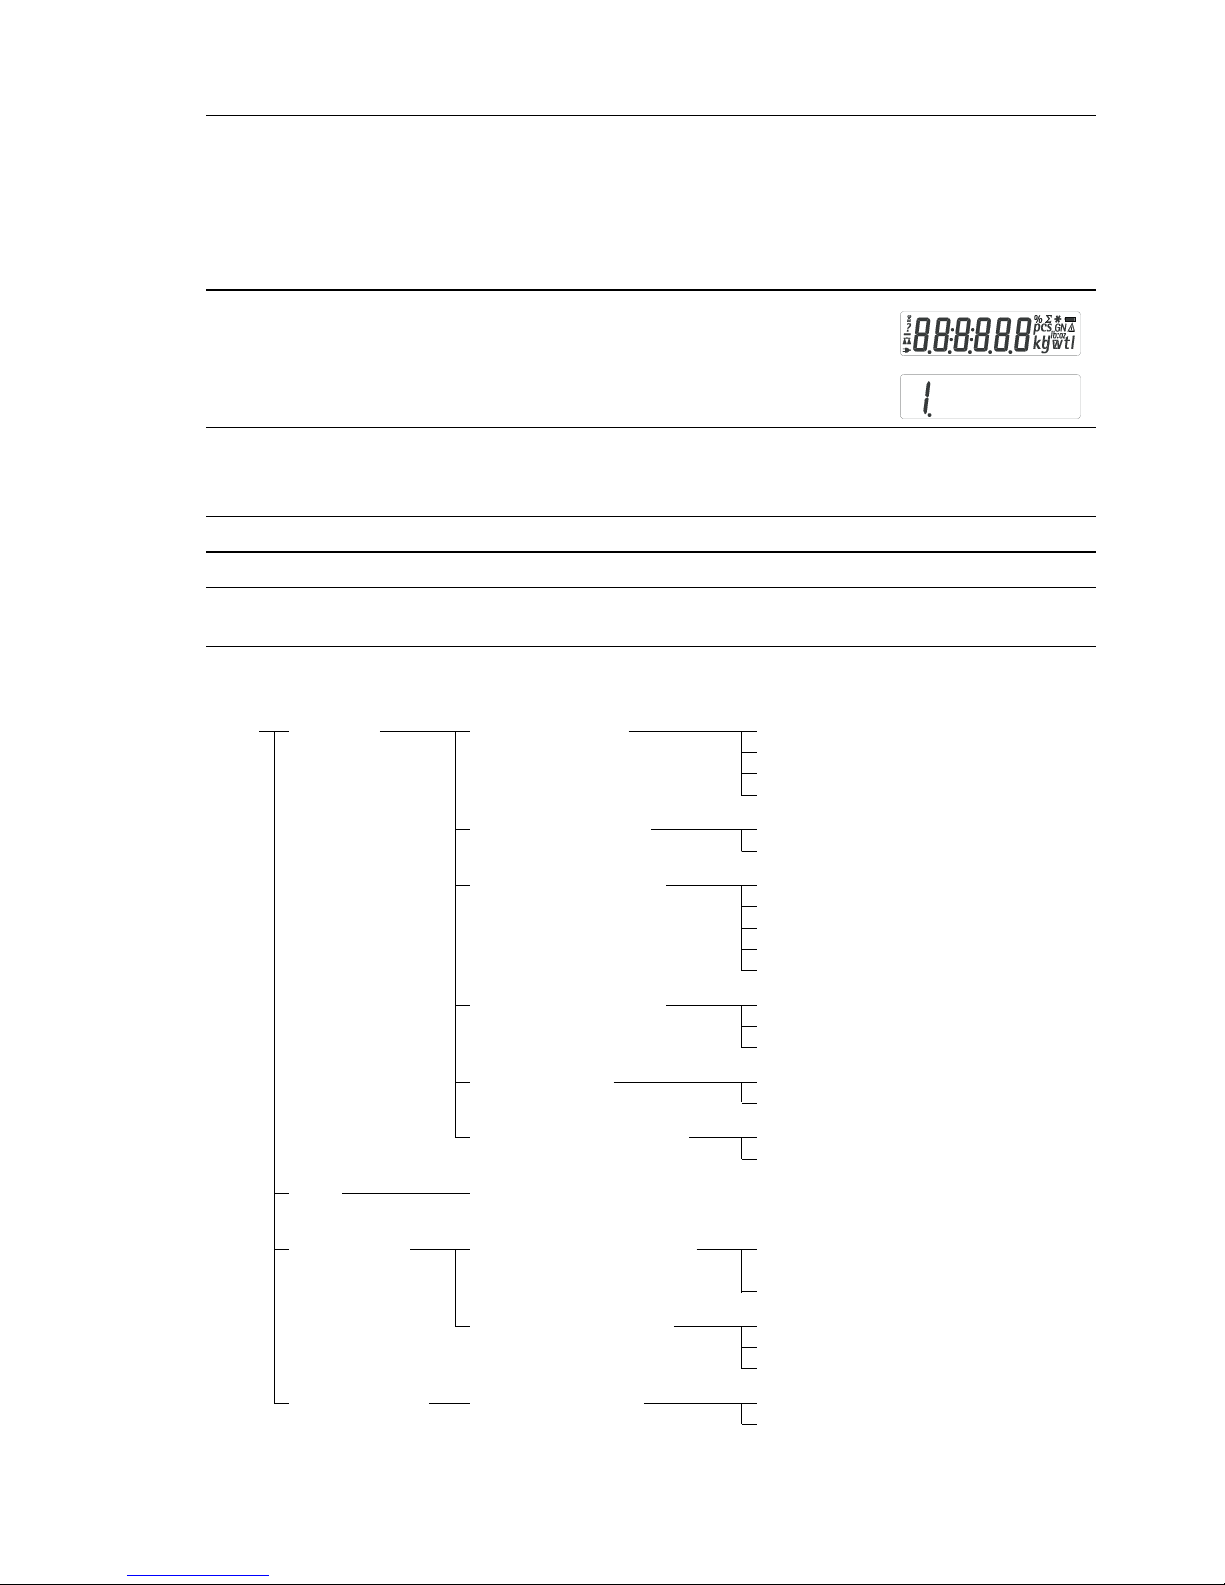
Ajustes previos (menú Setup)
Configuración de la balanza, es decir, adaptarla a los requerimientos del usuario.
Paso Pulsar tecla Lectura
1. apagar balanza (ON/OFF)
2. encender balanza y , (ON/OFF)
durante la indicación de todos
los segmentos pulsión breve (ZERO)
Funciones de teclas en el menú Setup:
Tecla Pulsión breve Pulsión larga
(ENTER) Nivel menú: mover hacia la derecha; rotando Confirmar ajuste
(F) Num. de menú: mover avanzando –
(ZERO) Nivel menú: mover hacia la izquierda Memorizar ajuste
y abandonar menú Setup
Ajustes parámetros (sinopsis) ο ajuste fábrica;
√ ajuste usuario
Menú 1 Pesar 1.1. Adapt. filtro 1.1.1 ambiente muy tranquilo
Setup 1.1.2
ο ambiente tranquilo
1.1.3 ambiente intranquilo
1.1.4 ambiente muy intranquilo
1.2. Filtro aplicación 1.2.1
ο pesar
1.2.2 dosificar
1.3. Rango estabilidad 1.3.1 1/4 de dígito
1.3.2 1/2 dígito
1.3.3 1 dígito
1.3.4
ο 2 dígitos
1.3.5 4 dígitos
1.5. Calibrar/linealizar: 1.5.1
ο calibrar
función tecla (CAL) 1.5.2
linealizar: sólo para el servicio
1.5.3 tecla bloqueada
1.6. Auto-cero 1.6.1
ο activado
1.6.2 desactivado
1.7.
1. Unidad peso o 2. en
1.7.1 seleccionable, ver
aplicación »Conmutar unidad«
hasta
1.7.23 en »Conmutar unidad«
5. y 6. Relevante sólo con interfaz datos integrada:
ver en descripción de interfaz respectiva
8. Funciones 8.1. Bloquear func. teclas 8.1.1 todas, excepto (ON/OFF)
adicionales y (ZERO)
8.1.2
ο todas accesibles
8.2. Apagar bal. autom. 8.2.1
ο después de 2 minutos
8.2.2 después de 5 minutos
8.2.3 después de 10 minutos
9. Reset menú 9.1. Ajuste fábrica 9.1.1 reponer
9.1.2
ο no reponer
Page 34

34
Mensajes de error
Mensajes de error aparecen en la lectura principal de pantalla por 2 seg. aprox.
A continuación, el programa retorna automáticamente al modo de pesada.
Lectura Causa Ayuda/solución
No aparecen segmentos No hay tensión en red Controle alimentación de red
de lectura Alimentador de CA no Conecte alimentador
está conectado de CA a la tensión de red
Pila/batería descargadas Recambie pila, recargue
batería con aparato externo
oL Desborde cap. pesada Quite la carga del plato
UL Plato no está colocado Coloque el plato correctamente
Roce entre el plato y su entorno Plato de carga no debe rozar piezas
adyacentes
disErr Desborde de lectura: Reduzca la carga
valor salida en pantalla
no es representable
calErr No se observó condición Quite carga de la balanza
para calibrar, p. ej.: Tare con tecla (ZERO)
– puesta a cero Calibre recién con lectura cero
– plato aún con carga
appErr Peso muy liviano, o bien plato Aumente el peso
sin carga en programas aplicación
PrtErr Interfaz de datos para Comunique al servicio técnico
imprimir, bloqueada BOECO
Bal.Err Aparato con carga al encender, Antes de encender:
o bien defectuoso descargue bal., o bien comunique
al servicio técnico BOECO
Sep.Err Aparato defectuoso Comunique al servicio técnico
BOECO
Rango pesaje máx. < lo Balanza encendida sin plato colocado Coloque el plato
predefinido en las técnicas balanza con tecla (ON/OFF) Apague y vuelva a encender especif.
Resultado de pesada Balanza no calibrada Calibre
obviamente erróneo No se taró antes de pesar Tare
¡En caso de aparecer otros mensajes de error, comunicarse con el servicio
técnico BOECO!
Page 35

35
Sinopsis
Especificaciones técnicas
Modelo BEB43 BEB53 BEB55
Rango de pesada g 120 610 210
Legibilidad g 0,001 0,01 0,01
Rango tara (substract.) g 120 610 210
Desv. Linealidad ≤± g 0,003 0,03 0,03
Rango temp. de uso 10°C – 30°C (273°K – 303°K; 50°F – 86°F)
Tiempo estabilización (típico) s 2,5 2 2
Adaptación a las condic. 4 escalas optimizadas de filtro; secuencia de
de uso e instalación s lectura: 0,1–0,8 (según escala de filtro ajustada)
Valor pesa calibración g 100 (F1) 200 (F2) 200 (M1))
Peso neto aprox. kg 1,2 1,35 1,2
Dimensiones plato carga mm 97 d 142+130 97 d
Conexión, tensión y frecuencia de red vía alimentador 230 V, o bien 115 V, +15%…– 20%, 48–60 Hz
Consumo eléctrico (típico) W 1 0,75 0,75
Tiempo funcionam. con
– pila monobloque 9 V (alcalina), aprox. h – 11 14
– batería carga compl. (NiMH), típico h – 2,5 4
Modelo BEB61
Rango de pesada g 5000
Legibilidad g 00,1
Rango tara (substract.) g 5000
Desv. linealidad ≤± g 0,2
Rango temp. de uso 10°C – 30°C (273°K – 303°K; 50°F – 86°F)
Tiempo estabilización (típico) s 2
Adaptación a las condic. 4 escalas optimizadas de filtro; secuencia de
de uso e instalación s lectura: 0,1–0,8 (según escala ajustada de filtro)
Valor pesa calibración kg 5 (F2)
Peso neto aprox. kg 1,1
Dimensiones plato carga mm 142+130
Conexión, tensión, frecuencia de red vía alimentador 230 V, o bien 115 V, +15%…– 20%, 48–60 Hz
Consumo eléctrico (típico) W 1
Tiempo funcionam. con
– pila monobloque 9 V (alcalina), aprox. h 11
– batería carga compl. (NiMH), típico h 2,5
Page 36

36
Marca C
El aparato cumple los requisitos de las
Directivas del Consejo de la Unión
Europea:
89/336/CEE »Compatibilidad electromagnética (CEM)«
Normas Europeas aplicables:
Limitación de las fuentes de distorsión:
según norma de producto EN 61326-1
clase B (residencial)
Inmunidad definida:
según norma de producto EN 61326-1
(requisitos mínimos de control, funcionamiento no continuo)
Advertencia:
Modificaciones en el aparato, así como
también la conexión de cables o aparatos
no suministrados por BOECO es de
responsabilidad del usuario y deben
ser controladas por él mismo, y en caso
dado corregidas.
BOECO pone a disposición según
consultas informaciones sobre la calidad
de funcionamiento (según las normas
sobre inmunidad definida más arriba
mencionadas).
73/23/CEE »Material eléctrico
a utilizarse con determinados límites
de tensión«
Normas Europeas aplicables:
EN 60950
Seguridad de los equipos de tratamiento
de la información, incluyendo los equipos
eléctricos de oficina
EN61010
Requisitos de seguridad de equipos
eléctricos de medida, control y uso en
laboratorio
Parte 1: Requisitos generales
Al utilizarse equipo eléctrico en instalaciones, bajo condiciones ambientales que
requieren altas medidas de seguridad,
han de observarse las prescripciones
correspondientes para la instalación.
Page 37

Page 38

Page 39

Page 40

Boeckel & Co.
Roedingsmarkt 33
20459 Hamburg, Germany
t +49 (0) 40-3256270
f +49 (0) 40-32562741
E-mail: [email protected]
98648-013-84
Publication No.:WXX6072-al05101
W1A000.BOECO BEB
 Loading...