

Page 1
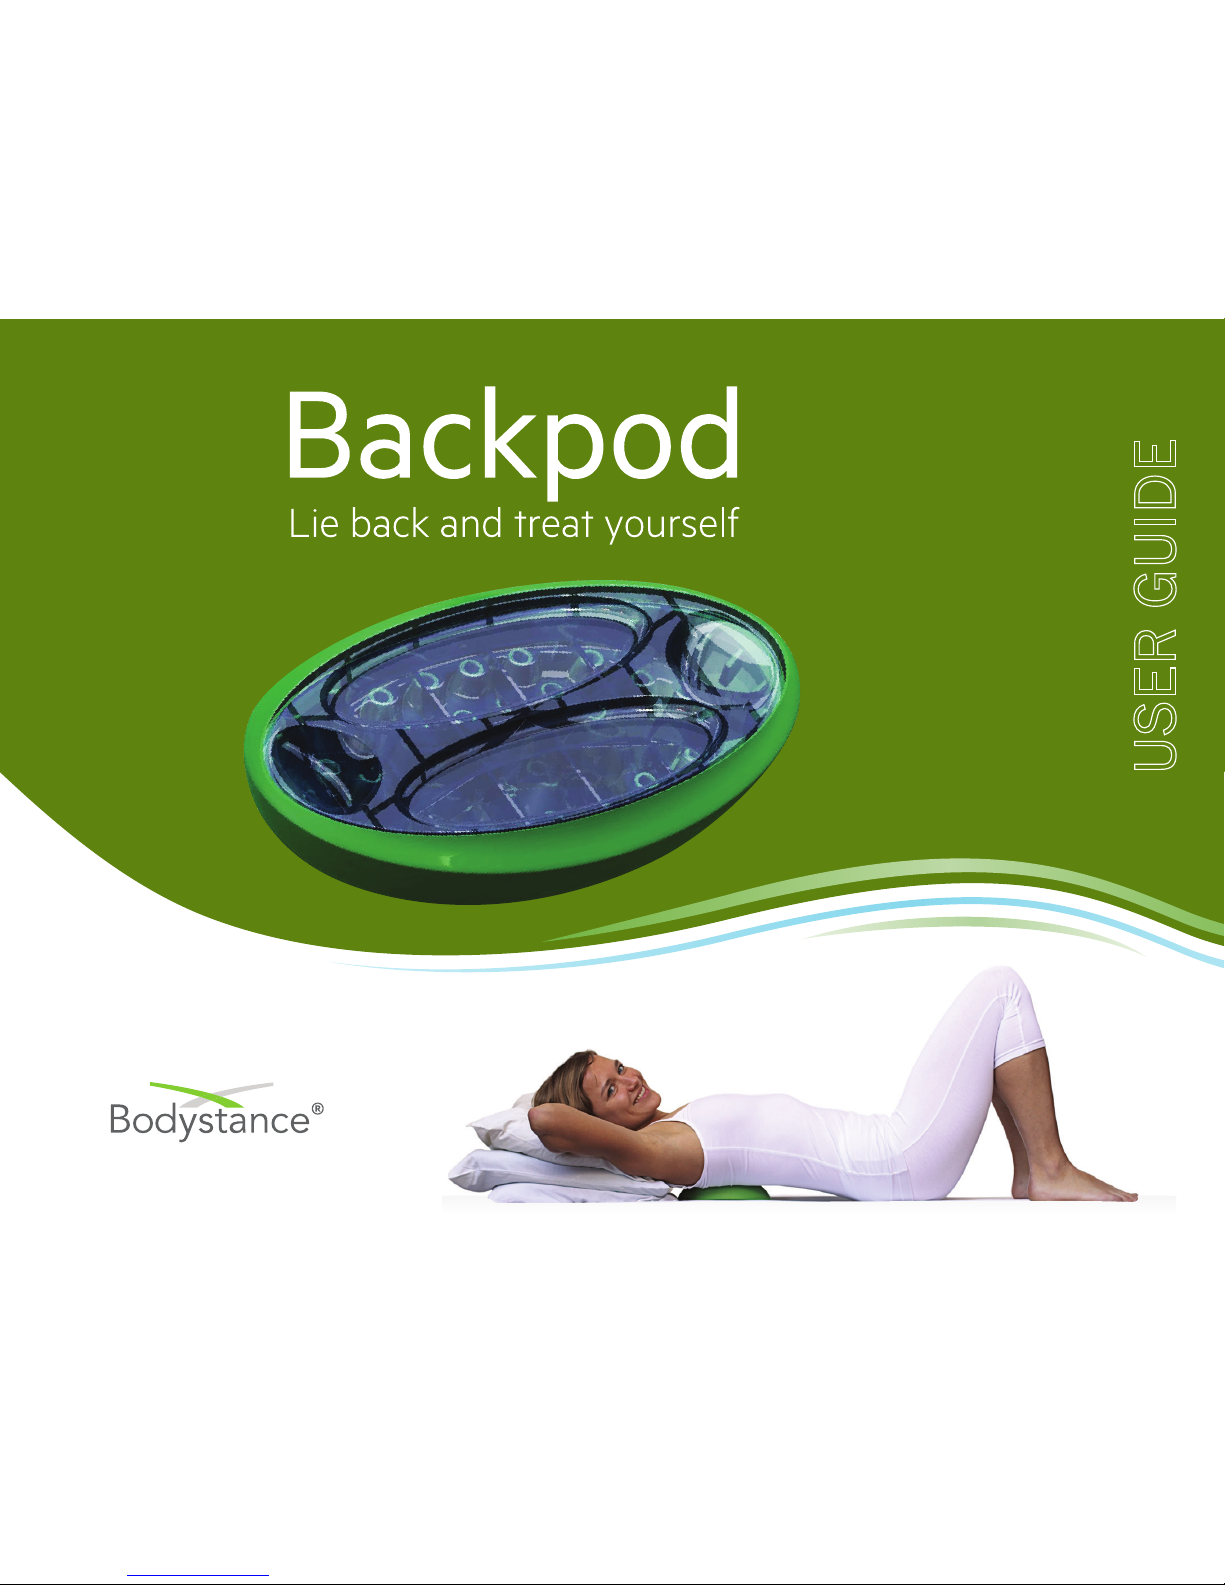
Designed and made in New Zealand
USER GUIDE
®
Page 2

Introduction and how to use the Backpod®
1
Introduction: Why you have neck or upper back pain - the iHunch
3
Instructions: How to use the Backpod
®
6
Care of your Backpod
®
7
Warnings and precautions
Home care programme
9
One simple muscle stretch
10
Two simple strengthening exercises
12
Posture
13
Massage – two simple techniques
Note from Steve August, B.A., Dip. Physio
Thank you for buying the Backpod®. The views and recommendations contained in this user guide are
my own. They are those of a New Zealand physiotherapist with 30 years’ experience. This amounts to
over 40,000 patient treatments performed personally, plus innumerable courses, conferences, clinical
discussions, reading, etc. Views on the strengths and limitations of other treatment and care approaches are
fair comment from the viewpoint of a very experienced practitioner.
Home care programme
Page 3

Health Practitioner pages
15
Backpod® combined with manipulation and manual therapy from doctors,
physiotherapists, osteopaths and chiropractors
17
Backpod® for straight or concave thoracic spines
18
Backpod® for scoliosis
19
Backpod for Costochondritis, Tietze’s Syndrome, ‘slipping ribs’ and
costovertebral (posterior rib) joints
21
Backpod® for chronic asthma, bronchitis; rib pain in pregnancy
23
Backpod® for ankylosing spondylitis, Scheuermann’s Osteochondritis and
Parkinson’s Disease
24
Backpod® for persisting pain after neck or thoracic surgery
25
Backpod® for sacroiliac mobilisations, and for coccydynia (tailbone pain)
27
Backpod
®
for T4 Syndrome
28
Backpod® for prescribing doctors, pharmacists and acupuncturists
29
Backpod® combined with massage therapy
30
Backpod® with yoga, Feldenkrais Method, Alexander Technique and ergonomics
31
Backpod® for gymnasiums, Pilates and personal trainers
Page 4
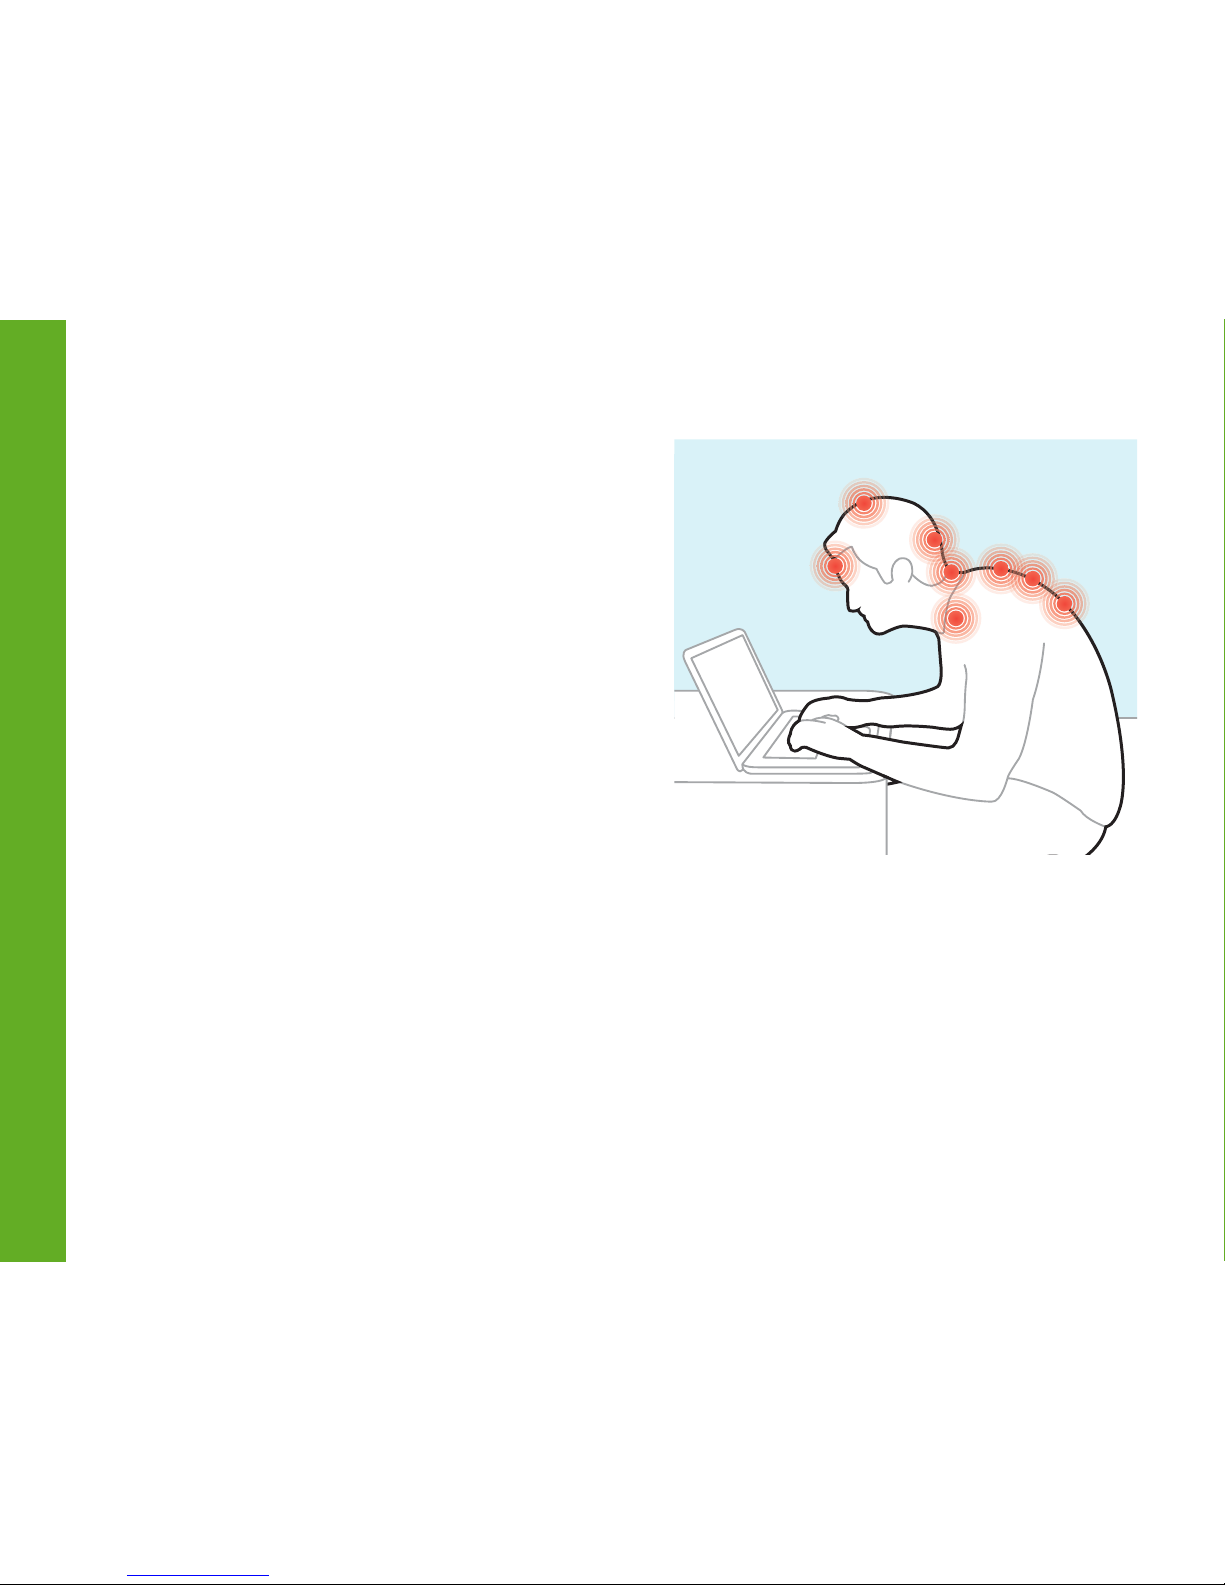
Why you have neck or upper back pain - the iHunch
Pain in the neck and upper back is a truly enormous
problem. Here’s how big: of 400 million people in
Europe, statistics show that perhaps 60 million will
be in acute pain right now, including headaches.
Forty-five million people in the USA and 600,000 in
New Zealand will have a problem right now. You are
not alone! What’s going on?
Here’s how it happens. We all start out upright:
watch four-year-olds running around with their
heads balanced perfectly above their shoulders.
But then we all bend forward to do things – in
school and on into adult life. Do enough of this and
the upper/middle back tightens into that bentforward hunch.
Then the muscles along the back of the neck have
to work several times harder just to hold the head
up – and they strain, scar and tighten. This puts a
compressive load on the joints in the neck giving
them a tendency to eventually jam up and lock,
which can cause acute pain and headaches. In the
worst cases discs and nerves become involved,
with pain spreading down the arms. Whiplash and
impact injuries also take their toll, but that upper
back hunching probably underlies the majority of
upper back and neck problems in the world today.
See the iHUNCH page on the Backpod’s website
www.backpod.co.nz.
And it’s getting worse. This forward-bending stoop
has accelerated in the last few years with the
advent of laptops, tablets, smartphones and similar
- see the Wikipedia entry on the iHunch. Unlike
desktop computers you can’t detach the keyboards
from the small screens, so users tend to hunch
forward even more. What to do?
1
Introduction
Page 5
The good news is that because it all happens in
a logical pattern, you can treat it logically and
effectively. But you have to treat all the pieces
causing the problem. Often health professionals
are so busy or specialised they treat only one or
two, so you tend to get only very temporary relief.
The Backpod® is a high-tech mobilising tool which
uses your own upper body weight to let you stretch
out the tightened hunched upper and middle back
which commonly underlies most neck problems.
This user guide also provides the basic stretching
and strengthening exercises, home massage and
postural techniques that you need to treat and care
for your own upper back and neck at home. These
aren’t time-consuming or complicated. They are
also available free as videos on our website
www.backpod.co.nz.
It’s fine if you’re already receiving help from a
doctor, physiotherapist, osteopath, chiropractor,
pharmacist or acupuncturist; doing Pilates or yoga;
working out at the gym; etc. The Backpod® and
its programme will generally help and enhance all
these other approaches. They provide stand-alone
treatment and maintenance for most middle back
and neck problems, but if your specific problem
needs extra help, your health practitioner is there to
provide it. We all want you, the patient, to get better,
and stay that way.
The second part of this user guide is for doctors,
physiotherapists, osteopaths, chiropractors and
other health professionals. It contains more
detailed information on how the Backpod® will
help their particular treatment approach. The
Backpod® and its programme are highly effective
complements to each speciality.
2
Introduction
Page 6
Instructions: How to use the Backpod
®
The Backpod® is designed to stretch out a bentforward and stiffened upper and middle back.
When the joints in the spine have jammed up
enough, and the very tough tissue surrounding
them has tightened, you can’t free them up using
your own muscles or body movements. It’s no
longer enough to just “sit up straight” – you haven’t
got the leverage to unlock a specific joint or stretch
out the stiffened ligaments around it on your own.
You can do it with the help of the Backpod® though.
Your own body weight provides the force, and the
shape of the Backpod® localises it to the particular
areas that need to free up.
The stretch provided by the Backpod® can be
strong, so the first time you use it, start off with
three pillows under your head, and if necessary
layers of fluffy towel over the Backpod® itself. This
will make the stretch more comfortable. It should
definitely not be actually painful.
However, the Backpod® is a real treatment device,
not a gimmick, and you could feel some slight
discomfort to start off with. It’s like stretching a
muscle – if you couldn’t feel anything, then you
wouldn’t be doing anything useful.
3
Instructions : How to use
Page 7
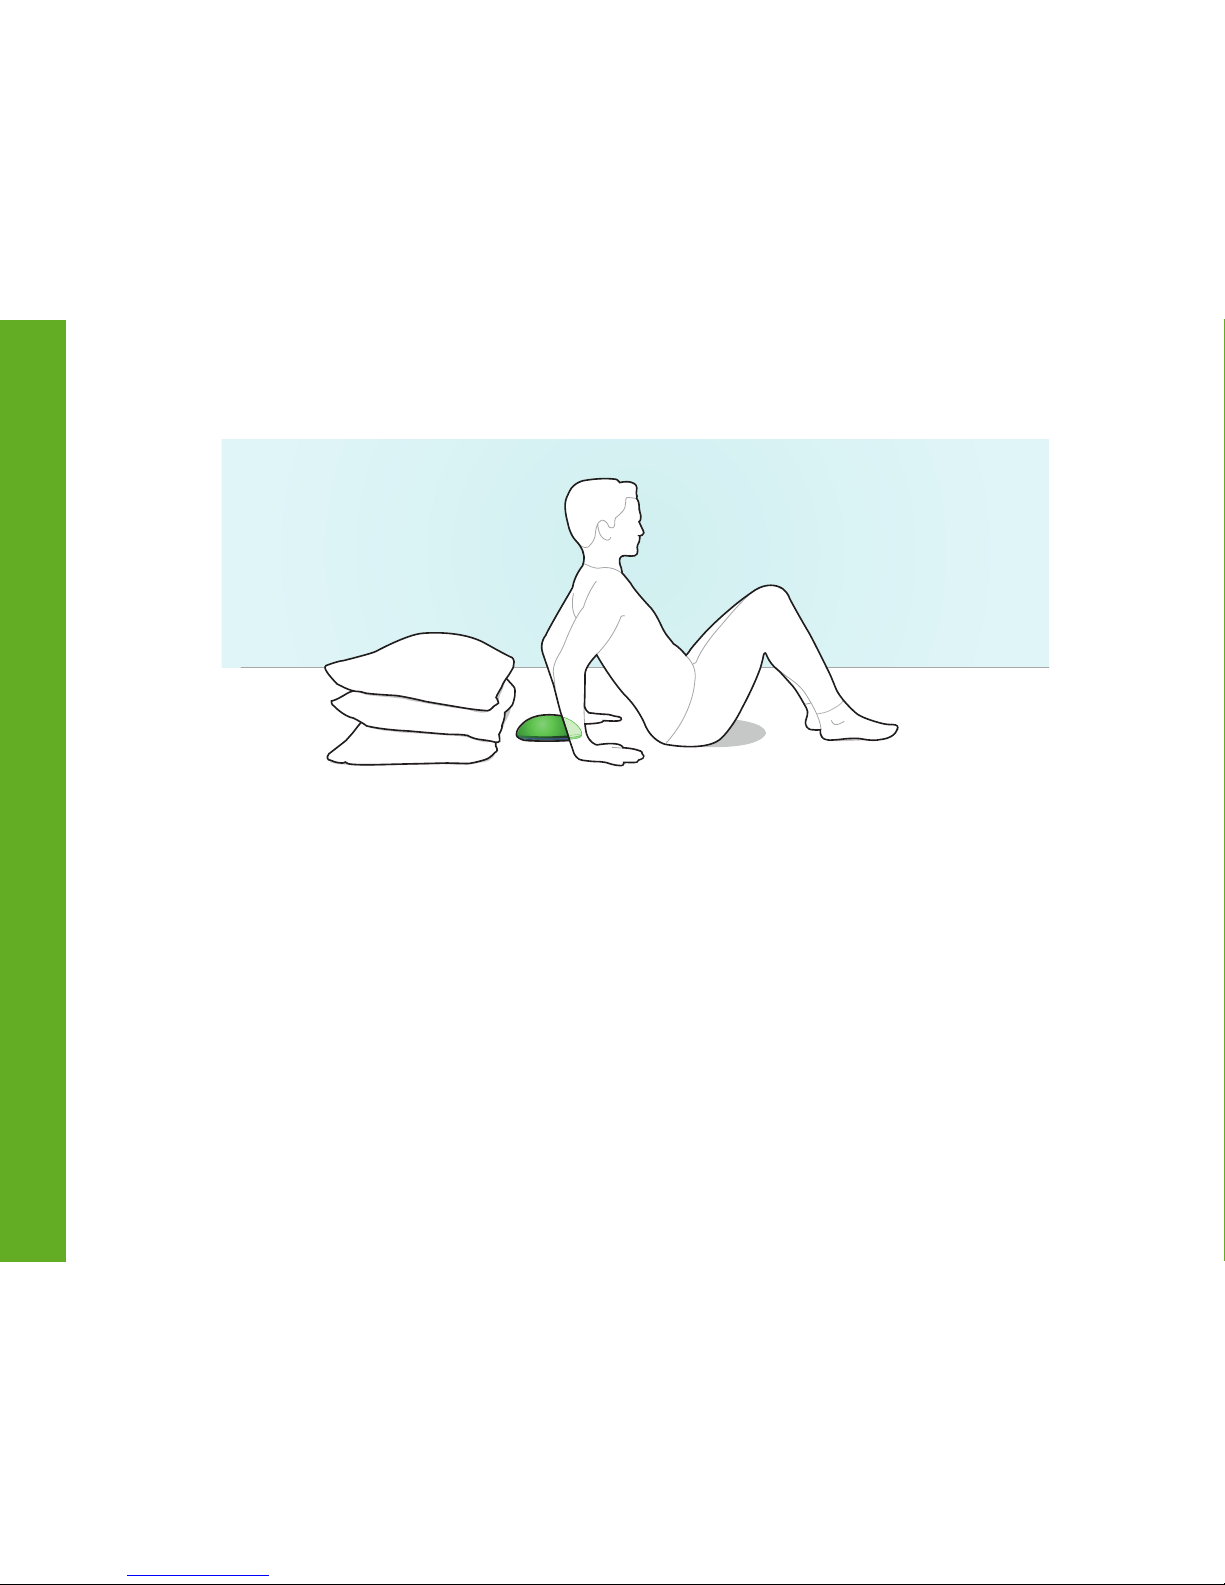
1 Place the Backpod® on the floor, flat side down.
(Don’t use it on a bed or any other soft, springy
surface.) Sit on the floor with your knees bent up
and your feet on the floor, and gently lower yourself
onto the Backpod® so that it lies lengthwise under
your spine between your shoulder-blades – as
shown in the picture on the front cover of this user
guide.
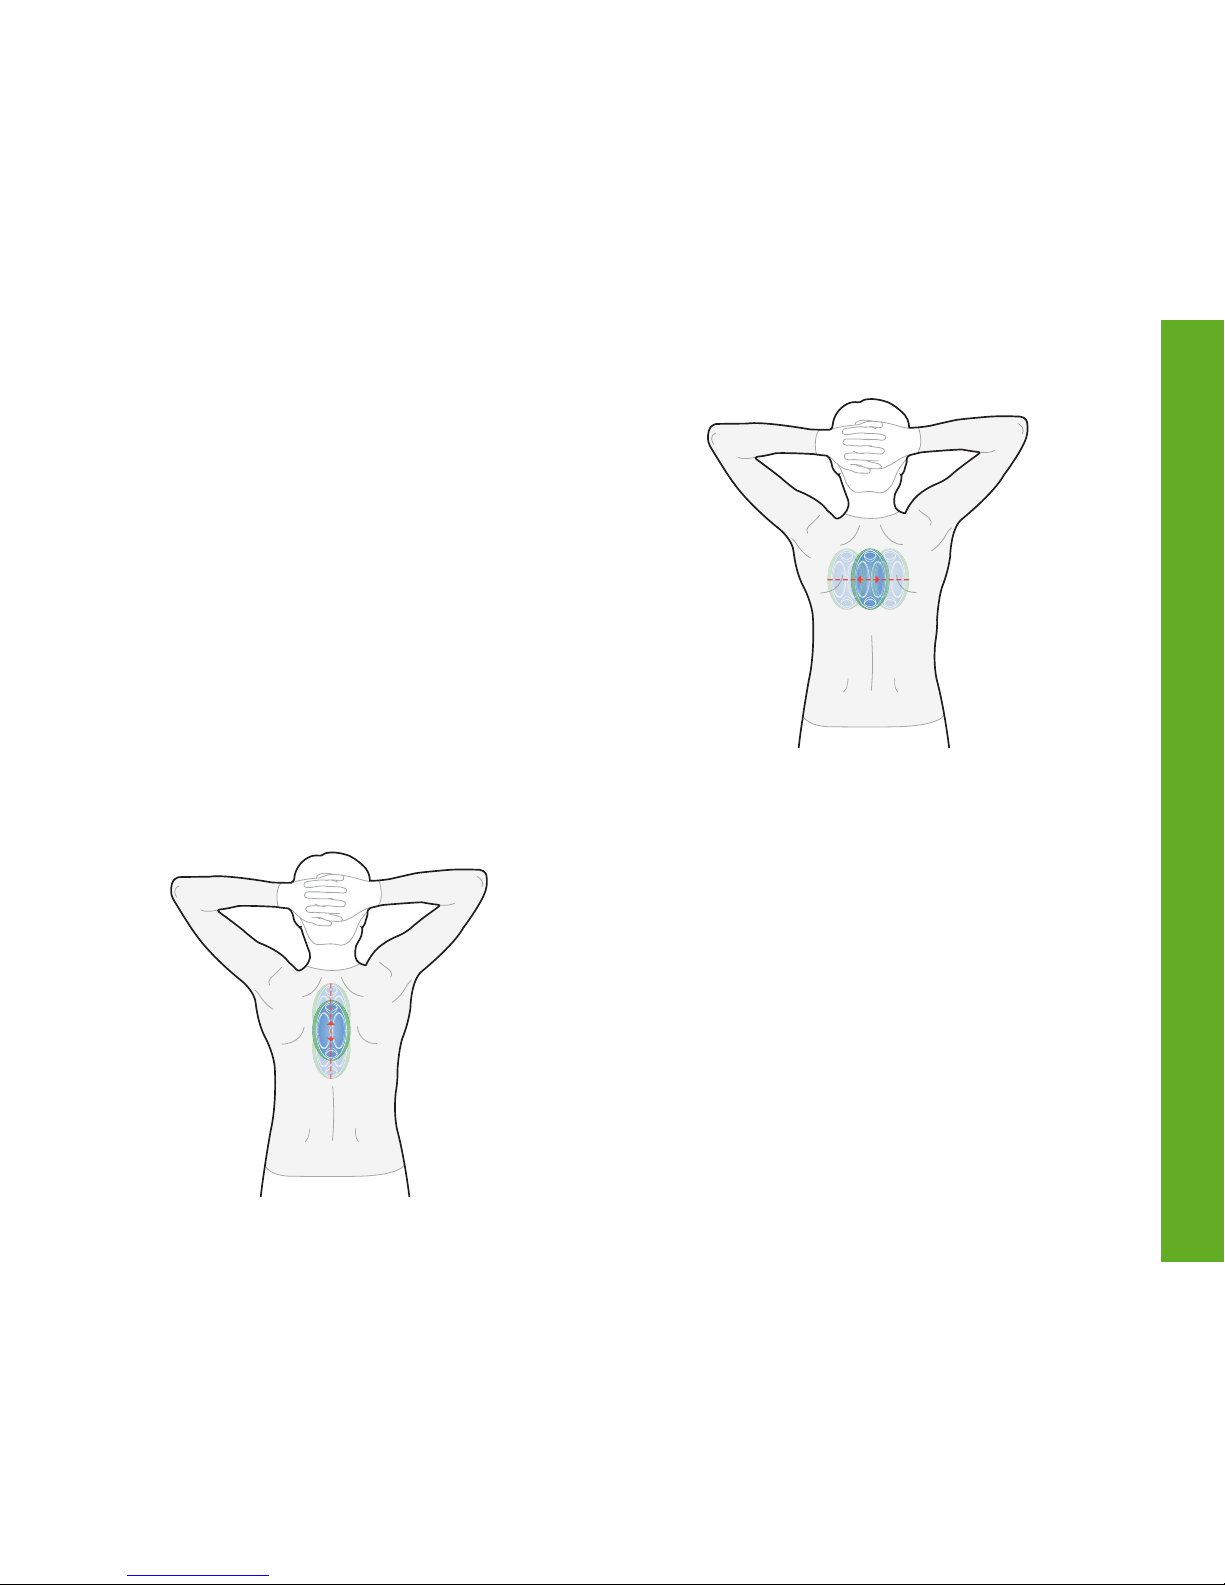
2 Place your hands behind your head, and let your
shoulders and back relax. Hold your chin in slightly.
You may feel some slight discomfort but this will
usually disappear inside a minute as the spine
stretches out a bit. If you think it’s still too sore, just
add some more padding over the Backpod®.
3 Relax in this position for 30-60 seconds. Let your
elbows also relax and drop, which will stretch your
chest muscles. Breathe slowly and deeply. Any initial
discomfort should ease off.
4 Every 30-60 seconds change your position about
50mm (2 inches). Work the Backpod® up and down
your middle back and about the same distance out
to both sides. Don’t go up the spine as high as your
neck or lower than the bottom of your rib cage. Most
tightness occurs around the shoulder blades, so
concentrate on that area. Positioning the Backpod®
about 50mm (2 inches) out to one side of the spine
between it and the shoulder blades mobilises the
rib joints, which can get tight just as the spine does.
Spend several minutes working around the whole
4
Instructions : How to use
Page 8

middle and upper back area like this. You can do
this once a day at home or at work, most days a
week. If the spine feels too tender, stretch only
every second day.
5 When stretching with the three pillows becomes
comfortable, you can make the stretch stronger by
using just two pillows. When that feels acceptable
drop back to one, and then to no pillow at all.
Depending on how tight your back is, it may take
weeks to get to this point. Stick with it – it’s very
tough material you’re loosening, and it may have
been frozen up for many years.
For a stronger stretch, turn the Backpod sideways
across your spine. (The tighter curve across the
Backpod will apply more localised pressure to your
back.) Or lift your buttocks off the floor. Or slowly
keep moving your linked hands over your head and
back down to your waist.
When you can do a session on the Backpod® with
no pillows and no discomfort you’ve reached your
goal! What this means is that nothing is jammed
and everything has been stretched back to normal
flexibility, and no longer hurts to move. To keep
everything freed up, just use the Backpod® once a
week, or if things feel like they’re getting tight again.
Using the Backpod® in a sitting position: You can
also use the Backpod® in a chair or car seat. Just
slip it down between your upper back and the seat
and lean back onto it. This sitting position gives
a milder stretch than the lying position. When
driving a car or truck you can push back against the
steering wheel to give a stronger stretch against the
Backpod®, so it’s an excellent opportunity for plenty
of stretching when commuting or on a long trip.
Further treatment: The Backpod® can stretch out
a tight spine more effectively than anyone can
with just their own exercises. But some spines
can be so tight that they also need manipulation
or mobilisation from a manipulating doctor,
physiotherapist, osteopath or chiropractor. These
practitioners can unlock joints so that the Backpod®
can then stretch them the rest of the way, and then
keep them free. It’s a perfect combination - and
avoids ongoing repeated manipulations.
5
Instructions : How to use
Page 9

Care of your Backpod
®
The Backpod® itself consists of a strong polycarbonate core (the transparent blue inner part)
with a cushioning synthetic rubber outer layer (the
flexible apple-green part). The inner core is sculpted
to stretch your spine when you lie back on the
Backpod® and the cushioning outer layer is there to
make this comfortable enough.
The Backpod® is immensely strong – we’ve driven
a BMW over one to test it for Europe and a Jeep
Cherokee to test it for the USA. The Backpod® was
fine both times. So we don’t think it’s going to break
when anyone lies on it, and we think it will last for
many, many years.
Any dust or fluff on the outer green layer can usually
be brushed or wiped off with a dry tea-towel or bath
towel. More resistant dust or fluff may need wiping
off with a warm, damp sponge or towel.
Any oils, such as massage oil or perspiration, should
be wiped off as the residue may reduce the life
of the green synthetic rubber outer layer. Use a
warm, damp sponge or towel, and also mild soap if
necessary.
Do not wash the Backpod® under a tap or submerge
it in a sink or basin – the internal core may fill up
with water.
Do not put the Backpod® in the microwave,
dishwasher, washing machine or oven.
Do not remove the flexible green outer layer of the
Backpod® as bending it backwards may possibly
cause internal cracks in the synthetic rubber.
Cracks on the inside of the green outer layer are not
grounds for return of the Backpod® because they can
only happen if the green layer is pulled off - don’t do
this.
6
Care of your Backpod®
View our instruction videos online
at www.bodystance.co.nz/backpod.php
Page 10

Warnings and precautions
When used sensibly, the Backpod® is safe to use
for almost all common musculoskeletal conditions
involving the upper back, middle back and neck.
It is a passive device and entirely under the user’s
control. The only force applied comes from the
user’s own upper body weight which they can lower
gently to lie on the Backpod®. They can get off again
if there are problems. Bodystance Ltd is not liable
for any damage or injury resulting from non-directed
or non-sensible use of the Backpod®, its user guide
or website videos.
If problems or pain persist when using the
Backpod® or following its programme, see your
doctor or other appropriate health practitioner. It
is not possible to build a single product perfectly
suited to every patient; however, the Backpod® and
its programme should benefit the vast majority of
upper back and neck problems. That the Backpod®
and its programme do not fully solve your particular
problem is not grounds for the return of the product
– you may also need specific health practitioner
intervention(s) as well.
Treatment soreness.
Any effective stretch of tight muscles, tendons or
ligaments may produce some discomfort, even mild
soreness – just like any warm-up muscle stretch.
This doesn’t do any harm. Patients commonly
describe a “good pain, which is doing the right
thing.”
Use of the Backpod® should be graded with
pillows and even layers of fluffy towel over the
Backpod® itself so it’s not too uncomfortable on
any one stretch. Stretching only every second day
is recommended if the spine is too tender. If pain is
clearly extreme, or persists for more than a day or
two, see your doctor or other health professional.
Don’t use the Backpod® if there is reason to
suspect a bony fracture, e.g., a heavy impact on the
spine or ribs.
Don’t use the Backpod® in the presence of recent
surgery, wounds, bruising, infections, shingles or
other skin lesions in the area. Watch that any catch
on a bra strap doesn’t dig in painfully.
7
Warnings and precautions
Page 11

Don’t use the Backpod® for children. Their bones
are still growing and their joints are usually fully
flexible anyway. However, the Backpod® programme
of muscle strengthening, posture education and
home massage can be extremely helpful. It is also
available as videos on our website
www.backpod.co.nz.
Osteoporosis and osteopenia
These are conditions of reduced bone density,
making the bones more at risk of a fracture. The
Backpod® should be used with increased caution,
but mild degrees of these conditions are not a
total contra-indication. The Backpod® provides
only a passive stretch of the spine, and can be
gently graded by using pillows under the head and
padding over the Backpod® itself. If unsure, check
with your doctor first.
Scheuermann’s Osteochondritis
The Backpod® may irritate this condition when it
is in the inflammatory phase. However, it is highly
appropriate for treatment of the common tight
flexed middle and upper back that remains once
the inflammation has settled. If unsure, check with
your doctor first.
Straight or concave middle and upper backs
This is the one fairly common case where the
standard use of the Backpod® won’t help. About
5% of middle backs are straight or even slightly
hollowed. This is usually because of a fall on the
back or other impact, or an excessively rigid upright
posture.
The Backpod® used in the usual way will push
these spines further in the wrong direction, causing
compressive loading on the joints at the back of the
bony vertebrae, which can then jam.
If you think you might have this sort of back, just
get someone to look at your spine between the
shoulder-blades. If it’s straight or hollowed, and
the Backpod® is not helping, see your health
professional. There is an effective use of the
Backpod® for this type of spine outlined on page
17 of the Health Practitioner pages: “Backpod® for
straight or concave thoracic spines”. The Backpod®
programme will help in any case – especially the
massage (see pages 13 & 14: “Massage – two
simple techniques”).
8
Warnings and precautions
Page 12
One simple muscle stretch
Flexibility is good for you. In an ideal world, we’d
have time to do an hour’s stretching every day. If
you haven’t got that time, here is the single stretch
with the greatest benefit for most neck problems. It
is for the upper trapezius muscle which runs from
the point of your shoulder across to the spine and
up to the base of your skull. When you’re wearing a
backpack, this is the muscle the straps are resting
on, and it’s what you use when you shrug. It’s
usually the first one to tighten up with stress and
lots of bent forward work. When you see someone
with their shoulders held up around their ears, they
need this stretch.
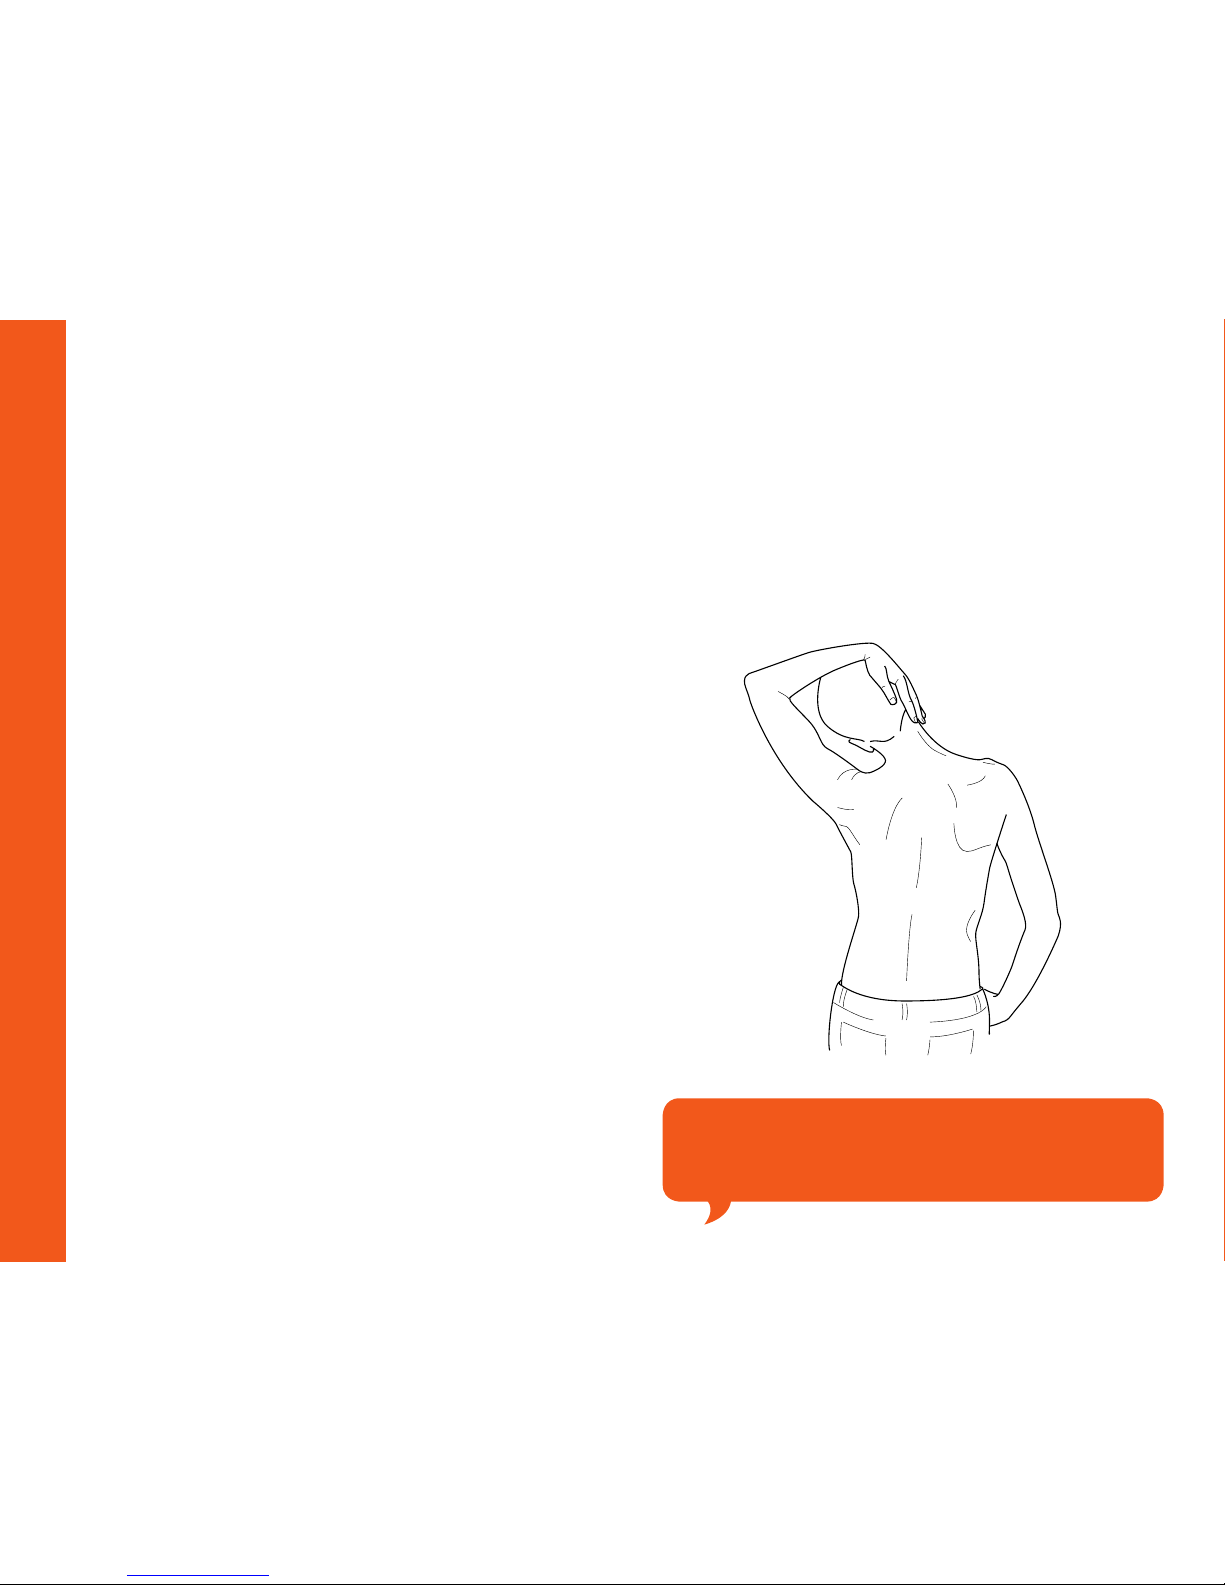
This is a simple side-bending stretch, which can
be done sitting or standing. Drop one arm and
shoulder down towards the ground and stretch your
head sideways away from it, using your other hand
to pull your head towards your other shoulder. Keep
the dropped shoulder relaxed. You can bend your
head forward slightly, and rotate it a little, to pull
on different fibres of the muscle. When doing this
stretch while sitting, tuck the hand of the dropped
arm under your buttock to help keep the shoulder
dropped.
If you’re doing this at home, hold the stretch for 30
seconds, then do the same for the other side. Do
two or three stretches if you have time. In a busy
and stressful workplace, even a 10-second stretch
from time to time will usually stop the muscle
straining and tightening.
9
Home care programme
View our instruction video online
at www.bodystance.co.nz/backpod.php
Page 13
Two simple strengthening exercises
A full gym strengthening programme will do a more
thorough job of building up the strength you need
to live your busy life. If you can’t fit that in, here
are the two strengthening exercises which will give
you the maximum benefit for the time and effort
involved.
The common hunched-forward upper back/pokedchin posture which is the basis of most neck and
upper back problems has two main areas of muscle
weakness. One is around the middle back and
includes the muscles which anchor and stabilise
the shoulder-blades and stop the upper back from
drooping forward. (These include the middle and
lower trapezius fibres and the rhomboid muscles.)
The second group that gets really weak are the
deep muscles around the front of the neck. When
this happens, the chin pokes out and the joints at
the back of the neck bones are compressed, which
can result in joints jamming and trapping of the
nerves which run out between the bony vertebrae.
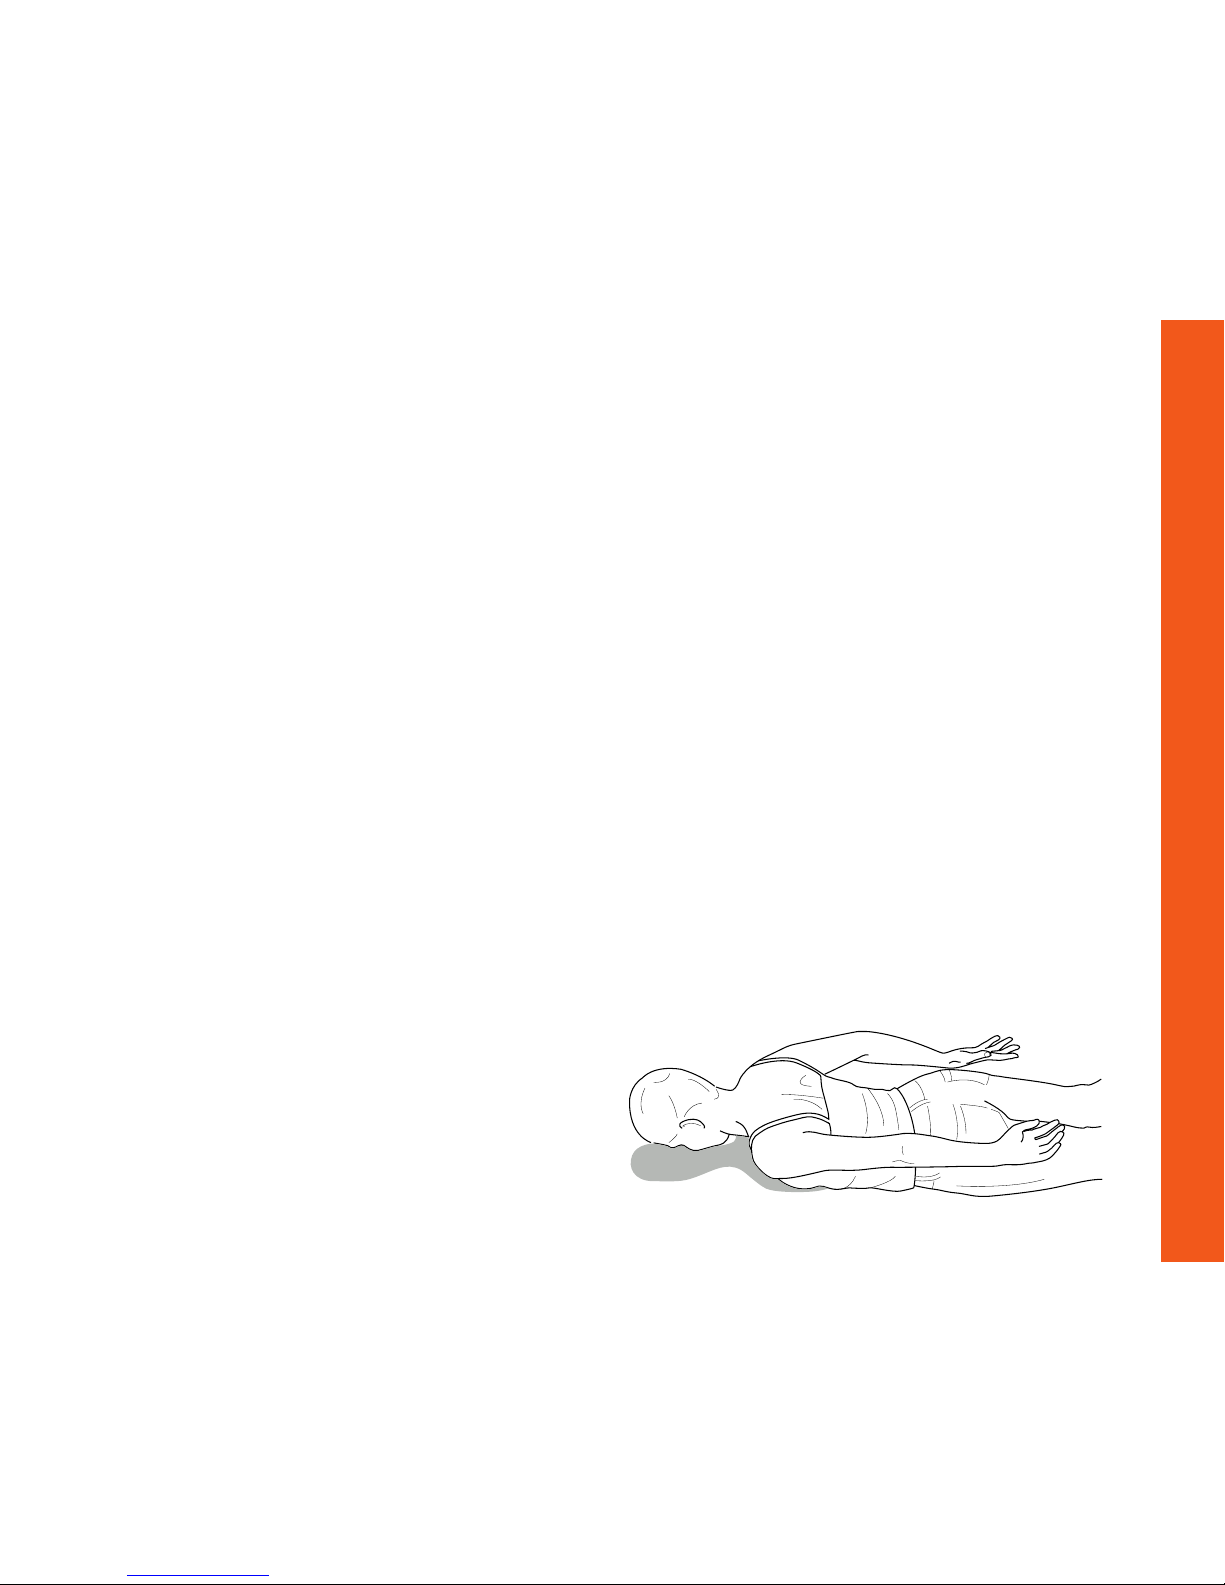
1 To strengthen between the shoulder-blades,
lie on your front, arms by your sides with palms
upwards, chin tucked in. Squeeze your shoulderblades together, lift your chest slightly up off the
ground, and lift your straight arms up so they
are just off the ground. Hold that position for five
seconds and then relax. Do it ten times in a row.
This is called a ‘set’. Rest for a minute, then do
another set. Rest for another minute, then do a
third set.
Do this exercise at home every day or every second
day. When it becomes easy, move your hands
inwards so the knuckles are just above each
buttock. When that becomes easy, do it holding
a half-kilogram (one pound) weight in each hand.
Then when that’s easy, use a 1kg (2lb) weight;
then finally progress to a 2kg (4lb) weight. You
can stop there - you’re strong enough! If you don’t
have hand weights, you can use cans of beans for
half-kilogram weights, and one-litre plastic bottles
filled with water for the 1kg weights, and 2L bottles
for the 2kg weights.
10
Home care programme
Page 14
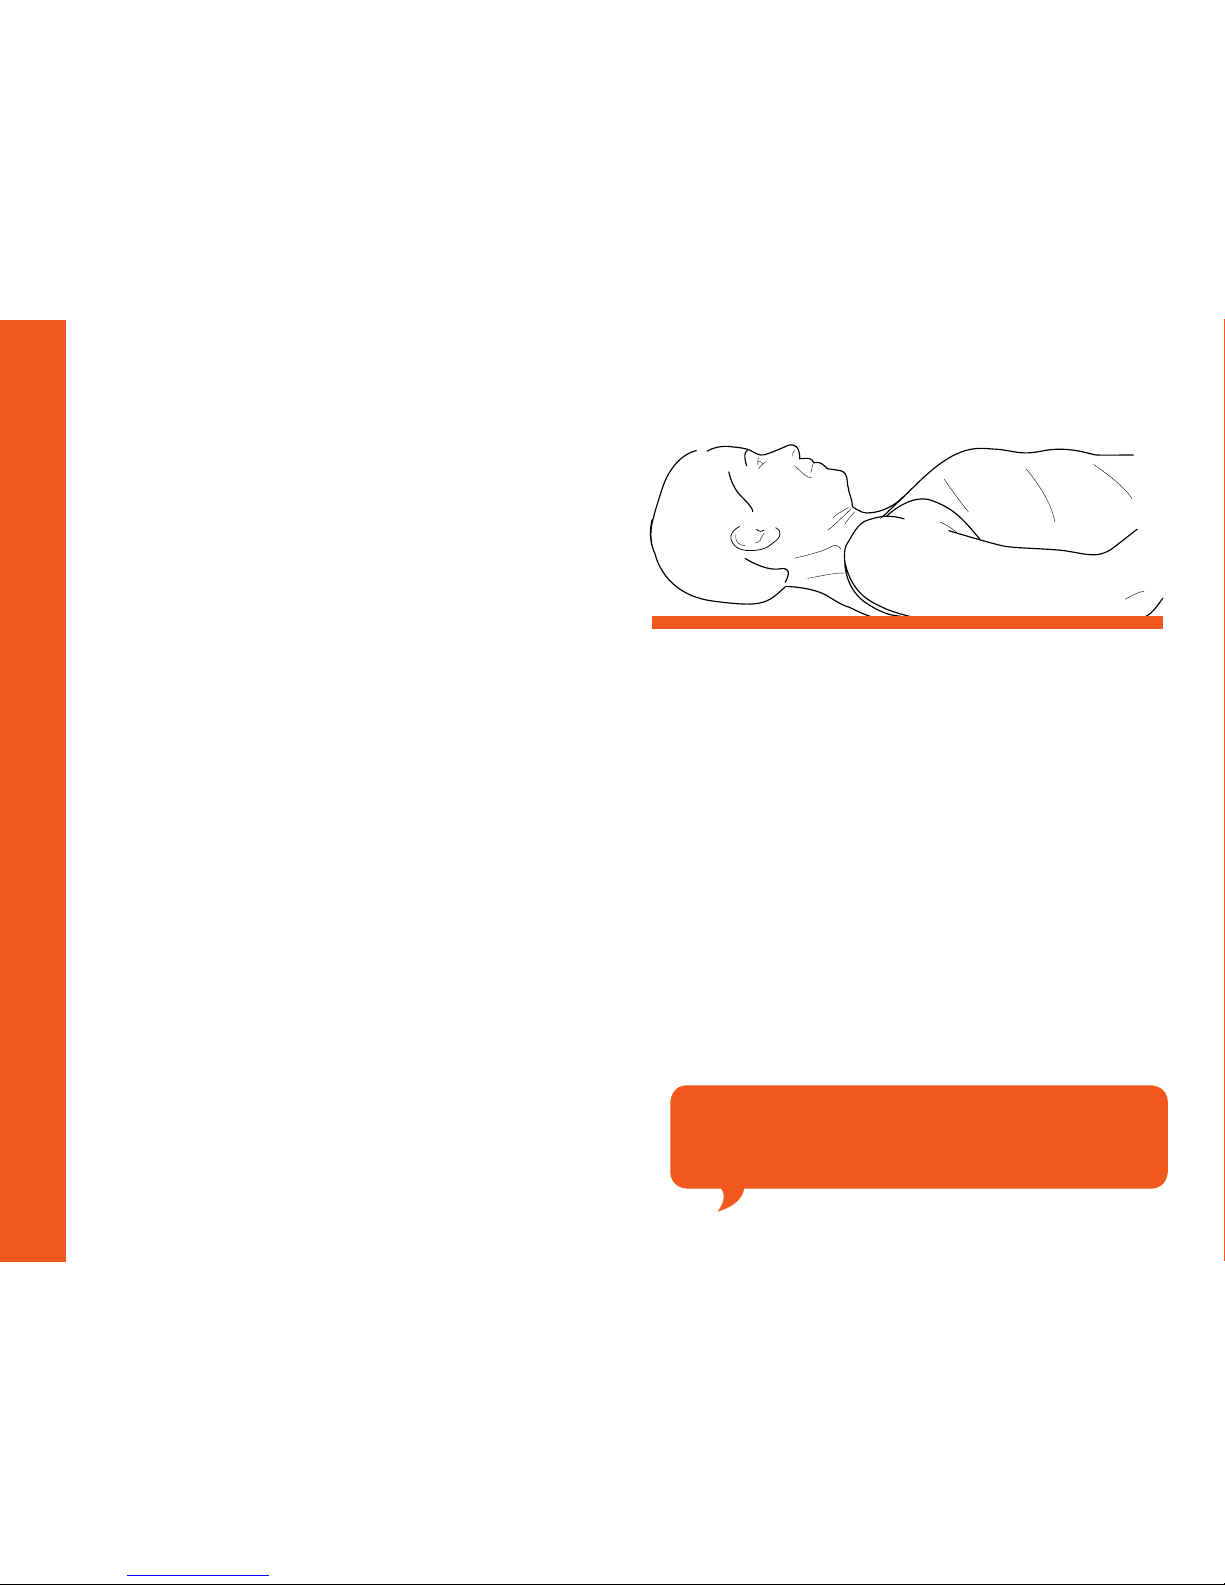
2 To strengthen the front neck muscles, lie on
your back on the floor with your knees bent and
your feet on the floor. Roll your head slightly to tuck
your chin in, hold it carefully in, and lift the back of
your head only a centimetre or two (half an inch)
off the floor. Hold that position for ten seconds,
then relax and rest. Repeat the exercise until you
have done it ten times.
It’s most important that this exercise be done
accurately – don’t let the chin poke out or the
head come too far off the floor. To start with, if you
can’t hold the position for a full ten seconds, just
hold it correctly for as long as you can. Also, if you
can’t do ten lifts in a row, just do as many as you
can correctly. Don’t be discouraged if it’s hard – it
may take weeks before you are strong enough to
manage ten full ten-second lifts in a row.
If your front neck muscles are really weak, and with
your chin held in you can’t lift your head off the floor
at all - don’t give up. It’s just where you’re starting
from and they’ll get stronger - muscles are really
good at that. Just do the exercise as described in
the first paragraph but don’t even try to lift the head
off as well. When you can firmly hold your chin in for
10 seconds, 10 times in a row, and do three lots of
that easily enough – then you’ll be strong enough to
start lifting the head off as well.
The reason for these two exercises is to get the
muscles strong enough to use during the day
to hold your neck and upper back in a neutral
position which won’t strain muscles or joints. This is
explained on the next page: ‘Posture’.
11
Home care programme
View our instruction videos online
at www.bodystance.co.nz/backpod.php
Page 15
Posture
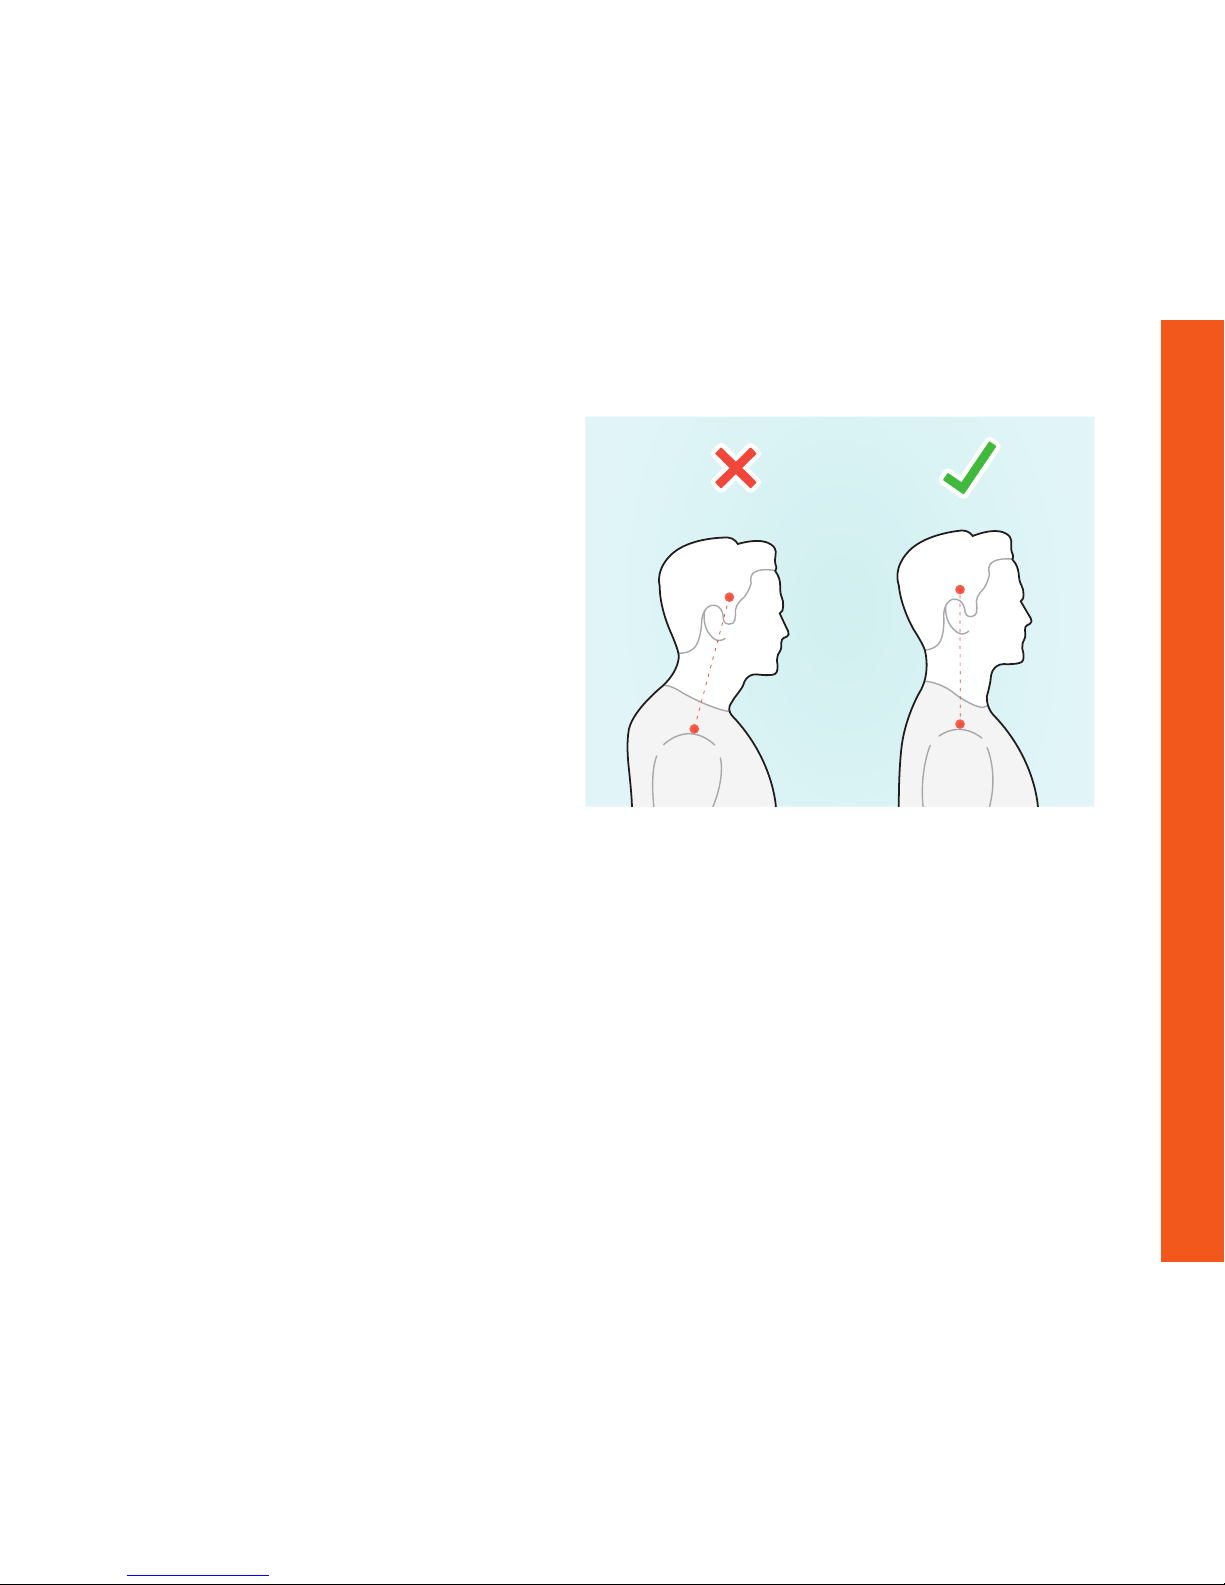
This is easier than you think. The two exercises
in the preceding strengthening section will give
you the strength you need to hold your neck in
a neutral position so that your joints won’t jam,
even when you are bending forward. Posture is the
practical daily application of that strength. It’s often
explained in a confusing and complicated way and
it doesn’t need to be. Here’s how simple it is:
1 For the neck, hold your chin in a little. Don’t let it
poke out.
2 For the upper and middle back, hold your
shoulders back and down a little. Don’t let them
hunch.
If you’re not sure exactly how far to go, just do
both actions as far and as hard as you can, then
relax a little from that position. Initially you’ll often
forget to hold your neck and shoulders like this, but
don’t give up – it becomes automatic with enough
practice, and easy when the muscles get stronger.
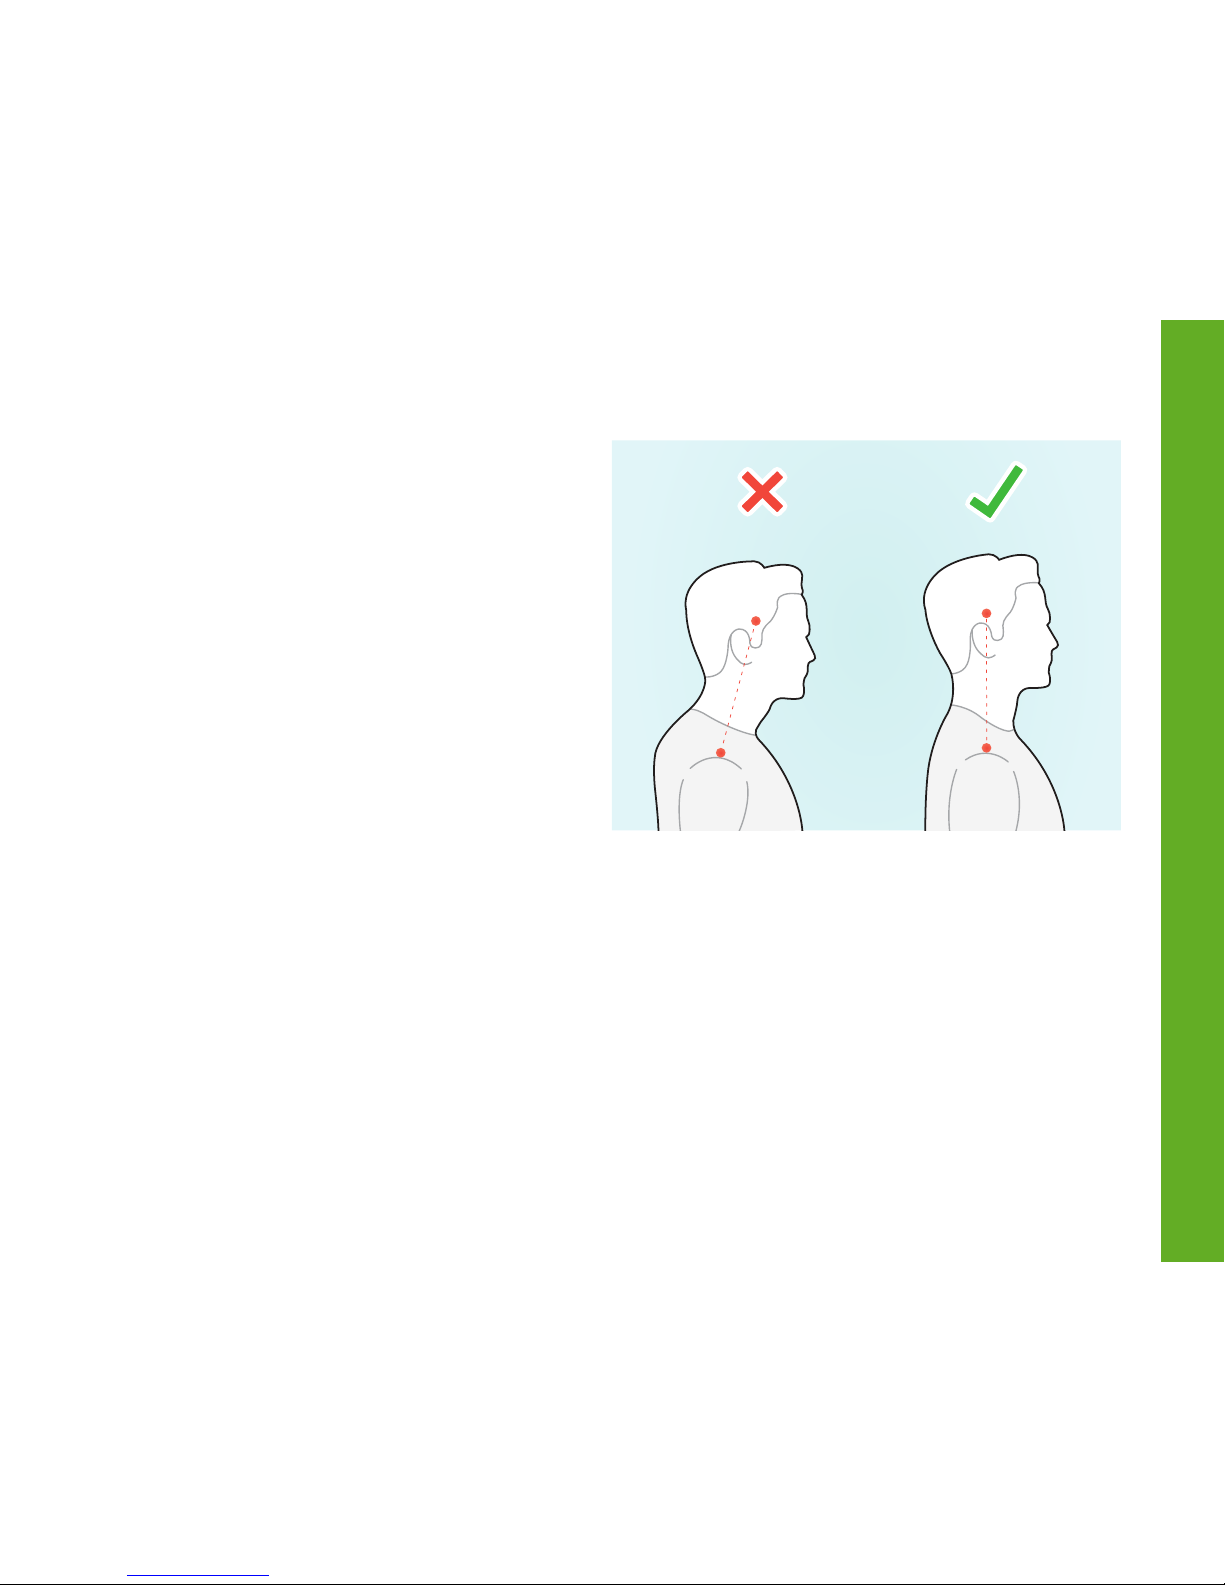
One indicator that you’re getting it right is that
your ear lobe sits vertically above the point of your
shoulder. (You can notice someone getting it badly
wrong – seen from side on, the back of their head
will sit vertically above the front of their chest.)
Posture is important not just for pain relief.
Research shows a hunched posture indicates and
may even drive a lack of personal confidence, and
also correlates strongly with not being listened to.
Perfect posture gets attention. For an inspiring
explanation of this, Google Dr Amy Cuddy’s TED talk
(with over 40 million views) on posture and body
language.
Home care programme
12
Page 16
Massage - two simple techniques
In an ideal world, frequent massage would be
part of our lives. Failing that, here are the two
massage techniques that are of most use in most
neck problems. You need a massage partner. If
you haven’t got someone on hand, find someone
else with a neck problem – which shouldn’t be too
difficult!
The main muscles that need massage run from
the base of the skull down the back of the neck
to below the shoulder blades, and also out to the
points of the shoulders. (The main ones are called
the trapezius, rhomboid and levator scapulae
muscles.) When they fatigue and strain, small tears
occur which scar up as part of their repair process.
A build-up of this scarring (called adhesive fibrosis)
shortens the muscles, lifting the shoulders up
towards the ears and pulling the head back so the
chin pokes out.
The upper trapezius stretch shown in the stretching
section on page 9 is a good daily way of keeping
that part of these muscles elastic but if they are
scarred enough they will also need massage.
Massage has much more leverage on tight, tough
muscle scarring than just stretching – like a rolling
pin flattening out a chunk of dough into a pancake.
Deep tissue massage like this shouldn’t be done
more than once a week – the tissues need time to
recover. You will need some massage wax, massage
oil or cooking oil to let your fingers slide easily over
the skin.
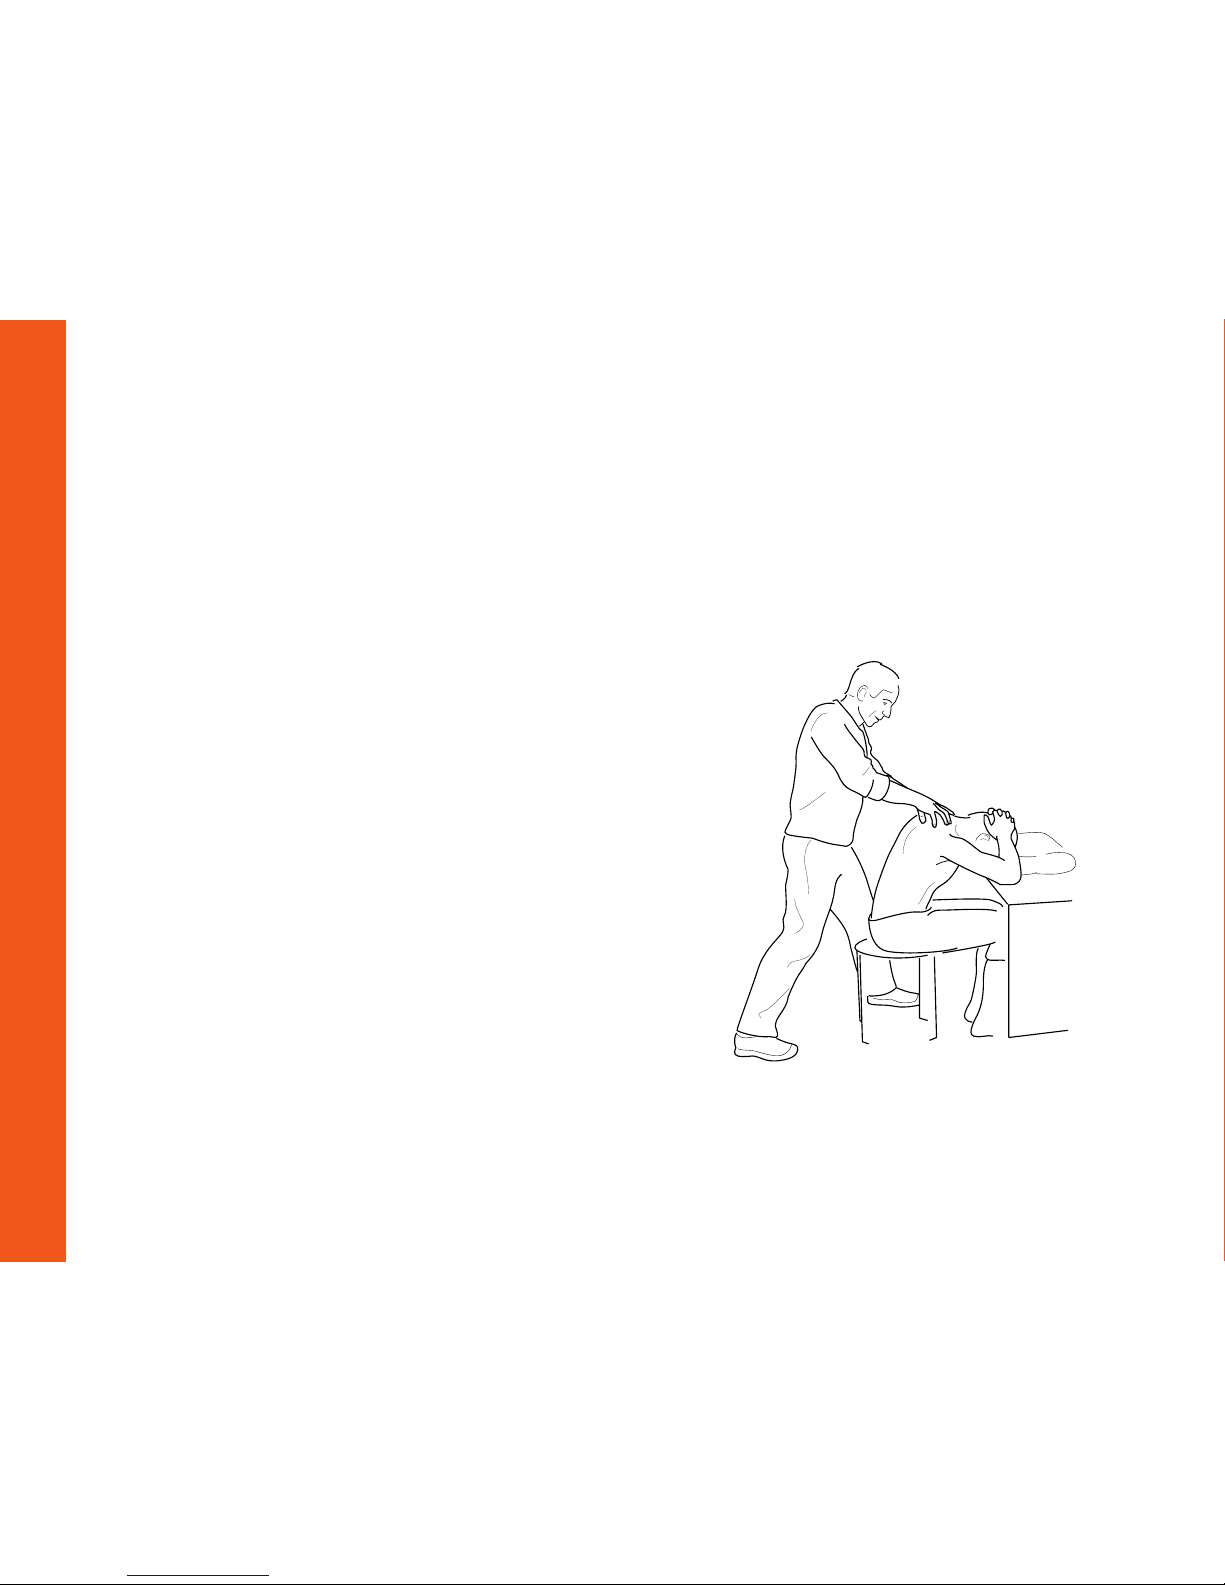
1 Sitting massage position.
Patient: sit at a desk or table with your forehead on
a pillow, rolled towel or something else comfortable.
Home care programme
13
Page 17
Clasp your hands behind your neck, then slide
them up onto the back of your head, pulling your
hair up and out of the way. Tuck your chin in so
that the muscles at the back of the neck are gently
stretched.
Person massaging: work up and down the neck and
back muscles from just below the shoulder blades
right up to the base of the skull. Take your time and
go gently to start with. Use your fingers, thumbs or
knuckles to work the muscle fibres lengthwise. You
may feel harder lumpy bits in the muscles – they
are the scarred patches so concentrate on them.
Spend about 10-15 minutes doing this.
2 Side lying massage position.
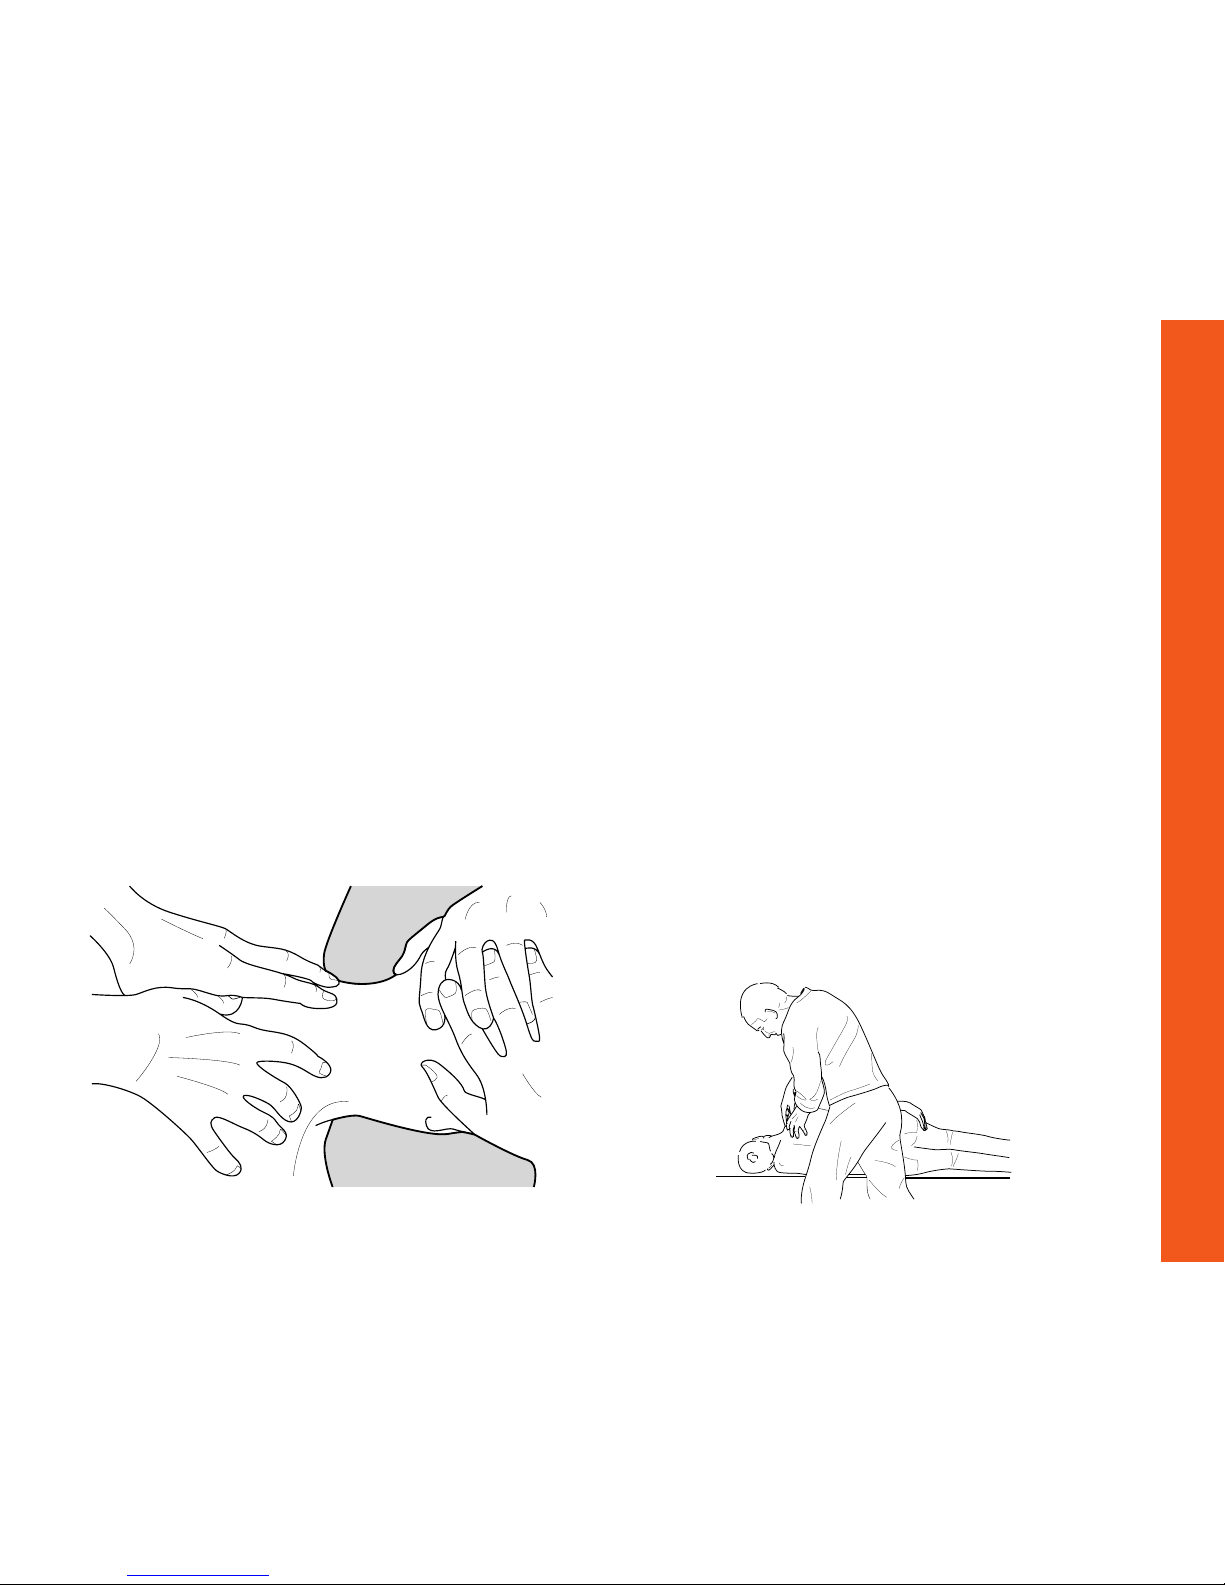
Patient: lie on your side, with your head dropped
sideways (without a pillow if that’s comfortable
enough). Your top shoulder should be relaxed and
dropped in the direction of your hip, with your hand
around your buttock to hold it like that. Your hips
and knees should be bent up so you don’t roll
around. This position stretches the upper trapezius
muscle running from the shoulder up the neck to
the base of the skull, which is usually the first one
to strain and tighten during bent forward work.
Person massaging: massage along the length of
this muscle. Concentrate on the hard patch of scar
tissue usually found between the shoulder and the
neck. Start gently. You can work more deeply into
the muscles once they have warmed up. Spend
about 5-10 minutes working on each side.
Home care programme
14
Page 18

Backpod® combined with manipulation and manual therapy from
doctors, physiotherapists, osteopaths and chiropractors
The Backpod® is an ideal adjunct to manual or
manipulative therapy. Manipulation is excellent for
unlocking jammed joints, but they usually won’t stay
free unless the surrounding tightened capsules and
ligaments are also stretched out. The Backpod® is
ideal for this, so you get a long-term solution, not just a
temporary fix.
High velocity short amplitude thrust manipulation is
a quick and effective way of banging free a locked
spinal apophyseal (facet) or costovertebral (CV,
posterior rib) joint. Obviously the usual precautions
and contraindications taught to trained manipulators
need to be observed. However, if the joint has been
jammed for some time, the surrounding collagenous
capsule and ligaments will have tightened around
the immobile hinge. Manipulation can free the hinge
movement, but the surrounding tight collagen close
around it tends to freeze it up again. Collagen is tough
and can take up to six months to remodel. This is
the main reason for the problem coming back again
weeks or only days after an effective manipulation
treatment session.
Lying back on the Backpod® for several minutes daily
will give a strong sustained stretch to shortened
ligaments and capsules around the joints and quietly
reduce an excessive thoracic kyphosis. The pressure
can be graded for the thoracic facets by positioning
the Backpod® longitudinally under the spine (a gentler
curve) or transversely (a sharper curve, hence more
stretch pressure); and by using pillows under the
patient’s head and even layers of fluffy towel over
the Backpod® itself. The CV joints are localised by
positioning the Backpod® longitudinally on the curve of
the ribs between the scapula and the spine itself. See
pages 3–5: ‘Instructions: How to use the Backpod®’.
The Backpod® works particularly well after
manipulation, when the joints have been definitively
unlocked so they will move to allow the stretch
pressure to directly reach the surrounding collagen. It
is also effective before manipulation, to produce some
loosening of the hypomobile segments first and make
the manipulation easier, both for the therapist and the
patient.
The Backpod® programme of posture, massage,
strengthening and stretching covers the other
aspects of the usual flexed thoracic/chin poked neck
problem. For instance, manipulation can effectively
and immediately unlock atlanto-occipital (C0/1) joints
jammed in extension and causing headaches – a
common problem. But the wider drivers (over-flexed
15
Health Practitioner pages
Page 19

thoracic spine, weak neck flexor muscles, strained
scarred upper trapezius muscles, poked chin posture,
etc.) that force the C0/1 joints into extension until
they freeze also need to be countered, or the problem
will rapidly return. The Backpod® programme covers
each of these necessary components in turn. It is also
available as free videos on our website
www.backpod.co.nz.
Backpod® in conjunction with manual
physiotherapy, the McKenzie approach, Mulligan
and Maitland techniques, etc.
The Backpod® fills a gap in physiotherapy techniques
for the common excessively kyphotic thoracic spine.
The patient can use it for a stretch lasting several
minutes, which is much more effective on chronically
shortened collagen than a few seconds of, say,
Maitland PAs. It can stretch tightened costovertebral
joint capsules in the same sustained way. Hands-on
manual techniques and manipulation can apply
greater force to unlock a chronically jammed joint, but
a sustained stretch is needed to stop the surrounding
tightened collagen just freezing it up again. The
Backpod® can provide this, with sufficient leverage, and
in the patient’s own home. A rolled-up towel or tennis
ball usually can’t.
In my experience the McKenzie treat-your-own-back
approach is brilliantly effective for treating bulging
lumbar discs. However, the thoracic spine is reinforced
and splinted to a fair extent by the rib cage and chest
muscles. So repeated active movements by the
patient alone cannot bring as much force to bear on a
specific vertebra here as they can in the low back. The
Backpod® enables the patient to bring the necessary
much greater leverage to a section of thoracic spine,
and they can do it at home in their own time. The
McKenzie approach does include appropriate therapist
hands-on mobilisation, of course. The Backpod® is a
valuable addition to these techniques for the thoracic
spine.
Sub-group of straight or concave thoracic spines.
The common manipulation techniques (vertical
downward thrust on the thoracic spine or ribs with the
patient lying prone, ‘knee-in-the-back’ or variants, ‘dog
technique’ body drop onto the supine patient with the
therapist’s fist underneath) are all appropriate for an
excessively flexed hypomobile thoracic spine. They
jolt the joints in an extension direction to reduce that
excessive flexion.
However, there is a small subgroup of patients with
thoracic segments locked in extension, indicated
clinically by a straight or even concave section of the
thoracic spine. These manipulations don’t help these
segments much, as they tend to shift the joints further
into the range they’re already locked in. There is a
logical and simple solution – see page 17: ‘Backpod®
for straight or concave thoracic spines’.
16
Health Practitioner pages
Page 20

Backpod® for straight or concave thoracic spines
The common problem with middle/upper thoracic
spines is excessive kyphosis from too much bentforward activity. This leads on to most neck problems
as the cervical spine is cranked into excessive
extension and joint loading to simply hold the head up,
and the upper trapezius muscles which do most of the
work strain, scar and shorten.
However, a minority of patients (perhaps 5%) have
straight or even concave sections of the thoracic spine
where the segments are locked in extension. This is
usually the result of a fall on the back or other impact,
or an excessively rigid upright posture. These type of
thoracic spines are readily identified simply by looking
at the patient from behind.
In my experience, the standard physiotherapy
mobilisation technique of oscillating downward
pressure on the spinous processes with the patient
lying prone (Maitland PAs) will tend to make this
sub-group worse, as it increases the extension glide of
facets already excessively extended (i.e., it increases
the concavity). On the same principle, repeated
manipulation similarly tends not to clear the problem.
The Backpod® answer to this subgroup is simple
and logical. Lay the patient prone with the Backpod®
longitudinally under their sternum – you may need
to cover it with a folded towel for extra padding. This
creates a flexion stretch at the extended thoracic
joints. Then glide the spinous processes longitudinally
apart using thumbs, fingers and/or hypothenar
eminences. This direction of mobilisation glides the
facets in a flexion direction, taking them out of their
locked end-range extension.
Oscillatory pressure is best initially to get the facets
moving, followed by sustained pressure to stretch the
shortened capsules and ligaments. It is a technique
that can generally be taught to the spouses, partners,
friends, etc. of patients for follow-up at home.
Note that these patients with straight or concave
thoracic spines can still have tight or frozen
costovertebral joints where the ribs hinge onto the
backbone. These patients can use the Backpod in the
normal way to stretch these posterior rib joints, with
the Backpod positioned slightly to either side of the
backbone but not over the spine itself. The positioning
is over the curve of the ribs, about 40-50mm (2
inches) out from the midline, i.e. between the midline
of the spine and the inside edge of the scapula.
17
Health Practitioner pages
Page 21

The Backpod® is a logical and appropriate counter
to milder scoliosis in the thoracic spine. Scoliosis is
a complex three-dimensional deformity of the spine,
ranging from a barely noticeable twist to appallingly
severe spinal distortion requiring surgical stabilization.
The Backpod® can’t significantly unwind the extreme
cases, but it is a logical and practical approach to
opposing the twist in milder examples – fortunately the
vast majority.
Milder scoliosis is readily identified in two ways. Seen
from behind, as the patient bends forward from
standing, one side of their rib cage will show as higher
than the other. Similarly, with the patient lying flat on
their front with their head not turned to either side
(ideally, prone on a plinth with their nose in the nose
hole), the posterior curve of the ribs on one side will be
raised relative to the other side. This indicates a twist
of the thoracic vertebrae towards the raised side.
Keeping it simple and treating it as a pure rotation
problem (which it isn’t), downward manual pressure on
the posterior curve of the raised ribs will use them as
levers through the costovertebral joints to ‘unwind’ the
thoracic rotation. The patient can produce this same
pressure at home by lying back on the Backpod® with it
positioned under the curve of the raised ribs, i.e. about
50mm (2 inches) out from the midline of the spine.
The amount of actual unwinding of the scoliotic twist
depends on its severity and chronicity, what is driving
it, patient compliance with the Backpod® and any
exercise programme, etc. However, nearly all scoliotic
problems start out mildly, commonly manifesting
first in adolescence. As they frequently progress over
the years, using the Backpod® to oppose, limit and
even unwind the torsion where possible is strongly
indicated.
Later mild scoliosis often exists in association with
an excessive thoracic kyphosis. The Backpod® is
ideally suited for treating both components of the
spinal torsion, being positioned in midline to treat the
kyphosis and slightly to the raised side to oppose the
scoliosis.
Use of the Backpod® should be combined with
thorough musculoskeletal assessment, looking for
underlying drivers of the scoliosis. These include
leg length difference, muscle imbalance, and pelvic
torsion associated with sacroiliac joint dysfunction
among others. Each identified factor needs to be
addressed specifically, for instance using shoe
inserts to compensate for a leg length difference,
Schroth method or similar gym approach to muscular
asymmetries, etc. The common statement that 65% of
scoliosis is idiopathic is highly suspect, and probably
set so high because in very many cases the underlying
drivers have not been understood.
Backpod® for scoliosis
18
Health Practitioner pages
Page 22

The Backpod’s small peaked shape is designed to
give a strong, specific stretch to tight posterior rib
(costovertebral and costotransverse) joints. Foam
rollers and Swiss balls cannot do this. It is positioned
longitudinally 40-50mm (about 2 inches) out to
the side of the spine, over the curve of the ribs,
i.e. between the midline of the spine and the
medial (inside) border of the scapula (shoulder blade)
- see pages 3 & 4. This ability to stretch tight and
frozen posterior rib joints makes the Backpod ideal for
treating several conditions:
Costochondritis is a scary and confusing (but not
life-threatening) condition with pain where your ribs
join onto your breastbone. Tietze’s Syndrome is just
costochondritis with enough inflammation to cause
obvious swelling at the rib joints on your breastbone
- it’s not a whole different entity. The swelling is not
an auto-immune inflammation but simply part of the
normal inflammatory response to mechanical injury,
like the swelling of a sprained ankle, or of a foot
blister.
Important - any acute chest pain should always be
seen first (and urgently) by a doctor or Emergency
Department in case it’s your heart. Cheeringly, up to
half of presentations of acute chest pain aren’t the
heart or anything else dire.
Almost all the standard medical statements about
costochondritis have almost no evidential basis. It
is NOT a mystery, or difficult to fix. Ribs work like
bucket handles, hinging at the front onto the sternum
(breastbone) at the costosternal joints, and at the
back onto the spine (at the costovertebral joints). The
ribs lift up and down with each breath, and the rib
joints also move with any torso movement.
Now, if the posterior rib joints are tight or immobile,
then the more delicate anterior joints where the ribs
hinge onto your breastbone HAVE to work excessively,
just to let allow breathing. So they strain, get irritated,
then get inflamed - and there’s the costochondritis.
Unlike other strained joints, they can never get a rest,
as long as breathing continues. If they get inflamed
enough to see obvious swelling then it’s called Tietze’s
Syndrome.
This understanding from New Zealand manual
physiotherapy is the only, repeat only, one which
explains such specific pain just at the rib joints on the
breastbone and nowhere else in the body. All other
suggestions and treatments, including the medical
ones, miss the point in that they seek to suppress
an irritation/inflammation without treating or even
Backpod® for costochondritis, Tietze’s Syndrome, ‘slipping ribs’ and
costovertebral (posterior rib) joints
19
Health Practitioner pages
Page 23

recognising the simple mechanical problem driving it.
Anti-inflammatory medications, steroid shots, Vitamin
D, omega-3, turmeric, etc. may indeed help the body
to better suppress the pain, but do not treat or fix the
cause.
Treatment uses the Backpod to free up the tight
posterior rib movement. The sustained stretch on the
Backpod is able to effectively stretch out the tough
shortened collagen surrounding immobile posterior
rib joints, enabling a lasting freeing up of the hinge
movement. Hands-on treatment including manipulation
cannot do this, though it may be a necessary addition if
the posterior rib joints are very frozen.
Sports massage for the muscles between and overlying
the ribs at the back and sides may also be needed;
also specific stretching of the intercostal muscles
between the ribs. For a detailed explanation and
treatment programme, see the COSTOCHONDRITIS
page on our website www.backpod.co.nz and also our
two YouTube videos “How to Fix (most) Chostochondritis
and Tietze’s Syndrome Chest Pain’, Parts (1) and (2).
’Slipping rib’ syndrome has the same cause as
costochondritis - the immobile posterior rib movement
driving compensatory excessive movement elsewhere,
just to allow breathing and torso movement. In this
case, the hypermobility happens to the side of the rib
cage at the costochondral junction where the bone of
the ribs changes to cartilage. Treatment is essentially
the same as for costochondritis, for the same reasons.
Costovertebral (posterior rib) joints can lock acutely
in flexion, causing very sharp unilateral local pain
slightly to the side of the spine. Passively rotating the
seated patient towards the painful side is very much
more painful and restricted than rotation away from
it; also the pain is reproduced on full inspiration.
This is because both these actions require the CV
joints to extend, and they have become locked in
flexion. Treatment is the same as for costochondritis,
though easier because the rib joints on the breastbone
have not also become strained.
For other conditions using the Backpod to free up tight
rib cage movement, see chronic asthma (page 21)
and rib pain in pregnancy (page 22).
20
Health Practitioner pages
View our instruction videos online
at www.bodystance.co.nz/backpod.php
Page 24

The Backpod® can be surprisingly useful in a number
of respiratory conditions, especially chronic asthma
and bronchitis. Regardless of the state of the lungs,
they cannot fully inflate unless the ribcage can expand
fully to allow this. This in turn requires full range of
movement at the costovertebral joints where the ribs
hinge onto the spine.
This movement has often become quite restricted
in patients with chronic asthma or bronchitis,
especially where the onset has been in childhood,
with the patient developing while bent forward trying
to suck in enough air. These patients usually exhibit
the common excessively hunched thoracic spine, with
rounded shoulders sitting more towards the front of
the chest. This posture will have become ‘set’ by the
tightening of the collagen of ligaments, capsules, etc.
around the restricted rib and spinal joints.
Chronically tightened collagen is extremely tough
and responds best to long sustained stretching. The
Backpod® provides this, with enough leverage to be
effective. It is used in the usual way, positioned for
about a minute at a time – up and down the middle
and upper back to stretch the thoracic hunch, and
about 50mm (2 inches) out to the sides of the spine
on the curve of the ribs to loosen the rib hinges.
The strengthening exercise on page 10: ‘Two simple
strengthening exercises’ (for the middle back muscles)
will probably be needed also to build up the support
strength for the area.
As a bonus, the Backpod® use position is also ideal
for practising deep diaphragmatic (also called
‘abdominal’) breathing at the same time. While lying
on the Backpod®, the patient inhales slowly through
the nose to a count of ten, then slowly and completely
exhales to a similar count. One hand may be placed
just below the rib cage to feel the stomach rise as the
air is drawn in to the deepest parts of the lungs.
A suitable timing would be three of these slow deep
breaths, then move the Backpod® 50mm (2 inches)
to another position under the spine or ribs. As well as
filling the lungs fully, diaphragmatic breathing is also
held to reduce anxiety and stress and boost energy
and stamina.
A variety of other lung conditions can leave behind
them a secondary effect of restricted CV joint
movement even after the condition has resolved.
For instance, the pain of pleurisy can mean that
the patient avoids expanding the ribcage fully, and
over time the limited rib hinge range becomes ‘set’
Backpod® for chronic asthma, bronchitis and some other respiratory
conditions; also rib pain in pregnancy
21
Health Practitioner pages
Page 25

by shortened collagen around the joints. The same
process can happen with pneumonia, pulmonary
and radiation fibrosis, other restrictive lung diseases,
and neurological conditions such as Guillain-Barré
syndrome. The Backpod® is ideal for treating the
rib cage restriction – an aspect often overlooked
by doctors concentrating perfectly correctly on the
underlying lung problem.
Rib pain in pregnancy is quite common partway
through term as the baby bulge grows bigger. The rib
cage needs to expand to accommodate it, and pain
results if the joints and muscles are too tight to allow
it. The pain can be sharp and severe, and certainly
detracts from the experience of bearing a child.
It does not always clear as the pregnancy continues,
even though Relaxin hormone release will be
facilitating joint hypermobility throughout the body.
The suggested mechanism is that Relaxin will soften
ligaments but not adhesive fibrosis, so any old scarring
restrictions will actually become tighter relative to the
other joints as the pregnancy continues - this further
explains the onset of pain partway through term. The
problem may be becoming much more common, as so
many young mothers now start into pregnancy carrying
a hunched thoracic spine and rib cage tightness
from much use of laptops, tablets and smartphones.
(See the Wikipedia entry on the iHunch.) It doesn’t
respond well to general stretching, as the already
well-moving parts of the rib cage machinery simply
stretch more, and the tight bits stay tight.
The restriction is usually at the posterior rib
articulations (costovertebral joints) where the ribs
join onto the spine, but can include tight, scarred
intercostal muscles between the ribs. As well,
immobile rib joint movement at the back can cause
compensatory overuse straining at the other ends of
the rib where they join onto the sternum (breastbone).
This is then diagnosed as costochondritis, or Tietze’s
Syndrome if there is sufficient observable swelling at
the rib joints on the sternum as well.
The problem usually responds very well and quickly
to the Backpod used slightly to the sides of the
spine to stretch free tight posterior rib joints, as
for costochondritis and other costovertebral joint
problems (see page 19). Tightness and scarring in the
intercostal muscles between the ribs responds well to
specific stretching of those muscles, by a partner or
therapist. The technique is described 10 minutes into
the YouTube video ‘How to Fix (most) Costochondritis
and Tietze’s Syndrome Chest Pain’ Part (2).
22
Health Practitioner pages
Page 26

All these conditions affect the middle back.
Ankylosing spondylitis is a rheumatoid condition
that can cause extreme thoracic flexion and eventual
fusion of the vertebrae – a severe progression of the
hunched-forward/poked-chin pattern of most neck
problems. It affects 0.1–0.2% of the population,
mostly males. Initially the thoracic spine is painful and
inflamed; only in later decades does it become fixed,
flexed and fused.
The Backpod® and its programme should be used
once the condition is diagnosed to slow and possibly
even halt the progression into flexion. The Backpod®
in particular is ideally designed to gently oppose the
ongoing flexion contraction. As well, the Backpod used
for sacroiliac joint stretches (see pages 25 & 26) will
oppose the ongoing tightening at these joints which is
part of ankylosing spondylitis.
Scheuermann’s Osteochondritis (also known as
Scheuermann’s disease) is an inflammation affecting
the thoracic spine, usually in adolescents. The acute
inflammation generally burns itself out after a few
years, commonly leaving adhesive fibrosis and locked
thoracic segments in its wake. These should respond
to the Backpod® and its programme in the usual way.
However, even the acute inflammatory stage is worth
treating cautiously in the same fashion, as why the
spine gets inflamed has not been explained. Excessive
flexion stress on the slouching adolescent spine is a
reasonable bet, and the Backpod® and programme will
address that.
Parkinson’s disease is a degenerative disorder of
the central nervous system, with motor symptoms
resulting from the death of dopamine-generating cells
in the mid-brain. The Backpod® and its programme
cannot help the degenerative progression of the
disease, of course. However, they can help with
the musculoskeletal consequences, namely the
characteristic thoracic hunching, muscular rigidity,
neck pain and headache.
The Backpod® is ideal to oppose the increasing
thoracic kyphosis. This will of itself drive neck pain
and headache as the posterior neck muscles strain to
simply hold the head up, with Parkinsonian muscular
rigidity compounding the problem. The two massage
techniques shown on pages 13 & 14 are simple and
easy for home carers to use, and a considerable help
in alleviating the musculoskeletal pain and headache,
on a daily or less frequent basis.
Backpod® for ankylosing spondylitis, Scheuermann’s Osteochondritis
and Parkinson’s Disease
23
Health Practitioner pages
Page 27

Cervical laminectomy or foraminotomy operations
are performed to trim back any bony impingement on
the nerves as they exit between the vertebrae, usually
at the C5/6 or C6/7 level. These patients are typically
older, with hunched thoracic spines. Excessive thoracic
kyphosis hunching requires the patient to extend
their neck just to look ahead, which has a closing
down effect on the nerve exit canals, exacerbating
any impingement. The Backpod® used in the usual
way reduces an excessive thoracic kyphosis, thereby
reducing the closing down of the cervical nerve exit
foramina, and allowing full benefit from the operation.
Further, these hunched patients hold their heads
up by overusing the upper trapezius and other neck
extensor muscles. These muscles become fatigued,
strained and scarred – from adhesive fibrotic repair
of the repeated micro-trauma of overuse. The fibrotic
scarring and shortening pulls the cervical spine into
excessive extension – which closes down the nerve
exit canals. This is increased by surgical scarring after
a posterior entry operation. These shortened cervical
extensors are usually found in conjunction with very
weak longus colli and deep neck flexors, giving rise
to a poked-chin posture. The Backpod® user guide
stretches, massage, posture and strengthening
exercises will specifically counter this pattern, so the
patient then gets the full and lasting benefits of the
operation performed.
Persisting pain after thoracic surgery is an
appallingly common problem. This is unsurprising
as the stretch on the intercostal (IC) muscles and
costovertebral (CV) and sternocostal (SC) joint
capsules required for most procedures is massive.
Normal adhesive fibrotic repair after such surgery
frequently leaves frozen CV joints, plus wound and
strain scarring of the IC and other muscles, plus or
minus tethering of the IC nerve(s). Ongoing pain is
particularly distressing for the patient as every time it
hurts they think the original problem is coming back.
Generally, they respond readily to the Backpod® used
to free up the contracted CV capsules (as outlined
on pages 19 & 20); massage in side lying for IC, lat.
dorsi, middle and lower trapezius tethering; specific
gentle hands-on IC muscle stretching; and therapeutic
ultrasound (1.4W/ cm2 continuous) for IC nerve
tethering at the operation site. Low dose tricyclics
such as amytriptyline help with the wound-up nervous
pathways in a chronic problem. Usually it is not a
full-blown pain syndrome, though often diagnosed as
such, especially if T4 syndrome autonomic symptoms
are present (see page 27).
Backpod® for persisting pain after neck or thoracic surgery
24
Health Practitioner pages
Page 28

The Backpod® can also be used to mobilise a
hypomobile sacroiliac (SI) joint problem such as
can commonly occur after a fall onto the low back
or coccyx. The impact can often leave the sacrum
‘ridden up’ along the SI joints and jammed in flexion
(i.e., nutated). This leaves the tailbone more exposed
to impact/pressure when sitting down and creates a
chronic coccydynia from the repeated banging on the
tip of the coccyx. This type of tailbone pain doesn’t
respond to purely local treatment of the tailbone but
clears when the SI movement is restored to normal.
The extremely tough mix of capsule, ligaments and
fascia around hypomobile SI joints means that good
results from mobilisation and manipulation techniques
are often quite temporary, before the surrounding
shortened collagen tightens them up again.
The Backpod® is ideal for a sustained stretch of
this very tough surrounding collagen and a shearing
mobilsation of the joint surfaces. The most basic
manual physiotherapy mobilisation technique for the
SI joints is a Maitland PA, a vertical oscillation of the
sacrum by the therapist while the patient lies prone.
The Backpod® essentially produces a sustained
version of this, using the patient’s own lower body
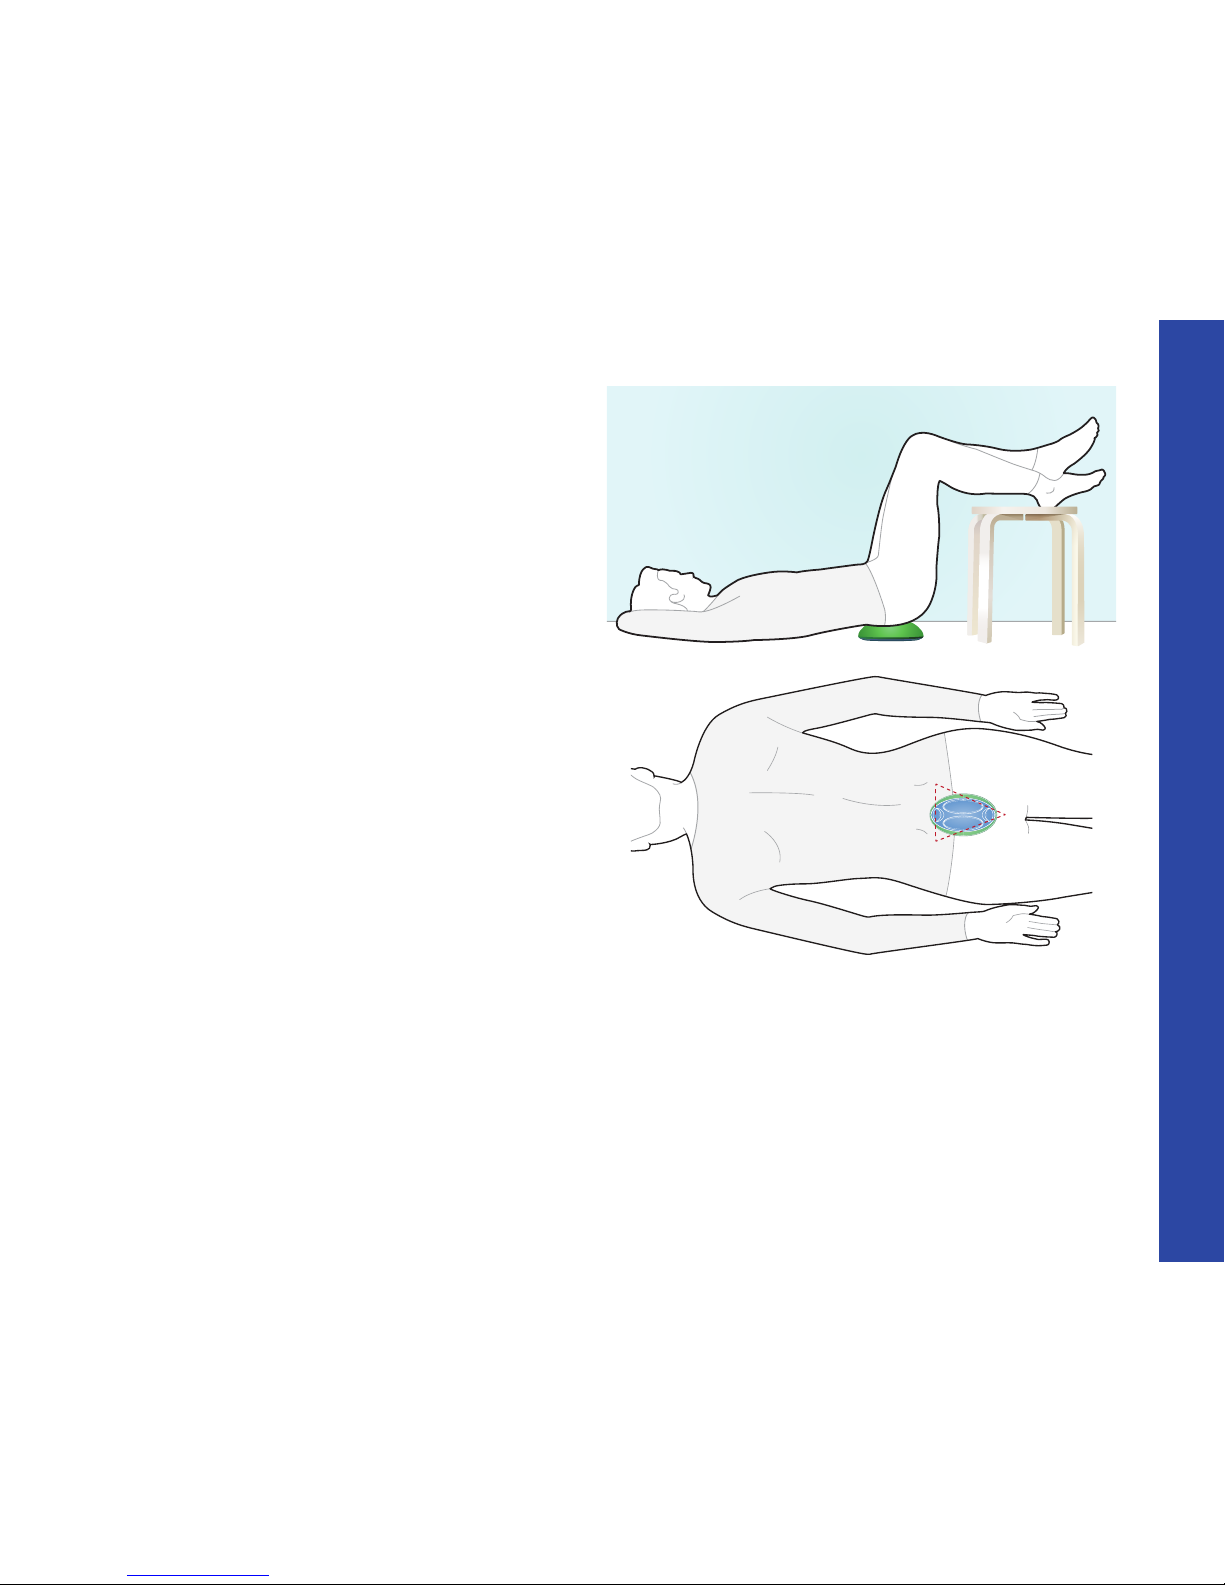
weight to provide the force. The patient lies on their
back on the floor, thighs vertical, shins horizontal,
ankles crossed and heel supported on the edge of a
table or chair. The Backpod® is positioned under the
sacrum longitudinally and the patient relaxes onto it
for at least several minutes, once or twice daily. It can
still take weeks before the SI joint movement is free
enough to stay free.
The Backpod® leverage on hypomobile SI joints can
be enough to free them up on its own, but frequently
they are tight enough to need the greater force of
a manipulation or specific therapist mobilisation
techniques. The Backpod® is then the ideal follow-up,
to stretch things further and retain the benefits of the
treatments.
Clinical Caution: The Backpod
®
should be used to
mobilise only restricted hypomobile sacroiliac joints.
Stretching already excessively moving hypermobile
SI joint problems will make them worse. The best
way to clinically distinguish between the two is Andry
Vleeming’s test for SI hypermobility. Briefly, the patient
lies on their back and actively lifts one straight leg
as high as they can. This is then repeated with the
therapist manually pushing both sides of the patient’s
pelvis together (i.e., artificially compressing and
stabilising the SI joints). If the leg raise is then clearly
higher and without pain, it indicates an unstable,
hypermobile sacroiliac joint. This should not be
Backpod
®
for sacroiliac joint mobilisations, and coccydynia (tailbone pain)
25
Health Practitioner pages
Page 29
manipulated or mobilised, with the Backpod® or any
other technique. These problems are best treated by
support muscle strengthening and stabilisation belts.
Sacroiliac pain during and after pregnancy is
common. Usually it is explained as arising from
excessively moving (i.e. hypermobile) and strained SI
joints, due to the loosening and softening effect on
the ligaments of hormones released during pregnancy
to allow the sacrum to hinge open fully to let the baby
come through the pelvic basin. This surely happens,
however it doesn’t explain unilateral SI pain, since
all the ligaments are presumably loosening equally.
Unpublished New Zealand research and extensive
clinical experience suggests that unilateral SI pain
appearing partway through pregnancy is more usually
from a hypomobile SI. These patients generally have
a history of a fall or impact on the low back, pelvis or
tailbone, presumably leaving the legacy of an adhesed
and hypomobile SI joint. The interpretation is that
as the pregnancy continues, and the surrounding
ligaments get looser, the adhesed SI joint becomes
relatively more hypomobile and then painful.
These problems generally respond well and quickly
to mobilising the hypomobile sacrum with manual
physiotherapy techniques, or on the Backpod® as
shown. This rather validates the model, as the patient
is no longer sore - even though the pregnancy is
continuing and the baby is getting bigger - so the pain
can’t just be coming from the stresses and strains
of pregnancy. If SI or tailbone pain persists months
after the baby is born it is then usually coming from
SI hypomobility after the ligaments have tightened up
again after the birth. The Backpod® is equally effective
in this situation to gently mobilise the tight SI hinges.
26
Health Practitioner pages
Page 30

T4 syndrome is essentially an add-on to the common
musculoskeletal problems that involve the mid-thoracic
vertebrae and ribs. It takes its special character from
the proximity of the sympathetic neural chain which
travels down the necks of the ribs. This can produce
distal sympathetic symptoms including whole hand
and/or forearm paraesthesia, swelling, blotchiness and
feelings of hot or cold in the hands.
The postulated mechanism is that sustained or extreme
thoracic postures can lead to relative ischemia within
multiple tissues, triggering the sympathetic signs and
symptoms. These may not be derived solely from the
fourth thoracic vertebra, hence ‘T4 syndrome’ may also
be referred to as ‘upper thoracic syndrome’.
In practical terms, treatment is the same as for the
vast majority of local thoracic and/or costovertebral
problems, so the Backpod® is ideal here. It can be used
by the patient to stretch out the common excessive
thoracic hunch and/or any hypomobile CV joints, or by
the therapist to mobilise the small sub-group of straight
or concave thoracic spines as detailed on page 17. The
Backpod® programme of support strengthening, home
massage and posture understanding also applies. Once
the thoracic spine and ribs have been restored to full
range supported movement, the distal sympathetic
symptoms will clear.
Health practitioner additions may include manipulation
to unlock any specifically jammed facet or CV hinges,
work station adjustment to limit excessive hunching,
brachial plexus stretching exercises, and non-steroidal
anti-inflammatory medications which are very helpful in
the acute phase. Deep sports massage is very useful
to tease out built-up adhesive fibrotic scarring fibres
in the surrounding muscles, especially around the T4
area and including the rhomboids and middle trapezius,
but also the pecs, the lats and the shoulder girdle, and
down the affected arm(s).
Backpod® for T4 Syndrome
27
Health Practitioner pages
Page 31
The Backpod® and its programme are intended to
be the most practical and effective home treatment
and ongoing care package that can be handed out or
recommended to almost all patients with upper back
and neck problems. Non-steroidal anti-inflammatory
(NSAID) and analgesic medications are excellent at
reducing the pain and effect of inflamed and strained
joints and muscles. However, they are aimed solely at
the inflammation and pain, and can have side-effects
such as damage to the lining of the gut.
It is simply good clinical sense to also treat the
mechanical pattern of structural tightness and
weakness which underlies and drives these acute
inflamed episodes – especially as, contrary to a
popular view, a large proportion do not just settle
down after an acute flare-up. The videos on our
website www.backpod.co.nz which teach ongoing
home care of the upper spine are free for any patient
to access.
The same comments apply to acupuncture. Flooding
the area with endorphins is most useful in the acute
phase, but is not likely to rapidly change chronic
underlying structural problems. Consider a broken leg:
you can acupuncture it but you still have a mechanical
problem – the fractured bone. The Backpod® and its
programme are a practical home package designed
to sort out the common pattern of tightness and
weakness driving the large majority of upper back and
neck pain. This mechanical approach to the underlying
drivers of the problem combines extremely well with
acupuncture which can contribute to pain relief and
healing, especially in the acute phase.
Backpod® for prescribing doctors, pharmacists, and acupuncturists
28
Health Practitioner pages
View our instruction videos online
at www.bodystance.co.nz/backpod.php
Page 32

Most neck problems arise from the common hunched
forward/poked chin posture. What holds the chin
up in this pattern are the upper trapezius and neck
extensor muscles. These overwork, fatigue, and strain,
and subsequently adhesive fibrotic scarring is laid
down as part of the repair process. Massage is the
most effective way of stretching out these tight fibrotic
fibres. It can apply more force to a specific area than
can a general stretch of the whole muscle.
The techniques shown in pages 13 & 14: ‘Massage –
two simple techniques’ are the most relevant ones for
the majority of neck problems. A more comprehensive
general massage will obviously do a more thorough
job. The usual way of doing massage has the patient
lying prone with the head flat, preferably on a massage
plinth with a nose hole. I find a more effective way
to loosen scarred and shortened fibres in the upper
trapezius and posterior neck muscles is to put them
on stretch first, so that all the slack is taken up, and
then massage them longitudinally. This position is
shown on page 13.
The other very common area of muscle overwork,
straining and scarring is the upper trapezius muscle
between the neck and the shoulder. These fibres
overstrain and scar because they come to provide
the major portion of support to the shoulder girdle so
the arms and hands can operate, while the middle
and lower trapezius fibres become stretched out and
weaker. This imbalance tends to get worse unless
corrected. One side-lying position to massage these
upper trapezius fibres is shown on page 14.
These two massage positions cover the release
areas most commonly needed. Good comprehensive
massage will pick up other areas of tightness.
There are other muscle groups likely to be tight and
scarred from repeated work in a hunched position.
They include the pectoral muscles as these are in a
shortened position when using the hands at, say, a
computer keyboard; muscles round the side of the
neck, especially sternocleidomastoid; and serratus
anterior, which pulls the scapulae forward around the
rib cage.
Massage is an essential part of any treatment
programme. On its own it will loosen off tight, scarred
muscles. However, it will not unlock jammed spinal
joints if these are tight enough, and it also won’t
provide support strength. The other components in
the Backpod® programme (muscle strengthening,
stretching, mobilising, posture and the Backpod®
itself) will almost certainly also be needed.
Backpod® combined with massage therapy
29
Health Practitioner pages
Page 33

Backpod® combined with yoga, the Feldenkrais Method, the Alexander
Technique, and ergonomics
Reasonable flexibility is good, and yoga is good at
producing muscle flexibility. However, if the specific
joints in the thoracic spine are too thoroughly jammed,
self-stretching does not have the leverage to free
them. We can only move our spines by ourselves as a
unit, so the parts that are moving well will reduce the
force we can bring onto any parts that aren’t moving.
The Backpod® can bring much more leverage to
bear on a specific vertebra, and is a highly effective
addition to a yoga session. The same principle applies
to scarring inside a muscle. You can stretch the whole
muscle with yoga, but often specific massage with its
higher leverage is necessary to break down the patch
of scarring in it.
The Feldenkrais Method and the Alexander Technique
both aim to teach correct, perfectly balanced
movement. This is a worthy goal, but again if the spinal
joints are sufficiently locked before you start, in my
experience they won’t free themselves just by moving
correctly. The Backpod® and its programme provide
the specific higher leverage loosening needed to
obtain the full benefit from both of these approaches.
There is a whole area of ergonomics concerned with
the appropriate positioning of computer screens and
their keyboards for their operators. The advent of
laptops, tablets, smartphones and similar devices has
made ideal positioning virtually impossible, as their
screens cannot be detached from their keyboards.
Granted, extra screens or keyboards can be attached,
but almost no-one ever does, because of the loss of
convenience and portability.
So even more hunching forward is required to use the
new devices, hence the surge in neck and upper back
problems. Given that people aren’t going to stop using
the technology, the Backpod® and its programme
are logical ways to unwind its effects on the spine,
ongoing.
For a more detailed analysis of the musculoskeletal
consequences of hunching, see the iHUNCH page on
the Backpod’s website www.backpod.co.nz See also
the Wikipedia entry on the iHunch.
30
Health Practitioner pages
Page 34

The Backpod® user guide contains two simple
muscle strengthening exercises. These are highly
useful, but cannot be as effective as a comprehensive
supervised strengthening programme. The usual
hunched forward/poked chin neck pattern arising from
bent-forward activity leads to a standard imbalance
in the muscles involved. The hands are being used,
so the pectoral muscles of the chest become strong
and tight. However, the retractors of the scapulae
(especially the middle and lower trapezius fibres and
rhomboids) become stretched out and weak.
An indicator of this is a wide gap between the inner
edge of the shoulder blades and the spine. This shows
the scapulae have migrated around the rib cage,
pulled by the tighter, stronger anterior chest muscles.
These are not restrained by the weaker stretched-out
middle back muscles, giving rise to a stooped-forward
upper back and hunched-forward shoulders. So
these are the ones that need concentrating on in a
strengthening programme to correct a neck or upper
back problem.
There are many techniques, but obvious ones to
include are the one-arm bent-over dumbbell row (a bit
like the action of pull-starting a motor lawnmower), the
seated row, lateral pulldown, and the two-arm bentover barbell row. A high bench, where the client can lie
face-down and pull a barbell up to the underside of the
bench, is particularly accurate for this whole group of
muscles. Correct form on all these exercises includes
the chin held in and the shoulder blades squeezed
hard together. The lateral pulldown bar should always
come down in front of the face and never behind the
head. For gym warm-ups and cardiovascular work-outs,
use rowing machines and cross-trainers as these work
the middle back muscles unlike, say, exercycles.
The other muscles essential to counter the chin-pokedforward posture are the longus colli and other deep
neck flexors. These hold the chin in, and are usually
missed by personal trainers and gym programmes.
However, the neck cannot maintain correct posture,
with the chin easily held in, unless these muscles are
strong enough to do it. They can be surprisingly weak
and should always be tested. Frequently, a client with
immense strength in the upper trapezius and neck
extensors can hardly lift their head off the ground with
the chin held in (which requires strength in the deep
neck flexors). This is at least partly why they have a
neck problem. See page 11 for the strengthening
exercise.
Backpod® for gymnasiums, Pilates and personal trainers
31
Health Practitioner pages
Page 35
About us
The Backpod® is a product from Bodystance Ltd, a New Zealand
company bringing practical innovations and solutions to
very-large-number musculoskeletal problems worldwide. The
Backpod® and its programme were developed and tested in
New Zealand, and are immediately applicable to most neck and
upper back problems anywhere in the developed world - they
are the same spines with the same forces acting upon them.
Bodystance Ltd is registered with Medsafe, the New Zealand
Medicines and Medical Devices Safety Authority (www.medsafe.
govt.nz) and the Backpod® has been notified to the Medsafe
data base for medical devices.
Contact us
Manufacturer:
Bodystance Ltd
Studio 9
31 Dowling Street
Dunedin 9016
New Zealand
email: [email protected]
cellphone: +64 274 463 356
www.backpod.co.nz
Import and Distribution: Germany
Bodystance GmbH
Berliner Platz 10
97080 Würzburg
t: +49 931 359 390
f: +49 931 359 3920
www.backpod.de
Import and Distribution: Australia
MAP2 Pty Ltd
t: +61 423 782 789
www.map2.co
© 2017 Bodystance Ltd, All rights reserved.
Product Information: UK
Delphic HSE Solutions Ltd.
5th Floor Abbey House, 282 Farnborough Road
Farnborough, GU14 7NA, UK
t: +44 (0)1252 856 700
www.delphichse.com
EC REP
Page 36
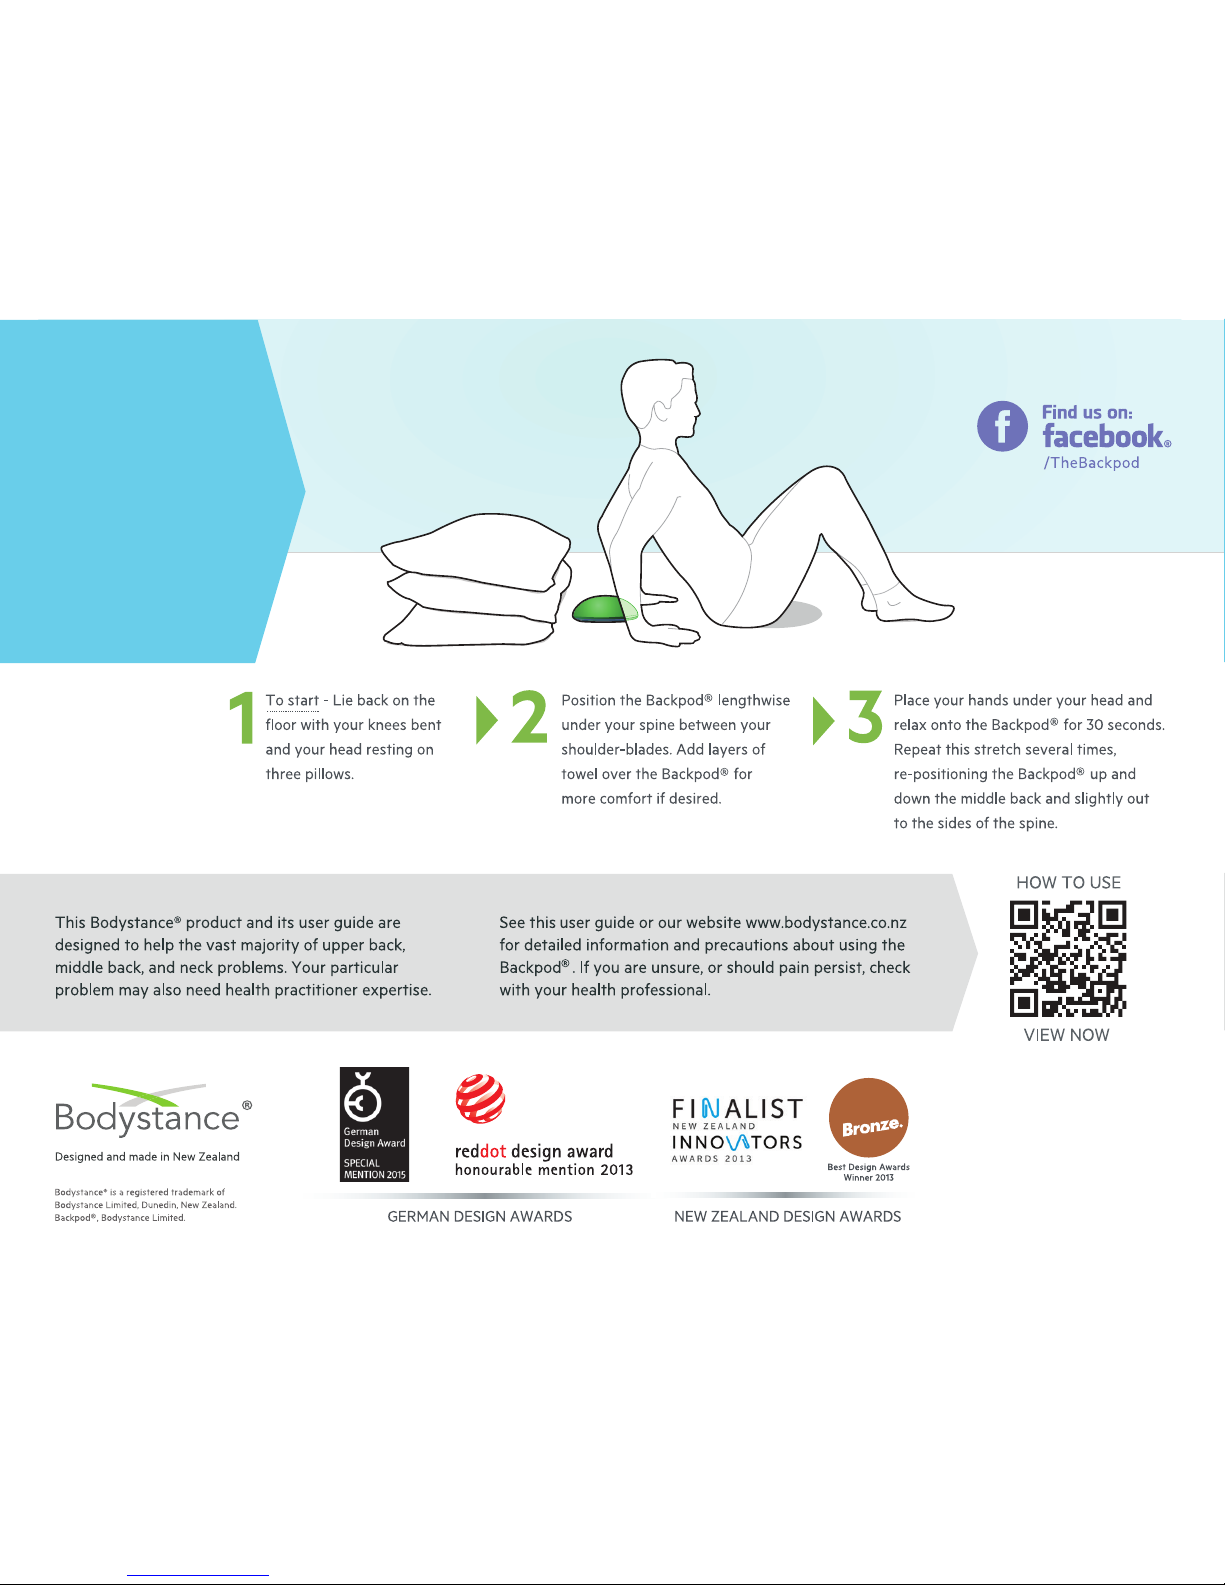
See pages
3-5 inside
for more
detailed user
instructions
Do read the more detailed
instructions in this user
guide, or view them as videos
from the HOW TO USE QR
code, or on our website
www.backpod.co.nz
 Loading...