

Page 1
WARNING:
To reduce risk of injury, the user must read and understand this instruction manual before using the BODY PLANK.
This machine is intended for domestic, indoor use only in accordance with the instructions provided in this manual.
Ideal Sourcing Ltd, Ideal Home House, Newark Road, Peterborough PE1 5WG
Please read these instructions carefully and retain for future use
Model No: JS-002
USER MANUAL
Page 2
2 3
MEDICAL RECOMMENDATIONS
You MUST NOT use the BODY PLANK without your
doctor’s consent if you:
• Are pregnant
• Have had a recent operation or surgery
• Have knee, shoulder, back or neck injuries
You are strongly recommended to consult your
doctor before using the BODY PLANK if you have
any of the following:
• Heart condition or cardiovascular disease
• High blood pressure
• Acute thrombosis
• Acute hernia
• Severe diabetes
• Epilepsy
• Severe migraines
• Malignant tumour
• Pacemaker, implants, artificial joint(s) or limb(s),
stents or IUDs, metal plates or pins
• Any recent illnesses or infections
• Deep Vein Thrombosis
• Cancer
Discontinue using if you experience dizziness, nausea,
shortness of breath, pain, or any other abnormal
symptoms. Consult your physician before continuing.
GENERAL SAFETY INSTRUCTIONS
• Consult your doctor before beginning this or any
exercise or diet programme.
• Follow the warm-up exercises before you
commence your workout.
• Increase speed, intensity and duration of
exercises gradually.
• The BODY PLANK must be securely assembled
as described in this manual before use.
• The BODY PLANK is NOT suitable for children.
• Do not let the BODY PLANK get wet with any
type of liquid.
• In addition, do not use the BODY PLANK while
your hands are wet.
• Only use the BODY PLANK on a surface that will not
be dented or damaged by the weight of the machine.
• Place the BODY PLANK on an old cloth or
training mat before use, to avoid marking the
floor or carpet.
• Only one person is allowed to use the
BODY PLANK at any time.
• Parents and others in charge of children should
be aware of their responsibility because the
natural play instinct, and the fondness of children
for experimenting, can lead to situations and
behaviour for which the training equipment
is not intended. If children are allowed to use
the equipment, their mental and physical
development and above all their temperament
should be taken into account; they should be
controlled and instructed to the correct use
of the equipment, the equipment is under no
circumstances suitable as a children’s toy.
• All users must be tall enough to comfortably
reach the pedals.
• Leave yourself 1 metre of space either side of the
BODY PLANK for your safety.
• Always wear the appropriate workout clothes
and footwear when exercising.
Avoid wearing loose clothing which might get
caught in the BODY PLANK.
• The BODY PLANK has been tested and certified
to EN957 class HC. Maximum
weight of user 120kg.
Congratulations on the purchase of your BODY PLANK. Please study these instructions
carefully before use paying special attention to the following guidelines.
For your safety and the safety of others the following safeguards are very important.
Failure to read and follow these instructions may lead to serious injury.
Page 3
4 5
WARNING:
Care must be taken when lifting the BODY PLANK as it may be heavy for you to lift.
You may need a friend or family member to help you unpack, assemble and position the unit.
UNPACKING:
• To avoid danger of suffocation, please keep all plastic bags out of the reach of children.
• Check that there is no damage to the unit prior to use. In case of visible damage before or during use,
stop using the BODY PLANK and contact your vendor. Do not attempt to use the BODY PLANK.
• The BODY PLANK is designed for home use only and is not intended for commercial use.
• Please do not use outdoors.
• Please retain all packaging and paperwork for future use and store safely away from children and animals.
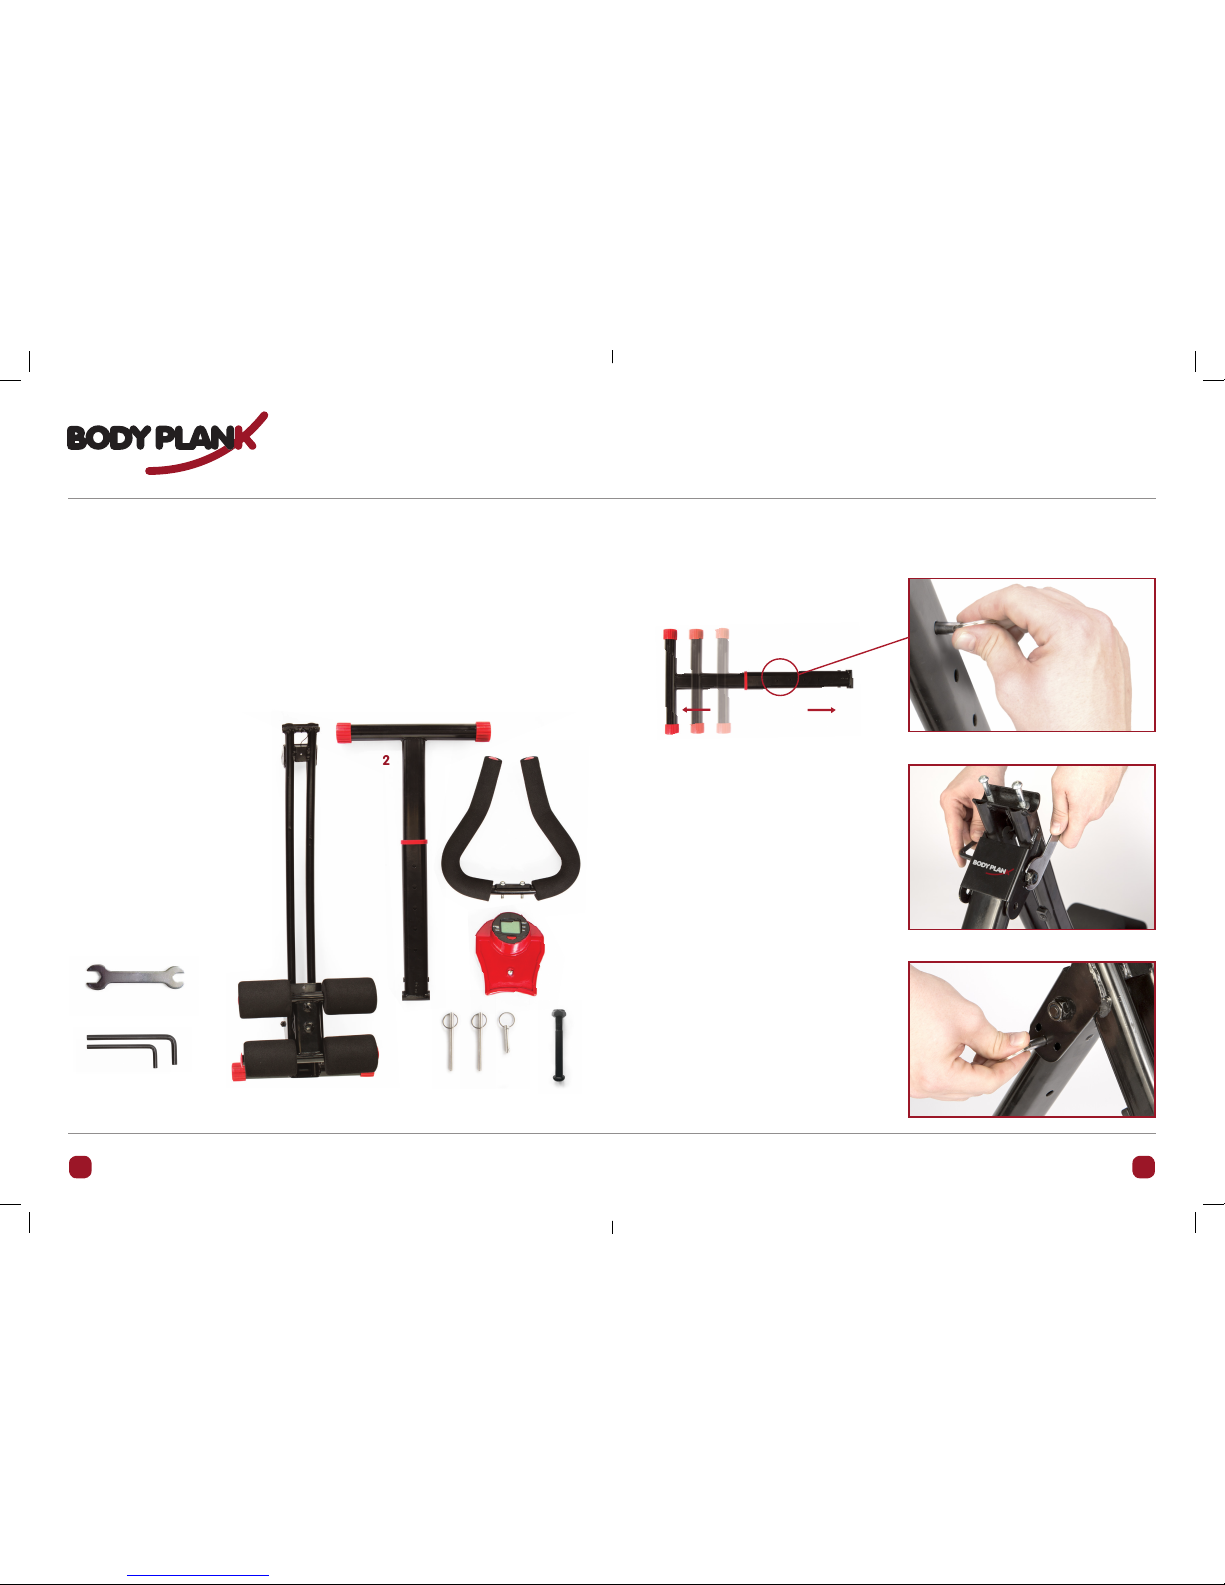
Assembly Instructions
Before you begin, check to make sure you have all the listed components in the box.
Lock into desired position using long
Locking pin 5
Attach Support frame 2 to Main frame 1 using
Bolt 6 provided. Tighten using Allen key B
and Spanner A provided.
Place small locking pin 5 through the
support frame 2 to stop the shuttle from
moving during assembly and storage.
1.
2.
3.
STOP
SUPPLIED TOOLS
WHAT’S IN THE BOX?
1 Main frame
(with Knee Pad Shuttle 1a. attached)
2 Support frame
3 Handle bar
(Handle bar bolts will be in a separate bag)
4 Display
5 Locking pin x 3 (2 Long & 1 Short)
6 Bolt
A Spanner
B Allen key x2
1
3
4
5
2
1a
6
Due to our ongoing improvements programme, the images of the equipment
in this manual may differ slightly to the machine you have received.
Page 4
6 7
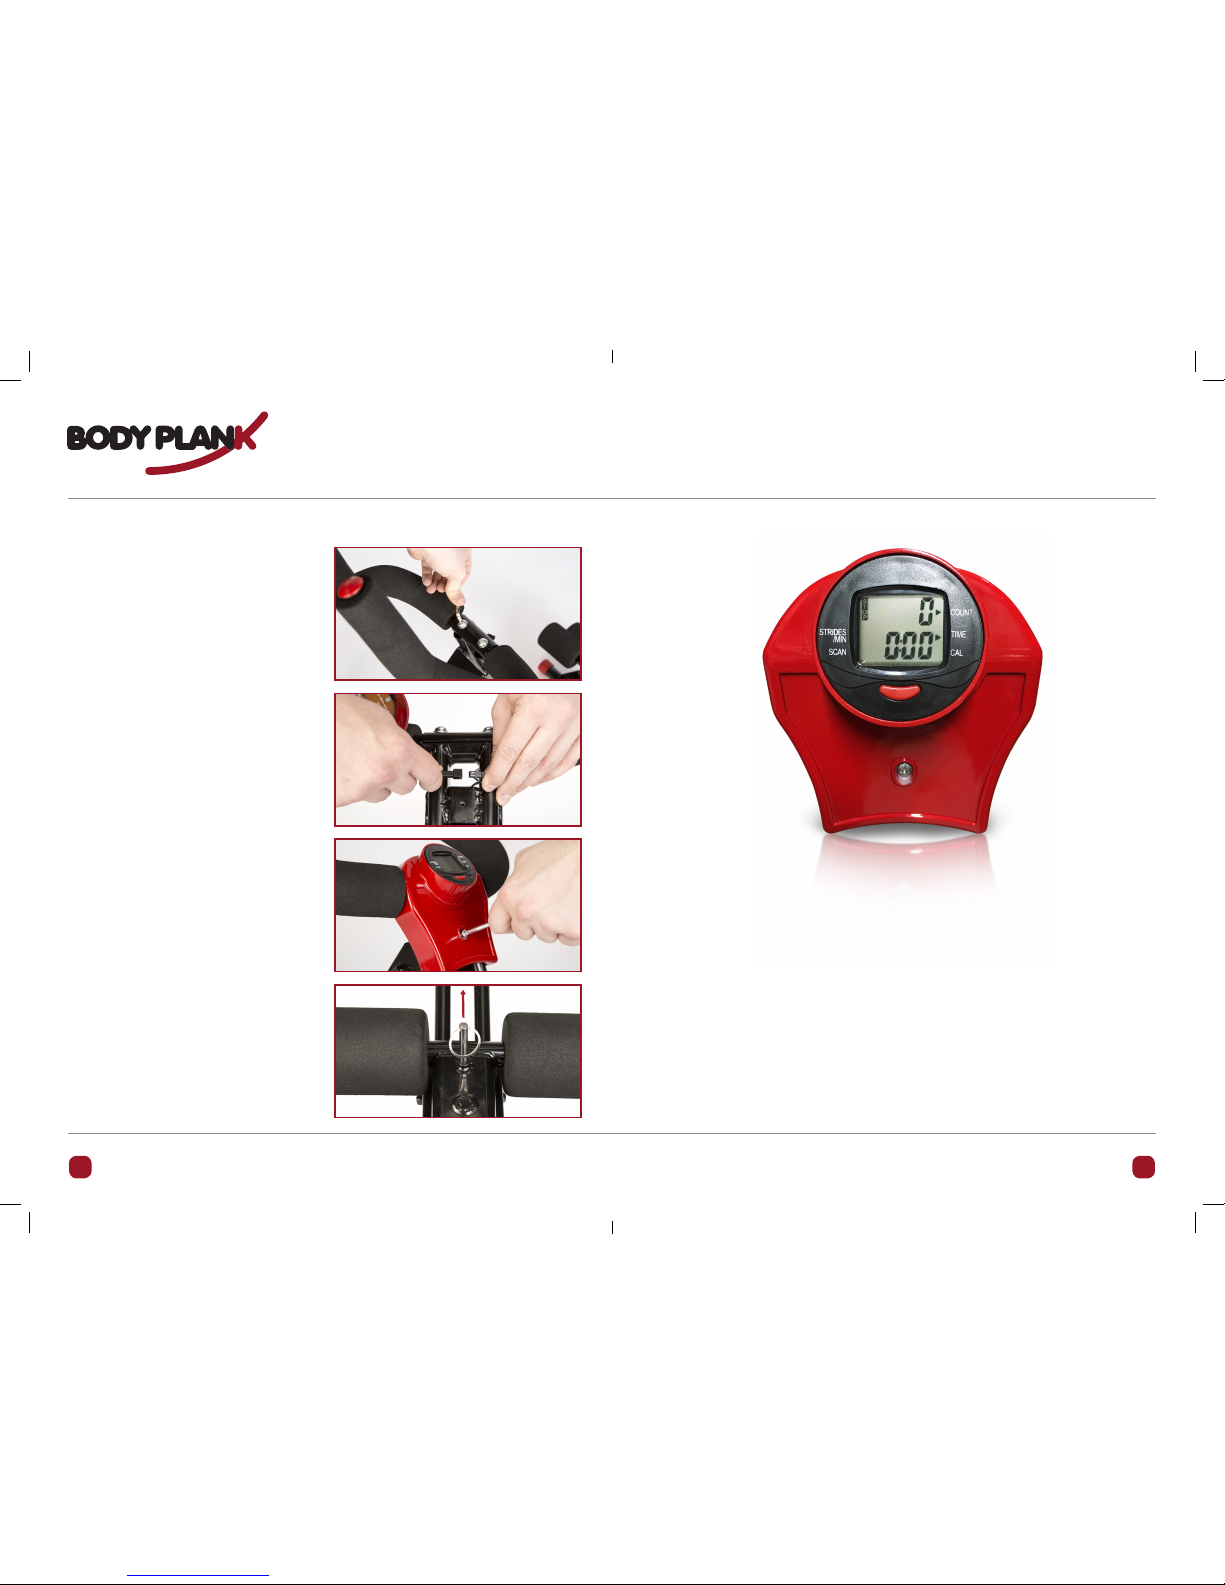
Assembly Instructions
To enable the knee pads to twist whilst
exercising, remove the long locking
pin 5 from the centre of the knee pad shuttle.
Secure the display in place using the screw
in the front of the display.
Connect the wire from the display to the
wire on the machine.
Place handle bar 3 on top of main frame
1, making sure the two holes align with the
holes on the top of the main frame 1. Using
the two screws with washers from the bag.
Secure the handle bars 3 into position with
allen key B.
Display Functions
4
5
6.
7.
Press the red button to turn it on, leave for a few moments and it will turn itself off.
Press the red button to cycle through functions.
To reset the display, press and hold the red button.
The display requires one button cell battery (SR44) provided.
Remove battery if not be used for long periods of time.
STRIDES/MIN
This shows you an average of how many strides
you are doing in one minute.
SCAN
This will flick between each of the different
functions on the display.
COUNT
Shows the total strides performed.
TIME
Shows you how long you have been exercising.
CAL
Shows you how many calories you have burned.
To remove the battery disconnect the display by unscrewing and unplugging the wire connectors.
Locate the battery housing on the reverse, bend the support arm and slide the battery out.
Page 5
8 9
WARMING UP AND COOLING DOWN – IMPORTANT
One of the most important parts of your workout is to prepare your body for exercise on the BODY
PLANK.
WARMING UP the muscles substantially decreases the chances of injury and only takes a few
moments to do. BODY PLANK can also be used for warming up and cooling down exercise.
COOLING DOWN helps removes the lactic acid build-up in the muscles by oxygenating the muscles
after your exercise routine. Lactic acid is what makes you ache after a workout, cooling down should
be undertaken soon after the last set of exercises you intend to complete.
Warming up and cooling down exercises are identical and easy to remember. Both warming up and
cooling down should be done slowly and accurately, there is no hurry to complete these exercises, it is
more important to complete them. In addition, it is good practise to move around after the cool down
exercises to further dissipate the lactic acid.
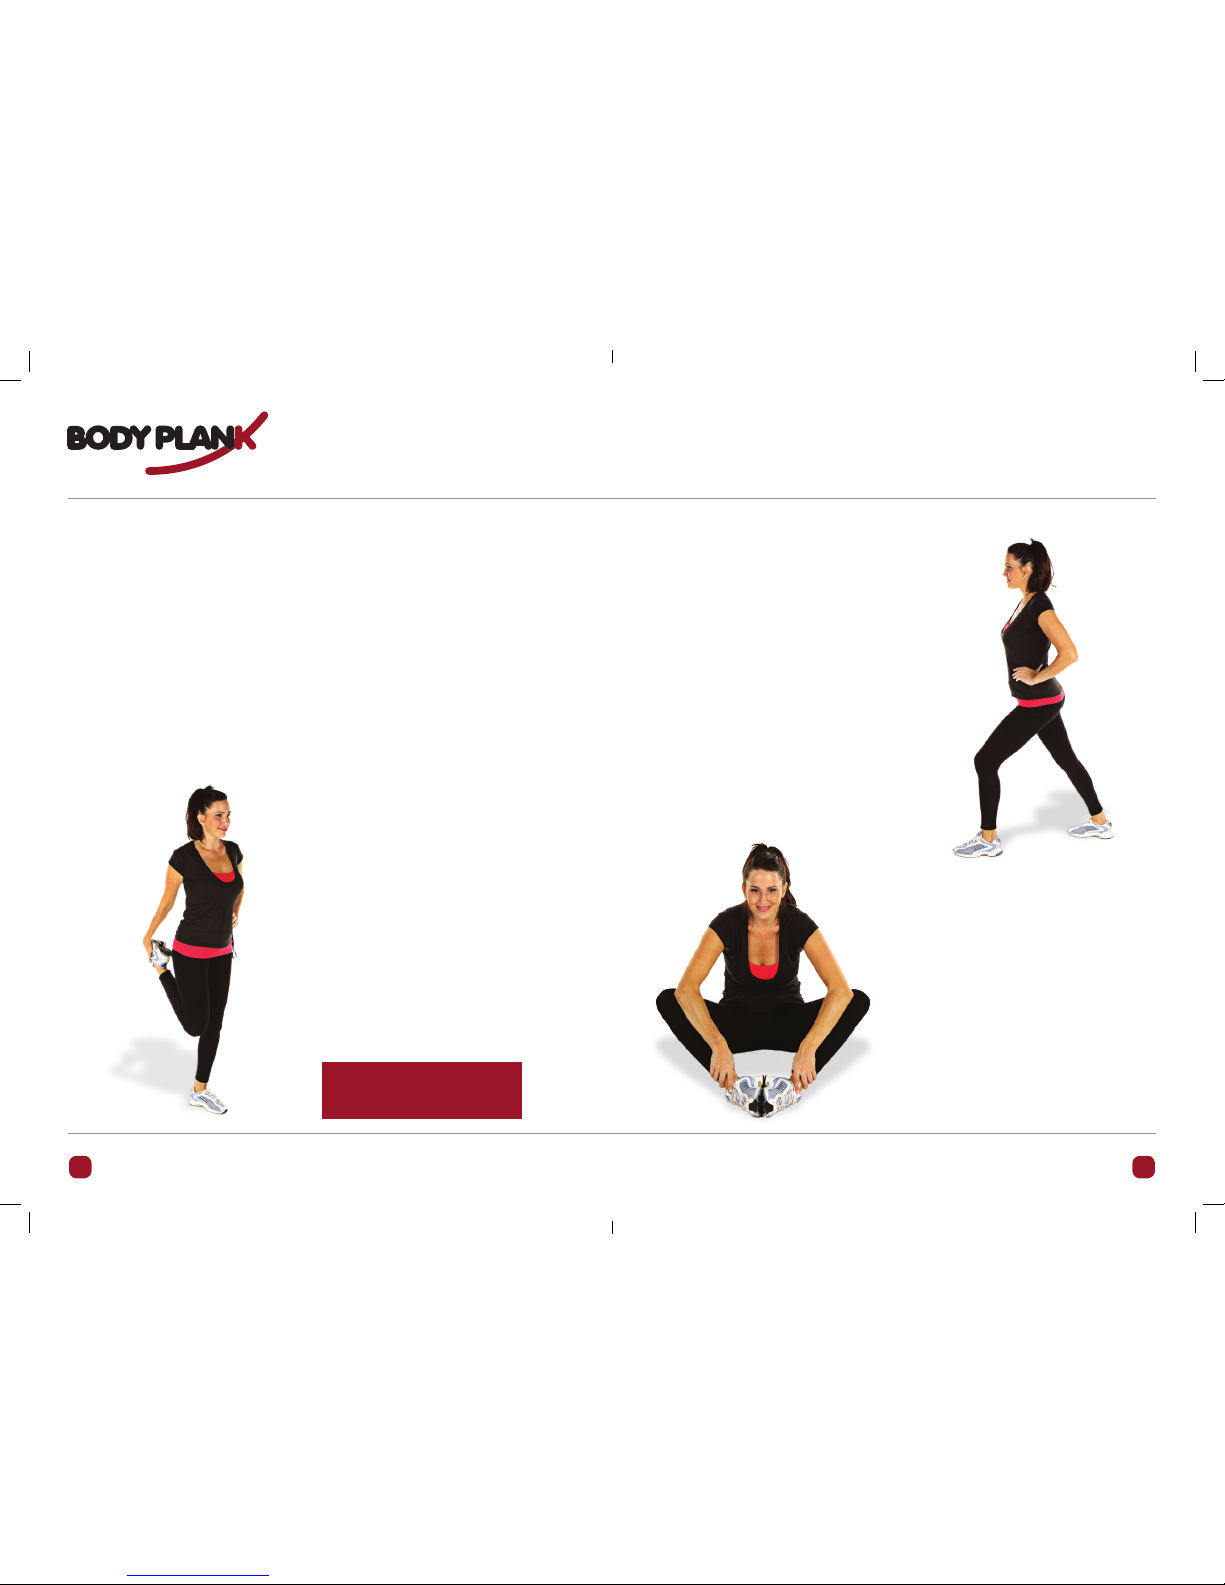
WARMING UP.
Stand close to a wall, chair or other solid object.
Use one hand to assist your balance. Bend the
opposite knee and lift your heel towards your
buttocks. Reach back and grasp the top of your
foot with the same side hand. Keeping your inner
thighs close together, slowly pull your foot towards
your buttocks until you feel a gentle stretch in
the front of your thigh. You do not have to touch
your buttocks with your heel. Stop pulling when
you feel the stretch. Keep your kneecap pointing
straight down and keep your knees close together.
(Do not let the lifted knee swing outward.) Hold the
stretch for 20 to 30 seconds.
Repeat the exercise for the other leg.
Sit on the floor and bend your legs so that the
soles of your feet are together. Place your hands
on your ankles. Lean forward from the waist and
press down lightly on the inside of your knees.
You should feel a stretch in the muscles of your
inner thighs.
QUADRICEPS STRETCH
INNER THIGH STRETCH
Stand approximately one arm’s length away from a
wall or chair with your feet hip-width apart. Keeping
your toes pointed forward, move one leg in close to
the chair while extending the other leg behind you.
Bending the leg closest to the chair and keeping
the other leg straight, place your hands on the
chair. Keep the heel of the back leg on the ground
and move your hips forward. Slowly lean forward
from the ankle, keeping your back leg straight until
you feel a stretch in your calf muscles. Hold for 20
to 30 seconds. Repeat the exercise for the opposite
leg.
CALF AND ACHILLES STRETCH
TOP TIP:
Use a chair or a wall to help keep
your balance only if you need to.
WARMING UP AND COOLING DOWN – IMPORTANT
Page 6
10 11
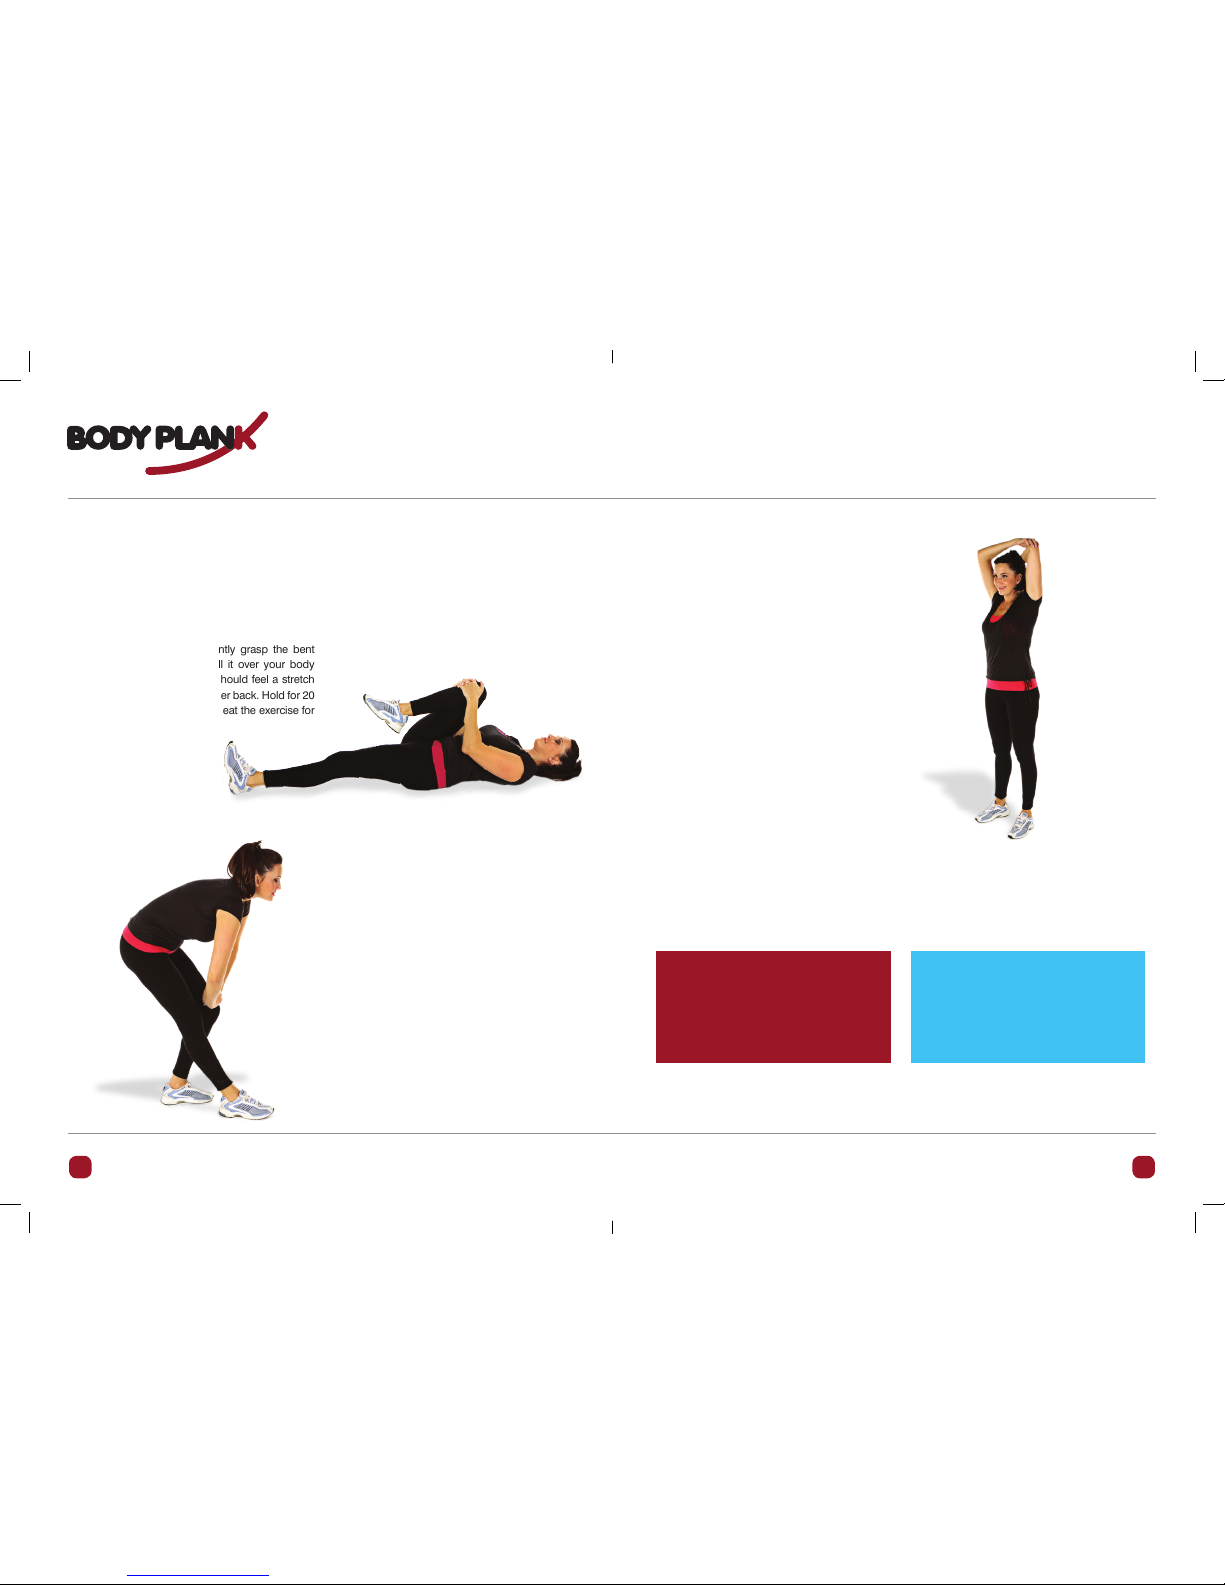
Lay flat on your back with your hips relaxed against
the floor. Bend one leg at the knee. Keeping both
shoulders flat on the floor, gently grasp the bent
knee with your hands and pull it over your body
and towards the ground. You should feel a stretch
in your hips, abdominal and lower back. Hold for 20
to 30 seconds and release. Repeat the exercise for
the opposite side.
Stand with your feet shoulder width apart and your
knees slightly bent. Lift one arm overhead and bend
your elbow, reaching down behind your head with
your hand toward the opposite shoulder blade.
Walk your fingertips down your back as far as you
can. Hold this position. Reach up with your opposite
hand and grasp your flexed elbow. Gently assist the
stretch by pulling on the elbow. Hold for 20 to 30
seconds.
Repeat the exercise for the opposite arm.
BUTTOCKS, HIPS AND ABDOMINAL STRETCH
OVERHEAD / TRICEPS STRETCH
Stand with your legs hip width apart. Extend
one leg out in front of you and keep that foot
flat against the ground. With your hands resting
lightly on your thighs, bend your back leg and
lean forward slightly from your hips until you feel
a stretch in the back of your thigh. Be sure to lean
forward from the hip joint rather than bending at
your waist. Hold for 20 to 30 seconds. Repeat the
exercise for the opposite leg.
STANDING HAMSTRINGS STRETCH
TOP TIP: As you progress, you can create
your own warm up and cool down exercise
routine, you do not need to keep strictly to
the above routine so long as you utilise all the
basic muscle types included above.
TOP TIP:
DONT FORGET YOUR
COOLING DOWN
ROUTINE
Warming up and cooling down should take around ten minutes each. It is sensible to adjust this
timing according to your own situation. You would benefit from a longer warm-up session if you
exercise soon after waking up than you would after a walk to the shops and back for example.
TAKE YOUR TIME WARMING UP AND COOLING DOWN,
ENJOY THE STRETCHES AS THEY WILL MAKE YOU FEEL BETTER.
WARMING UP AND COOLING DOWN – IMPORTANT WARMING UP AND COOLING DOWN – IMPORTANT
Page 7
12 13
Instructions for Use
Adjust the BODY PLANK machine height by removing the locking pin in the support frame and sliding
the stabilising feet either up or down. Then add the locking pin to secure into position.
The higher the support frame the more challenging the exercise.
Adjust the angle of the BODY PLANK by removing the long locking pin from the main frame.
With one hand on the support frame and the other on the main frame, adjust the angle before
securing with the locking pin. The steeper the angle, the more challenging the exercise.
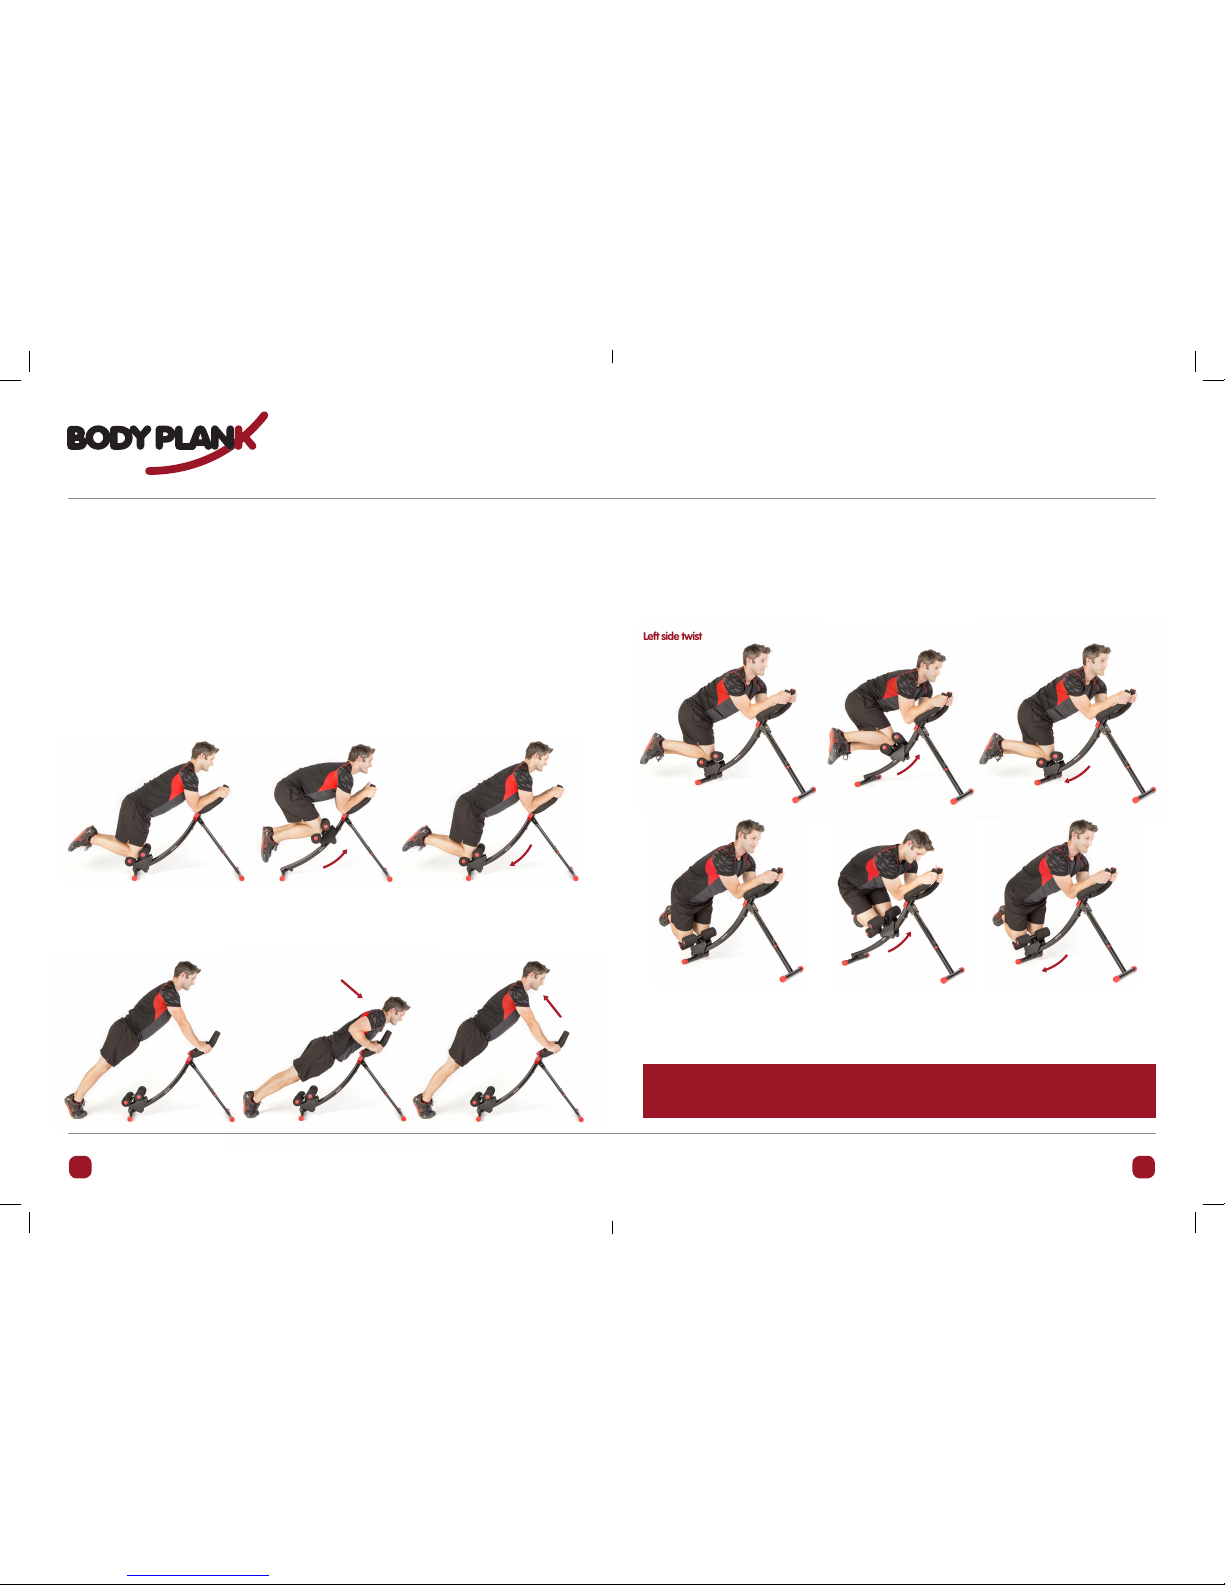
This is a more complete abdominal exercise that concentrates on two muscle groups at once.
Following a similar 3 step routine as the Ab Exercise start by removing the locking pin in the knee rest,
this will allow you to 1. twist your hips before beginning. 2. Still with hips twisted bring your knees up to
your chest, then 3. control the movement back down.
Make sure to repeat the twists for both the left and right sides of your body.
Please be advised that everyone’s physical fitness is different.
Please remember to work out within your means. Stop immediately if you start to feel faint, dizzy or sick.
Make sure you take on plenty of fluids before, during and after working out.
Once you are happy with the position of the BODY PLANK machine, 1. hold the handle bars firmly and gently
rest your knees between the foam pads. 2. Whilst holding the handle bars, resting your forearms on the
handle bars, bring your knees up to your chest, then 3. control the movement back down and repeat.
It is recommended for all the exercises shown here to start off doing 3 sets of 10 repetitions on
the easiest setting and building up the workout gradually.
To disembark from the machine make sure the knee pads are at its lowest point, whilst keeping
hold of the handle bars, gently lift off the knee pads and stand up.
Ab Exercise: This will engage your abdominal muscles
Ob/Ab Exercise : This will engage your oblique muscles as well as your abdominal muscles.
Do not lean back on the machine or let go off the handle bars until off the machine.
Right side twist
Left side twist
1. 2. 3.
1.
1.
2.
2.
3.
3.
Push ups: This will work your biceps, triceps, pectoral and deltoid muscles.
You can use the handle bars of the machine to perform a push up. 1. Holding the handle bars,
2. lower your chest towards the machine keeping your elbows close to your body, then 3. push
yourself away from the machine back to the starting position.
1. 2. 3.
Always dismount the BODY PLANK before making adjustments to the height
Page 8
14 15
STORAGE & CLEANING
• Clean the BODY PLANK with a damp cloth
and mild detergent only.
• Regularly check the BODY PLANK for
damage before storing. Should the
BODY PLANK become damaged; do not use.
• Should you need to store your
BODY PLANK it is advisable to
seek help with moving it.
Store on its feet at all times.
SPECIFICATIONS
Model No.: JS-002
Size: 95cm x 89cm x 35cm
Net Weight: 7kg approx. (unit only)
Maximum User Weight: 120kg
Class: HC
Made in China
Disposal of Old Electrical & Electronic Equipment
(Applicable in the European Union and other European countries with separate collection systems)
Problem Solution
Base is unstable
Make sure that the floor is flat and that there are
no tiny objects under the stabilizers.
Handlebar is shaking Ensure that the bolts are tightened securely
Display isn’t working
Check that the display wire is connected and
there is no damage to the wire.
Check that the battery is correctly connected
and the polarisation is the right way round.
If it still doesn’t work try with another battery.
TROUBLESHOOTING
Appliances bearing the symbol shown here may not be disposed of in domestic rubbish.
You are required to dispose of old electrical and electronic appliances like this separately.
Please visit www.recycle-more.co.uk or www.recyclenow.co.uk for access to information
about the recycling of electrical items. Please visit www.weeeireland.ie for access to
information about the recycling of electrical items purchased in Ireland.
The WEEE directive, introduced in August 2006, states that all electrical items must be
recycled, rather than taken to landfill.
Please arrange to take this appliance to your local Civic Amenity site for recycling,
once it has reached the end of its life.
NOTES
Page 9
© 2016 Ideal Sourcing Ltd E&OE 0716
Ideal Shopping Direct Limited, Ideal Home House, Newark Road, Peterborough PE1 5WG
Made in China
E&OE 8/16 V2.1
 Loading...