

Page 1

BODYGUARD®FITNESS, division of Procycle
CANADA
9095, 25
th
Avenue, Saint-Georges
(Québec) Canada G6A 1A1
The name “Bodyguard Fitness®” and heart logo are
registered trademarks of Procycle Group Inc.
T280P – T280C – T320
TREADMILLS
OWNER’S MANUAL
R1 11 / 2005
591149
Page 2
TABLE OF CONTENTS
IMPORTANT SAFETY NOTICE ....................................................................................................................................... 3
WARRANTY INFORMATION ......................................................................................................................................... 5
1. OPERATING YOUR T280P – T280C – T320 ............................................................................................................... 6
1.1 Getting to Know the T280P – T280C–T320 Computer Display Monitor ............................................................6
1.2 Pausing During an Exercise .................................................................................................................................. 8
1.3 Saving an Exercise ................................................................................................................................................. 8
1.4 Viewing Exercise Parameters ............................................................................................................................... 9
2. SETTING UP THE COMPUTER TO YOUR ENVIRONMENT................................................................................... 9
2.1 Access to “Settings Menu” .................................................................................................................................. 9
2.2 Language Feature ................................................................................................................................................ 9
2.3 Weight Unit Feature ......................................................................................................................................... 10
2.4 User Identification Feature................................................................................................................................ 10
2.5 Distance Unit Feature ........................................................................................................................................ 12
2.6 Time, Distance or Calories Feature.................................................................................................................... 12
2.7 Warm Up and Cool Down Feature ................................................................................................................... 12
2.8 Heart Rate Control Options Feature ................................................................................................................ 13
2.9 Heart Rate Access Options Feature .................................................................................................................. 13
2.10 Beeper Feature .................................................................................................................................................. 14
2.11 Speed Limits ...................................................................................................................................................... 14
2.12 Big Number Option ........................................................................................................................................... 14
2.13 Learn Program ................................................................................................................................................... 14
2.14 Heart Rate Recovery ......................................................................................................................................... 15
2.15 Max Duration .................................................................................................................................................... 15
2.16 Saving Option (On or Off) ................................................................................................................................ 15
2.17 Pause Time ......................................................................................................................................................... 15
2.18 Edit Text Feature ............................................................................................................................................... 15
2.19 Add/Remove Program ....................................................................................................................................... 16
3. T280P – T280C – T320 EXERCISE PROGRAMS ...................................................................................................... 16
4. USING A HEART RATE RECEIVER .......................................................................................................................... 22
Possible Chest Strap Heart Rate Problems ................................................................................................................. 23
Possible Contact Heart Rate Problems ....................................................................................................................... 23
5. COMPUTER DIAGNOSTICS...................................................................................................................................... 24
Acess to”Diagnostics” menu....................................................................................................................................... 24
6. MAINTENANCE INFORMATION ............................................................................................................................. 28
General Care ................................................................................................................................................................ 28
Belt and Running Deck ............................................................................................................................................... 28
Lubricant Application...................................................................................................................................................29
Quick Troubleshooting Check List ............................................................................................................................. 30
Error Codes .................................................................................................................................................................. 31
2
TTaabbllee ooff CCoonntteennttss
Table of Contents
Page 3
IMPORTANT SAFETY NOTICE
READ THIS MANUAL THOROUGHLY BEFORE ATTEMPTING
TO ASSEMBLE OR USE THIS EXERCISE EQUIPMENT.
To ensure that you get the maximum benefit from the engineering that has gone into your machine, we recommend
that you read this manual carefully before attempting to assemble and use the T280P – T280C – T320. Save these instructions
and refer to this manual if you are unfamiliar with the operation of the T280P – T280C – T320.
WARNING – Before attempting to use any of this equipment you should read this instruction manual carefully. Use of
this equipment by people with heart or other medical problems may result in serious injury. You should consult with a
physician prior to using this equipment. It is recommended to periodically consult your physician as you continue to use this
equipment. Immediately cease exercise if you feel dizzy, faint or short of breath. Use of this equipment in a manner other
than as prescribed by the instructions herewith may result in serious injury.
AVERTISSEMENT – Une lecture attentive de ce manuel d’instructions est recommandée avant de commencer à utiliser cet
appareil. Son utilisation peut provoquer des blessures sérieuses chez les personnes souffrant de troubles cardiaques ou
autres problèmes médicaux. Il est recommandé à ces personnes de consulter leur médecin avant d’utiliser cet appareil. Il est
aussi recommandé de consulter régulièrement le médecin au cours de la période d’entraînement. Si vous êtes pris de
vertiges ou d’étourdissements, si vous vous sentez défaillir ou avez le souffle court, cessez immédiatement l’exercice.
L’utilisation de cet appareil d’une manière inadéquate ou autre à celle décrite dans ce manuel d’instructions peut entraîner
des blessures sérieuses.
For Your Personal Safety
Do not place towels or clothing on any part of the treadmill.
Do not place liquids near the computer console, electrical power plug, ON/OFF switch or any part of the treadmill.
Before attempting to disconnect the power, exit the program screen, then turn power OFF. To reduce any risks of electrical
shock, do not pull the power cord from the cable. Gently remove the power cable by the head from the wall outlet.
Do not operate the treadmill if the power cord is damaged or if the treadmill is not working correctly. If the power cord
is damaged, please contact your distributor or manufacturer to get it replaced. The rating of the new power cord must be
15 amps (125 volts AC).
For the International version of the T280P– T280C – T320, note that the power cord to be used for replacement must be rated
10 Amps (250 Volts AC) and must be 2.5 meters (or 8 feet) long minimum.
Keep the power cord away from all moving parts of the treadmill, such as the elevation arm assembly and front transport wheels.
Do not use an extension cord that is not properly grounded. Keep all extension cords clear of all moving parts of the treadmill.
Place the equipment in a way that the power can be easily interrupted by pulling the power cord.
Do not allow children near the treadmill when in operation. Do not allow children unsupervised near the treadmill and keep
the safety key in a safe place away from children.
Wear proper exercise footwear when using the treadmill. Do not use the treadmill in bare feet or in socks. It is normal for
the treadmill belt to discharge soil or rocks that are on the sole of your shoes. It is always good practice to clean the soles
of your shoes before using the treadmill.
Never use the treadmill with more than one person on the belt.
Never try to accelerate or decelerate the speed of the running belt by pushing on it or trying to stop it, with or without power.
Always face towards the computer display and do not run backwards on the belt.
The treadmill should not be boxed in with other furniture or obstacles. Keep the rear and side of the treadmill clear of any
obstructions.
3
IImmppoottaanntt SSaaffeettyy NNoottiiccee
Important Safety Notice
Page 4
Electrical Information
CAUTION – This equipment is intended to be electrically grounded. The three-wire grounding plug (polarized) will fit
only a grounded AC outlet. Do not use an extension cord or outlet if it does not accept three-wire grounding plugs.
Contact a licensed electrician to replace the outlet with a properly grounded outlet.
WARNING – To prevent the risk of fire or electrical shock, do not expose this machine to rain or moisture. Do not place
machine outdoors. Do not place machine near swimming pools, sauna rooms or high humidity environments. Refer
servicing to qualified Bodyguard
®
Service personnel only.
MISE EN GARDE – Cet appareil est conçu pour une installation électrique avec fil de terre. La fiche à trois fils ne s’adaptera
qu’à une prise C.A. avec fil de terre. L’appareil ne doit pas être branché à un fil de rallonge ou une prise de courant qui
n’accepte pas les fiches à trois fils. Faites appel à un électricien qualifié pour le remplacement de la prise de courant par une
prise avec fil de terre.
ATTENTION – Afin de prévenir les risques d’incendie ou de chocs électriques, l’appareil ne doit pas être exposé à la pluie ou
à l’humidité. En confier l’entretien à une personne qualifiée de Bodyguard
®
uniquement.
If you have any questions about the assembly, proper use or repair of your treadmill, please call your local Bodyguard
®
Dealer. All necessary adjustments or repairs during the warranty period must be made by an Authorized Bodyguard
®
Dealer.
IMPORTANT NOTICE : This treadmill should be connected in a dedicated circuit in order to avoid functional problems.
NOTICE IMPORTANTE : Cet appareil est conçu pour être branché dans un circuit dédié pour éviter des problèmes
fonctionnels.
Should you need more information, you can call our Customer Service Department at:
1-418-228-8934
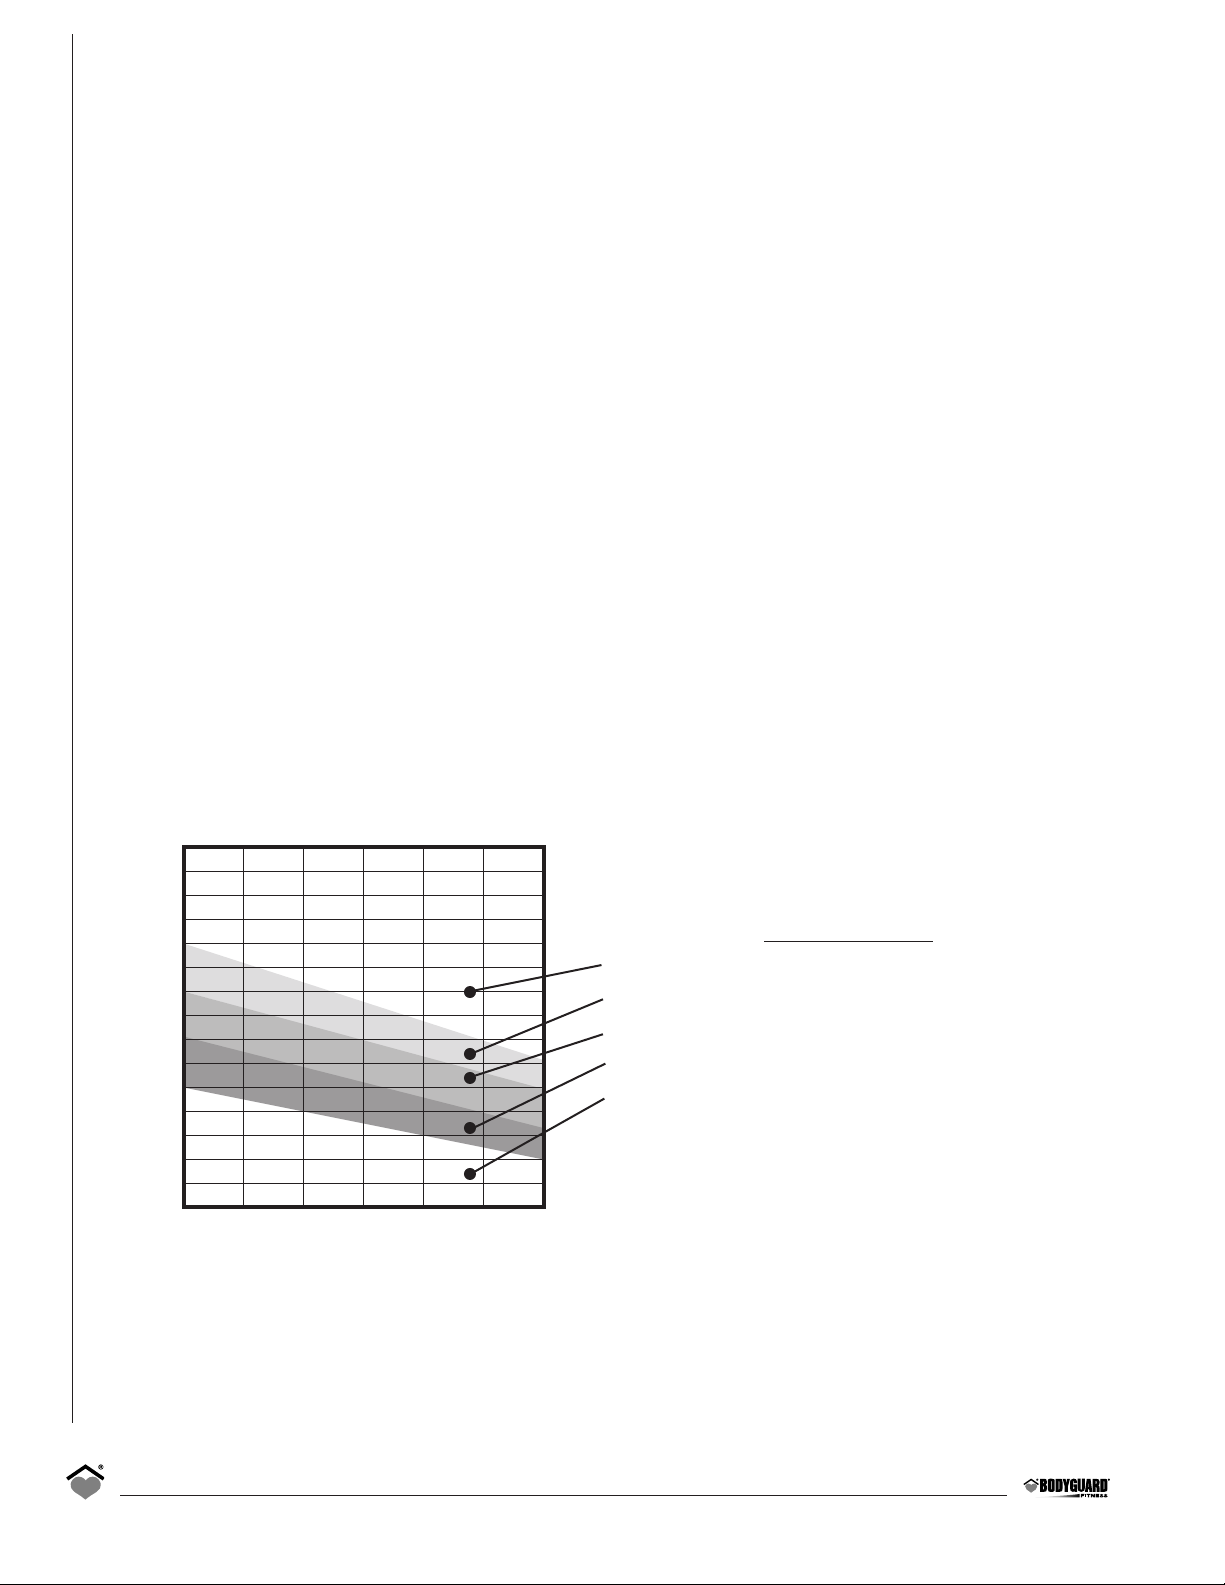
Know Your Heart Rate
4
To determine your recommended heart rate level, select the type of exercise
program you wish to follow. Your MAXIMUM HEART RATE (MHR)
is calculated as follows:
MHR = 220 – Age
It is not recommended to exercise above 90% of your MHR.
Exercise in 70-80% MHR area for an aerobic exercise.
Exercise in 60-70% MHR area for a moderate, healthy heart zone.
Exercise in 50-60% MHR area if you wish to train in a fat burning zone.
Difficult to achieve exercise benefit below 50% MHR.
20 30 40 50 60 70 80
Your Age
200
180
160
140
120
100
80
60
Your Heart Rate (beats/minute)
Page 5
BODYGUARD®FITNESS
T280P – T280C – T320 Limited Warranty
Bodyguard®Fitness warrants that product is in good working order and free of manufacturing defects in workmanship and
materials.
The T280P – T280C – T320 are guaranteed for a period of :
• Lifetime on main frame and motor
• 10 years on parts* In a residential (home) application only
• 3 years on labor
The T320 is guaranteed for a period of :
• Lifetime on main frame
• 5 years on motor
In an institutional application only
• 3 years on parts*
• 1 year on labor
This warranty is non-transferable and applies to the original owner of the unit only.
*Once the labor warranty has expired, shipping and handling cost of parts will be the end-user’s responsibility.
Responsibility of the User
The following items are not included in the Warranty since they are not considered manufacturing defects.
1. Damage resulting from any accidental use, disaster, misuse and abuse.
2. Service and parts required due to improper fusing or wiring.
3. Service and parts required as a result of improper servicing or from an unauthorized dealer.
4. Service and parts required as a result of flood, fire, vandalism or acts of God.
5. Labor to correct installation of the unit or instructing owners on how to use and install the unit.
6. Wear items such as handle bar foam coverings, drive belts and paint finish corrosion or discoloration resulting from
improper cleaning of the unit.
7. Do not put any lubricant product of any type (except the Bodyguard
®
Fitness lubricant) on the running belt. Using a
lubricant not approved by Bodyguard
®
will void the belt/deck warranty.
This Warranty is in addition to any statutory warranty. This Warranty supersedes all other written or expressed warranties.
In the event your T280P – T280C – T320 treadmills should require service, you must contact the Authorized Bodyguard
®
Dealer where you purchased your machine or the nearest Authorized Bodyguard®Dealer.
5
WWaarrrraannttyy IInnffoorrmmaattiioonn
Warranty Information
Page 6
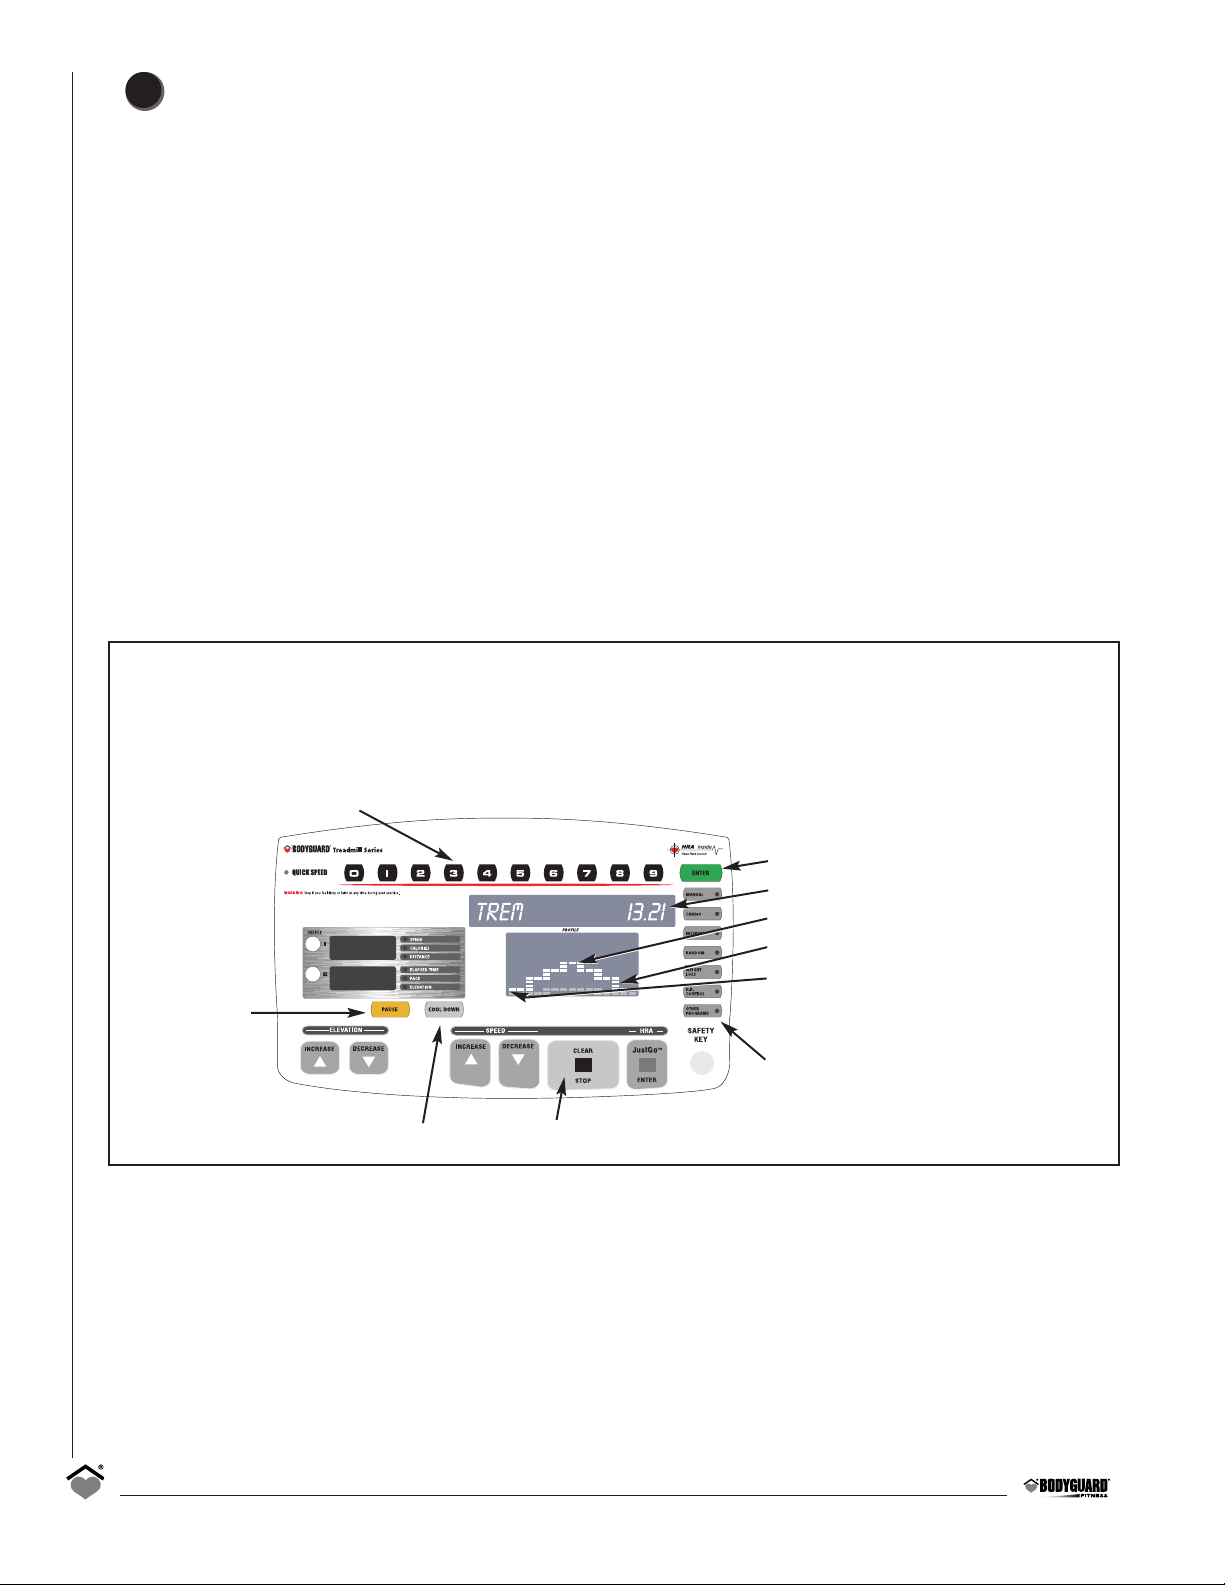
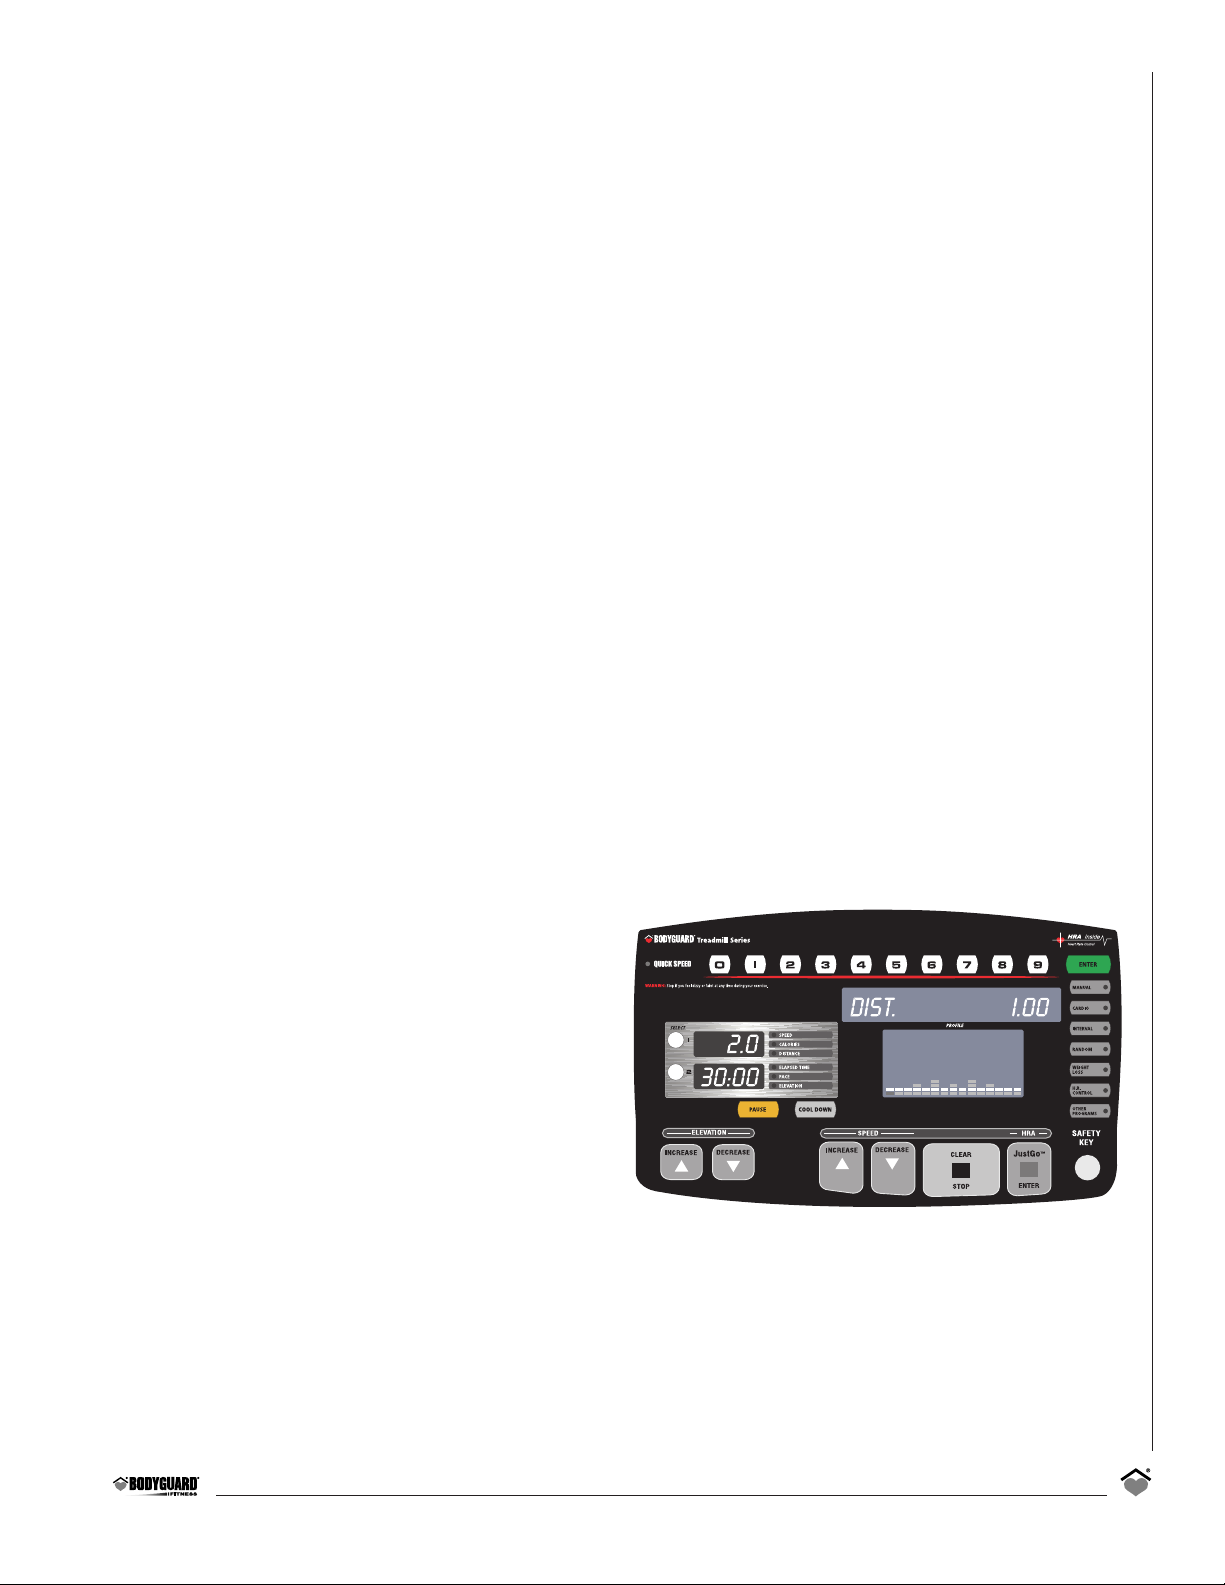
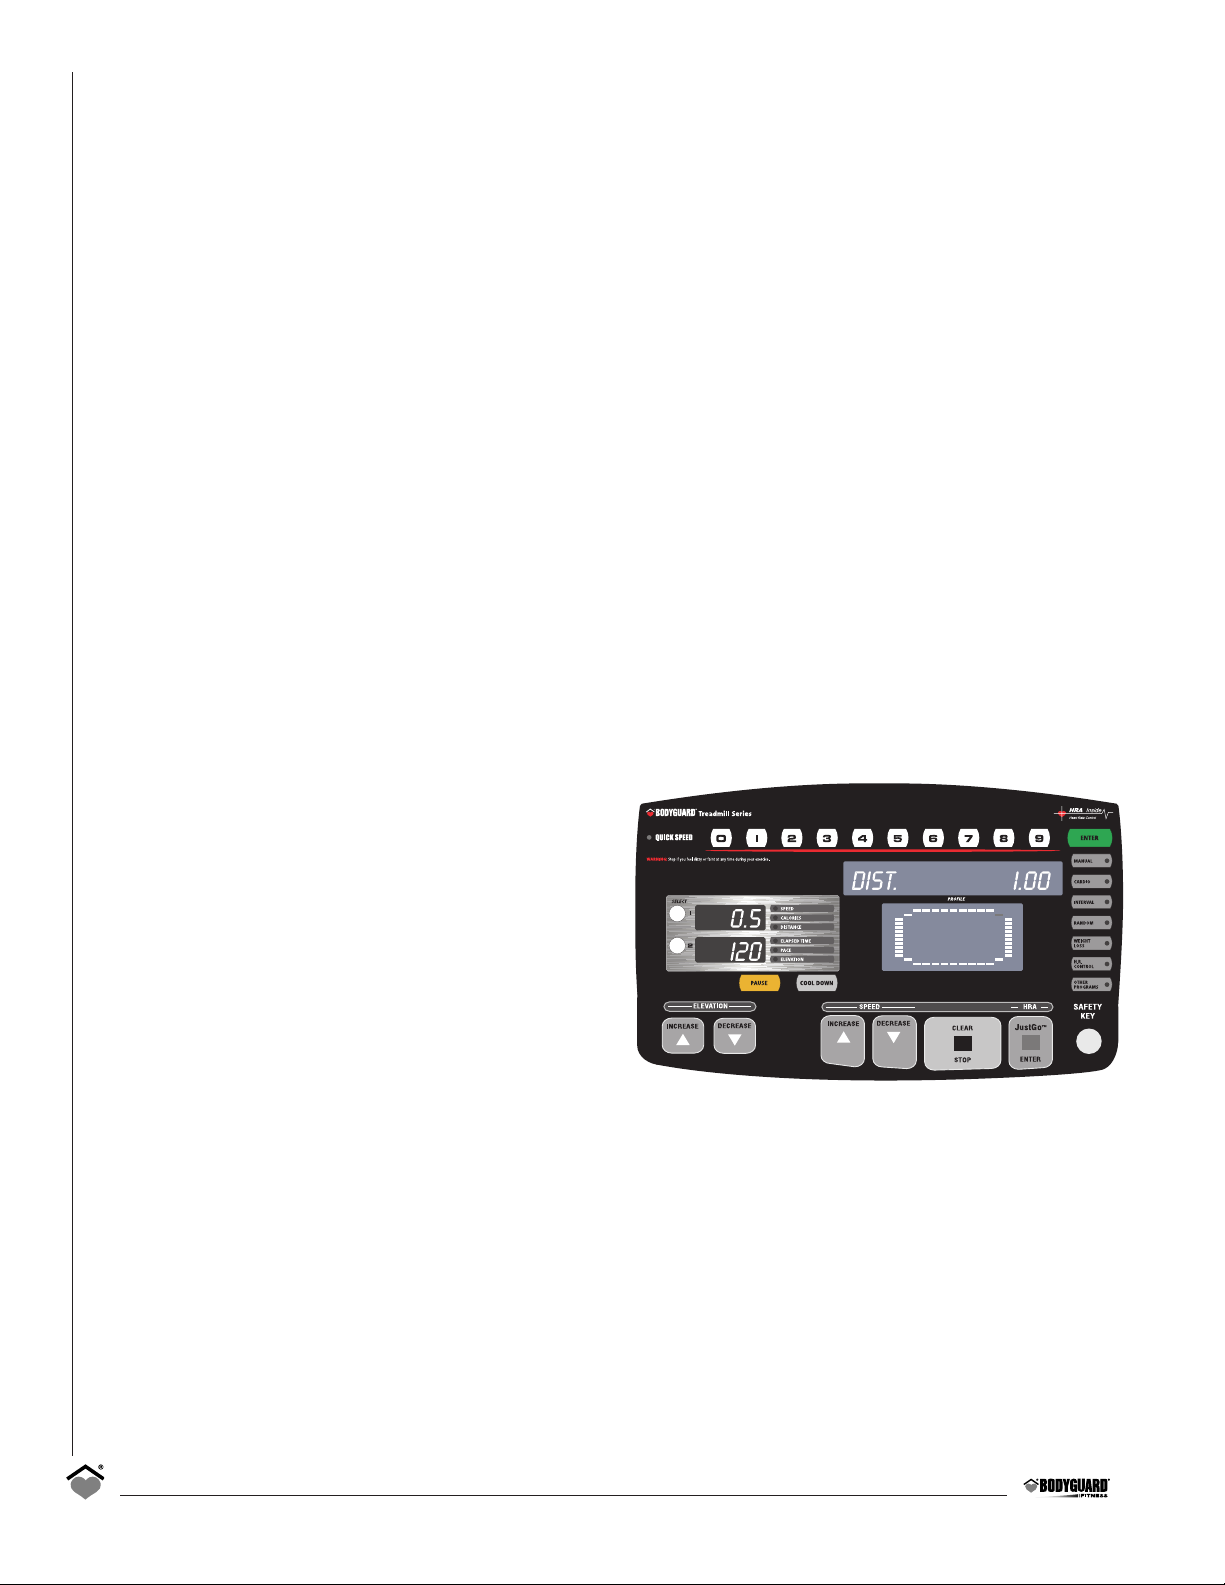
Each T280P – T280C – T320 treadmill contains a L.E.D. (light emitting diode) computer display monitor. The control functions,
unique programs and features have been designed with you in mind, to offer the best possible exercise by displaying
important and clear information regarding your excercise progress.
Please familiarize yourself with the functions of the computer display monitor and each program to allow you to have the
best possible exercise.
The T280P – T280C – T320 come with a magnetic security key. The key’s magnet must be inserted in the appropriate slot in
the console for the treadmill to be functional. For security purposes, make sure to attach the key’s clip to your clothes prior
to starting an exercise.
1.1 Getting to know the T280P – T280C – T320
Computer display Monitor
The computer display monitor consists of a main viewing screen, a central informational window and two additional
informational windows.
Each exercise program starts from the left part of the screen and terminates when it reaches the right part of the screen.
A flashing dot will indicate your progression in the program.
As the speed and elevation increase, the corresponding profile will move towards the top of the viewing screen. At the top
of the screen, a scrolling message center displays all your exercise parameters from the start of the program.
The two informational windows will display SPEED, DISTANCE, CALORIES, ELAPSED TIME, PACE and ELEVATION.
6
Horizontal rectangles (dot) represent speed and elevation values.
Each tick represents either 1 mph (1.6 km/h) or 1.5% elevation change.
The minimum values start from 0,5 mph (0,8 km/h) and 0% elevation at the bottom,
and the maximum values end at 11 mph (17.60 km/h) and 15% elevation to the top of the scale.
T280P – T280C –T320 COMPUTER DISPLAY MONITOR
OOppeerraattiinngg yyoouurr
TT228800PP –– TT228800CC –– TT332200
Operating your
T280P – T280C – T320
1
Enter key
Central information window
Speed profile (bright green)
Elevation profile (light green)
Flashing dot under profiles indicates
your progress in a program.
The program starts from the left
and ends at the extreme right side
Other programs key
figure 6
Numeric Keypad
Pause
Cool Down
Clear/Stop key
Page 7
7
SPEED indicates the treadmill belt speed in miles per hour or kilometers per hour, ranging from 0.50 to 11.00 mph or
0.80 to 17.60 km/h.
CALORIES will indicate total of your caloric expenditure from the start of the exercise.
DISTANCE displays the total distance in miles or kilometers from the start of the exercise, ranging from 0.00 to
99.00 miles or 0.00 to 99.00 km.
ELAPSED TIME indicates the amount of time accumulated from the start of any program. The time will range from
0 to a maximum of 99 minutes.
PACE indicates how long it will take to complete one mile or one kilometer at that current speed. Pace per mile or
kilometer is shown in minutes and seconds.
ELEVATION will display the slope of the running belt in terms of percentage. As an example, one percent (1%) slope is
equal to one foot (or one meter) climbed for each 100 feet (or 100 meters) covered.
NOTE – The parameter like calories displays an evaluation of the real values of your exercise parameters. The evaluations
are based on formal information, tests and are supported by specialists and physicians.
Keys
During an exercise, you can change the value shown on each informational window by pressing the adjacent round select
key once. If you wish to have the information displayed in a scanning mode, simply hold down the round select key for three
seconds and release it. You can also activate any window to scan by repeating the above sequence. To remove the scan, just
press the round select key once again.
The INCREASE and DECREASE Speed keys allow you to modify the speed of the running belt during an exercise. These
keys also allow you to select the programs and parameters prior to each exercise. During any exercise program, you can
modify the speed of the belt by pressing or holding either the INCREASE or DECREASE Speed key. If you continuously
hold down a Speed key, the speed display will change by a tenth of a mile (or kilometer) per hour (0.1 mph or 0.1 km/h).
Release the Speed key when you have selected your desired exercise speed.
Notice that the treadmill belt will slowly change to your desired speed. The desired SPEED L.E.D. will be
displayed flashing on the display window on the left, while the actual belt speed slowly ramps up to your
target speed. Once the speed has been attained the SPEED L.E.D. will stop flashing.
The CLEAR/STOP key allows you to cancel a program selection for any reason. Press this key once to clear data not yet
entered.
NOTE – Use the CLEAR/STOP key to stop the running belt should you encounter difficulty or need to stop quickly during an
exercise.
NUMERIC KEYPAD: Use Numeric keys to enter exercise time, belt speed, weight, distance and target heart rate.
NOTE – These keys also become Quick Speed keys during a program because they can be used to enter directly the speed
whole numbers you want to reach without having to use the SPEED INCREASE or DECREASE keys. You just need to select the
speed with the numeric keypad keys and press the ENTER key at the top on the right hand side of your computer display
monitor. However, if you want to go to 6.5 mph, you need to push 6 and press the ENTER key, you will see your entries on
the central information window. Then, with the INCREASE Speed key, go from 6 mph to 6.5 mph.
ENTER KEY: Press this key to accept entries of workout setup values.
NOTE – To enter data, you could use either the JustGo
TM
/ENTER key or the green “ENTER” key at the top on the right
hand side of your computer display monitor.
COOL DOWN: Press this key to begin an automatically customized workout cool-down.
PAUSE: Press this key to stop the belt and hold the current workout.
Page 8
Scanning Feature
During an exercise you will be able to view nine scanning exercise parameters on the central informational window along
with the exercise program. The parameters that will be displayed are :
• DISTANCE is shown in miles or kilometers for the entire exercise.
• CALORIES indicates the caloric expenditure based on your actual exercise.
• PACE is shown in minutes and seconds.
• ELEVATION is shown in % of elevation.
• HEART RATE displays your actual heart rate if the optional chest strap is used. The display is shown in beats per
minute.
• TREM (time remaning) indicates the amount of time left once a program has started.
or DIST. REM (distance remaining) if you chose distance in your settings
or CAL. REM (calories remaining) if you chose calories in your settings.
• CAL./HOUR (calories per hour) indicates the hourly caloric expenditure based on your actual exercise.
• SPEED displays the actual speed in miles per hour or kilometers per hour.
All these parameters scroll on the central informational window.
1.2 Pausing During an Exercise
You can pause any exercise by pressing the PAUSE key. When this key is pressed during an exercise, the motor will stop and
the running belt will slow down to 0 mph (0 km/h) within a few seconds. The stop is gradual, allowing the user to come
safely to a complete stop. The elevation will remain at the level just prior to the pause.
To pause an exercise:
1. Press the PAUSE key whenever you feel the need to stop the exercise or if you need to momentarily pause the exercise.
A message will appear on the screen indicating the amount of time remaining in the pause. The pause countdown
will only start once the running belt has come to a complete stop.
2. If you wish to continue the exercise, simply press the JustGo
TM
/ENTER key to start the running belt.
3. If you wish to cancel the exercise during the pause, simply press the CLEAR/STOP key. The exercise will be terminated and
a summary of your exercise parameters plus the option to save the exercise will be displayed. If your pause is over the
duration of the pause time, the exercise will terminate automatically.
1.3 Saving an Exercise (custom programs)
Once any program is finished or is prematurely terminated, the user has the option to save 15 elevations and speed levels
and recall it at a later date. This feature is very useful when a particular exercise is interesting and motivational. With
the T280P – T280C – T320, you have the ability to create or modify an existing program and save it with the ability to recall
it including the heart rate control program. The T280P – T280C – T320 has the unique feature of saving a heart rate control
program and being able to recall this exercise and do it without the chest strap.
Saving an exercise program allows the computer to store 15 speed and elevation changes made during your exercise. The
speed and elevation levels saved are the ones before it moves to the next segment. With the T280P – T280C – T320, you have
the ability to create or modify an existing program (personalize) and save it with the ability to recall it.
When any program is finished or is prematurely terminated, the exercise parameters will first appear and then a menu will
be displayed in which you have the option to save the exercise. The option will be displayed as “TO SAVE THIS EXERCISE
PRESS ENTER IF NOT PRESS STOP”.
If you wish to save the exercise at the end of the program: (The T280P–T280C treadmill has four custom program slots and
the T320 has six.)
1. Press the JustGo
TM
/ENTER key while your parameters are scrolling.
2. The T280P –T280C –T320 will indicate to you under which CUSTOM number it has been saved.
NOTE – If the memory is full press the INCREASE or DECREASE keys to select the CUSTOM program you would like to
overwrite. Press the JustGo
TM
/ENTER key to accept.
If you do not wish to save the exercise, press the CLEAR/STOP key to return to the welcome screen.
8
Page 9

SSeettttiinngg UUpp tthhee CCoommppuutteerr
ttoo YYoouurr EEnnvviirroonnmmeenntt
1.4 Viewing Exercise Parameters
At the end of each exercise program, the computer will display four exercise parameters. These parameters will be TOTAL
DISTANCE, CALORIES BURNED, TOTAL EXERCISE TIME, and AVERAGE SPEED.
• TOTAL DISTANCE displays the distance travelled for the entire exercise.
• CALORIES BURNED displays the approximate caloric expenditure for the entire exercise.
• TOTAL EXERCISE TIME displays the length of the exercise in minutes and seconds.
• AVERAGE SPEED displays the average speed value for the entire exercise.
The total exercise parameters on the T280P – T280C – T320 will loop for 2 minutes, showing your exercise parameters until
you press CLEAR/STOP to exit back to the welcome screen. If you do not wish to view the exercise parameters, press the
CLEAR/STOP key to return to the welcome screen.
The T280P – T280C – T320 treadmills offer unique features that allow the user to tailor the treadmill to its current
environment. The treadmill computer can also display a series of diagnostic features and calibration features.
T280P – T280C – T320 treadmills allow you to select and modify the following settings :
• Language
(English, French, Spanish)
• Weight Unit (Pounds or Kilograms)
• User ID
• Distance Unit (Miles or Kilometers)
• Time, Distance or Calories
• Warm Up (On or Off)
• Cool Down (On or Off)
• Heart Rate Control Options
• Heart Rate Access Options
2.1 Access to ”Settings Menu”
To view the above settings, you must enter into the “SETTINGS MENU” as followed:
1. Turn power ON.
2. While the introduction screens are displayed, simultaneously hold down the elevation INCREASE and the SELECT TOP keys.
3. Release the ELEVATION INCREASE and the SELECT TOP keys once entered into the Settings menu.
2.2 Language Feature
You can display all the instructions and information on the computer display screen in a choice of three languages.
To select a language: Enter into the Settings menu, see Section 2.1.
1. Select the LANGUAGE option, and press the JustGo
TM
/ENTER key to accept.
2. Select the language you wish to be displayed on the screen. Choose from English, French and Spanish. Press the INCREASE
or DECREASE keys to select the language.
3. Press the JustGo
TM
/ENTER key to accept.
From now on, all text will be displayed in the language you selected.
9
Setting Up the Computer
to Your Environment
2
• Beeper
(On or Off)
• Speed Limits
• Big Number Option
• Learn Program
• Heart Rate Recovery
• Maximum duration (T320 only)
• Saving Option
(On or Off)
(T320 only)
• Pause Time
• Edit Text (T320 only)
• Add/Remove Program (T320 only)
Page 10
2.3 Weight Unit Feature
The weight unit can be selected to display in pounds or kilograms.
To select a weight unit: Enter into the Settings menu, see Section 2.1.
1. Select the WEIGHT UNIT option, and press the JustGo
TM
/ENTER key to accept.
2. Select the weight unit you wish to be displayed on the screen. Choose from POUNDS or KILOGRAMS. Press the INCREASE
or DECREASE keys to select.
3. Press the JustGo
TM
/ENTER key to accept.
From now on, weight values entered will be in the selected units.
2.4 User Identification Feature
The User Identification feature allows the treadmill to recognize individuals and automatically enter their weight along with
additional information. The T280P–T280C will recognize four and the T320 will recognize six.
Whenever the User Identification feature is used, the weight will be automatically entered at each exercise program.
Therefore, user weight will not be asked during the program set up. Also, the user’s age will be automatically entered during
the Heart Rate Control program to calculate the maximum heart rate.
The User ID feature gives access to the following options:
• ACTIVATE USER ID
• CREATE USER ID
• VIEW STATISTICS
• EDIT USER ID
• RESET STATISTICS
• DELETE USER ID
Activate User
To activate the User Identification feature: Enter into the Settings menu, see Section 2.1.
1. Select the USER ID option and press the JustGo
TM
/ENTER key to accept.
2. Select the ACTIVATE USER ID option and press JustGo
TM
/ENTER key to accept.
3. Press INCREASE or DECREASE key to choose ON or OFF to activate or deactivate it and then press the JustGo
TM
/ENTER key
to accept.
Now that the User ID feature is activated; you will be prompted, at the beginning of each program, to select a User
Identification.
Create User
To create a User ID’s:
1. Enter into the Settings menu, see Section 2.1.
2. Select the USER ID option and press the JustGo
TM
/ENTER key to accept.
3. Select the CREATE USER option and press JustGo
TM
/ENTER key to accept.
4. You will immediately be sent to the lowest empty location, if the MEMORY is full you will have to go to the DELETE USER
option.
5. A total of six alpha-numeric characters can be used to name the USER ID. Use the INCREASE or DECREASE keys to select
any letter from A to Z or number from 0 to 9 as the first character. If you wish to leave a space between characters, simply
10
Page 11
select SPACE (blank character) between the 9 and the A characters. Press the JustGoTM/ENTER key to accept this character.
Now the second character must be selected. Repeat this procedure until you have selected a USER ID name.
If you wish to modify a character before all six spaces are accepted, press the CLEAR/STOP key to backspace.
6. Now you have to enter your age. Simply use the QUICK key to select your age. Press the JustGo
TM
/ ENTER key to accept
your age.
7. Enter your weight, press the INCREASE or DECREASE key to select your weight from 50 to 400 pounds (23 to
182 kilograms) and then press the JustGo
TM
/ENTER key to accept it.
8. Then press the CLEAR/STOP key to go back to the USER ID main menu.
Edit User
To edit the different User ID’s: Select the USER ID option and press the JustGoTM/ENTER key to accept.
1. Select the user you want to edit by using the INCREASE or DECREASE key and press the JustGo
TM
/ENTER key to accept it.
2. Enter your weight, press the INCREASE or DECREASE key to select your weight from 50 to 400 pounds (23 to 182 kg) and
then press the JustGo
TM
/ENTER key to accept it.
3. Now you have to enter your age. Simply use the INCREASE or DECREASE key to select your age. Press the JustGo
TM
/ENTER
key to accept your age.
4. Press the CLEAR/STOP key to go back to the USER ID main menu.
View Statistics
To view the statistics of a User Identification: Select the VIEW STATISTICS option and press JustGoTM/ENTER key to accept.
Select the User Identification for which you wish to see the statistics. These parameters represent the accumulated values
of all the exercises of a user while the User Identification feature was activated.
• TOTAL DISTANCE displays the distance traveled in miles (or in kilometers depending on your settings).
• TOTAL CALORIES displays the accumulated calories expended.
• TOTAL TIME displays the total exercise time.
Reset Statistics
To reset the statistics of a User Identification: Select the RESET STATISTICS option and press JustGoTM/ENTER key to accept.
Select the User Identification for which you wish to reset the statistics. Press the JustGo
TM
/ENTER key to reset the statistics
of this User Identification.
If you do not wish to reset the statistics of this User Identification, press the CLEAR/STOP key. The Reset Statistics feature can
help to monitor your progress week after week or between seasons.
Delete User
To delete a User Identification: Select the DELETE USER option and press JustGoTM/ENTER key to accept.
Select the User Identification you wish to delete. Press the JustGo
TM
/ENTER key to delete this User Identification.
If you do not wish to delete this User Identification, press the CLEAR/STOP key.
NOTE – If you choose to delete a user, you will clear all saved parameters under that user’s name.
11
Page 12
12
2.5 Distance Unit Feature
The distance unit can be selected to display in miles or kilometers.
To select a distance unit: Enter into the Settings menu, see Section 2.1.
1. Select the DISTANCE UNIT option, and press the JustGo
TM
/ENTER key to accept.
2. Select the distance unit you wish to be displayed on the screen. Choose from MILES or KILOMETERS. Press the INCREASE
or DECREASE keys to select the distance unit.
3. Press the JustGo
TM
/ENTER key to accept.
From now on, distance and speed values entered will be in the selected units.
2.6 Time, Distance or Calories Feature
The TIME, DISTANCE or CALORIES feature allows you to select either time, distance or calories as your exercise target.
To access TIME, DISTANCE or CALORIES: Enter into the Settings menu, see Section 2.1.
1. Select the TIME, DISTANCE or CALORIES menu with the INCREASE or DECREASE keys and press the JustGo
TM
/ENTER
key to enter it.
2. Make your choice between time, distance or calories with the INCREASE or DECREASE keys and press the JustGo
TM
/ENTER
key to accept it.
From now on, the new value of your exercise will be in the selected value.
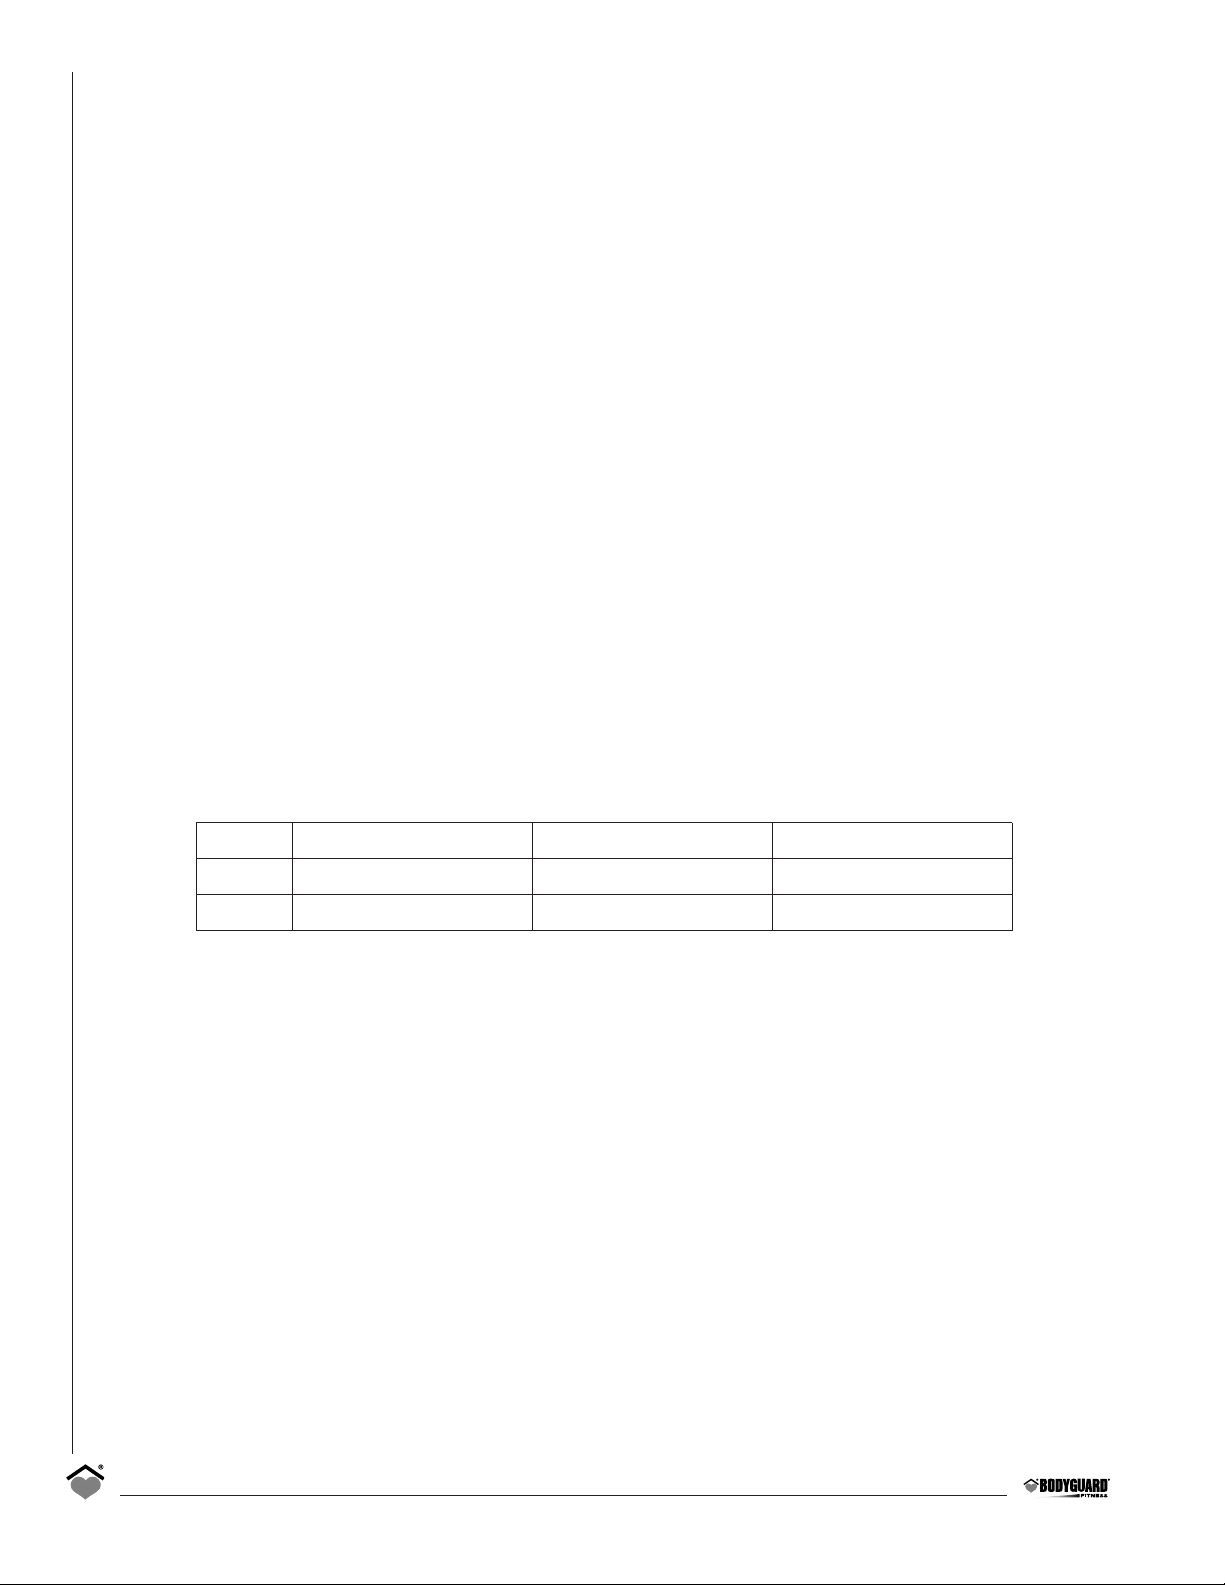
Table of minimum and maximum values
Here’s a table of the minimum and the maximum values that you can choose as a duration depending on your Settings
choice.
TIME DISTANCE CALORIES
MIN 5 minutes 1 mile or 1 km 25 calories
MAX 99 minutes 99 miles or 99 km 2000 calories
2.7 Warm Up and Cool Down Feature
Doing a warm up period before an exercise and a cool down period after an exercise is strongly recommended for your
safety. In your T280P– T280C– T320, you have a feature that will allow you to warm up and cool down on your treadmill.
If the warm up or cool down option is activated, a warm up screen will be displayed prior to each exercise as well as a cool
down screen after each exercise. Be aware that the warm up and cool down screens are not available for the JustGo
TM
program in which you need to establish your own warm up and cool down periods.
The warm up has an adjustable duration of one to four minutes and that period is divided in 3 parts.
Warm up:
Part 1: Is 40% in intensity of the first segment exercise.
Part 2: Is 60% in intensity of the first segment exercise.
Part 3: Is 80% in intensity of the first segment exercise.
NOTE – The default value of the warm up is 3 minutes.
Page 13
The cool down has an adjustable duration of one to four minutes and has only one part.
Cool down:
Part 1: Is a half in intensity of the last segment exercise with a maximum of 3.5 mph (5.6 km/h).
NOTE – The default value of the cool down is 3 minutes.
The calories, time and the distance are not accumulated in the “WARM UP OR COOL DOWN” modes.
The warm up or cool down option can be activated or deactivated separately.
To activate or deactivate the warm up or cool down option: Enter into the Settings menu, See Section 2.1.
1. Select the WARM UP or COOL DOWN option, and press the JustGo
TM
/ENTER key to accept.
2. Choose from ON or OFF. Press the speed INCREASE or DECREASE to choose and press the JustGo
TM
/ENTER key to accept.
3. To adjust the duration of the warm up or cool down, use the speed keys.
From now on, the warm up or cool down option will be in the selected mode.
NOTE – If you wish to cancel the warm up or cool down while you perform it, simply press the CLEAR/STOP key to interrupt
the feature.
2.8 Heart Rate Control Options Feature
The heart rate control feature lets you choose from three different operating modes. The first mode is “SPEED AND
ELEVATION MODE”. In this mode, the machine will bring you to your target heart rate by doing changes in speed and
elevation, but you can make your own changes at anytime. The second mode is “SPEED MODE”. In this mode, the machine
will bring you to your target heart rate by changing the speed but it will let you do any change manually at any time. The
computer will adjust the speed to keep you in your target heart rate. The third mode is “ELEVATION MODE”. In this mode,
the machine will bring you to your target heart rate by changing the elevation but it will let you do any change manually at
any time. The computer will adjust the elevation to keep you in your target heart rate. Note that the default mode is
“SPEED AND ELEVATION MODE”.
To select the mode you want to choose: Enter into the Settings menu, see Section 2.1.
1. Select HEART RATE CONTROL option and press the JustGo
TM
/ENTER key to accept.
2. Press the INCREASE or DECREASE keys to select the mode you want to choose and press the JustGo
TM
/ENTER key to
accept. The computer will indicate to you the mode you have just chosen and it will be active from now on.
2.9 Heart Rate Access Options Feature
The Heart Rate Access Options feature lets you choose from two different operating modes. The first mode is “SPEED
MODE”. In this mode, the machine will bring you to your target heart rate by changing the speed but it will let you do any
change manually at any time. The computer will adjust the speed to keep you in your target heart rate. The second mode is
“ELEVATION MODE”. In this mode, the machine will bring you to your target heart rate by changing the elevation but it will
let you do any change manually at any time. The computer will adjust the elevation to keep you in your target heart rate.
Note that the default mode is “SPEED MODE”.
To select the mode you want to choose: Enter into the Settings menu, see Section 2.1.
1. Select HEART RATE ACCESS OPTIONS and press the JustGo
TM
/ENTER key to accept.
2. Press the INCREASE or DECREASE keys to select the mode you want to choose and press the JustGo
TM
/ENTER key to
accept. The computer will indicate to you the mode you have just chosen and it will be active from now on.
13
Page 14
2.10 Beeper Feature
The beeper can be activated or deactivated.
To activate or deactivate the beeper:
1. Enter into the Settings menu, see Section 2.1.
2. Select the BEEPER option, and press the JustGo
TM
/ENTER key to accept.
3. Select the mode in which you wish the beeper to be. Choose ON or OFF with the SPEED keys and press JustGo
TM
/ENTER
key to accept.
From now on, the beeper will be in the selected mode.
2.11 Speed Limits
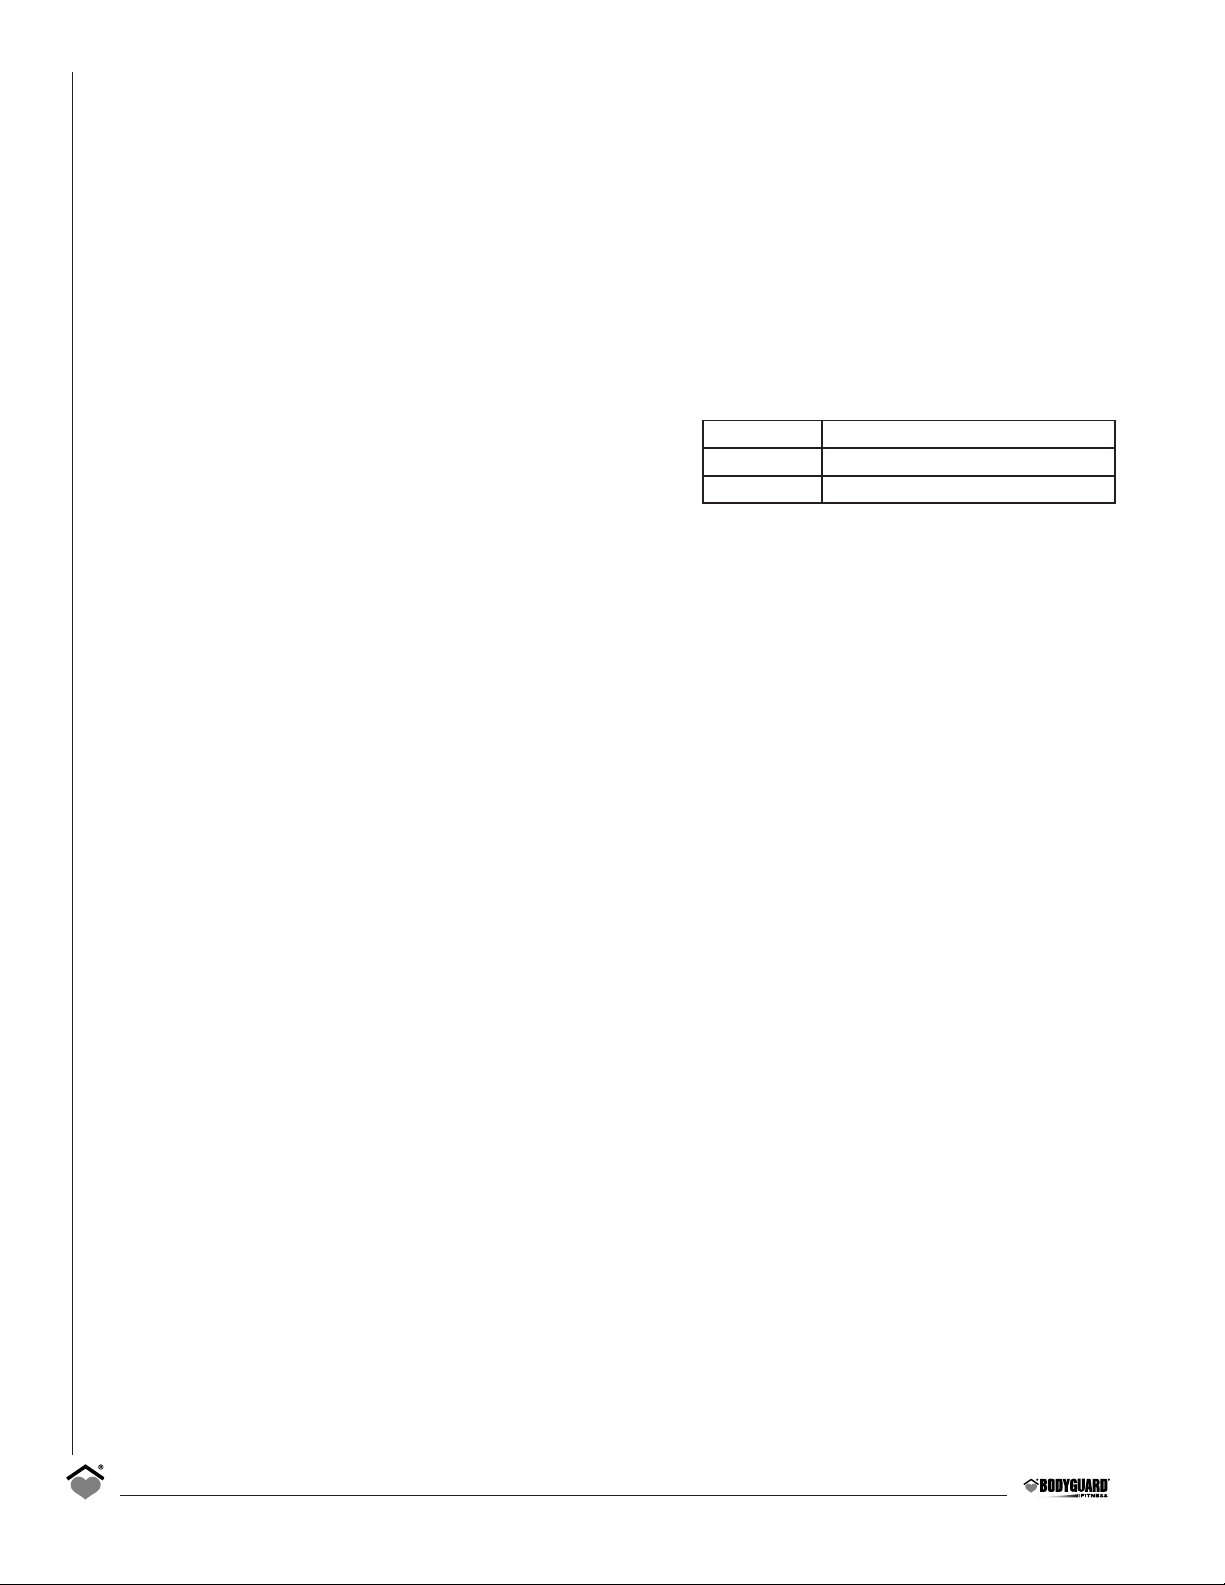
MINIMUM and MAXIMUM speeds can be set into the treadmill.
To select this option: Enter into the Settings menu, see Section 2.1.
1. Select the SPEED LIMITS option, and press the JustGo
TM
/ENTER key
to accept.
2. Select the MINIMUM OR MAXIMUM value with the ELEVATION INCREASE AND ELEVATION DECREASE keys. To modify
the value, use the SPEED INCREASE OR DECREASE keys. Press the JustGo/Enter key to accept (the values will not be
considered if you don’t press the ENTER key to accept).
Please refer to the following values to know the possible range of values.
2.12 Big Number Option
The big number option allows you to display LARGE numbers on the main screen. Profile will not be shown in this mode.
The big number option can be activated or deactivated. While in this option, you can select 7 different ways of display.
To select a big number option: Enter into the Setting menu, see section 2.1.
1. Select the BIG NUMBER OPTION, and press the JustGo
TM
/ENTER key to accept.
2. Select the option you wish to be displayed on the screen. Choose from, NONE, All, Speed, Distance, Calories, Time or
Heart Rate. Press the INCREASE or DECREASE key to select the option.
3. Press the JustGo
TM
/ENTER key to accept.
From now on, all the information will be displayed on screen as the option you selected.
NOTE – All the programs will be displayed in Big Numbers except for the Track and the Runner’s Interval program.
2.13 Learn Program
Bodyguard machines have the incredible ability to learn (pre-program) profiles. This is especially useful if you would like to
build a workout profile in advance. You now have the ability to build a program without actually doing it. This is great if
you are customizing a program for a client for example.
To use learn program: Enter into the Settings menu, see section 2.1.
1. You will be prompted to a screen that will ask you to increase or decrease either Speed and Elevation.
Adjust both parameters and look at the side select windows where you are going.
2. Once you are satisfied press ENTER to lock it and move to the next SEGMENT.
3. Repeat this procedure until the whole profile has been filled in.
- You can learn 4 programs in the T280P–T280C. You can learn 6 programs in the T320.
- To use a LEARN program, choose LEARN from the program selection window.
14
Minimum: 0.5 MPH(0.8 KM/H)
Maximum: 11 MPH (17.60 KM/H)
Default: 0.5 to 11 MPH (0.8 to 17.60 KM/H)
Page 15
2.14 Heart Rate Recovery
Your T280P–T280C–T320 is pre programmed with a unique and useful program that is used to help determine your fitness level.
After a program (workout) it can be used to count the time between the actual and your predetermined resting heart rate.
In order to use this program you will need to turn ON Heart Rate Recovery in the settings menu. By default, this option is
turned off. You would need to enter in you resting heart rate.
Fit Levels
Although it is difficult to assess each individual based on a generic chart, it is agreed that a quicker time from an exercise
level heart rate to a resting (predetermined) heart rate is beneficial to cardio fitness. The best way to use this program is to
use it today.
Using Recovery
It will only work while using the optional chest strap. After your exercise is complete, stay on the machine with your chest
strap facing the console. Try not to move. It is best to keep your arms to your side as to not interfere with the signal. Stay
in this position until the computer has finished reading the heart rate signal. Depending on your fitness level this could be
a few minutes or longer.
NOTE – Using Heart Rate Recovery with Cool/Down. Note that the Heart Rate Recovery will start counting only after the
Cool/Down has ended. If you are using Warm/Up and Cool/Down your Heart Rate Recovery will only start at the end. In order
to benefit from Heart Rate Recovery we recommend to deactivate the Cool/Down option.
2.15 Max Duration
To modify the maximum duration of any workout: Enter into the Settings menu, see Section 2.1.
1. Select the MAX DURATION option, and press the JustGo
TM
/ENTER key.
2. Use the Speed INCREASE or DECREASE keys to choose from TIME, DISTANCE or CALORIES. Press the JustGo
TM
/ENTER key
to accept.
3. Use the Speed INCREASE or DECREASE keys to adjust the maximum to the desired value (5 to 99 minutes for Time, 0.5
to 99 miles or Km for distance or 25 to 2000 Calories). Press the JustGo
TM
/ENTER key to accept.
2.16 Saving Option (On or Off) (T320 only)
To modify the saving possibility at the end of a program: Enter into the Settings menu, see Section 2.1.
1. Select the SAVING OPTION, and press the JustGo
TM
/ENTER key to accept.
2. Use the Speed INCREASE or DECREASE keys to choose from ON or OFF.
3. Press the JustGo
TM
/ENTER key to accept.
2.17 Pause Time
To modify the pause time: Enter into the Settings menu, see Section 2.1.
1. Select the PAUSE TIME option, and press the JustGo
TM
/ENTER key to accept.
2. Select from 1 to 5 minute pause times. Press the INCREASE or DECREASE keys to select the pause time.
3. Press the JustGo
TM
/ENTER key to accept.
NOTE – The T280P–T280C only will allow you to go up to a 30 minute pause time.
2.18 Edit Text Feature (T320 only)
The Edit Text feature allows the owner or users of the treadmills to modify the welcome message displayed on the main
computer display screen.
There is a standard welcome message entered in your T320. This message is displayed in the language of your choice
previously selected (refer to section 2.2). If the standard message is modified, it will only be displayed in the language you
entered.
15
Page 16
To activate the Edit Texte feature: Enter into the Settings menu, see section 2.1.
1. Select the EDIT TEXT option, and press the JustGoTM/ENTER key to accept.
To modify the welcome message, you will need to enter the letters and characters one by one. A total of 200 alphanumeric characters can be saved.
2. Use the INCREASE or DECREASE keys to select any letter from A to Z or number from 0 to 9 as the first character. If you
wish to leave a space between characters, select SPACE (blank character) between the 9 and the A characters. Press the
ELEVATION DECREASE key to move to the next character. Now the second character must be selected. Repeat this
procedure until you have entered the new welcome message. If you wish to modify a character before all 200 spaces are
accepted, press the ELEVATION INCREASE key to backspace.
3. Once all letters and characters of your message are entered, press SAVE on the informational window to save your
message.
From now on, your new welcome message will be displayed on the introduction screen.
2.19 Add/Remove Program (T320 only)
The T320 treadmill offers you the possibility to manage your main menu with your favorite programs by deleting from the
menu on the screen the programs that you would rather not have on screen. After deleting it, you can, if you changed your
mind, put it back to your menu with the add option.
To select the add/remove program feature: Enter the Settings menu, see Section 2.1.
1. Select the ADD/REMOVE PROGRAM feature with the INCREASE or DECREASE keys and press the JustGo
TM
/ENTER key to
accept.
2. Using the INCREASE or DECREASE keys, select YES in front of the program name you want to add or keep and select NO
in front of the programs you want to remove. Press the JustGo
TM
/ENTER key to accept.
NOTE – You cannot remove the program that appears on the console and the JustGo Program.
• Five Program Levels • One Walk Program
• One JustGo
TM
Program • One Hill Climb Program
• One Manual Program • One Speed Run Program
• One Cardiovascular Program • One Track Program
• Interval Program for T280C and T320 • Runner’s Interval Program (T280C and T320)
• One Random Program • Four Memory Programs for T280P and T280C / Six for T320
• One Weight Loss Program • Four Learn Programs for T280P and T280C / Six for T320
• One Heart Rate Control Program • Heart Rate Access Feature
A program is a pre-set hill pattern. You will get the same profile (hills and valleys) every time you select the same specific
exercise program. By increasing the levels you can change the predetermined hill profiles. The programs allow you to
monitor your progress and they add fun and interest to your exercise.
Each segment time is equal to the selected exercise time divided by 15 segments. Therefore, a 45 minute exercise results in
a 3 minute segment time.
16
WARNING
BEFORE SELECTING ANY EXERCISE PROGRAM, FIRST STRADDLE YOUR FEET
ON THE FOOT RESTS. NEVER START ANY EXERCISE PROGRAM
WITH ONE OR BOTH FEET ON THE RUNNING BELT.
TT228800PP –– TT228800CC –– TT332200
EExxeerrcciissee PPrrooggrraammss
T280P – T280C – T320
Exercise Programs
3
Page 17
Program Levels
The Cardiovascular, Interval, Random, Hill Climb and Speed Run programs have 5 individual exercise levels. LEVEL 1 is the
easiest and LEVEL 5 is the most difficult. This feature allows you to alter the intensity of your workout.
JustGo
TM
Program
The JustGoTMprogram allows you to start a manual exercise with the push of one key. Since the JustGoTMprogram is the
initial program, it will always be displayed first for easy selection. You have total control of the speed and elevation of the
belt at all times during this program. Use the JustGo
TM
program if you like to walk or run at fairly constant speeds with little
or no changes during the exercise.
During the exercise, the speed and elevation that you select will remain for the entire exercise until the next change you
make. Your progression in the exercise is shown by one flashing dot.
To start exercising in the JustGo
TM
program:
1. Press the JustGo
TM
/ENTER key when the JustGoTMprogram is displayed on the screen. The running belt will slowly start
at 0.5 mph or 0.8 km/h and at 0% elevation with the exercise duration automatically set to the maximum.
The JustGo
TM
program does not allow the user to predetermine the exercise duration or enter a weight amount.
Therefore, the caloric expenditure and calories per hour values will be based on a user of 150 pounds or 68 kilograms. The
calorie values should therefore be used only as references when in the JustGo
TM
program.
2. Change the speed and elevation at all times by pressing the respective Speed and Elevation INCREASE and DECREASE keys.
3. You can pause, resume, end the program and save the program at anytime. It is not necessary to exercise the full
duration to save the program.
Manual Program
The Manual program allows you to create your own exercise as you progress in the program. The speed and elevation
are completely controlled by the user at all times. At a glance, the JustGoTMand Manual programs seem very similar due to
the fact that the user controls both the speed and elevation at all times. The difference is that in the Manual program, you
can select your exercise duration and weight for a more accurate display of the calories.
During the exercise, the speed and elevation that you select will remain for the entire exercise until the next change you
make. Your progression in the exercise is shown by one flashing dot.
Cardiovascular Program
The Cardiovascular program has been designed to allow you to train at moderate intensity levels with short duration,
high intensity periods followed by a quick recovery period. The Cardiovascular program has predetermined speed and
elevation profiles according to the selected exercise levels. You can change the speed and elevation during the exercise if
you find it too easy or hard.
The speed profile has a set of high intensity segments to greater work your heart muscles. Changing the speed manually will
cause only that segment to change. Changing the elevation manually will cause the entire profile to change.
The following table shows the different speeds and elevations for each level.
Level Speed (mph) Speed (km/h) Elevation (%)
1 1.0 to 4 1.6 to 6.4 0.0 to 2.0
2 3.0 to 6 4.0 to 9.6 0.0 to 3.0
3 4.0 to 7 8.0 to 11.2 0.0 to 4.0
4 5.0 to 8 8.0 to 12.9 0.0 to 5.0
5 6.0 to 9 9.7 to 14.5 0.0 to 6.0
17
Page 18

Interval Program (T280C and T320)
The Interval Training program allows you to exercise with constant high intensity workouts and rest periodically at set
recovery periods. The Interval Training program has predetermined speed and elevation profiles according to the selected
exercise levels. You can change the speed and elevation during the exercise if you find it too easy or hard.
If you are at a rest (low intensity) segment, then changing the speed manually will cause all the other segments to change.
If your are at a peak (high intensity) segment, then changing the speed manually will cause all the peak segments to
change. Changing the elevation manually will cause the entire elevation profile to change.
Random Program
The Random program will display a completely new exercise each time the Random program is selected. This unique
feature allows an almost infinite amount of exercise programs to be displayed at the touch of a key. Each new Random
program will have a programmed speed and elevation profile, resulting in automatic speed and elevation changes. If
you wish, you can change the speed or elevation at anytime during the exercise. The computer can display over 4 billion
random programs.
Heart Rate Control Program (HRC) and Weight Loss Program
(Requires wireless chest strap)
The Heart Rate Control and Weight Loss Program allows you to exercise at a predetermined heart rate level. By selecting the
desired heart rate level (Weight Loss in Weight Loss program), the running belt and elevation will automatically adjust to
decrease or increase the exercise intensity.
By selecting your age, plus the intensity level that you want to work your heart at (Only HRC), a target heart rate level is
calculated by the computer.
NOTE – This program can only be used with the optional heart rate chest strap available from your Authorized Bodyguard
®
Dealer. Use of the heart rate chest strap will allow the treadmill belt to change speed along with a change in elevation. To
achieve optimal results, it is recommended to place the chest strap directly over the skin. The strap should be very snug since
any significant amount of shock or impact due to fast running may temporarily produce wrong heart rate signals. You should
not be more than arm’s length from the front handle bar to achieve the best signal. If at anytime the heart rate receiver does
not detect a signal from the chest strap for more than a few seconds, the following message will appear ‘‘UNSTABLE HR
SIGNAL PLEASE CHECK CHEST STRAP’’.
WARNING – Before attempting to use any of this equipment, you should read the instruction manual carefully. Use of
this equipment by people with heart or other medical problems may result in serious injury. You should consult with a
physician prior to using this equipment. It is recommended to periodically consult your physician as you continue to use this
equipment. Immediately cease exercise if you feel dizzy, faint or short of breath. Use of this equipment in a manner other
than as prescribed by these instructions herewith may result in serious injury.
To select the Heart Rate Control program or Weight Loss program:
1. Press the Speed DECREASE key to select HEART RATE or WEIGHT LOSS. Press the JustoGo
TM
/Enter key to accept the
Heart Rate Control program or Weight Loss program.
2. Select the exercise duration. Press the Speed INCREASE or DECREASE keys to select the appropriate exercise duration.
Press the JustGo
TM
/ENTER key to accept.
3. Select your weight. Press the Speed INCREASE or DECREASE keys to select the appropriate weight. The weight will
vary from 50 to 400 pounds (23 to 182 kilograms). Press the JustGo
TM
/ENTER key to accept.
4. Select your age to allow the computer to indicate your maximum allowable heart rate level. Press the Speed INCREASE
or DECREASE keys to select your age. The age will vary from 10 to 100 years. Press the JustGo
TM
/ENTER key to accept.
5. Select an exercise intensity based on your preferred level of exercise. The 60% level is a good guide for those interested
in training in the fat loss range. The 70% level is suitable for those interested in training in the cardiovascular range. The
80% level requires the most effort and is suitable for persons with a higher level of fitness. Press the JustGoTM/ENTER key
to accept the intensity (60% is a default in Weight Loss Program).
18
Page 19
6. You can modify the heart rate level suggested by the computer or press the JustGoTM/ENTER key to accept it and start
the exercise.
7. To start the exercise, press the JustGo
TM
/ENTER key.
During the Heart Rate Control or Weight Loss program, you can change the speed or elevation by pressing the Speed or
Elevation INCREASE or DECREASE keys. Keep in mind that the computer will then gradually readjust the speed and/or
elevation to compensate for the change in speed or elevation you made by gradually bringing your ACTUAL heart rate near
the TARGET heart rate level.
WARNING – If you feel that the running belt is moving too fast for your fitness level and you cannot keep up, press the
CLEAR/STOP key and terminate the exercise program. You can try the program again, but at a lower INTENSITY level
(60%). If this is still too fast for you, do not use the Heart Rate Control program until your fitness level allows you to
safely exercise at your TARGET heart rate level.
During the exercise, the main computer screen will show a speed or elevation profile like the other programs, but will display
your ACTUAL heart rate and your TARGET heart rate on the message center. Once the exercise has started, your ACTUAL
heart rate should be lower than the TARGET heart rate. The computer then will gradually regulate the speed and elevation
simultaneously to increase your exercise intensity level, resulting in a higher ACTUAL heart rate.
Your heart rate will be displayed on the message center as ACTUAL heart rate and TARGET heart rate (T). For example:
HRATE 110/115T.
NOTE – You can change your target heart rate while in the program by pressing the JustGo
TM
/ENTER key and modify it by
using the Speed DECREASE or INCREASE keys and by pressing the JustGo
TM
/ENTER key to accept it.
Walk Program
The Walk program allows you to create your own exercise as you progress in the program. The speed and elevation are
completely controlled by the user at all times. At a glance, Manual and Walk programs seem very similar due to the fact that
the user controls both the speed and elevation at all times. The difference is that in the Walk program, you can’t go over
4.0 MPH (6.4 KM/H) and 6% of elevation.
During the exercise, the speed and elevation that you select will remain for the entire exercise until the next change you
make. Your progression in the exercise is shown by the flashing dot.
Hill Climb Program
The Hill Climb program provides both a programmed hill and speed profiles. The programmed hill profile will cause the
running belt to elevate and descend at various points during your exercise. The programmed speed profile will cause the
speed to change. You can change the speed and elevation
during the exercise if you find it too easy or hard.
The speed and elevation will change as you progress into
the program. Changing the speed manually will cause only
that segment to change. Changing the elevation manually
will cause the entire elevation profile to change.
The following table shows the different elevations for each
level.
Level Elevation %
1 0 to 3
2 1 to 4
3 2 to 6
4 3 to 7.5
5 4 to 10
Speed Run Program
The Speed Run program like the Hill Climb program controls a certain parameter. Speed Run is speed changes. Selecting a
higher level will default a higher speed profile. Elevation changes are user controlled.
The speed will change as you progress into the program. Changing the speed or elevation manually will cause the rest of
the program to change.
19
figure 7
Page 20
To select the Speed Run program:
1. Press the DECREASE key to select Speed RUN. Press the JustGo
TM
/ENTER key to accept the Speed Run program.
2. Select your weight. Press the speed INCREASE or DECREASE keys to select the appropriate weight. The weight will vary
from 50 to 400 pounds (23 to 182 kilograms). Press the JustGo
TM
/ENTER key to accept.
3. Select the exercise duration. Press the speed INCREASE or DECREASE keys to select the appropriate exercise duration. Press
the JustGo
TM
/ENTER key to accept.
4. Select the exercise level by pressing the speed INCREASE or DECREASE keys. The higher the level, the greater the speed
will be during the program. Press the JustGo
TM
/ENTER key to accept and start the exercise.
Level Speed (mph) Speed (km/h)
1 1 to 4 1.6 to 6.4
2 1 to 5 1.6 to 8.1
3 2 to 6 3.2 to 9.7
4 3 to 7 4.8 to 11.3
5 4 to 8 6.4 to 12.9
Track Program
The Track program is one that enables you to choose from 1-99 laps of a 400 Meter (or about a 1/4 mile) Olympic track. Each
Track program allows the user to completely control their speed from the start of the exercise until the end since there is
no automatic speed control during the Track program.
The Track program will display an oval track screen that will show your progression on the track. The central information
window will show you how many laps have been done in your workout. Elevation although not usually found on any
track can be used on the T280P – T280C – T320.
To select the Track program :
1. Press the DECREASE key to select TRACK. Press the
JustGo
TM
/ ENTER key to accept the Track program.
2. Select your weight. Press the speed INCREASE or
DECREASE keys to select the appropriate weight. The
weight will vary from 50 to 400 pounds (23 to 182
kilograms). Press the JustGo
TM
/ ENTER key to accept.
3. Select the number of laps. Press the speed INCREASE or
DECREASE keys to select the appropriate number of laps.
Press the JustGo
TM
/ ENTER key to accept.
4. To commence the exercise, press the JustGo
TM
/ENTER
key. A three second countdown will appear on the screen
before the running belt starts moving. Remember, that at the start of this exercise, the speed will always start at 0.5 mph
(0.8 km/h). You must press the Speed INCREASE or DECREASE keys if you wish to change the speed during the exercise.
Runner’s Interval Program (T280C and T320)
The Runner’s Interval program is made for serious runners who want to simulate track workouts and create any workout
they choose.
The program enables to select interval distance, number of repeats, Pace, Recovery Time and Recovery Pace wanted.
20
figure 8
Page 21
The parameters values are:
Interval distance: 200, 400, 600, 800, 1000, 1200, 1400 or 1600 meters
Number of repeats: 1 to 20
Pace: number of min. for 1 mile or number of min. for 1 kilometer
Recovery Time: 20 sec. to 20 min.
Recovery Pace: number of min. for 1 mile or number of min. for 1 kilometer
The Recovery Time will count down. The last 3 seconds of the recovery time will appear on the display and an audible beep
will indicate the start of the next interval.
The program will start with a recovery segment, so that you are not starting from a dead stop.
The program will display an oval track of 400 meters that will show your progression on the track.
Example: 8 x 400’s meters @ 5:15 min. Pace with a 1 min. 30 sec. Recovery Time at 15:00 min. Pace.
To select the Runner’s Interval Program:
1. Press the other programs key.
2. Press the DECREASE key to select Runner’s Interval Program. Press ENTER key to accept.
3. Select your weight. Press the numbers on the keypad or the speed INCREASE or DECREASE keys to select the appropriate
weight. The weight will vary from 50 to 400 pounds (23 to 182 kilograms). Press JustGo
TM
/ENTER key to accept.
4. Select successively the Interval distance, number of repeats, Pace (by entering the required speed in order to choose the
closest PACE wanted), Recovery Time and Recovery Pace using on each selection the speed INCREASE or DECREASE keys
to select the appropriate value (values permitted are described above). Press JustGo
TM
/ENTER key to accept each
selection.
5. To start the exercise, press the JustGoTM/ENTER key to accept.
WARNING – This is for serious runners only. There is fast acceleration involved…
Memory & Learn Programs
These programs allow you to recall previously completed or edited exercises. After each exercise is finished, you are
prompted to save the current exercise or not. All programs, except the Track Program can be saved as Memory Programs.
The Learn Programs are the ones that were previously edited in the Settings menu under Learn Programs.
To select an exercise:
Press the Speed DECREASE key to select Memory or Learn Programs. Press the JustGo
TM
/ENTER key to accept the program.
An edited program will appear on the screen. You can select a particular saved or edited exercise by pressing the Speed
INCREASE and DECREASE keys until the desired name is displayed.
NOTE – By selecting a saved or a Learn Program in memory, you cannot enter an exercise level.
Select the exercise duration. Press the Speed INCREASE or DECREASE keys to select the appropriate exercise duration.
Press the JustGo
TM
/ENTER key to accept.
Select your weight. Press the Speed INCREASE or DECREASE keys to select the appropriate weight. The weight will vary from
50 to 400 pounds (23 to 182 kilograms). Press the JustGo
TM
/ENTER key to accept and start the exercise.
Using Contact Heart Rate
This machine has a built-in Contact Heart Rate System that allows you to verify your heart rate without the need of a
chest strap. By holding the contact bars, you will see your current pulse on screen. (In order for the Contact Heart Rate to
work properly, the palms must not be too moist.)
Heart Rate Access Feature (Requires wireless chest strap)
The Heart Rate Access feature allows you to selectively enter into a Heart Rate Control program without quitting your
exercise. It will allow you to choose, when you are ready, to change your current workout to a Heart Rate Control. You will
need to be wearing the optional wireless chest strap when choosing to use this feature.
21
Page 22

The Heart Rate Access feature allows the user to change any program at any time during the selected workout to Heart Rate
Control. On screen, you will see the program remaining change to a flat-line as it would look like in a normal Heart Rate
Control program. The part of the program that you just did though would remain unchanged.
How to Use Heart Rate Access™
While in a program you would press the JustGoTM/ENTER key. On screen you would see the message “Heart Rate Control
Activated” followed by a screen showing your target Heart Rate. Once your Heart Rate has been confirmed, the remainder
of the selected workout time would be in the form of a normal Heart Rate Control. If you pressed the button and were not
wearing a chest strap, the unit would disregard the button push and continue in the normal selected program.
1. JustGo
TM
, Manual, Walk and Cardiovascular programs
• These programs would change SPEED only or ELEVATION only, depending on your selected SETTINGS in Hear t Rate
Access options.
2. Speed Run and Track programs
• These programs will make SPEED changes only.
3. Hill Climb program
• This program will make ELEVATION changes only.
4. Memory programs
• These programs will make changes according to the type of changes that were done in the program that has been
recalled from memory. For example, if you did a Speed Run program and you pressed the JustGo
TM
/ENTER
key, you would get SPEED changes only.
5. Override
• In all programs, you can make SPEED and ELEVATION changes manually.
6. Saving
• You will also be able to save any program at the end except the TRACK program.
7. Profile
• You will also be able to see the profile and where the unit made a change to Heart Rate Access.
Changing Your Target Heart Rate in a Program
The normal Heart Rate Control program allows you to make Target Heart Rate changes at anytime while in a program by
pressing the JustGoTM/ENTER key. The difference is now that by pressing the JustGoTM/ENTER key, it will bring you into Heart
Rate Access; by pressing the JustGoTM/ENTER key again, you will be asked to make a new Target Heart Rate change.
The Bodyguard® Heart Rate receiver inside each T280P– T280C – T320 treadmill is specifically designed to work in conjunction
with the optional Heart Rate chest strap. The Heart Rate chest strap allows the computer to monitor your heart rate, or pulses
per minute. This value is shown on the computer screen and should only be used as a guide in helping you achieve your
personal fitness goals.
If no Heart Rate chest strap is used, no heart rate value (0) will be displayed on the computer screen. Before using any Heart Rate
chest strap on any exercise equipment, it is important to consult with a physician prior to commencing any exercise program.
WARNING – Before attempting to use any of this equipment, you should read the instruction manual carefully. Use of this
equipment by people with heart or other medical problems may result in serious injury. You should consult with a physician prior
to using this equipment. It is recommended to periodically consult your physician as you continue to use this equipment.
Immediately cease exercise if you feel dizzy, faint or short of breath. Use of this equipment in a manner other than as prescribed
by these instructions herewith may result in serious injury.
As a guide to effective exercising, to determine your recommended heart rate training zone, find your age on the heart rate
chart (refer to page 5) and read the heart rate target zone based on various intensity levels. These levels include fat burning zone,
cardiovascular zone and aerobic zone.
Tip – Sometimes you will need to moisten the back of the heart rate chest strap to obtain a signal. Use a few drops of water to
moisten the chest strap, then place directly over the skin. The chest strap does not work properly when placed over clothing.
22
UUssiinngg aa HHeeaarrtt RRaattee RReecceeiivveerr
Using a Heart Rate Receiver
4
Page 23
23
Possible Chest Strap Heart Rate Problems
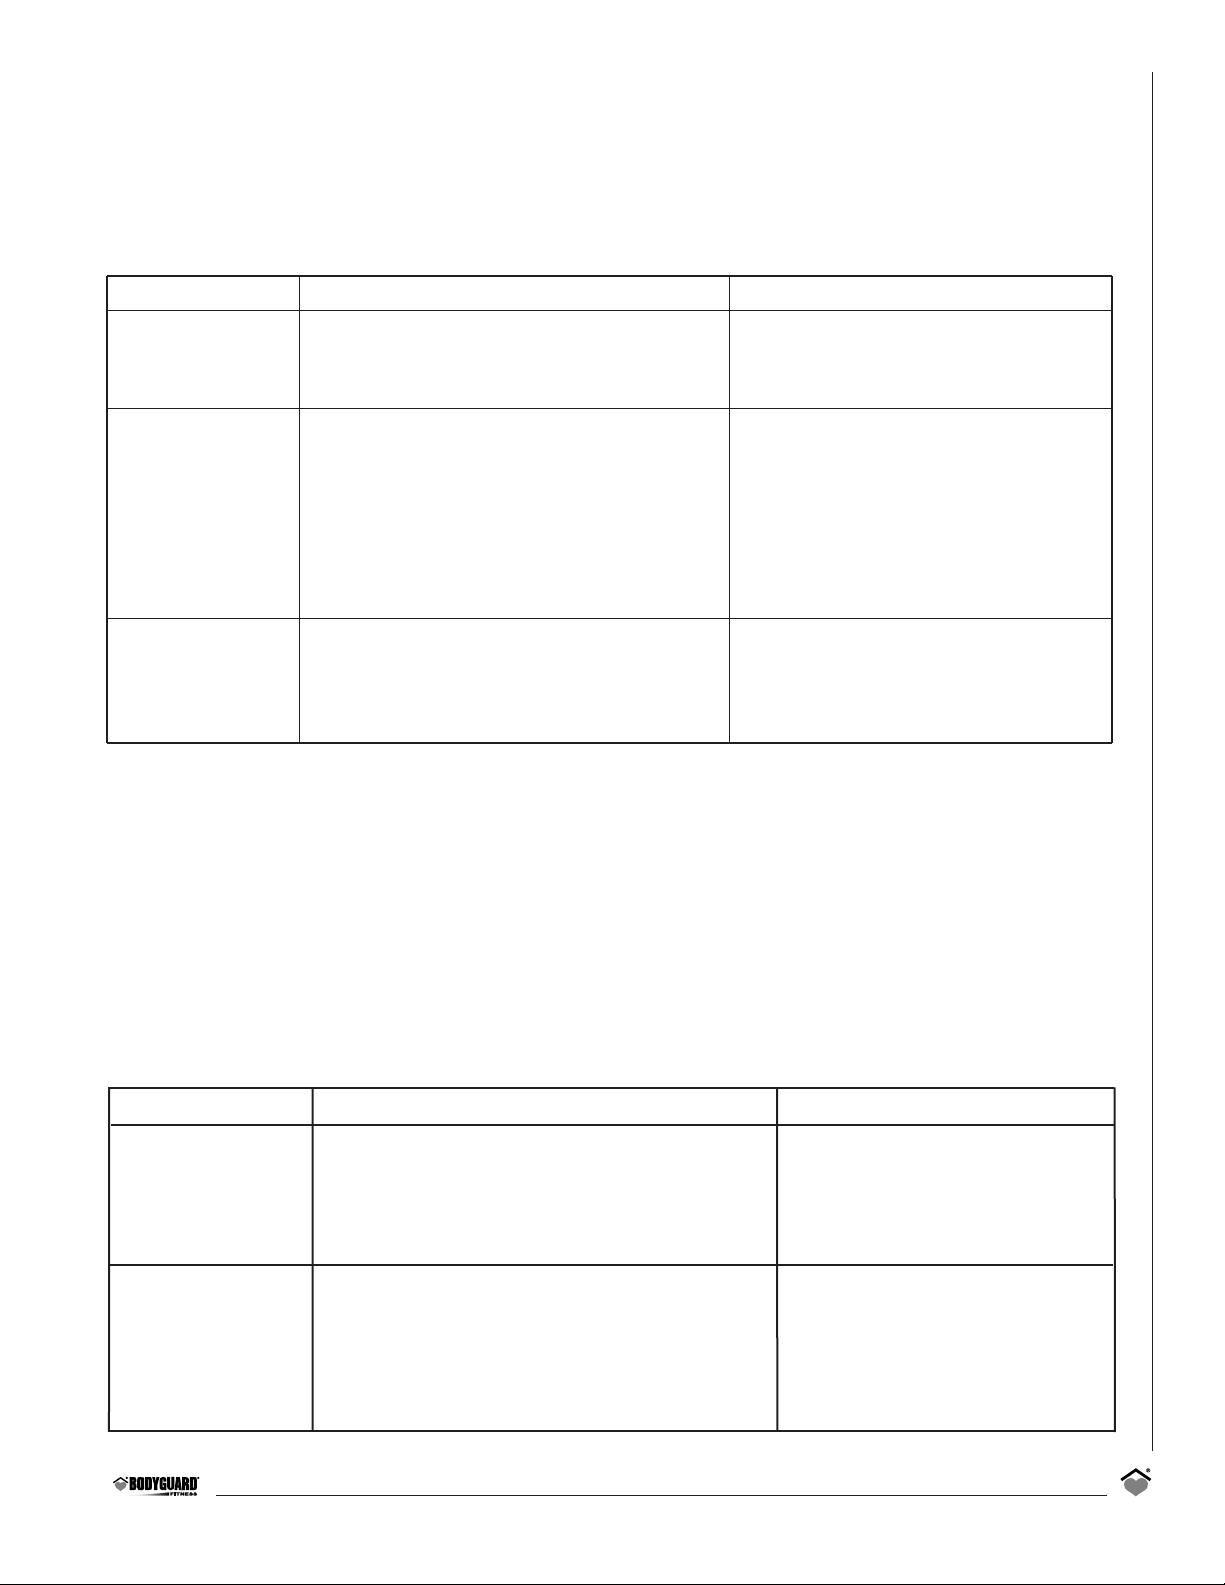
All Bodyguard®machines are compatible with the Polar wireless heart rate system. This includes a chest strap and a
receiver. The receiver is an integral part of the machine and it is hidden inside. The chest strap is an option on all machines
and can be purchased from Bodyguard
®
Polar. If you are having some problems with the reception, please use the following
troubleshooting check list.
Troubleshooting Check List – Table 1
The above table should help properly diagnose the problem. There is also misconceptions that the signal is immediate.
The chest strap electrodes need to be moistened in order to send a strong signal. Radio and neon light interferences can also
reduce the strength of the signal.
Possible Contact Heart Rate Problems
In order to properly diagnose any problem with the conctact heart rate system, please refer to the following procedures.
This machine uses a hand ECG (Electrocardiogram) printed circuit board along with wires and a set of metal plates. The hand
ECG board is an integral part of the machine and is hidden inside.
Troubleshoting Check List – Table 2
PROBLEM
• No signal.
• Weak signal.
• Erratic signal.
POSSIBLE CAUSE
• Dead battery in strap.
• Electrodes are not wet.
• Using wrong strap.
• Weak battery.
• Electrodes are not wet enough.
• Strap is not tight enough.
• Too much body fat.
• Chest size too small or too big.
• Receiver has a problem.
• Using wrong strap.
• Interference with other signals.
• Electrodes are not wet enough.
SOLUTION
• Change battery.
• Put water on electrodes.
• Use Polar.
• Change battery.
• Put water on electrodes.
• Put on tighter.
• No solution.
• Position strap accordingly.
• Verify signal in Diagnostics,
see Heart Rate Test section.
• Use Polar.
• Move the machine away from
potential interference sources.
• Put water on electrodes.
PROBLEM
• No reading
• Erratic reading
POSSIBLE CAUSE
• Hands have not been in contact
with the metal plates long enough
• Defective hand contact board
• Wires are not connected properly
• Hands may move too much on the plates
• Defective board hand contact board
• Strong neon lights too close to console
• Interference with other signals
SOLUTION
• Wait for 15-20 seconds before
a reading
• Change ECG board
• Verify Wiring
• Do not move your hands
• Change board
• Move the climber
• Use only this machine to verify
Page 24

Access to “Diagnostics” menu
To determine the condition of the various electrical and mechanical components, you will need to enter into the
DIAGNOSTICS menu as follows:
1. Turn power OFF.
2. Simultaneously hold down the speed INCREASE and DECREASE keys and turn power ON.
3. Release the speed INCREASE and DECREASE keys once entered into the Diagnostics menu.
4. Press JustGoTM/ENTER to access Diagnostic items.
When you access the Diagnostics menu, you will notice the following message: “TXXX VERSION”
The message above indicates the version of the computer software installed in your computer display monitor. This
information is helpful in diagnosing certain computer related conditions. Keep in mind that the version number may
change depending on the model number of your T280P – T280C – T320 treadmill.
The T280P – T280C – T320 treadmills allow you to perform the following tests :
To perform any one of the above procedures, press the Speed INCREASE or DECREASE keys to select the one you
want and press the JustGo
TM
/ENTER key to accept.
NVRAM Test
The NVRAM (Non-Volatile Random Access Memory) test will not erase all stored information such as user identification, and
all saved programs. The NVRAM is a computer chip that saves information even when the treadmill has been turned off.
1. In the Diagnostics menu, select the “NVRAM TEST” and accept it by pressing the JustGo
TM
/ ENTER key.
2. Press the JustGo™/ENTER key to start the NVRAM test. The NVRAM test will perform automatically.
EPROM test
The EPROM test allows you to determine if the program stored in the EPROM chip is intact.
1. In the Diagnostics menu, select the ‘‘EPROM TEST’’ and accept it by pressing the JustGoTM/ ENTER key. The EPROM TEST
will perform automatically.
• The display will show ‘‘EPROM IS OK’’ if the EPROM is intact and it will display a “CHECKSUM” code (for Bodyguard
®
internal use only).
• The display will show ‘‘EPROM IS NOT OK’’. This means the EPROM might be damaged.
Keypad Test
The keypad test allows you to verify that each key is responding when pressed.
1. Press each key one at a time and verify the confirmed response on the screen. Example, pressing the Elevation INCREASE
key will cause the screen to display “ELEVATION INCREASE” indicating that the key press was recognized.
2. Press the CLEAR/STOP and JustGo
TM
/ENTER keys simultaneously to terminate the keypad test.
24
• NVRAM TEST
• EPROM TEST
• KEYPAD TEST
• DISPLAY TEST
• BEEPER TEST
• HEART RATE TEST
• BELT ALIGNMENT
• MOTOR CHECK
• ELEVATION CALIBRATION
• STATISTICS
• SAFETY KEY TEST
• ERROR LOG
• CURRENT TEST
• SPEED SENSOR TEST
• MAINTENANCE
CCoommppuutteerr DDiiaaggnnoossttiiccss
Computer Diagnostics
5
Page 25
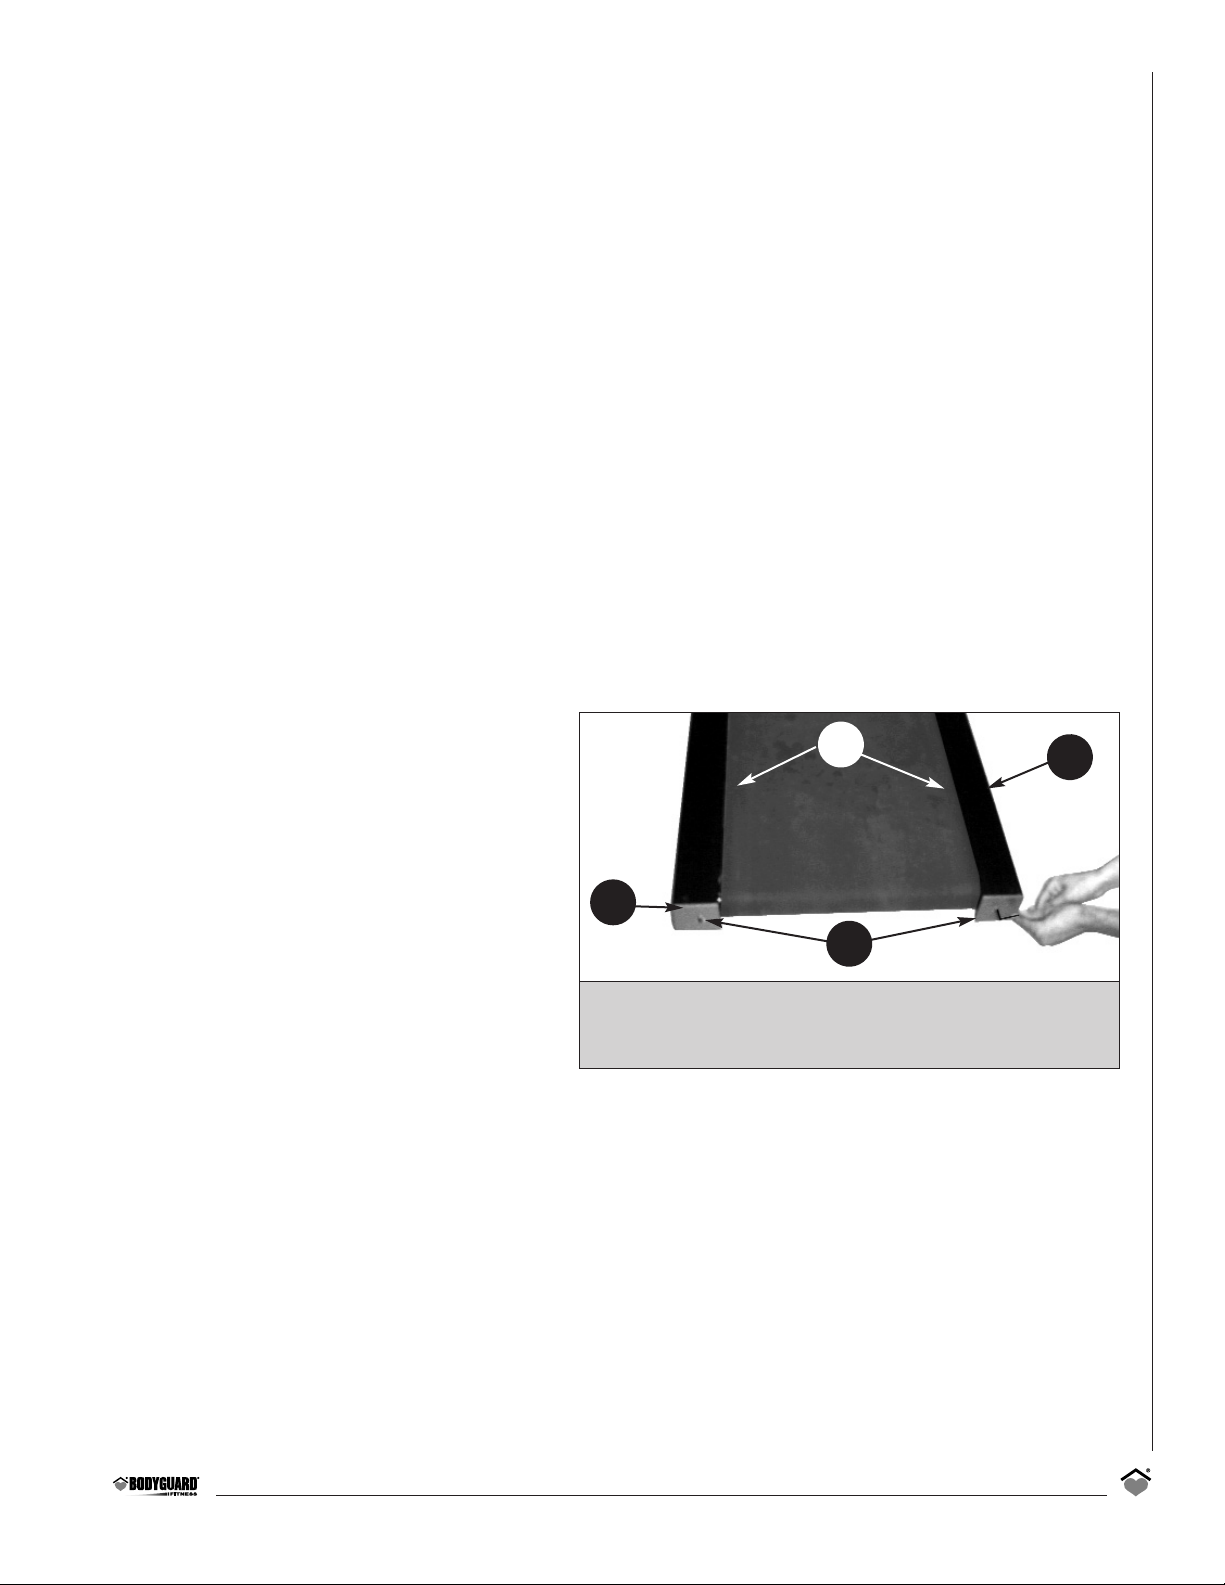
Display Test
The display test allows you to verify that each display light is properly working. If you notice that one or more areas on the
screen do not light up during an exercise, you should perform this test.
1. In the Diagnostics menu, select the “DISPLAY TEST” and accept it by pressing the JustGo
TM
/ ENTER key.
2. Now the display will illuminate a certain way. To proceed to the next display patterns, press any key.
Beeper test
The beeper test will cause the beeper to sound.
1. In the Diagnostics menu, select the “BEEPER TEST” and accept it by pressing the JustGo
TM
/ENTER key.
Listen for a series of “beeps”. The beeper test will stop automatically when you press the CLEAR/STOP key.
Heart Rate Test
The heart rate test allows you to determine if the heart rate system (chest strap or hand grip) is working properly and that
the computer is displaying your heart rate signal during a program.
1. In the Diagnostics menu, select the “HEART RATE TEST” and accept it by pressing the JustGo
TM
/ ENTER key.
2. The top left display will show the signal received from the chest strap and the bottom window will show the hand grip
signal. Attach your heart rate chest strap. You do not need to step on the treadmill for this test, but simply stand near
the computer. Within a few seconds, your actual heart rate signal will be displayed on the screen. Do the same for the
hand grip system; put your hands on the two metal plates and wait for 10 to 15 seconds.
3. Press the CLEAR/STOP key to terminate the test.
Belt Alignment
Should you need to adjust the tracking of the running
belt, you must make all adjustments during the BELT
ALIGNMENT procedure. To determine if the belt is not
aligned along the center of the deck, measure the
visible deck surface on both left and right sides of the
belt. If these values are nearly equal, do not adjust the
belt. If one side of the belt is closer to the foot rests
than the other side, then you will need to adjust the
belt to track to the opposite side.
NOTE – Your treadmill will need belt alignment
especially during the first 24 hours of use because the
belt stretches itself during that time. After the first 24
hours, no more adjustment should be needed.
To adjust running belt alignment.
1. In the Diagnostics menu, select the “BELT ALIGNMENT” and accept it by pressing the JustGo
TM
/ENTER key.
2. Press the JustGo
TM
/ENTER key to proceed.
3. You will need the 5/32” hex key to turn the bolts located inside the rear roller end caps.
WARNING – Do not stand on the belt during this procedure. Keep loose clothing and long hair away from the belt and
rollers when performing belt alignment.
4. Allow the belt to reach 2.0 mph or 3.2 km/h (speed will be displayed on the computer screen). Looking from the rear
of the treadmill, notice the gap between left and right sides of the belt and the foot rests.
If the running belt is tracking to the left of the deck surface:
• turn the left bolt in a clockwise direction to allow the belt to track to the right and ultimately in the center, or;
• turn the right bolt in a counter-clockwise direction to allow the belt to track to the right and ultimately in
the center.
25
To verify the belt alignment, check visual gap (A) between
belt ends and foot rests (B). Belt alignment bolts (D) are
visible through hole in rear roller caps (C).
D
B
C
A
figure 9
Page 26

26
If the running belt is tracking to the right of the deck surface:
• turn the left bolt in a counter-clockwise direction to allow the belt to track to the left and ultimately in the center, or;
• turn the right bolt in a clockwise direction to allow the belt to track to the left and ultimately in the center.
NOTE – During any belt alignment procedure, do not turn each bolt by more than 1 to 1-1/2 revolutions. Exceeding this may
cause a high amount of tension on the running belt and result in premature wear of the belt and rollers. It is best to adjust only
one alignment bolt, since this will prevent the belt from excessive stretching resulting from adjustment of both alignment bolts.
5. To verify that the belt is properly aligned, slowly increase the speed to a maximum of 6.0 mph or 9.6 km/h, and let
the belt turn for at least one minute. Carefully observe that the belt does not track to the left or right side. If the belt
continues to track to one side, or you hear a rubbing noise, immediately press the CLEAR/STOP key to stop the belt. You
will need to verify the alignment again.
6. Press the CLEAR/STOP key to terminate the test.
Motor Check
Motor check should only be performed if your computer needs to be changed or repaired, or if you feel that the speed is
not working properly. The motor check procedure is automatic and does not require any tools.
1. In the Diagnostics menu, select the “MOTOR CHECK” and accept it by pressing the JustGo
TM
/ENTER key.
2. Press the JustGo
TM
/ENTER key to proceed.
3. Press the CLEAR/STOP key to terminate the test.
WARNING – Do not stand on the belt during this procedure.
Wait while the treadmill performs the motor check. That operation should take less than 30 seconds. Once completed, the
message “MOTOR OK” will be displayed.
WARNING – If the motor check procedure is canceled prematurely, do not use the treadmill. It is important to fully complete
the motor check procedure prior to using the treadmill.
Elevation Calibration
Elevation calibration should only be performed if your computer, your motor drive or your elevation motor need to be
changed or repaired, or if you feel that the elevation is not working properly. The elevation calibration procedure is
automatic and does not require any tools.
1. In the Diagnostics menu, select the “ELEVATION CALIBRATION” and accept it by pressing the JustGo
TM
/ENTER key.
2. Press the JustGo
TM
/ENTER key to proceed.
3. Press the CLEAR/STOP key to terminate the test.
WARNING – Do not stand on the belt during this procedure. The treadmill will elevate to a maximum of 15% incline.
Allow the treadmill to raise and lower automatically. The procedure will take approximately one minute to complete. If for
any reason you must stop the test, press the CLEAR/STOP key to terminate the test.
WARNING – If the elevation calibration procedure is canceled prematurely, do not use the treadmill. It is important to
fully complete elevation calibration procedure prior to using the treadmill.
Statistics
The statistics allow you to view different parameters related to the use of your treadmill such as time and distance.
1. In the Diagnostics menu, select the “STATISTICS” option and accept it by pressing the JustGo
TM
/ENTER key.
• The TOTAL TIME displayed indicates the amount of time the treadmill has been used during all exercise programs.
• The TOTAL DISTANCE displayed indicates the total distance traveled with the treadmill during all exercise programs.
2. Press the CLEAR/ STOP key to terminate the test.
Page 27
27
Safety Key test
The safety key test verifies that the safety key works properly.
1. In the Diagnostics menu, select the “SAFETY KEY TEST” and accept it by pressing the JustGo
TM
/ENTER key.
Check the screen. If the safety key is properly inserted, a closed contact will be dislayed on the LED SCREEN. Otherwise, if
no safety key is inserted, an open contact will be displayed.
2. Press the CLEAR/STOP key to terminate the test.
Error log
The Error log allows you to see the number of times that a speed error is produced.
1. In the Diagnostics menu, select the “ERROR LOG” and accept it by pressing the JustGo
TM
/ENTER key.
2. You can see all the errors and the number of times that they occurred.
3. Press the CLEAR/STOP key to exit this test or press the JustGo
TM
/ENTER to clear all errors.
NOTE – The table of errors can be viewed at the end of this document.
Current test
The current test allows you to see the voltage and amperage in the motor.
1. In the Diagnostics menu, select “CURRENT TEST”. The motor will start and will reach 2.0 mph (or 3.2 km/h).
2. Press the JustGo
TM
/ENTER key to proceed.
3. Walk on the treadmill for a couple of minutes and the value of the current and voltage at the motor will appear on the
central information window.
4. Vary the speed to ensure that you get good readings for different speeds.
5. Press the CLEAR/STOP key to terminate the test.
NOTE – During this test, the amperage and the tension will be shown on the central information window in the following
format: 3.1 A, 20V.
Here 3.1 A stands for 3.1 Amps and 20 V stands for 20 Volts DC.
The value of the amperage must never exceed 15 amps (10 amps for international version).
Speed Sensor test
The Speed Sensor test allows you to see whether your speed sensor circuit is functional or not.
1. I
n the Diagnostics menu, select the “SPEED SENSOR TEST” and accept it by pressing the JustGoTM/ENTER key.
2. Press the JustGoTM/ENTER key to proceed and step off the machine. Allow the belt to reach 2.0 mph or 3.2 km/h.
3. A message will be displayed if the circuit is “GOOD” or “BAD” on the central information window:
• Check if your speed sensor is connected.
• Check if your optical disc is clean and that there is no dirt blocking the speed sensor.
4. Press the CLEAR/STOP key to terminate the test.
Maintenance
The maintenance menu allows you to see the average value of the current drawn by the motor. It also allows you to reset
this counter.
A first threshold has been set to make sure that the normal high limit of current drawn by the motor will not be exceeded.
When that level is reached, the user will get the message DECK MAINTENANCE IS REQUIRED and a diamond sign will be
displayed on the main screen. The message and sign will be displayed between each new exercise. After the maintenance
has been done and reset in the diagnostics menu, the notice will go away until there is a new rise of current.
If the maintenance is not done on the deck surface when required, a second threshold will trigger not too high above the
first one. Another notice with a square sign on the main display will come up. At that point the machine will not start again
until the deck maintenance is done and the maintenance has been reset in the diagnostics menu.
Page 28
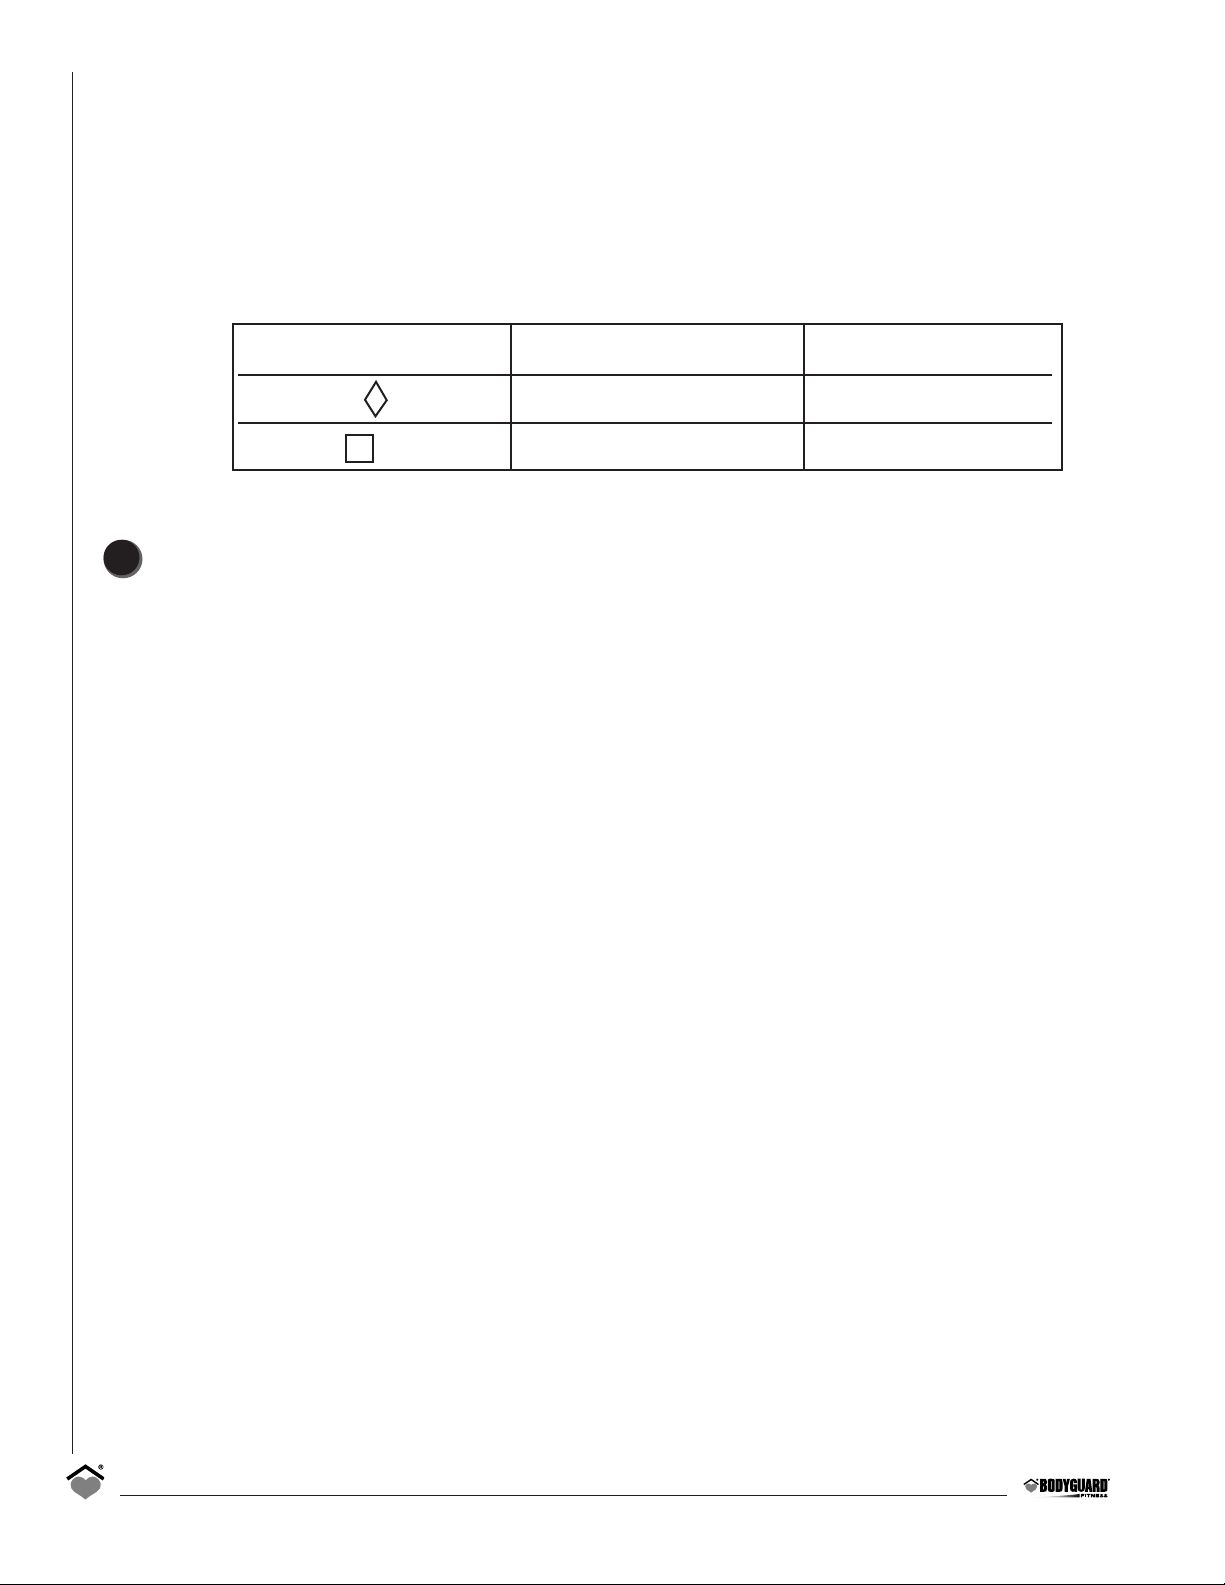
28
1. In Diagnostics menu, select “MAINTENANCE” and accept it by pressing the JustGoTM/ENTER key. There are two sub
menu items: AVERAGE and RESET. Scroll between them with the INCREASE/DECREASE key and press the JustGo
TM
/ENTER
key to accept your choice.
2. If you want to see the average current drawn by the motor simply go into the AVERAGE menu that will display the
average current in the motor from the last time it has been reset. To get out of that menu simply press CLEAR/STOP key.
3. If you have done the maintenance, you need to reset the maintenance counter by accessing the RESET MAINTENANCE
menu and enter that menu and confirm that it has been done. You will then get a message that the “MAINTENANCE
COUNTER HAS BEEN RESET”.
4. Press the CLEAR/STOP key to terminate the test.
Level of alerts America International
Diamond sign 13.5 amps 10 amps
Square sign 14.5 amps 10.8 amps
General Care
Your T280P – T280C – T320 have been designed and built to give you trouble free use. For maximum safety however, you
should periodically check your unit for signs of wear.
Here’s a quick check list followed by reference Table 3 :
• After each workout, you should wipe down your T280P– T280C – T320 using a mild, non-abrasive liquid cleanser applied
on a soft cotton cloth. Do not spray cleansers directly on the unit or use an excessively damp cloth. Do not clean the unit
with the power ON, be sure that it is OFF.
• Be sure that the treadmill is on a level surface and that it is not rocking. Excessive rocking may cause the running belt to
track to one side of the deck resulting in accelerated wear of the running belt.
• Keep liquids including excessive sweat away from the computer console.
• The running belt and deck surface should be kept clean. Dirt and other debris can cause slipping when exercising.
• Check that each handle bar is secure on the frame.
• Do not put any lubricating product other than the Bodyguard
®
lubricant.
• Place a carpet or rubber mat under the treadmill to avoid any build up of debris from your exercise shoes. Under
extreme conditions, some debris may collect on the floor just behind the rear roller. It is also recommended to periodically
remove any dust that may have accumulated under the treadmill. Excessive amounts of dust may enter into the motor
assembly and cause the motor to overheat.
• It is very important to periodically remove any dust that may have accumulated under the motor cover. Use compressed
air to blow out the accumulated dust in the motor and board area.
WARNING – To prevent electrical shock or risk of fire, always turn the power OFF and disconnect the power cord whenever
you are inspecting and repairing your T280P – T280C – T320.
Belt and Running Deck
Running Belt
The running belt supplied with each treadmill is of the highest quality, offering superior traction and low noise under
extreme conditions. It is therefore important to maintain each running belt periodically by observing that no cuts have
appeared over time, and that the running belt has not shifted to one side of the deck surface. If the running belt constantly
tracks (or moves) to one side of the deck, you must adjust the alignment bolts placed at the rear of the running belt.
See Belt Alignment for complete procedure.
MMaaiinntteennaannccee IInnffoorrmmaattiioonn
6
Maintenance Information
Page 29
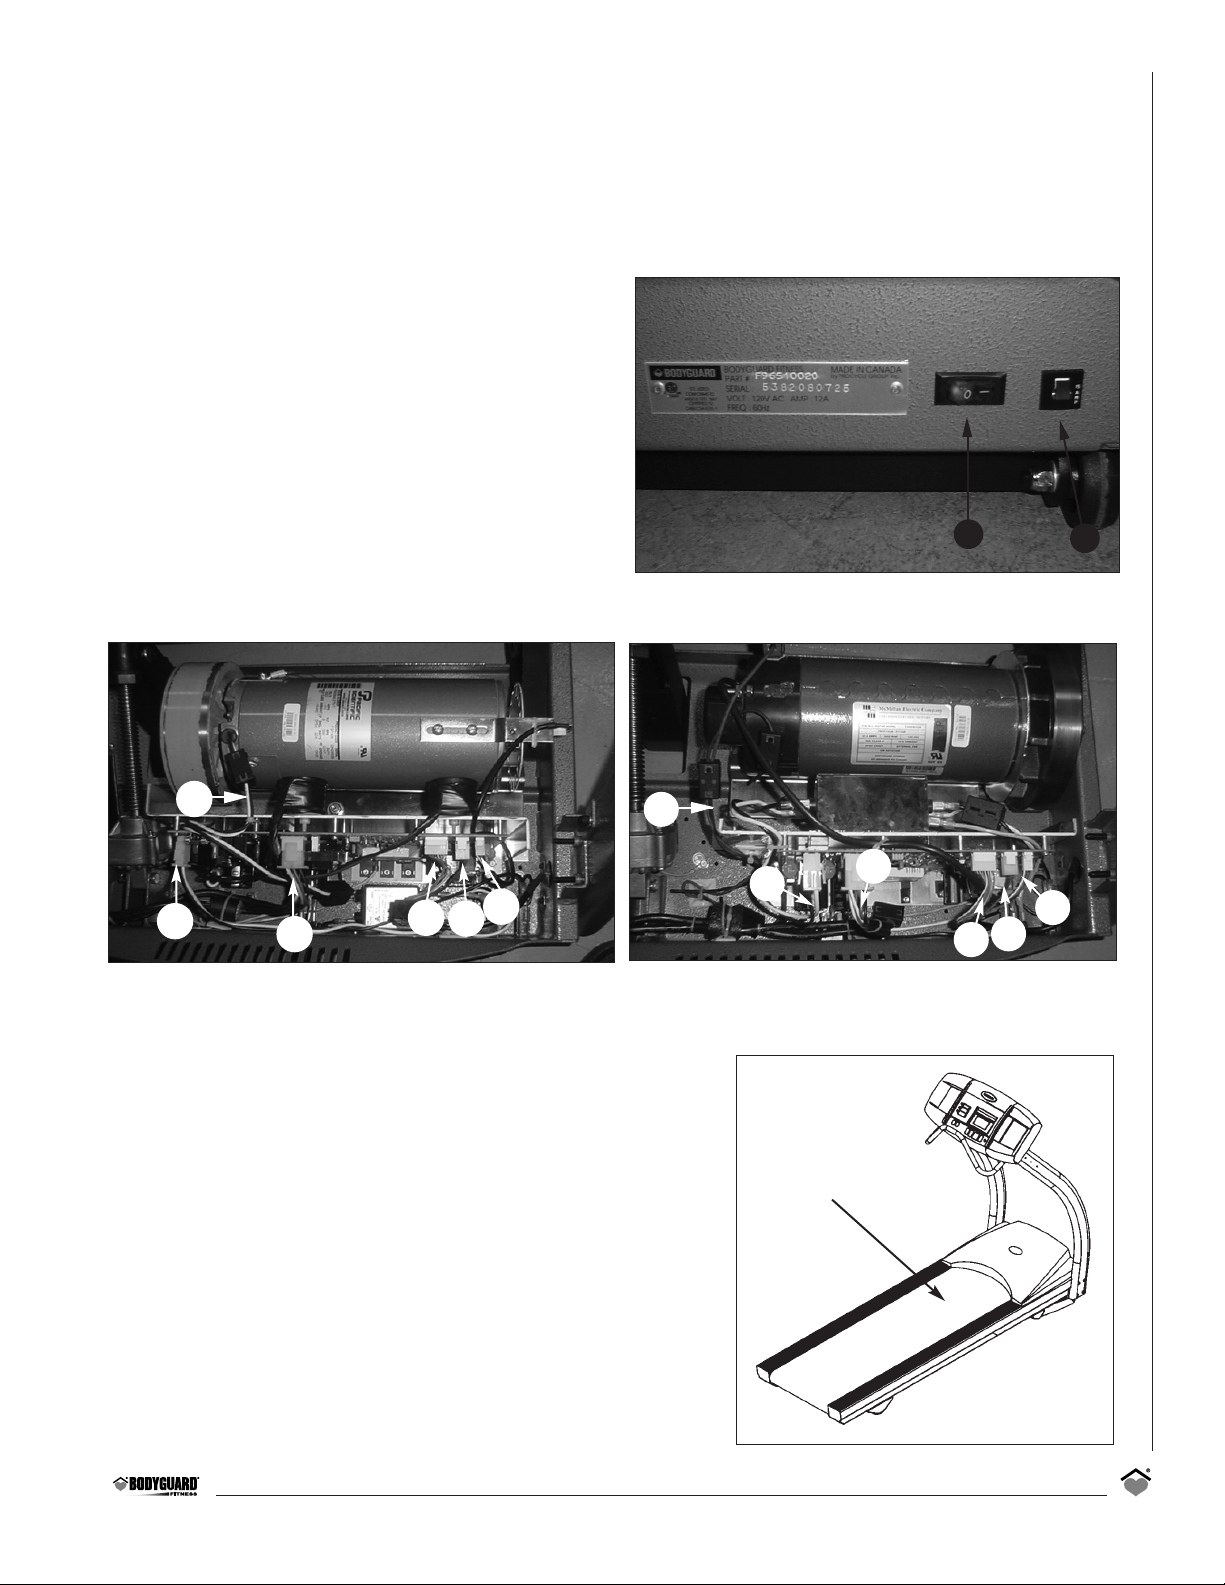
Deck Surface
The running deck needs to remain free of any loose items that may become trapped between the running belt and the
rollers. Avoid dropping liquids on the deck as this may cause gum up problem on the belt.
Under extreme conditions resulting in heavy wear and tear on the deck surface, it may be necessary to remove the deck and
turn it over, or turn it back-to-front to expose a fresh surface. The deck is especially designed to offer four reversible sides
for a longer life use of the deck.
Please contact your Bodyguard
®
Dealer for servicing the deck.
Make certain to have the power off before doing any
maintenance.
1 - Breaker
2 - ON/OFF switch
Drive motor with connection wires.
1 - Speed sensor cable
2 - Computer power cable
3 - Computer DATA cable
4 - Elevation motor cable
5 - Power AC cable
6 - Motor cable
Lubricant application
1. Clean the deck surface and the inside part of the belt with a dry piece of
fabric. Clean the belt first by using a long piece of fabric across the belt
and start the belt so it makes two complete turns. Then, release the
tension on the rear roller to be able to clean the deck surface of any
debris or remaining wax.
2. Open the lubricant supplied by your dealer. Place the lubricant tube in
the middle of the belt at about 15 inches from the hood cover. Step on
the treadmill and step down with your feet where the lubricant tube is
located under the belt to make sure that most of the lubricant is now
spread evenly on the deck surface. DO NOT START THE TREADMILL YET.
3. Remove the LUBE TUBE from under the belt and put the tension back
again on the rear roller. Stand where you applied the lubricant and
press JUSTGO to start the belt turning at 0.5 MPH (or 0.8 KMH). Let the
belt bring you a the back of the treadmill and come back where you
were standing. Do this twice so the lubricant will be present on the
total surface of the deck. Start the treadmill and make sure the belt
alignment is correct. Refer to the owner’s manual if any problem occurs.
29
2
1
1
2
3
4
5
6
figure 10
figure 11figure 11
Motor in treadmill for International models
1
2
3
4
5
6
Motor in treadmill for American models
BEST ZONE
Page 30
30
Quick Troubleshooting Check List
If you experience a problem during the normal operation of the T280P – T280C – T320, use the following troubleshooting
table below. If you are unfamiliar or uncertain with basic diagnostic maintenance procedures, contact your Authorized
Bodyguard
®
Dealer for diagnostics or repair of your T280P – T280C – T320.
Table 3
PROBLEM
• Computer will not light
up when power
is turned ON.
• Belt doesn’t turn.
• Elevation does not
respond properly.
• Motor drive does not
respond properly.
• Motor turns backwards.
• Computer key(s) not
responding to touch,
or sticking.
• Squeaking noise from
the motor.
• Belt tracks left
and right.
• Speed is not constant or
seems too fast or slow.
• Can’t get out at the end
of a program.
• Error log
POSSIBLE CAUSE/SOLUTION
• Unit is not plugged in. – Plug unit in.
• Power cord. – Check that power cord is functional; replace if necessary.
• Circuit breaker. – Reset the breaker.
• Damaged motor circuit board. – Contact your Bodyguard
®
Dealer.
• The belt is over tensioned. – Perform Belt Alignment.
• The wires are not connected. – Remove the cover and connect the wires properly.
• Magnetic key is not in place. – Insert the magnetic key.
• It is not calibrated. – Perform Elevation Calibration.
• The wire is not connected on the motor circuit board. –
Connect the elevation wire to the circuit board.
• It is not calibrated. – Perform Motor Check.
• The wire is not connected on the motor circuit board. –
Motor wiring harness needs to be connected to the lower board.
• The wires are reversed on the circuit drive. –
Contact your Bodyguard
®
Dealer.
• Keypad may be damaged by liquid penetrating through the seal. –
Contact your Bodyguard
®
Dealer.
• Excessive amount of cleaning solution used. –
Use mild cleanser on damp cloth only when cleaning console and unit.
• Poly V-belt slipping. – Contact your Bodyguard®Dealer.
• Motor brush noise excessive. – Contact your Bodyguard
®
Dealer.
• Uneven floor. – Move the treadmill to an even floor.
• Rear roller not adjusted for sloped floor. –
The rear roller needs to be adjusted. Perform Belt Alignment.
• The drive motor is not calibrated. – Perform Motor Check.
• The tension on the motor drive is too excessive. –
Remove tension on the running belt. Perform Belt Alignment.
• Elevation is not calibrated. – Perform Elevation Calibration.
• See table 4
Page 31
31
Error Codes
Table 4
PROBLEM
• Error 1
• Error 2
• Error 11
• Error 12
• Error 21
• Error 22
• Error 23
• Error 31
• Elevation
Motor
Error
CAUSE / SOLUTION
• Acceleration is too quick in the acceleration or reached speed phase.
• Possible causes: Motor drive defective or user pushing on the running belt for too long.
• Running belt not following the speed required in the reached speed phase.
• Possible causes: Deck too sticky. Walk on deck for 15 minutes at 4 mph.
• Motor drive board can be defective.
• Check speed sensor or optical disk.
• Acceleration is too fast during acceleration phase.
• Possible cause: Defective drive board.
• Acceleration is too slow during acceleration phase.
• Possible causes: Deck too sticky.
• Walk on deck for 15 minutes at 4 mph.
• Speed sensor problem.
• In a deceleration phase, the speed slows too fast.
• Possible cause: Drive board defective.
• In a deceleration mode, the speed slow down too slowly.
• Possible cause: Drive board defective, speed sensor problem.
• There is an abnormal acceleration during the deceleration phase.
• Motor drive board is defective.
• Acceleration is too quick under 2 mph.
• Possible causes: Motor drive defective or user pushing on the running belt for too long.
• Elevation motor values from potentiometer are out of range.
• Possible causes: Elevation motor is defective or uncalibrated.
• Perform an elevation calibration in the diagnostics menu.
• Motor drive board can be defective.
• Elevation Motor not functionnal.
• Elevation Motor not connected.
Page 32
32
Product Name
Model Number
Serial Number
Date Purchased
Dealer Store Name
Dealer Phone Number
Thank You for Purchasing a Bodyguard®T280P – T280C – T320
Bodyguard®Fitness is dedicated to designing and manufacturing the finest fitness equipment available today.
This manual outlines information on warranty, assembly, operation of the unit, safety and basic maintenance checks
for the Bodyguard
®
T280P – T280C – T320 treadmills.
When you require service for your T280P – T280C – T320, always present the unit product model, serial number and date
of purchase to the Bodyguard
®
Dealer. The product model and serial numbers are located at the front of the machine.
Now is a good time to write the product model and serial numbers and related information in the space provided.
Please fill out the warranty registration card and return it to Bodyguard
®
Fitness within 30 days of date of purchase
for registration of your T280P – T280C – T320 warranty. Your returned warranty registration card is important in helping
us keep you up-to-date with all the latest T280P – T280C – T320 product additions. Also, the warranty card is used to
establish the actual sale date.
NOTE – The warranty card is use to establish the beginning of the warranty of your treadmill. If you omit to send your
warranty card to Bodyguard
®
Fitness, we will use the dealer purchase date to honor the warranty time.
You can also register on-line at www.bodyguardfitness.com
Page 33
Safety requirements
North America
The T280P – T280C – T320 treadmills have been tested and approved to meet all ETL requirements concerning electrical
and mechanical safety. In addition, the T280P– T280C– T320 treadmills conform to UL 1647 and CAN/CSA-E335-1/2E.
International
The equipment listed in this manual has been tested to meet the Low Voltage Directive 73/23/EEC concerning the electrical
and mechanical safety.
Interference limits requirements
North America
This equipment has been tested and found to comply with the limits of Class B digital device, pursuant to Part 15 of the FCC
Rules. These limits are designed to provide reasonable protection against harmful interference in a residential installation.
This equipment generates, uses and can radiate radio frequency energy and, if not installed and used in accordance with
the instructions, may cause harmful interference to radio communications. However, there is no guarantee that interference
will not occur in a particular installation. If this equipment does cause harmful interference to radio or television reception,
which can be determined by turning the equipment off and on, the user is encouraged to try to correct the interference by
one or more of the following measures:
- Reorient or relocate the receiving antenna.
- Increase the separation between the equipment and receiver.
- Connect the equipment into an outlet on a circuit different from that to which the receiver is connected.
- Consult the dealer or an experienced radio/TV technician for help.
International
This equipment has been tested to comply with the Electromagnetic Interference Compatibility directive 89/336/EEC
required by the International Electrical Committee.
33
Page 34
34
MADE IN CANADA
Page 35
35
Page 36

36
 Loading...