

Page 1
#691110(-) 12/15
USER MANUAL
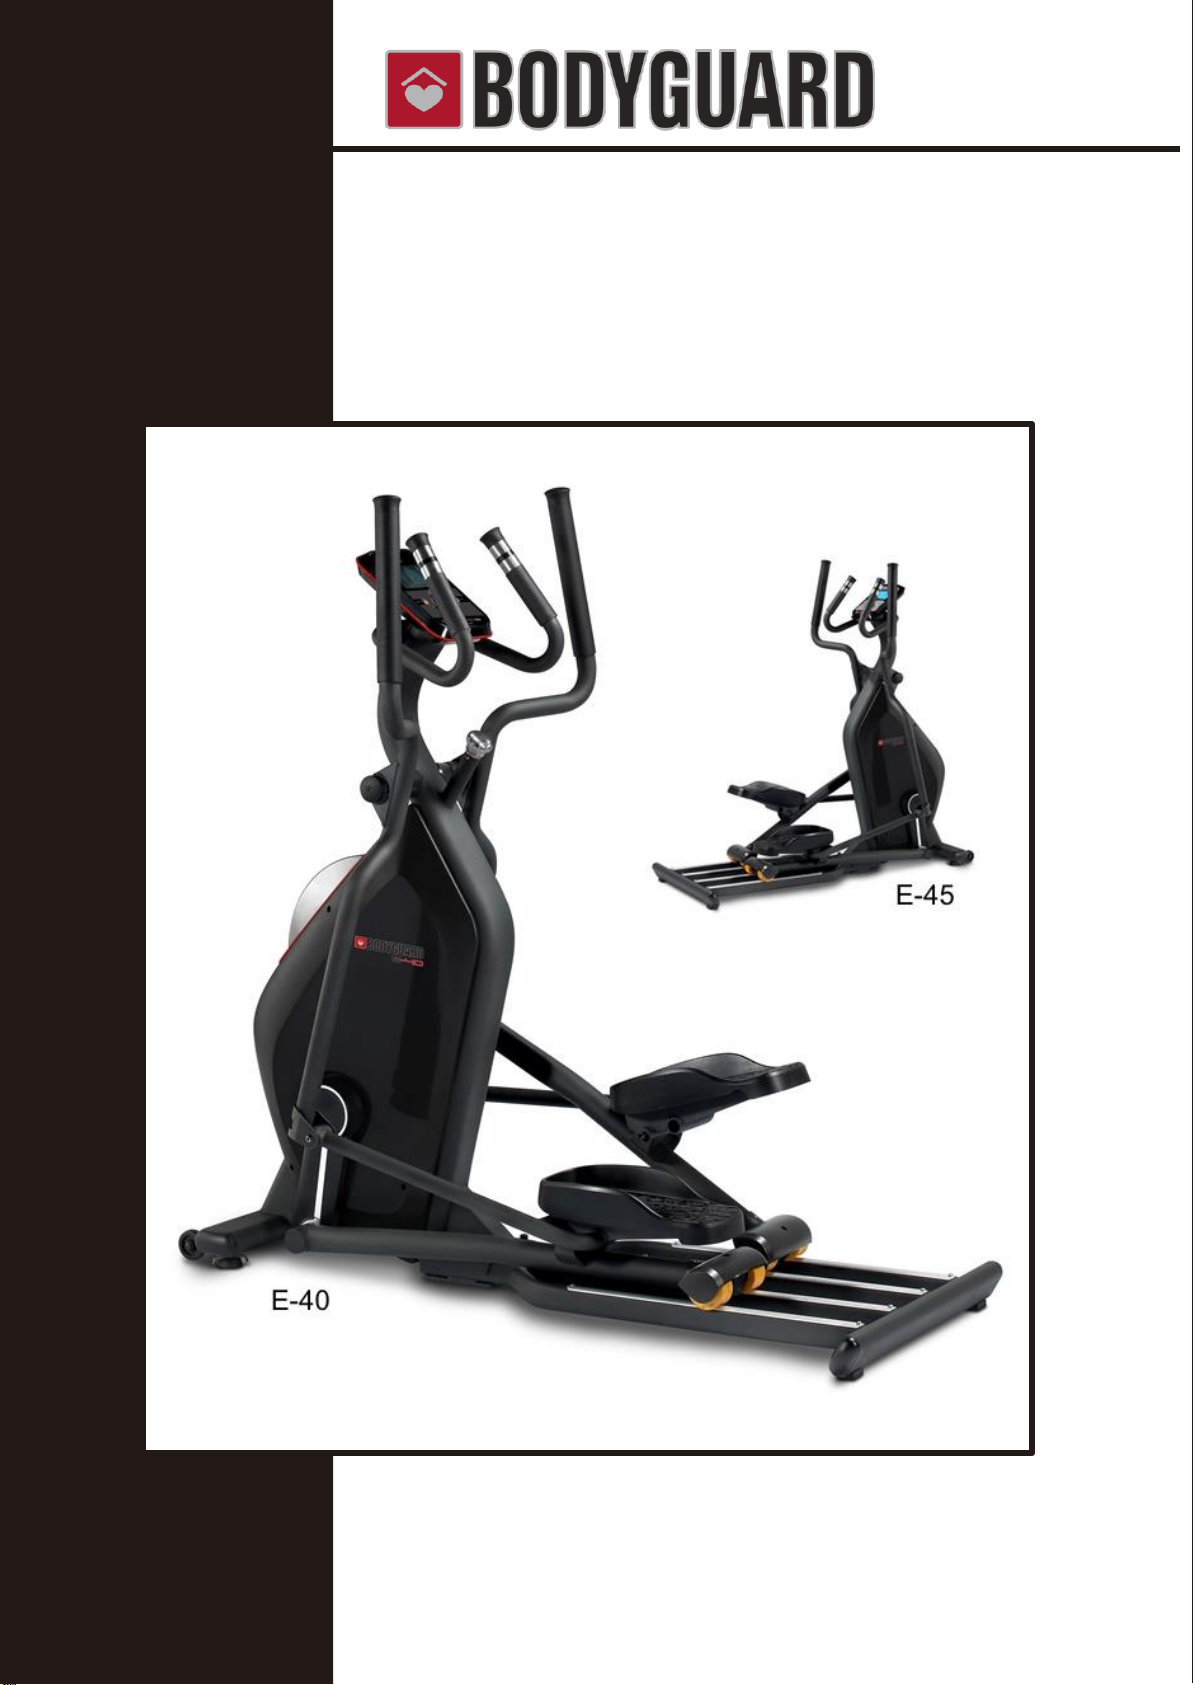
E-40 & E-45
ELLIPTICAL
MA
CHINE
Page 2

Page 3

3
TABLE OF CONTENTS
1 INTRODUCTION ...................................................................................... 5
1.1 PRODUCT WARRANTY ................................................................ .............................. 5
1.2 BODYGUARD FITNESS CONTACT INFORMATION .................................................. 5
2 IMPORTANT SAFETY INSTRUCTIONS .................................................. 6
3 GETTING TO KNOW YOUR ELLIPTICAL ............................................... 9
3.1 MAIN FRAME COMPONENTS .................................................................................... 9
3.2 E-40 CONSOLE ......................................................................................................... 10
3.3 E-40 CONSOLE BUTTONS / FEATURES ................................ ................................ .. 10
3.4 E-45 CONSOLE ......................................................................................................... 11
3.5 E-45 CONSOLE BUTTONS / FEATURES ................................ ................................ .. 12
3.6 WORKOUT PARAMETERS ....................................................................................... 14
3.7 PARAMETERS GLOSSARY ...................................................................................... 14
3.8 MEASURING YOUR HEART RATE ........................................................................... 16
3.9 MAXIMUM HEART RATE (MHR) ............................................................................... 16
3.10 HEART RATE RECOVERY TEST (E-40 only) ............................................................ 17
3.11 EQUIPMENT TRAINING BENEFITS .......................................................................... 17
4 EXERCISE PROGRAMS ........................................................................ 18
4.1 PROGRAM CATEGORY GRID .................................................................................. 18
4.2 E-40 PROGRAM SETUP ........................................................................................... 19
4.3 E-45 PROGRAM SETUP ........................................................................................... 19
4.4 E-45 PROGRAM MODES ................................ ................................ .......................... 19
4.5 E-45 INTENSITY MODES .......................................................................................... 21
4.6 JUSTGO PROGRAM ................................................................................................. 21
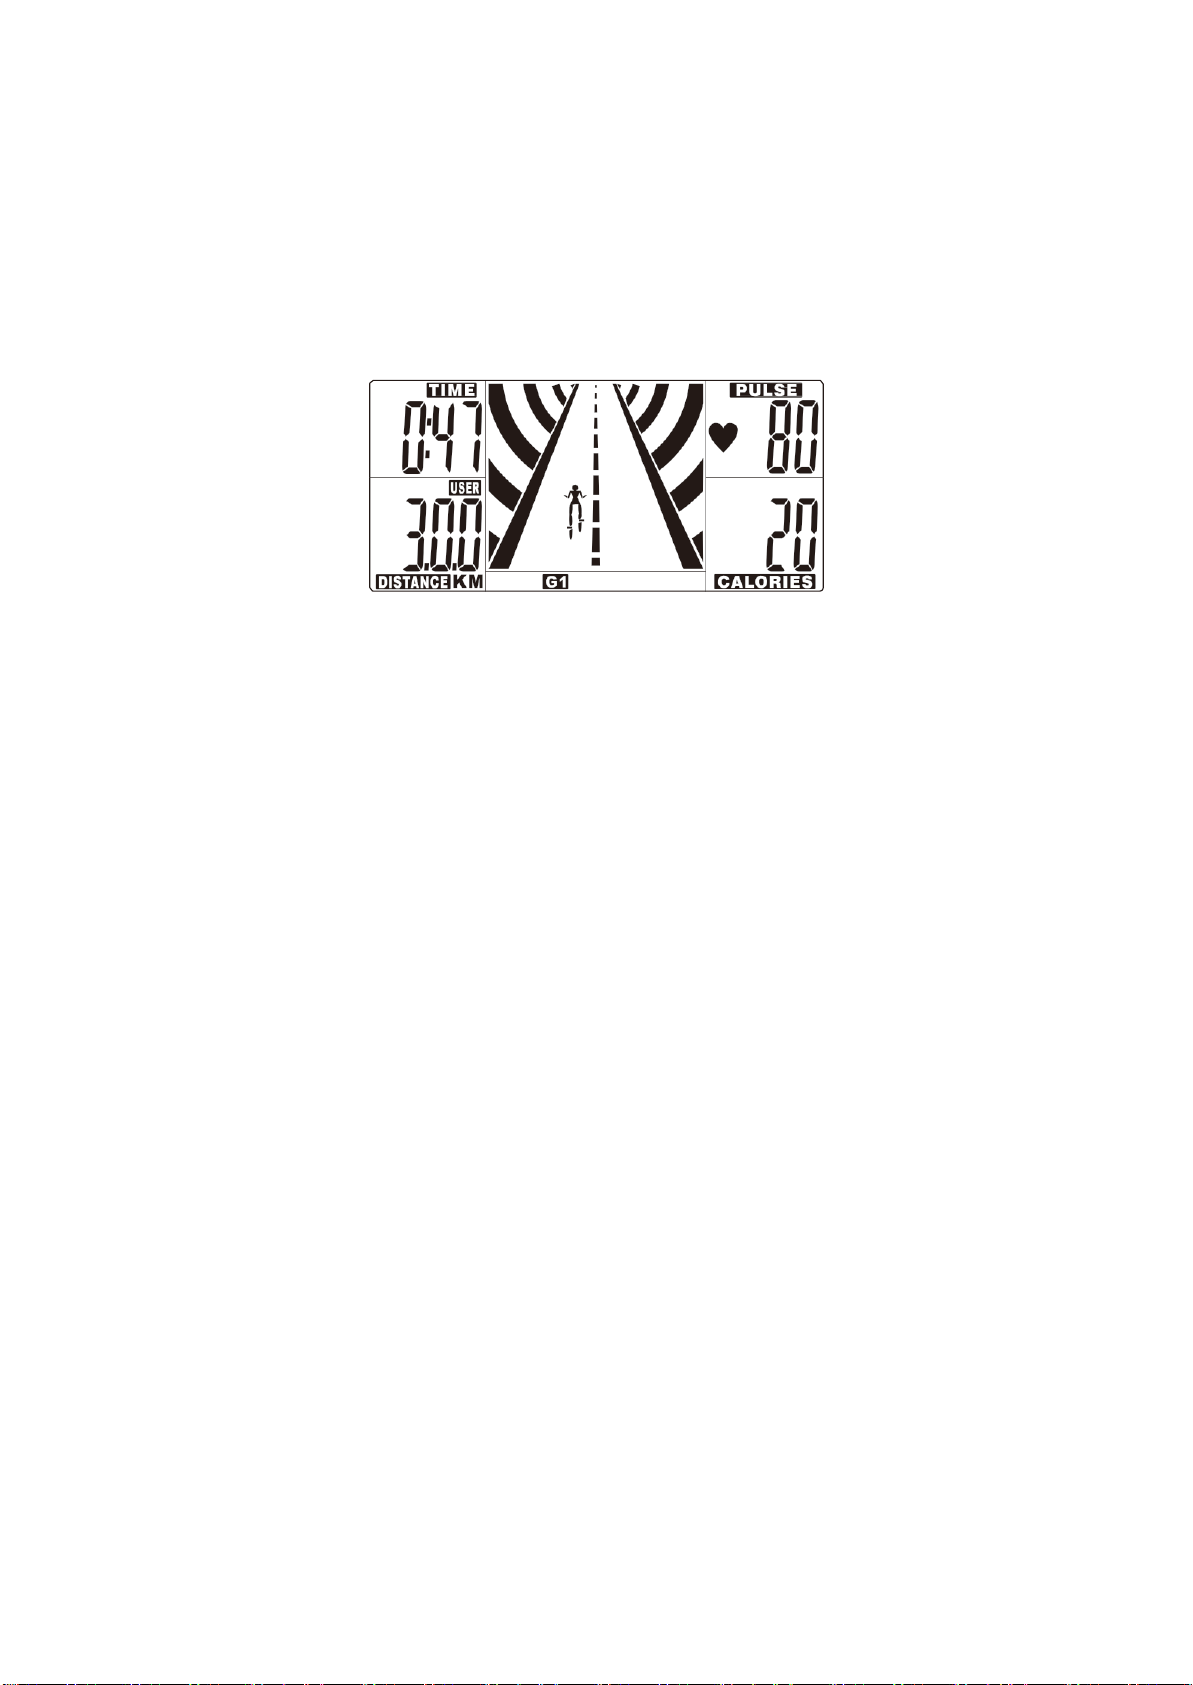
4.7 MANUAL PROGRAM (G1 on E-40) ........................................................................... 22
4.8 CALORIE GOAL PROGRAM ..................................................................................... 22
4.9 DISTANCE GOAL PROGRAM ................................................................................... 22
4.10 CROSS-COUNTRY PROGRAM ................................................................................ 22
4.11 INTERVAL PROGRAM .............................................................................................. 22
4.12 RANDOM PROGRAM ................................................................................................ 23
4.13 GOODBYE FAT PROGRAM ...................................................................................... 23
4.14 TRACK PROGRAM .................................................................................................... 23
4.15 RACING MODES (G2, 3 & 4 on E-40) ....................................................................... 23
4.16 HEART RATE CONTROL PROGRAM ....................................................................... 24
4.17 HEART RATE INTERVALS PROGRAM .................................................................... 25
4.18 FITNESS TEST PROGRAM ................................................................ ....................... 25
4.19 ADVANCED HILLS PROGRAM ................................................................................. 25
4.20 RACE PROGRAM ...................................................................................................... 25
4.21 BEAT MY RACE ......................................................................................................... 25
4.22 TARGET WATTS ....................................................................................................... 25
4.23 SMART REVERSE ..................................................................................................... 26
4.24 CUSTOM PROGRAMS .............................................................................................. 26
4.25 MEMORY PROGRAMS ............................................................................................. 26
5 SETTINGS MENU (E-45 only) ............................................................... 27
5.1 ACCESSING THE SETTINGS MENU ........................................................................ 27
5.2 LANGUAGE ............................................................................................................... 27
5.3 WEIGHT UNIT ............................................................................................................ 27
5.4 DISTANCE UNIT ........................................................................................................ 27
5.5 USER ID ..................................................................................................................... 27
5.5.1 CREATE USER............................................................................................................................................. 28
5.5.2 EDIT USER .................................................................................................................................................. 28
Page 4

ELLIPTICALS – USER MANUAL
5.5.3 DELETE USER
5.5.4 TURN USER ID OFF
5.5.5 STATS
5.5.6 View Statistics
5.5.7 Reset Statistics
5.6 WARM UP
5.7 COOL DOWN
5.8 PAUSE TIME
5.9 BIG NUMBER OPTION
5.10 CUSTOM PROGRAMS
5.11 MEMORY OPTION
5.12 SOUND OPTION
5.13 AUTO POWER OFF
5.14 INTENSITY
....................................................................................................................................................
6 DIAGNOSTICS MENU
6.1 ACCESSING THE DIAGNOSTICS MENU
6.2 NVRAM TEST
6.3 KEYPAD TEST
6.4 DISPLAY TEST
6.5 HEART RATE TEST
6.6 SOUND TEST
6.7 USB PORT TEST
6.8 BRAKE TEST
6.9 SPEED SENSOR TEST
6.10 STATISTICS
6.11 BATTERY LEVEL
6.12 BRAKE CALIBRATION
........................................................................................................................................
...............................................................................................................................
......................................................................................................................................
......................................................................................................................................
..................................................................................................................
.............................................................................................................
..............................................................................................................
..............................................................................................
..............................................................................................
.....................................................................................................
........................................................................................................
...................................................................................................
.................................................................................................................
.............................................................................
..............................................................................................................
............................................................................................................
............................................................................................................
....................................................................................................
..............................................................................................................
.........................................................................................................
..........................................................................................................................
..............................................................................................
................................................................................................................
........................................................................................................
................................................................................................
..................................................................
28
28
28
28
28
31
32
32
32
32
32
32
32
33
33
33
28
29
29
29
29
30
30
30
30
31
31
7 GENERAL MAINTENANCE
7.1 GENERAL MAINTENANCE TIMETABLE
7.2 UPDATING SOFTWARE
.............................................................................................
...................................................................
....................................................................
8 TROUBLESHOOTING PROBLEMS
8.1 DISPLAY MESSAGES (E-45 only)
8.2 COMMON NOISES
8.2.1 CLICKING NOISES
8.2.2 RUBBING OR SCRAPING NOISES
8.2.3 LOUD KNOCKING POPPING VIBRATION NOISES
8.3 HEART RATE MONITORING
8.3.1 CONTACT HEART RATE SYSTEM
8.3.2 WIRELESS HEART RATE SYSTEM
8.4 GENERAL TROUBLESHOOTING LIST
.......................................................................................................................
9 ASSEMBLY GUIDE
E-40
.............................................................................................................................
E-45
.............................................................................................................................
.....................................................................................................
...................................................................................................
...................................................................................................
...................................................................................................
................................................................................
..............................................................................
.............................................................................
......................................................................................
......................................................................
34
34
35
.......................................................
36
36
36
36
37
37
38
38
39
40
41
41
44
4
Page 5

ELLIPTICALS – USER MANUAL
5
Product Name (e.g. E-40 Elliptical)
Model Number (F16672400)
10-Digit Serial Number
Date of Purchase
Dealer Store Name
Dealer Phone Number
1 INTRODUCTION
Bodyguard Fitness is dedicated to designing and manufacturing the very best performing fitness
equipment on the market. This manual outlines the operational information, safety precautions, basic
maintenance requirements and service guidelines for your piece of Bodyguard Fitness equipment.
To ensure that you get the maximum benefit from your equipment, we recommend that you read this
manual carefully before attempting to assemble and use your elliptical.
If you require service for your equipment, be prepared to provide your machine's 10-digit serial
number.
You will find the10-digit serial number printed on a plate that is attached to the frame of the unit as
well as on the Warranty Registration Card. Please fill out the grid below so the information is easily
accessible if required in the future.
1.1 PRODUCT WARRANTY
It is important that you register your purchase with Bodyguard Fitness within 30 days of the purchase
date so your product’s warranty is activated. Product warranties are not transferrable so to avoid
delays if warrantied service is required please register your product immediately at
www.bodyguardfitness.com by clicking on “Customer Service” in the top menu then “Warranty
Registration” and completing the online form. Alternatively, you may fill out the warranty registration
card that came with your unit and mail it to the address on the card.
IMPORTANT – If you omit to send your warranty card to Bodyguard Fitness or register online within
30 days of the date of purchase then you will be required to send Bodyguard Fitness proof of
purchase before receiving any warrantied parts or service.
The product warranty is described in detail on the product warranty sheet found in your
documentation package. You may also see a complete copy of this document at
www.bodyguardfitness.com Read the product warranty information carefully and note the information
covering wear items and the owner’s responsibilities to general maintenance.
1.2 BODYGUARD FITNESS CONTACT INFORMATION
Bodyguard Fitness
9095, 25th Avenue Saint-Georges, Quebec, Canada, G6A-1A1
Customer Service: 1-888-407-3784 [email protected]
Sales: 1-800-373-2639 [email protected]
General Information: 1-418-228-8934 [email protected]
Page 6
ELLIPTICALS – USER MANUAL
6
1m / 39"
Clear Space
1m / 39"
1m / 39"
2 IMPORTANT SAFETY INSTRUCTIONS
To ensure that you get the maximum benefit from your equipment, we recommend that you read this
manual carefully before attempting to assemble and use your elliptical machine. Save this document
and refer back to it if you are unfamiliar with the operation of the machine.
Use of this equipment by people with heart or other medical problems may result in serious injury.
Consult your physician before using this equipment and continue to do so periodically as you
continue to use this equipment. Cease exercising immediately if you feel dizzy, faint or shortness of
breath.
Using this equipment improperly or in a manner other than that prescribed in this manual may result
in serious injury.
This equipment is not intended for use by persons (including children) with reduced physical, sensory
or mental capabilities, or lack of experience and knowledge, unless they have been given supervision
or instruction concerning use of the equipment by a person responsible for their safety.
Any changes or modifications to this equipment could void the product warranty. Refer servicing to
qualified Bodyguard Service personnel only. If you have any questions about the assembly, proper
use or repair of your equipment, please contact Bodyguard Fitness Customer Service. An Authorized
Bodyguard Fitness Dealer must make any necessary repairs during the warranty period.
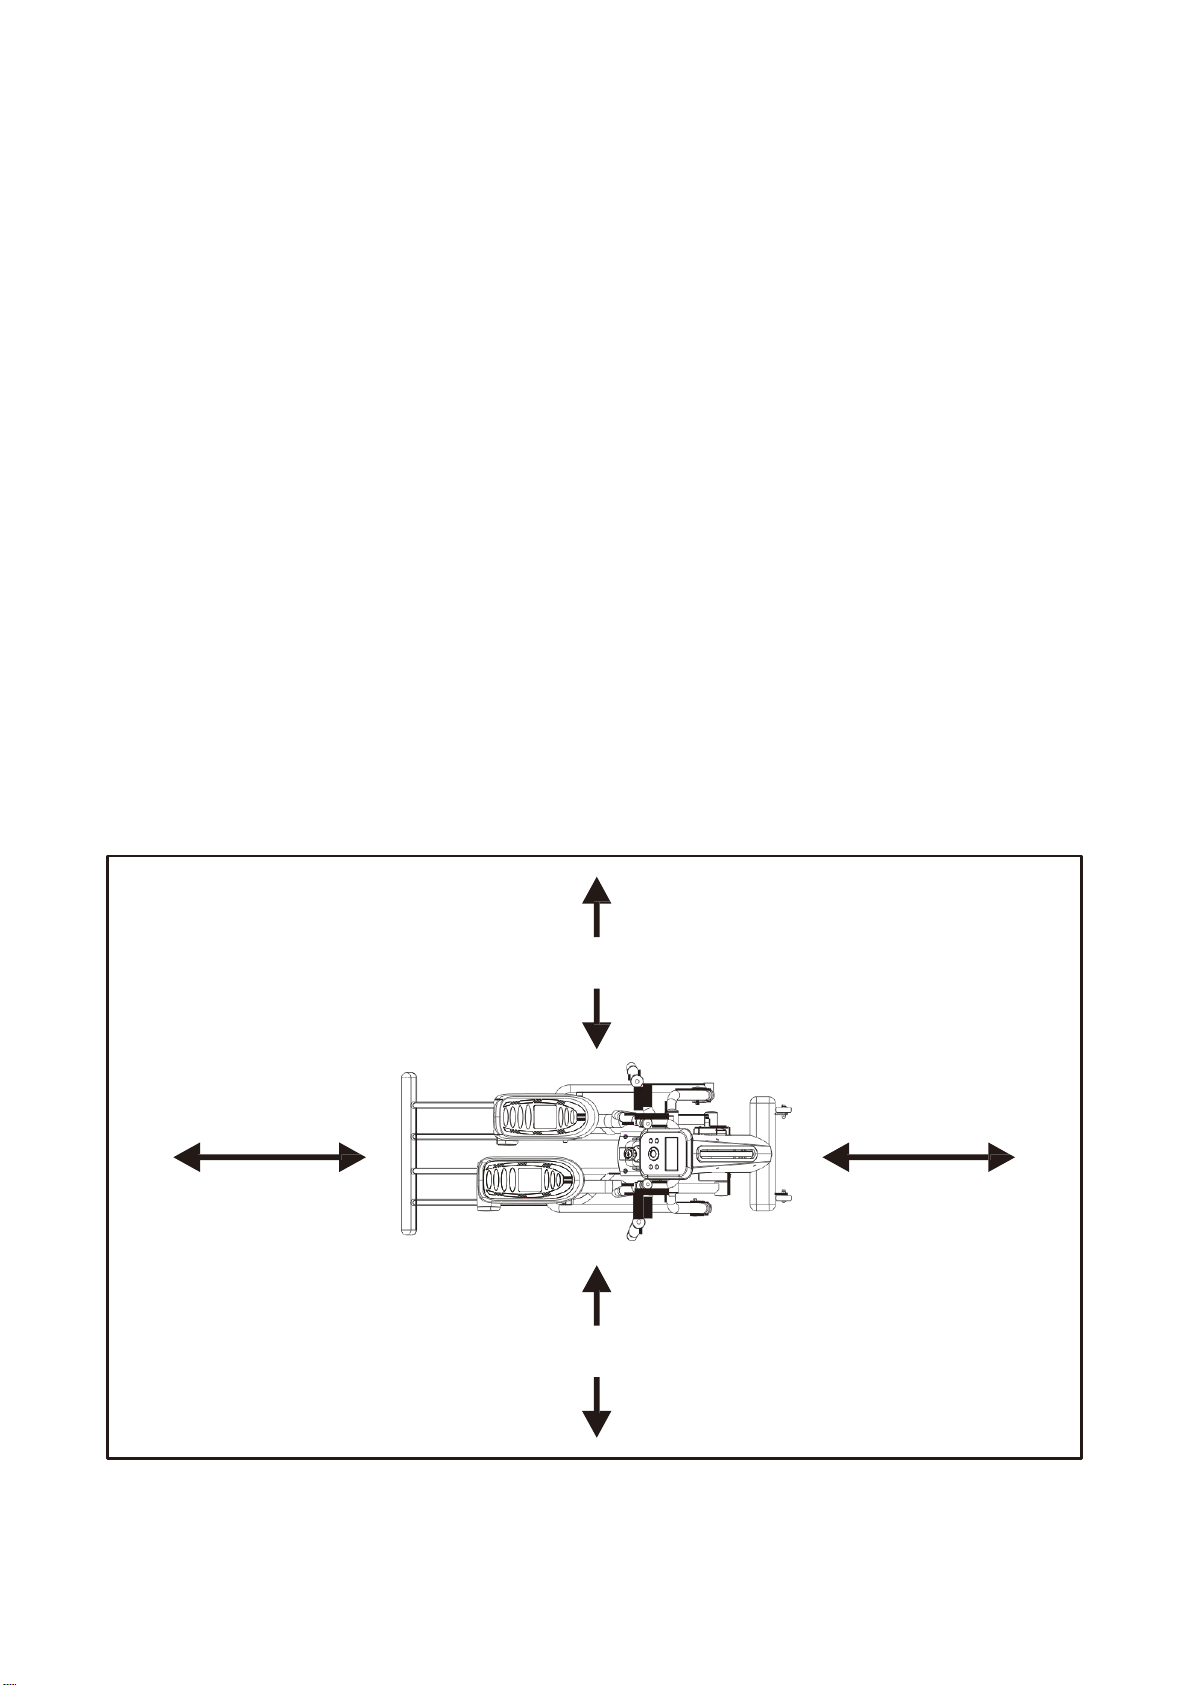
Always maintain a clear space around the machine of at least 1 meter (39 inches) on all sides. Do
not box in the equipment or place it up against walls, furniture or obstacles and avoid the possibility
of bystanders making contact with the user or the equipment. Place the equipment in such a way that
the power can be easily disconnected.
Page 7

ELLIPTICALS – USER MANUAL
7
WARNING - TO REDUCE THE RISK OF BURNS, FIRE, ELECTRIC SHOCK OR INJURY:
• Do not expose this machine to rain or moisture. Do not install the machine outdoors or near
swimming pools, sauna rooms or high humidity environments. Ensure the room temperature is
between 15°C & 35°C and the humidity is between 30% and 70%. Using your equipment in
conditions outside this range may affect some functionalities and/or your warranty.
• Always install the equipment on a stable base and ensure it is properly leveled.
• Keep machines with a power cord away from all moving parts of the machine as well as the front
transport wheels.
• Do not run power cords under or along the side of any machine. Do not use any power cords that
are damaged or have been pinched or even partially immersed in water; contact your service
provider or the manufacturer to have it replaced.
• Do not allow use of the equipment by unsupervised children or persons with reduced physical,
sensory or mental capabilities, or people lacking experience or knowledge of the equipment.
• Do not use attachments not recommended by the manufacturer.
• Never drop or insert any object into any opening. If an object should drop inside, turn off any
power switches and unplug any power cords from the outlet before attempting to retrieve it.
• Do not place liquids of any type on or near the unit.
• Do not exceed the maximum user weight as outlined in the product specifications.
• Allow only one person at a time on the machine.
• Keep all loose clothing, shoelaces, towels or other loose materials away from moving parts.
• Do not allow other people to interfere with the user or equipment during a workout.
• When disconnecting power cords always turn the power switch off first then gently remove the
plug from the wall outlet. Never pull the power cord by the cable.
• Allow only trained personnel to service this equipment.
DANGER – Improper connection of the equipment can result in a risk of electric shock. Do not modify
any plugs provided with Bodyguard products – if the supplied plug does not fit the outlet, have a
proper outlet installed by a qualified electrician.
120 V Units are designated for the North American Market.
The power outlet must have the same configuration as the plug. No adapter should ever be used. If
using an extension cord ensure it is 14 gauge or thicker.
IMPORTANT:
THE MAXIMUM RECOMMENDED WEIGHT
CAPACITY FOR THE E-40 OR E-45 ELLIPTICAL IS
150 KG (330 LB).
Page 8

ELLIPTICALS – USER MANUAL
8
AVIS DE SÉCURITÉ
L'utilisation de cet appareil peut provoquer des blessures graves chez les personnes
souffrant de troubles cardiaques ou d'autres problèmes de santé. Il est recommandé de
consulter un médecin avant d'utiliser cet appareil. Il est aussi recommandé de consulter
régulièrement un médecin si vous décidez de poursuivre l'entraînement. En cas de vertiges
ou d'étourdissements, de pertes de conscience ou d'essoufflements, cessez
immédiatement l'exercice. L'utilisation inadéquate de cet appareil ou une utilisation autre
que celle indiquée dans le manuel d'instructions peut entraîner des blessures graves.
Cet appareil n'est pas destiné à être utilisé par des enfants ou des personnes dont les
capacités physiques, sensorielles ou mentales sont réduites, ou par des personnes
manquant d'expérience et de connaissances à moins qu'elles n'aient été formées et
encadrées pour l'utilisation de cet appareil par une personne responsable de leur sécurité.
POUR VOTRE SÉCURITÉ PERSONNELLE :
Afin de prévenir les risques d’incendies, de brûlures, de blessures ou de chocs électriques:
• Toujours installer l’appareil sur une surface stable et correctement nivelée.
• Respecter le poids maximum de l'utilisateur tel qu’indiqué dans les spécifications du
produit.
• Ne pas déposer de serviettes ni de vêtements sur l’appareil.
• Ne placez pas de liquide près de l’ordinateur.
• Gardez une superficie de 1 mètre libre de toute obstruction autour de l’appareil en
utilisation.
• Faites toujours face à l’ordinateur lors de l’utilisation et jamais plus d’une personne à la
fois doit utiliser l’appareil.
• Ne pas insérez d’objets dans les ouvertures de l’appareil.
ATTENTION –
L’entretien doit être effectué UNIQUEMENT par une personne qualifiée, spécialisée dans les
équipements de marque Bodyguard. Tous les ajustements ou réparations nécessaires
pendant la période de garantie doivent être faits par un distributeur Bodyguard agréé.
IMPORTANT: LE POIDS MAXIMAL RECOMMENDÉ POUR CET APPAREIL
EST DE 150 KG (330 LB).
Page 9
ELLIPTICALS – USER MANUAL
9
3 GETTING TO KNOW YOUR ELLIPTICAL
3.1 MAIN FRAME COMPONENTS
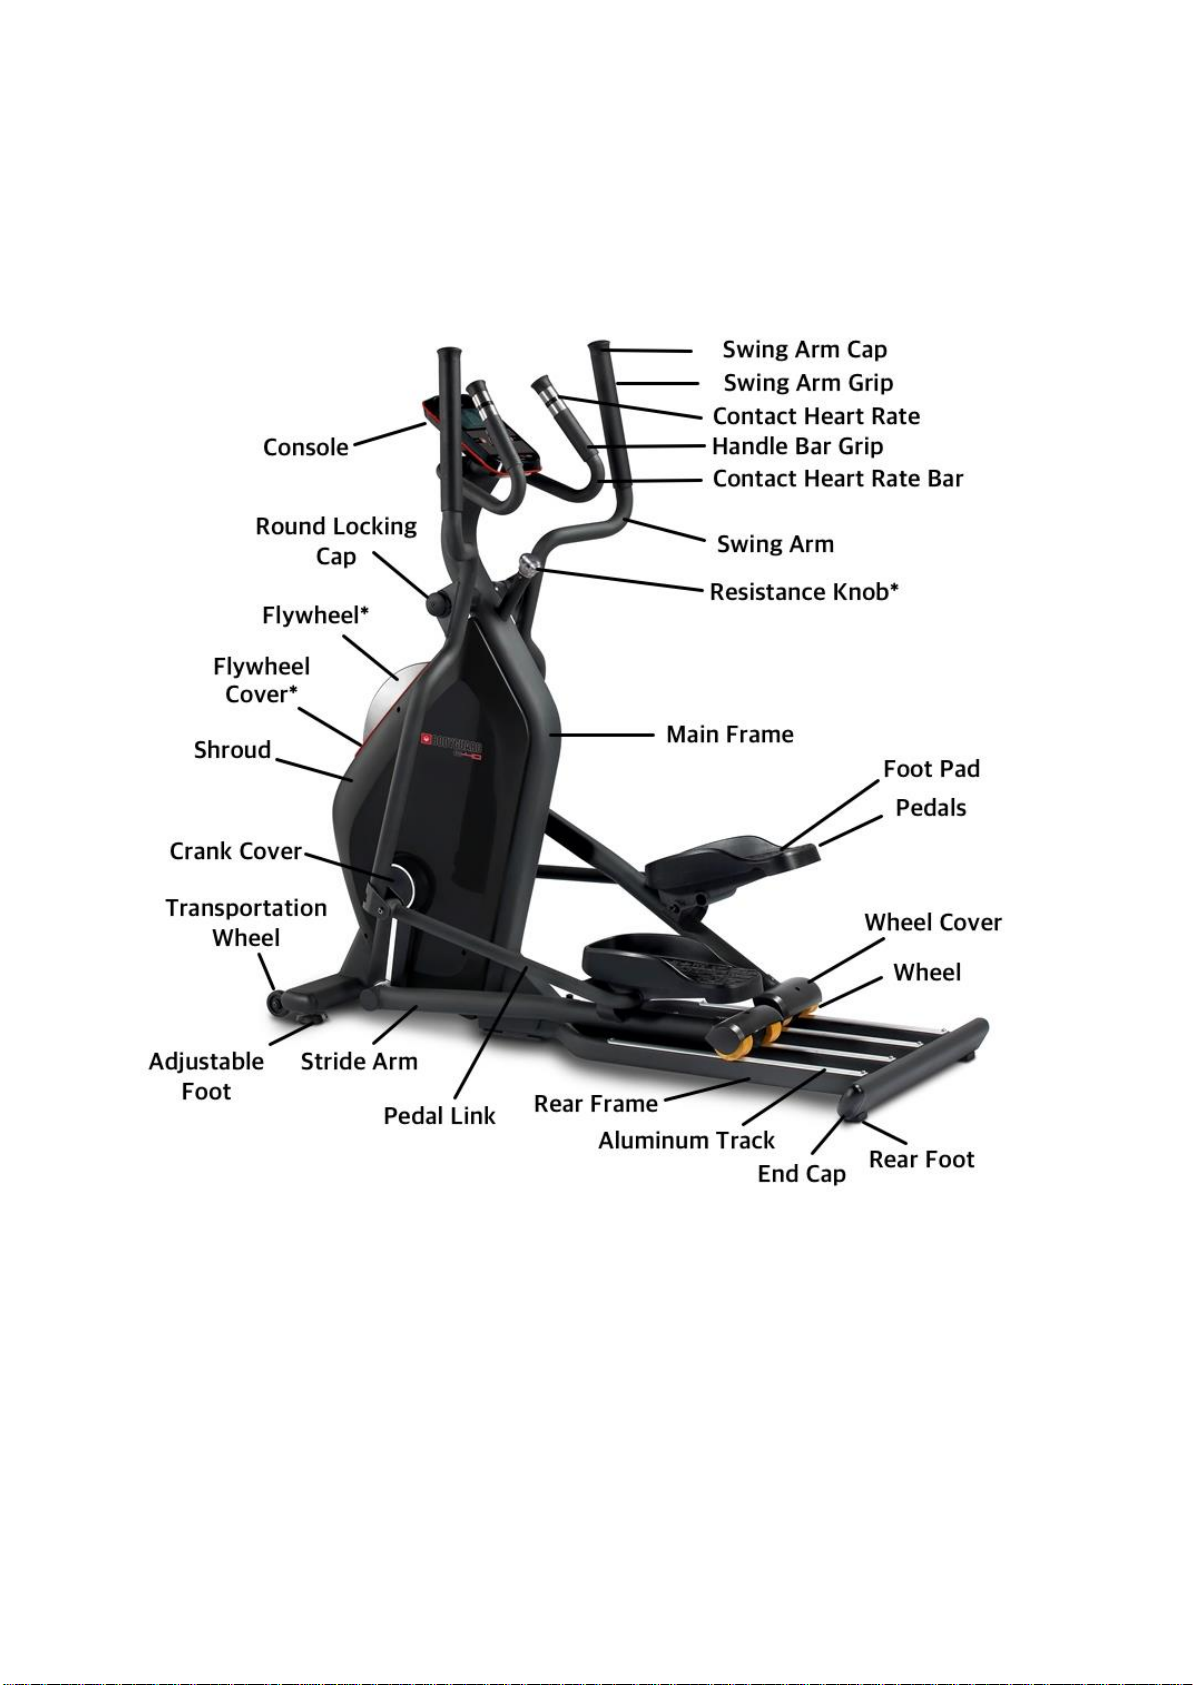
Note: Items with an asterix (*) are only found on the E-40 model
Safety Tip:
When getting onto the elliptical, rotate the pedal on the side you are standing to its lowest point and
hold that side’s swinging arm for stability with one arm while stepping up onto the pedals and
reaching out for the other swing arm with the opposite hand. When dismounting the elliptical always
leave on the side with the pedal in the lowest position.
Page 10
ELLIPTICALS – USER MANUAL
10
3.2 E-40 CONSOLE
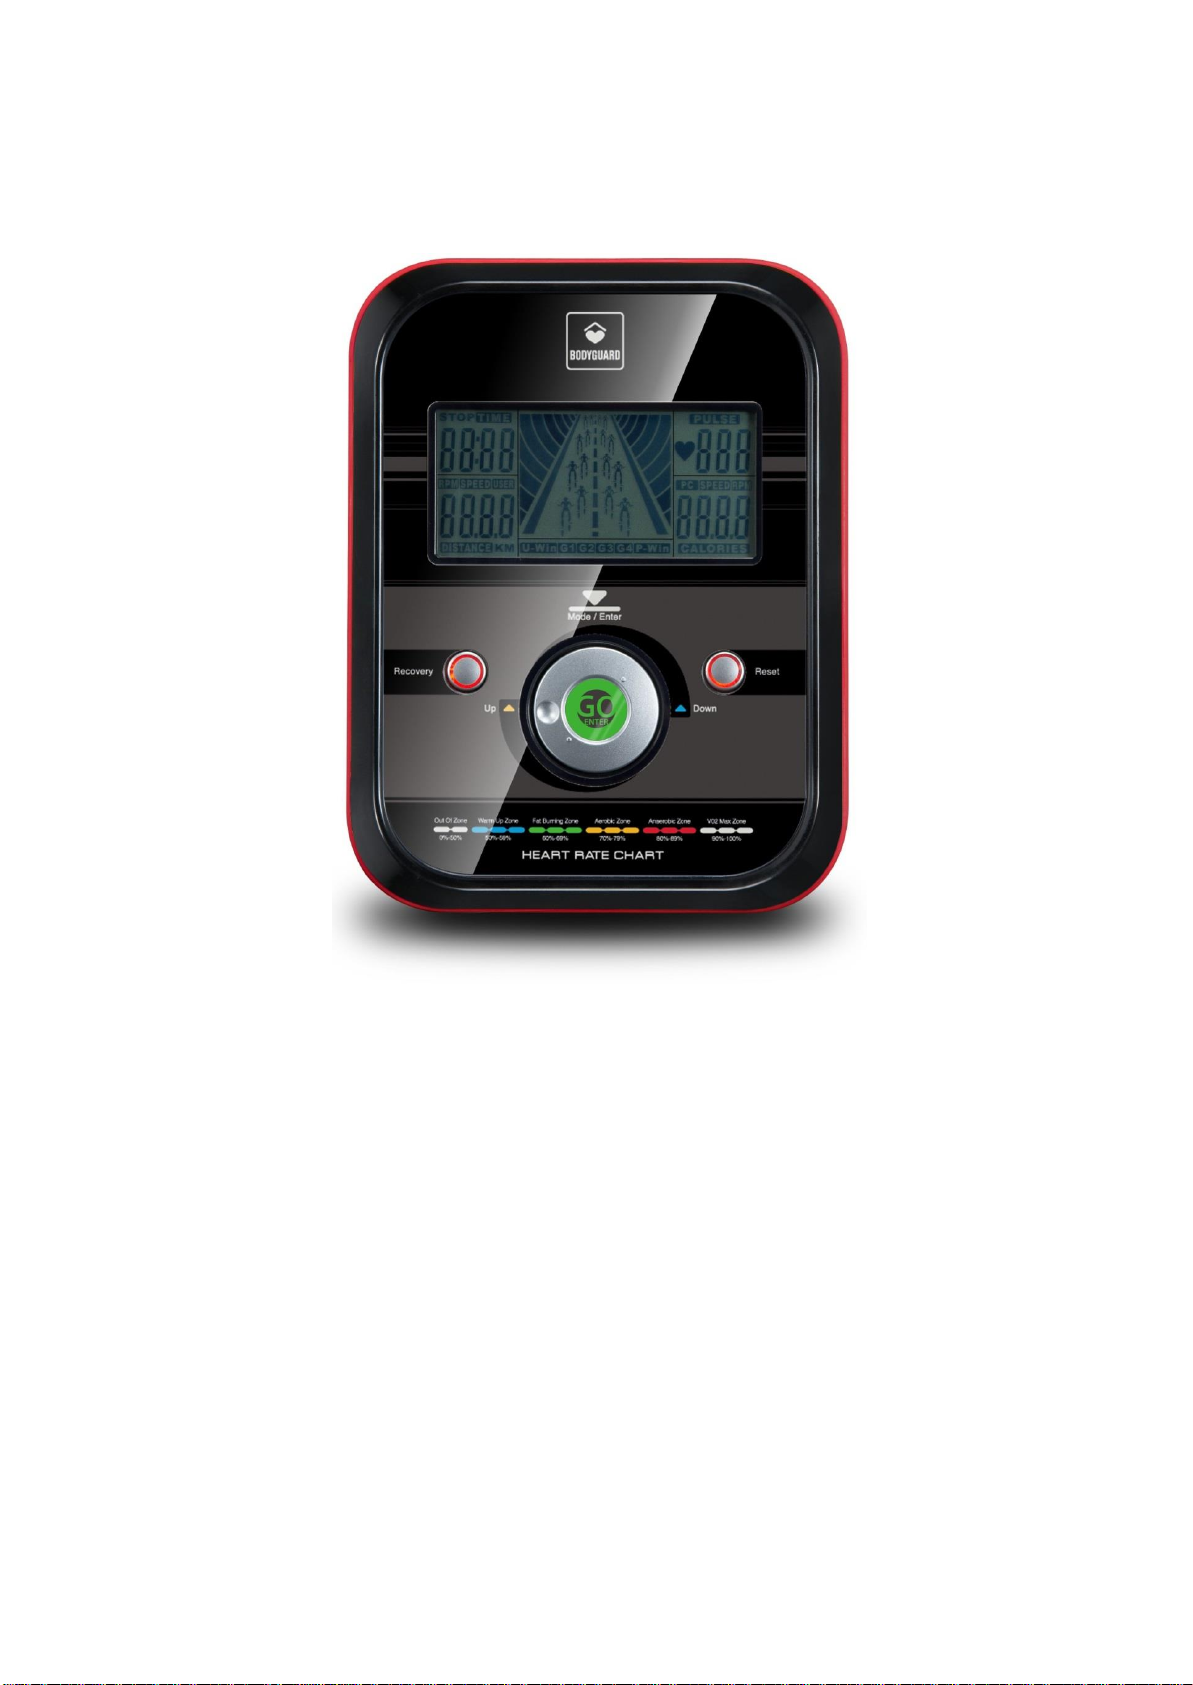
The E-40 elliptical features a battery powered L.C.D. display with an animation center surrounded by
information windows showing the parameters of the exercise under way.
3.3 E-40 CONSOLE BUTTONS / FEATURES
Note: The console will enter into a SLEEP mode (for power-saving purposes) after 4 minutes of
receiving no RPM or Heart Rate signal input. Press any button to awaken the console.
There are 3 buttons on the console; RECOVERY, RESET and the large rotating GO/ENTER button.
These buttons can perform various functions depending on the menu or status of the machine.
GO/ENTER: The Go/Enter button rotates clockwise and anti-clockwise to scroll through program
settings, increase or decrease values and can be pressed to confirm selections or values inputted
into the console.
During program setup if the user begins pedaling the workout will skip any unanswered program
setup questions and begin the workout on the screen at that time.
RECOVERY: Press this button to commence a Heart Rate Recovery Test. To learn more about the
Heart Rate Recovery Test see section 3.10.
RESET: Press and hold the reset button for 2 seconds to clear all data and reset the console.
Page 11
ELLIPTICALS – USER MANUAL
11
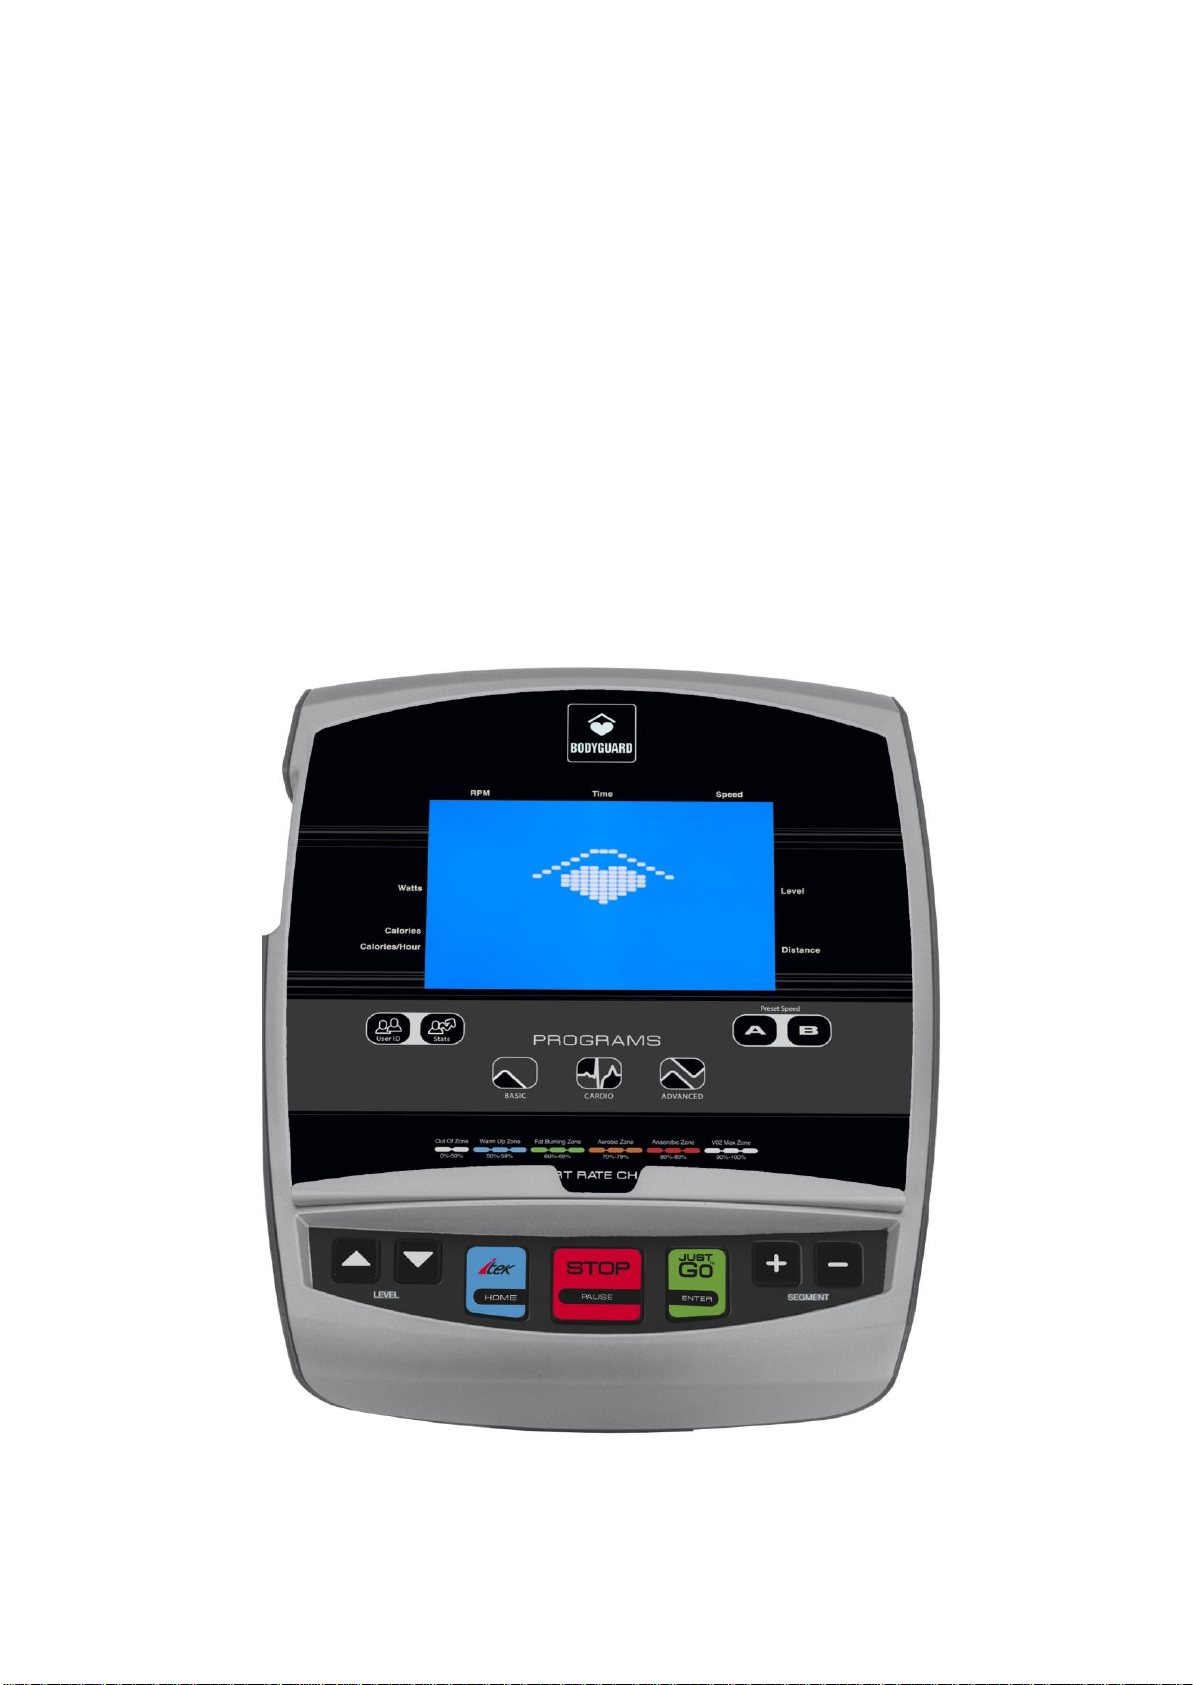
3.4 E-45 CONSOLE
The E-45 console features a 6.5” blue L.C.D. display with a 20 x 13 block profile surrounded by
information windows showing the parameters of the exercise under way. There is also a 16
character alphanumeric message center at the bottom of the screen that scrolls information during
and after a workout. The console also includes a range of advanced user functions as well as a
convenient reading rack/device holder.
The vertical axis of the profile shows the resistance level. A matrix of 20 horizontal segments and 13
vertical levels is displayed in the center of the screen. Horizontally, each segment (block) represents
one twentieth of the length of the exercise.
Every exercise program begins with a flashing block on the left-hand side of the screen and ends
when it has reached the right-hand side of the screen. As the resistance level increases, the profile
moves towards the top of the screen. At the bottom of the screen, an alphanumeric message center
displays various exercise parameters not shown in the dedicated windows.
Note: The console will enter into a SLEEP mode (for power-saving purposes) after a preset amount
of time of receiving no RPM signal input. Press any button or start pedaling to awaken the console.
Page 12

ELLIPTICALS – USER MANUAL
12
3.5 E-45 CONSOLE BUTTONS / FEATURES
ALPHANUMERIC MESSAGE CENTER
Situated below the profile the 16-character alphanumeric message center shows menu information,
workout parameters during and after a workout as well as maintenance and error data when
necessary.
INCREASE/DECREASE LEVEL
Pressing these keys allows you to select the programs and parameters prior to each exercise and
also allows you to modify the level of difficulty of a program during the workout.
INCREASE/DECREASE SEGMENT
Pressing these keys allows you to select the programs and parameters prior to each exercise and
also allows you to modify a particular segment’s resistance during the workout. These keys will also
be used to navigate through the SETTINGS and DIAGNOSTICS menus.
iTEK (HOME) KEY
This key has different functions depending on the operational stage of the equipment.
When at the HOME SCREEN;
Press the iTEK key once to access the SETTINGS MENU (see section 5.1).
Press and hold the iTEK key for 3 seconds to access the DIAGNOSTICS MENU (see section 6.1)
When in a general menu;
Pressing the iTEK key acts as a Home Key and cancels all data and returns to the HOME SCREEN.
During a workout;
Press the iTEK key to scroll through various equipment performance statistics.
TOTAL DISTANCE (XXX.X): Like an odometer in a car, it shows the total distance (miles/km)
covered by the machine prior to the current workout. Note this data is stored on a memory chip
on the upper board so if the upper board is changed the numbers will be reset.
TOTAL TIME (XX MONTHS, XX DAYS, XX HOURS, XX MINUTES, XX SECONDS): Shows
the total time of use of the unit prior to the current workout. This is used to calculate average
use per day statistics for commercial warranty purposes. Note this data is stored on a memory
chip on the upper board so if the upper board is changed the numbers will be reset.
TORQUE (X.X LB*FT): Indicates the amount of turning force being applied onto the pedals.
The torque value is displayed in Feet Pounds (LB*FT) when the DISTANCE UNIT is set in
Miles and in Newton Meters (NM) when set in Kilometers.
JUSTGO (ENTER) KEY
This key has different functions depending on the operational stage of the equipment.
When at the HOME SCREEN;
Press the green JUSTGO key to start a JustGo workout without inputting any parameters.
When the 3, 2, 1 workout countdown is in action:
Press the JUSTGO key to skip the countdown and begin the program.
When using the menu systems;
Press the ENTER key to select a menu and save data.
MAIN KEYPAD
The Main Keypad is a group of the most used operational keys. The keys on the Main Keypad are
made of silicone, as it is a more durable material able to withstand heavy use.
Page 13

ELLIPTICALS – USER MANUAL
13
PRESET SPEED KEYS - A & B
These keys allow you to quickly change the amount of resistance or level of effort during a segment.
This is especially interesting for users who wish to alternate between two settings quickly (such as in
Manual Interval training) and eliminates the annoyance of having to hold down or repeatedly press
the Increase/Decrease Segment buttons mid-exercise to reach a specific value. To store a value to a
Preset Speed Key, simply start a workout and manually adjust the resistance or level of effort to a
desired level and then press and hold down a Preset Speed Key (A or B) for 1 second until you hear
a beep. If a User ID is selected while completing this process, the value will be saved to that User ID
to use the next time they log in. If there is no User ID selected, the values will be cleared from the
memory after the workout ends.
PROGRAM CATEGORY KEYS
These 3 keys allow you to quickly access the program category of your choice. From left to right the
1st button leads you to a series of Basic Programs; the 2nd leads you to the Cardio Programs
(Programs that require a heart rate chest strap) and the 3rd key on the right leads you to Advanced
Programs which include the Memory and Custom Programs. Once a program category key is
pressed you will see the first program in that program category’s list and to scroll though the list you
may press the same category key again or the INCREASE/DECREASE SPEED or INCLINE
keys. See the Program Category grid in section 4.1 for more information on the programs under
each category.
READING RACK & DEVICE HOLDER
Designed to safely hold most magazines, small books and devices such as mobile phones, music
players and tablets.
STATS KEY
Each User ID saves cumulative statistics to their personal data file. The STATS key allows the
current User ID to view their total cumulative statistics from the HOME SCREEN. If no User ID has
been selected the key will be inactive.
STOP (PAUSE) KEY
This key has different functions depending on the operational stage of the equipment.
When using the menu systems;
Press the STOP key to go back in the menu system or cancel a function.
During a workout;
Press the red STOP key to place the program into a pause mode. Press the STOP key again during
the PAUSE mode to end the current program and the final stats for the completed workout will scroll
across the screen.
USB PORT
The USB Port can be used for software updates and charging of compatible devices. To learn how to
update software see section 7.2. To learn how to test if the USB Port is functioning see section 6.7.
USER ID KEY
This key accesses the User ID menu from the HOME SCREEN. In the User ID menu you may select,
create, edit or delete a User ID. You may scroll through the sub-menus by continually pressing the
USER ID key or by pressing the USER ID key once and then by pressing one of the
INCREASE/DECREASE SEGMENT keys followed by the ENTER key on your desired choice. For
more information on the User ID menu visit section 5.5.
WORKOUT PARAMETERS
Workout parameters are displayed in the designated L.C.D. windows as well as the Alphanumeric
Message Center. Due to space requirements, some windows automatically toggle the parameters
being displayed every few seconds.
Page 14
ELLIPTICALS – USER MANUAL
14
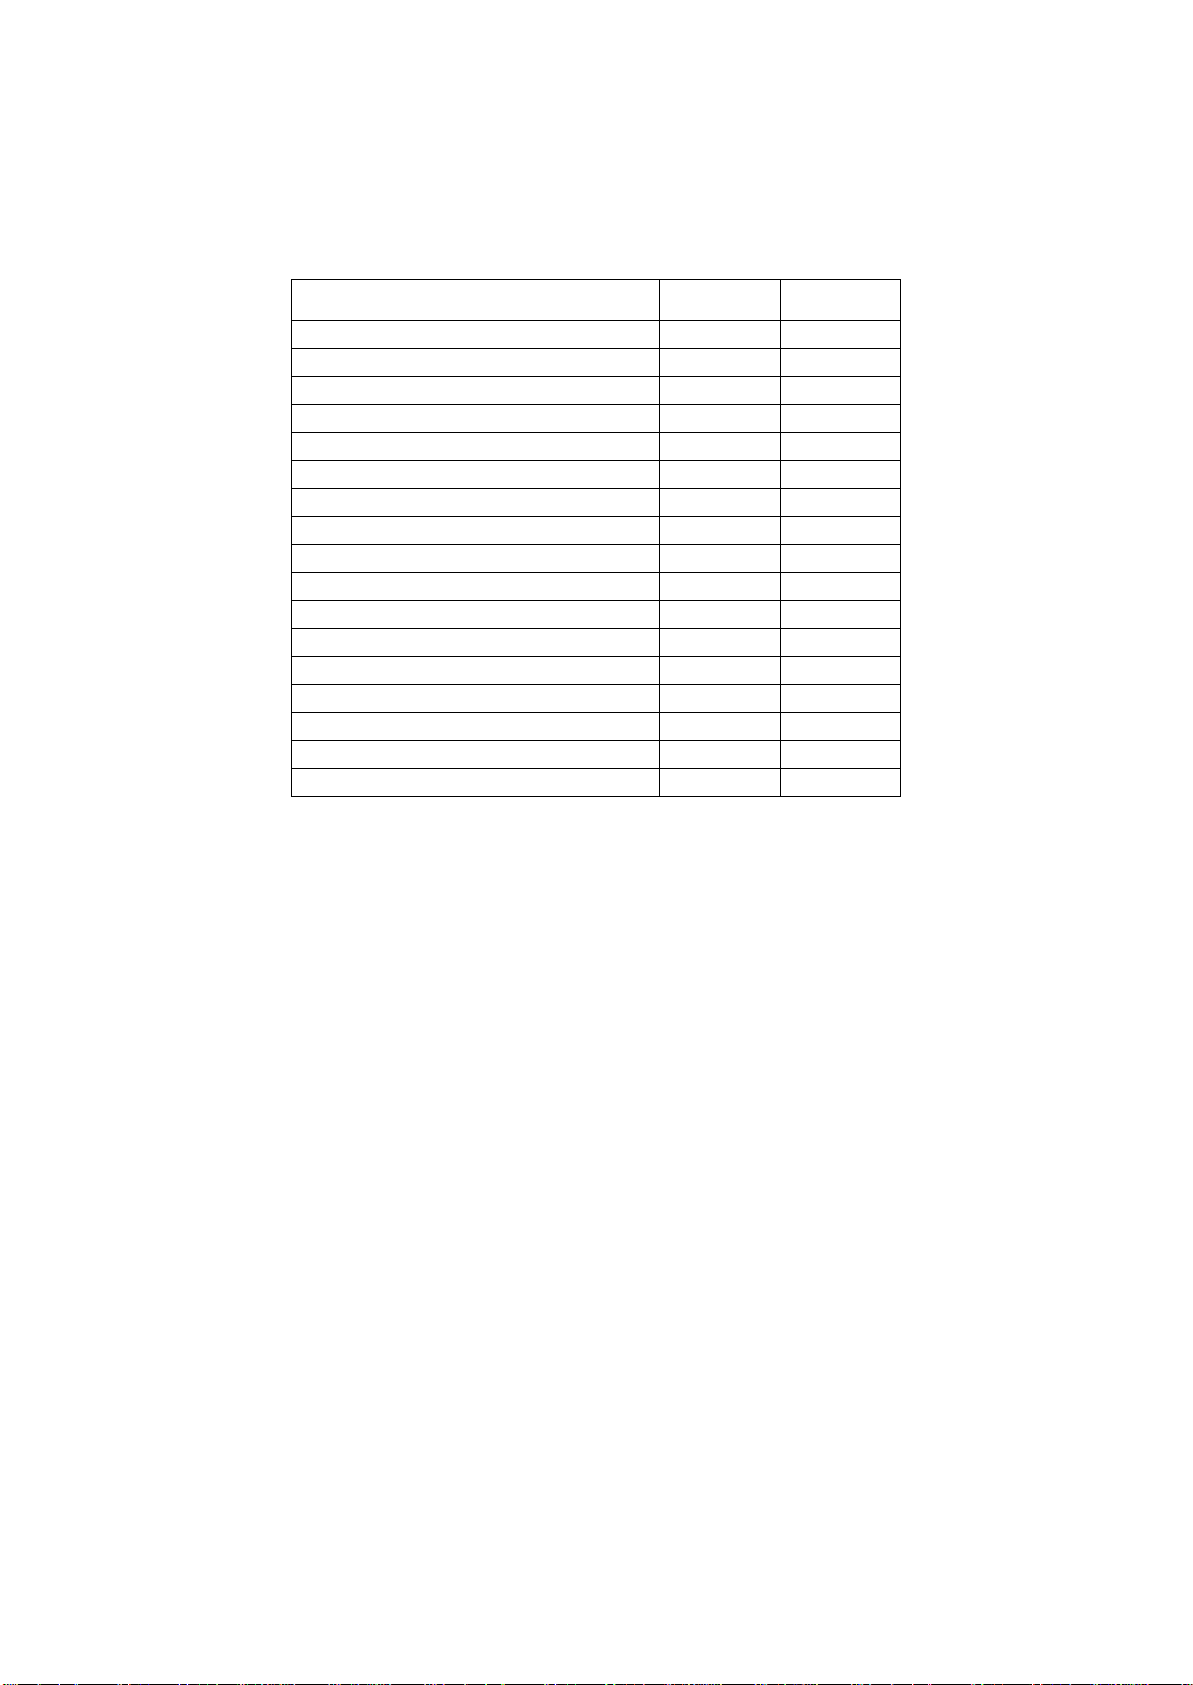
PARAMETERS
E-40
E-45
Calories
√
√
Calories / Hour
√
Distance
√
√
Elevation Change
√
Goal %
√
Maximum Heart Rate %
√
METS √
Pace √
Pulse / Heart Rate
√
√
Revolutions per Minute (RPM’s)
√
√
Speed √ √
Speed (Average)*
√
Target Beats per Minute (BPM)
√
Target Remaining
√
Time √ √
Time in Zone
√
Watts √
3.6 WORKOUT PARAMETERS
Workout Parameters are displayed on the console in various locations depending on the model.
Some parameters are permanent and some toggle in the same location.
On an E-45 display, extra parameters scroll across the alphanumeric screen during a workout and
some parameters, such as workout totals or averages are displayed there at the end of the workout.
Only displayed at the end of a workout
3.7 PARAMETERS GLOSSARY
AVERAGE SPEED: At the end of a program; the average speed value of the entire workout is
displayed.
CALORIES: Indicates an estimation of your total caloric expenditure from the start of the workout or
the amount of calories left if a calorie goal was preset.
CALORIES/HOUR: Indicates your hourly caloric expenditure based on your weight input and actual
exercise intensity level.
DISTANCE: Displays the total distance completed or the amount of distance left if a distance goal
was preset.
On an E-40 the value is displayed in meters and ranges from 0 to 99,500 m (99.5 km).
On an E-45 the value is displayed in miles or kilometers and ranges from 0.00 to 99.99 miles or 0.00
to 99.9 km.
DURATION SEGMENT: Indicates the time (or calories and distance) remaining during the current
segment. The parameters shown depend on the selected program.
ELEVATION CHANGE: Displays the total change in feet or meters in the Advanced Hill program.
GOAL %. Indicates the percentage of your goal achieved.
GOAL REMAINING (TIME, DISTANCE or CALORIES): Indicates the amount of the pre-set goal left
in the workout. The parameter shown depends on the selected goal.
Page 15

ELLIPTICALS – USER MANUAL
15
HEART RATE / PULSE: Displays your current heart rate in beats per minute (BPM) via the contact
heart rate sensors. On an E-45 a built-in wireless Heart Rate receiver can also display Heart Rate
readings transmitted by a compatible 5kHz chest strap. If both signals are used, the chest strap
signal has priority over the handgrip signal.
LEVEL. Indicates the level you are currently exercising at. It can vary from Level 1 to 20 for the
programs with difficulty levels or resistance levels.
MAXIMUM HEART RATE %: Displays your current BPM (beats per minute) percentage in relation
with your maximum BPM. Refer to Know your Heart Rate section on page 7 for more information. If
you are wearing a chest strap or if you are holding the hand grips continuously and are exercising in
a Heart Rate Program, the maximum heart rate % will automatically be shown.
METS: Indicates the ratio of working metabolism over the resting metabolism; as an example; when
you are home, sitting, your METS = 1. When you are exercising, if the unit shows METS = 10, it
means that you currently are spending 10 times more calories than if you were sitting at home.
PACE. Indicates how long it will take to complete one mile or one kilometer at your current speed.
Pace per mile or kilometer is shown in minutes and seconds.
REVOLUTIONS PER MINUTE (RPM): Displays the pedal rotation rate per 60 seconds. For cadence
(steps per minute) simply double the RPM value.
SEGMENT DURATION (TIME, DISTANCE or CALORIES): Indicates the portion of the goal
remaining during the current segment. The parameter shown depends on the selected goal.
Note: Each segment is equal to one-twentieth (1/20) of the total goal and is represented by one block
on the profile with a flashing block indicating the current segment.
SPEED: Displays an estimation of the speed based on the RPM’s and in the case of the E-45, the
resistance level. On the E-45, the speed may be displayed in miles or kilometers per hour.
TARGET BEATS PER MINUTE (BPM): Displays your Target Heart Rate in Beats per Minute during
Cardio Programs.
TIME: Indicates the amount of time accumulated from the start of a program or the amount
of time left if a time goal was preset.
On an E-40 the time will range from 0 to a maximum of 99 minutes.
On an E-45 the time will range from 0 to a maximum of 99 minutes for all the programs except for the
Manual Program. The manual program can last up to 6 hours (360 minutes).
TIME IN ZONE (TIZ): Indicates the amount of workout time the user stays within a designated Heart
Rate Zone. For example, in the Heart Rate Control program, if a user chooses to workout in the Fat
Burning Zone (60%-69% of MHR), then the amount of time during the workout the user stays in that
training zone will be accumulated and displayed during and at the end of the exercise.
TORQUE: Indicates the amount of turning force being applied onto the pedals. The torque value is
displayed in Feet Pounds (Lb*FT) when the DISTANCE UNIT is set in Miles and in Newton Meters
(NM) when set in Kilometers.
TOTAL DISTANCE: At the end of a workout; displays the distance traveled for the entire workout.
TOTAL EXERCISE TIME: At the end of a workout; displays the total time of the exercise in minutes
and seconds.
USB PORT: The USB Port can be used for software updates or various program based features.
WATTS: Indicates the level of effort related to the revolutions per minute (RPM).
Page 16
ELLIPTICALS – USER MANUAL
16
3.8 MEASURING YOUR HEART RATE
WARNING - Heart rate monitoring systems may be inaccurate. Over exercising may result in serious
injury or death. If you feel faint or dizzy, stop exercising immediately.
Your Bodyguard Fitness elliptical can display your heart rate (pulse) if you grip the contact heart rate
sensors while pedaling. When the equipment detects your heart rate a small heart begins to flash on
the display and after a short period of time if the reading is consistent a value will appear.
The E-45 elliptical also has a built-in heart rate receiver that can detect heart rate from users who
wear a compatible 5kHz heart rate chest strap. Note that the wireless heart rate system will be
displayed rather than the contact heart rate system if both are being used simultaneously.
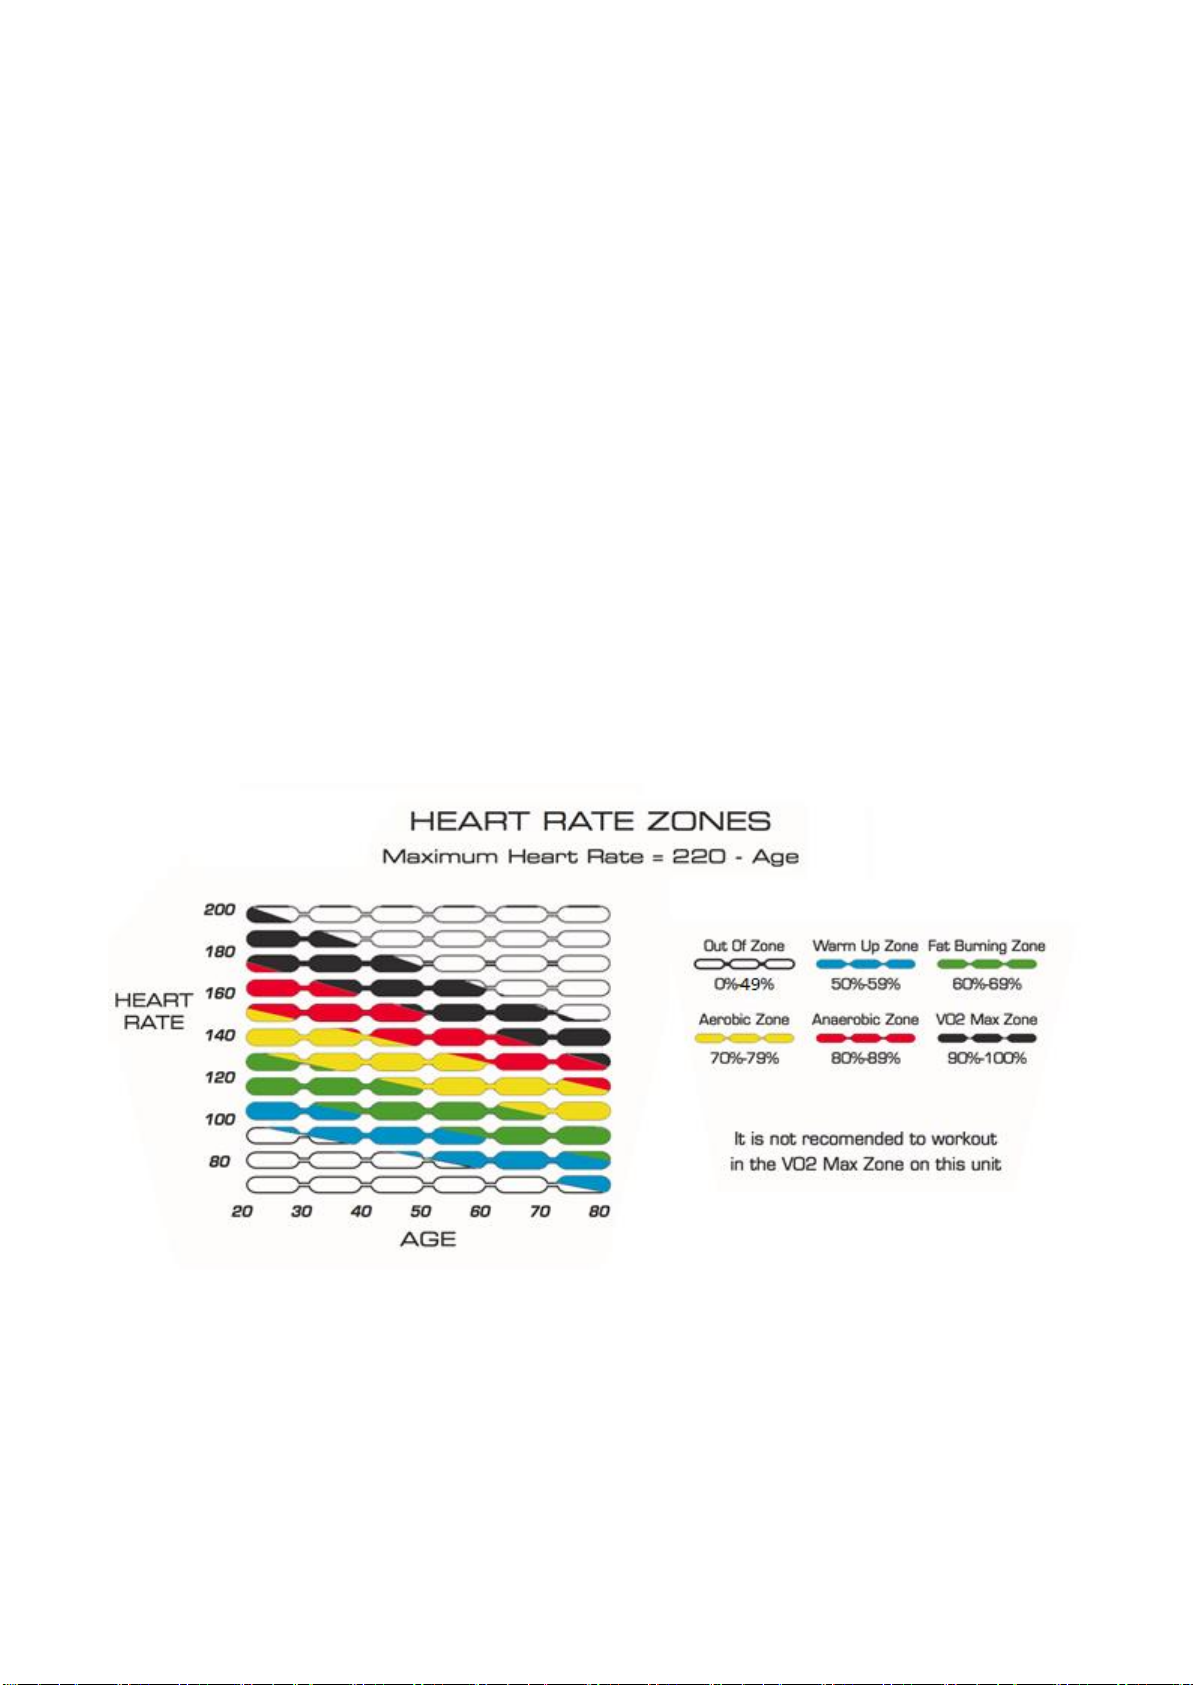
3.9 MAXIMUM HEART RATE (MHR)
Before you begin a workout, ensure you know your approximate Maximum Heart Rate (MHR), which
can be calculated as follows.
Approximate MHR = 220 – Age
Once you know your approximate MHR you may use the below graph to calculate your heart rate
zones. This will help you select the correct type of exercise program or level for your exercise.
WARNING: It is recommended that you never exceed 90% of your Maximum Heart Rate while
exercising on a Bodyguard Fitness product
On an E-40 elliptical, when setting up your workout, you may input a Maximum Heart Rate into the
Pulse parameter and the console will beep when you exceed it warning you that you are overtraining.
On and E-45, you will find several Heart Rate Training Programs whose Heart Rate parameters are
based on the above chart. These programs allow you to exercise at pre-determined Heart Rate levels.
By monitoring your heart rate and making changes to the equipment’s resistance level as you
exercise, these programs keep your heart rate within a few beats per minute of the target.
Page 17

ELLIPTICALS – USER MANUAL
17
3.10 HEART RATE RECOVERY TEST (E-40 only)
The E-40 includes a Heart Rate Recovery Test, a protocol that tests the heart’s ability to recover from
exercise, which is a key component of heart health and general fitness. The rate of the heart’s
recovery is scaled from F1 to F6 with F1 being the best result and F6 being the worst result. In order
to get a more accurate rate, users should complete the test after intense exercise where their pulse
was at a consistent level for at least 2 minutes. Once the Recovery button is pressed the user should
grip the contact heart rate bars, stand still and relax and the console will monitor the range and speed
that the user’s pulse recovers
(drops) for a period of 1 minute. After 1 minute is up, the result is displayed on the console.
Results:
F1 = Excellent Recovery Rate, a good indicator of cardiovascular fitness
F6 = Poor Recovery Rate, the heart is taking an above average amount of time to return to its rest
level.
The test may be cancelled at any time by pressing the RESET button.
3.11 EQUIPMENT TRAINING BENEFITS
Upper Body:
Deltoids, Biceps Brachia, Triceps Brachia, Brachioradialis, Hand and Finger Flexor Muscles.
Lower Body:
Brachial Quadriceps, Sartorius, Adductor Longus, Gluteus Maximus, Anterior Tibial and
Gastrocnemius.
Whole Body:
General muscle and tendon strength and tolerance, circulation and metabolism.
Page 18
ELLIPTICALS – USER MANUAL
18
CATEGORY
PROGRAM
SECTION
E-40
E-45
JustGo
4.6
√
√
Manual (G1 on E-40)
4.7
√
√
Calorie Goal
4.8
√
Distance Goal
4.9
√
Cross-Country
4.10
√
Interval
4.11
√
Random
4.12
√
Goodbye Fat
4.13
√
Track
4.14
√
Race Modes (G2, 3 & 4)
4.15
√
Heart Rate Control
4.16
√
Heart Rate Intervals
4.17
√
Fitness Test
4.18
√
Advanced Hills
4.19
√
Race
4.20
√
Beat My Race
4.21
√
Target Watts
4.22
√
Smart Reverse
4.23
√
Custom*
4.24
√
Memory
4.25
√
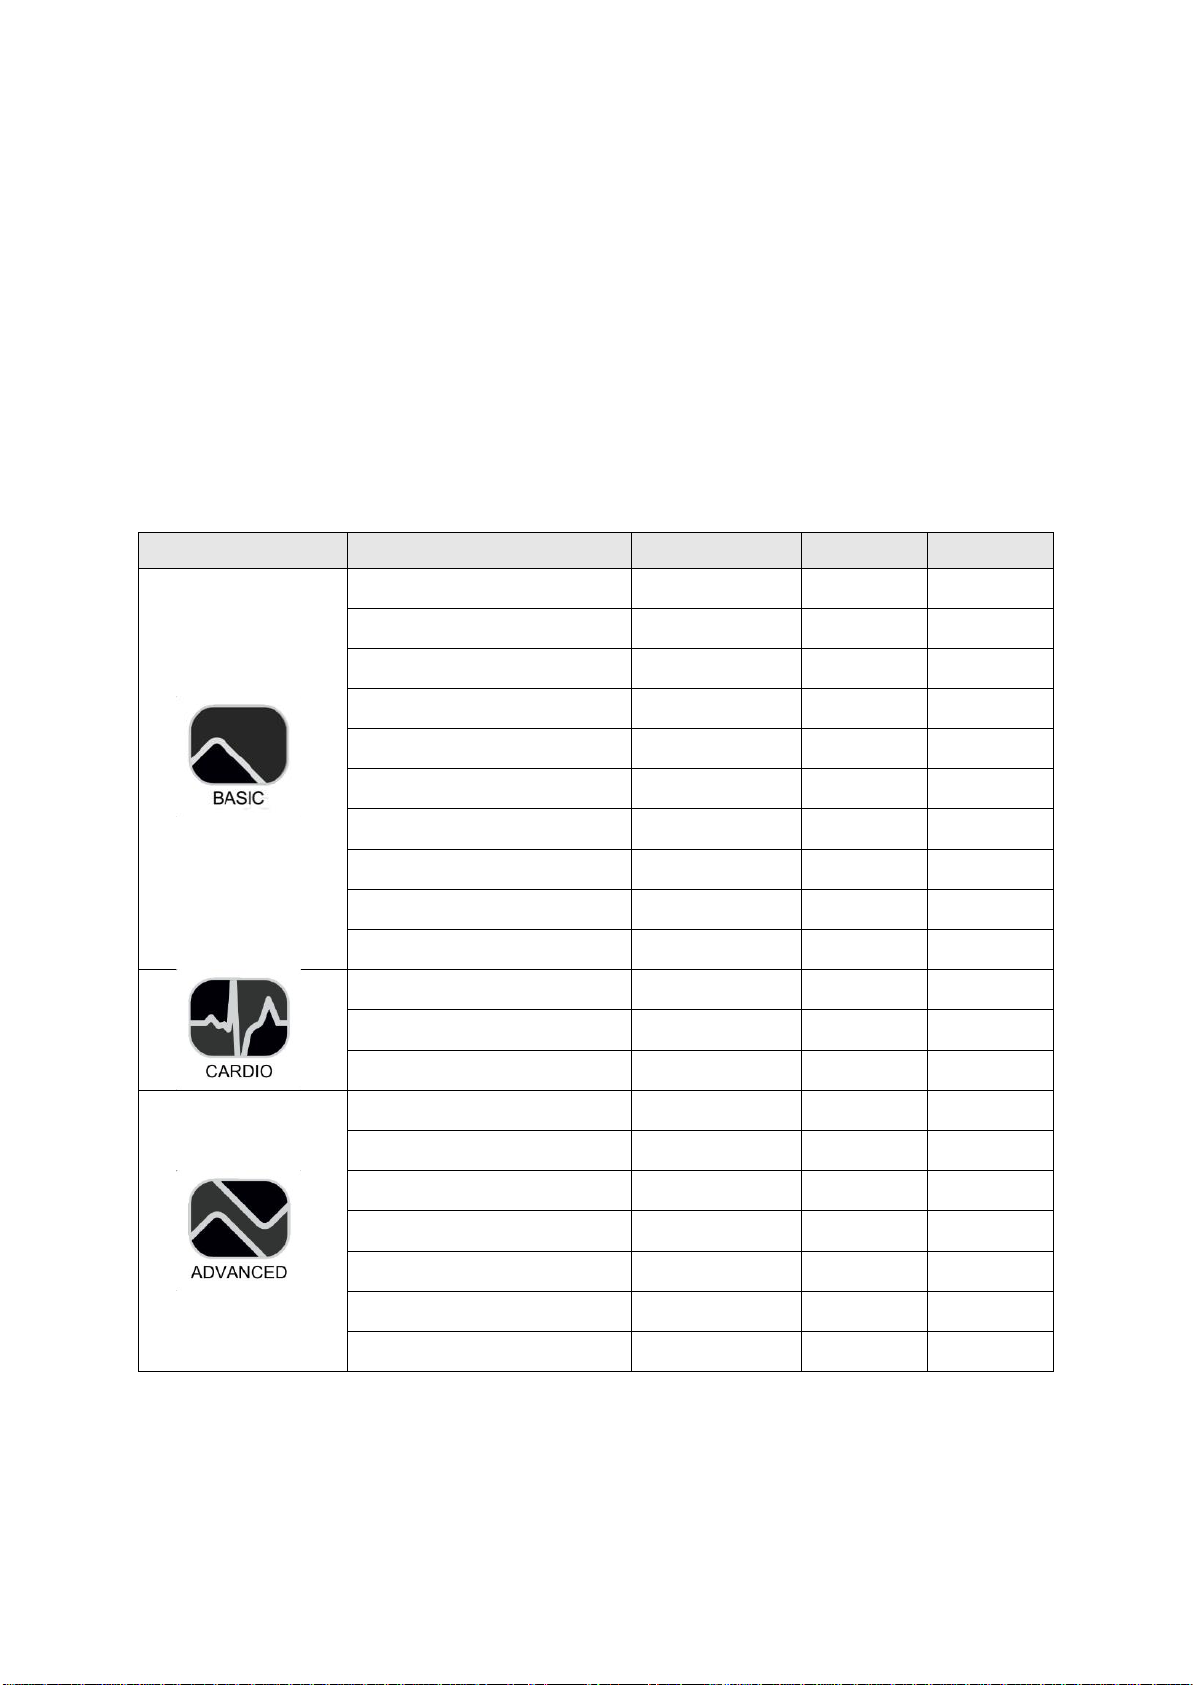
4 EXERCISE PROGRAMS
A program is a series of preset workout parameters that are controlled by the console. The programs
monitor exercise progress and statistics while adding fun, interest and variety to a workout program.
The E-40 elliptical has 4 program options that allow the user to set workout goals
or to race against a computer competitor at three different levels. The E-45 elliptical has 19 programs
broken into 3 categories, Basic, Cardio and Advanced. The E-45 programs are broken into 20 equal
segments of the total exercise goal (time, distance or calories). For example, a 20-minute exercise
program will consist of 20 one-minute time segments whereas a 40-minute exercise program will
consist of 20 two-minute segments. Each segment is represented on the E-45 console as one
flashing block in the profile.
4.1 PROGRAM CATEGORY GRID
* Custom Program only appears in the program list after one has been created.
Page 19

ELLIPTICALS – USER MANUAL
19
PROGRAM MODE
PROGRAMS
CONSTANT TORQUE
JUSTGO, MANUAL, DISTANCE GOAL (Custom),
CALORIE GOAL, CROSS COUNTRY, ADVANCED
HILLS, SMART REVERSE and CUSTOM
CONSTANT WATTS
INTERVAL, RANDOM, GOODBYE FAT, HEART RATE
CONTROL, HEART RATE INTERVALS, FITNESS TEST,
TARGET WATTS
GEAR RATIO
TRACK, RACE, BEAT MY RACE
4.2 E-40 PROGRAM SETUP
To choose a program, simply turn the Go/Enter button when at the main menu and the program
names (G1 to G4) will scroll across the bottom of the screen. Press the enter buttons to select the
desired program and enter any parameters if necessary.
The E-40 elliptical is fitted with a manual resistance knob that the user turns clockwise to increase
resistance (simulates hill-climbing) or anti-clockwise to decrease resistance at any time.
4.3 E-45 PROGRAM SETUP
When at the HOME SCREEN press the INCREASE/DECREASE SEGMENT keys to scroll through
the entire program list or press a PROGRAM CATEGORY key (Basic, Cardio or Advanced) to go
straight to that category’s list. Continue pressing the PROGRAM CATEGORY key or the
INCREASE/DECREASE SEGMENT keys to scroll just in that category’s list.
ENTERING WORKOUT PARAMETERS
Once a program has been selected, various parameters will need to be entered to setup the goal or
target of the workout. Programs will always require a weight value (default of 150 pounds or 68
kilograms) to be inputted for more accurate caloric expenditure calculation. Cardio programs that use
a chest strap will always require an age value to be inputted to calculate an approximate Maximum
Heart Rate value for the user. If a User ID is active then these questions are skipped as the values
are already saved under the User ID profile and are automatically inputted into the computer.
PROGRAM LEVELS
Several programs offer 5 intensity levels for the user to choose from during program setup.
Level 1 is the easiest and level 5 is the most difficult.
Users can change the level of intensity at any time during the workout by pressing the
INCREASE/DECREASE level keys. Any changes will remain in effect for the remainder of the
workout.
SPECIFIC WORKOUT PARAMETERS
Other programs require specific parameters to be input during a program’s setup and these are
explained in each program’s summary.
Any changes in speed or incline made during a rest or work period will modify future work or rest
periods during the same workout.
4.4 E-45 PROGRAM MODES
There are 3 different PROGRAM MODES that the Bodyguard E-45 elliptical uses. They are
CONSTANT TORQUE, CONSTANT WATTS and GEAR RATIO. Each program on an E-45 is
automatically assigned one of these modes.
PROGRAM OPERATING MODES
In CONSTANT TORQUE mode, the elliptical will apply a fixed level of resistance no matter the speed
being pedaled. There are 20 possible levels of resistance used in CONSTANT TORQUE mode. Each
level can be thought of as a level of gradient on a hill. The higher the level, the steeper the gradient.
Page 20

ELLIPTICALS – USER MANUAL
20
Gear
Speed at 60 RPM
(mph)
Speed at 60 RPM
(km/h)
1
4.3
6.9
2
5.1
8.2
3
5.8
9.3
4
6.4
10.3
5
7.1
11.4
6
7.8
12.6
7
8.4
13.5
8
9.1
14.6
9
9.8
15.8
10
10.4
16.7
11
11.1
17.9
12
11.7
18.8
13
12.4
19.9
14
13.1
21.1
15
13.7
22.0
16
14.4
23.2
17
15.1
24.3
18
15.8
25.4
19
16.4
26.4
20
17.1
27.5
If you pedal faster, you simply go up the hill quicker and increase your wattage (effort), if you pedal
slower, you take longer to climb the hill and reduce your wattage (effort).
In CONSTANT WATTS mode, the resistance will be automatically adjusted each second to make
sure the watts level remains constant. There are 20 possible levels of resistance used in CONSTANT
WATTS mode. Each level can be thought of as a set level of effort you wish to exert. The higher the
level, the greater amount of effort. If you pedal faster, the resistance will be reduced so you remain at
the designated effort level. If you pedal slower, the resistance will then be increased. Unlike in
CONSTANT TORQUE mode you cannot exert more wattage by simply pedaling faster, you would
need to manually increase your designated level during the workout by pressing the INCREASE keys
to do so. Constant Watts programs are a great way to ensure you do not over-train or under train.
In GEAR RATIO mode, the resistance is engineered to simulate a bicycle with 20 gears and 26 inch
(66 cm) wheels. GEAR 1 is the easiest (or slowest) and GEAR 20 is the most difficult (or fastest).
The higher the selected Gear the faster you travel over a distance. Gears can be changed at anytime
during your workout by pressing the Gear INCREASE and DECREASE keys.
The following table shows the riding speed in miles per hour and kilometers per hour at various gear
ratios for a given rotational pedal axle speed of 60 RPM’s.
Riding speed at a rotational pedal axle speed of 60 RPM for various gear ratios
Page 21

ELLIPTICALS – USER MANUAL
21
LEVEL
WATTAGE OUTPUT AT EACH INTENSITY MODE
LOW
MEDIUM
HIGH
1
35
35
35
2
40
40
52 3 45
49
68
4
50
61
85
5
55
72
101
6
59
84
118
7
67
96
135 8 76
108
151 9 84
120
168
10
92
132
184
11
101
144
201
12
109
155
218
13
117
167
234
14
125
179
251
15
134
191
267
16
142
203
284
17
150
215
301
18
159
226
317
19
167
238
334
20
175
250
350
4.5 E-45 INTENSITY MODES
The Intensity Modes feature allows the user to adjust the range of the resistance system when using
programs from the CONSTANT TORQUE and CONSTANT WATTS families.
There are 3 INTENSITY MODES to choose from; Low (200 Watts at 60 rpm), Medium (300 Watts at
60 rpm) and High (400 Watts at 60 rpm).
Because each program has 20 levels, when the Intensity Mode is modified, the increment size
between each level is also modified. For example, the wattage increment between levels on high
intensity mode will be approximately twice the size of the incremental wattage on a low intensity
mode. This feature is very useful in scenarios where a user prefers to have smaller resistance
increases between each level without ever needing to workout with very high wattages in the 200 to
400 watts range. The Table below shows the wattage value at 60 rpms for each level depending on
the selected Intensity Mode.
The Intensity Mode can be modified in the Settings Menu (see Section 5.19). It may also be assigned
to a User ID, which will always override the setting in the Settings menu.
Level of effort at a rotational pedal axle speed of 60 RPM for various exercise levels and
intensity modes. All levels of effort values are in watts.
4.6 JUSTGO PROGRAM
The JustGo program allows you to easily start a manual exercise simply by pedaling and in the case
of the E-45 also by simply pushing the JUSTGO key. You have total control of the resistance at all
times during this program. Use the JustGo program if you like to exercise at fairly constant
resistance with little or no changes during the exercise.
Page 22
ELLIPTICALS – USER MANUAL
22
4.7 MANUAL PROGRAM (G1 on E-40)
The Manual program (displayed as G1 on an E-40) allows you to preset your workout goal/s before
commencing a workout in which the resistance is completely controlled by the user at all times.
On an E-40, a Time, Distance or Calories parameter that has been preset will count down to zero
and beep for 8 seconds once achieved (press any button to stop the beeper) then the parameter will
begin counting upwards if the user continues exercising. A preset Pulse parameter between 30 and
199 can be set and will beep once achieved and keep beeping if the detected heart rate stays above
the preset value.
Note: The cycling animation on the E-40 will move forward once every 0.1 km/mile.
4.8 CALORIE GOAL PROGRAM
The Calorie Goal Program allows the user to select a predetermined quantity of calories they wish to
burn during the workout. At any time during the program the resistance may be manually changed
which will modify the length of time it will take to burn the target calories and achieve the goal. Also,
manually modifying the speed or incline will change the entire profile for the remainder of the
program. The program ends when the calorie goal is achieved.
4.9 DISTANCE GOAL PROGRAM
The Distance Goal Program allows the user to select a predetermined distance they wish to cover
during their workout. At any time during the program the resistance may be manually changed which
will modify the length of time it will take to achieve the goal. Also, manually modifying the resistance
will change the entire profile for the remainder of the program. The program ends when the distance
goal is achieved.
4.10 CROSS-COUNTRY PROGRAM
The Cross-Country Program is a distance based program that simulates a elliptical ride through a
range of hills of low to mid intensity. The principle difference with the Cross-Country Program is the
length of the intensity periods is longer than that of an interval program so as to replicate riding long
gradual climbs. This type of workout is a great blend of aerobic exercise and strength training. Users
may select from a range of levels, which will gradually increase the gradient of the hills.
4.11 INTERVAL PROGRAM
Interval Training has many benefits such as increasing the metabolism, which results in more
calories being burned all day long, as well as increasing average exercise speed, making it a great
way to increase average pace and improve race times. The Interval Program allows users to
alternate their workout intensity between high-intensity “work” periods and preset low- intensity “rest”
periods. The Interval Program allows you to select from 3 Work-Rest Ratios and a range of Work and
Rest Intensity levels. Users can change the level of intensity of the profile at any time during the
workout by pressing the INCREASE/DECREASE keys and those changes will stay in effect for the
remainder of the workout.
Page 23
ELLIPTICALS – USER MANUAL
23
LEVEL
MINIMUM
(LEVEL OF WATTS)
MAXIMUM
(LEVEL OF WATTS)
1
1
4
2
2
7
3
3
10
4
5
12
5
7
15
Time(min.)
RPM
1 2 3 4 5 6 7 8 9
10 11 12 13 14 15 16 17 18 19 20
G2 (RPM’S)
30
40
40
50
60
70
60
50
40
40
40
40
40
50
60
70
55
50
40
40
G3 (RPM’S)
40
40
50
50
60
60
70
70
80
80
90
80
80
80
70
70
56
60
50
50
G4 (RPM’S)
50
80
90
100
50
80
90
100
50
80
90
100
50
80
90
100
57
80
90
100
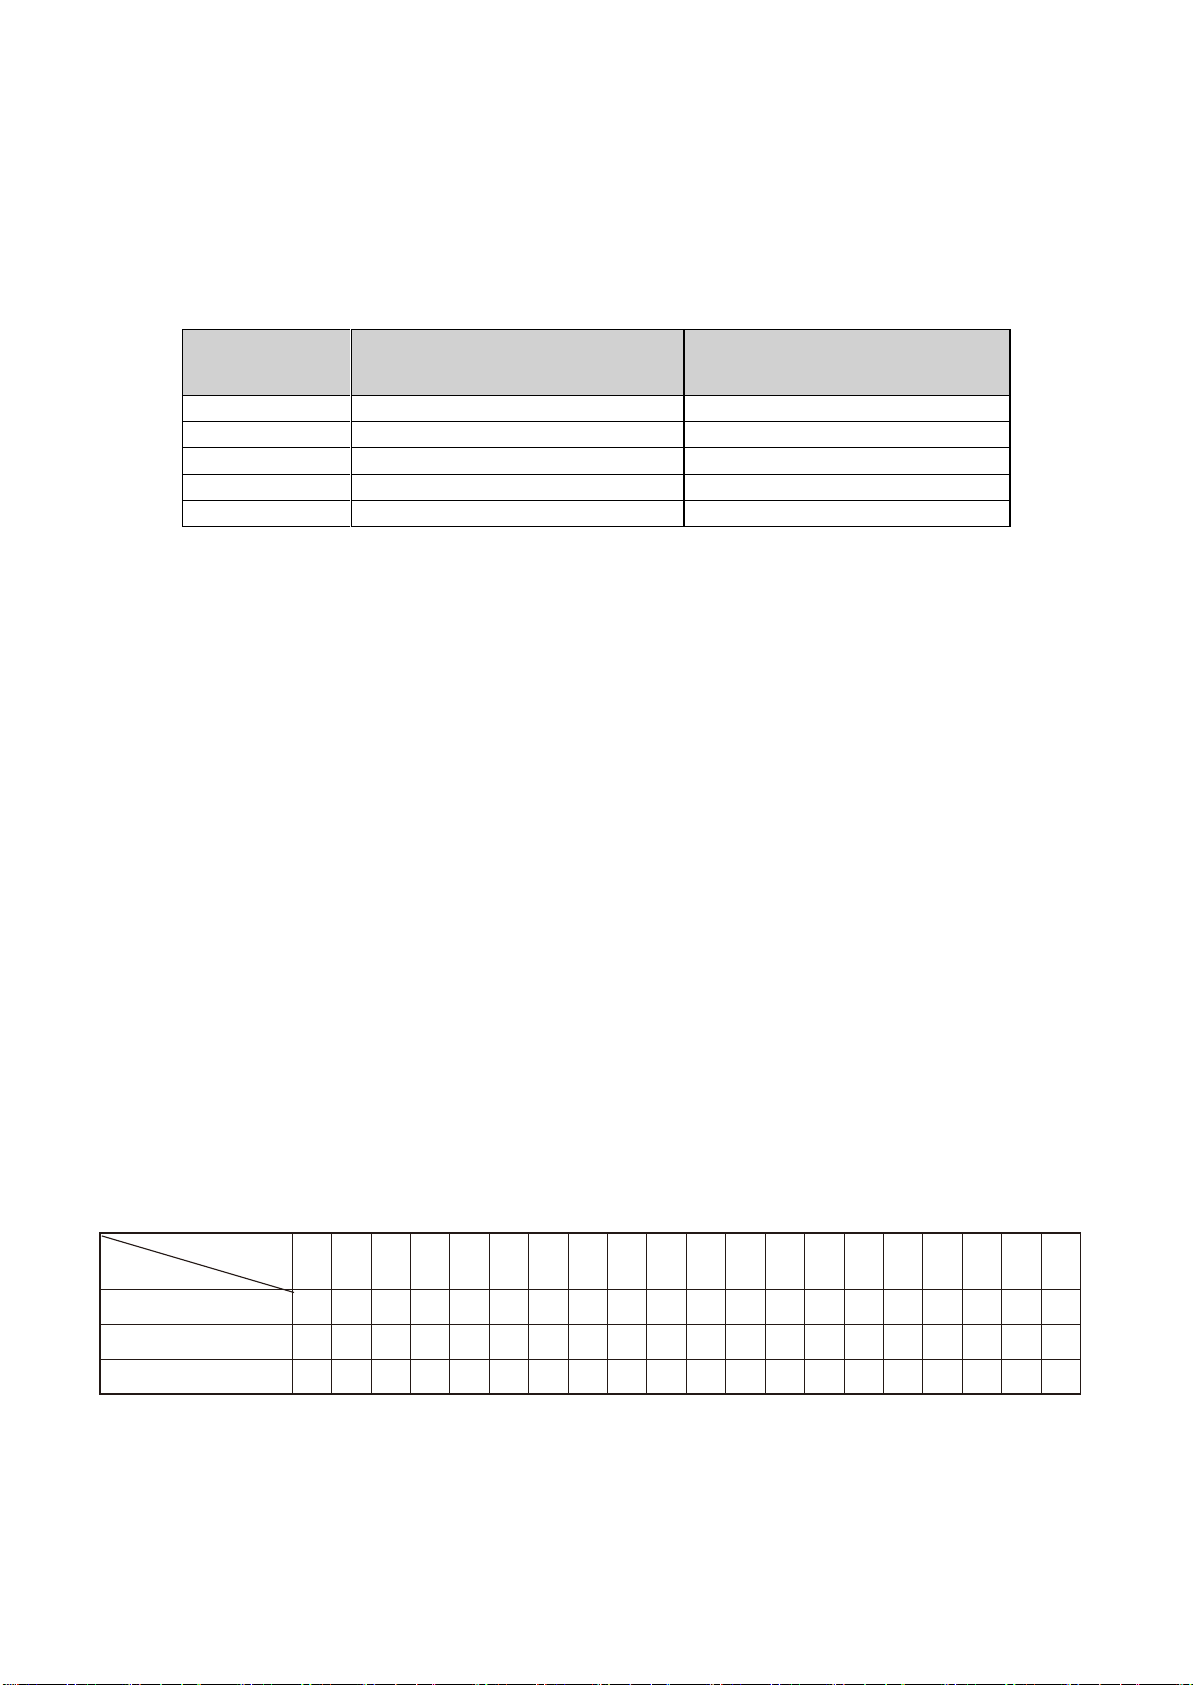
4.12 RANDOM PROGRAM
The Random Program is all about providing exercise variety. Each time this program is selected, a
unique exercise experience is provided from a bank of over 4 billion pre-programmed workouts. Each
workout gives you access to a randomly pre-programmed watts levels profile that will vary throughout
the workout. During the program, users can manually change the watts level any time.
The following table shows the different level of watts for each level.
4.13 GOODBYE FAT PROGRAM
The Goodbye Fat program is designed to burn off the fat stored in your body. It promotes weight loss
by keeping you in a comfortable zone that draws on energy directly from the areas of your body
where fat is. The program features a resistance profile that is relatively easier than other programs,
but effective in promoting weight loss when followed for a long period of time. This program features
up to 20 different WATTS values per segment. A flashing dot indicates your position throughout the
exercise. You may change the resistance of a segment at any time by pressing the
INCREASE/DECREASE SEGMENT keys because this program features a range of 20 resistance
values per segment. You may change the level of difficulty at any time using the
INCREASE/DECREASE LEVEL keys.
4.14 TRACK PROGRAM
The Track Program simulates training on a 1/4 mile-long (approx. 400 meter) track. Users may select
between one (1) and 99 laps while controlling the resistance from beginning to end as the program
does not have a predetermined profile. The Track Program appears on-screen as an oval track
showing the user’s progress around the circuit.
4.15 RACING MODES (G2, 3 & 4 on E-40)
The G2, G3 & G4 programs are preset racing modes where the user competes against the console
(PC) for a fixed race time of 20 minutes. The program presets RPM/speed profiles for the PC.
Table 1: Preset RPM values for each minute. G2 is the slowest competitor and G4 is the fastest.
Page 24
ELLIPTICALS – USER MANUAL
24
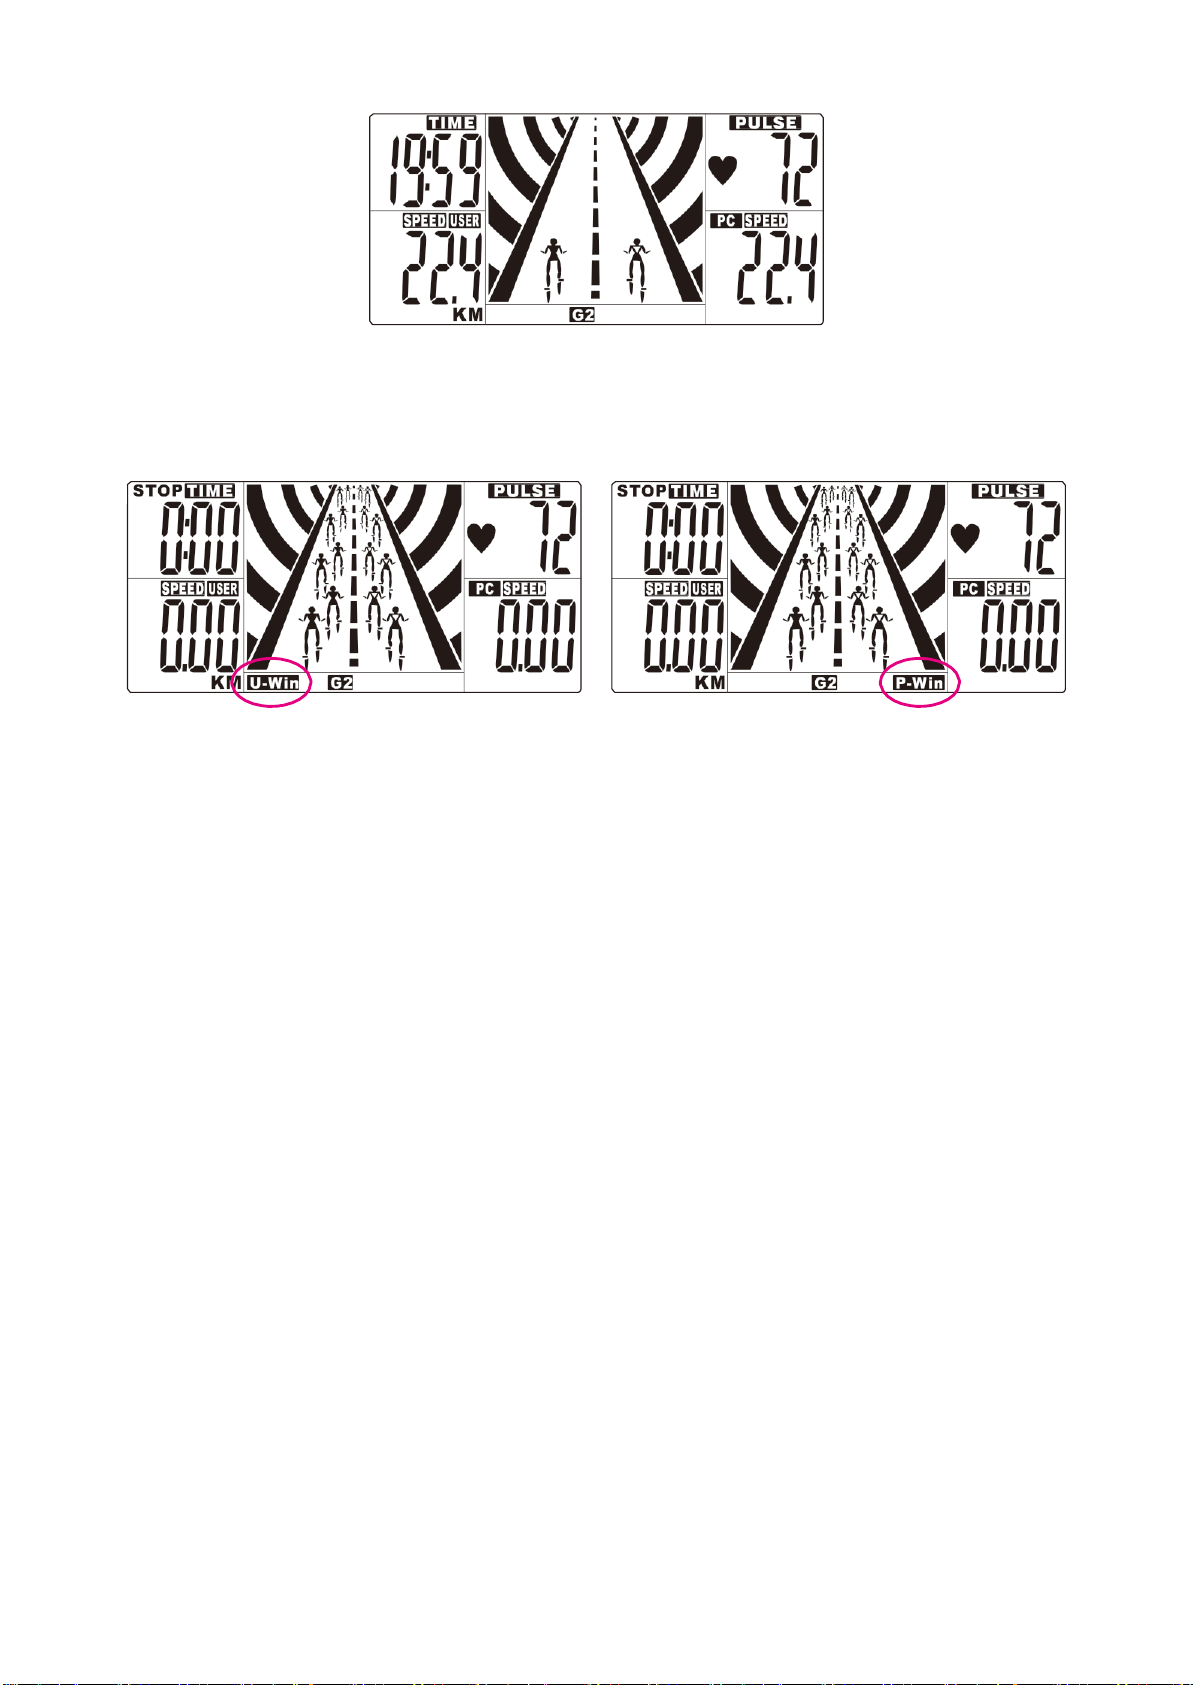
The goal of each program is for the USER (left animation) to have completed at least 60% of the
PC’s work (right animation) when the 20 minutes is up. When an animation is moving up the screen
and getting smaller it indicates that it is in front of the other animation. The higher and smaller it gets,
the further in front it is.
When the time reaches zero, STOP will appear in the top left corner of the console and it will beep for
8 seconds. If the user has completed at least 60% of the PC's work, then the console will display “UWin”. On the contrary, the console will show “P–Win” if less than 60% of the PC’s work is completed.
4.16 HEART RATE CONTROL PROGRAM
The Heart Rate Control Program allows a user to workout at the exact intensity level they desire by
exercising at a predetermined heart rate level. This reduces the risk of overtraining, which can cause
injuries, exhaustion or even burnout and under training, which can be ineffective and have the user
seeing little to no results. Before starting the program, users will need to enter their age (if no User ID
is selected) and the desired percentage of their maximum possible heart rate (50- 89%), they wish to
work out at. The computer will then calculate the recommended target heart rate value, which may be
altered before starting. The program starts in a warm up mode that will gradually bring the user’s
heart rate up to 80% of their Target Heart rate and which point the program will start. At that point the
resistance of the elliptical automatically adjusts to provide the necessary intensity to reach and
maintain the target heart rate.
NOTE – This program requires the user wearing a wireless chest strap but the user can also use the
hand grips but it must them continuously the ensure proper a functioning. This strap is available at
authorized Bodyguard Fitness dealers or from Bodyguard Fitness’ Customer Service Department
(888-407-3784).
The strap should fit snugly across the chest since any movement during exercise may result in an
incorrect reading of the heart beat. For an optimum reading, users should exercise within an arm’s
length of the console. If, after a few seconds, the heart rate receiver does not detect a signal from the
chest strap, then “UNSTABLE HR, PLEASE CHECK CHEST STRAP OR HANDS POSITION” will
appear on screen. If the heart rate receiver does not detect a signal for approximately two (2)
minutes, the program will stop. The same applies for the hand grips signal if is used.
CAUTION – If the resistance is too high for your fitness level and you are unable to keep up with the
program, press STOP to end the program. You may resume the exercise at a lower level of intensity
(e.g., 60%). If this is still too difficult, do not use the Heart Rate Control program until your level of
fitness allows you to complete the workout at the desired target heart rate.
Page 25

ELLIPTICALS – USER MANUAL
25
4.17 HEART RATE INTERVALS PROGRAM
The Heart Rate Interval Program combines the benefits of interval training with the accuracy of heart
rate training. This combination makes the Heart Rate Interval Program one of the most effective ways
to increase metabolism, burn fat, increase average pace and naturally produce human growth
hormones. During the Heart Rate Interval Program the computer will automatically alternate between
two heart rate % targets selected by the user. The possible values are between 55% and 85% of the
user’s maximum heart rate. Once a heart rate target is reached the intensity is maintained for the
duration of the interval time before alternating to the other target.
4.18 FITNESS TEST PROGRAM
The Fitness Test is a custom-made submaximal test designed to measure cardio-respiratory fitness.
Maximal oxygen uptake (VO2Max) is defined as the maximum volume of oxygen that can be taken
up, distributed and used by the body during physical activity. Testing one’s VO2Max allows users to
evaluate their fitness level and select the appropriate exercise program and intensity levels.
For the submaximal test, the user is challenged to reach 85%-10BPM of their maximum heart rate
through gradual increases in resistance while pedaling at 70rpm. Once the 85%-10BPM maximum
heart rate threshold is reached the program will automatically stop and the computer will extrapolate
the user’s VO2Max. In order to obtain a more accurate reading it is very important to maintain a
rotational speed of 70rpm.
NOTE – For this program, users must wear the heart rate chest strap or user must hold continuously
the hand grips. Cardio- respiratory fitness is a combination of cardiovascular fitness and respiratory
fitness. Always keep in mind that this test is submaximal, so the results are only to be used as a
guide.
4.19 ADVANCED HILLS PROGRAM
The Advanced Hills Program is excellent for developing leg strength and endurance by allowing
users to choose from a wide range of hill simulations at varying intensities. Users may choose up to
10 hills per program and select from an intensity range of 6% to 18%. The program is distance based
and resistance changes are made automatically. Users may change the intensity during the exercise
if they find it too easy or too difficult.
4.20 RACE PROGRAM
The Race Program is a distance based race simulation that pits the user against 1 or 2 competitors.
The racing speed of the competitor/s is determined by a formula/s based on past and current race
speeds. The Race program is a fun way to inject some competition into your workout. The resistance
may be manually modified at any time throughout the program.
4.21 BEAT MY RACE
The Beat My Race program is a track-based program that takes a User’s best average race speed
from the Race program and then allows the user to race themselves on a 1/4 mile-long (approx. 400
meter) track. This is a great motivational tool as it inspires the user to improve their times and always
improve. The resistance may be manually modified at any time throughout the program.
4.22 TARGET WATTS
The Target Watts program is an excellent way to guarantee that you always work out and a desired
wattage level. Like Heart Rate Control Training, Target Watts training is a great way to ensure that
you do not over train or under train however it uses wattage instead of heart rate to control the
resistance and therefore does not require a chest strap or to hold constantly onto the heart rate grips.
The Target Watts program is often referred to as an “Anti-Cheat” Program because if a user sets a
wattage reading but then gets tired or lazy and slows their rpm’s then the resistance will increase to
ensure the correct wattage is reached.
Page 26

ELLIPTICALS – USER MANUAL
26
4.23 SMART REVERSE
The Smart Reverse program guides you and helps you train in both directions, forward and
backward. The interactive console indicates when you should pedal forward and when to change to
a backward motion.
During a change of direction (ex: forward to backward), the console asks you to SLOW DOWN
while the resistance on the pedal increases to help you slow down. Then PEDAL BACKWARD
appears on the display. If you pedal the wrong way, WRONG WAY appears on the display to help
you remember the direction you were supposed to take. If you are pedaling in the right direction,
“KEEP THIS WAY” .This program features levels of difficulties and up to 20 different resistance
values per segment. A flashing dot indicates your position throughout the exercise.
You may change the resistance of a segment or the level of difficulty at any time by pressing
respectively the INCREASE/DECREASE keys if you find the exercise too hard or too easy.
Note: When you pedal backward, the speed value on the display is displayed flashing.
4.24 CUSTOM PROGRAMS
The Custom programs are pre-designed programs created by a user.
See section 5.10 to learn how to create or delete Custom Programs via the Settings menu.
NOTE – When a Custom program is chosen, an exercise level cannot be selected.
4.25 MEMORY PROGRAMS
The Memory programs allow the user to retrieve previously completed workouts that have been
saved. At the end of each workout, the computer asks whether to save the completed exercise or not.
All the programs, with the exception of the Track Program, Race, Beat my Race and Fitness Test
can be saved.
NOTE – When a Memory program is chosen, an exercise level cannot be selected.
Page 27

ELLIPTICALS – USER MANUAL
27
E-45 ELLIPTICAL
SETTINGS MENU
SECTION
Language
5.2
Weight Unit
5.3
Distance Unit
5.4
User ID
5.5
Warm Up
5.6
Cool Down
5.7
Pause Time
5.8
Big Number Option
5.9
Custom Programs
5.10
Memory Option
5.11
Sound Option
5.12
Auto Power Off
5.13
Intensity
5.14
5 SETTINGS MENU (E-45 only)
The E-45 elliptical offers a wide range of unique settings allowing the user to customize the unit to
their liking via the SETTINGS Menu. The following table shows the section that applies to each
feature.
5.1 ACCESSING THE SETTINGS MENU
To access the SETTINGS Menu, go to the HOME SCREEN and press the iTEK key once.
SETTINGS MENU will appear in the alphanumeric screen.
To scroll through the SETTINGS MENU, press the INCREASE/DECREASE SEGMENT keys
until you find the setting you wish to access.
Press the ENTER key to access that setting’s sub-menu.
Use the INCREASE/DECREASE SEGMENT keys to toggle choices ON/OFF or to modify
selections.
Press the ENTER key to confirm any settings changes.
Press the STOP key to return to the previous menu.
Press the INCREASE/DECREASE SEGMENT keys to scroll to another setting or if you are
finished press the STOP key again (or the iTEK/HOME key) to return to the HOME SCREEN.
5.2 LANGUAGE
Choose to display the console text in English or French.
5.3 WEIGHT UNIT
Choose your Weight units to be calculated in pounds or kilograms.
5.4 DISTANCE UNIT
Choose the Distance unit to be displayed in miles (Imperial) or kilometers (Metric).
5.5 USER ID
Note: The User ID function may also be accessed directly via the designated USER ID key on the
console.
Page 28

ELLIPTICALS – USER MANUAL
28
The USER ID feature lets the console recognize individual users and automatically enters weight and
any other required information such as the user’s age when calculating Maximum Heart Rate (MHR)
values for the Cardio programs. The display can store up to eight (8) users. Users may view their
accumulated statistics and reset their totals to zero if desired.
The User ID function includes the following sub-menus: ACTIVATE USER, CREATE USER, EDIT
USER, RESET STATISTICS and DELETE USER.
5.5.1 CREATE USER
Creates a New User if space is available. (maximum 8 users)
A total of six (6) alphanumeric characters can be used to create a user ID name. Use the
INCREASE/DECREASE SEGMENT keys to select any character from A to Z or any number from 0
to 9 to fill in spaces 1 to 6. If you wish to leave a space between characters, simply use the blank
character between 9 and A. Once a space is full, press the INCREASE/DECREASE LEVEL keys to
move to the next and repeat the same procedure to create a user ID name. When you have finished,
press the ENTER key. Next, enter the user’s weight and age and press the ENTER key to save the
information.
5.5.2 EDIT USER
Edit a User’s stored parameters.
5.5.3 DELETE USER
Deletes a User ID and all parameters saved under that user ID’s name.
5.5.4 TURN USER ID OFF
Turning the USER ID off allows a guest to complete a program without having to use a stored user’s
parameters or add to another users’ statistics bank.
NOTE – You can also turn off the USER ID by pressing and holding the stop key for 3 seconds when
at the HOME SCREEN or by pressing the USER ID key until USER ID OFF is displayed on screen
then pressing the ENTER key. A message will show saying ‘’ID FUNCTION CLEARED”.
5.5.5 STATS
The Stats feature allows users to view and reset the accumulated statistics of the current User ID. No
stats are stored for a GUEST user. These functions may also be accessed directly via the designated
STATS key on the console after a User ID has been selected. If no User ID has been selected,
“SELECT USER ID” will be displayed and the user will be returned to the HOME SCREEN.
5.5.6 View Statistics
Shows the accumulated Time, Distance and Calories for the current User ID.
Use the cumulative stats feature to achieve goals such as walk 20 miles/km in a week or run
the equivalent distance from Boston to New York City in the winter (215 miles / 346 km).
5.5.7 Reset Statistics
Resets the accumulated statistics of the current User ID.
5.6 WARM UP
Warming up before you exercise is strongly recommended. Bodyguard ellipticals have a feature that
allows the user to activate or deactivate a warm up period before the start of most programs. When
the WARM UP option is activated, a warm up screen will be displayed prior to each workout.
The duration of the warm up is four (4) minutes and is divided into three (3) parts.
Programs with Constant Torque and Constant Watts program modes will function like this.
Page 29

ELLIPTICALS – USER MANUAL
29
Part 1: 40% of the intensity of the first exercise segment.
Part 2: 60% of the intensity of the first exercise segment.
Part 3: 80% of the intensity of the first exercise segment.
In Heart Rate Control and Heart Rate Interval programs, the effort will be set according to the Target
Heart Rate. For example, if the Target HR is 140 BPM:
Part 1: will be 60% of the Target (140 BPM) = 84 BPM
Part 2: will be 70% of Target (140 BPM) = 98 BPM
Part 3: will be 80% of Target (140 BPM) = 112 BPM
NOTE – Users can skip the warm up period after it starts by pressing the STOP key. The console will
immediately commence the selected exercise program.
5.7 COOL DOWN
Cooling down after exercising is strongly recommended. The Cool Down Option allows the user to
activate or deactivate a cool down period that automatically begins at the end of most exercise
programs.
The duration of the cool down period is three (3) minutes and will operate at 50% of the intensity of
the last segment of the exercise program with a maximum value of 5.
5.8 PAUSE TIME
When the STOP key is pressed during a workout, the program goes into PAUSE mode for a predetermined amount of time. During this PAUSE period the console waits to see if the user wishes to
continue the program (by pressing the JUSTGO key) or end it completely and reset the console (by
pressing the STOP key a second time). If no action is taken, then the elliptical will automatically end
the program and reset the console once the PAUSE TIME is up. The default PAUSE TIME is 1
minute but it may be changed to anywhere from 10 seconds to 1 minute.
Note: The console can only stay in the Pause mode if the battery pack has sufficient charge.
5.9 BIG NUMBER OPTION
A wide range of parameters and workout information are displayed in their designated areas on the
display surrounding the central workout profile. However, if a user wishes to view a specific
parameter or have various parameters scrolling in large text in the middle of the screen in place of
the workout profile then that is possible with the BIG NUMBER OPTION.
When OFF is selected the speed and incline profiles will appear on screen.
When ALL is selected, all availble parameters will scroll on screen.
5.10 CUSTOM PROGRAMS
Bodyguard machines allow users to create up to 8 preprogrammed workouts. This is particularly
useful if a user wishes to customize their workout programs. Each Custom program contains 20
segments, each of which can be programmed with a unique resistance or level of effort value and
then saved by pressing the ENTER key. The user can backspace to correct a pre-entered value by
pressing the iTEK key. Each Custom Program is saved under the name “CUSTOM. X”, X being the
next available storage location. If all the locations are full, the user will have to delete another Custom
Program to make space or modify an existing program to meet their specific needs. To select a
stored program in the CUSTOM PROGRAM option, select CUSTOM PROGRAM from the programs
available, and then select the desired custom program number.
NOTE - Users can DELETE any CUSTOM program by entering the SETTINGS menu, scrolling
through until CUSTOM PROGRAM appears on screen. Press the ENTER key, then press the
DECREASE SEGMENT key repeatedly until DELETE appears on the screen (If Delete does not
appear on screen there are no stored Custom Programs). Then choose the CUSTOM program you
Page 30

ELLIPTICALS – USER MANUAL
30
wish to delete and press the ENTER key to accept.
5.11 MEMORY OPTION
The Memory option allows users to save most completed workouts, regardless of their duration, so
they can be repeated at a later time.
When the Memory option is turned on, the opportunity to save a program will appear at the end of the
workout (even if stopped before 100% completion) after the Total Workout Statistics have scrolled
through. This option is displayed in abbreviated form: SAVE PRESS ENTER followed by NOT
PRESS STOP. If you wish to save the workout, simply press the ENTER key and, if you do not wish
to save it, press the STOP key. If you choose to save the program a message will indicate the
position your workout was saved (e.g. PROGRAM SAVED AS MEMORY 1). There are eight (8)
positions available and if all the spaces are taken, you will be required to overwrite a stored memory
program by scrolling through the list with the INCREASE/DECREASE SEGMENT keys and pressing
enter to select the space you wish to overwrite.
Up to 20 speed and incline levels from the end of each on-screen segment is saved. E.g. If a user
makes 3 resistance level changes within a 1 minute segment, only the value at the end of the
segment is stored. This function is very useful when a workout is particularly interesting and
motivating.
Your Bodyguard unit offers a unique option to save the completed resistance or level of effort values
from a Heart Rate Control program which allows the user to repeat the same workout at a later date
without the use of a chest strap.
Note: Once the Memory option is activated, you do not have to wait for the SAVE PRESS ENTER
message to save the program. You may press enter as soon as the Total Workout Statistics begin
scrolling and the program will be saved in the next available Memory position.
5.12 SOUND OPTION
The SOUND option allows users to set the volume level of the beep on the console.
5.13 AUTO POWER OFF
The Auto Power Off feature saves energy by automatically turning off the display after a designated
period of inactivity. The period of time before the AUTO POWER OFF feature turns off the display
may be modified from 10 seconds to 2 minutes.
5.14 INTENSITY
The Intensity feature sets the intensity range for a workout from 3 options, LOW, MEDIUM or HIGH.
LOW will calibrate the wattage to 175 WATTS at 60 RPM. MEDIUM will calibrate the wattage to 250
WATTS at 60 RPM. HIGH will calibrate the wattage to 350 WATTS at 60 RPM. Each range has 20
levels but the increments between each level will increase as the setting ranges increase.
Note that the default factory setting for this feature is MEDIUM.
If a USER ID is active when an Intensity setting is changed then it will be stored in their profile and
recalled every time that USER ID is selected even if the default setting in Guest mode is different.
Page 31

ELLIPTICALS – USER MANUAL
31
E-45 ELLIPTICAL
DIAGNOSTICS MENU
SECTION
NVRAM Test
6.2
Keypad Test
6.3
Display Test
6.4
Heart Rate Test
6.5
Sound Test
6.6
USB Port Test
6.7
Brake Test
6.8
Speed Sensor Test
6.9
Statistics
6.10
Battery Level
6.11
Brake Calibration
6.12
6 DIAGNOSTICS MENU
The Diagnostics menu consists of a range of operational tests and stored usage data that can be
used to determine equipment performance as well as aid in the diagnosis of any equipment issues.
6.1 ACCESSING THE DIAGNOSTICS MENU
To access the DIAGNOSTIC Menu and perform an operational test or view stored usage data
complete the following process:
At the HOME SCREEN, press and hold the iTEK key for 3 seconds.
“DIAGNOSTICS MENU” will appear on the screen and “PRESS ENTER”. If you wait for 3 seconds
then the display and lower board software versions will appear in the alphanumeric screen.
For example, E45 VER. 1.25, means the equipment model name is E-45 and the Console Software
Version is 1.25
DRIVER VER. 0.46 means the Lower Board software version is 0.46
Scroll through the Diagnostics menu with the INCREASE/DECREASE SEGMENT keys until
you find the test/category you wish to access.
Press the ENTER key to begin that test or to view that category’s data.
If applicable, use the INCREASE/DECREASE SEGMENT keys to modify selections/settings.
Press the ENTER key to confirm any settings changes.
Press the STOP key to return to the DIAGNOSTICS Menu.
Use the INCREASE/DECREASE SEGMENT keys to scroll to another test/category or if you are
finished press the STOP key again (or the iTEK key) to return to the HOME SCREEN.
6.2 NVRAM TEST
The NVRAM TEST allows you to verify if the NVRAM (non-volatile memory) chip is functioning
correctly. Note that the NVRAM test will not erase any USER ID information, CUSTOM or MEMORY
programs.
Once the NVRAM TEST has been selected the test will automatically begin and take about 30
seconds to complete. Once complete, the message: ‘’SUCCESSFUL’’ will be displayed if the NVRAM
chip is functioning correctly.
Page 32

ELLIPTICALS – USER MANUAL
32
6.3 KEYPAD TEST
The KEYPAD TEST allows you to verify if each key on the console is functioning correctly. During the
test, when you press on a console key a confirmed response labeling that key should appear on the
screen. For example, if you press the INCREASE LEVEL key, the screen should display LEVEL
INC. Test the various keys and ensure the correct response appears on the screen.
6.4 DISPLAY TEST
The DISPLAY TEST allows you to verify if each part of the LCD display is functioning correctly.
Once the DISPLAY TEST has been selected the test will begin. During the test, the screen will light
up in a certain pattern; check that all segments in the pattern are functioning correctly. Proceed to the
next pattern by pressing the INCREASE/DECREASE SEGMENT key until all patterns have been
completed and checked.
6.5 HEART RATE TEST
The HEART RATE TEST allows you to verify if the two heart rate systems, wireless chest strap and
contact heart rate sensors, are functioning correctly.
Once the HEART RATE TEST has been selected the test will automatically begin.
Place your hands on the contact heart rate sensors and after 10 seconds your heart rate
should be displayed in the bottom center of the display.
Put on a compatible wireless heart rate chest strap. If a heart rate chest strap signal is
detected by the wireless receiver in the console the value will be displayed in the bottom lefthand side of the display.
If either system does not function or is erratic, refer to Heart Rate Troubleshooting in section 8.3.
6.6 SOUND TEST
The SOUND TEST allows you to verify if the beeper in the console is functioning correctly.
Once the SOUND TEST has been selected the test will automatically begin. A series of beeps should
be heard if everything is functioning correctly. Press any key to end the test.
6.7 USB PORT TEST
The USB TEST allows you to verify if the USB port and software is functioning correctly.
If the USB port is empty or not communicating correctly then USB TEST FAILED appears.
If a USB device is in the port and communicating correctly then USB TEST OK appears on screen.
Remove and insert the USB several times to confirm that the USB Port is working consistently.
6.8 BRAKE TEST
The Brake test will check if the Resistance System is operating correctly.
When the test begins, Level 1 will be displayed on the right hand side of the screen.
While pedaling increase the level to Level 20 ensuring that the resistance increases with the value.
6.9 SPEED SENSOR TEST
The speed sensor test allows you to see whether your speed sensor circuit is functional or not.
Page 33

ELLIPTICALS – USER MANUAL
33
6.10 STATISTICS
The statistics log allows you to view accumulated usage data of the equipment such as the Total
Time of Use and Total Distance of Use.
TOTAL TIME indicates the amount of time the unit has been used during all exercise programs.
TOTAL DISTANCE indicates the total distance traveled on the unit during all exercise programs.
Note: These values can be viewed during a workout by pressing the iTEK key.
6.11 BATTERY LEVEL
Displays an approximate value of the charge remaining in the battery pack. To get a more accurate
reading during the Battery Level test, pedal over 45 rpm.
6.12 BRAKE CALIBRATION
Calibrates the braking system to the factory settings. A calibration must be completed every time a
component related to the braking system has been adjusted or replaced or if the braking levels aren’t
increasing in consistent increments.
Page 34

ELLIPTICALS – USER MANUAL
34
7 GENERAL MAINTENANCE
Bodyguard Ellipticals have been designed to provide many years of quality use. However, in order to
maintain product safety, performance and to maximize the life of the product, some general
maintenance should be performed periodically.
Please note that general maintenance is the responsibility of the owner and is not covered by the
product's labor warranty, which only covers labor costs related to the diagnosis and repair of parts
damaged due to defects in materials and workmanship. For more information on the product's
warranty, visit www.bodyguardfitness.com.
7.1 GENERAL MAINTENANCE TIMETABLE
Note: Many people choose to complete all stages of general maintenance themselves, however,
most specialty fitness dealers and service providers offer maintenance services if you wish to pay for
an experienced technician to complete the following.
After each workout:
Wipe down the elliptical using a mild, non-abrasive liquid cleanser applied with a soft, cotton
cloth. Do not spray cleansers directly on the unit or use an excessively wet cloth.
Every month:
Clean the area underneath the elliptical of any built-up dust or debris. This prevents it from
getting onto the aluminum rails where it can cause issues such as noisy wheels.
Check the elliptical is level and that there is no rocking. Excessive rocking may cause
damage to bearings in the machine.
Clean the aluminum tracks and wheels of any debris using a clean cloth and a mild, non-
abrasive liquid cleanser.
Check the wheels for any debris, pits or bumps that can cause noise or vibration.
Every 6 months or as necessary:
Clean the aluminum rails and wheels thoroughly and dry. Apply an even amount of lubricant
to the aluminum rails and roll the wheels back and forth to spread it evenly.
Replace console batteries (E-40 only) to keep the monitor in good working condition.
Note: Remove batteries before long periods of disuse to prevent battery acid leakage.
Check all frame screws are securely tightened. Check the smoothness of moving parts.
Note: Do not apply any lubricant on a pivot joint if operating quietly. Joints with sealed
bearings installed cannot be lubricated, only tightened. If the noise persists, the bearings may
need to be replaced. Joints with bushings that are making noise may be lubricated by
spraying WD-40 through the hole on the housing of the pivot joint. (On some models, a
plastic cap on the hole will need to be removed before lubricating.)
Check the drive belt tension by attempting to make it slip by pedaling in short/sharp bursts. If
it is too loose you will feel the belt slipping on the pulleys and creating a jerking feel. If
manually adjusting the drive belt note that the correct drive belt tension should allow it to be
turned 90 degrees with the hands. Do not over tighten the drive belt or you may cause
damage to the pulley or flywheel bearings and prematurely wear your drive belt.
Check if the brake pad (E-40 only) is worn out by rotating the flywheel and listening for a
scraping sound and inspecting the top face of the flywheel for minor scratches being etched in
by the metal brake pad bracket. Replace the brake pad as necessary.
Page 35

ELLIPTICALS – USER MANUAL
35
7.2 UPDATING SOFTWARE
At times software updates are released for products that may offer new features or improve
performance. The latest version of software for each model may be viewed in the Customer Service
section at www.bodyguardfitness.com.
Note: You may confirm the current software versions on your model by entering the Diagnostic Menu
(see section 6.1) and all your software versions will scroll across the alphanumeric screen before you
press ENTER to see the submenus.
Updating software is very easy and can be done by downloading the correct software file from
bodyguardfitness.com (or receiving it as an attachment via email from the customer service
department) and saving it into the main directory on a USB key (no sub folder). Next, insert the USB
key into the USB port on compatible models when at the HOME SCREEN. If the software on the
USB key is a more recent version then the console will automatically update the software on the unit.
Follow the onscreen instructions about when to remove the USB key and allow the system to reboot
(console will flash quickly). Once the console returns to the HOME SCREEN you can confirm the
new software versions on the unit by reentering the Diagnostic Menu (see section 6.1) and
confirming the updated software versions scroll across the alphanumeric screen.
Page 36

ELLIPTICALS – USER MANUAL
36
8 TROUBLESHOOTING PROBLEMS
The following information is provided as a guide to solving common problems that may arise.
Read your warranty information carefully to have a clear understanding regarding what is covered.
8.1 DISPLAY MESSAGES (E-45 only)
BATTERY LOW - PEDAL OVER 30 RPM - OR RECHARGE
The built-in Battery Pack’s charge is low and the blue L.C.D. backlight will shut off to preserve energy.
The user needs to pedal over 30 rpm for the backlight to come back on and to begin recharging the
battery.
Note: A Recharging Adapter Pack that plugs into the unit and an electrical outlet may be purchased
from the Bodyguard Fitness Customer Service Department to allow for quick and easy recharging of
drained battery packs.
PEDAL OVER 30 RPM – OR CONSOLE DIMS
After 30 seconds of pedaling at less than 30 rpm, the console backlight will turn off to avoid battery
drain. Once the user pedals over 30 rpm the console backlight will turn back on.
8.2 COMMON NOISES
There are different types of noises that can be heard from an elliptical depending on the workload,
age and condition of the equipment. Ellipticals do have a lot of moving components creating
operational noise but if you feel there is a noise over and above what is considered normal then
diagnosing the cause of noises can be made easier by taking a simple step-by step approach.
1) What type of noise is it? Is it a loud banging or knocking sound or does it sound more like
something rattling due to vibration or something being loose. Is it a constant rubbing sound where
two things are in permanent contact or a clicking sound where there is a frequency to the contact?
What type of materials does it sound like are causing the
noise, metal, plastic or something synthetic?
2) Attempt to understand the noise by trying to replicate it under different circumstances such as
pedaling fast, pedaling slow and even when the elliptical is stopped. Does the noise volume or
frequency increase when you pedal faster? Does it only occur when you pull or lean on the swing
arms, contact heart rate bars or when you only pedal on one side of the elliptical? Can you replicate it
when the elliptical is stopped or just when the pedals/swing arms are moving?
3) Attempt to isolate the location of the noise? Is it at the front or back of the elliptical? Is it isolated to
the rear frame or is it something in the mainframe or swing arms. Remove the shrouds and see if the
volume increases indicating it may be related to a component inside the unit. Safely place your hands
on parts of the elliptical to see if you can isolate the noise to that area or feel vibration.
Once you have a good understanding of the type of noise and how it changes based on or actions
you can look at the nearby components to see a cause. Below are some common causes for
different types of noises heard on ellipticals.
8.2.1 CLICKING NOISES
A clicking noise that sounds as if something repeatedly makes contact with a moving part is different
to a rubbing noise as there is a frequency of contact involved as opposed to permanent contact. You
almost certainly will have to pedal the elliptical to hear the noise and maybe able to hear it by moving
the pedals without standing on the machine. You may also be able to increase its volume and
frequency by increasing the speed.
Shoelaces
Check that your shoelaces are securely tied and the loops in the laces are not too long or they may
click on the opposite pedal as it passes or on the shrouds/arms/links etc.
Page 37

ELLIPTICALS – USER MANUAL
37
Shroud Screws: Check the shroud screws are tight or the joining plastic pieces can click as they
stress from side to side.
Pedals
Check the screws that secure the pedals to the pedal link are tight or the plastic pedal can click as it
stresses from side to side.
Wheels
Loose securing bolts on the wheels can cause them to click as they shift laterally under stress.
Frame/Arm Joints
Check all bolts and nuts that secure the stride arms, pedal links and swing arms are securely
tightened as explained in the General Maintenance section and the Assembly Instructions. Loose
bolts may result in lateral movement that causes a clicking sound when there is play in the joining
parts.
8.2.2 RUBBING OR SCRAPING NOISES
A noise that sounds as if it is rubbing or scraping is almost certainly related to something making
permanent contact with a moving part. You should be able to replicate the noise when no one is on
the elliptical and possibly increase its volume by increasing the speed making it easier to diagnose.
Permanently moving parts on an elliptical in operation include the pedals, arms and links including
their bearings, the wheels, pulleys, drive belts, and the flywheel. If something is in permanent contact
with one of these parts then the noise is likely to get louder as the speed increases.
Flywheel
Check that the flywheel is not making contact with the flywheel cover which fits into a slot in the
shroud.
Foreign Object / Debris on Wheel/s
Check that nothing has become stuck on the wheels causing it to rub constantly as it runs along the
aluminum rails. Remove wheels and swap them with the opposite side to help isolate which wheel is
causing the problem. Clean wheels if dirty and replace if permanently damaged.
Brake Pad on Flywheel
Check that the brake pad is not completely worn down meaning the metal bracket the pad attaches
to would start making contact with the flywheel and scratching the top of it.
Inside Moving Parts
Check that nothing, such as cables or wires is making contact with the drive belt, pulley or flywheel.
8.2.3 LOUD KNOCKING/POPPING/VIBRATION NOISES
Loose Bolts
Severely loose bolts can cause metal movement and result in loud noises and vibration.
Check the front adjustable feet are balanced and locked and all frame connections (bolts/nuts etc.)
are tight.
Bearings
A damaged bearing in a stride arm, link arm, wheel, pulley or flywheel can result in a loud knocking
sound and a thumping vibration as the bad bearing is put under stress.
Page 38
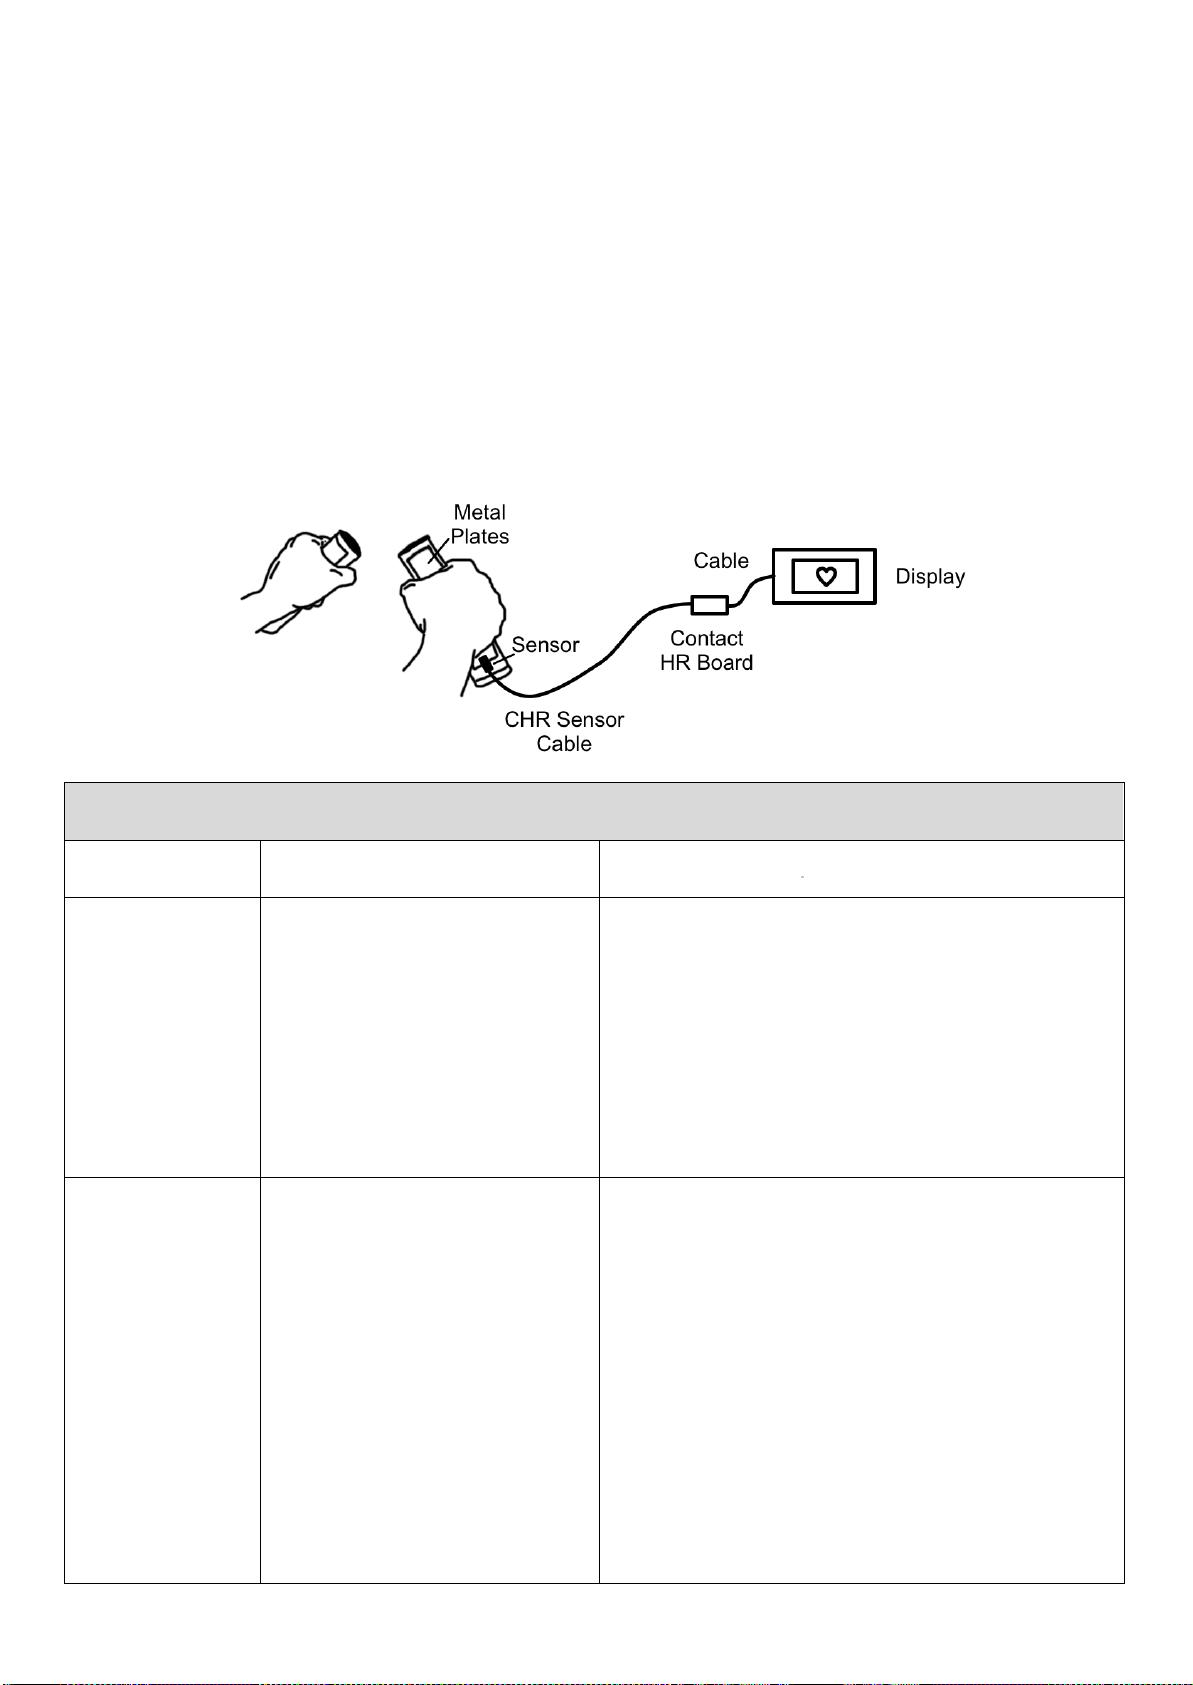
ELLIPTICALS – USER MANUAL
38
Table 1.1 – Contact Heart Rate Troubleshooting Checklist
PROBLEM
POSSIBLE CAUSE
SOLUTION
No Reading
a) Hands not in direct
contact with the metal
plate
b) Wires/connectors not
correctly attached
c) Damaged
wires/connectors
d) Damaged CHR Board
e) CHR Sensor attached
to metal plate damaged
f) Display damaged
a) Ensure the palm of the hands is in direct
contact with the metal plates – no gloves
etc.
b) Attach all wires/connectors per the wiring
diagram (both sides must be attached and
functioning correctly to get a reading)
c) Inspect wires/connectors for damage and
check for continuity with a multimeter
d) Change CHR board
e) Change CHR sensor
f) Replace Display
Erratic
Reading
a) Hands not making
consistent contact with
the metal plates
b) Hands too wet
c) Hands too dry
d) Pulse too light for a
consistent reading
e) Interference from
external force such as
Fluorescent (neon)
lights being too close to
the console or a dog
fence
f) Damaged CHR Board
in console
g) Display damaged
a) Grasp the metal sensors and keep the
hands in steady contact for 10 seconds.
b) Dry off excessive moisture as it can affect
the transfer of the pulse from the hands to
the metal plates and sensor.
c) Moisturize the hands so the pulse can be
transferred to the metal plates and sensor
easier
d) No Solution for Contact Heart Rate, try the
wireless chest transmitter as the pulse is
usually stronger in the chest area.
e) Move equipment out of range of interfering
force or disable it.
f) Change CHR board in console
g) Replace Display
8.3 HEART RATE MONITORING
Your heart rate can be detected via the hand sensors or a wireless chest strap transmitter.
When the equipment detects your heart rate a heart symbol begins to flash on the display and after a
short period of time if the reading is consistent a value will be displayed.
In the Diagnostics menu you may complete a Heart Rate Test (see section 6.6) to verify if both the
contact and wireless heart rate systems are functioning correctly.
8.3.1 CONTACT HEART RATE SYSTEM
To diagnose any problem with the Contact Heart Rate System, please refer to table 1.1.
The Contact Heart Rate System is made up of six parts; the metal plates the user places their hands
on, the heart rate sensors attached to the plates that take the reading, the wires that connect the
sensors to the Contact Heart Rate Board in the console, the Contact Heart Rate Board, the wires that
connect the Contact Heart Rate Board to the Display and the Display.
Page 39
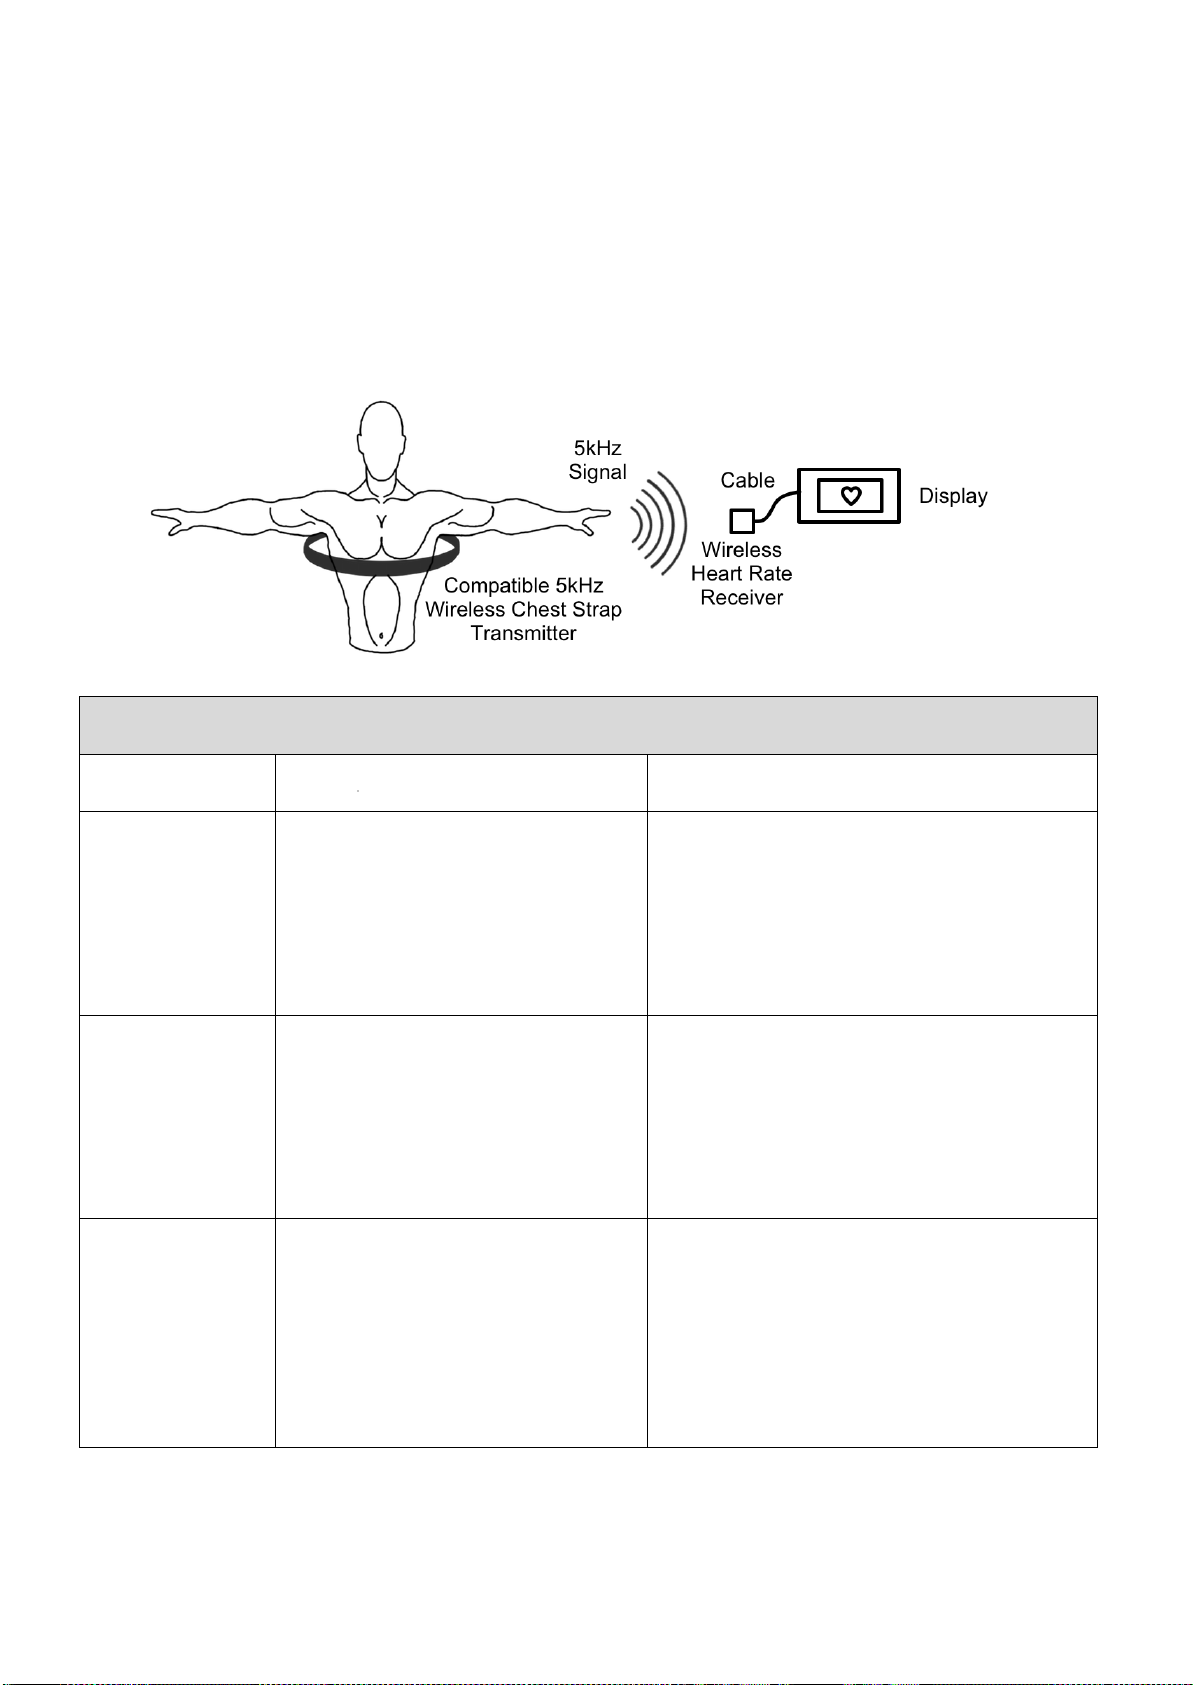
ELLIPTICALS – USER MANUAL
39
Table 1.2 – Wireless Heart Rate Troubleshooting Checklist
PROBLEM
POSSIBLE CAUSE
SOLUTION
No Reading
a) Non-compatible chest strap
transmitter (e.g. incorrect
frequency or Bluetooth)
b) Dead battery in chest strap
transmitter
c) Dry electrodes on chest
strap
d) HR Receiver problem
a) Use Polar compatible (5kHz) chest
strap transmitter.
b) Replace battery
c) Moisten Electrodes with water
d) Use the Diagnostics Menu to check
the signal (See Heart Rate Test in
section 6.5)
Weak Reading
a) Weak battery
b) Electrodes not wet enough
c) Poor skin contact
d) Too much body fat
e) HR Receiver problem
a) Replace battery
b) Moisten electrodes with water
c) Adjust chest strap to get a tight fit
on the skin
d) No solution
e) Use Diagnostics Menu to check
signal (See Heart Rate Test in
section 6.5)
Erratic
Reading
a) Electrodes not wet enough
b) Interference from other
signals
c) HR Receiver problem
a) Moisten electrodes with water
b) Move machine away from
potentials sources of interference
(or turn them off) such as radios,
neon or fluorescent lightning, dog
fences etc.
c) Use Diagnostics Menu to check
signal (See Heart Rate Test at
section 6.5)
8.3.2 WIRELESS HEART RATE SYSTEM
To diagnose any problems with the Wireless Heart Rate System, please refer to table 1.2.
NOTE – Only compatible 5kHz wireless chest strap transmitters will function with Bodyguard’s
Wireless Heart Rate receiver.
The Wireless Heart Rate System is made up of four parts; the compatible 5kHz Wireless Chest Strap
Transmitter the user attaches to their chest, Bodyguard’s Wireless Heart Rate Receiver in the unit,
the cable that connects the Wireless Heart Rate Receiver to the Display and the Display.
Page 40

40
PROBLEM
POSSIBLE CAUSE
SOLUTION
Console not
lighting Up
Note: On an E-40, if Data Cable is not
connected to the console, the console
should still light up when a button is
pressed.
1) Batteries in console are flat
On an E-45, if the Data Cable is not
connected to the console, then the console
will never light up.
2) Not pedaling fast enough
3) Damaged Display
1) Change batteries (2 x AA UM3,
1.5V)
2) Pedal over 30 rpm and console
should light up
3) Replace Console
Wheels squeaking
or displaying loud
operational noise.
1) Debris or pits (indentations) on wheels
due to aluminum rails not being clean.
1) Clean wheels
2) Add a small amount of lubricant
to aluminum rails with a clean cloth.
3) Rotate the position of the wheels
from one side to the other (like on a
car). Often the different position
causes a different wear line on the
wheel and stops any noise.
4) If noise persists, replace wheel.
Resistance not
Changing
1) On an E-40, if resistance is not
increasing check if the resistance knob
is threaded.
2) On an E-40, if the resistance is not
decreasing check if the spring attached
to Brake Pad Bracket is broken. If so,
the pad will not get pulled up away from
the flywheel when the resistance knob is
screwed up.
3) On an E-45, if the resistance value
changes on the display but the braking
system does not operate correctly then
check for servo motor, servo motor
cable, magnet springs or lower board
issues.
1) Replace Resistance Knob
2) Replace Brake Pad Bracket
Spring
3) Replace broken part in Braking
System
8.4 GENERAL TROUBLESHOOTING LIST
ELLIPTICALS – USER MANUAL
Page 41
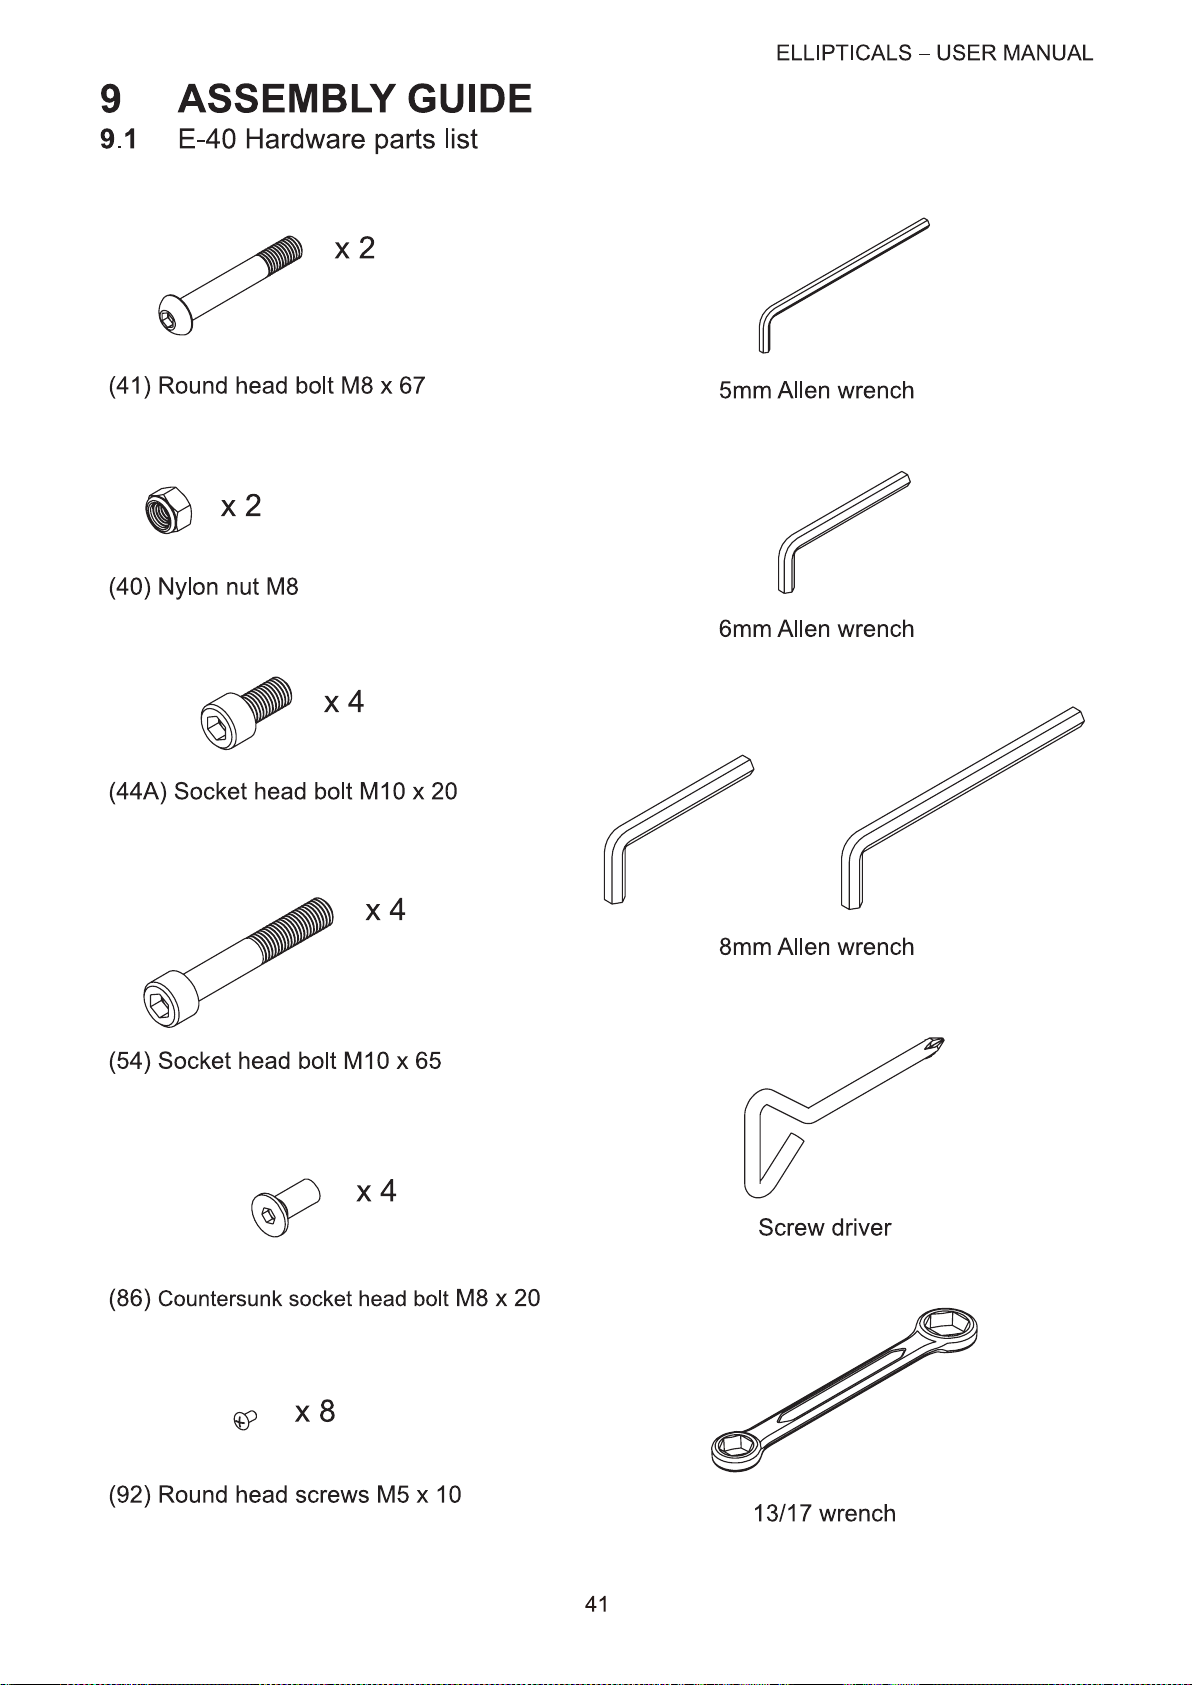
Page 42
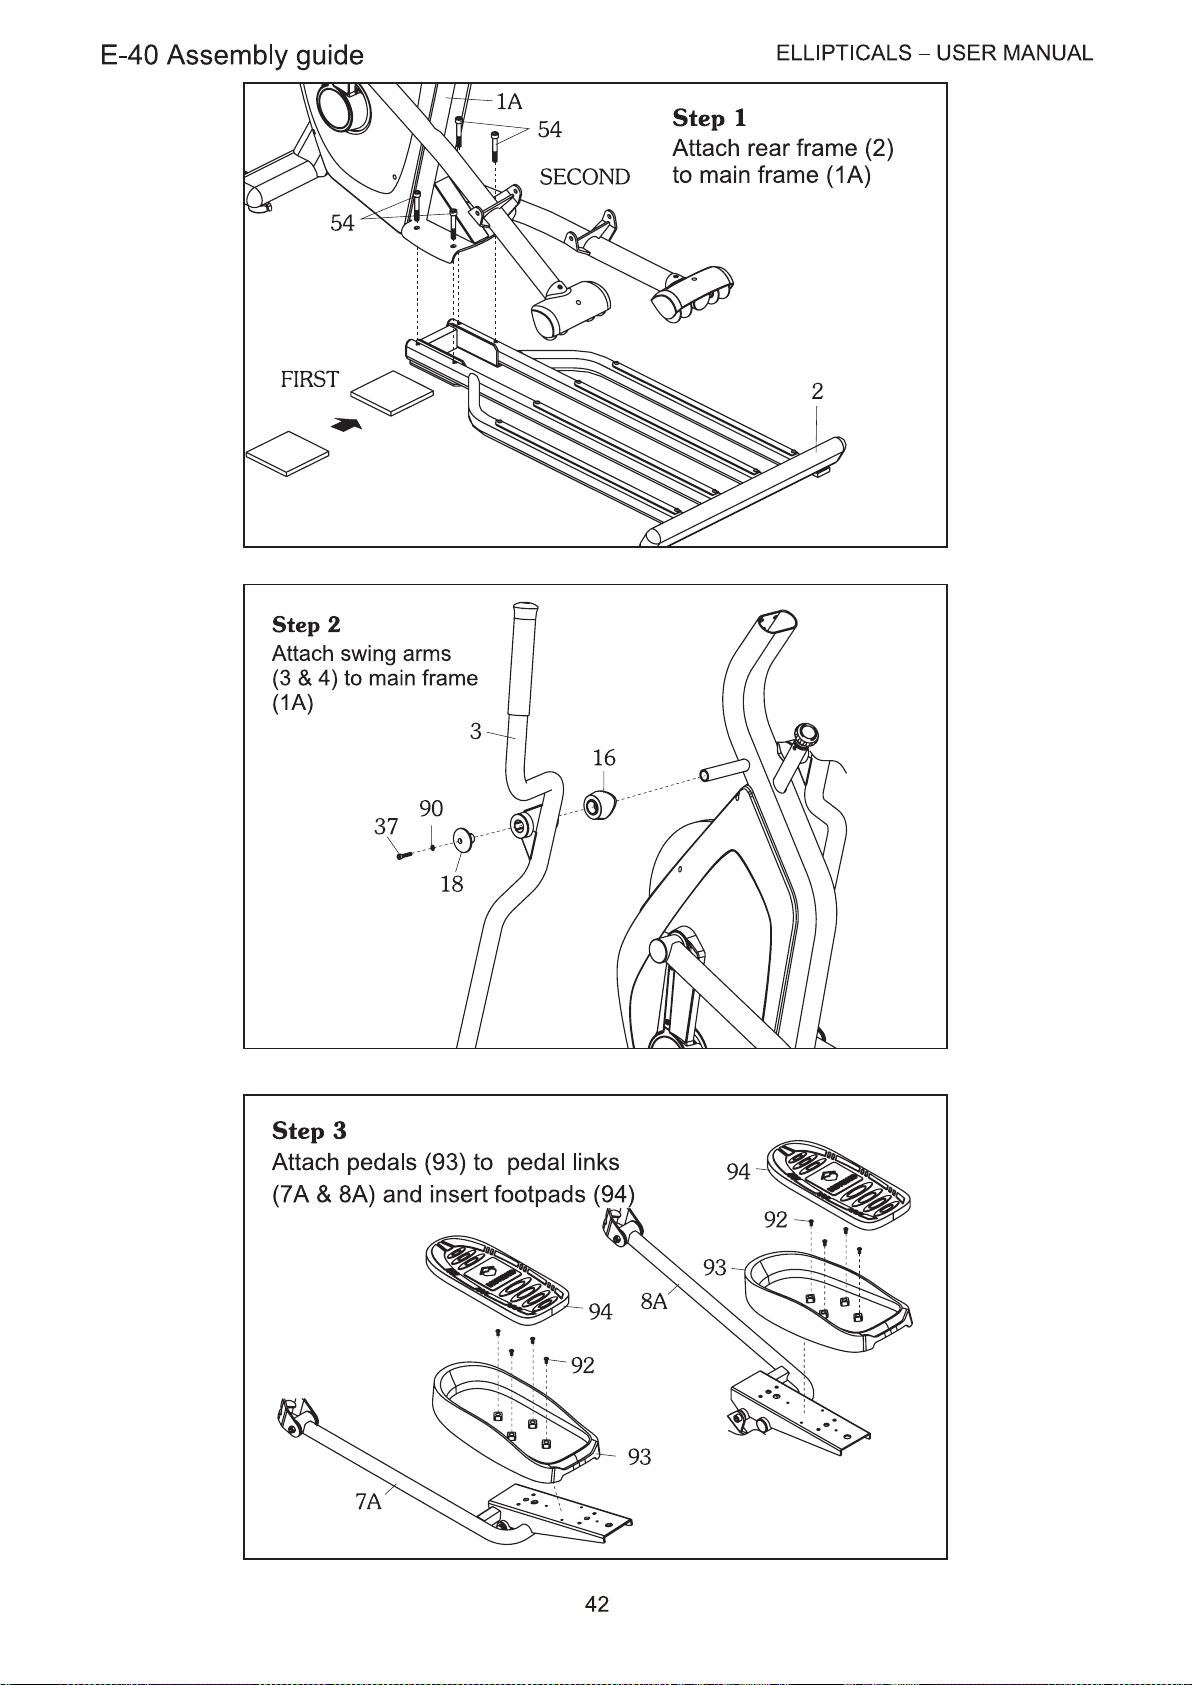
Page 43
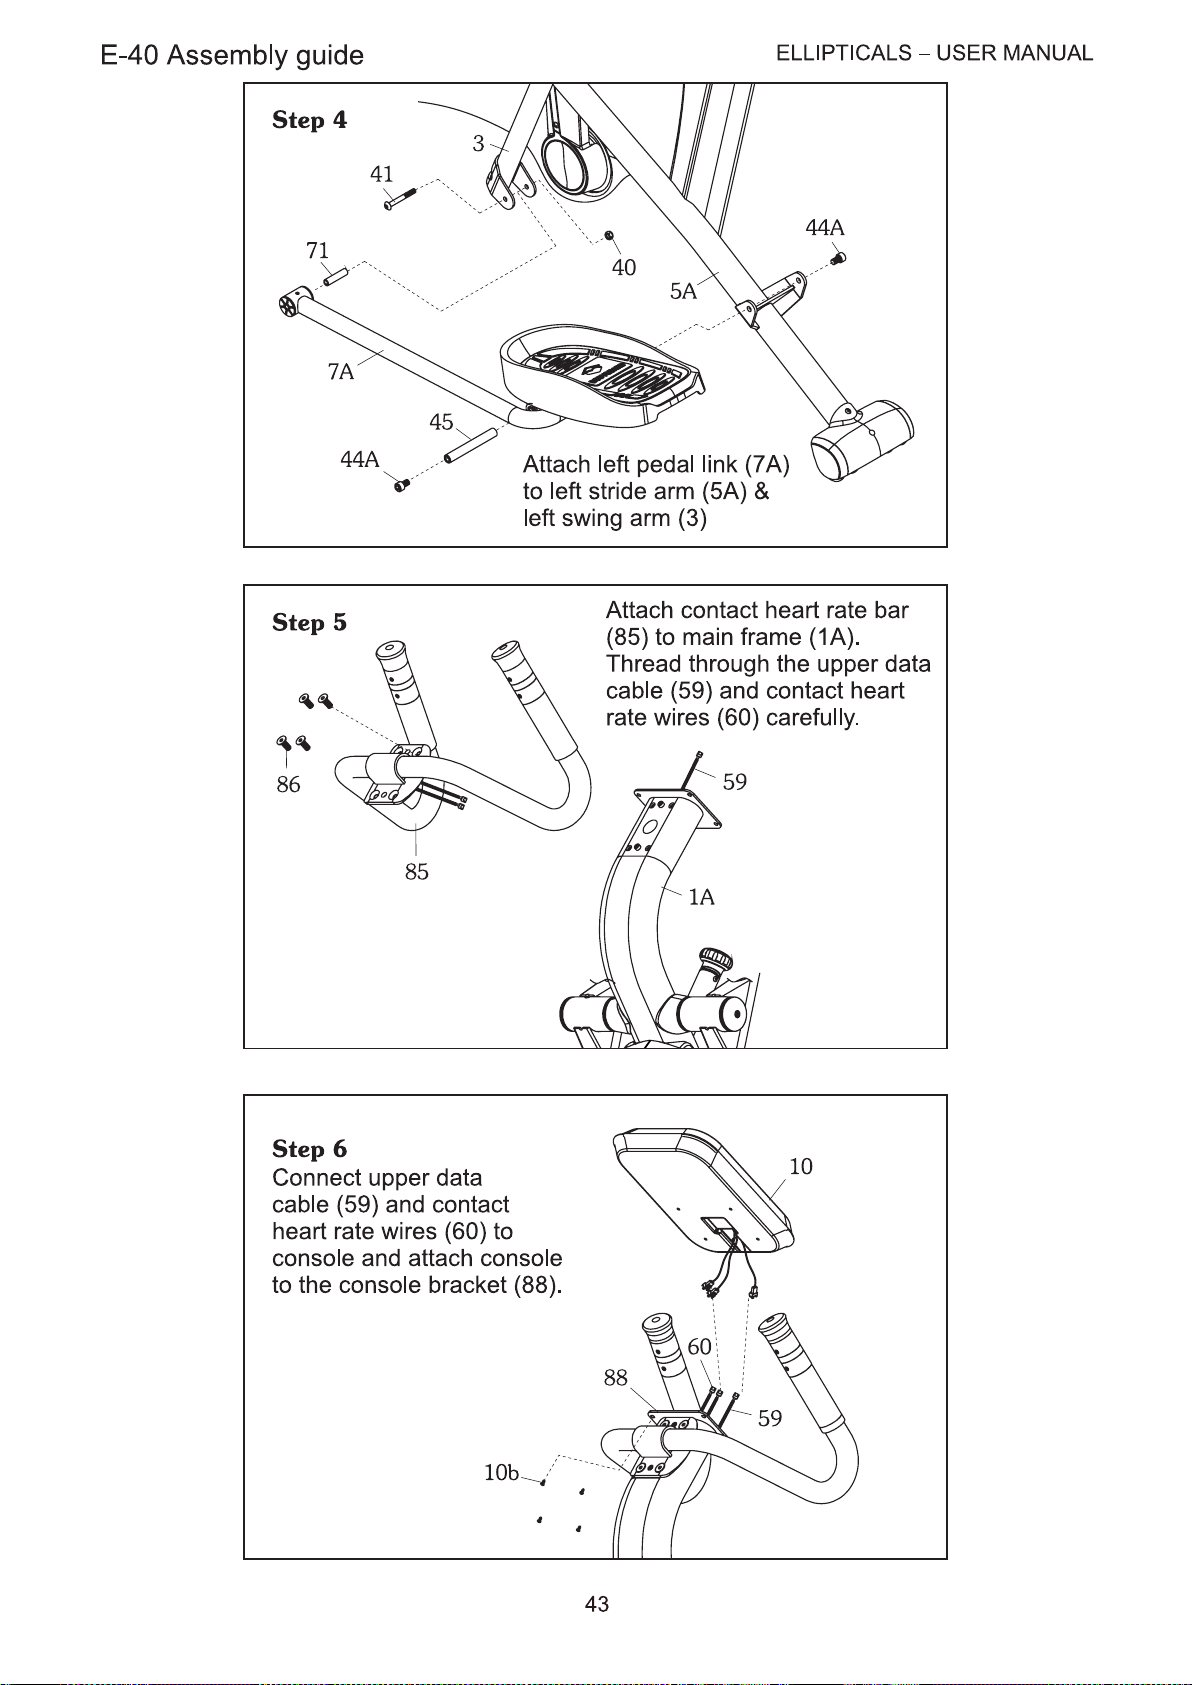
Page 44
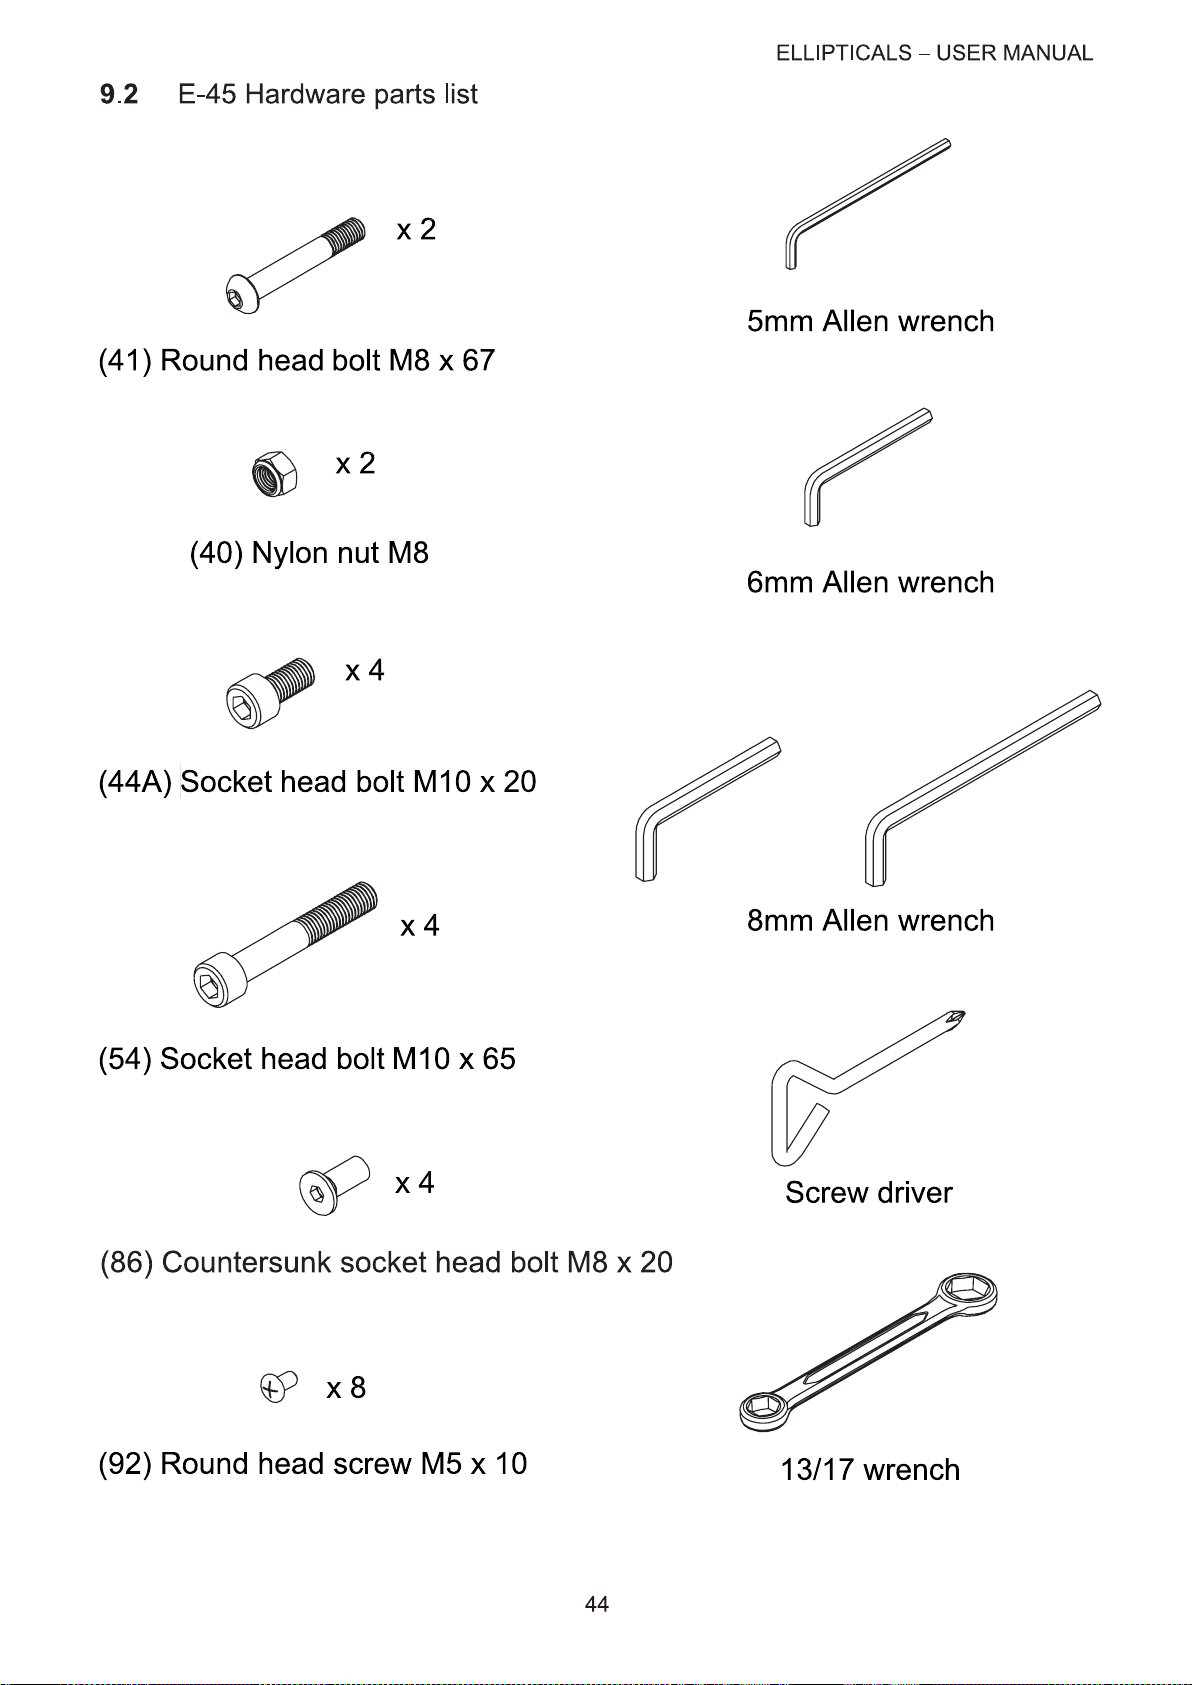
Page 45
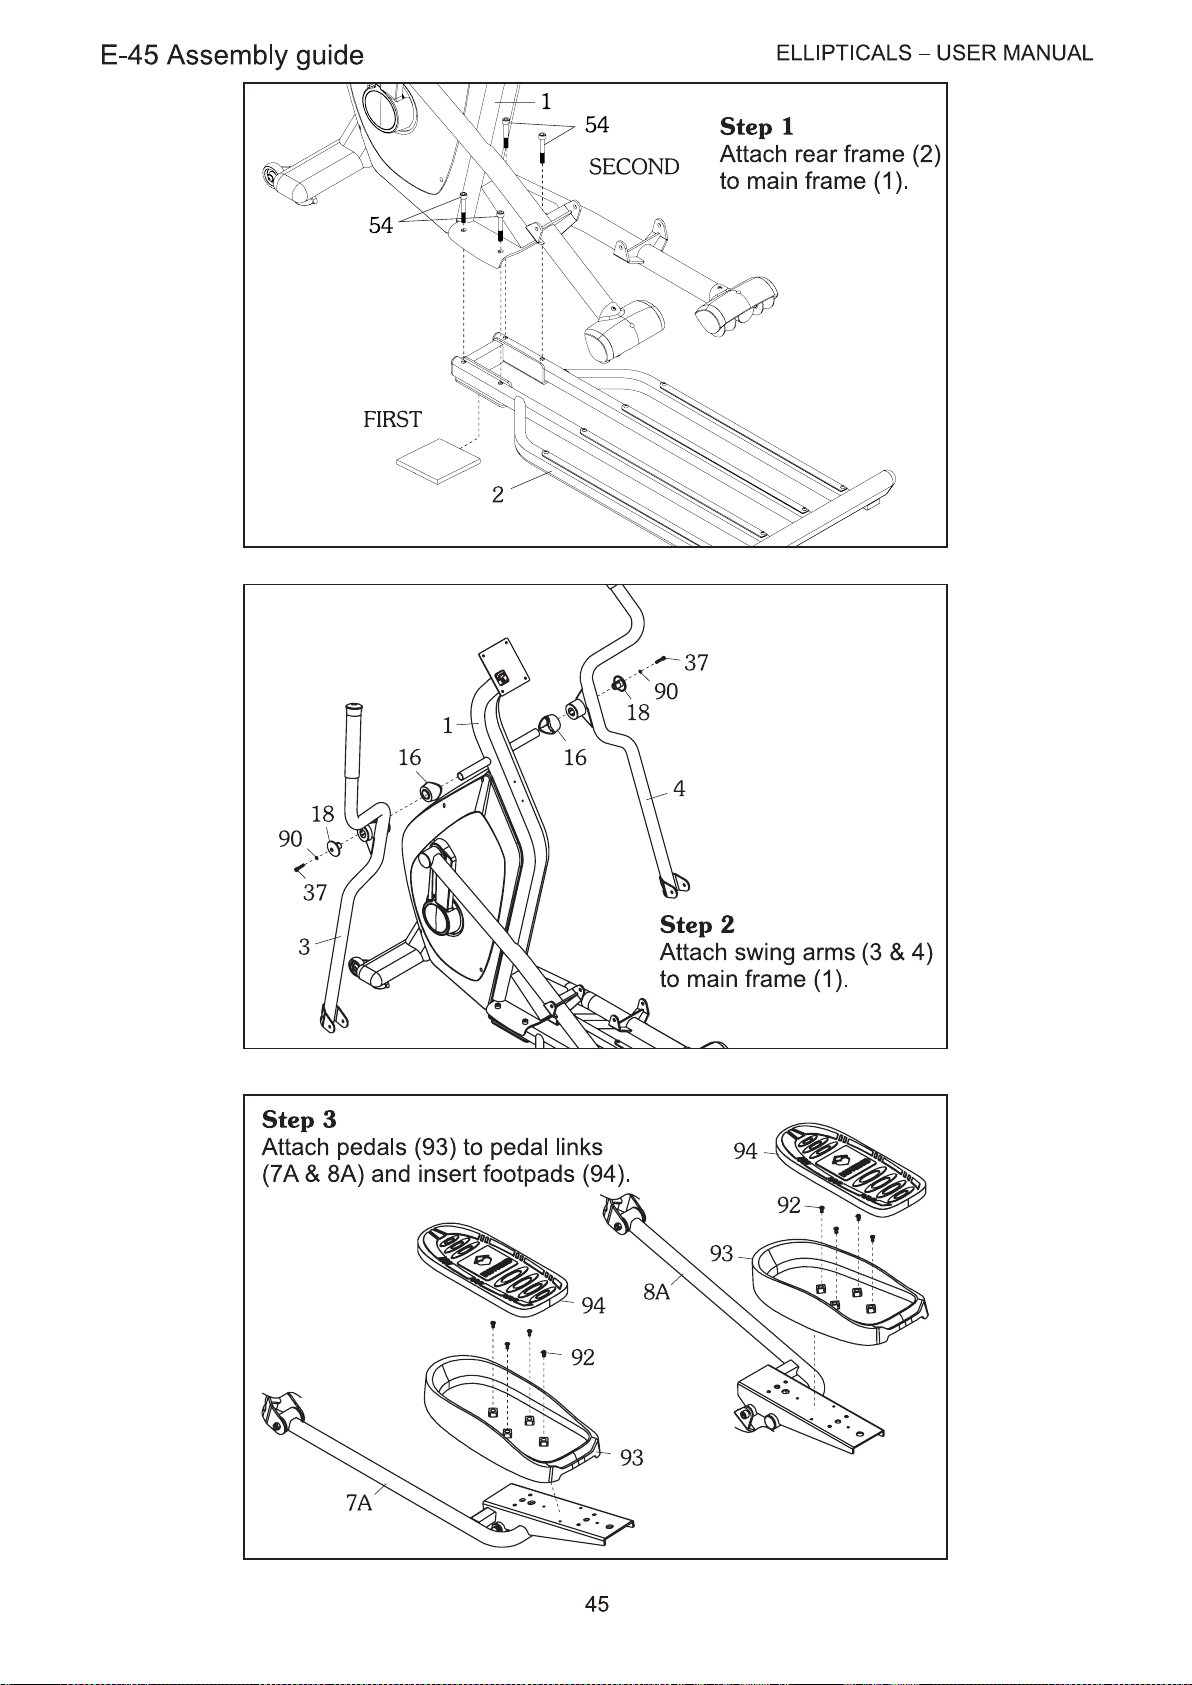
Page 46
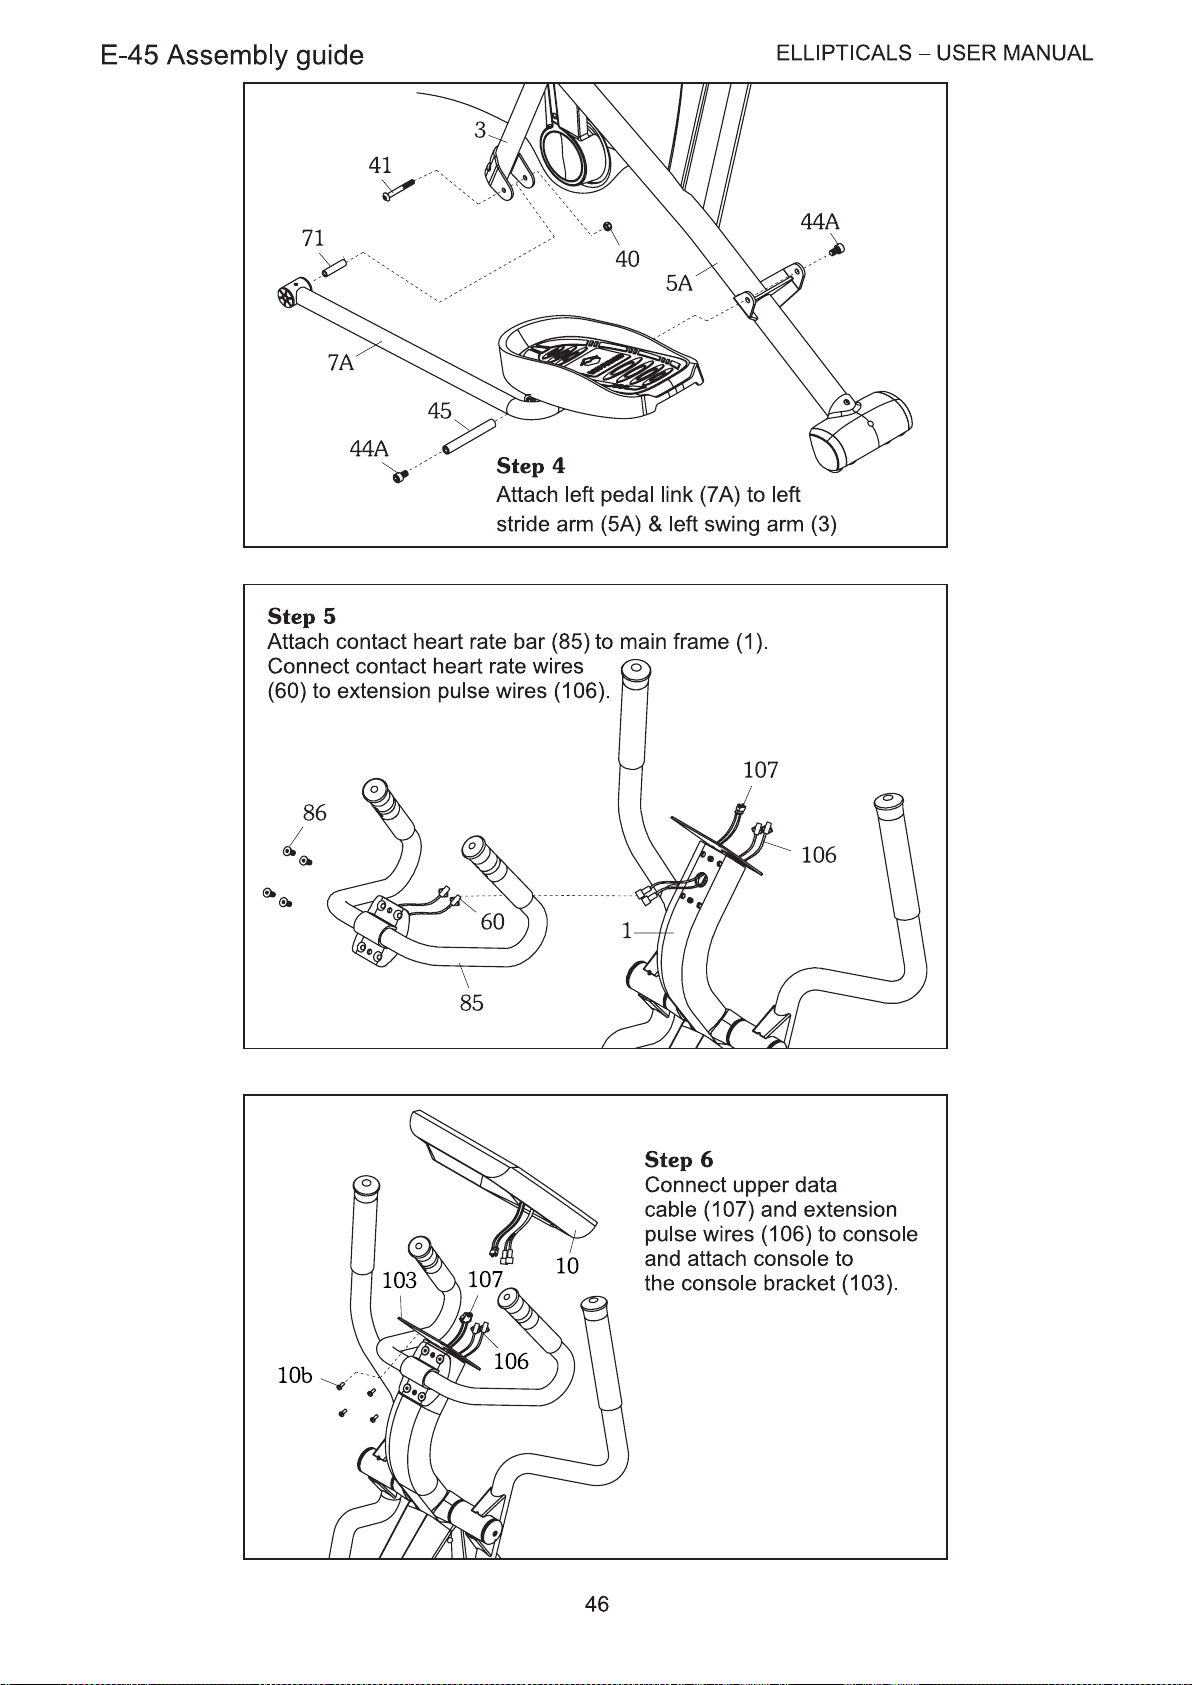
Page 47
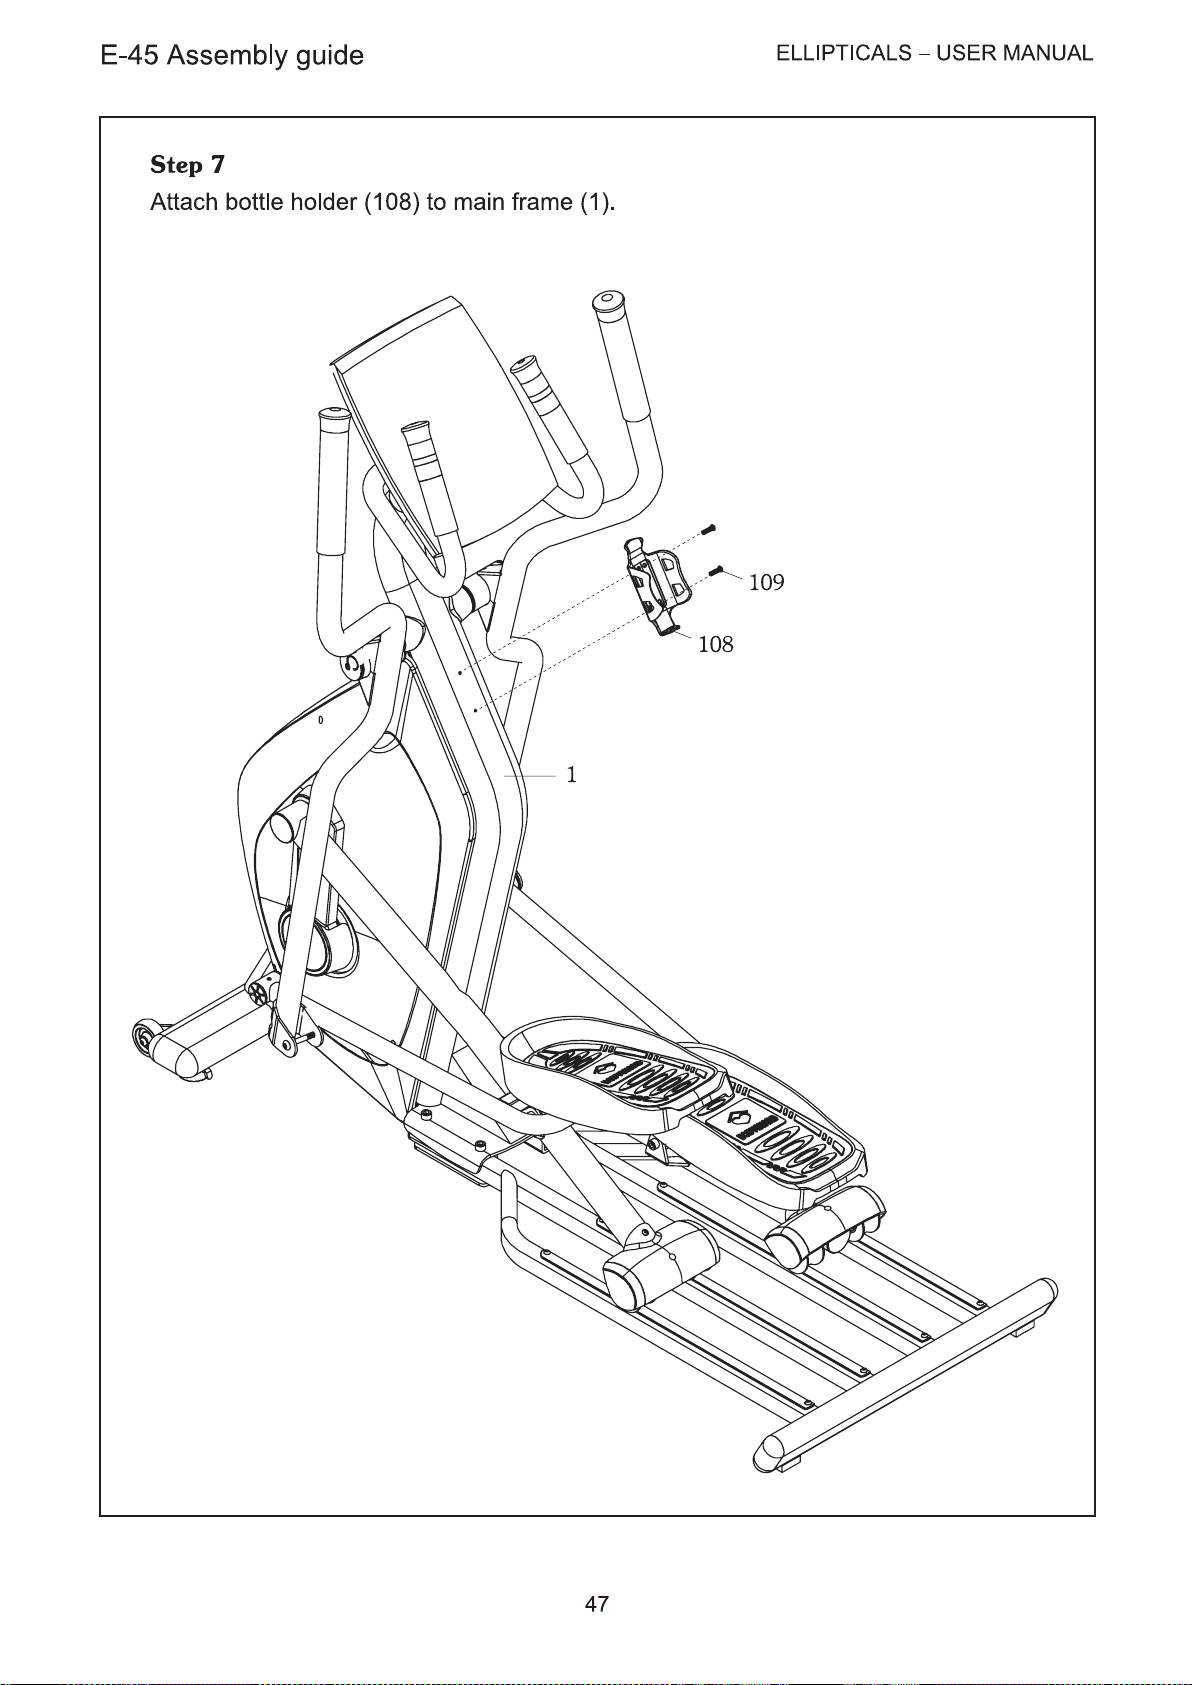
Page 48

 Loading...