


Fitness Deluxe Motorised Treadmill 3.0HP
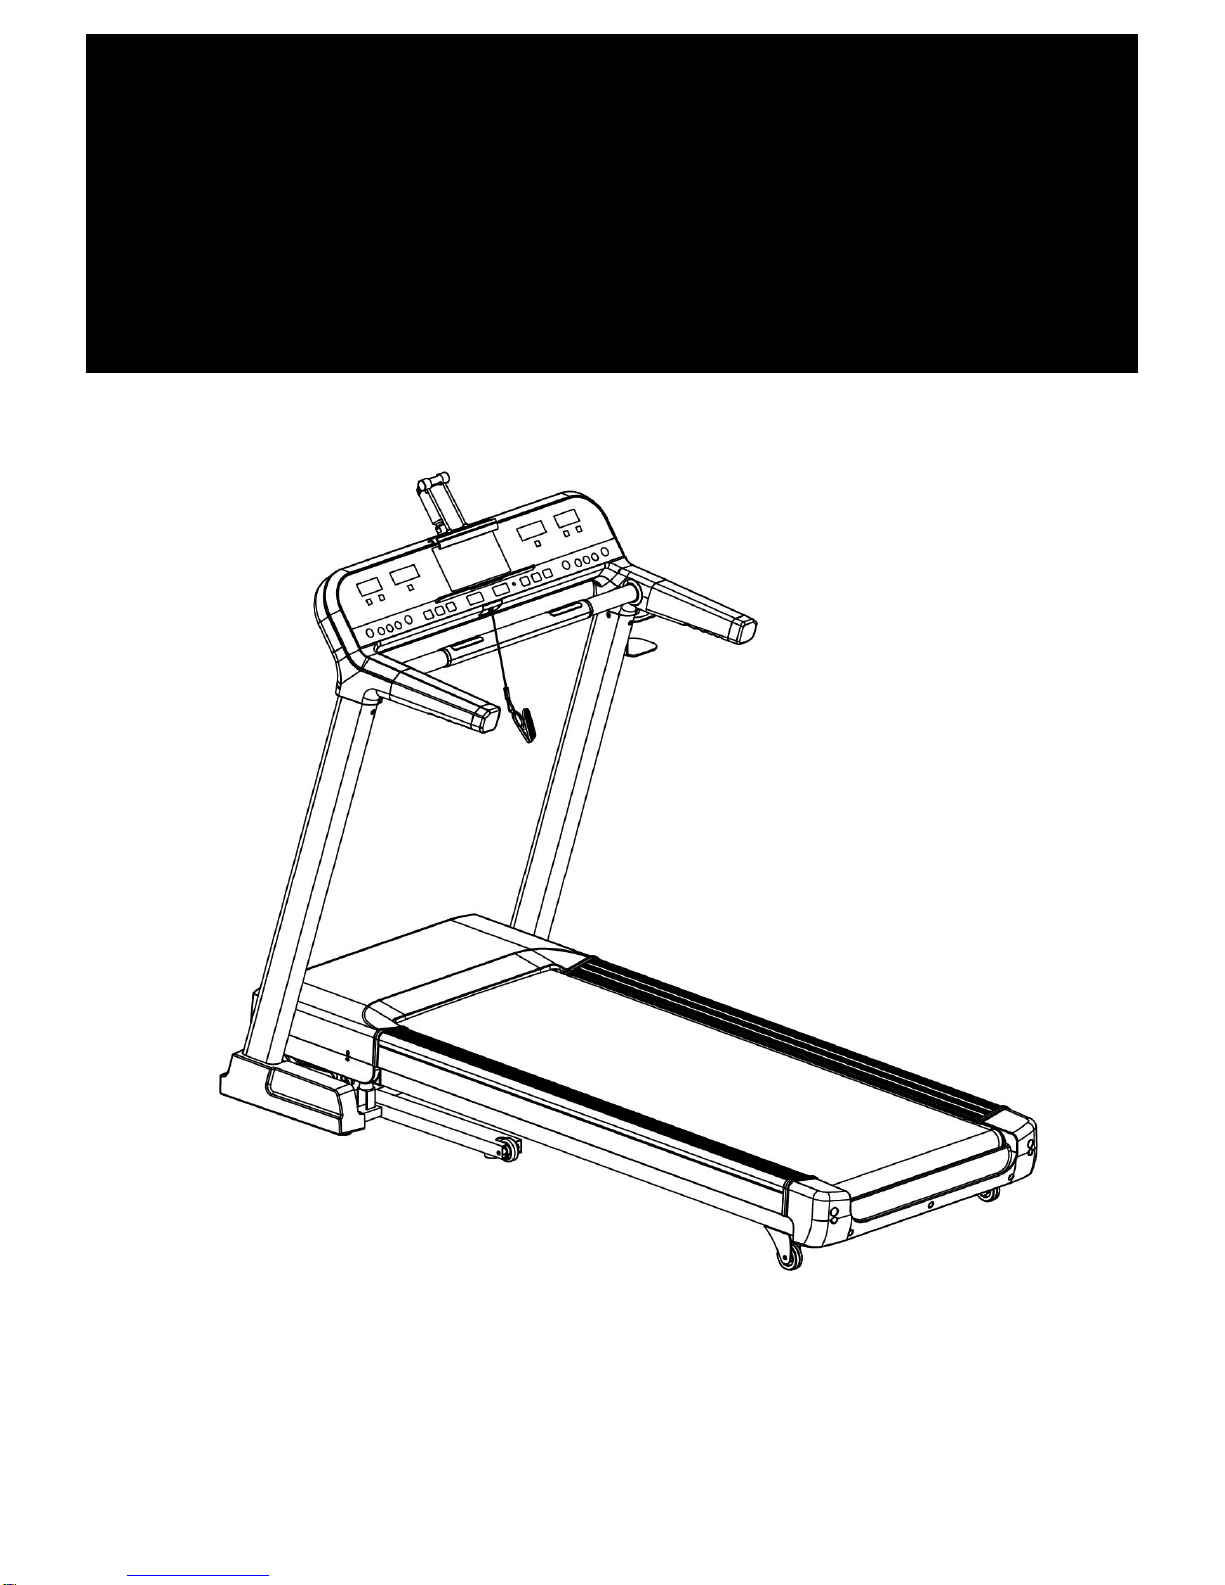
INSTRUCTION MANUAL
PLEASE READ THIS MANUAL CAREFULLY BEFORE USING AND SAVE IT FOR FUTURE REFERENCE.
ALL PRODUCT DRAWING IS USED FOR REFERENCE ONLY, THE FINALLY CORRECT DETAILS PLEASE SEE REAL
PRODUCTS.

2
Content
Safety Precautions
Assembly Steps
Folding Steps
Operation Instruction
Tips for Stretching
Maintenance
Explosive drawing
Part list

3
Safety Precautions
Thank you for purchasing this treadmill, it has been designed and manufactured to give you many years of trouble free service. You may
already be familiar with using a similar product but please take the time to read these instructions which have been written to ensure that
you get the very best from your purchase.
Warnings
1. To reduce the risk of serious injury, read the following important warnings before using the treadmill.
2. Before starting any exercise program you should consult your doctor to determine if you have any physical or health conditions that
could create a risk to your health and safety, or prevent you from using the treadmill properly. Your doctor’s advice is essential if you
are taking medication that affects your heart rate, blood pressure or cholesterol level.
3. Be aware of your body’s signals. Incorrect or excessive exercise can damage your health. Stop exercising if you experience any of
the following symptoms: Pain, tightness in your chest, irregular heartbeat, extreme shortness of breath, feeling light-headed, dizzy
or nauseous. If you do experience any of these conditions you should consult your doctor before continuing with your exercise
program.
Electrical Safety Precautions
Failure to observe the following warnings may increase the risk of an electric shock and personal injury.
1. Always check the power cable for damage prior to use. If any damage is observed, do NOT use the power cable.
2. Never touch the power cable with wet hands.
3. Position the power cable so that it cannot be walked on or pinched.
4. Only the supplied power cable should be used with the treadmill.
General Safety Precautions
1. Use the treadmill only in the way described in this instruction book.
2. Ensure that the voltage of the electrical supply is the same as that indicated on the power cable.
3. It is the responsibility of the owner to ensure that all users of the treadmill are adequately informed of all warnings and safety
precautions.
4. The treadmill is heavy and should be removed from the packaging and assembled by two people.
5. Before assembling the treadmill, make sure that it is not plugged into any electrical source, such as a wall socket.
6. Use the treadmill on a solid, flat level surface with a protective cover for your floor or carpet. Position the treadmill with at least 2
meters * 1 meter of free space behind the treadmill.
7. Keep the treadmill away from excessive moisture and dust.
8. Before using the treadmill, check the nuts and bolts are securely tightened.
9. The safety level of the treadmill can be maintained only if it is examined regularly for damage and wear. Replace defective
components immediately. Do not use the treadmill until they have been replaced.
10. The treadmill has been tested and certified to EN957 under class H.C. Suitable for domestic, home use only.
11. Braking is controlled by the belt rotation power supply.
12. The treadmill is not suitable for therapeutic use.
13. Keep children and pets away from the treadmill. The treadmill is designed for adult use only.
14. Wear suitable clothing whilst using the treadmill. Avoid wearing loose clothing which may get caught in the treadmill or clothing that
may restrict or prevent movement.
15. Do not arch your back when using the treadmill; always try to keep your back straight.

4
16. If you feel pain or dizziness while exercising, stop immediately and cool down.
17. The pulse sensor is not a medical device. Several things including user movement, may affect the accuracy of the sensor. The
sensor is intended only as an exercise aid in determining general heart rate trends.
18. Care must be taken when lifting or moving the treadmill so as not to injure your back. Always use proper lifting techniques and/or
use assistance.
19. A safe key is supplied for personal safety. Use the safe key when operating the treadmill for the emergency dismount function. In
the event of an emergency, place both hands on the handlebars and put your feet onto the non-slip surface of the main frame. As
you do this, the safe key will disengage from the computer and the emergency dismount function will be triggered.
20. All moveable accessories require weekly maintenance. Check them before use every time. If anything is broken or loose, please fix
it immediately. You may continue using the treadmill after any damaged parts have been fixed.
21. The treadmill is not to be used by children or persons with reduced physical, sensory or mental capabilities, or lack of experience
and knowledge, unless they have been given adequate supervision or instruction.
22. Supervised children using the treadmill must not be allowed to play with the treadmill.
23. This machine must be well earthed. It can decrease the danger of electric shock.
5
Assembly Steps
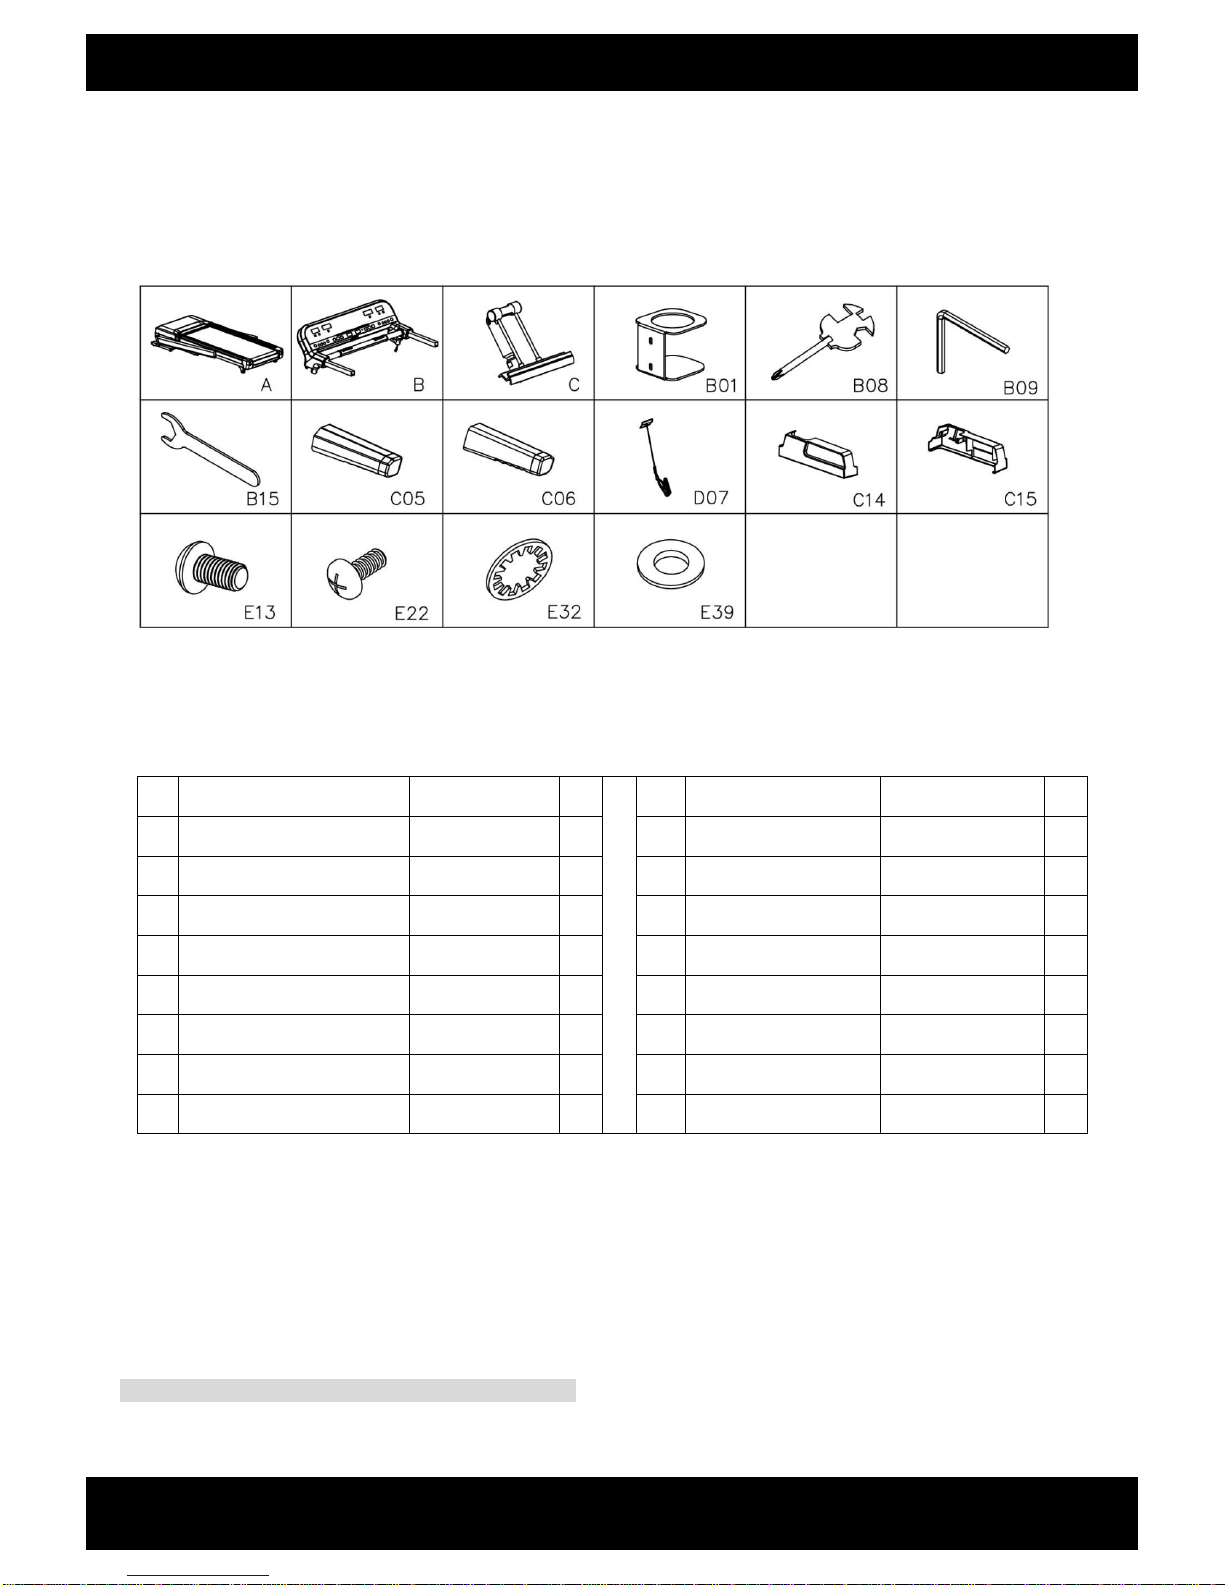
Please check the package list carefully before assembly.
Package list:
NO.
Description Specification QTY
NO.
Description Specification QTY
A
Mainframe 1 C06
Right foam handlebar 1
B Monitor 1 D07
Safety key module 1
C iPad holder (optional) 1 C14
Left bottom cover 1
B01
Bottle holder 1 C15
Right bottom cover 1
B08
Cross solid wrench 1 E13
Bolt M8*15 10
B09
5# Allen wrench 5mm 1 E22
Bolt M5*12 6
B15
Solid wrench 19mm 1 E32
Lock washer 8 10
C05
Left foam handlebar 1 E39
Big flat washer Φ5*φ13*1.0 4
Assembly tools:
5# Inner hex wrench 5mm 1pc
Cross solid wrench S=13 14 15 1pc
Solid wrench 19mm 1pc
Attention: please don`t switch on before finish assembling.
6
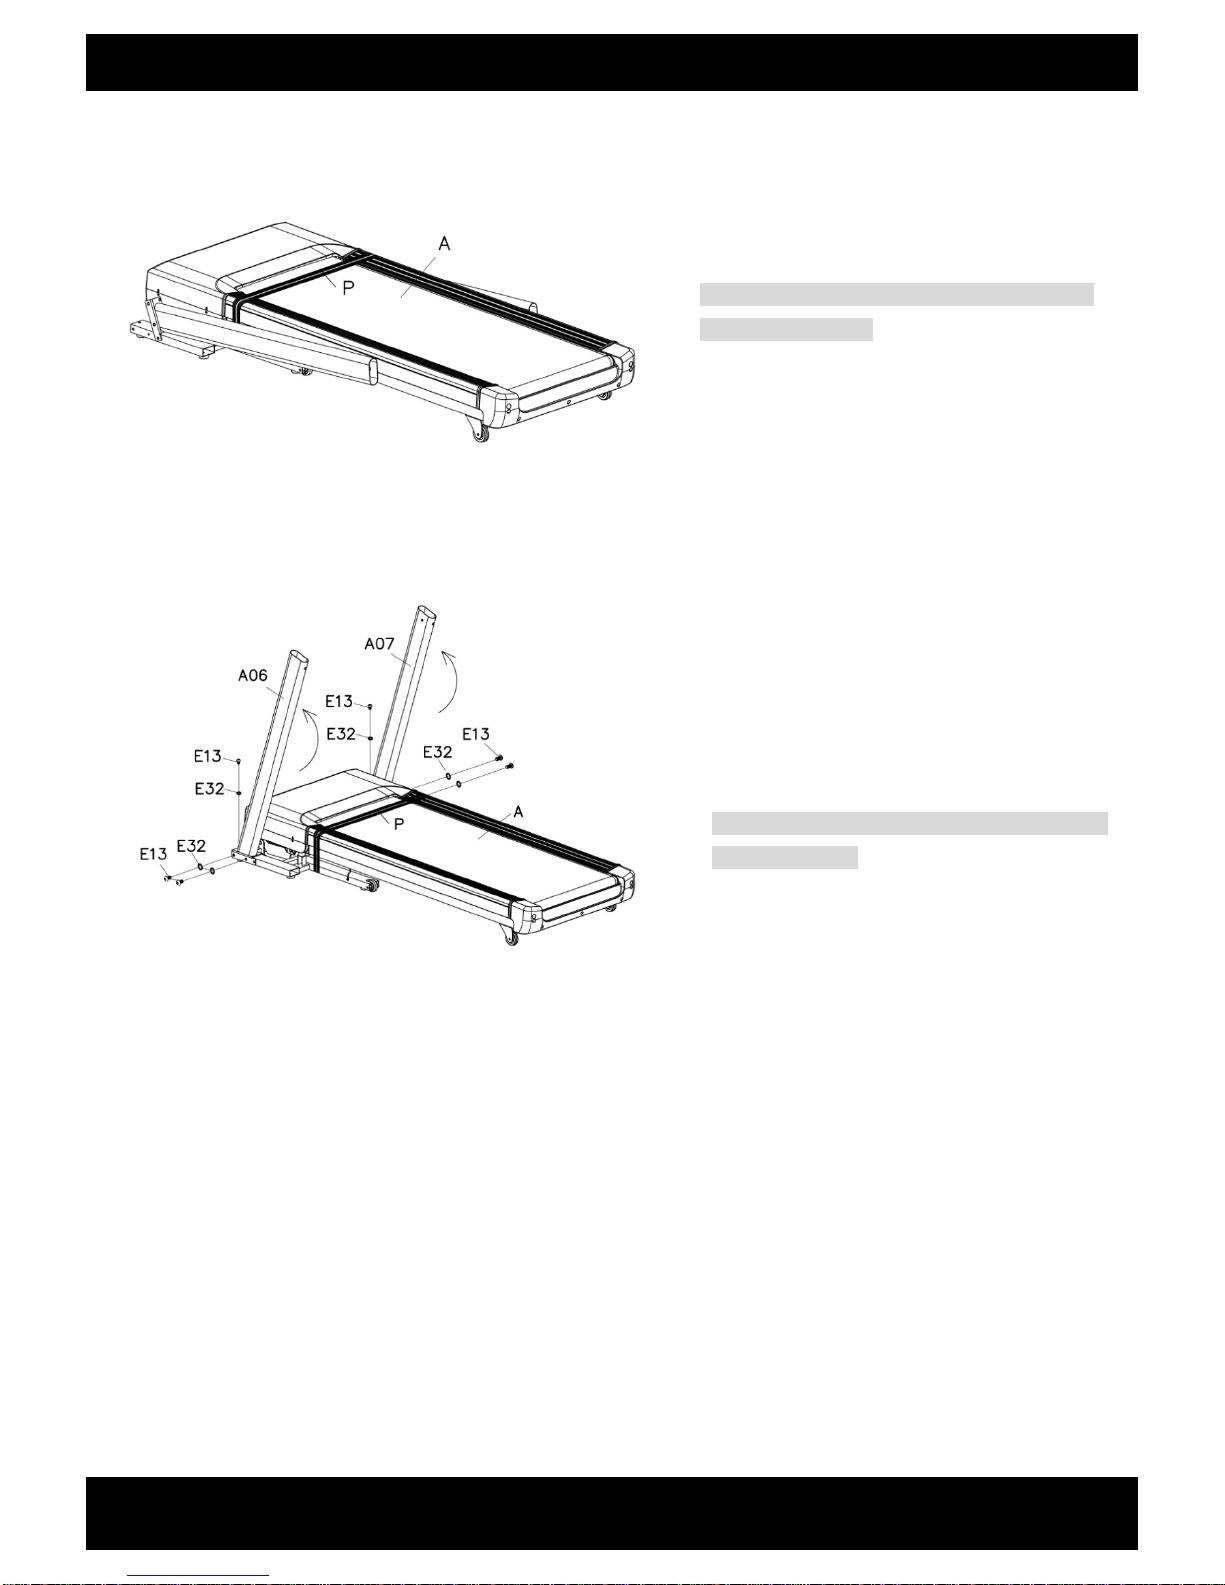
Step 1:
Step 2:
Open the package
and put the mainframe
A
on the
floor.
Attention: Don’t open the packing belt (P) before
set up of the treadmill.
1. Lift up
column A06
,A07 first;
2. Fix the column A06 to the mainframe A with bolt
E13 and lock washer E32 by 5# Allen wrench
B09 .
3. Fix the column A07 to the mainframe according
to the steps above.
Attention:
ATTENTION: Support the column with hand to
avoid falling down.
7
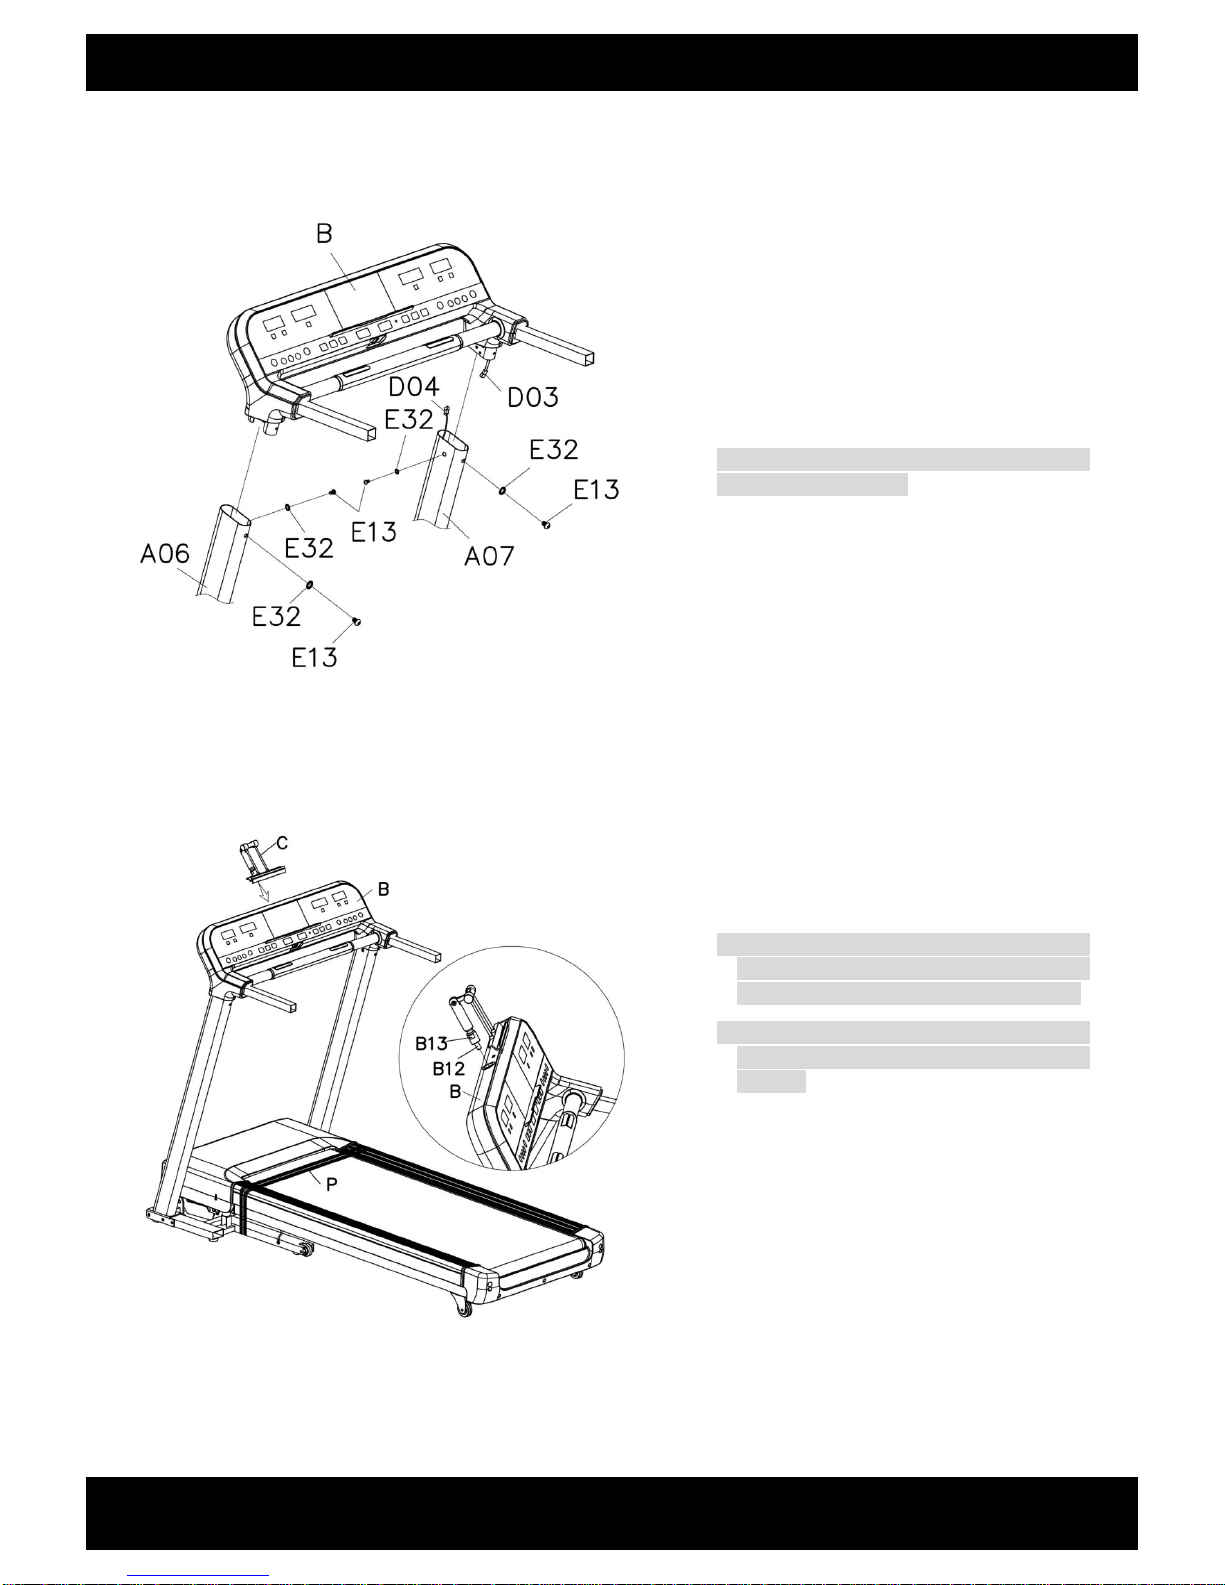
Step 3:
Step 4:
1. Connect the monitor cable D03 with D04.
2. Fix the monitor B to the left and right column
A06\A07 with bolt E13 and lock washer E32
by 5# Allen wrench B09.
Attention: Please make sure cables are well
connected before fasten.
Please screw the ipad holder C into the monitor
B
by solid wrench B15.
Attention: First screw the shaft B12 of the ipad
holder into the monitor B by hand and then
fasten the stop nut B13 by solid wrench B15.
The ipad holder is an optional part, you don’t
need to assemble it if not find it in the
package.
8
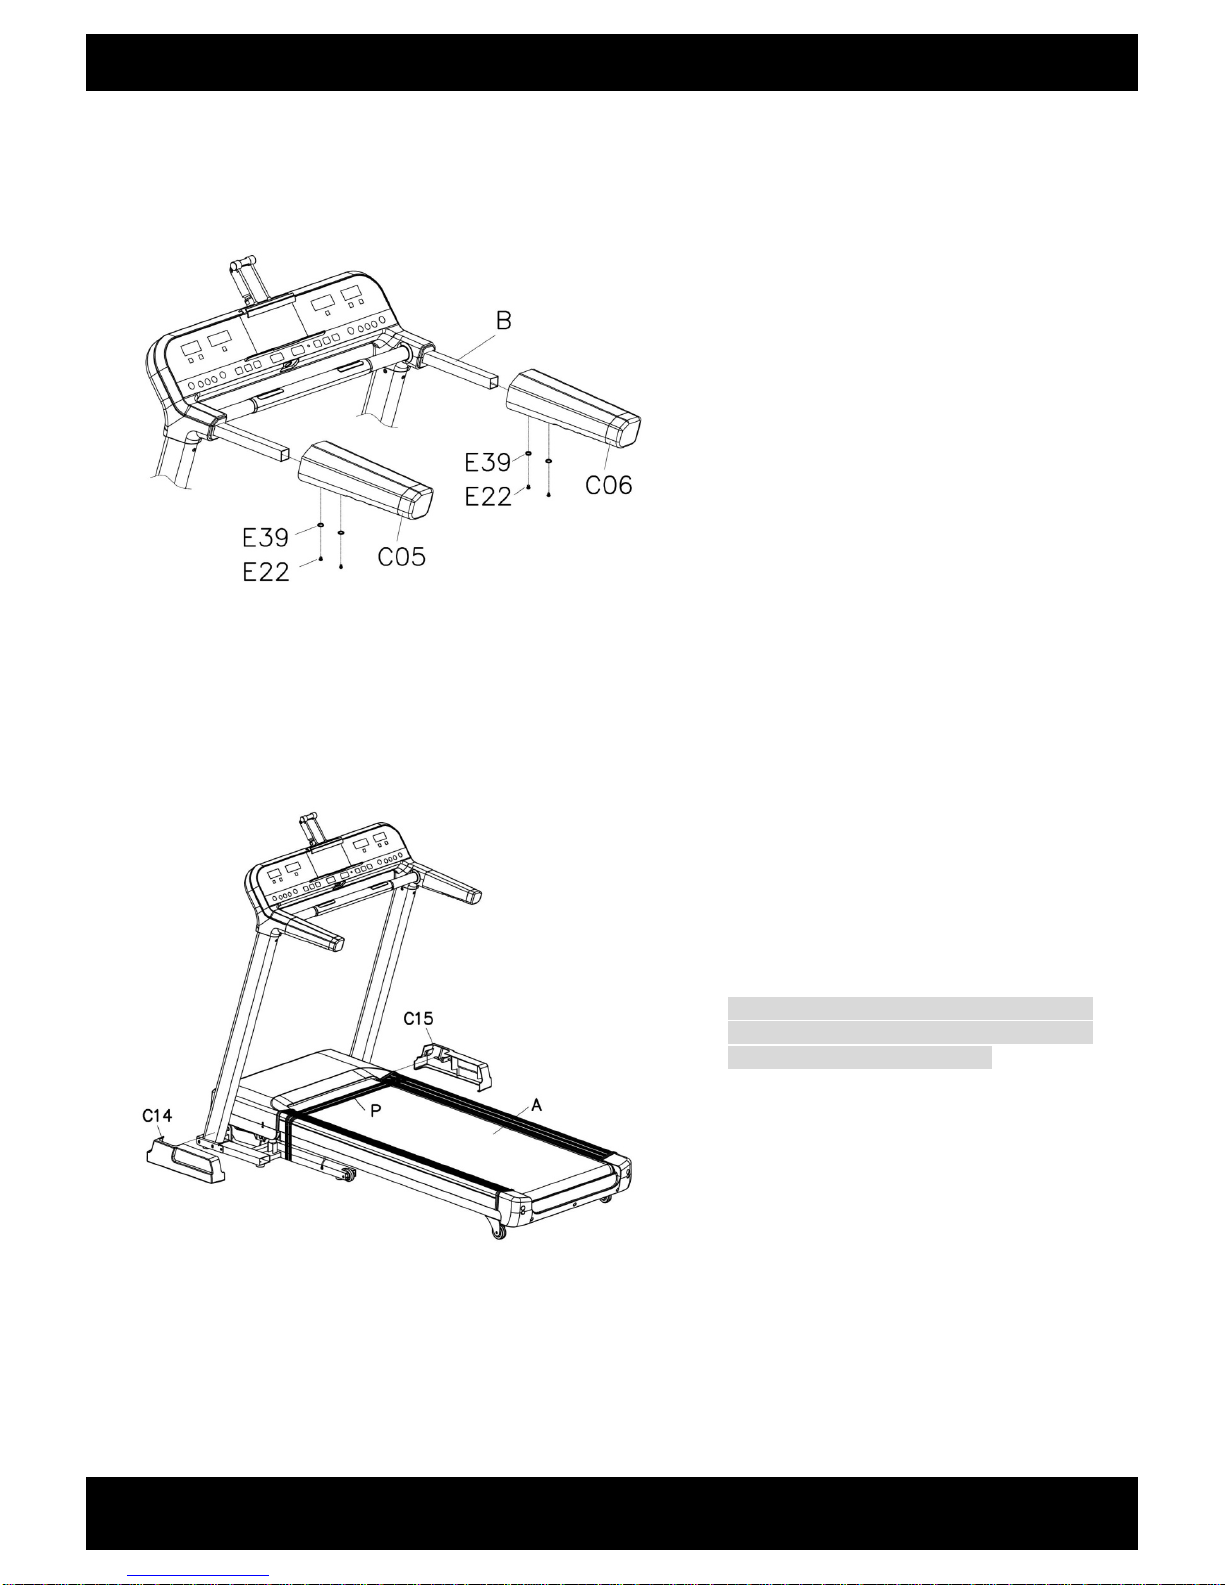
Step 5:
Step6
Fix the left and right foam hand
lebar C05
\
C06 to
the monitor B with bolt E22 and big washer E39
by cross solid wrench B08
Fix the left and right bottom cover C14
\
C15
to the
mainframe.
Attention: the structure of left and right bottom
cover is buckle design. Please make sure all
the buckles are securely fastened.
9
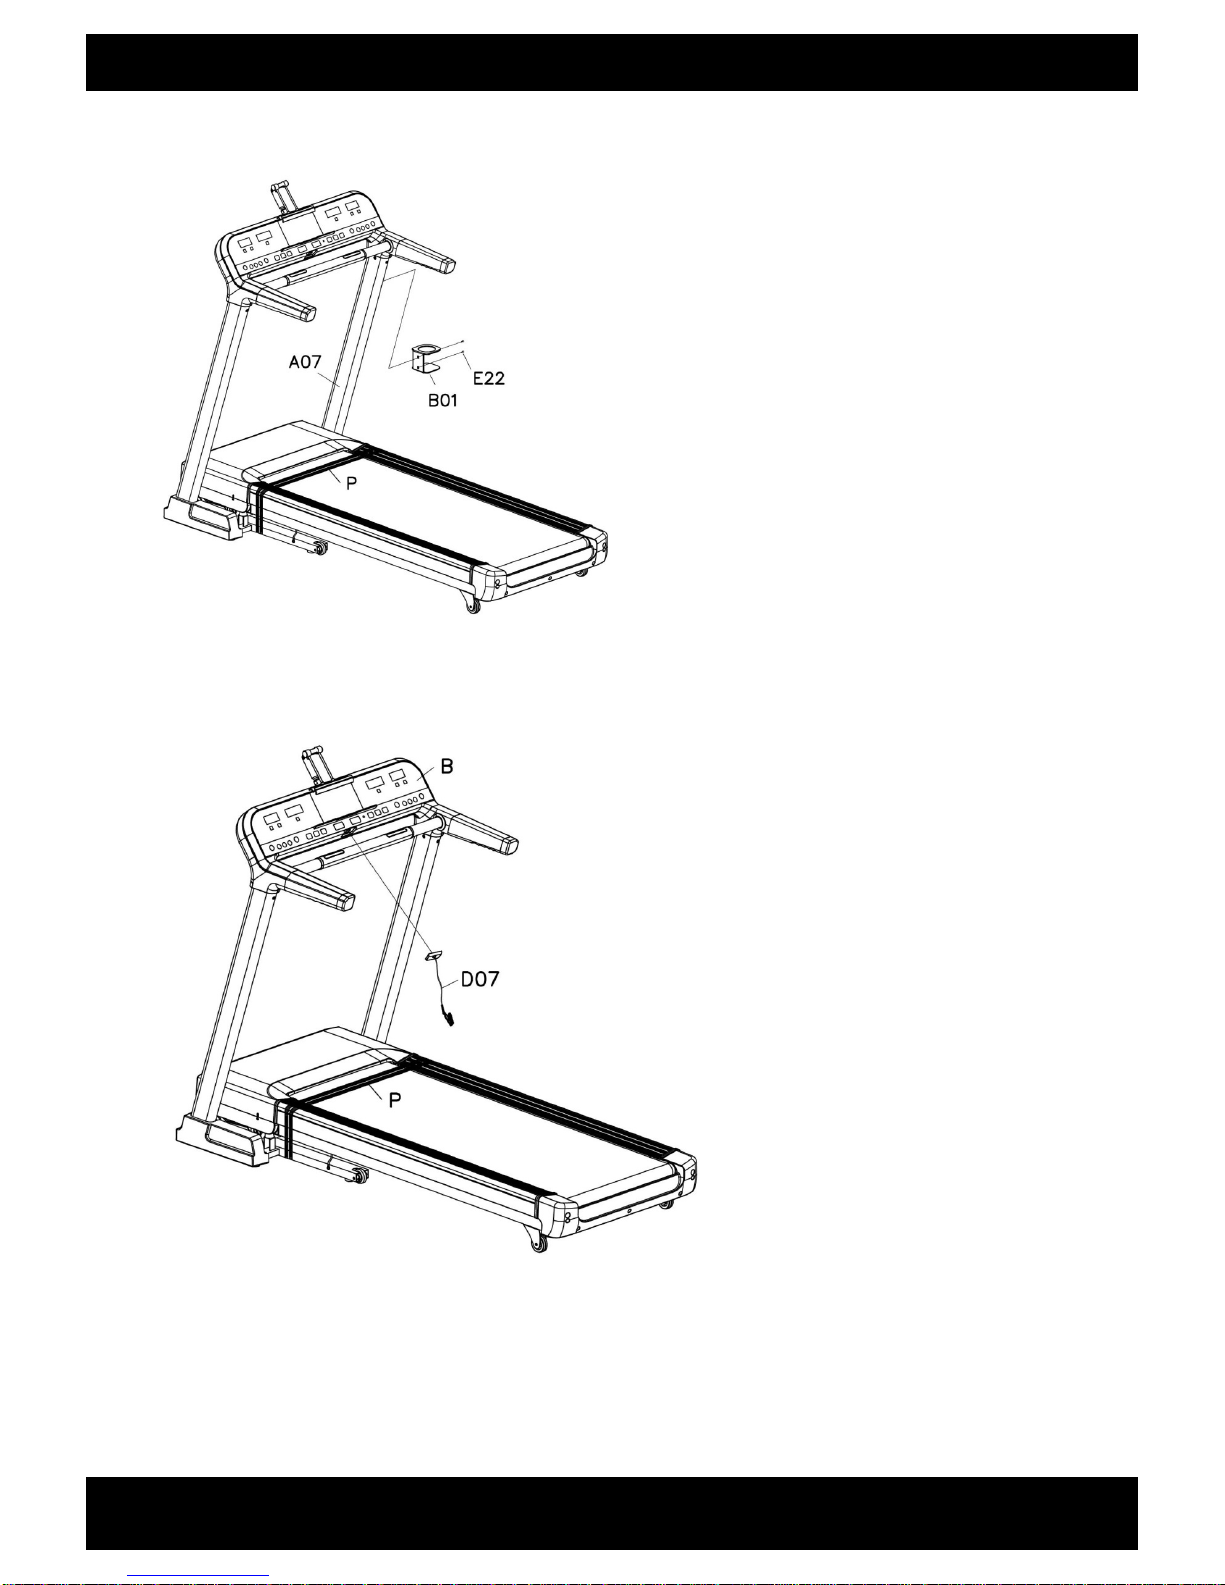
Step 7
Step 8
How to use safety key
Fix the bottle holder B01 to the right column A07
with bolt E22 by solid cross solid wrench B08.
1. Cut off belt P;
2. Insert the safety key D07 into the monitor B.
1. Before running, please nip the safety key clip D07 with your cloth.
2. For any emergency, please pull the safety key rope , and the machine will stop.
10
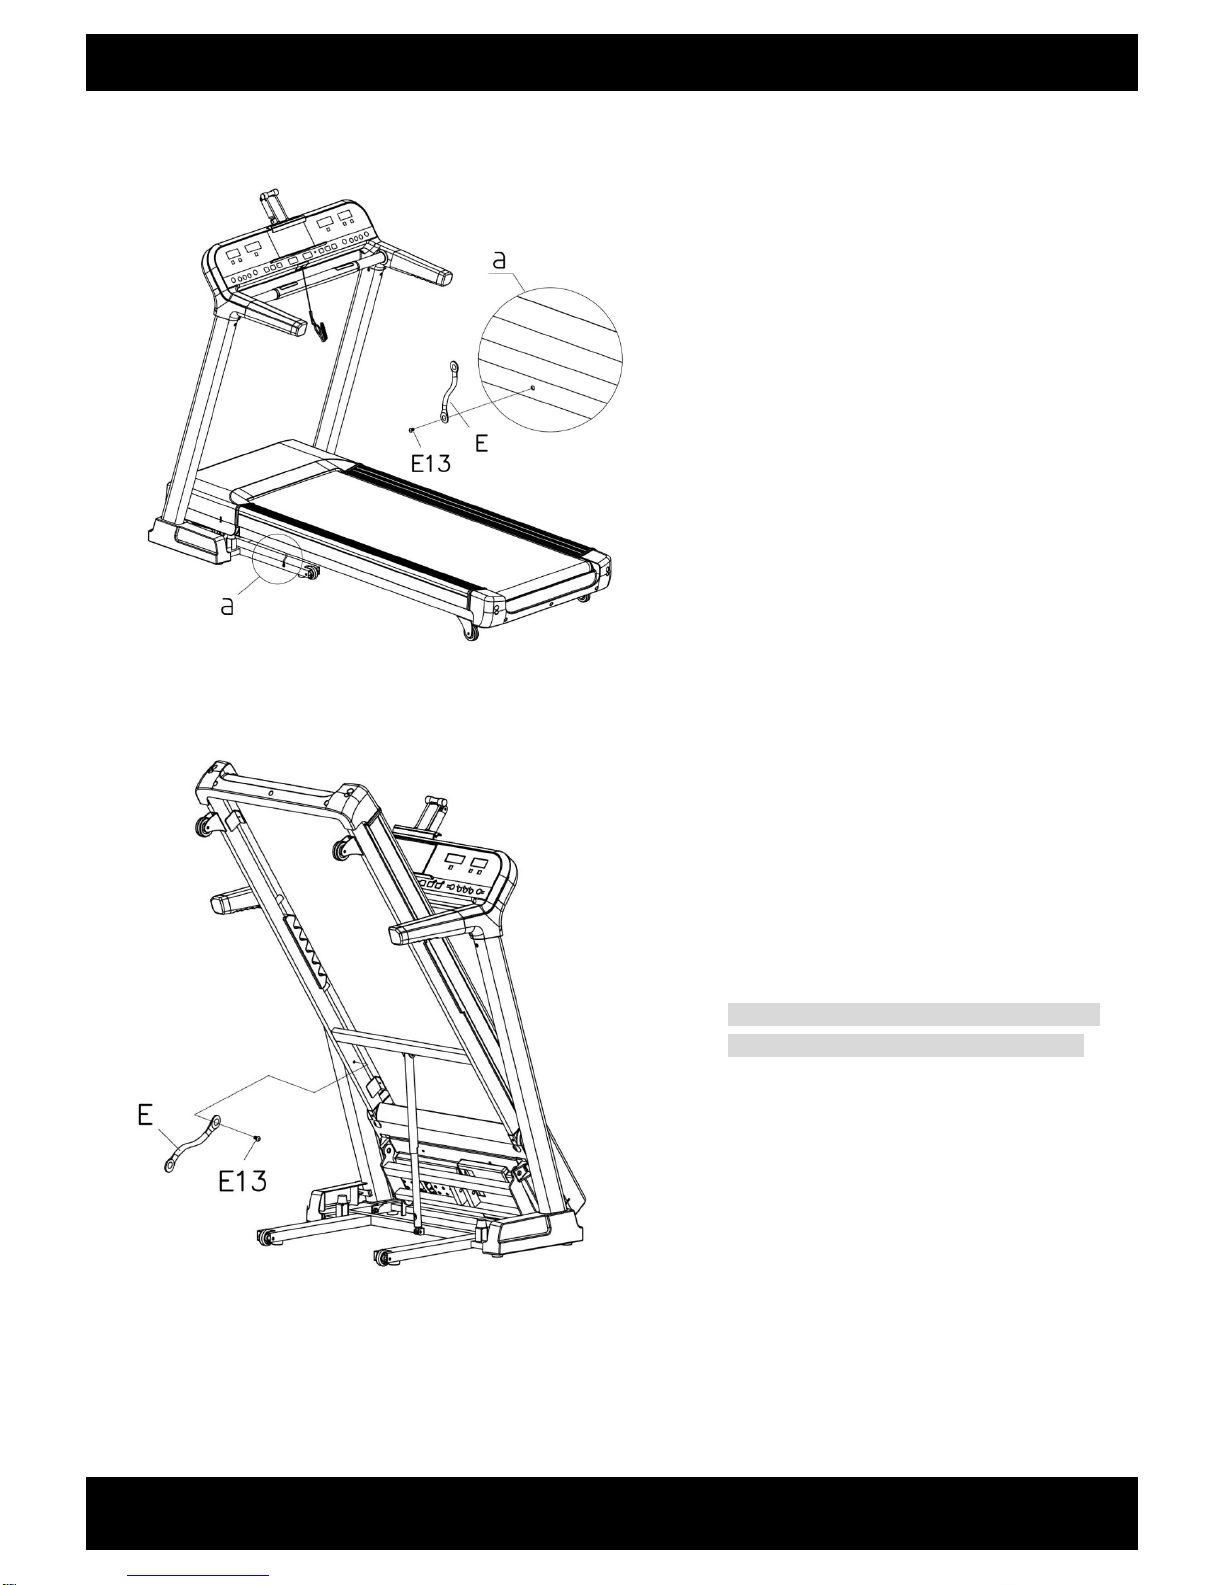
Step 9
Step 10
Take apart the bolt M8*15 ( E13) in the bottom side
of the steel cable (E) with 5# Allen wrench B09.
Take apart the bolt M8*15 ( E13) in the top side of
the steel cable (E) with 5# Allen wrench B09. Then
take away the steel cable from the bottom frame.
Notice: The steel cable will ensure your safety
during assembly; you can keep it for next use.
11
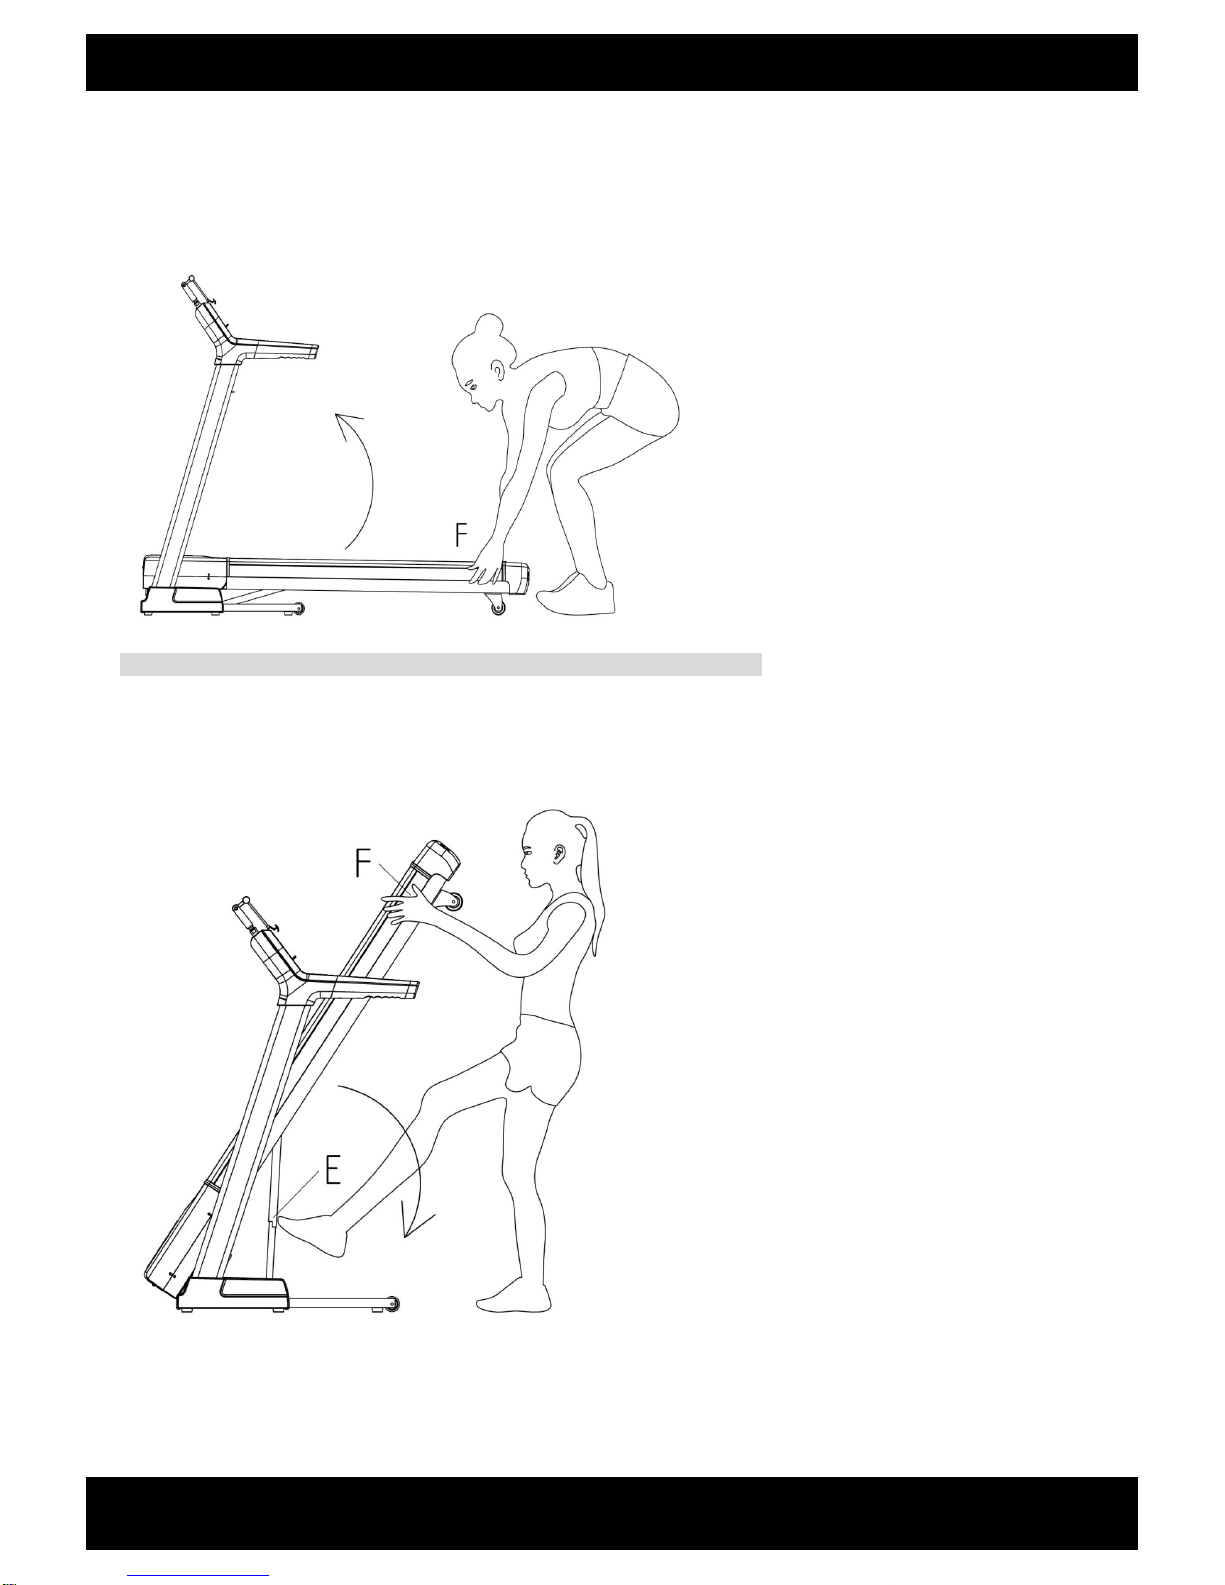
Folding steps
Folding up
Attention: it is forbidden to fold up when the machine is in running or incline mode.
Folding down
Hold the running deck which showed in “F” position
and then fold it up with the arrow direction until you
hear a “bang” voice from the air cylinder.
Support place F with hand , kick the place E of air
pressure bar, then the base frame will fall down
automatically.
12
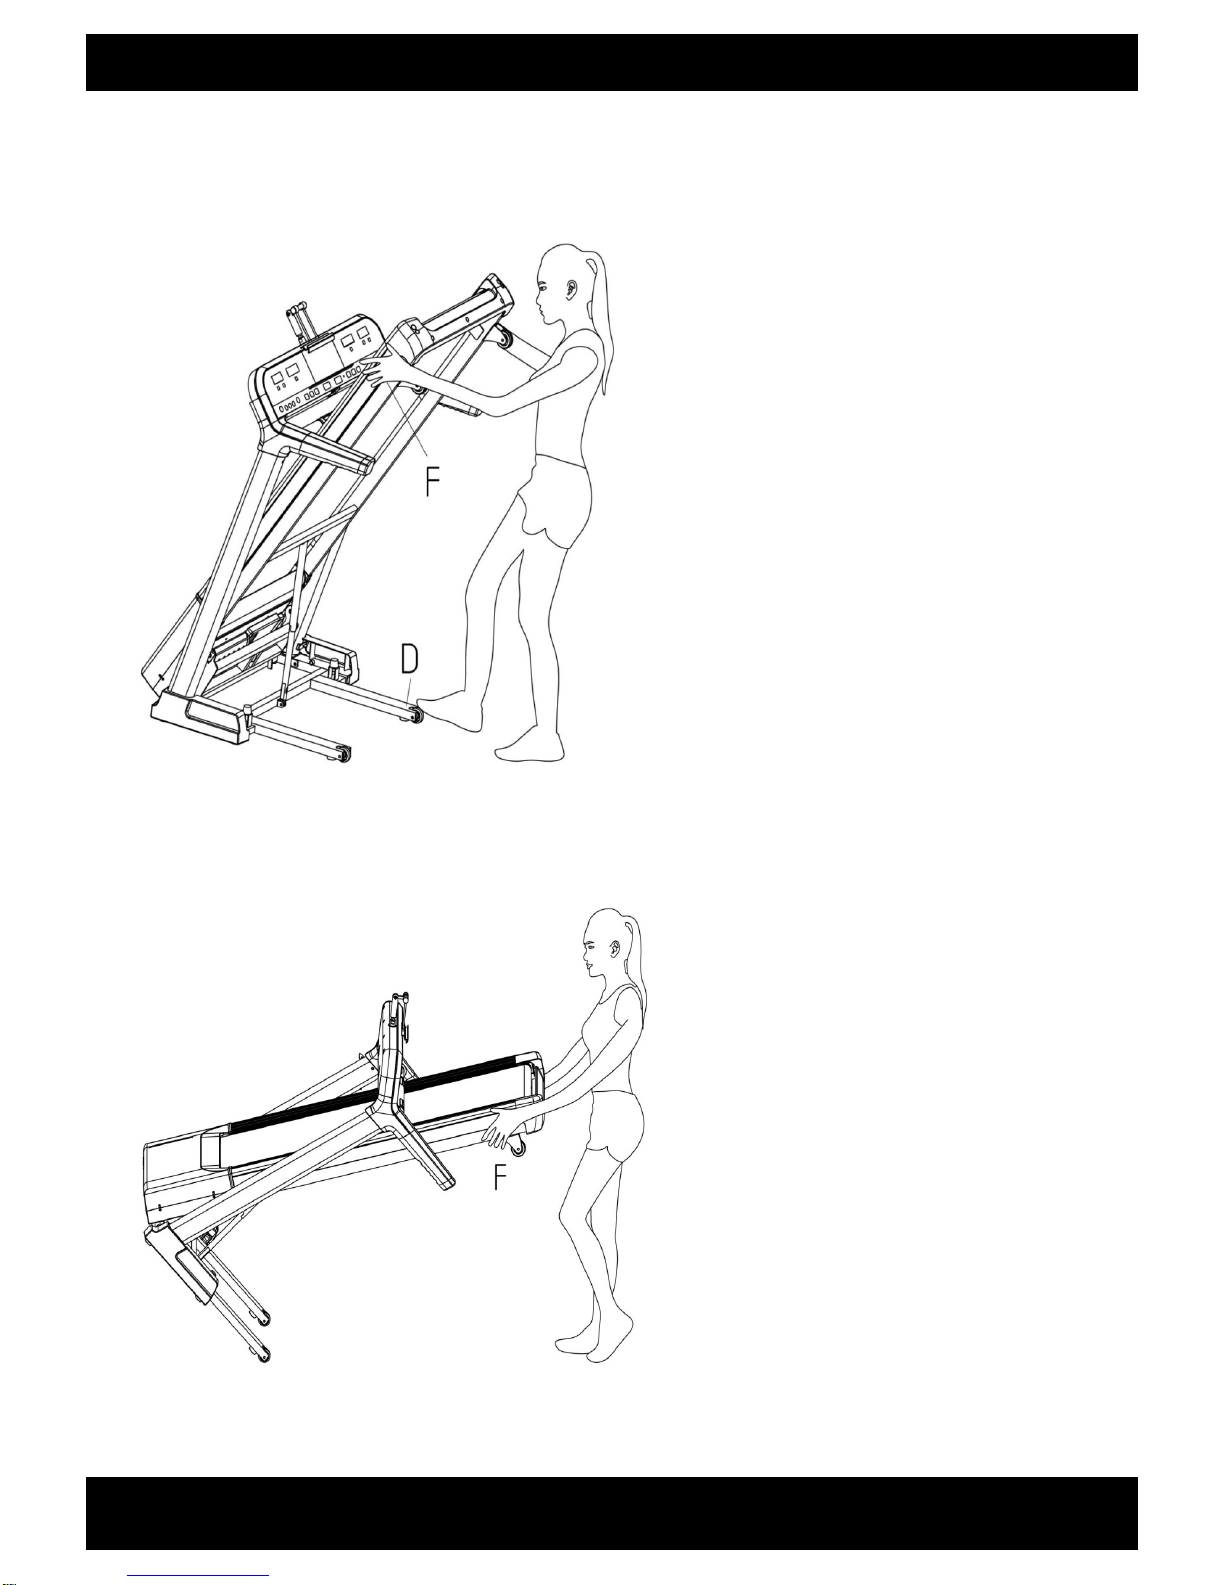
Transport tips
To tilt, start by placing one hand at position “F” to
support the top end of the treadmill. Next, place one
foot at position “D” to hold the bottom end of the
treadmill steady. With your foot at “D”, slowly tilt the
top of the treadmill downward towards the ground.
Once the Main Frame “F” reaches a low enough
point, the wheels of the treadmill will become active.
To transport, hold the treadmill from position “F”
and tilt until the wheels are able to move on the
ground.
 Loading...