

Page 1

User Manual
For
BodiTrak LT
Table of Contents
1.0 Introduction 2
2.0 Compliance 2
3.0 Warnings 4
4.0 Installation 5
5.0 Using the BodiTrak LT System 7
6.0 Care of the BodiTrak Mat 14
7.0 Cleaning the BodiTrak Mat 14
SH042-1 User Manual for BodiTrak LT V1.5, 25 Jan 2019
BodiTrak Technical Support: 800-847-3157
1
Page 2

1 INTRODUCTION
This manual applies to the model numbers BT1512 and BT1528.
The BodiTrak LT is an easy to use, stretchable, pressure and shear monitoring system
that is applied on top of a seating surface. It assists in identifying and managing areas
on a patient’s skin where they may be experiencing high pressures and shear forces. It
is a powerful tool to help prevent tissue trauma, increase patient comfort, monitor
support surface performance and educate both clients and caregivers.
Using an attached Tablet, a person can easily access Risk and Gradient information.
The software also includes a timer option with selectable time periods. The LT provides
the patient or caregiver with essential information for improving patient care and
reducing the expense of healing wounds.
2 COMPLIANCE
2.1 Canada
This Class A digital apparatus complies with the Canadian standard ICES-003. Cet
appareil numérique de la classe A est conforme a la norme NMB-003 du Canada.
2.2 United States
The FCC has specified (in 47 CFR 15.105) that the following notice be brought to the
attention of the users of this product:
“This equipment has been tested and found to comply with the limits for a Class A digital
device, pursuant to Part 15 of the FCC Rules. These limits are designed to provide
reasonable protection against harmful interference when the equipment is operated in a
commercial environment. This equipment generates, uses, and can radiate radio
frequency energy and, if not installed and used in accordance with the instruction
manual, may cause harmful interference to radio communications. Operation of this
equipment in a residential area is likely to cause harmful interference, in which case the
user will be required to correct the interference at his own expense.”
The end user of this product should be aware that any changes or modifications made to
this equipment without the approval of Vista Medical Ltd. could result in the product not
meeting the Class A limits, in which case the FCC could void the user's authority to
operate the equipment. Operation is subject to the following two conditions: (1) this
SH042-1 User Manual for BodiTrak LT V1.5, 25 Jan 2019
BodiTrak Technical Support: 800-847-3157
2
Page 3

device may not cause harmful interference, and (2) this device must accept any
interference received, including interference that may cause undesired operation.
2.3 Europe
The manufacturer of this product is in conformity with the European Medical Device
Directive 93/42/EEC and complies with ISO 13485.
2.4 Product Testing
This product has been tested and found to comply with:
• CAN/CSA C22.2 No. 60601-1:2008
• ANSI/AAMI ES 606011:2005/A2:2010
• EN 60601-1:2006/A11:2011
• IEC 60601-1-2:2007 – edition 3
2.5 The following table shows classifications and environmental parameters for the BodiTrak
pressure mat:
Medical Device Type Class 1 with measurement function
Class for electromagnetic
compatibility
Degree of protection against
electric shock
Degree of protection against
ingress of water
Mode of operation Continuous
Environmental Operating
Conditions
Environment Storage Conditions -40 to +70C
Class A
Type B Applied Part
IPX0
10 to 40°C
30 to 75% RH non-condensing
700-1060 hPa
10 to 100% RH non-condensing
500 to 1060 hPa
SH042-1 User Manual for BodiTrak LT V1.5, 25 Jan 2019
BodiTrak Technical Support: 800-847-3157
3
Page 4

3 WARNINGS
3.1 This equipment complies with IEC 60601-1, 3rd edition, which states the requirements for
basic safety and essential performance. Using this equipment with accessories or cables
other than those provided by Vista Medical may result in non-compliance with those
requirements. No modification of this equipment is allowed.
3.2 This equipment may cause radio interference or may disrupt the operation of nearby
equipment. It may be necessary to take mitigation measures such as:
• Reorienting or relocating the affected receiving antenna
• Increasing the separation between the equipment and the receiver
• Connecting the equipment into an outlet on a circuit different from that to which
the receiver is connected
• Consulting the dealer or a qualified radio/TV technician for help
3.3 When external equipment such as a computer is connected to this equipment it should
comply with EN 60950 for IT equipment, or the EN 60601-1-1 series for medical electrical
equipment. Equipment not complying with EN 60601-1-1 shall be kept outside the patient
environment, as defined in the standard, at least 1.5 m from the patient or the patient
support.
3.4 Electrical interference, such as electrical transients or bursts, may cause the sensing mat
to malfunction. Avoid using in close proximity to other equipment such as motors that have
a high amount of electrical switching. If unavoidable, verify normal operation prior to use.
3.5 The USB connector with this warning symbol for electrostatic discharge (ESD)
should not be touched directly, and connections should not be made, unless precautionary
procedures are used. Users should be trained to recognize the symbol and to discharge
themselves by touching grounded metal prior to handling the USB connector or plugging it
in. If function stops due to ESD, unplug the mat, reboot the computer, and plug the mat
back in.
SH042-1 User Manual for BodiTrak LT V1.5, 25 Jan 2019
BodiTrak Technical Support: 800-847-3157
4
Page 5
iv.
4 INSTALLATION
4.1 System Requirements
i. Tablet with Android 6.0 (OS) or greater
4.2 System Components Included
i. Sensor mat with USB cable and built-in Wi-Fi or
Sensor mat with micro USB cable
ii. Optional DataPort wireless module
4.3 Software Installation Instructions
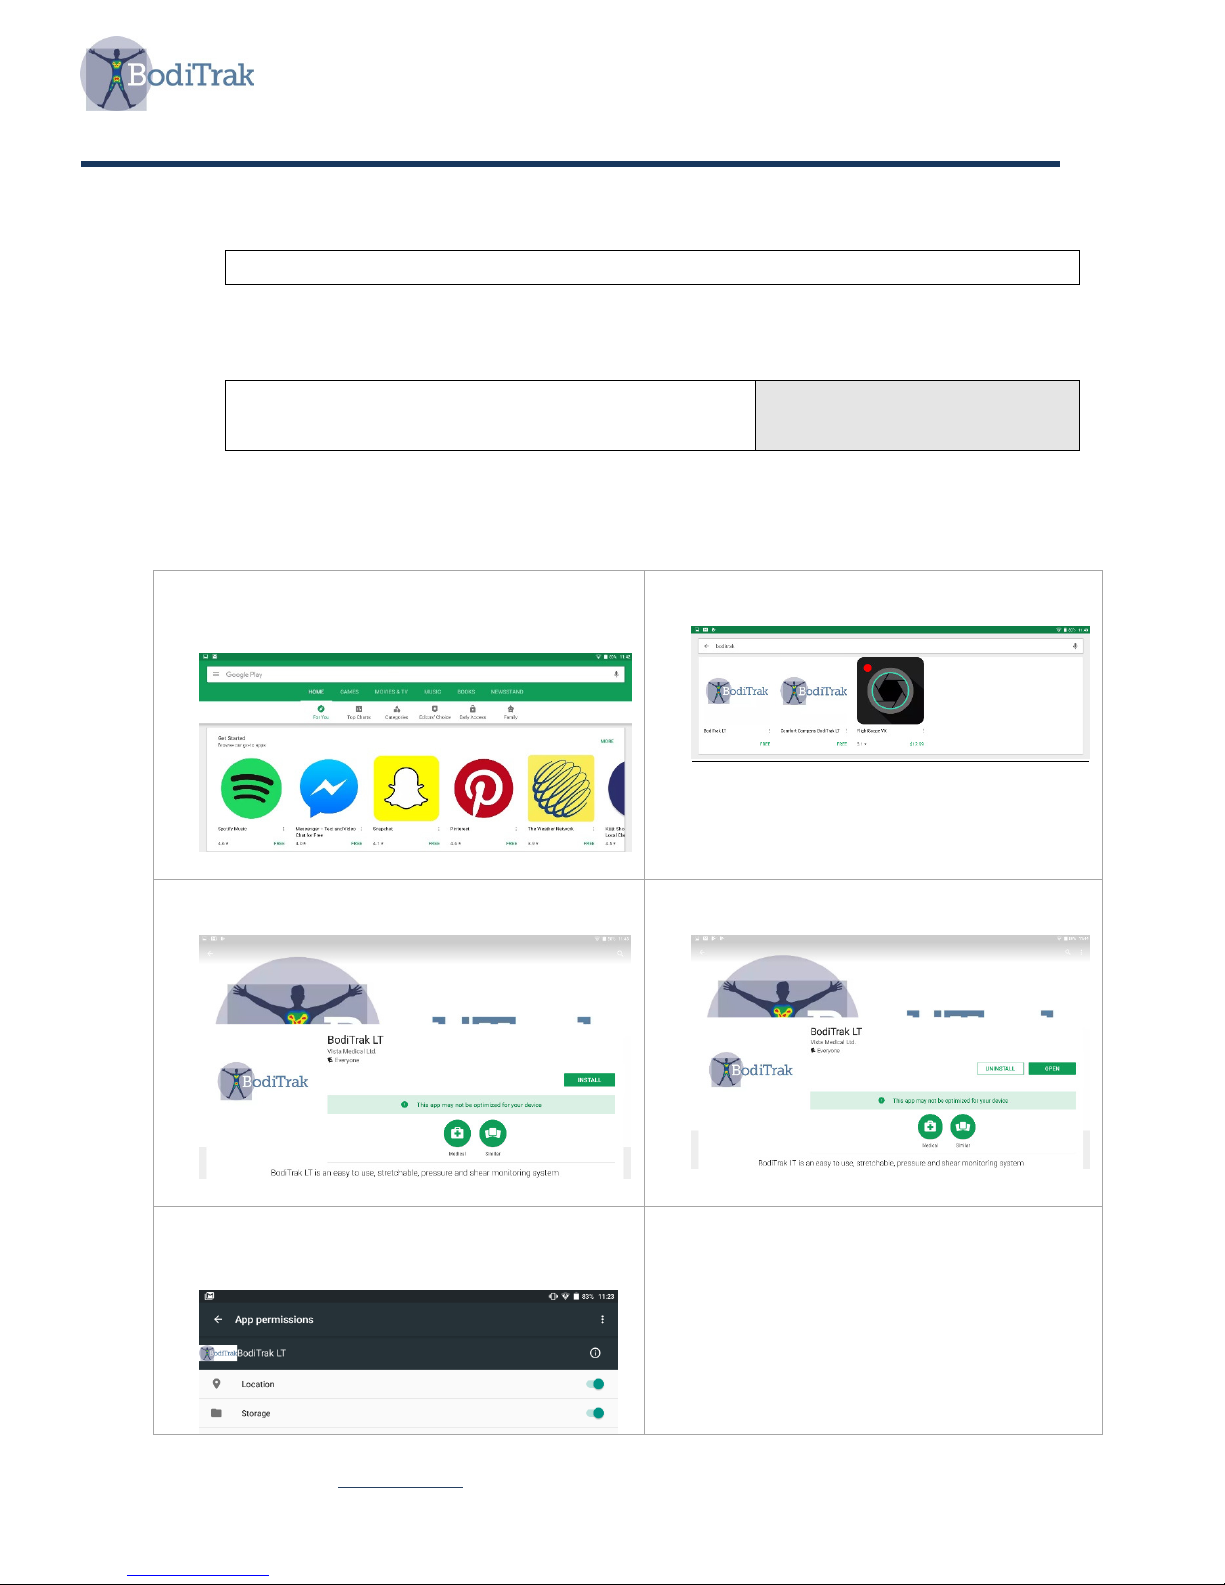
1. Using the tablet go to Google Play Store
2. In the search box type: BodiTrak
4. Tap Install button
iii. Quick Set Up Guide in PDF
User Manual in PDF
3. Choose BodiTrak LT
5. Tap Open button
6. If prompted for permissions, enable
location and storage
SH042-1 User Manual for BodiTrak LT V1.5, 25 Jan 2019
BodiTrak Technical Support: 800-847-3157
5
Page 6
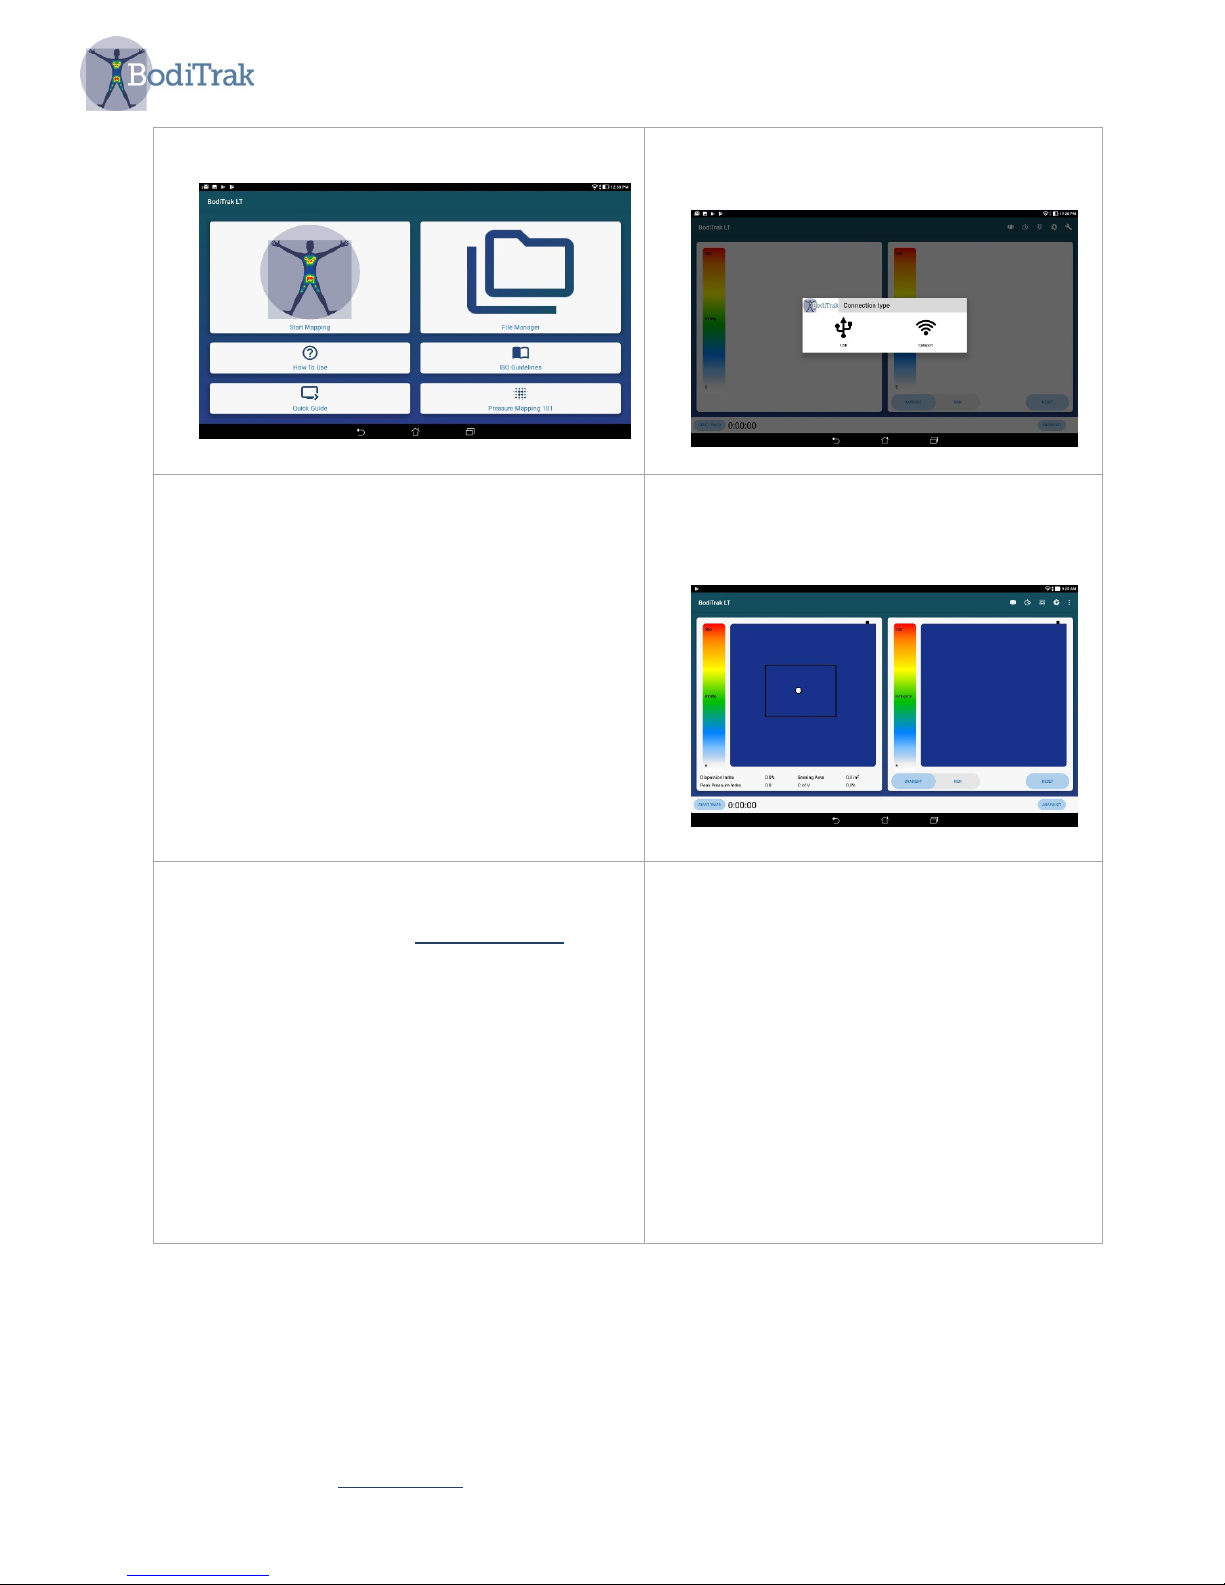
7. Tap ‘Start Mapping’
9. If you choose USB, then plug the Micro
USB cable from the pressure mat into
the tablet's Micro USB port and select
OK to allow access.
10. If you choose DataPort, then go to your
device’s Wi-Fi settings, select the
BodiTrak’s 2 or the Data Port’s SSID
you wish to connect to and input the
provided password. BodiTrak’s 2 SSID
and password can be found on the tag
attached to the USB cable. Data Port’s
SSID and password is shown on a tag
attached to your module.
8. Choose the connection type from the
message box.
11. If the blue mats appear on the User
Interface the connection was
successful.
12. If you are experiencing difficulties with
the software or physical set up, contact
technical support at 800-847-3157
SH042-1 User Manual for BodiTrak LT V1.5, 25 Jan 2019
BodiTrak Technical Support: 800-847-3157
6
Page 7
5 USING THE BODITRAK LT SYSTEM
5.1 From the tablet Home screen tap the BodiTrak LT shortcut, or go to Apps Drawer and select
the icon for BodiTrak LT.
5.2 Select “Start Mapping”.
5.3 If the blue mats appear on the User Interface the connection was successful.
5.4 Key Item: The system has 2 modes: On-the-Go scanning and Multiple Comparison. You
can switch back and forth by tapping the “square in a square” icon.
5.5.1 On-the-Go Scanning Mode
This mode is intended to provide a quick and easy way to assess a person’s situation
on a surface over time. The scanning starts as soon as you plug in the sensing mat
and select ‘start mapping’.
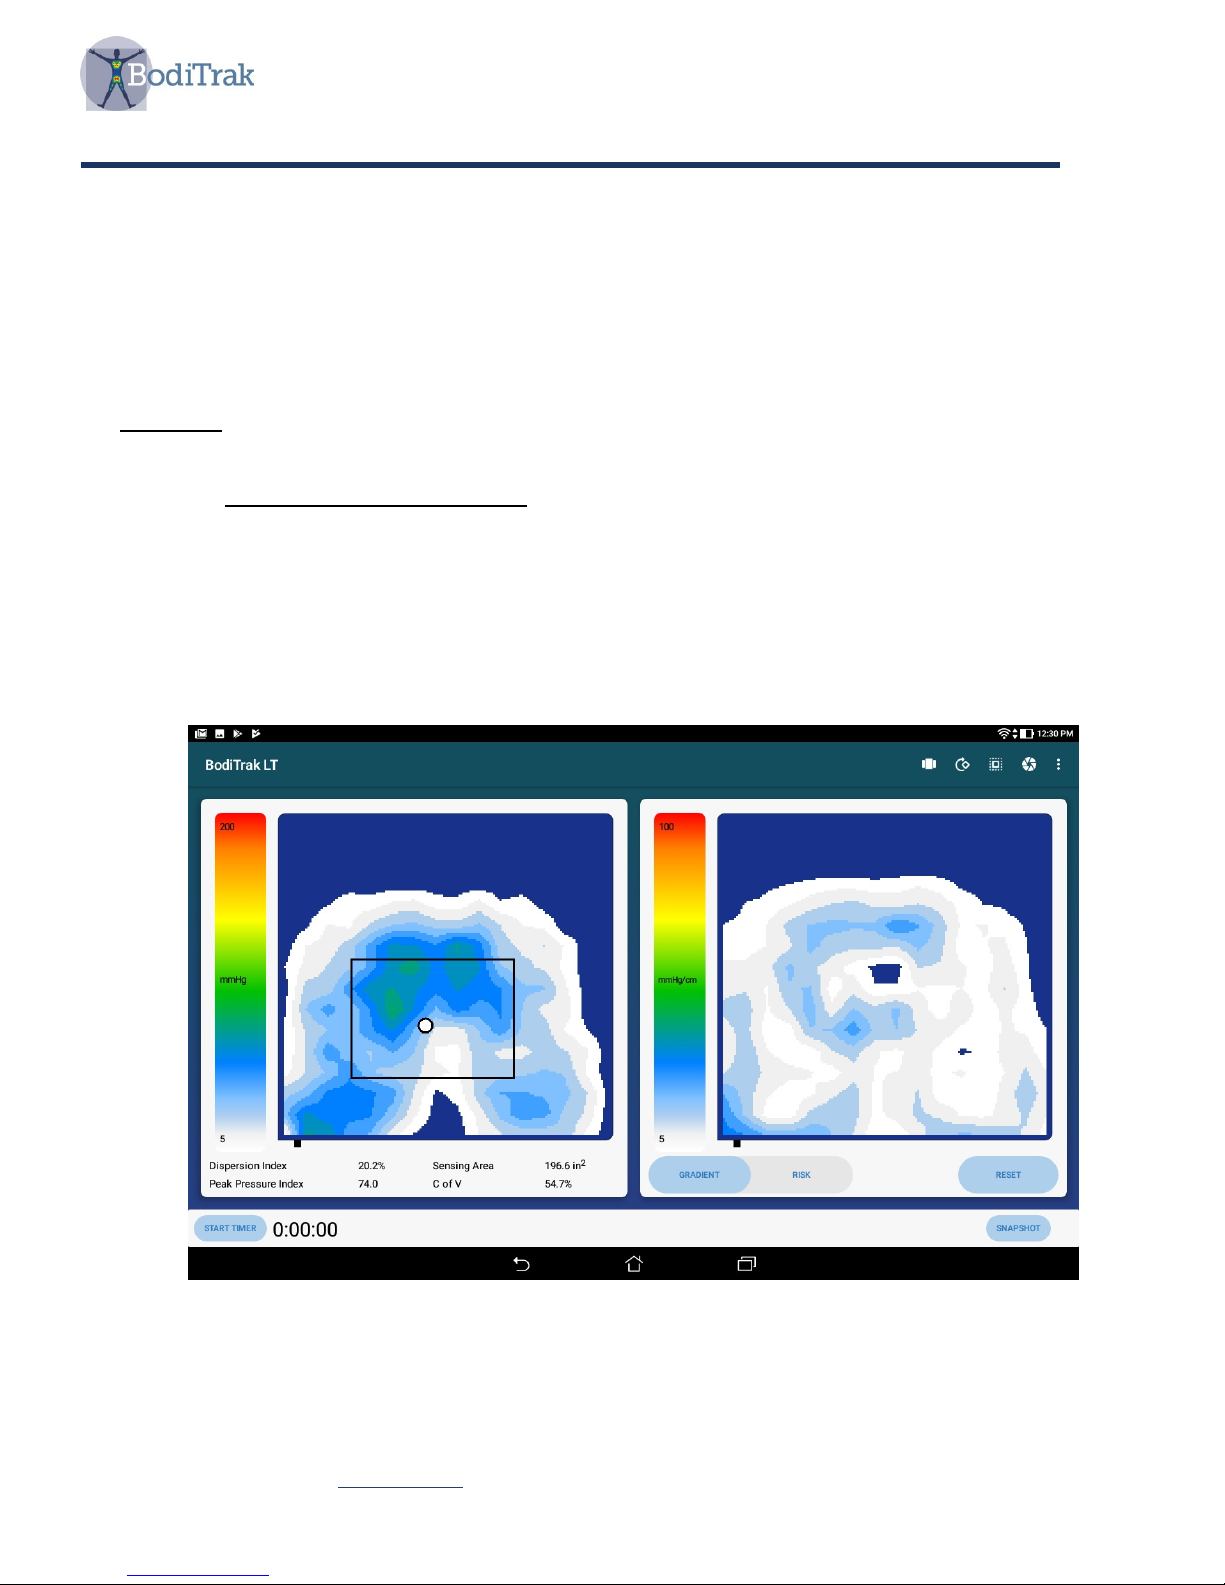
The display is divided to show two seat images as shown here in Figure 1. The image
on the left displays normal force pressures. The image on the right is for gradient and
risk considerations.
Figure 1 – User Interface
SH042-1 User Manual for BodiTrak LT V1.5, 25 Jan 2019
BodiTrak Technical Support: 800-847-3157
7
Page 8

On the left hand side of the display you will observe:
• a color bar indicating the level of pressure from 5-200 mmHg, or a chosen
pressure range
• the center of pressure on the mat, represented by a white dot
• the Dispersion Index box: a rectangle defined as 8 sensors across and 6 sensors
down which you can drag to a desired location (for example the ischial-sacrum
area) to calculate the Dispersion Index
• statistics which are useful for considering solutions and are explained as follows:
Dispersion Index (%) –The sum of pressure distributed over a region (for example
the ischial tuberosity (IT) and the sacral-coccygeal region) divided by the sum of
pressure readings over the entire sensor mat, expressed as a percentage. A value
of 50% or more is indicative of a potential risk of skin trauma.
Peak Pressure Index – The average of the highest recorded pressure values
within a 9 to10cm2 area (the contact area of an IT). PPI is a better comparative
bench mark than average seat pressures.
Sensing Area (in2) – The area of the mat the client is resting on which is displaying
above the minimum setting, e.g. 5 mmHg. Generally you want a larger sensing or
contact area as this means the area of support has increased.
C of V (%) – The coefficient of variation shows how evenly the pressure is
distributed across a support surface. It is expressed as a percentage, and is
normally the inverse of the sensing area. It is better to have a lower CoV value, but
be careful to compare to the pressure map; you may have a low CoV but still have a
high localized force somewhere in the seat surface.
On the right side of the display you will observe:
• Gradient and Risk display choices, as shown here in Figure 2
GRADIENT (spatial pressure)
RISK (pressure vs. time)
SH042-1 User Manual for BodiTrak LT V1.5, 25 Jan 2019
BodiTrak Technical Support: 800-847-3157
8
Page 9
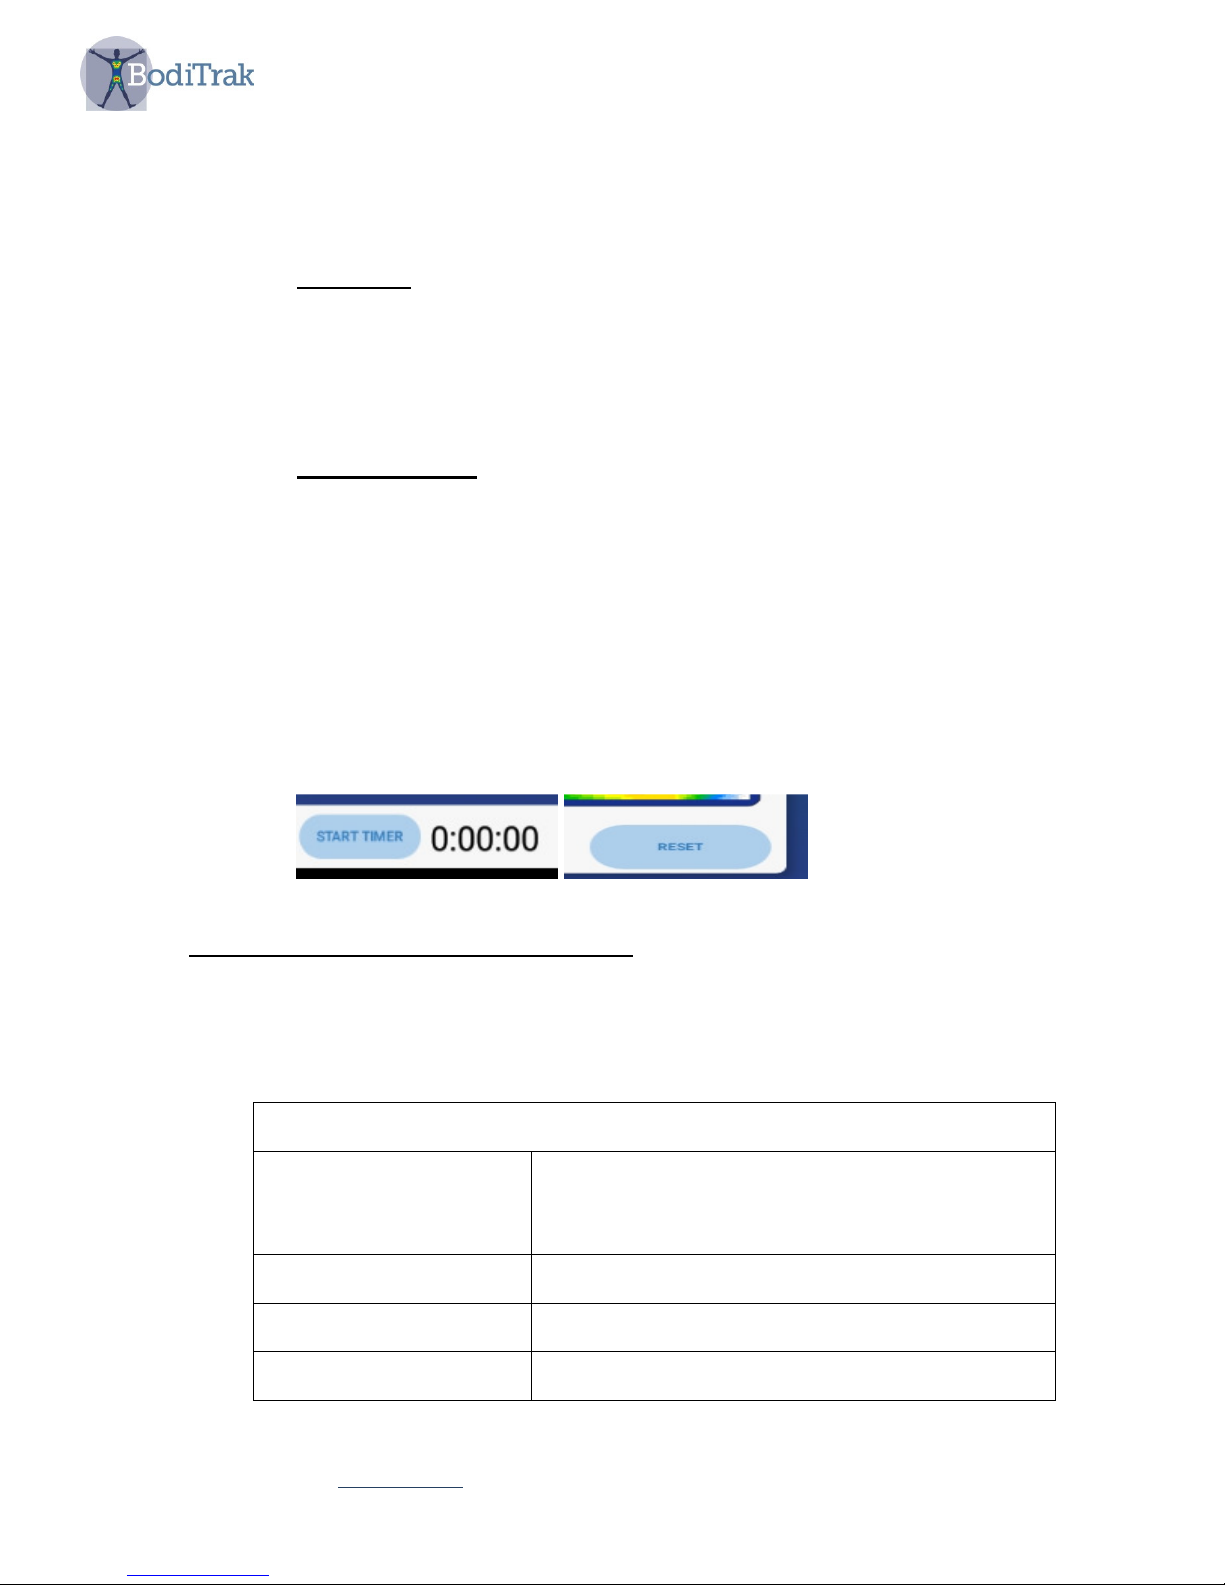
Figure 2 – Risk and Gradient
RISK TAB – The Risk tab will be highlighted when chosen. The pressure
map indicates tissue loading over time and is expressed in mmHg/hour. It
helps the client or caregiver to understand where the skin may be most at
risk of tissue trauma and repositioning may be required. (The software is
based on Reswick-Rogers pressure/time curve.)
GRADIENT TAB – The Gradient tab will be highlighted when chosen. The
pressure map identifies areas of the skin that may be affected by shear
forces and is expressed as mmHg/cm. Areas of fastest change in pressure
over the surface of the seat are displayed as hotter colors. It is believed
that where pressures change quickly from one location to another there is
a risk of shear occurring to tissue.
• a start timer and time indicator that can sound an alarm at a chosen time to remind
a client to shift their weight
• a Reset Risk button used to reset the risk display
On the top of the display you will observe:
• A three dots icon which gives you a drop-down showing two options, Data Port
Connection and Settings. If you tap on Settings you will see the following options:
USER SETTINGS
On or off. Useful for normalizing pressure
Maintain Weight
readings over extended periods of time.
User’s weight must be input.
User Weight Insertion of user’s weight
Timer Duration Set time duration before alarm sounds
Connect via DataPort On or off
SH042-1 User Manual for BodiTrak LT V1.5, 25 Jan 2019
BodiTrak Technical Support: 800-847-3157
9
Page 10
PRESSURE MAT SETTINGS
PSI Units On or off
mmHg Pressure Max Can set maximum displayed values
PSI Pressure Max Can set maximum displayed values
Sensor Rotation On or off
RISK VIEW SETTINGS
Risk Threshold
Can set the level of mmHg/hr at which risk
data is displayed. Normally set to 20.
Demo feature (usually set at 1 for use in
Risk Multiplier
monitoring or 20 to artificially accelerate time
for demo mode). Set higher to display quicker.
CENTER OF PRESSURE
Center of Pressure On or off. Shows center of pressure on mat
Center of Pressure
Tail Length
Can set from zero to several seconds
OTHER SETTINGS
Sensing Area Metric
Units
On or off
Orientation Portrait On or Off
APPLICATION INFORMATION
Version Displays Current Version
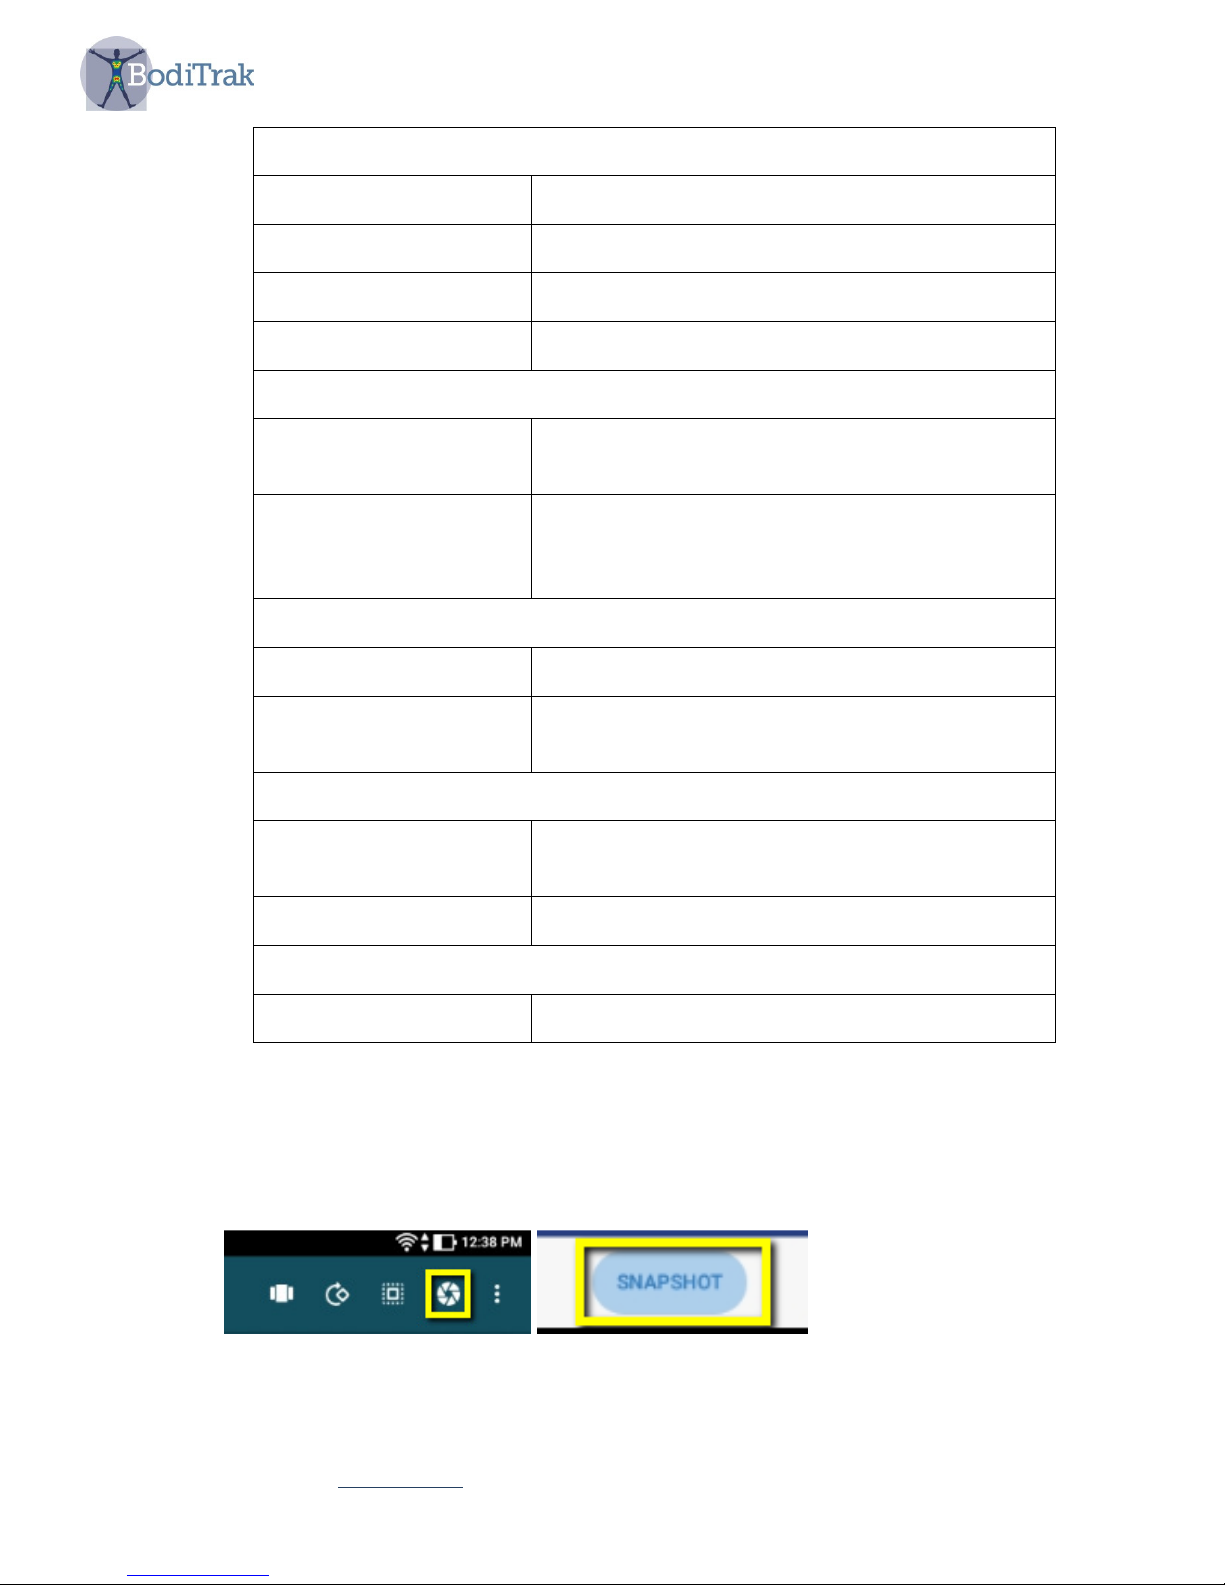
• A Snapshot icon (Figure 3) which allows you to take a screenshot. This will allow
you to take a picture of the current screen at any time during the On-the-Go
scanning. When the snapshot button is tapped you will be asked to enter User
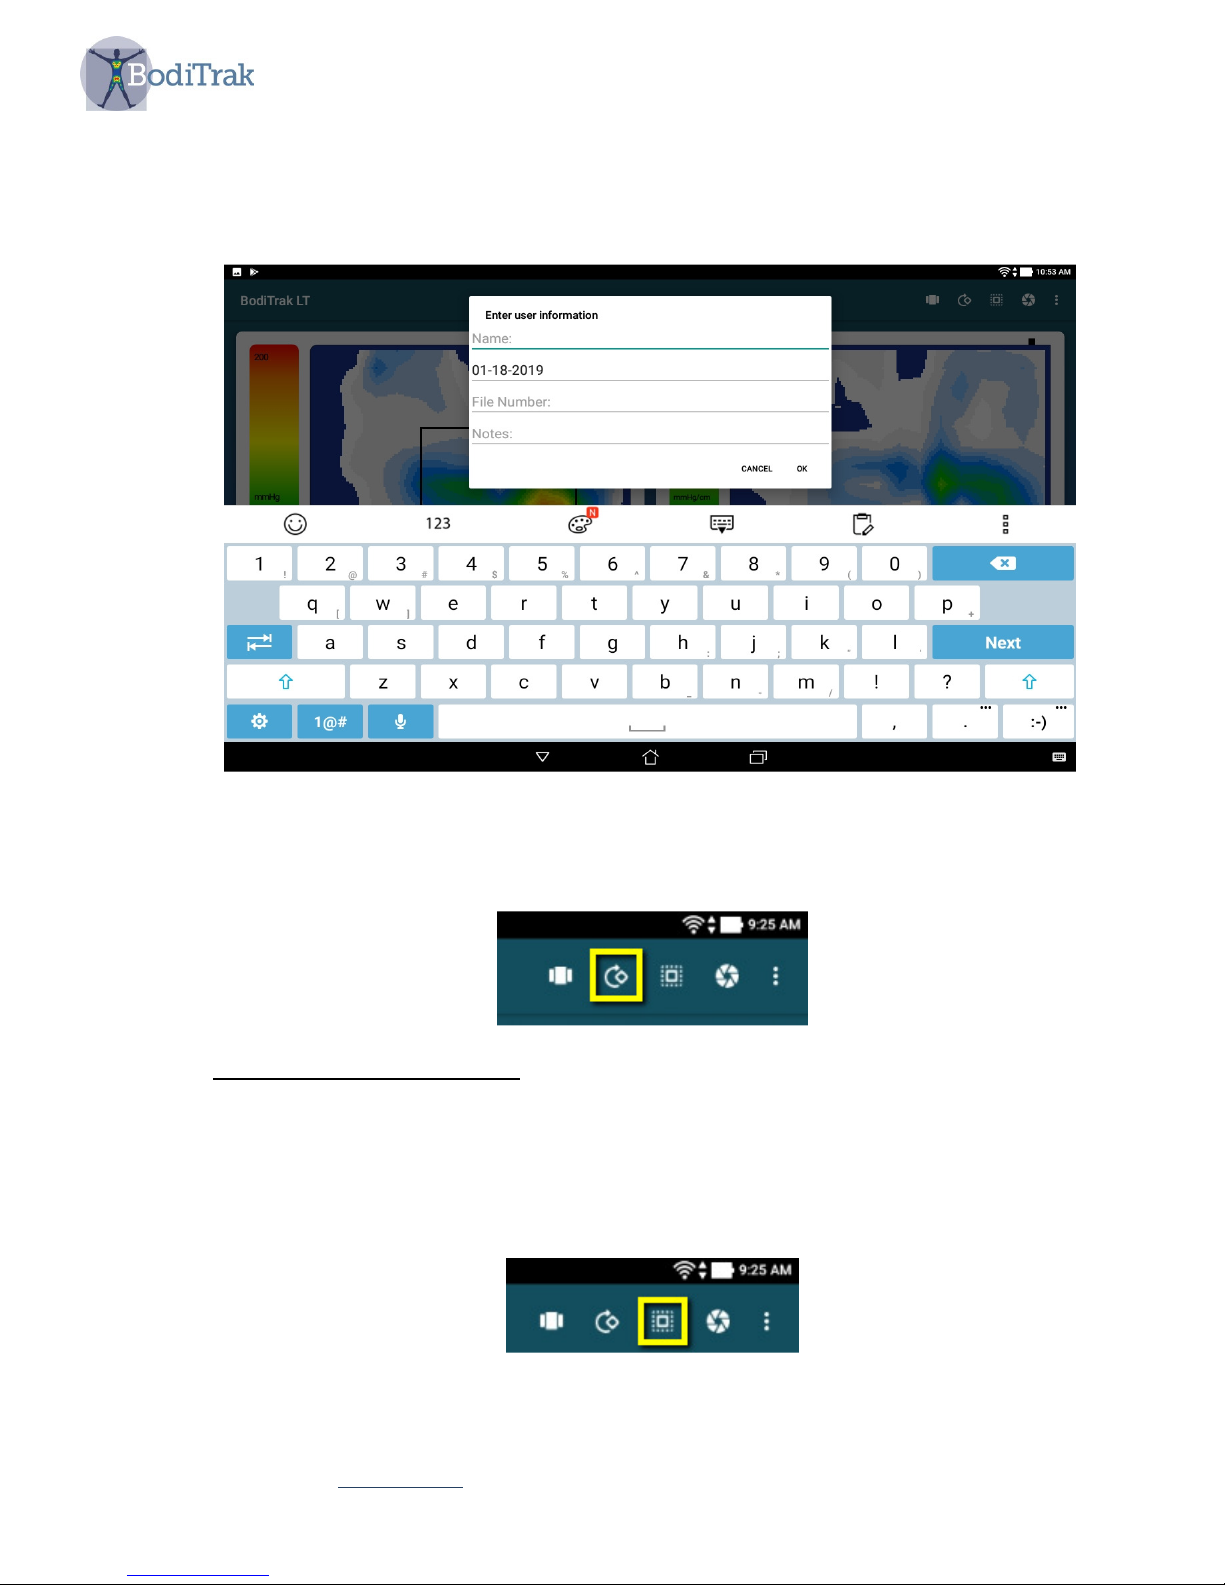
Information (Figure 4) and when you select OK the image will be saved.
Figure 3 – selecting the snapshot icon
SH042-1 User Manual for BodiTrak LT V1.5, 25 Jan 2019
BodiTrak Technical Support: 800-847-3157
10
Page 11
The image can be located by going to the BodiTrak LT home page and selecting
the File Manager icon. You can delete or export snapshots by selecting an
image and tapping either button. Exporting the image sends it to the tablet’s
document folder.
Figure 4 – entering user information
• A circular arrow icon which will rotate the view of the mat 180 degrees.
5.5.2 Multiple Comparison Mode
The Multiple Comparison is a comparison tool for considering solutions to seating
issues. A series of up to four images are taken in sequence to allow for side by side
comparison.
To begin the comparison wizard click the “square in a square” icon as shown in
Figure 5.
Figure 5 – Square in a square icon
SH042-1 User Manual for BodiTrak LT V1.5, 25 Jan 2019
BodiTrak Technical Support: 800-847-3157
11
Page 12
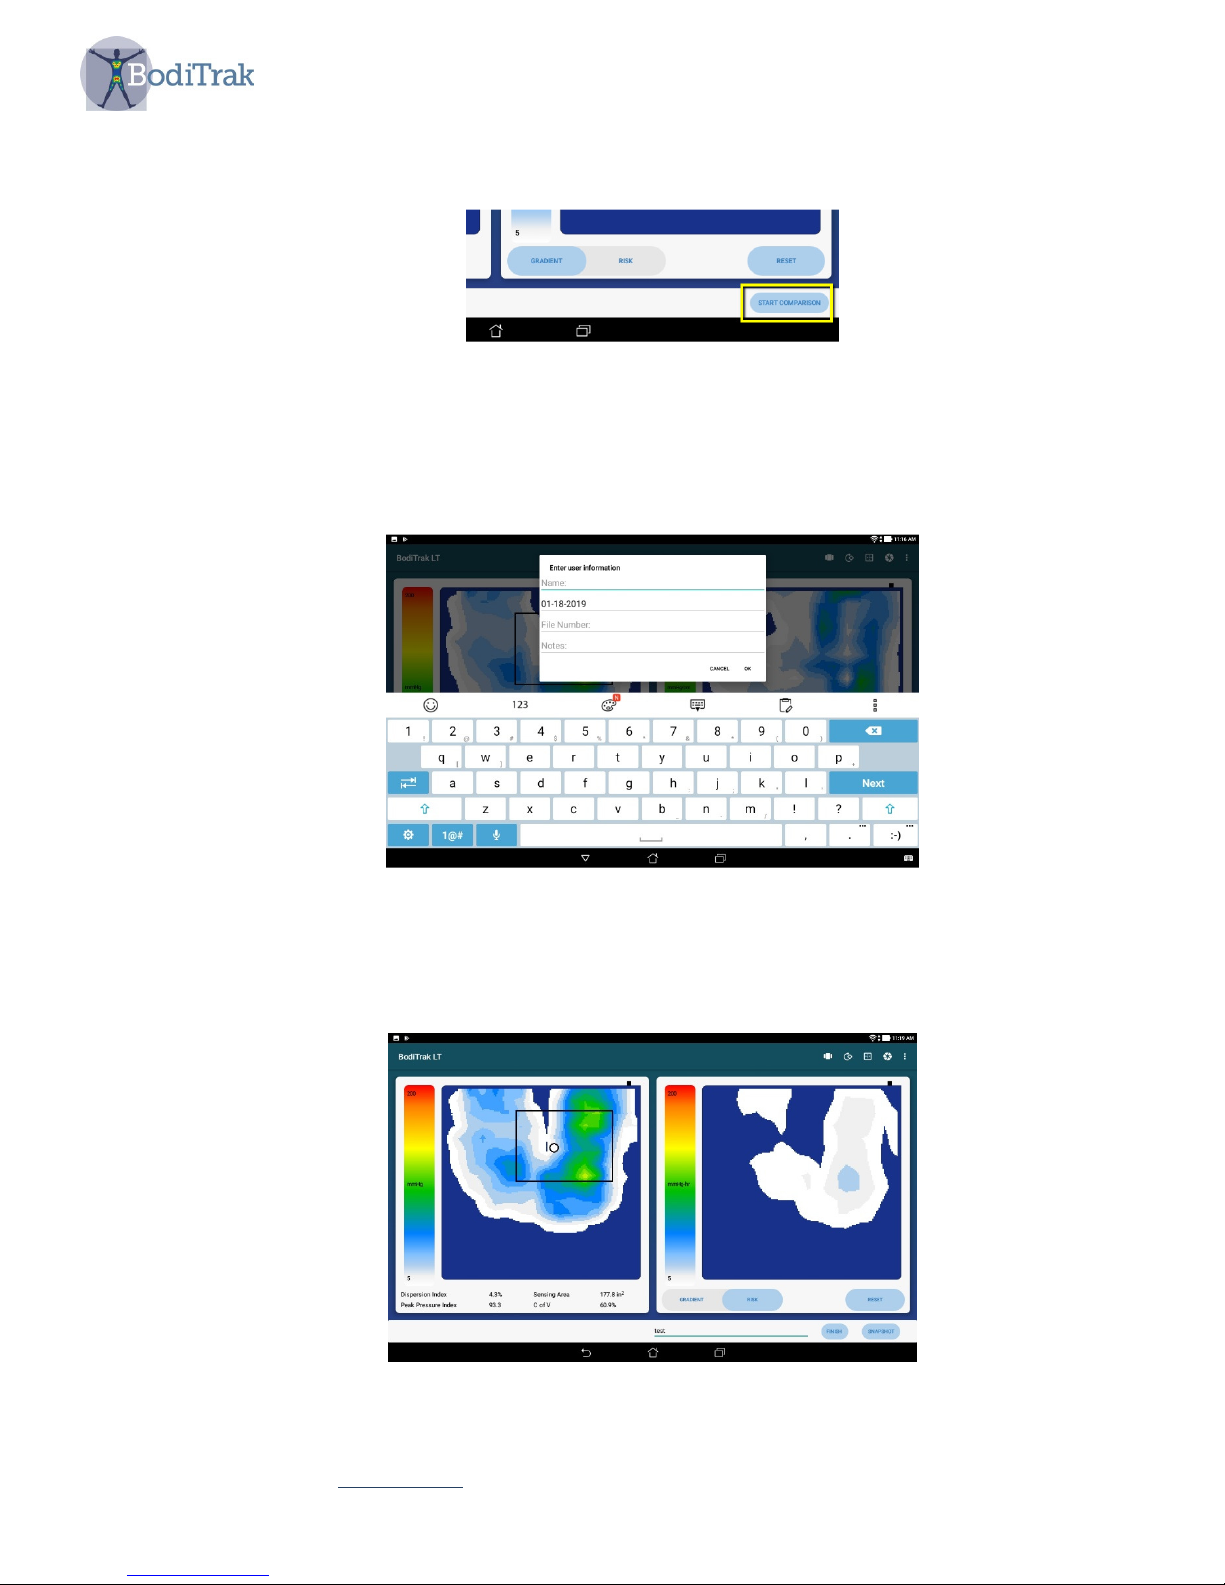
A ‘Start Comparison’ button will appear on the bottom right of the screen as shown
in Figure 6.
Figure 6 – Multiple Comparison user interface
When the Start Comparison button is touched an information dialogue box will
appear as shown in Figure 7. This will allow the user to input relevant data to
identify the images later.
Figure 7 – User information dialogue box
When the user information is entered and OK is selected, the scan page returns,
as shown in Figure 8.
Figure 8 – Multiple Comparison page
SH042-1 User Manual for BodiTrak LT V1.5, 25 Jan 2019
BodiTrak Technical Support: 800-847-3157
12
Page 13
Enter a name for the image in the ‘comments’ field to the right of the finish
button (Figure 8) and then touch the Snapshot button. A screenshot will be
saved. You can repeat this step up to three more times. If you wish to stop
before all four screenshots are taken simply tap the Finish button.
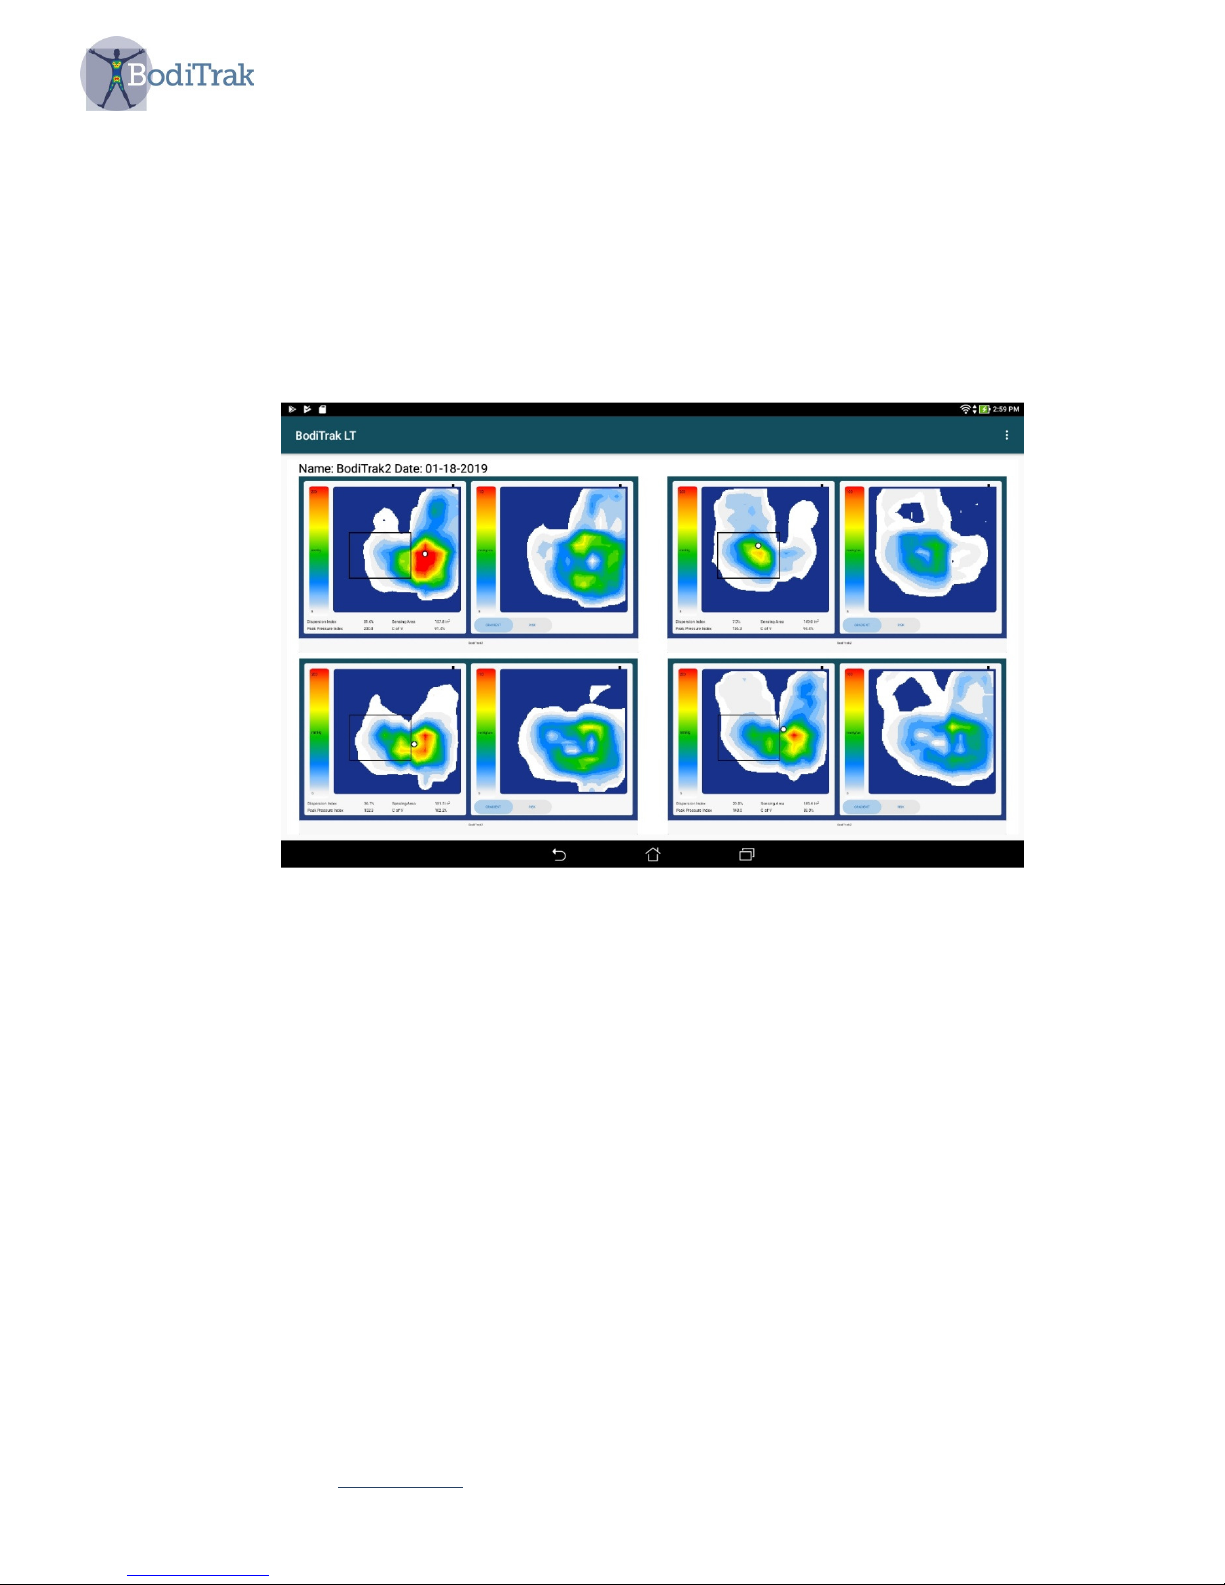
After you have taken the snapshots a screen will appear showing all of the
images together (Figure 9). You can select any one of the images to see an
enlarged view.
A pdf file is automatically generated. The image can be located by going to the
BodiTrak LT home page and selecting the File Manager icon.
Figure 9 – Multiple Comparison Report display
SH042-1 User Manual for BodiTrak LT V1.5, 25 Jan 2019
BodiTrak Technical Support: 800-847-3157
13
Page 14

6 CARE OF THE BODITRAK MAT
• Do not pull on or carry the mat by the USB cable.
• Place the mat gently on surfaces by using the corners.
• Do not pivot on the mat.
• Do not pull on the edges of the mat while it is under a client.
• The covering on the pressure sensing mat should not be in direct contact with broken
skin.
• Do not pinch the mat between moving components of a support surface.
• Do not fold the mat
• Store the mat flat or in the original packaging by rolling the mat around the foam tube
and storing in the shipping cylinder.
• If your mat has a ferrite installed on the USB cable do not remove it.
• It is the operator's responsibility to ensure all cables are in good condition; inspect all
cables for nicks or abrasions prior to each use.
7 CLEANING THE BODITRAK MAT
BodiTrak pressure sensing mats are typically covered in polyurethane coated nylon/Lycra
stretch fabric.
• Unplug the mat before cleaning.
• For daily cleaning, we recommend wiping down with a damp, not wet cloth using a mild
soap and water solution.
• Mild alcohol based cleaners and cleaners containing no more than 10% bleach in nonwetting amounts may also be used.
• Other cleaners / disinfectants sold under the following names may also be used:
Viraguard, Cavicide, Vitre Tb, and SeptFx.
• Undiluted bleach and Hydrogen Peroxide are not recommended.
• Cleaning products or disinfectants must be thoroughly wiped off after using them.
• Allow the mat to dry thoroughly before use or storage.
SH042-1 User Manual for BodiTrak LT V1.5, 25 Jan 2019
BodiTrak Technical Support: 800-847-3157
14
 Loading...