

Page 1
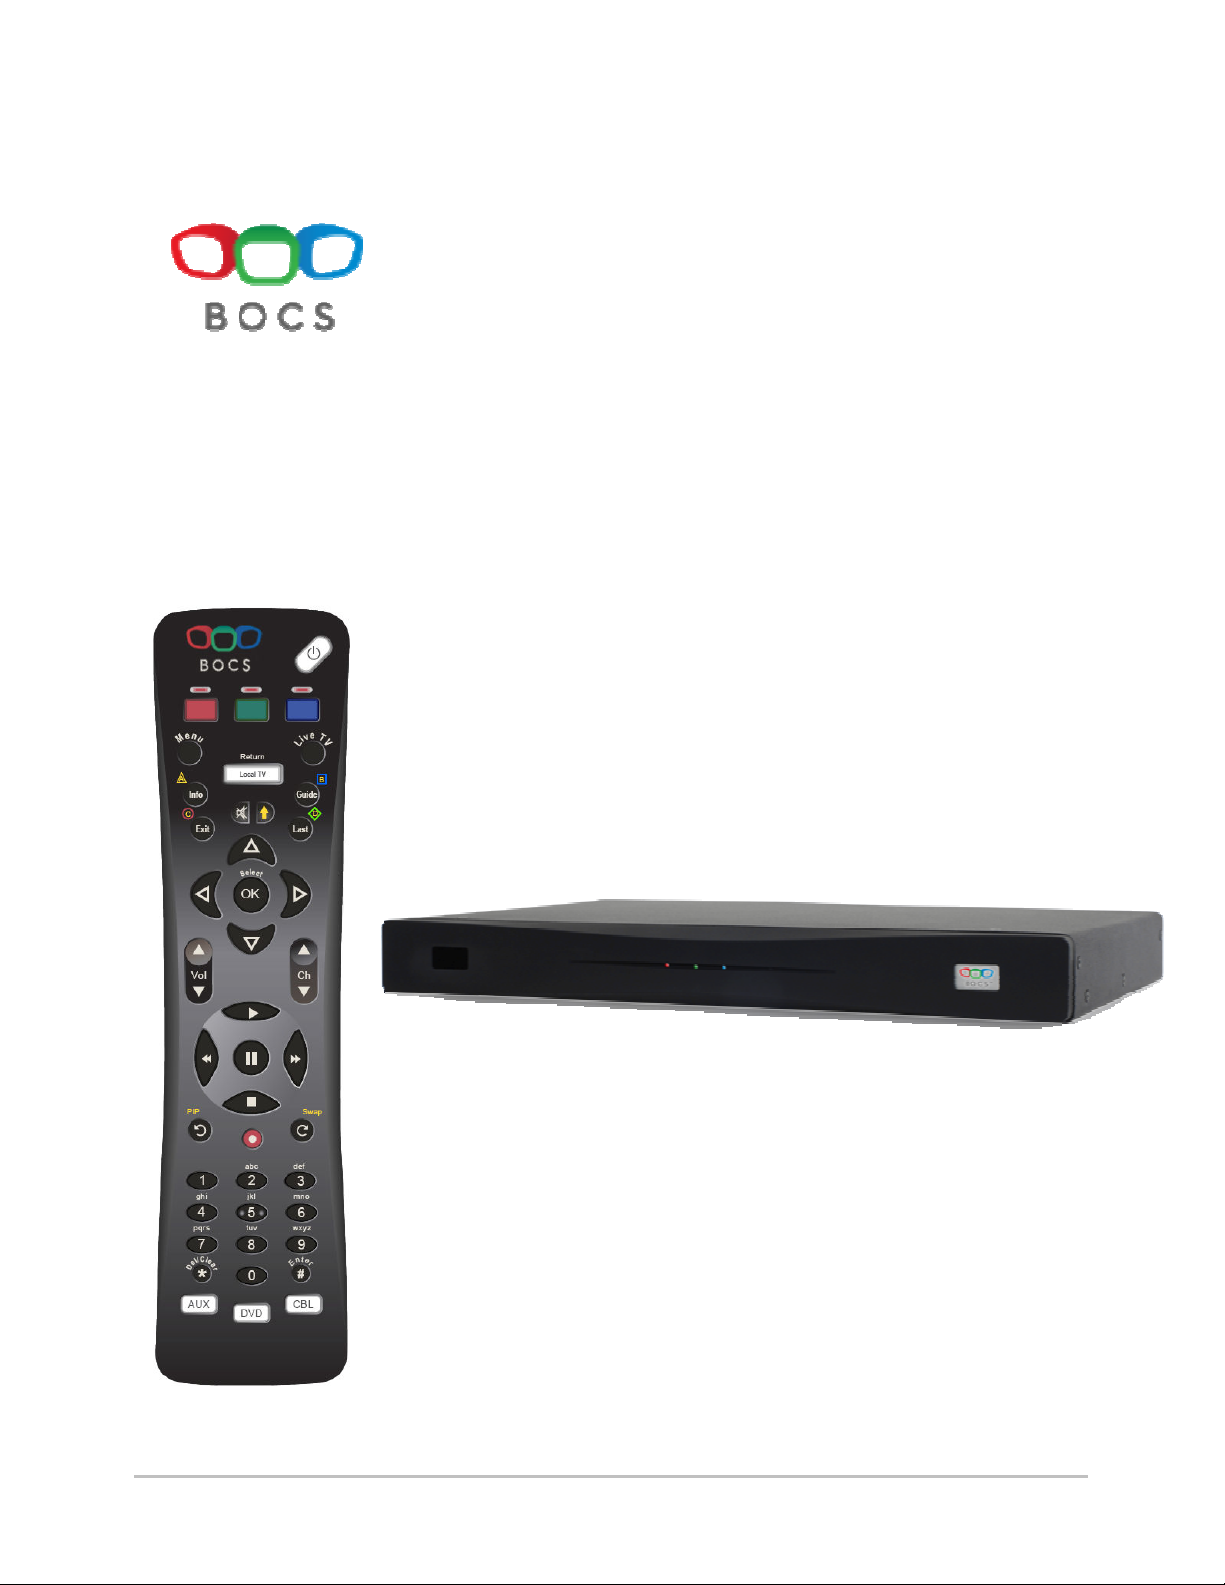
Xtender
Installation & Usage
Manual
Welcome 1
Page 2

Table of Contents
Welcome.......................................................................................................................................................4
What's in the Box?..................................................................................................................................... 5
Basic Terms used in this manual ..............................................................................................................6
Remote Control Lights ............................................................................................................................... 7
What’s on the Remote? ............................................................................................................................. 7
What’s on the Front Panel? ....................................................................................................................... 9
What’s on the Back Panel? .....................................................................................................................10
Installation Overview ...............................................................................................................................11
Step 1 Installing the SuperCombiner ......................................................................................................12
Select Location for the Xtender ............................................................................................................... 12
Power the Coax Wire...............................................................................................................................13
Locate Your Cable Box............................................................................................................................13
Find the Powered Cable .......................................................................................................................... 14
Connecting the SuperCombiner ..............................................................................................................15
Step 2 Installing the Xtender.................................................................................................................... 16
Connect Xtender to Power ......................................................................................................................16
Red, Green & Blue Channel Set-up – Connect the Audio/Video devices to the Xtender ...................... 16
Red Channel Set Up................................................................................................................................17
Green Channel Set Up ............................................................................................................................ 18
Blue Channel Set Up ............................................................................................................................... 19
Connecting Xtender’s Power Supply....................................................................................................... 19
Optional – Connect to the local TV.......................................................................................................... 20
Step 3 Programming the Remotes .......................................................................................................... 21
Step 1 – Pair Remotes ............................................................................................................................21
Step 2 – Pick a room, program a remote to work the TV in that room ....................................................21
Alternate Remote programming procedure for TV: Auto-Scan............................................................ 22
Step 3 – Program the Xtender to Control the A/V Devices ..................................................................... 22
Alternate Remote programming procedure for Red/Green/Blue Channels: Auto-Scan...................... 23
Step 4: Program the rest of your remotes for each room........................................................................ 24
Step 5: Set the Master Remote ...............................................................................................................24
More Programming Options ................................................................................................................. 25
Control Other Devices in the Same Room as the Remote .................................................................. 25
Punch-Through ....................................................................................................................................25
Volume Punch-Through ...................................................................................................................25
Input Punch-Through:....................................................................................................................... 25
Channel Punch-Through: .................................................................................................................26
Learn IR Code(s).............................................................................................................................. 26
Have the BOCS Remote Learn IR Codes .................................................................................... 27
Have the Xtender Learn IR Codes ...............................................................................................28
Unlearn IR Code(s)....................................................................................................................... 29
Channel Tuning Delay...................................................................................................................... 29
Channel Tuning Mode (2 or 3 digits or use the +100 key)............................................................... 30
Adjust the Video quality of Xtender channels .................................................................................. 30
Show IR codes programmed into Remote/Xtender………………………………………………….....31
Using the Remotes....................................................................................................................................32
Controlling the TV .................................................................................................................................... 32
Controlling the Red Channel ...................................................................................................................32
Controlling the Green Channel ................................................................................................................ 32
Controlling the Blue Channel................................................................................................................... 32
Buttons will Illuminate .............................................................................................................................. 33
Repeater Installation and Use …...………………………………………………………………………..……35
Device Codess.......................................................................................................................................4239
Remote Control Special Function Quick Reference ...................................................................................48
Welcome 2
Page 3

Important Safety Instructions:
1) Read these instruction
2) Keep these instructions
3) Heed all warnings
4) Follow all instructions
5) Do not use this apparatus near water
6) Clean only with dry cloth
7) Do not block and ventilation openings. Install in accordance with the manufacturer’s
instructions.
8) Do not install near any heat sources such as radiators, heat registers, stoves, or other
apparatus (including amplifiers) that produce heat.
9) Do not defeat the safety purpose of the polarized or grounding-type plug. A polarized plug
has two blades with one wider than the other. A grounding type plug has two blades and a
third grounding prong. The wide blade or the third prong are provided for your safety. If the
provided plug does not fit into your outlet, consult an electrician for replacement of the
obsolete outlet.
10) Protect the power cord from being walked on or pinched particularly at plugs, convenience
receptacles, and the point where they exit from the apparatus.
11) Only use attachments/accessories specified by the manufacturer.
12) Use only with the cart, stand, tripod, bracket, or table specified by the manufacturer, or sold
with the apparatus. When a cart is used, use caution when moving the cart/apparatus
combination to avoid injury from tip-over.
13) Unplug this apparatus during lightening storms or when unused for long periods of time.
14) Refer all servicing to qualified service personnel. Servicing is required when the apparatus
has been damaged in any way, such as power-supply cord or plug is damaged, liquid has
been spilled or objects have fallen into the apparatus, the apparatus has been exposed to
rain or moisture, does not operate normally, or has been dropped.
WARNING – To reduce the risk of electric shock, do not expose this apparatus to rain or moisture.
WARNING – Batteries shall not be exposed to excessive heat such as sunshine, fire, or the like.
Welcome 3
Page 4

Welcome
Chapter 1
Welcome to the World of Whole-Home Entertainment Choices
The BOCS Xtender will allow you and your family to Xtend the entertainment
options from your main system to all the TVs in your home. This sounds like a
simple proposition, but until now you could only do this by adding redundant
equipment or have a very expensive and complicated audio/video distribution
system installed in your home.
Now You Can…
Reduce the number of boxes in your home – instead of a full stack under each TV,
one stack supplies the entire home
Watch any TiVo DVR from any TV
Pause a program in one room, continue watching in another
Play a DVD on all the TVs in the house simultaneously
Hook up an iPod for whole-home music
See what your kids are watching in the basement
Continue to view your movies or programs uninterrupted even if you need to
change locations in your home
And much, much, more...
Without…
Purchasing additional Cable/Satellite Boxes
Purchasing additional DVRs
Purchasing additional DVD Players
Purchasing costly and complicated universal remote control systems - all you
have to remember is RED – GREEN – BLUE
Welcome 4
Page 5

What You Need
Tools
Small pair of pliers
Flat-blade screwdriver
What's in the Box?
Xtender
Xtender Unit
SuperCombiner
Power Supply for Xtender
Universal BOCS Remote Control
Xtender Installation Kit
Coax Power Adaptor
Cable Finder
Color Coded Combination Audio/Video Cables (3)
IR Blaster Cables (3)
Welcome 5
Page 6

Basic Terms used in this manual
A/V Device
Anything like a DVD player, VCR, TiVo DVR, Cable box or other device that you
plug into Xtender to watch throughout your home
Xtender
The main Xtender device – looks like a small A/V device with Red, Green, and Blue
lights on the front
Wireless Remote
The wireless remote control that came with your Xtender system
Wiring Pack
An accessory (purchased separately) that includes all the cables used in a typical
installation plus a cable finder tool
SuperCombiner
The cable splitter/insertion device that came with your Xtender system
Welcome 6
Page 7
Remote Control Lights
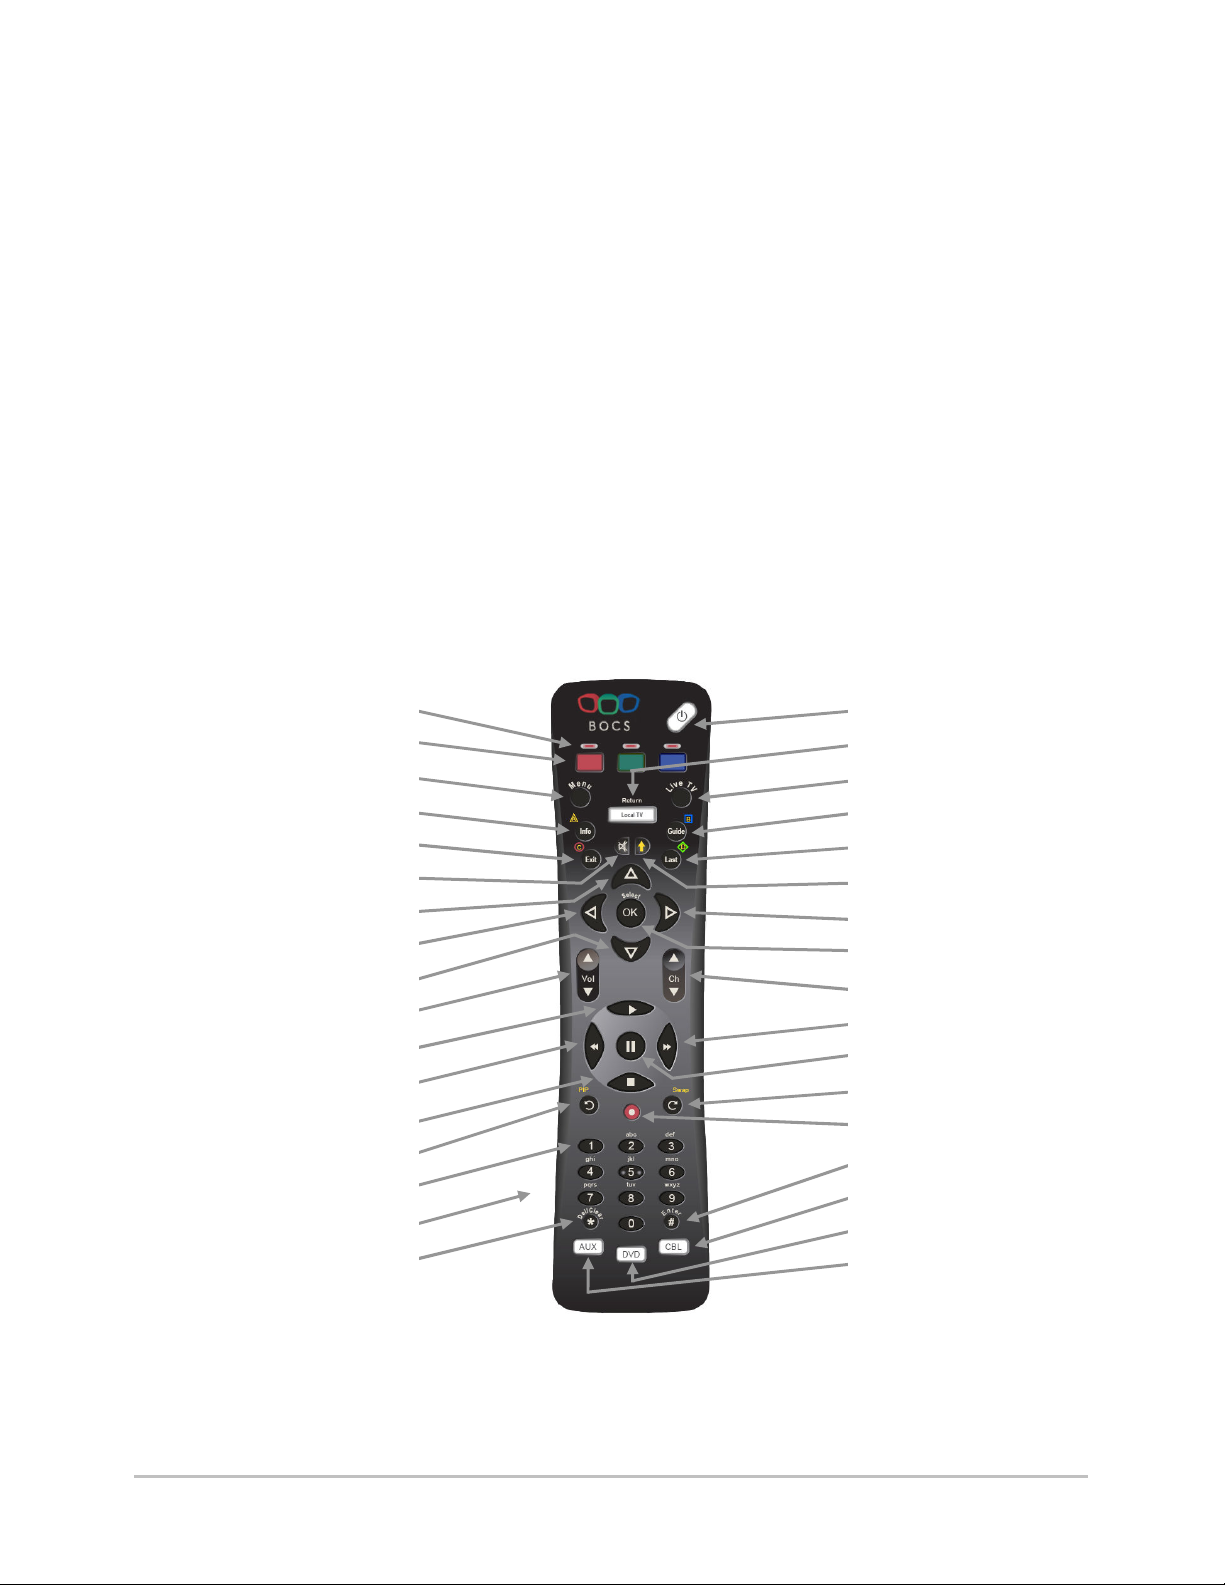
Xtender Channel Activity Lights
1
18. Power
Programming Mode
The power light comes on and stays on. Generally you have 10 seconds to enter a
command or the remote will exit Programming Mode.
Programming Success
The remote flashes the power button light two times
Programming Error
The remote fast flashes the power button light for one second
Remote Out-Of-Range
Three fast flashes of the Xtender Channel lights (Red/Green/Blue) – this occurs if
the remote is too far from the Xtender – either move closer to the Xtender or
purchase a BOCS Repeater to Xtend the range of the wireless remotes.
What’s on the Remote?
Xtender Channel Buttons 2
Replay and “PIP” 14
Number Keypad 16
Menu 3
Info and “A” 4
Exit and “C” 5
Mute 6
Stop/Slow 13
Del/Clear 17
Up 7
Left 8
Down 9
Vol +/- 10
Play 11
Rewind 12
+100 15
19. Local TV
20. Live TV
21. Guide and “B”
22. Last and “D”
23. Shift
24. Right
25. Select/OK
26. Channel +/-
27. Fast Forward
28. Pause
29. Skip
30. Record
31. Enter
32. Cable/Satellite
33. DVD/VCR/Laser Disk
34. AUX
Welcome 7
Page 8

What’s on the Remote (continued)
1. Xtender Channel Lights Blink when you send a command to one of the
devices connected to Xtender. For instance if you
press the Red BOCS channel button, then push play
the red light flashes letting you know that the play
command went to the Red channel. Three fast
flashes of all the Xtender Channel lights
(Red/Green/Blue) means the remote is out of range.
2. Xtender Channel Buttons The three new channels in your home – press RED
to watch and control whatever is plugged into the
Red input on Xtender (same for GREEN & BLUE)
3. Menu The DVD, DVR, or TiVo menu command, depending
on what you are controlling
4. Info/ “A” Push shift then info for “A” (a button common for
cable boxes)
13. Stop/Slow For most DVD players this is “Stop”, but many DVRs
(Like TiVo DVRs) do not commonly have a Stop
button so in those cases, this becomes the “Slow
Play” button
14. Replay Typically makes a DVR go back about 15 seconds
and play a clip again. For DVD it skips backward and
if you push Shift first it is the “PIP” or Picture-inPicture button
15. +100 Pushing shift then 1 gives the +100 command,
sometimes used to get to channels that are >100
18. Power In general, this button turns your TV on and off. If
this is pressed within 10 seconds of pressing a
BOCS channel button, it powers on/off the device
plugged into that Xtender channel (if the DVD player
on the Red channel is off – just press Red and
Power within 10 seconds). Press Shift-Power to
power-down the Xtender system (so any Cable or
Antenna channels that you cannot watch when
Xtender is on are now visible). A double flash
indicates programming success, a fast flash
indicates programming error, and an alternating
Power and Xtender Channel lights (Red/Green/Blue)
indicates remote is out of range of Xtender.
19. Local TV After watching a BOCS channel, pressing this
button returns you to watching normal
Cable/Antenna through your local TV. So you know
you are back to local control, the remote
automatically tunes to the “Favorite TV channel”
(see programming your remote).
34. AUX Any set of codes can be programmed into this mode
button but it is most commonly used for an audio
receiver. Note that if you use a separate receiver to
listen to your TV you can make the VOL+/- button
always send volume commands to the AUX device
instead of directly to the TV by following the “Punch
Through” procedure in “Setting Up the Remote”
Welcome 8
Page 9
What’s on the Front Panel?
1
2
3
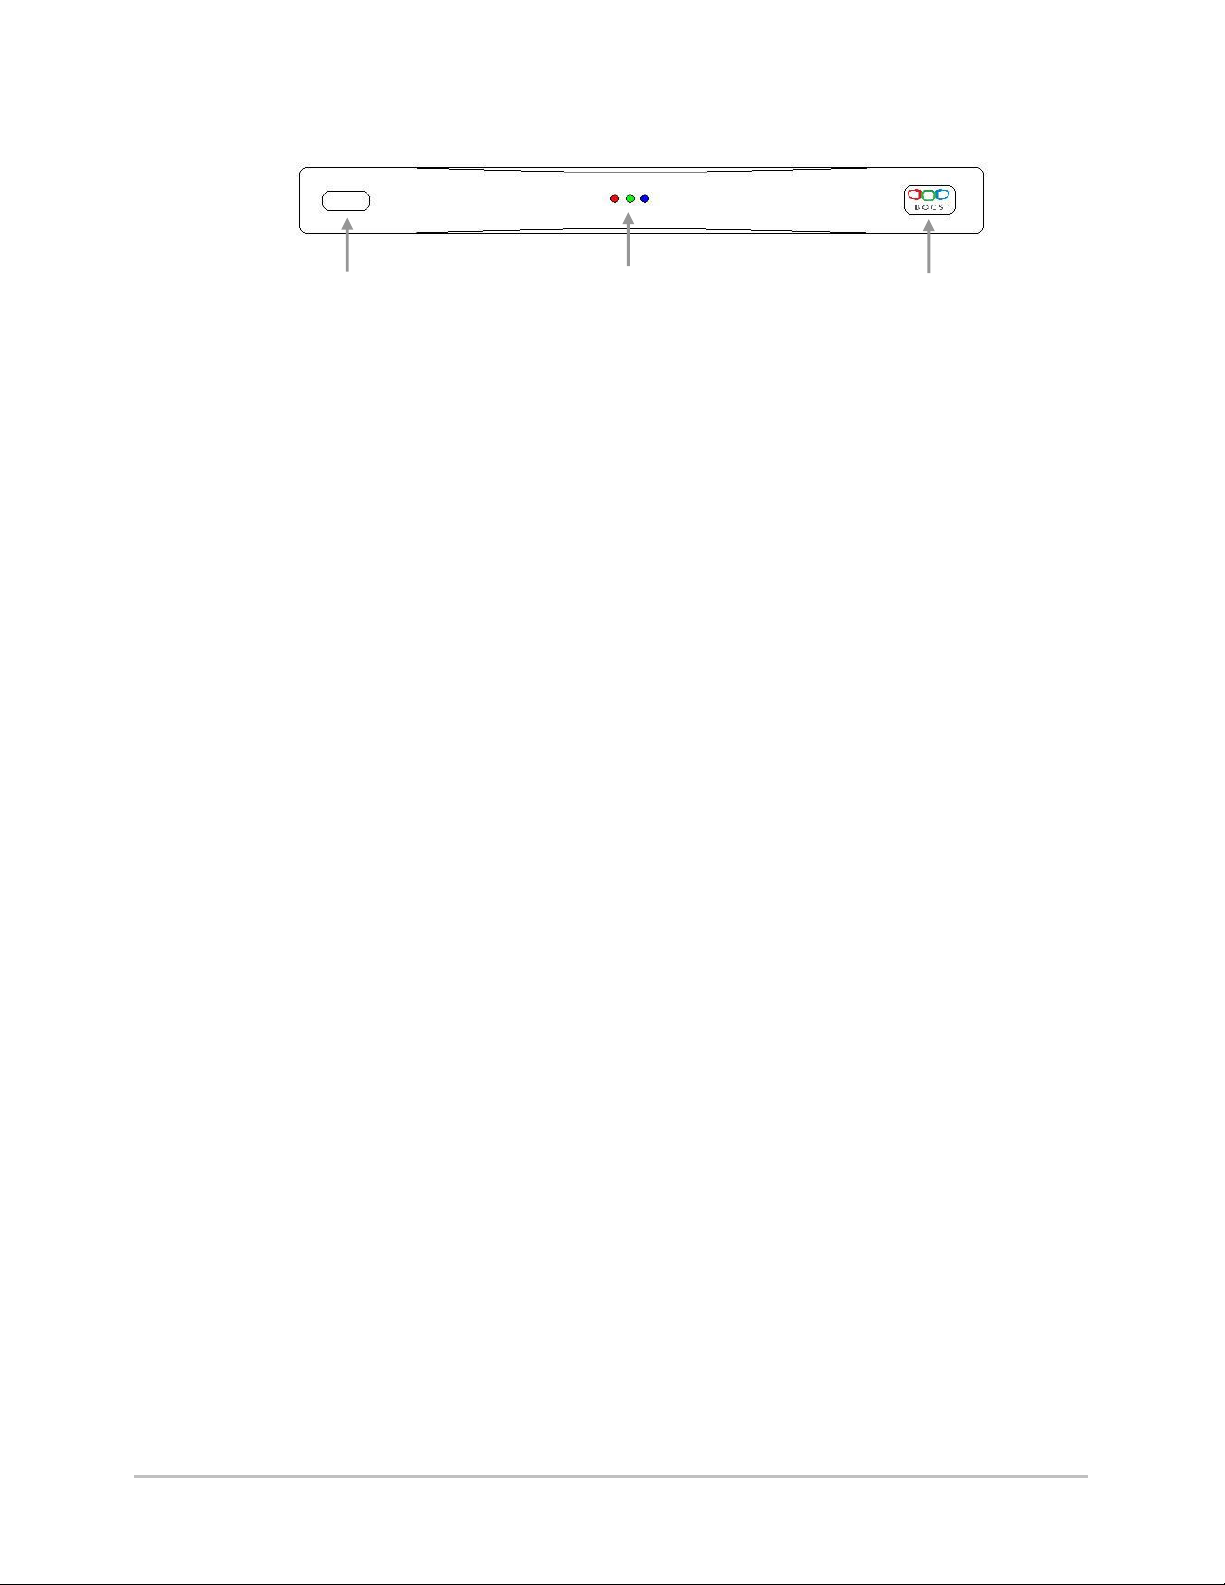
1. Learning Window Xtender has the ability to learn new codes to work
the devises attached (if the standard codes don’t
work properly). There is a simple procedure to follow
in the “Programming the Remote” section. This
window is where you point your remote control
during that process to allow Xtender to learn to
control things that are plugged into it.
2. Xtender Activity Lights These lights flash when anyone in the home is
controlling an Xtender channel with a wireless
remote control. The Red light flashes when using the
Red channel, Green for green channel, and Blue for
blue channel. All of the lights glow when Xtender is
powered on. All of the lights flash together when you
are pairing a remote to Xtender.
3. Remote “Pair” Button Each Xtender remote control must be paired to an
Xtender – this prevents your remotes from
controlling your neighbor’s Xtender as well as the
other way around. If you buy an extra remote or one
of your remotes needs to be re-paired, just press
this button then hold down the “Menu” and
“Channel +” buttons on the remote you would like to
pair.
Welcome 9
Page 10
What’s on the Back Panel?
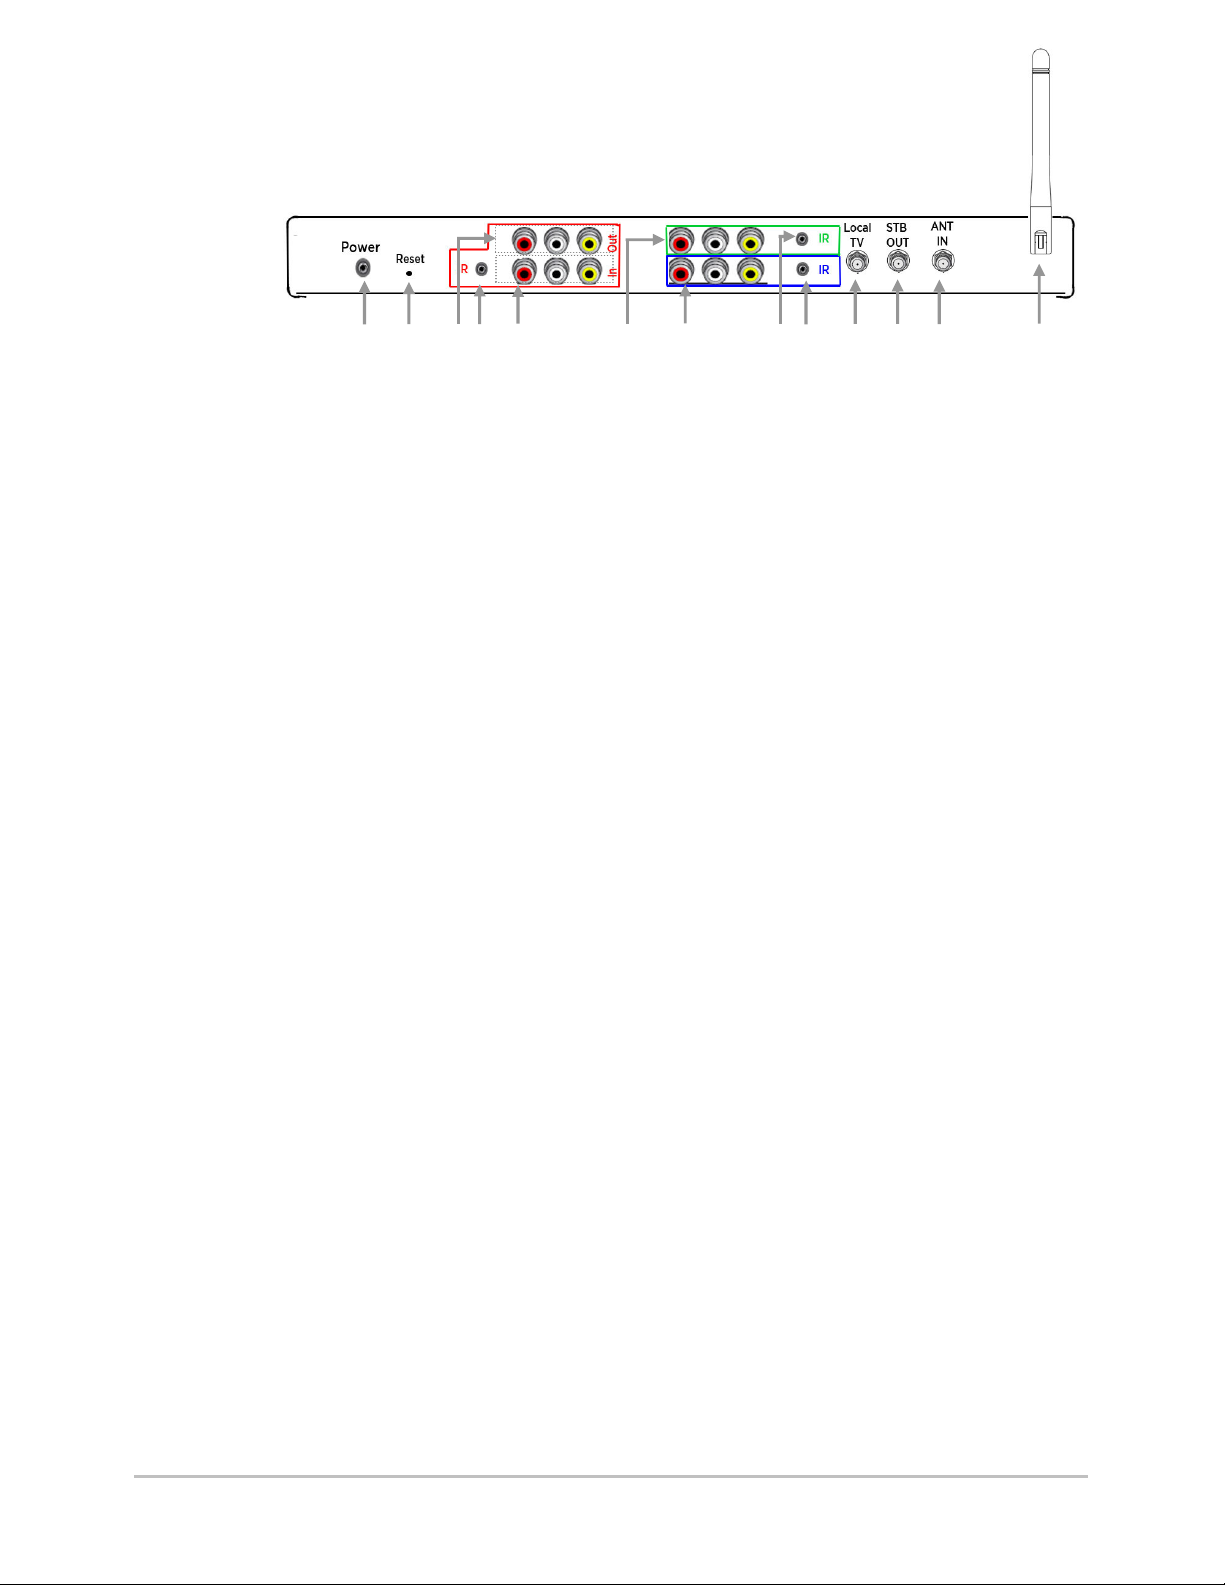
1. Power The AC adapter plugs in here – only use the adapter that
2. Reset Button Pushing this button resets Xtender to its factory default
3. Red Channel Input Composite Video (Yellow) and Stereo Audio (Red/White)
4. Red Channel IR Output A cable with a stick-on infrared emitter on the end is
5. Red Channel Video Output This is used to pass a composite video/stereo audio
6. Green Channel Input Whatever you plug in here will appear on the Green
7. Blue Channel Input Whatever you plug in here will appear on the Blue
8. Green Channel IR Output A cable with a stick-on infrared emitter on the end is
9. Blue Channel IR Output A cable with a stick-on infrared emitter on the end is
10. Local TV Out Coax cable output used for watching Cable/Antenna
11. Antenna Out Coax cable output used for connecting DVR, TiVo, Cable
12. Antenna IN Coax cable input – this must be connected directly to
13. Antenna Swivel antenna allows Xtender to communicate with
Welcome 10
1 2
3 4
5
6
7
came with Xtender!
settings
input to Xtender – whatever you plug in here will appear
on the Red channel throughout the house
plugged in here and the IR emitter is stuck onto the front
of your a/V device so Xtender can send it commands
from your wireless remotes – Cables available in the
optional wiring pack.
signal from your A/V device to a local TV
channel throughout the house.
channel throughout the house.
plugged in here and the IR emitter is stuck onto the front
of your A/V device so Xtender can send it commands
from your wireless remotes – cables are available in the
optional wiring pack.
plugged in here and the IR emitter is stuck onto the front
of your A/V device so Xtender can send it commands
from your wireless remotes – cables are available in the
optional wiring pack.
programs or Xtender channels on a TV located near
Xtender. Note that if this output is used then one
Xtender remote must be dedicated to this TV – see
programming the remote.
Box or anything else that needs Cable/Antenna input.
Note that Xtender channels are not available on this
output.
the Coax wall outlet or run directly to the
SuperCombiner.
remote.
8
9
10
11
12
13
Page 11

Installation Overview
Easy as 1-2-3
Step 1 – Install SuperCombiner
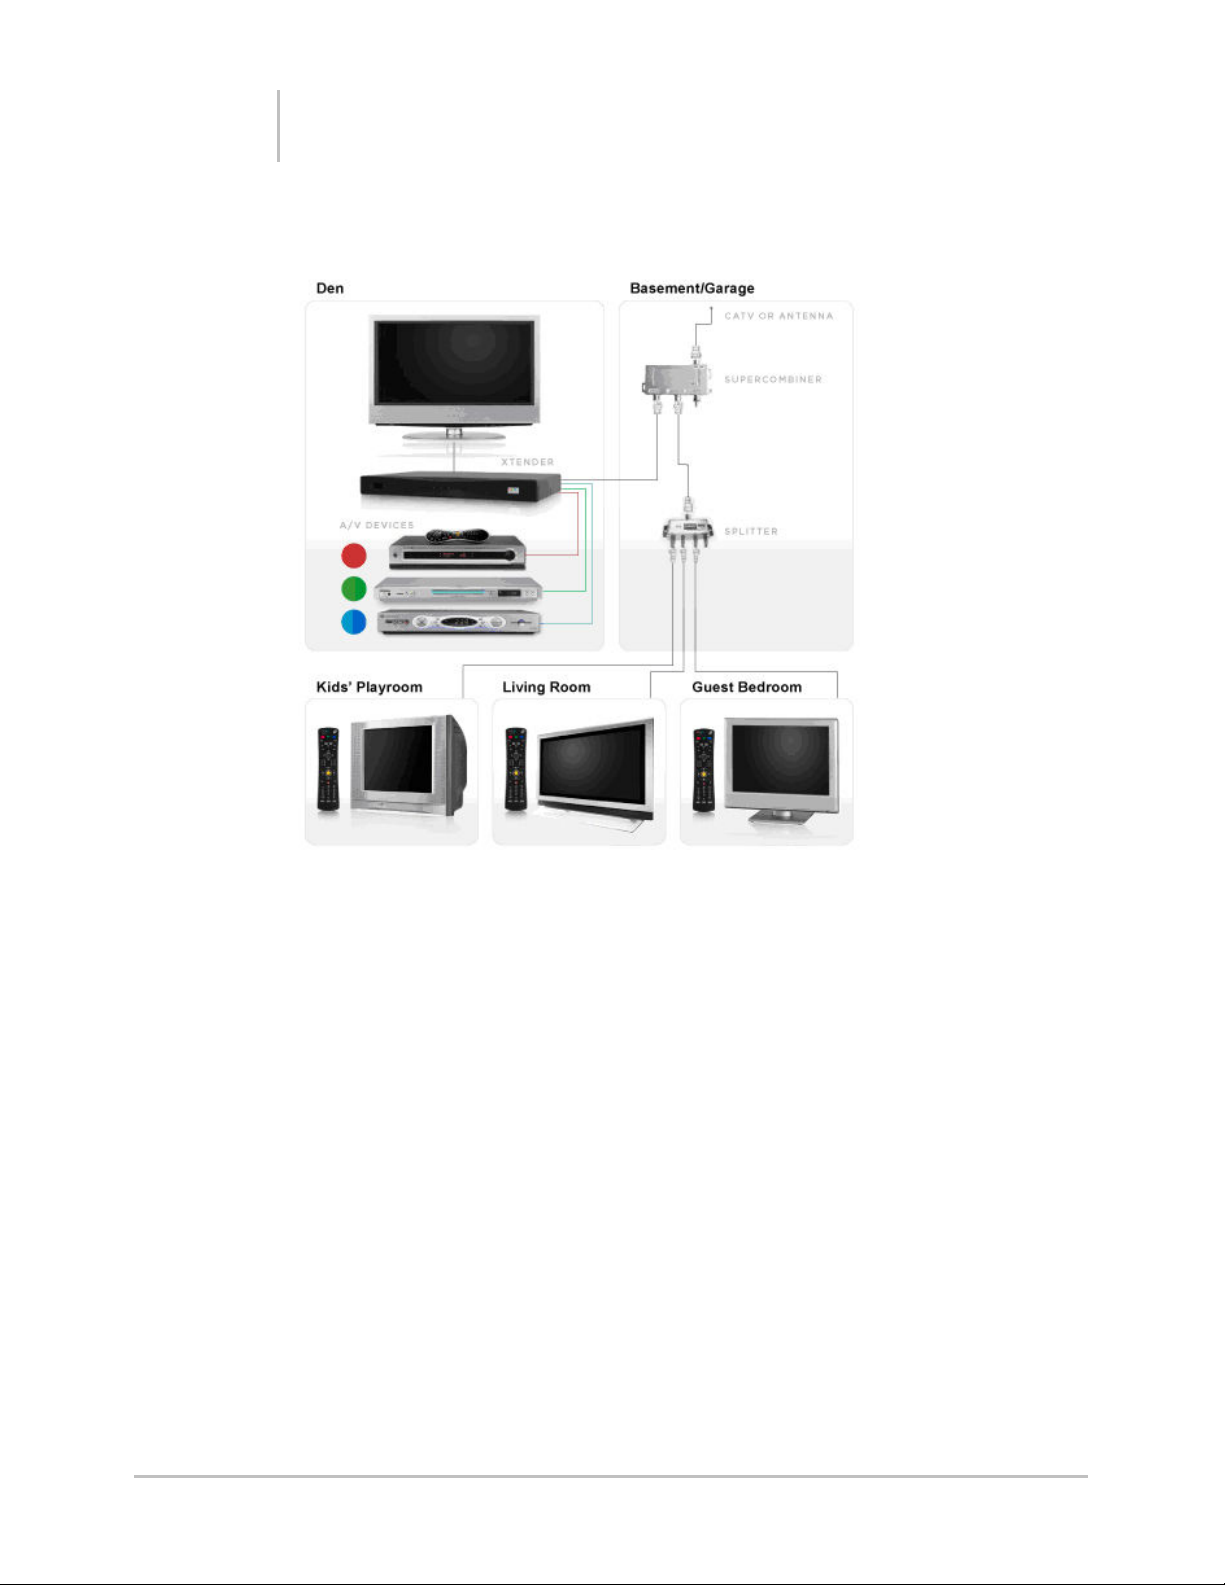
The SuperCombiner is a device that is installed just before your main
home “root splitter” to distribute your new BOCS channels all over your
home. In this step you will:
Decide where to put your Xtender.
Plug a special Cable-Finder into the nearest CATV outlet.
Find and open your cable splitter box.
Find the coaxial wire that goes to the room where you put Xtender.
Install the SuperCombiner.
Step 2 – Install the Xtender Unit
Xtender is connected to the three devices you want to control (just like
hooking up a new DVD player).
Xtender is connected (using stick-on IR emitter cables) to each of those
same three devices so Xtender can control them.
Xtender is connected to power and the Coax wall jack.
Step 3 – Program the Remote Controls
By punching in a few codes, the remote controls are programmed so they
know how to control both local TVs as well as the devices plugged into
Xtender.
Setup should take no more than 20 minutes for a typical home
A Quick Start Guide is provided in the Xtender package with large pictures of the
entire installation.
Installing the SuperCombiner 11
Page 12
Chapter 2
Step 1 Installing the SuperCombiner
Select Location for the Xtender
Minimum Location Requirements
• Coaxial cable outlet nearby
• AC power nearby
Likely Locations – Choose One:
• If you already have a stack of A/V equipment in one place (TiVo DVR, cable box,
satellite box, DVR, DVD jukebox etc.), you can put Xtender on top of that stack of
equipment.
• Or – you can move all that equipment to an out-of-the-way location (e.g. basement,
closet, or an office) as long as you have power and a coax cable jack there.
Installing the SuperCombiner 12
Page 13
Parts Needed
COAX Power Adaptor
Xtender Power Supply
s Needed
SuperCombiner
Cable Finder Tool
Part
Short COAX Cable
Power the Coax Wire
You will be installing the SuperCombiner, but the Xtender unit requires that the
Xtender have it’s own special connection to the SuperCombiner so the first step is
to determine which coax wire runs to the room where you decided to put the
Xtender. If you are in a new home and are really lucky, that wire will be labeled
with the room name in your cable splitter box. If not, we provide a tool in the
installation kit so you can find the right wire.
To find the right wire, you will apply power to the coax wire near Xtender so you
can use a little lightbulb (in the cable-finder tool) to test the different wires in your
cable splitter box – watching for wire that lights up the light.
Go to the nearest coax wire jack to the desired Xtender location and unplug any
cable attached to it.
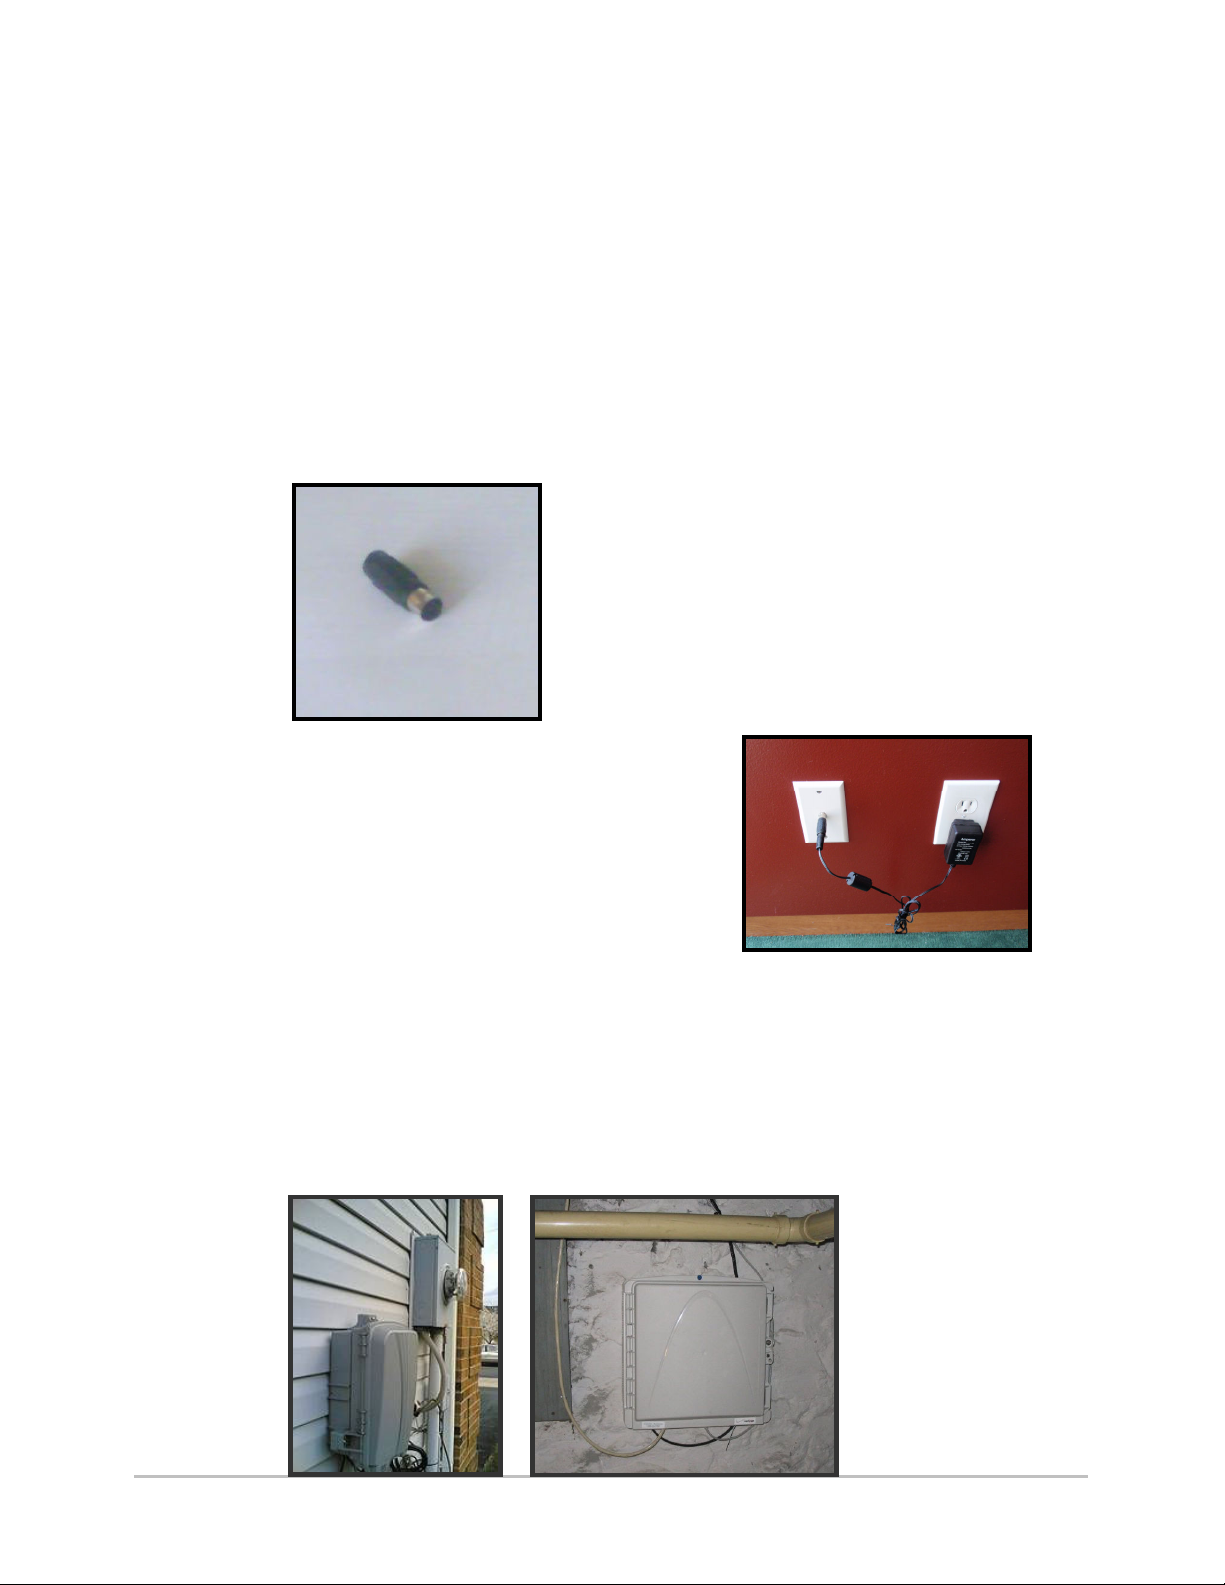
You are looking for the adapter that looks like this – it
comes with the optional installation kit.
Now, plug the power adapter that came with
your Xtender into the cable finder adapter,
and plug it into the coax wall outlet near
Xtender – you should now have something
that looks like this…
Warning do not plug the coax adapter into a
satellite TV outlet or you may damage your
satellite TV system!!
Locate Your Cable Box
This is usually found in the basement, garage or on the outside of your home and
will most likely look like one of the photos below:
Note that you might have both a telephone and a Cable-TV box and they
sometimes look alike.
Installing the SuperCombiner 13
Page 14
Locate the Splitter
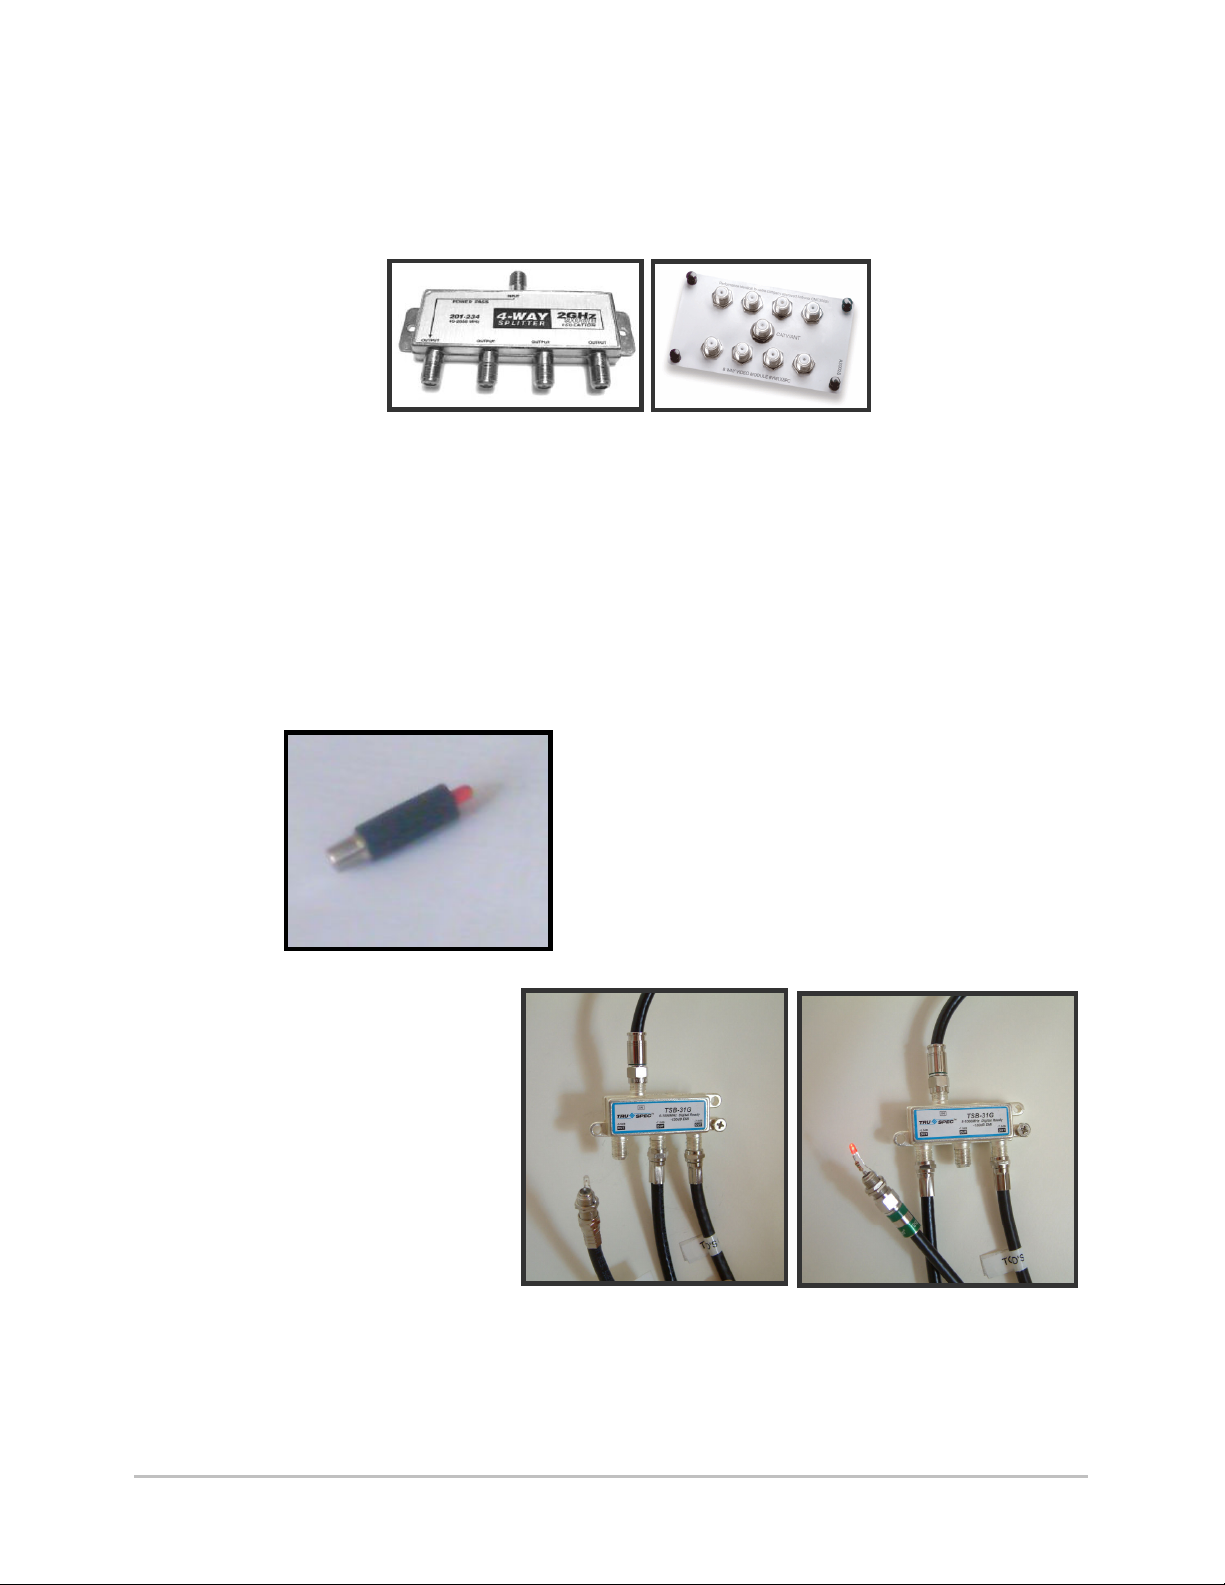
It will be in your cable box and will likely look like one of the following:
Note It will have wires hooked into most or all of its connectors, so it might be behind a
cluttered mess.
Find the Powered Cable
The cable that was powered in the previous step should be connected to one of the
outputs of the splitter. To determine which cable has been powered, unplug the
cables one at a time and connect the Cable Finder Tool. If the red light doesn’t
illuminate plug it back into the splitter. When you find the cable that illuminates the
red light, you have found the cable running to Xtender.
Simply disconnect the
cables one at a time
and plug them into the
cable-finder tool.
When you find the one
that illuminates the
light, you found the
correct cable.
Wrong Cable!! Correct Cable!!
The Cable Finder is a small light attached to a coax
connector – it comes with the optional installation
kit.
Note If you check all the cables connected to your splitter and none illuminates the
Cable-Finder light, see the troubleshooting guide.
Installing the SuperCombiner 14
Page 15
Connecting the SuperCombiner
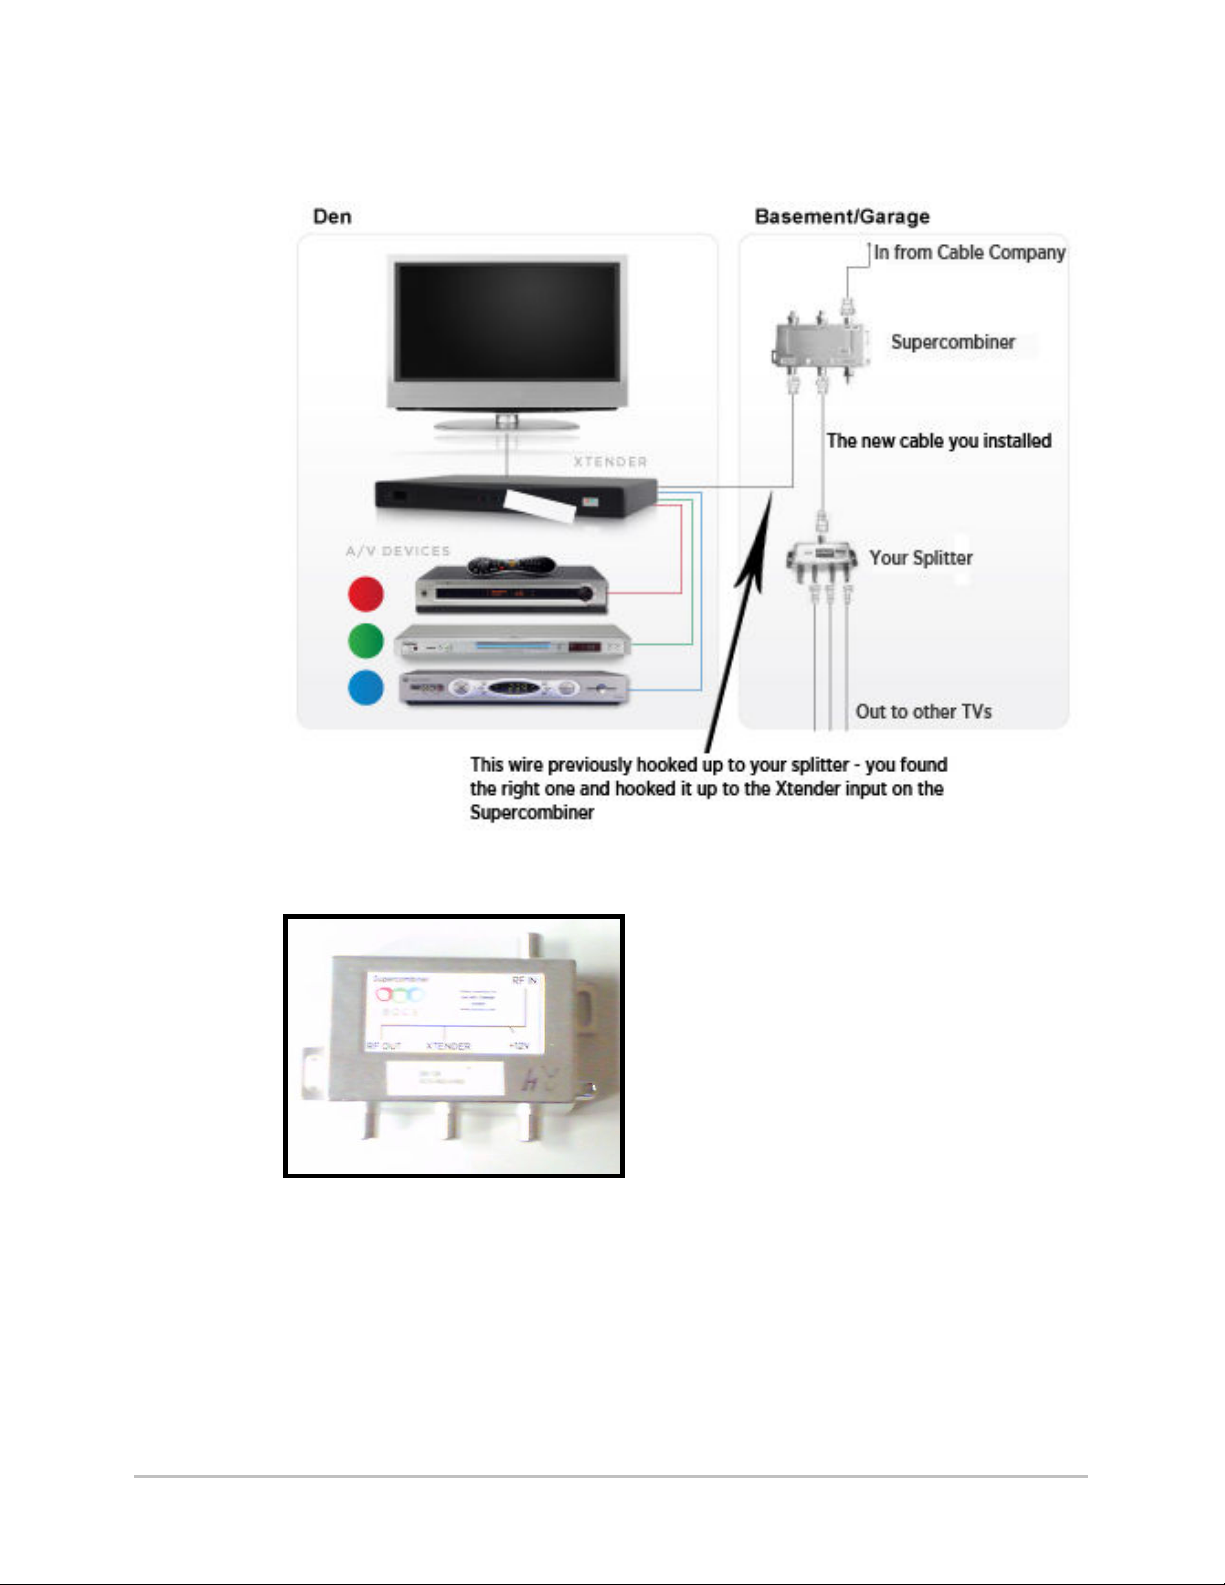
1) Plug the cable you located with the Cable
Finder Tool in the step above into the Xtender
port of the SuperCombiner.
2) Unplug the IN cable from your current
splitter and connect it to the RF IN on the
SuperCombiner.
3) Connect a short coax wire between the
OUT of the SuperCombiner and the IN of your
splitter.
Important When you are finished with the system installation, make sure to close the box
back up – especially if it is outside the home – you need to put everything back as
it was to reduce water/weather exposure to those connections.
Installing the SuperCombiner 15
Page 16
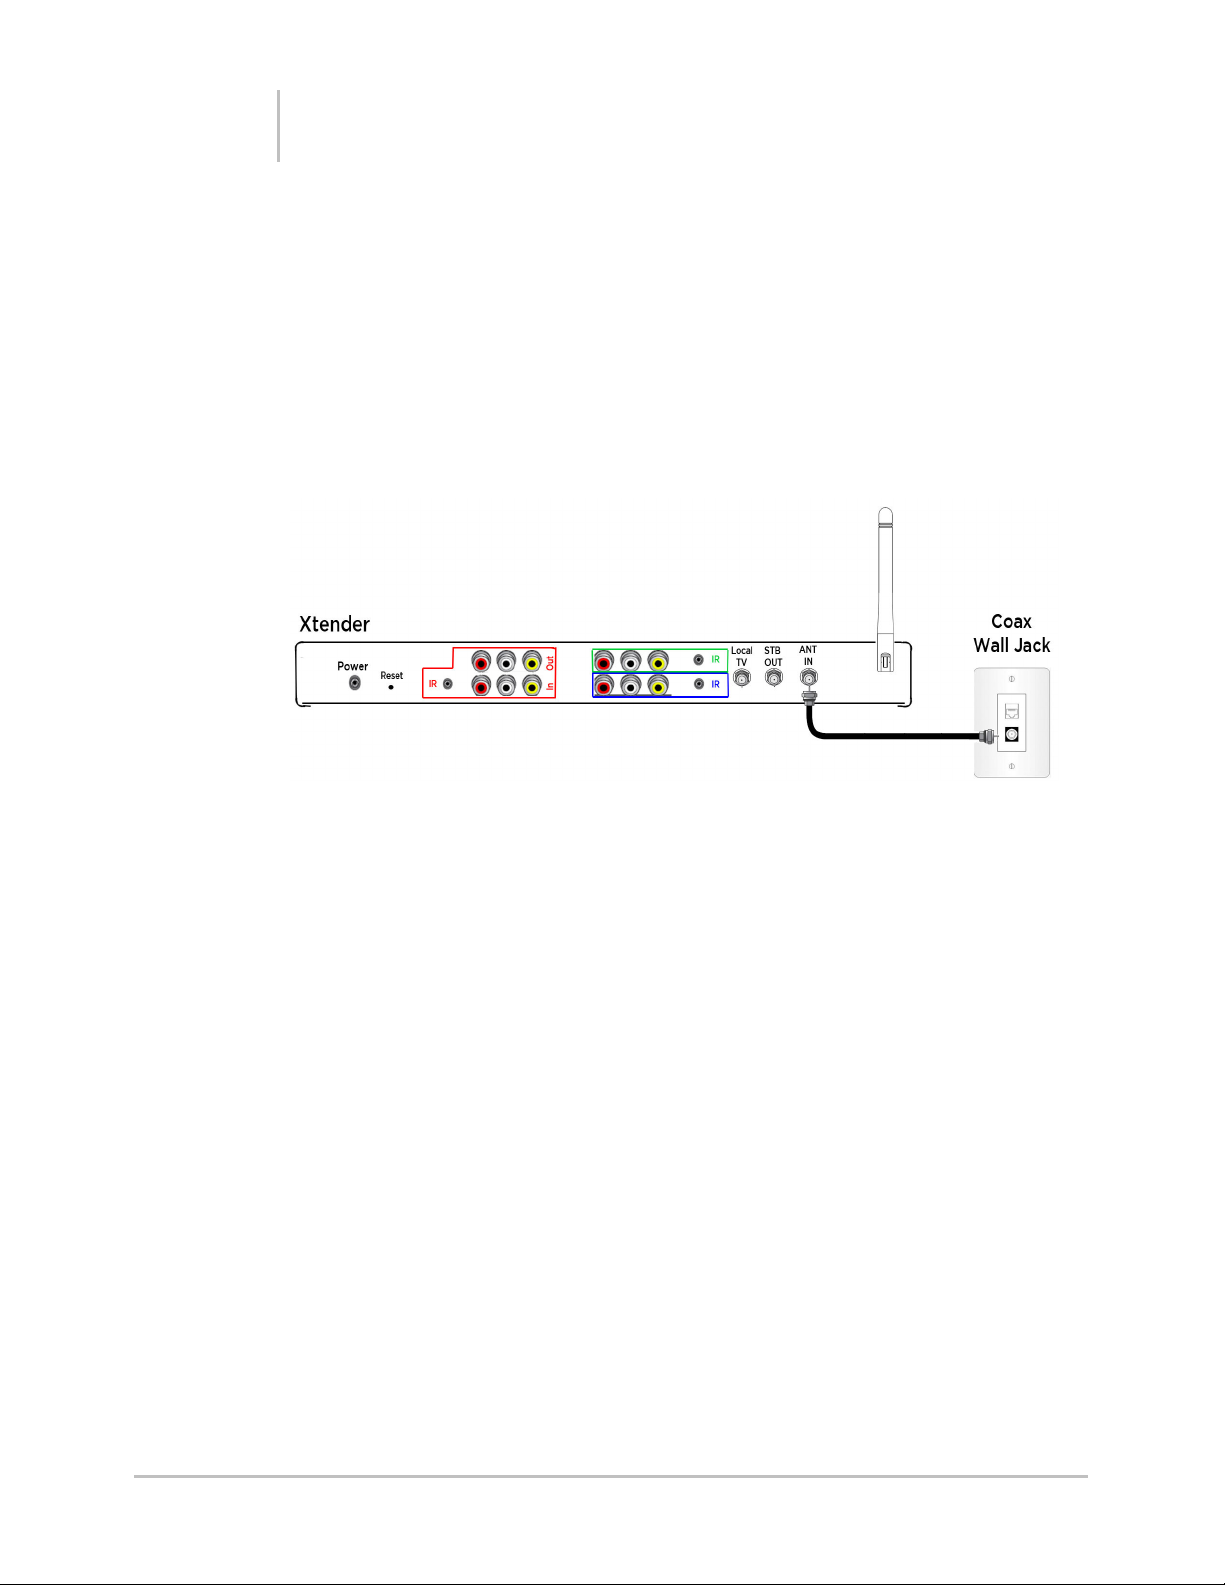
Chapter 3
Step 2 Installing the Xtender
Connect Xtender to Power
Remove the coax adapter and connect a coax cable from the nearby coaxial wire
wall jack (usually located on a plastic plate mounted on a wall) to the “ANT IN” jack
on Xtender.
Make sure that you rotate the antenna so that it points straight up – this will give
you the best range with your wireless remotes.
Red, Green & Blue Channel Set-up – Connect the Audio/Video
devices to the Xtender
Important Place Xtender on the top of your equipment stack, because any equipment placed
on top of the Xtender can impede performance.
Chose the devices
Typical choices are: Tivo, DVD jukebox, Cable Set-Top-Box, Windows Media
Center, VCR, VOD box, or anything else with composite audio/video output.
Installing the Xtender 16
Page 17
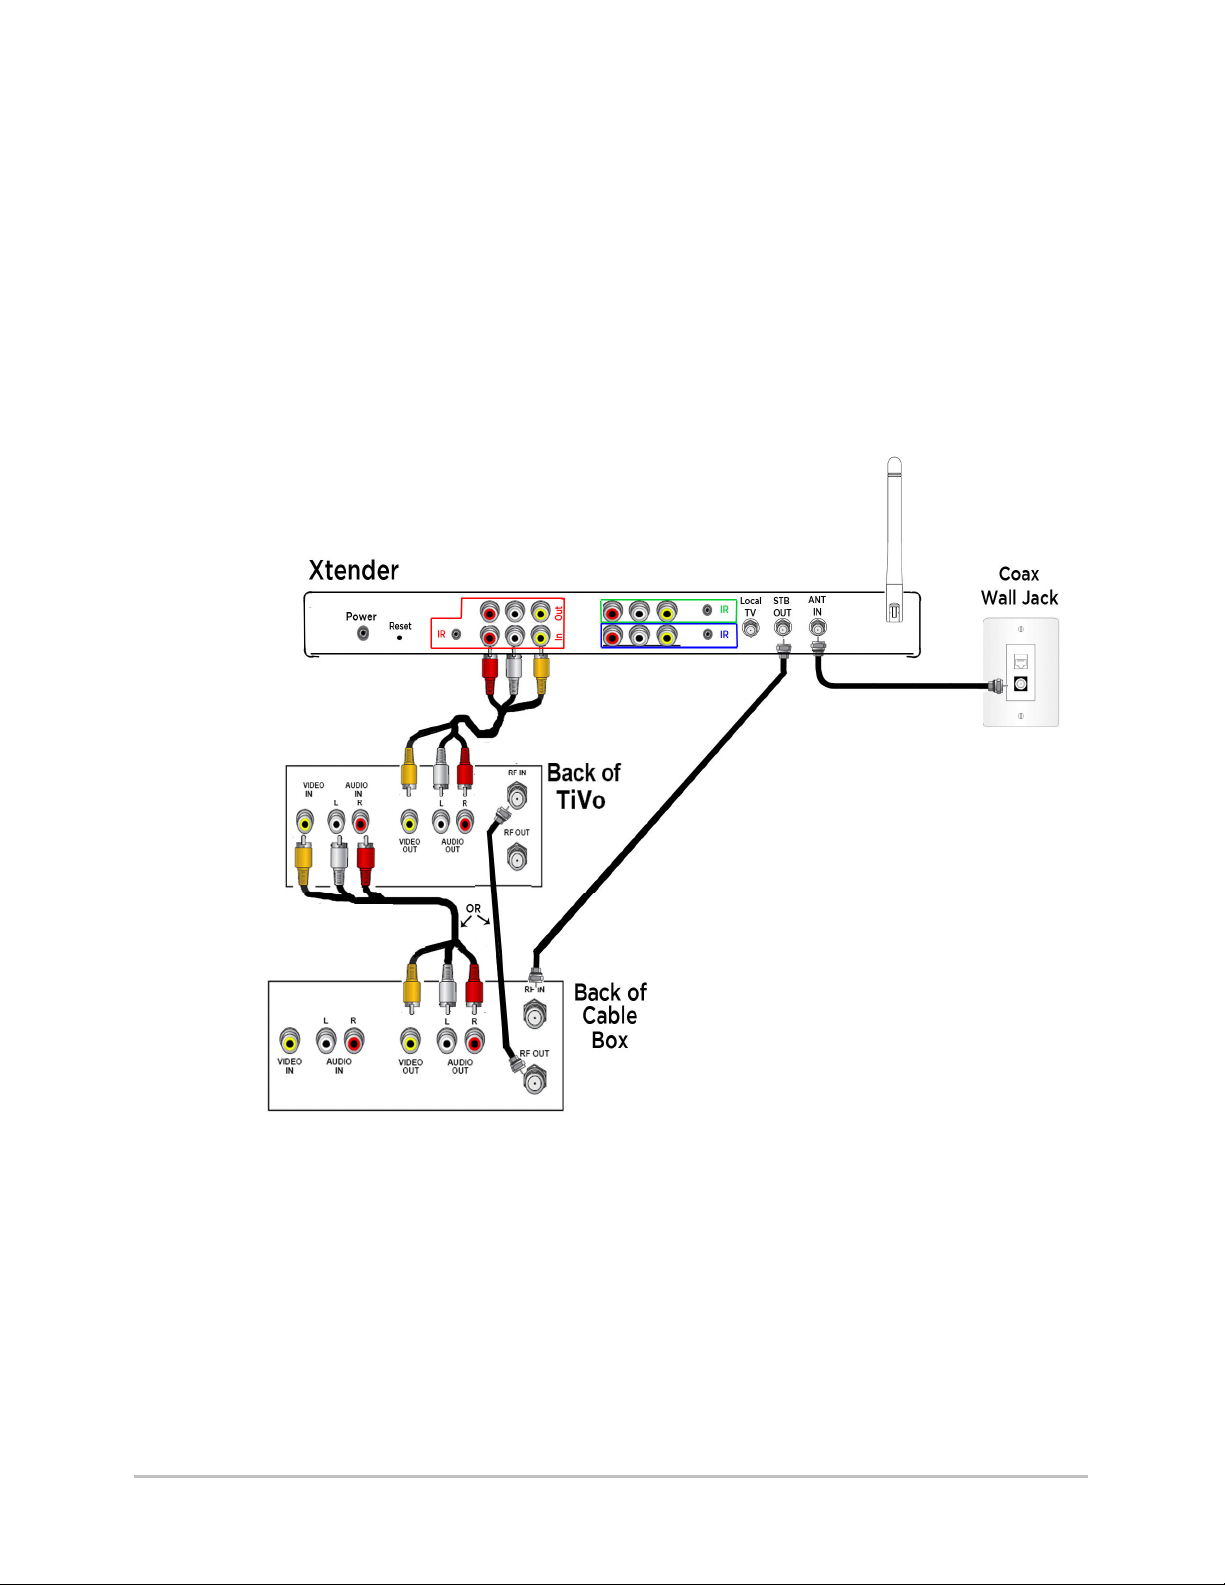
Red Channel Set Up
• (Example) TiVo DVR with a cable box that it controls
Connect the Device to the Xtender
Connect the Audio/Video output of the device to the inputs on the Red channel of
the Xtender. (white and red are audio Left and Right, yellow is composite video)
Let’s start with a more difficult one – a TiVo DVR that uses a digital cable box to
change channels and receive digital cable channels. The cable box gets its input
from the Xtender “Antenna Out” connector, it passes channels to the TiVo DVR
either using an A/V (R/W/Y) cable or another coax and the TiVo output goes into
the Xtender red channel (notice in the “Connecting Your TV to Xtender” section,
the red channel can pass its signal through to a TV directly using the Red Channel
Out connectors.
Note If any of your devices need a cable TV connection (TiVo, set-top-box etc), connect
a coax cable from the “STB OUT” jack on Xtender to that Device. If more than one
device needs a cable connection you will have to use a splitter to provide each
device a signal connection from the “STB OUT” jack on Xtender.
Installing the Xtender 17
Page 18
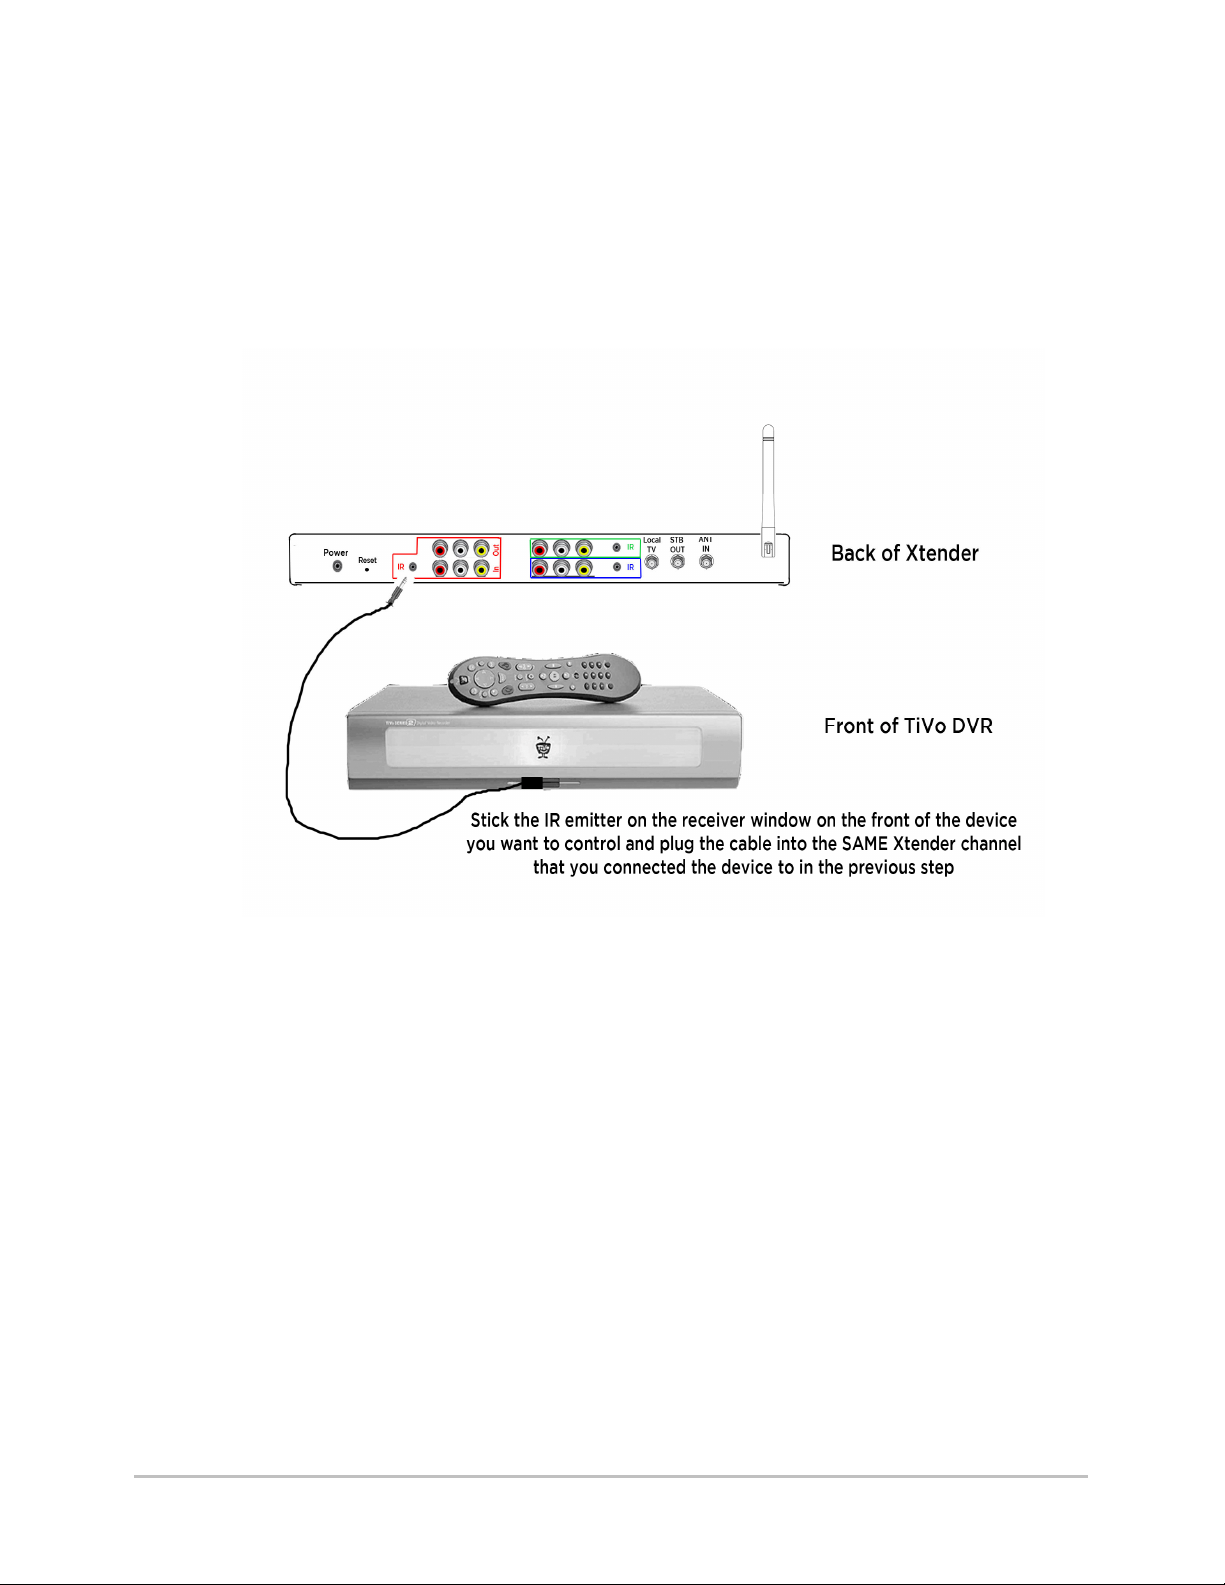
Connect the “IR Blaster”
This cable lets Xtender control the A/V device – IR Cables come in the optional
wiring pack.
Locate an IR cable in your Xtender Installation Kit (sold separately). Plug the
connector of the IR cable into the “IR Out” on the Xtender Red Channel.
Locate the IR window on the device that you have plugged into the Red Channel.
Peel the back off of the tape on the other end and stick it over the IR window of the
audio/video device you previously plugged into the Red channel input.
Important Make sure that if you plug a device into an Xtender channel that the IR emitter for
that device is plugged into the SAME COLOR as the A/V cables to that device.
Help If you are unsure of where the IR receiver is on your Audio/Video device, it usually
is a small red-tinted plastic “window” on the front panel. You can also hold the
remote (that originally came with that device) very close to the Audio/Video device
press one or more buttons on the remote while moving it slowly over different
areas of the Audio/Video device front panel and determine the location (of the
remote) where the device responds to the button presses.
Green Channel Set Up
• Example - Stand-Alone Tivo
Connect the A/V Device to the Xtender
Repeat the same steps as the Red Channel. That is, connect your TiVo device to
Xtender by plugging the Audio/Video connectors from the audio/video outputs on
the Tivo (or other A/V device) to the inputs on Xtender’s Green Channel.
Connect the “IR Blaster”
Repeat the same steps as the Red Channel by connecting the IR blaster to the IR
window on the device you are plugging into the Green Channel.
Installing the Xtender 18
Page 19
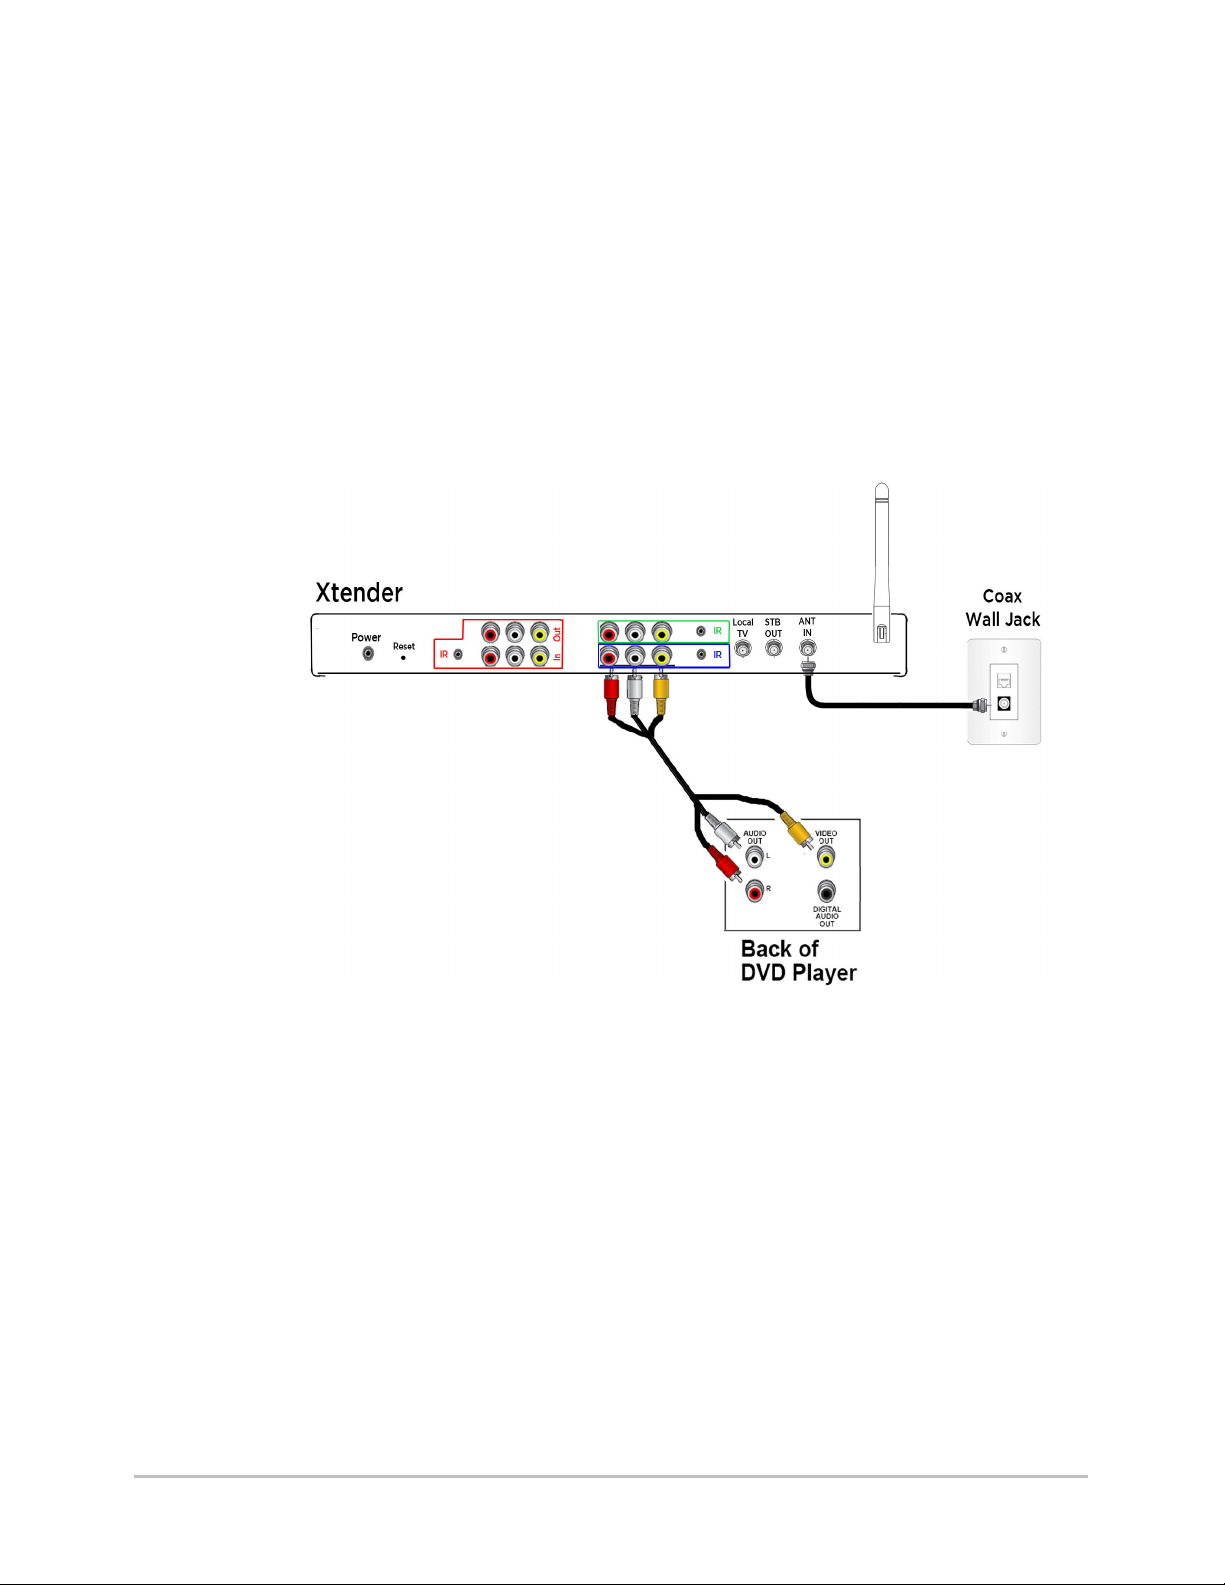
Locate the IR window on the device that you have plugged into the Green Channel.
Peel the back off of the tape on the other end and stick it over the IR window of the
audio/video device you previously plugged into the Green Channel input.
Blue Channel Set Up
Example - DVD Player/Changer
Connect the Device to the Xtender
As an example, we will connect a DVD player to the Blue Channel.
Repeat the same steps as the Red Channel. That is, connect your DVD device to
Xtender by plugging the Audio/Video connectors from the audio/video outputs on
the DVD player to the inputs on Xtender’s Blue Channel.
Connect the “IR Blaster”
Repeat the same steps as the red channel by connecting the IR blaster to the IR
window on the device you are plugging into the Blue Channel
.
Connecting Xtender’s Power Supply
Locate the power supply that came with Xtender. Plug power supply into “Power”
on the back panel of Xtender. Plug the power supply into a wall outlet or plug strip.
Checking Power Supply
• Check that the Xtender power lights are on
Installing the Xtender 19
Page 20
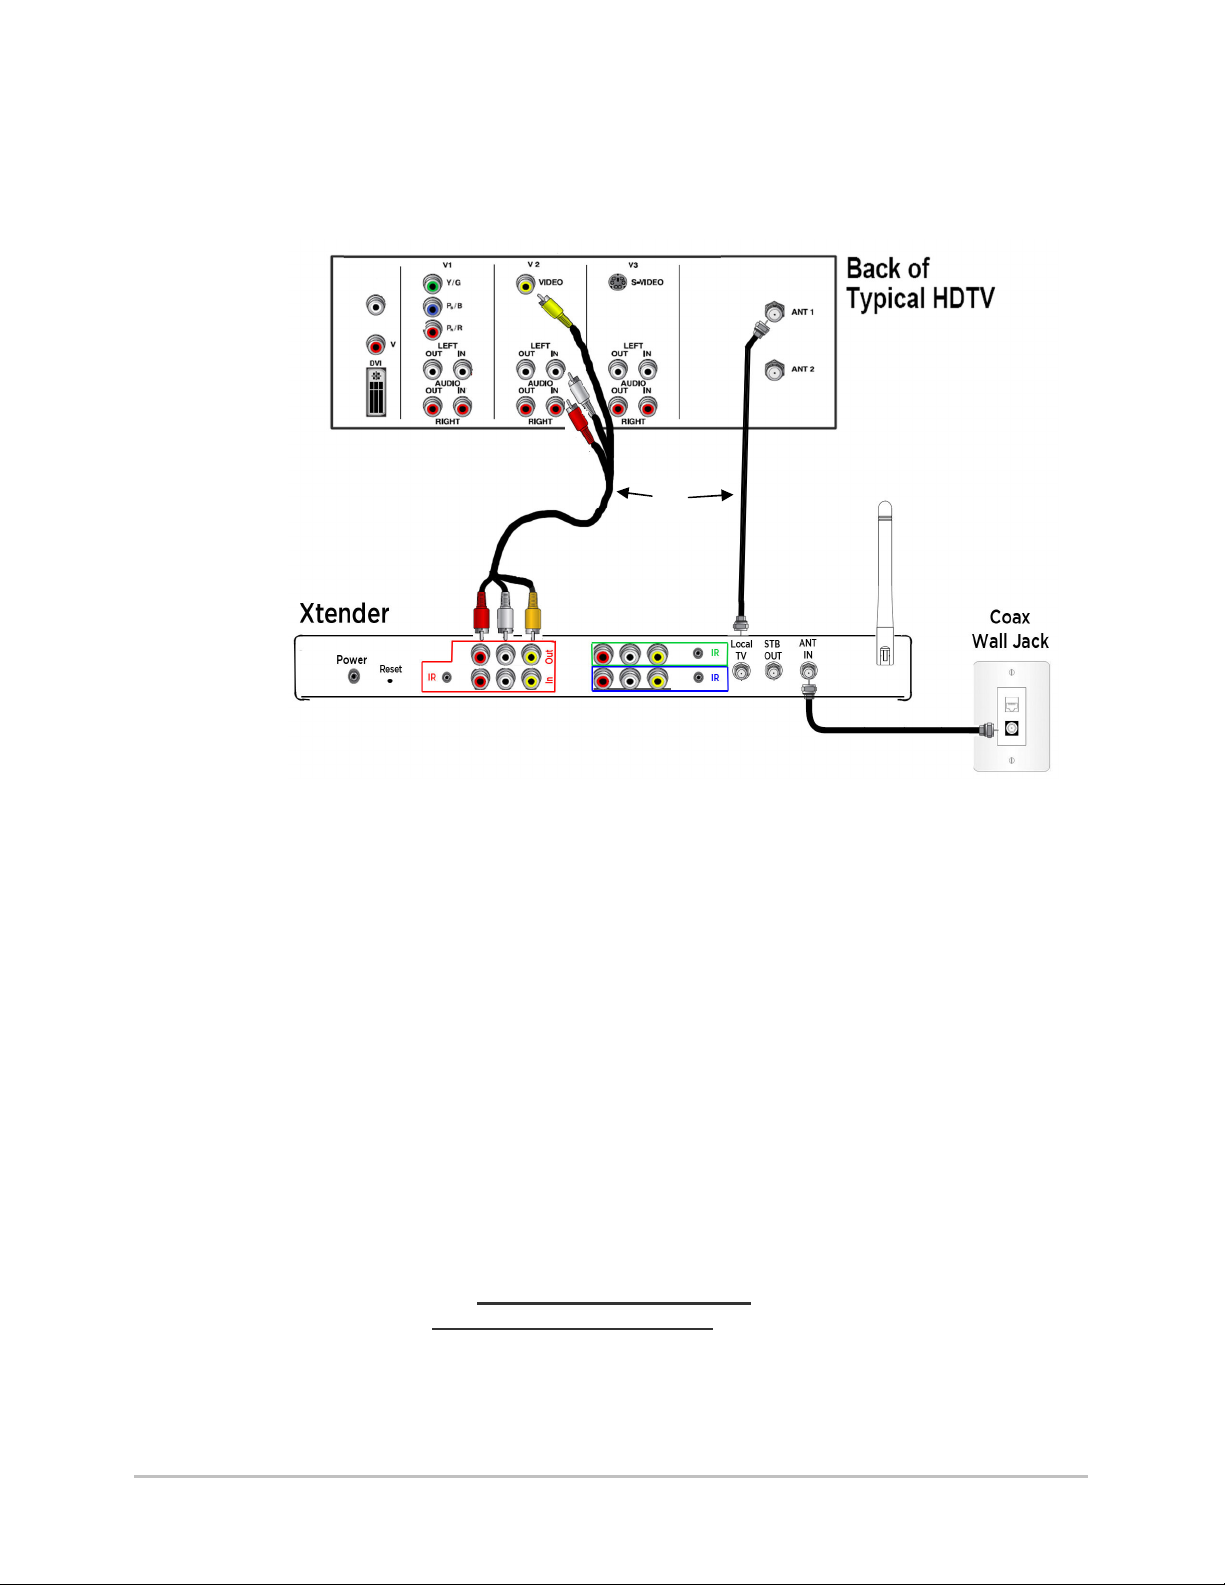
Optional – Connect to the local TV
Xtender’s job is to connect the rest of the TVs in your home to your stack of A/V
equipment, and as previously described, you might very well have moved your
equipment to some out-of-the-way location. If, however, your Xtender is now
sitting next to a TV, that TV needs to get connected.
OR
You can connect your TV to Xtender using the Local-TV coax output from Xtender
– now this TV will function just like all the rest of the TVs in your home and have
full access to all the Xtender channels. The “Local TV” output on Xtender will pass
cable TV, satellite, and Over the Air (whatever you have hooked up to your in-home
COAX system) to the local TV as well as provide the three (Red, Green, Blue) BOCS
channels to the local TV.
NOTE: If you use the LOCAL-TV output on Xtender you must set the remote for
that room as the “Local Master” – see below
If you would like to have even better video on the local TV, Xtender has a pass
through port on the Red channel – if you connect a composite A/V cable from this
output to your TV’s Video-1 input you will be able to switch inputs on your TV (to
Video-1) to get the best possible video from whatever is plugged into the Xtender
Red channel.
Remote Control Setup for Local TV - Set Local Master remote
If you are using the coax connection to the local TV, then the remote you intend to
leave in that room to work that TV needs to be uniquely identified to the Xtender.
Make sure the remote is paired to the Xtender unit (see instructions in the
“Remote” section
and stays on –
), Hold down Menu and Vol+
press select/OK to confirm
until the power light comes on
.
Installing the Xtender 20
Page 21
Chapter 4
Step 3 Programming the Remotes
Three Steps to Programming the Remotes
1. Pair remotes with your Xtender
2. Pick a room, program a remote to work the TV in that room.
3. Program red, green and blue channels
4. Program the rest of the remotes for each room
Step 1 – Pair Remotes
Why am I doing this? Just like you only want your cordless phone talking to your
own base station/phone line, you only want your remotes controlling your Xtender
and not your neighbor’s. This step “pairs” your remotes to your Xtender.
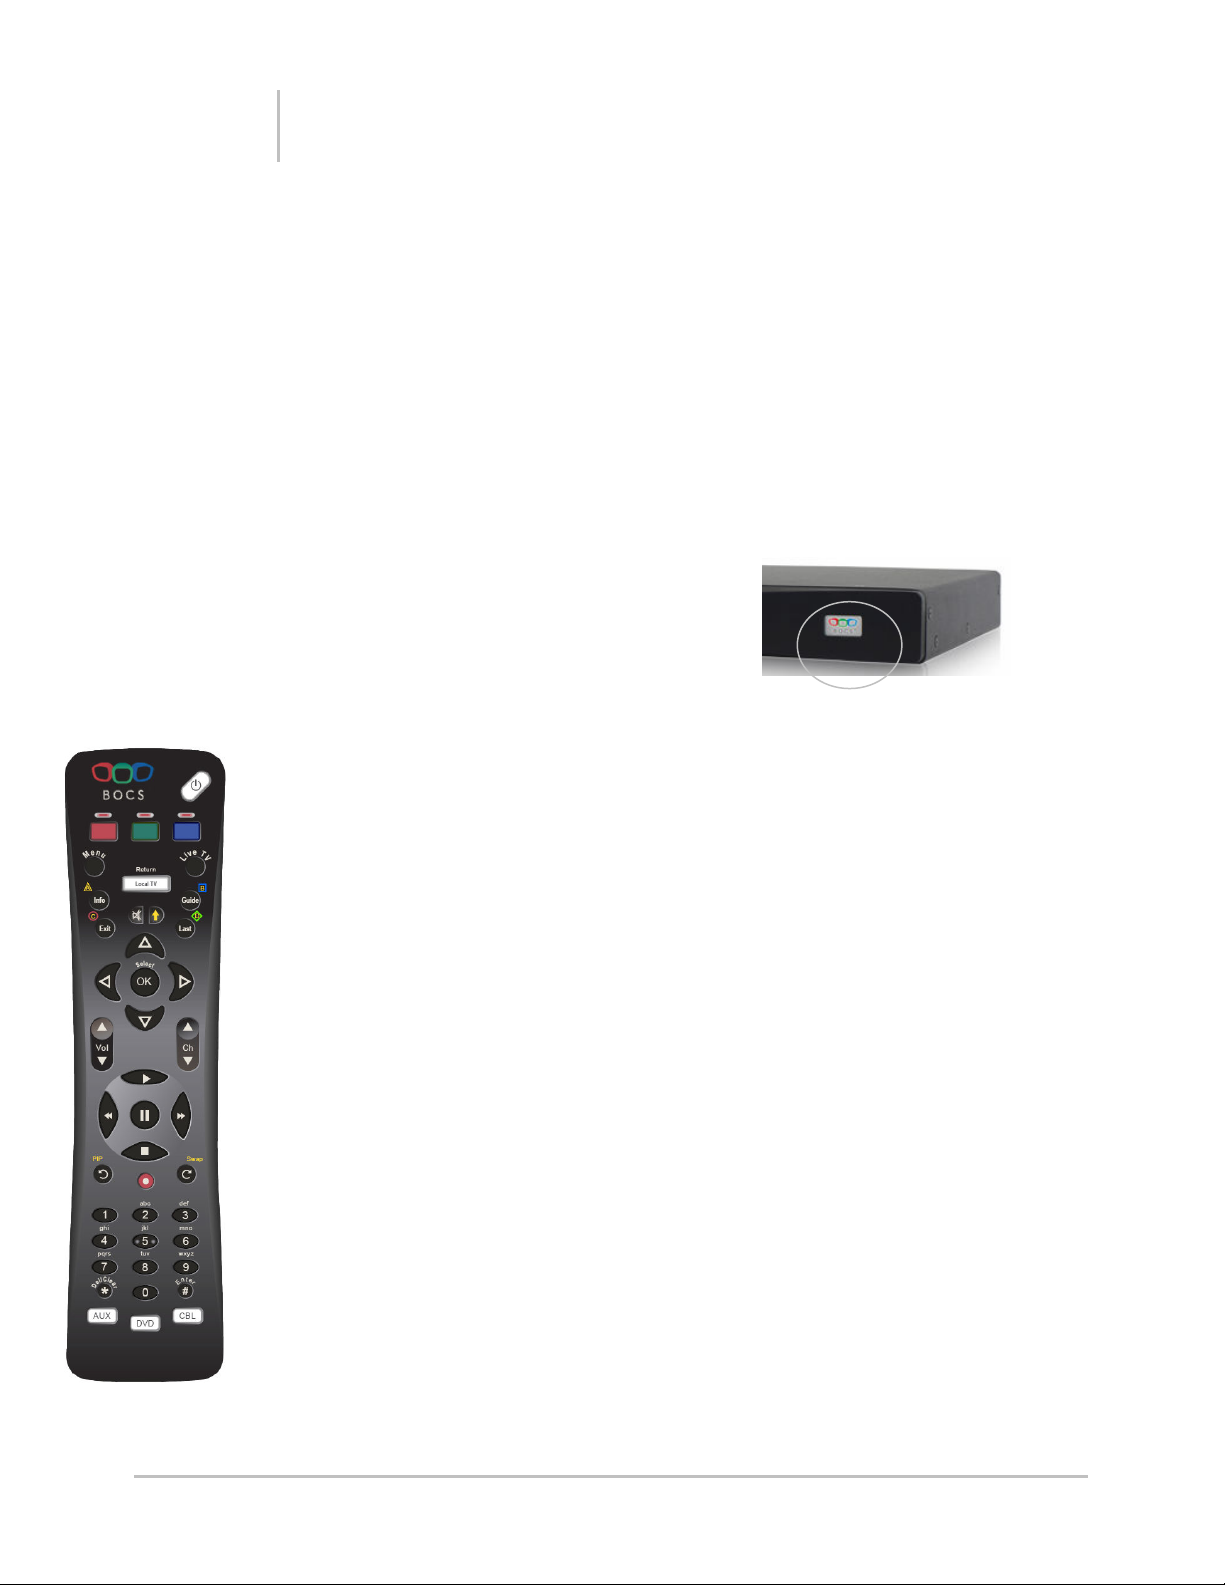
•••• Press the BOCS Logo button on the
front of the Xtender unit. The
Red/Green/Blue lights on the front of
Xtender will begin blinking
•••• Simultaneously press the “Menu” and “Ch+” buttons and hold for 2 seconds.
The red power light on the remote will flash twice
•••• Check to make sure the pairing worked by pressing the Red Xtender channel
button – if the red light on the front of Xtender flashes, pairing was successful.
If it does not (the remote will also give you an error code of either a fast flash
power light indicating the remote is not paired to anything or an out of range
indication – alternating power/Xtender channel lights on the remote) – If you
get an error try binding again.
•••• Repeat for each remote
Note In step 1, if the LEDs on Xtender stop blinking immediately upon release of
the pair button, the maximum number of remotes have already been bound to this
Xtender (12 are allowed). To un-pair all remotes and start over, press and hold the
BOCS Logo button for 10 seconds.
Check You can check to see if a remote is bound to Xtender – just go stand in front
of the Xtender and press the “BOCS-Red” channel button on the remote. If the red
light on the remote blinks once and the red light on Xtender blink once, it is paired.
If it is not paired, the Xtender light will not blink and there will be three fast flashes
of the red/green/blue lights on the remote (because it thinks it is simply out of
range from the Xtender it is paired with).
Step 2 – Pick a room, program a remote to work the TV in that room
• Start with either the TV in the same room as Xtender or the closest TV to
Xtender
• Find your TV brand in the code list for your TV type (Appendix A)
• Press and hold the TV and INFO buttons until the remote power light turns on
• Enter the device code while pointing the remote at the TV – the power light
should blink twice indicating a successful code was selected and a power
Programming the Remotes 21
Page 22

command was sent to the TV. If you get a fast flash, there was an error – we
suggest you exit program mode (press remote power button) and start over.
• If the TV turns off or on press Select/OK to confirm you found the right code –
the power light should blink twice to indicate that the code was saved
successfully.
• If the TV does not turn off or on enter the next five digit code – keep trying
codes until you find the one that works best with your TV
Important you will repeat these steps for each room/TV where you want a BOCS
remote control, but for now go to step 3.
Important We highly recommend that you try out all the buttons you think you will
use and make sure that the code you chose works for all those buttons. Keep in
mind that many TVs have “similar” IR codes, and sometimes you can choose a
code that works the power button but some of the other buttons do not work
correctly. In that case, just pick up where you left off and try other codes in that
group.
Programming a remote by using the code-scan feature
If you try all the codes for your brand of TV (make sure if you have a combo
TV/DVD or TV/VCR you find that group in the code list as well) and you have not
found one that works, you can have the remote automatically scan through all the
codes that is knows to see if one of them will work.
1. Turn on the TV you would like to pair with the remote. Press and hold “Local TV”
and “Guide” for at least two seconds – until the power light on the remote stays on
(this tells the remote you want to program a code for the “Local TV” button)
2. Press the TV button – power light should stay lit
3. Point the remote at the TV
4. Press and hold the Up Arrow button: the remote will scan through all the codes
transmitting a “power off” for each one. The indicator light will flash during the
scan. The full scan may take up to several minutes.
5. As soon as the TV you are trying to program turns on or off, release the UP Arrow
button note you must do this quickly. Pressing the up and down arrows
momentarily steps through the code list – so you may want to press the down
arrow a few times and to go back through the codes until you find the code that the
TV turns on/off again.
6. Press the Select/OK button to accept the new code. The power light should flash
twice indicating a successful code save.
Step 3 – Program the Xtender to Control the A/V Devices
In this step you will program the Xtender unit with the codes it needs to control the
A/V devices (Tivo, DVD, etc) plugged into Xtender.
Important: only program the channels one time, with one remote control. The
system will automatically program all the rest of the remotes in the home.
Red Channel
• Identify the device code from the list (Appendix A)
• Simultaneously press the BOCS-Red and Info buttons until the power button
lights
• Enter the device code – press “Select/OK” to confirm
• Remote power light should flash twice indicating success
Programming the Remotes 22
Page 23

Green Channel
• Identify the device code from the list (Appendix A)
• Simultaneously press the Green and Info buttons until the power button lights
• Enter the device code – press “Select/OK” to confirm Remote power light
should flash twice indicating success
Blue Channel
• Identify the device code from the list (Appendix A)
• Simultaneously press the Blue and Info buttons until the power button lights
• Enter the device code – press “Select/OK” to confirm
• Remote power light should flash twice indicating success
Example:
You plugged a TiVo DVR into the BOCS-Red channel:
• Look up the code for a TiVo (from the list that is one of the following: 17002
17020 17123 17124 17129 17623 17624) note they all might work, so try
each one to find the one that works best for your TiVo
• Hold down “Info” and “BOCS-Red” and the power light will come on
• Punch in 17002
• Press “Select/OK” to confirm
• Press the Red Channel button and try it out – press menu, navigate the Tivo
menu – if it does not work well try one of the other codes.
Programming Xtender using the code-scan feature
Important Many devices that you might plug into Xtender do not respond well to a “power
command” – for instance a TiVo DVR does not really have an off switch. Before
you do a scan for IR codes using this method, you should use the remote that
came with you’re A/V device, press power and see what happens so you know
what you are looking for.
1. Turn on the TV and press the Red, Green, or Blue button corresponding to the
device you wish to program.
2. Press and hold Red (or Green or Blue) and Guide for at least two seconds –until
the power light on the remote stays on
3. Press the device type button corresponding to the type of device you are
programming:
If programming a DVD player – Press the DVD button – power light
should stay lit
If programming a Cable Set Top Box – Press the CBL button – power
light should stay lit
If programming a VCR – Press the VCR button – power light should
stay lit
4. Press and hold the Up Arrow button: the remote will scan through all the codes
transmitting a “power off” for each one. The indicator light will flash during the
scan. The full scan may take up to several minutes.
5. As soon as the device you are trying to program turns off, release the UP Arrow
button – note that you must do this quickly. Pressing the up and down arrows
momentarily steps through the code list – so you may want to press the down
arrow a few times and to go back through the codes until you find the code that the
TV turns on/off again.
6. Press the Select/OK button to accept the new code. Power button will double flash
to indicate success.
Programming the Remotes 23
Page 24

Step 4: Program the rest of your remotes for each room
This is exactly like step 2 – just grab a new remote, make sure it is Paired to your
Xtender, and program it for the TV in the room where you intend to leave that
remote.
Step 5: Set the Master Remote
Note you only need to perform this step if you have connected a TV to the “Local TV”
coax connector on the Xtender
Important Only one remote per home should be set as local master.
The "Local Master" remote is defined as the remote that controls the TV that is
connected to the "local TV" coax output from the Xtender. This remote must
identify itself to the Xtender so that the Xtender can switch the correct output
signal onto the "local TV" output, depending on whether the TV is tuned to a TV
channel or a BOCS channel. When you press the red, green, or blue button on the
"Local Master" remote, the Xtender switches BOCS channels onto the "local TV"
coax output. When you press the "Local TV" button, the Xtender changes the
switch to output CATV signals to the "local TV" coax output.
To set or remove the remote as a "Local Master"
1. Press and hold one of the following combinations for at least 2 seconds:
"Menu" and "Vol +" to set the remote as local master.
"Menu" and "Vol -" to remove the remote as local master.
2. The Power LED will turn on.
3. Press Select/OK to confirm.
4. If successful, the power LED will pulse twice and turn off. If the function failed, the
power LED will pulse rapidly for one second, and then turn off.
That’s it! You are ready to begin using your Xtender system. Enjoy
Programming the Remotes 24
Page 25

More Programming Options
Control Other Devices in the Same Room as the Remote
The Xtender remote is a full universal remote and can control other devices that
are in the same room as the remote – the three buttons on the bottom of the
remote (Aux, CBL, and DVD) can each hold the codes for a device of your choice
• Decide on which device you would like to control with which button – for
example we will program a JBL DVD player to be controlled by the DVD button
• Find the JBL DVD codes in the code list (Appendix A) and write down those
codes – in this case 25278
• Hold down “Info” and “DVD” for about two seconds until the power light
comes on and stays on
• Punch in the code “25278”
• Press select/OK to confirm
• If there are multiple codes, try them one at a time until you find the one that
works for your device.
• Repeat for each of the other local control buttons
Punch-Through
Why might I want to do this? If you use something other than the built in speakers
in your TV to listen a show, you have an external receiver or video switch to
control what you are watching on your TV, or you change channels on something
other than your TV – like a Cable or Satellite Box.
Volume Punch-Through
By default, volume buttons always control the local TV, regardless of mode. To
redirect volume buttons ("Vol +", "Vol -", and "Mute") to the AUX device (an audio
receiver, external amp or anything else), or return these controls to the local TV,
use this procedure:
1. Make sure you have programmed the remote to control your external audio
device by using the AUX button – see “Control other devices in the same room
as the remote:” above
2. Press and hold one of the following combinations for at least 2 seconds:
"AUX" and "VOL +" - to direct volume & mute buttons to the AUX
device, or
"TV" and "VOL +" - to direct volume & mute buttons to the local TV.
3. The power LED will turn on.
4. Press Select/OK to confirm.
5. If successful, the power LED will pulse twice and turn off. If the function failed,
the power LED will pulse rapidly for one second, and then turn off.
Input Punch-Through:
By default, the remote sends the TV-Input button to the currently selected local or
BOCS device. To redirect the TV-Input button to the AUX device (when the remote
is in any local mode), or return it to its default behavior, use this procedure:
1. Press and hold one of the following combinations for at least 2 seconds:
Programming the Remotes 25
Page 26

"AUX" and "Live TV" - to direct the TV-Input button to the AUX
device, or
"TV" and "Live TV" - to restore the TV-Input button to its default
behavior.
2. The power LED will turn on.
3. Press Select/OK to confirm.
4. If successful, the power LED will pulse twice and turn off. If the function failed,
the power LED will pulse rapidly for one second, and then turn off.
Channel Punch-Through:
By default, the remote sends channel tuning buttons to the Local TV device when
in local TV Mode. To redirect channel tuning buttons (digits "0" - "9", "CH +", "CH ", "#/Enter", and "*/Delete" to the CBL device when in local TV mode, or to return
these controls to the local TV, use this procedure:
1. Press and hold one of the following combinations for at least 2 seconds:
"CBL" and "CH +" - to direct channel tuning buttons to the CBL
device, or
"TV" and "CH +" - to restore channel tuning buttons to the TV.
2. The power LED will turn on.
3. Press Select/OK to confirm.
4. If successful, the power LED will pulse twice and turn off. If the function failed,
the power LED will pulse rapidly for one second, and then turn off.
Learn IR Code(s)
Learning allows the BOCS remote or the Xtender to output IR codes that are
identical to those output by another remote. Note that all Xtenders can learn IR
codes to control devices plugged directly into them.
Important to learn IR codes for a TV or other “local device” you must purchase an upgrade
for your remote to make it a Learning remote.
• Learning associates a learned IR code with a specific button on the BOCS
remote for a specific device. For example, if you learn the "Menu" button for
the CBL device, the remote will output that code when you press "Menu" and
the remote is in CBL mode.
• Learning a button for a device overrides the IR code that the remote would
output for that device based on the device type set by the "Scan Local Device
Type or BOCS Device Type" or "Set Local Device Type or BOCS Device Type"
procedures. This makes it possible to first set a device type that is "close", and
then learn only the buttons that do not work as desired. Note the "Scan Local
Device Type or BOCS Device Type" and "Set Local Device Type or BOCS
Device Type" procedures erase any learned IR codes for the device whose type
is set.
Programming the Remotes 26
Page 27

Have the BOCS Remote Learn IR Codes from an OEM Remote
You “Learn a code” directly into the remote control only for devices in the same
room as the remote (TV, local DVD etc). To “Learn a code” for a device plugged
into the Xtender unit see the section below titled “Have the Xtender Learn IR
Codes”
Note that a learning remote must be purchased for this to work.
OEM = Original Equipment Manufacturer – i.e. the remote that came
with your TV or DVD player.
1. Place the two remotes pointing at each other, about 2" apart and directly
"nose-to-nose" in line with each other. Note that remotes must remain very still
during this process.
2. Press and hold simultaneously for at least 2 seconds one of these
combinations on the BOCS remote, to select which local device button the
learned codes will be associated with:
"Local TV" and "Enter/#" for the local TV button,
"CBL" and "Enter/#" for the local CBL button,
"DVD" and "Enter/#" for the local DVD button, or
"AUX" and "Enter/#" for the local AUX button.
3. The power LED will turn on and remain on (Times out after 10 seconds)
4. Press the button that the learned code will be assigned to on the BOCS remote
(the receiving button).
5. Within 5 seconds, press the button to teach on the OEM remote. NOTE that you
should press firmly but quickly on the OEM remote – do not hold down the
button.
6. The power LED flashes twice if the key was successfully learned, or flashes
rapidly after waiting 5 seconds if learning failed. If neither of these signals
occurs, repeat from step 4.
7. To learn another button (or to learn the same button again if the previous try
failed), go back to step 4.
8. When you are done with all the buttons to be learned for this device, just do
nothing. The remote will exit learn mode after 10 seconds of inactivity, and the
power LED will turn off.
Example – you have a TV that none of the built in codes work for:
1. Place the OEM remote and the Learning BOCS remote 2” apart nose to nose.
2. Hold “Local-TV” and “Enter/#” on the BOCS remote until the power light comes
on
3. Press “1” on BOCS remote, then press “1” on OEM remote – watch for a double
blink on BOCS remote power button (If error fast flash repeat this step)
4. Press “2” on BOCS remote, then press “2” on OEM remote – watch for a double
blink on BOCS remote power button (If error fast flash repeat this step)
5. Continue and learn every button on the OEM remote into the BOCS remote that
you will use
6. Wait 10 seconds for the learning process to time out and the BOCS remote
power light to go out.
Programming the Remotes 27
Page 28

Have the Xtender Learn IR Codes from Another Remote
To Control Devices Plugged into the Red, Green, or Blue channel – this is done at
the Xtender unit
1. Place the OEM remote so that it points at the IR window on the front of the
Xtender – it must be within 1 foot of the window and pointed directly at the
window level with the window. Note that the remote must remain very still and
at the same distance from the Xtender IR window – it is easiest if you place the
remote on something solid so it remains still.
2. Press and hold simultaneously for at least 2 seconds one of these
combinations on the BOCS remote, to select which BOCS device the learned
codes will be associated with:
"RED" and "Enter/#" for the BOCS RED channel,
"GREEN" and "Enter/#" for the BOCS GREEN channel, or
"BLUE" and "Enter/#" for the BOCS BLUE channel.
3. The power LED will turn on and remain on (Times out after 10 seconds)
4. Using any Paired BOCS remote control, press the button that the learned code
will be assigned to on the BOCS remote (the receiving button).
5. Within 5 seconds, press the button to teach on the OEM remote (still pointed at
Xtender). NOTE that you should press firmly but quickly on the OEM remote –
do not hold down the button, a half second firm push is the best.
6. The power LED flashes twice if the key was successfully learned, or flashes
rapidly after waiting 5 seconds if learning failed. If neither of these signals
occurs, repeat from step 4.
7. To learn another button (or to learn the same button again if the previous try
failed), go back to step 4.
8. When you are done with all the buttons to be learned for this device, just do
nothing. The remote will exit learn mode after 10 seconds of inactivity, and the
power LED will turn off.
Example – you have an iPod dock plugged into the RED channel that none of the
built in codes work for:
1. Point the OEM remote at the Xtender IR window no more than 1 foot away and
on a steady surface.
2. Hold “BOCS-RED” and “Enter/#” on a paired BOCS remote until the power light
comes on
3. Press “Play” on BOCS remote, then press “Play” on OEM remote – watch for a
double blink on BOCS remote power button (If error fast flash repeat this step)
4. Press “Up” on BOCS remote, then press “Up” on OEM remote – watch for a
double blink on BOCS remote power button (If error fast flash repeat this step)
5. Continue and learn every button on the OEM remote into the BOCS remote that
you will use
6. Wait 10 seconds for the learning process to time out and the BOCS remote
power light to go out.
Programming the Remotes 28
Page 29

Unlearn IR Code(s)
You may need to unlearn previously learned IR codes if there is an error during the
learning process, or to free up "learning memory" on the remote or the Xtender.
Note: the "Scan Local Device Type or BOCS Device Type" and "Set Local Device
Type or BOCS Device Type" procedures automatically unlearn all learned IR codes
for the device whose type is set.
For BOCS Remote or Xtender to Unlearn IR Codes
1. Press and hold simultaneously for at least 2 seconds one of these
combinations on the BOCS remote, to select which device to unlearn:
"Local TV" and "Delete/*" for the local TV,
"CBL" and "Delete/*" for the local CBL device,
"DVD" and "Delete/*" for the local DVD device,
"AUX" and "Delete/*" for the local AUX device,
"RED" and "Delete/*" for the BOCS RED channel,
"GREEN" and "Delete/*" for the BOCS GREEN channel, or
"BLUE" and "Delete/*" for the BOCS BLUE channel.
2. The power LED will turn on.
3. Press the button to be unlearned.
4. The power LED flashes twice if the key was successfully unlearned, or flashes
rapidly if unlearning failed.
5. To unlearn another button, go back to step 3.
6. When you are done with all the buttons to be unlearned for this device, just do
nothing. The remote will exit unlearn mode after 10 seconds of inactivity, and
the power LED will turn off.
Channel Tuning Delay
Important when the Red, Green, or Blue button is pressed, the remote control attempts to
tune the TV channel. Some TVs require longer delays between channel digits
transmitted by the remote. Follow this procedure to set longer delays if your TV is
having trouble tuning to the correct channel number for Red, Green, or Blue
channel.
1. Press and hold TV and CH+ for at least two seconds – until the power light on
the remote stays on
2. Press a number button corresponding to the desired channel tuning delay:
1 sets delay to 1/10th of a second
2 sets delay to 1/5th of a second (default factory setting)
3 sets delay to 1/2th of a second
4 sets delay to 3/4 of a second
5 sets delay to 1 second
6 sets delay to 2 seconds
3. If a valid value was entered, the red power light on the remote will flash twice
Programming the Remotes 29
Page 30

indicating success.
4. If the value entered is not recognized, the red power light on the remote will
blink rapidly, in this case repeat the programming procedure.
Channel Tuning Mode (2 or 3 digits or use the +100 key)
Important When you press one of the red, green, or blue BOCS buttons, the remote sends
two or more IR digits to the local TV to tune it to the channel for the red, green, or
blue device. Some TVs require different digit sequences to tune correctly,
especially for channels above 99. Use this function to set the method your TV
requires.
1. Press and hold "MENU" & "5" for at least 2 seconds. The power LED will light.
2. Press "1" or "2" to select the tuning mode:
1 = send two digits for channel 99 or lower; send "+100" followed by
two digits for channel 100 and above. This is the default.
2 = always send three digits.
3. Press Select/OK to confirm.
4. If successful, the power LED will pulse twice and turn off. If error, the power
LED will pulse rapidly for a second, then turn off.
Adjust the Video quality of Xtender channels
Important The Xtender can be adjusted to output different levels of video to the home, this
provides the ability to make Cable-TV channels and Xtender channels look the
same.
1. Set up the desired television to view the CATV signal, and make a note of its
signal quality.
2. Switch the television to view a BOCS channel.
3. Press and hold the "Menu" and "1" for at least 2 seconds.
4. The power LED will turn on.
5. While observing the BOCS signal on the television, press the up arrow or down
arrow as appropriate to optimize the signal.
6. When you have found the best gain setting, press Select/OK to confirm. To exit
without changing the gain, press any other button, or just wait 10 seconds for
the function to time out.
Note when either the maximum or minimum range of the attenuator is reached, the
power LED will flash rapidly for one second, then revert to full on. The full range of
the attenuator can be spanned in about 8 seconds.
Note that sometimes the problem is an Xtender channel that has “too much signal,” so
if the picture does not look good, also try turning the level down. You should find a
level that makes Xtender channels look good on all your TVs.
Programming the Remotes 30
Page 31

Show the IR codes programmed into the remote and Xtender
This function outputs an indication of the IR codes currently set for all the local IR
devices and the devices attached to the BOCS red, green, and blue channels, by
flashing the corresponding LEDs on the remote. Once you get your system up and
running well, it is a good idea to record all the codes you are using in case you
ever need to reprogram the system.
The device types are displayed using the following code:
• Each device type is flashed as five digits.
• Digits 1 through 9 are indicated by one through nine LED flashes, respectively.
For each flash the LED is on for ½ second and off for ½ second.
• Digit 0 is indicated by a rapidly flashing LED for 1 second.
• The LED is off for two seconds between digits.
Procedure:
Press and hold "MENU" and "2" on the remote for at least 2 seconds.
The power LED will turn on.
Press Select/OK to confirm.
The red LED will flash the device type for the red channel device.
The green LED will flash the device type for the green channel device.
The blue LED will flash the device type for the blue channel device.
The Local TV LED will flash the device type for the local TV device.
The AUX LED will flash the device type for the local AUX device.
The DVD LED will flash the device type for the local DVD device.
The CBL LED will flash the device type for the local CBL device.
The power LED will turn off.
Programming the Remotes 31
Page 32

Chapter 5
Using the Remotes
Controlling the TV
Press the Local TV button, the remote will now control the TV. The remote
automatically tunes the TV in front of you to your favorite TV channel.
To set your favorite TV channel:
• Press "Local TV" (to control the TV in front of you).
• Enter a two digit channel number (which the remote will send to the TV as
usual, tuning it to your favorite channel).
• Press "Local TV". The remote will remember the favorite channel and will
tune the TV to that channel anytime you press "Local TV".
Controlling the Red Channel
Press the Red button, the remote will now control the device connected to the Red
channel of the Xtender and command the TV in front of you to change to the
channel that Red is on – Red might be on any channel that you or your installer set
– so make sure you keep the remote pointed at the TV until it gets to the new
channel.
Controlling the Green Channel
Press the Green button, the remote will now control the device connected to the
Green channel of the Xtender.
Controlling the Blue Channel
Press the Blue button, the remote will now control the device connected to the
Blue channel of the Xtender.
Note: When controlling one of the Red/Green/Blue channels, the Vol+/- and Mute
buttons still control the TV.
Using the Power button
Normally, the Power button always controls the TV. However the power on a
device connected to the Red, Green, or Blue channel of the Xtender can be
controlled by following this procedure:
• Press the Red, Green, or Blue button corresponding to the device you want
to power on or off.
• Within 10 seconds after pressing the Red, Green, or Blue button, press the
Power button.
Controlling the Local Devices
If you want to use the remote to control one of the other devices in front of you,
press "CBL", "AUX", or "DVD". Once you press one of these buttons, the remote
will continue to control the device you selected until you press Local TV, Red,
Green, or Blue again.
Programming the Remotes 32
Page 33

Buttons will Illuminate
When you press a button, one of the following buttons on the remote will light up
briefly, indicating which device the remote is transmitting the button press to:
• Red (button sent to the red channel device)
• Green (button sent to the green channel device)
• Blue (button sent to the blue channel device)
• Local TV (button sent to the TV in front of you)
• DVD (button sent to the DVD device in front of you)
• CBL (button sent to the CBL device in front of you)
• AUX (button sent to the AUX device in front of you)
Programming the Remotes 33
Page 34

Chapter 6
Repeater Installation and Use
How do I know if I need a repeater?
If you have a larger home and you find that some rooms have poor BOCS Remote
Control coverage (If controlling a device through Xtender and you notice slow
response time to button pushes or you see a triple flash of all three BOCS LEDs –
Red, Green, Blue – then the remote is having difficulty communicating with
Xtender.
You should first try reorienting the antenna on Xtender – make sure it is pointed
straight up.
What does the repeater do?
The BOCS repeater extends the range of the wireless remote controls used with an
Xtender, but it only works if you put it in the right place.
Your repeater should be located:
• In a good coverage area – use a remote to find where there is good signal
and where it starts to drop off. Press any BOCS button (Red, Green, or
Blue), if the corresponding Light flashes briefly you are in good coverage,
if all three button (Red, Green, or Blue) flash together three times, the
remote is out of coverage area. The repeater should be placed in a solid
coverage area and not right on the edge of coverage.
• In the direction of the poor coverage area – If Xtender is in the basement,
and the poor coverage area is a bedroom on the third floor, the repeater
should be placed between the Xtender and the poor coverage area.
• At an A/C outlet away from metal or large furniture
• In a location that solves all the poor coverage areas in a home since only
one repeater can be used per home.
Programming the Repeater:
The BOCS repeater must be “paired” with an Xtender – just like adding a new
BOCS remote control to the home.
• Press the “pair” button on the front of the
Xtender – all three lights (R/G/B) on the front of
Xtender will begin flashing
• Within 10 seconds, plug the repeater into an A/C outlet within 15 feet of the
Xtender
• Wait at least 10 seconds for the repeater to synchronize (Lights on Xtender
will stop flashing and light on repeater will flash 2-3 times)
• Move the repeater to the chosen location (see above for instructions) and
plug into an A/C outlet
Testing and use of the Repeater:
A properly programmed and located repeater will extend the range of remotes up
to two times their original range – results may vary due to type of construction,
local interference, and location of the repeater. Each time a BOCS button is
pressed, the light on the repeater will flash briefly.
Programming the Remotes 34
Page 35
Troubleshooting:
General Sometimes while
I’m watching an
Xtender channel,
the channel or
program changes
It’s possible someone else in the house has pressed the
same Xtender channel button and has taken control.
Consider splitting the programs – perhaps Blue for kids
and Green for adults.
Video Quality
The video quality of
Xtender channels is
not as good as my
Cable TV channels
If you had an installer come out and put in your Xtender
system, they should have already adjusted everything,
but just in case, Xtender allows you to adjust the quality
of your Xtender channels just by using the remote
control:
Make sure the remote knows how to talk to Xtender press the Red Xtender channel button on the remote and
make sure the red light on the front of Xtender blinks.
Now - go to the furthest TV from where your Cable
comes into your home - (if you don't know where that is
then just go to the TV where you think the Xtender
channels are the weakest) - with the Xtender remote for
that room/TV- hold down "MENU" and "1" until the power
light on the remote comes on. Now (as long as you don't
ever pause for more than 10 seconds and the remote
comes out of program mode) you can press the up arrow
to make the signal stronger and the down arrow to make
it weaker - there are about 16 different choices - once
you find one that looks good press the select/OK button
to save that setting.
We recommend you set the signal as low as you can and
get a good picture - just setting it to its highest level
could interfere with other TV stations you receive.
Now - you should go around to all the other TVs and
make sure they all look good as well - you can up the
signal again to try to get the best picture everywhere.
Keep in mind you are adjusting the signal level for the
whole house every time you make this adjustment and
not just for the TV you are observing so be careful.
The video quality of
the Xtender
channels is not as
good as my Cable
TV channels on the
TV connected to the
LOCAL-TV output
on Xtender
My cable TV is not
as good now that I
have installed
Xtender
Programming the Remotes 35
The Local-TV output on Xtender puts out either Cable TV
stations or Xtender channels depending on what you
want to watch – but Xtender needs to know which remote
control you are using with this “Local-TV” so it can
switch those signals to the TV properly – simply hold
down Menu and VOL+ then press select/OK – Now when
you press an Xtender channel button, the Local-TV
output puts out a good quality Xtender channel signal,
and when you press Local-TV it switches back to putting
out good quality Cable TV signals
When the cable company installs cable TV in your home,
sometimes they only give you enough signal for your
TVs to work “OK” – and inserting Xtender could take
cable signals down just enough for you to notice. The
simplest answer is to add an amplifier right where the
Page 36
cable TV line comes into your home. Usually it is best to
insert it after any VOIP or Cable modems tapp off from
the line.
Remote control
Sometimes, when
watching BOCS
channels on the TV
connected to the
Local-TV output on
Xtender, the quality
of the video
suddenly goes bad
Sometimes
pressing a button
does not result in
anything happening
on an Xtender
channel
One of the other remotes in the home has also been set
as the “local master remote” – and when someone
pushes the local-TV button, the Xtender stops putting
out good quality Xtender channels to the TV connected
to Xtender. Simply go to all the other remotes in the
home and hold down Menu and VOL- then press
Select/OK -
Make sure the remote is paired with the Xtender – you
can tell this by going to Xtender with the remote in
question, pressing an Xtender channel button and
seeing if the corresponding color light on Xtender
flashes – if not pair the remote.
Look at the Xtender Channel light on the remote – when
you press the Xtender channel button, if the light
sometimes flashes and sometimes stays on for a few
seconds, the remote is having trouble communicating
with Xtender. Try the following:
Make sure the antenna on the Xtender is pointed straight
up.
Try moving closer to Xtender and see if the problem
goes away.
Consider buying a repeater to Xtend the range of your
remotes
I’ve tried all the
codes for my TV
and none of them
work
I found a code for
my TV or A/V device
and some buttons
work but others do
not
Try a TV code scan – see the procedure in the
“programming the remote section.”
Try a FULL code scan – use the same procedure but omit
pressing the “Local-TV button” after entering scan mode
– this will scan through all 2000 codes in the remote – it
might take a while.
Consider purchasing a learning remote so you can suck
the codes from the remote that originally came with your
TV into an Xtender remote.
This is fairly common because many manufacturers use
a slightly different code for each product they put on the
market. So – you might have found a code that worked
the power button and a few others but might not work
the menu, or other buttons do not work – the simple
solution is try other codes… Try them in this order:
2) Try all the codes in the category you are looking for
(i.e. if you are looking for a TV code, try all the TV
codes one at a time for the brand of TV you are
using)
3) Do a category code scan – hold down Guide and the
device you are trying to program (Local[-TV for TV,
BOCS Red, Green or Blue, or DVD, AUX, or CBL) then
press the kind of device you are trying to program
(Local TV for a TV, CBL for cable or sat box, DVD for
a DVD VCR or Laserdisc, or Aux for anything else)
Programming the Remotes 36
Page 37
then hold the up arrow until your device turns off/on
– then press select to save that code… If you have
trouble see the more detailed instructions in the
“programming the remote session”
4) Do a full scan (get something to drink before you do,
this takes a while) – same steps as #3 above, just
skip the “press the kind of device you are trying to
program” step…
5) Buy a learning remote and learn the codes for the
buttons that do not work
When I press an
Xtender channel
button, the TV
doesn’t change to a
channel where I can
see my Xtend-ed
device
Don't forget that even though we tried to make this as
simple as possible, the remote still has to be able to tell
your TV where it wants to go - with a standard
installation we put the Red channel on 14, Green on 98
and Blue on 96... One thing that is a little different about
an Xtender remote is that it usually has to tell your TV
two things to get to an Xtender channel - '1' and '4'... The
most common problem is that you don't keep the remote
pointing at the TV long enough and the TV only sees the
'1', it happily goes to channel 1, you realize that is not
where you wanted to be and quickly push the Red button
again - only to take you to channel '11'
The solution is simple - make sure you point the remote
at the TV and keep it pointed there until the TV goes
where you want - some TVs take a while to respond. if
the TV only sees one digit, wait until that clears before
you try pushing the Xtender channel button again.
One other thing to watch for, some TVs need a long time
in between pressing buttons - if you press the Red
button (and have the default configuration where red is
on channel 14) and you see the 1 on the TV but the 4
never shows up, see the next FAQ item "When I push an
Xtender channel button on the remote it only sends one
digit".
When I push an
Xtender channel
button on the
remote it only
sends one digit
Some TVs need a long time in between pressing buttons
- if you press the Red button (and have the default
configuration where red is on channel 14) and you see
the 1 on the TV but the 4 never shows up (and you were
a good user and kept the remote pointed right at the TV),
it is likely that the remote is sending the channel
commands too quickly. We have noticed some Insignia
TVs and a few others have this problem.
The tradeoff is that it will take longer to change between
Xtender channels, but since the alternative is not ever
getting there, we suggest the following:
Quick - pre-explanation first...
What actually happens when you push the Red button is
the remote sends a "1" then pauses then sends a "4" ...
Programming the Remotes 37
Page 38
Depending on the TV, a different "pause time" is required
- for now you will have to play with it a little to get it just
right (as we get more feedback from users we will
publish a detailed pause-time list for various TV models so if you don't mind let us know what works for you if
you have to adjust this in your house)...
To set the pause time,
Hold down the MENU button and the "4" key: The power
light should come on and stay on
press one of the following and then press Select/OK to
confirm
1 for a pause time of 1/10th of a second (fastest channel
changing)
2 for a pause time of 1/5th of a second (a little slower...)
3 for a pause time of 1/2 of a second
4 for a pause time of 3/4 of a second
5 for a pause time of 1 second
6 for a pause time of 2 seconds
Programming the Remotes 38
Page 39
Appendix A
Television Device Codes
Television
Admiral 00093 00463
Advent 00761 00783 00815
00817 00842 01933
25592
Aiko 00092
Akai 00812 00702 00030
00672 01675 01676
01903 01935 25271
25475
Albatron 00700 00843
Ambassador 00177
America Action 00180 16662
Ampro 00751
Anam National 00055 00180
AOC 00030 00185 01365
Apex Digital 00748 00879 00765
00767 00890 01217
01943 25406
Audiovox 00451 00180 00092
00623 00802 00875
01937 01951 01952
16662 25647 25697
25698
Aventura 00171
Axion 25647 01937
Bell & Howell 00154
BenQ 01032
Bradford 00180
Broksonic 00236 00463 01911
01929 01935 01938
16386 16863 17863
25271 25444
Candle 00030 00186
Carnivale 00030
Carver 00054
Celebrity 00000
Celera 00765
Changhong 00765
Citizen 00060 00030 00092
00186 01928 01935
17662 25271
Clairtone 00185
Clarion 00180
Colt 16456
Commercial Sol. 01447 00047
Contec 00180 00185
Craig 00180
Crosley 00054
Crown 00180
Curtis Mathes 00047 00054 00154
00451 00093 00060
00702 00030 00145
00166 00466 01147
01347 01919 17419
CXC 00180
Cytron 01326
Daewoo 00451 00092 01661
00623 00661 00672
01928 17662
Dell 01080 01178
Denon 00145 00511
Denstar 00628
Dumont 00017
Durabrand 00463 00180 00178
00171 01034
Television Device Codes 39
Dwin 00720 00774
Electroband 00000 00185
Electrograph 01755
Electrohome 00463
Emerson 00030 00154 00171
00177 00178 00180
00185 00236 00282
00463 00623 01394
01911 01928 01929
01944 16863 16386
16977 17662 17863
25251 25397 25844
Envision 00813 01365
Epson 00833 00840
ESA 00812 00171 01944
25397 25844
Fisher 00154 00159
Fujitsu 00186 00683 00809
Fujitsu 00853
Funai 00180 00171 01271
01904 16384 25844
25910
Futuretech 00180
Gateway 01755 01756
GE 00047 00051 00055
00135 00178 00282
00451 01347 01447
01917 01919 01922
16624 17191 17419
17444
Gibralter 00017 00030
Go Video 00886 25647
GoldStar 00178 00030 01926
17621
Grunpy 00180
Haier 01034 00768
Hallmark 00178
Hannspree 01348
Harley Davidson 01904 16384
Harman/Kardon 00054
Harvard 00180
Havermy 00093
Helios 00865
Hello Kitty 00451
Hewlett Packard 01088 01089 01494
01502
Hisense 00748
Hitachi 01145 00145 00151
00797 01904 01960
16384 25823
HP 01088 01089 01494
01502
Hyundai 00849
Infinity 00054
Insignia 00171 01204 01326
01517 25844 00463
Inteq 00017
JBL 00054
JCB 00000
Jensen 00761 00815 00817
01933 25592
JVC 00053 00731 01253
01923
KDS 01498
KEC 00180
Kenwood 00030
KLH 00765 00767
Konka 00628 00632 00638
00703 00707 25295
25296
Kost 01262
KTV 00180 00030 00185
LG 00178 00700 00829
00856 01265 01178
01265 01758 17421
Lloyd's 01904 16384
LXI 00047 00054 00154
00156 00178
MAG 01498
Magnasonic 01928 16977 17662
Magnavox 00030 00054 00186
00706 00802 01198
01254 01365 01454
01525 01904 01931
01944 16384 16977
18165 25844 25397
Magnin 16624
Marantz 00030 00054 00704
00854 00855 01154
Matsushita 00250 00650
Maxent 01755
Megapower 00700
Megatron 00178 00145
MEI 00185
Memorex 00154 00150 00178
00463 01911 01926
16546 17421 17546
17621 17646
MGA 00150 00178 00030
16624
Midland 00047 00017 00051
00135
Mitsubishi 00093 00150 00178
00836 00868 01250
01917 17191
Monivision 00700 00843
Motorola 00093 00055
MTC 00060 00030 00185
Multitech 00180
NAD 00156 00178 00866
NEC 00030 00497 00882
01704
NetTV 01755
Nikko 00178 00030 00092
Norcent 00748 00824 01089
01365
NTC 00092
Olevia 01144 01240 01331
01610
Onwa 00180
Optimus 00154 00250 00166
00650 16546 16977
17546 17646
Optoma 00887
Optonica 00093 00165
Orion 00236 00463 01463
01911 01929 16386
16863 17863
Panasonic 00051 00055 00250
00650 01291 01410
Page 40

01480 01919 01941
01946 01947 16546
17419 17546 17646
25938 26038 26066
Penney 00030 00047 00051
00060 00135 00156
00178 01347 01919
01926 16624 17419
17621
Petters 01523
Philco 00054 00030
Philips 01454 00054 00690
01154 01961 25430
25836
Pilot 00030
Pioneer 00166 00679 00866
01260
Polaroid 00765 00865 01262
01276 01314 01316
01326 01327 01328
01341 01498 01523
Portland 00092
Prima 00761 00783 00815
Prima 00817 01933 25592
Princeton 00700 00717
Prism 00051
Proscan 01447 00047 01347
01922
Proton 00178 00466
Proview 01498
Pulsar 00017
Quasar 00250 00051 00055
00165 00650 01919
16546 17419 17546
RadioShack 00030 00047 00154
00165 00178 00180
01904 16384 17421
RCA 00047 00090 00135
00679 01047 01147
01247 01347 01547
01917 01919 01922
01948 01953 01958
16624 17191 17419
17444 25598 25708
Realistic 00030 00154 00165
00178 00180
Rhapsody 00185
Runco 00017 00030 00497
00603
Sampo 00030 01755
Samsung 00030 00060 00178
00702 00766 00812
00814 01060 01312
01903 01959 17398
25475
Sansui 00463 01904 01911
01929 01935 16384
16863 17863 25271
Sanyo 00088 00154 00159
00799 00893 01142
16624
Sceptre 00878 01217
Scotch 00178
Scott 00236 00180 00178
Sears 00047 00054 00154
00156 00159 00171
00178 01904 01926
16384 17621
Sharp 00093 00165 00491
00688 00689 00818
00851 01393 01602
01917 17191 25206
Sheng Chia 00093
Signet 01262
Simpson 00186
Sony 00000 01100 00080
00810 00834 01317
01685 01904 01925
16384 17616
Soundesign 00180 00178 00186
Sova 01952 25698
Spectroniq 01498
Squareview 00171
SSS 00180
Starlite 00180
Studio Exp. 00843
Superscan 00093 00864 25397
Supreme 00000
SVA 00748 00587 00768
00865 00870 00871
00872
Sylvania 00054 00030 00171
01271 01314 01394
01931 01944 18165
25251 25397 25844
Symphonic 00180 00171 01904
01944 16384 16977
25397
Syntax 01144 01240 01331
Tandy 00093
Tatung 00055 01756
Technics 00250 00051
Techview 00847
Techwood 00051
Teknika 00054 00180 00150
00060 00092 00186
Telefunken 00702
Thomas 01904 16384
TMK 00178 00177
TNCi 00017
Toshiba 00060 00154 00156
00650 00832 00845
01156 01256 01265
01343 01356 01524
01656 01704 01918
01935 01936 01945
17229 17529 25271
25621
Tosonic 00185
TVS 00463
Vector Research 00030
Victor 00053
Vidikron 00054
Vidtech 00178
Viewsonic 00797 00857 00864
00885 01330 01578
01627 01755
Vizio 00864 00885 01499
01756 01758
Wards 00054 00178 00030
00080 00165 00866
01156
Waycon 00156
Westinghouse 00885 00889 00890
01282 01577
White WH 00463 00623
Wyse 01365
Yamaha 00030 00769 00797
00833 00839
Zenith 00017 00092 00178
00463 01265 01904
01911 01929 16384
16863 17863
DLP TV
Hewlett Packard 01494
HP 01494
LG 01265
Magnavox 01525
Mitsubishi 01250
Optoma 00887
Panasonic 01291
RCA 01447
Samsung 00812 01060 01312
SVA 00872
Toshiba 01265
Vizio 01499
Plasma TV
Akai 00812 01675
Albatron 00843
BenQ 01032
Daewoo 00661
Electrograph 01755
ESA 00812
Fujitsu 00186 00683 00809
00853
Funai 01271
Gateway 01755 01756
Helios 00865
Hewlett Packard 01089 01502
Hitachi 00797
Television Device Codes 40
HP 01089 01502
JVC 00731
LG 00178 00829 00856
01758
Marantz 00704
Maxent 01755
Mitsubishi 00836
Monivision 00843
NEC 01704
NetTV 01755
Norcent 00824 01089
Panasonic 00250 00650 01480
Philips 00690
Pioneer 00679 01260
Polaroid 00865 01276 01327
01328
Sampo 01755
Samsung 00812 01312
Sony 00000 00810 01317
Studio Exp. 00843
SVA 00865
Sylvania 01271 01394
Tatung 01756
Toshiba 00650 01704
Viewsonic 00797 01755
Vizio 01756 01758
Page 41

Yamaha 00797 Zenith 00178
TV/DVD Combination
Advent 01933 25592
Akai 01675 01935 25271
Apex Digital 01943 25406
Audiovox 01937 01951 01952
Audiovox 25647 25697 25698
Axion 01937 25647
Broksonic 01935 25271
Citizen 01935 25271
Emerson 01394 25251 25844
ESA 25844
Funai 25844
Go Vision 25647
Hitachi 01960 25823
Insignia 25844
Jensen 01933 25592
Konka 25295 25296
Magnavox 25844
Panasonic 01941 26066
TV/VCR Combination
America Action 00180 16662
Audiovox 00180 16662
Broksonic 01911 01929 16386
16863 17863
Citizen 01928 17662
Colt 16456
Curtis Mathes 01919 17419
Daewoo 01928 17662
Emerson 00236 01911 01928
01929 16386 16863
16977 17662 17863
Funai 01904 16384
GE 01917 01919 01922
16624 17191 17419
17444
GoldStar 01926 17621
Harley Davidson 01904 16384
Hitachi 01904 16384
JVC 01923
LG 17421
TV/VCR/DVD Combination
Akai 01903 25475
Broksonic 01938 25444
Emerson 01944 25397
ESA 01944 25397
Funai 25910
Lloyd's 01904 16384
Magnasonic 01928 16977 17662
Magnavox 01904 01931 16384
16977 18165
Magnin 16624
Memorex 01926 16546 17421
17546 17621 17646
MGA 16624
Mitsubishi 01917 17191
Optimus 16546 16977 17546
17646
Orion 01911 01929 16386
16863 17863
Panasonic 01919 16546 17419
17546 17646
Penney 01919 01926 16624
17419 17621
Quasar 01919 16546 17419
17546
RadioShack 01904 16384 17421
Magnavox 01944 25397
Panasonic 01946 01947 25938
26038
RCA 01953 25708
Sharp 01917 17191 25206
Philips 01961 25430 25836
Prima 01933 25592
RCA 01948 01958 25598
Samsung 01903 25475
Sansui 01935 25271
Sova 01952 25698
Sylvania 01394 25251 25844
Toshiba 01935 25271
RCA 01917 01919 01922
16624 17191 17419
17444
Samsung 01959 17398
Sansui 01904 01911 01929
16384 16863 17863
Sanyo 16624
Sears 01904 01926 16384
17621
Sony 01904 01925 16384
17616
Sylvania 01931 18165
Symphonic 01904 16384 16977
Thomas 01904 16384
Toshiba 01918 01936 17229
17529
Zenith 01904 01911 01929
16384 16863 17863
Superscan 25397
Sylvania 01944 25397
Symphonic 01944 25397
Toshiba 01945 25621
Television Device Codes 41
Page 42

Appendix B
Cable & Satellite Box Device Codes
Cable Box
ABC 04099 04104 04110
04113
Americast 04995
Amino 05698 05918
Bell & Howell 04110
Bell South 04995
Clearmaster 04979
ClearMax 04979
Coolmax 04979
Digeo 05283
Digi 04733
Director 04572
Dumont 04733
Gen.l Instrument 04572 04906 04372
04099
GoldStar 04240
Hamlin 04105 04369
i3 Micro 05698
Jerrold 04572 04906 04372
Satellite Box
AlphaStar 13060
Amino 09807
Century 13144
Chaparral 12504
Crossdigital 13397
DirecTV 13665 12680 12854
12927 13012 13037
13107 13396 13397
13430 13364 12387
12535 13680 13702
13730 13731 13732
13826 13827 13897
13927 13928 14037
14144 12387
Dish Network 13063 13293 13458
13459 13793 14063
Dishpro 13793 13293 13063
14063
Echostar 13793 13293 13063
13458 13459 14063
Expressvu 13063 14063
GE 12854
General Inst. 13157
04099 04108 04110
Memorex 04096
Motorola 05472 04572 04906
04372 05283 05350
05202
Multitech 04979
Myrio 05698 05918
Pace 05973 04333 04104
Panasonic 04096 04203
Panther 04733
Paragon 04096
Philips 05401 04413
Pioneer 05973 04973 04240
04629
Pulsar 04096
Quasar 04096
RadioShack 04979
RCA 05352
Regal 04375 04369
GOI 13063 14063
Gradiente 13144
Hisense 13823
Hitachi 13107 13538
HTS 13063 14063
Hughes Network 13430 13037 13730
13731 13732 13826
13827 14037 17123
17124 17129 17623
17624
Humax 14078
iLo 13823
JVC 13063 13458 14063
LG 13514 13702
Magnavox 13012 13010
Memorex 13012
Mitsubishi 13037
Motorola 13157
Next Level 13157
Panasonic 12535 12989
Paysat 13012
Philips 12387 13010 13012
13037 13144 13364
Runco 04096
Samsung 04240
Scientific Atlanta 05973 04973 04573
04104 04113
Sejin 05698
Sony 05102
Starcom 04099
Supercable 04372
Supermax 04979
Thomson 05352
Tocom 04108
Torx 04099
Toshiba 04096
Tristar 04979
V2 04979
Viewmaster 04979
Vision 04979
Vortex View 04979
Zenith 04096 04621 04995
13430 13730 14037
17123
Proscan 12680 12854
Proton 13823
RadioShack 13157
RCA 12854 13143 12431
13680
Samsung 13396 13564 13665
13397 13730 13897
17123
Sony 12927 13927 13928
Star Choice 13157
Tivo 13430 13730 13731
13732 13826 13827
Toshiba 13037 14037 13078
13573
UltimateTV 13680 13928
Uniden 13012 13010
US Digital 13823
USDTV 13823
Voom 13157
Zenith 14144 13144
Cable & Satellite Box Device Codes 42
Page 43

Appendix C
Video Device Codes
DVD Player
Accurian 25648 25992
Advent 25592
Aiwa 25217
Akai 25271 25346 25475
25665
Alco 25366
Allegro 25445
Amphion M.W. 25448
AMW 25448
Apex Digital 25248 25293 25331
25370 25372 25373
25406 25580 25596
25632 25637 25676
Arrgo 25599
Aspire Digital 25744 25983
Audiovox 25366 25647 25648
25697 25698
Axion 25647 25648
Blaupunkt 25293
Blue Parade 25147
Broksonic 25271 25444
Cinea 25407
CineVision 25452 25409 25445
Citizen 25271 25853
Coby 25354 25428 25662
25683 25741 25753
Craig 25407
Curtis Mathes 25663
CyberHome 25392 25450 25599
25600 25693 25705
26078
Daewoo 25360 25281 25409
25445 25745 25748
25810 25818 26017
Denon 25066 25210
Desay 25983
Disney 25251 25846
Dual 25644 25661
Durabrand 25703
DVD2000 25097
Emerson 25167 25251 25397
25844
Enterprise 25167
ESA 25397 25844
Fisher 25246
Funai 25251 25844 25910
Gateway 25649 25653 25734
25770
GE 25098 25391 25293
Go Video 25320 25291 25317
25359 25409 25445
25620 25651 25675
25734 25880 26306
Go Vision 25647 25648
GoldStar 25317
Greenhill 25293
Harman/Kardon 25158 25278
Hitachi 25149 25240 25823
Hiteker 25248
Humax 26164
iLo 25924
Initial 25293
Insignia 25844
Integra 25203
JBL 25278
Jensen 25592
JSI 25999
JVC 25134 25199 25443
25740
jWin 25625
Kawasaki 25366
Kenwood 25066 25110
KLH 25293 25366 25596
25725
Konka 25287 25295 25296
Koss 25227 25472 25999
Landel 25402
Lasonic 25374 25749
Lenoxx 25703
LG 25167 25317 25377
25445
LiteOn 25634 25734 25992
26016
Loewe 25087 25461
Magnavox 25079 25115 25222
25251 25397 25844
Malata 25358 25735
Marantz 25115
Memorex 25271 25407 25846
Microsoft 25098 26284
Mintek 25415 25293
Mitsubishi 26097 25097
Momitsu 25658
NAD 25317
NEC 25361
Nesa 25293
Next Base 25402
NexxTech 25978
Norcent 25579 25448 25683
25841
Onkyo 25079 25203 25368
OptoMedia Elec. 25472
Oritron 25227
Panasonic 25066 25279 25938
26038 26066 26338
Philips 25079 25115 25222
25251 25430 25836
25843 25930
Pioneer 25101 25147 25207
Polaroid 25596 25637 25662
Polk Audio 25115
Portland 25346
Presidian 25251 25648
Prima 25592
Proscan 25098
ProVision 25354
Qwestar 25227
RCA 25098 25147 25293
25366 25398 25598
25708 26345
Rio 25445
Rotel 25199
Rowa 25399
Sampo 25274 25328
Samsung 25066 25149 24775
25396 25475 25620
25651
Sansui 25271
Sanyo 25246 25271 25449
Sensory Science 25734
Sharp 25206 25251 25328
25832
Sharper Image 25693
Sherwood 25209 25346 25619
25653
Shinsonic 25109 25415
Sonic Blue 25445 25675
Sony 25109 26109 25440
25609 25646 26007
Sova 25698
Superscan 25397
SVA 25436 25681
Sylvania 25251 25397 25844
Symphonic 25251 25397
Teac 25366
Technics 25066 25279
Technosonic 25306
Theta Digital 25147
Toshiba 30460 25079 25271
25621 25730 26164
26345
Tredex 25376
Urban Concepts 25079
US Logic 25415
Venturer 25366
Vizio 25640 25802
Xbox 25098 26284
Yamaha 25066 25115 25121
Zenith 25079 25167 25317
25445
Zoece 25841
DVD-R
Accurian 25992
Apex Digital 25632
Aspire Digital 25744
Coby 25662
CyberHome 25705 26078
Funai 25251 25910
Gateway 25649 25734 25770
Go Video 25317 25734 25880
26306
Video Device Codes 43
iLo 25924
JVC 25740
LG 25317
LiteOn 25734 25992 26016
Magnavox 25222 25251 16384
Panasonic 25066
Philips 25222
Pioneer 25207
Polaroid 25662
RCA 25098
Samsung 25066
Sensory Science 25734
Sharp 25251
Sony 25609 25646 26007
Sylvania 25251
Zenith 25317
Page 44

Laser Disk Player
Carver 20674
Denon 20539 20652
Disco Vision 20503
Harman/Kardon 20674
Hitachi 20503
Magnavox 20674 20697
Marantz 20674
VCR
ABS 18356
Admiral 16432 16593
Adventura 16384
Aiko 16662
Aiwa 16421 16384 16508
Akai 16425
Alienware 18356
America Action 16662
American High 16419
Asha 16624
Audiovox 16421 16662
Beaumark 16624
Bell & Howell 16488
Broksonic 16568 16505 16593
16386 16863 17863
Calix 16421
Canon 16419
Carver 16465
CCE 16456 16662
Citizen 16421 16662 17662
Colt 16456
Craig 16421 16431 16624
16456
Curtis Mathes 16444 16419 16546
16425 17419
Cybernex 16624
CyberPower 18356
Daewoo 16429 16662 17662
Dell 18356
Denon 16426
DirecTV 17123 17124 17129
17623 17624
Durabrand 16423 16422
Dynatech 16384
Electrohome 16421
Electrophonic 16421
Emerex 16416
Emerson 16421 16568 16384
16505 16427 16593
16386 16662 16863
16977 17662 17863
17977
Fisher 16431 16488
Fuji 16419 16417
Funai 16384 16977 17977
Garrard 16384
Gateway 18356
GE 16444 16419 16624
17191 17419 17444
Go Video 16816 16998
GoldStar 16421 16422 17621
Gradiente 16384
Harley Davidson 16384
Harman/Kardon 16465 16422
Harwood 16456
Hewlett Packard 18356
HI-Q 16431
Hitachi 16384 16426 16425
Video Device Codes 44
Mitsubishi 20539
NAD 20539
Optimus 20539
Panasonic 20684
Philips 20674
Pioneer 20539 20503
Polk Audio 20674
16473
Howard Comp. 18356
HP 18356
Hughes Network 16426 17123 17124
17129 17623 17624
Humax 17123
Hush 18356
iBUYPOWER 18356
Jensen 16425
JVC 16451 16425
KEC 16421 16662
Kenwood 16451 16425 16422
KLH 16456
Kodak 16419 16421
LG 17421
Linksys 18356
Lloyd's 16384
Logik 16456
LXI 16421
Magnasonic 16977 17662
Magnavox 16419 16423 16465
16384 16533 16947
16977 17977 18165
Magnin 16624
Marantz 16419 16465
Marta 16421
Matsushita 16419 16546 17546
Media Center PC 18356
MEI 16419
Memorex 16419 16546 16421
16432 16423 16431
16624 16384 16488
16593 16863 17421
17546 17621 17646
MGA 16624 16427
MGN Tech. 16624
Microsoft 18356
Mind 18356
Minolta 16426
Mitsubishi 16451 16427 17191
Motorola 16419 16432
MTC 16624 16384
Multitech 16384 16456
NEC 16488 16451 16425
16422
Nikko 16421
Niveus Media 18356
Noblex 16624
Northgate 18356
Olympus 16419
Optimus 17446 16546 16421
16432 16488 16816
16977 17546 17646
Orion 16568 16593 16386
16863 17863
Panasonic 17446 16419 16546
16609 16998 17000
17419 17546 17646
Quasar 20684
Sega 20503
Sony 20673 20681
Technics 20684
Theta Digital 20674
Yamaha 20697
Penney 16419 16421 16624
16426 16422 17419
17621
Pentax 16426
Philco 16419
Philips 16419 16465 17002
17123 17465 17565
Pilot 16421
Pioneer 16451
Polk Audio 16465
Presidian 17977
Profitronic 16624
Proscan 16444 17444
Protec 16456
Pulsar 16423
Quasar 16419 16546 17419
17546
RadioShack 16384 17421
Radix 16421
Randex 16421
RCA 16444 16624 16426
16533 17191 17264
17419 17444
Realistic 16419 16421 16432
16431 16384 16488
ReplayTV 16998 17000 17999
18000
Ricavision 18356
Runco 16423
Samsung 16624 16429 17123
17398
Sanky 16432 16423
Sansui 16384 16451 16593
16425 16863 17863
Sanyo 16431 16624 16488
Scott 16568 16429 16505
16427
Sears 16419 16421 16431
16384 16426 16488
17621
Sharp 16432 17191 17232
Shintom 16456
Shogun 16624
Singer 16456
Sonic Blue 16998 17000 17999
18000
Sony 16419 16416 16417
16384 17020 17416
17616 18356
Stack 9 18356
STS 16426
Sylvania 16419 16465 16384
16427 16977 17977
18165
Symphonic 16384 16977 17977
Systemax 18356
Tagar Systems 18356
Tatung 16425
Page 45

Teac 16384 16425
Technics 16419 16546
Teknika 16419 16421 16384
Thomas 16384
Tivo 17002 17020 17123
17124 17129 17623
17624 18380 17887
TMK 16624
Toshiba 16429 16427 17229
17392 17529 17887
18356 18380
Totevision 16421 16624
Touch 18356
Unitech 16624
Vector 16429
Vector Research 16422
Video Concepts 16429
Videomagic 16421
Videosonic 16624
Viewsonic 18356
Villain 16384
Voodoo 18356
Digital Video Recorder (DVR)
ABS 18356
Alienware 18356
Amino 09807 09865
CyberPower 18356
Dell 18356
DirecTV 12387 12680 12927
13430 13364 13665
13680 13730 13731
13732 13826 13827
13928 17123
Dish Network 13793 13063
Dishpro 13793 13063
Echostar 13793 13063 13458
13459
Expressvu 13063
Gateway 18356
Go Video 16998
Hewlett Packard 18356
Howard Comp. 18356
HP 18356
Hughes Network 13430 13730 13731
13732 13826 13827
17123 17124 17129
17623 17624
Humax 17123
Hush 18356
iBUYPOWER 18356
JVC 13458
Linksys 18356
Media Center PC 18356
Microsoft 18356
Mind 18356
Motorola 13157
Niveus Media 18356
Northgate 18356
Panasonic 16998 17000
Philips 13430 13730 17002
17123
Proscan 12680
RCA 13680 17264
Wards 16444 16419 16432
16431 16465 16624
16384 16426 16456
16533
White WH 16593 16456
XR-1000 16419 16384 16456
Yamaha 16422
Zenith 16423 16417 16384
16593 16863 17863
ZT Group 18356
ReplayTV 16998 17000 17999
18000
Samsung 13730 17123
Sonic Blue 16998 17000 17999
18000
Sony 12927 13928 17020
18356
Stack 9 18356
Star Choice 13157
Systemax 18356
Tagar Systems 18356
Tivo 17002 17020 17123
17124 17129 17623
17624
Toshiba 17392 18356 18380
Touch 18356
Viewsonic 18356
Voodoo 18356
ZT Group 18356
Video Device Codes 45
Page 46
Appendix D
Auxiliary Device Codes
Audio Amplifier
Adcom 33345
Bose 33442
Curtis Mathes 33068
Durabrand 34329
Elan 33415
GE 32846
Harman/Kardon 33660
JVC 33099
Left Coast 33660
Lenoxx 34329
Marantz 33660
McIntosh 33019
Optimus 33163
Philips 33660
Pioneer 32781
Polk Audio 33660
RCA 33068
Realistic 33163
Sony 33583
Soundesign 32846
Victor 33099
Wards 32846
Yamaha 33122
Audio Accessory
Accurian 33874
Aiwa 32927
Altec Lansing 33824 34253
Apple 33883 34412
Cambridge SW 34298
Creative 33640
Marantz 34259
Motorola 34232
NaviPod 34412
Netgear 34553
Omnifi 34373
Roku 34596
Russound 34070
Slim Devices 34612
Sony 32927
Yamaha 34577 34578
Audio CD
Aiwa 37021
Burmester 37284
CA Audio Labs 36893 37167
Carver 37021 37043
Denon 37737 36867 36898
DKK 36864
DMX Electronics 37021
Emerson 37169
Fisher 37043
Garrard 37284
Genexxa 36896 37169
Harman/Kardon 37021 37037
Hitachi 36896
Integra 36965
JVC 36936
Kenwood 37545 37490 36892
36901 37054
KLH 38182 38236 38237
38575
Krell 37021
Linn 37021
LXI 37169
Magnavox 37021 37169
Marantz 37490 36893 37021
MCS 36893
Miro 36864
Mission 37021
MTC 37284
NSM 37021
Onkyo 37732 36965
Optimus 37927 36864 36896
36901 36951 37009
37043 37169 37284
37332 37939
Panasonic 36893 37167 37252
37616
Parasound 37284
Philips 37490 37021 37138
Pioneer 37927 37926 36896
37951 37169 37332
Polk Audio 37021
Proton 37021
QED 37021
Quad 37021
Quasar 36893
RadioShack 37939
RCA 37926 36896 36917
37043 37169 37284
37332
Realistic 37043 37284
Rotel 37021 37284
SAE 37021
Sansui 37021 37169
Sanyo 36951 37043
Scott 37169
Sears 37169
Sharp 37725 36901
Sherwood 37931
Sonic Frontiers 37021
Sony 37354 36864 36964
38228 37049
Soundesign 37009
Symphonic 37169
TAG McLaren 37021
Tascam 37284
Teac 37284
Technics 36893 37167
Victor 36936
Wards 37021 36917
Yamaha 37354 37752 36900
38156
Audio Receiver
ADC 29203
Aiwa 30077 28830 28861
28793 30060 30313
Akai 30184
Alco 30062
Amphion M.W. 30235 30287
AMW 30235 30287
Anam 30281 29746
Apex Digital 29929 30102 30446
Audiotronic 29861
Audiovox 30062 30299
B & K 29373 29492 29512
BK 29374
Bose 29901 29311 29925
30513 30605
Auxiliary Device Codes 46
Cambridge SW 30042
Capetronic 29203
Carver 29861 28861
Classic 30024
Coby 29935 30061
Daewoo 29922
Dell 30055
Delphi 30086
Denon 30032 29814
Fisher 30473
Gateway 30189
Glory Horse 29935
Harman/Kardon 28782 28861 29563
29976 29978
Hewlett Packard 29853
Hitachi 29945 30473
Insignia 29702
Integra 28807 29970 29992
JBL 28782 29978
JVC 28746 29935 30046
30167 30483
Kenwood 29985 30242 30241
28699 28858
KLH 30062 30084 30100
Koss 30038 30169
LG 29965
Linn 28861
Liquid Video 30169
Magnavox 29861 29941 28861
29203 30186
Page 47

Marantz 29861 29941 28711
28861 29961
MCS 28711
Mitsubishi 30065
NAD 28992
Norcent 30061
Nova 30061
Onkyo 28807 29514 29970
29992 30203
Optimus 29695 28858 29203
29342 29746
Oritron 30038 30169
Panasonic 29980 30190 28711
28981 29960 29988
30220 30305 30435
30436
Philips 29861 29941 28861
29938
Pioneer 29695 28686 28822
29203 29302 30056
Polaroid 30180
Polk Audio 28861 29961 30086
Proscan 29926
Quasar 28711
RadioShack 29935
RCA 29695 30281 29926
29203 29746 30062
30183
Rio 30055 30541
Samsung 29967 30172
Sansui 28861
Sanyo 30141 30473
Sharp 28858
Sharper Image 29935 30228
Sherwood 29749 30189 30325
Sirius 30299 30483 30659
Sonic Blue 30055 30541
Sony 29730 30113 29930
Digital Video Recorder (DVR)
ABS 18356
Alienware 18356
Amino 09865
CyberPower 18356
Dell 18356
DirecTV 17123
Gateway 18356
Go Video 16998
Hewlett Packard 18356
Howard Comp. 18356
HP 18356
Hughes Network 17123 17124 17129
17623 17624
Humax 17123
Hush 18356
iBUYPOWER 18356
Linksys 18356
Media Center PC 18356
Microsoft 18356
Mind 18356
Niveus Media 18356
Northgate 18356
Panasonic 16998 17000
Philips 17002 17123
RCA 17264
ReplayTV 16998 17000 17999
18000
Samsung 17123
Home Automation
Accutek 42175
Amana 42676
Audio Access 41114
Bionaire 41806 42175
Comfortex 41360
Da-Lite 41740
Frigidaire 42293 42805
GE 41200
GoldStar 42497
Holmes 42175
Hunter Douglas 41393
Kenmore 42497
Lasko 41806
LG 42497
Lightolier 41144
LiteTouch 41044
Lutron 41557 41278 42199
42557
One For All 41127
PCS 41144
RadioShack 41200
Royal Sovereign 42611
30431 30294 28830
29146 30078 30230
30330 30430 30530
Soundesign 29342
Stereophonics 29695
Sunfire 29985
Teac 29746 30062 30200
Technics 29980 30190 28711
28981
Thorens 29861
Toshiba 30460
Venturer 30062
Victor 28746
Wards 28830 28861 28686
XM 30078 30086
Yamaha 28848 28858 29848
29948 30003 30047
30148
Zenith 29965
Sonic Blue 16998 17000 17999
18000
Sony 17020 18356
Stack 9 18356
Systemax 18356
Tagar Systems 18356
Tivo 17002 17020 17123
17124 17129 17623
17624
Toshiba 17392 18356 18380
Touch 18356
Viewsonic 18356
Voodoo 18356
ZT Group 18356
Russound 42192 42193
Security System 41127
Sharper Image 41806
SmartLinc 41144
Somfy 41740
Universal X10 41127
Whirlpool 42292
Windmere 42175
X10 41127
Auxiliary Device Codes 47
Page 48

Shift, then Power
Remote Control Special Function Quick Reference
Function: Key Combination(s)
Pair a remote to an Xtender MENU + CH_UP
Set IR device type TV + INFO
DVD + INFO
CBL + INFO
AUX + INFO
RED + INFO
GREEN + INFO
BLUE + INFO
Scan IR device type TV + GUIDE
DVD + GUIDE
CBL + GUIDE
AUX + GUIDE
RED + GUIDE
GREEN + GUIDE
BLUE + GUIDE
Learn IR pattern for key and device TV + ENTER
DVD + ENTER
CBL + ENTER
AUX + ENTER
RED + ENTER
GREEN + ENTER
BLUE + ENTER
Unlearn IR pattern for key and device TV + DEL/CLEAR
DVD + DEL/CLEAR
CBL + DEL/CLEAR
AUX + DEL/CLEAR
RED + DEL/CLEAR
GREEN + DEL/CLEAR
BLUE + DEL/CLEAR
Enable volume punch-through to AUX device AUX + VOL_UP
Disable volume punch-through to AUX device TV + VOL_UP
Enable INPUT punch-through to AUX device AUX + Live-TV
Disable INPUT punch-through to AUX device TV + Live-TV
Enable channel tuning punch-through to CBL device CBL + CH_UP
Disable channel tuning punch-through to CBL device TV + CH_UP
Set local master remote MENU + VOL UP
Clear local master remote MENU + VOL DN
Program TV signal gain MENU + 1
Show IR device types MENU + 2
Set inter-digit delay MENU + 4
Select TV tuning mode MENU + 5
Enable power to SuperCombiner Press Red, Green, or Blue
Disable power to SuperCombiner Press/Release
Auxiliary Device Codes 48
Page 49

Appendix D
following two conditions: (1) This device may not cause harmful interference, and (2) this
device must accept any interference received, including interference that may cause
undesired operation.
compliance could void the user’s authority to operate the equipment.
digital device, pursuant to part 15 of the FCC Rules. These limits are designed to provide
reasonable protection against harmful interference in a residential installation. This
equipment generates, uses and can radiate radio frequency energy and, if not installed
and used in accordance with the instructions, may cause harmful interference to radio
communications. However, there is no guarantee that interference will not occur in a
particular installation. If this equipment does cause harmful interference to radio or
television reception, which can be determined by turning the equipment off and on, the
user is encouraged to try to correct the interference by one or more of the following
measures: Reorient or relocate the receiving antenna, Increase the separation between
the equipment and receiver, Connect the equipment into an outlet on a circuit different
from that to which the receiver is connected, Consult the dealer or an experienced
radio/TV technician for help.
FCC Notices
FCC ID: WAR-XTEND-SD
This device complies with part 15 of the FCC Rules. Operation is subject to the
Changes or modifications not expressly approved by the party responsible for
This equipment has been tested and found to comply with the limits for a Class B
Auxiliary Device Codes 49
 Loading...