

Page 1

®
BocaVision
Thin Clients
Hardware Reference
with Citrix ICA
Support
®
Page 2

2
Hardware Reference
Page 3

Founded in 1985, Boca Researc h designs , manufactures ,
markets and supports quality, cost-effective Internet access/
thin client/server computing devices , data communications
and networking products to facilitate the transmission of
information on personal computers , computer networks and
the Internet.
The Company also markets its products under the Global
Village brand name and sells them worldwide through
distributors, original equipment manufacturers (OEMs) and
33
3
33
retailers . Boca Research is a U.S . corporation headquartered
in Boca Raton, Florida with international operations and
ventures worldwide.
Boca Research’s WEB address: http://www.bocaresearch.com
CopyrightCopyright
Copyright
CopyrightCopyright
©1998. Boca Research, Inc. All rights reserved. No reproduction of this
document in any form is allowed without permission in writing from
Boca Research, Inc. Boca Research is not liable for any damages
resulting from technical or editorial errors or omissions contained in
this document. The information in this manual is subject to change
without notice. Revisions to the product(s) in this manual may occur at
any time without notice.
TT
rademarksrademarks
T
rademarks
TT
rademarksrademarks
All Boca Research products are trademarks of Boca Research, Inc. All
other references to computer systems, software, and peripherals use
trademarks owned by their respective manufacturers.
Publication Date:Publication Date:
Publication Date:
Publication Date:Publication Date:
Printed in the U.S.A.
November November
November
November November
,,
1998 1998
,
1998
,,
1998 1998
Page 4

4
Hardware Reference
Contents
1—Introduction.......................................................... 5
2—Summary of Connectors....................................... 6
3—Standard Connections.......................................... 8
4—Connecting to a TV/VCR ...................................... 10
5—Technical Specifications....................................... 18
6—Compatible Printers............................................. 21
7—Accessories............................................................ 23
8—Connecting a Wireless Keyboard......................... 24
Page 5
Introduction
1Introduction
BocaVision Thin Client network devices enable inexpensive
10BaseT access to corporate network servers . Built-in
browser software with open ISP support provides a variety
of user options . Configured with a 10BaseT Ethernet
connection, monitor (or TV), keyboard, mouse and/or printer,
55
5
55
BocaVision delivers exciting network access solutions .
Components
• BocaVision unit(s)
• Network Management Software CD
• PS/2 keyboard (104 keys)
• PS/2 mouse
• Administrator’s Manual
• User Handbook
• P ower cord
Page 6
6
2Summary of Connectors
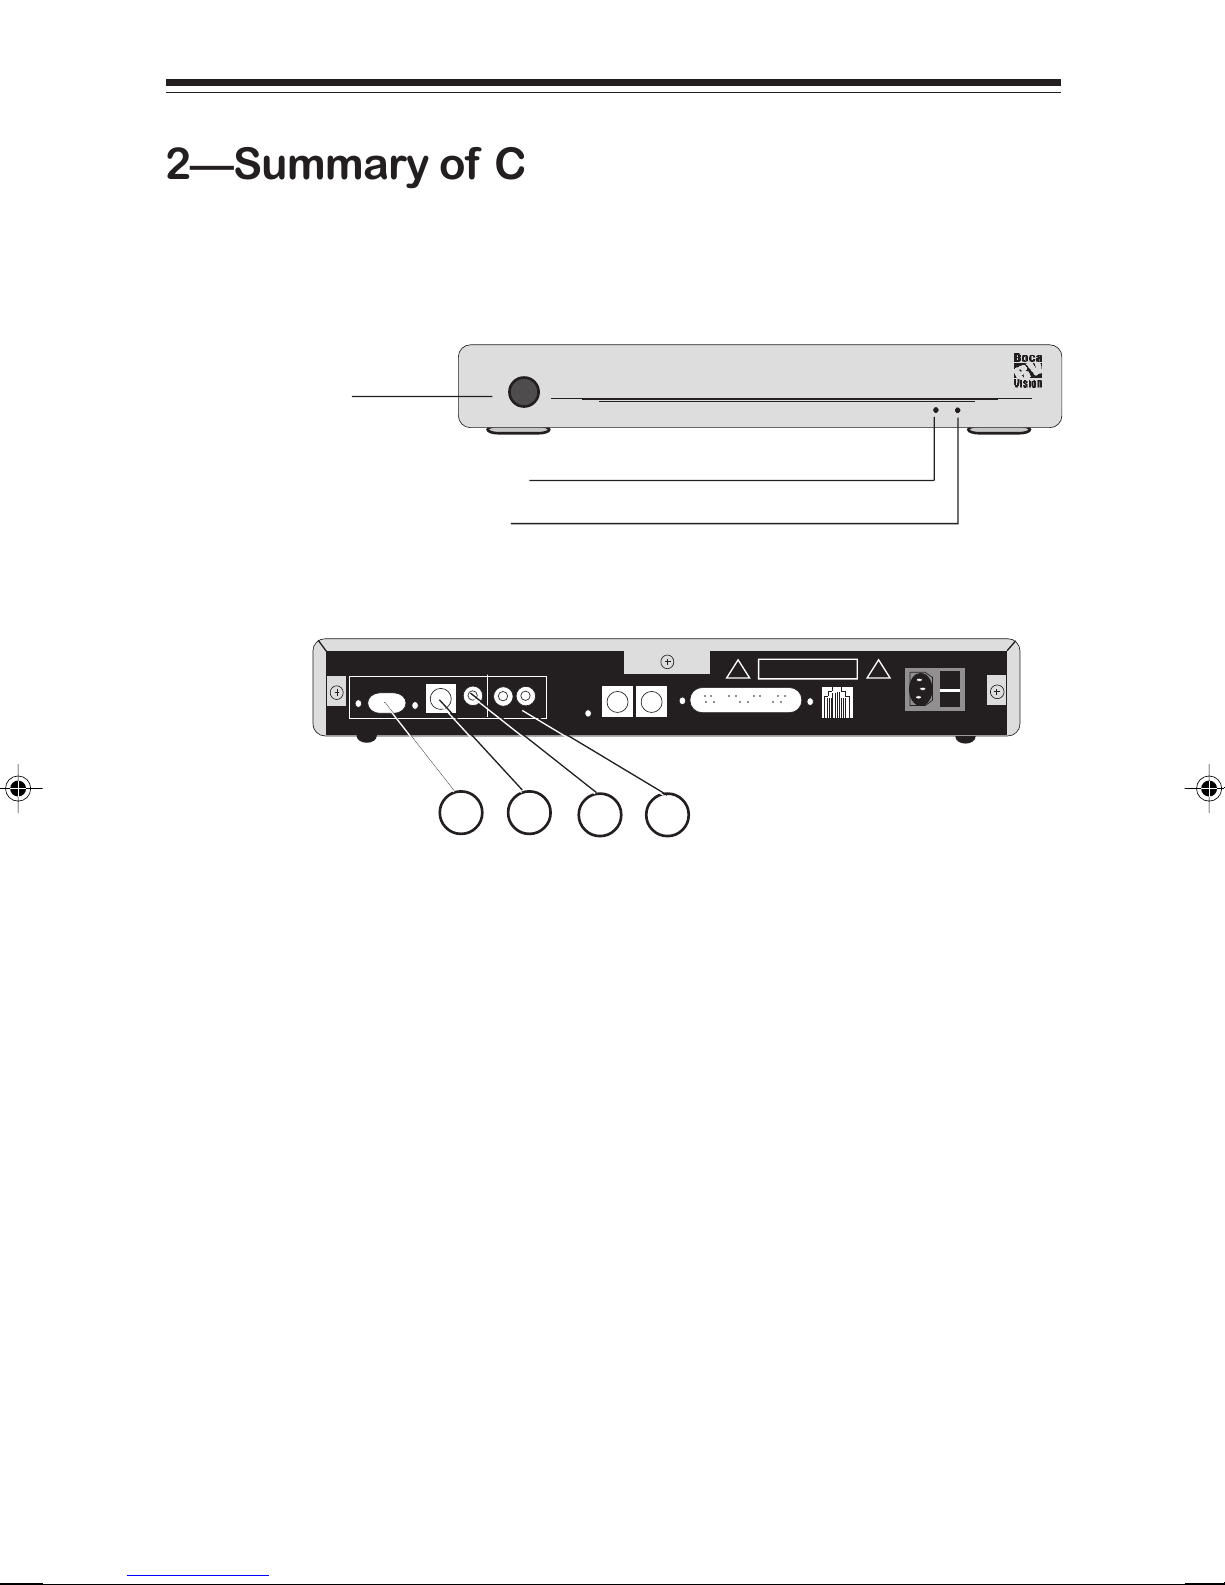
Connectors and LEDs
Hardware Reference
FRONT FRONT
FRONT
FRONT FRONT
IR ReceiIR Recei
IR Recei
IR ReceiIR Recei
Status LEDsStatus LEDs
Status LEDs
Status LEDsStatus LEDs
LED1LED1
LED1—Power (GREEN)
LED1LED1
LED2LED2
LED2— (RED)*
LED2LED2
*(flashing: looking for boot server)
(off: connected to boot server)
REAR REAR
REAR
REAR REAR
VIEWVIEW
VIEW
VIEWVIEW
verver
ver
verver
VIEWVIEW
VIEW
VIEWVIEW
::
:
::
11
1
11
::
:
::
22
2
22
33
3
33
44
4
44
○○○○○○○○
○○○
○○○
1—V1—V
1—V
1—V1—V
GA Monitor porGA Monitor por
GA Monitor por
GA Monitor porGA Monitor por
t.t.
t.
Use this port when connecting the
t.t.
unit to a computer monitor.
2—S-video Output.2—S-video Output.
2—S-video Output.
2—S-video Output.2—S-video Output.
Use this port if using a television and
the TV features an S-video connector. S-video may provide
improved clarity of video display.
3—Composite video output.3—Composite video output.
3—Composite video output.
3—Composite video output.3—Composite video output.
Use the video cable to connect
this port to the VIDEO-IN jac k on your TV.
4—Right/Left audio c4—Right/Left audio c
4—Right/Left audio c
4—Right/Left audio c4—Right/Left audio c
hannelshannels
hannels
hannelshannels
..
.
Use audio cables to
..
connect these ports to the AUDIO-IN jacks on your
computer speakers, or your T V.
Page 7
Summary of Connectors
55
5
55
66
6
66
77
7
77
○○○○○○○○
○○○
○○○
88
8
88
99
9
99
1010
10
1010
1111
11
1111
77
7
77
5—Reset Switc5—Reset Switc
5—Reset Switc
5—Reset Switc5—Reset Switc
h.h.
h.
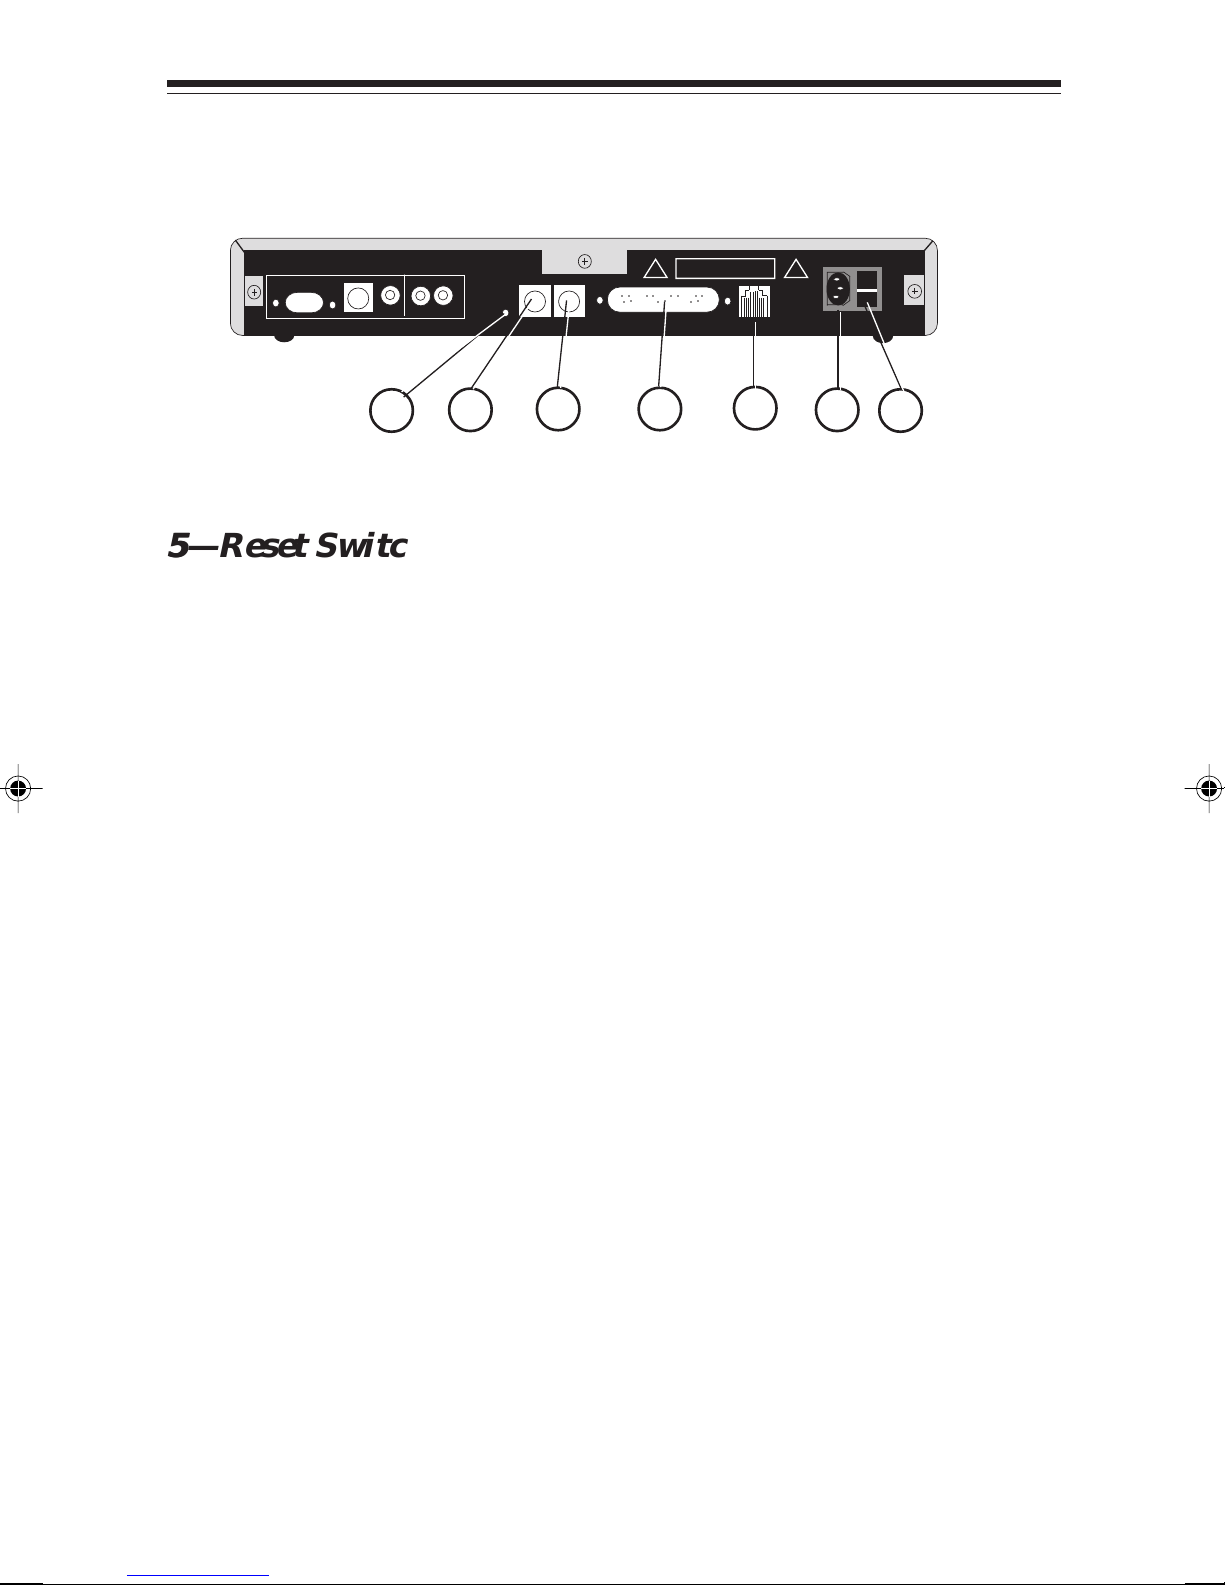
Use this reset switch to recover from
h.h.
memory corruption. Pressing the reset switc h once briefly
will clear all unprotected RAM. P owering up he unit with
the switch pressed in clears all RAM and resets the
EEPROM to factory defaults.
6—Mouse.6—Mouse.
6—Mouse.
6—Mouse.6—Mouse.
7—K7—K
7—K
7—K7—K
8—Pr8—Pr
8—Pr
8—Pr8—Pr
ee
yboaryboar
e
yboar
ee
yboaryboar
inter parinter par
inter par
inter parinter par
Connect a PS/2 mouse.
d jacd jac
d jac
d jacd jac
k.k.
k.
Connect a PS/2 keyboard.
k.k.
allel porallel por
allel por
allel porallel por
t (DB-25).t (DB-25).
t (DB-25).
t (DB-25).t (DB-25).
Allows connection of
printer to the unit.
9—10BaseT jac9—10BaseT jac
9—10BaseT jac
9—10BaseT jac9—10BaseT jac
k (RJ-45).k (RJ-45).
k (RJ-45).
k (RJ-45).k (RJ-45).
Attach one end of an RJ-45 cable
to this jack and the other end to an RJ-45 wall connector.
10—A10—A
10—A
10—A10—A
C PC P
C P
C PC P
oo
ww
er connectorer connector
o
w
er connector
oo
ww
er connectorer connector
Attach the other end to your w all outlet.
CONNECTION LAST)CONNECTION LAST)
CONNECTION LAST).
CONNECTION LAST)CONNECTION LAST)
11—P11—P
11—P
11—P11—P
oo
ww
er Switcer Switc
o
w
er Switc
oo
ww
er Switcer Switc
off .
..
. Connect the AC power cord here .
..
(MAKE (MAKE
(MAKE
(MAKE (MAKE
hh
..
h
. Simple rocker to power the unit on or
hh
..
THISTHIS
THIS
THISTHIS
Page 8
8
Hardware Reference
3Standard Connections
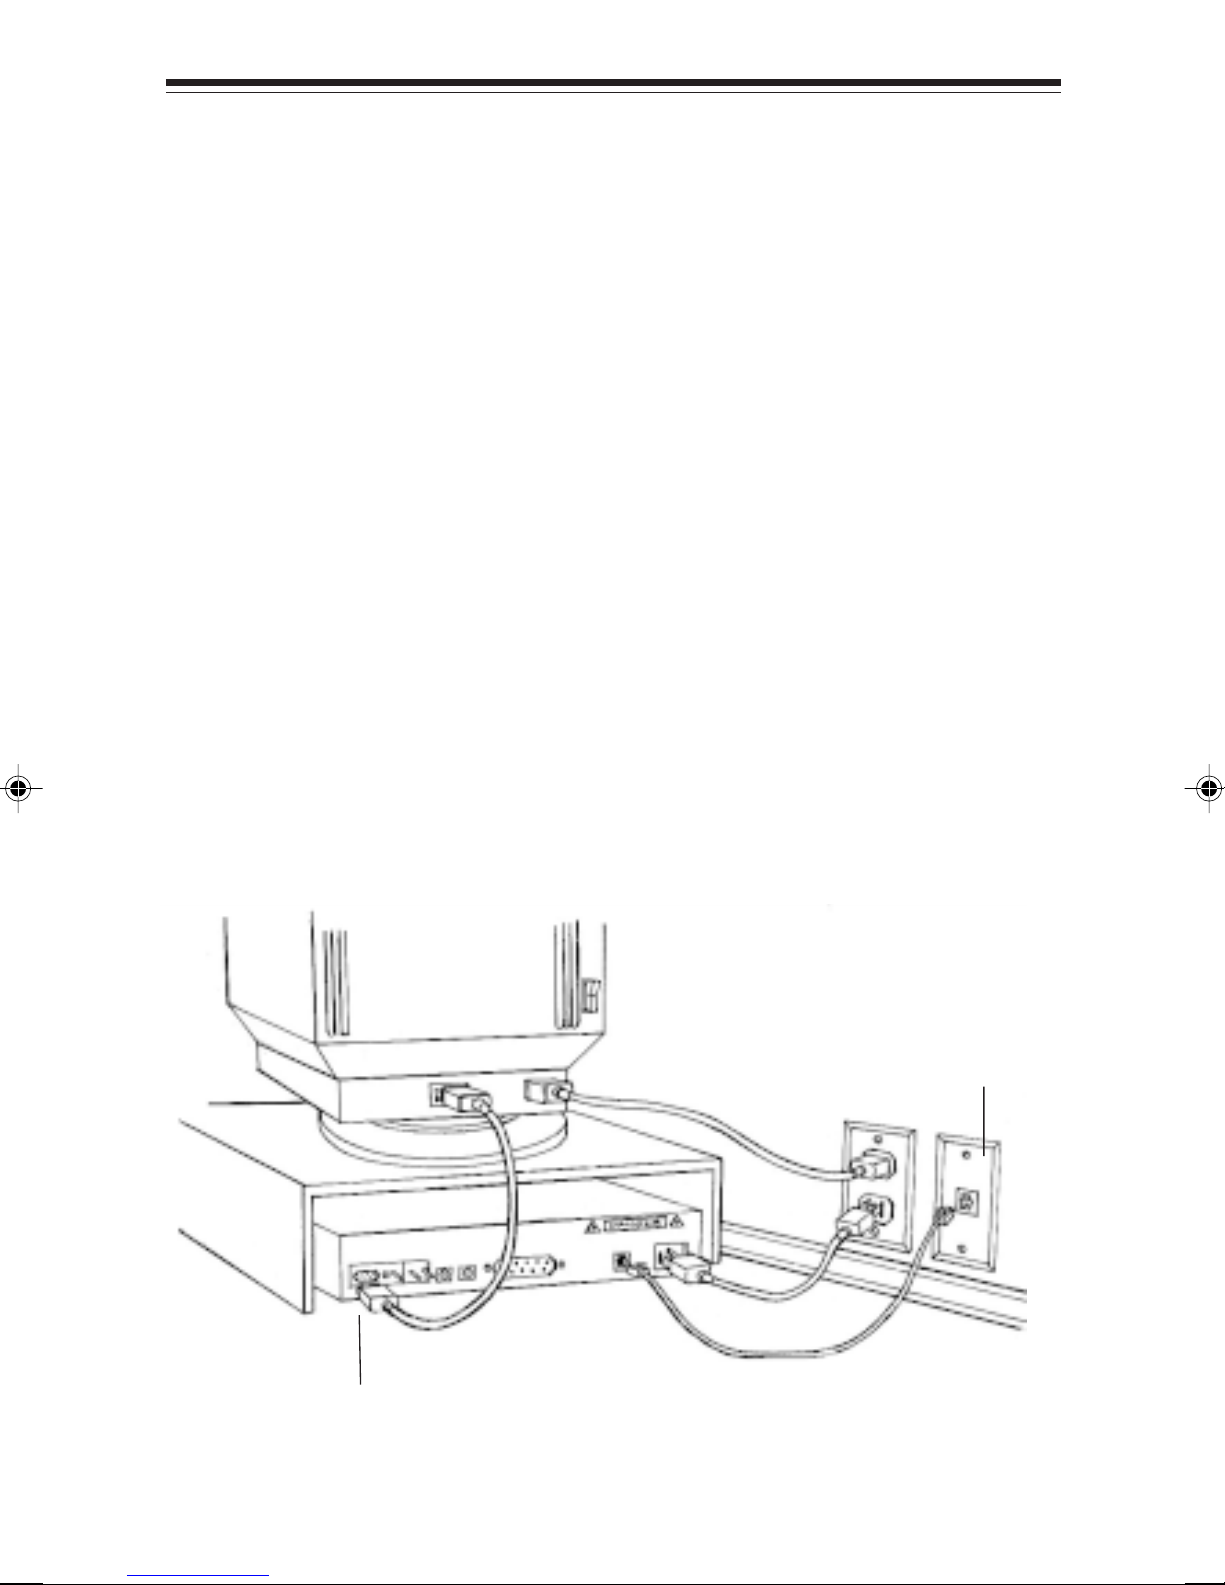
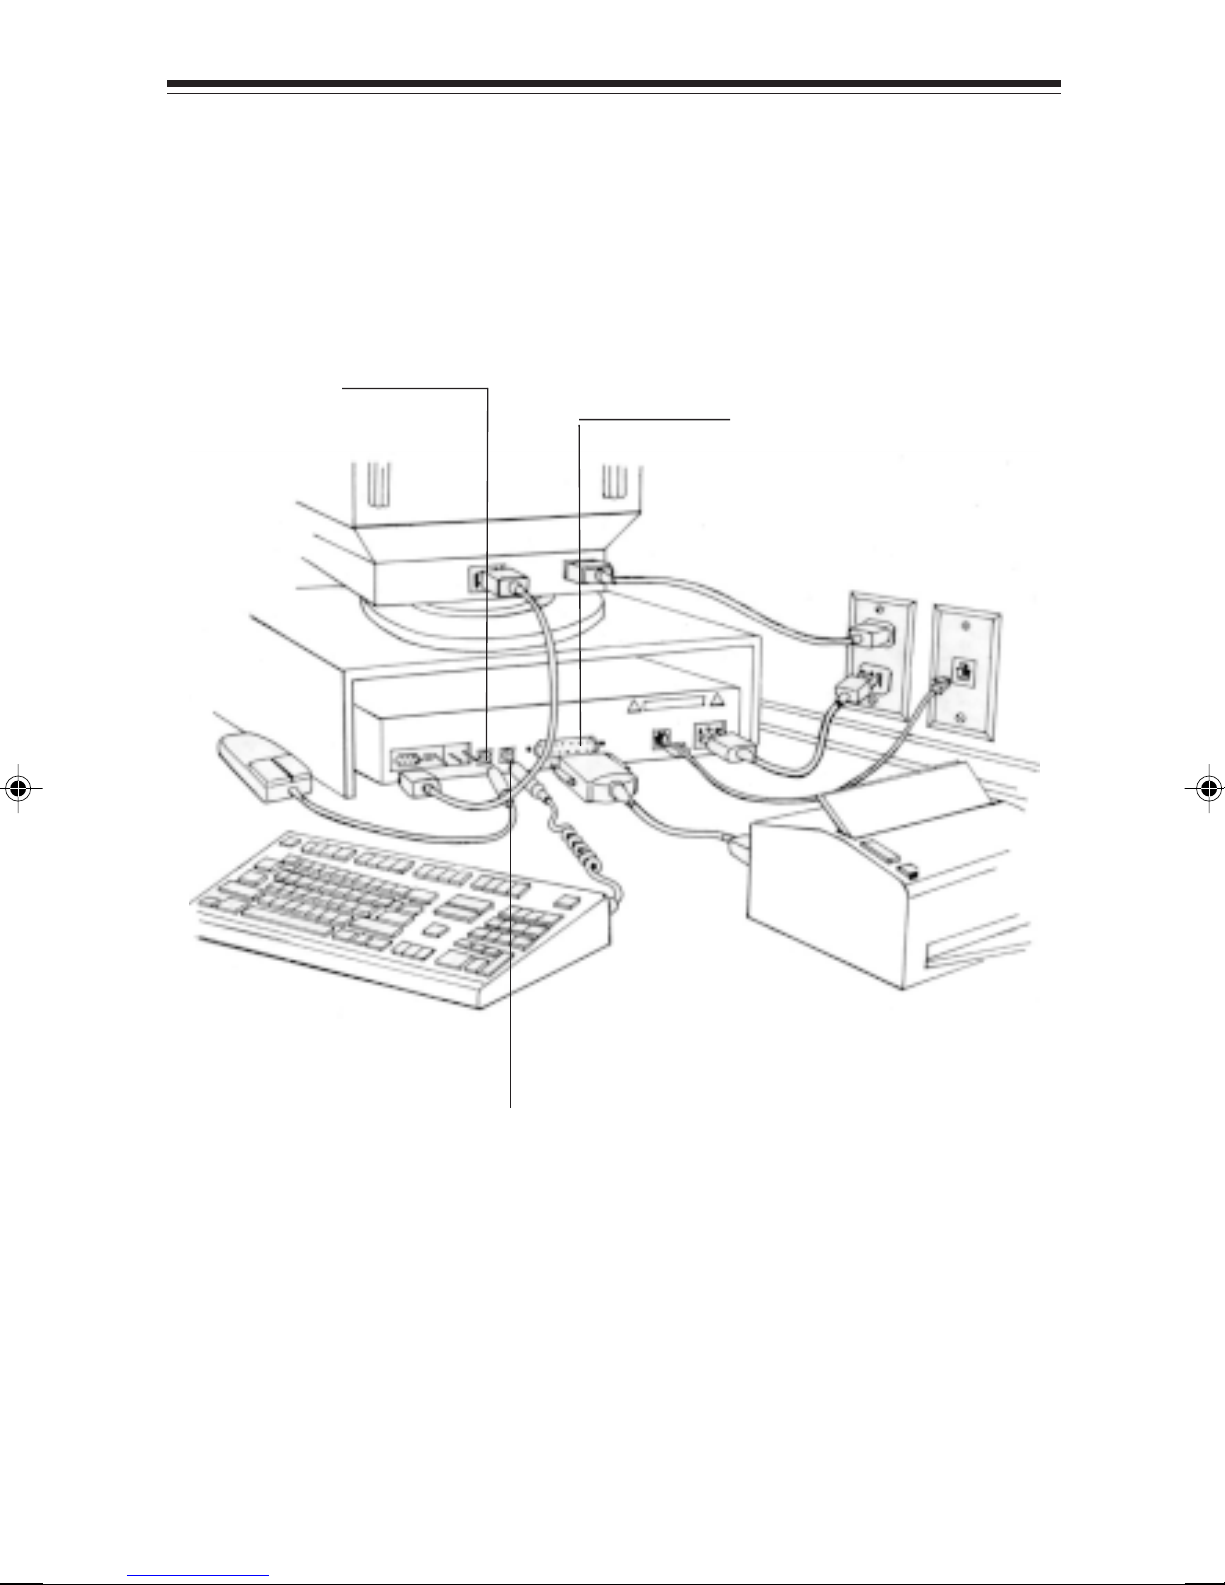
Common Installation with VGA Monitor
Before you can access the network, you need to connect the
unit to:
A. A VGA Monitor
B . RJ-45 w all jack for 10Base-T network connection
C . An AC electrical outlet
A common installation is depicted below. For an illustration
of a sample network configuration with the BocaVision unit,
see Section 5. In the event you wish to connect a television to
the unit, refer to Appendix D in this manual. To connect
peripheral devices such as a mouse, keyboard, and printer,
see the next page.
AC P ower Cord
RJ-45 (10BaseT jack)
VGA Monitor
Connector
Page 9
Summary of Connectors
Connecting Other Peripherals
Mouse Port
Parallel P ort
Connector
99
9
99
Keyboard P ort
Page 10

10
Hardware Reference
4Connecting to a TV/VCR
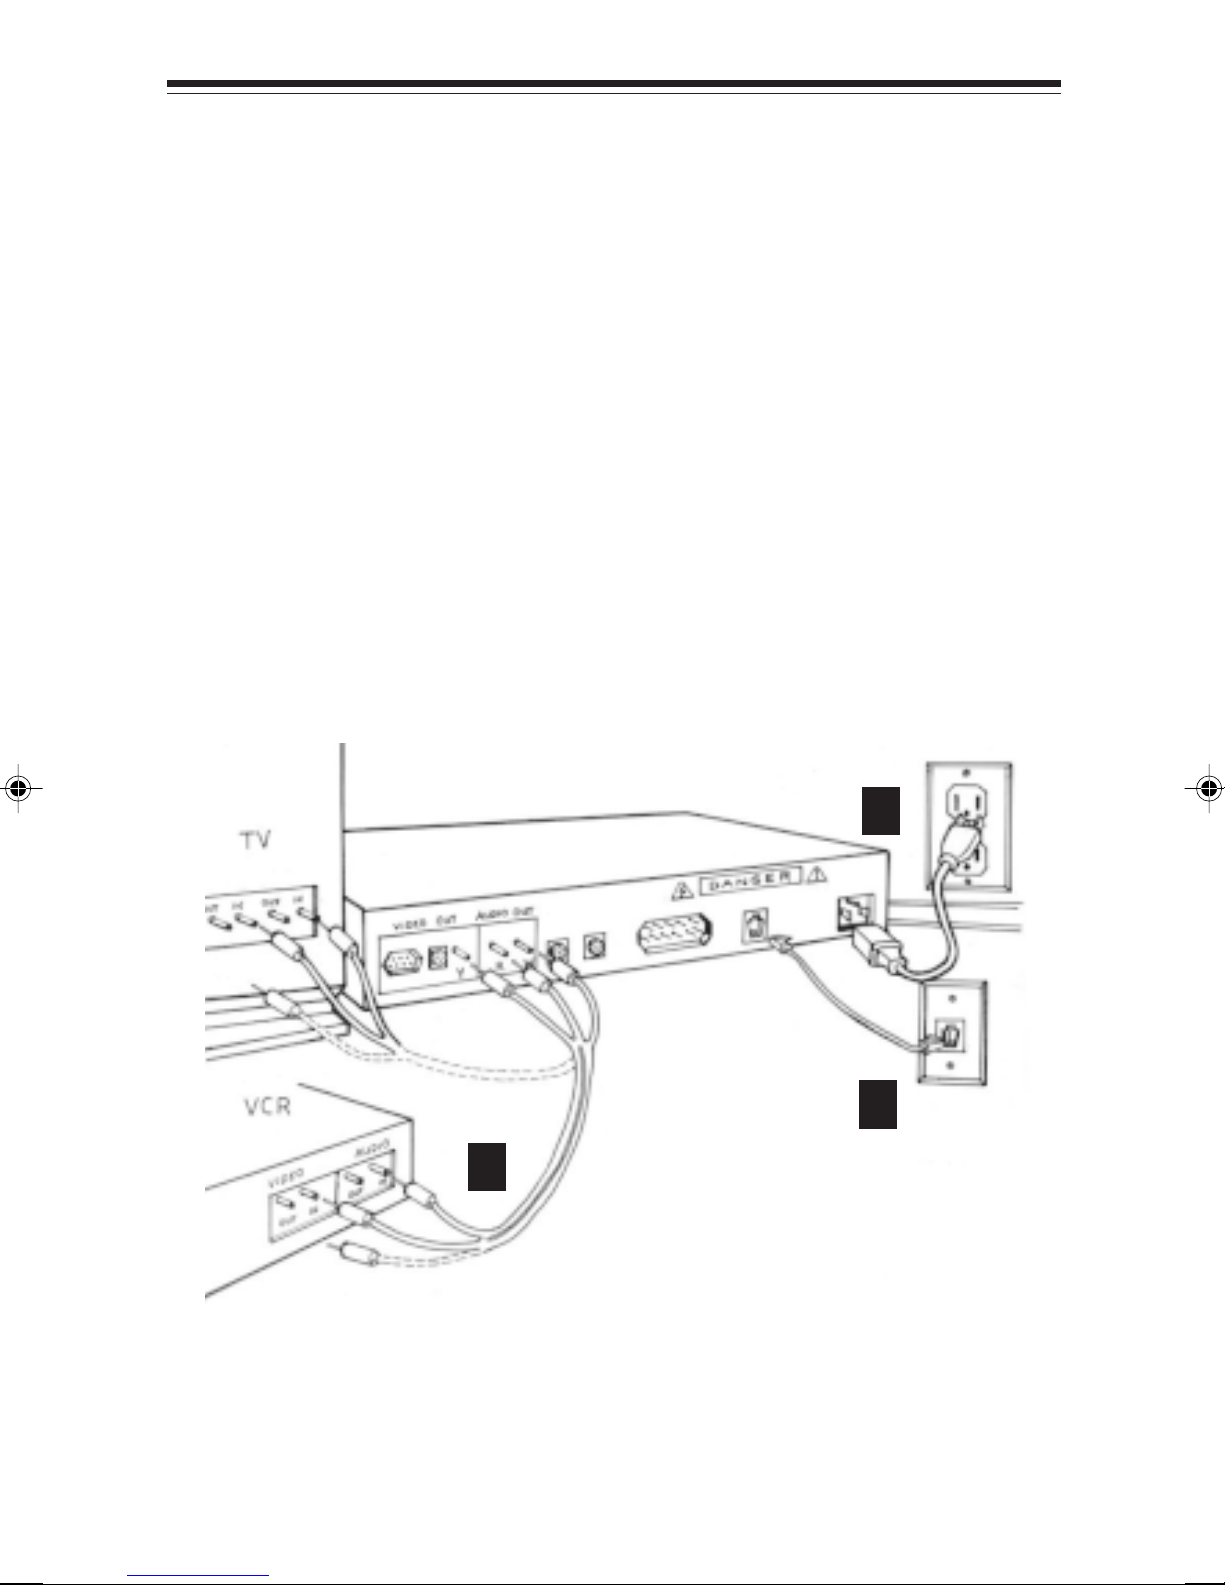
A common TV installation is depicted on the next page (TV
or VCR with Audio jacks). More details are provided on
subsequent pages. Your connection depends on how your TV
is set up:
1. Does your TV ha ve S-VIDEO, RCA-type A/V (audio/video),
Or RF coaxial jacks?
2. Is your TV connected to a VCR?
IF IF
YOU HAYOU HA
IF
YOU HA
IF IF
YOU HAYOU HA
VE:VE:
VE:
VE:VE:
THEN:THEN:
THEN:
THEN:THEN:
A TV/VCR without audio jacks... see page 12
A TV with S-VIDEO jack... see page 14
A TV/VCR with audio/video jacks... see page 16
NONO
TETE
NO
TE: Connection to S-VIDEO may offer improved video
NONO
TETE
display.
A.A.
TT
A.
A.A.
elevision and elevision and
T
elevision and
TT
elevision and elevision and
VCRVCR
VCR
VCRVCR
Connect one end of the supplied RCA-type A/V cable to the
BocaVision unit as identified and the other end to the A/V
IN jacks on your TV or VCR. Make sure you matc h colors. If
there is only one audio jack, connect the white plugs only.
NONO
TE:TE:
NO
TE: If connecting through your VCR, connect the VCR’ s
NONO
TE:TE:
A/V OUT jacks to the T V’ s A/V IN jacks . If using a coaxial
cable for this connection, connect the coax OUT jac k on your
VCR to the coax VHF/UHF jack on your TV, using a coaxial
connector cable (not supplied). You will need either a coaxial
cable, or an RCA-type A/V cable, but not both.
Page 11
Connecting to a TV/VCR
B.B.
TT
B.
B.B.
elephoneelephone
T
elephone
TT
elephoneelephone
Connect one end of the telephone cable to the unit’s
telephone jack. Connect the other end to the telephone wall
jack. For best results , connect the unit to a telephone wall
jack that you are not currently using . If you have only one
telephone wall jack, use the supplied T-splitter so the unit
and the phone can share the same line.
CC
..
P P
.
P
..
P P
owerower
ower
owerower
C
CC
Connect the proper end of the AC power cord to the unit’s
1111
11
1111
power receptacle and then plug in (
A
DO DO
DO
DO DO
THIS LASTTHIS LAST
THIS LAST).
THIS LASTTHIS LAST
C
B
Page 12

12
Hardware Reference
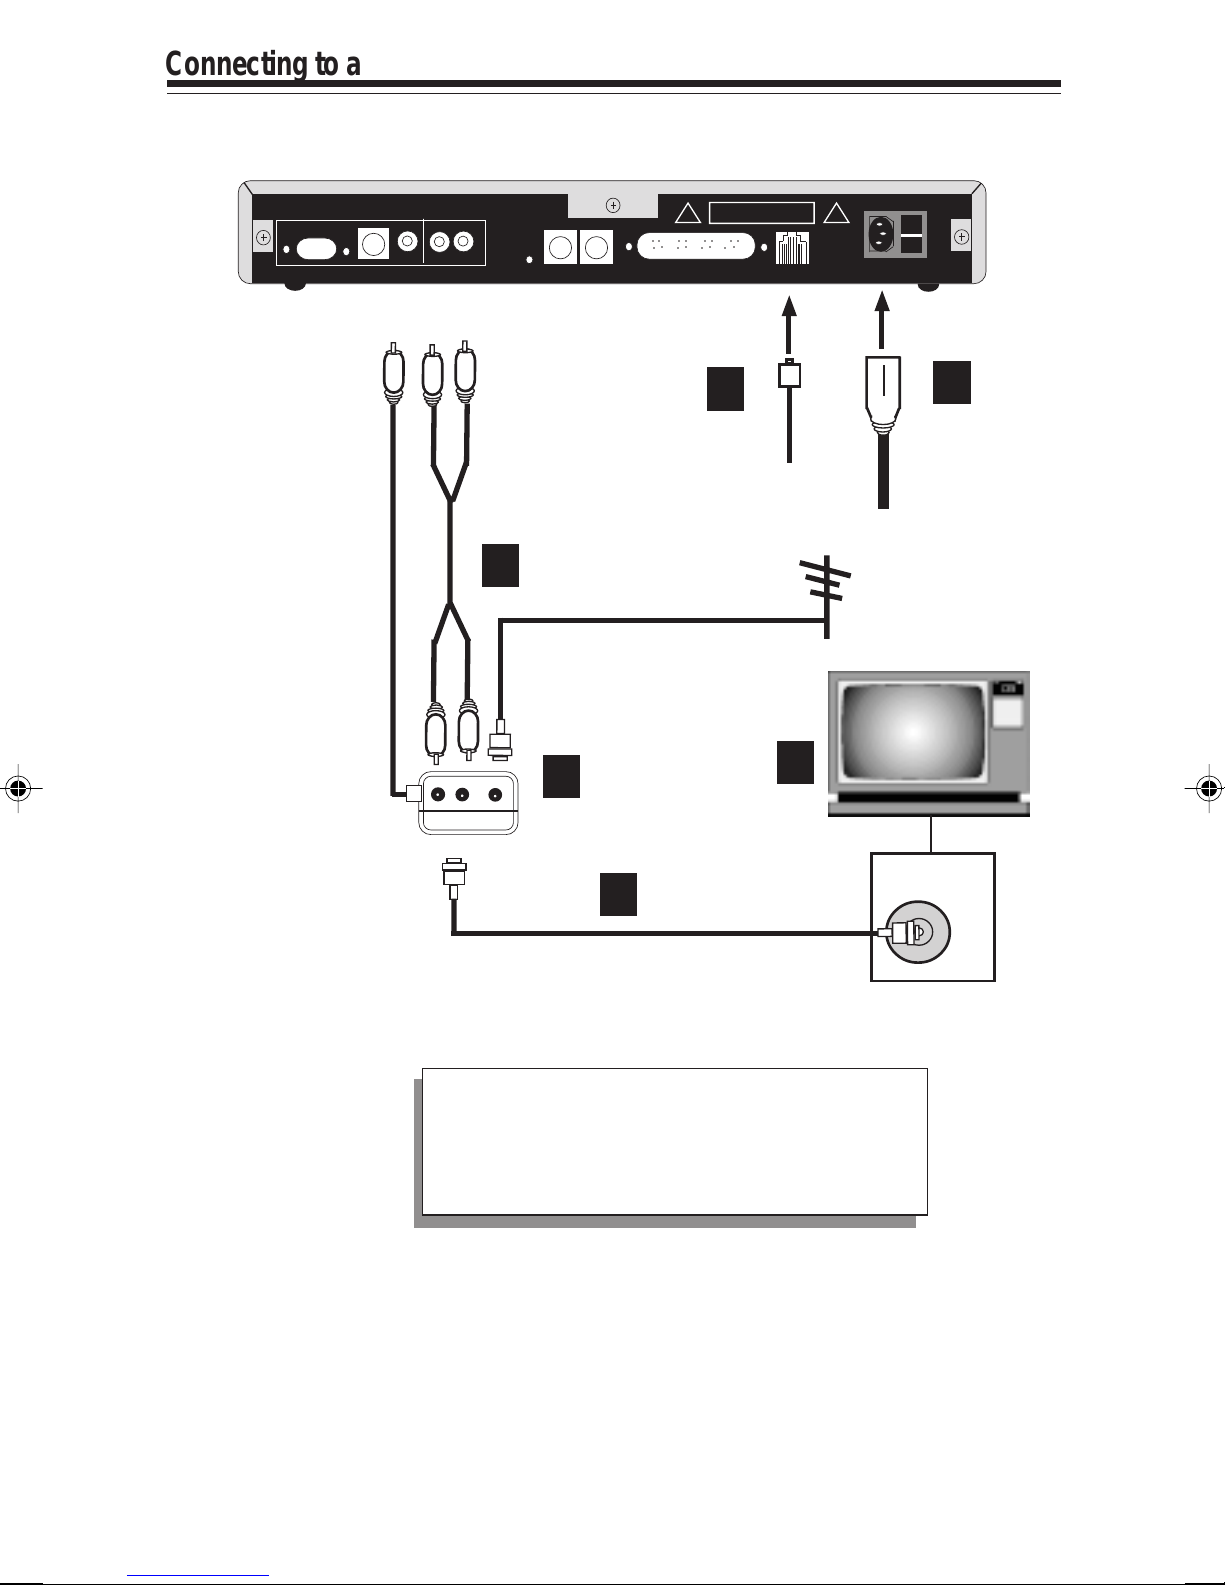
Connecting to a TV or VCR without Audio/Video
Jacks
1. Set the channel switch on the RF modulator (not supplied)
(Radio Shack cat. # 15-1283A) to VHF channel 3 or 4,
whichever is not used or the least used in your area.
2. Connect the RF modulator to the Composite Video Output
and Right/Left audio channel jacks on the unit.
3. Use an RF coaxial cable to connect the TO TV jack on the
adapter to the ANTENNA IN jack on the back of your TV.
You may need to disconnect the antenna/cable from your
TV to make this connection. Connect the antenna/cable to
the ANTENNA IN jac k on the RF modulator.
4. Connect one end of the telephone cable to the unit’s
telephone jack. Connect the other end to the telephone wall
jack.
5. Connect the proper end of the AC power cord to the unit’s
power receptacle.
6. Set your TV to channel 3 or 4, as selected in step 1 above.
Page 13
Connecting to a TV/VCR
○○○○○○○○
○○○○
○○○○
1313
13
1313
Video
Cable
A/V Cable
2
RF Modulator
Out to TV
Out to TV
TELEPHONE
RF coaxial cable
1
3
RF coaxial cable
4
CABLE
5
AC
POWER
CORD
6
TV
VHF/UHF
NONO
TE:TE:
NO
NONO
TV remote has a TV remote has a
TV remote has a
TV remote has a TV remote has a
button, push this button.button, push this button.
button, push this button.
button, push this button.button, push this button.
If your television or If your television or
TE:
If your television or
TE:TE:
If your television or If your television or
TV/videoTV/video
TV/video
TV/videoTV/video
Page 14

14
Hardware Reference
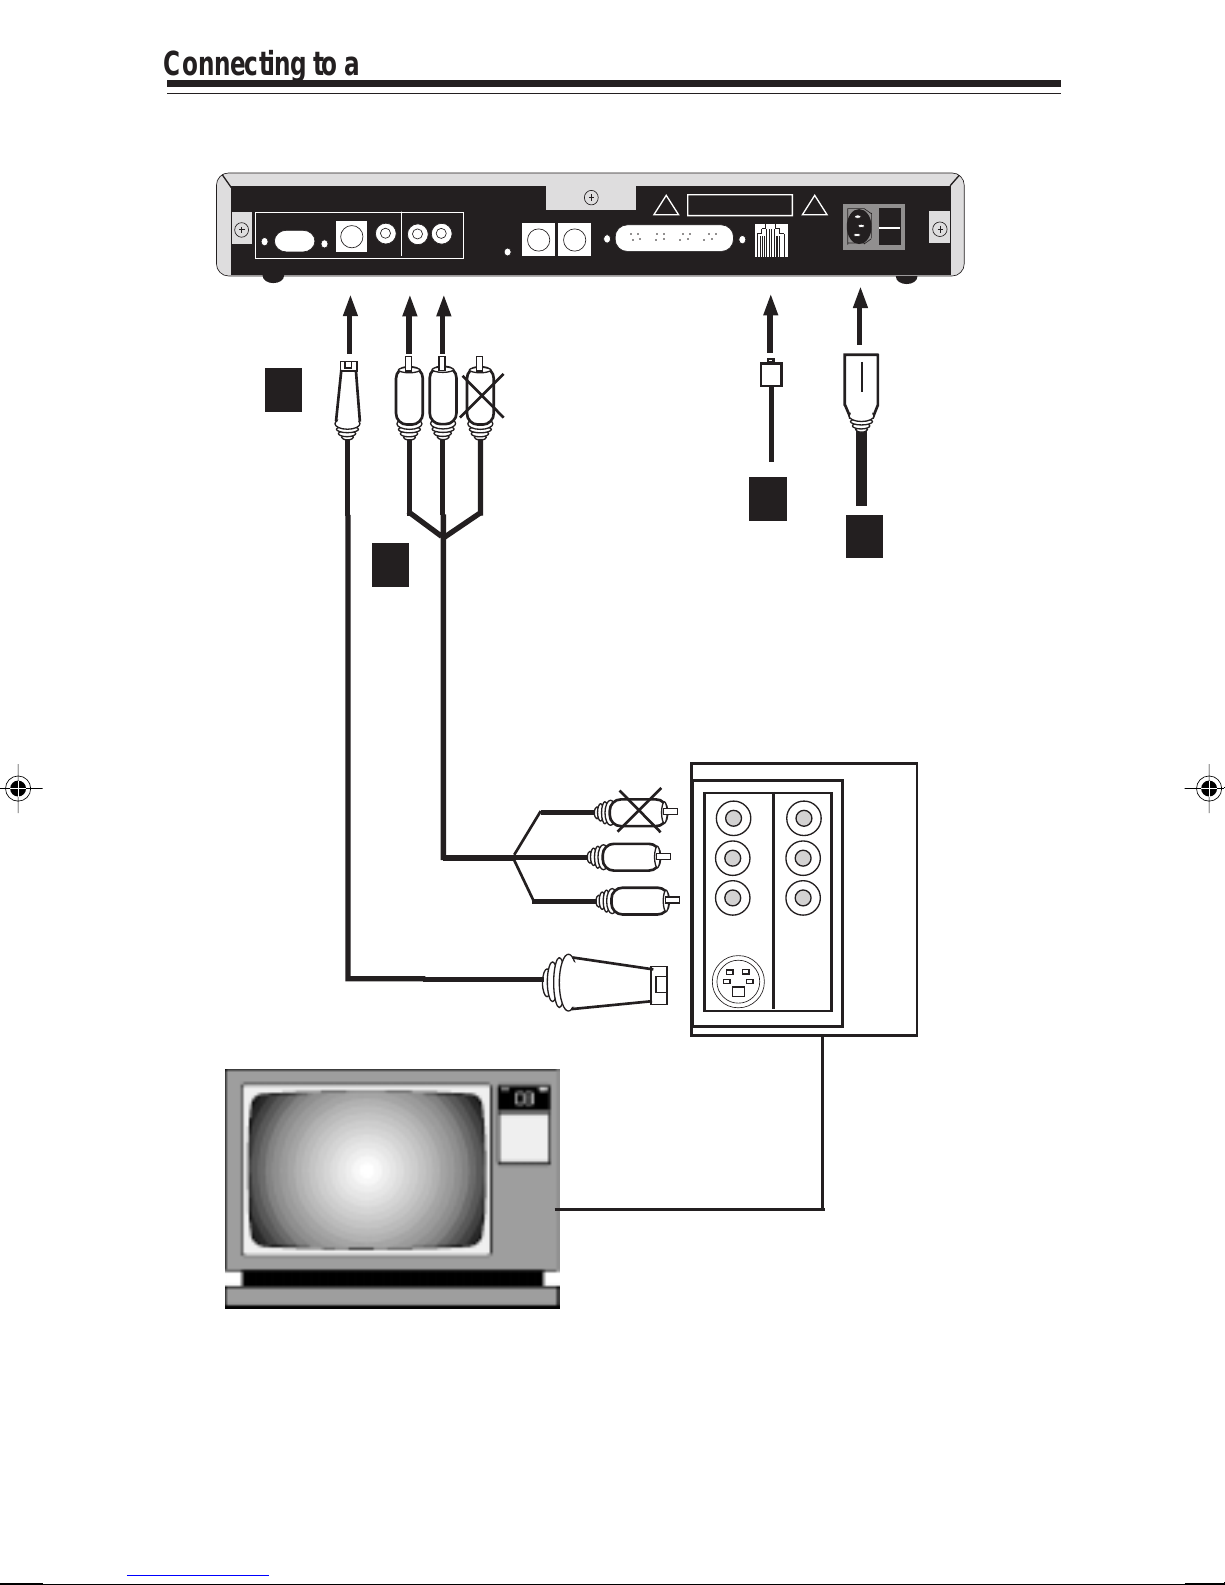
Connecting to a TV with an S-VIDEO Jack
NONO
TE:TE:
NO
NONO
Connection to S-VIDEO may offer improved Connection to S-VIDEO may offer improved
TE:
Connection to S-VIDEO may offer improved
TE:TE:
Connection to S-VIDEO may offer improved Connection to S-VIDEO may offer improved
video displayvideo display
video display
video displayvideo display
may want to integrate the unit into your homemay want to integrate the unit into your home
may want to integrate the unit into your home
may want to integrate the unit into your homemay want to integrate the unit into your home
entertainment system.entertainment system.
entertainment system.
entertainment system.entertainment system.
..
TT
o enhance audio performance,o enhance audio performance,
.
T
o enhance audio performance,
..
TT
o enhance audio performance,o enhance audio performance,
you you
you
you you
1. Use the supplied S-VIDEO cable to connect the S-VIDEO
OUT jack on the unit to the S-VIDEO In jack on your TV.
2. Connect the Audio (right and left) jacks on the unit to
your TV ’s AUDIO IN jacks, using the supplied audio
cables.
NONO
TE:TE:
TE:
TE:TE:
Do NO Do NO
Do NO
Do NO Do NO
NO
NONO
yellow) to the yellow) to the
yellow) to the
yellow) to the yellow) to the
connection.connection.
connection.
connection.connection.
T connect the T connect the
T connect the
T connect the T connect the
VIDEO jack when using the S-videoVIDEO jack when using the S-video
VIDEO jack when using the S-video
VIDEO jack when using the S-videoVIDEO jack when using the S-video
VIDEO cable (usuallyVIDEO cable (usually
VIDEO cable (usually
VIDEO cable (usuallyVIDEO cable (usually
3. Connect one end of the telephone cable to the unit’s
telephone jack. Connect the other end to the telephone
wall jack.
4. Connect the proper end of the AC power cord to the unit’ s
power receptacle.
Page 15
Connecting to a TV/VCR
1
S-VIDEO
○○○○○ ○○○
○○○○
○○○○
3
1515
15
1515
2
A/V
CABLE
TELEPHONE
CABLE
REAR OF TV
S-VIDEO
4
AC POWER
CORD
VIDEO
L.
AUDIO
R.
AUDIO
NONO
TE:TE:
NO
NONO
TV remote has a TV remote has a
TV remote has a
TV remote has a TV remote has a
button, push this button.button, push this button.
button, push this button.
button, push this button.button, push this button.
If your television or If your television or
TE:
If your television or
TE:TE:
If your television or If your television or
TV/videoTV/video
TV/video
TV/videoTV/video
Page 16

16
Hardware Reference
Connecting to a TV or VCR with Audio/Video
Jacks
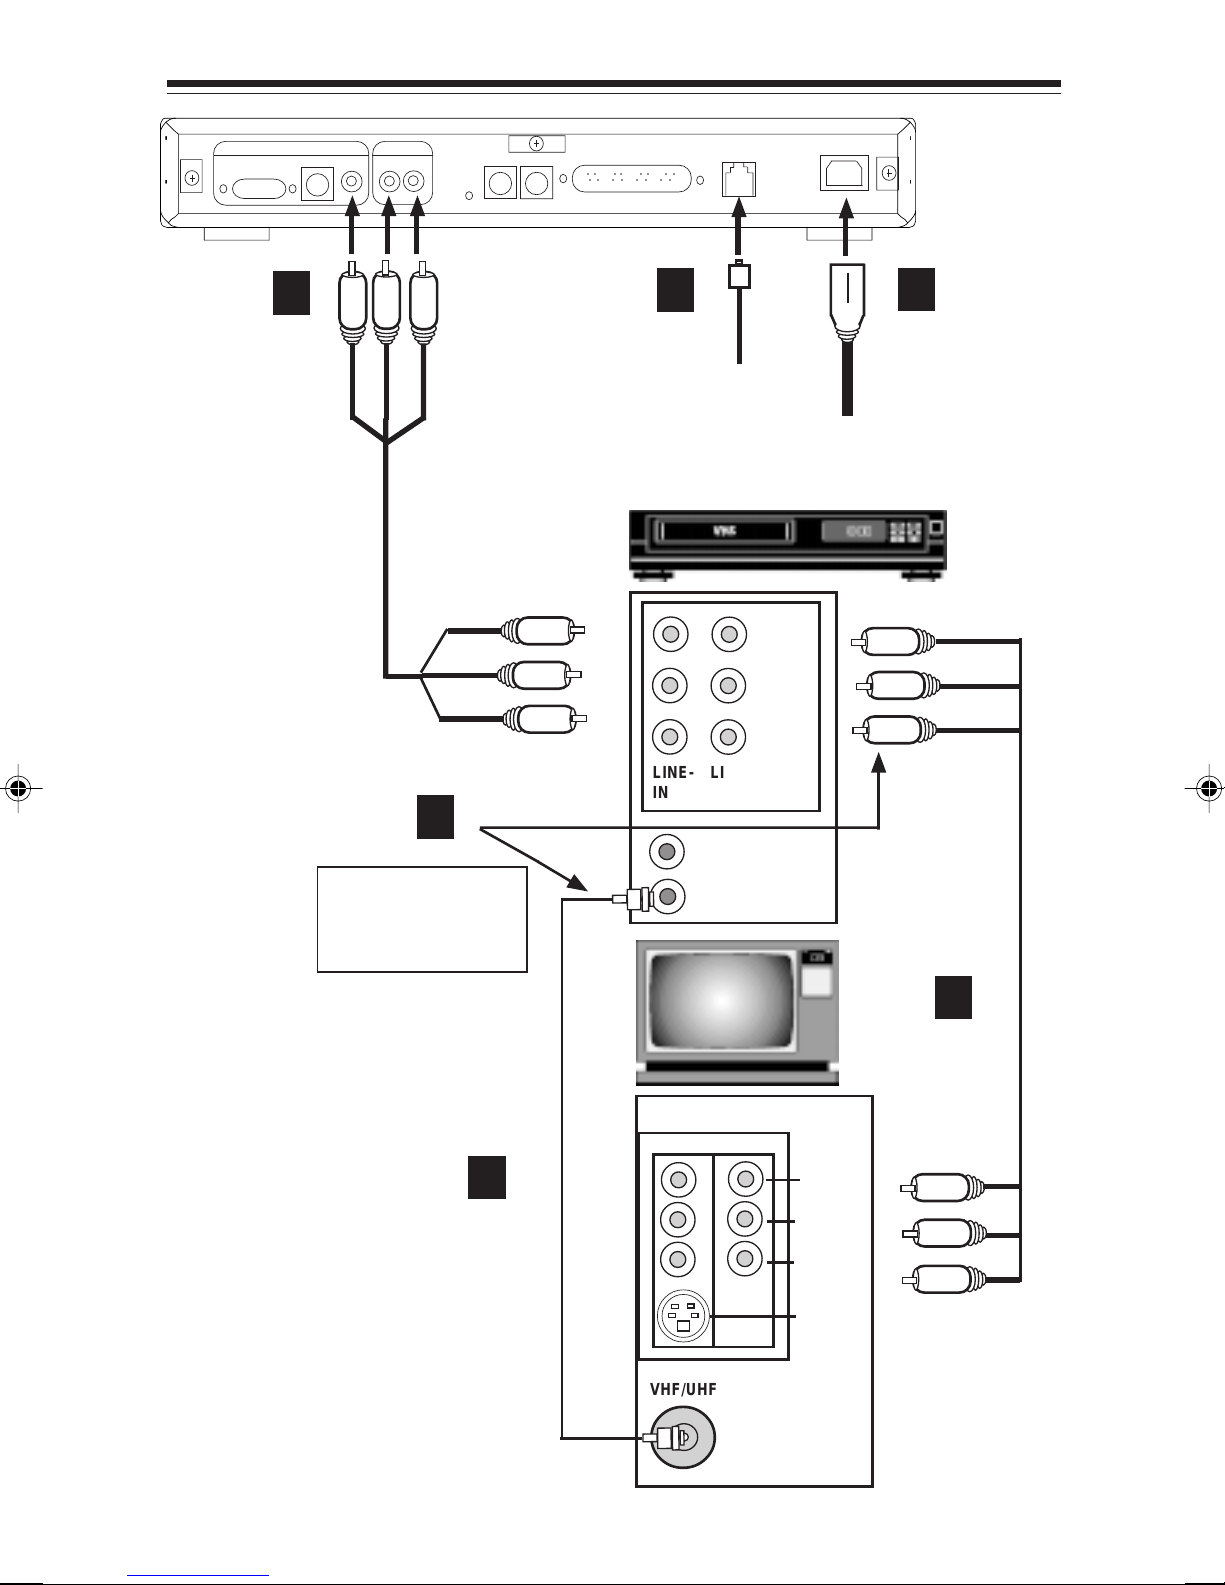
1. Connect one end of the supplied RCA-type A/V cable to
the unit as identified and other end to the A/V IN jac ks on
your VCR or TV. Make sure you matc h colors . If there is
only one audio jack, connect the white plugs.
2. Connect one end of the telephone cable to the unit’s
telephone jack. Connect the other end to the telephone
wall jack.
3. Connect the proper end of the AC power cord to the unit’s
power receptacle.
NONO
TE:TE:
F F
NO
TE:
NONO
TE:TE:
(A),(A),
or an RCA-type or an RCA-type
(A),
or an RCA-type
(A),(A),
or an RCA-type or an RCA-type
or step 4,or step 4,
F
or step 4,
F F
or step 4,or step 4,
you need either a coaxial cable you need either a coaxial cable
you need either a coaxial cable
you need either a coaxial cable you need either a coaxial cable
A/V cable (B),A/V cable (B),
A/V cable (B),
A/V cable (B),A/V cable (B),
but not both.but not both.
but not both.
but not both.but not both.
4. If connecting through your VCR, connect the VCR’s A/V
OUT jacks to the TV’s A/V IN jacks. If using a coaxial cable
for this connection, connect the coax OUT jac k on your
VCR to the coax VHF/UHF jac k on your TV, using a
coaxial connector cable (not supplied).
Page 17
Connecting to a TV/VCR
○○○○○○○○
○○○○○○○○
1717
17
1717
1
A/V
CABLE
4
VCR
2
TEL.
CABLE
LINE-INLINE-
OUT
IN
3
AC
POWER
CORD
LEFT
AUDIO
RIGHT
AUDIO
VIDEO
EITHER COAXIAL
OR RCA-TYPE
CABLE (not both)
Coax Cable
(not included)
A
NONO
TE:TE:
NO
NONO
or or
or
or or
video button, push thisvideo button, push this
video button, push this
video button, push thisvideo button, push this
button.button.
button.
button.button.
If your television If your television
TE:
If your television
TE:TE:
If your television If your television
TV remote has a TV remote has a
TV remote has a
TV remote has a TV remote has a
TV/TV/
TV/
TV/TV/
TV
OUT
IN
VIDEO 1
VHF/UHF
RCA-type A/V
Cable (included)
B
VIDEO 2
VIDEO
L AUDIO
R AUDIO
S-VIDEO
Page 18

18
Hardware Reference
5Technical Specifications
Components
• BocaVision WT unit
• Install CD for the server
• PS/2 keyboard
• PS/2 mouse
• Network Administrator User’ s Guide
• AC Power cord
Specifications
• ARM7500FE RISC-based processor (40MHz clock speed)
• 110/220V AC power supply
• Memory:
• ROM: 8MB Mask ROM (2M x 32bits)
• RAM: 8MB EDO DRAM (2Mx32 bits)
Connectors/Indicators
• Status LEDs: GREEN (standby or operational mode); RED
(flashing: attempting to connect with server; off: connected
to server)
• RJ-45 jack
• VGA port
• RCA composite video output
• RCA right/left audio c hannels
• S-video output
• P arallel port
• PS/2 keyboard port
• PS/2 mouse port
• P ower connector
• Reset switch
Page 19

Technical Specifications
Features
Display
For Browser :
• 640x480x8 bits @50Hz (PAL mode)
• 640x480x8 bits @60Hz (NTSC/VGA mode)
• 800x600x8 bits @60Hz
• 1024x768x4 bits @70Hz
1919
19
1919
For ICA Client:
Network (see more on following page)
• 10BaseT (IEEE802.3/802.3u)
• TCP/IP with DHCP
Flexible Boot Configurations
• Boot directly into ICA-3 Client softw are
• Boot into Web Browser
• 640x480 (256 colors)
• 800x600 (256 colors)
• 1024x768 (16 colors)
Basic F eatures:
• Full HTML 3.2 compatibility
• Support for Netscape and Microsoft IE HTML extensions
• Discrete navigation, dynamic horizontal scaling of web pages
• Support for formatting web content for TV display
Extended
Features:
• Audio: Real Audio,A U, SND, W A V, MIDI, AIFF
• Video: AVI movie files
• Internet Protocols: HTTP 0.9 and 1.0, SSL 2.0
Printer
• Bidirectional parallel port connection for over 150 models
including HP, Epson, Lexmark, Canon, Okidata and more
Product Dimensions
Width: 11.75” (29.85 cm) Length: 10.125” (25.72 cm)
Height: 1.625” (3.18 cm) Weight: 2.50 lbs. (1.13 kg)
Page 20
20
10BaseT Pin-Out Assignments
Hardware Reference
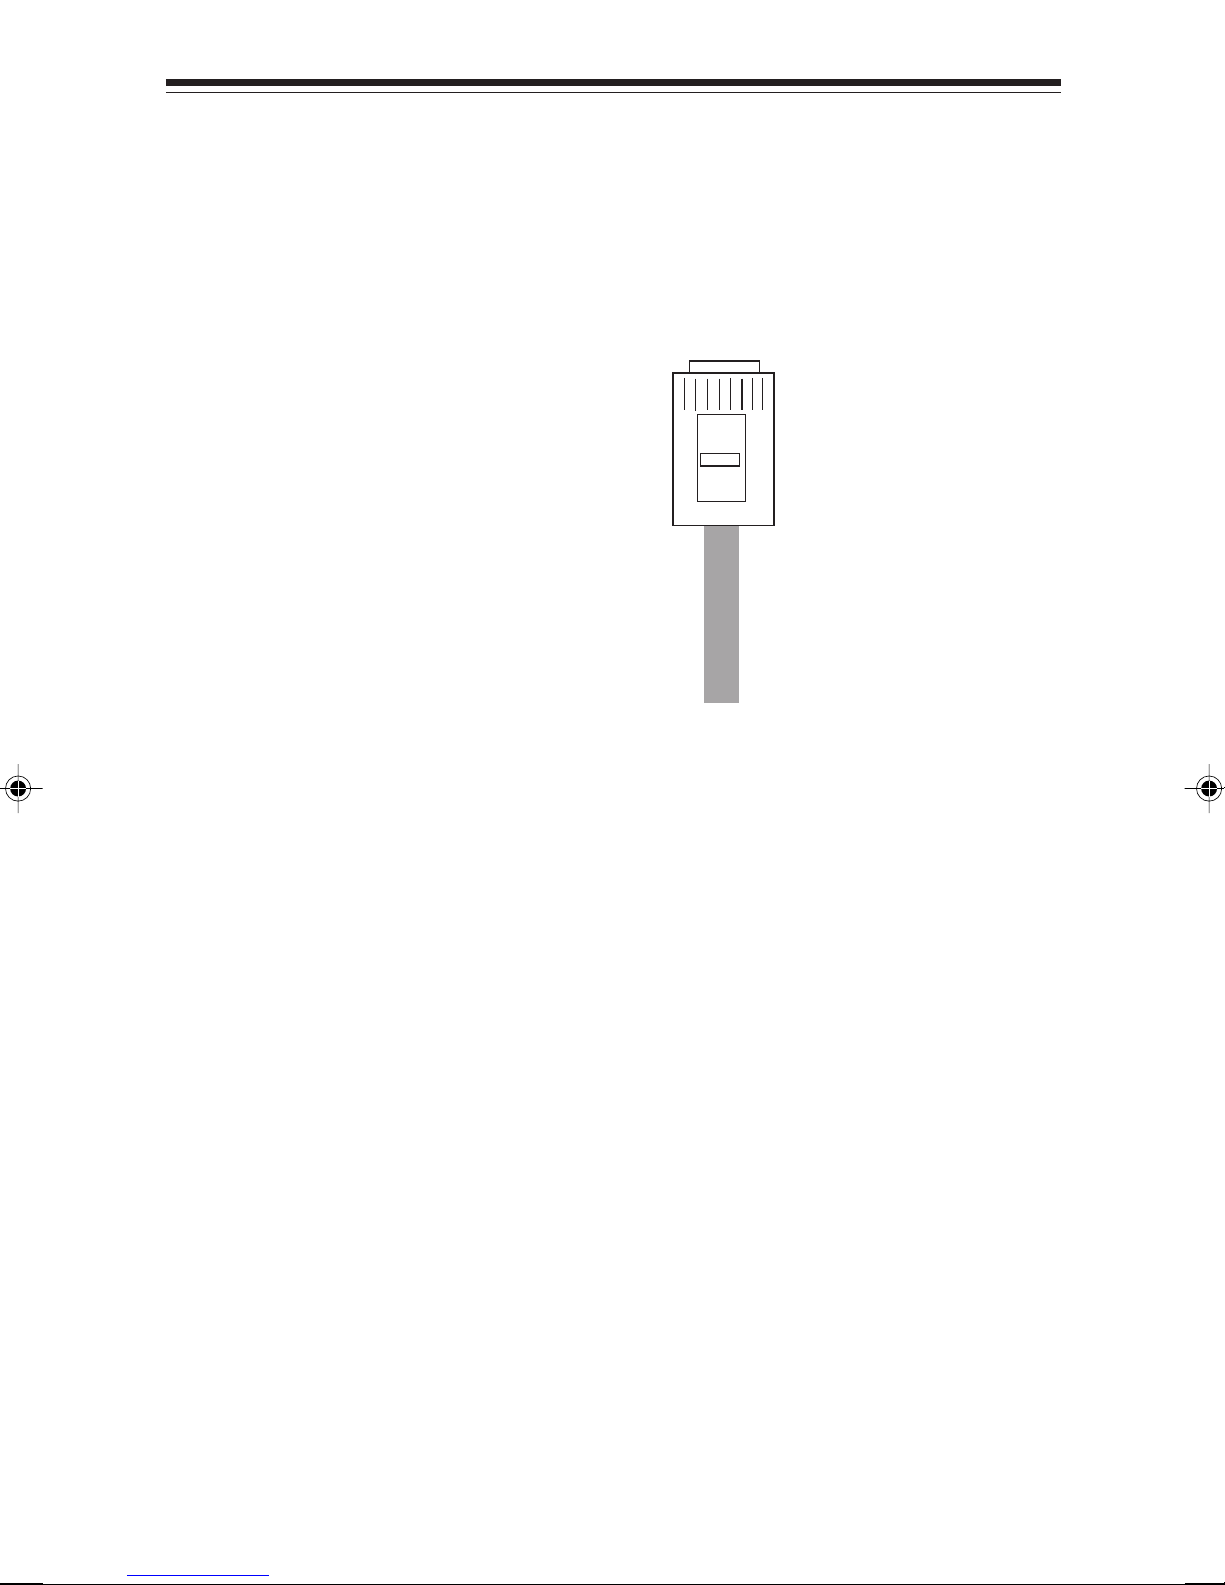
Pin-out assignments for the 10Base-T connector are as
follows:
8-pin RJ45
Connector
8-pin8-pin
8-pin
8-pin8-pin
Pin 1
Pin 8
1 Tx+
2 Tx3 Rx+
4NC
Bottom of
plug
5NC
6 Rx7NC
8NC
10BaseT Cabling Specifications
Cable:Cable:
Cable: RJ-45 (10BaseT) UTP Category 3, 4, 5, or
Cable:Cable:
better
Type:Type:
Type: Unshielded Twisted Pair (UTP)
Type:Type:
22-26 AWG (0.4-0.6 mm); 2 pairs
Max.Max.
Max.
Max.Max.
Distance:Distance:
Distance: 100mm (328’)
Distance:Distance:
Page 21

Compatible Printers
6Compatible
Printers
Printer Codes
Brother
HJ-100i ................................................ 1
HJ-400 ............................................... 11
HL-10M.............................................. 11
HL-10V .............................................. 11
HL-1260............................................. 11
HL-630............................................... 11
HL-655M............................................ 11
HL-660............................................... 11
HL-730............................................... 11
HL-730X ............................................ 11
HL-960............................................... 11
MFC 3900 ML.................................... 11
MFC 4000 ML.................................... 11
MFC 4500 ML.................................... 11
MFC 4550.......................................... 11
MFC 5500 ML.................................... 11
Canon
BJ-100 ................................................. 1
BJ-10EX .............................................. 1
BJ-105X............................................... 1
BJ-200 ................................................. 1
BJ-200E............................................... 1
BJ-200EX ............................................ 1
BJ-230 ................................................. 1
BJ-30 ................................................... 1
BJ-300 ................................................. 1
BJ-330 ................................................. 1
BJC-210 .............................................. 1
BJC-240 .............................................. 1
BJC-250 .............................................. 2
BJC-4000 ............................................ 2
BJC-4100 ............................................ 2
BJC-4200 ............................................ 2
BJC-4300 ............................................ 2
BJC-4550 ............................................ 2
BJC-600 .............................................. 2
BJC-600E ............................................ 2
BJC-620 .............................................. 2
BJC-70 ................................................ 2
LBP-1260 .......................................... 11
LBP-430 ............................................ 11
LBP45x.............................................. 11
MultiP ass 800 .............. ....... ........ ....... .. 1
MultiPass 1000.................................... 1
MultiPass C2500 ................................. 2
Citizen
Noteboook Printer II ............................1
PN50 Notebook Printer ....................... 1
PN60 Notebook Printer ....................... 1
ProJet 3 ............................................... 1
ProJet 11 ............................................. 7
ProLaser 6000................................... 11
Epson
ActionLaser II .................................... 11
ActionLaser 1000 .............................. 11
ActionLaser 1100 .............................. 11
ActionLaser 1400 .............................. 11
ActionLaser 1500 .............................. 11
ActionLaser 1600 .............................. 11
EPL-5500 .......................................... 15
FX-185................................................. 4
FX-286................................................. 4
FX-80................................................... 3
FX-85................................................... 4
FX-86................................................... 4
GX-80 .................................................. 3
Stylus 800 ........................................... 5
Stylus 800+ ......................................... 5
Stylus 1000 ......................................... 5
Stylus Color 200.................................. 6
Stylus Color 300.................................. 6
Stylus Color 400.................................. 6
Stylus Color 500.................................. 6
Stylus Color 800.................................. 6
Stylus Color..... .................................... 6
Stylus Color II.... ... ... ... ... ... ... .. ... ... ... ... .. 6
Stylus Color IIS ................................... 6
Stylus Pro............................................ 6
Stylus Pro XL .. ... .. ... .. ... .. .. ... .. ... .. ... .. ... . 6
HP
DeskJet 1200C.................................... 8
DeskJet 310 ........................................ 7
DeskJet 320 ........................................ 7
DeskJet 340 ........................................ 7
DeskJet 400 ........................................ 8
DeskJet 500 ........................................ 7
DeskJet 500C.......... ...... ..... ..... ...... ..... . 8
DeskJet 510 ........................................ 7
DeskJet 540 ........................................ 8
DeskJet 550C.......... ...... ..... ..... ...... ..... . 9
2121
21
2121
Page 22

22
Hardware Reference
DeskJet 560C...................................... 9
DeskJet 600 ........................................ 7
DeskJet 600C...................................... 8
DeskJet 660C...................................... 9
DeskJet 660Cse.................................. 8
DeskJet 672C...................................... 9
DeskJet 680C...................................... 9
DeskJet 682C...................................... 9
DeskJet 693C...................................... 9
DeskJet 850C...................................... 9
DeskJet 855C...................................... 9
DeskJet 855Cse.................................. 8
DeskJet 855Cxi ................................... 8
DeskJet Pro ........................................ 7
LaserJet 4.......................................... 11
LaserJet 4L........................................ 11
LaserJet 4ML..................................... 11
LaserJet 4MP .................................... 11
LaserJet 4P ....................................... 11
LaserJet 4Plus .................................. 11
LaserJet 5.......................................... 11
LaserJet 5L........................................ 11
LaserJet 5MP .................................... 11
LaserJet 5P ....................................... 11
LaserJet 6L........................................ 11
LaserJet 6P ....................................... 11
LaserJet II ........ ...... ..... ...... ................ 11
LaserJet III ........................................ 11
LaserJet IIP Plus ............................... 11
OfficeJet .............................................. 7
OfficeJet 300 ....................................... 7
OfficeJet 330 ....................................... 7
OfficeJet 350 ....................................... 7
OfficeJet LX......... .... ..... .... ..... .............. 7
PaintJet................................................ 8
PaintJet XL300 .................................. 10
IBM/Lexmark
4019 LaserPrinter E .......................... 11
4029-010 LaserPrinter ...................... 11
4029-020 LaserPrinter ...................... 11
4029-030 LaserPrinter ...................... 11
4037-SE ............................................ 11
4039-10R LasserPrinter .................... 11
4039-10 Plus ..................................... 11
4039-12 Plus ..................................... 11
4070IJ.................................................. 1
4072 ExecJet....................................... 1
ExecJet II 4076 ................................... 7
Color Jetprinter 1020BE ...................... 8
Color Jetprinter 3000........................... 9
ExecJet IIC.......................................... 8
Medley 4C ........................................... 8
Medley 4sx .......................................... 8
Medley 4X ........................................... 8
Optra E .............................................. 11
Optra Ep ............................................ 1 1
Optra E+............................................ 11
Optra R.............................................. 11
Optra RX ........................................... 11
V aluewriter 300.................................. 11
V aluewriter 600.................................. 11
Winwriter 400 .................................... 11
Winwriter 600 .................................... 11
NEC
SilentWriter Model 1097 .................... 11
SilentWriter Model 95 ........................ 11
SilentWriter Model 97fx ..................... 11
Superscript 610 ................................. 11
Superscript 660 ................................. 11
Okidata
Doc It 3000 ........................................ 11
Doc It 4000 ........................................ 11
OkiPage 16N ..................................... 11
OL 1200............................................. 11
OL1200/PS ........................................ 11
OL 400 ............................................... 11
OL 400E ............................................ 11
OL 410E ............................................ 11
OL 600E ............................................ 11
OL 610E ............................................ 11
OL 610E/PS ............ ...... ....... ...... ...... . 15
OL 800 ............................................... 11
OL 810 ............................................... 11
OL 810E ............................................ 11
OL 810E/PS ............ ...... ....... ...... ...... . 11
OL 830 Plus....................................... 15
OL 850 ............................................... 15
Panasonic
KX-P4400 Sidewriter ......................... 11
KX-P4410 .......................................... 11
KX-P4430 .......................................... 11
KX-P4440 .......................................... 11
KX-P5400 Sidewriter ......................... 11
KX-P5410 .......................................... 15
KX-P6100 .......................................... 11
KX-P6500 .......................................... 11
KX-P5600 .......................................... 11
Page 23

Accessories
7Accessories
• Keyboard: P art no . 8602
• Mouse P art no. 8603
• AA batteries P art no. 8264
• AC power cord: P art no . 8270
• Audio/Video cable: P art no. 8507
• S-video Cable: Part no. 8532
To order these items, contact your distributor. For a list of
2323
23
2323
local distributors, contact
Boca Research, Inc.
1601 Clint Moore Road
Boca Raton, Florida 33437-2841
(561) 241-8088
Page 24
24
Hardware Reference
8Connecting a Wireless Keyboard
Your wireless keyboard installation is fast and easy, as
described below.
Inserting the batteries
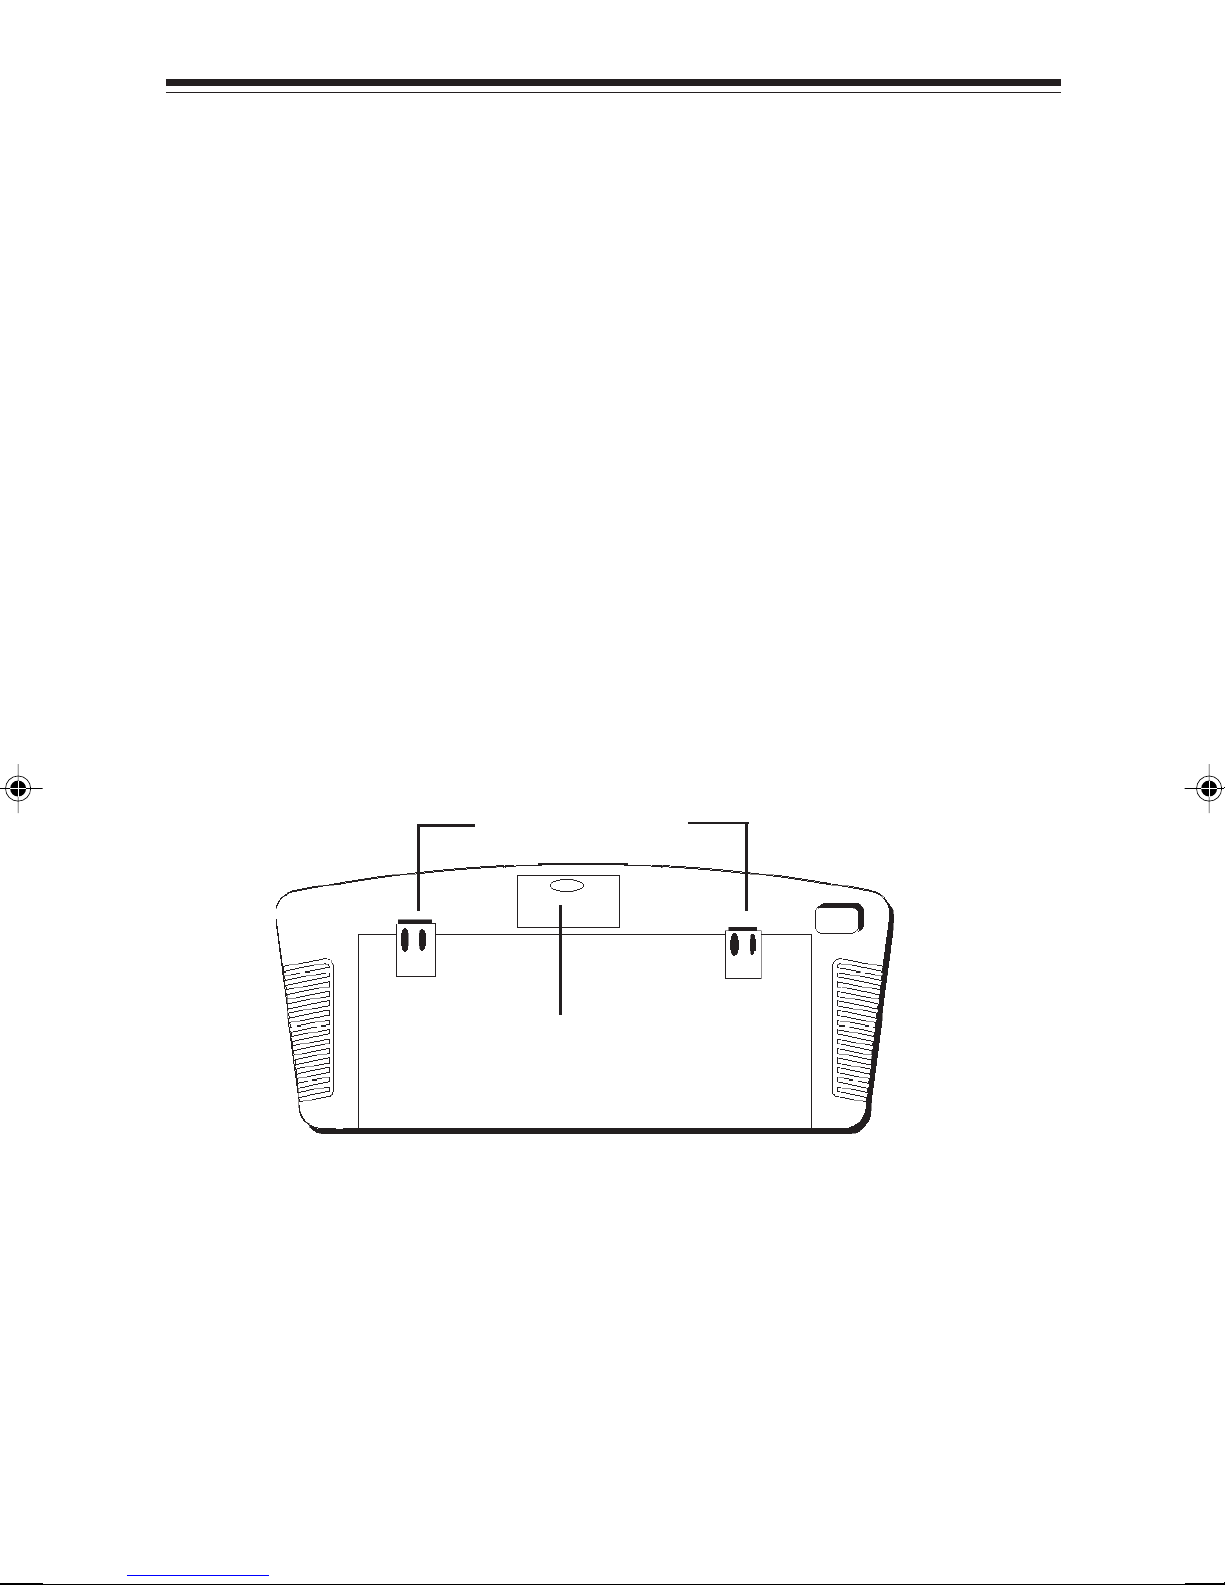
1. Remove the battery compartment door.
2. Insert batteries (included) as shown in the diagram inside
the battery compartment.
3. Replace the battery compartment door.
Keyboard Legs
Battery Compartment Door
Adjusting the Keyboard Height
To raise the keyboard, lift up the keyboard legs until they
snap into place. To lower the keyboard, push each leg down
until it fits securely back into its cavity.
Page 25

Wireless Keyboard
PP
ointing the Keyboardointing the Keyboard
P
ointing the Keyboard
PP
ointing the Keyboardointing the Keyboard
2525
25
2525
The wireless keyboard should be used
within 25 feet of the unit. For best results it
should be pointed at no more than a 45
o
45o angle
angle. The keyboard works on “line of sight”.
If there are obstructions between the keyboard and the unit,
or if the keyboard is tilted at too severe an angle, it may
appear as if the keyboard isn’t working .
Keyboard Functions and Features
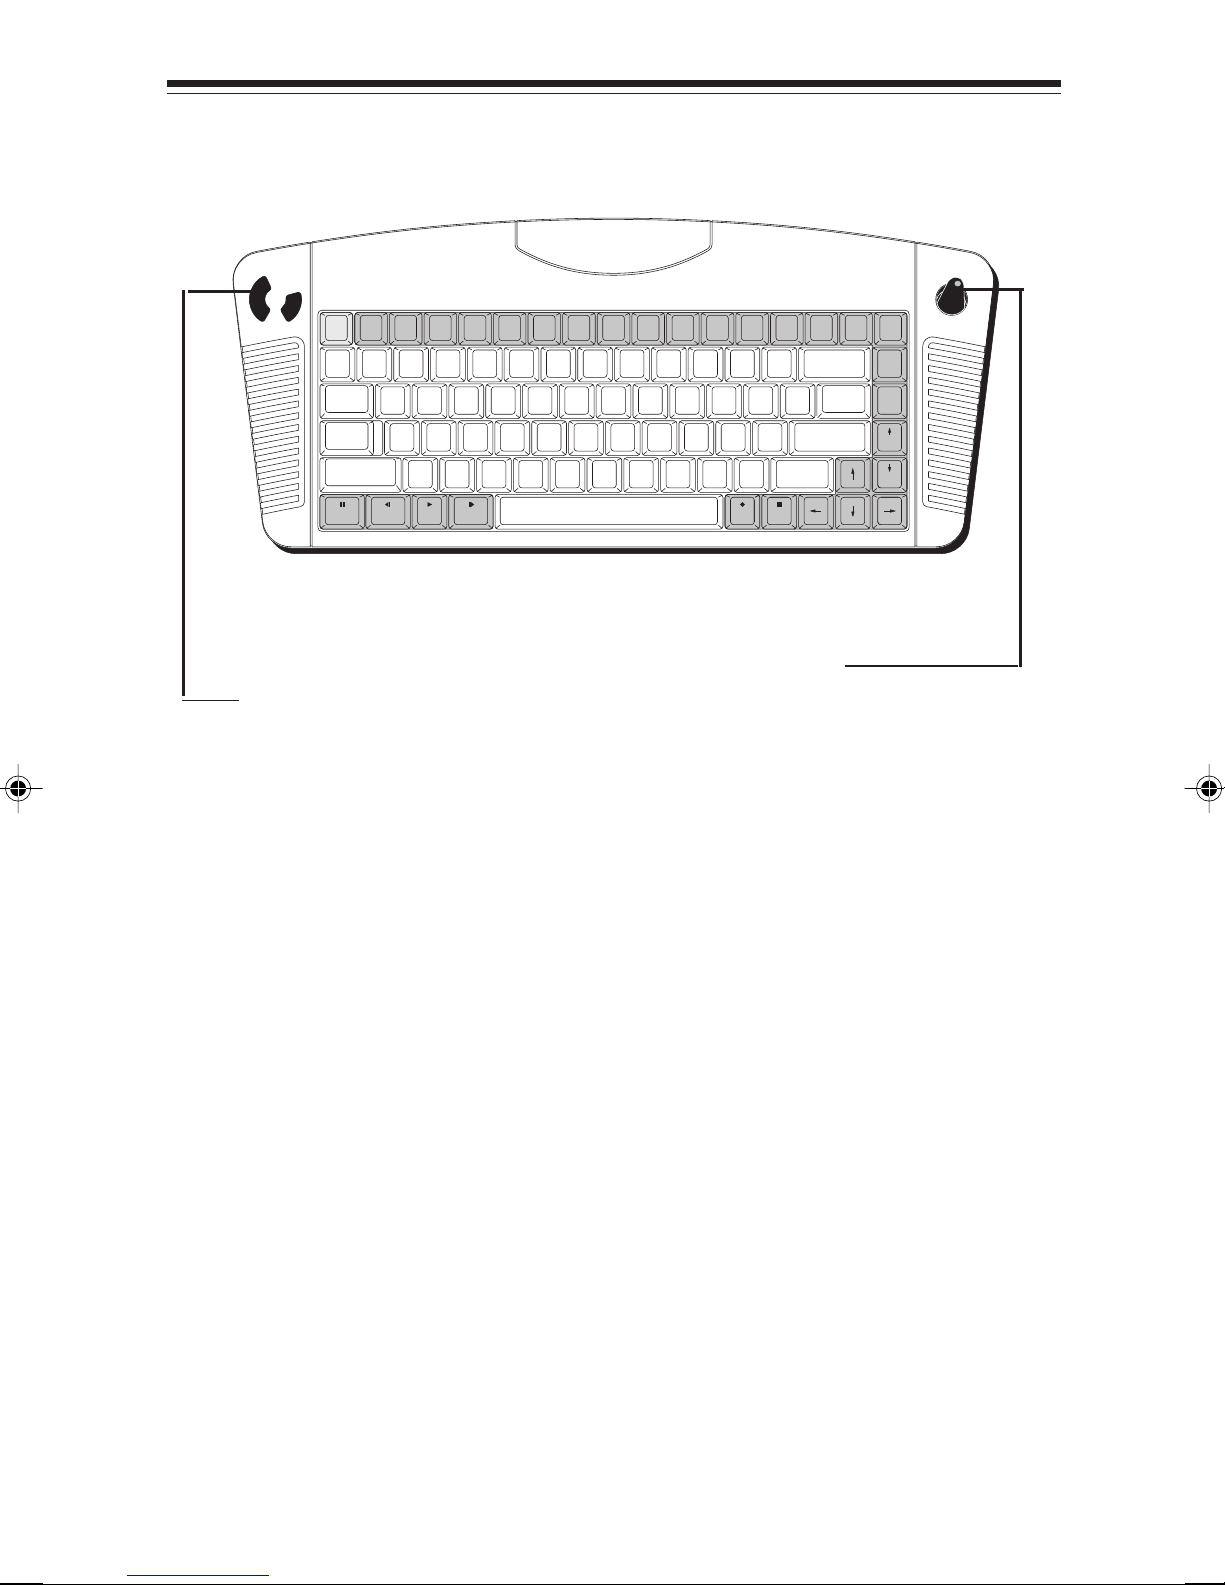
Arrows and ENTER / OKArrows and ENTER / OK
Arrows and ENTER / OK. Use the
Arrows and ENTER / OKArrows and ENTER / OK
on the menu screens , and when surfing the web. Press
OKOK
OK to select a highlighted item.
OKOK
ALAL
TT
AL
T. In ICA-application sessions, performs standard keyboard
ALAL
TT
functions.
CLEAR/ESCCLEAR/ESC
CLEAR/ESC
CLEAR/ESCCLEAR/ESC
keyboard functions .
CTRLCTRL
CTRL. In ICA-application sessions , performs standard keyboard
CTRLCTRL
functions.
FAFA
VV
FA
V. Displays sites that are stored under ‘Favorites’ (when you
FAFA
VV
are on-line).
..
. In ICA-application sessions, performs standard
..
arrowsarrows
arrows to highlight items
arrowsarrows
ENTER /ENTER /
ENTER /
ENTER /ENTER /
FUNCFUNC
FUNC. In combination with number keys, FUNC provides the
FUNCFUNC
equivalent function of pressing F1 to F10 on a PS/2-compatible
keyboard.
GO BACKGO BACK
GO BACK. Returns you to the preceding frame, web page , menu,
GO BACKGO BACK
or toolbar.
Page 26

26
GO GO
GO
GO GO
TT
OO
T
O. Displays the URL Entry T oolbar so you can type in an
TT
OO
Hardware Reference
URL to “go to” that web page.
GUIDEGUIDE
GUIDE. Reserved for future applications .
GUIDEGUIDE
HOMEHOME
HOME. Takes you back to the URL specified during setup .
HOMEHOME
INFOINFO
INFO. Gives you web page details for a web site.
INFOINFO
(continued on next page)
MAIL.MAIL.
MAIL.
MAIL.MAIL.
MENUMENU
MENU. Brings up the Main menu, or the Toolbar when you’re
MENUMENU
Reserved for future applications .
surfing the web.
PP
AGE UP and PAGE UP and P
P
AGE UP and P
PP
AGE UP and PAGE UP and P
AGE DOWNAGE DOWN
AGE DOWN. Scroll up and down through web
AGE DOWNAGE DOWN
content one page at a time.
POWERPOWER
POWER. Turns the unit on and turns it off (standby mode).
POWERPOWER
PRINTPRINT
PRINT. Displays the Print Options box.
PRINTPRINT
RELOADRELOAD
RELOAD. Reloads the current web page . If you are downloading
RELOADRELOAD
a page, it stops the download and loads the preceding page.
SASA
VEVE
SA
VE. Reserved for future applications.
SASA
VEVE
SEARCHSEARCH
SEARCH. Reserved for future applications.
SEARCHSEARCH
SENDSEND
SEND. Reserved for future applications .
SENDSEND
TT
ransport Keys (Pransport Keys (P
T
ransport Keys (P
TT
ransport Keys (Pransport Keys (P
sound and movie player functions . STOP also stops loading a web
page and stops printing. REV and FWD are reserved for future
applications.
WHOWHO
WHO. Reserved for future applications .
WHOWHO
AA
USE,USE,
A
USE,
AA
USE,USE,
PLA PLA
PLA
PLA PLA
YY
Y
YY
,,
ST ST
OP)OP)
,
ST
OP). Controls Internet
,,
ST ST
OP)OP)
Page 27
Wireless Keyboard
CLEAR
ESC
POWER
!
~
1
`
TAB
CAPS
LOCK
SHIFT
PAUSE REV PLAY FWD
2727
27
2727
ALT WHO
CTRL
FUNC
$
#
@
2
Q
Z
4
3
R
E
W
SA
F
D
C
X
PRINT
%
^
5
6
TY
G
V
RELOAD
&
7
U
H
N
B
FAV SAVE GO TO SEARCH
(
*
8
J
M
)
9
0
O
I
LK
<
>
,
.
P
MAIL
SEND
_
-
{
[
:
;
?
/
REC
INFO
+
BACK
=
SPACE
}
]
"
ENTER
'
SHIFT
STOP
HOME
GO BACK
GUIDE
|
MENU
\
OK
PAGE
UP
PAGE
DOWN
LEFT LEFT
LEFT
LEFT LEFT
MOUSE CONTROLSMOUSE CONTROLS
MOUSE CONTROLS
MOUSE CONTROLSMOUSE CONTROLS
AND RIGHTAND RIGHT
AND RIGHT
AND RIGHTAND RIGHT
..
.
..
Use the left mouse control
to select a highlighted
item on menu screen or
Internet. The right mouse
control is reserved for
future applications.
POINTER.POINTER.
POINTER.
POINTER.POINTER.
Use to highlight items on
menu screens and when
you’re surfing the web
and when running
softw are applications .
Page 28

12/98
 Loading...