


Bobrick AirCraft B-700, AirCraft B-708, AirCraft B-709, AirCraft B-7007 Installation Instructions Manual
INSTALLATION INSTRUCTIONS
B-700, B-7007, B-708 & B-709
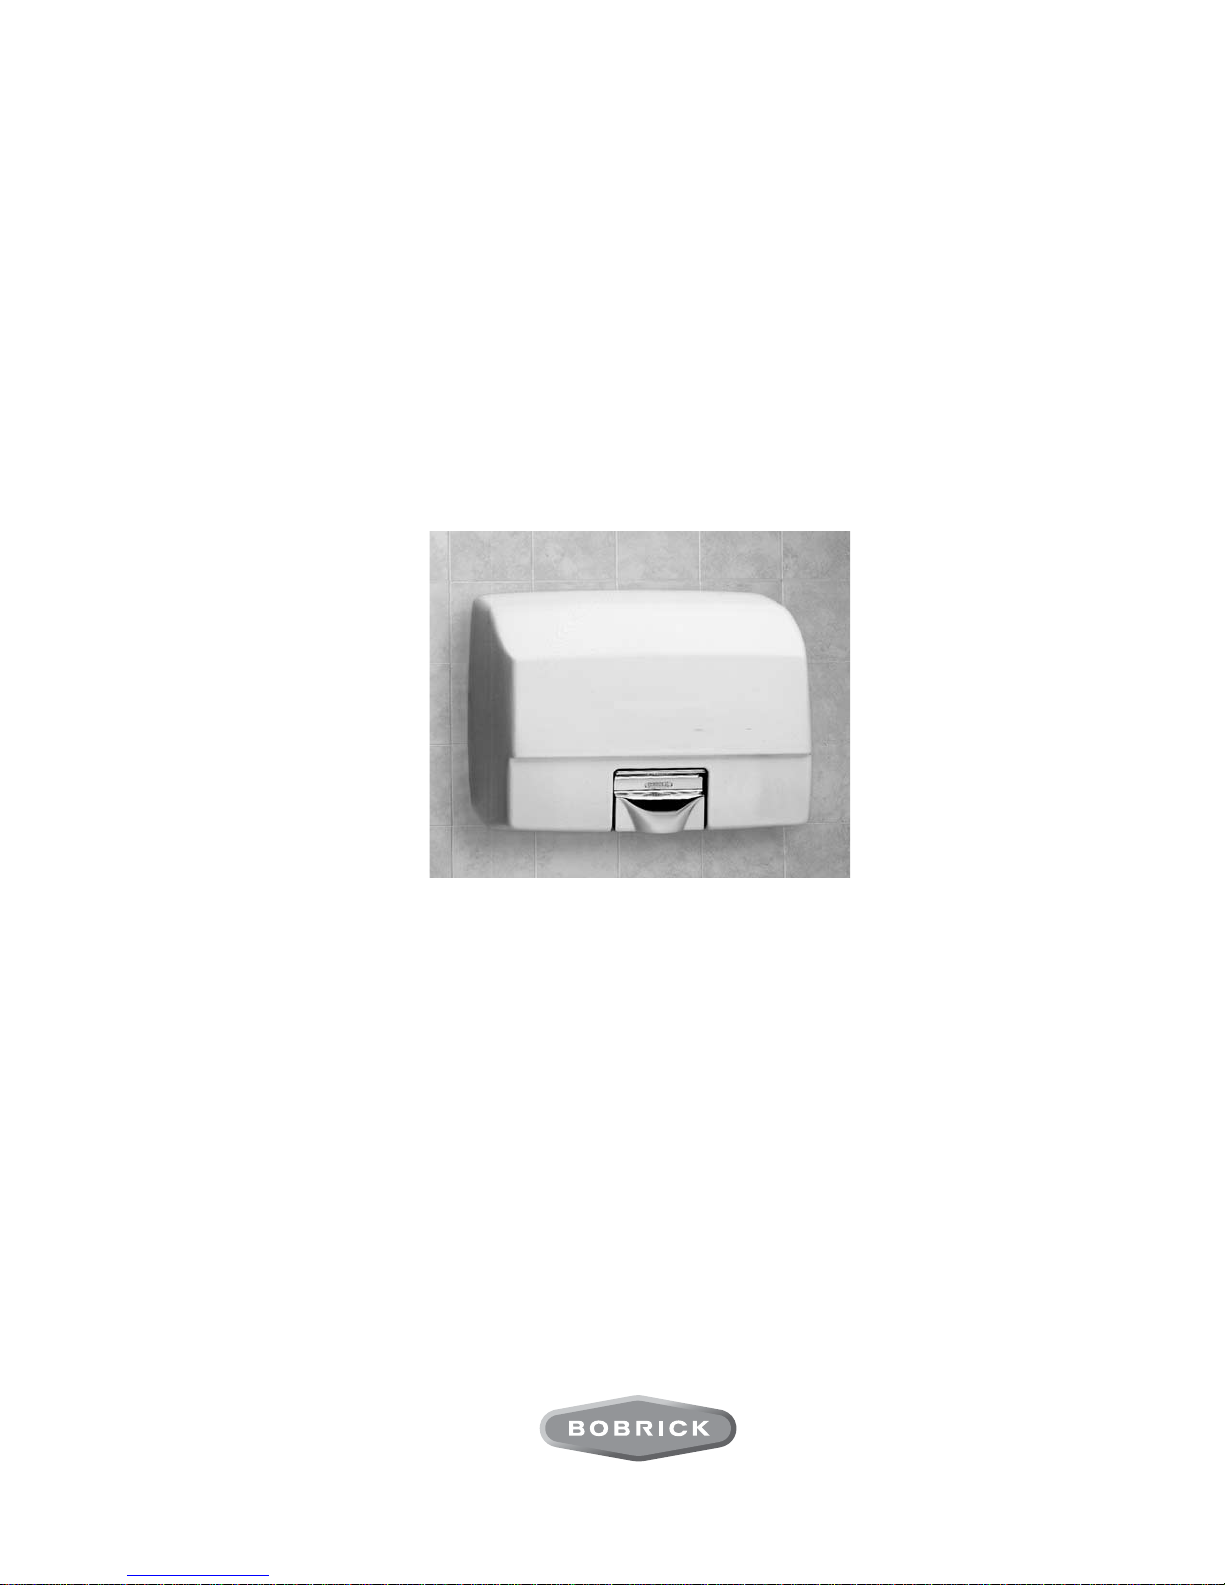
AirCraft
SURFACE-MOUNTED
AUTOMATIC HAND/HAIR DRYER
®
Installation Instructions AirCraft® Surface-Mounted Hand/Hair Dryer .......................Pages 2 & 3
Instrucciones De Instalación Secadores De Manos y Cabello Bobrick
®
Montados Sobre La Pared Tipo Aircraft
®
Einbauanleitung Bobrick Aircraft
Für Aufputzmontage ......................................................................................................Pages 6 & 7
Notice D’Installation Sèche-Mains Et Seche-Cheveux Bobrick Aircraft
Montés En Surface ..........................................................................................................Pages 8 & 9
Istruzioni Per L’installazione Asciugamani E Asciugacapelli A Parete
®
Bobrick Aircraft
.........................................................................................................Pages 10 & 11
-Hände- Und Haartrockner
......................................................................Pages 4 & 5
®
嵌入式自动感应干手机/干发机安装说明书 .........................................................Pages 12 & 13

Finish Face of Floor
10-15/64''
260mm
S
S
33/64''
13mm
7-43/64''
195mm
Dimension
A
1-7/64''
28mm
S
9-7/16''
240mm
5/16''
8mm
3/4''
19mm
15/32''
12mm
10-3/8''
265mm
8-43/64''
220mm
3/16''
5mm
3/4''
19mm
6-1/16''
155mm
S
1''
25mm
1-3/8''
35mm
Flange Cutout for
Surface Wiring
7/8''
22mm
Dia. Hole for
Between Wall Wiring
BOBRICK
BOBRICK
Electrical Characteristics
Hand dryer models B-700, B-7007, B-708, B-709 , and Hair dryer model B-731, 115V AC, 20 Amp, 50/60 Hz, Single Phase, cULus listed.
Hand dryer models B-700, B-7007, B-708, B-709 , and Hair dryer model B-731, 208–240V AC, 9–10 Amp, 50/60 Hz, Single Phase; cULus listed, VDE
approved, CCC approved, CE marked.
Recommended Mounting Heights
Distance from floor to bottom mounting screw holes of mounting base. (Dimension A)
Hand Dryer Hair Dryer
Men's Washrooms .......................................................46'' (117cm)
Women's Washrooms ..................................................44'' (112cm)
Children's Washrooms, ages 3-9 ................................32'' (81cm)
Children's Washrooms, ages 9-12 ...............................36'' (91cm)
Children's Washrooms, ages 12-15 .............................40'' (102cm)
Children's Washrooms, ages 15-18 .............................44'' (112cm)
Men's Dressing Rooms ...............................................72'' (183cm)
Women's Dressing Rooms ..........................................64'' (163cm)
Children's Dressing Rooms, ages 3-9 ........................45'' (114cm)
Children's Dressing Rooms, ages 9-12 .......................52'' (132cm)
Children's Dressing Rooms, ages 12-15 .....................58'' (147cm)
Children's Dressing Rooms, ages 15-18 .....................63'' (160cm)
For the Handicapped ...................................................38'' (97cm)
* Bobrick automatic hand dryers should be installed 15" (380mm) above any projection or horizontal surface which may interfere with the
operation of the automatic sensor.
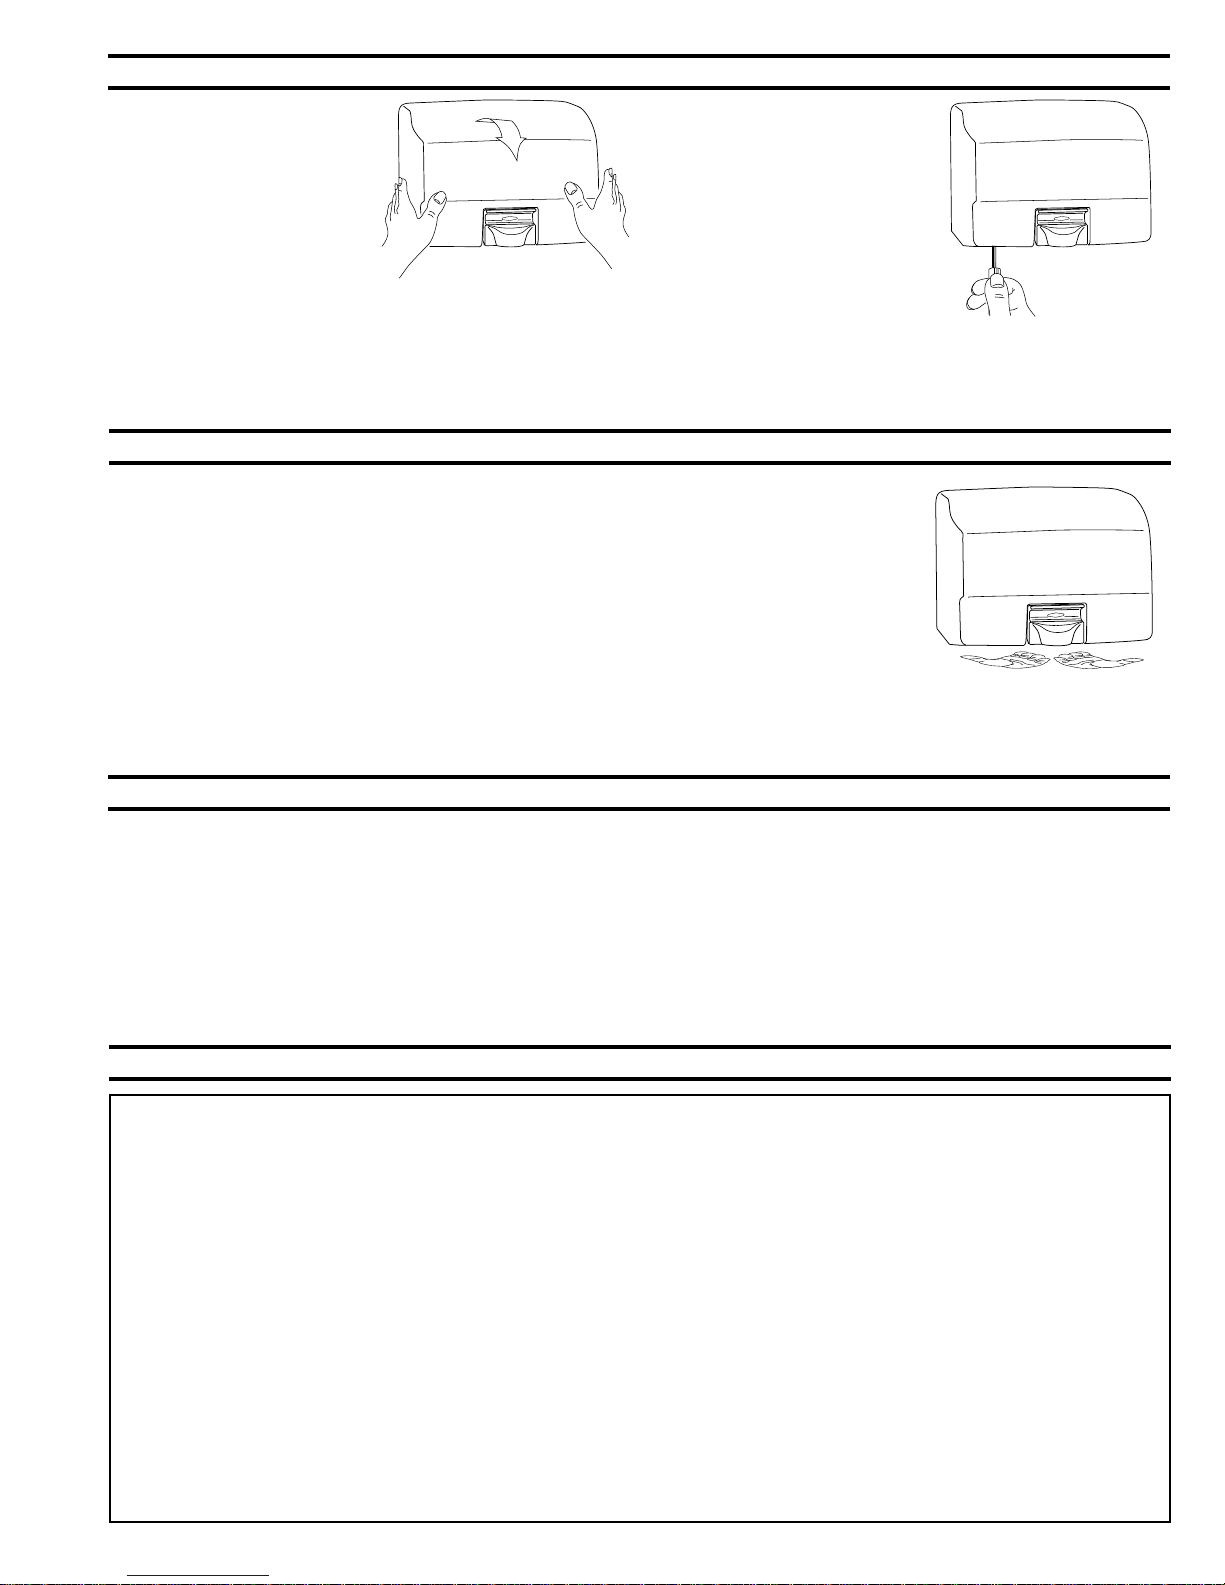
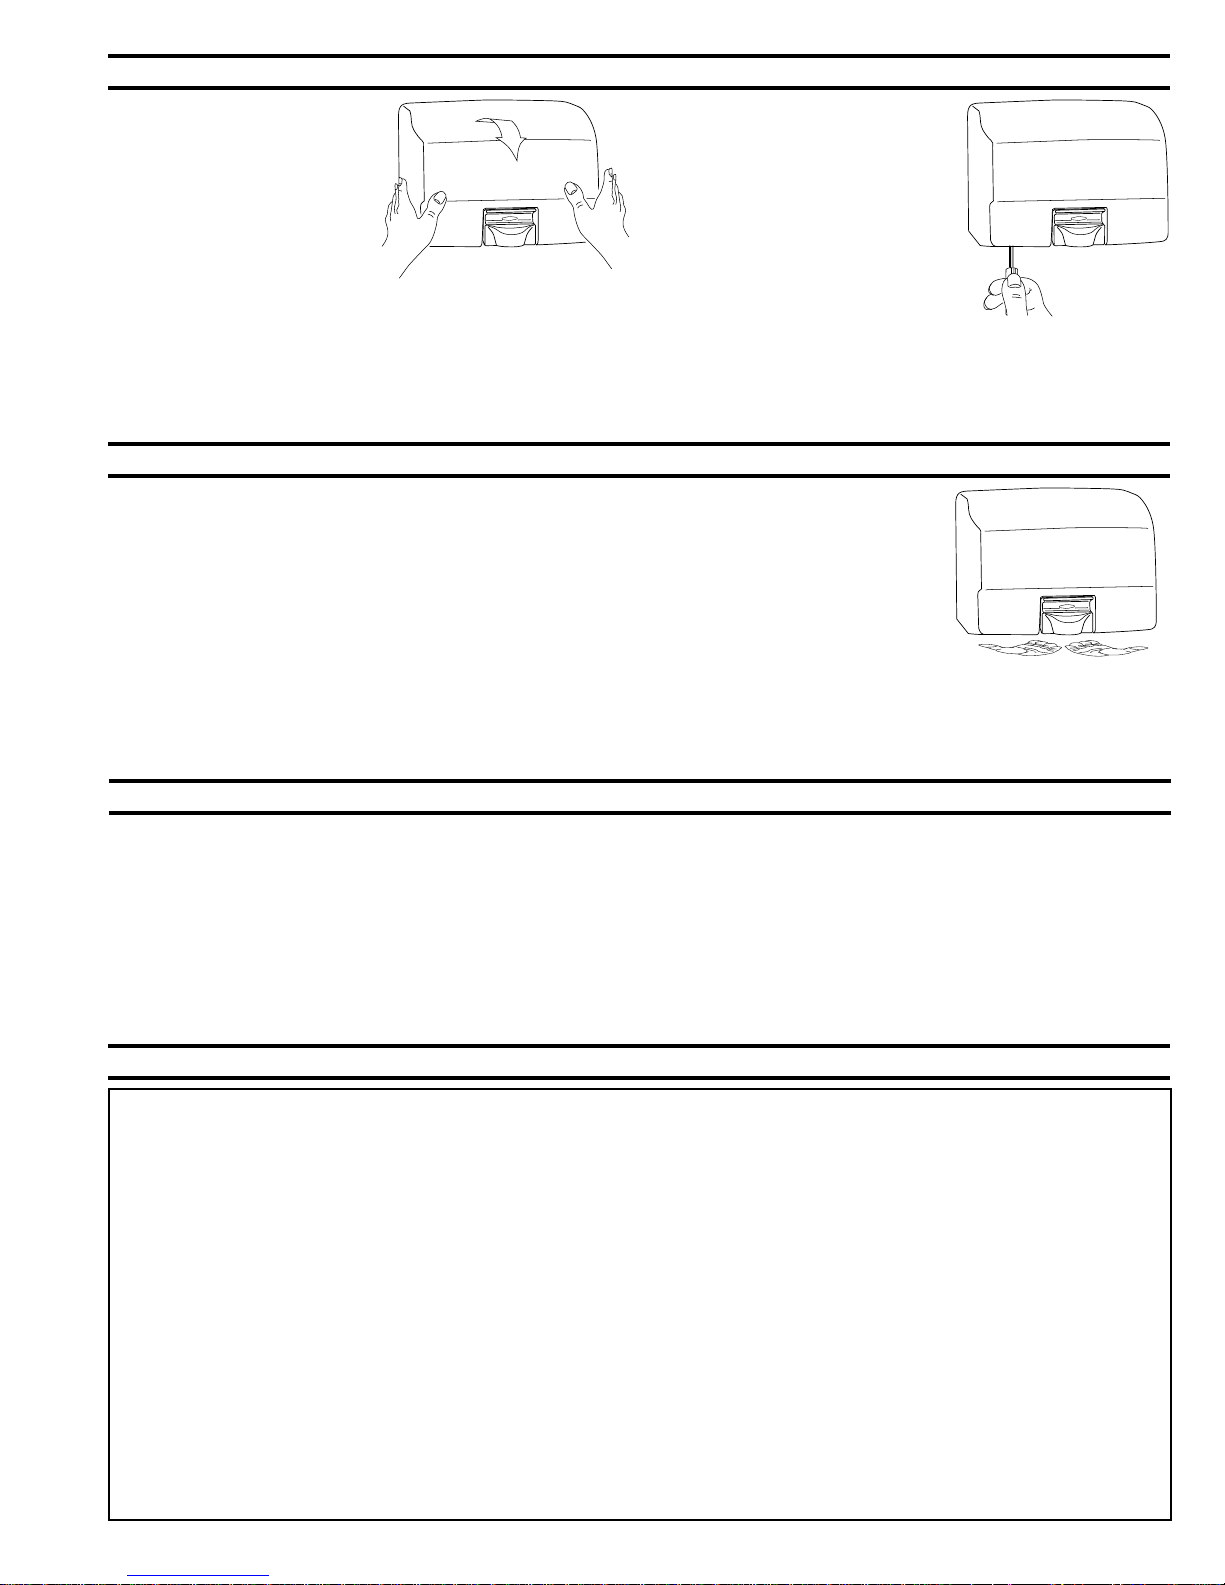
Removal of Cover
1. Start installation of dryer by
removing cover. To loosen two
cover bolts, insert Allen
Wrench (provided with dryer)
into holes located on bottom
of cover on each side of air
intake grille. Make sure
wrench fits into head of cover
bolts and turn CLOCKWISE
until bolts stop turning. When
cover bolts are screwed in all
the way, cover can be
removed.
2. To remove cover, place a
hand on each side of cover
and push up toward top of
dryer releasing cover from
studs at top of mounting base.
Lift cover off mounting base
by pulling forward at the
bottom and upward at the
same time.
Installation of Mounting Base
1. Place mounting base on wall at the desired location of the installed
dryer. See recommended mounting heights above.
2. Use the mounting base or the template provided with dryer to mark
location of four mounting screw holes and hole for electrical wiring if
electrical supply is concealed in wall and will enter dryer from back
through mounting base.
NOTE: Surface-mounted electrical supply is attached to mounting base
in lower right corner. Flange of mounting base and bottom of cover are
notched in lower right corner to accommodate connection of electrical
conduit.
3. Drill four holes for 1/4" (6.4mm) diameter mounting bolts or screws
(not furnished by Bobrick).
4. Fasten mounting base securely to wall.
WARNING: TURN ELECTRICAL POWER SUPPLY OFF BEFORE MAKING
ELECTRICAL CONNECTIONS. DRYER MUST BE GROUNDED (EARTHED).
Electrical Connection
FOR PROPER ELECTRICAL CONNECTIONS, CHECK LOCAL BUILDING CODE. UNIT MUST BE INSTALLED BY A QUALIFIED LICENSED
ELECTRICIAN
1.
Connect dryer to nearest distribution panel. Use wire as required by local electrical code. In the United States and Canada use No. 12 wire or larger.
2. Wiring Instructions:
a. A fused means for disconnection in all poles must be provided in the fixed wiring in accordance with the wiring rules.
b. For 115 Volt Dryers: Connect ground (earthed) wire to ground (earthed) terminal marked , the black or Hot wire to terminal marked L
and neutral or white wire to terminal marked N. A DEDICATED LINE IS REQUIRED FOR EACH 115 VOLT DRYER.
c. For 208–240 Volt Dryers: Connect ground (earthed) wire to ground (earthed) terminal marked and the 208-240 Volt wires to terminals
marked L (L1) and N (L2).
3. Secure electrical wire in strain relief clamp provided on mounting base.
Page 2
BOBRICK
BOBRICK
BOBRICK
Replace Cover
1. Replace cover by positioning top
of cover on studs on top of
mounting base and tipping bottom
of cover toward wall. Push bottom
of cover firmly against wall.
NOTE: Space between cover and
wall must be the same on four sides.
2. To tighten two cover bolts,
insert Allen wrench into holes
on bottom of cover. Make sure
wrench fits into head of cover
bolts and turn
COUNTERCLOCKWISE until
bolts are tightened.
NOTE: Do not overtighten cover
bolts; overtightening cover bolts
may damage enamel finish.
Check Dryer Operation
1. For TouchButton Hand and Hair Dryers: Turn electrical power supply on. Touch the chrome-plated
touchbutton once and dryer should turn on. Touch the touchbutton again after a few seconds and drye
should stop. If left on, Hand Dryers will shut off automatically after 30 seconds; Hair Dryers will shut off after
80 seconds.
2. For AutoPilot Hand Dryers: Turn electrical power supply on. Position hands under nozzle and dryer should
turn on. Remove hands from under nozzle and dryer should stop.
WARNING: MOTOR LAMINATIONS ARE LIVE. TURN ELECTRICAL POWER SUPPLY OFF BEFORE DOING ANY MAINTENANCE OR SERVICE
TO DRYER. DRYER MUST NOT BE OPERATED UNLESS COVER IS IN PLACE.
1. Exterior of cover should be cleaned with a damp cloth to remove dust and surface dirt. Do not use abrasive agents or solvents as they may
permanently damage surface of cover.
2. At least once every 6 months remove cover. Using a small brush or vacuum, clean out buildup of dust and lint from air-intake grille and baffle.
NOTE: if dryer is installed where there is a lot of dust and dirt in the air, the interior of the dryer should be cleaned out more frequently.
IMPORTANT LIMITED WARRANTY SAVE
Installation Date: _____________________________________________________________________________________________________________
Serial No(s).: _________________________________________________________________________________________________________________
Installation Address:___________________________________________________________________________________________________________
Telephone No.: _______________________________________________________________________________________________________________
The Bobrick Dryer of the serial number(s) indicated herein, and all parts (except motor brushes) are warranted to the original owner of the installed unit for ten years
from date of original purchase for AutoPilot No-Touch and TouchButton hand and hair dryers and five years for Model B-709 hand dryer, against defects in factory
workmanship or material under normal use and service. *
*Motor brushes shall be warranted for three years from date of purchase. This warranty is limited to repair or exchange of defective ____________________ parts
at the option of Bobrick Washroom Equipment, Inc.
THIS WARRANTY DOES NOT COVER ACCIDENTAL DAMAGE, IMPROPER HANDLING OR INSTALLATION, OR REPAIRS MADE BY UNAUTHORIZED
PERSONS, AND SPECIFICALLY EXCLUDES CLAIMS FOR INDIRECT, ACCIDENTAL OR CONSEQUENTIAL DAMAGES TO PROPERTY. THE IMPLIED
WARRANTIES OF MERCHANTABILITY AND FITNESS FOR A PARTICULAR PURPOSE ARE LIMITED TO THE SAME DURATION OF THE ABOVE WARRANTY.
Some states do not allow the exclusion of incidental or consequential damages, so the above limitation or exclusion may not apply to you. Some states do not allow
limitations on how long an implied warranty lasts, so the above limitation may not apply to you. This warranty gives you specific legal rights, and you may also have
other rights which vary from state to state.
* Normal service constitutes performing the following preventive maintenance procedures at six-month intervals.
A. Remove cover and clean any lint, dust or grease from air-intake grille and baffle from behind air-outlet nozzle.
B. Visually inspect motor brushes to insure remaining brush length is a minimum of 1/2 inch (12.7mm).
Labor costs for preventive maintenance shall be at owner's expense.
For repair or exchange of defective part, send the part, together with installation date and serial number, to BOBRICK.
Maintenance
Warranty
Page 3
Bodenoberfläche
260mm
10-15/64''
13mm
33/64''
195mm
7-43/64''
Abmessung
A
28mm
1-7/64''
240mm
9-7/16''
8mm
5/16''
19mm
3/4''
12mm
15/32''
265mm
10-3/8''
220mm
8-43/64''
5mm
3/16''
19mm
3/4''
155mm
6-1/16''
25mm
1''
Decoupure de
35mm 1-3/8'' Dans
Flanschausschnitt für
Aufputzverdrahtung
Lochdurchmesser
22mm 7/8'' für
Zwischenwand-Verdrahtung
S
S
S
S
BOBRICK
BOBRICK
Características Eléctricas
Secadores de manos models B0700, B-7007, B-708, B-709 and Secadores de cabello B-731, 115V CA, 20 A, 50/60 Hz, Monofásico, Clasificado
cULus.
Secadores de manos models B0700, B-7007, B-708, B-709 and Secadores de cabello B-731, 208-240V CA, 9-10 A, 50/60 Hz, Monofásico,
Clasificado cULus, Aprobado VDE, Aprobado CCC y marcado CE.
Alturas de Montaje Recomendadas
Alturas de montaje recomendadas: Distancia desde el suelo a los agujeros inferiores de montaje de la base de montaje (Dimensión A)
Secador de manos
Aseos para caballeros .................................................117cm (46'')
Aseos para señoras .....................................................112cm (44'')
Aseos para niños, de 3 a 9 años .................................81cm (32'')
Aseos para niños, de 9 a 12 años ...............................91cm (36'')
Aseos para niños, de 12 a 15 años .............................102cm (40'')
Aseos para niños, de 15 a 18 años .............................112cm (44'')
Vestuarios para caballeros ..........................................183cm (72'')
Vestuarios para señoras ..............................................163cm (64'')
Vestuarios para niños, de 3 a 9 años ..........................114cm (45'')
Vestuarios para niños, de 9 a 12 años ........................132cm (52'')
Vestuarios para niños, de 12 a 15 años ......................147cm (58'')
Vestuarios para niños, de 15 a 18 años ......................160cm (63'')
Secador de cabello
Acceso para sillas de ruedas .......................................97cm (38'')
* Los secadores de manos automáticos de Bobrick se deben instalar a 380mm (15") por encima de cualquier saliente o superficie horizontal
que pueda interferir con la operación del sensor automático.
Cómo Quitar La Cubierta Del Secador
1. Comenzar la instalación del secador
quitando la cubierta. Para soltar los
dos pernos de la cubierta, insertar
la llave Allen provista con el
secador en los agujeros situados
en la parte inferior de la cubierta en
cada lado de la rejilla de entrada de
aire. Asegure que la llave cabe en la
cabeza de los pernos de la cubierta
y girarla en sentido dextrorso
(A LA DERECHA) hasta que los
pernos ya no giran. Cuando se han
roscado los pernos de la cubierta lo
más posible, se puede retirar la
cubierta.
2. Para retirar la cubierta, colocar
una mano en cada lado de
la cubierta y empujar hacia
arriba hacia la parte superior
del secador, soltando la cubierta
de las clavijas en la parte
superior de la base de montaje.
Separar la cubierta de la base
de montaje tirándola hacia
delante y arriba al mismo
tiempo.
Instalación De La Base De Montaje
1. Colocar la base de montaje sobre la pared en la posición deseada del
secador cuando ha sido instalado. Véanse las alturas de montaje
recomendadas arriba.
2. Usar la base de montaje, o el patrón suministrado con el secador,
para marcar la posición de los cuatro agujeros para los tornillos de
montaje, y del agujero de acceso para el cableado eléctrico, si el
cable de alimentación sale de la pared y entrará el secador por la
parte posterior de la base de montaje.
NOTA: La alimentación de red montada en la superficie se conecta a
la base de montaje en su esquina izquierda inferior. El reborde en la
base de montaje y la parte inferior de la cubierta tienen una muesca en
la esquina izquierda inferior para acomodar la conexión del conducto
eléctrico.
3. Perforar cuatro agujeros para pernos o tornillos de montaje, de
diámetro 6 mm (1/4"), (no provistos por Bobrick).
4. Fijar la base firmemente sobre la pared
ADVERTENCIA: DESCONECTAR LA ALIMENTACIÓN DE RED ANTES
DE HACER LAS CONEXIONES ELÉCTRICAS. EL SECADOR TIENE
QUE ESTAR CONECTADO A TIERRA.
Conexión Eléctrica
PARA TENER LAS CONEXIONES ELÉCTRICAS CORRECTAS, CONSULTE EL CÓDIGO DE CONSTRUCCIÓN LOCAL. LA UNIDAD LA DEBE
INSTALAR UN ELECTRICISTA CAPACITADO CALIFICADO.
1. Conectar el secador al tablero de distribución más cercano. Usar el tipo de cable exigido por el código eléctrico local. En los Estados Unidos y
Canadá, usar alambre #12 o más pesado.
2. Instrucciones de cableado:
a. El cableado fijo debe incorporar un dispositivo interruptor de fusibles, para desconexión de todos los polos, según las normas de cableado.
b. Secadores de 115 voltios: Conectar el conductor de tierra al borne de tierra marcado , el conductor negro o a Tensión al borne marcado
L1 y el conductor blanco o Neutro al borne marcado N. SE NECESITA UNA LÍNEA DEDICADA PARA CADA SECADOR DE 115 VOLTIOS.
c. Secadores de 208-240 voltios: Conectar el conductor de tierra al borne de tierra marcado , y los conductores de 208–240 voltios a los
bornes marcados L (L1) y N (L2).
3. Sujetar el cable eléctrico usando la abrazadera de alivio de tensión provista en la base de montaje.
Page 4
BOBRICK
BOBRICK
BOBRICK
Restitución De La Cubierta
1. Reponer la cubierta colocando la
parte superior de la cubierta sobre
las clavijas en la parte superior de
la base de montaje y girando la
parte inferior de la cubierta hacia
la pared. Empujar la parte inferior
de la cubierta firmemente contra
la pared.
NOTA: El espacio entre la pared y la
cubierta debe ser igual en los cuatro
lados.
2. Para apretar los dos pernos de la
cubierta insertar la llave Allen
provista con el secador, en los
agujeros situados en la parte inferior
de la cubierta. Asegure que la
llave cabe en la cabeza de los
pernos de la cubierta y girarla en
sentido sinistrorso (A LA
IZQUIERDA) hasta que los pernos
están apretados.
NOTA: No apretar excesivamente los
pernos de la cubierta porque podría
dañar el acabado esmaltado vidrioso.
Verificación De La Operación Del Secador
1. Secadores de Manos y Cabello TouchButton: Conectar el secador a la alimentación. Tocar el botón
cromado una vez y el secador debe encenderse. Tocar el botón cromado otra vez y, después de pocos
segundos, el secador debe apagarse. Si se dejan encendidos, los Secadores de Manos se apagan
automáticamente después de 30 segundos; Los Secadores de Cabello deben apagarse después de 80
segundos.
2. Los Secadores de Manos AutoPilot: Conectar el secador a la alimentación. Colocar las manos debajo
de la tobera y el secador debe encenderse automáticamente. Quitando las manos de debajo la tobera debe
apagarlo.
ADVERTENCIA: TENER EN CUENTA QUE LAS LAMINACIONES DEL MOTOR ESTÁN BAJO TENSIÓN. DESCONECTAR LA ALIMENTACIÓN
DE RED ANTES DE HACER CUALQUIER TRABAJO DE REVISIÓN O MANTENIMIENTO DEL SECADOR. NO OPERAR EL SECADOR SIN
TENER LA CUBIERTA INSTALADA.
1. Se debe limpiar el exterior de la cubierta con un paño húmedo para quitar cualquier polvo o suciedad. No usar agentes abrasivos ni solventes
porque pueden dañar permanentemente la superficie de la cubierta.
2. Al menos cada seis meses, quitar la tapa y limpiar el secador con un cepillo pequeño o con un aspirador, y eliminar cualquier acumulación de
polvo en la rejilla de entrada y el deflector. NOTA: Si se ha instalado el secador en un sitio de mucho polvo y suciedad en el aire, se debe
limpiar el interior del secador con mayor frecuencia.
LIMITADA IMPORTANTE - COMPLETAR Y GUARDAR
La fecha de instalación: ___________________________________________________________________________________________________________
No(s). de serie: ___________________________________________________________________________________________________________________
Dirección de la instalación: _________________________________________________________________________________________________________
No. de teléfono: ___________________________________________________________________________________________________________________
El Secador Bobrick con el/los número/s de serie indicada aquí, y todas las piezas (excepto las escobillas del motor) están garantizadas al propietario original
de la unidad instalada por diez años desde la fecha de original de compra respecto a los Secadores de Manos y los Secadores de Cabello AutoPilot No-Touch
y TouchButton y cinco años respecto al Secador de Manos Modelo B-709, contra defectos de mano de obra en fábrica o de materiales, bajo un uso y servicio
normales. *
* Las escobillas del motor están garantizadas por tres años desde la fecha de instalación. Se limita esta garantía a una reparación o al cambio de piezas defectuosas
a la discreción de Bobrick Washroom Equipment, Inc.
ESTA GARANTÍA NO CUBRE DAÑOS ACCIDENTALES, EL MANEJO O INSTALACIÓN INADECUADAS NI REPARACIONES POR PERSONAS NO
AUTORIZADAS, Y EXCLUYE ESPECÍFICAMENTE CUALESQUIER RECLAMOS POR DAÑOS INDIRECTOS, ACCIDENTALES O CONSECUENCIALES A
PROPIEDAD. SE LIMITAN LAS GARANTÍAS IMPLÍCITAS DE COMERCIALIBILIDAD Y APTITUD PARA UN PROPÓSITO ESPECÍFICO A LA MISMA DURACIÓN
QUE LA SUSODICHA GARANTÍA.
Algunos estados no permiten la exclusión de compensaciones incidentales o consecuenciales, así que la susodicha limitación o exclusión quizás no le sea aplicable.
Esta garantía le otorga ciertos derechos legales específicos, y posiblemente tiene otros derechos que pueden variar entre estados.
* El servicio normal consiste en realizar los siguientes procedimientos de mantenimiento preventivo a intervalos de seis meses.
A. Retirar la cubierta y eliminar cualesquier hilos, polvo o grasa de la rejilla de entrada y del deflector desde detrás de la tobera de salida de aire.
B. Inspeccionar las escobillas del motor para asegurar que queda una longitud de escobilla mínima de 13 mm (1/2").
Los gastos de mano de obra del mantenimiento preventivo correrán a cargo del propietario.
Para reparar o cambiar una pieza defectuosa, sírvase enviar la pieza con su fecha de instalación y número de serie a BOBRICK.
Mantenimiento
Garantía
Page 5