

Page 1
INSTALLATION INSTRUCTIONS
URINAL SCREENS, BENCHES & SHOWER SEATS
IMPORTANT:
Storage and Handling Information on last page.
Review these instructions thoroughly prior to
installation.
1033 Stainless Steel Edge
1043 High Pressure Laminate Edge
1083 Solid Phenolic
1183 Class A Solid Phenolic
POST-TO
-CEILING
WALL
HUNG
1040 High Pressure Laminate
1080 Solid Phenolic
1180 Class A Solid Phenolic
1035 Stainless Steel Edge
1045 High Pressure Laminate Edge
1085 Solid Phenolic
1185 Class A Solid Phenolic
1545 Plastic Laminated Edge
1845 FRP
BENCHES &
SHOWER SEATS
Page 2

PREPARATION
BEFORE YOU BEGIN...
These installation instructions cover wall hung urinal
screens, post-to-ceiling urinal screens, benches and
shower seats only.
For detailed instructions regarding installation of toilet
partitions, floor anchored urinal screens or ceiling hung
urinal screens please refer to one of the following:
1040-69
1080-69
1540-69
1080.67-69
1040.65-69
PRE-INSTALLATION.
A. Structural support in walls and floors is not furnished
by Bobrick. Confirm that adequate backing is present
in wall, ceiling and floors prior to installation.
B. This installation booklet must be used with the Bobrick
layout sheets.
C. You may verify hardware received by cross-referencing
the last page of the layout sheets against the box
contents.
RECOMMENDED TOOLS.
CAUTION: Be sure to use proper safety gear.
1. Chalk Line
2. Plumb-bob
3. Masking Tape (for laying out holes on
floors/walls/ceilings to be drilled)
4. Tape Measure and Pencils
5. Center Punch
6. Electric and/or Battery-Powered
Drill – 1/2" and 3/4" (13 and
19mm) Concrete Drill Bits
7. Drill Bits
1/16" to 1/4", numbered 1 to 60
metric 1.0 to 7.0mm
INSTALLATION STEPS.
1. Brackets and Screws......................................... Page 3
2. Post-to-Ceiling Urinal Screens .......................... Page 4
3. Wall Hung Urinal Screens ................................. Page 7
4. 1040 Series Benches ........................................ Page 8
5. 1080/1180 Series Shower Seats....................... Page 8
6. Finishing and Cleanup ...................................... Page 9
A. Organize components with
appropriate hardware.
8. Screwdrivers/Screwdriver Bits
flathead and phillips, #1, #2 and #3
9. Shims
10. Adjustable Supports
1-1/2" to 12" (40–105mm)
11. Level
12. Wrench – Adjustable or 9/16"
(14mm) open end (2 req'd.
for adjusting hex nuts on
anchors)
13. Allen Wrench – 5/64" (2mm)
(to install door latch)-Supplied
by Bobrick
Page 2
14. Hack Saw
15. Hammer
Form No. 1045-69 r5/21/14 © 2014 Bobrick Washroom Equipment, Inc. Printed in U.S.A.
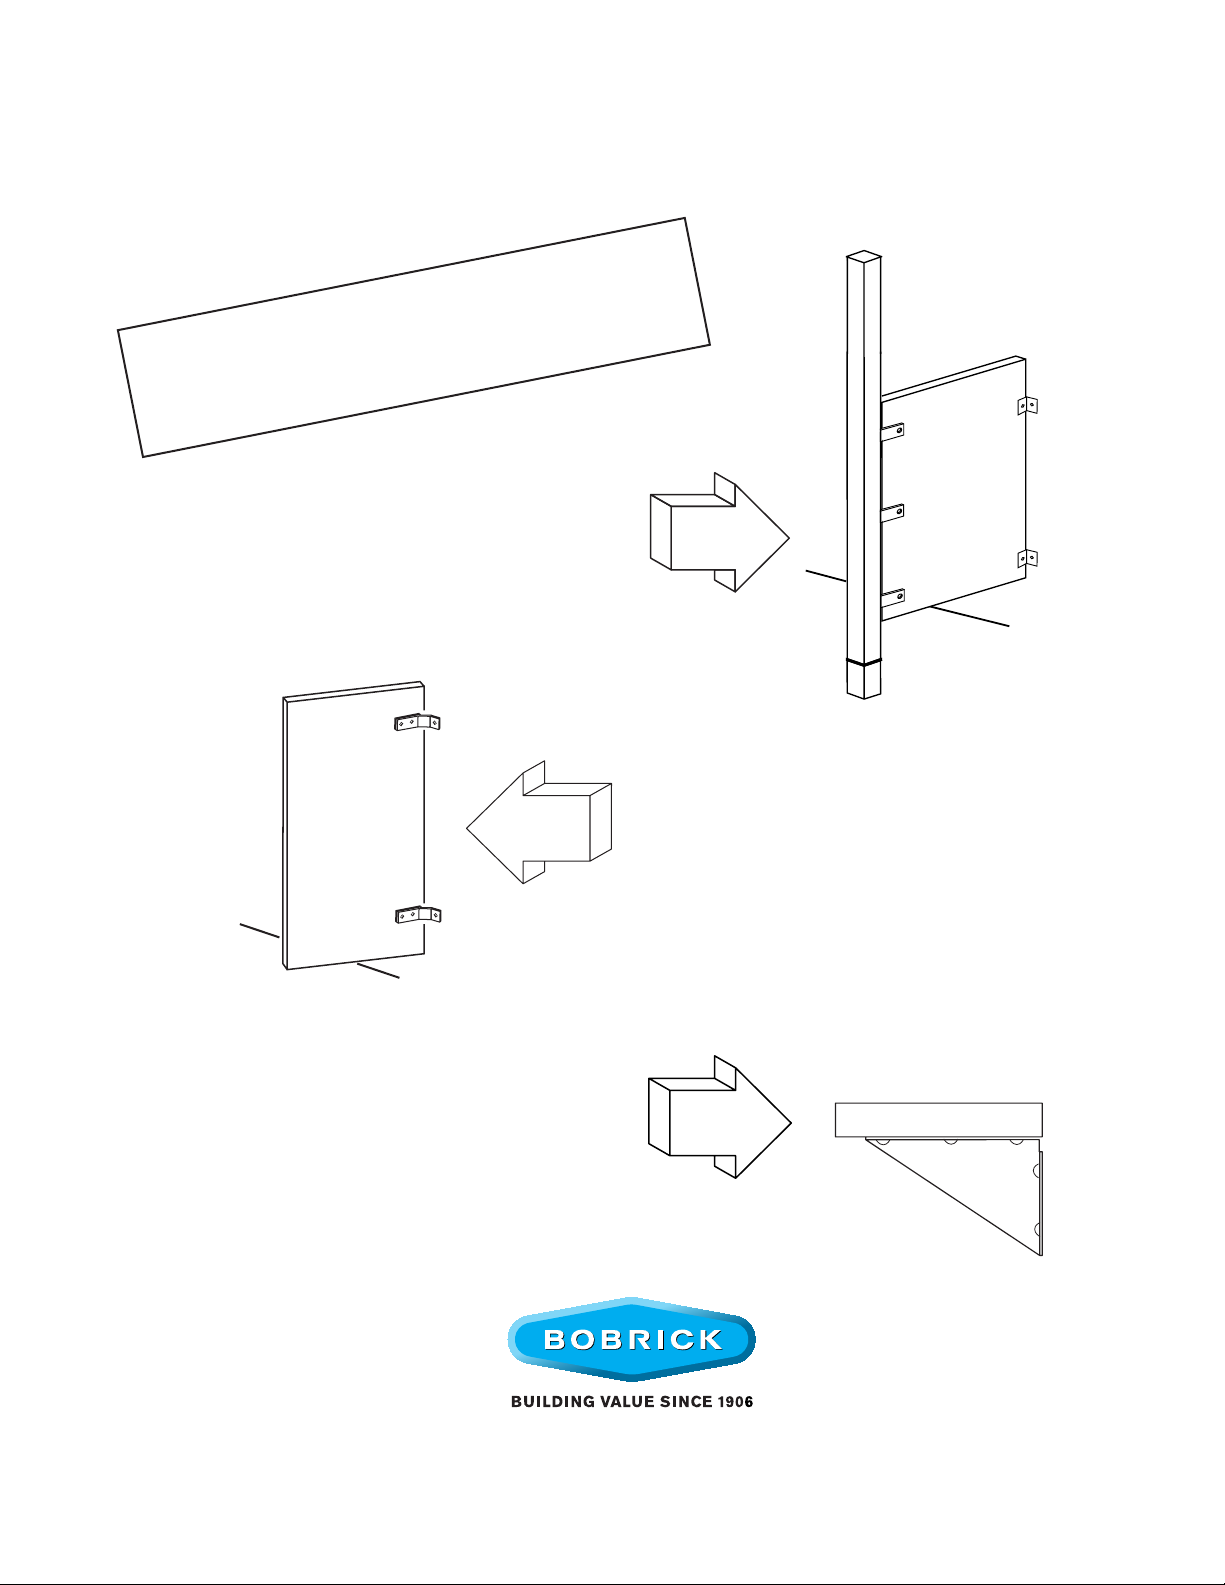
Page 3

BRACKETS AND SCREWS
F-brackets
#1000353
Panel to Wall
#1000975
Panel to Wall 1080 Series
U-brackets
#1000356
Panel to Stile
#1000972
Panel to Stile 1080 Series
U-brackets
#1000357
1045 series
Base Plate
#1000157
SPC Hardware
#1002500
#12 x 3/4'' 1040 Bracket to Screen
#1000158 Front Plate
#1000159 Rear Plate
SPC Hardware
#1002499
#12 x 7/16" Bracket to Panel/
Bracket to Stile 1080 Series
Shoe
#1000050
#10-32 x 3/8'' Phillips
SPC Bracket to Post
#1002956
1085 series
Shoe Retainer
#1000103
SPC Hardware
#1000133
Acorn Nut - 10-32
Through-Bolt Urinal Screen
#1000134
#10-32 x 1-3/4'' (44mm) Phillips
Through-Bolt Urinal Screen 1040 Series
Form No. 1045-69 r5/21/14 © 2014 Bobrick Washroom Equipment, Inc. Printed in U.S.A.
#1002966
#10-32 x 1-1/4'' (38mm) Phillips
Screen - 1080 Series/Bench 1040
#1002495
#12 x 2" (50mm)
Wall Screws
Page 3
Page 4

5/8"
16mm
Finish Face of Wall
2-1/2''
65mm
3-1/2''
90mm
2-1/2''
65mm
Cut to
4-3/4''
120mm
Overall
2''
50mm
Min.
Finish Face of Ceiling
Drill 1/2'' (
12mm
) Hole in Ceiling.
Run Toggle Bolt through
Base Plate and Spacer, then
into Ceiling. Tighten securely.
Base Plate
Spacer
POST-TO-CEILING URINAL SCREENSSTEP 1
LAYOUT EXAMPLE.
A. Refer to Bobrick layout sheets for distance location on
screen depth.
B. From back wall, measure and mark the location of the
edge of the screen.
C. Centerline of floor anchor from edge of screen is 5/8"
(16mm).
D. Be sure, by plumb line, that floor and ceiling holes are
in line.
LEGEND: Obtain Dimension from Bobrick Layout Sheet.
Mounting holes to be drilled.
Top View
INSTALL ALL ANCHORSSTEP 2
FLOOR AND CEILING ANCHORS.
A. Drill 3/8" (9.5mm) diameter hole to depth shown. Remove all loose material from hole.
B. Insert anchor into drilled hole. Stud to be 2-1/2" (65mm) above floor.
C. Use 9/16" (14mm) wrench to tighten hex nut until anchor is expanded. Make sure shoe retainer is in proper position to
accept shoe. Angled ends to face front and rear of urinal screen.
D. Install second hex nut.
E. Place base plate over threaded rod.
NOTE: Wood-floor anchors are available upon request.
Fig. 2a: Detail of Floor Anchor.
Fig. 2b: Detail of Ceiling Anchor.
For tile or concrete floors
using filler sleeve
Page 4
For tile or concrete floors
without filler sleeve
Form No. 1045-69 r5/21/14 © 2014 Bobrick Washroom Equipment, Inc. Printed in U.S.A.
Page 5

46''
(1170mm)
18''
(455mm)
C
L
Panel
C
L
Threaded Rod
12''
(305mm)
18''
(455mm)
46''
(1170mm)
Set panel on support(s)
and in brackets.
Do Not Fasten
STEP 3
POST-TO-CEILING URINAL SCREENS
Fig. 3a: Layout Walls and Install Brackets.
A. Using the wall brackets as templates, measure and
mark the location of all mounting holes, according to
dimensions shown in illustrations (Fig. 3a, 3b, 3c).
B. Use #19 (.166) drill bit for 2" (50mm) deep pilot holes
into adequate wall backing.
C. Secure wall brackets with #1002495 screws.
Fig. 3b: Put Screen in Place.
Form No. 1045-69 r5/21/14 © 2014 Bobrick Washroom Equipment, Inc. Printed in U.S.A.
Page 5
Page 6

23''
(535mm)
23''
(535mm)
16-3/8''
(416mm)
Upper
Nut
Trim End with Label
12''
(305mm)
STEP 3
POST-TO-CEILING URINAL SCREENS
Fig. 3c: Install Post
A. Post is furnished in 10' -0" (305cm) lengths. Post is to
be field cut on end with label attached.
Follow instructions on label to cut post to your job
conditions.
B. Fasten three brackets with No. 10 x 3/8" (10mm)
screws.
Be sure short end of post is towards floor to assure
proper mounting of panel to brackets.
C. Place post over floor base plate. Be sure brackets are
on panel side. Turn upper nut raising post to engage
on ceiling base plate.
Caution: Use care when raising post to prevent
damage to ceiling.
Fig. 3d: Attach Panel
D. Install shoe with No. 6 x 1/4" (6mm) screws. Screws to
be on panel side of post. Be sure to engage retainer at
floor.
Position panel so that it contacts the heads of the
screws that attach the brackets to the post. Drill No. 19
holes x 3/4" (19mm) deep. Fasten panel to brackets
on post with #1002499 screws for 1/2" (12mm) panels
and #1002500 for 1" (25mm) panels. Make sure that
post is plumb and straight. Drill pilot holes and fasten
wall brackets to panel.
Page 6
Form No. 1045-69 r5/21/14 © 2014 Bobrick Washroom Equipment, Inc. Printed in U.S.A.
Page 7

STEP 1
WALL HUNG URINAL SCREENS
Fig. a: Layout Walls and Install Brackets.
36''
(915mm)
21''
(535mm)
C
L
Panel
42''
(1070mm)
15''
(381mm)
C
Panel
L
For 42" (107cm) High Screens For 48" (122cm) High Screens
A. Using the wall brackets as templates, measure and mark the location of all mounting holes, according to
dimensions shown in illustrations (Fig. a, b).
B. Use #19 (.166) drill bit for 2" (50mm) deep pilot holes into adequate wall backing.
C. Secure wall brackets with #12 x 2" screws.
Fig. b: Put Screen in Place.
Set panel on support(s)
and in brackets.
36''
(915mm)
21''
(535mm)
18''
(455mm)
For 42" (107cm) High Screens For 48" (122cm) High Screens
A. Position panel so that it contacts the heads of the screws that attach the brackets to the wall.
B. Using brackets as templates, drill #19 through the panel.
42''
(1070mm)
15''
(381mm)
12''
(305mm)
Set panel on support(s)
and in brackets.
C. Fasten panel to brackets with #10-32 x 1-1/4'' (#10-32 x 1-3/4'' 1040 only) screw and #10-32 acorn nut.
Form No. 1045-69 r5/21/14 © 2014 Bobrick Washroom Equipment, Inc. Printed in U.S.A.
Page 7
Page 8

''D''
Finish Face of Floor
Sheet Metal
Screws
3/4''
19mm
Masonry Wall
Bracket
Sheet Metal Screws
2''
50mm
''D''
Finish Face of Floor
Panel
Bracket
Plain
Washers
Phenolic Shower Seat
12''
305mm
STEP 1
BENCH/SHOWER SEAT INSTALLATIONS
Fig. 1a: Bench 1040 Series
A. Mark holes on one side of bench using mounting
brackets as templates. Mounting holes to be 3"
maximum from each end of seat.
B. Drill #19 (.166) x 3/4" (19mm) deep holes in seat.
Caution: Do Not Drill Through.
C. Attach brackets with #1002500 screws.
D. Support bench so that height of bench complies with
local building codes. Bench must be level with the floor
in all directions and mounting brackets must be flat
against the wall.
E. Using brackets as templates mark and drill #19
(4.2mm) into wall 2" deep.
F. Attach brackets to wall with #1002495 screws.
G. Test and examine bench and fasteners and brackets to
make sure there are no loose parts.
Fig. 1b: Shower Seat 1080/1180 Series
(Panel Installation)
Page 8
Form No. 1045-69 r5/21/14 © 2014 Bobrick Washroom Equipment, Inc. Printed in U.S.A.
A. Mark holes on one side of shower seat using mounting
brackets as templates. Mounting holes to be 3" max.
from each end of seat.
B. Drill #19 x 7/16" (5.5 x 11mm) deep holes in seat.
Caution: Do Not Drill Through.
C. Attach brackets with #1002499 screws.
D. Support seat so that height of seat complies with local
building codes. Seat must be level with the floor in all
directions and mounting brackets must be flat against
the panel.
E. Using brackets as templates mark and drill #10
(4.8mm) holes through panels.
F. Attach brackets to panel with #10-32 x 1-1/4" machine
screws, hex nuts and washers.
G. Test and examine seat, fasteners and brackets to
make sure there are no loose parts.
Page 9

Finish Face of Floor
Phenolic Shower Seat
Masonry Wall
Bracket
''D''
STEP 1
BENCH/SHOWER SEAT INSTALLATIONS
Fig. 1c: Shower Seat 1080/1180 Series
A. Mark holes on one side of shower seat using mounting
brackets as templates. Mounting holes to be 3"
maximum from each end of seat.
B. Drill #19 x 3/8" deep holes in seat. Caution: Do Not
Drill Through.
C. Attach brackets with #1002499 screws.
D. Support seat so that height of seat complies with local
building codes. Seat must be level with the floor in all
directions and mounting brackets must be flat against
the panel.
E. Using brackets as templates mark and drill #19
(4.2mm) into wall 2" (50mm) deep.
F. Attach brackets to wall with #1002495 screws.
G. Test and examine seat and fasteners and brackets to
make sure there are no loose parts.
FINISHING AND CLEANUP
A. Remove any exposed labels from the components.
B. Clean surfaces as needed. CAUTION: Do not use cleaners containing acid on Bobrick toilet compartments.
For example, tile cleaners containing acid may attack the stainless steel hardware.
For Bobrick recommendations, refer to Bobrick Advisory Bulletins Nos. TB-21 and TB-60.
Form No. 1045-69 r5/21/14 © 2014 Bobrick Washroom Equipment, Inc. Printed in U.S.A.
Page 9
Page 10

In the United States: BOBRICK WASHROOM EQUIPMENT, INC.
200 Commerce Drive, Clifton Park, NY 12065-1350, Telephone: (518) 877-7444 • FAX: 518-877-5029
11611 Hart Street, North Hollywood, CA 91605-5882: (818) 982-9070 • FAX: 818-503-1102
or email Bobrickcustomerservice@bobrick.com
In Canada: BOBRICK WASHROOM EQUIPMENT COMPANY
45 Rolark Drive, Scarborough, Ontario M1R 3B1 • FAX: (877) 423-8555
1045-69
16954 00910
7
Form No. 1045-69 r5/21/14 © 2014 Bobrick Washroom Equipment, Inc. Printed in U.S.A.
4
 Loading...