

Page 1
www.bobike.com
maxi+
2 Gebruiksaanwijzing
6 User Instructions
10 Gebrauchsanweisung
14 Mode d’emploi
18 Instrucciones para el uso
22 Brugsanvisning
2 Gebruiksaanwijzing
6 User Instructions
10 Gebrauchsanweisung
14 Mode d’emploi
18 Instrucciones para el uso
22 Brugsanvisning
maxi+
www.bobike.com
Page 2
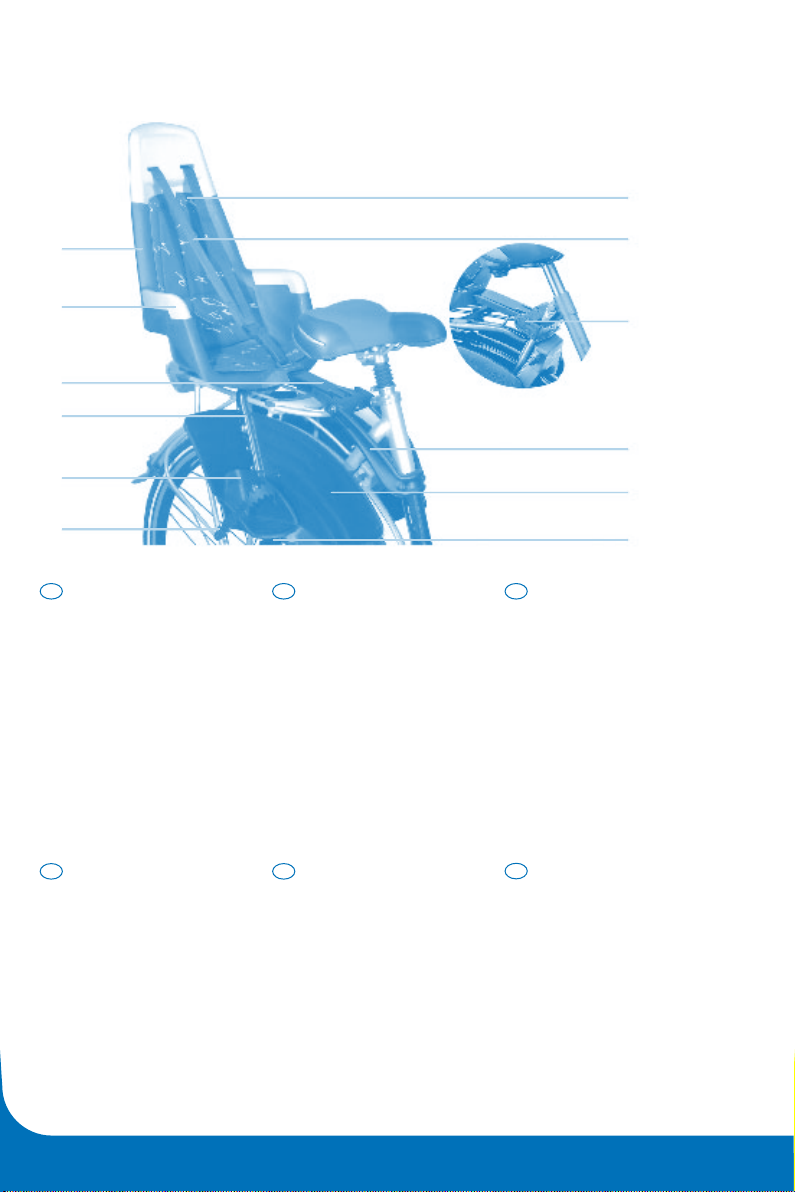
legenda/legend/Legende/légende/leyenda/signaturforklaring
G
A
B
C
D
E
F
A Zitje
nl
B Armleuning
C Montagebeugel
D Voetsteunbuis
E Voetbakjes
F Elastisch voetriempje
G Kussen
H Gordel
I Insteekelement
J ATB-beugel
K Voetbeschermplaat
L Montageknoppen
A Seat
gb
B Armrest
C Mounting bracket
D Footrest tube
E Footrests
F Elastic foot strap
G Cushion
H Safety belt
I Socket
J ATB bracket
K Foot guard
L Locking units
A Sitz
de
B Armstütze
C Montagebügel
D Fußstützenrohr
E Fußstützen
F Elastischer Fußriemen
G Kissen
H Gurt
I Einsteckelement
J ATB-bügel
K Fußschutsplatten
L Montageknöpfe
H
I
J
K
L
A Siège
fr
B Accoudoir
C Etrier de fixation
D Tube de cale-pied
E Cale-pieds
F Sangle élastique pour cale-pied
G Coussin
H Ceinture de sécurité
I Élément de fixation
J Armature ATB
K Plaque de protection pour les pieds
L Boutons de montage
A Silla
es
B Reposabrazos
C Aro de fijación
D Tubo del apoyapiés
E Apoyapiés
F Correas elásticas para pies
G Almohadilla
H Cinturón
I Pieza de acoplamiento
J Abrazadera ATB
K Placas protectoras para pies
L Elementos de fijación
A Sæde
dk
B Armlæn
C Montagebøjle
D Stang til fodstøtte
E Fodstøtter
F Elastiske fodremme
G Pude
H Sele
I Indsætningsstykket
J ATB-bøjle
K Fodskånere
L Montagebeslag
Page 3
1
1
2
2
A
B
A
B
8 stappen/steps/Schritten/étappes/pasos/skridt
Ø 12-18 mm
Ø 18-25 mm
Ø 10-12 mm
B
A
60° - 80°
60° - 80°
B
A
max.10cm
max.10cm
21
3
4
Page 4
5
B
A
60° - 80°
60° - 80°
B
A
max.10cm
max.10cm
6
87
Page 5
6 www.bobike.com
English
Bobike maxi+: a safe choice
You on the bike, your child in a bicycle seat behind
you, and off you ride. Sometimes we cycle purely
for the fun of it, sometimes because we need to and
we have a specific destination. Whatever the reason
for a bike ride, your child’s safety is paramount. By
purchasing the Bobike maxi+, approved according to
European safety standard EN 14344, you have made
a good choice. To ensure proper and safe fitting, it is
important to read this user manual carefully first, and
then follow the instructions carefully. Keep this user
manual in a safe place in case you need to refer to
it at a later date. Dremefa, the manufacturer of the
Bobike maxi+, wishes you many happy, and above all
safe, bicycle rides.
From 9 months to 6 years
The Bobike maxi+ is suitable for children aged from
9 months to 6 years. We recommend that you use the
seat only when your child is able to sit well on its own,
at least for the duration of the ride. The maximum
weight of a child in the Bobike maxi+ is 22 kilos. For
children older than 6 years or heavier than 22 kilos,
we offer the Bobike junior.
Bobike maxi+ accessories
If you want to use your Bobike maxi+ on several
bicycles, please ask your stockist about additional
mounting sets. For extra safety, you may also want to
consider jacket protectors and saddle spring protectors. Finally, the assortment includes safety belt pads
and separately available Bobike clothing.
to strict quality controls. Bobike therefore guarantees
this product for a period of one year. In the event of a
claim, please present your receipt to your stockist.
Method of mounting
The Bobike maxi+ can be mounted in two ways,
depending on your bicycle. The seat can be mounted using the socket (I) or an ATB bracket (J). When
mounting with the ATB bracket, the diameter of the
saddle tube must not exceed 50 mm. For both methods
of attachment, the width of the baggage carrier must
not exceed 160 mm.
The Bobike maxi+ is not suitable for mounting on a
bicycle with a carbon frame or on a moped. You must
only mount the seat on bicycles that are suitable for
carrying the extra weight of the seat and child. You
should therefore consult your bicycle’s manual or
ask your bicycle manufacturer or stockist for advice.
Should you have any further queries, please refer to
your Bobike stockist or visit www.bobike.com.
Eight steps to a correctly mounted
Bobike maxi+
The Bobike maxi+ complies with European safety
standard 14344 and is a very safe child bicycle seat.
Of course, the assembly must be carried out in the correct way. Run through the eight steps below as accurately as possible. The numbers of the steps match the
related drawings. For example, drawing 1A illustrates
what is described in step 1A.
Maintenance
Bobike child bicycle seats are simple to maintain. The
upholstery is attached with Velcro and can be easily
removed. The upholstery can be washed by hand and
the seat cleaned with a mild detergent. Do not use any
abrasive cleaning agents.
Guarantee
Bobike guarantees that the supplied child’s cycle seat
is manufactured from durable materials and subject
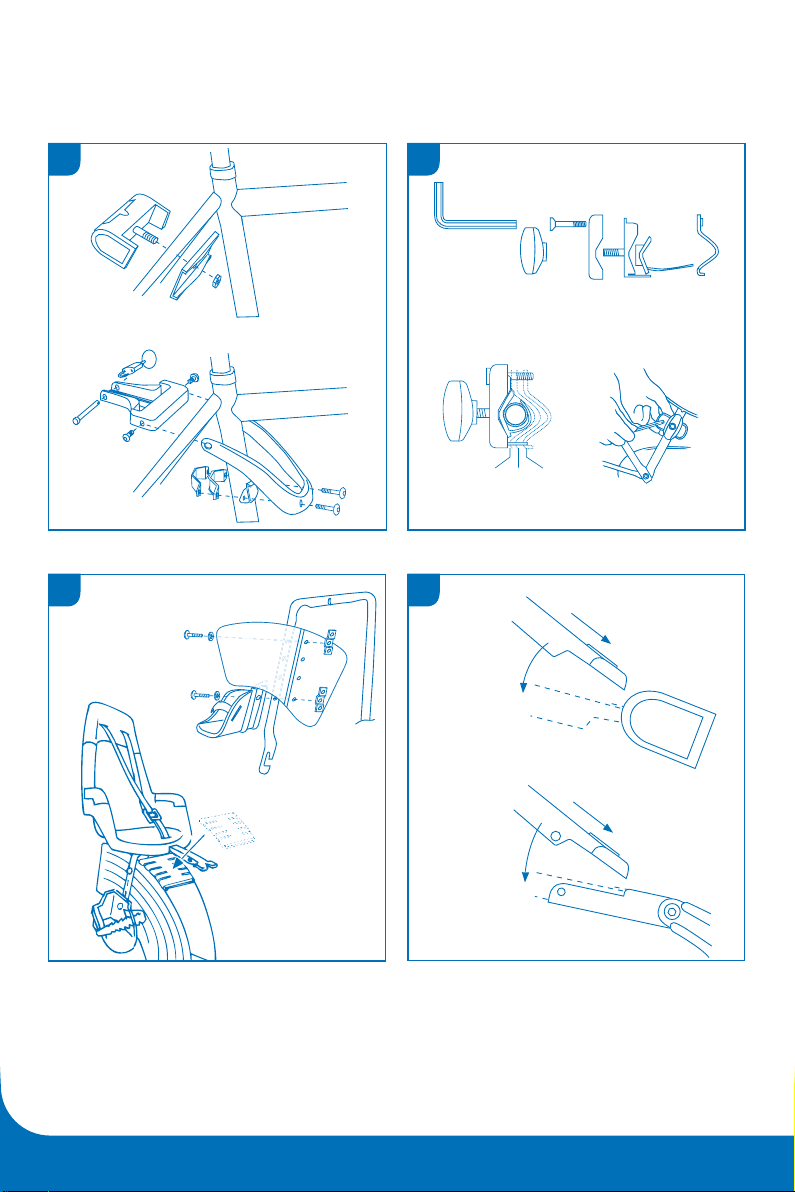
There are two options for mounting the Bobike maxi+:
either using only the socket (see illustration 1A) or
using the ATB bracket (see illustration 1B). If your seat
has the TÜV-GS symbol then it is equipped as standard
with an ATB bracket and with an extra wheel contact
guard (see illustration 3).
1 A Mounting using the socket
Secure the socket (I) to the upright rear fork
under the saddle. Secure the opposite half of the
Page 6

element with key 13, with the flat side against the
rear fork. Ensure that the socket is mounted horizontally and with the T-shaped opening facing
upwards.
B Mounting using the ATB bracket
Secure the ATB bracket (J) with the supplied
screws, the brackets and the plastic washers to
the saddle tube. To do this, take the large bracket
together with the plastic washer and the long
screws, and place these on the saddle tube from
the front. Then take the other plastic washer and
the small bracket and place these to the rear
side of the saddle tube. Now mount the brackets
to each other using the screws and the supplied
Allen key. Hand-tighten the screws, because the
correct position must still be set. Now mount the
plastic socket using the two short screws between
the bracket. Ensure that the correct side (opening)
is pointing upwards and hand-tighten the screws.
2 Now secure both locking units (L) to the rear fork
approximately 30 cm below the socket (I). The locking units are suitable for rear forks with a diameter
of between 12 and 25 mm. To adjust, insert the
clamp bracket of the locking unit in the first, middle
or rearmost slot.
Ensure that both locking units left and right are
secured at exactly the same height. Hand-tighten the
screws and the turn the knobs so as to create a slot
of about 1 cm.
3 The foot straps (F) must be fitted to the footrests (E)
before mounting. Mount the foot guards (K) and the
foot supports onto the footrest tube (D).
Adjust the height of the footrests
To set the correct height of the footrests (E), first
measure the length of your child’s lower legs from
the underside of the knee to the sole of the foot. This
measurement must match the distance from the seat
to the underside of the footrest. This then gives the
height at which the footrests must be mounted.
Mounting the foot guards
Place one foot guard on the inside of the footrest
tube. Place a footrest on the outside of the support
tube and slide the long screw through the washer,
the footrest, the support tube and the foot guard.
Ensure that the elasticised band of the safety belt,
which is attached to the footrest tube, is not trapped
between the foot guard and the footrest tube. The
elasticised band belongs in the uppermost position
below the seat. Secure the nut plate to the inside of
the foot guard, parallel to the support tube. Now
tighten the screw firmly with a torque of 3 Nm.
Mount one of the short screws together with the
washer and the nut plate as far from the footrest as
possible, so that the foot guard sits securely. After
the other foot guard and footrest have been moun-
ted, you can place your seat on your bicycle.
Wheel contact guard
If you bicycle does not have a baggage carrier
then mount the extra wheel contact guard to the
foot guards. You can click this securely to the foot
guards. If the extra wheel contact guard also fits on
your bicycle with a baggage carrier, then secure the
guard as well.
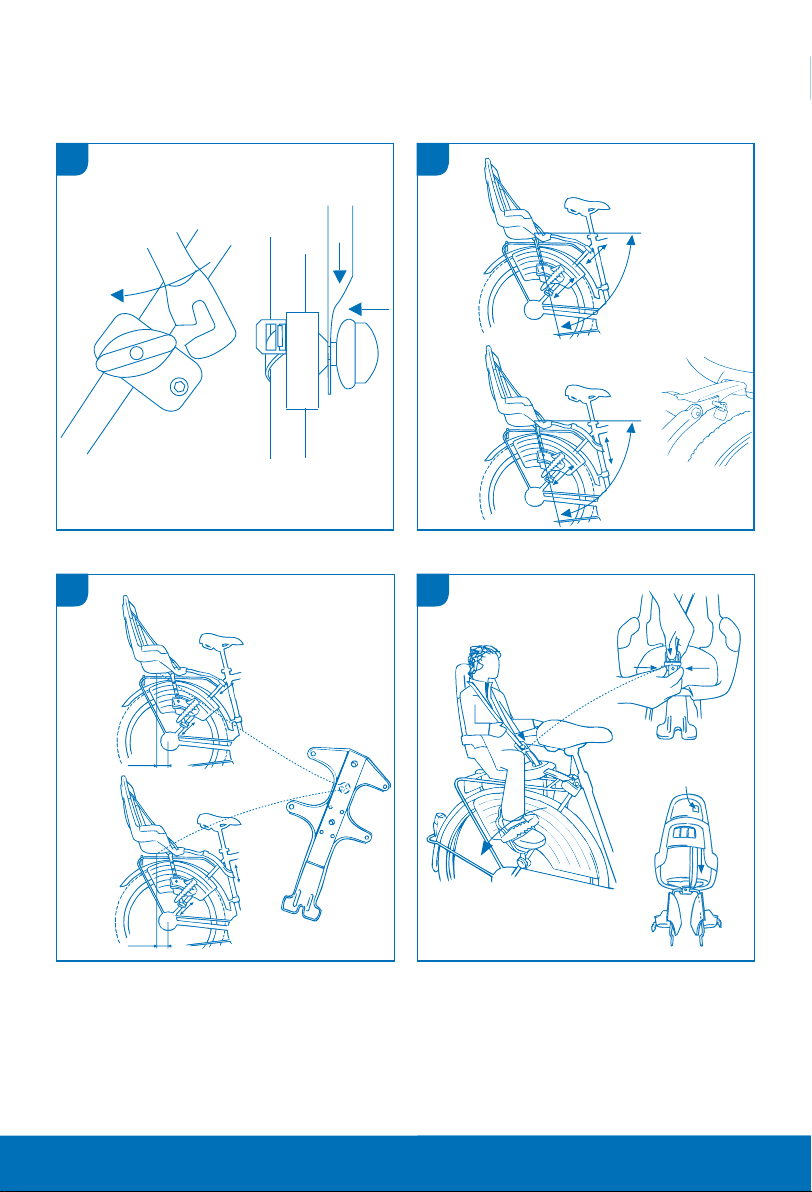
4 Take the seat and insert the head of the mounting
bracket (C) straight and all the way into the socket.
5 Turn the footrest tube down, fit the ends into the
locking units and tighten the knobs. Ensure that the
outer ends of the footrest tubes are placed in the slot
as far as possible.
6 When adjusting the seat, the surface of the seat must
not tip forwards. The child could slide out of it. It is
recommended to angle the seatback slightly towards
the rear. Ensure that a space of at least 1 cm
remains between the seat and the baggage carrier
or the mudguard. The seat is correctly mounted
when the footrest tubes are at an angle of between
60 and 80 degrees. If the position of the seat is still
not right then move the locking units up or down, or
adjust the position of the ATB bracket (J) or the soc-
ket (I). When the correct position is reached, tighten
the locking units and the screws of the ATB bracket
or the nut of the socket with a torque of 10 Nm.
Tighten the short screws in the plastic socket until the
slack is taken up. The steel pin and the lock ensure a
www.bobike.com 7
Page 7

8 www.bobike.com
safe connection and prevent the plastic socket from
turning. They also act as a safeguard against theft.
Note: always use the steel pin and lock for the ATB
bracket.
7 Check that the centre of gravity of the Bobike maxi+
does not lie more than 10 cm behind the rear axle.
Carry out this check before you go on a first test ride
with your child. The symbol for the centre of gravity
(a spot) can be found on the lower side of the mounting bracket (C).
8 Sit your child in the Bobike maxi+ and check that the
chosen setting is correct. If you want to change the
setting, always remove your child from the seat first.
Always fasten the safety belt and foot straps, even
when the Bobike maxi+ is not in use. You can adjust
the length of the safety belt on the rear of the seat.
Tighten the safety belt by pulling on it at the back
of the seat. By depressing the button on the rear of
the seat and pulling on the safety belt at the same
time, you can loosen the safety belt on the front.
In addition to the Bobike coat protectors and foot
guards, the foot straps also prevent your child’s feet
from getting between the spokes or other parts of
the bicycle.
Pay attention to how the clasp operates. The buckle
on the safety belt must be pushed into the buckle
on the seat with the pin (the protruding round bit)
pointing towards the front. The pin must go into the
hole provided on the front. Check this each time you
close safety belt.
Extra attention to safety
• Check whether all parts are properly mounted and
set. Tighten the screws and check regularly that all
attachments are still firmly and safely secured.
• After fitting the Bobike maxi+, check whether all the
components of the bicycle are still working properly.
• After fitting the Bobike maxi+, go on a short test ride
with your child.
• Bobike recommends only using the seat when your
child is able to sit independently for at least the
duration of the ride.
• Additional mounting sets are available separately
enabling your Bobike maxi+ to be used on more
than one bicycle. Ask your Bobike stockist for information.
• Check whether the bicycle is suitable for mounting
the Bobike maxi+ on.
• Check whether the use of the Bobike maxi+ is legally
permitted for conveying children in the country
where you wish to use it.
• The cyclist must be at least 16 years old in order to
carry a child in the Bobike maxi+. The law in this
area can vary by country.
• The centre of gravity on the seat must never be more
than 10 cm behind the rear wheel axle (also see
point 7 in the mounting instructions).
• Check from time to time that your child is not too
heavy for the Bobike maxi+. The greatest permissible weight is 22 kilograms. You can carry heavier
children in the Bobike junior.
• Before each ride, check that no body parts or
articles of clothing interfere with rotating or moving
parts of the bicycle. This will help prevent, for
example, a foot coming between the spokes or a
finger in the brake mechanism.
• Ensure that your child cannot touch any sharp parts
such as frayed brake cables.
• Always fasten the safety belt and foot straps, even
when the Bobike maxi+ is not in use.
• Ensure that your child is always properly protected
against the cold and rain when in the seat. Remember that your child is sitting still in the seat and will
therefore get colder more quickly than the cyclist.
• Ensure that your child always wears a properly-fit-
ting safety helmet.
• The seat can become very hot if it is exposed to
direct sunlight for any length of time. Remember this
before sitting your child in the Bobike maxi+.
• If the bicycle is transported on top of or on the back
of a moving car, the Bobike maxi+ must be removed.
The air turbulence can damage the seat and the
mounting, resulting in a hazardous situation.
• Check that your child cannot operate any locks or
Page 8

other blocking devices present on the bicycle while
seated in the Bobike maxi+.
• Never convey several children in a single seat.
• The seat must always be replaced following an acci-
dent, even if there is no visible damage. Ask your
stockist for information.
• Cover the saddle springs so that your child cannot
poke its fingers between them.
• Warning: Do not attach any extra baggage to the
Bobike maxi+. Whenever you carry extra baggage,
secure it to the other end of the bicycle, so that the
weight is evenly distributed. Use the baggage carrier designed for the front of the bicycle.
• Warning: The seat and/or the components must
not be modified. To do so will void any claim under
guarantee and/or liability.
• Warning: A bicycle seat such as the Bobike maxi+
influences the way you ride on your bicycle. Pay
extra attention therefore to steering, balancing and
braking.
• Warning: Never leave your child alone in the seat if
you leave the bicycle parked against a wall or on its
stand. The child could have a nasty fall.
• Warning: If a part of the Bobike maxi+ fails, you
should no longer use the seat. Have the part
repaired or replaced by your stockist.
• Warning: Always use the safety belt, the foot straps
and the wheel contact guard when carrying your
child in the Bobike maxi+. Always check whether the
safety belt and straps are closed before you set off.
The Bobike maxi+ is approved under European
standard 14344.
• Jacket protectors
• Handlebar with support bar for the Bobike mini+
• Footrests
• Tyre levers
Bobike is a registered trademark of Dremefa B.V.
For more information and an overview of our products,
visit www.bobike.com
Other Bobike bicycle products are:
• Bobike mini+ child bicycle seat
• Bobike windscreen
• Bobike foot guards
• Bobike junior
• Bobike clothing – available separately
• Bobike safety belt pads
• Saddle spring protectors
www.bobike.com 9
Page 9
www.bobike.com
maxi+
2 Gebruiksaanwijzing
6 User Instructions
10 Gebrauchsanweisung
14 Mode d’emploi
18 Instrucciones para el uso
22 Brugsanvisning
Dremefa BV
P.O. box 18
6980 AA Doesburg
The Netherlands
 Loading...