

BOB OMA17A User Manual
.
.
.
.
.
.
TRA
TRA
VEL baa
g INS
TR
UCTIONS
VEL b
g INS
TR
UCTIONS
(800) 893-2447 www.bobgear.com email- info@bobgear.com Phone: (208) 375-5171
Fax: (208) 375-5172, BOB Trailers, Inc.
5475 Gage St. Boise, Idaho 83706
Congratulations on your purchase of the BOB Travel Bag. It is
designed to contain and protect your single seat BOB Sport Utility,
Revolution or Stroller Strides stroller during transport. The Travel Bag
may be rolled and guided by the end handle or carried via shoulder
strap and/or side handle. The Travel Bag will need to be assembled
prior to use.
Before attempting to assemble or use your new Travel Bag, read
and understand these instructions to ensure proper assembly
and operation. If you are unclear on any point, contact your dealer
or BOB before use.
WARNINGS
This product is designed exclusively for use with BOB single Sport
Utility, Revolution or Stroller Strides strollers. It is not intended for
use with any other strollers or products.
When not in use, keep out of reach of children.
Maximum Weight Capacity 30lb (13.6Kg) Do not overload.
Never leave child unattended.
The Travel Bag is designed to reduce the possibility of damage to
your stroller during transportation but does not eliminate it completely.
We recommend inspecting your Stroller and Travel Bag before and
after each transport journey to ensure functionality and safety.
Assembly Instructions:
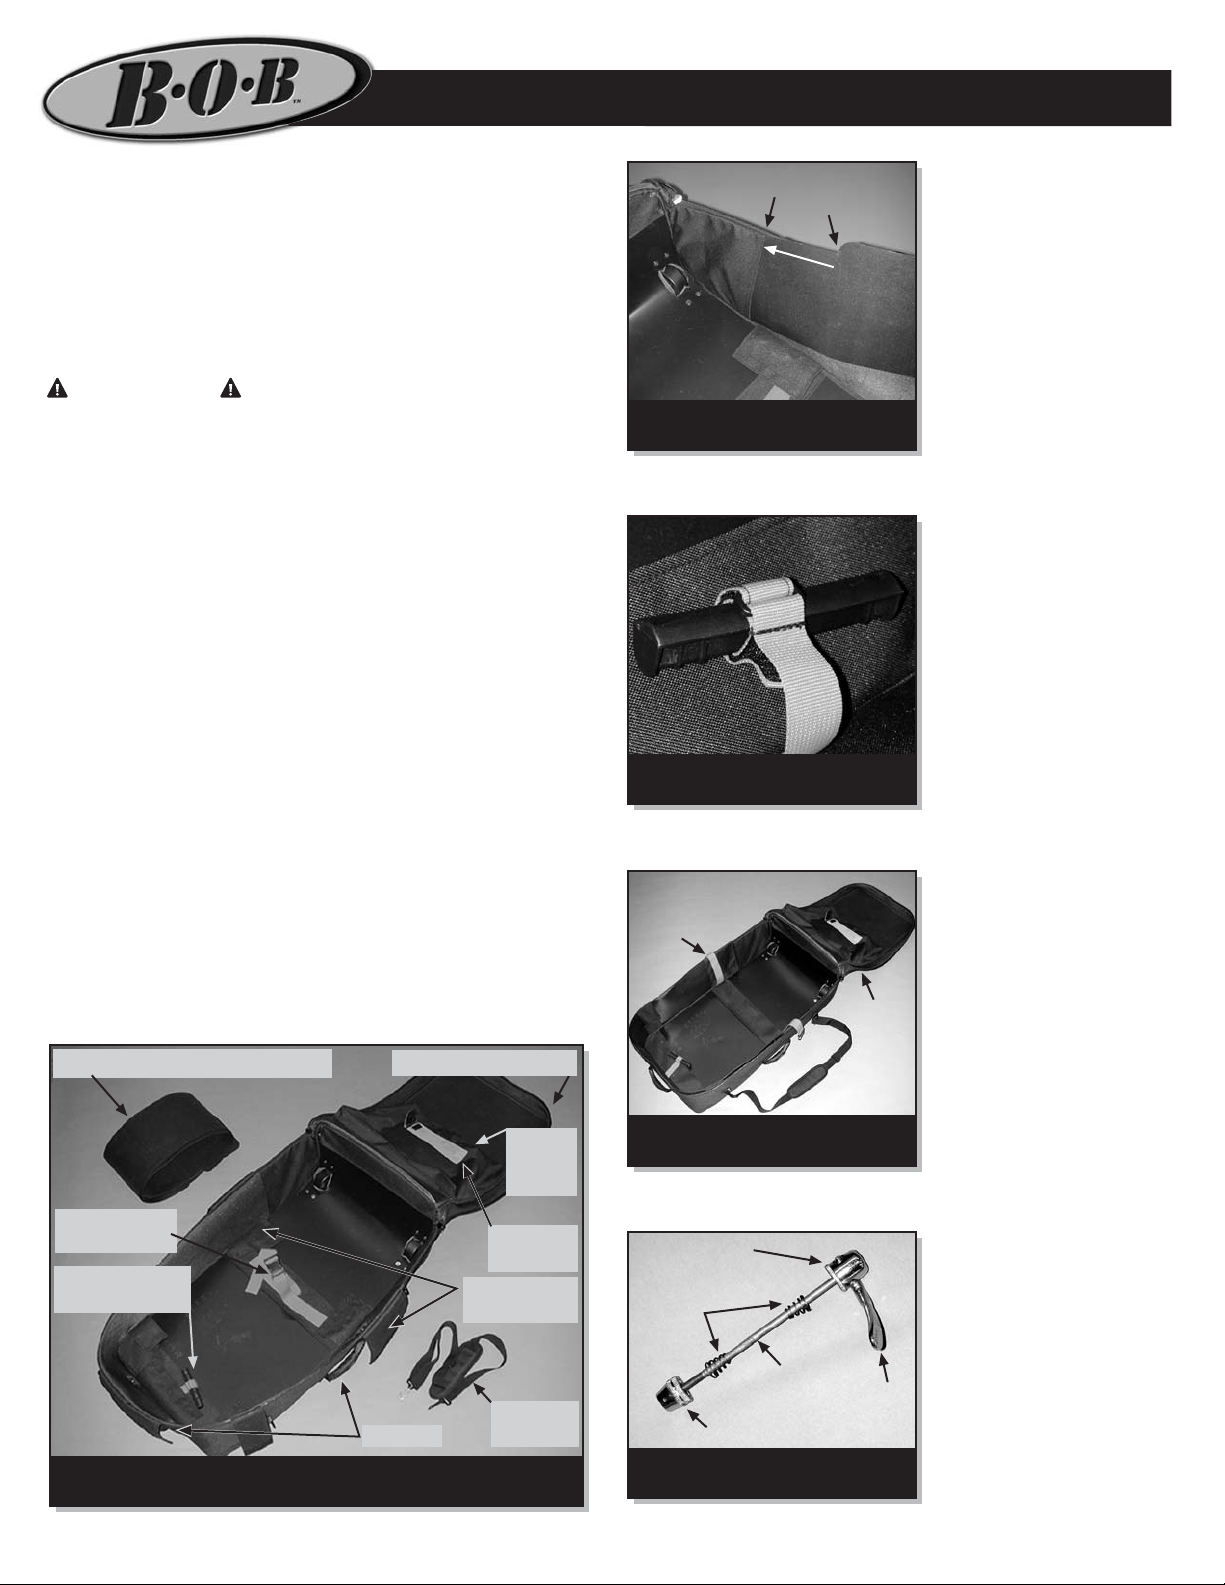
A1. Remove bag from packaging. Place bag flat on ground or table
with wheels down. Open Travel Bag top cover zipper and locate
components. Fig. A identifies the anatomy and components of the
Travel Bag.
A2. Unfasten the Velcro of the five Fabric Flaps along inboard sides
of travel bag. Temporarily place top of each over side and out of the
way as shown in Fig. A.
A3. Locate wall support panel, (black plastic sheet) unroll and note
orientation of notch at each end.
A4. Orient wall support panel with notches toward top cover (up)
and feed each end into each respective pocket along inside corners
of Travel Bag as shown in Fig B. Push ends of wall support panel
fully into each pocket until notch is aligned with pocket seam.
A5. Align and fasten Velcro of fabric flaps straight and secure around
wall support panel. You may find it helpful to bend the support panel
top edge slightly inboard while the Velcro of each fabric flap is secured.
Wall Support Panel (rolled up)
Center Strap
& Buckle
Fork Protector
& Strap
Fig. A: Anatomy of the BOB Travel Bag.
Zippered Top Cover
Front QR
Fabric Flaps
Handles
Front
Wheel
Pocket
Pocket
(open)
Shoulder
Strap
Pocket Seam
Notch
Insert
Notch
fully up
to Seam
Fig. B: Panel ends into corner
pockets (right side shown).
Fig. C: Fork Dropout Protector
shown properly attached.
Center Strap
open w/ends
outboard
Top
Cover
Open
Fig. 1: Travel Bag fully assembled
and prepared for stroller.
Cam Housing
Conical
Springs
Rod
QR
Adjusting Nut
Fig. 2: Front QR anatomy
shown properly assembled.
Lever
A6. Locate fork dropout
protector and confirm it is
attached securely to end of
small red webbing as shown
in Fig. C. The fork dropout
protector can be replaced
easily if lost or damaged with
most other common fork
dropout protector(s) used on
strollers and bicycles for
shipping, available through
your bicycle or stroller dealer.
Use Instructions:
U1. Prepare Travel Bag: Zip
Travel Bag zipper completely
open and fold top cover over,
exposing pockets for Front
Wheel and Front Wheel
Quick Release (QR). Locate
center strap and unfasten
side release buckle. Place
center strap ends outboard
of Travel Bag as shown in
Fig. 1.
U2. Prepare stroller to place
in Travel Bag. Remove
contents from stroller
(occupant and all contents of
Low Boy luggage pouch).
Remove stroller rear wheels.
Close rear wheel QRs. (See
Rear Wheel section of your
strollers owners manual).
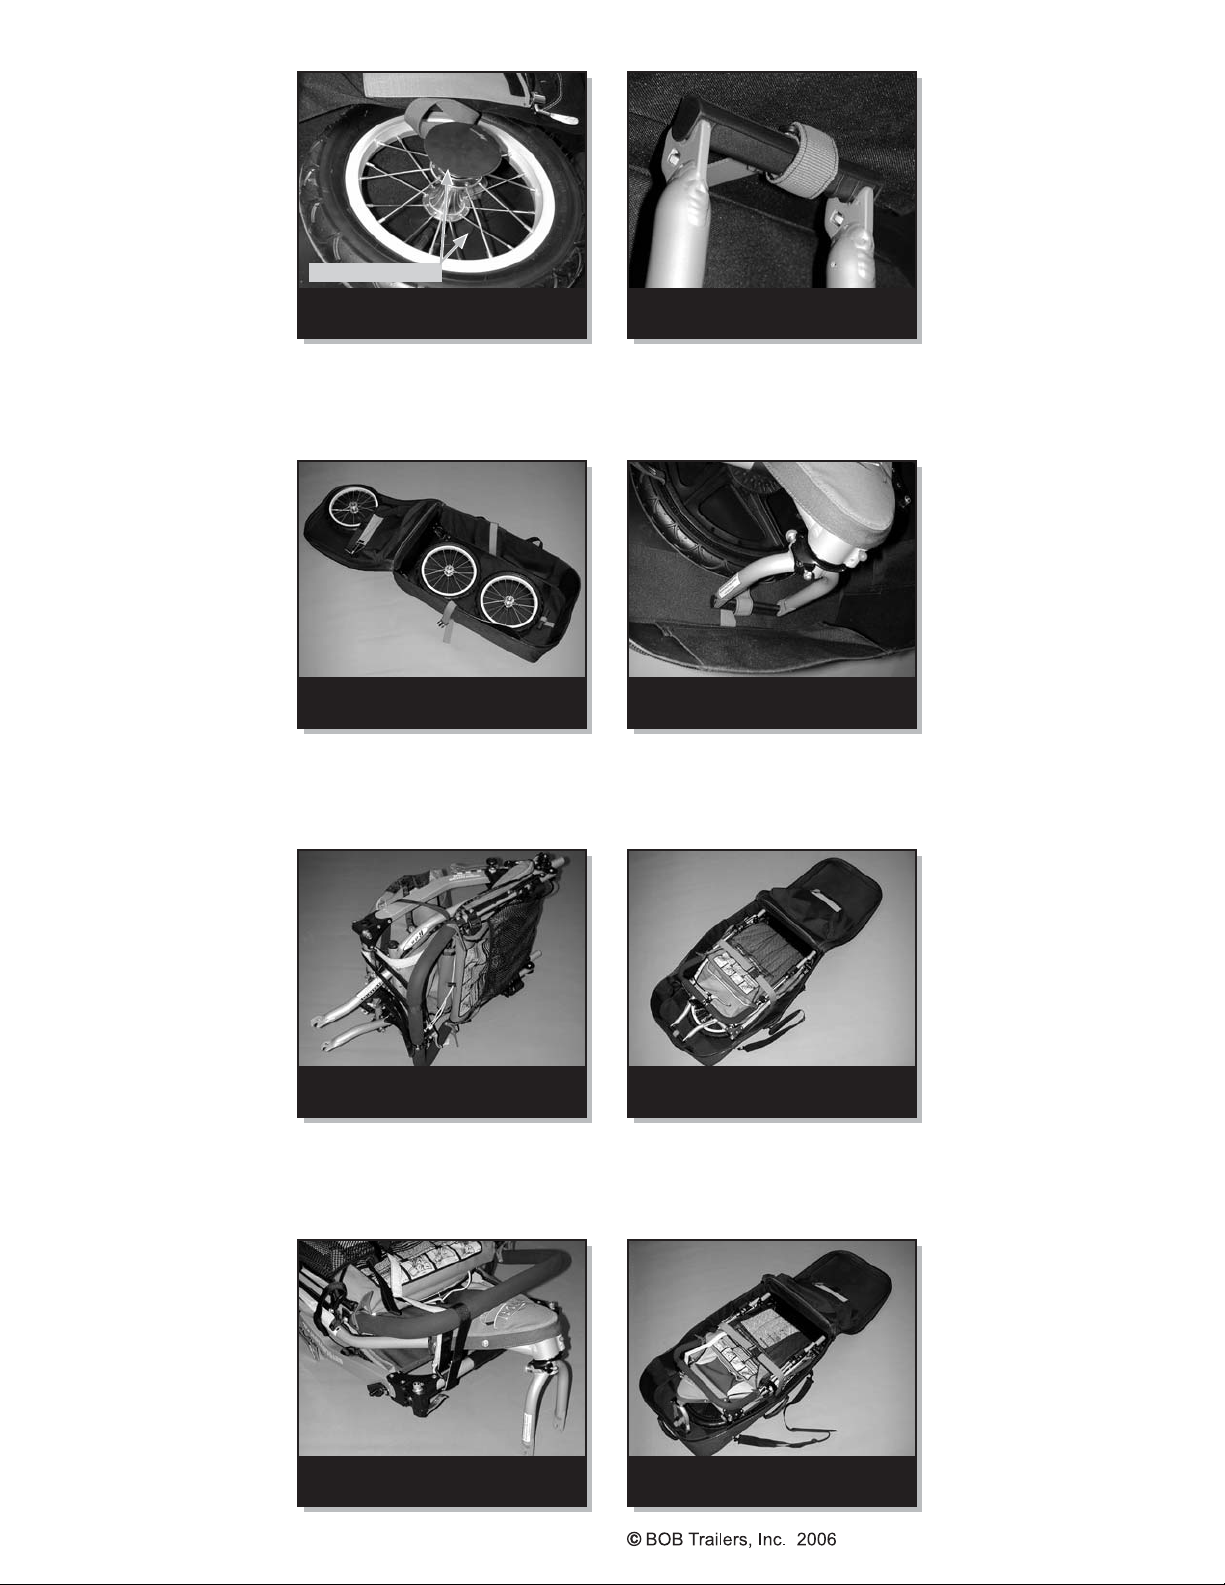
U3. Remove Front Wheel
from stroller (See Front
Wheel section of your
strollers owners manual).
Remove Front QR from Front
Wheel. Reassemble Front
QR components in proper
orientation as shown in Fig.
2, and place inside the gray
pocket located inside top
cover of Travel Bag. Locate
black plastic axle protectors
at ends of red straps inside
large front wheel pocket.
Push hollow end of each
plastic axle protector fully
over each end of Front Wheel
axle as shown in Fig. 3.
Place Front Wheel into
pocket inside top cover and
fasten Velcro closures.
U4. Place rear wheels inside
Travel Bag with stub axles
facing up. Position stroller
wheels along center line as
far back towards base of bag
as possible, leaving extra
space for fork protector, as
shown in Fig. 4.
U5. For Sport Utility Stroller
(fixed wheel) models, close
Caliper Brake Quick Release
Lever after removing wheel,
as stroller will fold more
OMA17A
P1
completely. (See Hand Brake
.
.
.
.
.
.
.
.
section of your strollers
owners manual). For
Revolution and Stroller
Strides (swivel wheel)
models, unlock Swivel
Lockout Knob and rotate the
fork rearwards in order to
minimize overall length (See
Swivel Lockout section of
your strollers owners
manual).
U6. Fold stroller completely
and secure with yellow Velcro
of wrist safety strap as shown
respectively by model in Fig
4A & Fig 4B. (See Folding
section of your strollers
owners manual). Make sure
Low Boy fabric is not pinched
between stroller components.
Note: It is not necessary to
remove fender (if equipped),
or Infant Car Seat Adapter (if
installed).
U7. Place stroller in Travel
Bag such that the handlebar
is on top and the stroller fork
is near the fork protector at
end of small red strap.
U8. Rock stroller side to
side and gently push down
to allow wheels to shift onto
space located between outer
frame components. Metal
shock brackets of stroller
should contact hard plastic
bottom of Travel Bag.
U9. Push black plastic fork
protector on to fork dropouts
as shown respectively by
model in Fig. 5A & Fig. 5B.
U10. Route red center strap
over top of stroller and fasten
buckle. Pull end of strap to
tighten and secure stroller.
Fig. 6A & Fig. 6B show
respective model strollers
placed properly into the
Travel Bag.
U11. Fold Travel Bag top
cover into position and zip
closed. Now it is ready to
travel!
Axle Protectors
Fig. 3: Plastic Axle Protectors
properly installed on Front Wheel.
Fig. 4: Wheels and Front QR
placement (alloy wheels shown).
Fig. 4A: Fixed wheel model stroller
ready to go into Travel Bag.
Fig. 5A: Fork protector placement
on fixed wheel model stroller.
Fig. 5B: Fork protector placement
on Revolution model stroller.
Fig. 6A: Fixed wheel model shown
properly placed into Travel Bag.
Limited Warranty
BOB Trailers Inc. takes pride
in its workmanship and strives
to manufacture the best
products possible. Therefore,
we warranty the Travel Bag
against defects in material
and workmanship subject to
the conditions listed below.
Since no product is
indestructible, it does not
cover defects attributable to
or resulting from normal wear,
abuse or alteration.
The Travel Bag is
warranted for one year from
the date of original
purchase.
Warranty is only valid for
the original purchaser.
Proof of purchase is
required to exercise this
warranty.
Labor and freight charges
are not included.
Normal wear, neglect,
abuse, accidents, and
improper use are not
covered by this warranty.
Warranty claims must be
made through an
authorized dealer.
This warranty is limited to
the repair or replacement
of the defective part. BOB
Trailers, Inc. shall in no
event be responsible for
consequential or special
damages.
This Limited Warranty is the
only express or implied
warranty applicable to BOB
Trailers, Inc. Any implied
warranties, including
warranties of
merchantability and fitness
shall be limited in scope
and duration in accordance
with this limited warranty.
Note: When checking on to
transportation services, we
recommend you remove the
shoulder strap and place it
inside Travel Bag to reduce
the possibility of damage or
loss.
Care
Instructions
Clean the fabric of Travel Bag
by hand with clean damp
cloth or sponge and air-dry
flat. Do not dry clean, iron,
or place in dryer.
OMA17A
Fig. 4B: Revolution model stroller
ready to go into Travel Bag.
Fig. 6B: Revolution model shown
properly placed into Travel Bag.
P2
 Loading...