

BOB Duallie User Manual
DUALLIE OWNERS MANUAL
CONGRATULATIONS on getting BOBd! (becoming the
new owner of a BOB Product). BOB is a company that
produces high quality products, which encourage a healthy,
outdoor, car-free lifestyle. In addition to strollers, we also
make single-wheeled cargo trailers for bicycles. See
www.bobtrailers.com for our complete line of products. Before
attempting to assemble or use your new stroller, read and
understand these operating instructions completely to insure
proper assembly and operation. This manual covers assembly,
use, and maintenance instructions.
Thanks for getting BOBd !!
Features:
2 position shock absorbers for light or heavy loads
padded, individual reclining seat backs
detachable, washable seat
2 hand position handle bars
light weight cro-moly/aluminum alloy frame
multi-position sun canopy
large storage compartments
quick release wheels
quick fold, compact design: folds with wheels attached or removed
Seat Back
Pocket
Seat Recline
Adjusters
Release Button
WARNINGS
Before using this BOB stroller read and understand this manual in its
entirety for assembly, use, and safety instructions. If you are unclear
on any point, contact your dealer or BOB before use.
Never leave children unattended in the stroller.
Failure to properly assemble or install the quick release hubs on
this stroller may result in the wheels becoming detached while
moving and a subsequent loss of control of the stroller.
Always use seat harnesses to avoid serious injury to children from
sliding or falling out of stroller.
Always use wrist safety strap.
Never allow occupants to stand in stroller.
The parking brake is not designed as a stopping brake. We do
not recommend using the brake to stop the stroller when it is
moving. The brake is intended to park the stroller on flat surfaces
not on inclines. Never leave your children in the stroller unattended
with or without the parking brake set!
Do not strap parcels or bags to the handle as it affects the balance
and stability of the stroller and can cause it to tip over backwards.
The maximum carrying capacity load of the stroller is 100 pounds.
Do not place sharp objects in the seatback pocket as your child
leans against this and can be injured as a result.
When starting out, always make sure that your kids hands and
feet are away from wheel spokes.
The Duallie is not equipped for use after dark. If you intend to
use it at night, we recommend installing wheel reflectors and a
lighting system available through your local bike shop.
We do not recommend wearing roller skates or inline skates while
pushing stroller.
AGE RECOMMENDATIONS - It is recommended that your
child be a minimum of 6 to 8 weeks old before riding in the stroller.
Young babies incapable of holding their head up must be provided
additional head and neck support to ride safely. For jogging and off
road use, children should be at least 6 to 8 months old.
Children develop at different rates. Consult with your pediatrician
regarding the suitability of the stroller use with your child.
ASSEMBLY INSTRUCTIONS:
NOTE: BOB IS NOT RESPONSIBLE FOR INJURY, DAMAGE, OR
FAILURE THAT RESULTS FROM OWNERS FAULTY ASSEMBLY
OR MAINTENANCE AFTER SHIPPING.
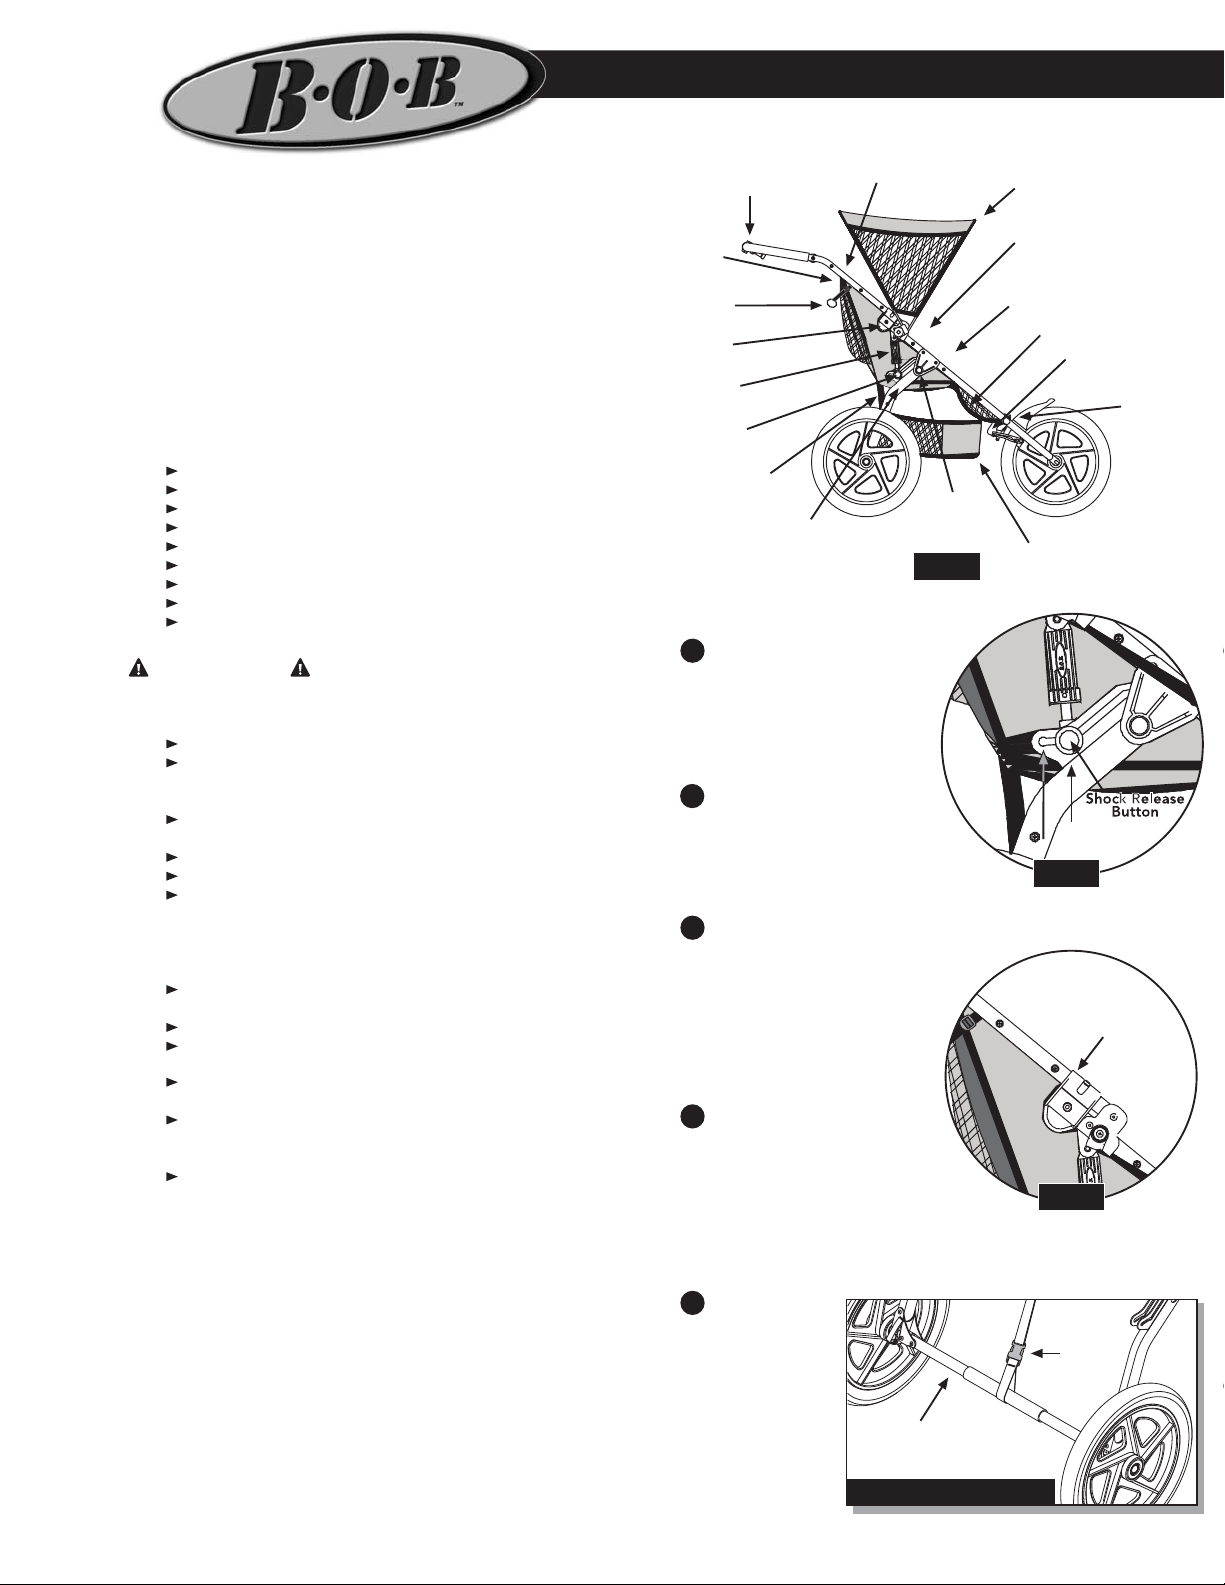
Reference Fig. 1 as it describes the various parts of the Duallie.
Handle Bar
& Brake Lever
Seat Tensioning
Strap
Clasp
Shock
Absorber
Shock
A.F.O.D.
Swing Arm
Anatomy of the BOB Duallie
1
SWINGARM: Rotate the
swingarm, away from the front of
the stroller until the shocks
engage in the first position as
shown in Fig. 2. The shocks
locking pins will snap and lock
into position.
2
HANDLE: Rotate the stroller
handle up to the fully open
position and secure the clasps as
shown in Fig. 3. To secure the
clasps, rotate them towards the
ground until they snap into place.
3
MULTI-POSITION SUN CANOPY:
To open the sun canopy, hold one
support in each hand and rotate them
away from one another until the
canopy is fully opened. The
canopy has a spring-loaded
adjustment system and will click
in place as it reaches each new
position.
4
AFOD: With the stroller in the
opened position, attach the
AFOD (Anti-Fly-Out-Device) around
the cross tube with the plastic
buckle, as shown in Fig. 4. It is
important that the AFOD is
always properly secured, as it is
part of the childs seat restraint
system.
5
FENDER
INSTALLATION:
Before installing
the front wheel in
step 6, you will
need to attach the
fender. The two
attachment screws
can be found
already installed
on the frame.
Remove the two
Fig. 4 AFOD correctly attached
Sun Canopy
Seat Pockets
5 Point
Safety Harness
Foot Well
Swing Arm
Pivot
Fig. 1
Low Boy
position #1
position #2
Fig. 2
Swingarm in unfolded position
with shock in position #1
Fig. 3
Stroller with handle in the unfolded
position and clasps shut.
Cross Tube
Brake Cable
Fender &
Brake
Assembly
Clasp
AFOD

Phone: (805) 541-2554 Fax: (805) 543-8464, 3641 Sacramento Dr. #3 San Luis Obispo, California 93401
(800) 893-2447 www.bobtrailers.com email- bob@bobtrailers.com
fender mounting
screws, see Fig 5.
You may wish to
Fig. 5 Fender Screws
Left Screw
remove a fabric
screw (right or left)
to give better
access to the cross
tube fender screw.
Right Screw
Fender Screws
Align the hole in the
metal tab of the
fender with the
threaded hole in the
center of the front
cross tube and
install screw, see
Fig. 6.
Align the hole in the
plastic fender with
Fig. 6 Fender Installation
Brake
Mounting
Plate Hole
Cross Tube Hole
Metal Tab Hole
the small hole in the
brake mounting
plate and install
screw, see Fig. 6.
Center fender on
stroller and tighten
both screws.
6
FRONT WHEEL:
Fabric
Screw
Hole
Fender Hole
Fender
Screw
Fig. 7 shows the
anatomy of the front wheel quick release. To install the quick release
remove the plastic axle caps from the axle of the wheel.
Remove the adjust nut and one spring from the quick release, and
install the quick release rod into the wheel axle. Install the spring
(small end towards the center of the wheel) and screw on the adjust
nut by turning
in a clockwise
direction.
RodAdjusting Nut
Quick Release Lever
Tighten the nut
only three turns
(final adjustment will be
made after the
wheel is
installed).
Open the brake
Fig. 7 Quick Release Anatomy
Conical
Spring
Cam Housing
quick release
as shown in Fig. 8 by squeezing the brake pads together with your
right hand, and pulling down and then rotating the quick release lever
in the clock-wise direction with your left hand.
The Duallie's drop
outs, Fig. 9, are
slotted to receive
the axle of the
wheel. Slide the
wheel into the
dropouts so that
Fig. 8 Caliper Brake Anatomy
Barrel
Adjuster
Lock
Nut
Brake Body
10 mm Nut
Brake & Fender
Mounting Screw
the quick release
lever is on the right
hand side as you
face the stroller.
Make sure the
Quick
Releas
e
Brake Pad
Brake
Pad Nut
wheel is centered
in the frame and
that the axle is
touching the back
of the drop out slot.
The quick release is NOT a nut and bolt system. It is a cam-activated
7
tightening mechanism. Securely tighten the quick release as follows:
Turn the quick release lever to a 90 degree angle to the dropout, Fig.
10. Keep the quick release lever from turning while you hand tighten
the adjusting nut by turning it in the clockwise direction until it comes
in contact with the stroller dropout. Turn the quick release lever
towards the rear of the stroller to the closed position, Fig. 11. The
word CLOSE should be clearly visible and the quick release lever
should be parallel to the stroller
frame tube. It should require
considerable pressure to close the
lever when it is properly adjusted.
If you do not feel this resistance,
turn the quick release lever back
to the adjusting position, Fig. 10.
Hand tighten the adjusting nut by
one or two more turns in the
clockwise direction. Move the quick
release lever toward the closed
position, Fig. 11. When properly
adjusted, it requires 80-105 inch pounds of pressure to move the
lever to the fully closed position.
NOTE: Follow all instructions
exactly. If you are unsure how to
operate the quick release, consult
your dealer.
8
PARKING BRAKE: The brake is
a parking brake, it prevents the
stroller from moving while loading
and unloading it. The parking brake
is not
designed as
a stopping
brake. We
do not
recommend
using the
brake to
stop the
stroller
when it is
moving. The
brake is
intended to
park the stroller on flat surfaces not on inclines. Never leave your
children in the stroller unattended with or without the parking brake
set! After installing the front wheel, the brake caliper will need to be
placed in the closed position. Close the brake quick release, as shown
in Fig. 8, by squeezing the brake pads against the wheel with your
right hand and rotating the brake quick release lever in the counter
clock-wise direction with your left hand until it points downward.
To set the parking
brake, squeeze the
brake lever and
depress the button
shown in Fig. 12 then
release lever. When
the brake is properly
set, the button will
remain depressed and
the lever will appear
as shown in Fig. 13.
To release the parking
brake, squeeze the
brake lever and note
how button pops up.
For the parking brake
to work correctly, it is
critical that the brake
be adjusted properly. Proper adjustment includes three main points:
1) that the pads contact the rim correctly, 2) that the brake is centered
on the frame, and 3) that the distance from the pads to the rim is
about 3/16 of an inch as shown in Fig. 14. Squeeze the brake lever
and verify that the brake pads contact the rim as shown in Fig. 15.
If they are misaligned, use a 10mm wrench to loosen brake nuts, slide
pads into correct position and tighten securely. The cable tension is
pre-adjusted at the factory yet the brake cable will need periodic
adjustment (as the cable stretches slightly and the black cable housing
compresses over time). (OVER)
MA0070
Dropouts
Fig. 9 Front wheel dropouts
shown with wheel in correct position.
Fig. 10 Quick release
perpendicular to the dropout.
Fig. 11 Quick Release in the closed
position and parallel to frame tube.
Brake lever Lock Ring Barrel Adjuster
Brake Lever
Body
Brake lever in the set position
with button depressed.
Parking Brake Button
Fig. 12
Parking Brake Button
Fig. 13
 Loading...