

Page 1

User manual
Contents
PREFACE ...............................................................................................................................................3
FOR YOUR SAFETY............................................................................................................................3
1ABOUT YOUR PHONE......................................................................................................................6
1.1 APPEARANCE...................................................................................................................................6
2GETTING STARTED..........................................................................................................................6
3 BASIC FUNCTION...........................................................................................................................11
3.1 POWER ON AND OFF.......................................................................................................................11
3.2 MAKE A CALL................................................................................................................................13
3.3 MAKE AN EXTENSION CALL...........................................................................................................13
3.4 MAKE AN INTERNATIONAL CALL ...................................................................................................13
3.5 MAKE A CALL FROM CONTACTS.....................................................................................................13
3.6 REDIAL A CALL BY CALL LOGS.......................................................................................................13
3.7 ANSWER A CALL ............................................................................................................................14
3.8 CALL OPTIONS...............................................................................................................................14
4 STK.....................................................................................................................................................15
5INTERNET.........................................................................................................................................15
5.1 INPUT URL....................................................................................................................................15
5.2 BOOKMARKS.................................................................................................................................16
5.3 HISTORY........................................................................................................................................16
5.4 OFFLINE PAGES .............................................................................................................................16
5.5 SETTINGS.......................................................................................................................................16
6 MESSAGE .........................................................................................................................................17
6.1 .1MESSAGE....................................................................................................................................17
Create message..............................................................................................................................17
6.1. 2 Inbox.....................................................................................................................................18
6. 1.3 Outbox:.................................................................................................................................19
6. 1.4 DRAFTS .....................................................................................................................................20
6. 1.5 SENTBOX...................................................................................................................................20
6.2Templates...................................................................................................................................20
6.3 Message Settings......................................................................................................................21
7 CALL LOGS......................................................................................................................................21
7.1 DIALED CALLS...............................................................................................................................22
7.2 RECEIVED CALLS...........................................................................................................................22
7.3 MISSED CALLS...............................................................................................................................22
7.4 REJECTED CALLS...........................................................................................................................23
7.5 DELETE ALL...................................................................................................................................23
7.6 CALL TIMERS.................................................................................................................................23
1
Page 2

User manual
7.8 GPRS COUNTER ............................................................................................................................23
8 MULTIMEDIA..................................................................................................................................24
8.1 CAMERA........................................................................................................................................24
8.2 AUDIO...........................................................................................................................................25
8.3 VIDEO ...........................................................................................................................................26
8.4 DV................................................................................................................................................27
8.5 FM RADIO.....................................................................................................................................27
8.6 SNAKE............................................................................................................................................28
9 CONTACTS.......................................................................................................................................28
10 SETTINGS.......................................................................................................................................31
10.1 CALL SETT INGS ...........................................................................................................................31
10.2 PHONE SETTINGS.........................................................................................................................33
10.3 DISPLAY SETTINGS.......................................................................................................................34
10.4 SECURITY....................................................................................................................................34
11 MY FILES........................................................................................................................................37
12 TOOLS.............................................................................................................................................37
12.1 ALARM........................................................................................................................................37
12.2 BLUETOOTH ................................................................................................................................37
12.3 CALENDAR..................................................................................................................................38
12.4 CALCULATOR ..............................................................................................................................38
12.5RECORDER....................................................................................................................................39
12.6 TORCH.........................................................................................................................................39
2
Page 3

User manual
Preface
Thank you very much for your choice of this product designed by our
company!
Our phone complies with the Telecommunication industries standards of
both the People's Republic of China andEurope.
GSM network is a global cellular communications system of international
standards.
Allow you to receive an international telephone call in your homeland.
However, before using these advanced network functions, you must
firstly apply for these required services.
In order to use your cell phone better, we suggest you to carefully read
this statement to know all the functions well.
Note: Due to the cellular network settings and theprovidedservices, some
functions may be unavailable, please query local service providers.
For your safety
Read these simple guidelines. Breaking the rules may be dangerous or
illegal. Further detailed information is givenin this manual.
ROAD SAFETY
Always keep your hands free to operate the vehicle while driving. Park
3
Page 4

User manual
the vehicle before using your phone.
SWITCH OFF IN AIRCRAFT
Using of wireless telephones in aircraft may disrupt the operation of the
aircraft. It is dangerous and illegal. Insure switching off the phone before
going aboard.
SWITCH OFF IN HOSPITALS
Follow any restrictionsor rules. Switch off the phone near medical
equipment.
SWITCH OFF WHEN REFUELING
Switch off the phone at a gas station or any fuel or chemicals places.
SWITCH OFF NEAR BLASTING POINT
Don’t use the phone where blasting is in progress. Observerestrictionsand
follow any regulations orrules.
INTERFERENCE
All radiotelephones may be susceptible to interference, which could
affect the performance.
USE NORMALLY
4
Page 5

User manual
Use in the normal position explained in the product documentation. Don't
touch the antenna unnecessarily.
ENHANCEMENTS AND BATTERIES
Use only the approved enhancements and batteries. Do not connect
incompatible products.
EMERGENCY CALLS
Ensure the phone is switched on and in service. Enter the emergency
number, and then press the call key. It will give your location. Do not end
the call until the permission.
5
Page 6
User manual
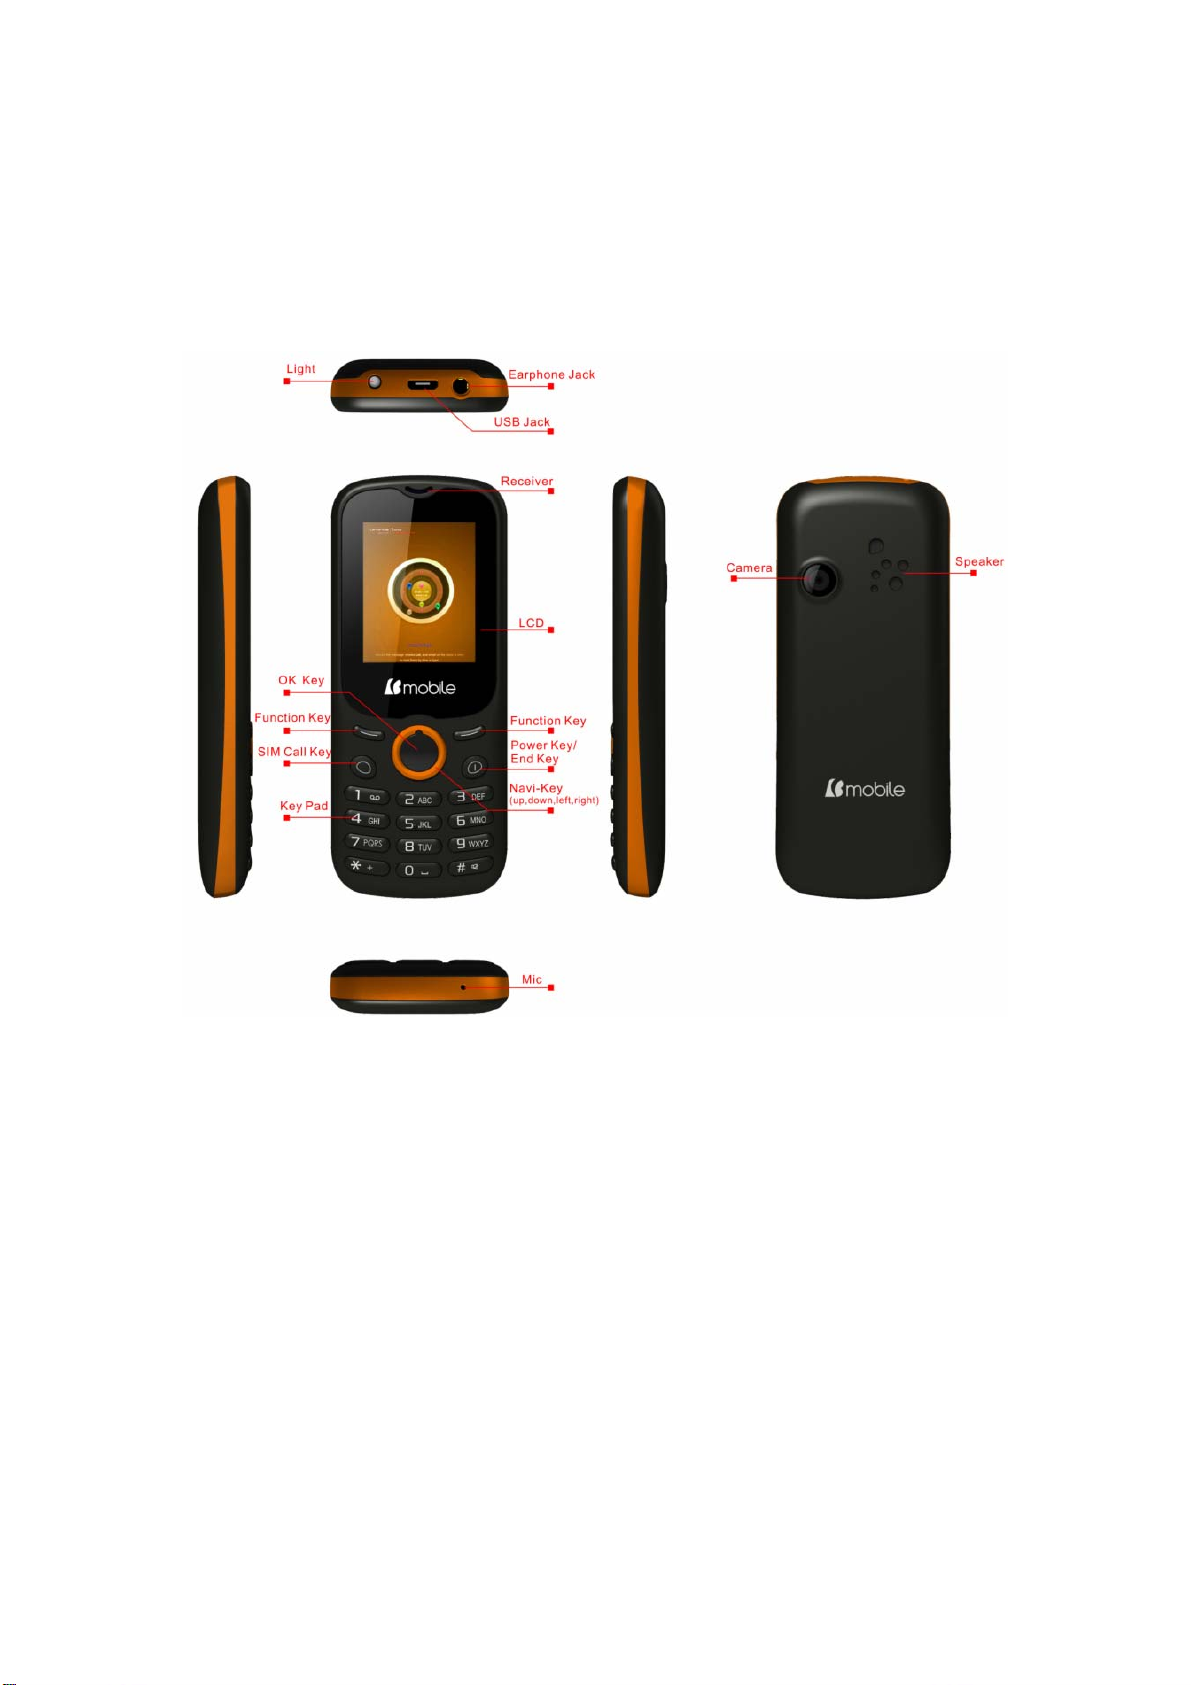
1 About your phone
1.1 Appearance
2 Getting started
What is a SIM card
When registering your mobile phone number, you will have a SIM card
(Subscriber Identity Module) provided by the network operator.
The SIM card has information reservedfor your use. It includes your
phonenumber, PIN (Personal IdentificationNumber), PUK (password
6
Page 7

User manual
tounlock PIN), IMSI (InternationalMobile Subscriber Identity) number,
network information, phonebookdata, SMS data and so on.If it is lost,
contact your network operator immediately for help.
PIN code
PIN is the password provided by your network operator. Itis usually 4
digits. When you input the PIN code, the screen displays “*” to replace
the number entered.
PIN is used to access the SIM card.If the PIN protection function is
enabled, the screen will display “Enter PIN” each time the phone
switched on.You can deactivate this feature but risk unauthorized use of
the phone. Some network operators do not permit deactivating the
control.
Note: If you enter the PIN incorrectly three times in a row, the SIM card
will be locked. Please contact your network operator immediately for
decoding. Attempting to decode by you may result in the permanent
failure of the SIM card.
PUK code
PUK (Personal Unblocking Key, 8-digit) unlocks a locked PIN. If you
enter the PUK incorrectly ten times in a row, the SIM card will become
invalid. Please contact your network operator for a new SIM card.
7
Page 8

User manual
Installing the SIM card
1. Press and hold the power/ending key to turn off the phone.
2. Remove the battery cover and then the battery.
3. Insert the SIM card into the card holder. Ensure that the metal contacts
face the phone.
4. Re-install the battery. Place the battery cover onto the back of your
phone and slide it forward until the latch catches the cover.
Note: A SIM card can be easily damaged if its metal contacts become
scratched. Therefore, take special care when holding or inserting it and
keep it away fromchildren.
Charging the battery
The battery is not fully charged when first unpacked.It takes three
charging-discharging cycles for the battery to reach its peak performance.
The battery can be charged and discharged hundreds of times. However,
the capacity of the battery will be reduced each time it is charged/emptied,
and it will eventually wear out. When the talk time and the standby time
are noticeably shorter than normal, replace the battery. Use original
batteries and charging devices only.
8
Page 9

User manual
Unplug the charger from the outlet and the phone when not in use. Do not
leave a fully-charged battery connected to a charger because overcharging
may shorten the lifetime of the battery. If unused, a fully-charged battery
will lose its charge over time.
If the battery is completely discharged, the charging may not start
immediately when you plug in the connector. Wait 10 to 15 minutes for
the phone to begin charging. Use the battery only for its intended purpose.
Never use any charger or battery that is damaged.
Do not short-circuit the battery. An accidental shortcircuit may occur
when a metallic object such as a coin, clip or pen causes the direct
connection of the positive (+) and negative (-) terminals of the battery, for
example, when you carry a spare battery in your pocket or
purse.Shortcircuit may damage the battery and the connecting object.
Storage at too high or low temperatures will result in a gradual capacity
loss. As a result the operating time of your mobile phone may be
considerably reduced, even thoughthe battery is fully charged.
Do not dispose of batteries into fire as they may explode. Batteries may
also explode if damaged. Dispose of unwanted batteries and phones as
permitted in the law in your countries.
9
Page 10

User manual
Note: The actual operation time of a battery varies based on the operation
mode, network settings and call settings.
Charge a battery according to the following steps:
1. Connect the charger to the connection jack of the phone in proper
direction, and connect the charger to a main socket.
2. The phone displays "Charger Connected!" and starts charging after
properly connected. The battery icon dynamically displays the
charging process. In switch-off state, the phone dynamically displays
the charging process.
3. When the battery is fully charged, the charging process stops
automatically, and the battery icon indicates full grid on the screen.
After the battery is fully charged, remove the charger from the phone
and socket as soon as possible.
Note:
z Do not change the parts and accessories of the battery or take off the
battery cover for safety.
z Use only original batteries and charging devices. Otherwise you will
risk serious damage to health and property.
z Do not charge batteries in too high or too low temperature.
10
Page 11

User manual
z Donot use the phone while charging.
z After pulling out the battery system date and time will be reset to
default values (factory settings).
T-Flash card
T-Flash card is a kind of multimedia memory card
Switching the Phone on and off
To switch on and off the phone, please press and hold the power
on/offkey on the topof your handset. If you switch the phone on without
inserting the SIM card, then the phone will remind you to Insert SIM
Card.
Even though INSERT SIM CARD comes on screen user can use all other
features except SIM features.
Then the following notices will appear on the screen in sequence after
inserting the SIM card and switching on the phone:
Enter the phone lock password—if you have set phone lock password on.
Enter PIN—if you have set SIM card password on.
Search the network—the phone will automatically search the network
until it connects to the appropriate network
3 Basic Function
3.1 Power on and off
1. Press and hold at top of power key to turn on/offthe phone.
11
Page 12

User manual
2. Please input password and press left soft key, if mobilephone need
input password.
3. Type PIN code and press left soft key to confirm,if mobilephone was
required to input PIN code.(PIN is personal identify code,in order to
avoid using SIM illegally,usually PIN code is the same provided by net
carrier as SIM card
Note:
1. Please contact with factory or agent’s service center, if forget
mobilephone open password
2.Delete character ahead of cursor, if type wrong keystrok when input
password
3. Screen indicates type again, if input PIN code wrong. Screen indicates
input PUK code, if type wrong three times. If PUK code correct, then
back to PIN code input interface, can preset new PIN code (puk CODE as
PIN code unlock code, provided by carrier). Mobilephone will display
SIM card will be not used any more, if type PUK code ten times wrong.
4. Please contact with network carrier or service supplier, if SIM card
inserted corretly, but indicate uninsert SIM card.
5.On standby state, Long press“*”key to lock screen, then long
press“*”key to release lock.
12
Page 13

User manual
3.2 Make a call
Enter the phone number including the area code. Pressdial key to make a
call.
3.3 Make an extension call
When making an extension call, press and hold “0”keyto get “P” that is a
prefix of extension numbers. It will dial automatically inseveral seconds
since you dialed the telephone exchange.
viz.: areacode—telephone exchange numbers—P—extension numbers,
then press dial key.
3.4 Make an international call
Enter the country code, the area code and the phone number, press dial
key. “+” is needed when input country code, and it can be got by
pressing and holding “0” key. Dial to Hongkong, Macao and Taiwan
phone ibid.
3.5 Make a call from contacts
Enter contacts, select the phone number, and then press dial key to make
a call.
3.6 Redial a call by call logs
In standby mode, press the Dialing key to find the recent call lists, scroll
to the number or name, then press dial key.
13
Page 14

User manual
3.7 Answer a call
An incoming call window will be displayed as the phone receives a call.
The number will appear on the window if you have opened this function.
If this number is not saved in the phonebook , the call’s district number
will show it on the window。
Press left soft key or dial keyto answer it. Press rightsoft key can set to
silence。
If an incoming call arrived during your operation in sub window, a new
window will be popped to inform you and your any operation will be
broken. If you missed a call, a missed call log will appear after you return
to the start screen.
3.8 Call options
During a call, press Left soft key to enter call options or press right soft
key to open or close hand free function. And the options content is
changeable according to your call status. The functions of Call Waiting,
Call Hold need the support of net work.
Here are some parts of the options, like “Hands-free”, “Switch”,“call
logs”,“Contacts”, “Message”, “Startrecording”,and “mute”. This should
be supported by the current network.
14
Page 15

User manual
4 STK
In addition to the functions available on the phone, your SIM card may
provideadditional services that you can access in this menu. It is shown
only if it is supportedby your SIM card. The name and contents of the
menu depends on theavailable services.
Warning:Contact your service provider for more information.
5 Internet
The Internet is a combination between wireless Internet communication
and application platform. You can get information resources and
e-commerce applications on the internet.
Note: 1. Your Internet service provider may not support somefunctions.In
order to guarantee the normal operation of the browser line, pleasconfirm
your SIM card which can support the Internet and opens up the function.
2. If you wantto browse the web, relevant traffic expenseswill be charged.
5.1 Input URL
Input web page address, you can understand the world convenient.
15
Page 16

User manual
5.2 Bookmarks
You can edit the bookmark on your own way.Set specific operation as
follows: add new bookmarks->choose add new bookmark->enter the new
bookmark address->name made after the preservation.
5.3 History
Record the web addresses you have visited.
5.4 Offline pages
Record theweb addresses your have saved.
5.5 settings
This is network supported function. The network that your phone uses is
configured automatically. The phone can connect to the designated
network automatically or to a roaming network when you are outside the
coverage of your regular network. You can manually select the local
network systembeyond regular network.
Account settings
Internet account: SIM card browser port information set.
Homepage Setup
Set the home page type: under the launch of the function, you can choose
the homepage for the default and custom types.
16
Page 17

User manual
Custom home page: according to the function,you can set the custom
home page.
Content settings
Download image:turn on the function, the download page image can be
shown.
Google transcoding:according to the function, the download page can be
turn yards.
Font size: you can set the font size of interface.
Restore defaultsettings
Reset the parameters value cell phone; make sure your mobile phone is
resetted to the default Settings.
6 Message
6.1 .1message
Create message
1)Character message
Enter into input interface, press left soft keystroke to confirm choose
send/save/save and send/send group/send multi-receiver, and then finish
the input.
--send: send the message to the appointed place
--insert template: Insert common phrases
17
Page 18

User manual
--Add contant:Insert the name from phone list
--save: save the message in the draft box
--Send to many: send message to many receiver at the same time
--send by group: send the message to one group
Ifusers choose save to draft, then back to message menu
Users choose the phone number in the list and click the left keystorke to
confirm send, after finish edit the message.
Message appendix
――use templates:Insert use templates in the phone
――insert object:Insert picture in the message
――charact format:Set the character’s size, style
――insert number:Insert the phone number from phone list
――insert bookmark:Insert bookmark from the option in the phone
Note: The message center will display “send”when you send message by
net service,which express the message have sent to the SIM card inner
message center,but not express that the message have reached the
destination. Please consult to the network carrier for more details
information about the message service.
6.1. 2 Inbox
The inbox message’s icon will express read or not
Press left soft keystroke to enter message option list.
18
Page 19

User manual
---reply: reply to sender;
----forward: forward direct to others’ or forward after edit.
---edit: edit choosed information
---delete: delete choosed information and press left soft keystroke to
confirm.
---delete all: delete inbox’s all information.
---use connects: connect the information’s website
---advance rank option: (including following content)
----copy to phone: copy the message to the phone
----move to the phone: moves the information to the phone
---copy all message: copy all message
---move all messages: move all messages
6. 1.3 Outbox:
The message will be store in draft box automatically when you send
message fail.
Information list option including following items:
----send: sen the message to the destination
---edit: send the message directly or send after re-edit
---delete: delete choosed information, press left soft keystroke, and
choose “yes” or “not”
---delete all: delete all inbox messages
19
Page 20

User manual
---use connects: connect the information’s website
---advance rank option: (including following content)
----copy to phone: copy the message to the phone
----move to the phone: moves the information to the phone
---copy all message: copy all message
---move all messages: move all messages
6. 1.4 Drafts
The messages unprepared for sending are stored in the Draft, waiting to
be modified and sent.
6. 1.5 Sentbox
Save the successful text message and MMS
6.2Templates
1)Character message
Availabe for preset 10 usually message phrase with this function.
---edit: available for input new message or edit choosed preset
inforamtion.
---delete: delete choosed preset information
---create new message from mode: available for edit new message based
on mode
2)Multimedia message
20
Page 21

User manual
Use this function, it can preset five usually phrase.
---check: browse mode information content
---write color message: press left soft keystroke to enter into multimedia
message editor interface.
-----information details: browse update information
the following options:
--Copy:Make message copied to mobile phone
--transfer:Make message transfered to mobile phone
--all short-message can be copied
--all short-message can be transferred
6.3 Message Settings
Access this menu to do the following functions: Profile Settings,Common
Settings, Memory Status, Preferred Storage, and Pref. Bearer.
7 Call logs
It also can keep such records as 20 Dialed calls, 20 Received calls and 20
Missed calls. The first two items can be check in it when mobile phone
work normal and network service supported.
1. Missed calls, answered and dialed phone can be viewed seperately in
on-phone record.
21
Page 22

User manual
2. Menu phone record including:
--details: Check telephone details
--call: you can choose left-soft key or sure.
--save: Keep contact number
--send SMS: you can send it to the ideal NO.
--add to existed contacts: Will join existing contact number in the record
--add to blacklist: Will join contact list
--delete: you can choose yes or no to delete it.
--delete all: delete all call records
7.1Dialed calls
You can check recent 20 dialed calls via this menu. Futhermore, you also
can view each phone NO you dialed, exactly your diaed date and times.
7.2Received calls
You can check recent 20 received calls via this menu. Futhermore, you
also can view each phone you answered, exactly on-phone date and
times.
7.3Missedcalls
You can check recent 20 missed calls via this menu. Futhermore, you also
can view eachphone NO and date, even save or delete from the phone
book.
22
Page 23

User manual
7.4Rejectedcalls
Will a number to join the blacklist, the other party calls, and can realize
refused to function.
7.5Delete all
You can delete unanswered, answered and dialed phone record seperately.
Meanwhile you can delete all from the menu.
7.6Call timers
You can check total time and the last call time (dialed phone and
answered phone).
1. Last call: the final one.
2. Total dialed phone NO
3. Total received phone NO
4. Reset all time: recover 0.00 after you delete phone time.
Note: all these data are for reference only. Actual it mainly depends on
network service.
7.8 GPRS counter
It adapt for keeping the quantity on GPRSwhich includes sending and
receiving information. And you can also delete all,which consists of last
transmittion, last receiving, alltransmittion, and all receiving andreverting
23
Page 24

User manual
informations.
8 Multimedia
8.1 Camera
choose menu "camera" to enter.All indicated icon can be displayed when
you enter it.when taking phone, You may adjust camera lens and fix
someone, press"photo key" to finish it.the percentage on the screen
indicate the rest of memory capacity.
1. Camera function options:
1)Size:you can freely set image size((480*640,240*320,128*160) and
image quality(superior, secondary, inferior). Generally the higher pixel
resolution set, the better image quality would be.
2) Night mode: Including day and night
3)Brightness: Increase or decrease brightness
4)Contrast: Increase or decrease the contrast
5)Exposure bias: Increase or reduce exposure compensation
6) Frame: With a box the photo was taken
7) Cont.shot:Three tickets or 6 zhang even pat
8) White balance:Including auto、incandescence 、fluorescent 、daylight、
cloud.
9)Delay:Delay 3 seconds or 10 seconds taking pictures
24
Page 25

User manual
10) Effect: total six modes for your reference.
8.2 Audio
Audio player allows you to play mp3 audio files by making playlist.
Enter audio player function ÆChoose my playlistsÆpress
optionsÆchoose “New playlist” to input the playlist name such as“my
playlist” ÆdoneÆpress optionsÆchoose loadÆ press optionsÆchoose
addÆchoose the storage of the music files: phone/memory cardÆchoose
open(to select your music file document)Æpress select. The music file
will be added to the current playlist. You can choose a song to play and
have a setting of the music.
1. Now Playing: To play songs from preloaded list. Following options
which are available to play songs from the selected playlist.
Play: Play the music files.
Move up: To move the selected song up in the playlist
Move down: To move the selected song down in the playlist
Send: Send the selected song via MMS, Email or Bluetooth to others.
Use as: To use the selected song as ringtone.
Add: Add new songs to the playlist
Remove: Remove selected song from the playlist
Details: Check the details of music files.
25
Page 26

User manual
Settings: 1. Player Settings include Repeat, Shuffle & Background play.
2. Display Settings include Skin, Spectrum display & Lyrics display.
3. Sound Effects include Audio effect, Bass enhancement & Play speed.
4. Bluetooth settings include BT stereo output & BT stereo headset.
2. My Playlists: To make the new play list. Following options are
available for the selected playlist.
New Playlist: To make a new playlist
Rename: To change the name of existing playlist
Delete: To delete the selected playlist
Delete all: To delete all the playlists
Storage: To select the storage location for the playlist
Settings: 1. Player Settings include Repeat, Shuffle & Background play.
2. Display Settings include Skin, Spectrum display & Lyrics display.
3. Sound Effects include Audio effect, Bass enhancement & Play speed.
4. Bluetooth settings include BT stereo output & BT stereo headset.
8.3 Video
Video player allows you to browse or process video recording files.
Select Video Player submenu to access movie list and you can access
“Option” for the following operations:
--Play list: Open the current play list
26
Page 27

User manual
-Play: Select a video file play
-Add video: From E: \ VIDEO in choice the songs to join the current
play list
-Search all videos: Search all video files
-Delete from list: From the list deletes one or more video files
-Mark/unmak: Mark or cancel mark one or more video files
--Fullscreen play: Full screen video files
--Order play: Open or closed cycle play function
--Video application: Video file will be selected set as power on/off
animation.
--File attribute: Check file attributes
8.4 DV
You can make video record on your way.
Enter video recorder,press left soft key can enter some options:
View video directory, Settings, Storage, and Help. After setting, press
center key to start or Suspend recording. And then, press right soft key to
stop and save.at the same time press the left/right soft key to return the
screen in video preview status.
8.5 FM Radio
This option allows you to listen to FM radio. You plug in the
headphones or not to insert the headset, you can enter FM。
27
Page 28

User manual
Auto search and save: Automatic search channel and preserved
Channel list: Edit channel list.
Save:Choose channel name to save other names
Manualsearch:Manual input a channel to search in
Background play: Backstage play FM
Record: Perform audio recording FM radio.
Record file list: Display the recording documents.
Help:The use of some methodsabout FM
Note:Make sure enough freememory on Schedule FM record
Or the memory card to store the recordings.
8.6 Snake
Enter the menu,select the snake into the game interface,you can use the
up key/down key/right key/left key to move.
Ok key can pause and start.
9 Contacts
The phone provides two kinds of storage media: SIM card and phone.The
phone can store 300 entries. The capacity of the phone book on your SIM
card depends on the type of SIM card provided by your network operator.
28
Page 29

User manual
Enter a number in idle screen and press the OK key to save the number.
Select the storage location. Then the edit interface appears. If To SIMis
selected, you need to edit the nameand number. If To phone is selected,
you need to edit the items that you set in the settings of phonebook,
including the name, number,caller picture, callerringtone andcaller group.
In idle screen, press the right soft keymention in NAMES to directly
access the phone book.
The phone book allows quick search through it. Input what you want to
search, Enter the first letter to the black blank, Then all the
recordsstarting with such letter are displayed.
Add new contact: This option is at top in the phonebook. You can add a
new phone number to SIMcard or phone.
Caller groups: A caller group isthe combination of phone settings used to
identify a particular group of records. The phone provides five call groups:
Friends, Family, Classmates,Business. You can manage and edit
thedetails of caller groups using Group setting option.
The small icon on the left of the phonebook list indicates whether the
record is stored on the SIM card or the phone. Press left soft key to select
following options.
View: View the detailed information of the record.
Send text message: Send text message after selecting a designated
29
Page 30

User manual
number.
Send multimedia message: Send multimedia message after selecting a
designated number.
Call: Make a call of the current phone number.
Edit: Edit the options included in a phone book record.
Delete: Delete the record.
Copy: Copy the record from the current storage to the other storage.
Add to blacklist: Add the current number to blacklist.
Delete multiple: delete marked, mark orunmark all.
Contacts settings: Allow you to have a setting of preferred storage, speed
dial, my number, extra numbers, and memory status, copy contacts, move
contacts and delete all contacts.
There are the following options if you access the phonebook settings.
Preferred storage: To set the phonebook to show the contacts saved in
SIMand phone.
Speed dial: Allow you to set status, speed dial list and 8 speed dial calls.
Set it as on to access the standby interface, hold down the corresponding
number from 2to 9 and you can allocat the set of numbersdirectly.
Status: turn it on/off.
Set number: allow you to set of 8 number lists.
30
Page 31

User manual
Memory status: View the memory status.
Copy contacts:copy all the contacts to phone or your SIM card.
Delete all contacts: delete all the contacts from the phone or your SIM
card.
10Settings
10.1Call settings
10.1.1Call divert
You can specify the conditions under which calls should be diverted to
your voice mail box or another number.
Divert all voice calls: All calls are diverted.
Divert if unreachable: A call is diverted if the phone is switched off or is
out of range.
Divert if no answer: A call is diverted if not answered.
Divert if busy: A call is diverted if another call is in progress.
Divert all data calls: All data calls are diverted.
Cancel all divert: Cancel all call diverts settings.
10.1.2Call barred
Restrict the dialing or receiving ofcertain calls. To activate or cancel
31
Page 32

User manual
callbarring, you have to enter the networkpassword provided by your
networkoperator.
Outgoing calls: If allcallsare activated, nocalls can be made.
IfInternational calls areactivated, no internationalcalls can be made.
IfInternational calls except to home PLMN is activated, only local calls
orcalls to the home country(that is, the country to which thenetwork
operator belongs) can be made.
Incoming calls: If allcallsare activated, nocalls can be received.
Whenroaming is activated, you may notreceive calls outside your
homenetwork.
Active all: Allow you to activate all call barring services by inputting
your password.
Cancel all: Cancel all restrictions tocalls. Password from yournetwork
operator isrequired.
Change barring password: Change barring password.The original
barringpassword is required.
10.1.3Call waiting
--Activate: If activated, an incomingcall is signaled by a callwaiting tone
when you areon another call. Thenumber/name of theincoming call is
displayed.
32
Page 33

User manual
--Off: Cancel the call waiting function.
--Query status: Inquire the current status from the network.
10.1.4Others
Talk time warning: May call time for 50 minutes to remind , 55 minutes,
60minutes ,customize and off.
Vibration when conneced:After open, then call, when each other
through your telephone, mobile phone will have a vibrating
alert
Auto redial: Once activated, the phone will automatically redial, if there
is no answer for a number you have dialed.
Reply SMS after reject: choose not to call, and then opt to reply message.
Any key answer: Choose, unless the answer key and the red button
outside, other keyscan answer the call.
Flight mode:Open or closed Flight mode.
10.2 Phone Settings
10.2.1Time and date
Set time:Set your time.
Set data: Set the current date
Time format: Format for the time.
Date display type: Set on display type
33
Page 34

User manual
10.2.2. Select language
Select the language for your handset.There are two languages for you to
choose: [Espanol] and [English].
10.2.3 Shortcut settings
Set all shortcut keys
10.2.4. Auto power on/off
Set time to power on/off the phone automatically.
10.2.5. Restore factorysettings
Reset the phone to default values(factory settings).
The phone password is required, which is "1234" by default.
10.3 Display settings
--Wallpaper settings: Set the standby image of the phone.
--contrast:Set the backlight brightness.
--Keypad backlight time: Set the Keypad backlight time
10.4 Security
The phone provides several security options to protect your phone from
misuse.
1. PIN
Open: enable PIN inspection, every time you open the cellular phone,
34
Page 35

User manual
need to input PIN code.
Update: you must open the PIN code firstly to modify PIN code.
Close: enter the correct PIN code.
Warning: please careful use this function, such as forget PUK password,
and please consult the network operators. If for 10 times PUK yards input
errors, SIM card will be scrapped.
2. Privacy
To through the unit password protection phone specific functions, in
order to prevent others see stealing. When [call records], [message]
functions enable password protection, in the corresponding main menu or
child function, must be to enter the correct password to just can be used,
default "1234".
3. Auto keypad lock
Keypad lock prevents the inadvertent phone usage. However, you can
still be called and you can make emergency calls.
5. Lock screen by end-key
Set a key lock according to hang up key screen
6. Power-on password
If the phone lock is activated, the phone lock password is requested after
the phone switched on. The default password is "1234". If the phone is
locked, only emergency calls can be made.
35
Page 36

User manual
7. Guardlock
Open: enable this function before, must first set password, if not set
password, cell phone tip "please first change password", to [modified
password] menu set the security password again open, open the
requirement in the input password and security notice mobile phone
number (receiving the illegal use of the mobile phone SIM card to send
about the illegal SIM card information), which has been set up correctly,
anti-theft functions start.
Close: close security function. Close security function must first input
security password.
Change the password: modify security password
10.5 Profiles
Profiles define how your phone reacts when you receive a call or a
message, how your keypad sounds when you press a key, and more. Each
of the available profiles can be left at their default setting or customized
to suit your needs. Select and customize the most suitable profile for your
situation. The available modes are Normal, Silent, Meeting, Indoor,
Outdoor.
10.6 Connections
Account settings
SIM cardnetwork account: SIM card browser port information set.
36
Page 37

User manual
11 My files
It provides you the functions such as browsing media files, checking
storage space and formatting function.
When browsing the media files, you can operate the selected files such
asview, rename, copy, move, delete etc.
12 Tools
12.1 Alarm
User can set three types of alarm clock time if required. Then the alarm
icon will be displayed on the idle screen.
Scroll to an alarm and select Edit for settings. You can set whether to
enable the alarm, message, time, ringtone, snooze minutes and alert type.
12.2Bluetooth
1. Power: Allow you to switch on/off Bluetooth.
2. Bluetooth visibility: Allow you to find all other Bluetooth hands-free
devices within the allowable scope of Bluetooth, and list all items; You
can connect and match the hands-free device in the list (the green
Bluetooth connection icon would appear in the status column on the top
of screen).
3. Paired device: It would display the history records of various devices
37
Page 38

User manual
connected to the Bluetooth for the following operations of the
devices in the records.
4. My Bluetooth name: View or modify the device name
5. Bluetooth file storage: Setting bluetooth receiving file storage
location
6. About: To display the device names of this phone, Bluetooth device
address of this phone and services supported by the device.
12.3 Calendar
You can enter events in the calendar. In the calendar interface, press the
up, down, the left and right direction keys to scroll to different days.
Add new schedule: Add event memos.
View schedules: View or edit event memos for the day.
All schedules: View stored all the events and memos
Clear today’s tasks:Delete events memos.
Clear all:Delete all events memos.
Go to date: Enter a specific date to be located and the cursor will jump to
the date quickly.
Weekly: According to the week show calendar trip
12.4 Calculator
The phone can be used as a calculator to finish some simple arithmetic
38
Page 39

User manual
work.
Press number key to enter the number. Press the key “*” to enter radix
point. Press the scroll up, down, left or right key to enter plus, minus,
multiplication or division. Press the right soft key can delete a number;
Press OK key to get the result
12.5Recorder
The record formatwav can be support.A call may also be
recorded and saved to the phone or the memory card.
12.6 Torch
In the menu, you can choose to open or close the flashlight function
39
Page 40

User manual
FCC Statement
1. This device complies with Part 15 of the FCC Rules. Operation is subject to the following two
conditions:
(1) This device may not cause harmful interference.
(2) This device must accept any interference received, including interference that may cause undesired
operation.
2. Changes or modifications not expressly approved by the party responsible for compliance could void
the user's authority to operate the equipment.
NOTE:
This equipment has been tested and found to comply with the limits for a Class B digital device,
pursuant to Part 15 of the FCC Rules. These limits are designed to provide reasonable protection
against harmful interference in a residential installation.
This equipment generates uses and can radiate radio frequency energy and, if not installed and used in
accordance with the instructions, may cause harmful interference to radio communications. However,
there is no guarantee that interference will not occur in a particular installation. If this equipment does
cause harmful interference to radio or television reception, which can be determined by turning the
equipment off and on, the user is encouraged to try to correct the interference by one or more of the
following measures:
Reorient or relocate the receiving antenna.
Increase the separation between the equipment and receiver.
Connect the equipment into an outlet on a circuit different from that to which the receiver is connected.
Consult the dealer or an experienced radio/TV technician for help.
SAR Information Statement
Your wireless phone is a radio transmitter and receiver. It is designed and manufactured not to exceed
the emission limits for exposure to radiofrequency (RF) energy set by the Federal Communications
Commission of the U.S. Government. These limits are part of comprehensive guidelines and establish
permitted levels of RF energy for the general population. The guidelines are based on standards that
were developed by independent scientific organizations through periodic and thorough evaluation of
scientific studies. The standards include a substantial safety margin designed to assure the safety of all
persons, regardless of age and health. The exposure standard for wireless mobile phones employs a unit
of measurement known as the Specific Absorption Rate, or SAR. The SAR limit set by the FCC is 1.6
W/kg. * Tests for SAR are conducted with the phone transmitting at its highest certified power level in
all tested frequency bands. Although the SAR is determined at the highest certified power level, the
actual SAR level of the phone while operating can be well below the maximum value. This is because
the phone is designed to operate at multiple power levels so as to use only the power required to reach
the network. In general, the closer you are to a wireless base station antenna, the lower the power
output. Before a phone model is available for sale to the public, it must be tested and certified to the
FCC that it does not exceed the limit established by the government adopted requirement for safe
exposure. The tests are performed in positions and locations (e.g., at the ear and worn on the body) as
required by the FCC for each model. The highest SAR value for this model phone when tested for use
at the ear is 0.139W/Kg and when worn on the body, as described in this user guide, is
33W/Kg(B
0.
accessories and FCC re
phones and at various positions, they all meet the government requirement for safe exposure. The FCC
has granted an Equipment Authorization for this model phone with all reported SAR levels evaluated as
in compliance with the FCC RFexposure guidelines. SAR information on this model phone is on file
with the FCC and can be found under the Display Grant section of http://www.fcc.gov/ oet/fccid after
searching on
FCC ID:
Cellu
lar Telecommunications Industry Asso-ciation (CTIA) web-site at http://www.wow-com.com. *
In the United States and Canada, the SAR limit for mobile phones used by the public is 1.6 watts/kg
(W/kg) averaged over one gram of tissue. The standard incorporates a sub-stantial margin of safety to
ody-worn measurements differ among phone models, depending upon available
quirements). While there may be differences between the SAR levels of various
ZSW-K106 Additional information on Specific Absorption Rates (SAR) can be found on the
40
Page 41

User manual
give additional protection for the public and to account for any variations in measurements.
Body-worn Operation
This device was tested for typical body-worn operations. To comply with RF exposure
requirements, a minimum separation distance of 15mm must be maintained between the
user’s body and the handset, including the antenna. Third-party belt-clips, holsters,
and similar accessories used by this device should not contain any metallic components.
Body-worn accessories that do not meet these requirements may not comply with RF exposure
requirements and should be avoided. Use only the supplied or an approved antenna.
41
 Loading...