


Contents
Safety .................................................................................................................... 3
1 Getting Started ................................................................................................. 4
1.1 Getting to know your touch phone .................................................... 4
1.2 Installing the SIM card, battery, and storage card ............................. 4
1.3 Charging the Battery .......................................................................... 6
1.4 Status Icons ........................................................................................ 7
2 Using phone features ....................................................................................... 8
2.1 Turning the phone function on and off .............................................. 8
2.2 Making a call ..................................................................................... 8
2.3 Answering and Ending a call ............................................................. 9
2.4 In-call options .................................................................................... 9
2.5 Using call history ............................................................................... 9
2.6 Call settings ........................................................................................ 9
3 Setting on your device .................................................................................... 10
4 ActiveSync ....................................................................................................... 13
5 Contacts .......................................................................................................... 14
6 Exchanging Messages .................................................................................... 15
7 Internet ........................................................................................................... 17
7.1 Ways of Connecting to the Internet ................................................. 17
7.2 Browser ............................................................................................ 18
8 Experiencing Multimedia .............................................................................. 19
8.1 Camera & Picture ............................................................................. 19
8.2 Music................................................................................................ 20
8.3 FM Radio ......................................................................................... 20
8.4 Voice Search ..................................................................................... 21
8.5 Sound record .................................................................................... 21
9 Other applications .......................................................................................... 21
9.1 Calendar ........................................................................................... 21
1

9.2 Alarm Clock ..................................................................................... 21
9.3 Calculator ......................................................................................... 23
9.4 warning statement ............................................................................ 23
2

Safety
Never attempt to disassemble your phone. You alone are responsible for how
you use your phone and any consequences of its use.
As a general rule, always switch off your phone wherever the use of a pho ne is
prohibited. Use of your phone is subject to safety measures designed to protect
users and their environment.
Do not use your phone in damp areas (bathroom, swi mming pool…). Protect it
from liquids and other moisture.
Do not expose your phone to extreme temperatures lower than - 10°C and
higher than + 55°C.
The physicochemical processes created by chargers impose temperature limits
when charging the battery. Your phone automatically protects the batteries in
extreme temperatures.
Do not leave your phone within the reach of small children (certain removable
parts may be accidentally ingested).
Electrical safety: Only use the chargers listed in the manufacturer’s catalogue.
Using any other charger may be dangerous; it would also invalidate your
warranty. Line voltage must be exactly the one indicated on the charger’s serial
plate.
Aircraft safety: When traveling by plane, you will need to switch your phone
off when so instructed by the cabin crew or the warning signs.
Using a mobile phone may be dangerous to the operation of the aircraft and may
disrupt the phone network.
Its use is illegal and you could be prosecuted or banned from using cellular
networks in the future if you do not abide by these regulations.
Explosive materials: Please comply with warning signs at petrol station asking
you to switch your phone off. You will need to comply with radio equipment
usage restrictions in places such as chemical plants, fuel depots and at a ny
location where blasting operations are under way.
Electronic equipment: To avoid the risk of demagnetization, do not let
electronic devices close to your phone for a long time.
Electronic medical equipment: Your phone is a radio transmitter which may
interfere with electronic medical equipment or implants, such as hearing aids,
3

pacemakers, insulin pumps, etc. It is recommended that a minimum separatio n
of 15 cm be maintained between the phone and an implant. Your doctor or the
manufacturers of such equipment will be able to give you any advice you ma y
need in this area.
Hospitals: Always make sure that your phone is switched off in hospitals when
so instructed by warning signs or by medical staff.
Road safety: Do not use your phone when driving. In order to g ive your full
attention to driving, stop and park safely before making a call. You must comply
with any current legislation.
Distance of operation: This phone model has been tested and meets
radiofrequency exposure guidelines when used as follows:
• Against the ear: Place or receive a phone call and hold the phone as you would
a wire line telephone.
• Body worn: When transmitting, place the phone in a carry accessory that
contains no metal and positions the phone a minimum of 2.5 cm form your bod y.
Use of other accessories may not ensure compliance with radiofrequency
exposure guidelines. If you do not use a body worn accessory and are not
holding the phone at the ear, position the phone a minimum of 2.5 cm from your
body,
• Data operation: When using a data feature, position the phone a m inimum of
2.5 cm from your body for the whole duration of the data transmission.
1 Getting Started
1.1 Getting to know your touch phone
1.2 Installing the SIM card, battery, and storage card
You need to remove the back cover before you can install the SIM card and
battery. Also, make sure to always turn off the power before installing or
replacing the SIM card and battery.
To remove the back cover
1. Make sure your device is turned off.
2. Firmly hold the device with both hands and the front panel facing down.
3. Push the back cover up with your thumbs until it disengages from the device
4

and then slide it up to remove.
To install the SIM card
The SIM card contains your phone number, service details, and phonebook/
message memory. Your device is supported both 2G and 3G (WCDMA) SIM
cards.
1. Remove the battery if it is installed.
2. Locate the SIM card slot, and then insert the SIM card with its gold contacts
facing down and its cut-off corner facing out the card slot.
3. Slide the SIM card completely into the slot.
Note: • The phone can be supported the double SIM cards. The card slot
1/2 will be both supported 3G SIM card (WCDMA), but one SIM card can
use 3G networks only.
If you need to use 3G operation, please insert 3G card in the card slot
1(Default SIM1 card, defined in the menu Settings/More…/Mobile
networks/3G service), the SIM2 card will be supported 2G network only (If
insert 3G card in the card slot 2, you can also use 2G operation only).
• Some legacy SIM cards may not function with your device. You should
consult with your service provider for a replacement SIM card. There may
be fees for this service.
To install the battery
Your device comes with a rechargeable Lithium-ion battery and is designed to
use only manufacturer-specified original batteries and accessories. Battery
performance depends on many factors, including network configuration, signal
strength, and usage patterns.
Warning: To reduce risk of fire or burns:
• Do not attempt to open, disassemble, or service the battery pack.
• Do not crush, puncture, short external contacts, or dispose of in fire or water.
• Do not expose to temperatures above 60°C (140°F).
• Replace only with the battery pack designated for this product.
• Recycle or dispose of used battery as stipulated by local regulations.
1. Align the battery’s exposed copper contacts with the battery connectors at the
bottom part of the battery compartment.
5

2. Insert the contacts side of the battery first and then gently push the battery
into place.
3. Replace the back cover.
To remove the battery
1. Make sure your device is turned off.
2. Remove the back cover.
3. The bottom of the phone has a notch. Lift the batter y by the notch to remove
it.
To install a memory card
To have additional storage for your images, videos, music, and files, you can
purchase a memory card and install it into your device.
1. Make sure that your device is turned off, and then remove the back cover.
2. Locate the memory card slot on the upper part of the exposed right panel.
3. Insert the memory card into the slot with its gold contacts facing down until it
clicks into place.
Note: To remove the memory card, press it to eject it from the slot.
1.3 Charging the Battery
New batteries are shipped partially charged. Before you start using your device,
it is recommended that you install and charge the battery. Some batteries
perform best after several full charge/discharge cycles.
Note: Only the AC adapter and USB sync cable provided with your device must
be used to charge the device.
Connect the USB connector of the AC adapter to the sync connector on your
device, and then plug in the AC adapter to an electrical outlet to start charging
the battery.
As the battery is being charged while the device is on, a charging icon appears
in the title bar of the Home screen. After the battery has been fully charged, a
full battery icon appears in the title bar of the Home screen.
Warning: • Do not remove the battery from the device while you are charging it
using the AC or car adapter.
• As a safety precaution, the battery stops charging before it overheats.
6
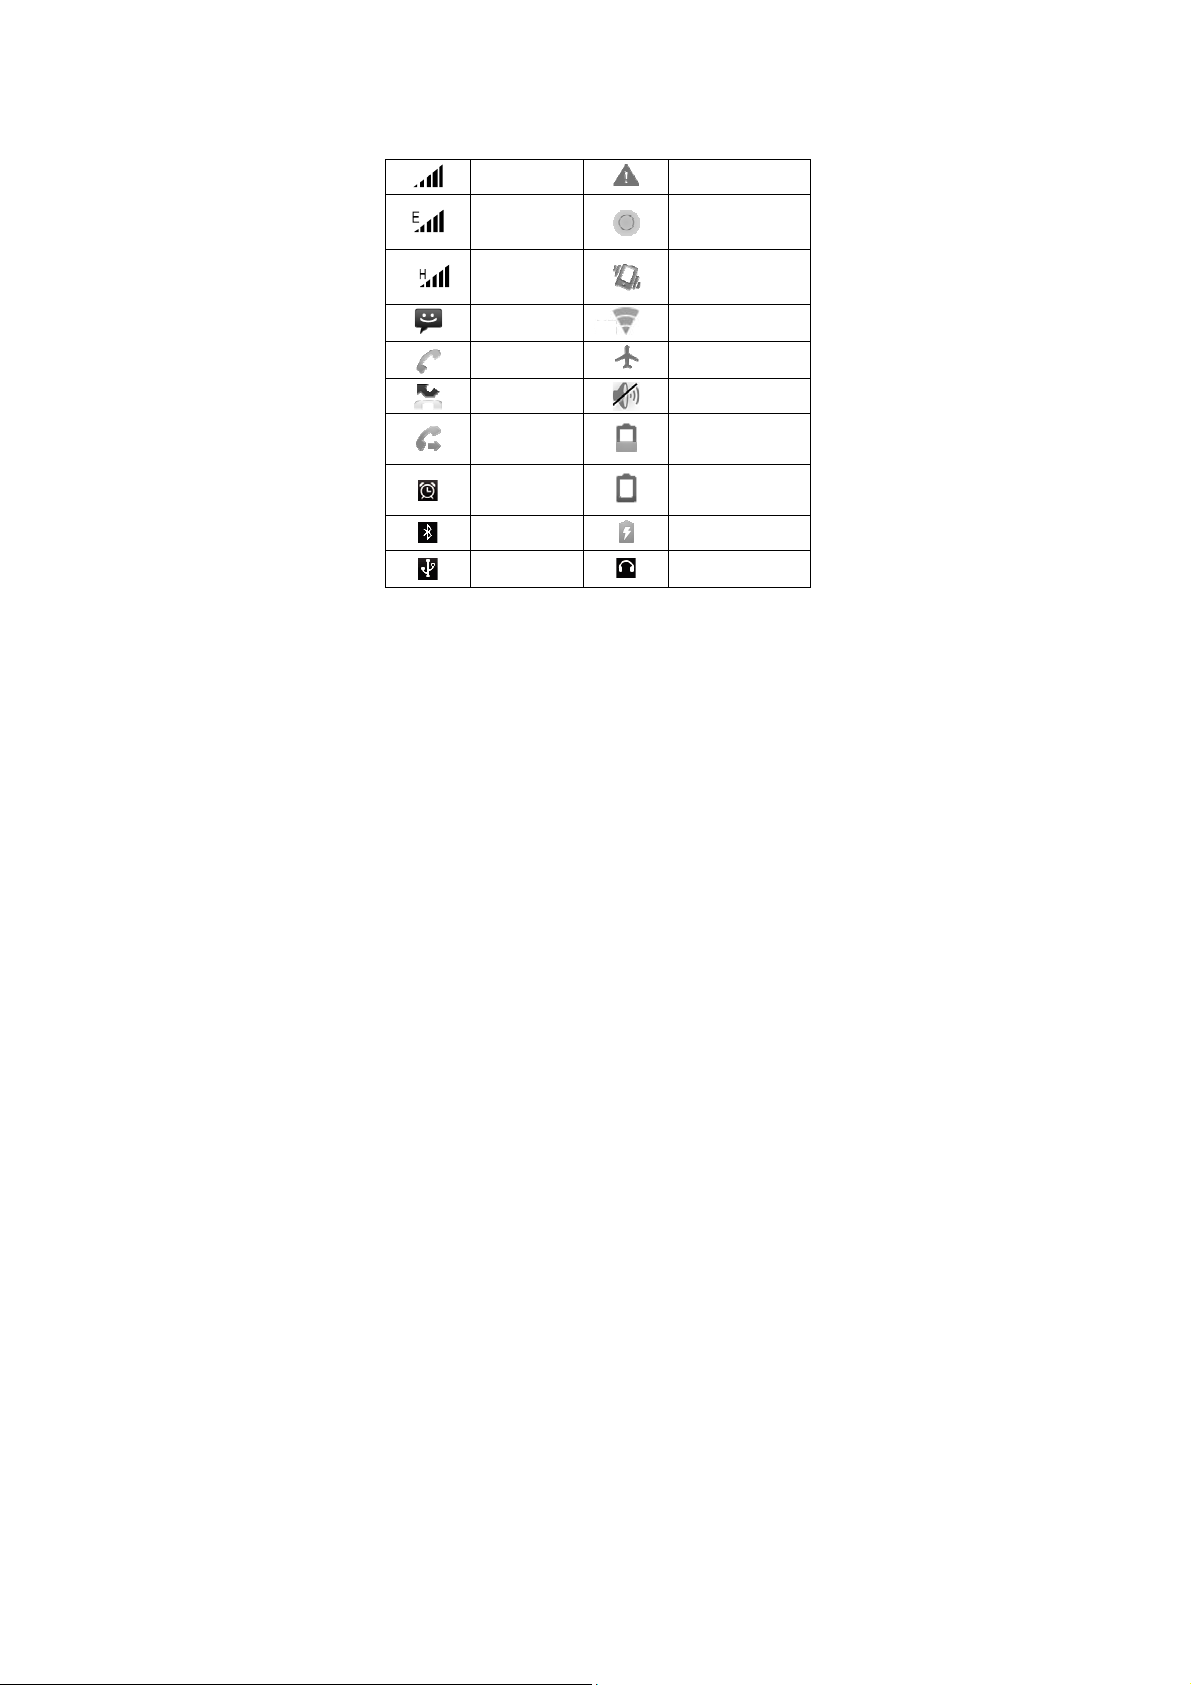
1.4 Status Icons
Connection status icons
Along the top of your phone screen is the status bar. On the left side, icons will
appear, notifying you of a new message, upcoming calendar event, or something
else you should notice. On the right side of the status bar, you’ll see connection
status icons.
Network signal
EDGE service
connected, data
flowing
WCDMA service
connected, data
flowing
SMS/MMS
Call in progress
Missed call
Call forward
Sign-in/sync error
Song is playing
Ringer is off
(Silent mode)
WLAN service
connected
Wireless services are
off (Airplane mode)
Phone on mute
Battery is low
Alarm is set
Bluetooth is on
Connected the
PC
7
Battery is very low!
Battery is charging
Connected the
earphone

2 Using phone features
2.1 Turning the phone function on and off
To enable or disable Airplane Mode
In many countries, you are required by law to turn off the phone while on board
an aircraft. Another way to turn off the phone function is to switch your device
to Airplane Mode.
When you enable Airplane Mode, all wireless radios on your device are turned
off, including the phone function, Bluetooth, and WLAN.
1. Touch
2. Touch ‘Airplane mode’ to enable or disable.
When you disable Airplane mode, the phone function is turned back on and the
previous state of Bluetooth and WLAN are restored.
Adjusting the volume
Press Volume button on the side of the phone to show the volume screen.
If the phone is in vibrating mode, the voice will be muted automatic ally and the
device will vibrate when there is an incoming call.
2.2 Making a call
Calling a voice call
On Home screen, touch
Touch the on-screen dial pad to enter a number, touch ‘Delete’ button to delete
numbers you’ve entered. Touch & hold to delete all the numbers in the field.
To dial a number, touch ‘Voice Call’ button (Green icon
card or SIM2 card to make a call. To end a call, touch ‘END’ button (Red icon).
1. Call log tab: Select an entry listed in the log to call the number.
2. Contacts tab: Contacts with phone numbers are listed. Select a contact, and
then select the phone number to dial the call.
Note:If you inserted dual SIM card, the dial screen is default dual call
(Defined in the menu Settings/SIM management/Voice call).
Calling a video call
On Home screen, touch
Touch the on-screen dial pad to enter a number, touch ‘Video Call’
-> Settings -> More… -> Airplane mode.
-> Phone to enter the dial screen.
) to select SIM1
-> Phone to enter the dial screen.
8

button to make a video call.
Notice: • SIM slot 1 can be supported video call default (SIM1 card must be
supported 3G network).
• Your phone must be in of the normal WCDMA network coverage, and the
other side (the receiver’s phone and SIM card) can also be supported the
video call function of 3G.
2.3 Answering and Ending a call
When you receive a phone call, the incoming voice call screen will appear,
allowing you to either answer or ignore the call.
1. To answer an incoming call, slide ‘ANSWER’ (Green icon) button rightward.
2. To reject a call, slide ‘REJECT’ button (Red icon) button leftward.
2.4 In-call options
While on a call, reveal the in-call options: Speaker, Mute, Hold, End.
Note that if Bluetooth services are on and you are connected to a hands-free
device, the more menu indicator will show Bluetooth on.
Note: Whether the group call function can be used depends on whether the
network operator supports and provides such function as well as w hether you
have applied for such function. Please contact network operator for details.
2.5 Using call history
1. The missed call icon
2. Use ‘Call log’ tab to check who the caller was, or view all your dialed
numbers, and received calls. To open ‘Call log’ tab, touch ‘Call log’ button in
the phone screen to enter the call history list.
3. Scroll to select the contact or number you want to dial, touch ‘Call’ button.
4. Tap and hold the selected contact you want to call, and then you can make to
do the following options of call, edit number before call, send text message, add
to contacts or remove from call log phone on the shortcut menu.
2.6 Call settings
On the dialing screen or call log screen, press MENU > Settings to enter Call
settings,you can make the operation of voice call, voice call and the other
settings.
appears in the title bar when you missed a call.
9

Note that when you open ‘Call settings’ for SIM1 or SIM2, your current settings
are fetched, which can take a few moments.
3 Setting on your device
Control phone-wide settings from the Home settings screen: touch and
select Settings.
3.1 Wireless & networks
SIM management
You can select to activate or deactivate the SIM card you want to open.
Set the default SIM to use voice call, Video call, messaging and data
connection.
Wi -Fi
Wi-Fi on/off: Select this check box if you prefer to use Wi-Fi for your data
connection.
Wi-Fi settings: Open the Wi-Fi settings screen; select it from the network list.
Provide your username or password if required.
Bluetooth
Bluetooth on/off: Use this check box to turn Bluetooth services on or off.
Bluetooth settings: With Bluetooth services on, you can open the Bluetooth
settings screen to: Rename, Pair or unpair etc.
More…
Airplane mode on/off: When airplane mode is selected, all wireless connectivity
is off. This icon
selected.
Mobile network
• Select data roaming capability.
• Select a wireless operator network - Scan for all available networks, or select a
network automatically.
• Add or edit network Access Point Names (APNs) - Do not change this settin g
unless advised to do so by your wireless operator!
3.2 Device
Audio profiles
will display in the status bar when airplane mode is
10

Select one user profile and enter the following options:
Vibrate: Select to have your phone vibrate for incoming calls.
Volumes: Select to open the volume control, and then slide your finger along the
volume bar to set an incoming call ring volume or alarm, playing back music,
videos.
Voice/video ring tone: Select to decide on a ring tone to use for incoming calls.
Note that you can override this setting for individual contacts in the Edit contact
details screens.
Notification ring tone: Select a ring tone to use for a notif ication (e.g., new
message). Note that you can override this setting for new Calendar event
notifications, text and multimedia message notifications. Go to the applications
settings screens to select specific ring tones.
Dial pad touch tones: Select to have a tone sound when you use the on-screen
Dialer.
Touch sound: Select to have a sound play when you select an item on the screen
either using touch.
Display
Brightness: Select to open the brightness control, and then slide your finger
along the brightness bar to set the level. In sunlight, increase the level.
Sleep: Select to decide how long your phone must be inact ive before the screen
turns off.
Storage
View and manage the data storage on your phone.
Applications
Unknown sources: Select this check box if you want the ability to download
applications from the Web. With this check box not selected, you will only be
able to download applications from Android Market. To ensure your personal
data and phone remain secure; it is recommended you not select this check box.
Manage applications: View all the applications stored on your phone and how
much space they occupy. If you’ve downloaded an application from Android
Market, you can uninstall it from this screen.
3.3 Personal
11

Location access
My Location: Select a source for determining your location: Wireless networks,
or GPS satellites. Typically GPS will be more accurate (to street level) but it
consumes more battery power.
Security
Screen unlock pattern: Create a pattern you will be asked to draw before your
screen will unlock. You can select to make the pattern visible or invisible as you
draw it.
SIM card lock settings: Lock your SIM card for extra security. You can also
change your SIM card PIN from this screen. If you don’t know your SIM PIN,
you can obtain it from your wireless operator.
Visible passwords: Select to have your password display as you type it.
Backup & reset
You can select to reset your phone to factory settings. This will erase all your
data from the phone and require you to sign in and go through the setup screens
to use any of the applications.
3.4 Accounts
Accounts & sync
Turn on/off synchronization for all services.
3.5 System
Date & time
Set time, time zone, and date: Use Automatic unless you need to override the
network values.
Time format: Select from 12 or 24 hour formats.
Date format: Select from a variety of formats.
About phone
View your phone Status: This screen lists a variety of information, including
your phone number, the network you are currently using, the type of network,
signal strength, whether you are roaming or not, any WLAN addresses you’re
connected to, and more.
View the model number and version information for your phone.
12

4 ActiveSync
4.1 Data synchronization
Sync by application
To control synchronization Contacts, you can do the following:
1. On the Home screen, then touch
2. Select Accounts & sync. When any of the applications are synchronizing, you
will see the “sync” icon
synchronized.
3. By default, the personal information in Contacts will sync whenever you
make a change or receive a new message. You can change this behavior:
Auto-sync: When selected, Auto-sync will sync Contacts automati cally, as you
make changes or receive new messages. When OFF, information will not be
synced automatically, although you can force sync by using the individual
application check boxes described below.
4. Sync problems:
If you see this icon
temporary problem with the data synchronization. Check your data connection
and try again later.
4.2 Bluetooth
You can use Bluetooth to send and receive calls using a headset or hands-free
car kit.
Turn on Bluetooth services
1. On the Home screen, then touch
2. Select Bluetooth, and then select ‘Bluetooth’ check box to turn on Bluetooth
services.
3. When on, the Bluetooth icon appears in the status bar.
Discoverability
By default, your phone is not “discoverable”. This means other Bluetooth
devices will not see your phone in their scans for Bluetooth devi ces. If you
make your phone discoverable, it will be visible to other Bluetooth devices for
up to 120 seconds.
to the left of the sync check box, then there was a
and select Settings.
. You will also see the last time your data was
and select Settings.
13

To make your phone discoverable:
1. Make sure you have turned Bluetooth on.
2. Touch the Bluetooth name to make your phone visible to other Bluetooth
devices for 120 seconds.
Name your Bluetooth device
1. Make sure you have turned Bluetooth on.
2. Select Settings > Bluetooth > Bluetooth settings > Device name.
3. Type the name for your device in the dialog box, and then select ‘OK’.
4. Your new device name appears on the Bluetooth settings screen.
Pair & connect with Bluetooth devices
Before your phone can communicate with a Bluetooth headset or hands-free car
kit, the devices must “pair”, then “connect”.
Notes: The phone supports only the headset and hands-free Bluetooth prof iles,
so if you try to connect to a device that is not a headset or hands-free car kit,
then you will receive an “unable to connect” message.
If you pair with a second headset while connected to the first, the first headset
will remain connected. To switch connection to the second headset you must
manually select that headset again after pairing.
Rescan for Bluetooth devices
If you want to update the list of Bluetooth devices, select ‘Scan for devices’.
5 Contacts
To view the contacts on your phone, touch and select People.
From the Contacts tab, you can:
1. Take action on a contact: Touch the contact’s name to open the context menu.
From the menu you can select to view the Contact details screen, call the
contact’s number, send a text message, add or remove a star, edit the contact
details, or delete the contact.
2. Go to Contact details: Select the contact’s name to open the Contact detai ls
screen, where all screen the information you’ve saved for this contact is
displayed.
Add a contact
14

You can touch the + icon on the bottom of the screen to add new contact, And
add all the information you want to store for this contact in the appropriate
fields.
Assign favorites
Use Favorites as a way to display only those contacts you contact most
frequently.
Edit contact details
You can always make changes to the information you’ve stored for a contact.
Communicate with a contact
From Contacts you can quickly call or text a contact’s default number, as
displayed below their name on the screen. However, to view all the information
you’ve stored for a contact, and to initiate other types of communication with
that contact, open the Contact details screen. To open a contact’s details screen,
simply select their name from Contacts. Then you can call the contact, send
message to the contact, send email to the contact ect.
SIM contacts importer
If you have stored names and phone numbers on your SIM card, you can add
these to the Contacts stored on your phone by selecting this settings option.
6 Exchanging Messages
6.1 SMS and MMS messaging
To open the SMS & MMS Messaging application, on the Home screen, then
and select the Messaging icon.
touch
View the message from the message list
Select a message thread in the list to open it for reading. When open, the
individual messages appear stacked on the screen, much like with instant
messaging conversations (or chats).
Compose text and multimedia messages
1. Touch ‘Compose’ icon. The Compose screen opens.
2. Add recipients by typing a name, phone number, or email address in the ‘To’
field.
3. To add a subject, press MENU and select ‘Add subject’. If you add a subject,
15

the message will convert to a multimedia message.
4. To add an attachment, touch ‘Attach’ icon on the right-top of the screen.
Adding an attachment will always convert the message to a multimedia message.
Select from audio or picture files. You can select to take a new picture if you
want, or record an audio file. Any recordings you make will be stored
automatically in the Music application in a play list named “M y recordings”. To
remove an attachment, select the attachment’s ‘Remove’ button.
5. Type your message. As you type, you’ll be able to track how many
characters/messages you’re creating. Remember that text messages have a li mit
around 160 characters. Once you go over that limit, a new message is actually
created but automatically joined into one when received.
6. Select ‘Send’ when ready. You can also save a draft.
7. As your message sends, progress displays in the title bar. If you see this icon
to the right of the message, it means your message is still being delivered.
Save message as draft
While composing, press BACK, your message automatically saves as a draft.
Text and multimedia message settings
To set text and multimedia message preferences, from the message list, press
MENU and select ‘Settings’. You can set the options from this screen:
Notification settings, Text message settings, Multimedia message settings.
6.2 POP3 and IMAP email accounts
Add an email account
You can fetch messages from up to five POP3 or IMAP accounts. Follow these
steps:
1. On the Home screen, then touch
2. The Set up new account screen appears.
3. Type your account email address and password.
4. If you want, select the Send email from this account by default check b ox.
This setting only applies if you have more than one POP3 or IMAP account set
up.
5. Select ‘Next’.
If you have a popular email account, the application will set everything up for
and select Email application.
16

you! Before you go to your Inbox, you can name the account (if you don’t, your
email address will be used). You are also asked to type your name as you want it
to display on outgoing messages. You must complete this field before you can
select ‘Next’ and go to your Inbox.
For less popular accounts, follow the prompts to type the email server, protocol,
and other account information yourself. After your account settings have been
verified, select ‘Next’ to go to your Inbox.
6. To add more accounts (up to five), from an Inbox or your Accounts screen,
press MENU and select ‘Add account’.
Use your POP3 and IMAP email account
Once you’ve set up an account, you can do the following: Refresh Inbox, Read
email, Forward, Reply, Reply all, Compose new, Delete message, Empty Trash,
Remove an email account.
Edit account settings
To open your Account settings screen, you can edit account settings.
Add another POP3 or IMAP
To add another account (you can add up to five), go to your Inbox, press MENU
and select ‘Accounts’. Your Accounts screen opens.
Press MENU and select ‘Add account’ another account.
7 Internet
7.1 Ways of Connecting to the Internet
Your device’s networking capabilities allow you to access the Internet or your
corporate network through WLAN, GPRS, EDGE (if available), or WCDMA (if
SIM card supported).
You can also add and set up a VPN or proxy connection.
WLAN
WLAN provides wireless Internet access over distances of up to 100 meters
(300 feet). To use WLAN on your device, you need access to a wireless access
point or “hotspot”. Note: The availability and range of your device’s WLAN
signal depends on the number, infrastructure, and other objects through which
the signal passes.
17

7.2 Browser
To open the Browser, touch
The Browser always opens to the last Web page you were viewing. The first
time you enter the Browser after powering on, your home page will display.
You can change your home page by pressing MENU > Settings >General > Set
homepage.
Zoom and navigation in Web pages
While viewing a Web page, you can press MENU and select
Settings > >Advanced >Default zoom to set the zoom controls.
Slide your fingertip in any direction to shift your page view.
The Browse screen
From the Browse screen you can do the following:
1. Go to a Web page: Make sure the focus is not on a text box and then start
typing the URL.
2. Add a bookmark: Bookmark the Web page you are currently viewing:
• Press MENU and select ‘Save to bookmarks’.
• Confirm the URL and name, and then select ‘OK’.
To view all your bookmarks, press MENU and select Bookmarks.
3. Refresh a Web page: To refresh the contents of the current page, press MENU
and select ‘Refresh’.
Open pages in separate windows
You can keep more than one Web page open by using multiple windows to
display the pages. You can open up to eight windows.
Open a new window: From a Web page, press MENU and select ‘Windows’.
The Current windows screen opens, showing the Web page you started from,
plus a “new window”. Select ‘New window’. Your home page opens in a new
window. To return to one of the other windows, press MENU and select
‘Windows’. Select the page you want to view.
Manage bookmarks
You can store as many bookmarks as you want on your phone.
Press MENU and select ‘Bookmarks’. The Bookmarks screen opens, you can
operate the menu below: Bookmark any page, Send bookmarked page’s URL,
and select Browser icon.
18

View bookmarked page, Edit bookmark, Delete a bookmark, Bookmark
current page etc.
Set your home page
You set your home page from the Settings screen:
1. Press MENU and select More > Settings. The Settings screen opens.
2. In the Page content section, select ‘Set home page’ to open the dialog box.
3. Type the URL of the page you want to set as home, and then select ‘OK’.
Download Web files and applications
Before you download any files or applications using the Browser, note the
following:
1. Before you can download Web applications, you must explicitly “allow”
downloading from the Home > Settings screen:
On the Home screen, then press
select ‘Unknown sources’ check box.
2. All items downloaded form the Web are stored on your memory card, so be
sure you have a card installed in your phone before you download f rom the
Browser.
3. The Browser will only allow you to download items that are supported by an
application installed on the phone.
Warning! Applications downloaded from the Web can be from unknown sources.
To protect your phone and personal data, only download applications from
sources you trust, such as Android Market.
and select Settings. Select ‘Security’, then
8 Experiencing Multimedia
8.1 Camera & Picture
All the pictures you can capture or view on your phone are stored on memory
card, which must be installed in your phone. Before you can use the Camera or
view pictures in Pictures, make sure you have a card installed.
Load pictures onto your memory card
You can copy .jpg or other image files into the memory card or the phone
storage ,then load the pictures from the phone.
Take a picture
19

Captured pictures are saved to the “DCIM” folder on your memory card or the
phone.
Tip: Before you take a picture, wipe the sensor window (on the back cover) to
remove any small amounts of oil.
1. To open the Camera, on the Home screen, touch
icon.
2. The Camera opens in capture mode. Frame your picture within the screen and
hold the phone steady. Touch Camera button to capture. Continue to hold the
camera steady for a second after you hear the shutter sound.
3. Immediately after capture, you can select to Save, Set as (contact icon or
wallpaper), Share (via a compatible application), or Delete your picture.
4. If you select to save, set as, or share, your picture is saved to Gallery
application.
View your pictures
To view the pictures you’ve captured, as well as any you’ve stored on your
memory card or the phone storage, go to Gallery application.
Picture options
You can do the following while in Pictures. Note: In all the instructions below,
you can touch & hold a picture to open the context menu to access all actions,
rather than open the picture in full-screen view.
8.2 Music
To open your music Library, on the Home screen, touch
Music icon. Your music is organized into four categories: Artists, Albums,
Songs, and Playlists. Select a category to view the lists within each. Once in a
category, keep selecting until you reach the music you want to play.
8.3 FM Radio
This device provides radio function.
Note: Within doors or shielded environment, the receiving effect of radio may
be affected. You can improve the effect in the following ways: Near window,
adjust the position of earphone cable or adopt manual adjustment.
and select Camera
and select the
20

8.4 Voice Search
When data connection or WLAN network is connected, input the keywords on
the input field to search the web page that matched keywords.
8.5 Sound record
The phone can be as sound record.
9 Other applications
9.1 Calendar
Calendar views
You can view multiple calendars on your phone, so each calendar event is coded
with a color.
You can view your calendar in a variety of ways. Touch the date on the left-top
of the screen to select from Day, Week, Month or Agenda.
Create an event
From any of the views, press MENU and select ‘New event’ to open the new
Event details screen.
• Type the information in the fields.
• Select date & time.
• Name that appears in Day view.
• Description can be as long as you like.
• Select a calendar if you display more than one.
• Set a default reminder time.
• Set online presence: available or busy.
• Select calendar privacy from Default (as defined when calendar was created),
Private, or Public.
When finished, select ‘Done’. Pressing BACK also saves the event.
Tip: Create an event quickly in the Day or Week view by selecting an empty
time slot. A new Event details screen appears. The ‘From’ field contains the
selected time slot.
9.2 Alarm Clock
To open Alarm Clock, on the Home screen, then touch
icon. The Alarm clock offers as many alarms as you want.
21
and select Clock

Set an alarm
Set the following options:
Alarm: Select the check box to turn alarm on (checked) or off (cleared). This is
the same check box that appears on the main Alarm Clock screen.
Time: The time the alarm will go off is shown. To change this time, select Time
to open the time selector. Slide the finger up or down to set the time you want,
and then select Set.
Repeat: The current repeat selection is shown. To change the setting, select
Repeat and make a selection from the menu. To have your alarm will only go
off once at the set time, don’t select any of the options. A one-time alarm is
shown on the Alarm Clock screen without any days under the set time.
Ring tone: The current ring tone selection is shown. Select Ring tone to pick
another ring tone that will play when the alarm rings. (When you select a ring
tone, it plays briefly.) Note that when your alarm goes off, the ring tone will
play a maximum of five minutes.
Vibrate: Select this check box to have your phone vibrate when it goes off.
Once your alarm goes off, you will receive an alert with the options to Snooze
(for 10 minutes) or Dismiss.
Add more alarms
To add more than three alarms, from the main Alarm Clock screen, press
MENU and select ‘Add alarm’.
Change clock display
You can change the appearance of the clock displayed on the main Alarm Clock
screen:
1. Go to the main Alarm Clock screen.
2. Touch the clock with your fingertip to open the Clock selection screen.
3. Slide your fingertip horizontally along the bottom clock face row and touch
the face you want to display.
Change date & time display
You can change the format of the time displayed in your alarms from the global
Settings screen:
1. Go to the main Alarm Clock screen. On the Home screen, then touch
22

and then press MENU and select Settings. Scroll down and select ‘Date & time’.
The Date & time settings screen appears.
2. Use the network-provided values by selecting ‘Automatic’ check box.
3. Select ‘Use 24 hour format’ check box if you wish to use that rather than 12
hour format.
4. Select t ‘Select date format’ option to open the menu of various date formats.
9.3 Calculator
To open Calculator, on the Home screen, then touch
Calculator icon.
The Calculator offers two panels: basic and advanced. Switch bac k and forth
between panels by pressing MENU and selecting ‘Advanced panel’ or ‘Basic
panel’, as you wish.
9.4 warning statement
FCC Caution.
and select the
§ 15.19 Labelling requirements.
This device complies with part 15 of the FCC Rules. Operation is subject to the
following two conditions: (1) This device may not cause harmful interference,
and (2) this device must accept any interference received, including interference
that may cause undesired operation.
§ 15.21 Information to user.
Any Changes or modifications not expressly approved by the party responsible
for compliance could void the user's authority to operate the equipment.
§ 15.105 Information to the user.
Note: This equipment has been tested and found to comply with the limits for a
Class B digital device, pursuant to part 15 of the FCC Rules. These limits are
designed to provide reasonable protection against harmful interference in a
residential installation. This equipment generates uses and can radiate radio
23

frequency energy and, if not installed and used in accordance with the
instructions, may cause harmful interference to radio communications. However,
there is no guarantee that interference will not occur in a particular installation.
If this equipment does cause harmful interference to radio or television
reception, which can be determined by turning the equipment off and on, the
user is encouraged to try to correct the interference by one or more of the
following measures:
-Reorient or relocate the receiving antenna.
-Increase the separation between the equipment and receiver.
-Connect the equipment into an outlet on a circuit different from that to which
the receiver is connected.
-Consult the dealer or an experienced radio/TV technician for help.
Body-worn Operation
This device was tested for typical body-worn operations. To comply with RF
exposure requirements, a minimum separation distance of 1.5 cm must be
maintained between the user’s body and the handset, including the antenna.
Third-party belt-clips, holsters, and similar accessories used by this device
should not contain any metallic components. Body-worn accessories that d o not
meet these requirements may not comply with RF exposure requirements and
should be avoided. Use only the supplied or an approved antenna.
24
 Loading...