

Page 1

Contents
Safety........ ............. ......................... ............ ........... ........................ ............ .......3
Environment ........................ ............ ............ ............ ............ ............................4
1 Getting Started.............. .............. ............ ........... ........................ ............ .......5
1.1 Getting to know your touch phone ................................... ............ ...5
1.2 Installing the SIM card and storage card..................... ..................... 5
1.3 Charging the Battery ........................................................ ............ ...5
1.4 Starting up the device.... ............ ........................ ..............................6
1.5 Status Icons..... ........... ............ ............ ............. ........... ............ ......... 7
2 Using phone features .................. ............ ........... ........................ ............ .......8
2.1 Turning the phone function on and off.............................................8
2.2 Making a call ................ ............ ........................ ..............................9
2.3 Answering and Ending a call..... ........................ ..............................9
2.4 In-call options ......................................................... ........................9
2.5 Using call history ...................... ........................ ............................10
2.6 Call settings ............... ............ ............ ............. ........... ............ .......10
3 Setting on your device.............. ................................................ ................... 11
4 ActiveSync.......... ......................... ............ ........... ........................ ............ .....14
5 Contacts ............. ......................... ............ ........... ........................ ............ .....16
6 Exchanging Messages ...................... ............ ............ ........................ ........... 19
7 Internet............ ............ ............. ................................................ ................... 25
7.1 Ways of Connecting to the Internet............................... ............ .....25
7.2 Browser............. ............ ............ ........................ ............................25
8 Experiencing Multimedia............. ............ ............ ............ ..........................27
8.1 Camera & Picture....... ............ ............ ............. ........... ............ .......27
8.2 Music......................... ............ ............ ............. ........... ............ .......29
8.3 FM Radio..... ........... ................................................ ...................... 32
8.4 Voice Search ................. ............ ........... ........................ .................32
8.5 Sound Recorder.......... ............ ............ ............. ........... ............ .......32
1
Page 2

9 Other applications ................... ................................................ ................... 32
9.1 Calendar..................... ............ ............ ............. ........... ............ .......32
9.2 Alarm Clock............ ................................................ ...................... 34
9.3 Calculator......................................................................... ............ .35
SAR .................... ............ ............. .................................... 错误!未定义书签。
2
Page 3

Safety
Never attempt to disassemble your phone. You alone are responsible for how
you use your phone and any consequences of its use.
As a general rule, always switch off your ph one wherever the use of a phone is
prohibited. Use of your phone is subject to safety measures designed to protect
users and their environment.
Do not use your phone in damp areas (bathroom, swimming pool…). Protect it
from liquids and other moisture.、
Do not expose your phone to extreme temperatures lower than - 10°C and
higher than + 55°C.
The physicochemical processes created by chargers impose temperature limits
when charging the battery. Your phone automatically protects the b atteries in
extreme temperatures.
Do not leave your phone within the reach of small children (certain removable
parts may be accidentally ingested).
Electrical sa fety: Only use the chargers listed in the manufacturer’s catalogue.
Using any other charger may be dangerous; it would also invalidate your
warranty. Line voltage must be exactly the one indicated on the charger’s serial
plate.
Aircraft safety: When travel ing by plane, you will need to switch your phone
off when so instructed by the cabin crew or the warning signs.
Using a mobile phone may be dangerous to the operation of the aircraft and may
disrupt the phone network.
Its use is illegal and you could be p rosecuted or banned from using cellular
networks in the future if you do not abide by these regulations.
Explosive materials: Please comply with warning signs at petrol station asking
you to switc h your phone off. You will need to comply with radio equipment
usage restrictions in places such as chemical plants, fuel depots an d at any
location where blasting operations are under way.
Electronic equipment: To avoid th e risk of demagnetization, do not let
electronic devices close to your phone for a long time.
Electronic medical equipment: Your phone is a radio transmitter which may
interfere with electronic medical equipment or implants, such as hearing aids,
pacemakers, insulin pumps, etc. It is recommended that a minimum separation
of 15 cm be maintained between the phone and an implant. Your doctor or the
3
Page 4

manufacturers of such equipment will be able to give you any advice you may
need in this area.
Hospitals: Always make sure that your phone is switched off in ho spitals when
so instructed by warning signs or by medical staff.
Road safety: Do not use your phone when driving. In order to give your full
attention to driving, stop and park safely before making a call. You must comply
with any current legislation.
Distance of operation: This ph one model has been tested and meets
radiofrequency exposure guidelines when used as follo ws:
• Against the ear: Place or recei ve a phone call and hold the phone as you would
a wire line telephone.
• Body worn: When transmitting, place the phone in a carry accessory that
contains no metal and positions the phone a minimum of 2.5 cm form your b ody.
Use of other accessories may not ensure compliance with radiofrequency
exposure guidelines. If you do not use a body worn accessory and are not
holding the phone at the ear, position the phone a minimum of 2.5 cm from your
body,
• Data operation: When using a data feature, position the phone a minimum of
2.5 cm from your body for the whole duration of the data transmission.
Environment
Packaging: To facilitate the recycling of packa ging materials, please obey the
sorting rules instituted locally for this type of waste.
Batteries: Spent batteries must be deposited at the designated collection points.
The product: The crossed-out waste bin mark affixed to the p roduct means that
it belongs to the family of electrical and electronic equipment.
To promote the recycling and recovery of waste electrical and electronic
equipment (WEEE) and at the same time safeguard the environment, European
regulations require you to obey the sorting rules instituted locally for th is type
of waste.
4
Page 5

1 Getting Started
1.1 Getting to know your touch phone
1.2 Installing the SIM card and storage card
You n eed to remove th e b ack co ver before you can install the SIM card. Also,
make sure to always turn off the power before installing or replacing th e SIM
card.
Note: • The battery can not be uninstalled.
To remove the back cover
1. Make sure your device is turned off.
2. Firmly hold the device with both hands and the front panel facing down.
3. Push th e back cover up with you r thumbs u ntil it d isengages from the device
and then slide it up to remove.
To install the SIM card
The SIM card contains your phone number, service d etails, and phonebook/
message memory.
1. Remove the battery if it is installed.
2. Locate the SIM card slot, and then insert the SIM card with its gold contacts
facing down and its cut-off corner facing out the card slot.
To install a memory card
To have additional storage for your images, videos, music, and files, you can
purchase a memory card and install it into your device.
1. Make sure that your device is turned off, and then remove the back cover.
2. Locate the memory card slot on the upper part of the expo sed right panel.
3. Insert the memory card into the slot with its gold contacts facing down until it
clicks into place.
Note: To remove the memory card, press it to eject it from the slot.
1.3 Charging the Battery
New batteries are shipped partially charged. Before you start using your device,
it is recommended that you install and charge the battery. Some bat teries
perform best after several full charge/discharge cycles.
Note: Only the AC adapter and USB sync cable provided with your device must
be used to charge the device.
5
Page 6

Connect the USB connector of the AC adapter to the sync connector on your
device, and then plug in the AC adapter to an electrical outlet to start charging
the battery.
As the battery is being charged while the device is on, a charging icon app ears
in th e titl e bar of the Home screen . After the bat tery has been fully charged, a
full battery icon appears in the title bar of the Home screen.
Warning: • As a safety precaution, the battery stops charging before it overheats.
1.4 Starting up the device
Power on/off
To power off your phone, press & hold POWER. On release, the Phone options
menu opens. Select ‘Power off’ and confirm.
To power on again, press & hold POWER.
Silent mode
To silence your phone quickly, press & hold the – volume button to zero volume.
Or o n the Home screen, touch
‘Silent’ check box.
Screen sleep
After a period of inactivity, your screen will go to sleep (display will tu rn black).
In sleep, your phone uses less battery power. You can control this behavior:
Set screen timeout period
1. Touch
2. Select a time from the menu.
Lock screen & put phone to sleep
Except when on a phone call, from any screen, press POWER (immediately).
While not on a call, to lo ck your control buttons and screen from accidental
touch activation, press POWER.
You can increase the security of your phone by setting a screen unlock pattern.
Once set, in order to unlock your screen, you’ll have to draw the correct unlock
pattern. You can set your screen unlock pattern as follows:
1. Touch
2. Set or change your unlock pattern by selecting either Set unlock pattern or
Change unlock pattern, as applicable.
3. Follow the prompts to define your pattern. Note: You must slide your finger
along the screen to create the pattern, not select individual dots. Connect at least
> Settings > Display > Sleep
> Settings > Security > Screen lock.
and select Settings> Audio profiles. Select
6
Page 7

four dots.
Home screen
1. Touch the application tab with your fin gertip to reveal the application
icons.
2. The Home screen actually extends beyond the screen width. On Home screen,
slide your fingertip left and right along the screen to reveal the full width of the
Home screen . This additional space gives you more room to customize Home
with applications, shortcuts, and widgets.
3. Create Home screen shortcuts and widgets:
• From the Home screen, touch the menu button to select ‘WIDGETS’, the
widgets menu opens.
• Select the widget you want to display on home screen, then touch & hold an
application icon. It can be added to the Home screen; b ack to the home screen to
see it.
4. To remo ve a sho rtcut or widget from your Home screen, touch & hold the
item to enter “remove”. The application tab turns into a Trash button. Drag the
item to the Trash button and release. You’ll know when your item is in the Trash
because the item and the tab will turn red.
5. Move objects on the Home screen
• To move an ico n or other item on the Home screen, you must first to uch &
hold it to enter move mod e. The object will magnify when it’s ready to be
moved.
• Without lifting your finger (or you’ll drop out of move mode), drag the object
to the new position. To move an item to a section of the Home screen not in
view, move it to the edge of the screen and hold it there for a mo ment. The
screen view will shift; position the object and release.
1.5 Status Icons
Connection status icons
Along the top of your phone screen is the status bar. On the left side, icons will
appear, notifying you of a new message, upcoming calendar e vent, or something
else you should notice. On th e right side of the statu s bar, you’ll see connection
status icons.
7
Page 8
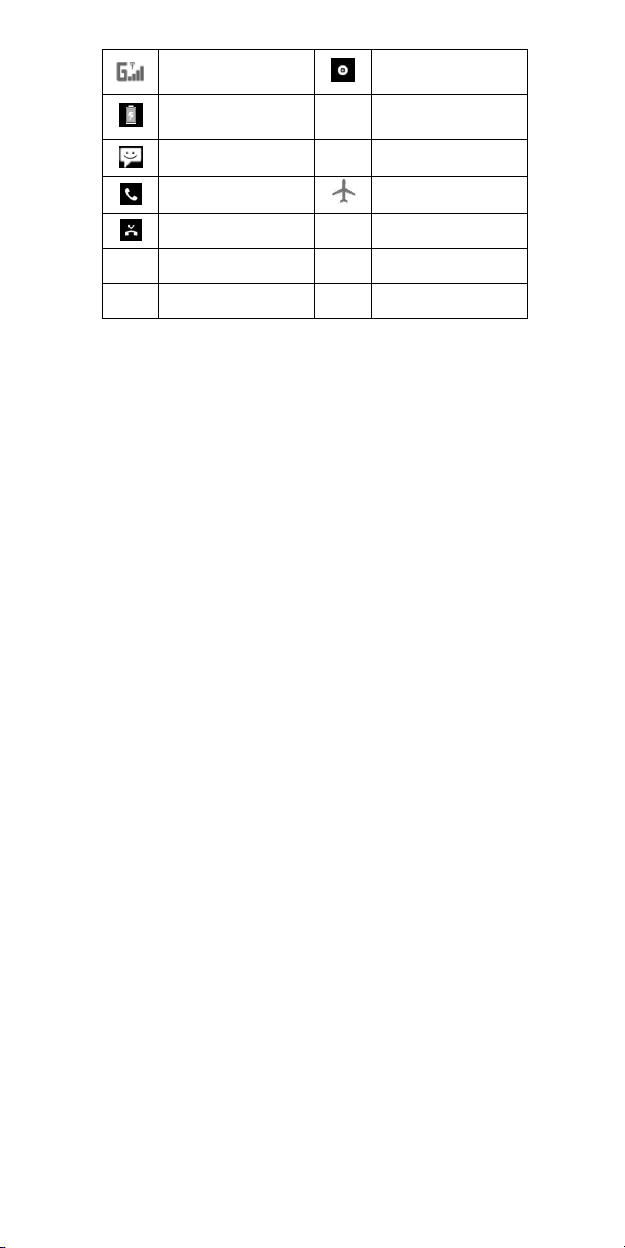
GPRS ser vice connected,
data flowing
Battery is charging
SMS/MMS
Call in progress
Missed call
Alarm is set
Bluetooth is on
Read your notifications
When you see a notification in the status bar, touch the bar and slide your finger
down the screen to open the list of notifications displayed in the sliding window.
Ongoing not ifications report activities such as call forwardin g ON, current call
status, song playing.
Notifications report the arrival of new messages, calendar events, an d alarms.
You can clear notifications list by selecting ‘Clear’ notifications at the top of the
notifications window.
To open th e message, reminder, or ot her no tification, you can touch the items.
To close the notifications window, slide your finger up the screen.
Song is playing
Ringer is off
(Silent mode)
WLAN service
connected
Wireless services are off
(Airplane mode)
Phone on mute
Connected the earphone
Connected the PC
2 Using phone features
2.1 Turning the phone function on and off
To enable or disable Airplane Mode
In many countries, you are required by law to turn off the phone while on board
an aircraft. Another way to turn off the phone function is to switch your device
8
Page 9

to Airplane Mode.
When you enable Airplane Mode, all wireless radios on your device are turned
off, including the phone function, Bluetooth, and WLAN.
1. Touch
2. Touch ‘Airplane mode’ to enable or disable.
When you disable Airplane mode, the phone function is turned back on and the
previous state of Bluetooth and WLAN are restored.
Adjusting the volume
Press Volu me button on the side of the phone to show the volume screen.
If the phone is in vibrating mode, the voice will be muted automatically and the
device will vibrate when there is an incoming call.
2.2 Making a call
On Home screen,touch
Touch the on-screen dial pad to enter a number, touch ‘Delete’ button to delete
numbers you’ve entered. Touch & hold to delete all the numbers in the field.
1. Call log tab: Select an entry listed in the log to call the number.
2. Con tacts tab: Conta cts with p hone numbers are listed. Select a contact, and
then select the phone number to dial the call.
Touch the on-screen dial pad to enter a number, touch ‘Video Call ’
make a video call.
*Notice: Your phone must be i n of the normal WCDMA network coverage,
and the other side (the receiver’s phone and SIM card) can a lso be
supported the video call function of 3G.
2.3 Answering and Ending a call
When you receive a phone call, the incoming voice call screen will appear,
allowing you to either answer or ignore the call.
1. To answer an incoming call, slide ‘ANSWER’ (Green icon) button rightward.
2. To reject a call, slide ‘REJECT’ (Red icon) button leftward.
2.4 In-call options
While on a call, reveal the in-call options: Speaker, Mute, End call ,Record,
Keypad.
> Settings > More… > Airplane mode.
> Phone to enter the dial screen.
9
button to
Page 10

Note that if Bluetooth services are on and you are connected to a hands-free
device, the more menu indicator will show Bluetooth on.
2.5 Using call history
1. The missed call icon appears in the title bar when you missed a call.
2. Use ‘Call log’ tab to check who the caller was, or view all your dialed
numbers, and received calls. To open ‘Call log’ tab, touch ‘Call log’ button in
the phone screen to enter the call history list.
3. Scroll to select the contact or number you want to dial, touch ‘Call’ button.
4. Tap and hold t he selected contact you want to call, and then you can make to
do the following options of call, edit number before call, send text message, add
to contacts or remove from call log phone on the sho rtcut menu.
2.6 Call settings
On the dialing screen or call log screen , press MENU > Settings to enter Call
settings,you can make the operation of voice call, video call and other settings.
Voice Call
Voicemail: Select to set a voicemail number that isn’t being read from the SIM
card.
Call forwarding: Select how you want busy, unanswered, and unreachable calls
to be handled. There is also an option to Always forward.
Call barring: Restrict to answer or dial the call in any situation. You need to
apply to the network operator for opening the international long-distance
function and get network restricting code for barring setups.
Additional settings: From th is setting you can set your Caller ID preference and
turn on/off call waiting.
Other Settings
Fixed Dialin g Numbers: This feature allows you to restrict outgoing calls to a
fixed set of nu mbers. To enable this feature you must know th e SIM PIN2 code
for your phone. You can get this number from your wireless operato r, assuming
this feature is supported.
10
Page 11

3 Setting on your device
Control phone-wide settings from the Home settings screen: touch and
select Settings.
3.1 Wireless & networks
SIM management
In this item ,you can manage the Roaming and Data connection.
Wi -Fi
Wi-Fi on/off: Select this check box if you prefer to use Wi-Fi for your data
connection.
Wi-Fi settings: Open the Wi-Fi settin gs screen; select it from the network list.
Provide your username or password if required.
Bluetooth
Bluetooth on/off: Use this check box to turn Bluetooth services on or off.
Bluetooth settings: With Bluetooth services on, you can open the Bluetooth
settings screen to:
• Rename your device.
• Select to be discoverable for up to 120 seconds, or not discoverable.
• Pair or unpaired with one of the Bluetooth devices in range - You will be asked
to type a PIN before pairing. Refer to the manufacturer’s documentation for the
PIN code.
• Rescan for devices.
More…
Airplane mode on/off: When airplane mode is selected, all wireless connectivity
is off. This icon
selected.
Mobile networks
• Select data roaming capability.
• Select a wireless operato r network - Scan for all available networks, or select a
network automatically.
• Add or edit network Access Point Names (APNs) - Do not change this setting
unless advised to do so by your wireless operator!
3.2 Device
will display in the status bar when airplane mode is
11
Page 12

Audio profiles
Select one user profile and enter the following options:
Vibrate: Select to have your phone vibrate for incoming calls.
Volume: Select to open the volume control, and t hen slide you r finger along the
volume bar to set an incoming call ring volume or alarm, playing back music,
videos.
Phone ringtone: Select to decide on a ring tone to use fo r incoming calls. Not e
that you can override this setting for individual contacts in the Edit contact
details screens.
Notification ringtone: Select a ring tone to use for a notification (e.g., new
message). Note that you can override th is setting for new Calendar event
notifications, text and multimedia message notifications. Go to the applications
settings screens to select specific ring tones.
Touch sound: Select to have a tone sound when you use the on-screen Dialer.
Display
Brightness: Select to open the bright ness control, and th en slide your finger
along the brightness bar to set the level. In sunlight, increase the l evel.
Sleep: Select to decide how long your ph one must b e inactive before th e screen
turns off.
Storage
View and manage the d ata storage on your phone.
Memory card: Monitor and manage th e use of your Memory card from this
screen: 1. View how much space you are using on your memory card. 2. Select
to use your memory card as USB mass storage when your p hone is connected to
your computer (selected by default) 3. Eject your memory card from your phone.
Note that when your phone is connected to your computer via USB, you cannot
view pictures or play any media stored on the card from your phone.
Internal phone storage: Reports how much internal storage is free.
Applications
Manage applications: View all the applications stored on you r phone and how
much space they occupy. If you’ve downloaded an ap plication from Android
Market, you can uninstall it from this screen. Select a specific application to:
1. Clear your user data (if you have any associated with a particular
12
Page 13

application).
2. Disassociate the application with any actions.
3. Uninsta ll - If you’ve downloaded an application from Android Market, you
will be able to uninstall it from this screen by selecting Uninstall.
Development: If you are an application d eveloper, you may be interested in
these settings: 1. USB debu gging: If you want be able to communicate with
your phone directly via USB, select ‘USB debugging’ ch eck box. 2. Stay awake:
To prevent your phone from sleeping while charging (via power adapter or
USB), select ‘Stay awake’ check box.
3.3 Personal
Location access
My Location: Select a source for determining your location: Wireless networks,
or GPS satellites. Typically GPS will be more accurate (to street level) but it
consumes more battery power.
Security
Screen unlock pattern: Create a pattern you will be asked to draw before your
screen will unlock. You can select to make the pattern visible or invisible as you
draw it.
SIM card lock settings: Lock your SIM card for extra security. You can also
change your SIM card PIN from th is screen. If you don’t know your SIM PIN,
you can obtain it from your wireless operator.
Visible passwords: Select to have your password display as you type it.
Unknown sources: Select this ch eck box if you want the ability to download
applications fro m the Web. With this check bo x not select ed, you will only b e
able to download applications from Android Market. To ensure your personal
data and phone remain secure; it is recommended you not select this check box.
Backup & reset
You can select to reset your ph one to factory settings. This will erase all your
data from the phone and require you to sign in and go through the setup screens
to use any of the applications.
3.4 Accounts
Turn on/off synchronization for all services.
13
Page 14

3.5 System
Date & time
Set time, time zone, and date: Use Auto matic unless you need to override th e
network values.
Time format: Select from 12 or 24 hour formats.
About phone
View your phone Status: This screen lists a variety o f information, including
your phone number, the network you are currently usin g, th e type of network,
signal stren gth, whether you are ro aming or not, any WLAN addresses you’ re
connected to, and more.
View the model number an d version information for your phone.
4 ActiveSync
4.1 Data synchronization
Some ap plications on your phone (Contacts and so on) give you access to the
same p ersonal information that you can add , view, and edit on your compu ter
using Web appl ications. This means that when you add, change, or d elete your
information in any of these applications on the Web, the updated information
also ap pears on your phone, and vice ver sa. Also, if you lose your phone or if
your p hone is destroyed, your personal information is not lo st and will appear,
as before, on a replacement phone.
This mirroring of information happens through over-the-air data
synchronization, or data “syncing”. Data syncing occurs in the background and
shouldn’t ever get in your way. You’ll know your data is being synchronized
when you see this icon in the status bar:
Because sending large amounts of data back and forth over the air can take time
and requ ire considerable bandwidth, there are so me settings on the phone that
allow you to control data sync.
Sync by application
To control synchronization Contacts, you can do the following:
1. On the Home screen, touch
> Settings> Accounts
14
Page 15

2. First you choose add account, then add account you h ave .When any of the
applications are synchronizing, you will see the “sync” icon . You will also
see the last time your data was synchronized.
3. By defau lt, the personal information in Contacts will sync whenever you
make a change or receive a new message. You can change this behavior:
Auto-sync: When selected, Auto-sync will sync Contacts automatically, as you
make changes or receive new messages. When OFF, in formation will not be
synced automatically, although you can force sync by using the individual
application check boxes described below.
4. Sync problems:
If you see this icon to the left of the sync check box, then there was a
temporary problem with the data syn chronization. Check your data connection
and try again later.
4.2 Bluetooth
You can use Bluetooth to send and recei ve calls using a headset or hands-free
car kit.
Turn on Bluetooth services
1. On the Home screen, touch
2. You can choose on.
3. When on, the Bluetooth icon appears in the status bar.
Discoverability
By default, you r phone is n ot “discoverable”. This means other Bluetooth
devices will not see your phone in their scans for Bluetooth devices. If you
make your phone discoverable, it will be visible to other Bluetooth device s for
up to 120 seconds.
To make your phone discoverable:
1. Make sure you have turned Bluetooth on.
2. Select Settings >Bluetooth> Bluetooth settings.
3. Select ‘Discoverable’ check box to make your phone visible to other
Bluetooth devices for 120 seconds. You must stay on the Bluetooth settings
screen to remain discoverable.
4. Select ‘Discoverable’ again during the 120 seconds, or leave the Bluetooth
> Settings > Bluetooth
15
Page 16

settings screen, to make your phone undiscoverable.
Name your Bluetooth device
1. Make sure you have turned Bluetooth on.
2. Select Settings > Bluetooth > Bluetooth settings > Device name.
3. Type the name for your device in the dialog box, and then select ‘OK’.
4. You r new device name appears on the Bluetooth settings screen.
Pair & connect with Bluetooth devices
Before your phone can communicate with a Bluetooth headset or hands-free car
kit, the devices must “pair”, then “connect”:
1. Make sure you have turned Bluetooth on.
2. Select Settings > Bluetooth > Bluetooth settings.
3. Your phone starts scanning for Bluetooth devices within range. As they are
found, the devices appear in the list of Bluetooth devices.
4. To pair with a device in the list, select it.
5. Type the device’s P IN and then select ‘OK’.
6. Once paired, select the device name to connect. You can also touch & hold
the name to open the context menu, and then select Connect.
7. Pairing and connection status appear under the device name.
8. Once the other Blu etooth device shows “connect ed” status, you can start
using it to make and receive phone calls.
Notes: The phone supports only the headset and hands-free Blu etooth profiles,
so if you try to connect to a device that is not a headset o r hands-free car kit,
then you will receive an “unable to connect” message.
If you pair with a seco nd headset while connected to th e first, the first headset
will rema in connected. To switch connection to the second headset you must
manually select that headset again after pairing.
Rescan for Bluetooth devices
If you want to update the list of Bluetooth devices, select ‘Scan for devices’.
5 Contacts
The contacts on your phone are synced with your account contacts stored on the
Web.
16
Page 17

To view the contacts on your phone, touch and select People.
Contacts belonging to a specific group (you can choose which group) are listed
in th e Contacts tab. Only those contacts you star as “favorites” are listed in the
Favorites tab. Browse through your contacts by sliding your fingertip up and
down on the screen. Another way to find a cont act quickly is to use “SEARCH”
button, input the first letter of the name you’re looking for and touch search icon,
the matching contacts are appeared on the screen.
From the Contacts tab, you can:
1. Take action on a contact: Touch the contact’s name to open the context menu.
From the menu you can select to view the Contact details screen, call the
contact’s number, send a text messa ge, add or remove a star, edit the contact
details, or delete the contact.
2. Go to Contact details: Select th e contact’s name to open the Contact details
screen, where all screen the information you’ve saved for this contact is
displayed.
Add a contact
1. On the Home screen, then touch
appears.
2. Touch the + icon on the bottom of the screen to add new contact.
3. Add all the information you want to store for this contact in th e appropriate
fields. You must add some information to save a contact. To change a default
label, sel ect the label name to open the label menu. Select a different lab el or
create a custom label. To add more fields, select ‘Add another field’.
4. You can assign a Caller ID icon to your contact by touching Call er ID icon.
The Pictures application opens. Navigate to a picture an d select it, size the
cropper with your fingertips. When finished, select ‘Crop’. The picture is
associated with your contact. If you do not assign an icon, a default android icon
will be assigned.
5. To save your contact, press BACK, or touch ‘Done’.
Assign favorites
Use Favorites as a way to display only those contacts you contact most
frequently. To add a contact to Favorites:
and select People. Your contact list
17
Page 18

1 From Contacts, touch th e contact you want to add to Favorites to open the
Contact details screen.
2. Touch the star icon on the right-top screen, and the color of star is changed
from grey to white.
3. Now your contact will be listed in Favorites.
Edit contact details
You can always make changes to the information you’ve stored for a co ntact:
1. From Contacts, tou ch & hold the contact who se information you want to ed it.
The context menu opens.
2. Select ‘Edit ’. The Edit contact screen appears.
3. Make your edits, then press ‘DONE’.
Communicate with a contact
From Contacts you can quickly call or text a contact’s default number, as
displayed below their name on the screen. Howe ver, to view all the information
you’ve stored for a contact, and to initiate other types of communication with
that contact, open the Contact details screen. To open a contact’s details screen,
simply select their name from Contacts.
1. Call a contact: From the contact list, touch the contact you want to open the
Contact details screen. To uch the call numb er directly to dial that contact’s
primary number (first in the list on their details screen).
2. To dial a different nu mber for the contact, select the contact’s name, and then
select the number on their details screen and then touch the call number that you
want.
3. Send a text or mult imedia: To send a text or multimedia message to a contact,
you must have a message to a contact mobile number stored for them in contact
details. From the Contact details screen, select a phone number and click
‘Message’ icon, A Compose screen opens for your new message. Complete your
message and select ‘Send’.
4. Send email to a contact: To send an email message to a contact, you mu st
have an email address stored for them in their contact details.
• Select the contact you want to email. Their Contact details screen opens.
• In the Send email section, select the email address. If you are fetching POP3 or
18
Page 19

IMAP email accounts to your phone, th en select the account you wish to use to
send. A Compose screen opens for your new message.
• Complete your message, select ‘Send’.
SIM contacts importer
If you have stored names and phone numbers on your SIM card, you can add
these to the Contacts sto red on your phone by selecting this settings o ption.
From the contact list, press MENU to select ‘Import/export’, you can select to
import from SIM card or memory card, on ce the list of names and numbers
appears you can:
Import all names/numbers in the list - Press MENU and select ‘Import al l’.
Import only certain names/numbers in the list - Select the name/number you
want to import , then repeat for others as you wish. (As soon as you select th e
name/number, it is imported)
6 Exchanging Messages
6.1 SMS and MMS messaging
To op en th e SMS & MMS Messagin g application, on the Home screen, then
touch
and select the Messaging icon.
About text and multimedia messages
SMS messages are also know as “text” messages and can each be around 160
characters. If you continue to type after the limit is reached, your message will
be delivered as one, but count as more than one message. These are called
“concatenated” messages.
MMS messages are also known as “multimedia” or “picture” messages and can
contain text, picture, audio, and video files.
When you compose a message, the phone will automatically convert a text
message into a multimedia message as soon as you add a sub ject or an
attachment, or if you address th e message using an email address rather than a
phone number.
View the message from the message list
19
Page 20

Select a message thread in the list to open it for reading. When open, the
individual messages appear stacked on the screen, much like with instant
messaging conversations (or chats).
Note that messages you send are also listed in the Read view.
1. Reading multimedia messages
If you have selected to auto -retrieve your multimedia messages, then both the
message header and body will download.
If you are downloading only the headers, then you must first select th e
Download button to retrieve the message body. If you are concerned about the
size of your data downloads, you can check the message size before you
download.
Once the message has downloaded, select “Play” button to view the message.
From a message read view, you can do the following:
1. To view deta ils about a particular message, in the Read view, touch & hold
the message to open the context menu. Select View details.
2. Reply to a message: Simply start typing your message in the text box at the
bottom of the screen to reply to a message. You can always pr ess MENU and
select to add a subject or an attachment to convert it to a multimedia message.
Select ‘Send’ when ready.
3. Links in me ssages: If a message contains a link to a Web page, it will b e
selectable. To view the Web page in the Browser, simply select it.
4. Delete messa ges: Your messages will be saved until you explicitly delete
them.
Delete one message in a thread - With the message th read open in Read vie w,
touch & h old the individual message you want to delete to open the context
menu. Delete all messages in a thread - With the message thread open in Read
view, press MENU > Delete. You can also delete an entire thread from the
message list by pressing & holding the thread to open the context menu, then
select ‘Delete’.
Delete all message threads - From the message list, press MENU and select
Delete all threads.
Compose text and multimedia messages
20
Page 21

1. Press MENU and select ‘New message’. The Compose screen opens.
2. Add recipients by typing a name, p hone number, or email address in the ‘To’
field. Matching contacts will appear. Select the recipient or continue typing.
Add as many recipients as you wish. If you send the message to an email
address, the messa ge will automatically convert from a te xt to a multimedia
message.
3. To add a subject, press MENU and select ‘Add subject’. If you add a subject,
the message will convert to a multimedia message.
4. To ad d an attachment, p ress ‘+’. Adding an attachment will always convert
the message to a multimedia message. Select from au dio or picture files. You
can select to take a new picture if you want, or record an audio file. Any
recordings you ma ke will be sto red automatically in the Music application in a
play list named “My recordings”. To remove an attachment, select the
attachment’s ‘Remove’ button.
5. Type your message. As you type, you’ll be able to tr ack how many
characters/messages you’re creating. Remember that text messages have a limit
around 160 characters. Once you go over that limit, a new message is actually
created but automatically joined into one when received.
6. Select ‘Send’ when ready. You can also save a draft.
7. As your me ssage sends, progress displays in the titl e bar. If you see this icon
to the right of the message, it means your message is still being delivered.
Save message as draft
While composing, press BACK, your message automatically saves as a draft.
Text and multimedia message settings
To set text an d multimedia me ssage preferences, from the message list, press
MENU and select ‘Settings’. You can set the following from this screen:
1. Notification settings
You can receive a notification each time you receive a new message.
Select ‘Notifications’ check box to receive a notification in the status bar when a
new message arrives. If you want your phone to ring when a new message
arrives, sel ect that check box as well. Select Ring tone to open the ring tone
menu and select a ring tone specific to new text and mult imedia message
notifications. Note that when you check a ring tone, it plays briefly.
If you want your phone to vibrate when you receive a new message, select
21
Page 22

‘Vibrate’ check box.
2. Text messa ge settings
Delivery reports: To receive a repo rt on th e delivery status of your me ssage,
select this check box.
Manage SIM card messages: Text messages can also be stored on your SIM card.
The exact SIM card number depends on your card, but it is usually around
25-50. To view messages on your SIM card, dele te them, and copy them to your
phone memory, select this setting.
3. Multimedia message settings
Delivery reports: To receive a repo rt on th e delivery status of your me ssage,
select this check box.
Read report s: To receive a report on whether each recipient has read or deleted
the message without reading it, select this check box.
Auto-retrieve: To retrieve all your MMS messages automatically (the header
plus the message will download to your phone), select this check box. If you
clear this check box, then only the message headers will be retrieved and
display in your message list. You can retrieve the full message by selecting the
Download button that displays in the header. Once the message has downloaded,
select the “play” button to expand the message.
Roaming auto-retrieve: If you are concerned about data traffic and just want the
message h eaders to download while roaming, clear the Roaming auto-retrieve
check box. Oth erwise, you can select this check box to have your messages
download even while roaming.
6.2 POP3 and IMAP email accounts
Add an email account
You can fetch messages from up to five POP3 or IMAP accounts. Follow these
steps:
1. On the Home screen, touch
2. Set up new account screen appears.
3. Type your account email address and password.
4. If you want, select the Send email from th is account by default check box.
This setting only applies if you ha ve more than one POP3 or IMAP account set
> Email.
22
Page 23

up.
5. Select ‘Next’.
If you have a popular email account, the application will set everything up for
you! Before you go to you r Inbox, you can name the account (if you don’t, your
email address will be used). You are also asked to type your name as you want it
to display on outgoing messages. You must complet e th is field before you can
select ‘Next’ and go to your Inbox.
For less popular accounts, follow the prompts to type the email server, protocol,
and other accou nt information yourself. After your account settings have been
verified, select ‘Next’ to go to your Inbox.
6. To add more accounts (up to five), from an Inbox or your Accounts screen,
press MENU and select ‘Add account’.
Use your POP3 and IMAP email account
Once you’ve set up an account, you can do the following:
1. Refresh Inbox: From the Inbox, press MENU and then select ‘Refresh’ to
update your Inbox .
2. Read email: You can display or collapse the messages in your Inbox by
selecting Inbox. Unread messages display with a colo red band.
3. Forward, Reply, Reply all: You can forward, reply, or reply all to an email
message from the Inbox. From the Inbox, touch & hold the message to o pen its
context menu. Select the action you want to take.
4. Compose new
From the Inbox: 1. Press MENU and select ‘Compose’. 2. Add recipients by
typing a name or address in the ‘To’ field. Matching contacts will app ear. Select
the recipient or continue typing the address. Add as many as you wish. 3. Type a
subject and message. 4. Select ‘Send’, ‘Save as draft’, or ‘Discard’. Pressing
BACK will also save as draft unless you have not typed anything.
5. Delete message
From the Inbox: 1. E xpand the Inbox to display the messages. 2. Touch & hold
the message you want to delete. 3. Select ‘Delete’. 4. Your message is moved to
the Trash.
23
Page 24

6. Empty Trash: Once you’ve moved a message to the Trash, to empty messages
in the Trash you must delete each message individually. Press MENU and select
‘Folders’ to enter the Trash.
Note that the message is only deleted from your phone, not from the account
server.
7. Remove an email account: You can always re move a POP3 or IMAP email
account from your phone. Go to your Inbox, press MENU and select ‘Accou nts’.
Your Accou nts screen opens. Touch & hold th e account you want to remove to
open the context menu . Select ‘Remove account’. You will be asked to confirm
before the account is removed.
Edit account settings
To open your Account settings screen, do the following:
1. From your account Inbox, press MENU and select ‘Account sett ings’.
2. The Accou nt settings screen appears. You can do the following fro m this
screen:
Account name: Select to change th e name of your account as it appears on your
Accounts screen.
Your name: Select to change your name as it appears in outgoing email.
Email check frequency: Select this pop-up menu to set how frequently your
email account is checked for new me ssages. Note that whenever you open a
folder, email is refreshed, regardless of this setting.
Default account: If you have more than one POP3 or IMAP email account set up
on your phone and want to use this account by default when selecting Compose
from the Accounts screen, select this check box.
Email notifications: If you want an ico n to appear in the status bar when a new
message arrives, select this check box.
Incoming server settings: Select Incoming settings if you need to edit the
username/ password, server, port, or option to delete email from server.
Outgoing server settings: Select Outgoing settings if you need to edit the SMTP
server, port, security type, option to require sign-in, or username/password.
Add another POP3 or IMAP
To add another account (you can add up to five), go to your Inbox, press MENU
24
Page 25

and select ‘Accounts’. Your Accounts screen opens.
Press MENU and select ‘Add account’ another account.
7 Internet
7.1 Ways of Connecting to the Internet
Your device’s networking capabilities allow you to access the Internet or your
corporate network through WLAN, GPRS, EDGE (if available), or WCDMA (if
SIM card supported).
You can also add and set up a VPN or proxy connection.
Wi-Fi
Wi-Fi provides wireless Internet access over distances of up to 100 meters (30 0
feet). To use Wi-Fi on your device, you need access to a wireless access po int or
“hotspot”.
Note: The availability and range of your device’s Wi-Fi signal d epends on th e
number, infrastructure, and other objects through which the signal passes.
7.2 Browser
To open the Browser, touch
The Browser always opens to the last Web page you were viewing. The first
time you enter the Browser after powering on, your home page will display.
You can change your home page by p ressing MENU > Settings >General > Set
homepage.
Zoom and navigation in Web pages
While viewing a Webpage, you can press MENU and select Settings >
>Advanced >Default zoom to set the zoom controls.
Slide your fingertip in any direction to shift your page view.
The Browse screen
From the Browse screen you can do the following:
1. Go to a Web page: Make sure th e focus is n ot on a text box an d then start
typing the URL.
2. Add a bookmark: Bookmark the Web page you are currently viewing:
• Press MENU and select ‘Save to bookmarks’.
> Browser .
25
Page 26

• Confirm the URL and name, and then select ‘OK’.
To view all your bookmarks, press MENU and select Bookmarks.
3. Refresh a Web page: To refresh the contents of the current page, press MENU
and select ‘Refresh’.
Open pages in separate windows
You can keep more than one Web page open by using multiple windows to
display the pages. You can open up to eight windows.
Open a new window: From a Web page, press th e icon on the bottom-right. The
Current windows screen opens, showing the Web page you started from, Your
home page opens in a new window. To return to one of the other windows, press
the icon . Select the page you want to view.
Manage bookmarks
You can store as many bookmarks as you want on your phone.
From the Browse screen you can do the following:
1. Bookmark any page: Press MENU and select ‘Save to bookmarks’.
2. Send bookmarked page’s URL: Open the bookmark you want to share , press
MENU .Select ‘Share page’. The context menu opens .Choose
Gmail ,Faceb ook ,Twitter, Bluetooth or Messaging , edit the information th en
sent.
3. View bookmarked page: Touch & hold th e bookmark you want to open. The
context menu opens. Select View page or Open in new window.
4. Edit bookmark: Touch & hold the bookmark you want to e op en. The context
menu opens. Select ‘Edit bookmark’. The edit bookmark dialog box opens.
Type your change and select ‘OK’.
5. Delete a bookmark: Touch & hold the bookmark you want to open. The
context menu opens. Select ‘Delete bookmark’. You will be asked to confirm.
6. Bookmark current page: Press MENU and select ‘Bookmarks / History ’. The
Bookmarks/ History screen opens. Press History and select the last-viewed page,
Touch the URL of the page ,the page open.
Download Web files and applications
Before you download any files or applications using the Browser, note the
following:
26
Page 27

1. Before you can download Web applications, you must explicitly “allow”
downloading.
2. You can go to Settings > Security, then select ‘Unknown sources’ check box.
Warning! Applications downloaded from the Web can be from unknown sources.
To protect your phone and personal data, only download applications from
sources you trust, such as Android Market.
8 Experiencing Multimedia
8.1 Camera & Picture
Load pictures onto your memory card
Read th e instructions below to add pictures to your Memory card or the phone
storage.
1. Mount your memory card to your computer by doing one of the following:
Remove the memory card and insert it into a card reader attached to your
computer.
2. On your computer, find the mounted USB drive and open it.
3. Create a folder at the top-level called “Pictures” or some other descriptive
name and open it.
4. Copy .jpg or other image files into this folder. To organize pictures into
albums that will display in th e Pictures application, create a folder and copy
pictures there for each album you want to display.
5. When finished, close the USB dri ve window and eject the drive as required
by your computer's operating system.
Take a picture
Captured pictu res are saved to the “DCIM” folder on you r memory card or the
phone.
Tip: Before you ta ke a picture, wipe the sensor window (on the back cover) to
remove any small amounts of oil.
1. To open the Camera, on the Home screen, touch
2. The Camera opens in captu re mode. Frame your picture within the screen and
27
and select Camera icon.
Page 28

hold the phone steady. Tou ch Camera button to capture. Continue to hold the
camera steady for a second after you hear the shutter sound.
3. Immediately after capture, you can select to Save, Set as (contact icon or
wallpaper), Share (via a compatible application), or Delete you r picture.
4. If you select to save, set as, or share, your picture is saved to Gallery
application.
View your pictures
To view the pictures you’ve cap tured, as well as any you’ve stored on your
memory card or the phone storage, go to Gallery application:
1. To open Pictures, on the Home screen, touch
2. Depending on how many pictures you’ ve stored, they may take a few minutes
to load.
3. If you’ve stored your pictures in folders on your Memory card, then the
folders will display as separate “camera”. The top left album always contains all
the pictures in all the albums.
4. The individual pictures display in a grid in thumbnail format. You can select
to display smaller or large thumbnails in Settings.
5. To open a picture in full-screen view, touch the picture. Once in full-screen,
select the arrows to scroll through the pictures within that album. If the arrows
disappear, touch the picture again to reveal the arrows and zoom controls.
Picture options
You can do the following while in Pictures. Note: In all the instructions below,
you can touch & hold a picture to open the context menu to access all actions,
rather than open the picture in full-screen view.
1. View fu ll-screen: Select a picture to open it in full-screen view.
2. Share a picture: In full-screen view, select Share. Select to share your picture
via Messa ging (MMS), or another application (if you have another application
installed on your phone that supports sharing).
3. Set as wallpaper: In full-screen view, press MENU and select Set p icture as.
From the menu that opens select Wallpaper. Touch & hold an edge of the
cropper to reveal the sizing arrows, then drag the edge in or out to size. Touch &
drag the center of the cropper to move it within the picture. When you’re happy
28
and select Gallery icon.
Page 29

with the cropped area, select ‘Save’.
4. Set as contact picture: In full-screen view, press MENU and select Set picture
as. From the men u that opens, select Contact icon. Your contact list opens.
Select the contact you want to associate with the picture. Touch & hold an edge
of the cropper to reveal the sizing arrows, then drag the edge in or out to size.
Touch & drag the center of the cropper to move it within the picture.
When you ’re happy with th e cropped area, select ‘Save’. The picture will now
appear in the Contact details screen, as well as on any incoming call
notifications.
7. Crop picture: In full-screen view, press ME NU and select Crop. Touch &
hold an edge of the cropper to reveal th e sizing arrows, then drag the edge in or
out to size. Touch & drag the center o f the cropper to move it within th e picture.
When you are happy with the cropped area, select ‘Save’. Select Discard to
cancel the crop. The cropped picture is saved to Pictures as a copy. Your original
is not touched.
8. Rotate picture: In full-screen vie w, pr ess MENU and select Rotate Left or
Rotate right. Yo ur picture rotates and is saved automatically.
9. Delete picture: In full-screen view, press MENU and select Delete.
The picture will be removed from the Memory card after you confirm.
10. View picture details: In full -screen vie w, press MENU and select Details.
The picture details window opens. You can see the title, resolution, file size, and
date of the picture.
8.2 Music
To open your music Library, on the Home screen, touch
Music icon. Your music is organized into four categories: Artists, Albums,
Songs, and Playlists. Select a category to vie w the lists within each. Once in a
category, keep selecting until you reach the music you want to play.
For example, if you select th e Artists cat egory, you will see a list of artists in
A-Z ord er. If you select an artist, the list opens to display that artist’s albums.
Select an album, and the album’s song list displays.
Load music onto your Memory card
Read the instructions below to add music to your memory card.
29
and select the
Page 30

1. Mount your memory card to your computer by doing one of the following:
Remove the memory card and insert it into a card reader attached to your
computer; or, attach your phone to your computer using a USB cable that came
in the box. If you use this method, make sure th e Home > Settin gs > Storage >
SD card is selected.
2. On your computer, find the mounted USB drive and open it.
3. Although your phone will find all music files on your me mory card, it’s
advisable to keep the number of file s or folders at the root level to a minimum.
So, if you wish, create a fol der at the top -level called “music” (or whatever you
want) to store your files.
4. Open this folder and copy music files into it. If you want, create folders
within “music” to organize your music further. If you want to use certain music
files as phone, notification, or alarm ring tones.
5. When finished copying, close the USB drive window and eject the drive as
required by your computer's operating system. Remove the USB cable from
your phone and computer.
Play back music
At any level in your Library, to uch & hold a listing (a song, artist, album, or
playlist) to open the context men u. Select Play to begin play and go to the
Playback screen. You can do the following using the Playback screen:
1. Shuffle songs: Shuffle p lays songs in random order. Touch to toggle shuffle
on and off. When the icon is grey, shuffle is off.
2. Repeat mode: Touch to step through repeat modes: repeat all songs, repeat
current song, don’t repeat (grey icon).
3. Go to any point in song: Slide fingertip in pro gress bar to desired po int in a
song.
4. Playback control: from left to right icons: Go to beginn ing song, Pause/
resume play and Go to next of song.
If a song is playing while you are on the Library screen, you can switch to th e
Playback screen quickly by selecting the lower song bar.
Playlists
30
Page 31

You can create as many pl aylists as you wish. Note that th e “Recen tly added”
playlist is a system playlist and cannot be deleted or renamed. Also, if you make
any voice recordings as part of a MMS message, they will be stored
automatically in a playlist called “My recordings”.
Create a playlist on your phone
1. From the Library, select a category. From the list that appe ars, navigate to the
artist, album, or song that you want on a playlist.
2. Touch & hold the artist, album, or song to open the context menu.
3. Select Add to playlist.
4. In the Add to playlist menu that opens, select New to create a new playlist, or
one of the existing playlists.
5. The song(s) are added.
Manage your playlists
Go to the Library screen and select ‘Playlists’. All your playlists appear.
Touch & hold the playlist to open the context menu. You can do th e following
from this screen: Play, Delete and Rename.
Create ringtones from songs
You can set any of your songs as a phone ringtone:
1. From the Library, navigate to a song you want to use as a phone ringtone.
2. Touch & hold the song in the list to open the context menu.
3. Select Use as phone ringtone. The rington e is set as your default incoming
call ringtone.
4. Now, when you go to Home > Settings > Audio profiles > General, and select
Voice call ringtone or Video call ringtone, your song will be listed as an option.
Delete music from memory card
All the music you play o n your phone is stored on the inserted memory card .
From your phone, you can delete music stored on the card:
1. From the Library screen, select the Artists, Albums, or Songs category.
2. Go to the screen that shows the artist, album, or song that you want to delete.
3. Touch & hold the item to open the context menu.
4. Select ‘Delete’. You will be asked to confirm that you want to delete the item
from your memory card.
31
Page 32

8.3 FM Radio
This device provides radio function.
Note: Within doors or shielded environment, the receiving effect of radio may
be affected. Yo u can improve the effect in the following ways: Near windo w,
adjust the position of earphone cable or adopt manual adjustment.
8.4 Voice Search
When data connection or WIFI network is connected, input the keywords on the
input field to search the web page that matched keywords.
8.5 Sound Recorder
The phone can be as sound record.
9 Other applications
9.1 Calendar
Calendar views
You can view your calendar in a variety of ways. Touch the d ate on the left-top
of the screen to select from Day, Week, Mon th or Agenda.
1. Month view
Days are sh own in a mo nth grid. Busy time slots are shown as vertical bars in
the corresponding part of the day. An all-day event is shown as a small vertical
bar at the top of the slot (it does not fill the entire slot).
View event details - Sel ect a day to view all the events in that day. This will take
you to either the Agenda or Day view, depending on which you last visited.
Select the event to view its details.
Edit an event - First select a day to go to either the Day or Agenda view. From
there, select the event to view its details. Assuming you have write privile ges on
an event, select ‘Edit’ to edit. Navigate months - Slide your fingertip up/down,
through the days and past the beginning/end of the month to move to the
previous/next month.
Create new event- Touch & hold a day to open the context menu. Select ‘New
event’. You can also press MENU and select ‘New event’.
2. Agenda view
32
Page 33

Events in the current month are shown vertically in a list, one event after the
other. Days with no events are not displayed.
Repeating events - Marked with icon following the time or dat e.
View event details - Sel ect the event to view its details.
Edit an event - First, select the event to view its details. Assuming you have
write privileges on an event, select ‘Edit’ to edit.
Navigate within the current month - Slide your fingertip up/down.
3. Week vie w
Days are shown vertically within the Week view. Time slots are defined
horizontally in rows. Events are shown as blocks.
View event details - High light an event to open a small popup win dow in the
lower part of the screen th at provides more event information. This window will
stay open for three seconds. (Note that highlighted events are outlined in
orange.) To view the full event details, touch the pop-up window while it’s open,
or select the event itself.
Edit an event - Assuming you have write privileges on an event, select ‘Edit ’ to
edit it.
Navigate within the current week -Slide your fingertip up/down.
Navigate to a past or future week - Slide your fingertip left/right.
4. Day view
Days are divided into hour time slots. Events are shown tiled and span the time
they last. All-day events are displayed at the top of the day list.
View event details - High light an event to open a small popup win dow in the
lower part of the screen th at provides more event information. This window will
stay open for three seconds. (Note that highlighted events are outlined in
orange.) To view the full event details, tou ch the pop-up wind ow while the
pop-up window is open, or select the event itself. You can also touch & hol d the
event to open the context menu, then select View event.
Edit an event - Assumin g you have write privileges on an event, select Edit to
edit it.
Navigate within the current day - Slide your fingertip up/down.
Navigate to a past or future day - Slide your fingertip left/right.
33
Page 34

Create new e vent - Touch an empty time slot to open the new Event details
screen.
Create an event
From an y of th e views, press MENU and select ‘New event’ to open the new
Event details screen.
• Type the information in the fields.
• Select date & time.
• Name that appears in Day view.
• Description can be as long as you like.
• Select a calendar if you display more than one.
• Set a default reminder time.
• Set online presence: available or busy.
• Select calendar privacy from Default (as defined when calendar was created),
Private, or Public.
When finished, select ‘Done’. Pressing BACK also saves the event.
Tip: Create an event quickly in the Day or Week vie w by selecting an empty
time slot. A new Event details screen appears. The ‘From’ field contains th e
selected time slot.
9.2 Alarm Clock
To op en Alarm Clock, on the Home screen, then touch
icon. The Alarm clock offers as many alarms as you want.
Set an alarm
Two alarms are set up for you, ready to customize. All two alarms are turned off
by default. Sele ct the check box to turn on the alarm. If no day shows under the
set time, the alarm will go off once when the set time is reached.
Two alarms will go off at 8:3 0 am from Monday to Friday and at 9:00 am on
Saturday and Sunday.
You can customize the alarm according to your need,select one of the default
alarms to open Alarm settings.
Set the following options:
Alarm: Select the check bo x to turn alarm on (checked) or o ff (cleared). This is
the same check box that appears on the main Alarm Clock screen.
34
and select Clock
Page 35

Time: The time the alarm will go o ff is shown. To change this time, select Time
to open th e time select or. Slide the finger up or down to set the time you want,
and then select Set.
Repeat: The current repeat selection is shown. To change the setting, select
Repeat and make a selection from th e menu. To have your alarm will only go
off on ce at the set time, don’t select any of the options. A on e-time alarm is
shown on the Alarm Clock screen without any days under the set time.
Ring to ne: The current ring tone selection is shown. Select Ring tone to pick
another ring tone that will play when the alarm rings. (When yo u select a ring
tone, it plays briefly.) Not e that when your alarm goes of f, the ring tone will
play a maximum of five minutes.
Vibrate: Select this check box to have your phone vibrate when it goes off.
Once your alarm goes off, you will receive an alert with the options to Snooze
(for 10 minutes) or Dismiss.
Add more alarms
To add more th an three alarms, from the main Alarm Clo ck screen, select ‘Add
alarm’.
Change clock display
You can change the appearance of the clock displayed on the main Alarm Clock
screen:
1. Go to the main Alarm Clock screen.
2. Select settings > style
3. Choose the display you want.
9.3 Calculator
To open Calculator, on the Home screen, then touch
Calculator icon.
35
and select the
Page 36

FCC Caution.
§ Labelling requirements.
This device complies w ith part 15 of the FCC Rules. Operat ion is subject to the
following two conditions: (1) This device may not cause harmful interference,
and (2) this device must accept any interference received, including interference
that may cause undesired operation.
§ Information to user.
Any Changes or modifications not expressly ap proved by the party responsible
for compliance could void the user's authority to operate the equipment.
§ Information to the user.
Note: This equipment has been tested and found to comply with t he limits for a
Class B digital device, pursuant to part 15 of the FCC Rules. These limits are
designed to provide reasonable protect ion against harmful interference in a
residential installation. This equipment generates uses and can radiate radio
frequency energy and, if not installed and used in accordance with the
instructions, may cause harmful interference to radio communications. However,
there is no guarantee that interference will not occur in a particular installation.
If this equipment does cause harmful interference to radio or television
reception, which can be determined by turning the equipment o ff and on, the
user is encouraged to try to correct the interference by one or more of the
following measures:
-Reorient or relocate the receiving antenna.
-Increase the separation between the equipment and receiver.
-Connect the equipment into an outlet on a circuit different from that to which
the receiver is connected.
-Consult the dealer or an experienced radio/TV technician for help.
The device has been evaluated to meet general RF exposure requ irement. The d
evice can be used in portable exposure condition without restriction.
Specific Absorption Rate (SAR) information:
?
This mobile phone meets the government's requirements for exposure to radio
waves. The guidelines are based on standards that were developed by
independent scientific organizations through periodic and thorough evaluation
36
Page 37

of scientific studies. The standards include a substantial safety margin designed
to assure the safety of all persons regardless of age or health.
FCC RF Exposure Information and Statement The SAR limit of USA (FCC) is
1.6 W/kg averaged over one gra m of tissue. Device types: AX710 (FCC ID:
ZSW-30-008) has also been tested against this SAR limit. The highest SAR
value reported under this standard during produ ct certification for use at the ear
is 0.56W/kg and when properly worn on the body is 0.51W/kg. This de vice was
tested for typical b ody-worn operations with the back of the handset kept 1.0cm
from the body. To maintain compliance with FCC RF exposure requ irements,
use accessories that maintain a 1.0cm separation distance between the user's
body and the back of the handset. The use of belt clips, holsters and similar
accessories should not contain metallic components in its assembly. The use of
accessories that do not satisfy these requirements may no t comply with FCC RF
exposure requirements, and should be avoided.
Body-worn Operation
This device was tested for typical body-worn operations. To comply with RF
exposure requirements, a minimum separation distance of 1.0 cm must be
maintained between the user’s body and the handset, including the antenna.
Third-party belt-clips, holsters, and similar accessories used by this device
should not contain any metallic components. Body-worn accessories th at do not
meet th ese requirements may not comply with RF exposure requirements and
should be avoided. Use only the supplied or an approved antenna.
37
 Loading...